├── docs
├── _config.yml
├── india.md
├── examples
│ ├── _TEMPLATE.md
│ └── led-lights.md
├── how_to_submit.md
├── eligible_countries.md
├── hack_club_bank.md
└── faq.md
├── .github
└── PULL_REQUEST_TEMPLATE.md
├── ivoinestrachan.md
├── Muirrum.md
├── snoglobe.md
├── 1mPink.md
├── YodaLightsabr.md
├── boyuan12.md
├── Neesh774.md
├── NoahSaxophone.md
├── CreNiruta.md
├── chicken-in-a-can.md
├── Michaell14.md
├── SK-2009.md
├── sahitid.md
├── ByteAtATime.md
├── thomaswcy.md
├── vedhasirur.md
├── darksidemanas.md
├── ahnedmohamed57.md
├── Erik-Dennis.md
├── SATOMASAHIRO2005.md
├── Mahak1729
├── Jackson-Turner.md
├── Arpan-206.md
├── Robertrover811.md
├── Omay238.md
├── Divya-2009.md
├── KrauseOlly.md
├── griffinli.md
├── briyandyju09.md
├── LuizWeitz.md
├── winstoniskandar&mayuridev.md
├── rachwel.md
├── sol5000.md
├── Roizor.md
├── SuperBoyne.md
├── YashasSingh.md
├── LinusSkucas.md
├── Puffball101961.md
├── chennisden.md
├── pikca-c.md
├── wollygfx.md
├── Steve-Dusty.md
├── xhaidendsouza.md
├── KrishnaSharma206.md
├── Carsblox.md
├── haitomns4173.md
├── cfanoulis.md
├── mattkrnwn.md
├── RhysMP.md
├── CatR3kd.md
├── Scott170c.md
├── sswangg.md
├── ParthAgarwal.md
├── alihussain23.md
├── MagiDarkPro.md
├── davidarogunre.md
├── rbccawang.md
├── peiprjs.md
├── bloggingKIng.md
├── helium fusor
├── linkai101.md
├── Bowiten.md
├── aleung18.md
├── JeffreyWangDev.md
├── pranavnt&quackduck.md
├── Gregor-Davies.md
├── TheTsar8756.md
├── MangoTornado.md
├── exu3.md
├── tejascreative.md
├── whatwareweb.md
├── chrisrama.md
├── paulsam06.md
├── rcyaon.md
├── geschmit.md
├── thaddeuskkr.md
├── vitaliikuzhdin.md
├── ThanatosXingYu.md
├── sanjay-nagesh.md
├── AHussein04.md
├── Screen-sLaYeR.md
├── AnishT500.md
├── KianTheCon.md
├── sohamb117.md
├── masonnamminga.md
├── SantoshiUser.md
└── Gam3rrXD.md
/docs/_config.yml:
--------------------------------------------------------------------------------
1 | theme: minima
2 | title: "@hackclub/winter"
3 | header_pages:
4 | - how_to_submit.md
5 | - faq.md
6 |
--------------------------------------------------------------------------------
/.github/PULL_REQUEST_TEMPLATE.md:
--------------------------------------------------------------------------------
1 | _Project proposals are no longer being accepted as of January 15th, 2023 23:59 EST._
2 |
3 | If this a bug fix, documentation update, or other, please describe the purpose of this pull request below:
4 |
--------------------------------------------------------------------------------
/docs/india.md:
--------------------------------------------------------------------------------
1 | # Using Hack Club Bank in India
2 |
3 | Hack Club Bank cards, when used in India, are automatically declined by many merchants. Unfortunately, Hack Club Bank has no control over this matter. However, there are a few merchants, listed below, that are confirmed to accept Hack Club Bank cards in India. If you find any other merchants that work for you, please make a pull request to this repository.
4 |
5 | For the time being, we recommend using the following merchants:
6 |
7 | - TBD
8 |
9 | The following merchants are known to not work:
10 |
11 | - Amazon
12 | - VistaPrint
13 | - ThingBits
14 |
15 | When adding purchase links in your project proposal, please do not include links to the list of merchants known not to work.
16 |
--------------------------------------------------------------------------------
/docs/examples/_TEMPLATE.md:
--------------------------------------------------------------------------------
1 | ---
2 | name: "@yourGitHubUsername"
3 | project: "Your Project Name Here"
4 | ---
5 |
6 | # Project Name
7 |
8 | ## Summary
9 |
10 | What are you going to build? What does it do? Why are you excited to build it?
11 |
12 | ## Plan
13 |
14 | What steps are you going to take to build it? What tools are you going to use? What will you do first, second, third, etc.?
15 |
16 | ## Budget
17 |
18 | What materials will you need for your project? Where will you get them? How much does it cost? Please include all materials, including components you already own. Make sure to factor in shipping costs and sales tax.
19 |
20 | | Product | Supplier/Link | Cost |
21 | | --------------- | ------------------------------------- | ------ |
22 | | Pack of wires | https://www.adafruit.com/product/1957 | $1.95 |
23 | | 1.8"LCD display | https://www.adafruit.com/product/358 | $19.95 |
24 | | Total | | $21.90 |
25 |
--------------------------------------------------------------------------------
/docs/how_to_submit.md:
--------------------------------------------------------------------------------
1 | # How to submit
2 |
3 | 1. Fork this repository
4 |
5 |  6 |
7 | 2. Create a new file with the name `githubusername.md` (replace `githubusername` with your GitHub username). Copy the [template](examples/_TEMPLATE.md) into your file, edit the information, and commit your changes.
8 |
9 |
6 |
7 | 2. Create a new file with the name `githubusername.md` (replace `githubusername` with your GitHub username). Copy the [template](examples/_TEMPLATE.md) into your file, edit the information, and commit your changes.
8 |
9 |  10 |
11 | 3. Submit a pull request with your file. Someone will review your pull request within 48 hours on weekdays (and the following Monday if you submit on the weekend).
12 |
13 |
10 |
11 | 3. Submit a pull request with your file. Someone will review your pull request within 48 hours on weekdays (and the following Monday if you submit on the weekend).
12 |
13 |  14 |
15 | Once your pull request is approved, the Hack Club Bank team will follow up with next steps!
16 |
17 | Happy hacking! ❤️
18 |
--------------------------------------------------------------------------------
/ivoinestrachan.md:
--------------------------------------------------------------------------------
1 | ---
2 | name: "@ivoinestrachan"
3 | project: "SkateBoard Collision"
4 | ---
5 |
6 | # SkateBoard Collision
7 |
8 | ## Summary
9 |
10 | The skateboard safety alert system is a device that uses sensors to detect potential collisions and sounds an alarm to alert the skateboarder. It includes a microcontroller, sensors, and an audio output device and requires code to be written to process sensor data and play the alarm sound. The system aims to improve skateboard safety by alerting skateboarders to potential collisions and helping them avoid accidents.
11 |
12 | ## Plan
13 |
14 | I am going to first get a sensor to detect the collision using a microcontroller and using a arduino then test if im going to hit then a alarm goes off. I am also going to make a vlog from this and I think its going to be pretty cool. I had to limit my imagination and get a lower budget because shipping stuff to The Bahamas is to pricey.
15 |
16 | ## Budget
17 |
18 | | Product | Supplier/Link | Cost |
19 | | ----------- | ---------------------- | ------ |
20 | | Mic | https://a.co/d/g8G0oWj | $34.57 |
21 | | Skateboard | https://a.co/d/bpwPXxN | $37.00 |
22 | | Arduino Kit | Already Owned | $0 |
23 | | Total | Taxes & Shipping | $57.49 |
24 |
25 | 
26 |
--------------------------------------------------------------------------------
/Muirrum.md:
--------------------------------------------------------------------------------
1 | ---
2 | name: "@Muirrum"
3 | project: "MIDI GO Box v2"
4 | ---
5 |
6 | # MIDI GO Box v2
7 |
8 | ## Summary
9 |
10 | An older [LnL](https://lnl.wpi.edu) project was the "MIDI Go Box" -- a small box with various buttons on it that could be used to trigger lighting cues. It was broken a few months before I arrived at WPI, and now I'm going to be resurrecting it!
11 |
12 | ## Plan
13 |
14 | 1. Schematic in KiCAD
15 | 2. Write Arduino software
16 | 3. Breadboard with switches and MIDI testing
17 | 4. CAD new case
18 | 5. Assemble finished project
19 |
20 | I'm planning on basing this around an Arduino Leonardo to take advantage of the extra
21 |
22 | ## Budget
23 |
24 | What materials will you need for your project? Where will you get them? How much does it cost? Please include all materials, including components you already own. Make sure to factor in shipping costs and sales tax.
25 |
26 | | Product | Supplier/Link | Cost |
27 | | --------------- | ------------------------------------- | ------ |
28 | | Arduino Leonardo | https://www.digikey.com/en/products/detail/arduino/A000057/3476353 | $24.90 |
29 | | MIDI Connector | [https://www.adafruit.com/product/1134](https://www.adafruit.com/product/1134) | $1.75 |
30 | | 2.1mm DC Panel-mount jack | https://www.adafruit.com/product/610 | $2.95 |
31 | | 2x Breadboard | https://www.adafruit.com/product/64 | $9 |
32 | | Misc switches | Already owned -- unknown supplier | Unknown |
33 | | Shipping + Tax | Subject to change because that's how that works | $20.49
34 | | Total | | $59.09 + additional materials as I need them |
35 |
--------------------------------------------------------------------------------
/snoglobe.md:
--------------------------------------------------------------------------------
1 | ---
2 | name: "@snoglobe"
3 | project: "snwboard"
4 | ---
5 |
6 | # Snwboard
7 |
8 | ## Summary
9 |
10 | A series of Arduino-like boards meant to be affordable and easy to build.
11 | The snwboard is accompanied by an IDE + simple scripting language meant to let beginners enter the hobby of making.
12 |
13 | ## Plan
14 |
15 | - Design Schematic (Done)
16 | - Design PCB (Done)
17 | - Order PCBs and components
18 | - Assemble boards
19 | - Create IDE and scripting language
20 | - Put on personal storefront for $5 per board (boards are approximately $3.08 to produce individually, including parts shipping + excess parts)
21 |
22 | ## Budget
23 |
24 | | Product | Supplier/Link | Cost |
25 | | --------------- | ------------------------------------- | ------ |
26 | | 100 PCBs | JLCPCB | $35.10 |
27 | | 136x C2325 2.54mm DIP-14 IC Sockets | LCSC | $4.86 |
28 | | 110x 10uf C432355 Electrolytic Capacitors | LCSC | $4.11 |
29 | | 250x C69880 1.5k Resistors | LCSC | $2.25 |
30 | | 110x C75485 3v3 Voltage Regulators | LCSC | $22.03 |
31 | | 110x C498173 USB-B connector | LCSC | $26.85 |
32 | | 150x C2848543 60ohm Resistors | LCSC | $0.89 |
33 | | 150x C377842 1nf Capacitor Ceramic Disc | LCSC | $1.14 |
34 | | LCSC Shipping | LCSC | $49.84 |
35 | | 179-TS026655BK160LCR Tactile Switches | Mouser Electronics | $9.46 |
36 | | 556-ATTINY84A-PU ATTiny84A-PU | Mouser Electronics | $143.00 |
37 | | Mouser Shipping | Mouser Electronics | $8.89 |
38 | | Total | | $308.42 |
39 |
40 | I will fund the Bank account out of my own pocket with the excess.
41 |
--------------------------------------------------------------------------------
/docs/eligible_countries.md:
--------------------------------------------------------------------------------
1 | # Does Hack Club Bank work in your country?
2 |
3 | You'll be receiving your grant through [Hack Club Bank](https://hackclub.com/bank) and purchasing your hardware using a Hack Club Bank card. Unfortunately, in some countries, Hack Club Bank doesn't work well with through the local banking system.
4 |
5 | Using Hack Club Bank outside of North America is still experimental. Listed below are countries where Hack Club Bank works. If your country isn't listed here, you are still welcome to submit a project proposal. While we can't guarantee that Hack Club Bank will work for you, we invite you to try it out.
6 |
7 | - Australia
8 | - Austria
9 | - Bahamas
10 | - Brazil
11 | - Canada
12 | - Colombia
13 | - Finland
14 | - France
15 | - Germany
16 | - Greece
17 | - Japan
18 | - Korea
19 | - Malaysia
20 | - New Zealand
21 | - Singapore
22 | - Spain
23 | - Sweden
24 | - South Africa
25 | - Sri Lanka
26 | - Turkey
27 | - Thailand
28 | - United Arab Emirates
29 | - United Kingdom
30 | - United States
31 | - Vietnam
32 |
33 | Due to differences in financial/banking systems, Hack Club Bank is not able to work in the following countries:
34 |
35 | - India
36 | - Nigeria
37 |
38 | Due to US government sanction sanctions, Visa cards will not work in the following countries:
39 |
40 | - Balkans
41 | - Belarus
42 | - Central African Republic
43 | - Congo
44 | - Iraq
45 | - Iran
46 | - Lebanon
47 | - Liberia
48 | - Libya
49 | - North Korea
50 | - Somalia
51 | - Syria
52 | - Russia
53 | - Venezuela
54 | - Yemen
55 | - Zimbabwe
56 |
57 | [See the US Treasury website for an up-to-date list of sanctions programs.](https://home.treasury.gov/policy-issues/financial-sanctions/sanctions-programs-and-country-information)
58 |
--------------------------------------------------------------------------------
/1mPink.md:
--------------------------------------------------------------------------------
1 | ---
2 | name: "@1mPink"
3 | project: "Proxmox Project"
4 | ---
5 |
6 | # Proxmox Project
7 |
8 | ## Summary
9 |
10 | I am going to build a server that will do virtualization.
11 | I want to move everything to my cloud, and not use something like AWS, Azure, DigitaOcean...
12 | I'm excited to build my own server, to learn mostly Proxmox, Route OS, load-balancing, containers, networking...
13 |
14 | ## Plan
15 |
16 | 1. Order materials, then wait for arrival.
17 | 2. Put the SSD and RAM in to the NUC.
18 | 3. Install Proxmox VE.
19 | 4. Boot, and configure Proxmox VE.
20 | 5. Log in to Proxmox VE via the network, and configure everything.
21 | 6. Create the first Virtual Machine.
22 | 7. Experiment.
23 |
24 | ## Budget
25 |
26 | | Product | Supplier/Link | Cost |
27 | | --------------- | ------------------------------------- | ------ |
28 | | Intel NUC BOXNUC7PJYHN2 Intel Pentium J5005 | https://www.pccomponentes.com/intel-nuc-boxnuc7pjyhn2-intel-pentium-j5005 | $153.78 + $0 (Free Shipping) |
29 | |Kioxia EXCERIA 480GB SSD SATA | https://www.pccomponentes.com/kioxia-exceria-480gb-ssd-sata | $36.02 + $4.19 (Shipping) |
30 | | Kingston Fury Impact SO-DIMM DDR4 2666 Mhz 8GB CL15 | https://www.pccomponentes.com/kingston-fury-impact-so-dimm-ddr4-2666-mhz-8gb-cl15?offer=4b236881-d845-4f08-8545-1cf2ad66336c | $30 + $6.04 (Shipping) |
31 | | Nanocable Cable de Red RJ-45 UTP AWG24 Cat.6 1m White | https://www.pccomponentes.com/nanocable-cable-de-red-rj-45-utp-awg24-cat6-1m-blanco | $2.22 + 4.19 (Shipping) |
32 | | x2 Kingston DataTraveler Exodia 128GB USB 3.2 | https://www.pccomponentes.com/kingston-datatraveler-exodia-128gb-usb-32 | $6.98 x2 + $4.19(Shipping) |
33 | | Total + Taxes| | $254.59 |
34 |
--------------------------------------------------------------------------------
/YodaLightsabr.md:
--------------------------------------------------------------------------------
1 | ---
2 | name: "@YodaLightsabr"
3 | project: "Smart Alarm Clock"
4 | ---
5 |
6 | # Smart Alarm Clock
7 |
8 | ## Summary
9 |
10 | This smart alarm clock will use a Raspberry PI, 7 inch display, and a physical button. Here's what it'll do:
11 |
12 | * Display time
13 | * Show weather
14 | * Show calendar events
15 | * Control smart home devices with Homebridge
16 | * Set alarms
17 |
18 | ## Plan
19 |
20 | After getting materials, I plan to wire up the button, RPi, and display to build the clock. Then I'll measure it and 3D-print a case that can go on my nightstand. I'll program the display with React and use Chromium in kiosk mode to render it. I'll use Nodejs to handle the button with the Raspberry Pi's GPIO pins and control which data is being displayed.
21 |
22 | ## Budget
23 |
24 | What materials will you need for your project? Where will you get them? How much does it cost? Please include all materials, including components you already own. Make sure to factor in shipping costs and sales tax.
25 |
26 |
27 | Product name | Link | Price
28 | --- | --- | ---
29 | Rugged Metal Pushbutton - 22mm 6V RGB Momentary | https://www.adafruit.com/product/3423 | $16.50
30 | 7" IPS Capacitive HDMI Touch Screen LCD (1024×600) | https://thepihut.com/collections/raspberry-pi-screens/products/7-ips-capacitive-hdmi-touch-screen-lcd-1024x600 | $63.19
31 | Black PLA Filament | https://www.microcenter.com/product/485634/inland-175mm-black-pla-3d-printer-filament-1kg-spool-(22-lbs) | $17.99
32 | 3D-printer | - | -
33 | Raspberry PI 4B 4GB Ram | - | -
34 | Jumper wires | - | -
35 | Breadboard | - | -
36 | | |
37 | | Subtotal | $97.68
38 | | Estimated Shipping | ~$30.00
39 | | CA Sales Tax @7.25% | $9.26
40 | | Total | $136.94
41 |
--------------------------------------------------------------------------------
/boyuan12.md:
--------------------------------------------------------------------------------
1 | ---
2 | name: "@boyuan12"
3 | project: "Spycam"
4 | ---
5 |
6 | # Spycam
7 |
8 | ## Summary
9 | I'm going to add a camera in front of my door that will broadcast to my computer. If there's a person within 2 meters, then it will sent me a SMS alert.
10 |
11 | ## Plan
12 | I will follow [this guide](https://null-byte.wonderhowto.com/how-to/create-wireless-spy-camera-using-raspberry-pi-0180123/) first, and then I will add the SMS alert part using Python with Twilio API.
13 |
14 | ## Budget
15 |
16 | | Product | Supplier/Link | Cost |
17 | | --------------- | ------------------------------------- | ------ |
18 | | Raspberry Pi 0 W | [Amazon](https://www.amazon.com/CanaKit-Raspberry-Wireless-Complete-Starter/dp/B07CMVDHWB/ref=sr_1_4?crid=VCDYK14HS08U&keywords=Pi+Zero+W&qid=1671426030&sprefix=pi+zero+w%2Caps%2C145&sr=8-4) | $79.99 |
19 | | 128GB SD Card | [Amazon](https://www.amazon.com/SanDisk-128GB-Extreme-UHS-I-Memory/dp/B09X7FXHVJ/ref=sr_1_3?crid=3HEPG9Z18EQ62&keywords=sd+card&qid=1671426188&sprefix=sd+car%2Caps%2C173&sr=8-3) | $24.89 |
20 | | Camera Module | [Amazon](https://www.amazon.com/Arducam-Raspberry-Camera-Module-Megapixel/dp/B083BHJZ16/ref=sr_1_15?gclid=EAIaIQobChMIq7Ok7e6E_AIVpxCtBh3ZnwkHEAAYASAAEgKyqvD_BwE&hvadid=406717555829&hvdev=c&hvlocphy=9032437&hvnetw=g&hvqmt=e&hvrand=2213951976077209749&hvtargid=kwd-838633651625&hydadcr=7465_9611852&keywords=raspberry%2Bpi%2Bwith%2Bcamera%2Bkit&qid=1671424876&sr=8-15&th=1) | $34.89
21 | | SD Card Reader | [Amazon](https://www.amazon.com/Integrated-Circuit-Interface-Raspberry-Breakout/dp/B08C4WY2WR/ref=sr_1_4?crid=UP5VA5XFZKKK&keywords=sd+card+reader+raspberry+pi+0&qid=1671426400&sprefix=sd+card+reader+raspberry+pi+0%2Caps%2C170&sr=8-4) | $5.99 |
22 | | Total | | $145.76 |
23 |
--------------------------------------------------------------------------------
/Neesh774.md:
--------------------------------------------------------------------------------
1 | ---
2 | name: "@neesh774"
3 | project: "Blindr"
4 | ---
5 |
6 | # Blindr
7 |
8 | ## Summary
9 |
10 | I'm going to build a system to automatically open and close my blinds automatically, or whenever I want it to.
11 |
12 | ## Plan
13 |
14 | I'm going to use a pulley system on the top and bottom where the wire is attached to a 3D printed clamp that's attached to the blind.
15 | That way, I can pull and push it based on the direction that I rotate the wire on the pulleys, and the clamp will bring the blinds down
16 | with the wire. I'll use a Raspberry Pi Pico and a motor to control the motor that rotates the pulleys.
17 | I need 3 of each component so I can build one for each of my blinds, and 2 motors for each side of each blind so they aren't imbalanced.
18 |
19 | ## Budget
20 |
21 | | Product | Supplier/Link | Cost |
22 | | --------------- | ------------------------------------- | ------ |
23 | | Raspberry Pi Pico x3 | [Adafruit](https://www.adafruit.com/product/5525) | $15.00 |
24 | | Breadboard x3 | [Adafruit](https://www.adafruit.com/product/5422) | $14.85 |
25 | | Wires x3 | [Adafruit](https://www.adafruit.com/product/1957) | $5.85 |
26 | | TT Motor Pulley x6 | [Adafruit](https://www.adafruit.com/product/3789) | $4.50 |
27 | | DC Gearbox Motor x6 | [Adafruit](https://www.adafruit.com/product/3777) | $17.10 |
28 | | Yarn x3 | [Adafruit](https://www.adafruit.com/product/4015) | $8.85 |
29 | | Creality Ender 3 3D Printer | [Amazon](https://www.amazon.com/Comgrow-Creality-Ender-Aluminum-220x220x250mm/dp/B07BR3F9N6/ref=sr_1_2?crid=1GV3BBJ7G87YR&keywords=3d+printer&qid=1671485001&sprefix=3d+prin,aps,109&sr=8-2&ufe=app_do:amzn1.fos.f5122f16-c3e8-4386-bf32-63e904010ad0) | $199.00 |
30 | | Taxes | | $12.64 |
31 | | Total | | $277.79 |
32 |
--------------------------------------------------------------------------------
/NoahSaxophone.md:
--------------------------------------------------------------------------------
1 | ---
2 | name: "@NoahSaxophone"
3 | project: "ADS-B Receiver"
4 | ---
5 |
6 | # ADS-B Receiver
7 |
8 | ## Summary
9 |
10 | I am going to build an ADS-B receiver so I can track a plane's location in the sky. Right now, my plan is to become a pilot when I turn 17. I've joined the Royal Canadian Air Cadets and hope to get my license through them. I've wanted to do this project for a long time now, but I couldn't find a raspberry pi that was cheap enough to do so.
11 |
12 | ## Plan
13 |
14 | After purchasing the components, my plan is to put them together. Next, I will download FlightRadar's Pi24 software and put it on the raspberry pi. Then, I will set it up and (hopefully) be able to see each plane's telemetry. Finally, I will design and 3-D print a case for everything to allow it to be outside. I know it sounds simple, but I find it fascinating that anyone can just scan the sky for planes.
15 |
16 | ## Budget
17 |
18 | | Product | Supplier/Link | Cost |
19 | | --------------- | ------------------------------------- | ------ |
20 | | Raspberry Pi 3 Model B+ | https://www.amazon.ca/Raspberry-Pi-3-Model-B/dp/B00LPESRUK/ref=sr_1_3?crid=181W7X9K1ZD7 | $119.36 CAD ($88.26 USD) |
21 | | The Antenna | https://www.amazon.ca/NooElec-NESDR-Mini-Compatible-Packages/dp/B009U7WZCA/ref=sr_1_4?crid=2Q21RVC7FK8LB | $37.90 CAD ($28.03 USD) |
22 | | Raspberry Pi Power Supply | https://www.amazon.ca/Seenov-Supply-Adapter-Raspberry-Tablets/dp/B0B1F5XXFD/ref=sr_1_1?crid=1MSVHYFFP2W18 | $12.86 CAD ($9.51 USD) |
23 | | 3-D Printer Filament | Already Own | $0.00 |
24 | | SD Card for Raspberry Pi | Already Own | $0.00 |
25 | | Import Fees | | $20.45 CAD ($15.12 USD) |
26 | | Tax | | $1.67 CAD ($1.24 USD) |
27 | | Total | | $192.24 CAD ($142.16 USD) |
28 |
--------------------------------------------------------------------------------
/CreNiruta.md:
--------------------------------------------------------------------------------
1 | ---
2 | name: "@CreNiruta"
3 | project: "Internet of Things Display Device"
4 | ---
5 |
6 | # Project Name
7 | IOT Display Device
8 | ## Summary
9 |
10 | I am going to build and IOT based Display Device that can fetch data from internet and feed to the display device live.For Example, Viewing Youtube Subscribers, Stock Market Prices etc.
11 |
12 | ## Plan
13 | First of all, I will use an API to fetch the JSON data and then after the JSON is returned I will display it to the Display Device.
14 | For Example, If I am to disply the Subscriber Count then I can use GoogleAPI and then fetch the JSON to display into the display device.
15 | Secondly, I would also like to experiment the display device with the Raspberry PI so I can get more creative with the Display Content inside the Display Device.
16 | Thirdly, I would also like to try combining the displays together to get some kind of sync extended display.
17 | ## Budget
18 |
19 | The Materials that I own are:
20 | Raspberry PI
21 | Arduino UNO
22 | USB A Cable
23 | Jumper Wires
24 | Breadboard
25 | Soldering Iron and other basic components.
26 |
27 | However, I would need following components to complete my project.
28 | | Product | Supplier/Link | Cost |
29 | | --------------- | ------------------------------------- | ------ |
30 | | Adafruit PyPortal Titano | https://www.adafruit.com/product/4444 | $59.95 |
31 | | Pi Display |https://www.daraz.com.np/products/raspberry-pi-lcd-7inch-tft-touch-screen-display-i105828375-s1027688612.html?spm=a2a0e.searchlist.list.3.6934f218oTb0rD&search=1 | $65.11 |
32 |
33 | Shipping from Adafruit : $53.03 (Dont know the customs tax office price)
34 | Shipping from Daraz : $1.15
35 | | Total | | $179.24 |
36 |
37 |
38 |
--------------------------------------------------------------------------------
/chicken-in-a-can.md:
--------------------------------------------------------------------------------
1 | ---
2 | name: "@Chicken-in-a-Can"
3 | project: USB HID Glove
4 | ---
5 |
6 | # USB HID Glove
7 |
8 | ## Summary
9 | Glove modifified with electronics, hopefully mounted in glove, to allow user to interact with computer
10 | Will interact based on finger position, hand speed and hand acceleration, allowing for gesture movement
11 | Will connect to computer via (kinda) wireless USB plugin
12 |
13 | ## Plan
14 | Day 1 will involve basic wiring on breadboards. Day 2 - 4 will be soldering to each other. Days 5 - 8 will be basic coding of glove and computer interaction. 9 & 10 will be for tuning.
15 |
16 |
17 | ## Budget
18 |
19 | Shipping and tax included
20 |
21 | | Product | Supplier/Link | Cost |
22 | | --------------- | ------------------------------------- | ------ |
23 | | Arduino Micro x2 | https://store-usa.arduino.cc/products/arduino-micro | $57 |
24 | | 100 RGB LEDs | https://a.co/d/gJyFXcB | $9.50 |
25 | | .96" OLED Display | https://a.co/d/7VmPywS | $6.50 |
26 | | Wireless transmitter & reciever | https://a.co/d/gaBA3L2 | $6.50 |
27 | | Unleaded Solder | https://a.co/d/7J4MeMp | $ 20 |
28 | | Rosin Flux | https://a.co/d/4c77Us4 | $9 |
29 | | Desoldering Braid | https://a.co/d/9qr7yWn |$ 9 |
30 | | Bend Sensor x5 | https://a.co/d/1bzJEG7 | $40 |
31 | | Accelerometer + Gyroscope x3| https://a.co/d/8EOv3kX | $10 |
32 | | 120 pcs Jumper Cable | https://a.co/d/eZoV28V | $7.50 |
33 | | Portable charger (for glove power) | https://a.co/d/7ndswFZ | $26.00 |
34 | | Glove | https://a.co/d/fbY6zLl | $10.50 |
35 | | Micro USB cable 3 ct. | https://a.co/d/aOddL9b | $9.50 |
36 | | Total | | $221.00 |
37 |
38 | Things I own:
39 | - Soldering Iron
40 | - Breadboard
41 | - Needle & Thread
42 |
--------------------------------------------------------------------------------
/Michaell14.md:
--------------------------------------------------------------------------------
1 | ---
2 | name: "@Michaell14"
3 | project: "Good Morning Smart Mirror"
4 | ---
5 |
6 | # Good Morning Smart Mirror
7 |
8 | ## Summary
9 |
10 | What are you going to build? What does it do? Why are you excited to build it?
11 | I am going to build a smart mirror. This is basically an mirror that has information (e.g. weather, date, daily tasks, motivational quotes) that you can interact with.
12 | It's going to be able to take in voice commands and respond to me based on those commands. Ex: "What is the weather at 3pm today?" -> will gather data from weather api.
13 | I am excited to build this because it is a larger project than I usually make so I wanted to see the difference in difficulty.
14 |
15 | Example: https://www.youtube.com/watch?v=RWjvJq4Zabk&t=573s
16 |
17 | ## Plan
18 |
19 | I am going to connect the raspberry pi to a tv (with two way mirror on it) and use a magic mirror module (https://magicmirror.builders/) for the initial set up.
20 | From there, I am going to customize the default code into responding to my voice. I will add a voice detector and camera onto the tv to recognize me.
21 |
22 | ## Budget
23 |
24 | | Product | Supplier/Link | Cost |
25 | | --------------- | ------------------------------------- | ------ |
26 | | Raspberry Pi 4 | shorturl.at/gkvT1 | $125.67|
27 | | Two Way Mirror (24"x19") | shorturl.at/rwGP7 | $99.00 |
28 | | 32 inch monitor | shorturl.at/apxKO | $139.99|
29 | | Infrared Touch Frame | shorturl.at/rxCW1 | $140.86|
30 | | Raspberry Charger | shorturl.at/bHQY0 | $7.99 |
31 | | LED Light Strip | shorturl.at/tBGS7 | $6.90 |
32 | | Monitor Wall Mount | shorturl.at/biNVW | $6.90 |
33 | | Total | | $527.31|
34 |
--------------------------------------------------------------------------------
/SK-2009.md:
--------------------------------------------------------------------------------
1 | ---
2 | name: "@SK-2009"
3 | project: "Mini Security Camera"
4 | ---
5 |
6 | # Mini Security Camera
7 |
8 | ## Summary
9 |
10 | What I plan on building is a small camera in a 3D printed enclosure that I can place anywhere with a adhesive bottom and go unnoticed for a long time
11 |
12 | ## Plan
13 |
14 | Design and print enclosure, Connect camera to vtx board, Connect anntennas to the boards, Mount camera and other components, Plug in battery, Watch on my analog screen
15 |
16 | Tools/Parts I have already have - Soldering iron, Solder, 3D printer filament, Small screws, Rubber Adhesive, Screw driver, Cables
17 |
18 | ## Budget
19 |
20 | | Product | Supplier/Link | Cost |
21 | | --------------- | ------------------------------------- | ------ |
22 | | Camera | https://www.getfpv.com/fpv/cameras/caddx-ant-1200tvl-1-8mm-fpv-nano-camera-14x14-black.html | $16 + Shipping $18 |
23 | | VTX | https://www.getfpv.com/fpv/video-transmitters/5-8ghz/lumenier-sm-25-25mw-micro-vtx-u-fl-sma.html | $12 (Bought with other things for free shipping) |
24 | | VRX | https://www.getfpv.com/fpv/video-receivers/tbs-fusion-goggle-receiver-module.html | $130 (Bought with other things for free shipping) |
25 | | Battery | https://www.nextfpv.com.au/collections/1s-1-cell/products/tattu-500mah-2s-95c-3-7v-95c-lipo-battery-pack-with-jst-phr-plug-long-pack | $7.33 + Shipping $5.99 |
26 | | Analog Screen | Already got one | $0 |
27 | | Antennas | https://www.getfpv.com/lumenier-micro-axii-2-antenna-5-8ghz-90-degree-sma.html + https://www.getfpv.com/lumenier-axii-patch-antenna-rhcp.html + https://www.getfpv.com/fpv/video-transmitters/5-8ghz/lumenier-sm-25-25mw-micro-vtx-u-fl-sma.html | $65 (Bought with other things for free shipping) |
28 | | Total | | $254.32 I am happy to spend and extra $4.32 to build my project :) |
29 |
--------------------------------------------------------------------------------
/sahitid.md:
--------------------------------------------------------------------------------
1 | ---
2 | name: "@sahitid"
3 | project: "Motion Sensor Video Recorder w/ Raspberry Pi"
4 | ---
5 |
6 | # Motion Sensor Video Recorder w/ Raspberry Pi
7 |
8 | ## Summary
9 |
10 | I'm going to build a Motion Sensor Video Recorder that is operated using a Raspberry Pi. It will ultimately use a motion sensor to trigger video recording.
11 |
12 | ## Plan
13 |
14 | Utilizing the Raspberry Pi, PIR sensor, and camera module, I will create a device that can detect motion (with GPIO 4) and then run a python program that records video and takes photos.
15 |
16 | ## Budget
17 |
18 | | Product | Supplier/Link | Cost |
19 | | -------------------------------- | -------------------------------------------------------------------------------- | ------- |
20 | | Raspberry Pi | https://amzn.to/3PNMf6d | $160.00 |
21 | | Raspberry Pi Camera Module | https://www.adafruit.com/product/3099 | $29.95 |
22 | | PIR motion sensor module | https://thepihut.com/products/pir-motion-sensor-module | $3.61 |
23 | | Jumper wires | https://amzn.to/3veRG4v | $11.69 |
24 | | Camera Board 360 Gooseneck Mount | https://thepihut.com/products/camera-board-360-gooseneck-mount | $7.23 |
25 | | Breadboard | https://amzn.to/3WpoTX1 | $6.69 |
26 | | Tax + Shipping | | $27.39 |
27 | | Total | | $246.56 |
28 |
--------------------------------------------------------------------------------
/ByteAtATime.md:
--------------------------------------------------------------------------------
1 | ---
2 | name: "@ByteAtATime"
3 | project: "Pomodoro Timer/TODO List"
4 | ---
5 |
6 | # Pomodoro Timer/TODO List
7 |
8 | ## Summary
9 |
10 | I plan to build a [Pomodoro](https://en.wikipedia.org/wiki/Pomodoro_Technique) timer that includes a basic task list/management system. I have a problem with time management, which is important as I'm a student, and I'm building this in hopes that I can get better at it and finish my tasks on time.
11 |
12 | ## Plan
13 |
14 | For the UI, I plan to use something like [Tauri](https://tauri.app). For educational purposes, I'm going to overengineer the system to use [Firebase](https://firebase.google.com) (Firestore in particular) to store the task information, along with statistics of Pomodoro's I've done.
15 |
16 | I'm thinking of something along the lines of [Todoist](https://todoist.com), which I like to use, crossed with [Pomofocus](https://pomofocus.io), which I like for its simplicity. Essentially, make something like Pomofocus with a better todo list. I also like the look of [Plausible Analytics](https://plausible.io), which I might base my statistics page on, and I might add some information about "most active times" and a streak counter to motivate me to do at least `n` pomodoros daily.
17 |
18 | Just want to clarify that these websites I'll be using for **inspiration**, I won't copy them.
19 |
20 | ## Budget
21 |
22 | | Product | Supplier/Link | Cost |
23 | | --------------- | ------------------------------------- | ------ |
24 | | Orange Pi | https://www.amazon.com/gp/product/B0BNSSB7JV/ | $150.99 |
25 | | 7" Touchscreen | https://www.amazon.com/gp/product/B01GDMDFZA/ | $63.99 |
26 | | Shipping | | $11.99 |
27 | | Tax | | $20.71 |
28 | | Total | | $247.68 |
29 |
--------------------------------------------------------------------------------
/thomaswcy.md:
--------------------------------------------------------------------------------
1 | ---
2 | name: ["@thomaswcy", "@MeliLXT"]
3 | project: "Home-Environment-Monitor"
4 | ---
5 |
6 | # Home-Environment-Monitor (HEV)
7 |
8 | ## Summary
9 |
10 | I'm going to build the HEV using RaspberryPi and sensors. It will be deployed on Linux. I'm excited because though I have lots experiences in Linux but I'm totally new to Raspberry. I am building this with my friend @MeliLXT and with the help from my friend @xingyujie, which is very familiar with RaspberryPi.
11 |
12 | It will use light, sound, temperature and humidity sensors.
13 |
14 | ## Plan
15 |
16 | I'm going to use RaspberryPi 4b to control all the sensors. It will run the RaspberryPi OS. I will control the sensors using Python and bash scripts. The data will be printed out using a electron.js application.
17 |
18 | This is my first project based on RaspberryPi and I will be very excited.
19 |
20 | ## Budget
21 |
22 | | Product | Supplier/Link | Cost |
23 | | ---------------------------------- | ---------------------------------------- | ------- |
24 | | RaspberryPi 4b beginner kit | https://m.tb.cn/h.Ukp6wQQ?tk=BhJjdUBBLjl | $210.85 |
25 | | temperature and humidity sensor | https://m.tb.cn/h.UP8oY8s?tk=ZGQ5dUBzGMz | $1.31 |
26 | | light sensor | https://m.tb.cn/h.Ukp8dNX?tk=4Mt0dUzZ6II | $0.45 |
27 | | sound sensor | https://m.tb.cn/h.UP8LhNT?tk=QtdqdUzZLko | $0.97 |
28 | | Dupont wires | https://m.tb.cn/h.UkpQKIS?tk=TONTdUzY1wv | $0.75 |
29 | | Redmi 23.8" rotatable display | https://m.tb.cn/h.UlW3WUV?tk=czgBdgi5wVv | $107.05 |
30 | | Xiaomi wireless keyboard and mouse | https://m.tb.cn/h.UP8qjnr?tk=su3fdUz0CxO | $12.71 |
31 | | Total | | $334.09 |
32 |
33 | All fees including tax and shipping are included.
34 |
--------------------------------------------------------------------------------
/vedhasirur.md:
--------------------------------------------------------------------------------
1 | ---
2 | name: "@vedhasirur
3 | project: "Water Level Monitoring System"
4 | ---
5 |
6 | # Project Name
7 | Water Level Monitoring System
8 |
9 | ## Summary
10 |
11 | I am going to build a water level monitoring system with the Blynk app.
12 | It uses ultrasonic sensor is used to measure the water level and displays it on the screen.
13 | I am excited to build it as it will be my first hardware project.
14 |
15 |
16 | ## Plan
17 | I will first start by connecting the LED bulbs to the Nodemcu board.
18 | I will then connect LCD screen, ultrasonic sensor, and relay module to the Nodemcu board as seen on the circut diagram.
19 | Lastly, I will set up the app and connect Nodemcu board to the computer and upload the program for this system.
20 |
21 | This is the video I will use for reference when building my project https://www.youtube.com/watch?v=MGPqFB0DI60
22 |
23 | ## Budget
24 |
25 | What materials will you need for your project? Where will you get them? How much does it cost? Please include all materials, including components you already own. Make sure to factor in shipping costs and sales tax.
26 |
27 | | Product | Supplier/Link | Cost |
28 | | --------------- | ------------------------------------- | ------ |
29 | 1.Nodemcu ESP8266 x 1 -- https://amzn.to/3hwqG7v 15.99
30 | 2.Ultrasonic sensor x 1 -- https://amzn.to/3gLCkRj 8.99
31 | 3.Relay module x 1 -- https://amzn.to/2FqK9Jv 7.39
32 | 4.LCD screen x 1 -- https://amzn.to/3isdBgz 8.99
33 | 5.I2C module x 1 -- https://amzn.to/3hqY5jC 7.49
34 | 6.LED bulb x 5 -- https://amzn.to/3hmJ9TV 4.99
35 | 7.220-ohm resistor x 5 -- https://amzn.to/3bOwdVF 6.27
36 | 8.Jumper wires -- https://amzn.to/2RjTt4e 6.99
37 | 9.Breadboard x 1 -- https://amzn.to/35rdMVE 13.99
38 | Tax $5.06
39 | Shipping $0
40 | Total $86.15
41 |
42 |
--------------------------------------------------------------------------------
/darksidemanas.md:
--------------------------------------------------------------------------------
1 | ---
2 | name: "@darksidemanas"
3 | project: "medical sos emergeny recordig and monitoring system"
4 | ---
5 |
6 | # MEDICAL SOS EMERGENCY MONITORING AND RECORDING SYSTEM
7 |
8 | ## Summary
9 |
10 | I WANT TO MAKE IOT DEVICE TO CONNECT PATIENTS AND ALL MEDICAL ,SO THEY CAN MONITOR MULTIPLE PEOPLE AT THE SAME TIME IT WILL HELP IN SITUATIONS LIKE COVID-19.
11 | I WILL BE DEVEOPING ANDRIOD APP TO DO SO.
12 |
13 | ## Plan
14 |
15 | 1.FIRST WE NEED TO CONFIGURE RASPBERRY PI TO READ ANALOG SIGNALS USING A CUSTOM DESIGNED PCB
16 | 2.TO MAKE AN ANDRIOD APP WITH MULTIPLE LANGUAGE SUPPORT AN ALGORITHM TO LIST OUT PATIENTS WHO NEED MEDICAL ASSISTANCE URGENTLY
17 | 3.PCB TOHCONNECT DIFFERENT MEDICAL PROBES WITH PI
18 | 4.USING MCB3008 AND SPI CONNECTION TO READ ANALOG SIGNALS
19 | 5.TESTING WITH DIFFRENT MEDICAL SENSORS
20 | 6.DESINGING A METAL ENCLOSER TO PROTECT PI AND OTHER PCB .
21 |
22 | ## Budget
23 |
24 | What materials will you need for your project? Where will you get them? How much does it cost? Please include all materials, including components you already own. Make sure to factor in shipping costs and sales tax.
25 |
26 | | Product | Supplier/Link | Cost |
27 | | --------------- | ------------------------------------- | ------ |
28 | | SOLDRING KIT | https://robu.in/product/plusivo-soldering-kit-with-multimeter-eu-plug/ | $21.27 |
29 | | raspberyy pi 4B+ 8GB| https://www.amazon.in/Raspberry-Pi-8GB-Desktop-Computer/dp/B08B9XS3B6?th=1 | $169.18 |
30 | | custom PCB | https://jlcpcb.com/ | $50 |
31 | | wires for pcb connections | https://robu.in/product/plusivo-22awg-hook-up-wire-kit-600v-tinned-stranded-silicone-wire-of-6-different-colors/ | $10.88 |
32 | | Total | | $251.33 |
33 |
34 | note - all the prices above are based on dollar rate of 82.75 ,INR to USD
35 | -THIS PRICE CONTAINS ALL SHIPPPING CHARGES
36 |
--------------------------------------------------------------------------------
/ahnedmohamed57.md:
--------------------------------------------------------------------------------
1 | ---
2 | name: "@ahnedmohamed57"
3 | project: "3D Printer"
4 | ---
5 |
6 | # 3D Printer
7 |
8 | ## Summary
9 |
10 | I am planing to rebuild my 3D ptinter. I tryed to build it last year but the components have burned. I will use this 3D printer to open a small business during my free time and help in building my scientific projects
11 |
12 | ## Plan
13 |
14 | I will start by collecting the parts together and create the remaining parts using wood. Then, I will use mariln firmware as a sofware to controll the components of the printer.
15 | And here is a guide for the 3d printer creation process: https://reprap.org/wiki/RepRap
16 |
17 | ## Budget
18 |
19 | What materials will you need for your project? Where will you get them? How much does it cost? Please include all materials, including components you already own. Make sure to factor in shipping costs and sales tax.
20 |
21 | | Product | Supplier/Link | Cost |
22 | | -------------------- | ------------------------------------- | ------ |
23 | |5pcs Black GT2 Pulley | https://a.co/d/fA6lhyj | $8.5 |
24 | |Steeper motor drivers | https://a.co/d/3uuH6EF | $14 |
25 | |MK8 Extruder | https://a.co/d/daainex | $42 |
26 | |PLA 3DPrinter Filament| https://a.co/d/fZCWpLS | $26 |
27 | | Shipping + import fees deposit| | $125 |
28 | | Tool box |https://a.co/d/fwPpMUv | $25 |
29 | | Arduino mega | I have this one! | $0 |
30 | | 4 Steeper motors | I have this one! | $0 |
31 | | RAMPS | I have this one! | $0 |
32 | | LCD Smart controller | I have this one! | $0 |
33 | | Heated bed | Home made! | $0 |
34 | | Total | | $240 |
35 |
--------------------------------------------------------------------------------
/Erik-Dennis.md:
--------------------------------------------------------------------------------
1 | ---
2 | name: "@Erik-Dennis"
3 | project: "Smart Device Controller"
4 | ---
5 |
6 | # Smart Device Controller
7 |
8 | ## Summary
9 |
10 | What are you going to build? What does it do? Why are you excited to build it?
11 |
12 | A touch screen smart device controller. This will be able to view camera feed and audio from ring devices, and control smart lights, thermostat, etc.
13 | I'll also be creating a custom webpage interface hosted locally through apache utilizing APIs.
14 |
15 |
16 | ## Plan
17 |
18 | What steps are you going to take to build it? What tools are you going to use? What will you do first, second, third, etc.?
19 |
20 | 1. Buy a Raspberry Pi
21 | 2. Buy a compatible form fitting touch screen
22 | 3. Buy Smart lights
23 | 4. Install and setup Home Assistant
24 | 5. Connect Devices (Ring Cameras, Smart Lights, Thermostat)
25 | 6. Create Webpage Interface
26 | 7. Add RDP for remote control and easy setup
27 | 8. Mount Pi to the wall as a smart controller
28 | 9. Research APIs and integration
29 |
30 |
31 | ## Budget
32 | (Cost Includes Tax)
33 |
34 | | Product | Supplier/Link | Cost |
35 | | --------------- | ------------------------------------- | ------ |
36 | | Raspberry Pi 4 B| https://www.amazon.com/gp/product/B07TC2BK1X/ref=ewc_pr_img_1?smid=AN9XFB4R34UOI&psc=1 | $185.56 |
37 | | 3.5" Touchscreen Display | https://www.amazon.com/gp/product/B07WQW6H9S/ref=ewc_pr_img_2?smid=AD7LID9K1N4N9&psc=1 | $40.82 |
38 | | Smart Bulbs | https://www.amazon.com/dp/B09J2JMDWV/ref=redir_mobile_desktop?_encoding=UTF8&aaxitk=ac6aff77d3ae108d64cfc17ea3adb68e&content-id=amzn1.sym.552bcbb2-81a1-4e8b-b868-3fba7d5af42a%3Aamzn1.sym.552bcbb2-81a1-4e8b-b868-3fba7d5af42a&hsa_cr_id=0&pd_rd_plhdr=t&pd_rd_r=ff443208-9d84-4836-9850-44fc021c1b65&pd_rd_w=bLlo9&pd_rd_wg=pMFPc&qid=1671695911&ref_=sbx_be_s_sparkle_lsi4d_asin_0_img&sr=1-1-9e67e56a-6f64-441f-a281-df67fc737124&th=1| $23.02 |
39 | | Total | | $249.43 |
40 |
--------------------------------------------------------------------------------
/SATOMASAHIRO2005.md:
--------------------------------------------------------------------------------
1 | ---
2 | name: "@satomasahiro2005"
3 | project: "MIDI keyboard for non-mainstream scales"
4 | ---
5 |
6 | # MIDI keyboard for non-mainstream scales
7 |
8 | ## Summary
9 |
10 | Making the MIDI keyboard for playing with non-mainstream scales
11 | 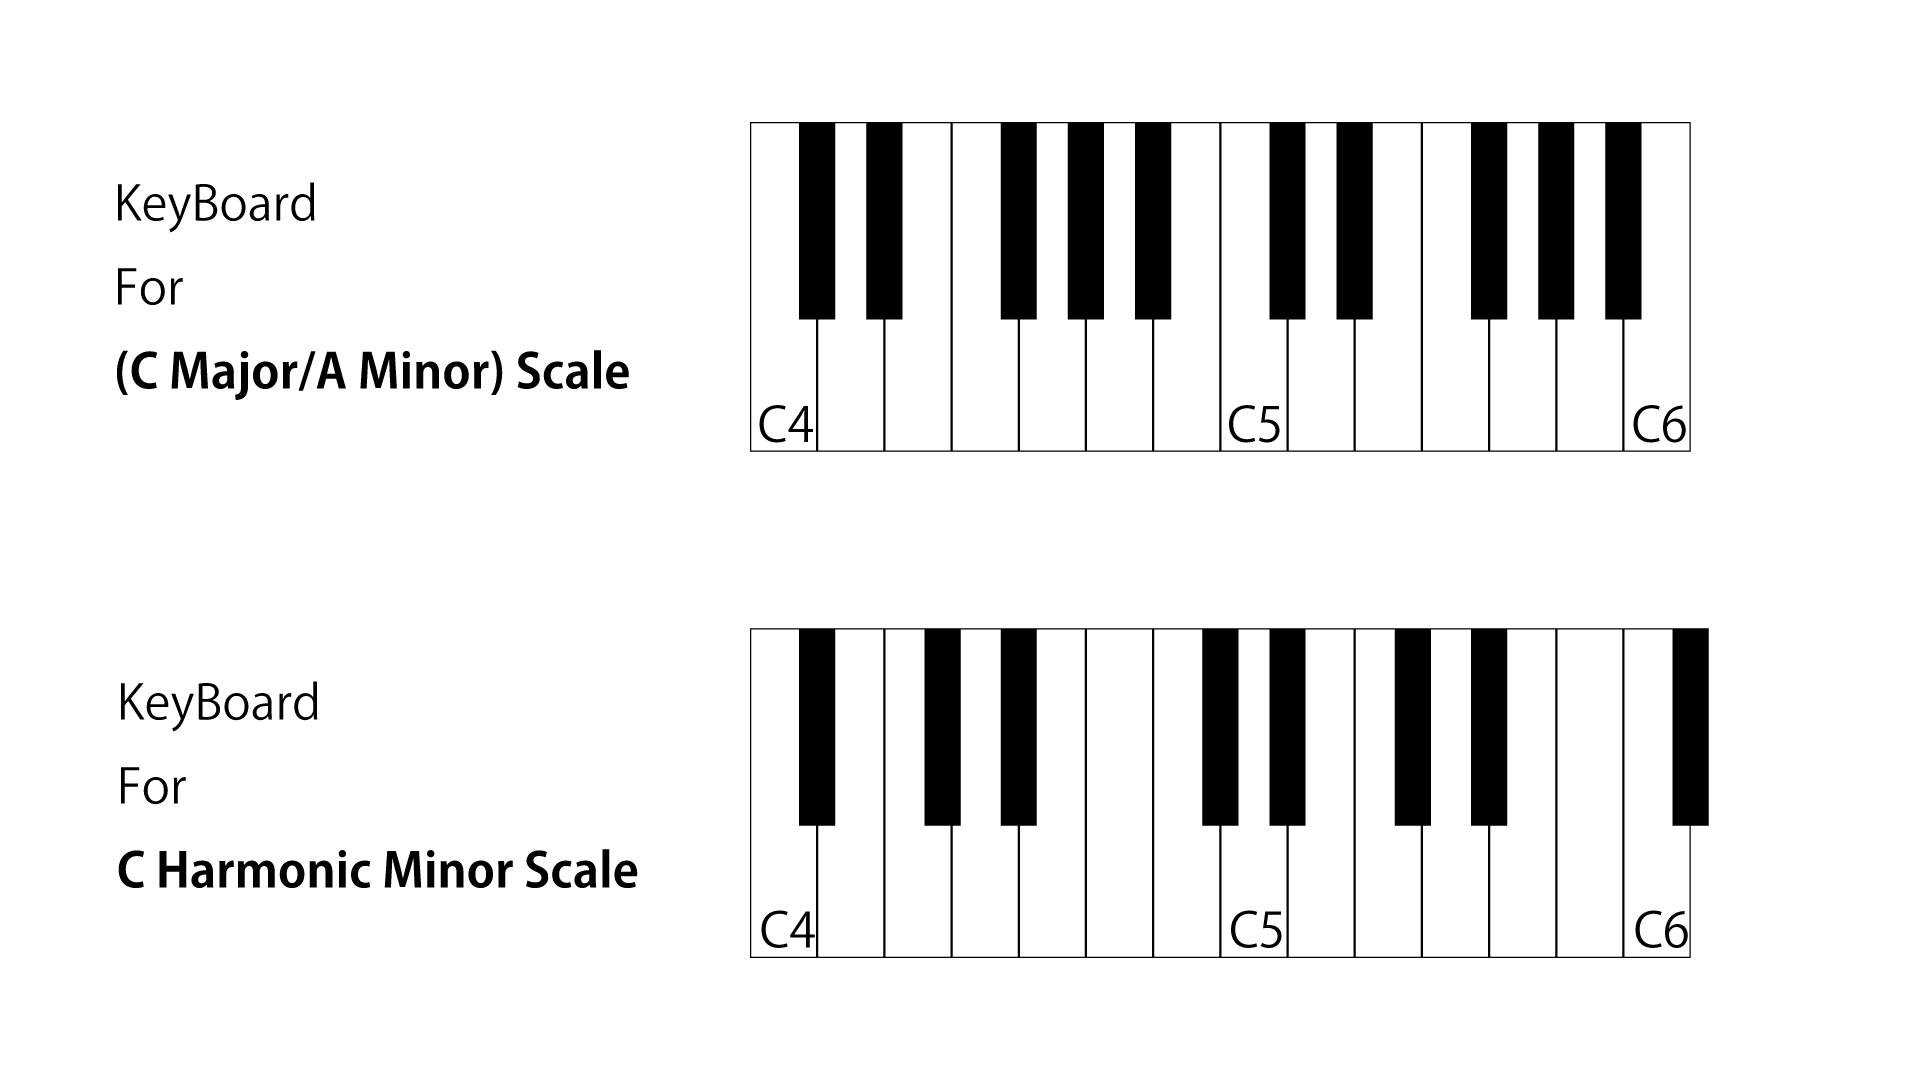
12 | You probably have seen upper one.
13 | It is the keyboard which is most popular in the world.
14 | It was designed for playing C Major Scale Music.
15 | But, in the world, there are a lot of Scale.
16 | in white keys, frequently used notes in C major are assigned.
17 | in black keys, another notes are assigned.
18 | So, it is hard to play another Scale Music in common keyboard.
19 | 
20 | I thought that if I could make a keyboard with lots of black keys and make the black keys removable, it would be a keyboard that could be used on any scale.
21 |
22 | ## Plan
23 |
24 | 1. Make a design for this keyboard with pencil and paper.
25 | 2. Make a 3D model with CAD.
26 | 3. Make a program to output MIDI signal and switch scale with arduino.
27 |
28 | - using 8 segment displays, I can check what selected scale is.
29 |
30 | ## Budget
31 |
32 | | Product | Supplier/Link | Cost |
33 | | ------------------- | --------------------------------------------------------------- | ---------- |
34 | | 3D Printer | https://www.elegoo.com/products/elegoo-neptune-3-fdm-3d-printer | 209.99 USD |
35 | | Arduino Starter Kit | https://www.amazon.co.jp/dp/B06XF2HZGT | 5,099 JPY |
36 | | Mechanical Switch | Purchase separately | 0 |
37 | | filament | Purchase separately | 0 |
38 | | Total | Considering the JPY/USD exchange rate | 250.00 USD |
39 |
--------------------------------------------------------------------------------
/Mahak1729:
--------------------------------------------------------------------------------
1 | ---
2 | name: "@Mahak1729"
3 | project: " Tron Hoodie "
4 | ---
5 |
6 | # Tron Hoodie
7 |
8 | ## Summary
9 |
10 | For my first-ever project, I am planning to make the Tron Hoodie. I am choosing it for the following reasons
11 | - Relatively cheap to start out
12 | - Relatively easy to do for someone of my level (which is pretty much nonexistent)
13 | This looks cools and would allow me to delve deep into a world I was not exposed to when I was young. Who could refuse to make something that looks so
14 | cool and could be used in your daily life.
15 |
16 | ## Plan
17 |
18 | Order \ Get them up (All the components that would be required) -> Get everything ready on an clean organised desk
19 | -> Follow the simple instructions as on the blog (https://learn.adafruit.com/tron-hoodie/) + video (https://learn.adafruit.com/tron-hoodie/)
20 | -> Tada ! The hoodie is made
21 |
22 | Once this project I would move on to another one which could look in the relams of the following
23 | (I will update the repo and make sure I am communicating what I am doing as I go) -
24 |
25 | - Tron Sneakers (https://learn.adafruit.com/glowing-star-chucks)
26 | - RGB Bag (https://learn.adafruit.com/matrix-portal-rgb-display-handbag) / Tron Laptop Bag (https://learn.adafruit.com/tron-bag)
27 | - Mechanical Keyboard (Using a barebone to start from)
28 | - Anything else that is quick + easy + has utility
29 |
30 | ## Budget
31 |
32 | | Product | Supplier/Link | Cost |
33 | | --------------- | ------------------------------------- | ------ |
34 | | EL wire starter pack - Red 2.5 meter (8.2 ft) | https://www.adafruit.com/product/587 | $19.95 |
35 | | Needle set - 3/9 sizes - 20 needles | https://www.adafruit.com/product/615 | $1.95 |
36 | | Hoodie | (Would probably get something from the store and would upload the receipts to get a refund on it) | ~15$ (Would update this when I have purchased it in Sitka Alaska) |
37 | | Shipping charges | | 13.25 $ |
38 | | Total (Estimate) | | ~ 50 $ |
39 |
--------------------------------------------------------------------------------
/Jackson-Turner.md:
--------------------------------------------------------------------------------
1 | ---
2 | name: "@Jackson-Turner"
3 | project: "Toys come to life"
4 | ---
5 |
6 | # Toys come to life
7 |
8 | ## Summary
9 |
10 | What are you going to build? What does it do? Why are you excited to build it?
11 |
12 | I am going to build a camera to track what your toys do when you are not in the room. Using OpenCV I will be able to track the movement of anything within a
13 | frame of video. I am excited to continue working on furthuring my OpenCV knowledge and getting to track toys.
14 |
15 | ## Plan
16 |
17 | What steps are you going to take to build it? What tools are you going to use? What will you do first, second, third, etc.?
18 |
19 | First I will set the camer up in a location where it will expirience relative little shaking. After that I will via the raspberry
20 | pi start processing the data specifically looking at the movement of the recognized toys in the frame. I will them output a picture where the path of the toy
21 | is drawn. TO go more minute I will utilize a nural network to recognize toys first. Then ultilizing open CV through a set period of time that could be idefinitely
22 | extended i will track the movement of the toys. At first the program will probabaly be limited to one or two toys but throughout development I hope to get that up.
23 |
24 | ## Budget
25 |
26 | | Product | Supplier/Link | Cost |
27 | | --------------- | ------------------------------------- | ------ |
28 | | OAK-D-Lite-AF | https://www.mouser.com/ProductDetail/?qs=Znm5pLBrcAKOqyMVx9BJ9A%3D%3D | $149.00 |
29 | | OAK D Bumper Case | https://www.mouser.com/ProductDetail/?qs=Znm5pLBrcAKmnV%252Bz9SAi2w%3D%3D | $14.99 |
30 | | Raspberry Pi 4 | https://www.mouser.com/ProductDetail/?qs=T%252BzbugeAwjieYVS2HrrK%2FQ%3D%3D | $45.00 |
31 | | PNY 128gb Micro SD | https://www.amazon.com/gp/product/B08RG6XJZD/ref=ewc_pr_img_2?smid=ATVPDKIKX0DER&psc=1 | $12.99 |
32 | | Shipping | ------------------- | $9.79 |
33 | | Tax | --------------- | $16.80 |
34 | | Total | | $248.57 |
35 |
--------------------------------------------------------------------------------
/Arpan-206.md:
--------------------------------------------------------------------------------
1 | ---
2 | name: "@Arpan-206"
3 | project: "Bonus Lector"
4 | ---
5 |
6 | # Bonus Lector
7 |
8 | ## Summary
9 |
10 | We are going to build our own eBook Reader (like Kindle) using the Raspberry Pi with a custom OS image, books store etc.
11 |
12 | ## Plan
13 |
14 | I couldn't see anyone doing this online, so can't attach many sources. Kinda figuring this out on our own.
15 | I have quite a bit of experience with Raspi and electronics but want to take this as an opportunity to work with and teach my sister and a friend about hardware projects and RPIs.
16 |
17 | Here are a few links for individual components though:
18 | 1. https://medium.com/swlh/create-an-e-paper-display-for-your-raspberry-pi-with-python-2b0de7c8820c
19 | 2. https://www.youtube.com/watch?v=Gun07uy3Nf8
20 |
21 | 1. Order all the parts as listed.
22 | 2. Simultaneously, build the image and necessary softwares for storing, and managing the eBook files.
23 | 3. Assemble the 3D Printer and other accessories.
24 | 4. Develop the 3D models necessary for the project.
25 | 5. Print the necessary 3D files.
26 | 6. Load the developed softwares onto the Raspberry Pi.
27 | 7. Assemble everything together.
28 | 8. Voila!
29 |
30 | ## Budget
31 |
32 | 3 People will be working on this project.
33 |
34 | | Product | Supplier/Link | Cost |
35 | | --------------- | ------------------------------------- | ------ |
36 | | 7.5" ePaper Diplay | https://www.amazon.in/gp/product/B07Z25LWTS/ | $245 |
37 | | 3D Printer | https://www.amazon.in/Flashforge-Adventurer-3-3D-Printer/dp/B07FPSZPK4 | $620 |
38 | | 3D Filament | https://www.amazon.in/gp/product/B079CHKQTF | $12 |
39 | | SD Cards | https://www.amazon.in/gp/product/B09MT6XSFW | $8 |
40 | | USB Type-C Adapter (Raspi) | https://www.amazon.in/gp/product/B09KTRZ5Y9 | $14 |
41 | | Powerbank for Raspi | https://www.amazon.in/gp/product/B09MZCQYHZ | $14 |
42 | | Raspberry Pi 4 | https://robocraze.com/products/raspberry-pi-4-model-b-4gb-ram?src=raspberrypi | $75 |
43 | | Total | | $988 |
44 |
45 |
--------------------------------------------------------------------------------
/Robertrover811.md:
--------------------------------------------------------------------------------
1 | ---
2 | name: "@Robertrover811"
3 | project: "3d printer upgrades"
4 | ---
5 |
6 | # 3d printer upgrades
7 |
8 | ## Summary
9 |
10 | I am going to build a resin curing station and upgrade my Ender 3 V2 with auto bed leveling and install a raspberry pi to run octoprint. This will allow me to cure my resin prints quicker and more reliably, remotely control my Ender 3 while gathering and observing lots of data that I can use to monitor and improve my prints. I aim to learn how to get octoprint running and efficently and reliably manage my 3d prints.
11 |
12 | What are you going to build? What does it do? Why are you excited to build it?
13 |
14 | ## Plan
15 |
16 | 1. 3d print an enclosure for the Raspberry Pi.
17 | 2. Install Octoprint on it.
18 | 3. Install the Auto bed level.
19 | 4. Drill a hole in the paint can route the UV light strip through.
20 | 5. Apply the UV light strip to the sides of the paint can.
21 | 6. Place the solar turntable inside.
22 |
23 | What steps are you going to take to build it? What tools are you going to use? What will you do first, second, third, etc.?
24 |
25 | ## Budget
26 |
27 | What materials will you need for your project? Where will you get them? How much does it cost? Please include all materials, including components you already own. Make sure to factor in shipping costs and sales tax.
28 |
29 | | Product | Supplier/Link | Cost |
30 | | --------------- | ------------------------------------- | ------ |
31 | | Raspberry Pi 4b 2gb | https://www.mcmaster.com/4284N11/ | $60.00 |
32 | | Empty Paint Can | https://www.amazon.com/Gallon-Empty-Paint-2-Pack-Unlined/dp/B0714B7B7Q/ | $15.99 |
33 | | Solar Turntable | https://www.amazon.com/FUNGDO-Turntable-360%C2%B0Rotating-Printed-Included/dp/B07ZR4B9YH/ | $13.99 |
34 | | UV Light Strip | https://www.amazon.com/YGS-Tech-395nm-405nm-Non-Waterproof-Blacklight-Sterilization/dp/B07K6BK639/ | $13.99 |
35 | | CRTouch Auto Bed Level | https://www.amazon.com/Creality-Leveling-3D-Printer-Mainboard/dp/B09DVYZSYJ/ | $39.99 |
36 | | Total | | $144.96 |
37 |
--------------------------------------------------------------------------------
/Omay238.md:
--------------------------------------------------------------------------------
1 | ---
2 | name: "@Omay238"
3 | project: "IRL Pong"
4 | ---
5 |
6 | # IRL Pong
7 |
8 | ## Summary
9 |
10 | I am planning to be building a Pong board with a physical ball and paddles. It will be a lot like normal Pong, but with a new way to experience it. I am excited to build it because I live by a place called Pinball Jones, and there I found a Pong game a lot like it.
11 |
12 | ## Plan
13 |
14 | I won't need many tools other than my 3D printer, and wood working tools in my garage.
15 | I will make simple files for the controls (just little wheels).
16 | The software will just control the paddles and ball, along with taking in input. I have made a JavaScript version of pong, so I believe it wouldn't be too hard to port that code to this project.
17 |
18 | 1. First, I will make a simple board, likely just smooth wood. (around 1 day)
19 | 2. Then, I will build a simple gantry to move a magnet around underneath the board. (with wiring, probably 2 days)
20 | 3. After that I will get simple balls and paddles with magnets inside (around 1/2 day)
21 | 4. Then, it's just the software, then I will be done.
22 |
23 | ## Budget
24 |
25 | | Product | Supplier/Link | Cost |
26 | | ------------------ | --------------------------------------- | ------- |
27 | | Arduino Uno | https://www.sparkfun.com/products/11021 | $27.95 |
28 | | 7-segment display | https://www.sparkfun.com/products/11408 | $3.50 |
29 | | Magnet (x10) | https://www.sparkfun.com/products/8643 | $16.00 |
30 | | Stepper Motor (x4) | https://www.sparkfun.com/products/9238 | $70.00 |
31 | | Breadboard | https://www.sparkfun.com/products/12002 | $5.50 |
32 | | Wires (M/M) (x2) | https://www.sparkfun.com/products/14284 | $5.50 |
33 | | Wires (F/F) (x2) | https://www.sparkfun.com/products/12796 | $4.20 |
34 | | Small Stepper (x2) | https://www.sparkfun.com/products/10551 | $17.90 |
35 | | Subtotal | | $150.55 |
36 | | Tax | | $6.78 |
37 | | Total | | $157.33 |
38 |
--------------------------------------------------------------------------------
/Divya-2009.md:
--------------------------------------------------------------------------------
1 | ---
2 | name: "@Divya-2009"
3 | project: "Arduino Car"
4 | ---
5 |
6 | # Arduino Car
7 |
8 | ## Summary
9 | I am going to build a bluetooth controlled car which is powered using an arudino uno. The reason I want to build this is because I have always wanted to create a robot and a car whihc i could control myself seemed like the perfect entry point. Also I think it would just be super cool to have a car that I could say i built myself.
10 |
11 | ## Plan
12 |
13 | For this build I will require a lit of parts since i am making it from scratch and not using a kit. Ecamples of things I will require is an arudino, a bluetooth chip, ply wood, motor drivers, mecanum wheel, etc. The first thing I will do is to tske the plywood and cut out an appropriate shape for the body of the car. I will then attach the motors to the board and connect them to the arudino and connect the wheels. After thst I will be putting in thr bluetooth chip so i can control the car and connect it with the arduino. Then i will put the bstteries in and program the arduino so it can function. Throughout this build I will be dollowing this video.
14 | https://youtu.be/7Rql1jhqmAg
15 |
16 | ## Budget
17 | | Product | Supplier/Link | Cost |
18 | | --------------- | ------------------------------------- | ------ |
19 | | Arduino Kit | https://amzn.asia/d/g4UOEPY | $75 |
20 | | Soldering Iron | https://amzn.asia/d/4maBpSN | $37.50 |
21 | | Hot Glue Gun | https://amzn.asia/d/fNnI3zz | $18 |
22 | | Double Sided Tape | https://amzn.asia/d/bLfET99 | $5 |
23 | | hc-05 | https://amzn.asia/d/hurMjGl | $19.50 |
24 | | Wheels | https://amzn.asia/d/1GZSD8p | $63 |
25 | | Cables | https://amzn.asia/d/006Zty0 | $10 |
26 | | Motors | https://a.co/d/amsC8SZ | $28 |
27 | | Motor Driver | https://amzn.asia/d/cKZPCqi | $25 |
28 | | Switches | https://amzn.asia/d/a80YfzH | $8.10 |
29 | | Battery Holder | https://amzn.asia/d/bZ5uThz | $4.30 |
30 | | Batteries | https://amzn.asia/d/2Wdo4jy | $59 |
31 | | Plywood | https://amzn.asia/d/bwzcl2I | $15 |
32 | | Total $Aud | | $367.40 |
33 | | Total $Usd | | $247 |
34 |
--------------------------------------------------------------------------------
/KrauseOlly.md:
--------------------------------------------------------------------------------
1 | ---
2 | name: "@KrauseOlly"
3 | project: "Onboard Go Kart Camera System"
4 | ---
5 |
6 | # FPV Go Kart
7 |
8 | ## Summary
9 | I plan on building a camera system that will be able to record and broadcast (using analog fpv equipment) back to spectators so they can watch the sport live from various views
10 | ## Plan
11 |
12 | Order Parts, Design a camera housing on fusion 360, Print, Test various camera angles and minimize vibrations, Record and analyse footage
13 |
14 | ## Budget
15 | All prices are in USD, I already have some parts, I will also be contributing ontop of the $250 grant as this is somthing I'm passionate about.
16 | | Product | Supplier/Link | Cost |
17 | | --------------- | ------------------------------------- | ------ |
18 | | 3D Printer | N/A Already have one | $0 |
19 | | Filament | https://www.inkstation.com.au/2102/pla-3d-filament-175mm-white-1kg-roll-p-18280.html?queryID=731f3a963b3f3a162278d0004b04c51c&objectID=12228#122288 | $22.34 (Including shipping) |
20 | | AIO FPV Camera | https://www.banggood.com/EWRF-701U-5_8Ghz-48CH-25mW-600tvl-F1_4mm-120-Degree-Wide-Angle-3-in-1-AIO-Video-Transmitter-FPV-Camera-VTX-for-FPV-Racing-RC-Drone-p-1900809.html?cur_warehouse=CN&rmmds=search | $17.19 (Shipping is around $5) |
21 | | 2S Lipos | N/A Already have 6 | $0 |
22 | | Adaptor Cables | https://www.ebay.com.au/itm/154545808562?hash=item23fba5e4b2:g:eDMAAOSwja9g~yrt&amdata=enc%3AAQAHAAAA8KZANDjke4zuoG2GJlx0TPt%2BEKjBt6%2F8qXvr1D5q8y%2BSi4hO8AyjJ%2B9KD3zKyAxe7AjSxni5J3aPt%2F7zPpcTYXAF95Hn4cd1Zt2p%2BZyLVJaeYcc%2B9lECCiO6JJoah0fo6FU0%2Fb9nlB4DbA7RIpgVENFRGIMPvr71Jvw1OjbG0UB4rPkztOe%2BHvorA9zzRofVJOhL2NU9FS2EIVquqlCFF4%2FKAWk2JlK2irZ4vSF6ibFGo0jRTSkLGY9A0v2R55477u9hToasqVLyy3bgMO7cxkQLP67LqlpTlrksXYNBQSlRNtMxHxMIGyWD%2BEUUWqkjpA%3D%3D%7Ctkp%3ABFBMpoXyzKZh | $3.99 (Free Shipping) |
23 | | FPV Goggles | https://www.getfpv.com/fpv/video-goggles/fat-shark-dominator-hdo-2-fpv-goggles.html | $500 (Shipping is around $18) |
24 | | Total | | $ 544.23 *I will also be contributing ontop of the $250 grant as this is somthing I'm passionate about* |
25 |
--------------------------------------------------------------------------------
/griffinli.md:
--------------------------------------------------------------------------------
1 | ---
2 | name: "@griffinli"
3 | project: "Smart Home Temperature Sensor"
4 | ---
5 |
6 | # Smart Home Temperature Sensor
7 |
8 | ## Summary
9 |
10 | A temperature sensor that keeps track of the temperature in a room over time and ideally integrates into HomeKit. It would track the temperature through the night with the goal of getting my dorm room (without AC and with a heater that's making it too warm but that I can't turn down) to the optimal temperature while sleeping. It'll have a display so that I can see the temperature by looking at it, in addition to its 24/7 monitoring. I'll try to also make it measure the rate at which temperature is changing and take into account the weather conditions (temperature and maybe wind as well) to help me figure out how much to open my window at night to get the optimal sleep temperature in my room.
11 |
12 | ## Plan
13 |
14 | 1. Order materials
15 | 2. Get the instantaneous temperature sensing + display working
16 | 3. (try to) Get the HomeKit integration working
17 | 4. Write software that shows the 24/7 temperature
18 | 5. Add weather data and temperature rate-of-change to the software
19 |
20 | ## Budget
21 |
22 | | Product | Supplier/Link | Cost |
23 | | --------------- | ------------------------------------- | ------ |
24 | | Sandisk MicroSD Card | https://www.amazon.com/SanDisk-Extreme-microSDTM-Adapter-SDSQXCD-128G-GN6MA/dp/B09X7DNF6G | $21.00 |
25 | | Raspberry Pi Power Supply | https://www.amazon.com/Raspberry-Model-Official-SC0218-Accessory/dp/B07W8XHMJZ | $7.95 |
26 | | Temperature Sensor | https://www.adafruit.com/product/1782 | $4.95 |
27 | | eInk Display | https://www.adafruit.com/product/4224 | $8.50 |
28 | | Large Breadboard | https://www.adafruit.com/product/239 | $5.95 |
29 | | Small Breadboard | https://www.adafruit.com/product/65 | $3.95 |
30 | | Wires | https://www.adafruit.com/product/153 | $4.95 |
31 | | Adafruit Shipping || $6.80 |
32 | | Raspberry Pi Compute Module || $135.00 |
33 | | Raspberry Pi Shipping || $26.65 |
34 | | Raspberry Pi Compute Module I/O Board | https://www.adafruit.com/product/4787 | $35.00 |
35 | | Soldering materials | have access to | $0 |
36 | | Total || $260.70 |
37 |
38 | I can cover the remainder.
39 |
--------------------------------------------------------------------------------
/briyandyju09.md:
--------------------------------------------------------------------------------
1 | ---
2 | name: "@briyandyju09"
3 | project: " DIY handheld game console like a nintendo switch"
4 | ---
5 |
6 | # RetroSwitch
7 |
8 | ## Summary
9 |
10 | This project was to create a portable gaming system that could also double as a portable computer. The goal was to create a console that was functional as well as aesthetically pleasing. Guide im using - https://www.instructables.com/Homemade-Game-Console-NinTIMdo-RP/
11 | ## Plan
12 |
13 | I am going to be printing and assembling a 3D model of the device using a online tool. The model files can be downloaded from a specific URL. The device can be assembled by joining the front and back halves using metal dowels, standoffs, and glue, and attaching a screen using epoxy and glue. The circuitry of the device involves wiring buttons and joysticks to a Teensy ++ 2.0 microcontroller using digital and analog pins, and connecting a battery and charger to power the device. The display can be attached using a flex cable and hot glue. Finally, the software for the device can be set up by installing an operating system and configuring the controls.
14 |
15 | ## Budget
16 |
17 | All adafruit products shipping - 20$
18 |
19 | | Product | Supplier/Link | Cost |
20 | | --------------- | ------------------------------------- | ------ |
21 | | Raspberry PI 4 | https://www.adafruit.com/product/4295 | $35 |
22 | | Screen | https://thepihut.com/products/official-raspberry-pi-7-touchscreen-display | $82.20 + 10 (shipping) |
23 | | Teensy LC | https://www.adafruit.com/product/2419 | $17.50 |
24 | | Soft tactile switch | https://www.adafruit.com/product/3101 | $1.95 |
25 | | Joystick x2 | https://www.adafruit.com/product/512 | $11.9 |
26 | | Wires | https://www.adafruit.com/product/1311 | $15.95 |
27 | | Case | www.pcbway.com (link for model - [https://github.com/timlindquist/Nintimdo-RP_3D_models]) | $40 |
28 | | Power bank | https://www.amazon.ae/Philips-10000mAh-Portable-DLP1710CV-97/dp/B082HQ6M7R/ref=sr_1_5?c=ts&keywords=Mobile%2BPhone%2BPortable%2BPower%2BBanks&qid=1672756310&s=electronics&sr=1-5&ts_id=12304344031&th=1 | $13.34 + 10 (shipping) |
29 | | Total | | $257.84 (Final price may vary due to later offers)|
30 |
--------------------------------------------------------------------------------
/LuizWeitz.md:
--------------------------------------------------------------------------------
1 | ---
2 | name: "@LuizWeitz"
3 | project: "E-reader using Raspberry Pi Pico"
4 | ---
5 |
6 | # E-reader With Raspberry Pi Pico
7 |
8 | ## Summary
9 |
10 | E-reader using Raspberry Pi Pico with E-Ink technology screen with rechargeable battery that fits in the palm of the hand, through which I intend to expand my adventures in the world of reading.
11 |
12 | ## Plan
13 |
14 | The first step is to plan how the components will be organized.
14 |
15 | Once your pull request is approved, the Hack Club Bank team will follow up with next steps!
16 |
17 | Happy hacking! ❤️
18 |
--------------------------------------------------------------------------------
/ivoinestrachan.md:
--------------------------------------------------------------------------------
1 | ---
2 | name: "@ivoinestrachan"
3 | project: "SkateBoard Collision"
4 | ---
5 |
6 | # SkateBoard Collision
7 |
8 | ## Summary
9 |
10 | The skateboard safety alert system is a device that uses sensors to detect potential collisions and sounds an alarm to alert the skateboarder. It includes a microcontroller, sensors, and an audio output device and requires code to be written to process sensor data and play the alarm sound. The system aims to improve skateboard safety by alerting skateboarders to potential collisions and helping them avoid accidents.
11 |
12 | ## Plan
13 |
14 | I am going to first get a sensor to detect the collision using a microcontroller and using a arduino then test if im going to hit then a alarm goes off. I am also going to make a vlog from this and I think its going to be pretty cool. I had to limit my imagination and get a lower budget because shipping stuff to The Bahamas is to pricey.
15 |
16 | ## Budget
17 |
18 | | Product | Supplier/Link | Cost |
19 | | ----------- | ---------------------- | ------ |
20 | | Mic | https://a.co/d/g8G0oWj | $34.57 |
21 | | Skateboard | https://a.co/d/bpwPXxN | $37.00 |
22 | | Arduino Kit | Already Owned | $0 |
23 | | Total | Taxes & Shipping | $57.49 |
24 |
25 | 
26 |
--------------------------------------------------------------------------------
/Muirrum.md:
--------------------------------------------------------------------------------
1 | ---
2 | name: "@Muirrum"
3 | project: "MIDI GO Box v2"
4 | ---
5 |
6 | # MIDI GO Box v2
7 |
8 | ## Summary
9 |
10 | An older [LnL](https://lnl.wpi.edu) project was the "MIDI Go Box" -- a small box with various buttons on it that could be used to trigger lighting cues. It was broken a few months before I arrived at WPI, and now I'm going to be resurrecting it!
11 |
12 | ## Plan
13 |
14 | 1. Schematic in KiCAD
15 | 2. Write Arduino software
16 | 3. Breadboard with switches and MIDI testing
17 | 4. CAD new case
18 | 5. Assemble finished project
19 |
20 | I'm planning on basing this around an Arduino Leonardo to take advantage of the extra
21 |
22 | ## Budget
23 |
24 | What materials will you need for your project? Where will you get them? How much does it cost? Please include all materials, including components you already own. Make sure to factor in shipping costs and sales tax.
25 |
26 | | Product | Supplier/Link | Cost |
27 | | --------------- | ------------------------------------- | ------ |
28 | | Arduino Leonardo | https://www.digikey.com/en/products/detail/arduino/A000057/3476353 | $24.90 |
29 | | MIDI Connector | [https://www.adafruit.com/product/1134](https://www.adafruit.com/product/1134) | $1.75 |
30 | | 2.1mm DC Panel-mount jack | https://www.adafruit.com/product/610 | $2.95 |
31 | | 2x Breadboard | https://www.adafruit.com/product/64 | $9 |
32 | | Misc switches | Already owned -- unknown supplier | Unknown |
33 | | Shipping + Tax | Subject to change because that's how that works | $20.49
34 | | Total | | $59.09 + additional materials as I need them |
35 |
--------------------------------------------------------------------------------
/snoglobe.md:
--------------------------------------------------------------------------------
1 | ---
2 | name: "@snoglobe"
3 | project: "snwboard"
4 | ---
5 |
6 | # Snwboard
7 |
8 | ## Summary
9 |
10 | A series of Arduino-like boards meant to be affordable and easy to build.
11 | The snwboard is accompanied by an IDE + simple scripting language meant to let beginners enter the hobby of making.
12 |
13 | ## Plan
14 |
15 | - Design Schematic (Done)
16 | - Design PCB (Done)
17 | - Order PCBs and components
18 | - Assemble boards
19 | - Create IDE and scripting language
20 | - Put on personal storefront for $5 per board (boards are approximately $3.08 to produce individually, including parts shipping + excess parts)
21 |
22 | ## Budget
23 |
24 | | Product | Supplier/Link | Cost |
25 | | --------------- | ------------------------------------- | ------ |
26 | | 100 PCBs | JLCPCB | $35.10 |
27 | | 136x C2325 2.54mm DIP-14 IC Sockets | LCSC | $4.86 |
28 | | 110x 10uf C432355 Electrolytic Capacitors | LCSC | $4.11 |
29 | | 250x C69880 1.5k Resistors | LCSC | $2.25 |
30 | | 110x C75485 3v3 Voltage Regulators | LCSC | $22.03 |
31 | | 110x C498173 USB-B connector | LCSC | $26.85 |
32 | | 150x C2848543 60ohm Resistors | LCSC | $0.89 |
33 | | 150x C377842 1nf Capacitor Ceramic Disc | LCSC | $1.14 |
34 | | LCSC Shipping | LCSC | $49.84 |
35 | | 179-TS026655BK160LCR Tactile Switches | Mouser Electronics | $9.46 |
36 | | 556-ATTINY84A-PU ATTiny84A-PU | Mouser Electronics | $143.00 |
37 | | Mouser Shipping | Mouser Electronics | $8.89 |
38 | | Total | | $308.42 |
39 |
40 | I will fund the Bank account out of my own pocket with the excess.
41 |
--------------------------------------------------------------------------------
/docs/eligible_countries.md:
--------------------------------------------------------------------------------
1 | # Does Hack Club Bank work in your country?
2 |
3 | You'll be receiving your grant through [Hack Club Bank](https://hackclub.com/bank) and purchasing your hardware using a Hack Club Bank card. Unfortunately, in some countries, Hack Club Bank doesn't work well with through the local banking system.
4 |
5 | Using Hack Club Bank outside of North America is still experimental. Listed below are countries where Hack Club Bank works. If your country isn't listed here, you are still welcome to submit a project proposal. While we can't guarantee that Hack Club Bank will work for you, we invite you to try it out.
6 |
7 | - Australia
8 | - Austria
9 | - Bahamas
10 | - Brazil
11 | - Canada
12 | - Colombia
13 | - Finland
14 | - France
15 | - Germany
16 | - Greece
17 | - Japan
18 | - Korea
19 | - Malaysia
20 | - New Zealand
21 | - Singapore
22 | - Spain
23 | - Sweden
24 | - South Africa
25 | - Sri Lanka
26 | - Turkey
27 | - Thailand
28 | - United Arab Emirates
29 | - United Kingdom
30 | - United States
31 | - Vietnam
32 |
33 | Due to differences in financial/banking systems, Hack Club Bank is not able to work in the following countries:
34 |
35 | - India
36 | - Nigeria
37 |
38 | Due to US government sanction sanctions, Visa cards will not work in the following countries:
39 |
40 | - Balkans
41 | - Belarus
42 | - Central African Republic
43 | - Congo
44 | - Iraq
45 | - Iran
46 | - Lebanon
47 | - Liberia
48 | - Libya
49 | - North Korea
50 | - Somalia
51 | - Syria
52 | - Russia
53 | - Venezuela
54 | - Yemen
55 | - Zimbabwe
56 |
57 | [See the US Treasury website for an up-to-date list of sanctions programs.](https://home.treasury.gov/policy-issues/financial-sanctions/sanctions-programs-and-country-information)
58 |
--------------------------------------------------------------------------------
/1mPink.md:
--------------------------------------------------------------------------------
1 | ---
2 | name: "@1mPink"
3 | project: "Proxmox Project"
4 | ---
5 |
6 | # Proxmox Project
7 |
8 | ## Summary
9 |
10 | I am going to build a server that will do virtualization.
11 | I want to move everything to my cloud, and not use something like AWS, Azure, DigitaOcean...
12 | I'm excited to build my own server, to learn mostly Proxmox, Route OS, load-balancing, containers, networking...
13 |
14 | ## Plan
15 |
16 | 1. Order materials, then wait for arrival.
17 | 2. Put the SSD and RAM in to the NUC.
18 | 3. Install Proxmox VE.
19 | 4. Boot, and configure Proxmox VE.
20 | 5. Log in to Proxmox VE via the network, and configure everything.
21 | 6. Create the first Virtual Machine.
22 | 7. Experiment.
23 |
24 | ## Budget
25 |
26 | | Product | Supplier/Link | Cost |
27 | | --------------- | ------------------------------------- | ------ |
28 | | Intel NUC BOXNUC7PJYHN2 Intel Pentium J5005 | https://www.pccomponentes.com/intel-nuc-boxnuc7pjyhn2-intel-pentium-j5005 | $153.78 + $0 (Free Shipping) |
29 | |Kioxia EXCERIA 480GB SSD SATA | https://www.pccomponentes.com/kioxia-exceria-480gb-ssd-sata | $36.02 + $4.19 (Shipping) |
30 | | Kingston Fury Impact SO-DIMM DDR4 2666 Mhz 8GB CL15 | https://www.pccomponentes.com/kingston-fury-impact-so-dimm-ddr4-2666-mhz-8gb-cl15?offer=4b236881-d845-4f08-8545-1cf2ad66336c | $30 + $6.04 (Shipping) |
31 | | Nanocable Cable de Red RJ-45 UTP AWG24 Cat.6 1m White | https://www.pccomponentes.com/nanocable-cable-de-red-rj-45-utp-awg24-cat6-1m-blanco | $2.22 + 4.19 (Shipping) |
32 | | x2 Kingston DataTraveler Exodia 128GB USB 3.2 | https://www.pccomponentes.com/kingston-datatraveler-exodia-128gb-usb-32 | $6.98 x2 + $4.19(Shipping) |
33 | | Total + Taxes| | $254.59 |
34 |
--------------------------------------------------------------------------------
/YodaLightsabr.md:
--------------------------------------------------------------------------------
1 | ---
2 | name: "@YodaLightsabr"
3 | project: "Smart Alarm Clock"
4 | ---
5 |
6 | # Smart Alarm Clock
7 |
8 | ## Summary
9 |
10 | This smart alarm clock will use a Raspberry PI, 7 inch display, and a physical button. Here's what it'll do:
11 |
12 | * Display time
13 | * Show weather
14 | * Show calendar events
15 | * Control smart home devices with Homebridge
16 | * Set alarms
17 |
18 | ## Plan
19 |
20 | After getting materials, I plan to wire up the button, RPi, and display to build the clock. Then I'll measure it and 3D-print a case that can go on my nightstand. I'll program the display with React and use Chromium in kiosk mode to render it. I'll use Nodejs to handle the button with the Raspberry Pi's GPIO pins and control which data is being displayed.
21 |
22 | ## Budget
23 |
24 | What materials will you need for your project? Where will you get them? How much does it cost? Please include all materials, including components you already own. Make sure to factor in shipping costs and sales tax.
25 |
26 |
27 | Product name | Link | Price
28 | --- | --- | ---
29 | Rugged Metal Pushbutton - 22mm 6V RGB Momentary | https://www.adafruit.com/product/3423 | $16.50
30 | 7" IPS Capacitive HDMI Touch Screen LCD (1024×600) | https://thepihut.com/collections/raspberry-pi-screens/products/7-ips-capacitive-hdmi-touch-screen-lcd-1024x600 | $63.19
31 | Black PLA Filament | https://www.microcenter.com/product/485634/inland-175mm-black-pla-3d-printer-filament-1kg-spool-(22-lbs) | $17.99
32 | 3D-printer | - | -
33 | Raspberry PI 4B 4GB Ram | - | -
34 | Jumper wires | - | -
35 | Breadboard | - | -
36 | | |
37 | | Subtotal | $97.68
38 | | Estimated Shipping | ~$30.00
39 | | CA Sales Tax @7.25% | $9.26
40 | | Total | $136.94
41 |
--------------------------------------------------------------------------------
/boyuan12.md:
--------------------------------------------------------------------------------
1 | ---
2 | name: "@boyuan12"
3 | project: "Spycam"
4 | ---
5 |
6 | # Spycam
7 |
8 | ## Summary
9 | I'm going to add a camera in front of my door that will broadcast to my computer. If there's a person within 2 meters, then it will sent me a SMS alert.
10 |
11 | ## Plan
12 | I will follow [this guide](https://null-byte.wonderhowto.com/how-to/create-wireless-spy-camera-using-raspberry-pi-0180123/) first, and then I will add the SMS alert part using Python with Twilio API.
13 |
14 | ## Budget
15 |
16 | | Product | Supplier/Link | Cost |
17 | | --------------- | ------------------------------------- | ------ |
18 | | Raspberry Pi 0 W | [Amazon](https://www.amazon.com/CanaKit-Raspberry-Wireless-Complete-Starter/dp/B07CMVDHWB/ref=sr_1_4?crid=VCDYK14HS08U&keywords=Pi+Zero+W&qid=1671426030&sprefix=pi+zero+w%2Caps%2C145&sr=8-4) | $79.99 |
19 | | 128GB SD Card | [Amazon](https://www.amazon.com/SanDisk-128GB-Extreme-UHS-I-Memory/dp/B09X7FXHVJ/ref=sr_1_3?crid=3HEPG9Z18EQ62&keywords=sd+card&qid=1671426188&sprefix=sd+car%2Caps%2C173&sr=8-3) | $24.89 |
20 | | Camera Module | [Amazon](https://www.amazon.com/Arducam-Raspberry-Camera-Module-Megapixel/dp/B083BHJZ16/ref=sr_1_15?gclid=EAIaIQobChMIq7Ok7e6E_AIVpxCtBh3ZnwkHEAAYASAAEgKyqvD_BwE&hvadid=406717555829&hvdev=c&hvlocphy=9032437&hvnetw=g&hvqmt=e&hvrand=2213951976077209749&hvtargid=kwd-838633651625&hydadcr=7465_9611852&keywords=raspberry%2Bpi%2Bwith%2Bcamera%2Bkit&qid=1671424876&sr=8-15&th=1) | $34.89
21 | | SD Card Reader | [Amazon](https://www.amazon.com/Integrated-Circuit-Interface-Raspberry-Breakout/dp/B08C4WY2WR/ref=sr_1_4?crid=UP5VA5XFZKKK&keywords=sd+card+reader+raspberry+pi+0&qid=1671426400&sprefix=sd+card+reader+raspberry+pi+0%2Caps%2C170&sr=8-4) | $5.99 |
22 | | Total | | $145.76 |
23 |
--------------------------------------------------------------------------------
/Neesh774.md:
--------------------------------------------------------------------------------
1 | ---
2 | name: "@neesh774"
3 | project: "Blindr"
4 | ---
5 |
6 | # Blindr
7 |
8 | ## Summary
9 |
10 | I'm going to build a system to automatically open and close my blinds automatically, or whenever I want it to.
11 |
12 | ## Plan
13 |
14 | I'm going to use a pulley system on the top and bottom where the wire is attached to a 3D printed clamp that's attached to the blind.
15 | That way, I can pull and push it based on the direction that I rotate the wire on the pulleys, and the clamp will bring the blinds down
16 | with the wire. I'll use a Raspberry Pi Pico and a motor to control the motor that rotates the pulleys.
17 | I need 3 of each component so I can build one for each of my blinds, and 2 motors for each side of each blind so they aren't imbalanced.
18 |
19 | ## Budget
20 |
21 | | Product | Supplier/Link | Cost |
22 | | --------------- | ------------------------------------- | ------ |
23 | | Raspberry Pi Pico x3 | [Adafruit](https://www.adafruit.com/product/5525) | $15.00 |
24 | | Breadboard x3 | [Adafruit](https://www.adafruit.com/product/5422) | $14.85 |
25 | | Wires x3 | [Adafruit](https://www.adafruit.com/product/1957) | $5.85 |
26 | | TT Motor Pulley x6 | [Adafruit](https://www.adafruit.com/product/3789) | $4.50 |
27 | | DC Gearbox Motor x6 | [Adafruit](https://www.adafruit.com/product/3777) | $17.10 |
28 | | Yarn x3 | [Adafruit](https://www.adafruit.com/product/4015) | $8.85 |
29 | | Creality Ender 3 3D Printer | [Amazon](https://www.amazon.com/Comgrow-Creality-Ender-Aluminum-220x220x250mm/dp/B07BR3F9N6/ref=sr_1_2?crid=1GV3BBJ7G87YR&keywords=3d+printer&qid=1671485001&sprefix=3d+prin,aps,109&sr=8-2&ufe=app_do:amzn1.fos.f5122f16-c3e8-4386-bf32-63e904010ad0) | $199.00 |
30 | | Taxes | | $12.64 |
31 | | Total | | $277.79 |
32 |
--------------------------------------------------------------------------------
/NoahSaxophone.md:
--------------------------------------------------------------------------------
1 | ---
2 | name: "@NoahSaxophone"
3 | project: "ADS-B Receiver"
4 | ---
5 |
6 | # ADS-B Receiver
7 |
8 | ## Summary
9 |
10 | I am going to build an ADS-B receiver so I can track a plane's location in the sky. Right now, my plan is to become a pilot when I turn 17. I've joined the Royal Canadian Air Cadets and hope to get my license through them. I've wanted to do this project for a long time now, but I couldn't find a raspberry pi that was cheap enough to do so.
11 |
12 | ## Plan
13 |
14 | After purchasing the components, my plan is to put them together. Next, I will download FlightRadar's Pi24 software and put it on the raspberry pi. Then, I will set it up and (hopefully) be able to see each plane's telemetry. Finally, I will design and 3-D print a case for everything to allow it to be outside. I know it sounds simple, but I find it fascinating that anyone can just scan the sky for planes.
15 |
16 | ## Budget
17 |
18 | | Product | Supplier/Link | Cost |
19 | | --------------- | ------------------------------------- | ------ |
20 | | Raspberry Pi 3 Model B+ | https://www.amazon.ca/Raspberry-Pi-3-Model-B/dp/B00LPESRUK/ref=sr_1_3?crid=181W7X9K1ZD7 | $119.36 CAD ($88.26 USD) |
21 | | The Antenna | https://www.amazon.ca/NooElec-NESDR-Mini-Compatible-Packages/dp/B009U7WZCA/ref=sr_1_4?crid=2Q21RVC7FK8LB | $37.90 CAD ($28.03 USD) |
22 | | Raspberry Pi Power Supply | https://www.amazon.ca/Seenov-Supply-Adapter-Raspberry-Tablets/dp/B0B1F5XXFD/ref=sr_1_1?crid=1MSVHYFFP2W18 | $12.86 CAD ($9.51 USD) |
23 | | 3-D Printer Filament | Already Own | $0.00 |
24 | | SD Card for Raspberry Pi | Already Own | $0.00 |
25 | | Import Fees | | $20.45 CAD ($15.12 USD) |
26 | | Tax | | $1.67 CAD ($1.24 USD) |
27 | | Total | | $192.24 CAD ($142.16 USD) |
28 |
--------------------------------------------------------------------------------
/CreNiruta.md:
--------------------------------------------------------------------------------
1 | ---
2 | name: "@CreNiruta"
3 | project: "Internet of Things Display Device"
4 | ---
5 |
6 | # Project Name
7 | IOT Display Device
8 | ## Summary
9 |
10 | I am going to build and IOT based Display Device that can fetch data from internet and feed to the display device live.For Example, Viewing Youtube Subscribers, Stock Market Prices etc.
11 |
12 | ## Plan
13 | First of all, I will use an API to fetch the JSON data and then after the JSON is returned I will display it to the Display Device.
14 | For Example, If I am to disply the Subscriber Count then I can use GoogleAPI and then fetch the JSON to display into the display device.
15 | Secondly, I would also like to experiment the display device with the Raspberry PI so I can get more creative with the Display Content inside the Display Device.
16 | Thirdly, I would also like to try combining the displays together to get some kind of sync extended display.
17 | ## Budget
18 |
19 | The Materials that I own are:
20 | Raspberry PI
21 | Arduino UNO
22 | USB A Cable
23 | Jumper Wires
24 | Breadboard
25 | Soldering Iron and other basic components.
26 |
27 | However, I would need following components to complete my project.
28 | | Product | Supplier/Link | Cost |
29 | | --------------- | ------------------------------------- | ------ |
30 | | Adafruit PyPortal Titano | https://www.adafruit.com/product/4444 | $59.95 |
31 | | Pi Display |https://www.daraz.com.np/products/raspberry-pi-lcd-7inch-tft-touch-screen-display-i105828375-s1027688612.html?spm=a2a0e.searchlist.list.3.6934f218oTb0rD&search=1 | $65.11 |
32 |
33 | Shipping from Adafruit : $53.03 (Dont know the customs tax office price)
34 | Shipping from Daraz : $1.15
35 | | Total | | $179.24 |
36 |
37 |
38 |
--------------------------------------------------------------------------------
/chicken-in-a-can.md:
--------------------------------------------------------------------------------
1 | ---
2 | name: "@Chicken-in-a-Can"
3 | project: USB HID Glove
4 | ---
5 |
6 | # USB HID Glove
7 |
8 | ## Summary
9 | Glove modifified with electronics, hopefully mounted in glove, to allow user to interact with computer
10 | Will interact based on finger position, hand speed and hand acceleration, allowing for gesture movement
11 | Will connect to computer via (kinda) wireless USB plugin
12 |
13 | ## Plan
14 | Day 1 will involve basic wiring on breadboards. Day 2 - 4 will be soldering to each other. Days 5 - 8 will be basic coding of glove and computer interaction. 9 & 10 will be for tuning.
15 |
16 |
17 | ## Budget
18 |
19 | Shipping and tax included
20 |
21 | | Product | Supplier/Link | Cost |
22 | | --------------- | ------------------------------------- | ------ |
23 | | Arduino Micro x2 | https://store-usa.arduino.cc/products/arduino-micro | $57 |
24 | | 100 RGB LEDs | https://a.co/d/gJyFXcB | $9.50 |
25 | | .96" OLED Display | https://a.co/d/7VmPywS | $6.50 |
26 | | Wireless transmitter & reciever | https://a.co/d/gaBA3L2 | $6.50 |
27 | | Unleaded Solder | https://a.co/d/7J4MeMp | $ 20 |
28 | | Rosin Flux | https://a.co/d/4c77Us4 | $9 |
29 | | Desoldering Braid | https://a.co/d/9qr7yWn |$ 9 |
30 | | Bend Sensor x5 | https://a.co/d/1bzJEG7 | $40 |
31 | | Accelerometer + Gyroscope x3| https://a.co/d/8EOv3kX | $10 |
32 | | 120 pcs Jumper Cable | https://a.co/d/eZoV28V | $7.50 |
33 | | Portable charger (for glove power) | https://a.co/d/7ndswFZ | $26.00 |
34 | | Glove | https://a.co/d/fbY6zLl | $10.50 |
35 | | Micro USB cable 3 ct. | https://a.co/d/aOddL9b | $9.50 |
36 | | Total | | $221.00 |
37 |
38 | Things I own:
39 | - Soldering Iron
40 | - Breadboard
41 | - Needle & Thread
42 |
--------------------------------------------------------------------------------
/Michaell14.md:
--------------------------------------------------------------------------------
1 | ---
2 | name: "@Michaell14"
3 | project: "Good Morning Smart Mirror"
4 | ---
5 |
6 | # Good Morning Smart Mirror
7 |
8 | ## Summary
9 |
10 | What are you going to build? What does it do? Why are you excited to build it?
11 | I am going to build a smart mirror. This is basically an mirror that has information (e.g. weather, date, daily tasks, motivational quotes) that you can interact with.
12 | It's going to be able to take in voice commands and respond to me based on those commands. Ex: "What is the weather at 3pm today?" -> will gather data from weather api.
13 | I am excited to build this because it is a larger project than I usually make so I wanted to see the difference in difficulty.
14 |
15 | Example: https://www.youtube.com/watch?v=RWjvJq4Zabk&t=573s
16 |
17 | ## Plan
18 |
19 | I am going to connect the raspberry pi to a tv (with two way mirror on it) and use a magic mirror module (https://magicmirror.builders/) for the initial set up.
20 | From there, I am going to customize the default code into responding to my voice. I will add a voice detector and camera onto the tv to recognize me.
21 |
22 | ## Budget
23 |
24 | | Product | Supplier/Link | Cost |
25 | | --------------- | ------------------------------------- | ------ |
26 | | Raspberry Pi 4 | shorturl.at/gkvT1 | $125.67|
27 | | Two Way Mirror (24"x19") | shorturl.at/rwGP7 | $99.00 |
28 | | 32 inch monitor | shorturl.at/apxKO | $139.99|
29 | | Infrared Touch Frame | shorturl.at/rxCW1 | $140.86|
30 | | Raspberry Charger | shorturl.at/bHQY0 | $7.99 |
31 | | LED Light Strip | shorturl.at/tBGS7 | $6.90 |
32 | | Monitor Wall Mount | shorturl.at/biNVW | $6.90 |
33 | | Total | | $527.31|
34 |
--------------------------------------------------------------------------------
/SK-2009.md:
--------------------------------------------------------------------------------
1 | ---
2 | name: "@SK-2009"
3 | project: "Mini Security Camera"
4 | ---
5 |
6 | # Mini Security Camera
7 |
8 | ## Summary
9 |
10 | What I plan on building is a small camera in a 3D printed enclosure that I can place anywhere with a adhesive bottom and go unnoticed for a long time
11 |
12 | ## Plan
13 |
14 | Design and print enclosure, Connect camera to vtx board, Connect anntennas to the boards, Mount camera and other components, Plug in battery, Watch on my analog screen
15 |
16 | Tools/Parts I have already have - Soldering iron, Solder, 3D printer filament, Small screws, Rubber Adhesive, Screw driver, Cables
17 |
18 | ## Budget
19 |
20 | | Product | Supplier/Link | Cost |
21 | | --------------- | ------------------------------------- | ------ |
22 | | Camera | https://www.getfpv.com/fpv/cameras/caddx-ant-1200tvl-1-8mm-fpv-nano-camera-14x14-black.html | $16 + Shipping $18 |
23 | | VTX | https://www.getfpv.com/fpv/video-transmitters/5-8ghz/lumenier-sm-25-25mw-micro-vtx-u-fl-sma.html | $12 (Bought with other things for free shipping) |
24 | | VRX | https://www.getfpv.com/fpv/video-receivers/tbs-fusion-goggle-receiver-module.html | $130 (Bought with other things for free shipping) |
25 | | Battery | https://www.nextfpv.com.au/collections/1s-1-cell/products/tattu-500mah-2s-95c-3-7v-95c-lipo-battery-pack-with-jst-phr-plug-long-pack | $7.33 + Shipping $5.99 |
26 | | Analog Screen | Already got one | $0 |
27 | | Antennas | https://www.getfpv.com/lumenier-micro-axii-2-antenna-5-8ghz-90-degree-sma.html + https://www.getfpv.com/lumenier-axii-patch-antenna-rhcp.html + https://www.getfpv.com/fpv/video-transmitters/5-8ghz/lumenier-sm-25-25mw-micro-vtx-u-fl-sma.html | $65 (Bought with other things for free shipping) |
28 | | Total | | $254.32 I am happy to spend and extra $4.32 to build my project :) |
29 |
--------------------------------------------------------------------------------
/sahitid.md:
--------------------------------------------------------------------------------
1 | ---
2 | name: "@sahitid"
3 | project: "Motion Sensor Video Recorder w/ Raspberry Pi"
4 | ---
5 |
6 | # Motion Sensor Video Recorder w/ Raspberry Pi
7 |
8 | ## Summary
9 |
10 | I'm going to build a Motion Sensor Video Recorder that is operated using a Raspberry Pi. It will ultimately use a motion sensor to trigger video recording.
11 |
12 | ## Plan
13 |
14 | Utilizing the Raspberry Pi, PIR sensor, and camera module, I will create a device that can detect motion (with GPIO 4) and then run a python program that records video and takes photos.
15 |
16 | ## Budget
17 |
18 | | Product | Supplier/Link | Cost |
19 | | -------------------------------- | -------------------------------------------------------------------------------- | ------- |
20 | | Raspberry Pi | https://amzn.to/3PNMf6d | $160.00 |
21 | | Raspberry Pi Camera Module | https://www.adafruit.com/product/3099 | $29.95 |
22 | | PIR motion sensor module | https://thepihut.com/products/pir-motion-sensor-module | $3.61 |
23 | | Jumper wires | https://amzn.to/3veRG4v | $11.69 |
24 | | Camera Board 360 Gooseneck Mount | https://thepihut.com/products/camera-board-360-gooseneck-mount | $7.23 |
25 | | Breadboard | https://amzn.to/3WpoTX1 | $6.69 |
26 | | Tax + Shipping | | $27.39 |
27 | | Total | | $246.56 |
28 |
--------------------------------------------------------------------------------
/ByteAtATime.md:
--------------------------------------------------------------------------------
1 | ---
2 | name: "@ByteAtATime"
3 | project: "Pomodoro Timer/TODO List"
4 | ---
5 |
6 | # Pomodoro Timer/TODO List
7 |
8 | ## Summary
9 |
10 | I plan to build a [Pomodoro](https://en.wikipedia.org/wiki/Pomodoro_Technique) timer that includes a basic task list/management system. I have a problem with time management, which is important as I'm a student, and I'm building this in hopes that I can get better at it and finish my tasks on time.
11 |
12 | ## Plan
13 |
14 | For the UI, I plan to use something like [Tauri](https://tauri.app). For educational purposes, I'm going to overengineer the system to use [Firebase](https://firebase.google.com) (Firestore in particular) to store the task information, along with statistics of Pomodoro's I've done.
15 |
16 | I'm thinking of something along the lines of [Todoist](https://todoist.com), which I like to use, crossed with [Pomofocus](https://pomofocus.io), which I like for its simplicity. Essentially, make something like Pomofocus with a better todo list. I also like the look of [Plausible Analytics](https://plausible.io), which I might base my statistics page on, and I might add some information about "most active times" and a streak counter to motivate me to do at least `n` pomodoros daily.
17 |
18 | Just want to clarify that these websites I'll be using for **inspiration**, I won't copy them.
19 |
20 | ## Budget
21 |
22 | | Product | Supplier/Link | Cost |
23 | | --------------- | ------------------------------------- | ------ |
24 | | Orange Pi | https://www.amazon.com/gp/product/B0BNSSB7JV/ | $150.99 |
25 | | 7" Touchscreen | https://www.amazon.com/gp/product/B01GDMDFZA/ | $63.99 |
26 | | Shipping | | $11.99 |
27 | | Tax | | $20.71 |
28 | | Total | | $247.68 |
29 |
--------------------------------------------------------------------------------
/thomaswcy.md:
--------------------------------------------------------------------------------
1 | ---
2 | name: ["@thomaswcy", "@MeliLXT"]
3 | project: "Home-Environment-Monitor"
4 | ---
5 |
6 | # Home-Environment-Monitor (HEV)
7 |
8 | ## Summary
9 |
10 | I'm going to build the HEV using RaspberryPi and sensors. It will be deployed on Linux. I'm excited because though I have lots experiences in Linux but I'm totally new to Raspberry. I am building this with my friend @MeliLXT and with the help from my friend @xingyujie, which is very familiar with RaspberryPi.
11 |
12 | It will use light, sound, temperature and humidity sensors.
13 |
14 | ## Plan
15 |
16 | I'm going to use RaspberryPi 4b to control all the sensors. It will run the RaspberryPi OS. I will control the sensors using Python and bash scripts. The data will be printed out using a electron.js application.
17 |
18 | This is my first project based on RaspberryPi and I will be very excited.
19 |
20 | ## Budget
21 |
22 | | Product | Supplier/Link | Cost |
23 | | ---------------------------------- | ---------------------------------------- | ------- |
24 | | RaspberryPi 4b beginner kit | https://m.tb.cn/h.Ukp6wQQ?tk=BhJjdUBBLjl | $210.85 |
25 | | temperature and humidity sensor | https://m.tb.cn/h.UP8oY8s?tk=ZGQ5dUBzGMz | $1.31 |
26 | | light sensor | https://m.tb.cn/h.Ukp8dNX?tk=4Mt0dUzZ6II | $0.45 |
27 | | sound sensor | https://m.tb.cn/h.UP8LhNT?tk=QtdqdUzZLko | $0.97 |
28 | | Dupont wires | https://m.tb.cn/h.UkpQKIS?tk=TONTdUzY1wv | $0.75 |
29 | | Redmi 23.8" rotatable display | https://m.tb.cn/h.UlW3WUV?tk=czgBdgi5wVv | $107.05 |
30 | | Xiaomi wireless keyboard and mouse | https://m.tb.cn/h.UP8qjnr?tk=su3fdUz0CxO | $12.71 |
31 | | Total | | $334.09 |
32 |
33 | All fees including tax and shipping are included.
34 |
--------------------------------------------------------------------------------
/vedhasirur.md:
--------------------------------------------------------------------------------
1 | ---
2 | name: "@vedhasirur
3 | project: "Water Level Monitoring System"
4 | ---
5 |
6 | # Project Name
7 | Water Level Monitoring System
8 |
9 | ## Summary
10 |
11 | I am going to build a water level monitoring system with the Blynk app.
12 | It uses ultrasonic sensor is used to measure the water level and displays it on the screen.
13 | I am excited to build it as it will be my first hardware project.
14 |
15 |
16 | ## Plan
17 | I will first start by connecting the LED bulbs to the Nodemcu board.
18 | I will then connect LCD screen, ultrasonic sensor, and relay module to the Nodemcu board as seen on the circut diagram.
19 | Lastly, I will set up the app and connect Nodemcu board to the computer and upload the program for this system.
20 |
21 | This is the video I will use for reference when building my project https://www.youtube.com/watch?v=MGPqFB0DI60
22 |
23 | ## Budget
24 |
25 | What materials will you need for your project? Where will you get them? How much does it cost? Please include all materials, including components you already own. Make sure to factor in shipping costs and sales tax.
26 |
27 | | Product | Supplier/Link | Cost |
28 | | --------------- | ------------------------------------- | ------ |
29 | 1.Nodemcu ESP8266 x 1 -- https://amzn.to/3hwqG7v 15.99
30 | 2.Ultrasonic sensor x 1 -- https://amzn.to/3gLCkRj 8.99
31 | 3.Relay module x 1 -- https://amzn.to/2FqK9Jv 7.39
32 | 4.LCD screen x 1 -- https://amzn.to/3isdBgz 8.99
33 | 5.I2C module x 1 -- https://amzn.to/3hqY5jC 7.49
34 | 6.LED bulb x 5 -- https://amzn.to/3hmJ9TV 4.99
35 | 7.220-ohm resistor x 5 -- https://amzn.to/3bOwdVF 6.27
36 | 8.Jumper wires -- https://amzn.to/2RjTt4e 6.99
37 | 9.Breadboard x 1 -- https://amzn.to/35rdMVE 13.99
38 | Tax $5.06
39 | Shipping $0
40 | Total $86.15
41 |
42 |
--------------------------------------------------------------------------------
/darksidemanas.md:
--------------------------------------------------------------------------------
1 | ---
2 | name: "@darksidemanas"
3 | project: "medical sos emergeny recordig and monitoring system"
4 | ---
5 |
6 | # MEDICAL SOS EMERGENCY MONITORING AND RECORDING SYSTEM
7 |
8 | ## Summary
9 |
10 | I WANT TO MAKE IOT DEVICE TO CONNECT PATIENTS AND ALL MEDICAL ,SO THEY CAN MONITOR MULTIPLE PEOPLE AT THE SAME TIME IT WILL HELP IN SITUATIONS LIKE COVID-19.
11 | I WILL BE DEVEOPING ANDRIOD APP TO DO SO.
12 |
13 | ## Plan
14 |
15 | 1.FIRST WE NEED TO CONFIGURE RASPBERRY PI TO READ ANALOG SIGNALS USING A CUSTOM DESIGNED PCB
16 | 2.TO MAKE AN ANDRIOD APP WITH MULTIPLE LANGUAGE SUPPORT AN ALGORITHM TO LIST OUT PATIENTS WHO NEED MEDICAL ASSISTANCE URGENTLY
17 | 3.PCB TOHCONNECT DIFFERENT MEDICAL PROBES WITH PI
18 | 4.USING MCB3008 AND SPI CONNECTION TO READ ANALOG SIGNALS
19 | 5.TESTING WITH DIFFRENT MEDICAL SENSORS
20 | 6.DESINGING A METAL ENCLOSER TO PROTECT PI AND OTHER PCB .
21 |
22 | ## Budget
23 |
24 | What materials will you need for your project? Where will you get them? How much does it cost? Please include all materials, including components you already own. Make sure to factor in shipping costs and sales tax.
25 |
26 | | Product | Supplier/Link | Cost |
27 | | --------------- | ------------------------------------- | ------ |
28 | | SOLDRING KIT | https://robu.in/product/plusivo-soldering-kit-with-multimeter-eu-plug/ | $21.27 |
29 | | raspberyy pi 4B+ 8GB| https://www.amazon.in/Raspberry-Pi-8GB-Desktop-Computer/dp/B08B9XS3B6?th=1 | $169.18 |
30 | | custom PCB | https://jlcpcb.com/ | $50 |
31 | | wires for pcb connections | https://robu.in/product/plusivo-22awg-hook-up-wire-kit-600v-tinned-stranded-silicone-wire-of-6-different-colors/ | $10.88 |
32 | | Total | | $251.33 |
33 |
34 | note - all the prices above are based on dollar rate of 82.75 ,INR to USD
35 | -THIS PRICE CONTAINS ALL SHIPPPING CHARGES
36 |
--------------------------------------------------------------------------------
/ahnedmohamed57.md:
--------------------------------------------------------------------------------
1 | ---
2 | name: "@ahnedmohamed57"
3 | project: "3D Printer"
4 | ---
5 |
6 | # 3D Printer
7 |
8 | ## Summary
9 |
10 | I am planing to rebuild my 3D ptinter. I tryed to build it last year but the components have burned. I will use this 3D printer to open a small business during my free time and help in building my scientific projects
11 |
12 | ## Plan
13 |
14 | I will start by collecting the parts together and create the remaining parts using wood. Then, I will use mariln firmware as a sofware to controll the components of the printer.
15 | And here is a guide for the 3d printer creation process: https://reprap.org/wiki/RepRap
16 |
17 | ## Budget
18 |
19 | What materials will you need for your project? Where will you get them? How much does it cost? Please include all materials, including components you already own. Make sure to factor in shipping costs and sales tax.
20 |
21 | | Product | Supplier/Link | Cost |
22 | | -------------------- | ------------------------------------- | ------ |
23 | |5pcs Black GT2 Pulley | https://a.co/d/fA6lhyj | $8.5 |
24 | |Steeper motor drivers | https://a.co/d/3uuH6EF | $14 |
25 | |MK8 Extruder | https://a.co/d/daainex | $42 |
26 | |PLA 3DPrinter Filament| https://a.co/d/fZCWpLS | $26 |
27 | | Shipping + import fees deposit| | $125 |
28 | | Tool box |https://a.co/d/fwPpMUv | $25 |
29 | | Arduino mega | I have this one! | $0 |
30 | | 4 Steeper motors | I have this one! | $0 |
31 | | RAMPS | I have this one! | $0 |
32 | | LCD Smart controller | I have this one! | $0 |
33 | | Heated bed | Home made! | $0 |
34 | | Total | | $240 |
35 |
--------------------------------------------------------------------------------
/Erik-Dennis.md:
--------------------------------------------------------------------------------
1 | ---
2 | name: "@Erik-Dennis"
3 | project: "Smart Device Controller"
4 | ---
5 |
6 | # Smart Device Controller
7 |
8 | ## Summary
9 |
10 | What are you going to build? What does it do? Why are you excited to build it?
11 |
12 | A touch screen smart device controller. This will be able to view camera feed and audio from ring devices, and control smart lights, thermostat, etc.
13 | I'll also be creating a custom webpage interface hosted locally through apache utilizing APIs.
14 |
15 |
16 | ## Plan
17 |
18 | What steps are you going to take to build it? What tools are you going to use? What will you do first, second, third, etc.?
19 |
20 | 1. Buy a Raspberry Pi
21 | 2. Buy a compatible form fitting touch screen
22 | 3. Buy Smart lights
23 | 4. Install and setup Home Assistant
24 | 5. Connect Devices (Ring Cameras, Smart Lights, Thermostat)
25 | 6. Create Webpage Interface
26 | 7. Add RDP for remote control and easy setup
27 | 8. Mount Pi to the wall as a smart controller
28 | 9. Research APIs and integration
29 |
30 |
31 | ## Budget
32 | (Cost Includes Tax)
33 |
34 | | Product | Supplier/Link | Cost |
35 | | --------------- | ------------------------------------- | ------ |
36 | | Raspberry Pi 4 B| https://www.amazon.com/gp/product/B07TC2BK1X/ref=ewc_pr_img_1?smid=AN9XFB4R34UOI&psc=1 | $185.56 |
37 | | 3.5" Touchscreen Display | https://www.amazon.com/gp/product/B07WQW6H9S/ref=ewc_pr_img_2?smid=AD7LID9K1N4N9&psc=1 | $40.82 |
38 | | Smart Bulbs | https://www.amazon.com/dp/B09J2JMDWV/ref=redir_mobile_desktop?_encoding=UTF8&aaxitk=ac6aff77d3ae108d64cfc17ea3adb68e&content-id=amzn1.sym.552bcbb2-81a1-4e8b-b868-3fba7d5af42a%3Aamzn1.sym.552bcbb2-81a1-4e8b-b868-3fba7d5af42a&hsa_cr_id=0&pd_rd_plhdr=t&pd_rd_r=ff443208-9d84-4836-9850-44fc021c1b65&pd_rd_w=bLlo9&pd_rd_wg=pMFPc&qid=1671695911&ref_=sbx_be_s_sparkle_lsi4d_asin_0_img&sr=1-1-9e67e56a-6f64-441f-a281-df67fc737124&th=1| $23.02 |
39 | | Total | | $249.43 |
40 |
--------------------------------------------------------------------------------
/SATOMASAHIRO2005.md:
--------------------------------------------------------------------------------
1 | ---
2 | name: "@satomasahiro2005"
3 | project: "MIDI keyboard for non-mainstream scales"
4 | ---
5 |
6 | # MIDI keyboard for non-mainstream scales
7 |
8 | ## Summary
9 |
10 | Making the MIDI keyboard for playing with non-mainstream scales
11 | 
12 | You probably have seen upper one.
13 | It is the keyboard which is most popular in the world.
14 | It was designed for playing C Major Scale Music.
15 | But, in the world, there are a lot of Scale.
16 | in white keys, frequently used notes in C major are assigned.
17 | in black keys, another notes are assigned.
18 | So, it is hard to play another Scale Music in common keyboard.
19 | 
20 | I thought that if I could make a keyboard with lots of black keys and make the black keys removable, it would be a keyboard that could be used on any scale.
21 |
22 | ## Plan
23 |
24 | 1. Make a design for this keyboard with pencil and paper.
25 | 2. Make a 3D model with CAD.
26 | 3. Make a program to output MIDI signal and switch scale with arduino.
27 |
28 | - using 8 segment displays, I can check what selected scale is.
29 |
30 | ## Budget
31 |
32 | | Product | Supplier/Link | Cost |
33 | | ------------------- | --------------------------------------------------------------- | ---------- |
34 | | 3D Printer | https://www.elegoo.com/products/elegoo-neptune-3-fdm-3d-printer | 209.99 USD |
35 | | Arduino Starter Kit | https://www.amazon.co.jp/dp/B06XF2HZGT | 5,099 JPY |
36 | | Mechanical Switch | Purchase separately | 0 |
37 | | filament | Purchase separately | 0 |
38 | | Total | Considering the JPY/USD exchange rate | 250.00 USD |
39 |
--------------------------------------------------------------------------------
/Mahak1729:
--------------------------------------------------------------------------------
1 | ---
2 | name: "@Mahak1729"
3 | project: " Tron Hoodie "
4 | ---
5 |
6 | # Tron Hoodie
7 |
8 | ## Summary
9 |
10 | For my first-ever project, I am planning to make the Tron Hoodie. I am choosing it for the following reasons
11 | - Relatively cheap to start out
12 | - Relatively easy to do for someone of my level (which is pretty much nonexistent)
13 | This looks cools and would allow me to delve deep into a world I was not exposed to when I was young. Who could refuse to make something that looks so
14 | cool and could be used in your daily life.
15 |
16 | ## Plan
17 |
18 | Order \ Get them up (All the components that would be required) -> Get everything ready on an clean organised desk
19 | -> Follow the simple instructions as on the blog (https://learn.adafruit.com/tron-hoodie/) + video (https://learn.adafruit.com/tron-hoodie/)
20 | -> Tada ! The hoodie is made
21 |
22 | Once this project I would move on to another one which could look in the relams of the following
23 | (I will update the repo and make sure I am communicating what I am doing as I go) -
24 |
25 | - Tron Sneakers (https://learn.adafruit.com/glowing-star-chucks)
26 | - RGB Bag (https://learn.adafruit.com/matrix-portal-rgb-display-handbag) / Tron Laptop Bag (https://learn.adafruit.com/tron-bag)
27 | - Mechanical Keyboard (Using a barebone to start from)
28 | - Anything else that is quick + easy + has utility
29 |
30 | ## Budget
31 |
32 | | Product | Supplier/Link | Cost |
33 | | --------------- | ------------------------------------- | ------ |
34 | | EL wire starter pack - Red 2.5 meter (8.2 ft) | https://www.adafruit.com/product/587 | $19.95 |
35 | | Needle set - 3/9 sizes - 20 needles | https://www.adafruit.com/product/615 | $1.95 |
36 | | Hoodie | (Would probably get something from the store and would upload the receipts to get a refund on it) | ~15$ (Would update this when I have purchased it in Sitka Alaska) |
37 | | Shipping charges | | 13.25 $ |
38 | | Total (Estimate) | | ~ 50 $ |
39 |
--------------------------------------------------------------------------------
/Jackson-Turner.md:
--------------------------------------------------------------------------------
1 | ---
2 | name: "@Jackson-Turner"
3 | project: "Toys come to life"
4 | ---
5 |
6 | # Toys come to life
7 |
8 | ## Summary
9 |
10 | What are you going to build? What does it do? Why are you excited to build it?
11 |
12 | I am going to build a camera to track what your toys do when you are not in the room. Using OpenCV I will be able to track the movement of anything within a
13 | frame of video. I am excited to continue working on furthuring my OpenCV knowledge and getting to track toys.
14 |
15 | ## Plan
16 |
17 | What steps are you going to take to build it? What tools are you going to use? What will you do first, second, third, etc.?
18 |
19 | First I will set the camer up in a location where it will expirience relative little shaking. After that I will via the raspberry
20 | pi start processing the data specifically looking at the movement of the recognized toys in the frame. I will them output a picture where the path of the toy
21 | is drawn. TO go more minute I will utilize a nural network to recognize toys first. Then ultilizing open CV through a set period of time that could be idefinitely
22 | extended i will track the movement of the toys. At first the program will probabaly be limited to one or two toys but throughout development I hope to get that up.
23 |
24 | ## Budget
25 |
26 | | Product | Supplier/Link | Cost |
27 | | --------------- | ------------------------------------- | ------ |
28 | | OAK-D-Lite-AF | https://www.mouser.com/ProductDetail/?qs=Znm5pLBrcAKOqyMVx9BJ9A%3D%3D | $149.00 |
29 | | OAK D Bumper Case | https://www.mouser.com/ProductDetail/?qs=Znm5pLBrcAKmnV%252Bz9SAi2w%3D%3D | $14.99 |
30 | | Raspberry Pi 4 | https://www.mouser.com/ProductDetail/?qs=T%252BzbugeAwjieYVS2HrrK%2FQ%3D%3D | $45.00 |
31 | | PNY 128gb Micro SD | https://www.amazon.com/gp/product/B08RG6XJZD/ref=ewc_pr_img_2?smid=ATVPDKIKX0DER&psc=1 | $12.99 |
32 | | Shipping | ------------------- | $9.79 |
33 | | Tax | --------------- | $16.80 |
34 | | Total | | $248.57 |
35 |
--------------------------------------------------------------------------------
/Arpan-206.md:
--------------------------------------------------------------------------------
1 | ---
2 | name: "@Arpan-206"
3 | project: "Bonus Lector"
4 | ---
5 |
6 | # Bonus Lector
7 |
8 | ## Summary
9 |
10 | We are going to build our own eBook Reader (like Kindle) using the Raspberry Pi with a custom OS image, books store etc.
11 |
12 | ## Plan
13 |
14 | I couldn't see anyone doing this online, so can't attach many sources. Kinda figuring this out on our own.
15 | I have quite a bit of experience with Raspi and electronics but want to take this as an opportunity to work with and teach my sister and a friend about hardware projects and RPIs.
16 |
17 | Here are a few links for individual components though:
18 | 1. https://medium.com/swlh/create-an-e-paper-display-for-your-raspberry-pi-with-python-2b0de7c8820c
19 | 2. https://www.youtube.com/watch?v=Gun07uy3Nf8
20 |
21 | 1. Order all the parts as listed.
22 | 2. Simultaneously, build the image and necessary softwares for storing, and managing the eBook files.
23 | 3. Assemble the 3D Printer and other accessories.
24 | 4. Develop the 3D models necessary for the project.
25 | 5. Print the necessary 3D files.
26 | 6. Load the developed softwares onto the Raspberry Pi.
27 | 7. Assemble everything together.
28 | 8. Voila!
29 |
30 | ## Budget
31 |
32 | 3 People will be working on this project.
33 |
34 | | Product | Supplier/Link | Cost |
35 | | --------------- | ------------------------------------- | ------ |
36 | | 7.5" ePaper Diplay | https://www.amazon.in/gp/product/B07Z25LWTS/ | $245 |
37 | | 3D Printer | https://www.amazon.in/Flashforge-Adventurer-3-3D-Printer/dp/B07FPSZPK4 | $620 |
38 | | 3D Filament | https://www.amazon.in/gp/product/B079CHKQTF | $12 |
39 | | SD Cards | https://www.amazon.in/gp/product/B09MT6XSFW | $8 |
40 | | USB Type-C Adapter (Raspi) | https://www.amazon.in/gp/product/B09KTRZ5Y9 | $14 |
41 | | Powerbank for Raspi | https://www.amazon.in/gp/product/B09MZCQYHZ | $14 |
42 | | Raspberry Pi 4 | https://robocraze.com/products/raspberry-pi-4-model-b-4gb-ram?src=raspberrypi | $75 |
43 | | Total | | $988 |
44 |
45 |
--------------------------------------------------------------------------------
/Robertrover811.md:
--------------------------------------------------------------------------------
1 | ---
2 | name: "@Robertrover811"
3 | project: "3d printer upgrades"
4 | ---
5 |
6 | # 3d printer upgrades
7 |
8 | ## Summary
9 |
10 | I am going to build a resin curing station and upgrade my Ender 3 V2 with auto bed leveling and install a raspberry pi to run octoprint. This will allow me to cure my resin prints quicker and more reliably, remotely control my Ender 3 while gathering and observing lots of data that I can use to monitor and improve my prints. I aim to learn how to get octoprint running and efficently and reliably manage my 3d prints.
11 |
12 | What are you going to build? What does it do? Why are you excited to build it?
13 |
14 | ## Plan
15 |
16 | 1. 3d print an enclosure for the Raspberry Pi.
17 | 2. Install Octoprint on it.
18 | 3. Install the Auto bed level.
19 | 4. Drill a hole in the paint can route the UV light strip through.
20 | 5. Apply the UV light strip to the sides of the paint can.
21 | 6. Place the solar turntable inside.
22 |
23 | What steps are you going to take to build it? What tools are you going to use? What will you do first, second, third, etc.?
24 |
25 | ## Budget
26 |
27 | What materials will you need for your project? Where will you get them? How much does it cost? Please include all materials, including components you already own. Make sure to factor in shipping costs and sales tax.
28 |
29 | | Product | Supplier/Link | Cost |
30 | | --------------- | ------------------------------------- | ------ |
31 | | Raspberry Pi 4b 2gb | https://www.mcmaster.com/4284N11/ | $60.00 |
32 | | Empty Paint Can | https://www.amazon.com/Gallon-Empty-Paint-2-Pack-Unlined/dp/B0714B7B7Q/ | $15.99 |
33 | | Solar Turntable | https://www.amazon.com/FUNGDO-Turntable-360%C2%B0Rotating-Printed-Included/dp/B07ZR4B9YH/ | $13.99 |
34 | | UV Light Strip | https://www.amazon.com/YGS-Tech-395nm-405nm-Non-Waterproof-Blacklight-Sterilization/dp/B07K6BK639/ | $13.99 |
35 | | CRTouch Auto Bed Level | https://www.amazon.com/Creality-Leveling-3D-Printer-Mainboard/dp/B09DVYZSYJ/ | $39.99 |
36 | | Total | | $144.96 |
37 |
--------------------------------------------------------------------------------
/Omay238.md:
--------------------------------------------------------------------------------
1 | ---
2 | name: "@Omay238"
3 | project: "IRL Pong"
4 | ---
5 |
6 | # IRL Pong
7 |
8 | ## Summary
9 |
10 | I am planning to be building a Pong board with a physical ball and paddles. It will be a lot like normal Pong, but with a new way to experience it. I am excited to build it because I live by a place called Pinball Jones, and there I found a Pong game a lot like it.
11 |
12 | ## Plan
13 |
14 | I won't need many tools other than my 3D printer, and wood working tools in my garage.
15 | I will make simple files for the controls (just little wheels).
16 | The software will just control the paddles and ball, along with taking in input. I have made a JavaScript version of pong, so I believe it wouldn't be too hard to port that code to this project.
17 |
18 | 1. First, I will make a simple board, likely just smooth wood. (around 1 day)
19 | 2. Then, I will build a simple gantry to move a magnet around underneath the board. (with wiring, probably 2 days)
20 | 3. After that I will get simple balls and paddles with magnets inside (around 1/2 day)
21 | 4. Then, it's just the software, then I will be done.
22 |
23 | ## Budget
24 |
25 | | Product | Supplier/Link | Cost |
26 | | ------------------ | --------------------------------------- | ------- |
27 | | Arduino Uno | https://www.sparkfun.com/products/11021 | $27.95 |
28 | | 7-segment display | https://www.sparkfun.com/products/11408 | $3.50 |
29 | | Magnet (x10) | https://www.sparkfun.com/products/8643 | $16.00 |
30 | | Stepper Motor (x4) | https://www.sparkfun.com/products/9238 | $70.00 |
31 | | Breadboard | https://www.sparkfun.com/products/12002 | $5.50 |
32 | | Wires (M/M) (x2) | https://www.sparkfun.com/products/14284 | $5.50 |
33 | | Wires (F/F) (x2) | https://www.sparkfun.com/products/12796 | $4.20 |
34 | | Small Stepper (x2) | https://www.sparkfun.com/products/10551 | $17.90 |
35 | | Subtotal | | $150.55 |
36 | | Tax | | $6.78 |
37 | | Total | | $157.33 |
38 |
--------------------------------------------------------------------------------
/Divya-2009.md:
--------------------------------------------------------------------------------
1 | ---
2 | name: "@Divya-2009"
3 | project: "Arduino Car"
4 | ---
5 |
6 | # Arduino Car
7 |
8 | ## Summary
9 | I am going to build a bluetooth controlled car which is powered using an arudino uno. The reason I want to build this is because I have always wanted to create a robot and a car whihc i could control myself seemed like the perfect entry point. Also I think it would just be super cool to have a car that I could say i built myself.
10 |
11 | ## Plan
12 |
13 | For this build I will require a lit of parts since i am making it from scratch and not using a kit. Ecamples of things I will require is an arudino, a bluetooth chip, ply wood, motor drivers, mecanum wheel, etc. The first thing I will do is to tske the plywood and cut out an appropriate shape for the body of the car. I will then attach the motors to the board and connect them to the arudino and connect the wheels. After thst I will be putting in thr bluetooth chip so i can control the car and connect it with the arduino. Then i will put the bstteries in and program the arduino so it can function. Throughout this build I will be dollowing this video.
14 | https://youtu.be/7Rql1jhqmAg
15 |
16 | ## Budget
17 | | Product | Supplier/Link | Cost |
18 | | --------------- | ------------------------------------- | ------ |
19 | | Arduino Kit | https://amzn.asia/d/g4UOEPY | $75 |
20 | | Soldering Iron | https://amzn.asia/d/4maBpSN | $37.50 |
21 | | Hot Glue Gun | https://amzn.asia/d/fNnI3zz | $18 |
22 | | Double Sided Tape | https://amzn.asia/d/bLfET99 | $5 |
23 | | hc-05 | https://amzn.asia/d/hurMjGl | $19.50 |
24 | | Wheels | https://amzn.asia/d/1GZSD8p | $63 |
25 | | Cables | https://amzn.asia/d/006Zty0 | $10 |
26 | | Motors | https://a.co/d/amsC8SZ | $28 |
27 | | Motor Driver | https://amzn.asia/d/cKZPCqi | $25 |
28 | | Switches | https://amzn.asia/d/a80YfzH | $8.10 |
29 | | Battery Holder | https://amzn.asia/d/bZ5uThz | $4.30 |
30 | | Batteries | https://amzn.asia/d/2Wdo4jy | $59 |
31 | | Plywood | https://amzn.asia/d/bwzcl2I | $15 |
32 | | Total $Aud | | $367.40 |
33 | | Total $Usd | | $247 |
34 |
--------------------------------------------------------------------------------
/KrauseOlly.md:
--------------------------------------------------------------------------------
1 | ---
2 | name: "@KrauseOlly"
3 | project: "Onboard Go Kart Camera System"
4 | ---
5 |
6 | # FPV Go Kart
7 |
8 | ## Summary
9 | I plan on building a camera system that will be able to record and broadcast (using analog fpv equipment) back to spectators so they can watch the sport live from various views
10 | ## Plan
11 |
12 | Order Parts, Design a camera housing on fusion 360, Print, Test various camera angles and minimize vibrations, Record and analyse footage
13 |
14 | ## Budget
15 | All prices are in USD, I already have some parts, I will also be contributing ontop of the $250 grant as this is somthing I'm passionate about.
16 | | Product | Supplier/Link | Cost |
17 | | --------------- | ------------------------------------- | ------ |
18 | | 3D Printer | N/A Already have one | $0 |
19 | | Filament | https://www.inkstation.com.au/2102/pla-3d-filament-175mm-white-1kg-roll-p-18280.html?queryID=731f3a963b3f3a162278d0004b04c51c&objectID=12228#122288 | $22.34 (Including shipping) |
20 | | AIO FPV Camera | https://www.banggood.com/EWRF-701U-5_8Ghz-48CH-25mW-600tvl-F1_4mm-120-Degree-Wide-Angle-3-in-1-AIO-Video-Transmitter-FPV-Camera-VTX-for-FPV-Racing-RC-Drone-p-1900809.html?cur_warehouse=CN&rmmds=search | $17.19 (Shipping is around $5) |
21 | | 2S Lipos | N/A Already have 6 | $0 |
22 | | Adaptor Cables | https://www.ebay.com.au/itm/154545808562?hash=item23fba5e4b2:g:eDMAAOSwja9g~yrt&amdata=enc%3AAQAHAAAA8KZANDjke4zuoG2GJlx0TPt%2BEKjBt6%2F8qXvr1D5q8y%2BSi4hO8AyjJ%2B9KD3zKyAxe7AjSxni5J3aPt%2F7zPpcTYXAF95Hn4cd1Zt2p%2BZyLVJaeYcc%2B9lECCiO6JJoah0fo6FU0%2Fb9nlB4DbA7RIpgVENFRGIMPvr71Jvw1OjbG0UB4rPkztOe%2BHvorA9zzRofVJOhL2NU9FS2EIVquqlCFF4%2FKAWk2JlK2irZ4vSF6ibFGo0jRTSkLGY9A0v2R55477u9hToasqVLyy3bgMO7cxkQLP67LqlpTlrksXYNBQSlRNtMxHxMIGyWD%2BEUUWqkjpA%3D%3D%7Ctkp%3ABFBMpoXyzKZh | $3.99 (Free Shipping) |
23 | | FPV Goggles | https://www.getfpv.com/fpv/video-goggles/fat-shark-dominator-hdo-2-fpv-goggles.html | $500 (Shipping is around $18) |
24 | | Total | | $ 544.23 *I will also be contributing ontop of the $250 grant as this is somthing I'm passionate about* |
25 |
--------------------------------------------------------------------------------
/griffinli.md:
--------------------------------------------------------------------------------
1 | ---
2 | name: "@griffinli"
3 | project: "Smart Home Temperature Sensor"
4 | ---
5 |
6 | # Smart Home Temperature Sensor
7 |
8 | ## Summary
9 |
10 | A temperature sensor that keeps track of the temperature in a room over time and ideally integrates into HomeKit. It would track the temperature through the night with the goal of getting my dorm room (without AC and with a heater that's making it too warm but that I can't turn down) to the optimal temperature while sleeping. It'll have a display so that I can see the temperature by looking at it, in addition to its 24/7 monitoring. I'll try to also make it measure the rate at which temperature is changing and take into account the weather conditions (temperature and maybe wind as well) to help me figure out how much to open my window at night to get the optimal sleep temperature in my room.
11 |
12 | ## Plan
13 |
14 | 1. Order materials
15 | 2. Get the instantaneous temperature sensing + display working
16 | 3. (try to) Get the HomeKit integration working
17 | 4. Write software that shows the 24/7 temperature
18 | 5. Add weather data and temperature rate-of-change to the software
19 |
20 | ## Budget
21 |
22 | | Product | Supplier/Link | Cost |
23 | | --------------- | ------------------------------------- | ------ |
24 | | Sandisk MicroSD Card | https://www.amazon.com/SanDisk-Extreme-microSDTM-Adapter-SDSQXCD-128G-GN6MA/dp/B09X7DNF6G | $21.00 |
25 | | Raspberry Pi Power Supply | https://www.amazon.com/Raspberry-Model-Official-SC0218-Accessory/dp/B07W8XHMJZ | $7.95 |
26 | | Temperature Sensor | https://www.adafruit.com/product/1782 | $4.95 |
27 | | eInk Display | https://www.adafruit.com/product/4224 | $8.50 |
28 | | Large Breadboard | https://www.adafruit.com/product/239 | $5.95 |
29 | | Small Breadboard | https://www.adafruit.com/product/65 | $3.95 |
30 | | Wires | https://www.adafruit.com/product/153 | $4.95 |
31 | | Adafruit Shipping || $6.80 |
32 | | Raspberry Pi Compute Module || $135.00 |
33 | | Raspberry Pi Shipping || $26.65 |
34 | | Raspberry Pi Compute Module I/O Board | https://www.adafruit.com/product/4787 | $35.00 |
35 | | Soldering materials | have access to | $0 |
36 | | Total || $260.70 |
37 |
38 | I can cover the remainder.
39 |
--------------------------------------------------------------------------------
/briyandyju09.md:
--------------------------------------------------------------------------------
1 | ---
2 | name: "@briyandyju09"
3 | project: " DIY handheld game console like a nintendo switch"
4 | ---
5 |
6 | # RetroSwitch
7 |
8 | ## Summary
9 |
10 | This project was to create a portable gaming system that could also double as a portable computer. The goal was to create a console that was functional as well as aesthetically pleasing. Guide im using - https://www.instructables.com/Homemade-Game-Console-NinTIMdo-RP/
11 | ## Plan
12 |
13 | I am going to be printing and assembling a 3D model of the device using a online tool. The model files can be downloaded from a specific URL. The device can be assembled by joining the front and back halves using metal dowels, standoffs, and glue, and attaching a screen using epoxy and glue. The circuitry of the device involves wiring buttons and joysticks to a Teensy ++ 2.0 microcontroller using digital and analog pins, and connecting a battery and charger to power the device. The display can be attached using a flex cable and hot glue. Finally, the software for the device can be set up by installing an operating system and configuring the controls.
14 |
15 | ## Budget
16 |
17 | All adafruit products shipping - 20$
18 |
19 | | Product | Supplier/Link | Cost |
20 | | --------------- | ------------------------------------- | ------ |
21 | | Raspberry PI 4 | https://www.adafruit.com/product/4295 | $35 |
22 | | Screen | https://thepihut.com/products/official-raspberry-pi-7-touchscreen-display | $82.20 + 10 (shipping) |
23 | | Teensy LC | https://www.adafruit.com/product/2419 | $17.50 |
24 | | Soft tactile switch | https://www.adafruit.com/product/3101 | $1.95 |
25 | | Joystick x2 | https://www.adafruit.com/product/512 | $11.9 |
26 | | Wires | https://www.adafruit.com/product/1311 | $15.95 |
27 | | Case | www.pcbway.com (link for model - [https://github.com/timlindquist/Nintimdo-RP_3D_models]) | $40 |
28 | | Power bank | https://www.amazon.ae/Philips-10000mAh-Portable-DLP1710CV-97/dp/B082HQ6M7R/ref=sr_1_5?c=ts&keywords=Mobile%2BPhone%2BPortable%2BPower%2BBanks&qid=1672756310&s=electronics&sr=1-5&ts_id=12304344031&th=1 | $13.34 + 10 (shipping) |
29 | | Total | | $257.84 (Final price may vary due to later offers)|
30 |
--------------------------------------------------------------------------------
/LuizWeitz.md:
--------------------------------------------------------------------------------
1 | ---
2 | name: "@LuizWeitz"
3 | project: "E-reader using Raspberry Pi Pico"
4 | ---
5 |
6 | # E-reader With Raspberry Pi Pico
7 |
8 | ## Summary
9 |
10 | E-reader using Raspberry Pi Pico with E-Ink technology screen with rechargeable battery that fits in the palm of the hand, through which I intend to expand my adventures in the world of reading.
11 |
12 | ## Plan
13 |
14 | The first step is to plan how the components will be organized.
15 | The second step is to connect all components through wire and solder.
16 | The third step is to plan a simple case in 3d and print out.
17 | The fourth step is to create a simple software that reads the books and sends them to the screen with the possibility of changing pages.
18 | The fifth step is to test everything.
19 |
20 | I have follow this project https://github.com/joeycastillo/The-Open-Book to get some ideas and I also did some research on the internet regarding the components, for example the screen I will follow the manufacturer's documentation.
21 |
22 | ### one of the prototypes:
23 |
24 | ## Budget
25 |
26 | | Product | Supplier/Link | Cost |
27 | | --------------- | ------------------------------------- | ------ |
28 | | Raspberry Pi Pico Board | https://www.aliexpress.com/item/1005002890682924.html?spm=a2g0o.cart.0.0.267538daPxA5wQ&mp=1 | $9.58 |
29 | | Waveshare 7.5inch E-Paper E-Ink Display Module For Raspberry Pi Pico | https://www.aliexpress.com/item/1005002841576759.html?spm=a2g0o.cart.0.0.267538daPxA5wQ&mp=1 | $63.89 |
30 | | MicroSD Card Adapter| https://www.aliexpress.com/item/1005001309671718.html?spm=a2g0o.cart.0.0.267538daPxA5wQ&mp=1 | $6.37 |
31 | | Lexar Card SD 32GB | https://www.aliexpress.com/item/1005003780732823.html?spm=a2g0o.cart.0.0.267538daPxA5wQ&mp=1 | $6.04 |
32 | | Raspberry Pi Zero UPS-Lite Power Supply Board with 1000mAh 3.7V | https://pt.aliexpress.com/item/1005002587907720.html?spm=a2g0o.cart.0.0.358b7f061w9Aq3&mp=1&gatewayAdapt=glo2bra | $28.79 |
33 | | K7 X1 3D Printer Mini | https://www.aliexpress.com/item/1005002668227870.html?spm=a2g0o.cart.0.0.5b8338daT6TgTX&mp=1 | $105.01 |
34 | | cable, welder, solder and filament 3d | I have | $0.00 |
35 | | Total products + Total Ship | | US $217.65 |
36 |
--------------------------------------------------------------------------------
/winstoniskandar&mayuridev.md:
--------------------------------------------------------------------------------
1 | ---
2 | name: ["@winstoniskandar","@mayuridev"]
3 | project: "Sound-Reactive Light Show"
4 | ---
5 |
6 | # Sound-Reactive Light Show
7 |
8 | ## Summary
9 |
10 | What are you going to build? What does it do? Why are you excited to build it?
11 |
12 | We are going to build a sound-reactive light show where the LED lights move based on speaker audio. This light show will be controlled by a microcontroller and a software program. We are extremely excited for this project because we currently do not have any audio system in our room and this would be such a cool feature in our room. We also mostly work with software, so this will be a great way to flex our muscles with some hardware.
13 |
14 | ## Plan
15 |
16 | What steps are you going to take to build it? What tools are you going to use? What will you do first, second, third, etc.?
17 | 1. Gather materials: We will need speakers, a microcontroller (Arduino), LED lights, and a program to do the magic.
18 |
19 | 2. We will set up the microcontroller and LED lights
20 |
21 | 3. Create a short program to code the lights based on audio input
22 |
23 | 4. Test and enjoy the creation!
24 |
25 | ## Budget
26 |
27 | What materials will you need for your project? Where will you get them? How much does it cost? Please include all materials, including components you already own. Make sure to factor in shipping costs and sales tax.
28 |
29 | | Product | Supplier/Link | Cost |
30 | | --------------- | ------------------------------------- | ------ |
31 | | Arduino | https://www.adafruit.com/product/2488 | $26 |
32 | | Bose Speaker | https://www.bose.com/en_us/products/speakers/portable_speakers/soundlink-revolve-plus-ii.html | $361 |
33 | | Breadboard | https://www.adafruit.com/product/64 | $0 (already have) |
34 | | Adafruit LED Light Strip 2m | https://www.adafruit.com/product/2842 | $67 |
35 | | Wiring | https://www.adafruit.com/product/1957 | $0 (already have) |
36 | | Soldering tools | | $0 (already have) |
37 | | Transistors | https://www.adafruit.com/product/3598 | $9 |
38 | | Resistor | https://www.radioshack.com/products/radioshack-1-8-watt-330-ohm-carbon-film-resistors-5-pack | $8 |
39 | | Total | | $471 |
40 |
--------------------------------------------------------------------------------
/rachwel.md:
--------------------------------------------------------------------------------
1 | ---
2 | name: "@rachwel"
3 | project: "Rc tracked vehicle"
4 | ---
5 |
6 | # The tank
7 |
8 | ## Summary
9 |
10 | What are you going to build? What does it do? Why are you excited to build it?
11 |
12 | I plan on building a [SnowCat](https://www.youtube.com/watch?v=UdL4M4JpdsU) like rc vehicle. It will be controlable with a 2.4gh rc controller and be powered by 2 moters. Im exited to build it as I have never build something like this before and want to learn the experience.
13 | ## Plan
14 |
15 | What steps are you going to take to build it? What tools are you going to use? What will you do first, second, third, etc.?
16 |
17 | 1. Design the tracks and the main gears in solidworks
18 | 2. Design the gearbox in solidworks and test to see what reduction I need
19 | 3. Design the body in solidworks and print everthing out on a 3d printer
20 | 4. Put together the moter and gearbox and test to make sure its working properly
21 | 5. Build all the track pieces and hope I have enough
22 | 6. Assembly the body with the motors, tracks, and shell
23 |
24 | ## Budget
25 |
26 | | Product | Supplier/Link | Cost |
27 | | Screws | https://www.amazon.com/iExcell-Stainless-Socket-Button-Screws/dp/B08H2GSY1H | 34.4 |
28 | | Barings | https://www.amazon.com/Pcs-608-2RS-Ball-Bearings/dp/B09PKD8QZZ | 15.98 |
29 | | Moter | https://www.amazon.com/dp/B09GFD1N98 | 65.54 |
30 | | Lipo | https://www.amazon.com/Zeee-Battery-5200mAh-Vehicles-Airplane/dp/B092CZGW2P | 38.99 |
31 | | Steel Rod | https://www.amazon.com/Stainless-Elements-Furniture-Shelving-Supports/dp/B07XP4H2K5 | 8.99 |
32 | | Steel rod | https://www.amazon.com/uxcell-300mm-Stainless-Steel-Solid/dp/B082ZPDN3C | 6.99 |
33 | | Small bearings | https://www.amazon.com/uxcell-Bearing-Double-Shielded-Bearings/dp/B07FW1958S | 9.99 |
34 | | Reciver | https://www.amazon.com/FlySky-2-4Ghz-receiver-Failsafe-FS-TH9X/dp/B009YSJM6W | 16.88|
35 | | Nuts | https://www.amazon.com/Pieces-Screws-Stainless-Washers-Assortment/dp/B09BLRFGZH | 24.99 |
36 | | Cr touch | https://www.creality3dparts.com/product/cr-touch-auto-leveling-standard-kit-wide-compatibility/ | 32.98 |
37 | | 3d Printer | Already have | 0 |
38 | | Toal Cost | All | 255.73 |
39 |
40 | Note, I will pay the remaining cost
41 |
--------------------------------------------------------------------------------
/sol5000.md:
--------------------------------------------------------------------------------
1 | ---
2 | name: "@sol5000"
3 | project: "nfc rfid wallet"
4 | ---
5 |
6 | # nfc wallet
7 |
8 | ## Summary
9 |
10 | using nfc tags to replace traditional cards in my wallet, it would be much easier to use and carry around, because of their small form factor. also to be used as rings, much easier
11 |
12 | ## Plan
13 |
14 | getting the tags and the copier, trying to figure out how to copy and rewrite the tags, customizing them, and using it as a wallet (replacing wallet with a ring and keychain) and the nfc reader paired the an arduino CQ robobot speaker so that it would be able to make a sound for each different card it detects
15 |
16 | ## Budget
17 |
18 | What materials will you need for your project? Where will you get them? How much does it cost? Please include all materials, including components you already own. Make sure to factor in shipping costs and sales tax.
19 |
20 | | Product | Supplier/Link | Cost |
21 | | ---------------------- | -------------------------------------------------------------------------------------------------------- | ------- |
22 | | Writable Ring | https://www.amazon.com/Rewritable-13-56MHz-Changeable-Ceramics-Duplicate/dp/B09F2C7RNB | $43.50 |
23 | | Carabiner To Hold Tags | https://www.amazon.com/LV-Retractable-Holder-Carabiner-Keychain/dp/B0839Q8M6X | $14.99 |
24 | | Writable Key Fobs | https://www.amazon.com/ETEKJOY-Proximity-Control-Security-Wholesale/dp/B07PNGGF4Z | $16.90 |
25 | | NFC/RFID Reader Writer | https://www.amazon.com/OBO-HANDS-Duplicator-Programmer-Changeable/dp/B083FF6ZG1 | $37.85 |
26 | | Arduino Speaker | https://www.amazon.co.uk/CQRobot-Electronics-JST-PH2-0-Interface-Electronic/dp/B0738NLFTG?currency=USD | $8.62 |
27 | | Arduino Starter Kit | https://www.amazon.com/gp/product/B01CZTLHGE?psc=1 | $59.99 |
28 | | SHIPPING + TAX | | $26.00 |
29 | | Total | | $207.85 |
30 |
--------------------------------------------------------------------------------
/Roizor.md:
--------------------------------------------------------------------------------
1 | ---
2 | name: "@Roizor"
3 | project: "Blue Board"
4 | ---
5 |
6 | # Blue Board
7 |
8 | ## Summary
9 |
10 | I am going to build a 65% mechanical keyboard but use custom firmware (a fork of QMK). The keyboard will be used for everything I do (home, school).
11 | I'll also create a custom key layout for the keyboard.
12 | I'm excited to build this because it's always been my dream to build a mechanical keyboard and modify it's firmware at the low level. It'll be my first time building a keyboard as well.
13 | I've also never truly explored C programming and I feel this project can help introduce me to it. As for what I am going to do for the firmware, my laptop builtin keys have special functions, such as trackpad on/off, key lights on/off, and a number pad. I want to include these settings on the keyboard itself because I think it will challenge me and be a fun first experience (for the most part).
14 |
15 | ## Plan
16 |
17 | From days 1-3, I will be assembling the keyboard with regular tests to make sure I haven't broken anything yet.
18 | After some research and playing with C on day 4 to get the hang of it, I will start to develop the firmware itself.
19 | On days 4-8, I will be continuing to program the board's firmware with regular tests & debugging sessions.
20 | On day 9, I'll do in depth testing to make sure everything is correct in case something was missed.
21 | On the final day (10), because everything will be done I will customize the keyboard and have 1 final look.
22 |
23 | ## Budget
24 | Changed because most of the items were out of stock.
25 |
26 | | Product | Supplier/Link | Cost |
27 | | --------------- | ------------------------------------- | ------ |
28 | | Lube for switches (Krytox 103 + brush) | https://1upkeyboards.com/shop/parts-and-tools/lubricant/switch-lubricant-3ml | $11.00 |
29 | | NK65 PCB/board (includes most things i will need) | https://novelkeys.com/collections/keyboards/products/nk65-entry-edition?variant=36839795589287 | $95.00 |
30 | | NovelKeys Cream+ Switches| https://novelkeys.com/collections/switches/products/cream-plus-switches | $46.80 |
31 | | Keycaps (SteelSeries PRISMCAPS) | https://www.amazon.com/SteelSeries-PRISMCAPS-Pudding-Style-Thermoplastic-Compatible/dp/B0955721RV | $29.99|
32 | | Total | | $182.79 |
33 |
--------------------------------------------------------------------------------
/SuperBoyne.md:
--------------------------------------------------------------------------------
1 | ---
2 | name: "@SuperBoyne"
3 | project: "Extra Fancy Alarm Clock"
4 | ---
5 |
6 | # Extra Fancy Alarm Clock
7 |
8 | ## Summary
9 |
10 | My alarm clock broke, but it was lame anyway. My goal is to build one that can:
11 | - Tell the time
12 | - Display random information
13 | - Play music
14 | - Listen to voice commands
15 | - Connect to the Internet
16 |
17 | ## Plan
18 |
19 | In order to accomplish such a feat, I plan to simply connect a Raspberry Pi to an LED matrix, pushbutton, speakers, and microphone, then put it all in a 3D-printed case.
20 | I've already programmed a basic voice assistant in Python, so I'll just drive the LED matrix with it too.
21 | I was going to use a wired keypad with the GPIO, but the LED matrix hat makes that annoying so I'll settle for a USB keypad. However, I may switch out the keycaps for 3D printed ones down the road.
22 |
23 | ## Budget
24 |
25 | ```
26 | | Product | Supplier/Link | Cost | Notes
27 | | --------------- | -------------------------------------------------------------------------------- | ------- |
28 | | LED Matrix Hat | https://www.adafruit.com/product/2345 | $32.75 |
29 | | 64x32 LED Matrix| https://www.adafruit.com/product/2279 | $61.85 |
30 | | Raspberry Pi 3 | Already Owned | $0.00 | I would get a new one if any were in stock
31 | | 128GB MicroSD | https://www.amazon.com/Amazon-Basics-microSDXC-Memory-Adapter/dp/B08TJRVWV1/ | $14.60 | Free shipping with Amazon Prime
32 | | Numeric Keypad | https://www.amazon.com/Numeric-Keyboard-Computer-Notebook-Letters/dp/B0BNPVMQVT/ | $9.53 | Free shipping with Amazon Prime
33 | | USB Speaker | https://www.amazon.com/gp/product/B08QRYTPGH/ | $21.18 | Free shipping with Amazon Prime
34 | | USB Microphone | https://www.amazon.com/gp/product/B074BLM973/ | $24.37 | Free shipping with Amazon Prime
35 | | 3D Printed Case | Already Owned | $0.00 |
36 |
37 | | Total | | $164.28 |
38 | ```
39 |
--------------------------------------------------------------------------------
/YashasSingh.md:
--------------------------------------------------------------------------------
1 | ---
2 | name: "@Checkers"
3 | project: "Virtual Assitant Hologram Alarm Clock"
4 | ---
5 |
6 | # Virtual Assitant Hologram Alarm Clock
7 |
8 |
9 | ## Summary
10 |
11 | Virtual Assitant Hologram Alarm Clock or, VAHAC for short, is a virtual assitant just like Alexa or Google Home. This also funtions as a hologram Alarm clock.
12 | The rasberrypi will use a camera to detect facial expressions and faces using open-cv in order to suggest information or help.
13 | For example if the user gives a face of pain then the assitant can tell the user what do.
14 | The hologram feature will show a random pictures like jellyfish floating when the virtual assitant is not in use.
15 | This project also features an alarm clock which will play music until the user is awake and out of the room.
16 |
17 |
18 | ## Plan
19 |
20 | Set up rasberry pi
21 | Connect the screen, camera, audio hat module
22 | Install a voice reconigition software to convert wavelengths into text this is from SpeechRecognition 3.8.1 library available on https://pypi.org/project/SpeechRecognition/
23 | Create a word that starts the program ex. Alexa or Ok Google
24 | Use Open Ai that runs when start word is said (Alexa, Ok Goolgle)
25 | Say the response from the speaker
26 | The clock software can be dowloaded from other pre-made clock sofware on GitHub.
27 | for example https://opensource.com/article/17/7/raspberry-pi-clock I could change the code slightly to make is hologram friendly.
28 |
29 | ## Budget
30 |
31 | | Product | Supplier/Link | Cost |
32 | | --------------- | ------------------------------------- | ------ |
33 | | Rasberry Pi 0 w | https://www.amazon.com/gp/product/B07CMVDHWB/ref=ewc_pr_img_4?smid=A30ZYR2W3VAJ0A&psc=1 | $79.99 |
34 | | Audio HAT Module| https://www.amazon.com/gp/product/B08CCV3XVZ/ref=ewc_pr_img_1?smid=A3B0XDFTVR980O&th=1 | $21.90 |
35 | | Raspberry pi Camera Day & Night Vision | https://www.amazon.com/gp/product/B07VSPSNL8/ref=ox_sc_act_title_2?smid=AF7ERVVKLDA4G&psc=1 | $16.99 |
36 | | Hologram pyrimid |https://www.amazon.com/gp/product/B01CO0EW34/ref=ox_sc_act_title_1?smid=A1FYYUX4EMPHQ6&psc=1 | $0.00|
37 | | Touch Screen | https://www.amazon.com/gp/product/B0852NW9FM/ref=ewc_pr_img_3?smid=A3B0XDFTVR980O&psc=1 | $50.69 |
38 | | Caseing box | Already own | $10.49 |
39 | | Amazon shipping | none | free|
40 | | Total | | $180.06 |
41 |
--------------------------------------------------------------------------------
/LinusSkucas.md:
--------------------------------------------------------------------------------
1 | ---
2 | name: "@LinusSkucas"
3 | project: "PlantPrint"
4 | ---
5 |
6 | # PlantPrint
7 |
8 | ## Summary
9 |
10 | PlantPrint at its core will be a device that senses the moisture in the soil of a plant. But what fun is a plant monitor that doesn’t try to do everything under the sun? So in addition to sensing soil moisture, PlantPrint has an air quality sensor that senses PM2.5 particles, like the ones for wildfire smoke. It makes this data available over the internet through an SparkFun Thing Plus (which has an ESP32) and over HomeKit. But what if you don’t have your phone? Well it also includes a really cool flexible eInk display that can be mounted on the side of the plant’s pot. Finally, like a true data collector, I will use a thermal printer to plot the change of moisture and air quality throughout the data, attached to a Raspberry Pi.
11 |
12 | ## Plan
13 |
14 | I’ll start by assembling the sensor portion of the project. I’ll get the sensors reading data and reporting it to the ESP32. Then I’ll do some programming to connect it to the internet and integrate it with HomeKit. I’ll then connect the eInk display up and mount it to the side of the plant’s pot and program it to display the current air quality. Finally, I’ll set up the thermal printer so that I can print out the data.
15 |
16 | ## Budget
17 |
18 | > View the entire cart on DigiKey (contains links to the products): https://www.digikey.com/short/z80hb2m9
19 |
20 | | Product | Cost |
21 | | --------------- | ------ |
22 | | Raspberry Pi (Already Own) | $0.00 |
23 | | 3D Printed Enclosure (Can print for free) | $0.00 |
24 | | SparkFun Thing Plus | $$24.95 |
25 | | Qwiic Cable Kit | $8.95 |
26 | | Adafruuit PMSA003I Air Quality Sensor (Qwiic) | $44.95 |
27 | | I2C to Dual UART Module | $8.00 |
28 | | 3.7V 2.5 AH Lithium Battery | $14.95 |
29 | | eInk Ribbon Cable Extension | $1.50 |
30 | | Adafruit Monk Makes Plant Monitor | $11.94 |
31 | | 24 Pin Ribbon Cable Extender | $0.95 |
32 | | Adafruit eInk Breakout | $8.50 |
33 | | 2.9in Flexible eInk | $24.95 |
34 | | Thermal Receipt Printer Guts | $49.95 |
35 | | Wall Mount Adapter 9V 1A | $9.63 |
36 | | 2.1mm Barrel Jack to Thermal Screw Block Connector | $2.00 |
37 | | *Shipping* | *~$11* |
38 | | *Tariff (‽)* | *$1.76* |
39 | | *Sales Tax (🤮)* | *$22.75* |
40 | | **Total** | **$250.00** |
41 |
42 | *Shipping depends on when backordered items are shipped
43 |
--------------------------------------------------------------------------------
/Puffball101961.md:
--------------------------------------------------------------------------------
1 | ---
2 | name: "@Puffball101961"
3 | project: "RGB Matrix Price Ticker"
4 | ---
5 |
6 | # RGB Matrix Price Ticker
7 |
8 | ## Summary
9 |
10 | I want to build an rgb matrix based price ticker, like the ones that scroll across and are massively wide, however on a much smaller scale.
11 | I would use 2 64x32 rgb matrices daisy chained together to form a 128x32 strip of pixels, which will scroll across and show various stock and crypto
12 | prices, such as Bitcoin, Ethereum, Google and Microsoft. I want to build this to experiment with rgb matrices, as I do not have much experience with them.
13 |
14 | ## Plan
15 | 1. Wire up the RGB matrices to the controller and Raspberry Pi.
16 | 2. Write basic python scripts to test that the panels are working and that they are wired correctly.
17 | 3. Plan and Model a case to be 3d printed.
18 | 4. 3d print the case. (with my own 3d printer)
19 | 5. Assemble the ticker.
20 | 6. Finish writing the software (and maybe include a nice web interface)
21 |
22 |
23 | ## Budget
24 |
25 | Prices are converted from AUD to USD, they may fluctuate slightly.
26 |
27 | | Product | Supplier/ Link | Price |
28 | |-------- |----------------|-------|
29 | | P2.5 64x32 RGB Matrix Panel x2 | [Aliexpress](https://www.aliexpress.com/item/4000002686894.html) | $40.00 |
30 | | 5V 10A Power Supply | [Aliexpress](https://www.aliexpress.com/item/4001085007933.html) | $16.00 |
31 | | Power Supply Socket | [Aliexpress](https://www.aliexpress.com/item/1005002421876736.html) | $2.50 |
32 | | Adafruit RGB Matrix HAT + RTC for RPi | [Core Electronics](https://core-electronics.com.au/adafruit-rgb-matrix-hat-rtc-for-raspberry-pi-mini-kit.html) | $33.05 |
33 | | Raspberry Pi 3 Model A+ | [Core Electronics](https://core-electronics.com.au/raspberry-pi-3-model-a-plus.html) | $27.00 |
34 | | 32GB Micro SD Card (owned) | | $0.00 |
35 | | Official Raspberry Pi 12.5W Micro USB Power Supply | [Core Electronics](https://core-electronics.com.au/official-raspberry-pi-12-5w-micro-usb-power-supply.html) | $10.50 |
36 | | Core Electronics Shipping Charge | | $6.00 |
37 | | Miscellaneous Wires (owned) | | $0.00 |
38 | | 1kg Matte Black 3d Printer PLA Filament | [Amazon AU](https://www.amazon.com.au/eSUN-Matte-PLA-Filament-1-75mm-Low-Density-Matte-3D-Printer-PLA-Filament-1KG-Spool-3D-Printing-Filament-for-3D-Printers-Deep-Black/dp/B09MK1VLFM) | $25.50 |
39 | | Total | | $160.55 |
40 |
--------------------------------------------------------------------------------
/chennisden.md:
--------------------------------------------------------------------------------
1 | ---
2 | name: "@chennisden"
3 | project: "Self-hosted server"
4 | ---
5 |
6 | # Self-hosted server
7 |
8 | ## Summary
9 |
10 | I plan to self-host a number of static websites and fullstack webapps for our non-profit, Math Advance (projects: a math contest portal, custom grading software for our online math program), along with hosting an email service.
11 |
12 | The main thing I will be hosting is a custom web Git host, and that is what I will spend the bulk of the time working on, along with the actual hardware setup.
13 |
14 | ## Plan
15 |
16 | - Burn Alpine Linux onto the disk
17 | - Install Postgres (database)
18 | - Install Postfix and Dovecot (email)
19 | - Migrate and set up web services, as well as updating reverse DNS
20 | - (long term) Write a custom, light-weight Git host and self-host on the server (work is already happening at https://sr.ht/~dennisc/glee/)
21 | - Migrate all non-profit code onto the host
22 | - Using Ethernet cables and our router, create a network with the Orange Pi set up to handle all incoming requests, and set up a DMZ to segregate outbound traffic from our personal machines and traffic on the server.
23 | - Wire DHT22 temp/humidity sensor to the Orange Pi and run a cronjob to email myself whenever external temperature/humidity conditions are negatively impacting the performance of the server
24 |
25 | ## Budget
26 |
27 | (We already have cables and do not need to purchase them.)
28 |
29 | Taxes/shipping are approximated from the DHT22 and 16GB SD Card; the Orange Pi's website already has both of these factored in.
30 |
31 | | Product | Supplier/Link | Cost |
32 | | --------------- | ---------------------------------------------------------------------------------- | ------ |
33 | | Orange Pi 3 LTS | https://orangepi.net/product/orange-pi-3-lts | $66.68 |
34 | | DHT22 | https://www.amazon.com/Aideepen-Digital-Temperature-Humidity-Replace/dp/B01IBBFOF0 | $9.95 |
35 | | 16GB SD Card | https://www.amazon.com/Micro-Center-Class-Flash-Memory/dp/B07K8339X8/ | $9.99 |
36 | | Shipping + Taxes| |~$5.00 |
37 | | Total | |~$81.63 |
38 |
--------------------------------------------------------------------------------
/pikca-c.md:
--------------------------------------------------------------------------------
1 | ---
2 | name: "@pikca-c"
3 | project: "Desktop Train Departure Board"
4 | ---
5 |
6 | # Desktop Train Departure Board
7 |
8 | ## Summary
9 |
10 | I'm a railway enthusiast and love the UK Railway Network, and had always wanted to check when trains are gonna arrive at home in a fashionable way. The board, complete with a case and stand, will mimic a real national rail dot matrix display (or maybe even the new LED ones that show more information if possible) and any station on the UK national rail network, as well as London Underground can be displayed. It's a train nerd's dream to be able to have their own departure board at home.
11 |
12 | ## Plan
13 |
14 | With all the components available, I will use the Raspberry Pi (Zero W or Zero 2 W) to obtain data from Network Rail's Data Feeds (that I have access already). It requires a bit of programming to link up the device to the data feeds, which (hopefully) shouldn't be a problem. If the dot matrix version works, I will then try to make a more advaced version with a full LED display that shows more information (e.g. seating info), but that'll involve a certain degree of graphic designing. Last but not least, I'll also 3D print a case for the departure board so that it looks like the ones that you can find at any National Rail station. HOWEVER, owing to the long term raspberry pi shortage, the raspberry pi might not arrive in time in Feb to complete the project. If that's the case, I'll use my Raspberry Pi 3 that I already have but I'll try my best to source a Raspberry Pi zero 2 as the 3 version uses a lot more energy.
15 | ## Budget
16 |
17 |
18 |
19 | | Product | Supplier/Link | Cost |
20 | | --------------- | ------------------------------------- | ------ |
21 | | Raspberry Pi Zero 2 W | https://thepihut.com/products/raspberry-pi-zero-2?src=raspberrypi | £17 ($21 USD) |
22 | | 3.1 inch Graphic OLED Module | https://www.amazon.com/Spacesea-Display-3-12Inch-Controller-500131408A1/dp/B0B6C8RTZY | $23.69 |
23 | | Creality Ender 3 3D Printer | https://detail.tmall.com/item.htm?abbucket=20&id=673650763165 | $368.41+$15.89 (shipping) = $384.3 |
24 | | 3D modeling software | https://www.sketchup.com/ | Subscription owned |
25 | | 8 GB SD card | / | Owned |
26 | | Total | | $428.99 (of which 278.99 will be paid for myself so the grand total will remain $243.69) |
27 |
--------------------------------------------------------------------------------
/wollygfx.md:
--------------------------------------------------------------------------------
1 | ---
2 | name: "@wollygfx"
3 | project: "Bedroom Security System"
4 | ---
5 |
6 | # Bedroom Security System
7 |
8 | ## Summary
9 |
10 | I am excited to build a bedroom security system. This security system will include features such as motion detection and video surveillance using a smartphone app. The idea of having an added layer of security for my personal space is really exciting for me. Knowing that I can monitor my bedroom even when I am not physically present gives me a sense of peace and control. I can't wait to start building and see the final product in action.
11 |
12 | ## Plan
13 |
14 | I am so excited to build my own bedroom security system. It's going to be reeeeally cool! The first step I'll take is to do some research and gather information on all the different components I'll need, including motion sensors, cameras, and a smart lock. I'll be buying all these components online.
15 |
16 | While everything is arriving, I'll start designing the layout of the system and figuring out the best places to put everything.
17 |
18 | Once I've got everything I need, I'll start installing everything in their place, starting with the motion sensors and cameras. Then, I'll try to program the cameras and the sensors so they can work. I am planning to use MotionEyeOS for this.
19 |
20 | I'll be using tools like a screwdriver, wire cutter, and a drill to get the job done, and I'll also be using programming languages like Python and JavaScript to integrate the system with my smartphone app.
21 |
22 | Finally, I'll do a bunch of testing to make sure everything is working properly and make any adjustments that are needed.
23 |
24 | It's going to take a lot of patience, attention to detail, and some technical know-how, but I'm confident that it'll be totally worth it in the end!
25 |
26 | Also, i would like to make a sound alarm to alert the intruder, i'll see if it is possible.
27 |
28 | ## Budget
29 |
30 |
31 | | Product | Supplier/Link | Cost |
32 | | --------------- | ----------------------- | ---- |
33 | | Raspberry Pi 4 | https://amzn.to/3XA4j6e | $175 |
34 | | 1.8"LCD display | https://amzn.to/3CMSP7y | $12 |
35 | | Arducam Camera | https://amzn.to/3X6bwv7 | $35 |
36 | | HONKYOB Speaker | https://amzn.to/3QL626Q | $15 |
37 | | 64 gb SD Card | http://bit.ly/3YsTyUi | $10 |
38 | | Total | | $250 |
39 |
40 |
41 |
42 |
43 |
44 |
45 |
--------------------------------------------------------------------------------
/Steve-Dusty.md:
--------------------------------------------------------------------------------
1 | ---
2 | name: "@Steve-Dusty"
3 | project: "Pet-feeding system"
4 | ---
5 |
6 | # Pet-feeding system
7 |
8 | ## Summary
9 |
10 | I plan on creating my first ever hardware project. I am choosing to build a pet feeding project because it can apply to me
11 | in real life, letting me see my creation come into play.
12 |
13 | ## Plan
14 |
15 | I am going to buy a kit with some other accessories to help me complete the project because as a total beginner, I don't know what to buy at first
16 | so I believe a kit would serve me the best.
17 |
18 | 1. Design my circuit and attach it to my supplies like cardboard and cans and create moving mechanisms with the 3D printer.
19 | 2. Attach that with servo and my camera, using the camera module, it'll periodically take pictures and send a POST request to my raspberry pi, which will analyze image (using openCV)to check if the food bowl is empty or not, sending a response back. If it's empty the servo will drop food.
20 | 3. I will also code an app that lets me set timer for food dropping intervals and automatic control. The raspberry pi will send data to the arduino (the server) through a USB cable.
21 |
22 | ## the food dropping mechanism
23 | I will create a 3/4th plastic using my 3D printer. It'll be connected to the servo that can spin the component. The cardboard box will have a hole beneath it.
24 | When it's ready to drop food, the servo will rotate the circle to where the 1/4th opening is, and the food will be able to dispense through that opening.
25 |
26 |
27 | ## Budget
28 |
29 | I can pay shipping for myself
30 | | Product | Supplier/Link | Cost |
31 | | --------------- | ------------------------------------- | ------ |
32 | | Complete Elegoo Start Kit with mega board | https://www.amazon.com/EL-KIT-008-Project-Complete-Ultimate-TUTORIAL/dp/B01EWNUUUA/ | $65.99 |
33 | | Arduino camera module |https://www.amazon.com/Arducam-Module-Megapixels-Arduino-Mega2560/ | $25.99 |
34 | | 2820 Pololu Servo | https://www.digikey.com/en/products/detail/pololu-corporation/2820/10450037 | $6.15 |
35 | | cardboard, plastic bottle, cans, stand | my own supplies | free |
36 | | Raspberry pi 4 Model B (with cable) | free |
37 | | Elegoo Neptune 2S 3D printer | https://www.elegoo.com/products/neptune2s-fdm-printer?variant=39681380286512&gclid=EAIaIQobChMI8sefyM3R_AIVKQetBh2YYwOQEAQYASABEgIWJfD_BwE | $149.99 |
38 | | Total | $248.12
39 |
--------------------------------------------------------------------------------
/xhaidendsouza.md:
--------------------------------------------------------------------------------
1 | ---
2 | name: ["@xhaidendsouza", "@daSeaTurtle", "@lolguineapig"]
3 | project: "Mechanically Codable Robot"
4 | ---
5 |
6 | # Mechanically Codable Robot
7 |
8 | ## Summary
9 |
10 | We are going to build a single motor robot that is able to read and execute mechanical "code" on a wheel. It will use gears to rotate the wheel around, and extrusions around the wheel will physical manipulate the robot such that it is able to turn and move. We have always loved the idea of mechanical coding, and we really want to be able to make a robot that can use it. This is our first ever project that is anything like this, so we are excited to see how it turns out.
11 |
12 | ## Plan
13 |
14 | 1) Brainstorm how the robot will read the mechanical wheel and turn it into an output (https://www.youtube.com/watch?v=TD_MLuMvkNw - Reference for Mechanical Coding Robots, https://www.youtube.com/watch?v=tBi0ecy5kPs - Reverse Gear Directions)
15 |
16 | 2) Use Fusion 360 to design the components of the robot. This will include a holder for the motor, multiple interchangable wheels that can each code the robot to to diffferent things, and a system of gears and other parts that will be able to turn that code into motion.
17 |
18 | 3) Print out all of the parts on the 3D printer (https://youtube.com/watch?v=iF5TEdEGyg8 - 3D Printer Review, https://www.youtube.com/watch?v=CpM5pSSYq2c - Unboxing and Setup)
19 |
20 | 4) Assmemble all of the parts and test!
21 |
22 | ## Budget
23 |
24 | |Product | Supplier/Link | Cost |
25 | | --------------- | ------------------------------------- | ------ |
26 | |3D Print Tools Kit|https://www.amazon.com/dp/B09TD8RBSG/| $25.26|
27 | |Creality Ender-3 S1 Pro 3D Printer|https://store.creality.com/products/ender-3-s1-pro-3d-printer |$460.73 |
28 | |PLA+ Filament x3 (Red, Black, Blue)|https://store.creality.com/products/ender-1-75mm-pla-3d-printing-filament-1kg-2p0t?cfb=589f0b45-caa6-4594-91a1-5790d5d4e43c&ifb=589f0b45-caa6-4594-91a1-5790d5d4e43c&scm=search.v4&score=3609.9840480000003&ssp=&spm=..search.search_1.2 |$70.77 |
29 | |Motor|https://www.jameco.com/z/RC-260RA-2670-Jameco-ReliaPro-4-5-Volt-DC-Motor-1-58A-15-000-RPM_211246.html | $8.25|
30 | |Battery Pack (AA Batteries)| https://www.amazon.com/Electronics-Battery-Holder-Switch-BHAA3B/dp/B09MZWMTGR |$2.39|
31 | |3D Printer Enclosure|https://www.amazon.com/Fireproof-Dustproof-Temperature-Protective-Room29-9x25-5x28-3/dp/B08JQC6Z9N/ |$69.38|
32 | | Total|| $636.78 |
33 |
--------------------------------------------------------------------------------
/KrishnaSharma206.md:
--------------------------------------------------------------------------------
1 | ---
2 | name: "@KrishnaSharma206"
3 | project: "An AI powered Robot"
4 | ---
5 |
6 | # Object Recognition Warehouse Robot
7 |
8 | ## Summary
9 |
10 | A robot that recohnizes certain shapes and navigates it's way accordingly, I am going to build this robot because I liked the idea of the amazon warehouse robot and the projects made by a guy named James Bruton, and I really wanna learn about object recognition through this project. I already have some experience making robots using arduino, so it will be something new for me.
11 |
12 | ## Plan
13 |
14 | I will be using the jetson nano as the brain of this project, the raspberry pi wont be enough for this and the jetson nano will be a better alternative
15 | , I will be using a camera for the detection and I am planning to add more sensors and actuators to it in the future(like a beanbag gripper arm).
16 |
17 | The Steps:
18 | 1. Learn how to use the jetson nano
19 | 2. Connect my laptop to the jetson nano using a vnc
20 | 3. Train the AI model on the jetson nano using basic shapes for easier recognition
21 | 4. Build the robot, then program the robot using python
22 | 5. Test the robot.
23 |
24 | ## Budget
25 |
26 | | Product | Supplier/Link | Cost |
27 | | --------------- | ----------------------------------------------------------- | ------- |
28 | | Nvidia Jetson nano | https://www.fabtolab.com/nvidia-jetson-nano-developer-kit | $136.17 |
29 | | camera |https://robu.in/product/arducam-imx219-1080p-raspberry-pi-camera-module-with-abs-case| $78 |
30 | | battery for jetson nano| https://amzn.eu/d/9LfkCYW | $14.00 |
31 | | wifi adapter | https://tannatechbiz.com/tp-link-tl-wn725n-150-mbps-wireless-n-nano-usb-adapter-nano-size-wifi-dongle-compatible-with-nvidia-jetson-nano-and-raspberry-pi.html | $6 |
32 | | power adapter | https://amzn.eu/d/2TpVtnH | $6 |
33 | | memory card (64gb) | https://amzn.eu/d/eRnp39g | $7 |
34 | | jumper cables | https://robu.in/product/10-cm-40-pin-dupont-male-male-male-female-female-female-cable-combo | $2 |
35 | | Total | | $239 |
36 |
37 | Note: I have mentioned everything I need for the robot, I have an old chassis which used for an arduino project, so I can use that again
38 |
--------------------------------------------------------------------------------
/Carsblox.md:
--------------------------------------------------------------------------------
1 | ---
2 | name: "@Carsblox"
3 | project: "SkyScanner"
4 | ---
5 |
6 | # SkyScanner
7 | ## Summary
8 |
9 | I'm going to build a flight tracker. This will track nearby planes and update flights' data in real time.
10 | I'm exited to build this because I'm going to learn many things while making this project. This includes learning how to 3d print, 3d model, and learning linux.
11 | I'll also learn more about physical computer hardware and how ADS-B antennas work.
12 |
13 | Inspired by: https://www.tomshardware.com/how-to/raspberry-pi-airplane-tracker
14 |
15 | ## Plan
16 |
17 | For this project you will need a device capable of running linux such as a rasberry pi or a libre computer and a micro sd card to boot from.
18 | You will also need a ADS-B antenna to recive signals from nearby aircrafts.
19 | You'll also need a computer to design a case for the build and a 3d printer and filament to print the case.
20 |
21 | Step 1: Setup linux on the libre computer board.
22 | Step 2: Install the ADS-B antenna software.
23 | Step 3: Connect the antenna to the computer via usb.
24 | Step 4: Wait for flights to be detected and test if the system works properly.
25 | Step 5: 3D model a inclosure for the project on blender.
26 | Step 6: 3D print the inclosure you designed.
27 | Step 7: Install the hardware into the case.
28 | Step 8: See the flights above you on a monitor.
29 |
30 | ## Budget
31 |
32 | | Product | Supplier/Link | Cost |
33 | | ---------------------------- | ------------------------------------- | ------- |
34 | | Libre computer board | https://amzn.to/3GvULU5 | $35.00 |
35 | | ADS-B antenna | https://amzn.to/3jIF971 | $27.95 |
36 | | Aquila X2 3D printer | https://bit.ly/3YUCYNE | $155.00 |
37 | | 3D printer filament | https://amzn.to/3Q8F9sQ | $24.99 |
38 | | Ethernet Cable | Already Owned | Owned |
39 | | Power Supply | Already Owned | Owned |
40 | | Micro SD card | Already Owned | Owned |
41 | | HDMI Cable | Already Owned | Owned |
42 | | Monitor/TV | Already Owned | Owned |
43 | | USB Keyboard/Mouse | Already Owned | Owned |
44 | | Total (After Tax + Shipping) | | $267.24 |
45 |
--------------------------------------------------------------------------------
/haitomns4173.md:
--------------------------------------------------------------------------------
1 | ---
2 | name: "@haitomns4173"
3 | project: "Rasberry Pi AI Assistant"
4 | ---
5 |
6 | # Rasberry Pi AI Assistant
7 |
8 | ## Summary
9 |
10 | So the plan is to make a AI assistant like Google Assistant, Alexa and Siri, for home automation as well as queries answered.
11 | I am even working on a python script to act as a simple assistant to answer small questions using data from the internet.
12 | It will be used for controlling the light, AC and other IOT devices in the home as well as we can get answer of queries.
13 |
14 | ## Plan
15 |
16 | First of all I will set up the OS in the SD card of the Raspberry Pi then power it on.
17 | The plan is to use a Raspberry Pi as a computation device to handle the assistant SDK from Google or Amazon.
18 | I will require a speaker and connect it to the Raspberry Pi and also connect a USB mic to it for taking the input.
19 | After setting up the hardware I will connect the pi through the SSH clint and set up the SKD as test if the speaker and mic are working.
20 | If everything is attached and working fine we can give a command to the Assistant and it will answer the queries.
21 | After that I am going to test my custom assistant, with some simple question.
22 | Finally if everything is tested and working properly, I will make a wooden cardboard enclosure to put all the contents in it and make it a single unit.
23 |
24 | ## Budget
25 |
26 | | Product | Supplier/Link | Cost |
27 | | ---------------------------------- | ------------------------------------- | ---------- |
28 | | Raspberry Pi 4 4GB RAM | https://amzn.to/3WeCro7 | $146.66 |
29 | | Raspberry Pi 4 Case | https://amzn.to/3GaJ859 | $25.24 |
30 | | Samsung EVO Plus 64GB SD Card | https://amzn.to/3FMz7JW | $7.24 |
31 | | Raspberry Pi 15.3W USB-C | https://amzn.to/3WDXssh | $7.31 |
32 | | AmazonBasics High-Speed Mini-HDMI | https://amzn.to/3HSvN2o | $2.89 |
33 | | MI Outdoor Bluetooth Speaker | https://amzn.to/3WyfSdJ | $15.70 |
34 | | FIFINE T669 USB Microphone | https://amzn.to/3WmtPMh | $36.67 |
35 | | Shipping Cost | | $3.33 |
36 | | Tax | | $2.94 |
37 | | Total | | $247.98 |
38 |
--------------------------------------------------------------------------------
/cfanoulis.md:
--------------------------------------------------------------------------------
1 | ---
2 | name: "@cfanoulis"
3 | project: "Veeby Deeby - A new way to vote for your favorite projects"
4 | ---
5 |
6 | # Veeby Deeby
7 |
8 | ## Summary
9 | I'm planning to create a smart vote colection system for hackathons, student science fairs & relevant events. Users will submit their details via an app running on the Raspberry Pi server, which will then print a submission receipt, like [this](https://hey-google.wheres-my-ta.co/5QFLM3iyo.png). After that, the voters may either scan the QR code on the receipt or enter the project ID on a web app hosted on the rPi to cast their vote (or votes). Operators may declare the vote finished, and have a tally of votes printed by the rPi, to allow them to declare their winners!
10 |
11 | ## Plan
12 | I expect the first 5 days to be spent on creating the web-app using RedwoodJS & Tailwind, as well as the low-level print daemon using Rust, allowing another 2 to be spent for troubleshooting them. I expect to spend at least one day setting up the thermal printer & the rPi. The final day will be spent on troubleshooting the system as one, intergrated whole & recording a promo video, maybe :>
13 |
14 | ## Budget
15 | | Product | Supplier/Link | Cost |
16 | | --------------- | ------------------------------------- | ------ |
17 | Acrylic rPi case | [CREATIVE MINDS EPE](https://www.hellasdigital.gr/go-create/raspberry-and-accessories-el/enclosures/acrylic-case-for-raspberry-pi-3.5inch-lcd-display/) | $ 3,73
18 | 5V PSU | [CREATIVE MINDS EPE](https://www.hellasdigital.gr/electronics/psu/5v-2a-anga-cp0502-2a/) | $ 3,19
19 | DC Adaptor | [CREATIVE MINDS EPE](https://www.hellasdigital.gr/surveillance-el/power-supply-el/dc-2-1mm-5-5mm-el/) | $ 0,53
20 | SD Card | [e-shop.gr](https://www.e-shop.gr/sandisk-sdsqxcg-032g-gn6ma-extreme-pro-a1-32gb-micro-sdhc-uhs-i-u3-with-adapter-p-PER.577061) | $ 11,64
21 | Raspberry Pi Power Supply | [NETTOP](https://nettop.gr/index.php/hlektronika/power-supplies/official-raspberry-pi-4-power-supply-black.html) | $ 10,55
22 | Raspberry Pi Model 4 - 2GB | [NETTOP](https://nettop.gr/index.php/raspberry-pi/kit-plaketes/raspberry-pi-4-model-b-2gb.html) | $ 63,83
23 | Shipping for Nettop order | NETTOP E.E. | $ 3,09
24 | Male/Male Jumper Wires - 20 x 3" (75mm) | [Adafruit](https://www.adafruit.com/product/1956) | $ 1,95
25 | Tiny Thermal Printer | [Adafruit](https://www.adafruit.com/product/2751) | $ 49,95
26 | Shipping for Adafruit order | ADAFRUIT INDUSTRIES LLC | $ 33,24
27 | VAT for Adafruit order | ADAFRUIT INDUSTRIES LLC | $ 20,43
28 | Total | | $ 203,10
29 |
--------------------------------------------------------------------------------
/mattkrnwn.md:
--------------------------------------------------------------------------------
1 | ---
2 | name: "@mattkrnwn"
3 | project: "Hand wired + 3D Printed 65% Mechanical Keyboard"
4 | ---
5 |
6 | # Agility65
7 |
8 | ## Summary
9 |
10 | I plan on building a 65% mechanical keyboard. The case will be modeled and printed by me, the switches will be handwired to an arduino microcontroller. It will be compatible with MX switches, Cherry stabilizers, and Cherry keycaps.
11 |
12 | ## Plan
13 |
14 | 1. Design keyboard layout and plan wiring matrix
15 | 2. 3D model a plate (potentially with flex) that accommodates hardware, switches, and case
16 | 3. Model and print case
17 | 4. Lube switches and stabilizers
18 | 5. Install stabilizers onto plate
19 | 6. Hand wire the diodes and wires to the switches
20 | 7. Install the switches to the plate
21 | 8. Put together case with plate, and install keyboard firmware (GMK)
22 |
23 | Taking inspiration from Matt3o’s blog and Ben Chapman’s article.
24 |
25 | ## Budget
26 |
27 | | Product | Supplier/Link | Cost |
28 | | --------------- | ------------------------------------- | ------ |
29 | | PLA Filament | https://a.co/d/e1sjukD | $24.99 |
30 | | Wires | https://a.co/d/hMwcCYP | $15.97 |
31 | | Diodes (x100) | https://a.co/d/hMwcCYP | $4.99 |
32 | | Switches | https://novelkeys.com/products/nk-silk-milkshake-switches?variant=42996497449127 | $39.60 |
33 | | Keycaps | https://novelkeys.com/products/dsa-milkshake?variant=40980340670631 | $50.00 |
34 | | Stabilizer | https://novelkeys.com/products/nk-stabilizers?variant=38218595893415 | $20.00 |
35 | | 205g0 Lube | https://novelkeys.com/collections/supplies/products/lubricants | $8.00 |
36 | | Novelkeys Shipping + Tax | --------------------- | $22.29 |
37 | | Microcontroller | https://keeb.io/products/elite-c-low-profile-version-usb-c-pro-micro-replacement-atmega32u4 | $17.99 |
38 | | Rotary Encoder | https://keeb.io/collections/diy-parts/products/horizontal-rotary-encoder-ec11b | $1.99 |
39 | | Rotary Encoder Knob | https://keeb.io/collections/diy-parts/products/aluminum-rotary-encoder-knob-ec11-ec11b | $2.99 |
40 | | Silicon Feet | https://keeb.io/products/skuf-silicone-rubber-keyboard-feet?variant=39592034304094 | $2.99 |
41 | | Keeb.io Shipping + Tax | ------------------------ | $5.17 |
42 | | Total | | $220.97 |
43 |
44 |
--------------------------------------------------------------------------------
/RhysMP.md:
--------------------------------------------------------------------------------
1 | ---
2 | name: "@RhysMP"
3 | project: "DonkeyCar RC car"
4 | ---
5 |
6 | # DonkeyCar RC car
7 |
8 | ## Summary
9 |
10 | I plan on building a RC car which can drive itself and also be controlled from mobile. I'm super excited as I have always wanted to experiemnt with a rasberry pi and see what amazing things I could do with it. I also have always thought RC cars were fasinating.
11 |
12 | Also
13 | Donkey has there own software but I would like to code my own. Having recently taken Computer Architecture I've learned about lower level programming and interfacing with electronics. I would want to be able to control every aspect about the RC from my computer and be able to custom code routines for it to be able to follow if possible using the embedded camera.
14 |
15 | ## Plan
16 |
17 | First I will order all of the products.
18 |
19 | Then I will send all the CAD files required for this car to my HS's Physics teacher to 3D print using the makerbots we have on campus.
20 |
21 | I will then clean up all of these prints.
22 |
23 | I will attach the parts together. (Pi > 3d printed plate) (Camera to Adatper)
24 |
25 | Then I will install the Donkeycare software and configure it all.
26 |
27 | Then using my own firmware that I will code, with what is going to be an extremely redimentary UI I would like to have fine control of the RC car. I would also like to be able to do basic autonomous pathfinding using the camera.
28 |
29 | http://docs.donkeycar.com/
30 |
31 |
32 | ## Budget
33 |
34 | | Product | Supplier/Link | Cost |
35 | | --------------- | ------------------------------------- | ------ |
36 | | Red LaTrax® Desert Prerunner: 1/18-Scale 4WD Electric Truck | https://latrax.com/products/prerunner | 142.30 (Includes tax) |
37 | | USB Battery with microUSB cable | https://www.amazon.com/Anker-PowerCore-Compact-Portable-Smartphones/dp/B07211V9XG | ~~36.95~~ 0 already owned|
38 | | Raspberry Pi 4 Model B 2019 Quad Core 64 Bit WiFi Bluetooth (4GB) | https://www.amazon.com/Raspberry-Model-2019-Quad-Bluetooth/dp/B07TC2BK1X | 174.08 (Includes tax)
39 | | SainSmart Wide Angle Fish-Eye Camera Lenses for Raspberry Pi 3 Model B Pi 2 Model B+ Arduino, RoHS certified | https://www.amazon.com/gp/product/B00N1YJKFS | 24.08
40 | | GenBasic 80 Piece Female to Female Jumper Wires (4 and 8 Inch) | https://www.amazon.com/GenBasic-Piece-Female-Jumper-Wires/dp/B01L5ULRUA | 6.49
41 | | Donkey Screw Kit | https://store.donkeycar.com/products/plastic-thread-forming-screw-kit?variant=9486169276473 | 5.36
42 | | Total 350.31
43 |
--------------------------------------------------------------------------------
/CatR3kd.md:
--------------------------------------------------------------------------------
1 | ---
2 | name: "@CatR3kd"
3 | project: "Covert Remote BadUSB With 3D Printed Disguise"
4 | ---
5 |
6 | # Covert Remote BadUSB With 3D Printed Disguise
7 |
8 | ## Summary
9 |
10 | I'm going to build a BadUSB that I can use at range by taking the bluetooth transmitter out of a cheap bluetooth mouse and connecting it to a Rpi Pico that acts as a "keyboard" to do keystroke injections
11 |
12 | ## Plan
13 |
14 | 1: Set up the pico with duckysctipt (Keystroke injection language)
15 | 2: Disassemble the bluetooth mouse and a microUSB to USB data cable
16 | 3: Combine the bluetooth transmitter from the mouse and the cable and use it as the Pico's output (If that does not work I'll just use a cord)
17 | 4: 3D Print nondescript housing for the recieving and transmitting end of the device
18 | 5: Test it out by writing a rickroll program and pranking my friends
19 |
20 | ## Budget
21 |
22 | What materials will you need for your project? Where will you get them? How much does it cost? Please include all materials, including components you already own. Make sure to factor in shipping costs and sales tax.
23 |
24 | | Product | Supplier/Link | Cost |
25 | | --------------- | ------------------------------------- | ------ |
26 | | Ender-3 Pro 3D printer | https://store.creality.com/products/ender-3-pro-3d-printer?variant=8ea4f135-e700-47e7-bbd3-d6cb686c2f2e | $206 |
27 | | Ender 1.75 mm Filament | https://store.creality.com/products/ender-1-75mm-pla-3d-printing-filament-1kg?variant=1b56be44-741f-4c75-a88e-840c7a01c810 | $22 |
28 | | Crappy Bluetooth Mouse | https://www.amazon.com/Rii-Wireless-1000DPI-Windows-Included/dp/B073319ZJF/ref=asc_df_B073319ZJF/?tag=hyprod-20&linkCode=df0&hvadid=320048880417&hvpos=&hvnetw=g&hvrand=15139288595409792239&hvpone=&hvptwo=&hvqmt=&hvdev=c&hvdvcmdl=&hvlocint=&hvlocphy=9019521&hvtargid=pla-613030974448&psc=1&tag=&ref=&adgrpid=61389685902&hvpone=&hvptwo=&hvadid=320048880417&hvpos=&hvnetw=g&hvrand=15139288595409792239&hvqmt=&hvdev=c&hvdvcmdl=&hvlocint=&hvlocphy=9019521&hvtargid=pla-613030974448 | $5.49 |
29 | | Raspberry Pi Pico | https://www.adafruit.com/product/4864?gclid=CjwKCAiAwomeBhBWEiwAM43YIPLenSA2TD8iwrIWBBDtRpfNlY6l3P4mjSR2t6CHGKLRjvcCi_YCeBoCzJEQAvD_BwE | (Already own) |
30 | | MicroUSB to USB data cable | https://www.adafruit.com/product/592?gclid=CjwKCAiAwomeBhBWEiwAM43YIIlkIhxi0hZaBkiNScav1TUIasVe9irUanQQofaYRP_xJ7yatwKrhhoChwwQAvD_BwE | (Already own) |
31 | | Total With Tax | | $249.54 |
32 |
33 | Note: WOW that is way closer to budget that I thought it would be
34 |
--------------------------------------------------------------------------------
/Scott170c.md:
--------------------------------------------------------------------------------
1 | ---
2 | name: "@Scott170c"
3 | project: "Quadruped Robot"
4 | ---
5 |
6 | # Quadruped Robot
7 |
8 | ## Summary
9 | I am going to build a quadruped robot, similar to boston dynamic's spot that has the ability to walk. I want to build it because I think this is a great way for me to learn how quadrupeds work and the design process that goes into it.
10 |
11 | ## Plan
12 |
13 | Before: Find design for the robot, find places to 3D print parts and model parts on CAD.
14 | days 1 - 5: Assemble the robot (legs, and then the main body)
15 | days 6 - 10: Program and test
16 |
17 | ## Budget (items subject to change)
18 |
19 | | Product | Supplier/Link | Cost |
20 | | --------------------- | ------------------------------------- | ------ |
21 | | Arduino Uno | already have | $0.00 |
22 | | 10x Servos | [amazon link](https://www.amazon.com/Smraza-Helicopter-Airplane-Control-Arduino/dp/B07L2SF3R4/ref=sr_1_1_sspa?crid=3895KJC0S2698&keywords=rc%2Bmicro%2Bservo&qid=1672606809&sr=8-1-spons&spLa=ZW5jcnlwdGVkUXVhbGlmaWVyPUFIUEZIMzBJSlNMNkgmZW5jcnlwdGVkSWQ9QTAxMjkwMDdPMzE0WlJLQk1XWUImZW5jcnlwdGVkQWRJZD1BMDIwNzMwN0dRSDFXTkhNVURFNCZ3aWRnZXROYW1lPXNwX2F0ZiZhY3Rpb249Y2xpY2tSZWRpcmVjdCZkb05vdExvZ0NsaWNrPXRydWU&th=1) | $20.00 |
23 | | IR Remote | [https://www.adafruit.com/product/389](https://www.adafruit.com/product/389) | $4.95 |
24 | | IR Receiver | [https://www.adafruit.com/product/157](https://www.adafruit.com/product/157) | $1.95 |
25 | | Power Boost 1000 | [https://www.adafruit.com/product/2465](https://www.adafruit.com/product/2465)| $19.95 |
26 | | Li-Ion battery | [https://www.adafruit.com/product/1781](https://www.adafruit.com/product/1781)| $9.95 |
27 | | 3D Printer (Creality Ender 3 3D) | [amazon link](https://www.amazon.com/Comgrow-Creality-Ender-Aluminum-220x220x250mm/dp/B07BR3F9N6/ref=sr_1_1?crid=18G6VJMWLDTLF&keywords=3D+printers&qid=1672681878&refinements=p_n_deal_type%3A23566065011&rnid=23566063011&s=industrial&sprefix=3d+printers%2Cindustrial%2C159&sr=1-1) | $199.00 |
28 | | Filament | [Microcenter Link](https://www.microcenter.com/product/611544/inland-175mm-white-pla-3d-printer-filament-1kg-spool-(22-lbs))| $18.99 |
29 | | Total | | $274.79|
30 |
31 | I will be following closely the schematic below and model from [goodboy][https://www.instructables.com/GoodBoy-3D-Printed-Arduino-Robot-Dog/]
32 | 
33 |
--------------------------------------------------------------------------------
/sswangg.md:
--------------------------------------------------------------------------------
1 | ---
2 | name: "@sswangg"
3 | project: "Custom Biquad Yagi Antenna"
4 | ---
5 |
6 | # WiFi/HAM Radio Antenna
7 |
8 | ## Summary
9 |
10 | I have created custom antennas before, including Yagi-Udas and helicals. However, I recently came across the biquad yagi design and it looks be an amazingly powerful design with a small footprint. It's just amazing! I want to build one biquad yagi to be used as a WiFi antenna and another to see if it can be used for amateur radio.
11 | Also, this grant opportunity excites me because I've ALWAYS wanted a VNA (vitual network analyzer) to analyze my antennas and find how to make them more efficient. However, as a broke high school hobbyist, I've never been able to justify even the $100 cost of even a low end VNA.
12 | I'm also excited to share my progress and design process when creating a new antenna!
13 |
14 | ## Plan
15 |
16 | 1. I've already CADed a 9 element biquad yagi design using Fusion 360 and uploaded it to printables here: https://www.printables.com/model/358225-24-ghz-biquad-yagi-wifi-antenna.
17 |
18 | 2. I'll 3D print parts out of PLA using my baby aka the best combined birthday+Chirstmas gift ever, my Ender 3 Pro.
19 |
20 | 3. Then, through a great amount of pain, I'll somehow bend 9 biquad elements out of gauge 14 copper wire. I made a 5 element biquad yagi during winter break as a proof-of-concept and bending those biquads precisely was HARD.
21 |
22 | 4. I'll super glue the copper wire into the guides and cover the reflector with copper tape. (Copper is very good for antennas due to its high conductivity).
23 |
24 | 5. I'll prep the RG402 coax and the driven element of the antenna and solder them together.
25 |
26 | 6. I'll use the NanoVNA to measure the VSWR (antenna efficiency basically, VSWR = 1 is ideal) and impedence (I'm not sure how to describe it but for WiFi it needs to be around 50 ohms) and resonant frequency to help me iterate upon the design to improve it.
27 |
28 | 7. Back to step 1 unless it's already perfect (very unlikely)
29 |
30 | ## Budget
31 |
32 | | Product | Supplier/Link | Cost |
33 | | --------------- | ------------------------------------- | ------ |
34 | | NanoVNA | https://a.co/d/0I138N2 | $152.63|
35 | | Copper wire | https://a.co/d/dojD00a | $14.83 |
36 | | Copper tape | https://a.co/d/5bIQGfS | $9.53 |
37 | | 60m tape measure| https://a.co/d/6MKiipN | $30.73 |
38 | | RG402 Coax | https://a.co/d/cNOhME7 | $11.65 |
39 | | Total | | $219.37|
40 |
--------------------------------------------------------------------------------
/ParthAgarwal.md:
--------------------------------------------------------------------------------
1 | ---
2 | name: "@Parth Agarwal"
3 | project: "Nvidia Jetbot"
4 | ---
5 |
6 | # Nvidia Jetbot
7 |
8 | ## Summary
9 |
10 | The plan is to create a Nvidia jetson nano powered jetbot that does basic tasks such as obstacle avoidance with the help of its onboard computer. With the help of this I
11 | would be able to learn basic robotics concepts such as programatic motor control. Later on I can build some other useful projects out of it.
12 |
13 | ## Plan
14 |
15 | First of all I would have to order parts from multiple stores. https://jetbot.org/master/getting_started.html have all the required steps I need to follow in order to get this project completed.
16 | Next on I will follow the examples given on the above mentioned site to complete my project.
17 |
18 | ## Budget
19 |
20 |
21 | | Product | Supplier/Link | Cost |
22 | | --------------- | -------------------------------------------------------------| ------ |
23 | | Jetson nano | https://developer.nvidia.com/embedded/buy/jetson-nano-devkit | $149.00 |
24 | | Micro SD card 64Gb | https://amzn.eu/d/gCJbjJM | $6.47 |
25 | | Power supply | Already Have | |
26 | | Motor | Already Have | |
27 | | Motor Driver |http://adafru.it/2927 | $19.95|
28 | | Caster Ball |https://robu.in/product/wheel-of-metal/?gclid=Cj0KCQiAtvSdBhD0ARIsAPf8oNmK4hd0EWhRQ4ghPwx1Aydilg9Y4lvEWmT9SyFQ6pbXQOQfIgWJdI8aAnxqEALw_wcB| $0.60|
29 | | Battery |https://amzn.to/2WRcIUe | $15.99|
30 | | USB cable pack | Already own | |
31 | | PiOLED display |http://adafru.it/3527 | $7.00|
32 | | PiOLES Header | Already Have | |
33 | | Camera |https://robu.in/product/waveshare-imx219-160-camera-160-fov-applicable-for-jetson-nano/?gclid=Cj0KCQiAtvSdBhD0ARIsAPf8oNmd4DwC95Nn4rrtpp0XVk0rD5Tr0LzZBC5iy1_d7fONXt7HtirXfcAaAvybEALw_wcB | $27.00|
34 | |WiFi Dongle - TP-Link Archer T2U Nano|https://a.co/d/9mO5wSD | $17.57|
35 | | Wheels 65mm |http://adafru.it/3757 | $3.00 |
36 | | Screws, Nuts, jumper wires and Adhresive pads | Local Market | $5.00|
37 | | Total | |$250.24|
38 |
--------------------------------------------------------------------------------
/alihussain23.md:
--------------------------------------------------------------------------------
1 | ---
2 | name: ["@alihussain23","@mehdihussain1786"]
3 | project: "Smart Door Lock"
4 | ---
5 |
6 | # Smart Door Lock
7 |
8 | ## Summary
9 |
10 | My plan is to build an external smart door lock that can be controlled using a smartphone app. It will have a main base housing all the components, as well as a secondary base where the locking pins will mesh into. The main base will sit on the door and the secondary base will sit on the door frame, so when the locking pins extend outward, the door won't open. As pre-made internal smart door locks can be quite expensive, and not many external ones exist with limited installation required, I believe this is an exciting project to pursue. I am also excited to work on with my little brother, as he always expressed interest in engineering and design like this but never knew where to start
11 |
12 | ## Plan
13 | What steps are you going to take to build it? What tools are you going to use? What will you do first, second, third, etc.?
14 | First we plan on using a 3D printer to build the chassis as well as the locking pins for the lock. Prototypes will be built out of PLA to make sure everything is in order then the final model will be built of PETG for strength. The pins will be pushed by a servo and be controlled with an arduino which will be housed inside the chassis. Once all the parts are ordered/created, assembly should be pretty straightforward. Afterwards we plan to create the code for the arduino as well as develop the mobile app through the help of flutter and firebase.
15 |
16 | ## Budget
17 | What materials will you need for your project? Where will you get them? How much does it cost? Please include all materials, including components you already own. Make sure to factor in shipping costs and sales tax.
18 |
19 | | Product | Supplier/Link | Cost |
20 | | --------------- | ---------------------------------------------------------------------------------------------------- | ------ |
21 | | Ender 3 S1 Plus | https://www.microcenter.com/product/651900/creality-ender-3-s1-plus-3d-printer | $454 |
22 | | PETG Filament. | https://www.microcenter.com/product/503745/inland-175mm-black-petg-3d-printer-filament-1kg-spool. | purchasing myself |
23 | | Servo. | https://www.amazon.com/Futaba-S3117-Micro-Hi-Torque-Servo/dp/B00EO8E9Y2 | $32 |
24 | |Arduino | already own| |
25 | | Total | | $486 |
26 |
--------------------------------------------------------------------------------
/MagiDarkPro.md:
--------------------------------------------------------------------------------
1 | ---
2 | name: "@MagiDarkPro"
3 | project: "75% custom gaming keyboard"
4 | ---
5 |
6 | # 75% custom keyboard
7 |
8 | ## Summary
9 |
10 | I am going to build a 75% keyboard that plays sounds when you press down keys. In order for this to happen, I design my own pcb that can plug in a small speaker to play noises. I need to make my own firmware that can process these things and play it through the speaker. I can also use this to make a soundboard built into my keyboard. The keys need to be as silent as possible so that no other noise happens when pressing down keys for the speaker to play out. The purpose for this project is to have different sounds without buying new switches or mod the keyboard. I am using KiCad to design my pcb. I used ai03's guide and Masterzen's guide for building a pcb.
11 |
12 | ## Plan
13 |
14 | I will buy a keyboard pcb, plate, case, and switches. I will use durock silent linear switches which I will lube myself. I will also buy o-rings as they decrease the amount of sound and increase how fast you can press down keys. I am designing a custom pcb that can plug in speakers and I am making my own firmware for this pcb as it has speakers. I will buy the pcb I designed myself. I am going to use the same dimensions as a KBD pcb so that I can fit it inside the case and plate. Steps: 1. lube switches 2. put first 2 switches in plate then place it in the pcb 3. put stabilizers onto the pcb 4. put pcb into case 5. put o rings on keycaps 6. put keycaps on the switches 7. plug in speaker and keyboard into computer
15 |
16 | ## Budget
17 |
18 | | Product | Supplier/Link | Cost |
19 | | --------------- | ------------------------------------- | ------ |
20 | | Stabilizers | https://www.amazon.com/dp/B0888932PV/ | 16.99 |
21 | | 5, 18 sets of durock silent linear switches | https://divinikey.com/collections/switches/products/durock-silent-linear-switches?variant=39872565575745 | $61.75 |
22 | | tofu84 plate | https://kbdfans.com/collections/tofu84/products/tofu84-alu-plate | $20.00 |
23 | | KBD75 case | https://divinikey.com/products/kbdfans-kbd75-v2-aluminum-case | $91.75 |
24 | | penguin keycaps | https://www.amazon.com/dp/B09ZDQPCSD/?th=1 | $25.99 |
25 | | o rings | https://www.amazon.com/dp/B09P56L4QP/ | $4.99 |
26 | | lube kit | https://www.amazon.com/dp/B09HGB38L5/ | $16.99 |
27 | | case foam | https://kbdfans.com/products/case-foam-collection?variant=41107132743819 | $10.00 |
28 | | Subtotal | | 248.46 |
29 | | Total | taxes+shipping+coupons | $277.29|
30 |
--------------------------------------------------------------------------------
/davidarogunre.md:
--------------------------------------------------------------------------------
1 | ---
2 | name: "@davidarogunre"
3 | project: "Chat Robot Implemented with Chat GPT-3"
4 | ---
5 |
6 | # Charlie(Chat Robot)
7 |
8 | ## Summary
9 |
10 | Chat Robot Implemented with Chat GPT-3 is an exciting project. My project will be to create a chatbot that can interact with users in a natural, conversational way, powered by the cutting-edge GPT-3 technology. I am excited because I will learn how to use hardware components to build the chatbot The chatbot will be able to respond to users with personalized, human-like conversations, making it a great way to engage users in an interactive experience. I believe that this project will give me an exciting experience, and will give me a chance to learn about and implement cutting-edge technology.
11 |
12 | ## Plan
13 |
14 | The first step I would take is to set up the hardware for the bot, including the Raspberry Pi and its position in the container. Then I would work on the software, coding the Chat GPT-3 and listening libraries to interpret commands and provide answers to the user. Once the code is installed in the Raspberry Pi, I would perform tests to ensure that the code and hardware are functioning correctly.
15 |
16 | ## Budget
17 |
18 | | Product | Supplier/Link | Cost |
19 | | ----------------- | ------------------------------------------------------------------ | ------ |
20 | | Raspberry Pi 3 | https://thepihut.com/products/raspberry-pi-3-model-b-plus | $76.44 |
21 | | USB Microphone | https://www.amazon.com/gp/product/B074BLM973/ | $22.99 |
22 | | 3.5mm Jack Speaker| https://www.amazon.com/Portable-Speaker-Mobile-Interface-Smartphone/dp/B0824HK17J/ | $14.99 |
23 | | RPI Power Supply |https://www.amazon.com/Listed-iUniker-Raspberry-Supply-Switch/dp/B0B79FVPQ4/ | $8.99 |
24 | | Sd Card |https://www.amazon.com/Lexar-Micro-microSDHC-Memory-Adapter/dp/B09JNL9VSR/ | $11.99 |
25 | | Sd card reader |https://www.amazon.com/gp/product/B06Y1G18KS | $16.99 |
26 | | Shipping | | $32.17 |
27 | | Import Fees | | $27.68 |
28 | | Total | | $212.15|
29 |
--------------------------------------------------------------------------------
/rbccawang.md:
--------------------------------------------------------------------------------
1 | ---
2 | name: "@rbccawang"
3 | project: "Alcohol Detection"
4 | ---
5 |
6 | # Alcohol Detection
7 |
8 | ## Summary
9 |
10 | Inspired by the rise of drunk-driving related accidents in the winter, I plan to build an alcohol detection sensor. I'm excited to experiment with an Arduino to learn the basics of embedded systems.
11 |
12 | The project will involve an alcohol sensor that analyzes if a person's breath contains alcohol. If it does, a LED lightbulb will turn on, and a message will display on a LCD Display. These components will be contained in a 3D-printed case.
13 |
14 | Although it is a relately small project, there are so many further project possibilities I can integrate with the alcohol sensor. For instance, I can connect the sensor's readings to a communication pipeline that alerts family members for help if the driver is intoxicated.
15 |
16 | ## Plan
17 |
18 | What steps are you going to take to build it? What tools are you going to use? What will you do first, second, third, etc.?
19 | 1. Acquire the materials listed in the Budget section
20 | 2. CAD a prototype of a compact case that fills all the components inside. 3D-print the case at my school's robotics club.
21 | 3. Learn the circuit diagram and pinouts of the alcohol sensor module with [this tutorial](https://circuitdigest.com/microcontroller-projects/interfacing-mq3-alcohol-sensor-with-arduino).
22 | 4. Assemble the circuit.
23 | 5. Program the Arduino, alcohol sensor, display, and LED in the Arduino IDE.
24 | 6. Test the entire product using the lid of a bottle of Ethanol.
25 | 7. Likely at the end or after the week of making: expand on the project (e.g., the communication pipeline idea mentioned in the Summary section).
26 |
27 | ## Budget
28 |
29 | What materials will you need for your project? Where will you get them? How much does it cost? Please include all materials, including components you already own. Make sure to factor in shipping costs and sales tax.
30 |
31 | | Product | Supplier/Link | Cost |
32 | | --------------- | ------------------------------------- | ------ |
33 | | Arduino Uno | https://a.co/d/7wVzzYE | $30 |
34 | | LED Lights | https://a.co/d/9XRSn1X | $8 |
35 | | MQ-3 Alcohol Sensor | https://a.co/d/2gegZiw | $8 |
36 | | 16x2 LCD Display | https://www.seeedstudio.com/Grove-16-x-2-LCD-Black-on-Yellow.html | $6.50 |
37 | | Breadboard and Jumper Wires | https://a.co/d/9EkeYQn | $13 |
38 | | 9V Battery | https://a.co/d/6CGdJqt | $8 |
39 | | 9V Battery Connector | https://a.co/d/hyEmO7S | $5 |
40 | | Shipping + Tax | | $20 |
41 | | Total | | $100 |
42 |
--------------------------------------------------------------------------------
/peiprjs.md:
--------------------------------------------------------------------------------
1 | ---
2 | name: "@peiprjs"
3 | project: "Desk Thing"
4 | ---
5 |
6 | # Car thing but for a desk instead (Desk thing)
7 |
8 | ## Summary
9 |
10 | Spotify has this device they call Car Thing. It's a screen that's supposed to go on your car (unsafe much?) and allow you to choose music and see what is currently playing at a glance. I would like that, but available for my desk, as I don't have a car (nor do I need one).\
11 | So my plan is to, using a ~~Raspberry~~ Orange Pi, a web server, a 3D-printed enclosure, a speaker, and a touchscreen, make something that allows me to see which song is playing (and album artwork, author and year), which song is next in the queue (and author), from which playlist/album, duration of the song and rough progress bar (can't be too exact because it will mostly comunicate through the API), basic controls (pause, skip, go back), and a sleep timer function (pause the music after a certain time).\
12 | The whole device would be built inside of a 3D printed structure, which would include a support for a Homepod mini (as I've heard that its sound is fairly flat and just a little bit of EQ makes it sing). The only problem is that streaming the music directly from the Pi would be very hard due to it being a very basic computer, which could reduce the quality of the music).
13 |
14 | ## Plan
15 |
16 | 1. Measure all of the parts, design, print, and sand a piece (or a few) that allow me to keep all of the tech parts together.
17 | 2. Assemble the device and plug all of the tech in.
18 | 3. Design a web interface that connects to the Spotify API and displays the data.
19 | 4. Run the web interface on the local device, connect the speaker and voilà! A ~~car~~ desk thing.
20 |
21 | ## Bill of materials
22 | | Product | Supplier/Link | Cost* |
23 | | --------------- | ---------------------------------- | ------ |
24 | | Touchscreen | https://www.amazon.es/dp/B07PHFQF7W | $56.43 |
25 | | PLA filament | https://www.amazon.es/dp/B07R6PL63K | $23.42 |
26 | | Electric plug | https://www.amazon.es/dp/B06XXNPLJ9 | $09.56 |
27 | | MiniHDMI->HDMI | https://www.amazon.es/dp/B07PHFQF7W | $06.10 |
28 | | Homepod Mini | (Apple Store) | $99.00 |
29 | | TP-Link TL-WN823N | https://www.amazon.es/dp/B0088TKTY2 | $09.25 |
30 | | Flat USB->USB | https://www.amazon.es/dp/B0953LJ84W | $10.80 |
31 | | Red paint (detailing)| (Supermarket) | $05.00 |
32 | | Current total | | $217.06 |
33 |
34 | *Price is after EUR->USD conversion. Actual price may vary by ±5% due to currency fluctuations. Prices include VAT/IVA.
35 |
--------------------------------------------------------------------------------
/bloggingKIng.md:
--------------------------------------------------------------------------------
1 | ---
2 | name: "@BloggingKIng"
3 | project: "Line/ Path following robots/cars"
4 | ---
5 |
6 | # Path following robots / cars
7 |
8 | ## Summary
9 |
10 | I will be building a line following car that will follow a certain line drawn on the floor or cardboard. The car will be able to figre out its path auomatically with the help of sensors and controller. The logic behind the movement will be to use an IR sensor or something like that to detect the path and then male the bot automatically follow the path.
11 |
12 | ## Plan
13 |
14 | ### Steps
15 |
16 | 1. Research (Yeah I am not very familiar with robotics and I will have to get help and information from google and other resources)
17 | 2. Assemble the hardware components together
18 | 3. Coding: I will code the controller (Aurdino), using C++
19 | 4. Casing: I will add casing to the car to give it a nice look
20 |
21 | ## Budget
22 |
23 | | Product | Supplier/Link | Cost |
24 | | --------------- | ------------------------------------- | ------ |
25 | | Aurdino UNO Rev3 | [https://www.adafruit.com/product/1957](https://store-usa.arduino.cc/products/arduino-uno-rev3/?selectedStore=us) | $33.94 |
26 | | IR proximity sensor (2) | [https://www.adafruit.com/product/358 ](https://digilent.com/shop/ir-proximity-sensor-2-pack/) | $90|
27 | | IC, BRIDGE DRIVER DUAL, 298 | https://www.newark.com/stmicroelectronics/l298n/ic-bridge-driver-dual-298/dp/10WX1394?rpsku=rel1:32M1527&isexcsku=false | $17.56 |
28 | | DC motors (2) | [https://www.newark.com/multicomp/287-2520/dc-motor-with-180-1-gear-reducer/dp/52Y4441?COM=ref_hackster](https://www.edinventory.com/parts/287-2520_multicomp) | $2.94 * 2
29 | | Multi tool screw driver | https://www.newark.com/duratool/gsd-329/all-in-one-screwdriverbit-set/dp/26W6260?COM=ref_hackster | $17
30 | |Male to Male & Female to Female Jump wires| https://www.amazon.ca/IZOKEE-240pcs-Solderless-Breadboard-Arduino/dp/B08151TQHG?crid=12ZHZWST2GGJO&keywords=jumper+wires&qid=1647209538&sprefix=jumper+wires,aps,182&sr=8-5&linkCode=sl1&tag=hashinclude0a-20&linkId=0fa6623a9d0d335f904dc6b4ae1e4b17&language=en_CA&ref_=as_li_ss_tl | $20
31 | |LiPo Batteries| https://www.amazon.ca/dp/B01LWMLDJJ/ref=syn_sd_onsite_desktop_19?ie=UTF8&psc=1&pd_rd_plhdr=t | $50
32 | |Car chassing|https://www.aliexpress.com/item/1005002479102437.html | $15.12
33 | | Total | | $249.38|
34 |
--------------------------------------------------------------------------------
/helium fusor:
--------------------------------------------------------------------------------
1 | ---
2 | name: "@hewer-thwart"
3 | project: "Helium Nuclear Fusr"
4 | ---
5 |
6 | Helium Nuclear Fusor
7 |
8 | ## Summary
9 |
10 | A Farnsworth-Hirsch fusor is a type of nuclear fusion reactor that uses an electric field to heat and compress ions until they fuse. The device uses two metal cages, called grids, to contain the ions. The inner grid is positively charged, while the outer grid is negatively charged. When a gas such as helium is introduced into the reactor, the ions are accelerated towards the inner grid by the electric field. As they collide with the grid, they transfer some of their kinetic energy to the electrons around the grid, causing them to heat up. As the ions continue to collide with the grid, they become more and more energetic, eventually reaching the point where they can fuse together, releasing energy in the form of light and heat.
11 |
12 | ## Plan
13 |
14 | First I am going to get the necessary power I need to run the fuser by using an AC Adapter and hooking it up to a voltage multiplier to get the necessary voltage. Then using tungsten I will make the inner grid and place it in the vacuum chamber with a connection outside. Then I would to create a low pressure in vacuum chamber with helium in it using the vacuum pump. Finally, I'll have to connect the positive terminal to the tungten grid inside and the negative terminal to the outer steel chamber.
15 |
16 | ## Budget
17 |
18 |
19 | | Product | Supplier/Link | Cost |
20 | | --------------- | -------------------------------------------------------------------------- | ------ |
21 | | Vacuum Pump | https://www.amazon.com/dp/B08NDLM31W/ref=emc_bcc_2_i?th=1 | $125.40|
22 | | Voltage Multiplier | https://rb.gy/fzpslr | $23.85 |
23 | | Vacuum Chamber | https://rb.gy/xlbxp5 | $44.79 |
24 | | Electrical Tape | https://rb.gy/ekcj6v | $5.41 |
25 | | Electrical Wire 16AWG | https://rb.gy/voarqo | $5.74 |
26 | | AC Adapter | https://rb.gy/mvyqls | $11.94 |
27 | | Tungsten Wire | https://rb.gy/zuzvv7 | $3.96 |
28 | | Total | | $220.82|
29 | | Total with tax | | $249.53|
30 |
31 |
--------------------------------------------------------------------------------
/linkai101.md:
--------------------------------------------------------------------------------
1 | ---
2 | name: "@linkai101"
3 | project: "Split-flap display"
4 | ---
5 |
6 | # Split-flap display
7 |
8 | ## Summary
9 | I'm building a split-flap display inspired from [this](https://www.youtube.com/watch?v=V4WQftf1Qio) project. This display will contain a row of 4-10 flippable characters and can be used to display time or other strings of text. The split-flap display works with sets of half-panels spinned in a rotary to display characters.
10 |
11 | ## Plan
12 | I will use a 3D printer to print out the flaps that make up the characters on the display as well as the structure of the display. Stepper motors will turn the mechanism that rotates through the characters, and hall effect sensors will be used to keep track of rotation positions of each character.
13 |
14 | ## Budget
15 | I'm relatively new to hardware, so I'll be learning as I go. I've included `Misc. materials` in case I need any small components that I hadn't thought of before, but I've included all significant materials needed.
16 |
17 | | Product | Supplier/Link | Cost |
18 | | --------------- | ------------------------------------- | ------ |
19 | | Raspberry Pi Pico W | https://www.microcenter.com/product/650108/raspberry-pi-pico-w | $5.99 |
20 | | Headers | https://www.amazon.com/dp/B09F2NZ3GB?ref_=cm_sw_r_cp_ud_dp_NNTCTWD6R5JS2Y7D2MFB | $5.99 |
21 | | Soldering iron kit | https://www.amazon.com/Soldering-soldering-solder-adjustable-temperature/dp/B09DY7CCW5/ref=sr_1_6?keywords=soldering+iron&qid=1673545070&sr=8-6 | $11.68 |
22 | | Raspberry Pi Pico starter kit | | Already owned |
23 | | 3D Printer | https://www.microcenter.com/site/content/specialoffer3dprintertxt.aspx?web=EMAIL+OPT+IN#eduformdiv | $99.99 |
24 | | PLA Filament | https://www.amazon.com/dp/B085C3597S/ref=twister_B07ZJPCQBN?_encoding=UTF8&th=1 | $42.99 |
25 | | Stepper motors (x2) | https://www.amazon.com/ELEGOO-28BYJ-48-ULN2003-Stepper-Arduino/dp/B01CP18J4A | $27.98 |
26 | | 3.5" touchscreen display | https://www.microcenter.com/product/632693/inland-35-inch-tft-lcd-touch-screen-monitor | $15.99 |
27 | | Hall effect sensor (x2) | https://www.amazon.com/Effect-Magnetic-Sensor-Arduino-MXRS/dp/B085KVV82D/ref=sr_1_4?crid=1MF86W8A48EF1&keywords=hall+sensor&qid=1673552280&sprefix=hall+sensor%2Caps%2C65&sr=8-4 | $11.98 |
28 | | 30-pack magnets | https://www.amazon.com/Magnets-Adhesive-Refrigerator-Projects-0-19H,50Pack/dp/B08ZN9TC7Z/?th=1 | $4.99 |
29 | | Misc. materials | | $20.00 |
30 | | Tax/shipping | (estimate) | $20.00 |
31 | | Total | | $227.58 |
32 |
--------------------------------------------------------------------------------
/Bowiten.md:
--------------------------------------------------------------------------------
1 | ---
2 | name: "@Bowiten"
3 | project: "bowiten65"
4 | ---
5 |
6 | # bowiten65
7 |
8 | ## Summary
9 |
10 | This is going to be a mechanical keyboard with a 65% layout, supporting stepped caps lock, split enter, and/or a 7u spacebar. The [PCB](https://github.com/Bowiten/bowiten65) and case are designed by me, with inspiration from a few open source keyboards. It supports MX style switches, and also has support for PCB mount stabilizers.
11 |
12 | ## Plan
13 |
14 | I used some open source keyboards/PCBs as a starting point, such as kkatano's [bakeneko65](https://github.com/kkatano/bakeneko-65) and dededecline's [SST60](https://github.com/dededecline/SST60). I also used some guides such as [ai03's pcb guide](https://wiki.ai03.com/books/pcb-design), [Masterzen's blog posts](https://www.masterzen.fr/2020/05/03/designing-a-keyboard-part-1/), and [Sleepdealr's RP2040 design guide](https://github.com/Sleepdealr/RP2040-designguide). Some of these guides are slightly outdated, but overall still helpful.
15 |
16 | I plan to salvage some switches from an old keyboard by desoldering them. I'll lube them with the Krytox 205g0 that I have somewhere. I have some spare stabilizers from another keyboard that I have, which I will be using. I also plan to lube those with Krytox 205g0. After I receive the PCBs, I'll flash them with firmware that I created using [Vial](https://github.com/vial-kb/vial-qmk), a fork of [QMK](https://github.com/qmk/qmk_firmware). If everything works, then I'll solder the switches in, add stabilizers, and assemble.
17 |
18 | ## Budget
19 |
20 | | Product | Supplier/Link | Cost |
21 | | -------------------------- | ------------------------------------------------------------------- | ------- |
22 | | PCB and plate (+ shipping) | https://jlcpcb.com | $107.41 |
23 | | Case (price may vary) | https://craftcloud3d.com | $106.04 |
24 | | SKUF Silicone Feet | https://keeb.io/products/skuf-silicone-rubber-keyboard-feet | $4.49 |
25 | | Screws | https://keeb.io/products/m2-screws-and-standoffs | $6.98 |
26 | | Shipping for keeb.io | | $5.76 |
27 | | C3 Unified Daughterboard | https://cannonkeys.com/products/unified-daughterboard-and-jst-cable | $8.00 |
28 | | Shipping for CannonKeys | | $4.30 |
29 | | Total | | $242.98 |
30 |
--------------------------------------------------------------------------------
/aleung18.md:
--------------------------------------------------------------------------------
1 | ---
2 | name: "@aleung18"
3 | project: "Raspberry Pi Powered Pet Feeder"
4 | ---
5 |
6 | # Raspberry Pi Powered Pet Feeder
7 |
8 | Project Guide: https://www.youtube.com/watch?v=Mx5WoefZ2h0&t=16s&ab_channel=MostElectronics
9 |
10 | ## Summary
11 |
12 | What are you going to build? What does it do? Why are you excited to build it?
13 |
14 | I am going to build a pet feeder for my dog using a Raspberry Pi, stepper motors, and driver boards.
15 | I am going to CAD design the feeder and print the components with my 3D printer.
16 | In the future, I would like to add the Raspberry Pi Camera module so that pet owners can see their dog eat when they are away.
17 | I am excited to build it because I will no longer have to feed my dog if successful! (Just kidding).
18 | Jokes aside, I am excited because it is my first “real” hardware project, and I have been trying out CAD design and playing with circuit boards
19 | and would like to make a project that has reflected what I have learned so far.
20 |
21 | ## Plan
22 |
23 | What steps are you going to take to build it? What tools are you going to use? What will you do first, second, third, etc.?
24 |
25 | 1. Download and install RPImotorlib and Flask Server, libraries
26 | 2. Configure Local IP and Port
27 | 3. Start the Python Script
28 | 4. Print components and put together 3D model
29 | 5. Dispense!
30 |
31 | ## Budget
32 |
33 | What materials will you need for your project? Where will you get them? How much does it cost? Please include all materials, including components you already own. Make sure to factor in shipping costs and sales tax.
34 |
35 | | Product | Supplier/Link | Cost |
36 | | --------------- | --------------------------------------------------------| ------ |
37 | | Ender 3 V2 (already own) | | $0 |
38 | | Overture Filament (already own) | | $0 |
39 | | Breadboard & Battery Power Supply (already own) || $0 |
40 | | Raspberry Pi 4 Model B (4 GB RAM) | bit.ly/3VOcGKl | $162.89|
41 | | Stepper Motor & Drivers | bit.ly/3jRQQrY | $13.99 |
42 | | Raspberry Pi Camera Module V2 | https://www.sparkfun.com/products/14028?src=raspberrypi | $39.96 (including tax)|
43 | | Tax | | + amazon tax ($15.26) |
44 | | Total | | $232.10|
45 |
--------------------------------------------------------------------------------
/docs/hack_club_bank.md:
--------------------------------------------------------------------------------
1 | # Hack Club Bank
2 |
3 | Hi there! If you’re seeing this it’s because you’re interested in joining Hack Club during the Winter Hardware Wonderland event! Welcome and we’re so excited to have you join us in making some cool shit with friends!
4 |
5 | In order for Hack Club to distribute the grant money to you, we’ll need to set you up with a Hack Club Bank account.
6 |
7 | Hack Club Bank is a full stack toolkit for organizing just about anything! Under the hood, Hack Club Bank grants nonprofit status to groups or individuals who would like to raise and spend money as a nonprofit. What this means for Winter Hardware Wonderland event is that you’ll be able to receive your grant, order a debit card, and easily purchase supplies for your project. We’re using Hack Club Bank to distribute grants because of how easy it’ll be for you to spend funds on the project you’re building. Within minutes of being set up you’ll be able to receive the grant and start ordering parts!
8 |
9 | Because you’ll be operating under Hack Club nonprofit status there are a few things that you’ll need to agree to before an account can be opened up for you.
10 |
11 | 1. You can’t use the funds for anything other than your project. If you choose to raise more money to build an even bigger project, you absolutely can! However, you’ll need to spend those funds on your project as well. You can’t buy things that aren’t related to your project.
12 | 2. You need to upload receipts for each of your transactions.
13 | 3. You (& a parent) will need to sign sign our fiscal sponsorship agreement. This is the contract that goes out that outlines the fact that you’ll be operating under Hack Club’s nonprofit status.
14 |
15 | Does this seem like a lot of confusing information? Or are you now asking yourself - what the heck is fiscal sponsorship? Don’t worry, that’s where the next step, an onboarding call comes in.
16 |
17 | During an onboarding call a member of the Bank operations team will chat with you about all the above. We’ll go over how to use Hack Club Bank, how to set up an account (or turn your demo account into a full account), and we’ll talk about what fiscal sponsorship means. This is a great chance for you to meet the Bank team and for us to meet you!
18 |
19 | The call is a casual get-to-know-you call where we’ll introduce ourselves and answer any questions you might have. This is not an interview or an application. During the onboarding call we'll also need to verify the following:
20 |
21 | - your age (you must be in high school or younger)
22 | - country (we'll need to make sure Hack Club Bank works in your country)
23 |
24 | There is no need to prepare anything in advance or stress out about this call. We are excited to work with you!
25 |
--------------------------------------------------------------------------------
/JeffreyWangDev.md:
--------------------------------------------------------------------------------
1 | ---
2 | name: "@JeffreyWangDev"
3 | project: "The cube"
4 | ---
5 |
6 | # The light cube
7 |
8 | ## Summary
9 |
10 | My project will be a 3d light cube controlled by a raspberry pi. The light cube will be 8 by 8 by 8 pixels and will be made of WS2811 round LEDs. After the construction of the main cube, I want to write a web interface for it in python/Django. I'm exited by this project as it allows me to put my programming skills and electrical skills to a real word test and not just in a classroom setting.
11 | ## Plan
12 |
13 | Im going to follow [this](https://www.youtube.com/watch?v=ciaFar8nfHc
14 | ) guild-ish mostly (not for all)
15 |
16 | ## Build phase
17 | 1. Get materials
18 | 2. Design and 3D print parts/jigs
19 | 3. Bend/test all 512 LEDS and replace all the broken ones
20 | 4. Start the long soldering process
21 | 5. End of the Build phase
22 |
23 | ## Software phase
24 | 1. Design a backend to control the LEDS with FastLeds and mysql database for queuing in python
25 | 2. Design a backend API in django/flask to send queuies to a mysql database
26 | 3. Design frontend in html/css/js
27 | 4. Debug all errors
28 | 5. If time, create diffrent algorithms for different function ect wave, sin, cosin, sync with...
29 | 6. If more time, create a IOS app to control all of this
30 |
31 | ## Budget
32 |
33 | What materials will you need for your project? Where will you get them? How much does it cost? Please include all materials, including components you already own. Make sure to factor in shipping costs and sales tax.
34 |
35 | | Product | Supplier/Link | Cost |
36 | | --------------- | ------------------------------------- | ------ |
37 | | Draw Plate | https://www.amazon.com/Huanyu-Tungsten-Carbide-Drawplate-Jewelry/dp/B075FQRF19 | $36.59 |
38 | | 0.8mm Steel Wire | https://www.amazon.com/Stainless-Wrapping-Artistic-Beading-Jewelry/dp/B07XN5KXJ2 | $12.99 |
39 | | Rasberry pi 4b | https://www.digikey.com/en/products/detail/raspberry-pi/RASPBERRY-PI-4B-4GB/10258781 | $55 |
40 | | 700 leds | https://www.aliexpress.us/item/2251832642793119.html | $79.86 |
41 | | 300w power supplys | https://www.amazon.com/BTF-LIGHTING-Aluminum-WS2812B-LED8806-Modules/dp/B01D8FLZV6?th=1 | $27.99 |
42 | | 12 AWG wire | https://www.amazon.com/TYUMEN-Electrical-Extension-Flexible-Lighting/dp/B08MF7BN8H | $16.99 |
43 | | 30 AWG wire | https://www.amazon.com/BNTECHGO-AWG-Magnet-Wire-Transformers/dp/B07P2HCKFJ | $8.43 |
44 | | 3d filament | Already have | FREE |
45 | | 3d printer | Already have | FREE |
46 | | Total | Before tax | $237.85 |
47 | | Total | Tax | $14.87 |
48 | | Total | After tax | $252.72 |
49 | | Total | Shipping | $6.99 |
50 | | Total | After tax and shipping | $259.71 |
51 |
52 |
53 |
--------------------------------------------------------------------------------
/pranavnt&quackduck.md:
--------------------------------------------------------------------------------
1 | ---
2 | name: ["@pranavnt", "@quackduck"]
3 | project: "FSC (full self cycling) Bike"
4 | ---
5 |
6 | # FSC (full self cycling Bike
7 |
8 | ## Summary
9 |
10 | Ishan and I are building an ebike that has full self cycling – you can press a button (on touchscreen) and it will cruise at ~8mph on a trail, detecting lanes and the side of the trail, and automatically steer.
11 |
12 | ## Plan
13 |
14 | 1) Put battery on top rack; surround with pre-owned foam and duct tape
15 | 2) Mount the Motor & ESC such that the motor moving will move the chain
16 | 3) Mount training wheels
17 | 4) Mount the touchscreen, servo that controls the steering, and OAK-D Camera. Tie string to handlebars.
18 | 5) Connect the Raspberry Pi to the ESC, Touchscreen, servo, and OAK-D Camera
19 | 6) Run self driving software
20 |
21 | Self-driving software will work by detecting the lane and edge of a trail using a pre-trained lane detection model. Based on this, we'll model how much the bike has to turn. Max speed in this mode will be ~8mph probably. String will be connected to a servo and each of the handles; turning will be adjusting the string.
22 |
23 | ## Budget
24 |
25 | What materials will you need for your project? Where will you get them? How much does it cost? Please include all materials, including components you already own. Make sure to factor in shipping costs and sales tax.
26 |
27 | | Product | Supplier/Link | Cost |
28 | | ---------------------------- | --------------------------------------- | ------ |
29 | | OAK-D Camera | OWNED | OWNED |
30 | | 7" Raspberry Pi Touchscreen | OWNED | OWNED |
31 | | Bike (lol) | OWNED | OWNED |
32 | | Raspberry Pi | OWNED | OWNED |
33 | | Duct Tape/Filiament | OWNED | OWNED |
34 | | Various wires | OWNED | OWNED |
35 | | Electronic Speed Controller | https://amzn.to/3Xd0AM5 | $117 |
36 | | Brushless Motor | https://amzn.to/3iB2l73 | $90 |
37 | | Battery | https://amzn.to/3iFHcZc | $170 |
38 | | Servo | https://www.adafruit.com/product/1142 | $20 |
39 | | Training wheels | https://amzn.to/3iFHy1Y | $33 |
40 | | Taxes | | $43 |
41 | | Shipping | | $15 |
42 | | Total | | $488 |
43 |
--------------------------------------------------------------------------------
/Gregor-Davies.md:
--------------------------------------------------------------------------------
1 | ---
2 | name: "@Gregor-Davies"
3 | project: "Greenpower Racing Go Kart Telemetry"
4 | ---
5 |
6 | # Greenpower Racing Go Kart Telemetry
7 |
8 | ## Summary
9 |
10 | What are you going to build? What does it do? Why are you excited to build it?
11 |
12 | I am planning to build a telemetry system for my team's greenpower racing go-kart (See link for the greenpower competition: https://www.greenpower.co.uk/). The main goal is to be able to record: The motor temperature, Heatsink temperature, Speed, Current and voltage of the vehicle and display it for the driver and send it back to the pitstops. I am excited to build this as I believe that this could change how our team races while contributing opensource hardware and software. Currently, no full telemetry system is open-source only parts of the hardware or software of the system.
13 |
14 | ## Plan
15 |
16 | What steps are you going to take to build it? What tools are you going to use? What will you do first, second, third, etc.?
17 |
18 | I have been researching ways to implement different sensors that meet our requirements in the Arduino programming language. By doing this I can work with preexisting libraries and code examples which will reduce the development time. The tools I will be using are the Arduino IDE for programming, 3D printing for the mounting hardware of the telemetry, A wire crimper for dupoint connections for the system and a soldering iron for other connections. The plan is to connect the sensors to the Arduino first off to test the sensors if they work fully, then using the initial connections I will write a preliminary version of the software to test all the sensors together. After that, I will make the final connections of the sensors and design and print mounting hardware for the system. After the final connections are done I will do the final software version that will be used.
19 |
20 | ## Budget
21 |
22 | | Product | Supplier/Link | Cost |
23 | | --------------- | ------------------------------------- | ------ |
24 | | Heltec Lora32 v3 | https://bit.ly/3WB01LD Amazon | $55 |
25 | | DS18B20 Sensor| https://bit.ly/3VdB5J5 Amazon | $16 |
26 | | 10000mah PowerBank | https://bit.ly/3v5uVju Amazon | $13 |
27 | | 15k Ohm Resistors | https://bit.ly/3FLcQMF Amazon | $3 |
28 | | 1k Potentiometer | https://bit.ly/3FJpsDI Amazon | $4 |
29 | | 100nF Capacitors| https://bit.ly/3G6lmXE Amazon| $7 |
30 | | Zener Diode | https://bit.ly/3HV55q9 Amazon | $2.5 |
31 | | Perfboard | https://bit.ly/3G37gq5 Amazon | $6.5 |
32 | | Right angle USB C Cable | https://bit.ly/3vaxn8l Amazon | $8 |
33 | | Speed sensor | https://bit.ly/3WocDWD Amazon | $7 |
34 | | 6.2k Resistors | https://bit.ly/3YDCV92 Amazon | $4.5 |
35 | | Total | | $126.5 |
36 |
37 |
--------------------------------------------------------------------------------
/TheTsar8756.md:
--------------------------------------------------------------------------------
1 | ---
2 | name: "@TheTsar8756"
3 | project: "Vr Body Trackers"
4 | ---
5 |
6 | # Vr Body Trackers
7 |
8 | ## Summary
9 |
10 | VR Body Trackers. There are 5 Trackers that take in the amount of inertia they feel and then calculate what parts of your body have moved.
11 | It then displays it in VR for you to see your arms and legs and where they are in real life. This is my first true hardware project and I want to figure out how to solder and
12 | how to attach these electronics together.
13 |
14 | ## Plan
15 |
16 | First I'm going to use my 3d printer to create the cases for the 5 trackers then I'm going to solder the IMUs, Battery, Diodes, and the charging board together.
17 | It should then be ready to put into the cases and to install the SLimeVr software in order for them to work.
18 |
19 | I'm following the schematics and instructions on this doc (https://docs.slimevr.dev/) that the SlimeVr team have come out. This contains the schematics of how I'm going to build
20 | the trackers.
21 |
22 | ## Budget
23 |
24 | With Shipping
25 |
26 | | Product | Supplier/Link | Cost |
27 | | ---------------------------------------------------- | ---------------------------------------------------- | ------- |
28 | | 5x Wemos D1 Mini V4.0 | https://www.aliexpress.us/item/3256804340898528.html | $10.76 |
29 | | 6x BN0085 IMUs | https://www.adafruit.com/product/4754 | $164.60 |
30 | | 3.7V 1800 mAh 804040 LiPo | https://www.aliexpress.us/item/3256803961495200.html | $20.67 |
31 | | TP4056 Type-c USB 5V 1A 18650 Battery Charger 10 Pcs | https://www.aliexpress.us/item/3256804257732334.html | $0.99 |
32 | | SS22F32 Switches 10 Pcs | https://www.aliexpress.us/item/2251832789220847.html | $0.99 |
33 | | 1N5817 Diodes 50 Pcs | https://www.aliexpress.us/item/3256801365779334.html | $2.83 |
34 | | 180K ohm Resistors 100 Pcs | https://www.aliexpress.us/item/3256802808441054.html | $3.98 |
35 | | 80W 110W (US) Soldering Iron | https://www.aliexpress.us/item/2255799833122842.html | $13.65 |
36 | | 5x 5 Pin JST Connectors | https://www.aliexpress.us/item/3256803829669959.html | $6.32 |
37 | | 2x 24 Awg Wire 10m Black and Red | https://www.aliexpress.us/item/3256804149903490.html | $3.33 |
38 | | Adjustable Straps 10 Pcs | https://www.aliexpress.us/item/3256802123549710.html | $4.00 |
39 | | Total | | $232.12 |
40 |
--------------------------------------------------------------------------------
/MangoTornado.md:
--------------------------------------------------------------------------------
1 | ---
2 | name: "@MangoTornado"
3 | project: "Portable Multifunction Device"
4 | ---
5 |
6 | # Portable Multifunction Device
7 |
8 | ## Summary
9 |
10 | I'm planning on building a portable multifunction device, that can assist in general applications as well as penetration testing the smart/not-smart devices around my home. Previously I joined a cybersecurity competition and started getting into a lot of the digital aspects, however I recently found out about a tool that combines an entry level sdr, nfc, rfic, as well as access to GPIO pins called the Flipper Zero. I hope to use this device to expand my knowledge on cybersecurity in more physical applications as well as digital ones. I also want to start learning how to solder and create prototyping boards for testing air quality, measuring distances, sniffing packets, and etc.
11 |
12 | ## Plan
13 |
14 | First I'm going to acquire a Flipper Zero and familiarize myself with its hardware and software development kits. Second, I'm going to buy a soldering iron and solder as well as prototyping boards so I can attach chips like the BME680 to the GPIO headers on the flipper, in order to monitor air quality easily on the go. For now I'm looking at air quality and measuring distance using the chip listed prior and the HC-SR04 for ultrasonic distance measuring. Third, I need to solder the chips onto the boards, and write software that can convert the chip's output data into readable human format and output it on the Flipper Zero screen
15 |
16 | ## Budget
17 |
18 | | Product | Supplier/Link | Cost |
19 | | --------------- | ------------------------------------- | ------ |
20 | | Flipper Zero | [https://shop.flipperzero.one/](https://shop.flipperzero.one/) | $169.00 |
21 | | Adafruit BME688 | [https://www.adafruit.com/product/5046](https://www.adafruit.com/product/5046) | $19.95 |
22 | | HC-SR04 | [https://www.adafruit.com/product/3942](https://www.adafruit.com/product/3942) | $3.95 |
23 | | PINECIL – Smart Mini Portable Soldering Iron | [https://www.amazon.com/dp/B096X6SG13](https://www.amazon.com/dp/B096X6SG13) | $39.99 |
24 | | Hakko 633-01 633 Soldering Iron Holder | [https://www.amazon.com/dp/B000TGNWCS](https://www.amazon.com/dp/B000TGNWCS) | $22.20 |
25 | | Prototyping Boards for Flipper Zero | [https://shop.flipperzero.one/products/proto-boards](https://shop.flipperzero.one/products/proto-boards) | $10.00 |
26 | | Dupont Wire | [https://www.amazon.com/dp/B01EV70C78/](https://www.amazon.com/dp/B01EV70C78/) | $6.98 |
27 | | Solder sucker | [https://www.adafruit.com/product/148](https://www.adafruit.com/product/148) | $5.00 |
28 | | Solder Wire | [https://www.adafruit.com/product/1886](https://www.adafruit.com/product/1886) | $7.95 |
29 | | Total | | $285.02 |
30 |
--------------------------------------------------------------------------------
/exu3.md:
--------------------------------------------------------------------------------
1 | ---
2 | name: "@exu3"
3 | project: "Hack Club Sign"
4 | ---
5 |
6 | # Hack Club Bank Sign
7 |
8 | 
9 |
10 | ## Summary
11 |
12 | I'm going to build a sign at Hack Club HQ that changes color based on user input through a web app. I'm excited to build it because Hack Club currently doesn't have a sign, and I think it would be a nice addition to the Town of Shelburne.
13 |
14 | ## Plan
15 |
16 | For the first 4 days, I'm going write a web app and API for people to change the color of the an LED. I will also make a small prototype of the sign using a breadboard, wires, microcontroller, LEDs, and some laser-cut scrap material. For the following 6 days, I'm going to make the full size sign using the 32x32 RGB LED matrix, aluminum sheet, and acrylic.
17 |
18 | ## Budget
19 |
20 | | Product | Supplier/Link | Cost |
21 | | -------------------------------------------- | ---------------------------------------------------------------------------------------------------------------------------------------------------------------------------------------- | ---- |
22 | | Microcontroller (Orpheus leap) | already own | $0 |
23 | | Wires | already own | $0 |
24 | | 32x32 RGB LED Matrix | https://www.adafruit.com/product/607 | $30 |
25 | | 3 pieces of 0.02" aluminum sheet (12" x 12") | https://www.onlinemetals.com/en/buy/aluminum-sheet-plate-2024-t3-t351 | $30 |
26 | | Acrylic sheet | https://www.amazon.com/Acrylic-Plexiglass-Plastic-Protective-Projects/dp/B083FLB8WH/ref=sr_1_3?crid=1MLLHRN8ITUTN&keywords=cast+acrylic&qid=1671417610&sprefix=cast+acryli,aps,98&sr=8-3 | $27 |
27 | | Total | | $87 |
28 |
--------------------------------------------------------------------------------
/tejascreative.md:
--------------------------------------------------------------------------------
1 | ---
2 | name: "@TejasCreative"
3 | project: "Don't Leave Your Key's Behind-Inator "
4 | ---
5 |
6 | # Don't Leave Your Key's Behind-Inator
7 |
8 | ## Summary
9 |
10 | I am going to build a system that prevents me from leaving my keys behind! I am really excited to build this as I've really wanted to get into hardware for a while but it was always really hard to get supplies to create something I wanted. It will detect if I am about to leave the room, and see if I have brought my keys with me. If not it will warn me to grab my keys. I frequently leave my keys behind so this will be very useful
11 |
12 | ## Plan
13 |
14 | I am going to have ultrasonic sensors near my door that will detect if I am about to leave. If I am about it it will check if I have left by keys behind as seeing if they are in their normal spot or not. If I have forgotten them it will send a sound and put an alert on a small display that I have left them behind.
15 |
16 |
17 | 1) I will set up the ultrasonic sensors and connect them to an arduino, and make sure they are working and detect when I am about to leave.
18 |
19 | 2) I will have an RFID reader and device set up on my key so the arduino will know if the key is there or not.
20 |
21 | 3) If it is not there it will send will make a sound and display it on a small display I will have facing me so I see it
22 |
23 | ## Budget
24 |
25 | Rasberry PI
26 | Ultrasonic Sensors
27 |
28 |
29 |
30 | | Product | Supplier/Link | Cost |
31 | | --------------- | ------------------------------------- | ------ |
32 | | 5 Ultrasonic Sesnor | https://www.amazon.com/gp/product/B07L68X65N/ref=ox_sc_act_title_5?smid=A3CX4TQNUXMB0L&psc=1 | $8.99 |
33 | |Arduino Duo | https://store-usa.arduino.cc/products/arduino-due?variant=39277096042703 | $48.40 |
34 | | Buzzer Set | https://www.amazon.com/gp/product/B07MPYWVGD/ref=ox_sc_act_title_3?smid=A32A7V0ESA8D26&psc=1 | 5.99|
35 | | Blue Tape | https://www.amazon.com/gp/product/B00004Z4CP/ref=ox_sc_act_title_4?smid=ATVPDKIKX0DER&psc=1 | 4.88|
36 | | RFID Kit | https://www.amazon.com/gp/product/B07KGBJ9VG/ref=ox_sc_act_title_6?smid=ADHH624DX2Q66&psc=1 | 8.99|
37 | | LCD Display | https://www.amazon.com/gp/product/B01GPUMP9C/ref=ox_sc_act_title_2?smid=ADHH624DX2Q66&psc=1 | 12.69|
38 | | Cables | https://www.amazon.com/gp/product/B081GMJVPB/ref=ox_sc_act_title_1?smid=ATHZ0BI0D2RLH&psc=1 | 9.99|
39 | | Micro a - b cable | https://www.sparkfun.com/products/10215 | 5.50|
40 | | Breadboards(8) | https://www.sparkfun.com/products/12002 | 44.00|
41 | |Power Supply | https://www.sparkfun.com/products/15314 | 6.50|
42 | | Aggregate Shipping | (Shipping of Aurdino + Sparkfun) | 15.36|
43 | |Aggregate Tax| (Aurdino + Amazon) | 8.46|
44 | | Sparkfun Tax | (Doesn't tell me so I have to do math so I did it seperate) | 4.34 |
45 | |Total | | 192.55|
46 |
47 |
48 |
--------------------------------------------------------------------------------
/whatwareweb.md:
--------------------------------------------------------------------------------
1 | ---
2 | name: "@whatwareweb"
3 | project: "Simple Stereo Amp"
4 | ---
5 |
6 | # Simple Stereo Amp
7 |
8 | ## Summary
9 |
10 | I am going to build a simple stereo amplifier. This amplifier will be able to play audio from a CD player, smartphone, TV, etc. on various speakers I have salvaged from broken electronics. I am excited to build this because I really enjoy listening to and making music but currently have some old cheap computer speakers, and this amplifier would have much higher sound quality.
11 |
12 |
13 | ## Plan
14 |
15 | 1. Receive parts
16 | 2. Assemble and solder amplifier board (day 1-2)
17 | 3. Test amplifier board (day 2)
18 | 4. Assemble rest of circuit (day 3-7)
19 | 5. Drill holes in case (day 8)
20 | 6. Mount all items in case (day 9)
21 | 7. Final assembly and testing (day 10)
22 |
23 | #### Circuitry plan:
24 | - DC jack + connected to power switch
25 | - DC jack gnd connected to gnd
26 | - Line in LR jacks + connected to input selector switch
27 | - Input selector connected to volume control knob potentiometer
28 | - Volume control potentiometer - one pole to ground, one pole to output, wiper to signal
29 | - Output of volume control connected to amplifier
30 | - +12V connected to amplifier +12V
31 | - Speaker output terminals connected to amplifier speaker output
32 |
33 |
34 |
35 | #### Physical plan:
36 | - DC jack, input switch, speaker terminals, line in jacks, power switch, and volume control have hole drilled in the plastic box and screw/bolt mounted
37 | - Heat sinks adhered to amplifier chip
38 | - Amplifier mounted with screws in box
39 |
40 |
41 | ## Budget
42 |
43 |
44 | | Product | Supplier/Link | Cost |
45 | | --------------- | ------------------------------------- | ------ |
46 | | Project box case| https://www.amazon.com/dp/B0B5QG83RC/ | $15.99 |
47 | | Mounting screws | https://www.amazon.com/dp/B07ZH9GJWP/ | $11.99 |
48 | | Power supply | https://www.amazon.com/dp/B07MXXXBV8/ | $20.99 |
49 | | DC jack | https://www.amazon.com/dp/B07XSQP3CT/ | $4.88 |
50 | | Input selector switch | https://www.amazon.com/dp/B07JM3M2B4/ | $13.49 |
51 | | Speaker terminals | https://www.amazon.com/dp/B08YMZ88Z5/ | $6.39 |
52 | | Amplifier board | https://www.amazon.com/dp/B08GYQTTXF/ | $21.99 |
53 | | Heat sinks | https://www.amazon.com/dp/B09877J8RM/ | $3.75 |
54 | | Line in jacks | https://www.amazon.com/dp/B07TY8XNRS/ | $5.99 |
55 | | Power switch | https://www.amazon.com/dp/B07QQ21QQS/ | $6.99 |
56 | | Volume control potentiometer | https://www.amazon.com/dp/B07DJ7H1YC/ | $9.99 |
57 | | Soldering tools | N/A | Already have |
58 | | Line in cables | N/A | Already have |
59 | | Speakers | N/A | Already have |
60 | | Subtotal | | $121.87 |
61 | | Tax (8%) | | $9.75|
62 | | Shipping | Amazon Prime free shipping over $25 | $0 |
63 | | Total | | $131.62 |
64 |
--------------------------------------------------------------------------------
/chrisrama.md:
--------------------------------------------------------------------------------
1 | ---
2 | name: "@chrisrama"
3 | project: "GPS tracking device"
4 | ---
5 |
6 | # Chris's GPS tracking device
7 |
8 | ## Summary
9 |
10 |
11 | I am buidling a GPS tracking device using arduino to be able to record and track the location of where a person was. This GPS tracker can also be use in high altitude ballon to track how far it travel. I am most exicted about this project because it going to be a step by step process that i will be able to understand working with arduino and learning to read data GPS module onto google earth, I will also used it to track where my I cycle with my bike at home,like when i borrow it to someone.
12 |
13 |
14 | ## Plan
15 |
16 |
17 | my step of building this project, I will be using a guide from a youtuber name [Paul McWhorter](https://www.youtube.com/watch?v=OsMoowoB2Rg) that explain step by step how to build a GPS Tracker. FIrst I will be using the aruino uno to connect to the GPS module and SD card, then I will program to the arduino to reocrd the data from The GPS module into the SD Card. after that all the recording is done,i will be able to read the GPS NMEA sentences and display in on google earth.
18 | MY next plan after this is to make the tracker ortal using a small power bank, and arduino mini, after all the code are done. I plan to also expand it to use the GSM module to be able to transmit Data from the tracker to a phone or any devices, this is part of my expansion of this project.
19 |
20 |
21 | ## Budget
22 |
23 |
24 | | Product | Supplier/Link | Cost |
25 | | ----------------| ------------------------------------- | ------ |
26 | | arduino uno R3(2x) | https://botshop.co.za/products/arduino-uno-r3-development-board-oem | $29.27 |
27 | | GPS Module | https://www.digikey.co.za/en/products/detail/adafruit-industries-llc/746/5353613?gclid=Cj0KCQiA2-2eBhClARIsAGLQ2RlkXX83cguNGV5Di6Ob1fjDg0ckJXzSzhHocgfiOuFKaLKgBgA3UPcaAl4BEALw_wcB | $29.95 |
28 | | 5V relay module | https://botshop.co.za/products/5v-relay-module-with-status-led-diode-and-transistor-trigger-1 | $1.41|
29 | | Arduino nano | https://botshop.co.za/products/arduino-nano-board | $8.32 |
30 | | Arduino USB Cable | https://botshop.co.za/products/arduino-usb-cable-length-20cm | $7.50 |
31 | | Fly Jumper Wire Cable | https://botshop.co.za/products/tin-plated-fly-jumper-wire-cable-24awg-20cm-100pcs | $3.25 |
32 | | Wire Strippers and Cutter | https://botshop.co.za/products/automatic-wire-stripper | $6.51 |
33 | | SD card reader | https://botshop.co.za/products/sd-card-module?variant=42891647615216 | $2.99 |
34 | | GSM Module | https://botshop.co.za/products/gsm-module | $10.74 |
35 | | bench power module | https://botshop.co.za/products/dc-dc-buck-converter-cc-cv-step-down-power-module | $45.57 |
36 | | Total | Bot shop - $113.45, DIGI-key - $65.91 | $219.56 |
37 |
38 |
39 |
40 |
41 |
42 |
43 |
44 |
--------------------------------------------------------------------------------
/paulsam06.md:
--------------------------------------------------------------------------------
1 | ---
2 | name: "@paulsam06"
3 | project: "Cyber Drone"
4 | ---
5 |
6 | # Cyber Drone
7 |
8 | ## Summary
9 |
10 | I planned to build quadcopter with integraton of raspberry Pi.
11 |
12 | In malls, railways, and other public places some hackers provide free wifi's connections. Some people don't know about this so they use wifi as normal users. But connecting hackers will gain full to their devices and use it for personal gain then they stole their data and blackmail them for money So, there are so many peoples affected by it.
13 |
14 | So, I have a plan of connecting with Raspberry Pi which is Linux based OS it is easy to write scripts, I use tools like Nmap, aircrack-ng, and others tools to combine all of them to first scan all the wifi connections with Nmap (hackers mostly run their connection on port 80 for gain access) then collect that connection and analyze it with aircrack-ng to drop down the connection and take control their access with twin evil attack finally we fill the complaint with the with data(IP, location etc)we have collected.
15 |
16 |
17 | ## Why you want to build this project?
18 | I interested in computer science but I don't know which domain is suits for me. So I try out many technologies like web development, programming etc. but in my school this is very well known common domain. So I like to learn new technologies. Suddenly, my brother @dharun016 will let me know about hackclub event and his ideas on drone . I so much exicited to do this project because this is completely new domain for me. It gives oppoturinity to learn and upskill my career . In my school they will conduct project expo at the end of march . I like to participate with this project and this drone project helps me to participating in national level hackathon.
19 |
20 | ## Plan
21 |
22 | For the first 5 days, I'm going assemble drone check its connectivety and testing. On Day 6,7 planning to integrate Raspberry Pi writing some scripts run the process After successfuly connected , after remaining days all the testing and deploying to vps
23 |
24 | ## Budget
25 |
26 | | Product | Supplier/Link | Cost |
27 | | ------------------------ | ------------------------------------- | ------ |
28 | | Wires | already own | $0 |
29 | | VPS & Servers | already own | $0 |
30 | | Quadcopter Drone Combo | https://bit.ly/3BR0RMn | $198.26|
31 | | Raspberry Pi 4 | https://bit.ly/3GaOxZY | $47.15 |
32 | | libo battery 11.1 V | https://bit.ly/3I4gB2q | $18 |
33 | | libo battery charger | https://bit.ly/3X9kEik | $8 |
34 | | Shipping & taxes | | $4 |
35 | | Total | | $275.41|
36 |
--------------------------------------------------------------------------------
/rcyaon.md:
--------------------------------------------------------------------------------
1 | ---
2 | name: "@rcyaon"
3 | project: "Telegraph"
4 | ---
5 |
6 | # Telegraph
7 |
8 | ## Summary
9 |
10 | My plan is to build a telegraph system, which like the original telegraph by Samuel Morse, would be outputting a message on a display once a user inputs their message in morse code. I'm excited to build it because the telegraph is one of the inventions in history that I'm most interested in! I love researching forms of communication and cryptography's evolution over the years.
11 |
12 |
13 | ## Plan
14 |
15 | Beginning, I simply want to get the message outputted onto the screen. However, if time allows for it, I want to make it able to communicate across several systems. I would be 3D printing first with the STL file available of Samuel Morse's telegraph, https://3d.si.edu/object/3d/morse-vail-telegraph-key%3Aed99f44d-3c60-4111-b666-e2908e1b64ef. Later, I'd be wiring the Arduino and LCD display together to code the software which registers the morse code from the button clicks. I'd be using the Arduino IDE.
16 |
17 | ## Budget
18 |
19 | What materials will you need for your project? Where will you get them? How much does it cost? Please include all materials, including components you already own. Make sure to factor in shipping costs and sales tax.
20 |
21 | | Product | Supplier/Link | Cost |
22 | | --------------- | ------------------------------------- | ------ |
23 | | UCTRONICS 0.96 Inch OLED Module 12864 128x64 Yellow Blue SSD1306 Driver I2C Serial Self-Luminous Display Board for Arduino Raspberry Pi Pico | https://www.amazon.com/UCTRONICS-SSD1306-Self-Luminous-Display-Raspberry/dp/B072Q2X2LL/ref=sr_1_1?crid=22AE9MN7I8EL1&keywords=UCTRONICS+0.96+Inch+OLED+Module+12864+128x64+Yellow+Blue+SSD1306+Driver+I2C+Serial+Self-Luminous+Display+Board+for+Arduino+Raspberry+Pi+Pico&qid=1672358011&s=electronics&sprefix=uctronics+0.96+inch+oled+module+12864+128x64+yellow+blue+ssd1306+driver+i2c+serial+self-luminous+display+board+for+arduino+raspberry+pi+pico%2Celectronics%2C341&sr=1-1 | $6.99 |
24 | | 3D Printed Components, screws, stock button | Already own or free | $0.00 |
25 | | Arduino UNO REV3 [A000066] | https://www.amazon.com/Arduino-A000066-ARDUINO-UNO-R3/dp/B008GRTSV6/ref=sr_1_3?crid=MEA30K8T836S&keywords=arduino&qid=1672357641&sprefix=arduino%2Caps%2C124&sr=8-3&th=1 | $29.95 |
26 | | Amazon Basics USB 2.0 Printer Cable - A-Male to B-Male Cord - 6 Feet (1.8 Meters), Black | https://www.amazon.com/dp/B00NH11KIK/ref=vp_d_pb_TIER3_p13sess_lp_B008GRTSV6_pd?_encoding=UTF8&pf_rd_p=7ff5771e-3d64-43df-8374-83d5fdf6e104&pf_rd_r=WTDZ5PKGF6TCPTEM6YCH&pd_rd_wg=8nfMZ&pd_rd_i=B00NH11KIK&pd_rd_w=EnZ1L&content-id=amzn1.sym.7ff5771e-3d64-43df-8374-83d5fdf6e104&pd_rd_r=68b94625-6d89-4073-9c3a-031e39c91232&th=1 | $6.29 |
27 | | Breadboard & Jumper Wires | https://a.co/d/cJkqFtq | $12.99 |
28 | | Total | | $56.22 |
29 |
--------------------------------------------------------------------------------
/geschmit.md:
--------------------------------------------------------------------------------
1 | ---
2 | name: "@geschmit"
3 | project: "MicroGeiger"
4 | ---
5 |
6 | # MicroGeiger: A geiger counter running on MicroPython
7 |
8 | ## Summary
9 | This is a DIY-style geiger counter, which utilizes a SBM-20 Geiger tube to detect beta and gamma radiation. Utilizing a nRF52840 and ILI9341 touchscreen display, users can control and monitor radiation levels around them, while being able to also optionally log the data to a supported Bluetooth device.
10 |
11 | All future source code relating to this project can be found [here](https://github.com/geschmit/microgeiger).
12 |
13 | ## Notes
14 | - This project originally used a ESP32 feather board, which would also allocate enough pricing to include a spare SBM-20 tube. Due to supply issues, I've switched to using a nRF-based feather board and removed the spare tube from the order.
15 | - Although my original plan was to use a VFD display which would look more visually appealing, I've settled instead for on a TFT display, which should be more than enough to handle button presses.
16 | - In the future, I may create a more permanant enclosure to store the parts inside; I'm going to use a black case from Adafruit to contain the counter, for now.
17 | - I have yet to locate a test isotope in order to ensure my counter can successfully operate. If I'm unable to locate a legitimate sample, I'll disassemble a smoke alarm and use it's Americium sample.
18 |
19 | ## Plan
20 | My plan is, as followed:
21 | - Order parts from suppliers
22 | - Test parts(primarily the tube) to ensure working order
23 | - Assemble geiger counter
24 | - Bootload MicroPython and flash program code
25 | - Share source & design with Hack Club!
26 |
27 | ## Budget
28 |
29 | | Product | Supplier/Link | Cost |
30 | | --- | --- | --- |
31 | | Adafruit Feather nRF52840 Sense | https://www.adafruit.com/product/4516 | 39.50$ |
32 | | Wiring | https://www.adafruit.com/product/1311 | 15.95$ |
33 | | Wire strippers | https://www.adafruit.com/product/4747 | 11.95$ |
34 | | Slightly overkill toggle switch | https://www.adafruit.com/product/3218 | 3.95$ |
35 | | Buzzer | https://www.adafruit.com/product/160 | 1.50$ |
36 | | JST XH 4-pin | https://www.adafruit.com/product/4874 | 0.95$ |
37 | | ILI9341 Display | https://www.adafruit.com/product/1770 | 29.95$ |
38 | | LiPo Charger | https://www.adafruit.com/product/1304 | 5.95$ |
39 | | 3.7V Battery | https://www.adafruit.com/product/258 | 9.95$ |
40 | | Black case | https://www.adafruit.com/product/3703 | 2.50$ |
41 | | Half breadboard | https://www.adafruit.com/product/4539 | 5.00$ |
42 | | F/M Jumper wires | https://www.adafruit.com/product/1953 | 1.50$ |
43 | | Shipping | Adafruit | 14.90$ |
44 | | Sales tax | Adafruit | 8.39$ |
45 | | I2C Dosimeter | https://www.tindie.com/products/climateguard/dosimeter-with-i2c-radsens-2-arduino/ | 50.00$ |
46 | | Shipping | Tindie | 17.00$ |
47 | | Sales tax | Tindie | 0.00$ |
48 | | **TOTAL** | | 222.94$ |
49 |
--------------------------------------------------------------------------------
/thaddeuskkr.md:
--------------------------------------------------------------------------------
1 | ---
2 | name: "@thaddeuskkr"
3 | project: "DIY Smart Home"
4 | ---
5 |
6 | # DIY Smart Home
7 |
8 | ## Summary
9 |
10 | A smart home. I'm moving houses sometime soon, so I'd like to automate some of the things I do at home, for example turning on lights and setting the temperature on my AC. No need for AI assistants. Since this is a pretty small project on its own, I'll probably be using the setup as a NAS as well, with a spare hard drive I have lying around, to stream content to my TV or store things. I'll use a Raspberry Pi (or an alternative if there's no stock) with displays, one for brief information always on and one with detailed controls. I'll be doing this and attempting to balance it with my work since I have major exams next year.
11 |
12 | ## Plan
13 |
14 | For the first few days, I'll play around with software. I will either be using [Home Assistant](https://www.home-assistant.io/) or [WebThings](https://webthings.io/) using the guides provided by each of them. ([WebThings](https://webthings.io/docs/gateway-getting-started-guide.html) | [Home Assistant](https://www.home-assistant.io/installation/raspberrypi)) Since I haven't moved yet, this will just be the initial set up and me playing around with things. I'll be purchasing adapters so my setup is compatible with most of the things I'll purchase along the way. After troubleshooting and setting up my smart home, I'll also be using the Pi as a NAS to stream content and store my school things (e.g. notes).
15 |
16 | ## Budget
17 |
18 | | Product | Supplier/Link | Cost |
19 | | ---------------------------------------------- | ----------------------------------------------------------------------------------------- | -------- |
20 | | Raspberry Pi 4B 8GB - Basic Kit | https://sg.cytron.io/p-raspberry-pi-4-model-b-8gb | $130.00 |
21 | | 135x240 Color TFT Display | https://www.digikey.sg/en/products/detail/adafruit-industries-llc/4393/10650640 | $25.65 |
22 | | 128x32 Monochrome OLED Display | https://www.digikey.sg/en/products/detail/adafruit-industries-llc/3527/7323609 | $25.65 |
23 | | LED Light Strip (Works with Zigbee - for test) | https://www.amazon.com/gp/product/B07QD2SGDB | $49.77 |
24 | | Conbee II Zigbee USB Stick | https://www.amazon.com/gp/product/B07PZ7ZHG5 | $33.60 |
25 | | Z-Wave USB Stick | https://www.amazon.com/gp/product/B07GNZ56BK NOT INCLUDED IN TOTAL | $39.71 |
26 | | Total (excluding exchange rate changes) | Some prices are converted from SGD to USD. Exchange rate is subject to change. | $264.67 |
27 |
--------------------------------------------------------------------------------
/vitaliikuzhdin.md:
--------------------------------------------------------------------------------
1 | ---
2 | name: "@vitaliikuzhdin"
3 | project: "E-Book for Blind"
4 | ---
5 |
6 | # E-Book for Blind
7 |
8 | ## Summary
9 |
10 | What are you going to build? What does it do? Why are you excited to build it?
11 |
12 | I want to create an e-book for blind.
13 | The reason for this is because physical ones are heavy, very expensive (up to $500 per book),
14 | and can only be read 3-5 times (those little "dots" get sanded away by fingers).
15 |
16 | ## Plan
17 |
18 | What steps are you going to take to build it? What tools are you going to use? What will you do first, second, third, etc.?
19 |
20 | I plan on using an Arduino Uno board (as a brain), micro solenoids (show/hide tactile "dots"),
21 | shift registers/expanders (to have enough pins), transistors (to open or close the segments),
22 | SD card module (to store the book itself) and a few buttons for easy navigation.
23 |
24 | ## Budget
25 |
26 | What materials will you need for your project? Where will you get them? How much does it cost? Please include all materials, including components you already own. Make sure to factor in shipping costs and sales tax.
27 |
28 | | Product | Supplier/Link | Quanity | Cost |
29 | | --------------- | ----------------------------------------------------- | ------- | ------- |
30 | | Arduino Nano | https://www.aliexpress.com/item/4000587268145.html | 1 pc | $2.49 |
31 | | PCF8575 | https://www.aliexpress.com/item/1005001930978496.html | 2 pc | $1.45 |
32 | | SD board (SPI) | https://www.aliexpress.com/item/32523546123.html | 1 pc | $0.45 |
33 | | Push Buttons | https://www.aliexpress.com/item/4001164258760.html | 1 lot | $0.53 |
34 | | Solder Wires | https://www.aliexpress.com/item/32949492882.html | 1 lot | $1.09 |
35 | | ProtoBoard | https://www.aliexpress.com/item/32981958921.html | 1 pc | $2.14 |
36 | | Diodes | https://www.aliexpress.com/item/1005004320920058.html | 1 lot | $4.56 |
37 | | Transistors | https://www.aliexpress.com/item/1005004320920058.html | 5 lots | $10.05 |
38 | | Resistors | https://www.aliexpress.com/item/1005002388714967.html | 2 lots | $1.99 |
39 | | Soldering Kit | https://www.aliexpress.com/item/1005001713978322.html | 1 pc | $15.70 |
40 | | Solenoids | https://www.aliexpress.com/item/1005002154277283.html | 30 pc | $1.88 |
41 | | Breadboard | https://www.aliexpress.com/item/32523839459.html | 1 pc | $1.77 |
42 | | USB C Dongle | https://www.aliexpress.com/item/4000180424469.html | 1 pc | $3.70 |
43 | | Plastic casing | Owned | 1 pc | $0 |
44 | | PowerBank, cable| Owned | 1 pc | $0 |
45 | | Total | | | $138.92 |
46 |
--------------------------------------------------------------------------------
/ThanatosXingYu.md:
--------------------------------------------------------------------------------
1 | ---
2 | name: "@ThanatosXingYu "
3 | project: "Smart toolbox"
4 | ---
5 |
6 | # Smart toolbox -- a box that can change our life a bit
7 |
8 | ## Summary
9 | Hi there!
10 | As I said in the title, this box can keep people away from danger and make our life more convenient.
11 |
12 | When I enter my home, my phone automatically connects to the raspberry pi in the box.
13 |
14 | Then when the Raspberry Pi recognizes the Bluetooth Address(BD_ADDR, a unique 48-bit identifier assigned to each Bluetooth device by the manufacturer) of the device, it will display the customized content on the 40" TV screen. *For each person, the displayed content is different.* For example, if it identifies that the BD_ADDR is my father's device, the TV will display today's stock, and for my mother, it will display today's WalMart promotion :)
15 |
16 | In addition, it can also recognize and answer our questions through Chat-GPT's api and voice recognition module. I will set a keyword "Hello, box" for it to prevent wake-up by mistake.
17 | For example, when I say "Hello box, how's the weather today ", it will use GPS to determine my location and then show today's weather on TV screen.
18 | Of course, when Bluetooth is disconnected, it will also send messages to the mobile phone via WiFi.
19 |
20 | At the same time, its own 3.5" screen will also display the current status, such as how many device links, wifi signal strength, system load, etc
21 |
22 |
23 | ## Plan
24 | ### STEP 1
25 | Test for apis that I have owned, such as Chat-GPT, weather, or stocks
26 |
27 | ### STEP 2
28 | Find the right place, connect the raspberry pie to the TV, and connect it to a stable power supply
29 |
30 | ### STEP 3
31 | Use a laptop to connect raspberry pi,download and then install Raspberry Pi imager .
32 |
33 | ### STEP 4
34 | Write a demo program for test. Then write true programs in Python or C (I like Python)
35 |
36 | ### STEP 5
37 | Connect the wifi signal at home and set the BD_ADDR of each device. Then go out and enter the door for test again.
38 |
39 | ### STEP 6
40 | Assemble All!
41 |
42 | ## Budget
43 |
44 |
45 | | Product | Supplier/Link | Cost |
46 | | --------------- | ------------------------------------- | ------ |
47 | | Raspberry Pi 4B + 32 GB TF + micro-HDMI wires + Type-C Power + Acrylic shell | [TMALL](https://detail.tmall.com/item_o.htm?abbucket=5&id=624594173139&skuId=4928005546003) | $226.76 |
48 | | 3.5" display | [TMALL](https://detail.tmall.com/item_o.htm?id=615266190445&skuId=4502665842552) | $6.92 |
49 | | Voice Recognition Module for R-Pi| [TMALL](https://detail.tmall.com/item_o.htm?id=628429845784)| $14.60 |
50 | | 40" TV display | Already Own | $0 |
51 | |Laptop | Already Own | $0 |
52 | | Dupont Line | Already Own | $0 |
53 | | All Apis | Already Own | $0 |
54 | | Shipping | FREE | $0|
55 | | Tax | FREE | $0 |
56 | | Total | | $248.28 |
57 |
58 |
59 | That's all, thxxxxxxxx :)
--------------------------------------------------------------------------------
/sanjay-nagesh.md:
--------------------------------------------------------------------------------
1 | ---
2 | name: "@sanjay-nagesh"
3 | project: "LED Cube"
4 | ---
5 |
6 | # LED Cube
7 |
8 | ## Summary
9 |
10 | I will be to constructing a cube-shaped object with a 4x4 array of Light-Emitting Diodes (LEDs). This LED 4x4 cube can be used for various purpose like display, decoration, etc. It will involve soldering and programming to control the LEDs and bring the cube to life. I will also glue a NFC card to the led cube.
11 |
12 | ## Plan
13 |
14 | Gather materials: You will need 64 LEDs, a soldering iron, soldering wire, a microcontroller (such as an Arduino), wires for connecting the microcontroller to the LEDs, and a power source.
15 |
16 | Plan the wiring: Sketch out a diagram of the cube, showing where each LED will be placed and how it will be wired to the microcontroller.
17 |
18 | Solder the LEDs: Carefully solder the LEDs to a circuit board, making sure to connect the anodes and cathodes correctly.
19 |
20 | Connect the microcontroller: Wire the microcontroller to the circuit board, connecting the appropriate pins to the anodes and cathodes of the LEDs.
21 |
22 | Write the code: Use a programming language such as C++ to write code that will control the LEDs, determining when and how they will light up.
23 |
24 | Assemble the cube: Carefully connect the circuit board to the structure of the cube, connecting all the LEDs and making sure the wiring is correct.
25 |
26 | Test and debug: Test the cube to make sure it functions correctly, and debug any issues that may arise.
27 |
28 | Power on: Connect a power source to the cube, and power it on. The cube should now be fully functional, displaying different patterns and animations.
29 |
30 | NFC CARD: Create a personal website and connect it to the nfc card and connect the nfc card to the led cube (glue)
31 |
32 | ## Budget
33 |
34 | What materials will you need for your project? Where will you get them? How much does it cost? Please include all materials, including components you already own. Make sure to factor in shipping costs and sales tax.
35 |
36 | | Product | Supplier/Link | Cost |
37 | | --------------- | ------------------------------------- | ------ |
38 | | Soldering Iron | https://a.co/d/fFcL4K9 | $49.99 |
39 | | Soldering IRon wire| https://www.amazon.com/dp/B0943RZCMV/ref=twister_B099NZ9GSG?_encoding=UTF8&th=1| $12.39
40 | |Ardiuno Nano | https://a.co/d/5Th6syh | $24.99
41 | |PCB Board | https://a.co/d/5Th6syh| $12.99
42 | |Header | https://a.co/d/b33iYUa | $12.99
43 | | LED Lights | https://a.co/d/0u174Qb| $11.99
44 | | Resistor | https://a.co/d/c4RxLoj | $7.99
45 | | Wood | https://a.co/d/bpX8hm9 | $11.95
46 | | Wire | https://a.co/d/bpX8hm9 | $16.95
47 | | NFC CARD | https://www.amazon.com/gp/product/B0BKSYWG3N/ref=ewc_pr_img_1?smid=A25C6CULAGFA87&psc=1 | $12.00
48 | |domain | $2.04 | can't put link but go to porkbun.com and search sanjay.world
49 | | Tax | $31
50 | | TOTAL| $207
51 |
52 |
53 |
--------------------------------------------------------------------------------
/AHussein04.md:
--------------------------------------------------------------------------------
1 | ---
2 | name: ["@AHussein04", "@kapaarnav"]
3 | project: "Enhanced Listening Experience"
4 | ---
5 |
6 | # Silent Disco
7 |
8 | ## Summary
9 |
10 | What are you going to build? What does it do? Why are you excited to build it?
11 | My partner and I are going to build a an audio visualizer setup for a silent disco project we are working on after finding inspiration from the internet https://www.youtube.com/watch?v=6FcszEPPI6c&t=55s. My Partner and I love listening to music. Often you can see on our discord statuses us listening to Spotify and according to our Spotify wrapped we combined for almost 300k minutes. Together we hope to relax and listen to music in a new sensory experience.
12 |
13 | ## Plan
14 |
15 | What steps are you going to take to build it? What tools are you going to use? What will you do first, second, third, etc.?
16 |
17 | Step 1.) Gather the parts
18 | Step 2.) Create the light rig and mod the headphones
19 | Step 3.) Connecting the smaller led strips to ESP32 to create for a wirelessly controlled setup for the headphones.
20 | Step 4.) Use audio visualizer program found https://github.com/IzzyBrand/ledvis
21 | Step 5.) Connect RPI to the led strips and have them run the audio visualizer code
22 | Step 6.) Take in the new music listening experience
23 |
24 | ## Budget
25 |
26 | What materials will you need for your project? Where will you get them? How much does it cost? Please include all materials, including components you already own. Make sure to factor in shipping costs and sales tax.
27 |
28 | | Product | Supplier/Link | Cost |
29 | | --------------- | ------------------------------------- | ------ |
30 | | SENNHEISER HD 450BT Bluetooth | https://www.amazon.com/Sennheiser-HD-450BT-Bluetooth-Cancellation/dp/B083W7V3RG| $99 x 2 |
31 | | Raspberry Pi 4| shorturl.at/ostzM | $100 |
32 | | Addressable Led strip | https://www.amazon.com/gp/product/B00VQ0D2TY/ | $26 |
33 | | Tracing Paper | https://www.amazon.com/Darice-Artists-Tracing-Paper-Sheets/dp/B004GXBXSK | $17 |
34 | | USB Audio Converter| https://www.amazon.com/gp/product/B00OJ5AV8I/ | $8 |
35 | | 2 x 4 x 16in block of wood |https://www.homedepot.com/p/2-in-x-4-in-x-16-ft-Prime-Standard-and-Better-Douglas-Fir-Lumber-2167-16/206019456 | $9.67 x 2 |
36 | | ESP32-C3-DevKitM-1 |https://www.amazon.com/ESP32-C3-DevKitM-1-Development-ESP32-C3-MINI-1-Module-ESP32-C3FN4/dp/B09F5XRK12/ | $21.98 |
37 | | Sodering kit |https://www.amazon.com/YIHUA-Soldering-194ºF-896ºF-Adjustable-Calibration/dp/B082F1WKP9/ | $50 |
38 | | Adressable LED Strip for headphones |https://www.amazon.com/Addressable-Aclorol-Magnetic-Compatible-Motherboard/dp/B08TWBFCRT/ | $13.99 |
39 | | Hat for RPI |https://www.amazon.com/YIHUA-Soldering-194ºF-896ºF-Adjustable-Calibration/dp/B082F1WKP9/ | $5 |
40 | | Headers for ESP32 |https://www.adafruit.com/product/400 | $3 |
41 |
42 |
43 |
44 | | Tax | | $27.73 |
45 | | Shipping | | $0.0|
46 | | Total | | $490.05 |
47 |
--------------------------------------------------------------------------------
/docs/examples/led-lights.md:
--------------------------------------------------------------------------------
1 | ---
2 | author: '@prophetorpheus'
3 | project: 'Desk Lights'
4 | ---
5 |
6 | > _Adapted from https://github.com/garyhtou/Desk-Lights_
7 |
8 | ## Summary
9 |
10 | I am going to build a light setup in my room that can be controlled through a web app. I think it'll be really cool to have something my friends can interact w/ while we're on calls + I saw Elan Lee's demo during Hack Club's AMA with him and it was awesome! I've never built an application that interfaces with "the real world" so it'll be fun to try.
11 |
12 | ## Plan
13 | For the software, I will be using Firebase and React. For the hardware, I will be using a dev board and LED strip from Adafruit. I'll be following [this guide](https://github.com/garyhtou/Desk-Lights) from [@garyhtou](https://github.com/garyhtou).
14 |
15 | ## Budget
16 |
17 | | Product | Supplier/Link | Cost |
18 | | ---------------------------------------------------------------- | ----------------------------------------------------------------------------------------------------------- | ------------------------------ |
19 | | Adafruit NeoPixel Digital RGBW LED Strip - White PCB 60 LED/m 1m | [Adafruit](https://www.adafruit.com/product/2842?length=1) | $35 (including tax & shipping) |
20 | | Assembled Adafruit Feather HUZZAH with ESP8266 With Headers | [Adafruit](https://www.adafruit.com/product/3046) | $20 |
21 | | 74AHCT125 - Quad Level-Shifter (3V to 5V) | [Adafruit](https://www.adafruit.com/product/1787) | $2 |
22 | | 1000µf 25V Capacitor (or any 1000 µF, 6.3V or higher) | [Amazon](https://www.amazon.com/McIgIcM-1000uf-capacitor-Aluminum-electrolytic/dp/B06WGPNM19) | $6 |
23 | | 470 Ohms Resistor (or any between 300 to 500 Ohm) | [Radio Shack](https://www.radioshack.com/products/radioshack-1-8-watt-330-ohm-carbon-film-resistors-5-pack) | $6 |
24 | | Breadboard | [Adafruit](https://www.adafruit.com/product/64) | $5 |
25 | | Male/Male Jumper Wires | [Adafruit](https://www.adafruit.com/product/1957) | $3 |
26 | | | | Total: $89 |
27 |
--------------------------------------------------------------------------------
/docs/faq.md:
--------------------------------------------------------------------------------
1 | # FAQ
2 |
3 | #### I'm in college. Can I join this event?
4 |
5 | No, this event is only open to current high school students (or younger).
6 |
7 | ##### Can I join the event if I'm not in the US?
8 |
9 | Yes, this event is open to everyone. However, Hack Club Bank, the platform you'll be using to receive and spend the grant money may or may not work as well outside of North America. Using Hack Club Bank outside of the North America is still experimental. We'd love to still hear from you and will try our best to help make it work!
10 |
11 | See [this page](./eligible_countries.md) for a list of countries where Hack Club Bank is confirmed to work.
12 |
13 | ##### What if I don't have a project idea?
14 |
15 | Check out the [examples](/examples) for inspiration. If you're still stuck, you can ask for help in the [#hardware-party](https://hackclub.slack.com/archives/C0168BR5PDE) channel on Slack.
16 |
17 | ##### Can multiple people team up to work on a project?
18 |
19 | If you team up with an IRL friend and want to build a project together, you would work together to submit one pull request. All teammates must meet requirements for the event (eg. under 18, have submitted RSVP, be on Slack, etc.) The grant amount would be for up to $250 per person, growing with team size. You must be able to meet up in person to work on the project with your teammate(s). The maximum number of people in a team is 4.
20 |
21 | ##### How many total grants are there availalbe?
22 |
23 | Currently, there is no limit for the number of grants available. This is be subject to change depending on the volume of project proposals.
24 |
25 | ##### Can we build multiple small projects instead of one project?
26 |
27 | You can build multiple small projects as long as you can outline a plan to complete them during the 10-day event.
28 |
29 | ##### Does the entire project have to cost less than $250?
30 |
31 | The project may have a budget exceeding $250. However, you would be responsible for covering the difference by adding money to your Hack Club Bank account.
32 |
33 | ##### What if I need more funds than initially planned?
34 |
35 | If your initial grant was less than $250, and you find yourself needing to order extra parts, reach out to the Bank team at bank@hackclub.com to request additional funds.
36 |
37 | ##### When will my pull request be reviewed?
38 |
39 | We'll try our best to review within 48 hours. However, there may be delays around federal holidays in the United States.
40 |
41 | ##### Will we have to pay the 7% fee for Hack Club Bank?
42 |
43 | The 7% fiscal sponsorship fee will be waived for Winter Hardware Wonderland grant funds. If your project's budget exceeds $250, and you need more funds to build your project, there will be no fee to add personal funds to your account.
44 |
45 | ##### Should my budget include shipping and taxes?
46 |
47 | Please do include shipping and taxes so the grant amount you receive will be as close as possible to your project expenses.
48 |
--------------------------------------------------------------------------------
/Screen-sLaYeR.md:
--------------------------------------------------------------------------------
1 | ---
2 | name: "@Screen-sLaYeR"
3 | project: "Robotic Arm"
4 | ---
5 |
6 | # Robotic Arm
7 |
8 | ## Summary
9 |
10 | what are ou going to build?
11 | A three axis Robotic Arm.
12 |
13 | What does it do?
14 | It pick up things and does many other stuff.
15 |
16 | Why are you excited to build it?
17 | It's my third Electronic Project and it can help me on my Desktop
18 |
19 | ## Plan
20 | What steps are you going to take to build it?
21 | 1. Follow this guide: https://howtomechatronics.com/tutorials/arduino/diy-arduino-robot-arm-with-smartphone-control/
22 | 2. Add Stepper Motors at the bottom and at the claw for a full rotation of the Base and the Claw
23 | 3. Make the Circuit Diagram
24 | 4. Get the Parts
25 | 5. Connect the parts
26 | 6. The Programming Part (an apllication that takes inputs and transmit it to the Arm)
27 |
28 | What tools are you going to use?
29 | 1. Soldering Iron (My Elder Sister own that)
30 | 2. 3D Printer for Printing the Parts or Cutting it out from PVC (Cutting is Preffered as I don't have 3D Printer)
31 |
32 | What will you do first, second, third, etc.?
33 | 1. Get The Parts
34 | 2. Assemble the Servos and Connect all of them Properly
35 | 3. Program it to Work Properly
36 |
37 | [Robotic Arm STL Files](https://cloud-qxhtc1x05-hack-club-bot.vercel.app/0arduino_robot_arm_stl_files.zip)
38 |
39 | ## Budget
40 |
41 | | Product | Supplier/Link | Cost |
42 | | --------------- | ------------------------------------- | ------ |
43 | | Pack of wires |https://www.amazon.in/gp/product/B071VQLQQQ/ref=ox_sc_act_image_8?smid=AH017Z3M1ZJ3T&psc=1 | $1.95 |
44 | | 5V - 2A Adapter |https://www.amazon.in/gp/product/B09BZXFHNL/ref=ox_sc_act_image_3?smid=A32I52VHFPY5IG&psc=1| $2.40 |
45 | | Stepper Motor x 2 |https://www.amazon.in/gp/product/B08J8C3TJS/ref=ox_sc_act_image_1?smid=ARY8SMPB4PT5P&psc=1 | $16.88 |
46 | | Servo SG90 x 3 |https://www.amazon.in/gp/product/B01H5IICJA/ref=ox_sc_act_image_7?smid=A14DHXI99GC1EO&psc=1| $8.00 |
47 | | Stepper motor Driver |https://www.amazon.in/gp/product/B01H5IICJA/ref=ox_sc_act_image_7?smid=A14DHXI99GC1EO&psc=1| $7.68 |
48 | | MG996R Servo x 2 |https://www.amazon.in/gp/product/B08NPQT5H3/ref=ox_sc_act_image_5?smid=A14DHXI99GC1EO&psc=1| $13.76 |
49 | | HC-05 Bluetooth Module |https://www.amazon.in/gp/product/B071HWFYJP/ref=ox_sc_act_image_4?smid=AFNRVQ5JHRILL&psc=1 | $4.23 |
50 | | Arduino UNO R3 Board |https://www.amazon.in/gp/product/B01LCN8IRK/ref=ox_sc_act_image_6?smid=AFNRVQ5JHRILL&psc=1 | $11.26 |
51 | | Arm Model |https://www.amazon.in/gp/product/B072F7WLGR/ref=ox_sc_act_image_1?smid=A265UAHVFOFJA3&psc=1| $10.28 |
52 | | Total | | $68.76 |
53 |
54 | Thank You!
55 |
--------------------------------------------------------------------------------
/AnishT500.md:
--------------------------------------------------------------------------------
1 | ---
2 | name: "@AnishT500"
3 | project: "Record Player"
4 | ---
5 |
6 | # Record Player
7 | ## Summary
8 |
9 | I'm planning to build an RFID record player. It will allow me to tap cards on to the record player to automatically play albums/playlists, play, pause, and skip a song. The record player will use python to switch the song based on the value it recieves from the RFID card, it will use spotify's api to source the music. The RFID scanner and all other wiring will be mounted inside of a box. The sound will play out of a bluetooth speaker that is connected to an amazon echo. This is because an amazon echo is always on, so the spotify connect won't go offline. I'm excited to build this project because I think it would be very cool to play music from tapping cards, it would also me to experiment further with a raspberry pi. Here is a youtube video I used for reference while planning out this project: https://www.youtube.com/watch?v=H_9H8qFnDr8
10 |
11 | ## Plan
12 |
13 | 1. Assemble the record player box by wiring the Raspberry Pi and RFID reciever together using dupont wires and powering the pi
14 | 2. Build the RFID cards by using RFID stickers, printed images of album covers, and the square cards
15 | 3. Connect the Raspberry Pi to the Spotify API using Python, and assign each RFID value to an album and to a play, pause, and skip
16 | 4. Make the Amazon Echo a spotify connect device so it is always connected to my spotify account
17 | 5. Optional: Connect my echo to bose speakers for better sound quality and better *vibes*
18 | 6. (The extender cord will be used to power the record player due to a lack of outlets)
19 |
20 |
21 | ## Budget
22 |
23 | What materials will you need for your project? Where will you get them? How much does it cost? Please include all materials, including components you already own. Make sure to factor in shipping costs and sales tax.
24 |
25 | (I already bought the raspberry pi 3 kit in fear of it being sold out)
26 |
27 | | Product | Supplier/Link | Cost |
28 | | --------------- | ------------------------------------- | ------ |
29 | | RFID RC522 Reciever | https://www.amazon.com/gp/product/B07VLDSYRW | $9.99 |
30 | | RFID Stickers | https://www.amazon.com/gp/product/B01LZYOR7P | $14.98 |
31 | | Raspberry Pi 3 Kit| https://www.ebay.com/itm/165877014506 | $60.00 |
32 | | Raspberry Pi 3 Case | https://www.amazon.com/dp/B07WCKLFLP | $10.13 |
33 | | Dupont Wires | https://www.amazon.com/gp/product/B01EV70C78 | $6.98 |
34 | | Square Cards | https://www.amazon.com/dp/B0B12G6H3D | $9.99 |
35 | | Wooden Boxes | https://www.amazon.com/gp/product/B086P8X4WV | $17.99 |
36 | | Amazon Echo | https://www.amazon.com/dp/B07XKF5RM3 | $74.99 |
37 | | Extender Cord | https://www.amazon.com/dp/B092J8LPWR/ | $19.99 |
38 | | Speakers | already own | $0.00 |
39 | | Illinois Amazon Taxes | | $11.96 |
40 | | Illinois Ebay Taxes | | $5.36 |
41 | | Amazon Shipping | | $0.00 |
42 | | Ebay Shipping | | $5.00 |
43 | | Total | | $247.36 |
44 |
--------------------------------------------------------------------------------
/KianTheCon.md:
--------------------------------------------------------------------------------
1 | ---
2 | name: "@KianTheCon"
3 | project: "Monopoly Tablet"
4 | ---
5 |
6 | # Monopoly Tablet
7 |
8 | ## Summary
9 |
10 | I am going to build a tablet designed to be mounted to a table so that one can play a digital version of the board game Monopoly on it. It will utilize pieces with special shapes of conductive pads on the bottom (as indicated in this instructable https://www.instructables.com/Object-Interaction-With-Touchscreens) to differentiate the specific pieces, allowing for more specialized semi-physical UI interactions (differentiating which player is moving, letting players move their pieces in a more fun/entertaining way, etc). In the long run, I envision having online play capabilities and possibly other board games (but that is way too ambitious for a short hackathon so I am keeping it simple for now).
11 |
12 | ## Plan
13 |
14 | First, I will first be following more or less this instructable (https://www.instructables.com/Object-Interaction-With-Touchscreens/) in order to set up several prototype game pieces. I will paint some felt pads with conductive filament and attach them to some metal game pieces I already have (or some similar conductive object if that doesn't work).
15 |
16 | Second, I will hook up a 7" LCD Display to a NucBox S SBC (I realize that this may seem overkill for this project, but given that I could've payed a similar price for something less powerful than a raspberry pi with the way the pricing is gouged at the moment, I though it would be more appropriate to try and get something that had a better value) in order to create the tablet device that will allow my special game pieces to be utilized.
17 |
18 | Finally, I will program a Monopoly port that utilizes my different shaped pieces, hopefully creating an interesting digital/physical board game fusion that puts a unique spin on the classic game.
19 |
20 | ## Budget
21 |
22 | Note: I'm aware this goes a few dollars over budget but I am willing to pay the excess myself if that is possible.
23 | | Product | Supplier/Link | Cost |
24 | | -------------------------- | ------------------------------------------------------------------------------------------------ | ------ |
25 | | Felt Pads | https://www.amazon.com/Pack-Two-Colors-Furniture-Protector/dp/B07X941JP2/ | $7.49 |
26 | | 7" Touchscreen LCD display | https://www.waveshare.com/product/raspberry-pi/displays/lcd-oled/15.6inch-fhd-monitor.htm | $62.99 |
27 | | Conductive Paint | https://www.amazon.com/Bare-Conductive-Electric-Paint-10ml/dp/B00KBXT6JW/ | $13.97 |
28 | | NucBox S (Intel SBC) | https://www.gmktec.com/collections/mini-pc/products/nucbox-most-powerful-palm-sized-4k-mini-pc-1 | $169.99 |
29 | | Total | | $254.44 |
30 |
31 |
--------------------------------------------------------------------------------
/sohamb117.md:
--------------------------------------------------------------------------------
1 | ---
2 | name: "@sohamb117"
3 | project: "Custom Locus Keyboard"
4 | ---
5 |
6 | # Modified Locus Keyboard
7 |
8 | ## Summary
9 |
10 | I'm going to build a split 45% keyboard using a stack of cut acrylic parts. The goal is to build a completely different type of keyboard from the one I am using right now, and to practice improve my skills at soldering, 3D printing, silicone casting, and modification. I'm excited to work on a completely different (and far more in-depth) project than most of my other hardware work, as this will require not just computer science skills but also a knowledge of materials and manufacturing.
11 |
12 | ## Plan
13 |
14 | 1) Go to Home Depot and compare different plastics based on their flexibility and resonance (this is just to decide what material to use)
15 | 2) Submit an order for the laser-cut case
16 | 3) 3D print tracing plates for the foam inserts, as well as a mold for the silicone
17 | 4) Cut the foam using the 3d-printed plates
18 | 5) Pour the silicone into the mold, let it harden, and then remove it
19 | 6) Modify PCB to add flex cuts, using a 3d-printed map and a Dremel (this is risky, so I might not do it, depending on how flexible the PCB is in-hand)
20 | 7) Tune stabilizers, using 3d-printed inserts to reduce opening tolerances and lubricants to prevent scratching
21 | 8) Add MillMax 3305 sockets to PCB
22 | 9) 3D-print switch films
23 | 10) Install all the custom foam and silicone
24 | 11) Install stabilizers
25 | 12) Lube and film switches
26 | 13) Install switches
27 | 14) Complete assembly of the case
28 | 15) Configure Vial development environment
29 | 16) Create firmware through Vial
30 |
31 | Total Expected Time: 15 Hours (plus cooling and printing time)
32 |
33 | ## Budget
34 |
35 | | Product | Supplier/Link | Cost |
36 | | --------------- | ------------------------------------- | ------ |
37 | | Case and PCB | [P3DStore](https://p3dstore.com/products/locus-invisibolt-acrylic-gasket-mount-case-and-pcb) | $135 |
38 | | 5x KTT HaluHalo Switches | [DangKeebs](https://dangkeebs.com/products/ktt-haluhalo?variant=39959357194412) | $15.00 |
39 | | Krytox 205g0 | [DangKeebs](https://dangkeebs.com/products/205g0?variant=36556464783521) | $12.00 |
40 | | MillMax 0305 | [Mouser](https://www.mouser.com/ProductDetail/Mill-Max/0305-2-15-80-47-80-10-0?qs=QtQX4uD3c2Uys0ai6Tr8NQ%3D%3D) | $17.89 |
41 | | Stabilizers | [Thockpop](https://thockpop.com/product/aeboards-staebies-v2/) | $22.00 |
42 | | Keycaps | [AliExpress](https://www.aliexpress.us/item/3256804603576206.html) | $26.39 |
43 | | Total | | $241.28 |
44 |
45 | (I've already purchased foams as well as silicone and masking tape)
46 |
47 |
48 | ## Microphone project (working with @KaiDevrim)
49 |
50 | |Product | Supplier/Link | Cost |
51 | | --------------- | ------------------------------------- | ------ |
52 | |SSM2019 | [Mouser](https://www.mouser.com/ProductDetail/Analog-Devices/SSM2019BNZ?qs=WIvQP4zGanhHwIaXxt763A%3D%3D) | $6.41 |
53 |
--------------------------------------------------------------------------------
/masonnamminga.md:
--------------------------------------------------------------------------------
1 | ---
2 | name: "@masonnamminga"
3 | project: "Smart Snack Machine"
4 | ---
5 |
6 | # Smart Snack Machine
7 |
8 | ## Summary
9 |
10 | Here's the sketch of the project:
11 | 
12 |
13 |
14 | I am planning on making a smart snack machine that dispenses snacks via a mobile app that anyone can access on my home network. The snack machine will be built out of plywood and plexiglass. The web app will be written in html/js and hosted on a raspberry pi. This raspberry pi will be attached to a touchscreen monitor fixed to the outside of the snack machine if the user would rather use the screen to order and not a phone. The servo motors that dispense the snacks will be controlled via the Blynk IoT platform and a NodeMCU–allowing for them to be triggered via a JS function. In summary, press a button on your phone or the built-in screen, you get a snack! I am excited to build this project because I have always wanted to build this project, and I feel that I now have the knowledge to bring this idea into reality!
15 |
16 | ## Plan
17 |
18 | I first plan to get the servos and NodeMCU's working and connected to my home network, after this I can create the webhooks that I will call in my js function to individually control the servos.
19 |
20 | Next is assembling all the servos together and verifying that every JavaScript function is working, after all the electronics are working I will create the web app. I plan to make a simple dashboard of buttons. When a button is pressed, the dispense function will be called, allowing for the servo to rotate and drop the snack.
21 |
22 | Finally, I will assemble the box with rows for the snacks and mount the screen and raspberry pi. For this I will use plywood and plexi glass. I will 3d print all needed brackets, and use a vinyl cutter for accents and labels. The last step is to add LED light strips that can be contolled with the touchscreen!
23 |
24 |
25 | ## Budget
26 |
27 | | Product | Supplier/Link | Cost |
28 | | ----------------------- | ------------------------------------- | ------- |
29 | | Raspberry Pi 3 | Already own. | $0.00 |
30 | | Touch Screen for Pi | https://amzn.to/3YvCXQh | $79.99 |
31 | | x16 360 Degree Servos | https://amzn.to/3YEQNzU | $103.96 |
32 | | Plywood/Particle Board | Already own. | $0.00 |
33 | | 3D Printer Filament | Already own. | $0.00 |
34 | | x4 Node MCU WiFi Board | https://amzn.to/3YvDPo1 | $12.59 |
35 | | Power Supply Module | https://amzn.to/3YC9RhR | $9.09 |
36 | | Solderless Breadboards | https://amzn.to/3BNoFRk | $6.69 |
37 | | LED WiFi Backlighting | https://amzn.to/3PGPTi6 | $19.99 |
38 | | Total | | $232.31 |
39 |
40 |
41 |
42 |
43 |
44 |
--------------------------------------------------------------------------------
/SantoshiUser.md:
--------------------------------------------------------------------------------
1 | ---
2 | name: ["@SantoshiUser", "@amareshw"]
3 | project: "Alexa Controlled Smart Mirror"
4 | ---
5 |
6 | # Alexa Controlled Smart Mirror
7 |
8 | ## Summary
9 |
10 |
11 | I have decided to build a Alexa controlled Smart Mirror that will be display Time, Weather ,etc.This project
12 | will be able to very exciting to make.I will be completing this project with [@amareshw](https://github.com/amareshw).
13 | This is the proposal for new project after the previous proposal of ID [#372](https://github.com/hackclub/winter/pull/372)
14 |
15 | ## Plan
16 |
17 | Once we have all the material required ,First of all we will assemble the frame attaching two way mirror
18 | and mounting the display behind it.
19 | Then we will connect the Raspberry Pi and the power supply, and install the software on the Raspberry Pi.
20 | after this we will connect the Alexa device to the Raspberry Pi and configure the software to communicate with it.
21 | This allows the mirror to respond to voice commands given to the Alexa device.Finally, If everything
22 | worked fine we will we will customize the software to display the information we want on the mirror,
23 | such as the time, weather, calendar and news updates.
24 |
25 |
26 |
27 |
28 |
29 | ## Budget
30 |
31 | | Product | Supplier/Link | Cost |
32 | | ---------------------------------- | ------------------------------------- | ---------- |
33 | | Raspberry Pi 4 4GB RAM | https://amzn.to/3WeCro7 | $146.66 |
34 | | Raspberry Pi 4 Case | https://amzn.to/3GaJ859 | $25.24 |
35 | | Samsung EVO Plus 64GB SD Card | https://amzn.to/3FMz7JW | $7.24 |
36 | | Raspberry Pi 15.3W USB-C | https://amzn.to/3WDXssh | $7.31 |
37 | | Micro HDMI to HDMI | https://amzn.to/3IqyeJY | $3.67 |
38 | | Display | https://amzn.to/3D4nSMd | $162.12 |
39 | | Two way Mirror | Locally Buy | around $30 |
40 | | Hammer Drill Machine Tool Kit | https://amzn.to/3XLJB3v | $47.6 |
41 | | Screw Driver Kit | https://amzn.to/3ZPtYd7 | $8.52 |
42 | | Amazon Echo Dot | https://amzn.to/3wj6iAs | $43.22 |
43 | | Glue |(I own) | $0 |
44 | | Tape |(I Own) | $0 |
45 | | Clamp |(I Own) | $0 |
46 | | 1.5" wood Screw |(I Own) | $0 |
47 | | Cardboard |(I own) | $0.00 |
48 | | Tax + Shipping | | $14.82 |
49 | | Total | | $497.37 |
50 |
--------------------------------------------------------------------------------
/Gam3rrXD.md:
--------------------------------------------------------------------------------
1 | ---
2 | name: "@Gam3rrXD"
3 | project: "RGB SmrtMirror"
4 | ---
5 |
6 | # RGB SmrtMirror
7 |
8 | ## Summary
9 |
10 | (Not going off of any guides, this is all going to be researched and done by me)
11 |
12 | I am going to be bulding an RGB Smart mirror with Alexa support and a Hands Free Experience. I am exited to build this because this has been on my building wishlist for a while and this is finally an opertunity to build it, this would be a great addition to the bathroom or even my bedroom! This would be used for asthetic and as a home automation device. Adding on, I plan to setup a motion sensor so that the screen will turn off when there is no motion aka no one is in the room, and plan to add a camera to implement facial detection so that each user can have a personalized viewing area.
13 | ## Plan
14 |
15 | 1. Get all the material for the build, wait for it to arrive
16 | 2. Design an application/plugin using IFTTT or Python to control the Lights and set up AVS along with setting up the motion sensor. Also, some code to implement facial detection for personalization (Camera will be mounted above head) (Already started the Voice services and motion sensor setup using python)
17 | 3 Build the frame according to the size of the display and leaving enough wiggle room for the PI to slot in and the speakers to fit
18 | 4 Place the display into the frame position the mirror and start prepping the Pi
19 | 5 Installing all necessary frameworks (Such as the magic mirror framework and amazon voice services) to operate the PI and seting it up within the frame.
20 | 6 Crafting a casing to fit the PI into to protect it
21 | 7 Screwing together the rest of the frame, Mount Camera, and motion sensor and mount it to the wall.
22 | 8.Enjoying the mirror!
23 | ## Budget
24 |
25 | | Product | Supplier/Link | Cost |
26 | | --------------- | ------------------------------------- | ------ |
27 | | 40 Inch Display | [Link1](https://www.bestbuy.com/site/hisense-40-class-a4g-series-led-full-hd-smart-vidaa-tv/6511284.p?skuId=6511284#tab=buyingOptions?bof=openbox) (Or Equivalent) | $142.98 |
28 | | Motherboard [Libre] | [Link3](https://www.amazon.com/Libre-Computer-AML-S905X-CC-Potato-64-bit/dp/B074P6BNGZ) | $38.54 (Changed because this board has pretty good performence and comes at a lower cost) |
29 | | Mirror Film | [Link4](https://www.amazon.com/gp/product/B06Y2C79FC/ref=ox_sc_act_title_1?smid=AELVJXV4J0ALF&psc=1) x2 | $18.83
30 | | Acrylic Panel | [HD](https://www.homedepot.com/p/OPTIX-36-in-x-30-in-x-093-in-Acrylic-Sheet-MC-06/202038044) | $42.21
31 | | Wood / Frame for mirror | Owned | $0.00
32 | | Speakers for Raspberry PI | Owned | $0.00
33 | | MicroSD Card and Display cables | Owned | $0.00
34 | | RGB Light Strip for lighting (Smart) | Owned | $0.00
35 | | Raspberry PI Motion Sensor | Owned | $0.00
36 | | Alexa Enabled Device (Echo Dot) | Owned | $0.00 |
37 | | Raspberry Pi Camera | Cost's Covered By Me As it goes over budget [Link5](https://www.amazon.com/Arducam-Megapixels-Sensor-OV5647-Raspberry/dp/B012V1HEP4/) | $0.00
38 | | Total | $242.56 | (includes all extra costs, tax, s&h, etc.)
39 |
40 |
--------------------------------------------------------------------------------