├── src
└── 2025_hands-on
│ ├── environments
│ ├── dev
│ │ ├── outputs.tf
│ │ ├── variables.tf
│ │ ├── main.tf
│ │ └── .terraform.lock.hcl
│ ├── production
│ │ ├── outputs.tf
│ │ ├── variables.tf
│ │ ├── main.tf
│ │ └── .terraform.lock.hcl
│ └── staging
│ │ ├── outputs.tf
│ │ ├── variables.tf
│ │ ├── main.tf
│ │ └── .terraform.lock.hcl
│ └── modules
│ ├── storage
│ ├── variables.tf
│ └── main.tf
│ └── integration
│ ├── variables.tf
│ └── main.tf
├── .github
├── ISSUE_TEMPLATE
│ ├── config.yaml
│ └── generic.md
├── renovate.json5
└── workflows
│ ├── textlint.yaml
│ └── ci.yml
├── .gitignore
├── assets
├── run-new-ui.png
├── policy-create-newui.png
├── teams
│ ├── Invite_a_user.png
│ ├── create_team.png
│ ├── add_team_member.png
│ ├── workspace_team.png
│ ├── Invite_a_user_button.png
│ ├── organization_access.png
│ └── workspace_permission.png
└── tfc-remote-state
│ ├── state-1.png
│ ├── state-2.png
│ ├── state-3.png
│ ├── new_state.png
│ ├── create-org.png
│ ├── user_setting.png
│ ├── execution_mode.png
│ ├── generate_token.png
│ ├── new_workspace.png
│ ├── create-org-name.png
│ ├── create-ws-new-ui.png
│ ├── generated_token.png
│ ├── create-ws-new-ui-2.png
│ ├── account_setting_detail.png
│ └── create-org-inputmail.png
├── package.json
├── _typos.toml
├── .textlintrc.json
├── README.md
└── contents
├── notifications.md
├── teams.md
├── vcs.md
├── vcs-azure.md
├── module.md
├── tfc-remote-state.md
├── variables.md
├── hello-terraform.md
├── api-driven-run.md
├── tf-api.md
└── sentinel.md
/src/2025_hands-on/environments/dev/outputs.tf:
--------------------------------------------------------------------------------
1 |
--------------------------------------------------------------------------------
/src/2025_hands-on/environments/dev/variables.tf:
--------------------------------------------------------------------------------
1 |
2 |
--------------------------------------------------------------------------------
/src/2025_hands-on/environments/production/outputs.tf:
--------------------------------------------------------------------------------
1 |
--------------------------------------------------------------------------------
/src/2025_hands-on/environments/staging/outputs.tf:
--------------------------------------------------------------------------------
1 |
--------------------------------------------------------------------------------
/src/2025_hands-on/environments/staging/variables.tf:
--------------------------------------------------------------------------------
1 |
2 |
--------------------------------------------------------------------------------
/src/2025_hands-on/environments/production/variables.tf:
--------------------------------------------------------------------------------
1 |
2 |
--------------------------------------------------------------------------------
/.github/ISSUE_TEMPLATE/config.yaml:
--------------------------------------------------------------------------------
1 | blank_issues_enabled: false
2 |
--------------------------------------------------------------------------------
/.gitignore:
--------------------------------------------------------------------------------
1 | .idea
2 | .terraform
3 | *.tfstate*
4 | .DS_Store
5 | node_modules/
--------------------------------------------------------------------------------
/assets/run-new-ui.png:
--------------------------------------------------------------------------------
https://raw.githubusercontent.com/hashicorp-japan/terraform-workshop-jp/HEAD/assets/run-new-ui.png
--------------------------------------------------------------------------------
/src/2025_hands-on/modules/storage/variables.tf:
--------------------------------------------------------------------------------
1 | variable "bucket_name" {
2 | type = string
3 | default = ""
4 | }
5 |
--------------------------------------------------------------------------------
/src/2025_hands-on/modules/integration/variables.tf:
--------------------------------------------------------------------------------
1 | variable "sqs_queue_name" {
2 | type = string
3 | default = ""
4 | }
--------------------------------------------------------------------------------
/assets/policy-create-newui.png:
--------------------------------------------------------------------------------
https://raw.githubusercontent.com/hashicorp-japan/terraform-workshop-jp/HEAD/assets/policy-create-newui.png
--------------------------------------------------------------------------------
/assets/teams/Invite_a_user.png:
--------------------------------------------------------------------------------
https://raw.githubusercontent.com/hashicorp-japan/terraform-workshop-jp/HEAD/assets/teams/Invite_a_user.png
--------------------------------------------------------------------------------
/assets/teams/create_team.png:
--------------------------------------------------------------------------------
https://raw.githubusercontent.com/hashicorp-japan/terraform-workshop-jp/HEAD/assets/teams/create_team.png
--------------------------------------------------------------------------------
/assets/teams/add_team_member.png:
--------------------------------------------------------------------------------
https://raw.githubusercontent.com/hashicorp-japan/terraform-workshop-jp/HEAD/assets/teams/add_team_member.png
--------------------------------------------------------------------------------
/assets/teams/workspace_team.png:
--------------------------------------------------------------------------------
https://raw.githubusercontent.com/hashicorp-japan/terraform-workshop-jp/HEAD/assets/teams/workspace_team.png
--------------------------------------------------------------------------------
/assets/tfc-remote-state/state-1.png:
--------------------------------------------------------------------------------
https://raw.githubusercontent.com/hashicorp-japan/terraform-workshop-jp/HEAD/assets/tfc-remote-state/state-1.png
--------------------------------------------------------------------------------
/assets/tfc-remote-state/state-2.png:
--------------------------------------------------------------------------------
https://raw.githubusercontent.com/hashicorp-japan/terraform-workshop-jp/HEAD/assets/tfc-remote-state/state-2.png
--------------------------------------------------------------------------------
/assets/tfc-remote-state/state-3.png:
--------------------------------------------------------------------------------
https://raw.githubusercontent.com/hashicorp-japan/terraform-workshop-jp/HEAD/assets/tfc-remote-state/state-3.png
--------------------------------------------------------------------------------
/assets/teams/Invite_a_user_button.png:
--------------------------------------------------------------------------------
https://raw.githubusercontent.com/hashicorp-japan/terraform-workshop-jp/HEAD/assets/teams/Invite_a_user_button.png
--------------------------------------------------------------------------------
/assets/teams/organization_access.png:
--------------------------------------------------------------------------------
https://raw.githubusercontent.com/hashicorp-japan/terraform-workshop-jp/HEAD/assets/teams/organization_access.png
--------------------------------------------------------------------------------
/assets/teams/workspace_permission.png:
--------------------------------------------------------------------------------
https://raw.githubusercontent.com/hashicorp-japan/terraform-workshop-jp/HEAD/assets/teams/workspace_permission.png
--------------------------------------------------------------------------------
/assets/tfc-remote-state/new_state.png:
--------------------------------------------------------------------------------
https://raw.githubusercontent.com/hashicorp-japan/terraform-workshop-jp/HEAD/assets/tfc-remote-state/new_state.png
--------------------------------------------------------------------------------
/assets/tfc-remote-state/create-org.png:
--------------------------------------------------------------------------------
https://raw.githubusercontent.com/hashicorp-japan/terraform-workshop-jp/HEAD/assets/tfc-remote-state/create-org.png
--------------------------------------------------------------------------------
/assets/tfc-remote-state/user_setting.png:
--------------------------------------------------------------------------------
https://raw.githubusercontent.com/hashicorp-japan/terraform-workshop-jp/HEAD/assets/tfc-remote-state/user_setting.png
--------------------------------------------------------------------------------
/assets/tfc-remote-state/execution_mode.png:
--------------------------------------------------------------------------------
https://raw.githubusercontent.com/hashicorp-japan/terraform-workshop-jp/HEAD/assets/tfc-remote-state/execution_mode.png
--------------------------------------------------------------------------------
/assets/tfc-remote-state/generate_token.png:
--------------------------------------------------------------------------------
https://raw.githubusercontent.com/hashicorp-japan/terraform-workshop-jp/HEAD/assets/tfc-remote-state/generate_token.png
--------------------------------------------------------------------------------
/assets/tfc-remote-state/new_workspace.png:
--------------------------------------------------------------------------------
https://raw.githubusercontent.com/hashicorp-japan/terraform-workshop-jp/HEAD/assets/tfc-remote-state/new_workspace.png
--------------------------------------------------------------------------------
/assets/tfc-remote-state/create-org-name.png:
--------------------------------------------------------------------------------
https://raw.githubusercontent.com/hashicorp-japan/terraform-workshop-jp/HEAD/assets/tfc-remote-state/create-org-name.png
--------------------------------------------------------------------------------
/assets/tfc-remote-state/create-ws-new-ui.png:
--------------------------------------------------------------------------------
https://raw.githubusercontent.com/hashicorp-japan/terraform-workshop-jp/HEAD/assets/tfc-remote-state/create-ws-new-ui.png
--------------------------------------------------------------------------------
/assets/tfc-remote-state/generated_token.png:
--------------------------------------------------------------------------------
https://raw.githubusercontent.com/hashicorp-japan/terraform-workshop-jp/HEAD/assets/tfc-remote-state/generated_token.png
--------------------------------------------------------------------------------
/assets/tfc-remote-state/create-ws-new-ui-2.png:
--------------------------------------------------------------------------------
https://raw.githubusercontent.com/hashicorp-japan/terraform-workshop-jp/HEAD/assets/tfc-remote-state/create-ws-new-ui-2.png
--------------------------------------------------------------------------------
/assets/tfc-remote-state/account_setting_detail.png:
--------------------------------------------------------------------------------
https://raw.githubusercontent.com/hashicorp-japan/terraform-workshop-jp/HEAD/assets/tfc-remote-state/account_setting_detail.png
--------------------------------------------------------------------------------
/assets/tfc-remote-state/create-org-inputmail.png:
--------------------------------------------------------------------------------
https://raw.githubusercontent.com/hashicorp-japan/terraform-workshop-jp/HEAD/assets/tfc-remote-state/create-org-inputmail.png
--------------------------------------------------------------------------------
/package.json:
--------------------------------------------------------------------------------
1 | {
2 | "devDependencies": {
3 | "textlint": "^15.5.0",
4 | "textlint-rule-ja-space-between-half-and-full-width": "^2.4.2",
5 | "textlint-rule-terminology": "^5.2.16"
6 | }
7 | }
8 |
--------------------------------------------------------------------------------
/src/2025_hands-on/modules/integration/main.tf:
--------------------------------------------------------------------------------
1 |
2 | resource "aws_sqs_queue" "example_sqs" {
3 | name = var.sqs_queue_name
4 | delay_seconds = 60
5 | max_message_size = 2048
6 | message_retention_seconds = 86400
7 | receive_wait_time_seconds = 10
8 | }
--------------------------------------------------------------------------------
/.github/ISSUE_TEMPLATE/generic.md:
--------------------------------------------------------------------------------
1 | ---
2 | name: Generic Issue Template
3 | about: Describe this issue template's purpose here.
4 | title: ''
5 | labels: ''
6 | assignees: ''
7 |
8 | ---
9 |
10 | ## Issue Overview
11 | Please describe the overview/details of issue you observed.
12 |
13 |
14 | ## (Optional) ToDo
15 | Please fill out the action items if you have already ideas for fixing issue.
16 | - [ ]
17 | - [ ]
18 |
--------------------------------------------------------------------------------
/.github/renovate.json5:
--------------------------------------------------------------------------------
1 | // refs: https://docs.renovatebot.com/configuration-options/
2 | {
3 | "$schema": "https://docs.renovatebot.com/renovate-schema.json",
4 | "extends": [
5 | "config:base",
6 | "schedule:weekly",
7 | "group:allNonMajor",
8 | ":semanticCommits",
9 | ":semanticCommitTypeAll(chore)",
10 | ":disableDependencyDashboard"
11 | ],
12 | "labels": ["deps", "renovate"],
13 | "baseBranches": ["main"],
14 | "rangeStrategy": "bump"
15 | }
16 |
--------------------------------------------------------------------------------
/src/2025_hands-on/environments/dev/main.tf:
--------------------------------------------------------------------------------
1 | terraform {
2 | required_providers {
3 | aws = {
4 | source = "hashicorp/aws"
5 | version = "6.26.0"
6 | }
7 | }
8 | }
9 |
10 | provider "aws" {
11 | # access_key = var.aws_access_key
12 | # secret_key = var.aws_secret_key
13 | region = "ap-northeast-1"
14 | }
15 |
16 | module "storage" {
17 | source = "./../../modules/storage"
18 | }
19 |
20 | module "integration" {
21 | source = "./../../modules/integration"
22 | }
--------------------------------------------------------------------------------
/src/2025_hands-on/environments/staging/main.tf:
--------------------------------------------------------------------------------
1 | terraform {
2 | required_providers {
3 | aws = {
4 | source = "hashicorp/aws"
5 | version = "6.26.0"
6 | }
7 | }
8 | }
9 |
10 | provider "aws" {
11 | # access_key = var.aws_access_key
12 | # secret_key = var.aws_secret_key
13 | region = "ap-northeast-1"
14 | }
15 |
16 | module "storage" {
17 | source = "./../../modules/storage"
18 | }
19 |
20 | module "integration" {
21 | source = "./../../modules/integration"
22 | }
--------------------------------------------------------------------------------
/src/2025_hands-on/environments/production/main.tf:
--------------------------------------------------------------------------------
1 | terraform {
2 | required_providers {
3 | aws = {
4 | source = "hashicorp/aws"
5 | version = "6.26.0"
6 | }
7 | }
8 | }
9 |
10 | provider "aws" {
11 | # access_key = var.aws_access_key
12 | # secret_key = var.aws_secret_key
13 | region = "ap-northeast-1"
14 | }
15 |
16 | module "storage" {
17 | source = "./../../modules/storage"
18 | }
19 |
20 | module "integration" {
21 | source = "./../../modules/integration"
22 | }
--------------------------------------------------------------------------------
/_typos.toml:
--------------------------------------------------------------------------------
1 | [default]
2 | # // spellchecker:disable-line を行末に入れるとチェックを回避
3 | extend-ignore-re = [
4 | "(?Rm)^.*(#|//)\\s*spellchecker:disable-line$",
5 | ]
6 |
7 | [default.extend-words]
8 | HashiCorp = "HashiCorp"
9 | Hashi = "Hashi"
10 | Terraform = "Terraform"
11 | Vault = "Vault"
12 | Consul = "Consul"
13 | Nomad = "Nomad"
14 | Vagrant = "Vagrant"
15 | Packer = "Packer"
16 | Boundary = "Boundary"
17 | Waypoint = "Waypoint"
18 | HCL = "HCL"
19 | Sentinel = "Sentinel"
20 | HCP = "HCP"
21 | InfraGraph = "InfraGraph"
22 |
--------------------------------------------------------------------------------
/.github/workflows/textlint.yaml:
--------------------------------------------------------------------------------
1 | name: textlint
2 |
3 | on:
4 | pull_request:
5 | paths:
6 | - "contents/**/*.md"
7 | workflow_dispatch:
8 |
9 | permissions:
10 | contents: read
11 |
12 | jobs:
13 | textlint-ja:
14 | runs-on: ubuntu-24.04
15 | steps:
16 | - name: Checkout
17 | uses: actions/checkout@v6
18 |
19 | - name: Setup Node.js
20 | uses: actions/setup-node@v6
21 |
22 | - name: Install textlint rules
23 | run: npm install -D textlint textlint-rule-preset-ja-spacing
24 |
25 | - name: Run textlint
26 | run: |
27 | export PATH="$PATH:$(npm root)/.bin"
28 | textlint README.md ./contents/**/*.md
29 |
--------------------------------------------------------------------------------
/src/2025_hands-on/modules/storage/main.tf:
--------------------------------------------------------------------------------
1 | resource "aws_s3_bucket" "example_bucket" {
2 | bucket = var.bucket_name
3 |
4 | tags = {
5 | Name = "an example bucket"
6 | }
7 | }
8 |
9 | /*
10 | * Continuous validation sample codes
11 | */
12 | resource "aws_s3_bucket_server_side_encryption_configuration" "this" {
13 | bucket = aws_s3_bucket.example_bucket.id
14 |
15 | rule {
16 | apply_server_side_encryption_by_default {
17 | sse_algorithm = "AES256"
18 | }
19 | }
20 | }
21 |
22 | check "s3_bucket_encryption" {
23 | assert {
24 | condition = contains([
25 | for rule in aws_s3_bucket_server_side_encryption_configuration.this.rule :
26 | rule.apply_server_side_encryption_by_default[0].sse_algorithm
27 | ], "AES256")
28 | error_message = "S3 bucket is not encrypted"
29 | }
30 | }
--------------------------------------------------------------------------------
/.textlintrc.json:
--------------------------------------------------------------------------------
1 | {
2 | "plugins": {},
3 | "filters": {},
4 | "rules": {
5 | "ja-space-between-half-and-full-width": {
6 | "space": "always",
7 | "lintStyledNode": true
8 | },
9 | "terminology": {
10 | "defaultTerms": true,
11 | "terms": [
12 | "HashiCorp",
13 | "HCP",
14 | "Terraform",
15 | "HCP Terraform",
16 | "Terraform Enterprise",
17 | "Vault",
18 | "HCP Vault",
19 | "HCP Vault Secrets",
20 | "Vault Enterprise",
21 | "Consul",
22 | "HCP Consul",
23 | "Consul Enterprise",
24 | "Nomad",
25 | "Nomad Enterprise",
26 | "Vagrant",
27 | "Packer",
28 | "HCP Packer",
29 | "Boundary",
30 | "HCP Boundary",
31 | "Waypoint",
32 | "HCP Waypoint",
33 | "Project Infragraph",
34 | "HCL",
35 | "Sentinel",
36 | "GitHub Actions"
37 | ]
38 | }
39 | }
40 | }
--------------------------------------------------------------------------------
/.github/workflows/ci.yml:
--------------------------------------------------------------------------------
1 | name: CI Checks
2 |
3 | on:
4 | push:
5 | branches: [ "main", "master" ]
6 | pull_request:
7 | workflow_dispatch:
8 |
9 | jobs:
10 | # 1. リンク切れチェック
11 | link-check:
12 | runs-on: ubuntu-latest
13 | permissions:
14 | contents: read
15 | steps:
16 | - uses: actions/checkout@v4
17 | - name: Link Checker
18 | uses: lycheeverse/lychee-action@v1
19 | with:
20 | args: --verbose --no-progress './**/*.md'
21 | env:
22 | GITHUB_TOKEN: ${{secrets.GITHUB_TOKEN}}
23 |
24 | # 2. タイポチェック
25 | typos-check:
26 | runs-on: ubuntu-latest
27 | steps:
28 | - uses: actions/checkout@v4
29 | - name: Typos source code spell checker
30 | uses: crate-ci/typos@master
31 |
32 | # 3. 表記揺れチェック (Textlint)
33 | textlint-check:
34 | runs-on: ubuntu-latest
35 | steps:
36 | - uses: actions/checkout@v4
37 | - name: Setup Node.js
38 | uses: actions/setup-node@v4
39 | with:
40 | node-version: '20'
41 | cache: 'npm'
42 | - name: Install dependencies
43 | run: npm ci
44 | - name: Run textlint
45 | run: npx textlint --config .textlintrc.json '**/*.md'
--------------------------------------------------------------------------------
/README.md:
--------------------------------------------------------------------------------
1 | # HashiCorp Terraform Enterprise Workshop
2 |
3 | [Terraform](https://www.terraform.io/) は HashiCorp が中心に開発をする OSS のプロビジョニングツールです。このレイヤではほぼ業界標準のソフトウェアと位置付けられており、国内外のコミュニティなども非常に活発です。
4 |
5 | Terraform はインフラのプロビジョニングツールというイメージが強いですが、現在 150 以上のプロバイダに対応しており、幅広いレイヤでの利用が可能です。
6 |
7 | OSS 版ではすでに多くの情報が日本語でも調べることが可能なため、本ワークショップはエンタープライズ機能に特化した内容にしています。**Terraform のコアの機能を学習する内容ではないのでご注意ください。**
8 |
9 | ## Pre-requisite
10 |
11 | * 環境
12 | * macOS or Linux
13 |
14 | * ソフトウェア
15 | * Terraform
16 | * jq,watch,curl
17 | * git cli
18 | * aws / gcloud
19 |
20 | * アカウント
21 | * GitHub
22 | * Terraform Cloud
23 | * AWS / GCP
24 |
25 | ## 資料
26 |
27 | * [Terraform Enterprise Overview](https://docs.google.com/presentation/d/1Ovdee0FIrJ_h66B5DToQNYKWJ9XRbudS0RCk4d_x1Eg/edit?usp=sharing)
28 |
29 | ## アジェンダ
30 | * [初めての Terraform](https://github.com/hashicorp-japan/terraform-workshop/blob/master/contents/hello-terraform.md)
31 | * [Terraform Cloud によるリモートステート管理](./contents/tfc-remote-state.md)
32 | * VCS 連携 ([GitHub](https://github.com/hashicorp-japan/terraform-workshop/blob/master/contents/vcs.md), [Azure DevOps](https://github.com/hashicorp-japan/terraform-workshop/blob/master/contents/vcs-azure.md))
33 | * [Secure Variable Storage](https://github.com/hashicorp-japan/terraform-workshop/blob/master/contents/variables.md)
34 | * [Enterprise 機能 1: RBAC](./contents/teams.md)
35 | * [Enterprise 機能 2: Policy as Code](https://github.com/hashicorp-japan/terraform-workshop/blob/master/contents/sentinel.md)
36 | * [Enterprise 機能 3: Private Module Registry](https://github.com/hashicorp-japan/terraform-workshop/blob/master/contents/module.md)
37 | * [Enterprise 機能 4: Terraform Enterprise API](https://github.com/hashicorp-japan/terraform-workshop/blob/master/contents/tf-api.md)
38 | * [Enterprise 機能 5: Notifications](https://github.com/hashicorp-japan/terraform-workshop/blob/master/contents/notifications.md)
39 | * CLI Drive Run
40 | * [API Drive Run](./contents/api-driven-run.md)
41 | * Terraform Enterprise のインストール
42 |
--------------------------------------------------------------------------------
/src/2025_hands-on/environments/dev/.terraform.lock.hcl:
--------------------------------------------------------------------------------
1 | # This file is maintained automatically by "terraform init".
2 | # Manual edits may be lost in future updates.
3 |
4 | provider "registry.terraform.io/hashicorp/aws" {
5 | version = "6.26.0"
6 | constraints = "6.26.0"
7 | hashes = [
8 | "h1:/G7Fb/OINBkXvq2LFLrPfPBxqBMdr1cqFRIAkD/XhyM=",
9 | "h1:6Wu7+MenomJx4k82rl5/lHMcP7xh0CoeCY9PhuhbcdI=",
10 | "h1:79RHpchB+IjuZLMNkbCSjkguoAOUsSWnr0N6Bei+PxI=",
11 | "h1:9+Cx2w/zhs5ROinFqFStL+l8bu1Mi+B3+WROcEHEoRI=",
12 | "h1:B7X8EU6aZ9KzIvP0VBDhhgadgjXIrUgMXt/pJ6EUXvo=",
13 | "h1:J1tK3tbpNdEvTLs00Z0aUUgovF/fC6GCRcD3p+6TXqw=",
14 | "h1:NyoEMqqQt3roRP7QB/UvZDKl5mpuSbgzqQqduB5Fo8M=",
15 | "h1:YOnnhggw+uxkhLtx96Vait5tBlSBaufCQCTYmZ+ZIyY=",
16 | "h1:bq6gvZehoO4jBx/MsjIyMFHU56DX+TP7ndl34o3Fncs=",
17 | "h1:iut0YILWmDkv5f/rMsNCiAlVz9Iop1r2s3FIGAiHatU=",
18 | "h1:kkP6pGZ57uBS2TuYjLy4SHzdU2nig9jTGYz5ikQBsyk=",
19 | "h1:pxymO0z9mzldaBpAYLY1OigD8MT0QUmH+owW+9/s+UQ=",
20 | "h1:saa2buUwCBo+WpGC96bGRbmUsl5pO13SXFeffCpLNJE=",
21 | "h1:yqvGC5L3f1fznyq+J/fGM86cWQ8A6fdMaIZvTSel1UI=",
22 | "zh:038fd943de79acd9f9f73106fa0eba588c6a0d4e0993e146f51f3aa043728c5f",
23 | "zh:06fa0177d33d3d3f9cb7e205fbeb1c4c3095ba637e2b4d292429401ec5612e81",
24 | "zh:212714fc8b6ee57e26d11d0fdf2ecfe23b37a6eac1008b399c1d790528c3f072",
25 | "zh:3197725d772f360e9e466b68a5ba67363e9f6786809c9adefc50f7f7e525bf42",
26 | "zh:33385539f3e3fafb96c6036421fd72b05c76505eeefaaff8a089c3eeba25db65",
27 | "zh:4ce065e0d3c384d11c1b59fe92582d331aae27ff6e019ace07b8cedef5653aae",
28 | "zh:67863d6ff5517db2c0b8097443708dca548f1922d2e08ad76a98d493ff480cb1",
29 | "zh:771ccf61fc107013b437b0a05cdb342823a99200653bfe9b892702b9fd8997fe",
30 | "zh:80adcf83bef9d683606c48bbe53cbb2b5a04878641674e957939b5e8f124ada0",
31 | "zh:9675c7f209db8e64ba2d5197acc8ba0073bd73b48c3dd61a1961a44844bc8a81",
32 | "zh:9b12af85486a96aedd8d7984b0ff811a4b42e3d88dad1a3fb4c0b580d04fa425",
33 | "zh:b47d0f5eff91c94c5d5677815b9361e64dfbe2ee2d59ba2867e2d0f5fa7181e4",
34 | "zh:b4933663b8d6cc1cfb51aa47bd8f26c06012ee2e278e57663faffdc722dd5baa",
35 | "zh:d53a94ecdb6b68a8dc19ec6e16ba2d4c2acde575af254d1b8b80143e57c76abf",
36 | "zh:e7cb8c1770c6f87c5ce1d3e28b838380bb8e5296dd03034b796168de8be1c7ec",
37 | ]
38 | }
39 |
--------------------------------------------------------------------------------
/src/2025_hands-on/environments/production/.terraform.lock.hcl:
--------------------------------------------------------------------------------
1 | # This file is maintained automatically by "terraform init".
2 | # Manual edits may be lost in future updates.
3 |
4 | provider "registry.terraform.io/hashicorp/aws" {
5 | version = "6.26.0"
6 | constraints = "6.26.0"
7 | hashes = [
8 | "h1:/G7Fb/OINBkXvq2LFLrPfPBxqBMdr1cqFRIAkD/XhyM=",
9 | "h1:6Wu7+MenomJx4k82rl5/lHMcP7xh0CoeCY9PhuhbcdI=",
10 | "h1:79RHpchB+IjuZLMNkbCSjkguoAOUsSWnr0N6Bei+PxI=",
11 | "h1:9+Cx2w/zhs5ROinFqFStL+l8bu1Mi+B3+WROcEHEoRI=",
12 | "h1:B7X8EU6aZ9KzIvP0VBDhhgadgjXIrUgMXt/pJ6EUXvo=",
13 | "h1:J1tK3tbpNdEvTLs00Z0aUUgovF/fC6GCRcD3p+6TXqw=",
14 | "h1:NyoEMqqQt3roRP7QB/UvZDKl5mpuSbgzqQqduB5Fo8M=",
15 | "h1:YOnnhggw+uxkhLtx96Vait5tBlSBaufCQCTYmZ+ZIyY=",
16 | "h1:bq6gvZehoO4jBx/MsjIyMFHU56DX+TP7ndl34o3Fncs=",
17 | "h1:iut0YILWmDkv5f/rMsNCiAlVz9Iop1r2s3FIGAiHatU=",
18 | "h1:kkP6pGZ57uBS2TuYjLy4SHzdU2nig9jTGYz5ikQBsyk=",
19 | "h1:pxymO0z9mzldaBpAYLY1OigD8MT0QUmH+owW+9/s+UQ=",
20 | "h1:saa2buUwCBo+WpGC96bGRbmUsl5pO13SXFeffCpLNJE=",
21 | "h1:yqvGC5L3f1fznyq+J/fGM86cWQ8A6fdMaIZvTSel1UI=",
22 | "zh:038fd943de79acd9f9f73106fa0eba588c6a0d4e0993e146f51f3aa043728c5f",
23 | "zh:06fa0177d33d3d3f9cb7e205fbeb1c4c3095ba637e2b4d292429401ec5612e81",
24 | "zh:212714fc8b6ee57e26d11d0fdf2ecfe23b37a6eac1008b399c1d790528c3f072",
25 | "zh:3197725d772f360e9e466b68a5ba67363e9f6786809c9adefc50f7f7e525bf42",
26 | "zh:33385539f3e3fafb96c6036421fd72b05c76505eeefaaff8a089c3eeba25db65",
27 | "zh:4ce065e0d3c384d11c1b59fe92582d331aae27ff6e019ace07b8cedef5653aae",
28 | "zh:67863d6ff5517db2c0b8097443708dca548f1922d2e08ad76a98d493ff480cb1",
29 | "zh:771ccf61fc107013b437b0a05cdb342823a99200653bfe9b892702b9fd8997fe",
30 | "zh:80adcf83bef9d683606c48bbe53cbb2b5a04878641674e957939b5e8f124ada0",
31 | "zh:9675c7f209db8e64ba2d5197acc8ba0073bd73b48c3dd61a1961a44844bc8a81",
32 | "zh:9b12af85486a96aedd8d7984b0ff811a4b42e3d88dad1a3fb4c0b580d04fa425",
33 | "zh:b47d0f5eff91c94c5d5677815b9361e64dfbe2ee2d59ba2867e2d0f5fa7181e4",
34 | "zh:b4933663b8d6cc1cfb51aa47bd8f26c06012ee2e278e57663faffdc722dd5baa",
35 | "zh:d53a94ecdb6b68a8dc19ec6e16ba2d4c2acde575af254d1b8b80143e57c76abf",
36 | "zh:e7cb8c1770c6f87c5ce1d3e28b838380bb8e5296dd03034b796168de8be1c7ec",
37 | ]
38 | }
39 |
--------------------------------------------------------------------------------
/src/2025_hands-on/environments/staging/.terraform.lock.hcl:
--------------------------------------------------------------------------------
1 | # This file is maintained automatically by "terraform init".
2 | # Manual edits may be lost in future updates.
3 |
4 | provider "registry.terraform.io/hashicorp/aws" {
5 | version = "6.26.0"
6 | constraints = "6.26.0"
7 | hashes = [
8 | "h1:/G7Fb/OINBkXvq2LFLrPfPBxqBMdr1cqFRIAkD/XhyM=",
9 | "h1:6Wu7+MenomJx4k82rl5/lHMcP7xh0CoeCY9PhuhbcdI=",
10 | "h1:79RHpchB+IjuZLMNkbCSjkguoAOUsSWnr0N6Bei+PxI=",
11 | "h1:9+Cx2w/zhs5ROinFqFStL+l8bu1Mi+B3+WROcEHEoRI=",
12 | "h1:B7X8EU6aZ9KzIvP0VBDhhgadgjXIrUgMXt/pJ6EUXvo=",
13 | "h1:J1tK3tbpNdEvTLs00Z0aUUgovF/fC6GCRcD3p+6TXqw=",
14 | "h1:NyoEMqqQt3roRP7QB/UvZDKl5mpuSbgzqQqduB5Fo8M=",
15 | "h1:YOnnhggw+uxkhLtx96Vait5tBlSBaufCQCTYmZ+ZIyY=",
16 | "h1:bq6gvZehoO4jBx/MsjIyMFHU56DX+TP7ndl34o3Fncs=",
17 | "h1:iut0YILWmDkv5f/rMsNCiAlVz9Iop1r2s3FIGAiHatU=",
18 | "h1:kkP6pGZ57uBS2TuYjLy4SHzdU2nig9jTGYz5ikQBsyk=",
19 | "h1:pxymO0z9mzldaBpAYLY1OigD8MT0QUmH+owW+9/s+UQ=",
20 | "h1:saa2buUwCBo+WpGC96bGRbmUsl5pO13SXFeffCpLNJE=",
21 | "h1:yqvGC5L3f1fznyq+J/fGM86cWQ8A6fdMaIZvTSel1UI=",
22 | "zh:038fd943de79acd9f9f73106fa0eba588c6a0d4e0993e146f51f3aa043728c5f",
23 | "zh:06fa0177d33d3d3f9cb7e205fbeb1c4c3095ba637e2b4d292429401ec5612e81",
24 | "zh:212714fc8b6ee57e26d11d0fdf2ecfe23b37a6eac1008b399c1d790528c3f072",
25 | "zh:3197725d772f360e9e466b68a5ba67363e9f6786809c9adefc50f7f7e525bf42",
26 | "zh:33385539f3e3fafb96c6036421fd72b05c76505eeefaaff8a089c3eeba25db65",
27 | "zh:4ce065e0d3c384d11c1b59fe92582d331aae27ff6e019ace07b8cedef5653aae",
28 | "zh:67863d6ff5517db2c0b8097443708dca548f1922d2e08ad76a98d493ff480cb1",
29 | "zh:771ccf61fc107013b437b0a05cdb342823a99200653bfe9b892702b9fd8997fe",
30 | "zh:80adcf83bef9d683606c48bbe53cbb2b5a04878641674e957939b5e8f124ada0",
31 | "zh:9675c7f209db8e64ba2d5197acc8ba0073bd73b48c3dd61a1961a44844bc8a81",
32 | "zh:9b12af85486a96aedd8d7984b0ff811a4b42e3d88dad1a3fb4c0b580d04fa425",
33 | "zh:b47d0f5eff91c94c5d5677815b9361e64dfbe2ee2d59ba2867e2d0f5fa7181e4",
34 | "zh:b4933663b8d6cc1cfb51aa47bd8f26c06012ee2e278e57663faffdc722dd5baa",
35 | "zh:d53a94ecdb6b68a8dc19ec6e16ba2d4c2acde575af254d1b8b80143e57c76abf",
36 | "zh:e7cb8c1770c6f87c5ce1d3e28b838380bb8e5296dd03034b796168de8be1c7ec",
37 | ]
38 | }
39 |
--------------------------------------------------------------------------------
/contents/notifications.md:
--------------------------------------------------------------------------------
1 | # Notifications を利用して Slack と連携する
2 |
3 | ここでは Terraform Enterprise の Notifications の機能を利用して Slack と連携し Terraform Enterprise のイベント通知を受信する方法を試してみます。
4 |
5 | ## Slack の設定
6 |
7 | このハンズオンを完了させるには Slack ワークスペースの`Custom Integration`の編集のできる権限が必要です。
8 |
9 | [こちら](https://hashicorp-apac.slack.com/apps/manage/custom-integrations)にアクセスして、`Incoming WebHook`の設定を行います。
10 |
11 |
12 | 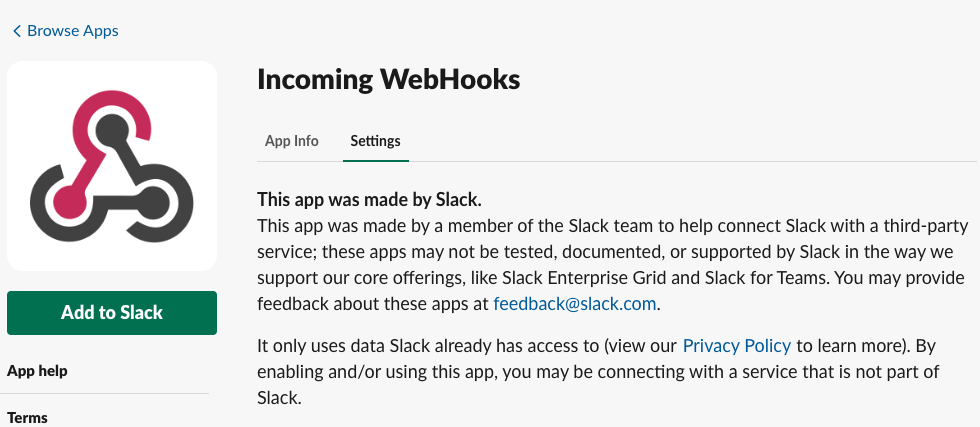 13 |
14 |
15 | `Add to Slack`をクリックして、次の画面に進みます。
16 |
17 |
18 |
13 |
14 |
15 | `Add to Slack`をクリックして、次の画面に進みます。
16 |
17 |
18 | 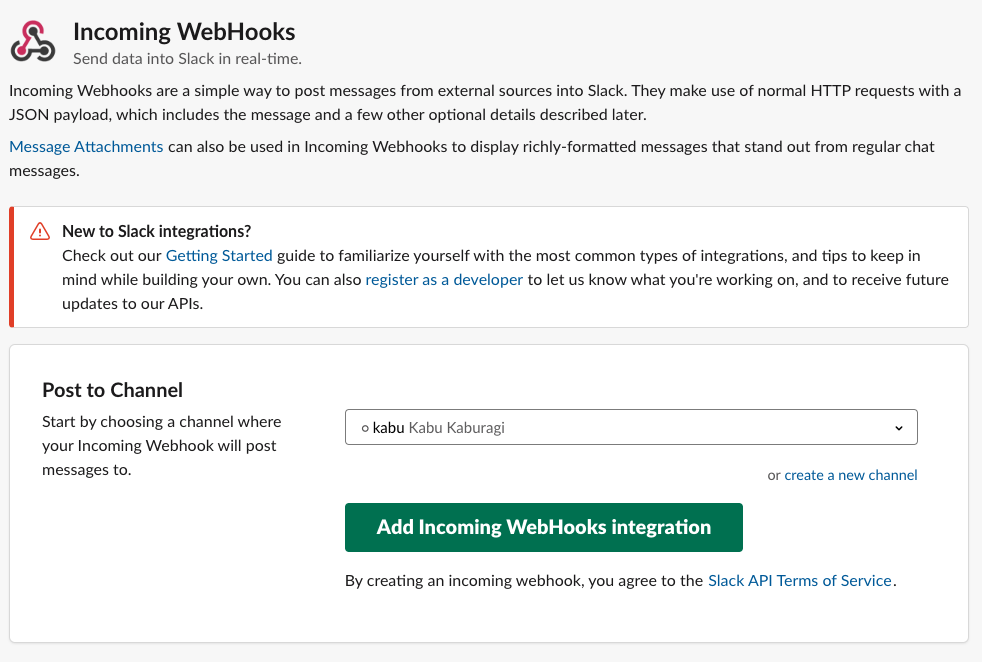 19 |
20 |
21 | `Post to Channel`のプルダウンで通知をしたいチャネルやダイレクトメッセージ先を選択しましょう。
22 |
23 |
24 |
19 |
20 |
21 | `Post to Channel`のプルダウンで通知をしたいチャネルやダイレクトメッセージ先を選択しましょう。
22 |
23 |
24 | 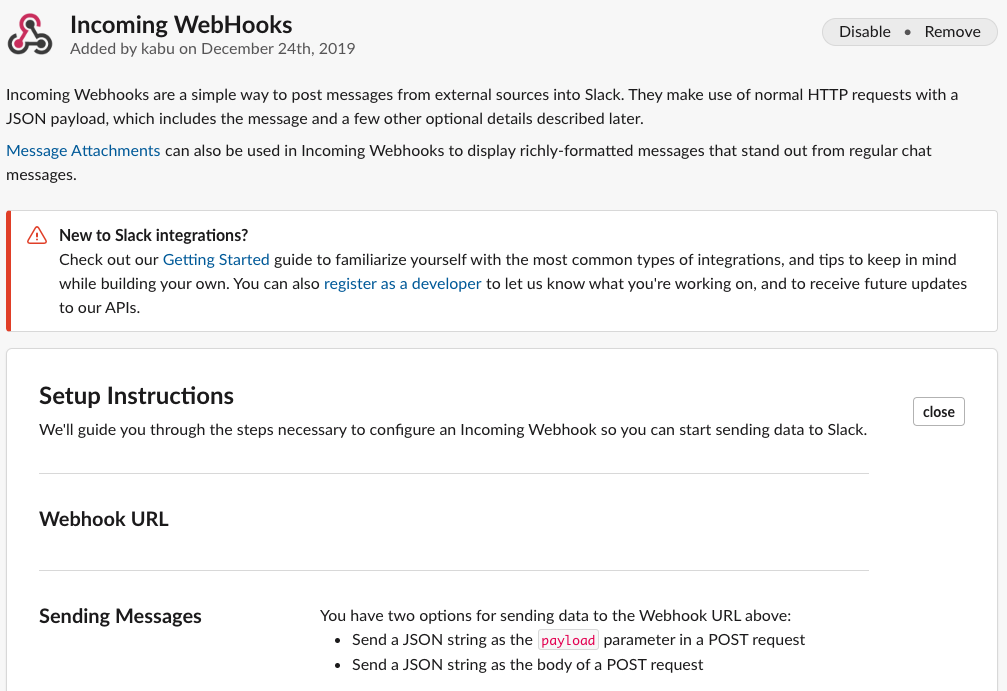 25 |
26 |
27 | `Add Incoming WebHook Integaraion`をクリックすると WebHook の設定画面になります。ここで表示される`WebHook URL`をメモしておきます。
28 |
29 |
30 | **この URL は Slack のトークンも含まれるので絶対に GitHub のレポジトリ等にアップロードしてはいけません。**
31 |
32 | ## Terraform Enterprise の設定
33 |
34 | あとはこの URL を Terraform Entprise のワークスペースに設定するだけです。
35 |
36 | TFC のブラウザの`Workspaces` -> `handson-workshop` -> `Settings` -> `Notifications` -> `Create a Notification`と進んでください。
37 |
38 |
39 |
25 |
26 |
27 | `Add Incoming WebHook Integaraion`をクリックすると WebHook の設定画面になります。ここで表示される`WebHook URL`をメモしておきます。
28 |
29 |
30 | **この URL は Slack のトークンも含まれるので絶対に GitHub のレポジトリ等にアップロードしてはいけません。**
31 |
32 | ## Terraform Enterprise の設定
33 |
34 | あとはこの URL を Terraform Entprise のワークスペースに設定するだけです。
35 |
36 | TFC のブラウザの`Workspaces` -> `handson-workshop` -> `Settings` -> `Notifications` -> `Create a Notification`と進んでください。
37 |
38 |
39 | 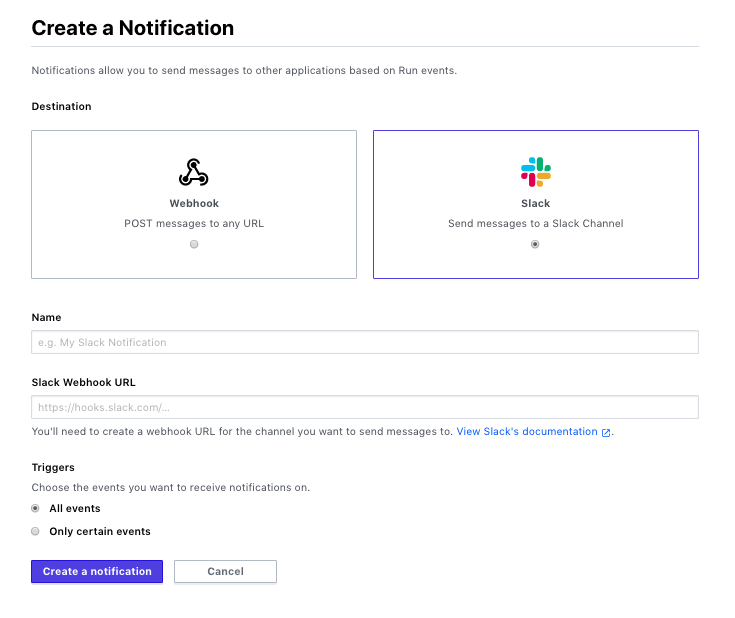 40 |
41 |
42 | General な WebHook と Slack が選択できます。Microsoft Teams や Mattermost など Slack 以外の WebHook での通知に対応しているツールと連携する際は WebHook を選択します。
43 |
44 | ここでは Slack を選択し
45 |
46 | * `Name`: `My Notification`
47 | * `WebHook URL`: 先ほどコピーしたもの
48 | * `Triggers`: `All events`
49 |
50 | を選択し`Create a Notification`をクリックします。
51 |
52 | 完了画面で`Send a Test`をクリックし、Slack に通知が来ることを確認してください。
53 |
54 |
55 |
40 |
41 |
42 | General な WebHook と Slack が選択できます。Microsoft Teams や Mattermost など Slack 以外の WebHook での通知に対応しているツールと連携する際は WebHook を選択します。
43 |
44 | ここでは Slack を選択し
45 |
46 | * `Name`: `My Notification`
47 | * `WebHook URL`: 先ほどコピーしたもの
48 | * `Triggers`: `All events`
49 |
50 | を選択し`Create a Notification`をクリックします。
51 |
52 | 完了画面で`Send a Test`をクリックし、Slack に通知が来ることを確認してください。
53 |
54 |
55 | 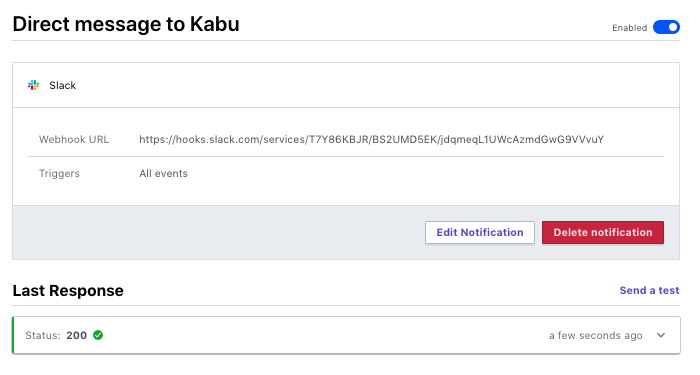 56 |
57 |
58 | ## 実際にプロビジョニングを試す
59 |
60 | 最後に実際のプロビジョニングでどのようなメッセージが来るかを確認してみましょう。`handson-workshop`のメニューで以下のように`Queue Plan`をして下さい。
61 |
62 |
63 |
56 |
57 |
58 | ## 実際にプロビジョニングを試す
59 |
60 | 最後に実際のプロビジョニングでどのようなメッセージが来るかを確認してみましょう。`handson-workshop`のメニューで以下のように`Queue Plan`をして下さい。
61 |
62 |
63 | 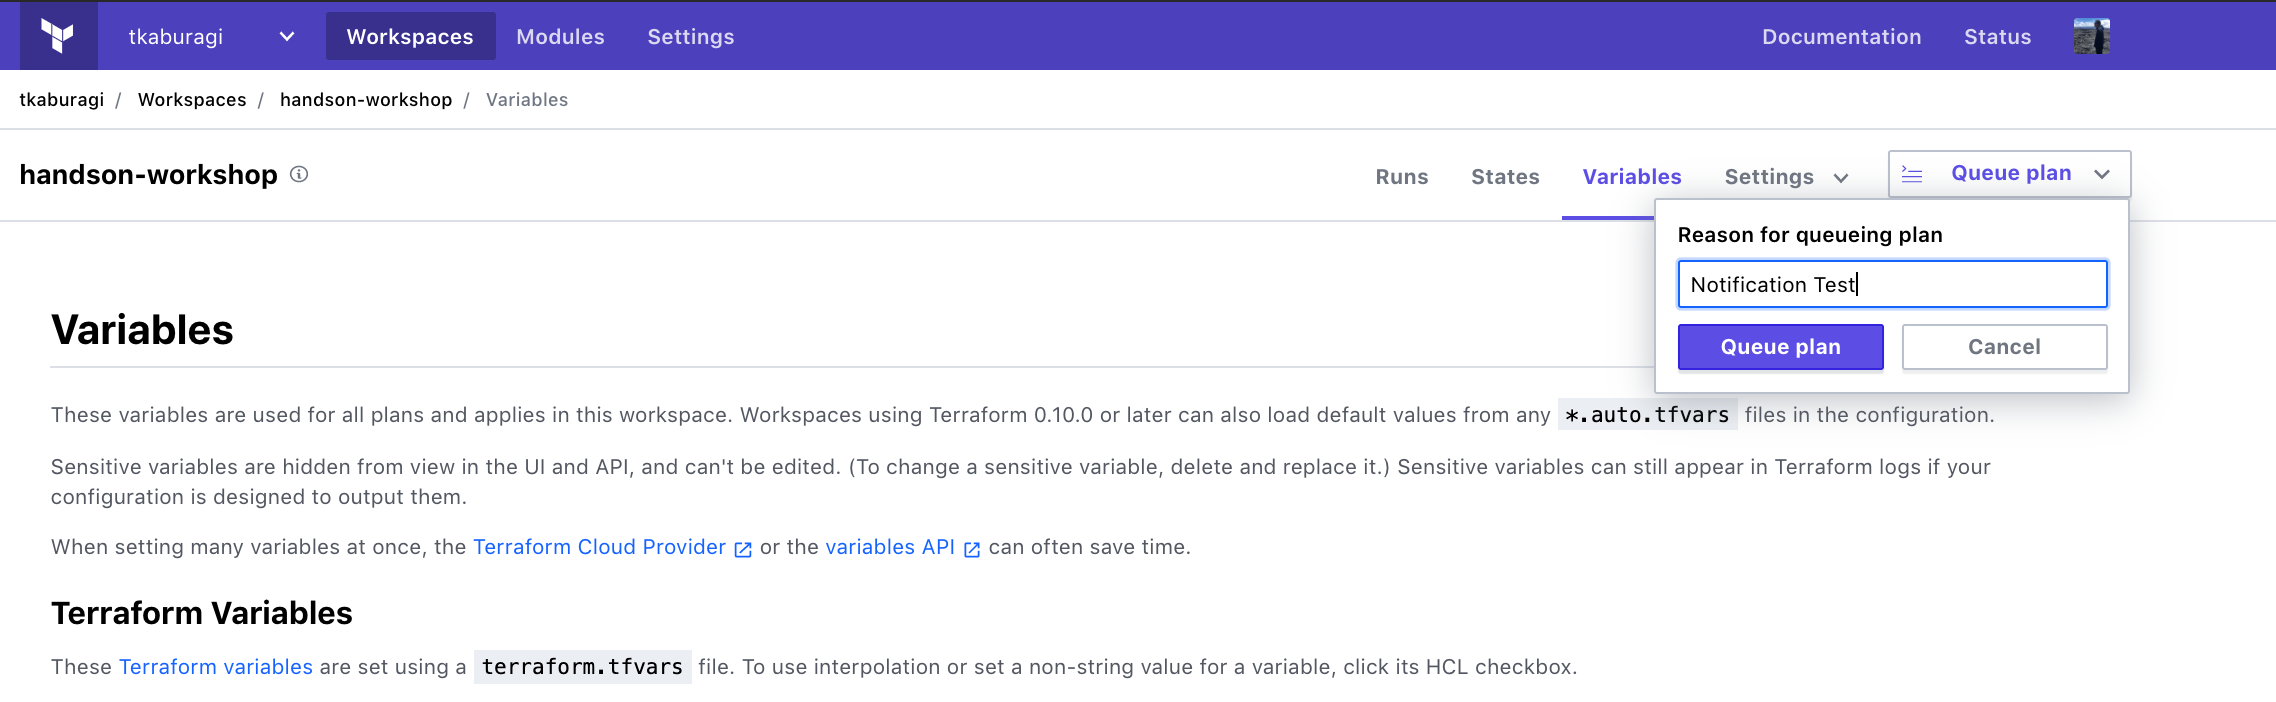 64 |
65 |
66 | `Run`の内容を確認すると、プロビジョニングのワークフローが開始され、都度 Slack に通知が来るでしょう。
67 |
68 |
69 | 以下のように通知が来ていれば成功です。
70 |
71 |
64 |
65 |
66 | `Run`の内容を確認すると、プロビジョニングのワークフローが開始され、都度 Slack に通知が来るでしょう。
67 |
68 |
69 | 以下のように通知が来ていれば成功です。
70 |
71 | 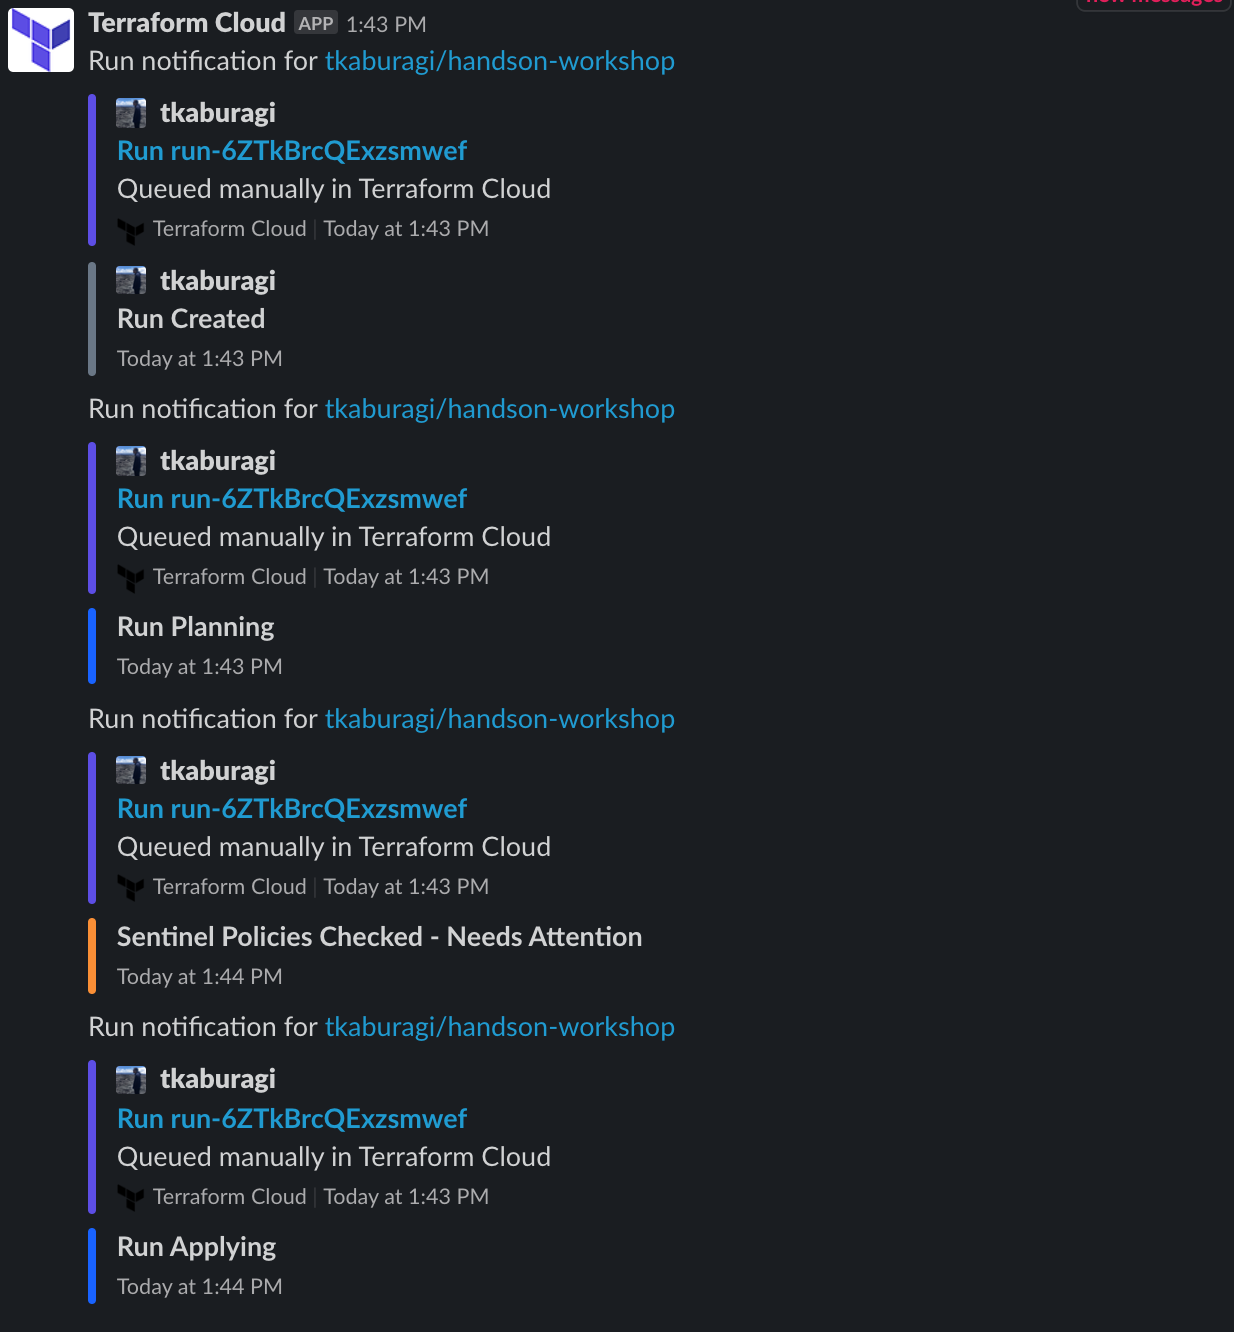 72 |
73 |
74 | 簡単ですが、Terrafrom Enterprise の通知機能を試してみました。
75 |
76 | ## 参考リンク
77 | * [Run Notifications](https://www.terraform.io/docs/cloud/workspaces/notifications.htmlz)
--------------------------------------------------------------------------------
/contents/teams.md:
--------------------------------------------------------------------------------
1 | # Teams in Terraform cloud/enterpise
2 |
3 | Terraform cloud free-tier (無料版)には Team という概念がありません。よって複数のメンバーで使用するときにアクセス制御をつける事ができません。
4 |
5 | その問題を解決するために、Terraform cloud 及び Enterprise には**Roles / Team managerment**という機能が準備されています。
6 | この機能は以下の Terraform offering で利用可能です。
7 | - Terraform cloud team
8 | - Terraform cloud team & governance
9 | - Terraform Enterprise
10 |
11 | Team に対する権限は Organization レベルと Workspace レベルの 2 段階で設定できます。
12 |
13 | ここでのエクササイズでは、organization 及び Workspace に対して Team を作成し、アクセス権限を付与してみます。
14 |
15 | ## Organization レベルの Team の作成
16 |
17 | まず、[Terraform cloud](https://app.terraform.io/)へアクセスし、Organization の**Setting >> Teams**へ行きます。
18 |
19 |
20 |
72 |
73 |
74 | 簡単ですが、Terrafrom Enterprise の通知機能を試してみました。
75 |
76 | ## 参考リンク
77 | * [Run Notifications](https://www.terraform.io/docs/cloud/workspaces/notifications.htmlz)
--------------------------------------------------------------------------------
/contents/teams.md:
--------------------------------------------------------------------------------
1 | # Teams in Terraform cloud/enterpise
2 |
3 | Terraform cloud free-tier (無料版)には Team という概念がありません。よって複数のメンバーで使用するときにアクセス制御をつける事ができません。
4 |
5 | その問題を解決するために、Terraform cloud 及び Enterprise には**Roles / Team managerment**という機能が準備されています。
6 | この機能は以下の Terraform offering で利用可能です。
7 | - Terraform cloud team
8 | - Terraform cloud team & governance
9 | - Terraform Enterprise
10 |
11 | Team に対する権限は Organization レベルと Workspace レベルの 2 段階で設定できます。
12 |
13 | ここでのエクササイズでは、organization 及び Workspace に対して Team を作成し、アクセス権限を付与してみます。
14 |
15 | ## Organization レベルの Team の作成
16 |
17 | まず、[Terraform cloud](https://app.terraform.io/)へアクセスし、Organization の**Setting >> Teams**へ行きます。
18 |
19 |
20 |  21 |
22 |
23 | Team には以下のような 3 つの権限をつけることが出来ます。**ここでの権限は Organization レベルの権限であり、Workspace レベルの権限ではありません。**
24 | - Managed Policies
25 | - Manage workspaces
26 | - Manage VCS setting
27 |
28 |
29 |
21 |
22 |
23 | Team には以下のような 3 つの権限をつけることが出来ます。**ここでの権限は Organization レベルの権限であり、Workspace レベルの権限ではありません。**
24 | - Managed Policies
25 | - Manage workspaces
26 | - Manage VCS setting
27 |
28 |
29 |  30 |
31 |
32 | **Create a New Team**から以下の 3 つのチームを 1 つづつ作成します。
33 |
34 | 1. admin
35 | - admin には 3 つ全ての権限をつけて下さい。
36 | 2. developers
37 | - 権限は何もつけなくてよいです。(Organization レベルの権限は付与しない)
38 | 3. managers
39 | - 権限は何もつけなくてよいです。(Organization レベルの権限は付与しない)
40 |
41 | ## Workspace レベルの Team の作成
42 |
43 | 次に Workspace レベルの Team の作成を行います。
44 |
45 | Workspace を開き、**Settings > Team Access**へナビゲートしてください。
46 |
47 |
48 |
30 |
31 |
32 | **Create a New Team**から以下の 3 つのチームを 1 つづつ作成します。
33 |
34 | 1. admin
35 | - admin には 3 つ全ての権限をつけて下さい。
36 | 2. developers
37 | - 権限は何もつけなくてよいです。(Organization レベルの権限は付与しない)
38 | 3. managers
39 | - 権限は何もつけなくてよいです。(Organization レベルの権限は付与しない)
40 |
41 | ## Workspace レベルの Team の作成
42 |
43 | 次に Workspace レベルの Team の作成を行います。
44 |
45 | Workspace を開き、**Settings > Team Access**へナビゲートしてください。
46 |
47 |
48 |  49 |
50 |
51 | ここで先程作成した Team に、以下のように Workspace レベルの Permissions を付与してください。
52 |
53 | - admin
54 | - admin
55 | - developers
56 | - write
57 | - managers
58 | - read
59 |
60 | 以下のように表示されれば OK です。
61 |
62 |
63 |
49 |
50 |
51 | ここで先程作成した Team に、以下のように Workspace レベルの Permissions を付与してください。
52 |
53 | - admin
54 | - admin
55 | - developers
56 | - write
57 | - managers
58 | - read
59 |
60 | 以下のように表示されれば OK です。
61 |
62 |
63 |  64 |
65 |
66 | この Permission については詳細は[ドキュメント](https://www.terraform.io/docs/cloud/users-teams-organizations/permissions.html)を参照いただければと思います。簡単にまとめますと:
67 |
68 | - Read
69 | - State ファイルの参照
70 | - Run 履歴の参照
71 | - セキュア変数の参照
72 | - State ファイルに変更の加わる処理はできない
73 | - Plan
74 | - Read 権限の全て
75 | - Run の作成(Plan の実行可、Apply の実行不可)
76 | - Write
77 | - Plan 権限の全て
78 | - State ファイルへの変更(Apply の実行)
79 | - Run 実行の承認
80 | - セキュア変数の変更
81 | - Workspace の Lock/Unlock
82 | - Admin
83 | - Write 権限の全て
84 | - Workspace の削除
85 | - Workspace へのメンバーの追加・変更
86 | - Workspace 設定(VCS など)の変更
87 |
88 | となります。
89 |
90 | ## チームメンバーを Team にアサイン
91 |
92 | Team が設定されたら、admins 権限のあるユーザーはチームメンバーを Team にアサインします。
93 |
94 | 既に Organization に追加されているユーザーであれば、**organization レベルの Settings >> Teams** から Team を選択し、**Add a New Team Member**でユーザーを追加します。
95 |
96 |
97 |
64 |
65 |
66 | この Permission については詳細は[ドキュメント](https://www.terraform.io/docs/cloud/users-teams-organizations/permissions.html)を参照いただければと思います。簡単にまとめますと:
67 |
68 | - Read
69 | - State ファイルの参照
70 | - Run 履歴の参照
71 | - セキュア変数の参照
72 | - State ファイルに変更の加わる処理はできない
73 | - Plan
74 | - Read 権限の全て
75 | - Run の作成(Plan の実行可、Apply の実行不可)
76 | - Write
77 | - Plan 権限の全て
78 | - State ファイルへの変更(Apply の実行)
79 | - Run 実行の承認
80 | - セキュア変数の変更
81 | - Workspace の Lock/Unlock
82 | - Admin
83 | - Write 権限の全て
84 | - Workspace の削除
85 | - Workspace へのメンバーの追加・変更
86 | - Workspace 設定(VCS など)の変更
87 |
88 | となります。
89 |
90 | ## チームメンバーを Team にアサイン
91 |
92 | Team が設定されたら、admins 権限のあるユーザーはチームメンバーを Team にアサインします。
93 |
94 | 既に Organization に追加されているユーザーであれば、**organization レベルの Settings >> Teams** から Team を選択し、**Add a New Team Member**でユーザーを追加します。
95 |
96 |
97 |  98 |
99 |
100 | これからユーザーを追加する場合は、**organization レベルの Settings >> Users**の**Invite a user**ボタンからユーザーの Team を選択してインバイトします。
101 |
102 |
103 |
98 |
99 |
100 | これからユーザーを追加する場合は、**organization レベルの Settings >> Users**の**Invite a user**ボタンからユーザーの Team を選択してインバイトします。
101 |
102 |
103 |  104 |
105 |
106 |
107 |
104 |
105 |
106 |
107 |  108 |
109 |
110 | ## まとめ
111 |
112 | Terraform cloud free-tier では Workspace へのアクセスがあれば誰でも State ファイルへ変更(Apply の実効)が可能ですが、Terraform cloud paid 及び Enterprise では、様々な処理に対しアクセス制限を付けることができます。複数のチームメンバーに対し、それぞれ役割に応じた権限を割り当てることで、ルールに応じたワークフローを実現できるのではないでしょうか。
113 |
114 | Team とアクセス制限を駆使して Terraform Cloud/Enterprise では RBAC(Role based access control)を実現します。
115 |
--------------------------------------------------------------------------------
/contents/vcs.md:
--------------------------------------------------------------------------------
1 | # Version Control System 連携を試す
2 |
3 | TFC には三つの Apply のトリガーを使うことができます。
4 |
5 | * API Driven
6 | * CLI Drive
7 | * VCS Driven
8 |
9 | ここでは VCS Drive パターンの Webhook での実行を試してみます。
10 |
11 | ## GitHub と Terraform Cloud のセットアップ
12 |
13 | ここでは Terraform Cloud(以下、TFC)を使って Enterprise 版の機能を使ってみます。Terraform Cloud には機能が限定的な無償版と Enterprise のライセンスでアクティベートされる有償版があります。このハンズオンでは講師が事前に期限限定でアクティベートしてあります。
14 |
15 | TFC にアクセスし最初のセットアップを行いましょう。
16 |
17 | ワークスペースを作成し、そこに VCS との連携の設定を行います。対応している VCS は以下の通りです。
18 |
19 | * [GitHub](https://www.terraform.io/docs/cloud/vcs/github.html)
20 | * [GitHub Enterprise](https://www.terraform.io/docs/cloud/vcs/github-enterprise.html)
21 | * [GitLab.com](https://www.terraform.io/docs/cloud/vcs/gitlab-com.html)
22 | * [GitLab EE and CE](https://www.terraform.io/docs/cloud/vcs/gitlab-eece.html)
23 | * [Bitbucket Cloud](https://www.terraform.io/docs/cloud/vcs/bitbucket-cloud.html)
24 | * [Bitbucket Server](https://www.terraform.io/docs/cloud/vcs/bitbucket-server.html)
25 | * [Azure DevOps](https://www.terraform.io/docs/cloud/vcs/azure-devops-services.html)
26 | * [Azure DevOps Server](https://www.terraform.io/docs/cloud/vcs/azure-devops-services.html)
27 |
28 | 以下は GitHub の手順ですが、違う VCS で実施した場合はリンクの手順を参考にしてください。
29 |
30 | ### GitHub レポジトリ作成
31 |
32 | ```
33 | GitHub上に"tf-handson-workshop"という名前のパブリックレポジトリを作成してください。
34 | ```
35 | ### GitHub の OAuth Application の作成
36 |
37 | トップ画面の`Settings`からサイドメニューの`Version control` -> `Providers`を選んでください。
38 |
39 |
40 |
108 |
109 |
110 | ## まとめ
111 |
112 | Terraform cloud free-tier では Workspace へのアクセスがあれば誰でも State ファイルへ変更(Apply の実効)が可能ですが、Terraform cloud paid 及び Enterprise では、様々な処理に対しアクセス制限を付けることができます。複数のチームメンバーに対し、それぞれ役割に応じた権限を割り当てることで、ルールに応じたワークフローを実現できるのではないでしょうか。
113 |
114 | Team とアクセス制限を駆使して Terraform Cloud/Enterprise では RBAC(Role based access control)を実現します。
115 |
--------------------------------------------------------------------------------
/contents/vcs.md:
--------------------------------------------------------------------------------
1 | # Version Control System 連携を試す
2 |
3 | TFC には三つの Apply のトリガーを使うことができます。
4 |
5 | * API Driven
6 | * CLI Drive
7 | * VCS Driven
8 |
9 | ここでは VCS Drive パターンの Webhook での実行を試してみます。
10 |
11 | ## GitHub と Terraform Cloud のセットアップ
12 |
13 | ここでは Terraform Cloud(以下、TFC)を使って Enterprise 版の機能を使ってみます。Terraform Cloud には機能が限定的な無償版と Enterprise のライセンスでアクティベートされる有償版があります。このハンズオンでは講師が事前に期限限定でアクティベートしてあります。
14 |
15 | TFC にアクセスし最初のセットアップを行いましょう。
16 |
17 | ワークスペースを作成し、そこに VCS との連携の設定を行います。対応している VCS は以下の通りです。
18 |
19 | * [GitHub](https://www.terraform.io/docs/cloud/vcs/github.html)
20 | * [GitHub Enterprise](https://www.terraform.io/docs/cloud/vcs/github-enterprise.html)
21 | * [GitLab.com](https://www.terraform.io/docs/cloud/vcs/gitlab-com.html)
22 | * [GitLab EE and CE](https://www.terraform.io/docs/cloud/vcs/gitlab-eece.html)
23 | * [Bitbucket Cloud](https://www.terraform.io/docs/cloud/vcs/bitbucket-cloud.html)
24 | * [Bitbucket Server](https://www.terraform.io/docs/cloud/vcs/bitbucket-server.html)
25 | * [Azure DevOps](https://www.terraform.io/docs/cloud/vcs/azure-devops-services.html)
26 | * [Azure DevOps Server](https://www.terraform.io/docs/cloud/vcs/azure-devops-services.html)
27 |
28 | 以下は GitHub の手順ですが、違う VCS で実施した場合はリンクの手順を参考にしてください。
29 |
30 | ### GitHub レポジトリ作成
31 |
32 | ```
33 | GitHub上に"tf-handson-workshop"という名前のパブリックレポジトリを作成してください。
34 | ```
35 | ### GitHub の OAuth Application の作成
36 |
37 | トップ画面の`Settings`からサイドメニューの`Version control` -> `Providers`を選んでください。
38 |
39 |
40 |  41 |
42 |
43 |
44 |
41 |
42 |
43 |
44 | 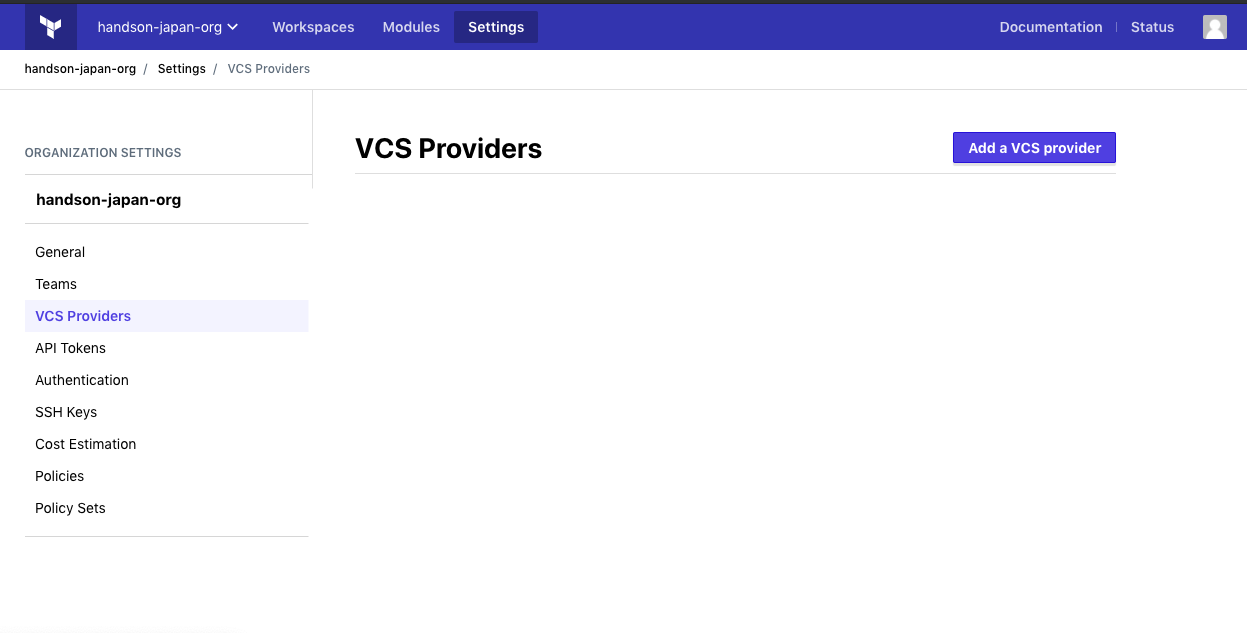 45 |
46 |
47 | 次に[こちら](https://github.com/settings/applications/new)にアクセスし TFC 用のキーを発行します。
48 |
49 | OAuth アプリケーションの登録画面で以下のように入力してください。
50 |
51 |
52 |
45 |
46 |
47 | 次に[こちら](https://github.com/settings/applications/new)にアクセスし TFC 用のキーを発行します。
48 |
49 | OAuth アプリケーションの登録画面で以下のように入力してください。
50 |
51 |
52 | 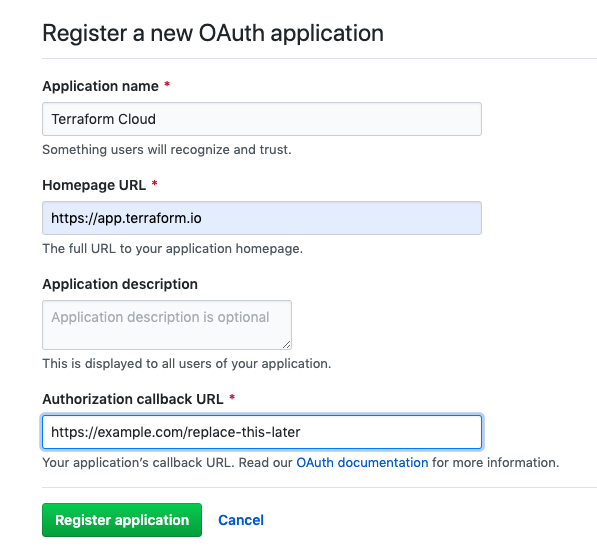 53 |
54 |
55 | * Application Name : Terraform Cloud
56 | * Homepage URL: `https://app.terraform.io`
57 | * Authorization callback URL: `https://example.com/replace-this-later`
58 |
59 | 入力したら`Register`をクリックします。
60 |
61 |
62 |
53 |
54 |
55 | * Application Name : Terraform Cloud
56 | * Homepage URL: `https://app.terraform.io`
57 | * Authorization callback URL: `https://example.com/replace-this-later`
58 |
59 | 入力したら`Register`をクリックします。
60 |
61 |
62 | 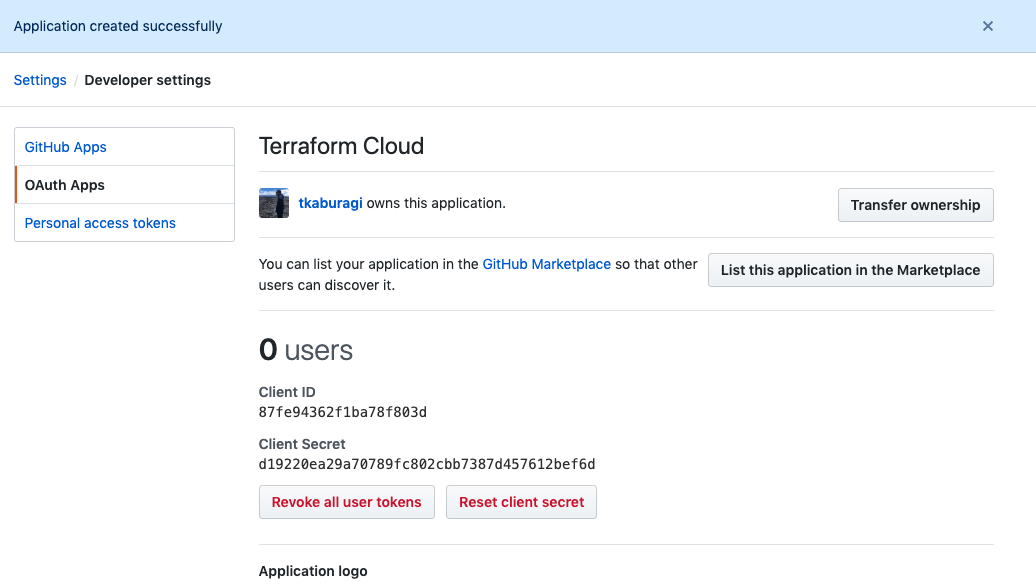 63 |
64 |
65 | 次に TFC に戻り`Add VCS Provider`を選択します。`Client ID`と`Client Secret`の欄に上の GitHub 上の画面で取得した値をコピペしてください。
66 |
67 |
68 |
63 |
64 |
65 | 次に TFC に戻り`Add VCS Provider`を選択します。`Client ID`と`Client Secret`の欄に上の GitHub 上の画面で取得した値をコピペしてください。
66 |
67 |
68 | 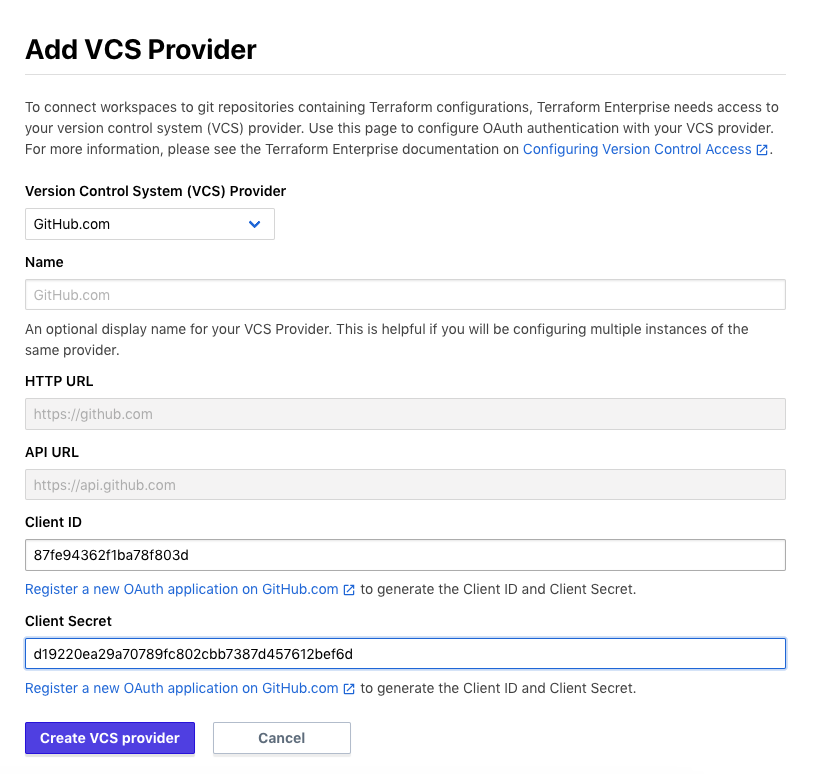 69 |
70 |
71 | `Create`をクリックします。
72 |
73 |
74 |
69 |
70 |
71 | `Create`をクリックします。
72 |
73 |
74 | 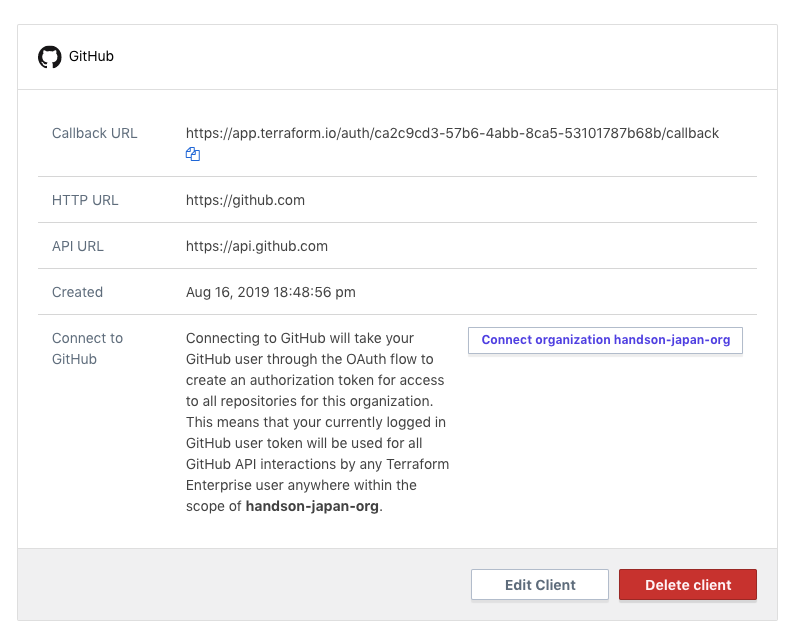 75 |
76 |
77 | VCS Provider が一つ追加され、Callback URL が生成されたのでこれをコピーし、これを GitHub の`Authorization callback URL`の項目を置き換えます。
78 |
79 |
80 |
75 |
76 |
77 | VCS Provider が一つ追加され、Callback URL が生成されたのでこれをコピーし、これを GitHub の`Authorization callback URL`の項目を置き換えます。
78 |
79 |
80 | 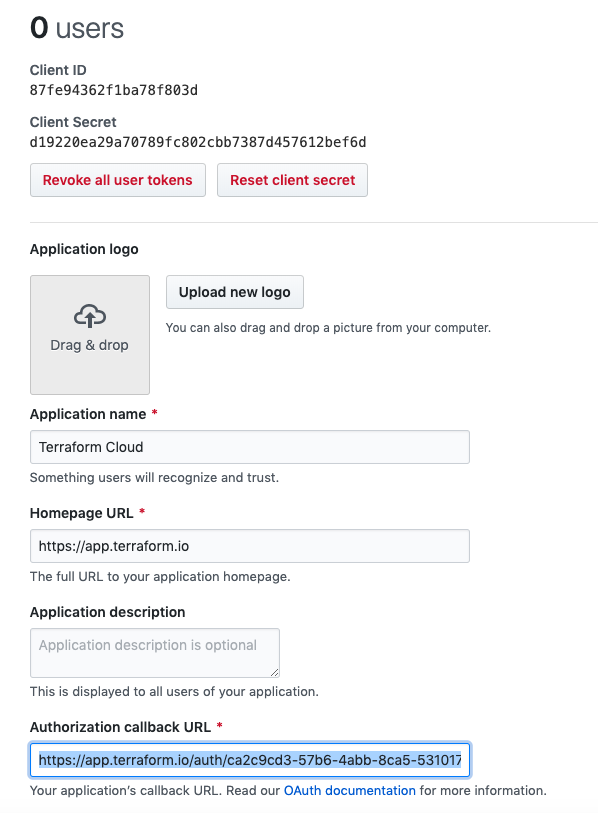 81 |
82 |
83 | これで Save しましょう。
84 |
85 | 最後にトップ画面の`Settings`からサイドメニューの`Version control` -> `Providers`から先ほど追加した GitHub の`Connect`をクリックして認証行ってください。
86 |
87 | これで VCS の設定は完了です。次にこれを紐付けたワークスペースを作成します。
88 |
89 | ## Workspace の作成
90 |
91 | まずワークスペースのレポジトリを作ります。
92 |
93 | ```shell
94 | $ cd path/to/tf-workspace
95 | $ mkdir tf-handson-workshop
96 | $ cd tf-handson-workshop
97 | ```
98 |
99 | 以下のファイルを作ります。
100 |
101 | ```shell
102 | $ cat < main.tf
103 | terraform {
104 | }
105 | EOF
106 | ```
107 |
108 | GitHub にプッシュして連携の確認をしてみましょう。
109 |
110 | ```shell
111 | $ export GITURL=
112 | $ git init
113 | $ git add main.tf
114 | $ git commit -m "first commit"
115 | $ git branch -M main
116 | $ git remote add origin $GITURL
117 | $ git push -u origin main
118 | ```
119 |
120 | TFC 上で Workspace を作成します。トップ画面の`+ New Workspace`を選択しします。
121 | ワークスペース作成画面で`VCS Drive Workflow`を選択し、その後の画面で GitHub を選択します。
122 |
123 |
124 |
81 |
82 |
83 | これで Save しましょう。
84 |
85 | 最後にトップ画面の`Settings`からサイドメニューの`Version control` -> `Providers`から先ほど追加した GitHub の`Connect`をクリックして認証行ってください。
86 |
87 | これで VCS の設定は完了です。次にこれを紐付けたワークスペースを作成します。
88 |
89 | ## Workspace の作成
90 |
91 | まずワークスペースのレポジトリを作ります。
92 |
93 | ```shell
94 | $ cd path/to/tf-workspace
95 | $ mkdir tf-handson-workshop
96 | $ cd tf-handson-workshop
97 | ```
98 |
99 | 以下のファイルを作ります。
100 |
101 | ```shell
102 | $ cat < main.tf
103 | terraform {
104 | }
105 | EOF
106 | ```
107 |
108 | GitHub にプッシュして連携の確認をしてみましょう。
109 |
110 | ```shell
111 | $ export GITURL=
112 | $ git init
113 | $ git add main.tf
114 | $ git commit -m "first commit"
115 | $ git branch -M main
116 | $ git remote add origin $GITURL
117 | $ git push -u origin main
118 | ```
119 |
120 | TFC 上で Workspace を作成します。トップ画面の`+ New Workspace`を選択しします。
121 | ワークスペース作成画面で`VCS Drive Workflow`を選択し、その後の画面で GitHub を選択します。
122 |
123 |
124 |  125 |
126 |
127 | レポジトリは先ほど作成した`tf-handson-workshop`を選択し、`Create Workspace`をクリックします。
128 |
129 |
130 |
125 |
126 |
127 | レポジトリは先ほど作成した`tf-handson-workshop`を選択し、`Create Workspace`をクリックします。
128 |
129 |
130 | 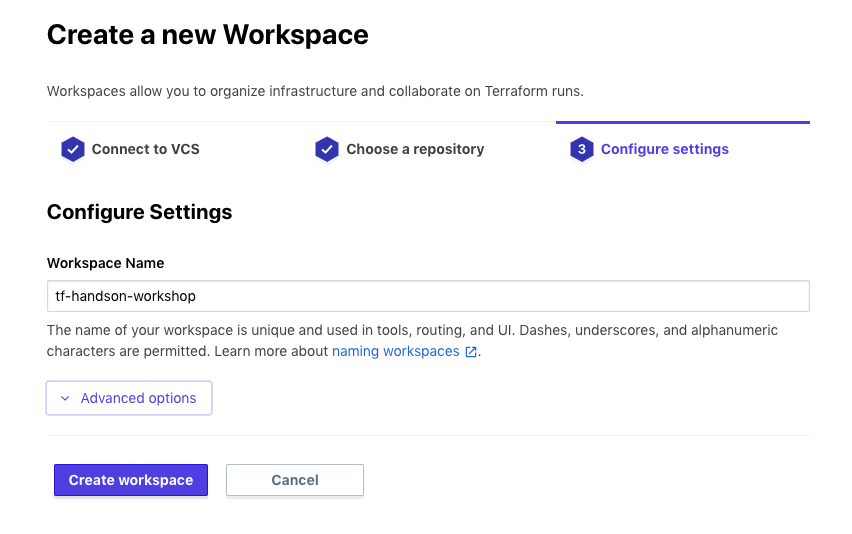 131 |
132 |
133 | 成功の画面が出たら`Actions` -> `Start a New Plan` を実行して動作を確認してみましょう。ここでは空のコードを実行しているため`Apply will not run`となるはずです。
134 |
135 |
136 |
131 |
132 |
133 | 成功の画面が出たら`Actions` -> `Start a New Plan` を実行して動作を確認してみましょう。ここでは空のコードを実行しているため`Apply will not run`となるはずです。
134 |
135 |
136 | 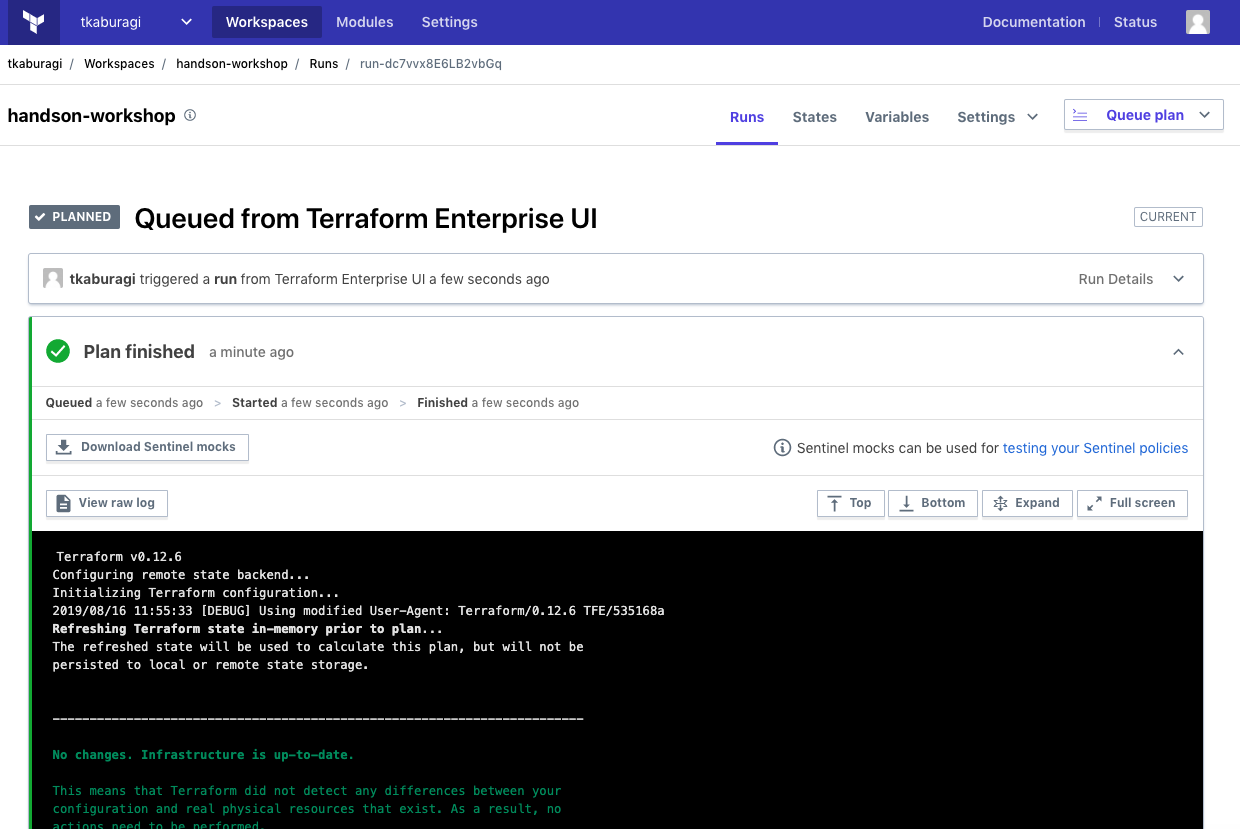 137 |
138 |
139 |
140 | 次以降の章で実際のコードを Apply して GitHub を通したインフラのプロビジョニングを試してみます。
141 |
142 | ## 参考リンク
143 | * [VCS Integration](https://www.terraform.io/docs/cloud/vcs/index.html)
144 | * [VCS Driven Run](https://www.terraform.io/docs/cloud/run/ui.html)
145 |
--------------------------------------------------------------------------------
/contents/vcs-azure.md:
--------------------------------------------------------------------------------
1 | # Version Control System 連携を試す
2 |
3 | TFC には三つの Apply のトリガーを使うことができます。
4 |
5 | * API Driven
6 | * CLI Drive
7 | * VCS Driven
8 |
9 | ここでは VCS Drive パターンの Webhook での実行を試してみます。
10 |
11 | ## GitHub と Terraform Cloud のセットアップ
12 |
13 | ここでは Terraform Cloud(以下、TFC)を使って Enterprise 版の機能を使ってみます。Terraform Cloud には機能が限定的な無償版と Enterprise のライセンスでアクティベートされる有償版があります。このハンズオンでは講師が事前に期限限定でアクティベートしてあります。
14 |
15 | TFC にアクセスし最初のセットアップを行いましょう。
16 |
17 | ワークスペースを作成し、そこに VCS との連携の設定を行います。対応している VCS は以下の通りです。
18 |
19 | * [GitHub](https://www.terraform.io/docs/cloud/vcs/github.html)
20 | * [GitHub Enterprise](https://www.terraform.io/docs/cloud/vcs/github-enterprise.html)
21 | * [GitLab.com](https://www.terraform.io/docs/cloud/vcs/gitlab-com.html)
22 | * [GitLab EE and CE](https://www.terraform.io/docs/cloud/vcs/gitlab-eece.html)
23 | * [Bitbucket Cloud](https://www.terraform.io/docs/cloud/vcs/bitbucket-cloud.html)
24 | * [Bitbucket Server](https://www.terraform.io/docs/cloud/vcs/bitbucket-server.html)
25 | * [Azure DevOps Services](https://www.terraform.io/docs/cloud/vcs/azure-devops-services.html)
26 | * [Azure DevOps Server](https://www.terraform.io/docs/cloud/vcs/azure-devops-services.html)
27 |
28 | 以下は Azure DevOps の手順ですが、違う VCS で実施した場合はリンクの手順を参考にしてください。
29 |
30 | ### Azure DevOps Progects 作成
31 |
32 | [こちらから](https://aex.dev.azure.com/me?mkt=en-US)Organization を作成してください。次に、
33 |
34 | ```
35 | "tf-handson-workshop"という名前のパブリックプロジェクトを作成してください。
36 | ```
37 | ### GitHub の OAuth Application の作成
38 |
39 | トップ画面の`Settings`からサイドメニューの`Version control` -> `Providers`を選んでください。この画面はこのままにしておいてください。
40 |
41 |
42 |
43 |
44 |
45 |
46 |
47 |
48 |
49 | 次に[こちら](https://aex.dev.azure.com/app/register?mkt=en-US)にアクセスし TFC 用のキーを発行します。
50 |
51 | OAuth アプリケーションの登録画面で以下のように入力してください。
52 |
53 |
54 |
137 |
138 |
139 |
140 | 次以降の章で実際のコードを Apply して GitHub を通したインフラのプロビジョニングを試してみます。
141 |
142 | ## 参考リンク
143 | * [VCS Integration](https://www.terraform.io/docs/cloud/vcs/index.html)
144 | * [VCS Driven Run](https://www.terraform.io/docs/cloud/run/ui.html)
145 |
--------------------------------------------------------------------------------
/contents/vcs-azure.md:
--------------------------------------------------------------------------------
1 | # Version Control System 連携を試す
2 |
3 | TFC には三つの Apply のトリガーを使うことができます。
4 |
5 | * API Driven
6 | * CLI Drive
7 | * VCS Driven
8 |
9 | ここでは VCS Drive パターンの Webhook での実行を試してみます。
10 |
11 | ## GitHub と Terraform Cloud のセットアップ
12 |
13 | ここでは Terraform Cloud(以下、TFC)を使って Enterprise 版の機能を使ってみます。Terraform Cloud には機能が限定的な無償版と Enterprise のライセンスでアクティベートされる有償版があります。このハンズオンでは講師が事前に期限限定でアクティベートしてあります。
14 |
15 | TFC にアクセスし最初のセットアップを行いましょう。
16 |
17 | ワークスペースを作成し、そこに VCS との連携の設定を行います。対応している VCS は以下の通りです。
18 |
19 | * [GitHub](https://www.terraform.io/docs/cloud/vcs/github.html)
20 | * [GitHub Enterprise](https://www.terraform.io/docs/cloud/vcs/github-enterprise.html)
21 | * [GitLab.com](https://www.terraform.io/docs/cloud/vcs/gitlab-com.html)
22 | * [GitLab EE and CE](https://www.terraform.io/docs/cloud/vcs/gitlab-eece.html)
23 | * [Bitbucket Cloud](https://www.terraform.io/docs/cloud/vcs/bitbucket-cloud.html)
24 | * [Bitbucket Server](https://www.terraform.io/docs/cloud/vcs/bitbucket-server.html)
25 | * [Azure DevOps Services](https://www.terraform.io/docs/cloud/vcs/azure-devops-services.html)
26 | * [Azure DevOps Server](https://www.terraform.io/docs/cloud/vcs/azure-devops-services.html)
27 |
28 | 以下は Azure DevOps の手順ですが、違う VCS で実施した場合はリンクの手順を参考にしてください。
29 |
30 | ### Azure DevOps Progects 作成
31 |
32 | [こちらから](https://aex.dev.azure.com/me?mkt=en-US)Organization を作成してください。次に、
33 |
34 | ```
35 | "tf-handson-workshop"という名前のパブリックプロジェクトを作成してください。
36 | ```
37 | ### GitHub の OAuth Application の作成
38 |
39 | トップ画面の`Settings`からサイドメニューの`Version control` -> `Providers`を選んでください。この画面はこのままにしておいてください。
40 |
41 |
42 |
43 |
44 |
45 |
46 |
47 |
48 |
49 | 次に[こちら](https://aex.dev.azure.com/app/register?mkt=en-US)にアクセスし TFC 用のキーを発行します。
50 |
51 | OAuth アプリケーションの登録画面で以下のように入力してください。
52 |
53 |
54 | 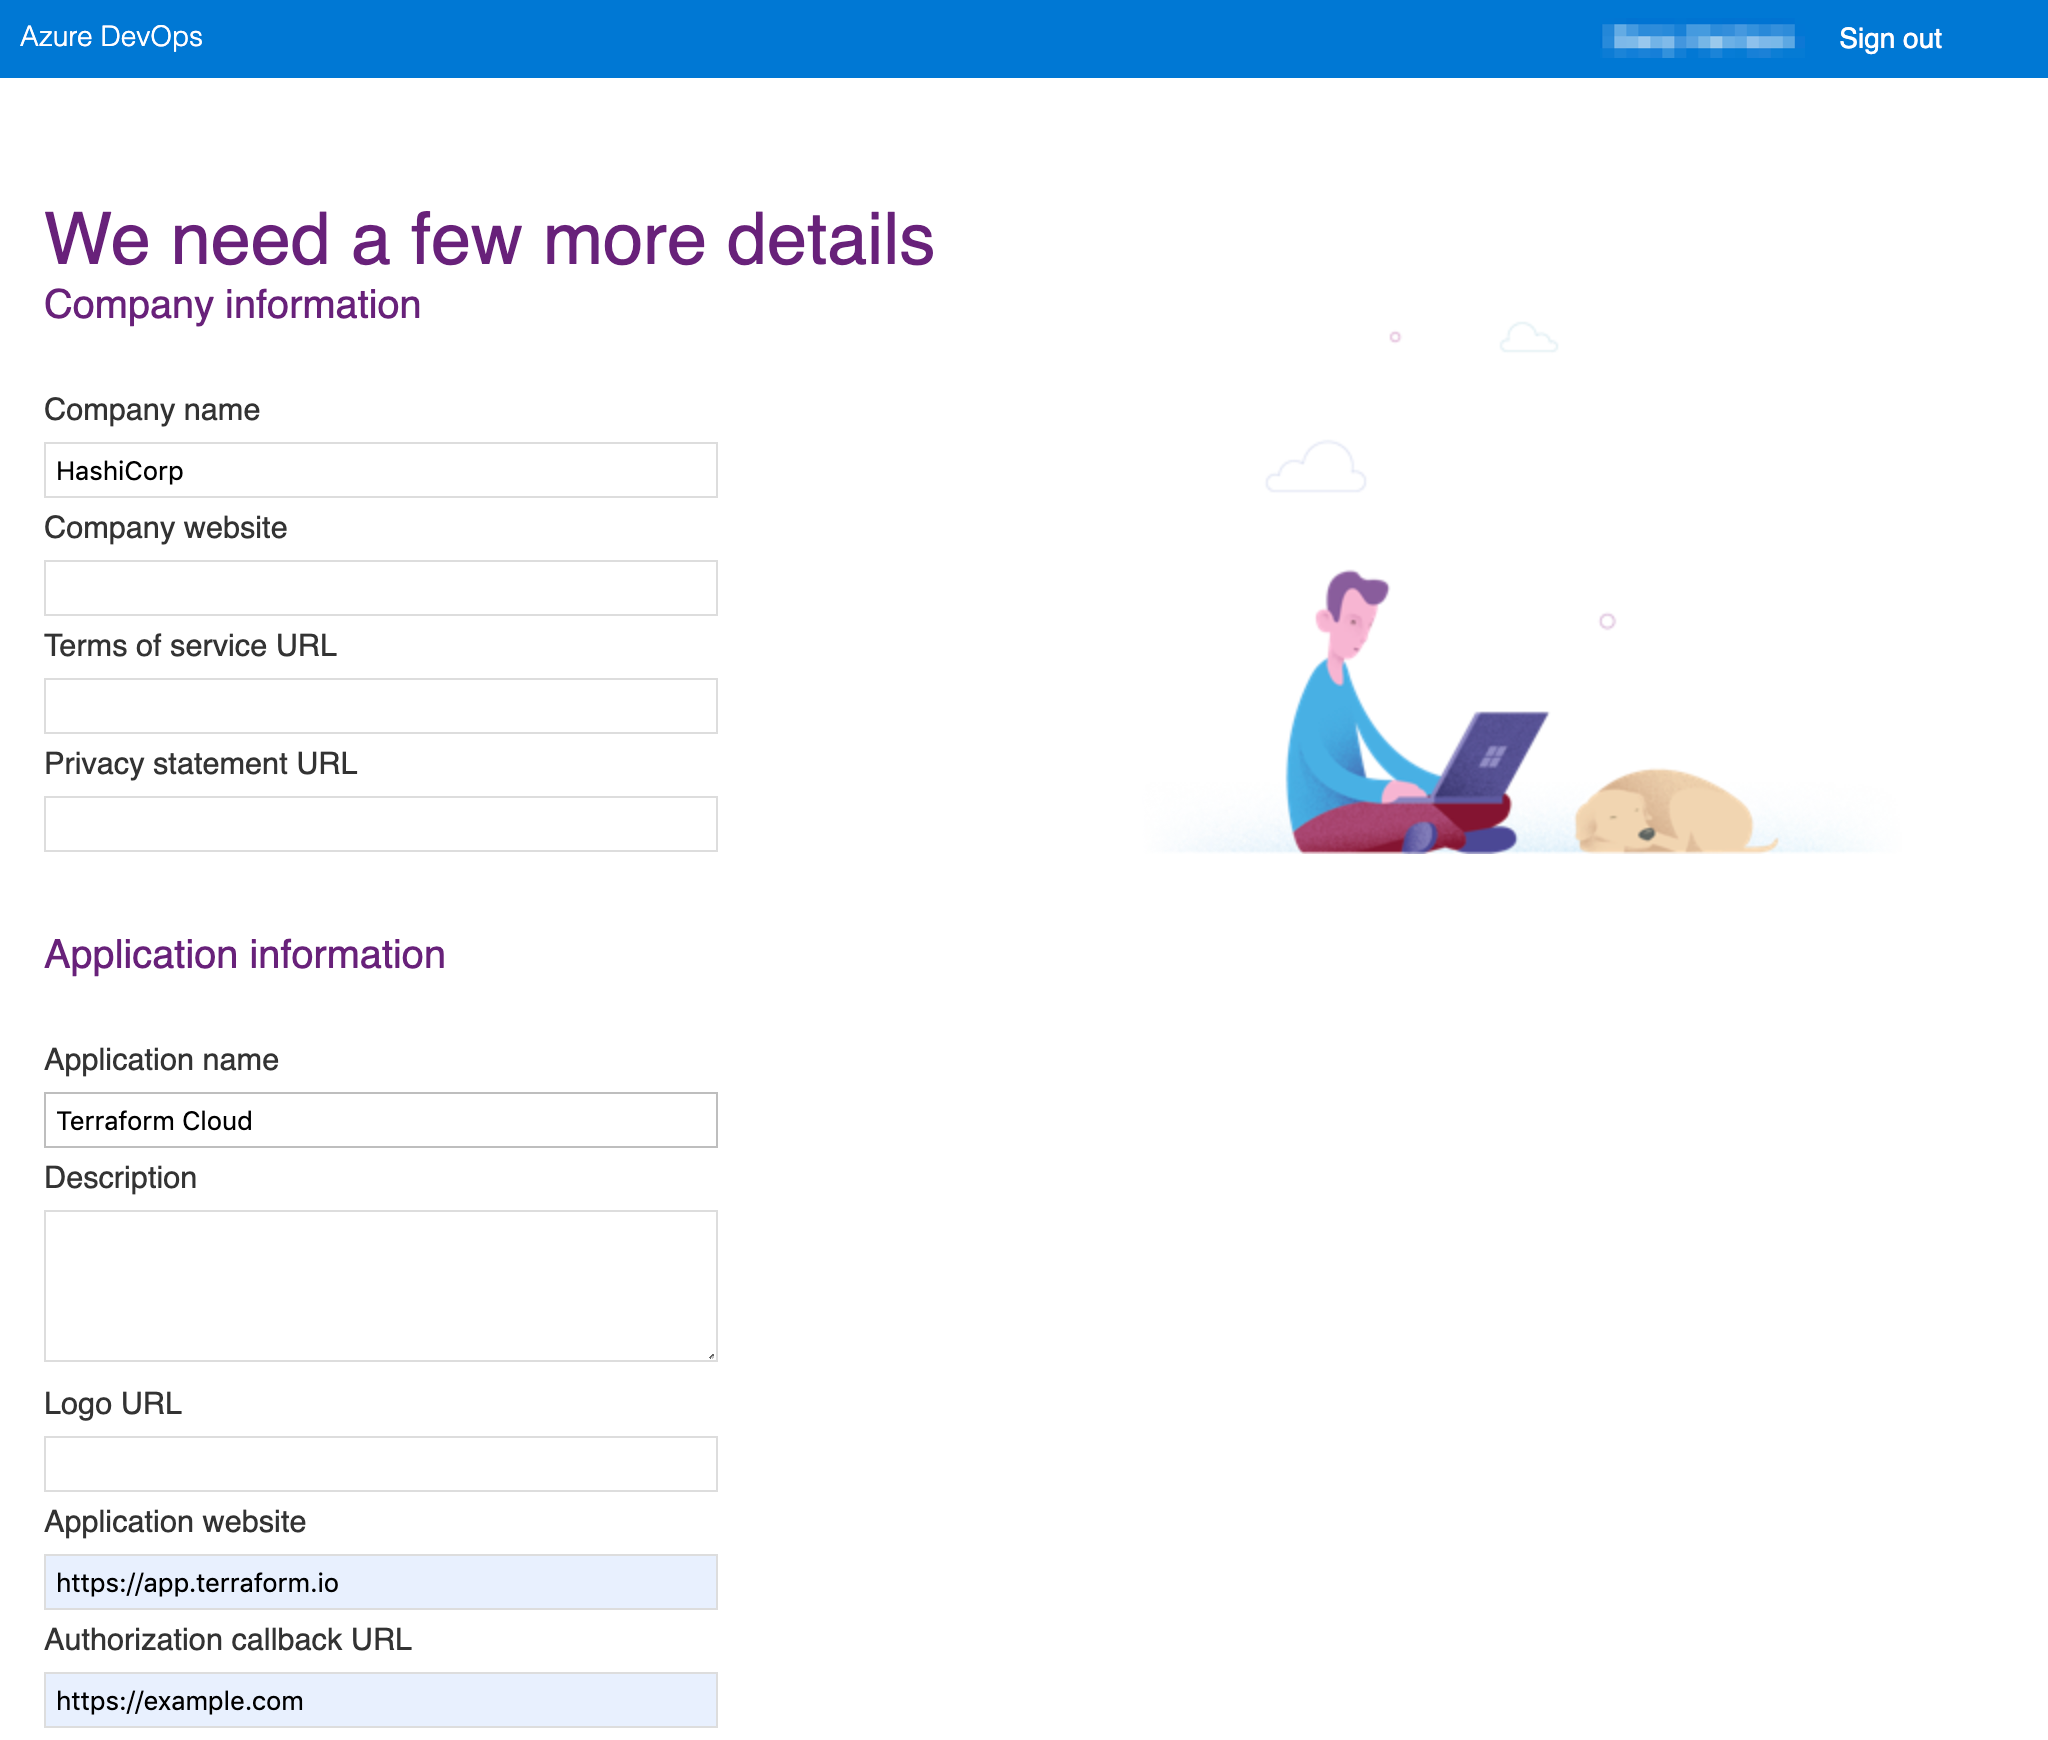 55 |
56 |
57 | * Company name:
58 | * Application Name : Terraform Cloud
59 | * Application website: `https://app.terraform.io`
60 | * Authorization callback URL: `https://example.com/replace-this-later`
61 | * Authorized scopes: Code(read), Code(status)にチェック
62 |
63 | 入力したら`Create Application`をクリックします。
64 |
65 |
66 |
55 |
56 |
57 | * Company name:
58 | * Application Name : Terraform Cloud
59 | * Application website: `https://app.terraform.io`
60 | * Authorization callback URL: `https://example.com/replace-this-later`
61 | * Authorized scopes: Code(read), Code(status)にチェック
62 |
63 | 入力したら`Create Application`をクリックします。
64 |
65 |
66 | 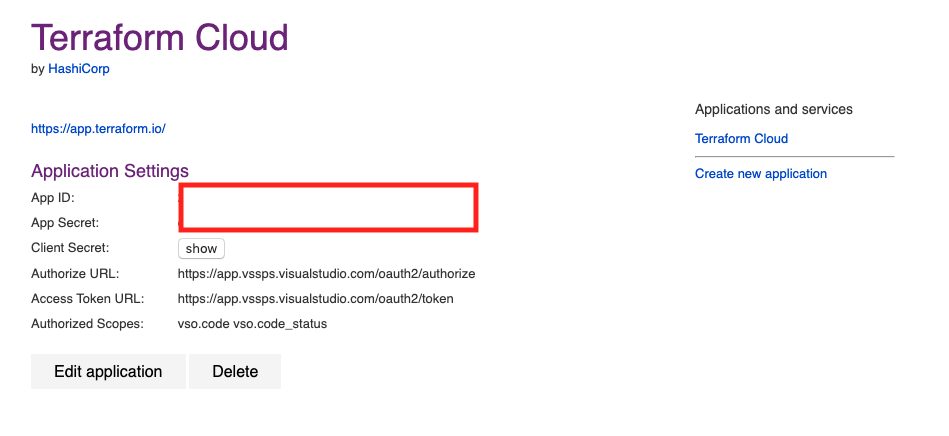 67 |
68 |
69 | `App ID`と`Client Secret`はコピーしておいてください。この画面はこのままにしておいてください。
70 |
71 | 次に TFC に戻り`Add VCS Provider`を選択します。
72 |
73 | `Version Control System(VCS) Provider`からプルダウンで`Azure DevOps Services`を選択し、`App ID`と`Client Secret`の欄に上の Azure DevOps 上の画面で取得した値をコピペしてください。
74 |
75 |
76 |
67 |
68 |
69 | `App ID`と`Client Secret`はコピーしておいてください。この画面はこのままにしておいてください。
70 |
71 | 次に TFC に戻り`Add VCS Provider`を選択します。
72 |
73 | `Version Control System(VCS) Provider`からプルダウンで`Azure DevOps Services`を選択し、`App ID`と`Client Secret`の欄に上の Azure DevOps 上の画面で取得した値をコピペしてください。
74 |
75 |
76 | 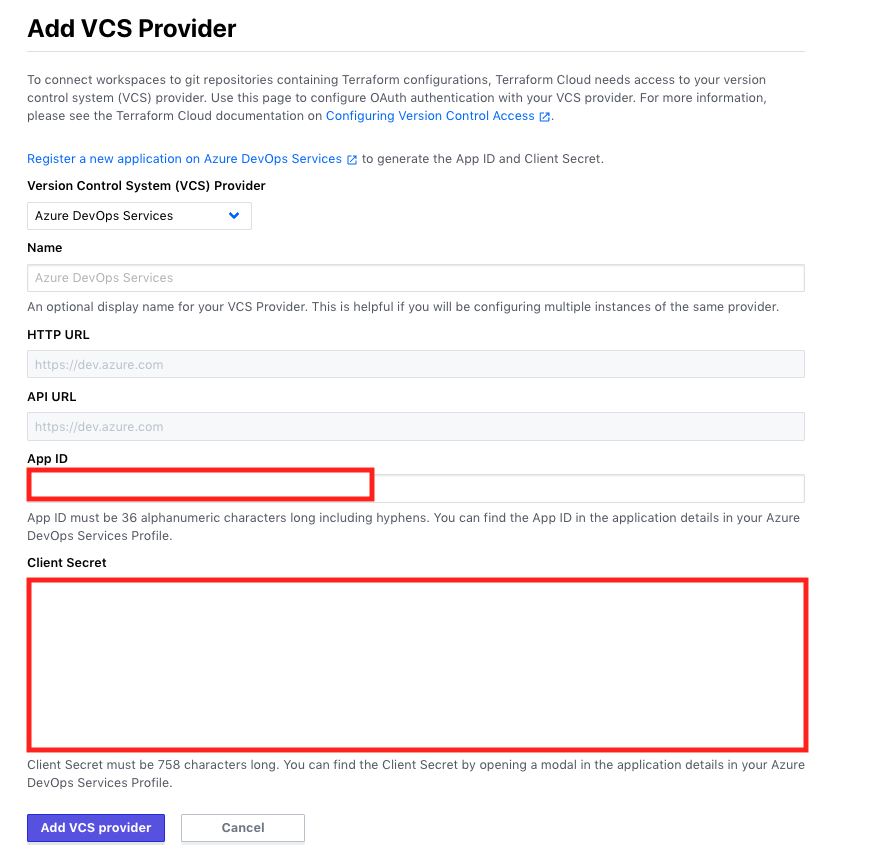 77 |
78 |
79 | `Add VCS Provider`をクリックします。
80 |
81 |
82 |
77 |
78 |
79 | `Add VCS Provider`をクリックします。
80 |
81 |
82 |  83 |
84 |
85 | VCS Provider が一つ追加され、Callback URL が生成されたのでこれをコピーし、これを Azure DevOps の`Authorization callback URL`の項目を置き換えます。
86 |
87 | Azure DevOps の画面に戻り、`Edit Application`をクリックし、`Authorization callback URL`の`https://example.com/replace-this-later`をコピーした Callback URL に変更します。
88 |
89 |
90 |
83 |
84 |
85 | VCS Provider が一つ追加され、Callback URL が生成されたのでこれをコピーし、これを Azure DevOps の`Authorization callback URL`の項目を置き換えます。
86 |
87 | Azure DevOps の画面に戻り、`Edit Application`をクリックし、`Authorization callback URL`の`https://example.com/replace-this-later`をコピーした Callback URL に変更します。
88 |
89 |
90 | 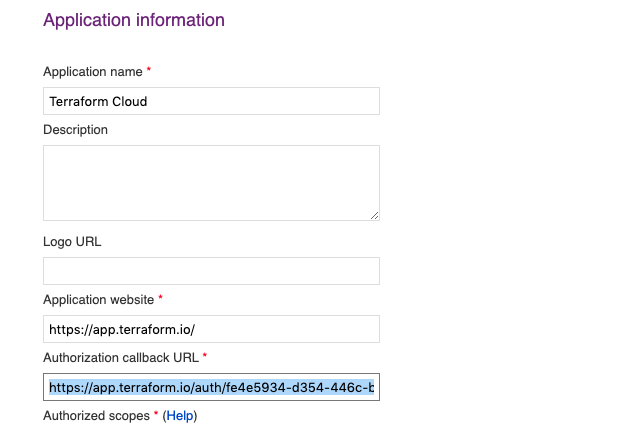 91 |
92 |
93 | これで Save changes しましょう。
94 |
95 | 最後にトップ画面の`Settings`からサイドメニューの`Version control` -> `Providers`から先ほど追加した GitHub の`Connect organization username`をクリックして認証行ってください。
96 |
97 | これで VCS の設定は完了です。次にこれを紐付けたワークスペースを作成します。
98 |
99 | ## Workspace の作成
100 |
101 | まずワークスペースのレポジトリを作ります。
102 |
103 | ```shell
104 | $ mkdir -p tf-workspace/tf-handson-workshop
105 | $ cd tf-workspace/tf-handson-workshop
106 | ```
107 |
108 | 以下のファイルを作ります。
109 |
110 | ```shell
111 | $ cat < main.tf
112 | terraform {
113 | }
114 | EOF
115 | ```
116 |
117 | Azure DevOps にプッシュして連携の確認をしてみましょう。[Azure DevOps のコンソール](https://aex.dev.azure.com/)から先ほど作った Organization->`tf-handson-workshop`を選択し、左カラムの`Repos`から URL をコピーしてください。また、`Generate Git Credentials`からパスワードをコピーしておいて下さい。
118 |
119 | ```shell
120 | $ export ADO_URL=
121 | $ git init
122 | $ git add main.tf
123 | $ git commit -m "first commit"
124 | $ git branch -M main
125 | $ git remote add origin $ADO_URL
126 | $ git push -u origin main
127 | ```
128 |
129 | TFC 上で Workspace を作成します。トップ画面の`+ New Workspace`を選択し、Azure DevOps を選択します。
130 |
131 |
132 |
91 |
92 |
93 | これで Save changes しましょう。
94 |
95 | 最後にトップ画面の`Settings`からサイドメニューの`Version control` -> `Providers`から先ほど追加した GitHub の`Connect organization username`をクリックして認証行ってください。
96 |
97 | これで VCS の設定は完了です。次にこれを紐付けたワークスペースを作成します。
98 |
99 | ## Workspace の作成
100 |
101 | まずワークスペースのレポジトリを作ります。
102 |
103 | ```shell
104 | $ mkdir -p tf-workspace/tf-handson-workshop
105 | $ cd tf-workspace/tf-handson-workshop
106 | ```
107 |
108 | 以下のファイルを作ります。
109 |
110 | ```shell
111 | $ cat < main.tf
112 | terraform {
113 | }
114 | EOF
115 | ```
116 |
117 | Azure DevOps にプッシュして連携の確認をしてみましょう。[Azure DevOps のコンソール](https://aex.dev.azure.com/)から先ほど作った Organization->`tf-handson-workshop`を選択し、左カラムの`Repos`から URL をコピーしてください。また、`Generate Git Credentials`からパスワードをコピーしておいて下さい。
118 |
119 | ```shell
120 | $ export ADO_URL=
121 | $ git init
122 | $ git add main.tf
123 | $ git commit -m "first commit"
124 | $ git branch -M main
125 | $ git remote add origin $ADO_URL
126 | $ git push -u origin main
127 | ```
128 |
129 | TFC 上で Workspace を作成します。トップ画面の`+ New Workspace`を選択し、Azure DevOps を選択します。
130 |
131 |
132 | 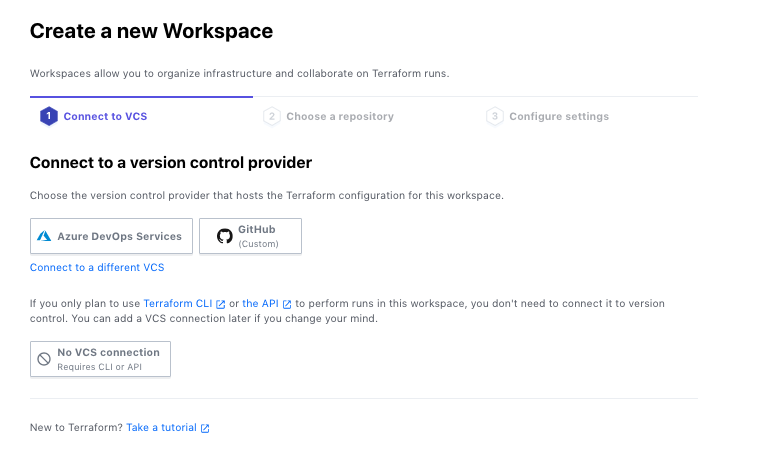 133 |
134 |
135 | レポジトリは先ほど作成した`tf-handson-workshop`を選択し、`Create Workspace`をクリックします。
136 |
137 |
138 |
133 |
134 |
135 | レポジトリは先ほど作成した`tf-handson-workshop`を選択し、`Create Workspace`をクリックします。
136 |
137 |
138 | 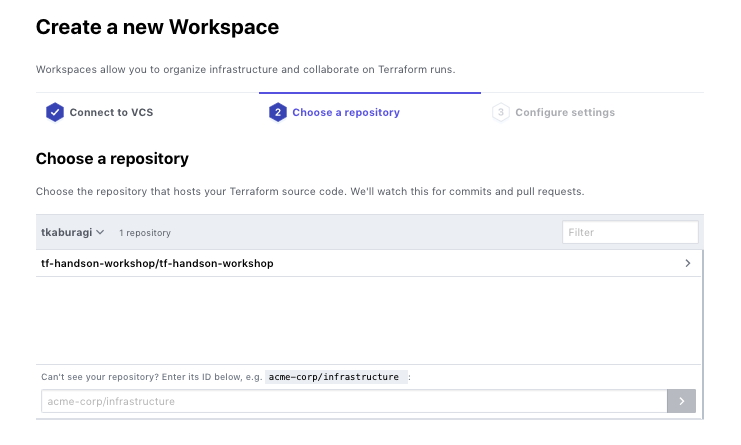 139 |
140 |
141 | 成功の画面が出たら`Queue Plan`を実行して動作を確認してみましょう。ここでは空のコードを実行しているため`Apply will not run`となるはずです。
142 |
143 |
144 |
145 |
146 |
147 |
148 | 次以降の章で実際のコードを Apply して GitHub を通したインフラのプロビジョニングを試してみます。
149 |
150 | ## 参考リンク
151 | * [VCS Integration](https://www.terraform.io/docs/cloud/vcs/index.html)
152 | * [VCS Driven Run](https://www.terraform.io/docs/cloud/run/ui.html)
153 |
--------------------------------------------------------------------------------
/contents/module.md:
--------------------------------------------------------------------------------
1 | # Private Module Registry を試す
2 |
3 | Terraform には DRY(Don't Repeat Yourself)を実現するために共通処理のコードをモジュール化する機能があります。OSS でも利用が可能ですが Git などのレポジトリから取得するか[Public Module Registry](https://registry.terraform.io/)から取得する方法が用意されています。
4 |
5 | Enterprise 版では Organization ごとにプライベートな Module Registry を持つことが出来ます。これを利用することでチームだけに限定した Module のレジストリを介してソースコードを再利用できます。
6 |
7 | ## モジュールを作る
8 |
9 | まず Module を作っていきましょう。モジュールは TFE で対応しているコードレポジトリ上に作っていきます。まずは GitHub 上にレポジトリを作ります。
10 |
11 | ```
12 | GitHubのアカウントに"terraform-aws-securitygroup"という名前のレポジトリを作ってください。
13 | ```
14 |
15 | レポジトリ名は必ず`terraform--`という形にする必要があります。
16 |
17 | 次に必要なファイルを作っていきます。
18 |
19 | ```shell
20 | $ mkdir path/to/tf-workshop/terraform-aws-securitygroup
21 | $ cd path/to/tf-workshop/terraform-aws-securitygroup
22 | $ touch README.md main.tf variables.tf output.tf
23 | ```
24 |
25 | `README.md`を以下のように編集します。
26 |
27 |
139 |
140 |
141 | 成功の画面が出たら`Queue Plan`を実行して動作を確認してみましょう。ここでは空のコードを実行しているため`Apply will not run`となるはずです。
142 |
143 |
144 |
145 |
146 |
147 |
148 | 次以降の章で実際のコードを Apply して GitHub を通したインフラのプロビジョニングを試してみます。
149 |
150 | ## 参考リンク
151 | * [VCS Integration](https://www.terraform.io/docs/cloud/vcs/index.html)
152 | * [VCS Driven Run](https://www.terraform.io/docs/cloud/run/ui.html)
153 |
--------------------------------------------------------------------------------
/contents/module.md:
--------------------------------------------------------------------------------
1 | # Private Module Registry を試す
2 |
3 | Terraform には DRY(Don't Repeat Yourself)を実現するために共通処理のコードをモジュール化する機能があります。OSS でも利用が可能ですが Git などのレポジトリから取得するか[Public Module Registry](https://registry.terraform.io/)から取得する方法が用意されています。
4 |
5 | Enterprise 版では Organization ごとにプライベートな Module Registry を持つことが出来ます。これを利用することでチームだけに限定した Module のレジストリを介してソースコードを再利用できます。
6 |
7 | ## モジュールを作る
8 |
9 | まず Module を作っていきましょう。モジュールは TFE で対応しているコードレポジトリ上に作っていきます。まずは GitHub 上にレポジトリを作ります。
10 |
11 | ```
12 | GitHubのアカウントに"terraform-aws-securitygroup"という名前のレポジトリを作ってください。
13 | ```
14 |
15 | レポジトリ名は必ず`terraform--`という形にする必要があります。
16 |
17 | 次に必要なファイルを作っていきます。
18 |
19 | ```shell
20 | $ mkdir path/to/tf-workshop/terraform-aws-securitygroup
21 | $ cd path/to/tf-workshop/terraform-aws-securitygroup
22 | $ touch README.md main.tf variables.tf output.tf
23 | ```
24 |
25 | `README.md`を以下のように編集します。
26 |
27 |
28 | README.md
29 |
30 | ```
31 | | IP address | デフォルト | 用途 |
32 | | --------------- |----- | --- |
33 | | http_port | 8500 | HTTP APIのインターフェース |
34 | | http_port | 8501 | HTTPS APIのインターフェース|
35 | | grpc_port | 8502 | gRPC APIのインターフェース |
36 | | cluster_rpc_port | 8300 | サーバー間のRPC用 |
37 | | lan_serf | 8301 | LAN Serf |
38 | | lan_serf | 8302 | WAN Serf |
39 | ```
40 |
41 |
42 |
43 | `main.tf`を以下のように編集してください。
44 |
45 |
46 | main.tf
47 |
48 | ```hcl
49 | resource "aws_security_group" "consul_security_group" {
50 | name = "consul_security_group"
51 | description = "Consul Sercuriy Group"
52 | vpc_id = var.vpc_id
53 |
54 | ingress {
55 | protocol = "tcp"
56 | cidr_blocks = var.cidr_blocks
57 | from_port = var.http_port
58 | to_port = var.http_port
59 | }
60 |
61 | ingress {
62 | cidr_blocks = var.cidr_blocks
63 | protocol = "tcp"
64 | from_port = var.https_port
65 | to_port = var.https_port
66 | }
67 |
68 | ingress {
69 | cidr_blocks = var.cidr_blocks
70 | protocol = "tcp"
71 | from_port = var.grpc_port
72 | to_port = var.grpc_port
73 | }
74 |
75 | ingress {
76 | cidr_blocks = var.cidr_blocks
77 | protocol = "tcp"
78 | from_port = var.cluster_rpc_port
79 | to_port = var.cluster_rpc_port
80 | }
81 |
82 | ingress {
83 | cidr_blocks = var.cidr_blocks
84 | protocol = "tcp"
85 | from_port = var.lan_serf
86 | to_port = var.lan_serf
87 | }
88 |
89 | egress {
90 | cidr_blocks = ["0.0.0.0/0"]
91 | protocol = "-1"
92 | from_port = 0
93 | to_port = 0
94 | }
95 |
96 | }
97 | ```
98 |
99 |
100 |
101 | 次に以下のように`variables.tf`を編集します。
102 |
103 |
104 | variables.tf
105 |
106 | ```hcl
107 | variable "vpc_id" {}
108 | variable "http_port" {
109 | default = "8500"
110 | }
111 | variable "https_port" {
112 | default = "8501"
113 | }
114 | variable "grpc_port" {
115 | default = "8502"
116 | }
117 | variable "cluster_rpc_port" {
118 | default = "8600"
119 | }
120 | variable "lan_serf" {
121 | default = "8301"
122 | }
123 | variable "cidr_blocks" {
124 | type = list(string)
125 | default = ["0.0.0.0/0"]
126 | }
127 | ```
128 |
129 |
130 | 最後に以下のように`output.tf`を編集します。
131 |
132 |
133 | output.tf
134 |
135 | ```hcl
136 | output "http_port" {
137 | value = var.http_port
138 | }
139 |
140 | output "https_port" {
141 | value = var.https_port
142 | }
143 |
144 | output "grpc_port" {
145 | value = var.grpc_port
146 | }
147 |
148 | output "cluster_rpc_port" {
149 | value = var.cluster_rpc_port
150 | }
151 |
152 | output "lan_serf" {
153 | value = var.lan_serf
154 | }
155 | ```
156 |
157 |
158 | これでモジュール作りは終了です。GitHub にコミットしましょう。
159 |
160 | ```shell
161 | $ git init
162 | $ git add .
163 | $ git remote add origin https://github.com/tkaburagi/terraform-aws-securitygroup.git
164 | $ git commit -m "first commit"
165 | $ git tag -a 0.0.1 -m "v 0.0.1"
166 | $ git push origin 0.0.1 master
167 | ```
168 |
169 | TFE の Private Module Registry のいいところはバージョン管理ができ、いつでも複数バージョンから選択できる点です。Git の tag からバージョンを取得しています。
170 |
171 | バージョニングは`x.x.x`のフォーマットでセマンティックバージョニングを行うのが良いでしょう。
172 |
173 | ## Module Registry の作成
174 |
175 | それではコミットしたモジュールを TFE 上で公開してみます。公開範囲は Organization で、その中の Workspace であればどのコンフィグからも利用可能です。
176 |
177 |
178 | 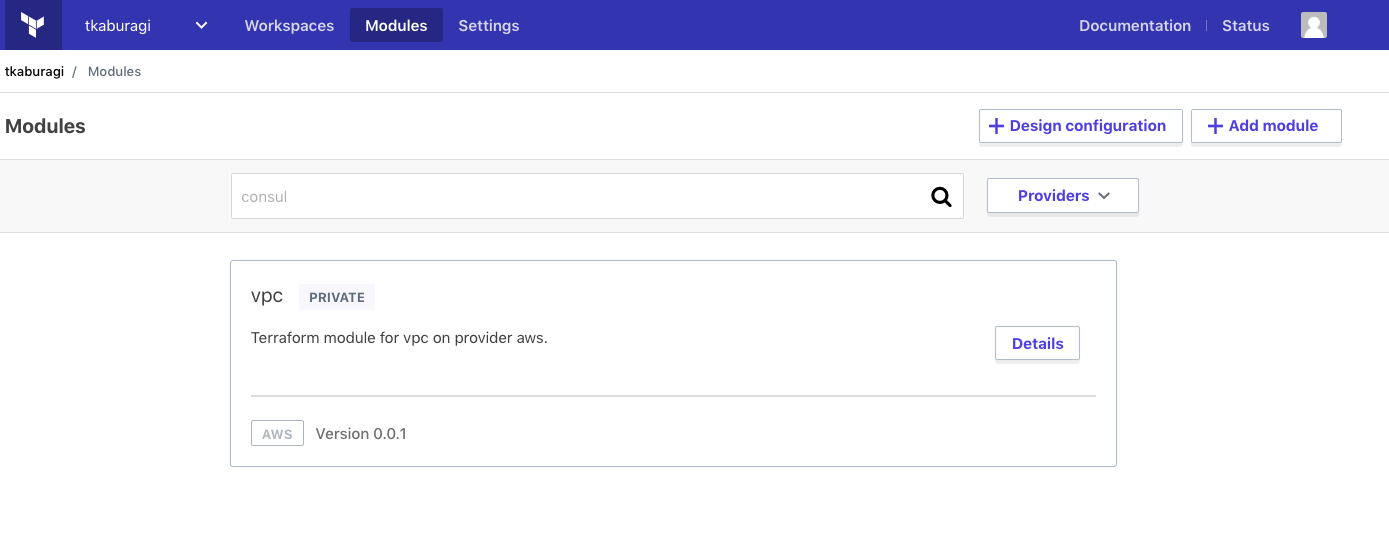 179 |
180 |
181 | トップ画面から`Modules`を選択します。(まだ何もリストされていないはずです) `Add Module`を選択し、
182 |
183 |
184 |
179 |
180 |
181 | トップ画面から`Modules`を選択します。(まだ何もリストされていないはずです) `Add Module`を選択し、
182 |
183 |
184 | 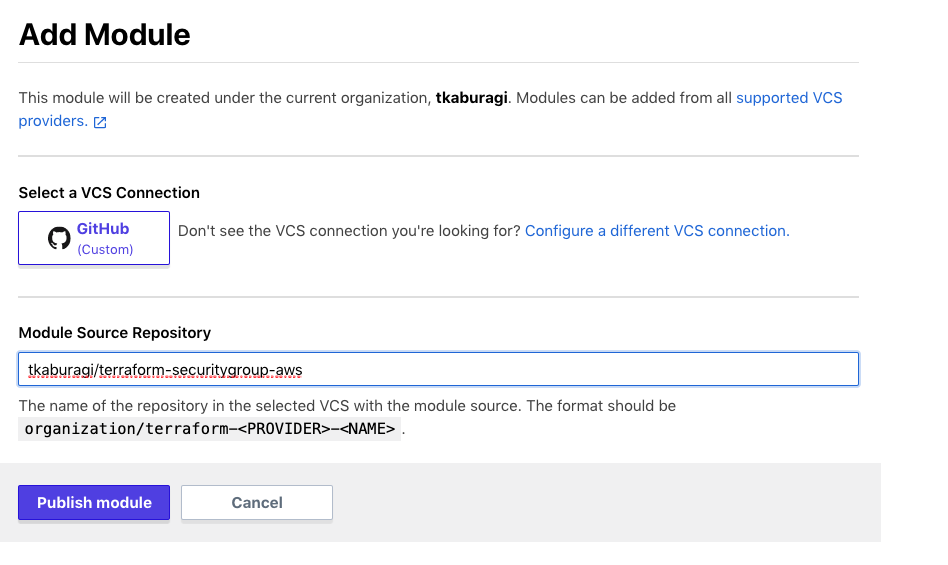 185 |
186 |
187 | 次の画面で先ほどのレポジトリを指定します。`Publish Module`を押してください。これでモジュールの公開は終了です。
188 |
189 |
190 |
185 |
186 |
187 | 次の画面で先ほどのレポジトリを指定します。`Publish Module`を押してください。これでモジュールの公開は終了です。
188 |
189 |
190 | 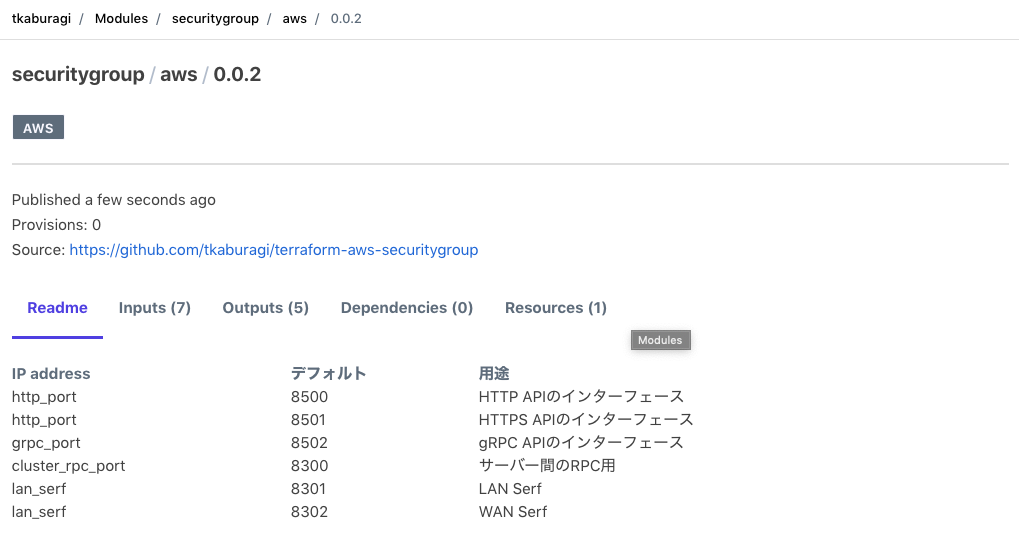 191 |
192 |
193 | 上記のようなサマリー画面が見えるはずです。README、変数のインプットやバージョンなどの情報が確認出来ます。
194 |
195 | ## Module Registry の利用
196 |
197 | このモジュールを使ってみます。トップ画面から`Modules`に戻り、次は`Design configuration`をクリックします。
198 |
199 | `Design configuration`はモジュールを利用するための設定を行うためのエンタープライズ機能です。
200 |
201 | 先ほど追加したモジュールが出てくるはずなので`Add module`をクリックして、`Next`をクリックして下さい。
202 |
203 | なお、複数のモジュールを組み合わせて使う際はここから複数選択して、まとめてコンフィグレーションを行うことが出来ます。
204 |
205 |
206 |
191 |
192 |
193 | 上記のようなサマリー画面が見えるはずです。README、変数のインプットやバージョンなどの情報が確認出来ます。
194 |
195 | ## Module Registry の利用
196 |
197 | このモジュールを使ってみます。トップ画面から`Modules`に戻り、次は`Design configuration`をクリックします。
198 |
199 | `Design configuration`はモジュールを利用するための設定を行うためのエンタープライズ機能です。
200 |
201 | 先ほど追加したモジュールが出てくるはずなので`Add module`をクリックして、`Next`をクリックして下さい。
202 |
203 | なお、複数のモジュールを組み合わせて使う際はここから複数選択して、まとめてコンフィグレーションを行うことが出来ます。
204 |
205 |
206 | 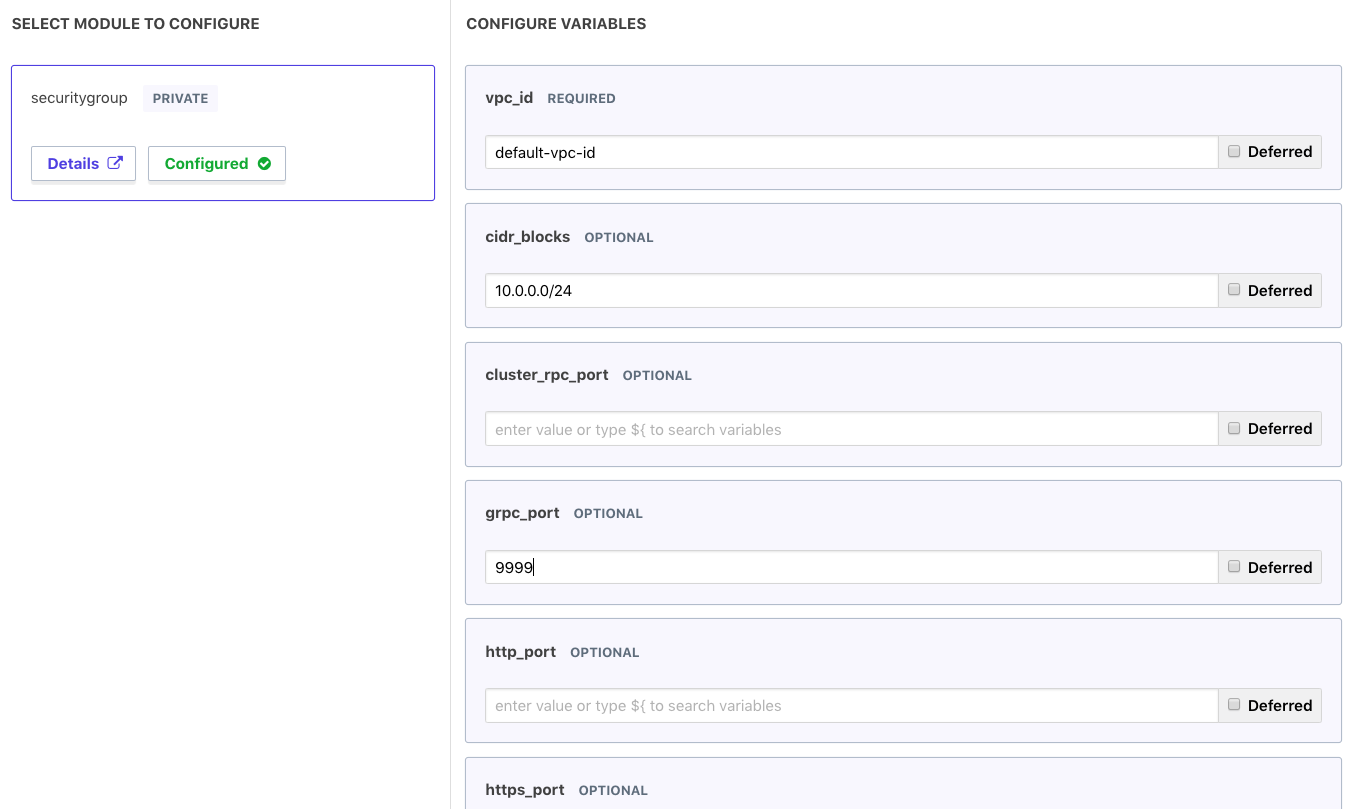 207 |
208 |
209 | 変数の設定画面が出てくるはずです。`Design configuration` ではインプットに必要な変数を自動で検出して GUI 上で設定することが出来ます。この際、`variables.tf`で`default`が設定されているものは`OPTIONAL`、設定されていないものは`REQUIRED`となり、設定漏れを防ぐことが出来て便利です。
210 |
211 | 今回実際 Apply は行わないので適当な値を入れて`Next`をクリックして下さい。
212 |
213 |
214 |
207 |
208 |
209 | 変数の設定画面が出てくるはずです。`Design configuration` ではインプットに必要な変数を自動で検出して GUI 上で設定することが出来ます。この際、`variables.tf`で`default`が設定されているものは`OPTIONAL`、設定されていないものは`REQUIRED`となり、設定漏れを防ぐことが出来て便利です。
210 |
211 | 今回実際 Apply は行わないので適当な値を入れて`Next`をクリックして下さい。
212 |
213 |
214 | 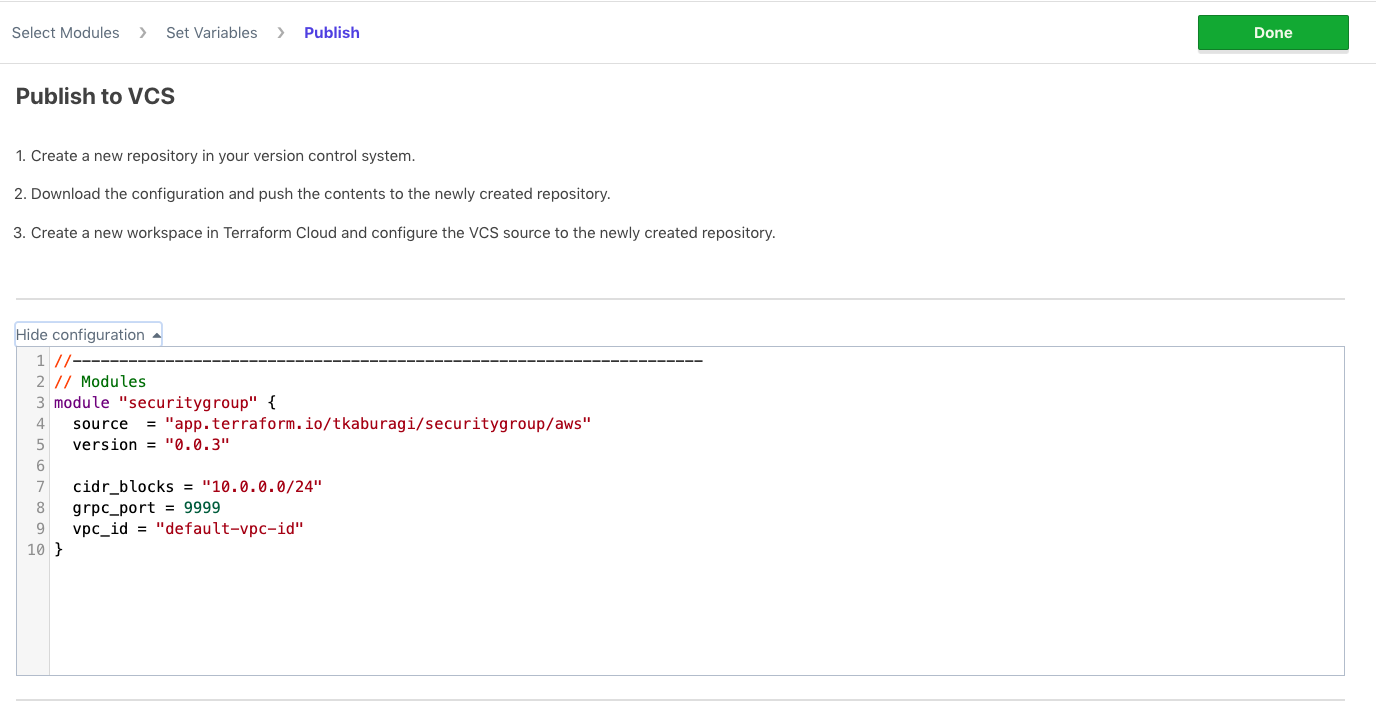 215 |
216 |
217 | コードが生成されるはずです。これをコピーして既存のコードに利用してもいいですし、ダウンロードして新規のコンフィグレーションを立ち上げても OK です。このコードはここでしか取得出来ないので何らかの形で残しておきましょう。
218 |
219 | `Done`をクリックして終了します。
220 |
221 | 以上で一連の使い方は終了ですが、余力のある方はバージョンアップをやってみましょう。
222 |
223 | ## Module のバージョンアップ
224 |
225 | バージョンを指定して Module を利用出来ることはエンタープライズ版のメリットのうちの一つです。`main`, `variables`, `output`をそれぞれ以下のように編集します。
226 |
227 | `main.tf`
228 |
229 | ```hcl
230 | ingress {
231 | cidr_blocks = var.cidr_blocks
232 | protocol = "tcp"
233 | from_port = var.wan_serf
234 | to_port = var.wan_serf
235 | }
236 | ```
237 |
238 | `variables.tf`
239 |
240 | ```hcl
241 | variable "wan_serf" {
242 | default = "8302"
243 | }
244 | ```
245 |
246 | `output.tf`
247 |
248 | ```hcl
249 | output "wan_serf" {
250 | value = var.wan_serf
251 | }
252 | ```
253 |
254 | コミットしてみましょう。
255 |
256 | ```shell
257 | $ git add .
258 | $ git commit -m "added wan feature"
259 | $ git tag -a 0.1.0 -m "v 0.1.0"
260 | $ git push origin 0.1.0 master
261 | ```
262 |
263 | TFE の画面に戻り`Modules`をクリックしてモジュールの`Details`を選ぶとバージョンが`0.1.0`にアップしていることがわかるでしょう。
264 |
265 | また`Versions`のボタンから複数バージョンを確認することが出来ます。
266 |
267 |
268 |
215 |
216 |
217 | コードが生成されるはずです。これをコピーして既存のコードに利用してもいいですし、ダウンロードして新規のコンフィグレーションを立ち上げても OK です。このコードはここでしか取得出来ないので何らかの形で残しておきましょう。
218 |
219 | `Done`をクリックして終了します。
220 |
221 | 以上で一連の使い方は終了ですが、余力のある方はバージョンアップをやってみましょう。
222 |
223 | ## Module のバージョンアップ
224 |
225 | バージョンを指定して Module を利用出来ることはエンタープライズ版のメリットのうちの一つです。`main`, `variables`, `output`をそれぞれ以下のように編集します。
226 |
227 | `main.tf`
228 |
229 | ```hcl
230 | ingress {
231 | cidr_blocks = var.cidr_blocks
232 | protocol = "tcp"
233 | from_port = var.wan_serf
234 | to_port = var.wan_serf
235 | }
236 | ```
237 |
238 | `variables.tf`
239 |
240 | ```hcl
241 | variable "wan_serf" {
242 | default = "8302"
243 | }
244 | ```
245 |
246 | `output.tf`
247 |
248 | ```hcl
249 | output "wan_serf" {
250 | value = var.wan_serf
251 | }
252 | ```
253 |
254 | コミットしてみましょう。
255 |
256 | ```shell
257 | $ git add .
258 | $ git commit -m "added wan feature"
259 | $ git tag -a 0.1.0 -m "v 0.1.0"
260 | $ git push origin 0.1.0 master
261 | ```
262 |
263 | TFE の画面に戻り`Modules`をクリックしてモジュールの`Details`を選ぶとバージョンが`0.1.0`にアップしていることがわかるでしょう。
264 |
265 | また`Versions`のボタンから複数バージョンを確認することが出来ます。
266 |
267 |
268 | 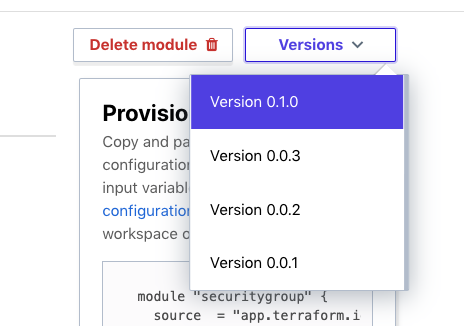 269 |
270 |
271 | 実際に作成する際もこれらのバージョンから選択してモジュールを使っていくことになります。
272 |
273 | ## 参考リンク
274 |
275 | * [Terraform Registry](https://www.terraform.io/docs/registry/index.html)
276 | * [Private Module Registry](https://www.terraform.io/docs/cloud/registry/index.html)
--------------------------------------------------------------------------------
/contents/tfc-remote-state.md:
--------------------------------------------------------------------------------
1 | # Terraform Cloud によるリモートステート管理
2 |
3 | さて、最初の Workshop では Local 環境で Terraform を実行し、State ファイルも Local 環境に作成されました。
4 |
5 | State ファイルは非常に重要なファイルで様々な情報がつまっています。
6 | - Provisioning された Resource の識別情報
7 | - API キーやパスワードなどの Secret
8 | - など
9 |
10 | Terraform で継続的に Provisioning を行なうためには State ファイルの管理が必至です。Terraform はデフォルトの挙動として、実行されて得た State ファイルを Local 環境に保存します。ただ、Local 環境で State ファイルを管理するにはいくつかの問題があります。
11 | - 個人の Local 環境だけに存在すると、チームでの作業が出来ない
12 | - 例えば A さんのローカルマシン上にだけ State ファイルがある場合、A さん以外の人はその環境にたいして、それ以上の Provisioning が出来ない。
13 | - 誤って削除してしまうと元に戻せない(よって全てのインフラ情報が損失してしまう)
14 | - 既存の環境を State ファイルに取り込む import というコマンドもありますが、非常に手間と時間がかかります。
15 | - State ファイルは常に最後の Terraform 実行の情報だけが記載されるので、過去のインフラ状態のトラッキングが出来ない
16 | - トラッキングのために、Terraform の実行毎に State ファイルを共有スペース(ファイルサーバーや S3 など)や VCS などに保存するやり方もありますが、手間がかかります。
17 |
18 | そこで、Terraform OSS のユーザーはこれらの問題を回避するために様々な仕組みをカスタムしてきました。ただ、これらのカスタマイズは各ユーザー側の開発・メンテナンスなどを必要とし、その管理のために本来の仕事とは別の時間を費やしてしまいます。
19 |
20 | Terraform Cloud 及び Terraform Enterprise にはこれらの問題を解決すべく、様々な Team collaboration 及び Governance の機能を予め用意してあります。これからの Workshop では、これら機能を紹介していきます。
21 |
22 | ## 事前準備
23 |
24 | 1. この Workshop を行なうには Terraform Cloud のアカウントが必要です。こちらからサインアップをしてください。(すでにアカウントをお持ちの方はスキップしてください。)
25 |
26 | [https://app.terraform.io/signup/account](https://app.terraform.io/signup/account)
27 |
28 | ## リモートステート管理機能
29 |
30 | Terraform Cloud には Remote State 管理機能があります。ちなみに、**この機能は誰でも無料で利用できます**。
31 |
32 | ここでは、Remote State 管理機能を使うエクササイズを行います。
33 |
34 |
35 | ### Organization の設定
36 |
37 | Terraform Cloud にログインし、新規 Organization を作成します。
38 |
39 | すでに Organization を作ってる人はこの手順をスキップしてください。
40 | Organization は、ユーザや、チームや、Workcpace を束ねて扱う事ができる最上位単位です。
41 |
42 |
43 |
269 |
270 |
271 | 実際に作成する際もこれらのバージョンから選択してモジュールを使っていくことになります。
272 |
273 | ## 参考リンク
274 |
275 | * [Terraform Registry](https://www.terraform.io/docs/registry/index.html)
276 | * [Private Module Registry](https://www.terraform.io/docs/cloud/registry/index.html)
--------------------------------------------------------------------------------
/contents/tfc-remote-state.md:
--------------------------------------------------------------------------------
1 | # Terraform Cloud によるリモートステート管理
2 |
3 | さて、最初の Workshop では Local 環境で Terraform を実行し、State ファイルも Local 環境に作成されました。
4 |
5 | State ファイルは非常に重要なファイルで様々な情報がつまっています。
6 | - Provisioning された Resource の識別情報
7 | - API キーやパスワードなどの Secret
8 | - など
9 |
10 | Terraform で継続的に Provisioning を行なうためには State ファイルの管理が必至です。Terraform はデフォルトの挙動として、実行されて得た State ファイルを Local 環境に保存します。ただ、Local 環境で State ファイルを管理するにはいくつかの問題があります。
11 | - 個人の Local 環境だけに存在すると、チームでの作業が出来ない
12 | - 例えば A さんのローカルマシン上にだけ State ファイルがある場合、A さん以外の人はその環境にたいして、それ以上の Provisioning が出来ない。
13 | - 誤って削除してしまうと元に戻せない(よって全てのインフラ情報が損失してしまう)
14 | - 既存の環境を State ファイルに取り込む import というコマンドもありますが、非常に手間と時間がかかります。
15 | - State ファイルは常に最後の Terraform 実行の情報だけが記載されるので、過去のインフラ状態のトラッキングが出来ない
16 | - トラッキングのために、Terraform の実行毎に State ファイルを共有スペース(ファイルサーバーや S3 など)や VCS などに保存するやり方もありますが、手間がかかります。
17 |
18 | そこで、Terraform OSS のユーザーはこれらの問題を回避するために様々な仕組みをカスタムしてきました。ただ、これらのカスタマイズは各ユーザー側の開発・メンテナンスなどを必要とし、その管理のために本来の仕事とは別の時間を費やしてしまいます。
19 |
20 | Terraform Cloud 及び Terraform Enterprise にはこれらの問題を解決すべく、様々な Team collaboration 及び Governance の機能を予め用意してあります。これからの Workshop では、これら機能を紹介していきます。
21 |
22 | ## 事前準備
23 |
24 | 1. この Workshop を行なうには Terraform Cloud のアカウントが必要です。こちらからサインアップをしてください。(すでにアカウントをお持ちの方はスキップしてください。)
25 |
26 | [https://app.terraform.io/signup/account](https://app.terraform.io/signup/account)
27 |
28 | ## リモートステート管理機能
29 |
30 | Terraform Cloud には Remote State 管理機能があります。ちなみに、**この機能は誰でも無料で利用できます**。
31 |
32 | ここでは、Remote State 管理機能を使うエクササイズを行います。
33 |
34 |
35 | ### Organization の設定
36 |
37 | Terraform Cloud にログインし、新規 Organization を作成します。
38 |
39 | すでに Organization を作ってる人はこの手順をスキップしてください。
40 | Organization は、ユーザや、チームや、Workcpace を束ねて扱う事ができる最上位単位です。
41 |
42 |
43 |  44 |
45 |
46 | `+ create organization` ボタンを押して詳細を入力します。
47 |
48 |
49 |
44 |
45 |
46 | `+ create organization` ボタンを押して詳細を入力します。
47 |
48 |
49 |  50 |
51 |
52 |
53 | `Terraform organization name` には、unique な名前を設定します。
54 | 数字、文字、アンダースコア (_)、ハイフン (-)が利用できます。
55 |
56 | 入力したら、メールアドレスを入力して、 `create organization` ボタンを押したら Organization が作成されます。
57 | メールアドレスはログインした情報を元に自動で入力されています。
58 |
59 |
60 |
50 |
51 |
52 |
53 | `Terraform organization name` には、unique な名前を設定します。
54 | 数字、文字、アンダースコア (_)、ハイフン (-)が利用できます。
55 |
56 | 入力したら、メールアドレスを入力して、 `create organization` ボタンを押したら Organization が作成されます。
57 | メールアドレスはログインした情報を元に自動で入力されています。
58 |
59 |
60 |  61 |
62 |
63 | ### Workspace の設定
64 |
65 | Organization を作成したら、新規 Workspace を作成します。
66 | ワークスペース名は任意で構いません。
67 |
68 | **1 つの Organization 内では全ての Workspace 名が一意である必要がありますので、複数のユーザーで作業する場合、Workspace 名がユニークになるようにしてください。**
69 |
70 | Workspace は以下の `Create a workspace` ボタンより作成できます。
71 |
72 | 
73 |
74 | 以下の画面で、**CLI Drive Workflow**を選択してください。
75 |
76 |
77 |
61 |
62 |
63 | ### Workspace の設定
64 |
65 | Organization を作成したら、新規 Workspace を作成します。
66 | ワークスペース名は任意で構いません。
67 |
68 | **1 つの Organization 内では全ての Workspace 名が一意である必要がありますので、複数のユーザーで作業する場合、Workspace 名がユニークになるようにしてください。**
69 |
70 | Workspace は以下の `Create a workspace` ボタンより作成できます。
71 |
72 | 
73 |
74 | 以下の画面で、**CLI Drive Workflow**を選択してください。
75 |
76 |
77 |  78 |
79 |
80 | ここでは、ワークスペース名は**hello-tf**とします。
81 | 併せて、Workspace を作成する Project を選択します。
82 |
83 | Project を独自に作っている人は任意の Project を選択し、
84 | 初めて利用する人は最初から作られている **Default Project** のまま進んでください。
85 |
86 | **Create** ボタンを押すと Workspace が作成されます。
87 |
88 |
89 |
78 |
79 |
80 | ここでは、ワークスペース名は**hello-tf**とします。
81 | 併せて、Workspace を作成する Project を選択します。
82 |
83 | Project を独自に作っている人は任意の Project を選択し、
84 | 初めて利用する人は最初から作られている **Default Project** のまま進んでください。
85 |
86 | **Create** ボタンを押すと Workspace が作成されます。
87 |
88 |
89 |  90 |
91 |
92 | つぎに作成したワークスペースの Settings メニューから以下の操作を実施して下さい。
93 |
94 | ```
95 | * Settings > General ナビゲートし、Execution modeをLocalに設定
96 | * Save Settingsを選択して保存
97 | ```
98 |
99 |
100 |
90 |
91 |
92 | つぎに作成したワークスペースの Settings メニューから以下の操作を実施して下さい。
93 |
94 | ```
95 | * Settings > General ナビゲートし、Execution modeをLocalに設定
96 | * Save Settingsを選択して保存
97 | ```
98 |
99 |
100 |  101 |
102 |
103 | Execution mode を**Local**に設定すると、Terraform の実行は Local 環境で行いますが、作成される State ファイルは Terraform Cloud に保存されます。
104 |
105 | ### User Token の作成
106 |
107 | さて、次に Local の Terraform 環境から Terraform Cloud にアクセスするために、User token を作成します。
108 | この User token はローカル環境や別のシステム(CI/CD パイプラインや外部ツールなど)から Terraform Cloud API を叩く際に必要となります。
109 |
110 | 右上の自分のアイコンをクリックして **Account settings** を選択します。
111 |
112 |
113 |
101 |
102 |
103 | Execution mode を**Local**に設定すると、Terraform の実行は Local 環境で行いますが、作成される State ファイルは Terraform Cloud に保存されます。
104 |
105 | ### User Token の作成
106 |
107 | さて、次に Local の Terraform 環境から Terraform Cloud にアクセスするために、User token を作成します。
108 | この User token はローカル環境や別のシステム(CI/CD パイプラインや外部ツールなど)から Terraform Cloud API を叩く際に必要となります。
109 |
110 | 右上の自分のアイコンをクリックして **Account settings** を選択します。
111 |
112 |
113 |  114 |
115 |
116 | そこから、**Tokens** メニューから **Create an API Token** ボタンで User Token を作成します。
117 |
118 |
119 |
114 |
115 |
116 | そこから、**Tokens** メニューから **Create an API Token** ボタンで User Token を作成します。
117 |
118 |
119 |  120 |
121 |
122 | ダイアログが表示されるので、
123 | Description にはこの Token についての説明を追加します。
124 | ここでは **for workshop** などとしておくと workshop 用途で使った token である事を後から判別できます。
125 | 入力したら **Generate token** ボタンを押して Token を作成します。
126 |
127 |
128 |
120 |
121 |
122 | ダイアログが表示されるので、
123 | Description にはこの Token についての説明を追加します。
124 | ここでは **for workshop** などとしておくと workshop 用途で使った token である事を後から判別できます。
125 | 入力したら **Generate token** ボタンを押して Token を作成します。
126 |
127 |
128 |  129 |
130 |
131 | Tokens の一覧に、作成した Token が表示されます。
132 | 作成されたばかりの Token には、Token の文字列が表示されています。(キャプチャの灰色部分です)
133 | 作成された Token は画面遷移するともう表示されないので、必ず安全なところへコピーして控えておいてください。
134 |
135 |
136 |
129 |
130 |
131 | Tokens の一覧に、作成した Token が表示されます。
132 | 作成されたばかりの Token には、Token の文字列が表示されています。(キャプチャの灰色部分です)
133 | 作成された Token は画面遷移するともう表示されないので、必ず安全なところへコピーして控えておいてください。
134 |
135 |
136 |  137 |
138 |
139 |
140 | 次に、ここで作成された Token を Local 環境の設定ファイルに登録します。`terraform login` コマンドを使います。Token は `~/.terraform.d/credentials.tfrc.json `に保存されます。
141 | **Windows の場合、%APPDATA%\terraform.rc となります。**
142 |
143 | **Token for app.terraform.io:** と聞かれたら、Token をペーストします。
144 |
145 | ```console
146 | $ cd path/to/hello-tf
147 | $ terraform login
148 | Terraform will request an API token for app.terraform.io using your browser.
149 |
150 | If login is successful, Terraform will store the token in plain text in
151 | the following file for use by subsequent commands:
152 | /Users//.terraform.d/credentials.tfrc.json
153 |
154 | Do you want to proceed?
155 | Only 'yes' will be accepted to confirm.
156 |
157 | Enter a value: yes
158 |
159 |
160 | ---------------------------------------------------------------------------------
161 |
162 | Terraform must now open a web browser to the tokens page for app.terraform.io.
163 |
164 | If a browser does not open this automatically, open the following URL to proceed:
165 | https://app.terraform.io/app/settings/tokens?source=terraform-login
166 |
167 |
168 | ---------------------------------------------------------------------------------
169 |
170 | Generate a token using your browser, and copy-paste it into this prompt.
171 |
172 | Terraform will store the token in plain text in the following file
173 | for use by subsequent commands:
174 | /Users//.terraform.d/credentials.tfrc.json
175 |
176 | Token for app.terraform.io:
177 | Enter a value:
178 |
179 |
180 | Retrieved token for user
181 | ```
182 |
183 | これで Local 環境から Terraform Cloud の API にアクセスする準備が整いました。
184 |
185 | ### Remote Backend の設定
186 |
187 | つぎに Terraform に Remote Backend を使用するコードを追加します。`main.tf` の `terraform` スタンザを以下のように変更してください。*YOUR_ORGANIZATION* は使用している Organization の値に置き換えてください。
188 |
189 | ```hcl
190 | terraform {
191 | #ここから
192 | cloud {
193 | organization = "YOUR_ORGANIZATION"
194 |
195 | workspaces {
196 | name = "hello-tf"
197 | }
198 | }
199 | #ここまで追加
200 | }
201 | ```
202 |
203 | ここまでの準備が出来ましたら、Terraform を実行します。
204 | `terraform init` コマンドを実行してください。
205 |
206 | ```console
207 | % terraform init
208 | Initializing HCP Terraform...
209 | Migrating from backend "remote" to HCP Terraform.
210 | Initializing provider plugins...
211 | - Reusing previous version of hashicorp/aws from the dependency lock file
212 | - Using previously-installed hashicorp/aws v6.12.0
213 |
214 | HCP Terraform has been successfully initialized!
215 |
216 | You may now begin working with HCP Terraform. Try running "terraform plan" to
217 | see any changes that are required for your infrastructure.
218 |
219 | If you ever set or change modules or Terraform Settings, run "terraform init"
220 | again to reinitialize your working directory.
221 | ```
222 |
223 | **Migrating from backend "remote" to HCP Terraform.** と表示されているのが確認できます。
224 |
225 | 実際に state ファイルを Terraform cloud の remote で管理するには `terraform apply` による実行が必要です。
226 |
227 | ```console
228 | $ terraform apply
229 | ```
230 |
231 | この段階で、Terraform Cloud の Workspace を確認すると、State ファイルが作成されているはずです。
232 |
233 |
234 |
137 |
138 |
139 |
140 | 次に、ここで作成された Token を Local 環境の設定ファイルに登録します。`terraform login` コマンドを使います。Token は `~/.terraform.d/credentials.tfrc.json `に保存されます。
141 | **Windows の場合、%APPDATA%\terraform.rc となります。**
142 |
143 | **Token for app.terraform.io:** と聞かれたら、Token をペーストします。
144 |
145 | ```console
146 | $ cd path/to/hello-tf
147 | $ terraform login
148 | Terraform will request an API token for app.terraform.io using your browser.
149 |
150 | If login is successful, Terraform will store the token in plain text in
151 | the following file for use by subsequent commands:
152 | /Users//.terraform.d/credentials.tfrc.json
153 |
154 | Do you want to proceed?
155 | Only 'yes' will be accepted to confirm.
156 |
157 | Enter a value: yes
158 |
159 |
160 | ---------------------------------------------------------------------------------
161 |
162 | Terraform must now open a web browser to the tokens page for app.terraform.io.
163 |
164 | If a browser does not open this automatically, open the following URL to proceed:
165 | https://app.terraform.io/app/settings/tokens?source=terraform-login
166 |
167 |
168 | ---------------------------------------------------------------------------------
169 |
170 | Generate a token using your browser, and copy-paste it into this prompt.
171 |
172 | Terraform will store the token in plain text in the following file
173 | for use by subsequent commands:
174 | /Users//.terraform.d/credentials.tfrc.json
175 |
176 | Token for app.terraform.io:
177 | Enter a value:
178 |
179 |
180 | Retrieved token for user
181 | ```
182 |
183 | これで Local 環境から Terraform Cloud の API にアクセスする準備が整いました。
184 |
185 | ### Remote Backend の設定
186 |
187 | つぎに Terraform に Remote Backend を使用するコードを追加します。`main.tf` の `terraform` スタンザを以下のように変更してください。*YOUR_ORGANIZATION* は使用している Organization の値に置き換えてください。
188 |
189 | ```hcl
190 | terraform {
191 | #ここから
192 | cloud {
193 | organization = "YOUR_ORGANIZATION"
194 |
195 | workspaces {
196 | name = "hello-tf"
197 | }
198 | }
199 | #ここまで追加
200 | }
201 | ```
202 |
203 | ここまでの準備が出来ましたら、Terraform を実行します。
204 | `terraform init` コマンドを実行してください。
205 |
206 | ```console
207 | % terraform init
208 | Initializing HCP Terraform...
209 | Migrating from backend "remote" to HCP Terraform.
210 | Initializing provider plugins...
211 | - Reusing previous version of hashicorp/aws from the dependency lock file
212 | - Using previously-installed hashicorp/aws v6.12.0
213 |
214 | HCP Terraform has been successfully initialized!
215 |
216 | You may now begin working with HCP Terraform. Try running "terraform plan" to
217 | see any changes that are required for your infrastructure.
218 |
219 | If you ever set or change modules or Terraform Settings, run "terraform init"
220 | again to reinitialize your working directory.
221 | ```
222 |
223 | **Migrating from backend "remote" to HCP Terraform.** と表示されているのが確認できます。
224 |
225 | 実際に state ファイルを Terraform cloud の remote で管理するには `terraform apply` による実行が必要です。
226 |
227 | ```console
228 | $ terraform apply
229 | ```
230 |
231 | この段階で、Terraform Cloud の Workspace を確認すると、State ファイルが作成されているはずです。
232 |
233 |
234 |  235 |
236 |
237 | 中を見てみると先ほど作成した環境のステートが記述されているはずです。
238 |
239 |
240 |
235 |
236 |
237 | 中を見てみると先ほど作成した環境のステートが記述されているはずです。
238 |
239 |
240 |  241 |
242 |
243 | ### 環境のクリーンアップ
244 |
245 | 次に`destroy`で環境をリセットします。
246 |
247 | ```shell
248 | $ terraform destroy
249 | ```
250 | 実行中にステートレポジトリの GUI を見るとロックがかかっていることがわかります。
251 |
252 |
253 |
241 |
242 |
243 | ### 環境のクリーンアップ
244 |
245 | 次に`destroy`で環境をリセットします。
246 |
247 | ```shell
248 | $ terraform destroy
249 | ```
250 | 実行中にステートレポジトリの GUI を見るとロックがかかっていることがわかります。
251 |
252 |
253 |  254 |
255 |
256 | 実行ししばらくすると EC2 インスタンスが `terminated` の状態になってることがわかるはずです。(GCP/Azure の場合は Web ブラウザから確認してください。)
257 |
258 | ```console
259 | $ aws ec2 describe-instances --query "Reservations[].Instances[].{InstanceId:InstanceId,State:State}"
260 | [
261 | {
262 | "InstanceId": "i-0988a3fc4de8f2980",
263 | "State": {
264 | "Code": 48,
265 | "Name": "terminated"
266 | }
267 | },
268 | {
269 | "InstanceId": "i-0b22f0bca411f88cb",
270 | "State": {
271 | "Code": 48,
272 | "Name": "terminated"
273 | }
274 | }
275 | ]
276 | ```
277 |
278 | この `destroy` では Local の State ファイルではなく、Terraform Cloud 上の State ファイルを使用します。よって、もう Local の State ファイルは必要ないので削除しても構いません。
279 |
280 | 再度 Terraform Cloud の GUI からステートファイルを確認してください。変更が反映されることがわかるはずです。
281 |
282 |
283 |
254 |
255 |
256 | 実行ししばらくすると EC2 インスタンスが `terminated` の状態になってることがわかるはずです。(GCP/Azure の場合は Web ブラウザから確認してください。)
257 |
258 | ```console
259 | $ aws ec2 describe-instances --query "Reservations[].Instances[].{InstanceId:InstanceId,State:State}"
260 | [
261 | {
262 | "InstanceId": "i-0988a3fc4de8f2980",
263 | "State": {
264 | "Code": 48,
265 | "Name": "terminated"
266 | }
267 | },
268 | {
269 | "InstanceId": "i-0b22f0bca411f88cb",
270 | "State": {
271 | "Code": 48,
272 | "Name": "terminated"
273 | }
274 | }
275 | ]
276 | ```
277 |
278 | この `destroy` では Local の State ファイルではなく、Terraform Cloud 上の State ファイルを使用します。よって、もう Local の State ファイルは必要ないので削除しても構いません。
279 |
280 | 再度 Terraform Cloud の GUI からステートファイルを確認してください。変更が反映されることがわかるはずです。
281 |
282 |
283 |  284 |
285 |
286 | ## まとめ
287 |
288 | これで Remote Backend の設定は完了です。ここでのエクササイズでは、個人個人で Workspace を作りましたが、これをチームで共有することで State ファイルの共有が実現できます。
289 |
290 | ただ、State ファイルの共有が実現できたとしてもまだまだチーム利用としては足りない機能が多々あります。それらを次からの Workshop で見ていきたいと思います。
291 |
--------------------------------------------------------------------------------
/contents/variables.md:
--------------------------------------------------------------------------------
1 | # Secure Variables Storage
2 |
3 | Terraform はソフトウェアの性質上、非常に機密性の高いデータを利用します。例えば AWS にプロビジョニングを実行する際は強い権限を持ったアカウントのキーを使う必要があります。
4 |
5 | 「初めての Terraform」の章で変数をセットするには下記の方法があると記述しました。
6 |
7 | * `tfvars`というファイルの中で定義する
8 | * `terraform apply -vars=***`という形で CLI の引数で定義する
9 | * `TF_VAR_***`という環境変数で定義する
10 | * Plan 中に対話式で入力して定義する
11 |
12 | いずれの方法もファイル、OS のコマンド履歴、環境変数などにシークレットが残ってしまう可能性があります。そこで Enterprise 版では HashiCorp Vault の暗号化エンジンをバックエンドで利用した Variable Storage を簡単に使うことができます。これによって安全に変数を扱うことができます。
13 |
14 | Variable のストレージは一つのワークスペースに一つ用意されます。またこの他にもステートファイルなど重要なデータは例外なく暗号化され保存されています。
15 |
16 | Terraform Enterprise には二種類に変数がサポートされています。`Terraform Variables`と`Environment Variables`です。
17 |
18 | `Terraform Variables`は Terrafrom で扱う変数です。ここでセットされた値は`terraform.tfvars`として扱われます。そのため連携する VCS にもし`terraform.tfvars`がある場合はオーバーライドされます。
19 |
20 | `Environment Variables`は Linux の Worker(Terraform Run などを行うコンポーネント)上にセットされる値です。ここでセットされた値が export コマンドよって実行前に環境変数としてセットされます。`Environment Variables`の中には TFE 上で特別な意味を持つものが存在します。
21 |
22 | * `CONFIRM_DESTROY`: `Destroy`を許容するかどうか。デフォルトでは無効です。
23 | * `TFE_PARALLELISM`: 処理高速化のための並列実行のオプション。デフォルトは 10 です。
24 |
25 |
26 | ## 変数のセット
27 |
28 | 先ほど作成した`tf-handson-workshop`に変更を加えます。
29 |
30 | ```shell
31 | $ cd path/to/tf-workspace/tf-handson-workshop
32 | ```
33 |
34 | 以下の二つのファイルを作成してください。`main.tf`, `variables.tf` というファイル名です。
35 |
36 |
37 | ```shell
38 | $ cat < main.tf
39 |
40 | terraform {
41 | }
42 |
43 | provider "aws" {
44 | access_key = var.access_key
45 | secret_key = var.secret_key
46 | region = var.region
47 | }
48 |
49 | resource "aws_instance" "hello-tf-instance" {
50 | ami = var.ami
51 | count = var.hello_tf_instance_count
52 | instance_type = var.hello_tf_instance_type
53 | }
54 |
55 | EOF
56 | ```
57 |
58 | ```shell
59 | $ cat << EOF > variables.tf
60 |
61 | variable "access_key" {}
62 | variable "secret_key" {}
63 | variable "region" {}
64 | variable "ami" {}
65 | variable "hello_tf_instance_count" {
66 | default = 2
67 | }
68 | variable "hello_tf_instance_type" {
69 | default = "t2.micro"
70 | }
71 |
72 | EOF
73 | ```
74 |
75 |
284 |
285 |
286 | ## まとめ
287 |
288 | これで Remote Backend の設定は完了です。ここでのエクササイズでは、個人個人で Workspace を作りましたが、これをチームで共有することで State ファイルの共有が実現できます。
289 |
290 | ただ、State ファイルの共有が実現できたとしてもまだまだチーム利用としては足りない機能が多々あります。それらを次からの Workshop で見ていきたいと思います。
291 |
--------------------------------------------------------------------------------
/contents/variables.md:
--------------------------------------------------------------------------------
1 | # Secure Variables Storage
2 |
3 | Terraform はソフトウェアの性質上、非常に機密性の高いデータを利用します。例えば AWS にプロビジョニングを実行する際は強い権限を持ったアカウントのキーを使う必要があります。
4 |
5 | 「初めての Terraform」の章で変数をセットするには下記の方法があると記述しました。
6 |
7 | * `tfvars`というファイルの中で定義する
8 | * `terraform apply -vars=***`という形で CLI の引数で定義する
9 | * `TF_VAR_***`という環境変数で定義する
10 | * Plan 中に対話式で入力して定義する
11 |
12 | いずれの方法もファイル、OS のコマンド履歴、環境変数などにシークレットが残ってしまう可能性があります。そこで Enterprise 版では HashiCorp Vault の暗号化エンジンをバックエンドで利用した Variable Storage を簡単に使うことができます。これによって安全に変数を扱うことができます。
13 |
14 | Variable のストレージは一つのワークスペースに一つ用意されます。またこの他にもステートファイルなど重要なデータは例外なく暗号化され保存されています。
15 |
16 | Terraform Enterprise には二種類に変数がサポートされています。`Terraform Variables`と`Environment Variables`です。
17 |
18 | `Terraform Variables`は Terrafrom で扱う変数です。ここでセットされた値は`terraform.tfvars`として扱われます。そのため連携する VCS にもし`terraform.tfvars`がある場合はオーバーライドされます。
19 |
20 | `Environment Variables`は Linux の Worker(Terraform Run などを行うコンポーネント)上にセットされる値です。ここでセットされた値が export コマンドよって実行前に環境変数としてセットされます。`Environment Variables`の中には TFE 上で特別な意味を持つものが存在します。
21 |
22 | * `CONFIRM_DESTROY`: `Destroy`を許容するかどうか。デフォルトでは無効です。
23 | * `TFE_PARALLELISM`: 処理高速化のための並列実行のオプション。デフォルトは 10 です。
24 |
25 |
26 | ## 変数のセット
27 |
28 | 先ほど作成した`tf-handson-workshop`に変更を加えます。
29 |
30 | ```shell
31 | $ cd path/to/tf-workspace/tf-handson-workshop
32 | ```
33 |
34 | 以下の二つのファイルを作成してください。`main.tf`, `variables.tf` というファイル名です。
35 |
36 |
37 | ```shell
38 | $ cat < main.tf
39 |
40 | terraform {
41 | }
42 |
43 | provider "aws" {
44 | access_key = var.access_key
45 | secret_key = var.secret_key
46 | region = var.region
47 | }
48 |
49 | resource "aws_instance" "hello-tf-instance" {
50 | ami = var.ami
51 | count = var.hello_tf_instance_count
52 | instance_type = var.hello_tf_instance_type
53 | }
54 |
55 | EOF
56 | ```
57 |
58 | ```shell
59 | $ cat << EOF > variables.tf
60 |
61 | variable "access_key" {}
62 | variable "secret_key" {}
63 | variable "region" {}
64 | variable "ami" {}
65 | variable "hello_tf_instance_count" {
66 | default = 2
67 | }
68 | variable "hello_tf_instance_type" {
69 | default = "t2.micro"
70 | }
71 |
72 | EOF
73 | ```
74 |
75 | GCPの場合はこちら
76 |
77 | ```hcl
78 | terraform {
79 | }
80 |
81 | provider "google" {
82 | credentials = var.gcp_key
83 | project = var.project
84 | region = var.region
85 | }
86 |
87 | resource "google_compute_instance" "vm_instance" {
88 | name = "terraform-instance-${count.index}-"
89 | count = var.hello_tf_instance_count
90 | machine_type = var.machine_type
91 | zone = "asia-northeast1-a"
92 | boot_disk {
93 | initialize_params {
94 | image = var.image
95 | }
96 | }
97 |
98 | network_interface {
99 | # A default network is created for all GCP projects
100 | network = "default"
101 | access_config {
102 | }
103 | }
104 | }
105 | ```
106 | ```hcl
107 | variable "gcp_key" {}
108 | variable "machine_type" {}
109 | variable "hello_tf_instance_count" {
110 | default = 1
111 | }
112 | variable "region" {
113 | default = "asia-northeast1"
114 | }
115 | variable "project" {}
116 | variable "image" {}
117 | ```
118 | Azureの場合はこちら
122 |
123 | ```hcl
124 | terraform {
125 | }
126 |
127 | provider "azurerm" {
128 | client_id = var.client_id
129 | tenant_id = var.tenant_id
130 | subscription_id = var.subscription_id
131 | client_secret = var.client_secret
132 | features {}
133 | }
134 |
135 | resource "azurerm_virtual_machine" "main" {
136 | name = "my-vm-${count.index}"
137 | count = var.hello_tf_instance_count
138 | location = var.location
139 | resource_group_name = azurerm_resource_group.example.name
140 | network_interface_ids = [azurerm_network_interface.example.*.id[count.index]]
141 | vm_size = var.vm_size
142 |
143 | os_profile {
144 | computer_name = "hostname"
145 | admin_username = "vmadmin"
146 | admin_password = var.admin_password
147 | }
148 | os_profile_linux_config {
149 | disable_password_authentication = false
150 | }
151 | storage_image_reference {
152 | publisher = "Canonical"
153 | offer = "UbuntuServer"
154 | sku = "16.04-LTS"
155 | version = "latest"
156 | }
157 | storage_os_disk {
158 | name = "my-osdisk-${count.index}"
159 | caching = "ReadWrite"
160 | create_option = "FromImage"
161 | managed_disk_type = "Standard_LRS"
162 | }
163 | }
164 |
165 | resource "azurerm_resource_group" "example" {
166 | name = "my-group"
167 | location = var.location
168 | }
169 |
170 |
171 | resource "azurerm_virtual_network" "example" {
172 | name = "my-network"
173 | address_space = ["10.0.0.0/16"]
174 | location = var.location
175 | resource_group_name = azurerm_resource_group.example.name
176 | }
177 |
178 | resource "azurerm_subnet" "example" {
179 | name = "my-subnet"
180 | resource_group_name = azurerm_resource_group.example.name
181 | virtual_network_name = azurerm_virtual_network.example.name
182 | address_prefix = "10.0.2.0/24"
183 | }
184 |
185 | resource "azurerm_network_interface" "example" {
186 | name = "my-nw-interface-${count.index}"
187 | count = var.hello_tf_instance_count
188 | location = var.location
189 | resource_group_name = azurerm_resource_group.example.name
190 |
191 | ip_configuration {
192 | name = "my-ip-config"
193 | subnet_id = azurerm_subnet.example.id
194 | private_ip_address_allocation = "Dynamic"
195 | }
196 |
197 | tags = {
198 | environment = "payground"
199 | }
200 | }
201 | ```
202 | ```hcl
203 | variable "vm_size" {}
204 | variable "client_id" {}
205 | variable "client_secret" {}
206 | variable "tenant_id" {}
207 | variable "subscription_id" {}
208 | variable "location" {}
209 | variable "admin_password" {}
210 | variable "hello_tf_instance_count" {
211 | default = 1
212 | }
213 | ```
214 | 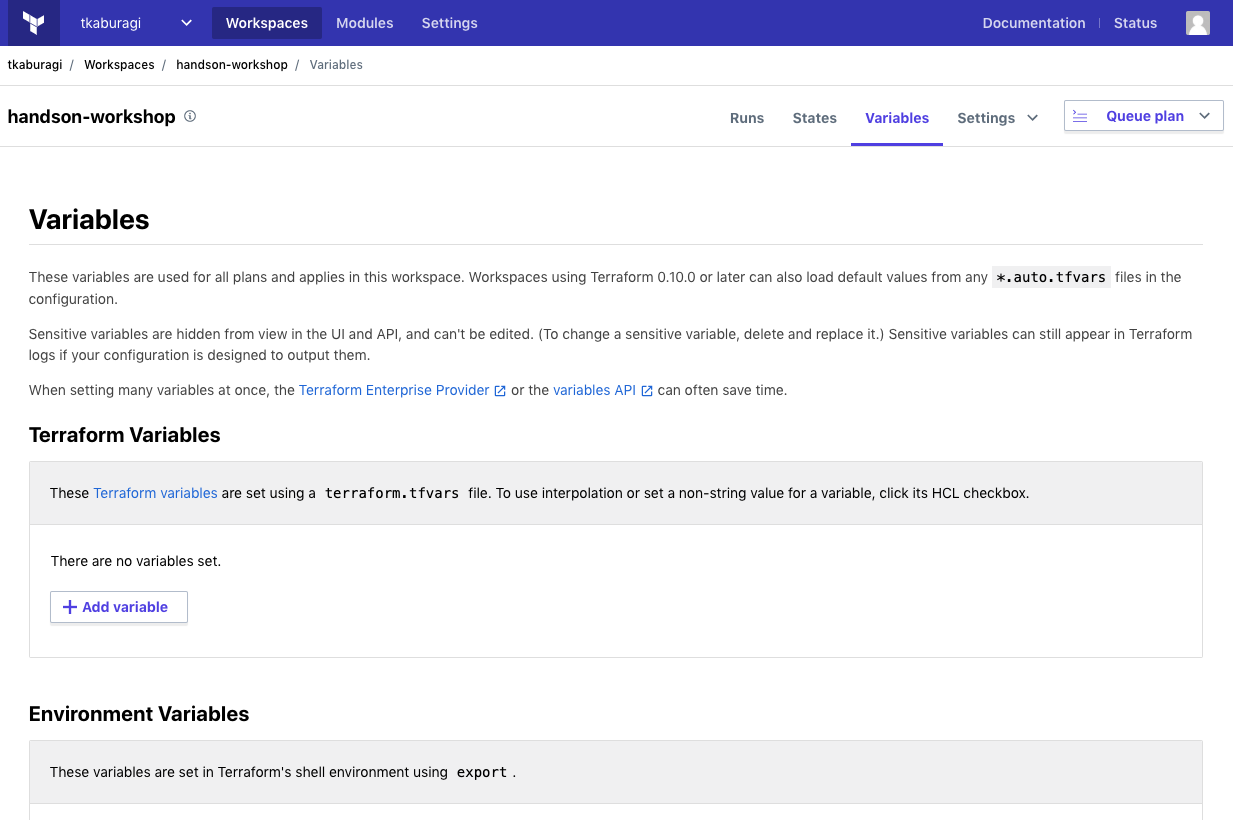 228 |
229 |
230 | `Add variables`をクリックして以下の変数を入力してください。
231 |
232 | ```
233 | * access_key : 自身のキー : Senstive
234 | * secret_key : 自身のキー : Senstive
235 | * region : ap-northeast-1
236 | * ami : ami-06d9ad3f86032262d
237 | * hello_tf_instance_count : 1
238 | * hello_tf_instance_type : t2.micro
239 | ```
240 |
241 |
228 |
229 |
230 | `Add variables`をクリックして以下の変数を入力してください。
231 |
232 | ```
233 | * access_key : 自身のキー : Senstive
234 | * secret_key : 自身のキー : Senstive
235 | * region : ap-northeast-1
236 | * ami : ami-06d9ad3f86032262d
237 | * hello_tf_instance_count : 1
238 | * hello_tf_instance_type : t2.micro
239 | ```
240 |
241 | GCPの場合はこちら
242 |
243 | ```
244 | * gcp_key : JSONファイルコピペ : Senstive
245 | * region : ap-northeast1
246 | * image : debian-cloud/debian-9
247 | * machine_type : f1-micro
248 | * project : PROJECT_NAME
249 | * hello_tf_instance_count : 1
250 | ```
251 | Azureの場合はこちら
254 |
255 | ```
256 | * client_id : ******* : Senstive
257 | * client_secret : ******* : Senstive
258 | * tenant_id : ******* : Senstive
259 | * subscription_id : ******* : Senstive
260 | * location : East Asia
261 | * admin_password : Password1234!
262 | * hello_tf_instance_count : 1
263 | * vm_size : Standard_DS1_v2
264 | ```
265 | 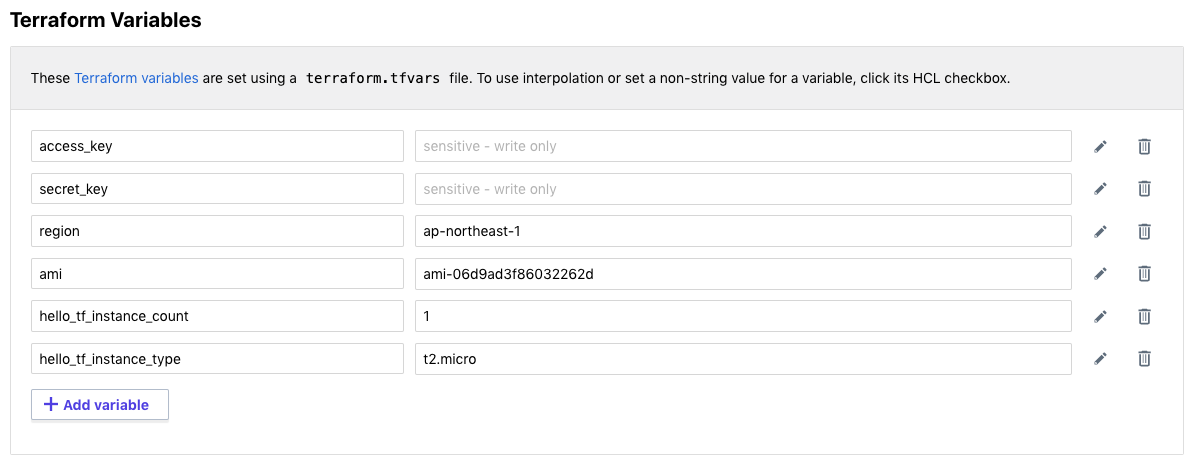 269 |
270 |
271 | またこれらの値は[TFC API](https://www.terraform.io/docs/cloud/api/variables.html)でセットすることもできます。
272 |
273 | ここまで完了したらコードをコミットしてみます。
274 |
275 | ```shell
276 | $ git add .
277 | $ git commit -m "second commit"
278 | $ git push -u origin main
279 | ```
280 |
281 | ## 実行結果の確認
282 |
283 | ワークスペースのトップ画面に戻り`Runs`のタブを見ると新規のコミットに対してプランが走っていることがわかります。
284 |
285 |
286 |
269 |
270 |
271 | またこれらの値は[TFC API](https://www.terraform.io/docs/cloud/api/variables.html)でセットすることもできます。
272 |
273 | ここまで完了したらコードをコミットしてみます。
274 |
275 | ```shell
276 | $ git add .
277 | $ git commit -m "second commit"
278 | $ git push -u origin main
279 | ```
280 |
281 | ## 実行結果の確認
282 |
283 | ワークスペースのトップ画面に戻り`Runs`のタブを見ると新規のコミットに対してプランが走っていることがわかります。
284 |
285 |
286 |  287 |
288 |
289 | クリックしてプランの詳細を確認し、プランが終わると Apply 可能になります。`Confirm`をクリックし Apply を実行ししばらくすると成功するはずです。
290 |
291 | AWS CLI で確認します。(GCP/Azure の場合は Web ブラウザから確認してください。)
292 |
293 | ```console
294 | $ aws ec2 describe-instances --query "Reservations[].Instances[].{InstanceId:InstanceId,State:State}"
295 | [
296 | {
297 | "InstanceId": "i-07bbdb6c0532e1617",
298 | "State": {
299 | "Code": 16,
300 | "Name": "running"
301 | }
302 | }
303 | ]
304 | ```
305 |
306 | 節約のために環境を綺麗にしておきましょう。ワークスペースのセッテイングから`Destruction and Deletion`を選びます。
307 |
308 |
309 |
287 |
288 |
289 | クリックしてプランの詳細を確認し、プランが終わると Apply 可能になります。`Confirm`をクリックし Apply を実行ししばらくすると成功するはずです。
290 |
291 | AWS CLI で確認します。(GCP/Azure の場合は Web ブラウザから確認してください。)
292 |
293 | ```console
294 | $ aws ec2 describe-instances --query "Reservations[].Instances[].{InstanceId:InstanceId,State:State}"
295 | [
296 | {
297 | "InstanceId": "i-07bbdb6c0532e1617",
298 | "State": {
299 | "Code": 16,
300 | "Name": "running"
301 | }
302 | }
303 | ]
304 | ```
305 |
306 | 節約のために環境を綺麗にしておきましょう。ワークスペースのセッテイングから`Destruction and Deletion`を選びます。
307 |
308 |
309 | 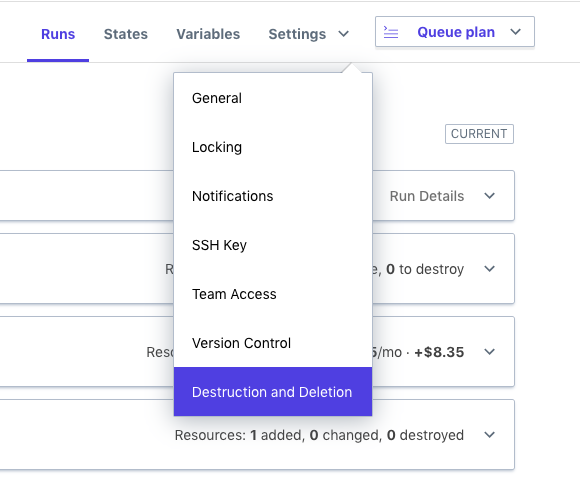 310 |
311 |
312 | `Queue Destroy Plan`を選択し、プランが完了したら`Confirm & Apply`で destroy を実行してください。
313 |
314 |
315 |
310 |
311 |
312 | `Queue Destroy Plan`を選択し、プランが完了したら`Confirm & Apply`で destroy を実行してください。
313 |
314 |
315 | 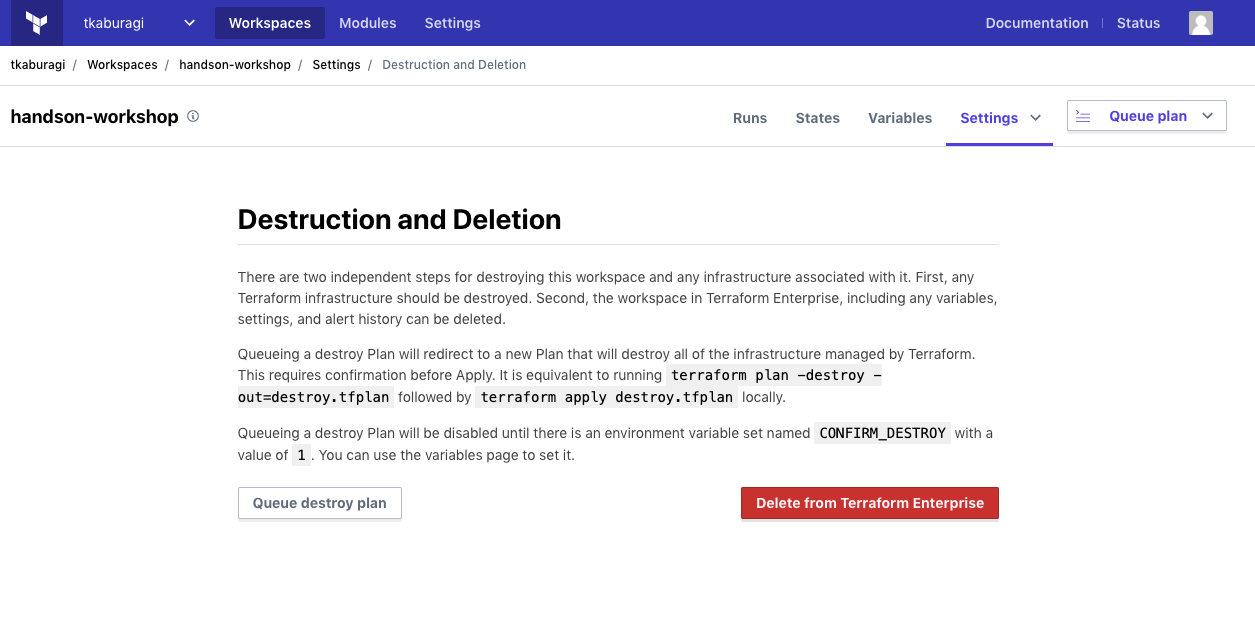 316 |
317 |
318 | Destroy されていることを確認しましょう。(GCP/Azure の場合は Web ブラウザから確認してください。)
319 |
320 | ```console
321 | $ aws ec2 describe-instances --query "Reservations[].Instances[].{InstanceId:InstanceId,State:State}"
322 | [
323 | {
324 | "InstanceId": "i-07bbdb6c0532e1617",
325 | "State": {
326 | "Code": 16,
327 | "Name": "terminated"
328 | }
329 | }
330 | ]
331 | ```
332 |
333 | ## ステートファイルの確認
334 |
335 | ユーザは Terraform のステートファイルの運用を TFC に任せることができます。TFC はステートファイルのシングルレポジトリとなり、ステートの共有、外部ストレージの作成、外部ストレージへの保存、暗号化やバージョン管理などといった通常必要な作業を実施してくれます。
336 |
337 | ワークスペースのメニューから`States`を選択します。
338 |
339 |
340 |
316 |
317 |
318 | Destroy されていることを確認しましょう。(GCP/Azure の場合は Web ブラウザから確認してください。)
319 |
320 | ```console
321 | $ aws ec2 describe-instances --query "Reservations[].Instances[].{InstanceId:InstanceId,State:State}"
322 | [
323 | {
324 | "InstanceId": "i-07bbdb6c0532e1617",
325 | "State": {
326 | "Code": 16,
327 | "Name": "terminated"
328 | }
329 | }
330 | ]
331 | ```
332 |
333 | ## ステートファイルの確認
334 |
335 | ユーザは Terraform のステートファイルの運用を TFC に任せることができます。TFC はステートファイルのシングルレポジトリとなり、ステートの共有、外部ストレージの作成、外部ストレージへの保存、暗号化やバージョン管理などといった通常必要な作業を実施してくれます。
336 |
337 | ワークスペースのメニューから`States`を選択します。
338 |
339 |
340 | 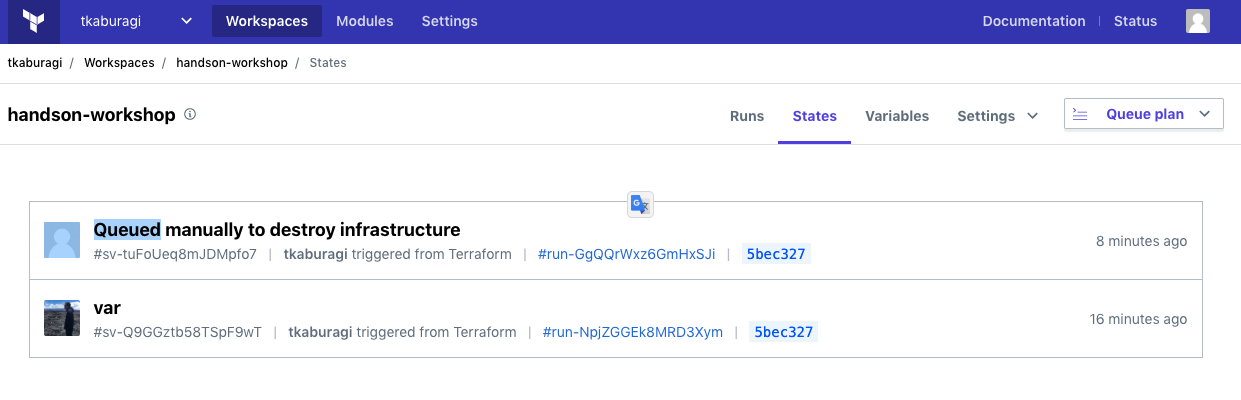 341 |
342 |
343 | 複数バージョンのステートがリストされていることがわかります。最新のステートを選択してみましょう。
344 |
345 |
346 |
341 |
342 |
343 | 複数バージョンのステートがリストされていることがわかります。最新のステートを選択してみましょう。
344 |
345 |
346 |  347 |
348 |
349 | diff が取られ、変更点なども直感的に確認できます。各実行は毎回この最新のステートが取得されるためステートファイルの共有などもシンプルなワークフローとなります。
350 |
351 | ## 参考リンク
352 | * [Data Protection](https://www.terraform.io/docs/enterprise/system-overview/data-security.html)
353 | * [Variables](https://www.terraform.io/docs/cloud/workspaces/variables.html)
354 | * [TFC API Doc](https://www.terraform.io/docs/cloud/api/index.html)
355 | * [Terraform Variables と Environ Variables](https://www.terraform.io/docs/cloud/workspaces/variables.html#terraform-variables)
356 |
--------------------------------------------------------------------------------
/contents/hello-terraform.md:
--------------------------------------------------------------------------------
1 | # 初めての Terraform
2 |
3 | ここでは OSS 版の Terraform を利用して AWS 上に一つインスタンスを作り、それぞれのコンポーネントや用語について説明をします。
4 |
5 | Terrform がインストールされていない場合は[こちら](https://www.terraform.io/downloads.html)よりダウンロードをしてください。
6 |
7 | ダウンロードしたら unzip して実行権限を付与し、パスを通します。下記は macOS の手順です。
8 |
9 | ```console
10 | $ unzip terraform*.zip
11 | $ chmod + x terraform
12 | $ mv terraform /usr/local/bin
13 | $ terraform -version
14 | Terraform v0.12.6
15 | ```
16 |
17 | 次に任意の作業用ディレクトリを作ります。
18 |
19 | ```shell
20 | $ mkdir -p tf-workspace/hello-tf
21 | $ cd tf-workspace/hello-tf
22 | ```
23 |
24 | 早速このフォルダに Terraform のコンフィグファイルを作ってみます。コンフィグファイルは`HashiCorp Configuration Language`というフレームワークを使って記述していきます。
25 |
26 | `main.tf`と`vaiables.tf`という二つのファイルを作ってみます。`main.tf`はその名の通り Terraform のメインのファイルで、このファイルに記述されている内容が Terraform で実行されます。`variables.tf`は変数を定義するファイルです。各変数にはデフォルト値や型などを指定できます。
27 |
28 | ```shell
29 | $ cat < main.tf
30 | terraform {
31 | }
32 |
33 | provider "aws" {
34 | access_key = var.access_key
35 | secret_key = var.secret_key
36 | region = var.region
37 | }
38 |
39 | resource "aws_instance" "hello-tf-instance" {
40 | ami = var.ami
41 | count = var.hello_tf_instance_count
42 | instance_type = var.hello_tf_instance_type
43 | }
44 |
45 | EOF
46 | ```
47 |
48 |
347 |
348 |
349 | diff が取られ、変更点なども直感的に確認できます。各実行は毎回この最新のステートが取得されるためステートファイルの共有などもシンプルなワークフローとなります。
350 |
351 | ## 参考リンク
352 | * [Data Protection](https://www.terraform.io/docs/enterprise/system-overview/data-security.html)
353 | * [Variables](https://www.terraform.io/docs/cloud/workspaces/variables.html)
354 | * [TFC API Doc](https://www.terraform.io/docs/cloud/api/index.html)
355 | * [Terraform Variables と Environ Variables](https://www.terraform.io/docs/cloud/workspaces/variables.html#terraform-variables)
356 |
--------------------------------------------------------------------------------
/contents/hello-terraform.md:
--------------------------------------------------------------------------------
1 | # 初めての Terraform
2 |
3 | ここでは OSS 版の Terraform を利用して AWS 上に一つインスタンスを作り、それぞれのコンポーネントや用語について説明をします。
4 |
5 | Terrform がインストールされていない場合は[こちら](https://www.terraform.io/downloads.html)よりダウンロードをしてください。
6 |
7 | ダウンロードしたら unzip して実行権限を付与し、パスを通します。下記は macOS の手順です。
8 |
9 | ```console
10 | $ unzip terraform*.zip
11 | $ chmod + x terraform
12 | $ mv terraform /usr/local/bin
13 | $ terraform -version
14 | Terraform v0.12.6
15 | ```
16 |
17 | 次に任意の作業用ディレクトリを作ります。
18 |
19 | ```shell
20 | $ mkdir -p tf-workspace/hello-tf
21 | $ cd tf-workspace/hello-tf
22 | ```
23 |
24 | 早速このフォルダに Terraform のコンフィグファイルを作ってみます。コンフィグファイルは`HashiCorp Configuration Language`というフレームワークを使って記述していきます。
25 |
26 | `main.tf`と`vaiables.tf`という二つのファイルを作ってみます。`main.tf`はその名の通り Terraform のメインのファイルで、このファイルに記述されている内容が Terraform で実行されます。`variables.tf`は変数を定義するファイルです。各変数にはデフォルト値や型などを指定できます。
27 |
28 | ```shell
29 | $ cat < main.tf
30 | terraform {
31 | }
32 |
33 | provider "aws" {
34 | access_key = var.access_key
35 | secret_key = var.secret_key
36 | region = var.region
37 | }
38 |
39 | resource "aws_instance" "hello-tf-instance" {
40 | ami = var.ami
41 | count = var.hello_tf_instance_count
42 | instance_type = var.hello_tf_instance_type
43 | }
44 |
45 | EOF
46 | ```
47 |
48 | GCPの場合はこちら
49 |
50 | ```hcl
51 | terraform {
52 | }
53 |
54 | provider "google" {
55 | credentials = var.gcp_key
56 | project = var.project
57 | region = var.region
58 | }
59 |
60 | resource "google_compute_instance" "vm_instance" {
61 | name = "terraform-instance-${count.index}-"
62 | count = var.hello_tf_instance_count
63 | machine_type = var.machine_type
64 | zone = "asia-northeast1-a"
65 | boot_disk {
66 | initialize_params {
67 | image = var.image
68 | }
69 | }
70 |
71 | network_interface {
72 | # A default network is created for all GCP projects
73 | network = "default"
74 | access_config {
75 | }
76 | }
77 | }
78 | ```
79 | Azureの場合はこちら
82 |
83 | ```hcl
84 | terraform {
85 | }
86 |
87 | provider "azurerm" {
88 | client_id = var.client_id
89 | tenant_id = var.tenant_id
90 | subscription_id = var.subscription_id
91 | client_secret = var.client_secret
92 | features {}
93 | }
94 |
95 | resource "azurerm_virtual_machine" "main" {
96 | name = "my-vm-${count.index}"
97 | count = var.hello_tf_instance_count
98 | location = var.location
99 | resource_group_name = azurerm_resource_group.example.name
100 | network_interface_ids = [azurerm_network_interface.example.*.id[count.index]]
101 | vm_size = "Standard_DS1_v2"
102 |
103 | os_profile {
104 | computer_name = "hostname"
105 | admin_username = "vmadmin"
106 | admin_password = var.admin_password
107 | }
108 | os_profile_linux_config {
109 | disable_password_authentication = false
110 | }
111 | storage_image_reference {
112 | publisher = "Canonical"
113 | offer = "UbuntuServer"
114 | sku = "16.04-LTS"
115 | version = "latest"
116 | }
117 | storage_os_disk {
118 | name = "my-osdisk-${count.index}"
119 | caching = "ReadWrite"
120 | create_option = "FromImage"
121 | managed_disk_type = "Standard_LRS"
122 | }
123 | }
124 |
125 | resource "azurerm_resource_group" "example" {
126 | name = "my-group"
127 | location = var.location
128 | }
129 |
130 |
131 | resource "azurerm_virtual_network" "example" {
132 | name = "my-network"
133 | address_space = ["10.0.0.0/16"]
134 | location = var.location
135 | resource_group_name = azurerm_resource_group.example.name
136 | }
137 |
138 | resource "azurerm_subnet" "example" {
139 | name = "my-subnet"
140 | resource_group_name = azurerm_resource_group.example.name
141 | virtual_network_name = azurerm_virtual_network.example.name
142 | address_prefix = "10.0.2.0/24"
143 | }
144 |
145 | resource "azurerm_network_interface" "example" {
146 | name = "my-nw-interface-${count.index}"
147 | count = var.hello_tf_instance_count
148 | location = var.location
149 | resource_group_name = azurerm_resource_group.example.name
150 |
151 | ip_configuration {
152 | name = "my-ip-config"
153 | subnet_id = azurerm_subnet.example.id
154 | private_ip_address_allocation = "Dynamic"
155 | }
156 |
157 | tags = {
158 | environment = "payground"
159 | }
160 | }
161 | ```
162 | GCPの場合はこちら
183 |
184 | ```hcl
185 | variable "gcp_key" {}
186 | variable "machine_type" {}
187 | variable "hello_tf_instance_count" {
188 | default = 1
189 | }
190 | variable "region" {
191 | default = "asia-northeast1"
192 | }
193 | variable "project" {}
194 | variable "image" {}
195 | ```
196 | Azureの場合はこちら
199 |
200 | ```hcl
201 | variable "client_id" {}
202 | variable "client_secret" {}
203 | variable "tenant_id" {}
204 | variable "subscription_id" {}
205 | variable "location" {}
206 | variable "admin_password" {}
207 | variable "hello_tf_instance_count" {
208 | default = 1
209 | }
210 | ```
211 | GCPの場合はこちら
269 |
270 | ```
271 | $ export TF_VAR_gcp_key=PATH_TO_KEY_JSON
272 | $ export TF_VAR_machine_type=f1-micro
273 | $ export TF_VAR_image=debian-cloud/debian-9
274 | $ export TF_VAR_project=YOUT_PROJECT
275 | $ terraform plan
276 | $ terraform apply
277 | ```
278 | Azureの場合はこちら
281 |
282 | ```
283 | $ export TF_VAR_client_id="************"
284 | $ export TF_VAR_subscription_id="************"
285 | $ export TF_VAR_client_secret="************"
286 | $ export TF_VAR_tenant_id="************"
287 | $ export TF_VAR_location="East Asia"
288 | $ export TF_VAR_admin_password="Password1234"
289 | $ terraform plan
290 | $ terraform apply
291 | ```
292 | Azureの場合はこちら
350 |
351 | ```shell
352 | $ cd ..
353 | $ git clone https://github.com/tkaburagi/tf-azure-simple-web
354 | $ cd tf-azure-simple-web
355 | ```
356 | List Runのレスポンス
163 |
164 | ```json
165 | {
166 | "data": [
167 | {
168 | "id": "run-bc4WDCExqr5CF4Ad",
169 | "type": "runs",
170 | "attributes": {
171 | "actions": {
172 | "is-cancelable": false,
173 | "is-confirmable": true,
174 | "is-discardable": true,
175 | "is-force-cancelable": false
176 | },
177 | "canceled-at": null,
178 | "created-at": "2020-04-14T06:34:05.962Z",
179 | "has-changes": true,
180 | "is-destroy": false,
181 | "message": "New configuration uploaded via the Terraform Cloud API",
182 | "plan-only": false,
183 | "source": "tfe-configuration-version",
184 | "status-timestamps": {
185 | "planned-at": "2020-04-14T06:34:22+00:00",
186 | "planning-at": "2020-04-14T06:34:06+00:00",
187 | "plan-queued-at": "2020-04-14T06:34:06+00:00",
188 | "cost-estimated-at": "2020-04-14T06:34:29+00:00",
189 | "plan-queueable-at": "2020-04-14T06:34:06+00:00",
190 | "cost-estimating-at": "2020-04-14T06:34:22+00:00"
191 | },
192 | "status": "cost_estimated",
193 | "trigger-reason": "manual",
194 | "permissions": {
195 | "can-apply": true,
196 | "can-cancel": true,
197 | "can-discard": true,
198 | "can-force-execute": true,
199 | "can-force-cancel": true,
200 | "can-override-policy-check": true
201 | }
202 | },
203 | "relationships": {
204 | "workspace": {
205 | "data": {
206 | "id": "ws-ajLLjugn2ngooBV9",
207 | "type": "workspaces"
208 | }
209 | },
210 | "apply": {
211 | "data": {
212 | "id": "apply-YnTxd3Jyca6QxRyz",
213 | "type": "applies"
214 | },
215 | "links": {
216 | "related": "/api/v2/runs/run-bc4WDCExqr5CF4Ad/apply"
217 | }
218 | },
219 | "configuration-version": {
220 | "data": {
221 | "id": "cv-Fcd8m1fT1SYHukBV",
222 | "type": "configuration-versions"
223 | },
224 | "links": {
225 | "related": "/api/v2/runs/run-bc4WDCExqr5CF4Ad/configuration-version"
226 | }
227 | },
228 | "cost-estimate": {
229 | "data": {
230 | "id": "ce-QNvdDKY5LaFfX2K6",
231 | "type": "cost-estimates"
232 | },
233 | "links": {
234 | "related": "/api/v2/cost-estimates/ce-QNvdDKY5LaFfX2K6"
235 | }
236 | },
237 | "created-by": {
238 | "data": {
239 | "id": "user-F1BcjnRCZtW8irfQ",
240 | "type": "users"
241 | },
242 | "links": {
243 | "related": "/api/v2/runs/run-bc4WDCExqr5CF4Ad/created-by"
244 | }
245 | },
246 | "plan": {
247 | "data": {
248 | "id": "plan-QDeb8Th3SKGjmMfP",
249 | "type": "plans"
250 | },
251 | "links": {
252 | "related": "/api/v2/runs/run-bc4WDCExqr5CF4Ad/plan"
253 | }
254 | },
255 | "run-events": {
256 | "data": [
257 | {
258 | "id": "re-zEvX8pBeQmveXGCU",
259 | "type": "run-events"
260 | },
261 | {
262 | "id": "re-H14w91kpaBkYSZE3",
263 | "type": "run-events"
264 | },
265 | {
266 | "id": "re-PoqrfPvkTLeuRUyu",
267 | "type": "run-events"
268 | },
269 | {
270 | "id": "re-DQHX1WNuvtmkUf8e",
271 | "type": "run-events"
272 | },
273 | {
274 | "id": "re-G6XjkF2uCbG5LJ9T",
275 | "type": "run-events"
276 | },
277 | {
278 | "id": "re-7LsT4e4tKqUxk8bn",
279 | "type": "run-events"
280 | }
281 | ],
282 | "links": {
283 | "related": "/api/v2/runs/run-bc4WDCExqr5CF4Ad/run-events"
284 | }
285 | },
286 | "policy-checks": {
287 | "data": [],
288 | "links": {
289 | "related": "/api/v2/runs/run-bc4WDCExqr5CF4Ad/policy-checks"
290 | }
291 | },
292 | "comments": {
293 | "data": [],
294 | "links": {
295 | "related": "/api/v2/runs/run-bc4WDCExqr5CF4Ad/comments"
296 | }
297 | }
298 | },
299 | "links": {
300 | "self": "/api/v2/runs/run-bc4WDCExqr5CF4Ad"
301 | }
302 | }
303 | ],
304 | "links": {
305 | "self": "https://app.terraform.io/api/v2/workspaces/ws-ajLLjugn2ngooBV9/runs?page%5Bnumber%5D=1&page%5Bsize%5D=1",
306 | "first": "https://app.terraform.io/api/v2/workspaces/ws-ajLLjugn2ngooBV9/runs?page%5Bnumber%5D=1&page%5Bsize%5D=1",
307 | "prev": null,
308 | "next": "https://app.terraform.io/api/v2/workspaces/ws-ajLLjugn2ngooBV9/runs?page%5Bnumber%5D=2&page%5Bsize%5D=1",
309 | "last": "https://app.terraform.io/api/v2/workspaces/ws-ajLLjugn2ngooBV9/runs?page%5Bnumber%5D=2&page%5Bsize%5D=1"
310 | },
311 | "meta": {
312 | "pagination": {
313 | "current-page": 1,
314 | "prev-page": null,
315 | "next-page": 2,
316 | "total-pages": 2,
317 | "total-count": 2
318 | }
319 | }
320 | }
321 | ```
322 | 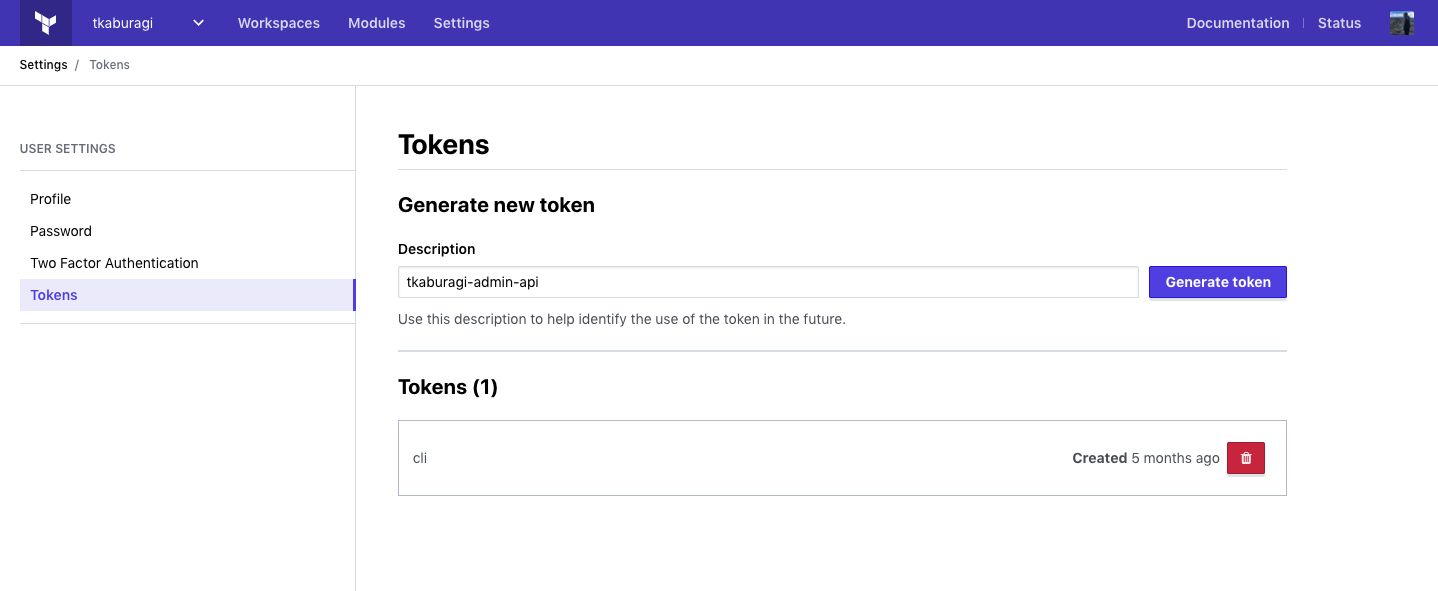 17 |
18 |
19 | 上記のように任意のトークンの名前を入力して、`Generate Token`をクリックしてください。
20 |
21 | トークンが生成されるはずです。トークンはここでしか表示されないのでコピーして保存するかダウンロードをしてください。
22 |
23 | トークンを生成したらテストしてみます。
24 |
25 | ```shell
26 | $ export TF_TOKEN=
27 |
28 | $ curl \
29 | --header "Authorization: Bearer $TF_TOKEN" \
30 | --header "Content-Type: application/vnd.api+json" \
31 | --request GET \
32 | https://app.terraform.io/api/v2/account/details | jq
33 | ```
34 |
35 | `account/details`を実行し、以下のようにユーザ情報が出力されるはずです。
36 |
37 |
17 |
18 |
19 | 上記のように任意のトークンの名前を入力して、`Generate Token`をクリックしてください。
20 |
21 | トークンが生成されるはずです。トークンはここでしか表示されないのでコピーして保存するかダウンロードをしてください。
22 |
23 | トークンを生成したらテストしてみます。
24 |
25 | ```shell
26 | $ export TF_TOKEN=
27 |
28 | $ curl \
29 | --header "Authorization: Bearer $TF_TOKEN" \
30 | --header "Content-Type: application/vnd.api+json" \
31 | --request GET \
32 | https://app.terraform.io/api/v2/account/details | jq
33 | ```
34 |
35 | `account/details`を実行し、以下のようにユーザ情報が出力されるはずです。
36 |
37 | 出力例
38 |
39 | ```json
40 | {
41 | "data": {
42 | "id": "user-9szJo2sfxhVLevKp",
43 | "type": "users",
44 | "attributes": {
45 | "username": "tkaburagi",
46 | "is-service-account": false,
47 | "avatar-url": "https://www.gravatar.com/avatar/98f321325ba59b28d4af94339fb5e3e4?s=100&d=mm",
48 | "password": null,
49 | "v2-only": true,
50 | "enterprise-support": true,
51 | "is-site-admin": true,
52 | "is-sso-login": false,
53 | "two-factor": {
54 | "enabled": true,
55 | "verified": true
56 | },
57 | "email": "kabu@hashicorp.com",
58 | "unconfirmed-email": null,
59 | "has-git-hub-app-token": false,
60 | "permissions": {
61 | "can-create-organizations": true,
62 | "can-change-email": true,
63 | "can-change-username": true
64 | }
65 | },
66 | "relationships": {
67 | "authentication-tokens": {
68 | "links": {
69 | "related": "/api/v2/users/user-9szJo2sfxhVLevKp/authentication-tokens"
70 | }
71 | }
72 | },
73 | "links": {
74 | "self": "/api/v2/users/user-9szJo2sfxhVLevKp"
75 | }
76 | }
77 | }
78 | ```
79 | 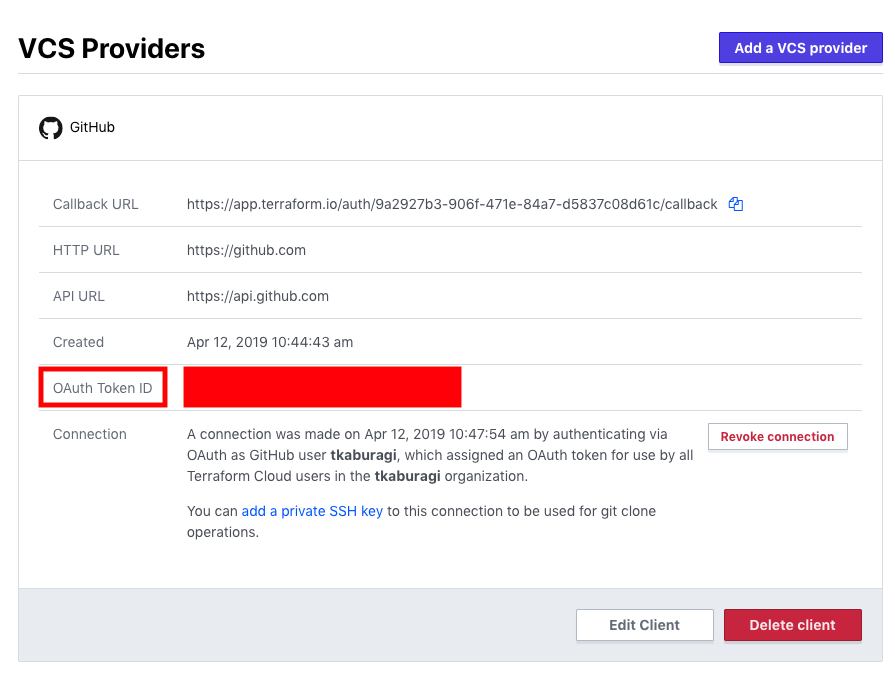 105 |
106 |
107 |
108 | ```shell
109 | $ export GITHUB_USERNAME=
110 | $ export OAUTH_TOKEN_ID=
111 |
112 | $ cat << EOF > payload-workspace.json
113 | {
114 | "data": {
115 | "attributes": {
116 | "name": "new-workspace",
117 | "terraform_version": "0.12.6",
118 | "working-directory": "",
119 | "vcs-repo": {
120 | "identifier": "${GITHUB_USERNAME}/tf-handson-workshop",
121 | "oauth-token-id": "${OAUTH_TOKEN_ID}",
122 | "branch": "",
123 | "default-branch": true
124 | }
125 | },
126 | "type": "workspaces"
127 | }
128 | }
129 | EOF
130 |
131 | $ curl \
132 | --header "Authorization: Bearer $TF_TOKEN" \
133 | --header "Content-Type: application/vnd.api+json" \
134 | --request POST \
135 | --data @payload.json \
136 | https://app.terraform.io/api/v2/organizations/${TF_ORG}/workspaces | jq
137 | ```
138 |
139 | `organizations/ORG_ID/workspaces`を実行し、一つワークスペースが作成されました。再度一覧を見てみましょう。一つワークスペースが作成されているはずです。ここで出力される`.data.id`の`ws-********`の値はワークスペースの ID です後で利用するのでメモしておいてください。
140 |
141 | ```shell
142 | $ export WS_ID=
143 |
144 | $ curl \
145 | --header "Authorization: Bearer $TF_TOKEN" \
146 | --header "Content-Type: application/vnd.api+json" \
147 | --request GET \
148 | https://app.terraform.io/api/v2/organizations/${TF_ORG}/workspaces | jq -r ".data[].attributes.name"
149 | ```
150 |
151 | ```shell
152 | new-workspace
153 | handson-workshop
154 | ```
155 |
156 | ワークスペースの情報を確認して VCS の連携の設定などが正しく反映されているか確認してください。`organizations/${TF_ORG}/workspaces/`がエンドポイントです。
157 |
158 | ```shell
159 | $ curl \
160 | --header "Authorization: Bearer $TF_TOKEN" \
161 | --header "Content-Type: application/vnd.api+json" \
162 | --request GET \
163 | https://app.terraform.io/api/v2/organizations/${TF_ORG}/workspaces/new-workspace | jq
164 | ```
165 |
166 | ### 変数のセット
167 |
168 | 次に変数をセットします。変数のセットは JSON で定義した変数を`/vars`のエンドポイントに POST します。取得する時は同エンドポイントに GET します。
169 |
170 | 先ほど作ったワークスペースで試してみましょう。
171 |
172 | ```shell
173 | $ curl \
174 | --header "Authorization: Bearer $TF_TOKEN" \
175 | --header "Content-Type: application/vnd.api+json" \
176 | --request GET \
177 | https://app.terraform.io/api/v2/vars\?filter%5Borganization%5D%5Bname%5D\=${TF_ORG}\&filter%5Bworkspace%5D%5Bname%5D\=handson-workshop | jq
178 | ```
179 |
180 | セットしたインスタンス数の値が見れる一方、`senstive`としてセットした AWS のキーなどは`null`と表示されるでしょう。
181 |
182 | それでは変数をセットしていきます。JSON で変数をセットするために必要なパラメータは[こちら](https://www.terraform.io/docs/cloud/api/variables.html)を参照してください。まずは`hello_tf_instance_count`です。
183 |
184 | ```shell
185 | $ cat << EOF > payload-var.json
186 | {
187 | "data": {
188 | "type": "vars",
189 | "attributes": {
190 | "key": "hello_tf_instance_count",
191 | "value": "1",
192 | "sensitive": false,
193 | "category": "terraform",
194 | "hcl": false,
195 | "description": null
196 | },
197 | "relationships": {
198 | "configurable": {
199 | "data": {
200 | "id": "${WS_ID}",
201 | "type": "workspaces"
202 | }
203 | }
204 | }
205 | }
206 | }
207 | EOF
208 |
209 | $ curl \
210 | --header "Authorization: Bearer $TF_TOKEN" \
211 | --header "Content-Type: application/vnd.api+json" \
212 | --request POST \
213 | --data @payload-var.json \
214 | https://app.terraform.io/api/v2/vars
215 | ```
216 |
217 | 次に`hello_tf_instance_type`をセットします。
218 |
219 | ```shell
220 | $ cat << EOF > payload-var.json
221 | {
222 | "data": {
223 | "type": "vars",
224 | "attributes": {
225 | "key": "hello_tf_instance_type",
226 | "value": "t2.micro",
227 | "sensitive": false,
228 | "category": "terraform",
229 | "hcl": false,
230 | "description": null
231 | },
232 | "relationships": {
233 | "configurable": {
234 | "data": {
235 | "id": "${WS_ID}",
236 | "type": "workspaces"
237 | }
238 | }
239 | }
240 | }
241 | }
242 | EOF
243 |
244 | $ curl \
245 | --header "Authorization: Bearer $TF_TOKEN" \
246 | --header "Content-Type: application/vnd.api+json" \
247 | --request POST \
248 | --data @payload-var.json \
249 | https://app.terraform.io/api/v2/vars
250 | ```
251 |
252 | セットした変数を確認してみましょう。
253 |
254 | ```shell
255 | $ curl \
256 | --header "Authorization: Bearer $TF_TOKEN" \
257 | --header "Content-Type: application/vnd.api+json" \
258 | --request GET \
259 | https://app.terraform.io/api/v2/vars\?filter%5Borganization%5D%5Bname%5D\=${TF_ORG}\&filter%5Bworkspace%5D%5Bname%5D\=new-workspace | jq
260 | ```
261 |
262 | 残りの変数をセットしていきますが、現在 TFE API ではデータのリスト型をサポートしていないため一つ一つファイルを定義していく必要があります。
263 |
264 | ここでは API とは関係ありませんが、ここでは Terraform の`Terraform Enterprise Provider`を使ってバルクでセットしてみます。Terraform Enterprise Provider については[こちら](https://www.terraform.io/docs/providers/tfe/index.html)を参照して下さい。
265 |
266 | 残りの`aws_access_key`, `aws_secret_key`, `ami`, `region`, `confirm_destroy`をまとめてセットしていきます。
267 |
268 | ```shell
269 | $ mkdir tfe-provider
270 |
271 | $ cat << EOF > tfe-provider/main.tf
272 | terraform {
273 | required_version = "~> 0.12"
274 | }
275 |
276 | provider "tfe" {
277 | hostname = var.hostname
278 | token = var.token
279 | }
280 |
281 | resource "tfe_variable" "aws_access_key" {
282 | key = "access_key"
283 | value = var.aws_access_key
284 | category = "terraform"
285 | sensitive = true
286 | workspace_id = var.workspace_id
287 | }
288 |
289 | resource "tfe_variable" "aws_secret_key" {
290 | key = "secret_key"
291 | value = var.aws_secret_key
292 | category = "terraform"
293 | sensitive = true
294 | workspace_id = var.workspace_id
295 | }
296 |
297 | resource "tfe_variable" "ami" {
298 | key = "ami"
299 | value = "ami-06d9ad3f86032262d"
300 | category = "terraform"
301 | sensitive = false
302 | workspace_id = var.workspace_id
303 | }
304 |
305 | resource "tfe_variable" "region" {
306 | key = "region"
307 | value = "ap-northeast-1"
308 | category = "terraform"
309 | sensitive = false
310 | workspace_id = var.workspace_id
311 | }
312 |
313 | resource "tfe_variable" "confirm_destroy" {
314 | key = "CONFIRM_DESTROY"
315 | value = 1
316 | category = "env"
317 | sensitive = false
318 | workspace_id = var.workspace_id
319 | }
320 | EOF
321 |
322 | $ cat << EOF > tfe-provider/variables.tf
323 | variable "hostname" {
324 | default = "app.terraform.io"
325 | }
326 | variable "token" {}
327 | variable "workspace_id" {
328 | default = "${TF_ORG}/new-workspace"
329 | }
330 | variable "aws_access_key" {}
331 | variable "aws_secret_key" {}
332 | EOF
333 | ```
334 |
335 | `terraform plan & apply`してみましょう。
336 |
337 | ```shell
338 | $ cd tfe-provider
339 | $ terraform init
340 | $ terraform plan
341 | $ terraform apply -auto-approve
342 | $ cd ..
343 | ```
344 |
345 | `aws_access_key`, `aws_secret_key`, `token`の入力が必要です。`token`には Terraform Enterprise のトークンを入力します。
346 |
347 | Apply が終了したら変数を確認してください。
348 |
349 | ```shell
350 | $ curl \
351 | --header "Authorization: Bearer $TF_TOKEN" \
352 | --header "Content-Type: application/vnd.api+json" \
353 | --request GET \
354 | https://app.terraform.io/api/v2/vars\?filter%5Borganization%5D%5Bname%5D\=${TF_ORG}\&filter%5Bworkspace%5D%5Bname%5D\=new-workspace | jq
355 | ```
356 |
357 | ### プロビジョニングを実行
358 |
359 | それでは最後にプロビジョニングと環境の削除をやってみます。
360 |
361 | まず`/runs`エンドポイントでプランを作成しましょう。プランにはプランに含めるメッセージやワークスペースの ID などが必要です。
362 |
363 | これを JSON で定義し、`runs`エンドポイントに POST することでプランが作成されます。
364 |
365 | ```shell
366 | $ cat << EOF > payload-plans.json
367 | {
368 | "data": {
369 | "attributes": {
370 | "is-destroy":false,
371 | "message": "This is an API Driven Run"
372 | },
373 | "type":"runs",
374 | "relationships": {
375 | "workspace": {
376 | "data": {
377 | "type": "workspaces",
378 | "id": "${WS_ID}"
379 | }
380 | }
381 | }
382 | }
383 | }
384 | EOF
385 |
386 | $ curl \
387 | --header "Authorization: Bearer $TF_TOKEN" \
388 | --header "Content-Type: application/vnd.api+json" \
389 | --request POST \
390 | --data @payload-plans.json \
391 | https://app.terraform.io/api/v2/runs | jq > plan-response-body.json
392 | ```
393 |
394 | これで Plan が開始されているはずです。`plan-response-body.json`の内容を確認してみてください。
395 |
396 | 以下の`workspaces/${WS_ID}/runs`で状態を確認してみましょう。
397 |
398 | ```shell
399 | $ curl \
400 | --header "Authorization: Bearer $TF_TOKEN" \
401 | --header "Content-Type: application/vnd.api+json" \
402 | --request GET \
403 | https://app.terraform.io/api/v2/workspaces/${WS_ID}/runs | jq
404 | ```
405 |
406 | 以下のように何度か実行すると`status`のパラメータが変化しているでしょう。
407 |
408 | ```json
409 | {
410 | "data": [
411 | {
412 | "id": "run-3YUm7dKKh6qHQo1y",
413 | "type": "runs",
414 | "attributes": {
415 | "actions": {
416 | "is-cancelable": false,
417 | "is-confirmable": true,
418 | "is-discardable": true,
419 | "is-force-cancelable": false
420 | },
421 | "canceled-at": null,
422 | "created-at": "2019-12-12T07:45:21.828Z",
423 | "has-changes": true,
424 | "is-destroy": false,
425 | "message": "This is an API Driven Run",
426 | "plan-only": false,
427 | "source": "tfe-api",
428 | "status-timestamps": {
429 | "planned-at": "2019-12-12T07:45:50+00:00",
430 | "planning-at": "2019-12-12T07:45:22+00:00",
431 | "plan-queued-at": "2019-12-12T07:45:22+00:00",
432 | "cost-estimated-at": "2019-12-12T07:45:55+00:00",
433 | "plan-queueable-at": "2019-12-12T07:45:21+00:00",
434 | "cost-estimating-at": "2019-12-12T07:45:50+00:00"
435 | },
436 | "status": "cost_estimated",
437 | "trigger-reason": "manual",
438 | "permissions": {
439 | "can-apply": true,
440 | "can-cancel": true,
441 | "can-discard": true,
442 | "can-force-execute": true,
443 | "can-force-cancel": true,
444 | "can-override-policy-check": false
445 | }
446 | },
447 | ```
448 |
449 | 上記の`id`のパラメータをメモして環境変数にセットします。
450 |
451 | ```shell
452 | $ export RUN_ID=run-3YUm7dKKh6qHQo1y
453 | ```
454 |
455 | Plan が終わったらプラン内容を確認します。先ほど取得した`plan-response-body.json`から Plan ID を取得しましょう。
456 |
457 | ```shell
458 | $ export PLAN_ID=$(cat plan-response-body.json | jq -r '.data.relationships.plan.data.id')
459 |
460 | $ curl \
461 | --header "Authorization: Bearer $TF_TOKEN" \
462 | --header "Content-Type: application/vnd.api+json" \
463 | --request GET \
464 | https://app.terraform.io/api/v2/plans/${PLAN_ID} | jq > plan-details.json
465 | ```
466 |
467 | `plan-details.json`の内容を確認してください。ここから`log-read-url`のファイルを取得し、プランの変更内容を確認します。
468 |
469 | ```shell
470 | wget $(cat plan-details.json | jq -r '.data.attributes."log-read-url"'
471 | ```
472 |
473 | テキストファイルが出力されますので内容を確認してください。
474 |
475 | 最後に Apply をします。プランの結果、`apply`や`dsicard`を選択できます。
476 |
477 | Apply の場合は、`/runs/:run_id/actions/apply`がエンドポイントです。
478 |
479 | ```shell
480 | $ cat << EOF > payload-comment.json
481 | {
482 | "comment":"Looks good to me"
483 | }
484 | EOF
485 | ```
486 |
487 | コメントを JSON で定義して、Apply をしてみましょう。
488 |
489 | ```shell
490 | $ curl \
491 | --header "Authorization: Bearer $TF_TOKEN" \
492 | --header "Content-Type: application/vnd.api+json" \
493 | --request POST \
494 | --data @payload-comment.json \
495 | https://app.terraform.io/api/v2/runs/${RUN_ID}/actions/apply
496 | ```
497 |
498 | Run の状態を何度か見ると`applied`となり、プロビジョニングが完了します。
499 |
500 | ```shell
501 | $ curl \
502 | --header "Authorization: Bearer $TF_TOKEN" \
503 | --header "Content-Type: application/vnd.api+json" \
504 | --request GET \
505 | https://app.terraform.io/api/v2/runs/${RUN_ID}
506 | ```
507 |
508 | ### 環境をクリーンナップする
509 |
510 | 最後に`destroy`を実行し、環境をクリーンナップしましょう。Destroy は Plan と同一のエンドポイントに`data.attributes.is-destroy`が`true`にセットされた JSON を実行させます。
511 |
512 | ```shell
513 | $ cat << EOF > payload-destroy.json
514 | {
515 | "data": {
516 | "attributes": {
517 | "is-destroy":true,
518 | "message": "Will be destroyed"
519 | },
520 | "type":"runs",
521 | "relationships": {
522 | "workspace": {
523 | "data": {
524 | "type": "workspaces",
525 | "id": "${WS_ID}"
526 | }
527 | }
528 | }
529 | }
530 | }
531 | EOF
532 | ```
533 |
534 | `is-destroy`が True になっていることを確認してください。これをプランしてみましょう。
535 |
536 | ```shell
537 | $ curl \
538 | --header "Authorization: Bearer $TF_TOKEN" \
539 | --header "Content-Type: application/vnd.api+json" \
540 | --request POST \
541 | --data @payload-destroy.json \
542 | https://app.terraform.io/api/v2/runs | jq
543 | ```
544 |
545 | 次に、コメントをつけて Destroy を Apply します。上記で出力された`Run ID`は環境変数にセットしておきます。
546 |
547 | ```shell
548 | $ export RUN_ID=run-msjedz6ExGfGZuqm
549 | ```
550 |
551 | `actions/apply`のエンドポイントにコメントの JSON を POST します。
552 |
553 | ```shell
554 | $ cat << EOF > payload-comment.json
555 | {
556 | "comment":"Yes, Let's Destroy"
557 | }
558 | EOF
559 |
560 | $ curl \
561 | --header "Authorization: Bearer $TF_TOKEN" \
562 | --header "Content-Type: application/vnd.api+json" \
563 | --request POST \
564 | --data @payload-comment.json \
565 | https://app.terraform.io/api/v2/runs/${RUN_ID}/actions/apply
566 | ```
567 |
568 | 最後に Run の内容を確認し、Destroy が終了していることを確認してください。
569 |
570 | ```shell
571 | $ curl \
572 | --header "Authorization: Bearer $TF_TOKEN" \
573 | --header "Content-Type: application/vnd.api+json" \
574 | --request GET \
575 | https://app.terraform.io/api/v2/runs/${RUN_ID}
576 | ```
577 |
578 | 以上で API の利用の章は終了です。TFE API ではワークスペースやプロビジョニングに関する操作の他に、ユーザ管理系のオプレーションなど様々な作業を実施することができ、自動化のプロセスに組み込むことが可能です。
579 |
580 | ## 参考リンク
581 | * [Terraform Cloud API Document](https://www.terraform.io/docs/cloud/api/index.html)
582 | * [API Drive Run](https://www.terraform.io/docs/cloud/run/api.html)
--------------------------------------------------------------------------------
/contents/sentinel.md:
--------------------------------------------------------------------------------
1 | # Sentinel による Policy as Code
2 |
3 | Terraform は便利なツールですが、多くのユーザが利用し大規模な運用になるとガバンナンスをきかせユーザの行動を制御することが運用上課題となります。有償版では HashiCorp が開発する[Sentinel](https://www.hashicorp.com/sentinel)というフレームワークを利用し、ポリシーを定義することができます。
4 |
5 | 定義できるポリシーは多岐に渡りますが、下記のような一例としてユースケースがあります。
6 |
7 | * Terrafrom 実行時間の制御
8 | * AZ/Region の制約
9 | * タグの確認
10 | * CIDR やネットワーク設定の確認
11 | * 特定リソースの利用禁止
12 |
13 | ## Sentinel コードの作成
14 | それではまずは Sentinel を利用するための設定を行います。Sentinel は最低限二つのファイルが必要です。一つは`sentinel.hcl`、もう一つは`.sentinel`です。
15 |
16 | ```
17 | GitHub上に`sentinel-handson-workshop`という名前のパブリックレポジトリを作成してください。
18 | ```
19 |
20 | ```shell
21 | $ cd path/to/tf-workspace
22 | $ mkdir sentinel-handson-workshop
23 | $ cd sentinel-handson-workshop
24 | ```
25 |
26 | 以下の二つのファイルを追加します。
27 |
28 | * 全クラウド共通のファイル (sentinel.hcl)
29 |
30 | ```shell
31 | $ cat < sentinel.hcl
32 | policy "first-policy" {
33 | enforcement_level = "hard-mandatory"
34 | }
35 | EOF
36 | ```
37 |
38 | * クラウドごとに変化するファイル (first-policy.sentinel)
39 |
40 | ```
41 | WIP
42 | ```
43 |
44 |
105 |
106 |
107 |
108 | ```shell
109 | $ export GITHUB_USERNAME=
110 | $ export OAUTH_TOKEN_ID=
111 |
112 | $ cat << EOF > payload-workspace.json
113 | {
114 | "data": {
115 | "attributes": {
116 | "name": "new-workspace",
117 | "terraform_version": "0.12.6",
118 | "working-directory": "",
119 | "vcs-repo": {
120 | "identifier": "${GITHUB_USERNAME}/tf-handson-workshop",
121 | "oauth-token-id": "${OAUTH_TOKEN_ID}",
122 | "branch": "",
123 | "default-branch": true
124 | }
125 | },
126 | "type": "workspaces"
127 | }
128 | }
129 | EOF
130 |
131 | $ curl \
132 | --header "Authorization: Bearer $TF_TOKEN" \
133 | --header "Content-Type: application/vnd.api+json" \
134 | --request POST \
135 | --data @payload.json \
136 | https://app.terraform.io/api/v2/organizations/${TF_ORG}/workspaces | jq
137 | ```
138 |
139 | `organizations/ORG_ID/workspaces`を実行し、一つワークスペースが作成されました。再度一覧を見てみましょう。一つワークスペースが作成されているはずです。ここで出力される`.data.id`の`ws-********`の値はワークスペースの ID です後で利用するのでメモしておいてください。
140 |
141 | ```shell
142 | $ export WS_ID=
143 |
144 | $ curl \
145 | --header "Authorization: Bearer $TF_TOKEN" \
146 | --header "Content-Type: application/vnd.api+json" \
147 | --request GET \
148 | https://app.terraform.io/api/v2/organizations/${TF_ORG}/workspaces | jq -r ".data[].attributes.name"
149 | ```
150 |
151 | ```shell
152 | new-workspace
153 | handson-workshop
154 | ```
155 |
156 | ワークスペースの情報を確認して VCS の連携の設定などが正しく反映されているか確認してください。`organizations/${TF_ORG}/workspaces/`がエンドポイントです。
157 |
158 | ```shell
159 | $ curl \
160 | --header "Authorization: Bearer $TF_TOKEN" \
161 | --header "Content-Type: application/vnd.api+json" \
162 | --request GET \
163 | https://app.terraform.io/api/v2/organizations/${TF_ORG}/workspaces/new-workspace | jq
164 | ```
165 |
166 | ### 変数のセット
167 |
168 | 次に変数をセットします。変数のセットは JSON で定義した変数を`/vars`のエンドポイントに POST します。取得する時は同エンドポイントに GET します。
169 |
170 | 先ほど作ったワークスペースで試してみましょう。
171 |
172 | ```shell
173 | $ curl \
174 | --header "Authorization: Bearer $TF_TOKEN" \
175 | --header "Content-Type: application/vnd.api+json" \
176 | --request GET \
177 | https://app.terraform.io/api/v2/vars\?filter%5Borganization%5D%5Bname%5D\=${TF_ORG}\&filter%5Bworkspace%5D%5Bname%5D\=handson-workshop | jq
178 | ```
179 |
180 | セットしたインスタンス数の値が見れる一方、`senstive`としてセットした AWS のキーなどは`null`と表示されるでしょう。
181 |
182 | それでは変数をセットしていきます。JSON で変数をセットするために必要なパラメータは[こちら](https://www.terraform.io/docs/cloud/api/variables.html)を参照してください。まずは`hello_tf_instance_count`です。
183 |
184 | ```shell
185 | $ cat << EOF > payload-var.json
186 | {
187 | "data": {
188 | "type": "vars",
189 | "attributes": {
190 | "key": "hello_tf_instance_count",
191 | "value": "1",
192 | "sensitive": false,
193 | "category": "terraform",
194 | "hcl": false,
195 | "description": null
196 | },
197 | "relationships": {
198 | "configurable": {
199 | "data": {
200 | "id": "${WS_ID}",
201 | "type": "workspaces"
202 | }
203 | }
204 | }
205 | }
206 | }
207 | EOF
208 |
209 | $ curl \
210 | --header "Authorization: Bearer $TF_TOKEN" \
211 | --header "Content-Type: application/vnd.api+json" \
212 | --request POST \
213 | --data @payload-var.json \
214 | https://app.terraform.io/api/v2/vars
215 | ```
216 |
217 | 次に`hello_tf_instance_type`をセットします。
218 |
219 | ```shell
220 | $ cat << EOF > payload-var.json
221 | {
222 | "data": {
223 | "type": "vars",
224 | "attributes": {
225 | "key": "hello_tf_instance_type",
226 | "value": "t2.micro",
227 | "sensitive": false,
228 | "category": "terraform",
229 | "hcl": false,
230 | "description": null
231 | },
232 | "relationships": {
233 | "configurable": {
234 | "data": {
235 | "id": "${WS_ID}",
236 | "type": "workspaces"
237 | }
238 | }
239 | }
240 | }
241 | }
242 | EOF
243 |
244 | $ curl \
245 | --header "Authorization: Bearer $TF_TOKEN" \
246 | --header "Content-Type: application/vnd.api+json" \
247 | --request POST \
248 | --data @payload-var.json \
249 | https://app.terraform.io/api/v2/vars
250 | ```
251 |
252 | セットした変数を確認してみましょう。
253 |
254 | ```shell
255 | $ curl \
256 | --header "Authorization: Bearer $TF_TOKEN" \
257 | --header "Content-Type: application/vnd.api+json" \
258 | --request GET \
259 | https://app.terraform.io/api/v2/vars\?filter%5Borganization%5D%5Bname%5D\=${TF_ORG}\&filter%5Bworkspace%5D%5Bname%5D\=new-workspace | jq
260 | ```
261 |
262 | 残りの変数をセットしていきますが、現在 TFE API ではデータのリスト型をサポートしていないため一つ一つファイルを定義していく必要があります。
263 |
264 | ここでは API とは関係ありませんが、ここでは Terraform の`Terraform Enterprise Provider`を使ってバルクでセットしてみます。Terraform Enterprise Provider については[こちら](https://www.terraform.io/docs/providers/tfe/index.html)を参照して下さい。
265 |
266 | 残りの`aws_access_key`, `aws_secret_key`, `ami`, `region`, `confirm_destroy`をまとめてセットしていきます。
267 |
268 | ```shell
269 | $ mkdir tfe-provider
270 |
271 | $ cat << EOF > tfe-provider/main.tf
272 | terraform {
273 | required_version = "~> 0.12"
274 | }
275 |
276 | provider "tfe" {
277 | hostname = var.hostname
278 | token = var.token
279 | }
280 |
281 | resource "tfe_variable" "aws_access_key" {
282 | key = "access_key"
283 | value = var.aws_access_key
284 | category = "terraform"
285 | sensitive = true
286 | workspace_id = var.workspace_id
287 | }
288 |
289 | resource "tfe_variable" "aws_secret_key" {
290 | key = "secret_key"
291 | value = var.aws_secret_key
292 | category = "terraform"
293 | sensitive = true
294 | workspace_id = var.workspace_id
295 | }
296 |
297 | resource "tfe_variable" "ami" {
298 | key = "ami"
299 | value = "ami-06d9ad3f86032262d"
300 | category = "terraform"
301 | sensitive = false
302 | workspace_id = var.workspace_id
303 | }
304 |
305 | resource "tfe_variable" "region" {
306 | key = "region"
307 | value = "ap-northeast-1"
308 | category = "terraform"
309 | sensitive = false
310 | workspace_id = var.workspace_id
311 | }
312 |
313 | resource "tfe_variable" "confirm_destroy" {
314 | key = "CONFIRM_DESTROY"
315 | value = 1
316 | category = "env"
317 | sensitive = false
318 | workspace_id = var.workspace_id
319 | }
320 | EOF
321 |
322 | $ cat << EOF > tfe-provider/variables.tf
323 | variable "hostname" {
324 | default = "app.terraform.io"
325 | }
326 | variable "token" {}
327 | variable "workspace_id" {
328 | default = "${TF_ORG}/new-workspace"
329 | }
330 | variable "aws_access_key" {}
331 | variable "aws_secret_key" {}
332 | EOF
333 | ```
334 |
335 | `terraform plan & apply`してみましょう。
336 |
337 | ```shell
338 | $ cd tfe-provider
339 | $ terraform init
340 | $ terraform plan
341 | $ terraform apply -auto-approve
342 | $ cd ..
343 | ```
344 |
345 | `aws_access_key`, `aws_secret_key`, `token`の入力が必要です。`token`には Terraform Enterprise のトークンを入力します。
346 |
347 | Apply が終了したら変数を確認してください。
348 |
349 | ```shell
350 | $ curl \
351 | --header "Authorization: Bearer $TF_TOKEN" \
352 | --header "Content-Type: application/vnd.api+json" \
353 | --request GET \
354 | https://app.terraform.io/api/v2/vars\?filter%5Borganization%5D%5Bname%5D\=${TF_ORG}\&filter%5Bworkspace%5D%5Bname%5D\=new-workspace | jq
355 | ```
356 |
357 | ### プロビジョニングを実行
358 |
359 | それでは最後にプロビジョニングと環境の削除をやってみます。
360 |
361 | まず`/runs`エンドポイントでプランを作成しましょう。プランにはプランに含めるメッセージやワークスペースの ID などが必要です。
362 |
363 | これを JSON で定義し、`runs`エンドポイントに POST することでプランが作成されます。
364 |
365 | ```shell
366 | $ cat << EOF > payload-plans.json
367 | {
368 | "data": {
369 | "attributes": {
370 | "is-destroy":false,
371 | "message": "This is an API Driven Run"
372 | },
373 | "type":"runs",
374 | "relationships": {
375 | "workspace": {
376 | "data": {
377 | "type": "workspaces",
378 | "id": "${WS_ID}"
379 | }
380 | }
381 | }
382 | }
383 | }
384 | EOF
385 |
386 | $ curl \
387 | --header "Authorization: Bearer $TF_TOKEN" \
388 | --header "Content-Type: application/vnd.api+json" \
389 | --request POST \
390 | --data @payload-plans.json \
391 | https://app.terraform.io/api/v2/runs | jq > plan-response-body.json
392 | ```
393 |
394 | これで Plan が開始されているはずです。`plan-response-body.json`の内容を確認してみてください。
395 |
396 | 以下の`workspaces/${WS_ID}/runs`で状態を確認してみましょう。
397 |
398 | ```shell
399 | $ curl \
400 | --header "Authorization: Bearer $TF_TOKEN" \
401 | --header "Content-Type: application/vnd.api+json" \
402 | --request GET \
403 | https://app.terraform.io/api/v2/workspaces/${WS_ID}/runs | jq
404 | ```
405 |
406 | 以下のように何度か実行すると`status`のパラメータが変化しているでしょう。
407 |
408 | ```json
409 | {
410 | "data": [
411 | {
412 | "id": "run-3YUm7dKKh6qHQo1y",
413 | "type": "runs",
414 | "attributes": {
415 | "actions": {
416 | "is-cancelable": false,
417 | "is-confirmable": true,
418 | "is-discardable": true,
419 | "is-force-cancelable": false
420 | },
421 | "canceled-at": null,
422 | "created-at": "2019-12-12T07:45:21.828Z",
423 | "has-changes": true,
424 | "is-destroy": false,
425 | "message": "This is an API Driven Run",
426 | "plan-only": false,
427 | "source": "tfe-api",
428 | "status-timestamps": {
429 | "planned-at": "2019-12-12T07:45:50+00:00",
430 | "planning-at": "2019-12-12T07:45:22+00:00",
431 | "plan-queued-at": "2019-12-12T07:45:22+00:00",
432 | "cost-estimated-at": "2019-12-12T07:45:55+00:00",
433 | "plan-queueable-at": "2019-12-12T07:45:21+00:00",
434 | "cost-estimating-at": "2019-12-12T07:45:50+00:00"
435 | },
436 | "status": "cost_estimated",
437 | "trigger-reason": "manual",
438 | "permissions": {
439 | "can-apply": true,
440 | "can-cancel": true,
441 | "can-discard": true,
442 | "can-force-execute": true,
443 | "can-force-cancel": true,
444 | "can-override-policy-check": false
445 | }
446 | },
447 | ```
448 |
449 | 上記の`id`のパラメータをメモして環境変数にセットします。
450 |
451 | ```shell
452 | $ export RUN_ID=run-3YUm7dKKh6qHQo1y
453 | ```
454 |
455 | Plan が終わったらプラン内容を確認します。先ほど取得した`plan-response-body.json`から Plan ID を取得しましょう。
456 |
457 | ```shell
458 | $ export PLAN_ID=$(cat plan-response-body.json | jq -r '.data.relationships.plan.data.id')
459 |
460 | $ curl \
461 | --header "Authorization: Bearer $TF_TOKEN" \
462 | --header "Content-Type: application/vnd.api+json" \
463 | --request GET \
464 | https://app.terraform.io/api/v2/plans/${PLAN_ID} | jq > plan-details.json
465 | ```
466 |
467 | `plan-details.json`の内容を確認してください。ここから`log-read-url`のファイルを取得し、プランの変更内容を確認します。
468 |
469 | ```shell
470 | wget $(cat plan-details.json | jq -r '.data.attributes."log-read-url"'
471 | ```
472 |
473 | テキストファイルが出力されますので内容を確認してください。
474 |
475 | 最後に Apply をします。プランの結果、`apply`や`dsicard`を選択できます。
476 |
477 | Apply の場合は、`/runs/:run_id/actions/apply`がエンドポイントです。
478 |
479 | ```shell
480 | $ cat << EOF > payload-comment.json
481 | {
482 | "comment":"Looks good to me"
483 | }
484 | EOF
485 | ```
486 |
487 | コメントを JSON で定義して、Apply をしてみましょう。
488 |
489 | ```shell
490 | $ curl \
491 | --header "Authorization: Bearer $TF_TOKEN" \
492 | --header "Content-Type: application/vnd.api+json" \
493 | --request POST \
494 | --data @payload-comment.json \
495 | https://app.terraform.io/api/v2/runs/${RUN_ID}/actions/apply
496 | ```
497 |
498 | Run の状態を何度か見ると`applied`となり、プロビジョニングが完了します。
499 |
500 | ```shell
501 | $ curl \
502 | --header "Authorization: Bearer $TF_TOKEN" \
503 | --header "Content-Type: application/vnd.api+json" \
504 | --request GET \
505 | https://app.terraform.io/api/v2/runs/${RUN_ID}
506 | ```
507 |
508 | ### 環境をクリーンナップする
509 |
510 | 最後に`destroy`を実行し、環境をクリーンナップしましょう。Destroy は Plan と同一のエンドポイントに`data.attributes.is-destroy`が`true`にセットされた JSON を実行させます。
511 |
512 | ```shell
513 | $ cat << EOF > payload-destroy.json
514 | {
515 | "data": {
516 | "attributes": {
517 | "is-destroy":true,
518 | "message": "Will be destroyed"
519 | },
520 | "type":"runs",
521 | "relationships": {
522 | "workspace": {
523 | "data": {
524 | "type": "workspaces",
525 | "id": "${WS_ID}"
526 | }
527 | }
528 | }
529 | }
530 | }
531 | EOF
532 | ```
533 |
534 | `is-destroy`が True になっていることを確認してください。これをプランしてみましょう。
535 |
536 | ```shell
537 | $ curl \
538 | --header "Authorization: Bearer $TF_TOKEN" \
539 | --header "Content-Type: application/vnd.api+json" \
540 | --request POST \
541 | --data @payload-destroy.json \
542 | https://app.terraform.io/api/v2/runs | jq
543 | ```
544 |
545 | 次に、コメントをつけて Destroy を Apply します。上記で出力された`Run ID`は環境変数にセットしておきます。
546 |
547 | ```shell
548 | $ export RUN_ID=run-msjedz6ExGfGZuqm
549 | ```
550 |
551 | `actions/apply`のエンドポイントにコメントの JSON を POST します。
552 |
553 | ```shell
554 | $ cat << EOF > payload-comment.json
555 | {
556 | "comment":"Yes, Let's Destroy"
557 | }
558 | EOF
559 |
560 | $ curl \
561 | --header "Authorization: Bearer $TF_TOKEN" \
562 | --header "Content-Type: application/vnd.api+json" \
563 | --request POST \
564 | --data @payload-comment.json \
565 | https://app.terraform.io/api/v2/runs/${RUN_ID}/actions/apply
566 | ```
567 |
568 | 最後に Run の内容を確認し、Destroy が終了していることを確認してください。
569 |
570 | ```shell
571 | $ curl \
572 | --header "Authorization: Bearer $TF_TOKEN" \
573 | --header "Content-Type: application/vnd.api+json" \
574 | --request GET \
575 | https://app.terraform.io/api/v2/runs/${RUN_ID}
576 | ```
577 |
578 | 以上で API の利用の章は終了です。TFE API ではワークスペースやプロビジョニングに関する操作の他に、ユーザ管理系のオプレーションなど様々な作業を実施することができ、自動化のプロセスに組み込むことが可能です。
579 |
580 | ## 参考リンク
581 | * [Terraform Cloud API Document](https://www.terraform.io/docs/cloud/api/index.html)
582 | * [API Drive Run](https://www.terraform.io/docs/cloud/run/api.html)
--------------------------------------------------------------------------------
/contents/sentinel.md:
--------------------------------------------------------------------------------
1 | # Sentinel による Policy as Code
2 |
3 | Terraform は便利なツールですが、多くのユーザが利用し大規模な運用になるとガバンナンスをきかせユーザの行動を制御することが運用上課題となります。有償版では HashiCorp が開発する[Sentinel](https://www.hashicorp.com/sentinel)というフレームワークを利用し、ポリシーを定義することができます。
4 |
5 | 定義できるポリシーは多岐に渡りますが、下記のような一例としてユースケースがあります。
6 |
7 | * Terrafrom 実行時間の制御
8 | * AZ/Region の制約
9 | * タグの確認
10 | * CIDR やネットワーク設定の確認
11 | * 特定リソースの利用禁止
12 |
13 | ## Sentinel コードの作成
14 | それではまずは Sentinel を利用するための設定を行います。Sentinel は最低限二つのファイルが必要です。一つは`sentinel.hcl`、もう一つは`.sentinel`です。
15 |
16 | ```
17 | GitHub上に`sentinel-handson-workshop`という名前のパブリックレポジトリを作成してください。
18 | ```
19 |
20 | ```shell
21 | $ cd path/to/tf-workspace
22 | $ mkdir sentinel-handson-workshop
23 | $ cd sentinel-handson-workshop
24 | ```
25 |
26 | 以下の二つのファイルを追加します。
27 |
28 | * 全クラウド共通のファイル (sentinel.hcl)
29 |
30 | ```shell
31 | $ cat < sentinel.hcl
32 | policy "first-policy" {
33 | enforcement_level = "hard-mandatory"
34 | }
35 | EOF
36 | ```
37 |
38 | * クラウドごとに変化するファイル (first-policy.sentinel)
39 |
40 | ```
41 | WIP
42 | ```
43 |
44 | GCPの場合はこちら
45 |
46 | ```
47 | import "tfplan/v2" as tfplan
48 |
49 | mandatory_labels = [
50 | "ttl",
51 | ]
52 |
53 | instances = filter tfplan.resource_changes as _, rc {
54 | rc.mode is "managed" and
55 | rc.type is "google_compute_instance"
56 | }
57 |
58 | tags = instances["google_compute_instance.vm_instance[0]"]["change"]["after"]["labels"]
59 |
60 | main = rule {
61 | all mandatory_labels as t {
62 | tags contains t
63 | }
64 | }
65 | ```
66 | Azureの場合はこちら
69 |
70 | ```
71 | import "tfplan/v2" as tfplan
72 |
73 | mandatory_tags = [
74 | "ttl",
75 | ]
76 |
77 | instances = filter tfplan.resource_changes as _, rc {
78 | rc.mode is "managed" and
79 | rc.type is "azurerm_virtual_machine"
80 | }
81 |
82 | tags = instances["azurerm_virtual_machine.main[0]"]["change"]["after"]["tags"]
83 |
84 | main = rule {
85 | all mandatory_tags as t {
86 | tags contains t
87 | }
88 | }
89 | ```
90 | 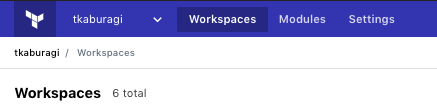 134 |
135 |
136 | `Policy Sets`を選び`Connect a new Policy Set`をクリックします。
137 |
138 |
139 |
134 |
135 |
136 | `Policy Sets`を選び`Connect a new Policy Set`をクリックします。
137 |
138 |
139 | 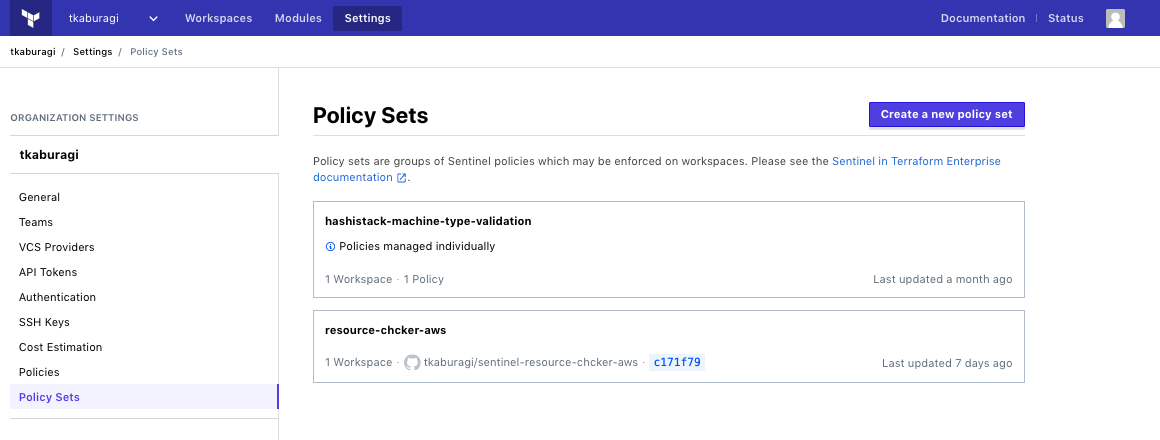 140 |
141 |
142 | `Connect a Policy Set`で先程作った`sentinel-handson-workshop`のレポジトリを選択します。
143 |
144 |
145 |
140 |
141 |
142 | `Connect a Policy Set`で先程作った`sentinel-handson-workshop`のレポジトリを選択します。
143 |
144 |
145 |  146 |
147 |
148 | 次の画面で以下のように入力してください。名前などは任意で構いません。**workspace を選んだら ADD WORKSPACE を押すのを忘れないでください。**
149 |
150 |
151 |
146 |
147 |
148 | 次の画面で以下のように入力してください。名前などは任意で構いません。**workspace を選んだら ADD WORKSPACE を押すのを忘れないでください。**
149 |
150 |
151 | 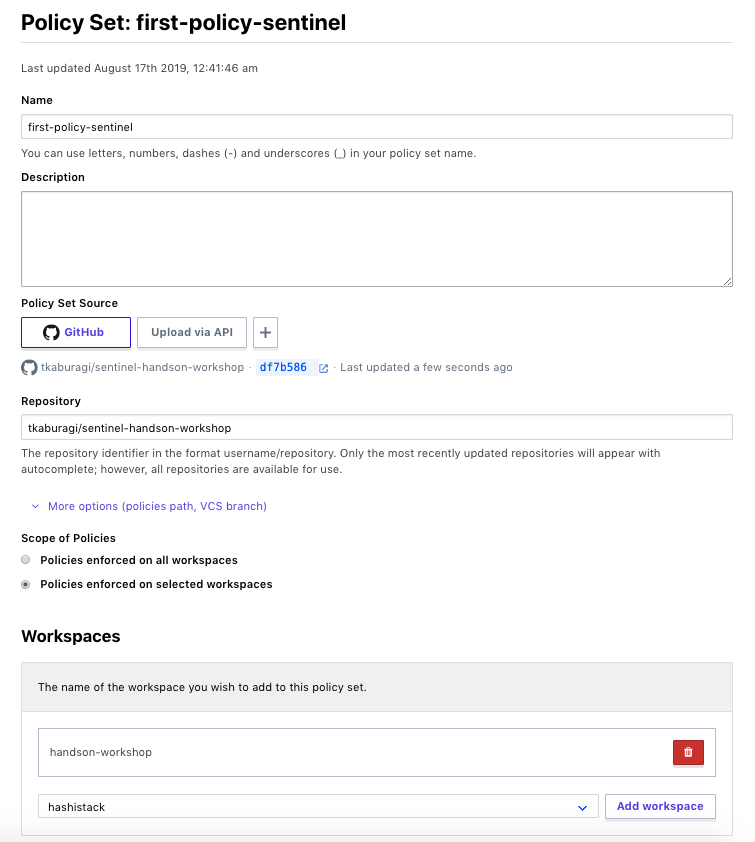 152 |
153 |
154 | ## ポリシーを試してみる
155 |
156 | それでは実行してみましょう。ワークスペースの`Actions` -> `Start a New Plan` を選択し、Run をキックします。
157 |
158 |
159 |
152 |
153 |
154 | ## ポリシーを試してみる
155 |
156 | それでは実行してみましょう。ワークスペースの`Actions` -> `Start a New Plan` を選択し、Run をキックします。
157 |
158 |
159 | 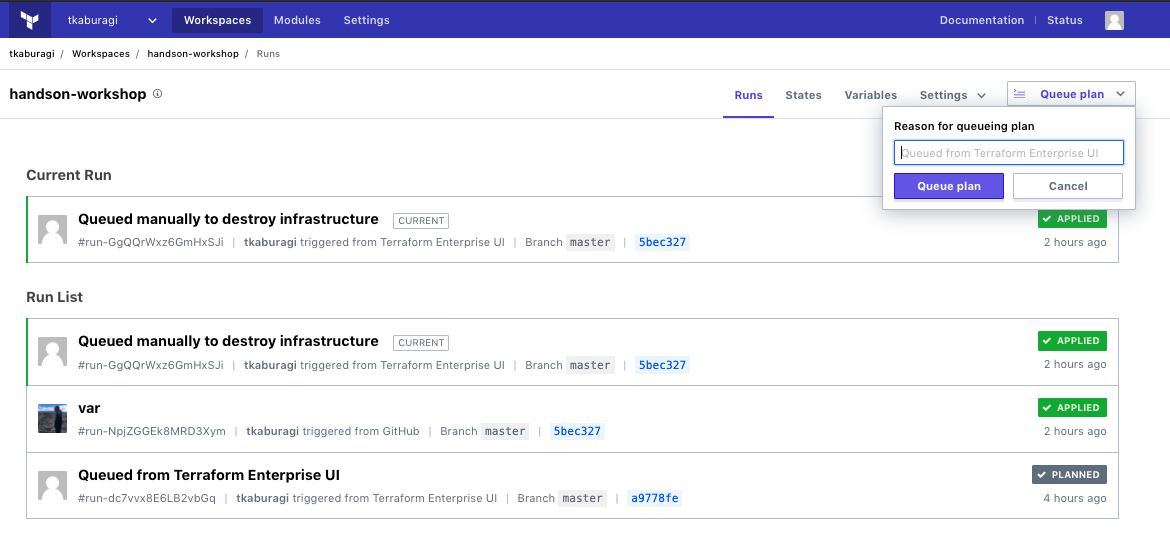 160 |
161 |
162 | 前回と違い Policy Check のワークフローが追加されていることがわかります。
163 |
164 |
165 |
160 |
161 |
162 | 前回と違い Policy Check のワークフローが追加されていることがわかります。
163 |
164 |
165 | 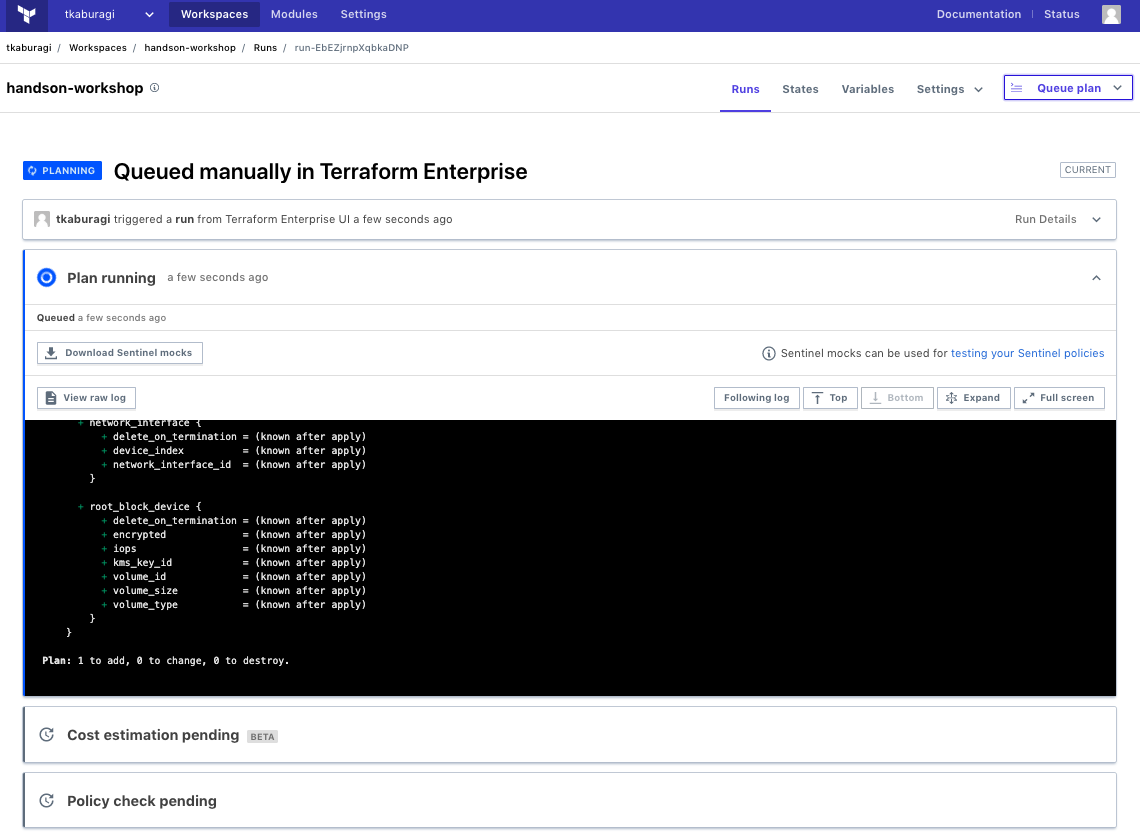 166 |
167 |
168 | 程なくするとポリシーチェックが開始されエラーになるでしょう。
169 |
170 | 次にコードを修正し、再度コミットしてみます。`path/to/tf-handson-workshop/main.tf`のコードを以下のように修正してください。
171 |
172 | ```hcl
173 | terraform {
174 | }
175 |
176 | provider "aws" {
177 | access_key = var.access_key
178 | secret_key = var.secret_key
179 | region = var.region
180 | }
181 |
182 | resource "aws_instance" "hello-tf-instance" {
183 | ami = var.ami
184 | count = var.hello_tf_instance_count
185 | instance_type = var.hello_tf_instance_type
186 | tags = {
187 | owner = "me"
188 | ttl = "100"
189 | }
190 | }
191 | ```
192 |
193 |
166 |
167 |
168 | 程なくするとポリシーチェックが開始されエラーになるでしょう。
169 |
170 | 次にコードを修正し、再度コミットしてみます。`path/to/tf-handson-workshop/main.tf`のコードを以下のように修正してください。
171 |
172 | ```hcl
173 | terraform {
174 | }
175 |
176 | provider "aws" {
177 | access_key = var.access_key
178 | secret_key = var.secret_key
179 | region = var.region
180 | }
181 |
182 | resource "aws_instance" "hello-tf-instance" {
183 | ami = var.ami
184 | count = var.hello_tf_instance_count
185 | instance_type = var.hello_tf_instance_type
186 | tags = {
187 | owner = "me"
188 | ttl = "100"
189 | }
190 | }
191 | ```
192 |
193 | GCPの場合はこちら
194 |
195 | ```
196 | terraform {
197 | }
198 |
199 | provider "google" {
200 | credentials = var.gcp_key
201 | project = var.project
202 | region = var.region
203 | }
204 |
205 | resource "google_compute_instance" "vm_instance" {
206 | name = "terraform-instance-${count.index}"
207 | machine_type = var.machine_type
208 | count = var.hello_tf_instance_count
209 | zone = "asia-northeast1-a"
210 | labels = {
211 | owner = "me",
212 | ttl = "100"
213 | }
214 | boot_disk {
215 | initialize_params {
216 | image = var.image
217 | }
218 | }
219 |
220 | network_interface {
221 | # A default network is created for all GCP projects
222 | network = "default"
223 | access_config {
224 | }
225 | }
226 | }
227 | ```
228 | Azureの場合はこちら
231 |
232 | ```hcl
233 | terraform {
234 | }
235 |
236 | provider "azurerm" {
237 | client_id = var.client_id
238 | tenant_id = var.tenant_id
239 | subscription_id = var.subscription_id
240 | client_secret = var.client_secret
241 | features {}
242 | }
243 |
244 | resource "azurerm_virtual_machine" "main" {
245 | name = "my-vm-${count.index}"
246 | count = var.hello_tf_instance_count
247 | location = var.location
248 | resource_group_name = azurerm_resource_group.example.name
249 | network_interface_ids = [azurerm_network_interface.example.*.id[count.index]]
250 | vm_size = var.vm_size
251 |
252 | os_profile {
253 | computer_name = "hostname"
254 | admin_username = "vmadmin"
255 | admin_password = var.admin_password
256 | }
257 | os_profile_linux_config {
258 | disable_password_authentication = false
259 | }
260 | tags = {
261 | owner = "me",
262 | ttl = "100"
263 | }
264 | storage_image_reference {
265 | publisher = "Canonical"
266 | offer = "UbuntuServer"
267 | sku = "16.04-LTS"
268 | version = "latest"
269 | }
270 | storage_os_disk {
271 | name = "my-osdisk-${count.index}"
272 | caching = "ReadWrite"
273 | create_option = "FromImage"
274 | managed_disk_type = "Standard_LRS"
275 | }
276 | }
277 |
278 | resource "azurerm_resource_group" "example" {
279 | name = "my-group"
280 | location = var.location
281 | }
282 |
283 |
284 | resource "azurerm_virtual_network" "example" {
285 | name = "my-network"
286 | address_space = ["10.0.0.0/16"]
287 | location = var.location
288 | resource_group_name = azurerm_resource_group.example.name
289 | }
290 |
291 | resource "azurerm_subnet" "example" {
292 | name = "my-subnet"
293 | resource_group_name = azurerm_resource_group.example.name
294 | virtual_network_name = azurerm_virtual_network.example.name
295 | address_prefix = "10.0.2.0/24"
296 | }
297 |
298 | resource "azurerm_network_interface" "example" {
299 | name = "my-nw-interface-${count.index}"
300 | count = var.hello_tf_instance_count
301 | location = var.location
302 | resource_group_name = azurerm_resource_group.example.name
303 |
304 | ip_configuration {
305 | name = "my-ip-config"
306 | subnet_id = azurerm_subnet.example.id
307 | private_ip_address_allocation = "Dynamic"
308 | }
309 |
310 | tags = {
311 | environment = "payground"
312 | }
313 | }
314 | ```
315 | 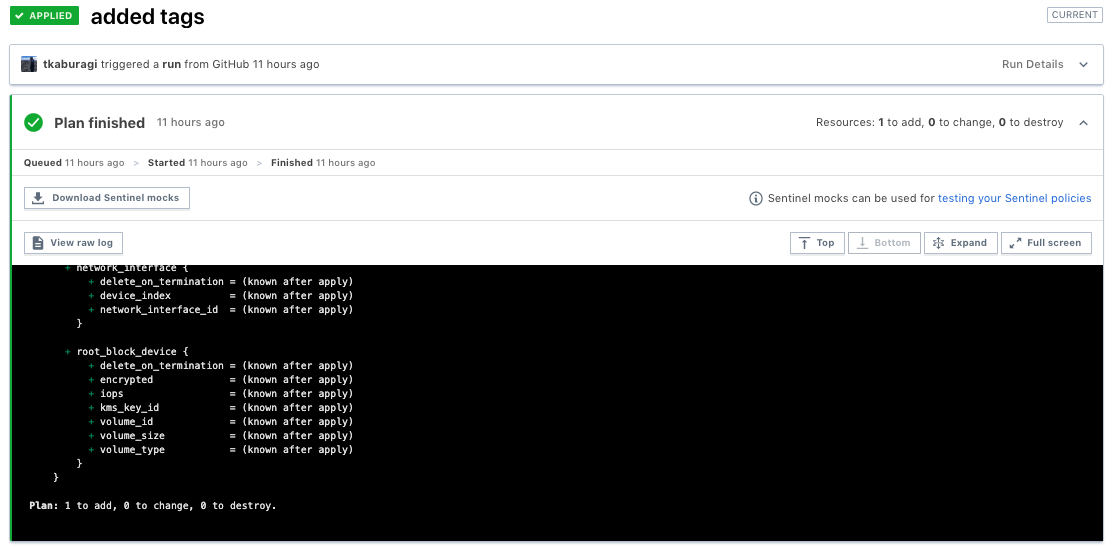 463 |
464 |
465 | Workspaces の Runs から最新の実行結果の`Plan finished`をクリックすると`Downloads Sentinel mocks`というボタンがあるのでこれをクリックしてモックデータをダウンロードし新しいフォルダを作ります。
466 |
467 | ```shell
468 | $ cd path/to/tf-workspace
469 | $ mkdir simulator-tf-sample simulator-tf-sample/testdata
470 | $ touch simulator-tf-sample/sentinel.hcl simulator-tf-sample/tags-check.sentinel
471 | $ tar xvfz path/to/run-gvXm387VP1VShKC1-sentinel-mocks.tar.gz -C simulator-tf-sample/testdata
472 | ```
473 |
474 | 以下のような構造になれば OK です。
475 |
476 | ```console
477 | simulator-tf-sample
478 | ├── sentinel.hcl
479 | ├── tags-check.sentinel
480 | └── testdata
481 | ├── mock-tfconfig-v2.sentinel
482 | ├── mock-tfconfig.sentinel
483 | ├── mock-tfplan-v2.sentinel
484 | ├── mock-tfplan.sentinel
485 | ├── mock-tfrun.sentinel
486 | ├── mock-tfstate-v2.sentinel
487 | ├── mock-tfstate.sentinel
488 | └── sentinel.hcl
489 | ```
490 |
491 | `testdata/`以下にコピーした 3 つのファイルには Sentinel で定義されたモックデータが入っています。全てを理解する必要はないので、これが最新の Terraform の状況をシミュレートしているとだけ押さえておけばとりあえず大丈夫です。
492 |
493 | sentinel.hcl を以下のように記述してください。
494 |
495 | ```hcl
496 | mock "tfconfig" {
497 | module {
498 | source = "testdata/mock-tfconfig.sentinel"
499 | }
500 | }
501 |
502 | mock "tfconfig/v1" {
503 | module {
504 | source = "testdata/mock-tfconfig.sentinel"
505 | }
506 | }
507 |
508 | mock "tfconfig/v2" {
509 | module {
510 | source = "testdata/mock-tfconfig-v2.sentinel"
511 | }
512 | }
513 |
514 | mock "tfplan" {
515 | module {
516 | source = "testdata/mock-tfplan.sentinel"
517 | }
518 | }
519 |
520 | mock "tfplan/v1" {
521 | module {
522 | source = "testdata/mock-tfplan.sentinel"
523 | }
524 | }
525 |
526 | mock "tfplan/v2" {
527 | module {
528 | source = "testdata/mock-tfplan-v2.sentinel"
529 | }
530 | }
531 |
532 | mock "tfstate" {
533 | module {
534 | source = "testdata/mock-tfstate.sentinel"
535 | }
536 | }
537 |
538 | mock "tfstate/v1" {
539 | module {
540 | source = "testdata/mock-tfstate.sentinel"
541 | }
542 | }
543 | ```
544 |
545 | ダウンロードした環境をシミュレートする Sentinel ファイルをモックデータとして指定しています。実際のポリシーコードではこの`tfconfig`, `tfplan`,`tfstate`を import してポリシーを定義しローカルで実行します。
546 |
547 | 一番最初に試したタグの有無をチェックするポリシーを使って試してみたいと思います。`tags-check.sentinel`を以下のように編集します。
548 |
549 | ```sentinel
550 | WIP
551 | ```
552 |
553 |
463 |
464 |
465 | Workspaces の Runs から最新の実行結果の`Plan finished`をクリックすると`Downloads Sentinel mocks`というボタンがあるのでこれをクリックしてモックデータをダウンロードし新しいフォルダを作ります。
466 |
467 | ```shell
468 | $ cd path/to/tf-workspace
469 | $ mkdir simulator-tf-sample simulator-tf-sample/testdata
470 | $ touch simulator-tf-sample/sentinel.hcl simulator-tf-sample/tags-check.sentinel
471 | $ tar xvfz path/to/run-gvXm387VP1VShKC1-sentinel-mocks.tar.gz -C simulator-tf-sample/testdata
472 | ```
473 |
474 | 以下のような構造になれば OK です。
475 |
476 | ```console
477 | simulator-tf-sample
478 | ├── sentinel.hcl
479 | ├── tags-check.sentinel
480 | └── testdata
481 | ├── mock-tfconfig-v2.sentinel
482 | ├── mock-tfconfig.sentinel
483 | ├── mock-tfplan-v2.sentinel
484 | ├── mock-tfplan.sentinel
485 | ├── mock-tfrun.sentinel
486 | ├── mock-tfstate-v2.sentinel
487 | ├── mock-tfstate.sentinel
488 | └── sentinel.hcl
489 | ```
490 |
491 | `testdata/`以下にコピーした 3 つのファイルには Sentinel で定義されたモックデータが入っています。全てを理解する必要はないので、これが最新の Terraform の状況をシミュレートしているとだけ押さえておけばとりあえず大丈夫です。
492 |
493 | sentinel.hcl を以下のように記述してください。
494 |
495 | ```hcl
496 | mock "tfconfig" {
497 | module {
498 | source = "testdata/mock-tfconfig.sentinel"
499 | }
500 | }
501 |
502 | mock "tfconfig/v1" {
503 | module {
504 | source = "testdata/mock-tfconfig.sentinel"
505 | }
506 | }
507 |
508 | mock "tfconfig/v2" {
509 | module {
510 | source = "testdata/mock-tfconfig-v2.sentinel"
511 | }
512 | }
513 |
514 | mock "tfplan" {
515 | module {
516 | source = "testdata/mock-tfplan.sentinel"
517 | }
518 | }
519 |
520 | mock "tfplan/v1" {
521 | module {
522 | source = "testdata/mock-tfplan.sentinel"
523 | }
524 | }
525 |
526 | mock "tfplan/v2" {
527 | module {
528 | source = "testdata/mock-tfplan-v2.sentinel"
529 | }
530 | }
531 |
532 | mock "tfstate" {
533 | module {
534 | source = "testdata/mock-tfstate.sentinel"
535 | }
536 | }
537 |
538 | mock "tfstate/v1" {
539 | module {
540 | source = "testdata/mock-tfstate.sentinel"
541 | }
542 | }
543 | ```
544 |
545 | ダウンロードした環境をシミュレートする Sentinel ファイルをモックデータとして指定しています。実際のポリシーコードではこの`tfconfig`, `tfplan`,`tfstate`を import してポリシーを定義しローカルで実行します。
546 |
547 | 一番最初に試したタグの有無をチェックするポリシーを使って試してみたいと思います。`tags-check.sentinel`を以下のように編集します。
548 |
549 | ```sentinel
550 | WIP
551 | ```
552 |
553 | GCPの場合はこちら
554 |
555 | ```sentinel
556 | import "tfplan/v2" as tfplan
557 |
558 | mandatory_labels = [
559 | "ttl",
560 | ]
561 |
562 | instances = filter tfplan.resource_changes as _, rc {
563 | rc.mode is "managed" and
564 | rc.type is "google_compute_instance"
565 | }
566 |
567 | tags = instances["google_compute_instance.vm_instance[0]"]["change"]["after"]["labels"]
568 |
569 | main = rule {
570 | all mandatory_labels as t {
571 | tags contains t
572 | }
573 | }
574 | ```
575 | Azureの場合はこちら
578 |
579 | ```sentinel
580 | import "tfplan/v2" as tfplan
581 |
582 | mandatory_tags = [
583 | "ttl",
584 | ]
585 |
586 | instances = filter tfplan.resource_changes as _, rc {
587 | rc.mode is "managed" and
588 | rc.type is "azurerm_virtual_machine"
589 | }
590 |
591 | tags = instances["azurerm_virtual_machine.main[0]"]["change"]["after"]["tags"]
592 |
593 | main = rule {
594 | all mandatory_tags as t {
595 | tags contains t
596 | }
597 | }
598 | ```
599 | GCPの場合はこちら
651 |
652 | ```sentinel
653 | import "tfplan/v2" as tfplan
654 |
655 | mandatory_labels = [
656 | "ttl",
657 | "test",
658 | ]
659 |
660 | instances = filter tfplan.resource_changes as _, rc {
661 | rc.mode is "managed" and
662 | rc.type is "google_compute_instance"
663 | }
664 |
665 | tags = instances["google_compute_instance.vm_instance[0]"]["change"]["after"]["labels"]
666 |
667 | main = rule {
668 | all mandatory_labels as t {
669 | tags contains t
670 | }
671 | }
672 | ```
673 | Azureの場合はこちら
676 |
677 | ```sentinel
678 | WIP
679 | ```
680 |