20 |
22 |
10 | {{name}}
11 |
12 |
13 |
14 |
--------------------------------------------------------------------------------
/lite-monitor-client/src/main/java/org/example/utils/CronUtils.java:
--------------------------------------------------------------------------------
1 | package org.example.utils;
2 |
3 | /**
4 | * @author Doge2077
5 | */
6 | public class CronUtils {
7 |
8 | /**
9 | * 生成对应的 CRON 表达式。
10 | *
11 | * @param seconds 间隔的秒数 (0-59)
12 | * @return 对应的 CRON 表达式字符串
13 | * @throws IllegalArgumentException 如果秒数不在有效范围内,抛出异常
14 | */
15 | public static String generateCron(Integer seconds) {
16 | if (seconds == null || seconds < 0 || seconds > 59) {
17 | throw new IllegalArgumentException("时间非法");
18 | }
19 | // 返回 CRON 表达式,每隔 seconds 秒执行一次
20 | return String.format("*/%d * * * * ?", seconds);
21 | }
22 | }
23 |
--------------------------------------------------------------------------------
/lite-monitor-web/src/main.js:
--------------------------------------------------------------------------------
1 | import {createApp} from 'vue'
2 | import App from './App.vue'
3 | import router from './router'
4 | import axios from "axios"
5 | import '@/assets/css/elemenet.less'
6 | import 'flag-icons/css/flag-icons.min.css'
7 | import 'element-plus/theme-chalk/dark/css-vars.css'
8 | import {createPinia} from "pinia";
9 | import piniaPluginPersistedstate from 'pinia-plugin-persistedstate'
10 |
11 | // axios.defaults.baseURL = '/api'
12 | axios.defaults.baseURL = 'http://127.0.0.1:8080/api'
13 |
14 |
15 | const app = createApp(App)
16 | const pinia = createPinia()
17 | app.use(pinia)
18 | pinia.use(piniaPluginPersistedstate)
19 | app.use(router)
20 |
21 | app.mount('#app')
22 |
--------------------------------------------------------------------------------
/lite-monitor-server/src/main/java/com/example/config/WebConfiguration.java:
--------------------------------------------------------------------------------
1 | package com.example.config;
2 |
3 | import org.springframework.context.annotation.Bean;
4 | import org.springframework.context.annotation.Configuration;
5 | import org.springframework.security.crypto.bcrypt.BCryptPasswordEncoder;
6 | import org.springframework.security.crypto.password.PasswordEncoder;
7 | import org.springframework.web.servlet.config.annotation.WebMvcConfigurer;
8 |
9 | /**
10 | * 一般Web服务相关配置
11 | */
12 | @Configuration
13 | public class WebConfiguration implements WebMvcConfigurer {
14 |
15 | @Bean
16 | public PasswordEncoder passwordEncoder(){
17 | return new BCryptPasswordEncoder();
18 | }
19 | }
20 |
--------------------------------------------------------------------------------
/lite-monitor-web/index.html:
--------------------------------------------------------------------------------
1 |
2 |
3 |
4 |
5 |
6 |
7 |
8 |
9 |
10 |
11 |
23 |
24 |
25 |
47 |
--------------------------------------------------------------------------------
/lite-monitor-server/src/main/resources/application-prod.yml:
--------------------------------------------------------------------------------
1 | #生产环境配置
2 | server:
3 | port: 8010
4 | springdoc:
5 | api-docs:
6 | enabled: false
7 | mybatis-plus:
8 | configuration:
9 | log-impl: org.apache.ibatis.logging.stdout.StdOutImpl
10 | spring:
11 | mail:
12 | host: smtp.163.com
13 | username: chalys2021@163.com
14 | password: QLWTZHQLHAGBQQZL
15 | rabbitmq:
16 | addresses: monitor-rabbitmq
17 | username: admin
18 | password: monitorrabbitmqadmin
19 | virtual-host: /
20 | influx:
21 | url: http://monitor-influxdb:8086/
22 | user: admin
23 | password: monitorinfluxdbadmin
24 | datasource:
25 | url: jdbc:mysql://monitor-mysql:3306/lite-monitor-db
26 | username: root
27 | password: monitormysqlroot
28 | driver-class-name: com.mysql.cj.jdbc.Driver
29 | security:
30 | jwt:
31 | key: 'abcdefghijklmn'
32 | expire: 72
33 | limit:
34 | base: 10
35 | upgrade: 300
36 | frequency: 30
37 | filter:
38 | order: -100
39 | web:
40 | verify:
41 | mail-limit: 60
42 | flow:
43 | period: 5
44 | limit: 1000
45 | block: 30
46 | cors:
47 | origin: '*'
48 | credentials: false
49 | methods: '*'
50 | data:
51 | redis:
52 | host: monitor-redis
53 | port: 6379
54 | database: 0
--------------------------------------------------------------------------------
/lite-monitor-server/src/main/java/com/example/service/AccountService.java:
--------------------------------------------------------------------------------
1 | package com.example.service;
2 |
3 | import com.baomidou.mybatisplus.extension.service.IService;
4 | import com.example.entity.dto.Account;
5 | import com.example.entity.vo.request.ConfirmResetVO;
6 | import com.example.entity.vo.request.CreateSubAccountVO;
7 | import com.example.entity.vo.request.EmailResetVO;
8 | import com.example.entity.vo.request.ModifyEmailVO;
9 | import com.example.entity.vo.response.SubAccountVO;
10 | import org.springframework.security.core.userdetails.UserDetailsService;
11 |
12 | import java.util.List;
13 |
14 | public interface AccountService extends IService 添加新的主机
12 | 请按照以下步骤完成新主机的添加,添加后即可实时管理服务器以及检测运行状态
13 | 1.部署客户端
15 | 在需要监控的服务器上运行监控客户端程序,客户端程序依赖于Java17运行环境,请提前安装好,启动完成后即可进行下一步。
16 | 2.输入监控服务器地址
17 | 此地址用于客户端实时上报运行时状态数据,请务必保证正确填写。
18 | 3.输入授权码
20 | 客户端所有请求必须携带授权码才能被服务端正确识别。
21 |
3 |
21 |
22 |
23 |
26 |
27 |
--------------------------------------------------------------------------------
/lite-monitor-server/src/main/java/com/example/entity/BaseData.java:
--------------------------------------------------------------------------------
1 | package com.example.entity;
2 |
3 | import org.slf4j.Logger;
4 | import org.slf4j.LoggerFactory;
5 |
6 | import java.lang.reflect.Constructor;
7 | import java.lang.reflect.Field;
8 | import java.util.Arrays;
9 | import java.util.function.Consumer;
10 |
11 | /**
12 | * 用于DTO快速转换VO实现,只需将DTO类继承此类即可使用
13 | */
14 | public interface BaseData {
15 | /**
16 | * 创建指定的VO类并将当前DTO对象中的所有成员变量值直接复制到VO对象中
17 | * @param clazz 指定VO类型
18 | * @param consumer 返回VO对象之前可以使用Lambda进行额外处理
19 | * @return 指定VO对象
20 | * @param
5 |
13 | 欢迎来到 Lite-Monitor 监控终端~
6 |
7 | 我们将为您的服务器提供专业的监控服务
8 |
9 |
10 | 为您的数据安全保驾护航!
11 |
12 |
14 |
15 |
16 |
18 |
19 |
20 |
3 |
43 |
44 |
45 |
75 |
76 |
79 |
--------------------------------------------------------------------------------
/lite-monitor-server/src/main/java/com/example/service/impl/ReportServiceImpl.java:
--------------------------------------------------------------------------------
1 | package com.example.service.impl;
2 |
3 | import com.example.entity.dto.Account;
4 | import com.example.entity.dto.Client;
5 | import com.example.entity.vo.request.RuntimeDetailVO;
6 | import com.example.entity.vo.response.ClientDetailsVO;
7 | import com.example.service.AccountService;
8 | import com.example.service.ClientService;
9 | import com.example.service.ReportService;
10 | import com.example.utils.Const;
11 | import com.example.utils.MailUtils;
12 | import jakarta.annotation.Resource;
13 | import lombok.extern.slf4j.Slf4j;
14 | import org.apache.commons.lang3.StringUtils;
15 | import org.springframework.amqp.core.AmqpTemplate;
16 | import org.springframework.data.redis.core.StringRedisTemplate;
17 | import org.springframework.mail.SimpleMailMessage;
18 | import org.springframework.stereotype.Service;
19 |
20 | import java.util.List;
21 | import java.util.concurrent.TimeUnit;
22 |
23 | /**
24 | * @author : liyusen02 22:45 2025/1/5
25 | */
26 | @Slf4j
27 | @Service
28 | public class ReportServiceImpl implements ReportService {
29 |
30 | @Resource
31 | AmqpTemplate rabbitTemplate;
32 |
33 | @Resource
34 | private AccountService accountService;
35 |
36 | @Resource
37 | private ClientService clientService;
38 |
39 | @Resource
40 | private StringRedisTemplate stringRedisTemplate;
41 |
42 | @Override
43 | public void autoReport(Client client, RuntimeDetailVO runtime) {
44 | Double cpuUsage = runtime.getCpuUsage();
45 | Double memoryUsage = runtime.getMemoryUsage();
46 | ClientDetailsVO clientDetailsVO = clientService.clientDetails(client.getClientId());
47 | memoryUsage = memoryUsage / clientDetailsVO.getOsMemory();
48 | Double reportMemory = clientDetailsVO.getReportMemory();
49 | Double reportCpuUsage = clientDetailsVO.getReportCpuUsage();
50 | List
4 |
7 | 登录
5 | 在进入系统之前请先输入用户名和密码进行登录
6 |
8 |
9 |
10 |
11 |
12 |
13 |
15 |
16 |
17 |
18 |
19 |
20 |
21 |
22 |
24 |
25 |
26 |
27 |
28 |
29 |
30 |
32 |
33 |
34 | 忘记密码?
35 |
36 |
37 |
38 |
39 |
40 | 立即登录
41 |
42 |
84 |
85 |
86 |
87 |
88 |
89 |
90 |
91 |
98 |
--------------------------------------------------------------------------------
/lite-monitor-server/src/main/java/com/example/filter/JwtAuthenticationFilter.java:
--------------------------------------------------------------------------------
1 | package com.example.filter;
2 |
3 | import com.auth0.jwt.interfaces.DecodedJWT;
4 | import com.example.entity.RestBean;
5 | import com.example.entity.dto.Client;
6 | import com.example.service.ClientService;
7 | import com.example.utils.Const;
8 | import com.example.utils.JwtUtils;
9 | import jakarta.annotation.Resource;
10 | import jakarta.servlet.FilterChain;
11 | import jakarta.servlet.ServletException;
12 | import jakarta.servlet.http.HttpServletRequest;
13 | import jakarta.servlet.http.HttpServletResponse;
14 | import org.springframework.security.authentication.UsernamePasswordAuthenticationToken;
15 | import org.springframework.security.core.context.SecurityContextHolder;
16 | import org.springframework.security.core.userdetails.UserDetails;
17 | import org.springframework.security.web.authentication.WebAuthenticationDetailsSource;
18 | import org.springframework.stereotype.Component;
19 | import org.springframework.web.filter.OncePerRequestFilter;
20 |
21 | import java.io.IOException;
22 | import java.util.ArrayList;
23 |
24 | /**
25 | * 用于对请求头中Jwt令牌进行校验的工具,为当前请求添加用户验证信息
26 | * 并将用户的ID存放在请求对象属性中,方便后续使用
27 | */
28 | @Component
29 | public class JwtAuthenticationFilter extends OncePerRequestFilter {
30 |
31 | @Resource
32 | JwtUtils utils;
33 |
34 | @Resource
35 | ClientService clientService;
36 |
37 | @Override
38 | protected void doFilterInternal(HttpServletRequest request,
39 | HttpServletResponse response,
40 | FilterChain filterChain) throws ServletException, IOException {
41 | String authorization = request.getHeader("Authorization");
42 | String uri = request.getRequestURI();
43 | if (uri.startsWith("/monitor")) {
44 | if (!uri.endsWith("/register")) {
45 | Client client = this.clientService.getClientByToken(authorization);
46 | if (client == null) {
47 | response.setStatus(401);
48 | response.setCharacterEncoding("utf-8");
49 | response.getWriter().write(RestBean.failure(401, "未注册的客户端").asJsonString());
50 | return ;
51 | } else {
52 | request.setAttribute(Const.ATTR_CLIENT, client);
53 | }
54 | }
55 | } else {
56 | DecodedJWT jwt = utils.resolveJwt(authorization);
57 | if(jwt != null) {
58 | UserDetails user = utils.toUser(jwt);
59 | UsernamePasswordAuthenticationToken authentication =
60 | new UsernamePasswordAuthenticationToken(user, null, user.getAuthorities());
61 | authentication.setDetails(new WebAuthenticationDetailsSource().buildDetails(request));
62 | SecurityContextHolder.getContext().setAuthentication(authentication);
63 | request.setAttribute(Const.ATTR_USER_ID, utils.toId(jwt));
64 | request.setAttribute(Const.ATTR_USER_ROLE, new ArrayList<>(user.getAuthorities()).get(0).getAuthority());
65 | }
66 | }
67 | filterChain.doFilter(request, response);
68 | }
69 | }
70 |
--------------------------------------------------------------------------------
/lite-monitor-server/src/main/java/com/example/utils/FlowUtils.java:
--------------------------------------------------------------------------------
1 | package com.example.utils;
2 |
3 | import jakarta.annotation.Resource;
4 | import lombok.extern.slf4j.Slf4j;
5 | import org.springframework.data.redis.core.StringRedisTemplate;
6 | import org.springframework.stereotype.Component;
7 |
8 | import java.util.Optional;
9 | import java.util.concurrent.TimeUnit;
10 |
11 | /**
12 | * 限流通用工具
13 | * 针对于不同的情况进行限流操作,支持限流升级
14 | */
15 | @Slf4j
16 | @Component
17 | public class FlowUtils {
18 |
19 | @Resource
20 | StringRedisTemplate template;
21 |
22 | /**
23 | * 针对于单次频率限制,请求成功后,在冷却时间内不得再次进行请求,如3秒内不能再次发起请求
24 | * @param key 键
25 | * @param blockTime 限制时间
26 | * @return 是否通过限流检查
27 | */
28 | public boolean limitOnceCheck(String key, int blockTime){
29 | return this.internalCheck(key, 1, blockTime, (overclock) -> false);
30 | }
31 |
32 | /**
33 | * 针对于单次频率限制,请求成功后,在冷却时间内不得再次进行请求
34 | * 如3秒内不能再次发起请求,如果不听劝阻继续发起请求,将限制更长时间
35 | * @param key 键
36 | * @param frequency 请求频率
37 | * @param baseTime 基础限制时间
38 | * @param upgradeTime 升级限制时间
39 | * @return 是否通过限流检查
40 | */
41 | public boolean limitOnceUpgradeCheck(String key, int frequency, int baseTime, int upgradeTime){
42 | return this.internalCheck(key, frequency, baseTime, (overclock) -> {
43 | if (overclock)
44 | template.opsForValue().set(key, "1", upgradeTime, TimeUnit.SECONDS);
45 | return false;
46 | });
47 | }
48 |
49 | /**
50 | * 针对于在时间段内多次请求限制,如3秒内限制请求20次,超出频率则封禁一段时间
51 | * @param counterKey 计数键
52 | * @param blockKey 封禁键
53 | * @param blockTime 封禁时间
54 | * @param frequency 请求频率
55 | * @param period 计数周期
56 | * @return 是否通过限流检查
57 | */
58 | public boolean limitPeriodCheck(String counterKey, String blockKey, int blockTime, int frequency, int period){
59 | return this.internalCheck(counterKey, frequency, period, (overclock) -> {
60 | if (overclock)
61 | template.opsForValue().set(blockKey, "", blockTime, TimeUnit.SECONDS);
62 | return !overclock;
63 | });
64 | }
65 |
66 | /**
67 | * 内部使用请求限制主要逻辑
68 | * @param key 计数键
69 | * @param frequency 请求频率
70 | * @param period 计数周期
71 | * @param action 限制行为与策略
72 | * @return 是否通过限流检查
73 | */
74 | private boolean internalCheck(String key, int frequency, int period, LimitAction action){
75 | String count = template.opsForValue().get(key);
76 | if (count != null) {
77 | long value = Optional.ofNullable(template.opsForValue().increment(key)).orElse(0L);
78 | int c = Integer.parseInt(count);
79 | if(value != c + 1)
80 | template.expire(key, period, TimeUnit.SECONDS);
81 | return action.run(value > frequency);
82 | } else {
83 | template.opsForValue().set(key, "1", period, TimeUnit.SECONDS);
84 | return true;
85 | }
86 | }
87 |
88 | /**
89 | * 内部使用,限制行为与策略
90 | */
91 | private interface LimitAction {
92 | boolean run(boolean overclock);
93 | }
94 | }
95 |
--------------------------------------------------------------------------------
/lite-monitor-web/src/component/TerminalWindow.vue:
--------------------------------------------------------------------------------
1 |
54 |
55 |
56 |
57 |
85 |
86 |
87 |
100 |
--------------------------------------------------------------------------------
/lite-monitor-web/src/tools/index.js:
--------------------------------------------------------------------------------
1 | import { ElMessage, ElMessageBox } from 'element-plus'
2 | import { post } from '@/net'
3 | import { useClipboard } from '@vueuse/core'
4 |
5 | function fitByUnit(value, unit) {
6 | const units = ['B', 'KB', 'MB', 'GB', 'TB', 'PB']
7 | let index = units.indexOf(unit)
8 | while (((value < 1 && value != 0) || value >= 1024) && (index >= 0 || index < units.length)) {
9 | if (value >= 1024) {
10 | value = value / 1024
11 | index = index + 1
12 | } else {
13 | value = value * 1024
14 | index = index - 1
15 | }
16 | }
17 | return `${parseInt(value)} ${units[index]}`
18 | }
19 |
20 | function percentageToStatus(percentage) {
21 | if (percentage < 50) return 'success'
22 | else if (percentage < 80) return 'warning'
23 | else return 'exception'
24 | }
25 |
26 | function rename(clientId, clientName, after) {
27 | ElMessageBox.prompt('请输入新的服务器主机名称', '修改名称', {
28 | confirmButtonText: '确认',
29 | cancelButtonText: '取消',
30 | inputValue: clientName,
31 | inputPattern: /^[a-zA-Z0-9_\u4e00-\u9fa5]{1,10}$/,
32 | inputErrorMessage: '名称只能包含中英文字符、数字和下划线',
33 | }).then(({value}) => post('/monitor/rename', {
34 | clientId: clientId,
35 | clientName: value
36 | }, () => {
37 | ElMessage.success('主机名称已更新')
38 | after()
39 | })
40 | )
41 | }
42 |
43 | function reportConfig(clientId, reportCpuUsage, reportMemory, after) {
44 | // 先修改CPU报警阈值
45 | ElMessageBox.prompt('请输入新的CPU报警阈值', '修改CPU报警阈值', {
46 | confirmButtonText: '下一步',
47 | cancelButtonText: '取消',
48 | inputValue: reportCpuUsage
49 | }).then(({value: cpuValue}) => {
50 | // 修改内存报警阈值
51 | return ElMessageBox.prompt('请输入新的内存报警阈值', '修改内存报警阈值', {
52 | confirmButtonText: '确认',
53 | cancelButtonText: '取消',
54 | inputValue: reportMemory
55 | }).then(({value: memoryValue}) => {
56 | return {cpuValue, memoryValue}
57 | })
58 | }).then(({cpuValue, memoryValue}) => {
59 | // 提交更新的报警阈值
60 | post('/monitor/report', {
61 | clientId: clientId,
62 | reportMemory: memoryValue,
63 | reportCpuUsage: cpuValue
64 | }, () => {
65 | ElMessage.success('报警阈值已更新')
66 | after()
67 | })
68 | }).catch(() => {
69 | ElMessage.info('操作已取消')
70 | })
71 | }
72 |
73 | const {copy} = useClipboard()
74 | const copyId = (data) => copy(data.clientAddress).then(() => ElMessage.success('成功复制到剪切板'))
75 |
76 | function osNameToIcon(name) {
77 | if (name.indexOf('Ubuntu') >= 0)
78 | return {icon: 'fa-ubuntu', color: '#db4c1a'}
79 | else if (name.indexOf('CentOS') >= 0)
80 | return {icon: 'fa-centos', color: '#9dcd30'}
81 | else if (name.indexOf('macOS') >= 0)
82 | return {icon: 'fa-apple', color: 'grey'}
83 | else if (name.indexOf('Windows') >= 0)
84 | return {icon: 'fa-windows', color: '#3578b9'}
85 | else if (name.indexOf('Debian') >= 0)
86 | return {icon: 'fa-debian', color: '#a80836'}
87 | else
88 | return {icon: 'fa-linux', color: 'grey'}
89 | }
90 |
91 |
92 | export { fitByUnit, percentageToStatus, rename, copyId, osNameToIcon, reportConfig }
--------------------------------------------------------------------------------
/lite-monitor-server/src/main/java/com/example/utils/InfluxDbUtils.java:
--------------------------------------------------------------------------------
1 | package com.example.utils;
2 |
3 | import com.alibaba.fastjson2.JSONObject;
4 | import com.example.entity.dto.RuntimeDetail;
5 | import com.example.entity.vo.request.RuntimeDetailVO;
6 | import com.example.entity.vo.response.RuntimeHistoryVO;
7 | import com.influxdb.client.InfluxDBClient;
8 | import com.influxdb.client.InfluxDBClientFactory;
9 | import com.influxdb.client.WriteApiBlocking;
10 | import com.influxdb.client.domain.WritePrecision;
11 | import com.influxdb.query.FluxRecord;
12 | import com.influxdb.query.FluxTable;
13 | import jakarta.annotation.PostConstruct;
14 | import lombok.extern.slf4j.Slf4j;
15 | import org.springframework.beans.BeanUtils;
16 | import org.springframework.beans.factory.annotation.Value;
17 | import org.springframework.stereotype.Component;
18 |
19 | import java.util.Date;
20 | import java.util.List;
21 |
22 | @Slf4j
23 | @Component
24 | public class InfluxDbUtils {
25 | @Value("${spring.influx.url}")
26 | String url;
27 |
28 | @Value("${spring.influx.user}")
29 | String user;
30 |
31 | @Value("${spring.influx.password}")
32 | String password;
33 |
34 | private final String BUCKET = "lite-monitor";
35 | private final String ORG = "admin";
36 |
37 | private InfluxDBClient client;
38 |
39 | @PostConstruct
40 | public void initInfluxDbClient() {
41 | this.client = InfluxDBClientFactory.create(url, user, password.toCharArray());
42 | }
43 |
44 | public void updateRuntimeDetial(int clientId, RuntimeDetailVO runtimeDetailVO) {
45 | RuntimeDetail runtimeDetail = new RuntimeDetail();
46 | BeanUtils.copyProperties(runtimeDetailVO, runtimeDetail);
47 | runtimeDetail.setId(clientId);
48 | runtimeDetail.setTimestamp(new Date(runtimeDetailVO.getTimestamp()).toInstant());
49 | WriteApiBlocking writeApi = this.client.getWriteApiBlocking();
50 | writeApi.writeMeasurement(BUCKET, ORG, WritePrecision.NS, runtimeDetail);
51 | }
52 |
53 | // 查询一个小时内的历史数据
54 | public RuntimeHistoryVO readRuntimeData(int clientId) {
55 | RuntimeHistoryVO runtimeHistoryVO = new RuntimeHistoryVO();
56 | String query = """
57 | from(bucket: "%s")
58 | |> range(start: %s)
59 | |> filter(fn: (r) => r["_measurement"] == "runtime_detail")
60 | |> filter(fn: (r) => r["id"] == "%s")
61 | """;
62 | String formatedQuery = String.format(query, BUCKET, "-1h", clientId);
63 | List
58 |
59 |
62 |
71 |
73 |
74 |
76 | 立即连接
77 |
78 |
79 | 服务端连接信息
60 |
63 |
64 |
66 |
67 |
69 |
70 |
80 |
83 |
84 |
73 |
94 |
96 |
97 |
98 |
99 |
--------------------------------------------------------------------------------
/lite-monitor-client/pom.xml:
--------------------------------------------------------------------------------
1 |
2 |
74 |
79 |
75 |
78 | 报告主机列表
76 | 在这里查看主机健康报告,具备智能监控预警和人工智能风险预测功能
77 |
81 |
82 |
83 |
84 | {{node.desc}}
85 |
86 |
87 |
88 |
89 |
92 |
7 |
18 |
22 |
23 |
26 |
27 |
28 |
29 |
30 |
10 |
17 |
11 | 管理员
12 | 子账户
13 | {{store.user.username}}
14 |
15 | {{store.user.email}}
16 |
13 |
72 |
73 |
74 |
--------------------------------------------------------------------------------
/lite-monitor-web/src/component/PreviewCard.vue:
--------------------------------------------------------------------------------
1 |
10 |
11 |
12 |
14 |
39 |
15 |
24 |
16 |
17 | {{data.clientName }}
18 |
19 |
20 |
21 | 操作系统:{{`${data.osName} ${data.osVersion}`}}
22 |
23 |
25 |
34 |
26 |
27 | 存在风险
28 |
29 |
30 |
31 | 状态健康
32 |
33 |
35 |
36 | 暂停监测
37 |
38 |
41 | 公网IP:{{ data.clientAddress }}
42 |
43 |
44 |
45 | 处理器:{{ data.cpuName }}
46 |
47 |
48 |
49 | {{data.cpuCores}} CPU
50 |
51 | {{ data.osMemory?.toFixed(1) ?? '未知'}} GB
52 |
53 |
54 |
55 | 预警提醒阈值
56 | {{ `${(data.cpuUsage * 100 * 1.20212)?.toFixed(1) ?? '未知'}`}} %
57 |
70 |
71 |
60 |
61 | 人工智能分析
62 |
63 |
64 |
65 |
66 | 分析功能受限
67 |
68 |
69 |
13 |
68 |
69 |
70 |
139 |
--------------------------------------------------------------------------------
/lite-monitor-web/src/component/ReportDetails.vue:
--------------------------------------------------------------------------------
1 |
76 |
77 |
78 |
14 |
33 |
15 |
24 |
16 |
17 | {{data.clientName }}
18 |
19 |
20 |
21 | 操作系统:{{`${data.osName} ${data.osVersion}`}}
22 |
23 |
25 |
26 | 运行中
27 |
28 |
29 |
30 | 离线
31 |
32 |
35 | 公网IP:{{ data.clientAddress }}
36 |
37 |
38 |
39 | 处理器:{{ data.cpuName }}
40 |
41 |
42 |
43 | {{data.cpuCores}} CPU
44 |
45 | {{ data.osMemory?.toFixed(1) ?? '未知'}} GB
46 |
47 |
48 | CPU: {{ `${(data.cpuUsage * 100)?.toFixed(1) ?? '未知'}`}} %
49 |
51 |
52 | 内存: {{ `${(data.memoryUsage)?.toFixed(1) ?? '未知'}`}} GB({{`${(data.memoryUsage / data.osMemory * 100)?.toFixed(1) ?? '未知'}`}}%)
53 |
55 |
56 |
67 |
57 | 网络流量
58 |
59 |
60 |
61 | {{ `${fitByUnit(data.networkUpload, 'KB')}/s` }}
62 |
66 |
80 |
108 |
109 |
81 |
92 |
82 |
83 | 历史监控信息
84 |
85 |
88 |
90 |
93 |
107 |
94 |
95 | AI 恶意攻击预测
96 |
97 |
100 |
105 |
101 |
104 |
78 |
104 |
106 |
108 |
110 |
113 |
114 |
123 |
124 |
125 |
126 |
157 |
--------------------------------------------------------------------------------
/README.md:
--------------------------------------------------------------------------------
1 |
79 |
88 |
80 |
83 | 管理主机列表
81 | 在这里管理所有已经注册的主机实例,实时监控主机状态,快速管理
82 |
84 | 添加新主机
86 |
87 |
90 |
91 |
92 |
93 | {{node.desc}}
94 |
95 |
96 |
97 |
98 |
101 |
115 |
120 |
121 | SSH远程连接
116 |
117 | 远程连接的建立将由服务端完成,因此在内网环境下也可以正常使用。
118 |
119 |
2 |
3 |  4 |
4 |
6 |
7 |
9 |
10 |
11 |
![]() 12 |
12 | ![]() 13 |
13 |
14 |
![]() 15 |
15 |
16 |
![]() 17 |
17 |
22 | 简体中文 23 | | 24 | English 25 |
26 | 27 | ## 关于 Lite-monitor 28 | 29 | **** 30 | 31 | 这是一个快速、准确、轻量化的服务器监控系统,拥有秒级的监控粒度,支持历史数据查看便于拥有多平台服务器的用户集中管理: 32 | 33 |  34 | 35 | 支持一键 SSH 到目标主机,便于快速操作: 36 | 37 | 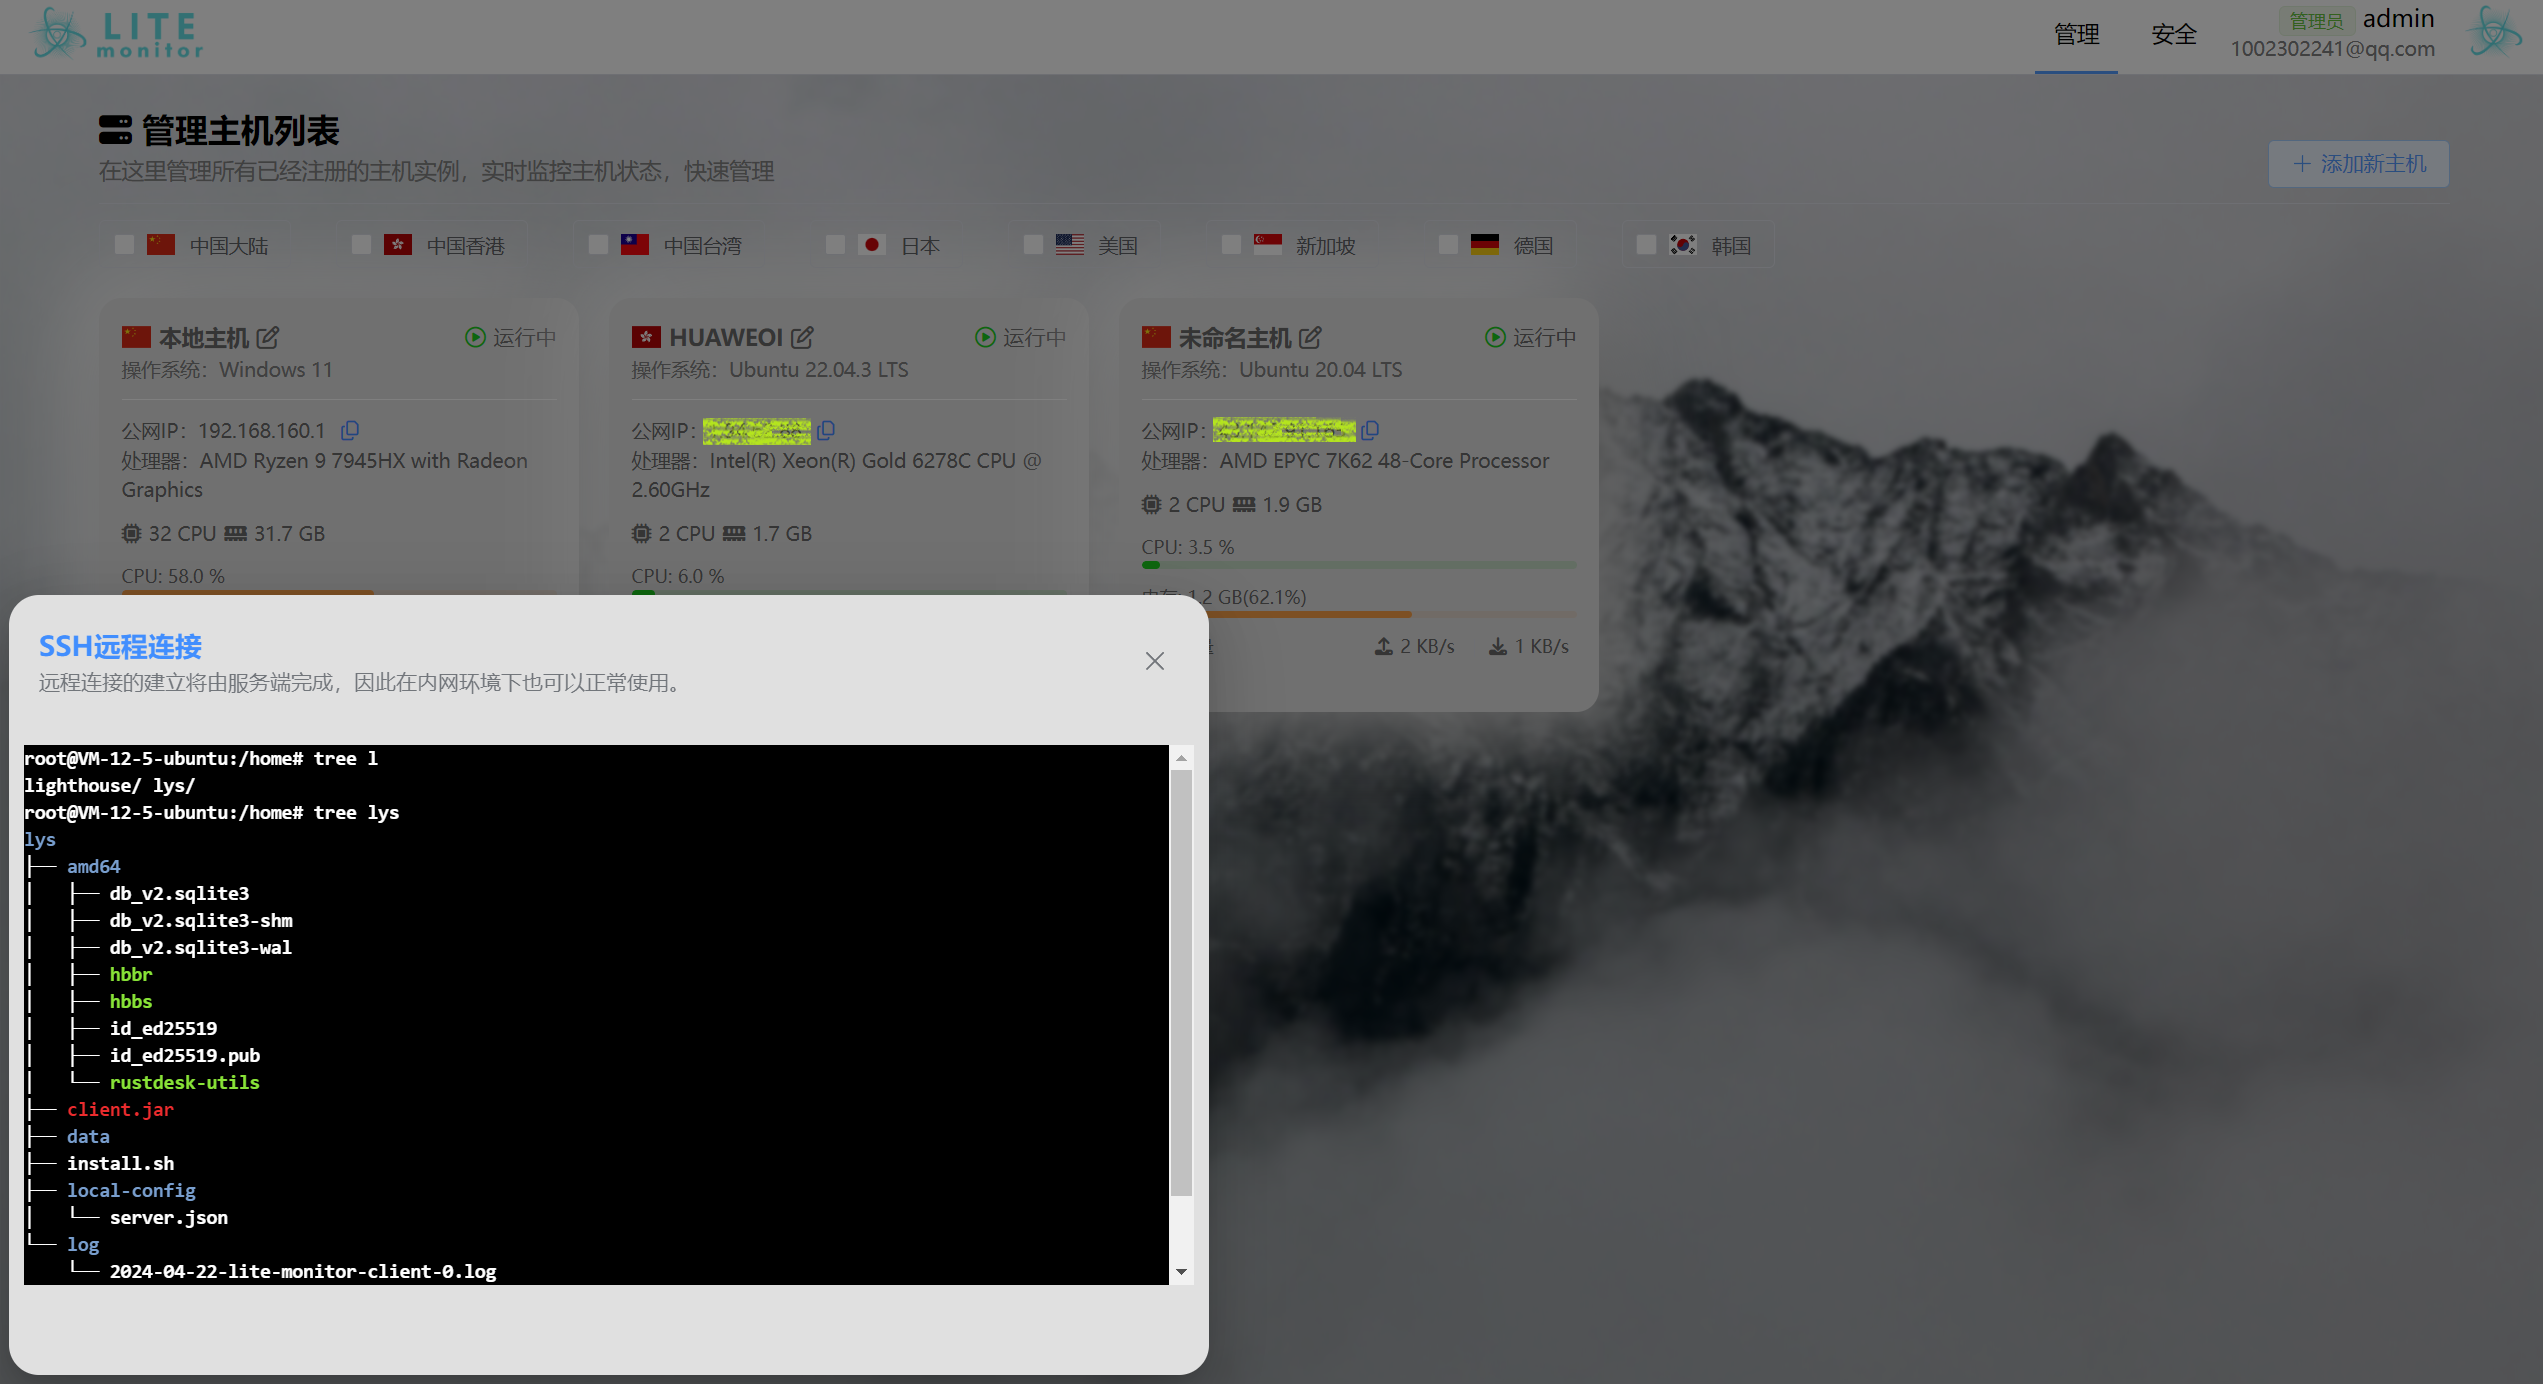 38 | 39 | 支持多用户管理不同主机: 40 | 41 |  42 | 43 | **** 44 | 45 | ## 服务端部署 46 | 47 | **** 48 | 49 | ### 环境依赖 50 | 51 | **** 52 | 53 | - JDK17 54 | - SpringBoot3 55 | - Vue3 56 | - MySQL 5.7+ 57 | - Redis 58 | - InfluxDB 59 | - RabbitMQ 60 | 61 | **** 62 | 63 | ### 手动部署 64 | 65 | **** 66 | 67 | 部署 Redis: 68 | 69 | - 设置端口 `6379` 70 | - 使用 `0` 号数据库 71 | 72 | 部署 MySQL: 73 | 74 | - 设置用户 `root`,密码 `monitormysqlroot` 75 | - 创建数据库 `lite-monitor-db`,字符集设置为 `utf8mb4` 76 | - 执行导入 SQL 脚本,文件为 [`lite-monitor-db.sql`](https://github.com/Doge2077/lite-monitor/blob/main/lite-monitor-db.sql) 77 | 78 | 部署 InfluxDB: 79 | 80 | - 访问主机的 `8086` 端口进入 InfluxDB 的控制台 81 | - 设置用户为 `admin`,密码 `monitorinfluxdbadmin` 82 | - 创建新的 Bucket,名称为:`lite-monitor`,推荐设置过期时间为 7 天 83 | 84 | 部署 RabbitMQ: 85 | 86 | - 添加用户 `admin`,密码 `monitorrabbitmqadmin`,虚拟主机 `/` 87 | - 在 vhost / 下创建队列:mail 和 report 88 | - `rabbitmqadmin declare queue name=mail auto_delete=false durable=true --vhost /` 89 | - `rabbitmqadmin declare queue name=report auto_delete=false durable=true --vhost /` 90 | 91 | 92 | 部署 Redis: 93 | 94 | - 无需设置密码验证 95 | 96 | 部署后端: 97 | 98 | - 拉取本项目仓库到本地,对 `lite-monitor-server` 执行 `maven` 构建 99 | - 如果数据库等配置不与本例相同,请注意修改 `application-prod.yml` 中的配置 100 | - 使用 `maven` 打包,注意勾选 `prod` 环境配置并跳过测试 101 | - 将打包好的后端 `jar` 上传到管理监控的主机执行,主机需要 `Java17` 运行环境,默认监听 `8010` 端口 102 | 103 | 部署前端: 104 | 105 | - 配置 [`main.js`](https://github.com/Doge2077/lite-monitor/blob/main/lite-monitor-web/src/main.js) 的 `axios.defaults.baseURL` 中的主机 `ip` 106 | - 配置 [`Terminal.vue`](https://github.com/Doge2077/lite-monitor/blob/main/lite-monitor-web/src/component/Terminal.vue) 的 `ws` 地址为主机 `ip` 107 | - 本地执行 `npm` 构建,将打包后的前端文件上传到主机 108 | 109 | 部署 Nginx: 110 | 111 | - 根据实际需要进行配置 112 | 113 | 默认登录用户为 `admin`,密码默认为 `123456`,可在【安全】管理界面修改邮箱和密码 114 | 115 | **** 116 | 117 | ### Docker 部署 118 | 119 | **** 120 | 121 | 拉取本项目仓库到本地 122 | 123 | 修改前端路由: 124 | 125 | - 配置 [`main.js`](https://github.com/Doge2077/lite-monitor/blob/main/lite-monitor-web/src/main.js) 的 `axios.defaults.baseURL` 中的主机 `ip` 126 | - 配置 [`Terminal.vue`](https://github.com/Doge2077/lite-monitor/blob/main/lite-monitor-web/src/component/Terminal.vue) 的 `ws` 地址为主机 `ip` 127 | 128 | 执行 [`docker-compose.yml`](https://github.com/Doge2077/lite-monitor/blob/main/docker-compose.yml) 到目标服务器 129 | 130 | 初始化 MySQL: 131 | 132 | - 执行导入 SQL 脚本,文件为 [`lite-monitor-db.sql`](https://github.com/Doge2077/lite-monitor/blob/main/lite-monitor-db.sql) 133 | 134 | 初始化 InfluxDB: 135 | 136 | - 访问主机的 `8086` 端口进入 InfluxDB 的控制台 137 | - 设置用户为 `admin`,密码 `monitorinfluxdbadmin` 138 | - 创建新的 Bucket,名称为:`lite-monitor`,推荐设置过期时间为 7 天 139 | 140 | 默认登录用户为 `admin`,密码默认为 `123456`,可在【安全】管理界面修改邮箱和密码 141 | 142 | **** 143 | 144 | ## 客户端部署 145 | 146 | **** 147 | 148 | ### 环境依赖 149 | 150 | **** 151 | 152 | - JDK17 153 | - SpringBoot3 154 | 155 | **** 156 | 157 | ### 手动部署 158 | 159 | **** 160 | 161 | - 拉取本项目仓库到本地,对 `lite-monitor-client` 执行 `maven` 构建 162 | - 使用 `maven` 打包,注意勾选 `prod` 环境配置并跳过测试 163 | - 将打包好的后端 `jar` 上传到需要被监控的主机执行,主机需要 `Java17` 运行环境 164 | - 首次运行会在当前目录创建 `config-local` 目录,并要求注册到服务端,输入服务端主机 `ip:port` 和服务端生成的 `token` 即可 165 | - 支持将客户端以 `systemd` 方式注册为服务,具体配置可参考其他资料 166 | 167 | **** 168 | -------------------------------------------------------------------------------- /lite-monitor-web/src/component/CreateSubAccount.vue: -------------------------------------------------------------------------------- 1 | 75 | 76 | 77 |
78 |
131 |
132 |
133 |
155 |
--------------------------------------------------------------------------------
/lite-monitor-db.sql:
--------------------------------------------------------------------------------
1 | -- MySQL dump 10.13 Distrib 8.0.19, for Win64 (x86_64)
2 | --
3 | -- Host: 127.0.0.1 Database: lite-monitor-db
4 | -- ------------------------------------------------------
5 | -- Server version 5.7.44
6 |
7 | /*!40101 SET @OLD_CHARACTER_SET_CLIENT = @@CHARACTER_SET_CLIENT */;
8 | /*!40101 SET @OLD_CHARACTER_SET_RESULTS = @@CHARACTER_SET_RESULTS */;
9 | /*!40101 SET @OLD_COLLATION_CONNECTION = @@COLLATION_CONNECTION */;
10 | /*!50503 SET NAMES utf8mb4 */;
11 | /*!40103 SET @OLD_TIME_ZONE = @@TIME_ZONE */;
12 | /*!40103 SET TIME_ZONE = '+00:00' */;
13 | /*!40014 SET @OLD_UNIQUE_CHECKS = @@UNIQUE_CHECKS, UNIQUE_CHECKS = 0 */;
14 | /*!40014 SET @OLD_FOREIGN_KEY_CHECKS = @@FOREIGN_KEY_CHECKS, FOREIGN_KEY_CHECKS = 0 */;
15 | /*!40101 SET @OLD_SQL_MODE = @@SQL_MODE, SQL_MODE = 'NO_AUTO_VALUE_ON_ZERO' */;
16 | /*!40111 SET @OLD_SQL_NOTES = @@SQL_NOTES, SQL_NOTES = 0 */;
17 |
18 | --
19 | -- Table structure for table `db_account`
20 | --
21 |
22 | DROP TABLE IF EXISTS `db_account`;
23 | /*!40101 SET @saved_cs_client = @@character_set_client */;
24 | /*!50503 SET character_set_client = utf8mb4 */;
25 | CREATE TABLE `db_account`
26 | (
27 | `id` int(11) NOT NULL AUTO_INCREMENT,
28 | `username` varchar(255) DEFAULT NULL,
29 | `email` varchar(255) DEFAULT NULL,
30 | `password` varchar(255) DEFAULT NULL,
31 | `role` varchar(255) DEFAULT NULL,
32 | `register_time` datetime DEFAULT NULL,
33 | `clients` json DEFAULT NULL,
34 | PRIMARY KEY (`id`),
35 | UNIQUE KEY `unique_email` (`email`),
36 | UNIQUE KEY `unique_username` (`username`)
37 | ) ENGINE = InnoDB
38 | AUTO_INCREMENT = 7
39 | DEFAULT CHARSET = utf8mb4;
40 | /*!40101 SET character_set_client = @saved_cs_client */;
41 |
42 | --
43 | -- Dumping data for table `db_account`
44 | --
45 |
46 | LOCK TABLES `db_account` WRITE;
47 | /*!40000 ALTER TABLE `db_account`
48 | DISABLE KEYS */;
49 | INSERT INTO `db_account`
50 | VALUES (1, 'admin', '1002302241@qq.com', '$2a$10$2WIHD6ZkM5AkV7iNZ0Uh4uiNgNrXMgXXq6zq8aUJRW34e5nWDcDf.', 'admin',
51 | '2024-04-04 14:45:54', NULL),
52 | (6, 'liyusen', '123456@qq.com', '$2a$10$Ry0MiC3Kvo5ebXCEi2/jjusX7CuB8shlhNicjY.PdXWNtKC8hz5oa', 'user',
53 | '2024-04-18 09:16:54', '[
54 | 35388460,
55 | 16090204
56 | ]');
57 | /*!40000 ALTER TABLE `db_account`
58 | ENABLE KEYS */;
59 | UNLOCK TABLES;
60 |
61 | --
62 | -- Table structure for table `db_client`
63 | --
64 |
65 | DROP TABLE IF EXISTS `db_client`;
66 | /*!40101 SET @saved_cs_client = @@character_set_client */;
67 | /*!50503 SET character_set_client = utf8mb4 */;
68 | CREATE TABLE `db_client`
69 | (
70 | `client_id` int(11) NOT NULL,
71 | `client_name` varchar(255) DEFAULT NULL,
72 | `client_token` varchar(255) DEFAULT NULL,
73 | `register_time` datetime DEFAULT NULL,
74 | `node` varchar(255) DEFAULT NULL,
75 | `location` varchar(255) DEFAULT NULL,
76 | PRIMARY KEY (`client_id`)
77 | ) ENGINE = InnoDB
78 | DEFAULT CHARSET = utf8mb4;
79 | /*!40101 SET character_set_client = @saved_cs_client */;
80 |
81 | --
82 | -- Dumping data for table `db_client`
83 | --
84 |
85 | LOCK TABLES `db_client` WRITE;
86 | /*!40000 ALTER TABLE `db_client`
87 | DISABLE KEYS */;
88 | /*!40000 ALTER TABLE `db_client`
89 | ENABLE KEYS */;
90 | UNLOCK TABLES;
91 |
92 | --
93 | -- Table structure for table `db_client_detail`
94 | --
95 |
96 | DROP TABLE IF EXISTS `db_client_detail`;
97 | /*!40101 SET @saved_cs_client = @@character_set_client */;
98 | /*!50503 SET character_set_client = utf8mb4 */;
99 | CREATE TABLE `db_client_detail`
100 | (
101 | `client_id` int(11) NOT NULL,
102 | `os_arch` varchar(255) NOT NULL,
103 | `client_address` varchar(255) NOT NULL,
104 | `os_name` varchar(255) NOT NULL,
105 | `os_version` varchar(255) NOT NULL,
106 | `os_bit` int(11) NOT NULL,
107 | `cpu_name` varchar(255) NOT NULL,
108 | `cpu_cores` int(11) NOT NULL,
109 | `os_memory` double NOT NULL,
110 | `disk_memory` varchar(255) NOT NULL,
111 | `report_memory` double DEFAULT 0.8 NOT NULL,
112 | `report_cpu_usage` double DEFAULT 0.8 NOT NULL
113 | PRIMARY KEY (`client_id`)
114 | ) ENGINE = InnoDB
115 | DEFAULT CHARSET = utf8mb4;
116 | /*!40101 SET character_set_client = @saved_cs_client */;
117 |
118 | --
119 | -- Dumping data for table `db_client_detail`
120 | --
121 |
122 | LOCK TABLES `db_client_detail` WRITE;
123 | /*!40000 ALTER TABLE `db_client_detail`
124 | DISABLE KEYS */;
125 | /*!40000 ALTER TABLE `db_client_detail`
126 | ENABLE KEYS */;
127 | UNLOCK TABLES;
128 |
129 | --
130 | -- Table structure for table `db_client_ssh`
131 | --
132 |
133 | DROP TABLE IF EXISTS `db_client_ssh`;
134 | /*!40101 SET @saved_cs_client = @@character_set_client */;
135 | /*!50503 SET character_set_client = utf8mb4 */;
136 | CREATE TABLE `db_client_ssh`
137 | (
138 | `client_id` int(11) NOT NULL,
139 | `port` int(11) NOT NULL,
140 | `username` varchar(100) NOT NULL,
141 | `password` varchar(100) NOT NULL,
142 | PRIMARY KEY (`client_id`)
143 | ) ENGINE = InnoDB
144 | DEFAULT CHARSET = utf8mb4;
145 | /*!40101 SET character_set_client = @saved_cs_client */;
146 |
147 | --
148 | -- Dumping data for table `db_client_ssh`
149 | --
150 |
151 | LOCK TABLES `db_client_ssh` WRITE;
152 | /*!40000 ALTER TABLE `db_client_ssh`
153 | DISABLE KEYS */;
154 | /*!40000 ALTER TABLE `db_client_ssh`
155 | ENABLE KEYS */;
156 | UNLOCK TABLES;
157 |
158 | --
159 | -- Dumping routines for database 'lite-monitor-db'
160 | --
161 | /*!40103 SET TIME_ZONE = @OLD_TIME_ZONE */;
162 |
163 | /*!40101 SET SQL_MODE = @OLD_SQL_MODE */;
164 | /*!40014 SET FOREIGN_KEY_CHECKS = @OLD_FOREIGN_KEY_CHECKS */;
165 | /*!40014 SET UNIQUE_CHECKS = @OLD_UNIQUE_CHECKS */;
166 | /*!40101 SET CHARACTER_SET_CLIENT = @OLD_CHARACTER_SET_CLIENT */;
167 | /*!40101 SET CHARACTER_SET_RESULTS = @OLD_CHARACTER_SET_RESULTS */;
168 | /*!40101 SET COLLATION_CONNECTION = @OLD_COLLATION_CONNECTION */;
169 | /*!40111 SET SQL_NOTES = @OLD_SQL_NOTES */;
170 |
--------------------------------------------------------------------------------
/lite-monitor-server/src/main/java/com/example/websocket/TerminalWebSocket.java:
--------------------------------------------------------------------------------
1 | package com.example.websocket;
2 |
3 | import com.example.entity.dto.ClientDetail;
4 | import com.example.entity.dto.ClientSsh;
5 | import com.example.mapper.ClientDetailMapper;
6 | import com.example.mapper.ClientSshMapper;
7 | import com.jcraft.jsch.ChannelShell;
8 | import com.jcraft.jsch.JSch;
9 | import com.jcraft.jsch.JSchException;
10 | import jakarta.annotation.Resource;
11 | import jakarta.websocket.*;
12 | import jakarta.websocket.server.PathParam;
13 | import jakarta.websocket.server.ServerEndpoint;
14 | import lombok.extern.slf4j.Slf4j;
15 | import org.springframework.stereotype.Component;
16 |
17 | import java.io.IOException;
18 | import java.io.InputStream;
19 | import java.io.OutputStream;
20 | import java.nio.charset.StandardCharsets;
21 | import java.util.Arrays;
22 | import java.util.Map;
23 | import java.util.concurrent.ConcurrentHashMap;
24 | import java.util.concurrent.ExecutorService;
25 | import java.util.concurrent.Executors;
26 |
27 | @Slf4j
28 | @Component
29 | @ServerEndpoint("/terminal/{clientId}")
30 | public class TerminalWebSocket {
31 |
32 | private static ClientDetailMapper clientDetailMapper;
33 |
34 | @Resource
35 | public void setDetailMapper(ClientDetailMapper detailMapper) {
36 | TerminalWebSocket.clientDetailMapper = detailMapper;
37 | }
38 |
39 | private static ClientSshMapper clientSshMapper;
40 |
41 | @Resource
42 | public void setSshMapper(ClientSshMapper sshMapper) {
43 | TerminalWebSocket.clientSshMapper = sshMapper;
44 | }
45 |
46 | private static final Map
79 |
106 |
125 |
130 |
80 |
86 |
81 | 添加新的子账户
82 |
83 | 子账户同样用于管理服务器,但是可以自由分配指定的服务器,子账户只能访问被分配到的服务器。
84 |
87 |
89 |
90 |
93 |
94 |
97 |
98 |
101 |
102 |
105 | 请在下方选择允许子账户访问的服务器列表。
104 |
107 |
124 |
109 |
123 |
110 |
111 | {{ item.clientName }}
112 |
113 |
114 | 操作系统:
115 |
117 | {{`${item.osName} ${item.osVersion}`}}
118 |
119 |
120 | 公网IP: {{item.clientAddress}}
121 |
122 |
126 | 确认创建
128 |
129 |
4 |
5 |  6 |
6 |
8 |
9 |
11 |
12 |
13 |
![]() 14 |
14 | ![]() 15 |
15 |
16 |
![]() 17 |
17 |
18 |
![]() 19 |
19 |
24 | 简体中文 25 | | 26 | English 27 |
28 | 29 | ## About Lite-monitor 30 | 31 | **** 32 | 33 | This is a fast, accurate, lightweight server monitoring system with second-level monitoring granularity, supporting historical data view for multi-platform server users: 34 | 35 |  36 | 37 | Supports one-click SSH to the target host, which is convenient for quick operations: 38 | 39 |  40 | 41 | Supports multi-user management of different hosts: 42 | 43 |  44 | 45 | **** 46 | 47 | ## Server Deployment 48 | 49 | **** 50 | 51 | ### Environment Dependencies 52 | 53 | **** 54 | 55 | - JDK17 56 | - SpringBoot3 57 | - Vue3 58 | - MySQL 5.7+ 59 | - Redis 60 | - InfluxDB 61 | - RabbitMQ 62 | 63 | **** 64 | 65 | ### Manual Deployment 66 | 67 | **** 68 | 69 | Redis Deployment: 70 | 71 | - Set port `6379` 72 | - Use the `0` database 73 | 74 | MySQL Deployment: 75 | 76 | - Set user `root`, password `monitormysqlroot` 77 | - Create database `lite-monitor-db` with character set `utf8mb4` 78 | - Run the import SQL script, the file is [`lite-monitor-db.sql`](https://github.com/Doge2077/lite-monitor/blob/main/lite-monitor-db.sql) 79 | 80 | InfluxDB Deployment: 81 | 82 | - Access the host's console on port `8086` 83 | - Set the user to `admin` with the password `monitorinfluxdbadmin` 84 | - Create a new Bucket with the name: `lite-monitor`, we recommend setting an expiration time of 7 days 85 | 86 | RabbitMQ Deployment: 87 | 88 | - Add user `admin`, password `monitorrabbitmqadmin`, virtual host `/` 89 | - `rabbitmqadmin declare queue name=mail auto_delete=false durable=false --vhost` 90 | - `rabbitmqadmin declare queue name=report auto_delete=false durable=false --vhost` 91 | 92 | Redis Deployment: 93 | 94 | - No password validation required 95 | 96 | Backend Deployment: 97 | 98 | - Pull this project repository locally, run `maven` build for `lite-monitor-server` 99 | - If database configurations differ from this example, please modify the configurations in `application-prod.yml` 100 | - Package with `maven`, ensure `prod` environment config is selected and tests are skipped 101 | - Upload the packaged backend `jar` to the monitoring host for running. The host requires `Java17` runtime environment and listens on port `8010` by default 102 | 103 | Frontend Deployment: 104 | 105 | - Configure the host `ip` in [`main.js`](https://github.com/Doge2077/lite-monitor/blob/main/lite-monitor-web/src/main.js) under `axios.defaults.baseURL` 106 | - Configure the `ws` address in [`Terminal.vue`](https://github.com/Doge2077/lite-monitor/blob/main/lite-monitor-web/src/component/Terminal.vue) to the host `ip` 107 | - Run `npm` build locally and upload the built frontend files to the host 108 | 109 | Nginx Deployment: 110 | 111 | - Configure based on actual needs 112 | 113 | The default login user is `admin` with the default password `123456`, you can modify the email and password in the [Security] management page 114 | 115 | **** 116 | 117 | ### Docker Deployment 118 | 119 | **** 120 | 121 | Pull this project repository locally 122 | 123 | Modify frontend routing: 124 | 125 | - Configure the host `ip` in [`main.js`](https://github.com/Doge2077/lite-monitor/blob/main/lite-monitor-web/src/main.js) under `axios.defaults.baseURL` 126 | - Configure the `ws` address in [`Terminal.vue`](https://github.com/Doge2077/lite-monitor/blob/main/lite-monitor-web/src/component/Terminal.vue) to the host `ip` 127 | 128 | Run [`docker-compose.yml`](https://github.com/Doge2077/lite-monitor/blob/main/docker-compose.yml) on the target server 129 | 130 | MySQL Initialization: 131 | 132 | - Run the import SQL script, the file is [`lite-monitor-db.sql`](https://github.com/Doge2077/lite-monitor/blob/main/lite-monitor-db.sql) 133 | 134 | InfluxDB Initialization: 135 | 136 | - Access the host console on port `8086` 137 | - Set user to `admin`, password `monitorinfluxdbadmin` 138 | - Create a new Bucket named `lite-monitor`, we recommend a 7-day expiration time 139 | 140 | The default login user is `admin` with the default password `123456`, you can modify the email and password on the [Security] management page 141 | 142 | **** 143 | 144 | ## Client Deployment 145 | 146 | **** 147 | 148 | ### Environment Dependencies 149 | 150 | **** 151 | 152 | - JDK17 153 | - SpringBoot3 154 | 155 | **** 156 | 157 | ### Manual Deployment 158 | 159 | **** 160 | 161 | - Pull the repository locally, run `maven` build for `lite-monitor-client` 162 | - Package with `maven`, ensure `prod` environment config is selected and tests are skipped 163 | - Upload the packaged backend `jar` to the host that needs monitoring. The host needs the `Java17` runtime environment 164 | - The first run will create a `config-local` directory in the current directory, requiring registration with the server. Enter server host `ip:port` and the `token` generated by the server 165 | - Support for registering the client as a `systemd` service, specific configurations can refer to other documentation -------------------------------------------------------------------------------- /lite-monitor-server/pom.xml: -------------------------------------------------------------------------------- 1 | 2 |