


32 | phduino
33 | 34 |Automatically exported from code.google.com/p/phduino
35 | 36 |37 | About
38 | 39 |This project describes an open software open hardware pH meter using an Arduino/Freeduino board. In other words, this is an electronic circuit to be connected with a glass electrode pH sensor.
40 | 41 |It was possible by the idea from my friend Mr. Denis Vidal, the space that my supervisor gave me, prof. Dr. Emanuel Carrilho, BioMicS Group, Instituto de Química de São Carlos, Universidade de São Paulo, Brazil, and by facilities and suggestions from prof. Dr. Claudimir Lucio do Lago, LAIA Laboratory, Instituto de Química da Universidade de São Paulo, Brazil. Thanks Fapesp - Fundação de Amparo à Pesquisa do Estado de São Paulo by the financial support for my different projects during my academic life.
42 | 43 | 44 | 45 |46 | Importance and Applications
47 | 48 |pH is a very important property in aqueous solutions. The pH is defined the colog (-log) of the hydrogen ion (H^+^) activity in the medium (or concentration when the H^+^ is low quantity). This property indicates if the medium is acid, neutral, or basic.
49 | 50 |For example, it is necessary control the pH of an aquarium. Some species of fish can not live out of a range of pH. So, we need read it and make the write correction of the pH. Other areas or applications where is important to know the pH are hydroponic, fermentation processes like beer and wine production, environmental monitoring of soils, water of rivers, lakes, and rain, sewage treatment tanks, monitoring of solution and buffers in laboratories of chemistry, and etc.
51 | 52 |53 | Overview
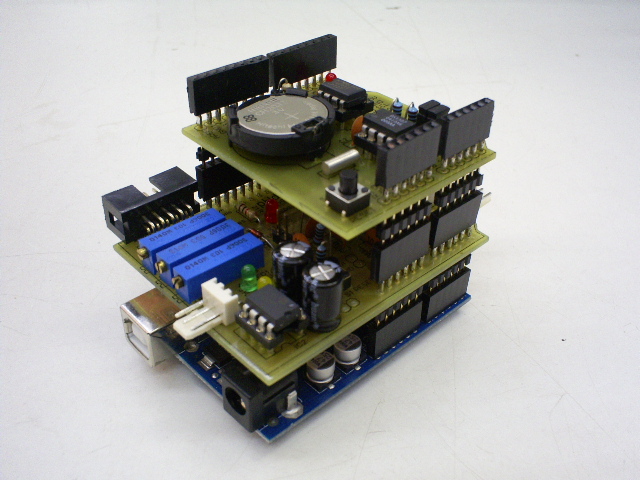
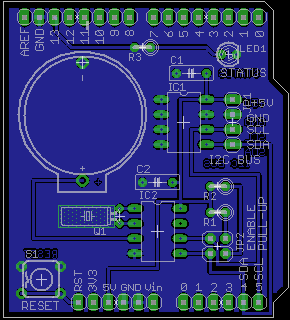
54 | 55 |The pHduino can operate using a LCD to display the pH and the temperature data like a pH meter. Also, you can control it using a computer by USB port.
56 | 57 |The signal gain (slope) and the signal offset are adjusted manually by trimpots. The signal is compensated by a temperature sensor.
58 | 59 |It seems inferior and a little bit more expensive compared with a pH meter bench instrument. However, it is interfaceable, programmable, expansible, and, the more important, open and free!
60 | 61 |Again, it is not intent to be a high resolution analytical instrument to compete with a commercial pH meter. It is to be simple, easy to understand, easy to modify, and different!
62 | 63 |64 | News
65 | 66 |-
67 |
2015-04-29 Released hardware v0.3: update of parts and Eagle 7.
68 | 2015-04-03 Exported to the Github.
69 | 2012-07-13 Released Python Jabberbot script v0.1.
70 | 2012-03-12 Arduino 1.0 compatible.
71 | 2011-01-01 pHduino Datalogger hardware v0.1 and firmware v0.4.1-0.3 released.
72 | 2010-09-07 Released new hardware v0.2_0.3 and gerber files package v0.1.
73 | 2010-04-25 Released pYpHpoT v0.1.
74 | 2010-04-21 Released firmware v0.4.1.
75 | 2009-09-20 Released firmware v0.4.
76 | 2009-09-13 Released firmware v0.3.
77 | 2009-08-31 Released hardware v0.2 and firmware v0.2.
78 | 2009-08-12 First public release of the electronic circuit.
79 | 2009-08-04 Project opened.
80 |
83 | License
84 | 85 |The layout PCB is under Creative Commons 3.0 and the source code under GPLv2.
86 | 87 |88 | Photos
89 | 90 | 91 | 92 | 93 | 94 |95 | References
96 | 97 |The Simplest Possible pH Meter
98 | 99 |http://www.66pacific.com/ph/simplest_ph.aspx
100 | 101 |pH Meter - ProjectWIKI
102 | 103 |http://blea.ch/wiki/index.php/PH_Meter
104 | 105 |pH Meter - Circuit Operation
106 | 107 |http://home.zonnet.nl/rsetteur/ph_ice.org/www.ice.org/equipment/phmeter/phoper.html
108 | 109 |pH-meter.info
110 | 111 |http://www.ph-meter.info/pH-meter-construction
112 | 113 |Tiny pH-meter
114 | 115 |http://damien.douxchamps.net/elec/ph_meter/
116 | 117 |pH Amplifier for Micro
118 | 119 |http://www.electro-tech-online.com/electronic-projects/41430-ph-amplifier-micro.html
120 | 121 |pH Probe Amplifier/Temperature Compensator
122 | 123 |http://www.national.com/ds/LF/LF444.pdf LF444 Datasheet - Typical Application
124 | 125 |pH Meter
126 | 127 |http://focus.ti.com/lit/ds/symlink/opa129.pdf OPA129 Datasheet - High impedance amplifier.
128 | 129 |130 | Articles
131 | 132 | 133 | 134 |135 | 136 |
Updated: 2016-12-05
137 |