├── .github
├── CODEOWNERS
├── SECURITY.md
└── FUNDING.yml
├── banner.jpg
├── challenge-labs
├── GSP315
│ ├── images
│ │ ├── map.jpg
│ │ ├── trigger.png
│ │ ├── package-json.png
│ │ ├── code_function.png
│ │ └── labs_variable.png
│ └── index.md
├── GSP341
│ ├── images
│ │ └── year.png
│ └── index.md
├── GSP787
│ ├── images
│ │ ├── limit.png
│ │ ├── month.png
│ │ ├── deaths.png
│ │ ├── percentage.png
│ │ ├── looker_date.png
│ │ ├── date variable.png
│ │ └── start_close_date.png
│ └── index.md
├── GSP305
│ ├── images
│ │ ├── bucket.png
│ │ └── kubernetes_cluster.png
│ └── index.md
├── GSP306
│ ├── images
│ │ ├── DB_host.png
│ │ ├── DB_host2.png
│ │ ├── SSH_blog.png
│ │ ├── blog_demo.png
│ │ ├── SQL_instance.png
│ │ ├── vm_instances.png
│ │ └── IP_demo_blog_site.png
│ └── index.md
├── GSP101
│ ├── images
│ │ ├── firewall.png
│ │ ├── vm_create.png
│ │ └── lab_variable.png
│ └── index.md
├── GSP303
│ ├── images
│ │ ├── RDP_login.png
│ │ ├── IIS_install.png
│ │ ├── IIS_install2.png
│ │ ├── RDP_extension.png
│ │ ├── RDP_vm-bastionhost_creds.png
│ │ ├── RDP_vm-securehost_creds.png
│ │ ├── VM_instances_vm-bastionhost.png
│ │ └── VM_instances_vm-securehost.png
│ └── index.md
├── GSP313
│ ├── images
│ │ ├── machine-type.png
│ │ ├── labs_variable.jpg
│ │ ├── labs_variable2.png
│ │ └── zone_variable_task2.jpg
│ └── index.md
├── GSP319
│ ├── images
│ │ ├── fancy store.png
│ │ ├── export variable.png
│ │ ├── kubectl get svc.png
│ │ ├── labs variable.png
│ │ └── kubectl get services.png
│ └── index.md
├── GSP322
│ ├── images
│ │ ├── bastion_ssh.png
│ │ ├── lab_variable.png
│ │ └── vm_instances.png
│ └── index.md
├── GSP342
│ ├── images
│ │ └── lab_variable.png
│ └── index.md
├── GSP345
│ ├── images
│ │ └── Instance ID.png
│ └── index.md
├── GSP304
│ └── index.md
└── GSP301
│ └── index.md
├── README.md
└── LICENSE.md
/.github/CODEOWNERS:
--------------------------------------------------------------------------------
1 | * @hiiruki
2 |
--------------------------------------------------------------------------------
/banner.jpg:
--------------------------------------------------------------------------------
https://raw.githubusercontent.com/hiiruki/google-cloudskillsboost/HEAD/banner.jpg
--------------------------------------------------------------------------------
/challenge-labs/GSP315/images/map.jpg:
--------------------------------------------------------------------------------
https://raw.githubusercontent.com/hiiruki/google-cloudskillsboost/HEAD/challenge-labs/GSP315/images/map.jpg
--------------------------------------------------------------------------------
/challenge-labs/GSP341/images/year.png:
--------------------------------------------------------------------------------
https://raw.githubusercontent.com/hiiruki/google-cloudskillsboost/HEAD/challenge-labs/GSP341/images/year.png
--------------------------------------------------------------------------------
/challenge-labs/GSP787/images/limit.png:
--------------------------------------------------------------------------------
https://raw.githubusercontent.com/hiiruki/google-cloudskillsboost/HEAD/challenge-labs/GSP787/images/limit.png
--------------------------------------------------------------------------------
/challenge-labs/GSP787/images/month.png:
--------------------------------------------------------------------------------
https://raw.githubusercontent.com/hiiruki/google-cloudskillsboost/HEAD/challenge-labs/GSP787/images/month.png
--------------------------------------------------------------------------------
/challenge-labs/GSP305/images/bucket.png:
--------------------------------------------------------------------------------
https://raw.githubusercontent.com/hiiruki/google-cloudskillsboost/HEAD/challenge-labs/GSP305/images/bucket.png
--------------------------------------------------------------------------------
/challenge-labs/GSP306/images/DB_host.png:
--------------------------------------------------------------------------------
https://raw.githubusercontent.com/hiiruki/google-cloudskillsboost/HEAD/challenge-labs/GSP306/images/DB_host.png
--------------------------------------------------------------------------------
/challenge-labs/GSP315/images/trigger.png:
--------------------------------------------------------------------------------
https://raw.githubusercontent.com/hiiruki/google-cloudskillsboost/HEAD/challenge-labs/GSP315/images/trigger.png
--------------------------------------------------------------------------------
/challenge-labs/GSP787/images/deaths.png:
--------------------------------------------------------------------------------
https://raw.githubusercontent.com/hiiruki/google-cloudskillsboost/HEAD/challenge-labs/GSP787/images/deaths.png
--------------------------------------------------------------------------------
/challenge-labs/GSP101/images/firewall.png:
--------------------------------------------------------------------------------
https://raw.githubusercontent.com/hiiruki/google-cloudskillsboost/HEAD/challenge-labs/GSP101/images/firewall.png
--------------------------------------------------------------------------------
/challenge-labs/GSP101/images/vm_create.png:
--------------------------------------------------------------------------------
https://raw.githubusercontent.com/hiiruki/google-cloudskillsboost/HEAD/challenge-labs/GSP101/images/vm_create.png
--------------------------------------------------------------------------------
/challenge-labs/GSP303/images/RDP_login.png:
--------------------------------------------------------------------------------
https://raw.githubusercontent.com/hiiruki/google-cloudskillsboost/HEAD/challenge-labs/GSP303/images/RDP_login.png
--------------------------------------------------------------------------------
/challenge-labs/GSP306/images/DB_host2.png:
--------------------------------------------------------------------------------
https://raw.githubusercontent.com/hiiruki/google-cloudskillsboost/HEAD/challenge-labs/GSP306/images/DB_host2.png
--------------------------------------------------------------------------------
/challenge-labs/GSP306/images/SSH_blog.png:
--------------------------------------------------------------------------------
https://raw.githubusercontent.com/hiiruki/google-cloudskillsboost/HEAD/challenge-labs/GSP306/images/SSH_blog.png
--------------------------------------------------------------------------------
/challenge-labs/GSP306/images/blog_demo.png:
--------------------------------------------------------------------------------
https://raw.githubusercontent.com/hiiruki/google-cloudskillsboost/HEAD/challenge-labs/GSP306/images/blog_demo.png
--------------------------------------------------------------------------------
/challenge-labs/GSP787/images/percentage.png:
--------------------------------------------------------------------------------
https://raw.githubusercontent.com/hiiruki/google-cloudskillsboost/HEAD/challenge-labs/GSP787/images/percentage.png
--------------------------------------------------------------------------------
/challenge-labs/GSP101/images/lab_variable.png:
--------------------------------------------------------------------------------
https://raw.githubusercontent.com/hiiruki/google-cloudskillsboost/HEAD/challenge-labs/GSP101/images/lab_variable.png
--------------------------------------------------------------------------------
/challenge-labs/GSP303/images/IIS_install.png:
--------------------------------------------------------------------------------
https://raw.githubusercontent.com/hiiruki/google-cloudskillsboost/HEAD/challenge-labs/GSP303/images/IIS_install.png
--------------------------------------------------------------------------------
/challenge-labs/GSP303/images/IIS_install2.png:
--------------------------------------------------------------------------------
https://raw.githubusercontent.com/hiiruki/google-cloudskillsboost/HEAD/challenge-labs/GSP303/images/IIS_install2.png
--------------------------------------------------------------------------------
/challenge-labs/GSP306/images/SQL_instance.png:
--------------------------------------------------------------------------------
https://raw.githubusercontent.com/hiiruki/google-cloudskillsboost/HEAD/challenge-labs/GSP306/images/SQL_instance.png
--------------------------------------------------------------------------------
/challenge-labs/GSP306/images/vm_instances.png:
--------------------------------------------------------------------------------
https://raw.githubusercontent.com/hiiruki/google-cloudskillsboost/HEAD/challenge-labs/GSP306/images/vm_instances.png
--------------------------------------------------------------------------------
/challenge-labs/GSP313/images/machine-type.png:
--------------------------------------------------------------------------------
https://raw.githubusercontent.com/hiiruki/google-cloudskillsboost/HEAD/challenge-labs/GSP313/images/machine-type.png
--------------------------------------------------------------------------------
/challenge-labs/GSP315/images/package-json.png:
--------------------------------------------------------------------------------
https://raw.githubusercontent.com/hiiruki/google-cloudskillsboost/HEAD/challenge-labs/GSP315/images/package-json.png
--------------------------------------------------------------------------------
/challenge-labs/GSP319/images/fancy store.png:
--------------------------------------------------------------------------------
https://raw.githubusercontent.com/hiiruki/google-cloudskillsboost/HEAD/challenge-labs/GSP319/images/fancy store.png
--------------------------------------------------------------------------------
/challenge-labs/GSP322/images/bastion_ssh.png:
--------------------------------------------------------------------------------
https://raw.githubusercontent.com/hiiruki/google-cloudskillsboost/HEAD/challenge-labs/GSP322/images/bastion_ssh.png
--------------------------------------------------------------------------------
/challenge-labs/GSP322/images/lab_variable.png:
--------------------------------------------------------------------------------
https://raw.githubusercontent.com/hiiruki/google-cloudskillsboost/HEAD/challenge-labs/GSP322/images/lab_variable.png
--------------------------------------------------------------------------------
/challenge-labs/GSP322/images/vm_instances.png:
--------------------------------------------------------------------------------
https://raw.githubusercontent.com/hiiruki/google-cloudskillsboost/HEAD/challenge-labs/GSP322/images/vm_instances.png
--------------------------------------------------------------------------------
/challenge-labs/GSP342/images/lab_variable.png:
--------------------------------------------------------------------------------
https://raw.githubusercontent.com/hiiruki/google-cloudskillsboost/HEAD/challenge-labs/GSP342/images/lab_variable.png
--------------------------------------------------------------------------------
/challenge-labs/GSP345/images/Instance ID.png:
--------------------------------------------------------------------------------
https://raw.githubusercontent.com/hiiruki/google-cloudskillsboost/HEAD/challenge-labs/GSP345/images/Instance ID.png
--------------------------------------------------------------------------------
/challenge-labs/GSP787/images/looker_date.png:
--------------------------------------------------------------------------------
https://raw.githubusercontent.com/hiiruki/google-cloudskillsboost/HEAD/challenge-labs/GSP787/images/looker_date.png
--------------------------------------------------------------------------------
/challenge-labs/GSP303/images/RDP_extension.png:
--------------------------------------------------------------------------------
https://raw.githubusercontent.com/hiiruki/google-cloudskillsboost/HEAD/challenge-labs/GSP303/images/RDP_extension.png
--------------------------------------------------------------------------------
/challenge-labs/GSP313/images/labs_variable.jpg:
--------------------------------------------------------------------------------
https://raw.githubusercontent.com/hiiruki/google-cloudskillsboost/HEAD/challenge-labs/GSP313/images/labs_variable.jpg
--------------------------------------------------------------------------------
/challenge-labs/GSP313/images/labs_variable2.png:
--------------------------------------------------------------------------------
https://raw.githubusercontent.com/hiiruki/google-cloudskillsboost/HEAD/challenge-labs/GSP313/images/labs_variable2.png
--------------------------------------------------------------------------------
/challenge-labs/GSP315/images/code_function.png:
--------------------------------------------------------------------------------
https://raw.githubusercontent.com/hiiruki/google-cloudskillsboost/HEAD/challenge-labs/GSP315/images/code_function.png
--------------------------------------------------------------------------------
/challenge-labs/GSP315/images/labs_variable.png:
--------------------------------------------------------------------------------
https://raw.githubusercontent.com/hiiruki/google-cloudskillsboost/HEAD/challenge-labs/GSP315/images/labs_variable.png
--------------------------------------------------------------------------------
/challenge-labs/GSP319/images/export variable.png:
--------------------------------------------------------------------------------
https://raw.githubusercontent.com/hiiruki/google-cloudskillsboost/HEAD/challenge-labs/GSP319/images/export variable.png
--------------------------------------------------------------------------------
/challenge-labs/GSP319/images/kubectl get svc.png:
--------------------------------------------------------------------------------
https://raw.githubusercontent.com/hiiruki/google-cloudskillsboost/HEAD/challenge-labs/GSP319/images/kubectl get svc.png
--------------------------------------------------------------------------------
/challenge-labs/GSP319/images/labs variable.png:
--------------------------------------------------------------------------------
https://raw.githubusercontent.com/hiiruki/google-cloudskillsboost/HEAD/challenge-labs/GSP319/images/labs variable.png
--------------------------------------------------------------------------------
/challenge-labs/GSP787/images/date variable.png:
--------------------------------------------------------------------------------
https://raw.githubusercontent.com/hiiruki/google-cloudskillsboost/HEAD/challenge-labs/GSP787/images/date variable.png
--------------------------------------------------------------------------------
/challenge-labs/GSP306/images/IP_demo_blog_site.png:
--------------------------------------------------------------------------------
https://raw.githubusercontent.com/hiiruki/google-cloudskillsboost/HEAD/challenge-labs/GSP306/images/IP_demo_blog_site.png
--------------------------------------------------------------------------------
/challenge-labs/GSP787/images/start_close_date.png:
--------------------------------------------------------------------------------
https://raw.githubusercontent.com/hiiruki/google-cloudskillsboost/HEAD/challenge-labs/GSP787/images/start_close_date.png
--------------------------------------------------------------------------------
/challenge-labs/GSP305/images/kubernetes_cluster.png:
--------------------------------------------------------------------------------
https://raw.githubusercontent.com/hiiruki/google-cloudskillsboost/HEAD/challenge-labs/GSP305/images/kubernetes_cluster.png
--------------------------------------------------------------------------------
/challenge-labs/GSP313/images/zone_variable_task2.jpg:
--------------------------------------------------------------------------------
https://raw.githubusercontent.com/hiiruki/google-cloudskillsboost/HEAD/challenge-labs/GSP313/images/zone_variable_task2.jpg
--------------------------------------------------------------------------------
/challenge-labs/GSP319/images/kubectl get services.png:
--------------------------------------------------------------------------------
https://raw.githubusercontent.com/hiiruki/google-cloudskillsboost/HEAD/challenge-labs/GSP319/images/kubectl get services.png
--------------------------------------------------------------------------------
/challenge-labs/GSP303/images/RDP_vm-bastionhost_creds.png:
--------------------------------------------------------------------------------
https://raw.githubusercontent.com/hiiruki/google-cloudskillsboost/HEAD/challenge-labs/GSP303/images/RDP_vm-bastionhost_creds.png
--------------------------------------------------------------------------------
/challenge-labs/GSP303/images/RDP_vm-securehost_creds.png:
--------------------------------------------------------------------------------
https://raw.githubusercontent.com/hiiruki/google-cloudskillsboost/HEAD/challenge-labs/GSP303/images/RDP_vm-securehost_creds.png
--------------------------------------------------------------------------------
/challenge-labs/GSP303/images/VM_instances_vm-bastionhost.png:
--------------------------------------------------------------------------------
https://raw.githubusercontent.com/hiiruki/google-cloudskillsboost/HEAD/challenge-labs/GSP303/images/VM_instances_vm-bastionhost.png
--------------------------------------------------------------------------------
/challenge-labs/GSP303/images/VM_instances_vm-securehost.png:
--------------------------------------------------------------------------------
https://raw.githubusercontent.com/hiiruki/google-cloudskillsboost/HEAD/challenge-labs/GSP303/images/VM_instances_vm-securehost.png
--------------------------------------------------------------------------------
/.github/SECURITY.md:
--------------------------------------------------------------------------------
1 | # SECURITY POLICY
2 |
3 | .-""-.
4 | / .--. \
5 | / / \ \
6 | | | | |
7 | | |.-""-.|
8 | ///`.::::.`\
9 | ||| ::/ \:: ;
10 | ||; ::\__/:: ;
11 | \\\ '::::' /
12 | `=':-..-'`
13 |
14 | ## Reporting Security Issues
15 |
16 | **Please do not report security vulnerabilities through public GitHub issues.**
17 |
18 | If you discover a security issue in this repository, please submit it through my [email](mailto:hi@hiiruki.dev) address.
19 |
20 | ## Preferred Languages to Report a Vulnerability
21 |
22 | I prefer all communications to be in English (EN).
23 |
--------------------------------------------------------------------------------
/.github/FUNDING.yml:
--------------------------------------------------------------------------------
1 | # These are supported funding model platforms
2 | # https://docs.github.com/en/repositories/managing-your-repositorys-settings-and-features/customizing-your-repository/displaying-a-sponsor-button-in-your-repository
3 |
4 | github: hiiruki
5 | patreon:
6 | open_collective:
7 | ko_fi: hiiruki
8 | tidelift: # Replace with a single Tidelift platform-name/package-name e.g., npm/babel
9 | community_bridge: # Replace with a single Community Bridge project-name e.g., cloud-foundry
10 | liberapay: hiiruki
11 | issuehunt: # Replace with a single IssueHunt username
12 | otechie: # Replace with a single Otechie username
13 | custom: ["https://trakteer.id/hiiruki/tip"]
14 |
--------------------------------------------------------------------------------
/README.md:
--------------------------------------------------------------------------------
1 | # Google Cloud Skills Boost
2 |
3 | 
4 |
5 | This repository contains the solutions for the [Google Cloud Skills Boost](https://www.cloudskillsboost.google/) challenge labs (formerly [Qwiklabs](https://go.qwiklabs.com/)). The challenge labs are a set of labs that test your skills in [Google Cloud](https://cloud.google.com/). The labs are designed to test your skills in Google Cloud and are not designed to be guides. If you are looking for guides, please visit the [Google Cloud Documentation](https://cloud.google.com/docs) or use this guide as a reference.
6 |
7 | ## Challenge Labs
8 |
9 | - [GSP101](./challenge-labs/GSP101/index.md) Google Cloud Essential Skills
10 | - [GSP301](./challenge-labs/GSP301/index.md) Deploy a Compute Instance with a Remote Startup Script
11 | - [GSP303](./challenge-labs/GSP303/index.md) Configure Secure RDP using a Windows Bastion Host
12 | - [GSP304](./challenge-labs/GSP304/index.md) Build and Deploy a Docker Image to a Kubernetes Cluster
13 | - [GSP305](./challenge-labs/GSP305/index.md) Scale Out and Update a Containerized Application on a Kubernetes Cluster
14 | - [GSP306](./challenge-labs/GSP306/index.md) Migrate a MySQL Database to Google Cloud SQL
15 | - [GSP313](./challenge-labs/GSP313/index.md) Create and Manage Cloud Resources
16 | - [GSP315](./challenge-labs/GSP315/index.md) Perform Foundational Infrastructure Tasks in Google Cloud
17 | - [GSP319](./challenge-labs/GSP319/index.md) Build a Website on Google Cloud
18 | - [GSP322](./challenge-labs/GSP322/index.md) Build and Secure Networks in Google Cloud
19 | - [GSP341](./challenge-labs/GSP341/index.md) Create ML Models with BigQuery ML
20 | - [GSP342](./challenge-labs/GSP342/index.md) Ensure Access & Identity in Google Cloud
21 | - [GSP345](./challenge-labs/GSP345/index.md) Automating Infrastructure on Google Cloud with Terraform
22 | - [GSP787](./challenge-labs/GSP787/index.md) Insights from Data with BigQuery
23 |
24 |
25 |
26 | > **Note**: If the lab is labeled **deprecated**, it means the lab has been updated and this solution will not work, but you can still use it to study.
27 |
28 | ## License
29 |
30 | This content is licensed under the terms of the [Attribution-ShareAlike 4.0 International](./LICENSE.md).
31 |
--------------------------------------------------------------------------------
/challenge-labs/GSP304/index.md:
--------------------------------------------------------------------------------
1 | # [GSP304] Build and Deploy a Docker Image to a Kubernetes Cluster
2 |
3 | ### [GSP304](https://www.cloudskillsboost.google/focuses/1738?parent=catalog)
4 |
5 | 
6 |
7 | ---
8 |
9 | Time: 1 hour 15 minutes
10 | Difficulty: Intermediate
11 | Price: 5 Credits
12 |
13 | Quest: [Cloud Architecture: Design, Implement, and Manage](https://www.cloudskillsboost.google/quests/124)
14 |
15 | Last updated: May 25, 2023
16 |
17 | ---
18 |
19 | ## Challenge scenario
20 |
21 | Your development team is interested in adopting a containerized microservices approach to application architecture. You need to test a sample application they have provided for you to make sure that that it can be deployed to a Google Kubernetes container. The development group provided a simple Go application called `echo-web` with a Dockerfile and the associated context that allows you to build a Docker image immediately.
22 |
23 | ## Your challenge
24 |
25 | To test the deployment, you need to download the sample application, then build the Docker container image using a tag that allows it to be stored on the Container Registry. Once the image has been built, you'll push it out to the Container Registry before you can deploy it.
26 |
27 | With the image prepared you can then create a Kubernetes cluster, then deploy the sample application to the cluster.
28 |
29 | 1. An application image with a v1 tag has been pushed to the gcr.io repository
30 |
31 | ```bash
32 | mkdir echo-web
33 | cd echo-web
34 | gsutil cp -r gs://$DEVSHELL_PROJECT_ID/echo-web.tar.gz .
35 | tar -xzf echo-web.tar.gz
36 | rm echo-web.tar.gz
37 | cd echo-web
38 | docker build -t echo-app:v1 .
39 | docker tag echo-app:v1 gcr.io/$DEVSHELL_PROJECT_ID/echo-app:v1
40 | docker push gcr.io/$DEVSHELL_PROJECT_ID/echo-app:v1
41 | ```
42 |
43 | 2. A new Kubernetes cluster exists (zone: us-central1-a)
44 |
45 | ```bash
46 | gcloud config set compute/zone us-central1-a
47 |
48 | gcloud container clusters create echo-cluster --num-nodes=2 --machine-type=n1-standard-2
49 | ```
50 |
51 | 3. Check that an application has been deployed to the cluster
52 |
53 | ```bash
54 | kubectl create deployment echo-web --image=gcr.io/$DEVSHELL_PROJECT_ID/echo-app:v1
55 | ```
56 |
57 | 4. Test that a service exists that responds to requests like Echo-app
58 |
59 | ```bash
60 | kubectl expose deployment echo-web --type=LoadBalancer --port 80 --target-port 8000
61 | ```
62 |
63 | ## Congratulations!
64 |
65 | 
66 |
67 |
71 |
72 |
73 | [HOME](../../README.md)
74 |
--------------------------------------------------------------------------------
/challenge-labs/GSP101/index.md:
--------------------------------------------------------------------------------
1 | # [GSP101] Google Cloud Essential Skills: Challenge Lab
2 |
3 | ### [GSP101](https://www.cloudskillsboost.google/focuses/1734?parent=catalog)
4 |
5 | 
6 |
7 | ---
8 |
9 | Time: 45 minutes
10 | Difficulty: Intermediate
11 | Price: 5 Credits
12 |
13 | Quest: [Cloud Architecture: Design, Implement, and Manage](https://www.cloudskillsboost.google/quests/124)
14 |
15 | Last updated: May 26, 2023
16 |
17 | ---
18 |
19 | ## Challenge scenario
20 |
21 | Your company is ready to launch a brand new product! Because you are entering a totally new space, you have decided to deploy a new website as part of the product launch. The new site is complete, but the person who built the new site left the company before they could deploy it.
22 |
23 | ## Your challenge
24 |
25 | Your challenge is to deploy the site in the public cloud by completing the tasks below. You will use a simple Apache web server as a placeholder for the new site in this exercise. Good luck!
26 |
27 | 1. Create a Compute Engine instance, add necessary firewall rules.
28 |
29 | - In the **Cloud Console**, click the **Navigation menu** > **Compute Engine** > **VM Instances**.
30 | - Click **Create instance**.
31 | - Set the following values, leave all other values at their defaults:
32 |
33 | | Property | Value (type value or select option as specified) |
34 | | --- | --- |
35 | | Name | `INSTANCE_NAME` |
36 | | Zone | `COMPUTE_ZONE` |
37 |
38 | 
39 |
40 | 
41 |
42 | - Under **Firewall** check **Allow HTTP traffic**.
43 |
44 | 
45 |
46 | - Click **Create**.
47 |
48 | 2. Configure Apache2 Web Server in your instance.
49 |
50 | - In the **Cloud Console**, click the **Navigation menu** > **Compute Engine** > **VM Instances**.
51 | - Click on the SSH button next to `INSTANCE_NAME` instance.
52 | - Run the following command:
53 |
54 | ```bash
55 | sudo su -
56 | ```
57 |
58 | then run:
59 |
60 | ```bash
61 | apt-get update
62 | apt-get install apache2 -y
63 |
64 | service --status-all
65 | ```
66 |
67 | 3. Test your server.
68 |
69 | - In the **Cloud Console**, click the **Navigation menu** > **Compute Engine** > **VM Instances**.
70 | - Access the VM using an https address. Check that your URL is http:// EXTERNAL_IP and not https:// EXTERNAL_IP
71 | - Verify **Apache2 Debian Default Page** showed up.
72 |
73 | ## Congratulations!
74 |
75 | 
76 |
77 |
80 |
81 |
82 | [HOME](../../README.md)
83 |
--------------------------------------------------------------------------------
/challenge-labs/GSP301/index.md:
--------------------------------------------------------------------------------
1 | # [GSP301] Deploy a Compute Instance with a Remote Startup Script
2 |
3 | ### [GSP301](https://www.cloudskillsboost.google/focuses/1735?parent=catalog)
4 |
5 | 
6 |
7 | ---
8 |
9 | Time: 1 hour
10 | Difficulty: Intermediate
11 | Price: 5 Credits
12 |
13 | Quest: [Cloud Architecture: Design, Implement, and Manage](https://www.cloudskillsboost.google/quests/124)
14 |
15 | Last updated: May 22, 2023
16 |
17 | ---
18 |
19 | ## Challenge scenario
20 |
21 | You have been given the responsibility of managing the configuration of your organization's Google Cloud virtual machines. You have decided to make some changes to the framework used for managing the deployment and configuration machines - you want to make it easier to modify the startup scripts used to initialize a number of the compute instances. Instead of storing startup scripts directly in the instances' metadata, you have decided to store the scripts in a Cloud Storage bucket and then configure the virtual machines to point to the relevant script file in the bucket.
22 |
23 | A basic bash script that installs the Apache web server software called `install-web.sh` has been provided for you as a sample startup script. You can download this from the Student Resources links on the left side of the page.
24 |
25 | ## Your challenge
26 |
27 | Configure a Linux Compute Engine instance that installs the Apache web server software using a remote startup script. In order to confirm that a compute instance Apache has successfully installed, the Compute Engine instance must be accessible via HTTP from the internet.
28 |
29 | ## Task 1. Confirm that a Google Cloud Storage bucket exists that contains a file
30 |
31 | Go to cloud shell and run the following command:
32 |
33 | ```bash
34 | gsutil mb gs://$DEVSHELL_PROJECT_ID
35 | gsutil cp gs://sureskills-ql/challenge-labs/ch01-startup-script/install-web.sh gs://$DEVSHELL_PROJECT_ID
36 | ```
37 |
38 | ## Task 2. Confirm that a compute instance has been created that has a remote startup script called install-web.sh configured
39 |
40 | ```bash
41 | gcloud compute instances create example-instance --zone=us-central1-a --tags=http-server --metadata startup-script-url=gs://$DEVSHELL_PROJECT_ID/install-web.sh
42 | ```
43 |
44 | ## Task 3. Confirm that a HTTP access firewall rule exists with tag that applies to that virtual machine
45 |
46 | ```bash
47 | gcloud compute firewall-rules create allow-http --target-tags http-server --source-ranges 0.0.0.0/0 --allow tcp:80
48 | ```
49 |
50 | ## Task 4. Connect to the server ip-address using HTTP and get a non-error response
51 |
52 | After firewall creation (Task 3) just wait and then check the score
53 |
54 | ## Congratulations!
55 |
56 | 
57 |
58 |
62 |
63 |
64 | [HOME](../../README.md)
65 |
--------------------------------------------------------------------------------
/challenge-labs/GSP305/index.md:
--------------------------------------------------------------------------------
1 | # [GSP305] Scale Out and Update a Containerized Application on a Kubernetes Cluster
2 |
3 | ### [GSP305](https://www.cloudskillsboost.google/focuses/1739?parent=catalog)
4 |
5 | 
6 |
7 | ---
8 |
9 | Time: 1 hour
10 | Difficulty: Intermediate
11 | Price: 5 Credits
12 |
13 | Quest: [Cloud Architecture: Design, Implement, and Manage](https://www.cloudskillsboost.google/quests/124)
14 |
15 | Last updated: May 25, 2023
16 |
17 | ---
18 |
19 | ## Challenge scenario
20 |
21 | You are taking over ownership of a test environment and have been given an updated version of a containerized test application to deploy. Your systems' architecture team has started adopting a containerized microservice architecture. You are responsible for managing the containerized test web applications. You will first deploy the initial version of a test application, called `echo-app` to a Kubernetes cluster called `echo-cluster` in a deployment called `echo-web`.
22 |
23 | Before you get started, open the navigation menu and select **Cloud Storage**. The last steps in the Deployment Manager script used to set up your environment creates a bucket.
24 |
25 | Refresh the Storage browser until you see your bucket. You can move on once your Console resembles the following:
26 |
27 | 
28 |
29 | Check to make sure your GKE cluster has been created before continuing. Open the navigation menu and select **Kubernetes Engine** > **Clusters**.
30 |
31 | Continue when you see a green checkmark next to `echo-cluster`:
32 |
33 | 
34 |
35 | To deploy your first version of the application, run the following commands in Cloud Shell to get up and running:
36 |
37 | ```bash
38 | gcloud container clusters get-credentials echo-cluster --zone=us-central1-a
39 | ```
40 |
41 | ```bash
42 | kubectl create deployment echo-web --image=gcr.io/qwiklabs-resources/echo-app:v1
43 | ```
44 |
45 | ```bash
46 | kubectl expose deployment echo-web --type=LoadBalancer --port 80 --target-port 8000
47 | ```
48 |
49 | ## Your challenge
50 |
51 | You need to update the running `echo-app` application in the `echo-web` deployment from the v1 to the v2 code you have been provided. You must also scale out the application to 2 instances and confirm that they are all running.
52 |
53 | 1. Check that there is a tagged image in gcr.io for echo-app:v2.
54 |
55 | ```bash
56 | mkdir echo-web
57 | cd echo-web
58 | gsutil cp -r gs://$DEVSHELL_PROJECT_ID/echo-web-v2.tar.gz .
59 | tar -xzf echo-web-v2.tar.gz
60 | rm echo-web-v2.tar.gz
61 | docker build -t echo-app:v2 .
62 | docker tag echo-app:v2 gcr.io/$DEVSHELL_PROJECT_ID/echo-app:v2
63 | docker push gcr.io/$DEVSHELL_PROJECT_ID/echo-app:v2
64 | ```
65 |
66 | 2. Echo-app:v2 is running on the Kubernetes cluster.
67 |
68 | Deploy the first version of the application.
69 |
70 | ```bash
71 | gcloud container clusters get-credentials echo-cluster --zone=us-central1-a
72 | kubectl create deployment echo-web --image=gcr.io/qwiklabs-resources/echo-app:v1
73 | kubectl expose deployment echo-web --type=LoadBalancer --port 80 --target-port 8000
74 | ```
75 |
76 | Edit the `deployment.apps` file.
77 |
78 | ```bash
79 | kubectl edit deploy echo-web
80 | ```
81 |
82 | Start the editor by type `i`. Change `image=...:v1` to `image=...:v2`.
83 |
84 | `image=gcr.io/qwiklabs-resources/echo-app:v2`
85 |
86 | Save the `deployment.apps` file, hit **ESC** then type `:wq` and **Enter**.
87 |
88 | 3. The Kubernetes cluster deployment reports 2 replicas.
89 |
90 | ```bash
91 | kubectl scale deployment echo-web --replicas=2
92 | ```
93 |
94 | 4. The application must respond to web requests with V2.0.0.
95 |
96 | ```bash
97 | kubectl expose deployment echo-web --type=LoadBalancer --port 80 --target-port 8000
98 |
99 | kubectl get svc
100 | ```
101 |
102 | ## Congratulations!
103 |
104 | 
105 |
106 |
110 |
111 |
112 | [HOME](../../README.md)
113 |
--------------------------------------------------------------------------------
/challenge-labs/GSP306/index.md:
--------------------------------------------------------------------------------
1 | # [GSP306] Migrate a MySQL Database to Google Cloud SQL
2 |
3 | ### [GSP306](https://www.cloudskillsboost.google/focuses/1740?parent=catalog)
4 |
5 | 
6 |
7 | ---
8 |
9 | Time: 1 hour 15 minutes
10 | Difficulty: Advanced
11 | Price: 7 Credits
12 |
13 | Quest: [Cloud Architecture: Design, Implement, and Manage](https://www.cloudskillsboost.google/quests/124)
14 |
15 | Last updated: May 25, 2023
16 |
17 | ---
18 |
19 | ## Challenge scenario
20 |
21 | Your WordPress blog is running on a server that is no longer suitable. As the first part of a complete migration exercise, you are migrating the locally hosted database used by the blog to Cloud SQL.
22 |
23 | The existing WordPress installation is installed in the `/var/www/html/wordpress` directory in the instance called `blog` that is already running in the lab. You can access the blog by opening a web browser and pointing to the external IP address of the blog instance.
24 |
25 | The existing database for the blog is provided by MySQL running on the same server. The existing MySQL database is called `wordpress` and the user called **blogadmin** with password __Password1*__, which provides full access to that database.
26 |
27 | ## Your challenge
28 |
29 | - You need to create a new Cloud SQL instance to host the migrated database
30 | - Once you have created the new database and configured it, you can then create a database dump of the existing database and import it into Cloud SQL.
31 | - When the data has been migrated, you will then reconfigure the blog software to use the migrated database.
32 |
33 | For this lab, the WordPress site configuration file is located here: `/var/www/html/wordpress/wp-config.php.`
34 |
35 | To sum it all up, your challenge is to migrate the database to Cloud SQL and then reconfigure the application so that it no longer relies on the local MySQL database. Good luck!
36 |
37 | 1. Check that there is a Cloud SQL instance.
38 |
39 | Go to cloud shell and run the following command:
40 |
41 | ```bash
42 | export ZONE=us-central1-a
43 |
44 | gcloud sql instances create wordpress --tier=db-n1-standard-1 --activation-policy=ALWAYS --zone $ZONE
45 | ```
46 |
47 | > **Note**: It will take a several times to create the instance.
48 |
49 | Run the following command:
50 |
51 | ```bash
52 | export ADDRESS=[IP_ADDRESS]/32
53 | ```
54 |
55 | Change the `[IP_ADDRESS]` with IP Address from `Demo Blog Site` field
56 |
57 | 
58 |
59 | or from the External IP of the `blog` instance in VM Compute Engine.
60 |
61 | 
62 |
63 | For example:
64 |
65 | ```bash
66 | export ADDRESS=104.196.226.155/32
67 | ```
68 |
69 | Run the following command:
70 |
71 | ```bash
72 | gcloud sql users set-password --host % root --instance wordpress --password Password1*
73 |
74 | gcloud sql instances patch wordpress --authorized-networks $ADDRESS --quiet
75 | ```
76 |
77 | 2. Check that there is a user database on the Cloud SQL instance.
78 |
79 | - In the **Cloud Console**, click the **Navigation menu** > **Compute Engine** > **VM Instances**.
80 | - Click on the SSH button next to `blog` instance.
81 | - Run the following command:
82 |
83 | ```bash
84 | MYSQLIP=$(gcloud sql instances describe wordpress --format="value(ipAddresses.ipAddress)")
85 |
86 | mysql --host=$MYSQLIP \
87 | --user=root --password
88 | ```
89 |
90 | > **Note**: Enter the password with __Password1*__
91 |
92 | And then run the following command:
93 |
94 | ```sql
95 | CREATE DATABASE wordpress;
96 | CREATE USER 'blogadmin'@'%' IDENTIFIED BY 'Password1*';
97 | GRANT ALL PRIVILEGES ON wordpress.* TO 'blogadmin'@'%';
98 | FLUSH PRIVILEGES;
99 | ```
100 |
101 | - type `exit` to exit the mysql shell.
102 |
103 | 3. Check that the blog instance is authorized to access Cloud SQL.
104 |
105 | In the `blog` SSH instance, run the following command:
106 |
107 | ```bash
108 | sudo mysqldump -u root -p Password1* wordpress > wordpress_backup.sql
109 |
110 | mysql --host=$MYSQLIP --user=root -pPassword1* --verbose wordpress < wordpress_backup.sql
111 |
112 | sudo service apache2 restart
113 | ```
114 |
115 | 4. Check that wp-config.php points to the Cloud SQL instance.
116 | - Run the following command:
117 |
118 | ```bash
119 | cd /var/www/html/wordpress/
120 |
121 | sudo nano wp-config.php
122 | ```
123 |
124 | - Replace `localhost` string on `DB_HOST` with **Public IP address** of SQL Instance that has copied before.
125 |
126 | 
127 |
128 | From this:
129 |
130 | 
131 |
132 | To this:
133 |
134 | 
135 |
136 | - Press **Ctrl + O** and then press **Enter** to save your edited file. Press **Ctrl + X** to exit the nano editor.
137 | - Exit the SSH.
138 |
139 | 5. Check that the blog still responds to requests.
140 |
141 | - In the **Cloud Console**, click the **Navigation menu** > **Compute Engine** > **VM Instances**.
142 | - Click the **External IP** of the `blog` instance.
143 | - Verify that no error.
144 |
145 | 
146 |
147 | ## Congratulations!
148 |
149 | 
150 |
151 |
155 |
156 |
157 | [HOME](../../README.md)
158 |
--------------------------------------------------------------------------------
/challenge-labs/GSP322/index.md:
--------------------------------------------------------------------------------
1 | # [GSP322] Build and Secure Networks in Google Cloud: Challenge Lab
2 |
3 | ### [GSP322](https://www.cloudskillsboost.google/focuses/12068?parent=catalog)
4 |
5 | 
6 |
7 | ---
8 |
9 | Time: 1 hour
10 | Difficulty: Advanced
11 | Price: 7 Credits
12 |
13 | Quest: [Build and Secure Networks in Google Cloud](https://www.cloudskillsboost.google/quests/128)
14 |
15 | Last updated: May 26, 2023
16 |
17 | ---
18 |
19 | ## Setup
20 |
21 | Define the environment variables:
22 |
23 | ```bash
24 | export IAP_NETWORK_TAG=
25 | export INTERNAL_NETWORK_TAG=
26 | export HTTP_NETWORK_TAG=
27 | export ZONE=
28 | ```
29 |
30 | Fill the variables with the values from the lab
31 |
32 | For the zone you can check first. In the console, click the **Navigation menu** > **Compute Engine** > **VM Instance**. In my case I used `us-east1-b`
33 |
34 | 
35 |
36 | To list all available zones:
37 |
38 | ```bash
39 | gcloud compute zones list
40 | ```
41 |
42 | Reference: [gcloud compute zones list](https://cloud.google.com/sdk/gcloud/reference/compute/zones/list)
43 |
44 | 
45 |
46 | For example in my case:
47 |
48 | ```bash
49 | export IAP_NETWORK_TAG=allow-ssh-iap-ingress-ql-901
50 | export INTERNAL_NETWORK_TAG=allow-ssh-internal-ingress-ql-803
51 | export HTTP_NETWORK_TAG=allow-http-ingress-ql-982
52 | export ZONE=us-east1-b
53 | ```
54 |
55 | ## Challenge scenario
56 |
57 | You are a security consultant brought in by Jeff, who owns a small local company, to help him with his very successful website (juiceshop). Jeff is new to Google Cloud and had his neighbour's son set up the initial site. The neighbour's son has since had to leave for college, but before leaving, he made sure the site was running.
58 |
59 | You need to help out Jeff and perform appropriate configuration for security. Below is the current situation:
60 |
61 | 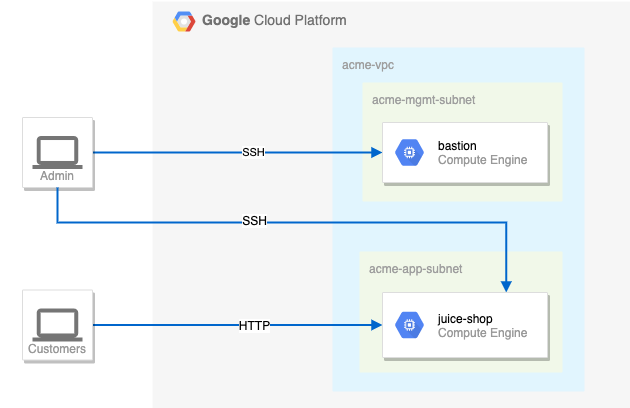
62 |
63 | ## Your challenge
64 |
65 | You need to configure this simple environment securely. Your first challenge is to set up appropriate firewall rules and virtual machine tags. You also need to ensure that SSH is only available to the bastion via IAP.
66 |
67 | For the firewall rules, make sure:
68 |
69 | - The bastion host does not have a public IP address.
70 | - You can only SSH to the bastion and only via IAP.
71 | - You can only SSH to juice-shop via the bastion.
72 | - Only HTTP is open to the world for `juice-shop`.
73 |
74 | Tips and tricks:
75 |
76 | - Pay close attention to the network tags and the associated VPC firewall rules.
77 | - Be specific and limit the size of the VPC firewall rule source ranges.
78 | - Overly permissive permissions will not be marked correct.
79 |
80 | 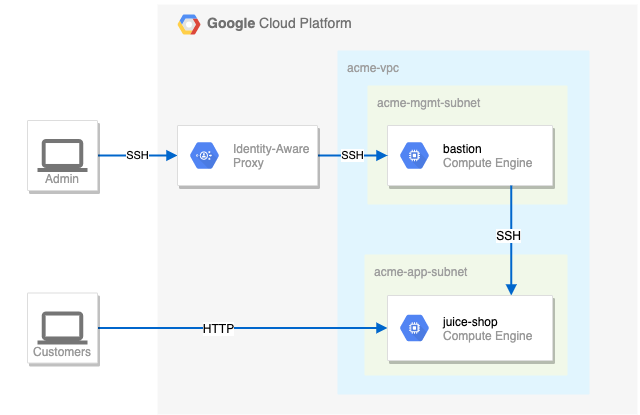
81 |
82 | Suggested order of actions:
83 |
84 | 1. Check the firewall rules. Remove the overly permissive rules.
85 |
86 | ```bash
87 | gcloud compute firewall-rules delete open-access
88 | ```
89 |
90 | Press `y` and `enter` to confirm.
91 |
92 | 2. Navigate to Compute Engine in the Cloud Console (**Navigation menu** > **Compute Engine** > **VM Instance**) and identify the bastion host. The instance should be stopped. Start the instance.
93 |
94 | ```bash
95 | gcloud compute instances start bastion --zone=$ZONE
96 | ```
97 |
98 | If you getting **_error_** when run this command, you can manually activate bastion in VM Instance.
99 |
100 | 3. The bastion host is the one machine authorized to receive external SSH traffic. Create a firewall rule that allows [SSH (tcp/22) from the IAP service](https://cloud.google.com/iap/docs/using-tcp-forwarding). The firewall rule must be enabled for the bastion host instance using a network tag of `SSH_IAP_NETWORK_TAG`.
101 |
102 | ```bash
103 | gcloud compute firewall-rules create ssh-ingress --allow=tcp:22 --source-ranges 35.235.240.0/20 --target-tags $IAP_NETWORK_TAG --network acme-vpc
104 |
105 | gcloud compute instances add-tags bastion --tags=$IAP_NETWORK_TAG --zone=$ZONE
106 | ```
107 |
108 | 4. The `juice-shop` server serves HTTP traffic. Create a firewall rule that allows traffic on HTTP (tcp/80) to any address. The firewall rule must be enabled for the juice-shop instance using a network tag of `HTTP_NETWORK_TAG`.
109 |
110 | ```bash
111 | gcloud compute firewall-rules create http-ingress --allow=tcp:80 --source-ranges 0.0.0.0/0 --target-tags $HTTP_NETWORK_TAG --network acme-vpc
112 |
113 | gcloud compute instances add-tags juice-shop --tags=$HTTP_NETWORK_TAG --zone=$ZONE
114 | ```
115 |
116 | 5. You need to connect to `juice-shop` from the bastion using SSH. Create a firewall rule that allows traffic on SSH (tcp/22) from `acme-mgmt-subnet` network address. The firewall rule must be enabled for the `juice-shop` instance using a network tag of `SSH_INTERNAL_NETWORK_TAG`.
117 |
118 | ```bash
119 | gcloud compute firewall-rules create internal-ssh-ingress --allow=tcp:22 --source-ranges 192.168.10.0/24 --target-tags $INTERNAL_NETWORK_TAG --network acme-vpc
120 |
121 | gcloud compute instances add-tags juice-shop --tags=$INTERNAL_NETWORK_TAG --zone=$ZONE
122 | ```
123 |
124 | 6. In the Compute Engine instances page, click the SSH button for the **bastion** host.
125 |
126 | 
127 |
128 | Once connected, SSH to `juice-shop`.
129 |
130 | ```bash
131 | gcloud compute ssh juice-shop --internal-ip
132 | ```
133 |
134 | When prompted `Do you want to continue (Y/n)?`, press `y` and `enter`.
135 |
136 | Then create a phrase key for the `juice-shop` instance. You can just press `enter` for the empty passphrase.
137 |
138 | When prompted `Did you mean zone [us-east1-b] for instance: [juice-shop] (Y/n)?`, press `y` and `enter`.
139 |
140 | 
141 |
142 | ## Congratulations!
143 |
144 | 
145 |
146 |
150 |
151 |
152 | [HOME](../../README.md)
153 |
--------------------------------------------------------------------------------
/challenge-labs/GSP313/index.md:
--------------------------------------------------------------------------------
1 | # [GSP313] Create and Manage Cloud Resources: Challenge Lab
2 |
3 | ### [GSP313](https://www.cloudskillsboost.google/focuses/10258?parent=catalog)
4 |
5 | 
6 |
7 | ---
8 |
9 | Time: 1 hour
10 | Difficulty: Introductory
11 | Price: 1 Credit
12 |
13 | Quest: [Create and Manage Cloud Resources](https://www.cloudskillsboost.google/quests/120)
14 |
15 | Last updated: May 22, 2023
16 |
17 | ---
18 |
19 | ## Challenge scenario
20 |
21 | You have started a new role as a Junior Cloud Engineer for Jooli, Inc. You are expected to help manage the infrastructure at Jooli. Common tasks include provisioning resources for projects.
22 |
23 | You are expected to have the skills and knowledge for these tasks, so step-by-step guides are not provided.
24 |
25 | Some Jooli, Inc. standards you should follow:
26 |
27 | Create all resources in the default region or zone, unless otherwise directed.
28 |
29 | Naming normally uses the format _team-resource_; for example, an instance could be named **nucleus-webserver1**.
30 |
31 | Allocate cost-effective resource sizes. Projects are monitored, and excessive resource use will result in the containing project's termination (and possibly yours), so plan carefully. This is the guidance the monitoring team is willing to share: unless directed, use **f1-micro** for small Linux VMs, and use **n1-standard-1** for Windows or other applications, such as Kubernetes nodes.
32 |
33 | ## Your challenge
34 |
35 | As soon as you sit down at your desk and open your new laptop, you receive several requests from the Nucleus team. Read through each description, and then create the resources.
36 |
37 | ## Setup
38 |
39 | Export the following environment variables using the values specific to your labs instruction.
40 |
41 | ```bash
42 | export INSTANCE_NAME=
43 | export ZONE=
44 | export REGION=
45 | export PORT=
46 | export FIREWALL_NAME=
47 | ```
48 |
49 | 
50 |
51 | You can find the zone in Task 2 description.
52 |
53 | 
54 |
55 | Region is just the first part of the zone. For example, if the zone is `us-east1-b`, then the region is `us-east1`.
56 |
57 | Example:
58 |
59 | ```bash
60 | export INSTANCE_NAME=nucleus-jumphost-295
61 | export ZONE=us-central1-b
62 | export REGION=us-central1
63 | export PORT=8080
64 | export FIREWALL_NAME=accept-tcp-rule-633
65 | ```
66 |
67 | ## Task 1. Create a project jumphost instance
68 |
69 | **_Beware with machine-type, maybe have different with me, dont forget to change_**
70 | 
71 |
72 | Go to cloud shell and run the following command:
73 |
74 | ```bash
75 | gcloud compute instances create $INSTANCE_NAME \
76 | --network nucleus-vpc \
77 | --zone $ZONE \
78 | --machine-type e2-micro \
79 | --image-family debian-10 \
80 | --image-project debian-cloud
81 | ```
82 |
83 | ## Task 2. Create a Kubernetes service cluster
84 |
85 | Go to cloud shell and run the following command:
86 |
87 | ```bash
88 | gcloud container clusters create nucleus-backend \
89 | --num-nodes 1 \
90 | --network nucleus-vpc \
91 | --zone $ZONE
92 |
93 | gcloud container clusters get-credentials nucleus-backend \
94 | --zone $ZONE
95 | ```
96 |
97 | - Use the Docker container hello-app (`gcr.io/google-samples/hello-app:2.0`) as place holder.
98 |
99 | ```bash
100 | kubectl create deployment hello-server \
101 | --image=gcr.io/google-samples/hello-app:2.0
102 | ```
103 |
104 | - Expose the app on port `APP_PORT_NUMBER`.
105 |
106 | ```bash
107 | kubectl expose deployment hello-server \
108 | --type=LoadBalancer \
109 | --port $PORT
110 | ```
111 |
112 | ## Task 3. Set up an HTTP load balancer
113 |
114 | 1. Create startup-script.
115 |
116 | ```bash
117 | cat << EOF > startup.sh
118 | #! /bin/bash
119 | apt-get update
120 | apt-get install -y nginx
121 | service nginx start
122 | sed -i -- 's/nginx/Google Cloud Platform - '"\$HOSTNAME"'/' /var/www/html/index.nginx-debian.html
123 | EOF
124 | ```
125 |
126 | 2. Create instance template.
127 |
128 | ```bash
129 | gcloud compute instance-templates create web-server-template \
130 | --metadata-from-file startup-script=startup.sh \
131 | --network nucleus-vpc \
132 | --machine-type g1-small \
133 | --region $ZONE
134 | ```
135 |
136 | 3. Create target pool.
137 |
138 | ```bash
139 | gcloud compute target-pools create nginx-pool --region=$REGION
140 | ```
141 |
142 | 4. Create managed instance group.
143 |
144 | ```bash
145 | gcloud compute instance-groups managed create web-server-group \
146 | --base-instance-name web-server \
147 | --size 2 \
148 | --template web-server-template \
149 | --region $REGION
150 | ```
151 |
152 | 5. Create firewall rule named as `FIREWALL_RULE` to allow traffic (80/tcp).
153 |
154 | ```bash
155 | gcloud compute firewall-rules create $FIREWALL_NAME \
156 | --allow tcp:80 \
157 | --network nucleus-vpc
158 | ```
159 |
160 | 6. Create health check.
161 |
162 | ```bash
163 | gcloud compute http-health-checks create http-basic-check
164 | gcloud compute instance-groups managed \
165 | set-named-ports web-server-group \
166 | --named-ports http:80 \
167 | --region $REGION
168 | ```
169 |
170 | 7. Create backend service, and attach the managed instance group with named port (http:80).
171 |
172 | ```bash
173 | gcloud compute backend-services create web-server-backend \
174 | --protocol HTTP \
175 | --http-health-checks http-basic-check \
176 | --global
177 |
178 | gcloud compute backend-services add-backend web-server-backend \
179 | --instance-group web-server-group \
180 | --instance-group-region $REGION \
181 | --global
182 | ```
183 |
184 | 8. Create URL map and target the HTTP proxy to route requests to your URL map.
185 |
186 | ```bash
187 | gcloud compute url-maps create web-server-map \
188 | --default-service web-server-backend
189 |
190 | gcloud compute target-http-proxies create http-lb-proxy \
191 | --url-map web-server-map
192 | ```
193 |
194 | 9. Create forwarding rule.
195 |
196 | ```bash
197 | gcloud compute forwarding-rules create http-content-rule \
198 | --global \
199 | --target-http-proxy http-lb-proxy \
200 | --ports 80
201 |
202 | gcloud compute forwarding-rules create $FIREWALL_NAME \
203 | --global \
204 | --target-http-proxy http-lb-proxy \
205 | --ports 80
206 | gcloud compute forwarding-rules list
207 | ```
208 |
209 | > **Note**: Just wait for the load balancer to finish setting up. It may take a few minutes. If you get an error checkmark, wait a few moments and try again.
210 |
211 | 10. Testing traffic sent to your instances. (**Optional**)
212 |
213 | - In the **Cloud Console**, click the **Navigation menu** > **Network services** > **Load balancing**.
214 | - Click on the load balancer that you just created (`web-server-map`).
215 | - In the **Backend** section, click on the name of the backend and confirm that the VMs are **Healthy**. If they are not healthy, wait a few moments and try reloading the page.
216 | - When the VMs are healthy, test the load balancer using a web browser, going to `http://IP_ADDRESS/`, replacing `IP_ADDRESS` with the load balancer's IP address.
217 |
218 | ## Congratulations!
219 |
220 | 
221 |
222 |
226 |
227 |
228 | [HOME](../../README.md)
229 |
--------------------------------------------------------------------------------
/challenge-labs/GSP342/index.md:
--------------------------------------------------------------------------------
1 | # [GSP342] Ensure Access & Identity in Google Cloud: Challenge Lab
2 |
3 | ### [GSP342](https://www.cloudskillsboost.google/focuses/14572?parent=catalog)
4 |
5 | 
6 |
7 | ---
8 |
9 | Time: 1 hour 30 minutes
10 | Difficulty: Intermediate
11 | Price: 5 Credits
12 |
13 | Quest: [Ensure Access & Identity in Google Cloud](https://www.cloudskillsboost.google/quests/150)
14 |
15 | Last updated: May 26, 2023
16 |
17 | ---
18 |
19 | ## Challenge scenario
20 |
21 | You have started a new role as a junior member of the security team for the Orca team in Jooli Inc. Your team is responsible for ensuring the security of the Cloud infrastucture and services that the company's applications depend on.
22 |
23 | You are expected to have the skills and knowledge for these tasks, so don't expect step-by-step guides to be provided.
24 |
25 | ## Your challenge
26 |
27 | You have been asked to deploy, configure, and test a new Kubernetes Engine cluster that will be used for application development and pipeline testing by the the Orca development team.
28 |
29 | As per the organisation's security standards you must ensure that the new Kubernetes Engine cluster is built according to the organisation's most recent security standards and thereby must comply with the following:
30 |
31 | - The cluster must be deployed using a dedicated service account configured with the least privileges required.
32 | - The cluster must be deployed as a Kubernetes Engine private cluster, with the public endpoint disabled, and the master authorized network set to include only the ip-address of the Orca group's management jumphost.
33 | - The Kubernetes Engine private cluster must be deployed to the `orca-build-subnet` in the Orca Build VPC.
34 |
35 | From a previous project you know that the minimum permissions required by the service account that is specified for a Kubernetes Engine cluster is covered by these three built in roles:
36 |
37 | - `roles/monitoring.viewer`
38 | - `roles/monitoring.metricWriter`
39 | - `roles/logging.logWriter`
40 |
41 | These roles are specified in the Google Kubernetes Engine (GKE)'s Harden your cluster's security guide in the [Use least privilege Google service accounts](https://cloud.google.com/kubernetes-engine/docs/how-to/hardening-your-cluster#use_least_privilege_sa) section.
42 |
43 | You must bind the above roles to the service account used by the cluster as well as a custom role that you must create in order to provide access to any other services specified by the development team. Initially you have been told that the development team requires that the service account used by the cluster should have the permissions necessary to add and update objects in Google Cloud Storage buckets. To do this you will have to create a new custom IAM role that will provide the following permissions:
44 |
45 | - `storage.buckets.get`
46 | - `storage.objects.get`
47 | - `storage.objects.list`
48 | - `storage.objects.update`
49 | - `storage.objects.create`
50 |
51 | Once you have created the new private cluster you must test that it is correctly configured by connecting to it from the jumphost, `orca-jumphost`, in the management subnet `orca-mgmt-subnet`. As this compute instance is not in the same subnet as the private cluster you must make sure that the master authorized networks for the cluster includes the internal ip-address for the instance, and you must specify the `--internal-ip` flag when retrieving cluster credentials using the `gcloud container clusters get-credentials` command.
52 |
53 | All new cloud objects and services that you create should include the "orca-" prefix.
54 |
55 | Your final task is to validate that the cluster is working correctly by deploying a simple application to the cluster to test that management access to the cluster using the `kubectl` tool is working from the `orca-jumphost` compute instance.
56 |
57 | ## Setup
58 |
59 | Define variables:
60 |
61 | ```bash
62 | export CUSTOM_SECURIY_ROLE=
63 | export SERVICE_ACCOUNT=
64 | export CLUSTER_NAME=
65 | ```
66 |
67 | for example, in my case:
68 |
69 | 
70 |
71 | ```bash
72 | export CUSTOM_SECURIY_ROLE=orca_storage_editor_923
73 | export SERVICE_ACCOUNT=orca-private-cluster-278-sa
74 | export CLUSTER_NAME=orca-cluster-995
75 | ```
76 |
77 | ## Task 1. Create a custom security role.
78 |
79 | Set the default zone to `us-east1-b` and create `role-definition.yaml` file.
80 |
81 | ```bash
82 | gcloud config set compute/zone us-east1-b
83 | ```
84 |
85 | Create `role-definition.yaml` file.
86 |
87 | ```bash
88 | cat < role-definition.yaml
89 | title: ""
90 | description: "<DESCRIPTION>"
91 | stage: "ALPHA"
92 | includedPermissions:
93 | - storage.buckets.get
94 | - storage.objects.get
95 | - storage.objects.list
96 | - storage.objects.update
97 | - storage.objects.create
98 | EOF
99 | ```
100 |
101 | Replace `<TITLE>` and `<DESCRIPTION>` with the variables using [sed](https://linux.die.net/man/1/sed) command.
102 |
103 | ```bash
104 | sed -i "s/<TITLE>/$CUSTOM_SECURIY_ROLE/g" role-definition.yaml
105 | sed -i "s/<DESCRIPTION>/Permission/g" role-definition.yaml
106 | ```
107 |
108 | Create a custom security role
109 |
110 | ```bash
111 | gcloud iam roles create $CUSTOM_SECURIY_ROLE --project $DEVSHELL_PROJECT_ID --file role-definition.yaml
112 | ```
113 |
114 | ## Task 2. Create a service account.
115 |
116 | ```bash
117 | gcloud iam service-accounts create $SERVICE_ACCOUNT --display-name "${SERVICE_ACCOUNT} Service Account"
118 | ```
119 |
120 | ## Task 3. Bind a custom security role to a service account.
121 |
122 | ```bash
123 | gcloud projects add-iam-policy-binding $DEVSHELL_PROJECT_ID --member serviceAccount:$SERVICE_ACCOUNT@$DEVSHELL_PROJECT_ID.iam.gserviceaccount.com --role roles/monitoring.viewer
124 |
125 | gcloud projects add-iam-policy-binding $DEVSHELL_PROJECT_ID --member serviceAccount:$SERVICE_ACCOUNT@$DEVSHELL_PROJECT_ID.iam.gserviceaccount.com --role roles/monitoring.metricWriter
126 |
127 | gcloud projects add-iam-policy-binding $DEVSHELL_PROJECT_ID --member serviceAccount:$SERVICE_ACCOUNT@$DEVSHELL_PROJECT_ID.iam.gserviceaccount.com --role roles/logging.logWriter
128 |
129 | gcloud projects add-iam-policy-binding $DEVSHELL_PROJECT_ID --member serviceAccount:$SERVICE_ACCOUNT@$DEVSHELL_PROJECT_ID.iam.gserviceaccount.com --role projects/$DEVSHELL_PROJECT_ID/roles/$CUSTOM_SECURIY_ROLE
130 | ```
131 |
132 | ## Task 4. Create and configure a new Kubernetes Engine private cluster
133 |
134 | ```bash
135 | gcloud config set compute/zone us-east1-b
136 |
137 | gcloud container clusters create $CLUSTER_NAME --num-nodes 1 --master-ipv4-cidr=172.16.0.64/28 --network orca-build-vpc --subnetwork orca-build-subnet --enable-master-authorized-networks --master-authorized-networks 192.168.10.2/32 --enable-ip-alias --enable-private-nodes --enable-private-endpoint --service-account $SERVICE_ACCOUNT@$DEVSHELL_PROJECT_ID.iam.gserviceaccount.com --zone us-east1-b
138 | ```
139 |
140 | ## Task 5. Deploy an application to a private Kubernetes Engine cluster.
141 |
142 | Connect to the `orca-jumphost` compute instance (SSH).
143 |
144 | ```bash
145 | gcloud compute ssh --zone "us-east1-b" "orca-jumphost"
146 | ```
147 |
148 | Define variables:
149 |
150 | ```bash
151 | export CUSTOM_SECURIY_ROLE=
152 | export SERVICE_ACCOUNT=
153 | export CLUSTER_NAME=
154 | ```
155 |
156 | for example, in my case:
157 |
158 | 
159 |
160 | ```bash
161 | export CUSTOM_SECURIY_ROLE=orca_storage_editor_923
162 | export SERVICE_ACCOUNT=orca-private-cluster-278-sa
163 | export CLUSTER_NAME=orca-cluster-995
164 | ```
165 |
166 | Install the [gcloud auth plugin for Kubernetes](https://cloud.google.com/blog/products/containers-kubernetes/kubectl-auth-changes-in-gke):
167 |
168 | ```bash
169 | sudo apt-get install google-cloud-sdk-gke-gcloud-auth-plugin
170 | ```
171 |
172 | Create and expose a deployment in Kubernetes:
173 |
174 | ```bash
175 | gcloud container clusters get-credentials $CLUSTER_NAME --zone=us-east1-b --internal-ip
176 |
177 | kubectl create deployment hello-server --image=gcr.io/google-samples/hello-app:1.0
178 |
179 | kubectl expose deployment hello-server --name orca-hello-service --type LoadBalancer --port 80 --target-port 8080
180 | ```
181 |
182 | ## Congratulations!
183 |
184 | 
185 |
186 | <div style="display: flex; justify-content: space-between;">
187 | <a style="text-align: left;" href="../GSP341/index.md"><= PREV (GSP341)</a>
188 | <a style="text-align: right;" href="../GSP345/index.md">NEXT (GSP345) =></a>
189 | </div>
190 | <br>
191 |
192 | [HOME](../../README.md)
193 |
--------------------------------------------------------------------------------
/challenge-labs/GSP303/index.md:
--------------------------------------------------------------------------------
1 | # [GSP303] Configure Secure RDP using a Windows Bastion Host
2 |
3 | ### [GSP303](https://www.cloudskillsboost.google/focuses/1737?parent=catalog)
4 |
5 | 
6 |
7 | ---
8 |
9 | Time: 1 hour<br>
10 | Difficulty: Intermediate<br>
11 | Price: 5 Credits
12 |
13 | Quest: [Cloud Architecture: Design, Implement, and Manage](https://www.cloudskillsboost.google/quests/124)<br>
14 |
15 | Last updated: Sep 7, 2023
16 |
17 | ---
18 |
19 | ## Challenge scenario
20 |
21 | Your company has decided to deploy new application services in the cloud and your assignment is developing a secure framework for managing the Windows services that will be deployed. You will need to create a new VPC network environment for the secure production Windows servers.
22 |
23 | Production servers must initially be completely isolated from external networks and cannot be directly accessed from, or be able to connect directly to, the internet. In order to configure and manage your first server in this environment, you will also need to deploy a bastion host, or jump box, that can be accessed from the internet using the Microsoft Remote Desktop Protocol (RDP). The bastion host should only be accessible via RDP from the internet, and should only be able to communicate with the other compute instances inside the VPC network using RDP.
24 |
25 | Your company also has a monitoring system running from the default VPC network, so all compute instances must have a second network interface with an internal only connection to the default VPC network.
26 |
27 | ## Your challenge
28 |
29 | Deploy the secure Windows machine that is not configured for external communication inside a new VPC subnet, then deploy the Microsoft Internet Information Server on that secure machine.
30 |
31 | ## Task 1. Create the VPC network
32 |
33 | 1. Create a new VPC network called `securenetwork`
34 |
35 | Go to cloud shell and run the following command:
36 |
37 | ```bash
38 | gcloud compute networks create securenetwork --project=$DEVSHELL_PROJECT_ID --subnet-mode=custom --mtu=1460 --bgp-routing-mode=regional
39 | ```
40 |
41 | 2. Then create a new VPC subnet inside `securenetwork`
42 |
43 | ```bash
44 | gcloud compute networks subnets create secure-subnet --project=$DEVSHELL_PROJECT_ID --range=10.0.0.0/24 --stack-type=IPV4_ONLY --network=securenetwork --region=us-central1
45 | ```
46 |
47 | 3. Once the network and subnet have been configured, configure a firewall rule that allows inbound RDP traffic (`TCP port 3389`) from the internet to the bastion host. This rule should be applied to the appropriate host using network tags.
48 |
49 | ```bash
50 | gcloud compute --project=$DEVSHELL_PROJECT_ID firewall-rules create secuer-firewall --direction=INGRESS --priority=1000 --network=securenetwork --action=ALLOW --rules=tcp:3389 --source-ranges=0.0.0.0/0 --target-tags=rdp
51 | ```
52 |
53 | ## Task 2. Deploy your Windows instances and configure user passwords
54 |
55 | 1. Deploy a Windows 2016 server instance called `vm-securehost` with two network interfaces.
56 | 2. Configure the first network interface with an internal only connection to the new VPC subnet, and the second network interface with an internal only connection to the default VPC network. This is the secure server.
57 |
58 | ```bash
59 | gcloud compute instances create vm-securehost --project=$DEVSHELL_PROJECT_ID --zone=us-central1-a --machine-type=n1-standard-2 --network-interface=stack-type=IPV4_ONLY,subnet=secure-subnet,no-address --network-interface=stack-type=IPV4_ONLY,subnet=default,no-address --metadata=enable-oslogin=true --maintenance-policy=MIGRATE --provisioning-model=STANDARD --tags=rdp --create-disk=auto-delete=yes,boot=yes,device-name=vm-securehost,image=projects/windows-cloud/global/images/windows-server-2016-dc-v20230510,mode=rw,size=150,type=projects/$DEVSHELL_PROJECT_ID/zones/us-central1-a/diskTypes/pd-standard --no-shielded-secure-boot --shielded-vtpm --shielded-integrity-monitoring --labels=goog-ec-src=vm_add-gcloud --reservation-affinity=any
60 | ```
61 |
62 | 3. Install a second Windows 2016 server instance called `vm-bastionhost` with two network interfaces.
63 | 4. Configure the first network interface to connect to the new VPC subnet with an ephemeral public (external NAT) address, and the second network interface with an internal only connection to the default VPC network. This is the jump box or bastion host.
64 |
65 | ```bash
66 | gcloud compute instances create vm-bastionhost --project=$DEVSHELL_PROJECT_ID --zone=us-central1-a --machine-type=n1-standard-2 --network-interface=network-tier=PREMIUM,stack-type=IPV4_ONLY,subnet=secure-subnet --network-interface=network-tier=PREMIUM,stack-type=IPV4_ONLY,subnet=default --metadata=enable-oslogin=true --maintenance-policy=MIGRATE --provisioning-model=STANDARD --tags=rdp --create-disk=auto-delete=yes,boot=yes,device-name=vm-securehost,image=projects/windows-cloud/global/images/windows-server-2016-dc-v20230510,mode=rw,size=150,type=projects/$DEVSHELL_PROJECT_ID/zones/us-central1-a/diskTypes/pd-standard --no-shielded-secure-boot --shielded-vtpm --shielded-integrity-monitoring --labels=goog-ec-src=vm_add-gcloud --reservation-affinity=any
67 | ```
68 |
69 | 5. After your Windows instances have been created, create a user account and reset the Windows passwords in order to connect to each instance.
70 | 6. The following `gcloud` command creates a new user called `app-admin` and resets the password for a host called `vm-bastionhost` and `vm-securehost` located in the `us-central1-a` region:
71 |
72 | ```bash
73 | gcloud compute reset-windows-password vm-bastionhost --user app_admin --zone us-central1-a
74 | ```
75 |
76 | 
77 |
78 | > **Note**: Take note of the password that is generated for the user account. You will need this to connect to the bastion host.
79 |
80 | ```bash
81 | gcloud compute reset-windows-password vm-securehost --user app_admin --zone us-central1-a
82 | ```
83 |
84 | 
85 |
86 | > **Note**: Take note of the password that is generated for the user account. You will need this to connect to the secure host.
87 |
88 | 7. Alternatively, you can force a password reset from the Compute Engine console. You will have to repeat this for the second host as the login credentials for that instance will be different.
89 |
90 | ## Task 3. Connect to the secure host and configure Internet Information Server
91 |
92 | To connect to the secure host, you have to RDP into the bastion host first, and from there open a second RDP session to connect to the internal private network address of the secure host. A Windows Compute Instance with an external address can be connected to via RDP using the RDP button that appears next to Windows Compute instances in the Compute Instance summary page.
93 |
94 | 1. Connect to the bastion host using the RDP button in the Compute Engine console.
95 |
96 | You can install [Chrome RDP](https://chrome.google.com/webstore/detail/chrome-rdp-for-google-clo/mpbbnannobiobpnfblimoapbephgifkm) extension for Google Cloud Platform
97 |
98 | 
99 |
100 | 2. Go to Compute Engine > VM instances, click RDP on `vm-bastionhost`, fill username with app_admin and password with your copied `vm-bastionhost`'s password.
101 |
102 | 
103 |
104 | 
105 |
106 | When connected to a Windows server, you can launch the Microsoft RDP client using the command `mstsc.exe`, or you can search for `Remote Desktop Manager` from the Start menu. This will allow you to connect from the bastion host to other compute instances on the same VPC even if those instances do not have a direct internet connection themselves.
107 |
108 | 3. Click Search, search for Remote Desktop Connection and run it
109 | 4. Copy and paste the internal ip from `vm-securehost`, click Connect
110 |
111 | 
112 |
113 | 5. Fill username with app_admin and password with your copied `vm-securehost`'s password
114 | 6. Click Search, type Powershell, right click and Run as Administrator
115 | 7. Run the following command to install IIS (Internet Information Server) :
116 |
117 | ```powershell
118 | Install-WindowsFeature -name Web-Server -IncludeManagementTools
119 | ```
120 |
121 | 
122 |
123 | 
124 |
125 | ## Congratulations!
126 |
127 | 
128 |
129 | <div style="display: flex; justify-content: space-between;">
130 | <a style="text-align: left;" href="../GSP301/index.md"><= PREV (GSP301)</a>
131 | <a style="text-align: right;" href="../GSP304/index.md">NEXT (GSP304) =></a>
132 | </div>
133 | <br>
134 |
135 | [HOME](../../README.md)
136 |
--------------------------------------------------------------------------------
/challenge-labs/GSP341/index.md:
--------------------------------------------------------------------------------
1 | # [GSP341] Create ML Models with BigQuery ML: Challenge Lab
2 |
3 |
4 | ### [GSP341](https://www.cloudskillsboost.google/focuses/14294?parent=catalog)
5 |
6 | 
7 |
8 | ---
9 |
10 | Time: 1 hour 30 minutes<br>
11 | Difficulty: Intermediate<br>
12 | Price: 7 Credits
13 |
14 | Quest: [Create ML Models with BigQuery ML](https://www.cloudskillsboost.google/quests/146)<br>
15 |
16 | Last updated: May 20, 2023
17 |
18 | ---
19 |
20 | ## Challenge lab scenario
21 |
22 | You have started a new role as a junior member of the Data Science department Jooli Inc. Your team is working on a number of machine learning initiatives related to urban mobility services. You are expected to help with the development and assessment of data sets and machine learning models to help provide insights based on real work data sets.
23 |
24 | You are expected to have the skills and knowledge for these tasks, so don't expect step-by-step guides to be provided.
25 |
26 | ## Your challenge
27 |
28 | One of the projects you are working on needs to provide analysis based on real world data that will help in the selection of new bicycle models for public bike share systems. Your role in this project is to develop and evaluate machine learning models that can predict average trip durations for bike schemes using the public data from Austin's public bike share scheme to train and evaluate your models.
29 |
30 | Two of the senior data scientists in your team have different theories on what factors are important in determining the duration of a bike share trip and you have been asked to prioritise these to start. The first data scientist maintains that the key factors are the start station, the location of the start station, the day of the week and the hour the trip started. While the second data scientist argues that this is an over complication and the key factors are simply start station, subscriber type, and the hour the trip started.
31 |
32 | You have been asked to develop a machine learning model based on each of these input features. Given the fact that stay-at-home orders were in place for Austin during parts of 2021 as a result of COVID-19 you will be working on data from previous years. You have been instructed to train your models on data from `Training Year` and then evaluate them against data from `Evaluation Year` on the basis of Mean Absolute Error and the square root of Mean Squared Error.
33 |
34 | You can access the public data for the Austin bike share scheme in your project by opening [this link to the Austin bike share dataset](https://console.cloud.google.com/bigquery?p=bigquery-public-data&d=austin_bikeshare&page=dataset) in the browser tab for your lab.
35 |
36 | As a final step you must create and run a query that uses the model that includes subscriber type as a feature, to predict the average trip duration for all trips from the busiest bike sharing station in `Evaluation Year` (based on the number of trips per station in `Evaluation Year`) where the subscriber type is 'Single Trip'.
37 |
38 | ## Setup
39 |
40 | ```bash
41 | gcloud auth list
42 |
43 | gcloud config list project
44 | ```
45 |
46 | ## Task 1. Create a dataset to store your machine learning models
47 |
48 | - Create a new dataset in which you can store your machine learning models.
49 |
50 | Go to your cloud shell and run the following command to create the model:
51 |
52 | ```bash
53 | bq mk austin
54 | ```
55 |
56 | ## Task 2. Create a forecasting BigQuery machine learning model
57 |
58 | - Create the first machine learning model to predict the trip duration for bike trips.
59 |
60 | The features of this model must incorporate the starting station name, the hour the trip started, the weekday of the trip, and the address of the start station labeled as `location`. You must use `Training Year` data only to train this model.
61 |
62 | Go to BigQuery to make the first model and run the following query:
63 |
64 | Replace `<****Training_Year****>` with the year you are using for training.
65 |
66 | The year in your lab variable looks like this:
67 |
68 | 
69 |
70 | ```sql
71 | CREATE OR REPLACE MODEL austin.location_model
72 | OPTIONS
73 | (model_type='linear_reg', labels=['duration_minutes']) AS
74 | SELECT
75 | start_station_name,
76 | EXTRACT(HOUR FROM start_time) AS start_hour,
77 | EXTRACT(DAYOFWEEK FROM start_time) AS day_of_week,
78 | duration_minutes,
79 | address as location
80 | FROM
81 | `bigquery-public-data.austin_bikeshare.bikeshare_trips` AS trips
82 | JOIN
83 | `bigquery-public-data.austin_bikeshare.bikeshare_stations` AS stations
84 | ON
85 | trips.start_station_name = stations.name
86 | WHERE
87 | EXTRACT(YEAR FROM start_time) = <****Training_Year****>
88 | AND duration_minutes > 0
89 | ```
90 |
91 | ## Task 3. Create the second machine learning model
92 |
93 | - Create the second machine learning model to predict the trip duration for bike trips.
94 |
95 | The features of this model must incorporate the starting station name, the bike share subscriber type and the start time for the trip. You must also use `Training Year` data only to train this model.
96 |
97 | Go to BigQuery to make the second model and run the following query:
98 |
99 | Replace `<****Training_Year****>` with the year you are using for training.
100 |
101 | ```sql
102 | CREATE OR REPLACE MODEL austin.subscriber_model
103 | OPTIONS
104 | (model_type='linear_reg', labels=['duration_minutes']) AS
105 | SELECT
106 | start_station_name,
107 | EXTRACT(HOUR FROM start_time) AS start_hour,
108 | subscriber_type,
109 | duration_minutes
110 | FROM `bigquery-public-data.austin_bikeshare.bikeshare_trips` AS trips
111 | WHERE EXTRACT(YEAR FROM start_time) = <****Training_Year****>
112 | ```
113 |
114 | ## Task 4. Evaluate the two machine learning models
115 |
116 | - Evaluate each of the machine learning models against `Evaluation Year` data only using separate queries.
117 |
118 | Your queries must report both the Mean Absolute Error and the Root Mean Square Error.
119 |
120 | Go to BigQuery and run the following query:
121 |
122 | Replace `<****Evaluation_Year****>` with the year you are using for evaluating.
123 |
124 | ```sql
125 | SELECT
126 | SQRT(mean_squared_error) AS rmse,
127 | mean_absolute_error
128 | FROM
129 | ML.EVALUATE(MODEL austin.location_model, (
130 | SELECT
131 | start_station_name,
132 | EXTRACT(HOUR FROM start_time) AS start_hour,
133 | EXTRACT(DAYOFWEEK FROM start_time) AS day_of_week,
134 | duration_minutes,
135 | address as location
136 | FROM
137 | `bigquery-public-data.austin_bikeshare.bikeshare_trips` AS trips
138 | JOIN
139 | `bigquery-public-data.austin_bikeshare.bikeshare_stations` AS stations
140 | ON
141 | trips.start_station_name = stations.name
142 | WHERE EXTRACT(YEAR FROM start_time) = <****Evaluation_Year****> )
143 | )
144 | ```
145 |
146 | ```sql
147 | SELECT
148 | SQRT(mean_squared_error) AS rmse,
149 | mean_absolute_error
150 | FROM
151 | ML.EVALUATE(MODEL austin.subscriber_model, (
152 | SELECT
153 | start_station_name,
154 | EXTRACT(HOUR FROM start_time) AS start_hour,
155 | subscriber_type,
156 | duration_minutes
157 | FROM
158 | `bigquery-public-data.austin_bikeshare.bikeshare_trips` AS trips
159 | WHERE
160 | EXTRACT(YEAR FROM start_time) = <****Evaluation_Year****>)
161 | )
162 | ```
163 |
164 | ## Task 5. Use the subscriber type machine learning model to predict average trip durations
165 |
166 | - When both models have been created and evaluated, use the second model, that uses `subscriber_type` as a feature, to predict average trip length for trips from the busiest bike sharing station in `Evaluation Year` where the subscriber type is `Single Trip`.
167 |
168 | Go to BigQuery and run the following query:
169 |
170 | Replace `<****Evaluation_Year****>` with the year you are using for evaluating.
171 |
172 | ```sql
173 | SELECT
174 | start_station_name,
175 | COUNT(*) AS trips
176 | FROM
177 | `bigquery-public-data.austin_bikeshare.bikeshare_trips`
178 | WHERE
179 | EXTRACT(YEAR FROM start_time) = <****Evaluation_Year****>
180 | GROUP BY
181 | start_station_name
182 | ORDER BY
183 | trips DESC
184 | ```
185 |
186 | ```sql
187 | SELECT AVG(predicted_duration_minutes) AS average_predicted_trip_length
188 | FROM ML.predict(MODEL austin.subscriber_model, (
189 | SELECT
190 | start_station_name,
191 | EXTRACT(HOUR FROM start_time) AS start_hour,
192 | subscriber_type,
193 | duration_minutes
194 | FROM
195 | `bigquery-public-data.austin_bikeshare.bikeshare_trips`
196 | WHERE
197 | EXTRACT(YEAR FROM start_time) = <****Evaluation_Year****>
198 | AND subscriber_type = 'Single Trip'
199 | AND start_station_name = '21st & Speedway @PCL'))
200 | ```
201 |
202 | ## Congratulations!
203 |
204 | 
205 |
206 | <div style="display: flex; justify-content: space-between;">
207 | <a style="text-align: left;" href="../GSP322/index.md"><= PREV (GSP322)</a>
208 | <a style="text-align: right;" href="../GSP342/index.md">NEXT (GSP342) =></a>
209 | </div>
210 | <br>
211 |
212 | [HOME](../../README.md)
213 |
--------------------------------------------------------------------------------
/challenge-labs/GSP315/index.md:
--------------------------------------------------------------------------------
1 | # [GSP315] Perform Foundational Infrastructure Tasks in Google Cloud: Challenge Lab
2 |
3 | ### [GSP315](https://www.cloudskillsboost.google/focuses/10379?parent=catalog)
4 |
5 | 
6 |
7 | ---
8 |
9 | Time: 1 hour<br>
10 | Difficulty: Introductory<br>
11 | Price: 1 Credit
12 |
13 | Quest: [Perform Foundational Infrastructure Tasks in Google Cloud](https://www.cloudskillsboost.google/quests/118)<br>
14 |
15 | Last updated: May 21, 2023
16 |
17 | ---
18 |
19 | ## Challenge scenario
20 |
21 | You are just starting your junior cloud engineer role with Jooli inc. So far you have been helping teams create and manage Google Cloud resources.
22 |
23 | You are expected to have the skills and knowledge for these tasks so don’t expect step-by-step guides.
24 |
25 | ## Your challenge
26 |
27 | You are now asked to help a newly formed development team with some of their initial work on a new project around storing and organizing photographs, called memories. You have been asked to assist the memories team with initial configuration for their application development environment; you receive the following request to complete the following tasks:
28 |
29 | - Create a bucket for storing the photographs.
30 | - Create a Pub/Sub topic that will be used by a Cloud Function you create.
31 | - Create a Cloud Function.
32 | - Remove the previous cloud engineer’s access from the memories project.
33 |
34 | Some Jooli Inc. standards you should follow:
35 |
36 | - Create all resources in the **us-east1** region and **us-east1-b** zone, unless otherwise directed.
37 | - Use the project VPCs.
38 | - Naming is normally _team-resource_, e.g. an instance could be named **kraken-webserver1**.
39 | - Allocate cost effective resource sizes. Projects are monitored and excessive resource use will result in the containing project's termination (and possibly yours), so beware. This is the guidance the monitoring team is willing to share; unless directed, use **f1-micro** for small Linux VMs and **n1-standard-1** for Windows or other applications such as Kubernetes nodes.
40 |
41 | Each task is described in detail below, good luck!
42 |
43 | ## Task 1. Create a bucket
44 |
45 | - You need to create a bucket called `Bucket Name` for the storage of the photographs.
46 |
47 | Go to cloud shell and run the following command to create a bucket.
48 |
49 | Replace `[BUCKET_NAME]` with the name of the bucket in the lab instructions.
50 |
51 | 
52 |
53 | ```bash
54 | gsutil mb gs://[BUCKET_NAME]/
55 | ```
56 |
57 | ## Task 2. Create a Pub/Sub topic
58 |
59 | - Create a Pub/Sub topic called `Topic Name` for the Cloud Function to send messages.
60 |
61 | Go to cloud shell and run the following command to create a Pub/Sub topic.
62 |
63 | Replace `[TOPIC_NAME]` with the name of the bucket in the lab instructions.
64 |
65 | ```bash
66 | gcloud pubsub topics create [TOPIC_NAME]
67 | ```
68 |
69 | ## Task 3. Create the thumbnail Cloud Function
70 |
71 | 1. In the **Cloud Console**, click the **Navigation menu** > **Cloud Functions**.
72 | 2. Click **Create function**.
73 | 3. In the **Create function** dialog, enter the following values:
74 |
75 | - Function Name: `CLOUD_FUNCTION_NAME`, change the name of the function in the lab instructions.
76 | - Trigger: Cloud Storage
77 | - Event Type: Finalizing/Creating
78 | - Bucket: `BUCKET_NAME`
79 |
80 | 
81 |
82 | - Click **_Save_**.
83 | - Click **_Next_**.
84 | - Runtime: Node.js 14
85 | - Entry Point (Function to execute): thumbnail
86 | - Source Code: Inline editor
87 | - Replace code for index.js and package.json
88 |
89 | In `line 15` of `index.js` replace the text **REPLACE_WITH_YOUR_TOPIC_NAME** with the `TOPIC_NAME` you created in task 2.
90 |
91 | `index.js`:
92 |
93 | ```JavaScript
94 | /* globals exports, require */
95 | //jshint strict: false
96 | //jshint esversion: 6
97 | "use strict";
98 | const crc32 = require("fast-crc32c");
99 | const { Storage } = require('@google-cloud/storage');
100 | const gcs = new Storage();
101 | const { PubSub } = require('@google-cloud/pubsub');
102 | const imagemagick = require("imagemagick-stream");
103 | exports.thumbnail = (event, context) => {
104 | const fileName = event.name;
105 | const bucketName = event.bucket;
106 | const size = "64x64"
107 | const bucket = gcs.bucket(bucketName);
108 | const topicName = "REPLACE_WITH_YOUR_TOPIC_NAME";
109 | const pubsub = new PubSub();
110 | if ( fileName.search("64x64_thumbnail") == -1 ){
111 | // doesn't have a thumbnail, get the filename extension
112 | var filename_split = fileName.split('.');
113 | var filename_ext = filename_split[filename_split.length - 1];
114 | var filename_without_ext = fileName.substring(0, fileName.length - filename_ext.length );
115 | if (filename_ext.toLowerCase() == 'png' || filename_ext.toLowerCase() == 'jpg'){
116 | // only support png and jpg at this point
117 | console.log(`Processing Original: gs://${bucketName}/${fileName}`);
118 | const gcsObject = bucket.file(fileName);
119 | let newFilename = filename_without_ext + size + '_thumbnail.' + filename_ext;
120 | let gcsNewObject = bucket.file(newFilename);
121 | let srcStream = gcsObject.createReadStream();
122 | let dstStream = gcsNewObject.createWriteStream();
123 | let resize = imagemagick().resize(size).quality(90);
124 | srcStream.pipe(resize).pipe(dstStream);
125 | return new Promise((resolve, reject) => {
126 | dstStream
127 | .on("error", (err) => {
128 | console.log(`Error: ${err}`);
129 | reject(err);
130 | })
131 | .on("finish", () => {
132 | console.log(`Success: ${fileName} → ${newFilename}`);
133 | // set the content-type
134 | gcsNewObject.setMetadata(
135 | {
136 | contentType: 'image/'+ filename_ext.toLowerCase()
137 | }, function(err, apiResponse) {});
138 | pubsub
139 | .topic(topicName)
140 | .publisher()
141 | .publish(Buffer.from(newFilename))
142 | .then(messageId => {
143 | console.log(`Message ${messageId} published.`);
144 | })
145 | .catch(err => {
146 | console.error('ERROR:', err);
147 | });
148 | });
149 | });
150 | }
151 | else {
152 | console.log(`gs://${bucketName}/${fileName} is not an image I can handle`);
153 | }
154 | }
155 | else {
156 | console.log(`gs://${bucketName}/${fileName} already has a thumbnail`);
157 | }
158 | };
159 | ```
160 |
161 | Look like this:
162 |
163 | 
164 |
165 | `package.json`:
166 |
167 | ```json
168 | {
169 | "name": "thumbnails",
170 | "version": "1.0.0",
171 | "description": "Create Thumbnail of uploaded image",
172 | "scripts": {
173 | "start": "node index.js"
174 | },
175 | "dependencies": {
176 | "@google-cloud/pubsub": "^2.0.0",
177 | "@google-cloud/storage": "^5.0.0",
178 | "fast-crc32c": "1.0.4",
179 | "imagemagick-stream": "4.1.1"
180 | },
181 | "devDependencies": {},
182 | "engines": {
183 | "node": ">=4.3.2"
184 | }
185 | }
186 | ```
187 |
188 | Like this:
189 |
190 | 
191 |
192 | - Click **Deploy**.
193 |
194 | 4. Download this [image](https://storage.googleapis.com/cloud-training/gsp315/map.jpg).
195 | 5. In the console, click the **Navigation menu** > **Cloud Storage** > **Buckets**.
196 | 6. Click the name of the bucket that you created.
197 | 7. In the **Objects** tab, click **Upload files**.
198 | 8. In the file dialog, go to the file that you downloaded and select it.
199 | 9. Click **Refresh Bucket**.
200 | 10. Verify that the thumbnail image was created.
201 | 11. If you getting error, you can upload the image again.
202 |
203 | ## Task 4. Remove the previous cloud engineer
204 |
205 | 1. In the console, click the **Navigation menu** > **IAM & Admin** > **IAM**.
206 | 2. Search for the previous cloud engineer (`Username 2` with the role of Viewer).
207 | 3. Click the **pencil icon** to edit, and then select the **trash icon** to delete role.
208 | 4. Click **Save**.
209 |
210 | ## Congratulations!
211 |
212 | 
213 |
214 | <div style="display: flex; justify-content: space-between;">
215 | <a style="text-align: left;" href="../GSP313/index.md"><= PREV (GSP313)</a>
216 | <a style="text-align: right;" href="../GSP319/index.md">NEXT (GSP319) =></a>
217 | </div>
218 | <br>
219 |
220 | [HOME](../../README.md)
221 |
--------------------------------------------------------------------------------
/challenge-labs/GSP319/index.md:
--------------------------------------------------------------------------------
1 | # [GSP319] Build a Website on Google Cloud: Challenge Lab
2 |
3 | ### [GSP319](https://www.cloudskillsboost.google/focuses/11765?parent=catalog)
4 |
5 | 
6 |
7 | ---
8 |
9 | Time: 1 hour 30 minutes<br>
10 | Difficulty: Intermediate<br>
11 | Price: 5 Credits
12 |
13 | Quest: [Build a Website on Google Cloud](https://www.cloudskillsboost.google/quests/115)<br>
14 |
15 | Last updated: May 23, 2023
16 |
17 | ---
18 |
19 | ## Challenge lab scenario
20 |
21 | You have just started a new role at FancyStore, Inc.
22 |
23 | Your task is to take the company's existing monolithic e-commerce website and break it into a series of logically separated microservices. The existing monolith code is sitting in a GitHub repo, and you will be expected to containerize this app and then refactor it.
24 |
25 | You are expected to have the skills and knowledge for these tasks, so don't expect step-by-step guides.
26 |
27 | You have been asked to take the lead on this, after the last team suffered from monolith-related burnout and left for greener pastures (literally, they are running a lavender farm now). You will be tasked with pulling down the source code, building a container from it (one of the farmers left you a Dockerfile), and then pushing it out to GKE.
28 |
29 | You should first build, deploy, and test the Monolith, just to make sure that the source code is sound. After that, you should break out the constituent services into their own microservice deployments.
30 |
31 | Some FancyStore, Inc. standards you should follow:
32 |
33 | - Create your cluster in `us-central1`.
34 | - Naming is normally *team-resource*, e.g. an instance could be named **fancystore-orderservice1**.
35 | - Allocate cost effective resource sizes. Projects are monitored and excessive resource use will result in the containing project's termination.
36 | - Use the `n1-standard-1` machine type unless directed otherwise.
37 |
38 | ## Your challenge
39 |
40 | As soon as you sit down at your desk and open your new laptop, you receive the following request to complete these tasks. Good luck!
41 |
42 | ## Setup
43 |
44 | Export the following variables in the Cloud Shell:
45 |
46 | ```bash
47 | export MONOLITH_IDENTIFIER=
48 | export CLUSTER_NAME=
49 | export ORDERS_IDENTIFIER=
50 | export PRODUCTS_IDENTIFIER=
51 | export FRONTEND_IDENTIFIER=
52 | ```
53 |
54 | from the labs variables, you can copy the value of each variable and paste it in the cloud shell
55 |
56 | 
57 |
58 | > **Note**: Don't forget to replace the value of each variable with the value of the labs variable
59 |
60 | like this
61 | 
62 |
63 | > **Note**: Don't forget to enable the API's
64 |
65 | ```bash
66 | gcloud services enable cloudbuild.googleapis.com
67 | gcloud services enable container.googleapis.com
68 | ```
69 |
70 | ## Task 1: Download the monolith code and build your container
71 |
72 | First things first, you'll need to [clone your team's git repo](https://github.com/googlecodelabs/monolith-to-microservices.git).
73 |
74 | ```bash
75 | git clone https://github.com/googlecodelabs/monolith-to-microservices.git
76 | ```
77 |
78 | There's a `setup.sh` script in the root directory of the project that you'll need to run to get your monolith container built up.
79 |
80 | ``` bash
81 | cd ~/monolith-to-microservices
82 |
83 | ./setup.sh
84 | ```
85 |
86 | After running the setup.sh script, ensure your Cloud Shell is running its latest version of nodeJS.
87 |
88 | ```bash
89 | nvm install --lts
90 | ```
91 |
92 | There's a Dockerfile located in the `~/monotlith-to-microservices/monolith` folder which you can use to build the application container. Before building the Docker container, you can preview the monolith application on **port 8080**.
93 |
94 | > Note: You can skip previewing the application if you want to, but it's a good idea to make sure it's working before you containerize it.
95 |
96 | ```bash
97 | cd ~/monolith-to-microservices/monolith
98 |
99 | npm start
100 | ```
101 |
102 | `CTRL+C` to stop the application.
103 |
104 | You will have to run Cloud Build (in that monolith folder) to build it, then push it up to GCR. Name your artifact as follows:
105 |
106 | - GCR Repo: gcr.io/${GOOGLE_CLOUD_PROJECT}
107 | - Image name: `MONOLITH_IDENTIFIER`
108 | - Image version: 1.0.0
109 |
110 | ```bash
111 | gcloud services enable cloudbuild.googleapis.com
112 |
113 | gcloud builds submit --tag gcr.io/${GOOGLE_CLOUD_PROJECT}/${MONOLITH_IDENTIFIER}:1.0.0 .
114 | ```
115 |
116 | ## Task 2: Create a kubernetes cluster and deploy the application
117 |
118 | Create your cluster as follows:
119 |
120 | - Cluster name: `CLUSTER_NAME`
121 | - Region: us-central1-a
122 | - Node count: 3
123 |
124 | ```bash
125 | gcloud config set compute/zone us-central1-a
126 |
127 | gcloud services enable container.googleapis.com
128 |
129 | gcloud container clusters create $CLUSTER_NAME --num-nodes 3
130 |
131 | gcloud container clusters get-credentials $CLUSTER_NAME
132 | ```
133 |
134 | Create and expose your deployment as follows:
135 |
136 | - Cluster name: `CLUSTER_NAME`
137 | - Container name: `MONOLITH_IDENTIFIER`
138 | - Container version: 1.0.0
139 | - Application port: 8080
140 | - Externally accessible port: 80
141 |
142 | ```bash
143 | kubectl create deployment $MONOLITH_IDENTIFIER --image=gcr.io/${GOOGLE_CLOUD_PROJECT}/${MONOLITH_IDENTIFIER}:1.0.0
144 |
145 | kubectl expose deployment $MONOLITH_IDENTIFIER --type=LoadBalancer --port 80 --target-port 8080
146 | ```
147 |
148 | Make note of the IP address that is assigned in the expose deployment operation. Use this command to get the IP address:
149 |
150 | ```bash
151 | kubectl get service
152 | ```
153 |
154 | 
155 |
156 | You should now be able to visit this IP address from your browser and see the following:
157 |
158 | 
159 |
160 | ## Task 3. Create new microservices
161 |
162 | Below is the set of services which need to be containerized. Navigate to the source roots mentioned below, and upload the artifacts which are created to the Google Container Registry with the metadata indicated. Name your artifact as follows:
163 |
164 | **Orders Microservice**
165 |
166 | - Service root folder: `~/monolith-to-microservices/microservices/src/orders`
167 | - GCR Repo: gcr.io/${GOOGLE_CLOUD_PROJECT}
168 | - Image name: `ORDERS_IDENTIFIER`
169 | - Image version: 1.0.0
170 |
171 | ```bash
172 | cd ~/monolith-to-microservices/microservices/src/orders
173 |
174 | gcloud builds submit --tag gcr.io/${GOOGLE_CLOUD_PROJECT}/${ORDERS_IDENTIFIER}:1.0.0 .
175 | ```
176 |
177 | **Products Microservice**
178 |
179 | - Service root folder: `~/monolith-to-microservices/microservices/src/products`
180 | - GCR Repo: gcr.io/${GOOGLE_CLOUD_PROJECT}
181 | - Image name: `PRODUCTS_IDENTIFIER`
182 | - Image version: 1.0.0
183 |
184 | ```bash
185 | cd ~/monolith-to-microservices/microservices/src/products
186 |
187 | gcloud builds submit --tag gcr.io/${GOOGLE_CLOUD_PROJECT}/${PRODUCTS_IDENTIFIER}:1.0.0 .
188 | ```
189 |
190 | ## Task 4: Deploy the new microservices
191 |
192 | Deploy these new containers following the same process that you followed for the `MONOLITH_IDENTIFIER` monolith. Note that these services will be listening on different ports, so make note of the port mappings in the table below. Create and expose your deployments as follows:
193 |
194 | **Orders Microservice**
195 |
196 | - Cluster name: `CLUSTER_NAME`
197 | - Container name: `ORDERS_IDENTIFIER`
198 | - Container version: 1.0.0
199 | - Application port: 8081
200 | - Externally accessible port: 80
201 |
202 | ```bash
203 | kubectl create deployment $ORDERS_IDENTIFIER --image=gcr.io/${GOOGLE_CLOUD_PROJECT}/${ORDERS_IDENTIFIER}:1.0.0
204 |
205 | kubectl expose deployment $ORDERS_IDENTIFIER --type=LoadBalancer --port 80 --target-port 8081
206 | ```
207 |
208 | **Products Microservice**
209 |
210 | - Cluster name: `CLUSTER_NAME`
211 | - Container name: `PRODUCTS_IDENTIFIER`
212 | - Container version: 1.0.0
213 | - Application port: 8082
214 | - Externally accessible port: 80
215 |
216 | ```bash
217 | kubectl create deployment $PRODUCTS_IDENTIFIER --image=gcr.io/${GOOGLE_CLOUD_PROJECT}/${PRODUCTS_IDENTIFIER}:1.0.0
218 |
219 | kubectl expose deployment $PRODUCTS_IDENTIFIER --type=LoadBalancer --port 80 --target-port 8082
220 | ```
221 |
222 | Get the external IP addresses for the Orders and Products microservices:
223 |
224 | ```bash
225 | kubectl get svc -w
226 | ```
227 |
228 | `CTRL+C` to stop the command.
229 |
230 | Now you can verify that the deployments were successful and that the services have been exposed by going to the following URLs in your browser:
231 |
232 | - `http://ORDERS_EXTERNAL_IP/api/orders`
233 | - `http://PRODUCTS_EXTERNAL_IP/api/products`
234 |
235 | Write down the IP addresses for the Orders and Products microservices. You will need them in the next task.
236 |
237 | ## Task 5. Configure and deploy the Frontend microservice
238 |
239 | >**Note**: You can use the lab method or use my method. **Choose one that suits you**.
240 |
241 | 1. My method (Using [sed](https://linux.die.net/man/1/sed) (stream editor) and using one-line command)
242 |
243 | ```bash
244 | export ORDERS_SERVICE_IP=$(kubectl get services -o jsonpath="{.items[1].status.loadBalancer.ingress[0].ip}")
245 |
246 | export PRODUCTS_SERVICE_IP=$(kubectl get services -o jsonpath="{.items[2].status.loadBalancer.ingress[0].ip}")
247 | ```
248 |
249 | ```bash
250 | cd ~/monolith-to-microservices/react-app
251 | sed -i "s/localhost:8081/$ORDERS_SERVICE_IP/g" .env
252 | sed -i "s/localhost:8082/$PRODUCTS_SERVICE_IP/g" .env
253 | npm run build
254 | ```
255 |
256 | 2. The lab method (Using [nano](https://linux.die.net/man/1/nano) text editor)
257 |
258 | Use the `nano` editor to replace the local URL with the IP address of the new Products microservices.
259 |
260 | ```bash
261 | cd ~/monolith-to-microservices/react-app
262 | nano .env
263 | ```
264 |
265 | When the editor opens, your file should look like this.
266 |
267 | ```bash
268 | REACT_APP_ORDERS_URL=http://localhost:8081/api/orders
269 | REACT_APP_PRODUCTS_URL=http://localhost:8082/api/products
270 | ```
271 |
272 | Replace the `REACT_APP_ORDERS_URL` and `REACT_APP_PRODUCTS_URL` to the new format while replacing with your Orders and Product microservice IP addresses so it matches below.
273 |
274 | ```bash
275 | REACT_APP_ORDERS_URL=http://<ORDERS_IP_ADDRESS>/api/orders
276 | REACT_APP_PRODUCTS_URL=http://<PRODUCTS_IP_ADDRESS>/api/products
277 | ```
278 |
279 | Press **CTRL+O**, press **ENTER**, then **CTRL+X** to save the file in the `nano` editor. Now rebuild the frontend app before containerizing it.
280 |
281 | ```bash
282 | npm run build
283 | ```
284 |
285 | ## Task 6: Create a containerized version of the Frontend microservice
286 |
287 | The final step is to containerize and deploy the Frontend. Use Cloud Build to package up the contents of the Frontend service and push it up to the Google Container Registry.
288 |
289 | - Service root folder: `~/monolith-to-microservices/microservices/src/frontend`
290 | - GCR Repo: gcr.io/${GOOGLE_CLOUD_PROJECT}
291 | - Image name: `FRONTEND_IDENTIFIER`
292 | - Image version: 1.0.0
293 |
294 | ```bash
295 | cd ~/monolith-to-microservices/microservices/src/frontend
296 |
297 | gcloud builds submit --tag gcr.io/${GOOGLE_CLOUD_PROJECT}/${FRONTEND_IDENTIFIER}:1.0.0 .
298 | ```
299 |
300 | ## Task 7: Deploy the Frontend microservice
301 |
302 | Deploy this container following the same process that you followed for the **Orders** and **Products** microservices. Create and expose your deployment as follows:
303 |
304 | - Cluster name: `CLUSTER_NAME`
305 | - Container name: `FRONTEND_IDENTIFIER`
306 | - Container version: 1.0.0
307 | - Application port: 8080
308 | - Externally accessible port: 80
309 |
310 | ```bash
311 | kubectl create deployment $FRONTEND_IDENTIFIER --image=gcr.io/${GOOGLE_CLOUD_PROJECT}/${FRONTEND_IDENTIFIER}:1.0.0
312 |
313 | kubectl expose deployment $FRONTEND_IDENTIFIER --type=LoadBalancer --port 80 --target-port 8080
314 | ```
315 |
316 | ```bash
317 | kubectl get svc -w
318 | ```
319 |
320 | `CTRL+C` to stop the command.
321 |
322 | 
323 |
324 | Wait until you see the external IP address and check the progress.
325 |
326 | ## Congratulations!
327 |
328 | 
329 |
330 | <div style="display: flex; justify-content: space-between;">
331 | <a style="text-align: left;" href="../GSP315/index.md"><= PREV (GSP315)</a>
332 | <a style="text-align: right;" href="../GSP322/index.md">NEXT (GSP322) =></a>
333 | </div>
334 | <br>
335 |
336 | [HOME](../../README.md)
337 |
--------------------------------------------------------------------------------
/challenge-labs/GSP787/index.md:
--------------------------------------------------------------------------------
1 | # [GSP787] Insights from Data with BigQuery: Challenge Lab
2 |
3 | ### [GSP787](https://www.cloudskillsboost.google/focuses/14294?parent=catalog)
4 |
5 | 
6 |
7 | ---
8 |
9 | Time: 1 hour<br>
10 | Difficulty: Intermediate<br>
11 | Price: 5 Credits
12 |
13 | Quest: [Insights from Data with BigQuery](https://www.cloudskillsboost.google/quests/123)<br>
14 |
15 | Last updated: May 20, 2023
16 |
17 | ---
18 |
19 | ## Challenge lab scenario
20 |
21 | You're part of a public health organization which is tasked with identifying answers to queries related to the Covid-19 pandemic. Obtaining the right answers will help the organization in planning and focusing healthcare efforts and awareness programs appropriately.
22 |
23 | The dataset and table that will be used for this analysis will be : `bigquery-public-data.covid19_open_data.covid19_open_data`. This repository contains country-level datasets of daily time-series data related to COVID-19 globally. It includes data relating to demographics, economy, epidemiology, geography, health, hospitalizations, mobility, government response, and weather.
24 |
25 | ## Task 1. Total confirmed cases
26 |
27 | - Build a query that will answer "What was the total count of confirmed cases on `Date`?" The query needs to return a single row containing the sum of confirmed cases across all countries. The name of the column should be **total_cases_worldwide**.
28 |
29 | Columns to reference:
30 |
31 | - cumulative_confirmed
32 | - date
33 |
34 | Go to BigQuery and run the following query:
35 |
36 | Change the `date` based on the lab instructions.
37 |
38 | 
39 |
40 | ```sql
41 | SELECT sum(cumulative_confirmed) as total_cases_worldwide
42 | FROM `bigquery-public-data.covid19_open_data.covid19_open_data`
43 | WHERE date=<****change date eg '2020-05-15'****>
44 | ```
45 |
46 | Mine is `May, 15 2020`. So, I will change the date to `2020-05-15`.
47 |
48 | example:
49 |
50 | ```sql
51 | SELECT sum(cumulative_confirmed) as total_cases_worldwide
52 | FROM `bigquery-public-data.covid19_open_data.covid19_open_data`
53 | WHERE date='2020-05-15'
54 | ```
55 |
56 | ## Task 2. Worst affected areas
57 |
58 | - Build a query for answering "How many states in the US had more than `Death Count` deaths on `Date`?" The query needs to list the output in the field **count_of_states**.
59 |
60 | > **Note**: Don't include NULL values.
61 |
62 | Columns to reference:
63 |
64 | - country_name
65 | - subregion1_name (for state information)
66 | - cumulative_deceased
67 |
68 | Go to BigQuery and run the following query:
69 |
70 | Change the `date` and `death_count` based on the lab instructions.
71 |
72 | ```sql
73 | with deaths_by_states as (
74 | SELECT subregion1_name as state, sum(cumulative_deceased) as death_count
75 | FROM `bigquery-public-data.covid19_open_data.covid19_open_data`
76 | where country_name="United States of America" and date=<****change date eg '2020-05-15'****> and subregion1_name is NOT NULL
77 | group by subregion1_name
78 | )
79 | select count(*) as count_of_states
80 | from deaths_by_states
81 | where death_count > <****change death count here****>
82 | ```
83 |
84 | Mine is `250` deaths. So, I will change the `death_count` to `250`.
85 |
86 | 
87 |
88 | example:
89 |
90 | ```sql
91 | with deaths_by_states as (
92 | SELECT subregion1_name as state, sum(cumulative_deceased) as death_count
93 | FROM `bigquery-public-data.covid19_open_data.covid19_open_data`
94 | where country_name="United States of America" and date='2020-05-15' and subregion1_name is NOT NULL
95 | group by subregion1_name
96 | )
97 | select count(*) as count_of_states
98 | from deaths_by_states
99 | where death_count > 250
100 | ```
101 |
102 | ## Task 3. Identifying hotspots
103 |
104 | - Build a query that will answer "List all the states in the United States of America that had more than `Confirmed Cases` confirmed cases on `Date`?" The query needs to return the State Name and the corresponding confirmed cases arranged in descending order. Name of the fields to return state and **total_confirmed_cases**.
105 |
106 | Columns to reference:
107 |
108 | - country_code
109 | - subregion1_name (for state information)
110 | - cumulative_confirmed
111 |
112 | Go to BigQuery and run the following query:
113 |
114 | ```sql
115 | SELECT * FROM (
116 | SELECT subregion1_name as state, sum(cumulative_confirmed) as total_confirmed_cases
117 | FROM `bigquery-public-data.covid19_open_data.covid19_open_data`
118 | WHERE country_code="US" AND date=<****change date eg '2020-05-15'****> AND subregion1_name is NOT NULL
119 | GROUP BY subregion1_name
120 | ORDER BY total_confirmed_cases DESC
121 | )
122 | WHERE total_confirmed_cases > <****change confirmed case here****>
123 | ```
124 |
125 | ## Task 4. Fatality ratio
126 |
127 | 1. Build a query that will answer "What was the case-fatality ratio in Italy for the month of Month 2020?" Case-fatality ratio here is defined as (total deaths / total confirmed cases) * 100.
128 |
129 | 2. Write a query to return the ratio for the month of Month 2020 and contain the following fields in the output: total_confirmed_cases, total_deaths, case_fatality_ratio.
130 |
131 | Columns to reference:
132 |
133 | - country_name
134 | - cumulative_confirmed
135 | - cumulative_deceased
136 |
137 | Go to BigQuery and run the following query:
138 |
139 | ```sql
140 | SELECT sum(cumulative_confirmed) as total_confirmed_cases, sum(cumulative_deceased) as total_deaths, (sum(cumulative_deceased)/sum(cumulative_confirmed))*100 as case_fatality_ratio
141 | FROM `bigquery-public-data.covid19_open_data.covid19_open_data`
142 | where country_name="Italy" AND date BETWEEN <****change month here '2020-06-01'****> and <****change month here '2020-06-30'****>
143 | ```
144 |
145 | Change the `month` based on the lab instructions.
146 |
147 | 
148 |
149 | Mine is `June, 2020`. So, I will change the month to `2020-06-01` and `2020-06-30`.
150 |
151 | example:
152 |
153 | ```sql
154 | SELECT sum(cumulative_confirmed) as total_confirmed_cases, sum(cumulative_deceased) as total_deaths, (sum(cumulative_deceased)/sum(cumulative_confirmed))*100 as case_fatality_ratio
155 | FROM `bigquery-public-data.covid19_open_data.covid19_open_data`
156 | where country_name="Italy" AND date BETWEEN '2020-06-01' and '2020-06-30'
157 | ```
158 |
159 | ## Task 5. Identifying specific day
160 |
161 | - Build a query that will answer: "On what day did the total number of deaths cross `Death count in Italy` in Italy?" The query should return the date in the format **yyyy-mm-dd**.
162 |
163 | Columns to reference:
164 |
165 | - country_name
166 | - cumulative_deceased
167 |
168 | Go to BigQuery and run the following query:
169 |
170 | ```sql
171 | SELECT date
172 | FROM `bigquery-public-data.covid19_open_data.covid19_open_data`
173 | where country_name="Italy" and cumulative_deceased> <****change the value of death cross****>
174 | order by date asc
175 | limit 1
176 | ```
177 |
178 | ## Task 6. Finding days with zero net new cases
179 |
180 | The following query is to identify the number of days in India between `Start date in India` and `Close date in India` when there were zero increases in the number of confirmed cases.
181 |
182 | Go to BigQuery and run the following query:
183 |
184 | ```sql
185 | WITH india_cases_by_date AS (
186 | SELECT
187 | date,
188 | SUM( cumulative_confirmed ) AS cases
189 | FROM
190 | `bigquery-public-data.covid19_open_data.covid19_open_data`
191 | WHERE
192 | country_name ="India"
193 | AND date between < ****change the date here'2020-02-21'****> and <****change the date here'2020-03-15'****>
194 | GROUP BY
195 | date
196 | ORDER BY
197 | date ASC
198 | )
199 | , india_previous_day_comparison AS
200 | (SELECT
201 | date,
202 | cases,
203 | LAG(cases) OVER(ORDER BY date) AS previous_day,
204 | cases - LAG(cases) OVER(ORDER BY date) AS net_new_cases
205 | FROM india_cases_by_date
206 | )
207 | select count(*)
208 | from india_previous_day_comparison
209 | where net_new_cases=0
210 | ```
211 |
212 | Change the `start date` in India and `close date` in India based on the lab instructions.
213 |
214 | 
215 |
216 | Mine is `25, Feb 2020` and `10, March 2020`. So, I will change the date to `2020-02-25` and `2020-03-10`.
217 |
218 | example:
219 |
220 | ```sql
221 | WITH india_cases_by_date AS (
222 | SELECT
223 | date,
224 | SUM( cumulative_confirmed ) AS cases
225 | FROM
226 | `bigquery-public-data.covid19_open_data.covid19_open_data`
227 | WHERE
228 | country_name ="India"
229 | AND date between '2020-02-25' and '2020-03-10'
230 | GROUP BY
231 | date
232 | ORDER BY
233 | date ASC
234 | )
235 | , india_previous_day_comparison AS
236 | (SELECT
237 | date,
238 | cases,
239 | LAG(cases) OVER(ORDER BY date) AS previous_day,
240 | cases - LAG(cases) OVER(ORDER BY date) AS net_new_cases
241 | FROM india_cases_by_date
242 | )
243 | select count(*)
244 | from india_previous_day_comparison
245 | where net_new_cases=0
246 | ```
247 |
248 | ## Task 7. Doubling rate
249 |
250 | - Using the previous query as a template, write a query to find out the dates on which the confirmed cases increased by more than `Limit Value`% compared to the previous day (indicating doubling rate of ~ 7 days) in the US between the dates March 22, 2020 and April 20, 2020. The query needs to return the list of dates, the confirmed cases on that day, the confirmed cases the previous day, and the percentage increase in cases between the days.
251 | - Use the following names for the returned fields: **Date**, **Confirmed_Cases_On_Day**, **Confirmed_Cases_Previous_Day**, and **Percentage_Increase_In_Cases**.
252 |
253 | Go to BigQuery and run the following query:
254 |
255 | Change the `Limit Value` based on the lab instructions.
256 |
257 | 
258 |
259 | Mine is `5`% so, I will change the value to `5`.
260 |
261 | ```sql
262 | WITH us_cases_by_date AS (
263 | SELECT
264 | date,
265 | SUM(cumulative_confirmed) AS cases
266 | FROM
267 | `bigquery-public-data.covid19_open_data.covid19_open_data`
268 | WHERE
269 | country_name="United States of America"
270 | AND date between '2020-03-22' and '2020-04-20'
271 | GROUP BY
272 | date
273 | ORDER BY
274 | date ASC
275 | )
276 | , us_previous_day_comparison AS
277 | (SELECT
278 | date,
279 | cases,
280 | LAG(cases) OVER(ORDER BY date) AS previous_day,
281 | cases - LAG(cases) OVER(ORDER BY date) AS net_new_cases,
282 | (cases - LAG(cases) OVER(ORDER BY date))*100/LAG(cases) OVER(ORDER BY date) AS percentage_increase
283 | FROM us_cases_by_date
284 | )
285 | select Date, cases as Confirmed_Cases_On_Day, previous_day as Confirmed_Cases_Previous_Day, percentage_increase as Percentage_Increase_In_Cases
286 | from us_previous_day_comparison
287 | where percentage_increase > <****change percentage value here****>
288 | ```
289 |
290 | ## Task 8. Recovery rate
291 |
292 | 1. Build a query to list the recovery rates of countries arranged in descending order (limit to `Limit Value`) upto the date May 10, 2020.
293 |
294 | 2. Restrict the query to only those countries having more than 50K confirmed cases.
295 | - The query needs to return the following fields: `country`, `recovered_cases`, `confirmed_cases`, `recovery_rate`.
296 |
297 | Columns to reference:
298 |
299 | - country_name
300 | - cumulative_confirmed
301 | - cumulative_recovered
302 |
303 | Go to BigQuery and run the following query:
304 |
305 | Change the `limit` based on the lab instructions.
306 |
307 | 
308 |
309 | Mine is `5` so, I will change the value to `5`.
310 |
311 | ```sql
312 | WITH cases_by_country AS (
313 | SELECT
314 | country_name AS country,
315 | sum(cumulative_confirmed) AS cases,
316 | sum(cumulative_recovered) AS recovered_cases
317 | FROM
318 | bigquery-public-data.covid19_open_data.covid19_open_data
319 | WHERE
320 | date = '2020-05-10'
321 | GROUP BY
322 | country_name
323 | )
324 | , recovered_rate AS
325 | (SELECT
326 | country, cases, recovered_cases,
327 | (recovered_cases * 100)/cases AS recovery_rate
328 | FROM cases_by_country
329 | )
330 | SELECT country, cases AS confirmed_cases, recovered_cases, recovery_rate
331 | FROM recovered_rate
332 | WHERE cases > 50000
333 | ORDER BY recovery_rate desc
334 | LIMIT <****change limit here****>
335 | ```
336 |
337 | ## Task 9. CDGR - Cumulative daily growth rate
338 |
339 | - The following query is trying to calculate the CDGR on `Date` (Cumulative Daily Growth Rate) for France since the day the first case was reported.The first case was reported on Jan 24, 2020.
340 | - The CDGR is calculated as:
341 | `((last_day_cases/first_day_cases)^1/days_diff)-1)`
342 |
343 | Where :
344 |
345 | - `last_day_cases` is the number of confirmed cases on May 10, 2020
346 | - `first_day_cases` is the number of confirmed cases on Jan 24, 2020
347 | - `days_diff` is the number of days between Jan 24 - May 10, 2020
348 |
349 | Go to BigQuery and run the following query:
350 |
351 | ```sql
352 | WITH
353 | france_cases AS (
354 | SELECT
355 | date,
356 | SUM(cumulative_confirmed) AS total_cases
357 | FROM
358 | `bigquery-public-data.covid19_open_data.covid19_open_data`
359 | WHERE
360 | country_name="France"
361 | AND date IN ('2020-01-24',
362 | <****change the date value here'2020-05-10'****>)
363 | GROUP BY
364 | date
365 | ORDER BY
366 | date)
367 | , summary as (
368 | SELECT
369 | total_cases AS first_day_cases,
370 | LEAD(total_cases) OVER(ORDER BY date) AS last_day_cases,
371 | DATE_DIFF(LEAD(date) OVER(ORDER BY date),date, day) AS days_diff
372 | FROM
373 | france_cases
374 | LIMIT 1
375 | )
376 | select first_day_cases, last_day_cases, days_diff, POW((last_day_cases/first_day_cases),(1/days_diff))-1 as cdgr
377 | from summary
378 | ```
379 |
380 | ## Task 10. Create a Looker Studio report
381 |
382 | - Create a [Looker Studio](https://datastudio.google.com/) report that plots the following for the United States:
383 | - Number of Confirmed Cases
384 | - Number of Deaths
385 | - Date range : `Date Range`
386 |
387 | Change the `Date Range` based on the lab instructions.
388 |
389 | 
390 |
391 | ```sql
392 | SELECT
393 | date, SUM(cumulative_confirmed) AS country_cases,
394 | SUM(cumulative_deceased) AS country_deaths
395 | FROM
396 | `bigquery-public-data.covid19_open_data.covid19_open_data`
397 | WHERE
398 | date BETWEEN <****change the date value here'2020-03-19'****>
399 | AND <****change the date value here'2020-04-22'****>
400 | AND country_name ="United States of America"
401 | GROUP BY date
402 | ```
403 |
404 | Mine is `2020-03-19` to `2020-04-22`. It should look like this:
405 |
406 | ```sql
407 | SELECT
408 | date, SUM(cumulative_confirmed) AS country_cases,
409 | SUM(cumulative_deceased) AS country_deaths
410 | FROM
411 | `bigquery-public-data.covid19_open_data.covid19_open_data`
412 | WHERE
413 | date BETWEEN '2020-03-19'
414 | AND '2020-04-22'
415 | AND country_name ="United States of America"
416 | GROUP BY date
417 | ```
418 |
419 | ## Congratulations!
420 |
421 | 
422 |
423 | <div style="display: flex; justify-content: space-between;">
424 | <a style="text-align: left;" href="../GSP345/index.md"><= PREV (GSP345)</a>
425 | </div>
426 | <br>
427 |
428 | [HOME](../../README.md)
429 |
--------------------------------------------------------------------------------
/challenge-labs/GSP345/index.md:
--------------------------------------------------------------------------------
1 | # [GSP345] Automating Infrastructure on Google Cloud with Terraform: Challenge Lab
2 |
3 |
4 | ### [GSP345](https://www.cloudskillsboost.google/focuses/42740?parent=catalog)
5 |
6 | 
7 |
8 | ---
9 |
10 | Time: 1 hour 30 minutes<br>
11 | Difficulty: Introductory<br>
12 | Price: 1 Credit
13 |
14 | Quest: [Automating Infrastructure on Google Cloud with Terraform](https://www.cloudskillsboost.google/quests/159)<br>
15 |
16 | Last updated: May 19, 2023
17 |
18 | ---
19 |
20 | ## Challenge scenario
21 |
22 | You are a cloud engineer intern for a new startup. For your first project, your new boss has tasked you with creating infrastructure in a quick and efficient manner and generating a mechanism to keep track of it for future reference and changes. You have been directed to use [Terraform](https://www.terraform.io/) to complete the project.
23 |
24 | For this project, you will use Terraform to create, deploy, and keep track of infrastructure on the startup's preferred provider, Google Cloud. You will also need to import some mismanaged instances into your configuration and fix them.
25 |
26 | In this lab, you will use Terraform to import and create multiple VM instances, a VPC network with two subnetworks, and a firewall rule for the VPC to allow connections between the two instances. You will also create a Cloud Storage bucket to host your remote backend.
27 |
28 |
29 | ## Task 1. Create the configuration files
30 |
31 | 1. Make the empty files and directories in Cloud Shell or the Cloud Shell Editor.
32 |
33 | ```bash
34 | touch main.tf
35 | touch variables.tf
36 | mkdir modules
37 | cd modules
38 | mkdir instances
39 | cd instances
40 | touch instances.tf
41 | touch outputs.tf
42 | touch variables.tf
43 | cd ..
44 | mkdir storage
45 | cd storage
46 | touch storage.tf
47 | touch outputs.tf
48 | touch variables.tf
49 | cd
50 | ```
51 |
52 | Folder structure should look like this:
53 |
54 | ```bash
55 | main.tf
56 | variables.tf
57 | modules/
58 | └── instances
59 | ├── instances.tf
60 | ├── outputs.tf
61 | └── variables.tf
62 | └── storage
63 | ├── storage.tf
64 | ├── outputs.tf
65 | └── variables.tf
66 | ```
67 |
68 | 2. Add the following to the each variables.tf file, and replace `PROJECT_ID` with your GCP Project ID, also change the `REGION` and the `ZONE` based on the lab instructions.
69 |
70 | ```terraform
71 | variable "region" {
72 | default = "<****us-central1****>"
73 | }
74 |
75 | variable "zone" {
76 | default = "<****us-central1-a****>"
77 | }
78 |
79 | variable "project_id" {
80 | default = "<****PROJECT_ID****>"
81 | }
82 | ```
83 |
84 | 3. Add the following to the `main.tf` file.
85 |
86 | ```terraform
87 | terraform {
88 | required_providers {
89 | google = {
90 | source = "hashicorp/google"
91 | version = "4.53.0"
92 | }
93 | }
94 | }
95 |
96 | provider "google" {
97 | project = var.project_id
98 | region = var.region
99 | zone = var.zone
100 | }
101 |
102 | module "instances" {
103 | source = "./modules/instances"
104 | }
105 | ```
106 |
107 | 4. Run the following commands in Cloud Shell in the root directory to initialize terraform.
108 |
109 | ```bash
110 | terraform init
111 | ```
112 |
113 | ## Task 2. Import infrastructure
114 |
115 | 1. In the Cloud Console, go to the **Navigation menu** and select **Compute Engine**.
116 | 2. Click the `tf-instance-1`, then copy the **Instance ID** down somewhere to use later.
117 | 
118 | 3. In the Cloud Console, go to the **Navigation menu** and select **Compute Engine**.
119 | 4. Do the same thing on previous step, click the `tf-instance-2`, then copy the **Instance ID** down somewhere to use later.
120 | 5. Next, navigate to `modules/instances/instances.tf`. Copy the following configuration into the file.
121 |
122 | ```terraform
123 | resource "google_compute_instance" "tf-instance-1" {
124 | name = "tf-instance-1"
125 | machine_type = "n1-standard-1"
126 | zone = var.zone
127 |
128 | boot_disk {
129 | initialize_params {
130 | image = "debian-cloud/debian-10"
131 | }
132 | }
133 |
134 | network_interface {
135 | network = "default"
136 | }
137 |
138 | metadata_startup_script = <<-EOT
139 | #!/bin/bash
140 | EOT
141 | allow_stopping_for_update = true
142 | }
143 |
144 | resource "google_compute_instance" "tf-instance-2" {
145 | name = "tf-instance-2"
146 | machine_type = "n1-standard-1"
147 | zone = var.zone
148 |
149 | boot_disk {
150 | initialize_params {
151 | image = "debian-cloud/debian-10"
152 | }
153 | }
154 |
155 | network_interface {
156 | network = "default"
157 | }
158 |
159 | metadata_startup_script = <<-EOT
160 | #!/bin/bash
161 | EOT
162 | allow_stopping_for_update = true
163 | }
164 | ```
165 |
166 | 6. Run the following commands in Cloud Shell to import the first instance. Replace `INSTANCE_ID_1` with **Instance ID** for `tf-instance-1` you copied down earlier.
167 |
168 | ```bash
169 | terraform import module.instances.google_compute_instance.tf-instance-1 <****INSTANCE_ID_1****>
170 | ```
171 |
172 | 7. Run the following commands in Cloud Shell to import the first instance. Replace `INSTANCE_ID_2` with **Instance ID** for `tf-instance-2` you copied down earlier.
173 |
174 | ```bash
175 | terraform import module.instances.google_compute_instance.tf-instance-2 <****INSTANCE_ID_2****>
176 | ```
177 |
178 | 8. Run the following commands to apply your changes.
179 |
180 | ```bash
181 | terraform plan
182 |
183 | terraform apply
184 | ```
185 |
186 | ## Task 3. Configure a remote backend
187 |
188 | 1. Add the following code to the `modules/storage/storage.tf` file. Replace `BUCKET_NAME` with bucket name given in lab instructions.
189 |
190 | ```terraform
191 | resource "google_storage_bucket" "storage-bucket" {
192 | name = "<****BUCKET_NAME****>"
193 | location = "US"
194 | force_destroy = true
195 | uniform_bucket_level_access = true
196 | }
197 | ```
198 |
199 | 2. Next, add the following to the `main.tf` file.
200 |
201 | ```terraform
202 | module "storage" {
203 | source = "./modules/storage"
204 | }
205 | ```
206 |
207 | 3. Run the following commands to initialize the module and create the storage bucket resource. Type `yes` at the dialogue after you run the apply command to accept the state changes.
208 |
209 | ```bash
210 | terraform init
211 |
212 | terraform apply
213 | ```
214 |
215 | 4. Next, update the `main.tf` file so that the terraform block looks like the following. Fill in your GCP Project ID for the bucket argument definition. Replace `BUCKET_NAME` with Bucket Name given in lab instructions.
216 |
217 | ```terraform
218 | terraform {
219 | backend "gcs" {
220 | bucket = "<****BUCKET_NAME****>"
221 | prefix = "terraform/state"
222 | }
223 |
224 | required_providers {
225 | google = {
226 | source = "hashicorp/google"
227 | version = "4.53.0"
228 | }
229 | }
230 | }
231 | ```
232 |
233 | 5. Run the following commands to initialize the remote backend. Type `yes` at the prompt.
234 |
235 | ```bash
236 | terraform init
237 | ```
238 |
239 | ## Task 4. Modify and update infrastructure
240 |
241 | 1. Navigate to `modules/instances/instance.tf`. Replace the entire contents of the file with the following, then replace `INSTANCE_NAME` with instance name given in lab instructions.
242 |
243 | ```terraform
244 | resource "google_compute_instance" "tf-instance-1" {
245 | name = "tf-instance-1"
246 | machine_type = "n1-standard-2"
247 | zone = var.zone
248 |
249 | boot_disk {
250 | initialize_params {
251 | image = "debian-cloud/debian-10"
252 | }
253 | }
254 |
255 | network_interface {
256 | network = "default"
257 | }
258 |
259 | metadata_startup_script = <<-EOT
260 | #!/bin/bash
261 | EOT
262 | allow_stopping_for_update = true
263 | }
264 |
265 | resource "google_compute_instance" "tf-instance-2" {
266 | name = "tf-instance-2"
267 | machine_type = "n1-standard-2"
268 | zone = var.zone
269 |
270 | boot_disk {
271 | initialize_params {
272 | image = "debian-cloud/debian-10"
273 | }
274 | }
275 |
276 | network_interface {
277 | network = "default"
278 | }
279 |
280 | metadata_startup_script = <<-EOT
281 | #!/bin/bash
282 | EOT
283 | allow_stopping_for_update = true
284 | }
285 |
286 | resource "google_compute_instance" "<****INSTANCE_NAME****>" {
287 | name = "<****INSTANCE_NAME****>"
288 | machine_type = "n1-standard-2"
289 | zone = var.zone
290 |
291 | boot_disk {
292 | initialize_params {
293 | image = "debian-cloud/debian-10"
294 | }
295 | }
296 |
297 | network_interface {
298 | network = "default"
299 | }
300 |
301 | metadata_startup_script = <<-EOT
302 | #!/bin/bash
303 | EOT
304 | allow_stopping_for_update = true
305 | }
306 | ```
307 |
308 | 2. Run the following commands to initialize the module and create/update the instance resources. Type `yes` at the dialogue after you run the apply command to accept the state changes.
309 |
310 | ```bash
311 | terraform init
312 |
313 | terraform apply
314 | ```
315 |
316 | ## Task 5. Destroy resources
317 |
318 | 1. Taint the `INSTANCE_NAME` resource by running the following command.
319 |
320 | ```bash
321 | terraform taint module.instances.google_compute_instance.<****INSTANCE_NAME****>
322 | ```
323 |
324 | 2. Run the following commands to apply the changes.
325 |
326 | ```bash
327 | terraform init
328 |
329 | terraform apply
330 | ```
331 |
332 | 3. Remove the `INSTANCE_NAME` (instance 3) resource from the `instances.tf` file. Delete the following code chunk from the file.
333 |
334 | ```terraform
335 | resource "google_compute_instance" "<****INSTANCE_NAME****>" {
336 | name = "<****INSTANCE_NAME****>"
337 | machine_type = "n1-standard-2"
338 | zone = var.zone
339 |
340 | boot_disk {
341 | initialize_params {
342 | image = "debian-cloud/debian-10"
343 | }
344 | }
345 |
346 | network_interface {
347 | network = "default"
348 | }
349 |
350 | metadata_startup_script = <<-EOT
351 | #!/bin/bash
352 | EOT
353 | allow_stopping_for_update = true
354 | }
355 | ```
356 |
357 | 4. Run the following commands to apply the changes. Type yes at the prompt.
358 |
359 | ```bash
360 | terraform apply
361 | ```
362 |
363 | ## Task 6. Use a module from the Registry
364 |
365 | 1. Copy and paste the following into the `main.tf` file. Replace `VPC_NAME` with VPC Name given in lab instructions.
366 |
367 | ```terraform
368 | module "vpc" {
369 | source = "terraform-google-modules/network/google"
370 | version = "~> 6.0.0"
371 |
372 | project_id = var.project_id
373 | network_name = "<****VPC_NAME****>"
374 | routing_mode = "GLOBAL"
375 |
376 | subnets = [
377 | {
378 | subnet_name = "subnet-01"
379 | subnet_ip = "10.10.10.0/24"
380 | subnet_region = var.region
381 | },
382 | {
383 | subnet_name = "subnet-02"
384 | subnet_ip = "10.10.20.0/24"
385 | subnet_region = var.region
386 | subnet_private_access = "true"
387 | subnet_flow_logs = "true"
388 | description = "This subnet has a description"
389 | }
390 | ]
391 | }
392 | ```
393 |
394 | 2. Run the following commands to initialize the module and create the VPC. Type `yes` at the prompt.
395 |
396 | ```bash
397 | terraform init
398 |
399 | terraform apply
400 | ```
401 |
402 | 3. Navigate to `modules/instances/instances.tf`. Replace the entire contents of the file with the following. Replace `VPC_NAME` with VPC Name given in lab instructions.
403 |
404 | ```terraform
405 | resource "google_compute_instance" "tf-instance-1" {
406 | name = "tf-instance-1"
407 | machine_type = "n1-standard-2"
408 | zone = var.zone
409 |
410 | boot_disk {
411 | initialize_params {
412 | image = "debian-cloud/debian-10"
413 | }
414 | }
415 |
416 | network_interface {
417 | network = "<****VPC_NAME****>"
418 | subnetwork = "subnet-01"
419 | }
420 |
421 | metadata_startup_script = <<-EOT
422 | #!/bin/bash
423 | EOT
424 | allow_stopping_for_update = true
425 | }
426 |
427 | resource "google_compute_instance" "tf-instance-2" {
428 | name = "tf-instance-2"
429 | machine_type = "n1-standard-2"
430 | zone = var.zone
431 |
432 | boot_disk {
433 | initialize_params {
434 | image = "debian-cloud/debian-10"
435 | }
436 | }
437 |
438 | network_interface {
439 | network = "<****VPC_NAME****>"
440 | subnetwork = "subnet-02"
441 | }
442 |
443 | metadata_startup_script = <<-EOT
444 | #!/bin/bash
445 | EOT
446 | allow_stopping_for_update = true
447 | }
448 |
449 | module "vpc" {
450 | source = "terraform-google-modules/network/google"
451 | version = "~> 6.0.0"
452 |
453 | project_id = "*****PROJECT_ID****"
454 | network_name = "****VPC_NAME*****"
455 | routing_mode = "GLOBAL"
456 |
457 | subnets = [
458 | {
459 | subnet_name = "subnet-01"
460 | subnet_ip = "10.10.10.0/24"
461 | subnet_region = "us-central1"
462 | },
463 | {
464 | subnet_name = "subnet-02"
465 | subnet_ip = "10.10.20.0/24"
466 | subnet_region = "us-central1"
467 | subnet_private_access = "true"
468 | subnet_flow_logs = "true"
469 | description = "This subnet has a description"
470 | },
471 | ]
472 | }
473 | ```
474 |
475 | 4. Run the following commands to initialize the module and update the instances. Type `yes` at the prompt.
476 |
477 | ```bash
478 | terraform init
479 |
480 | terraform apply
481 | ```
482 |
483 | ## Task 7. Configure a firewall
484 |
485 | 1. Add the following resource to the `main.tf` file and replace `PROJECT_ID` and `VPC_NAME` with your GCP Project ID and VPC Name given in lab instructions.
486 |
487 | ```terraform
488 | resource "google_compute_firewall" "tf-firewall" {
489 | name = "tf-firewall"
490 | network = "projects/<****PROJECT_ID****>/global/networks/<****VPC_NAME****>"
491 |
492 | allow {
493 | protocol = "tcp"
494 | ports = ["80"]
495 | }
496 |
497 | source_tags = ["web"]
498 | source_ranges = ["0.0.0.0/0"]
499 | }
500 | ```
501 |
502 | 2. Run the following commands to configure the firewall. Type `yes` at the prompt.
503 |
504 | ```bash
505 | terraform init
506 |
507 | terraform apply
508 | ```
509 |
510 | ## Congratulations!
511 |
512 | 
513 |
514 | <div style="display: flex; justify-content: space-between;">
515 | <a style="text-align: left;" href="../GSP342/index.md"><= PREV (GSP342)</a>
516 | <a style="text-align: right;" href="../GSP787/index.md">NEXT (GSP787) =></a>
517 | </div>
518 | <br>
519 |
520 | [HOME](../../README.md)
521 |
--------------------------------------------------------------------------------
/LICENSE.md:
--------------------------------------------------------------------------------
1 | Attribution-ShareAlike 4.0 International
2 |
3 | =======================================================================
4 |
5 | Creative Commons Corporation ("Creative Commons") is not a law firm and
6 | does not provide legal services or legal advice. Distribution of
7 | Creative Commons public licenses does not create a lawyer-client or
8 | other relationship. Creative Commons makes its licenses and related
9 | information available on an "as-is" basis. Creative Commons gives no
10 | warranties regarding its licenses, any material licensed under their
11 | terms and conditions, or any related information. Creative Commons
12 | disclaims all liability for damages resulting from their use to the
13 | fullest extent possible.
14 |
15 | Using Creative Commons Public Licenses
16 |
17 | Creative Commons public licenses provide a standard set of terms and
18 | conditions that creators and other rights holders may use to share
19 | original works of authorship and other material subject to copyright
20 | and certain other rights specified in the public license below. The
21 | following considerations are for informational purposes only, are not
22 | exhaustive, and do not form part of our licenses.
23 |
24 | Considerations for licensors: Our public licenses are
25 | intended for use by those authorized to give the public
26 | permission to use material in ways otherwise restricted by
27 | copyright and certain other rights. Our licenses are
28 | irrevocable. Licensors should read and understand the terms
29 | and conditions of the license they choose before applying it.
30 | Licensors should also secure all rights necessary before
31 | applying our licenses so that the public can reuse the
32 | material as expected. Licensors should clearly mark any
33 | material not subject to the license. This includes other CC-
34 | licensed material, or material used under an exception or
35 | limitation to copyright. More considerations for licensors:
36 | wiki.creativecommons.org/Considerations_for_licensors
37 |
38 | Considerations for the public: By using one of our public
39 | licenses, a licensor grants the public permission to use the
40 | licensed material under specified terms and conditions. If
41 | the licensor's permission is not necessary for any reason--for
42 | example, because of any applicable exception or limitation to
43 | copyright--then that use is not regulated by the license. Our
44 | licenses grant only permissions under copyright and certain
45 | other rights that a licensor has authority to grant. Use of
46 | the licensed material may still be restricted for other
47 | reasons, including because others have copyright or other
48 | rights in the material. A licensor may make special requests,
49 | such as asking that all changes be marked or described.
50 | Although not required by our licenses, you are encouraged to
51 | respect those requests where reasonable. More_considerations
52 | for the public:
53 | wiki.creativecommons.org/Considerations_for_licensees
54 |
55 | =======================================================================
56 |
57 | Creative Commons Attribution-ShareAlike 4.0 International Public
58 | License
59 |
60 | By exercising the Licensed Rights (defined below), You accept and agree
61 | to be bound by the terms and conditions of this Creative Commons
62 | Attribution-ShareAlike 4.0 International Public License ("Public
63 | License"). To the extent this Public License may be interpreted as a
64 | contract, You are granted the Licensed Rights in consideration of Your
65 | acceptance of these terms and conditions, and the Licensor grants You
66 | such rights in consideration of benefits the Licensor receives from
67 | making the Licensed Material available under these terms and
68 | conditions.
69 |
70 |
71 | Section 1 -- Definitions.
72 |
73 | a. Adapted Material means material subject to Copyright and Similar
74 | Rights that is derived from or based upon the Licensed Material
75 | and in which the Licensed Material is translated, altered,
76 | arranged, transformed, or otherwise modified in a manner requiring
77 | permission under the Copyright and Similar Rights held by the
78 | Licensor. For purposes of this Public License, where the Licensed
79 | Material is a musical work, performance, or sound recording,
80 | Adapted Material is always produced where the Licensed Material is
81 | synched in timed relation with a moving image.
82 |
83 | b. Adapter's License means the license You apply to Your Copyright
84 | and Similar Rights in Your contributions to Adapted Material in
85 | accordance with the terms and conditions of this Public License.
86 |
87 | c. BY-SA Compatible License means a license listed at
88 | creativecommons.org/compatiblelicenses, approved by Creative
89 | Commons as essentially the equivalent of this Public License.
90 |
91 | d. Copyright and Similar Rights means copyright and/or similar rights
92 | closely related to copyright including, without limitation,
93 | performance, broadcast, sound recording, and Sui Generis Database
94 | Rights, without regard to how the rights are labeled or
95 | categorized. For purposes of this Public License, the rights
96 | specified in Section 2(b)(1)-(2) are not Copyright and Similar
97 | Rights.
98 |
99 | e. Effective Technological Measures means those measures that, in the
100 | absence of proper authority, may not be circumvented under laws
101 | fulfilling obligations under Article 11 of the WIPO Copyright
102 | Treaty adopted on December 20, 1996, and/or similar international
103 | agreements.
104 |
105 | f. Exceptions and Limitations means fair use, fair dealing, and/or
106 | any other exception or limitation to Copyright and Similar Rights
107 | that applies to Your use of the Licensed Material.
108 |
109 | g. License Elements means the license attributes listed in the name
110 | of a Creative Commons Public License. The License Elements of this
111 | Public License are Attribution and ShareAlike.
112 |
113 | h. Licensed Material means the artistic or literary work, database,
114 | or other material to which the Licensor applied this Public
115 | License.
116 |
117 | i. Licensed Rights means the rights granted to You subject to the
118 | terms and conditions of this Public License, which are limited to
119 | all Copyright and Similar Rights that apply to Your use of the
120 | Licensed Material and that the Licensor has authority to license.
121 |
122 | j. Licensor means the individual(s) or entity(ies) granting rights
123 | under this Public License.
124 |
125 | k. Share means to provide material to the public by any means or
126 | process that requires permission under the Licensed Rights, such
127 | as reproduction, public display, public performance, distribution,
128 | dissemination, communication, or importation, and to make material
129 | available to the public including in ways that members of the
130 | public may access the material from a place and at a time
131 | individually chosen by them.
132 |
133 | l. Sui Generis Database Rights means rights other than copyright
134 | resulting from Directive 96/9/EC of the European Parliament and of
135 | the Council of 11 March 1996 on the legal protection of databases,
136 | as amended and/or succeeded, as well as other essentially
137 | equivalent rights anywhere in the world.
138 |
139 | m. You means the individual or entity exercising the Licensed Rights
140 | under this Public License. Your has a corresponding meaning.
141 |
142 |
143 | Section 2 -- Scope.
144 |
145 | a. License grant.
146 |
147 | 1. Subject to the terms and conditions of this Public License,
148 | the Licensor hereby grants You a worldwide, royalty-free,
149 | non-sublicensable, non-exclusive, irrevocable license to
150 | exercise the Licensed Rights in the Licensed Material to:
151 |
152 | a. reproduce and Share the Licensed Material, in whole or
153 | in part; and
154 |
155 | b. produce, reproduce, and Share Adapted Material.
156 |
157 | 2. Exceptions and Limitations. For the avoidance of doubt, where
158 | Exceptions and Limitations apply to Your use, this Public
159 | License does not apply, and You do not need to comply with
160 | its terms and conditions.
161 |
162 | 3. Term. The term of this Public License is specified in Section
163 | 6(a).
164 |
165 | 4. Media and formats; technical modifications allowed. The
166 | Licensor authorizes You to exercise the Licensed Rights in
167 | all media and formats whether now known or hereafter created,
168 | and to make technical modifications necessary to do so. The
169 | Licensor waives and/or agrees not to assert any right or
170 | authority to forbid You from making technical modifications
171 | necessary to exercise the Licensed Rights, including
172 | technical modifications necessary to circumvent Effective
173 | Technological Measures. For purposes of this Public License,
174 | simply making modifications authorized by this Section 2(a)
175 | (4) never produces Adapted Material.
176 |
177 | 5. Downstream recipients.
178 |
179 | a. Offer from the Licensor -- Licensed Material. Every
180 | recipient of the Licensed Material automatically
181 | receives an offer from the Licensor to exercise the
182 | Licensed Rights under the terms and conditions of this
183 | Public License.
184 |
185 | b. Additional offer from the Licensor -- Adapted Material.
186 | Every recipient of Adapted Material from You
187 | automatically receives an offer from the Licensor to
188 | exercise the Licensed Rights in the Adapted Material
189 | under the conditions of the Adapter's License You apply.
190 |
191 | c. No downstream restrictions. You may not offer or impose
192 | any additional or different terms or conditions on, or
193 | apply any Effective Technological Measures to, the
194 | Licensed Material if doing so restricts exercise of the
195 | Licensed Rights by any recipient of the Licensed
196 | Material.
197 |
198 | 6. No endorsement. Nothing in this Public License constitutes or
199 | may be construed as permission to assert or imply that You
200 | are, or that Your use of the Licensed Material is, connected
201 | with, or sponsored, endorsed, or granted official status by,
202 | the Licensor or others designated to receive attribution as
203 | provided in Section 3(a)(1)(A)(i).
204 |
205 | b. Other rights.
206 |
207 | 1. Moral rights, such as the right of integrity, are not
208 | licensed under this Public License, nor are publicity,
209 | privacy, and/or other similar personality rights; however, to
210 | the extent possible, the Licensor waives and/or agrees not to
211 | assert any such rights held by the Licensor to the limited
212 | extent necessary to allow You to exercise the Licensed
213 | Rights, but not otherwise.
214 |
215 | 2. Patent and trademark rights are not licensed under this
216 | Public License.
217 |
218 | 3. To the extent possible, the Licensor waives any right to
219 | collect royalties from You for the exercise of the Licensed
220 | Rights, whether directly or through a collecting society
221 | under any voluntary or waivable statutory or compulsory
222 | licensing scheme. In all other cases the Licensor expressly
223 | reserves any right to collect such royalties.
224 |
225 |
226 | Section 3 -- License Conditions.
227 |
228 | Your exercise of the Licensed Rights is expressly made subject to the
229 | following conditions.
230 |
231 | a. Attribution.
232 |
233 | 1. If You Share the Licensed Material (including in modified
234 | form), You must:
235 |
236 | a. retain the following if it is supplied by the Licensor
237 | with the Licensed Material:
238 |
239 | i. identification of the creator(s) of the Licensed
240 | Material and any others designated to receive
241 | attribution, in any reasonable manner requested by
242 | the Licensor (including by pseudonym if
243 | designated);
244 |
245 | ii. a copyright notice;
246 |
247 | iii. a notice that refers to this Public License;
248 |
249 | iv. a notice that refers to the disclaimer of
250 | warranties;
251 |
252 | v. a URI or hyperlink to the Licensed Material to the
253 | extent reasonably practicable;
254 |
255 | b. indicate if You modified the Licensed Material and
256 | retain an indication of any previous modifications; and
257 |
258 | c. indicate the Licensed Material is licensed under this
259 | Public License, and include the text of, or the URI or
260 | hyperlink to, this Public License.
261 |
262 | 2. You may satisfy the conditions in Section 3(a)(1) in any
263 | reasonable manner based on the medium, means, and context in
264 | which You Share the Licensed Material. For example, it may be
265 | reasonable to satisfy the conditions by providing a URI or
266 | hyperlink to a resource that includes the required
267 | information.
268 |
269 | 3. If requested by the Licensor, You must remove any of the
270 | information required by Section 3(a)(1)(A) to the extent
271 | reasonably practicable.
272 |
273 | b. ShareAlike.
274 |
275 | In addition to the conditions in Section 3(a), if You Share
276 | Adapted Material You produce, the following conditions also apply.
277 |
278 | 1. The Adapter's License You apply must be a Creative Commons
279 | license with the same License Elements, this version or
280 | later, or a BY-SA Compatible License.
281 |
282 | 2. You must include the text of, or the URI or hyperlink to, the
283 | Adapter's License You apply. You may satisfy this condition
284 | in any reasonable manner based on the medium, means, and
285 | context in which You Share Adapted Material.
286 |
287 | 3. You may not offer or impose any additional or different terms
288 | or conditions on, or apply any Effective Technological
289 | Measures to, Adapted Material that restrict exercise of the
290 | rights granted under the Adapter's License You apply.
291 |
292 |
293 | Section 4 -- Sui Generis Database Rights.
294 |
295 | Where the Licensed Rights include Sui Generis Database Rights that
296 | apply to Your use of the Licensed Material:
297 |
298 | a. for the avoidance of doubt, Section 2(a)(1) grants You the right
299 | to extract, reuse, reproduce, and Share all or a substantial
300 | portion of the contents of the database;
301 |
302 | b. if You include all or a substantial portion of the database
303 | contents in a database in which You have Sui Generis Database
304 | Rights, then the database in which You have Sui Generis Database
305 | Rights (but not its individual contents) is Adapted Material,
306 |
307 | including for purposes of Section 3(b); and
308 | c. You must comply with the conditions in Section 3(a) if You Share
309 | all or a substantial portion of the contents of the database.
310 |
311 | For the avoidance of doubt, this Section 4 supplements and does not
312 | replace Your obligations under this Public License where the Licensed
313 | Rights include other Copyright and Similar Rights.
314 |
315 |
316 | Section 5 -- Disclaimer of Warranties and Limitation of Liability.
317 |
318 | a. UNLESS OTHERWISE SEPARATELY UNDERTAKEN BY THE LICENSOR, TO THE
319 | EXTENT POSSIBLE, THE LICENSOR OFFERS THE LICENSED MATERIAL AS-IS
320 | AND AS-AVAILABLE, AND MAKES NO REPRESENTATIONS OR WARRANTIES OF
321 | ANY KIND CONCERNING THE LICENSED MATERIAL, WHETHER EXPRESS,
322 | IMPLIED, STATUTORY, OR OTHER. THIS INCLUDES, WITHOUT LIMITATION,
323 | WARRANTIES OF TITLE, MERCHANTABILITY, FITNESS FOR A PARTICULAR
324 | PURPOSE, NON-INFRINGEMENT, ABSENCE OF LATENT OR OTHER DEFECTS,
325 | ACCURACY, OR THE PRESENCE OR ABSENCE OF ERRORS, WHETHER OR NOT
326 | KNOWN OR DISCOVERABLE. WHERE DISCLAIMERS OF WARRANTIES ARE NOT
327 | ALLOWED IN FULL OR IN PART, THIS DISCLAIMER MAY NOT APPLY TO YOU.
328 |
329 | b. TO THE EXTENT POSSIBLE, IN NO EVENT WILL THE LICENSOR BE LIABLE
330 | TO YOU ON ANY LEGAL THEORY (INCLUDING, WITHOUT LIMITATION,
331 | NEGLIGENCE) OR OTHERWISE FOR ANY DIRECT, SPECIAL, INDIRECT,
332 | INCIDENTAL, CONSEQUENTIAL, PUNITIVE, EXEMPLARY, OR OTHER LOSSES,
333 | COSTS, EXPENSES, OR DAMAGES ARISING OUT OF THIS PUBLIC LICENSE OR
334 | USE OF THE LICENSED MATERIAL, EVEN IF THE LICENSOR HAS BEEN
335 | ADVISED OF THE POSSIBILITY OF SUCH LOSSES, COSTS, EXPENSES, OR
336 | DAMAGES. WHERE A LIMITATION OF LIABILITY IS NOT ALLOWED IN FULL OR
337 | IN PART, THIS LIMITATION MAY NOT APPLY TO YOU.
338 |
339 | c. The disclaimer of warranties and limitation of liability provided
340 | above shall be interpreted in a manner that, to the extent
341 | possible, most closely approximates an absolute disclaimer and
342 | waiver of all liability.
343 |
344 |
345 | Section 6 -- Term and Termination.
346 |
347 | a. This Public License applies for the term of the Copyright and
348 | Similar Rights licensed here. However, if You fail to comply with
349 | this Public License, then Your rights under this Public License
350 | terminate automatically.
351 |
352 | b. Where Your right to use the Licensed Material has terminated under
353 | Section 6(a), it reinstates:
354 |
355 | 1. automatically as of the date the violation is cured, provided
356 | it is cured within 30 days of Your discovery of the
357 | violation; or
358 |
359 | 2. upon express reinstatement by the Licensor.
360 |
361 | For the avoidance of doubt, this Section 6(b) does not affect any
362 | right the Licensor may have to seek remedies for Your violations
363 | of this Public License.
364 |
365 | c. For the avoidance of doubt, the Licensor may also offer the
366 | Licensed Material under separate terms or conditions or stop
367 | distributing the Licensed Material at any time; however, doing so
368 | will not terminate this Public License.
369 |
370 | d. Sections 1, 5, 6, 7, and 8 survive termination of this Public
371 | License.
372 |
373 |
374 | Section 7 -- Other Terms and Conditions.
375 |
376 | a. The Licensor shall not be bound by any additional or different
377 | terms or conditions communicated by You unless expressly agreed.
378 |
379 | b. Any arrangements, understandings, or agreements regarding the
380 | Licensed Material not stated herein are separate from and
381 | independent of the terms and conditions of this Public License.
382 |
383 |
384 | Section 8 -- Interpretation.
385 |
386 | a. For the avoidance of doubt, this Public License does not, and
387 | shall not be interpreted to, reduce, limit, restrict, or impose
388 | conditions on any use of the Licensed Material that could lawfully
389 | be made without permission under this Public License.
390 |
391 | b. To the extent possible, if any provision of this Public License is
392 | deemed unenforceable, it shall be automatically reformed to the
393 | minimum extent necessary to make it enforceable. If the provision
394 | cannot be reformed, it shall be severed from this Public License
395 | without affecting the enforceability of the remaining terms and
396 | conditions.
397 |
398 | c. No term or condition of this Public License will be waived and no
399 | failure to comply consented to unless expressly agreed to by the
400 | Licensor.
401 |
402 | d. Nothing in this Public License constitutes or may be interpreted
403 | as a limitation upon, or waiver of, any privileges and immunities
404 | that apply to the Licensor or You, including from the legal
405 | processes of any jurisdiction or authority.
406 |
407 |
408 | =======================================================================
409 |
410 | Creative Commons is not a party to its public
411 | licenses. Notwithstanding, Creative Commons may elect to apply one of
412 | its public licenses to material it publishes and in those instances
413 | will be considered the “Licensor.” The text of the Creative Commons
414 | public licenses is dedicated to the public domain under the CC0 Public
415 | Domain Dedication. Except for the limited purpose of indicating that
416 | material is shared under a Creative Commons public license or as
417 | otherwise permitted by the Creative Commons policies published at
418 | creativecommons.org/policies, Creative Commons does not authorize the
419 | use of the trademark "Creative Commons" or any other trademark or logo
420 | of Creative Commons without its prior written consent including,
421 | without limitation, in connection with any unauthorized modifications
422 | to any of its public licenses or any other arrangements,
423 | understandings, or agreements concerning use of licensed material. For
424 | the avoidance of doubt, this paragraph does not form part of the
425 | public licenses.
426 |
427 | Creative Commons may be contacted at creativecommons.org.
428 |
--------------------------------------------------------------------------------