 4 |
5 |
6 |
4 |
5 |
6 | Non-software content in this project is licensed under a [Name of the license](link to the license) license.
52 |
53 | When you license your “non-software content,” you’re referring to things like your contribution guidelines, code of conduct, and any media or text that might appear on a webpage or in an app.
54 |
55 | If you are an academic researcher collecting data, writing articles, books, and papers, or creating visualizations and other research products, you may want to explore making your work Open Access, which means making it available on the web with no restrictions to access and minimal or no restrictions on use.
56 |
57 |
58 |
59 | ### Sharing Your Code
60 |
61 | If you and your community are collaborating on code, we recommend using an open license. Open licenses for code help make clear how people can use or contribute to your work, and makes it clear to the community that it's open for remixing. To begin, you’ll need to select an open source software license (OSS). There’s a really easy way to do this, built in to GitHub. When you create a repo, GitHub gives you the option of selecting from a number common OSS licenses, and GitHub automatically generates a LICENSE.md file for you with the terms and conditions of whatever license you picked. This is a handy feature if you and your community want to share the code you create together.
62 |
63 | Of course, you can create your own license file or edit your LICENSE.md at any time. This lets you change your license or add a license for content that isn’t code.
64 |
65 | Visit [choosealicense.com](http://choosealicense.com/) to learn more about the different kinds of OSS licenses available for your project. The site asks you to identify your primary motivation or need for licensing your project’s code and then suggests a license to you. There are also content licenses in the [“My project isn’t software”](http://choosealicense.com/non-software/) section of [choosealicense.com](http://choosealicense.com).
66 |
67 | 
68 |
69 | From [choosealicense.com](http://choosealicense.com/non-software/)
70 |
71 | You can cut and paste the license into your pre-existing LICENSE.md file or create a new LICENSE.md file if you didn’t pick a license when you set up your repo
72 |
73 | ### {{ site.assignment }} Add a License to Your Project
74 |
75 | 1. Pick an OSS license if your project has code. (10 minutes)
76 | * Spend some time reading and researching the software licenses on [choosealicense.com](http://choosealicense.com/non-software/). Pick a license that makes the most sense for your project, but remember that the goal of working open is build stuff people can use, adapt, and make their own. Don’t unduly limit your project’s usefulness to your community.
77 | * Once you’ve picked a license, go to your GitHub repo and look for your LICENSE.md file. Make one if you don’t already have one. Copy and paste your OSS license into the file.
78 | 2. Pick a content license for the rest of your work. (10 minutes)
79 | * Likewise, read around the license descriptions on [Creative Commons](https://creativecommons.org/licenses/) website to get an idea of which content license serves your community best. Once you’ve picked a license, grab its name (like CC-BY 4.0) and [its link](http://creativecommons.org/licenses/by/4.0/). Add the license at the top of your LICENSE.md file like this:
80 | > Non-software content in this project is licensed under a [CC-BY 4.0](http://creativecommons.org/licenses/by/4.0/) license.
81 | * If you’re unsure about which licenses to pick for your project, take it to the community. Ask your contributors what they think is appropriate and ask your community, at-large, how they would like to be able to use the project when it is completed and released.
--------------------------------------------------------------------------------
/_articles/get-your-project-online/the-github-interface-and-markdown.md:
--------------------------------------------------------------------------------
1 | ---
2 | layout: page
3 | title: "The GitHub Interface and Markdown"
4 | module: "4.2"
5 | date: 2016-10-06 14:05:56
6 | time: "30 min"
7 | following: _articles/get-your-project-online/project-set-up-for-collaboration-with-github.md
8 | summary: "In this module, we’ll get acquainted with GitHub interface-- the place where all the magic happens. You’ll also sign up for a GitHub account, and start getting your project online!"
9 | prereq: "Have completed all previous sections and modules"
10 | format: "Read, watch videos, use GitHub"
11 | materials: "a computer, an internet connection, and a free GitHub account"
12 | ---
13 | * TOC
14 | {:toc}
15 |
16 | ### The GitHub Interface
17 |
18 | Probably the easiest way to get to know the GitHub interface is to click around it a bit. We’ll do that in the video below to give you a preview, but you should explore on your own when you get your account set up in the assignment that follows.
19 |
20 | {% include videowrapper.html
21 | url="https://www.filepicker.io/api/file/JBBnlYcIQlGAth3Uaw9F"
22 | title="The GitHub Interface, Abby Cabunoc Mayes" %}
23 |
24 | ### Using Markdown
25 |
26 | In the previous video, you saw lots of documents and issues (those bits of information about work that needs to be done). Some of these files and issues included links, images, and emoticons. These documents were formatted using a handy system called “markdown” designed to make any document more organized and readable for display on the web. When you use markdown you are adding a bit of extra notation to your text file. This Markdown notation instructs your web browser how to display the text-- where to bold or italicize text, create lists, embed an image or a link, etc. Markdown is very much like HTML, the language of the web, in that it lets you easily create and display text in different ways online.
27 |
28 | Here are some examples of how you can use Markdown.
29 |
30 | * `#` creates a top-level heading, like a title. (e.g. `# My README File`)
31 | * `## `through `######` create sub-headings like those you might use for different chapters or sections within a larger document. (e.g. `## Part 1: Project Description`)
32 | * `*` makes text bold or strong. (e.g. `*Key vocabulary*`)
33 | * `**` makes text italic or emphasized. (e.g. `The **internet** is a network of computers.`)
34 | * `-` creates a list item. (e.g. `- First, click on the file called readme.md.`)
35 | * `- [ ]` creates a checklist item (e.g. `- [ ] Draft contributor guidelines.`)
36 | * Any number starts a numbered list.
37 | * You format links like this: `[text](link)`. (e.g. `Visit [our teaching activities page]([https://teach.mozilla.org](https://teach.mozilla.org)).`)
38 | * You format images like this: ``. (e.g. ``).
39 |
40 | 
41 |
42 | You can preview the message you write before sending using the preview tab in the markdown editor.
43 |
44 | Find [more documentation on using Markdown on Daring Fireball](http://daringfireball.net/projects/markdown/syntax), and [GitHub has its own markdown documented here](https://guides.github.com/features/mastering-markdown/). There are also tools like [MacDown](http://macdown.uranusjr.com/) that show live previews to make writing Markdown easier.
45 |
46 | ### {{ site.assignment }} Get on GitHub!
47 |
48 | 1.Sign up.
Start by signing up with Github Online.
You’ll be creating a new account, and joining the larger GitHub community of people working openly. Access the site https://github.com and fill the form of *sign up for GitHub*.
49 |
50 | 
51 |
52 | 2.Create a Repository, or place to store all your working files
. Every project starts by creating a new repository.
53 |
54 | 
55 |
56 | 2.1. Create a project title. Good practice is to either use dashes ("-") or underscores ("_") between words in your title (e.g. my-first-repo or my_first_repo), in the same way you might structure a file name on your desktop. Computers read continuous names more easily than ones punctuated by spaces, so it's nice to reinforce that convention in your file names. You can change the name of this repo later on (under the settings tab) if need be, but if you’re working with a community of contributors it’s best to keep your naming conventions consistent to avoid confusion.
57 |
58 | 
59 |
60 | 2.2. Write a short description of your repository in the space provided.
61 |
62 | 
63 |
64 | 2.3. Initialize your repo with a README: check the box the box in the interface to add your very first file, a README, to your brand new repository. GitHub will generate a generic file containing the title and description you wrote in b, above. You’ll add more content to it in step 3, below.
65 | 2.4. Select a license. If you are sure what kind of license you want on your repo, select one here. If you’re not sure, don’t worry! Licences are covered in section 4.5, so you can skip selection for now and add a license after you’ve completed that section.
66 | 2.5. Click in the **create repository** button.
67 |
68 | 
69 |
70 | 3.Your first commit.
Let's start by adding some content to your README.
71 |
72 | 3.1. Click on the README.md and then the edit button
73 |
74 | 
75 |
76 | 3.2. Using the README text you generated in the first module, add Markdown to create any headings, images, links, or lists you need. Note that you can toggle between editing (in markdown) and previewing the changes that markdown makes to the text.
77 |
78 | 
79 |
80 | 3.3. Add a commit message - Your commit message should point to the changes that you've made (e.g. “added content to readme”) and press the commit button!
81 |
82 | 
83 |
84 | 3.4. Hooray! You did it! 👏🏽✨🎉 Your first commit!
85 |
86 | 4.Now that you’ve added your first file, go ahead and add another-- put your project Roadmap, which you created in Section 2, up on GitHub as well, using Markdown to format it, as in the previous step. Do the same with your Code Of Conduct and CONTRIBUTING files. Now your project is on the web and ready for collaboration!
87 |
--------------------------------------------------------------------------------
/_articles/github-for-collaboration.md:
--------------------------------------------------------------------------------
1 | ---
2 | layout: page
3 | title: "GitHub for Collaboration"
4 | module: "5"
5 | date: 2016-10-06 14:05:56
6 | contents:
7 | - _articles/github-for-collaboration/getting-around-github.md
8 | - _articles/github-for-collaboration/collaborative-workflow-for-contributions.md
9 | following: _articles/github-for-collaboration/getting-around-github.md
10 | ---
11 |
12 | As you learned in a previous section, GitHub is a web-based interface for version control. To review, version control is a way of keeping track of changes made to a collection of working documents. GitHub also provides an excellent set of collaborative tools as well as structure and space for communicating about collaborative work on open projects. You’ve already got your project set up on Github in the previous section, in this section you’ll establish a good workflow to create a respectful and productive environment for your collaborators.
13 |
14 | First, you’ll learn a bit more about how repositories are shared, stored, and updated on GitHub. You’ll learn about GitHub-specific concepts related to making those changes: branches, pull requests, merges, forks, and issues. And you’ll get some practice managing and making changes to a repository.
--------------------------------------------------------------------------------
/_articles/github-for-collaboration/collaborative-workflow-for-contributions.md:
--------------------------------------------------------------------------------
1 | ---
2 | layout: page
3 | title: "Collaborative Workflow"
4 | module: "5.2"
5 | date: 2016-10-06 14:05:56
6 | time: "60 mins"
7 | following: _articles/open-communications.md
8 | summary: "In this module, you’ll be introduced to a good, open, welcome workflow for collaboration on GitHub. You’ll get some tips for good GitHub communications, and you’ll practice making and managing changes to repositories… You’ll play the role of both Project Lead and contributor. Get ready to make and merge your first pull requests!"
9 | prereq: "Have completed all previous sections and modules"
10 | format: "Read, watch videos, and work with GitHub in two roles: as a contributor, and as a project lead"
11 | materials: "Your computer, GitHub account, your own project— plus someone else’s project you’ll contribute to!"
12 | ---
13 | * TOC
14 | {:toc}
15 |
16 | ### Collaboration as Conversation
17 |
18 | Good collaboration is a back and forth process, like a conversation, or a call and response. It’s not complicated, but you need to know the steps and the roles for contributor and lead. The series of videos below walks you through a workflow for collaboration on open projects, and demonstrates good communication with contributors. Watch closely, because you’ll be doing these steps (and playing both roles) yourself in the assignments at the end of this module! We’ve included screenshots in the assignment section to help you along.
19 |
20 |
21 |
22 | If you master this workflow and practice it in your community, contribution can happen more smoothly and be more satisfying for all involved. You, the project lead, need to move this whole process forward! These handy tips should help.
23 |
24 | * Acknowledge when a new issue is posted by a contributor (remember, both contributors and project leads can post issues!)
25 | * Notify users when you start and finish work
26 | * Summarize the state of the issue
27 | * Give periodic status updates
28 | * Inform everyone if you slip
29 | * Inform everyone if you’re on track
30 | * Make responsibility handoffs clear
31 | * Notify when new functionality is added to the project, and when fixes are made
32 | * Always use friendly tone and correct grammar to increase legibility
33 | * Talk to users on their terms, follow their cues
34 |
35 | ### Writing Great Messages and Comments on GitHub
36 |
37 | Your communications on GitHub don’t need to be literary masterpieces, but it’s really helpful if they are clear and well-written. Remember the history of your document is a timeline of commits. Each "commit message" is the backstory of your changes. A good, comprehensible, useful "commit message" is one that fills in that story. It lets collaborators and the project owner/lead know what you've done, what changes you’ve made, what you’ve added. This includes your own commits as project lead. While you might know the ins and outs of any change you made at the moment, in 5 days or 5 weeks or 5 years, those details will probably have slipped your mind. A detailed commit will capture that information forever.
38 |
39 | When you’re writing commit messages, you’ll want to make them short, clear, and in a fairly uniform format so they're easy to read. Here are a few rules for writing messages like these, taken from this excellent blog post, [How to Write a Git Commit Message](http://chris.beams.io/posts/git-commit/), by Chris Beams. Read the post to learn about the rationale behind each rule.
40 |
41 | 1. Separate subject from body with a blank line
42 | 2. Limit the subject line to 50 characters
43 | 3. Capitalize the subject line
44 | 4. Do not end the subject line with a period
45 | 5. Use the imperative mood in the subject line
46 | 6. Wrap the body at 72 characters
47 | 7. Use the body to explain what and why vs. how
48 |
49 | Here is an example to illustrate the above points:
50 |
51 | ```
52 | Add example commit message to collab workflow lesson
53 |
54 | An example of what a nice commit message looks like to make the points from
55 | the lesson text more concrete.
56 | ```
57 |
58 | ### {{ site.assignment }} As a Contributor, Make a Pull Request
59 |
60 | 1. Find a project you’d like to contribute to and check out the README
61 | 2. Read the contributing.md file and code of conduct
62 | 3. Familiarize yourself with the project’s roadmap
63 | 4. Review the issues and pick one-- ideally a “good first bug” that you can take on
64 | 5. Comment on the issue, be sure to ask if you have any questions about the task
65 | 6. Follow the contributor guidelines
66 | 1. Fork the repo
67 | 2. Make a branch
68 | 3. Make a commit
69 | 4. Write a great commit message
70 | 5. Make a pull request!
71 |
72 | *Switch to your branch containing the changes*
73 | 
74 |
75 | *Compare your changes with the remote branch*
76 | 
77 |
78 | *Provide a title and a description for your pull request*
79 | 
80 |
81 | ### {{ site.assignment }} As Project Lead, Merge a Pull Request
82 |
83 | Follow the steps described for as project lead
84 |
85 | 1. Make a label
86 | 2. Make an issue for a good first bug
87 | 3. Let your community know about this issue!
88 | 4. Reply to Comment
89 | 5. Wait for Pull request
90 | 6. Review pull request, and be sure to provide useful feedback and encouragement
91 | 7. Merge pull request
92 | 8. Thank your contributor!
93 | 9. Close the issue! Woo-Hoo!
94 |
--------------------------------------------------------------------------------
/_articles/github-for-collaboration/getting-around-github.md:
--------------------------------------------------------------------------------
1 | ---
2 | layout: page
3 | title: "Getting Around in GitHub"
4 | module: "5.1"
5 | date: 2016-10-06 14:05:56
6 | time: "10 mins"
7 | following: _articles/github-for-collaboration/collaborative-workflow-for-contributions.md
8 | summary: "This module will help you understand how and where you and your collaborators will save changes and any work on a collection of files (a repository) when using gitHub."
9 | prereq: "Have completed all previous sections and modules"
10 | format: "Read and look at diagrams"
11 | materials: "None"
12 |
13 | ---
14 | * TOC
15 | {:toc}
16 |
17 | ### Repos, Forks, and Branches, Oh My!
18 |
19 | What's special about Git and GitHub is that every instance or copy of a repository (or collection of files) has its full life history, the full timeline of changes bundled with it. When you’re working with GitHub, you may have multiple copies of the same repository in use at once, and it’s helpful to understand how that works, and why. Let’s take a moment to understand how this works, starting with the simplest scenario.
20 |
21 | If you're working alone you might use version control on a single repository on your local computer. Here’s a diagram that illustrates that scenario:
22 |
23 | 
24 |
25 | Every save or commit you make is tracked and we can step back and forth between versions.
26 |
27 | This is great! But what if you have a crazy new idea you want to try out, that you’re excited about but not sure will work. You might make a whole boatload of changes that could take your project to amazing new levels-- OR totally break everything you’ve done so far. To experiment with your repository without permanently altering it, you can use a special feature enabled by GitHub (and the underlying technology Git) to create a copy or branch of your existing code that has all the functionality of the original, but is still connected to the original (it’s not a separate duplicate or clone), which is called the master branch.
28 |
29 | This concept of branching is a bit tricky to explain. For a metaphor, you can imagine a river. This river is just flowing along, but every once in awhile, there might be a stream that flows out from the river in a new direction-- let’s call this a new branch. This new branch is doing its own thing. It may flow along with lots of twists and turns but go nowhere and just peter out... or it may splash along and then join up and flow into the river again somewhere down the line.
30 |
31 | Back in your repository, your new experimental branch (which contains a copy of all your code or content) is connected to the master branch (also containing code and content) in the same way as our stream is connected to the river. In your new branch (the stream), you make all sorts of great changes, and if they work out, you can choose to merge (or flow) them back into the master branch (the river). Our new branch and the master branch are always connected, and part of the same project.
32 |
33 | If you’ve got lots of new ideas, you can make lots of branches. This concept of branching allows you to work in many new directions without altering your code or content base in the master branch until you are ready.
34 |
35 | But what about sharing your files? You can’t do that if they are only stored your own, local computer. You need GitHub! To get your files on GitHub, you’ll make a copy or clone of your local repository and upload it to GitHub. When you put a repository on GitHub, it’s stored on GitHub server, so anyone can find them on the web. An added benefit is that the clone on GitHub serves as a backup of your local repository, in case the files on your own computer catch a virus, get lost, or are accidentally erased. To work with this repository, you’d most likely make changes to the files on your local machine, using your favorite text or code editor. Then you’d PUSH those changes as commits to the copy of the repo on the server. Your local copy of the repo and the one on the server are in sync, and you have a stable, reliable back-up.
36 |
37 | 
38 |
39 | This method where you’re working locally and pushing changes to the server is pretty simple. It gets a teeny bit more complex when you have lots of contributors. Luckily, and this is where GitHub really shines.
40 |
41 | To work with contributors, you need to designate a main repo, hosted on GitHub. This repo that contains all the project code, content, and changes your community agrees should be part of the project. There's nothing structurally different or special about this repo (since all repos contain a full history of changes), it's just the one all your contributors agreed to use. We’ll call this repo the main repo.
42 |
43 | 
44 |
45 | Usually in this workflow, each collaborator makes their own local copy or clone of the main repo, so they can work and make changes locally. In addition, they may make a BRANCH in their clone of the main repository. 
46 |
47 | Work on a collaborator’s branch won't change anything in the main repo until the collaborator makes what's called a pull request, a request for the main owner of the repo to incorporate the changes from the branch. The project lead or owner (that’s you!) will review the changes and may decide to merge them into the master branch. A collaborator working on a branch is working along with, in the same direction as everyone else on the master branch, and communicating about their work within the context of that repo.
48 |
49 | 
50 |
51 | A collaborator might make a complete copy of a master repo from another user’s account and bring it into their own account-- this is called a fork. A fork is a complete copy of a repo made from one user’s account to another account, often for repurposing or independent work.
52 |
53 | 
54 |
55 | People often fork when they are going to take the content or code and repurpose it or take it into a completely different direction. The project lead will have specified what can and can’t be done with the original work in a the project license (refer back to module 4\. 5 for a refresher on licensing). When a project is forked, work and decisions happen independently, outside of the context of the original or upstream repo, independently, in the new fork. Now that you’ve got some sense of how and where work happens in GitHub, head to the next section to practice a collaborative workflow.
--------------------------------------------------------------------------------
/_articles/glossary.md:
--------------------------------------------------------------------------------
1 | ---
2 | layout: page
3 | title: "Glossary"
4 | ---
5 |
6 | * TOC
7 | {:toc}
8 |
9 | #### Bug
10 |
11 | Bugs are problems in a project, particularly one in code, they are either problems where a program/project does not perform according to intention, or situations where the users' expectations are not met in a program/project. You can read a more granular definition in [Code Simplicity](http://www.codesimplicity.com/post/what-is-a-bug/) or in [Wikipedia](https://en.wikipedia.org/wiki/Software_bug).
12 |
13 |
14 | #### Bug Tracker Tool
15 |
16 | bug reporting tools are applications for processing and organizing bugs submitted by product contributors or users, [Bugzilla](https://bugzilla.mozilla.org/) is Mozilla's bug tracking tool, and [Github has it's own issue system](https://github.com/features) built into every repository, in the "issues" tab of your repo. See [Wikipedia](https://en.wikipedia.org/wiki/Bug_tracking_system) for more details.
17 |
18 | #### Branch
19 |
20 | a copy of a repo that is contained within the orignal repo. Branches are used to work on a project features without altering the original or "master" repo.
21 |
22 | #### Code of conduct
23 |
24 | a set of rules outlining the social norms and rules and responsibilities of, or proper practices for, an individual, party or organization.
25 |
26 | #### Commit
27 |
28 | a saved change to a document in a repository.
29 |
30 | #### Contributor
31 |
32 | a person that contributes content or services to an open source project.
33 |
34 | #### Discrimination
35 |
36 | treatment or consideration of, or making a distinction in favor of or against, a person or thing based on the group, class, or category to which that person or thing is perceived to belong to rather than on individual merit. types of discrimination include race, color, religion, sex, socioeconomic status, sexual orientation, public assistance status, disability, and age.
37 |
38 | #### Elevation / Escalation
39 |
40 | the process of flagging an issue or violation to be addressed by the Safety/ Code of Conduct behavior.
41 |
42 | #### Enforcement
43 |
44 | the process of moving from elevating an issue to be addressed, to acting on resolving that issue.
45 |
46 | #### Fork
47 |
48 | a copy of a repository that is saved in another user's GitHub account.
49 |
50 | #### Git
51 |
52 | the command-line software that tracks all changes to a collection of documents
53 |
54 | #### GitHub
55 |
56 | a service that hosts your repository online and helps you work with contributors. GitHub adds a web-based interface to version control.
57 |
58 | #### Global Sprint
59 |
60 | is an event with multiple sites around the world where participants work on projects for a set time period within their timezone.
61 |
62 | #### Harassment
63 |
64 | covers a wide range of behaviours of an offensive nature. It is commonly understood as behaviour which disturbs or upsets, and it is characteristically repetitive. It also includes behaviours that are threatening or disturbing.
65 |
66 | #### Inclusion
67 |
68 | a state of being valued, respected and supported. often referred to in terms of an event or community, as in an "inclusive event", meaning one that's welcoming and a respectful environment.
69 |
70 | #### Issue
71 |
72 | a message on gitHub that outlines a task that needs to be completed.
73 |
74 | #### Jargon
75 |
76 | a type of language, especially vocabulary, that is particular to a certian trade or discipline, and is not understood by anyone outside that discipline.
77 |
78 | #### Licensing
79 |
80 | A license gives explicit permissions for the use of something. This is particularly important if you want to make your data open as some jurisdictions assign copyrights to data sets which limit their use. There are several types of licenses that are in common use for data. You can read more about them here: http://www.dcc.ac.uk/resources/how-guides/license-research-data.
81 |
82 | #### Local sprint
83 |
84 | is an event that has projects, project leads and contributors that come from the local area.
85 |
86 | #### Markdown
87 |
88 | a lightweight way of annotating a document with instructions that tell a web browser how to format and display text.
89 |
90 | #### Merge
91 |
92 | the act of incorporating new changes (commits) into a repository.
93 |
94 | #### Metadata
95 |
96 | Information that describes, explains, locates, or in some way makes it easier to find, access, and use a resource (in this case, data). For example, metadata for a photograph may include the name of the photographer, when and where it was taken, as well as the type of camera and settings used to take the photograph.
97 |
98 | #### Milestone
99 |
100 | An event or state marking a specific stage in development on the project.
101 |
102 | #### Naming Conventions
103 |
104 | These are a set of predefined rules for the naming and structure of folders, files, field names, etc. (E.g. All files begin with a date, location and project name.) Naming conventions help provide context to a data set, as well as make sure a standard of data collection and management is being followed by all members of a team.
105 |
106 | #### Open Data
107 |
108 | Data that is made easily and freely available for anyone to access, use, and share without restrictions, the possible exception being a requirement of attribution.
109 |
110 | #### Permanent Identifiers
111 |
112 | A permanent identifier (or PID) is a set of numbers and/or characters, frequently in the form of a URL, that points to the location of a resource. PIDs are set up in such a way that even though the storage location of the resource may change over time (e.g. moving data from one university server to another), the PID will always point to the correct location. DOI is a commonly known type of PID.
113 |
114 | #### Persona
115 |
116 | A fictional user, based on real-world observations of actual or potential users. personas are used to test and shape the design of a product or experience, so that the final design responsive and relevant to user needs.
117 |
118 | #### Project Lead
119 |
120 | a person that is the main contact for a particular project.
121 |
122 | #### Pull Request
123 |
124 | a request to add a commit or collection of commits to a repository.
125 |
126 | #### README file
127 |
128 | a document that introduces an open project to the public and any potential contributors.
129 |
130 | #### Repository or Repo
131 |
132 | a collection of documents related to your project, in which you create and save new code or content.
133 |
134 | #### Roadmap
135 |
136 | A document outlining the schedule of work to be done on a project.
137 |
138 | #### Sprint
139 |
140 | is an event where project leads connect with contributors from the community to work on open source projects.
141 |
142 | #### Swag
143 |
144 | promotional merchandise given away at events, trade fairs or conferences.
145 |
146 | #### Venue
147 |
148 | the place where the sprint will be held.
149 |
150 | #### Version Control
151 |
152 | a way of tracking changes to a document or collection of documents. Version control is like a time machine, it can take you back to the moment your document was created, or any other point in time when you or a collaborator saved that document.
153 |
--------------------------------------------------------------------------------
/_articles/introduction-to-open-leadership.md:
--------------------------------------------------------------------------------
1 | ---
2 | layout: page
3 | title: "Intro to Open Leadership"
4 | module: 1
5 | date: 2016-10-06 14:05:56
6 | contents:
7 | - _articles/introduction-to-open-leadership/getting-to-know-mozilla-and-the-leadership-network.md
8 | - _articles/introduction-to-open-leadership/introduction-to-working-open.md
9 | - _articles/introduction-to-open-leadership/understanding-the-project-lead-role.md
10 | - _articles/introduction-to-open-leadership/stating-your-project-vision.md
11 | following: _articles/introduction-to-open-leadership/getting-to-know-mozilla-and-the-leadership-network.md
12 | ---
13 |
14 | **Before you start this section, be sure to read the Series README file, for information about how this training series is structured, and what you’ll need to begin.**
15 |
16 | In this first section in the Open Leadership Series, you’ll learn more about working open and open projects, with the aim of helping you understand how working open can improve your project. You’ll get a sense of what it actually means to lead an open project, and you’ll learn a bit more about Mozilla, the organization that created this training. You’ll also get an introduction to Mozilla’s amazing network of people and projects, which you are welcome to join!
17 |
--------------------------------------------------------------------------------
/_articles/introduction-to-open-leadership/getting-to-know-mozilla-and-the-leadership-network.md:
--------------------------------------------------------------------------------
1 | ---
2 | layout: page
3 | title: "Getting to Know Mozilla"
4 | module: "1.1"
5 | date: 2016-10-06 14:05:56
6 | time: "20 mins"
7 | following: _articles/introduction-to-open-leadership/introduction-to-working-open.md
8 | summary: "This module explains a bit about Mozilla’s history with working open, and introduces Mozilla’s Network."
9 | prereq: "Have read the Series README file"
10 | format: "Read and watch videos on this topic"
11 | materials: "None"
12 | ---
13 |
14 | * TOC
15 | {:toc}
16 |
17 |
18 | ### Oh Hi, We’re Mozilla
19 |
20 | This training was developed by the non-profit Mozilla Foundation, with help from members of the broader Mozilla Community. You may recognize the name Mozilla-- we’re a group of people, organized as a non-profit, public charity-- that makes the Firefox web browser. Mozilla’s Firefox is an open source project, which means the source code is freely, publicly available and anyone who would like to can help develop the project. Firefox was created and is sustained by the Mozilla staff and a collaborative community of volunteers, called “contributors.” The open source movement showed that scrappy, self-organized groups of passionate volunteers could collaborate to develop viable alternatives to proprietary software, and even compete against huge corporations! Many practices of "working open"-- particularly the use of the web as a collaboration tool-- were created, tested, and refined by software developers working on open-source projects like Firefox.
21 |
22 | {% include videowrapper.html
23 | url="https://www.filepicker.io/api/file/kLlp7wEAQBWJf8emecWo?autoplay=0"
24 | title="Mozilla And The Firefox Creation Myth, Mark Surman" %}
25 |
26 | In addition to developing Firefox and the community of contributors that builds and supports it, Mozilla fights for what we call the “open web.” We’re doing this by championing:
27 |
28 | * **Inclusion:** an accessible, free Internet for all
29 | * **Privacy:** user control of their own data on the web
30 | * **Web literacy***: the ability for everyone to meaningfully
31 | * Read: navigate the web, and find, evaluate, and synthesize web content
32 | * Write: code, design, compose, revise and remix content for the web
33 | * Participate: connect with online communities, share, contribute, maintain control over their own personal data, and work collaboratively with others on the web.
34 |
35 | While we are constantly refining our working open practices, we’re excited to share our decades of experience and expertise in this area with you… to help you and your communities create your own amazing projects on the web.
36 |
37 | *for more, see [Mozilla’s web literacy map.](https://teach.mozilla.org/web-literacy/)
38 |
39 | ### Meet Mozilla’s Network
40 |
41 | To drive our efforts to secure and expand the open web, we coordinate and support a network of leaders. These leaders are people (like you) committed to working open and using the web to build, create, or make positive change-- especially around issues of inclusion, privacy, and web literacy. Members of the network are leading projects as diverse as improving civic engagement, creating better educational experiences, building more human technologies, and making scientific research more collaborative and efficient. Here’s a glimpse of some of the awesome people and projects that are part of the network-- we hope you’ll join us, too!
42 |
43 | {% include videowrapper.html
44 | url="https://www.filepicker.io/api/file/KUpDbyKUQii3CMw3yU1i"
45 | title="The Mozilla Leadership Network, Kaitlin Thaney" %}
46 |
47 | As you work through the training-- whether you’re using our online interface or taking one of our in-person workshops-- there will be lots of opportunities to connect with both Mozilla staff and members of our leadership network.
48 |
49 | ### {{ site.assignment }} Explore the Network
50 |
51 | [Browse Network Pulse](https://www.mozillapulse.org/), a stream of assets news and stories from the Mozilla network and communities, to find projects with a shared vision, audience, or strategy. This exploration will help you get a better sense of Mozilla's network and the connections you can make within it.
52 |
--------------------------------------------------------------------------------
/_articles/introduction-to-open-leadership/introduction-to-working-open.md:
--------------------------------------------------------------------------------
1 | ---
2 | layout: page
3 | title: "Working Open"
4 | module: "1.2"
5 | date: 2016-10-06 14:05:56
6 | time: "10 min"
7 | following: _articles/introduction-to-open-leadership/understanding-the-project-lead-role.md
8 | summary: "This module introduces you to the basic concepts of working open."
9 | materials: None
10 | format: Read and watch videos on this topic
11 | prereq: "Have read the [Series README file](/open-leadership-training-series/articles/readme)"
12 | ---
13 | * TOC
14 | {:toc}
15 |
16 | ### Welcome! And a Look at Working Open IRL (In Real Life)
17 |
18 | Welcome! We’re excited that you’re here. In this training series, you’ll learn a specific set of practices which we’re calling “working open.”
19 |
20 | * **When you are “working open” you use the power, knowledge, and skills of a diverse community of volunteers (called “contributors”) to accomplish something that a single person or a small team couldn’t do alone.**
21 | * **When your project is “open” you share knowledge and information generated by the project widely and freely, allow others to build on your project, and maximize its usefulness for everyone.**
22 |
23 | The Open Leadership Training Series is designed for those who want to work together with others to create, build, and make amazing stuff-- anything from software projects to learning materials to organizations or advocacy campaigns. As we mentioned in the [Series README]({{ site.baseurl }}/)-- it doesn’t matter if your project aims to teach kids to code in Cleveland or build mobile apps with taxi drivers in Bangladesh, this is a one-size-fits-all resource. Here is one example of how people are working open, in real life, on real projects.
24 |
25 | {% include videowrapper.html
26 | url="https://www.filepicker.io/api/file/383PaLJiSF68FFgvH5Qb"
27 | title="A Working Open Example - STEMM Role Models, Kirstie Whitaker" %}
28 |
29 | ### The Ingredients of an Open Project
30 |
31 | Very different projects can be open, but there are some commonalities to open projects, a list of basic ingredients for working open:
32 |
33 | * A great **idea of something amazing to make or build**
34 |
35 | * A **clear intention to share** your idea, project and process widely
36 |
37 | * A group of **contributors, which form a community** to shape and drive your project
38 |
39 | * The **world wide web** to connect and collaborate
40 |
41 | * **A project leader** (this is you!)
42 |
43 | * A series of **open practices and tools** for planning, project management, mentorship, growing a community and running events, which we’ll cover in this training.
44 |
45 | By working open, we can often get far more done (and often done better) than we could working alone. And the knowledge, resources, and tools we generate in our work are more useful and powerful because they’re shared widely. Now that you’ve seen how working open happens in real life, and have a better sense of what’s a project needs to be open, it’s time to explore what it means to actually lead an open project. Continue to the next module to learn more.
46 |
--------------------------------------------------------------------------------
/_articles/introduction-to-open-leadership/stating-your-project-vision.md:
--------------------------------------------------------------------------------
1 | ---
2 | layout: page
3 | title: "Your Project Vision"
4 | module: "1.4"
5 | date: 2016-10-06 14:05:56
6 | time: "15 mins"
7 | following: _articles/opening-your-project.md
8 | summary: "Articulate your big idea, vision or dream that you want to achieve by working open, and experiment with expressing your vision in a short format."
9 | prereq: "Have completed previous modules in this section"
10 | format: >
11 | * Read and watch videos on this topic
12 |
13 | * Complete a thinking/writing assignment
14 | materials: "Pencil and paper or a computer-- a way of recording your statement."
15 | ---
16 |
17 | * TOC
18 | {:toc}
19 |
20 |
21 | ### Your Vision Drives Your Project
22 |
23 | Before you jump into section 2, on Opening Your Project, take a few minutes to state your vision for your project and community going forward. Your vision is what powers your project and excites and attracts contributors. It’s important to be able to say what you plan to do, clearly and concisely, in a short form, to anyone, on a moment’s notice! The process of choosing these words may also help you think through and refine your project idea and goals. This is a great exercise to do with a small group of community members or contributors if available, to ensure that everyone has a shared understanding of the project.
24 |
25 | > *Articulate your big idea, vision or dream that you want to achieve by working open, and experiment with expressing your vision in a short format.*
26 |
27 | Take a few minutes to state your vision for your project and community going forward. It’s important to be able to say what you plan to do, clearly and concisely, in a short form, to anyone, on a moment’s notice! t.
28 |
29 |
30 |
31 | ### {{ site.assignment }} Write Your Vision or Mission Statement
32 |
33 | 1. Brainstorm answers to these questions to help you craft your vision statement.
34 | * Who you’re working with, or hope to work with
35 | * What you’re doing
36 | * Who you’re doing it for, your audience (may be same as the previous question)
37 | * Why you’re doing this, the impact or change you hope to make
38 |
39 | 2. Put your answers together in a short statement
40 |
41 | Incorporating your responses, write your vision or mission statement in a short, simple format. Feel free to tweak the format. Color coding is added here for clarity, to indicate each key piece of information and where it appears in the statement:
42 |
43 | > I’m working with [community, allies, contributors] to [make, build, teach, or do something] so that [audience, end users, consumers, community members] can [do something different, achieve a goal]
44 |
45 | Sample Statement:
46 |
47 | > I’m working with public school teachers in Boston to teach computational thinking and creative coding skills to public school students so that they can use and create with technology to actively shape their own futures.
48 |
49 | Tips for writing your vision statement:
50 |
51 | * Use clear concise language-- see if you can get your statement down to a single, powerful sentence
52 | * Use cause and effect language-- verbs that express both what you’ll do, and what your users or community members will do differently when your vision is realized.
53 |
54 | 3. Add a second part to your vision statement-- thinking back on the benefits/challenges of working open that you reflected on in module 1.2, add a sentence that expresses why you want to work openly: “I’m working open because…”
55 |
56 | 4. If you’d like, share this vision statement with the Mozilla’s network of leaders by sharing it on [Mozilla's Network Pulse](http://mzl.la/pulse). Browse the inspiring and energizing statements that others have shared there. Do you see any opportunities for connection or collaboration or resource sharing between projects?
57 |
58 | Your project, and your vision for it, will be the basis for all the work you do in this series; you may find you need to return to it for clarity and inspiration when you get lost in the details or encounter stumbling blocks. You might discover you need to tweak your vision as your project evolves. Revisit your vision statement often, and get in the habit of using it when you talk to newcomers to your project.
59 |
--------------------------------------------------------------------------------
/_articles/introduction-to-open-leadership/understanding-the-project-lead-role.md:
--------------------------------------------------------------------------------
1 | ---
2 | layout: page
3 | title: "The Project Lead Role"
4 | module: "1.3"
5 | date: 2016-10-06 14:05:56
6 | time: "25 mins"
7 | following: _articles/introduction-to-open-leadership/stating-your-project-vision.md
8 | summary: "This module explores what project leaders, or “leads” do on open projects, and the kind of mindset and approach this role requires."
9 | prereq: >
10 | * Have completed previous modules in this section
11 |
12 | * Have a project idea
13 | format: >
14 | * Read and watch videos on this topic
15 |
16 | * Do a short thinking/writing reflection exercise
17 | materials: "Paper and pen or computer for recording reflection"
18 | ---
19 |
20 | * TOC
21 | {:toc}
22 |
23 |
24 | ### Introduction
25 |
26 | When you're leading an open project, there are a few things you’ll do, listed below in the order they’ll likely happen on your project. Some of these practices (such as working with volunteers) aren’t so unusual, but in an open project the notions of community involvement and information-sharing become core, driving principles. When you work open you:
27 |
28 | * **Invite others to work on the project-- anyone with some level of skill who has an interest can pitch in. These are your project contributors, who volunteer their time and skills to your project. You’ll learn more about contributors in Section 3 of this training).**
29 |
30 | * **Provide information, help, and encouragement to any contributor working on your project, and connect them with their fellow contributors.**
31 |
32 | * **Encourage this community of contributors to participate in project decision-making and planning, and make these conversations as public as possible.**
33 |
34 | * **With intention and thoughtfulness, make both the end product of your project and the process you used to get there widely and freely accessible to all, for use and reuse.**
35 |
36 | Each of these points deals with making a project **participatory (getting new people involved)** and **transparent (sharing information about the project widely, in a way that’s useful for others).** Every project is different, and some of the points above may be less relevant to your project, while others will be at its core. Some projects will implement these elements slowly, while others may work fully in the open from day one. No matter how you do it, you can think of working open as a way of working that invites outsiders-- those who might otherwise have little or no part in project work, creation, and decision-making-- to become insiders in those aspects of the project. You can do this is by building trust in your community of collaborators.
37 |
38 | {% include videowrapper.html
39 | url="https://www.filepicker.io/api/file/2Egul1krQXaCeNTqfZGN"
40 | title="Creating Trust on an Open Project, Abby Cabunoc Mayes" %}
41 |
42 |
43 | To recap, here are ways that you can build trust on your project.
44 |
45 | To show that you trust and value those in your community, you should:
46 |
47 | * **Listen to and respect the views and approaches of your contributors.**
48 |
49 | * **Provide contributors with truly important, meaningful work to do on the project.**
50 |
51 | * **Give up some control of the project to your contributors.**
52 |
53 | To secure the trust of members of your community, you should:
54 |
55 | * **Be consistent and prompt in communicating with them.**
56 |
57 | * **Follow through and execute project work as planned.**
58 |
59 | * **Show that the project is solid, and worthy of their time and energy.**
60 |
61 | ### What Working Open Can (and Can’t) Do for You
62 |
63 | As Project Lead, you also need to have a good grasp of the possibilities and limitations of working open, and realistic expectations of what it can (and can’t) do for your project.
64 |
65 | As project lead, you need to ask yourself, “What’s the value of opening my project to community contribution and collaboration?” Below we’ve outlined some benefits of working open.
66 |
67 | **Working open can sharpen your thinking and help you find errors you hadn't realized you’d made.** Having many contributors on your project means you benefit from different approaches and ways of thinking-- a contributor might offer a totally novel solution to a design problem that would never occur to you. Diverse perspectives produce a better, richer product. Contributors may also catch errors that you’ve missed. In the world of software engineering, this is expressed in the "many eyes" principle, or Linus's Law: "given enough eyeballs, all bugs are shallow." In other words, the more people involved, the more likely someone is to spot an error or come up with a novel approach. And the process of mentoring contributors can enhance and deepen your own skills-- you may find efficiencies or better ways of working as you help contributors solve problems or tackle new chunks of creative work.
68 |
69 | **Working open is a way to incorporate user-centric thinking in the design and creation of your project.** Many projects-- from web apps or tools to advocacy campaigns to learning materials-- languish because they never find an audience. By inviting a broad community to contribute to your project, you can integrate your target audience into the development process to help ensure that you’re creating a tool, experience, or resource that meets their needs. Future users can be involved in decision-making about project design, direction, and features, as well as contributing project work. They can provide invaluable insights during user testing and evaluation of anything you make. In the words of Aspiration technology's Allen Gunn:
70 |
71 | "I believe in the ‘many eyes’ principle” — but also in the ‘many hearts and souls’ principle. Having many personalities, values and experience-sets involved in creating something intrinsically makes the finished product more robust and broadly relevant — versus, say, three privileged white guys in Silicon Valley kicking something out."
72 |
73 | **Working open can allow your project to achieve its maximum impact.** When you’re engaging contributors and target users from day one, your final product will launch to a built-in audience and be more likely to be supported, championed and sustained by contributors with a long history with the project. When you share your process and making ongoing work openly available on the web, others can build on your work, adapt your process or a part of your project for a novel use. Your project can have positive, transformative effects far beyond what you’re able to imagine.
74 |
75 | Working open can help your project flourish and grow, but there are also many misconceptions about the practice. Let’s address a few common confusions about working open, and get at some of the challenges inherent in this way of working.
76 |
77 | **Working open is not a way to get free software engineering work or other kinds labor for your project, without providing anything in return.** In a successful open project, volunteers will contribute time, energy and work, but if you open your project solely for the purpose of getting resources for free and you treat your contributors only as unpaid laborers, your contributors won’t stick around and your project will fail. Contributors on an open project should gain as much (if not more) than they give to the project, though not as monetary compensation. As an open project lead, you’ll need to figure out how to engage contributors in ways that are meaningful and valuable to them, appreciate and reward them, and create system of shared decision-making, mentorship, and skill sharing so that contributors grow and benefit along with the project. More about this in Section 3.
78 |
79 | **Working open is not a way to hit your deadline faster.** On an open project with a sizable community of enthusiastic contributors, you might think that work gets done rapidly and efficiently. And in some instances that can be true. But you should be prepared for the reality that it takes time and energy build a functional community of people who work well together. You’ll spend less time working directly on the project while you coordinate contributors and contributions, a task that requires intention, mindfulness, and consistent effort. Again, we’ll talk more about this in Section 3.
80 |
81 | **Working open is not a way to avoid process or structure.** Because decision-making is shared by the community and everyone pitches in as they like, it may seem like there’s no need to create roles on a project or define a system or series of steps to for contributors to follow-- why not just keep it casual? Actually, good open projects should provide clear guidelines and a coherent process so new contributors know what to do and what to expect as they make their first contributions. It’s helpful to have roles-- even if these are lightweight and somewhat flexible-- so it’s clear who contributors can go to for help or who might approve or review a contribution they make. Any power structures or decision making processes need to be transparent, so contributors feel encouraged to participate meaningfully in shaping the direction of the project. We’ll discuss good, transparent project set-up in Section 2.
82 |
83 | ### {{ site.assignment }} Reflecting on Benefits and Challenges of Working Open
84 |
85 | Reflect on what the benefits, challenges, and limitations of working open might mean for your project. For example, how do you envision your project specifically benefiting from more community contribution and participation? How do you feel about the need for well-defined process and structure on this project? Take about 4 or 5 minutes to write out your thoughts on this. If working in a group, you can write your reflections on sticky notes and then share and discuss together.
86 |
--------------------------------------------------------------------------------
/_articles/open-communications.md:
--------------------------------------------------------------------------------
1 | ---
2 | layout: page
3 | title: "Open Communications"
4 | module: "6"
5 | date: 2016-10-06 14:05:56
6 | contents:
7 | - _articles/open-communications/communicating-openly-about-your-work.md
8 | following: _articles/open-communications/communicating-openly-about-your-work.md
9 | ---
10 |
11 | **Before you start this section, make sure you have completed your project README and established an online repository for your work. Also consider the online communication channels your contributors and community members use most often.**
12 |
13 | In this section, you'll learn about the importance of open communications to your project and then develop communication channels, or "comms," specific to your project and your community needs including a calendar, online presence (such as a blog), and community call schedule.
--------------------------------------------------------------------------------
/_articles/open-communications/communicating-openly-about-your-work.md:
--------------------------------------------------------------------------------
1 | ---
2 | layout: page
3 | title: "Communication Channels"
4 | module: "6.1"
5 | date: 2016-10-06 14:05:56
6 | time: "60 mins"
7 | following: _articles/running-awesome-community-events.md
8 | summary: "In this module you’ll learn about the different types of communication channels, or “comms” you can use to help your community discover, explore, and contribute to your project."
9 | prereq: >
10 | * A project with content like a [README file](/open-leadership-training-series/articles/opening-your-project/write-a-great-project-readme/) and [contribution guidelines](/open-leadership-training-series/articles/building-communities-of-contributors/write-contributor-guidelines/)
11 |
12 | * Online contact information (like email addresses or social media user names) for project participants
13 | format: >
14 | * Read and watch videos
15 |
16 | * Writing and planning exercises to establish and document regular communication with your community
17 | materials: "Access to your GitHub project repo"
18 | ---
19 | * TOC
20 | {:toc}
21 |
22 |
23 | ### Intro to Communications (a.k.a. Comms)
24 |
25 | “Comms” are the communications channels you use to help others discover, share, and contribute to your project. You want to send your comms out in the open; they should be easily findable and show people how to get involved with your community’s work.
26 |
27 | Comms also give project members a chance to talk with one another and support each other’s contributions to the project. In the video below, see how Coral Project Community Lead Sydette Harry describes how the Tiny Letter tool curates and archives online conversations about ‘creating common ground’ for collaborators in open journalism projects. Sydette and her colleagues are working to create a web-based platform and shared space for journalism communities to discuss their shared values, interests, and work.
28 |
29 | {% include videowrapper.html
30 | url="https://www.filepicker.io/api/file/ho0atyueQOyzh0byiOox"
31 | title="Why Do Comms Matter to an Open Project? Sydette Harry" %}
32 |
33 | ### Useful Communication Channels for Open Projects
34 |
35 | For contributors, your [GitHub](https://github.com) repo is likely to be the central hub of communication about the project itself. When contributors interact with one another on GitHub (by mentioning one another in their messages using @username) and issue pull requests (PR), they receive notifications on GitHub and/or through email indicating that they’re needed in a conversation or to review new work.
36 |
37 | Your contributors are the volunteers to who create content for your project - anything from code to codes of conduct, and everything in between. Contributors share the project’s workload with you and bring their time, talent, and generosity to attacking the problem your community and project want to solve.
38 |
39 | Sometimes community members also link out from GitHub to other sharing docs like an [Etherpad](http://etherpad.org/) or [Google Doc](https://drive.google.com), commonly-used platforms for asynchronous planning and collaboration. They might also use chat channels like [IRC](https://en.wikipedia.org/wiki/Internet_Relay_Chat), [Gitter](https://en.wikipedia.org/wiki/Gitter), and e-mail ([mailing-lists](https://en.wikipedia.org/wiki/Electronic_mailing_list), as an example). Keep in mind that one to one emails are okay but they should probably be replaced with more public communications in the name of openness around the project.
40 |
41 |
42 | However, other participants and community members less directly involved with the day-to-day work of the project still want to know what you’re making, how they can contribute, how it will help them,and when it will be ready to access. You can use a variety of communication channels to keep your larger community of potential supporters and users informed about your project’s progress. Which channels and forms of communication you choose or create should be determined with accessibility and inclusivity in mind. Use the tools that are available most broadly in your project’s community. When you’re planning communication channels, think back to your Building Community module work and strive to create or find the channels that best fit your contributors’ and community’s needs.
43 |
44 | At the very least, consider creating a shared calendar of events and two kinds of communication channels to help people find and keep up with your work. You may even decide to establish a third channel on a platform more familiar to you than your community. For example, if you don’t have a project page on [Facebook](https://facebook.com), but your community uses Facebook all the time, you should show up there. Creating these channels is another area for co-creation and delegation: inviting contributors to work on comms is a great way to raise others’ voices in the project.
45 |
46 | Your shared calendar can make it easy for community members to follow upcoming events and schedule their own project-related calls and convenings with minimal conflict. Use something like an [Google Calendar](https://calendar.google.com) to help your project members feel like they know what’s next. Sharing calendars lets you see your contributors’ availability and it lets them see yours. It’s easier to schedule meetings and send invitations community members can accept when you know one another’s schedules.
47 |
48 | Next, create some kind of online presence that people can find through search or social media. This is kind of like the landing page for your project - the front page people should encounter first when they search for your project online.
49 |
50 | If you or a volunteer contributor have some basic knowledge of HTML, consider building a web page for your project and hosting it from your repo with GitHub Pages. Online tutorials like this one [guide like this](https://guides.github.com/features/pages/) can help you get started. You can, of course, host your webpage somewhere else depending on your needs and the web expertise in your project community.
51 |
52 | If your community doesn’t have much web expertise, you can ask around to see what social media channel your community members use to communicate (such as Facebook or [Twitter](https://twitter.com)). You can create an account for your project on a social media platform that’s widely used by your community and reference that account in your documentation as the home base for your online presence. If you need help, look for an exemplar or mentor community to give you feedback and help, like the [Mozilla Design Community](https://github.com/mozilla/OpenDesign/blob/master/README.md).
53 |
54 | After establishing your web presence, create a communications channel or publication that lets you regularly update your entire community on your project’s progress. While you can do this through social media updates via a project account, you might also develop more in-depth platform for sharing news like a community call (over the phone or video conferencing), newsletter, or development blog. Here's a clip from a [Mozilla community call on International Women's Day](https://www.youtube.com/watch?v=QfvrKvx4mUk).
55 |
56 | {% include videowrapper.html
57 | url="https://www.filepicker.io/api/file/sazygmpkS0hsiU1CL4UC"
58 | title="Mozilla Community Call on International Women's Day" %}
59 |
60 | Community calls are regularly scheduled phone calls or webcasts that any community member can listen to, watch, and otherwise participate in live. Generally each call follows an agenda shared ahead of time that includes times for call organizers and project contributors to share updates, as well as time for less involved participants to ask questions about what’s been going on in the project. The agenda is typically published as a shared document so call organizers and participants can take notes during the call. You can see [an example of how Mozilla’s learning community structures its community calls here](https://teach.mozilla.org/community/community-call).
61 |
62 | A newsletter is a form of communication you can draft and send on a regular basis. You can collect updates from core contributors and survey your project for particular needs to share via email with anyone subscribed to your newsletter. If you choose to use a newsletter to talks/share about your project, make sure you meet your commitment to publish it regularly.
63 |
64 | Moreover, make sure that it’s easy for people who find your project to subscribe to the newsletter. Services like [Mailchimp](http://mailchimp.com)[](http://mailchimp.com) offer HTML email and newsletter design software free to small projects and communities.
65 |
66 | As you set up your newsletter, be sure to protect any email addresses you collect by sending the email to recipients using bcc or by using a mailing list you create rather than including every subscriber’s email address in the “to” line of every mailing. While your project is an open one, you should safeguard as much personal information about your contributors as possible so that sharing their email addresses or anything else about themselves is a choice they make.
67 |
68 | One other option for sharing updates is a development blog like [this one from the Coral Project](https://coralproject.net/)). A blog is a web page made up of posts that share news about a project. Platforms like [Wordpress](https://wordpress.com) let you create a blog without knowing much HTML. You can compose and edit your posts using a text-editor instead. A development blog might be just the thing to serve as both an easily discoverable landing page for your site and a regularly updated comms channel for your community.
69 |
70 | ### {{ site.assignment }} Start a Shared Calendar
71 | (10-15 minutes)
72 |
73 | Using a service like Google Calendar, chart upcoming opportunities for project members to meet online or off. Also consider posting essential milestones for your project.
74 |
75 | ### {{ site.assignment }} Build a Web Presence for Your Project
76 | (30+ minutes)
77 |
78 | Survey your contributors and other community members to see what kind of web presence they think would work best as an easily discoverable landing page for the project. You might do this through a GitHub issue (e.g. “Let’s develop our web presence”) or use a simple online survey tool like Google Forms or [Survey Monkey](https://www.surveymonkey.com/).
79 |
80 | Work to reach consensus about what kind of web presence makes the most sense for your project. Then ask community members if any volunteers have the expertise necessary to build that site or create that account. Work with them to get your landing page or main social media account set up. Finally, add the address of your landing page to your project documentation and share it widely with your community and others who might benefit from its work.
81 |
82 | ### {{ site.assignment }} Create a Comms Channel for Your Project
83 | (20-30 minutes)
84 |
85 | In consultation with community members, determine a format for sharing updates about your project on a regular basis. You might set up an online community call, publish a newsletter, or commit to writing posts for a development blog alongside core contributors.
86 |
87 | While you might have to create on these channels from time to time, your primary responsibility here is to make sure as many contributors’ voices are heard as possible by helping them to share their progress with others. Help your community figure out which channel works best, work with volunteers to set it up, and stick to your commitments to steward and publish updates on a regular basis.
88 |
89 |
--------------------------------------------------------------------------------
/_articles/open-leadership-outro-and-next-steps.md:
--------------------------------------------------------------------------------
1 | ---
2 | layout: page
3 | title: "Open Leadership Outro"
4 | module: "9"
5 | date: 2016-10-06 14:05:56
6 | contents:
7 | - _articles/open-leadership-outro-and-next-steps/next-steps-for-open-leadership.md
8 | following: _articles/open-leadership-outro-and-next-steps/next-steps-for-open-leadership.md
9 | ---
10 |
11 | **Before you begin this section, gather together the offline and online materials and documentation you've assembled over the course of your project.**
12 |
13 | In this section, you'll consider open leadership advice from community organizers, expert facilitators, and veterans of working and leading in the open. After that, you'll have the chance to compose and share your own open leadership reflection on what you and your community have made and learned together over the course of Mozilla's Open Leadership Training Series.
--------------------------------------------------------------------------------
/_articles/open-leadership-outro-and-next-steps/next-steps-for-open-leadership.md:
--------------------------------------------------------------------------------
1 | ---
2 | layout: page
3 | title: "Next Steps for Open Leadership"
4 | module: "9.1"
5 | date: 2016-10-06 14:05:56
6 | time: "60 mins"
7 | summary: "Reflect on your open leadership journey and key takeaways for continuing your work."
8 | prereq: "Your project, its documentation, and event reports, including goal-setting documents like your open canvas"
9 | format: "Writing and reflection exercise on your experience as an open leader"
10 | materials: Your project's GitHub repo and a blog or other platform/technology for composing and sharing your reflection
11 | following: _articles/glossary.md
12 | ---
13 | * TOC
14 | {:toc}
15 |
16 |
17 | ### Open Leadership Takeaways
18 |
19 | Congratulations! You've done a lot of work in a short amount of time to level up your open leadership skills. As you take what you've learned and built into the future, keep these open essentials in mind.
20 |
21 | As [community organizers Marisa Franco, B Loewe, and Tania Unaueta write](https://medium.com/organizer-sandbox/how-we-make-change-is-changing-part-i-5326186575e6#.q10o4lync), "what makes open projects open-source is not the platform they use, but the way participation is designed. Whereas there’s still a hub and a core development team, participants have an ability to see the code and alter it to improve it."
22 |
23 | Your project might involve code, or it might not. It might be about policy or a design challenge that demands a response in an altogether different kind of materiality. Regardless, deciding to lead and work in the open means creating a platform that involves others in work that matters to them. As Franco et al. ask, "Does the problem you are trying to solve really matter to anyone? Is the solution you propose realistic and effective? In entrepreneurship, if the product you’re selling doesn’t meet a need or solve a problem, it’s not going anywhere." Moreover,
24 |
25 | > Establishing critical mass and that the demand resonates are critical because it drives participation and defines the depth of the participant’s commitments. It identifies and filters the team of the willing. For an open source campaign, if no one is moved by the problem addressed or the solution offered, it doesn’t matter that there’s an open door for his or her participation. Especially when there’s a long way to go from problem, to solution, to victory, the campaign needs both a foundational team of key players who have the guts, need, motivation and skills to win and a trajectory that will translate into mass appeal as it progresses.
26 | >
27 | > Take on projects that count; if you propose work that's important to your community, you'll find your "team of the willing" and can delegate a lot of the "work" of the project to them while you concentrate on the structures for participation, contribution, and meeting face-to-face that sustains the team's efforts.
28 |
29 | While urging us to bridge ["From Open to Justice,"](http://hackeducation.com/2014/11/16/from-open-to-justice) #edtech journalist Audrey Watters tells us that invoking "open" is not enough. You need to avoid "openwashing" your projects; don't convene communities around decisions you've already made and work you've already done. Your role is not to get community approval for something you made on your own. Rather, it is to create a deeply inclusive and respectful platform that contributors can use to meet the challenges facing your shared community. To realize the full potential of open-sourced projects like yours, Watters urges us to "recognize that what we need is social justice. We need politics, not simply a license. We need politics, not simply technology solutions. We need an ethics of care, of justice, not simply assume that “open” does the work of those for us."
30 |
31 | In other words, as "Open Matt" Thompson puts it: ["Stamping our feet and saying, 'work open, damnit!' doesn’t work."](https://openmatt.org/2011/04/06/how-to-work-open/) You have to commit to the process of inviting, testing, and iterating contributions. Toward those ends, Thompson asserts that "feedback is sometimes useful. Testing always is." The difference here is between asking, "What do you think?", and "Does this work?" Be specific when you ask users to test your work. If you're observing user interaction with your project - look for whether or not specific features function the way users think they should. It's essential that you know whether or not your project is meeting its stated goals - that you know whether or not it works.
32 |
33 | Finally, remember that your responsibility to your community is twofold. You're stewarding the project, but you're also modeling the open beliefs, habits, and technologies that make the work possible. Expert facilitator Allen Gunn [summarizes open commitments like this](http://blog.workopen.org/leadership/):
34 |
35 | > For 'open' to work well, there has to be an intrinsic commitment by all the stakeholders — to follow the process, follow through on commitments, and give feedback and interact with others in the community, in a lateral peer-based fashion.
36 |
37 | You are an open leader if you do all of those things and make it safe, possible, and compelling for others to do the same.
38 |
39 | ### What Does Success Look Like at the End of a Project?
40 |
41 |
42 |
43 | Mozilla’s [Hive Research Lab](https://hiveresearchlab.org/) characterizes the [core principles and benefits of working open](https://hiveresearchlab.files.wordpress.com/2014/12/what-does-it-mean-to-work-open-in-hive-nyc-hive-research-lab-october-2014.pdf) like this:
44 |
45 | 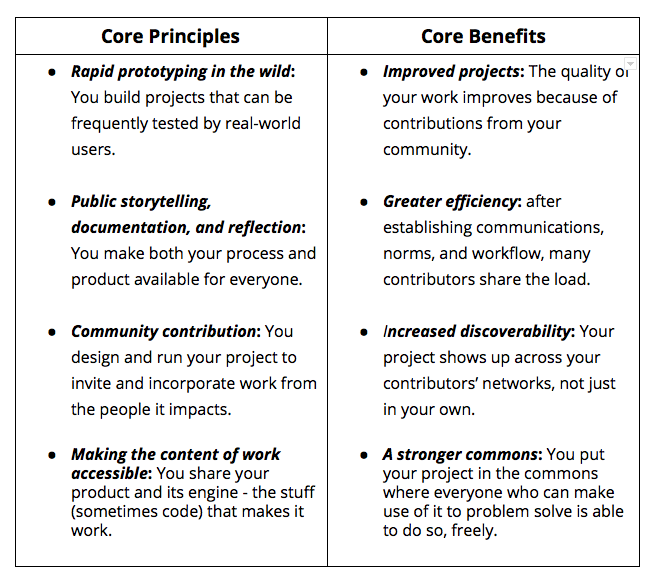
46 |
47 | Does your project allow for rapid prototyping and testing? Are you capturing and sharing your process and all the content below the surface of your project? Have you established clear contribution pathways and made it possible to benefit from community contributions and adaptations while explicitly recognizing and valuing the goodwill and labor of your contributors?
48 |
49 | Whether you take what you learned to launch another project or look for work that requires open leadership, it’s your role to help others realize the principles and benefits to see what they can accomplish together by working open.
50 |
51 | ### {{ site.assignment }} Draft a Reflection on Your Open Leadership Journey
52 | (45 minutes)
53 |
54 | Invite you contributors and other open leaders to read and comment on your thoughts. Add your voice to open conversations on the web and help others find the entry points into their own open leadership journeys.
55 |
56 | In drafting your reflection, consider questions like these (but don’t let them limit your response if you have more to say!):
57 |
58 | * How do you define open leadership?
59 | * How have you changed as a leader and person over the course of your project? By following this curriculum?
60 | * What have you learned?
61 | * What do you struggle with in leading and working in the open? What do you struggle with in the curriculum?
62 | * What surprised you the most?
63 | * What seemed easiest?
64 | * What seemed most difficult?
65 | * What are your most important takeaways or lessons learned?
66 | * What would you do differently if you could begin again? What will you do differently in your next project?
67 |
68 | As you continue to develop your open leadership skills and take on new projects in the open, we hope you’ll let us know how it goes, as well as how to improve this curriculum. We hope you’ll visit other [Mozilla Leadership Network](https://learning.mozilla.org) communities online and [join other leaders around the world](https://learning.mozilla.org/en-US/opportunities) supporting local communities in the fight to keep the web an open and free resource, accessible to all.
69 |
70 |
--------------------------------------------------------------------------------
/_articles/open-project-maintenance.md:
--------------------------------------------------------------------------------
1 | ---
2 | layout: page
3 | title: "Open Project Maintenance"
4 | module: "8"
5 | date: 2016-10-06 14:05:56
6 | contents:
7 | - _articles/open-project-maintenance/open-project-maintenance.md
8 | following: _articles/open-project-maintenance/open-project-maintenance.md
9 | ---
10 |
11 | **Before you begin this section, make sure you have all of your project's online and event documentation up-to-date in your repo.**
12 |
13 | In this section, you'll learn how to steward your project and its community by mentoring contributors and developing an explicit plan to maintain your project's key content.
--------------------------------------------------------------------------------
/_articles/open-project-maintenance/open-project-maintenance.md:
--------------------------------------------------------------------------------
1 | ---
2 | layout: page
3 | title: "Open Project Maintenance"
4 | module: "8.1"
5 | date: 2016-10-06 14:05:56
6 | time: "60 mins"
7 | following: _articles/open-leadership-outro-and-next-steps.md
8 | summary: "Create a maintenance plan to prolong the life of your project and keep it accessible for your community and others."
9 | prereq: "Your community project and its documentation and materials in your GitHub repo"
10 | format: "You'll complete a project in GitHub."
11 | materials: "Access to your GitHub project repo"
12 | ---
13 | * TOC
14 | {:toc}
15 |
16 |
17 | ### Mentorship as Maintenance
18 |
19 | Imagine reaching the end of your project. You've shipped an open source product to a community of users who helped build it.
20 |
21 | It's a natural time to ask, "What's next?" However, your project still needs your attention if it's to remain functional and useful in the long term. Maintenance of your open project is essential to its longevity and and is needed in order to be adopted by communities similar to yours.
22 |
23 | Mentorship in an important, but often overlooked a next step. Maintaining your project is as much about keeping its technology fresh - or at least functional - as it is about continuing your relationship with your contributors. As an open leader, you should continue to find ways to support them even after the official end of your shared project. Perhaps your next step is to mentor someone who wants to become an open leader, as well, and to serve as a contributor on their project.
24 |
25 | This draft of a [mentorship rubric](https://github.com/MozillaFoundation/curriculum-workshop/blob/master/march-8-2016/g-doc-transcript.md) for women mentors came out of the inaugural [Mozilla Curriculum Workshop](https://teach.mozilla.org/community/curriculum-workshop/) webcast on International Women’s Day. Consider forking or cloning it into your own GitHub repo and developing its guidelines further for your own mentorship work with community members.
26 |
27 | [](https://github.com/MozillaFoundation/curriculum-workshop/blob/master/march-8-2016/g-doc-transcript.md)
28 |
29 | What would you add to those guidelines? What kind of mentorship practices should you adopt to help others, but also push yourself forward as a leader and community support? As a mentor, how would you use guidelines like these to help acclimate a mentee to the culture, contribution guidelines, and code of conduct for your project?
30 |
31 | You can also help your contributors move along the “committment curve” to deepen their engagement with, and contribute to your project. Check out [this curve from the A-Team Bootcamp](http://ateam-bootcamp.readthedocs.io/en/latest/guide/curve.html) to help you consider how community members can “level-up.”
32 |
33 | ### Maintaining the Stuff
34 |
35 | GitHub is a fine place to host your project as it enters maintenance mode; depositing your work and documentation in this kind of repository keeps its available for others to fork, clone, adapt, and improve over time. You don't need to update your project every day, but you should be able to update it when people offer suggestions or make pull requests through Git. You should also expect some questions or even requests for assistance from users who discover your project online and want to localize it for their communities.
36 |
37 | As a first step in drafting and implementing your project maintenance plan, audit your documentation to see if there are parts of your project that aren't adequately explained. Be sure to fill in any gaps in documentation so potential users know which parts of your project do what and how they do it.
38 |
39 | Consider setting aside a certain amount of time per week or month to check in on your project and with your community via your project's GitHub issues. If your project has a website hosted on GitHub Pages or another sever, keep the contact information on that site up to date. If your project collects user-data, review what gets collected frequently to make sure the data comes through in a useful format and doesn't expose private or sensitive information to anyone visiting your repo. In general, plan to check in on your project frequently enough to make sure it's working correctly and accessible to anyone who needs it.
40 |
41 | Additionally, draft and upload documentation to your repo, outlining your plan for project maintenance. Take feedback from project participants and contributors and consider recruiting a volunteer with whom you can share maintenance duties.
42 |
43 | For live communication between you and your contributors, set up a chat room through a service like [IRC](https://developer.mozilla.org/en-US/docs/Mozilla/QA/Getting_Started_with_IRC), [Gitter](https://gitter.im/), or [Mattermost](http://www.mattermost.org/) where people can ask questions and connect.
44 |
45 | If your project makes heavy use of open data, check out [this presentation on Open Data Reuse](https://docs.google.com/presentation/d/1kZd-ZD5lru5a7jIbyi9q8cBYCCAKRnIBSRvixYFtoF0/edit?pref=2&pli=1#slide=id.g1088c5b110_0_72) from the [Mozilla Science Lab](https://mozillascience.org/). You'll want to ensure that your data "is made easily and freely available for anyone to access, use, and share without restriction" while addressing how you approach human data use, data ownership, and data formatting through your documentation.
46 |
47 | If your project makes use of a particular open code-base for data visualization, web development, or any other kind of scripting, you'll want make such dependencies clear in your documentation and in the comments of your coded products. Part of your maintenance plan should be checking for updates for any of the APIs, coding languages, or libraries you use in your project and implementing them to keep your work as accessible as possible for others.
48 |
49 | Finally, think about how you might deprecate, or stop supporting, your project if it outlasts its usefulness to its users. Is there a way to share its content and documentation even after it stops working? Can you turn the project over to new maintainers in the project community? How will its ultimate form the work you and your community members did create it?
50 |
51 | ### Questions to Consider
52 |
53 | To help draft your maintenance plan and sustain your project, answer questions like these.
54 |
55 | **Logistical**
56 |
57 | * Which parts of your documentation do you need to maintain or update?
58 | * Which parts of your content or codebase do you need to maintain or update?
59 | * How often should you perform maintenance on your repo?
60 |
61 | **Interpersonal**
62 |
63 | * How will you identify and recruit community members who want to help maintain the project?
64 | * How will you decide when to end maintenance?
65 | * How will you keep your project’s documentation and content or codebase discoverable and functional enough to help communities that need and find it?
66 |
67 |
68 | ### {{ site.assignment }} Audit Your Documentation and Fill in the Blanks
69 | (30 minutes)
70 |
71 | Read through the GitHub documentation for your project. Look for gaps in your documentation and fill-in-the-blanks with new documents that provide explanations for how you and the community implemented pieces of work that are missing initial documentation. Also clarify anything that sounds clunky or jargony so it's clear to the most diverse audience of users possible. Finally, update anything in the documentation that's changed in the course of your project.
72 |
73 | ### {{ site.assignment }} Create a Maintenance Plan and Add it to GitHub
74 | (15 minutes)
75 |
76 | Draft your maintenance plan and share it with your community on GitHub. Your plan should describe:
77 |
78 | * Who is responsible for which parts of the plan.
79 | * Expected time commitments from each person or for each role.
80 | * How you and your team will maintain your technology and fix bugs.
81 | * How you and your team will maintain your data.
82 | * How you and your team will help others fork and use your project.
83 | * How and when you and your team will deprecate or sunset and archive your project.
84 | * How you and your community will stay in touch during the maintenance phase of your project.
85 |
86 | Upload it to your repo and invite comments, suggestions, and pull requests that might improve it or cover any blind-spots you had while writing it. Survey contributors to see if any of them would like to volunteer to help maintaining the project in the long-term.
87 |
88 | ### {{ site.assignment }} File Issues and Set Milestones for Your Check-Ins
89 | (15 minutes)
90 |
91 | Finally, add new issues and milestones in GitHub that reflect the steps and scheduling in your maintenance plan. Build on the trust you and your community established in creating the project by stewarding and updating it to ensure its longevity and reliability. Your project is an example of leading and working in the open that can inform and inspire other communities and projects in the future.
--------------------------------------------------------------------------------
/_articles/opening-your-project.md:
--------------------------------------------------------------------------------
1 | ---
2 | layout: page
3 | title: "Opening Your Project"
4 | module: "2"
5 | date: 2016-10-06 14:05:56
6 | contents:
7 | - _articles/opening-your-project/develop-an-open-project-strategy-with-open-canvas.md
8 | - _articles/opening-your-project/write-a-great-project-readme.md
9 | - _articles/opening-your-project/start-your-project-roadmap.md
10 | following: _articles/opening-your-project/develop-an-open-project-strategy-with-open-canvas.md
11 | ---
12 |
13 | This section is designed to help you clarify and communicate your project idea, purpose and goals in a way that will invite and encourage participation from your community. This is a first step if you’re opening up a brand new project, but you can also use these exercises to refocus an open project that’s stalled or stuck. You’ll expand your project vision statement into a more detailed description, strategy, and plan for upcoming work. These documents will serve as a “welcome mat” for your project, a clear way for newcomers to quickly understand what the project is about, who can be involved, and where the work is headed.
14 |
--------------------------------------------------------------------------------
/_articles/opening-your-project/develop-an-open-project-strategy-with-open-canvas.md:
--------------------------------------------------------------------------------
1 | ---
2 | layout: page
3 | title: "Open Canvas"
4 | module: "2.1"
5 | date: 2016-10-06 14:05:56
6 | time: "40 mins"
7 | following: _articles/opening-your-project/write-a-great-project-readme.md
8 | summary: "Use a format called Open Canvas to help further define your project goals, strategy, and needs for resources."
9 | prereq: "Have completed the previous section"
10 | format: >
11 | * Read and watch videos on this topic
12 |
13 | * Do a thinking/writing assignment on your own or with a group
14 | materials: >
15 | * Pencil and paper or this [editable version of Open Canvas](https://goo.gl/to6PYn) (if you’d like to work online)
16 |
17 | * If you are working in a group, you can use a whiteboard and sticky notes so ideas can be easily shared with all members
18 | ---
19 |
20 | * TOC
21 | {:toc}
22 |
23 | ### Introducing Open Canvas
24 |
25 | Open Canvas is a way of clarifying your project idea and encouraging you to think strategically about project goals, plans, and resources you’ll need. It’s adapted from [Lean Canvas](https://leanstack.com/lean-canvas/), a one-page format used for describing a start-up business project. **What’s special about Open Canvas is that it assumes you’ll be working collaboratively with others-- that your project is community-based and will be fueled by significant contributions from volunteers, one of the key principles of working open.**
26 |
27 | To make an Open Canvas, you’ll fill a one-page template with information about your project. You’re not starting from scratch here-- you can use the vision statement from the previous section as a starting point. Here’s a sample of the Open Canvas template, with descriptions of the information required in each section. The blue dotted line separates your thinking around your **product** and your thinking about your **community,** to highlight that you need to think about both of these when making your plan. The content in the green square deals with **project execution**, the resources you need to build your product
28 |
29 | 
30 |
31 | Here’s more about the Open Canvas tool from its creator, Abby Cabunoc Mayes, Developer Engagement Manager at the Mozilla Foundation.
32 |
33 | {% include videowrapper.html
34 | url="https://www.filepicker.io/api/file/LZtI0qVRTDqy0stDOkxX"
35 | title="Open Canvas, Abby Cabunoc Mayes" %}
36 |
37 | Here’s a sample of an Open Canvas created by Abby for Mozilla Science Lab’s Paper Badger Open Project.
38 |
39 | 
40 |
41 | ### Minimum Viable Product (MVP)
42 |
43 | Open Canvas should help you identify needs and resources that are critical to create a Minimum Viable Product (MVP), or a first, simple version of your project that meets the key goals for the project. The concept of MVP comes from the start-up world, where resources are often scarce and timelines are tight, so creating a simple functional product or project quickly is a priority. While you may have ideas or plans for an extended, enhanced version of your project-- for example you may want to eventually expand from coding workshops for students in public schools to running summer coding camps, or you might have a brilliant idea for that fancy extra feature for your app-- it’s always best to build your Minimum Viable Product first. This way, you can test out the project and ensure the idea works before you spend lots of time and resources expanding it. If you find your project is too complex to fit into the Open Canvas model, it may be that you’re trying to do too much, and need to narrow your scope.
44 |
45 | ### {{ site.assignment }} Make an Open Canvas
46 |
47 | In this assignment you’ll use Open Canvas to organize the information you already know about your project, clarify and summarize project goals and define resource needs.
48 |
49 | 1. [Using the template](https://docs.google.com/presentation/d/1_eya6vVXpaZOpXFZsZNbVHboROI4IPWy-poCnYTNtnQ/edit#slide=id.p), fill out Open Canvas for your project/idea. Read the description of what goes in each field (aloud, if you’re working in a group).
50 | 2. For your project, write what you think goes in each field-- your problem, solution, etc. Take a minute or two on each. If working in a group, have everyone write their own answer to each field on a sticky note.
51 | 3. Share, revise, and add. If working in a group, review the answers and spend a few minutes coming to shared definitions of each. Add these to the template or sticky note collection,
52 | 4. If you don’t yet know some of this information-- that’s OK! You can leave user channels, contributor profiles and channels boxes blank for now if you don’t have that information. We’ll go over those items in later Sections (see Building Communities of Contributors, Open Communications). You should have information for the problem, solution, value proposition, key metrics, and user profiles boxes filled in.
53 |
54 | Now that you’ve got a more complete, detailed sense of your project down on paper, in the next module you’ll make a user-friendly version of this information, to welcome and orient potential contributors to the project.
55 |
56 |
--------------------------------------------------------------------------------
/_articles/opening-your-project/start-your-project-roadmap.md:
--------------------------------------------------------------------------------
1 | ---
2 | layout: page
3 | title: "Start Your Roadmap"
4 | module: "2.3"
5 | date: 2016-10-06 14:05:56
6 | time: "45 min"
7 | following: _articles/building-communities-of-contributors.md
8 | summary: "Outline the work ahead on this project in a document called a “Roadmap.”"
9 | prereq: "Have completed all previous sections and modules"
10 | format: "A writing and thinking assignment. It can be done alone, but you can invite a supporter or community member to help you plan!"
11 | materials: "Pen and paper, or a computer and word processing software"
12 |
13 | ---
14 | * TOC
15 | {:toc}
16 |
17 |
18 | ### Introducing Project Roadmaps
19 |
20 | When you're starting an open project (or restarting a project, or starting a new phase of a project), it's important to outline and plan for the work ahead and share that plan with any potential contributors. **We’ll do this using a text document we’ll call a “roadmap, ” Like a road map you’d use while traveling, this document will help to identify where you are now and how to reach your project’s end goal, as well as the course that you will need to take to get there.** Your roadmap summarizes your vision and includes a timeline for tasks. This a great tool for you-- it helps you schedule work and track goals-- but it’s key for anyone who might contribute to your project, so they know what’s currently happening on the project, and what’s next.
21 |
22 | As you make your Roadmap, you may realize there are dependencies among different tasks. For example, you might need to define the structure of your database before you decide on a strategy for searching it, or you might need to secure a venue for an event before you decide the number of sessions or speakers you'll invite. Creating a Roadmap helps you get a sense of not only all the steps that have to be done on a project are (there are always more than we anticipate), but also how to schedule tasks and plan work efficiently.
23 |
24 | [Check out this example Roadmap from the STEMM Role Models project.](https://github.com/KirstieJane/STEMMRoleModels/issues/1)
25 |
26 | ### Milestones
27 |
28 | The timeline of tasks is the probably most important part of the Roadmap so as a warm-up exercise, you’ll decide on **project milestones which are significant turning points or events that will move the project forward**. Review the different types of milestones outlined below, and decide which ones are most appropriate for the kind of work you’ll do on your project.
29 |
30 | * **Project Status Goals.** If you’re creating a software project, a milestone could be completing a specific feature or a release (see the section on Prototypes, below).
31 | * **Dates.** If you have deadlines or a set span of time to work on this project, use those dates as milestones. If you’re working in formal education, dates in the academic calendar can be natural milestones.
32 | * **Events.** If your project will be demoed or shown at an event or conference, or if your project involves planning an event, then you’d want to create milestones around that event, for preparation (such as sending invites, arrange for space, etc), running the actual event, and follow-up after the event. (more or events and convenings in section X.
33 | * **Timeframes.** If your project is a longer, ongoing effort and you don’t yet have any hard deadlines, you may want to create short, medium and long term milestones.
34 | * Short term - tasks you are working on now
35 | * Medium term - tasks that are coming up next
36 | * Long term - where your project is going, beyond the next few weeks or months
37 |
38 | ### GitHub Projects
39 |
40 | Another way to track your project's progress is use to use [GitHub's Projects](https://help.github.com/articles/tracking-the-progress-of-your-work-with-projects/). This feature allows you create [kanban-style boards](https://en.wikipedia.org/wiki/Kanban_(development)) to manage tasks, take Notes to quickly add tasks or reminders to your project which can be converted to Issues when you're ready.
41 |
42 | It's found here:
43 |
44 | 
45 |
46 | Examples:
47 |
48 | * [Bootstrap Project](https://github.com/twbs/bootstrap/projects/2)
49 |
50 | ### Prototyping
51 |
52 | As you plan your project, you might want consider when you’ll create and test prototypes. **A prototype is an early, unpolished version of your project or a feature of your project, created specifically for testing purposes.** Prototyping is the act of testing a feature or solution by building or making a rough or mocked-up version of that feature. It’s important to note the difference between a prototype and an MVP (Minimum Viable Product). The MVP is a stripped down but functional version of your project that’s ready for use. The prototype is often incomplete, and not for real-world use, long term use or distribution.
53 |
54 |
55 |
56 | Protyping small, testable iterations of different features of your project is a great way to manage time and resources. It allows you to break down a larger project into a series of achievable tasks. **Testing helps ensure that a feature is successful before you move on to the next task, so you don’t spend time refining something that’s not viable.** Since prototypes are not designed for long term use, they come in all forms: you could make a prototype of a user interface, a workflow, or a game mechanic by drawing on sheets of paper. You might prototype in code and make a very simple, un-designed, partial version of an app to test some very basic functionality. You might sketch out a draft lesson plan and mock up some materials for a workshop. Often in a project you will make several prototypes, each modified according to feedback or lessons learned from the previous version. You may try several different prototypes represent different directions for the project. It’s OK if something you do doesn’t work out! These “failures” are actually learning experiences that will improve your final product.
57 |
58 | ### User Testing
59 |
60 | **No matter what form your prototype takes, it should be something users can react to, and their feedback should help answer questions or define a direction for further work.** When you’re ready to test with users, it’s great to have a that specific question in mind. For example, you might want to know if users can easily find the search function in your interface, if the instructions for a workshop activity or game you’ve devised are complete and make sense, or if a tagging function in your app is working properly.
61 |
62 | You don’t have to test your prototype with hundreds or even dozens of people, even talking just a to a handful of people is useful. It’s always best to test with people who are potential users, who’d might have an actual interest in using your project when it’s done. User testing sessions can be as simple as sitting down with someone who is not familiar with the project, providing them with the prototype, observing how they use it, and then asking a few questions and listening to their feedback. If your project is easily shared online, you might invite lots of people from your community to test, and ask them to fill out a feedback survey. User testing is great for both your project and your testers. Your users get a better product because they can give feedback on the design. And by showing your project to users early on, you generate buzz about your work and prime your testers to use the eventual, finished product. Some of your testers may be so excited about the project that they decide to become contributors!
63 |
64 | ### {{ site.assignment }} Make A Project Roadmap
65 |
66 | 1. Write your "Project Mission & Summary." Start with the project name along with a shorted version of your project description from the readme, or you can use your vision statement. Since this is key information that all contributors need to understand, it’s okay for some it to be repeated in different places, in different documents.
67 |
68 | 2. Pick 1-3 milestones. Depending on your project, milestones can vary: they may be related to software development goals, learning resources you’ll create, events or meetings you plan to hold, campaigns you’ll run.
69 |
70 | 3. List tasks to complete for each milestone. Write a short description of each task required to successfully complete project work on a milestone. Depending on your project, these might be items like: “Research existing Javascript learning resources for kids” or “Publicize the October Online Privacy Meet-up” or “Implement a new visualization scheme for the user-facing badges.” Be sure to time here to explain why you are doing this task. This will reinforce your vision for the project and help others see why each step is meaningful in the larger timeline.
71 |
72 | 4. Let people know how they can get involved. As mentioned in the readme section above, this is where you’ll link to contributor guidelines.
73 |
74 | 5. Post your Roadmap. You’ll want to put your roadmap online where your potential contributors can find it, and let people know it’s there. If you already have a project website or a repository on a web-based collaboration tool like GitHub, these are excellent places to post your Roadmap. If you don’t have an online presence yet, don’t worry! We’ll cover GitHub in the next section!
75 |
76 | 6. Update often! The direction of your project will change as the work evolves. Return to your roadmap frequently to update, add or change milestones, and track your progress! You may want to welcome supporters or key participants into any conversation about Roadmapping, as a way of increasing their participation and sense of ownership of the project.
77 |
78 | Now, armed with a great project description and a plan for what you’re going to do, you’re ready to consider the community of contributors that you hope to develop around your open project.
79 |
--------------------------------------------------------------------------------
/_articles/opening-your-project/write-a-great-project-readme.md:
--------------------------------------------------------------------------------
1 | ---
2 | layout: page
3 | title: "Writing a README.md"
4 | module: "2.2"
5 | date: 2016-10-06 14:05:56
6 | time: "20 min"
7 | following: _articles/opening-your-project/start-your-project-roadmap.md
8 | summary: "In this module, you’ll create a short text document called a “README” file, to welcome newcomers to your project."
9 | prereq: "Have completed the [Open Canvas](/open-leadership-training-series/articles/opening-your-project/develop-an-open-project-strategy-with-open-canvas/) exercise for your project"
10 | format: >
11 | * Read text and explore links
12 |
13 | * Do a writing/thinking exercise to create a README (best done with community members, if available)
14 | materials: "Pen and paper, or a computer with word processing software"
15 |
16 | ---
17 | * TOC
18 | {:toc}
19 |
20 | ### Introducing README files
21 |
22 | The README file (whose name by convention is written in all-caps, and represents a request to one and all--- “read me!”) is one of the first things that potential contributors will encounter when learning about your project. The aim of the README is to welcome, orient, and encourage newcomers to participate. This file will live on the web, as part of a collection of working documents on your project, called a “repository” (If your project isn’t online, don’t worry about that just yet, you’ll set that up in Module 5).
23 |
24 | When you open your project, you may have an audience in mind (for example, software developers, educators, scientists or activists)... but you may want to reach a much broader community! Many people outside of your target audience may be interested in your project. People from all walks of life and professions-- writers, designers, artists, journalists, parents, citizen scientists-- may have valuable contributions to offer. Clearly communicating information about your project will enable others to understand and participate.
25 |
26 | [Here’s a sample README file from the STEMM Role Models Project.](https://github.com/KirstieJane/STEMMRoleModels) This project and all related files are hosted on the collaboration platform GitHub (more about that in Sections 4 and 5), so you'll need to scroll down below the list of files to see the README text.
27 | [](https://github.com/KirstieJane/STEMMRoleModels)
28 |
29 | ### {{ site.assignment }} Write your README
30 |
31 | 1. Draft your README file.
32 |
33 | Use the information you gathered in the Open Canvas exercise as a starting point. Be sure to:
34 |
35 | * Say hello! Welcome people to the project. It’s great to introduce yourself here, so people know they’re dealing with a person or group of real people. Let potential contributors know you’re excited that they’re here to learn more
36 | * Write a project description: what you're doing, with who, for who, and why. Sound familiar? This is a version of your project vision. Expand your sentence as a full paragraph, adding any new details about aims and the problems you plan to solve that surfaced in the Open Canvas activity. Try to phrase this so it’s understandable and appealing to a wide variety of people, not just those in your field.
37 | * Explain what makes your project special, useful, exciting! You can use the ideas you generated for “Unique Value Proposition” in your Open Canvas here.
38 | * Show how to get started using or contributing to the project. If you’re just getting started, this could be as simple as asking people to attend a planning call or kick-off event, or sign up for an email newsletter about the project. If you’re not sure quite how to get users involved just yet, don’t worry! In the next module, you’ll devise some ways for newcomers to get involved, and create contributor guidelines. Once you’ve done the next module, and you can come back to this README and add a link to contributor guidelines to this section.
39 | * State what resources are most needed. If you have a need for a special kind of help, expertise, or a resource like event space, be sure to mention that here.
40 |
41 | 2. Test your README for Jargon
42 |
43 | When you’re working in any field, whether it’s software engineering or K-12 education, you’ll learn and use jargon -- terms that have a special meaning to your field but likely won’t make sense to anyone who isn’t part of that field. **Relying too heavily on jargon can not only confuse newcomers, but it can also obscure detail and prevent even those in the know from coming to a shared understanding of terms.**
44 |
45 | As an experiment, copy and paste your project description (what you're doing, for who, and why, as described in the second bullet point above) and drop it into the [Up-Goer 5 text editor](http://splasho.com/upgoer5/). This text editor limits you to only the “ten hundred” most common words in the English language (so-called because “thousand” isn’t one of those common words). See if you can rewrite the description using only allowed words-- it’s often harder than it looks. For reference, [here is an example of a rocket ship diagram communicated in common language.](http://xkcd.com/1133/) This specialized text editor is a great way to identify technical language or any other wording that may confuse newcomers. It’s also a good way for you to clarify your understanding of the terms you use. **In your final text, you don't need to restrict yourself to only the most common words, as in the previous step--if you do, your project description may become overly simplified and limited.** But you should use what you've learned in step 2 to keep your README as understandable and jargon-free as possible.
46 |
47 | 3. Re-write your README
48 |
49 | Re-write your entire README in clear language and define all terms. If you use jargon, be sure to define those words as clearly as you can, as part of the README text.
50 |
51 | In the next module, you’ll create a Roadmap for your project, a way for you and any potential contributors to keep track of project work that’s upcoming and underway.
52 |
--------------------------------------------------------------------------------
/_articles/readme.md:
--------------------------------------------------------------------------------
1 | ---
2 | layout: page
3 | title: "README"
4 | following: _articles/introduction-to-open-leadership.md
5 | ---
6 |
7 | ### Intro to the Open Leadership Series (Series README)
8 |
9 | This Open Leadership Training Series is designed to teach you best practices in “working open” -- a way of working in which:
10 |
11 | * **a community of people collaborate to make or build something amazing,**
12 | * **and any product or knowledge that the community of collaborators creates is shared widely and freely with the public on the world wide web.**
13 |
14 | This training is designed for those starting up or currently leading open projects-- project leads, partners, or small groups of co-leaders responsible for project success and growth.
15 |
16 | This training was developed by the non-profit Mozilla Foundation, with help from members of the broader Mozilla Community. You may recognize the name Mozilla-- we’re a group of people, organized as a non-profit, public charity-- that makes the Firefox web browser and champions a free and open web for all. Mozilla’s Firefox is an open source project, which means the source code is freely, publicly available and anyone who would like to can help develop the project. To create this training, we drew on our many years of experience leading open projects.
17 |
18 | The training consists of nine sections, each containing a set of modules on a topic related to working open. In each module, you’ll learn by reading, watching short videos created by Mozilla staff and community members, and completing hands-on assignments. The assignments build on each other, so this training works best if you do the modules in order. The nine sections are:
19 |
20 | 1. [Introduction to Open Leadership]({{ site.baseurl }}/articles/introduction-to-open-leadership)
21 | 2. [Opening Your Project]({{ site.baseurl }}/articles/opening-your-project)
22 | 3. [Building Communities of Contributors]({{ site.baseurl }}/articles/building-communities-of-contributors)
23 | 4. [Get Your Project Online -- Getting Started with GitHub]({{ site.baseurl }}/articles/get-your-project-online)
24 | 5. [GitHub for Collaboration]({{ site.baseurl }}/articles/github-for-collaboration)
25 | 6. [Open Communications]({{ site.baseurl }}/articles/open-communications)
26 | 7. [Running Awesome Community Events]({{ site.baseurl }}/articles/running-awesome-community-events)
27 | 8. [Open Project Maintenance]({{ site.baseurl }}/articles/open-project-maintenance)
28 | 9. [Open Leadership Outro and Next Steps]({{ site.baseurl }}/articles/open-leadership-outro-and-next-steps)
29 |
30 | #### Before you start the training series, you must have:
31 |
32 | 1. a project, or a vision or idea of something you want to create,
33 | 2. an audience or community in mind; the group of people who will work together to build this project
34 | 3. access to the world wide web
35 |
36 | Having a project in mind or underway is key, because you’ll work through the assignments in each module using your own content, knowledge, and ideas, related to your project. **This is a one-size-fits-all resource-- it doesn’t matter if your project aims to teach kids to code in Cleveland or build mobile apps with taxi drivers in Bangladesh**. And it’s okay if your project is just getting up and running, or if you haven’t even started yet. This training is also useful if you have an open project that’s gotten derailed or is struggling to gain momentum or attract contributors. If you don’t have a community of contributors (those people eager to pitch in and help) or if you only have a handful of contributors, don’t worry! The “Building Communities of Contributors” section of this training is all about helping you find, connect with, and keep contributors on your project.
37 |
38 | **Completion of the assignments in this series is very important!** The work in each assignment represents real, significant work on your project, from project planning to developing good workflows to convening events and communicating effectively with contributors. It’s important to do the modules in order, because the assignments build on each other-- for example, you’ll want to complete the module on open communications before you jump into a module about running an event, because the open communications module will help you set up the tools and infrastructure to get the word out about your event. We’ve provided a time estimate of how long it should take to complete each module, including assignments. **This training series is designed to grow along with your project-- from project set-up through maintenance**. While you might complete the reading/learning part of this training over the course of a few days, some of the assignments-- such as convening a community event-- may take much longer to complete.
39 |
40 | **Upon completion of this training series, you’ll have the basic knowledge and initial technical skills to lead your own open project, or to get an existing open project back on track by improving your open practice**. If all this sounds good to you, and you’re ready with your project or project idea, let’s jump in and start with the first section, Intro to Open Leadership.
41 |
--------------------------------------------------------------------------------
/_articles/running-awesome-community-events.md:
--------------------------------------------------------------------------------
1 | ---
2 | layout: page
3 | title: "Running Awesome Events"
4 | module: "7"
5 | date: 2016-10-06 14:05:56
6 | contents:
7 | - _articles/running-awesome-community-events/designing-an-open-event.md
8 | - _articles/running-awesome-community-events/event-planning-and-facilitation.md
9 | - _articles/running-awesome-community-events/event-follow-up.md
10 | - _articles/running-awesome-community-events/documenting-and-reporting.md
11 | following: _articles/running-awesome-community-events/designing-an-open-event.md
12 | ---
13 |
14 | **Before you start this section, you'll need to have an established online project and community communication channels you can use to bring contributors together for a face-to-face (F2F) event such as a work sprint or hack jam.**
15 |
16 | In the section, you'll learn how to design your event for accessibility, inclusivity, and openness. You'll also learn how to facilitate the learning and logistics at your event. Finally, you'll develop plans for following up with participants after your event and for documenting and reporting what you accomplished there.
--------------------------------------------------------------------------------
/_articles/running-awesome-community-events/documenting-and-reporting.md:
--------------------------------------------------------------------------------
1 | ---
2 | layout: page
3 | title: "Documenting & Reporting"
4 | module: "7.4"
5 | date: 2016-10-06 14:05:56
6 | time: "60 mins"
7 | following: _articles/open-project-maintenance.md
8 | summary: "Plan to capture and share the community-building, learning, and work that goes on at face-to-face events supporting your project."
9 | prereq: "Plans for a face-to-face event you can use to think through documenting and reporting its outcomes"
10 | format: "Preparation and planning for documentation around your event"
11 | materials: "Documentation tools and an open place (like a blog) to share your reports"
12 | ---
13 | * TOC
14 | {:toc}
15 |
16 | ### Planning Your Documentation and Reporting
17 |
18 | To help yourself and your community benefit and learn from everything that goes on at a face-to-face (F2F) event, it's important to capture key parts of the event and report on the work done there.
19 |
20 | {% include videowrapper.html
21 | url="https://www.filepicker.io/api/file/hwjxTPRAQCuYJOtuX7GT"
22 | title="Documenting and Reporting, Caro Alvarez" %}
23 |
24 | Part of working open is making sure that everyone who wants to contribute to your project or comment on it can do so. By showing others what happens at your events, you help people who can't attend stay involved the work done there.
25 |
26 | If you can find a contributor willing to help, it's great to delegate documentation and reporting responsibilities while you facilitate an event. You should have a plan worked out with that contributor ahead of time to make sure you collect the kind of information and media you want to share afterwards.
27 |
28 | * Who will record what happens at the event?
29 | * Which parts of the event are essential to capture?
30 | * What technologies make the most sense for reporting to your community?
31 |
32 | Ahead of your event, decide on who will collect and share the stories and artifacts you’re looking for. Think about what kinds of notes and recordings they should take throughout the training. To report to the widest and most diverse audience possible after your event, it’s a good idea to use several different kinds of media for gathering information and reporting.
33 |
34 | * You can take typed or written notes, or even photograph or sketch events, for a recap blog post or newsletter article.
35 | * You can capture photos and videos of hands-on, participatory events to show how work was done at the event.
36 | * You can record brief interviews to embed in your report or to edit into a podcast about the event.
37 | * You can share a hashtag or social media channel ahead of the event and post it throughout your venue to encourage backchannel communication and chatting between onsite and remote attendees. Then, after the event, you can collect and share those conversations with a service like [Storify](https://storify.com/).
38 |
39 | Keep participants’ privacy choices in mind as you record or take photos at events. Make sure attendees know how to opt out of being photographed or otherwise recorded and include those steps in your code of conduct for the event. Many events offer different colored name-tags or wristbands, and the different colors represent different privacy choices.
40 |
41 | For example, a youth attendee might have a blue lanyard indicating you need to get parental permission before photographing them. Attendees who do not want to be photographed at all might have an orange lanyard instead.
42 |
43 | Finally, as you capture individual and group contributions to share, be sure to ask your contributors how they would like their work attributed in your report.
44 |
45 | Tips for event documentation and reporting:
46 |
47 | * **Before the event:** Create a plan for documenting what goes on at your face-to-face event. Then assemble the people and stuff you need to record what happens at the event.
48 |
49 | * **During the event:** Take notes and collect data! Keep an eye out for stories, projects, or other data points to share. Document those things. You shouldn’t try to hold everything in your head until after the event. Also you don’t want to have to rely on your memory.
50 |
51 | * **After the event:** Share what happened at your event with onsite and remote participants through a blog post, community call, newsletter, or other open platform.
52 |
53 | ### Examples of Event Reporting
54 |
55 | Great event reports
56 |
57 | * Contain clear calls to action to get involved with the project.
58 | * Respect the privacy of attendees.
59 | * Clearly articulate the goals and outcomes of covered events.
60 |
61 | Here's an example of event reporting from digital literacy work in Kenya.
62 |
63 | 
64 |
65 | [What we learned at the DSO community bootcamp](https://mozilla-foundation-research.herokuapp.com/what-we-learned-with-the-dso-community-bootcamp/)
66 |
67 | Here's another example of an event report from a web literacy training for educators in the United States.
68 |
69 | 
70 |
71 | [Pilot Experience by Mozilla Learning Network](https://iteachtheweb.wordpress.com/2015/11/23/nwp/)
72 |
73 | Notice how each report explains the purpose of each event and summarizes it with images, text, and other media.
74 |
75 | The Mozilla Clubs network also offers [this tool for event reporting](http://mozilla.github.io/clubs-events).
76 |
77 | Think through your documentation and reporting plan and make sure you collaborate on it with your delegate beforehand. Work through these questions, but also add anything specific you want to track that's not covered in the list.
78 |
79 | * How can you summarize the event for people who cannot attend?
80 | * How can you surface and share the essential work done there that shapes your project going forward?
81 | * How can you use your event report as an invitation to contribute to the next phase of your project?
82 |
83 | Your reports are also a great way to share the story of your project with a wider audience online. Resources like this [solutions journalism toolkit from the Pulitzer Center](http://www.solutionsjournalism.org/wp-content/uploads/2014/11/Pulitzer-toolkit-FINAL-2-pg-spread.pdf) can help you ask and answer questions that surface the importance and impact of your community’s work for others.
84 |
85 |
86 | ### {{ site.assignment }} Draft a Documentation Checklist on GitHub
87 | (20 minutes)
88 |
89 | Add an issue to your project or event-planning folder and outline your plan for recording your event. Be sure to indicate who will do what and include items or steps that remind you to account for attendees’ privacy choices and attribution preferences. Invite your entire community to offer suggestions about what’s most important to capture during the convening.
90 |
91 | For example, drawing from [Leslie Hawthorn’s](https://hawthornlandings.org/about-2/) [“How To: Writing an Excellent Post-Event Wrap Up Report,”](https://hawthornlandings.org/2013/02/15/how-to-writing-an-excellent-post-event-wrap-up-report/) you might assign yourself or others to gather
92 |
93 | * High quality photos from around the event. [Assignee’s name]
94 | * High quality audio or video interviews and snippets from around the event. [Assignee’s name]
95 | * Any session audio or video your record. [Assignee’s name]
96 | * Social media updates from the event, including relevant usernames and hashtags. [Assignee’s name]
97 | * Key graphics from speakers presentations. [Assignee’s name].
98 | * Blog posts that others write after a session or after the event. [Assignee’s name]
99 |
100 | As a checklist in GitHub, your list might look more like this:
101 |
102 | ### {{ site.assignment }} Document Your Event
103 | (Event time)
104 |
105 | Whether you document the event or delegate documentation to a volunteer, make sure to complete each step in your plan and capture the essential parts of the gathering.
106 |
107 | ### {{ site.assignment }} Write up Your Report and Share
108 | (20-30 minutes)
109 |
110 | After your event, gather together all of your documentation and shape it into one report or several. You might:
111 |
112 | * Write-up a recap blog post and also send that copy out in your next project newsletter.
113 | * Edit and post a video or podcast as standalone reports or as multimedia pieces to embed in a blog post or newsletter.
114 | * Schedule a community call with a few guests who attended the event and a few who did not to talk about what happened.
115 |
116 | [Remember](https://docs.google.com/document/d/1dgOxD5V_Z0oWjOSwIIa4v3MNgfd_ejSa2q-rr4dvvbg/edit) that community calls are regularly scheduled phone calls, webcasts, or hangouts that any community member can listen to, watch, and otherwise participate in live. Generally each call follows an agenda shared ahead of time that includes times for call organizers and project contributors to share updates, as well as time for less involved participants to ask questions about what’s been going on in the project. The agenda is typically published as a shared document so call organizers and participants can take notes during the call.
117 |
118 | Share your report - or reports - as widely as possible in your project community and use it as a call to action for next steps in the your project. Invite your community members to share their own recaps, questions, and suggestions for next steps, as well.
--------------------------------------------------------------------------------
/_articles/running-awesome-community-events/event-follow-up.md:
--------------------------------------------------------------------------------
1 | ---
2 | layout: page
3 | title: "Event Follow-up"
4 | module: "7.3"
5 | date: 2016-10-06 14:05:56
6 | time: "60 mins"
7 | following: _articles/running-awesome-community-events/documenting-and-reporting.md
8 | summary: "Survey your attendees to improve offline events and sustain online contributions to your project."
9 | prereq: "Plans for convening and facilitating a face-to-face event in support of your project"
10 | format: "Design a survey around your event to help plan next steps for your project"
11 | materials: An internet-connected computer, an online survey tool, access to your GitHub project repo
12 | ---
13 | * TOC
14 | {:toc}
15 |
16 |
17 | ### Organizing for Action After an Event
18 |
19 | When you organize attendees as part of an event or after it ends, you help contributors and community members find ways to remain engaged with the project and continue its work.
20 |
21 | Organizing people to contribute to your project happens before, during, and after the event, but it’s especially important to take what you learn from events and other interactions with contributors to improve the ways you work together. Organizing is equal parts project-management, relationship-management, and delegation. Organizing in the open lets you and your community come to consensus on who should do what according to their capacities, interests, and skills. By paying attention to your community members as an organizer, you can observe their strengths and craft invitations for them to use those talents in "best fit" ways to help the project.
22 |
23 | Observing contributors at in-person, or face-to-face (F2F), events is a great way to learn how they self-organize, learn, and relate to others. It can also give you a sense of their prefered workflows, lines of communication, and ways to be recognized for their work. The more you learn about how your community functions, the better able you'll be to organize people for action through your project.
24 |
25 | Heading out of your event, here are questions you can use as a checklist for organizing contributors and next steps.
26 |
27 | **Logistical**
28 |
29 | * How will you track work coming out of the event?
30 | * How will you gather feedback on the event itself?
31 | * How can you help attendees stay in touch to continue their face-to-face collaboration online?
32 | * How can you make the work of the event accessible to people who did not attend?
33 |
34 | **Interpersonal**
35 |
36 | * How will you recognize contributions made at the event?
37 | * How will make sure that you collect feedback in an accessible and inclusive way?
38 | * How will you accommodate participants' privacy decisions in collecting survey data?
39 |
40 | ### Survey Examples
41 |
42 | Your post-event survey should have three main goals:
43 |
44 | 1. Find out what people learned or did not learn.
45 | 2. Discover ways to improve future events.
46 | 3. Determine next steps for your project.
47 |
48 | You can find sample surveys below.
49 |
50 | Feel free to design and hack on your questions offline before picking an online platform for delivering your survey. You want to find a polling or survey platform that lets respondents make their own choices about how much information to give you in addition to their answers. It's better to err on the side of privacy and security than to require too much personal information. Just be sure to include an email address or other communications channel somewhere in the survey so people who want to make specific requests - like to manage part of the project - have a way to contact you directly.
51 |
52 | Also in your survey, be clear about things like whether or not people can see one another's responses or whether or not they can see to whom else you sent the survey. Your community needs to know, in an open way, who sees what so that individuals can make their own decisions about privacy and participation.
53 |
54 | Finally, set a deadline for responses so you can move ahead in planning or organizing next steps of your project. It's a good idea to schedule a reminder email or two before that deadline, as well.
55 |
56 | Here’s part of [a survey shared to participants](https://docs.google.com/a/mozillafoundation.org/forms/d/11Ptvzq5k91iYZjQdDGqGAS8U67WLORKTU8IF4BVpUyo/viewform?edit_requested=true) at the end of a web literacy training for the National Afterschool Alliance. You can visit the survey online and make a copy to remix it.
57 |
58 |
59 |
60 | Notice that it mixes and matches question types. As you develop your questions and survey, think about which questions are answerable with multiple-choice or a scale. Make the survey as short and easy as possible to complete to encourage people to finish it. Ask just a few, essential, open ended questions with text boxes so recipients aren’t overwhelmed by the survey.
61 |
62 | Here’s [another example](http://joeyklee.github.io/friendly-github-intro/#survey), from a GitHub training, that mixes and matches scales with text boxes for comments on each answer. This is another survey you can copy in Google Drive and remix for your event.
63 |
64 |
65 |
66 |
67 | ### {{ site.assignment }} Create Your Survey and Plan for Delivery and Review
68 | (45 minutes)
69 |
70 | After you have the chance to debrief on your event and see participants’ survey responses, make a checklist of next steps as a GitHub issue others can comment on in the open. List the tasks that people have suggested or self-selected and cc or @ contributors alongside the particular pieces of work that interest them. Assign yourself as the organizer for the ticket, encourage everyone involved to comment on work being done or work that's complete, keep the checklist up-to-date, and close the issue when all its goals are met.
71 |
72 | Create separate GitHub issues for especially complex or multi-step follow-up tasks, as well as for tasks that you want to delegate to community members. Assign yourself as an organizer for "unclaimed" work, but assign volunteer contributors as organizers for work delegated to them. Help those volunteer organizers manage the issues by asking for updates through comments and asking people at work on the issue to share their progress and to keep the checklist up to date.
73 |
74 | However, if you wind up with 50 issues and only 5 or 6 contributors working on them at any given time, you and your team might feel overwhelmed by the work ahead. As project lead, take time to prioritize issues and help contributors find manageable tasks they can complete. Help them feel good about the work and its progress while you work through the best way to manage the total number of issues active at once and how to solve the trickiest ones together.
75 |
76 | Encourage organizers to close these issues once their tasks have been completed.
77 |
78 | Of course, you don’t need to spin up a huge checklist with a million sub-issues ticketed for small events or discrete tasks. In this case, coming up with a checklist like this might be just the thing to keep event follow-up manageable and encourage volunteers to take on discrete tasks they can quickly complete for the community.
79 |
80 | 81 | * [ ] Draft survey. 82 | * [ ] Get feedback on survey - ask which questions are 83 | unnecessary and if any are missing. 84 | * [ ] Revise survey. 85 | * [ ] Send survey to mailing list from the event. 86 | * [ ] Tally results. 87 | * [ ] Double check results to remove any private information. 88 | * [ ] Report aggregate results on a GH issue in this repo. 89 | * Close the loop: cite your results and use them when you 90 | plan your next event. 91 |-------------------------------------------------------------------------------- /_config.yml: -------------------------------------------------------------------------------- 1 | title: Open Leadership Training Series 2 | subtitle: 3 | email: abby@mozillafoundation.org 4 | twitter: https://twitter.com/MozOpenLeaders 5 | chat: https://chat.mozillafoundation.org/mozilla/channels/mozfest-open-projects 6 | description: > # this means to ignore newlines until "baseurl:" 7 | Does your MozFest session involve hands-on, project based learning? This 8 | training is for anyone running an open project at MozFest. This can be 9 | software, curriculum, or anything you can build together with a group. 10 | baseurl: "/open-leadership-training-series" # the subpath of your site, e.g. /blog 11 | url: "https://mozilla.github.io" # the base hostname & protocol for your site 12 | github: 13 | repo: "mozilla/open-leadership-training-series" 14 | branch: "gh-pages" 15 | 16 | 17 | collections: 18 | articles: 19 | output: true 20 | permalink: /:path/ 21 | 22 | # Build settings 23 | markdown: kramdown 24 | 25 | redcarpet: 26 | extensions: [ 27 | 'no_intra_emphasis', 28 | 'fenced_code_blocks', 29 | 'autolink', 30 | 'strikethrough', 31 | 'superscript', 32 | 'with_toc_data', 33 | 'tables', 34 | 'hardwrap' 35 | ] 36 | 37 | # variables 38 | video: "" 39 | assignment: "Assignment: " -------------------------------------------------------------------------------- /_includes/contents.html: -------------------------------------------------------------------------------- 1 | {% if include.item %} 2 | {% assign item = include.item %} 3 | {% else %} 4 | {% assign item = site.pages | where: "path", "contents.html" | first %} 5 | {% endif %} 6 | 7 | -------------------------------------------------------------------------------- /_includes/footer.html: -------------------------------------------------------------------------------- 1 | -------------------------------------------------------------------------------- /_includes/navigation.html: -------------------------------------------------------------------------------- 1 |
4 |
5 |
6 | 17 | {{ page.summary }} 18 |19 |
56 | {% if subpage.module %}{{ subpage.module }}.{% endif %} 57 | {{ subpage.title }} 58 | {% if subpage.time %} 59 | ({{ subpage.time }}) 60 | {% endif %} 61 |
62 | {% endfor %} 63 | {% endif %} 64 | 65 | {% if page.following %} 66 | {% assign next = site.articles | where: "path", page.following | first %} 67 | 68 | next: 69 | {{ next.title }} 70 | 71 | 72 |
77 |