├── blog
├── blog
│ ├── __init__.py
│ ├── wsgi.py
│ ├── production_settings.py
│ ├── urls.py
│ └── settings.py
├── article
│ ├── __init__.py
│ ├── migrations
│ │ ├── __init__.py
│ │ └── 0001_initial.py
│ ├── tests.py
│ ├── apps.py
│ ├── admin.py
│ ├── templates
│ │ ├── create_article.html
│ │ └── detail.html
│ ├── models.py
│ └── views.py
├── runtime.txt
├── Procfile
├── .gitignore
├── requirements.txt
└── manage.py
├── demo
├── calc
│ ├── __init__.py
│ ├── migrations
│ │ └── __init__.py
│ ├── models.py
│ ├── admin.py
│ ├── apps.py
│ ├── templates
│ │ └── calculator.html
│ ├── scalc.py
│ ├── views.py
│ ├── calculator.py
│ └── tests.py
├── demo
│ ├── __init__.py
│ ├── wsgi.py
│ ├── urls.py
│ └── settings.py
├── .gitignore
├── manage.py
├── requirements.txt
└── features
│ ├── steps
│ ├── zh_calc.py
│ └── calc.py
│ ├── zh_calc.feature
│ └── calc.feature
├── jenkins.png
├── .gitignore
├── demo-calc1.png
├── demo-calc2.png
├── uncertainty.png
├── demo-reports.png
├── jenkins-myBuild.png
├── uncertainty_rd.png
├── welcome2django.png
├── uncertainty_agile.png
├── Systems_Engineering_Process_II.png
├── uncertainty_traditional_engineering.png
├── connecting-the-steps-with-the-interface.png
├── pyparsing
├── ex0.py
├── ex1.py
├── ex2.py
├── ex3.py
├── ex4.py
└── ex5.py
├── test
├── features
│ ├── 帳號.feature
│ ├── steps
│ │ ├── 步驟.py
│ │ ├── steps.py
│ │ └── account.py
│ └── account.feature
└── account
│ ├── account2.py
│ └── account1.py
├── README.md
├── types-of-tests.md
├── mysql-connector.md
├── django-jenkins.md
├── env.sh
├── environment.md
├── pyparsing_exercise.md
├── sqlite.md
├── unittest.md
├── behave.md
├── behave-django.md
├── pyparsing.md
├── executable-specifications.md
├── unittest.mock.md
├── jenkins.md
├── django.md
└── experiment.md
/blog/blog/__init__.py:
--------------------------------------------------------------------------------
1 |
--------------------------------------------------------------------------------
/demo/calc/__init__.py:
--------------------------------------------------------------------------------
1 |
--------------------------------------------------------------------------------
/demo/demo/__init__.py:
--------------------------------------------------------------------------------
1 |
--------------------------------------------------------------------------------
/blog/article/__init__.py:
--------------------------------------------------------------------------------
1 |
--------------------------------------------------------------------------------
/blog/runtime.txt:
--------------------------------------------------------------------------------
1 | python-3.5.1
2 |
--------------------------------------------------------------------------------
/demo/calc/migrations/__init__.py:
--------------------------------------------------------------------------------
1 |
--------------------------------------------------------------------------------
/blog/article/migrations/__init__.py:
--------------------------------------------------------------------------------
1 |
--------------------------------------------------------------------------------
/blog/Procfile:
--------------------------------------------------------------------------------
1 | web: gunicorn --pythonpath blog blog.wsgi
2 |
--------------------------------------------------------------------------------
/blog/.gitignore:
--------------------------------------------------------------------------------
1 | *.pyc
2 | __pycache__
3 | staticfiles
4 | db.sqlite3
5 |
--------------------------------------------------------------------------------
/jenkins.png:
--------------------------------------------------------------------------------
https://raw.githubusercontent.com/hugolu/learn-test/HEAD/jenkins.png
--------------------------------------------------------------------------------
/.gitignore:
--------------------------------------------------------------------------------
1 | __pycache__
2 | db.sqlite3
3 | .python-version
4 | *.pyc
5 | .*.swp
6 |
--------------------------------------------------------------------------------
/demo-calc1.png:
--------------------------------------------------------------------------------
https://raw.githubusercontent.com/hugolu/learn-test/HEAD/demo-calc1.png
--------------------------------------------------------------------------------
/demo-calc2.png:
--------------------------------------------------------------------------------
https://raw.githubusercontent.com/hugolu/learn-test/HEAD/demo-calc2.png
--------------------------------------------------------------------------------
/uncertainty.png:
--------------------------------------------------------------------------------
https://raw.githubusercontent.com/hugolu/learn-test/HEAD/uncertainty.png
--------------------------------------------------------------------------------
/demo-reports.png:
--------------------------------------------------------------------------------
https://raw.githubusercontent.com/hugolu/learn-test/HEAD/demo-reports.png
--------------------------------------------------------------------------------
/demo/calc/models.py:
--------------------------------------------------------------------------------
1 | from django.db import models
2 |
3 | # Create your models here.
4 |
--------------------------------------------------------------------------------
/blog/article/tests.py:
--------------------------------------------------------------------------------
1 | from django.test import TestCase
2 |
3 | # Create your tests here.
4 |
--------------------------------------------------------------------------------
/demo/calc/admin.py:
--------------------------------------------------------------------------------
1 | from django.contrib import admin
2 |
3 | # Register your models here.
4 |
--------------------------------------------------------------------------------
/jenkins-myBuild.png:
--------------------------------------------------------------------------------
https://raw.githubusercontent.com/hugolu/learn-test/HEAD/jenkins-myBuild.png
--------------------------------------------------------------------------------
/uncertainty_rd.png:
--------------------------------------------------------------------------------
https://raw.githubusercontent.com/hugolu/learn-test/HEAD/uncertainty_rd.png
--------------------------------------------------------------------------------
/welcome2django.png:
--------------------------------------------------------------------------------
https://raw.githubusercontent.com/hugolu/learn-test/HEAD/welcome2django.png
--------------------------------------------------------------------------------
/uncertainty_agile.png:
--------------------------------------------------------------------------------
https://raw.githubusercontent.com/hugolu/learn-test/HEAD/uncertainty_agile.png
--------------------------------------------------------------------------------
/demo/.gitignore:
--------------------------------------------------------------------------------
1 | __pycache__
2 | db.sqlite3
3 | .python-version
4 | *.pyc
5 | .*.swp
6 | reports/
7 |
--------------------------------------------------------------------------------
/Systems_Engineering_Process_II.png:
--------------------------------------------------------------------------------
https://raw.githubusercontent.com/hugolu/learn-test/HEAD/Systems_Engineering_Process_II.png
--------------------------------------------------------------------------------
/demo/calc/apps.py:
--------------------------------------------------------------------------------
1 | from django.apps import AppConfig
2 |
3 |
4 | class CalcConfig(AppConfig):
5 | name = 'calc'
6 |
--------------------------------------------------------------------------------
/blog/article/apps.py:
--------------------------------------------------------------------------------
1 | from django.apps import AppConfig
2 |
3 |
4 | class ArticleConfig(AppConfig):
5 | name = 'article'
6 |
--------------------------------------------------------------------------------
/uncertainty_traditional_engineering.png:
--------------------------------------------------------------------------------
https://raw.githubusercontent.com/hugolu/learn-test/HEAD/uncertainty_traditional_engineering.png
--------------------------------------------------------------------------------
/connecting-the-steps-with-the-interface.png:
--------------------------------------------------------------------------------
https://raw.githubusercontent.com/hugolu/learn-test/HEAD/connecting-the-steps-with-the-interface.png
--------------------------------------------------------------------------------
/blog/requirements.txt:
--------------------------------------------------------------------------------
1 | dj-database-url==0.4.1
2 | dj-static==0.0.6
3 | Django==1.9.7
4 | django-grappelli==2.8.1
5 | gunicorn==19.6.0
6 | static3==0.7.0
7 | psycopg2==2.6.1
8 |
--------------------------------------------------------------------------------
/blog/article/admin.py:
--------------------------------------------------------------------------------
1 | from django.contrib import admin
2 | from article.models import Article, Category
3 |
4 | # Register your models here.
5 | admin.site.register(Article)
6 | admin.site.register(Category)
7 |
--------------------------------------------------------------------------------
/demo/calc/templates/calculator.html:
--------------------------------------------------------------------------------
1 |
6 |
--------------------------------------------------------------------------------
/pyparsing/ex0.py:
--------------------------------------------------------------------------------
1 | from pyparsing import Word, StringEnd, alphas
2 |
3 | noEnd = Word(alphas)
4 | print(noEnd.parseString('Dorking...'))
5 |
6 | withEnd = Word(alphas) + StringEnd()
7 | print(withEnd.parseString('Dorking...'))
8 |
--------------------------------------------------------------------------------
/blog/article/templates/create_article.html:
--------------------------------------------------------------------------------
1 |
2 |
3 |
4 |
9 |
10 |
11 |
--------------------------------------------------------------------------------
/blog/article/templates/detail.html:
--------------------------------------------------------------------------------
1 |
2 |
3 |
4 | {{ article.title }}
5 | {% if article.pk == 1 %}
6 | {{ article.content|upper }}
7 | {% else %}
8 | {{ article.content }}
9 | {% endif %}
10 |
11 |
12 |
--------------------------------------------------------------------------------
/demo/calc/scalc.py:
--------------------------------------------------------------------------------
1 | class SimpleCalculator:
2 |
3 | def add(self, a, b):
4 | return a+b
5 |
6 | def sub(self, a, b):
7 | return a-b
8 |
9 | def mul(self, a, b):
10 | return a*b
11 |
12 | def div(self, a, b):
13 | return a/b
14 |
--------------------------------------------------------------------------------
/blog/manage.py:
--------------------------------------------------------------------------------
1 | #!/usr/bin/env python
2 | import os
3 | import sys
4 |
5 | if __name__ == "__main__":
6 | os.environ.setdefault("DJANGO_SETTINGS_MODULE", "blog.settings")
7 |
8 | from django.core.management import execute_from_command_line
9 |
10 | execute_from_command_line(sys.argv)
11 |
--------------------------------------------------------------------------------
/demo/manage.py:
--------------------------------------------------------------------------------
1 | #!/usr/bin/env python
2 | import os
3 | import sys
4 |
5 | if __name__ == "__main__":
6 | os.environ.setdefault("DJANGO_SETTINGS_MODULE", "demo.settings")
7 |
8 | from django.core.management import execute_from_command_line
9 |
10 | execute_from_command_line(sys.argv)
11 |
--------------------------------------------------------------------------------
/demo/requirements.txt:
--------------------------------------------------------------------------------
1 | astroid==1.4.6
2 | behave==1.2.5
3 | behave-django==0.3.0
4 | colorama==0.3.7
5 | configparser==3.5.0
6 | coverage==4.1
7 | Django==1.9.7
8 | django-jenkins==0.19.0
9 | lazy-object-proxy==1.2.2
10 | nose==1.3.7
11 | parse==1.6.6
12 | parse-type==0.3.4
13 | pylint==1.5.6
14 | PyMySQL==0.7.4
15 | pyparsing==2.1.5
16 | six==1.10.0
17 | wrapt==1.10.8
18 |
--------------------------------------------------------------------------------
/demo/calc/views.py:
--------------------------------------------------------------------------------
1 | from django.shortcuts import render
2 | from django.http import HttpResponse
3 | from calc.calculator import Calculator
4 |
5 | # Create your views here.
6 | def calc(request):
7 | value = ''
8 |
9 | if request.method == 'POST':
10 | calc = Calculator()
11 | expr = request.POST['expr']
12 | value = calc.evalString(expr)
13 |
14 | return render(request, 'calculator.html', {'value': value})
15 |
--------------------------------------------------------------------------------
/demo/demo/wsgi.py:
--------------------------------------------------------------------------------
1 | """
2 | WSGI config for demo project.
3 |
4 | It exposes the WSGI callable as a module-level variable named ``application``.
5 |
6 | For more information on this file, see
7 | https://docs.djangoproject.com/en/1.9/howto/deployment/wsgi/
8 | """
9 |
10 | import os
11 |
12 | from django.core.wsgi import get_wsgi_application
13 |
14 | os.environ.setdefault("DJANGO_SETTINGS_MODULE", "demo.settings")
15 |
16 | application = get_wsgi_application()
17 |
--------------------------------------------------------------------------------
/blog/blog/wsgi.py:
--------------------------------------------------------------------------------
1 | """
2 | WSGI config for blog project.
3 |
4 | It exposes the WSGI callable as a module-level variable named ``application``.
5 |
6 | For more information on this file, see
7 | https://docs.djangoproject.com/en/1.9/howto/deployment/wsgi/
8 | """
9 |
10 | import os
11 |
12 | from django.core.wsgi import get_wsgi_application
13 |
14 | from dj_static import Cling
15 |
16 | os.environ.setdefault("DJANGO_SETTINGS_MODULE", "blog.settings")
17 |
18 | application = Cling(get_wsgi_application())
19 |
--------------------------------------------------------------------------------
/blog/article/models.py:
--------------------------------------------------------------------------------
1 | from django.db import models
2 |
3 | # Create your models here.
4 | class Category(models.Model):
5 | name = models.CharField(u'Name', max_length=50)
6 |
7 | def __str__(self):
8 | return self.name
9 |
10 | class Article(models.Model):
11 | content = models.TextField(u'Content')
12 | title = models.CharField(u'Title', max_length=50)
13 | category = models.ForeignKey('Category', blank=True, null=True)
14 |
15 | def __str__(self):
16 | return self.title
17 |
--------------------------------------------------------------------------------
/blog/blog/production_settings.py:
--------------------------------------------------------------------------------
1 | # Import all default settings.
2 | from .settings import *
3 |
4 | import dj_database_url
5 | DATABASES = {
6 | 'default': dj_database_url.config()
7 | }
8 |
9 | # Static asset configuration.
10 | STATIC_ROOT = 'staticfiles'
11 |
12 | # Honor the 'X-Forwarded-Proto' header for request.is_secure().
13 | SECURE_PROXY_SSL_HEADER = ('HTTP_X_FORWARDED_PROTO', 'https')
14 |
15 | # Allow all host headers.
16 | ALLOWED_HOSTS = ['*']
17 |
18 | # Turn off DEBUG mode.
19 | DEBUG = False
20 |
--------------------------------------------------------------------------------
/pyparsing/ex1.py:
--------------------------------------------------------------------------------
1 | from pyparsing import Word, nums, alphas, Forward, Suppress, ZeroOrMore
2 | import unittest
3 |
4 | intStack = []
5 | def pushStack(s, l, t):
6 | intStack.append(t[0])
7 |
8 | atom = Word(nums).setParseAction(pushStack) | Suppress(Word(alphas))
9 | expr = Forward()
10 | expr << atom + ZeroOrMore(expr)
11 |
12 | def evalString(string):
13 | return expr.parseString(string).asList()
14 |
15 | class TestEx1(unittest.TestCase):
16 |
17 | def test_evalString(self):
18 | self.assertEqual(evalString("12ab34cd56ef"), ['12', '34', '56'])
19 | self.assertEqual(evalString("ab12cd34ef56"), ['12', '34', '56'])
20 |
21 |
--------------------------------------------------------------------------------
/test/features/帳號.feature:
--------------------------------------------------------------------------------
1 | # language: zh-TW
2 |
3 | 功能: 用戶帳號
4 | 為了買賣商品
5 | 身為買家或賣家
6 | 我想要有一個電子商務網站帳號
7 |
8 | 場景: 用正確的帳號跟密碼登入
9 | 假設< 帳號django與密碼django123已註冊
10 | 當< 我用django與密碼django123登入
11 | 那麼< 我得到登入結果:成功
12 |
13 | 場景: 用不正確的帳號跟密碼登入
14 | 假設< 帳號django與密碼django123已註冊
15 | 當< 我用django與密碼abcdef123登入
16 | 那麼< 我得到登入結果:失敗
17 |
18 | 場景大綱: 帳號與密碼必須大於5個字元
19 | 當< 嘗試用帳號與密碼註冊
20 | 那麼< 我得到註冊結果:
21 |
22 | 例子: 一些帳號與密碼
23 | | username | password | result |
24 | | abc | 123456 | 無效的帳號或密碼 |
25 | | abcedf | 123 | 無效的帳號或密碼 |
26 | | abc | 123 | 無效的帳號或密碼 |
27 | | abcdef | 123456 | 帳號建立 |
28 |
--------------------------------------------------------------------------------
/test/features/steps/步驟.py:
--------------------------------------------------------------------------------
1 | from account import *
2 |
3 | @given(u'< 帳號{username}與密碼{password}已註冊')
4 | def step_impl(context, username, password):
5 | account_insert(username, password)
6 |
7 | @when(u'< 我用{username}與密碼{password}登入')
8 | def step_impl(context, username, password):
9 | if account_login(username, password) == True:
10 | context.result = "成功"
11 | else:
12 | context.result = "失敗"
13 |
14 | @then(u'< 我得到登入結果:{result}')
15 | def step_impl(context, result):
16 | assert(context.result == result)
17 |
18 | @when(u'< 嘗試用帳號{username}與密碼{password}註冊')
19 | def step_impl(context, username, password):
20 | if account_register(username, password) == True:
21 | context.result = "帳號建立"
22 | else:
23 | context.result = "無效的帳號或密碼"
24 |
25 | @then(u'< 我得到註冊結果:{result}')
26 | def step_impl(context, result):
27 | assert(context.result == result)
28 |
--------------------------------------------------------------------------------
/demo/features/steps/zh_calc.py:
--------------------------------------------------------------------------------
1 | from calc.calculator import Calculator
2 |
3 | @given(u'< 我輸入{expr}')
4 | def step_impl(context, expr):
5 | context.expr = expr
6 |
7 | @when(u'< 我按下等號按鈕')
8 | def step_impl(context):
9 | calc = Calculator()
10 | context.answer = calc.evalString(context.expr)
11 |
12 | @then(u'< 我得到的答案是{answer}')
13 | def step_impl(context, answer):
14 | try:
15 | ans = float(answer)
16 | except ValueError:
17 | ans = answer
18 |
19 | assert context.answer == ans
20 |
21 | @when(u'< 我先輸入{expr1}')
22 | def step_impl(context, expr1):
23 | calc = Calculator()
24 | context.answer1 = calc.evalString(expr1)
25 |
26 | @when(u'< 我再輸入{expr2}')
27 | def step_impl(context, expr2):
28 | calc = Calculator()
29 | context.answer2 = calc.evalString(expr2)
30 |
31 | @then(u'< 我得到相同的答案')
32 | def step_impl(context):
33 | assert context.answer1 == context.answer2
34 |
--------------------------------------------------------------------------------
/demo/demo/urls.py:
--------------------------------------------------------------------------------
1 | """demo URL Configuration
2 |
3 | The `urlpatterns` list routes URLs to views. For more information please see:
4 | https://docs.djangoproject.com/en/1.9/topics/http/urls/
5 | Examples:
6 | Function views
7 | 1. Add an import: from my_app import views
8 | 2. Add a URL to urlpatterns: url(r'^$', views.home, name='home')
9 | Class-based views
10 | 1. Add an import: from other_app.views import Home
11 | 2. Add a URL to urlpatterns: url(r'^$', Home.as_view(), name='home')
12 | Including another URLconf
13 | 1. Import the include() function: from django.conf.urls import url, include
14 | 2. Add a URL to urlpatterns: url(r'^blog/', include('blog.urls'))
15 | """
16 | from django.conf.urls import url
17 | from django.contrib import admin
18 | import calc.views as calc_views
19 |
20 | urlpatterns = [
21 | url(r'^admin/', admin.site.urls),
22 | url(r'^$', calc_views.calc),
23 | ]
24 |
--------------------------------------------------------------------------------
/blog/article/views.py:
--------------------------------------------------------------------------------
1 | from django.shortcuts import render
2 | from django.http import HttpResponse, HttpResponseRedirect
3 | from article.models import Article
4 | from django import forms
5 |
6 | # Create your views here.
7 | def home(request):
8 | s = "Hello World!"
9 | return HttpResponse(s)
10 |
11 | def detail(request, pk):
12 | article = Article.objects.get(pk=int(pk))
13 | return render(request, 'detail.html', {'article': article})
14 |
15 | class ArticleForm(forms.ModelForm):
16 | class Meta:
17 | model = Article
18 | fields = ['title', 'content', ]
19 |
20 | def create(request):
21 | if request.method == 'POST':
22 | form = ArticleForm(request.POST)
23 | if form.is_valid():
24 | new_article = form.save()
25 | return HttpResponseRedirect('/article/' + str(new_article.pk))
26 |
27 | form = ArticleForm()
28 | return render(request, 'create_article.html', {'form': form})
29 |
--------------------------------------------------------------------------------
/demo/features/steps/calc.py:
--------------------------------------------------------------------------------
1 | from calc.calculator import Calculator
2 |
3 | @given(u'I enter {expr}')
4 | def step_impl(context, expr):
5 | context.expr = expr
6 |
7 | @when(u'I press "=" button')
8 | def step_impl(context):
9 | calc = Calculator()
10 | context.answer = calc.evalString(context.expr)
11 |
12 | @then(u'I get the answer {answer}')
13 | def step_impl(context, answer):
14 | try:
15 | ans = float(answer)
16 | except ValueError:
17 | ans = answer
18 |
19 | assert context.answer == ans
20 |
21 | @when(u'I enter {expr1} first')
22 | def step_impl(context, expr1):
23 | calc = Calculator()
24 | context.answer1 = calc.evalString(expr1)
25 |
26 | @when(u'I enter {expr2} again')
27 | def step_impl(context, expr2):
28 | calc = Calculator()
29 | context.answer2 = calc.evalString(expr2)
30 |
31 | @then(u'I get the same answer')
32 | def step_impl(context):
33 | assert context.answer1 == context.answer2
34 |
--------------------------------------------------------------------------------
/test/account/account2.py:
--------------------------------------------------------------------------------
1 | import pymysql.cursors
2 |
3 | cnx = pymysql.Connect(user='root', password='000000', host='127.0.0.1', db='test')
4 | cursor = cnx.cursor()
5 |
6 | def login_check(username, password):
7 | query = "SELECT password FROM account WHERE username='%s'" % username
8 | cursor.execute(query)
9 | row = cursor.fetchone()
10 | if row is not None:
11 | (pw,) = row
12 | return "successful" if pw == password else "failed"
13 | else:
14 | return "failed"
15 |
16 | import unittest
17 | class TestAccount(unittest.TestCase):
18 |
19 | def test_login_with_correct_username_password(self):
20 | self.assertEqual(login_check("abcdef", "123456"), "successful")
21 |
22 | def test_login_with_invalid_username(self):
23 | self.assertEqual(login_check("ABCEDF", "123456"), "failed")
24 |
25 | def test_login_with_invalid_password(self):
26 | self.assertEqual(login_check("abcedf", "000000"), "failed")
27 |
--------------------------------------------------------------------------------
/test/account/account1.py:
--------------------------------------------------------------------------------
1 | import mysql.connector
2 |
3 | cnx = mysql.connector.connect(user='root', password='000000', host='127.0.0.1', database='test')
4 | cursor = cnx.cursor()
5 |
6 | def login_check(username, password):
7 | query = "SELECT password FROM account WHERE username='%s'" % username
8 | cursor.execute(query)
9 | row = cursor.fetchone()
10 | if row is not None:
11 | (pw,) = row
12 | return "successful" if pw == password else "failed"
13 | else:
14 | return "failed"
15 |
16 | import unittest
17 | class TestAccount(unittest.TestCase):
18 |
19 | def test_login_with_correct_username_password(self):
20 | self.assertEqual(login_check("abcdef", "123456"), "successful")
21 |
22 | def test_login_with_invalid_username(self):
23 | self.assertEqual(login_check("ABCEDF", "123456"), "failed")
24 |
25 | def test_login_with_invalid_password(self):
26 | self.assertEqual(login_check("abcedf", "000000"), "failed")
27 |
--------------------------------------------------------------------------------
/test/features/steps/steps.py:
--------------------------------------------------------------------------------
1 | from account import *
2 |
3 | @given(u'an username {username} with the password {password} is registered')
4 | def step_impl(context, username, password):
5 | account_insert(username, password)
6 |
7 | @when(u'I login as {username} and give the password {password}')
8 | def step_impl(context, username, password):
9 | if account_login(username, password) == True:
10 | context.result = "successful"
11 | else:
12 | context.result = "failed"
13 |
14 | @then(u'I get the login result: {result}')
15 | def step_impl(context, result):
16 | assert(context.result == result)
17 |
18 | @when(u'try to register a name {username} with a password {password}')
19 | def step_impl(context, username, password):
20 | if account_register(username, password) == True:
21 | context.result = "successful"
22 | else:
23 | context.result = "invalid username or password"
24 |
25 | @then(u'I get the register result: {result}')
26 | def step_impl(context, result):
27 | assert(context.result == result)
28 |
--------------------------------------------------------------------------------
/blog/blog/urls.py:
--------------------------------------------------------------------------------
1 | """blog URL Configuration
2 |
3 | The `urlpatterns` list routes URLs to views. For more information please see:
4 | https://docs.djangoproject.com/en/1.9/topics/http/urls/
5 | Examples:
6 | Function views
7 | 1. Add an import: from my_app import views
8 | 2. Add a URL to urlpatterns: url(r'^$', views.home, name='home')
9 | Class-based views
10 | 1. Add an import: from other_app.views import Home
11 | 2. Add a URL to urlpatterns: url(r'^$', Home.as_view(), name='home')
12 | Including another URLconf
13 | 1. Import the include() function: from django.conf.urls import url, include
14 | 2. Add a URL to urlpatterns: url(r'^blog/', include('blog.urls'))
15 | """
16 | from django.conf.urls import url, include
17 | from django.contrib import admin
18 |
19 | urlpatterns = [
20 | #url(r'^grappelli/', include('grappelli.urls')),
21 | url(r'^admin/', admin.site.urls),
22 | url(r'^$', 'article.views.home'),
23 | url(r'^article/(?P[0-9]+)/$', 'article.views.detail'),
24 | url(r'^create/$', 'article.views.create'),
25 | ]
26 |
--------------------------------------------------------------------------------
/test/features/account.feature:
--------------------------------------------------------------------------------
1 | Feature: User account
2 | In order to buy or sell commodities
3 | As a buyer or seller
4 | I want to have a account in the Ecommerce website
5 |
6 | Scenario: Login as correct username and password
7 | Given an username django with the password django123 is registered
8 | When I login as django and give the password django123
9 | Then I get the login result: successful
10 |
11 | Scenario: Login as incorrect username and password
12 | Given an username django with the password django123 is registered
13 | When I login as django and give the password abcdef123
14 | Then I get the login result: failed
15 |
16 | Scenario Outline: username and password must be large than 5 characters
17 | When try to register a name with a password
18 | Then I get the register result:
19 |
20 | Examples: some usernames and passwords
21 | | username | password | result |
22 | | abc | 123456 | invalid username or password |
23 | | abcedf | 123 | invalid username or password |
24 | | abc | 123 | invalid username or password |
25 | | abcdef | 123456 | successful |
26 |
--------------------------------------------------------------------------------
/blog/article/migrations/0001_initial.py:
--------------------------------------------------------------------------------
1 | # -*- coding: utf-8 -*-
2 | # Generated by Django 1.9.7 on 2016-06-10 03:43
3 | from __future__ import unicode_literals
4 |
5 | from django.db import migrations, models
6 | import django.db.models.deletion
7 |
8 |
9 | class Migration(migrations.Migration):
10 |
11 | initial = True
12 |
13 | dependencies = [
14 | ]
15 |
16 | operations = [
17 | migrations.CreateModel(
18 | name='Article',
19 | fields=[
20 | ('id', models.AutoField(auto_created=True, primary_key=True, serialize=False, verbose_name='ID')),
21 | ('content', models.TextField(verbose_name='Content')),
22 | ('title', models.CharField(max_length=50, verbose_name='Title')),
23 | ],
24 | ),
25 | migrations.CreateModel(
26 | name='Category',
27 | fields=[
28 | ('id', models.AutoField(auto_created=True, primary_key=True, serialize=False, verbose_name='ID')),
29 | ('name', models.CharField(max_length=50, verbose_name='Name')),
30 | ],
31 | ),
32 | migrations.AddField(
33 | model_name='article',
34 | name='category',
35 | field=models.ForeignKey(blank=True, null=True, on_delete=django.db.models.deletion.CASCADE, to='article.Category'),
36 | ),
37 | ]
38 |
--------------------------------------------------------------------------------
/README.md:
--------------------------------------------------------------------------------
1 | # 關於測試,我說的其實是......
2 |
3 | ## Slide
4 | - [關於測試,我說的其實是......](http://www.slideshare.net/hugolu/ss-63936508)
5 |
6 | ## Demo
7 |
8 | - [demo](demo.md) - 透過開發網頁計算的的例子,串連 BDD, TDD, Test Double, Test Automation, Web Development 多項技術
9 | - [source code](demo/)
10 | - [環境設定](environment.md)
11 |
12 | ## 參考
13 |
14 | - 重要觀念
15 | - [可執行的需求](executable-specifications.md) - 這次學習的濫觴,薄薄一本言簡意賅,超推!
16 | - [測試的種類](types-of-tests.md) - 分類各種測試
17 | - 測試基本技能
18 | - BDD
19 | - [Behave](behave.md) - Behaviour-Driven Development, Python style
20 | - TDD
21 | - [unittest](unittest.md) - python 單元測試框架
22 | - [unittest.mock](unittest.mock.md) - python 單元測試替身,切開元件間的相依性
23 | - BDD/TDD 實驗
24 | - [實驗](experiment.md) - 使用 BDD/TDD 開發網頁登入、註冊核心功能,不含網頁呈現部分
25 | - [test/](test/) - BDD/TDD 實驗的程式碼
26 | - Django 網站開發
27 | - [django](django.md) - 從無到有,一步步架設網頁,範例程式在 [blog/](blog/)
28 | - [behave-django](behave-django.md) - 支援 Djando 的 BDD 測試框架
29 | - [django-jenkins](django-jenkins.md) - 支援 Django 的 Jenkins 套件,用來自動化測試與產生報表
30 | - [mysql-connector](mysql-connector.md) - MySQL driver for Python
31 | - [sqlite](sqlite.md) - sqlite3 使用說明
32 | - [Jenkins](jenkins.md) - 透過自動化測試、自動化建置與部署,提高敏捷開發的可能性
33 | - pyparsing
34 | - [pyparsing](pyparsing.md) - 翻譯說明文件
35 | - [pyparsing 練習](pyparsing_exercise.md) - 透過幾個練習,熟悉 pyparsing 解析字串的功能
36 | - [pyparsing/](pyparsing/) - pyparsing 練習的程式碼
37 |
38 |
--------------------------------------------------------------------------------
/demo/features/zh_calc.feature:
--------------------------------------------------------------------------------
1 | # language: zh-TW
2 | 功能: 網頁計算機
3 |
4 | 身為一個學生
5 | 為了完成家庭作業
6 | 我想要做算術運算
7 |
8 | 場景大綱: 做簡單的運算
9 | 假設< 我輸入
10 | 當< 我按下等號按鈕
11 | 那麼< 我得到的答案是
12 |
13 | 例子:
14 | | expression | answer |
15 | | 3 + 2 | 5 |
16 | | 3 - 2 | 1 |
17 | | 3 * 2 | 6 |
18 | | 3 / 2 | 1.5 |
19 | | 3 +-*/ 2 | Invalid Input |
20 | | hello world | Invalid Input |
21 |
22 | 場景大綱: 滿足交換律
23 | 當< 我先輸入
24 | 當< 我再輸入
25 | 那麼< 我得到相同的答案
26 |
27 | 例子:
28 | | expression1 | expression2 |
29 | | 3 + 4 | 4 + 3 |
30 | | 2 * 5 | 5 * 2 |
31 |
32 | 場景大綱: 滿足結合律
33 | 當< 我先輸入
34 | 當< 我再輸入
35 | 那麼< 我得到相同的答案
36 |
37 | 例子:
38 | | expression1 | expression2 |
39 | | (2 + 3) + 4 | 2 + (3 + 4) |
40 | | 2 * (3 * 4) | (2 * 3) * 4 |
41 |
42 | 場景大綱: 滿足結合律
43 | 當< 我先輸入
44 | 當< 我再輸入
45 | 那麼< 我得到相同的答案
46 |
47 | 例子:
48 | | expression1 | expression2 |
49 | | 2 * (1 + 3) | (2*1) + (2*3) |
50 | | (1 + 3) * 2 | (1*2) + (3*2) |
51 |
--------------------------------------------------------------------------------
/types-of-tests.md:
--------------------------------------------------------------------------------
1 | # 測試的分類
2 |
3 | ## 業務導向且支持開發過程的測試
4 |
5 | 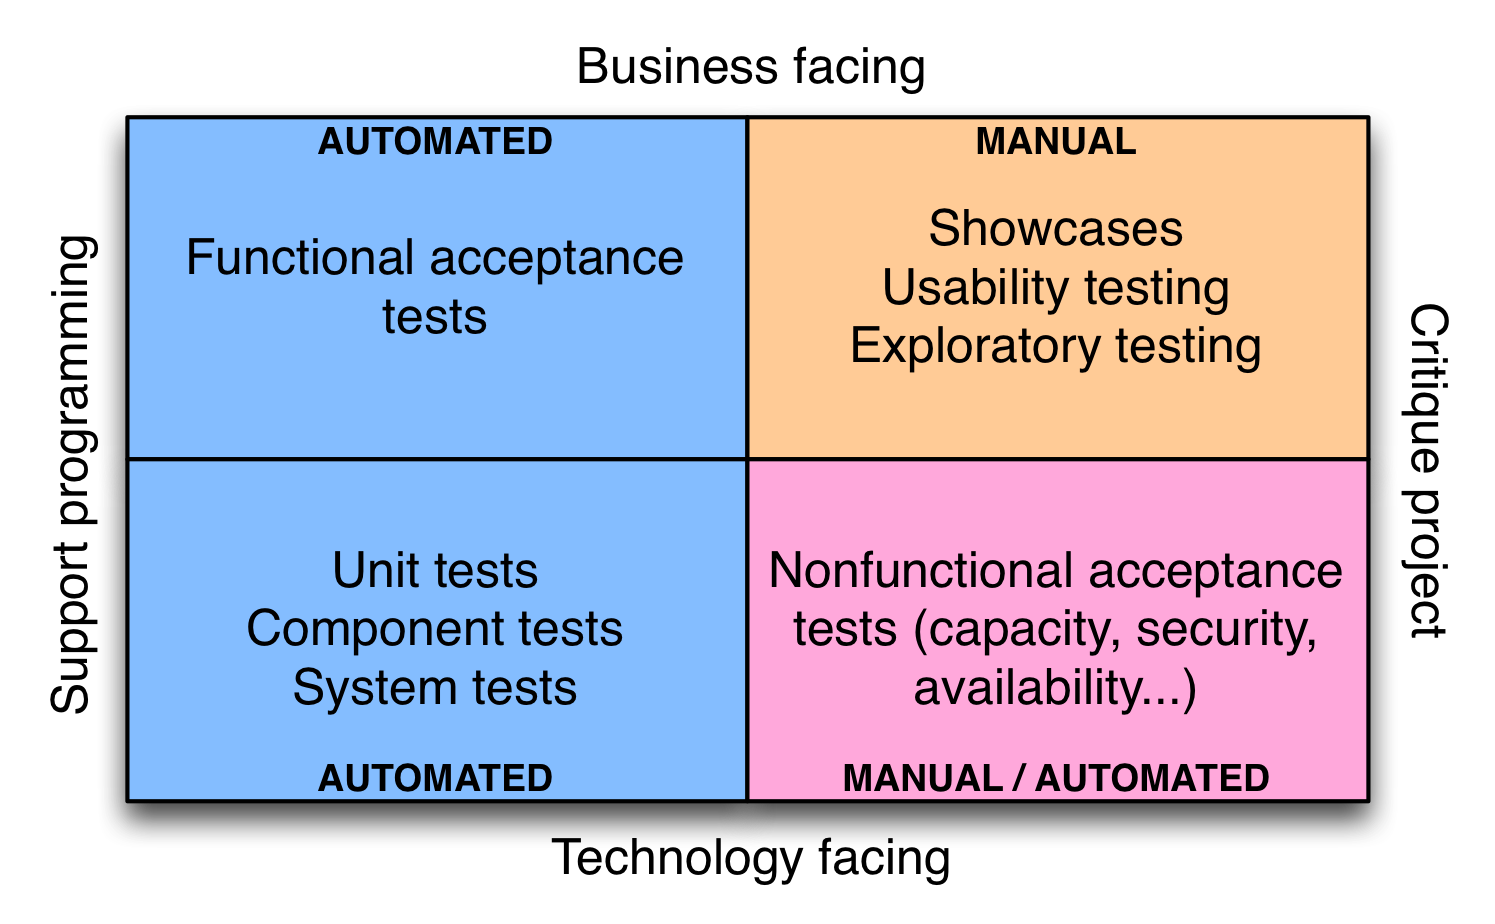
6 | (圖片來自:http://continuousdelivery.com/foundations/test-automation/)
7 |
8 | ### 驗收測試
9 | - 確保用戶故事的驗收條件得到滿足
10 | - 做對的事情 (the the right thing)
11 | - 由用戶寫測試腳本,開發人員和測試人員努力實現這些腳本
12 | - Happy Path: Given-When-Then
13 | - 自動化驗收測試
14 | - 加速反應速度
15 | - 減少測試人員負擔
16 | - 提高探索性測試與高價值的活動
17 | - 支援回歸測試
18 | - 活文件 (不斷更新的規格書)
19 |
20 | ## 技術導向且支持開發過程的測試
21 |
22 | ### 單元測試
23 | - 單元測試單獨測試一段特定的程式碼
24 | - 把事情做對 (do the thing right)
25 | - 常常倚賴測試替身 (test double) 模擬系統其他部分
26 | - 沒有系統組件間的交互,執行速度快
27 | - 偵測修改程式碼是否破獲現有的功能
28 |
29 | ### 組件測試
30 | - 用於測試功能集合,捕捉系統不同部分交互產生的缺陷
31 | - 需要執行更多 I/O 操作、連接資料庫、檔案系統等
32 |
33 | ### 部署測試
34 | - 用於檢查部署過程是否正常
35 | - 應用程式是否是否正確安裝、配置,能否與所需的服務連接,得到相對的回應
36 |
37 | ## 業務導向且評價專案的測試
38 |
39 | ### 展示
40 | - 每次迭代結束時,敏捷開發團隊向用戶展示其開發完成的新功能
41 | - 頻繁地向客戶演示功能,儘早發現對需求規格的誤解,或修正有問題的規格
42 |
43 | ### 探索性測試
44 | - 創造學習的過程,不只是發現缺陷
45 | - 創建新的自動化測試,用來覆蓋新的需求
46 |
47 | ### 易用性測試
48 | - 驗證用戶能否容易使用軟體完成工作
49 | - 情境調查:觀察使用者操作過程,收集量化數據,如使用者多久時間完成任務、按了多少次錯誤的按鈕、試用者自評滿意度
50 | - Beta測試:網站同時運行多個版本,收集、統計、分析新功能的使用情形,讓功能適者生存不斷演進
51 |
52 | ## 技術導向且評價專案的測試
53 |
54 | ### 非功能性測試
55 | - 除了功能之外的系統品質測試,如容量、可用性、安全性
56 | - 客戶不關心非功能需求,但當他們意識這方面的問題,事情往往一發不可收拾
57 | - 容量:網站因為容量問題,停止提供服務
58 | - 安全性:用戶個資外洩、信用卡被盜刷
59 |
60 | ## 開發流程
61 | - 客戶、分析師、測試人員**定義**驗收條件
62 | - 測試人員與開發人員基於驗收條件,**實現**驗收測試自動化
63 | - 開發人員編寫程式**滿足**驗收條件
64 | - 只要有自動化測試失敗,無論是單元測試、組件測試、驗收測試,開發人員要優先處理並修復問題
65 |
66 | ----
67 | ## 參考
68 | - https://continuousdelivery.com/foundations/test-automation/
69 | - https://www.thoughtworks.com/continuous-delivery
70 |
--------------------------------------------------------------------------------
/demo/features/calc.feature:
--------------------------------------------------------------------------------
1 | Feature: Web calculator
2 |
3 | As a student
4 | In order to finish my homework
5 | I want to do arithmatical operations
6 |
7 | Scenario Outline: do simple operations
8 | Given I enter
9 | When I press "=" button
10 | Then I get the answer
11 |
12 | Examples:
13 | | expression | answer |
14 | | 3 + 2 | 5 |
15 | | 3 - 2 | 1 |
16 | | 3 * 2 | 6 |
17 | | 3 / 2 | 1.5 |
18 | | 3 +-*/ 2 | Invalid Input |
19 | | hello world | Invalid Input |
20 |
21 | Scenario Outline: satisfy commutative property
22 | When I enter first
23 | And I enter again
24 | Then I get the same answer
25 |
26 | Examples:
27 | | expression1 | expression2 |
28 | | 3 + 4 | 4 + 3 |
29 | | 2 * 5 | 5 * 2 |
30 |
31 | Scenario Outline: satisfy associative property
32 | When I enter first
33 | And I enter again
34 | Then I get the same answer
35 |
36 | Examples:
37 | | expression1 | expression2 |
38 | | (2 + 3) + 4 | 2 + (3 + 4) |
39 | | 2 * (3 * 4) | (2 * 3) * 4 |
40 |
41 | Scenario Outline: satisfy distributive property
42 | When I enter first
43 | And I enter again
44 | Then I get the same answer
45 |
46 | Examples:
47 | | expression1 | expression2 |
48 | | 2 * (1 + 3) | (2*1) + (2*3) |
49 | | (1 + 3) * 2 | (1*2) + (3*2) |
50 |
--------------------------------------------------------------------------------
/demo/calc/calculator.py:
--------------------------------------------------------------------------------
1 | from pyparsing import nums, Word, StringEnd, ParseException, Literal, ZeroOrMore, Forward
2 | from calc.scalc import SimpleCalculator
3 |
4 | """
5 | integer :: '0'...'9'*
6 | addop :: '+' | '-'
7 | mulop :: '*' | '/'
8 | atom :: integer | '(' + expr + ')'
9 | term :: atom [mulop atom]*
10 | expr :: term [addop term]*
11 | """
12 |
13 | class Calculator:
14 |
15 | def __init__(self, calc = SimpleCalculator()):
16 | self.exprStack = []
17 |
18 | def pushStack(s, l, t):
19 | self.exprStack.append(t[0])
20 |
21 | integer = Word(nums).addParseAction(pushStack)
22 | addop = Literal('+') | Literal('-')
23 | mulop = Literal('*') | Literal('/')
24 | lpar = Literal('(')
25 | rpar = Literal(')')
26 |
27 | expr = Forward()
28 | atom = integer | lpar + expr + rpar
29 | term = atom + ZeroOrMore((mulop + atom).addParseAction(pushStack))
30 | expr << term + ZeroOrMore((addop + term).addParseAction(pushStack))
31 | self.expr = expr + StringEnd()
32 |
33 | self.opfun = {
34 | '+' : (lambda a, b: calc.add(a,b)),
35 | '-' : (lambda a, b: calc.sub(a,b)),
36 | '*' : (lambda a, b: calc.mul(a,b)),
37 | '/' : (lambda a, b: calc.div(a,b)) }
38 |
39 | def parseString(self, string):
40 | self.exprStack = []
41 | self.expr.parseString(string)
42 | return self.exprStack
43 |
44 | def evalStack(self, stack):
45 | op = stack.pop()
46 | if op in '+-*/':
47 | op2 = self.evalStack(stack)
48 | op1 = self.evalStack(stack)
49 | return self.opfun[op](op1, op2)
50 | else:
51 | return float(op)
52 |
53 | def evalString(self, string):
54 | try:
55 | self.parseString(string)
56 | return self.evalStack(self.exprStack)
57 | except ParseException:
58 | return 'Invalid Input'
59 |
--------------------------------------------------------------------------------
/pyparsing/ex2.py:
--------------------------------------------------------------------------------
1 | from pyparsing import Word, Literal, nums, ZeroOrMore
2 | import unittest
3 |
4 | """
5 | op :: '+' | '-' | '*' | '/'
6 | num :: '0'...'9'+
7 | expr :: num + [op + num]*
8 | """
9 |
10 | exprStack = []
11 | def pushFirst(s, l, t):
12 | exprStack.append(t[0])
13 |
14 | add = Literal('+')
15 | sub = Literal('-')
16 | mul = Literal('*')
17 | div = Literal('/')
18 | op = add | sub | mul | div
19 |
20 | atom = Word(nums).addParseAction(pushFirst)
21 | expr = atom + ZeroOrMore((op + atom).addParseAction(pushFirst))
22 |
23 | def parseString(string):
24 | global exprStack
25 | exprStack = []
26 | expr.parseString(string)
27 | return exprStack
28 |
29 | opf = { '+' : (lambda a, b: a + b),
30 | '-' : (lambda a, b: a - b),
31 | '*' : (lambda a, b: a * b),
32 | '/' : (lambda a, b: a / b) }
33 |
34 | def evalStack(stack):
35 | op = stack.pop()
36 | if op in '+-*/':
37 | op2 = evalStack(stack)
38 | op1 = evalStack(stack)
39 | return opf[op](op1, op2)
40 | else:
41 | return float(op)
42 |
43 | def evalString(string):
44 | stack = parseString(string)
45 | result = evalStack(stack)
46 | return result
47 |
48 | class TestEx2(unittest.TestCase):
49 |
50 | def test_parseString(self):
51 | self.assertEqual(parseString('6+3'), ['6', '3', '+'])
52 | self.assertEqual(parseString('6-3'), ['6', '3', '-'])
53 | self.assertEqual(parseString('6*3'), ['6', '3', '*'])
54 | self.assertEqual(parseString('6/3'), ['6', '3', '/'])
55 |
56 | def test_evalStack(self):
57 | self.assertEqual(evalStack(['6', '3', '+']), 9.0)
58 | self.assertEqual(evalStack(['6', '3', '-']), 3.0)
59 | self.assertEqual(evalStack(['6', '3', '*']), 18.0)
60 | self.assertEqual(evalStack(['6', '3', '/']), 2.0)
61 |
62 | def test_evalString(self):
63 | self.assertEqual(evalString('6+3'), 9.0)
64 | self.assertEqual(evalString('6-3'), 3.0)
65 | self.assertEqual(evalString('6*3'), 18.0)
66 | self.assertEqual(evalString('6/3'), 2.0)
67 |
68 | def test_multiple_op(self):
69 | self.assertEqual(evalString('6+3+2'), 11.0)
70 | self.assertEqual(evalString('6-3-2'), 1.0)
71 | self.assertEqual(evalString('6*3*2'), 36.0)
72 | self.assertEqual(evalString('6/3/2'), 1.0)
73 |
--------------------------------------------------------------------------------
/pyparsing/ex3.py:
--------------------------------------------------------------------------------
1 | from pyparsing import Word, Literal, nums, ZeroOrMore
2 | import unittest
3 |
4 | """
5 | op :: '+' | '-' | '*' | '/'
6 | atom :: '0'...'9'+
7 | term :: atom + [mulop + atom]*
8 | expr :: term + [addop + term]*
9 | """
10 |
11 | exprStack = []
12 | def pushFirst(s, l, t):
13 | exprStack.append(t[0])
14 |
15 | add = Literal('+')
16 | sub = Literal('-')
17 | mul = Literal('*')
18 | div = Literal('/')
19 | addop = add | sub
20 | mulop = mul | div
21 |
22 | atom = Word(nums).addParseAction(pushFirst)
23 | term = atom + ZeroOrMore((mulop + atom).addParseAction(pushFirst))
24 | expr = term + ZeroOrMore((addop + term).addParseAction(pushFirst))
25 |
26 | def parseString(string):
27 | global exprStack
28 | exprStack = []
29 | expr.parseString(string)
30 | return exprStack
31 |
32 | opf = { '+' : (lambda a, b: a + b),
33 | '-' : (lambda a, b: a - b),
34 | '*' : (lambda a, b: a * b),
35 | '/' : (lambda a, b: a / b) }
36 |
37 | def evalStack(stack):
38 | op = stack.pop()
39 | if op in '+-*/':
40 | op2 = evalStack(stack)
41 | op1 = evalStack(stack)
42 | return opf[op](op1, op2)
43 | else:
44 | return float(op)
45 |
46 | def evalString(string):
47 | stack = parseString(string)
48 | result = evalStack(stack)
49 | return result
50 |
51 | class TestEx2(unittest.TestCase):
52 |
53 | def test_parseString(self):
54 | self.assertEqual(parseString('6+3'), ['6', '3', '+'])
55 | self.assertEqual(parseString('6-3'), ['6', '3', '-'])
56 | self.assertEqual(parseString('6*3'), ['6', '3', '*'])
57 | self.assertEqual(parseString('6/3'), ['6', '3', '/'])
58 |
59 | def test_evalStack(self):
60 | self.assertEqual(evalStack(['6', '3', '+']), 9.0)
61 | self.assertEqual(evalStack(['6', '3', '-']), 3.0)
62 | self.assertEqual(evalStack(['6', '3', '*']), 18.0)
63 | self.assertEqual(evalStack(['6', '3', '/']), 2.0)
64 |
65 | def test_evalString(self):
66 | self.assertEqual(evalString('6+3'), 9.0)
67 | self.assertEqual(evalString('6-3'), 3.0)
68 | self.assertEqual(evalString('6*3'), 18.0)
69 | self.assertEqual(evalString('6/3'), 2.0)
70 |
71 | def test_multiple_op(self):
72 | self.assertEqual(evalString('6+3+2'), 11.0)
73 | self.assertEqual(evalString('6-3-2'), 1.0)
74 | self.assertEqual(evalString('6*3*2'), 36.0)
75 | self.assertEqual(evalString('6/3/2'), 1.0)
76 |
77 | def test_order_of_operations(self):
78 | self.assertEqual(evalString('2+3*4'), 14.0)
79 | self.assertEqual(evalString('5+4*3-2/1'), 15.0)
80 |
--------------------------------------------------------------------------------
/mysql-connector.md:
--------------------------------------------------------------------------------
1 | # MySQL connector for Python
2 |
3 | 目前找到兩種
4 | - [MySQL Connector](https://www.mysql.com/products/connector/) - 由 MySQL 官方提供
5 | - [MyMySQL Connector](https://github.com/PyMySQL/PyMySQL) - 第三方維護,純 Python code
6 |
7 | ## MySQL Connector
8 |
9 | - [MySQL Connector/Python Developer Guide](https://dev.mysql.com/doc/connector-python/en/) - mysql 官方說明
10 |
11 | ### 搜尋適合版本
12 | - [Index of Packages Matching 'mysql-connector'](https://pypi.python.org/pypi?%3Aaction=search&term=mysql-connector&submit=search)
13 |
14 | 找到 mysql-connector-python 2.0.4
15 |
16 | ### 下載
17 | - [mysql-connector-python 2.0.4](https://pypi.python.org/pypi/mysql-connector-python/2.0.4)
18 |
19 | 下載壓縮檔
20 | ```shell
21 | $ wget http://cdn.mysql.com/Downloads/Connector-Python/mysql-connector-python-2.0.4.zip#md5=3df394d89300db95163f17c843ef49df
22 | ```
23 |
24 | 解壓縮
25 | ```shell
26 | $ unzip mysql-connector-python-2.0.4.zip
27 | ```
28 |
29 | ### 安裝
30 | - [MySQL Connector/Python Developer Guide](http://dev.mysql.com/doc/connector-python/en/)
31 | - [Installing Connector/Python from a Source Distribution](http://dev.mysql.com/doc/connector-python/en/connector-python-installation-source.html)
32 |
33 | ```shell
34 | $ python setup.py install
35 | ```
36 |
37 | ### 測試
38 | ```
39 | $ python
40 | Python 3.5.1 (default, Jun 9 2016, 17:09:39)
41 | [GCC 4.9.2] on linux
42 | Type "help", "copyright", "credits" or "license" for more information.
43 | >>> import mysql.connector
44 | >>>
45 | ```
46 |
47 | 或是在 test/account/ 目錄,執行以下單元測試
48 | ```shell
49 | $ python -m unittest -v account1
50 | test_login_with_correct_username_password (account1.TestAccount) ... ok
51 | test_login_with_invalid_password (account1.TestAccount) ... ok
52 | test_login_with_invalid_username (account1.TestAccount) ... ok
53 |
54 | ----------------------------------------------------------------------
55 | Ran 3 tests in 0.004s
56 |
57 | OK
58 | ```
59 |
60 | ## PyMySQL Connector
61 |
62 | - [PyMySQL github](https://github.com/PyMySQL/PyMySQL)
63 |
64 | ### 安裝
65 | ```shell
66 | $ pip install PyMySQL
67 | ```
68 |
69 | ### 測試
70 | ```shell
71 | $ python
72 | Python 3.5.1 (default, Jun 9 2016, 17:09:39)
73 | [GCC 4.9.2] on linux
74 | Type "help", "copyright", "credits" or "license" for more information.
75 | >>> import pymysql.cursors
76 | >>>
77 | ```
78 |
79 | 或是在 test/account/ 目錄,執行以下單元測試
80 | ```shell
81 | $ python -m unittest -v account2.py
82 | test_login_with_correct_username_password (account2.TestAccount) ... ok
83 | test_login_with_invalid_password (account2.TestAccount) ... ok
84 | test_login_with_invalid_username (account2.TestAccount) ... ok
85 |
86 | ----------------------------------------------------------------------
87 | Ran 3 tests in 0.004s
88 |
89 | OK
90 | ```
91 |
--------------------------------------------------------------------------------
/pyparsing/ex4.py:
--------------------------------------------------------------------------------
1 | from pyparsing import Word, Literal, nums, ZeroOrMore, Forward
2 | import unittest
3 |
4 | """
5 | op :: '+' | '-' | '*' | '/'
6 | integer :: '0'...'9'+
7 | atom :: integer | '(' expr ')'
8 | term :: atom [mulop atom]*
9 | expr :: term [addop term]*
10 | """
11 |
12 | exprStack = []
13 | def pushFirst(s, l, t):
14 | exprStack.append(t[0])
15 |
16 | add = Literal('+')
17 | sub = Literal('-')
18 | mul = Literal('*')
19 | div = Literal('/')
20 | lpar = Literal('(')
21 | rpar = Literal(')')
22 | addop = add | sub
23 | mulop = mul | div
24 |
25 | expr = Forward()
26 | atom = Word(nums).addParseAction(pushFirst) | (lpar + expr + rpar)
27 | term = atom + ZeroOrMore((mulop + atom).addParseAction(pushFirst))
28 | expr << term + ZeroOrMore((addop + term).addParseAction(pushFirst))
29 |
30 | def parseString(string):
31 | global exprStack
32 | exprStack = []
33 | expr.parseString(string)
34 | return exprStack
35 |
36 | opf = { '+' : (lambda a, b: a + b),
37 | '-' : (lambda a, b: a - b),
38 | '*' : (lambda a, b: a * b),
39 | '/' : (lambda a, b: a / b) }
40 |
41 | def evalStack(stack):
42 | op = stack.pop()
43 | if op in '+-*/':
44 | op2 = evalStack(stack)
45 | op1 = evalStack(stack)
46 | return opf[op](op1, op2)
47 | else:
48 | return float(op)
49 |
50 | def evalString(string):
51 | stack = parseString(string)
52 | result = evalStack(stack)
53 | return result
54 |
55 | class TestEx2(unittest.TestCase):
56 |
57 | def test_parseString(self):
58 | self.assertEqual(parseString('6+3'), ['6', '3', '+'])
59 | self.assertEqual(parseString('6-3'), ['6', '3', '-'])
60 | self.assertEqual(parseString('6*3'), ['6', '3', '*'])
61 | self.assertEqual(parseString('6/3'), ['6', '3', '/'])
62 |
63 | def test_evalStack(self):
64 | self.assertEqual(evalStack(['6', '3', '+']), 9.0)
65 | self.assertEqual(evalStack(['6', '3', '-']), 3.0)
66 | self.assertEqual(evalStack(['6', '3', '*']), 18.0)
67 | self.assertEqual(evalStack(['6', '3', '/']), 2.0)
68 |
69 | def test_evalString(self):
70 | self.assertEqual(evalString('6+3'), 9.0)
71 | self.assertEqual(evalString('6-3'), 3.0)
72 | self.assertEqual(evalString('6*3'), 18.0)
73 | self.assertEqual(evalString('6/3'), 2.0)
74 |
75 | def test_multiple_op(self):
76 | self.assertEqual(evalString('6+3+2'), 11.0)
77 | self.assertEqual(evalString('6-3-2'), 1.0)
78 | self.assertEqual(evalString('6*3*2'), 36.0)
79 | self.assertEqual(evalString('6/3/2'), 1.0)
80 |
81 | def test_order_of_operations(self):
82 | self.assertEqual(evalString('2+3*4'), 14.0)
83 | self.assertEqual(evalString('5+4*3-2/1'), 15.0)
84 |
85 | def test_parentheses(self):
86 | self.assertEqual(evalString('(2+3)*4'), 20.0)
87 | self.assertEqual(evalString('(5+4)*((3-2)-1)'), 0.0)
88 |
--------------------------------------------------------------------------------
/django-jenkins.md:
--------------------------------------------------------------------------------
1 | # django-jenkins
2 |
3 | ## 開始之前
4 |
5 | 請參考 [django 設定環境](django.md#設定環境),準備開發環境、建立專案 (假設叫做 demo)...
6 |
7 | ```shell
8 | $ cd ~/myWorkspace
9 | $ source venv/bin/activate
10 | (venv) vagrant@debian:~/myWorkspace$ cd demo
11 | ```
12 | 進入 django virtualenv 之後,繼續下面步驟 (以下省略提示符號前文字)
13 |
14 | ## 安裝 django-jenkins
15 |
16 | ```shell
17 | pip install django-jenkins
18 | ```
19 |
20 | ## 設定專案
21 |
22 | 修改 demo/settings.py:
23 | - 加入 'django_jenkins' App
24 | - 加入要跑 jenkins test, report 的 App,例如 `calc`
25 |
26 | ```python
27 | INSTALLED_APPS = [
28 | 'behave_django',
29 | 'django_jenkins',
30 | ...
31 | 'calc',
32 | ]
33 |
34 | # Jenkins settings
35 | PROJECT_APPS = [
36 | 'calc',
37 | ]
38 |
39 | JENKINS_TASKS = (
40 | 'django_jenkins.tasks.run_pylint',
41 | )
42 | ```
43 |
44 | ## 專案版控
45 |
46 | 初始化 git repository
47 | ```shell
48 | $ git init
49 | ```
50 |
51 | 建立 .gitignore,設定哪些檔案不做版本追蹤
52 | ```
53 | __pycache__
54 | db.sqlite3
55 | .python-version
56 | *.pyc
57 | .*.swp
58 | reports/
59 | ```
60 |
61 | 上傳 git repository
62 | ```shell
63 | $ git add .
64 | $ git commit -m "first commit"
65 | ```
66 |
67 | ## 設定 Jenkins server
68 |
69 | 開啟瀏覽器,連接 http://192.168.33.10:8080/ ([虛擬機](environment.md))
70 |
71 | - Jenkins 管理首頁
72 | - New Item
73 | - Item name: `demo`
74 | - [x] Freestyle project
75 | - Source Code Management
76 | - [x] Git
77 | - Repository URL: `file:///home/vagrant/myWorkspace/demo`
78 | - Build Triggers
79 | - [x] Poll SCM
80 | - Schedule: `* * * * *`
81 | - Build Environment
82 | - [x] pyenv build wrapper
83 | - The Python version: `3.5.1`
84 | - Build
85 | - [x] Execute shell
86 | - Command: [shell command](#shell-command)
87 | - Post-build Actions
88 | - [x] Publish Cobertura Coverage Report
89 | - Cobertura xml report pattern: `reports/coverage.xml`
90 | - [x] Publish JUnit test result report
91 | - Test report XMLs: `reports/junit.xml`
92 | - [x] Report Violations
93 | - pylint: `reports/pylint.report`
94 | - Save
95 |
96 | ### shell command
97 | ```
98 | PATH=$WORKSPACE/venv/bin:/usr/local/bin:$PATH
99 |
100 | if [ ! -d "venv" ]; then
101 | virtualenv venv
102 | fi
103 | . venv/bin/activate
104 | pip install -r requirements.txt
105 |
106 | python manage.py jenkins --enable-coverage
107 | ```
108 |
109 | ## 觀看 reports
110 | 
111 |
112 | 
113 |
114 | 
115 |
116 | ## 參考資料
117 |
118 | - [django-jenkins Github](https://github.com/kmmbvnr/django-jenkins)
119 | - [django-jenkins Tutorial](https://sites.google.com/site/kmmbvnr/home/django-jenkins-tutorial)
120 |
--------------------------------------------------------------------------------
/demo/calc/tests.py:
--------------------------------------------------------------------------------
1 | from django.test import TestCase
2 | from calc.calculator import Calculator
3 | from calc.scalc import SimpleCalculator
4 | from unittest.mock import MagicMock
5 |
6 | # Create your tests here.
7 | class TestCalculator(TestCase):
8 |
9 | def setUp(self):
10 | """
11 | add_dict = {(3,2) : 5, (4,6) : 10, (4,3) : 7, (2,2) : 4}
12 | sub_dict = {(3,2) : 1, (9,6) : 3, (9,3) : 6}
13 | mul_dict = {(3,2) : 6, (7,2) : 14, (6,4) : 24}
14 | div_dict = {(3,2) : 1.5, (2,1) : 2, (24,1) : 24}
15 |
16 | def add(*args):
17 | return add_dict[args]
18 | def sub(*args):
19 | return sub_dict[args]
20 | def mul(*args):
21 | return mul_dict[args]
22 | def div(*args):
23 | return div_dict[args]
24 |
25 | scalc = SimpleCalculator()
26 | scalc.add = MagicMock(side_effect = add)
27 | scalc.sub = MagicMock(side_effect = sub)
28 | scalc.mul = MagicMock(side_effect = mul)
29 | scalc.div = MagicMock(side_effect = div)
30 |
31 | self.calc = Calculator(scalc)
32 | """
33 | self.calc = Calculator()
34 |
35 | def test_parseString(self):
36 | parseString = self.calc.parseString
37 | self.assertEqual(parseString('0'), ['0'])
38 | self.assertEqual(parseString('1'), ['1'])
39 | self.assertEqual(parseString('3+2'), ['3', '2', '+'])
40 |
41 | def test_evalStack(self):
42 | evalStack = self.calc.evalStack
43 | self.assertEqual(evalStack(['0']), 0)
44 | self.assertEqual(evalStack(['1']), 1)
45 |
46 | def test_evalString(self):
47 | evalString = self.calc.evalString
48 | self.assertEqual(evalString('0'), 0)
49 | self.assertEqual(evalString('1'), 1)
50 |
51 | def test_invalid_input(self):
52 | evalString = self.calc.evalString
53 | self.assertEqual(evalString('hello world'), 'Invalid Input')
54 |
55 | def test_num_op_num(self):
56 | evalString = self.calc.evalString
57 | self.assertEqual(evalString('3+2'), 5)
58 | self.assertEqual(evalString('3-2'), 1)
59 | self.assertEqual(evalString('3*2'), 6)
60 | self.assertEqual(evalString('3/2'), 1.5)
61 |
62 | def test_order_of_operations(self):
63 | evalString = self.calc.evalString
64 | self.assertEqual(evalString('4+3*2'), 10)
65 | self.assertEqual(evalString('9-3*2+2/1'), 5)
66 |
67 | def test_parentheses(self):
68 | evalString = self.calc.evalString
69 | self.assertEqual(evalString('(4+3)*2'), 14)
70 | self.assertEqual(evalString('(9-3)*(2+2)/1'), 24)
71 |
72 | def test_commutative_property(self):
73 | evalString = self.calc.evalString
74 | self.assertEqual(evalString('3+4'), evalString('4+3'))
75 | self.assertEqual(evalString('2*5'), evalString('5*2'))
76 |
77 | def test_associative_property(self):
78 | evalString = self.calc.evalString
79 | self.assertEqual(evalString('(5+2) + 1'), evalString('5 + (2+1)'))
80 | self.assertEqual(evalString('(5*2) * 3'), evalString('5 * (2*3)'))
81 |
82 | def test_distributive_property(self):
83 | evalString = self.calc.evalString
84 | self.assertEqual(evalString('2 * (1+3)'), evalString('(2*1) + (2*3)'))
85 | self.assertEqual(evalString('(1+3) * 2'), evalString('(1*2) + (3*2)'))
86 |
--------------------------------------------------------------------------------
/pyparsing/ex5.py:
--------------------------------------------------------------------------------
1 | from pyparsing import Word, Literal, nums, ZeroOrMore, Forward
2 | import unittest
3 |
4 | """
5 | op :: '+' | '-' | '*' | '/'
6 | integer :: '0'...'9'+
7 | atom :: integer | '(' expr ')'
8 | term :: atom [mulop atom]*
9 | expr :: term [addop term]*
10 | """
11 |
12 | exprStack = []
13 | def pushFirst(s, l, t):
14 | exprStack.append(t[0])
15 |
16 | add = Literal('+')
17 | sub = Literal('-')
18 | mul = Literal('*')
19 | div = Literal('/')
20 | lpar = Literal('(')
21 | rpar = Literal(')')
22 | addop = add | sub
23 | mulop = mul | div
24 |
25 | expr = Forward()
26 | atom = Word(nums).addParseAction(pushFirst) | (lpar + expr + rpar)
27 | term = atom + ZeroOrMore((mulop + atom).addParseAction(pushFirst))
28 | expr << term + ZeroOrMore((addop + term).addParseAction(pushFirst))
29 |
30 | def parseString(string):
31 | global exprStack
32 | exprStack = []
33 | expr.parseString(string)
34 | return exprStack
35 |
36 | opf = { '+' : (lambda a, b: a + b),
37 | '-' : (lambda a, b: a - b),
38 | '*' : (lambda a, b: a * b),
39 | '/' : (lambda a, b: a / b) }
40 |
41 | def evalStack(stack):
42 | op = stack.pop()
43 | if op in '+-*/':
44 | op2 = evalStack(stack)
45 | op1 = evalStack(stack)
46 | return opf[op](op1, op2)
47 | else:
48 | return float(op)
49 |
50 | def evalString(string):
51 | stack = parseString(string)
52 | result = evalStack(stack)
53 | return result
54 |
55 | class TestEx2(unittest.TestCase):
56 |
57 | def test_parseString(self):
58 | self.assertEqual(parseString('6+3'), ['6', '3', '+'])
59 | self.assertEqual(parseString('6-3'), ['6', '3', '-'])
60 | self.assertEqual(parseString('6*3'), ['6', '3', '*'])
61 | self.assertEqual(parseString('6/3'), ['6', '3', '/'])
62 |
63 | def test_evalStack(self):
64 | self.assertEqual(evalStack(['6', '3', '+']), 9.0)
65 | self.assertEqual(evalStack(['6', '3', '-']), 3.0)
66 | self.assertEqual(evalStack(['6', '3', '*']), 18.0)
67 | self.assertEqual(evalStack(['6', '3', '/']), 2.0)
68 |
69 | def test_evalString(self):
70 | self.assertEqual(evalString('6+3'), 9.0)
71 | self.assertEqual(evalString('6-3'), 3.0)
72 | self.assertEqual(evalString('6*3'), 18.0)
73 | self.assertEqual(evalString('6/3'), 2.0)
74 |
75 | def test_multiple_op(self):
76 | self.assertEqual(evalString('6+3+2'), 11.0)
77 | self.assertEqual(evalString('6-3-2'), 1.0)
78 | self.assertEqual(evalString('6*3*2'), 36.0)
79 | self.assertEqual(evalString('6/3/2'), 1.0)
80 |
81 | def test_order_of_operations(self):
82 | self.assertEqual(evalString('2+3*4'), 14.0)
83 | self.assertEqual(evalString('5+4*3-2/1'), 15.0)
84 |
85 | def test_parentheses(self):
86 | self.assertEqual(evalString('(2+3)*4'), 20.0)
87 | self.assertEqual(evalString('(5+4)*((3-2)-1)'), 0.0)
88 |
89 | def test_commutative_property(self):
90 | self.assertEqual(evalString('3+4'), evalString('4+3'))
91 | self.assertEqual(evalString('2*5'), evalString('5*2'))
92 |
93 | def test_associative_property(self):
94 | self.assertEqual(evalString('(5+2) + 1'), evalString('5 + (2+1)'))
95 | self.assertEqual(evalString('(5*2) * 3'), evalString('5 * (2*3)'))
96 |
97 | def test_distributive_property(self):
98 | self.assertEqual(evalString('2 * (1+3)'), evalString('(2*1) + (2*3)'))
99 |
--------------------------------------------------------------------------------
/env.sh:
--------------------------------------------------------------------------------
1 | #!/bin/bash
2 | source ~/.profile
3 | source ~/.bashrc
4 |
5 | function info() { echo -e "\e[34m[INFO]\e[0m $1"; }
6 |
7 | function install_packages() {
8 | info "setup apt source"
9 | wget -q -O - https://pkg.jenkins.io/debian/jenkins.io.key | sudo apt-key add -
10 | sudo sh -c 'echo deb http://pkg.jenkins.io/debian-stable binary/ > /etc/apt/sources.list.d/jenkins.list'
11 |
12 | sudo apt-get update
13 |
14 | info "install jenkins"
15 | sudo apt-get install jenkins
16 |
17 | info "install basic packages"
18 | sudo apt-get install -y make build-essential libssl-dev zlib1g-dev libbz2-dev libreadline-dev libsqlite3-dev wget curl llvm git
19 |
20 | info "install sqlite"
21 | sudo apt-get install -y sqlite3 libsqlite3-dev
22 | }
23 |
24 | function install_pyenv() {
25 | rm -rf ~/.pyenv
26 |
27 | info "install pyenv"
28 | git clone https://github.com/yyuu/pyenv.git ~/.pyenv
29 |
30 | info "setup environment"
31 | echo 'export PYENV_ROOT="$HOME/.pyenv"' >> ~/.profile
32 | echo 'export PATH="$PYENV_ROOT/bin:$PATH"' >> ~/.profile
33 | echo 'eval "$(pyenv init -)"' >> ~/.profile
34 |
35 | source ~/.profile
36 | }
37 |
38 | function install_python(){
39 | info "install python 3.4.1"
40 | pyenv install 3.4.1
41 | pyenv versions
42 |
43 | info "switch python version"
44 | pyenv local 3.4.1
45 | pyenv version
46 | python --version
47 | }
48 |
49 | function install_pip() {
50 | info "install pip"
51 | wget https://bootstrap.pypa.io/get-pip.py
52 | python get-pip.py
53 | pip install -U pip
54 | }
55 |
56 | function install_pip_packages(){
57 | info "install pip packages"
58 | pip install coverage nose pylint
59 |
60 | info "install behave"
61 | pip install behave
62 | pip install -U behave
63 |
64 | info "install django"
65 | pip install Django==1.9.7
66 | pip install behave-django
67 | pip install pyparsing
68 | }
69 |
70 | function install_virtualenv(){
71 | info "install virtualenv"
72 | git clone https://github.com/yyuu/pyenv-virtualenv.git ~/.pyenv/plugins/pyenv-virtualenv
73 | pip install virtualenv
74 |
75 | info "setup virtualevn"
76 | mkdir -p ${HOME}/myWorkspace/venv
77 |
78 | virtualenv ${HOME}/myWorkspace/venv
79 | source ${HOME}/myWorkspace/venv/bin/activate
80 |
81 | echo "source ${HOME}/myWorkspace/venv/bin/activate" >> ~/.bashrc
82 | }
83 |
84 | function setup(){
85 | case "$1" in
86 | apt-pkg)
87 | install_packages
88 | ;;
89 | pyenv)
90 | install_pyenv
91 | ;;
92 | python)
93 | install_python
94 | ;;
95 | pip)
96 | install_pip
97 | ;;
98 | pip-pkg)
99 | install_pip_packages
100 | ;;
101 | virtualenv)
102 | install_virtualenv
103 | ;;
104 | all)
105 | install_packages
106 | install_pyenv
107 | install_python
108 | install_pip
109 | install_pip_packages
110 | install_virtualenv
111 | ;;
112 | *)
113 | echo "Usage $0 apt-pkg|pyenv|python|pip|pip-pkg|virtualenv|all"
114 | exit 1
115 | esac
116 | }
117 |
118 | if [ $# == 0 ]; then setup help; fi
119 | for opt in $*; do setup $opt; done
120 |
--------------------------------------------------------------------------------
/blog/blog/settings.py:
--------------------------------------------------------------------------------
1 | """
2 | Django settings for blog project.
3 |
4 | Generated by 'django-admin startproject' using Django 1.9.7.
5 |
6 | For more information on this file, see
7 | https://docs.djangoproject.com/en/1.9/topics/settings/
8 |
9 | For the full list of settings and their values, see
10 | https://docs.djangoproject.com/en/1.9/ref/settings/
11 | """
12 |
13 | import os
14 |
15 | # Build paths inside the project like this: os.path.join(BASE_DIR, ...)
16 | BASE_DIR = os.path.dirname(os.path.dirname(os.path.abspath(__file__)))
17 |
18 |
19 | # Quick-start development settings - unsuitable for production
20 | # See https://docs.djangoproject.com/en/1.9/howto/deployment/checklist/
21 |
22 | # SECURITY WARNING: keep the secret key used in production secret!
23 | SECRET_KEY = '5y(%6aa)9teeygp8cq#h=hut0dh6*u%6+_)du2v72nuxe#3_ru'
24 |
25 | # SECURITY WARNING: don't run with debug turned on in production!
26 | DEBUG = True
27 |
28 | ALLOWED_HOSTS = []
29 |
30 |
31 | # Application definition
32 |
33 | INSTALLED_APPS = [
34 | 'grappelli',
35 | 'django.contrib.admin',
36 | 'django.contrib.auth',
37 | 'django.contrib.contenttypes',
38 | 'django.contrib.sessions',
39 | 'django.contrib.messages',
40 | 'django.contrib.staticfiles',
41 | 'article',
42 | ]
43 |
44 | MIDDLEWARE_CLASSES = [
45 | 'django.middleware.security.SecurityMiddleware',
46 | 'django.contrib.sessions.middleware.SessionMiddleware',
47 | 'django.middleware.common.CommonMiddleware',
48 | 'django.middleware.csrf.CsrfViewMiddleware',
49 | 'django.contrib.auth.middleware.AuthenticationMiddleware',
50 | 'django.contrib.auth.middleware.SessionAuthenticationMiddleware',
51 | 'django.contrib.messages.middleware.MessageMiddleware',
52 | 'django.middleware.clickjacking.XFrameOptionsMiddleware',
53 | ]
54 |
55 | ROOT_URLCONF = 'blog.urls'
56 |
57 | TEMPLATES = [
58 | {
59 | 'BACKEND': 'django.template.backends.django.DjangoTemplates',
60 | 'DIRS': [],
61 | 'APP_DIRS': True,
62 | 'OPTIONS': {
63 | 'context_processors': [
64 | 'django.template.context_processors.debug',
65 | 'django.template.context_processors.request',
66 | 'django.contrib.auth.context_processors.auth',
67 | 'django.contrib.messages.context_processors.messages',
68 | ],
69 | },
70 | },
71 | ]
72 |
73 | WSGI_APPLICATION = 'blog.wsgi.application'
74 |
75 |
76 | # Database
77 | # https://docs.djangoproject.com/en/1.9/ref/settings/#databases
78 |
79 | DATABASES = {
80 | 'default': {
81 | 'ENGINE': 'django.db.backends.sqlite3',
82 | 'NAME': os.path.join(BASE_DIR, 'db.sqlite3'),
83 | }
84 | }
85 |
86 |
87 | # Password validation
88 | # https://docs.djangoproject.com/en/1.9/ref/settings/#auth-password-validators
89 |
90 | AUTH_PASSWORD_VALIDATORS = [
91 | {
92 | 'NAME': 'django.contrib.auth.password_validation.UserAttributeSimilarityValidator',
93 | },
94 | {
95 | 'NAME': 'django.contrib.auth.password_validation.MinimumLengthValidator',
96 | },
97 | {
98 | 'NAME': 'django.contrib.auth.password_validation.CommonPasswordValidator',
99 | },
100 | {
101 | 'NAME': 'django.contrib.auth.password_validation.NumericPasswordValidator',
102 | },
103 | ]
104 |
105 |
106 | # Internationalization
107 | # https://docs.djangoproject.com/en/1.9/topics/i18n/
108 |
109 | LANGUAGE_CODE = 'en-us'
110 |
111 | TIME_ZONE = 'UTC'
112 |
113 | USE_I18N = True
114 |
115 | USE_L10N = True
116 |
117 | USE_TZ = True
118 |
119 |
120 | # Static files (CSS, JavaScript, Images)
121 | # https://docs.djangoproject.com/en/1.9/howto/static-files/
122 |
123 | STATIC_URL = '/static/'
124 |
--------------------------------------------------------------------------------
/demo/demo/settings.py:
--------------------------------------------------------------------------------
1 | """
2 | Django settings for demo project.
3 |
4 | Generated by 'django-admin startproject' using Django 1.9.7.
5 |
6 | For more information on this file, see
7 | https://docs.djangoproject.com/en/1.9/topics/settings/
8 |
9 | For the full list of settings and their values, see
10 | https://docs.djangoproject.com/en/1.9/ref/settings/
11 | """
12 |
13 | import os
14 |
15 | # Build paths inside the project like this: os.path.join(BASE_DIR, ...)
16 | BASE_DIR = os.path.dirname(os.path.dirname(os.path.abspath(__file__)))
17 |
18 |
19 | # Quick-start development settings - unsuitable for production
20 | # See https://docs.djangoproject.com/en/1.9/howto/deployment/checklist/
21 |
22 | # SECURITY WARNING: keep the secret key used in production secret!
23 | SECRET_KEY = 'xd2n4@_fn)j=18vie4ush3u)0xmjbc3rsn@9*5o1+t_iix3hu-'
24 |
25 | # SECURITY WARNING: don't run with debug turned on in production!
26 | DEBUG = True
27 |
28 | ALLOWED_HOSTS = []
29 |
30 |
31 | # Application definition
32 |
33 | INSTALLED_APPS = [
34 | 'behave_django',
35 | 'django_jenkins',
36 | 'django.contrib.admin',
37 | 'django.contrib.auth',
38 | 'django.contrib.contenttypes',
39 | 'django.contrib.sessions',
40 | 'django.contrib.messages',
41 | 'django.contrib.staticfiles',
42 | 'calc',
43 | ]
44 |
45 | MIDDLEWARE_CLASSES = [
46 | 'django.middleware.security.SecurityMiddleware',
47 | 'django.contrib.sessions.middleware.SessionMiddleware',
48 | 'django.middleware.common.CommonMiddleware',
49 | 'django.middleware.csrf.CsrfViewMiddleware',
50 | 'django.contrib.auth.middleware.AuthenticationMiddleware',
51 | 'django.contrib.auth.middleware.SessionAuthenticationMiddleware',
52 | 'django.contrib.messages.middleware.MessageMiddleware',
53 | 'django.middleware.clickjacking.XFrameOptionsMiddleware',
54 | ]
55 |
56 | ROOT_URLCONF = 'demo.urls'
57 |
58 | TEMPLATES = [
59 | {
60 | 'BACKEND': 'django.template.backends.django.DjangoTemplates',
61 | 'DIRS': [],
62 | 'APP_DIRS': True,
63 | 'OPTIONS': {
64 | 'context_processors': [
65 | 'django.template.context_processors.debug',
66 | 'django.template.context_processors.request',
67 | 'django.contrib.auth.context_processors.auth',
68 | 'django.contrib.messages.context_processors.messages',
69 | ],
70 | },
71 | },
72 | ]
73 |
74 | WSGI_APPLICATION = 'demo.wsgi.application'
75 |
76 |
77 | # Database
78 | # https://docs.djangoproject.com/en/1.9/ref/settings/#databases
79 |
80 | DATABASES = {
81 | 'default': {
82 | 'ENGINE': 'django.db.backends.sqlite3',
83 | 'NAME': os.path.join(BASE_DIR, 'db.sqlite3'),
84 | }
85 | }
86 |
87 |
88 | # Password validation
89 | # https://docs.djangoproject.com/en/1.9/ref/settings/#auth-password-validators
90 |
91 | AUTH_PASSWORD_VALIDATORS = [
92 | {
93 | 'NAME': 'django.contrib.auth.password_validation.UserAttributeSimilarityValidator',
94 | },
95 | {
96 | 'NAME': 'django.contrib.auth.password_validation.MinimumLengthValidator',
97 | },
98 | {
99 | 'NAME': 'django.contrib.auth.password_validation.CommonPasswordValidator',
100 | },
101 | {
102 | 'NAME': 'django.contrib.auth.password_validation.NumericPasswordValidator',
103 | },
104 | ]
105 |
106 |
107 | # Internationalization
108 | # https://docs.djangoproject.com/en/1.9/topics/i18n/
109 |
110 | LANGUAGE_CODE = 'en-us'
111 |
112 | TIME_ZONE = 'UTC'
113 |
114 | USE_I18N = True
115 |
116 | USE_L10N = True
117 |
118 | USE_TZ = True
119 |
120 |
121 | # Static files (CSS, JavaScript, Images)
122 | # https://docs.djangoproject.com/en/1.9/howto/static-files/
123 |
124 | STATIC_URL = '/static/'
125 |
126 | # Jenkins settings
127 | PROJECT_APPS = [
128 | 'calc',
129 | ]
130 |
131 | JENKINS_TASKS = (
132 | 'django_jenkins.tasks.run_pylint',
133 | )
134 |
--------------------------------------------------------------------------------
/test/features/steps/account.py:
--------------------------------------------------------------------------------
1 | import mysql.connector
2 |
3 | cnx = mysql.connector.connect(user='root', password='000000', host='127.0.0.1', database='test')
4 | cursor = cnx.cursor()
5 |
6 | def account_insert(username, password):
7 | query = "INSERT INTO account (username, password) VALUES ('%s', '%s')" % (username, password)
8 | cursor.execute(query)
9 | cnx.commit()
10 |
11 | def account_login(username, password):
12 | query = "SELECT id FROM account WHERE username='%s' AND password='%s'" % (username, password)
13 | cursor.execute(query)
14 | row = cursor.fetchone()
15 | return (row is not None)
16 |
17 | def account_register(username, password):
18 | if len(username) < 6 or len(password) < 6:
19 | return False
20 | account_insert(username, password)
21 | return True
22 |
23 | import unittest
24 | from unittest.mock import Mock, patch
25 | class TestAccount(unittest.TestCase):
26 |
27 | def setUp(self):
28 | self.result = None
29 |
30 | def test_account_insert(self):
31 | with patch('mysql.connector.cursor.MySQLCursor.execute') as mock_execute:
32 | with patch('mysql.connector.connection.MySQLConnection.commit') as mock_commit:
33 | account_insert('abcdef', '123456')
34 |
35 | mock_execute.assert_called_with("INSERT INTO account (username, password) VALUES ('abcdef', '123456')")
36 | mock_commit.assert_called_with()
37 |
38 | def test_login_with_correct_username_password(self):
39 | def mock_execute(_, query):
40 | self.result = ('1',) if query == "SELECT id FROM account WHERE username='abcdef' AND password='123456'" else None
41 | def mock_fetchone(_):
42 | return self.result
43 |
44 | with patch('mysql.connector.cursor.MySQLCursor.execute', mock_execute):
45 | with patch('mysql.connector.cursor.MySQLCursor.fetchone', mock_fetchone):
46 | self.assertTrue(account_login('abcdef', '123456'))
47 |
48 | def test_login_with_invalid_username(self):
49 | def mock_execute(_, query):
50 | self.result = ('1',) if query == "SELECT id FROM account WHERE username='abcdef' AND password='123456'" else None
51 | def mock_fetchone(_):
52 | return self.result
53 |
54 | with patch('mysql.connector.cursor.MySQLCursor.execute', mock_execute):
55 | with patch('mysql.connector.cursor.MySQLCursor.fetchone', mock_fetchone):
56 | self.assertFalse(account_login('abc', '123456'))
57 |
58 | def test_login_with_invalid_password(self):
59 | def mock_execute(_, query):
60 | self.result = ('1',) if query == "SELECT id FROM account WHERE username='abcdef' AND password='123456'" else None
61 | def mock_fetchone(_):
62 | return self.result
63 |
64 | with patch('mysql.connector.cursor.MySQLCursor.execute', mock_execute):
65 | with patch('mysql.connector.cursor.MySQLCursor.fetchone', mock_fetchone):
66 | self.assertFalse(account_login('abcdef', '123'))
67 |
68 | def test_register_with_valid_username_password(self):
69 | with patch('mysql.connector.cursor.MySQLCursor.execute') as mock_execute:
70 | with patch('mysql.connector.connection.MySQLConnection.commit') as mock_commit:
71 | self.assertTrue(account_register('abcdef', '123456'))
72 |
73 | self.assertTrue(mock_execute.called)
74 | self.assertTrue(mock_commit.called)
75 |
76 | def test_reigster_with_invalid_username(self):
77 | with patch('mysql.connector.cursor.MySQLCursor.execute') as mock_execute:
78 | with patch('mysql.connector.connection.MySQLConnection.commit') as mock_commit:
79 | self.assertFalse(account_register('abc', '123456'))
80 |
81 | self.assertFalse(mock_execute.called)
82 | self.assertFalse(mock_commit.called)
83 |
84 | def test_register_with_invalid_password(self):
85 | with patch('mysql.connector.cursor.MySQLCursor.execute') as mock_execute:
86 | with patch('mysql.connector.connection.MySQLConnection.commit') as mock_commit:
87 | self.assertFalse(account_register('abcdef', '123'))
88 |
89 | self.assertFalse(mock_execute.called)
90 | self.assertFalse(mock_commit.called)
91 |
--------------------------------------------------------------------------------
/environment.md:
--------------------------------------------------------------------------------
1 | # 實驗環境
2 |
3 | ## 安裝虛擬機器
4 |
5 | - [VirtualBox](https://www.virtualbox.org/) 虛擬機器
6 | - [Vagrant](https://www.vagrantup.com/) 虛擬機器管理工具
7 |
8 | ## 下載作業系統影像檔
9 |
10 | 到 [Vagrantbox](http://www.vagrantbox.es/) 查詢適當的作業系統,我用 "debian jessie" 關鍵字查詢找到 "Debian Jessie 8.1.0 Release x64"
11 |
12 | ```shell
13 | $ vagrant box add https://atlas.hashicorp.com/ARTACK/boxes/debian-jessie
14 | $ vagrant box list
15 | ARTACK/debian-jessie (virtualbox, 8.1.0)
16 | debian7.8.0 (virtualbox, 0)
17 | opentable/win-2008r2-standard-amd64-nocm (virtualbox, 1.0.1)
18 | ubuntu/trusty64 (virtualbox, 20151020.0.0)
19 | ```
20 |
21 | 初始化設定
22 | ```shell
23 | $ mkdir test
24 | $ cd test
25 | $ vagrant init ARTACK/debian-jessie
26 | ```
27 |
28 | 因為將來要弄一個 web server,為了讓 host os 可以連接,需要產生一個 private network 介面,修改 Vagrantfile 加入下面一行
29 | ```
30 | config.vm.network "private_network", ip: "192.168.33.10"
31 | ```
32 |
33 | 啟動機器後登入系統
34 | ```shell
35 | $ vagrant up
36 | $ vagrant ssh
37 | ```
38 |
39 | > 懶人安裝腳本:[env.sh](env.sh)
40 |
41 | ## 安裝基本套件
42 |
43 | ```shell
44 | $ sudo apt-get update
45 | $ sudo apt-get install -y make build-essential libssl-dev zlib1g-dev libbz2-dev libreadline-dev libsqlite3-dev wget curl llvm git
46 | ```
47 |
48 | ## 安裝 pip - python 套件管理程式
49 |
50 | - [安裝 PIP 來管理 Python Packages](https://blog.longwin.com.tw/2014/08/python-setup-pip-package-2014/)
51 | - [pip](https://pip.pypa.io/en/stable/)
52 |
53 | ```shell
54 | $ sudo apt-get install python-pip
55 | ```
56 |
57 | ## 安裝 pyenv、virtualenv
58 |
59 | 安裝與管理套件版本是軟體開發頗讓人頭疼的一環,幸好靠著 pyenv 管理多個 Python 版本問題,與 virtualenv 創造虛擬(獨立)Python 環境的工具,Python 工程師的生活才能過得輕鬆點。
60 |
61 | - [使用 Pyenv 管理多個 Python 版本](http://blog.codylab.com/python-pyenv-management/)
62 | - [pyenv 教程](https://wp-lai.gitbooks.io/learn-python/content/0MOOC/pyenv.html)
63 | - [Python 開發好幫手 – virtualenv](http://tech.mozilla.com.tw/posts/2155/python-%E9%96%8B%E7%99%BC%E5%A5%BD%E5%B9%AB%E6%89%8B-virtualenv)
64 |
65 | ```shell
66 | $ git clone https://github.com/yyuu/pyenv.git ~/.pyenv
67 | $ git clone https://github.com/yyuu/pyenv-virtualenv.git ~/.pyenv/plugins/pyenv-virtualenv
68 | $ sudo pip install virtualenv
69 | ```
70 |
71 | 添加以下內容到 `~/.bashrc`
72 | ```
73 | export PYENV_ROOT="$HOME/.pyenv"
74 | export PATH="$PYENV_ROOT/bin:$PATH"
75 | eval "$(pyenv init -)"
76 | ```
77 |
78 | 重新載入 `~/.bashrc`
79 | ```shell
80 | $ source ~/.bashrc
81 | ```
82 |
83 | 查看可用的 python 版本
84 | ```shell
85 | $ pyenv versions
86 | system
87 | ```
88 |
89 | 列出可用的 python 版本
90 | ```shell
91 | $ pyenv install -l
92 | Available versions:
93 | ...
94 | 3.4.0
95 | 3.4-dev
96 | 3.4.1
97 | 3.4.2
98 | 3.4.3
99 | 3.4.4
100 | 3.5.0
101 | 3.5-dev
102 | 3.5.1
103 | 3.6.0a1
104 | 3.6-dev
105 | ...
106 | ```
107 |
108 | 安裝 python 3.4.1
109 | ```shell
110 | $ pyenv install 3.4.1
111 | $ pyenv versions
112 | system
113 | * 3.4.1 (set by /home/vagrant/.python-version)
114 | ```
115 |
116 | 切換 python 版本
117 | ```shell
118 | $ pyenv version
119 | system (set by /home/vagrant/.python-version)
120 | $ python --version
121 | Python 2.7.9
122 |
123 | $ pyenv local 3.4.1
124 |
125 | $ pyenv version
126 | 3.4.1 (set by /home/vagrant/.python-version)
127 | $ python --version
128 | Python 3.4.1
129 | ```
130 |
131 | > Python 自 2.1 起開始內建 unittest,積極面可作為測試驅動開發(TDD),消極面至少提供一個容易上手的測試框架。往後實驗會用到 unittest.mock,這個在 python 2 沒有提供,需要切換到 python 3 才能使用測試替身 (Test Double) 切開相依的元件。
132 |
133 | 建立虛擬環境
134 | ```shell
135 | $ virtualenv .env
136 | $ source .env/bin/activate
137 | ```
138 |
139 | 使用 pip 安裝套件,會安裝在 .env
140 | ```shell
141 | $ pip install coverage nose pylint
142 | ```
143 |
144 | 修改 .bash,加入下面內容 (jenkins 登入後使用 .env)
145 | ```
146 | . $HOME/.env/bin/activate
147 | ```
148 |
149 | ## 安裝 behave - Python BDD Framework
150 |
151 | ```shell
152 | $ pip --version
153 | pip 1.5.6 from /home/vagrant/.pyenv/versions/3.4.1/lib/python3.4/site-packages (python 3.4)
154 | $ pip install behave
155 | pip install -U behave
156 | ```
157 |
158 | ## 安裝 Sqlite - Lightweight SQL Database
159 |
160 | ```shell
161 | $ sudo apt-get install sqlite3 libsqlite3-dev
162 | ```
163 |
164 | ## 安裝 Django - Python Web Framework
165 |
166 | - [How to get Django](https://www.djangoproject.com/download/)
167 |
168 | ```shell
169 | $ pip install Django==1.9.7
170 | ```
171 |
--------------------------------------------------------------------------------
/pyparsing_exercise.md:
--------------------------------------------------------------------------------
1 | # pyparsing 練習
2 |
3 | 這份文件不是 pyparsing 的完整說明,只為了把字串解析成數學運算式所做的練習與摸索。
4 |
5 | 以下透過一些練習,嘗試理解 [fourFn.py](http://pyparsing.wikispaces.com/file/view/fourFn.py) 這份解析工程數學運算式的程式碼。
6 |
7 | ## 練習一:熟悉 `Forward()`, `<<`, `setParseAction()`, `Suppress()`
8 |
9 | 完整程式碼: [ex1.py](pyparsing/ex1.py)
10 | ```python
11 | intStack = []
12 | def pushStack(s, l, t):
13 | intStack.append(t[0])
14 |
15 | atom = Word(nums).setParseAction(pushStack) | Suppress(Word(alphas))
16 | expr = Forward()
17 | expr << atom + ZeroOrMore(expr)
18 | ```
19 | - 解析字串,取出數字放入 `intStack`,忽略字母
20 |
21 | ## 練習二:簡單算數: 解析數字與運算符號
22 |
23 | 完整程式碼: [ex2.py](pyparsing/ex2.py)
24 | ```python
25 | """
26 | op :: '+' | '-' | '*' | '/'
27 | num :: '0'...'9'+
28 | expr :: num + [op + num]*
29 | """
30 |
31 | exprStack = []
32 | def pushFirst(s, l, t):
33 | exprStack.append(t[0])
34 |
35 | add = Literal('+')
36 | sub = Literal('-')
37 | mul = Literal('*')
38 | div = Literal('/')
39 | op = add | sub | mul | div
40 |
41 | atom = Word(nums).addParseAction(pushFirst)
42 | expr = atom + ZeroOrMore((op + atom).addParseAction(pushFirst))
43 | ```
44 | - 滿足簡單加減乘除運算,但運算符號沒有次序性,所以只能解析如: '1+2+3-4', '1*2*3/4',無法處理加減乘除混合運算
45 |
46 | ```python
47 | def parseString(string):
48 | global exprStack
49 | exprStack = []
50 | expr.parseString(string)
51 | return exprStack
52 | ```
53 | - 將字串轉成運算的 stack,如 '1+2' => ['1', '2', '+']
54 |
55 | ```python
56 | opf = { '+' : (lambda a, b: a + b),
57 | '-' : (lambda a, b: a - b),
58 | '*' : (lambda a, b: a * b),
59 | '/' : (lambda a, b: a / b) }
60 |
61 | def evalStack(stack):
62 | op = stack.pop()
63 | if op in '+-*/':
64 | op2 = evalStack(stack)
65 | op1 = evalStack(stack)
66 | return opf[op](op1, op2)
67 | else:
68 | return float(op)
69 | ```
70 | - 處理 exprStack,取出元素如果是
71 | - 運算元(numbers),轉成浮點數 (可能當作除法除數或被除數),回傳結果
72 | - 運算子(+,-,*,/) 後再取出兩個運算元,呼叫運算子函數,傳入剛剛得到的運算元,回傳運算結果
73 |
74 | ```python
75 | def evalString(string):
76 | stack = parseString(string)
77 | result = evalStack(stack)
78 | return result
79 | ```
80 | - 結合 `parseString()` 與 `evalStack()`,求出輸入字串的運算結果
81 |
82 | ## 練習三:符合先乘除、後加減
83 |
84 | 完整程式碼: [ex3.py](pyparsing/ex3.py)
85 | ```python
86 | """
87 | op :: '+' | '-' | '*' | '/'
88 | atom :: '0'...'9'+
89 | term :: atom + [mulop + atom]*
90 | expr :: term + [addop + term]*
91 | """
92 |
93 | exprStack = []
94 | def pushFirst(s, l, t):
95 | exprStack.append(t[0])
96 |
97 | add = Literal('+')
98 | sub = Literal('-')
99 | mul = Literal('*')
100 | div = Literal('/')
101 | addop = add | sub
102 | mulop = mul | div
103 |
104 | atom = Word(nums).addParseAction(pushFirst)
105 | term = atom + ZeroOrMore((mulop + atom).addParseAction(pushFirst))
106 | expr = term + ZeroOrMore((addop + term).addParseAction(pushFirst))
107 | ```
108 | - `expr` 先處理 `term`,再處理加減運算
109 | - `term` 先處理 `atom`,再處理乘除運算
110 |
111 | ## 練習四:括號優先權大於加減乘除
112 |
113 | 完整程式碼: [ex4.py](pyparsing/ex4.py)
114 | ```python
115 | """
116 | op :: '+' | '-' | '*' | '/'
117 | integer :: '0'...'9'+
118 | atom :: integer | '(' expr ')'
119 | term :: atom [mulop atom]*
120 | expr :: term [addop term]*
121 | """
122 |
123 | exprStack = []
124 | def pushFirst(s, l, t):
125 | exprStack.append(t[0])
126 |
127 | add = Literal('+')
128 | sub = Literal('-')
129 | mul = Literal('*')
130 | div = Literal('/')
131 | lpar = Literal('(')
132 | rpar = Literal(')')
133 | addop = add | sub
134 | mulop = mul | div
135 |
136 | expr = Forward()
137 | atom = Word(nums).addParseAction(pushFirst) | (lpar + expr + rpar)
138 | term = atom + ZeroOrMore((mulop + atom).addParseAction(pushFirst))
139 | expr << term + ZeroOrMore((addop + term).addParseAction(pushFirst))
140 | ```
141 | - 最基本的運算單位可能是"整數"或是"有括號的運算式"
142 | - 如果是整數,處理後推入 exprStack
143 | - 如果是括號運算式,進行遞迴求出括號裡面的值
144 |
145 | ## 練習五:驗證四則運算規則
146 |
147 | 完整程式碼: [ex5.py](pyparsing/ex5.py)
148 | ```python
149 | def test_order_of_operations(self):
150 | self.assertEqual(evalString('2+3*4'), 14.0)
151 | self.assertEqual(evalString('5+4*3-2/1'), 15.0)
152 |
153 | def test_parentheses(self):
154 | self.assertEqual(evalString('(2+3)*4'), 20.0)
155 | self.assertEqual(evalString('(5+4)*((3-2)-1)'), 0.0)
156 |
157 | def test_commutative_property`
158 | `(self):
159 | self.assertEqual(evalString('3+4'), evalString('4+3'))
160 | self.assertEqual(evalString('2*5'), evalString('5*2'))
161 |
162 | def test_associative_property(self):
163 | self.assertEqual(evalString('(5+2) + 1'), evalString('5 + (2+1)'))
164 | self.assertEqual(evalString('(5*2) * 3'), evalString('5 * (2*3)'))
165 |
166 | def test_distributive_property(self):
167 | self.assertEqual(evalString('2 * (1+3)'), evalString('(2*1) + (2*3)'))
168 | ```
169 | - `test_order_of_operations` 驗證[運算次序](https://zh.wikipedia.org/wiki/%E9%81%8B%E7%AE%97%E6%AC%A1%E5%BA%8F)
170 | - `test_parentheses` 驗證括號優先權
171 | - `test_commutative_property` 驗證[交換律](https://zh.wikipedia.org/wiki/%E4%BA%A4%E6%8F%9B%E5%BE%8B)
172 | - `test_associative_property` 驗證[結合律](https://zh.wikipedia.org/wiki/%E7%BB%93%E5%90%88%E5%BE%8B)
173 | - `test_distributive_property` 驗證[分配律](https://zh.wikipedia.org/wiki/%E5%88%86%E9%85%8D%E5%BE%8B)
174 |
--------------------------------------------------------------------------------
/sqlite.md:
--------------------------------------------------------------------------------
1 | # sqlite 快速瀏覽
2 |
3 | 這份文件快速瀏覽 SQLite 基本語法,包含創建資料庫、創建表格,新增、更新、查詢、刪除記錄 (CURD)。
4 |
5 | ## 參考資料
6 |
7 | - [SQLite 教程](http://www.runoob.com/sqlite/sqlite-tutorial.html)
8 | - [SQLite 官網](https://www.sqlite.org/)
9 |
10 | ## 創建資料庫
11 | - http://www.runoob.com/sqlite/sqlite-create-database.html
12 |
13 | 在當前目錄產生一個 testDB.db 檔案作為 SQLite 資料庫。
14 | ```shell
15 | $ sqlite3 testDB.db
16 | SQLite version 3.8.7.1 2014-10-29 13:59:56
17 | Enter ".help" for usage hints.
18 | sqlite>
19 | ```
20 |
21 | 使用 `.databases` 命令列出資料庫的檔案名稱
22 | ```sql
23 | sqlite> .database
24 | seq name file
25 | --- --------------- ----------------------------------------------------------
26 | 0 main /tmp/sqlite/testDB.db
27 | ```
28 |
29 | 使用 `.quit` 退出資料庫
30 | ```sql
31 | sqlite> .quit
32 | ```
33 |
34 | ## 創建表格
35 | - http://www.runoob.com/sqlite/sqlite-create-table.html
36 |
37 | 建立 `COMPANY` 與 `DEPARTMENT` 兩個表格
38 | ```sql
39 | sqlite> CREATE TABLE COMPANY (
40 | ...> ID INT PRIMARY KEY NOT NULL,
41 | ...> NAME TEXT NOT NULL,
42 | ...> AGE INT NOT NULL,
43 | ...> ADDRESS CHAR(50),
44 | ...> SALARY REAL
45 | ...> );
46 | sqlite> CREATE TABLE DEPARTMENT (
47 | ...> ID INT PRIMARY KEY NOT NULL,
48 | ...> DEPT CHAR(50) NOT NULL,
49 | ...> EMP_ID INT NOT NULL
50 | ...> );
51 | ```
52 |
53 | 使用 `.tables` 列出表格
54 | ```sql
55 | sqlite> .tables
56 | COMPANY DEPARTMENT
57 | ```
58 |
59 | 使用 `.schema` 顯示表格結構
60 | ```sql
61 | sqlite> .schema COMPANY
62 | CREATE TABLE COMPANY (
63 | ID INT PRIMARY KEY NOT NULL,
64 | NAME TEXT NOT NULL,
65 | AGE INT NOT NULL,
66 | ADDRESS CHAR(50),
67 | SALARY REAL
68 | );
69 | ```
70 |
71 | ## 插入紀錄
72 | - http://www.runoob.com/sqlite/sqlite-insert.html
73 |
74 | 方法一
75 | ```sql
76 | sqlite> INSERT INTO COMPANY (ID,NAME,AGE,ADDRESS,SALARY)
77 | ...> VALUES (1, 'Paul', 32, 'California', 20000.00 );
78 | sqlite> INSERT INTO COMPANY (ID,NAME,AGE,ADDRESS,SALARY)
79 | ...> VALUES (2, 'Allen', 25, 'Texas', 15000.00 );
80 | sqlite>
81 | sqlite> INSERT INTO COMPANY (ID,NAME,AGE,ADDRESS,SALARY)
82 | ...> VALUES (3, 'Teddy', 23, 'Norway', 20000.00 );
83 | sqlite>
84 | sqlite> INSERT INTO COMPANY (ID,NAME,AGE,ADDRESS,SALARY)
85 | ...> VALUES (4, 'Mark', 25, 'Rich-Mond ', 65000.00 );
86 | sqlite>
87 | sqlite> INSERT INTO COMPANY (ID,NAME,AGE,ADDRESS,SALARY)
88 | ...> VALUES (5, 'David', 27, 'Texas', 85000.00 );
89 | sqlite>
90 | sqlite> INSERT INTO COMPANY (ID,NAME,AGE,ADDRESS,SALARY)
91 | ...> VALUES (6, 'Kim', 22, 'South-Hall', 45000.00 );
92 | ```
93 |
94 | 方法二
95 | ```sql
96 | sqlite> INSERT INTO COMPANY VALUES (7, 'James', 24, 'Houston', 10000.00 );
97 | ```
98 |
99 | ## 查詢記錄
100 | - http://www.runoob.com/sqlite/sqlite-select.html
101 |
102 | 使用 `SELECT` 查詢表格資料
103 | ```sql
104 | sqlite> SELECT * FROM COMPANY;
105 | 1|Paul|32|California|20000.0
106 | 2|Allen|25|Texas|15000.0
107 | 3|Teddy|23|Norway|20000.0
108 | 4|Mark|25|Rich-Mond |65000.0
109 | 5|David|27|Texas|85000.0
110 | 6|Kim|22|South-Hall|45000.0
111 | 7|James|24|Houston|10000.0
112 | ```
113 |
114 | 使用 `.header on` 命令顯示表格標頭,使用 `.mode column` 排列欄位,提高表格可讀性
115 | ```sql
116 | sqlite> .header on
117 | sqlite> .mode column
118 | sqlite> SELECT * FROM COMPANY;
119 | ID NAME AGE ADDRESS SALARY
120 | ---------- ---------- ---------- ---------- ----------
121 | 1 Paul 32 California 20000.0
122 | 2 Allen 25 Texas 15000.0
123 | 3 Teddy 23 Norway 20000.0
124 | 4 Mark 25 Rich-Mond 65000.0
125 | 5 David 27 Texas 85000.0
126 | 6 Kim 22 South-Hall 45000.0
127 | 7 James 24 Houston 10000.0
128 | ```
129 |
130 | ## 更新紀錄
131 | - http://www.runoob.com/sqlite/sqlite-update.html
132 |
133 | 使用 `UPDATE` 更新紀錄內容,用 `WHERE` 找出更新對象
134 | ```sql
135 | sqlite> UPDATE COMPANY SET ADDRESS = 'Texas' WHERE ID = 6;
136 | sqlite> SELECT * FROM COMPANY;
137 | ID NAME AGE ADDRESS SALARY
138 | ---------- ---------- ---------- ---------- ----------
139 | 1 Paul 32 California 20000.0
140 | 2 Allen 25 Texas 15000.0
141 | 3 Teddy 23 Norway 20000.0
142 | 4 Mark 25 Rich-Mond 65000.0
143 | 5 David 27 Texas 85000.0
144 | 6 Kim 22 Texas 45000.0
145 | 7 James 24 Houston 10000.0
146 | ```
147 |
148 | ## 刪除記錄
149 | - http://www.runoob.com/sqlite/sqlite-delete.html
150 |
151 | 使用 `DELETE` 刪除紀錄,用 `WHERE` 找出刪除對象
152 | ```sql
153 | sqlite> DELETE FROM COMPANY WHERE ID = 7;
154 | sqlite> SELECT * FROM COMPANY;
155 | ID NAME AGE ADDRESS SALARY
156 | ---------- ---------- ---------- ---------- ----------
157 | 1 Paul 32 California 20000.0
158 | 2 Allen 25 Texas 15000.0
159 | 3 Teddy 23 Norway 20000.0
160 | 4 Mark 25 Rich-Mond 65000.0
161 | 5 David 27 Texas 85000.0
162 | 6 Kim 22 Texas 45000.0
163 | ```
164 |
165 | ## 刪除表格
166 | - http://www.runoob.com/sqlite/sqlite-drop-table.html
167 |
168 | 刪除表格前,列出目前的表格
169 | ```sql
170 | sqlite> .tables
171 | COMPANY DEPARTMENT
172 | ```
173 |
174 | 使用 `DROP TABLE` 刪除表格
175 | ```sql
176 | sqlite> DROP TABLE DEPARTMENT;
177 | sqlite> .tables
178 | COMPANY
179 | ```
180 |
--------------------------------------------------------------------------------
/unittest.md:
--------------------------------------------------------------------------------
1 | # unittest 筆記
2 |
3 | Python unittest 測試框架發想自 JUnit 並與其他單元測試的框架有類似的味道:
4 |
5 | - 支援自動化測試
6 | - 測試間共享 setup 與 shutdown 程式碼
7 | - 每次測試皆是獨立,結果不會受其他測試影響
8 |
9 | | 名詞 | 解釋 |
10 | |------|------|
11 | | 測試夾具 (test fixture) | 包含一個或多個被執行的測試,與相關的初始與結束動作。 |
12 | | 測試案例 (test case) | 個別單元測試,用來檢查特定輸入的反應。 |
13 | | 測試套組 (test suite) | 由測試案例、測試套組構成,用來集合應該被一起執行的測試。 |
14 | | 測試執行 (test runner) | 負責執行測試與回報結果。 |
15 |
16 | ## 基本範例
17 |
18 | Arithmetic.py:
19 | ```python
20 | import unittest
21 |
22 | def add(a, b):
23 | return a + b
24 |
25 | def subtract(a, b):
26 | return a - b
27 |
28 | def multiply(a, b):
29 | return a * b
30 |
31 | def divide(a, b):
32 | return a / b
33 |
34 | class TestArithmetic(unittest.TestCase):
35 |
36 | def test_add(self):
37 | self.assertEqual(add(1, 1), 2)
38 |
39 | def test_subtract(self):
40 | self.assertEqual(subtract(5, 2), 3)
41 |
42 | def test_multiply(self):
43 | self.assertEqual(multiply(3, 2), 6)
44 |
45 | def test_divide(self):
46 | self.assertEqual(divide(3.0, 2), 1.5)
47 |
48 | if __name__ == '__main__':
49 | unittest.main()
50 | ```
51 |
52 | - `test_add` 測試 `add()` 函數是否正確運作
53 | - `test_subtract` 測試 `subtract()` 函數是否正確運作
54 | - `test_multiply` 測試 `multiply()` 函數是否正確運作
55 | - `test_divide` 測試 `divide()` 函數是否正確運作
56 | - `if __name__ == '__main__'` 判斷是否執行執行,若是則執行測試
57 |
58 | 執行結果:
59 | ```shell
60 | $ python Arithmetic.py
61 | ....
62 | ----------------------------------------------------------------------
63 | Ran 4 tests in 0.000s
64 |
65 | OK
66 | /tmp/test$ python Arithmetic.py -v # 使用參數 -v 提供測試細節
67 | test_add (__main__.TestArithmetic) ... ok
68 | test_divide (__main__.TestArithmetic) ... ok
69 | test_multiply (__main__.TestArithmetic) ... ok
70 | test_subtract (__main__.TestArithmetic) ... ok
71 |
72 | ----------------------------------------------------------------------
73 | Ran 4 tests in 0.000s
74 |
75 | OK
76 | ```
77 |
78 | ## 命令列
79 |
80 | TestArithmetic.py:
81 | ```python
82 | import unittest
83 |
84 | class TestArithmetic(unittest.TestCase):
85 |
86 | def test_add(self):
87 | self.assertEqual(1 + 1, 2)
88 |
89 | def test_subtrat(self):
90 | self.assertEqual(5 - 2, 3)
91 |
92 | def test_multiply(self):
93 | self.assertEqual(2 * 3, 6)
94 |
95 | def test_divide(self):
96 | self.assertEqual(3.0 / 2, 1.5)
97 | ```
98 |
99 | 執行結果:
100 | ```shell
101 | $ python -m unittest -h # 顯示 help message
102 | $ python -m unittest TestArithmetic # 測試 TestArithmetic 模組,不含副檔名 (.py)
103 | ....
104 | ----------------------------------------------------------------------
105 | Ran 4 tests in 0.000s
106 |
107 | OK
108 | $ python -m unittest TestArithmetic.TestArithmetic # 測試 TestArithmetic 模組的 TestArithmetic 類別
109 | ....
110 | ----------------------------------------------------------------------
111 | Ran 4 tests in 0.000s
112 |
113 | OK
114 | $ python -m unittest TestArithmetic.TestArithmetic.test_add # 測試 TestArithmetic 模組的 TestArithmetic 類別的 test_add 測試項目
115 | .
116 | ----------------------------------------------------------------------
117 | Ran 1 test in 0.000s
118 |
119 | OK
120 | $ python -m unittest -v TestArithmetic # 顯示測試細節
121 | test_add (TestArithmetic.TestArithmetic) ... ok
122 | test_divide (TestArithmetic.TestArithmetic) ... ok
123 | test_multiply (TestArithmetic.TestArithmetic) ... ok
124 | test_subtrat (TestArithmetic.TestArithmetic) ... ok
125 |
126 | ----------------------------------------------------------------------
127 | Ran 4 tests in 0.000s
128 |
129 | OK
130 | $ python -m unittest TestArithmetic TestStringMethods # 測試兩個模組
131 | .......
132 | ----------------------------------------------------------------------
133 | Ran 7 tests in 0.000s
134 |
135 | OK
136 | ```
137 |
138 | ## 測試探索
139 |
140 | ```shell
141 | $ ls
142 | TestArithmetic.py TestStringMethods.py
143 | $ python -m unittest discover -p "Test*.py" # 找出 "Test*.py" 的檔案測試
144 | .......
145 | ----------------------------------------------------------------------
146 | Ran 7 tests in 0.000s
147 |
148 | OK
149 | $ python -m unittest discover -v -p "Test*.py" # 找出 "Test*.py" 的檔案測試,並顯示測試細節
150 | test_add (TestArithmetic.TestArithmetic) ... ok
151 | test_divide (TestArithmetic.TestArithmetic) ... ok
152 | test_multiply (TestArithmetic.TestArithmetic) ... ok
153 | test_subtrat (TestArithmetic.TestArithmetic) ... ok
154 | test_isupper (TestStringMethods.TestStringMethods) ... ok
155 | test_split (TestStringMethods.TestStringMethods) ... ok
156 | test_upper (TestStringMethods.TestStringMethods) ... ok
157 |
158 | ----------------------------------------------------------------------
159 | Ran 7 tests in 0.000s
160 |
161 | OK
162 | ```
163 |
164 | > 不清楚文件提到的 test suite 怎麼弄,先 pass
165 |
166 | ## 重新使用舊測試
167 |
168 | (略)
169 |
170 | ## 忽略測試與預期的錯誤
171 |
172 | testSkip.py:
173 | ```python
174 | import unittest
175 | import sys
176 |
177 | __version__ = (1, 2)
178 |
179 | class TestSkipCase(unittest.TestCase):
180 |
181 | @unittest.skip("demonstrating skipping")
182 | def test_nothing(self):
183 | self.fail("shouldn't happen")
184 |
185 | @unittest.skipIf(__version__ < (1, 3), "not supported in this library version")
186 | def test_format(self):
187 | # Tests that work for only a certain version of the library.
188 | pass
189 |
190 | @unittest.skipUnless(sys.platform.startswith("win"), "requires Windows")
191 | def test_windows_support(self):
192 | # windows specific testing code
193 | pass
194 |
195 | def test_catchExcept(self):
196 | try:
197 | 1 / 0
198 | except:
199 | raise unittest.SkipTest("skipping because ...")
200 | self.assertEqual(True)
201 | ```
202 |
203 | testExpectedFailure.py:
204 | ```python
205 | import unittest
206 |
207 | class ExpectedFailureTestCase(unittest.TestCase):
208 | @unittest.expectedFailure
209 | def test_fail(self):
210 | self.assertEqual(1, 0, "broken")
211 | ```
212 |
213 | 測試結果:
214 | ```shell
215 | $ python -m unittest discover -v -p "test*.py"
216 | test_fail (testExpectedFailure.ExpectedFailureTestCase) ... expected failure
217 | test_catchExcept (testSkip.TestSkipCase) ... skipped 'skipping because ...'
218 | test_format (testSkip.TestSkipCase) ... skipped 'not supported in this library version'
219 | test_nothing (testSkip.TestSkipCase) ... skipped 'demonstrating skipping'
220 | test_windows_support (testSkip.TestSkipCase) ... skipped 'requires Windows'
221 |
222 | ----------------------------------------------------------------------
223 | Ran 5 tests in 0.001s
224 |
225 | OK (skipped=4, expected failures=1)
226 | ```
227 |
228 | 以下修飾詞 (decorator) 用來忽略或預期失敗:
229 |
230 | | 修飾詞 | 說明 |
231 | |--------|------|
232 | | `@unittest.skip(reason)` | 無條件忽略測試。reason 說明為何要忽略測試 |
233 | | `@unittest.skipIf(condition, reason)` | 如果條件成立,則忽略測試 |
234 | | `@unittest.skipUnless(condition, reason)` | 除非條件成立,否則忽略測試 |
235 | | `@unittest.expectedFailure` | 標記測試為預期錯誤。執行時如果測試失敗,結果不算失敗 |
236 | | `exception unittest.SkipTest(reason)` | 產生例外,忽略測試 |
237 |
238 | ## 測試方法
239 |
240 | | 方法 | 檢查 |
241 | |------|------|
242 | | `assertEqual(a, b)` | a == b |
243 | | `assertNotEqual(a, b)` | a != b |
244 | | `assertTrue(x)` | bool(x) is True |
245 | | `assertFalse(x)` | bool(x) is False |
246 | | `assertIs(a, b)` | a is b |
247 | | `assertIsNot(a, b)` | a is not b |
248 | | `assertIsNone(x)` | x is None |
249 | | `assertIsNotNone(x)` | x is not None |
250 | | `assertIn(a, b)` | a in b |
251 | | `assertNotIn(a, b)` | a not in b |
252 | | `assertIsInstance(a, b)` | isinstance(a, b) |
253 | | `assertNotIsInstance(a, b)` | not isinstance(a, b) |
254 |
255 | ## Grouping tests
256 |
257 | `class unittest.TestSuite(tests=())`
258 |
259 | == TBC ==
260 |
261 | ----
262 | ## 參考
263 |
264 | - [unittest — Unit testing framework](https://docs.python.org/3/library/unittest.html)
265 |
--------------------------------------------------------------------------------
/behave.md:
--------------------------------------------------------------------------------
1 | # Behave
2 |
3 | ## 透過範例快速上手
4 |
5 | 參考:[Python BDD自动化测试框架初探](http://lovesoo.org/python-bdd-exploration-of-the-automated-testing-framework.html),計算 fibonacci 數列
6 |
7 | 首先建立目錄結構
8 | ```shell
9 | $ mkdir fib
10 | $ cd fib
11 | $ mkdir -p features/steps
12 | ```
13 |
14 | 描述 feature 的長相
15 | ```python
16 | # file:features/fib.feature
17 | Feature:Calc Fib
18 | In order to introduce Behave
19 | We calc fib as example
20 |
21 | Scenario: Calc fib number
22 | Given we have the number 10
23 | when we calc the fib
24 | then we get the fib number 55
25 | ```
26 |
27 | 執行 beheve
28 | ```shell
29 | $ behave
30 | Feature: Calc Fib # features/fib.feature:2
31 | In order to introduce Behave
32 | We calc fib as example
33 | Scenario: Calc fib number # features/fib.feature:6
34 | Given we have the number 10 # None
35 | When we calc the fib # None
36 | Then we get the fib number 55 # None
37 |
38 |
39 | Failing scenarios:
40 | features/fib.feature:6 Calc fib number
41 |
42 | 0 features passed, 1 failed, 0 skipped
43 | 0 scenarios passed, 1 failed, 0 skipped
44 | 0 steps passed, 0 failed, 0 skipped, 3 undefined
45 | Took 0m0.000s
46 |
47 | You can implement step definitions for undefined steps with these snippets:
48 |
49 | @given(u'we have the number 10')
50 | def step_impl(context):
51 | raise NotImplementedError(u'STEP: Given we have the number 10')
52 |
53 | @when(u'we calc the fib')
54 | def step_impl(context):
55 | raise NotImplementedError(u'STEP: When we calc the fib')
56 |
57 | @then(u'we get the fib number 55')
58 | def step_impl(context):
59 | raise NotImplementedError(u'STEP: Then we get the fib number 55')
60 | ```
61 |
62 | 把 behave 提供的 snippets 拿來改成 steps
63 | ```python
64 | # file:features/steps/step_fib.py
65 | # ----------------------------------------------------------------------------
66 | # STEPS:
67 | # ----------------------------------------------------------------------------
68 | @given(u'we have the number 10')
69 | def step_impl(context):
70 | raise NotImplementedError(u'STEP: Given we have the number 10')
71 |
72 | @when(u'we calc the fib')
73 | def step_impl(context):
74 | raise NotImplementedError(u'STEP: When we calc the fib')
75 |
76 | @then(u'we get the fib number 55')
77 | def step_impl(context):
78 | raise NotImplementedError(u'STEP: Then we get the fib number 55')
79 | ```
80 |
81 | 再跑一次 behave
82 | ```shell
83 | $ behave
84 | Feature: Calc Fib # features/fib.feature:2
85 | In order to introduce Behave
86 | We calc fib as example
87 | Scenario: Calc fib number # features/fib.feature:6
88 | Given we have the number 10 # features/steps/step_fib.py:2 0.000s
89 | Traceback (most recent call last):
90 | File "/usr/local/lib/python2.6/dist-packages/behave/model.py", line 1456, in run
91 | match.run(runner.context)
92 | File "/usr/local/lib/python2.6/dist-packages/behave/model.py", line 1903, in run
93 | self.func(context, *args, **kwargs)
94 | File "features/steps/step_fib.py", line 4, in step_impl
95 | raise NotImplementedError(u'STEP: Given we have the number 10')
96 | NotImplementedError: STEP: Given we have the number 10
97 |
98 | When we calc the fib # None
99 | Then we get the fib number 55 # None
100 |
101 |
102 | Failing scenarios:
103 | features/fib.feature:6 Calc fib number
104 |
105 | 0 features passed, 1 failed, 0 skipped
106 | 0 scenarios passed, 1 failed, 0 skipped
107 | 0 steps passed, 1 failed, 2 skipped, 0 undefined
108 | Took 0m0.000s
109 | ```
110 |
111 | 修改 steps,並實作 fibs
112 | ```python
113 | # file:features/steps/step_fib.py
114 | # ----------------------------------------------------------------------------
115 | # PROBLEM DOMAIN:
116 | # ----------------------------------------------------------------------------
117 | def fibs(num):
118 | a = b = 1
119 | for i in range(num):
120 | yield a
121 | a, b = b, a + b
122 | # ----------------------------------------------------------------------------
123 | # STEPS:
124 | # ----------------------------------------------------------------------------
125 | @given(u'we have the number 10')
126 | def step_impl(context):
127 | context.fib_number = 10
128 |
129 | @when(u'we calc the fib')
130 | def step_impl(context):
131 | context.fib_number=list(fibs(context.fib_number))[-1]
132 |
133 | @then(u'we get the fib number 55')
134 | def step_impl(context):
135 | context.expected_number = 55
136 | assert context.fib_number == context.expected_number, "Calc fib number: %d" % context.fib_number
137 | ```
138 | - 實作出 `fibs`
139 | - 修改每個 `step_impl`
140 |
141 | > `list(fibs(context.fib_number))[-1]`: 將 `fibs()` 計算結果轉成 `list`,然侯取出最後一個值 (寫得很有技巧,但可讀性很差)
142 |
143 | 將 steps 改得更有彈性
144 | ```python
145 | # file:features/steps/step_fib.py
146 | # ----------------------------------------------------------------------------
147 | # PROBLEM DOMAIN:
148 | # ----------------------------------------------------------------------------
149 | def fibs(num):
150 | a = b = 1
151 | for i in range(num):
152 | yield a
153 | a, b = b, a + b
154 | # ----------------------------------------------------------------------------
155 | # STEPS:
156 | # ----------------------------------------------------------------------------
157 | @given(u'we have the number {number}')
158 | def step_impl(context, number):
159 | context.fib_number = int(number)
160 |
161 | @when(u'we calc the fib')
162 | def step_impl(context):
163 | context.fib_number=list(fibs(context.fib_number))[-1]
164 |
165 | @then(u'we get the fib number {number}')
166 | def step_impl(context, number):
167 | context.expected_number = int(number)
168 | assert context.fib_number == context.expected_number, "Calc fib number: %d" % context.fib_number
169 | ```
170 |
171 | 跑一次 behave
172 | ```shell
173 | $ behave
174 | Feature: Calc Fib # features/fib.feature:2
175 | In order to introduce Behave
176 | We calc fib as example
177 | Scenario: Calc fib number # features/fib.feature:6
178 | Given we have the number 10 # features/steps/step_fib.py:13 0.000s
179 | When we calc the fib # features/steps/step_fib.py:17 0.000s
180 | Then we get the fib number 55 # features/steps/step_fib.py:21 0.000s
181 |
182 | 1 feature passed, 0 failed, 0 skipped
183 | 1 scenario passed, 0 failed, 0 skipped
184 | 3 steps passed, 0 failed, 0 skipped, 0 undefined
185 | Took 0m0.000s
186 | ```
187 |
188 | 修改 features: 新增測試條件
189 | ```python
190 | # file:features/fib.feature
191 | Feature:Calc Fib
192 | In order to introduce Behave
193 | We calc fib as example
194 |
195 | Scenario Outline: Calc fib number
196 | Given we have the number
197 | When we calc the fib
198 | Then we get the fib number
199 |
200 | Examples: Some numbers
201 | | number | fib_number |
202 | | 1 | 1 |
203 | | 2 | 2 |
204 | | 10 | 55 |
205 | ```
206 |
207 | 執行 behave 驗證
208 | ```shell
209 | $ behave
210 | Feature: Calc Fib # features/fib.feature:2
211 | In order to introduce Behave
212 | We calc fib as example
213 | Scenario Outline: Calc fib number -- @1.1 Some numbers # features/fib.feature:13
214 | Given we have the number 1 # features/steps/step_fib.py:13 0.000s
215 | When we calc the fib # features/steps/step_fib.py:17 0.000s
216 | Then we get the fib number 1 # features/steps/step_fib.py:21 0.000s
217 |
218 | Scenario Outline: Calc fib number -- @1.2 Some numbers # features/fib.feature:14
219 | Given we have the number 2 # features/steps/step_fib.py:13 0.000s
220 | When we calc the fib # features/steps/step_fib.py:17 0.000s
221 | Then we get the fib number 2 # features/steps/step_fib.py:21 0.000s
222 | Assertion Failed: Calc fib number: 1
223 |
224 |
225 | Scenario Outline: Calc fib number -- @1.3 Some numbers # features/fib.feature:15
226 | Given we have the number 10 # features/steps/step_fib.py:13 0.000s
227 | When we calc the fib # features/steps/step_fib.py:17 0.000s
228 | Then we get the fib number 55 # features/steps/step_fib.py:21 0.000s
229 |
230 |
231 | Failing scenarios:
232 | features/fib.feature:14 Calc fib number -- @1.2 Some numbers
233 |
234 | 0 features passed, 1 failed, 0 skipped
235 | 2 scenarios passed, 1 failed, 0 skipped
236 | 8 steps passed, 1 failed, 0 skipped, 0 undefined
237 | Took 0m0.001s
238 | ```
239 | - 發生錯誤 `Assertion Failed: Calc fib number: 1`: 原因是 features 定義時誤以為第二個 fibonacci 數是 2 (1 才是對的)
240 |
241 | ----
242 | ## 參考
243 |
244 | - [Behave official site](http://pythonhosted.org/behave/)
245 | - [behave Examples and Tutorials](https://jenisys.github.io/behave.example/index.html)
246 | - [Behavior-Driven Development in Python](http://code.tutsplus.com/tutorials/behavior-driven-development-in-python--net-26547)
247 |
--------------------------------------------------------------------------------
/behave-django.md:
--------------------------------------------------------------------------------
1 | # behave-django
2 |
3 | ## 安裝
4 |
5 | behave-django 要安裝在 Django project 中,在這之前要先設定虛擬環境、安裝 Django、產生 Django project
6 |
7 | ```shell
8 | $ source venv/bin/activate
9 | $ pip install Django==1.9.7
10 | $ django-admin.py startproject mysite
11 | $ cd mysite/
12 | $ pip install behave-django
13 | ```
14 |
15 | 修改 mysite/settings.py,新增 behave_django app
16 | ```python
17 | INSTALLED_APPS = [
18 | ...
19 | 'behave_django',
20 | ]
21 | ```
22 |
23 | ### 一個簡單的範例
24 |
25 | 在 mysite/ 目錄裡產生以下目錄與檔案
26 | ```
27 | features/
28 | ├── environment.py
29 | ├── running-tests.feature
30 | └── steps
31 | └── running_tests.py
32 | ```
33 |
34 | features/environment.py:
35 | ```python
36 | """
37 | behave environment module for testing behave-django
38 | """
39 |
40 | def before_feature(context, feature):
41 | if feature.name == 'Fixture loading':
42 | context.fixtures = ['behave-fixtures.json']
43 |
44 |
45 | def before_scenario(context, scenario):
46 | if scenario.name == 'Load fixtures for this scenario and feature':
47 | context.fixtures.append('behave-second-fixture.json')
48 | ```
49 |
50 | features/running-tests.feature:
51 | ```python
52 | Feature: Running tests
53 | In order to prove that behave-django works
54 | As the Maintainer
55 | I want to test running behave against this features directory
56 |
57 | Scenario: The Test
58 | Given this step exists
59 | When I run "python manage.py behave"
60 | Then I should see the behave tests run
61 | ```
62 |
63 | features/steps/running_tests.py:
64 | ```python
65 | from behave import given, when, then
66 |
67 | @given(u'this step exists')
68 | def step_exists(context):
69 | pass
70 |
71 | @when(u'I run "python manage.py behave"')
72 | def run_command(context):
73 | pass
74 |
75 | @then(u'I should see the behave tests run')
76 | def is_running(context):
77 | pass
78 | ```
79 |
80 | 執行測試
81 | ```shell
82 | $ python manage.py behave
83 |
84 | Creating test database for alias 'default'...
85 | Feature: Running tests # features/running-tests.feature:1
86 | In order to prove that behave-django works
87 | As the Maintainer
88 | I want to test running behave against this features directory
89 | Scenario: The Test # features/running-tests.feature:6
90 | Given this step exists # features/steps/running_tests.py:4 0.000s
91 | When I run "python manage.py behave" # features/steps/running_tests.py:9 0.000s
92 | Then I should see the behave tests run # features/steps/running_tests.py:14 0.000s
93 |
94 | 1 feature passed, 0 failed, 0 skipped
95 | 1 scenario passed, 0 failed, 0 skipped
96 | 3 steps passed, 0 failed, 0 skipped, 0 undefined
97 | Took 0m0.000s
98 | Destroying test database for alias 'default'...
99 | ```
100 |
101 | > 附註:從 0.2.0 開始,不再需要在 environment.py 中插入 `environment.before_scenario()` 與 `environment.after_scenario()`。
102 |
103 | ### 下載範例
104 |
105 | ```shell
106 | $ git clone https://github.com/behave/behave-django
107 | ```
108 |
109 | 以下,透過下載範例進行說明。
110 |
111 | ## 用法
112 |
113 | ### 網頁瀏覽器自動化 (Web browser automation)
114 |
115 | 網頁自動化函式庫可以透過 `context.base_url` 存取伺服器。此外,使用 `context.get_url()` 得到保留專案URL與絕對路徑。
116 |
117 | ```python
118 | # Get context.base_url
119 | context.get_url()
120 |
121 | # Get context.base_url + '/absolute/url/here'
122 | context.get_url('/absolute/url/here')
123 |
124 | # Get context.base_url + reverse('view-name')
125 | context.get_url('view-name')
126 |
127 | # Get context.base_url + reverse('view-name', 'with args', and='kwargs')
128 | context.get_url('view-name', 'with args', and='kwargs')
129 |
130 | # Get context.base_url + model_instance.get_absolute_url()
131 | context.get_url(model_instance)
132 | ```
133 |
134 | #### 網頁自動化測試
135 |
136 | 透過瀏覽器打開 `http://192.168.33.10:8000/`,得到下面內容
137 | ```
138 | Behave Django works
139 | ```
140 |
141 | 以下驗證透過瀏覽器看到的內容合乎預期。
142 |
143 | features/live-test-server.feature
144 | ```
145 | Feature: Live server
146 | In order to prove that the live server works
147 | As the Maintainer
148 | I want to send an HTTP request
149 |
150 | Scenario: HTTP GET
151 | When I visit "/"
152 | Then I should see "Behave Django works"
153 | ```
154 |
155 | features/steps/live_test_server.py
156 | ```python
157 | @when(u'I visit "{url}"')
158 | def visit(context, url):
159 | page = urlopen(context.base_url + url)
160 | context.response = str(page.read())
161 |
162 | @then(u'I should see "{text}"')
163 | def i_should_see(context, text):
164 | assert text in context.response
165 | ```
166 | - 透過 `context.base_url` 取得網頁URL,使用 `urlopen()` 取得網頁物件
167 | - `context.response = str(page.read())` 讀取網頁內容
168 | - `assert text in context.response` 驗證讀取的網頁內容符合預期
169 |
170 | 執行結果
171 | ```shell
172 | $ python manage.py behave --include=live-test-server
173 | Creating test database for alias 'default'...
174 | Feature: Live server # features/live-test-server.feature:1
175 | In order to prove that the live server works
176 | As the Maintainer
177 | I want to send an HTTP request
178 | Scenario: HTTP GET # features/live-test-server.feature:6
179 | When I visit "/" # features/steps/live_test_server.py:9 0.008s
180 | Then I should see "Behave Django works" # features/steps/live_test_server.py:15 0.000s
181 |
182 | 1 feature passed, 0 failed, 0 skipped
183 | 1 scenario passed, 0 failed, 0 skipped
184 | 2 steps passed, 0 failed, 0 skipped, 0 undefined
185 | Took 0m0.009s
186 | Destroying test database for alias 'default'...
187 | ```
188 |
189 | ### 測試用客戶端 (Django’s testing client)
190 |
191 | `context` 包含 TestCase 的實例。`context.test` 提供 Django 測試客戶端程式,驗證透過 URL 讀取網頁內容是否合乎預期。
192 |
193 | 修改 features/steps/live_test_server.py
194 | ```python
195 | @when(u'I visit "{url}"')
196 | def visit(context, url):
197 | context.response = context.test.client.get(url)
198 |
199 | @then(u'I should see "{text}"')
200 | def i_should_see(context, text):
201 | context.test.assertContains(context.response, text)
202 | ```
203 | - `context.text` 提供一堆類似 unittest 的函式,例如 `assertRedirects`, `assertContains`, `assertNotContains`, `assertFormError`, `assertFormsetError`, `assertTemplateUsed`, `assertTemplateNotUsed`, `assertRaisesMessage`, `assertFieldOutput`, `assertHTMLEqual`, `assertHTMLNotEqual`, `assertInHTML`, `assertJSONEqual`, `assertJSONNotEqual`, `assertXMLEqual`, `assertXMLNotEqual`, `assertQuerysetEqual`, `assertNumQueries`
204 |
205 | ### 資料庫事務 (Database transactions per scenario)
206 | (看不懂)
207 |
208 | ### 載入基礎設施 (Fixture loading)
209 |
210 | 我的理解是,可以事先使用 json (例如,fixtures/behave-fixtures.json) 設定一些物件,在環境 (environment.py) 設定時載入成為 Model 的內容。
211 |
212 | features/environment.py
213 | ```python
214 | def before_feature(context, feature):
215 | if feature.name == 'Fixture loading':
216 | context.fixtures = ['behave-fixtures.json']
217 |
218 | def before_scenario(context, scenario):
219 | if scenario.name == 'Load fixtures for this scenario and feature':
220 | context.fixtures.append('behave-second-fixture.json')
221 | ```
222 | - 如果 feature 是 'Fixture loading',載入 'behave-fixtures.json' >> BehaveTestModel 內有一個物件
223 | - 如果 feature 是 'Load fixtures for this scenario and feature',附加 'behave-second-fixture.json' >> BehaveTestModel 內有兩個物件
224 |
225 | test_app/fixtures/behave-fixtures.json
226 | ```json
227 | [{
228 | "fields": {
229 | "name": "fixture loading test",
230 | "number": 42
231 | },
232 | "model": "test_app.behavetestmodel",
233 | "pk": 1
234 | }]
235 | ```
236 |
237 | test_app/fixtures/behave-second-fixture.json
238 | ```
239 | [{
240 | "fields": {
241 | "name": "second fixture",
242 | "number": 7
243 | },
244 | "model": "test_app.behavetestmodel",
245 | "pk": 2
246 | }]
247 | ```
248 |
249 | test_app/models.py
250 | ```python
251 | class BehaveTestModel(models.Model):
252 | name = models.CharField(max_length=255)
253 | number = models.IntegerField()
254 |
255 | def get_absolute_url(self):
256 | return '/behave/test/%i/%s' % (self.number, self.name)
257 | ```
258 | - `BehaveTestModel` 有兩個屬性: name, number
259 |
260 | features/fixture-loading.feature
261 | ```
262 | Feature: Fixture loading
263 | In order to have sample data during my behave tests
264 | As the Maintainer
265 | I want to load fixtures
266 |
267 | Scenario: Load fixtures
268 | Then the fixture should be loaded
269 |
270 | Scenario: Load fixtures for this scenario and feature
271 | Then the fixture for the second scenario should be loaded
272 | ```
273 |
274 | features/steps/fixture-loading.py
275 | ```python
276 | from test_app.models import BehaveTestModel
277 |
278 | @then(u'the fixture should be loaded')
279 | def check_fixtures(context):
280 | context.test.assertEqual(BehaveTestModel.objects.count(), 1)
281 |
282 | @then(u'the fixture for the second scenario should be loaded')
283 | def check_second_fixtures(context):
284 | context.test.assertEqual(BehaveTestModel.objects.count(), 2)
285 | ```
286 | - 搭配 features/environment.py 閱讀,就能理解 assert 為何合乎預期
287 |
288 | ## 命令列選項 (Command line options)
289 |
290 | - `--use-existing-database`: 不產生測試用資料庫,使用 runserver 時使用的資料庫。(除非必須這樣做,不然不要冒險)
291 | - `--keepdb`: 測試使用已有的資料庫而不是每次都重新產生,得到比較快的測試速度。(Django 1.8 之後已經把 --keepdb 加到 manage.py 了)
292 |
293 | ## Behave 配置檔 (Behave configuration file)
294 |
295 | 專案根目錄下的 behave.ini, .behaverc, or setup.cfg 檔案。
296 |
297 | 例如,setup.cfg
298 | ```
299 | [behave]
300 | paths = features/
301 | test_app/features/
302 | show_skipped = no
303 |
304 | [flake8]
305 | exclude = docs/*
306 |
307 | [pytest]
308 | testpaths = tests/
309 | ```
310 |
311 | 更多資料在 [Behave Configuration Files](https://pythonhosted.org/behave/behave.html#configuration-files)
312 |
313 | ----
314 | ## 參考
315 |
316 | - https://pythonhosted.org/behave-django/index.html (文件)
317 | - https://github.com/behave/behave-django/tree/master/features (範例)
318 |
--------------------------------------------------------------------------------
/pyparsing.md:
--------------------------------------------------------------------------------
1 | # pyparsing
2 |
3 | 除了 [Getting Started with Pyparsing](http://shop.oreilly.com/product/9780596514235.do) 這本書,pyparsing 似乎沒有完整的說明文件?!以下內容來自 [pyparsing quick reference](http://infohost.nmt.edu/tcc/help/pubs/pyparsing/web/index.html)。
4 |
5 | ## pyparsing: 從本文抽取訊息的工具
6 |
7 | pyparsing 模組提供程式設計師使用 python 語言從結構化的文本資料抽取資訊。
8 |
9 | 這個工具比正規化表示式更強大 (python re 模組),但又不像編譯器那樣一般化。
10 |
11 | 為了找出結構化文本中的訊息,我們必須描述結構。pyparsing 模組建立在 [Backus-Naur Form](https://en.wikipedia.org/wiki/Backus%E2%80%93Naur_Form) (BNF) 語法描述技術的基礎上。熟悉 BNF 的語法標記有助於使用 pyparsing。
12 |
13 | pyparsing 模組運作的方式是使用遞迴減少解析器 [recursive descent parser](https://en.wikipedia.org/wiki/Recursive_descent_parser) 匹配輸入文字:我們寫出像 BNF 語法產物,然後 pyparsing 提供機制用這些產物匹配輸入文本。
14 |
15 | The pyparsing module works best when you can describe the exact syntactic structure of the text you are analyzing. A common application of pyparsing is the analysis of log files. Log file entries generally have a predictable structure including such fields as dates, IP addresses, and such. Possible applications of the module to natural language work are not addressed here.
16 |
17 | 當你能精準描述分析的文本結構,pyparsing 模組就能發揮強大的作用。通常 pyparsing 會拿來分析 log 檔。log 檔通常有個可預測的結構,欄位包含日期、IP位置、等等。
18 |
19 | ## 建構應用程式
20 |
21 | 1. 寫出 BNF 描述要分析文本的結構
22 | 2. 視需要,安裝 pyparsing 模組
23 | 3. 在 python script 中匯入 pyparsing 模組:`import pyparsing as pp`
24 | 4. 在 python script 中寫出能匹配 BNF 的 parser
25 | 5. 準備要分析的文本
26 | 6. 如果用 p 表示 parser,用 s 表示文本,執行的程式碼就像 `p.parseString(s)`
27 | 7. 從解析結果得到需要的訊息
28 |
29 | ## 一個小型完整的範例
30 |
31 | python 識別符號包含一個或多的字元,第一個字元是 字母或 `_`,接著可能是 字母、數字、或 `_`。用 BNF 方式寫成
32 |
33 | ```
34 | first ::= letter | "_"
35 | letter ::= "a" | "b" | ... "z" | "A" | "B" | ... | "Z"
36 | digit ::= "0" | "1" | ... | "9"
37 | rest ::= first | digit
38 | identifier ::= first rest*
39 | ```
40 |
41 | 最終產出物可讀作:一個識別符號包含一個 `first`,接著可能有零個或多個 `rest`。
42 |
43 | 以下程式碼
44 | ```python
45 | #!/usr/bin/env python
46 | #================================================================
47 | # trivex: Trivial example
48 | #----------------------------------------------------------------
49 |
50 | # - - - - - I m p o r t s
51 |
52 | import sys
53 |
54 | import pyparsing as pp
55 |
56 | # - - - - - M a n i f e s t c o n s t a n t s
57 |
58 | first = pp.Word(pp.alphas+"_", exact=1)
59 | rest = pp.Word(pp.alphanums+"_")
60 | identifier = first+pp.Optional(rest)
61 |
62 | testList = [ # List of test strings
63 | # Valid identifiers
64 | "a", "foo", "_", "Z04", "_bride_of_mothra",
65 | # Not valid
66 | "", "1", "$*", "a_#" ]
67 |
68 | # - - - - - m a i n
69 |
70 | def main():
71 | """
72 | """
73 | for text in testList:
74 | test(text)
75 |
76 | # - - - t e s t
77 |
78 | def test(s):
79 | '''See if s matches identifier.
80 | '''
81 | print ("---Test for '{0}'".format(s))
82 |
83 | try:
84 | result = identifier.parseString(s)
85 | print " Matches: {0}".format(result)
86 | except pp.ParseException as x:
87 | print " No match: {0}".format(str(x))
88 |
89 | # - - - - - E p i l o g u e
90 |
91 | if __name__ == "__main__":
92 | main()
93 | ```
94 | ```
95 | $ python trivex.py
96 | ---Test for 'a'
97 | Matches: ['a']
98 | ---Test for 'foo'
99 | Matches: ['f', 'oo']
100 | ---Test for '_'
101 | Matches: ['_']
102 | ---Test for 'Z04'
103 | Matches: ['Z', '04']
104 | ---Test for '_bride_of_mothra'
105 | Matches: ['_', 'bride_of_mothra']
106 | ---Test for ''
107 | No match: Expected W:(ABCD...) (at char 0), (line:1, col:1)
108 | ---Test for '1'
109 | No match: Expected W:(ABCD...) (at char 0), (line:1, col:1)
110 | ---Test for '$*'
111 | No match: Expected W:(ABCD...) (at char 0), (line:1, col:1)
112 | ---Test for 'a_#'
113 | Matches: ['a', '_']
114 | ```
115 |
116 | 回傳值是 `pp.ParseResults class` 的實例。當列印出來,會像個 list。單一字母的測試字串只有一個元素,多字母字串有兩個元素,一個是 `first` 接著是 `rest`。
117 |
118 | 如果想讓回傳值合併匹配的元素,使用
119 | ```python
120 | identifier = pp.Combine(first+pp.Optional(rest))
121 | ```
122 |
123 | 結果會像這樣
124 | ```
125 | ---Test for '_bride_of_mothra'
126 | Matches: ['_bride_of_mothra']
127 | ```
128 |
129 | ## 如何組織回傳結果 ParseResults
130 |
131 | 當輸入與建立的解析器匹配,`.parseString()` 回傳 `class ParseResults` 的實例。
132 |
133 | 對於一個複雜的結構,這個實例可能有很多訊息在裡面。`ParseResults` 實例的結構跟你如何建立解析器有關。
134 |
135 | 存取 `ParserResults` 有幾種方式:
136 | - 當作一個 list
137 | ```python
138 | >>> import pyparsing as pp
139 | >>> number = pp.Word(pp.nums)
140 | >>> result = number.parseString('17')
141 | >>> print result
142 | ['17']
143 | >>> type(result)
144 |
145 | >>> result[0]
146 | '17'
147 | >>> list(result)
148 | ['17']
149 | >>> numberList = pp.OneOrMore(number)
150 | >>> print numberList.parseString('17 33 88')
151 | ['17', '33', '88']
152 | ```
153 | - 當作一個 dictionary
154 | ```python
155 | >>> number = pp.Word(pp.nums).setResultsName('nVache')
156 | >>> result = number.parseString('17')
157 | >>> print result
158 | ['17']
159 | >>> result['nVache']
160 | '17'
161 | ```
162 |
163 | ### 使用 `pp.Group()` 分而治之
164 |
165 | 如果採取分而治之的原則 (分段精練),解析器的組織會更容易追蹤理解。
166 |
167 | 實例上,這個意指頂層的 `ParseResults` 應該包含更多子部分。
168 | 如果這一層有太多子部分,查看輸入把它拆解成兩個或更多的子解析器。
169 | 然後組織頂層,它只會包含這些。
170 | 如果需要,拆解小解析器成為更小的,直到每個解析器都能用內建的基礎功能清楚定義。
171 |
172 | ----
173 | ## `Word`: Match characters from a specified set
174 |
175 | ```python
176 | from pyparsing import Word
177 | from pyparsing import nums, alphas, alphanums
178 |
179 | name = Word('abcdef')
180 | print(name.parseString('fadedglory'))
181 |
182 | pyName = Word(alphas + '_', bodyChars = alphanums + '_')
183 | print(pyName.parseString('_crunchyFrog13'))
184 |
185 | name4 = Word(alphas, exact=4)
186 | print(name4.parseString('Whizzo'))
187 |
188 | noXY = Word(alphas, excludeChars='xy')
189 | print(noXY.parseString('Sussex'))
190 | ```
191 | ```
192 | ['faded']
193 | ['_crunchyFrog13']
194 | ['Whiz']
195 | ['Susse']
196 | ```
197 | ## `ZeroOrMore`: Match any number of repetitions including none
198 |
199 | ```python
200 | from pyparsing import Word, ZeroOrMore
201 | from pyparsing import nums, alphas
202 |
203 | item = Word(nums) | Word(alphas)
204 | expr = ZeroOrMore(item)
205 | bnf = expr
206 |
207 | tests = ("123abc456def", "123 abc 456 def", "abc def 123 456")
208 |
209 | for t in tests:
210 | print(t, " >>> ", bnf.parseString(t))
211 | ```
212 | ```
213 | 123abc456def >>> ['123', 'abc', '456', 'def']
214 | 123 abc 456 def >>> ['123', 'abc', '456', 'def']
215 | abc def 123 456 >>> ['abc', 'def', '123', '456']
216 | ```
217 |
218 | ## `StringEnd`: Match the end of the text
219 |
220 | ```python
221 | >>> from pyparsing import Word, StringEnd, alphas
222 | >>> noEnd = Word(alphas)
223 | >>> noEnd.parseString('Dorking...')
224 | (['Dorking'], {})
225 | >>> withEnd = Word(alphas) + StringEnd()
226 | >>> withEnd.parseString('Dorking...')
227 | Traceback (most recent call last):
228 | ...(skipped)
229 | pyparsing.ParseException: Expected end of text (at char 7), (line:1, col:8)
230 | ```
231 |
232 | ## `Suppress`: Omit matched text from the result
233 | ```python
234 | from pyparsing import Word, Literal, Suppress
235 | from pyparsing import nums, alphas, alphanums
236 |
237 | name = Word(alphas)
238 | lb = Literal('[')
239 | rb = Literal(']')
240 |
241 | pat1 = lb + name + rb
242 | print(pat1.parseString('[Pewty]'))
243 |
244 | pat2 = Suppress(lb) + name + Suppress(rb)
245 | print(pat2.parseString('[Pewty]'))
246 | ```
247 | ```
248 | ['[', 'Pewty', ']']
249 | ['Pewty']
250 | ```
251 |
252 | ## `CharsNotIn`: Match characters not in a given set
253 |
254 | ```python
255 | from pyparsing import CharsNotIn
256 | from pyparsing import nums
257 |
258 | nonDigits = CharsNotIn(nums)
259 | print(nonDigits.parseString('zoot86'))
260 |
261 | fourNonDigits = CharsNotIn(nums, exact=4)
262 | print(fourNonDigits.parseString('a$_/#'))
263 | ```
264 | ```
265 | ['zoot']
266 | ['a$_/']
267 | ```
268 |
269 | ## `CaselessLiteral`: Case-insensitive string match
270 |
271 | ```python
272 | from pyparsing import CaselessLiteral
273 |
274 | ni = CaselessLiteral('Ni')
275 |
276 | print(ni.parseString('Ni'))
277 | print(ni.parseString('NI'))
278 | print(ni.parseString('nI'))
279 | print(ni.parseString('ni'))
280 | ```
281 | ```
282 | ['Ni']
283 | ['Ni']
284 | ['Ni']
285 | ['Ni']
286 | ```
287 |
288 | ## `Forward()`
289 |
290 | Forward declaration of an expression to be defined later - used for recursive grammars, such as algebraic infix notation. When the expression is known, it is assigned to the Forward variable using the '<<' operator.
291 |
292 | ```python
293 | #!/usr/bin/env python
294 | #================================================================
295 | # hollerith: Demonstrate Forward class
296 | #----------------------------------------------------------------
297 | import sys
298 | from pyparsing import Word, Forward, Suppress, CaselessLiteral
299 | from pyparsing import ParseException, CharsNotIn
300 | from pyparsing import nums
301 |
302 | # - - - - - M a n i f e s t c o n s t a n t s
303 |
304 | TEST_STRINGS = [ '1HX', '2h$#', '10H0123456789', '999Hoops']
305 |
306 | # - - - - - m a i n
307 |
308 | def main():
309 | holler = hollerith()
310 | for text in TEST_STRINGS:
311 | test(holler, text)
312 |
313 | # - - - t e s t
314 |
315 | def test(pat, text):
316 | '''Test to see if text matches parser (pat).
317 | '''
318 | print ("--- Test for '{0}'".format(text))
319 | try:
320 | result = pat.parseString(text)
321 | print (" Matches: '{0}'".format(result[0]))
322 | except ParseException as x:
323 | print (" No match: '{0}'".format(str(x)))
324 |
325 | # - - - h o l l e r i t h
326 |
327 | def hollerith():
328 | '''Returns a parser for a FORTRAN Hollerith character constant.
329 | '''
330 |
331 | #--
332 | # Define a recognizer for the character count.
333 | #--
334 | intExpr = Word(nums).setParseAction(lambda t: int(t[0]))
335 |
336 | #--
337 | # Allocate a placeholder for the rest of the parsing logic.
338 | #--
339 | stringExpr = Forward()
340 |
341 | #--
342 | # Define a closure that transfers the character count from
343 | # the intExpr to the stringExpr.
344 | #--
345 | def countedParseAction(toks):
346 | '''Closure to define the content of stringExpr.
347 | '''
348 | n = toks[0]
349 |
350 | #--
351 | # Create a parser for any (n) characters.
352 | #--
353 | contents = CharsNotIn('', exact=n)
354 |
355 | #--
356 | # Store a recognizer for 'H' + contents into stringExpr.
357 | #--
358 | stringExpr << (Suppress(CaselessLiteral('H')) + contents)
359 |
360 | return None
361 | #--
362 | # Add the above closure as a parse action for intExpr.
363 | #--
364 | intExpr.addParseAction(countedParseAction)
365 |
366 | #--
367 | # Return the completed pattern.
368 | #--
369 | return (Suppress(intExpr) + stringExpr)
370 |
371 | # - - - - - E p i l o g u e
372 |
373 | if __name__ == "__main__":
374 | main()
375 | ```
376 |
377 | `hollerith()` 怎麼運作的,故事倒著說
378 | - `(Suppress(intExpr) + stringExpr)` 先對字串執行 `intExptr`,處理過的字串忽略結果,然後執行 `stringExpr`
379 | - `stringExptr` 是個 `Forward()` 生出來的 placeholder
380 | - `intExpr = Word(nums).setParseAction(lambda t: int(t[0]))`,匹配字串成數字,將數字解析成 `int`
381 | - `intExpr.addParseAction(countedParseAction)` 剛剛解析處來的 `int` 傳入 `countedParseAction()`
382 | - `countedParseAction()` 組合 `(Suppress(CaselessLiteral('H')) + contents)` 存到 `stringExpr`
383 | - `Suppress(CaselessLiteral('H'))` 匹配不分大小寫字母 `H`,但忽略結果
384 | - `contents = CharsNotIn('', exact=n)` 匹配n個任意字元
385 |
386 | 輸入 `10H0123456789`:
387 | - `10` 會被 `intExpr` 解釋成整數 10 (忽略結果)
388 | - `H` 會被 `Suppress(CaselessLiteral('H'))` 匹配到 (忽略結果)
389 | - `0123456789` 會被 `contents` 匹配到,取出字串
390 |
391 | ```
392 | --- Test for '1HX'
393 | Matches: 'X'
394 | --- Test for '2h$#'
395 | Matches: '$#'
396 | --- Test for '10H0123456789'
397 | Matches: '0123456789'
398 | --- Test for '999Hoops'
399 | No match: 'Expected !W:() (at char 8), (line:1, col:9)'
400 | ```
401 |
402 | ----
403 | ## 參考
404 |
405 | - [Pyparsing Wiki Home](http://pyparsing.wikispaces.com/)
406 | - [pyparsing quick reference](http://infohost.nmt.edu/tcc/help/pubs/pyparsing/web/index.html) - 說明&範例
407 | - [Module pyparsing](https://pythonhosted.org/pyparsing/)
408 |
--------------------------------------------------------------------------------
/executable-specifications.md:
--------------------------------------------------------------------------------
1 | # Quotes of Executable Specifications with Scrum
2 |
3 | ## Chapter 1 - Solving the Right Problem
4 |
5 | “Unfortunately, there are still too many bloated and complex software systems. Even if all team members write code correctly, more often than not, they do not efficiently solve the actual problem. There is a distinct disconnect between what the client may want or need and what is subsequently produced.”
6 |
7 |  8 |
8 |  9 |
9 |  10 |
10 |  11 |
12 | “Conversely, when almost all the risks are related to the requirements, you are in the position experienced by the majority of software development teams. This is where using an agile framework, such as Scrum, is appropriate.”
13 |
14 | ## Chapter 2 - Relying on a Stable Foundation
15 |
16 | “The most important element of this team is the presence of someone devoted full time to the specification of the software.”
17 |
18 | “The second most important element is a development team with devel- opers who have complementary skills and expertise.”
19 |
20 | “The third most important element is a product owner who ensures the development team is the ultimate product.”
21 |
22 | “The fourth and final element of importance to creating a healthy team is a team that inspects and adapts repeatedly, using prescribed events.”
23 |
24 | “Expressing a shared vision is an activity directed by the product owner. It consists mainly of face-to-face meetings with stakeholders. The result is a short, one-line summary of what the software is supposed to be and do.”
25 |
26 | “A feature is a piece of high-level functionality that delivers value to one or more stakeholders.”
27 |
28 | “The vision, the meaningful common goal, and the high-level features are guardrails because it is unlikely those will change rapidly.”
29 |
30 | ## Chapter 3 - Discovering Through Short Feedback Loops and Stakeholders’ Desirements
31 |
32 | “Deliberate discovery does not happen from the failure itself but rather from understanding the failure, making an improvement, and then trying again.”
33 |
34 | “Frequent feedback loops provide you with the ability to correct errors while costs are minimal. It is the responsibility of the team not only to learn about the problem but also to help stakeholders understand what is being built for them.”
35 |
36 | “There is a powerful and important feedback loop that occurs when stakeholders have early access to running software. They can experiment with real software, come up with new ideas, and change their minds about old ideas and perceptions.”
37 |
38 | “Fulfilling desirements through early and continuous delivery of valuable software can result in sprints that stakeholders want to evaluate.”
39 |
40 | ## Chapter 4 - Expressing Desirements with User Stories
41 |
42 | “As a ``, I want `` so that ``.”
43 | - Who = role
44 | - What = desire
45 | - Why = benefit
46 |
47 | “A well-written user story follows the INVEST mnemonic developed by Bill Wake.”
48 | - **Independent**: A story should stand alone and be self-contained without depending on other stories.
49 | - **Negotiable**: A story is a placeholder that facilitates conversation and negotiation between the team and stakeholders. At any time, the story can be rewritten or even discarded. A story is not fixed and set in stone, up until it is part of the upcoming sprint.
50 | - **Valuable**: A story needs to deliver value to the stakeholders (either the end user or the purchaser).
51 | - **Estimable**: The team needs to be able to roughly estimate the size of the effort to complete the story.
52 | - **Small**: A story can start its life as a big placeholder. As time goes by and you better understand the intricacies of the desires, the placeholder will be split into smaller stories. When the most important ones are close to being delivered, they need to be small enough so that they can be completed in a single sprint.
53 | - **Testable**: A story must provide the necessary information to clearly define the acceptance criteria that confirm the story is completed.
54 |
55 | ## Chapter 5 - Refining User Stories by Grooming the Product Backlog
56 |
57 | “The product owner is responsible for ensuring that the product backlog is always in a healthy state. He is the primary interface between the development team and the stakeholders.”
58 |
59 | “There is a major difference between a true analyst and a product owner. Product owners represent the business and have the authority to make decisions that affect their product. Typically, an analyst does not have this decision-making authority.”
60 |
61 | “Grooming the backlog boils down to a sequence of four activities: ranking, illustrating, sizing, and splitting user stories.”
62 | - Ranking User Stories with a Dot Voting Method
63 | - Illustrating User Stories with Storyboards
64 | - Sizing User Stories Using Comparison
65 | - Splitting User Stories Along Business Values
66 |
67 | “Although, according to the development team, the product owner is perceived as the one who decides the ordering of the backlog, it is actually not his decision. He must rely on stakeholders who are the ones who decide the importance of each story.”
68 |
69 | “The product owner is a facilitator, not a decider.”
70 |
71 | “If user stories help monitor conversations with stakeholders, storyboards help to illustrate expectations rapidly and cheaply.”
72 |
73 | “As experience teaches, stakeholders love to envision the software from the user interface standpoint.”
74 |
75 | “Only the development team can identify the size of a story.”
76 |
77 | “Humans are poor at estimating absolute sizes. However, we are great at assessing relative sizes.”
78 |
79 | “The product owner should not plan stories that are bigger than one-half the velocity.”
80 |
81 | “You should focus on the perspective of stakeholders by thin slicing stories that favor the business value. Thin slicing is based on evolutionary architecture; it provides stories that implement only a small bit of functionality, but all the way through the architecture layers of the software.”
82 |
83 | “In this regard, over the years, experienced practitioners have acknowledged the necessity of structuring the backlog along a two-dimensional collaboration board. This way of organizing the stories to avoid half-baked incremental iterations was initially promoted by Jeff Patton and is now known as story mapping.”
84 |
85 | “When a story has gone through the process of grooming, you have reached an important milestone, which is the transition from conversation to confirmation.”
86 |
87 | ## Chapter 6 - Confirming User Stories with Scenarios
88 |
89 | “If user stories and their storyboards help monitor conversations with stakeholders during backlog grooming, the scenarios help to confirm expectations when the team is ready to plan a new sprint.”
90 |
91 | “Success criteria establish the conditions of acceptation from the stakeholders’ point of view. Scenarios are the perfect medium for expressing the success criteria.”
92 |
93 | “The scenario contains a precondition, an action, and a consequence.”
94 | - `Given` A precondition is the current state of the software before action is taken.
95 | - `When` An action is something that is accomplished to perform the behavior of the scenario.
96 | - `Then` A consequence is the result of the action.
97 |
98 | “Triggering a single action is crucial in keeping the state transition simple.”
99 |
100 | “Successful teams don’t use raw examples, they refine the specification from them. They extract the essence from the key examples and turn them into a clear and unambiguous definition of what makes the implementation done, without any extraneous detail.”
101 |
102 | “It is important to note that the analyst’s competency is related to the specifications and not to how the software will be implemented.”
103 |
104 | “The role of business analysts is now more focused and can be summarized as ensuring that all the scenarios illustrating a story are refined and completed in time for the development team.”
105 |
106 | “Because designing the technical solution is not the purpose of the specification, you should focus only on writing scenarios that relate to the business rules.”
107 |
108 | “‘Why?’ five times, successively, helps the team understand the true root cause of the scenario and easily reformulate it at the business domain level.”
109 |
110 | “A feature is a piece of high-level functionality that delivers value to one or more stakeholders.”
111 |
112 | ## Chapter 7 - Automating Confirmation with Acceptance Tests
113 |
114 | “You must turn scenarios into acceptance tests with minimal changes. An acceptance test is only a copy of a scenario in a format suitable for execution on a computer.”
115 |
116 | “First and foremost, we want to confirm requirements have been met. These “executable” scenarios are not a quality assurance tool. They are used to prevent defects, not to discover them.”
117 |
118 | “these “executable” scenarios do not replace the need to include quality assurance practices, such as exploratory or unit testing.”
119 |
120 | “It goes without saying that the widespread approach of creating tests using record-and-playback tools is inappropriate. ... Their main advantage, which is to enable testers to author tests without having to learn how to craft code, is also their main weakness.”
121 |
122 | “Acceptance tests represent assumptions stakeholders made during the specification.”
123 |
124 | “The red-green-refactor cycle is the core of Test-Driven Development (TDD). It is a widely recognized programming practice popularized by Kent Beck that promotes the notion of writing tests first when programming a piece of code. TDD relies on the repetition of a short development cycle divided into three stages: the red, the green, and the refactor stage.”
125 |
126 | “TDD requires programmers to articulate their assumptions using a test case. Programmers must foresee how the functionality will be used by the test case. TDD places constraints on programmers; it requires that they define the interface before deciding on the implementation. TDD tends to lead to better designs.”
127 |
128 | “If the development team members are the only ones who understand the result of the translation, they lose the ability to collaborate effectively with stakeholders.”
129 |
130 | “To obtain a failing assertion, the tester must design the programming interface and connect the newly created test with it.”
131 |
132 | “When connecting the newly created test, the tester focuses first on defining the outside-facing programming interface and only after that does the programmer go on evolving the internal implementation.”
133 |
134 | “The natural candidates for this type of design are the testers because they are the ones responsible for creating a failing acceptance test.”
135 |
136 | “You must resist this temptation to mix acceptance tests with continuous integration. Because of hardware constraints, this can unduly slow down the code integration.”
137 |
138 | “Testing the “executable” scenarios during the nightly build ensures that every morning the team can easily confirm that the software under construction still meets the evolving specifications.”
139 |
140 | ## Chapter 8 - Addressing Nonfunctional Requirements
141 |
142 | “External quality is how well the software carries out its functions at run time, and as such, is not only visible to stakeholders, but is also highly desirable.”
143 |
144 | “Internal quality is characteristics of the software barely visible to stakeholders but which simplifies the process of building and evolving the software.”
145 |
146 | ## Chapter 9 - Conclusion
147 |
148 | “If you are going to put time and effort into solving a problem, ensure that you first solve the right problem and then that you solve it properly.”
149 |
150 | “To be successful, you must remember that above all else, needs are emergent and constantly evolving. There is no set plan that can and will be successful. Instead, it is a question of constantly being open to changes and uncertainties. It is only when flexibility is embraced that the proper attitude can be taken.”
151 |
152 | ----
153 | ## 參考
154 | - [Executable Specifications with Scrum](http://www.ibchamber.org/wp-content/uploads/2014/09/AWP.Executable.Specifications.with_.Scrum_.Jul_.2013.pdf)
155 |
--------------------------------------------------------------------------------
/unittest.mock.md:
--------------------------------------------------------------------------------
1 | # unittest.mock
2 |
3 | unittest.mock 是 python 用於測試的函式庫,用 mock 物件替換待測試系統的某些部分,宣告這些偽造的部分應該如何被使用。
4 |
5 | ## Test Double
6 |
7 | [介紹Test Double](http://teddy-chen-tw.blogspot.tw/2014/09/test-double1.html)之前先介紹兩個測試常用術語:
8 |
9 | - SUT:System Under Test或Software Under Test的簡寫,代表待測程式。如果是單元測試,SUT就是一個function或method。
10 | - DOC:Depended-on Component(相依元件),又稱為Collaborator(合作者)。DOC是SUT執行的時候會使用到的元件。例如,有一個函數X如果執行失敗會寄送email,則email元件就是函數X的DOC。
11 |
12 | [Test Double 的種類](http://www.martinfowler.com/bliki/TestDouble.html):
13 | - **Dummy** 用來傳遞給函式但不會真的被使用,通常只充當函式參數讓程式順利編譯。
14 | - **Fake** 物件真正功能,但通常會採用捷徑實作,不適合用在生產環境。(範例:InMemoryTestDatabase)
15 | - **Stub** 為測試時期的呼叫提供罐裝答案,通常不會對外界所有輸入做出反應。
16 | - **Spy** 記錄他們怎麼被呼叫的資訊。
17 | - **Mock** 是一連串預先編排的執行動作,對特定預期的呼叫做出反應,如果收到非預期呼叫方式則丟出例外。
18 |
19 |
20 |
21 | ## 快速導覽
22 |
23 | ### 範例一
24 | Something.py:
25 | ```python
26 | class Something:
27 | def method(self, a, b, c, key):
28 | print(a, b, c, key)
29 | return 3
30 | ```
31 |
32 | testSomething.py
33 | ```python
34 | import unittest
35 | from unittest.mock import MagicMock
36 | from Something import Something
37 |
38 | class TestSomethingCases(unittest.TestCase):
39 |
40 | def test_return_value(self):
41 | s = Something()
42 | self.assertEqual(s.method(1,2,3,key='hello'), 3)
43 |
44 | def test_mock_return_value(self):
45 | something = Something()
46 | something.method = MagicMock(return_value = 5)
47 | self.assertEqual(something.method(1, 2, 3, key='hello'), 5)
48 |
49 | def test_mock_called_with(self):
50 | something = Something()
51 | something.method = MagicMock(return_value = 5)
52 | something.method(3,4,5,key='value')
53 | something.method.assert_called_with(3, 4, 5, key='value')
54 | ```
55 | - `test_return_value` 檢查物件方法預設回傳值
56 | - `test_mock_return_value` 偽造方法回傳值 (Stub)
57 | - `test_mock_called_with` 檢查方法呼叫是否如預期 (Spy or Mock)
58 |
59 | testing:
60 | ```shell
61 | $ python -m unittest -v testSomething
62 | test_mock_called_with (testSomething.TestSomethingCases) ... ok
63 | test_mock_return_value (testSomething.TestSomethingCases) ... ok
64 | test_return_value (testSomething.TestSomethingCases) ... 1 2 3 hello
65 | ok
66 |
67 | ----------------------------------------------------------------------
68 | Ran 3 tests in 0.004s
69 |
70 | OK
71 | ```
72 |
73 | ### 範例二
74 |
75 | `side_effect` 允許執行副作用,包含當 mock 被呼叫時產生例外。
76 |
77 | ```python
78 | >>> from unittest.mock import Mock
79 | >>> mock = Mock(side_effect=KeyError('foo'))
80 | >>> mock()
81 | Traceback (most recent call last):
82 | File "", line 1, in
83 | File "/usr/lib/python3.4/unittest/mock.py", line 902, in __call__
84 | return _mock_self._mock_call(*args, **kwargs)
85 | File "/usr/lib/python3.4/unittest/mock.py", line 958, in _mock_call
86 | raise effect
87 | KeyError: 'foo'
88 | ```
89 | - 呼叫 `mock` 產生例外
90 |
91 | ```python
92 | >>> values ={'a' : 1, 'b' : 2, 'c' : 3}
93 | >>> def side_effect(arg):
94 | ... return values[arg]
95 | ...
96 | >>> mock.side_effect = side_effect
97 | >>> mock('a'), mock('b'), mock('c')
98 | (1, 2, 3)
99 | ```
100 | - 透過 `side_effect()` 控制呼叫 `mock` 時回應的值
101 |
102 | ```python
103 | >>> mock.side_effect = [5, 4, 3, 2, 1]
104 | >>> mock(), mock(), mock()
105 | (5, 4, 3)
106 | ```
107 | - 預設呼叫 `mock` 回應的值
108 |
109 | ### 範例三
110 |
111 | ----
112 |
113 | ## Using Mock
114 |
115 | ### Mock Patching Methods
116 |
117 | Mock 通常用在
118 |
119 | - 取代物件方法 (stub)
120 | - 檢查物件方法呼叫是否合乎預期 (spy)
121 |
122 | ```python
123 | >>> from unittest.mock import MagicMock
124 | >>> class SomeClass:
125 | ... def method(self, a, b, c):
126 | ... return a + b + c
127 | ...
128 | >>> real = SomeClass()
129 | >>> real.method(1,2,3)
130 | 6
131 | >>> real.method = MagicMock(name='method')
132 | >>> real.method(2,3,4)
133 |
134 | >>> real.method.assert_called_with(2,3,4)
135 | ```
136 | ### Mock for Method Calls on an Object
137 |
138 | 傳遞物件給方法,檢查物件是否被正確使用
139 |
140 | ```python
141 | >>> class ProductionClass:
142 | ... def closer(self, something):
143 | ... something.close()
144 | ...
145 | >>> real = ProductionClass()
146 | >>> mock = MagicMock()
147 | >>> real.closer(mock)
148 | >>> mock.close.assert_called_with()
149 | ```
150 | - `ProductionClass.closer` 會呼叫傳入參數的方法 `something.close()`
151 | - `mock = MagicMock()` 產生 spy 傳入方法中,然後檢是否被正確呼叫
152 |
153 | ### Mocking Classes
154 |
155 | 常見的情況是要在測試中用替換某類別,當你 patch 一個類別,這個類別就被 mock 取代。類別的物件是在被呼叫的方法中產生,你可以藉由查看被偽裝類別的回傳值存取偽裝物件。
156 |
157 | > 不用 IoC 嗎?
158 |
159 | module.py:
160 | ```python
161 | class Foo:
162 | def method(self):
163 | return 'foo'
164 | ```
165 |
166 | software under test:
167 | ```python
168 | >>> import module
169 | >>> def some_function():
170 | ... instance = module.Foo()
171 | ... return instance.method()
172 | ...
173 | >>> some_function()
174 | 'foo'
175 | ```
176 |
177 | 用 mock 取代 `module.Foo`
178 | ```python
179 | >>> from unittest.mock import patch
180 | >>> with patch('module.Foo') as mock:
181 | ... instance = mock.return_value
182 | ... instance.method.return_value = 'bar
183 | ... result = some_function()
184 | ... assert result == 'bar'
185 | ```
186 |
187 | ### Naming your mocks
188 |
189 | 命名 mock 物件,當出現錯誤可以快速找到原因
190 |
191 | ```python
192 | >>> from unittest.mock import MagicMock
193 | >>> mock = MagicMock(name='foo')
194 | >>> mock
195 |
196 | >>> mock.method
197 |
198 | ```
199 |
200 | ### Tracking all Calls
201 |
202 | `mock_calls` 屬性紀錄所有呼叫 mock 與其子類的歷程
203 |
204 | ```python
205 | >>> from unittest.mock import MagicMock
206 | >>> mock = MagicMock()
207 | >>> mock.method(1)
208 |
209 | >>> mock.method(2)
210 |
211 | >>> mock.method(3)
212 |
213 | >>> mock.mock_calls
214 | [call.method(1), call.method(2), call.method(3)]
215 | ```
216 | ### Setting Return Values and Attributes
217 |
218 | 設定 mock 回傳值很簡單
219 | ```python
220 | >>> from unittest.mock import Mock
221 | >>> mock = Mock()
222 | >>> mock.return_value = 3
223 | >>> mock()
224 | ```
225 |
226 | 可以定義 mock 方法的回傳值
227 | ```python
228 | >>> mock = Mock()
229 | >>> mock.method.return_value = 3
230 | >>> mock.method()
231 | 3
232 | ```
233 |
234 | 可以在建構函式中宣告回傳值
235 | ```python
236 | >>> mock = Mock(return_value = 3)
237 | >>> mock()
238 | 3
239 | ```
240 |
241 | 可以設定 mock 的屬性值
242 | ```python
243 | >>> mock = Mock()
244 | >>> mock.x = 3
245 | >>> mock.x
246 | 3
247 | ```
248 |
249 | 有時候要設定更複雜的情況,例如 `mock.connection.cursor().execute("SELECT 1")`,如果希望回傳一個陣列,就要設定一個遞迴呼叫的回傳結果。
250 | ```python
251 | >>> from unittest.mock import call
252 | >>> mock = Mock()
253 | >>> cursor = mock.connection.coursor.return_value
254 | >>> cursor.execute.return_value = ['foo']
255 | >>> mock.connection.coursor().execute("SELECT 1")
256 | ['foo']
257 | >>> expected = call.connection.coursor().execute("SELECT 1").call_list()
258 | >>> mock.mock_calls
259 | [call.connection.coursor(), call.connection.coursor().execute('SELECT 1')]
260 | >>> mock.mock_calls == expected
261 | True
262 | ```
263 | - `cursor = mock.connection.coursor.return_value` 產生第一個回傳值,回傳一個 `cursor`
264 | - `cursor.execute.return_value = ['foo']` 設定執行第一個回傳值的結果,回傳一個陣列
265 |
266 | 使用偽造的 cursor 查詢資料庫
267 | ```python
268 | >>> cursor.execute("SELECT 1")
269 | ['foo']
270 | ```
271 |
272 | ### Raising exceptions with mocks
273 |
274 | 做出一個會產生例外的 mock
275 | ```python
276 | >>> from unittest.mock import Mock
277 | >>> mock = Mock(side_effect=Exception('Boom!'))
278 | >>> mock()
279 | Traceback (most recent call last):
280 | File "", line 1, in
281 | File "/usr/lib/python3.4/unittest/mock.py", line 902, in __call__
282 | return _mock_self._mock_call(*args, **kwargs)
283 | File "/usr/lib/python3.4/unittest/mock.py", line 958, in _mock_call
284 | raise effect
285 | Exception: Boom!
286 | ```
287 |
288 | ### Side effect functions and iterables
289 |
290 | `side_effect` 可以設定為函數或 **iterable**。當 mock 預計要被多次呼叫,每次回傳不同的值。當設定 side_effect 成為 iterable,每次呼叫會從 iterable 回傳 next value。
291 |
292 | ```python
293 | >>> from unittest.mock import MagicMock
294 | >>> mock = MagicMock(side_effect=[4,5,6])
295 | >>> mock()
296 | 4
297 | >>> mock()
298 | 5
299 | >>> mock()
300 | 6
301 | >>> mock()
302 | Traceback (most recent call last):
303 | File "", line 1, in
304 | File "/usr/lib/python3.4/unittest/mock.py", line 902, in __call__
305 | return _mock_self._mock_call(*args, **kwargs)
306 | File "/usr/lib/python3.4/unittest/mock.py", line 961, in _mock_call
307 | result = next(effect)
308 | StopIteration
309 | ```
310 |
311 | 更進階用法是根據傳入參數變化回傳的值,此時 side_effect 可以是個 **function**。下例透過 dictionary 偽造傳入參數與回傳值的對應關係。
312 | ```python
313 | >>> vals = {(1,2): 1, (2,3): 2}
314 | >>> def side_effect(*args):
315 | ... return vals[args]
316 | ...
317 | >>> mock = MagicMock(side_effect=side_effect)
318 | >>> mock(1,2)
319 | 1
320 | >>> mock(2,3)
321 | 2
322 | ```
323 |
324 | ### Creating a Mock from an Existing Object
325 |
326 | 有時隨著時間演進,測試與待測物變得不匹配,例如 `Foo` 原先有 `old_method` 方法,但後來改成 `method`。使用 spec 關鍵字,當存取的方法或屬性不存在於 spec 定義的物件中,就會立即產生錯誤。
327 |
328 | ```python
329 | >>> class Foo:
330 | ... def method():
331 | ... return 'foo'
332 | ...
333 | >>> mock = Mock(spec=Foo)
334 | >>> mock.method.return_value = 'bar'
335 | >>> mock.method()
336 | 'bar'
337 | >>> mock.old_method.return_value = 'baz'
338 | Traceback (most recent call last):
339 | File "", line 1, in
340 | File "/usr/lib/python3.4/unittest/mock.py", line 574, in __getattr__
341 | raise AttributeError("Mock object has no attribute %r" % name)
342 | AttributeError: Mock object has no attribute 'old_method'
343 | ```
344 |
345 | 也可以使用 spec 定義呼叫 mock 的方法,不管參數是根據位置傳遞或是依照參數名稱傳遞。
346 | ```python
347 | >>> def f(a,b,c): pass
348 | ...
349 | >>> mock = Mock(spec=f)
350 | >>> mock(1,2,3)
351 |
352 | >>> mock.assert_called_with(a=1, b=2, c=3)
353 | >>> mock(c=3, b=2, a=1)
354 |
355 | >>> mock.assert_called_with(a=1, b=2, c=3)
356 | ```
357 |
358 | ## Patch Decorators
359 |
360 | “使用patch或者patch.object的目的是为了控制mock的范围,意思就是在一个函数范围内,或者一个类的范围内,或者with语句的范围内mock掉一个对象。” - [Python Mock的入门](https://segmentfault.com/a/1190000002965620)
361 |
362 | - [`patch()`](https://docs.python.org/3.4/library/unittest.mock.html#unittest.mock.patch) acts as a function decorator, class decorator or a context manager. Inside the body of the function or with statement, the target is patched with a new object. When the function/with statement exits the patch is undone.
363 | - [`patch.object()`](https://docs.python.org/3.4/library/unittest.mock.html#unittest.mock.patch.object) can be used as a decorator, class decorator or a context manager. Arguments new, spec, create, spec_set, autospec and new_callable have the same meaning as for patch(). Like patch(), patch.object() takes arbitrary keyword arguments for configuring the mock object it creates.
364 |
365 | Game.py:
366 | ```python
367 | import random
368 |
369 | def choice(*seq):
370 | return random.choice(seq)
371 |
372 | class Game:
373 | def coin(self):
374 | return choice(['head', 'tail'])
375 |
376 | def bet(self, side):
377 | return 'win' if side == self.coin() else 'lose'
378 | ```
379 | - `choice()` 隨機回傳 seq 裡面任意元素
380 | - `coin()` 透過 `choice()` 決定硬幣正反面
381 | - `bet()` 判斷 `side` 與 `coin()` 是否相同,決定輸贏
382 |
383 | testGame.py:
384 | ```python
385 | import unittest
386 | from unittest.mock import patch
387 |
388 | class TestGame(unittest.TestCase):
389 |
390 | def test_head_tail(self):
391 | def always_tail(self):
392 | return 'tail'
393 | with patch('Game.choice', always_tail):
394 | from Game import Game
395 | game = Game()
396 | self.assertEqual(game.bet('head'), 'lose')
397 |
398 | def test_head_head(self):
399 | from Game import Game
400 | def always_head(self):
401 | return 'head'
402 | with patch.object(Game, 'coin', always_head):
403 | game = Game()
404 | self.assertEqual(game.bet('head'), 'win')
405 | ```
406 |
407 | 為了測試 `Game.bet` 裡面判斷輸贏的邏輯是否正確,必須將底層的依賴元件取代為可操作結果的 test double。取代有兩種方式,`patch` 與 `patch.object`:
408 |
409 | - `test_head_tail`: 用 `always_tail` 取代 `Game` 模組的 `choice` 函式
410 | - `test_head_head`: 用 `always_head` 取代 `Game` 類別的 `coni` 方法
411 |
412 | run test:
413 | ```chell
414 | $ python -m unittest -v test
415 | test_head_head (test.TestGame) ... ok
416 | test_head_tail (test.TestGame) ... ok
417 |
418 | ----------------------------------------------------------------------
419 | Ran 2 tests in 0.010s
420 |
421 | OK
422 | ```
423 |
424 | ## Further Examples
425 |
426 | ### Mocking chained calls
427 |
428 | 一旦理解 `return_value` 這個屬性,偽裝一連串的呼叫使用上會很直覺。當 `mock` 第一次被呼叫,或是在呼叫前讀取 `return_value`,新的 `mock` 物件就因應而生。
429 |
430 | ```python
431 | >>> from unittest.mock import Mock
432 | >>> mock = Mock()
433 | >>> mock().foo(a=2,b=3)
434 |
435 | >>> mock.return_value.foo.assert_called_with(a=2,b=3)
436 | ```
437 | - 呼叫 `mock()` 則產生一個新的 mock 物件,然後繼續呼叫新 mock 物件的方法 `foo(a=2,b=3)`
438 | - 最後用 `mock.return_value.foo.assert_called_with(a=2,b=3)` 檢查一開始的 `mock` 產生的物件 `mock.return_value` 的 `foo` 方法是否以 `(a=2,b=3)` 方式呼叫
439 |
440 | ### Partial mocking
441 | ### Mocking a Generator Method
442 | ### Applying the same patch to every test method
443 | ### Mocking Unbound Methods
444 | ### Checking multiple calls with mock
445 | ### Coping with mutable arguments
446 | ### Nesting Patches
447 | ### Mocking a dictionary with MagicMock
448 | ### Mock subclasses and their attributes
449 | ### Mocking imports with patch.dict
450 | ### Tracking order of calls and less verbose call assertions
451 | ### More complex argument matching
452 |
453 | ----
454 | ## 參考
455 | - [unittest.mock — mock object library
456 | ](https://docs.python.org/3.4/library/unittest.mock.html)
457 | - [unittest.mock — getting started](https://docs.python.org/3.4/library/unittest.mock-examples.html)
458 |
--------------------------------------------------------------------------------
/jenkins.md:
--------------------------------------------------------------------------------
1 | # Jenkins
2 |
3 | Jenkins is an award-winning, cross-platform, **continuous integration** and **continuous delivery** application that increases your productivity. Use Jenkins to build and test your software projects continuously making it easier for developers to integrate changes to the project, and making it easier for users to obtain a fresh build. It also allows you to continuously deliver your software by providing powerful ways to define your build pipelines and integrating with a large number of testing and deployment technologies. - 摘錄 [Jenkins](https://wiki.jenkins-ci.org/display/JENKINS/Meet+Jenkins) 官網介紹
4 |
5 | ## 安裝
6 |
7 | 參考: https://wiki.jenkins-ci.org/display/JENKINS/Installing+Jenkins+on+Ubuntu
8 |
9 | 依照官網說明安裝 Jenkins 非常簡單
10 | ```shell
11 | $ wget -q -O - https://jenkins-ci.org/debian/jenkins-ci.org.key | sudo apt-key add -
12 | $ sudo sh -c 'echo deb http://pkg.jenkins-ci.org/debian-stable binary/ > /etc/apt/sources.list.d/jenkins.list'
13 | $ sudo apt-get update
14 | $ sudo apt-get install jenkins
15 | ```
16 |
17 | 安裝完後,Jenkins 預設已經啟動
18 | ```shell
19 | $ ps aux | grep jenkins
20 | jenkins 10670 0.0 0.0 18596 172 ? S 16:27 0:00 /usr/bin/daemon --name=jenkins --inherit --env=JENKINS_HOME=/var/lib/jenkins --output=/var/log/jenkins/jenkins.log --pidfile=/var/run/jenkins/jenkins.pid -- /usr/bin/java -Djava.awt.headless=true -jar /usr/share/jenkins/jenkins.war --webroot=/var/cache/jenkins/war --httpPort=8080 --ajp13Port=-1
21 | jenkins 10671 9.9 35.4 1186188 179532 ? Sl 16:27 0:34 /usr/bin/java -Djava.awt.headless=true -jar /usr/share/jenkins/jenkins.war --webroot=/var/cache/jenkins/war --httpPort=8080 --ajp13Port=-1
22 | vagrant 10752 0.0 0.4 12720 2124 pts/1 S+ 16:33 0:00 grep --color=auto jenkins
23 | ```
24 |
25 | 手動設定 Jenkins 服務
26 | ```shell
27 | $ sudo service jenkins start # 啟動
28 | $ sudo service jenkins stop # 停止
29 | $ sudo service jenkins restart # 重新啟動
30 | ```
31 |
32 | ## 啟動與存取
33 |
34 | 參考: https://wiki.jenkins-ci.org/display/JENKINS/Starting+and+Accessing+Jenkins
35 |
36 | 啟動 Jenkins 最簡單的方式
37 | ```shell
38 | $ java -jar jenkins.war
39 | ```
40 |
41 | 打開瀏覽器,開啟 http://192.168.33.10:8080/ (192.168.33.10 是[虛擬機](environment.md)的IP),就能看到管理介面
42 |
43 | ### 變更語言
44 |
45 | 啟動 Jenkins 後,因為瀏覽器語系關係為顯示為中文操作介面,想改成與官網說明一樣的英文介面,依照下面步驟
46 |
47 | - 安裝插件:「管理 Jenkins」→「管理外掛程式」→「過濾條件」輸入 `locale` →「下載並於重新啟動後安裝」
48 | - 變更語系:「管理 Jenkins」→「設定系統」→「預設語言」輸入 `en_US` →「Ignore browser preference and force this language to all users」
49 |
50 | 
51 |
52 | ### Jenkins 功能階層圖
53 | ```
54 | Jenkins Home
55 | |-- Jenkins configure
56 | |-- Build Jobs
57 | |-- Job_A
58 | | |-- Job Configure
59 | | |-- Build History
60 | | |-- Build #1
61 | | |-- Build #2
62 | | |-- Build #3
63 | |-- Job_B
64 | |-- Job_C
65 | ```
66 |
67 | ## 實驗一:“Hello World”
68 |
69 | ### 練習目標
70 |
71 | - 在開發環境上
72 | - 無
73 |
74 | - 在 Jenkins Server 上
75 | - 建立簡單的 Build Job
76 | - 手動執行 Build Job
77 | - 自動執行 Build Job (週期性)
78 |
79 | ### 在 Jenkins Server 上
80 |
81 | #### 建立 Build Job
82 |
83 | - 到 Jenkins 首頁,點選「New Item」
84 | - 「Item name」填入 `myBuild`,選擇「Freestyle project」,接著進入設定 Build Job 細節頁面
85 | - 「Build」內按下「Add build step」,選擇「Execute shell」,「Command」填入下面 shell script
86 | - 按下「Save」儲存離開
87 |
88 | ```shell
89 | #!/bin/bash
90 | echo "Hello World"
91 | ```
92 |
93 | #### 手動執行
94 |
95 | - 到「myBuild」頁面,點選「Build Now」
96 | - 看到「Build History」出現 Build item,點選 #1
97 | - 點選「Console Output」,看到以下 Build process
98 |
99 | ```
100 | Started by user anonymous
101 | Building in workspace /var/lib/jenkins/jobs/myProject/workspace
102 | [workspace] $ /bin/bash /tmp/hudson6372466822262253605.sh
103 | Hello World
104 | Finished: SUCCESS
105 | ```
106 |
107 | #### 自動執行
108 |
109 | - 到「myBuild」頁面,點選「Configure」
110 | - 「Build Triggers」下點選「Build periodically」,「Schedule」填入 `* * * * *` (表示每分鐘 build 一次)
111 | - 按下「Save」儲存離開
112 | - 等待數分鐘,看到「Build History」出現多個 Build item
113 |
114 | ## 實驗二:配合 SCM 進行自動化建置
115 |
116 | Jenkins 能根據 Source Code Management (SCM) 上程式碼的變化觸發建置與測試,除了預設的 CVS 還有許多 plugin 支援各式各樣的版本控制系統,如 Accurev, Bazaar, BitKeeper, ClearCase, CMVC, Dimensions, Git, CA Harvest, Mercurial, Perforce, PVCS, StarTeam, CM/Synergy, Microsoft Team Foundation Server, and even Visual SourceSafe。 (資料來源[Jenkins: The Definitive Guide](https://www.safaribooksonline.com/library/view/jenkins-the-definitive/9781449311155/ch05s04.html))
117 |
118 | ### 練習目標
119 |
120 | - 在開發環境上
121 | - 建立專案,設定 Git repository
122 |
123 | - 在 Jenkins Server 上
124 | - 安裝 plugin (Git)
125 | - 隨著 Git repository 更新,進行自動化建置
126 |
127 | ### 在開發環境上
128 |
129 | #### 建立工作目錄
130 |
131 | ```shell
132 | $ mkdir myWorkspace
133 | $ cd myWorkspace
134 | ```
135 |
136 | #### 設定 Python 版本
137 |
138 | ```shell
139 | $ pyenv local 3.5.1
140 | $ python --version
141 | Python 3.5.1
142 | ```
143 |
144 | #### 建立虛擬環境
145 |
146 | ```shell
147 | $ pyvenv venv
148 | ```
149 |
150 | #### 切換虛擬環境
151 |
152 | ```shell
153 | $ pyvenv venv
154 | $ source venv/bin/activate
155 | (venv) $ pip install --upgrade pip
156 | ```
157 |
158 | > 出現 (venv) 提示表示目前使用 Python virtualenv,往後範例省略顯示
159 |
160 | #### 建立專案目錄
161 |
162 | ```shell
163 | $ mkdir myProject
164 | $ cd myProject
165 | $ pwd
166 | /home/vagrant/myWorkspace/myProject
167 | ```
168 |
169 | #### 產生 HelloWorld.py
170 |
171 | ```shell
172 | $ echo 'print("Hello World")' > HelloWorld.py
173 | $ python HelloWorld.py
174 | Hello World
175 | ```
176 |
177 | #### 初始化 Git repository
178 |
179 | ```shell
180 | $ git init
181 | ```
182 |
183 | #### 將 HelloWorld.py 加入 Git repository
184 |
185 | ```shell
186 | $ git add .
187 | $ git commit -m "add a python file"
188 | ```
189 |
190 | ### 在 Jenkins Server 上
191 |
192 | #### 安裝 Git plugin
193 |
194 | - 到 Jenkins 首頁,選擇「Manage Jenkins」
195 | - 點選「Manage Plugins」,進入設定插件管理頁面
196 | - 選擇「Available」標籤,「filter」輸入 `Git plugin`
197 | - 選取「Git plugin」,按下「Install without restart」
198 | - 等候安裝完成
199 |
200 | #### 修改 Build Job
201 |
202 | - 到「myBuild」頁面,點選「Configure」
203 | - 「Source Code Management」下選擇「Git」,「Repository URL」填入 `file:///home/vagrant/myWorkspace/myProject`
204 | - 「Build Triggers」,取消「Build periodically」,改選取「Poll SCM」,「Schedule」填入 `* * * * *` (表示每分鐘查詢 git repository 一次,如果 git repository 有更新則觸發 Build Job)
205 | - 「Build」下「Execute shell」,「Command」改成下面 shell script
206 | - 按下「Save」儲存離開
207 |
208 | ```shell
209 | #!/bin/bash
210 | python --version
211 | python HelloWorld.py
212 | ```
213 |
214 | 如果 git repository 在 Jenkins Server 上從未建置過、或有任何更新產生,會在一分鐘內看到自動執行的 Build result
215 |
216 | ```shell
217 | Started by an SCM change
218 | Building in workspace /var/lib/jenkins/jobs/myProject/workspace
219 | Cloning the remote Git repository
220 | Cloning repository file:///home/vagrant/myWorkspace/myProject
221 | > git init /var/lib/jenkins/jobs/myProject/workspace # timeout=10
222 | Fetching upstream changes from file:///home/vagrant/myWorkspace/myProject
223 | > git --version # timeout=10
224 | > git -c core.askpass=true fetch --tags --progress file:///home/vagrant/myWorkspace/myProject +refs/heads/*:refs/remotes/origin/*
225 | > git config remote.origin.url file:///home/vagrant/myWorkspace/myProject # timeout=10
226 | > git config --add remote.origin.fetch +refs/heads/*:refs/remotes/origin/* # timeout=10
227 | > git config remote.origin.url file:///home/vagrant/myWorkspace/myProject # timeout=10
228 | Fetching upstream changes from file:///home/vagrant/myWorkspace/myProject
229 | > git -c core.askpass=true fetch --tags --progress file:///home/vagrant/myWorkspace/myProject +refs/heads/*:refs/remotes/origin/*
230 | > git rev-parse refs/remotes/origin/master^{commit} # timeout=10
231 | > git rev-parse refs/remotes/origin/origin/master^{commit} # timeout=10
232 | Checking out Revision 8e045c06247802b5d08f757c0a9fe467a3700424 (refs/remotes/origin/master)
233 | > git config core.sparsecheckout # timeout=10
234 | > git checkout -f 8e045c06247802b5d08f757c0a9fe467a3700424
235 | First time build. Skipping changelog.
236 | [workspace] $ /bin/bash /tmp/hudson105525603757121577.sh
237 | Python 2.7.9
238 | Hello World
239 | Finished: SUCCESS
240 | ```
241 |
242 | 雖然建置成功,但是 `python --version` 顯示 Python 2.7.9,跟開發環境使用的版本 Python 3.5.1 不同。接下來要讓 Jenkins Server 的執行環境跟開發環境保持一致。
243 |
244 | ## 實驗三:設定環境
245 |
246 | ### 練習目標
247 |
248 | - 在開發環境上
249 | - 無
250 |
251 | - 在 Jenkins Server 上
252 | - 安裝 plugin (pyenv)
253 | - 設定 Build environment
254 |
255 | ### 在 Jenkins Server 上
256 |
257 | #### 安裝 pyenv plugin
258 |
259 | - 到 Jenkins 首頁,選擇「Manage Jenkins」
260 | - 點選「Manage Plugins」,進入設定插件管理頁面
261 | - 選擇「Available」標籤,「filter」輸入 `pyenv plugin`
262 | - 選取「Git plugin」,按下「Install without restart」
263 | - 等候安裝完成
264 |
265 | > 我的經驗:安裝 pvenv plugin 後要重新啟動 jenkins,這個 plugin 才會生效
266 |
267 | #### 修改 Build Job
268 |
269 | - 到「myBuild」頁面,點選「Configure」
270 | - 「Build Environment」內選取「pyenv build wrapper」,「The Python version」填寫 `3.5.1`
271 | - 按下「Save」儲存離開
272 |
273 | 修改 myBuild Configure,不會觸發 Build Job,手動執行後觀察結果
274 |
275 | - 到「myBuild」頁面,點選「Build Now」
276 | - 看到「Build History」出現 Build item,點選最新的 Build result
277 | - 點選「Console Output」,看到以下 Build process
278 |
279 | ```
280 | ... (略)
281 | Python 3.5.1
282 | Hello World
283 | Finished: SUCCESS
284 | ```
285 |
286 | 除了執行程式,Jenkins 還可以將自動執行單元測試。接下來看看 Jenkins 怎麼將瑣碎的手動步驟變成自動化。
287 |
288 | ## 實驗四:自動化單元測試
289 |
290 | ### 練習目標
291 |
292 | - 在開發環境上
293 | - 建立一個 Arithmetic 類別與單元測試
294 | - 手動執行測試
295 |
296 | - 在 Jenkins Server 上
297 | - 設定自動化測試
298 |
299 | ### 在開發環境上
300 |
301 | #### 新增檔案 Arithmetic.py
302 |
303 | ```python
304 | def add(a, b):
305 | return a + b
306 |
307 | def subtract(a, b):
308 | return a - b
309 |
310 | def multiply(a, b):
311 | return a * b
312 |
313 | def divide(a, b):
314 | return a / b
315 |
316 | ##############################################
317 | # Unittest
318 |
319 | import unittest
320 |
321 | class TestArithmetic(unittest.TestCase):
322 |
323 | def testAdd(self):
324 | self.assertEqual(add(1, 1), 2)
325 |
326 | def test_subtract(self):
327 | self.assertEqual(subtract(5, 2), 3)
328 |
329 | def test_multiply(self):
330 | self.assertEqual(multiply(3, 2), 6)
331 |
332 | def test_divide(self):
333 | self.assertEqual(divide(3.0, 2), 1.5)
334 | ```
335 |
336 | #### 手動測試
337 |
338 | ```shell
339 | $ python -m unittest -v Arithmetic.py
340 | testAdd (Arithmetic.TestArithmetic) ... ok
341 | test_divide (Arithmetic.TestArithmetic) ... ok
342 | test_multiply (Arithmetic.TestArithmetic) ... ok
343 | test_subtract (Arithmetic.TestArithmetic) ... ok
344 |
345 | ----------------------------------------------------------------------
346 | Ran 4 tests in 0.003s
347 |
348 | OK
349 | ```
350 |
351 | > 非常重要的原則:檔案進 SCM 前,一定要確定程式碼可以編譯成功,單元測試可以順利通過
352 |
353 | #### 新增檔案 .gitignore
354 |
355 | .gitignore 可以避免不必要的資料提交到 git repository,例如編譯中間檔、資料庫、密碼等等。目前先略過 Python cache data
356 |
357 | ```
358 | __pycache__
359 | ```
360 |
361 | #### 提交程式碼
362 |
363 | ```shell
364 | $ git add .
365 | $ git commit -m "add Arithmetic with unittest"
366 | ```
367 |
368 | ### 在 Jenkins Server 上
369 |
370 | #### 修改 Build Job
371 |
372 | - 到「myBuild」頁面,點選「Configure」
373 | - 「Build」下「Execute shell」,「Command」改成下面 shell script
374 | - 按下「Save」儲存離開
375 |
376 | ```shell
377 | #!/bin/bash
378 | python -m unittest -v *.py
379 | ```
380 |
381 | 修改 myBuild Configure,不會觸發 Build Job,手動執行後觀察結果
382 |
383 | - 到「myBuild」頁面,點選「Build Now」
384 | - 看到「Build History」出現 Build item,點選最新的 Build result
385 | - 點選「Console Output」,看到以下 Build process
386 |
387 | ```
388 | ... (略)
389 | testAdd (Arithmetic.TestArithmetic) ... ok
390 | test_divide (Arithmetic.TestArithmetic) ... ok
391 | test_multiply (Arithmetic.TestArithmetic) ... ok
392 | test_subtract (Arithmetic.TestArithmetic) ... ok
393 |
394 | ----------------------------------------------------------------------
395 | Ran 4 tests in 0.000s
396 |
397 | OK
398 | Hello World
399 | Finished: SUCCESS
400 | ```
401 |
402 | 使用 `python -m unittest *.py` 執行單元測試太過土砲,接下來改用正式的執行方式,順便導入一些靜態檢查的工具。
403 |
404 | ## 實驗五:自動化測試工具
405 |
406 | ### 練習目標
407 |
408 | - 在開發環境上
409 | - 使用 pip 安裝 [coverage](http://nedbatchelder.com/code/coverage/), [nose](https://nose.readthedocs.org/), [pylint](http://www.pylint.org/) 套件
410 | - 使用 coverage 產生程式碼覆蓋率的分析報告
411 | - 使用 nosetest 運行單元測試
412 | - 使用 pylint 產生程式碼質量的分析報告
413 | - 提交 Python 套件相依清單到 git repository
414 |
415 | - 在 Jenkins Server 上
416 | - 以 jenkins 使用者身份安裝 virtualenv
417 | - 設定自動化測試工具
418 |
419 | ### 在開發環境上
420 |
421 | #### 安裝套件
422 |
423 | ```shell
424 | $ pip install coverage nose pylint
425 | ```
426 |
427 | #### 運行單元測試
428 |
429 | ```shell
430 | $ nosetests --with-xunit --all-modules --traverse-namespace --with-coverage --cover-package=. --cover-inclusive
431 | ....
432 | Name Stmts Miss Cover
433 | -----------------------------------
434 | Arithmetic.py 18 0 100%
435 | HelloWorld.py 1 0 100%
436 | -----------------------------------
437 | TOTAL 19 0 100%
438 | ----------------------------------------------------------------------
439 | Ran 4 tests in 0.009s
440 |
441 | OK
442 | ```
443 | - 產生分析報告 nosetests.xml
444 |
445 | #### 檢查程式碼覆蓋率
446 |
447 | ```shell
448 | $ python -m coverage xml --include=*
449 | ```
450 | - 產生分析報告 coverage.xml
451 |
452 | #### 檢查程式碼質量
453 |
454 | ```shell
455 | $ pylint -f parseable *.py | tee pylint.out
456 | ...(略)
457 |
458 | Report
459 | ======
460 | 19 statements analysed.
461 |
462 | Statistics by type
463 | ------------------
464 |
465 | +---------+-------+-----------+-----------+------------+---------+
466 | |type |number |old number |difference |%documented |%badname |
467 | +=========+=======+===========+===========+============+=========+
468 | |module |2 |2 |= |0.00 |0.00 |
469 | +---------+-------+-----------+-----------+------------+---------+
470 | |class |1 |1 |= |0.00 |0.00 |
471 | +---------+-------+-----------+-----------+------------+---------+
472 | |method |4 |4 |= |0.00 |25.00 |
473 | +---------+-------+-----------+-----------+------------+---------+
474 | |function |4 |4 |= |0.00 |0.00 |
475 | +---------+-------+-----------+-----------+------------+---------+
476 |
477 | ...(略)
478 | ```
479 | - 產生分析報告 pylint.out
480 |
481 | #### 匯出套件相依列表
482 |
483 | ```shell
484 | $ pip freeze > requirements.txt
485 | ```
486 |
487 | requirements.txt 內容:
488 | ```
489 | astroid==1.4.6
490 | colorama==0.3.7
491 | coverage==4.1
492 | lazy-object-proxy==1.2.2
493 | nose==1.3.7
494 | pylint==1.5.6
495 | six==1.10.0
496 | wrapt==1.10.8
497 | ```
498 |
499 | #### 修改 .gitignore
500 |
501 | ```
502 | __pycache__
503 | .coverage
504 | coverage.xml
505 | nosetests.xml
506 | pylint.out
507 | ```
508 |
509 | #### 提交相依列表
510 |
511 | ```shell
512 | $ git add .
513 | $ git commit -m "add requirements for pip"
514 | ```
515 | ### 在 Jenkins Server 上
516 |
517 | 要在 Jenkins Server 執行開發環境相同的任務 ([coverage](http://nedbatchelder.com/code/coverage/), [nose](https://nose.readthedocs.org/), [pylint](http://www.pylint.org/)),也要安裝相同的虛擬環境。
518 |
519 | #### 設定 jenkins 環境
520 |
521 | - 以 jenkins 身份登入系統
522 | - 設定環境,[安裝 pyenv、virtualenv](environment.md#安裝-pyenvvirtualenv)
523 |
524 | ```shell
525 | $ sudo su jenkins -l
526 | $ git clone https://github.com/yyuu/pyenv.git ~/.pyenv
527 | $ git clone https://github.com/yyuu/pyenv-virtualenv.git ~/.pyenv/plugins/pyenv-virtualenv
528 | ```
529 |
530 | #### 修改 Build Job
531 |
532 | - 到「myBuild」頁面,點選「Configure」
533 | - 「Build」下「Execute shell」,「Command」改成下面 shell script
534 | - 按下「Save」儲存離開
535 |
536 | ```shell
537 | PATH=$WORKSPACE/venv/bin:/usr/local/bin:$PATH
538 |
539 | nosetests --with-xunit --all-modules --traverse-namespace --with-coverage --cover-package=. --cover-inclusive
540 | python -m coverage xml --include=*
541 | pylint -f parseable *.py | tee pylint.out
542 | ```
543 |
544 | - 到「myBuild」頁面,點選「Configure」
545 | - 「Build」內按下「Add build step」,選擇「Execute shell」,「Command」填入下面 shell script
546 | - 將這個 「Execute shell」移動到「Build」區塊最上面
547 | - 按下「Save」儲存離開
548 |
549 | ```shell
550 | PATH=$WORKSPACE/venv/bin:/usr/local/bin:$PATH
551 |
552 | if [ ! -d "venv" ]; then
553 | virtualenv venv
554 | fi
555 | . venv/bin/activate
556 | pip install -r requirements.txt
557 | ```
558 |
559 | > 上面這段 script 主要目的是設定 python 虛擬環境,並且安裝開發環境需要的 python 套件
560 |
561 | 修改 myBuild Configure,不會觸發 Build Job,手動執行後觀察結果
562 |
563 | - 到「myBuild」頁面,點選「Build Now」
564 | - 看到「Build History」出現 Build item,點選最新的 Build result
565 | - 點選「Console Output」,看到以下 Build process
566 |
567 | Jenkins Console Output 的內容就是手動執行的結果,雖然詳細但可讀性非常差。接下來在 Jenkins Server 上加入一些 plugin,讓結果可以用圖形方式呈現。
568 |
569 | ## 實驗六:圖形化測試結果
570 |
571 | ### 練習目標
572 |
573 | - 在 Jenkins Server 上
574 | - 安裝 [Cobertura plugin](https://wiki.jenkins-ci.org/display/JENKINS/Cobertura+Plugin) (用来顯示程式碼覆蓋率)
575 | - 安裝 [Violations plugin](https://wiki.jenkins-ci.org/display/JENKINS/Violations) (用來顯示程式碼是否合乎規範)
576 | - 設定 Post-build Actions,產生圖形結果
577 |
578 | ### 在 Jenkins Server 上
579 |
580 | #### 安裝 Cobertura plugin
581 |
582 | - 到 Jenkins 首頁,選擇「Manage Jenkins」
583 | - 點選「Manage Plugins」,進入設定插件管理頁面
584 | - 選擇「Available」標籤,「filter」輸入 `Cobertura plugin`
585 | - 選取「Cobertura plugin」,按下「Install without restart」
586 | - 等候安裝完成
587 |
588 | #### 安裝 Violations plugin
589 |
590 | - 到 Jenkins 首頁,選擇「Manage Jenkins」
591 | - 點選「Manage Plugins」,進入設定插件管理頁面
592 | - 選擇「Available」標籤,「filter」輸入 `Violations plugin`
593 | - 選取「Violations plugin」,按下「Install without restart」
594 | - 等候安裝完成
595 |
596 | #### 修改 Build Job
597 |
598 | - 到「myBuild」頁面,點選「Build Now」
599 | - 「Post-build Actions」下點選「Publish Cobertura Coverage Report」,「Cobertura xml report pattern」填入 `coverage.xml`
600 | - 「Post-build Actions」下點選「Publish JUnit test result report」,「Test report XMLs」填入 `nosetests.xml`
601 | - 「Post-build Actions」下點選「Report Violations」,「pylint」填入 `pylint.out`
602 | - 按下「Save」儲存離開
603 |
604 | 修改 myBuild Configure,不會觸發 Build Job,手動執行後觀察結果
605 |
606 | - 到「myBuild」頁面,點選「Build Now」
607 | - 看到「Build History」出現 Build item,點選最新的 Build result
608 | - 點選「Console Output」,看到以下 Build process
609 | - 到「myBuild」頁面,點選「Coverage Report」,觀察圖形分析報告
610 | - 到「myBuild」頁面,點選「Violations」,觀察圖形分析報告
611 |
612 | 
613 |
614 | ----
615 | ## 參考
616 | - [Using Jenkins](https://wiki.jenkins-ci.org/display/JENKINS/Use+Jenkins) - Jenkins 官網文件
617 | - [CI (Continuous integration) 關鍵技術:使用 Jenkins](http://www.books.com.tw/products/0010596579) - 偏重 Android App 開發
618 | - [持續整合與自動化測試 - 使用 Jenkins 與 Docker 進行課程實作](https://www.gitbook.com/book/smlsunxie/jenkins-workshop/details) - 內容較完整
619 | - [Jenkins CI 實戰手冊](http://jenkins.readbook.tw/) - 內容不完整
620 | - [Jenkins CI 從入門到實戰講座](http://trunk-studio.kktix.cc/events/jenkins-2016001) - 送電子書,內有詳盡的實作步驟說明
621 | - [Python Projects](https://wiki.jenkins-ci.org/display/JENKINS/Python+Projects) - Using Jenkins for Python Projects
622 | - Automated python unit testing, code coverage and code quality analysis with Jenkins - [part 1](http://bhfsteve.blogspot.tw/2012/04/automated-python-unit-testing-code.html), [part 2](http://bhfsteve.blogspot.tw/2012/04/automated-python-unit-testing-code_20.html), [part 3](http://bhfsteve.blogspot.tw/2012/04/automated-python-unit-testing-code_27.html)
623 | - [基于 Jenkins 的 Python 代码集成整合](http://yumminhuang.github.io/blog/2015/04/17/%E5%9F%BA%E4%BA%8E-jenkins-%E7%9A%84-python-%E4%BB%A3%E7%A0%81%E9%9B%86%E6%88%90%E6%95%B4%E5%90%88/)
624 | - [jenkins集成python的单元测试](http://www.mamicode.com/info-detail-1383168.html)
625 | - [Making Jenkins Work With Python's Virtualenv](http://iamnearlythere.com/jenkins-python-virtualenv/)
626 |
--------------------------------------------------------------------------------
/django.md:
--------------------------------------------------------------------------------
1 | # Django
2 |
3 | 雖然 Django 跟 BDD/TDD 沒有直接的關係,但為了開發流程的完整概念,我嘗試把 Django 這個 web framework 安裝起來,然後在上面開發與測試。
4 |
5 | 練習過程以這份 [Django Tutorial](http://daikeren.github.io/django_tutorial/) 為主,但因為版本關係有些使用方式太舊,參考了另一份 [Django Girls 學習指南](https://www.gitbook.com/book/djangogirlstaipei/django-girls-taipei-tutorial/details) 作為輔助。
6 |
7 | > 本來想練習 Django 官網提供的土托魚 Writing your first Django app, part [1](https://docs.djangoproject.com/en/1.9/intro/tutorial01/), [2](https://docs.djangoproject.com/en/1.9/intro/tutorial02/), [3](https://docs.djangoproject.com/en/1.9/intro/tutorial03/), [4](https://docs.djangoproject.com/en/1.9/intro/tutorial04/), [5](https://docs.djangoproject.com/en/1.9/intro/tutorial05/), [6](https://docs.djangoproject.com/en/1.9/intro/tutorial06/), [7](https://docs.djangoproject.com/en/1.9/intro/tutorial07/),但這一系列鉅細彌遺的讓人有點吃不消 (我只想快速上手啊,摔筆),只好改看其他人消化吸收過的東西。
8 |
9 | Let's 開始練功吧!
10 |
11 | ## 簡介
12 |
13 | 世界上除了 RoR 之外,還有其他 Web Framework,像是 Node.js 以及 Django。
14 |
15 | 如同 Python 生態環境之豐富,Django 也有很多如資料庫、表單、登入系統、管理界面等元件,大大縮短了後端開發的時間。
16 |
17 | ## 設定環境
18 |
19 | 安裝與管理套件版本是軟體開發頗讓人頭疼的一環,幸好靠著 pyenv 管理多個 Python 版本問題,與 virtualenv 創造虛擬(獨立)Python 環境的工具,Python 工程師的生活才能過得輕鬆點。
20 |
21 | ### 安裝 pyenv 與 virtualenv
22 | ```shell
23 | $ git clone https://github.com/yyuu/pyenv.git ~/.pyenv
24 | $ git clone https://github.com/yyuu/pyenv-virtualenv.git ~/.pyenv/plugins/pyenv-virtualenv
25 | $ sudo pip install virtualenv
26 | ```
27 |
28 | 設定 ~/.bashrc
29 | ```
30 | export PYENV_ROOT="$HOME/.pyenv"
31 | export PATH="$PYENV_ROOT/bin:$PATH"
32 | eval "$(pyenv init -)"
33 | ```
34 |
35 | 重新載入 ~/.bashrc
36 | ```shell
37 | $ source ~/.bashrc
38 | ```
39 |
40 | ### 安裝 Python 3.5.1
41 | ```shell
42 | $ pyenv install 3.5.1
43 | ```
44 |
45 | 設定 Python 3.5.1
46 | ```shell
47 | $ pyenv local 3.5.1
48 | $ python --version
49 | Python 3.5.1
50 | ```
51 |
52 | ### 設定虛擬環境
53 |
54 | 建立工作目錄,設定虛擬環境,更新 pip (從此只要在 virtualenv 下面安裝的 package 都只會存在于這個 virtualenv 當中,安裝套件不需要 root 權限)
55 |
56 | ```shell
57 | $ mkdir myWorkspace
58 | $ cd myWorkspace/
59 | $ pyvenv venv
60 | $ source venv/bin/activate
61 | (venv) $ pip install --upgrade pip
62 | ```
63 |
64 | > 使用 `virtualenv` 安裝虛擬環境,跟使用 `pyvenv` 結果有點不同。`virtualenv` 似乎只會安裝系統預設的 python 版本,用 `pyvenv` 裝的 python 版本跟 `pyenv local 3.5.1` 才一致。
65 |
66 | ### 安裝 Django
67 | ```shell
68 | $ pip install Django==1.9.7
69 | ```
70 |
71 | ## Django Project
72 |
73 | 建立 project
74 | ```shell
75 | $ django-admin.py startproject blog
76 | $ tree blog/
77 | blog/
78 | ├── blog
79 | │ ├── __init__.py
80 | │ ├── settings.py
81 | │ ├── urls.py
82 | │ └── wsgi.py
83 | └── manage.py
84 | ```
85 | - 外層的 `blog/`: 包含整個專案的根目錄
86 | - 內層的 `blog/`: 放置專案相關的設定
87 | - `mysite/__init__.py`: 空檔,告訴 Python 把這個目錄當成 package
88 | - `mysite/settings.py`: 專案設定檔
89 | - `mysite/urls.py`: URL 定義檔,用來告訴 Django 怎麼發送 URL request
90 | - `mysite/wsgi.py`: 用來執行專案的 WSGI-compatible web servers 進入點 (將來上雲端才會用到)
91 | - `manage.py`: 命令列工具,用來操作專案
92 |
93 | 進入外層 `blog/` (之後都在這裡開發應用程式),啟動服務
94 | ```shell
95 | $ cd blog/
96 | $ python manage.py runserver 0.0.0.0:8000
97 | ```
98 |
99 | 開啟瀏覽器,連接 `http://192.168.33.10:8000/` ([虛擬機](environment.md)),看到以下訊息
100 | ```
101 | It worked!
102 | Congratulations on your first Django-powered page.
103 | ```
104 |
105 | ## Django APPs
106 |
107 | - Django Project 由多個 Django APP 組成,每個 Django App 可以被多個 Django Project 所使用
108 | - Django App 就是一個功能單純的應用
109 |
110 | 創建 Django App
111 | ```shell
112 | $ python manage.py startapp article
113 | $ tree article/
114 | article/
115 | ├── admin.py
116 | ├── apps.py
117 | ├── __init__.py
118 | ├── migrations
119 | │ └── __init__.py
120 | ├── models.py
121 | ├── tests.py
122 | └── views.py
123 | ```
124 |
125 | 讓 project 知道多了這個 app,編輯 `blog/settings.py`
126 | ```
127 | INSTALLED_APPS = [
128 | 'django.contrib.admin',
129 | 'django.contrib.auth',
130 | 'django.contrib.contenttypes',
131 | 'django.contrib.sessions',
132 | 'django.contrib.messages',
133 | 'django.contrib.staticfiles',
134 | 'article',
135 | ]
136 | ```
137 | - 在 INSTALLED_APPS 內新增 `article`
138 |
139 | ## Django Views & Django URLs
140 |
141 | Django 不採取 MVC 架構,而是 MTV 架構。操作 View 與 URL 之前,先由下圖了解 URL Request 被如何處理,然後變成使用者在瀏覽器看到的結果。
142 |
143 | (圖片出處 http://mropengate.blogspot.tw/2015/08/mvcdjangomtv.html)
144 |
145 | 1. URL 派送器 (urls.py) 將 URL Request 對應到 View 的函式
146 | 2. View 函式 (views.py) 執行 request 動作,通常引發讀寫資料庫的動作
147 | 3. Model (models.py) 定義資料庫的資料以及如何跟它互動的方式
148 | 4. 處理完 request 任務,View 就會回覆 HTTP Response 給瀏覽器
149 | 5. Templates 放置 HTML 檔案,這些檔案包含 HTML 語法與網頁如何呈現的邏輯
150 |
151 | 創建一個 View,修改 article/views.py,新增一下程式
152 | ```python
153 | from django.http import HttpResponse
154 |
155 | def home(request):
156 | s = "Hello World!"
157 | return HttpResponse(s)
158 | ```
159 | - 沒有涉及底層 Model,僅僅回覆 "Hello World!" 訊息
160 |
161 | 告訴 Django 要如何處理 URL,修改 blog/urls.py,在 `urlpatterns` 加入下面程式
162 | ```python
163 | urlpatterns = [
164 | ...
165 | url(r'^$', 'article.views.home'),
166 | ]
167 | ```
168 |
169 | 重啟服務,連接 `http://192.168.33.10:8000/`,看到以下訊息
170 | ```
171 | Hello World!
172 | ```
173 |
174 | ## Django Model
175 |
176 | Django 支援許多資料庫,只要簡單設定就能存取 sqlite、PostgreSQL、MySQL 與 Oracle。
177 |
178 | 與資料庫相關設定放在 blog/settings.py,來看看
179 | ```python
180 | DATABASES = {
181 | 'default': {
182 | 'ENGINE': 'django.db.backends.sqlite3',
183 | 'NAME': os.path.join(BASE_DIR, 'db.sqlite3'),
184 | }
185 | }
186 | ```
187 | - `ENGINE` 採用 sqlite3
188 | - `NAME` 宣告資料庫檔案位置在 `blog/db.sqlite3`
189 |
190 | Django 中透過 Model 來處理與底層資料庫的互動,要在 Model 定義表格的存取方式
191 |
192 | - Model 繼承 `django.db.models.Model`
193 | - Model 的屬性 (attribute) 都是一個資料庫的欄位
194 | - 透過 Model API 執行資料庫 query,將每種資料庫 SQL 版本間的差異隱藏起來
195 |
196 | 設定 blog/article 的資料 Model,修改 articles/models.py,加入以下程式碼
197 | ```python
198 | from django.db import models
199 |
200 | # Create your models here.
201 | class Category(models.Model):
202 | name = models.CharField(u'Name', max_length=50)
203 |
204 | def __str__(self):
205 | return self.name
206 |
207 | class Article(models.Model):
208 | content = models.TextField(u'Content')
209 | title = models.CharField(u'Title', max_length=50)
210 | category = models.ForeignKey('Category', blank=True, null=True)
211 |
212 | def __str__(self):
213 | return self.title
214 | ```
215 | - 建立兩個 Model: Category & Article
216 | - Category 宣告一個屬性: `name`,並定義 `__str__` 用字串表示自己
217 | - Article 宣告三個屬性: `content` 表示文章內容, `title` 表示文章標題, `category` 使用 `ForeignKey` 定義資料表格間的關聯性
218 |
219 | 剛剛只是定義 Model,資料庫的表格還沒建立起來,要透過以下指令產生
220 | ```shell
221 | $ python manage.py makemigrations
222 | $ python manage.py migrate
223 | ```
224 |
225 | 現在透過 Django 提供的 shell 來看看資料庫表格的樣子
226 | ```
227 | $ python manage.py shell
228 | >>>
229 | ```
230 | - 看到 `>>>` 提示符號表示進入 Python REPL
231 |
232 | 試試創建三筆記錄
233 | ```python
234 | >>> from article.models import Article, Category
235 | >>> Article.objects.create(content="Test1", title="article 1")
236 |
237 | >>> Article.objects.create(content="Test2", title="article 2")
238 |
239 | >>> c = Category.objects.create(name="category 1")
240 | >>> Article.objects.create(content="Test3", title="article 3", category=c)
241 |
242 | >>>
243 | ```
244 |
245 | 查詢剛剛插入的資料
246 | ```python
247 | >>> Article.objects.all()
248 | [, , , ]
249 | >>> for article in Article.objects.all():
250 | ... print(article.title)
251 | ...
252 | article 1
253 | article 2
254 | article 3
255 | ```
256 |
257 | 修改一筆記錄
258 | ```python
259 | >>> from article.models import Article, Category
260 | >>> a = Article.objects.get(title="article 1")
261 | >>> a.title = "Article"
262 | >>> a.save()
263 | ```
264 |
265 | 操作完畢,使用 Ctrl-D 離開 Python REPL
266 |
267 | Django Model 幫忙處理了與資料庫互動的部分,我很好奇它做了什麼,以下透過 sqlite 直接下 SQL 來看看
268 | ```shell
269 | $ sqlite3 db.sqlite3
270 | ```
271 |
272 | 透過 `.table` 命令列出所有表格
273 | ```mysql
274 | sqlite> .tables
275 | article_article auth_user_groups
276 | article_category auth_user_user_permissions
277 | auth_group django_admin_log
278 | auth_group_permissions django_content_type
279 | auth_permission django_migrations
280 | auth_user django_session
281 | ```
282 | - `article_article` 對應到 article/models.py 裡面的 `class Article(models.Model)`
283 | - `article_category` 對應到 article/models.py 裡面的 `class Category(models.Model)`
284 |
285 | 使用 `.schema` 顯示表格 schema
286 | ```sql
287 | sqlite> .schema article_article
288 | CREATE TABLE "article_article" ("id" integer NOT NULL PRIMARY KEY AUTOINCREMENT, "content" text NOT NULL, "title" varchar(50) NOT NULL, "category_id" integer NULL REFERENCES "article_category" ("id"));
289 | CREATE INDEX "article_article_b583a629" ON "article_article" ("category_id");
290 | sqlite> .schema article_category
291 | CREATE TABLE "article_category" ("id" integer NOT NULL PRIMARY KEY AUTOINCREMENT, "name" varchar(50) NOT NULL);
292 | ```
293 | - 除了原先設定的表格,Django Model 還透過 `id` 維護一個自動增加的唯一主鍵
294 |
295 | 查詢 `article_article` 與 `article_category` 表格內容
296 | ```sql
297 | sqlite> .header on
298 | sqlite> .mode column
299 | sqlite> SELECT * FROM article_article;
300 | id content title category_id
301 | ---------- ---------- ---------- -----------
302 | 1 Test1 Article
303 | 2 Test2 article 2
304 | 3 Test3 article 3 1
305 | sqlite> SELECT * FROM article_category;
306 | id name
307 | ---------- ----------
308 | 1 category 1
309 | ```
310 |
311 | 不做任何修改,使用 `.quit` 離開
312 | ```sql
313 | sqlite> .quit
314 | ```
315 |
316 | ## Django Admin
317 |
318 | 除了可以透過 Shell 操作 Model,Django 提供了 admin app 讓使用者可以透過 web UI 做創造、讀取、更新、刪除的動作。
319 |
320 | Django 預設安裝 admin,打開 blog/settings.py 查看
321 | ```python
322 | INSTALLED_APPS = [
323 | 'django.contrib.admin',
324 | ...
325 | ]
326 | ```
327 |
328 | URL 導向設定在 blog/urls.py
329 | ```python
330 | urlpatterns = [
331 | url(r'^admin/', admin.site.urls),
332 | ...
333 | ]
334 | ```
335 |
336 | 修改 article/admin.py,告訴 Django 建立了 Category, Article 這兩個 Model
337 | ```python
338 | from django.contrib import admin
339 | from article.models import Article, Category
340 |
341 | # Register your models here.
342 | admin.site.register(Article)
343 | admin.site.register(Category)
344 | ```
345 |
346 | 設定 superuser 帳號
347 | ```shell
348 | $ python manage.py createsuperuser
349 | Username (leave blank to use 'vagrant'): django
350 | Email address: printk@gmail.com
351 | Password:
352 | Password (again):
353 | Superuser created successfully.
354 | You have mail in /var/mail/vagrant
355 | ```
356 |
357 | 設定完成,啟動服務,登入 http://192.168.33.10:8000/admin/,透過 Web UI 新增、查詢、修改、刪除記錄。
358 |
359 | ## Django Views & Django URL 再訪
360 |
361 | 想辦法做出讓網站可以根據 URL 動態產生網頁,例如 URL=`article/1/` 呈顯第一則文章
362 |
363 | 先從 view 開始,修改 article/views.py,加上下面程式碼
364 | ```python
365 | from article.models import Article
366 |
367 | def detail(request, pk):
368 | article = Article.objects.get(pk=int(pk))
369 | s = """
370 |
371 |
372 |
373 |
11 |
12 | “Conversely, when almost all the risks are related to the requirements, you are in the position experienced by the majority of software development teams. This is where using an agile framework, such as Scrum, is appropriate.”
13 |
14 | ## Chapter 2 - Relying on a Stable Foundation
15 |
16 | “The most important element of this team is the presence of someone devoted full time to the specification of the software.”
17 |
18 | “The second most important element is a development team with devel- opers who have complementary skills and expertise.”
19 |
20 | “The third most important element is a product owner who ensures the development team is the ultimate product.”
21 |
22 | “The fourth and final element of importance to creating a healthy team is a team that inspects and adapts repeatedly, using prescribed events.”
23 |
24 | “Expressing a shared vision is an activity directed by the product owner. It consists mainly of face-to-face meetings with stakeholders. The result is a short, one-line summary of what the software is supposed to be and do.”
25 |
26 | “A feature is a piece of high-level functionality that delivers value to one or more stakeholders.”
27 |
28 | “The vision, the meaningful common goal, and the high-level features are guardrails because it is unlikely those will change rapidly.”
29 |
30 | ## Chapter 3 - Discovering Through Short Feedback Loops and Stakeholders’ Desirements
31 |
32 | “Deliberate discovery does not happen from the failure itself but rather from understanding the failure, making an improvement, and then trying again.”
33 |
34 | “Frequent feedback loops provide you with the ability to correct errors while costs are minimal. It is the responsibility of the team not only to learn about the problem but also to help stakeholders understand what is being built for them.”
35 |
36 | “There is a powerful and important feedback loop that occurs when stakeholders have early access to running software. They can experiment with real software, come up with new ideas, and change their minds about old ideas and perceptions.”
37 |
38 | “Fulfilling desirements through early and continuous delivery of valuable software can result in sprints that stakeholders want to evaluate.”
39 |
40 | ## Chapter 4 - Expressing Desirements with User Stories
41 |
42 | “As a ``, I want `` so that ``.”
43 | - Who = role
44 | - What = desire
45 | - Why = benefit
46 |
47 | “A well-written user story follows the INVEST mnemonic developed by Bill Wake.”
48 | - **Independent**: A story should stand alone and be self-contained without depending on other stories.
49 | - **Negotiable**: A story is a placeholder that facilitates conversation and negotiation between the team and stakeholders. At any time, the story can be rewritten or even discarded. A story is not fixed and set in stone, up until it is part of the upcoming sprint.
50 | - **Valuable**: A story needs to deliver value to the stakeholders (either the end user or the purchaser).
51 | - **Estimable**: The team needs to be able to roughly estimate the size of the effort to complete the story.
52 | - **Small**: A story can start its life as a big placeholder. As time goes by and you better understand the intricacies of the desires, the placeholder will be split into smaller stories. When the most important ones are close to being delivered, they need to be small enough so that they can be completed in a single sprint.
53 | - **Testable**: A story must provide the necessary information to clearly define the acceptance criteria that confirm the story is completed.
54 |
55 | ## Chapter 5 - Refining User Stories by Grooming the Product Backlog
56 |
57 | “The product owner is responsible for ensuring that the product backlog is always in a healthy state. He is the primary interface between the development team and the stakeholders.”
58 |
59 | “There is a major difference between a true analyst and a product owner. Product owners represent the business and have the authority to make decisions that affect their product. Typically, an analyst does not have this decision-making authority.”
60 |
61 | “Grooming the backlog boils down to a sequence of four activities: ranking, illustrating, sizing, and splitting user stories.”
62 | - Ranking User Stories with a Dot Voting Method
63 | - Illustrating User Stories with Storyboards
64 | - Sizing User Stories Using Comparison
65 | - Splitting User Stories Along Business Values
66 |
67 | “Although, according to the development team, the product owner is perceived as the one who decides the ordering of the backlog, it is actually not his decision. He must rely on stakeholders who are the ones who decide the importance of each story.”
68 |
69 | “The product owner is a facilitator, not a decider.”
70 |
71 | “If user stories help monitor conversations with stakeholders, storyboards help to illustrate expectations rapidly and cheaply.”
72 |
73 | “As experience teaches, stakeholders love to envision the software from the user interface standpoint.”
74 |
75 | “Only the development team can identify the size of a story.”
76 |
77 | “Humans are poor at estimating absolute sizes. However, we are great at assessing relative sizes.”
78 |
79 | “The product owner should not plan stories that are bigger than one-half the velocity.”
80 |
81 | “You should focus on the perspective of stakeholders by thin slicing stories that favor the business value. Thin slicing is based on evolutionary architecture; it provides stories that implement only a small bit of functionality, but all the way through the architecture layers of the software.”
82 |
83 | “In this regard, over the years, experienced practitioners have acknowledged the necessity of structuring the backlog along a two-dimensional collaboration board. This way of organizing the stories to avoid half-baked incremental iterations was initially promoted by Jeff Patton and is now known as story mapping.”
84 |
85 | “When a story has gone through the process of grooming, you have reached an important milestone, which is the transition from conversation to confirmation.”
86 |
87 | ## Chapter 6 - Confirming User Stories with Scenarios
88 |
89 | “If user stories and their storyboards help monitor conversations with stakeholders during backlog grooming, the scenarios help to confirm expectations when the team is ready to plan a new sprint.”
90 |
91 | “Success criteria establish the conditions of acceptation from the stakeholders’ point of view. Scenarios are the perfect medium for expressing the success criteria.”
92 |
93 | “The scenario contains a precondition, an action, and a consequence.”
94 | - `Given` A precondition is the current state of the software before action is taken.
95 | - `When` An action is something that is accomplished to perform the behavior of the scenario.
96 | - `Then` A consequence is the result of the action.
97 |
98 | “Triggering a single action is crucial in keeping the state transition simple.”
99 |
100 | “Successful teams don’t use raw examples, they refine the specification from them. They extract the essence from the key examples and turn them into a clear and unambiguous definition of what makes the implementation done, without any extraneous detail.”
101 |
102 | “It is important to note that the analyst’s competency is related to the specifications and not to how the software will be implemented.”
103 |
104 | “The role of business analysts is now more focused and can be summarized as ensuring that all the scenarios illustrating a story are refined and completed in time for the development team.”
105 |
106 | “Because designing the technical solution is not the purpose of the specification, you should focus only on writing scenarios that relate to the business rules.”
107 |
108 | “‘Why?’ five times, successively, helps the team understand the true root cause of the scenario and easily reformulate it at the business domain level.”
109 |
110 | “A feature is a piece of high-level functionality that delivers value to one or more stakeholders.”
111 |
112 | ## Chapter 7 - Automating Confirmation with Acceptance Tests
113 |
114 | “You must turn scenarios into acceptance tests with minimal changes. An acceptance test is only a copy of a scenario in a format suitable for execution on a computer.”
115 |
116 | “First and foremost, we want to confirm requirements have been met. These “executable” scenarios are not a quality assurance tool. They are used to prevent defects, not to discover them.”
117 |
118 | “these “executable” scenarios do not replace the need to include quality assurance practices, such as exploratory or unit testing.”
119 |
120 | “It goes without saying that the widespread approach of creating tests using record-and-playback tools is inappropriate. ... Their main advantage, which is to enable testers to author tests without having to learn how to craft code, is also their main weakness.”
121 |
122 | “Acceptance tests represent assumptions stakeholders made during the specification.”
123 |
124 | “The red-green-refactor cycle is the core of Test-Driven Development (TDD). It is a widely recognized programming practice popularized by Kent Beck that promotes the notion of writing tests first when programming a piece of code. TDD relies on the repetition of a short development cycle divided into three stages: the red, the green, and the refactor stage.”
125 |
126 | “TDD requires programmers to articulate their assumptions using a test case. Programmers must foresee how the functionality will be used by the test case. TDD places constraints on programmers; it requires that they define the interface before deciding on the implementation. TDD tends to lead to better designs.”
127 |
128 | “If the development team members are the only ones who understand the result of the translation, they lose the ability to collaborate effectively with stakeholders.”
129 |
130 | “To obtain a failing assertion, the tester must design the programming interface and connect the newly created test with it.”
131 |
132 | “When connecting the newly created test, the tester focuses first on defining the outside-facing programming interface and only after that does the programmer go on evolving the internal implementation.”
133 |
134 | “The natural candidates for this type of design are the testers because they are the ones responsible for creating a failing acceptance test.”
135 |
136 | “You must resist this temptation to mix acceptance tests with continuous integration. Because of hardware constraints, this can unduly slow down the code integration.”
137 |
138 | “Testing the “executable” scenarios during the nightly build ensures that every morning the team can easily confirm that the software under construction still meets the evolving specifications.”
139 |
140 | ## Chapter 8 - Addressing Nonfunctional Requirements
141 |
142 | “External quality is how well the software carries out its functions at run time, and as such, is not only visible to stakeholders, but is also highly desirable.”
143 |
144 | “Internal quality is characteristics of the software barely visible to stakeholders but which simplifies the process of building and evolving the software.”
145 |
146 | ## Chapter 9 - Conclusion
147 |
148 | “If you are going to put time and effort into solving a problem, ensure that you first solve the right problem and then that you solve it properly.”
149 |
150 | “To be successful, you must remember that above all else, needs are emergent and constantly evolving. There is no set plan that can and will be successful. Instead, it is a question of constantly being open to changes and uncertainties. It is only when flexibility is embraced that the proper attitude can be taken.”
151 |
152 | ----
153 | ## 參考
154 | - [Executable Specifications with Scrum](http://www.ibchamber.org/wp-content/uploads/2014/09/AWP.Executable.Specifications.with_.Scrum_.Jul_.2013.pdf)
155 |
--------------------------------------------------------------------------------
/unittest.mock.md:
--------------------------------------------------------------------------------
1 | # unittest.mock
2 |
3 | unittest.mock 是 python 用於測試的函式庫,用 mock 物件替換待測試系統的某些部分,宣告這些偽造的部分應該如何被使用。
4 |
5 | ## Test Double
6 |
7 | [介紹Test Double](http://teddy-chen-tw.blogspot.tw/2014/09/test-double1.html)之前先介紹兩個測試常用術語:
8 |
9 | - SUT:System Under Test或Software Under Test的簡寫,代表待測程式。如果是單元測試,SUT就是一個function或method。
10 | - DOC:Depended-on Component(相依元件),又稱為Collaborator(合作者)。DOC是SUT執行的時候會使用到的元件。例如,有一個函數X如果執行失敗會寄送email,則email元件就是函數X的DOC。
11 |
12 | [Test Double 的種類](http://www.martinfowler.com/bliki/TestDouble.html):
13 | - **Dummy** 用來傳遞給函式但不會真的被使用,通常只充當函式參數讓程式順利編譯。
14 | - **Fake** 物件真正功能,但通常會採用捷徑實作,不適合用在生產環境。(範例:InMemoryTestDatabase)
15 | - **Stub** 為測試時期的呼叫提供罐裝答案,通常不會對外界所有輸入做出反應。
16 | - **Spy** 記錄他們怎麼被呼叫的資訊。
17 | - **Mock** 是一連串預先編排的執行動作,對特定預期的呼叫做出反應,如果收到非預期呼叫方式則丟出例外。
18 |
19 |
20 |
21 | ## 快速導覽
22 |
23 | ### 範例一
24 | Something.py:
25 | ```python
26 | class Something:
27 | def method(self, a, b, c, key):
28 | print(a, b, c, key)
29 | return 3
30 | ```
31 |
32 | testSomething.py
33 | ```python
34 | import unittest
35 | from unittest.mock import MagicMock
36 | from Something import Something
37 |
38 | class TestSomethingCases(unittest.TestCase):
39 |
40 | def test_return_value(self):
41 | s = Something()
42 | self.assertEqual(s.method(1,2,3,key='hello'), 3)
43 |
44 | def test_mock_return_value(self):
45 | something = Something()
46 | something.method = MagicMock(return_value = 5)
47 | self.assertEqual(something.method(1, 2, 3, key='hello'), 5)
48 |
49 | def test_mock_called_with(self):
50 | something = Something()
51 | something.method = MagicMock(return_value = 5)
52 | something.method(3,4,5,key='value')
53 | something.method.assert_called_with(3, 4, 5, key='value')
54 | ```
55 | - `test_return_value` 檢查物件方法預設回傳值
56 | - `test_mock_return_value` 偽造方法回傳值 (Stub)
57 | - `test_mock_called_with` 檢查方法呼叫是否如預期 (Spy or Mock)
58 |
59 | testing:
60 | ```shell
61 | $ python -m unittest -v testSomething
62 | test_mock_called_with (testSomething.TestSomethingCases) ... ok
63 | test_mock_return_value (testSomething.TestSomethingCases) ... ok
64 | test_return_value (testSomething.TestSomethingCases) ... 1 2 3 hello
65 | ok
66 |
67 | ----------------------------------------------------------------------
68 | Ran 3 tests in 0.004s
69 |
70 | OK
71 | ```
72 |
73 | ### 範例二
74 |
75 | `side_effect` 允許執行副作用,包含當 mock 被呼叫時產生例外。
76 |
77 | ```python
78 | >>> from unittest.mock import Mock
79 | >>> mock = Mock(side_effect=KeyError('foo'))
80 | >>> mock()
81 | Traceback (most recent call last):
82 | File "", line 1, in
83 | File "/usr/lib/python3.4/unittest/mock.py", line 902, in __call__
84 | return _mock_self._mock_call(*args, **kwargs)
85 | File "/usr/lib/python3.4/unittest/mock.py", line 958, in _mock_call
86 | raise effect
87 | KeyError: 'foo'
88 | ```
89 | - 呼叫 `mock` 產生例外
90 |
91 | ```python
92 | >>> values ={'a' : 1, 'b' : 2, 'c' : 3}
93 | >>> def side_effect(arg):
94 | ... return values[arg]
95 | ...
96 | >>> mock.side_effect = side_effect
97 | >>> mock('a'), mock('b'), mock('c')
98 | (1, 2, 3)
99 | ```
100 | - 透過 `side_effect()` 控制呼叫 `mock` 時回應的值
101 |
102 | ```python
103 | >>> mock.side_effect = [5, 4, 3, 2, 1]
104 | >>> mock(), mock(), mock()
105 | (5, 4, 3)
106 | ```
107 | - 預設呼叫 `mock` 回應的值
108 |
109 | ### 範例三
110 |
111 | ----
112 |
113 | ## Using Mock
114 |
115 | ### Mock Patching Methods
116 |
117 | Mock 通常用在
118 |
119 | - 取代物件方法 (stub)
120 | - 檢查物件方法呼叫是否合乎預期 (spy)
121 |
122 | ```python
123 | >>> from unittest.mock import MagicMock
124 | >>> class SomeClass:
125 | ... def method(self, a, b, c):
126 | ... return a + b + c
127 | ...
128 | >>> real = SomeClass()
129 | >>> real.method(1,2,3)
130 | 6
131 | >>> real.method = MagicMock(name='method')
132 | >>> real.method(2,3,4)
133 |
134 | >>> real.method.assert_called_with(2,3,4)
135 | ```
136 | ### Mock for Method Calls on an Object
137 |
138 | 傳遞物件給方法,檢查物件是否被正確使用
139 |
140 | ```python
141 | >>> class ProductionClass:
142 | ... def closer(self, something):
143 | ... something.close()
144 | ...
145 | >>> real = ProductionClass()
146 | >>> mock = MagicMock()
147 | >>> real.closer(mock)
148 | >>> mock.close.assert_called_with()
149 | ```
150 | - `ProductionClass.closer` 會呼叫傳入參數的方法 `something.close()`
151 | - `mock = MagicMock()` 產生 spy 傳入方法中,然後檢是否被正確呼叫
152 |
153 | ### Mocking Classes
154 |
155 | 常見的情況是要在測試中用替換某類別,當你 patch 一個類別,這個類別就被 mock 取代。類別的物件是在被呼叫的方法中產生,你可以藉由查看被偽裝類別的回傳值存取偽裝物件。
156 |
157 | > 不用 IoC 嗎?
158 |
159 | module.py:
160 | ```python
161 | class Foo:
162 | def method(self):
163 | return 'foo'
164 | ```
165 |
166 | software under test:
167 | ```python
168 | >>> import module
169 | >>> def some_function():
170 | ... instance = module.Foo()
171 | ... return instance.method()
172 | ...
173 | >>> some_function()
174 | 'foo'
175 | ```
176 |
177 | 用 mock 取代 `module.Foo`
178 | ```python
179 | >>> from unittest.mock import patch
180 | >>> with patch('module.Foo') as mock:
181 | ... instance = mock.return_value
182 | ... instance.method.return_value = 'bar
183 | ... result = some_function()
184 | ... assert result == 'bar'
185 | ```
186 |
187 | ### Naming your mocks
188 |
189 | 命名 mock 物件,當出現錯誤可以快速找到原因
190 |
191 | ```python
192 | >>> from unittest.mock import MagicMock
193 | >>> mock = MagicMock(name='foo')
194 | >>> mock
195 |
196 | >>> mock.method
197 |
198 | ```
199 |
200 | ### Tracking all Calls
201 |
202 | `mock_calls` 屬性紀錄所有呼叫 mock 與其子類的歷程
203 |
204 | ```python
205 | >>> from unittest.mock import MagicMock
206 | >>> mock = MagicMock()
207 | >>> mock.method(1)
208 |
209 | >>> mock.method(2)
210 |
211 | >>> mock.method(3)
212 |
213 | >>> mock.mock_calls
214 | [call.method(1), call.method(2), call.method(3)]
215 | ```
216 | ### Setting Return Values and Attributes
217 |
218 | 設定 mock 回傳值很簡單
219 | ```python
220 | >>> from unittest.mock import Mock
221 | >>> mock = Mock()
222 | >>> mock.return_value = 3
223 | >>> mock()
224 | ```
225 |
226 | 可以定義 mock 方法的回傳值
227 | ```python
228 | >>> mock = Mock()
229 | >>> mock.method.return_value = 3
230 | >>> mock.method()
231 | 3
232 | ```
233 |
234 | 可以在建構函式中宣告回傳值
235 | ```python
236 | >>> mock = Mock(return_value = 3)
237 | >>> mock()
238 | 3
239 | ```
240 |
241 | 可以設定 mock 的屬性值
242 | ```python
243 | >>> mock = Mock()
244 | >>> mock.x = 3
245 | >>> mock.x
246 | 3
247 | ```
248 |
249 | 有時候要設定更複雜的情況,例如 `mock.connection.cursor().execute("SELECT 1")`,如果希望回傳一個陣列,就要設定一個遞迴呼叫的回傳結果。
250 | ```python
251 | >>> from unittest.mock import call
252 | >>> mock = Mock()
253 | >>> cursor = mock.connection.coursor.return_value
254 | >>> cursor.execute.return_value = ['foo']
255 | >>> mock.connection.coursor().execute("SELECT 1")
256 | ['foo']
257 | >>> expected = call.connection.coursor().execute("SELECT 1").call_list()
258 | >>> mock.mock_calls
259 | [call.connection.coursor(), call.connection.coursor().execute('SELECT 1')]
260 | >>> mock.mock_calls == expected
261 | True
262 | ```
263 | - `cursor = mock.connection.coursor.return_value` 產生第一個回傳值,回傳一個 `cursor`
264 | - `cursor.execute.return_value = ['foo']` 設定執行第一個回傳值的結果,回傳一個陣列
265 |
266 | 使用偽造的 cursor 查詢資料庫
267 | ```python
268 | >>> cursor.execute("SELECT 1")
269 | ['foo']
270 | ```
271 |
272 | ### Raising exceptions with mocks
273 |
274 | 做出一個會產生例外的 mock
275 | ```python
276 | >>> from unittest.mock import Mock
277 | >>> mock = Mock(side_effect=Exception('Boom!'))
278 | >>> mock()
279 | Traceback (most recent call last):
280 | File "", line 1, in
281 | File "/usr/lib/python3.4/unittest/mock.py", line 902, in __call__
282 | return _mock_self._mock_call(*args, **kwargs)
283 | File "/usr/lib/python3.4/unittest/mock.py", line 958, in _mock_call
284 | raise effect
285 | Exception: Boom!
286 | ```
287 |
288 | ### Side effect functions and iterables
289 |
290 | `side_effect` 可以設定為函數或 **iterable**。當 mock 預計要被多次呼叫,每次回傳不同的值。當設定 side_effect 成為 iterable,每次呼叫會從 iterable 回傳 next value。
291 |
292 | ```python
293 | >>> from unittest.mock import MagicMock
294 | >>> mock = MagicMock(side_effect=[4,5,6])
295 | >>> mock()
296 | 4
297 | >>> mock()
298 | 5
299 | >>> mock()
300 | 6
301 | >>> mock()
302 | Traceback (most recent call last):
303 | File "", line 1, in
304 | File "/usr/lib/python3.4/unittest/mock.py", line 902, in __call__
305 | return _mock_self._mock_call(*args, **kwargs)
306 | File "/usr/lib/python3.4/unittest/mock.py", line 961, in _mock_call
307 | result = next(effect)
308 | StopIteration
309 | ```
310 |
311 | 更進階用法是根據傳入參數變化回傳的值,此時 side_effect 可以是個 **function**。下例透過 dictionary 偽造傳入參數與回傳值的對應關係。
312 | ```python
313 | >>> vals = {(1,2): 1, (2,3): 2}
314 | >>> def side_effect(*args):
315 | ... return vals[args]
316 | ...
317 | >>> mock = MagicMock(side_effect=side_effect)
318 | >>> mock(1,2)
319 | 1
320 | >>> mock(2,3)
321 | 2
322 | ```
323 |
324 | ### Creating a Mock from an Existing Object
325 |
326 | 有時隨著時間演進,測試與待測物變得不匹配,例如 `Foo` 原先有 `old_method` 方法,但後來改成 `method`。使用 spec 關鍵字,當存取的方法或屬性不存在於 spec 定義的物件中,就會立即產生錯誤。
327 |
328 | ```python
329 | >>> class Foo:
330 | ... def method():
331 | ... return 'foo'
332 | ...
333 | >>> mock = Mock(spec=Foo)
334 | >>> mock.method.return_value = 'bar'
335 | >>> mock.method()
336 | 'bar'
337 | >>> mock.old_method.return_value = 'baz'
338 | Traceback (most recent call last):
339 | File "", line 1, in
340 | File "/usr/lib/python3.4/unittest/mock.py", line 574, in __getattr__
341 | raise AttributeError("Mock object has no attribute %r" % name)
342 | AttributeError: Mock object has no attribute 'old_method'
343 | ```
344 |
345 | 也可以使用 spec 定義呼叫 mock 的方法,不管參數是根據位置傳遞或是依照參數名稱傳遞。
346 | ```python
347 | >>> def f(a,b,c): pass
348 | ...
349 | >>> mock = Mock(spec=f)
350 | >>> mock(1,2,3)
351 |
352 | >>> mock.assert_called_with(a=1, b=2, c=3)
353 | >>> mock(c=3, b=2, a=1)
354 |
355 | >>> mock.assert_called_with(a=1, b=2, c=3)
356 | ```
357 |
358 | ## Patch Decorators
359 |
360 | “使用patch或者patch.object的目的是为了控制mock的范围,意思就是在一个函数范围内,或者一个类的范围内,或者with语句的范围内mock掉一个对象。” - [Python Mock的入门](https://segmentfault.com/a/1190000002965620)
361 |
362 | - [`patch()`](https://docs.python.org/3.4/library/unittest.mock.html#unittest.mock.patch) acts as a function decorator, class decorator or a context manager. Inside the body of the function or with statement, the target is patched with a new object. When the function/with statement exits the patch is undone.
363 | - [`patch.object()`](https://docs.python.org/3.4/library/unittest.mock.html#unittest.mock.patch.object) can be used as a decorator, class decorator or a context manager. Arguments new, spec, create, spec_set, autospec and new_callable have the same meaning as for patch(). Like patch(), patch.object() takes arbitrary keyword arguments for configuring the mock object it creates.
364 |
365 | Game.py:
366 | ```python
367 | import random
368 |
369 | def choice(*seq):
370 | return random.choice(seq)
371 |
372 | class Game:
373 | def coin(self):
374 | return choice(['head', 'tail'])
375 |
376 | def bet(self, side):
377 | return 'win' if side == self.coin() else 'lose'
378 | ```
379 | - `choice()` 隨機回傳 seq 裡面任意元素
380 | - `coin()` 透過 `choice()` 決定硬幣正反面
381 | - `bet()` 判斷 `side` 與 `coin()` 是否相同,決定輸贏
382 |
383 | testGame.py:
384 | ```python
385 | import unittest
386 | from unittest.mock import patch
387 |
388 | class TestGame(unittest.TestCase):
389 |
390 | def test_head_tail(self):
391 | def always_tail(self):
392 | return 'tail'
393 | with patch('Game.choice', always_tail):
394 | from Game import Game
395 | game = Game()
396 | self.assertEqual(game.bet('head'), 'lose')
397 |
398 | def test_head_head(self):
399 | from Game import Game
400 | def always_head(self):
401 | return 'head'
402 | with patch.object(Game, 'coin', always_head):
403 | game = Game()
404 | self.assertEqual(game.bet('head'), 'win')
405 | ```
406 |
407 | 為了測試 `Game.bet` 裡面判斷輸贏的邏輯是否正確,必須將底層的依賴元件取代為可操作結果的 test double。取代有兩種方式,`patch` 與 `patch.object`:
408 |
409 | - `test_head_tail`: 用 `always_tail` 取代 `Game` 模組的 `choice` 函式
410 | - `test_head_head`: 用 `always_head` 取代 `Game` 類別的 `coni` 方法
411 |
412 | run test:
413 | ```chell
414 | $ python -m unittest -v test
415 | test_head_head (test.TestGame) ... ok
416 | test_head_tail (test.TestGame) ... ok
417 |
418 | ----------------------------------------------------------------------
419 | Ran 2 tests in 0.010s
420 |
421 | OK
422 | ```
423 |
424 | ## Further Examples
425 |
426 | ### Mocking chained calls
427 |
428 | 一旦理解 `return_value` 這個屬性,偽裝一連串的呼叫使用上會很直覺。當 `mock` 第一次被呼叫,或是在呼叫前讀取 `return_value`,新的 `mock` 物件就因應而生。
429 |
430 | ```python
431 | >>> from unittest.mock import Mock
432 | >>> mock = Mock()
433 | >>> mock().foo(a=2,b=3)
434 |
435 | >>> mock.return_value.foo.assert_called_with(a=2,b=3)
436 | ```
437 | - 呼叫 `mock()` 則產生一個新的 mock 物件,然後繼續呼叫新 mock 物件的方法 `foo(a=2,b=3)`
438 | - 最後用 `mock.return_value.foo.assert_called_with(a=2,b=3)` 檢查一開始的 `mock` 產生的物件 `mock.return_value` 的 `foo` 方法是否以 `(a=2,b=3)` 方式呼叫
439 |
440 | ### Partial mocking
441 | ### Mocking a Generator Method
442 | ### Applying the same patch to every test method
443 | ### Mocking Unbound Methods
444 | ### Checking multiple calls with mock
445 | ### Coping with mutable arguments
446 | ### Nesting Patches
447 | ### Mocking a dictionary with MagicMock
448 | ### Mock subclasses and their attributes
449 | ### Mocking imports with patch.dict
450 | ### Tracking order of calls and less verbose call assertions
451 | ### More complex argument matching
452 |
453 | ----
454 | ## 參考
455 | - [unittest.mock — mock object library
456 | ](https://docs.python.org/3.4/library/unittest.mock.html)
457 | - [unittest.mock — getting started](https://docs.python.org/3.4/library/unittest.mock-examples.html)
458 |
--------------------------------------------------------------------------------
/jenkins.md:
--------------------------------------------------------------------------------
1 | # Jenkins
2 |
3 | Jenkins is an award-winning, cross-platform, **continuous integration** and **continuous delivery** application that increases your productivity. Use Jenkins to build and test your software projects continuously making it easier for developers to integrate changes to the project, and making it easier for users to obtain a fresh build. It also allows you to continuously deliver your software by providing powerful ways to define your build pipelines and integrating with a large number of testing and deployment technologies. - 摘錄 [Jenkins](https://wiki.jenkins-ci.org/display/JENKINS/Meet+Jenkins) 官網介紹
4 |
5 | ## 安裝
6 |
7 | 參考: https://wiki.jenkins-ci.org/display/JENKINS/Installing+Jenkins+on+Ubuntu
8 |
9 | 依照官網說明安裝 Jenkins 非常簡單
10 | ```shell
11 | $ wget -q -O - https://jenkins-ci.org/debian/jenkins-ci.org.key | sudo apt-key add -
12 | $ sudo sh -c 'echo deb http://pkg.jenkins-ci.org/debian-stable binary/ > /etc/apt/sources.list.d/jenkins.list'
13 | $ sudo apt-get update
14 | $ sudo apt-get install jenkins
15 | ```
16 |
17 | 安裝完後,Jenkins 預設已經啟動
18 | ```shell
19 | $ ps aux | grep jenkins
20 | jenkins 10670 0.0 0.0 18596 172 ? S 16:27 0:00 /usr/bin/daemon --name=jenkins --inherit --env=JENKINS_HOME=/var/lib/jenkins --output=/var/log/jenkins/jenkins.log --pidfile=/var/run/jenkins/jenkins.pid -- /usr/bin/java -Djava.awt.headless=true -jar /usr/share/jenkins/jenkins.war --webroot=/var/cache/jenkins/war --httpPort=8080 --ajp13Port=-1
21 | jenkins 10671 9.9 35.4 1186188 179532 ? Sl 16:27 0:34 /usr/bin/java -Djava.awt.headless=true -jar /usr/share/jenkins/jenkins.war --webroot=/var/cache/jenkins/war --httpPort=8080 --ajp13Port=-1
22 | vagrant 10752 0.0 0.4 12720 2124 pts/1 S+ 16:33 0:00 grep --color=auto jenkins
23 | ```
24 |
25 | 手動設定 Jenkins 服務
26 | ```shell
27 | $ sudo service jenkins start # 啟動
28 | $ sudo service jenkins stop # 停止
29 | $ sudo service jenkins restart # 重新啟動
30 | ```
31 |
32 | ## 啟動與存取
33 |
34 | 參考: https://wiki.jenkins-ci.org/display/JENKINS/Starting+and+Accessing+Jenkins
35 |
36 | 啟動 Jenkins 最簡單的方式
37 | ```shell
38 | $ java -jar jenkins.war
39 | ```
40 |
41 | 打開瀏覽器,開啟 http://192.168.33.10:8080/ (192.168.33.10 是[虛擬機](environment.md)的IP),就能看到管理介面
42 |
43 | ### 變更語言
44 |
45 | 啟動 Jenkins 後,因為瀏覽器語系關係為顯示為中文操作介面,想改成與官網說明一樣的英文介面,依照下面步驟
46 |
47 | - 安裝插件:「管理 Jenkins」→「管理外掛程式」→「過濾條件」輸入 `locale` →「下載並於重新啟動後安裝」
48 | - 變更語系:「管理 Jenkins」→「設定系統」→「預設語言」輸入 `en_US` →「Ignore browser preference and force this language to all users」
49 |
50 | 
51 |
52 | ### Jenkins 功能階層圖
53 | ```
54 | Jenkins Home
55 | |-- Jenkins configure
56 | |-- Build Jobs
57 | |-- Job_A
58 | | |-- Job Configure
59 | | |-- Build History
60 | | |-- Build #1
61 | | |-- Build #2
62 | | |-- Build #3
63 | |-- Job_B
64 | |-- Job_C
65 | ```
66 |
67 | ## 實驗一:“Hello World”
68 |
69 | ### 練習目標
70 |
71 | - 在開發環境上
72 | - 無
73 |
74 | - 在 Jenkins Server 上
75 | - 建立簡單的 Build Job
76 | - 手動執行 Build Job
77 | - 自動執行 Build Job (週期性)
78 |
79 | ### 在 Jenkins Server 上
80 |
81 | #### 建立 Build Job
82 |
83 | - 到 Jenkins 首頁,點選「New Item」
84 | - 「Item name」填入 `myBuild`,選擇「Freestyle project」,接著進入設定 Build Job 細節頁面
85 | - 「Build」內按下「Add build step」,選擇「Execute shell」,「Command」填入下面 shell script
86 | - 按下「Save」儲存離開
87 |
88 | ```shell
89 | #!/bin/bash
90 | echo "Hello World"
91 | ```
92 |
93 | #### 手動執行
94 |
95 | - 到「myBuild」頁面,點選「Build Now」
96 | - 看到「Build History」出現 Build item,點選 #1
97 | - 點選「Console Output」,看到以下 Build process
98 |
99 | ```
100 | Started by user anonymous
101 | Building in workspace /var/lib/jenkins/jobs/myProject/workspace
102 | [workspace] $ /bin/bash /tmp/hudson6372466822262253605.sh
103 | Hello World
104 | Finished: SUCCESS
105 | ```
106 |
107 | #### 自動執行
108 |
109 | - 到「myBuild」頁面,點選「Configure」
110 | - 「Build Triggers」下點選「Build periodically」,「Schedule」填入 `* * * * *` (表示每分鐘 build 一次)
111 | - 按下「Save」儲存離開
112 | - 等待數分鐘,看到「Build History」出現多個 Build item
113 |
114 | ## 實驗二:配合 SCM 進行自動化建置
115 |
116 | Jenkins 能根據 Source Code Management (SCM) 上程式碼的變化觸發建置與測試,除了預設的 CVS 還有許多 plugin 支援各式各樣的版本控制系統,如 Accurev, Bazaar, BitKeeper, ClearCase, CMVC, Dimensions, Git, CA Harvest, Mercurial, Perforce, PVCS, StarTeam, CM/Synergy, Microsoft Team Foundation Server, and even Visual SourceSafe。 (資料來源[Jenkins: The Definitive Guide](https://www.safaribooksonline.com/library/view/jenkins-the-definitive/9781449311155/ch05s04.html))
117 |
118 | ### 練習目標
119 |
120 | - 在開發環境上
121 | - 建立專案,設定 Git repository
122 |
123 | - 在 Jenkins Server 上
124 | - 安裝 plugin (Git)
125 | - 隨著 Git repository 更新,進行自動化建置
126 |
127 | ### 在開發環境上
128 |
129 | #### 建立工作目錄
130 |
131 | ```shell
132 | $ mkdir myWorkspace
133 | $ cd myWorkspace
134 | ```
135 |
136 | #### 設定 Python 版本
137 |
138 | ```shell
139 | $ pyenv local 3.5.1
140 | $ python --version
141 | Python 3.5.1
142 | ```
143 |
144 | #### 建立虛擬環境
145 |
146 | ```shell
147 | $ pyvenv venv
148 | ```
149 |
150 | #### 切換虛擬環境
151 |
152 | ```shell
153 | $ pyvenv venv
154 | $ source venv/bin/activate
155 | (venv) $ pip install --upgrade pip
156 | ```
157 |
158 | > 出現 (venv) 提示表示目前使用 Python virtualenv,往後範例省略顯示
159 |
160 | #### 建立專案目錄
161 |
162 | ```shell
163 | $ mkdir myProject
164 | $ cd myProject
165 | $ pwd
166 | /home/vagrant/myWorkspace/myProject
167 | ```
168 |
169 | #### 產生 HelloWorld.py
170 |
171 | ```shell
172 | $ echo 'print("Hello World")' > HelloWorld.py
173 | $ python HelloWorld.py
174 | Hello World
175 | ```
176 |
177 | #### 初始化 Git repository
178 |
179 | ```shell
180 | $ git init
181 | ```
182 |
183 | #### 將 HelloWorld.py 加入 Git repository
184 |
185 | ```shell
186 | $ git add .
187 | $ git commit -m "add a python file"
188 | ```
189 |
190 | ### 在 Jenkins Server 上
191 |
192 | #### 安裝 Git plugin
193 |
194 | - 到 Jenkins 首頁,選擇「Manage Jenkins」
195 | - 點選「Manage Plugins」,進入設定插件管理頁面
196 | - 選擇「Available」標籤,「filter」輸入 `Git plugin`
197 | - 選取「Git plugin」,按下「Install without restart」
198 | - 等候安裝完成
199 |
200 | #### 修改 Build Job
201 |
202 | - 到「myBuild」頁面,點選「Configure」
203 | - 「Source Code Management」下選擇「Git」,「Repository URL」填入 `file:///home/vagrant/myWorkspace/myProject`
204 | - 「Build Triggers」,取消「Build periodically」,改選取「Poll SCM」,「Schedule」填入 `* * * * *` (表示每分鐘查詢 git repository 一次,如果 git repository 有更新則觸發 Build Job)
205 | - 「Build」下「Execute shell」,「Command」改成下面 shell script
206 | - 按下「Save」儲存離開
207 |
208 | ```shell
209 | #!/bin/bash
210 | python --version
211 | python HelloWorld.py
212 | ```
213 |
214 | 如果 git repository 在 Jenkins Server 上從未建置過、或有任何更新產生,會在一分鐘內看到自動執行的 Build result
215 |
216 | ```shell
217 | Started by an SCM change
218 | Building in workspace /var/lib/jenkins/jobs/myProject/workspace
219 | Cloning the remote Git repository
220 | Cloning repository file:///home/vagrant/myWorkspace/myProject
221 | > git init /var/lib/jenkins/jobs/myProject/workspace # timeout=10
222 | Fetching upstream changes from file:///home/vagrant/myWorkspace/myProject
223 | > git --version # timeout=10
224 | > git -c core.askpass=true fetch --tags --progress file:///home/vagrant/myWorkspace/myProject +refs/heads/*:refs/remotes/origin/*
225 | > git config remote.origin.url file:///home/vagrant/myWorkspace/myProject # timeout=10
226 | > git config --add remote.origin.fetch +refs/heads/*:refs/remotes/origin/* # timeout=10
227 | > git config remote.origin.url file:///home/vagrant/myWorkspace/myProject # timeout=10
228 | Fetching upstream changes from file:///home/vagrant/myWorkspace/myProject
229 | > git -c core.askpass=true fetch --tags --progress file:///home/vagrant/myWorkspace/myProject +refs/heads/*:refs/remotes/origin/*
230 | > git rev-parse refs/remotes/origin/master^{commit} # timeout=10
231 | > git rev-parse refs/remotes/origin/origin/master^{commit} # timeout=10
232 | Checking out Revision 8e045c06247802b5d08f757c0a9fe467a3700424 (refs/remotes/origin/master)
233 | > git config core.sparsecheckout # timeout=10
234 | > git checkout -f 8e045c06247802b5d08f757c0a9fe467a3700424
235 | First time build. Skipping changelog.
236 | [workspace] $ /bin/bash /tmp/hudson105525603757121577.sh
237 | Python 2.7.9
238 | Hello World
239 | Finished: SUCCESS
240 | ```
241 |
242 | 雖然建置成功,但是 `python --version` 顯示 Python 2.7.9,跟開發環境使用的版本 Python 3.5.1 不同。接下來要讓 Jenkins Server 的執行環境跟開發環境保持一致。
243 |
244 | ## 實驗三:設定環境
245 |
246 | ### 練習目標
247 |
248 | - 在開發環境上
249 | - 無
250 |
251 | - 在 Jenkins Server 上
252 | - 安裝 plugin (pyenv)
253 | - 設定 Build environment
254 |
255 | ### 在 Jenkins Server 上
256 |
257 | #### 安裝 pyenv plugin
258 |
259 | - 到 Jenkins 首頁,選擇「Manage Jenkins」
260 | - 點選「Manage Plugins」,進入設定插件管理頁面
261 | - 選擇「Available」標籤,「filter」輸入 `pyenv plugin`
262 | - 選取「Git plugin」,按下「Install without restart」
263 | - 等候安裝完成
264 |
265 | > 我的經驗:安裝 pvenv plugin 後要重新啟動 jenkins,這個 plugin 才會生效
266 |
267 | #### 修改 Build Job
268 |
269 | - 到「myBuild」頁面,點選「Configure」
270 | - 「Build Environment」內選取「pyenv build wrapper」,「The Python version」填寫 `3.5.1`
271 | - 按下「Save」儲存離開
272 |
273 | 修改 myBuild Configure,不會觸發 Build Job,手動執行後觀察結果
274 |
275 | - 到「myBuild」頁面,點選「Build Now」
276 | - 看到「Build History」出現 Build item,點選最新的 Build result
277 | - 點選「Console Output」,看到以下 Build process
278 |
279 | ```
280 | ... (略)
281 | Python 3.5.1
282 | Hello World
283 | Finished: SUCCESS
284 | ```
285 |
286 | 除了執行程式,Jenkins 還可以將自動執行單元測試。接下來看看 Jenkins 怎麼將瑣碎的手動步驟變成自動化。
287 |
288 | ## 實驗四:自動化單元測試
289 |
290 | ### 練習目標
291 |
292 | - 在開發環境上
293 | - 建立一個 Arithmetic 類別與單元測試
294 | - 手動執行測試
295 |
296 | - 在 Jenkins Server 上
297 | - 設定自動化測試
298 |
299 | ### 在開發環境上
300 |
301 | #### 新增檔案 Arithmetic.py
302 |
303 | ```python
304 | def add(a, b):
305 | return a + b
306 |
307 | def subtract(a, b):
308 | return a - b
309 |
310 | def multiply(a, b):
311 | return a * b
312 |
313 | def divide(a, b):
314 | return a / b
315 |
316 | ##############################################
317 | # Unittest
318 |
319 | import unittest
320 |
321 | class TestArithmetic(unittest.TestCase):
322 |
323 | def testAdd(self):
324 | self.assertEqual(add(1, 1), 2)
325 |
326 | def test_subtract(self):
327 | self.assertEqual(subtract(5, 2), 3)
328 |
329 | def test_multiply(self):
330 | self.assertEqual(multiply(3, 2), 6)
331 |
332 | def test_divide(self):
333 | self.assertEqual(divide(3.0, 2), 1.5)
334 | ```
335 |
336 | #### 手動測試
337 |
338 | ```shell
339 | $ python -m unittest -v Arithmetic.py
340 | testAdd (Arithmetic.TestArithmetic) ... ok
341 | test_divide (Arithmetic.TestArithmetic) ... ok
342 | test_multiply (Arithmetic.TestArithmetic) ... ok
343 | test_subtract (Arithmetic.TestArithmetic) ... ok
344 |
345 | ----------------------------------------------------------------------
346 | Ran 4 tests in 0.003s
347 |
348 | OK
349 | ```
350 |
351 | > 非常重要的原則:檔案進 SCM 前,一定要確定程式碼可以編譯成功,單元測試可以順利通過
352 |
353 | #### 新增檔案 .gitignore
354 |
355 | .gitignore 可以避免不必要的資料提交到 git repository,例如編譯中間檔、資料庫、密碼等等。目前先略過 Python cache data
356 |
357 | ```
358 | __pycache__
359 | ```
360 |
361 | #### 提交程式碼
362 |
363 | ```shell
364 | $ git add .
365 | $ git commit -m "add Arithmetic with unittest"
366 | ```
367 |
368 | ### 在 Jenkins Server 上
369 |
370 | #### 修改 Build Job
371 |
372 | - 到「myBuild」頁面,點選「Configure」
373 | - 「Build」下「Execute shell」,「Command」改成下面 shell script
374 | - 按下「Save」儲存離開
375 |
376 | ```shell
377 | #!/bin/bash
378 | python -m unittest -v *.py
379 | ```
380 |
381 | 修改 myBuild Configure,不會觸發 Build Job,手動執行後觀察結果
382 |
383 | - 到「myBuild」頁面,點選「Build Now」
384 | - 看到「Build History」出現 Build item,點選最新的 Build result
385 | - 點選「Console Output」,看到以下 Build process
386 |
387 | ```
388 | ... (略)
389 | testAdd (Arithmetic.TestArithmetic) ... ok
390 | test_divide (Arithmetic.TestArithmetic) ... ok
391 | test_multiply (Arithmetic.TestArithmetic) ... ok
392 | test_subtract (Arithmetic.TestArithmetic) ... ok
393 |
394 | ----------------------------------------------------------------------
395 | Ran 4 tests in 0.000s
396 |
397 | OK
398 | Hello World
399 | Finished: SUCCESS
400 | ```
401 |
402 | 使用 `python -m unittest *.py` 執行單元測試太過土砲,接下來改用正式的執行方式,順便導入一些靜態檢查的工具。
403 |
404 | ## 實驗五:自動化測試工具
405 |
406 | ### 練習目標
407 |
408 | - 在開發環境上
409 | - 使用 pip 安裝 [coverage](http://nedbatchelder.com/code/coverage/), [nose](https://nose.readthedocs.org/), [pylint](http://www.pylint.org/) 套件
410 | - 使用 coverage 產生程式碼覆蓋率的分析報告
411 | - 使用 nosetest 運行單元測試
412 | - 使用 pylint 產生程式碼質量的分析報告
413 | - 提交 Python 套件相依清單到 git repository
414 |
415 | - 在 Jenkins Server 上
416 | - 以 jenkins 使用者身份安裝 virtualenv
417 | - 設定自動化測試工具
418 |
419 | ### 在開發環境上
420 |
421 | #### 安裝套件
422 |
423 | ```shell
424 | $ pip install coverage nose pylint
425 | ```
426 |
427 | #### 運行單元測試
428 |
429 | ```shell
430 | $ nosetests --with-xunit --all-modules --traverse-namespace --with-coverage --cover-package=. --cover-inclusive
431 | ....
432 | Name Stmts Miss Cover
433 | -----------------------------------
434 | Arithmetic.py 18 0 100%
435 | HelloWorld.py 1 0 100%
436 | -----------------------------------
437 | TOTAL 19 0 100%
438 | ----------------------------------------------------------------------
439 | Ran 4 tests in 0.009s
440 |
441 | OK
442 | ```
443 | - 產生分析報告 nosetests.xml
444 |
445 | #### 檢查程式碼覆蓋率
446 |
447 | ```shell
448 | $ python -m coverage xml --include=*
449 | ```
450 | - 產生分析報告 coverage.xml
451 |
452 | #### 檢查程式碼質量
453 |
454 | ```shell
455 | $ pylint -f parseable *.py | tee pylint.out
456 | ...(略)
457 |
458 | Report
459 | ======
460 | 19 statements analysed.
461 |
462 | Statistics by type
463 | ------------------
464 |
465 | +---------+-------+-----------+-----------+------------+---------+
466 | |type |number |old number |difference |%documented |%badname |
467 | +=========+=======+===========+===========+============+=========+
468 | |module |2 |2 |= |0.00 |0.00 |
469 | +---------+-------+-----------+-----------+------------+---------+
470 | |class |1 |1 |= |0.00 |0.00 |
471 | +---------+-------+-----------+-----------+------------+---------+
472 | |method |4 |4 |= |0.00 |25.00 |
473 | +---------+-------+-----------+-----------+------------+---------+
474 | |function |4 |4 |= |0.00 |0.00 |
475 | +---------+-------+-----------+-----------+------------+---------+
476 |
477 | ...(略)
478 | ```
479 | - 產生分析報告 pylint.out
480 |
481 | #### 匯出套件相依列表
482 |
483 | ```shell
484 | $ pip freeze > requirements.txt
485 | ```
486 |
487 | requirements.txt 內容:
488 | ```
489 | astroid==1.4.6
490 | colorama==0.3.7
491 | coverage==4.1
492 | lazy-object-proxy==1.2.2
493 | nose==1.3.7
494 | pylint==1.5.6
495 | six==1.10.0
496 | wrapt==1.10.8
497 | ```
498 |
499 | #### 修改 .gitignore
500 |
501 | ```
502 | __pycache__
503 | .coverage
504 | coverage.xml
505 | nosetests.xml
506 | pylint.out
507 | ```
508 |
509 | #### 提交相依列表
510 |
511 | ```shell
512 | $ git add .
513 | $ git commit -m "add requirements for pip"
514 | ```
515 | ### 在 Jenkins Server 上
516 |
517 | 要在 Jenkins Server 執行開發環境相同的任務 ([coverage](http://nedbatchelder.com/code/coverage/), [nose](https://nose.readthedocs.org/), [pylint](http://www.pylint.org/)),也要安裝相同的虛擬環境。
518 |
519 | #### 設定 jenkins 環境
520 |
521 | - 以 jenkins 身份登入系統
522 | - 設定環境,[安裝 pyenv、virtualenv](environment.md#安裝-pyenvvirtualenv)
523 |
524 | ```shell
525 | $ sudo su jenkins -l
526 | $ git clone https://github.com/yyuu/pyenv.git ~/.pyenv
527 | $ git clone https://github.com/yyuu/pyenv-virtualenv.git ~/.pyenv/plugins/pyenv-virtualenv
528 | ```
529 |
530 | #### 修改 Build Job
531 |
532 | - 到「myBuild」頁面,點選「Configure」
533 | - 「Build」下「Execute shell」,「Command」改成下面 shell script
534 | - 按下「Save」儲存離開
535 |
536 | ```shell
537 | PATH=$WORKSPACE/venv/bin:/usr/local/bin:$PATH
538 |
539 | nosetests --with-xunit --all-modules --traverse-namespace --with-coverage --cover-package=. --cover-inclusive
540 | python -m coverage xml --include=*
541 | pylint -f parseable *.py | tee pylint.out
542 | ```
543 |
544 | - 到「myBuild」頁面,點選「Configure」
545 | - 「Build」內按下「Add build step」,選擇「Execute shell」,「Command」填入下面 shell script
546 | - 將這個 「Execute shell」移動到「Build」區塊最上面
547 | - 按下「Save」儲存離開
548 |
549 | ```shell
550 | PATH=$WORKSPACE/venv/bin:/usr/local/bin:$PATH
551 |
552 | if [ ! -d "venv" ]; then
553 | virtualenv venv
554 | fi
555 | . venv/bin/activate
556 | pip install -r requirements.txt
557 | ```
558 |
559 | > 上面這段 script 主要目的是設定 python 虛擬環境,並且安裝開發環境需要的 python 套件
560 |
561 | 修改 myBuild Configure,不會觸發 Build Job,手動執行後觀察結果
562 |
563 | - 到「myBuild」頁面,點選「Build Now」
564 | - 看到「Build History」出現 Build item,點選最新的 Build result
565 | - 點選「Console Output」,看到以下 Build process
566 |
567 | Jenkins Console Output 的內容就是手動執行的結果,雖然詳細但可讀性非常差。接下來在 Jenkins Server 上加入一些 plugin,讓結果可以用圖形方式呈現。
568 |
569 | ## 實驗六:圖形化測試結果
570 |
571 | ### 練習目標
572 |
573 | - 在 Jenkins Server 上
574 | - 安裝 [Cobertura plugin](https://wiki.jenkins-ci.org/display/JENKINS/Cobertura+Plugin) (用来顯示程式碼覆蓋率)
575 | - 安裝 [Violations plugin](https://wiki.jenkins-ci.org/display/JENKINS/Violations) (用來顯示程式碼是否合乎規範)
576 | - 設定 Post-build Actions,產生圖形結果
577 |
578 | ### 在 Jenkins Server 上
579 |
580 | #### 安裝 Cobertura plugin
581 |
582 | - 到 Jenkins 首頁,選擇「Manage Jenkins」
583 | - 點選「Manage Plugins」,進入設定插件管理頁面
584 | - 選擇「Available」標籤,「filter」輸入 `Cobertura plugin`
585 | - 選取「Cobertura plugin」,按下「Install without restart」
586 | - 等候安裝完成
587 |
588 | #### 安裝 Violations plugin
589 |
590 | - 到 Jenkins 首頁,選擇「Manage Jenkins」
591 | - 點選「Manage Plugins」,進入設定插件管理頁面
592 | - 選擇「Available」標籤,「filter」輸入 `Violations plugin`
593 | - 選取「Violations plugin」,按下「Install without restart」
594 | - 等候安裝完成
595 |
596 | #### 修改 Build Job
597 |
598 | - 到「myBuild」頁面,點選「Build Now」
599 | - 「Post-build Actions」下點選「Publish Cobertura Coverage Report」,「Cobertura xml report pattern」填入 `coverage.xml`
600 | - 「Post-build Actions」下點選「Publish JUnit test result report」,「Test report XMLs」填入 `nosetests.xml`
601 | - 「Post-build Actions」下點選「Report Violations」,「pylint」填入 `pylint.out`
602 | - 按下「Save」儲存離開
603 |
604 | 修改 myBuild Configure,不會觸發 Build Job,手動執行後觀察結果
605 |
606 | - 到「myBuild」頁面,點選「Build Now」
607 | - 看到「Build History」出現 Build item,點選最新的 Build result
608 | - 點選「Console Output」,看到以下 Build process
609 | - 到「myBuild」頁面,點選「Coverage Report」,觀察圖形分析報告
610 | - 到「myBuild」頁面,點選「Violations」,觀察圖形分析報告
611 |
612 | 
613 |
614 | ----
615 | ## 參考
616 | - [Using Jenkins](https://wiki.jenkins-ci.org/display/JENKINS/Use+Jenkins) - Jenkins 官網文件
617 | - [CI (Continuous integration) 關鍵技術:使用 Jenkins](http://www.books.com.tw/products/0010596579) - 偏重 Android App 開發
618 | - [持續整合與自動化測試 - 使用 Jenkins 與 Docker 進行課程實作](https://www.gitbook.com/book/smlsunxie/jenkins-workshop/details) - 內容較完整
619 | - [Jenkins CI 實戰手冊](http://jenkins.readbook.tw/) - 內容不完整
620 | - [Jenkins CI 從入門到實戰講座](http://trunk-studio.kktix.cc/events/jenkins-2016001) - 送電子書,內有詳盡的實作步驟說明
621 | - [Python Projects](https://wiki.jenkins-ci.org/display/JENKINS/Python+Projects) - Using Jenkins for Python Projects
622 | - Automated python unit testing, code coverage and code quality analysis with Jenkins - [part 1](http://bhfsteve.blogspot.tw/2012/04/automated-python-unit-testing-code.html), [part 2](http://bhfsteve.blogspot.tw/2012/04/automated-python-unit-testing-code_20.html), [part 3](http://bhfsteve.blogspot.tw/2012/04/automated-python-unit-testing-code_27.html)
623 | - [基于 Jenkins 的 Python 代码集成整合](http://yumminhuang.github.io/blog/2015/04/17/%E5%9F%BA%E4%BA%8E-jenkins-%E7%9A%84-python-%E4%BB%A3%E7%A0%81%E9%9B%86%E6%88%90%E6%95%B4%E5%90%88/)
624 | - [jenkins集成python的单元测试](http://www.mamicode.com/info-detail-1383168.html)
625 | - [Making Jenkins Work With Python's Virtualenv](http://iamnearlythere.com/jenkins-python-virtualenv/)
626 |
--------------------------------------------------------------------------------
/django.md:
--------------------------------------------------------------------------------
1 | # Django
2 |
3 | 雖然 Django 跟 BDD/TDD 沒有直接的關係,但為了開發流程的完整概念,我嘗試把 Django 這個 web framework 安裝起來,然後在上面開發與測試。
4 |
5 | 練習過程以這份 [Django Tutorial](http://daikeren.github.io/django_tutorial/) 為主,但因為版本關係有些使用方式太舊,參考了另一份 [Django Girls 學習指南](https://www.gitbook.com/book/djangogirlstaipei/django-girls-taipei-tutorial/details) 作為輔助。
6 |
7 | > 本來想練習 Django 官網提供的土托魚 Writing your first Django app, part [1](https://docs.djangoproject.com/en/1.9/intro/tutorial01/), [2](https://docs.djangoproject.com/en/1.9/intro/tutorial02/), [3](https://docs.djangoproject.com/en/1.9/intro/tutorial03/), [4](https://docs.djangoproject.com/en/1.9/intro/tutorial04/), [5](https://docs.djangoproject.com/en/1.9/intro/tutorial05/), [6](https://docs.djangoproject.com/en/1.9/intro/tutorial06/), [7](https://docs.djangoproject.com/en/1.9/intro/tutorial07/),但這一系列鉅細彌遺的讓人有點吃不消 (我只想快速上手啊,摔筆),只好改看其他人消化吸收過的東西。
8 |
9 | Let's 開始練功吧!
10 |
11 | ## 簡介
12 |
13 | 世界上除了 RoR 之外,還有其他 Web Framework,像是 Node.js 以及 Django。
14 |
15 | 如同 Python 生態環境之豐富,Django 也有很多如資料庫、表單、登入系統、管理界面等元件,大大縮短了後端開發的時間。
16 |
17 | ## 設定環境
18 |
19 | 安裝與管理套件版本是軟體開發頗讓人頭疼的一環,幸好靠著 pyenv 管理多個 Python 版本問題,與 virtualenv 創造虛擬(獨立)Python 環境的工具,Python 工程師的生活才能過得輕鬆點。
20 |
21 | ### 安裝 pyenv 與 virtualenv
22 | ```shell
23 | $ git clone https://github.com/yyuu/pyenv.git ~/.pyenv
24 | $ git clone https://github.com/yyuu/pyenv-virtualenv.git ~/.pyenv/plugins/pyenv-virtualenv
25 | $ sudo pip install virtualenv
26 | ```
27 |
28 | 設定 ~/.bashrc
29 | ```
30 | export PYENV_ROOT="$HOME/.pyenv"
31 | export PATH="$PYENV_ROOT/bin:$PATH"
32 | eval "$(pyenv init -)"
33 | ```
34 |
35 | 重新載入 ~/.bashrc
36 | ```shell
37 | $ source ~/.bashrc
38 | ```
39 |
40 | ### 安裝 Python 3.5.1
41 | ```shell
42 | $ pyenv install 3.5.1
43 | ```
44 |
45 | 設定 Python 3.5.1
46 | ```shell
47 | $ pyenv local 3.5.1
48 | $ python --version
49 | Python 3.5.1
50 | ```
51 |
52 | ### 設定虛擬環境
53 |
54 | 建立工作目錄,設定虛擬環境,更新 pip (從此只要在 virtualenv 下面安裝的 package 都只會存在于這個 virtualenv 當中,安裝套件不需要 root 權限)
55 |
56 | ```shell
57 | $ mkdir myWorkspace
58 | $ cd myWorkspace/
59 | $ pyvenv venv
60 | $ source venv/bin/activate
61 | (venv) $ pip install --upgrade pip
62 | ```
63 |
64 | > 使用 `virtualenv` 安裝虛擬環境,跟使用 `pyvenv` 結果有點不同。`virtualenv` 似乎只會安裝系統預設的 python 版本,用 `pyvenv` 裝的 python 版本跟 `pyenv local 3.5.1` 才一致。
65 |
66 | ### 安裝 Django
67 | ```shell
68 | $ pip install Django==1.9.7
69 | ```
70 |
71 | ## Django Project
72 |
73 | 建立 project
74 | ```shell
75 | $ django-admin.py startproject blog
76 | $ tree blog/
77 | blog/
78 | ├── blog
79 | │ ├── __init__.py
80 | │ ├── settings.py
81 | │ ├── urls.py
82 | │ └── wsgi.py
83 | └── manage.py
84 | ```
85 | - 外層的 `blog/`: 包含整個專案的根目錄
86 | - 內層的 `blog/`: 放置專案相關的設定
87 | - `mysite/__init__.py`: 空檔,告訴 Python 把這個目錄當成 package
88 | - `mysite/settings.py`: 專案設定檔
89 | - `mysite/urls.py`: URL 定義檔,用來告訴 Django 怎麼發送 URL request
90 | - `mysite/wsgi.py`: 用來執行專案的 WSGI-compatible web servers 進入點 (將來上雲端才會用到)
91 | - `manage.py`: 命令列工具,用來操作專案
92 |
93 | 進入外層 `blog/` (之後都在這裡開發應用程式),啟動服務
94 | ```shell
95 | $ cd blog/
96 | $ python manage.py runserver 0.0.0.0:8000
97 | ```
98 |
99 | 開啟瀏覽器,連接 `http://192.168.33.10:8000/` ([虛擬機](environment.md)),看到以下訊息
100 | ```
101 | It worked!
102 | Congratulations on your first Django-powered page.
103 | ```
104 |
105 | ## Django APPs
106 |
107 | - Django Project 由多個 Django APP 組成,每個 Django App 可以被多個 Django Project 所使用
108 | - Django App 就是一個功能單純的應用
109 |
110 | 創建 Django App
111 | ```shell
112 | $ python manage.py startapp article
113 | $ tree article/
114 | article/
115 | ├── admin.py
116 | ├── apps.py
117 | ├── __init__.py
118 | ├── migrations
119 | │ └── __init__.py
120 | ├── models.py
121 | ├── tests.py
122 | └── views.py
123 | ```
124 |
125 | 讓 project 知道多了這個 app,編輯 `blog/settings.py`
126 | ```
127 | INSTALLED_APPS = [
128 | 'django.contrib.admin',
129 | 'django.contrib.auth',
130 | 'django.contrib.contenttypes',
131 | 'django.contrib.sessions',
132 | 'django.contrib.messages',
133 | 'django.contrib.staticfiles',
134 | 'article',
135 | ]
136 | ```
137 | - 在 INSTALLED_APPS 內新增 `article`
138 |
139 | ## Django Views & Django URLs
140 |
141 | Django 不採取 MVC 架構,而是 MTV 架構。操作 View 與 URL 之前,先由下圖了解 URL Request 被如何處理,然後變成使用者在瀏覽器看到的結果。
142 |
143 | (圖片出處 http://mropengate.blogspot.tw/2015/08/mvcdjangomtv.html)
144 |
145 | 1. URL 派送器 (urls.py) 將 URL Request 對應到 View 的函式
146 | 2. View 函式 (views.py) 執行 request 動作,通常引發讀寫資料庫的動作
147 | 3. Model (models.py) 定義資料庫的資料以及如何跟它互動的方式
148 | 4. 處理完 request 任務,View 就會回覆 HTTP Response 給瀏覽器
149 | 5. Templates 放置 HTML 檔案,這些檔案包含 HTML 語法與網頁如何呈現的邏輯
150 |
151 | 創建一個 View,修改 article/views.py,新增一下程式
152 | ```python
153 | from django.http import HttpResponse
154 |
155 | def home(request):
156 | s = "Hello World!"
157 | return HttpResponse(s)
158 | ```
159 | - 沒有涉及底層 Model,僅僅回覆 "Hello World!" 訊息
160 |
161 | 告訴 Django 要如何處理 URL,修改 blog/urls.py,在 `urlpatterns` 加入下面程式
162 | ```python
163 | urlpatterns = [
164 | ...
165 | url(r'^$', 'article.views.home'),
166 | ]
167 | ```
168 |
169 | 重啟服務,連接 `http://192.168.33.10:8000/`,看到以下訊息
170 | ```
171 | Hello World!
172 | ```
173 |
174 | ## Django Model
175 |
176 | Django 支援許多資料庫,只要簡單設定就能存取 sqlite、PostgreSQL、MySQL 與 Oracle。
177 |
178 | 與資料庫相關設定放在 blog/settings.py,來看看
179 | ```python
180 | DATABASES = {
181 | 'default': {
182 | 'ENGINE': 'django.db.backends.sqlite3',
183 | 'NAME': os.path.join(BASE_DIR, 'db.sqlite3'),
184 | }
185 | }
186 | ```
187 | - `ENGINE` 採用 sqlite3
188 | - `NAME` 宣告資料庫檔案位置在 `blog/db.sqlite3`
189 |
190 | Django 中透過 Model 來處理與底層資料庫的互動,要在 Model 定義表格的存取方式
191 |
192 | - Model 繼承 `django.db.models.Model`
193 | - Model 的屬性 (attribute) 都是一個資料庫的欄位
194 | - 透過 Model API 執行資料庫 query,將每種資料庫 SQL 版本間的差異隱藏起來
195 |
196 | 設定 blog/article 的資料 Model,修改 articles/models.py,加入以下程式碼
197 | ```python
198 | from django.db import models
199 |
200 | # Create your models here.
201 | class Category(models.Model):
202 | name = models.CharField(u'Name', max_length=50)
203 |
204 | def __str__(self):
205 | return self.name
206 |
207 | class Article(models.Model):
208 | content = models.TextField(u'Content')
209 | title = models.CharField(u'Title', max_length=50)
210 | category = models.ForeignKey('Category', blank=True, null=True)
211 |
212 | def __str__(self):
213 | return self.title
214 | ```
215 | - 建立兩個 Model: Category & Article
216 | - Category 宣告一個屬性: `name`,並定義 `__str__` 用字串表示自己
217 | - Article 宣告三個屬性: `content` 表示文章內容, `title` 表示文章標題, `category` 使用 `ForeignKey` 定義資料表格間的關聯性
218 |
219 | 剛剛只是定義 Model,資料庫的表格還沒建立起來,要透過以下指令產生
220 | ```shell
221 | $ python manage.py makemigrations
222 | $ python manage.py migrate
223 | ```
224 |
225 | 現在透過 Django 提供的 shell 來看看資料庫表格的樣子
226 | ```
227 | $ python manage.py shell
228 | >>>
229 | ```
230 | - 看到 `>>>` 提示符號表示進入 Python REPL
231 |
232 | 試試創建三筆記錄
233 | ```python
234 | >>> from article.models import Article, Category
235 | >>> Article.objects.create(content="Test1", title="article 1")
236 |
237 | >>> Article.objects.create(content="Test2", title="article 2")
238 |
239 | >>> c = Category.objects.create(name="category 1")
240 | >>> Article.objects.create(content="Test3", title="article 3", category=c)
241 |
242 | >>>
243 | ```
244 |
245 | 查詢剛剛插入的資料
246 | ```python
247 | >>> Article.objects.all()
248 | [, , , ]
249 | >>> for article in Article.objects.all():
250 | ... print(article.title)
251 | ...
252 | article 1
253 | article 2
254 | article 3
255 | ```
256 |
257 | 修改一筆記錄
258 | ```python
259 | >>> from article.models import Article, Category
260 | >>> a = Article.objects.get(title="article 1")
261 | >>> a.title = "Article"
262 | >>> a.save()
263 | ```
264 |
265 | 操作完畢,使用 Ctrl-D 離開 Python REPL
266 |
267 | Django Model 幫忙處理了與資料庫互動的部分,我很好奇它做了什麼,以下透過 sqlite 直接下 SQL 來看看
268 | ```shell
269 | $ sqlite3 db.sqlite3
270 | ```
271 |
272 | 透過 `.table` 命令列出所有表格
273 | ```mysql
274 | sqlite> .tables
275 | article_article auth_user_groups
276 | article_category auth_user_user_permissions
277 | auth_group django_admin_log
278 | auth_group_permissions django_content_type
279 | auth_permission django_migrations
280 | auth_user django_session
281 | ```
282 | - `article_article` 對應到 article/models.py 裡面的 `class Article(models.Model)`
283 | - `article_category` 對應到 article/models.py 裡面的 `class Category(models.Model)`
284 |
285 | 使用 `.schema` 顯示表格 schema
286 | ```sql
287 | sqlite> .schema article_article
288 | CREATE TABLE "article_article" ("id" integer NOT NULL PRIMARY KEY AUTOINCREMENT, "content" text NOT NULL, "title" varchar(50) NOT NULL, "category_id" integer NULL REFERENCES "article_category" ("id"));
289 | CREATE INDEX "article_article_b583a629" ON "article_article" ("category_id");
290 | sqlite> .schema article_category
291 | CREATE TABLE "article_category" ("id" integer NOT NULL PRIMARY KEY AUTOINCREMENT, "name" varchar(50) NOT NULL);
292 | ```
293 | - 除了原先設定的表格,Django Model 還透過 `id` 維護一個自動增加的唯一主鍵
294 |
295 | 查詢 `article_article` 與 `article_category` 表格內容
296 | ```sql
297 | sqlite> .header on
298 | sqlite> .mode column
299 | sqlite> SELECT * FROM article_article;
300 | id content title category_id
301 | ---------- ---------- ---------- -----------
302 | 1 Test1 Article
303 | 2 Test2 article 2
304 | 3 Test3 article 3 1
305 | sqlite> SELECT * FROM article_category;
306 | id name
307 | ---------- ----------
308 | 1 category 1
309 | ```
310 |
311 | 不做任何修改,使用 `.quit` 離開
312 | ```sql
313 | sqlite> .quit
314 | ```
315 |
316 | ## Django Admin
317 |
318 | 除了可以透過 Shell 操作 Model,Django 提供了 admin app 讓使用者可以透過 web UI 做創造、讀取、更新、刪除的動作。
319 |
320 | Django 預設安裝 admin,打開 blog/settings.py 查看
321 | ```python
322 | INSTALLED_APPS = [
323 | 'django.contrib.admin',
324 | ...
325 | ]
326 | ```
327 |
328 | URL 導向設定在 blog/urls.py
329 | ```python
330 | urlpatterns = [
331 | url(r'^admin/', admin.site.urls),
332 | ...
333 | ]
334 | ```
335 |
336 | 修改 article/admin.py,告訴 Django 建立了 Category, Article 這兩個 Model
337 | ```python
338 | from django.contrib import admin
339 | from article.models import Article, Category
340 |
341 | # Register your models here.
342 | admin.site.register(Article)
343 | admin.site.register(Category)
344 | ```
345 |
346 | 設定 superuser 帳號
347 | ```shell
348 | $ python manage.py createsuperuser
349 | Username (leave blank to use 'vagrant'): django
350 | Email address: printk@gmail.com
351 | Password:
352 | Password (again):
353 | Superuser created successfully.
354 | You have mail in /var/mail/vagrant
355 | ```
356 |
357 | 設定完成,啟動服務,登入 http://192.168.33.10:8000/admin/,透過 Web UI 新增、查詢、修改、刪除記錄。
358 |
359 | ## Django Views & Django URL 再訪
360 |
361 | 想辦法做出讓網站可以根據 URL 動態產生網頁,例如 URL=`article/1/` 呈顯第一則文章
362 |
363 | 先從 view 開始,修改 article/views.py,加上下面程式碼
364 | ```python
365 | from article.models import Article
366 |
367 | def detail(request, pk):
368 | article = Article.objects.get(pk=int(pk))
369 | s = """
370 |
371 |
372 |
373 | {0}
374 | {1}
375 |
376 |
377 | """.format(article.title, article.content)
378 | return HttpResponse(s)
379 | ```
380 | - `detail` 根據參數 `pk` 查詢文章的標題與內容,插入 HTML 中,然後回覆給瀏覽器
381 |
382 | 接著,修該 blog/urls.py,讓 Django 能夠解析 URL Request,得到要給 `detail` 的 `pk`
383 | ```python
384 | urlpatterns = [
385 | ...
386 | url(r'^article/(?P[0-9]+)/$', 'article.views.detail'),
387 | ]
388 | ```
389 | - `(?P[0-9]+)` 解析 URL=`article/1` 後面的數字,得到 pk 這個 group name 然後傳給 `detail`
390 | - [Named Group](https://docs.djangoproject.com/ja/1.9/topics/http/urls/#named-groups): In Python regular expressions, the syntax for named regular-expression groups is `(?Ppattern)`, where `name` is the name of the group and `pattern` is some pattern to match.
391 |
392 | 設定完成,啟動服務,打開 http://192.168.33.10:8000/article/1 ,看到第一篇文章的標題與內容。
393 | ```
394 | Article
395 |
396 | Test1
397 | ```
398 |
399 | ## Django Template
400 |
401 | 剛剛把 HTML 放在 View 會讓邏輯控制與網頁呈現的程式碼交錯混合,增加了前後端工程的複雜度。接下來要將 HTML 的提到 Templates 目錄中,讓前端網頁設計師處理 HTML 時不需要知道後端操作的邏輯。
402 |
403 | 在 article 目錄創建 templates 目錄,裡面新增一個檔案 article/templates/detail.html
404 | ```html
405 |
406 |
407 |
408 | {{ article.title }}
409 | {{ article.content }}
410 |
411 |
412 | ```
413 | - Django 定義許多 [template languate](https://docs.djangoproject.com/en/1.9/ref/templates/language/),方便前端工程師存取後端的變數
414 | - 這個 HTML 預期被 View 呼叫時會得到 `article` 物件,藉由 `{{ article.title }}` 與 `{{ article.content }}` 取得文章的標題與內容
415 |
416 | 修改之前的 View,article/views.py
417 | ```python
418 | def detail(request, pk):
419 | article = Article.objects.get(pk=int(pk))
420 | return render(request, 'detail.html', {'article': article})
421 | ```
422 | - 透過 python dictionary 傳遞 `article` 變數給 template
423 |
424 | 除了簡單的變數取代,還可以使用 [if](https://docs.djangoproject.com/en/1.9/ref/templates/builtins/#std:templatetag-if) tag 與 [up](https://docs.djangoproject.com/en/1.9/ref/templates/builtins/#upper) filter 增加 template 的變化。修改 article/templates/detail.html
425 | ```html
426 |
427 |
428 |
429 | {{ article.title }}
430 | {% if article.pk == 1 %}
431 | {{ article.content|upper }}
432 | {% else %}
433 | {{ article.content }}
434 | {% endif %}
435 |
436 |
437 | ```
438 |
439 | 設定完成,啟動服務,打開 http://192.168.33.10:8000/article/1 ,看到第一篇文章的內容是否變成大寫。
440 | ```
441 | Article
442 |
443 | TEST1
444 | ```
445 |
446 | ## Django Forms
447 |
448 | 除了透過 Django Admin 修改資料,還可以手動產生自己的介面。
449 |
450 | 傳統 framework 會這麼做:
451 |
452 | - 用 HTML 刻個 form
453 | - 處理 HTTP POST request
454 | - 檢查表單欄位內容是否正確
455 | - 把確認過的資料存進 database 當中
456 |
457 | Django Form 提供另一種方便的方式,產生表單對應相對 Model 欄位,提供讀取、修改的功能。
458 |
459 | 先在 article/views.py 產生一個表單類別
460 | ```python
461 | from django import forms
462 |
463 | class ArticleForm(forms.ModelForm):
464 | class Meta:
465 | model = Article
466 | fields = ['title', 'content', ]
467 | ```
468 |
469 | 然後告訴 View 如何處理 ArticleForm
470 | ```python
471 | def create(request):
472 | if request.method == 'POST':
473 | form = ArticleForm(request.POST)
474 | if form.is_valid():
475 | new_article = form.save()
476 | return HttpResponseRedirect('/article/' + str(new_article.pk))
477 |
478 | form = ArticleForm()
479 | return render(request, 'create_article.html', {'form': form})
480 | ```
481 | - 如果 request 是 POST,表示使用者送出表單,則驗證資料合法後寫入資料庫,然後將網頁導向剛剛輸入的資料
482 | - 如果 request 不是 POST,表示使用者準備填寫表單,則送出 `create_article.html`
483 |
484 | 接者產生 article/templates/create_article.html,讓使用者可以填寫資料
485 | ```html
486 |
487 |
488 |
489 |
494 |
495 |
496 | ```
497 | - 透過 `form.as_p` 在 HTML 中產生表單
498 | - 使用 `csrf_token` 做到 [Cross Site Request Forgery protection](https://docs.djangoproject.com/en/dev/ref/contrib/csrf/),避免網站被攻擊
499 |
500 | > [[技術分享] Cross-site Request Forgery (Part 1)](http://cyrilwang.pixnet.net/blog/post/31813568-%5B%E6%8A%80%E8%A1%93%E5%88%86%E4%BA%AB%5D-cross-site-request-forgery-(part-1)): 簡單來說,CSRF 就是在使用者不知情的情況下,讓瀏覽器送出請求給目標網站以達攻擊目的。 對於 HTTP 協定有所了解的讀者,看到這句話可能會覺得很困惑。因為在預設的情況下,任何人只要知道 URL 與參數都可以對網站發出任何請求,如此說來不是所有的網站都會遭受 CSRF 的攻擊了嗎?可以說是,也可以說不是。因此嚴格來說,CSRF 通常指的是發生在使用者已經登入目標網站後,駭客利用受害者的身分來進行請求,如此一來不但可以獲得受害者的權限,而且在系統的相關紀錄中也很難發現可疑之處。
501 |
502 | 最後修改 blog/urls.py,把 URL request 與 View 串起來
503 | ```python
504 | urlpatterns = [
505 | ...
506 | url(r'^create/$', 'article.views.create'),
507 | ]
508 | ```
509 |
510 | 設定完成,啟動服務,打開 http://192.168.33.10:8000/create 產生一篇文章,送出表單看看是否被導向剛剛產生的文章。
511 | ```
512 | hello world
513 |
514 | this is a test
515 | ```
516 |
517 | ## Django 的第三方套件們
518 |
519 | 除了 Django 自帶的套件,[Django Packages](https://www.djangopackages.com/) 提供更多樣化的套件。
520 |
521 | 接下來試著安裝 django-grappelli,讓 admin 畫面變得更漂亮些。
522 |
523 | 安裝套件
524 | ```shell
525 | $ pip install django-grappelli
526 | ```
527 |
528 | 告訴 Django 新增 app,修改 blog/settings.py
529 | ```python
530 | INSTALLED_APPS = [
531 | 'grappelli',
532 | 'django.contrib.admin',
533 | ...
534 | ]
535 | ```
536 | - 加入 grappelli 放在 django.contrib.admin 之前
537 |
538 | 修改 blog/urls.py,加上相對 URL
539 | ```python
540 | from django.conf.urls import include
541 |
542 | urlpatterns = [
543 | url(r'^grappelli/', include('grappelli.urls')),
544 | url(r'^admin/', admin.site.urls),
545 | ...
546 | ]
547 | ```
548 | > 實驗發現,似乎不需要修改 blog/urls.py 這部分,只要在 blog/settings.py 新增 'grappelli' 這個 app 即可
549 |
550 | 設定完成,啟動服務,打開 http://192.168.33.10:8000/admin 看看網頁是不是變漂亮了。
551 |
552 | ## Deploy 前置動作
553 |
554 | 目前所做的工作只能透過本機瀏覽器看到結果,想讓全世界看到你的作品就要部署到伺服器上。[Heroku](https://dashboard.heroku.com/) 提供免費額度的服務給一些小型網站,讓還沒獲利的網站可以免費營運。接下來設定部署環境準備將剛剛寫的程式放上雲端。
555 |
556 | 安裝部署需要的工具
557 | ```shell
558 | $ pip install dj-database-url gunicorn dj-static
559 | ```
560 |
561 | 將虛擬環境套件的版本列出來,儲存在 requirements.txt
562 | ```shell
563 | $ pip freeze > requirements.txt
564 | ```
565 |
566 | 建立 Procfile 檔案,告訴 Heroku 要如何啟動我們的應用
567 | ```
568 | web: gunicorn --pythonpath blog blog.wsgi
569 | ```
570 |
571 | 為了讓 Heroku 知道要用哪一個版本的 Python,新增 runtime.txt
572 | ```
573 | python-3.5.1
574 | ```
575 |
576 | 跟 blog/settings.py 不同,正式上線的環境透過 blog/production_settings.py 來設定
577 | ```python
578 | # Import all default settings.
579 | from .settings import *
580 |
581 | import dj_database_url
582 | DATABASES = {
583 | 'default': dj_database_url.config()
584 | }
585 |
586 | # Static asset configuration.
587 | STATIC_ROOT = 'staticfiles'
588 |
589 | # Honor the 'X-Forwarded-Proto' header for request.is_secure().
590 | SECURE_PROXY_SSL_HEADER = ('HTTP_X_FORWARDED_PROTO', 'https')
591 |
592 | # Allow all host headers.
593 | ALLOWED_HOSTS = ['*']
594 |
595 | # Turn off DEBUG mode.
596 | DEBUG = False
597 | ```
598 |
599 | WSGI - Web Server Gateway Interface 是 Python 定義網頁程式和伺服器溝通的介面。為了讓 Heroku 的服務能夠透過 WSGI 介面與我們的網站溝通,修改 blog/wsgi.py 如下:
600 | ```python
601 | import os
602 | from django.core.wsgi import get_wsgi_application
603 | from dj_static import Cling
604 |
605 | os.environ.setdefault("DJANGO_SETTINGS_MODULE", "blog.settings")
606 | application = Cling(get_wsgi_application())
607 | ```
608 | - 將 dj_static 引入,並在 application 上使用它,以協助幫我們部署 static 檔案(例如圖片、CSS、JavaScript 檔案等等)
609 |
610 | 不想把開發時使用的檔案,例如虛擬環境、本機資料庫、Python cache等等放到網路上。建立一個 .gitignore 檔案,排除這些資料
611 | ```
612 | *.pyc
613 | __pycache__
614 | staticfiles
615 | db.sqlite3
616 | ```
617 |
618 | ## Deploy to Heroku
619 |
620 | 在開始部署(deploy)之前
621 |
622 | 1. 註冊 Heroku 帳號:https://id.heroku.com/signup
623 | 2. 安裝 Heroku 工具箱:https://toolbelt.heroku.com
624 |
625 | 以虛擬機 (ARTACK/debian-jessie) 為例,安裝工具步驟如下
626 | ```shell
627 | $ wget -O- https://toolbelt.heroku.com/install-ubuntu.sh | sh
628 | ```
629 |
630 | ### Step 1. 登入 Heroku
631 |
632 | ```shell
633 | $ heroku login
634 | ```
635 |
636 | ### Step 2. 建立 git repository
637 |
638 | ```shell
639 | $ git init
640 | $ git add .
641 | $ git commit -m "my blog app"
642 | ```
643 |
644 | ### Step 3-1: 新增新的 Heroku app
645 |
646 | 新增一個可以上傳 repository 的地方
647 | ```shell
648 | $ heroku create
649 | Heroku CLI submits usage information back to Heroku. If you would like to disable this, set `skip_analytics: true` in /home/vagrant/.heroku/config.json
650 | Creating app... done, ⬢ guarded-harbor-11820
651 | https://guarded-harbor-11820.herokuapp.com/ | https://git.heroku.com/guarded-harbor-11820.git
652 | ```
653 | - 沒給 app 名稱,由 Heroku 隨機產生,得到 `guarded-harbor-11820`
654 |
655 | ### Step 3-2: 指定已經存在的 app
656 |
657 | 用指令 heroku apps 查看新增過 app 的名稱
658 | ```shell
659 | $ heroku apps
660 | === My Apps
661 | guarded-harbor-11820
662 | hidden-brook-77287
663 | ```
664 |
665 | 設定成你想要上傳的 app
666 | ```shell
667 | $ heroku git:remote -a guarded-harbor-11820
668 | ```
669 |
670 | 使用 `git remote` 指令檢查剛剛的設定
671 | ```shell
672 | $ git remote -v
673 | heroku https://git.heroku.com/guarded-harbor-11820.git (fetch)
674 | heroku https://git.heroku.com/guarded-harbor-11820.git (push)
675 | ```
676 |
677 | ### Step 4: 設定環境變數
678 |
679 | ```shell
680 | $ heroku config:set DJANGO_SETTINGS_MODULE=blog.production_settings
681 | ```
682 |
683 | ### Step 5: 利用 git push 上傳到 Heroku
684 | ```shell
685 | $ git push heroku master
686 | Counting objects: 24, done.
687 | Compressing objects: 100% (20/20), done.
688 | Writing objects: 100% (24/24), 5.12 KiB | 0 bytes/s, done.
689 | Total 24 (delta 0), reused 0 (delta 0)
690 | remote: Compressing source files... done.
691 | remote: Building source:
692 | remote:
693 | remote: -----> Python app detected
694 | remote: -----> Installing python-3.5.1
695 | remote: $ pip install -r requirements.txt
696 | ...
697 | ```
698 | - python 版本依照 runtime.txt 安裝 python-3.5.1
699 |
700 | ### Step 6: 啟動 web process
701 |
702 | ```shell
703 | $ heroku ps:scale web=1
704 | ```
705 |
706 | ### Step 7: Django project 初始化
707 |
708 | 進行資料庫初始化
709 | ```shell
710 | $ heroku run python manage.py migrate
711 | ```
712 |
713 | 為新資料庫建立一個 superuser
714 | ```shell
715 | $ heroku run python manage.py createsuperuser
716 | ```
717 |
718 | ### Step 8: 開啟瀏覽器觀看你的網站
719 |
720 | 透過 open 指令會自動在瀏覽器打開你的網站
721 | ```shell
722 | $ heroku open
723 | ```
724 |
725 | 上面那招只能在 terminal console 跟 web browser 在同一個機器的情況下使用,因為我是透過虛擬環境開發的,要自行打開瀏覽器輸入剛剛 heroku 給的 app 名稱加上 “heroku.com” 才能連上,例如 https://guarded-harbor-11820.herokuapp.com/
726 |
727 | ### Troubleshooting
728 |
729 | 參考: https://devcenter.heroku.com/articles/application-offline
730 |
731 | 查看 app 日誌訊息
732 | ```shell
733 | $ heroku logs
734 | ```
735 |
736 | 檢查目前 process 狀態
737 | ```shell
738 | $ heroku ps
739 | ```
740 |
741 | 顯示應用程式 dyno 使用狀態
742 | ```shell
743 | $ heroku scale web=1
744 | Scaling dynos... done, now running web at 1:Free
745 | ```
746 |
747 | 如果掛掉,錯誤訊息會像這樣
748 | ```shell
749 | $ heroku ps
750 | === web (Free): gunicorn --pythonpath blog blog.wsgi (1)
751 | web.1: crashed 2016/06/10 12:00:30 +0200 (~ 17s ago)
752 | ```
753 |
754 | 重新啟動看看能不能解決問題
755 | ```shell
756 | $ heroku restart
757 | ```
758 |
759 | > learn-test/blog 裡面放的就是先前過做的事情,除了 “Deploy to Heroku” 這部分。想將這個 Project 部署到 Heroku,請先複製到 learn-test/ 以外的目錄 (因為 deploy 需要初始化 git repository,這會與 learn-test/.git 衝突),然後按照 Step1~8 完成部署動作。
760 |
761 | ## What’s next?
762 |
763 | 不管是 [Django Tutorial](http://daikeren.github.io/django_tutorial/) 還是 [Django Girls 學習指南](https://www.gitbook.com/book/djangogirlstaipei/django-girls-taipei-tutorial/details) 在文章最後都有一個 Todo list,可能是修改 template 使用 tag/filter 或套用 css/javascript,修改 Model 增加、刪除欄位,上傳檔案,增加留言功能等等。我的下一步是什麼呢?
764 |
765 | - 結合 Django 與 Behave,透過與 stakeholder 的對話逐步完成網站的功能
766 | - 使用 Python unittest 開發 View 或 Model 的功能
767 | - 使用 CI 做到測試自動化
768 | - 研究如何自動部署到 Heroku
769 |
770 | ----
771 | ## 參考
772 | - [Django Tutorial](http://daikeren.github.io/django_tutorial/)
773 | - [Django Girls 學習指南](https://www.gitbook.com/book/djangogirlstaipei/django-girls-taipei-tutorial/details)
774 | - [Django documentation](https://docs.djangoproject.com/en/1.9/)
775 |
--------------------------------------------------------------------------------
/experiment.md:
--------------------------------------------------------------------------------
1 | # 實驗
2 |
3 | ### 前言
4 |
5 | 這份筆記紀錄 TDD 與 BDD 的開發步驟,實驗意義大於真實開發所需要的步驟。過程中,筆記與程式碼 (在 test/ 目錄中) 幾經修修改改,除非你很有興趣想聽我碎碎念,不然建議不要看這篇 XD
6 |
7 | ### 準備工作
8 |
9 | 設定 mysql 環境
10 | ```mysql
11 | CREATE DATABASE `test`;
12 | USE `test`;
13 |
14 | CREATE TABLE `account` (
15 | `id` int(11) NOT NULL AUTO_INCREMENT,
16 | `username` varchar(50) NOT NULL,
17 | `password` varchar(50) NOT NULL,
18 | PRIMARY KEY (`id`)
19 | ) ENGINE=InnoDB AUTO_INCREMENT=1 DEFAULT CHARSET=latin1;
20 | ```
21 |
22 | ## BDD (Behavior-Driven Development)
23 |
24 | 目標:**溝通**帳號註冊與登入的邏輯
25 |
26 | 準備工作:產生專案目錄,建立 features 與 steps 目錄
27 | ```shell
28 | $ mkdir test
29 | $ cd test
30 | $ mkdir -p features/steps
31 | $ tree
32 | .
33 | └── features
34 | └── steps
35 | ```
36 |
37 | ### 描述功能 (Feature)
38 |
39 | 在 features/account.feature 檔案一開頭,使用文字描述功能特性,讓創建規格的**產品經理**與實作功能的**程式設計師**在相同的 context 下進行溝通。
40 |
41 | ```
42 | Feature: User account
43 | In order to buy or sell commodities
44 | As a buyer or seller
45 | I want to have a account in the Ecommerce website
46 | ```
47 |
48 | ### 登入邏輯
49 |
50 | 在 features/account.feature 描述帳號登入的場景
51 | ```
52 | Scenario: Login as correct username and password
53 | Given an username django with the password django123 is registered
54 | When I login as django and give the password django123
55 | Then I get the login result: successful
56 |
57 | Scenario: Login as incorrect username and password
58 | Given an username django with the password django123 is registered
59 | When I login as django and give the password abcdef123
60 | Then I get the login result: failed
61 | ```
62 |
63 | 在什麼事情都沒做的情形下,執行 behave 會得到錯誤訊息,還有一些貼心的 snippet
64 | ```shell
65 | $ behave
66 | ...(略)
67 |
68 | 0 features passed, 1 failed, 0 skipped
69 | 0 scenarios passed, 2 failed, 0 skipped
70 | 0 steps passed, 0 failed, 0 skipped, 6 undefined
71 | Took 0m0.000s
72 |
73 | You can implement step definitions for undefined steps with these snippets:
74 |
75 | @given(u'an username django with the password django123 is registered')
76 | def step_impl(context):
77 | raise NotImplementedError(u'STEP: Given an username django with the password django123 is registered')
78 |
79 | @when(u'I login as django and give the password django123')
80 | def step_impl(context):
81 | raise NotImplementedError(u'STEP: When I login as django and give the password django123')
82 |
83 | @then(u'I get the login result: successful')
84 | def step_impl(context):
85 | raise NotImplementedError(u'STEP: Then I get the login result: successful')
86 |
87 | @when(u'I login as django and give the password abcdef123')
88 | def step_impl(context):
89 | raise NotImplementedError(u'STEP: When I login as django and give the password abcdef123')
90 |
91 | @then(u'I get the login result: failed')
92 | def step_impl(context):
93 | raise NotImplementedError(u'STEP: Then I get the login result: failed')
94 | ```
95 |
96 | 修改上面的 snippet 產生跟應用程式介接的 steps,儲存在 features/steps/steps.py
97 | ```python
98 | @given(u'an username {username} with the password {password} is registered')
99 | def step_impl(context, username, password):
100 | raise NotImplementedError(u'STEP: Given an username {username} with the password {password} is registered')
101 |
102 | @when(u'I login as {username} and give the password {password}')
103 | def step_impl(context, username, password):
104 | raise NotImplementedError(u'STEP: When I login as {username} and give the password {password}')
105 |
106 | @then(u'I get the login result: {result}')
107 | def step_impl(context, result):
108 | raise NotImplementedError(u'STEP: Then I get the login result: {result}')
109 | ```
110 |
111 | 再次執行 behave,得到下面結果
112 | ```shell
113 | Feature: User account # features/account.feature:1
114 | In order to buy or sell commodities
115 | As a buyer or seller
116 | I want to have a account in the Ecommerce website
117 | Scenario: Login as correct username and password # features/account.feature:6
118 | Given an username django with the password django123 is registered # features/steps/steps.py:1 0.000s
119 | Traceback (most recent call last):
120 | ...(略)
121 | NotImplementedError: STEP: Given an username {username} with the password {password} is registered
122 |
123 | When I login as django and give the password django123 # None
124 | Then I get the login result: successful # None
125 |
126 | Scenario: Login as incorrect username and password # features/account.feature:11
127 | Given an username django with the password django123 is registered # features/steps/steps.py:1 0.000s
128 | Traceback (most recent call last):
129 | ...(略)
130 | NotImplementedError: STEP: Given an username {username} with the password {password} is registered
131 |
132 | When I login as django and give the password abcdef123 # None
133 | Then I get the login result: failed # None
134 |
135 |
136 | Failing scenarios:
137 | features/account.feature:6 Login as correct username and password
138 | features/account.feature:11 Login as incorrect username and password
139 |
140 | 0 features passed, 1 failed, 0 skipped
141 | 0 scenarios passed, 2 failed, 0 skipped
142 | 0 steps passed, 2 failed, 4 skipped, 0 undefined
143 | Took 0m0.001s
144 | ```
145 | - regular expression 解析 `{username}`, `{password}`, `{result}` 的部分ok,
146 | - 但因為功能尚未實作,得到測試錯誤的結果 (符合預期)
147 |
148 | ### 驗收測試 (Acceptance Test) 的意義
149 |
150 | 
151 |
152 | 參考上圖 (請搭配下面的程式用力想像),steps.py 將 function.feature 裡面定義的 Given-When-Then 變成可執行的程式,但不是在這裡把功能做出來,而只是把上層的請求派送 (delegate) 到真正做事的地方 function.py。
153 |
154 | function.feature
155 | ```
156 | Feature: function description
157 | As a , I want so that .
158 |
159 | Scenario:
160 | Given statement #1
161 | When statement #2
162 | Then statement #3
163 | ```
164 |
165 | steps.py
166 | ```python
167 | @given(u'statement #1')
168 | def step_impl(context, ...):
169 | function1(...)
170 |
171 | @when(u'statement #2')
172 | def step_impl(context, ...):
173 | function2(...)
174 |
175 | @then(u'statement #3')
176 | def step_impl(context):
177 | assert(...)
178 | ```
179 |
180 | function.py
181 | ```python
182 | def function1(...):
183 | # 真正做事情的地方
184 |
185 | def function2(...):
186 | # 真正做事情的地方
187 | ```
188 |
189 | 接下來,我們會透過 TDD 的方式把底層功能實作出來。但真正開始實作功能之前,先思考介面(或是服務接口)如何設計。
190 |
191 | 回頭修改 features/steps/steps.py
192 | ```python
193 | @given(u'an username {username} with the password {password} is registered')
194 | def step_impl(context, username, password):
195 | account_insert(username, password)
196 |
197 | @when(u'I login as {username} and give the password {password}')
198 | def step_impl(context, username, password):
199 | context.result = "successful" if account_login(username, password) == True else "failed"
200 |
201 | @then(u'I get the login result: {result}')
202 | def step_impl(context, result):
203 | assert(context.result == result)
204 | ```
205 |
206 | 執行 behave
207 | ```shell
208 | $ behave
209 | Feature: User account # features/account.feature:1
210 | In order to buy or sell commodities
211 | As a buyer or seller
212 | I want to have a account in the Ecommerce website
213 | Scenario: Login as correct username and password # features/account.feature:6
214 | Given an username django with the password django123 is registered # features/steps/steps.py:1 0.000s
215 | Traceback (most recent call last):
216 | ...(略)
217 | NameError: name 'account_insert' is not defined
218 |
219 | When I login as django and give the password django123 # None
220 | Then I get the login result: successful # None
221 |
222 | Scenario: Login as incorrect username and password # features/account.feature:11
223 | Given an username django with the password django123 is registered # features/steps/steps.py:1 0.000s
224 | Traceback (most recent call last):
225 | ...(略)
226 | NameError: name 'account_insert' is not defined
227 |
228 | When I login as django and give the password abcdef123 # None
229 | Then I get the login result: failed # None
230 |
231 |
232 | Failing scenarios:
233 | features/account.feature:6 Login as correct username and password
234 | features/account.feature:11 Login as incorrect username and password
235 |
236 | 0 features passed, 1 failed, 0 skipped
237 | 0 scenarios passed, 2 failed, 0 skipped
238 | 0 steps passed, 2 failed, 4 skipped, 0 undefined
239 | Took 0m0.000s
240 | ```
241 |
242 | 還是執行失敗,但不同的是,錯誤訊息告訴我們 "NameError: name 'account_insert' is not defined" 有個函數沒有定義,接著就把它定義出來吧。
243 |
244 | 產生 features/steps/account.py,負責帳號管理
245 | ```python
246 | def account_insert(username, password):
247 | pass
248 |
249 | def account_login(username, password):
250 | pass
251 |
252 | def account_register(username, password):
253 | pass
254 | ```
255 |
256 | 修改 features/steps/steps.py ,把 `form account import *` 加在最上面
257 |
258 | 執行 behave
259 | ```shell
260 | $ behave
261 | Feature: User account # features/account.feature:1
262 | In order to buy or sell commodities
263 | As a buyer or seller
264 | I want to have a account in the Ecommerce website
265 | Scenario: Login as correct username and password # features/account.feature:6
266 | Given an username django with the password django123 is registered # features/steps/steps.py:3 0.000s
267 | When I login as django and give the password django123 # features/steps/steps.py:7 0.000s
268 | Then I get the login result: successful # features/steps/steps.py:11 0.000s
269 | Traceback (most recent call last):
270 | ...(略)
271 | AssertionError
272 |
273 |
274 | Scenario: Login as incorrect username and password # features/account.feature:11
275 | Given an username django with the password django123 is registered # features/steps/steps.py:3 0.000s
276 | When I login as django and give the password abcdef123 # features/steps/steps.py:7 0.000s
277 | Then I get the login result: failed # features/steps/steps.py:11 0.000s
278 |
279 |
280 | Failing scenarios:
281 | features/account.feature:6 Login as correct username and password
282 |
283 | 0 features passed, 1 failed, 0 skipped
284 | 1 scenario passed, 1 failed, 0 skipped
285 | 5 steps passed, 1 failed, 0 skipped, 0 undefined
286 | Took 0m0.001s
287 | ```
288 |
289 | 因為串接了底層的功能,場景 (Scenario) 的 `Given`, `When` 可以順利執行,但又因為沒有真的做什麼,所以 `Then` 驗證結果時發生錯誤 (第二個場景通過測試只是剛好條件符合而已,不是真的因為底層提供功能而通過)。
290 |
291 | 至此介面算是串接完成,我們先放下 BDD,來看看如何用 TDD 開發下層。
292 |
293 | ## TDD (Test-Driven Development)
294 |
295 | 雖然先有 interface,但接下來不是要實作功能,而是把單元測試補上
296 |
297 | 修改 features/steps/account.py,增加以下測試
298 | ```python
299 | import unittest
300 | class TestAccount(unittest.TestCase):
301 |
302 | @unittest.skip("need database mock")
303 | def test_account_insert(self):
304 | pass
305 |
306 | @unittest.skip("need database mock")
307 | def test_login_with_correct_username_password(self):
308 | pass
309 |
310 | @unittest.skip("need database mock")
311 | def test_login_with_invalid_username(self):
312 | pass
313 |
314 | @unittest.skip("need database mock")
315 | def test_login_with_invalid_password(self):
316 | pass
317 |
318 | @unittest.skip("need database mock")
319 | def test_register_with_valid_username_password(self):
320 | pass
321 |
322 | @unittest.skip("need database mock")
323 | def test_reigster_with_invalid_username(self):
324 | pass
325 |
326 | @unittest.skip("need database mock")
327 | def test_register_with_invalid_password(self):
328 | pass
329 | ```
330 |
331 | account 需要跟資料庫互動才能完成 `account_insert`, `account_login`, `account_register` 的功能,但我想把這個依賴關係切開,先把測試標記為 skip
332 |
333 | 接下來不用 behave 進行測試,改用 `python -m unittest`
334 | ```shell
335 | $ python -m unittest -v account
336 | test_account_insert (account.TestAccount) ... skipped 'need database mock'
337 | test_login_with_correct_username_password (account.TestAccount) ... skipped 'need database mock'
338 | test_login_with_invalid_password (account.TestAccount) ... skipped 'need database mock'
339 | test_login_with_invalid_username (account.TestAccount) ... skipped 'need database mock'
340 | test_register_with_invalid_password (account.TestAccount) ... skipped 'need database mock'
341 | test_register_with_valid_username_password (account.TestAccount) ... skipped 'need database mock'
342 | test_reigster_with_invalid_username (account.TestAccount) ... skipped 'need database mock'
343 |
344 | ----------------------------------------------------------------------
345 | Ran 7 tests in 0.005s
346 |
347 | OK (skipped=7)
348 | ```
349 |
350 | 要切開與底層資料庫的依賴關係,要借用 unittest.mock 偽裝 database connector。先看看正常網路 MySQL-Connector 運作的方式,再決定如何偽造
351 | ```python
352 | import mysql.connector
353 |
354 | cnx = mysql.connector.connect(user='root', password='000000', host='127.0.0.1', database='test')
355 | cursor = cnx.cursor()
356 |
357 | query = "TRUNCATE TABLE account"
358 | cursor.execute(query)
359 | cnx.commit()
360 |
361 | query = "INSERT INTO account (username, password) VALUES ('abcdef', '123456')"
362 | cursor.execute(query)
363 | cnx.commit()
364 |
365 | query = "SELECT * FROM account WHERE username='%s'" % 'abcdef'
366 | cursor.execute(query)
367 | result = cursor.fetchone()
368 | print(result)
369 |
370 | cursor.close()
371 | cnx.close()
372 | ```
373 | - 先不管 `mysql.connector.connect()`, `cnx.cursor()`, `cursor.close()`, `cnx.close()`,這些在 setup, tearDown 才會用到
374 | - `INSERT` 需要 `cursor.execute()` 與 `cnx.commit()`
375 | - `SELECT` 需要 `cursor.execute()` 與 `cursor.fetchone()`
376 |
377 | 藉由上面的範例,可以預期 `account_insert` 會呼叫到 `cursor.execute()` 與 `cnx.commit()`;而 `account_login` 會呼叫到 `cursor.execute()` 與 `cursor.fetchone()`。
378 |
379 | 加入 `from unittest.mock import Mock, patch`,移除 `@unittest.skip` 標記,修改單元測試
380 | ```python
381 | import unittest
382 | from unittest.mock import Mock, patch
383 | class TestAccount(unittest.TestCase):
384 |
385 | def setUp(self):
386 | self.result = None
387 |
388 | def test_account_insert(self):
389 | with patch('mysql.connector.cursor.MySQLCursor.execute') as mock_execute:
390 | with patch('mysql.connector.connection.MySQLConnection.commit') as mock_commit:
391 | account_insert('abcdef', '123456')
392 |
393 | mock_execute.assert_called_with("INSERT INTO account (username, password) VALUES ('abcdef', '123456')")
394 | mock_commit.assert_called_with()
395 |
396 | def test_login_with_correct_username_password(self):
397 | def mock_execute(_, query):
398 | self.result = ('1',) if query == "SELECT id FROM account WHERE username='abcdef' AND password='123456'" else None
399 | def mock_fetchone(_):
400 | return self.result
401 |
402 | with patch('mysql.connector.cursor.MySQLCursor.execute', mock_execute):
403 | with patch('mysql.connector.cursor.MySQLCursor.fetchone', mock_fetchone):
404 | self.assertTrue(account_login('abcdef', '123456'))
405 |
406 | def test_login_with_invalid_username(self):
407 | def mock_execute(_, query):
408 | self.result = ('1',) if query == "SELECT id FROM account WHERE username='abcdef' AND password='123456'" else None
409 | def mock_fetchone(_):
410 | return self.result
411 |
412 | with patch('mysql.connector.cursor.MySQLCursor.execute', mock_execute):
413 | with patch('mysql.connector.cursor.MySQLCursor.fetchone', mock_fetchone):
414 | self.assertFalse(account_login('abc', '123456'))
415 |
416 | def test_login_with_invalid_password(self):
417 | def mock_execute(_, query):
418 | self.result = ('1',) if query == "SELECT id FROM account WHERE username='abcdef' AND password='123456'" else None
419 | def mock_fetchone(_):
420 | return self.result
421 |
422 | with patch('mysql.connector.cursor.MySQLCursor.execute', mock_execute):
423 | with patch('mysql.connector.cursor.MySQLCursor.fetchone', mock_fetchone):
424 | self.assertFalse(account_login('abcdef', '123'))
425 |
426 | def test_register_with_valid_username_password(self):
427 | with patch('mysql.connector.cursor.MySQLCursor.execute') as mock_execute:
428 | with patch('mysql.connector.connection.MySQLConnection.commit') as mock_commit:
429 | self.assertTrue(account_register('abcdef', '123456'))
430 |
431 | self.assertTrue(mock_execute.called)
432 | self.assertTrue(mock_commit.called)
433 |
434 | def test_reigster_with_invalid_username(self):
435 | with patch('mysql.connector.cursor.MySQLCursor.execute') as mock_execute:
436 | with patch('mysql.connector.connection.MySQLConnection.commit') as mock_commit:
437 | self.assertFalse(account_register('abc', '123456'))
438 |
439 | self.assertFalse(mock_execute.called)
440 | self.assertFalse(mock_commit.called)
441 |
442 | def test_register_with_invalid_password(self):
443 | with patch('mysql.connector.cursor.MySQLCursor.execute') as mock_execute:
444 | with patch('mysql.connector.connection.MySQLConnection.commit') as mock_commit:
445 | self.assertFalse(account_register('abcdef', '123'))
446 | ```
447 |
448 | 很辛苦的單元測試...
449 | - `test_account_insert` patch 兩個 mysql.connector 的方法,呼叫 `account_insert('abcdef', '123456')`後,檢查
450 | - `cursor.execute()` 是否傳入 `"INSERT INTO account (username, password) VALUES ('abcdef', '123456')"`
451 | - `cnx.commit()` 是否被呼叫
452 | - `test_login_with_correct_username_password`, `test_login_with_invalid_username`, `test_login_with_invalid_password` patch 兩個 mysql.connector 的方法,然後呼叫 `account_login()`
453 | - `cursor.execute()` 接收 query,如果 query 是預期的則儲存 `('1',)` 否則儲存 `None`
454 | - `cursor.fetchone()` 回傳之前 query 儲存的結果
455 | - `test_register_with_valid_username_password`, `test_reigster_with_invalid_username`, `test_register_with_invalid_password` patch 兩個 mysql.connector 的方法
456 | - 如果 `username`, `password` 合法,回傳 `True`,否則回傳 `False`
457 | - 如果 `username`, `password` 合法,則 `cursor.execute()` 與 `cursor.fetchone()` 會被呼叫
458 |
459 | 有了單元測試,開時實作功能
460 | ```python
461 | import mysql.connector
462 |
463 | cnx = mysql.connector.connect(user='root', password='000000', host='127.0.0.1', database='test')
464 | cursor = cnx.cursor()
465 |
466 | def account_insert(username, password):
467 | query = "INSERT INTO account (username, password) VALUES ('%s', '%s')" % (username, password)
468 | cursor.execute(query)
469 | cnx.commit()
470 |
471 | def account_login(username, password):
472 | query = "SELECT id FROM account WHERE username='%s' AND password='%s'" % (username, password)
473 | cursor.execute(query)
474 | row = cursor.fetchone()
475 | return (row is not None)
476 |
477 | def account_register(username, password):
478 | if len(username) < 6 or len(password) < 6:
479 | return False
480 | account_insert(username, password)
481 | return True
482 | ```
483 |
484 | 然後測試進行單元測試
485 | ```shell
486 | $ python -m unittest -v account
487 | test_account_insert (account.TestAccount) ... ok
488 | test_login_with_correct_username_password (account.TestAccount) ... ok
489 | test_login_with_invalid_password (account.TestAccount) ... ok
490 | test_login_with_invalid_username (account.TestAccount) ... ok
491 | test_register_with_invalid_password (account.TestAccount) ... ok
492 | test_register_with_valid_username_password (account.TestAccount) ... ok
493 | test_reigster_with_invalid_username (account.TestAccount) ... ok
494 |
495 | ----------------------------------------------------------------------
496 | Ran 7 tests in 0.008s
497 |
498 | OK
499 | ```
500 |
501 | 天呀~ 寫到這裡,發現這樣 TDD 真是太辛苦了!好在實務上 [django](https://www.djangoproject.com/) 藉由 Model 切開與資料庫的依賴關係,加上 [behave-django](https://pythonhosted.org/behave-django/) 提供更優良的 mock 技術,才能讓 Python 程式設計師的生活輕鬆點...
502 |
503 | 抱怨歸抱怨,既然頭已經洗下去,就繼續把它洗乾淨吧 XD
504 |
505 | ## 業務邏輯
506 |
507 | ### 驗證登入功能
508 |
509 | ```python
510 | $ behave
511 | Feature: User account # ../account.feature:1
512 | In order to buy or sell commodities
513 | As a buyer or seller
514 | I want to have a account in the Ecommerce website
515 | Scenario: Login as correct username and password # ../account.feature:6
516 | Given an username django with the password django123 is registered # steps.py:3 0.006s
517 | When I login as django and give the password django123 # steps.py:7 0.001s
518 | Then I get the login result: successful # steps.py:11 0.000s
519 |
520 | Scenario: Login as incorrect username and password # ../account.feature:11
521 | Given an username django with the password django123 is registered # steps.py:3 0.002s
522 | When I login as django and give the password abcdef123 # steps.py:7 0.001s
523 | Then I get the login result: failed # steps.py:11 0.000s
524 |
525 | 1 feature passed, 0 failed, 0 skipped
526 | 2 scenarios passed, 0 failed, 0 skipped
527 | 6 steps passed, 0 failed, 0 skipped, 0 undefined
528 | Took 0m0.010s
529 | ```
530 |
531 | ### 新增註冊邏輯
532 |
533 | 在 features/account.feature 增加描述帳號登入的場景,這次使用 `Scenario Outline` 描述多個測試場景
534 | ```
535 | Scenario Outline: username and password must be large than 5 characters
536 | When try to register a name with a password
537 | Then I get the register result:
538 |
539 | Examples: some usernames and passwords
540 | | username | password | result |
541 | | abc | 123456 | invalid username or password |
542 | | abcedf | 123 | invalid username or password |
543 | | abc | 123 | invalid username or password |
544 | | abcdef | 123456 | successful |
545 | ```
546 |
547 | 在 features/steps/account.py 中,相對應的步驟如下
548 | ```python
549 | @when(u'try to register a name {username} with a password {password}')
550 | def step_impl(context, username, password):
551 | if account_register(username, password) == True:
552 | context.result = "successful"
553 | else:
554 | context.result = "invalid username or password"
555 |
556 | @then(u'I get the register result: {result}')
557 | def step_impl(context, result):
558 | assert(context.result == result)
559 | ```
560 | - 使用 `{username}`, `{password}`, `{result}` 變數,不需要囉囉唆唆的針對每個場景寫 steps
561 |
562 | 執行 behave,得到下面有關註冊邏輯的驗證結果
563 | ```shell
564 | $ behave
565 | ...(略)
566 |
567 | Scenario Outline: username and password must be large than 5 characters -- @1.1 some usernames and passwords # account.feature:22
568 | When try to register a name abc with a password 123456 # steps/steps.py:18 0.000s
569 | Then I get the register result: invalid username or password # steps/steps.py:25 0.000s
570 |
571 | Scenario Outline: username and password must be large than 5 characters -- @1.2 some usernames and passwords # account.feature:23
572 | When try to register a name abcedf with a password 123 # steps/steps.py:18 0.001s
573 | Then I get the register result: invalid username or password # steps/steps.py:25 0.000s
574 |
575 | Scenario Outline: username and password must be large than 5 characters -- @1.3 some usernames and passwords # account.feature:24
576 | When try to register a name abc with a password 123 # steps/steps.py:18 0.000s
577 | Then I get the register result: invalid username or password # steps/steps.py:25 0.000s
578 |
579 | Scenario Outline: username and password must be large than 5 characters -- @1.4 some usernames and passwords # account.feature:25
580 | When try to register a name abcdef with a password 123456 # steps/steps.py:18 0.001s
581 | Then I get the register result: successful # steps/steps.py:25 0.000s
582 |
583 | ...(略)
584 | ```
585 |
586 | ### 中文化
587 |
588 | behave 支援許多語系
589 | ```shell
590 | $ behave --lang-list
591 | Languages available:
592 | ar: العربية / Arabic
593 | bg: български / Bulgarian
594 | ca: català / Catalan
595 | cs: Česky / Czech
596 | cy-GB: Cymraeg / Welsh
597 | da: dansk / Danish
598 | de: Deutsch / German
599 | en: English / English
600 | en-Scouse: Scouse / Scouse
601 | en-au: Australian / Australian
602 | en-lol: LOLCAT / LOLCAT
603 | en-pirate: Pirate / Pirate
604 | en-tx: Texan / Texan
605 | eo: Esperanto / Esperanto
606 | es: español / Spanish
607 | et: eesti keel / Estonian
608 | fi: suomi / Finnish
609 | fr: français / French
610 | he: עברית / Hebrew
611 | hr: hrvatski / Croatian
612 | hu: magyar / Hungarian
613 | id: Bahasa Indonesia / Indonesian
614 | is: Íslenska / Icelandic
615 | it: italiano / Italian
616 | ja: 日本語 / Japanese
617 | ko: 한국어 / Korean
618 | lt: lietuvių kalba / Lithuanian
619 | lu: Lëtzebuergesch / Luxemburgish
620 | lv: latviešu / Latvian
621 | nl: Nederlands / Dutch
622 | no: norsk / Norwegian
623 | pl: polski / Polish
624 | pt: português / Portuguese
625 | ro: română / Romanian
626 | ru: русский / Russian
627 | sk: Slovensky / Slovak
628 | sr-Cyrl: Српски / Serbian
629 | sr-Latn: Srpski (Latinica) / Serbian (Latin)
630 | sv: Svenska / Swedish
631 | tr: Türkçe / Turkish
632 | uk: Українська / Ukrainian
633 | uz: Узбекча / Uzbek
634 | vi: Tiếng Việt / Vietnamese
635 | zh-CN: 简体中文 / Chinese simplified
636 | zh-TW: 繁體中文 / Chinese traditional
637 | ```
638 |
639 | > python3.5 不支援 dict.sort(),要修改 /lib/python3.5/site-packages/behave/__main__.py:65: `iso_codes = sorted(iso_codes)#iso_codes.sort()`
640 |
641 | feature 可以寫成中文,只要文件第一行註記使用什麼語言,在 features/帳號.feature
642 | ```
643 | # language: zh-TW
644 |
645 | 功能: 用戶帳號
646 | 為了買賣商品
647 | 身為買家或賣家
648 | 我想要有一個電子商務網站帳號
649 |
650 | 場景: 用正確的帳號跟密碼登入
651 | 假設< 帳號django與密碼django123已註冊
652 | 當< 我用django與密碼django123登入
653 | 那麼< 我得到登入結果:成功
654 |
655 | 場景: 用不正確的帳號跟密碼登入
656 | 假設< 帳號django與密碼django123已註冊
657 | 當< 我用django與密碼abcdef123登入
658 | 那麼< 我得到登入結果:失敗
659 |
660 | 場景大綱: 帳號與密碼必須大於5個字元
661 | 當< 嘗試用帳號與密碼註冊
662 | 那麼< 我得到註冊結果:
663 |
664 | 例子: 一些帳號與密碼
665 | | username | password | result |
666 | | abc | 123456 | 無效的帳號或密碼 |
667 | | abcedf | 123 | 無效的帳號或密碼 |
668 | | abc | 123 | 無效的帳號或密碼 |
669 | | abcdef | 123456 | 帳號建立 |
670 | ```
671 |
672 | 步驟也可以用中文編寫,在 features/steps/步驟.py
673 | ```python
674 | from account import *
675 |
676 | @given(u'< 帳號{username}與密碼{password}已註冊')
677 | def step_impl(context, username, password):
678 | account_insert(username, password)
679 |
680 | @when(u'< 我用{username}與密碼{password}登入')
681 | def step_impl(context, username, password):
682 | if account_login(username, password) == True:
683 | context.result = "成功"
684 | else:
685 | context.result = "失敗"
686 |
687 | @then(u'< 我得到登入結果:{result}')
688 | def step_impl(context, result):
689 | assert(context.result == result)
690 |
691 | @when(u'< 嘗試用帳號{username}與密碼{password}註冊')
692 | def step_impl(context, username, password):
693 | if account_register(username, password) == True:
694 | context.result = "帳號建立"
695 | else:
696 | context.result = "無效的帳號或密碼"
697 |
698 | @then(u'< 我得到註冊結果:{result}')
699 | def step_impl(context, result):
700 | assert(context.result == result)
701 | ```
702 |
703 | - features/account.feature 與 features/帳號.feature 做一樣的檢查
704 | - features/steps/step.py 與 features/steps/步驟.py 做一樣的事情
705 |
706 | 執行 behave,得到下面驗證結果
707 | ```shell
708 | $ mysql -uroot -p000000 -e 'truncate table account' test
709 | $ behave --include 帳號
710 | 功能: 用戶帳號 # features/帳號.feature:3
711 | 為了買賣商品
712 | 身為買家或賣家
713 | 我想要有一個電子商務網站帳號
714 | 場景: 用正確的帳號跟密碼登入 # features/帳號.feature:8
715 | 假設 < 帳號django與密碼django123已註冊 # features/steps/步驟.py:3 0.001s
716 | 當 < 我用django與密碼django123登入 # features/steps/步驟.py:7 0.001s
717 | 那麼 < 我得到登入結果:成功 # features/steps/步驟.py:14 0.000s
718 |
719 | 場景: 用不正確的帳號跟密碼登入 # features/帳號.feature:13
720 | 假設 < 帳號django與密碼django123已註冊 # features/steps/步驟.py:3 0.010s
721 | 當 < 我用django與密碼abcdef123登入 # features/steps/步驟.py:7 0.001s
722 | 那麼 < 我得到登入結果:失敗 # features/steps/步驟.py:14 0.000s
723 |
724 | 場景大綱: 帳號與密碼必須大於5個字元 -- @1.1 一些帳號與密碼 # features/帳號.feature:24
725 | 當 < 嘗試用帳號abc與密碼123456註冊 # features/steps/步驟.py:18 0.000s
726 | 那麼 < 我得到註冊結果:無效的帳號或密碼 # features/steps/步驟.py:25 0.000s
727 |
728 | 場景大綱: 帳號與密碼必須大於5個字元 -- @1.2 一些帳號與密碼 # features/帳號.feature:25
729 | 當 < 嘗試用帳號abcedf與密碼123註冊 # features/steps/步驟.py:18 0.000s
730 | 那麼 < 我得到註冊結果:無效的帳號或密碼 # features/steps/步驟.py:25 0.000s
731 |
732 | 場景大綱: 帳號與密碼必須大於5個字元 -- @1.3 一些帳號與密碼 # features/帳號.feature:26
733 | 當 < 嘗試用帳號abc與密碼123註冊 # features/steps/步驟.py:18 0.000s
734 | 那麼 < 我得到註冊結果:無效的帳號或密碼 # features/steps/步驟.py:25 0.000s
735 |
736 | 場景大綱: 帳號與密碼必須大於5個字元 -- @1.4 一些帳號與密碼 # features/帳號.feature:27
737 | 當 < 嘗試用帳號abcdef與密碼123456註冊 # features/steps/步驟.py:18 0.002s
738 | 那麼 < 我得到註冊結果:帳號建立 # features/steps/步驟.py:25 0.000s
739 |
740 | 1 feature passed, 0 failed, 0 skipped
741 | 6 scenarios passed, 0 failed, 0 skipped
742 | 14 steps passed, 0 failed, 0 skipped, 0 undefined
743 | Took 0m0.016s
744 | ```
745 |
746 | > 這邊有個環境的設定問題:因為測試註冊功能會在資料庫插入一筆資料,數次實驗後會有多筆,如果每次測試前沒有清空資料庫,就會測試失敗... 每次測試,環境都要獨立、要獨立、要獨立,獨立很重要所以說三次!這部分先欠著,等使用 behave-django 再交代清楚。
747 |
748 | ## Using V Models for Testing
749 |
750 | 
751 |
752 | (圖片來源 https://en.wikipedia.org/wiki/V-Model)
753 |
754 | - 軟體開發從定義需求開始,透過文字 PM 與 QC 共同定義 features
755 | - QC 將 features 轉成可執行的 steps
756 | - RD 透過 TDD 方式實作 functions,滿足 features
757 | - PM 與 QC 確認功能正常
758 |
--------------------------------------------------------------------------------