├── .DEREK.yml
├── .gitignore
├── CONTRIBUTING.md
├── EULA.md
├── Makefile
├── README.md
├── artifacts
├── README.md
├── client-with-secrets.yaml
├── client.yaml
├── inlets-pro.service
├── server.yaml
└── split-plane-server.yaml
├── chart
├── README.md
├── inlets-http-server
│ ├── .gitignore
│ ├── .helmignore
│ ├── Chart.yaml
│ ├── README.md
│ ├── templates
│ │ ├── NOTES.txt
│ │ ├── _helpers.tpl
│ │ ├── control-plane-ingress.yaml
│ │ ├── data-plane-ingress.yaml
│ │ ├── deployment.yaml
│ │ ├── service.yaml
│ │ └── serviceaccount.yaml
│ └── values.yaml
├── inlets-tcp-client
│ ├── .gitignore
│ ├── .helmignore
│ ├── Chart.yaml
│ ├── README.md
│ ├── templates
│ │ ├── NOTES.txt
│ │ ├── _helpers.tpl
│ │ ├── deployment.yaml
│ │ └── serviceaccount.yaml
│ └── values.yaml
└── inlets-tcp-server
│ ├── .gitignore
│ ├── .helmignore
│ ├── Chart.yaml
│ ├── README.md
│ ├── templates
│ ├── NOTES.txt
│ ├── _helpers.tpl
│ ├── control-plane-service.yaml
│ ├── data-plane-service.yaml
│ ├── deployment.yaml
│ ├── ingress.yaml
│ └── serviceaccount.yaml
│ └── values.yaml
├── dashboards
└── uplink-dashboard.json
└── docs
├── README.md
├── cassandra-tutorial.md
├── charts
├── index.yaml
├── inlets-http-server-0.2.1.tgz
├── inlets-http-server-0.3.0.tgz
├── inlets-http-server-0.4.0.tgz
├── inlets-http-server-0.4.1.tgz
├── inlets-http-server-0.4.2.tgz
├── inlets-http-server-0.4.3.tgz
├── inlets-http-server-0.5.0.tgz
├── inlets-http-server-0.5.1.tgz
├── inlets-http-server-0.5.2.tgz
├── inlets-pro-0.2.1.tgz
├── inlets-pro-0.3.0.tgz
├── inlets-pro-0.4.0.tgz
├── inlets-pro-0.4.1.tgz
├── inlets-pro-0.4.2.tgz
├── inlets-pro-0.4.3.tgz
├── inlets-pro-client-0.2.1.tgz
├── inlets-pro-client-0.3.0.tgz
├── inlets-pro-client-0.4.0.tgz
├── inlets-pro-client-0.4.1.tgz
├── inlets-pro-client-0.4.2.tgz
├── inlets-pro-client-0.4.3.tgz
├── inlets-tcp-client-0.5.0.tgz
├── inlets-tcp-client-0.5.2.tgz
├── inlets-tcp-client-0.5.3.tgz
├── inlets-tcp-server-0.5.0.tgz
├── inlets-tcp-server-0.6.0.tgz
├── inlets-tcp-server-0.6.1.tgz
└── inlets-tcp-server-0.6.2.tgz
├── cli-reference.md
├── images
├── heading.png
├── inlets-pro-sm.png
├── inlets-pro-split-plane.png
├── inlets-pro-vip-ha.png
├── inlets-pro-vip-k8s.png
└── inlets-pro-vip.png
├── inlets-tcp-server-hard-way.md
└── reference.md
/.DEREK.yml:
--------------------------------------------------------------------------------
1 | curators:
2 | - alexellis
3 |
4 | features:
5 | - dco_check
6 | - comments
7 | - pr_description_required
8 | - release_notes
9 |
--------------------------------------------------------------------------------
/.gitignore:
--------------------------------------------------------------------------------
1 | bin/inlets-pro*
2 | /inlets-pro*
3 | .idea/
4 | test.yaml
5 |
--------------------------------------------------------------------------------
/CONTRIBUTING.md:
--------------------------------------------------------------------------------
1 | ## Contributing
2 |
3 | If you find a typo, or wish to let us know about a correction required, feel free to raise an issue.
4 |
5 | The content in this repository is licensed under the inlets Pro EULA, available in the repository.
6 |
7 | Third party contributions are made under the MIT license and must be signed-off, signing off is not the same as signing which is a form of encryption.
8 |
9 | See also: [Developer Certificate of Origin](https://en.wikipedia.org/wiki/Developer_Certificate_of_Origin)
10 |
--------------------------------------------------------------------------------
/EULA.md:
--------------------------------------------------------------------------------
1 | End User License Agreement (EULA)
2 |
3 | 1. Licensed software. inlets Pro is licensed as commercial software and must not be used without a valid license key from OpenFaaS Ltd.
4 |
5 | 1.1 OpenFaaS Ltd. ("Supplier") is a registered company in England & Wales with number: 11076587, registered address: Peterborough UK.
6 |
7 | 2. Your agreement. By accessing, executing, or otherwise using the Licensed Software, you ("Customer") acknowledge that you have read this Agreement, understand it, and agree to be bound by its terms and conditions. If you are not willing to be bound by the terms of this Agreement, do not access or use the Licensed Software.
8 |
9 | 2.1 If you are using the Licensed Software in your capacity as employee or agent of a company or organization, then any references to “you” in this Agreement shall refer to such entity and not to you in your personal capacity. You warrant that you are authorized to legally bind the company or organization on whose behalf you are accessing the Licensed Software. If you are not so authorized, then neither you nor your company or organization may use the Licensed Software in any manner whatsoever.
10 |
11 | 2.2 This Agreement, including any supplemental terms is between You ("Customer) and OpenFaaS Ltd. ("Supplier").
12 |
13 | 2.3 Governing law. This Agreement is entered into the law of The Courts of England and Wales and shall be governed by, and construed in accordance with, the laws of England and Wales, exclusive of its choice of law rules.
14 |
15 | 3. Free Trial
16 |
17 | If you either register on the inlets Pro web site for a free trial or otherwise order a free trial version, OpenFaaS Ltd will make certain Licensed Software available to you on a trial basis (the “Trial Version”) free of charge until the end of the free trial period for which you registered or ordered the applicable Licensed Software. The Trial Version may be used only to review, demonstrate and evaluate the Licensed Software and may have limited features. The Trial Version may cease operating after the applicable time period or number of uses based on an internal metering mechanism within the Trial Version itself. Regardless of any such metering, you must stop use at the end of such period or number of uses. Additional trial terms and conditions may appear on the trial registration web page or Order Form. Any such additional terms and conditions are incorporated into this Agreement by reference and are legally binding.
18 |
19 | 4. Grant of License; Ownership.
20 |
21 | 4.1 License Grant. Subject to the terms and conditions of this Agreement and Order Form, OpenFaaS Ltd hereby:
22 |
23 | (i) grants to the Licensee a limited, non-exclusive, non-transferable, revocable, license to use the Licensed Software and solely for its internal business purposes for use by End Users and for the term and in accordance with the conditions and limitations set forth herein and in the Order Form.
24 |
25 | (ii) To the extent that there is any Third Party Software embedded in, bundled with, or otherwise provided to Licensee in connection with the Licensed Program Materials under this License Agreement, such third party software shall be considered Licensed Software and such Third Party Software shall be used and operated solely with the operation of the Licensed Program Materials and not as a standalone application or any other purpose. Certain Third Party Software may be subject to an open source license(“OSS License”), which when required by such license is included with the documentation for the Licensed Software (“Documentation”). Licensee’s license rights with respect to Third Party Software subject to an OSS License are defined by the terms of the applicable OSS License; nothing in this Agreement shall restrict, limit, or otherwise affect any rights or obligations Licensee may have, or conditions to which Licensee may be subject, under such OSS License. The foregoing includes, without limitation, the Apache License, Version 2.0 found at: http://www.apache.org/licenses/LICENSE-2.0 (the “Apache License”) and the MIT License found at: https://opensource.org/licenses/MIT
26 |
27 | 4.2 Ownership. As between the parties, OpenFaaS Ltd retains all right, title and interest in the Licensed Program Materials, including but not limited to any and all Intellectual Property Rights in the Licensed Program Materials now owned or that may be owned in the future by OpenFaaS Ltd.
28 |
29 | 4.3 Intellectual Property Rights (IPR). Copyright for samples, code, logos, trademarks, diagrams and documentation rests with OpenFaaS Ltd. All pre-existing IPR remains the property of the originating party; and it is agreed that no IPR is transferred from the Client to the Supplier under this agreement.
30 |
31 | 4.4 Restrictions. Licensee shall not distribute, display, sublicense, rent, lease, use in a service bureau, modify, translate, reverse engineer, decompile, disassemble, create derivative works based on, or copy the Licensed Program Materials, except to the extent expressly permitted by applicable law, and only to the extent OpenFaaS Ltd shall not be permitted by that applicable law to exclude or limit such rights.
32 |
33 | 4.5 Feedback. Customer may provide feedback to OpenFaaS Ltd about the Products (e.g. technical support input, suggestions, or enhancement requests). OpenFaaS Ltd may develop, modify, and improve the Products based on Customer’s Feedback without obligation to Customer, and Customer irrevocably assigns to OpenFaaS Ltd all right, title, and interest in that Feedback.
34 |
35 | 5. Termination and ongoing effectiveness
36 |
37 | This Agreement is effective from the first date you install the Software. You may terminate this Agreement at any time by permanently deleting, destroying and returning, at your own cost, the Software, all backup copies and all related materials provided by OpenFaaS Ltd. OpenFaaS Ltd or its licensors may terminate this Agreement at any time without notice if you fail to comply with any terms or conditions of this Agreement. Once it is terminated you MUST stop using this Software and delete all the Software and associated materials already copied and/or installed on your computer immediately.
38 |
39 | 6. Customer Data
40 |
41 | 6.1 Customer Data. In order to use the Products, Customer may need to complete a registration process and provide contact information such as an email address, credentials and other account billing information ("Account Data"). Customer must provide complete and accurate Account Data during the registration process and must keep Customer's Account Data up-to-date. Customer is prohibited from misrepresenting Customer's identity or affiliation with any company or other entity. By providing Account Data, Customer hereby consents that it may receive email or other communications from OpenFaaS Ltd. Such communications may include communications regarding Customer's use of the Products and/or commercial content relating to other OpenFaaS Ltd Products. If you do not wish to receive such communications, a Customer may opt-out by notifying OpenFaaS Ltd at contact@openfaas.com
42 |
43 | 7. Co-Marketing
44 | At the request of Supplier, Customer agrees to participate in other reasonable marketing activities that promote the benefits of the Services to other potential customers and to use of Customer's name and logo on the Supplier's web site and in Supplier's promotional materials. Customer agrees that Supplier may disclose Customer as a customer of the Products.
45 |
46 | 8. Limitation of Liability.
47 |
48 | 8.1 Warranty disclaimer. You acknowledge that the Software is provided "as is" without warranty of any kind, express or implied. You use the Software at your own risk and the product is supplied on an "as is" and "as available" basis. You assume all responsibility for selecting the Software to achieve your intended results, and for the installation of, and results obtained from the Software.
49 |
50 | 8.2 No Consequential Damages. IN NO EVENT SHALL OpenFaaS Ltd BE LIABLE HEREUNDER FOR SPECIAL, PUNITIVE, INCIDENTAL, INDIRECT OR CONSEQUENTIAL DAMAGES, INCLUDING, BUT NOT LIMITED TO, LOSS OF PROFITS, LOSS OF REVENUE, LOSS OF USE OR LOSS OF DATA, EVEN IF ADVISED OF THE POSSIBILITY THEREOF OR, IF REASONABLY FORESEEABLE, INCURRED BY LICENSEE OR END USERS, OR CLAIMED AGAINST LICENSEE BY ANY OTHER PARTY, INCLUDING END USERS (WHETHER ANY SUCH CLAIMS ARISE UNDER THEORY OF CONTRACT, TORT OR OTHERWISE).
51 |
52 | 8.3 Limitation of Liability. To the extent permitted by applicable law, the liability of OpenFaaS Ltd and its licensors, personnel, subcontractors and suppliers arising out of, in connection with, or resulting from this Agreement and, without limitation, for any and all causes with respect to the Licensed Program Materials, breach of contract, tort, warranty or otherwise, shall in the aggregate not exceed the license fees paid by Licensee hereunder in the twelve (12) months immediately preceding the event giving rise to the claim.
53 |
54 | 8.3 Sections 1, 2, 3, 4, 5, 6, 7 and 8 will remain effective after the termination of the Agreement.
55 |
56 | 8.4 If you have any questions about these terms or our Services you may contact us by email at: contact@openfaas.com
57 |
58 | 9. Telemetry and data-sharing
59 |
60 | The inlets-uplink operator product may send telemetry data to OpenFaaS Ltd. This data includes non-confidential, non-identifiable metrics used for calculating accurate usage metrics for billing purposes. The data is not shared with any third-party and is not used for marketing purposes.
61 |
--------------------------------------------------------------------------------
/Makefile:
--------------------------------------------------------------------------------
1 | .PHONY: charts all
2 |
3 | VERBOSE?=false
4 |
5 | all: verify-charts charts
6 |
7 | verify-charts:
8 | @echo Verifying helm charts images in remote registries && \
9 | arkade chart verify --verbose=$(VERBOSE) -f ./chart/inlets-http-server/values.yaml && \
10 | arkade chart verify --verbose=$(VERBOSE) -f ./chart/inlets-tcp-client/values.yaml && \
11 | arkade chart verify --verbose=$(VERBOSE) -f ./chart/inlets-tcp-server/values.yaml
12 |
13 | upgrade-charts:
14 | @echo Upgrading images for all helm charts && \
15 | arkade chart upgrade --verbose=$(VERBOSE) -w -f ./chart/inlets-http-server/values.yaml && \
16 | arkade chart upgrade --verbose=$(VERBOSE) -w -f ./chart/inlets-tcp-client/values.yaml && \
17 | arkade chart upgrade --verbose=$(VERBOSE) -w -f ./chart/inlets-tcp-server/values.yaml
18 |
19 | charts:
20 | cd chart && \
21 | helm package inlets-http-server/ && \
22 | helm package inlets-tcp-server/ && \
23 | helm package inlets-tcp-client/
24 | mv chart/*.tgz docs/charts
25 | helm repo index docs/charts --url https://inlets.github.io/inlets-pro/charts --merge ./docs/charts/index.yaml
26 |
--------------------------------------------------------------------------------
/README.md:
--------------------------------------------------------------------------------
1 | ## Inlets reinvents the concept of a tunnel for a Cloud Native world.
2 |
3 | With inlets you are in control of your data, unlike with a SaaS tunnel where shared servers mean your data may be at risk. You can use inlets for local development and in your production environment. It works just as well on bare-metal as in VMs, containers and Kubernetes clusters.
4 |
5 |  6 |
7 | > inlets is not just compatible with tricky networks and Cloud Native architecture, it was purpose-built for them.
8 |
9 | Common use-cases include:
10 |
11 | * Exposing your local endpoints on the Internet
12 | * Self-hosting Kubernetes or K3s clusters
13 | * Deploying and monitoring apps across multiple locations
14 | * Supporting your customers remotely
15 | * Hybrid cloud for legacy TCP applications
16 |
17 | ## What's it look like?
18 |
19 | Every inlets tunnel has two parts: its server and its client, but they're one binary and can run entirely within userspace. This makes it very easy to customise and distribute for different use-cases.
20 |
21 | * It's a single binary for MacOS, Windows and Linux
22 | * Works on bare-metal, in VMs, in containers and on Kubernetes
23 | * Set it up manually, with Helm, or with a Kubernetes Operator
24 |
25 |
6 |
7 | > inlets is not just compatible with tricky networks and Cloud Native architecture, it was purpose-built for them.
8 |
9 | Common use-cases include:
10 |
11 | * Exposing your local endpoints on the Internet
12 | * Self-hosting Kubernetes or K3s clusters
13 | * Deploying and monitoring apps across multiple locations
14 | * Supporting your customers remotely
15 | * Hybrid cloud for legacy TCP applications
16 |
17 | ## What's it look like?
18 |
19 | Every inlets tunnel has two parts: its server and its client, but they're one binary and can run entirely within userspace. This makes it very easy to customise and distribute for different use-cases.
20 |
21 | * It's a single binary for MacOS, Windows and Linux
22 | * Works on bare-metal, in VMs, in containers and on Kubernetes
23 | * Set it up manually, with Helm, or with a Kubernetes Operator
24 |
25 | 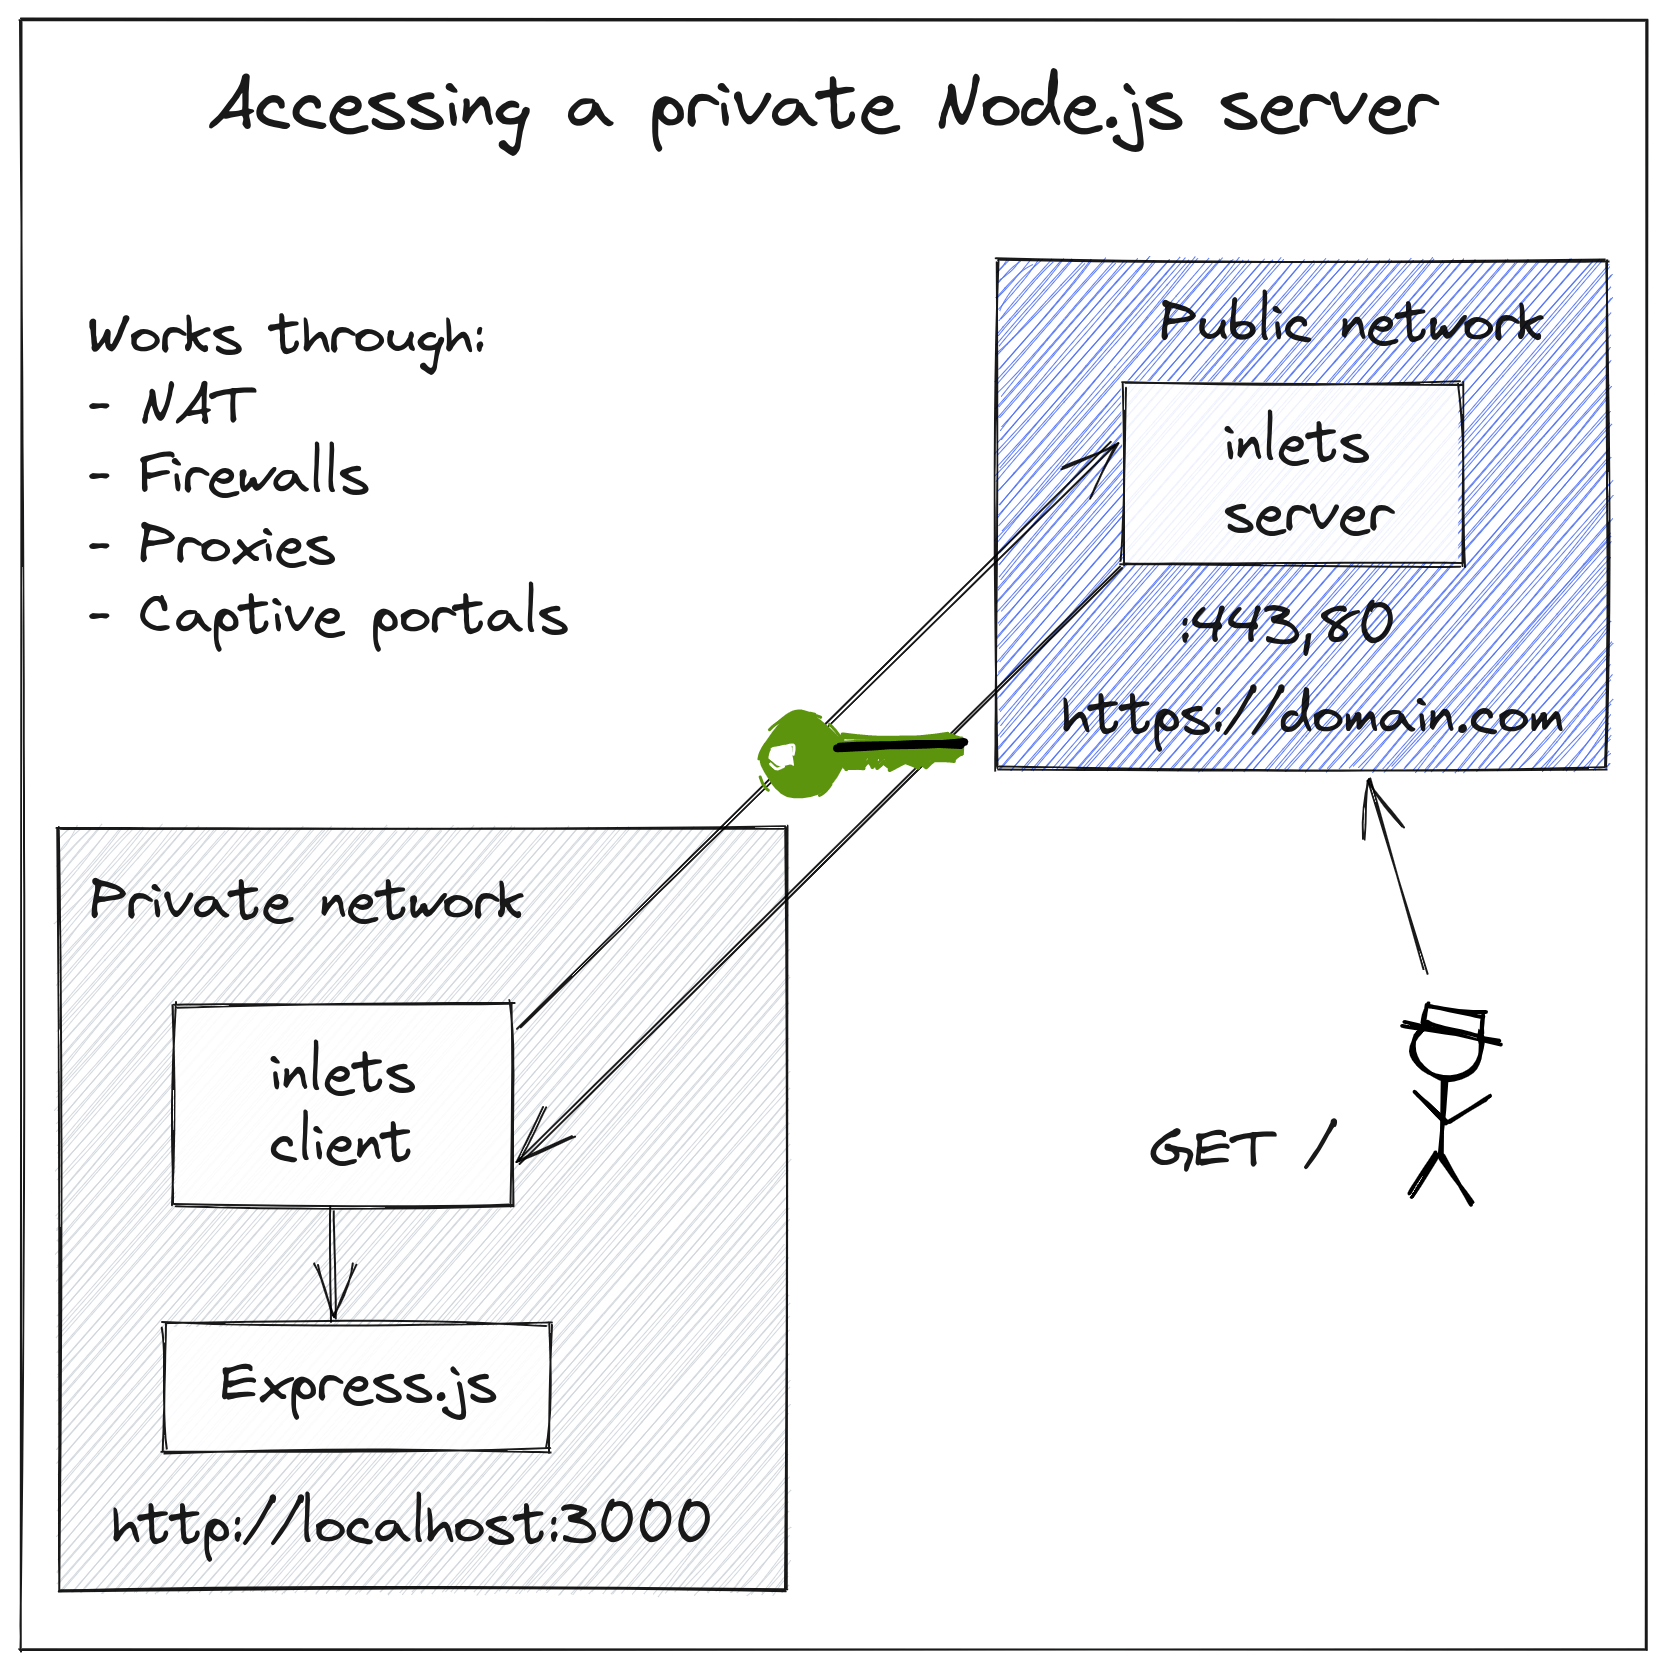 26 |
27 | > inlets *just works*, why not test it and see?
28 |
29 | The tunnel client usually runs in a private network, and the server may run on a network with a public IP. When the two are connected, it's like the private server is actually on the Internet.
30 |
31 | ### How's it different to other solutions?
32 |
33 | Inlets is not a VPN, it's for exposing local services on another network or on the Internet. You can [read more in our FAQ](https://docs.inlets.dev/reference/faq/)
34 |
35 | * Host your tunnel server wherever you want for low latency
36 | * Use it in development and production environments
37 | * Expose as many HTTPS websites as you like
38 | * Expose whatever TCP ports you need
39 | * Get more done, without running into rate-limits imposed by a service provider
40 | * Use your own DNS instead of paying per domain.
41 |
42 | ## Getting started
43 |
44 | > A valid license key or Gumroad subscription is required to launch or deploy inlets. By using the software you agree that you have purchased a license and are bound by the terms of the [End User License Agreement (EULA)](/EULA.md)
45 |
46 | Find out more:
47 |
48 | * [Read the documentation](https://docs.inlets.dev/)
49 | * [Understand use-cases on the blog](https://inlets.dev/blog/)
50 | * [Contact us](https://inlets.dev/contact/)
51 |
52 | ### For cloud natives
53 |
54 | * [Kubernetes Ingress with the inlets-operator](https://docs.inlets.dev/tutorial/kubernetes-ingress/)
55 | * [Expose Ingress with the helm chart](https://inlets.dev/blog/2021/07/08/short-lived-clusters.html)
56 | * [Reliable local port-forwarding from Kubernetes](https://inlets.dev/blog/2021/04/13/local-port-forwarding-kubernetes.html)
57 | * [How to connect your on-premises databases to Kubernetes in the cloud](https://inlets.dev/blog/2020/11/06/hybrid-cloud-with-inlets.html)
58 | * [How to monitor multi-cloud Kubernetes with Prometheus and Grafana](https://inlets.dev/blog/2020/12/15/multi-cluster-monitoring.html)
59 |
60 | ### For modernizing apps and exposing private services
61 |
62 | * [Tutorial: Expose one or more local HTTP services via HTTPS](https://inlets.dev/blog/2021/08/08/private-tunnel.html)
63 | * [When you can't get a static IP from your ISP](https://inlets.dev/blog/2021/04/13/your-isp-wont-give-you-a-static-ip.html)
64 | * [The Simple Way To Connect Existing Apps to Public Cloud](https://inlets.dev/blog/2021/04/07/simple-hybrid-cloud.html)
65 | * [Tutorial: Tunnel a private Postgresql database](https://docs.inlets.dev/tutorial/postgresql-tcp-tunnel/)
66 |
67 | ### Getting inlets
68 |
69 | You'll need a [subscription for inlets](https://openfaas.gumroad.com/l/inlets-subscription), but can pay monthly or save money through an annual subscription.
70 |
71 | Both the client and server are contained within the same binary.
72 |
73 | It is recommended that you use [inletsctl](https://github.com/inlets/inletsctl), or [inlets-operator](https://github.com/inlets/inlets-operator) to create inlets tunnel servers, but you can also [create these manually](https://docs.inlets.dev/tutorial/manual-http-server/).
74 |
75 | The inlets binary can be obtained as a stand-alone executable, or via a container image.
76 |
77 | * As a binary:
78 |
79 | ```sh
80 | curl -SLsf https://github.com/inlets/inlets-pro/releases/download/0.9.23/inlets-pro > inlets-pro
81 | chmod +x ./inlets-pro
82 | ```
83 |
84 | Or find a binary for [a different architecture on the releases page](https://github.com/inlets/inlets-pro/releases)
85 |
86 | See also [CLI reference guide](docs/cli-reference.md)
87 |
88 | * As a container image
89 |
90 | A container image is published at as `ghcr.io/inlets/inlets-pro`
91 |
92 | See the various tags available: [View tags](https://github.com/orgs/inlets/packages/container/package/inlets-pro)
93 |
94 | * Kubernetes Helm charts & Operator
95 |
96 | Run ad-hoc clients and servers on your Kubernetes clusters
97 |
98 | See the [helm chart](chart)
99 |
100 | Or try [the Operator](https://github.com/inlets/inlets-operator) if you want an integration for your LoadBalancers on Kubernetes.
101 |
102 | ## Want to speak to someone?
103 |
104 | If you want to contact someone about inlets, please feel free to get in touch via this form:
105 |
106 | * [Contact us](https://inlets.dev/contact/)
107 |
--------------------------------------------------------------------------------
/artifacts/README.md:
--------------------------------------------------------------------------------
1 | # Artifacts for inlets Pro
2 |
3 | See also: [Options for Kubernetes integration and deployment](chart/)
4 |
--------------------------------------------------------------------------------
/artifacts/client-with-secrets.yaml:
--------------------------------------------------------------------------------
1 | ---
2 | ## This example exposes Prometheus from your OpenFaaS instance on a HTTP tunnel server
3 | ---
4 |
5 | ## It uses secrets that are mounted into the Pod for the token and the license
6 |
7 | # kubectl create secret generic inlets-server-token --from-literal inlets-server-token=$TOKEN
8 | # kubectl create secret generic inlets-license --from-file inlets-license=$HOME/.inlets/LICENSE
9 |
10 | # Change SERVER_IP_HERE
11 | #
12 | # Optionally: change --upstream or add a custom domain such as
13 | # tunnel.example.com=http://prometheus.openfaas:9090
14 | #
15 | ---
16 | apiVersion: apps/v1
17 | kind: Deployment
18 | metadata:
19 | name: inlets-client
20 | spec:
21 | replicas: 1
22 | selector:
23 | matchLabels:
24 | app: inlets-client
25 | template:
26 | metadata:
27 | labels:
28 | app: inlets-client
29 | spec:
30 | volumes:
31 | - name: inlets-license
32 | secret:
33 | secretName: inlets-license
34 | - name: inlets-server-token
35 | secret:
36 | secretName: inlets-server-token
37 | containers:
38 | - name: inlets-client
39 | image: ghcr.io/inlets/inlets-pro:0.9.23
40 | imagePullPolicy: IfNotPresent
41 | command: ["inlets-pro"]
42 | args:
43 | - "http"
44 | - "client"
45 | - "--url=wss://SERVER_IP_HERE:8123"
46 | - "--token-file=/var/secrets/inlets-server-token/inlets-server-token"
47 | - "--license-file=/var/secrets/inlets-license/inlets-license"
48 | - "--upstream=http://prometheus.openfaas:9090"
49 | volumeMounts:
50 | - mountPath: /var/secrets/inlets-server-token
51 | name: inlets-server-token
52 | - mountPath: /var/secrets/inlets-license
53 | name: inlets-license
54 |
55 |
--------------------------------------------------------------------------------
/artifacts/client.yaml:
--------------------------------------------------------------------------------
1 | ---
2 | apiVersion: apps/v1
3 | kind: Deployment
4 | metadata:
5 | name: inlets-client
6 | spec:
7 | replicas: 1
8 | selector:
9 | matchLabels:
10 | app: inlets-client
11 | template:
12 | metadata:
13 | labels:
14 | app: inlets-client
15 | spec:
16 | containers:
17 | - name: inlets-client
18 | image: ghcr.io/inlets/inlets-pro:0.9.23
19 | imagePullPolicy: IfNotPresent
20 | command: ["inlets-pro"]
21 | args:
22 | - "tcp"
23 | - "client"
24 | - "--url=wss://EXIT_NODE_IP:8123/connect"
25 | - "--ports=80,443"
26 | - "--token=AUTH_TOKEN_HERE"
27 | - "--license=LICENSE_JWT_HERE"
28 | - "--upstream=SERVICE_NAME_HERE"
29 | ---
30 |
--------------------------------------------------------------------------------
/artifacts/inlets-pro.service:
--------------------------------------------------------------------------------
1 | [Unit]
2 | Description=inlets Pro TCP server
3 | After=network.target
4 |
5 | [Service]
6 | Type=simple
7 | Restart=always
8 | RestartSec=2
9 | StartLimitInterval=0
10 | EnvironmentFile=/etc/default/inlets-pro
11 | ExecStart=/usr/local/bin/inlets-pro tcp server --auto-tls --auto-tls-san="${IP}" --token="${AUTHTOKEN}"
12 |
13 | [Install]
14 | WantedBy=multi-user.target
15 |
--------------------------------------------------------------------------------
/artifacts/server.yaml:
--------------------------------------------------------------------------------
1 | ---
2 | apiVersion: apps/v1
3 | kind: Deployment
4 | metadata:
5 | name: inlets-server
6 | spec:
7 | replicas: 1
8 | selector:
9 | matchLabels:
10 | app: inlets-server
11 | template:
12 | metadata:
13 | labels:
14 | app: inlets-server
15 | spec:
16 | containers:
17 | - name: inlets-server
18 | image: ghcr.io/inlets/inlets-pro:0.9.23
19 | imagePullPolicy: IfNotPresent
20 | command: ["inlets-pro"]
21 | args:
22 | - "tcp"
23 | - "server"
24 | - "--auto-tls=true"
25 | - "--auto-tls-name=PUBLIC_IP"
26 | - "--token=TOKEN"
27 |
--------------------------------------------------------------------------------
/artifacts/split-plane-server.yaml:
--------------------------------------------------------------------------------
1 | ---
2 | apiVersion: apps/v1
3 | kind: Deployment
4 | metadata:
5 | name: inlets-server
6 | spec:
7 | replicas: 1
8 | selector:
9 | matchLabels:
10 | app: inlets-server
11 | template:
12 | metadata:
13 | labels:
14 | app: inlets-server
15 | spec:
16 | containers:
17 | - name: inlets-server
18 | image: ghcr.io/inlets/inlets-pro:0.9.23
19 | imagePullPolicy: IfNotPresent
20 | command: ["inlets-pro"]
21 | args:
22 | - "tcp"
23 | - "server"
24 | - "--auto-tls=true"
25 | - "--auto-tls-name=PUBLIC_IP"
26 | - "--token=TOKEN"
27 | ---
28 |
29 | # Private ClusterIP, to which applications will connect within the cluster
30 | ---
31 | apiVersion: v1
32 | kind: Service
33 | metadata:
34 | name: inlets-control
35 | labels:
36 | app: inlets-server
37 | spec:
38 | type: LoadBalancer
39 | ports:
40 | - name: inlets-control
41 | port: 8123
42 | protocol: TCP
43 | targetPort: 8123
44 | nodePort: 30023
45 | selector:
46 | app: inlets-server
47 |
48 | # Public LoadBalancer, or Ingress, or NodePort to which the remote service
49 | # behind NAT or a firewall will connect
50 |
51 | # If we are tunnelling `ssh` for instance on port 22
52 | # Clients from within the cluster can connect to :
53 | # tunnel-client-1-ssh.default:22
54 | ---
55 | apiVersion: v1
56 | kind: Service
57 | metadata:
58 | name: tunnel-client-1-ssh
59 | labels:
60 | app: inlets-server
61 | spec:
62 | type: ClusterIP
63 | ports:
64 | - name: inlets-ssh-data
65 | port: 22
66 | protocol: TCP
67 | targetPort: 22
68 | selector:
69 | app: inlets-server
70 | ---
71 | # Multiple ports can also be exposed via the data-plane
72 | # In this instance client-1 forwards ports 22 and 27017 for MongoDB:
73 |
74 | # mongodb://tunnel-client-1.default:27017
75 | # ssh -p 22 tunnel-client-1.default
76 | ---
77 | apiVersion: v1
78 | kind: Service
79 | metadata:
80 | name: tunnel-client-1
81 | labels:
82 | app: inlets-server
83 | spec:
84 | type: ClusterIP
85 | ports:
86 | - name: inlets-ssh-data
87 | port: 22
88 | protocol: TCP
89 | targetPort: 22
90 | - name: inlets-mongofb-data
91 | port: 27017
92 | protocol: TCP
93 | targetPort: 27017
94 | selector:
95 | app: inlets-server
96 | ---
97 |
98 |
--------------------------------------------------------------------------------
/chart/README.md:
--------------------------------------------------------------------------------
1 | ## Helm charts for inlets
2 |
3 | [inlets](https://inlets.dev) has both a client and a server, which connect to each other to build a tunnel.
4 |
5 | When a client wants to expose a service publicly, or privately within a remote network, it connects to a server using its control-plane (a HTTPS websocket).
6 |
7 | There is no need for your data plane to be exposed on the Internet, you can bind to a local LAN adapter, or a private ClusterIP. If you do want to expose your tunnelled services to the Internet, you can do with a NodePort, LoadBalancer or through Ingress.
8 |
9 | Kubernetes v1.19+ is required for the helm charts provided in this repository, due to the various versions of the Ingress API, the minimum supported version will be `networking.k8s.io/v1`.
10 |
11 | ### Deploy the inlets tunnel client or server as a Kubernetes Deployment
12 |
13 | * [Deploy an inlets TCP client](inlets-tcp-client) - connect an internal service to a public inlets TCP server - use this to expose an IngressController like ingress-nginx, Istio, Traefik, or Kong.
14 |
15 | * [Deploy an inlets TCP server](inlets-tcp-server) - one or more inlets TCP tunnel servers in a Kubernetes cluster, instead of using multiple VMs.
16 |
17 | * [Deploy an inlets HTTP server](inlets-http-server) - one or more inlets HTTP tunnel servers in a Kubernetes cluster, instead of using multiple VMs.
18 |
19 | ## Other Kubernetes use-cases
20 |
21 | ### Get Public L4 Load Balancers for your cluster
22 |
23 | See also: [inlets-operator](https://github.com/inlets/inlets-operator) which automates both parts of the above for a set number of supported clouds, and integrates through Kubernetes services of type LoadBalancer.
24 |
25 | ### Setup your preferred IngressController with TLS certs from Let's Encrypt
26 |
27 | * [Quick-start: Expose Your IngressController and get TLS from LetsEncrypt and cert-manager](https://docs.inlets.dev/#/get-started/quickstart-ingresscontroller-cert-manager?id=quick-start-expose-your-ingresscontroller-and-get-tls-from-letsencrypt-and-cert-manager)
28 |
29 | ### Get kubectl access to your private cluster from anywhere
30 |
31 | * [Tutorial: Expose a local Kubernetes API Server](https://docs.inlets.dev/tutorial/kubernetes-api-server/)
32 |
33 | ### Continous Deployment and fleet management with ArgoCD
34 |
35 | * [How To Manage Inlets Tunnels Servers With Argo CD and GitOps](https://inlets.dev/blog/2022/08/10/managing-tunnel-servers-with-argocd.html)
36 | * [Argo CD for your private Raspberry Pi k3s cluster](https://johansiebens.dev/posts/2020/08/argo-cd-for-your-private-raspberry-pi-k3s-cluster/)
37 |
--------------------------------------------------------------------------------
/chart/inlets-http-server/.gitignore:
--------------------------------------------------------------------------------
1 | /*.old
2 |
--------------------------------------------------------------------------------
/chart/inlets-http-server/.helmignore:
--------------------------------------------------------------------------------
1 | # Patterns to ignore when building packages.
2 | # This supports shell glob matching, relative path matching, and
3 | # negation (prefixed with !). Only one pattern per line.
4 | .DS_Store
5 | # Common VCS dirs
6 | .git/
7 | .gitignore
8 | .bzr/
9 | .bzrignore
10 | .hg/
11 | .hgignore
12 | .svn/
13 | # Common backup files
14 | *.swp
15 | *.bak
16 | *.tmp
17 | *.orig
18 | *~
19 | # Various IDEs
20 | .project
21 | .idea/
22 | *.tmproj
23 | .vscode/
24 |
--------------------------------------------------------------------------------
/chart/inlets-http-server/Chart.yaml:
--------------------------------------------------------------------------------
1 | apiVersion: v2
2 | name: inlets-http-server
3 | description: Deploy an inlets HTTP tunnel server to a cluster
4 | type: application
5 | version: 0.5.2
6 | appVersion: 1.16.0
7 |
--------------------------------------------------------------------------------
/chart/inlets-http-server/README.md:
--------------------------------------------------------------------------------
1 | # inlets-http-server
2 |
3 | This is the helm chart for an inlets Pro HTTP server
4 |
5 | Use it to deploy one or more inlets Pro HTTP tunnel servers to your Kubernetes cluster using a wildcard domain.
6 |
7 | # Use your Kubernetes cluster for inlets-pro HTTP exit-servers
8 |
9 | Install [arkade](https://arkade.dev/), which is used in the tutorial to install Kubernetes software.
10 |
11 | ```bash
12 | curl -sLS https://dl.arkade.dev | sh # Move to /usr/local/bin/
13 | curl -sLS https://dl.arkade.dev | sudo sh # Moved automatically.
14 | ```
15 |
16 | Install helm with `arkade get helm`.
17 |
18 | You also need to add the helm chart repository:
19 |
20 | ```bash
21 | $ helm repo add inlets-pro https://inlets.github.io/inlets-pro/charts/
22 | $ helm repo update
23 | ```
24 |
25 | ## Setup cert-manager, Ingress and a DNS01 certificate
26 |
27 | ```bash
28 | arkade install cert-manager
29 | arkade install ingress-nginx
30 | ```
31 |
32 | Note that all the resources we will create will be within the `inlets` namespace. cert-manager and ingress-nginx can reside in their own respective namespaces.
33 |
34 | Now create a DNS01 issuer for your preferred cloud:
35 |
36 | ```bash
37 | export EMAIL="you@example.com"
38 | export ACCESS_KEY_ID="AKIAIOSFODNN7EXAMPLE"
39 | export REGION="eu-central-1"
40 |
41 | cat > issuer.yaml < certificate.yaml < If you are wanting to test inlets Pro TCP tunnel servers in Kubernetes, without a domain and without configuring TLS and Ingress, you can try out: [The hard way to host an inlets TCP tunnel on Kubernetes](../../docs/inlets-tcp-server-hard-way.md)
8 |
9 | ## Getting started
10 |
11 | In this tutorial, you'll learn how to set up a tunnel for a Prometheus service running on a private network. It will be tunneled to your Kubernetes cluster through an inlets server running in a Pod. [Prometheus](https://prometheus.io) is a time-series database used for monitoring microservices. It is assumed that you have one or more Prometheus instances that you want to monitor from a cloud Kubernetes cluster.
12 |
13 | You will need a cloud Kubernetes cluster and access to a sub-domain available and its DNS control-panel.
14 |
15 | ### Install the prerequisites
16 |
17 | You can run this on any Intel or ARM cluster.
18 |
19 | Install [arkade](https://arkade.dev/), which is used in the tutorial to install Kubernetes software.
20 |
21 | ```bash
22 | curl -sLS https://dl.arkade.dev | sh # Move to /usr/local/bin/
23 | curl -sLS https://dl.arkade.dev | sudo sh # Moved automatically.
24 | ```
25 |
26 | Install helm with `arkade get helm`.
27 |
28 | You also need to add the helm chart repository:
29 |
30 | ```bash
31 | $ helm repo add inlets-pro https://inlets.github.io/inlets-pro/charts/
32 | $ helm repo update
33 | ```
34 |
35 | #### Install nginx-ingress
36 |
37 | ```bash
38 | $ arkade install nginx-ingress
39 | ```
40 |
41 | #### Install cert-manager
42 |
43 | [cert-manager](https://cert-manager.io/), can obtain TLS certificates from LetsEncrypt through NginxIngress.
44 |
45 | ```bash
46 | $ arkade install cert-manager
47 | ```
48 |
49 | It is assumed that you installed `kubectl` when you created your Kubernetes cluster, otherwise run `arkade get kubectl`.
50 |
51 | ### Install an Issuer
52 |
53 | Create a production certificate issuer issuer-prod.yaml, similar to the staging issuer you produced earlier. Be sure to change the email address to your email.
54 |
55 | ```bash
56 | export DOMAIN="prometheus.example.com"
57 | export EMAIL="webmaster@$DOMAIN"
58 |
59 | cat > issuer-prod.yaml < Note: if you plan to run many tunnels, each with their own certificate, then you may wish to configure the cert-manager Issuer to use a DNS01 challenge. See also: [Configuring DNS01 Challenge Provider ](https://cert-manager.io/docs/configuration/acme/dns01/)
86 |
87 | ### Generate a token for your prometheus inlets-pro server
88 |
89 | ```bash
90 | # Generate a random password
91 | export TOKEN=$(head -c 16 /dev/random | shasum|cut -d" " -f1)
92 |
93 | # Save a copy for later
94 | echo $TOKEN > prometheus-token.txt
95 |
96 | # Create a secret in the cluster for the tunnel server
97 | kubectl create secret generic prometheus-tunnel-token \
98 | --from-literal token=$TOKEN
99 | ```
100 |
101 | ### Install the inlets-pro TCP server chart
102 |
103 | Edit `values.yaml`:
104 |
105 | Make any changes you need.
106 |
107 | ```bash
108 | export DOMAIN="prometheus.example.com"
109 | export TOKEN="prometheus-tunnel-token"
110 |
111 | helm upgrade --install prometheus-tunnel inlets-pro/inlets-tcp-server \
112 | --set ingress.domain=$DOMAIN \
113 | --set tokenSecretName=$TOKEN
114 | ```
115 |
116 | > Note: replace the domain with a domain you own.
117 |
118 | The chart will deploy two Kubernetes services, an Ingress record and a Deployment to run the inlets-pro server process.
119 |
120 | * `prometheus-tunnel-control` - a service exposed by Ingress, for the websocket of inlets Pro (usually port 8123)
121 | * `prometheus-tunnel-data` - a local service to access Prometheus from within the cluster (usually 9090)
122 |
123 | ### Now connect your client on your computer.
124 |
125 | You can now connect Prometheus from wherever you have it running, whether that's in a container, on your system as a normal process, or within a Kubernetes cluster.
126 |
127 | Let's run a Prometheus container with Docker, so that we can connect it to the inlets server quickly.
128 |
129 | ```bash
130 | docker run --name prometheus \
131 | -p 9090:9090 \
132 | -d prom/prometheus:latest
133 | ```
134 |
135 | > Note: you can remove this container later with `docker rm -f prometheus`
136 |
137 | You will need the tunnel token to connect the inlets-pro client. If you saved a copy of the token you can used that. Otherwise it can be retrieved from the cluster:
138 |
139 | ```bash
140 | kubectl get secret -n default prometheus-tunnel-token -o jsonpath="{.data.token}" | base64 --decode > prometheus-token.txt
141 | ```
142 |
143 | Now connect your inlets-pro client:
144 |
145 | ```bash
146 | export DOMAIN="prometheus.example.com"
147 | export TOKEN_FILE="./prometheus-token.txt"
148 | inlets-pro tcp client --url wss://$DOMAIN/connect \
149 | --token-file $TOKEN_FILE \
150 | --license-file ~/LICENSE \
151 | --port 9090 \
152 | --auto-tls=false \
153 | --upstream 127.0.0.1
154 | ```
155 |
156 | We use a value of `--upstream 127.0.0.1` since the Prometheus container was exposed on 127.0.0.1 in the previous `docker run` command. If you were running the inlets client as a Pod, then you would use something like `--upstream prometheus` instead. You can also put an IP address attached to another computer in the upstream field. It just needs to be accessible from the client.
157 |
158 | ### Now access the tunnelled Prometheus from the Kubernetes cluster
159 |
160 | We haven't exposed the Prometheus service on the Internet for general consumption, so let's access it through its private ClusterIP which was deployed through the helm chart.
161 |
162 | Run a container with curl installed.
163 |
164 | ```bash
165 | kubectl run -t -i curl --rm --image ghcr.io/openfaas/curl:latest /bin/sh
166 | ```
167 |
168 | Now access the tunneled service via curl:
169 |
170 | ```bash
171 | curl prometheus-tunnel-data:9090
172 | ```
173 |
174 | You can also use `kubectl port-forward` to view the tunneled service:
175 |
176 | ```bash
177 | kubectl port-forward \
178 | svc/prometheus-tunnel-data 9091:9090
179 |
180 | echo Open: http://127.0.0.1:9091
181 | ```
182 |
183 | ### Install multiple tunnels
184 | To deploy multiple tunnel servers with the Helm chart some steps will need to be repeated for each tunnel:
185 |
186 | - Create a secret for the tunnel.
187 | - Create a `values.yaml` file with the helm parameter configuration.
188 | - Deploy the tunnel server using Helm.
189 |
190 | In this example we will setup a second tunnel for a PostgreSQL server running on a private network.
191 |
192 | Create a new secret for the PostgreSQL tunnel:
193 |
194 | ```bash
195 | # Generate a random password
196 | export TOKEN=$(head -c 16 /dev/random | shasum|cut -d" " -f1)
197 |
198 | # Save a copy for later
199 | echo $TOKEN > postgres-token.txt
200 |
201 | # Create a secret in the cluster for the tunnel server
202 | kubectl create secret generic postgres-tunnel-token \
203 | --from-literal token=$TOKEN
204 | ```
205 |
206 | Create a values file `postgres-values.yaml` with the chart configuration parameters for the tunnel:
207 |
208 | ```yaml
209 | export DOMAIN=postgres.example.com
210 |
211 | cat >> postgres-values.yaml < inlets-pro
15 | chmod +x ./inlets-pro
16 | mv ./inlets-pro /usr/bin/inlets-pro
17 | ```
18 |
19 | Find your public IP:
20 |
21 | ```
22 | export IP=$(curl -s ifconfig.co)
23 | ```
24 |
25 | Confirm the IP with `echo $IP` and save it, you need it for the client
26 |
27 | Get an auth token and save it for later to use with the client
28 |
29 | ```sh
30 | export TOKEN="$(head -c 16 /dev/urandom |shasum|cut -d'-' -f1)"
31 |
32 | echo $TOKEN
33 | ```
34 |
35 | Start the server:
36 |
37 | ```sh
38 | sudo inlets-pro server \
39 | --auto-tls \
40 | --auto-tls-name $IP \
41 | --remote-tcp 127.0.0.1 \
42 | --token $TOKEN
43 | ```
44 |
45 | ## Get Cassandra on your laptop
46 |
47 | Using Docker you can run Cassandra.
48 |
49 | ```sh
50 | docker run --name cassandra -p 9042:9042 -ti cassandra:latest
51 | ```
52 |
53 | The client port is `9042` which will become available on the public IP
54 |
55 | Now run the inlets client on the other side:
56 |
57 | For a Linux client
58 |
59 | ```sh
60 | curl -SLsf https://github.com/inlets/inlets-pro/releases/download/0.6.0/inlets-pro > inlets-pro
61 | chmod +x ./inlets-pro
62 | mv ./inlets-pro /usr/bin/inlets-pro
63 | ```
64 |
65 | For a MacOS client
66 |
67 | ```sh
68 | curl -SLsf https://github.com/inlets/inlets-pro/releases/download/0.6.0/inlets-pro-darwin > inlets-pro
69 | chmod +x ./inlets-pro
70 | sudo mv ./inlets-pro /usr/bin/inlets-pro
71 | ```
72 |
73 | Run the inlets-pro client:
74 |
75 | ```sh
76 | export IP="" # take this from the exit node
77 | export TOKEN="" # take this from the server earlier
78 | export LICENSE="" # your license
79 |
80 | sudo -E inlets-pro client \
81 | --connect wss://$IP:8123/connect \
82 | --tcp-ports 9042 \
83 | --token $TOKEN \
84 | --license $LICENSE
85 | ```
86 |
87 | ## Connect to Cassandra on your exit node
88 |
89 | On your laptop or another computer use the Cassandra client `cqlsh` to connect and verify the tunnel is operational.
90 |
91 | ```sh
92 | export IP="" # Exit-node IP
93 | docker run \
94 | -e CQLSH_HOST=$IP \
95 | -e CQLSH_PORT=9042 \
96 | -it --rm cassandra cqlsh
97 | ```
98 |
99 | Now you're connected.
100 |
101 | ```sh
102 | Connected to Test Cluster at 185.136.232.127:9042.
103 | [cqlsh 5.0.1 | Cassandra 3.11.4 | CQL spec 3.4.4 | Native protocol v4]
104 | Use HELP for help.
105 | cqlsh>
106 | ```
107 |
108 | Try a query:
109 |
110 | ```sh
111 | cqlsh> SELECT cluster_name, listen_address FROM system.local;
112 |
113 | cluster_name | listen_address
114 | --------------+----------------
115 | Test Cluster | 172.17.0.2
116 |
117 | (1 rows)
118 | cqlsh>
119 | ```
120 |
--------------------------------------------------------------------------------
/docs/charts/index.yaml:
--------------------------------------------------------------------------------
1 | apiVersion: v1
2 | entries:
3 | inlets-http-server:
4 | - apiVersion: v2
5 | appVersion: 1.16.0
6 | created: "2024-01-29T09:49:00.732544Z"
7 | description: Deploy an inlets HTTP tunnel server to a cluster
8 | digest: 526169db9f229c574c092d714c1883fb76c3089e7e7f620f568bb6310022fa2d
9 | name: inlets-http-server
10 | type: application
11 | urls:
12 | - https://inlets.github.io/inlets-pro/charts/inlets-http-server-0.5.2.tgz
13 | version: 0.5.2
14 | - apiVersion: v2
15 | appVersion: 1.16.0
16 | created: "2024-01-29T09:49:00.732299Z"
17 | description: Deploy an inlets HTTP tunnel server to a cluster
18 | digest: 7b1c3d6aff3473a6834f84cfbb8c90b55ab769d24746ccb0c9e1396c1130ac78
19 | name: inlets-http-server
20 | type: application
21 | urls:
22 | - https://inlets.github.io/inlets-pro/charts/inlets-http-server-0.5.1.tgz
23 | version: 0.5.1
24 | - apiVersion: v2
25 | appVersion: 1.16.0
26 | created: "2024-01-29T09:49:00.732057Z"
27 | description: Deploy an inlets HTTP tunnel server to a cluster
28 | digest: 019ba36a7461647292ce9dcdae4af85e382b041cbd2becf81eeb1a5a18ef4a53
29 | name: inlets-http-server
30 | type: application
31 | urls:
32 | - https://inlets.github.io/inlets-pro/charts/inlets-http-server-0.5.0.tgz
33 | version: 0.5.0
34 | - apiVersion: v2
35 | appVersion: 1.16.0
36 | created: "2024-01-29T09:49:00.731809Z"
37 | description: Helm chart for an inlets HTTP server
38 | digest: 69416d500a12ad1b04a8857f24f748fecea8d67965d5618cc7f259059897af10
39 | name: inlets-http-server
40 | type: application
41 | urls:
42 | - https://inlets.github.io/inlets-pro/charts/inlets-http-server-0.4.3.tgz
43 | version: 0.4.3
44 | - apiVersion: v2
45 | appVersion: 1.16.0
46 | created: "2024-01-29T09:49:00.731552Z"
47 | description: Helm chart for an inlets HTTP server
48 | digest: e226d19e14aac943de2e2dfb25535998ae474bb39fe88aaa4f0ce6b7212ee1df
49 | name: inlets-http-server
50 | type: application
51 | urls:
52 | - https://inlets.github.io/inlets-pro/charts/inlets-http-server-0.4.2.tgz
53 | version: 0.4.2
54 | - apiVersion: v2
55 | appVersion: 1.16.0
56 | created: "2024-01-29T09:49:00.73131Z"
57 | description: Helm chart for an inlets HTTP server
58 | digest: 83126ada1077e4ab9aeb40babe89cd13539d381c235335f8b637e89b21291dd5
59 | name: inlets-http-server
60 | type: application
61 | urls:
62 | - https://inlets.github.io/inlets-pro/charts/inlets-http-server-0.4.1.tgz
63 | version: 0.4.1
64 | - apiVersion: v2
65 | appVersion: 1.16.0
66 | created: "2024-01-29T09:49:00.731056Z"
67 | description: Helm chart for an inlets HTTP server
68 | digest: 2427570cee3593f76b7787a07d81d69a3266f31bec2edcd97b46e8bb6b6e020a
69 | name: inlets-http-server
70 | type: application
71 | urls:
72 | - https://inlets.github.io/inlets-pro/charts/inlets-http-server-0.4.0.tgz
73 | version: 0.4.0
74 | - apiVersion: v2
75 | appVersion: 1.16.0
76 | created: "2024-01-29T09:49:00.730794Z"
77 | description: Helm chart for an inlets HTTP server
78 | digest: f6de8d04eef6af9c26a17005849f885aece0a5b04117e10ebcd054f5235f9f60
79 | name: inlets-http-server
80 | type: application
81 | urls:
82 | - https://inlets.github.io/inlets-pro/charts/inlets-http-server-0.3.0.tgz
83 | version: 0.3.0
84 | - apiVersion: v2
85 | appVersion: 1.16.0
86 | created: "2024-01-29T09:49:00.730524Z"
87 | description: Helm chart for an inlets HTTP server
88 | digest: 9c946af21b3fba2710002fc24409b72b43f7377d4f9768109e02213fffcff82a
89 | name: inlets-http-server
90 | type: application
91 | urls:
92 | - https://inlets.github.io/inlets-pro/charts/inlets-http-server-0.2.1.tgz
93 | version: 0.2.1
94 | inlets-pro:
95 | - apiVersion: v2
96 | appVersion: 1.16.0
97 | created: "2024-01-29T09:49:00.735625Z"
98 | description: Helm chart for an inlets-pro TCP server
99 | digest: b849b6e9c6c4a0825fdcfa1a59f6a44c816aff2c8768b66e2710c3721187b901
100 | name: inlets-pro
101 | type: application
102 | urls:
103 | - https://inlets.github.io/inlets-pro/charts/inlets-pro-0.4.3.tgz
104 | version: 0.4.3
105 | - apiVersion: v2
106 | appVersion: 1.16.0
107 | created: "2024-01-29T09:49:00.735269Z"
108 | description: Helm chart for an inlets-pro TCP server
109 | digest: 54bfa103641526ce4ab10d5dc2ee3a7420754bfe2f4dce3d569957bf38d78538
110 | name: inlets-pro
111 | type: application
112 | urls:
113 | - https://inlets.github.io/inlets-pro/charts/inlets-pro-0.4.2.tgz
114 | version: 0.4.2
115 | - apiVersion: v2
116 | appVersion: 1.16.0
117 | created: "2024-01-29T09:49:00.733683Z"
118 | description: Helm chart for an inlets-pro TCP server
119 | digest: 4b5b7b8032d40e5d3969399cba1943eb752b15efb28b2fbf77b9566522ecc0bc
120 | name: inlets-pro
121 | type: application
122 | urls:
123 | - https://inlets.github.io/inlets-pro/charts/inlets-pro-0.4.1.tgz
124 | version: 0.4.1
125 | - apiVersion: v2
126 | appVersion: 1.16.0
127 | created: "2024-01-29T09:49:00.733392Z"
128 | description: Helm chart for an inlets-pro TCP server
129 | digest: 898f6551157fb49c0a617eb30f225b9921a4aba60eba804c6307245b1f8e205a
130 | name: inlets-pro
131 | type: application
132 | urls:
133 | - https://inlets.github.io/inlets-pro/charts/inlets-pro-0.4.0.tgz
134 | version: 0.4.0
135 | - apiVersion: v2
136 | appVersion: 1.16.0
137 | created: "2024-01-29T09:49:00.733113Z"
138 | description: Helm chart for an inlets-pro TCP server
139 | digest: 108eaf1e75fa15ba60316867c6bdc645f177dbe305bf320382b49fa0e40222db
140 | name: inlets-pro
141 | type: application
142 | urls:
143 | - https://inlets.github.io/inlets-pro/charts/inlets-pro-0.3.0.tgz
144 | version: 0.3.0
145 | - apiVersion: v2
146 | appVersion: 1.16.0
147 | created: "2024-01-29T09:49:00.732828Z"
148 | description: Helm chart for an inlets-pro TCP server
149 | digest: 75c0ca85be33d6461410332b2d3f9438e681e53a326f0b12cb80540a5b8db0f2
150 | name: inlets-pro
151 | type: application
152 | urls:
153 | - https://inlets.github.io/inlets-pro/charts/inlets-pro-0.2.1.tgz
154 | version: 0.2.1
155 | inlets-pro-client:
156 | - apiVersion: v2
157 | appVersion: 1.0.0
158 | created: "2024-01-29T09:49:00.73695Z"
159 | description: Helm chart for an inlets-pro TCP client
160 | digest: 7db4d044da23c3171b6de57cdb2318f32e10e40445fa0f2009df619852a83a86
161 | name: inlets-pro-client
162 | type: application
163 | urls:
164 | - https://inlets.github.io/inlets-pro/charts/inlets-pro-client-0.4.3.tgz
165 | version: 0.4.3
166 | - apiVersion: v2
167 | appVersion: 1.0.0
168 | created: "2024-01-29T09:49:00.736743Z"
169 | description: Helm chart for an inlets-pro TCP client
170 | digest: 3193fd6292800c0fbc176ba906d4115dd94551e3e1fb21112e0d637d19ecdab4
171 | name: inlets-pro-client
172 | type: application
173 | urls:
174 | - https://inlets.github.io/inlets-pro/charts/inlets-pro-client-0.4.2.tgz
175 | version: 0.4.2
176 | - apiVersion: v2
177 | appVersion: 1.0.0
178 | created: "2024-01-29T09:49:00.736516Z"
179 | description: Helm chart for an inlets-pro TCP client
180 | digest: e52a838e3411b2a2609afcc1ce47471f66497b9c3ffbde631809b7574885a189
181 | name: inlets-pro-client
182 | type: application
183 | urls:
184 | - https://inlets.github.io/inlets-pro/charts/inlets-pro-client-0.4.1.tgz
185 | version: 0.4.1
186 | - apiVersion: v2
187 | appVersion: 1.0.0
188 | created: "2024-01-29T09:49:00.736293Z"
189 | description: Helm chart for an inlets-pro TCP client
190 | digest: b6bfd6f0d4f74ff7bad733ada9c8d2ad426a139925a01346ec15186a2a89f29c
191 | name: inlets-pro-client
192 | type: application
193 | urls:
194 | - https://inlets.github.io/inlets-pro/charts/inlets-pro-client-0.4.0.tgz
195 | version: 0.4.0
196 | - apiVersion: v2
197 | appVersion: 1.0.0
198 | created: "2024-01-29T09:49:00.736074Z"
199 | description: Helm chart for an inlets-pro TCP client
200 | digest: db19167e8659dfca115294b51ca8c8cc3ee53e4b4b692ba6ddf3f61a748cdd00
201 | name: inlets-pro-client
202 | type: application
203 | urls:
204 | - https://inlets.github.io/inlets-pro/charts/inlets-pro-client-0.3.0.tgz
205 | version: 0.3.0
206 | - apiVersion: v2
207 | appVersion: 1.0.0
208 | created: "2024-01-29T09:49:00.73585Z"
209 | description: Helm chart for an inlets-pro TCP client
210 | digest: 627dc96ec83d8dd8cff9421d503bd71488a8e276ddbc6c72ec599aa50fd147c0
211 | name: inlets-pro-client
212 | type: application
213 | urls:
214 | - https://inlets.github.io/inlets-pro/charts/inlets-pro-client-0.2.1.tgz
215 | version: 0.2.1
216 | inlets-tcp-client:
217 | - apiVersion: v2
218 | appVersion: 1.0.0
219 | created: "2024-01-29T09:49:00.737559Z"
220 | description: Deploy an inlets TCP tunnel client to forward internal traffic to
221 | an external endpoint
222 | digest: 77eb9dfed38757ad7806c8f1373f028ccd882cde6ef905f5847b5bc667f680a3
223 | name: inlets-tcp-client
224 | type: application
225 | urls:
226 | - https://inlets.github.io/inlets-pro/charts/inlets-tcp-client-0.5.3.tgz
227 | version: 0.5.3
228 | - apiVersion: v2
229 | appVersion: 1.0.0
230 | created: "2024-01-29T09:49:00.737356Z"
231 | description: Deploy an inlets TCP tunnel client to forward internal traffic to
232 | an external endpoint
233 | digest: 533171d23a8dbd2987a2b0176c055df26907f41f194a5e698c3515f601007f00
234 | name: inlets-tcp-client
235 | type: application
236 | urls:
237 | - https://inlets.github.io/inlets-pro/charts/inlets-tcp-client-0.5.2.tgz
238 | version: 0.5.2
239 | - apiVersion: v2
240 | appVersion: 1.0.0
241 | created: "2024-01-29T09:49:00.737152Z"
242 | description: Deploy an inlets TCP tunnel client to a cluster
243 | digest: 8a05dcd92590a678a61453c1455ed10b20a8fad10d04783bf2e7f169df025227
244 | name: inlets-tcp-client
245 | type: application
246 | urls:
247 | - https://inlets.github.io/inlets-pro/charts/inlets-tcp-client-0.5.0.tgz
248 | version: 0.5.0
249 | inlets-tcp-server:
250 | - apiVersion: v2
251 | appVersion: 1.16.0
252 | created: "2024-01-29T09:49:00.738698Z"
253 | description: Deploy an inlets TCP tunnel server to a cluster
254 | digest: 059173df29788055b04e7eb86bd59d199d29fd2eb4122af1155f0799f5696a32
255 | name: inlets-tcp-server
256 | type: application
257 | urls:
258 | - https://inlets.github.io/inlets-pro/charts/inlets-tcp-server-0.6.2.tgz
259 | version: 0.6.2
260 | - apiVersion: v2
261 | appVersion: 1.16.0
262 | created: "2024-01-29T09:49:00.738391Z"
263 | description: Deploy an inlets TCP tunnel server to a cluster
264 | digest: 6551a447ca33286f75ffb6dc452f3d85c81a055d76ff1d26aba447673e424efa
265 | name: inlets-tcp-server
266 | type: application
267 | urls:
268 | - https://inlets.github.io/inlets-pro/charts/inlets-tcp-server-0.6.1.tgz
269 | version: 0.6.1
270 | - apiVersion: v2
271 | appVersion: 1.16.0
272 | created: "2024-01-29T09:49:00.738101Z"
273 | description: Deploy an inlets TCP tunnel server to a cluster
274 | digest: b45e178ef25214be9353b300f989137108945943dadb178c3a3fc37862201aab
275 | name: inlets-tcp-server
276 | type: application
277 | urls:
278 | - https://inlets.github.io/inlets-pro/charts/inlets-tcp-server-0.6.0.tgz
279 | version: 0.6.0
280 | - apiVersion: v2
281 | appVersion: 1.16.0
282 | created: "2024-01-29T09:49:00.73783Z"
283 | description: Deploy an inlets TCP tunnel server to a cluster
284 | digest: 01dfdb92723407872e4d8321f21e5f5d0c3db38b0d8b28578e3e0a41c2a71609
285 | name: inlets-tcp-server
286 | type: application
287 | urls:
288 | - https://inlets.github.io/inlets-pro/charts/inlets-tcp-server-0.5.0.tgz
289 | version: 0.5.0
290 | generated: "2024-01-29T09:49:00.729563Z"
291 |
--------------------------------------------------------------------------------
/docs/charts/inlets-http-server-0.2.1.tgz:
--------------------------------------------------------------------------------
https://raw.githubusercontent.com/inlets/inlets-pro/e6a235342c5d441cb16c507bcfd7ba993768676f/docs/charts/inlets-http-server-0.2.1.tgz
--------------------------------------------------------------------------------
/docs/charts/inlets-http-server-0.3.0.tgz:
--------------------------------------------------------------------------------
https://raw.githubusercontent.com/inlets/inlets-pro/e6a235342c5d441cb16c507bcfd7ba993768676f/docs/charts/inlets-http-server-0.3.0.tgz
--------------------------------------------------------------------------------
/docs/charts/inlets-http-server-0.4.0.tgz:
--------------------------------------------------------------------------------
https://raw.githubusercontent.com/inlets/inlets-pro/e6a235342c5d441cb16c507bcfd7ba993768676f/docs/charts/inlets-http-server-0.4.0.tgz
--------------------------------------------------------------------------------
/docs/charts/inlets-http-server-0.4.1.tgz:
--------------------------------------------------------------------------------
https://raw.githubusercontent.com/inlets/inlets-pro/e6a235342c5d441cb16c507bcfd7ba993768676f/docs/charts/inlets-http-server-0.4.1.tgz
--------------------------------------------------------------------------------
/docs/charts/inlets-http-server-0.4.2.tgz:
--------------------------------------------------------------------------------
https://raw.githubusercontent.com/inlets/inlets-pro/e6a235342c5d441cb16c507bcfd7ba993768676f/docs/charts/inlets-http-server-0.4.2.tgz
--------------------------------------------------------------------------------
/docs/charts/inlets-http-server-0.4.3.tgz:
--------------------------------------------------------------------------------
https://raw.githubusercontent.com/inlets/inlets-pro/e6a235342c5d441cb16c507bcfd7ba993768676f/docs/charts/inlets-http-server-0.4.3.tgz
--------------------------------------------------------------------------------
/docs/charts/inlets-http-server-0.5.0.tgz:
--------------------------------------------------------------------------------
https://raw.githubusercontent.com/inlets/inlets-pro/e6a235342c5d441cb16c507bcfd7ba993768676f/docs/charts/inlets-http-server-0.5.0.tgz
--------------------------------------------------------------------------------
/docs/charts/inlets-http-server-0.5.1.tgz:
--------------------------------------------------------------------------------
https://raw.githubusercontent.com/inlets/inlets-pro/e6a235342c5d441cb16c507bcfd7ba993768676f/docs/charts/inlets-http-server-0.5.1.tgz
--------------------------------------------------------------------------------
/docs/charts/inlets-http-server-0.5.2.tgz:
--------------------------------------------------------------------------------
https://raw.githubusercontent.com/inlets/inlets-pro/e6a235342c5d441cb16c507bcfd7ba993768676f/docs/charts/inlets-http-server-0.5.2.tgz
--------------------------------------------------------------------------------
/docs/charts/inlets-pro-0.2.1.tgz:
--------------------------------------------------------------------------------
https://raw.githubusercontent.com/inlets/inlets-pro/e6a235342c5d441cb16c507bcfd7ba993768676f/docs/charts/inlets-pro-0.2.1.tgz
--------------------------------------------------------------------------------
/docs/charts/inlets-pro-0.3.0.tgz:
--------------------------------------------------------------------------------
https://raw.githubusercontent.com/inlets/inlets-pro/e6a235342c5d441cb16c507bcfd7ba993768676f/docs/charts/inlets-pro-0.3.0.tgz
--------------------------------------------------------------------------------
/docs/charts/inlets-pro-0.4.0.tgz:
--------------------------------------------------------------------------------
https://raw.githubusercontent.com/inlets/inlets-pro/e6a235342c5d441cb16c507bcfd7ba993768676f/docs/charts/inlets-pro-0.4.0.tgz
--------------------------------------------------------------------------------
/docs/charts/inlets-pro-0.4.1.tgz:
--------------------------------------------------------------------------------
https://raw.githubusercontent.com/inlets/inlets-pro/e6a235342c5d441cb16c507bcfd7ba993768676f/docs/charts/inlets-pro-0.4.1.tgz
--------------------------------------------------------------------------------
/docs/charts/inlets-pro-0.4.2.tgz:
--------------------------------------------------------------------------------
https://raw.githubusercontent.com/inlets/inlets-pro/e6a235342c5d441cb16c507bcfd7ba993768676f/docs/charts/inlets-pro-0.4.2.tgz
--------------------------------------------------------------------------------
/docs/charts/inlets-pro-0.4.3.tgz:
--------------------------------------------------------------------------------
https://raw.githubusercontent.com/inlets/inlets-pro/e6a235342c5d441cb16c507bcfd7ba993768676f/docs/charts/inlets-pro-0.4.3.tgz
--------------------------------------------------------------------------------
/docs/charts/inlets-pro-client-0.2.1.tgz:
--------------------------------------------------------------------------------
https://raw.githubusercontent.com/inlets/inlets-pro/e6a235342c5d441cb16c507bcfd7ba993768676f/docs/charts/inlets-pro-client-0.2.1.tgz
--------------------------------------------------------------------------------
/docs/charts/inlets-pro-client-0.3.0.tgz:
--------------------------------------------------------------------------------
https://raw.githubusercontent.com/inlets/inlets-pro/e6a235342c5d441cb16c507bcfd7ba993768676f/docs/charts/inlets-pro-client-0.3.0.tgz
--------------------------------------------------------------------------------
/docs/charts/inlets-pro-client-0.4.0.tgz:
--------------------------------------------------------------------------------
https://raw.githubusercontent.com/inlets/inlets-pro/e6a235342c5d441cb16c507bcfd7ba993768676f/docs/charts/inlets-pro-client-0.4.0.tgz
--------------------------------------------------------------------------------
/docs/charts/inlets-pro-client-0.4.1.tgz:
--------------------------------------------------------------------------------
https://raw.githubusercontent.com/inlets/inlets-pro/e6a235342c5d441cb16c507bcfd7ba993768676f/docs/charts/inlets-pro-client-0.4.1.tgz
--------------------------------------------------------------------------------
/docs/charts/inlets-pro-client-0.4.2.tgz:
--------------------------------------------------------------------------------
https://raw.githubusercontent.com/inlets/inlets-pro/e6a235342c5d441cb16c507bcfd7ba993768676f/docs/charts/inlets-pro-client-0.4.2.tgz
--------------------------------------------------------------------------------
/docs/charts/inlets-pro-client-0.4.3.tgz:
--------------------------------------------------------------------------------
https://raw.githubusercontent.com/inlets/inlets-pro/e6a235342c5d441cb16c507bcfd7ba993768676f/docs/charts/inlets-pro-client-0.4.3.tgz
--------------------------------------------------------------------------------
/docs/charts/inlets-tcp-client-0.5.0.tgz:
--------------------------------------------------------------------------------
https://raw.githubusercontent.com/inlets/inlets-pro/e6a235342c5d441cb16c507bcfd7ba993768676f/docs/charts/inlets-tcp-client-0.5.0.tgz
--------------------------------------------------------------------------------
/docs/charts/inlets-tcp-client-0.5.2.tgz:
--------------------------------------------------------------------------------
https://raw.githubusercontent.com/inlets/inlets-pro/e6a235342c5d441cb16c507bcfd7ba993768676f/docs/charts/inlets-tcp-client-0.5.2.tgz
--------------------------------------------------------------------------------
/docs/charts/inlets-tcp-client-0.5.3.tgz:
--------------------------------------------------------------------------------
https://raw.githubusercontent.com/inlets/inlets-pro/e6a235342c5d441cb16c507bcfd7ba993768676f/docs/charts/inlets-tcp-client-0.5.3.tgz
--------------------------------------------------------------------------------
/docs/charts/inlets-tcp-server-0.5.0.tgz:
--------------------------------------------------------------------------------
https://raw.githubusercontent.com/inlets/inlets-pro/e6a235342c5d441cb16c507bcfd7ba993768676f/docs/charts/inlets-tcp-server-0.5.0.tgz
--------------------------------------------------------------------------------
/docs/charts/inlets-tcp-server-0.6.0.tgz:
--------------------------------------------------------------------------------
https://raw.githubusercontent.com/inlets/inlets-pro/e6a235342c5d441cb16c507bcfd7ba993768676f/docs/charts/inlets-tcp-server-0.6.0.tgz
--------------------------------------------------------------------------------
/docs/charts/inlets-tcp-server-0.6.1.tgz:
--------------------------------------------------------------------------------
https://raw.githubusercontent.com/inlets/inlets-pro/e6a235342c5d441cb16c507bcfd7ba993768676f/docs/charts/inlets-tcp-server-0.6.1.tgz
--------------------------------------------------------------------------------
/docs/charts/inlets-tcp-server-0.6.2.tgz:
--------------------------------------------------------------------------------
https://raw.githubusercontent.com/inlets/inlets-pro/e6a235342c5d441cb16c507bcfd7ba993768676f/docs/charts/inlets-tcp-server-0.6.2.tgz
--------------------------------------------------------------------------------
/docs/cli-reference.md:
--------------------------------------------------------------------------------
1 | # inlets-pro CLI reference
2 |
3 | There are two components to inlets-pro, the server and the client.
4 |
5 | This reference guide is designed for self-service, but customers of OpenFaaS Ltd can request hands-on support and training. Just email [contact@openfaas.com](mailto:contact@openfaas.com) for more. Business customers are entitled to free support, [find out more](https://inlets.dev/).
6 |
7 | Community and personal users can also find help in the [OpenFaaS Slack community](https://slack.openfaas.io/), in the #inlets channel.
8 |
9 | ## Contents:
10 |
11 | * Working with MacOS, Linux, and Windows
12 | * Topology
13 | * HTTP or TCP tunnels?
14 | * Configure the inlets-pro tcp client
15 | * Configure the inlets-pro tcp server
16 | * Configure the inlets-pro http client
17 | * Configure the inlets-pro http server
18 | * Troubleshooting
19 | * Working with Kubernetes
20 |
21 | ## Working with MacOS, Linux, and Windows
22 |
23 | The examples given in the documentation are valid for all three operating systems and use bash as a syntax.
24 |
25 | Windows users can use either Windows Subsystem for Linux (WSL) or [Git bash](https://git-scm.com/downloads), this is the simplest way to make all commands compatible.
26 |
27 | The client and server component are packaged in the same `inlets-pro` binary and can be run as:
28 |
29 | * A process on MacOS, Linux, Windows on ARM or Intel architecture
30 | * As a Docker container with docker, or Kubernetes as a Pod on ARM or Intel architecture
31 |
32 | ## Topology
33 |
34 | inlets is not about exposing services on the Internet, it's about making one service available within another network. What, where and how accessible that network is, is purely up to you.
35 |
36 | Consider a typical example that you may use a SaaS tunnel for:
37 |
38 | 
39 | > HTTP tunnels
40 |
41 | Here, we have a private Node.js server running on localhost and port 3000, we want to expose that on the Internet with a TLS certificate.
42 |
43 | ### Split-plane configuration
44 |
45 | inlets has two TCP ports, both of which can be exposed on various interfaces. By default, both ports are exposed on on all available adapters, i.e. `0.0.0.0` (IPv4) and `::` (IPv6).
46 |
47 | The first TCP port is called the Control Plane, the Control Plane is a websocket secured with TLS, that the inlets client connects to, in order to establish the tunnel.
48 |
49 | The Data Plane is one or more TCP ports that are exposed on the server, which map back to a private service on the client's end.
50 |
51 | To replace the role of a site-to-site VPN or Direct Connect, you can expose the Control Plane publicly on `0.0.0.0`, and the data-plane on either `127.0.0.1` or one of the other internal interfaces i.e. `10.0.0.10`, which is not accessible from the Internet.
52 |
53 | ### What about High Availability?
54 |
55 | It's possible to run multiple inlets client processes and have them connect to the same server. The server will load-balance incoming requests and distribute them between each client.
56 |
57 | The server can also be made High Availability, by running more than one copy. You could run two public Virtual Machines (VMs) and then add a VIP/FIP or Load Balancer in front. In this way, the pair of inlets servers work in an active-active configuration, and if one VM locks up or goes down, then the other will continue to serve traffic.
58 |
59 | ## HTTP or TCP tunnels?
60 |
61 | A HTTP tunnel is most useful for HTTP services and APIs. In this mode, a single tunnel can use the HTTP Host header to expose multiple different services using a DNS name and a single port.
62 |
63 | A TCP tunnel is a pass-through proxy for any TCP service. Use a TCP tunnel if you want to run a reverse proxy on the client's machine, or if you have traffic that is non-HTTP like a database, RDP, SSH and so on.
64 |
65 | Any traffic that is sent over an inlets tunnel is encrypted, even if the underlying protocol does not support encryption. This is because the data is encapsulated and send over a link with TLS enabled.
66 |
67 | ### Configure a TCP client
68 |
69 | The client component connects to an inlets server and then routes incoming requests to a private service. The client can run on the same host as your private service, or run on another host and act as gateway.
70 |
71 | ### Configure the license key
72 |
73 | The license terms of inlets-pro require that both the inlets client and server have a valid license, only the client requires to have the license configured.
74 |
75 | The default location for a license is `$HOME/.inlets/LICENSE`, you can also override the license with the `--license-file` or `--license` flag to pass a literal value.
76 |
77 | ## Setup a TCP client
78 |
79 | ### Set the upstream
80 |
81 | The upstream is where the client should send traffic, when it receives requests on one of the ports from the server.
82 |
83 | ```sh
84 | export UPSTREAM="127.0.0.1"
85 | inlets-pro tcp client \
86 | --upstream $UPSTREAM
87 | ```
88 |
89 | You can pass the IP address or DNS name of a service available on the local network of the client.
90 |
91 | ```sh
92 | export UPSTREAM="192.168.0.101"
93 | inlets-pro tcp client \
94 | --upstream $UPSTREAM
95 | ```
96 |
97 | When running inside a Kubernetes cluster as a Pod, the inlets client can use the DNS name of services.
98 |
99 | ```sh
100 | export UPSTREAM="traefik.kube-system"
101 | inlets-pro tcp client \
102 | --upstream $UPSTREAM
103 | ```
104 |
105 | In TCP mode, all traffic is passed through without inspection or modification, for this reason, only one `--upstream` server is possible for TCP tunnels.
106 |
107 | ### Set the ports for the tunnel `--ports` / `--port`
108 |
109 | Expose ports on the tunnel server, from the client with one of the following:
110 |
111 | ```sh
112 | --port 80
113 | -p 80
114 | ```
115 |
116 | Or give the flag multiple times:
117 |
118 | ```sh
119 | --port 80 --port 443
120 | ```
121 |
122 | Or use `--ports` and a comma-separated list:
123 |
124 | ```sh
125 | --ports 80,443
126 | ```
127 |
128 | ### Connect to the remote host (server) with `--url`
129 |
130 | inlets-pro uses a websocket for its control plane on port `8123` by default with *automatic TLS* configured.
131 |
132 | * Automatic TLS with `auto tls`
133 |
134 | In this mode the client and server will negotiate TLS through the use of a generate Certificate Authority (CA) and encrypt all traffic automatically.
135 |
136 | This is the default option, connect with `wss://` and the IP of the remote machine
137 |
138 | `--url wss://remote-machine:8123`
139 |
140 | The control-port of 8123 is used for auto-tls.
141 |
142 | * External TLS
143 |
144 | In this mode, you are providing your own TLS certificate or termination through a gateway, Kubernetes Ingress Controller, reverse-proxy or some other kind of product.
145 |
146 | Turn auto-TLS off, and use port 443 (implicit) for the control-plane.
147 |
148 | `--url wss://remote-machine`
149 |
150 | You must also pass the `--auto-tls=false` flag
151 |
152 | * No TLS or encryption
153 |
154 | This mode may be useful for testing, but is not recommended for confidential use.
155 |
156 | `--url ws://remote-machine:8123`
157 |
158 | Use port `8123` for the control-plane and `ws://` instead of `wss://`
159 |
160 | #### Set the authentication token `--token`
161 |
162 | The `inlets-pro tcp server` requires a token for authentication to make sure that the client is genuine. It is recommended to combine the use of the token with auto-tls or external TLS.
163 |
164 | You can create your own token, or generate one with bash:
165 |
166 | ```sh
167 | export TOKEN="$(head -c 16 /dev/urandom |shasum|cut -d'-' -f1)"
168 | echo $TOKEN
169 | ```
170 |
171 | Now pass the token via `--token $TOKEN`.
172 |
173 | ### Generate a systemd unit file for the client
174 |
175 | Add `inlets-pro tcp client --generate=systemd` to generate a system unit file.
176 |
177 | You'll need all the parameters that you would use to run the client, so don't leave any off.
178 |
179 | For example:
180 |
181 | ```bash
182 | export TOKEN="TOKEN_HERE"
183 | export UPSTREAM="127.0.0.1"
184 |
185 | inlets-pro tcp client \
186 | --upstream $UPSTREAM \
187 | --license-file /var/lib/inlets-pro/LICENSE \
188 | --tcp-ports "80,443" \
189 | --url "wss://167.99.90.104:8123" \
190 | --token $TOKEN \
191 | --generate=systemd
192 | ```
193 |
194 | ### Configure the TCP server
195 |
196 | The inlets-pro tcp server begins by opening a single TCP port `8123` for the control-plane, this is port `8123`. The port can be changed if required, by passing the `--control-port` flag.
197 |
198 | Additional ports are opened at runtime by the inlets-server for the data-plane. These ports must be advertised by the client via the `--tcp-ports` flag.
199 |
200 | #### Start with auto-tls
201 |
202 | Auto-TLS will create a Certificate Authority CA and start serving it via the control-plane port.
203 |
204 | You can view it like this:
205 |
206 | ```sh
207 | curl -k -i http://localhost:8123/.well-known/ca.crt
208 | ```
209 |
210 | An authentication token is also required which must be shared with the client ahead of time.
211 |
212 | #### Set the `--auto-tls-san` name
213 |
214 | The `--auto-tls-san` sets the subject-alternative-name (SAN) for the TLS certificate that is generated by the server.
215 |
216 | You can use the public IP address of the inlets-server, or a DNS record.
217 |
218 | * Public IP
219 |
220 | ```sh
221 | --auto-tls-san 35.1.25.103
222 | ```
223 |
224 | * DNS A or CNAME record
225 |
226 | ```sh
227 | --auto-tls-san inlets-control-tunnel1.example.com
228 | ```
229 |
230 | In this example `inlets-control-tunnel1.example.com` will resolve to the public IP, i.e. `35.1.25.103`
231 |
232 | #### Use a pre-supplied, or self-signed certificate
233 |
234 | You can use a TLS certificate with the inlets Pro server obtained from a third-party tool such as [certbot](https://certbot.eff.org), or your own Public Key Infrastructure (PKI).
235 |
236 | If you wanted to use an exit-server with a public IP, you can create a DNS A record for it before configuring certbot or another tool to fetch a TLS certificate for you from LetsEncrypt. If you don't want to set up a separate DNS record, then you can get an automated one from [xip.io](http://xip.io) such as `104.16.182.15.xip.io` or `104.16.182.15.xip.io`, where your public IP is `104.16.182.15`.
237 |
238 | The below instructions are for a DNS name on a local network `space-mini.local`, but you can customise the example.
239 |
240 | For the server:
241 |
242 | ```bash
243 | export AUTH_TOKEN="test-token"
244 |
245 | inlets-pro tcp server \
246 | --tls-key server.key \
247 | --tls-cert server.cert \
248 | --auto-tls=false \
249 | --token "${AUTH_TOKEN}"
250 | ```
251 |
252 | Note that you need to supply a server.key and server.cert file, and that you need to disable `--auto-tls`.
253 |
254 | On your client, add the certificate to your trust store, or add its issuer to your trust store, then run:
255 |
256 | ```bash
257 | export AUTH_TOKEN="test-token"
258 |
259 | inlets-pro tcp client \
260 | --tcp-ports 2222 \
261 | --license-file $HOME/.inlets/LICENSE \
262 | --token "${AUTH_TOKEN}" \
263 | --url wss://space-mini.local:8123 \
264 | --auto-tls=false
265 | ```
266 |
267 | Note that you must turn off `--auto-tls`, so that the client does not attempt to download the server's generated CA.
268 |
269 | #### Want to generate your own TLS certificate for testing?
270 |
271 | Make sure that you set the auto-tls-san or TLS SAN name to the hostname that the client will use to connect.
272 |
273 | Generate a new key:
274 |
275 | ```bash
276 | openssl genrsa -out server.key 2048
277 | ```
278 |
279 | Generate a certificate signing request (CSR):
280 |
281 | When promoted, do not enter a challenge key. If your hostname is `space-mini.local`, then enter that as the `Common Name`.
282 |
283 | ```bash
284 | openssl req -new -key server.key -out server.csr
285 | ```
286 |
287 | Obtain the server certificate from the CSR:
288 |
289 | ```bash
290 | openssl x509 -req -sha256 -days 365 -in server.csr -signkey server.key -out server.cert
291 | ```
292 |
293 | You will receive an error on your client such as:
294 |
295 | ```
296 | ERRO[0000] Failed to connect to proxy. Empty dialer response error="x509: certificate signed by unknown authority"
297 | ```
298 |
299 | Therefore, place the server.cert file in your trust store on your client and set the trust policy to "Always trust".
300 |
301 | If you are thinking about using self-signed certificates, then the automatic TLS option is already built-in and is easier to use.
302 |
303 | #### Set the authentication token `--token`
304 |
305 | The inlets-pro tcp server requires a token for authentication to make sure that the client is genuine. It is recommended to combine the use of the token with auto-tls or external TLS.
306 |
307 | You can create your own token, or generate one with bash:
308 |
309 | ```sh
310 | export TOKEN="$(head -c 16 /dev/urandom |shasum|cut -d'-' -f1)"
311 | echo $TOKEN
312 | ```
313 |
314 | Now pass the token via `--token $TOKEN`.
315 |
316 | ### Configure a http tunnel
317 |
318 | The HTTP mode of inlets Pro is suitable for REST / HTTP traffic. Use it when you want to add TLS termination on the exit-server without running a reverse-proxy in the client's network.
319 |
320 | Just like a TCP tunnel, a HTTP tunnel has two TCP ports, one for the control-plane and one for the data-plane.
321 |
322 | For more information, see the help commands:
323 |
324 | * See also: `inlets-pro http server --help`
325 | * See also: `inlets-pro http client --help`
326 |
327 | ### Configuring TLS for the HTTP server's data-plane
328 |
329 | The control-plane will use Auto-TLS by default, but the data-plane does not.
330 |
331 | #### Use Let's Encrypt to obtain a TLS certificate for the data plane
332 |
333 | inlets Pro HTTP tunnels are able to obtain TLS certificates from Let's Encrypt for the data-plane. In this mode, you'll find that the server exposes port 80 and 443 in order to process a HTTP01 challenge.
334 |
335 | Three additional fields enable the client to obtain a TLS certificate for the data-plane:
336 |
337 | ```bash
338 | --letsencrypt-domain stringArray obtain TLS certificates from Let's Encrypt for the following domains using a HTTP01 challenge
339 | --letsencrypt-email string email address to be used with Let's Encrypt
340 | --letsencrypt-issuer string obtain TLS certificates from the prod or staging Let's Encrypt issuer (default "prod")
341 | ```
342 |
343 | For example, to setup a HTTP tunnel to a LetsEncrypt-enabled exit-server, you can use the following command:
344 |
345 | ```bash
346 | export IP=$(curl -sfSL https://checkip.amazonaws.com)
347 | export TOKEN=""
348 |
349 | inlets-pro http server \
350 | --auto-tls \
351 | --control-port 8123 \
352 | --auto-tls-san $IP \
353 | --letsencrypt-domain prometheus.example.com \
354 | --letsencrypt-email user@example.com \
355 | --token TOKEN
356 | ```
357 |
358 | Then create a DNS A record mapping `prometheus.example.com` to the public IP of the server.
359 |
360 | You can pass the `--letsencrypt-domain` flag multiple times to obtain TLS certificates for multiple domains.
361 |
362 | Then on the client side, you will run a command such as:
363 |
364 | ```bash
365 | export IP="SERVER_IP"
366 | export TOKEN=""
367 |
368 | inlets-pro http client \
369 | --auto-tls \
370 | --url wss://$SERVER_IP:8123 \
371 | --upstream prometheus.example.com=http://127.0.0.1:9090 \
372 | --token TOKEN
373 | ```
374 |
375 | The `--upstream` flag can accept multiple DNS name mappings for instance: `prometheus.example.com=http://127.0.0.1:9090,grafana.example.com=http://127.0.0.1:3000`
376 |
377 | Follow a tutorial: [Get a secure HTTPS tunnel with Let's Encrypt](https://inlets.dev/blog/2021/02/11/secure-letsencrypt-tunnel.html)
378 |
379 | ## Working with Kubernetes
380 |
381 | You can deploy an inlets server or client as a Pod using the [inlets-pro helm chart](/chart/).
382 |
383 | For a server, you can expose its control and / or data plane for external access:
384 |
385 | * As a Service type LoadBalancer
386 |
387 | It will gain its own IP address, and you'll pay for one cloud load-balancer per tunnel.
388 |
389 | * As a Service type NodePort
390 |
391 | You will have to use high, non-standard TCP ports and may run into issues with manually managing the mapping of ports. This adds no cost to the Kubernetes cluster. You can also use auto-TLS for the control-plane.
392 |
393 | * As an Ingress definition
394 |
395 | The Ingress definition is the most advanced option and works without auto-TLS. For each inlets-server you need to create a separate Kubernetes Ingress definition and domain name.
396 |
397 | Clients will connect to the domain name and your IngressController will be responsible for configuring TLS either via LetsEncrypt or your own certificate store.
398 |
399 | * Split-plane with an Ingress definition
400 |
401 | In this configuration, only the inlets-pro control plane is exposed (usually port `8123`) with a publicly accessible address, and the data-plane is not exposed outside the network. This can be achieved through the use of two separate ClusterIP services.
402 |
403 | This configuration is ideal for command and control. The private network will be able to traverse firewalls and NAT to connect to the remote inlets-pro tcp server, but only internal services within the Kubernetes cluster can connect to the tunnelled service.
404 |
405 | See [split-plane-server.yaml](../artifacts/split-plane-server.yaml) as an example.
406 |
407 | ### Pod / Service / Deployment definitions
408 |
409 | You can use the sample artifact for the [client.yaml](../artifacts/client.yaml) or [server.yaml](../artifacts/server.yaml)
410 |
411 | There is also a [helm chart for the client and server](/chart/).
412 |
413 | ## Troubleshooting
414 |
415 | * You have a port permission issue for low ports `< 1024` such as `80`
416 |
417 | The reason for this error is that the inlets-pro Docker image is set to run as a non-root user and non-root users are not allowed to bind to ports below 1024.
418 |
419 | There are two ways around this, the first being that you perhaps don't need to bind to that low port. Docker, Kubernetes and inlets-pro all allow for port remapping, so there should be no reason for a you to need to bind directly to port 80 in a service.
420 |
421 | Try adding each port to the Kubernetes container spec with your override:
422 |
423 | ```yaml
424 | ports:
425 | - name: http
426 | containerPort: 8080
427 | protocol: TCP
428 | ```
429 |
430 | The second solution is to change the security context so that your inlets server runs as root. You may also need to run the pod as a root user by [editing the security context of the Pod](https://kubernetes.io/docs/tasks/configure-pod-container/security-context/).
431 |
432 | Further more, if you are not a Kubernetes user, but using Docker, you can derive a new image from our upstream image and override the user there:
433 |
434 | ```Dockerfile
435 | FROM inlets/inlets-pro:TAG
436 |
437 | USER root
438 | ```
439 |
440 | For manual use with Docker, you can also set a non-root user via the `--user root` / `--user 0` flag: `docker run --uid 0 --name inlets-pro-root-server -ti inlets/inlets-pro:TAG server`
441 |
442 | * The client cannot write the auto-TLS certificate to `/tmp/` due to a read-only filesystem
443 |
444 | Add a tmpfs mount or an empty-dir mount to the Pod Spec at `/tmp/`
445 |
446 | ```yaml
447 | volumes:
448 | - name: tmp-cert
449 | emptyDir: {}
450 | ```
451 |
452 | To the container spec:
453 |
454 | ```yaml
455 | volumeMounts:
456 | - mountPath: /tmp
457 | name: tmp-cert
458 | ```
459 |
460 | * `apiVersion: apps/v1beta1` vs `apiVersion: apps/v1`
461 |
462 | If you're on a very old version of Kubernetes, then the `apps/v1` apiVersion may need to be changed to `apps/v1beta1`. Feel free to contact technical support for more hands-on help.
463 |
464 | * Multiple inlets tunnels
465 |
466 | You can run as many inlets tunnels as you like, both client and server Pods. Make sure that each is named appropriately.
467 |
468 | The server will require its own Service and Deployment.
469 |
470 | The client just requires a Deployment.
471 |
472 | I.e. replace `inlets-server` with `inlets-server-tunnel1` and so forth.
473 |
474 | If you are managing several tunnels, then feel free to contact OpenFaaS Ltd about an automation solution.
475 |
--------------------------------------------------------------------------------
/docs/images/heading.png:
--------------------------------------------------------------------------------
https://raw.githubusercontent.com/inlets/inlets-pro/e6a235342c5d441cb16c507bcfd7ba993768676f/docs/images/heading.png
--------------------------------------------------------------------------------
/docs/images/inlets-pro-sm.png:
--------------------------------------------------------------------------------
https://raw.githubusercontent.com/inlets/inlets-pro/e6a235342c5d441cb16c507bcfd7ba993768676f/docs/images/inlets-pro-sm.png
--------------------------------------------------------------------------------
/docs/images/inlets-pro-split-plane.png:
--------------------------------------------------------------------------------
https://raw.githubusercontent.com/inlets/inlets-pro/e6a235342c5d441cb16c507bcfd7ba993768676f/docs/images/inlets-pro-split-plane.png
--------------------------------------------------------------------------------
/docs/images/inlets-pro-vip-ha.png:
--------------------------------------------------------------------------------
https://raw.githubusercontent.com/inlets/inlets-pro/e6a235342c5d441cb16c507bcfd7ba993768676f/docs/images/inlets-pro-vip-ha.png
--------------------------------------------------------------------------------
/docs/images/inlets-pro-vip-k8s.png:
--------------------------------------------------------------------------------
https://raw.githubusercontent.com/inlets/inlets-pro/e6a235342c5d441cb16c507bcfd7ba993768676f/docs/images/inlets-pro-vip-k8s.png
--------------------------------------------------------------------------------
/docs/images/inlets-pro-vip.png:
--------------------------------------------------------------------------------
https://raw.githubusercontent.com/inlets/inlets-pro/e6a235342c5d441cb16c507bcfd7ba993768676f/docs/images/inlets-pro-vip.png
--------------------------------------------------------------------------------
/docs/inlets-tcp-server-hard-way.md:
--------------------------------------------------------------------------------
1 | # The hard way to host an inlets TCP tunnel on Kubernetes
2 |
3 | This post walks you through all the manual steps required to host an inlets TCP tunnel on a Kubernetes cluster.
4 |
5 | ## Who is this tutorial for?
6 |
7 | This tutorial is not recommended for production, because we have better, cheaper and more convenient options available. It's really a tutorial for those who want to understand all the moving parts involved in creating and configuring Kubernetes objects.
8 |
9 | If you're a service provider, or part of a SaaS company, don't follow these steps, but use one of the examples we provide below:
10 |
11 | Instead, we've built a platform you can deploy to your cluster which makes it trivial to manage tunnels for customers: [Inlets Uplink for SaaS & Service Providers](https://inlets.dev/blog/2022/11/16/service-provider-uplinks.html)
12 |
13 | If you're not a Service Provider or at a SaaS company, but need to host a bunch of TCP tunnels on your Kubernetes cluster, then you should use the [Helm chart for the Inlets Pro TCP server](https://github.com/inlets/inlets-pro/tree/master/chart/inlets-tcp-server)
14 |
15 | If you're a personal user, you probably just want one or two tunnel servers, in which case we have a couple of tools that would probably suit you better:
16 |
17 | * [inletsctl](https://github.com/inlets/inletsctl) - provision tunnel servers on a number of different public cloud platforms using userdata for the configuration
18 | * [inlets-operator](https://github.com/inlets/inlets-operator) - a completely automated solution for getting public IPs for a local or private Kubernetes cluster
19 |
20 | Following the steps in this tutorial will create a separate cloud LoadBalancer for each tunnel, which adds 20-30 USD / mo to your cloud bill per tunnel. Instead, we always use Ingress or an Istio Gateway which only needs a single LoadBalancer and keeps costs low.
21 |
22 | ## Deploy a TCP tunnel server
23 |
24 | You'll need a Kubernetes cluster on a public cloud provider, but no domain name, no Ingress Controller, no Istio, etc.
25 |
26 | ### Create a service of type LoadBalancer and note down its IP address
27 |
28 | The naming convention will be one namespace per customer, and the name will be repeated for each Kubernetes object, from the Service through to the Deployment.
29 |
30 | In this example, the tunnel will be for a customer forwarding SSH and HTTP traffic using two different ports.
31 |
32 | ```yaml
33 | apiVersion: v1
34 | kind: Namespace
35 | metadata:
36 | name: customer1
37 | ```
38 |
39 | ### Create a secret with the token for the customer's tunnel to use
40 |
41 | ```bash
42 | kubectl create secret generic tunnel \
43 | --from-literal=token=$(openssl rand -base64 32) \
44 | --namespace=customer1
45 | ```
46 |
47 | ### Deploy the dataplane service
48 |
49 | Deploy a dataplane service, this will not be exposed on the Internet, you'll use this to access the services that the customer has forwarded over the tunnel:
50 |
51 | ```yaml
52 | apiVersion: v1
53 | kind: Service
54 | metadata:
55 | name: tunnel
56 | namespace: customer1
57 | labels:
58 | app:
59 | spec:
60 | ports:
61 | - name: postgres
62 | port: 5432
63 | protocol: TCP
64 | targetPort: 5432
65 | selector:
66 | app.kubernetes.io/name: tunnel
67 | type: ClusterIP
68 | status: {}
69 | ```
70 |
71 | ### Create the LoadBalancer service
72 |
73 | Create and apply the LoadBalancer:
74 |
75 | ```yaml
76 | apiVersion: v1
77 | kind: Service
78 | metadata:
79 | name: tunnel-lb
80 | namespace: customer1
81 | labels:
82 | app:
83 | spec:
84 | ports:
85 | - name: control
86 | port: 8123
87 | protocol: TCP
88 | targetPort: 8123
89 | selector:
90 | app.kubernetes.io/name: tunnel
91 | type: LoadBalancer
92 | status: {}
93 | ```
94 |
95 | Wait until the LoadBalancer has an IP address, do not proceed until you have it.
96 |
97 | ### Create a Deployment for the tunnel server
98 |
99 | Create a Deployment for the `inlets-pro tcp server`, and insert the IP address in the `--auto-tls-san=` flag.
100 |
101 | Note for AWS users, you'll have to find the tunnel's DNS entry instead of its IP, so you will need to eyeball the results of `kubectl get svc -n customer1 -o wide` and copy the `EXTERNAL-IP` column to `export AUTO_TLS_SAN=""`.
102 |
103 | ```yaml
104 | export AUTO_TLS_IP=$(kubectl get svc tunnel-lb -n customer1 -o jsonpath="{.status.loadBalancer.ingress[0].ip}")
105 |
106 | cat >> tunnel-dep.yaml <
26 |
27 | > inlets *just works*, why not test it and see?
28 |
29 | The tunnel client usually runs in a private network, and the server may run on a network with a public IP. When the two are connected, it's like the private server is actually on the Internet.
30 |
31 | ### How's it different to other solutions?
32 |
33 | Inlets is not a VPN, it's for exposing local services on another network or on the Internet. You can [read more in our FAQ](https://docs.inlets.dev/reference/faq/)
34 |
35 | * Host your tunnel server wherever you want for low latency
36 | * Use it in development and production environments
37 | * Expose as many HTTPS websites as you like
38 | * Expose whatever TCP ports you need
39 | * Get more done, without running into rate-limits imposed by a service provider
40 | * Use your own DNS instead of paying per domain.
41 |
42 | ## Getting started
43 |
44 | > A valid license key or Gumroad subscription is required to launch or deploy inlets. By using the software you agree that you have purchased a license and are bound by the terms of the [End User License Agreement (EULA)](/EULA.md)
45 |
46 | Find out more:
47 |
48 | * [Read the documentation](https://docs.inlets.dev/)
49 | * [Understand use-cases on the blog](https://inlets.dev/blog/)
50 | * [Contact us](https://inlets.dev/contact/)
51 |
52 | ### For cloud natives
53 |
54 | * [Kubernetes Ingress with the inlets-operator](https://docs.inlets.dev/tutorial/kubernetes-ingress/)
55 | * [Expose Ingress with the helm chart](https://inlets.dev/blog/2021/07/08/short-lived-clusters.html)
56 | * [Reliable local port-forwarding from Kubernetes](https://inlets.dev/blog/2021/04/13/local-port-forwarding-kubernetes.html)
57 | * [How to connect your on-premises databases to Kubernetes in the cloud](https://inlets.dev/blog/2020/11/06/hybrid-cloud-with-inlets.html)
58 | * [How to monitor multi-cloud Kubernetes with Prometheus and Grafana](https://inlets.dev/blog/2020/12/15/multi-cluster-monitoring.html)
59 |
60 | ### For modernizing apps and exposing private services
61 |
62 | * [Tutorial: Expose one or more local HTTP services via HTTPS](https://inlets.dev/blog/2021/08/08/private-tunnel.html)
63 | * [When you can't get a static IP from your ISP](https://inlets.dev/blog/2021/04/13/your-isp-wont-give-you-a-static-ip.html)
64 | * [The Simple Way To Connect Existing Apps to Public Cloud](https://inlets.dev/blog/2021/04/07/simple-hybrid-cloud.html)
65 | * [Tutorial: Tunnel a private Postgresql database](https://docs.inlets.dev/tutorial/postgresql-tcp-tunnel/)
66 |
67 | ### Getting inlets
68 |
69 | You'll need a [subscription for inlets](https://openfaas.gumroad.com/l/inlets-subscription), but can pay monthly or save money through an annual subscription.
70 |
71 | Both the client and server are contained within the same binary.
72 |
73 | It is recommended that you use [inletsctl](https://github.com/inlets/inletsctl), or [inlets-operator](https://github.com/inlets/inlets-operator) to create inlets tunnel servers, but you can also [create these manually](https://docs.inlets.dev/tutorial/manual-http-server/).
74 |
75 | The inlets binary can be obtained as a stand-alone executable, or via a container image.
76 |
77 | * As a binary:
78 |
79 | ```sh
80 | curl -SLsf https://github.com/inlets/inlets-pro/releases/download/0.9.23/inlets-pro > inlets-pro
81 | chmod +x ./inlets-pro
82 | ```
83 |
84 | Or find a binary for [a different architecture on the releases page](https://github.com/inlets/inlets-pro/releases)
85 |
86 | See also [CLI reference guide](docs/cli-reference.md)
87 |
88 | * As a container image
89 |
90 | A container image is published at as `ghcr.io/inlets/inlets-pro`
91 |
92 | See the various tags available: [View tags](https://github.com/orgs/inlets/packages/container/package/inlets-pro)
93 |
94 | * Kubernetes Helm charts & Operator
95 |
96 | Run ad-hoc clients and servers on your Kubernetes clusters
97 |
98 | See the [helm chart](chart)
99 |
100 | Or try [the Operator](https://github.com/inlets/inlets-operator) if you want an integration for your LoadBalancers on Kubernetes.
101 |
102 | ## Want to speak to someone?
103 |
104 | If you want to contact someone about inlets, please feel free to get in touch via this form:
105 |
106 | * [Contact us](https://inlets.dev/contact/)
107 |
--------------------------------------------------------------------------------
/artifacts/README.md:
--------------------------------------------------------------------------------
1 | # Artifacts for inlets Pro
2 |
3 | See also: [Options for Kubernetes integration and deployment](chart/)
4 |
--------------------------------------------------------------------------------
/artifacts/client-with-secrets.yaml:
--------------------------------------------------------------------------------
1 | ---
2 | ## This example exposes Prometheus from your OpenFaaS instance on a HTTP tunnel server
3 | ---
4 |
5 | ## It uses secrets that are mounted into the Pod for the token and the license
6 |
7 | # kubectl create secret generic inlets-server-token --from-literal inlets-server-token=$TOKEN
8 | # kubectl create secret generic inlets-license --from-file inlets-license=$HOME/.inlets/LICENSE
9 |
10 | # Change SERVER_IP_HERE
11 | #
12 | # Optionally: change --upstream or add a custom domain such as
13 | # tunnel.example.com=http://prometheus.openfaas:9090
14 | #
15 | ---
16 | apiVersion: apps/v1
17 | kind: Deployment
18 | metadata:
19 | name: inlets-client
20 | spec:
21 | replicas: 1
22 | selector:
23 | matchLabels:
24 | app: inlets-client
25 | template:
26 | metadata:
27 | labels:
28 | app: inlets-client
29 | spec:
30 | volumes:
31 | - name: inlets-license
32 | secret:
33 | secretName: inlets-license
34 | - name: inlets-server-token
35 | secret:
36 | secretName: inlets-server-token
37 | containers:
38 | - name: inlets-client
39 | image: ghcr.io/inlets/inlets-pro:0.9.23
40 | imagePullPolicy: IfNotPresent
41 | command: ["inlets-pro"]
42 | args:
43 | - "http"
44 | - "client"
45 | - "--url=wss://SERVER_IP_HERE:8123"
46 | - "--token-file=/var/secrets/inlets-server-token/inlets-server-token"
47 | - "--license-file=/var/secrets/inlets-license/inlets-license"
48 | - "--upstream=http://prometheus.openfaas:9090"
49 | volumeMounts:
50 | - mountPath: /var/secrets/inlets-server-token
51 | name: inlets-server-token
52 | - mountPath: /var/secrets/inlets-license
53 | name: inlets-license
54 |
55 |
--------------------------------------------------------------------------------
/artifacts/client.yaml:
--------------------------------------------------------------------------------
1 | ---
2 | apiVersion: apps/v1
3 | kind: Deployment
4 | metadata:
5 | name: inlets-client
6 | spec:
7 | replicas: 1
8 | selector:
9 | matchLabels:
10 | app: inlets-client
11 | template:
12 | metadata:
13 | labels:
14 | app: inlets-client
15 | spec:
16 | containers:
17 | - name: inlets-client
18 | image: ghcr.io/inlets/inlets-pro:0.9.23
19 | imagePullPolicy: IfNotPresent
20 | command: ["inlets-pro"]
21 | args:
22 | - "tcp"
23 | - "client"
24 | - "--url=wss://EXIT_NODE_IP:8123/connect"
25 | - "--ports=80,443"
26 | - "--token=AUTH_TOKEN_HERE"
27 | - "--license=LICENSE_JWT_HERE"
28 | - "--upstream=SERVICE_NAME_HERE"
29 | ---
30 |
--------------------------------------------------------------------------------
/artifacts/inlets-pro.service:
--------------------------------------------------------------------------------
1 | [Unit]
2 | Description=inlets Pro TCP server
3 | After=network.target
4 |
5 | [Service]
6 | Type=simple
7 | Restart=always
8 | RestartSec=2
9 | StartLimitInterval=0
10 | EnvironmentFile=/etc/default/inlets-pro
11 | ExecStart=/usr/local/bin/inlets-pro tcp server --auto-tls --auto-tls-san="${IP}" --token="${AUTHTOKEN}"
12 |
13 | [Install]
14 | WantedBy=multi-user.target
15 |
--------------------------------------------------------------------------------
/artifacts/server.yaml:
--------------------------------------------------------------------------------
1 | ---
2 | apiVersion: apps/v1
3 | kind: Deployment
4 | metadata:
5 | name: inlets-server
6 | spec:
7 | replicas: 1
8 | selector:
9 | matchLabels:
10 | app: inlets-server
11 | template:
12 | metadata:
13 | labels:
14 | app: inlets-server
15 | spec:
16 | containers:
17 | - name: inlets-server
18 | image: ghcr.io/inlets/inlets-pro:0.9.23
19 | imagePullPolicy: IfNotPresent
20 | command: ["inlets-pro"]
21 | args:
22 | - "tcp"
23 | - "server"
24 | - "--auto-tls=true"
25 | - "--auto-tls-name=PUBLIC_IP"
26 | - "--token=TOKEN"
27 |
--------------------------------------------------------------------------------
/artifacts/split-plane-server.yaml:
--------------------------------------------------------------------------------
1 | ---
2 | apiVersion: apps/v1
3 | kind: Deployment
4 | metadata:
5 | name: inlets-server
6 | spec:
7 | replicas: 1
8 | selector:
9 | matchLabels:
10 | app: inlets-server
11 | template:
12 | metadata:
13 | labels:
14 | app: inlets-server
15 | spec:
16 | containers:
17 | - name: inlets-server
18 | image: ghcr.io/inlets/inlets-pro:0.9.23
19 | imagePullPolicy: IfNotPresent
20 | command: ["inlets-pro"]
21 | args:
22 | - "tcp"
23 | - "server"
24 | - "--auto-tls=true"
25 | - "--auto-tls-name=PUBLIC_IP"
26 | - "--token=TOKEN"
27 | ---
28 |
29 | # Private ClusterIP, to which applications will connect within the cluster
30 | ---
31 | apiVersion: v1
32 | kind: Service
33 | metadata:
34 | name: inlets-control
35 | labels:
36 | app: inlets-server
37 | spec:
38 | type: LoadBalancer
39 | ports:
40 | - name: inlets-control
41 | port: 8123
42 | protocol: TCP
43 | targetPort: 8123
44 | nodePort: 30023
45 | selector:
46 | app: inlets-server
47 |
48 | # Public LoadBalancer, or Ingress, or NodePort to which the remote service
49 | # behind NAT or a firewall will connect
50 |
51 | # If we are tunnelling `ssh` for instance on port 22
52 | # Clients from within the cluster can connect to :
53 | # tunnel-client-1-ssh.default:22
54 | ---
55 | apiVersion: v1
56 | kind: Service
57 | metadata:
58 | name: tunnel-client-1-ssh
59 | labels:
60 | app: inlets-server
61 | spec:
62 | type: ClusterIP
63 | ports:
64 | - name: inlets-ssh-data
65 | port: 22
66 | protocol: TCP
67 | targetPort: 22
68 | selector:
69 | app: inlets-server
70 | ---
71 | # Multiple ports can also be exposed via the data-plane
72 | # In this instance client-1 forwards ports 22 and 27017 for MongoDB:
73 |
74 | # mongodb://tunnel-client-1.default:27017
75 | # ssh -p 22 tunnel-client-1.default
76 | ---
77 | apiVersion: v1
78 | kind: Service
79 | metadata:
80 | name: tunnel-client-1
81 | labels:
82 | app: inlets-server
83 | spec:
84 | type: ClusterIP
85 | ports:
86 | - name: inlets-ssh-data
87 | port: 22
88 | protocol: TCP
89 | targetPort: 22
90 | - name: inlets-mongofb-data
91 | port: 27017
92 | protocol: TCP
93 | targetPort: 27017
94 | selector:
95 | app: inlets-server
96 | ---
97 |
98 |
--------------------------------------------------------------------------------
/chart/README.md:
--------------------------------------------------------------------------------
1 | ## Helm charts for inlets
2 |
3 | [inlets](https://inlets.dev) has both a client and a server, which connect to each other to build a tunnel.
4 |
5 | When a client wants to expose a service publicly, or privately within a remote network, it connects to a server using its control-plane (a HTTPS websocket).
6 |
7 | There is no need for your data plane to be exposed on the Internet, you can bind to a local LAN adapter, or a private ClusterIP. If you do want to expose your tunnelled services to the Internet, you can do with a NodePort, LoadBalancer or through Ingress.
8 |
9 | Kubernetes v1.19+ is required for the helm charts provided in this repository, due to the various versions of the Ingress API, the minimum supported version will be `networking.k8s.io/v1`.
10 |
11 | ### Deploy the inlets tunnel client or server as a Kubernetes Deployment
12 |
13 | * [Deploy an inlets TCP client](inlets-tcp-client) - connect an internal service to a public inlets TCP server - use this to expose an IngressController like ingress-nginx, Istio, Traefik, or Kong.
14 |
15 | * [Deploy an inlets TCP server](inlets-tcp-server) - one or more inlets TCP tunnel servers in a Kubernetes cluster, instead of using multiple VMs.
16 |
17 | * [Deploy an inlets HTTP server](inlets-http-server) - one or more inlets HTTP tunnel servers in a Kubernetes cluster, instead of using multiple VMs.
18 |
19 | ## Other Kubernetes use-cases
20 |
21 | ### Get Public L4 Load Balancers for your cluster
22 |
23 | See also: [inlets-operator](https://github.com/inlets/inlets-operator) which automates both parts of the above for a set number of supported clouds, and integrates through Kubernetes services of type LoadBalancer.
24 |
25 | ### Setup your preferred IngressController with TLS certs from Let's Encrypt
26 |
27 | * [Quick-start: Expose Your IngressController and get TLS from LetsEncrypt and cert-manager](https://docs.inlets.dev/#/get-started/quickstart-ingresscontroller-cert-manager?id=quick-start-expose-your-ingresscontroller-and-get-tls-from-letsencrypt-and-cert-manager)
28 |
29 | ### Get kubectl access to your private cluster from anywhere
30 |
31 | * [Tutorial: Expose a local Kubernetes API Server](https://docs.inlets.dev/tutorial/kubernetes-api-server/)
32 |
33 | ### Continous Deployment and fleet management with ArgoCD
34 |
35 | * [How To Manage Inlets Tunnels Servers With Argo CD and GitOps](https://inlets.dev/blog/2022/08/10/managing-tunnel-servers-with-argocd.html)
36 | * [Argo CD for your private Raspberry Pi k3s cluster](https://johansiebens.dev/posts/2020/08/argo-cd-for-your-private-raspberry-pi-k3s-cluster/)
37 |
--------------------------------------------------------------------------------
/chart/inlets-http-server/.gitignore:
--------------------------------------------------------------------------------
1 | /*.old
2 |
--------------------------------------------------------------------------------
/chart/inlets-http-server/.helmignore:
--------------------------------------------------------------------------------
1 | # Patterns to ignore when building packages.
2 | # This supports shell glob matching, relative path matching, and
3 | # negation (prefixed with !). Only one pattern per line.
4 | .DS_Store
5 | # Common VCS dirs
6 | .git/
7 | .gitignore
8 | .bzr/
9 | .bzrignore
10 | .hg/
11 | .hgignore
12 | .svn/
13 | # Common backup files
14 | *.swp
15 | *.bak
16 | *.tmp
17 | *.orig
18 | *~
19 | # Various IDEs
20 | .project
21 | .idea/
22 | *.tmproj
23 | .vscode/
24 |
--------------------------------------------------------------------------------
/chart/inlets-http-server/Chart.yaml:
--------------------------------------------------------------------------------
1 | apiVersion: v2
2 | name: inlets-http-server
3 | description: Deploy an inlets HTTP tunnel server to a cluster
4 | type: application
5 | version: 0.5.2
6 | appVersion: 1.16.0
7 |
--------------------------------------------------------------------------------
/chart/inlets-http-server/README.md:
--------------------------------------------------------------------------------
1 | # inlets-http-server
2 |
3 | This is the helm chart for an inlets Pro HTTP server
4 |
5 | Use it to deploy one or more inlets Pro HTTP tunnel servers to your Kubernetes cluster using a wildcard domain.
6 |
7 | # Use your Kubernetes cluster for inlets-pro HTTP exit-servers
8 |
9 | Install [arkade](https://arkade.dev/), which is used in the tutorial to install Kubernetes software.
10 |
11 | ```bash
12 | curl -sLS https://dl.arkade.dev | sh # Move to /usr/local/bin/
13 | curl -sLS https://dl.arkade.dev | sudo sh # Moved automatically.
14 | ```
15 |
16 | Install helm with `arkade get helm`.
17 |
18 | You also need to add the helm chart repository:
19 |
20 | ```bash
21 | $ helm repo add inlets-pro https://inlets.github.io/inlets-pro/charts/
22 | $ helm repo update
23 | ```
24 |
25 | ## Setup cert-manager, Ingress and a DNS01 certificate
26 |
27 | ```bash
28 | arkade install cert-manager
29 | arkade install ingress-nginx
30 | ```
31 |
32 | Note that all the resources we will create will be within the `inlets` namespace. cert-manager and ingress-nginx can reside in their own respective namespaces.
33 |
34 | Now create a DNS01 issuer for your preferred cloud:
35 |
36 | ```bash
37 | export EMAIL="you@example.com"
38 | export ACCESS_KEY_ID="AKIAIOSFODNN7EXAMPLE"
39 | export REGION="eu-central-1"
40 |
41 | cat > issuer.yaml < certificate.yaml < If you are wanting to test inlets Pro TCP tunnel servers in Kubernetes, without a domain and without configuring TLS and Ingress, you can try out: [The hard way to host an inlets TCP tunnel on Kubernetes](../../docs/inlets-tcp-server-hard-way.md)
8 |
9 | ## Getting started
10 |
11 | In this tutorial, you'll learn how to set up a tunnel for a Prometheus service running on a private network. It will be tunneled to your Kubernetes cluster through an inlets server running in a Pod. [Prometheus](https://prometheus.io) is a time-series database used for monitoring microservices. It is assumed that you have one or more Prometheus instances that you want to monitor from a cloud Kubernetes cluster.
12 |
13 | You will need a cloud Kubernetes cluster and access to a sub-domain available and its DNS control-panel.
14 |
15 | ### Install the prerequisites
16 |
17 | You can run this on any Intel or ARM cluster.
18 |
19 | Install [arkade](https://arkade.dev/), which is used in the tutorial to install Kubernetes software.
20 |
21 | ```bash
22 | curl -sLS https://dl.arkade.dev | sh # Move to /usr/local/bin/
23 | curl -sLS https://dl.arkade.dev | sudo sh # Moved automatically.
24 | ```
25 |
26 | Install helm with `arkade get helm`.
27 |
28 | You also need to add the helm chart repository:
29 |
30 | ```bash
31 | $ helm repo add inlets-pro https://inlets.github.io/inlets-pro/charts/
32 | $ helm repo update
33 | ```
34 |
35 | #### Install nginx-ingress
36 |
37 | ```bash
38 | $ arkade install nginx-ingress
39 | ```
40 |
41 | #### Install cert-manager
42 |
43 | [cert-manager](https://cert-manager.io/), can obtain TLS certificates from LetsEncrypt through NginxIngress.
44 |
45 | ```bash
46 | $ arkade install cert-manager
47 | ```
48 |
49 | It is assumed that you installed `kubectl` when you created your Kubernetes cluster, otherwise run `arkade get kubectl`.
50 |
51 | ### Install an Issuer
52 |
53 | Create a production certificate issuer issuer-prod.yaml, similar to the staging issuer you produced earlier. Be sure to change the email address to your email.
54 |
55 | ```bash
56 | export DOMAIN="prometheus.example.com"
57 | export EMAIL="webmaster@$DOMAIN"
58 |
59 | cat > issuer-prod.yaml < Note: if you plan to run many tunnels, each with their own certificate, then you may wish to configure the cert-manager Issuer to use a DNS01 challenge. See also: [Configuring DNS01 Challenge Provider ](https://cert-manager.io/docs/configuration/acme/dns01/)
86 |
87 | ### Generate a token for your prometheus inlets-pro server
88 |
89 | ```bash
90 | # Generate a random password
91 | export TOKEN=$(head -c 16 /dev/random | shasum|cut -d" " -f1)
92 |
93 | # Save a copy for later
94 | echo $TOKEN > prometheus-token.txt
95 |
96 | # Create a secret in the cluster for the tunnel server
97 | kubectl create secret generic prometheus-tunnel-token \
98 | --from-literal token=$TOKEN
99 | ```
100 |
101 | ### Install the inlets-pro TCP server chart
102 |
103 | Edit `values.yaml`:
104 |
105 | Make any changes you need.
106 |
107 | ```bash
108 | export DOMAIN="prometheus.example.com"
109 | export TOKEN="prometheus-tunnel-token"
110 |
111 | helm upgrade --install prometheus-tunnel inlets-pro/inlets-tcp-server \
112 | --set ingress.domain=$DOMAIN \
113 | --set tokenSecretName=$TOKEN
114 | ```
115 |
116 | > Note: replace the domain with a domain you own.
117 |
118 | The chart will deploy two Kubernetes services, an Ingress record and a Deployment to run the inlets-pro server process.
119 |
120 | * `prometheus-tunnel-control` - a service exposed by Ingress, for the websocket of inlets Pro (usually port 8123)
121 | * `prometheus-tunnel-data` - a local service to access Prometheus from within the cluster (usually 9090)
122 |
123 | ### Now connect your client on your computer.
124 |
125 | You can now connect Prometheus from wherever you have it running, whether that's in a container, on your system as a normal process, or within a Kubernetes cluster.
126 |
127 | Let's run a Prometheus container with Docker, so that we can connect it to the inlets server quickly.
128 |
129 | ```bash
130 | docker run --name prometheus \
131 | -p 9090:9090 \
132 | -d prom/prometheus:latest
133 | ```
134 |
135 | > Note: you can remove this container later with `docker rm -f prometheus`
136 |
137 | You will need the tunnel token to connect the inlets-pro client. If you saved a copy of the token you can used that. Otherwise it can be retrieved from the cluster:
138 |
139 | ```bash
140 | kubectl get secret -n default prometheus-tunnel-token -o jsonpath="{.data.token}" | base64 --decode > prometheus-token.txt
141 | ```
142 |
143 | Now connect your inlets-pro client:
144 |
145 | ```bash
146 | export DOMAIN="prometheus.example.com"
147 | export TOKEN_FILE="./prometheus-token.txt"
148 | inlets-pro tcp client --url wss://$DOMAIN/connect \
149 | --token-file $TOKEN_FILE \
150 | --license-file ~/LICENSE \
151 | --port 9090 \
152 | --auto-tls=false \
153 | --upstream 127.0.0.1
154 | ```
155 |
156 | We use a value of `--upstream 127.0.0.1` since the Prometheus container was exposed on 127.0.0.1 in the previous `docker run` command. If you were running the inlets client as a Pod, then you would use something like `--upstream prometheus` instead. You can also put an IP address attached to another computer in the upstream field. It just needs to be accessible from the client.
157 |
158 | ### Now access the tunnelled Prometheus from the Kubernetes cluster
159 |
160 | We haven't exposed the Prometheus service on the Internet for general consumption, so let's access it through its private ClusterIP which was deployed through the helm chart.
161 |
162 | Run a container with curl installed.
163 |
164 | ```bash
165 | kubectl run -t -i curl --rm --image ghcr.io/openfaas/curl:latest /bin/sh
166 | ```
167 |
168 | Now access the tunneled service via curl:
169 |
170 | ```bash
171 | curl prometheus-tunnel-data:9090
172 | ```
173 |
174 | You can also use `kubectl port-forward` to view the tunneled service:
175 |
176 | ```bash
177 | kubectl port-forward \
178 | svc/prometheus-tunnel-data 9091:9090
179 |
180 | echo Open: http://127.0.0.1:9091
181 | ```
182 |
183 | ### Install multiple tunnels
184 | To deploy multiple tunnel servers with the Helm chart some steps will need to be repeated for each tunnel:
185 |
186 | - Create a secret for the tunnel.
187 | - Create a `values.yaml` file with the helm parameter configuration.
188 | - Deploy the tunnel server using Helm.
189 |
190 | In this example we will setup a second tunnel for a PostgreSQL server running on a private network.
191 |
192 | Create a new secret for the PostgreSQL tunnel:
193 |
194 | ```bash
195 | # Generate a random password
196 | export TOKEN=$(head -c 16 /dev/random | shasum|cut -d" " -f1)
197 |
198 | # Save a copy for later
199 | echo $TOKEN > postgres-token.txt
200 |
201 | # Create a secret in the cluster for the tunnel server
202 | kubectl create secret generic postgres-tunnel-token \
203 | --from-literal token=$TOKEN
204 | ```
205 |
206 | Create a values file `postgres-values.yaml` with the chart configuration parameters for the tunnel:
207 |
208 | ```yaml
209 | export DOMAIN=postgres.example.com
210 |
211 | cat >> postgres-values.yaml < inlets-pro
15 | chmod +x ./inlets-pro
16 | mv ./inlets-pro /usr/bin/inlets-pro
17 | ```
18 |
19 | Find your public IP:
20 |
21 | ```
22 | export IP=$(curl -s ifconfig.co)
23 | ```
24 |
25 | Confirm the IP with `echo $IP` and save it, you need it for the client
26 |
27 | Get an auth token and save it for later to use with the client
28 |
29 | ```sh
30 | export TOKEN="$(head -c 16 /dev/urandom |shasum|cut -d'-' -f1)"
31 |
32 | echo $TOKEN
33 | ```
34 |
35 | Start the server:
36 |
37 | ```sh
38 | sudo inlets-pro server \
39 | --auto-tls \
40 | --auto-tls-name $IP \
41 | --remote-tcp 127.0.0.1 \
42 | --token $TOKEN
43 | ```
44 |
45 | ## Get Cassandra on your laptop
46 |
47 | Using Docker you can run Cassandra.
48 |
49 | ```sh
50 | docker run --name cassandra -p 9042:9042 -ti cassandra:latest
51 | ```
52 |
53 | The client port is `9042` which will become available on the public IP
54 |
55 | Now run the inlets client on the other side:
56 |
57 | For a Linux client
58 |
59 | ```sh
60 | curl -SLsf https://github.com/inlets/inlets-pro/releases/download/0.6.0/inlets-pro > inlets-pro
61 | chmod +x ./inlets-pro
62 | mv ./inlets-pro /usr/bin/inlets-pro
63 | ```
64 |
65 | For a MacOS client
66 |
67 | ```sh
68 | curl -SLsf https://github.com/inlets/inlets-pro/releases/download/0.6.0/inlets-pro-darwin > inlets-pro
69 | chmod +x ./inlets-pro
70 | sudo mv ./inlets-pro /usr/bin/inlets-pro
71 | ```
72 |
73 | Run the inlets-pro client:
74 |
75 | ```sh
76 | export IP="" # take this from the exit node
77 | export TOKEN="" # take this from the server earlier
78 | export LICENSE="" # your license
79 |
80 | sudo -E inlets-pro client \
81 | --connect wss://$IP:8123/connect \
82 | --tcp-ports 9042 \
83 | --token $TOKEN \
84 | --license $LICENSE
85 | ```
86 |
87 | ## Connect to Cassandra on your exit node
88 |
89 | On your laptop or another computer use the Cassandra client `cqlsh` to connect and verify the tunnel is operational.
90 |
91 | ```sh
92 | export IP="" # Exit-node IP
93 | docker run \
94 | -e CQLSH_HOST=$IP \
95 | -e CQLSH_PORT=9042 \
96 | -it --rm cassandra cqlsh
97 | ```
98 |
99 | Now you're connected.
100 |
101 | ```sh
102 | Connected to Test Cluster at 185.136.232.127:9042.
103 | [cqlsh 5.0.1 | Cassandra 3.11.4 | CQL spec 3.4.4 | Native protocol v4]
104 | Use HELP for help.
105 | cqlsh>
106 | ```
107 |
108 | Try a query:
109 |
110 | ```sh
111 | cqlsh> SELECT cluster_name, listen_address FROM system.local;
112 |
113 | cluster_name | listen_address
114 | --------------+----------------
115 | Test Cluster | 172.17.0.2
116 |
117 | (1 rows)
118 | cqlsh>
119 | ```
120 |
--------------------------------------------------------------------------------
/docs/charts/index.yaml:
--------------------------------------------------------------------------------
1 | apiVersion: v1
2 | entries:
3 | inlets-http-server:
4 | - apiVersion: v2
5 | appVersion: 1.16.0
6 | created: "2024-01-29T09:49:00.732544Z"
7 | description: Deploy an inlets HTTP tunnel server to a cluster
8 | digest: 526169db9f229c574c092d714c1883fb76c3089e7e7f620f568bb6310022fa2d
9 | name: inlets-http-server
10 | type: application
11 | urls:
12 | - https://inlets.github.io/inlets-pro/charts/inlets-http-server-0.5.2.tgz
13 | version: 0.5.2
14 | - apiVersion: v2
15 | appVersion: 1.16.0
16 | created: "2024-01-29T09:49:00.732299Z"
17 | description: Deploy an inlets HTTP tunnel server to a cluster
18 | digest: 7b1c3d6aff3473a6834f84cfbb8c90b55ab769d24746ccb0c9e1396c1130ac78
19 | name: inlets-http-server
20 | type: application
21 | urls:
22 | - https://inlets.github.io/inlets-pro/charts/inlets-http-server-0.5.1.tgz
23 | version: 0.5.1
24 | - apiVersion: v2
25 | appVersion: 1.16.0
26 | created: "2024-01-29T09:49:00.732057Z"
27 | description: Deploy an inlets HTTP tunnel server to a cluster
28 | digest: 019ba36a7461647292ce9dcdae4af85e382b041cbd2becf81eeb1a5a18ef4a53
29 | name: inlets-http-server
30 | type: application
31 | urls:
32 | - https://inlets.github.io/inlets-pro/charts/inlets-http-server-0.5.0.tgz
33 | version: 0.5.0
34 | - apiVersion: v2
35 | appVersion: 1.16.0
36 | created: "2024-01-29T09:49:00.731809Z"
37 | description: Helm chart for an inlets HTTP server
38 | digest: 69416d500a12ad1b04a8857f24f748fecea8d67965d5618cc7f259059897af10
39 | name: inlets-http-server
40 | type: application
41 | urls:
42 | - https://inlets.github.io/inlets-pro/charts/inlets-http-server-0.4.3.tgz
43 | version: 0.4.3
44 | - apiVersion: v2
45 | appVersion: 1.16.0
46 | created: "2024-01-29T09:49:00.731552Z"
47 | description: Helm chart for an inlets HTTP server
48 | digest: e226d19e14aac943de2e2dfb25535998ae474bb39fe88aaa4f0ce6b7212ee1df
49 | name: inlets-http-server
50 | type: application
51 | urls:
52 | - https://inlets.github.io/inlets-pro/charts/inlets-http-server-0.4.2.tgz
53 | version: 0.4.2
54 | - apiVersion: v2
55 | appVersion: 1.16.0
56 | created: "2024-01-29T09:49:00.73131Z"
57 | description: Helm chart for an inlets HTTP server
58 | digest: 83126ada1077e4ab9aeb40babe89cd13539d381c235335f8b637e89b21291dd5
59 | name: inlets-http-server
60 | type: application
61 | urls:
62 | - https://inlets.github.io/inlets-pro/charts/inlets-http-server-0.4.1.tgz
63 | version: 0.4.1
64 | - apiVersion: v2
65 | appVersion: 1.16.0
66 | created: "2024-01-29T09:49:00.731056Z"
67 | description: Helm chart for an inlets HTTP server
68 | digest: 2427570cee3593f76b7787a07d81d69a3266f31bec2edcd97b46e8bb6b6e020a
69 | name: inlets-http-server
70 | type: application
71 | urls:
72 | - https://inlets.github.io/inlets-pro/charts/inlets-http-server-0.4.0.tgz
73 | version: 0.4.0
74 | - apiVersion: v2
75 | appVersion: 1.16.0
76 | created: "2024-01-29T09:49:00.730794Z"
77 | description: Helm chart for an inlets HTTP server
78 | digest: f6de8d04eef6af9c26a17005849f885aece0a5b04117e10ebcd054f5235f9f60
79 | name: inlets-http-server
80 | type: application
81 | urls:
82 | - https://inlets.github.io/inlets-pro/charts/inlets-http-server-0.3.0.tgz
83 | version: 0.3.0
84 | - apiVersion: v2
85 | appVersion: 1.16.0
86 | created: "2024-01-29T09:49:00.730524Z"
87 | description: Helm chart for an inlets HTTP server
88 | digest: 9c946af21b3fba2710002fc24409b72b43f7377d4f9768109e02213fffcff82a
89 | name: inlets-http-server
90 | type: application
91 | urls:
92 | - https://inlets.github.io/inlets-pro/charts/inlets-http-server-0.2.1.tgz
93 | version: 0.2.1
94 | inlets-pro:
95 | - apiVersion: v2
96 | appVersion: 1.16.0
97 | created: "2024-01-29T09:49:00.735625Z"
98 | description: Helm chart for an inlets-pro TCP server
99 | digest: b849b6e9c6c4a0825fdcfa1a59f6a44c816aff2c8768b66e2710c3721187b901
100 | name: inlets-pro
101 | type: application
102 | urls:
103 | - https://inlets.github.io/inlets-pro/charts/inlets-pro-0.4.3.tgz
104 | version: 0.4.3
105 | - apiVersion: v2
106 | appVersion: 1.16.0
107 | created: "2024-01-29T09:49:00.735269Z"
108 | description: Helm chart for an inlets-pro TCP server
109 | digest: 54bfa103641526ce4ab10d5dc2ee3a7420754bfe2f4dce3d569957bf38d78538
110 | name: inlets-pro
111 | type: application
112 | urls:
113 | - https://inlets.github.io/inlets-pro/charts/inlets-pro-0.4.2.tgz
114 | version: 0.4.2
115 | - apiVersion: v2
116 | appVersion: 1.16.0
117 | created: "2024-01-29T09:49:00.733683Z"
118 | description: Helm chart for an inlets-pro TCP server
119 | digest: 4b5b7b8032d40e5d3969399cba1943eb752b15efb28b2fbf77b9566522ecc0bc
120 | name: inlets-pro
121 | type: application
122 | urls:
123 | - https://inlets.github.io/inlets-pro/charts/inlets-pro-0.4.1.tgz
124 | version: 0.4.1
125 | - apiVersion: v2
126 | appVersion: 1.16.0
127 | created: "2024-01-29T09:49:00.733392Z"
128 | description: Helm chart for an inlets-pro TCP server
129 | digest: 898f6551157fb49c0a617eb30f225b9921a4aba60eba804c6307245b1f8e205a
130 | name: inlets-pro
131 | type: application
132 | urls:
133 | - https://inlets.github.io/inlets-pro/charts/inlets-pro-0.4.0.tgz
134 | version: 0.4.0
135 | - apiVersion: v2
136 | appVersion: 1.16.0
137 | created: "2024-01-29T09:49:00.733113Z"
138 | description: Helm chart for an inlets-pro TCP server
139 | digest: 108eaf1e75fa15ba60316867c6bdc645f177dbe305bf320382b49fa0e40222db
140 | name: inlets-pro
141 | type: application
142 | urls:
143 | - https://inlets.github.io/inlets-pro/charts/inlets-pro-0.3.0.tgz
144 | version: 0.3.0
145 | - apiVersion: v2
146 | appVersion: 1.16.0
147 | created: "2024-01-29T09:49:00.732828Z"
148 | description: Helm chart for an inlets-pro TCP server
149 | digest: 75c0ca85be33d6461410332b2d3f9438e681e53a326f0b12cb80540a5b8db0f2
150 | name: inlets-pro
151 | type: application
152 | urls:
153 | - https://inlets.github.io/inlets-pro/charts/inlets-pro-0.2.1.tgz
154 | version: 0.2.1
155 | inlets-pro-client:
156 | - apiVersion: v2
157 | appVersion: 1.0.0
158 | created: "2024-01-29T09:49:00.73695Z"
159 | description: Helm chart for an inlets-pro TCP client
160 | digest: 7db4d044da23c3171b6de57cdb2318f32e10e40445fa0f2009df619852a83a86
161 | name: inlets-pro-client
162 | type: application
163 | urls:
164 | - https://inlets.github.io/inlets-pro/charts/inlets-pro-client-0.4.3.tgz
165 | version: 0.4.3
166 | - apiVersion: v2
167 | appVersion: 1.0.0
168 | created: "2024-01-29T09:49:00.736743Z"
169 | description: Helm chart for an inlets-pro TCP client
170 | digest: 3193fd6292800c0fbc176ba906d4115dd94551e3e1fb21112e0d637d19ecdab4
171 | name: inlets-pro-client
172 | type: application
173 | urls:
174 | - https://inlets.github.io/inlets-pro/charts/inlets-pro-client-0.4.2.tgz
175 | version: 0.4.2
176 | - apiVersion: v2
177 | appVersion: 1.0.0
178 | created: "2024-01-29T09:49:00.736516Z"
179 | description: Helm chart for an inlets-pro TCP client
180 | digest: e52a838e3411b2a2609afcc1ce47471f66497b9c3ffbde631809b7574885a189
181 | name: inlets-pro-client
182 | type: application
183 | urls:
184 | - https://inlets.github.io/inlets-pro/charts/inlets-pro-client-0.4.1.tgz
185 | version: 0.4.1
186 | - apiVersion: v2
187 | appVersion: 1.0.0
188 | created: "2024-01-29T09:49:00.736293Z"
189 | description: Helm chart for an inlets-pro TCP client
190 | digest: b6bfd6f0d4f74ff7bad733ada9c8d2ad426a139925a01346ec15186a2a89f29c
191 | name: inlets-pro-client
192 | type: application
193 | urls:
194 | - https://inlets.github.io/inlets-pro/charts/inlets-pro-client-0.4.0.tgz
195 | version: 0.4.0
196 | - apiVersion: v2
197 | appVersion: 1.0.0
198 | created: "2024-01-29T09:49:00.736074Z"
199 | description: Helm chart for an inlets-pro TCP client
200 | digest: db19167e8659dfca115294b51ca8c8cc3ee53e4b4b692ba6ddf3f61a748cdd00
201 | name: inlets-pro-client
202 | type: application
203 | urls:
204 | - https://inlets.github.io/inlets-pro/charts/inlets-pro-client-0.3.0.tgz
205 | version: 0.3.0
206 | - apiVersion: v2
207 | appVersion: 1.0.0
208 | created: "2024-01-29T09:49:00.73585Z"
209 | description: Helm chart for an inlets-pro TCP client
210 | digest: 627dc96ec83d8dd8cff9421d503bd71488a8e276ddbc6c72ec599aa50fd147c0
211 | name: inlets-pro-client
212 | type: application
213 | urls:
214 | - https://inlets.github.io/inlets-pro/charts/inlets-pro-client-0.2.1.tgz
215 | version: 0.2.1
216 | inlets-tcp-client:
217 | - apiVersion: v2
218 | appVersion: 1.0.0
219 | created: "2024-01-29T09:49:00.737559Z"
220 | description: Deploy an inlets TCP tunnel client to forward internal traffic to
221 | an external endpoint
222 | digest: 77eb9dfed38757ad7806c8f1373f028ccd882cde6ef905f5847b5bc667f680a3
223 | name: inlets-tcp-client
224 | type: application
225 | urls:
226 | - https://inlets.github.io/inlets-pro/charts/inlets-tcp-client-0.5.3.tgz
227 | version: 0.5.3
228 | - apiVersion: v2
229 | appVersion: 1.0.0
230 | created: "2024-01-29T09:49:00.737356Z"
231 | description: Deploy an inlets TCP tunnel client to forward internal traffic to
232 | an external endpoint
233 | digest: 533171d23a8dbd2987a2b0176c055df26907f41f194a5e698c3515f601007f00
234 | name: inlets-tcp-client
235 | type: application
236 | urls:
237 | - https://inlets.github.io/inlets-pro/charts/inlets-tcp-client-0.5.2.tgz
238 | version: 0.5.2
239 | - apiVersion: v2
240 | appVersion: 1.0.0
241 | created: "2024-01-29T09:49:00.737152Z"
242 | description: Deploy an inlets TCP tunnel client to a cluster
243 | digest: 8a05dcd92590a678a61453c1455ed10b20a8fad10d04783bf2e7f169df025227
244 | name: inlets-tcp-client
245 | type: application
246 | urls:
247 | - https://inlets.github.io/inlets-pro/charts/inlets-tcp-client-0.5.0.tgz
248 | version: 0.5.0
249 | inlets-tcp-server:
250 | - apiVersion: v2
251 | appVersion: 1.16.0
252 | created: "2024-01-29T09:49:00.738698Z"
253 | description: Deploy an inlets TCP tunnel server to a cluster
254 | digest: 059173df29788055b04e7eb86bd59d199d29fd2eb4122af1155f0799f5696a32
255 | name: inlets-tcp-server
256 | type: application
257 | urls:
258 | - https://inlets.github.io/inlets-pro/charts/inlets-tcp-server-0.6.2.tgz
259 | version: 0.6.2
260 | - apiVersion: v2
261 | appVersion: 1.16.0
262 | created: "2024-01-29T09:49:00.738391Z"
263 | description: Deploy an inlets TCP tunnel server to a cluster
264 | digest: 6551a447ca33286f75ffb6dc452f3d85c81a055d76ff1d26aba447673e424efa
265 | name: inlets-tcp-server
266 | type: application
267 | urls:
268 | - https://inlets.github.io/inlets-pro/charts/inlets-tcp-server-0.6.1.tgz
269 | version: 0.6.1
270 | - apiVersion: v2
271 | appVersion: 1.16.0
272 | created: "2024-01-29T09:49:00.738101Z"
273 | description: Deploy an inlets TCP tunnel server to a cluster
274 | digest: b45e178ef25214be9353b300f989137108945943dadb178c3a3fc37862201aab
275 | name: inlets-tcp-server
276 | type: application
277 | urls:
278 | - https://inlets.github.io/inlets-pro/charts/inlets-tcp-server-0.6.0.tgz
279 | version: 0.6.0
280 | - apiVersion: v2
281 | appVersion: 1.16.0
282 | created: "2024-01-29T09:49:00.73783Z"
283 | description: Deploy an inlets TCP tunnel server to a cluster
284 | digest: 01dfdb92723407872e4d8321f21e5f5d0c3db38b0d8b28578e3e0a41c2a71609
285 | name: inlets-tcp-server
286 | type: application
287 | urls:
288 | - https://inlets.github.io/inlets-pro/charts/inlets-tcp-server-0.5.0.tgz
289 | version: 0.5.0
290 | generated: "2024-01-29T09:49:00.729563Z"
291 |
--------------------------------------------------------------------------------
/docs/charts/inlets-http-server-0.2.1.tgz:
--------------------------------------------------------------------------------
https://raw.githubusercontent.com/inlets/inlets-pro/e6a235342c5d441cb16c507bcfd7ba993768676f/docs/charts/inlets-http-server-0.2.1.tgz
--------------------------------------------------------------------------------
/docs/charts/inlets-http-server-0.3.0.tgz:
--------------------------------------------------------------------------------
https://raw.githubusercontent.com/inlets/inlets-pro/e6a235342c5d441cb16c507bcfd7ba993768676f/docs/charts/inlets-http-server-0.3.0.tgz
--------------------------------------------------------------------------------
/docs/charts/inlets-http-server-0.4.0.tgz:
--------------------------------------------------------------------------------
https://raw.githubusercontent.com/inlets/inlets-pro/e6a235342c5d441cb16c507bcfd7ba993768676f/docs/charts/inlets-http-server-0.4.0.tgz
--------------------------------------------------------------------------------
/docs/charts/inlets-http-server-0.4.1.tgz:
--------------------------------------------------------------------------------
https://raw.githubusercontent.com/inlets/inlets-pro/e6a235342c5d441cb16c507bcfd7ba993768676f/docs/charts/inlets-http-server-0.4.1.tgz
--------------------------------------------------------------------------------
/docs/charts/inlets-http-server-0.4.2.tgz:
--------------------------------------------------------------------------------
https://raw.githubusercontent.com/inlets/inlets-pro/e6a235342c5d441cb16c507bcfd7ba993768676f/docs/charts/inlets-http-server-0.4.2.tgz
--------------------------------------------------------------------------------
/docs/charts/inlets-http-server-0.4.3.tgz:
--------------------------------------------------------------------------------
https://raw.githubusercontent.com/inlets/inlets-pro/e6a235342c5d441cb16c507bcfd7ba993768676f/docs/charts/inlets-http-server-0.4.3.tgz
--------------------------------------------------------------------------------
/docs/charts/inlets-http-server-0.5.0.tgz:
--------------------------------------------------------------------------------
https://raw.githubusercontent.com/inlets/inlets-pro/e6a235342c5d441cb16c507bcfd7ba993768676f/docs/charts/inlets-http-server-0.5.0.tgz
--------------------------------------------------------------------------------
/docs/charts/inlets-http-server-0.5.1.tgz:
--------------------------------------------------------------------------------
https://raw.githubusercontent.com/inlets/inlets-pro/e6a235342c5d441cb16c507bcfd7ba993768676f/docs/charts/inlets-http-server-0.5.1.tgz
--------------------------------------------------------------------------------
/docs/charts/inlets-http-server-0.5.2.tgz:
--------------------------------------------------------------------------------
https://raw.githubusercontent.com/inlets/inlets-pro/e6a235342c5d441cb16c507bcfd7ba993768676f/docs/charts/inlets-http-server-0.5.2.tgz
--------------------------------------------------------------------------------
/docs/charts/inlets-pro-0.2.1.tgz:
--------------------------------------------------------------------------------
https://raw.githubusercontent.com/inlets/inlets-pro/e6a235342c5d441cb16c507bcfd7ba993768676f/docs/charts/inlets-pro-0.2.1.tgz
--------------------------------------------------------------------------------
/docs/charts/inlets-pro-0.3.0.tgz:
--------------------------------------------------------------------------------
https://raw.githubusercontent.com/inlets/inlets-pro/e6a235342c5d441cb16c507bcfd7ba993768676f/docs/charts/inlets-pro-0.3.0.tgz
--------------------------------------------------------------------------------
/docs/charts/inlets-pro-0.4.0.tgz:
--------------------------------------------------------------------------------
https://raw.githubusercontent.com/inlets/inlets-pro/e6a235342c5d441cb16c507bcfd7ba993768676f/docs/charts/inlets-pro-0.4.0.tgz
--------------------------------------------------------------------------------
/docs/charts/inlets-pro-0.4.1.tgz:
--------------------------------------------------------------------------------
https://raw.githubusercontent.com/inlets/inlets-pro/e6a235342c5d441cb16c507bcfd7ba993768676f/docs/charts/inlets-pro-0.4.1.tgz
--------------------------------------------------------------------------------
/docs/charts/inlets-pro-0.4.2.tgz:
--------------------------------------------------------------------------------
https://raw.githubusercontent.com/inlets/inlets-pro/e6a235342c5d441cb16c507bcfd7ba993768676f/docs/charts/inlets-pro-0.4.2.tgz
--------------------------------------------------------------------------------
/docs/charts/inlets-pro-0.4.3.tgz:
--------------------------------------------------------------------------------
https://raw.githubusercontent.com/inlets/inlets-pro/e6a235342c5d441cb16c507bcfd7ba993768676f/docs/charts/inlets-pro-0.4.3.tgz
--------------------------------------------------------------------------------
/docs/charts/inlets-pro-client-0.2.1.tgz:
--------------------------------------------------------------------------------
https://raw.githubusercontent.com/inlets/inlets-pro/e6a235342c5d441cb16c507bcfd7ba993768676f/docs/charts/inlets-pro-client-0.2.1.tgz
--------------------------------------------------------------------------------
/docs/charts/inlets-pro-client-0.3.0.tgz:
--------------------------------------------------------------------------------
https://raw.githubusercontent.com/inlets/inlets-pro/e6a235342c5d441cb16c507bcfd7ba993768676f/docs/charts/inlets-pro-client-0.3.0.tgz
--------------------------------------------------------------------------------
/docs/charts/inlets-pro-client-0.4.0.tgz:
--------------------------------------------------------------------------------
https://raw.githubusercontent.com/inlets/inlets-pro/e6a235342c5d441cb16c507bcfd7ba993768676f/docs/charts/inlets-pro-client-0.4.0.tgz
--------------------------------------------------------------------------------
/docs/charts/inlets-pro-client-0.4.1.tgz:
--------------------------------------------------------------------------------
https://raw.githubusercontent.com/inlets/inlets-pro/e6a235342c5d441cb16c507bcfd7ba993768676f/docs/charts/inlets-pro-client-0.4.1.tgz
--------------------------------------------------------------------------------
/docs/charts/inlets-pro-client-0.4.2.tgz:
--------------------------------------------------------------------------------
https://raw.githubusercontent.com/inlets/inlets-pro/e6a235342c5d441cb16c507bcfd7ba993768676f/docs/charts/inlets-pro-client-0.4.2.tgz
--------------------------------------------------------------------------------
/docs/charts/inlets-pro-client-0.4.3.tgz:
--------------------------------------------------------------------------------
https://raw.githubusercontent.com/inlets/inlets-pro/e6a235342c5d441cb16c507bcfd7ba993768676f/docs/charts/inlets-pro-client-0.4.3.tgz
--------------------------------------------------------------------------------
/docs/charts/inlets-tcp-client-0.5.0.tgz:
--------------------------------------------------------------------------------
https://raw.githubusercontent.com/inlets/inlets-pro/e6a235342c5d441cb16c507bcfd7ba993768676f/docs/charts/inlets-tcp-client-0.5.0.tgz
--------------------------------------------------------------------------------
/docs/charts/inlets-tcp-client-0.5.2.tgz:
--------------------------------------------------------------------------------
https://raw.githubusercontent.com/inlets/inlets-pro/e6a235342c5d441cb16c507bcfd7ba993768676f/docs/charts/inlets-tcp-client-0.5.2.tgz
--------------------------------------------------------------------------------
/docs/charts/inlets-tcp-client-0.5.3.tgz:
--------------------------------------------------------------------------------
https://raw.githubusercontent.com/inlets/inlets-pro/e6a235342c5d441cb16c507bcfd7ba993768676f/docs/charts/inlets-tcp-client-0.5.3.tgz
--------------------------------------------------------------------------------
/docs/charts/inlets-tcp-server-0.5.0.tgz:
--------------------------------------------------------------------------------
https://raw.githubusercontent.com/inlets/inlets-pro/e6a235342c5d441cb16c507bcfd7ba993768676f/docs/charts/inlets-tcp-server-0.5.0.tgz
--------------------------------------------------------------------------------
/docs/charts/inlets-tcp-server-0.6.0.tgz:
--------------------------------------------------------------------------------
https://raw.githubusercontent.com/inlets/inlets-pro/e6a235342c5d441cb16c507bcfd7ba993768676f/docs/charts/inlets-tcp-server-0.6.0.tgz
--------------------------------------------------------------------------------
/docs/charts/inlets-tcp-server-0.6.1.tgz:
--------------------------------------------------------------------------------
https://raw.githubusercontent.com/inlets/inlets-pro/e6a235342c5d441cb16c507bcfd7ba993768676f/docs/charts/inlets-tcp-server-0.6.1.tgz
--------------------------------------------------------------------------------
/docs/charts/inlets-tcp-server-0.6.2.tgz:
--------------------------------------------------------------------------------
https://raw.githubusercontent.com/inlets/inlets-pro/e6a235342c5d441cb16c507bcfd7ba993768676f/docs/charts/inlets-tcp-server-0.6.2.tgz
--------------------------------------------------------------------------------
/docs/cli-reference.md:
--------------------------------------------------------------------------------
1 | # inlets-pro CLI reference
2 |
3 | There are two components to inlets-pro, the server and the client.
4 |
5 | This reference guide is designed for self-service, but customers of OpenFaaS Ltd can request hands-on support and training. Just email [contact@openfaas.com](mailto:contact@openfaas.com) for more. Business customers are entitled to free support, [find out more](https://inlets.dev/).
6 |
7 | Community and personal users can also find help in the [OpenFaaS Slack community](https://slack.openfaas.io/), in the #inlets channel.
8 |
9 | ## Contents:
10 |
11 | * Working with MacOS, Linux, and Windows
12 | * Topology
13 | * HTTP or TCP tunnels?
14 | * Configure the inlets-pro tcp client
15 | * Configure the inlets-pro tcp server
16 | * Configure the inlets-pro http client
17 | * Configure the inlets-pro http server
18 | * Troubleshooting
19 | * Working with Kubernetes
20 |
21 | ## Working with MacOS, Linux, and Windows
22 |
23 | The examples given in the documentation are valid for all three operating systems and use bash as a syntax.
24 |
25 | Windows users can use either Windows Subsystem for Linux (WSL) or [Git bash](https://git-scm.com/downloads), this is the simplest way to make all commands compatible.
26 |
27 | The client and server component are packaged in the same `inlets-pro` binary and can be run as:
28 |
29 | * A process on MacOS, Linux, Windows on ARM or Intel architecture
30 | * As a Docker container with docker, or Kubernetes as a Pod on ARM or Intel architecture
31 |
32 | ## Topology
33 |
34 | inlets is not about exposing services on the Internet, it's about making one service available within another network. What, where and how accessible that network is, is purely up to you.
35 |
36 | Consider a typical example that you may use a SaaS tunnel for:
37 |
38 | 
39 | > HTTP tunnels
40 |
41 | Here, we have a private Node.js server running on localhost and port 3000, we want to expose that on the Internet with a TLS certificate.
42 |
43 | ### Split-plane configuration
44 |
45 | inlets has two TCP ports, both of which can be exposed on various interfaces. By default, both ports are exposed on on all available adapters, i.e. `0.0.0.0` (IPv4) and `::` (IPv6).
46 |
47 | The first TCP port is called the Control Plane, the Control Plane is a websocket secured with TLS, that the inlets client connects to, in order to establish the tunnel.
48 |
49 | The Data Plane is one or more TCP ports that are exposed on the server, which map back to a private service on the client's end.
50 |
51 | To replace the role of a site-to-site VPN or Direct Connect, you can expose the Control Plane publicly on `0.0.0.0`, and the data-plane on either `127.0.0.1` or one of the other internal interfaces i.e. `10.0.0.10`, which is not accessible from the Internet.
52 |
53 | ### What about High Availability?
54 |
55 | It's possible to run multiple inlets client processes and have them connect to the same server. The server will load-balance incoming requests and distribute them between each client.
56 |
57 | The server can also be made High Availability, by running more than one copy. You could run two public Virtual Machines (VMs) and then add a VIP/FIP or Load Balancer in front. In this way, the pair of inlets servers work in an active-active configuration, and if one VM locks up or goes down, then the other will continue to serve traffic.
58 |
59 | ## HTTP or TCP tunnels?
60 |
61 | A HTTP tunnel is most useful for HTTP services and APIs. In this mode, a single tunnel can use the HTTP Host header to expose multiple different services using a DNS name and a single port.
62 |
63 | A TCP tunnel is a pass-through proxy for any TCP service. Use a TCP tunnel if you want to run a reverse proxy on the client's machine, or if you have traffic that is non-HTTP like a database, RDP, SSH and so on.
64 |
65 | Any traffic that is sent over an inlets tunnel is encrypted, even if the underlying protocol does not support encryption. This is because the data is encapsulated and send over a link with TLS enabled.
66 |
67 | ### Configure a TCP client
68 |
69 | The client component connects to an inlets server and then routes incoming requests to a private service. The client can run on the same host as your private service, or run on another host and act as gateway.
70 |
71 | ### Configure the license key
72 |
73 | The license terms of inlets-pro require that both the inlets client and server have a valid license, only the client requires to have the license configured.
74 |
75 | The default location for a license is `$HOME/.inlets/LICENSE`, you can also override the license with the `--license-file` or `--license` flag to pass a literal value.
76 |
77 | ## Setup a TCP client
78 |
79 | ### Set the upstream
80 |
81 | The upstream is where the client should send traffic, when it receives requests on one of the ports from the server.
82 |
83 | ```sh
84 | export UPSTREAM="127.0.0.1"
85 | inlets-pro tcp client \
86 | --upstream $UPSTREAM
87 | ```
88 |
89 | You can pass the IP address or DNS name of a service available on the local network of the client.
90 |
91 | ```sh
92 | export UPSTREAM="192.168.0.101"
93 | inlets-pro tcp client \
94 | --upstream $UPSTREAM
95 | ```
96 |
97 | When running inside a Kubernetes cluster as a Pod, the inlets client can use the DNS name of services.
98 |
99 | ```sh
100 | export UPSTREAM="traefik.kube-system"
101 | inlets-pro tcp client \
102 | --upstream $UPSTREAM
103 | ```
104 |
105 | In TCP mode, all traffic is passed through without inspection or modification, for this reason, only one `--upstream` server is possible for TCP tunnels.
106 |
107 | ### Set the ports for the tunnel `--ports` / `--port`
108 |
109 | Expose ports on the tunnel server, from the client with one of the following:
110 |
111 | ```sh
112 | --port 80
113 | -p 80
114 | ```
115 |
116 | Or give the flag multiple times:
117 |
118 | ```sh
119 | --port 80 --port 443
120 | ```
121 |
122 | Or use `--ports` and a comma-separated list:
123 |
124 | ```sh
125 | --ports 80,443
126 | ```
127 |
128 | ### Connect to the remote host (server) with `--url`
129 |
130 | inlets-pro uses a websocket for its control plane on port `8123` by default with *automatic TLS* configured.
131 |
132 | * Automatic TLS with `auto tls`
133 |
134 | In this mode the client and server will negotiate TLS through the use of a generate Certificate Authority (CA) and encrypt all traffic automatically.
135 |
136 | This is the default option, connect with `wss://` and the IP of the remote machine
137 |
138 | `--url wss://remote-machine:8123`
139 |
140 | The control-port of 8123 is used for auto-tls.
141 |
142 | * External TLS
143 |
144 | In this mode, you are providing your own TLS certificate or termination through a gateway, Kubernetes Ingress Controller, reverse-proxy or some other kind of product.
145 |
146 | Turn auto-TLS off, and use port 443 (implicit) for the control-plane.
147 |
148 | `--url wss://remote-machine`
149 |
150 | You must also pass the `--auto-tls=false` flag
151 |
152 | * No TLS or encryption
153 |
154 | This mode may be useful for testing, but is not recommended for confidential use.
155 |
156 | `--url ws://remote-machine:8123`
157 |
158 | Use port `8123` for the control-plane and `ws://` instead of `wss://`
159 |
160 | #### Set the authentication token `--token`
161 |
162 | The `inlets-pro tcp server` requires a token for authentication to make sure that the client is genuine. It is recommended to combine the use of the token with auto-tls or external TLS.
163 |
164 | You can create your own token, or generate one with bash:
165 |
166 | ```sh
167 | export TOKEN="$(head -c 16 /dev/urandom |shasum|cut -d'-' -f1)"
168 | echo $TOKEN
169 | ```
170 |
171 | Now pass the token via `--token $TOKEN`.
172 |
173 | ### Generate a systemd unit file for the client
174 |
175 | Add `inlets-pro tcp client --generate=systemd` to generate a system unit file.
176 |
177 | You'll need all the parameters that you would use to run the client, so don't leave any off.
178 |
179 | For example:
180 |
181 | ```bash
182 | export TOKEN="TOKEN_HERE"
183 | export UPSTREAM="127.0.0.1"
184 |
185 | inlets-pro tcp client \
186 | --upstream $UPSTREAM \
187 | --license-file /var/lib/inlets-pro/LICENSE \
188 | --tcp-ports "80,443" \
189 | --url "wss://167.99.90.104:8123" \
190 | --token $TOKEN \
191 | --generate=systemd
192 | ```
193 |
194 | ### Configure the TCP server
195 |
196 | The inlets-pro tcp server begins by opening a single TCP port `8123` for the control-plane, this is port `8123`. The port can be changed if required, by passing the `--control-port` flag.
197 |
198 | Additional ports are opened at runtime by the inlets-server for the data-plane. These ports must be advertised by the client via the `--tcp-ports` flag.
199 |
200 | #### Start with auto-tls
201 |
202 | Auto-TLS will create a Certificate Authority CA and start serving it via the control-plane port.
203 |
204 | You can view it like this:
205 |
206 | ```sh
207 | curl -k -i http://localhost:8123/.well-known/ca.crt
208 | ```
209 |
210 | An authentication token is also required which must be shared with the client ahead of time.
211 |
212 | #### Set the `--auto-tls-san` name
213 |
214 | The `--auto-tls-san` sets the subject-alternative-name (SAN) for the TLS certificate that is generated by the server.
215 |
216 | You can use the public IP address of the inlets-server, or a DNS record.
217 |
218 | * Public IP
219 |
220 | ```sh
221 | --auto-tls-san 35.1.25.103
222 | ```
223 |
224 | * DNS A or CNAME record
225 |
226 | ```sh
227 | --auto-tls-san inlets-control-tunnel1.example.com
228 | ```
229 |
230 | In this example `inlets-control-tunnel1.example.com` will resolve to the public IP, i.e. `35.1.25.103`
231 |
232 | #### Use a pre-supplied, or self-signed certificate
233 |
234 | You can use a TLS certificate with the inlets Pro server obtained from a third-party tool such as [certbot](https://certbot.eff.org), or your own Public Key Infrastructure (PKI).
235 |
236 | If you wanted to use an exit-server with a public IP, you can create a DNS A record for it before configuring certbot or another tool to fetch a TLS certificate for you from LetsEncrypt. If you don't want to set up a separate DNS record, then you can get an automated one from [xip.io](http://xip.io) such as `104.16.182.15.xip.io` or `104.16.182.15.xip.io`, where your public IP is `104.16.182.15`.
237 |
238 | The below instructions are for a DNS name on a local network `space-mini.local`, but you can customise the example.
239 |
240 | For the server:
241 |
242 | ```bash
243 | export AUTH_TOKEN="test-token"
244 |
245 | inlets-pro tcp server \
246 | --tls-key server.key \
247 | --tls-cert server.cert \
248 | --auto-tls=false \
249 | --token "${AUTH_TOKEN}"
250 | ```
251 |
252 | Note that you need to supply a server.key and server.cert file, and that you need to disable `--auto-tls`.
253 |
254 | On your client, add the certificate to your trust store, or add its issuer to your trust store, then run:
255 |
256 | ```bash
257 | export AUTH_TOKEN="test-token"
258 |
259 | inlets-pro tcp client \
260 | --tcp-ports 2222 \
261 | --license-file $HOME/.inlets/LICENSE \
262 | --token "${AUTH_TOKEN}" \
263 | --url wss://space-mini.local:8123 \
264 | --auto-tls=false
265 | ```
266 |
267 | Note that you must turn off `--auto-tls`, so that the client does not attempt to download the server's generated CA.
268 |
269 | #### Want to generate your own TLS certificate for testing?
270 |
271 | Make sure that you set the auto-tls-san or TLS SAN name to the hostname that the client will use to connect.
272 |
273 | Generate a new key:
274 |
275 | ```bash
276 | openssl genrsa -out server.key 2048
277 | ```
278 |
279 | Generate a certificate signing request (CSR):
280 |
281 | When promoted, do not enter a challenge key. If your hostname is `space-mini.local`, then enter that as the `Common Name`.
282 |
283 | ```bash
284 | openssl req -new -key server.key -out server.csr
285 | ```
286 |
287 | Obtain the server certificate from the CSR:
288 |
289 | ```bash
290 | openssl x509 -req -sha256 -days 365 -in server.csr -signkey server.key -out server.cert
291 | ```
292 |
293 | You will receive an error on your client such as:
294 |
295 | ```
296 | ERRO[0000] Failed to connect to proxy. Empty dialer response error="x509: certificate signed by unknown authority"
297 | ```
298 |
299 | Therefore, place the server.cert file in your trust store on your client and set the trust policy to "Always trust".
300 |
301 | If you are thinking about using self-signed certificates, then the automatic TLS option is already built-in and is easier to use.
302 |
303 | #### Set the authentication token `--token`
304 |
305 | The inlets-pro tcp server requires a token for authentication to make sure that the client is genuine. It is recommended to combine the use of the token with auto-tls or external TLS.
306 |
307 | You can create your own token, or generate one with bash:
308 |
309 | ```sh
310 | export TOKEN="$(head -c 16 /dev/urandom |shasum|cut -d'-' -f1)"
311 | echo $TOKEN
312 | ```
313 |
314 | Now pass the token via `--token $TOKEN`.
315 |
316 | ### Configure a http tunnel
317 |
318 | The HTTP mode of inlets Pro is suitable for REST / HTTP traffic. Use it when you want to add TLS termination on the exit-server without running a reverse-proxy in the client's network.
319 |
320 | Just like a TCP tunnel, a HTTP tunnel has two TCP ports, one for the control-plane and one for the data-plane.
321 |
322 | For more information, see the help commands:
323 |
324 | * See also: `inlets-pro http server --help`
325 | * See also: `inlets-pro http client --help`
326 |
327 | ### Configuring TLS for the HTTP server's data-plane
328 |
329 | The control-plane will use Auto-TLS by default, but the data-plane does not.
330 |
331 | #### Use Let's Encrypt to obtain a TLS certificate for the data plane
332 |
333 | inlets Pro HTTP tunnels are able to obtain TLS certificates from Let's Encrypt for the data-plane. In this mode, you'll find that the server exposes port 80 and 443 in order to process a HTTP01 challenge.
334 |
335 | Three additional fields enable the client to obtain a TLS certificate for the data-plane:
336 |
337 | ```bash
338 | --letsencrypt-domain stringArray obtain TLS certificates from Let's Encrypt for the following domains using a HTTP01 challenge
339 | --letsencrypt-email string email address to be used with Let's Encrypt
340 | --letsencrypt-issuer string obtain TLS certificates from the prod or staging Let's Encrypt issuer (default "prod")
341 | ```
342 |
343 | For example, to setup a HTTP tunnel to a LetsEncrypt-enabled exit-server, you can use the following command:
344 |
345 | ```bash
346 | export IP=$(curl -sfSL https://checkip.amazonaws.com)
347 | export TOKEN=""
348 |
349 | inlets-pro http server \
350 | --auto-tls \
351 | --control-port 8123 \
352 | --auto-tls-san $IP \
353 | --letsencrypt-domain prometheus.example.com \
354 | --letsencrypt-email user@example.com \
355 | --token TOKEN
356 | ```
357 |
358 | Then create a DNS A record mapping `prometheus.example.com` to the public IP of the server.
359 |
360 | You can pass the `--letsencrypt-domain` flag multiple times to obtain TLS certificates for multiple domains.
361 |
362 | Then on the client side, you will run a command such as:
363 |
364 | ```bash
365 | export IP="SERVER_IP"
366 | export TOKEN=""
367 |
368 | inlets-pro http client \
369 | --auto-tls \
370 | --url wss://$SERVER_IP:8123 \
371 | --upstream prometheus.example.com=http://127.0.0.1:9090 \
372 | --token TOKEN
373 | ```
374 |
375 | The `--upstream` flag can accept multiple DNS name mappings for instance: `prometheus.example.com=http://127.0.0.1:9090,grafana.example.com=http://127.0.0.1:3000`
376 |
377 | Follow a tutorial: [Get a secure HTTPS tunnel with Let's Encrypt](https://inlets.dev/blog/2021/02/11/secure-letsencrypt-tunnel.html)
378 |
379 | ## Working with Kubernetes
380 |
381 | You can deploy an inlets server or client as a Pod using the [inlets-pro helm chart](/chart/).
382 |
383 | For a server, you can expose its control and / or data plane for external access:
384 |
385 | * As a Service type LoadBalancer
386 |
387 | It will gain its own IP address, and you'll pay for one cloud load-balancer per tunnel.
388 |
389 | * As a Service type NodePort
390 |
391 | You will have to use high, non-standard TCP ports and may run into issues with manually managing the mapping of ports. This adds no cost to the Kubernetes cluster. You can also use auto-TLS for the control-plane.
392 |
393 | * As an Ingress definition
394 |
395 | The Ingress definition is the most advanced option and works without auto-TLS. For each inlets-server you need to create a separate Kubernetes Ingress definition and domain name.
396 |
397 | Clients will connect to the domain name and your IngressController will be responsible for configuring TLS either via LetsEncrypt or your own certificate store.
398 |
399 | * Split-plane with an Ingress definition
400 |
401 | In this configuration, only the inlets-pro control plane is exposed (usually port `8123`) with a publicly accessible address, and the data-plane is not exposed outside the network. This can be achieved through the use of two separate ClusterIP services.
402 |
403 | This configuration is ideal for command and control. The private network will be able to traverse firewalls and NAT to connect to the remote inlets-pro tcp server, but only internal services within the Kubernetes cluster can connect to the tunnelled service.
404 |
405 | See [split-plane-server.yaml](../artifacts/split-plane-server.yaml) as an example.
406 |
407 | ### Pod / Service / Deployment definitions
408 |
409 | You can use the sample artifact for the [client.yaml](../artifacts/client.yaml) or [server.yaml](../artifacts/server.yaml)
410 |
411 | There is also a [helm chart for the client and server](/chart/).
412 |
413 | ## Troubleshooting
414 |
415 | * You have a port permission issue for low ports `< 1024` such as `80`
416 |
417 | The reason for this error is that the inlets-pro Docker image is set to run as a non-root user and non-root users are not allowed to bind to ports below 1024.
418 |
419 | There are two ways around this, the first being that you perhaps don't need to bind to that low port. Docker, Kubernetes and inlets-pro all allow for port remapping, so there should be no reason for a you to need to bind directly to port 80 in a service.
420 |
421 | Try adding each port to the Kubernetes container spec with your override:
422 |
423 | ```yaml
424 | ports:
425 | - name: http
426 | containerPort: 8080
427 | protocol: TCP
428 | ```
429 |
430 | The second solution is to change the security context so that your inlets server runs as root. You may also need to run the pod as a root user by [editing the security context of the Pod](https://kubernetes.io/docs/tasks/configure-pod-container/security-context/).
431 |
432 | Further more, if you are not a Kubernetes user, but using Docker, you can derive a new image from our upstream image and override the user there:
433 |
434 | ```Dockerfile
435 | FROM inlets/inlets-pro:TAG
436 |
437 | USER root
438 | ```
439 |
440 | For manual use with Docker, you can also set a non-root user via the `--user root` / `--user 0` flag: `docker run --uid 0 --name inlets-pro-root-server -ti inlets/inlets-pro:TAG server`
441 |
442 | * The client cannot write the auto-TLS certificate to `/tmp/` due to a read-only filesystem
443 |
444 | Add a tmpfs mount or an empty-dir mount to the Pod Spec at `/tmp/`
445 |
446 | ```yaml
447 | volumes:
448 | - name: tmp-cert
449 | emptyDir: {}
450 | ```
451 |
452 | To the container spec:
453 |
454 | ```yaml
455 | volumeMounts:
456 | - mountPath: /tmp
457 | name: tmp-cert
458 | ```
459 |
460 | * `apiVersion: apps/v1beta1` vs `apiVersion: apps/v1`
461 |
462 | If you're on a very old version of Kubernetes, then the `apps/v1` apiVersion may need to be changed to `apps/v1beta1`. Feel free to contact technical support for more hands-on help.
463 |
464 | * Multiple inlets tunnels
465 |
466 | You can run as many inlets tunnels as you like, both client and server Pods. Make sure that each is named appropriately.
467 |
468 | The server will require its own Service and Deployment.
469 |
470 | The client just requires a Deployment.
471 |
472 | I.e. replace `inlets-server` with `inlets-server-tunnel1` and so forth.
473 |
474 | If you are managing several tunnels, then feel free to contact OpenFaaS Ltd about an automation solution.
475 |
--------------------------------------------------------------------------------
/docs/images/heading.png:
--------------------------------------------------------------------------------
https://raw.githubusercontent.com/inlets/inlets-pro/e6a235342c5d441cb16c507bcfd7ba993768676f/docs/images/heading.png
--------------------------------------------------------------------------------
/docs/images/inlets-pro-sm.png:
--------------------------------------------------------------------------------
https://raw.githubusercontent.com/inlets/inlets-pro/e6a235342c5d441cb16c507bcfd7ba993768676f/docs/images/inlets-pro-sm.png
--------------------------------------------------------------------------------
/docs/images/inlets-pro-split-plane.png:
--------------------------------------------------------------------------------
https://raw.githubusercontent.com/inlets/inlets-pro/e6a235342c5d441cb16c507bcfd7ba993768676f/docs/images/inlets-pro-split-plane.png
--------------------------------------------------------------------------------
/docs/images/inlets-pro-vip-ha.png:
--------------------------------------------------------------------------------
https://raw.githubusercontent.com/inlets/inlets-pro/e6a235342c5d441cb16c507bcfd7ba993768676f/docs/images/inlets-pro-vip-ha.png
--------------------------------------------------------------------------------
/docs/images/inlets-pro-vip-k8s.png:
--------------------------------------------------------------------------------
https://raw.githubusercontent.com/inlets/inlets-pro/e6a235342c5d441cb16c507bcfd7ba993768676f/docs/images/inlets-pro-vip-k8s.png
--------------------------------------------------------------------------------
/docs/images/inlets-pro-vip.png:
--------------------------------------------------------------------------------
https://raw.githubusercontent.com/inlets/inlets-pro/e6a235342c5d441cb16c507bcfd7ba993768676f/docs/images/inlets-pro-vip.png
--------------------------------------------------------------------------------
/docs/inlets-tcp-server-hard-way.md:
--------------------------------------------------------------------------------
1 | # The hard way to host an inlets TCP tunnel on Kubernetes
2 |
3 | This post walks you through all the manual steps required to host an inlets TCP tunnel on a Kubernetes cluster.
4 |
5 | ## Who is this tutorial for?
6 |
7 | This tutorial is not recommended for production, because we have better, cheaper and more convenient options available. It's really a tutorial for those who want to understand all the moving parts involved in creating and configuring Kubernetes objects.
8 |
9 | If you're a service provider, or part of a SaaS company, don't follow these steps, but use one of the examples we provide below:
10 |
11 | Instead, we've built a platform you can deploy to your cluster which makes it trivial to manage tunnels for customers: [Inlets Uplink for SaaS & Service Providers](https://inlets.dev/blog/2022/11/16/service-provider-uplinks.html)
12 |
13 | If you're not a Service Provider or at a SaaS company, but need to host a bunch of TCP tunnels on your Kubernetes cluster, then you should use the [Helm chart for the Inlets Pro TCP server](https://github.com/inlets/inlets-pro/tree/master/chart/inlets-tcp-server)
14 |
15 | If you're a personal user, you probably just want one or two tunnel servers, in which case we have a couple of tools that would probably suit you better:
16 |
17 | * [inletsctl](https://github.com/inlets/inletsctl) - provision tunnel servers on a number of different public cloud platforms using userdata for the configuration
18 | * [inlets-operator](https://github.com/inlets/inlets-operator) - a completely automated solution for getting public IPs for a local or private Kubernetes cluster
19 |
20 | Following the steps in this tutorial will create a separate cloud LoadBalancer for each tunnel, which adds 20-30 USD / mo to your cloud bill per tunnel. Instead, we always use Ingress or an Istio Gateway which only needs a single LoadBalancer and keeps costs low.
21 |
22 | ## Deploy a TCP tunnel server
23 |
24 | You'll need a Kubernetes cluster on a public cloud provider, but no domain name, no Ingress Controller, no Istio, etc.
25 |
26 | ### Create a service of type LoadBalancer and note down its IP address
27 |
28 | The naming convention will be one namespace per customer, and the name will be repeated for each Kubernetes object, from the Service through to the Deployment.
29 |
30 | In this example, the tunnel will be for a customer forwarding SSH and HTTP traffic using two different ports.
31 |
32 | ```yaml
33 | apiVersion: v1
34 | kind: Namespace
35 | metadata:
36 | name: customer1
37 | ```
38 |
39 | ### Create a secret with the token for the customer's tunnel to use
40 |
41 | ```bash
42 | kubectl create secret generic tunnel \
43 | --from-literal=token=$(openssl rand -base64 32) \
44 | --namespace=customer1
45 | ```
46 |
47 | ### Deploy the dataplane service
48 |
49 | Deploy a dataplane service, this will not be exposed on the Internet, you'll use this to access the services that the customer has forwarded over the tunnel:
50 |
51 | ```yaml
52 | apiVersion: v1
53 | kind: Service
54 | metadata:
55 | name: tunnel
56 | namespace: customer1
57 | labels:
58 | app:
59 | spec:
60 | ports:
61 | - name: postgres
62 | port: 5432
63 | protocol: TCP
64 | targetPort: 5432
65 | selector:
66 | app.kubernetes.io/name: tunnel
67 | type: ClusterIP
68 | status: {}
69 | ```
70 |
71 | ### Create the LoadBalancer service
72 |
73 | Create and apply the LoadBalancer:
74 |
75 | ```yaml
76 | apiVersion: v1
77 | kind: Service
78 | metadata:
79 | name: tunnel-lb
80 | namespace: customer1
81 | labels:
82 | app:
83 | spec:
84 | ports:
85 | - name: control
86 | port: 8123
87 | protocol: TCP
88 | targetPort: 8123
89 | selector:
90 | app.kubernetes.io/name: tunnel
91 | type: LoadBalancer
92 | status: {}
93 | ```
94 |
95 | Wait until the LoadBalancer has an IP address, do not proceed until you have it.
96 |
97 | ### Create a Deployment for the tunnel server
98 |
99 | Create a Deployment for the `inlets-pro tcp server`, and insert the IP address in the `--auto-tls-san=` flag.
100 |
101 | Note for AWS users, you'll have to find the tunnel's DNS entry instead of its IP, so you will need to eyeball the results of `kubectl get svc -n customer1 -o wide` and copy the `EXTERNAL-IP` column to `export AUTO_TLS_SAN=""`.
102 |
103 | ```yaml
104 | export AUTO_TLS_IP=$(kubectl get svc tunnel-lb -n customer1 -o jsonpath="{.status.loadBalancer.ingress[0].ip}")
105 |
106 | cat >> tunnel-dep.yaml <