8 |
9 |
10 |
22 |
--------------------------------------------------------------------------------
/themes/gallery.md:
--------------------------------------------------------------------------------
1 | # Themes Gallery
2 |
3 | Browse awesome themes available for Slidev here.
4 |
5 | Read more about [how to use a theme](/themes/use), or [how to write your own](/themes/write-a-theme) and share with the community!
6 |
7 | ## Official Themes
8 |
9 |
10 |
11 |
12 |
13 | ## Community Themes
14 |
15 | Here are the curated themes made by the community.
16 |
17 |
18 |
19 |
20 |
21 |
22 | ## More Themes
23 |
24 | Find all the [themes available on NPM](https://www.npmjs.com/search?q=keywords%3Aslidev-theme).
25 |
--------------------------------------------------------------------------------
/custom/config-vue.md:
--------------------------------------------------------------------------------
1 | # Configure Vue
2 |
3 |
4 |
5 | Slidev uses [Vue 3](https://v3.vuejs.org/) to render the application on the client side. You can extend the app to add custom plugins or configurations.
6 |
7 | Create `./setup/main.ts` with the following content:
8 |
9 | ```ts
10 | import { defineAppSetup } from '@slidev/types'
11 |
12 | export default defineAppSetup(({ app, router }) => {
13 | // Vue App
14 | app.use(YourPlugin)
15 | })
16 | ```
17 |
18 | This could also be used as the main entrance of your Slidev app to do some initializations before the app starts.
19 |
20 | Learn more: [Vue Application API](https://v3.vuejs.org/api/application-api.html#component).
21 |
--------------------------------------------------------------------------------
/.vitepress/theme/components/HomeFooter.vue:
--------------------------------------------------------------------------------
1 |
2 |
9 |
10 |
11 |
41 |
--------------------------------------------------------------------------------
/.vitepress/theme/components/demo/DemoEditor.vue:
--------------------------------------------------------------------------------
1 |
2 |
15 |
16 | This setup function will only run on Node.js environment, you can have access to Node's API.
17 |
18 |
19 | This setup function will only run on client side. Make sure the browser compatibility when importing packages.
20 |
21 |
68 |
69 |
--------------------------------------------------------------------------------
/custom/global-layers.md:
--------------------------------------------------------------------------------
1 | # Global Layers
2 |
3 | > Available since v0.17
4 |
5 | Global layers allow you to have custom components that **persistent** across slides. This could be useful for having footers, cross-slides animations, global effects, etc.
6 |
7 | Slidev provides two layers for this usage, create `global-top.vue` or `global-bottom.vue` under your project root and it will pick up automatically.
8 |
9 | Layers relationship:
10 |
11 | - Global Top (`global-top.vue`)
12 | - Slides
13 | - Global Bottom (`global-bottom.vue`)
14 |
15 | ## Example
16 |
17 | ```html
18 |
19 |
20 |
21 |
22 | ```
23 |
24 | The text `Your Name` will appear to all your slides.
25 |
26 | To enabled it conditionally, you can apply it with the [Vue Global Context](/custom/vue-context).
27 |
28 | ```html
29 |
30 |
31 |
37 |
38 | ```
39 |
40 | ```html
41 |
42 |
43 |
49 |
50 | ```
51 |
52 | ```html
53 |
54 |
55 |
61 |
62 | ```
63 |
--------------------------------------------------------------------------------
/custom/config-windicss.md:
--------------------------------------------------------------------------------
1 | # Configure Windi CSS
2 |
3 |
4 |
5 | Markdown naturally supports embedded HTML markups. You can therefore style your content the way you want. To provide some convenience, we have [Windi CSS](https://github.com/windicss/windicss) built-in, so you can style markup directly using class utilities.
6 |
7 | For example:
8 |
9 | ```html
10 |
30 |
31 | The VS Code extension provides some features to help you better organize your slides and have a quick overview of them.
32 |
33 | ### Features
34 |
35 | - View slides in the side panel
36 | - Go to next / prev buttons
37 | - Re-ordering slides
38 | - Folding for slide blocks
39 | - Convert Markdown to HTML
40 |
41 | 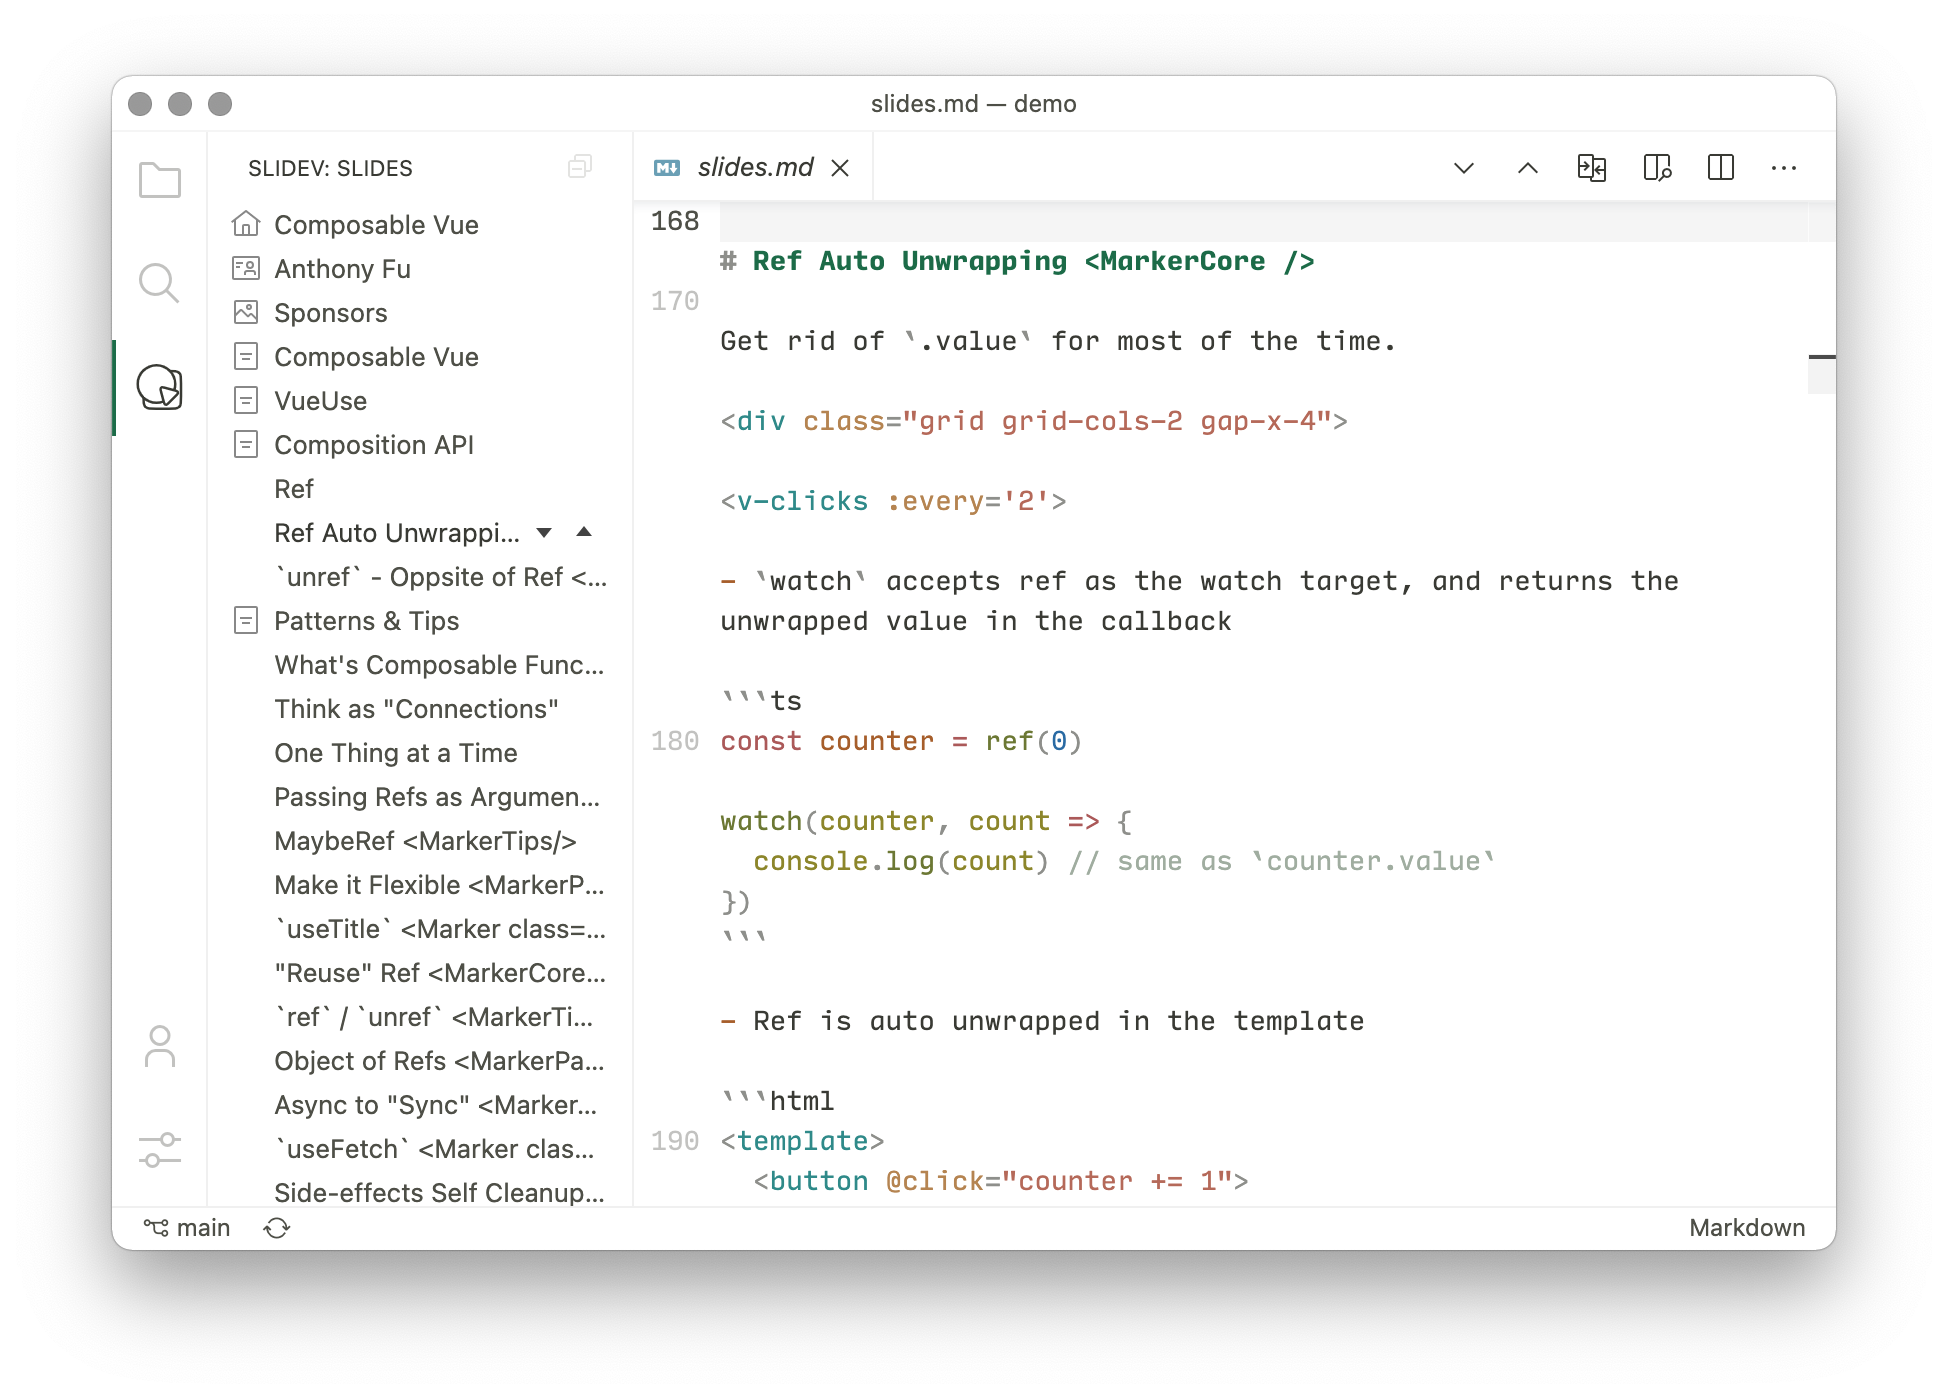
42 |
43 |
44 |
--------------------------------------------------------------------------------
/custom/config-vite.md:
--------------------------------------------------------------------------------
1 | # Configure Vite
2 |
3 |
4 |
5 | Slidev is powered by [Vite](http://vitejs.dev/) under the hood. This means you can leverage Vite's great plugin system to customize your slides even further.
6 |
7 | The `vite.config.ts` will be respected if you have one.
8 |
9 | Slidev has the following plugins preconfigured:
10 |
11 | - [@vitejs/plugin-vue](https://github.com/vitejs/vite/tree/main/packages/plugin-vue)
12 | - [unplugin-vue-components](https://github.com/antfu/unplugin-vue-components)
13 | - [unplugin-icons](https://github.com/antfu/unplugin-icons)
14 | - [vite-plugin-md](https://github.com/antfu/vite-plugin-md)
15 | - [vite-plugin-windicss](https://github.com/windicss/vite-plugin-windicss)
16 | - [vite-plugin-remote-assets](https://github.com/antfu/vite-plugin-remote-assets)
17 |
18 | Learn more about the [pre-configurations here](https://github.com/slidevjs/slidev/blob/main/packages/slidev/node/plugins/preset.ts).
19 |
20 | ## Configure Internal Plugins
21 |
22 | > Available since v0.21
23 |
24 | To configure the built-in plugins list above, create `vite.config.ts` with the following content. Please note Slidev has some preconfigure options for those plugins, this usage will override some of them, which could potentially cause the app to break. Please treat this as **an advanced feature**, make sure you know what you are doing before moving on.
25 |
26 | ```ts
27 | import { defineConfig } from 'vite'
28 |
29 | export default defineConfig({
30 | slidev: {
31 | vue: {
32 | /* vue options */
33 | },
34 | markdown: {
35 | /* markdown-it options */
36 | markdownItSetup(md) {
37 | /* custom markdown-it plugins */
38 | md.use(/* ... */)
39 | },
40 | },
41 | /* options for other plugins */
42 | },
43 | })
44 | ```
45 |
46 | See the [type declarations](https://github.com/slidevjs/slidev/blob/main/packages/slidev/node/options.ts#L50) for more options.
47 |
--------------------------------------------------------------------------------
/public/assets/arrow-bottom-left.svg:
--------------------------------------------------------------------------------
1 |
29 |
--------------------------------------------------------------------------------
/builtin/components.md:
--------------------------------------------------------------------------------
1 | # Components
2 |
3 | ## Built-in Components
4 |
5 | > The documentations of this section is still working in progress. Before that, you can take a look at the [source code](https://github.com/slidevjs/slidev/blob/main/packages/client/builtin) directly.
6 |
7 | ### `TOC`
8 |
9 | Insert a Table Of Content.
10 |
11 | Titles and title levels get automatically retrieved from the first title element of each slides.
12 |
13 | You can override this automatic behaviour for a slide by using the front matter syntax:
14 | ```yml
15 | ---
16 | title: Amazing slide title
17 | level: 2
18 | ---
19 | ```
20 |
21 | Or if you prefer the slide to not appear in the TOC at all, you can use:
22 | ```yml
23 | ---
24 | hideInToc: true
25 | ---
26 | ```
27 |
28 | #### Usage
29 | ~~~md
30 |
31 | ~~~
32 |
33 | Parameters:
34 |
35 | * `columns` (`string | number`, default: `1`): The number of columns of the display
36 | * `maxDepth` (`string | number`, default: `Infinity`): The maximum depth level of title to display
37 | * `minDepth` (`string | number`, default: `1`): The minimum depth level of title to display
38 | * `mode` (`'all' | 'onlyCurrentTree'| 'onlySiblings'`, default: `'all'`):
39 | * `'all'`: Display all items
40 | * `'onlyCurrentTree'`: Display only items that are in current tree (active item, parents and children of active item)
41 | * `'onlySiblings'`: Display only items that are in current tree and their direct siblings
42 |
43 | ## Custom Components
44 |
45 | Create a directory `components/` under your project root, and simply put your custom Vue components under it, then you can use it with the same name in your markdown file!
46 |
47 | Read more in the [Customization](/custom/directory-structure#components) section.
48 |
49 | ## Theme-provided Components
50 |
51 | Themes can provide components as well. Please read their documentations for what they have provided.
52 |
53 | Check more in the [directory structure](/custom/directory-structure) section.
54 |
--------------------------------------------------------------------------------
/guide/navigation.md:
--------------------------------------------------------------------------------
1 | # Navigation
2 |
3 | ## Navigation Bar
4 |
5 | Move your mouse to the left bottom corner of Slidev page, the navigation bar will be appeared.
6 |
7 | 
8 |
9 | | Shortcuts | Button | Description |
10 | | --- | --- | --- |
11 | | f | | toggle fullscreen |
12 | | right / space | | next animation or slide |
13 | | left | | previous animation or slide |
14 | | up | - | previous slide |
15 | | down | - | next slide |
16 | | o | | toggle [slides overview](#slides-overview) |
17 | | d | | toggle dark mode |
18 | | - | | toggle [camera view](/guide/recording#camera-view) |
19 | | - | | [recording](/guide/recording#camera-view) |
20 | | - | | enter [presenter mode](/guide/presenter-mode) |
21 | | - | | toggle [integrated editor](/guide/editors#integrated-editor) |
22 | | - | | download slides (only appear in [SPA build](/guide/exporting#single-page-application-spa)) |
23 | | - | | show information about the slides |
24 | | - | | show settings menu |
25 | | g | - | show goto... |
26 |
27 |
28 |
29 | ## Slides Overview
30 |
31 | By pressing o or clicking the button in the navigation bar, you can have the overview of your slides so you can jump between them easily.
32 |
33 | 
34 |
--------------------------------------------------------------------------------
/custom/vue-context.md:
--------------------------------------------------------------------------------
1 | # Vue Global Context
2 |
3 | Slidev injected a [global Vue context](https://v3.vuejs.org/api/application-config.html#globalproperties) `$slidev` for advanced conditions or navigation controls.
4 |
5 | ## Usage
6 |
7 | You can access it anywhere in your markdown and Vue template, with the ["Mustache" syntax](https://v3.vuejs.org/guide/template-syntax.html#interpolations).
8 |
9 | ```md
10 |
11 |
12 | # Page 1
13 |
14 | Current page is: {{ $slidev.nav.currentPage }}
15 | ```
16 |
17 | ```html
18 |
19 |
20 |
21 |
Title: {{ $slidev.configs.title }}
22 |
23 |
24 | ```
25 |
26 | ## Properties
27 |
28 | ### `$slidev.nav`
29 |
30 | A reactive object holding the properties and controls of the slides navigation. For examples:
31 |
32 | ```js
33 | $slidev.nav.next() // go next step
34 |
35 | $slidev.nav.nextSlide() // go next slide (skip v-clicks)
36 |
37 | $slidev.nav.go(10) // go slide #10
38 | ```
39 |
40 | ```js
41 | $slidev.nav.currentPage // current slide number
42 |
43 | $slidev.nav.currentLayout // current layout id
44 |
45 | $slidev.nav.clicks // current clicks count
46 | ```
47 |
48 | For more properties available, refer to the [nav.ts](https://github.com/slidevjs/slidev/blob/main/packages/client/logic/nav.ts) exports.
49 |
50 | ### `$slidev.configs`
51 |
52 | A reactive object holding the parsed [configurations in the first frontmatter](/custom/#frontmatter-configures) of your `slides.md`. For example
53 |
54 | ```yaml
55 | ---
56 | title: My First Slidev!
57 | ---
58 | ```
59 |
60 | ```
61 | {{ $slidev.configs.title }} // 'My First Slidev!'
62 | ```
63 |
64 | ### `$slidev.themeConfigs`
65 |
66 | A reactive object holding the parsed theme configurations.
67 |
68 | ```yaml
69 | ---
70 | title: My First Slidev!
71 | themeConfig:
72 | primary: #213435
73 | ---
74 | ```
75 |
76 | ```
77 | {{ $slidev.themeConfigs.primary }} // '#213435'
78 | ```
79 |
--------------------------------------------------------------------------------
/.vitepress/theme/components/NavDropdownLinkItem.vue:
--------------------------------------------------------------------------------
1 |
2 |
18 |
19 |
20 |
34 |
35 |
138 |
--------------------------------------------------------------------------------
/custom/config-monaco.md:
--------------------------------------------------------------------------------
1 | # Configure Monaco
2 |
3 |
4 |
5 | Create `./setup/monaco.ts` with the following content:
6 |
7 | ```ts
8 | import { defineMonacoSetup } from '@slidev/types'
9 |
10 | export default defineMonacoSetup(async (monaco) => {
11 | // use `monaco` to configure
12 | })
13 | ```
14 |
15 | Learn more about [configuring Monaco](https://github.com/Microsoft/monaco-editor).
16 |
17 | ## Usage
18 |
19 | To use Monaco in your slides, simply append `{monaco}` to your code snippets:
20 |
21 | ~~~js
22 | //```js
23 | const count = ref(1)
24 | const plusOne = computed(() => count.value + 1)
25 |
26 | console.log(plusOne.value) // 2
27 |
28 | plusOne.value++ // error
29 | //```
30 | ~~~
31 |
32 | To
33 |
34 | ~~~js
35 | //```js {monaco}
36 | const count = ref(1)
37 | const plusOne = computed(() => count.value + 1)
38 |
39 | console.log(plusOne.value) // 2
40 |
41 | plusOne.value++ // error
42 | //```
43 | ~~~
44 |
45 | ## Exporting
46 |
47 | By default, Monaco will ONLY work on `dev` mode. If you would like to have it available in the exported SPA, configure it in your frontmatter:
48 |
49 | ```yaml
50 | ---
51 | monaco: true # default "dev"
52 | ---
53 | ```
54 |
55 | ## Types Auto Installing
56 |
57 | When use TypeScript with Monaco, types for dependencies will be installed to the client-side automatically.
58 |
59 | ~~~ts
60 | //```ts {monaco}
61 | import { ref } from 'vue'
62 | import { useMouse } from '@vueuse/core'
63 |
64 | const counter = ref(0)
65 | //```
66 | ~~~
67 |
68 | In the example above, make sure `vue` and `@vueuse/core` are installed locally as dependencies / devDependencies, Slidev will handle the rest to get the types working for the editor automatically!
69 |
70 | ## Configure Themes
71 |
72 | The theme is controlled by Slidev based on the light/dark theme. If you want to customize it, you can pass the theme id to the setup function:
73 |
74 | ```ts
75 | // ./setup/monaco.ts
76 | import { defineMonacoSetup } from '@slidev/types'
77 |
78 | export default defineMonacoSetup(() => {
79 | return {
80 | theme: {
81 | dark: 'vs-dark',
82 | light: 'vs',
83 | },
84 | }
85 | })
86 | ```
87 |
88 | If you want to load custom themes:
89 |
90 | ```ts
91 | import { defineMonacoSetup } from '@slidev/types'
92 |
93 | // change to your themes
94 | import dark from 'theme-vitesse/themes/vitesse-dark.json'
95 | import light from 'theme-vitesse/themes/vitesse-light.json'
96 |
97 | export default defineMonacoSetup((monaco) => {
98 | monaco.editor.defineTheme('vitesse-light', light as any)
99 | monaco.editor.defineTheme('vitesse-dark', dark as any)
100 |
101 | return {
102 | theme: {
103 | light: 'vitesse-light',
104 | dark: 'vitesse-dark',
105 | },
106 | }
107 | })
108 | ```
109 |
110 | > If you are creating a theme for Slidev, use dynamic `import()` inside the setup function to get better tree-shaking and code-splitting results.
111 |
--------------------------------------------------------------------------------
/guide/faq.md:
--------------------------------------------------------------------------------
1 | # FAQ
2 |
3 | ## Grids
4 |
5 | Since Slidev is based on the Web, you can apply any grid layouts as you want. [CSS Grids](https://css-tricks.com/snippets/css/complete-guide-grid/), [flexboxes](https://css-tricks.com/snippets/css/a-guide-to-flexbox/), or even [Masonry](https://css-tricks.com/native-css-masonry-layout-in-css-grid/), you get the full controls.
6 |
7 | Since we have [Windi CSS](https://windicss.org/) built-in, here is one simple way for you to reference:
8 |
9 | ```html
10 |
11 |
12 |
13 | The first column
14 |
15 |
16 |
17 |
18 | The second column
19 |
20 |
21 |
22 | ```
23 |
24 | Go further, you can customize the size of each column like:
25 |
26 | ```html
27 |
28 |
29 |
30 | The first column (200px)
31 |
32 |
33 |
34 |
35 | The second column (auto fit)
36 |
37 |
38 |
39 |
40 | The third column (10% width to parent container)
41 |
42 |
43 |
44 | ```
45 |
46 | Learn more about [Windi CSS Grids](https://windicss.org/utilities/grid.html).
47 |
48 | ## Positioning
49 |
50 | Slides are defined in fixed sizes (default `980x552px`) and scale to fit with the user screen. You can safely use absolute position in your slides as they will scale along with the screen.
51 |
52 | For example:
53 |
54 | ```html
55 |
56 | This is a left-bottom aligned footer
57 |
58 | ```
59 |
60 | To change the canvas' actual size, you can pass the `canvasWidth` options in your first frontmatter:
61 |
62 | ```yaml
63 | ---
64 | canvasWidth: 800
65 | ---
66 | ```
67 |
68 | ## Font Size
69 |
70 | If you feel the font size in your slides are too small, you can adjust it in a few ways:
71 |
72 | ### Override Local Style
73 |
74 | You can override styles for each slide with the inlined `
84 |
85 | ---
86 |
87 | # Page 2
88 |
89 | This will not be affected.
90 | ```
91 |
92 | Learn more: [Embedded Styles](/guide/syntax.html#embedded-styles)
93 |
94 | ### Override Global Style
95 |
96 | You can provide custom global styles by creating `./style.css`, for example
97 |
98 | ```css
99 | /* style.css */
100 |
101 | h1 {
102 | font-size: 10em !important;
103 | }
104 | ```
105 |
106 | Learn more: [Global Style](/custom/directory-structure.html#style)
107 |
108 | ### Scale the Canvas
109 |
110 | Changing the canvas' actual size will scale all your contents(text, images, components, etc.) and slides
111 |
112 | ```yaml
113 | ---
114 | # default: 980
115 | # since the canvas gets smaller, the visual size will become larger
116 | canvasWidth: 800
117 | ---
118 | ```
119 |
120 | ### Use Transform
121 |
122 | We provide a built-in component ``, which is a thin wrapper of CSS transform property.
123 |
124 | ```md
125 |
126 |
127 | - Item 1
128 | - Item 2
129 |
130 |
131 | ```
132 |
--------------------------------------------------------------------------------
/.vitepress/theme/components/NavDropdownLink.vue:
--------------------------------------------------------------------------------
1 |
2 |
3 |
7 |
8 |
9 |
10 |
11 |
12 |
13 |
14 |
15 |
16 |
36 |
37 |
132 |
--------------------------------------------------------------------------------
/custom/fonts.md:
--------------------------------------------------------------------------------
1 | # Fonts
2 |
3 | > Available since v0.20
4 |
5 | While you can use HTML and CSS to custom the fonts and style for your slides as you want, Slidev also provides a convenient way to use them effortlessly.
6 |
7 | In your frontmatter, configure as following
8 |
9 | ```yaml
10 | ---
11 | fonts:
12 | # basically the text
13 | sans: 'Robot'
14 | # use with `font-serif` css class from windicss
15 | serif: 'Robot Slab'
16 | # for code blocks, inline code, etc.
17 | mono: 'Fira Code'
18 | ---
19 | ```
20 |
21 | And that's all.
22 |
23 | Fonts will be **imported automatically from [Google Fonts](https://fonts.google.com/)**. That means you can use any fonts available on Google Fonts directly.
24 |
25 | ## Local Fonts
26 |
27 | By default, Slidev assumes all the fonts specified via `fonts` configurations come from Google Fonts. If you want to use local fonts, specify the `fonts.local` to opt-out the auto-importing.
28 |
29 | ```yaml
30 | ---
31 | fonts:
32 | # like font-family in css, you can use `,` to separate multiple fonts for fallback
33 | sans: 'Helvetica Neue,Robot'
34 | # mark 'Helvetica Neue' as local font
35 | local: 'Helvetica Neue'
36 | ---
37 | ```
38 |
39 | ## Weights & Italic
40 |
41 | By default, Slidev imports three weights `200`,`400`,`600` for each font. You can configure them by:
42 |
43 | ```yaml
44 | ---
45 | fonts:
46 | sans: 'Robot'
47 | # default
48 | weights: '200,400,600'
49 | # import italic fonts, default `false`
50 | italic: false
51 | ---
52 | ```
53 |
54 | This configuration applies to all web fonts. For more fine-grained controls of each font's weights, you will need to manually import them with [HTML](/custom/directory-structure.html#index-html) and CSS.
55 |
56 | ## Fallback Fonts
57 |
58 | For most of the scenarios, you only need to specify the "special font" and Slidev will append the fallback fonts for you, for example:
59 |
60 | ```yaml
61 | ---
62 | fonts:
63 | sans: 'Robot'
64 | serif: 'Robot Slab'
65 | mono: 'Fira Code'
66 | ---
67 | ```
68 |
69 | will result in
70 |
71 | ```css
72 | .font-sans {
73 | font-family: "Robot",ui-sans-serif,system-ui,-apple-system,BlinkMacSystemFont,"Segoe UI",Roboto,"Helvetica Neue",Arial,"Noto Sans",sans-serif,"Apple Color Emoji","Segoe UI Emoji","Segoe UI Symbol","Noto Color Emoji";
74 | }
75 | .font-serif {
76 | font-family: "Robot Slab",ui-serif,Georgia,Cambria,"Times New Roman",Times,serif;
77 | }
78 | .font-mono {
79 | font-family: "Fira Code",ui-monospace,SFMono-Regular,Menlo,Monaco,Consolas,"Liberation Mono","Courier New",monospace;
80 | }
81 | ```
82 |
83 | If you want to disable the fallback fonts, configure as following
84 |
85 | ```yaml
86 | ---
87 | fonts:
88 | mono: 'Fira Code, monospace'
89 | fallback: false
90 | ---
91 | ```
92 |
93 | ## Providers
94 |
95 | - Options: `google` | `none`
96 | - Default: `google`
97 |
98 | Currently, only Google Fonts is supported, we are planned to add more providers in the future. Specify to `none` will disable the auto-importing feature entirely and treat all the fonts local.
99 |
100 | ```yaml
101 | ---
102 | fonts:
103 | provider: 'none'
104 | ---
105 | ```
106 |
107 |
108 |
--------------------------------------------------------------------------------
/.vitepress/theme/styles/code.css:
--------------------------------------------------------------------------------
1 | /* https://github.com/antfu/prism-theme-vars */
2 | @import 'prism-theme-vars/base.css';
3 | @import 'prism-theme-vars/marker.css';
4 |
5 | :root {
6 | --prism-font-family: var(--font-family-mono);
7 | --prism-font-size: 0.85rem;
8 | --prism-marker-opacity: 0;
9 | }
10 |
11 | html:not(.dark) {
12 | --prism-foreground: #393a34;
13 | --prism-background: #fafafa;
14 | --prism-inline-background: #f5f5f5;
15 | --prism-comment: #a0ada0;
16 | --prism-string: #b56959;
17 | --prism-literal: #2f8a89;
18 | --prism-number: #296aa3;
19 | --prism-keyword: #1c6b48;
20 | --prism-function: #6c7834;
21 | --prism-boolean: #296aa3;
22 | --prism-constant: #a65e2b;
23 | --prism-deleted: #a14f55;
24 | --prism-class: #2993a3;
25 | --prism-builtin: #ab5959;
26 | --prism-property: #b58451;
27 | --prism-namespace: #b05a78;
28 | --prism-punctuation: #8e8f8b;
29 | --prism-decorator: #bd8f8f;
30 | --prism-regex: #ab5e3f;
31 | --prism-json-property: #698c96;
32 | }
33 |
34 | html.dark {
35 | --prism-scheme: dark;
36 | --prism-foreground: #d4cfbf;
37 | --prism-background: #181818;
38 | --prism-comment: #758575;
39 | --prism-string: #d48372;
40 | --prism-literal: #429988;
41 | --prism-keyword: #4d9375;
42 | --prism-boolean: #6394bf;
43 | --prism-number: #6394bf;
44 | --prism-variable: #c2b36e;
45 | --prism-function: #a1b567;
46 | --prism-deleted: #bc6066;
47 | --prism-class: #54b1bf;
48 | --prism-builtin: #e0a569;
49 | --prism-property: #dd8e6e;
50 | --prism-namespace: #db889a;
51 | --prism-punctuation: #858585;
52 | --prism-decorator: #bd8f8f;
53 | --prism-regex: #ab5e3f;
54 | --prism-json-property: #6b8b9e;
55 | --prism-line-number: #888888;
56 | --prism-line-number-gutter: #eeeeee;
57 | --prism-line-highlight-background: #444444;
58 | --prism-selection-background: #444444;
59 | --prism-inline-background: theme('colors.dark.300');
60 | }
61 |
62 |
63 | .token.title {
64 | color: var(--prism-keyword);
65 | }
66 |
67 | /* Overrides */
68 |
69 | pre, code {
70 | @apply font-mono;
71 | }
72 |
73 | :not(pre) > code {
74 | background: var(--prism-inline-background);
75 | padding: 1px 6px;
76 | border-radius: 3px;
77 | }
78 |
79 | a > code {
80 | color: var(--c-brand-dark);
81 | }
82 |
83 | div[class*='language-'] {
84 | position: relative;
85 | }
86 |
87 | div[class*='language-'] pre {
88 | margin: 0;
89 | z-index: 1;
90 | }
91 |
92 | div[class*='language-'] code {
93 | font-size: var(--prism-font-size);
94 | font-family: var(--prism-font-family);
95 | }
96 |
97 | .token.important {
98 | font-weight: normal;
99 | }
100 |
101 | /* Line highlighting */
102 |
103 | .highlight-lines {
104 | position: absolute;
105 | top: 0;
106 | bottom: 0;
107 | left: 0;
108 | padding: var(--prism-block-padding-y) 0;
109 | width: 100%;
110 | line-height: var(--prism-line-height);
111 | font-family: var(--prism-font-family);
112 | font-size: var(--prism-font-size);
113 | user-select: none;
114 | overflow: hidden;
115 | z-index: -1;
116 | }
117 |
118 | .highlight-lines .highlighted {
119 | background-color: var(--prism-line-highlight-background);
120 | }
121 |
--------------------------------------------------------------------------------
/.vitepress/theme/styles/vars.css:
--------------------------------------------------------------------------------
1 | /** Base Styles */
2 | :root {
3 |
4 | /**
5 | * Colors
6 | * --------------------------------------------------------------------- */
7 | --c-bg: #fff;
8 | --c-bg-semi: rgba(255,255,255,0.8);
9 | --c-bg-secondary: #f3f5f7;
10 |
11 | --c-white: #ffffff;
12 | --c-black: #000000;
13 |
14 | --c-divider-light: rgba(60, 60, 67, .12);
15 | --c-divider-dark: rgba(84, 84, 88, .48);
16 |
17 | --c-text-light-1: #2c3e50;
18 | --c-text-light-2: #476582;
19 | --c-text-light-3: #90a4b7;
20 |
21 | --c-brand: #3AB9D4;
22 | --c-brand-active: #3AB9D4;
23 | --c-brand-dark: #3AB9D4;
24 | --c-brand-light: #3AB9D4;
25 |
26 | --c-disabled-bg: #e5e5e5;
27 | --c-disabled-fg: #666;
28 |
29 | --code-bg-color: #f8f8f8;
30 | --code-inline-bg-color: rgba(27, 31, 35, .04);
31 | --code-highlight: rgba(0, 0, 0, .04);
32 |
33 | /**
34 | * Typography
35 | * --------------------------------------------------------------------- */
36 |
37 | --font-family-base: 'Inter', apple-system, BlinkMacSystemFont, 'Segoe UI', Roboto, Oxygen, Ubuntu, Cantarell, 'Fira Sans', 'Droid Sans', 'Helvetica Neue', sans-serif;
38 | --font-family-mono: 'IBM Plex Mono', source-code-pro, Menlo, Monaco, Consolas, 'Courier New', monospace;
39 |
40 | /**
41 | * Z Indexes
42 | *
43 | * Algolia SearchBox has a z-index of 200, so make sure not to go above
44 | * that value.
45 | * --------------------------------------------------------------------- */
46 |
47 | --z-index-navbar: 10;
48 | --z-index-sidebar: 6;
49 |
50 | /**
51 | * Shadows
52 | * --------------------------------------------------------------------- */
53 |
54 | --shadow-1: 0 1px 2px rgba(0, 0, 0, .04), 0 1px 2px rgba(0, 0, 0, .06);
55 | --shadow-2: 0 3px 12px rgba(0, 0, 0, .07), 0 1px 4px rgba(0, 0, 0, .07);
56 | --shadow-3: 0 12px 32px rgba(0, 0, 0, .1), 0 2px 6px rgba(0, 0, 0, .08);
57 | --shadow-4: 0 14px 44px rgba(0, 0, 0, .12), 0 3px 9px rgba(0, 0, 0, .12);
58 | --shadow-5: 0 18px 56px rgba(0, 0, 0, .16), 0 4px 12px rgba(0, 0, 0, .16);
59 |
60 | /**
61 | * Sizes
62 | * --------------------------------------------------------------------- */
63 |
64 | --header-height: 3.6rem;
65 | --sidebar-width: 17.5rem;
66 | --scrollbar-width: 0;
67 | }
68 |
69 | html.dark {
70 | --c-bg: #111;
71 | --c-bg-semi: rgba(17,17,17,0.8);
72 | --c-bg-secondary: #222;
73 | --c-text: #f5f7fa;
74 | --c-text-light: #f9f9f9;
75 | --c-text-lighter: #ffffff;
76 |
77 | --c-divider-light: rgba(200, 200, 200, .12);
78 | --c-divider-dark: rgba(200, 200, 200, .48);
79 | --code-bg-color: #191919;
80 | --code-inline-bg-color: rgba(255, 255, 255, .04);
81 | --code-highlight: rgba(0, 0, 0, .66);
82 |
83 | --c-disabled-bg: #333;
84 | --c-disabled-fg: #aaa;
85 | }
86 |
87 | /** Fallback Styles */
88 | :root {
89 | --c-divider: var(--c-divider-light);
90 |
91 | --c-text: var(--c-text-light-1);
92 | --c-text-light: var(--c-text-light-2);
93 | --c-text-lighter: var(--c-text-light-3);
94 |
95 | --c-bg: var(--c-white);
96 |
97 | --code-line-height: 24px;
98 | --code-font-family: var(--font-family-mono);
99 | --code-font-size: 14px;
100 | }
101 |
102 | .no-sidebar {
103 | --sidebar-width: 0;
104 | }
105 |
--------------------------------------------------------------------------------
/.vitepress/theme/config.ts:
--------------------------------------------------------------------------------
1 | /* eslint-disable no-use-before-define */
2 | /* eslint-disable @typescript-eslint/no-namespace */
3 |
4 | export namespace DefaultTheme {
5 | export interface Config {
6 | logo?: string
7 | nav?: NavItem[] | false
8 | sidebar?: SideBarConfig | MultiSideBarConfig
9 |
10 | /**
11 | * GitHub repository following the format /.
12 | *
13 | * @example `"vuejs/vue-next"`
14 | */
15 | repo?: string
16 |
17 | /**
18 | * Customize the header label. Defaults to GitHub/Gitlab/Bitbucket
19 | * depending on the provided repo.
20 | *
21 | * @exampe `"Contribute!"`
22 | */
23 | repoLabel?: string
24 |
25 | /**
26 | * If your docs are in a different repository from your main project.
27 | *
28 | * @example `"vuejs/docs-next"`
29 | */
30 | docsRepo?: string
31 |
32 | /**
33 | * If your docs are not at the root of the repo.
34 | *
35 | * @example `"docs"`
36 | */
37 | docsDir?: string
38 |
39 | /**
40 | * If your docs are in a different branch. Defaults to `main`.
41 | *
42 | * @example `"next"`
43 | */
44 | docsBranch?: string
45 |
46 | /**
47 | * Enable links to edit pages at the bottom of the page.
48 | */
49 | editLinks?: boolean
50 |
51 | /**
52 | * Custom text for edit link. Defaults to "Edit this page".
53 | */
54 | editLinkText?: string
55 |
56 | /**
57 | * Show last updated time at the bottom of the page. Defaults to `false`.
58 | * If given a string, it will be displayed as a prefix (default value:
59 | * "Last Updated").
60 | */
61 | lastUpdated?: string | boolean
62 |
63 | prevLinks?: boolean
64 | nextLinks?: boolean
65 |
66 | locales?: Record>
67 | }
68 |
69 | // navbar --------------------------------------------------------------------
70 |
71 | export type NavItem = NavItemWithLink | NavItemWithChildren
72 |
73 | export interface NavItemBase {
74 | text: string
75 | target?: string
76 | rel?: string
77 | ariaLabel?: string
78 | activeMatch?: string
79 | }
80 |
81 | export interface NavItemWithLink extends NavItemBase {
82 | link: string
83 | }
84 |
85 | export interface NavItemWithChildren extends NavItemBase {
86 | items: NavItemWithLink[]
87 | }
88 |
89 | // sidebar -------------------------------------------------------------------
90 |
91 | export type SideBarConfig = SideBarItem[] | 'auto' | false
92 |
93 | export interface MultiSideBarConfig {
94 | [path: string]: SideBarConfig
95 | }
96 |
97 | export type SideBarItem = SideBarLink | SideBarGroup
98 |
99 | export interface SideBarLink {
100 | text: string
101 | link: string
102 | }
103 |
104 | export interface SideBarGroup {
105 | text: string
106 | link?: string
107 |
108 | /**
109 | * @default false
110 | */
111 | collapsable?: boolean
112 |
113 | children: SideBarItem[]
114 | }
115 |
116 | // locales -------------------------------------------------------------------
117 |
118 | export interface LocaleConfig {
119 | /**
120 | * Text for the language dropdown.
121 | */
122 | selectText?: string
123 |
124 | /**
125 | * Label for this locale in the language dropdown.
126 | */
127 | label?: string
128 | }
129 | }
130 |
--------------------------------------------------------------------------------
/guide/hosting.md:
--------------------------------------------------------------------------------
1 | # Static Hosting
2 |
3 | ## Build Single Page Applications (SPA)
4 |
5 | You can also build the slides into a self-hostable SPA:
6 |
7 | ```bash
8 | $ slidev build
9 | ```
10 |
11 | The generated application will be available under `dist/` and then you can host it on [GitHub Pages](https://pages.github.com/), [Netlify](https://netlify.app/), [Vercel](https://vercel.com/), or whatever you want. Now you can share your slides with the rest of the world with a single link.
12 |
13 | ### Base Path
14 |
15 | To deploy your slides under sub-routes, you will need to pass the `--base` option. For example:
16 |
17 | ```bash
18 | $ slidev build --base /talks/my-cool-talk/
19 | ```
20 |
21 | Refer to [Vite's documentation](https://vitejs.dev/guide/build.html#public-base-path) for more details.
22 |
23 | ### Provide Downloadable PDF
24 |
25 | You can provide a downloadable PDF to the viewers of your SPA with the following config:
26 |
27 | ```md
28 | ---
29 | download: true
30 | ---
31 | ```
32 |
33 | Slidev will generate a pdf file along with the build, and a download button will be displayed in the SPA.
34 |
35 | You can also provide a custom url to the PDF. In that case, the rendering process will be skipped.
36 |
37 | ```md
38 | ---
39 | download: 'https://myside.com/my-talk.pdf'
40 | ---
41 | ```
42 |
43 | ## Examples
44 |
45 | Here are a few examples of the exported SPA:
46 |
47 | - [Starter Template](https://sli.dev/demo/starter)
48 | - [Composable Vue](https://talks.antfu.me/2021/composable-vue) by [Anthony Fu](https://github.com/antfu)
49 |
50 | For more, check out [Showcases](/showcases).
51 |
52 | ## Hosting
53 |
54 | We recommend to use `npm init slidev@lastest` to scaffolding your project, which contains the necessary configuration files for hosting services out-of-box.
55 |
56 | ### Netlify
57 |
58 | - [Netlify](https://netlify.com/)
59 |
60 | Create `netlify.toml` in your project root with the following content.
61 |
62 | ```ts
63 | [build.environment]
64 | NODE_VERSION = "14"
65 |
66 | [build]
67 | publish = "dist"
68 | command = "npm run build"
69 |
70 | [[redirects]]
71 | from = "/*"
72 | to = "/index.html"
73 | status = 200
74 | ```
75 |
76 | Then go to your Netlify dashboard, create new site with the repository.
77 |
78 | ### Vercel
79 |
80 | - [Vercel](https://vercel.com/)
81 |
82 | Create `vercel.json` in your project root with the following content.
83 |
84 | ```json
85 | {
86 | "rewrites": [
87 | { "source": "/(.*)", "destination": "/index.html" }
88 | ]
89 | }
90 | ```
91 |
92 | Then go to your Vercel dashboard, create new site with the repository.
93 |
94 | ## GitHub Pages
95 |
96 | - [GitHub Pages](https://pages.github.com/)
97 |
98 | Create `.github/workflows/deploy.yml` with following content to deploy your slides to GitHub Pages via GitHub Actions.
99 |
100 | ```yaml
101 | name: Deploy pages
102 | on: push
103 | jobs:
104 | deploy:
105 | runs-on: ubuntu-latest
106 | steps:
107 | - uses: actions/checkout@v2
108 | - uses: actions/setup-node@v2
109 | with:
110 | node-version: '14'
111 | - name: Install dependencies
112 | run: npm install
113 | - name: Build
114 | run: npm run build
115 | - name: Deploy pages
116 | uses: crazy-max/ghaction-github-pages@v2
117 | with:
118 | build_dir: dist
119 | env:
120 | GITHUB_TOKEN: ${{ secrets.GITHUB_TOKEN }}
121 | ```
122 |
--------------------------------------------------------------------------------
/public/logo.svg:
--------------------------------------------------------------------------------
1 |
61 |
--------------------------------------------------------------------------------
/.vitepress/theme/composables/activeSidebarLink.ts:
--------------------------------------------------------------------------------
1 | import { onMounted, onUnmounted, onUpdated } from 'vue-demi'
2 |
3 | export function useActiveSidebarLinks() {
4 | let rootActiveLink: HTMLAnchorElement | null = null
5 | let activeLink: HTMLAnchorElement | null = null
6 |
7 | const onScroll = throttleAndDebounce(setActiveLink, 300)
8 |
9 | function setActiveLink(): void {
10 | const sidebarLinks = getSidebarLinks()
11 | const anchors = getAnchors(sidebarLinks)
12 |
13 | for (let i = 0; i < anchors.length; i++) {
14 | const anchor = anchors[i]
15 | const nextAnchor = anchors[i + 1]
16 |
17 | const [isActive, hash] = isAnchorActive(i, anchor, nextAnchor)
18 |
19 | if (isActive) {
20 | history.replaceState(null, document.title, hash || ' ')
21 | activateLink(hash)
22 | return
23 | }
24 | }
25 | }
26 |
27 | function activateLink(hash: string | null): void {
28 | deactiveLink(activeLink)
29 | deactiveLink(rootActiveLink)
30 |
31 | activeLink = document.querySelector(`.sidebar a[href="${hash}"]`)
32 |
33 | if (!activeLink)
34 | return
35 |
36 | activeLink.classList.add('active')
37 |
38 | // also add active class to parent h2 anchors
39 | const rootLi = activeLink.closest('.sidebar-links > ul > li')
40 |
41 | if (rootLi && rootLi !== activeLink.parentElement) {
42 | rootActiveLink = rootLi.querySelector('a')
43 | rootActiveLink && rootActiveLink.classList.add('active')
44 | }
45 | else {
46 | rootActiveLink = null
47 | }
48 | }
49 |
50 | function deactiveLink(link: HTMLAnchorElement | null): void {
51 | link && link.classList.remove('active')
52 | }
53 |
54 | onMounted(() => {
55 | setActiveLink()
56 | window.addEventListener('scroll', onScroll)
57 | })
58 |
59 | onUpdated(() => {
60 | // sidebar update means a route change
61 | activateLink(decodeURIComponent(location.hash))
62 | })
63 |
64 | onUnmounted(() => {
65 | window.removeEventListener('scroll', onScroll)
66 | })
67 | }
68 |
69 | function getSidebarLinks(): HTMLAnchorElement[] {
70 | return [].slice.call(
71 | document.querySelectorAll('.sidebar a.sidebar-link-item'),
72 | )
73 | }
74 |
75 | function getAnchors(sidebarLinks: HTMLAnchorElement[]): HTMLAnchorElement[] {
76 | return [].slice
77 | .call(document.querySelectorAll('.header-anchor'))
78 | .filter((anchor: HTMLAnchorElement) =>
79 | sidebarLinks.some(sidebarLink => sidebarLink.hash === anchor.hash),
80 | ) as HTMLAnchorElement[]
81 | }
82 |
83 | function getPageOffset(): number {
84 | return (document.querySelector('.nav-bar') as HTMLElement).offsetHeight
85 | }
86 |
87 | function getAnchorTop(anchor: HTMLAnchorElement): number {
88 | const pageOffset = getPageOffset()
89 |
90 | return anchor.parentElement!.offsetTop - pageOffset - 15
91 | }
92 |
93 | function isAnchorActive(
94 | index: number,
95 | anchor: HTMLAnchorElement,
96 | nextAnchor: HTMLAnchorElement,
97 | ): [boolean, string | null] {
98 | const scrollTop = window.scrollY
99 |
100 | if (index === 0 && scrollTop === 0)
101 | return [true, null]
102 |
103 | if (scrollTop < getAnchorTop(anchor))
104 | return [false, null]
105 |
106 | if (!nextAnchor || scrollTop < getAnchorTop(nextAnchor))
107 | return [true, decodeURIComponent(anchor.hash)]
108 |
109 | return [false, null]
110 | }
111 |
112 | function throttleAndDebounce(fn: () => void, delay: number): () => void {
113 | let timeout: NodeJS.Timeout
114 | let called = false
115 |
116 | return () => {
117 | if (timeout)
118 | clearTimeout(timeout)
119 |
120 | if (!called) {
121 | fn()
122 | called = true
123 | setTimeout(() => {
124 | called = false
125 | }, delay)
126 | }
127 | else {
128 | timeout = setTimeout(fn, delay)
129 | }
130 | }
131 | }
132 |
--------------------------------------------------------------------------------
/builtin/layouts.md:
--------------------------------------------------------------------------------
1 | # Layouts
2 |
3 | ## Built-in Layouts
4 |
5 | > As themes may override layouts behaviour, the best way to know exactly the usage, parameters and examples is referring their documentation.
6 |
7 |
8 | ### `center`
9 |
10 | Displays the content in the middle of the screen.
11 |
12 | ### `cover`
13 |
14 | Used to display the cover page for the presentation, may contain the presentation title, contextualization, etc.
15 |
16 | ### `default`
17 |
18 | The most basic layout, to display any kind of content.
19 |
20 | ### `end`
21 |
22 | The final page for the presentation.
23 |
24 | ### `fact`
25 |
26 | To show some fact or data with a lot of prominence on the screen.
27 |
28 | ### `full`
29 |
30 | Use all the space of the screen to display the content.
31 |
32 | ### `image-left`
33 |
34 | Shows an image on the left side of the screen, the content will be placed on the right side.
35 |
36 | #### Usage
37 |
38 | ```yaml
39 | ---
40 | layout: image-left
41 |
42 | # the image source
43 | image: ./path/to/the/image
44 |
45 | # a custom class name to the content
46 | class: my-cool-content-on-the-right
47 | ---
48 | ```
49 |
50 | ### `image-right`
51 |
52 | Shows an image on the right side of the screen, the content will be placed on the left side.
53 |
54 | #### Usage
55 |
56 | ```yaml
57 | ---
58 | layout: image-right
59 |
60 | # the image source
61 | image: ./path/to/the/image
62 |
63 | # a custom class name to the content
64 | class: my-cool-content-on-the-left
65 | ---
66 | ```
67 |
68 | ### `image`
69 |
70 | Shows an image as the main content of the page.
71 |
72 | #### Usage
73 |
74 | ```yaml
75 | ---
76 | layout: image
77 |
78 | # the image source
79 | image: ./path/to/the/image
80 | ---
81 | ```
82 |
83 |
84 | ### `iframe-left`
85 |
86 | Shows a web page on the left side of the screen, the content will be placed on the right side.
87 |
88 | #### Usage
89 |
90 | ```yaml
91 | ---
92 | layout: iframe-left
93 |
94 | # the web page source
95 | url: https://github.com/slidevjs/slidev
96 |
97 | # a custom class name to the content
98 | class: my-cool-content-on-the-right
99 | ---
100 | ```
101 |
102 | ### `iframe-right`
103 |
104 | Shows a web page on the right side of the screen, the content will be placed on the left side.
105 |
106 | #### Usage
107 |
108 | ```yaml
109 | ---
110 | layout: iframe-right
111 |
112 | # the web page source
113 | url: https://github.com/slidevjs/slidev
114 |
115 | # a custom class name to the content
116 | class: my-cool-content-on-the-left
117 | ---
118 | ```
119 |
120 | ### `iframe`
121 |
122 | Shows a web page as the main content of the page.
123 |
124 | #### Usage
125 |
126 | ```yaml
127 | ---
128 | layout: iframe
129 |
130 | # the web page source
131 | url: https://github.com/slidevjs/slidev
132 | ---
133 | ```
134 |
135 |
136 | ### `intro`
137 |
138 | To introduce the presentation, usually with the presentation title, a short description, the author, etc.
139 |
140 | ### `none`
141 |
142 | A layout without any existent styling.
143 |
144 | ### `quote`
145 |
146 | To display a quotation with prominience.
147 |
148 | ### `section`
149 |
150 | Used to mark the beginning of a new presentation section.
151 |
152 | ### `statement`
153 |
154 | Make an affirmation/statement as the main page content.
155 |
156 | ### `two-cols`
157 |
158 | Separates the page content in two columns.
159 |
160 | #### Usage
161 |
162 |
163 | ```md
164 | ---
165 | layout: two-cols
166 | ---
167 |
168 | # Left
169 |
170 | This shows on the left
171 |
172 | ::right::
173 |
174 | # Right
175 |
176 | This shows on the right
177 | ```
178 |
179 | ## Custom Layouts
180 |
181 | Create a directory `layouts/` under your project root, and simply put your custom Vue layout components under it.
182 |
183 | Read more in the [Customization](/custom/directory-structure#layouts) section.
184 |
185 | ## Theme-provided Layouts
186 |
187 | Themes can provide layouts or override existing ones. Please read their documentation for what they have provided.
188 |
--------------------------------------------------------------------------------
/guide/why.md:
--------------------------------------------------------------------------------
1 | # Why Slidev
2 |
3 | There are a lot of feature-rich, general-purpose, WYSIWYG slides makers like [Microsoft PowerPoint](https://www.microsoft.com/en-us/microsoft-365/powerpoint) and [Apple Keynote](https://www.apple.com/keynote/). They work pretty well for making nice slides with animations, charts, and many other things, while being very intuitive and easy to learn. So why bother making Slidev?
4 |
5 | Slidev aims to provide the flexibility and interactivity for developers to make their presentations even more interesting, expressive, and attractive by using the tools and technologies they are already familiar with.
6 |
7 | When working with WYSIWYG editors, it is easy to get distracted by the styling options. Slidev remedies that by separating the content and visuals. This allows you to focus on one thing at a time, while also being able to reuse the themes from the community. Slidev does not seek to replace other slide deck builders entirely. Rather, it focuses on catering to the developer community.
8 |
9 | ## Slidev
10 |
11 | 
12 |
13 | Here are a few of the coolest features of Slidev:
14 |
15 | ## Markdown-based
16 |
17 | Slidev uses an extended Markdown format to store and organize your slides in a single plain text file. This lets you focus on making the content. And since the content and styles are separated, this also made it possible to switch between different themes effortlessly.
18 |
19 | Learn more about [Slidev's Markdown Syntax](/guide/syntax).
20 |
21 | ## Themable
22 |
23 | Themes for Slidev can be shared and installed using npm packages. You then apply them with only one line of config.
24 |
25 | Check out the [theme gallery](/themes/gallery) or [learn how to write a theme](/themes/write-a-theme).
26 |
27 | ## Developer Friendly
28 |
29 | Slidev provides first-class support for code snippets for developers. It supports both [Prism](https://prismjs.com/) and [Shiki](https://github.com/shikijs/shiki) to get pixel perfect syntax highlighting, while still being able to modify the code at any time. With [Monaco editor](https://microsoft.github.io/monaco-editor/) built-in, it also empowers you to do live coding / demonstration in your presentation with autocompletion, type hovering, and even TypeScript type check support.
30 |
31 | Learn more about [highlighters](/custom/highlighters) and [Monaco configuration](/custom/config-monaco).
32 |
33 | ## Fast
34 |
35 | Slidev is powered by [Vite](https://vitejs.dev/), [Vue 3](https://v3.vuejs.org/) and [Windi CSS](https://windicss.org/), which give you the most wonderful authoring experience. Every change you made will reflect to your slides **instantly**.
36 |
37 | Find more about [our tech stack](/guide/#tech-stack).
38 |
39 | ## Interactive & Expressive
40 |
41 | You can write custom Vue components and use them directly inside your markdown file. You can also interact with them inside the presentation to express your idea in a more interesting and intuitive way.
42 |
43 | ## Recording Support
44 |
45 | Slidev provides built-in recording and camera view. You can share your presentation with your camera view inside, or record and save them separately for your screen and camera. All with one go, no additional tools are needed.
46 |
47 | Learn more about [recording here](/guide/recording).
48 |
49 | ## Portable
50 |
51 | Export your slides into PDF, PNGs, or even a hostable Single-page Application (SPA) with a single command, and share them anywhere.
52 |
53 | Read more about that in the [exporting docs](/guide/exporting).
54 |
55 | ## Hackable
56 |
57 | Being powered by web technologies, anything that can be done in a web app is also possible with Slidev. For example, WebGL, API requests, iframes, or even live sharing. It's up to your imagination!
58 |
59 | ## Give it a Try
60 |
61 | Playing around with Slidev will tell you more than a thousand words. You are just one command away:
62 |
63 | ```bash
64 | $ npm init slidev
65 | ```
66 |
67 | Or have a quick preview of it:
68 |
69 |
70 |
71 |
72 |
--------------------------------------------------------------------------------
/guide/install.md:
--------------------------------------------------------------------------------
1 | # Installation
2 |
3 | ## Starter Template
4 |
5 | > Slidev requires [**Node.js >=14.0**](https://nodejs.org/)
6 |
7 | The best way to get started is using our official starter template.
8 |
9 | With NPM:
10 |
11 | ```bash
12 | $ npm init slidev@latest
13 | ```
14 |
15 | With Yarn:
16 |
17 | ```bash
18 | $ yarn create slidev
19 | ```
20 |
21 | Follow the prompts and it will open up the slideshow at http://localhost:3030/ automatically for you.
22 |
23 | It also contains the basic setup and a short demo with instructions on how to get started with Slidev.
24 |
25 | ## Install Manually
26 |
27 | If you still prefer to install Slidev manually or would like to integrate it into your existing projects, you can do:
28 |
29 | ```bash
30 | $ npm install @slidev/cli @slidev/theme-default
31 | ```
32 | ```bash
33 | $ touch slides.md
34 | ```
35 | ```bash
36 | $ npx slidev
37 | ```
38 |
39 | > Please note if you are using [pnpm](https://pnpm.io), you will need to enable [shamefully-hoist](https://pnpm.io/npmrc#shamefully-hoist) option for Slidev to work properly:
40 | >
41 | > ```bash
42 | > echo 'shamefully-hoist=true' >> .npmrc
43 | > ```
44 |
45 | ## Install Globally
46 |
47 | > Available since v0.14
48 |
49 | You can install Slidev globally with the following command
50 |
51 | ```bash
52 | $ npm i -g @slidev/cli
53 | ```
54 |
55 | And then use `slidev` everywhere without creating a project every time.
56 |
57 | ```bash
58 | $ slidev
59 | ```
60 |
61 | This command will also try to use local `@slidev/cli` if it has been found in the `node_modules`.
62 |
63 | ## Install on Docker
64 |
65 | If you need a rapid way to run a presentation with containers, you can use the prebuilt [docker](https://hub.docker.com/r/tangramor/slidev) image maintained by [tangramor](https://github.com/tangramor), or build your own.
66 |
67 | Just run following command in your work folder:
68 |
69 | ```bash
70 | docker run --name slidev --rm -it \
71 | --user node \
72 | -v ${PWD}:/slidev \
73 | -p 3030:3030 \
74 | tangramor/slidev:latest
75 | ```
76 |
77 | If your work folder is empty, it will generate a template `slides.md` and other related files under your work folder, and launch the server on port `3030`.
78 |
79 | You can access your slides from http://localhost:3030/
80 |
81 |
82 | ### Build deployable image
83 |
84 | Or you can create your own slidev project to a docker image with Dockerfile:
85 |
86 | ```Dockerfile
87 | FROM tangramor/slidev:latest
88 |
89 | ADD . /slidev
90 |
91 | ```
92 |
93 | Create the docker image: `docker build -t myppt .`
94 |
95 | And run the container: `docker run --name myslides --rm --user node -p 3030:3030 myppt`
96 |
97 | You can visit your slides from http://localhost:3030/
98 |
99 |
100 | ### Build hostable SPA (Single Page Application)
101 |
102 | Run command `docker exec -i slidev npx slidev build` on the running container `slidev`. It will generate static HTML files under `dist` folder.
103 |
104 |
105 | #### Host on Github Pages
106 |
107 | You can host `dist` in a static web site such as [Github Pages](https://tangramor.github.io/slidev_docker/) or Gitlab Pages.
108 |
109 | Because in Github pages the url may contain subfolder, so you need to modify the generated `index.html` to change `href="/assets/xxx` to `href="./assets/xxx`. Or you may use `--base=//` option during the build process, such as: `docker exec -i slidev npx slidev build --base=/slidev_docker/`.
110 |
111 | And to avoid Jekyll build process, you need to add an empty file `.nojekyll`.
112 |
113 |
114 | #### Host by docker
115 |
116 | You can also host it by yourself with docker:
117 |
118 | ```bash
119 | docker run --name myslides --rm -p 80:80 -v ${PWD}/dist:/usr/share/nginx/html nginx:alpine
120 | ```
121 |
122 | Or create a static image with following Dockerfile:
123 |
124 | ```Dockerfile
125 | FROM nginx:alpine
126 |
127 | COPY dist /usr/share/nginx/html
128 |
129 | ```
130 |
131 | Create the docker image: `docker build -t mystaticppt .`
132 |
133 | And run the container: `docker run --name myslides --rm -p 80:80 mystaticppt`
134 |
135 | You can visit your slides from http://localhost/
136 |
137 |
138 | Refer to the [tangramor/slidev_docker](https://github.com/tangramor/slidev_docker) for more details.
139 |
--------------------------------------------------------------------------------
/.vitepress/theme/Layout.vue:
--------------------------------------------------------------------------------
1 |
2 |
49 |
50 |
51 |
52 |
72 |
73 |
175 |
--------------------------------------------------------------------------------
/themes/write-a-theme.md:
--------------------------------------------------------------------------------
1 | # Write a Theme
2 |
3 | To get started, we recommend you use our generator for scaffolding your first theme
4 |
5 | ```bash
6 | $ npm init slidev-theme
7 | ```
8 |
9 | Then you can modify and play with it. You can also refer to the [official themes](/themes/gallery) as examples.
10 |
11 | ## Capability
12 |
13 | A theme can contribute to the following points:
14 |
15 | - Global styles
16 | - Provide default configurations (fonts, color schema, highlighters, etc.)
17 | - Provide custom layouts or override the existing one
18 | - Provide custom components or override the existing one
19 | - Extend Windi CSS configurations
20 | - Configure tools like Monaco and Prism
21 |
22 | ## Conventions
23 |
24 | Themes are published to npm registry, and they should follow the conventions below:
25 |
26 | - Package name should start with `slidev-theme-`, for example: `slidev-theme-awesome`
27 | - Add `slidev-theme` and `slidev` in the `keywords` field of your `package.json`
28 |
29 | ## Setup
30 |
31 | To set up the testing playground for your theme, you can create `example.md` with the following frontmatter, to tell Slidev you are using the current directory as a theme.
32 |
33 | ```md
34 | ---
35 | theme: ./
36 | ---
37 | ```
38 |
39 | Optionally, you can also add some scripts to your `packages.json`
40 |
41 | ```json
42 | // package.json
43 | {
44 | "scripts": {
45 | "dev": "slidev example.md",
46 | "build": "slidev build example.md",
47 | "export": "slidev export example.md",
48 | "screenshot": "slidev export example.md --format png"
49 | }
50 | }
51 | ```
52 |
53 | To publish your theme, simply run `npm publish` and you are good to go. There is no build process required (which means you can directly publish `.vue` and `.ts` files, Slidev is smart enough to understand them).
54 |
55 | Theme contribution points follow the same conventions as local customization, please refer to [the docs for the naming conventions](/custom/).
56 |
57 | ## Default Configurations
58 |
59 | > Available since v0.19
60 |
61 | A theme can provide default [configurations](/custom/#frontmatter-configures) via `package.json`.
62 |
63 | ```json
64 | // package.json
65 | {
66 | "slidev": {
67 | "default": {
68 | "aspectRatio": "16/9",
69 | "canvasWidth": 980,
70 | "fonts": {
71 | "sans": "Robot",
72 | "mono": "Fira Code"
73 | }
74 | }
75 | }
76 | }
77 | ```
78 |
79 | Fonts will be auto imported from [Google Fonts](https://fonts.google.com/).
80 |
81 | Learn more about [fonts](/custom/fonts) and [frontmatter configurations](/custom/#frontmatter-configures).
82 |
83 | ## Theme Metadata
84 |
85 | ### Color Schema
86 |
87 | By default, Slidev assumes themes support both light mode and dark mode. If you only want your theme be presented in a designed color schema, you will need to specify it explicitly in `package.json`
88 |
89 | ```json
90 | // package.json
91 | {
92 | "name": "slidev-theme-my-cool-theme",
93 | "keywords": [
94 | "slidev-theme",
95 | "slidev"
96 | ],
97 | "slidev": {
98 | "colorSchema": "light" // or "dark" or "both"
99 | }
100 | }
101 | ```
102 |
103 | To access the dark mode when creating your theme styles, you can wrap the dark-mode-specific css inside a `dark` class:
104 |
105 | ```css
106 | /* general css here */
107 |
108 | html:not(.dark) {
109 | /* light mode css here */
110 | }
111 |
112 | html.dark {
113 | /* dark mode css here */
114 | }
115 | ```
116 |
117 | Slidev toggles a `dark` class on the page's `html` element for switching color schema.
118 |
119 | ### Highlighter
120 |
121 | Syntax highlighting colors are also provided in the theme. We support both [Prism](https://prismjs.com/) and [Shiki](https://github.com/shikijs/shiki). For more information please refer to [the syntax highlighting docs](/custom/highlighters).
122 |
123 | You can support either one of them, or both. Refer to the default theme for configurations examples [`./styles/code.css`](https://github.com/slidevjs/slidev/blob/main/packages/create-theme/template/styles/code.css) / [`./setup/shiki.ts`](https://github.com/slidevjs/slidev/blob/main/packages/create-theme/template/setup/shiki.ts).
124 |
125 | Also, remember to specify the supported highlighters in your `package.json`
126 |
127 | ```json
128 | // package.json
129 | {
130 | "slidev": {
131 | "highlighter": "shiki" // or "prism" or "all"
132 | }
133 | }
134 | ```
135 |
136 | ### Slidev Version
137 |
138 | If the theme is relying on a specific feature of Slidev that are newly introduced, you can set the minimal Slidev version required to have your theme working properly:
139 |
140 | ```json
141 | // package.json
142 | {
143 | "engines": {
144 | "slidev": ">=0.19.3"
145 | }
146 | }
147 | ```
148 |
149 | If users are using older versions of Slidev, an error will be thrown.
150 |
--------------------------------------------------------------------------------
/.vitepress/showcases.ts:
--------------------------------------------------------------------------------
1 | export interface ShowCaseInfo {
2 | title: string
3 | cover: string
4 | slidesLink?: string
5 | sourceLink?: string
6 | videoLink?: string
7 | at?: string
8 | datetime: string
9 | author: {
10 | name: string
11 | link?: string
12 | }
13 | }
14 |
15 | export const showcases: ShowCaseInfo[] = [
16 | {
17 | title: 'Composable Vue',
18 | cover: `${import.meta.env.BASE_URL}showcases/composable-vue.png`,
19 | author: {
20 | name: 'Anthony Fu',
21 | link: 'https://github.com/antfu',
22 | },
23 | slidesLink: 'https://sli.dev/demo/composable-vue',
24 | sourceLink: 'https://github.com/antfu/talks/tree/master/2021-04-29',
25 | at: 'VueDay 2021',
26 | datetime: '2021-04-29',
27 | },
28 | {
29 | title: 'Developer Seonglae',
30 | cover: 'https://seonglae-slides.vercel.app/og.png',
31 | author: {
32 | name: 'Seonglae Cho',
33 | link: 'https://github.com/seonglae',
34 | },
35 | slidesLink: 'https://seonglae-slides.vercel.app',
36 | sourceLink: 'https://github.com/seonglae/seonglae-slides',
37 | at: 'Seongland',
38 | datetime: '2021-05-10',
39 | },
40 | {
41 | title: 'Vue 3 > Vue 2 + 1',
42 | cover: 'https://user-images.githubusercontent.com/11247099/122246420-1df97b80-cef9-11eb-9c57-7751c6999deb.png',
43 | author: {
44 | name: 'Thorsten Lünborg',
45 | link: 'https://github.com/LinusBorg',
46 | },
47 | slidesLink: 'http://vueday-2021.linusb.org',
48 | sourceLink: 'https://github.com/LinusBorg/vueday-enterjs-vue3',
49 | at: 'Enter.js Vue Day',
50 | datetime: '2021-06-15',
51 | },
52 | {
53 | title: 'Simply Publish Your Package to npm',
54 | author: {
55 | name: 'Lucky Dewa Satria',
56 | link: 'https://github.com/lucky401',
57 | },
58 | at: 'Weekly sharing',
59 | slidesLink: 'https://masukin.link/talks/simply-publish-your-package-to-npm',
60 | cover: 'https://masukin.link/talks-cover-npm.png',
61 | datetime: '2021-06-12',
62 | },
63 | {
64 | title: 'Create Icon Package With Vue and Rollup',
65 | author: {
66 | name: 'Lucky Dewa Satria',
67 | link: 'https://github.com/lucky401',
68 | },
69 | at: 'Weekly Sharing',
70 | slidesLink: 'https://masukin.link/talks/create-icon-package-with-vue-and-rollup',
71 | sourceLink: 'https://github.com/lucky401/Create-Icon-Package-With-Vue-and-Rollup',
72 | cover: 'https://masukin.link/talks-cover-create-icon-package-with-vue-and-rollup.png',
73 | datetime: '2021-06-19',
74 | },
75 | {
76 | title: 'BeAPT',
77 | author: {
78 | name: 'Daniel Sousa @TutoDS',
79 | link: 'https://github.com/tutods',
80 | },
81 | at: 'Presentation of my college final project',
82 | slidesLink: 'https://beapt-presentation.netlify.app',
83 | sourceLink: 'https://github.com/TutoDS/lei-project/tree/master/presentation',
84 | cover: 'https://raw.githubusercontent.com/TutoDS/lei-project/master/presentation/cover.png',
85 | datetime: '2021-07-20',
86 | },
87 | {
88 | title: 'Prisma as my ORM for PostgreSQL',
89 | cover: 'https://raw.githubusercontent.com/cedric25/prisma-talk/main/cover-for-slidev.png',
90 | author: {
91 | name: 'Cedric Nicoloso',
92 | link: 'https://github.com/cedric25',
93 | },
94 | slidesLink: 'https://prisma-talk.netlify.app/',
95 | sourceLink: 'https://github.com/cedric25/prisma-talk',
96 | at: 'LyonJS Meetup',
97 | datetime: '2021-07-21',
98 | },
99 | {
100 | title: 'Introduction to SVG',
101 | cover: 'https://raw.githubusercontent.com/lyqht/intro-to-svg-slides/main/intro-to-svg-slides-cover.png',
102 | author: {
103 | name: 'Estee Tey',
104 | link: 'https://github.com/lyqht',
105 | },
106 | slidesLink: 'https://lyqht.github.io/intro-to-svg-slides/',
107 | sourceLink: 'https://github.com/lyqht/intro-to-svg-slides',
108 | at: 'Thoughtworks Internal Lunch & Learn',
109 | datetime: '2021-11-12',
110 | },
111 | {
112 | title: 'Git\'s Most Wanted',
113 | cover: 'https://cdn.jsdelivr.net/gh/alexanderdavide/git-most-wanted@assets/slides-export/01.png',
114 | author: {
115 | name: 'Alexander Eble',
116 | link: 'https://github.com/alexanderdavide',
117 | },
118 | slidesLink: 'https://git-most-wanted.alex-eble.de',
119 | sourceLink: 'https://github.com/alexanderdavide/git-most-wanted',
120 | at: 'Internal Tech Talk',
121 | datetime: '2022-03-11',
122 | },
123 | // Add yours here!
124 | {
125 | title: 'Yours?',
126 | author: {
127 | name: '',
128 | },
129 | at: 'Submit your talk/presentation to be list here!',
130 | slidesLink: 'https://github.com/slidevjs/docs/edit/main/.vitepress/showcases.ts',
131 | cover: `${import.meta.env.BASE_URL}theme-placeholder.png`,
132 | datetime: '2021-04-29',
133 | },
134 | ]
135 |
--------------------------------------------------------------------------------
/TRANSLATIONS.md:
--------------------------------------------------------------------------------
1 | # Help on Translating
2 |
3 |
4 |
5 | First of all, thank you for being interested in contributing to translations!
6 |
7 | You can find the repositories for each existing translation in [README.md](./README.md). To help improve them, simply sending a Pull Request to their repo.
8 |
9 | If the language you want to contribute isn't on the list, join [our Discord server](https://chat.sli.dev), and find the `#translations` channel to see if someone is already working on the language you want, consider joining them and translate together. If not, you can start a new translation project with the following steps.
10 |
11 | In case it's already been translated but you're wondering how to maintain it, skip to the end.
12 | ## Some tips before you get started
13 | - It is recommended that you use your IDE of choice (e.g VSCode) paired with a development server running, so you can see your translation changes in real-time.
14 | - You can mark these checkmarks as the translation progresses or use your own workflow. The translations don't need to be made in any particular order.
15 | - Translations don't need to be literal, but they should convey the same message. In case you're not sure how to translate something, you can either leave it as it is or use online tools like WordReference or Linguee to aid you.
16 | - Most translations will simply consist in editing Markdown files. Certain areas are buried under Vue components, which will be listed below. You can also use your IDE to find the string to translate.
17 |
18 | ## Getting started
19 |
20 | - [ ] Fork the main docs repo: [slidevjs/docs](https://github.com/slidevjs/docs)
21 | - [ ] Translate README.md, you can take one of the already translated repositories as an example.
22 | - [ ] Share your repo's link to the `#translations` channel telling people you are working on it and find collaborators.
23 |
24 | ## Translating Markdown files
25 |
26 | - [ ] `showcases.md` - A gallery showcase of Slidev presentations.
27 | - [ ] `index.md` - Mainpage content, note that some of it is buried under Vue components listed further below.
28 |
29 | ### .vitepress/
30 |
31 | - [ ] `config.js` - Sitemap
32 | - [ ] `/theme/components/WorkingInProgress.vue` - WIP notice shown in mainpage
33 | - [ ] `/theme/components/demo/Demo.vue` - Animated demo shown in mainpage
34 | - [ ] `/theme/components/Environment.vue` - Describes the environment of a setting.
35 |
36 | ### builtin/
37 |
38 | - [ ] `components.md` - Use [Vue components](https://v3.vuejs.org/guide/component-basics.html) inside Slidev
39 | - [ ] `layouts.md` - Use Vue layouts inside Slidev
40 |
41 | ### custom/
42 |
43 | - [ ] `config-katex.md` - Configuring Katex
44 | - [ ] `config-mermaid.md` - Configuring Mermaid
45 | - [ ] `config-monaco.md` - Configuring Monaco
46 | - [ ] `config-shortcuts.md` - Configuring Shortcuts
47 | - [ ] `config-vite.md` - Configuring Vite
48 | - [ ] `config-vue.md` - Configuring Vue
49 | - [ ] `config-windicss.md`- Configuring Windicss
50 | - [ ] `directory-structure.md` - Configuring the directory structure
51 | - [ ] `fonts.md` - Configuring fonts
52 | - [ ] `global-layers.md` - Configuring the global layers
53 | - [ ] `highlighters.md` - Configuring code highlighters
54 | - [ ] `index.md`- Customizations index page
55 | - [ ] `vue-context.md` - The Vue global context
56 |
57 | ### guide/
58 |
59 | - [ ] `animations.md` - Animations and transitions
60 | - [ ] `editors.md` - Editor integrations
61 | - [ ] `exporting.md`- Exporting your slides
62 | - [ ] `faq.md` - Frequent Answered Questions
63 | - [ ] `index.md` - Getting started with Slidev
64 | - [ ] `navigation.md` - Navigation across slides
65 | - [ ] `presenter-mode.md`- Toggling presenter mode
66 | - [ ] `recording.md`- Recording your presentation
67 | - [ ] `syntax.md` - Markdown syntax
68 | - [ ] `why.md` - _Why Slidev?_
69 |
70 | ### resources/
71 |
72 | - [ ] `covers.md` - Curated covers for Slidev
73 |
74 | ### themes/
75 |
76 | - [ ] `gallery.md` - Theme gallery
77 | - [ ] `use.md` - How to use Slidev themes
78 | - [ ] `write-a-theme.md` - Write your own theme
79 |
80 | ## Publishing your translations
81 |
82 | - [ ] When you finish the translation (at least 90%), `@antfu` in the Discord and we will invite you to the org and make the translation official.
83 | - [ ] Once the transferring is done, we will set up the subdomain, auto-deployment, and a daily sync-up bot to keep the translation up-to-date with the latest English docs.
84 | - [ ] The site is live, and we will send a shout-out tweet on [our Twitter account](https://twitter.com/Slidevjs).
85 |
86 | ## Maintaining the translations up-to-date
87 |
88 | - `docschina-bot` will periodically submit merge requests from the `slidev/docs` repository. Switch to the branch created in the pull request, make any changes necessary and merge it. [example](https://github.com/slidevjs/docs-fr/pull/13).
89 | - Sometimes it will occur that a merge request is made and you haven't merged the previous one. The latest PR always checks your main branch against the English one; so you can just close the previous PR(s), move your work to the latest one and merge it.
90 |
91 |
92 | [Working-in-progress translation list](https://discord.com/channels/851817370623410197/851822360955977760/852614294017146900)
93 |
94 | Thanks again!
95 |
--------------------------------------------------------------------------------
/.vitepress/theme/components/demo/Demo.vue:
--------------------------------------------------------------------------------
1 |
111 |
112 |
113 |
154 |
155 |
156 |
164 |
--------------------------------------------------------------------------------
/guide/index.md:
--------------------------------------------------------------------------------
1 | # Getting Started
2 |
3 | ## Overview
4 |
5 | Slidev (slide + dev, `/slʌɪdɪv/`) is a web-based slides maker and presenter. It's designed for developers to focus on writing content in Markdown while also having the power of HTML and Vue components to deliver pixel-perfect layouts and designs with embedded interactive demos in your presentations.
6 |
7 | It uses a feature-rich markdown file to generate beautiful slides with an instant reloading experience, along with many built-in integrations such as live coding, PDF exporting, presentation recording, and so on. Since it's powered by the web, you can do anything with Slidev - the possibilities are endless.
8 |
9 | You can learn more about the rationale behind the project in the [Why Slidev](/guide/why) section.
10 |
11 | ### Features
12 |
13 | - 📝 [**Markdown-based**](/guide/syntax.html) - use your favorite editors and workflow
14 | - 🧑💻 [**Developer Friendly**](/guide/syntax.html#code-blocks) - built-in syntax highlighting, live coding, etc.
15 | - 🎨 [**Themable**](/themes/gallery.html) - theme can be shared and used with npm packages
16 | - 🌈 [**Stylish**](/guide/syntax.html#embedded-styles) - [Windi CSS](https://windicss.org/) on-demand utilities, easy-to-use embedded stylesheets
17 | - 🤹 [**Interactive**](/custom/directory-structure.html#components) - embedding Vue components seamlessly
18 | - 🎙 [**Presenter Mode**](/guide/presenter-mode.html) - use another window, or even your phone to control your slides
19 | - 🎨 [**Drawing**](/guide/drawing.html) - draw and annotate on your slides
20 | - 🧮 [**LaTeX**](/guide/syntax.html#latex) - built-in LaTeX math equations support
21 | - 📰 [**Diagrams**](/guide/syntax.html#diagrams) - creates diagrams with textual descriptions
22 | - 🌟 [**Icons**](/guide/syntax.html#icons) - Access to icons from any iconset directly
23 | - 💻 [**Editors**](/guide/editors.html) - integrated editor, or [extension for VS Code](https://github.com/slidevjs/slidev-vscode)
24 | - 🎥 [**Recording**](/guide/recording.html) - built-in recording and camera view
25 | - 📤 [**Portable**](/guide/exporting.html) - export into PDF, PNGs, or even a hostable SPA
26 | - ⚡️ [**Fast**](https://vitejs.dev) - instant reloading powered by [Vite](https://vitejs.dev)
27 | - 🛠 [**Hackable**](/custom/config-vite.html) - using Vite plugins, Vue components, or any npm packages
28 |
29 | ### Tech Stack
30 |
31 | Slidev is made possible by combining these tools and technologies.
32 |
33 | - [Vite](https://vitejs.dev) - An extremely fast frontend tooling
34 | - [Vue 3](https://v3.vuejs.org/) powered [Markdown](https://daringfireball.net/projects/markdown/syntax) - Focus on the content while having the power of HTML and Vue components whenever needed
35 | - [Windi CSS](https://github.com/windicss/windicss) - On-demand utility-first CSS framework, style your slides at ease
36 | - [Prism](https://github.com/PrismJS/prism), [Shiki](https://github.com/shikijs/shiki), [Monaco Editor](https://github.com/Microsoft/monaco-editor) - First-class code snippets support with live coding capability
37 | - [RecordRTC](https://recordrtc.org) - Built-in recording and camera view
38 | - [VueUse](https://vueuse.org) family - [`@vueuse/core`](https://github.com/vueuse/vueuse), [`@vueuse/head`](https://github.com/vueuse/head), [`@vueuse/motion`](https://github.com/vueuse/motion), etc.
39 | - [Iconify](https://iconify.design/) - Iconsets collection.
40 | - [Drauu](https://github.com/antfu/drauu) - Drawing and annotations support
41 | - [KaTeX](https://katex.org/) - LaTeX math rendering.
42 | - [Mermaid](https://mermaid-js.github.io/mermaid) - Textual Diagrams.
43 |
44 | ### Scaffolding Your First Presentation
45 |
46 |
47 |
48 | #### Try it Online
49 |
50 | [sli.dev/new](https://sli.dev/new)
51 |
52 | [](https://sli.dev/new)
53 |
54 | #### Create Locally
55 |
56 | With NPM:
57 |
58 | ```bash
59 | $ npm init slidev
60 | ```
61 |
62 | With Yarn:
63 |
64 | ```bash
65 | $ yarn create slidev
66 | ```
67 |
68 | Follow the prompts and start making your slides now! For more details about the markdown syntax, read through the [syntax guide](/guide/syntax).
69 |
70 | ### Command Line Interface
71 |
72 | In a project where Slidev is installed, you can use the `slidev` binary in your npm scripts.
73 |
74 | ```json
75 | {
76 | "scripts": {
77 | "dev": "slidev", // start dev server
78 | "build": "slidev build", // build for production SPA
79 | "export": "slidev export" // export slides to pdf
80 | }
81 | }
82 | ```
83 |
84 | Otherwise, you can use it with [`npx`](https://www.npmjs.com/package/npx)
85 |
86 | ```bash
87 | $ npx slidev
88 | ```
89 |
90 | Run `slidev --help` for more options available.
91 |
92 | ### Markdown Syntax
93 |
94 | Slidev reads your `slides.md` file under your project root and converts them into slides. Whenever you made changes to it, the content of the slides will be updated immediately. For example:
95 |
96 | ~~~md
97 | # Slidev
98 |
99 | Hello World
100 |
101 | ---
102 |
103 | # Page 2
104 |
105 | Directly use code blocks for highlighting
106 |
107 | //```ts
108 | console.log('Hello, World!')
109 | //```
110 |
111 | ---
112 |
113 | # Page 3
114 | ~~~
115 |
116 | Read more about the Slidev Markdown syntax in the [syntax guide](/guide/syntax).
117 |
--------------------------------------------------------------------------------
/guide/animations.md:
--------------------------------------------------------------------------------
1 | # Animations
2 |
3 | ## Click Animations
4 |
5 | ### `v-click`
6 |
7 | To apply "click animations" for elements, you can use the `v-click` directive or `` components
8 |
9 | ```md
10 | # Hello
11 |
12 |
13 |
14 |
15 | Hello World
16 |
17 |
18 |
19 |
20 |
21 |
22 | Hey!
23 |
24 |
25 | ```
26 |
27 | ### `v-after`
28 |
29 | The usage of `v-after` is similar to `v-click` but it will turn the element visible when the previous `v-click` is triggered.
30 |
31 | ```md
32 |
Hello
33 |
World
34 | ```
35 |
36 | When you click the "next" button, both `Hello` and `World` will show up together.
37 |
38 | ### `v-click-hide`
39 |
40 | Same as `v-click` but instead of making the element appear, it makes the element invisible after clicking.
41 |
42 | ```md
43 |
Hello
44 | ```
45 |
46 | ### `v-clicks`
47 |
48 | `v-clicks` is only provided as a component. It's a shorthand to apply the `v-click` directive to all its child elements. It is especially useful when working with lists.
49 |
50 | ```md
51 |
52 |
53 | - Item 1
54 | - Item 2
55 | - Item 3
56 | - Item 4
57 |
58 |
59 | ```
60 |
61 | An item will become visible each time you click "next".
62 |
63 | ### Custom Clicks Count
64 |
65 | By default, Slidev counts how many steps are needed before going to the next slide. You can override this setting by passing the `clicks` frontmatter option:
66 |
67 | ```yaml
68 | ---
69 | # 10 clicks in this slide, before going to the next
70 | clicks: 10
71 | ---
72 | ```
73 |
74 | ### Ordering
75 |
76 | Passing the click index to your directives, you can customize the order of the revealing
77 |
78 | ```md
79 |
99 |
100 | ```
101 |
102 | ### Element Transitions
103 |
104 | When you apply the `v-click` directive to your elements, it will attach the class name `slidev-vclick-target` to it. When the elements are hidden, the class name `slidev-vclick-hidden` will also be attached. For example:
105 |
106 | ```html
107 |
Text
108 | ```
109 |
110 | After a click, it will become
111 |
112 | ```html
113 |
Text
114 | ```
115 |
116 | By default, a subtle opacity transition is applied to those classes:
117 |
118 | ```css
119 | // the default
120 |
121 | .slidev-vclick-target {
122 | transition: opacity 100ms ease;
123 | }
124 |
125 | .slidev-vclick-hidden {
126 | opacity: 0;
127 | pointer-events: none;
128 | }
129 | ```
130 |
131 | You can override them to customize the transition effects in your custom stylesheets.
132 |
133 | For example, you can achieve the scaling up transitions by:
134 |
135 | ```css
136 | // styles.css
137 |
138 | .slidev-vclick-target {
139 | transition: all 500ms ease;
140 | }
141 |
142 | .slidev-vclick-hidden {
143 | transform: scale(0);
144 | }
145 | ```
146 |
147 | To specify animations for only certain slide or layout
148 |
149 | ```scss
150 | .slidev-page-7,
151 | .slidev-layout.my-custom-layout {
152 | .slidev-vclick-target {
153 | transition: all 500ms ease;
154 | }
155 |
156 | .slidev-vclick-hidden {
157 | transform: scale(0);
158 | }
159 | }
160 | ```
161 |
162 | Learn more about [customizing styles](/custom/directory-structure#style).
163 |
164 | ## Motion
165 |
166 | Slidev has [@vueuse/motion](https://motion.vueuse.org/) built-in. You can use the `v-motion` directive to any elements to make apply motion on them. For example
167 |
168 | ```html
169 |
173 | Slidev
174 |
175 | ```
176 |
177 | The text `Slidev` will move from `-80px` to its original position on initialization.
178 |
179 | > Note: Slidev preloads the next slide for performance, which means the animations might start before you navigate to the page. To get it works properly, you can disable the preloading for the particular slide
180 | >
181 | > ```md
182 | > ---
183 | > preload: false
184 | > ---
185 | > ```
186 | >
187 | > Or control the element life-cycle with `v-if` to have fine-grained controls
188 | >
189 | > ```html
190 | >
197 | > ```
198 |
199 | Learn mode: [Demo](https://sli.dev/demo/starter/7) | [@vueuse/motion](https://motion.vueuse.org/) | [v-motion](https://motion.vueuse.org/directive-usage.html) | [Presets](https://motion.vueuse.org/presets.html)
200 |
201 | ## Pages Transitions
202 |
203 | > Built-in support for slides is NOT YET provided in the current version. We are planning to add support for them in the next major version. Before that, you can still use your custom styles and libraries to do that.
204 |
--------------------------------------------------------------------------------
/.vitepress/theme/components/AlgoliaSearchBox.vue:
--------------------------------------------------------------------------------
1 |
2 |
3 |
4 |
5 |
130 |
131 |
174 |
--------------------------------------------------------------------------------
/custom/directory-structure.md:
--------------------------------------------------------------------------------
1 | # Directory Structure
2 |
3 | Slidev employs some directory structure conventions to minimize the configuration surface and to make the functionality extensions flexible and intuitive.
4 |
5 | The basic structure is as follows:
6 |
7 | ```bash
8 | your-slidev/
9 | ├── components/ # custom components
10 | ├── layouts/ # custom layouts
11 | ├── public/ # static assets
12 | ├── setup/ # custom setup / hooks
13 | ├── styles/ # custom style
14 | ├── index.html # injections to index.html
15 | ├── slides.md # the main slides entry
16 | └── vite.config.ts # extending vite config
17 | ```
18 |
19 | All of them are optional.
20 |
21 | ## Components
22 |
23 | Conventions: `./components/*.{vue,js,ts,jsx,tsx,md}`
24 |
25 | Components inside this directory can be directly used in the slides Markdown with the same component name as the file name.
26 |
27 | For example:
28 |
29 | ```bash
30 | your-slidev/
31 | ├── ...
32 | └── components/
33 | ├── MyComponent.vue
34 | └── HelloWorld.ts
35 | ```
36 |
37 | ```md
38 |
39 |
40 | # My Slide
41 |
42 |
43 |
44 |
45 |
46 |
47 | Slot
48 |
49 | ```
50 |
51 | This feature is powered by [`vite-plugin-components`](https://github.com/antfu/vite-plugin-components), learn more there.
52 |
53 | Slidev also provides some [built-in components](/builtin/components) for you to use.
54 |
55 | ## Layouts
56 |
57 | Conventions: `./layouts/*.{vue,js,ts,jsx,tsx}`
58 |
59 | ```
60 | your-slidev/
61 | ├── ...
62 | └── layouts/
63 | ├── cover.vue
64 | └── my-cool-theme.vue
65 | ```
66 |
67 | You can use any filename for your layout. You then reference your layout in you YAML header using the filename.
68 |
69 | ```yaml
70 | ---
71 | layout: my-cool-theme
72 | ---
73 | ```
74 |
75 | If the layout you provide has the same name as a built-in layout or a theme layout, your custom layout will take precedence over the built-in/theme layout. The priority order is `local > theme > built-in`.
76 |
77 | In the layout component, use `` for the slide content. For example:
78 |
79 | ```html
80 |
81 |
82 |
 24 |
25 |
26 |
27 |
24 |
25 |
26 |
27 |  28 |
29 |
28 |
29 |  43 |
43 |