├── .gitignore
├── Java
├── README.md
├── Tomcat
│ ├── image_tomcat_config.png
│ ├── image_tomcat_issue_1.png
│ ├── Misc.md
│ └── Deploy.md
├── Eclipse.md
├── Annotation.md
├── logback
│ ├── README.md
│ ├── logback-spring.xml
│ └── logback.xml
├── Spring
│ ├── Filter_Interceptor.md
│ ├── Profile.md
│ ├── PropertyFile.md
│ ├── Environment.md
│ └── ApplicationContext.md
├── UseSystemVariables.md
└── Sping-cloud
│ ├── Hystrix.md
│ └── Feign.md
├── etc
├── README.md
├── yum.md
├── UniqueIDs.md
├── equity.md
└── fast_del.md
├── linux
├── README.md
├── systemtap.md
├── systemcmd
│ ├── iptables.md
│ ├── chattr.md
│ ├── selinux.md
│ └── nologin.md
├── openssh.md
├── OOM.md
└── drop_caches.md
├── clickhouse
├── Engines
│ ├── Null.md
│ ├── Log.md
│ ├── Set.md
│ ├── Join.md
│ ├── TinyLog.md
│ ├── Memory.md
│ ├── ReplacingMergeTree.md
│ ├── Merge.md
│ ├── SummingMergeTree.md
│ ├── CollapsingMergeTree.md
│ ├── External.md
│ ├── Buffer.md
│ ├── AggregatingMergeTree.md
│ └── MergeTree.md
├── Client.md
└── install.md
├── consul
├── server
│ ├── systemd
│ │ ├── consul
│ │ └── consul.service
│ └── consul.d
│ │ └── config.json
├── client
│ ├── consul.d
│ │ └── client
│ │ │ └── config.json
│ └── start.sh
├── install.md
├── README.md
└── QuickCmd.md
├── testing
└── README.md
├── druidio
└── script
│ ├── env.sh
│ └── druid.sh
├── README.md
├── SQLite
└── README.md
├── web
├── gulp.md
├── README.md
└── named_css.md
├── logrotate
└── nginx
├── FreeSWITCH
├── FusionPBX
│ └── install.md
├── pgsql.md
└── README.md
├── PostgreSQL
├── QuickCmd.md
├── scripts
│ ├── pg_backup.sh
│ ├── jsonb_ext.sql
│ └── random_string.c
├── compile
├── install.md
├── AccessControl.md
├── docker
│ └── docker-compose.yml
├── Replication.md
├── postgres.conf
├── xact_Isolation.md
└── show_bloat.sql
├── PulsarIO
├── README.md
├── DataFlow.md
├── Pulsar_Real_time_Analytics_at_Scale
│ ├── concluding.md
│ ├── part1-introduction.md
│ └── README.md
├── Processor.md
├── Structure.md
├── Management.md
└── Startup.md
├── nginx
├── README.md
├── nginx_force_redirect.conf
├── auth.md
├── compile.md
├── source
│ └── 配置模块.md
└── nginx_sample.conf
├── python
├── code
│ ├── process_bar.py
│ ├── tar_untar.py
│ ├── zip_unzip.py
│ └── blockedpool.py
├── logging.md
├── README.md
├── data_science.md
├── tornado.md
└── install.md
├── supervisord
└── script
│ ├── supervisor.service
│ ├── conf.d
│ ├── superset.ini
│ └── airflow.ini
│ └── supervisor_init_script.sh
├── etcd
└── README.md
├── claude
├── sample.md
├── claude.md
├── command
│ └── brief.md
└── readme.md
├── pentaho
└── kettle.md
├── nodejs
├── README.md
└── npm_config.md
├── R-Server
├── install_package.md
└── README.md
├── chrome
└── pull_tag.md
├── ZooKeeper
├── scripts
│ └── zookeeper.init
├── deploy.md
├── file_format.md
└── README.md
├── Jenkins
├── ansible
│ ├── sample_nginx.yaml
│ ├── do.build.nginx.yaml
│ ├── do.deploy.nginx.yaml
│ ├── sample_web.yaml
│ ├── sample.yaml
│ └── sample_vars.yaml
└── consul_api.sh
├── Airflow
├── script
│ └── hive_create.sh
└── DAG
│ └── hive_create_partition.py
├── Mac
├── lldb.md
└── rw_ntfs.md
├── kafka
├── Consumer.md
├── kafka4.0_Cmd.md
├── monitor.md
└── docker-compose.yml
├── mattermost
├── deploy_docker.md
├── env.sample
└── docker-compose.yml
├── pulsar
└── QuickCmd.md
├── mysql
└── docker-compose.yml
├── ELK
├── elastic
│ ├── Filter.md
│ └── INSTALL.md
└── logstash
│ └── config.md
├── Flex-Bison
└── Flex_Basic.md
├── ldap
└── README.md
├── php
├── install_php_pgsql.sh
└── install.md
├── CPP
├── gcc
│ └── install.md
└── guard.h
├── oracle
└── sqlplus.md
├── spark
└── README.md
├── docker
└── README.md
├── init_scripts
├── zookeeper.init
├── redis-sentinel.init
├── kafka-manager.init
├── elasticsearch.init
├── kafka.init
├── jenkins.init
└── redis.init
├── zabbix
└── install.md
├── starrocks
└── install.md
├── DNS
└── README.md
└── apisix
├── 介绍.md
└── introduce.md
/.gitignore:
--------------------------------------------------------------------------------
1 | .DS_Store
2 |
--------------------------------------------------------------------------------
/Java/README.md:
--------------------------------------------------------------------------------
1 | # Java
2 |
3 | 记录Java的一些入门姿势。
4 |
--------------------------------------------------------------------------------
/etc/README.md:
--------------------------------------------------------------------------------
1 | etc
2 | ========
3 |
4 | Variable RPM Website: http://rpm.pbone.net/
5 |
6 |
--------------------------------------------------------------------------------
/linux/README.md:
--------------------------------------------------------------------------------
1 | # Linux
2 |
3 | # Misc
4 | [Linux工具快速教程](http://linuxtools-rst.readthedocs.org/zh_CN/latest/)
5 |
--------------------------------------------------------------------------------
/clickhouse/Engines/Null.md:
--------------------------------------------------------------------------------
1 | # Null
2 |
3 | 写入空表时,将忽略数据。从空表读取时,内容为空。
4 |
5 | 但是,您可以在Null表上建立物化视图,写入表的数据会被view(视图)收到
6 |
--------------------------------------------------------------------------------
/Java/Tomcat/image_tomcat_config.png:
--------------------------------------------------------------------------------
https://raw.githubusercontent.com/jaiminpan/awesome-memo/HEAD/Java/Tomcat/image_tomcat_config.png
--------------------------------------------------------------------------------
/Java/Tomcat/image_tomcat_issue_1.png:
--------------------------------------------------------------------------------
https://raw.githubusercontent.com/jaiminpan/awesome-memo/HEAD/Java/Tomcat/image_tomcat_issue_1.png
--------------------------------------------------------------------------------
/consul/server/systemd/consul:
--------------------------------------------------------------------------------
1 | # vi /etc/sysconfig/consul
2 |
3 | CONSUL_OPTIONS="-config-dir=/etc/consul.d -pid-file=/run/consul/consul.pid"
4 |
--------------------------------------------------------------------------------
/testing/README.md:
--------------------------------------------------------------------------------
1 | # Testing
2 |
3 | ## Misc
4 |
5 | [How Google Tests Software](http://www.cnblogs.com/oscarxie/archive/2011/02/17/1956968.html)
6 |
--------------------------------------------------------------------------------
/Java/Eclipse.md:
--------------------------------------------------------------------------------
1 | # Eclipse
2 |
3 |
4 | ## Misc
5 | [怎样用eclipse进行远程debug][1]
6 |
7 |
8 | [1]: http://jingyan.baidu.com/article/148a192199c7a24d71c3b103.html
9 |
--------------------------------------------------------------------------------
/druidio/script/env.sh:
--------------------------------------------------------------------------------
1 |
2 | export DRUID_CONF_DIR=/etc/druid/conf/druid
3 |
4 | export DRUID_LOG_DIR=/data/applogs/druid
5 |
6 | export DRUID_PID_DIR=/data/appdata/druid/pids
7 |
8 | # export LIB_DIR=
9 |
--------------------------------------------------------------------------------
/README.md:
--------------------------------------------------------------------------------
1 | # Awesome Memo []()
2 |
3 |
4 | Just For My Record
5 | Deprecated stuff in [Wiki](https://github.com/jaiminpan/MYWIKI/wiki) page
6 |
--------------------------------------------------------------------------------
/SQLite/README.md:
--------------------------------------------------------------------------------
1 | # SQLite
2 |
3 | ## Python
4 |
5 | [SQLite - Python](http://www.runoob.com/sqlite/sqlite-python.html)
6 |
7 | ## Performace
8 |
9 | [提升SQLite数据插入效率低、速度慢的方法](http://blog.csdn.net/chenguanzhou123/article/details/9376537)
10 |
--------------------------------------------------------------------------------
/web/gulp.md:
--------------------------------------------------------------------------------
1 | # gulp
2 |
3 |
4 | ## Misc
5 |
6 | * http://www.w3ctrain.com/2015/12/22/gulp-for-beginners/
7 | * https://ruby-china.org/topics/25477
8 | * http://www.ido321.com/1622.html
9 | * http://www.cnblogs.com/fengyuqing/p/5332112.html
10 |
--------------------------------------------------------------------------------
/Java/Annotation.md:
--------------------------------------------------------------------------------
1 | # Annotation
2 |
3 |
4 | ## Misc
5 | * [Java 注解Annotation使用解析][1]
6 | * [Java基础之理解Annotation][2]
7 |
8 |
9 |
10 | [1]: http://www.sunnyang.com/413.html
11 | [2]: http://www.cnblogs.com/mandroid/archive/2011/07/18/2109829.html
12 |
--------------------------------------------------------------------------------
/clickhouse/Client.md:
--------------------------------------------------------------------------------
1 | # Client
2 |
3 | ## import data
4 | ```sh
5 | # CSV FORMAT
6 | cat qv_stock.csv | clickhouse-client --query="INSERT INTO stock FORMAT CSV";
7 |
8 | # CSV FORMAT WITH HEADER
9 | cat qv_stock.csv | clickhouse-client --query="INSERT INTO stock FORMAT CSVWithNames";
10 | ```
11 |
--------------------------------------------------------------------------------
/clickhouse/Engines/Log.md:
--------------------------------------------------------------------------------
1 | # Log
2 |
3 |
4 | 日志与TinyLog 的不同之处在于,列文件中存在一个'marks'小文件。
5 |
6 | 这些marks(标记)写入每个数据块,并包含偏移量—从何处开始读取文件,以便跳过指定的行数。这使得可以在多个线程中读取表数据。
7 |
8 | 对于并发数据访问,读操作可以同时执行,而写操作互相阻塞并阻塞读操作。
9 |
10 | Log引擎不支持索引。
11 |
12 | 同样,如果对表的写入操作失败,表就会损坏,从表中读数据也会错误误。
13 |
14 | Log引擎适用于临时数据、一次写入表以及测试或演示目的。
15 |
--------------------------------------------------------------------------------
/logrotate/nginx:
--------------------------------------------------------------------------------
1 | /var/log/nginx/*log {
2 | daily
3 | rotate 10
4 | missingok
5 | notifempty
6 | dateext
7 | compress
8 | delaycompress
9 | sharedscripts
10 | postrotate
11 | [ -f /var/run/nginx.pid ] && kill -USR1 `cat /var/run/nginx.pid`
12 | endscript
13 | }
14 |
--------------------------------------------------------------------------------
/clickhouse/Engines/Set.md:
--------------------------------------------------------------------------------
1 | # Set
2 |
3 | 始终位于RAM中的数据集。它用于IN运算符的右侧(请参见“IN operators”一节)。
4 |
5 | 可以使用INSERT在表中插入数据。新元素将添加到数据集,而重复元素将被忽略。
6 | 但不能从表中执行SELECT。检索数据的唯一方法是在IN运算符的右半部分使用它。
7 |
8 | 数据始终位于RAM中。对于插入,插入的数据块也写入磁盘上的表目录。启动服务器时,此数据将加载到RAM中。换句话说,在重新启动之后,数据保持在原位。
9 |
10 | 对于粗暴的服务器重启,磁盘上的数据块可能丢失或损坏。在后一种情况下,可能需要手动删除数据已损坏的文件。
11 |
12 |
--------------------------------------------------------------------------------
/FreeSWITCH/FusionPBX/install.md:
--------------------------------------------------------------------------------
1 | # FusionPBX
2 |
3 |
4 | [github](https://github.com/fusionpbx/fusionpbx)
5 |
6 | [官方安装指南](https://www.fusionpbx.com/download)
7 |
8 | ## Install
9 | #### Prepare
10 | 1. 提前安装好
11 | * nginx
12 | * php-frm
13 | * PostgreSQL (OR SQLite)
14 |
15 | 参考 https://github.com/fusionpbx/fusionpbx-install.sh.git
16 |
--------------------------------------------------------------------------------
/PostgreSQL/QuickCmd.md:
--------------------------------------------------------------------------------
1 | # Quick Cmd
2 |
3 |
4 | ### 导入
5 | `
6 | # 编码转换
7 | iconv -f UTF16LE -t UTF8 -o file_utf.csv file.csv
8 | # 去掉boom
9 | sed -i '1s/^\xEF\xBB\xBF//' file_utf.csv
10 |
11 | # 导入tab分割、无指定quote的文件
12 | copy test_table from program 'sed ''s/\\/\\\\/g'' < /var/lib/pgsql/file_utf.csv' with (format csv, delimiter E'\t', quote '\');
13 | `
--------------------------------------------------------------------------------
/linux/systemtap.md:
--------------------------------------------------------------------------------
1 | # SystemTap
2 |
3 | 图示
4 | 
5 | 
6 |
7 | ## Reference
8 | * https://www.ibm.com/developerworks/cn/linux/l-systemtap/
9 | * http://blog.csdn.net/zhangskd/article/details/25708441
10 |
--------------------------------------------------------------------------------
/PulsarIO/README.md:
--------------------------------------------------------------------------------
1 | # PulsarIO
2 |
3 | * [jetstream](https://github.com/pulsarIO/jetstream):
4 | PulsarIO的核心,提供大部分基础包,和运行框架
5 | * [jetstream-esper](https://github.com/pulsarIO/jetstream-esper):
6 | 把 esper 做了一层封装,使其能在jetstream框架中使用
7 | * [realtime-analytics](https://github.com/pulsarIO/realtime-analytics):
8 | 使用 jetstream 和 jetstream-esper 的一个简单例子
9 |
10 |
--------------------------------------------------------------------------------
/Java/logback/README.md:
--------------------------------------------------------------------------------
1 | # logback
2 |
3 |
4 | #### Reference
5 | * https://logback.qos.ch/manual/
6 | * https://docs.spring.io/spring-boot/docs/current/reference/html/howto-logging.html
7 | * https://www.cnblogs.com/DeepLearing/p/5663178.html
8 | * https://lankydanblog.com/2017/08/31/configuring-logback-with-spring-boot/
9 | * http://www.leftso.com/blog/132.html
10 |
--------------------------------------------------------------------------------
/PostgreSQL/scripts/pg_backup.sh:
--------------------------------------------------------------------------------
1 | #!/bin/env bash
2 |
3 | TARGET_DAY=`date -d '0 days' +%Y%m%d`
4 |
5 |
6 | TARGET_DIR=/data/appdatas/pg_base/base_${TARGET_DAY}
7 | LOG_DIR=/data/applogs/pg_base/${TARGET_DAY}.log
8 |
9 | if [ ! -d "${TARGET_DIR}" ]; then
10 | mkdir "${TARGET_DIR}" && pg_basebackup -D "${TARGET_DIR}" -Ft -Xf -v -P -h 10.81.5.1 -p 15432 >> $LOG_DIR 2>&1
11 | fi
12 |
--------------------------------------------------------------------------------
/PulsarIO/DataFlow.md:
--------------------------------------------------------------------------------
1 | # DataFlow
2 |
3 | 位于com.ebay.jetstream.application.dataflows包下
4 |
5 | ## 介绍
6 | 这个部分,主要是用来显示相关bean所处理的数据流。
7 |
8 | * DataFlows: 继承了Spring的BeanFactoryAware, 从源头类InboundChannel开始,获取相关的EventSource,形成数据流数据,保存起来
9 | * VisualDataFlow: 通过DataFlows得到数据流,然后使用外部接口 http://yuml.me/ 生成对应的图片。
10 | * VisualServlet: 把VisualDataFlow用servlet暴露出去。
11 | * DirectedGraph: 辅助类,保存图数据
12 |
13 |
--------------------------------------------------------------------------------
/PostgreSQL/compile:
--------------------------------------------------------------------------------
1 | ./configure \
2 | --prefix=/usr/local/pgsql \
3 | --with-pgport=1999 \
4 | --with-perl \
5 | --with-tcl \
6 | --with-python \
7 | --with-openssl \
8 | --with-pam \
9 | --without-ldap \
10 | --with-libxml \
11 | --with-libxslt \
12 | --enable-thread-safety \
13 | --with-wal-blocksize=16 \
14 | --with-blocksize=16 \
15 | --enable-dtrace \
16 | --enable-debug \
17 | --enable-cassert
18 |
--------------------------------------------------------------------------------
/nginx/README.md:
--------------------------------------------------------------------------------
1 | Nginx Reference
2 | =================
3 |
4 | Offical Website: http://nginx.org/
5 |
6 | Packages: http://nginx.org/packages/
7 |
8 | Third Party Module: https://www.nginx.com/resources/wiki/modules/
9 |
10 | ## Optimized
11 |
12 | [How to Configure Nginx for Optimized Performance][1]
13 |
14 | [1]: https://www.linode.com/docs/websites/nginx/configure-nginx-for-optimized-performance
15 |
--------------------------------------------------------------------------------
/python/code/process_bar.py:
--------------------------------------------------------------------------------
1 | # -*- coding: utf-8 -*-
2 |
3 | import sys
4 | import time
5 |
6 | def processbar():
7 |
8 | for num in range(1000):
9 | nowtime = time.strftime('%Y-%m-%d %H:%M:%S', time.localtime(time.time()))
10 | sys.stdout.write('\r%s progress (% 10d)' % (nowtime, num))
11 | sys.stdout.flush()
12 | time.sleep(1)
13 |
14 | if __name__ == '__main__':
15 | processbar()
16 |
--------------------------------------------------------------------------------
/consul/client/consul.d/client/config.json:
--------------------------------------------------------------------------------
1 | {
2 | "datacenter": "sz-dc",
3 | "data_dir": "/home/java/consul/data",
4 | "log_level": "INFO",
5 | "addresses": {
6 | "http": "0.0.0.0"
7 | },
8 | "retry_join": [
9 | "10.81.xx.xxx2",
10 | "10.81.xx.xxx3"
11 | ],
12 | "retry_interval": "10s",
13 | "skip_leave_on_interrupt": true,
14 | "leave_on_terminate": false,
15 | "rejoin_after_leave": true
16 | }
17 |
--------------------------------------------------------------------------------
/supervisord/script/supervisor.service:
--------------------------------------------------------------------------------
1 | [Unit]
2 | Description=supervisor
3 | After=network.target
4 |
5 | [Service]
6 | Type=forking
7 | ExecStart=/usr/bin/supervisord -c /etc/supervisor/supervisord.conf
8 | ExecStop=/usr/bin/supervisorctl $OPTIONS shutdown
9 | ExecReload=/usr/bin/supervisorctl $OPTIONS reload
10 | KillMode=process
11 | Restart=on-failure
12 | RestartSec=42s
13 |
14 | [Install]
15 | WantedBy=multi-user.target
16 |
--------------------------------------------------------------------------------
/PulsarIO/Pulsar_Real_time_Analytics_at_Scale/concluding.md:
--------------------------------------------------------------------------------
1 | 总结
2 | ================================
3 | 在这篇文章中,我们讲述了用于解决实时用户行为分析问题的数据和处理模型。
4 | 我们讲述了Pulsar在一些设计上的考虑,Pulsar已经在eBay云环境运行了一年多,我们每秒处理十万事件并达到99.9%的数据精确度。
5 | 我们管道端对端的延迟在95%都小于100毫秒,我们管道在99.99%的时间里顺利运行,一些eBay的团队使用我们成功地构建一些解决方案,如in-session的个性化推荐、互联网广告营销、记账、业务监控等等。
6 |
7 | 虽然我们主要场景是用户行为分析,但我们可以想象Pulsar可以使用很多其他的实时处理场景。
8 |
9 | -----------------
10 |
11 | [« 首页](README.md)
12 |
--------------------------------------------------------------------------------
/linux/systemcmd/iptables.md:
--------------------------------------------------------------------------------
1 |
2 | cmd `iptables`
3 | ```
4 | # Enable access on IP ranges from 172.16.1.1 to 172.16.1.10 for Port 11211 ##
5 | iptables -A INPUT -p tcp --destination-port 11211 -m state --state NEW -m iprange --src-range 172.16.1.1-172.16.1.10 -j ACCEPT
6 | iptables -A INPUT -p udp --destination-port 11211 -m state --state NEW -m iprange --src-range 172.16.1.1-172.16.1.10 -j ACCEPT
7 |
8 | service iptables restart
9 | ```
10 |
--------------------------------------------------------------------------------
/clickhouse/Engines/Join.md:
--------------------------------------------------------------------------------
1 | # Join
2 |
3 | 为JOIN 预处理的数据结构,始终位于RAM中。
4 |
5 | ```
6 | Join(ANY|ALL, LEFT|INNER, k1[, k2, ...])
7 | ```
8 |
9 | 引擎参数:
10 | * ANY | ALL : 方式
11 | * LEFT | INNER: join类型
12 |
13 | 这些参数设置为不带引号,并且必须与表将用于的JOIN 相匹配。k1,k2,…是将在其上进行连接的USING子句中的关键列。
14 |
15 | 表不能用于GLOBAL JOINs。
16 |
17 | 可以使用INSERT向表中添加数据,类似于Set引擎。对于ANY,将忽略重复键的数据。对于ALL,这将被计算在内。
18 |
19 | 不能直接从表中执行SELECT。检索数据的唯一方法是将其用作JOIN的“右侧”表。
20 |
21 | 在磁盘上存储数据与在Set engine中存储数据相同
22 |
--------------------------------------------------------------------------------
/PostgreSQL/install.md:
--------------------------------------------------------------------------------
1 | # PostgreSQL Install
2 |
3 |
4 | ## CentOS
5 |
6 | #### A
7 | ```
8 | yum install https://download.postgresql.org/pub/repos/yum/9.6/redhat/rhel-6.8-x86_64/pgdg-centos96-9.6-3.noarch.rpm
9 |
10 | yum install postgresql95-server postgresql95-contrib
11 | ```
12 |
13 |
14 | #### B
15 | Reference https://www.postgresql.org/download/linux/redhat/
16 |
17 |
18 | #### C
19 | Direct Download RPM
20 | Click https://yum.postgresql.org/rpmchart.php
21 |
--------------------------------------------------------------------------------
/clickhouse/Engines/TinyLog.md:
--------------------------------------------------------------------------------
1 | # TinyLog
2 |
3 | 最简单的表引擎,用于在磁盘上存储数据。
4 | 每个列都存储在单独的压缩文件中。写入时,数据会附加到文件末尾。
5 |
6 | 并发数据访问不受任何限制:
7 | * 如果您同时对表做读取和写入操作,则读取操作会报错。
8 | * 如果您同时在多个查询做写入操作,则数据将会损坏。
9 |
10 | 使用此表的典型方法是一次写入:首先只写入一次数据,然后根据需要多次读取。读取操作是在单个流中执行的。
11 | 换句话说,此引擎用于相对较小的表(建议最多使用1百万行)。如果您有许多小表,使用此表引擎是有意义的,因为它比Log 引擎简单(需要打开的文件更少)。
12 | 当您拥有大量的小表时,这种情况被证明是有较差的效率,但在使用其他DBMS时可能已经在这样用了,那么您可能会发现切换到使用TinyLog类型的表会很容易。
13 |
14 | 此引擎不支持索引。
15 |
16 | 在Yandex.Metrica、TinyLog 表使用在作为小批量处理的中间数据。
17 |
--------------------------------------------------------------------------------
/supervisord/script/conf.d/superset.ini:
--------------------------------------------------------------------------------
1 | ;vi /usr/lib/python2.7/site-packages/superset/config.py
2 | ;- DATA_DIR = os.path.join(os.path.expanduser('~'), '.superset')
3 | ;+ DATA_DIR = os.getcwd()
4 |
5 | [program:superset]
6 | command=superset runserver
7 | user=superset
8 | redirect_stderr=true
9 | stdout_logfile=/data/applogs/superset/superset.log
10 | autostart=true
11 | autorestart=false
12 | startsecs=5
13 | priority=1
14 | stopasgroup=true
15 | killasgroup=true
16 | directory=/data/appdata/superset
17 |
--------------------------------------------------------------------------------
/etcd/README.md:
--------------------------------------------------------------------------------
1 | # etcd
2 |
3 | etcd is a distributed, consistent key-value store for shared configuration and service discovery, with a focus on being:
4 |
5 | * Simple: well-defined, user-facing API (gRPC)
6 | * Secure: automatic TLS with optional client cert authentication
7 | * Fast: benchmarked 10,000 writes/sec
8 | * Reliable: properly distributed using Raft
9 |
10 | https://github.com/coreos/etcd
11 |
12 |
13 | #### Misc
14 | http://dockone.io/article/667
15 | https://my.oschina.net/u/2362111/blog/714503
16 |
--------------------------------------------------------------------------------
/python/logging.md:
--------------------------------------------------------------------------------
1 | # Logging
2 |
3 | Refference:
4 | https://docs.python.org/2/howto/logging.html
5 | https://docs.python.org/2/howto/logging-cookbook.html
6 | https://docs.python.org/2/library/logging.html
7 |
8 | #### Example
9 | ```
10 | FORMAT = '%(asctime)-15s %(clientip)s %(user)-8s %(message)s'
11 | logging.basicConfig(format=FORMAT)
12 | d = {'clientip': '192.168.0.1', 'user': 'fbloggs'}
13 | logger = logging.getLogger('tcpserver')
14 | logger.warning('Protocol problem: %s', 'connection reset', extra=d)
15 | ```
16 |
--------------------------------------------------------------------------------
/claude/sample.md:
--------------------------------------------------------------------------------
1 | markdown### 🗺️ 关键文档模式
2 | **总是把重要的文档加在这里!** 当你创建或发现:
3 | - **架构**: `/docs/OVERALL_ARCHITECTURE.md` 🐳
4 | - **数据库架构**: `/docs/DATABASE_ARCHITECTURE.md`
5 | - **密码真相**: `/docs/PASSWORD_TRUTH.md` 🚨 先读这个!
6 | - **JWT 认证**: `/docs/JWT_AUTHENTICATION_ARCHITECTURE.md` 🔐
7 | - **安全检查清单**: `/docs/SECURITY_CHECKLIST.md` 🚨
8 | - **功能请求**: `/docs/enhancements/README.md`
9 | - **健康监测 V2**: `/docs/enhancements/HEALTH_MONITORING_V2.md` 🆕
10 |
11 |
12 | > /start 然后请阅读 Brief,并根据 Brief 进行修复,我们上一次会议调查了,记录了我们发现的内容,以便您可以在本次会议上进行修复,开始吧!
13 |
--------------------------------------------------------------------------------
/clickhouse/Engines/Memory.md:
--------------------------------------------------------------------------------
1 | # Memory
2 |
3 |
4 | Memory引擎以未压缩形式将数据存储在RAM中。
5 |
6 | #### 特点
7 | * 数据的存储形式与读取时接收的形式完全相同。
8 | 换句话说,从这个表中读取是完全自由的。并发数据访问是同步过的(synchronized)。
9 |
10 | * 锁很短:读和写操作不会相互阻塞。
11 | * 不支持索引。
12 | * 读取是可以并发的。由于没有从磁盘读取、解压缩或反序列化数据,因此在简单查询上可以达到最高的生产效率(超过 10GB/sec)。
13 | (我们应该注意到,在许多情况下,MergeTree 引擎的生产率几乎一样高。)
14 |
15 | * 重新启动服务器时,数据丢失,表变为空。
16 |
17 | * 通常,使用此表引擎是不合理的。但是,它可以用于测试,也可以用于在相对较少的行(最多约一亿行)上要求最大速度的任务。
18 |
19 | PS:
20 | Memory引擎在系统内用于作为进行查询外部数据的临时表(请参阅“External data for processing a query”章节)和实现全局IN(请参阅“IN operators”章节)。
21 |
--------------------------------------------------------------------------------
/nginx/nginx_force_redirect.conf:
--------------------------------------------------------------------------------
1 |
2 | # 1. enforce https
3 | server {
4 | listen 80;
5 | listen [::]:80;
6 | server_name xxx.xxx.com;
7 |
8 | # return 301 https://$server_name$request_uri;
9 | return 307 https://$server_name$request_uri;
10 | }
11 |
12 | # 2. enforce https
13 | server {
14 | listen 80;
15 | server_name xxx.xxx.com;
16 | location / {
17 | rewrite ^/(.*) https://$server_name/$1 permanent;
18 | break;
19 | }
20 | error_page 497 https://$host:$server_port$request_uri;
21 | }
22 |
--------------------------------------------------------------------------------
/pentaho/kettle.md:
--------------------------------------------------------------------------------
1 | # Kettle
2 |
3 | ## Install
4 | ## Download
5 | http://community.pentaho.com/projects/data-integration/
6 | https://sourceforge.net/projects/pentaho
7 |
8 | #### Prepare
9 | yum install webkitgtk
10 |
11 | #### Running
12 | ./spoon.sh
13 |
14 | #### Other Problem:
15 | Q. undefined symbol: soup_message_set_first_party
16 | A. yum install libsoup
17 |
18 |
19 | ## Usage
20 | http://itroadmap.sinaapp.com/2014/12/10/%E5%BC%80%E6%BA%90etl%E5%B7%A5%E5%85%B7-kettle%EF%BC%88kettle-5-2-0%EF%BC%89%E7%9A%84%E4%BD%BF%E7%94%A8%E4%B9%8Bhello-world/
21 |
--------------------------------------------------------------------------------
/python/code/tar_untar.py:
--------------------------------------------------------------------------------
1 |
2 | import os
3 | import tarfile
4 |
5 | def tar_file(target_name, src_dir):
6 | #创建压缩包名
7 | tar = tarfile.open(target_name,"w:gz")
8 |
9 | #创建压缩包
10 | for root,dir,files in os.walk(src_dir):
11 | for filename in files:
12 | fullpath = os.path.join(root, filename)
13 | tar.add(fullpath)
14 | tar.close()
15 |
16 | def untar_file(target_name, dest):
17 | tar = tarfile.open(target_name)
18 | for filename in tar.getnames():
19 | tar.extract(filename, path=dest)
20 | tar.close()
21 |
--------------------------------------------------------------------------------
/claude/claude.md:
--------------------------------------------------------------------------------
1 | 全局配置
2 | - 技术问题优先中文回复, 代码和代码的注释必须用英文
3 | - 优先使用成熟开源方案,避免造轮子
4 | - 保持数据流与依赖清晰
5 | - 性能优化必须有benchmark数据
6 | - 数据库操作需考虑并发安全
7 |
8 | 工具策略
9 | - 绿灯区:Git、文件读写、pytest、npm install(自动允许)
10 | - 黄灯区:系统命令、网络请求(需确认)
11 | - 红灯区:删除操作、系统配置(禁止自动执行)
12 |
13 | 技术决策
14 | - 单一职责,避免过早抽象
15 | - 易于测试
16 | - 符合现有代码模式
17 |
18 | 开发流程
19 | - 规划:在 WORKING_PLAN.md 记录目标/标准/状态,完成后删除
20 | - 开发:理解 → 实现(绿灯)→ 重构
21 |
22 | 遇阻处理(尝试≤3次):
23 | - 记录尝试+错误+原因
24 | - 寻找 2–3 个替代方案
25 | - 停止盲目尝试,重新评估
26 |
27 | 行为准则
28 | - 禁止:--no-verify 跳过钩子、禁测提交、提交不可编译代码、无验证假设
29 | - 必须:逐步提交可运行代码、更新计划、复用实现、三次失败即停
30 |
--------------------------------------------------------------------------------
/clickhouse/Engines/ReplacingMergeTree.md:
--------------------------------------------------------------------------------
1 | # ReplacingMergeTree
2 |
3 | 此引擎与MergeTree 的不同之处在于,它可以在合并时按主键消除重复数据。
4 |
5 | 对于ReplacingMergeTree模式,最后一个参数是作为'version(版本)'的列(可选)。
6 |
7 | 合并时,对于具有相同主键的所有行,只选取一行(如果没有指定版本列,选择最后一行,如果指定了版本,选择版本号最大的最后一行。)
8 |
9 | version列的类型必须是`UInt`系列或`Date`或`DateTime`其中一种。
10 |
11 | ```
12 | ReplacingMergeTree(EventDate, (OrderID, EventDate, BannerID, ...), 8192, ver)
13 | ```
14 |
15 | 请注意,只有在合并过程中才会对数据进行重复数据消除。合并在后台处理。未指定合并的确切时间,您无法依赖它。部分数据根本无法合并。
16 | 虽然您可以使用OPTIMIZE查询触发额外合并,但不建议这样做,因为OPTIMIZE将读取和写入大量数据。
17 | 此表引擎适用于重复数据的后台删除,以节省空间,但不适于保证重复数据消除。
18 |
19 | *专为特殊目的开发*
20 |
--------------------------------------------------------------------------------
/PostgreSQL/scripts/jsonb_ext.sql:
--------------------------------------------------------------------------------
1 |
2 | -- jsonb de-duplicate json array
3 | CREATE OR REPLACE FUNCTION jsonb_usedef_dedup(arg JSONB) RETURNS JSONB AS
4 | $$
5 | DECLARE
6 | res JSONB;
7 | begin
8 | with in_test as
9 | (
10 | select distinct(jsonb_array_elements(arg)) as jsobj
11 | )
12 |
13 | select jsonb_agg(jsobj) into res from in_test;
14 | return res;
15 | end;
16 | $$ LANGUAGE plpgsql immutable SECURITY DEFINER
17 |
18 | -- jsonb aggregate concat
19 | CREATE AGGREGATE jsonb_object_agg(jsonb) (
20 | SFUNC = 'jsonb_concat',
21 | STYPE = jsonb,
22 | PARALLEL = SAFE
23 | );
24 |
--------------------------------------------------------------------------------
/nodejs/README.md:
--------------------------------------------------------------------------------
1 | # Node
2 |
3 |
4 |
5 | ## Install
6 | 目前,最推荐的使用nvm进行node版本管理及对应版本的npm安装。具体安装步骤如下:
7 |
8 | ```sh
9 | curl -o- https://raw.githubusercontent.com/creationix/nvm/v0.33.8/install.sh | bash
10 | nvm --version
11 | ```
12 |
13 | #### Mirror
14 | ```sh
15 | export NVM_NODEJS_ORG_MIRROR=https://npm.taobao.org/mirrors/node npm --registry=https://registry.npm.taobao.org
16 | ```
17 |
18 | #### Quick-cmd
19 | ```sh
20 | # 查看node版本
21 | nvm ls-remote
22 | # 查看本地安装的node版本
23 | nvm list
24 |
25 | nvm install [node版本号]
26 | nvm uninstall [node 版本]
27 |
28 | # 选定node版本作为开发环境
29 | nvm use [node 版本]
30 | ```
--------------------------------------------------------------------------------
/R-Server/install_package.md:
--------------------------------------------------------------------------------
1 | # install package
2 |
3 | #### Sample
4 |
5 | Install `RPostgreSQL` package in default foler.
6 | ```
7 | [root@localhost]# R
8 |
9 | > install.packages("RPostgreSQL")
10 | ```
11 |
12 | Install `RPostgreSQL` in to `/lib64/R/library/` folder
13 | ```
14 | [root@localhost]# R
15 |
16 | > install.packages("RPostgreSQL", "/lib64/R/library/")
17 | ```
18 |
19 | ## trouble shoot
20 |
21 | if file missing for include or library. Please use
22 | ```
23 | # sample as pgsql
24 | ln -s /usr/pgsql/include /usr/local/include/pgsql
25 | # and
26 | ln -s /usr/pgsql/lib /usr/local/lib/pgsql
27 |
28 | ```
29 |
--------------------------------------------------------------------------------
/chrome/pull_tag.md:
--------------------------------------------------------------------------------
1 | Chromium 的每个版本都会打 tag,可以通过 git fetch origin tag [tag-name] 或取指定版本,减少拉取的时间,拉取完之后需要重新同步相关依赖,具体命令如下:
2 |
3 |
4 |
5 | 1. 拉取指定版本的 tag
6 |
7 | ```bash
8 | git fetch origin tag [tag-name]
9 | # git fetch origin --tags
10 | ```
11 |
12 | 1. 切换到拉取的 tag
13 |
14 | ```bash
15 | git checkout tags/[tag-name]
16 | ```
17 |
18 | 1. 同步依赖
19 |
20 | ```bash
21 | gclient sync
22 | ```
23 |
24 | 1. (可选)有时候可能会需要移除一些在当前版本没有用的依赖
25 |
26 | ```bash
27 | gclient sync -D
28 | ```
29 |
30 | 1. 重新编译,这个步骤可能会报错,重试一遍即可
31 |
32 | ```bash
33 | autoninja -C out\Default chrome
34 | ```
35 |
36 | 1. 生成最小的安装包
37 |
38 | ```bash
39 | ninja -C out/Default mini_installer
40 | ```
41 |
--------------------------------------------------------------------------------
/PostgreSQL/AccessControl.md:
--------------------------------------------------------------------------------
1 | # AccessControl
2 |
3 |
4 | ```sh
5 | Revoke ALL ON DATABASE xxx from public;
6 | Revoke ALL ON SCHEMA public from public;
7 |
8 | # OPTION
9 | CREATE SCHEMA sss;
10 | ALTER DATABASE XXX SET search_path TO sss;
11 |
12 | CREATE USER xxx password 'XXX' with role xxx;
13 |
14 | # GRANT
15 | GRANT CONNECT ON DATABASE XXX TO XXX;
16 | GRANT USAGE ON SCHEMA SSS TO XXXUSER;
17 |
18 | ALTER DEFAULT PRIVILEGES IN SCHEMA SSS grant select, insert, update, delete, references on tables to XXXUSER;
19 | ALTER DEFAULT PRIVILEGES IN SCHEMA SSS grant all on SEQUENCES TO XXXUSER;
20 | ALTER DEFAULT PRIVILEGES IN SCHEMA SSS grant EXECUTE on FUNCTIONS TO XXXUSER;
21 |
22 | ```
23 |
--------------------------------------------------------------------------------
/consul/server/systemd/consul.service:
--------------------------------------------------------------------------------
1 | # vi /etc/systemd/system/consul.service
2 |
3 | [Unit]
4 | Description=Consul service discovery agent
5 | Requires=network-online.target
6 | After=network-online.target
7 |
8 | [Service]
9 | User=consul
10 | Group=consul
11 | Type=simple
12 | EnvironmentFile=/etc/sysconfig/consul
13 | Environment=GOMAXPROCS=2
14 | ExecStartPre=[ -f "/run/consul/consul.pid" ] && /usr/bin/rm -f /run/consul/consul.pid
15 | ExecStartPre=/usr/local/bin/consul validate /etc/consul.d
16 | ExecStart=/usr/local/bin/consul agent $CONSUL_OPTIONS
17 | ExecReload=/bin/kill -HUP $MAINPID
18 | KillSignal=SIGTERM
19 | Restart=on-failure
20 | TimeoutStopSec=5
21 |
22 | [Install]
23 | WantedBy=multi-user.target
--------------------------------------------------------------------------------
/nodejs/npm_config.md:
--------------------------------------------------------------------------------
1 | # npm
2 |
3 | npm 是node.js 环境下的包管理器,非常强大智能.
4 |
5 | 生活这这片神奇的土地上,各种奇葩手段屡见不鲜啊.
6 |
7 | 为什么要换源? npm 官方站点 http://www.npmjs.org/ 并没有被墙,但是下载第三方依赖包的速度让人着急啊!
8 |
9 | 就拿阿里云环境来说,有时npm 一个包也需要耐心等待......等待过去也许是原地踏步,也许就是安装失败.
10 |
11 | 幸运的是,国内有几个镜像站点可以供我们使用,本人在使用 http://www.cnpmjs.org/
12 |
13 | ## 给npm换源
14 |
15 | (1)通过 config 配置指向国内镜像源
16 | ```bash
17 | npm config set registry http://registry.cnpmjs.org //配置指向源
18 | npm info express //下载安装第三方包
19 | ```
20 |
21 | (2)通过 npm 命令指定下载源
22 | ```
23 | npm --registry http://registry.cnpmjs.org info express
24 | ```
25 |
26 | (3)在配置文件 ~/.npmrc 文件写入源地址
27 | ```bash
28 | nano ~/.npmrc //打开配置文件
29 |
30 | registry =https://registry.npm.taobao.org //写入配置文件
31 | ```
32 |
33 |
--------------------------------------------------------------------------------
/ZooKeeper/scripts/zookeeper.init:
--------------------------------------------------------------------------------
1 | #!/bin/sh
2 | #
3 | # chkconfig: 2345 20 90
4 | # description: zookeeper
5 | # processname: zookeeper
6 |
7 | ZOOKEEPER_HOME=/data/appsoft/zookeeper
8 | ZK_USER=zookeeper
9 |
10 | SU=su
11 |
12 | start()
13 | {
14 | $SU -l $ZK_USER -c "$ZOOKEEPER_HOME/bin/zkServer.sh start"
15 | }
16 |
17 | stop()
18 | {
19 | $SU -l $ZK_USER -c "$ZOOKEEPER_HOME/bin/zkServer.sh stop"
20 | }
21 |
22 | status()
23 | {
24 | $SU -l $ZK_USER -c "$ZOOKEEPER_HOME/bin/zkServer.sh status"
25 | }
26 |
27 | restart()
28 | {
29 | $SU -l $ZK_USER -c "$ZOOKEEPER_HOME/bin/zkServer.sh restart"
30 | }
31 |
32 | case $1 in
33 | start|stop|status|restart)
34 | $1
35 | ;;
36 | *)
37 | echo "require start|stop|status|restart" ;;
38 | esac
39 |
--------------------------------------------------------------------------------
/Jenkins/ansible/sample_nginx.yaml:
--------------------------------------------------------------------------------
1 | ---
2 | # ansible-playbook sample
3 |
4 | # usage: ansible-playbook deploy.yaml --
5 | # example: in jenkins | ansible-playbook /etc/ansible/www-sre/deploy.nginx.yaml --extra-vars "work_space=${WORKSPACE}"
6 |
7 | - hosts: www-lbhost1-java
8 | vars: #定义变量
9 | work_space: /data/home/jenkins/.jenkins/workspace/www-job-name
10 | become: yes
11 | become_user: root
12 |
13 | tasks:
14 |
15 | - name: sync nginx conf
16 | synchronize:
17 | src: "{{work_space}}/nginx/"
18 | dest: /data/appdatas/nginx/
19 | delete: yes
20 |
21 | - name: nginx check
22 | shell: nginx -t
23 |
24 | - name: nginx reload
25 | # shell: service nginx reload
26 | service: name=nginx state=reloaded
27 |
--------------------------------------------------------------------------------
/consul/server/consul.d/config.json:
--------------------------------------------------------------------------------
1 | {
2 | "datacenter": "sz-dc",
3 | "data_dir": "/data/appdatas/consul",
4 | "log_level": "INFO",
5 | "enable_syslog": true,
6 | "syslog_facility": "local0",
7 | "node_name": "mynode",
8 | "server": true,
9 | # only one can be on boostrap, others be commented
10 | "bootstrap_expect": 1,
11 | "bind_addr": "10.81.xxx.xxx1",
12 | "addresses": {
13 | "http": "0.0.0.0"
14 | },
15 | "ports": {
16 | "http": 8500
17 | },
18 | "ui": true,
19 | "performance": {
20 | "raft_multiplier": 1
21 | },
22 | "retry_join": [
23 | "10.81.xx.xxx2",
24 | "10.81.xx.xxx3"
25 | ],
26 | "retry_interval": "10s",
27 | "skip_leave_on_interrupt": true,
28 | "leave_on_terminate": false,
29 | "rejoin_after_leave": true
30 | }
31 |
--------------------------------------------------------------------------------
/PostgreSQL/scripts/random_string.c:
--------------------------------------------------------------------------------
1 | PG_FUNCTION_INFO_V1(random_string);
2 |
3 | Datum
4 | random_string(PG_FUNCTION_ARGS)
5 | {
6 | int32 length = PG_GETARG_INT32(0);
7 | int32 i;
8 | const char chars[] = "0123456789ABCDEFGHIJKLMNOPQRSTUVWXYZabcdefghijklmnopqrstuvwxyz";
9 | const int chars_len;
10 | char *result;
11 |
12 | if (length < 0)
13 | PG_RETURN_NULL();
14 |
15 | if (length == 0)
16 | PG_RETURN_TEXT_P(cstring_to_text(""));
17 |
18 | result = palloc(length + 1);
19 | if (result == NULL)
20 | ereport(ERROR,
21 | (errcode(ERRCODE_OUT_OF_MEMORY),
22 | errmsg("out of memory")));
23 |
24 | chars_len = sizeof(chars) - 1;
25 | for (i = 0; i < length; i++)
26 | {
27 | result[i] = chars[random() % chars_len];
28 | }
29 | result[length] = '\0';
30 |
31 | PG_RETURN_TEXT_P(cstring_to_text(result));
32 | }
33 |
--------------------------------------------------------------------------------
/python/code/zip_unzip.py:
--------------------------------------------------------------------------------
1 | import zipfile
2 |
3 | #解压zip文件
4 | def unzip(package_path, dest):
5 | myzip=zipfile.ZipFile(package_path, 'r')
6 | for name in myzip.namelist():
7 | myzip.extract(name, dest)
8 | f_handle=open(dest+name,"wb")
9 | f_handle.write(myzip.read(name))
10 | f_handle.close()
11 | myzip.close()
12 |
13 | #添加文件到已有的zip包中
14 | def addzip(package_path, src):
15 | f = zipfile.ZipFile(package_path,'w',zipfile.ZIP_DEFLATED)
16 | f.write(src)
17 | f.close()
18 |
19 | #把整个文件夹内的文件打包
20 | def adddirfile(package_path, src):
21 | f = zipfile.ZipFile(package_path,'w',zipfile.ZIP_DEFLATED)
22 | for dirpath, dirnames, filenames in os.walk(src):
23 | for filename in filenames:
24 | f.write(os.path.join(dirpath,filename))
25 | f.close()
26 |
--------------------------------------------------------------------------------
/Java/Spring/Filter_Interceptor.md:
--------------------------------------------------------------------------------
1 | ## Filter
2 |
3 | 依赖于servlet容器。在实现上基于函数回调,可以对几乎所有请求进行过滤,但是缺点是一个过滤器实例只能在容器初始化时调用一次。
4 | 使用过滤器的目的是用来做一些过滤操作,获取我们想要获取的数据,
5 |
6 | 比如:在过滤器中修改字符编码;在过滤器中修改HttpServletRequest的一些参数,包括:过滤低俗文字、危险字符等
7 |
8 | ## Interceptor
9 | 依赖于web框架,在SpringMVC中就是依赖于SpringMVC框架。
10 | 在实现上基于Java的反射机制,属于面向切面编程(AOP)的一种运用。
11 | 由于拦截器是基于web框架的调用,因此可以使用Spring的依赖注入(DI)进行一些业务操作,同时一个拦截器实例在一个controller生命周期之内可以多次调用。
12 | 但是缺点是只能对controller请求进行拦截,对其他的一些比如直接访问静态资源的请求则没办法进行拦截处理
13 |
14 | 
15 |
16 | ## Define Interceptor
17 | ```
18 | public class XXX implements HandlerInterceptor { ... }
19 | ```
20 | ```
21 | public class XXX implements HandlerInterceptorAdapter { ... }
22 | ```
23 | ```
24 | public class XXX implements WebRequestInterceptor { ... }
25 | ```
26 |
--------------------------------------------------------------------------------
/linux/systemcmd/chattr.md:
--------------------------------------------------------------------------------
1 | chattr命令
2 | -----------
3 | 文件权限属性设置 chattr命令用来改变文件属性。
4 |
5 | 这项指令可改变存放在ext2文件系统上的文件或目录属性,这些属性共有以下8种模式:
6 | ```
7 | a:让文件或目录仅供附加用途;
8 | b:不更新文件或目录的最后存取时间;
9 | c:将文件或目录压缩后存放;
10 | d:将文件或目录排除在倾倒操作之外;
11 | i:不得任意更动文件或目录;
12 | s:保密性删除文件或目录;
13 | S:即时更新文件或目录;
14 | u:预防意外删除。
15 | ```
16 |
17 | ### 语法
18 | ```
19 | chattr(选项)
20 | ```
21 |
22 | ### 选项
23 | ```
24 | -R:递归处理,将指令目录下的所有文件及子目录一并处理;
25 | -v<版本编号>:设置文件或目录版本;
26 | -V:显示指令执行过程;
27 | +<属性>:开启文件或目录的该项属性;
28 | -<属性>:关闭文件或目录的该项属性;
29 | =<属性>:指定文件或目录的该项属性。
30 | ```
31 |
32 | ### 实例
33 | 用chattr命令防止系统中某个关键文件被修改:
34 | ```
35 | chattr +i /etc/fstab
36 | ```
37 | 然后试一下rm、mv、rename等命令操作于该文件,都是得到Operation not permitted的结果。
38 |
39 |
40 | 让某个文件只能往里面追加内容,不能删除,一些日志文件适用于这种操作:
41 | ```
42 | chattr +a /data1/user_act.log
43 | ```
44 |
45 | 来自: http://man.linuxde.net/chattr
46 |
--------------------------------------------------------------------------------
/web/README.md:
--------------------------------------------------------------------------------
1 |
2 |
3 | ## 基本页面格式
4 | 样式位于开头,内容在中间,脚本位于最后
5 | ```
6 |
7 |
8 | Source Example
9 |
10 |
11 |
12 | Hello world!
13 |
14 |
15 |
16 |
17 |
18 |
19 |
20 | ```
21 | 详细参考:[JavaScript 的性能优化:加载和执行](http://www.ibm.com/developerworks/cn/web/1308_caiys_jsload/)
22 |
23 | ## Misc
24 | [学习JavaScript - 我的经验与建议(译)](http://blog.xiayf.cn/2013/03/25/learning-js/)
25 |
26 | ## Books
27 | JavaScript DOM编程艺术 第2版
28 | [JavaScript语言精粹_修订版](http://shop.oreilly.com/product/9780596517748.do)
29 |
--------------------------------------------------------------------------------
/Airflow/script/hive_create.sh:
--------------------------------------------------------------------------------
1 | #!/bin/bash
2 |
3 | TEMPFILE=`mktemp`
4 | echo $TEMPFILE
5 |
6 | TARGET=$1
7 |
8 | CURID=$RANDOM
9 | YEAR=`date -d '1 days ago' +%Y`
10 | MONTH=`date -d '1 days ago' +%m`
11 | DAY=`date -d '1 days ago' +%d`
12 |
13 |
14 | CMDDATA="alter table content_r1 add partition (y='$YEAR', m='$MONTH', d='$DAY') location 'hdfs://mwa/mw/data/tracking/v4/C/$YEAR/$MONTH/$DAY'; alter table request_r1 add partition (y='$YEAR', m='$MONTH', d='$DAY') location 'hdfs://mwa/mw/data/tracking/v4/I/$YEAR/$MONTH/$DAY';
15 | "
16 |
17 |
18 | #CMDDATA="alter table test_txt add partition (y='$YEAR', m='$MONTH', d='$MIN') location 'hdfs://mwa/mw/data/test/C/$YEAR/$MONTH/$MIN';"
19 |
20 |
21 | echo $CMDDATA > $TEMPFILE
22 |
23 | scp -r $TEMPFILE hive@$TARGET:/tmp/airflow_job.$CURID.sh
24 |
25 | ssh hive@$TARGET "hive -f /tmp/airflow_job.$CURID.sh"
26 |
27 | exit $?
28 |
--------------------------------------------------------------------------------
/Java/Tomcat/Misc.md:
--------------------------------------------------------------------------------
1 | # Misc
2 |
3 | ## Configure
4 | I am using `maven + eclipse + tomcat` as java develop environment.
5 |
6 | Configure standalone tomcat server please reference [here][2] and following image.
7 |
8 | 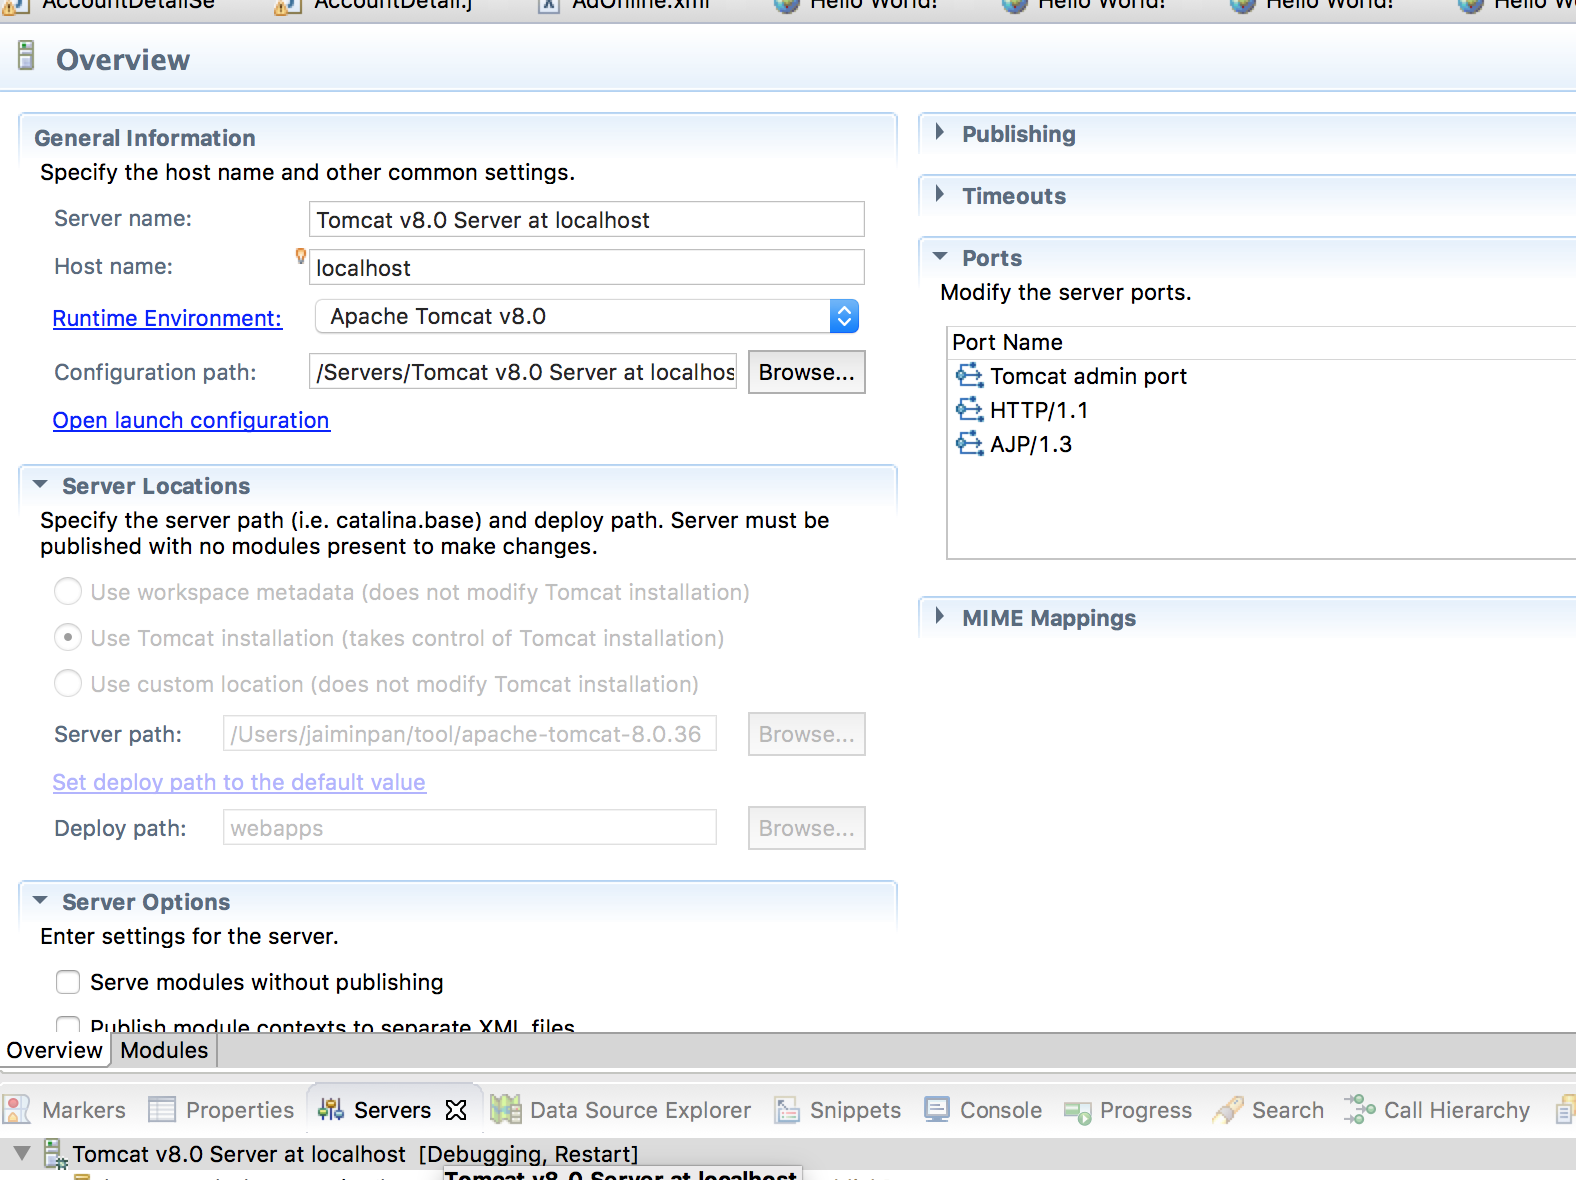 9 |
10 |
11 | #### Issue
12 |
13 | [maven + eclipse + tomcat : class not found exception][1]
14 |
15 | When `mvn compile` is every thing OK, but deploy to Tomcat without .class file
16 | Please try following action in image.
17 |
18 |
9 |
10 |
11 | #### Issue
12 |
13 | [maven + eclipse + tomcat : class not found exception][1]
14 |
15 | When `mvn compile` is every thing OK, but deploy to Tomcat without .class file
16 | Please try following action in image.
17 |
18 | 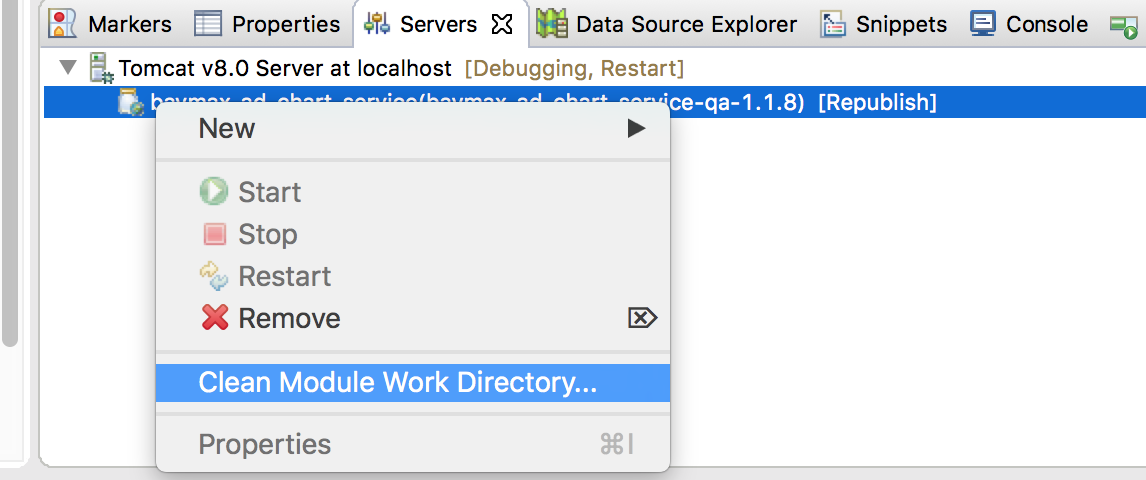 19 |
20 |
21 |
22 | [1]: http://stackoverflow.com/questions/21222978/maven-eclipse-tomcat-class-not-found-exception
23 | [2]: http://jingyan.baidu.com/article/ca2d939dd90183eb6d31ce79.html
24 |
--------------------------------------------------------------------------------
/Mac/lldb.md:
--------------------------------------------------------------------------------
1 | # lldb
2 |
3 | Since Xcode itself now uses LLDB instead of GDB, this can be a more convenient alternative for Mac users. It integrated much easier in Eclipse than GDB.
4 |
5 | ## lldb on Eclipse CDT
6 | CDT has experimental support for LLDB starting from CDT 9.1. The minimum recommended version for LLDB is 3.8.
7 |
8 | #### How do I install the LLDB debugger integration?
9 |
10 | + Go to Help > Install new Software
11 | + Select the CDT update site (9.1 or greater)
12 | + Under CDT Optional Features, select C/C++ LLDB Debugger Integration
13 |
14 | #### How do I debug with LLDB?
15 | Only local debug (new process) and local attach are supported right now.
16 | First, create a debug configuration just like you would when debugging with GDB. Then you need to set the launcher to **LLDB-MI Debug Process Launcher**.
17 |
18 | ## Reference
19 | https://wiki.eclipse.org/CDT/User/FAQ#How_do_I_get_the_LLDB_debugger.3F
--------------------------------------------------------------------------------
/Java/Spring/Profile.md:
--------------------------------------------------------------------------------
1 | # Profile
2 |
3 | #### Profile in springboot
4 |
5 |
6 | #### Profile in spring tomcat
7 |
8 | In `Spring-applicationContext.xml`
9 | ```
10 |
11 |
15 |
16 |
17 |
21 |
22 | ```
23 |
24 | In `web.xml`
25 | ```
26 |
27 | spring.profiles.default
28 | dev
29 |
30 |
31 | profileEnable
32 | true
33 |
34 | ```
35 |
--------------------------------------------------------------------------------
/linux/systemcmd/selinux.md:
--------------------------------------------------------------------------------
1 | SELinux
2 | ==========
3 |
4 | 关于linux权限控制目前碰到有三种:
5 | * 文件系统权限 lsattr chattr
6 | * 用户组 user:group:other
7 | * SELiunx
8 |
9 | 一般情况下我们只会和用户组权限打交道,一般用chmod chown这两个命令做权限控制,这个也叫 DAC (Discretionary Access Control)”任意式读取控制”。
10 | (DAC权限方式,我的理解就是静态的权限控制,对比于SELinux 我看作动态的权限控制)。
11 |
12 | 如果你已经获取root权限,也无法修改删除响应的文件时,考虑用lsattr查看对应的文件,并用chattr修改。
13 | 这种方式是文件系统对权限进行了限制,只有一部分文件系统支持,如ext3,ext4等。系统被黑了以后才知道的,说多了都是泪。
14 |
15 | SELinux是后期的Linux系统才有的权限控制方式,在同一个用户下面,通过不同的进程拥有不同标签组,才有权限访问对应的标签组的文件。
16 | 也叫 MAC (Mandatory Access Control)“强制性读取控制”。
17 | 通过ps –Z 和 ls –Z查看对应的标签组,用chcon -u|-r|-t 修改对应的用户、角色、类型。
18 |
19 | 简单用法
20 | ```
21 | setenforce 0/1 0 表示允许;1 表示强制
22 | getenforce 查看当前SElinux的状态
23 | ```
24 |
25 | 详见下面链接
26 | http://blog.chinaunix.net/uid-21266384-id-186394.html
27 | http://vbird.dic.ksu.edu.tw/linux_basic/0440processcontrol_5.php
28 | https://wiki.centos.org/zh/HowTos/SELinux
29 |
--------------------------------------------------------------------------------
/consul/install.md:
--------------------------------------------------------------------------------
1 | # Consul install
2 |
3 | ## Install Sample
4 | Example As `consul_1.4.1_linux_amd64.zip`
5 |
6 | ### Download
7 | Download From [Office Website](https://www.consul.io/downloads.html)
8 | #### OR
9 | Compile with [Github](https://github.com/hashicorp/consul)
10 |
11 | ### Install Binary
12 | ```sh
13 |
14 | unzip consul_1.4.1_linux_amd64.zip # Extract to consul
15 |
16 | mv consul /usr/local/bin
17 |
18 | ```
19 |
20 | ### Config Dir
21 | Config location is `/etc/consul.d/config.json` OR `/data/etc/consul.d/config.json`
22 | Reference `consul.d/config.json`
23 |
24 | ## Start
25 | consul agent -config-dir=/data/etc/consul.d
26 |
27 | ## Web Visit
28 | http://ip:port/
29 | http://127.0.0.1:8500/
30 |
31 |
32 | ## Other Config Guide
33 | https://www.consul.io/docs/agent/options.html#command-line-options
34 | https://my.oschina.net/guol/blog/353391
35 | https://www.cnblogs.com/sunsky303/p/9209024.html
36 |
--------------------------------------------------------------------------------
/Java/Spring/PropertyFile.md:
--------------------------------------------------------------------------------
1 | # SpringBoot Application Property Files
2 |
3 | [Application Property Files](https://docs.spring.io/spring-boot/docs/current-SNAPSHOT/reference/htmlsingle/#boot-features-external-config-application-property-files)
4 |
5 |
6 | SpringApplication loads properties from application.properties files in the following locations and adds them to the Spring Environment:
7 | * A /config subdirectory of the current directory
8 | * The current directory
9 | * A classpath /config package
10 | * The classpath root
11 | The list is ordered by precedence (properties defined in locations higher in the list override those defined in lower locations).
12 |
13 | Summary is
14 | * `file:./config/`
15 | * `file:./`
16 | * `classpath:/config/`
17 | * `classpath:/`
18 |
19 | ### Use --spring.config.location
20 | ```
21 | $ java -jar myproject.jar --spring.config.location=classpath:/default.properties,classpath:/override.properties
22 | ```
23 |
--------------------------------------------------------------------------------
/kafka/Consumer.md:
--------------------------------------------------------------------------------
1 | # Kafka Consumer
2 |
3 | [原文](http://m.blog.csdn.net/article/details?id=69554569)
4 |
5 | Kafka从0.7版本到现在的0.10版本, 经历了巨大的变化; 而其中, 首当其冲的是Consumer的机制.
6 |
7 | Kafka最早设计Consumer的时候, 大方向比较明确, 就是同时支持Subscribe功能和Message Queue功能. 语义设计上很清晰,但是实现之后, 发现有一些问题. 主要问题集中在:
8 | * 用户希望自己能够控制Offset的保存和读取;
9 | 0.8.0 SimpleConsumer Example
10 | * Offset保存在Zookeeper中对Zookeeper带来压力较大, 需要脱离的ZK的依赖;
11 | * Committing and fetching consumer offsets in Kafka
12 | * Offset Management
13 | * https://issues.apache.org/jira/browse/KAFKA-657
14 | * 用户希望能获得Offset并且自行决定保存的位置;
15 | * 用户自己控制Offset时, 却会陷入复杂的异常处理逻辑;
16 | * 老的Consumer会有惊群效应和脑裂问题;
17 |
18 | #### Consumer Client Re-Design
19 | Consumer的改进直到0.9版本, 终于有了一个接近完美的版本; 但是由于向前兼容的需要, 以前的Consumer方式正在被使用, 并没有彻底移除. 由于Consumer的多版本存在, 并且个版本的Consumer变化很大, 这些影响又是对上层可见的, 所以对使用者造成了很大的混淆和困惑.
20 | 所以我想在这篇Blog中整理分析一下各Consumer的特点和区别, 让大家有一个纵观历史的认识.
21 |
22 | 
23 |
--------------------------------------------------------------------------------
/linux/systemcmd/nologin.md:
--------------------------------------------------------------------------------
1 | nologin命令
2 | -------------
3 |
4 |
5 | **nologin命令**可以实现礼貌地拒绝用户登录系统,同时给出信息。
6 | 如果尝试以这类用户登录,就在log里添加记录,然后在终端输出This account is currently not available信息,就是这样。
7 | 一般设置这样的帐号是给启动服务的账号所用的,这只是让服务启动起来,但是不能登录系统。
8 |
9 | #### 语法
10 | ```sh
11 | nologin
12 | ```
13 |
14 | #### 实例
15 | Linux禁止用户登录: 禁止用户登录后,用户不能登录系统,但可以登录ftp、SAMBA等。
16 |
17 | 我们在Linux下做系统维护的时候,希望个别用户或者所有用户不能登录系统,保证系统在维护期间正常运行。
18 |
19 | 这个时候我们就要禁止用户登录。
20 |
21 | 1、禁止个别用户登录,比如禁止lynn用户登录。
22 |
23 | ```sh
24 | passwd -l lynn
25 | ```
26 | 这就话的意思是锁定lynn用户,这样该用户就不能登录了。
27 | ```sh
28 | passwd -u lynn
29 | ```
30 | 上面是对锁定的用户lynn进行解锁,用户可登录了。
31 |
32 | 2、我们通过修改`/etc/passwd`文件中用户登录的shell
33 |
34 | ```sh
35 | vi /etc/passwd
36 | ```
37 | 更改为:
38 | ```sh
39 | lynn:x:500:500::/home/lynn:/sbin/nologin
40 | ```
41 |
42 | 该用户就无法登录了。
43 | 3、禁止所有用户登录。
44 |
45 | ```sh
46 | touch /etc/nologin
47 | ```
48 | 除root以外的用户不能登录了。
49 |
50 |
51 | 来自: http://man.linuxde.net/nologin
52 |
--------------------------------------------------------------------------------
/kafka/kafka4.0_Cmd.md:
--------------------------------------------------------------------------------
1 | kafka4.0 Cmd
2 |
3 | # 查看
4 | ./kafka-consumer-groups.sh --bootstrap-server localhost:9092 --describe --group game_detail
5 |
6 | # 列出所有 Consumer Groups(User Groups)
7 | bin/kafka-consumer-groups.sh --bootstrap-server localhost:9092 --list
8 |
9 |
10 | ```
11 | bin/kafka-consumer-groups.sh \
12 | --bootstrap-server \
13 | --group \
14 | --reset-offsets \
15 | --topic \
16 | --to-earliest | --to-latest | --to-offset | --shift-by \
17 | --execute
18 | ```
19 |
20 | # 重置到最新(跳过未消费消息)
21 | bin/kafka-consumer-groups.sh \
22 | --bootstrap-server localhost:9092 \
23 | --group my-consumer-group \
24 | --topic my-topic \
25 | --reset-offsets \
26 | --to-latest \
27 | --execute
28 |
29 | bin/kafka-consumer-groups.sh \
30 | --bootstrap-server localhost:9092 \
31 | --group game_detail \
32 | --topic admin_game_detail \
33 | --reset-offsets \
34 | --to-latest \
35 | --execute
36 |
--------------------------------------------------------------------------------
/linux/openssh.md:
--------------------------------------------------------------------------------
1 |
2 |
3 | ## 背景介绍
4 | 很多公司都使用静态密码+动态密码的方式登陆跳板机,某些还会强制一个动态密码只能登陆一次,于是我们面临着等一分钟才能登陆一次跳板机,很不方便。本文介绍一种在本机的设置,免除每次输入密码的方法。
5 |
6 | ## 实现方法
7 | 此功能是利用SSH的ControlPersist特性,SSH版本必须是5.6或以上版本才可使用ControlPersist特性。升级SSH可参考CentOS6下升级OpenSSH至7.1一文。
8 |
9 |
10 | ```sh
11 | # vi ~/.ssh/config
12 |
13 | Host *
14 | ControlMaster auto
15 | ControlPersist 4h
16 | # ControlPersist yes
17 | ControlPath ~/.ssh/sessions/ctrl:%h:%p:%r
18 | # Compression yes
19 |
20 |
21 | ```
22 |
23 | ```
24 | # Check
25 | ssh -O check HostName
26 |
27 | # Exit
28 | ssh -O exit HostName
29 | ```
30 |
31 |
32 | ### Other Config
33 |
34 | ```sh
35 | # vi ~/.ssh/config, mod 600
36 |
37 | Host jpserver
38 | User testa
39 | Hostname 10.100.3.80
40 | PreferredAuthentications publickey
41 | IdentityFile /Users/xxx/.ssh/abc.pem
42 |
43 | Host fileserver
44 | User centos
45 | Port 22
46 | Hostname 10.81.23.81
47 | #ProxyCommand ssh nixcraft@gateway.uk.cyberciti.biz nc %h %p 2> /dev/null
48 | ```
--------------------------------------------------------------------------------
/etc/yum.md:
--------------------------------------------------------------------------------
1 | YUM
2 | ===========
3 |
4 | yum是基于Red Hat的系统(如CentOS、Fedora、RHEl)上的默认包管理器。使用yum,你可以安装或者更新一个RPM包,并且他会自动解决包依赖关系。
5 |
6 |
7 | #### 如何只从Red Hat 的标准仓库中下载一个RPM包,而不进行安装
8 |
9 | yum命令本身就可以用来下载一个RPM包,标准的yum命令提供了--downloadonly(只下载)的选项来达到这个目的。
10 | ```sh
11 | $ sudo yum install --downloadonly
12 | ```
13 | 默认情况下,一个下载的RPM包会保存在下面的目录中:
14 | ```sh
15 | /var/cache/yum//[centos/fedora-version]/[repository]/packages
16 | ```
17 | 以上的[repository]表示下载包的来源仓库的名称(例如:base、fedora、updates)
18 |
19 | 如果你想要将一个包下载到一个指定的目录(如/tmp):
20 | ```sh
21 | $ sudo yum install --downloadonly --downloaddir=/tmp
22 | ```
23 | 注意,如果下载的包包含了任何没有满足的依赖关系,yum将会把所有的依赖关系包下载,但是都不会被安装。
24 |
25 | PS:
26 | 另外一个重要的事情是,在CentOS/RHEL 6或更早期的版本中,你需要安装一个单独yum插件(名称为 yum-plugin-downloadonly)才能使用--downloadonly命令选项:
27 | ```sh
28 | $ sudo yum install yum-plugin-downloadonly
29 | ```
30 | 或者update yum也同样可以解决问题
31 |
32 | 如果没有该插件,你会在使用yum时得到以下错误:
33 | ```sh
34 | Command line error: no such option: --downloadonly
35 | ```
36 |
--------------------------------------------------------------------------------
/R-Server/README.md:
--------------------------------------------------------------------------------
1 | # Install
2 |
3 | Reference: http://www.rstudio.com/products/rstudio/download-server/
4 |
5 | ## Step On CentOS 7
6 |
7 | #### Install
8 | ```sh
9 | $ sudo yum -y install R
10 |
11 | $ wget https://download2.rstudio.org/rstudio-server-rhel-1.0.143-x86_64.rpm
12 | $ sudo yum install --nogpgcheck rstudio-server-rhel-1.0.143-x86_64.rpm
13 | ```
14 |
15 | Now visit http://:8787
16 |
17 | #### Post config Firewall (option)
18 | ```
19 | vi /etc/sysconfig/iptables
20 | -A INPUT -m state --state NEW -m tcp -p tcp --dport 22 -j ACCEPT
21 | + -A INPUT-m state --state NEW -m tcp -p tcp --dport 8787 -j ACCEPT
22 | ```
23 |
24 | ## Login
25 |
26 | change config
27 | ```
28 | vi /etc/rstudio/rserver.conf
29 | auth-required-user-group=rstudio_users
30 | ```
31 |
32 | Add user
33 | ```
34 | useradd ruser
35 | passwd ruser
36 |
37 | usermod -a -G rstudio_users ruser
38 | ```
39 |
40 | Now you can login using the user in groups rstudio_users by http://:8787
41 |
42 |
43 |
44 |
--------------------------------------------------------------------------------
/Java/Spring/Environment.md:
--------------------------------------------------------------------------------
1 | # Environment
2 |
3 |
4 | ## Custom Env
5 | ```java
6 | // configname = "application-uat.properties";
7 | private Environment customEnv(String configname) throws Exception {
8 | Resource resource = new ClassPathResource(configname);
9 | Properties props = PropertiesLoaderUtils.loadProperties(resource);
10 |
11 | StandardEnvironment stdenv = new StandardEnvironment();
12 | stdenv.getPropertySources().addLast(new PropertiesPropertySource(configname, props));
13 | return stdenv;
14 | }
15 | ```
16 |
17 | ## Without Spring Env
18 | ```java
19 | public static void initialization(String path) throws IOException {
20 |
21 | Properties properties = new Properties()
22 |
23 | try (InputStream resourceAsStream = getPropertyStream(path); //
24 | InputStreamReader inputstreamreader = new InputStreamReader(resourceAsStream, charset);) {
25 | properties.load(inputstreamreader);
26 | }
27 |
28 | properties.forEach((k, v) -> {
29 | LOGGER.info(k + "=" + v);
30 | });
31 | }
32 | ```
33 |
--------------------------------------------------------------------------------
/mattermost/deploy_docker.md:
--------------------------------------------------------------------------------
1 | # Deploy Mattermost on Docker
2 |
3 | https://docs.mattermost.com/deploy/server/deploy-containers.html
4 |
5 |
6 | 1. In a terminal window, clone the repository and enter the directory.
7 |
8 | git clone https://github.com/mattermost/docker
9 | cd docker
10 | Create your .env file by copying and adjusting the env.example file.
11 |
12 | cp env.example .env
13 | Important
14 |
15 | At a minimum, you must edit the DOMAIN value in the .env file to correspond to the domain for your Mattermost server.
16 |
17 | We recommend configuring the Support Email via MM_SUPPORTSETTINGS_SUPPORTEMAIL. This is the email address your users will contact when they need help.
18 |
19 | 2. Create the required directories and set their permissions.
20 |
21 | mkdir -p ./volumes/app/mattermost/{config,data,logs,plugins,client/plugins,bleve-indexes}
22 | sudo chown -R 2000:2000 ./volumes/app/mattermost
23 | (Optional) Configure TLS for NGINX. If you’re not using the included NGINX reverse proxy, you can skip this step.
24 |
25 |
26 |
--------------------------------------------------------------------------------
/PulsarIO/Pulsar_Real_time_Analytics_at_Scale/part1-introduction.md:
--------------------------------------------------------------------------------
1 | 第一部分:简介
2 | =========================================
3 | 用户行为事包含了结构化的信息就像user-agent或者本地应用标识(IP地址)。应用能够通过相关的事件类型来扩展它的内部属性,这些事件被本地或Web应用收集以用于实时或离线分析。在eBay,我们每秒收集成百上千的事件,增长速度是用户增长的5倍。BOTs 伪装成人们的Bots产生一些有意义的事件。BOT来源于有效(例如,搜索引擎爬虫)和没价值的(抓取在分页信息)。另外一个例子,我们需要通过检测他们来保护我们的下游系统,然后隔离这些事件或者根据不通的服务级别进行处理。BOT很重要的一点是能够准确地判断这个马甲还是在购物!
4 |
5 | 另一类的用户行为事件是非结构化数据,就像地理位置,设备标识,人口统计数据和许多需要越早越好需要数据通道传输到集中式处理的反范式的数据。其他场景,就像风险检测和欺诈分析,实时用户行为模式经过某些周期或者年需要垂直扩展摘要信息,这种场景系统需要高吞吐因此不能用关系型数据库。
6 |
7 | 会话化数据是关键数据结构,这种结构允许事件在一个数据容器里计算直到用户会话完成,通常基于固定的一段时间。许多业务指标包括根据用户会话的转化率,这种也是最好在数据通道做一次早期处理。
8 |
9 | 在业务监控领域,为了探索性可视化和可选维度的告警,就需要可实时聚合的时序指标数据。这种场景特别需要更高的查询性能,也不能使用关系型数据库。指标数据实时聚合带来了挑战,就像由于大量的不同维度和大量的维度基数导致爆炸性的计数器操作。
10 |
11 | 为了让态系统接入数据流, 原始流中的部分视图(过滤器,直充,转换)对于需要低成本处理下游系统至关重要。
12 |
13 | 在这篇论文中,我们打算设计一个数据通道:构建一个用于我们大部分的计算、实时处理,基于CEP引擎构高可用的分布式的计算系统。我们的目的是把事件流看作是一个数据库表,类SQL查询能够处理在实时流来创建聚合,就像用数据库表。接下来我们会描述我们怎么做到直充,过滤,转换和创建不同的事件流视图。
14 |
15 | -----------------
16 |
17 | [« 概述](README.md) [第二部分:数据和处理模型»](part2-data-model.md)
18 |
--------------------------------------------------------------------------------
/pulsar/QuickCmd.md:
--------------------------------------------------------------------------------
1 |
2 | # QuickCmd
3 |
4 | ## Basic
5 | ```
6 |
7 | ```
8 |
9 | ## Topics
10 |
11 | ```sh
12 |
13 | bin/pulsar-admin namespaces get-backlog-quotas test-tenant/standalone/test-ns
14 |
15 |
16 | bin/pulsar-admin namespaces set-backlog-quota test-tenant/standalone/test-ns --limit 1k --policy producer_exception
17 | ```
18 |
19 | ## Producer & Consumer
20 |
21 | ```sh
22 | ### comsumer subscriptions
23 | bin/pulsar-admin --admin-url http://10.0.xx.xx:8080/ topics subscriptions topic_name
24 |
25 | ### comsumer unsubscribe
26 | bin/pulsar-admin --admin-url http://10.0.xx.xx:8080/ topics unsubscribe -s my_comsumer_name topic_name
27 |
28 | ```
29 |
30 |
31 | ## Lession & learn
32 |
33 | Q: Found Log
34 | ```
35 | pulsar write failed
36 | org.apache.pulsar.client.api.PulsarClientException$TimeoutException: Could not send message to broker within given timeout
37 | ```
38 | after Restart
39 | ```
40 | Found Exception: Cannot create producer on topic with backlog quota exceeded
41 | ```
42 | A: Delete Unused consumer which block the message dead.
--------------------------------------------------------------------------------
/clickhouse/Engines/Merge.md:
--------------------------------------------------------------------------------
1 | # Merge
2 |
3 | Merge引擎(不要与Mergetree混淆)本身不存储数据,但允许同时读取任意数量的其他表。读取将自动并行化。不支援写入表。
4 | 读取时,使用实际正在读取的表的索引(如果存在)。合并引擎接受参数:数据库名称和表的正则表达式。范例:
5 | ```
6 | Merge(hits, '^WatchLog')
7 | ```
8 |
9 | * 将使用hits中,所有匹配正则`^WatchLog`的表中读取数据。
10 |
11 | 您可以使用传回字串的常数表达式,而不是数据库字符串名。例如,`currentDatabase()`。
12 |
13 | 正则表达式是re2 (类似于PCRE),区分大小写。请参阅“匹配”部分中有关在正则表达式中转义符号的注释。
14 |
15 | 选择要读取的表时,Merge 表本身将不会被选择,即使它与regex匹配。
16 | 这是为了避免循环。比如可以创建两个合并表,它们将无休止地尝试读取彼此的数据。但不要这样做。
17 |
18 | 使用Merge 引擎的典型方法是,把大量的TinyLog表,用起来像使用单个表一样。
19 |
20 | ## Virtual columns
21 |
22 | 虚拟列是由表引擎提供的列,与表定义无关。换句话说,`CREATE TABLE`中未指定这些列,但可以用SELECT访问这些列。
23 |
24 | 虚拟列与普通列的不同之处如下:
25 | * 表定义中未指定它们。
26 | * 无法使用`INSERT`将数据添加到其中。
27 | * 在不指定列列表的情况下使用`INSERT`时,将忽略虚拟列。
28 | * `SELECT *`时,不会选择它们。
29 | * `SHOW CREATE TABLE`和`DESC TABLE`查询中不显示虚拟列。
30 |
31 | Merge 表包含String类型的虚拟列**_table**。(如果表中已有`_table`列,则虚拟列名为`_table1`,如果已有`_table1`,则名为`_table2`,依此类推)。
32 | 它包含读取数据的表的名称。
33 |
34 | 如果WHERE或PREWHERE子句包含不依赖于其他表列的`_table`列的条件(作为连接元素之一或作为整个表达式),则这些条件将用作索引。
35 | 对要从中读取数据的表名数据集执行条件,并且将仅从触发条件的那些表执行读取操作。
36 |
37 |
38 |
--------------------------------------------------------------------------------
/clickhouse/install.md:
--------------------------------------------------------------------------------
1 | # Install
2 |
3 | ## Download
4 |
5 | [Location](https://packagecloud.io/altinity/clickhouse)
6 |
7 | Sample as version 1.1.54318-3 on CentOS7
8 | * clickhouse-server-common-1.1.54318-3.el7.x86_64.rpm
9 | * clickhouse-server-1.1.54318-3.el7.x86_64.rpm
10 | * clickhouse-debuginfo-1.1.54318-3.el7.x86_64.rpm
11 | * clickhouse-compressor-1.1.54318-3.el7.x86_64.rpm
12 | * clickhouse-client-1.1.54318-3.el7.x86_64.rpm
13 |
14 | ## RPM install
15 | * rpm -ivh clickhouse-server-common-1.1.54318-3.el7.x86_64.rpm
16 | * rpm -ivh clickhouse-server-1.1.54318-3.el7.x86_64.rpm
17 | * rpm -ivh clickhouse-client-1.1.54318-3.el7.x86_64.rpm
18 | * rpm -ivh clickhouse-compressor-1.1.54318-3.el7.x86_64.rpm
19 |
20 | ## Config Dir
21 | /etc/clickhouse-server/
22 |
23 | ## Start
24 | 1. service clickhouse-server start
25 | 2. clickhouse-server --daemon --config-file=/etc/clickhouse-server/config.xml
26 |
27 | ## Client
28 | ```sh
29 | clickhouse-client --host=xx.xx.xx.xx --port=9001
30 | :) show tables;
31 | :) select now();
32 | :) select 1;
33 |
34 | ```
35 |
--------------------------------------------------------------------------------
/Jenkins/ansible/do.build.nginx.yaml:
--------------------------------------------------------------------------------
1 | ---
2 |
3 | - name: do package etc stuff
4 | hosts: www-saasfront-web
5 | vars: #定义变量
6 | # work_space: /data/home/jenkins/.jenkins/workspace/www-job-name
7 | timestamp_vary: "{{ lookup('pipe', 'date +%Y%m%d%H%M%S') }}"
8 | # pack_dir_name:
9 | pack_dir_base: /data/appdatas/jenkins_pack
10 |
11 | # become: yes
12 | # become_user: root
13 |
14 | tasks:
15 | - shell: 'date +%Y%m%d%H%M%S'
16 | register: current_run_timestamp
17 |
18 | - name: set facts
19 | set_fact:
20 | timestamp: "{{current_run_timestamp.stdout}}"
21 |
22 | - name: tar file
23 | local_action: shell cd {{work_space}} && tar -cvzf dist.tar.gz dist
24 |
25 | - name: tar file
26 | local_action: shell cd {{work_space}} && mkdir -p {{pack_dir_base}}/{{pack_dir_name}} && mv dist.tar.gz {{pack_dir_base}}/{{pack_dir_name}}/dist_{{timestamp}}.tar.gz
27 |
28 | - name: keep latest 5 then clean other
29 | local_action: shell cd {{pack_dir_base}}/{{pack_dir_name}} && ls -t .| grep ".tar.gz" | awk "{if(NR>5){print $1}}" | xargs rm -rf
30 |
31 |
32 |
--------------------------------------------------------------------------------
/PulsarIO/Processor.md:
--------------------------------------------------------------------------------
1 | # Process
2 |
3 | ## EventSource接口
4 | 定义了添加删除sink的接口
5 | * addEventSink
6 | * getEventSinks
7 | * removeEventSink
8 | * setEventSinks
9 |
10 | ## EventSink接口
11 | * sendEvent
12 |
13 | ## AbstractEventSource
14 |
15 | 简单实现EventSource 接口
16 | * 对sink进行pause/resume
17 | * fireSendEvent(): 实现了把消息发送给子sink对象
18 | * 实现 error接口,注册erro,取error等
19 |
20 | **主要是对子sink的控制**
21 |
22 | ## AbstractEventProcessor
23 |
24 | 继承抽象类AbstractEventSource,并实现EventProcessor接口,
25 | EventProcessor接口主要是组合EventSource,EventSink,Monitorable, MonitorableStatCollector四个接口
26 |
27 | Monitorable, MonitorableStatCollector两个接口主要和监控统计相关
28 | 此类大部分代码是和监控有关,还有用PipelineFlowControl控制process的能力,包括此process的pause/resume状态变更
29 |
30 | **主要是对process本身的控制和信息统计**
31 |
32 | ## AbstractQueuedEventProcessor
33 | 真正实现 sendEvent 的抽象类,在sendEvent中调用queueEvent方法, 默认实现queueEvent方法为:把事件放入RequestQueueProcessor(一个util类,此类实现了一个ringbuffer的工作线程池)线程池并配置真正处理的EventProcessRequest工作类,在工作线程处理
34 |
35 | 子类可以重载 queueEvent方法,并必须实现 getProcessEventRequest,来决定真正的处理工作方式。在EventProcessRequest 中留有接口processEvent方法来处理,如在EsperProcessor的实现中,新增了ProcessEventRequest来让epl处理真正的工作。
36 |
37 |
--------------------------------------------------------------------------------
/mysql/docker-compose.yml:
--------------------------------------------------------------------------------
1 | version: '3.8'
2 |
3 | services:
4 | db:
5 | image: swr.cn-north-4.myhuaweicloud.com/ddn-k8s/docker.io/mysql/mysql-server:8.0
6 | container_name: mysql_container
7 | restart: unless-stopped
8 | environment:
9 | MYSQL_ROOT_PASSWORD: 123456
10 | ports:
11 | - "0.0.0.0:3306:3306"
12 | volumes:
13 | - C:\work\docker_data\mysql\db_data:/var/lib/mysql
14 |
15 | services:
16 | mysql:
17 | image: mysql:8.0.42
18 | container_name: mysql8
19 | restart: always
20 | ports:
21 | - "3306:3306"
22 | environment:
23 | MYSQL_ROOT_PASSWORD: root1234 # root 密码
24 | MYSQL_DATABASE: mysql # 初始数据库
25 | MYSQL_USER: test # 初始用户
26 | MYSQL_PASSWORD: test # 用户密码
27 | volumes:
28 | - /Users/jaiminpan/.data/appdatas/mysql/mysql_84:/var/lib/mysql # 数据持久化
29 | - ./init:/docker-entrypoint-initdb.d # 初始 SQL 脚本(可选)
30 | command:
31 | --default-authentication-plugin=mysql_native_password
32 | --character-set-server=utf8mb4
33 | --collation-server=utf8mb4_unicode_ci
--------------------------------------------------------------------------------
/python/README.md:
--------------------------------------------------------------------------------
1 | Python
2 | -----------
3 |
4 | ## Website
5 | [Python 官网](https://www.python.org/)
6 | [Python 官网文档](https://www.python.org/doc/)
7 |
8 | ## Install
9 | [安装教程](https://github.com/jaiminpan/MYWIKI/blob/master/python/install.md)
10 |
11 | ## Book
12 | * **无编程基础**
13 | 《head first python》
14 | [与孩子一起学编程](http://book.douban.com/subject/5338024/)
15 | * **有编程基础**
16 | [简明 Python 教程](http://woodpecker.org.cn/abyteofpython_cn/chinese/index.html) ([地址2](http://itlab.idcquan.com/linux/manual/Python_chinese/))
17 | [Dive Into Python](http://woodpecker.org.cn/diveintopython/)
18 |
19 | # Misc
20 |
21 | ## scrapy爬虫框架
22 | [官网http://scrapy.org/](http://scrapy.org/)
23 | [中文教程](http://scrapy-chs.readthedocs.org/zh_CN/0.24/intro/tutorial.html)
24 |
25 | ## 数据分析工具
26 | [python数据分析工具](https://github.com/jaiminpan/MYWIKI/blob/master/python/data_science.md)
27 |
28 | ## supervisor
29 | supervisor 是类似于Daemontools的监控工具,它基于python,能随时监控系统中某些进程的状态,并在“适当的时候给予适当的操作”。
30 |
31 | 官网 http://supervisord.org
32 | [supervisor-进程控制服务](http://www.litrin.net/2012/08/02/supervisor-%E8%BF%9B%E7%A8%8B%E6%8E%A7%E5%88%B6%E6%9C%8D%E5%8A%A1/)
33 |
--------------------------------------------------------------------------------
/ELK/elastic/Filter.md:
--------------------------------------------------------------------------------
1 | # Filter
2 |
3 | ES中filter的用法有两种,一种是filted query,如下
4 | 1.
5 | ```json
6 | {
7 | "query":{
8 | "filtered":{
9 | "query":{
10 | "term":{"title":"kitchen3"}
11 | },
12 | "filter":{
13 | "term":{"price":1000}
14 | }
15 | }
16 | }
17 | }
18 | ```
19 | 这种方式已经deprecated了,可以通过boolQuery实现。
20 | 2.
21 | ```json
22 | {
23 | "query": {
24 | "bool": {
25 | "must": {
26 | "term": {
27 | "term":{"title":"kitchen3"}
28 | }
29 | },
30 | "filter": {
31 | "term": {
32 | "price":1000
33 | }
34 | }
35 | }
36 | }
37 | }
38 | ```
39 |
40 | 另一种是直接放在根目录:
41 | 3.
42 | ```json
43 | {
44 | "query":{
45 | "term":{"title":"kitchen3"}
46 | },
47 | "filter":{
48 | "term":{"price":1000}
49 | }
50 | }
51 | ```
52 |
53 | ### 区别
54 | 根目录中的filter(**3**)在query后执行。在filter query先执行filter(**2**),不计算score,再执行query。
55 | 如果还要在搜索结果中执行aggregation操作,filter query(**2**)聚合的是filter和query之后的结果,而filter(**3**)聚合的是query的结果。
56 |
57 |
58 | https://stackoverflow.com/questions/28958882/elasticsearch-filtered-query-vs-filter
59 |
60 |
--------------------------------------------------------------------------------
/Java/logback/logback-spring.xml:
--------------------------------------------------------------------------------
1 |
2 |
3 |
4 |
5 |
6 |
7 |
9 |
10 |
12 |
14 |
15 |
16 |
17 |
18 |
19 |
20 |
26 |
27 |
28 |
--------------------------------------------------------------------------------
/Flex-Bison/Flex_Basic.md:
--------------------------------------------------------------------------------
1 | # Lex & Flex
2 |
3 | ## 基本格式
4 | Lex & Flex 文件一般以`.l`后缀结尾。
5 |
6 | ```
7 | 定义段
8 | %%
9 | 规则段
10 | %%
11 | 代码段
12 | ```
13 | #### 例子
14 | ```
15 | // test.l
16 | %{
17 | #include
18 | %}
19 |
20 | %option noyywrap
21 | %option main
22 |
23 | digit [0-9]
24 | %%
25 | stop printf("Stop command received\n");
26 | start printf("Start command received\n");
27 | %%
28 | int yywrap(void)
29 | {
30 | return 1;
31 | }
32 | ```
33 |
34 | #### 编译
35 | ```
36 | # flex test.l // 默认输出文件名 lex.core_yy.c
37 | flex -o test.c test.l // 指定文件名 test.c
38 | gcc -o test test.c
39 | ```
40 | #### 输出
41 | ```
42 | -># ./test
43 | start stop
44 | Start command received
45 | Stop command received
46 | ```
47 |
48 | ## 基本语法
49 | #### 定义段
50 | * 格式:
51 | ```
52 | DIGIT [0-9]
53 | ID [a-z][a-z0-9]*
54 | ```
55 | * 定义段的: /*注释内容*/ 也会被复制到输出“.c”文件中。
56 |
57 | #### 规则段:
58 | * pattern action
59 | * 规则中也可以通过/**/加注释,但不会被复制到输出".c"文件中。
60 |
61 | #### 代码段
62 | * 原样复制到输出的“.c”文件中
63 |
64 | #### 其它
65 | * 在定义和规则段,任何缩进的文本,或者是放在“%{”和“%}”之间的内容会被原封不动的复制到输出".c"文件中。
66 |
67 | ## Misc
68 | http://liuzeshu.com/2015/07/21/flex-bison-notes/
69 |
70 |
71 |
--------------------------------------------------------------------------------
/ldap/README.md:
--------------------------------------------------------------------------------
1 | # ldap
2 |
3 |
4 |
5 | dn: cn=module,cn=config
6 | cn: module
7 | objectclass: olcModuleList
8 | objectclass: top
9 | olcmoduleload: memberof
10 | olcmodulepath: /usr/lib/ldap
11 |
12 | dn: olcOverlay={0}memberof,olcDatabase={1}hdb,cn=config
13 | objectClass: olcConfig
14 | objectClass: olcMemberOf
15 | objectClass: olcOverlayConfig
16 | objectClass: top
17 | olcOverlay: memberof
18 |
19 |
20 |
21 |
22 | dn: cn=module,cn=config
23 | cn: module
24 | objectclass: olcModuleList
25 | objectclass: top
26 | olcmoduleload: refint
27 | olcmodulepath: /usr/lib/ldap
28 |
29 | dn: olcOverlay={1}refint,olcDatabase={1}hdb,cn=config
30 | objectClass: olcConfig
31 | objectClass: olcMemberOf
32 | objectClass: olcOverlayConfig
33 | objectClass: top
34 | olcOverlay: refint
35 |
36 |
37 |
38 | ldapadd -Y EXTERNAL -H ldapi:///
39 | dn: olcOverlay=memberof,olcDatabase={2}hdb,cn=config
40 | objectClass: olcOverlayConfig
41 | objectClass: olcMemberOf
42 | olcOverlay: memberof
43 | olcMemberOfRefint: TRUE
44 |
45 |
46 |
47 | ldapmodify -Q -Y EXTERNAL -H ldapi:///
48 | dn: cn=module{0},cn=config
49 | changetype: modify
50 | add: olcModuleLoad
51 | olcModuleLoad: memberof.la
--------------------------------------------------------------------------------
/php/install_php_pgsql.sh:
--------------------------------------------------------------------------------
1 | # php -i | grep postgres to check if postgres installed
2 |
3 | PHP_VER="5.5.29"
4 |
5 | # Check if extension exists first
6 | php -m | grep pgsql
7 |
8 | # Update brew and install requirements
9 | brew update
10 | brew install autoconf
11 |
12 | # Download PHP source and extract
13 | mkdir -p ~/src; cd ~/src
14 | wget -c http://br1.php.net/distributions/php-$PHP_VER.tar.bz2
15 | tar -xjf php-$PHP_VER.tar.bz2
16 |
17 | # Go to extension dir and phpize
18 | cd php-$PHP_VER/ext/pdo_pgsql/
19 | phpize
20 |
21 | # Configure for Postgress.app
22 | # Use just "./configure" for brew version
23 | ./configure --with-pdo-pgsql="/Library/PostgreSQL/9.3/"
24 | make
25 | sudo make install
26 |
27 | # Add extension to php.ini
28 | sudo echo "extension=pdo_pgsql.so" >> /etc/php.ini
29 |
30 | # Go to extension dir and phpize
31 | cd php-$PHP_VER/ext/pgsql/
32 | phpize
33 |
34 | # Configure for Postgress.app
35 | # Use just "./configure" for brew version
36 | ./configure --with-pgsql="/Library/PostgreSQL/9.3/"
37 | make
38 | sudo make install
39 |
40 | # Add extension to php.ini
41 | sudo echo "extension=pgsql.so" >> /etc/php.ini
42 |
43 | # Check if extension exists, again
44 | php -m | grep pgsql
45 |
--------------------------------------------------------------------------------
/Jenkins/ansible/do.deploy.nginx.yaml:
--------------------------------------------------------------------------------
1 |
2 | - hosts: www-saasfront-web
3 | vars: #定义变量
4 | # dir_name: /www/sample-name-web
5 | # package_name:
6 | # pack_dir_base:
7 | timestamp_vary: "{{ lookup('pipe', 'date +%Y%m%d%H%M%S') }}"
8 |
9 | # become: yes
10 | # become_user: root
11 |
12 | tasks:
13 | - shell: 'date +%Y%m%d%H%M%S'
14 | register: current_run_timestamp
15 |
16 | - name: set facts
17 | set_fact:
18 | timestamp: "{{current_run_timestamp.stdout}}"
19 |
20 | - name: copy file to remote
21 | copy: src={{pack_dir_base}}/{{package_name}} dest=/data/www-datas/{{dir_name}}
22 |
23 | - name: extract tar
24 | shell: tar -C /data/www-datas/{{dir_name}} -xvzf /data/www-datas/{{dir_name}}/{{package_name}}
25 |
26 | - name: rename dist
27 | shell: cd /data/www-datas/{{dir_name}} && mv dist dist_{{timestamp}} && rm -f current && ln -s dist_{{timestamp}} current
28 |
29 | - name: clear bakckup
30 | shell: cd /data/www-datas/{{dir_name}} && rm -f dist.tar.gz && mkdir -p backup && cd backup && ls . | xargs rm -rf
31 |
32 | - name: bakckup old package
33 | shell: cd /data/www-datas/{{dir_name}} && ls . | grep -v -E "dist_{{timestamp}}|current|backup" | xargs mv -t backup
34 | ignore_errors: True
35 |
36 |
--------------------------------------------------------------------------------
/clickhouse/Engines/SummingMergeTree.md:
--------------------------------------------------------------------------------
1 | # SummingMergeTree
2 |
3 | 此引擎与MergeTree的不同之处在于,它在合并时汇总数据。
4 |
5 | ```
6 | SummingMergeTree(EventDate, (OrderID, EventDate, BannerID, ...), 8192)
7 | ```
8 | 要合计的列是隐式的。合并时,具有相同主键值的所有行(在示例中为OrderId、eventdate、BannerID,...)进行汇总,并且不在主键中。
9 |
10 |
11 | ```
12 | SummingMergeTree(EventDate, (OrderID, EventDate, BannerID, ...), 8192, (Shows, Clicks, Cost, ...))
13 | ```
14 | 要合计的列是显式设置的(最后一个参数 -Shows, Clicks, Cost, ...)中。
15 | 合并时,具有相同主键的所有行在指定列中汇总。指定的列也必须是numeric(数字)类型的,并且不能是主键的一部分。
16 |
17 |
18 | 如果所有这些列中的值都为null,则将删除行。(例外的情况是数据part中没有任何行。
19 |
20 | 对于不属于主键的其他行,合并时将选择出现的第一个值。
21 |
22 | 不对读取操作执行求和。如有必要,请编写相应的GROUP BY。
23 |
24 |
25 | 此外,表可以具有以特殊方式处理的嵌套数据结构。
26 | 如果嵌套表的名称以“Map”结尾,并且它至少包含两个满足以下条件的列: *对于第一个表,numeric ((U)IntN, Date, DateTime),
27 | 我们将对于其他表把他称为“key”*,arithmetic ((U)IntN, Float32/64),我们将将其称为“(值...) '
28 |
29 | 然后,将此嵌套表解释为key => (values...),并且当合并其行时,两个数据集的元素通过“key”与相应的(值...)中。
30 |
31 | 例子
32 | ```
33 | [(1, 100)] + [(2, 150)] -> [(1, 100), (2, 150)]
34 | [(1, 100)] + [(1, 150)] -> [(1, 250)]
35 | [(1, 100)] + [(1, 150), (2, 150)] -> [(1, 250), (2, 150)]
36 | [(1, 100), (2, 150)] + [(1, -100)] -> [(2, 150)]
37 | ```
38 | 对聚合映射, 使用函数sumMap(key, value)。
39 |
40 | 对于嵌套数据结构,不需要指定需要汇总的列。
41 |
42 | 这种表引擎并不特别有用。请记住,在保存预聚合数据时,您将失去系统上的一些优势。
43 |
44 |
--------------------------------------------------------------------------------
/kafka/monitor.md:
--------------------------------------------------------------------------------
1 | # Monitor
2 |
3 |
4 | ## KafkaOffsetMonitor
5 | [github](https://github.com/quantifind/KafkaOffsetMonitor)
6 |
7 | ### Running
8 | Download then run
9 | ```sh
10 | java -cp KafkaOffsetMonitor-assembly-0.2.1.jar \
11 | com.quantifind.kafka.offsetapp.OffsetGetterWeb \
12 | --zk zk-server1,zk-server2 \
13 | --port 8080 \
14 | --refresh 10.seconds \
15 | --retain 7.days
16 | ```
17 |
18 | ### Problem
19 | It's slow to visit the index.html because it use google cdn.
20 | Fix it by
21 | 1. `jar xvf KafkaOffsetMonitor-assembly-0.2.1.jar` to directory `package`
22 | 2. modify `package/offsetapp/index.html`
23 |
24 | Origin
25 | ```xml
26 |
27 |
28 |
29 | ```
30 | Fixed
31 | ```xml
32 |
33 |
34 |
35 | ```
36 |
37 | 3. `jar cvf myKafkaOffsetMonitor.jar -C package/ .`
38 |
39 |
--------------------------------------------------------------------------------
/PulsarIO/Structure.md:
--------------------------------------------------------------------------------
1 | # Code Structure
2 |
3 | 核心项目 jetstream的代码结构
4 | * -- PATH
5 | * |- jetstreamcore
6 | * |- jetstreamframework
7 | * |- jetstreamspring
8 | * |- jetstream-messaging
9 | * |- jetstream-channels-processors
10 | * |- jetstream-hdfs
11 | * |- configurationmanagement
12 | * |- jetstreamdemo
13 |
14 | ## jetstreamcore
15 | * 核心类库,主要实现Messaging(核心的消息传递框架,包括zookeeper交互[ZooKeeperTransport类]、netty的交互[NettyTransport类])
16 | * Configure(Spring的ApplicationContext)
17 | * Management
18 | * netty服务器和客户端
19 | * jettyserver (已废弃,直接用)
20 |
21 | ## jetstreamframework
22 | * Application启动入口和参数解析
23 | * 事件(event)流的处理框架(核心抽象类 AbstractEventSource、AbstractEventProcessor)
24 | * AbstractEventSource子类(补充统计相关信息,AbstractInboundChannel、AbstractOutboundChannel)
25 | * 数据流画像 dataflow
26 | * 通用事件生成器 GenericEventGenerator
27 | * 默认spring xml配置
28 |
29 | ## jetstream-messaging
30 | * 连接流处理框架、 Messaging (InboundMessagingChannel、OutboundMessagingChannel)
31 | * 连接流处理框架、 REST(http) (InboundRESTChannel、OutboundRESTChannel)
32 | * 连接流处理框架、 kafka (InboundKafkaChannel、OutboundKafkaChannel)
33 |
34 | ## jetstreamspring
35 | 主要是Configure用到,和Spring的 ListableBeanFactory、 ApplicationEvent、BeanChangeAware 相关的代码。
36 |
37 | ## jetstream-channels-processors
38 |
39 | ## jetstream-hdfs
40 |
41 | ## configurationmanagement
42 |
43 | ## jetstreamdemo
44 | 例子
45 |
--------------------------------------------------------------------------------
/CPP/gcc/install.md:
--------------------------------------------------------------------------------
1 | # Install guide
2 |
3 |
4 | ## Download
5 | 下载 gcc 5.4
6 | http://ftp.tsukuba.wide.ad.jp/software/gcc/releases/gcc-5.4.0/
7 |
8 | 下载 mpc-0.8.1,mpfr-2.4.2,gmp-4.3.2
9 | http://ftp.tsukuba.wide.ad.jp/software/gcc/infrastructure/
10 |
11 | ## 准备
12 | 解压gcc后,在gcc根目录下,分别设置 mpc-0.8.1,mpfr-2.4.2,gmp-4.3.2的软连接mpc,mpfr,gmp
13 | ```bash
14 | ln -sf /PATH/mpc-0.8.1 mpc
15 | ln -sf /PATH/gmp-4.3.2 gmp
16 | ln -sf /PATH/mpfr-2.4.2 mpfr
17 | ```
18 |
19 | ## 编译
20 | 创建build目录,然后configure 再make
21 | ```bash
22 | mkdir build && cd build
23 |
24 | # 如果不带--disable-multilib选项,则编译就会生成32bit和64bit的版本,即多平台交叉编译
25 | ../configure --enable-checking=release --enable-languages=c,c++ --disable-multilib
26 |
27 | make -j4
28 | make install
29 | ```
30 |
31 | ## 更新默认gcc
32 | 添加新GCC到可选项,倒数第三个是名字,倒数第二个参数为新GCC路径,最后一个参数40为优先级,值越大,就越先启用
33 | ```
34 | update-alternatives --install /usr/bin/gcc gcc /usr/local/bin/gcc 101
35 | ```
36 | 说明(从最后一个参数说起)
37 | * 101:版本优先级,值越大,就越先启用
38 | * /usr/local/bin/gcc:新的gcc文件目录,以上的编译操作默认,会在路径/usr/local下生成相应的库文件和执行文件等。
39 | * gcc:系统调用时,在命令行中的名字,也就是路径的一个别名吧。
40 | * /usr/bin/gcc:之前版本gcc调用时的路径。
41 |
42 | 查看信息
43 | ```
44 | update-alternatives --display gcc
45 | ```
46 | 如果想要,切换回旧版本,请参考
47 | ```
48 | update-alternatives --config gcc
49 | ```
50 |
51 | 然后,执行updatedb,更新系统文件信息,并退出当前session,重新连接session:
52 |
53 | 检查`gcc -v`
54 |
55 |
--------------------------------------------------------------------------------
/oracle/sqlplus.md:
--------------------------------------------------------------------------------
1 |
2 | # Oracle Client
3 |
4 | ## Connect to Oracle using clinet
5 |
6 | #### Install
7 | ```
8 | oracle-instantclient12.2-basic-12.2.0.1.0-1.x86_64.rpm
9 | oracle-instantclient12.2-sqlplus-12.2.0.1.0-1.x86_64.rpm
10 | oracle-instantclient12.2-devel-12.2.0.1.0-1.x86_64.rpm
11 | oracle-instantclient12.2-odbc-12.2.0.1.0-1.x86_64.rpm
12 | ```
13 | It will install into `/usr/lib/oracle/12.2/client64`
14 |
15 | #### Env
16 | ```
17 | export ORACLE_HOME=/usr/lib/oracle/12.2/client64
18 | export LD_LIBRARY_PATH=/usr/lib/oracle/12.2/client64/lib:$LD_LIBRARY_PATH
19 | ```
20 |
21 | #### Prepare tnsnames.ora
22 | Prepare tnsnames.ora. If the tnsnames.ora location is `/usr/lib/oracle/12.2/client64/network/admin/tnsnames.ora`
23 | ```
24 | export TNS_ADMIN=/usr/lib/oracle/12.2/client64/network/admin
25 | ```
26 |
27 | ** tnsnames.ora Sample **
28 | ```
29 | ORA12 =
30 | (DESCRIPTION =
31 | (ADDRESS_LIST =
32 | (ADDRESS = (PROTOCOL = TCP)(HOST = 127.0.0.1)(PORT = 1521))
33 | )
34 | (CONNECT_DATA =
35 | (sid = orcl)
36 | (SERVER = DEDICATED)
37 | )
38 | )
39 | ```
40 |
41 | #### Connecting
42 | Use following command to Connect oracle
43 |
44 | ```
45 | $ORACLE_HOME/bin/sqlplus 'user/password@ORA12'
46 | ```
47 |
48 |
49 | ### Reference
50 | http://www.xenialab.it/meo/web/white/oracle/HT_IC_RH.htm
51 |
--------------------------------------------------------------------------------
/Jenkins/ansible/sample_web.yaml:
--------------------------------------------------------------------------------
1 | ---
2 |
3 | - hosts: www-AppVue-web
4 | vars: #定义变量
5 | # work_space: /data/home/jenkins/.jenkins/workspace/www-job-name
6 | # dir_name: /www/sample-name-web
7 | timestamp_vary: "{{ lookup('pipe', 'date +%Y%m%d%H%M%S') }}" # eval each time
8 |
9 | # become: yes
10 | # become_user: root
11 |
12 | tasks:
13 |
14 | - name: set facts
15 | set_fact:
16 | timestamp: "{{timestamp_vary}}" # eval here
17 |
18 | - name: tar file
19 | local_action: shell cd {{work_space}} && tar -cvzf dist.tar.gz dist
20 |
21 | - name: copy tar to remote
22 | copy: src={{work_space}}/dist.tar.gz dest=/data/www-datas/{{dir_name}}
23 |
24 | - name: extract tar
25 | shell: tar -C /data/www-datas/{{dir_name}} -xvzf /data/www-datas/{{dir_name}}/dist.tar.gz
26 |
27 | - name: rename dist
28 | shell: cd /data/www-datas/{{dir_name}} && mv dist dist_{{timestamp}} && rm -f current && ln -s dist_{{timestamp}} current
29 | # shell: cd /data/www-datas/{{dir_name}} && mv dist dist_$(date +'%Y%m%d%H%M%S')
30 |
31 | - name: clear bakckup
32 | shell: cd /data/www-datas/{{dir_name}} && rm -f dist.tar.gz && mkdir -p backup && cd backup && ls . | xargs rm -rf
33 |
34 | - name: bakckup old package
35 | shell: cd /data/www-datas/{{dir_name}} && ls . | grep -v -E "dist_{{timestamp}}|current|backup" | xargs mv -t backup
36 | ignore_errors: True
37 |
38 |
--------------------------------------------------------------------------------
/mattermost/env.sample:
--------------------------------------------------------------------------------
1 | # Domain of service
2 | DOMAIN=mm.example.com
3 |
4 | TZ=UTC
5 |
6 | POSTGRES_USER=mmuser
7 | POSTGRES_PASSWORD=mmuser_password
8 | POSTGRES_DB=mattermost
9 |
10 | ## Bleve index (inside the container)
11 | MM_BLEVESETTINGS_INDEXDIR=/mattermost/bleve-indexes
12 |
13 | ## The app port is only relevant for using Mattermost without the nginx container as reverse proxy. This is not meant
14 | ## to be used with the internal HTTP server exposed but rather in case one wants to host several services on one host
15 | ## or for using it behind another existing reverse proxy.
16 | APP_PORT=8065
17 |
18 | ## Configuration settings for Mattermost. Documentation on the variables and the settings itself can be found at
19 | ## https://docs.mattermost.com/administration/config-settings.html
20 | ## Keep in mind that variables set here will take precedence over the same setting in config.json. This includes
21 | ## the system console as well and settings set with env variables will be greyed out.
22 |
23 | ## Below one can find necessary settings to spin up the Mattermost container
24 | MM_SQLSETTINGS_DRIVERNAME=postgres
25 | MM_SQLSETTINGS_DATASOURCE=postgres://${POSTGRES_USER}:${POSTGRES_PASSWORD}@postgres:5432/${POSTGRES_DB}?sslmode=disable&connect_timeout=10
26 |
27 | ## Example settings (any additional setting added here also needs to be introduced in the docker-compose.yml)
28 | MM_SERVICESETTINGS_SITEURL=https://${DOMAIN}
--------------------------------------------------------------------------------
/spark/README.md:
--------------------------------------------------------------------------------
1 | # Spark
2 |
3 | ## Install
4 | #### Prepare
5 | 1. Linux
6 | 2. Java environment(JDK)
7 |
8 | Example:
9 | ```
10 | sudo yum install java-1.8.0-openjdk
11 | ```
12 |
13 | Download: https://spark.apache.org/downloads.html
14 |
15 | Here we choose `spark-1.6.1-bin-hadoop2.4.tgz`
16 |
17 | tar xvfz spark-1.6.1-bin-hadoop2.4.tgz
18 |
19 | ## Usage
20 | #### standalone
21 | You can use following 'standalone' Commands to execute your code directly.
22 |
23 | bin/spark-shell scala
24 | bin/spark-sql sql
25 | bin/pyspark python
26 | bin/spark-class java
27 |
28 | #### cluster
29 | configuration your env in `conf/*` then execute the commands in 'sbin/*'
30 |
31 | Example:
32 | ```
33 | vi conf/slaves
34 | sbin/start-all.sh # or start-master.sh && start-slaves.sh
35 | ```
36 | You can specific your master(spark://IP:PORT) to connect the SparkContext
37 | Example:
38 | ```
39 | MASTER=spark://localhost:7077 ./spark-shell
40 | # OR
41 | MASTER=spark://localhost:7077 ./pyspark
42 | ```
43 |
44 | #### Web
45 | The default web address `http://192.168.0.108:8080/` to view your spark
46 |
47 | ## Reference:
48 | * http://yixuan.cos.name/cn/2015/04/spark-beginner-1/
49 | * http://colobu.com/2014/12/11/spark-sql-quick-start/
50 | * http://blog.csdn.net/zwx19921215/article/details/41821147
51 | * http://www.oschina.net/translate/spark-standalone?print
52 | * https://spark.apache.org/docs/1.5.2/api/python/pyspark.sql.html
53 |
--------------------------------------------------------------------------------
/supervisord/script/conf.d/airflow.ini:
--------------------------------------------------------------------------------
1 | [program:airflow_webserver]
2 | command=airflow webserver
3 | user=airflow
4 | redirect_stderr=true
5 | stdout_logfile=/data/applogs/airflow/web.log
6 | autostart=true
7 | autorestart=false
8 | startsecs=5
9 | priority=1
10 | stopasgroup=true
11 | killasgroup=true
12 | environment=AIRFLOW_HOME=/data/appdata/airflow
13 | directory=/data/appdata/airflow
14 |
15 | [program:airflow_scheduler]
16 | command=airflow scheduler
17 | user=airflow
18 | redirect_stderr=true
19 | stdout_logfile=/data/applogs/airflow/scheduler.log
20 | autostart=true
21 | autorestart=false
22 | startsecs=5
23 | priority=1
24 | stopasgroup=true
25 | killasgroup=true
26 | environment=AIRFLOW_HOME=/data/appdata/airflow
27 | directory=/data/appdata/airflow
28 |
29 | [program:airflow_worker]
30 | command=airflow worker
31 | user=airflow
32 | redirect_stderr=true
33 | stdout_logfile=/data/applogs/airflow/worker.log
34 | autostart=true
35 | autorestart=false
36 | startsecs=5
37 | priority=1
38 | stopasgroup=true
39 | killasgroup=true
40 | environment=AIRFLOW_HOME=/data/appdata/airflow
41 | directory=/data/appdata/airflow
42 |
43 | [program:airflow_flower]
44 | command=airflow flower
45 | user=airflow
46 | redirect_stderr=true
47 | stdout_logfile=/data/applogs/airflow/flower.log
48 | autostart=true
49 | autorestart=false
50 | startsecs=5
51 | priority=1
52 | stopasgroup=true
53 | killasgroup=true
54 | environment=AIRFLOW_HOME=/data/appdata/airflow
55 | directory=/data/appdata/airflow
56 |
--------------------------------------------------------------------------------
/consul/README.md:
--------------------------------------------------------------------------------
1 | # Consul
2 |
3 | ### Consul 介绍
4 | Consul 是 HashiCorp 公司推出的开源工具,用于实现分布式系统的服务发现与配置。与其它分布式服务注册与发现的方案,Consul 的方案更“一站式”,内置了服务注册与发现框 架、分布一致性协议实现、健康检查、Key/Value 存储、多数据中心方案,不再需要依赖其它工具(比如 ZooKeeper 等)。使用起来也较 为简单。Consul 使用 Go 语言编写,因此具有天然可移植性(支持Linux、windows和Mac OS X);安装包仅包含一个可执行文件,方便部署,与 Docker 等轻量级容器可无缝配合。
5 |
6 | #### Consul 的优势:
7 | * 使用 Raft 算法来保证一致性, 比复杂的 Paxos 算法更直接. 相比较而言, zookeeper 采用的是 Paxos, 而 etcd 使用的则是 Raft。
8 | * 支持多数据中心,内外网的服务采用不同的端口进行监听。 多数据中心集群可以避免单数据中心的单点故障,而其部署则需要考虑网络延迟, 分片等情况等。 zookeeper 和 etcd 均不提供多数据中心功能的支持。
9 | * 支持健康检查。 etcd 不提供此功能。
10 | * 支持 http 和 dns 协议接口。 zookeeper 的集成较为复杂, etcd 只支持 http 协议。
11 | * 官方提供 web 管理界面, etcd 无此功能。
12 | * 综合比较, Consul 作为服务注册和配置管理的新星, 比较值得关注和研究。
13 |
14 | #### 特性:
15 | * 服务发现
16 | * 健康检查
17 | * Key/Value 存储
18 | * 多数据中心
19 |
20 | #### Consul 角色
21 | * client: 客户端, 无状态, 将 HTTP 和 DNS 接口请求转发给局域网内的服务端集群。
22 | * server: 服务端, 保存配置信息, 高可用集群, 在局域网内与本地客户端通讯, 通过广域网与其它数据中心通讯。 每个数据中心的 server 数量推荐为 3 个或是 5 个。
23 | * Consul 客户端、服务端还支持夸中心的使用,更加提高了它的高可用性。
24 |
25 |
26 |
27 | #### Consul 工作原理:
28 |
29 | 1、当 Producer 启动的时候,会向 Consul 发送一个 post 请求,告诉 Consul 自己的 IP 和 Port
30 | 2、Consul 接收到 Producer 的注册后,每隔10s(默认)会向 Producer 发送一个健康检查的请求,检验Producer是否健康
31 | 3、当 Consumer 发送 GET 方式请求 /api/address 到 Producer 时,会先从 Consul 中拿到一个存储服务 IP 和 Port 的临时表,从表中拿到 Producer 的 IP 和 Port 后再发送 GET 方式请求 /api/address
32 | 4、该临时表每隔10s会更新,只包含有通过了健康检查的 Producer
33 | Spring Cloud Consul 项目是针对 Consul 的服务治理实现。Consul 是一个分布式高可用的系统,它包含多个组件,但是作为一个整体,在微服务架构中为我们的基础设施提供服务发现和服务配置的工具。
34 |
35 |
36 |
--------------------------------------------------------------------------------
/php/install.md:
--------------------------------------------------------------------------------
1 | # Install
2 |
3 | ## Install 5.6 On CentOS
4 |
5 | #### List what already installed
6 | ```
7 | yum list installed | grep php
8 | ```
9 | #### Remove them
10 | ```
11 | yum remove php.x86_64 php-cli.x86_64 php-common.x86_64 \
12 | php-gd.x86_64 php-ldap.x86_64 \
13 | php-mbstring.x86_64 php-mcrypt.x86_64 \
14 | php-mysql.x86_64 php-pdo.x86_64
15 | ```
16 |
17 | #### Config new `yum` source
18 |
19 | 追加CentOS 6.5的epel及remi源。
20 | ```
21 | # rpm -Uvh http://ftp.iij.ad.jp/pub/linux/fedora/epel/6/x86_64/epel-release-6-8.noarch.rpm
22 |
23 | # rpm -Uvh http://rpms.famillecollet.com/enterprise/remi-release-6.rpm
24 | ```
25 |
26 | 以下是CentOS 7.0的源。
27 | ```
28 | # yum install epel-release
29 |
30 | # rpm -ivh http://rpms.famillecollet.com/enterprise/remi-release-7.rpm
31 | ```
32 | 使用yum list命令查看可安装的包(Packege)。
33 | ```
34 | # yum list --enablerepo=remi --enablerepo=remi-php56 | grep php
35 | ```
36 |
37 | ### Install PHP5.6.x
38 | ```
39 | # yum install --enablerepo=remi --enablerepo=remi-php56 \
40 | php php-opcache \
41 | php-devel php-mbstring \
42 | php-gd php-bcmath php-ldap \
43 | php-mcrypt \
44 | php-mysqlnd php-phpunit-PHPUnit \
45 | php-pecl-xdebug php-pecl-xhprof
46 | # php --version
47 | ```
48 |
49 | ```
50 | # for postgresql connection
51 | yum install --enablerepo=remi --enablerepo=remi-php56 php-pgsql
52 | ```
53 |
54 | #### Install PHP-fpm
55 | ```
56 | yum install --enablerepo=remi --enablerepo=remi-php56 php-fpm
57 | ```
58 |
59 |
--------------------------------------------------------------------------------
/Airflow/DAG/hive_create_partition.py:
--------------------------------------------------------------------------------
1 | #!/usr/bin/env python
2 | # -*- coding: utf-8 -*-
3 |
4 | import logging
5 | import airflow
6 |
7 | from airflow import DAG
8 | from airflow.operators.python_operator import PythonOperator
9 | from airflow.operators import BashOperator, DummyOperator
10 |
11 | from datetime import datetime, timedelta
12 |
13 |
14 | # --------------------------------------------------------------------------------
15 | # set default arguments
16 | # --------------------------------------------------------------------------------
17 |
18 | default_args = {
19 | 'owner': 'Jaimin',
20 | 'depends_on_past': False,
21 | 'start_date': datetime.now(),
22 | 'email': ['airflow@airflow.com'],
23 | 'email_on_failure': False,
24 | 'email_on_retry': False,
25 | 'retries': 1,
26 | 'retry_delay': timedelta(minutes=5),
27 | # 'queue': 'bash_queue',
28 | # 'pool': 'backfill',
29 | # 'priority_weight': 10,
30 | # 'end_date': datetime(2016, 1, 1),
31 | }
32 |
33 | dag = DAG(
34 | 'hive_create_part_v1',
35 | default_args=default_args,
36 | schedule_interval="0 1 * * *",
37 | concurrency=1)
38 |
39 | # --------------------------------------------------------------------------------
40 | # set tasks
41 | # --------------------------------------------------------------------------------
42 |
43 | task = BashOperator(
44 | task_id='hive_create_parition',
45 | bash_command='bash /data/appdata/airflow/script/hive_create_job.sh mnode2 ',
46 | dag=dag)
47 |
--------------------------------------------------------------------------------
/python/data_science.md:
--------------------------------------------------------------------------------
1 | 数据分析工具
2 | ---------------
3 |
4 | #### Pandas
5 |
6 | pandas 是一个开源的软件,它具有 BSD 的开源许可,为 Python 编程语言提供高性能,易用数据结构和数据分析工具。在数据改动和数据预处理方面,Python 早已名声显赫,但是在数据分析与建模方面,Python 是个短板。Pands 软件就填补了这个空白,能让你用 Python 方便地进行你所有数据的处理,而不用转而选择更主流的专业语言,例如 R 语言。
7 |
8 | 整合了劲爆的 IPyton 工具包和其他的库,它在 Python 中进行数据分析的开发环境在处理性能,速度,和兼容方面都性能卓越。Pands 不会执行重要的建模函数超出线性回归和面板回归;对于这些,参考 statsmodel 统计建模工具和 scikit-learn 库。为了把 Python 打造成顶级的统计建模分析环境,我们需要进一步努力,但是我们已经奋斗在这条路上了。
9 |
10 | 由 Galvanize 专家,数据科学家 Nir Kaldero 提供。
11 |
12 | #### Matplotlib
13 |
14 | matplotlib 是基于 Python 的 2D(数据)绘图库,它产生(输出)出版级质量的图表,用于各种打印纸质的原件格式和跨平台的交互式环境。matplotlib 既可以用在 python 脚本, python 和 ipython 的 shell 界面 (ala MATLAB? 或 Mathematica?),web 应用服务器,和6类 GUI 工具箱。
15 |
16 | matplotlib 尝试使容易事情变得更容易,使困难事情变为可能。你只需要少量几行代码,就可以生成图表,直方图,能量光谱(power spectra),柱状图,errorcharts,散点图(scatterplots)等,。
17 |
18 | 为简化数据绘图,pyplot 提供一个类 MATLAB 的接口界面,尤其是它与 IPython 共同使用时。对于高级用户,你可以完全定制包括线型,字体属性,坐标属性等,借助面向对象接口界面,或项 MATLAB 用户提供类似(MATLAB)的界面。
19 |
20 | Galvanize 公司的首席科学官 Mike Tamir 供稿。
21 |
22 | #### Scikit-Learn
23 |
24 |
25 |
26 | Scikit-Learn 是一个简单有效地数据挖掘和数据分析工具(库)。关于最值得一提的是,它人人可用,重复用于多种语境。它基于 NumPy,SciPy 和 mathplotlib 等构建。Scikit 采用开源的 BSD 授权协议,同时也可用于商业。Scikit-Learn 具备如下特性:
27 |
28 | 分类(Classification) – 识别鉴定一个对象属于哪一类别
29 |
30 | 回归(Regression) – 预测对象关联的连续值属性
31 |
32 | 聚类(Clustering) – 类似对象自动分组集合
33 |
34 | 降维(Dimensionality Reduction) – 减少需要考虑的随机变量数量
35 |
36 | 模型选择(Model Selection) –比较、验证和选择参数和模型
37 |
38 | 预处理(Preprocessing) – 特征提取和规范化
39 |
40 | Galvanize 公司数据科学讲师,Isaac Laughlin提供
41 |
42 |
--------------------------------------------------------------------------------
/CPP/guard.h:
--------------------------------------------------------------------------------
1 | #ifndef _PZM_GUARD_H_
2 | #define _PZM_GUARD_H_
3 |
4 | namespace pzm{
5 | namespace Synch{
6 |
7 | //scoped locking
8 | template
9 | class Guard{
10 | public:
11 | Guard(LOCK& lock):lock_(&lock), own_(false)
12 | {
13 | acquire();
14 | }
15 | ~Guard()
16 | {
17 | release();
18 | }
19 | void acquire()
20 | {
21 | lock_->acquire();
22 | own_ = true;
23 | }
24 | void release()
25 | {
26 | if(own_) {
27 | own_ = false;
28 | lock_->release();
29 | }
30 | }
31 |
32 | private:
33 | LOCK* lock_;
34 | bool own_;
35 |
36 | Guard(){}
37 | Guard(const Guard &){}
38 | void operator=(const Guard &){}
39 | };
40 |
41 | class Lock
42 | {
43 | public:
44 | virtual void acquire()=0;
45 | virtual void release()=0;
46 | };
47 |
48 | class Null_Lock:public Lock
49 | {
50 | public:
51 | virtual void acquire(){};
52 | virtual void release(){};
53 | };
54 |
55 | }
56 | }
57 |
58 | /* example
59 | #include "Guard.h"
60 | #include "iostream"
61 | using namespace std;
62 |
63 | class mutex:public pzm::Synch::Lock
64 | {
65 | public:
66 |
67 | virtual void acquire(){cout<<"lock"< guard(m);
75 | }
76 | cout<<"end"<php;
30 | root /data/site/www.ttlsa.com;
31 |
32 | location /
33 | {
34 | auth_basic "nginx basic http test for ttlsa.com";
35 | auth_basic_user_file conf/htpasswd;
36 | autoindex on;
37 | }
38 | }
39 | ```
40 |
41 | 备注:一定要注意auth_basic_user_file路径(指定的文件是nginx.conf所在目录的相对路径),否则会不厌其烦的出现403。
42 |
43 | 生成密码
44 | 可以使用htpasswd,或者使用openssl
45 | ```
46 | # printf "test:$(openssl passwd -crypt 123456)\n" >>conf/htpasswd
47 | # cat conf/htpasswd
48 | # OR "htpasswd -c -b passwordfile username password"
49 | test:xyJkVhXGAZ8tM
50 | ```
51 |
52 | 账号:test
53 | 密码:123456
54 | reload nginx
55 | ```
56 | nginx -s reload
57 | ```
58 |
--------------------------------------------------------------------------------
/supervisord/script/supervisor_init_script.sh:
--------------------------------------------------------------------------------
1 | #!/bin/bash
2 | #
3 | # supervisord This scripts turns supervisord on
4 | #
5 | # Author: Mike McGrath (based off yumupdatesd)
6 | #
7 | # chkconfig: - 95 04
8 | #
9 | # description: supervisor is a process control utility. It has a web based
10 | # xmlrpc interface as well as a few other nifty features.
11 | # processname: supervisord
12 | # config: /etc/supervisor/supervisord.conf
13 | # pidfile: /var/run/supervisord.pid
14 | #
15 |
16 | # source function library
17 | . /etc/rc.d/init.d/functions
18 |
19 | RETVAL=0
20 |
21 | start() {
22 | echo -n $"Starting supervisord: "
23 | daemon "supervisord -c /etc/supervisor/supervisord.conf "
24 | RETVAL=$?
25 | echo
26 | [ $RETVAL -eq 0 ] && touch /var/lock/subsys/supervisord
27 | }
28 |
29 | stop() {
30 | echo -n $"Stopping supervisord: "
31 | killproc supervisord
32 | echo
33 | [ $RETVAL -eq 0 ] && rm -f /var/lock/subsys/supervisord
34 | }
35 |
36 | restart() {
37 | stop
38 | start
39 | }
40 |
41 | case "$1" in
42 | start)
43 | start
44 | ;;
45 | stop)
46 | stop
47 | ;;
48 | restart|force-reload|reload)
49 | restart
50 | ;;
51 | condrestart)
52 | [ -f /var/lock/subsys/supervisord ] && restart
53 | ;;
54 | status)
55 | status supervisord
56 | RETVAL=$?
57 | ;;
58 | *)
59 | echo $"Usage: $0 {start|stop|status|restart|reload|force-reload|condrestart}"
60 | exit 1
61 | esac
62 |
63 | exit $RETVAL
64 |
--------------------------------------------------------------------------------
/claude/command/brief.md:
--------------------------------------------------------------------------------
1 | ### /brief - 写会话摘要
2 |
3 | 如果会话快结束了,并且用户输入 `/brief` 或者让你 "写摘要",立即:
4 | 1. 检查 `./docs/Brief.md` 以查看是否有任何现有内容可以保留
5 | 2. 写一个全面的摘要,涵盖:
6 | - 当前会话中取得的重要进展
7 | - 关键的决策和架构变更
8 | - 未完成的任务和下一步
9 | - 需要保留的技术细节
10 | - 任何使用 compact 功能可能会丢失的上下文
11 | 3. 在开头包含当前的日期和时间 (EST)
12 | 4. 用新内容覆盖整个 Brief.md 文件
13 |
14 | **目的**: 摘要作为 Claude Code 的 "compact" 功能之上的一个额外层,以确保会话之间不会丢失重要细节。 这与简洁无关 - 尽可能彻底,以保留所有重要上下文。
15 |
16 | **何时使用**:
17 | - 在重要的开发会话结束时
18 | - 当做出重要的架构决策时
19 | - 在使用 compact 功能之前,如果关键细节可能会丢失
20 | - 当用户明确要求时
21 |
22 | **注意**: 当被要求 "阅读摘要" 时,只需阅读 Brief.md 文件,无需修改它。 这通常发生在 /start 之后会话的开始。
23 |
24 |
25 | ## > vi Brief.md
26 |
27 | 在创建新的 Brief 时,除非用户指示,否则始终覆盖整个 Brief,因为有时我们只需要更新现有的 Brief(除了顶部的这一段,它应该始终保持原样)。 创建 Brief 时,始终包含 Brief 的日期和时间 EST。 Brief 是临时的,仅用于帮助从一个会话延续到另一个会话。 始终只有一个 Brief 文档。 我们不使用 Claude Code CLI 的 "compact" 功能。 相反,我们使用 Brief 作为在需要时确保会话到会话连续性的手段。
28 |
29 | # 摘要
30 |
31 | **日期/时间**: 2025 年 7 月 5 日,凌晨 12:11 EST
32 |
33 |
34 | Create a futuristic website banner inspired by this layout: https://i.ibb.co/s9YRj9nM/2-1.png. The design is for "iPunic", a global IP proxy service. Enhance the tech aesthetic by adding elements like glowing global networks, digital nodes, abstract 3D world maps, and data streams. Use a dark gradient background (deep blue to purple), with luminous lines, cyber grid overlays, and motion-inspired visuals to convey speed and security. Incorporate HUD-style UI details and abstract server visuals. Leave central space for headline text. The overall tone should be high-tech, secure, futuristic, and
--------------------------------------------------------------------------------
/Java/UseSystemVariables.md:
--------------------------------------------------------------------------------
1 | # Using System Variables
2 |
3 | Reference:
4 | * https://docs.oracle.com/javase/tutorial/essential/environment/sysprop.html
5 | * https://docs.oracle.com/javase/8/docs/api/java/lang/System.html
6 |
7 | ## In Code
8 |
9 | #### System.getenv()
10 | ```
11 | public static Map getenv()
12 | ```
13 | > https://docs.oracle.com/javase/8/docs/api/java/lang/System.html#getenv--
14 | > Returns an unmodifiable string map view of the **current system environment**.
15 |
16 | #### System.getProperties()
17 | ```
18 | public static Properties getProperties()
19 | ```
20 | > https://docs.oracle.com/javase/8/docs/api/java/lang/System.html#getProperties--
21 | > Determines the **current system properties**.
22 |
23 |
24 | ## In Spring
25 | * https://docs.spring.io/autorepo/docs/spring-framework/4.2.x/javadoc-api/org/springframework/core/env/StandardEnvironment.html
26 |
27 | #### System.getenv()
28 | * `{systemEnvironment['ENV_VARIABLE_NAME']}`
29 |
30 | You can supply app.environment varialble as,
31 | * environment varilable: export ENV_VARIABLE_NAME=DEV
32 |
33 | #### System.getProperties()
34 | * `#{systemProperties['yourkey']}`
35 | * `#{systemProperties.yourkey}`
36 |
37 | sample
38 | ```
39 |
40 |
41 |
42 |
43 | ```
44 |
45 | You can supply app.environment varialble as,
46 | * commandline param: java -Dapp.environment=DEV ....
47 |
48 |
--------------------------------------------------------------------------------
/PostgreSQL/docker/docker-compose.yml:
--------------------------------------------------------------------------------
1 | # https://docs.docker.com/compose/environment-variables/
2 | services:
3 | postgres:
4 | image: postgres:17.7 # Specifies the PostgreSQL image version
5 | container_name: my_postgres_db
6 | restart: always # Ensures the container restarts if it stops Or `unless-stopped`
7 | ports:
8 | - "5432:5432" # Maps host port 5432 to container port 5432
9 | tmpfs:
10 | - /tmp
11 | - /var/run/postgresql
12 | environment:
13 | POSTGRES_USER: username # The PostgreSQL user (useful to connect to the database)
14 | POSTGRES_PASSWORD: password # The PostgreSQL password (useful to connect to the database)
15 | POSTGRES_DB: my_db # The PostgreSQL default database (automatically created at first launch)
16 | security_opt:
17 | - no-new-privileges:true
18 |
19 | # The `volumes` tag allows us to share a folder with our container.
20 | # Its syntax is as follows: [folder path on our machine]:[folder path to retrieve in the container]
21 | volumes:
22 | - /data/appdatas/postgres/data:/var/lib/postgresql/data # Persists data using a named volume
23 |
24 |
25 | ####
26 | ## If you want to use a `.env` file, please comment the `environment` section.
27 | ####
28 |
29 | # The `env_file` tag allows us to declare an environment file
30 | #env_file:
31 | # - .env # The name of your environment file (the one at the repository root)
32 |
33 | ####
34 | ## If you want to persist the database data, please uncomment the lines below.
35 | ####
36 |
--------------------------------------------------------------------------------
/linux/OOM.md:
--------------------------------------------------------------------------------
1 | # Out Of Memory (OOM)
2 |
3 | Reference: http://learning-kernel.readthedocs.org/en/latest/mem-management.html
4 |
5 | 1. OOM启动是在分配内存时发生页面错误时触发的,没有剩余内存阙值可控制。
6 |
7 | 2. OOM结束进程只是简单的搜寻哪个进程的`/proc//oom_score`数值分最大。
8 | 系统综合进程的内存消耗量、CPU时间、存活时间和oom_adj、oom_score_adj计算,消耗内存越多分越高,存活时间越长分越低,
9 | 总的策略是:损失最少的工作,释放最大的内存同时不伤及无辜的用了很大内存的进程,并且杀掉的进程数尽量少。
10 |
11 | 3. 调整oom_score的值可通过更改`/proc//oom_score_adj`或`/proc//oom_adj`进行。
12 | oom_score_adj范围-1000~~+1000,数值越小越安全,-1000表示OOM对此进程禁用;
13 | 同样oom_adj范围-17~~+15,数值越小越安全,-17表示OOM对此进程禁用。
14 | 对oom_adj的支持基于兼容过去内核版本,尽量使用`/proc//oom_score_adj`进行设置。
15 |
16 | 4. Linux在计算进程的内存消耗的时候,会将子进程所耗内存的一半同时算到父进程中。
17 |
18 | ```sh
19 | # It's often a good idea to protect the postmaster from being killed by the
20 | # OOM killer (which will tend to preferentially kill the postmaster because
21 | # of the way it accounts for shared memory). Setting the OOM_SCORE_ADJ value
22 | # to -1000 will disable OOM kill altogether. If you enable this, you probably
23 | # want to compile PostgreSQL with "-DLINUX_OOM_SCORE_ADJ=0", so that
24 | # individual backends can still be killed by the OOM killer.
25 | #OOM_SCORE_ADJ=-1000
26 | # Older Linux kernels may not have /proc/self/oom_score_adj, but instead
27 | # /proc/self/oom_adj, which works similarly except the disable value is -17.
28 | # For such a system, enable this and compile with "-DLINUX_OOM_ADJ=0".
29 | #OOM_ADJ=-17
30 |
31 | test x"$OOM_SCORE_ADJ" != x && echo "$OOM_SCORE_ADJ" > /proc/self/oom_score_adj
32 | test x"$OOM_ADJ" != x && echo "$OOM_ADJ" > /proc/self/oom_adj
33 | # then do your start proc here
34 | start_my_proc
35 | ```
36 |
--------------------------------------------------------------------------------
/clickhouse/Engines/CollapsingMergeTree.md:
--------------------------------------------------------------------------------
1 | # CollapsingMergeTree
2 |
3 | 此引擎与MergeTree 的不同之处在于,它允许在合并时自动删除或'折叠(collapsing)'某些行。
4 |
5 | Yandex.Metrica有一些正常日志(如hit log)和change log。Change log用于增量计算不断更改的数据的统计信息。例如会话更改日志或用户历史记录更改日志。
6 | Yandex.Metrica中的会话总是不断变化。例如,每个会话的命中数会增加。我们将任何对象中的更改称为一对(?旧值?新值)。如果创建了对象,则可能缺少旧值。
7 | 如果删除了对象,则可能缺少新值。如果对象已更改,但以前存在且未删除,则两个值都存在。在更改日志中,为每个更改创建一个或两个条目。
8 | 每个条目都包含对象具有的所有属性,以及用于区分新旧值的特殊属性。当对象发生更改时,仅将新条目添加到更改日志中,现有条目不会被触及。
9 |
10 | 通过change log,可以增量计算几乎所有统计信息。为此,我们需要考虑带加号的"new"行和带减号的"old"行。
11 | 换句话说,对于代数结构包含用于取元素的逆的操作的所有统计信息,增量计算都是可能的。大多数统计数据都是这样。
12 | 我们还可以计算“幂等”统计信息,如唯一访问者的数量,因为在更改会话时不会删除唯一访问者。
13 |
14 | 这是允许 Yandex.Metrica 进行实时工作的主要概念。
15 |
16 | CollapsingMergeTree 接受一个附加参数-- int8类型的列,其包含该行的'sign'。例子:
17 | ```
18 | CollapsingMergeTree(EventDate, (CounterID, EventDate, intHash32(UniqID), VisitID), 8192, Sign)
19 |
20 | ```
21 | 在这里,'Sign'是一个对旧值用-1对新值用1的列。
22 |
23 | 在合并时,每个连续相同的主键(排序数据的列)的每组减少到不超过一行,列值“sign_column = -1”(“负行”),且不超过一行与列值"sign_column = 1"(“正行”)。
24 | 换句话说,change log中的条目被折叠了。
25 | 如果正和负行的数目匹配,则写入第一个负行和最后一个正行。如果有正行比负行的数量多,则只写入最后一行。如果负行的比正行的数量多,则只写入第一个负行。
26 | 否则,就会有逻辑错误,不会写入任何行。(如果日志中的同一部分意外插入了一次以上,则可能发生逻辑错误。错误仅记录在服务器日志中,合并继续。)
27 |
28 | 因此,'折叠'不应更改统计信息的计算结果。变更会逐渐折叠,以便最后只剩下几乎每个object的最后值。
29 | 与MergeTree相比,CollapsingMergeTree 引擎支持多种形式的数据量减少。
30 |
31 | 有多种方法可以从CollapsingMergeTree 表中获得完全“折叠”的数据:
32 | 编写包含GROUPBY和aggregate函数的查询,这些函数用于解释sign。
33 | 例如,
34 | * 要计算数量,请写入“sum(Sign)”而不是“count()”
35 | * 要计算某事物的总和,请写“sum(Sign * x)”而不是“sum(x)”
36 | * 依此类推,并加上“HAVING sum(Sign) > 0”
37 |
38 | 并非所有数字都可以这样计算。例如,无法重写聚合函数“min”和“max”。
39 | 如果必须提取数据而不进行聚合(例如,检查是否存在最新值与特定条件匹配的行),则可以在FROM子句中用FINAL修饰符。这种方法效率要低得多。
40 |
41 |
42 |
--------------------------------------------------------------------------------
/Jenkins/ansible/sample.yaml:
--------------------------------------------------------------------------------
1 | ---
2 | # ansible-playbook sample
3 |
4 | - hosts: www-DctCenter-java
5 | vars:
6 | service_name: "appexs"
7 | run_dir: "appexs"
8 | work_space: "/data/home/jenkins/.jenkins/workspace/sample"
9 | script_name: "jenkins_appexs.sh"
10 | remote_user: java
11 | tasks:
12 |
13 | - name: pause service
14 | shell: CURRENT_SERVICE_NAME={{service_name}} ./consul_api.sh pause
15 |
16 | - name: Copy war file to client
17 | copy: src={{work_space}}/target.tar.gz dest=~/{{run_dir}}
18 |
19 | - name: extract target.tar.gz
20 | shell: tar -C ~/{{run_dir}} -xvzf ~/{{run_dir}}/target.tar.gz
21 |
22 | - name: sleep 5
23 | shell: sleep 5
24 |
25 | - name: stop java
26 | shell: ./{{script_name}} stop
27 | register: outMessg
28 |
29 | - debug: var=outMessg.stdout_lines
30 | ignore_errors: True
31 |
32 | - name: bakckup old package
33 | shell: ./{{script_name}} backup
34 | ignore_errors: True
35 |
36 | - name: delete old package
37 | shell: rm -rf ~/{{run_dir}}/*.jar
38 | ignore_errors: True
39 |
40 | - name: mv package
41 | shell: mv -f ~/{{run_dir}}/target/*.jar ~/{{run_dir}}
42 |
43 | - name: start java
44 | shell: ./{{script_name}} restart
45 |
46 | - shell: ps -eo pid,cmd,etime,stime | grep java
47 | register: ps
48 |
49 | - debug: var=ps.stdout_lines
50 |
51 | - name: Clean target.tar.gz
52 | shell: rm -rf ~/{{run_dir}}/target*
53 | ignore_errors: True
54 |
55 | - name: sleep 10
56 | shell: sleep 10
57 |
58 | - name: resume service
59 | shell: CURRENT_SERVICE_NAME={{service_name}} ./consul_api.sh resume
--------------------------------------------------------------------------------
/ZooKeeper/deploy.md:
--------------------------------------------------------------------------------
1 | # Deploy
2 |
3 | # Deploy
4 | 下载zookeeper安装包,解压
5 |
6 | * 修改日志位置
7 | `bin/zkEnv.sh`中, 设置 `ZOO_LOG_DIR="日志目录"`
8 | * 配置
9 | ```bash
10 | cp zoo_sample.cfg zoo.cfg
11 | vi zoo.cfg
12 | # 设置
13 | dataDir=/tmp/test # 设置data目录
14 | dataLogDir=/tmp/test_wal 设置wal目录 #
15 |
16 | # 集群ip,只有配置集群才需要
17 | server.1= 10.2.27.72:2888:3888
18 | server.2= 10.2.27.73:2888:3888
19 | server.3= 10.2.27.75:2888:3888
20 | ```
21 |
22 | * 设置本机的集群id,只有配置集群才需要
23 | touch /tmp/test/myid # 新建文件
24 | echo 1 > /tmp/test/myid #假设本机ip对应了server.1,则把 1放入myid中
25 |
26 | * 启动 bin/zkServer.sh start
27 |
28 |
29 | ### Log rotate
30 |
31 | vi /etc/logrotate.d/zookeeper
32 | ```
33 | /PATH/TO/zookeeper/zookeeper.out
34 | {
35 | missingok
36 | notifempty
37 | size 200M
38 | compress
39 | dateext
40 | weekly
41 | rotate 4
42 | copytruncate
43 | }
44 | ```
45 |
46 | #### 手动触发
47 | /usr/sbin/logrotate /etc/logrotate.conf
48 | 或者
49 | /usr/sbin/logrotate /etc/logrotate.d/zookeeper
50 |
51 | #### 自动触发
52 | Logrotate是基于CRON运行的,其脚本是`/etc/cron.daily/logrotate`
53 | ```
54 | #!/bin/sh
55 |
56 | /usr/sbin/logrotate /etc/logrotate.conf
57 | EXITVALUE=$?
58 | if [ $EXITVALUE != 0 ]; then
59 | /usr/bin/logger -t logrotate "ALERT exited abnormally with [$EXITVALUE]"
60 | fi
61 | exit 0
62 | ```
63 |
64 | vi /etc/crontab
65 | ```bash
66 | SHELL=/bin/bash
67 | PATH=/sbin:/bin:/usr/sbin:/usr/bin
68 | MAILTO=root
69 | HOME=/
70 |
71 | # run-parts
72 | 01 * * * * root run-parts /etc/cron.hourly
73 | 59 23 * * * root run-parts /etc/cron.daily
74 | 22 4 * * 0 root run-parts /etc/cron.weekly
75 | 42 4 1 * * root run-parts /etc/cron.monthly
76 | ```
77 |
--------------------------------------------------------------------------------
/consul/QuickCmd.md:
--------------------------------------------------------------------------------
1 | # QuickCmd
2 |
3 | ### Office Guide
4 | https://www.consul.io/api/agent/service.html
5 |
6 | ### Other Guide
7 |
8 | ## Agent
9 | ```
10 | # list
11 | curl http://localhost:8500/v1/agent/members
12 |
13 | # check health
14 | curl http://localhost:8500/v1/agent/checks
15 |
16 | # config
17 | curl http://localhost:8500/v1/kv/commons/test/config?raw
18 |
19 | ```
20 |
21 | ## all Service
22 | ```
23 | curl -s localhost:8500/v1/catalog/service/web
24 |
25 | curl localhost:8500/v1/agent/services | python -m json.tool | grep ID | awk '{print $2}'|sed 's/["|,]//g' | grep ${SERVICE_NAME}
26 | ```
27 |
28 |
29 | ## agent Service
30 | ```
31 | # register
32 | curl -XPUT http://localhost:8500/v1/agent/service/register -d \
33 | '{
34 | "ID": "myinst_id",
35 | "Name": "service_name",
36 | "Tags": [
37 | "primary",
38 | "v1"
39 | ],
40 | "Address": "127.0.0.1",
41 | "Port": 80,
42 | "EnableTagOverride": false,
43 | "Check": {
44 | "DeregisterCriticalServiceAfter": "12h",
45 | "HTTP": "http://localhost:5000/health",
46 | "Interval": "10s"
47 | }
48 | }'
49 |
50 | # delete
51 | curl -s -XPUT localhost:8500/v1/agent/service/deregister/${SERVICE_ID}
52 |
53 | # set check passing:
54 | curl -s localhost:8500/v1/agent/check/pass/${SERVICE_ID}
55 |
56 | # list critical service
57 | curl -s localhost:8500/v1/health/state/critical | python -m json.tool
58 |
59 | # maintenance
60 | curl -s -XPUT "localhost:8500/v1/agent/service/maintenance/${SERVICE_ID}?enable=true&reason=deploy"
61 |
62 | # maintenance resume
63 | curl -s -XPUT "localhost:8500/v1/agent/service/maintenance/${SERVICE_ID}?enable=false"
64 |
65 | ```
66 |
--------------------------------------------------------------------------------
/docker/README.md:
--------------------------------------------------------------------------------
1 | Docker
2 | =================
3 |
4 | Usage
5 | -----------------
6 | Install the most recent version of the Docker Engine for your platform using the official Docker releases, which can also be installed using:
7 | ```
8 | # This script is meant for quick & easy install via:
9 | 'curl -sSL https://get.docker.com/ | sh'
10 | # or:
11 | 'wget -qO- https://get.docker.com/ | sh'
12 | ```
13 |
14 |
15 | Docker In Github
16 | ---------------
17 | * Gitlab, PostgreSQL, MySQL, MongoDB and etc
18 | https://github.com/sameersbn/
19 | PS: Gitlab-8.3 in docker will get error 500 if git clone from svn and commits message title is 'git-svn-id......'
20 | (reword comments can fix it)
21 |
22 | Gitlab Docker Sample:
23 | ---------------
24 | According to [Guilding](https://github.com/sameersbn/docker-gitlab)
25 | Note:
26 | * The alias of the postgresql server container should be set to **postgresql** while linking with the gitlab image.
27 | * The alias of the redis server container should be set to **redisio** while linking with the gitlab image.
28 | * If host (pg or redis server) is not reachable inside Gitlab docker, use **`iptables -t filter -A DOCKER -d 172.17.0.0/16 -i docker0 -o docker0 -j ACCEPT`**
29 |
30 |
31 | Reference
32 | --------------
33 | https://github.com/widuu/chinese_docker/tree/master/userguide
34 |
35 | Books
36 | ------------
37 | [Docker —— 从入门到实践](https://www.gitbook.com/book/yeasy/docker_practice)
38 |
39 |
40 | ### docker-compose
41 | > sudo curl -L "https://github.com/docker/compose/releases/download/v2.27.0/docker-compose-$(uname -s)-$(uname -m)" -o /usr/local/bin/docker-compose
42 | > ln -s /usr/local/bin/docker-compose /usr/bin
--------------------------------------------------------------------------------
/python/code/blockedpool.py:
--------------------------------------------------------------------------------
1 | # -*- coding: utf-8 -*-
2 |
3 | from multiprocessing.pool import Pool
4 | from time import sleep
5 | # from random import randint
6 |
7 | ADD_FAST = 0
8 | ADD_SLOW = 1
9 |
10 | class BlockedPool(Pool):
11 | def __init__(self, processes, lowsize, batchsize):
12 | super(BlockedPool, self).__init__(processes)
13 | self.lowsize = lowsize
14 | self.fastsize = batchsize
15 | self.fastcnt = 0
16 | self.addmod = ADD_FAST
17 |
18 | def apply_block_async(self, func, args=(), kwds={}, callback=None,
19 | error_callback=None):
20 |
21 | if self.addmod == ADD_FAST:
22 | self.fastcnt = self.fastcnt + 1
23 | if self.fastcnt > self.fastsize:
24 | self.addmod = ADD_SLOW
25 | self.fastcnt = 0
26 | else:
27 | if self._taskqueue.qsize() < self.lowsize:
28 | self.addmod = ADD_FAST
29 | else:
30 | # sleep(randint(1, 5))
31 | sleep(2)
32 |
33 | return self.apply_async(func, args, kwds, callback, error_callback)
34 |
35 | def call_main():
36 |
37 | pool = BlockedPool(10, 5000, 1000)
38 |
39 | num = 0
40 | for input in range(1000):
41 |
42 | pool.apply_block_async(lambda x:print(x), (input, ))
43 |
44 | if num % 10 == 0:
45 | nowtime = time.strftime('%Y-%m-%d %H:%M:%S', time.localtime(time.time()))
46 | sys.stdout.write('\rprogress: %s, (% 10d)%s' % (nowtime, num, phone_num))
47 | sys.stdout.flush()
48 |
49 | num = num + 1
50 |
51 | pool.close()
52 | pool.join()
53 |
54 | if __name__ == "__main__":
55 | call_main()
56 |
--------------------------------------------------------------------------------
/PostgreSQL/Replication.md:
--------------------------------------------------------------------------------
1 | # Replication
2 |
3 | (version > pg10)
4 |
5 | ## Step 0
6 | #### 主库检查 postgres.conf
7 | ```
8 | wal_level = replica
9 | ```
10 |
11 | ## Step 1
12 | ##### CREATE USER
13 | > CREATE ROLE repadmin login replication encrypted password 'pwd'
14 |
15 | ##### MODIFY `pg_hba.conf`
16 | ```
17 | host replication repadmin 10.0.0.0/16 md5
18 | ```
19 | ##### reload conf
20 | > systemctl reload xxx.service
21 |
22 | ```
23 | cp /usr/pgsql-11/share/recovery.conf.sample /PATH/TO/PGDATA/recovery.done
24 | chown postgres:postgres recovery.done
25 | chmod 600 recovery.done
26 | ```
27 |
28 | ##### vi recovery.done
29 | ```
30 | standby_mode = on
31 | primary_conninfo = 'host=10.0.xx.xx port=xxx user=repadmin password=pwd'
32 | ```
33 |
34 | #### Ensure
35 | Make sure all file in postgres data directory has accessed permission by `postgres`
36 |
37 | ## Step 2
38 | #### 生成备库
39 | ```
40 | mkdir /data/appdatas/pgsql/data_xx
41 | chown postgres /data/appdatas/pgsql/data_xx
42 | chmod 700 /data/appdatas/pgsql/data_xx
43 |
44 | su - postgres
45 | export PGPASSWORD="pwd"
46 | pg_basebackup -D /data/appdatas/pgsql/11/dataxx -Fp -P -X stream -v -h 10.0.x.x -p xxx -U repadmin
47 | ```
48 |
49 | ## Step 3
50 | #### 主库操作
51 | > select * from pg_create_physical_replication_slot('rep_slot_1');
52 |
53 |
54 | ## 备库操作
55 | ##### mv recovery.done recovery.conf
56 | ##### vi recovery.conf
57 | ```
58 | primary_slot_name = 'rep_slot_1'
59 | ```
60 |
61 | ##### option 修改 postgresql.conf
62 | ```
63 | hot_standby_feedback = on
64 | ```
65 |
66 | ## Step 4
67 | #### 启动备库
68 | > /usr/pgsql-11/bin/pg_ctl start -D dataxx
69 |
70 | ## Step 5
71 | postgres version > 12
72 |
73 | > touch standby.signal
74 |
75 |
76 |
77 |
78 |
79 |
--------------------------------------------------------------------------------
/PostgreSQL/postgres.conf:
--------------------------------------------------------------------------------
1 | template 1
2 | ======================
3 | fsync off
4 | shared_buffers 8GB
5 | work_mem 32MB
6 | effective_cache_size 8GB
7 | maintenance_work_mem 2GB
8 |
9 | wal_log_hints = on
10 | wal_level = replica
11 | checkpoint_completion_target 0.9
12 | # checkpoint_segments 64
13 | min_wal_size = 1GB
14 | max_wal_size = 4GB
15 | wal_keep_segments = 1000
16 |
17 |
18 | wal_buffer 8MB
19 | commit_delay 10
20 | commit_siblings 4
21 |
22 |
23 | # wal_level = replica
24 | # archive_mode = on
25 | # archive_command = 'test ! -f /archive/pg_archive/archive_active || cp %p /archive/pg_archive/%f'
26 | # archive_command = 'ssh 127.0.0.1 test ! -f /data/appdatas/pg_archive/%f && scp %p 127.0.0.1:/data/appdatas/pg_archive/%f'
27 | # Add settings for extensions here
28 |
29 |
30 | template 2
31 | ======================
32 | cluster_name = 'CN70'
33 | listen_addresses = '*'
34 | port = 15071
35 | max_connections = 300
36 | shared_buffers = 16GB
37 | work_mem = 16MB
38 | wal_level = replica
39 | wal_compression = on
40 |
41 | commit_delay = 10
42 | commit_siblings = 4
43 | checkpoint_timeout = 15min
44 | max_wal_size = 2GB
45 | min_wal_size = 1GB
46 | checkpoint_completion_target = 0.9
47 |
48 | log_destination = 'csvlog'
49 | log_min_duration_statement = '5s'
50 |
51 | archive_mode = on
52 | #archive_command = 'ssh 10.81.7.1 test ! -f /data/appdatas/pg_archive/%f && scp %p 10.81.7.1:/data/appdatas/pg_archive/%f'
53 | archive_command = 'test ! -f /data/appdatas/pgsql/11/backups/archive_active_70 || cp %p /data/appdatas/pgsql/11/backups/archive_70/%f'
54 |
55 | # Add settings for extensions here
56 |
--------------------------------------------------------------------------------
/Jenkins/ansible/sample_vars.yaml:
--------------------------------------------------------------------------------
1 | ---
2 | # ansible-playbook sample
3 | # usage: ansible-playbook sample_vars.yaml --extra-vars "service_name=myname work_space=${WORKSPACE}"
4 |
5 | - hosts: www-test-java
6 | vars:
7 | service_name: "myname"
8 | run_dir: "mydir"
9 | work_space: "/data/home/jenkins/.jenkins/workspace/sample"
10 | script_name: "jenkins_reboot.sh"
11 | remote_user: java
12 | tasks:
13 |
14 | - name: pause service
15 | shell: CURRENT_SERVICE_NAME={{service_name}} ./service_mesh_api.sh pause
16 |
17 | - name: Copy war file to client
18 | copy: src={{work_space}}/target.tar.gz dest=~/{{run_dir}}
19 |
20 | - name: extract target.tar.gz
21 | shell: tar -C ~/{{run_dir}} -xvzf ~/{{run_dir}}/target.tar.gz
22 |
23 | - name: sleep 5
24 | shell: sleep 5
25 |
26 | - name: stop java
27 | shell: ./{{script_name}} stop
28 | register: outMessg
29 |
30 | - debug: var=outMessg.stdout_lines
31 | ignore_errors: True
32 |
33 | - name: bakckup old package
34 | shell: ./{{script_name}} backup
35 | ignore_errors: True
36 |
37 | - name: delete old package
38 | shell: rm -rf ~/{{run_dir}}/*.jar
39 | ignore_errors: True
40 |
41 | - name: mv package
42 | shell: mv -f ~/{{run_dir}}/target/*.jar ~/{{run_dir}}
43 |
44 | - name: start java
45 | shell: ./{{script_name}} restart
46 |
47 | - shell: ps -eo pid,cmd,etime,stime | grep java
48 | register: ps
49 |
50 | - debug: var=ps.stdout_lines
51 |
52 | - name: Clean target.tar.gz
53 | shell: rm -rf ~/{{run_dir}}/target*
54 | ignore_errors: True
55 |
56 | - name: sleep 10
57 | shell: sleep 10
58 |
59 | - name: resume service
60 | shell: CURRENT_SERVICE_NAME={{service_name}} ./service_mesh_api.sh resume
61 |
--------------------------------------------------------------------------------
/claude/readme.md:
--------------------------------------------------------------------------------
1 |
2 |
3 |
4 | 创建 CLAUDE.md 上下文文件
5 | # 常用命令
6 | - `npm run build`: 构建项目
7 | - `npm run typecheck`: 运行类型检查
8 |
9 | # 代码风格
10 | - 使用 ES 模块语法(`import/export`),而非 CommonJS(`require`)
11 | - 尽可能使用解构导入(例如:`import { foo } from 'bar'`)
12 |
13 | # 工作流程
14 | - 完成一系列代码修改后,务必进行类型检查
15 | - 出于性能考虑,优先运行单个测试,而非整个测试套件
16 |
17 | # 核心文件与函数
18 | - 项目中的关键模块或工具函数。
19 |
20 | # 测试说明
21 | - 如何运行单元测试或端到端测试。
22 |
23 | # 仓库规范
24 | - 分支命名规则、合并策略等。
25 |
26 | # 仓库规范
27 | - pyenv 的使用、特定编译器的要求。
28 |
29 | # 项目特有的行为
30 | - 任何需要注意的警告或非预期行为。
31 |
32 |
33 | ```
34 |
35 | 你希望 Claude 执行的主要任务或目标
36 |
37 |
38 |
39 | 任务的背景信息,比如涉及的框架、业务逻辑、团队规范等
40 |
41 |
42 |
43 | 可以参考的代码片段、接口规范或已有实现
44 |
45 | ```
46 |
47 |
48 | 1.
49 | 确认需求,详细的需求
50 |
51 | 2.
52 | 基于需求文档,列一个计划,渐进的TODO列表
53 |
54 | 3.
55 | 不只是测试,不要硬编码,要实现真正的逻辑,代码要健壮可维护可扩展,如果需求不合理请直接告诉我
56 |
57 |
58 | 3. 探索常见的高效工作流
59 | Claude Code 的灵活性允许你自由设计工作流。以下是社区中沉淀下来的一些高效模式。
60 |
61 |
62 | a. 探索、规划、编码、提交
63 | 这是一个适用于多种复杂任务的通用工作流,它强调在编码前进行充分的思考和规划。
64 |
65 | 探索:要求 Claude 阅读相关文件、图片或 URL,但明确指示它暂时不要编写任何代码。
66 | 规划:让 Claude 制定解决问题的计划。使用“think”、“think hard”或“ultrathink”等关键词,可以给予 Claude 更多的计算时间来评估不同方案。
67 | 编码:在确认计划后,让 Claude 开始实施。
68 | 提交:最后,让 Claude 提交代码、创建 PR,并更新相关文档。
69 |
70 | b. 测试驱动开发(TDD)
71 | TDD 与代理式编程相结合,威力倍增。Claude 在有明确目标(如通过测试用例)时表现最佳。
72 |
73 | 编写测试:让 Claude 根据预期输入输出编写测试用例。
74 | 确认失败:运行测试,确保它们因功能未实现而失败。
75 | 提交测试:将测试用例提交到版本控制。
76 | 实现功能:指示 Claude 编写能通过所有测试的代码,并在此过程中不断迭代。
77 | 提交代码:在所有测试通过后,提交最终实现。
78 |
79 |
80 | c. 视觉驱动开发
81 | 与 TDD 类似,你可以为 Claude 提供视觉目标,尤其适用于 UI 开发。
82 |
83 | 1. 提供截图工具:通过 Puppeteer MCP 服务器或 iOS 模拟器 MCP 服务器,让 Claude 能够截取浏览器或应用的界面。
84 | 2. 提供视觉稿:通过粘贴、拖拽或文件路径的方式,将设计稿图片提供给 Claude。
85 | 3. 迭代实现:要求 Claude 编写代码、截图、比对视觉稿,并循环迭代直至结果匹配。
86 | 4. 提交:满意后提交代码。
87 |
88 |
89 |
--------------------------------------------------------------------------------
/etc/UniqueIDs.md:
--------------------------------------------------------------------------------
1 | Sharding & IDs
2 | ---------------
3 |
4 | http://instagram-engineering.tumblr.com/post/10853187575/sharding-ids-at-instagram
5 |
6 |
7 | #### Each of our IDs consists of:
8 |
9 | * 41 bits for time in milliseconds (gives us 41 years of IDs with a custom epoch)
10 | * 13 bits that represent the logical shard ID (max shards id: 2^13 = 8192)
11 | * 10 bits that represent an auto-incrementing sequence, modulus 1024 (2^10 = 1024). This means we can generate 1024 IDs, per shard, per millisecond
12 |
13 | #### Example:
14 |
15 | 1. time id:
16 | 1387263000 = September 9th, 2011, at 5:00pm
17 | milliseconds since the beginning of our epoch (defined January 1st, 2011)
18 | `id = 1387263000 << (64-41)`
19 |
20 | 2. shard id:
21 | user ID: 31341, logical shards: 2000, 31341 % 2000 -> 1341
22 | `id |= 1341 << (64-41-13)`
23 |
24 | 3. seq id:
25 | generated 5000 IDs for this table already; next value is 5001
26 | `id |= (5001 % 1024)`
27 |
28 | ### Here’s the PL/PGSQL that accomplishes all this (for an example schema insta5):
29 | ```plpgsql
30 | CREATE SCHEMA insta5;
31 | CREATE SEQUENCE table_id_seq;
32 |
33 | CREATE OR REPLACE FUNCTION insta5.next_id(OUT result bigint) AS $$
34 | DECLARE
35 | our_epoch bigint := 1314220021721;
36 | seq_id bigint;
37 | now_millis bigint;
38 | shard_id int := 5;
39 | BEGIN
40 | SELECT nextval('insta5.table_id_seq') % 1024 INTO seq_id;
41 |
42 | SELECT FLOOR(EXTRACT(EPOCH FROM clock_timestamp()) * 1000) INTO now_millis;
43 | result := (now_millis - our_epoch) << 23;
44 | result := result | (shard_id << 10);
45 | result := result | (seq_id);
46 | END;
47 | $$ LANGUAGE PLPGSQL;
48 |
49 | CREATE TABLE insta5.our_table (
50 | "id" bigint NOT NULL DEFAULT insta5.next_id(),
51 | ...rest of table schema...
52 | )
53 | ```
54 |
--------------------------------------------------------------------------------
/nginx/compile.md:
--------------------------------------------------------------------------------
1 | The Guide to Compile Nginx
2 | ==========================
3 |
4 | ```
5 | # Configure nginx.
6 | #
7 | # This is based on the default package in Debian. Additional flags have
8 | # been added:
9 | #
10 | # * --with-debug: adds helpful logs for debugging
11 | # * --with-openssl=$HOME/sources/openssl-1.0.1e: compile against newer version
12 | # of openssl
13 | # * --with-http_spdy_module: include the SPDY module
14 | ./configure --prefix=/etc/nginx \
15 | --sbin-path=/usr/sbin/nginx \
16 | --conf-path=/etc/nginx/nginx.conf \
17 | --error-log-path=/var/log/nginx/error.log \
18 | --http-log-path=/var/log/nginx/access.log \
19 | --pid-path=/var/run/nginx.pid \
20 | --lock-path=/var/run/nginx.lock \
21 | --http-client-body-temp-path=/var/cache/nginx/client_temp \
22 | --http-proxy-temp-path=/var/cache/nginx/proxy_temp \
23 | --http-fastcgi-temp-path=/var/cache/nginx/fastcgi_temp \
24 | --http-uwsgi-temp-path=/var/cache/nginx/uwsgi_temp \
25 | --http-scgi-temp-path=/var/cache/nginx/scgi_temp \
26 | --user=www-data \
27 | --group=www-data \
28 | --with-http_ssl_module \
29 | --with-http_realip_module \
30 | --with-http_addition_module \
31 | --with-http_sub_module \
32 | --with-http_dav_module \
33 | --with-http_flv_module \
34 | --with-http_mp4_module \
35 | --with-http_gunzip_module \
36 | --with-http_gzip_static_module \
37 | --with-http_random_index_module \
38 | --with-http_secure_link_module \
39 | --with-http_stub_status_module \
40 | --with-mail \
41 | --with-mail_ssl_module \
42 | --with-file-aio \
43 | --with-http_spdy_module \
44 | --with-cc-opt='-g -O2 -fstack-protector --param=ssp-buffer-size=4 -Wformat -Werror=format-security -Wp,-D_FORTIFY_SOURCE=2' \
45 | --with-ld-opt='-Wl,-z,relro -Wl,--as-needed' \
46 | --with-ipv6 \
47 | --with-debug \
48 | --with-openssl=$HOME/sources/openssl-1.0.1g
49 |
50 | make
51 | make install
52 | ```
53 |
--------------------------------------------------------------------------------
/Jenkins/consul_api.sh:
--------------------------------------------------------------------------------
1 | #!/bin/bash
2 |
3 | # consul service api
4 |
5 | CONSUL_NODE="127.0.0.1:8500"
6 | SERVICE_NAME=${CURRENT_SERVICE_NAME}
7 |
8 | ########################################## info() #################################
9 | info() {
10 | echo "****************************"
11 | echo "CONSUL_NODE=$CONSUL_NODE"
12 | echo "SERVICE_NAME=$SERVICE_NAME"
13 |
14 | SERVICE_IDS=`curl http://${CONSUL_NODE}/v1/agent/services | python -m json.tool | grep ID | awk '{print $2}'|sed 's/["|,]//g' | grep ${SERVICE_NAME}`
15 |
16 | echo "SERVICE_IDS=$SERVICE_IDS"
17 | echo "****************************"
18 | }
19 |
20 | ########################################## pause() #################################
21 | pause() {
22 | SERVICE_IDS=`curl http://${CONSUL_NODE}/v1/agent/services | python -m json.tool | grep ID | awk '{print $2}'|sed 's/["|,]//g' | grep ${SERVICE_NAME}`
23 | for SERVICE_ID in ${SERVICE_IDS}
24 | do
25 | echo "Service \"${SERVICE_ID}\" pause "
26 | curl -s -XPUT "http://$CONSUL_NODE/v1/agent/service/maintenance/${SERVICE_ID}?enable=true&reason=${SERVICE_NAME}_deploying"
27 | done
28 | }
29 |
30 | ########################################## resume() #################################
31 | resume() {
32 | SERVICE_IDS=`curl http://${CONSUL_NODE}/v1/agent/services | python -m json.tool | grep ID | awk '{print $2}'|sed 's/["|,]//g' | grep ${SERVICE_NAME}`
33 | for SERVICE_ID in ${SERVICE_IDS}
34 | do
35 | echo "Service \"${SERVICE_ID}\" resume "
36 | curl -s -XPUT "http://$CONSUL_NODE/v1/agent/service/maintenance/${SERVICE_ID}?enable=false"
37 | done
38 | }
39 |
40 | case "$1" in
41 |
42 | 'info')
43 | info
44 | ;;
45 | 'pause')
46 | pause
47 | ;;
48 | 'resume')
49 | resume
50 | ;;
51 | *)
52 | echo "Usage: $0 {pause|resume|info}"
53 | exit 1
54 | esac
55 | exit 0
--------------------------------------------------------------------------------
/PostgreSQL/xact_Isolation.md:
--------------------------------------------------------------------------------
1 | # 事务隔离
2 | Reference: [WiKi](https://zh.wikipedia.org/wiki/事務隔離)
3 |
4 | # 隔离级别(Isolation levels)
5 | 有四种隔离级别:
6 | * 可序列化(Serializable)
7 | * 可重复读(Repeatable reads)
8 | * 提交读(Read committed)
9 | * 未提交读(Read uncommitted)
10 |
11 | 讨论一个提问: 当存在表test(id int)有id=1 一条记录, 以下两种行为
12 | a. SessionA启动事务后,SessionB做了更新id=2操作后,此时SessionA进行 `UPDATE test SET id=id+2`,结果如何。
13 | b. SessionA启动事务后,SessionB在事务中做了更新id=2操作后,先不提交,此时SessionA进行 `UPDATE test SET id=id+2`,结果如何。
14 |
15 | 顺着源码分析一下Postgres的是如何实现这种行为的。
16 |
17 | #### 提交读(PostgreSQL的默认设置)
18 | 在提交读的隔离级别下,
19 | 1.行为a的结果,SessionA 进行更新操作前查询id变为2,更新操作成功后,查询id为4。
20 | 2.行为b的结果,在SessionB提交前,SessionA的查询id为1,如进行update操作,会一直阻塞直到SessionB提交或回滚,如SessionB成功提交查询id为4,若SessionB回滚,查询id结果为3。
21 |
22 | 行为1分析
23 | SessionA的运行流程和普通的更新流程类似,先得到需要更新的row,然后进入`heap_update`,对选定的row使用`HeapTupleSatisfiesUpdate`进行版本(MVCC)检查,由于SessionB的事务已经提交,所以会得到`HeapTupleMayBeUpdated`的状态,然后真正进行更新操作。(其中包括hot-update等各种流程就不在此描述)
24 |
25 | 行为2分析
26 | 此时的运行流程会和上面略有不同,当获取目标row时候会得到尚未更新的那行row(因为此row虽然被标记为已删除,但是因为SessionB尚未提交,所以仍然可见),对row进行更新版本检查时,发现此row已经删除,且SessionB还未提交,标记为HeapTupleBeingUpdated,接着尝试取得该row的锁(会等待直到SessionB提交或者回滚),之后检查此row,如果被更新成功(SessionB提交),则进行row的refresh,对refresh后的row重新进行之前的操作,如果更新失败(SessionB回滚),则直接更新。
27 |
28 |
29 | #### 可重复读
30 | 在可重复读的隔离级别下,
31 | 1.行为a的结果, SessionA 进行更新操作前查询id为1,若进行更新操作, 则报错 “could not serialize access due to concurrent update”。
32 | 2.行为b的结果, 在SessionB提交前,SessionA的查询id为1,如进行update操作,会一直阻塞直到SessionB提交或回滚,如SessionB成功提交则报错 “could not serialize access due to concurrent update”, 若SessionB回滚,则sessionA 的 UPDATE操作成功,查询id结果为3,
33 |
34 | 行为1分析
35 | 和提交读隔离级别的行为有点类似,但由于是可重复读的快照,所以一开始取得的目标row是更新前的row,也就是id=1(提交读id=2)的行,于是在更新操作的mvcc版本检查中会认为此row是HeapTupleUpdated状态,需要重新refresh row,在refresh对隔离级别进行检查,如果大于等于可重复读的级别,则抛错。
36 |
37 | 行为2分析
38 | 和提交读隔离级别的代码路径一致,只是在 refresh row 时 对隔离级别进行检查,因为此时为可重复读,所以抛错。
39 |
--------------------------------------------------------------------------------
/Java/Tomcat/Deploy.md:
--------------------------------------------------------------------------------
1 | # Tomcat Deploy
2 |
3 | 把war部署到tomcat有三种方式
4 |
5 | * 将xxx.war包直接复制到`webapps`目录中。
6 | * 在`conf/server.xml`中定义
7 | * 配置目录`conf/Catalina/localhost`,在该目录中新建一个后缀为xml的文件
8 |
9 | #### 将war包直接放到`webapps`目录中
10 | Tomcat的`webapps`目录是Tomcat默认的应用目录,当服务器启动时,会加载所有这个目录下的应用。
11 |
12 | 也可以将JSP程序打包成一个war包放在目录下,服务器会自动解开这个war包,并在这个目录下生成一个同名的文件夹。
13 | 一个war包就是有特性格式的jar包,它是将一个Web程序的所有内容进行压缩得到。
14 | 具体如何打包,可以使用许多开发工具的IDE环境,如Eclipse、NetBeans、ant、JBuilder等。
15 | 也可以用cmd 命令:`jar -cvf applicationname.war package.*;`
16 |
17 |
18 | webapps这个默认的应用目录也是可以改变。打开Tomcat的`conf/server.xml`文件,找到下面内容:
19 | ```xml
20 |
21 | ```
22 |
23 | #### 在server.xml中指定
24 | 在Tomcat的配置文件中,一个Web应用就是一个特定的Context,可以通过在server.xml中新建Context里部署一个JSP应用程序。
25 | 打开server.xml文件,在Host标签内建一个Context,内容如下。
26 | ```xml
27 |
28 | ```
29 | 其中path是虚拟路径,docBase是JSP应用程序的物理路径。
30 |
31 |
32 | #### 配置目录`conf/Catalina/localhost`, 加入一个Context文件
33 | 以上两种方法,Web应用被服务器加载后都会在Tomcat的conf\catalina\localhost目录下生成一个XML文件,其内容如下:
34 | ```xml
35 |
36 |
37 | # OR
38 |
39 |
40 | ```
41 | 可以看出,文件中描述一个应用程序的Context信息,其内容和server.xml中的Context信息格式是一致的,文件名便是虚拟目录名。
42 | 您可以直接建立这样的一个xml文件,放在Tomcat的conf\catalina\localhost目录下。
43 |
44 | 这个方法有个优点,可以定义别名。服务器端运行的项目名称为path,外部访问的URL则使用XML的文件名。
45 | 这个方法很方便的隐藏了项目的名称,对一些项目名称被固定不能更换,但外部访问时又想换个路径,非常有效。
46 |
47 |
48 | ## 注意:
49 | 删除一个Web应用同时也要删除webapps下相应的文件夹祸server.xml中相应的Context,
50 | 还要将Tomcat的conf\catalina\localhost目录下相应的xml文件删除。
51 | 否则Tomcat仍会岸配置去加载。。。
52 |
53 |
--------------------------------------------------------------------------------
/init_scripts/zookeeper.init:
--------------------------------------------------------------------------------
1 | #!/bin/sh
2 | #
3 | # chkconfig: 345 20 90
4 | # description: zookeeper
5 | #
6 |
7 | ZOOKEEPER_HOME=/data/appsoft/zookeeper
8 |
9 | EXEC_USER=zookeeper
10 |
11 | # OPTIONS=""
12 |
13 | # Source function library.
14 | INITD=/etc/rc.d/init.d
15 | source $INITD/functions
16 |
17 | # Find the name of the script
18 | NAME=`basename $0`
19 | if [ ${NAME:0:1} = "S" -o ${NAME:0:1} = "K" ]
20 | then
21 | NAME=${NAME:3}
22 | fi
23 |
24 | # For SELinux we need to use 'runuser' not 'su'
25 | if [ -x /sbin/runuser ]
26 | then
27 | SU=runuser
28 | else
29 | SU=su
30 | fi
31 |
32 | start(){
33 | echo -n "Starting ${NAME} service: "
34 | $SU -l ${EXEC_USER} -c "$ZOOKEEPER_HOME/bin/zkServer.sh start"
35 | ret=$?
36 | if [ $ret -eq 0 ]
37 | then
38 | echo_success
39 | else
40 | echo_failure
41 | script_result=1
42 | fi
43 | echo
44 | }
45 |
46 | stop(){
47 | echo -n "Stopping ${NAME} service: "
48 | $SU -l ${EXEC_USER} -c "$ZOOKEEPER_HOME/bin/zkServer.sh stop"
49 | ret=$?
50 | if [ $ret -eq 0 ]
51 | then
52 | echo_success
53 | else
54 | echo_failure
55 | script_result=1
56 | fi
57 | echo
58 | }
59 |
60 |
61 | status(){
62 | $SU -l ${EXEC_USER} -c "$ZOOKEEPER_HOME/bin/zkServer.sh status"
63 | }
64 |
65 | restart(){
66 | echo -n "Restarting ${NAME} service: "
67 | $SU -l ${EXEC_USER} -c "$ZOOKEEPER_HOME/bin/zkServer.sh restart"
68 | ret=$?
69 | if [ $ret -eq 0 ]
70 | then
71 | echo_success
72 | else
73 | echo_failure
74 | script_result=1
75 | fi
76 | echo
77 | }
78 |
79 | # See how we were called.
80 | case "$1" in
81 |
82 | start|stop|status|restart)
83 | $1
84 | ;;
85 | *)
86 | echo "Usage: $0 {start|stop|restart|status}"
87 | exit 2
88 | ;;
89 | esac
90 |
91 | exit $script_result
92 |
--------------------------------------------------------------------------------
/zabbix/install.md:
--------------------------------------------------------------------------------
1 | # Zabbix install
2 |
3 | ## Install on CentOS with PostgreSQL
4 | software | version
5 | ---- | ----
6 | centos | 6.8
7 | zabbix | 3.4.1
8 | postgres | 9.6
9 |
10 | ### Install PostgreSQL
11 | Reference [Install Guide](https://github.com/jaiminpan/fast-memo/blob/master/PostgreSQL/install.md)
12 |
13 | ### Install Zabbix
14 | Download From https://www.zabbix.com/download
15 |
16 | #### Install package
17 | ```
18 | zabbix-server-pgsql
19 | ```
20 |
21 | #### Prepared DB
22 | ```
23 | CREATE USER zabbix;
24 | CREATE DATABASE zabbix OWNER zabbix;
25 | ```
26 | Import data to postgresql
27 | ```
28 | cd /usr/share/doc/zabbix-server-pgsql-3.0.4/
29 | zcat create.sql.gz | psql -U zabbix -d zabbix
30 | ```
31 |
32 | Adjust the /etc/zabbix/zabbix_server.conf, adding:
33 | ```
34 | DBUser=zabbix
35 | DBPort=5432
36 | DBHost=localhost
37 | ```
38 | #### Install Web
39 | Zabbix Web is written by php.
40 | To install web just by copy `zabbix/frontends/php` directory from source code and config nginx
41 | ** Upgrade php to 5.6 **
42 | Reference [php5.6 Install Guide](https://github.com/jaiminpan/fast-memo/blob/master/php/install.md)
43 |
44 |
45 | ## Source Code Install
46 | Reference [Official Webpage](https://www.zabbix.com/documentation/3.4/manual/installation/install)
47 | ### Download Source Code
48 | Go to the [Zabbix Download Page](https://www.zabbix.com/download)
49 | ```
50 | tar xvfz zabbix-3.4.0.tar.gz
51 | ```
52 | ### Create user account
53 | ```
54 | useradd zabbix
55 | ```
56 |
57 | ### Compile & install
58 | ```
59 | ./configure --prefix=/usr/local/zabbix/3.4 \
60 | --enable-server \
61 | --enable-agent \
62 | --with-postgresql \
63 | --enable-ipv6 \
64 | --with-net-snmp \
65 | --with-libcurl \
66 | --with-libxml2
67 | ```
68 |
69 |
70 | ## Other Installation Guide
71 | https://yq.aliyun.com/articles/9091
72 | https://www.phpsong.com/2015.html
73 |
74 |
75 |
76 |
--------------------------------------------------------------------------------
/FreeSWITCH/pgsql.md:
--------------------------------------------------------------------------------
1 | # Pgsql
2 |
3 | ## Enable Pgsql
4 |
5 | ```sh
6 | ./configure --enable-core-pgsql-support
7 | ```
8 |
9 | 安装后需要修改的配置文件
10 |
11 | freeswitch默认每个程序都有一个数据库。根据自己需要,将不通程序对于的配置文件修改即可。
12 | 大概有以下文件需要修改
13 | * switch.conf.xml //核心表
14 | * db.conf.xml //核心表
15 | * voicemail.conf.xml //留言相关的表
16 | * internal.xml //
17 | * external.xml //
18 | * cdr_pg_csv.conf.xml //通话记录
19 | * fifo.conf.xml //fifo相关的表
20 | * callcenter.conf.xml //callcenter程序相关的表。
21 |
22 | ```xml
23 |
24 | ```
25 |
26 |
27 | #### cdr
28 |
29 | 在 modules.conf 中开启 mod_cdr_pg_csv
30 | ```sh
31 | # vi modules.conf
32 | event_handlers/mod_cdr_pg_csv
33 | ```
34 |
35 | 修改 cdr_pg_csv.conf.xml
36 | ```xml
37 |
38 | ```
39 |
40 | 手动创建
41 | ```sql
42 | create table cdr (
43 | id serial primary key,
44 | local_ip_v4 inet not null,
45 | caller_id_name varchar,
46 | caller_id_number varchar,
47 | destination_number varchar not null,
48 | context varchar not null,
49 | start_stamp timestamp with time zone not null,
50 | answer_stamp timestamp with time zone,
51 | end_stamp timestamp with time zone not null,
52 | duration int not null,
53 | billsec int not null,
54 | hangup_cause varchar not null,
55 | uuid uuid not null,
56 | bleg_uuid uuid,
57 | accountcode varchar,
58 | read_codec varchar,
59 | write_codec varchar,
60 | sip_hangup_disposition varchar,
61 | ani varchar
62 | );
63 | ```
64 |
--------------------------------------------------------------------------------
/ZooKeeper/file_format.md:
--------------------------------------------------------------------------------
1 |
2 | ## 简介
3 | zoo.cfg配置文件中:
4 | * `dataDir`: 用于存储Snapshot(快照)数据,
5 | * `dataLogDir`: 用于存储Log(事务日志),如果没有设置,则默认使用dataDir的配置。
6 | * 在Log文件写入频率非常高的情况下,可以为Log与Snapshot分别配置不同的目录存储。
7 |
8 |
9 | 本文主要是结合源码分析Zookeeper的Log与Snapshot文件。
10 |
11 |
12 | 事务日志与Snapshot的操作是在org.apache.zookeeper.server.persistence包中,
13 | 这里也主要是分析该包下的各个类;
14 | * FileTxnSnapLog类:为Log日志与Snapshot配置的目录下又创建了子目录`version-2`,同时又指定为该两种文件的存储路径,
15 | * FileTxnLog、FileSnap类:分别为处理事务日志和Snapshot的
16 |
17 | ## LOG 事务日志文件
18 |
19 | 在Zab协议中我们知道每当有接收到客户端的事务请求后Leader与Follower都会将把该事务日志存入磁盘日志文件中,
20 | 该日志文件就是这里所说的事务日志,下面将详细分析该日志文件;
21 | FileTxnLog类用于处理事务日志文件这里就从此类开始,
22 | 在该类中看到了preAllocSize、TXNLOG_MAGIC、VERSION、lastZxidSeen、dbId等这样的属性:
23 | 1. preAllocSize: 默认预分配的日志文件的大小65536*1024字节
24 | 2. TXNLOG_MAGIC:日志文件魔数为ZKLG
25 | 3. VERSION:日志文件版本号2
26 | 4. lastZxidSeen:最后的ZXID
27 |
28 | 类中还有一个静态代码块用于读取配置项中的preAllocSize,
29 | 也就是说预分配的日志文件大小是可配置的,接下来看看该类中最重要的一个方法append,
30 | 该方法主要功能是创建新的日志文件与往日志文件中追加新的事务日志记录;从中可以看到日志文件的相关信息:
31 |
32 | 1. 文件名为log,后缀为十六进制的ZXID
33 | 2. 日志文件头有:magic、version、dbid
34 | 3. 创建文件后分配的文件大小为:67108864字节+16字节,其中16字节为文件头
35 | 4. 使用Adler32作为日志文件的校验码
36 | 5. 当日志文件写满预分配大大小后就扩充日志文件一倍大小
37 |
38 | #### 知识点
39 | * 如代码一样,`version-2`目录中存储着Zookeeper的事务日志文件,有看到如`log.xx`文件(大小为64MB文件),这些都是事务日志文件;
40 | **时间越早的文件,其后缀xx数字越小,反之越晚生成的,xx数字越大。**
41 |
42 | * 如果有了解过Zookeeper的ZAB协议,可以知道zookeeper为每一个事务请求都分配了一个事务ID也就是ZXID
43 | * 文件后缀的xx其实就是Zookeeper处理请求的ZXID,该ZXID为log文件中第一条事务的ZXID
44 | * ZXID规则为前32字节为Leader周期,后32字节为事务请求序列
45 | * 通过事务日志就可以轻松的知道当前的Leader周期与每个文件所属的Leader周期
46 |
47 | ## SNAPSHOT 快照文件
48 |
49 | 在FileSnap类中处理,与事务日志文件一样快照文件也一样有SNAP_MAGIC、VERSION、dbId这些,这作用也只是用来标识这是一个快照文件;
50 | Zookeeper的数据在内存中是以DataTree为数据结构存储的,快照就是每间隔一段时间Zookeeper就会把整个DataTree的数据序列化然后把它存储在磁盘中,这就是Zookeeper的快照文件,
51 | 快照文件是指定时间间隔对数据的备份,所以快照文件中数据通常都不是最新的,
52 |
53 | 多久抓一个快照这也是可以配置的snapCount配置项用于配置处理几个事务请求后生成一个快照文件;
54 | 与事务日志文件一样快照文件也是使用ZXID作为快照文件的后缀,
55 | 在FileTxnSnapLog类中的save方法中生成文件并调用FileSnap类序列化DataTree数据并且写入快照文件中;
56 |
57 |
--------------------------------------------------------------------------------
/Java/logback/logback.xml:
--------------------------------------------------------------------------------
1 |
2 |
3 |
4 |
5 |
6 |
7 |
8 |
9 |
10 |
11 |
12 |
13 |
15 |
16 |
17 |
18 |
19 | ${LOG_PATTERN}
20 |
21 |
22 |
23 |
24 |
25 |
26 |
27 | ${LOG_FILE_PATH}/${LOG_FILE_NAME}.%d{yyyy-MM-dd}.%i.log
28 |
29 | 100MB
30 | 60
31 | 20GB
32 |
33 |
34 | ${LOG_PATTERN}
35 |
36 |
37 |
38 |
39 |
40 |
41 |
42 |
43 |
44 |
45 |
--------------------------------------------------------------------------------
/python/tornado.md:
--------------------------------------------------------------------------------
1 | Tornado
2 | ---------
3 |
4 | http://www.tornadoweb.org/
5 |
6 | Tornado 由前 Facebook 开发,用 Apache License 开源。
7 | 代码非常精练,实现也很轻巧,加上清晰的注释和丰富的 demo,我们可以很容易的阅读分析 tornado, 通过阅读 Tornado 的源码,你将学到:
8 |
9 | 理解 Tornado 的内部实现,使用 tornado 进行 web 开发将更加得心应手。
10 | * 如何实现一个高性能,非阻塞的 http 服务器。
11 | * 如何实现一个 web 框架。
12 | * 各种网络编程的知识,比如 epoll
13 | * python 编程的绝佳实践
14 |
15 | 在tornado的子目录中,每个模块都应该有一个.py文件,你可以通过检查他们来判断你是否从已经从代码仓库中完整的迁出了项目。在每个源代码的文件中,你都可以发现至少一个大段落的用来解释该模块的doc string,doc string中给出了一到两个关于如何使用该模块的例子。
16 |
17 | ## 模块分类
18 |
19 | 1. Core web framework
20 |
21 | tornado.web — 包含web框架的大部分主要功能,包含RequestHandler和Application两个重要的类
22 | tornado.httpserver — 一个无阻塞HTTP服务器的实现
23 | tornado.template — 模版系统
24 | tornado.escape — HTML,JSON,URLs等的编码解码和一些字符串操作
25 | tornado.locale — 国际化支持
26 | 2. Asynchronous networking 底层模块
27 |
28 | tornado.ioloop — 核心的I/O循环
29 | tornado.iostream — 对非阻塞式的 socket 的简单封装,以方便常用读写操作
30 | tornado.httpclient — 一个无阻塞的HTTP服务器实现
31 | tornado.netutil — 一些网络应用的实现,主要实现TCPServer类
32 | 3. Integration with other services
33 |
34 | tornado.auth — 使用OpenId和OAuth进行第三方登录
35 | tornado.database — 简单的MySQL服务端封装
36 | tornado.platform.twisted — 在Tornado上运行为Twisted实现的代码
37 | tornado.websocket — 实现和浏览器的双向通信
38 | tornado.wsgi — 与其他python网络框架/服务器的相互操作
39 | 4. Utilities
40 |
41 | tornado.autoreload — 生产环境中自动检查代码更新
42 | tornado.gen — 一个基于生成器的接口,使用该模块保证代码异步运行
43 | tornado.httputil — 分析HTTP请求内容
44 | tornado.options — 解析终端参数
45 | tornado.process — 多进程实现的封装
46 | tornado.stack_context — 用于异步环境中对回调函数的上下文保存、异常处理
47 | tornado.testing — 单元测试
48 |
49 | ## 架构
50 |
51 | 
52 |
53 | 从上面的图可以看出,Tornado 不仅仅是一个WEB框架,它还完整地实现了HTTP服务器和客户端,在此基础上提供WEB服务。它可以分为四层:
54 |
55 | * 最底层的EVENT层处理IO事件;
56 | * TCP层实现了TCP服务器,负责数据传输;
57 | * HTTP/HTTPS层基于HTTP协议实现了HTTP服务器和客户端;
58 | * 最上层为WEB框架,包含了处理器、模板、数据库连接、认证、本地化等等WEB框架需要具备的功能。
59 |
60 |
61 | ## Book
62 | [Introduction to Tornado 中文翻译](https://github.com/alioth310/itt2zh)
63 |
--------------------------------------------------------------------------------
/FreeSWITCH/README.md:
--------------------------------------------------------------------------------
1 | # FreeSWITCH
2 | FreeSWITCH 是一个 免费、 开源 的软交换软件。 它采用 Mozilla Public License (MPL)授权协议, MPL是一个 开源的软件协议. 它的核心库libfreeswitch可以嵌入其它系统或产品中,也可以做一个单独的应用存在。
3 |
4 | ## 历史
5 |
6 | FreeSWITCH 项目最初于2006年1月在O'Reilly Media's ETEL 会议上发布。[1] 2007年6月,FreeSWITCH 被Truphone 采用[2]。2007年8月, Gaboogie 宣布使用FreeSWITCH作为电话会议平台。[3]
7 |
8 | [更多](https://zh.wikipedia.org/wiki/FreeSWITCH)
9 |
10 | ## Install
11 |
12 | #### 可选安装
13 |
14 | *update cmake*
15 | ```sh
16 | yum remove cmake
17 | wget https://cmake.org/files/v3.14/cmake-3.14.0.tar.gz
18 | tar vzxf cmake-3.14.0.tar.gz
19 | cd cmake-3.14.0
20 | ./configure
21 | make
22 | make install
23 | ```
24 |
25 | *libks*
26 | ```sh
27 | yum install libatomic
28 | git clone https://github.com/signalwire/libks.git
29 | cd libks
30 | mkdir build & cd build
31 | cmake ..
32 | make
33 | make install
34 | ln -sf /usr/lib/pkgconfig/libks.pc /usr/lib64/pkgconfig/libks.pc
35 | ```
36 |
37 | *signalwire*
38 | ```sh
39 | git clone https://github.com/signalwire/signalwire-c.git
40 | cd signalwire-c/
41 | mkdir build & cd build
42 | cmake ..
43 | make
44 | make install
45 | ln -sf /usr/local/lib/pkgconfig/signalwire_client.pc /usr/lib64/pkgconfig/signalwire_client.pc
46 | ```
47 |
48 | #### Prepare
49 | 1. Linux
50 |
51 | ```sh
52 | $ sh support-d/prereq.sh
53 | $ sh bootstrap.sh
54 |
55 | $ ./configure
56 | # OR
57 | $ ./configure -enable-portable-binary \
58 | --enable-core-pgsql-support --with-openssl -enable-zrtp
59 |
60 | $ make
61 | $ sudo make install
62 |
63 | # 安装声音文件
64 | $ make cd-sounds
65 | $ sudo make cd-sounds-install
66 | $ make cd-moh
67 | $ sudo make cd-moh-install
68 | ```
69 |
70 | #### 做成服务
71 | ```sh
72 | [Unit]
73 | Description=freeswitch
74 | After=syslog.target
75 | After=network.target
76 |
77 | [Service]
78 | Type=simple
79 | User=root
80 | Group=root
81 | WorkingDirectory=/home/mintcode
82 | ExecStart=/usr/local/freeswitch/bin/freeswitch
83 | ExecStop=/usr/local/freeswitch/bin/freeswitch -stop
84 | Restart=always
85 |
86 | [Install]
87 | WantedBy=multi-user.target
88 | ```
89 |
--------------------------------------------------------------------------------
/Java/Sping-cloud/Hystrix.md:
--------------------------------------------------------------------------------
1 | # Hystrix
2 |
3 | ## Base
4 | Base on
5 | ```
6 |
7 | org.springframework.boot
8 | spring-boot-starter-parent
9 | 2.0.5.RELEASE
10 |
11 |
12 | ```
13 |
14 | ## pom.xml
15 |
16 | ```
17 |
18 | Finchley.RELEASE
19 |
20 |
21 |
22 | +
23 | + org.springframework.cloud
24 | + spring-cloud-starter-netflix-hystrix
25 | +
26 |
27 |
28 |
29 |
30 |
31 | org.springframework.cloud
32 | spring-cloud-dependencies
33 | ${spring-cloud.version}
34 | pom
35 | import
36 |
37 |
38 |
39 | ```
40 |
41 | ## application.properties
42 | ```
43 | # default is false
44 | +feign.hystrix.enabled=true
45 | ```
46 |
47 | ## Code
48 | ```
49 | +
50 | +import org.springframework.stereotype.Component;
51 | +
52 | +@Component
53 | +public class XXXHystrix implements XXClient {
54 |
55 |
56 | ```
57 |
58 | ```
59 | package xxxx.feign;
60 |
61 | import org.springframework.cloud.openfeign.FeignClient;
62 | import org.springframework.stereotype.Component;
63 | import org.springframework.web.bind.annotation.*;
64 |
65 | -@FeignClient(value = "ServiceName", path = "/ContextPath")
66 | +@FeignClient(value = "ServiceName", path = "/ContextPath", fallback = XXXHystrix.class)
67 | public interface XXClient {
68 | .....
69 | }
70 |
71 | public class ProcListenerStart {
72 | + @Autowired
73 | + private XXXClient client;
74 | + ....
75 |
76 | }
77 | ```
78 |
79 |
--------------------------------------------------------------------------------
/etc/equity.md:
--------------------------------------------------------------------------------
1 | 在(联合)创始人之间如何分配股权(原创翻译)
2 | -------------------------------------
3 |
4 | 英文原文 http://themacro.com/articles/2015/12/splitting-equity-among-founders/
5 |
6 | ## 内容
7 | 有创始人经常询问,应该怎么分配股权给他们的联合创始人。
8 | 当我在网上搜索这个话题,我经常看到一些可怕的建议,通常提倡不同的创始人间享有完全不同的股权比例。
9 | 我们看到这一趋势在Y Combinator每年关注的数以千计的app项目上有所体现。
10 |
11 | #### 不平等股权分配
12 | 以下是一些最经常提到的不平等股权分配的原因:
13 | * 我最先想出了这个点子
14 | * 我比联合创始人早开始为此工作N个月
15 | * 这是我们已经达成一致的
16 | * 我的联合创始人拿了N个月薪水,而我没有
17 | * 我比我的联合创始人早N个月工作开始全职工作
18 | * 我比我的联合创始人经验更丰富
19 | * 我募集了N万美元后,我的联合创始人才加入
20 | * 我做出了MVP(minimum viable product)后,我的联合创始人才加入
21 | * 为了创始人间决定投票计数原因
22 |
23 | 
24 | *Founders tend to make the mistake of splitting equity based on early work.*
25 |
26 | #### 四个基本原则
27 | 以上的这些理由都违背了四个基本原则:
28 |
29 | * **一般需要7〜10年时间打造一个公司的高价值。** 第一年内的小变化没有理由造成今后2-10年的巨大股份差异。
30 |
31 | * **更多的股票=更多的动力。** 因为几乎所有的创业公司最终都会失败。创始人越有驱动力,成功的机会就越高。
32 | 如果你的创始团队的动力不足而导致失败,就算有较大的股权比例也是一文不值的。
33 |
34 | * **如果你不重视/珍惜你的联合创始人,更不会重视/珍惜其他人。** 投资者关注创始人的股权分配,就能知道CEO是否重视他的联合创始人。
35 | 如果只给一个联合创始人10%或1%,其他人要么认为他们要么不出色要么不重要。该团队的素质往往是投资人是否投资的主要因素。
36 | 为什么要传达给投资者,你的团队不是很有价值或者不是很重要?
37 |
38 | * **初创公司取决于执行力,而不是想法。** 创始人间重大不合比例的股权分配,往往会倾向于最初提出想法的联合创始人,而不是那些打造产品,把产品推向市场的那部分联合创始人。
39 |
40 | 
41 | *Equity should be split equally because all the work is ahead of you.*
42 |
43 | #### 建议
44 | 我对股权分配的建议可能是有争议的,但我们所有孵化的初创公司都是这样子做的,并且我们在YC几乎都是这样建议:
45 | 在联合创始人间平均股权分配。 **[1]** 这些都是和你一起战斗的人。你和这些人相处的时间多过你的家人。
46 | 这些都是人可以帮助你决定公司中最重要的问题的人。最后,这些人也是在你成功时和你一起庆祝的人。
47 |
48 | 我相信,在创始人间平等或者接近平等的股权权益分配会成为标准。如果你不愿给你的合伙人同等的份额,那么或许你选择了错误的伙伴。
49 |
50 | #### 感谢
51 | 感谢Justin Kan, Qasar Younis和Colleen Taylor评审了初稿
52 |
53 | #### 备注
54 | 如果你害怕万一你不得不和其他联合创始人分道扬镳,确保你有一个合适的行权计划/股权退出计划(vesting schedule)。
55 | 在硅谷,一个典型的设置是分四年行权,和一年的cliff。换句话说,虽然你可能持有该公司50%的股份,如果在一年内你离开或者被开除,那么你什么也得不到。
56 | 一年后,你会得到你的股票的25%。之后每个月你另外会得到你总份额的的1/48。你所有的股份将会在4年后全部到手。
57 | 对于创业旅行来说,这有利于选择合适的合伙人 - 万一有问题,你也可以在第一年内解决。
58 | 另一个好的可操作措施是,在股权融资前,只有CEO有一个董事会席位。这将避免在艰难的决定时,产生董事会纠纷。比如CEO不得不需要开除联合创始人。
59 |
--------------------------------------------------------------------------------
/Java/Spring/ApplicationContext.md:
--------------------------------------------------------------------------------
1 | # ApplicationContext
2 |
3 | [源码位置][code]
4 |
5 |
6 | ## 图示
7 | ClassPathXmlAppliationContext的类继承层次图
8 |
19 |
20 |
21 |
22 | [1]: http://stackoverflow.com/questions/21222978/maven-eclipse-tomcat-class-not-found-exception
23 | [2]: http://jingyan.baidu.com/article/ca2d939dd90183eb6d31ce79.html
24 |
--------------------------------------------------------------------------------
/Mac/lldb.md:
--------------------------------------------------------------------------------
1 | # lldb
2 |
3 | Since Xcode itself now uses LLDB instead of GDB, this can be a more convenient alternative for Mac users. It integrated much easier in Eclipse than GDB.
4 |
5 | ## lldb on Eclipse CDT
6 | CDT has experimental support for LLDB starting from CDT 9.1. The minimum recommended version for LLDB is 3.8.
7 |
8 | #### How do I install the LLDB debugger integration?
9 |
10 | + Go to Help > Install new Software
11 | + Select the CDT update site (9.1 or greater)
12 | + Under CDT Optional Features, select C/C++ LLDB Debugger Integration
13 |
14 | #### How do I debug with LLDB?
15 | Only local debug (new process) and local attach are supported right now.
16 | First, create a debug configuration just like you would when debugging with GDB. Then you need to set the launcher to **LLDB-MI Debug Process Launcher**.
17 |
18 | ## Reference
19 | https://wiki.eclipse.org/CDT/User/FAQ#How_do_I_get_the_LLDB_debugger.3F
--------------------------------------------------------------------------------
/Java/Spring/Profile.md:
--------------------------------------------------------------------------------
1 | # Profile
2 |
3 | #### Profile in springboot
4 |
5 |
6 | #### Profile in spring tomcat
7 |
8 | In `Spring-applicationContext.xml`
9 | ```
10 |
11 |
15 |
16 |
17 |
21 |
22 | ```
23 |
24 | In `web.xml`
25 | ```
26 |
27 | spring.profiles.default
28 | dev
29 |
30 |
31 | profileEnable
32 | true
33 |
34 | ```
35 |
--------------------------------------------------------------------------------
/linux/systemcmd/selinux.md:
--------------------------------------------------------------------------------
1 | SELinux
2 | ==========
3 |
4 | 关于linux权限控制目前碰到有三种:
5 | * 文件系统权限 lsattr chattr
6 | * 用户组 user:group:other
7 | * SELiunx
8 |
9 | 一般情况下我们只会和用户组权限打交道,一般用chmod chown这两个命令做权限控制,这个也叫 DAC (Discretionary Access Control)”任意式读取控制”。
10 | (DAC权限方式,我的理解就是静态的权限控制,对比于SELinux 我看作动态的权限控制)。
11 |
12 | 如果你已经获取root权限,也无法修改删除响应的文件时,考虑用lsattr查看对应的文件,并用chattr修改。
13 | 这种方式是文件系统对权限进行了限制,只有一部分文件系统支持,如ext3,ext4等。系统被黑了以后才知道的,说多了都是泪。
14 |
15 | SELinux是后期的Linux系统才有的权限控制方式,在同一个用户下面,通过不同的进程拥有不同标签组,才有权限访问对应的标签组的文件。
16 | 也叫 MAC (Mandatory Access Control)“强制性读取控制”。
17 | 通过ps –Z 和 ls –Z查看对应的标签组,用chcon -u|-r|-t 修改对应的用户、角色、类型。
18 |
19 | 简单用法
20 | ```
21 | setenforce 0/1 0 表示允许;1 表示强制
22 | getenforce 查看当前SElinux的状态
23 | ```
24 |
25 | 详见下面链接
26 | http://blog.chinaunix.net/uid-21266384-id-186394.html
27 | http://vbird.dic.ksu.edu.tw/linux_basic/0440processcontrol_5.php
28 | https://wiki.centos.org/zh/HowTos/SELinux
29 |
--------------------------------------------------------------------------------
/consul/install.md:
--------------------------------------------------------------------------------
1 | # Consul install
2 |
3 | ## Install Sample
4 | Example As `consul_1.4.1_linux_amd64.zip`
5 |
6 | ### Download
7 | Download From [Office Website](https://www.consul.io/downloads.html)
8 | #### OR
9 | Compile with [Github](https://github.com/hashicorp/consul)
10 |
11 | ### Install Binary
12 | ```sh
13 |
14 | unzip consul_1.4.1_linux_amd64.zip # Extract to consul
15 |
16 | mv consul /usr/local/bin
17 |
18 | ```
19 |
20 | ### Config Dir
21 | Config location is `/etc/consul.d/config.json` OR `/data/etc/consul.d/config.json`
22 | Reference `consul.d/config.json`
23 |
24 | ## Start
25 | consul agent -config-dir=/data/etc/consul.d
26 |
27 | ## Web Visit
28 | http://ip:port/
29 | http://127.0.0.1:8500/
30 |
31 |
32 | ## Other Config Guide
33 | https://www.consul.io/docs/agent/options.html#command-line-options
34 | https://my.oschina.net/guol/blog/353391
35 | https://www.cnblogs.com/sunsky303/p/9209024.html
36 |
--------------------------------------------------------------------------------
/Java/Spring/PropertyFile.md:
--------------------------------------------------------------------------------
1 | # SpringBoot Application Property Files
2 |
3 | [Application Property Files](https://docs.spring.io/spring-boot/docs/current-SNAPSHOT/reference/htmlsingle/#boot-features-external-config-application-property-files)
4 |
5 |
6 | SpringApplication loads properties from application.properties files in the following locations and adds them to the Spring Environment:
7 | * A /config subdirectory of the current directory
8 | * The current directory
9 | * A classpath /config package
10 | * The classpath root
11 | The list is ordered by precedence (properties defined in locations higher in the list override those defined in lower locations).
12 |
13 | Summary is
14 | * `file:./config/`
15 | * `file:./`
16 | * `classpath:/config/`
17 | * `classpath:/`
18 |
19 | ### Use --spring.config.location
20 | ```
21 | $ java -jar myproject.jar --spring.config.location=classpath:/default.properties,classpath:/override.properties
22 | ```
23 |
--------------------------------------------------------------------------------
/kafka/Consumer.md:
--------------------------------------------------------------------------------
1 | # Kafka Consumer
2 |
3 | [原文](http://m.blog.csdn.net/article/details?id=69554569)
4 |
5 | Kafka从0.7版本到现在的0.10版本, 经历了巨大的变化; 而其中, 首当其冲的是Consumer的机制.
6 |
7 | Kafka最早设计Consumer的时候, 大方向比较明确, 就是同时支持Subscribe功能和Message Queue功能. 语义设计上很清晰,但是实现之后, 发现有一些问题. 主要问题集中在:
8 | * 用户希望自己能够控制Offset的保存和读取;
9 | 0.8.0 SimpleConsumer Example
10 | * Offset保存在Zookeeper中对Zookeeper带来压力较大, 需要脱离的ZK的依赖;
11 | * Committing and fetching consumer offsets in Kafka
12 | * Offset Management
13 | * https://issues.apache.org/jira/browse/KAFKA-657
14 | * 用户希望能获得Offset并且自行决定保存的位置;
15 | * 用户自己控制Offset时, 却会陷入复杂的异常处理逻辑;
16 | * 老的Consumer会有惊群效应和脑裂问题;
17 |
18 | #### Consumer Client Re-Design
19 | Consumer的改进直到0.9版本, 终于有了一个接近完美的版本; 但是由于向前兼容的需要, 以前的Consumer方式正在被使用, 并没有彻底移除. 由于Consumer的多版本存在, 并且个版本的Consumer变化很大, 这些影响又是对上层可见的, 所以对使用者造成了很大的混淆和困惑.
20 | 所以我想在这篇Blog中整理分析一下各Consumer的特点和区别, 让大家有一个纵观历史的认识.
21 |
22 | 
23 |
--------------------------------------------------------------------------------
/linux/systemcmd/nologin.md:
--------------------------------------------------------------------------------
1 | nologin命令
2 | -------------
3 |
4 |
5 | **nologin命令**可以实现礼貌地拒绝用户登录系统,同时给出信息。
6 | 如果尝试以这类用户登录,就在log里添加记录,然后在终端输出This account is currently not available信息,就是这样。
7 | 一般设置这样的帐号是给启动服务的账号所用的,这只是让服务启动起来,但是不能登录系统。
8 |
9 | #### 语法
10 | ```sh
11 | nologin
12 | ```
13 |
14 | #### 实例
15 | Linux禁止用户登录: 禁止用户登录后,用户不能登录系统,但可以登录ftp、SAMBA等。
16 |
17 | 我们在Linux下做系统维护的时候,希望个别用户或者所有用户不能登录系统,保证系统在维护期间正常运行。
18 |
19 | 这个时候我们就要禁止用户登录。
20 |
21 | 1、禁止个别用户登录,比如禁止lynn用户登录。
22 |
23 | ```sh
24 | passwd -l lynn
25 | ```
26 | 这就话的意思是锁定lynn用户,这样该用户就不能登录了。
27 | ```sh
28 | passwd -u lynn
29 | ```
30 | 上面是对锁定的用户lynn进行解锁,用户可登录了。
31 |
32 | 2、我们通过修改`/etc/passwd`文件中用户登录的shell
33 |
34 | ```sh
35 | vi /etc/passwd
36 | ```
37 | 更改为:
38 | ```sh
39 | lynn:x:500:500::/home/lynn:/sbin/nologin
40 | ```
41 |
42 | 该用户就无法登录了。
43 | 3、禁止所有用户登录。
44 |
45 | ```sh
46 | touch /etc/nologin
47 | ```
48 | 除root以外的用户不能登录了。
49 |
50 |
51 | 来自: http://man.linuxde.net/nologin
52 |
--------------------------------------------------------------------------------
/kafka/kafka4.0_Cmd.md:
--------------------------------------------------------------------------------
1 | kafka4.0 Cmd
2 |
3 | # 查看
4 | ./kafka-consumer-groups.sh --bootstrap-server localhost:9092 --describe --group game_detail
5 |
6 | # 列出所有 Consumer Groups(User Groups)
7 | bin/kafka-consumer-groups.sh --bootstrap-server localhost:9092 --list
8 |
9 |
10 | ```
11 | bin/kafka-consumer-groups.sh \
12 | --bootstrap-server \
13 | --group \
14 | --reset-offsets \
15 | --topic \
16 | --to-earliest | --to-latest | --to-offset | --shift-by \
17 | --execute
18 | ```
19 |
20 | # 重置到最新(跳过未消费消息)
21 | bin/kafka-consumer-groups.sh \
22 | --bootstrap-server localhost:9092 \
23 | --group my-consumer-group \
24 | --topic my-topic \
25 | --reset-offsets \
26 | --to-latest \
27 | --execute
28 |
29 | bin/kafka-consumer-groups.sh \
30 | --bootstrap-server localhost:9092 \
31 | --group game_detail \
32 | --topic admin_game_detail \
33 | --reset-offsets \
34 | --to-latest \
35 | --execute
36 |
--------------------------------------------------------------------------------
/linux/openssh.md:
--------------------------------------------------------------------------------
1 |
2 |
3 | ## 背景介绍
4 | 很多公司都使用静态密码+动态密码的方式登陆跳板机,某些还会强制一个动态密码只能登陆一次,于是我们面临着等一分钟才能登陆一次跳板机,很不方便。本文介绍一种在本机的设置,免除每次输入密码的方法。
5 |
6 | ## 实现方法
7 | 此功能是利用SSH的ControlPersist特性,SSH版本必须是5.6或以上版本才可使用ControlPersist特性。升级SSH可参考CentOS6下升级OpenSSH至7.1一文。
8 |
9 |
10 | ```sh
11 | # vi ~/.ssh/config
12 |
13 | Host *
14 | ControlMaster auto
15 | ControlPersist 4h
16 | # ControlPersist yes
17 | ControlPath ~/.ssh/sessions/ctrl:%h:%p:%r
18 | # Compression yes
19 |
20 |
21 | ```
22 |
23 | ```
24 | # Check
25 | ssh -O check HostName
26 |
27 | # Exit
28 | ssh -O exit HostName
29 | ```
30 |
31 |
32 | ### Other Config
33 |
34 | ```sh
35 | # vi ~/.ssh/config, mod 600
36 |
37 | Host jpserver
38 | User testa
39 | Hostname 10.100.3.80
40 | PreferredAuthentications publickey
41 | IdentityFile /Users/xxx/.ssh/abc.pem
42 |
43 | Host fileserver
44 | User centos
45 | Port 22
46 | Hostname 10.81.23.81
47 | #ProxyCommand ssh nixcraft@gateway.uk.cyberciti.biz nc %h %p 2> /dev/null
48 | ```
--------------------------------------------------------------------------------
/etc/yum.md:
--------------------------------------------------------------------------------
1 | YUM
2 | ===========
3 |
4 | yum是基于Red Hat的系统(如CentOS、Fedora、RHEl)上的默认包管理器。使用yum,你可以安装或者更新一个RPM包,并且他会自动解决包依赖关系。
5 |
6 |
7 | #### 如何只从Red Hat 的标准仓库中下载一个RPM包,而不进行安装
8 |
9 | yum命令本身就可以用来下载一个RPM包,标准的yum命令提供了--downloadonly(只下载)的选项来达到这个目的。
10 | ```sh
11 | $ sudo yum install --downloadonly
12 | ```
13 | 默认情况下,一个下载的RPM包会保存在下面的目录中:
14 | ```sh
15 | /var/cache/yum//[centos/fedora-version]/[repository]/packages
16 | ```
17 | 以上的[repository]表示下载包的来源仓库的名称(例如:base、fedora、updates)
18 |
19 | 如果你想要将一个包下载到一个指定的目录(如/tmp):
20 | ```sh
21 | $ sudo yum install --downloadonly --downloaddir=/tmp
22 | ```
23 | 注意,如果下载的包包含了任何没有满足的依赖关系,yum将会把所有的依赖关系包下载,但是都不会被安装。
24 |
25 | PS:
26 | 另外一个重要的事情是,在CentOS/RHEL 6或更早期的版本中,你需要安装一个单独yum插件(名称为 yum-plugin-downloadonly)才能使用--downloadonly命令选项:
27 | ```sh
28 | $ sudo yum install yum-plugin-downloadonly
29 | ```
30 | 或者update yum也同样可以解决问题
31 |
32 | 如果没有该插件,你会在使用yum时得到以下错误:
33 | ```sh
34 | Command line error: no such option: --downloadonly
35 | ```
36 |
--------------------------------------------------------------------------------
/R-Server/README.md:
--------------------------------------------------------------------------------
1 | # Install
2 |
3 | Reference: http://www.rstudio.com/products/rstudio/download-server/
4 |
5 | ## Step On CentOS 7
6 |
7 | #### Install
8 | ```sh
9 | $ sudo yum -y install R
10 |
11 | $ wget https://download2.rstudio.org/rstudio-server-rhel-1.0.143-x86_64.rpm
12 | $ sudo yum install --nogpgcheck rstudio-server-rhel-1.0.143-x86_64.rpm
13 | ```
14 |
15 | Now visit http://:8787
16 |
17 | #### Post config Firewall (option)
18 | ```
19 | vi /etc/sysconfig/iptables
20 | -A INPUT -m state --state NEW -m tcp -p tcp --dport 22 -j ACCEPT
21 | + -A INPUT-m state --state NEW -m tcp -p tcp --dport 8787 -j ACCEPT
22 | ```
23 |
24 | ## Login
25 |
26 | change config
27 | ```
28 | vi /etc/rstudio/rserver.conf
29 | auth-required-user-group=rstudio_users
30 | ```
31 |
32 | Add user
33 | ```
34 | useradd ruser
35 | passwd ruser
36 |
37 | usermod -a -G rstudio_users ruser
38 | ```
39 |
40 | Now you can login using the user in groups rstudio_users by http://:8787
41 |
42 |
43 |
44 |
--------------------------------------------------------------------------------
/Java/Spring/Environment.md:
--------------------------------------------------------------------------------
1 | # Environment
2 |
3 |
4 | ## Custom Env
5 | ```java
6 | // configname = "application-uat.properties";
7 | private Environment customEnv(String configname) throws Exception {
8 | Resource resource = new ClassPathResource(configname);
9 | Properties props = PropertiesLoaderUtils.loadProperties(resource);
10 |
11 | StandardEnvironment stdenv = new StandardEnvironment();
12 | stdenv.getPropertySources().addLast(new PropertiesPropertySource(configname, props));
13 | return stdenv;
14 | }
15 | ```
16 |
17 | ## Without Spring Env
18 | ```java
19 | public static void initialization(String path) throws IOException {
20 |
21 | Properties properties = new Properties()
22 |
23 | try (InputStream resourceAsStream = getPropertyStream(path); //
24 | InputStreamReader inputstreamreader = new InputStreamReader(resourceAsStream, charset);) {
25 | properties.load(inputstreamreader);
26 | }
27 |
28 | properties.forEach((k, v) -> {
29 | LOGGER.info(k + "=" + v);
30 | });
31 | }
32 | ```
33 |
--------------------------------------------------------------------------------
/mattermost/deploy_docker.md:
--------------------------------------------------------------------------------
1 | # Deploy Mattermost on Docker
2 |
3 | https://docs.mattermost.com/deploy/server/deploy-containers.html
4 |
5 |
6 | 1. In a terminal window, clone the repository and enter the directory.
7 |
8 | git clone https://github.com/mattermost/docker
9 | cd docker
10 | Create your .env file by copying and adjusting the env.example file.
11 |
12 | cp env.example .env
13 | Important
14 |
15 | At a minimum, you must edit the DOMAIN value in the .env file to correspond to the domain for your Mattermost server.
16 |
17 | We recommend configuring the Support Email via MM_SUPPORTSETTINGS_SUPPORTEMAIL. This is the email address your users will contact when they need help.
18 |
19 | 2. Create the required directories and set their permissions.
20 |
21 | mkdir -p ./volumes/app/mattermost/{config,data,logs,plugins,client/plugins,bleve-indexes}
22 | sudo chown -R 2000:2000 ./volumes/app/mattermost
23 | (Optional) Configure TLS for NGINX. If you’re not using the included NGINX reverse proxy, you can skip this step.
24 |
25 |
26 |
--------------------------------------------------------------------------------
/PulsarIO/Pulsar_Real_time_Analytics_at_Scale/part1-introduction.md:
--------------------------------------------------------------------------------
1 | 第一部分:简介
2 | =========================================
3 | 用户行为事包含了结构化的信息就像user-agent或者本地应用标识(IP地址)。应用能够通过相关的事件类型来扩展它的内部属性,这些事件被本地或Web应用收集以用于实时或离线分析。在eBay,我们每秒收集成百上千的事件,增长速度是用户增长的5倍。BOTs 伪装成人们的Bots产生一些有意义的事件。BOT来源于有效(例如,搜索引擎爬虫)和没价值的(抓取在分页信息)。另外一个例子,我们需要通过检测他们来保护我们的下游系统,然后隔离这些事件或者根据不通的服务级别进行处理。BOT很重要的一点是能够准确地判断这个马甲还是在购物!
4 |
5 | 另一类的用户行为事件是非结构化数据,就像地理位置,设备标识,人口统计数据和许多需要越早越好需要数据通道传输到集中式处理的反范式的数据。其他场景,就像风险检测和欺诈分析,实时用户行为模式经过某些周期或者年需要垂直扩展摘要信息,这种场景系统需要高吞吐因此不能用关系型数据库。
6 |
7 | 会话化数据是关键数据结构,这种结构允许事件在一个数据容器里计算直到用户会话完成,通常基于固定的一段时间。许多业务指标包括根据用户会话的转化率,这种也是最好在数据通道做一次早期处理。
8 |
9 | 在业务监控领域,为了探索性可视化和可选维度的告警,就需要可实时聚合的时序指标数据。这种场景特别需要更高的查询性能,也不能使用关系型数据库。指标数据实时聚合带来了挑战,就像由于大量的不同维度和大量的维度基数导致爆炸性的计数器操作。
10 |
11 | 为了让态系统接入数据流, 原始流中的部分视图(过滤器,直充,转换)对于需要低成本处理下游系统至关重要。
12 |
13 | 在这篇论文中,我们打算设计一个数据通道:构建一个用于我们大部分的计算、实时处理,基于CEP引擎构高可用的分布式的计算系统。我们的目的是把事件流看作是一个数据库表,类SQL查询能够处理在实时流来创建聚合,就像用数据库表。接下来我们会描述我们怎么做到直充,过滤,转换和创建不同的事件流视图。
14 |
15 | -----------------
16 |
17 | [« 概述](README.md) [第二部分:数据和处理模型»](part2-data-model.md)
18 |
--------------------------------------------------------------------------------
/pulsar/QuickCmd.md:
--------------------------------------------------------------------------------
1 |
2 | # QuickCmd
3 |
4 | ## Basic
5 | ```
6 |
7 | ```
8 |
9 | ## Topics
10 |
11 | ```sh
12 |
13 | bin/pulsar-admin namespaces get-backlog-quotas test-tenant/standalone/test-ns
14 |
15 |
16 | bin/pulsar-admin namespaces set-backlog-quota test-tenant/standalone/test-ns --limit 1k --policy producer_exception
17 | ```
18 |
19 | ## Producer & Consumer
20 |
21 | ```sh
22 | ### comsumer subscriptions
23 | bin/pulsar-admin --admin-url http://10.0.xx.xx:8080/ topics subscriptions topic_name
24 |
25 | ### comsumer unsubscribe
26 | bin/pulsar-admin --admin-url http://10.0.xx.xx:8080/ topics unsubscribe -s my_comsumer_name topic_name
27 |
28 | ```
29 |
30 |
31 | ## Lession & learn
32 |
33 | Q: Found Log
34 | ```
35 | pulsar write failed
36 | org.apache.pulsar.client.api.PulsarClientException$TimeoutException: Could not send message to broker within given timeout
37 | ```
38 | after Restart
39 | ```
40 | Found Exception: Cannot create producer on topic with backlog quota exceeded
41 | ```
42 | A: Delete Unused consumer which block the message dead.
--------------------------------------------------------------------------------
/clickhouse/Engines/Merge.md:
--------------------------------------------------------------------------------
1 | # Merge
2 |
3 | Merge引擎(不要与Mergetree混淆)本身不存储数据,但允许同时读取任意数量的其他表。读取将自动并行化。不支援写入表。
4 | 读取时,使用实际正在读取的表的索引(如果存在)。合并引擎接受参数:数据库名称和表的正则表达式。范例:
5 | ```
6 | Merge(hits, '^WatchLog')
7 | ```
8 |
9 | * 将使用hits中,所有匹配正则`^WatchLog`的表中读取数据。
10 |
11 | 您可以使用传回字串的常数表达式,而不是数据库字符串名。例如,`currentDatabase()`。
12 |
13 | 正则表达式是re2 (类似于PCRE),区分大小写。请参阅“匹配”部分中有关在正则表达式中转义符号的注释。
14 |
15 | 选择要读取的表时,Merge 表本身将不会被选择,即使它与regex匹配。
16 | 这是为了避免循环。比如可以创建两个合并表,它们将无休止地尝试读取彼此的数据。但不要这样做。
17 |
18 | 使用Merge 引擎的典型方法是,把大量的TinyLog表,用起来像使用单个表一样。
19 |
20 | ## Virtual columns
21 |
22 | 虚拟列是由表引擎提供的列,与表定义无关。换句话说,`CREATE TABLE`中未指定这些列,但可以用SELECT访问这些列。
23 |
24 | 虚拟列与普通列的不同之处如下:
25 | * 表定义中未指定它们。
26 | * 无法使用`INSERT`将数据添加到其中。
27 | * 在不指定列列表的情况下使用`INSERT`时,将忽略虚拟列。
28 | * `SELECT *`时,不会选择它们。
29 | * `SHOW CREATE TABLE`和`DESC TABLE`查询中不显示虚拟列。
30 |
31 | Merge 表包含String类型的虚拟列**_table**。(如果表中已有`_table`列,则虚拟列名为`_table1`,如果已有`_table1`,则名为`_table2`,依此类推)。
32 | 它包含读取数据的表的名称。
33 |
34 | 如果WHERE或PREWHERE子句包含不依赖于其他表列的`_table`列的条件(作为连接元素之一或作为整个表达式),则这些条件将用作索引。
35 | 对要从中读取数据的表名数据集执行条件,并且将仅从触发条件的那些表执行读取操作。
36 |
37 |
38 |
--------------------------------------------------------------------------------
/clickhouse/install.md:
--------------------------------------------------------------------------------
1 | # Install
2 |
3 | ## Download
4 |
5 | [Location](https://packagecloud.io/altinity/clickhouse)
6 |
7 | Sample as version 1.1.54318-3 on CentOS7
8 | * clickhouse-server-common-1.1.54318-3.el7.x86_64.rpm
9 | * clickhouse-server-1.1.54318-3.el7.x86_64.rpm
10 | * clickhouse-debuginfo-1.1.54318-3.el7.x86_64.rpm
11 | * clickhouse-compressor-1.1.54318-3.el7.x86_64.rpm
12 | * clickhouse-client-1.1.54318-3.el7.x86_64.rpm
13 |
14 | ## RPM install
15 | * rpm -ivh clickhouse-server-common-1.1.54318-3.el7.x86_64.rpm
16 | * rpm -ivh clickhouse-server-1.1.54318-3.el7.x86_64.rpm
17 | * rpm -ivh clickhouse-client-1.1.54318-3.el7.x86_64.rpm
18 | * rpm -ivh clickhouse-compressor-1.1.54318-3.el7.x86_64.rpm
19 |
20 | ## Config Dir
21 | /etc/clickhouse-server/
22 |
23 | ## Start
24 | 1. service clickhouse-server start
25 | 2. clickhouse-server --daemon --config-file=/etc/clickhouse-server/config.xml
26 |
27 | ## Client
28 | ```sh
29 | clickhouse-client --host=xx.xx.xx.xx --port=9001
30 | :) show tables;
31 | :) select now();
32 | :) select 1;
33 |
34 | ```
35 |
--------------------------------------------------------------------------------
/Jenkins/ansible/do.build.nginx.yaml:
--------------------------------------------------------------------------------
1 | ---
2 |
3 | - name: do package etc stuff
4 | hosts: www-saasfront-web
5 | vars: #定义变量
6 | # work_space: /data/home/jenkins/.jenkins/workspace/www-job-name
7 | timestamp_vary: "{{ lookup('pipe', 'date +%Y%m%d%H%M%S') }}"
8 | # pack_dir_name:
9 | pack_dir_base: /data/appdatas/jenkins_pack
10 |
11 | # become: yes
12 | # become_user: root
13 |
14 | tasks:
15 | - shell: 'date +%Y%m%d%H%M%S'
16 | register: current_run_timestamp
17 |
18 | - name: set facts
19 | set_fact:
20 | timestamp: "{{current_run_timestamp.stdout}}"
21 |
22 | - name: tar file
23 | local_action: shell cd {{work_space}} && tar -cvzf dist.tar.gz dist
24 |
25 | - name: tar file
26 | local_action: shell cd {{work_space}} && mkdir -p {{pack_dir_base}}/{{pack_dir_name}} && mv dist.tar.gz {{pack_dir_base}}/{{pack_dir_name}}/dist_{{timestamp}}.tar.gz
27 |
28 | - name: keep latest 5 then clean other
29 | local_action: shell cd {{pack_dir_base}}/{{pack_dir_name}} && ls -t .| grep ".tar.gz" | awk "{if(NR>5){print $1}}" | xargs rm -rf
30 |
31 |
32 |
--------------------------------------------------------------------------------
/PulsarIO/Processor.md:
--------------------------------------------------------------------------------
1 | # Process
2 |
3 | ## EventSource接口
4 | 定义了添加删除sink的接口
5 | * addEventSink
6 | * getEventSinks
7 | * removeEventSink
8 | * setEventSinks
9 |
10 | ## EventSink接口
11 | * sendEvent
12 |
13 | ## AbstractEventSource
14 |
15 | 简单实现EventSource 接口
16 | * 对sink进行pause/resume
17 | * fireSendEvent(): 实现了把消息发送给子sink对象
18 | * 实现 error接口,注册erro,取error等
19 |
20 | **主要是对子sink的控制**
21 |
22 | ## AbstractEventProcessor
23 |
24 | 继承抽象类AbstractEventSource,并实现EventProcessor接口,
25 | EventProcessor接口主要是组合EventSource,EventSink,Monitorable, MonitorableStatCollector四个接口
26 |
27 | Monitorable, MonitorableStatCollector两个接口主要和监控统计相关
28 | 此类大部分代码是和监控有关,还有用PipelineFlowControl控制process的能力,包括此process的pause/resume状态变更
29 |
30 | **主要是对process本身的控制和信息统计**
31 |
32 | ## AbstractQueuedEventProcessor
33 | 真正实现 sendEvent 的抽象类,在sendEvent中调用queueEvent方法, 默认实现queueEvent方法为:把事件放入RequestQueueProcessor(一个util类,此类实现了一个ringbuffer的工作线程池)线程池并配置真正处理的EventProcessRequest工作类,在工作线程处理
34 |
35 | 子类可以重载 queueEvent方法,并必须实现 getProcessEventRequest,来决定真正的处理工作方式。在EventProcessRequest 中留有接口processEvent方法来处理,如在EsperProcessor的实现中,新增了ProcessEventRequest来让epl处理真正的工作。
36 |
37 |
--------------------------------------------------------------------------------
/mysql/docker-compose.yml:
--------------------------------------------------------------------------------
1 | version: '3.8'
2 |
3 | services:
4 | db:
5 | image: swr.cn-north-4.myhuaweicloud.com/ddn-k8s/docker.io/mysql/mysql-server:8.0
6 | container_name: mysql_container
7 | restart: unless-stopped
8 | environment:
9 | MYSQL_ROOT_PASSWORD: 123456
10 | ports:
11 | - "0.0.0.0:3306:3306"
12 | volumes:
13 | - C:\work\docker_data\mysql\db_data:/var/lib/mysql
14 |
15 | services:
16 | mysql:
17 | image: mysql:8.0.42
18 | container_name: mysql8
19 | restart: always
20 | ports:
21 | - "3306:3306"
22 | environment:
23 | MYSQL_ROOT_PASSWORD: root1234 # root 密码
24 | MYSQL_DATABASE: mysql # 初始数据库
25 | MYSQL_USER: test # 初始用户
26 | MYSQL_PASSWORD: test # 用户密码
27 | volumes:
28 | - /Users/jaiminpan/.data/appdatas/mysql/mysql_84:/var/lib/mysql # 数据持久化
29 | - ./init:/docker-entrypoint-initdb.d # 初始 SQL 脚本(可选)
30 | command:
31 | --default-authentication-plugin=mysql_native_password
32 | --character-set-server=utf8mb4
33 | --collation-server=utf8mb4_unicode_ci
--------------------------------------------------------------------------------
/python/README.md:
--------------------------------------------------------------------------------
1 | Python
2 | -----------
3 |
4 | ## Website
5 | [Python 官网](https://www.python.org/)
6 | [Python 官网文档](https://www.python.org/doc/)
7 |
8 | ## Install
9 | [安装教程](https://github.com/jaiminpan/MYWIKI/blob/master/python/install.md)
10 |
11 | ## Book
12 | * **无编程基础**
13 | 《head first python》
14 | [与孩子一起学编程](http://book.douban.com/subject/5338024/)
15 | * **有编程基础**
16 | [简明 Python 教程](http://woodpecker.org.cn/abyteofpython_cn/chinese/index.html) ([地址2](http://itlab.idcquan.com/linux/manual/Python_chinese/))
17 | [Dive Into Python](http://woodpecker.org.cn/diveintopython/)
18 |
19 | # Misc
20 |
21 | ## scrapy爬虫框架
22 | [官网http://scrapy.org/](http://scrapy.org/)
23 | [中文教程](http://scrapy-chs.readthedocs.org/zh_CN/0.24/intro/tutorial.html)
24 |
25 | ## 数据分析工具
26 | [python数据分析工具](https://github.com/jaiminpan/MYWIKI/blob/master/python/data_science.md)
27 |
28 | ## supervisor
29 | supervisor 是类似于Daemontools的监控工具,它基于python,能随时监控系统中某些进程的状态,并在“适当的时候给予适当的操作”。
30 |
31 | 官网 http://supervisord.org
32 | [supervisor-进程控制服务](http://www.litrin.net/2012/08/02/supervisor-%E8%BF%9B%E7%A8%8B%E6%8E%A7%E5%88%B6%E6%9C%8D%E5%8A%A1/)
33 |
--------------------------------------------------------------------------------
/ELK/elastic/Filter.md:
--------------------------------------------------------------------------------
1 | # Filter
2 |
3 | ES中filter的用法有两种,一种是filted query,如下
4 | 1.
5 | ```json
6 | {
7 | "query":{
8 | "filtered":{
9 | "query":{
10 | "term":{"title":"kitchen3"}
11 | },
12 | "filter":{
13 | "term":{"price":1000}
14 | }
15 | }
16 | }
17 | }
18 | ```
19 | 这种方式已经deprecated了,可以通过boolQuery实现。
20 | 2.
21 | ```json
22 | {
23 | "query": {
24 | "bool": {
25 | "must": {
26 | "term": {
27 | "term":{"title":"kitchen3"}
28 | }
29 | },
30 | "filter": {
31 | "term": {
32 | "price":1000
33 | }
34 | }
35 | }
36 | }
37 | }
38 | ```
39 |
40 | 另一种是直接放在根目录:
41 | 3.
42 | ```json
43 | {
44 | "query":{
45 | "term":{"title":"kitchen3"}
46 | },
47 | "filter":{
48 | "term":{"price":1000}
49 | }
50 | }
51 | ```
52 |
53 | ### 区别
54 | 根目录中的filter(**3**)在query后执行。在filter query先执行filter(**2**),不计算score,再执行query。
55 | 如果还要在搜索结果中执行aggregation操作,filter query(**2**)聚合的是filter和query之后的结果,而filter(**3**)聚合的是query的结果。
56 |
57 |
58 | https://stackoverflow.com/questions/28958882/elasticsearch-filtered-query-vs-filter
59 |
60 |
--------------------------------------------------------------------------------
/Java/logback/logback-spring.xml:
--------------------------------------------------------------------------------
1 |
2 |
3 |
4 |
5 |
6 |
7 |
9 |
10 |
12 |
14 |
15 |
16 |
17 |
18 |
19 |
20 |
26 |
27 |
28 |
--------------------------------------------------------------------------------
/Flex-Bison/Flex_Basic.md:
--------------------------------------------------------------------------------
1 | # Lex & Flex
2 |
3 | ## 基本格式
4 | Lex & Flex 文件一般以`.l`后缀结尾。
5 |
6 | ```
7 | 定义段
8 | %%
9 | 规则段
10 | %%
11 | 代码段
12 | ```
13 | #### 例子
14 | ```
15 | // test.l
16 | %{
17 | #include
18 | %}
19 |
20 | %option noyywrap
21 | %option main
22 |
23 | digit [0-9]
24 | %%
25 | stop printf("Stop command received\n");
26 | start printf("Start command received\n");
27 | %%
28 | int yywrap(void)
29 | {
30 | return 1;
31 | }
32 | ```
33 |
34 | #### 编译
35 | ```
36 | # flex test.l // 默认输出文件名 lex.core_yy.c
37 | flex -o test.c test.l // 指定文件名 test.c
38 | gcc -o test test.c
39 | ```
40 | #### 输出
41 | ```
42 | -># ./test
43 | start stop
44 | Start command received
45 | Stop command received
46 | ```
47 |
48 | ## 基本语法
49 | #### 定义段
50 | * 格式:
51 | ```
52 | DIGIT [0-9]
53 | ID [a-z][a-z0-9]*
54 | ```
55 | * 定义段的: /*注释内容*/ 也会被复制到输出“.c”文件中。
56 |
57 | #### 规则段:
58 | * pattern action
59 | * 规则中也可以通过/**/加注释,但不会被复制到输出".c"文件中。
60 |
61 | #### 代码段
62 | * 原样复制到输出的“.c”文件中
63 |
64 | #### 其它
65 | * 在定义和规则段,任何缩进的文本,或者是放在“%{”和“%}”之间的内容会被原封不动的复制到输出".c"文件中。
66 |
67 | ## Misc
68 | http://liuzeshu.com/2015/07/21/flex-bison-notes/
69 |
70 |
71 |
--------------------------------------------------------------------------------
/ldap/README.md:
--------------------------------------------------------------------------------
1 | # ldap
2 |
3 |
4 |
5 | dn: cn=module,cn=config
6 | cn: module
7 | objectclass: olcModuleList
8 | objectclass: top
9 | olcmoduleload: memberof
10 | olcmodulepath: /usr/lib/ldap
11 |
12 | dn: olcOverlay={0}memberof,olcDatabase={1}hdb,cn=config
13 | objectClass: olcConfig
14 | objectClass: olcMemberOf
15 | objectClass: olcOverlayConfig
16 | objectClass: top
17 | olcOverlay: memberof
18 |
19 |
20 |
21 |
22 | dn: cn=module,cn=config
23 | cn: module
24 | objectclass: olcModuleList
25 | objectclass: top
26 | olcmoduleload: refint
27 | olcmodulepath: /usr/lib/ldap
28 |
29 | dn: olcOverlay={1}refint,olcDatabase={1}hdb,cn=config
30 | objectClass: olcConfig
31 | objectClass: olcMemberOf
32 | objectClass: olcOverlayConfig
33 | objectClass: top
34 | olcOverlay: refint
35 |
36 |
37 |
38 | ldapadd -Y EXTERNAL -H ldapi:///
39 | dn: olcOverlay=memberof,olcDatabase={2}hdb,cn=config
40 | objectClass: olcOverlayConfig
41 | objectClass: olcMemberOf
42 | olcOverlay: memberof
43 | olcMemberOfRefint: TRUE
44 |
45 |
46 |
47 | ldapmodify -Q -Y EXTERNAL -H ldapi:///
48 | dn: cn=module{0},cn=config
49 | changetype: modify
50 | add: olcModuleLoad
51 | olcModuleLoad: memberof.la
--------------------------------------------------------------------------------
/php/install_php_pgsql.sh:
--------------------------------------------------------------------------------
1 | # php -i | grep postgres to check if postgres installed
2 |
3 | PHP_VER="5.5.29"
4 |
5 | # Check if extension exists first
6 | php -m | grep pgsql
7 |
8 | # Update brew and install requirements
9 | brew update
10 | brew install autoconf
11 |
12 | # Download PHP source and extract
13 | mkdir -p ~/src; cd ~/src
14 | wget -c http://br1.php.net/distributions/php-$PHP_VER.tar.bz2
15 | tar -xjf php-$PHP_VER.tar.bz2
16 |
17 | # Go to extension dir and phpize
18 | cd php-$PHP_VER/ext/pdo_pgsql/
19 | phpize
20 |
21 | # Configure for Postgress.app
22 | # Use just "./configure" for brew version
23 | ./configure --with-pdo-pgsql="/Library/PostgreSQL/9.3/"
24 | make
25 | sudo make install
26 |
27 | # Add extension to php.ini
28 | sudo echo "extension=pdo_pgsql.so" >> /etc/php.ini
29 |
30 | # Go to extension dir and phpize
31 | cd php-$PHP_VER/ext/pgsql/
32 | phpize
33 |
34 | # Configure for Postgress.app
35 | # Use just "./configure" for brew version
36 | ./configure --with-pgsql="/Library/PostgreSQL/9.3/"
37 | make
38 | sudo make install
39 |
40 | # Add extension to php.ini
41 | sudo echo "extension=pgsql.so" >> /etc/php.ini
42 |
43 | # Check if extension exists, again
44 | php -m | grep pgsql
45 |
--------------------------------------------------------------------------------
/Jenkins/ansible/do.deploy.nginx.yaml:
--------------------------------------------------------------------------------
1 |
2 | - hosts: www-saasfront-web
3 | vars: #定义变量
4 | # dir_name: /www/sample-name-web
5 | # package_name:
6 | # pack_dir_base:
7 | timestamp_vary: "{{ lookup('pipe', 'date +%Y%m%d%H%M%S') }}"
8 |
9 | # become: yes
10 | # become_user: root
11 |
12 | tasks:
13 | - shell: 'date +%Y%m%d%H%M%S'
14 | register: current_run_timestamp
15 |
16 | - name: set facts
17 | set_fact:
18 | timestamp: "{{current_run_timestamp.stdout}}"
19 |
20 | - name: copy file to remote
21 | copy: src={{pack_dir_base}}/{{package_name}} dest=/data/www-datas/{{dir_name}}
22 |
23 | - name: extract tar
24 | shell: tar -C /data/www-datas/{{dir_name}} -xvzf /data/www-datas/{{dir_name}}/{{package_name}}
25 |
26 | - name: rename dist
27 | shell: cd /data/www-datas/{{dir_name}} && mv dist dist_{{timestamp}} && rm -f current && ln -s dist_{{timestamp}} current
28 |
29 | - name: clear bakckup
30 | shell: cd /data/www-datas/{{dir_name}} && rm -f dist.tar.gz && mkdir -p backup && cd backup && ls . | xargs rm -rf
31 |
32 | - name: bakckup old package
33 | shell: cd /data/www-datas/{{dir_name}} && ls . | grep -v -E "dist_{{timestamp}}|current|backup" | xargs mv -t backup
34 | ignore_errors: True
35 |
36 |
--------------------------------------------------------------------------------
/clickhouse/Engines/SummingMergeTree.md:
--------------------------------------------------------------------------------
1 | # SummingMergeTree
2 |
3 | 此引擎与MergeTree的不同之处在于,它在合并时汇总数据。
4 |
5 | ```
6 | SummingMergeTree(EventDate, (OrderID, EventDate, BannerID, ...), 8192)
7 | ```
8 | 要合计的列是隐式的。合并时,具有相同主键值的所有行(在示例中为OrderId、eventdate、BannerID,...)进行汇总,并且不在主键中。
9 |
10 |
11 | ```
12 | SummingMergeTree(EventDate, (OrderID, EventDate, BannerID, ...), 8192, (Shows, Clicks, Cost, ...))
13 | ```
14 | 要合计的列是显式设置的(最后一个参数 -Shows, Clicks, Cost, ...)中。
15 | 合并时,具有相同主键的所有行在指定列中汇总。指定的列也必须是numeric(数字)类型的,并且不能是主键的一部分。
16 |
17 |
18 | 如果所有这些列中的值都为null,则将删除行。(例外的情况是数据part中没有任何行。
19 |
20 | 对于不属于主键的其他行,合并时将选择出现的第一个值。
21 |
22 | 不对读取操作执行求和。如有必要,请编写相应的GROUP BY。
23 |
24 |
25 | 此外,表可以具有以特殊方式处理的嵌套数据结构。
26 | 如果嵌套表的名称以“Map”结尾,并且它至少包含两个满足以下条件的列: *对于第一个表,numeric ((U)IntN, Date, DateTime),
27 | 我们将对于其他表把他称为“key”*,arithmetic ((U)IntN, Float32/64),我们将将其称为“(值...) '
28 |
29 | 然后,将此嵌套表解释为key => (values...),并且当合并其行时,两个数据集的元素通过“key”与相应的(值...)中。
30 |
31 | 例子
32 | ```
33 | [(1, 100)] + [(2, 150)] -> [(1, 100), (2, 150)]
34 | [(1, 100)] + [(1, 150)] -> [(1, 250)]
35 | [(1, 100)] + [(1, 150), (2, 150)] -> [(1, 250), (2, 150)]
36 | [(1, 100), (2, 150)] + [(1, -100)] -> [(2, 150)]
37 | ```
38 | 对聚合映射, 使用函数sumMap(key, value)。
39 |
40 | 对于嵌套数据结构,不需要指定需要汇总的列。
41 |
42 | 这种表引擎并不特别有用。请记住,在保存预聚合数据时,您将失去系统上的一些优势。
43 |
44 |
--------------------------------------------------------------------------------
/kafka/monitor.md:
--------------------------------------------------------------------------------
1 | # Monitor
2 |
3 |
4 | ## KafkaOffsetMonitor
5 | [github](https://github.com/quantifind/KafkaOffsetMonitor)
6 |
7 | ### Running
8 | Download then run
9 | ```sh
10 | java -cp KafkaOffsetMonitor-assembly-0.2.1.jar \
11 | com.quantifind.kafka.offsetapp.OffsetGetterWeb \
12 | --zk zk-server1,zk-server2 \
13 | --port 8080 \
14 | --refresh 10.seconds \
15 | --retain 7.days
16 | ```
17 |
18 | ### Problem
19 | It's slow to visit the index.html because it use google cdn.
20 | Fix it by
21 | 1. `jar xvf KafkaOffsetMonitor-assembly-0.2.1.jar` to directory `package`
22 | 2. modify `package/offsetapp/index.html`
23 |
24 | Origin
25 | ```xml
26 |
27 |
28 |
29 | ```
30 | Fixed
31 | ```xml
32 |
33 |
34 |
35 | ```
36 |
37 | 3. `jar cvf myKafkaOffsetMonitor.jar -C package/ .`
38 |
39 |
--------------------------------------------------------------------------------
/PulsarIO/Structure.md:
--------------------------------------------------------------------------------
1 | # Code Structure
2 |
3 | 核心项目 jetstream的代码结构
4 | * -- PATH
5 | * |- jetstreamcore
6 | * |- jetstreamframework
7 | * |- jetstreamspring
8 | * |- jetstream-messaging
9 | * |- jetstream-channels-processors
10 | * |- jetstream-hdfs
11 | * |- configurationmanagement
12 | * |- jetstreamdemo
13 |
14 | ## jetstreamcore
15 | * 核心类库,主要实现Messaging(核心的消息传递框架,包括zookeeper交互[ZooKeeperTransport类]、netty的交互[NettyTransport类])
16 | * Configure(Spring的ApplicationContext)
17 | * Management
18 | * netty服务器和客户端
19 | * jettyserver (已废弃,直接用)
20 |
21 | ## jetstreamframework
22 | * Application启动入口和参数解析
23 | * 事件(event)流的处理框架(核心抽象类 AbstractEventSource、AbstractEventProcessor)
24 | * AbstractEventSource子类(补充统计相关信息,AbstractInboundChannel、AbstractOutboundChannel)
25 | * 数据流画像 dataflow
26 | * 通用事件生成器 GenericEventGenerator
27 | * 默认spring xml配置
28 |
29 | ## jetstream-messaging
30 | * 连接流处理框架、 Messaging (InboundMessagingChannel、OutboundMessagingChannel)
31 | * 连接流处理框架、 REST(http) (InboundRESTChannel、OutboundRESTChannel)
32 | * 连接流处理框架、 kafka (InboundKafkaChannel、OutboundKafkaChannel)
33 |
34 | ## jetstreamspring
35 | 主要是Configure用到,和Spring的 ListableBeanFactory、 ApplicationEvent、BeanChangeAware 相关的代码。
36 |
37 | ## jetstream-channels-processors
38 |
39 | ## jetstream-hdfs
40 |
41 | ## configurationmanagement
42 |
43 | ## jetstreamdemo
44 | 例子
45 |
--------------------------------------------------------------------------------
/CPP/gcc/install.md:
--------------------------------------------------------------------------------
1 | # Install guide
2 |
3 |
4 | ## Download
5 | 下载 gcc 5.4
6 | http://ftp.tsukuba.wide.ad.jp/software/gcc/releases/gcc-5.4.0/
7 |
8 | 下载 mpc-0.8.1,mpfr-2.4.2,gmp-4.3.2
9 | http://ftp.tsukuba.wide.ad.jp/software/gcc/infrastructure/
10 |
11 | ## 准备
12 | 解压gcc后,在gcc根目录下,分别设置 mpc-0.8.1,mpfr-2.4.2,gmp-4.3.2的软连接mpc,mpfr,gmp
13 | ```bash
14 | ln -sf /PATH/mpc-0.8.1 mpc
15 | ln -sf /PATH/gmp-4.3.2 gmp
16 | ln -sf /PATH/mpfr-2.4.2 mpfr
17 | ```
18 |
19 | ## 编译
20 | 创建build目录,然后configure 再make
21 | ```bash
22 | mkdir build && cd build
23 |
24 | # 如果不带--disable-multilib选项,则编译就会生成32bit和64bit的版本,即多平台交叉编译
25 | ../configure --enable-checking=release --enable-languages=c,c++ --disable-multilib
26 |
27 | make -j4
28 | make install
29 | ```
30 |
31 | ## 更新默认gcc
32 | 添加新GCC到可选项,倒数第三个是名字,倒数第二个参数为新GCC路径,最后一个参数40为优先级,值越大,就越先启用
33 | ```
34 | update-alternatives --install /usr/bin/gcc gcc /usr/local/bin/gcc 101
35 | ```
36 | 说明(从最后一个参数说起)
37 | * 101:版本优先级,值越大,就越先启用
38 | * /usr/local/bin/gcc:新的gcc文件目录,以上的编译操作默认,会在路径/usr/local下生成相应的库文件和执行文件等。
39 | * gcc:系统调用时,在命令行中的名字,也就是路径的一个别名吧。
40 | * /usr/bin/gcc:之前版本gcc调用时的路径。
41 |
42 | 查看信息
43 | ```
44 | update-alternatives --display gcc
45 | ```
46 | 如果想要,切换回旧版本,请参考
47 | ```
48 | update-alternatives --config gcc
49 | ```
50 |
51 | 然后,执行updatedb,更新系统文件信息,并退出当前session,重新连接session:
52 |
53 | 检查`gcc -v`
54 |
55 |
--------------------------------------------------------------------------------
/oracle/sqlplus.md:
--------------------------------------------------------------------------------
1 |
2 | # Oracle Client
3 |
4 | ## Connect to Oracle using clinet
5 |
6 | #### Install
7 | ```
8 | oracle-instantclient12.2-basic-12.2.0.1.0-1.x86_64.rpm
9 | oracle-instantclient12.2-sqlplus-12.2.0.1.0-1.x86_64.rpm
10 | oracle-instantclient12.2-devel-12.2.0.1.0-1.x86_64.rpm
11 | oracle-instantclient12.2-odbc-12.2.0.1.0-1.x86_64.rpm
12 | ```
13 | It will install into `/usr/lib/oracle/12.2/client64`
14 |
15 | #### Env
16 | ```
17 | export ORACLE_HOME=/usr/lib/oracle/12.2/client64
18 | export LD_LIBRARY_PATH=/usr/lib/oracle/12.2/client64/lib:$LD_LIBRARY_PATH
19 | ```
20 |
21 | #### Prepare tnsnames.ora
22 | Prepare tnsnames.ora. If the tnsnames.ora location is `/usr/lib/oracle/12.2/client64/network/admin/tnsnames.ora`
23 | ```
24 | export TNS_ADMIN=/usr/lib/oracle/12.2/client64/network/admin
25 | ```
26 |
27 | ** tnsnames.ora Sample **
28 | ```
29 | ORA12 =
30 | (DESCRIPTION =
31 | (ADDRESS_LIST =
32 | (ADDRESS = (PROTOCOL = TCP)(HOST = 127.0.0.1)(PORT = 1521))
33 | )
34 | (CONNECT_DATA =
35 | (sid = orcl)
36 | (SERVER = DEDICATED)
37 | )
38 | )
39 | ```
40 |
41 | #### Connecting
42 | Use following command to Connect oracle
43 |
44 | ```
45 | $ORACLE_HOME/bin/sqlplus 'user/password@ORA12'
46 | ```
47 |
48 |
49 | ### Reference
50 | http://www.xenialab.it/meo/web/white/oracle/HT_IC_RH.htm
51 |
--------------------------------------------------------------------------------
/Jenkins/ansible/sample_web.yaml:
--------------------------------------------------------------------------------
1 | ---
2 |
3 | - hosts: www-AppVue-web
4 | vars: #定义变量
5 | # work_space: /data/home/jenkins/.jenkins/workspace/www-job-name
6 | # dir_name: /www/sample-name-web
7 | timestamp_vary: "{{ lookup('pipe', 'date +%Y%m%d%H%M%S') }}" # eval each time
8 |
9 | # become: yes
10 | # become_user: root
11 |
12 | tasks:
13 |
14 | - name: set facts
15 | set_fact:
16 | timestamp: "{{timestamp_vary}}" # eval here
17 |
18 | - name: tar file
19 | local_action: shell cd {{work_space}} && tar -cvzf dist.tar.gz dist
20 |
21 | - name: copy tar to remote
22 | copy: src={{work_space}}/dist.tar.gz dest=/data/www-datas/{{dir_name}}
23 |
24 | - name: extract tar
25 | shell: tar -C /data/www-datas/{{dir_name}} -xvzf /data/www-datas/{{dir_name}}/dist.tar.gz
26 |
27 | - name: rename dist
28 | shell: cd /data/www-datas/{{dir_name}} && mv dist dist_{{timestamp}} && rm -f current && ln -s dist_{{timestamp}} current
29 | # shell: cd /data/www-datas/{{dir_name}} && mv dist dist_$(date +'%Y%m%d%H%M%S')
30 |
31 | - name: clear bakckup
32 | shell: cd /data/www-datas/{{dir_name}} && rm -f dist.tar.gz && mkdir -p backup && cd backup && ls . | xargs rm -rf
33 |
34 | - name: bakckup old package
35 | shell: cd /data/www-datas/{{dir_name}} && ls . | grep -v -E "dist_{{timestamp}}|current|backup" | xargs mv -t backup
36 | ignore_errors: True
37 |
38 |
--------------------------------------------------------------------------------
/mattermost/env.sample:
--------------------------------------------------------------------------------
1 | # Domain of service
2 | DOMAIN=mm.example.com
3 |
4 | TZ=UTC
5 |
6 | POSTGRES_USER=mmuser
7 | POSTGRES_PASSWORD=mmuser_password
8 | POSTGRES_DB=mattermost
9 |
10 | ## Bleve index (inside the container)
11 | MM_BLEVESETTINGS_INDEXDIR=/mattermost/bleve-indexes
12 |
13 | ## The app port is only relevant for using Mattermost without the nginx container as reverse proxy. This is not meant
14 | ## to be used with the internal HTTP server exposed but rather in case one wants to host several services on one host
15 | ## or for using it behind another existing reverse proxy.
16 | APP_PORT=8065
17 |
18 | ## Configuration settings for Mattermost. Documentation on the variables and the settings itself can be found at
19 | ## https://docs.mattermost.com/administration/config-settings.html
20 | ## Keep in mind that variables set here will take precedence over the same setting in config.json. This includes
21 | ## the system console as well and settings set with env variables will be greyed out.
22 |
23 | ## Below one can find necessary settings to spin up the Mattermost container
24 | MM_SQLSETTINGS_DRIVERNAME=postgres
25 | MM_SQLSETTINGS_DATASOURCE=postgres://${POSTGRES_USER}:${POSTGRES_PASSWORD}@postgres:5432/${POSTGRES_DB}?sslmode=disable&connect_timeout=10
26 |
27 | ## Example settings (any additional setting added here also needs to be introduced in the docker-compose.yml)
28 | MM_SERVICESETTINGS_SITEURL=https://${DOMAIN}
--------------------------------------------------------------------------------
/spark/README.md:
--------------------------------------------------------------------------------
1 | # Spark
2 |
3 | ## Install
4 | #### Prepare
5 | 1. Linux
6 | 2. Java environment(JDK)
7 |
8 | Example:
9 | ```
10 | sudo yum install java-1.8.0-openjdk
11 | ```
12 |
13 | Download: https://spark.apache.org/downloads.html
14 |
15 | Here we choose `spark-1.6.1-bin-hadoop2.4.tgz`
16 |
17 | tar xvfz spark-1.6.1-bin-hadoop2.4.tgz
18 |
19 | ## Usage
20 | #### standalone
21 | You can use following 'standalone' Commands to execute your code directly.
22 |
23 | bin/spark-shell scala
24 | bin/spark-sql sql
25 | bin/pyspark python
26 | bin/spark-class java
27 |
28 | #### cluster
29 | configuration your env in `conf/*` then execute the commands in 'sbin/*'
30 |
31 | Example:
32 | ```
33 | vi conf/slaves
34 | sbin/start-all.sh # or start-master.sh && start-slaves.sh
35 | ```
36 | You can specific your master(spark://IP:PORT) to connect the SparkContext
37 | Example:
38 | ```
39 | MASTER=spark://localhost:7077 ./spark-shell
40 | # OR
41 | MASTER=spark://localhost:7077 ./pyspark
42 | ```
43 |
44 | #### Web
45 | The default web address `http://192.168.0.108:8080/` to view your spark
46 |
47 | ## Reference:
48 | * http://yixuan.cos.name/cn/2015/04/spark-beginner-1/
49 | * http://colobu.com/2014/12/11/spark-sql-quick-start/
50 | * http://blog.csdn.net/zwx19921215/article/details/41821147
51 | * http://www.oschina.net/translate/spark-standalone?print
52 | * https://spark.apache.org/docs/1.5.2/api/python/pyspark.sql.html
53 |
--------------------------------------------------------------------------------
/supervisord/script/conf.d/airflow.ini:
--------------------------------------------------------------------------------
1 | [program:airflow_webserver]
2 | command=airflow webserver
3 | user=airflow
4 | redirect_stderr=true
5 | stdout_logfile=/data/applogs/airflow/web.log
6 | autostart=true
7 | autorestart=false
8 | startsecs=5
9 | priority=1
10 | stopasgroup=true
11 | killasgroup=true
12 | environment=AIRFLOW_HOME=/data/appdata/airflow
13 | directory=/data/appdata/airflow
14 |
15 | [program:airflow_scheduler]
16 | command=airflow scheduler
17 | user=airflow
18 | redirect_stderr=true
19 | stdout_logfile=/data/applogs/airflow/scheduler.log
20 | autostart=true
21 | autorestart=false
22 | startsecs=5
23 | priority=1
24 | stopasgroup=true
25 | killasgroup=true
26 | environment=AIRFLOW_HOME=/data/appdata/airflow
27 | directory=/data/appdata/airflow
28 |
29 | [program:airflow_worker]
30 | command=airflow worker
31 | user=airflow
32 | redirect_stderr=true
33 | stdout_logfile=/data/applogs/airflow/worker.log
34 | autostart=true
35 | autorestart=false
36 | startsecs=5
37 | priority=1
38 | stopasgroup=true
39 | killasgroup=true
40 | environment=AIRFLOW_HOME=/data/appdata/airflow
41 | directory=/data/appdata/airflow
42 |
43 | [program:airflow_flower]
44 | command=airflow flower
45 | user=airflow
46 | redirect_stderr=true
47 | stdout_logfile=/data/applogs/airflow/flower.log
48 | autostart=true
49 | autorestart=false
50 | startsecs=5
51 | priority=1
52 | stopasgroup=true
53 | killasgroup=true
54 | environment=AIRFLOW_HOME=/data/appdata/airflow
55 | directory=/data/appdata/airflow
56 |
--------------------------------------------------------------------------------
/consul/README.md:
--------------------------------------------------------------------------------
1 | # Consul
2 |
3 | ### Consul 介绍
4 | Consul 是 HashiCorp 公司推出的开源工具,用于实现分布式系统的服务发现与配置。与其它分布式服务注册与发现的方案,Consul 的方案更“一站式”,内置了服务注册与发现框 架、分布一致性协议实现、健康检查、Key/Value 存储、多数据中心方案,不再需要依赖其它工具(比如 ZooKeeper 等)。使用起来也较 为简单。Consul 使用 Go 语言编写,因此具有天然可移植性(支持Linux、windows和Mac OS X);安装包仅包含一个可执行文件,方便部署,与 Docker 等轻量级容器可无缝配合。
5 |
6 | #### Consul 的优势:
7 | * 使用 Raft 算法来保证一致性, 比复杂的 Paxos 算法更直接. 相比较而言, zookeeper 采用的是 Paxos, 而 etcd 使用的则是 Raft。
8 | * 支持多数据中心,内外网的服务采用不同的端口进行监听。 多数据中心集群可以避免单数据中心的单点故障,而其部署则需要考虑网络延迟, 分片等情况等。 zookeeper 和 etcd 均不提供多数据中心功能的支持。
9 | * 支持健康检查。 etcd 不提供此功能。
10 | * 支持 http 和 dns 协议接口。 zookeeper 的集成较为复杂, etcd 只支持 http 协议。
11 | * 官方提供 web 管理界面, etcd 无此功能。
12 | * 综合比较, Consul 作为服务注册和配置管理的新星, 比较值得关注和研究。
13 |
14 | #### 特性:
15 | * 服务发现
16 | * 健康检查
17 | * Key/Value 存储
18 | * 多数据中心
19 |
20 | #### Consul 角色
21 | * client: 客户端, 无状态, 将 HTTP 和 DNS 接口请求转发给局域网内的服务端集群。
22 | * server: 服务端, 保存配置信息, 高可用集群, 在局域网内与本地客户端通讯, 通过广域网与其它数据中心通讯。 每个数据中心的 server 数量推荐为 3 个或是 5 个。
23 | * Consul 客户端、服务端还支持夸中心的使用,更加提高了它的高可用性。
24 |
25 |
26 |
27 | #### Consul 工作原理:
28 |
29 | 1、当 Producer 启动的时候,会向 Consul 发送一个 post 请求,告诉 Consul 自己的 IP 和 Port
30 | 2、Consul 接收到 Producer 的注册后,每隔10s(默认)会向 Producer 发送一个健康检查的请求,检验Producer是否健康
31 | 3、当 Consumer 发送 GET 方式请求 /api/address 到 Producer 时,会先从 Consul 中拿到一个存储服务 IP 和 Port 的临时表,从表中拿到 Producer 的 IP 和 Port 后再发送 GET 方式请求 /api/address
32 | 4、该临时表每隔10s会更新,只包含有通过了健康检查的 Producer
33 | Spring Cloud Consul 项目是针对 Consul 的服务治理实现。Consul 是一个分布式高可用的系统,它包含多个组件,但是作为一个整体,在微服务架构中为我们的基础设施提供服务发现和服务配置的工具。
34 |
35 |
36 |
--------------------------------------------------------------------------------
/php/install.md:
--------------------------------------------------------------------------------
1 | # Install
2 |
3 | ## Install 5.6 On CentOS
4 |
5 | #### List what already installed
6 | ```
7 | yum list installed | grep php
8 | ```
9 | #### Remove them
10 | ```
11 | yum remove php.x86_64 php-cli.x86_64 php-common.x86_64 \
12 | php-gd.x86_64 php-ldap.x86_64 \
13 | php-mbstring.x86_64 php-mcrypt.x86_64 \
14 | php-mysql.x86_64 php-pdo.x86_64
15 | ```
16 |
17 | #### Config new `yum` source
18 |
19 | 追加CentOS 6.5的epel及remi源。
20 | ```
21 | # rpm -Uvh http://ftp.iij.ad.jp/pub/linux/fedora/epel/6/x86_64/epel-release-6-8.noarch.rpm
22 |
23 | # rpm -Uvh http://rpms.famillecollet.com/enterprise/remi-release-6.rpm
24 | ```
25 |
26 | 以下是CentOS 7.0的源。
27 | ```
28 | # yum install epel-release
29 |
30 | # rpm -ivh http://rpms.famillecollet.com/enterprise/remi-release-7.rpm
31 | ```
32 | 使用yum list命令查看可安装的包(Packege)。
33 | ```
34 | # yum list --enablerepo=remi --enablerepo=remi-php56 | grep php
35 | ```
36 |
37 | ### Install PHP5.6.x
38 | ```
39 | # yum install --enablerepo=remi --enablerepo=remi-php56 \
40 | php php-opcache \
41 | php-devel php-mbstring \
42 | php-gd php-bcmath php-ldap \
43 | php-mcrypt \
44 | php-mysqlnd php-phpunit-PHPUnit \
45 | php-pecl-xdebug php-pecl-xhprof
46 | # php --version
47 | ```
48 |
49 | ```
50 | # for postgresql connection
51 | yum install --enablerepo=remi --enablerepo=remi-php56 php-pgsql
52 | ```
53 |
54 | #### Install PHP-fpm
55 | ```
56 | yum install --enablerepo=remi --enablerepo=remi-php56 php-fpm
57 | ```
58 |
59 |
--------------------------------------------------------------------------------
/Airflow/DAG/hive_create_partition.py:
--------------------------------------------------------------------------------
1 | #!/usr/bin/env python
2 | # -*- coding: utf-8 -*-
3 |
4 | import logging
5 | import airflow
6 |
7 | from airflow import DAG
8 | from airflow.operators.python_operator import PythonOperator
9 | from airflow.operators import BashOperator, DummyOperator
10 |
11 | from datetime import datetime, timedelta
12 |
13 |
14 | # --------------------------------------------------------------------------------
15 | # set default arguments
16 | # --------------------------------------------------------------------------------
17 |
18 | default_args = {
19 | 'owner': 'Jaimin',
20 | 'depends_on_past': False,
21 | 'start_date': datetime.now(),
22 | 'email': ['airflow@airflow.com'],
23 | 'email_on_failure': False,
24 | 'email_on_retry': False,
25 | 'retries': 1,
26 | 'retry_delay': timedelta(minutes=5),
27 | # 'queue': 'bash_queue',
28 | # 'pool': 'backfill',
29 | # 'priority_weight': 10,
30 | # 'end_date': datetime(2016, 1, 1),
31 | }
32 |
33 | dag = DAG(
34 | 'hive_create_part_v1',
35 | default_args=default_args,
36 | schedule_interval="0 1 * * *",
37 | concurrency=1)
38 |
39 | # --------------------------------------------------------------------------------
40 | # set tasks
41 | # --------------------------------------------------------------------------------
42 |
43 | task = BashOperator(
44 | task_id='hive_create_parition',
45 | bash_command='bash /data/appdata/airflow/script/hive_create_job.sh mnode2 ',
46 | dag=dag)
47 |
--------------------------------------------------------------------------------
/python/data_science.md:
--------------------------------------------------------------------------------
1 | 数据分析工具
2 | ---------------
3 |
4 | #### Pandas
5 |
6 | pandas 是一个开源的软件,它具有 BSD 的开源许可,为 Python 编程语言提供高性能,易用数据结构和数据分析工具。在数据改动和数据预处理方面,Python 早已名声显赫,但是在数据分析与建模方面,Python 是个短板。Pands 软件就填补了这个空白,能让你用 Python 方便地进行你所有数据的处理,而不用转而选择更主流的专业语言,例如 R 语言。
7 |
8 | 整合了劲爆的 IPyton 工具包和其他的库,它在 Python 中进行数据分析的开发环境在处理性能,速度,和兼容方面都性能卓越。Pands 不会执行重要的建模函数超出线性回归和面板回归;对于这些,参考 statsmodel 统计建模工具和 scikit-learn 库。为了把 Python 打造成顶级的统计建模分析环境,我们需要进一步努力,但是我们已经奋斗在这条路上了。
9 |
10 | 由 Galvanize 专家,数据科学家 Nir Kaldero 提供。
11 |
12 | #### Matplotlib
13 |
14 | matplotlib 是基于 Python 的 2D(数据)绘图库,它产生(输出)出版级质量的图表,用于各种打印纸质的原件格式和跨平台的交互式环境。matplotlib 既可以用在 python 脚本, python 和 ipython 的 shell 界面 (ala MATLAB? 或 Mathematica?),web 应用服务器,和6类 GUI 工具箱。
15 |
16 | matplotlib 尝试使容易事情变得更容易,使困难事情变为可能。你只需要少量几行代码,就可以生成图表,直方图,能量光谱(power spectra),柱状图,errorcharts,散点图(scatterplots)等,。
17 |
18 | 为简化数据绘图,pyplot 提供一个类 MATLAB 的接口界面,尤其是它与 IPython 共同使用时。对于高级用户,你可以完全定制包括线型,字体属性,坐标属性等,借助面向对象接口界面,或项 MATLAB 用户提供类似(MATLAB)的界面。
19 |
20 | Galvanize 公司的首席科学官 Mike Tamir 供稿。
21 |
22 | #### Scikit-Learn
23 |
24 |
25 |
26 | Scikit-Learn 是一个简单有效地数据挖掘和数据分析工具(库)。关于最值得一提的是,它人人可用,重复用于多种语境。它基于 NumPy,SciPy 和 mathplotlib 等构建。Scikit 采用开源的 BSD 授权协议,同时也可用于商业。Scikit-Learn 具备如下特性:
27 |
28 | 分类(Classification) – 识别鉴定一个对象属于哪一类别
29 |
30 | 回归(Regression) – 预测对象关联的连续值属性
31 |
32 | 聚类(Clustering) – 类似对象自动分组集合
33 |
34 | 降维(Dimensionality Reduction) – 减少需要考虑的随机变量数量
35 |
36 | 模型选择(Model Selection) –比较、验证和选择参数和模型
37 |
38 | 预处理(Preprocessing) – 特征提取和规范化
39 |
40 | Galvanize 公司数据科学讲师,Isaac Laughlin提供
41 |
42 |
--------------------------------------------------------------------------------
/CPP/guard.h:
--------------------------------------------------------------------------------
1 | #ifndef _PZM_GUARD_H_
2 | #define _PZM_GUARD_H_
3 |
4 | namespace pzm{
5 | namespace Synch{
6 |
7 | //scoped locking
8 | template
9 | class Guard{
10 | public:
11 | Guard(LOCK& lock):lock_(&lock), own_(false)
12 | {
13 | acquire();
14 | }
15 | ~Guard()
16 | {
17 | release();
18 | }
19 | void acquire()
20 | {
21 | lock_->acquire();
22 | own_ = true;
23 | }
24 | void release()
25 | {
26 | if(own_) {
27 | own_ = false;
28 | lock_->release();
29 | }
30 | }
31 |
32 | private:
33 | LOCK* lock_;
34 | bool own_;
35 |
36 | Guard(){}
37 | Guard(const Guard &){}
38 | void operator=(const Guard &){}
39 | };
40 |
41 | class Lock
42 | {
43 | public:
44 | virtual void acquire()=0;
45 | virtual void release()=0;
46 | };
47 |
48 | class Null_Lock:public Lock
49 | {
50 | public:
51 | virtual void acquire(){};
52 | virtual void release(){};
53 | };
54 |
55 | }
56 | }
57 |
58 | /* example
59 | #include "Guard.h"
60 | #include "iostream"
61 | using namespace std;
62 |
63 | class mutex:public pzm::Synch::Lock
64 | {
65 | public:
66 |
67 | virtual void acquire(){cout<<"lock"< guard(m);
75 | }
76 | cout<<"end"<php;
30 | root /data/site/www.ttlsa.com;
31 |
32 | location /
33 | {
34 | auth_basic "nginx basic http test for ttlsa.com";
35 | auth_basic_user_file conf/htpasswd;
36 | autoindex on;
37 | }
38 | }
39 | ```
40 |
41 | 备注:一定要注意auth_basic_user_file路径(指定的文件是nginx.conf所在目录的相对路径),否则会不厌其烦的出现403。
42 |
43 | 生成密码
44 | 可以使用htpasswd,或者使用openssl
45 | ```
46 | # printf "test:$(openssl passwd -crypt 123456)\n" >>conf/htpasswd
47 | # cat conf/htpasswd
48 | # OR "htpasswd -c -b passwordfile username password"
49 | test:xyJkVhXGAZ8tM
50 | ```
51 |
52 | 账号:test
53 | 密码:123456
54 | reload nginx
55 | ```
56 | nginx -s reload
57 | ```
58 |
--------------------------------------------------------------------------------
/supervisord/script/supervisor_init_script.sh:
--------------------------------------------------------------------------------
1 | #!/bin/bash
2 | #
3 | # supervisord This scripts turns supervisord on
4 | #
5 | # Author: Mike McGrath (based off yumupdatesd)
6 | #
7 | # chkconfig: - 95 04
8 | #
9 | # description: supervisor is a process control utility. It has a web based
10 | # xmlrpc interface as well as a few other nifty features.
11 | # processname: supervisord
12 | # config: /etc/supervisor/supervisord.conf
13 | # pidfile: /var/run/supervisord.pid
14 | #
15 |
16 | # source function library
17 | . /etc/rc.d/init.d/functions
18 |
19 | RETVAL=0
20 |
21 | start() {
22 | echo -n $"Starting supervisord: "
23 | daemon "supervisord -c /etc/supervisor/supervisord.conf "
24 | RETVAL=$?
25 | echo
26 | [ $RETVAL -eq 0 ] && touch /var/lock/subsys/supervisord
27 | }
28 |
29 | stop() {
30 | echo -n $"Stopping supervisord: "
31 | killproc supervisord
32 | echo
33 | [ $RETVAL -eq 0 ] && rm -f /var/lock/subsys/supervisord
34 | }
35 |
36 | restart() {
37 | stop
38 | start
39 | }
40 |
41 | case "$1" in
42 | start)
43 | start
44 | ;;
45 | stop)
46 | stop
47 | ;;
48 | restart|force-reload|reload)
49 | restart
50 | ;;
51 | condrestart)
52 | [ -f /var/lock/subsys/supervisord ] && restart
53 | ;;
54 | status)
55 | status supervisord
56 | RETVAL=$?
57 | ;;
58 | *)
59 | echo $"Usage: $0 {start|stop|status|restart|reload|force-reload|condrestart}"
60 | exit 1
61 | esac
62 |
63 | exit $RETVAL
64 |
--------------------------------------------------------------------------------
/claude/command/brief.md:
--------------------------------------------------------------------------------
1 | ### /brief - 写会话摘要
2 |
3 | 如果会话快结束了,并且用户输入 `/brief` 或者让你 "写摘要",立即:
4 | 1. 检查 `./docs/Brief.md` 以查看是否有任何现有内容可以保留
5 | 2. 写一个全面的摘要,涵盖:
6 | - 当前会话中取得的重要进展
7 | - 关键的决策和架构变更
8 | - 未完成的任务和下一步
9 | - 需要保留的技术细节
10 | - 任何使用 compact 功能可能会丢失的上下文
11 | 3. 在开头包含当前的日期和时间 (EST)
12 | 4. 用新内容覆盖整个 Brief.md 文件
13 |
14 | **目的**: 摘要作为 Claude Code 的 "compact" 功能之上的一个额外层,以确保会话之间不会丢失重要细节。 这与简洁无关 - 尽可能彻底,以保留所有重要上下文。
15 |
16 | **何时使用**:
17 | - 在重要的开发会话结束时
18 | - 当做出重要的架构决策时
19 | - 在使用 compact 功能之前,如果关键细节可能会丢失
20 | - 当用户明确要求时
21 |
22 | **注意**: 当被要求 "阅读摘要" 时,只需阅读 Brief.md 文件,无需修改它。 这通常发生在 /start 之后会话的开始。
23 |
24 |
25 | ## > vi Brief.md
26 |
27 | 在创建新的 Brief 时,除非用户指示,否则始终覆盖整个 Brief,因为有时我们只需要更新现有的 Brief(除了顶部的这一段,它应该始终保持原样)。 创建 Brief 时,始终包含 Brief 的日期和时间 EST。 Brief 是临时的,仅用于帮助从一个会话延续到另一个会话。 始终只有一个 Brief 文档。 我们不使用 Claude Code CLI 的 "compact" 功能。 相反,我们使用 Brief 作为在需要时确保会话到会话连续性的手段。
28 |
29 | # 摘要
30 |
31 | **日期/时间**: 2025 年 7 月 5 日,凌晨 12:11 EST
32 |
33 |
34 | Create a futuristic website banner inspired by this layout: https://i.ibb.co/s9YRj9nM/2-1.png. The design is for "iPunic", a global IP proxy service. Enhance the tech aesthetic by adding elements like glowing global networks, digital nodes, abstract 3D world maps, and data streams. Use a dark gradient background (deep blue to purple), with luminous lines, cyber grid overlays, and motion-inspired visuals to convey speed and security. Incorporate HUD-style UI details and abstract server visuals. Leave central space for headline text. The overall tone should be high-tech, secure, futuristic, and
--------------------------------------------------------------------------------
/Java/UseSystemVariables.md:
--------------------------------------------------------------------------------
1 | # Using System Variables
2 |
3 | Reference:
4 | * https://docs.oracle.com/javase/tutorial/essential/environment/sysprop.html
5 | * https://docs.oracle.com/javase/8/docs/api/java/lang/System.html
6 |
7 | ## In Code
8 |
9 | #### System.getenv()
10 | ```
11 | public static Map getenv()
12 | ```
13 | > https://docs.oracle.com/javase/8/docs/api/java/lang/System.html#getenv--
14 | > Returns an unmodifiable string map view of the **current system environment**.
15 |
16 | #### System.getProperties()
17 | ```
18 | public static Properties getProperties()
19 | ```
20 | > https://docs.oracle.com/javase/8/docs/api/java/lang/System.html#getProperties--
21 | > Determines the **current system properties**.
22 |
23 |
24 | ## In Spring
25 | * https://docs.spring.io/autorepo/docs/spring-framework/4.2.x/javadoc-api/org/springframework/core/env/StandardEnvironment.html
26 |
27 | #### System.getenv()
28 | * `{systemEnvironment['ENV_VARIABLE_NAME']}`
29 |
30 | You can supply app.environment varialble as,
31 | * environment varilable: export ENV_VARIABLE_NAME=DEV
32 |
33 | #### System.getProperties()
34 | * `#{systemProperties['yourkey']}`
35 | * `#{systemProperties.yourkey}`
36 |
37 | sample
38 | ```
39 |
40 |
41 |
42 |
43 | ```
44 |
45 | You can supply app.environment varialble as,
46 | * commandline param: java -Dapp.environment=DEV ....
47 |
48 |
--------------------------------------------------------------------------------
/PostgreSQL/docker/docker-compose.yml:
--------------------------------------------------------------------------------
1 | # https://docs.docker.com/compose/environment-variables/
2 | services:
3 | postgres:
4 | image: postgres:17.7 # Specifies the PostgreSQL image version
5 | container_name: my_postgres_db
6 | restart: always # Ensures the container restarts if it stops Or `unless-stopped`
7 | ports:
8 | - "5432:5432" # Maps host port 5432 to container port 5432
9 | tmpfs:
10 | - /tmp
11 | - /var/run/postgresql
12 | environment:
13 | POSTGRES_USER: username # The PostgreSQL user (useful to connect to the database)
14 | POSTGRES_PASSWORD: password # The PostgreSQL password (useful to connect to the database)
15 | POSTGRES_DB: my_db # The PostgreSQL default database (automatically created at first launch)
16 | security_opt:
17 | - no-new-privileges:true
18 |
19 | # The `volumes` tag allows us to share a folder with our container.
20 | # Its syntax is as follows: [folder path on our machine]:[folder path to retrieve in the container]
21 | volumes:
22 | - /data/appdatas/postgres/data:/var/lib/postgresql/data # Persists data using a named volume
23 |
24 |
25 | ####
26 | ## If you want to use a `.env` file, please comment the `environment` section.
27 | ####
28 |
29 | # The `env_file` tag allows us to declare an environment file
30 | #env_file:
31 | # - .env # The name of your environment file (the one at the repository root)
32 |
33 | ####
34 | ## If you want to persist the database data, please uncomment the lines below.
35 | ####
36 |
--------------------------------------------------------------------------------
/linux/OOM.md:
--------------------------------------------------------------------------------
1 | # Out Of Memory (OOM)
2 |
3 | Reference: http://learning-kernel.readthedocs.org/en/latest/mem-management.html
4 |
5 | 1. OOM启动是在分配内存时发生页面错误时触发的,没有剩余内存阙值可控制。
6 |
7 | 2. OOM结束进程只是简单的搜寻哪个进程的`/proc//oom_score`数值分最大。
8 | 系统综合进程的内存消耗量、CPU时间、存活时间和oom_adj、oom_score_adj计算,消耗内存越多分越高,存活时间越长分越低,
9 | 总的策略是:损失最少的工作,释放最大的内存同时不伤及无辜的用了很大内存的进程,并且杀掉的进程数尽量少。
10 |
11 | 3. 调整oom_score的值可通过更改`/proc//oom_score_adj`或`/proc//oom_adj`进行。
12 | oom_score_adj范围-1000~~+1000,数值越小越安全,-1000表示OOM对此进程禁用;
13 | 同样oom_adj范围-17~~+15,数值越小越安全,-17表示OOM对此进程禁用。
14 | 对oom_adj的支持基于兼容过去内核版本,尽量使用`/proc//oom_score_adj`进行设置。
15 |
16 | 4. Linux在计算进程的内存消耗的时候,会将子进程所耗内存的一半同时算到父进程中。
17 |
18 | ```sh
19 | # It's often a good idea to protect the postmaster from being killed by the
20 | # OOM killer (which will tend to preferentially kill the postmaster because
21 | # of the way it accounts for shared memory). Setting the OOM_SCORE_ADJ value
22 | # to -1000 will disable OOM kill altogether. If you enable this, you probably
23 | # want to compile PostgreSQL with "-DLINUX_OOM_SCORE_ADJ=0", so that
24 | # individual backends can still be killed by the OOM killer.
25 | #OOM_SCORE_ADJ=-1000
26 | # Older Linux kernels may not have /proc/self/oom_score_adj, but instead
27 | # /proc/self/oom_adj, which works similarly except the disable value is -17.
28 | # For such a system, enable this and compile with "-DLINUX_OOM_ADJ=0".
29 | #OOM_ADJ=-17
30 |
31 | test x"$OOM_SCORE_ADJ" != x && echo "$OOM_SCORE_ADJ" > /proc/self/oom_score_adj
32 | test x"$OOM_ADJ" != x && echo "$OOM_ADJ" > /proc/self/oom_adj
33 | # then do your start proc here
34 | start_my_proc
35 | ```
36 |
--------------------------------------------------------------------------------
/clickhouse/Engines/CollapsingMergeTree.md:
--------------------------------------------------------------------------------
1 | # CollapsingMergeTree
2 |
3 | 此引擎与MergeTree 的不同之处在于,它允许在合并时自动删除或'折叠(collapsing)'某些行。
4 |
5 | Yandex.Metrica有一些正常日志(如hit log)和change log。Change log用于增量计算不断更改的数据的统计信息。例如会话更改日志或用户历史记录更改日志。
6 | Yandex.Metrica中的会话总是不断变化。例如,每个会话的命中数会增加。我们将任何对象中的更改称为一对(?旧值?新值)。如果创建了对象,则可能缺少旧值。
7 | 如果删除了对象,则可能缺少新值。如果对象已更改,但以前存在且未删除,则两个值都存在。在更改日志中,为每个更改创建一个或两个条目。
8 | 每个条目都包含对象具有的所有属性,以及用于区分新旧值的特殊属性。当对象发生更改时,仅将新条目添加到更改日志中,现有条目不会被触及。
9 |
10 | 通过change log,可以增量计算几乎所有统计信息。为此,我们需要考虑带加号的"new"行和带减号的"old"行。
11 | 换句话说,对于代数结构包含用于取元素的逆的操作的所有统计信息,增量计算都是可能的。大多数统计数据都是这样。
12 | 我们还可以计算“幂等”统计信息,如唯一访问者的数量,因为在更改会话时不会删除唯一访问者。
13 |
14 | 这是允许 Yandex.Metrica 进行实时工作的主要概念。
15 |
16 | CollapsingMergeTree 接受一个附加参数-- int8类型的列,其包含该行的'sign'。例子:
17 | ```
18 | CollapsingMergeTree(EventDate, (CounterID, EventDate, intHash32(UniqID), VisitID), 8192, Sign)
19 |
20 | ```
21 | 在这里,'Sign'是一个对旧值用-1对新值用1的列。
22 |
23 | 在合并时,每个连续相同的主键(排序数据的列)的每组减少到不超过一行,列值“sign_column = -1”(“负行”),且不超过一行与列值"sign_column = 1"(“正行”)。
24 | 换句话说,change log中的条目被折叠了。
25 | 如果正和负行的数目匹配,则写入第一个负行和最后一个正行。如果有正行比负行的数量多,则只写入最后一行。如果负行的比正行的数量多,则只写入第一个负行。
26 | 否则,就会有逻辑错误,不会写入任何行。(如果日志中的同一部分意外插入了一次以上,则可能发生逻辑错误。错误仅记录在服务器日志中,合并继续。)
27 |
28 | 因此,'折叠'不应更改统计信息的计算结果。变更会逐渐折叠,以便最后只剩下几乎每个object的最后值。
29 | 与MergeTree相比,CollapsingMergeTree 引擎支持多种形式的数据量减少。
30 |
31 | 有多种方法可以从CollapsingMergeTree 表中获得完全“折叠”的数据:
32 | 编写包含GROUPBY和aggregate函数的查询,这些函数用于解释sign。
33 | 例如,
34 | * 要计算数量,请写入“sum(Sign)”而不是“count()”
35 | * 要计算某事物的总和,请写“sum(Sign * x)”而不是“sum(x)”
36 | * 依此类推,并加上“HAVING sum(Sign) > 0”
37 |
38 | 并非所有数字都可以这样计算。例如,无法重写聚合函数“min”和“max”。
39 | 如果必须提取数据而不进行聚合(例如,检查是否存在最新值与特定条件匹配的行),则可以在FROM子句中用FINAL修饰符。这种方法效率要低得多。
40 |
41 |
42 |
--------------------------------------------------------------------------------
/Jenkins/ansible/sample.yaml:
--------------------------------------------------------------------------------
1 | ---
2 | # ansible-playbook sample
3 |
4 | - hosts: www-DctCenter-java
5 | vars:
6 | service_name: "appexs"
7 | run_dir: "appexs"
8 | work_space: "/data/home/jenkins/.jenkins/workspace/sample"
9 | script_name: "jenkins_appexs.sh"
10 | remote_user: java
11 | tasks:
12 |
13 | - name: pause service
14 | shell: CURRENT_SERVICE_NAME={{service_name}} ./consul_api.sh pause
15 |
16 | - name: Copy war file to client
17 | copy: src={{work_space}}/target.tar.gz dest=~/{{run_dir}}
18 |
19 | - name: extract target.tar.gz
20 | shell: tar -C ~/{{run_dir}} -xvzf ~/{{run_dir}}/target.tar.gz
21 |
22 | - name: sleep 5
23 | shell: sleep 5
24 |
25 | - name: stop java
26 | shell: ./{{script_name}} stop
27 | register: outMessg
28 |
29 | - debug: var=outMessg.stdout_lines
30 | ignore_errors: True
31 |
32 | - name: bakckup old package
33 | shell: ./{{script_name}} backup
34 | ignore_errors: True
35 |
36 | - name: delete old package
37 | shell: rm -rf ~/{{run_dir}}/*.jar
38 | ignore_errors: True
39 |
40 | - name: mv package
41 | shell: mv -f ~/{{run_dir}}/target/*.jar ~/{{run_dir}}
42 |
43 | - name: start java
44 | shell: ./{{script_name}} restart
45 |
46 | - shell: ps -eo pid,cmd,etime,stime | grep java
47 | register: ps
48 |
49 | - debug: var=ps.stdout_lines
50 |
51 | - name: Clean target.tar.gz
52 | shell: rm -rf ~/{{run_dir}}/target*
53 | ignore_errors: True
54 |
55 | - name: sleep 10
56 | shell: sleep 10
57 |
58 | - name: resume service
59 | shell: CURRENT_SERVICE_NAME={{service_name}} ./consul_api.sh resume
--------------------------------------------------------------------------------
/ZooKeeper/deploy.md:
--------------------------------------------------------------------------------
1 | # Deploy
2 |
3 | # Deploy
4 | 下载zookeeper安装包,解压
5 |
6 | * 修改日志位置
7 | `bin/zkEnv.sh`中, 设置 `ZOO_LOG_DIR="日志目录"`
8 | * 配置
9 | ```bash
10 | cp zoo_sample.cfg zoo.cfg
11 | vi zoo.cfg
12 | # 设置
13 | dataDir=/tmp/test # 设置data目录
14 | dataLogDir=/tmp/test_wal 设置wal目录 #
15 |
16 | # 集群ip,只有配置集群才需要
17 | server.1= 10.2.27.72:2888:3888
18 | server.2= 10.2.27.73:2888:3888
19 | server.3= 10.2.27.75:2888:3888
20 | ```
21 |
22 | * 设置本机的集群id,只有配置集群才需要
23 | touch /tmp/test/myid # 新建文件
24 | echo 1 > /tmp/test/myid #假设本机ip对应了server.1,则把 1放入myid中
25 |
26 | * 启动 bin/zkServer.sh start
27 |
28 |
29 | ### Log rotate
30 |
31 | vi /etc/logrotate.d/zookeeper
32 | ```
33 | /PATH/TO/zookeeper/zookeeper.out
34 | {
35 | missingok
36 | notifempty
37 | size 200M
38 | compress
39 | dateext
40 | weekly
41 | rotate 4
42 | copytruncate
43 | }
44 | ```
45 |
46 | #### 手动触发
47 | /usr/sbin/logrotate /etc/logrotate.conf
48 | 或者
49 | /usr/sbin/logrotate /etc/logrotate.d/zookeeper
50 |
51 | #### 自动触发
52 | Logrotate是基于CRON运行的,其脚本是`/etc/cron.daily/logrotate`
53 | ```
54 | #!/bin/sh
55 |
56 | /usr/sbin/logrotate /etc/logrotate.conf
57 | EXITVALUE=$?
58 | if [ $EXITVALUE != 0 ]; then
59 | /usr/bin/logger -t logrotate "ALERT exited abnormally with [$EXITVALUE]"
60 | fi
61 | exit 0
62 | ```
63 |
64 | vi /etc/crontab
65 | ```bash
66 | SHELL=/bin/bash
67 | PATH=/sbin:/bin:/usr/sbin:/usr/bin
68 | MAILTO=root
69 | HOME=/
70 |
71 | # run-parts
72 | 01 * * * * root run-parts /etc/cron.hourly
73 | 59 23 * * * root run-parts /etc/cron.daily
74 | 22 4 * * 0 root run-parts /etc/cron.weekly
75 | 42 4 1 * * root run-parts /etc/cron.monthly
76 | ```
77 |
--------------------------------------------------------------------------------
/consul/QuickCmd.md:
--------------------------------------------------------------------------------
1 | # QuickCmd
2 |
3 | ### Office Guide
4 | https://www.consul.io/api/agent/service.html
5 |
6 | ### Other Guide
7 |
8 | ## Agent
9 | ```
10 | # list
11 | curl http://localhost:8500/v1/agent/members
12 |
13 | # check health
14 | curl http://localhost:8500/v1/agent/checks
15 |
16 | # config
17 | curl http://localhost:8500/v1/kv/commons/test/config?raw
18 |
19 | ```
20 |
21 | ## all Service
22 | ```
23 | curl -s localhost:8500/v1/catalog/service/web
24 |
25 | curl localhost:8500/v1/agent/services | python -m json.tool | grep ID | awk '{print $2}'|sed 's/["|,]//g' | grep ${SERVICE_NAME}
26 | ```
27 |
28 |
29 | ## agent Service
30 | ```
31 | # register
32 | curl -XPUT http://localhost:8500/v1/agent/service/register -d \
33 | '{
34 | "ID": "myinst_id",
35 | "Name": "service_name",
36 | "Tags": [
37 | "primary",
38 | "v1"
39 | ],
40 | "Address": "127.0.0.1",
41 | "Port": 80,
42 | "EnableTagOverride": false,
43 | "Check": {
44 | "DeregisterCriticalServiceAfter": "12h",
45 | "HTTP": "http://localhost:5000/health",
46 | "Interval": "10s"
47 | }
48 | }'
49 |
50 | # delete
51 | curl -s -XPUT localhost:8500/v1/agent/service/deregister/${SERVICE_ID}
52 |
53 | # set check passing:
54 | curl -s localhost:8500/v1/agent/check/pass/${SERVICE_ID}
55 |
56 | # list critical service
57 | curl -s localhost:8500/v1/health/state/critical | python -m json.tool
58 |
59 | # maintenance
60 | curl -s -XPUT "localhost:8500/v1/agent/service/maintenance/${SERVICE_ID}?enable=true&reason=deploy"
61 |
62 | # maintenance resume
63 | curl -s -XPUT "localhost:8500/v1/agent/service/maintenance/${SERVICE_ID}?enable=false"
64 |
65 | ```
66 |
--------------------------------------------------------------------------------
/docker/README.md:
--------------------------------------------------------------------------------
1 | Docker
2 | =================
3 |
4 | Usage
5 | -----------------
6 | Install the most recent version of the Docker Engine for your platform using the official Docker releases, which can also be installed using:
7 | ```
8 | # This script is meant for quick & easy install via:
9 | 'curl -sSL https://get.docker.com/ | sh'
10 | # or:
11 | 'wget -qO- https://get.docker.com/ | sh'
12 | ```
13 |
14 |
15 | Docker In Github
16 | ---------------
17 | * Gitlab, PostgreSQL, MySQL, MongoDB and etc
18 | https://github.com/sameersbn/
19 | PS: Gitlab-8.3 in docker will get error 500 if git clone from svn and commits message title is 'git-svn-id......'
20 | (reword comments can fix it)
21 |
22 | Gitlab Docker Sample:
23 | ---------------
24 | According to [Guilding](https://github.com/sameersbn/docker-gitlab)
25 | Note:
26 | * The alias of the postgresql server container should be set to **postgresql** while linking with the gitlab image.
27 | * The alias of the redis server container should be set to **redisio** while linking with the gitlab image.
28 | * If host (pg or redis server) is not reachable inside Gitlab docker, use **`iptables -t filter -A DOCKER -d 172.17.0.0/16 -i docker0 -o docker0 -j ACCEPT`**
29 |
30 |
31 | Reference
32 | --------------
33 | https://github.com/widuu/chinese_docker/tree/master/userguide
34 |
35 | Books
36 | ------------
37 | [Docker —— 从入门到实践](https://www.gitbook.com/book/yeasy/docker_practice)
38 |
39 |
40 | ### docker-compose
41 | > sudo curl -L "https://github.com/docker/compose/releases/download/v2.27.0/docker-compose-$(uname -s)-$(uname -m)" -o /usr/local/bin/docker-compose
42 | > ln -s /usr/local/bin/docker-compose /usr/bin
--------------------------------------------------------------------------------
/python/code/blockedpool.py:
--------------------------------------------------------------------------------
1 | # -*- coding: utf-8 -*-
2 |
3 | from multiprocessing.pool import Pool
4 | from time import sleep
5 | # from random import randint
6 |
7 | ADD_FAST = 0
8 | ADD_SLOW = 1
9 |
10 | class BlockedPool(Pool):
11 | def __init__(self, processes, lowsize, batchsize):
12 | super(BlockedPool, self).__init__(processes)
13 | self.lowsize = lowsize
14 | self.fastsize = batchsize
15 | self.fastcnt = 0
16 | self.addmod = ADD_FAST
17 |
18 | def apply_block_async(self, func, args=(), kwds={}, callback=None,
19 | error_callback=None):
20 |
21 | if self.addmod == ADD_FAST:
22 | self.fastcnt = self.fastcnt + 1
23 | if self.fastcnt > self.fastsize:
24 | self.addmod = ADD_SLOW
25 | self.fastcnt = 0
26 | else:
27 | if self._taskqueue.qsize() < self.lowsize:
28 | self.addmod = ADD_FAST
29 | else:
30 | # sleep(randint(1, 5))
31 | sleep(2)
32 |
33 | return self.apply_async(func, args, kwds, callback, error_callback)
34 |
35 | def call_main():
36 |
37 | pool = BlockedPool(10, 5000, 1000)
38 |
39 | num = 0
40 | for input in range(1000):
41 |
42 | pool.apply_block_async(lambda x:print(x), (input, ))
43 |
44 | if num % 10 == 0:
45 | nowtime = time.strftime('%Y-%m-%d %H:%M:%S', time.localtime(time.time()))
46 | sys.stdout.write('\rprogress: %s, (% 10d)%s' % (nowtime, num, phone_num))
47 | sys.stdout.flush()
48 |
49 | num = num + 1
50 |
51 | pool.close()
52 | pool.join()
53 |
54 | if __name__ == "__main__":
55 | call_main()
56 |
--------------------------------------------------------------------------------
/PostgreSQL/Replication.md:
--------------------------------------------------------------------------------
1 | # Replication
2 |
3 | (version > pg10)
4 |
5 | ## Step 0
6 | #### 主库检查 postgres.conf
7 | ```
8 | wal_level = replica
9 | ```
10 |
11 | ## Step 1
12 | ##### CREATE USER
13 | > CREATE ROLE repadmin login replication encrypted password 'pwd'
14 |
15 | ##### MODIFY `pg_hba.conf`
16 | ```
17 | host replication repadmin 10.0.0.0/16 md5
18 | ```
19 | ##### reload conf
20 | > systemctl reload xxx.service
21 |
22 | ```
23 | cp /usr/pgsql-11/share/recovery.conf.sample /PATH/TO/PGDATA/recovery.done
24 | chown postgres:postgres recovery.done
25 | chmod 600 recovery.done
26 | ```
27 |
28 | ##### vi recovery.done
29 | ```
30 | standby_mode = on
31 | primary_conninfo = 'host=10.0.xx.xx port=xxx user=repadmin password=pwd'
32 | ```
33 |
34 | #### Ensure
35 | Make sure all file in postgres data directory has accessed permission by `postgres`
36 |
37 | ## Step 2
38 | #### 生成备库
39 | ```
40 | mkdir /data/appdatas/pgsql/data_xx
41 | chown postgres /data/appdatas/pgsql/data_xx
42 | chmod 700 /data/appdatas/pgsql/data_xx
43 |
44 | su - postgres
45 | export PGPASSWORD="pwd"
46 | pg_basebackup -D /data/appdatas/pgsql/11/dataxx -Fp -P -X stream -v -h 10.0.x.x -p xxx -U repadmin
47 | ```
48 |
49 | ## Step 3
50 | #### 主库操作
51 | > select * from pg_create_physical_replication_slot('rep_slot_1');
52 |
53 |
54 | ## 备库操作
55 | ##### mv recovery.done recovery.conf
56 | ##### vi recovery.conf
57 | ```
58 | primary_slot_name = 'rep_slot_1'
59 | ```
60 |
61 | ##### option 修改 postgresql.conf
62 | ```
63 | hot_standby_feedback = on
64 | ```
65 |
66 | ## Step 4
67 | #### 启动备库
68 | > /usr/pgsql-11/bin/pg_ctl start -D dataxx
69 |
70 | ## Step 5
71 | postgres version > 12
72 |
73 | > touch standby.signal
74 |
75 |
76 |
77 |
78 |
79 |
--------------------------------------------------------------------------------
/PostgreSQL/postgres.conf:
--------------------------------------------------------------------------------
1 | template 1
2 | ======================
3 | fsync off
4 | shared_buffers 8GB
5 | work_mem 32MB
6 | effective_cache_size 8GB
7 | maintenance_work_mem 2GB
8 |
9 | wal_log_hints = on
10 | wal_level = replica
11 | checkpoint_completion_target 0.9
12 | # checkpoint_segments 64
13 | min_wal_size = 1GB
14 | max_wal_size = 4GB
15 | wal_keep_segments = 1000
16 |
17 |
18 | wal_buffer 8MB
19 | commit_delay 10
20 | commit_siblings 4
21 |
22 |
23 | # wal_level = replica
24 | # archive_mode = on
25 | # archive_command = 'test ! -f /archive/pg_archive/archive_active || cp %p /archive/pg_archive/%f'
26 | # archive_command = 'ssh 127.0.0.1 test ! -f /data/appdatas/pg_archive/%f && scp %p 127.0.0.1:/data/appdatas/pg_archive/%f'
27 | # Add settings for extensions here
28 |
29 |
30 | template 2
31 | ======================
32 | cluster_name = 'CN70'
33 | listen_addresses = '*'
34 | port = 15071
35 | max_connections = 300
36 | shared_buffers = 16GB
37 | work_mem = 16MB
38 | wal_level = replica
39 | wal_compression = on
40 |
41 | commit_delay = 10
42 | commit_siblings = 4
43 | checkpoint_timeout = 15min
44 | max_wal_size = 2GB
45 | min_wal_size = 1GB
46 | checkpoint_completion_target = 0.9
47 |
48 | log_destination = 'csvlog'
49 | log_min_duration_statement = '5s'
50 |
51 | archive_mode = on
52 | #archive_command = 'ssh 10.81.7.1 test ! -f /data/appdatas/pg_archive/%f && scp %p 10.81.7.1:/data/appdatas/pg_archive/%f'
53 | archive_command = 'test ! -f /data/appdatas/pgsql/11/backups/archive_active_70 || cp %p /data/appdatas/pgsql/11/backups/archive_70/%f'
54 |
55 | # Add settings for extensions here
56 |
--------------------------------------------------------------------------------
/Jenkins/ansible/sample_vars.yaml:
--------------------------------------------------------------------------------
1 | ---
2 | # ansible-playbook sample
3 | # usage: ansible-playbook sample_vars.yaml --extra-vars "service_name=myname work_space=${WORKSPACE}"
4 |
5 | - hosts: www-test-java
6 | vars:
7 | service_name: "myname"
8 | run_dir: "mydir"
9 | work_space: "/data/home/jenkins/.jenkins/workspace/sample"
10 | script_name: "jenkins_reboot.sh"
11 | remote_user: java
12 | tasks:
13 |
14 | - name: pause service
15 | shell: CURRENT_SERVICE_NAME={{service_name}} ./service_mesh_api.sh pause
16 |
17 | - name: Copy war file to client
18 | copy: src={{work_space}}/target.tar.gz dest=~/{{run_dir}}
19 |
20 | - name: extract target.tar.gz
21 | shell: tar -C ~/{{run_dir}} -xvzf ~/{{run_dir}}/target.tar.gz
22 |
23 | - name: sleep 5
24 | shell: sleep 5
25 |
26 | - name: stop java
27 | shell: ./{{script_name}} stop
28 | register: outMessg
29 |
30 | - debug: var=outMessg.stdout_lines
31 | ignore_errors: True
32 |
33 | - name: bakckup old package
34 | shell: ./{{script_name}} backup
35 | ignore_errors: True
36 |
37 | - name: delete old package
38 | shell: rm -rf ~/{{run_dir}}/*.jar
39 | ignore_errors: True
40 |
41 | - name: mv package
42 | shell: mv -f ~/{{run_dir}}/target/*.jar ~/{{run_dir}}
43 |
44 | - name: start java
45 | shell: ./{{script_name}} restart
46 |
47 | - shell: ps -eo pid,cmd,etime,stime | grep java
48 | register: ps
49 |
50 | - debug: var=ps.stdout_lines
51 |
52 | - name: Clean target.tar.gz
53 | shell: rm -rf ~/{{run_dir}}/target*
54 | ignore_errors: True
55 |
56 | - name: sleep 10
57 | shell: sleep 10
58 |
59 | - name: resume service
60 | shell: CURRENT_SERVICE_NAME={{service_name}} ./service_mesh_api.sh resume
61 |
--------------------------------------------------------------------------------
/claude/readme.md:
--------------------------------------------------------------------------------
1 |
2 |
3 |
4 | 创建 CLAUDE.md 上下文文件
5 | # 常用命令
6 | - `npm run build`: 构建项目
7 | - `npm run typecheck`: 运行类型检查
8 |
9 | # 代码风格
10 | - 使用 ES 模块语法(`import/export`),而非 CommonJS(`require`)
11 | - 尽可能使用解构导入(例如:`import { foo } from 'bar'`)
12 |
13 | # 工作流程
14 | - 完成一系列代码修改后,务必进行类型检查
15 | - 出于性能考虑,优先运行单个测试,而非整个测试套件
16 |
17 | # 核心文件与函数
18 | - 项目中的关键模块或工具函数。
19 |
20 | # 测试说明
21 | - 如何运行单元测试或端到端测试。
22 |
23 | # 仓库规范
24 | - 分支命名规则、合并策略等。
25 |
26 | # 仓库规范
27 | - pyenv 的使用、特定编译器的要求。
28 |
29 | # 项目特有的行为
30 | - 任何需要注意的警告或非预期行为。
31 |
32 |
33 | ```
34 |
35 | 你希望 Claude 执行的主要任务或目标
36 |
37 |
38 |
39 | 任务的背景信息,比如涉及的框架、业务逻辑、团队规范等
40 |
41 |
42 |
43 | 可以参考的代码片段、接口规范或已有实现
44 |
45 | ```
46 |
47 |
48 | 1.
49 | 确认需求,详细的需求
50 |
51 | 2.
52 | 基于需求文档,列一个计划,渐进的TODO列表
53 |
54 | 3.
55 | 不只是测试,不要硬编码,要实现真正的逻辑,代码要健壮可维护可扩展,如果需求不合理请直接告诉我
56 |
57 |
58 | 3. 探索常见的高效工作流
59 | Claude Code 的灵活性允许你自由设计工作流。以下是社区中沉淀下来的一些高效模式。
60 |
61 |
62 | a. 探索、规划、编码、提交
63 | 这是一个适用于多种复杂任务的通用工作流,它强调在编码前进行充分的思考和规划。
64 |
65 | 探索:要求 Claude 阅读相关文件、图片或 URL,但明确指示它暂时不要编写任何代码。
66 | 规划:让 Claude 制定解决问题的计划。使用“think”、“think hard”或“ultrathink”等关键词,可以给予 Claude 更多的计算时间来评估不同方案。
67 | 编码:在确认计划后,让 Claude 开始实施。
68 | 提交:最后,让 Claude 提交代码、创建 PR,并更新相关文档。
69 |
70 | b. 测试驱动开发(TDD)
71 | TDD 与代理式编程相结合,威力倍增。Claude 在有明确目标(如通过测试用例)时表现最佳。
72 |
73 | 编写测试:让 Claude 根据预期输入输出编写测试用例。
74 | 确认失败:运行测试,确保它们因功能未实现而失败。
75 | 提交测试:将测试用例提交到版本控制。
76 | 实现功能:指示 Claude 编写能通过所有测试的代码,并在此过程中不断迭代。
77 | 提交代码:在所有测试通过后,提交最终实现。
78 |
79 |
80 | c. 视觉驱动开发
81 | 与 TDD 类似,你可以为 Claude 提供视觉目标,尤其适用于 UI 开发。
82 |
83 | 1. 提供截图工具:通过 Puppeteer MCP 服务器或 iOS 模拟器 MCP 服务器,让 Claude 能够截取浏览器或应用的界面。
84 | 2. 提供视觉稿:通过粘贴、拖拽或文件路径的方式,将设计稿图片提供给 Claude。
85 | 3. 迭代实现:要求 Claude 编写代码、截图、比对视觉稿,并循环迭代直至结果匹配。
86 | 4. 提交:满意后提交代码。
87 |
88 |
89 |
--------------------------------------------------------------------------------
/etc/UniqueIDs.md:
--------------------------------------------------------------------------------
1 | Sharding & IDs
2 | ---------------
3 |
4 | http://instagram-engineering.tumblr.com/post/10853187575/sharding-ids-at-instagram
5 |
6 |
7 | #### Each of our IDs consists of:
8 |
9 | * 41 bits for time in milliseconds (gives us 41 years of IDs with a custom epoch)
10 | * 13 bits that represent the logical shard ID (max shards id: 2^13 = 8192)
11 | * 10 bits that represent an auto-incrementing sequence, modulus 1024 (2^10 = 1024). This means we can generate 1024 IDs, per shard, per millisecond
12 |
13 | #### Example:
14 |
15 | 1. time id:
16 | 1387263000 = September 9th, 2011, at 5:00pm
17 | milliseconds since the beginning of our epoch (defined January 1st, 2011)
18 | `id = 1387263000 << (64-41)`
19 |
20 | 2. shard id:
21 | user ID: 31341, logical shards: 2000, 31341 % 2000 -> 1341
22 | `id |= 1341 << (64-41-13)`
23 |
24 | 3. seq id:
25 | generated 5000 IDs for this table already; next value is 5001
26 | `id |= (5001 % 1024)`
27 |
28 | ### Here’s the PL/PGSQL that accomplishes all this (for an example schema insta5):
29 | ```plpgsql
30 | CREATE SCHEMA insta5;
31 | CREATE SEQUENCE table_id_seq;
32 |
33 | CREATE OR REPLACE FUNCTION insta5.next_id(OUT result bigint) AS $$
34 | DECLARE
35 | our_epoch bigint := 1314220021721;
36 | seq_id bigint;
37 | now_millis bigint;
38 | shard_id int := 5;
39 | BEGIN
40 | SELECT nextval('insta5.table_id_seq') % 1024 INTO seq_id;
41 |
42 | SELECT FLOOR(EXTRACT(EPOCH FROM clock_timestamp()) * 1000) INTO now_millis;
43 | result := (now_millis - our_epoch) << 23;
44 | result := result | (shard_id << 10);
45 | result := result | (seq_id);
46 | END;
47 | $$ LANGUAGE PLPGSQL;
48 |
49 | CREATE TABLE insta5.our_table (
50 | "id" bigint NOT NULL DEFAULT insta5.next_id(),
51 | ...rest of table schema...
52 | )
53 | ```
54 |
--------------------------------------------------------------------------------
/nginx/compile.md:
--------------------------------------------------------------------------------
1 | The Guide to Compile Nginx
2 | ==========================
3 |
4 | ```
5 | # Configure nginx.
6 | #
7 | # This is based on the default package in Debian. Additional flags have
8 | # been added:
9 | #
10 | # * --with-debug: adds helpful logs for debugging
11 | # * --with-openssl=$HOME/sources/openssl-1.0.1e: compile against newer version
12 | # of openssl
13 | # * --with-http_spdy_module: include the SPDY module
14 | ./configure --prefix=/etc/nginx \
15 | --sbin-path=/usr/sbin/nginx \
16 | --conf-path=/etc/nginx/nginx.conf \
17 | --error-log-path=/var/log/nginx/error.log \
18 | --http-log-path=/var/log/nginx/access.log \
19 | --pid-path=/var/run/nginx.pid \
20 | --lock-path=/var/run/nginx.lock \
21 | --http-client-body-temp-path=/var/cache/nginx/client_temp \
22 | --http-proxy-temp-path=/var/cache/nginx/proxy_temp \
23 | --http-fastcgi-temp-path=/var/cache/nginx/fastcgi_temp \
24 | --http-uwsgi-temp-path=/var/cache/nginx/uwsgi_temp \
25 | --http-scgi-temp-path=/var/cache/nginx/scgi_temp \
26 | --user=www-data \
27 | --group=www-data \
28 | --with-http_ssl_module \
29 | --with-http_realip_module \
30 | --with-http_addition_module \
31 | --with-http_sub_module \
32 | --with-http_dav_module \
33 | --with-http_flv_module \
34 | --with-http_mp4_module \
35 | --with-http_gunzip_module \
36 | --with-http_gzip_static_module \
37 | --with-http_random_index_module \
38 | --with-http_secure_link_module \
39 | --with-http_stub_status_module \
40 | --with-mail \
41 | --with-mail_ssl_module \
42 | --with-file-aio \
43 | --with-http_spdy_module \
44 | --with-cc-opt='-g -O2 -fstack-protector --param=ssp-buffer-size=4 -Wformat -Werror=format-security -Wp,-D_FORTIFY_SOURCE=2' \
45 | --with-ld-opt='-Wl,-z,relro -Wl,--as-needed' \
46 | --with-ipv6 \
47 | --with-debug \
48 | --with-openssl=$HOME/sources/openssl-1.0.1g
49 |
50 | make
51 | make install
52 | ```
53 |
--------------------------------------------------------------------------------
/Jenkins/consul_api.sh:
--------------------------------------------------------------------------------
1 | #!/bin/bash
2 |
3 | # consul service api
4 |
5 | CONSUL_NODE="127.0.0.1:8500"
6 | SERVICE_NAME=${CURRENT_SERVICE_NAME}
7 |
8 | ########################################## info() #################################
9 | info() {
10 | echo "****************************"
11 | echo "CONSUL_NODE=$CONSUL_NODE"
12 | echo "SERVICE_NAME=$SERVICE_NAME"
13 |
14 | SERVICE_IDS=`curl http://${CONSUL_NODE}/v1/agent/services | python -m json.tool | grep ID | awk '{print $2}'|sed 's/["|,]//g' | grep ${SERVICE_NAME}`
15 |
16 | echo "SERVICE_IDS=$SERVICE_IDS"
17 | echo "****************************"
18 | }
19 |
20 | ########################################## pause() #################################
21 | pause() {
22 | SERVICE_IDS=`curl http://${CONSUL_NODE}/v1/agent/services | python -m json.tool | grep ID | awk '{print $2}'|sed 's/["|,]//g' | grep ${SERVICE_NAME}`
23 | for SERVICE_ID in ${SERVICE_IDS}
24 | do
25 | echo "Service \"${SERVICE_ID}\" pause "
26 | curl -s -XPUT "http://$CONSUL_NODE/v1/agent/service/maintenance/${SERVICE_ID}?enable=true&reason=${SERVICE_NAME}_deploying"
27 | done
28 | }
29 |
30 | ########################################## resume() #################################
31 | resume() {
32 | SERVICE_IDS=`curl http://${CONSUL_NODE}/v1/agent/services | python -m json.tool | grep ID | awk '{print $2}'|sed 's/["|,]//g' | grep ${SERVICE_NAME}`
33 | for SERVICE_ID in ${SERVICE_IDS}
34 | do
35 | echo "Service \"${SERVICE_ID}\" resume "
36 | curl -s -XPUT "http://$CONSUL_NODE/v1/agent/service/maintenance/${SERVICE_ID}?enable=false"
37 | done
38 | }
39 |
40 | case "$1" in
41 |
42 | 'info')
43 | info
44 | ;;
45 | 'pause')
46 | pause
47 | ;;
48 | 'resume')
49 | resume
50 | ;;
51 | *)
52 | echo "Usage: $0 {pause|resume|info}"
53 | exit 1
54 | esac
55 | exit 0
--------------------------------------------------------------------------------
/PostgreSQL/xact_Isolation.md:
--------------------------------------------------------------------------------
1 | # 事务隔离
2 | Reference: [WiKi](https://zh.wikipedia.org/wiki/事務隔離)
3 |
4 | # 隔离级别(Isolation levels)
5 | 有四种隔离级别:
6 | * 可序列化(Serializable)
7 | * 可重复读(Repeatable reads)
8 | * 提交读(Read committed)
9 | * 未提交读(Read uncommitted)
10 |
11 | 讨论一个提问: 当存在表test(id int)有id=1 一条记录, 以下两种行为
12 | a. SessionA启动事务后,SessionB做了更新id=2操作后,此时SessionA进行 `UPDATE test SET id=id+2`,结果如何。
13 | b. SessionA启动事务后,SessionB在事务中做了更新id=2操作后,先不提交,此时SessionA进行 `UPDATE test SET id=id+2`,结果如何。
14 |
15 | 顺着源码分析一下Postgres的是如何实现这种行为的。
16 |
17 | #### 提交读(PostgreSQL的默认设置)
18 | 在提交读的隔离级别下,
19 | 1.行为a的结果,SessionA 进行更新操作前查询id变为2,更新操作成功后,查询id为4。
20 | 2.行为b的结果,在SessionB提交前,SessionA的查询id为1,如进行update操作,会一直阻塞直到SessionB提交或回滚,如SessionB成功提交查询id为4,若SessionB回滚,查询id结果为3。
21 |
22 | 行为1分析
23 | SessionA的运行流程和普通的更新流程类似,先得到需要更新的row,然后进入`heap_update`,对选定的row使用`HeapTupleSatisfiesUpdate`进行版本(MVCC)检查,由于SessionB的事务已经提交,所以会得到`HeapTupleMayBeUpdated`的状态,然后真正进行更新操作。(其中包括hot-update等各种流程就不在此描述)
24 |
25 | 行为2分析
26 | 此时的运行流程会和上面略有不同,当获取目标row时候会得到尚未更新的那行row(因为此row虽然被标记为已删除,但是因为SessionB尚未提交,所以仍然可见),对row进行更新版本检查时,发现此row已经删除,且SessionB还未提交,标记为HeapTupleBeingUpdated,接着尝试取得该row的锁(会等待直到SessionB提交或者回滚),之后检查此row,如果被更新成功(SessionB提交),则进行row的refresh,对refresh后的row重新进行之前的操作,如果更新失败(SessionB回滚),则直接更新。
27 |
28 |
29 | #### 可重复读
30 | 在可重复读的隔离级别下,
31 | 1.行为a的结果, SessionA 进行更新操作前查询id为1,若进行更新操作, 则报错 “could not serialize access due to concurrent update”。
32 | 2.行为b的结果, 在SessionB提交前,SessionA的查询id为1,如进行update操作,会一直阻塞直到SessionB提交或回滚,如SessionB成功提交则报错 “could not serialize access due to concurrent update”, 若SessionB回滚,则sessionA 的 UPDATE操作成功,查询id结果为3,
33 |
34 | 行为1分析
35 | 和提交读隔离级别的行为有点类似,但由于是可重复读的快照,所以一开始取得的目标row是更新前的row,也就是id=1(提交读id=2)的行,于是在更新操作的mvcc版本检查中会认为此row是HeapTupleUpdated状态,需要重新refresh row,在refresh对隔离级别进行检查,如果大于等于可重复读的级别,则抛错。
36 |
37 | 行为2分析
38 | 和提交读隔离级别的代码路径一致,只是在 refresh row 时 对隔离级别进行检查,因为此时为可重复读,所以抛错。
39 |
--------------------------------------------------------------------------------
/Java/Tomcat/Deploy.md:
--------------------------------------------------------------------------------
1 | # Tomcat Deploy
2 |
3 | 把war部署到tomcat有三种方式
4 |
5 | * 将xxx.war包直接复制到`webapps`目录中。
6 | * 在`conf/server.xml`中定义
7 | * 配置目录`conf/Catalina/localhost`,在该目录中新建一个后缀为xml的文件
8 |
9 | #### 将war包直接放到`webapps`目录中
10 | Tomcat的`webapps`目录是Tomcat默认的应用目录,当服务器启动时,会加载所有这个目录下的应用。
11 |
12 | 也可以将JSP程序打包成一个war包放在目录下,服务器会自动解开这个war包,并在这个目录下生成一个同名的文件夹。
13 | 一个war包就是有特性格式的jar包,它是将一个Web程序的所有内容进行压缩得到。
14 | 具体如何打包,可以使用许多开发工具的IDE环境,如Eclipse、NetBeans、ant、JBuilder等。
15 | 也可以用cmd 命令:`jar -cvf applicationname.war package.*;`
16 |
17 |
18 | webapps这个默认的应用目录也是可以改变。打开Tomcat的`conf/server.xml`文件,找到下面内容:
19 | ```xml
20 |
21 | ```
22 |
23 | #### 在server.xml中指定
24 | 在Tomcat的配置文件中,一个Web应用就是一个特定的Context,可以通过在server.xml中新建Context里部署一个JSP应用程序。
25 | 打开server.xml文件,在Host标签内建一个Context,内容如下。
26 | ```xml
27 |
28 | ```
29 | 其中path是虚拟路径,docBase是JSP应用程序的物理路径。
30 |
31 |
32 | #### 配置目录`conf/Catalina/localhost`, 加入一个Context文件
33 | 以上两种方法,Web应用被服务器加载后都会在Tomcat的conf\catalina\localhost目录下生成一个XML文件,其内容如下:
34 | ```xml
35 |
36 |
37 | # OR
38 |
39 |
40 | ```
41 | 可以看出,文件中描述一个应用程序的Context信息,其内容和server.xml中的Context信息格式是一致的,文件名便是虚拟目录名。
42 | 您可以直接建立这样的一个xml文件,放在Tomcat的conf\catalina\localhost目录下。
43 |
44 | 这个方法有个优点,可以定义别名。服务器端运行的项目名称为path,外部访问的URL则使用XML的文件名。
45 | 这个方法很方便的隐藏了项目的名称,对一些项目名称被固定不能更换,但外部访问时又想换个路径,非常有效。
46 |
47 |
48 | ## 注意:
49 | 删除一个Web应用同时也要删除webapps下相应的文件夹祸server.xml中相应的Context,
50 | 还要将Tomcat的conf\catalina\localhost目录下相应的xml文件删除。
51 | 否则Tomcat仍会岸配置去加载。。。
52 |
53 |
--------------------------------------------------------------------------------
/init_scripts/zookeeper.init:
--------------------------------------------------------------------------------
1 | #!/bin/sh
2 | #
3 | # chkconfig: 345 20 90
4 | # description: zookeeper
5 | #
6 |
7 | ZOOKEEPER_HOME=/data/appsoft/zookeeper
8 |
9 | EXEC_USER=zookeeper
10 |
11 | # OPTIONS=""
12 |
13 | # Source function library.
14 | INITD=/etc/rc.d/init.d
15 | source $INITD/functions
16 |
17 | # Find the name of the script
18 | NAME=`basename $0`
19 | if [ ${NAME:0:1} = "S" -o ${NAME:0:1} = "K" ]
20 | then
21 | NAME=${NAME:3}
22 | fi
23 |
24 | # For SELinux we need to use 'runuser' not 'su'
25 | if [ -x /sbin/runuser ]
26 | then
27 | SU=runuser
28 | else
29 | SU=su
30 | fi
31 |
32 | start(){
33 | echo -n "Starting ${NAME} service: "
34 | $SU -l ${EXEC_USER} -c "$ZOOKEEPER_HOME/bin/zkServer.sh start"
35 | ret=$?
36 | if [ $ret -eq 0 ]
37 | then
38 | echo_success
39 | else
40 | echo_failure
41 | script_result=1
42 | fi
43 | echo
44 | }
45 |
46 | stop(){
47 | echo -n "Stopping ${NAME} service: "
48 | $SU -l ${EXEC_USER} -c "$ZOOKEEPER_HOME/bin/zkServer.sh stop"
49 | ret=$?
50 | if [ $ret -eq 0 ]
51 | then
52 | echo_success
53 | else
54 | echo_failure
55 | script_result=1
56 | fi
57 | echo
58 | }
59 |
60 |
61 | status(){
62 | $SU -l ${EXEC_USER} -c "$ZOOKEEPER_HOME/bin/zkServer.sh status"
63 | }
64 |
65 | restart(){
66 | echo -n "Restarting ${NAME} service: "
67 | $SU -l ${EXEC_USER} -c "$ZOOKEEPER_HOME/bin/zkServer.sh restart"
68 | ret=$?
69 | if [ $ret -eq 0 ]
70 | then
71 | echo_success
72 | else
73 | echo_failure
74 | script_result=1
75 | fi
76 | echo
77 | }
78 |
79 | # See how we were called.
80 | case "$1" in
81 |
82 | start|stop|status|restart)
83 | $1
84 | ;;
85 | *)
86 | echo "Usage: $0 {start|stop|restart|status}"
87 | exit 2
88 | ;;
89 | esac
90 |
91 | exit $script_result
92 |
--------------------------------------------------------------------------------
/zabbix/install.md:
--------------------------------------------------------------------------------
1 | # Zabbix install
2 |
3 | ## Install on CentOS with PostgreSQL
4 | software | version
5 | ---- | ----
6 | centos | 6.8
7 | zabbix | 3.4.1
8 | postgres | 9.6
9 |
10 | ### Install PostgreSQL
11 | Reference [Install Guide](https://github.com/jaiminpan/fast-memo/blob/master/PostgreSQL/install.md)
12 |
13 | ### Install Zabbix
14 | Download From https://www.zabbix.com/download
15 |
16 | #### Install package
17 | ```
18 | zabbix-server-pgsql
19 | ```
20 |
21 | #### Prepared DB
22 | ```
23 | CREATE USER zabbix;
24 | CREATE DATABASE zabbix OWNER zabbix;
25 | ```
26 | Import data to postgresql
27 | ```
28 | cd /usr/share/doc/zabbix-server-pgsql-3.0.4/
29 | zcat create.sql.gz | psql -U zabbix -d zabbix
30 | ```
31 |
32 | Adjust the /etc/zabbix/zabbix_server.conf, adding:
33 | ```
34 | DBUser=zabbix
35 | DBPort=5432
36 | DBHost=localhost
37 | ```
38 | #### Install Web
39 | Zabbix Web is written by php.
40 | To install web just by copy `zabbix/frontends/php` directory from source code and config nginx
41 | ** Upgrade php to 5.6 **
42 | Reference [php5.6 Install Guide](https://github.com/jaiminpan/fast-memo/blob/master/php/install.md)
43 |
44 |
45 | ## Source Code Install
46 | Reference [Official Webpage](https://www.zabbix.com/documentation/3.4/manual/installation/install)
47 | ### Download Source Code
48 | Go to the [Zabbix Download Page](https://www.zabbix.com/download)
49 | ```
50 | tar xvfz zabbix-3.4.0.tar.gz
51 | ```
52 | ### Create user account
53 | ```
54 | useradd zabbix
55 | ```
56 |
57 | ### Compile & install
58 | ```
59 | ./configure --prefix=/usr/local/zabbix/3.4 \
60 | --enable-server \
61 | --enable-agent \
62 | --with-postgresql \
63 | --enable-ipv6 \
64 | --with-net-snmp \
65 | --with-libcurl \
66 | --with-libxml2
67 | ```
68 |
69 |
70 | ## Other Installation Guide
71 | https://yq.aliyun.com/articles/9091
72 | https://www.phpsong.com/2015.html
73 |
74 |
75 |
76 |
--------------------------------------------------------------------------------
/FreeSWITCH/pgsql.md:
--------------------------------------------------------------------------------
1 | # Pgsql
2 |
3 | ## Enable Pgsql
4 |
5 | ```sh
6 | ./configure --enable-core-pgsql-support
7 | ```
8 |
9 | 安装后需要修改的配置文件
10 |
11 | freeswitch默认每个程序都有一个数据库。根据自己需要,将不通程序对于的配置文件修改即可。
12 | 大概有以下文件需要修改
13 | * switch.conf.xml //核心表
14 | * db.conf.xml //核心表
15 | * voicemail.conf.xml //留言相关的表
16 | * internal.xml //
17 | * external.xml //
18 | * cdr_pg_csv.conf.xml //通话记录
19 | * fifo.conf.xml //fifo相关的表
20 | * callcenter.conf.xml //callcenter程序相关的表。
21 |
22 | ```xml
23 |
24 | ```
25 |
26 |
27 | #### cdr
28 |
29 | 在 modules.conf 中开启 mod_cdr_pg_csv
30 | ```sh
31 | # vi modules.conf
32 | event_handlers/mod_cdr_pg_csv
33 | ```
34 |
35 | 修改 cdr_pg_csv.conf.xml
36 | ```xml
37 |
38 | ```
39 |
40 | 手动创建
41 | ```sql
42 | create table cdr (
43 | id serial primary key,
44 | local_ip_v4 inet not null,
45 | caller_id_name varchar,
46 | caller_id_number varchar,
47 | destination_number varchar not null,
48 | context varchar not null,
49 | start_stamp timestamp with time zone not null,
50 | answer_stamp timestamp with time zone,
51 | end_stamp timestamp with time zone not null,
52 | duration int not null,
53 | billsec int not null,
54 | hangup_cause varchar not null,
55 | uuid uuid not null,
56 | bleg_uuid uuid,
57 | accountcode varchar,
58 | read_codec varchar,
59 | write_codec varchar,
60 | sip_hangup_disposition varchar,
61 | ani varchar
62 | );
63 | ```
64 |
--------------------------------------------------------------------------------
/ZooKeeper/file_format.md:
--------------------------------------------------------------------------------
1 |
2 | ## 简介
3 | zoo.cfg配置文件中:
4 | * `dataDir`: 用于存储Snapshot(快照)数据,
5 | * `dataLogDir`: 用于存储Log(事务日志),如果没有设置,则默认使用dataDir的配置。
6 | * 在Log文件写入频率非常高的情况下,可以为Log与Snapshot分别配置不同的目录存储。
7 |
8 |
9 | 本文主要是结合源码分析Zookeeper的Log与Snapshot文件。
10 |
11 |
12 | 事务日志与Snapshot的操作是在org.apache.zookeeper.server.persistence包中,
13 | 这里也主要是分析该包下的各个类;
14 | * FileTxnSnapLog类:为Log日志与Snapshot配置的目录下又创建了子目录`version-2`,同时又指定为该两种文件的存储路径,
15 | * FileTxnLog、FileSnap类:分别为处理事务日志和Snapshot的
16 |
17 | ## LOG 事务日志文件
18 |
19 | 在Zab协议中我们知道每当有接收到客户端的事务请求后Leader与Follower都会将把该事务日志存入磁盘日志文件中,
20 | 该日志文件就是这里所说的事务日志,下面将详细分析该日志文件;
21 | FileTxnLog类用于处理事务日志文件这里就从此类开始,
22 | 在该类中看到了preAllocSize、TXNLOG_MAGIC、VERSION、lastZxidSeen、dbId等这样的属性:
23 | 1. preAllocSize: 默认预分配的日志文件的大小65536*1024字节
24 | 2. TXNLOG_MAGIC:日志文件魔数为ZKLG
25 | 3. VERSION:日志文件版本号2
26 | 4. lastZxidSeen:最后的ZXID
27 |
28 | 类中还有一个静态代码块用于读取配置项中的preAllocSize,
29 | 也就是说预分配的日志文件大小是可配置的,接下来看看该类中最重要的一个方法append,
30 | 该方法主要功能是创建新的日志文件与往日志文件中追加新的事务日志记录;从中可以看到日志文件的相关信息:
31 |
32 | 1. 文件名为log,后缀为十六进制的ZXID
33 | 2. 日志文件头有:magic、version、dbid
34 | 3. 创建文件后分配的文件大小为:67108864字节+16字节,其中16字节为文件头
35 | 4. 使用Adler32作为日志文件的校验码
36 | 5. 当日志文件写满预分配大大小后就扩充日志文件一倍大小
37 |
38 | #### 知识点
39 | * 如代码一样,`version-2`目录中存储着Zookeeper的事务日志文件,有看到如`log.xx`文件(大小为64MB文件),这些都是事务日志文件;
40 | **时间越早的文件,其后缀xx数字越小,反之越晚生成的,xx数字越大。**
41 |
42 | * 如果有了解过Zookeeper的ZAB协议,可以知道zookeeper为每一个事务请求都分配了一个事务ID也就是ZXID
43 | * 文件后缀的xx其实就是Zookeeper处理请求的ZXID,该ZXID为log文件中第一条事务的ZXID
44 | * ZXID规则为前32字节为Leader周期,后32字节为事务请求序列
45 | * 通过事务日志就可以轻松的知道当前的Leader周期与每个文件所属的Leader周期
46 |
47 | ## SNAPSHOT 快照文件
48 |
49 | 在FileSnap类中处理,与事务日志文件一样快照文件也一样有SNAP_MAGIC、VERSION、dbId这些,这作用也只是用来标识这是一个快照文件;
50 | Zookeeper的数据在内存中是以DataTree为数据结构存储的,快照就是每间隔一段时间Zookeeper就会把整个DataTree的数据序列化然后把它存储在磁盘中,这就是Zookeeper的快照文件,
51 | 快照文件是指定时间间隔对数据的备份,所以快照文件中数据通常都不是最新的,
52 |
53 | 多久抓一个快照这也是可以配置的snapCount配置项用于配置处理几个事务请求后生成一个快照文件;
54 | 与事务日志文件一样快照文件也是使用ZXID作为快照文件的后缀,
55 | 在FileTxnSnapLog类中的save方法中生成文件并调用FileSnap类序列化DataTree数据并且写入快照文件中;
56 |
57 |
--------------------------------------------------------------------------------
/Java/logback/logback.xml:
--------------------------------------------------------------------------------
1 |
2 |
3 |
4 |
5 |
6 |
7 |
8 |
9 |
10 |
11 |
12 |
13 |
15 |
16 |
17 |
18 |
19 | ${LOG_PATTERN}
20 |
21 |
22 |
23 |
24 |
25 |
26 |
27 | ${LOG_FILE_PATH}/${LOG_FILE_NAME}.%d{yyyy-MM-dd}.%i.log
28 |
29 | 100MB
30 | 60
31 | 20GB
32 |
33 |
34 | ${LOG_PATTERN}
35 |
36 |
37 |
38 |
39 |
40 |
41 |
42 |
43 |
44 |
45 |
--------------------------------------------------------------------------------
/python/tornado.md:
--------------------------------------------------------------------------------
1 | Tornado
2 | ---------
3 |
4 | http://www.tornadoweb.org/
5 |
6 | Tornado 由前 Facebook 开发,用 Apache License 开源。
7 | 代码非常精练,实现也很轻巧,加上清晰的注释和丰富的 demo,我们可以很容易的阅读分析 tornado, 通过阅读 Tornado 的源码,你将学到:
8 |
9 | 理解 Tornado 的内部实现,使用 tornado 进行 web 开发将更加得心应手。
10 | * 如何实现一个高性能,非阻塞的 http 服务器。
11 | * 如何实现一个 web 框架。
12 | * 各种网络编程的知识,比如 epoll
13 | * python 编程的绝佳实践
14 |
15 | 在tornado的子目录中,每个模块都应该有一个.py文件,你可以通过检查他们来判断你是否从已经从代码仓库中完整的迁出了项目。在每个源代码的文件中,你都可以发现至少一个大段落的用来解释该模块的doc string,doc string中给出了一到两个关于如何使用该模块的例子。
16 |
17 | ## 模块分类
18 |
19 | 1. Core web framework
20 |
21 | tornado.web — 包含web框架的大部分主要功能,包含RequestHandler和Application两个重要的类
22 | tornado.httpserver — 一个无阻塞HTTP服务器的实现
23 | tornado.template — 模版系统
24 | tornado.escape — HTML,JSON,URLs等的编码解码和一些字符串操作
25 | tornado.locale — 国际化支持
26 | 2. Asynchronous networking 底层模块
27 |
28 | tornado.ioloop — 核心的I/O循环
29 | tornado.iostream — 对非阻塞式的 socket 的简单封装,以方便常用读写操作
30 | tornado.httpclient — 一个无阻塞的HTTP服务器实现
31 | tornado.netutil — 一些网络应用的实现,主要实现TCPServer类
32 | 3. Integration with other services
33 |
34 | tornado.auth — 使用OpenId和OAuth进行第三方登录
35 | tornado.database — 简单的MySQL服务端封装
36 | tornado.platform.twisted — 在Tornado上运行为Twisted实现的代码
37 | tornado.websocket — 实现和浏览器的双向通信
38 | tornado.wsgi — 与其他python网络框架/服务器的相互操作
39 | 4. Utilities
40 |
41 | tornado.autoreload — 生产环境中自动检查代码更新
42 | tornado.gen — 一个基于生成器的接口,使用该模块保证代码异步运行
43 | tornado.httputil — 分析HTTP请求内容
44 | tornado.options — 解析终端参数
45 | tornado.process — 多进程实现的封装
46 | tornado.stack_context — 用于异步环境中对回调函数的上下文保存、异常处理
47 | tornado.testing — 单元测试
48 |
49 | ## 架构
50 |
51 | 
52 |
53 | 从上面的图可以看出,Tornado 不仅仅是一个WEB框架,它还完整地实现了HTTP服务器和客户端,在此基础上提供WEB服务。它可以分为四层:
54 |
55 | * 最底层的EVENT层处理IO事件;
56 | * TCP层实现了TCP服务器,负责数据传输;
57 | * HTTP/HTTPS层基于HTTP协议实现了HTTP服务器和客户端;
58 | * 最上层为WEB框架,包含了处理器、模板、数据库连接、认证、本地化等等WEB框架需要具备的功能。
59 |
60 |
61 | ## Book
62 | [Introduction to Tornado 中文翻译](https://github.com/alioth310/itt2zh)
63 |
--------------------------------------------------------------------------------
/FreeSWITCH/README.md:
--------------------------------------------------------------------------------
1 | # FreeSWITCH
2 | FreeSWITCH 是一个 免费、 开源 的软交换软件。 它采用 Mozilla Public License (MPL)授权协议, MPL是一个 开源的软件协议. 它的核心库libfreeswitch可以嵌入其它系统或产品中,也可以做一个单独的应用存在。
3 |
4 | ## 历史
5 |
6 | FreeSWITCH 项目最初于2006年1月在O'Reilly Media's ETEL 会议上发布。[1] 2007年6月,FreeSWITCH 被Truphone 采用[2]。2007年8月, Gaboogie 宣布使用FreeSWITCH作为电话会议平台。[3]
7 |
8 | [更多](https://zh.wikipedia.org/wiki/FreeSWITCH)
9 |
10 | ## Install
11 |
12 | #### 可选安装
13 |
14 | *update cmake*
15 | ```sh
16 | yum remove cmake
17 | wget https://cmake.org/files/v3.14/cmake-3.14.0.tar.gz
18 | tar vzxf cmake-3.14.0.tar.gz
19 | cd cmake-3.14.0
20 | ./configure
21 | make
22 | make install
23 | ```
24 |
25 | *libks*
26 | ```sh
27 | yum install libatomic
28 | git clone https://github.com/signalwire/libks.git
29 | cd libks
30 | mkdir build & cd build
31 | cmake ..
32 | make
33 | make install
34 | ln -sf /usr/lib/pkgconfig/libks.pc /usr/lib64/pkgconfig/libks.pc
35 | ```
36 |
37 | *signalwire*
38 | ```sh
39 | git clone https://github.com/signalwire/signalwire-c.git
40 | cd signalwire-c/
41 | mkdir build & cd build
42 | cmake ..
43 | make
44 | make install
45 | ln -sf /usr/local/lib/pkgconfig/signalwire_client.pc /usr/lib64/pkgconfig/signalwire_client.pc
46 | ```
47 |
48 | #### Prepare
49 | 1. Linux
50 |
51 | ```sh
52 | $ sh support-d/prereq.sh
53 | $ sh bootstrap.sh
54 |
55 | $ ./configure
56 | # OR
57 | $ ./configure -enable-portable-binary \
58 | --enable-core-pgsql-support --with-openssl -enable-zrtp
59 |
60 | $ make
61 | $ sudo make install
62 |
63 | # 安装声音文件
64 | $ make cd-sounds
65 | $ sudo make cd-sounds-install
66 | $ make cd-moh
67 | $ sudo make cd-moh-install
68 | ```
69 |
70 | #### 做成服务
71 | ```sh
72 | [Unit]
73 | Description=freeswitch
74 | After=syslog.target
75 | After=network.target
76 |
77 | [Service]
78 | Type=simple
79 | User=root
80 | Group=root
81 | WorkingDirectory=/home/mintcode
82 | ExecStart=/usr/local/freeswitch/bin/freeswitch
83 | ExecStop=/usr/local/freeswitch/bin/freeswitch -stop
84 | Restart=always
85 |
86 | [Install]
87 | WantedBy=multi-user.target
88 | ```
89 |
--------------------------------------------------------------------------------
/Java/Sping-cloud/Hystrix.md:
--------------------------------------------------------------------------------
1 | # Hystrix
2 |
3 | ## Base
4 | Base on
5 | ```
6 |
7 | org.springframework.boot
8 | spring-boot-starter-parent
9 | 2.0.5.RELEASE
10 |
11 |
12 | ```
13 |
14 | ## pom.xml
15 |
16 | ```
17 |
18 | Finchley.RELEASE
19 |
20 |
21 |
22 | +
23 | + org.springframework.cloud
24 | + spring-cloud-starter-netflix-hystrix
25 | +
26 |
27 |
28 |
29 |
30 |
31 | org.springframework.cloud
32 | spring-cloud-dependencies
33 | ${spring-cloud.version}
34 | pom
35 | import
36 |
37 |
38 |
39 | ```
40 |
41 | ## application.properties
42 | ```
43 | # default is false
44 | +feign.hystrix.enabled=true
45 | ```
46 |
47 | ## Code
48 | ```
49 | +
50 | +import org.springframework.stereotype.Component;
51 | +
52 | +@Component
53 | +public class XXXHystrix implements XXClient {
54 |
55 |
56 | ```
57 |
58 | ```
59 | package xxxx.feign;
60 |
61 | import org.springframework.cloud.openfeign.FeignClient;
62 | import org.springframework.stereotype.Component;
63 | import org.springframework.web.bind.annotation.*;
64 |
65 | -@FeignClient(value = "ServiceName", path = "/ContextPath")
66 | +@FeignClient(value = "ServiceName", path = "/ContextPath", fallback = XXXHystrix.class)
67 | public interface XXClient {
68 | .....
69 | }
70 |
71 | public class ProcListenerStart {
72 | + @Autowired
73 | + private XXXClient client;
74 | + ....
75 |
76 | }
77 | ```
78 |
79 |
--------------------------------------------------------------------------------
/etc/equity.md:
--------------------------------------------------------------------------------
1 | 在(联合)创始人之间如何分配股权(原创翻译)
2 | -------------------------------------
3 |
4 | 英文原文 http://themacro.com/articles/2015/12/splitting-equity-among-founders/
5 |
6 | ## 内容
7 | 有创始人经常询问,应该怎么分配股权给他们的联合创始人。
8 | 当我在网上搜索这个话题,我经常看到一些可怕的建议,通常提倡不同的创始人间享有完全不同的股权比例。
9 | 我们看到这一趋势在Y Combinator每年关注的数以千计的app项目上有所体现。
10 |
11 | #### 不平等股权分配
12 | 以下是一些最经常提到的不平等股权分配的原因:
13 | * 我最先想出了这个点子
14 | * 我比联合创始人早开始为此工作N个月
15 | * 这是我们已经达成一致的
16 | * 我的联合创始人拿了N个月薪水,而我没有
17 | * 我比我的联合创始人早N个月工作开始全职工作
18 | * 我比我的联合创始人经验更丰富
19 | * 我募集了N万美元后,我的联合创始人才加入
20 | * 我做出了MVP(minimum viable product)后,我的联合创始人才加入
21 | * 为了创始人间决定投票计数原因
22 |
23 | 
24 | *Founders tend to make the mistake of splitting equity based on early work.*
25 |
26 | #### 四个基本原则
27 | 以上的这些理由都违背了四个基本原则:
28 |
29 | * **一般需要7〜10年时间打造一个公司的高价值。** 第一年内的小变化没有理由造成今后2-10年的巨大股份差异。
30 |
31 | * **更多的股票=更多的动力。** 因为几乎所有的创业公司最终都会失败。创始人越有驱动力,成功的机会就越高。
32 | 如果你的创始团队的动力不足而导致失败,就算有较大的股权比例也是一文不值的。
33 |
34 | * **如果你不重视/珍惜你的联合创始人,更不会重视/珍惜其他人。** 投资者关注创始人的股权分配,就能知道CEO是否重视他的联合创始人。
35 | 如果只给一个联合创始人10%或1%,其他人要么认为他们要么不出色要么不重要。该团队的素质往往是投资人是否投资的主要因素。
36 | 为什么要传达给投资者,你的团队不是很有价值或者不是很重要?
37 |
38 | * **初创公司取决于执行力,而不是想法。** 创始人间重大不合比例的股权分配,往往会倾向于最初提出想法的联合创始人,而不是那些打造产品,把产品推向市场的那部分联合创始人。
39 |
40 | 
41 | *Equity should be split equally because all the work is ahead of you.*
42 |
43 | #### 建议
44 | 我对股权分配的建议可能是有争议的,但我们所有孵化的初创公司都是这样子做的,并且我们在YC几乎都是这样建议:
45 | 在联合创始人间平均股权分配。 **[1]** 这些都是和你一起战斗的人。你和这些人相处的时间多过你的家人。
46 | 这些都是人可以帮助你决定公司中最重要的问题的人。最后,这些人也是在你成功时和你一起庆祝的人。
47 |
48 | 我相信,在创始人间平等或者接近平等的股权权益分配会成为标准。如果你不愿给你的合伙人同等的份额,那么或许你选择了错误的伙伴。
49 |
50 | #### 感谢
51 | 感谢Justin Kan, Qasar Younis和Colleen Taylor评审了初稿
52 |
53 | #### 备注
54 | 如果你害怕万一你不得不和其他联合创始人分道扬镳,确保你有一个合适的行权计划/股权退出计划(vesting schedule)。
55 | 在硅谷,一个典型的设置是分四年行权,和一年的cliff。换句话说,虽然你可能持有该公司50%的股份,如果在一年内你离开或者被开除,那么你什么也得不到。
56 | 一年后,你会得到你的股票的25%。之后每个月你另外会得到你总份额的的1/48。你所有的股份将会在4年后全部到手。
57 | 对于创业旅行来说,这有利于选择合适的合伙人 - 万一有问题,你也可以在第一年内解决。
58 | 另一个好的可操作措施是,在股权融资前,只有CEO有一个董事会席位。这将避免在艰难的决定时,产生董事会纠纷。比如CEO不得不需要开除联合创始人。
59 |
--------------------------------------------------------------------------------
/Java/Spring/ApplicationContext.md:
--------------------------------------------------------------------------------
1 | # ApplicationContext
2 |
3 | [源码位置][code]
4 |
5 |
6 | ## 图示
7 | ClassPathXmlAppliationContext的类继承层次图
8 |  9 |
10 | FileSystemXmlApplicationContext的类继承层次图
11 |
9 |
10 | FileSystemXmlApplicationContext的类继承层次图
11 |  12 |
13 |
14 | #### 结构图
15 |
12 |
13 |
14 | #### 结构图
15 |  16 |
17 | ## 简单分析
18 | * __DefaultResourceLoader__:
19 | * 资源定位类,可以通过一个String类型的path获取一个Resource,从而指向一个具体的文件。
20 | 此类中最重要的方法是Resource getResource(String location),该方法间接调用getResourceByPath来获取Resource.
21 |
22 | * __AbstractApplicationContext__:
23 | * refresh: refresh方法是入口方法也是核心方法,定义了生成ApplicationContext的实现步骤,使用了典型的模板方法模式,一些子步骤交给子类来实现。
24 | obtainFreshBeanFactory方法可以获取一个真正的底层beanFactory,其中的refreshBeanFactory() 和 getBeanFactory()都是抽象方法
25 |
26 | * __AbstractRefreshableApplicationContext__:
27 | * 实现了 refreshBeanFactory() 和 getBeanFactory(),都是对父类AbstractApplicationContext的接口实现
28 | createBeanFactory()在refreshBeanFactory被调用,是真正的创建工厂的方法,在此方法中创建了一个DefaultListableBeanFactory类型的工厂。
29 | 此类的中的beanFactory属性保存了此前创建的工厂实例。
30 | * 提供接口 loadBeanDefinitions 在refreshBeanFactory中被调用
31 | * createBeanFactory()可以被继承重载。
32 |
33 | * __AbstractRefreshableConfigApplicationContext__:
34 | * 这个类的最主要的作用的保存配置文件的信息,主要存储在configLocations数组中。此类提供了如下方法
35 | * setConfigLocations()
36 | * getConfigLocations()
37 |
38 | * __AbstractXmlApplicationContext__:
39 | * 最核心的是实现了父类AbstractRefreshableApplicationContext中的`loadBeanDefinitions()`方法,
40 | 此方法拉开了解析XML配置文件的序幕。
41 |
42 | * __FileSystemXmlApplicationContext__:
43 | * FileSystemXmlApplicationContext(String configLocations[], boolean refresh, ApplicationContext parent)
44 | getResourceByPath方法是对父类DefaultResourceLoader中getResourceByPath的覆盖。
45 |
46 |
47 | [code]: https://github.com/spring-projects/spring-framework/blob/master/spring-context/src/main/java/org/springframework/context/support/AbstractApplicationContext.java
48 |
--------------------------------------------------------------------------------
/Java/Sping-cloud/Feign.md:
--------------------------------------------------------------------------------
1 | # Feign
2 |
3 | ## Base
4 | Base on
5 | ```
6 |
7 | org.springframework.boot
8 | spring-boot-starter-parent
9 | 2.0.5.RELEASE
10 |
11 |
12 | ```
13 |
14 | ## pom.xml
15 |
16 | ```
17 |
18 | Finchley.RELEASE
19 |
20 |
21 |
22 |
23 | org.springframework.cloud
24 | spring-cloud-starter-openfeign
25 |
26 |
27 |
28 |
29 |
30 |
31 | org.springframework.cloud
32 | spring-cloud-dependencies
33 | ${spring-cloud.version}
34 | pom
35 | import
36 |
37 |
38 |
39 | ```
40 |
41 | ## Code
42 | ```
43 | +import org.springframework.cloud.openfeign.EnableFeignClients;
44 |
45 | +@EnableFeignClients
46 | @EnableDiscoveryClient
47 | @SpringBootApplication
48 | public class XXXApplication {
49 | public static void main(String[] args) {
50 | SpringApplication.run(XXXApplication.class, args);
51 | }
52 | }
53 |
54 | ```
55 |
56 | ```
57 | package xxxx.feign;
58 |
59 | import org.springframework.cloud.openfeign.FeignClient;
60 | import org.springframework.stereotype.Component;
61 | import org.springframework.web.bind.annotation.*;
62 |
63 | @FeignClient(value = "ServiceName", path = "/ContextPath")
64 | public interface XXClient {
65 |
66 | @PostMapping(value = "/send/{id}")
67 | public String send(@PathVariable("id") String id;
68 | }
69 |
70 | public class ProcListenerStart {
71 | + @Autowired
72 | + private XXXClient client;
73 | + ....
74 | }
75 | ```
76 |
77 |
--------------------------------------------------------------------------------
/nginx/source/配置模块.md:
--------------------------------------------------------------------------------
1 | # nginx配置解析模块
2 |
3 | ## 简介
4 | nginx提供配置文件供用户方便的定义nginx的行为,通过修改配置项可以指定nginx进程工作模块,指定log的输出方式,指定如何处理用户请求等等。
5 | 该模块的函数`ngx_conf_include`和`ngx_conf_parse`同时被其他一些模块用于conf处理
6 |
7 | 主要代码在[core/ngx_conf_file.c][code]中,`ngx_conf_parse`函数在nginx启动过程中被调用来解析配置文件,
8 | 它读取配置文件内容并将配置项交由指定的模块处理。如将http配置项交由ngx_http_module处理。
9 |
10 | 配置文件通常使用include配置项从其它文件中加载配置,如nginx.conf文件中使用”include mime.types”配置项加载mime.types文件。
11 |
12 | 当在配置文件中发现include配置项时就调用`ngx_conf_module`模块提供的`ngx_conf_include`函数来解析,
13 |
14 | #### ngx_conf_include
15 | 它首先分析出include配置项指定的文件名,对每一个文件分别调用`ngx_conf_parse`函数来解析。
16 | 此函数也作为 `ngx_conf_module` 模块提供的指令(`ngx_conf_commands`)
17 |
18 | #### ngx_conf_parse
19 | 主要做三件事,
20 | * 在nginx启动时被调用来处理配置文件(入口在`ngx_init_cycle`)。
21 | * 解析include配置项。
22 | * 提供预设的配置项解析回调函数(`ngx_conf_module`提供了12个回调函数)。
23 |
24 | 每一个配置文件中的指令,把它存在 cf->args 中(这个过程是由 ngx_conf_read_token 完成)
25 | 接着会调用`ngx_conf_handler`处理,如果匹配则使用回调函数`rv = cmd->set(cf, cmd, conf);`
26 |
27 | ## 部分代码
28 | ```
29 | static ngx_command_t ngx_conf_commands[] = {
30 |
31 | { ngx_string("include"),
32 | NGX_ANY_CONF|NGX_CONF_TAKE1,
33 | ngx_conf_include,
34 | 0,
35 | 0,
36 | NULL },
37 |
38 | ngx_null_command
39 | };
40 |
41 | ngx_module_t ngx_conf_module = {
42 | NGX_MODULE_V1,
43 | NULL, /* module context */
44 | ngx_conf_commands, /* module directives */
45 | NGX_CONF_MODULE, /* module type */
46 | NULL, /* init master */
47 | NULL, /* init module */
48 | NULL, /* init process */
49 | NULL, /* init thread */
50 | NULL, /* exit thread */
51 | ngx_conf_flush_files, /* exit process */
52 | NULL, /* exit master */
53 | NGX_MODULE_V1_PADDING
54 | };
55 | ```
56 |
57 | ## Misc:
58 | http://blog.sunheqiubai.com/?p=386
59 |
60 |
61 | [code]: https://github.com/nginx/nginx/blob/master/src/core/ngx_conf_file.c
62 |
--------------------------------------------------------------------------------
/clickhouse/Engines/External.md:
--------------------------------------------------------------------------------
1 | # External data for query processing
2 |
3 | ClickHouse 允许向服务器发送SELECT语句的同时,发送处理查询所需的数据。此数据放在临时表中(请参阅'Temporary tables'章节),并可用于查询(例如,IN运算符)。
4 |
5 | 例如,如果您有一个包含重要用户标识符的文本文件,则可以将其与使用此列表筛选的查询一起上载到服务器。
6 |
7 | 如果需要使用大量外部数据运行多个查询,请不要使用此功能。最好提前将数据上载到DB。
8 |
9 | 外部数据可以使用命令行客户端(在非交互模式下)或HTTP接口上传。
10 |
11 | 在命令行客户端中,可以按以下格式指定参数部分
12 | ```
13 | --external --file=... [--name=...] [--format=...] [--types=...|--structure=...]
14 | ```
15 |
16 | 对于传输的数据,您可能有多个类似的部分。
17 | * -external: 开始的标记。
18 | * -file:具有表转储的文件的文件路径,或–仅可从stdin检索到一个表,该表转储引用stdin。
19 |
20 | 以下参数是可选的:
21 | * –Name-表的名称。如果省略,则使用_data。
22 | * –format-文件中的数据格式。如果省略,则使用TabSeparated。
23 |
24 | 以下参数至少需要一个:
25 | * –types:列类型的逗号分隔列表。例如uint64,String。列将命名为_1、_2
26 | * –structure: Table结构,格式为UserID UInt64, URL String。定义列名和类型。
27 |
28 |
29 | **file**中指定的文件将,使用**types**或**structure**中指定的数据类型,使用**format**指定的格式分析。该表将上载到服务器,并可通过**name**临时表访问。
30 |
31 | Examples:
32 | ```
33 | echo -ne "1\n2\n3\n" | clickhouse-client --query="SELECT count() FROM test.visits WHERE TraficSourceID IN _data" --external --file=- --types=Int8
34 | 849897
35 | cat /etc/passwd | sed 's/:/\t/g' | clickhouse-client --query="SELECT shell, count() AS c FROM passwd GROUP BY shell ORDER BY c DESC" --external --file=- --name=passwd --structure='login String, unused String, uid UInt16, gid UInt16, comment String, home String, shell String'
36 | /bin/sh 20
37 | /bin/false 5
38 | /bin/bash 4
39 | /usr/sbin/nologin 1
40 | /bin/sync 1
41 | ```
42 |
43 | 使用HTTP接口时,外部数据以multipart / form -data格式传递。
44 | 每个表作为单独的文件传输。表名取自文件名。“query_string”传递参数 ‘name_format’, ‘name_types’, and ‘name_structure’,
45 | 其中name是这些参数对应的表的名称。参数的含义与使用命令行客户端时相同。
46 |
47 | ```
48 | cat /etc/passwd | sed 's/:/\t/g' > passwd.tsv
49 |
50 | curl -F 'passwd=@passwd.tsv;' 'http://localhost:8123/?query=SELECT+shell,+count()+AS+c+FROM+passwd+GROUP+BY+shell+ORDER+BY+c+DESC&passwd_structure=login+String,+unused+String,+uid+UInt16,+gid+UInt16,+comment+String,+home+String,+shell+String'
51 | /bin/sh 20
52 | /bin/false 5
53 | /bin/bash 4
54 | /usr/sbin/nologin 1
55 | /bin/sync 1
56 | ```
57 |
58 | 对于分布式查询处理,临时表被发送到所有远程服务器。
59 |
60 |
--------------------------------------------------------------------------------
/etc/fast_del.md:
--------------------------------------------------------------------------------
1 | # How to delete file(s) using fast way
2 |
3 | * rm
4 | * find
5 | * find with delete
6 | * rsync
7 | * Python
8 | * Perl
9 |
10 | ## Test 1
11 | generate 1000000 files:
12 | ```
13 | for i in $(seq 1 1000000)
14 | for> do
15 | for> touch $i.txt
16 | for> done
17 | ```
18 |
19 | | Command | System Time(s) | User Time(s) | %CPU | cs(Vol/Invol) |
20 | | ---- | ---- | ---- | ---- | ---- |
21 | | `rsync -a –delete empty/ to_del/` | 10.60 | 1.31 | 95 | 106/22 |
22 | | `find to_del/ -type f -delete` | 28.51 | 14.46 | 52 | 14849/11 |
23 | | `find to_del/ -type f | xargs -L 100 rm` | 41.69 | 20.60 | 54 | 37048/15074 |
24 | | `find to_del/ -type f | xargs -L 100 -P 100 rm` | 34.32 | 27.82 | 89 | 929897/21720 |
25 | | `rm -rf to_del` | 31.29 | 14.80 | 47 | 15134/11 |
26 |
27 | ## Test 2
28 | generate 500000 files:
29 | ```
30 | for i in $(seq 1 500000)
31 | for> do
32 | for> echo test >>$i.txt
33 | for> done
34 | ```
35 |
36 | | No | cmd | times | detail |
37 | | ---- | ---- | ----- | ------ |
38 | | 1 | `rm -rf ./to_del` | fail | |
39 | | 2 | `find ./to_del -type f -exec rm {} \` | 43m19s | 49.86s user 1032.13s system 41% cpu 43:19.17 total |
40 | | 3 | `find ./to_del -type f -delete` | 9m13s | 0.43s user 11.21s system 2% cpu 9:13.38 total |
41 | | 4 | `rsync -a --delete empty/ to_del/` | 0m16s | 0.59s user 7.86s system 51% cpu 16.418 total |
42 | | 5 | Python | 8m14s | 494.272291183 |
43 | | 6 | `perl -e 'for(<*>){((stat)[9]<(unlink))}' ` | 0m16s | 1.28s user 7.23s system 50% cpu 16.784 total |
44 |
45 | #### PS:
46 | 4 rsync
47 | firstly, mkdir empty
48 |
49 | 5 Python
50 | ```python
51 | import os
52 | import time
53 | stime = time.time()
54 | for pathname,dirnames,files in os.walk('/home/username/test'):
55 | for filename in files:
56 | file = os.path.join(pathname,filename)
57 | os.remove(file)
58 | ftime=time.time()
59 | print ftime-stime
60 | ```
61 |
62 | ```python
63 | def delfiles(strpath, suffix):
64 | if os.path.exists(strpath):
65 | for pathname, dir ,files in os.walk(strpath):
66 | for filename in files:
67 | if filename.endswith(suffix):
68 | file = os.path.join(pathname, filename)
69 | os.remove(file)
70 |
71 | delfiles('to_del', 'py')
72 | ```
73 |
74 |
--------------------------------------------------------------------------------
/PulsarIO/Management.md:
--------------------------------------------------------------------------------
1 | # Management 资源管理
2 |
3 | ## 相关类
4 | #### Management
5 | Management 是资源管理最核心的实现。主要功能如下:
6 | * bean相关
7 | * addBean(), getBeanOrFolder(), removeBeanOrFolder()
8 | * ManagementListener接口,调用registerManagementListener注册,实现对上述add remove方法的监听。
9 | * ResourceFormatters相关: 主要作用就是以哪种格式输出的策略模式,如html json等
10 | * registerResourceFormatter
11 | * getResourceFormatter
12 |
13 | #### ResourceFormatter
14 | ResourceFormatter 有一组类,功能就是格式输出
15 | * 接口类ManagedResourceFormatter
16 | * 抽象实现类 AbstractResourceFormatter,提供主要子类如下
17 | * HtmlResourceFormatter
18 | * JsonResourceFormatter
19 | * HelpFormatter
20 | * XmlResourceFormatter
21 | * SpringResourceFormatter
22 |
23 | #### ManagementServlet
24 | 可调用的Servlet接口,在JetstreamAppliation.xml使用jetty提供服务。服务端口由JetstreamAppliation启动项-p指定,否则默认9999
25 |
26 | static方法初始化xml、spring、html、json、help五种输出格式。
27 | 内部使用 BeanController 输出具体内容。
28 |
29 | BeanController有两个主要方法 process()和 write()
30 | * process实现了对bean的控制,内部使用了反射进行函数调用,调用此方法前需要鉴权,鉴权由ManagementNetworkSecurity类提供功能,主要就是对比ip,需要提前进行初始化
31 | * write则只是对bean的内容进行了简单的输出。
32 | * 注意的是,如果控制的是ControlBean的实例,则可以调用ControlBean的process函数,进行具体参数的自定义处理。
33 |
34 | #### PingServlet
35 | 如其名字,是一个简单提供状态输出的接口,用来看服务是否存活的公共实现。
36 |
37 | #### JvmManagement
38 | 没什么好说的,代码如下,很简单
39 | ```java
40 | public class JvmManagement {
41 | public JvmManagement() {
42 | XMLSerializationManager.registerXSerializable(MemoryManagerMXBean.class);
43 | XMLSerializationManager.registerXSerializable(MemoryPoolMXBean.class);
44 | Management.addBean("Jvm/ClassLoading", ManagementFactory.getClassLoadingMXBean());
45 | Management.addBean("Jvm/Compilation", ManagementFactory.getCompilationMXBean());
46 | Management.addBean("Jvm/GarbageCollector", ManagementFactory.getGarbageCollectorMXBeans());
47 | Management.addBean("Jvm/MemoryManager", ManagementFactory.getMemoryManagerMXBeans());
48 | Management.addBean("Jvm/Memory", ManagementFactory.getMemoryMXBean());
49 | Management.addBean("Jvm/MemoryPool", ManagementFactory.getMemoryPoolMXBeans());
50 | Management.addBean("Jvm/OS", ManagementFactory.getOperatingSystemMXBean());
51 | Management.addBean("Jvm/Runtime", ManagementFactory.getRuntimeMXBean());
52 | Management.addBean("Jvm/Threads", ManagementFactory.getThreadMXBean());
53 | }
54 | }
55 | ```
56 |
57 |
58 |
59 |
--------------------------------------------------------------------------------
/PulsarIO/Startup.md:
--------------------------------------------------------------------------------
1 | # Startup 启动
2 |
3 | ## JetstreamApplication
4 | 启动入口的的main函数位置在 [JetstreamApplication][C_JetstreamApplication]中。
5 | 这个类使用了singleton模式,主要提供了启动位置,还有shutdown的清理。
6 |
7 | 核心是在init()中使用了RootConfiguration进行spring bean的初始化工作,RootConfiguration继承自AbstractApplicationContext。
8 |
9 | 首先使用getInstance进行初始化
10 | ```java
11 | public static void main(String[] args) throws Exception {
12 | ...
13 | try {
14 | ta = getInstance();
15 | // Allow JetstreamApplication option handling methods to be protected
16 | final JetstreamApplication optionHandler = ta;
17 | new CliOptions(new CliOptionHandler() {
18 | public Options addOptions(Options options) {
19 | return optionHandler.addOptions(options);
20 | }
21 |
22 | public void parseOptions(CommandLine line) {
23 | optionHandler.parseOptions(line);
24 | }
25 | }, args);
26 | ...
27 | ta.init();
28 | }
29 | ...
30 | }
31 | ```
32 |
33 | 再使用CliOptions解析参数(ref:parseOptions函数)
34 | ```java
35 | options.addOption("b", "beans", true, "Beans to start during initialization");
36 | options.addOption("c", "config", true, "Configuration URL or file path");
37 | options.addOption("cv", "configversion", true, "Version of configuration");
38 | options.addOption("n", "name", true, "Name of application");
39 | options.addOption("p", "port", true, "Monitoring port");
40 | options.addOption("z", "zone", true, "URL or path of dns zone content");
41 | options.addOption("nd", "nodns", false, "Not a network application");
42 | options.addOption("wqz", "workqueuesz", true, "work queue size");
43 | options.addOption("wt", "workerthreads", true, "worker threads");
44 | ```
45 |
46 | ## RootConfiguration
47 | RootConfiguration是一个全局的spring ApplicationContext,使用singleton模式可以让任意的class获取相关bean。
48 | 此类获取环境变量`$JETSTREAM_HOME/JetstreamConf`,定位相关资源目录, 通过调用 getDefaultContexts()获取所有资源,
49 | 然后使用父类Configuration的构造函数初始化。
50 | Configuration真正实现相关的函数接口,如
51 | * getConfigResources()
52 | * getResourceByPath()
53 | * loadBeanDefinitions()
54 |
55 | 在父类AbstractUpdateableApplicationContext中定义 UpdateableListableBeanFactory,所以可以动态更新相关的bean信息。
56 |
57 |
58 | [C_JetstreamApplication]: https://github.com/pulsarIO/jetstream/blob/master/jetstreamframework/src/main/java/com/ebay/jetstream/application/JetstreamApplication.java
59 |
--------------------------------------------------------------------------------
/PulsarIO/Pulsar_Real_time_Analytics_at_Scale/README.md:
--------------------------------------------------------------------------------
1 |
2 | 原文链接: [Pulsar-Real-time Analytics at Scale](https://github.com/pulsarIO/realtime-analytics/wiki/documents/Whitepaper_Pulsar_Real-timeAnalyticsatScale.pdf)
3 |
4 | 关PPT:[Pulsar_Presentation](http://gopulsar.io/docs/Pulsar_Presentation.pdf)
5 |
6 |
7 | Pulsar-可扩展的实时分析系统
8 | =======================================
9 | 随着移动设备的快速增长,每天有数以百万计消费者在选购十多亿的商品,数千万的机器在提供服务,为了更好的购物体验,实时地响应他们的操作至关重要,并在购买的过程中提供有关下一步的服务。
10 |
11 | 用户体验在过去几年里越来越好,现在他们希望在多屏中更加个性化,包括运营人员--能根据消费选择意向来提供丰富且而贴切的广告。
12 |
13 | 欺诈检测,购物行为监控等都需要实时地处理数据,在秒级收集可疑点,还要快速地产生信号然后处理。像Hadoop这种廷时的存储-处理的面向批处理系统不太合适。
14 |
15 | 海量的数据和低廷时场景要求源源不断地数据处理,而不是存储-处理,流式处理架构需要分布在每个数据中心上,同样这个程序模型不需要专业人才能明白。这个系统还能支持高可用(例如. 允许应用不停机重新发布)
16 |
17 | 这篇论文主要讨论Puslar的设计,一个解决了上述问题的实时分析平台。我们将讨论关键的子系统和组件的设计和选择理由。
18 |
19 |
20 | 目录
21 | -----------------
22 |
23 | - [译序](#译序)
24 | - [概述](#Pulsar-可扩展的实时分析系统)
25 | - [第一部分:简介](part1-introduction.md)
26 | - [第二部分:数据和处理模型](part2-data-model.md)
27 | 1. [用户行为数据](part2-data-model.md#用户行为数据])
28 | 2. [非结构化数据](part2-data-model.md#混合数据)
29 | 3. [会话数据](part2-data-model.md#会话数据)
30 | 4. [用户自定义流](part2-data-model.md#用户自定义流)
31 | 5. [多维度实时聚合计算](part2-data-model.md#多维度实时聚合计算)
32 | 6. [实时计算TopN,百分比和Disctinct指标](part2-data-model.md#实时计算TopN,百分比和Disctinct指标)
33 | 7. [处理无序和廷迟件](part2-data-model.md#处理无序和廷迟事件)
34 | - [第三部分:架构](part3-architecture.md)
35 | 1. [复杂事件(`CEP`)处理框架](part3-architecture.md)
36 | 2. [消息传递](part3-architecture.md)
37 | - [收集消息](part3-architecture.md)
38 | - [Push vs. Pull消息传递](part3-architecture.md)
39 | 3. [消息传递选择](part3-architecture.md)
40 | - [第四部分:实时通道](part4-pipeline.md)
41 | 1. [收集组件](part4-pipeline.md)
42 | - [地理和设备类别数据](part4-pipeline.md)
43 | 2. [Bot检测组件](part4-pipeline.md)
44 | 3. [Session化组件](part4-pipeline.md)
45 | - [会话元数据,计数器和状态](part4-pipeline.md)
46 | - [会话存储](part4-pipeline.md)
47 | - [会话回退存储](part4-pipeline.md)
48 | - [SQL扩展](part4-pipeline.md)
49 | 4. [事件分发组件](part4-pipeline.md)
50 | - [事件过滤,转换和路由](part4-pipeline.md)
51 | 5. [多维度OLAP的Metrics计算组件](part4-pipeline.md)
52 | - [收集Metrics](part4-pipeline.md)
53 | - [聚合](part4-pipeline.md)
54 | - [用时序数据库汇总](part4-pipeline.md)
55 | - [Metrics存储](part4-pipeline.md)
56 | - [总结](concluding.md)
57 |
--------------------------------------------------------------------------------
/clickhouse/Engines/Buffer.md:
--------------------------------------------------------------------------------
1 | # Buffer
2 |
3 |
4 | 缓存数据在RAM(内存)中,定期将刷新到另一个表。在读取操作期间,同时从缓冲和相印表中读取数据。
5 | ```
6 | Buffer(database, table, num_layers, min_time, max_time, min_rows, max_rows, min_bytes, max_bytes)
7 | ```
8 |
9 | 引擎参数:
10 | * database, table: 要将数据刷新到的表。您可以使用返回字串的常量表达式,而不是字符串名。
11 | * num_layers: 并行级别。物理上,表将视为互相独立的数量为'num_layers'个的buffer。推荐值为16。
12 | * min_time, max_time, min_rows, max_rows, min_bytes, and max_bytes: 是从缓冲区刷出数据的条件。如果满足所有“最小”条件或至少一个“最大”条件,则将数据从缓冲区刷新并写入目标表。
13 | * min_time, max_timee: 从第一次写入缓冲区那一刻起的时间条件(以秒为单位)。
14 | * min_rows, max_rowse:缓冲区中行数的条件。
15 | * min_bytes, max_bytes:缓冲区中字节数的条件。
16 |
17 | 在写入操作期间,将数据插入到num_layers数量的随机缓冲区中。或者,如果要插入的数据部分足够大(大于 ‘max_rows’ or ‘max_bytes’),则直接写入目标表,而略过缓冲区。
18 |
19 | 刷新目标表的条件是每个缓冲区互相独立计算的。例如,当num_layers = 16且max_bytes = 100000000,则最大RAM消耗为1.6GB。
20 |
21 | #### 例子
22 | ```
23 | CREATE TABLE merge.hits_buffer AS merge.hits ENGINE = Buffer(merge, hits, 16, 10, 100, 10000, 1000000, 10000000, 100000000)
24 | ```
25 | 使用缓冲区引擎创建具有与merge.hits相同结构的 merge.hits_buffer表。
26 | 写入此表时,数据缓存在RAM中,然后写入merge.hits表。创建了16个缓冲区。
27 |
28 | 如果已经过去100秒,或者已经写入一百万行,或者已经写入100MB的数据,则刷新它们中的每一个中的数据;
29 | 或者如果同时已经过去10秒并且已经写入10,000行和10mb的数据,也刷新它们中的每一个中的数据;
30 | 例如,如果只写入了一行,则100秒后,无论发生什么情况,都将刷新该行。但是,如果写入了许多行,数据将更快被刷新。
31 |
32 | 当服务器停止时,使用DROP TABLE或DETACHTABLE,缓冲区数据也会刷新到目标表。
33 |
34 | 可以为数据库和表名设置单引号中的空字符串。这表示没有目标表。在这种情况下,当达到数据刷新条件时,只会清除缓冲区。
35 | 这对于在内存中保持窗口数据是有用的。
36 |
37 | 从缓冲区表读取数据时,将同时从缓冲区和目标表(如果有)获取数据。请注意,缓冲区表不支持索引。
38 | 换句话说,缓冲区中的数据被完全扫描,这对于大缓冲区来说可能是缓慢的。(对于从属表中的数据,将使用其支持的索引。)
39 |
40 | #### 特点
41 | 如果缓冲表中的列集与从属表中的列集不匹配,则会插入两个表中存在的列子集。
42 |
43 | 如果缓冲区表和从属表中的没有任何一列匹配,则会在服务器日志中输入错误消息并清除缓冲区。当缓冲区被刷新时,如果从属表不存在,也会发生同样的情况。
44 |
45 | 如果需要对从属表和缓冲区表运行ALTER,建议首先删除缓冲区表,对从属表运行ALTER,然后再次创建缓冲区表。
46 |
47 | 如果服务器异常重新启动,缓冲区中的数据将丢失。
48 |
49 | PREWHERE、FINAL和SAMPLE不能正确用于缓冲表。这些条件传递到目标表,但不用于处理缓冲区中的数据。
50 | 因此,我们建议在从目标表读取时仅使用缓冲区表进行写入。
51 |
52 | 向一个缓冲区添加数据时,这个缓冲区被锁定。如果同时从表中执行读取操作,这将导致读取延迟。
53 |
54 | 插入缓冲表的数据可能以不同的顺序和不同的块结束在从属表中。因此,很难使用缓冲区表正确写入CollapsingMergeTree 。为了避免出现问题,可以将“num _layers”设置为1。
55 |
56 | 如果目标表是复制表(replicated),则在写入缓冲表时,复制表的某些预期特性将丢失。
57 | 对行顺序和数据部分大小的随机更改会导致消除重复数据停止工作,这意味着不可能对复制的表进行可靠的'exactly once' 写入。
58 |
59 | #### 建议
60 | 由于这些缺点,**我们只能建议在极少数情况下使用缓冲表**。
61 | 当在一个时间单位内从大量服务器接收到过多的INSERTs,并且在插入之前无法缓冲数据时,意味着无法足够快地运行INSERTs操作,则考虑使用缓冲表。
62 |
63 | 请注意,即使对于缓冲表,一次插入一行数据也是没有意义的。这将仅产生每秒几千行的速度,而插入较大的数据块每秒可产生超过一百万行(请参见“性能”一节)。
64 |
--------------------------------------------------------------------------------
/init_scripts/redis-sentinel.init:
--------------------------------------------------------------------------------
1 | #!/bin/sh
2 | #
3 | # redis init file for starting up the redis-sentinel daemon
4 | #
5 | # chkconfig: - 21 79
6 | # description: Starts and stops the redis-sentinel daemon.
7 | #
8 | ### BEGIN INIT INFO
9 | # Provides: redis-sentinel
10 | # Required-Start: $local_fs $remote_fs $network
11 | # Required-Stop: $local_fs $remote_fs $network
12 | # Short-Description: start and stop Sentinel server
13 | # Description: A persistent key-value database
14 | ### END INIT INFO
15 |
16 | # Source function library.
17 | . /etc/rc.d/init.d/functions
18 |
19 | name="redis-sentinel"
20 | exec="/usr/bin/$name"
21 | shut="/usr/libexec/redis-shutdown"
22 | pidfile="/var/run/redis/sentinel.pid"
23 | SENTINEL_CONFIG="/etc/redis-sentinel.conf"
24 |
25 | [ -e /etc/sysconfig/redis-sentinel ] && . /etc/sysconfig/redis-sentinel
26 |
27 | lockfile=/var/lock/subsys/redis
28 |
29 | start() {
30 | [ -f $SENTINEL_CONFIG ] || exit 6
31 | [ -x $exec ] || exit 5
32 | echo -n $"Starting $name: "
33 | daemon --user ${REDIS_USER-redis} "$exec $SENTINEL_CONFIG --daemonize yes --pidfile $pidfile"
34 | retval=$?
35 | echo
36 | [ $retval -eq 0 ] && touch $lockfile
37 | return $retval
38 | }
39 |
40 | stop() {
41 | echo -n $"Stopping $name: "
42 | [ -x $shut ] && $shut $name
43 | retval=$?
44 | if [ -f $pidfile ]
45 | then
46 | # shutdown haven't work, try old way
47 | killproc -p $pidfile $name
48 | retval=$?
49 | else
50 | success "$name shutdown"
51 | fi
52 | echo
53 | [ $retval -eq 0 ] && rm -f $lockfile
54 | return $retval
55 | }
56 |
57 | restart() {
58 | stop
59 | start
60 | }
61 |
62 | rh_status() {
63 | status -p $pidfile $name
64 | }
65 |
66 | rh_status_q() {
67 | rh_status >/dev/null 2>&1
68 | }
69 |
70 |
71 | case "$1" in
72 | start)
73 | rh_status_q && exit 0
74 | $1
75 | ;;
76 | stop)
77 | rh_status_q || exit 0
78 | $1
79 | ;;
80 | restart)
81 | $1
82 | ;;
83 | status)
84 | rh_status
85 | ;;
86 | condrestart|try-restart)
87 | rh_status_q || exit 0
88 | restart
89 | ;;
90 | *)
91 | echo $"Usage: $0 {start|stop|status|restart|condrestart|try-restart}"
92 | exit 2
93 | esac
94 | exit $?
95 |
--------------------------------------------------------------------------------
/init_scripts/kafka-manager.init:
--------------------------------------------------------------------------------
1 | #!/bin/sh
2 | #
3 | # chkconfig: 345 99 01
4 | # description:
5 | #
6 |
7 | export JAVA_HOME=/usr/local/java/jdk1.8.0_25
8 |
9 | KAFKAMANAGER_ROOT=/data/appsoft/kafkaManager/kafka-manager
10 | EXEC_BIN=$KAFKAMANAGER_ROOT/bin/kafka-manager
11 | PORT=9001
12 |
13 | PS_NAME='kafka-manager'
14 |
15 | LOG_FILE=$KAFKAMANAGER_ROOT/startup.log
16 | CONFIG_FILE=$KAFKAMANAGER_ROOT/conf/application.conf
17 |
18 | OPTIONS="-Dconfig.file=$CONFIG_FILE -Dhttp.port=$PORT -Dapplication.home=$KAFKAMANAGER_ROOT"
19 |
20 | # Source function library.
21 | INITD=/etc/rc.d/init.d
22 | source $INITD/functions
23 |
24 | # Find the name of the script
25 | NAME=`basename $0`
26 | if [ ${NAME:0:1} = "S" -o ${NAME:0:1} = "K" ]
27 | then
28 | NAME=${NAME:3}
29 | fi
30 |
31 | # For SELinux we need to use 'runuser' not 'su
32 | if [ -x /sbin/runuser ]
33 | then
34 | SU=runuser
35 | else
36 | SU=su
37 | fi
38 |
39 | start(){
40 | echo -n "Starting ${NAME} service: "
41 | nohup $EXEC_BIN $OPTIONS >$LOG_FILE 2>&1 &
42 | # $EXEC_BIN $OPTIONS
43 | ret=$?
44 | if [ $ret -eq 0 ]
45 | then
46 | echo_success
47 | else
48 | echo_failure
49 | script_result=1
50 | fi
51 | echo
52 | }
53 |
54 | stop(){
55 | echo -n "Stopping ${NAME} service: "
56 | $SU -l ${EXEC_USER} -c "ps -ef | grep $PS_NAME | grep -v grep | awk '{print \$2}' | xargs kill"
57 | ret=$?
58 | if [ $ret -eq 0 ]
59 | then
60 | echo_success
61 | else
62 | echo_failure
63 | script_result=1
64 | fi
65 | echo
66 | }
67 |
68 | hardstop(){
69 | echo -n "Stopping (hard) ${NAME} service: "
70 | $SU -l ${EXEC_USER} -c "ps -ef | grep $PS_NAME | grep -v grep | awk '{print \$2}' | xargs kill -9"
71 | ret=$?
72 | if [ $ret -eq 0 ]
73 | then
74 | echo_success
75 | else
76 | echo_failure
77 | script_result=1
78 | fi
79 | echo
80 | }
81 |
82 | status(){
83 | c_pid=`ps -ef | grep $PS_NAME | grep -v grep | awk '{print $2}'`
84 | if [ "$c_pid" = "" ] ; then
85 | echo "Stopped"
86 | exit 3
87 | else
88 | echo "Running $c_pid"
89 | exit 0
90 | fi
91 | }
92 |
93 | # See how we were called.
94 | case "$1" in
95 |
96 | start|stop|hardstop|status)
97 | $1
98 | ;;
99 | *)
100 | echo "Usage: $0 {start|stop|hardstop|status}"
101 | exit 2
102 | ;;
103 | esac
104 |
105 | exit $script_result
106 |
--------------------------------------------------------------------------------
/init_scripts/elasticsearch.init:
--------------------------------------------------------------------------------
1 | #!/bin/sh
2 | #
3 | # chkconfig: 345 99 01
4 | # description: elastic
5 | #
6 | # File : elastic
7 | #
8 | # Description: Starts and stops the elastic server
9 | #
10 |
11 |
12 | ES_HOME=/data/appsoft/elastic
13 |
14 | EXEC_BIN=${ES_HOME}/bin/elasticsearch
15 |
16 | OPTIONS='-d'
17 |
18 | PID_PATH=${ES_HOME}/config/elasitc.pid
19 |
20 | PS_NAME=org.elasticsearch.bootstrap.Elasticsearch
21 |
22 | EXEC_USER=elastic
23 |
24 | # Source function library.
25 | INITD=/etc/rc.d/init.d
26 | source $INITD/functions
27 |
28 | # Find the name of the script
29 | NAME=`basename $0`
30 | if [ ${NAME:0:1} = "S" -o ${NAME:0:1} = "K" ]
31 | then
32 | NAME=${NAME:3}
33 | fi
34 |
35 | # For SELinux we need to use 'runuser' not 'su'
36 | if [ -x /sbin/runuser ]
37 | then
38 | SU=runuser
39 | else
40 | SU=su
41 | fi
42 |
43 | start(){
44 | echo -n "Starting ${NAME} service: "
45 | $SU -l ${EXEC_USER} -c "${EXEC_BIN} ${OPTIONS} -p ${PID_PATH}"
46 | ret=$?
47 | if [ $ret -eq 0 ]
48 | then
49 | echo_success
50 | else
51 | echo_failure
52 | script_result=1
53 | fi
54 | echo
55 | }
56 |
57 | stop(){
58 | echo -n "Stopping ${NAME} service: "
59 | $SU -l ${EXEC_USER} -c "cat ${PID_PATH} | xargs kill"
60 | ret=$?
61 | if [ $ret -eq 0 ]
62 | then
63 | echo_success
64 | else
65 | echo_failure
66 | script_result=1
67 | fi
68 | echo
69 | }
70 |
71 | hardstop(){
72 | echo -n "Stopping (hard) ${NAME} service: "
73 | $SU -l ${EXEC_USER} -c "cat ${PID_PATH} | xargs kill -9"
74 | ret=$?
75 | if [ $ret -eq 0 ]
76 | then
77 | echo_success
78 | else
79 | echo_failure
80 | script_result=1
81 | fi
82 | echo
83 | }
84 |
85 | status(){
86 | c_pid=`ps -ef | grep $PS_NAME | grep -v grep | awk '{print $2}'`
87 | if [ "$c_pid" = "" ] ; then
88 | echo "Stopped"
89 | exit 3
90 | else
91 | echo "Running $c_pid"
92 | exit 0
93 | fi
94 | }
95 |
96 | # See how we were called.
97 | case "$1" in
98 |
99 | start|stop|status|hardstop)
100 | $1
101 | ;;
102 | *)
103 | echo "Usage: $0 {start|stop|hardstop|status}"
104 | exit 2
105 | ;;
106 | esac
107 |
108 | exit $script_result
--------------------------------------------------------------------------------
/clickhouse/Engines/AggregatingMergeTree.md:
--------------------------------------------------------------------------------
1 | # AggregatingMergeTree
2 |
3 | 此引擎与MergeTree不同,因为合并操作将存储在表中的聚合函数的状态合并为具有相同的主键值的行。
4 |
5 | 为了使这种行为能正常工作,它使用AggregateFunction数据类型和 -State和 -Merge修饰符来实现聚合函数。
6 |
7 | ##
8 | 有一个aggregatefunction数据类型,它是一个参数数据类型。第一个参数是聚合函数的名称,然后的参数是这个函数的参数类型。例子:
9 | ```
10 | CREATE TABLE t
11 | (
12 | column1 AggregateFunction(uniq, UInt64),
13 | column2 AggregateFunction(anyIf, String, UInt8),
14 | column3 AggregateFunction(quantiles(0.5, 0.9), UInt64)
15 | ) ENGINE = ...
16 | ```
17 | 这个列的类型是存储聚合函数的state的类型。
18 |
19 |
20 | 要获取此类型的值,请使用带有'State'后缀的聚合函数。
21 | 示例: uniqState(UserID), quantilesState(0.5, 0.9)(SendTiming)-与对应的'uniq'和'quantiles'函数相比,这些函数返回state状态,而不是准备的值。
22 | 换句话说,它们返回一个AggregateFunction 类型的值。
23 | AggregateFunction 类型值不能以漂亮的格式输出。在其他格式中,这些类型的值作为特定的二进制数据输出。AggregateFunction 类型值不用于输出或备份。
24 |
25 | 唯一使用AggregateFunction类型值的地方是合并state并获得结果,这实质上意味着完成聚合操作。具有'Merge'后缀的聚合函数用于完成聚合。
26 | 示例: uniqMerge(UserIDState), 其中UserIDState 具有AggregateFunction 类型。
27 |
28 | 换句话说,带有'Merge'后缀的聚合函数使用一组state,合并它们并返回结果。例如,下面这两个查询返回相同的结果:
29 | ```
30 | SELECT uniq(UserID) FROM table
31 |
32 | SELECT uniqMerge(state) FROM (SELECT uniqState(UserID) AS state FROM table GROUP BY RegionID)
33 | ```
34 |
35 | 有一个AggregatingMergeTree引擎。它在合并期间的工作是将来自不同表的数据,以相同的主键值,合并聚合函数的state。
36 |
37 | 对于含有AggregateFunction 列的表,不能使用普通的insert操作。因为不能显式定义AggregateFunction 的值。
38 | 而是使用INSERT SELECT with '-State' 聚合函数插入数据。
39 |
40 | 从AggregatingMergeTree 引擎的表中进行SELECT,使用GROUP BY和aggregate函数以及'-Merge'修饰符完成数据聚合。
41 |
42 | 您可以使用AggregatingMergeTree 表进行增量数据聚合,包括聚合物化视图(materialized views)。
43 |
44 | 示例:创建一个AggregatingMergeTree类型的物化视图,追踪'test.visits'表:
45 | ```
46 | CREATE MATERIALIZED VIEW test.basic
47 | ENGINE = AggregatingMergeTree(StartDate, (CounterID, StartDate), 8192)
48 | AS SELECT
49 | CounterID,
50 | StartDate,
51 | sumState(Sign) AS Visits,
52 | uniqState(UserID) AS Users
53 | FROM test.visits
54 | GROUP BY CounterID, StartDate;
55 | ```
56 |
57 | 在'test.visits'表中插入数据,同样还将在视图中插入数据,数据将在视图中聚合:
58 | ```
59 | INSERT INTO test.visits ...
60 | ```
61 |
62 | 通过对视图进行 GROUP BY 查询完成数据聚合:
63 | ```
64 | SELECT
65 | StartDate,
66 | sumMerge(Visits) AS Visits,
67 | uniqMerge(Users) AS Users
68 | FROM test.basic
69 | GROUP BY StartDate
70 | ORDER BY StartDate;
71 | ```
72 |
73 | 您可以创建这样的物化视图,并为其分配完成数据聚合的普通视图。
74 |
75 | 请注意,在大多数情况下,使用AggregatingMergeTree 是不合理的,因为查询可以在非聚合数据上足够高效地运行。
76 |
--------------------------------------------------------------------------------
/ELK/elastic/INSTALL.md:
--------------------------------------------------------------------------------
1 | # Elastic Search
2 |
3 | ## 一.下载安装包
4 | 1.官网下载地址
5 | https://www.elastic.co/downloads/elasticsearch (当然也可以直接在linux中使用命令下载,但是可能比较慢,我们选择在官网进行下载)
6 | 选择对应的系统版本即可
7 |
8 | 2.历史版本下载
9 | 这个地址默认是最新的版本,如果想要历史版本,在此页面上找到past releases
10 |
11 | 点击进去找到想要的版本即可。
12 | 本文下载的是6.8.2版本(Elasticsearch和Kibana)
13 | Elasticsearch 6.8.2
14 | Kibana 6.8.2
15 |
16 | 注意:ES启动需要jdk,我本地已经配置了java8环境变量,不想改动,就用6.X的版本。
17 | 如果还没有配置jdk环境变量,则需要先安装jdk,因为ES是基于java以言编写,需要jdk环境。
18 | 7.0及以上版本虽然内置了jdk,但是需要java11及以上,我们不适用此版本。
19 |
20 | ## 二.elasticsearch-6.8.2安装
21 | 1.上传安装包至linux
22 | 下载好elasticsearch-6.8.2.tar.gz安装包后,上传至linux中,
23 | 我放在了/home/zjq中,在此目录下使用命令 rz 选择安装包上传即可;
24 |
25 | 2.解压
26 | 上传完成后,使用如下命令解压:
27 | tar -zxvf elasticsearch-6.8.2.tar.gz
28 |
29 | 3.修改配置文件
30 | 进入解压后的config目录,
31 | cd ./elasticsearch-6.8.2/config
32 | 修改elasticsearch.yml配置文件,
33 | 找到下面两项配置,开放出来(删除前面的#符号)
34 | network.host: 192.168.212.151
35 | http.port: 9200
36 | bootstrap.memory_lock: true
37 |
38 | vi config/jvm.options
39 | ```
40 | # 替换为总内存的一半:例如内存为16g
41 | -Xms8g
42 | -Xmx8g
43 | ```
44 |
45 | c. 这时候需要修改系统配置文件:
46 | ```
47 | #> vi /etc/sysctl.conf
48 | ##生产上一定要打开文件描述符。
49 | vm.max_map_count=262144
50 |
51 | #> sudo sysctl -p
52 |
53 | # when bootstrap.memory_lock: true
54 | vm.swappiness=0
55 | ```
56 |
57 | d. 这时候还需要修改系统配置文件:
58 | ```
59 | vi /etc/security/limits.conf
60 | 添加如下4行:
61 | * soft nofile 65536
62 | * hard nofile 131072
63 | * soft nproc 2048
64 | * hard nproc 4096
65 |
66 | # when bootstrap.memory_lock: true
67 | # * can replace to username
68 | * soft memlock unlimited
69 | * hard memlock unlimited
70 | ```
71 |
72 | 4.启动ES
73 | 注意,es启动过程中会多次失败,需要修改多处配置文件,注意下文步骤:
74 |
75 | 修改完成后,重启linux系统。然后启动ES即可。
76 |
77 | 5.访问ES
78 | 注意没关闭防火墙的,需要关闭防火墙:
79 | 关闭防火墙 systemctl stop firewalld.service
80 |
81 | 启动完成后,访问地址,显示如下内容表示启动成功。
82 |
83 | #### 分词插件
84 |
85 | #####离线
86 | wget https://github.com/medcl/elasticsearch-analysis-ik/releases/download/v6.8.4/elasticsearch-analysis-ik-6.8.4.zip
87 | #./elasticsearch-plugin install file://ik的文件路径
88 | ./elasticsearch-plugin install file:///usr/local/elasticsearch-analysis-ik-6.8.4.zip
89 | #####在线
90 | ./bin/elasticsearch-plugin install https://github.com/medcl/elasticsearch-analysis-ik/releases/download/v6.8.4/elasticsearch-analysis-ik-6.8.4.zip
91 |
92 | ### pinyin
93 | https://github.com/medcl/elasticsearch-analysis-pinyin/releases/download/v6.8.6/elasticsearch-analysis-pinyin-6.8.6.zip
94 |
--------------------------------------------------------------------------------
/init_scripts/kafka.init:
--------------------------------------------------------------------------------
1 | #!/bin/sh
2 | #
3 | # chkconfig: 345 99 01
4 | # description: Kafka
5 | #
6 | # File : Kafka
7 | #
8 | # Description: Starts and stops the Kafka server
9 | #
10 |
11 |
12 | KAFKA_HOME=/data/appsoft/kafka
13 |
14 | CONFIG_FILE=$KAFKA_HOME/config/server.properties
15 |
16 | OPTIONS='-daemon'
17 |
18 | PS_NAME=kafka.Kafka
19 |
20 | EXEC_USER=kafka
21 |
22 | # Source function library.
23 | INITD=/etc/rc.d/init.d
24 | source $INITD/functions
25 |
26 | # Find the name of the script
27 | NAME=`basename $0`
28 | if [ ${NAME:0:1} = "S" -o ${NAME:0:1} = "K" ]
29 | then
30 | NAME=${NAME:3}
31 | fi
32 |
33 | # For SELinux we need to use 'runuser' not 'su'
34 | if [ -x /sbin/runuser ]
35 | then
36 | SU=runuser
37 | else
38 | SU=su
39 | fi
40 |
41 | start(){
42 | echo -n "Starting ${NAME} service: "
43 | $SU -l ${EXEC_USER} -c "JMX_PORT=9999 ${KAFKA_HOME}/bin/kafka-server-start.sh ${OPTIONS} ${CONFIG_FILE}"
44 | ret=$?
45 | if [ $ret -eq 0 ]
46 | then
47 | echo_success
48 | else
49 | echo_failure
50 | script_result=1
51 | fi
52 | echo
53 | }
54 |
55 | stop(){
56 | echo -n "Stopping ${NAME} service: "
57 | $SU -l ${EXEC_USER} -c "${KAFKA_HOME}/bin/kafka-server-stop.sh"
58 | ret=$?
59 | if [ $ret -eq 0 ]
60 | then
61 | echo_success
62 | else
63 | echo_failure
64 | script_result=1
65 | fi
66 | echo
67 | }
68 |
69 | hardstop(){
70 | echo -n "Stopping (hard) ${NAME} service: "
71 | $SU -l ${EXEC_USER} -c "ps -ef | grep $PS_NAME | grep -v grep | awk '{print \$2}' | xargs kill -9"
72 | ret=$?
73 | if [ $ret -eq 0 ]
74 | then
75 | echo_success
76 | else
77 | echo_failure
78 | script_result=1
79 | fi
80 | echo
81 | }
82 |
83 | status(){
84 | c_pid=`ps -ef | grep $PS_NAME | grep -v grep | awk '{print $2}'`
85 | if [ "$c_pid" = "" ] ; then
86 | echo "Stopped"
87 | exit 3
88 | else
89 | echo "Running $c_pid"
90 | exit 0
91 | fi
92 | }
93 |
94 | # See how we were called.
95 | case "$1" in
96 |
97 | start|stop|status|hardstop)
98 | $1
99 | ;;
100 | *)
101 | echo "Usage: $0 {start|stop|hardstop|status}"
102 | exit 2
103 | ;;
104 | esac
105 |
106 | exit $script_result
107 |
--------------------------------------------------------------------------------
/nginx/nginx_sample.conf:
--------------------------------------------------------------------------------
1 |
2 | upstream backend_server {
3 | server 10.10.xx.xx:8500;
4 | server 10.10.xx.xx:8500;
5 | server 10.10.xx.xx:8500;
6 | }
7 |
8 | log_format samp_fmt '{"@timestamp":"$time_iso8601",'
9 | '"host":"$server_addr",'
10 | '"clientip":"$remote_addr",'
11 | '"size":$body_bytes_sent,'
12 | '"responsetime":$request_time,'
13 | '"upstreamtime":"$upstream_response_time",'
14 | '"upstreamhost":"$upstream_addr",'
15 | '"http_host":"$host",'
16 | '"url":"$request_uri",'
17 | '"referer":"$http_referer",'
18 | '"agent":"$http_user_agent",'
19 | '"xff":"$http_x_forwarded_for",'
20 | '"status":"$status"}';
21 |
22 | server {
23 | listen 80;
24 | server_name xxx.xxx.com;
25 | root /data/appdata/path/dist;
26 | index /index.html;
27 |
28 | # Load configuration files for the default server block.
29 | include /etc/nginx/default.d/*.conf;
30 |
31 | auth_basic "Please input password";
32 | auth_basic_user_file /etc/nginx/conf.d/cloudpasswd;
33 |
34 | access_log /data/applogs/nginx/access.log samp_fmt;
35 | error_log /data/applogs/nginx/error.log warn;
36 |
37 | location / {
38 | proxy_pass http://backend_server;
39 | # try_files $uri /index.html;
40 | }
41 |
42 | location ~^/static/ {
43 | etag on;
44 | expires max;
45 | }
46 |
47 |
48 | location ^~ /api/ {
49 | proxy_set_header Host $host;
50 | proxy_set_header X-Real-IP $remote_addr;
51 | proxy_set_header X-Forwarded-For $proxy_add_x_forwarded_for;
52 | proxy_pass http://10.10.44.4:13501/;
53 | }
54 |
55 | location ~ \.php$ {
56 | try_files $uri =404;
57 | fastcgi_split_path_info ^(.+\.php)(/.+)$;
58 | fastcgi_pass unix:/var/run/php5-fpm.sock;
59 | fastcgi_index index.php;
60 | fastcgi_param SCRIPT_FILENAME $document_root$fastcgi_script_name;
61 | include fastcgi_params;
62 | }
63 |
64 | location /websocket/ {
65 | proxy_http_version 1.1;
66 | proxy_set_header Upgrade $http_upgrade;
67 | proxy_set_header Connection "upgrade";
68 | }
69 |
70 | error_page 404 /404.html;
71 | location = /40x.html {
72 | }
73 |
74 | }
75 |
--------------------------------------------------------------------------------
/consul/client/start.sh:
--------------------------------------------------------------------------------
1 | #!/bin/bash
2 | set +o posix
3 |
4 | CMD_PATH="consul"
5 | CONFIG_DIRECTORY="consul.d/client"
6 | LOG_FILE="consul.log"
7 | DAEMON_RUNNABLE="true"
8 |
9 | # Fail fast with concise message when cwd does not exist
10 | if ! [[ -d "$PWD" ]]; then
11 | echo "Error: The current working directory doesn't exist, cannot proceed." >&2
12 | exit 1
13 | fi
14 |
15 | quiet_cd() {
16 | cd "$@" >/dev/null || return
17 | }
18 |
19 | onwarn() {
20 | if [[ -t 2 ]] # check whether stderr is a tty.
21 | then
22 | echo -ne "\\033[4;31mWarn\\033[0m: " >&2 # highlight Warb with underline and red color
23 | else
24 | echo -n "Warn: " >&2
25 | fi
26 | if [[ $# -eq 0 ]]
27 | then
28 | cat >&2
29 | else
30 | echo "$*" >&2
31 | fi
32 | }
33 |
34 | onoe() {
35 | if [[ -t 2 ]] # check whether stderr is a tty.
36 | then
37 | echo -ne "\\033[4;31mError\\033[0m: " >&2 # highlight Error with underline and red color
38 | else
39 | echo -n "Error: " >&2
40 | fi
41 | if [[ $# -eq 0 ]]
42 | then
43 | cat >&2
44 | else
45 | echo "$*" >&2
46 | fi
47 | }
48 |
49 | odie() {
50 | onoe "$@"
51 | exit 1
52 | }
53 |
54 | SHELL_FILE_DIRECTORY="$(quiet_cd "${0%/*}/" && pwd -P)"
55 |
56 | if [[ -f "${CMD_PATH}" ]]
57 | then
58 | CMD_FULL_PATH="${CMD_PATH}"
59 | else
60 | CMD_FULL_PATH="$SHELL_FILE_DIRECTORY/${CMD_PATH}"
61 | fi
62 |
63 | if [[ -d "${CONFIG_DIRECTORY}" ]]
64 | then
65 | CONFIG_DIR_FULL_PATH="${CONFIG_DIRECTORY}"
66 | else
67 | CONFIG_DIR_FULL_PATH="$SHELL_FILE_DIRECTORY/${CONFIG_DIRECTORY}"
68 | fi
69 |
70 | if [[ -f "${LOG_FILE}" ]]
71 | then
72 | LOG_FILE_FULL_PATH="${LOG_FILE}"
73 | else
74 | LOG_FILE_FULL_PATH="$SHELL_FILE_DIRECTORY/${LOG_FILE}"
75 | fi
76 |
77 | if ! [[ -f "${CMD_FULL_PATH}" ]]
78 | then
79 | odie "Command $CMD_FULL_PATH not exists"
80 | fi
81 |
82 | if ! [[ -d "${CONFIG_DIR_FULL_PATH}" ]]
83 | then
84 | odie "Directory $CONFIG_DIR_FULL_PATH not exists"
85 | fi
86 |
87 | if [[ -f "${LOG_FILE_FULL_PATH}" ]]
88 | then
89 | onwarn "Log file $LOG_FILE_FULL_PATH exists"
90 | fi
91 |
92 |
93 | if [[ -n "$DAEMON_RUNNABLE" ]]
94 | then
95 | echo "Daemon run"
96 | nohup ${CMD_FULL_PATH} agent -config-dir=${CONFIG_DIR_FULL_PATH} 2>&1 > ${LOG_FILE_FULL_PATH} &
97 | else
98 | ${CMD_FULL_PATH} agent -config-dir=${CONFIG_DIR_FULL_PATH}
99 | fi
100 |
101 |
102 |
--------------------------------------------------------------------------------
/init_scripts/jenkins.init:
--------------------------------------------------------------------------------
1 | #!/bin/sh
2 | #
3 | # chkconfig: 345 99 01
4 | # description: jenkins
5 | #
6 |
7 | #JENKINS_HOME=/data/appsoft/jenkins
8 | JENKINS_ROOT=/data/appsoft/jenkins
9 | JENKINS_WAR=$JENKINS_ROOT/jenkins.war
10 |
11 | PORT=8080
12 |
13 | PS_NAME=jenkins.war
14 |
15 | EXEC_USER=jenkins
16 |
17 | JENKINS_LOGFILE=/data/applogs/jenkins/jenkins.log
18 |
19 | OPTIONS="--daemon --httpPort=$PORT --logfile=$JENKINS_LOGFILE"
20 |
21 | # Source function library.
22 | INITD=/etc/rc.d/init.d
23 | source $INITD/functions
24 |
25 | # Find the name of the script
26 | NAME=`basename $0`
27 | if [ ${NAME:0:1} = "S" -o ${NAME:0:1} = "K" ]
28 | then
29 | NAME=${NAME:3}
30 | fi
31 |
32 | # For SELinux we need to use 'runuser' not 'su'
33 | if [ -x /sbin/runuser ]
34 | then
35 | SU=runuser
36 | else
37 | SU=su
38 | fi
39 |
40 | start(){
41 | echo -n "Starting ${NAME} service: "
42 | $SU -l ${EXEC_USER} -c "java -jar $JENKINS_WAR ${OPTIONS}"
43 | ret=$?
44 | if [ $ret -eq 0 ]
45 | then
46 | echo_success
47 | else
48 | echo_failure
49 | script_result=1
50 | fi
51 | echo
52 | }
53 |
54 | stop(){
55 | echo -n "Stopping ${NAME} service: "
56 | $SU -l ${EXEC_USER} -c "ps -ef | grep $PS_NAME | grep -v grep | awk '{print \$2}' | xargs kill"
57 | ret=$?
58 | if [ $ret -eq 0 ]
59 | then
60 | echo_success
61 | else
62 | echo_failure
63 | script_result=1
64 | fi
65 | echo
66 | }
67 |
68 | hardstop(){
69 | echo -n "Stopping (hard) ${NAME} service: "
70 | $SU -l ${EXEC_USER} -c "ps -ef | grep $PS_NAME | grep -v grep | awk '{print \$2}' | xargs kill -9"
71 | ret=$?
72 | if [ $ret -eq 0 ]
73 | then
74 | echo_success
75 | else
76 | echo_failure
77 | script_result=1
78 | fi
79 | echo
80 | }
81 |
82 | status(){
83 | c_pid=`ps -ef | grep $PS_NAME | grep -v grep | awk '{print $2}'`
84 | if [ "$c_pid" = "" ] ; then
85 | echo "Stopped"
86 | exit 3
87 | else
88 | echo "Running $c_pid"
89 | exit 0
90 | fi
91 | }
92 |
93 | # See how we were called.
94 | case "$1" in
95 |
96 | start|stop|hardstop|status)
97 | $1
98 | ;;
99 | *)
100 | echo "Usage: $0 {start|stop|hardstop|status}"
101 | exit 2
102 | ;;
103 | esac
104 |
105 | exit $script_result
106 |
--------------------------------------------------------------------------------
/clickhouse/Engines/MergeTree.md:
--------------------------------------------------------------------------------
1 | # MergeTree
2 |
3 | MergeTree引擎支持一个按primary key和date的索引,并提供了实时更新数据的可能性。这是ClickHouse中最先进的表引擎。不要把它和Merge引擎搞混淆。
4 |
5 | MergeTree引擎接受参数: 一个包含date类型的列名、一个采样表达式(可选)、定义主键的元组和索引粒度(index granularity)。例子:
6 |
7 | ```
8 | Example without sampling support:
9 | #> MergeTree(EventDate, (CounterID, EventDate), 8192)
10 |
11 | Example with sampling support:
12 | #> MergeTree(EventDate, intHash32(UserID), (CounterID, EventDate, intHash32(UserID)), 8192)
13 | ```
14 |
15 | Datek列:MergeTree类型的表必须有一个单独包含date的列。在这个示例中,它是EventDate。date列的类型必须是Date(不是DateTime)。
16 |
17 | 主键:可以是来自任何表达式的元组(通常这是一个组列名),或者一个表达式。
18 |
19 | 采样表达式(可选):可以是任何表达式。它还必须存在于主键中。该示例使用UserID的哈希值对表中的每个CounterID和EventDatee散布数据。
20 | 换句话说,当查询示例时,您会得到一个UserID子集的数据均匀的伪随机样本。
21 |
22 | MergeTree表会分为很多part,然后通过part的合集实现。每个part都按主键排序。此外,每个part都具有分配的最小和最大date。
23 | 当往表中插入数据时,将创建一个新的排序part。合并进程会在后台定期启动执行。在合并时,选择几个part,通常是数据量最小的part,然后合并成一个大的排序part。
24 |
25 | 换句话说,在插入到表时会发生增量排序。因此表总是由较少的排序part组成,合并本身不会做太多的工作。
26 |
27 | 在插入期间,属于不同月份的数据被分为不同的part。不同月份对应的part从不合并。其目的是提供本地数据修改(以方便备份)。
28 | part合并后会有一定大小的threshold(阈值)限制,因此不会有耗时太长的合并发生。
29 |
30 | 对于每个part,对应生成一个索引文件。索引文件包含表中的每个'index_granularity(索引粒度)'行的主键值。换句话说,这是排序数据的简要索引(abbreviated index)。
31 | 对于列,每个'index_granularity(索引粒度)'行的'marks'也会写入,以便可以在特定范围内读取数据。
32 |
33 | 从表中读取时,SELECT查询会被分析是否可以使用索引。如果WHERE或PREWHERE子句具有等式操作或不等式比较操作的表达式(作为一个或全部的连接元素),
34 | 或者主键、日期的以上列中有IN、Boolean运算符,则可以使用索引。
35 |
36 | 因此,可以对主键的一个或多个范围快速运行查询。查询很快的例子:
37 | ```
38 | SELECT count() FROM table WHERE EventDate = toDate(now()) AND CounterID = 34
39 | SELECT count() FROM table WHERE EventDate = toDate(now()) AND (CounterID = 34 OR CounterID = 42)
40 | SELECT count() FROM table WHERE ((EventDate >= toDate('2014-01-01') AND EventDate <= toDate('2014-01-31')) OR EventDate = toDate('2014-05-01')) AND CounterID IN (101500, 731962, 160656) AND (CounterID = 101500 OR EventDate != toDate('2014-05-01'))
41 | ```
42 | 所有上面的例子都使用索引(日期和主键)。甚至复杂表达式都用了索引。对表的读取顺序是重新组织过的,以便使用索引的速度不会慢于全表扫描。
43 |
44 |
45 | 在下面的例中,无法使用索引:
46 | ```
47 | SELECT count() FROM table WHERE CounterID = 34 OR URL LIKE '%upyachka%'
48 | ```
49 |
50 | date索引从所需范围中仅仅读取包含此date的part。但是,数据部分可能包含其他date的数据(最多整个月),而在单个part中,数据按主键排序,
51 | 主键可能不包含日期作为第一列。因此,使用仅具有未指定主键前缀的日期条件的查询将导致读取的数据多于单个日期的数据。
52 |
53 | 对于并发表查询,我们使用多版本控制。换句话说,当同时读取和更新表时,数据从当前正在查询的一组part中读取数据。没有长锁。插入不会妨碍读取操作。
54 |
55 | 从表中读取数据将自动并行化。
56 |
57 | 支持优化查询,这将调用额外的合并步骤。
58 |
59 | 您可以使用单个大表,并以chunks(小块)的形式向其连续添加数据,这就是MergeTree的设计目标。
60 |
61 | MergeTree系列中所有类型的表都支持数据复制
62 |
--------------------------------------------------------------------------------
/ELK/logstash/config.md:
--------------------------------------------------------------------------------
1 |
2 | ## Logstash
3 |
4 | vi logstash.yml
5 | ```
6 | input {
7 | file {
8 | path => "/var/log/test.log"
9 | start_position => "beginning"
10 | codec => multiline { # 使用codec/multiline插件
11 | pattern => "^%{TIMESTAMP_ISO8601}" # 指定匹配的表达式
12 | negate => true # 是否匹配到
13 | what => "previous" # 可选previous或next, previous是合并到匹配的上一行末尾
14 | max_lines => 1000 # 最大允许的行
15 | max_bytes => "10MiB" # 允许的大小
16 | auto_flush_interval => 30 # 如果在规定时候内没有新的日志事件就不等待后面的日志事件
17 | }
18 |
19 | }
20 | }
21 | ```
22 |
23 | ### test config
24 | ```
25 | input {
26 | stdin {}
27 | }
28 |
29 | filter {
30 | grok {
31 | match => { "message" => "%{TIMESTAMP_ISO8601:logtime} %{USERNAME:appname},%{USERNAME:traceid},%{USERNAME:spanid} %{LOGLEVEL:loglevel} %{USERNAME:thread} %{JAVACLASS:logclass} - %{JAVALOGMESSAGE:message}" }
32 | }
33 | geoip {
34 | source => "clientip"
35 | }
36 | }
37 |
38 | output {
39 | stdout {
40 | codec => rubydebug
41 | }
42 | }
43 | ```
44 |
45 | ### practice filebeat config
46 |
47 | For log Pattern `[%d{yyyy-MM-dd HH:mm:ss.SSS}][${spring.application.name:-},%X{X-B3-TraceId:-},%X{X-B3-SpanId:-}] %level %thread %logger{32}:%line - %msg%n`
48 |
49 | ```
50 | input {
51 | beats {
52 | port => 5044
53 | }
54 | }
55 |
56 | filter {
57 | grok {
58 | match => { "message" => "\[%{TIMESTAMP_ISO8601:logtime}\]\[%{USERNAME:appname}?,%{USERNAME:traceid}?,%{USERNAME:spanid}?\] %{LOGLEVEL:loglevel} (?[0-9a-zA-Z.+-_$#@]+) (?[0-9a-zA-Z.]+:[0-9]+) - %{JAVALOGMESSAGE:message}" }
59 | }
60 | geoip {
61 | source => "clientip"
62 | }
63 | }
64 |
65 | output {
66 | elasticsearch {
67 | hosts => ["http://127.0.0.1:9200"]
68 | index => "log-main-%{+YYYY.MM.dd}"
69 | # index in weekly
70 | # index => "applog-main-%{+xxxx.ww}"
71 | #user => "elastic"
72 | #password => "changeme"
73 | }
74 | }
75 |
76 | ```
77 |
78 |
79 | ## filebeat
80 |
81 | cat filebeat.yml
82 | ```
83 | # for log multiline meld to pervious
84 | multiline.pattern: ^\[[0-9]{4}-[0-9]{2}-[0-9]{2}
85 | multiline.negate: true
86 | multiline.match: after
87 | multiline.timeout: 30s
88 |
89 | output.logstash.hosts: ["10.10.xx.xx:5044"]
90 |
91 | logging.to_files: true
92 | logging.files:
93 | path: /data/applogs/filebeat
94 | name: filebeat
95 | keepfiles: 7
96 | permissions: 0644
97 | ```
98 |
--------------------------------------------------------------------------------
/web/named_css.md:
--------------------------------------------------------------------------------
1 | # DIV+CSS规范命名大全集合
2 |
3 | ## 一、命名规则说明
4 |
5 | 1)、所有的命名最好都小写
6 | 2)、属性的值一定要用双引号("")括起来,且一定要有值如class="divcss5",id="divcss5"
7 | 3)、每个标签都要有开始和结束,且要有正确的层次,排版有规律工整
8 | 4)、空元素要有结束的tag或于开始的tag后加上"/"
9 | 5)、表现与结构完全分离,代码中不涉及任何的表现元素,如style、font、bgColor、border等
10 | 6)、`
16 |
17 | ## 简单分析
18 | * __DefaultResourceLoader__:
19 | * 资源定位类,可以通过一个String类型的path获取一个Resource,从而指向一个具体的文件。
20 | 此类中最重要的方法是Resource getResource(String location),该方法间接调用getResourceByPath来获取Resource.
21 |
22 | * __AbstractApplicationContext__:
23 | * refresh: refresh方法是入口方法也是核心方法,定义了生成ApplicationContext的实现步骤,使用了典型的模板方法模式,一些子步骤交给子类来实现。
24 | obtainFreshBeanFactory方法可以获取一个真正的底层beanFactory,其中的refreshBeanFactory() 和 getBeanFactory()都是抽象方法
25 |
26 | * __AbstractRefreshableApplicationContext__:
27 | * 实现了 refreshBeanFactory() 和 getBeanFactory(),都是对父类AbstractApplicationContext的接口实现
28 | createBeanFactory()在refreshBeanFactory被调用,是真正的创建工厂的方法,在此方法中创建了一个DefaultListableBeanFactory类型的工厂。
29 | 此类的中的beanFactory属性保存了此前创建的工厂实例。
30 | * 提供接口 loadBeanDefinitions 在refreshBeanFactory中被调用
31 | * createBeanFactory()可以被继承重载。
32 |
33 | * __AbstractRefreshableConfigApplicationContext__:
34 | * 这个类的最主要的作用的保存配置文件的信息,主要存储在configLocations数组中。此类提供了如下方法
35 | * setConfigLocations()
36 | * getConfigLocations()
37 |
38 | * __AbstractXmlApplicationContext__:
39 | * 最核心的是实现了父类AbstractRefreshableApplicationContext中的`loadBeanDefinitions()`方法,
40 | 此方法拉开了解析XML配置文件的序幕。
41 |
42 | * __FileSystemXmlApplicationContext__:
43 | * FileSystemXmlApplicationContext(String configLocations[], boolean refresh, ApplicationContext parent)
44 | getResourceByPath方法是对父类DefaultResourceLoader中getResourceByPath的覆盖。
45 |
46 |
47 | [code]: https://github.com/spring-projects/spring-framework/blob/master/spring-context/src/main/java/org/springframework/context/support/AbstractApplicationContext.java
48 |
--------------------------------------------------------------------------------
/Java/Sping-cloud/Feign.md:
--------------------------------------------------------------------------------
1 | # Feign
2 |
3 | ## Base
4 | Base on
5 | ```
6 |
7 | org.springframework.boot
8 | spring-boot-starter-parent
9 | 2.0.5.RELEASE
10 |
11 |
12 | ```
13 |
14 | ## pom.xml
15 |
16 | ```
17 |
18 | Finchley.RELEASE
19 |
20 |
21 |
22 |
23 | org.springframework.cloud
24 | spring-cloud-starter-openfeign
25 |
26 |
27 |
28 |
29 |
30 |
31 | org.springframework.cloud
32 | spring-cloud-dependencies
33 | ${spring-cloud.version}
34 | pom
35 | import
36 |
37 |
38 |
39 | ```
40 |
41 | ## Code
42 | ```
43 | +import org.springframework.cloud.openfeign.EnableFeignClients;
44 |
45 | +@EnableFeignClients
46 | @EnableDiscoveryClient
47 | @SpringBootApplication
48 | public class XXXApplication {
49 | public static void main(String[] args) {
50 | SpringApplication.run(XXXApplication.class, args);
51 | }
52 | }
53 |
54 | ```
55 |
56 | ```
57 | package xxxx.feign;
58 |
59 | import org.springframework.cloud.openfeign.FeignClient;
60 | import org.springframework.stereotype.Component;
61 | import org.springframework.web.bind.annotation.*;
62 |
63 | @FeignClient(value = "ServiceName", path = "/ContextPath")
64 | public interface XXClient {
65 |
66 | @PostMapping(value = "/send/{id}")
67 | public String send(@PathVariable("id") String id;
68 | }
69 |
70 | public class ProcListenerStart {
71 | + @Autowired
72 | + private XXXClient client;
73 | + ....
74 | }
75 | ```
76 |
77 |
--------------------------------------------------------------------------------
/nginx/source/配置模块.md:
--------------------------------------------------------------------------------
1 | # nginx配置解析模块
2 |
3 | ## 简介
4 | nginx提供配置文件供用户方便的定义nginx的行为,通过修改配置项可以指定nginx进程工作模块,指定log的输出方式,指定如何处理用户请求等等。
5 | 该模块的函数`ngx_conf_include`和`ngx_conf_parse`同时被其他一些模块用于conf处理
6 |
7 | 主要代码在[core/ngx_conf_file.c][code]中,`ngx_conf_parse`函数在nginx启动过程中被调用来解析配置文件,
8 | 它读取配置文件内容并将配置项交由指定的模块处理。如将http配置项交由ngx_http_module处理。
9 |
10 | 配置文件通常使用include配置项从其它文件中加载配置,如nginx.conf文件中使用”include mime.types”配置项加载mime.types文件。
11 |
12 | 当在配置文件中发现include配置项时就调用`ngx_conf_module`模块提供的`ngx_conf_include`函数来解析,
13 |
14 | #### ngx_conf_include
15 | 它首先分析出include配置项指定的文件名,对每一个文件分别调用`ngx_conf_parse`函数来解析。
16 | 此函数也作为 `ngx_conf_module` 模块提供的指令(`ngx_conf_commands`)
17 |
18 | #### ngx_conf_parse
19 | 主要做三件事,
20 | * 在nginx启动时被调用来处理配置文件(入口在`ngx_init_cycle`)。
21 | * 解析include配置项。
22 | * 提供预设的配置项解析回调函数(`ngx_conf_module`提供了12个回调函数)。
23 |
24 | 每一个配置文件中的指令,把它存在 cf->args 中(这个过程是由 ngx_conf_read_token 完成)
25 | 接着会调用`ngx_conf_handler`处理,如果匹配则使用回调函数`rv = cmd->set(cf, cmd, conf);`
26 |
27 | ## 部分代码
28 | ```
29 | static ngx_command_t ngx_conf_commands[] = {
30 |
31 | { ngx_string("include"),
32 | NGX_ANY_CONF|NGX_CONF_TAKE1,
33 | ngx_conf_include,
34 | 0,
35 | 0,
36 | NULL },
37 |
38 | ngx_null_command
39 | };
40 |
41 | ngx_module_t ngx_conf_module = {
42 | NGX_MODULE_V1,
43 | NULL, /* module context */
44 | ngx_conf_commands, /* module directives */
45 | NGX_CONF_MODULE, /* module type */
46 | NULL, /* init master */
47 | NULL, /* init module */
48 | NULL, /* init process */
49 | NULL, /* init thread */
50 | NULL, /* exit thread */
51 | ngx_conf_flush_files, /* exit process */
52 | NULL, /* exit master */
53 | NGX_MODULE_V1_PADDING
54 | };
55 | ```
56 |
57 | ## Misc:
58 | http://blog.sunheqiubai.com/?p=386
59 |
60 |
61 | [code]: https://github.com/nginx/nginx/blob/master/src/core/ngx_conf_file.c
62 |
--------------------------------------------------------------------------------
/clickhouse/Engines/External.md:
--------------------------------------------------------------------------------
1 | # External data for query processing
2 |
3 | ClickHouse 允许向服务器发送SELECT语句的同时,发送处理查询所需的数据。此数据放在临时表中(请参阅'Temporary tables'章节),并可用于查询(例如,IN运算符)。
4 |
5 | 例如,如果您有一个包含重要用户标识符的文本文件,则可以将其与使用此列表筛选的查询一起上载到服务器。
6 |
7 | 如果需要使用大量外部数据运行多个查询,请不要使用此功能。最好提前将数据上载到DB。
8 |
9 | 外部数据可以使用命令行客户端(在非交互模式下)或HTTP接口上传。
10 |
11 | 在命令行客户端中,可以按以下格式指定参数部分
12 | ```
13 | --external --file=... [--name=...] [--format=...] [--types=...|--structure=...]
14 | ```
15 |
16 | 对于传输的数据,您可能有多个类似的部分。
17 | * -external: 开始的标记。
18 | * -file:具有表转储的文件的文件路径,或–仅可从stdin检索到一个表,该表转储引用stdin。
19 |
20 | 以下参数是可选的:
21 | * –Name-表的名称。如果省略,则使用_data。
22 | * –format-文件中的数据格式。如果省略,则使用TabSeparated。
23 |
24 | 以下参数至少需要一个:
25 | * –types:列类型的逗号分隔列表。例如uint64,String。列将命名为_1、_2
26 | * –structure: Table结构,格式为UserID UInt64, URL String。定义列名和类型。
27 |
28 |
29 | **file**中指定的文件将,使用**types**或**structure**中指定的数据类型,使用**format**指定的格式分析。该表将上载到服务器,并可通过**name**临时表访问。
30 |
31 | Examples:
32 | ```
33 | echo -ne "1\n2\n3\n" | clickhouse-client --query="SELECT count() FROM test.visits WHERE TraficSourceID IN _data" --external --file=- --types=Int8
34 | 849897
35 | cat /etc/passwd | sed 's/:/\t/g' | clickhouse-client --query="SELECT shell, count() AS c FROM passwd GROUP BY shell ORDER BY c DESC" --external --file=- --name=passwd --structure='login String, unused String, uid UInt16, gid UInt16, comment String, home String, shell String'
36 | /bin/sh 20
37 | /bin/false 5
38 | /bin/bash 4
39 | /usr/sbin/nologin 1
40 | /bin/sync 1
41 | ```
42 |
43 | 使用HTTP接口时,外部数据以multipart / form -data格式传递。
44 | 每个表作为单独的文件传输。表名取自文件名。“query_string”传递参数 ‘name_format’, ‘name_types’, and ‘name_structure’,
45 | 其中name是这些参数对应的表的名称。参数的含义与使用命令行客户端时相同。
46 |
47 | ```
48 | cat /etc/passwd | sed 's/:/\t/g' > passwd.tsv
49 |
50 | curl -F 'passwd=@passwd.tsv;' 'http://localhost:8123/?query=SELECT+shell,+count()+AS+c+FROM+passwd+GROUP+BY+shell+ORDER+BY+c+DESC&passwd_structure=login+String,+unused+String,+uid+UInt16,+gid+UInt16,+comment+String,+home+String,+shell+String'
51 | /bin/sh 20
52 | /bin/false 5
53 | /bin/bash 4
54 | /usr/sbin/nologin 1
55 | /bin/sync 1
56 | ```
57 |
58 | 对于分布式查询处理,临时表被发送到所有远程服务器。
59 |
60 |
--------------------------------------------------------------------------------
/etc/fast_del.md:
--------------------------------------------------------------------------------
1 | # How to delete file(s) using fast way
2 |
3 | * rm
4 | * find
5 | * find with delete
6 | * rsync
7 | * Python
8 | * Perl
9 |
10 | ## Test 1
11 | generate 1000000 files:
12 | ```
13 | for i in $(seq 1 1000000)
14 | for> do
15 | for> touch $i.txt
16 | for> done
17 | ```
18 |
19 | | Command | System Time(s) | User Time(s) | %CPU | cs(Vol/Invol) |
20 | | ---- | ---- | ---- | ---- | ---- |
21 | | `rsync -a –delete empty/ to_del/` | 10.60 | 1.31 | 95 | 106/22 |
22 | | `find to_del/ -type f -delete` | 28.51 | 14.46 | 52 | 14849/11 |
23 | | `find to_del/ -type f | xargs -L 100 rm` | 41.69 | 20.60 | 54 | 37048/15074 |
24 | | `find to_del/ -type f | xargs -L 100 -P 100 rm` | 34.32 | 27.82 | 89 | 929897/21720 |
25 | | `rm -rf to_del` | 31.29 | 14.80 | 47 | 15134/11 |
26 |
27 | ## Test 2
28 | generate 500000 files:
29 | ```
30 | for i in $(seq 1 500000)
31 | for> do
32 | for> echo test >>$i.txt
33 | for> done
34 | ```
35 |
36 | | No | cmd | times | detail |
37 | | ---- | ---- | ----- | ------ |
38 | | 1 | `rm -rf ./to_del` | fail | |
39 | | 2 | `find ./to_del -type f -exec rm {} \` | 43m19s | 49.86s user 1032.13s system 41% cpu 43:19.17 total |
40 | | 3 | `find ./to_del -type f -delete` | 9m13s | 0.43s user 11.21s system 2% cpu 9:13.38 total |
41 | | 4 | `rsync -a --delete empty/ to_del/` | 0m16s | 0.59s user 7.86s system 51% cpu 16.418 total |
42 | | 5 | Python | 8m14s | 494.272291183 |
43 | | 6 | `perl -e 'for(<*>){((stat)[9]<(unlink))}' ` | 0m16s | 1.28s user 7.23s system 50% cpu 16.784 total |
44 |
45 | #### PS:
46 | 4 rsync
47 | firstly, mkdir empty
48 |
49 | 5 Python
50 | ```python
51 | import os
52 | import time
53 | stime = time.time()
54 | for pathname,dirnames,files in os.walk('/home/username/test'):
55 | for filename in files:
56 | file = os.path.join(pathname,filename)
57 | os.remove(file)
58 | ftime=time.time()
59 | print ftime-stime
60 | ```
61 |
62 | ```python
63 | def delfiles(strpath, suffix):
64 | if os.path.exists(strpath):
65 | for pathname, dir ,files in os.walk(strpath):
66 | for filename in files:
67 | if filename.endswith(suffix):
68 | file = os.path.join(pathname, filename)
69 | os.remove(file)
70 |
71 | delfiles('to_del', 'py')
72 | ```
73 |
74 |
--------------------------------------------------------------------------------
/PulsarIO/Management.md:
--------------------------------------------------------------------------------
1 | # Management 资源管理
2 |
3 | ## 相关类
4 | #### Management
5 | Management 是资源管理最核心的实现。主要功能如下:
6 | * bean相关
7 | * addBean(), getBeanOrFolder(), removeBeanOrFolder()
8 | * ManagementListener接口,调用registerManagementListener注册,实现对上述add remove方法的监听。
9 | * ResourceFormatters相关: 主要作用就是以哪种格式输出的策略模式,如html json等
10 | * registerResourceFormatter
11 | * getResourceFormatter
12 |
13 | #### ResourceFormatter
14 | ResourceFormatter 有一组类,功能就是格式输出
15 | * 接口类ManagedResourceFormatter
16 | * 抽象实现类 AbstractResourceFormatter,提供主要子类如下
17 | * HtmlResourceFormatter
18 | * JsonResourceFormatter
19 | * HelpFormatter
20 | * XmlResourceFormatter
21 | * SpringResourceFormatter
22 |
23 | #### ManagementServlet
24 | 可调用的Servlet接口,在JetstreamAppliation.xml使用jetty提供服务。服务端口由JetstreamAppliation启动项-p指定,否则默认9999
25 |
26 | static方法初始化xml、spring、html、json、help五种输出格式。
27 | 内部使用 BeanController 输出具体内容。
28 |
29 | BeanController有两个主要方法 process()和 write()
30 | * process实现了对bean的控制,内部使用了反射进行函数调用,调用此方法前需要鉴权,鉴权由ManagementNetworkSecurity类提供功能,主要就是对比ip,需要提前进行初始化
31 | * write则只是对bean的内容进行了简单的输出。
32 | * 注意的是,如果控制的是ControlBean的实例,则可以调用ControlBean的process函数,进行具体参数的自定义处理。
33 |
34 | #### PingServlet
35 | 如其名字,是一个简单提供状态输出的接口,用来看服务是否存活的公共实现。
36 |
37 | #### JvmManagement
38 | 没什么好说的,代码如下,很简单
39 | ```java
40 | public class JvmManagement {
41 | public JvmManagement() {
42 | XMLSerializationManager.registerXSerializable(MemoryManagerMXBean.class);
43 | XMLSerializationManager.registerXSerializable(MemoryPoolMXBean.class);
44 | Management.addBean("Jvm/ClassLoading", ManagementFactory.getClassLoadingMXBean());
45 | Management.addBean("Jvm/Compilation", ManagementFactory.getCompilationMXBean());
46 | Management.addBean("Jvm/GarbageCollector", ManagementFactory.getGarbageCollectorMXBeans());
47 | Management.addBean("Jvm/MemoryManager", ManagementFactory.getMemoryManagerMXBeans());
48 | Management.addBean("Jvm/Memory", ManagementFactory.getMemoryMXBean());
49 | Management.addBean("Jvm/MemoryPool", ManagementFactory.getMemoryPoolMXBeans());
50 | Management.addBean("Jvm/OS", ManagementFactory.getOperatingSystemMXBean());
51 | Management.addBean("Jvm/Runtime", ManagementFactory.getRuntimeMXBean());
52 | Management.addBean("Jvm/Threads", ManagementFactory.getThreadMXBean());
53 | }
54 | }
55 | ```
56 |
57 |
58 |
59 |
--------------------------------------------------------------------------------
/PulsarIO/Startup.md:
--------------------------------------------------------------------------------
1 | # Startup 启动
2 |
3 | ## JetstreamApplication
4 | 启动入口的的main函数位置在 [JetstreamApplication][C_JetstreamApplication]中。
5 | 这个类使用了singleton模式,主要提供了启动位置,还有shutdown的清理。
6 |
7 | 核心是在init()中使用了RootConfiguration进行spring bean的初始化工作,RootConfiguration继承自AbstractApplicationContext。
8 |
9 | 首先使用getInstance进行初始化
10 | ```java
11 | public static void main(String[] args) throws Exception {
12 | ...
13 | try {
14 | ta = getInstance();
15 | // Allow JetstreamApplication option handling methods to be protected
16 | final JetstreamApplication optionHandler = ta;
17 | new CliOptions(new CliOptionHandler() {
18 | public Options addOptions(Options options) {
19 | return optionHandler.addOptions(options);
20 | }
21 |
22 | public void parseOptions(CommandLine line) {
23 | optionHandler.parseOptions(line);
24 | }
25 | }, args);
26 | ...
27 | ta.init();
28 | }
29 | ...
30 | }
31 | ```
32 |
33 | 再使用CliOptions解析参数(ref:parseOptions函数)
34 | ```java
35 | options.addOption("b", "beans", true, "Beans to start during initialization");
36 | options.addOption("c", "config", true, "Configuration URL or file path");
37 | options.addOption("cv", "configversion", true, "Version of configuration");
38 | options.addOption("n", "name", true, "Name of application");
39 | options.addOption("p", "port", true, "Monitoring port");
40 | options.addOption("z", "zone", true, "URL or path of dns zone content");
41 | options.addOption("nd", "nodns", false, "Not a network application");
42 | options.addOption("wqz", "workqueuesz", true, "work queue size");
43 | options.addOption("wt", "workerthreads", true, "worker threads");
44 | ```
45 |
46 | ## RootConfiguration
47 | RootConfiguration是一个全局的spring ApplicationContext,使用singleton模式可以让任意的class获取相关bean。
48 | 此类获取环境变量`$JETSTREAM_HOME/JetstreamConf`,定位相关资源目录, 通过调用 getDefaultContexts()获取所有资源,
49 | 然后使用父类Configuration的构造函数初始化。
50 | Configuration真正实现相关的函数接口,如
51 | * getConfigResources()
52 | * getResourceByPath()
53 | * loadBeanDefinitions()
54 |
55 | 在父类AbstractUpdateableApplicationContext中定义 UpdateableListableBeanFactory,所以可以动态更新相关的bean信息。
56 |
57 |
58 | [C_JetstreamApplication]: https://github.com/pulsarIO/jetstream/blob/master/jetstreamframework/src/main/java/com/ebay/jetstream/application/JetstreamApplication.java
59 |
--------------------------------------------------------------------------------
/PulsarIO/Pulsar_Real_time_Analytics_at_Scale/README.md:
--------------------------------------------------------------------------------
1 |
2 | 原文链接: [Pulsar-Real-time Analytics at Scale](https://github.com/pulsarIO/realtime-analytics/wiki/documents/Whitepaper_Pulsar_Real-timeAnalyticsatScale.pdf)
3 |
4 | 关PPT:[Pulsar_Presentation](http://gopulsar.io/docs/Pulsar_Presentation.pdf)
5 |
6 |
7 | Pulsar-可扩展的实时分析系统
8 | =======================================
9 | 随着移动设备的快速增长,每天有数以百万计消费者在选购十多亿的商品,数千万的机器在提供服务,为了更好的购物体验,实时地响应他们的操作至关重要,并在购买的过程中提供有关下一步的服务。
10 |
11 | 用户体验在过去几年里越来越好,现在他们希望在多屏中更加个性化,包括运营人员--能根据消费选择意向来提供丰富且而贴切的广告。
12 |
13 | 欺诈检测,购物行为监控等都需要实时地处理数据,在秒级收集可疑点,还要快速地产生信号然后处理。像Hadoop这种廷时的存储-处理的面向批处理系统不太合适。
14 |
15 | 海量的数据和低廷时场景要求源源不断地数据处理,而不是存储-处理,流式处理架构需要分布在每个数据中心上,同样这个程序模型不需要专业人才能明白。这个系统还能支持高可用(例如. 允许应用不停机重新发布)
16 |
17 | 这篇论文主要讨论Puslar的设计,一个解决了上述问题的实时分析平台。我们将讨论关键的子系统和组件的设计和选择理由。
18 |
19 |
20 | 目录
21 | -----------------
22 |
23 | - [译序](#译序)
24 | - [概述](#Pulsar-可扩展的实时分析系统)
25 | - [第一部分:简介](part1-introduction.md)
26 | - [第二部分:数据和处理模型](part2-data-model.md)
27 | 1. [用户行为数据](part2-data-model.md#用户行为数据])
28 | 2. [非结构化数据](part2-data-model.md#混合数据)
29 | 3. [会话数据](part2-data-model.md#会话数据)
30 | 4. [用户自定义流](part2-data-model.md#用户自定义流)
31 | 5. [多维度实时聚合计算](part2-data-model.md#多维度实时聚合计算)
32 | 6. [实时计算TopN,百分比和Disctinct指标](part2-data-model.md#实时计算TopN,百分比和Disctinct指标)
33 | 7. [处理无序和廷迟件](part2-data-model.md#处理无序和廷迟事件)
34 | - [第三部分:架构](part3-architecture.md)
35 | 1. [复杂事件(`CEP`)处理框架](part3-architecture.md)
36 | 2. [消息传递](part3-architecture.md)
37 | - [收集消息](part3-architecture.md)
38 | - [Push vs. Pull消息传递](part3-architecture.md)
39 | 3. [消息传递选择](part3-architecture.md)
40 | - [第四部分:实时通道](part4-pipeline.md)
41 | 1. [收集组件](part4-pipeline.md)
42 | - [地理和设备类别数据](part4-pipeline.md)
43 | 2. [Bot检测组件](part4-pipeline.md)
44 | 3. [Session化组件](part4-pipeline.md)
45 | - [会话元数据,计数器和状态](part4-pipeline.md)
46 | - [会话存储](part4-pipeline.md)
47 | - [会话回退存储](part4-pipeline.md)
48 | - [SQL扩展](part4-pipeline.md)
49 | 4. [事件分发组件](part4-pipeline.md)
50 | - [事件过滤,转换和路由](part4-pipeline.md)
51 | 5. [多维度OLAP的Metrics计算组件](part4-pipeline.md)
52 | - [收集Metrics](part4-pipeline.md)
53 | - [聚合](part4-pipeline.md)
54 | - [用时序数据库汇总](part4-pipeline.md)
55 | - [Metrics存储](part4-pipeline.md)
56 | - [总结](concluding.md)
57 |
--------------------------------------------------------------------------------
/clickhouse/Engines/Buffer.md:
--------------------------------------------------------------------------------
1 | # Buffer
2 |
3 |
4 | 缓存数据在RAM(内存)中,定期将刷新到另一个表。在读取操作期间,同时从缓冲和相印表中读取数据。
5 | ```
6 | Buffer(database, table, num_layers, min_time, max_time, min_rows, max_rows, min_bytes, max_bytes)
7 | ```
8 |
9 | 引擎参数:
10 | * database, table: 要将数据刷新到的表。您可以使用返回字串的常量表达式,而不是字符串名。
11 | * num_layers: 并行级别。物理上,表将视为互相独立的数量为'num_layers'个的buffer。推荐值为16。
12 | * min_time, max_time, min_rows, max_rows, min_bytes, and max_bytes: 是从缓冲区刷出数据的条件。如果满足所有“最小”条件或至少一个“最大”条件,则将数据从缓冲区刷新并写入目标表。
13 | * min_time, max_timee: 从第一次写入缓冲区那一刻起的时间条件(以秒为单位)。
14 | * min_rows, max_rowse:缓冲区中行数的条件。
15 | * min_bytes, max_bytes:缓冲区中字节数的条件。
16 |
17 | 在写入操作期间,将数据插入到num_layers数量的随机缓冲区中。或者,如果要插入的数据部分足够大(大于 ‘max_rows’ or ‘max_bytes’),则直接写入目标表,而略过缓冲区。
18 |
19 | 刷新目标表的条件是每个缓冲区互相独立计算的。例如,当num_layers = 16且max_bytes = 100000000,则最大RAM消耗为1.6GB。
20 |
21 | #### 例子
22 | ```
23 | CREATE TABLE merge.hits_buffer AS merge.hits ENGINE = Buffer(merge, hits, 16, 10, 100, 10000, 1000000, 10000000, 100000000)
24 | ```
25 | 使用缓冲区引擎创建具有与merge.hits相同结构的 merge.hits_buffer表。
26 | 写入此表时,数据缓存在RAM中,然后写入merge.hits表。创建了16个缓冲区。
27 |
28 | 如果已经过去100秒,或者已经写入一百万行,或者已经写入100MB的数据,则刷新它们中的每一个中的数据;
29 | 或者如果同时已经过去10秒并且已经写入10,000行和10mb的数据,也刷新它们中的每一个中的数据;
30 | 例如,如果只写入了一行,则100秒后,无论发生什么情况,都将刷新该行。但是,如果写入了许多行,数据将更快被刷新。
31 |
32 | 当服务器停止时,使用DROP TABLE或DETACHTABLE,缓冲区数据也会刷新到目标表。
33 |
34 | 可以为数据库和表名设置单引号中的空字符串。这表示没有目标表。在这种情况下,当达到数据刷新条件时,只会清除缓冲区。
35 | 这对于在内存中保持窗口数据是有用的。
36 |
37 | 从缓冲区表读取数据时,将同时从缓冲区和目标表(如果有)获取数据。请注意,缓冲区表不支持索引。
38 | 换句话说,缓冲区中的数据被完全扫描,这对于大缓冲区来说可能是缓慢的。(对于从属表中的数据,将使用其支持的索引。)
39 |
40 | #### 特点
41 | 如果缓冲表中的列集与从属表中的列集不匹配,则会插入两个表中存在的列子集。
42 |
43 | 如果缓冲区表和从属表中的没有任何一列匹配,则会在服务器日志中输入错误消息并清除缓冲区。当缓冲区被刷新时,如果从属表不存在,也会发生同样的情况。
44 |
45 | 如果需要对从属表和缓冲区表运行ALTER,建议首先删除缓冲区表,对从属表运行ALTER,然后再次创建缓冲区表。
46 |
47 | 如果服务器异常重新启动,缓冲区中的数据将丢失。
48 |
49 | PREWHERE、FINAL和SAMPLE不能正确用于缓冲表。这些条件传递到目标表,但不用于处理缓冲区中的数据。
50 | 因此,我们建议在从目标表读取时仅使用缓冲区表进行写入。
51 |
52 | 向一个缓冲区添加数据时,这个缓冲区被锁定。如果同时从表中执行读取操作,这将导致读取延迟。
53 |
54 | 插入缓冲表的数据可能以不同的顺序和不同的块结束在从属表中。因此,很难使用缓冲区表正确写入CollapsingMergeTree 。为了避免出现问题,可以将“num _layers”设置为1。
55 |
56 | 如果目标表是复制表(replicated),则在写入缓冲表时,复制表的某些预期特性将丢失。
57 | 对行顺序和数据部分大小的随机更改会导致消除重复数据停止工作,这意味着不可能对复制的表进行可靠的'exactly once' 写入。
58 |
59 | #### 建议
60 | 由于这些缺点,**我们只能建议在极少数情况下使用缓冲表**。
61 | 当在一个时间单位内从大量服务器接收到过多的INSERTs,并且在插入之前无法缓冲数据时,意味着无法足够快地运行INSERTs操作,则考虑使用缓冲表。
62 |
63 | 请注意,即使对于缓冲表,一次插入一行数据也是没有意义的。这将仅产生每秒几千行的速度,而插入较大的数据块每秒可产生超过一百万行(请参见“性能”一节)。
64 |
--------------------------------------------------------------------------------
/init_scripts/redis-sentinel.init:
--------------------------------------------------------------------------------
1 | #!/bin/sh
2 | #
3 | # redis init file for starting up the redis-sentinel daemon
4 | #
5 | # chkconfig: - 21 79
6 | # description: Starts and stops the redis-sentinel daemon.
7 | #
8 | ### BEGIN INIT INFO
9 | # Provides: redis-sentinel
10 | # Required-Start: $local_fs $remote_fs $network
11 | # Required-Stop: $local_fs $remote_fs $network
12 | # Short-Description: start and stop Sentinel server
13 | # Description: A persistent key-value database
14 | ### END INIT INFO
15 |
16 | # Source function library.
17 | . /etc/rc.d/init.d/functions
18 |
19 | name="redis-sentinel"
20 | exec="/usr/bin/$name"
21 | shut="/usr/libexec/redis-shutdown"
22 | pidfile="/var/run/redis/sentinel.pid"
23 | SENTINEL_CONFIG="/etc/redis-sentinel.conf"
24 |
25 | [ -e /etc/sysconfig/redis-sentinel ] && . /etc/sysconfig/redis-sentinel
26 |
27 | lockfile=/var/lock/subsys/redis
28 |
29 | start() {
30 | [ -f $SENTINEL_CONFIG ] || exit 6
31 | [ -x $exec ] || exit 5
32 | echo -n $"Starting $name: "
33 | daemon --user ${REDIS_USER-redis} "$exec $SENTINEL_CONFIG --daemonize yes --pidfile $pidfile"
34 | retval=$?
35 | echo
36 | [ $retval -eq 0 ] && touch $lockfile
37 | return $retval
38 | }
39 |
40 | stop() {
41 | echo -n $"Stopping $name: "
42 | [ -x $shut ] && $shut $name
43 | retval=$?
44 | if [ -f $pidfile ]
45 | then
46 | # shutdown haven't work, try old way
47 | killproc -p $pidfile $name
48 | retval=$?
49 | else
50 | success "$name shutdown"
51 | fi
52 | echo
53 | [ $retval -eq 0 ] && rm -f $lockfile
54 | return $retval
55 | }
56 |
57 | restart() {
58 | stop
59 | start
60 | }
61 |
62 | rh_status() {
63 | status -p $pidfile $name
64 | }
65 |
66 | rh_status_q() {
67 | rh_status >/dev/null 2>&1
68 | }
69 |
70 |
71 | case "$1" in
72 | start)
73 | rh_status_q && exit 0
74 | $1
75 | ;;
76 | stop)
77 | rh_status_q || exit 0
78 | $1
79 | ;;
80 | restart)
81 | $1
82 | ;;
83 | status)
84 | rh_status
85 | ;;
86 | condrestart|try-restart)
87 | rh_status_q || exit 0
88 | restart
89 | ;;
90 | *)
91 | echo $"Usage: $0 {start|stop|status|restart|condrestart|try-restart}"
92 | exit 2
93 | esac
94 | exit $?
95 |
--------------------------------------------------------------------------------
/init_scripts/kafka-manager.init:
--------------------------------------------------------------------------------
1 | #!/bin/sh
2 | #
3 | # chkconfig: 345 99 01
4 | # description:
5 | #
6 |
7 | export JAVA_HOME=/usr/local/java/jdk1.8.0_25
8 |
9 | KAFKAMANAGER_ROOT=/data/appsoft/kafkaManager/kafka-manager
10 | EXEC_BIN=$KAFKAMANAGER_ROOT/bin/kafka-manager
11 | PORT=9001
12 |
13 | PS_NAME='kafka-manager'
14 |
15 | LOG_FILE=$KAFKAMANAGER_ROOT/startup.log
16 | CONFIG_FILE=$KAFKAMANAGER_ROOT/conf/application.conf
17 |
18 | OPTIONS="-Dconfig.file=$CONFIG_FILE -Dhttp.port=$PORT -Dapplication.home=$KAFKAMANAGER_ROOT"
19 |
20 | # Source function library.
21 | INITD=/etc/rc.d/init.d
22 | source $INITD/functions
23 |
24 | # Find the name of the script
25 | NAME=`basename $0`
26 | if [ ${NAME:0:1} = "S" -o ${NAME:0:1} = "K" ]
27 | then
28 | NAME=${NAME:3}
29 | fi
30 |
31 | # For SELinux we need to use 'runuser' not 'su
32 | if [ -x /sbin/runuser ]
33 | then
34 | SU=runuser
35 | else
36 | SU=su
37 | fi
38 |
39 | start(){
40 | echo -n "Starting ${NAME} service: "
41 | nohup $EXEC_BIN $OPTIONS >$LOG_FILE 2>&1 &
42 | # $EXEC_BIN $OPTIONS
43 | ret=$?
44 | if [ $ret -eq 0 ]
45 | then
46 | echo_success
47 | else
48 | echo_failure
49 | script_result=1
50 | fi
51 | echo
52 | }
53 |
54 | stop(){
55 | echo -n "Stopping ${NAME} service: "
56 | $SU -l ${EXEC_USER} -c "ps -ef | grep $PS_NAME | grep -v grep | awk '{print \$2}' | xargs kill"
57 | ret=$?
58 | if [ $ret -eq 0 ]
59 | then
60 | echo_success
61 | else
62 | echo_failure
63 | script_result=1
64 | fi
65 | echo
66 | }
67 |
68 | hardstop(){
69 | echo -n "Stopping (hard) ${NAME} service: "
70 | $SU -l ${EXEC_USER} -c "ps -ef | grep $PS_NAME | grep -v grep | awk '{print \$2}' | xargs kill -9"
71 | ret=$?
72 | if [ $ret -eq 0 ]
73 | then
74 | echo_success
75 | else
76 | echo_failure
77 | script_result=1
78 | fi
79 | echo
80 | }
81 |
82 | status(){
83 | c_pid=`ps -ef | grep $PS_NAME | grep -v grep | awk '{print $2}'`
84 | if [ "$c_pid" = "" ] ; then
85 | echo "Stopped"
86 | exit 3
87 | else
88 | echo "Running $c_pid"
89 | exit 0
90 | fi
91 | }
92 |
93 | # See how we were called.
94 | case "$1" in
95 |
96 | start|stop|hardstop|status)
97 | $1
98 | ;;
99 | *)
100 | echo "Usage: $0 {start|stop|hardstop|status}"
101 | exit 2
102 | ;;
103 | esac
104 |
105 | exit $script_result
106 |
--------------------------------------------------------------------------------
/init_scripts/elasticsearch.init:
--------------------------------------------------------------------------------
1 | #!/bin/sh
2 | #
3 | # chkconfig: 345 99 01
4 | # description: elastic
5 | #
6 | # File : elastic
7 | #
8 | # Description: Starts and stops the elastic server
9 | #
10 |
11 |
12 | ES_HOME=/data/appsoft/elastic
13 |
14 | EXEC_BIN=${ES_HOME}/bin/elasticsearch
15 |
16 | OPTIONS='-d'
17 |
18 | PID_PATH=${ES_HOME}/config/elasitc.pid
19 |
20 | PS_NAME=org.elasticsearch.bootstrap.Elasticsearch
21 |
22 | EXEC_USER=elastic
23 |
24 | # Source function library.
25 | INITD=/etc/rc.d/init.d
26 | source $INITD/functions
27 |
28 | # Find the name of the script
29 | NAME=`basename $0`
30 | if [ ${NAME:0:1} = "S" -o ${NAME:0:1} = "K" ]
31 | then
32 | NAME=${NAME:3}
33 | fi
34 |
35 | # For SELinux we need to use 'runuser' not 'su'
36 | if [ -x /sbin/runuser ]
37 | then
38 | SU=runuser
39 | else
40 | SU=su
41 | fi
42 |
43 | start(){
44 | echo -n "Starting ${NAME} service: "
45 | $SU -l ${EXEC_USER} -c "${EXEC_BIN} ${OPTIONS} -p ${PID_PATH}"
46 | ret=$?
47 | if [ $ret -eq 0 ]
48 | then
49 | echo_success
50 | else
51 | echo_failure
52 | script_result=1
53 | fi
54 | echo
55 | }
56 |
57 | stop(){
58 | echo -n "Stopping ${NAME} service: "
59 | $SU -l ${EXEC_USER} -c "cat ${PID_PATH} | xargs kill"
60 | ret=$?
61 | if [ $ret -eq 0 ]
62 | then
63 | echo_success
64 | else
65 | echo_failure
66 | script_result=1
67 | fi
68 | echo
69 | }
70 |
71 | hardstop(){
72 | echo -n "Stopping (hard) ${NAME} service: "
73 | $SU -l ${EXEC_USER} -c "cat ${PID_PATH} | xargs kill -9"
74 | ret=$?
75 | if [ $ret -eq 0 ]
76 | then
77 | echo_success
78 | else
79 | echo_failure
80 | script_result=1
81 | fi
82 | echo
83 | }
84 |
85 | status(){
86 | c_pid=`ps -ef | grep $PS_NAME | grep -v grep | awk '{print $2}'`
87 | if [ "$c_pid" = "" ] ; then
88 | echo "Stopped"
89 | exit 3
90 | else
91 | echo "Running $c_pid"
92 | exit 0
93 | fi
94 | }
95 |
96 | # See how we were called.
97 | case "$1" in
98 |
99 | start|stop|status|hardstop)
100 | $1
101 | ;;
102 | *)
103 | echo "Usage: $0 {start|stop|hardstop|status}"
104 | exit 2
105 | ;;
106 | esac
107 |
108 | exit $script_result
--------------------------------------------------------------------------------
/clickhouse/Engines/AggregatingMergeTree.md:
--------------------------------------------------------------------------------
1 | # AggregatingMergeTree
2 |
3 | 此引擎与MergeTree不同,因为合并操作将存储在表中的聚合函数的状态合并为具有相同的主键值的行。
4 |
5 | 为了使这种行为能正常工作,它使用AggregateFunction数据类型和 -State和 -Merge修饰符来实现聚合函数。
6 |
7 | ##
8 | 有一个aggregatefunction数据类型,它是一个参数数据类型。第一个参数是聚合函数的名称,然后的参数是这个函数的参数类型。例子:
9 | ```
10 | CREATE TABLE t
11 | (
12 | column1 AggregateFunction(uniq, UInt64),
13 | column2 AggregateFunction(anyIf, String, UInt8),
14 | column3 AggregateFunction(quantiles(0.5, 0.9), UInt64)
15 | ) ENGINE = ...
16 | ```
17 | 这个列的类型是存储聚合函数的state的类型。
18 |
19 |
20 | 要获取此类型的值,请使用带有'State'后缀的聚合函数。
21 | 示例: uniqState(UserID), quantilesState(0.5, 0.9)(SendTiming)-与对应的'uniq'和'quantiles'函数相比,这些函数返回state状态,而不是准备的值。
22 | 换句话说,它们返回一个AggregateFunction 类型的值。
23 | AggregateFunction 类型值不能以漂亮的格式输出。在其他格式中,这些类型的值作为特定的二进制数据输出。AggregateFunction 类型值不用于输出或备份。
24 |
25 | 唯一使用AggregateFunction类型值的地方是合并state并获得结果,这实质上意味着完成聚合操作。具有'Merge'后缀的聚合函数用于完成聚合。
26 | 示例: uniqMerge(UserIDState), 其中UserIDState 具有AggregateFunction 类型。
27 |
28 | 换句话说,带有'Merge'后缀的聚合函数使用一组state,合并它们并返回结果。例如,下面这两个查询返回相同的结果:
29 | ```
30 | SELECT uniq(UserID) FROM table
31 |
32 | SELECT uniqMerge(state) FROM (SELECT uniqState(UserID) AS state FROM table GROUP BY RegionID)
33 | ```
34 |
35 | 有一个AggregatingMergeTree引擎。它在合并期间的工作是将来自不同表的数据,以相同的主键值,合并聚合函数的state。
36 |
37 | 对于含有AggregateFunction 列的表,不能使用普通的insert操作。因为不能显式定义AggregateFunction 的值。
38 | 而是使用INSERT SELECT with '-State' 聚合函数插入数据。
39 |
40 | 从AggregatingMergeTree 引擎的表中进行SELECT,使用GROUP BY和aggregate函数以及'-Merge'修饰符完成数据聚合。
41 |
42 | 您可以使用AggregatingMergeTree 表进行增量数据聚合,包括聚合物化视图(materialized views)。
43 |
44 | 示例:创建一个AggregatingMergeTree类型的物化视图,追踪'test.visits'表:
45 | ```
46 | CREATE MATERIALIZED VIEW test.basic
47 | ENGINE = AggregatingMergeTree(StartDate, (CounterID, StartDate), 8192)
48 | AS SELECT
49 | CounterID,
50 | StartDate,
51 | sumState(Sign) AS Visits,
52 | uniqState(UserID) AS Users
53 | FROM test.visits
54 | GROUP BY CounterID, StartDate;
55 | ```
56 |
57 | 在'test.visits'表中插入数据,同样还将在视图中插入数据,数据将在视图中聚合:
58 | ```
59 | INSERT INTO test.visits ...
60 | ```
61 |
62 | 通过对视图进行 GROUP BY 查询完成数据聚合:
63 | ```
64 | SELECT
65 | StartDate,
66 | sumMerge(Visits) AS Visits,
67 | uniqMerge(Users) AS Users
68 | FROM test.basic
69 | GROUP BY StartDate
70 | ORDER BY StartDate;
71 | ```
72 |
73 | 您可以创建这样的物化视图,并为其分配完成数据聚合的普通视图。
74 |
75 | 请注意,在大多数情况下,使用AggregatingMergeTree 是不合理的,因为查询可以在非聚合数据上足够高效地运行。
76 |
--------------------------------------------------------------------------------
/ELK/elastic/INSTALL.md:
--------------------------------------------------------------------------------
1 | # Elastic Search
2 |
3 | ## 一.下载安装包
4 | 1.官网下载地址
5 | https://www.elastic.co/downloads/elasticsearch (当然也可以直接在linux中使用命令下载,但是可能比较慢,我们选择在官网进行下载)
6 | 选择对应的系统版本即可
7 |
8 | 2.历史版本下载
9 | 这个地址默认是最新的版本,如果想要历史版本,在此页面上找到past releases
10 |
11 | 点击进去找到想要的版本即可。
12 | 本文下载的是6.8.2版本(Elasticsearch和Kibana)
13 | Elasticsearch 6.8.2
14 | Kibana 6.8.2
15 |
16 | 注意:ES启动需要jdk,我本地已经配置了java8环境变量,不想改动,就用6.X的版本。
17 | 如果还没有配置jdk环境变量,则需要先安装jdk,因为ES是基于java以言编写,需要jdk环境。
18 | 7.0及以上版本虽然内置了jdk,但是需要java11及以上,我们不适用此版本。
19 |
20 | ## 二.elasticsearch-6.8.2安装
21 | 1.上传安装包至linux
22 | 下载好elasticsearch-6.8.2.tar.gz安装包后,上传至linux中,
23 | 我放在了/home/zjq中,在此目录下使用命令 rz 选择安装包上传即可;
24 |
25 | 2.解压
26 | 上传完成后,使用如下命令解压:
27 | tar -zxvf elasticsearch-6.8.2.tar.gz
28 |
29 | 3.修改配置文件
30 | 进入解压后的config目录,
31 | cd ./elasticsearch-6.8.2/config
32 | 修改elasticsearch.yml配置文件,
33 | 找到下面两项配置,开放出来(删除前面的#符号)
34 | network.host: 192.168.212.151
35 | http.port: 9200
36 | bootstrap.memory_lock: true
37 |
38 | vi config/jvm.options
39 | ```
40 | # 替换为总内存的一半:例如内存为16g
41 | -Xms8g
42 | -Xmx8g
43 | ```
44 |
45 | c. 这时候需要修改系统配置文件:
46 | ```
47 | #> vi /etc/sysctl.conf
48 | ##生产上一定要打开文件描述符。
49 | vm.max_map_count=262144
50 |
51 | #> sudo sysctl -p
52 |
53 | # when bootstrap.memory_lock: true
54 | vm.swappiness=0
55 | ```
56 |
57 | d. 这时候还需要修改系统配置文件:
58 | ```
59 | vi /etc/security/limits.conf
60 | 添加如下4行:
61 | * soft nofile 65536
62 | * hard nofile 131072
63 | * soft nproc 2048
64 | * hard nproc 4096
65 |
66 | # when bootstrap.memory_lock: true
67 | # * can replace to username
68 | * soft memlock unlimited
69 | * hard memlock unlimited
70 | ```
71 |
72 | 4.启动ES
73 | 注意,es启动过程中会多次失败,需要修改多处配置文件,注意下文步骤:
74 |
75 | 修改完成后,重启linux系统。然后启动ES即可。
76 |
77 | 5.访问ES
78 | 注意没关闭防火墙的,需要关闭防火墙:
79 | 关闭防火墙 systemctl stop firewalld.service
80 |
81 | 启动完成后,访问地址,显示如下内容表示启动成功。
82 |
83 | #### 分词插件
84 |
85 | #####离线
86 | wget https://github.com/medcl/elasticsearch-analysis-ik/releases/download/v6.8.4/elasticsearch-analysis-ik-6.8.4.zip
87 | #./elasticsearch-plugin install file://ik的文件路径
88 | ./elasticsearch-plugin install file:///usr/local/elasticsearch-analysis-ik-6.8.4.zip
89 | #####在线
90 | ./bin/elasticsearch-plugin install https://github.com/medcl/elasticsearch-analysis-ik/releases/download/v6.8.4/elasticsearch-analysis-ik-6.8.4.zip
91 |
92 | ### pinyin
93 | https://github.com/medcl/elasticsearch-analysis-pinyin/releases/download/v6.8.6/elasticsearch-analysis-pinyin-6.8.6.zip
94 |
--------------------------------------------------------------------------------
/init_scripts/kafka.init:
--------------------------------------------------------------------------------
1 | #!/bin/sh
2 | #
3 | # chkconfig: 345 99 01
4 | # description: Kafka
5 | #
6 | # File : Kafka
7 | #
8 | # Description: Starts and stops the Kafka server
9 | #
10 |
11 |
12 | KAFKA_HOME=/data/appsoft/kafka
13 |
14 | CONFIG_FILE=$KAFKA_HOME/config/server.properties
15 |
16 | OPTIONS='-daemon'
17 |
18 | PS_NAME=kafka.Kafka
19 |
20 | EXEC_USER=kafka
21 |
22 | # Source function library.
23 | INITD=/etc/rc.d/init.d
24 | source $INITD/functions
25 |
26 | # Find the name of the script
27 | NAME=`basename $0`
28 | if [ ${NAME:0:1} = "S" -o ${NAME:0:1} = "K" ]
29 | then
30 | NAME=${NAME:3}
31 | fi
32 |
33 | # For SELinux we need to use 'runuser' not 'su'
34 | if [ -x /sbin/runuser ]
35 | then
36 | SU=runuser
37 | else
38 | SU=su
39 | fi
40 |
41 | start(){
42 | echo -n "Starting ${NAME} service: "
43 | $SU -l ${EXEC_USER} -c "JMX_PORT=9999 ${KAFKA_HOME}/bin/kafka-server-start.sh ${OPTIONS} ${CONFIG_FILE}"
44 | ret=$?
45 | if [ $ret -eq 0 ]
46 | then
47 | echo_success
48 | else
49 | echo_failure
50 | script_result=1
51 | fi
52 | echo
53 | }
54 |
55 | stop(){
56 | echo -n "Stopping ${NAME} service: "
57 | $SU -l ${EXEC_USER} -c "${KAFKA_HOME}/bin/kafka-server-stop.sh"
58 | ret=$?
59 | if [ $ret -eq 0 ]
60 | then
61 | echo_success
62 | else
63 | echo_failure
64 | script_result=1
65 | fi
66 | echo
67 | }
68 |
69 | hardstop(){
70 | echo -n "Stopping (hard) ${NAME} service: "
71 | $SU -l ${EXEC_USER} -c "ps -ef | grep $PS_NAME | grep -v grep | awk '{print \$2}' | xargs kill -9"
72 | ret=$?
73 | if [ $ret -eq 0 ]
74 | then
75 | echo_success
76 | else
77 | echo_failure
78 | script_result=1
79 | fi
80 | echo
81 | }
82 |
83 | status(){
84 | c_pid=`ps -ef | grep $PS_NAME | grep -v grep | awk '{print $2}'`
85 | if [ "$c_pid" = "" ] ; then
86 | echo "Stopped"
87 | exit 3
88 | else
89 | echo "Running $c_pid"
90 | exit 0
91 | fi
92 | }
93 |
94 | # See how we were called.
95 | case "$1" in
96 |
97 | start|stop|status|hardstop)
98 | $1
99 | ;;
100 | *)
101 | echo "Usage: $0 {start|stop|hardstop|status}"
102 | exit 2
103 | ;;
104 | esac
105 |
106 | exit $script_result
107 |
--------------------------------------------------------------------------------
/nginx/nginx_sample.conf:
--------------------------------------------------------------------------------
1 |
2 | upstream backend_server {
3 | server 10.10.xx.xx:8500;
4 | server 10.10.xx.xx:8500;
5 | server 10.10.xx.xx:8500;
6 | }
7 |
8 | log_format samp_fmt '{"@timestamp":"$time_iso8601",'
9 | '"host":"$server_addr",'
10 | '"clientip":"$remote_addr",'
11 | '"size":$body_bytes_sent,'
12 | '"responsetime":$request_time,'
13 | '"upstreamtime":"$upstream_response_time",'
14 | '"upstreamhost":"$upstream_addr",'
15 | '"http_host":"$host",'
16 | '"url":"$request_uri",'
17 | '"referer":"$http_referer",'
18 | '"agent":"$http_user_agent",'
19 | '"xff":"$http_x_forwarded_for",'
20 | '"status":"$status"}';
21 |
22 | server {
23 | listen 80;
24 | server_name xxx.xxx.com;
25 | root /data/appdata/path/dist;
26 | index /index.html;
27 |
28 | # Load configuration files for the default server block.
29 | include /etc/nginx/default.d/*.conf;
30 |
31 | auth_basic "Please input password";
32 | auth_basic_user_file /etc/nginx/conf.d/cloudpasswd;
33 |
34 | access_log /data/applogs/nginx/access.log samp_fmt;
35 | error_log /data/applogs/nginx/error.log warn;
36 |
37 | location / {
38 | proxy_pass http://backend_server;
39 | # try_files $uri /index.html;
40 | }
41 |
42 | location ~^/static/ {
43 | etag on;
44 | expires max;
45 | }
46 |
47 |
48 | location ^~ /api/ {
49 | proxy_set_header Host $host;
50 | proxy_set_header X-Real-IP $remote_addr;
51 | proxy_set_header X-Forwarded-For $proxy_add_x_forwarded_for;
52 | proxy_pass http://10.10.44.4:13501/;
53 | }
54 |
55 | location ~ \.php$ {
56 | try_files $uri =404;
57 | fastcgi_split_path_info ^(.+\.php)(/.+)$;
58 | fastcgi_pass unix:/var/run/php5-fpm.sock;
59 | fastcgi_index index.php;
60 | fastcgi_param SCRIPT_FILENAME $document_root$fastcgi_script_name;
61 | include fastcgi_params;
62 | }
63 |
64 | location /websocket/ {
65 | proxy_http_version 1.1;
66 | proxy_set_header Upgrade $http_upgrade;
67 | proxy_set_header Connection "upgrade";
68 | }
69 |
70 | error_page 404 /404.html;
71 | location = /40x.html {
72 | }
73 |
74 | }
75 |
--------------------------------------------------------------------------------
/consul/client/start.sh:
--------------------------------------------------------------------------------
1 | #!/bin/bash
2 | set +o posix
3 |
4 | CMD_PATH="consul"
5 | CONFIG_DIRECTORY="consul.d/client"
6 | LOG_FILE="consul.log"
7 | DAEMON_RUNNABLE="true"
8 |
9 | # Fail fast with concise message when cwd does not exist
10 | if ! [[ -d "$PWD" ]]; then
11 | echo "Error: The current working directory doesn't exist, cannot proceed." >&2
12 | exit 1
13 | fi
14 |
15 | quiet_cd() {
16 | cd "$@" >/dev/null || return
17 | }
18 |
19 | onwarn() {
20 | if [[ -t 2 ]] # check whether stderr is a tty.
21 | then
22 | echo -ne "\\033[4;31mWarn\\033[0m: " >&2 # highlight Warb with underline and red color
23 | else
24 | echo -n "Warn: " >&2
25 | fi
26 | if [[ $# -eq 0 ]]
27 | then
28 | cat >&2
29 | else
30 | echo "$*" >&2
31 | fi
32 | }
33 |
34 | onoe() {
35 | if [[ -t 2 ]] # check whether stderr is a tty.
36 | then
37 | echo -ne "\\033[4;31mError\\033[0m: " >&2 # highlight Error with underline and red color
38 | else
39 | echo -n "Error: " >&2
40 | fi
41 | if [[ $# -eq 0 ]]
42 | then
43 | cat >&2
44 | else
45 | echo "$*" >&2
46 | fi
47 | }
48 |
49 | odie() {
50 | onoe "$@"
51 | exit 1
52 | }
53 |
54 | SHELL_FILE_DIRECTORY="$(quiet_cd "${0%/*}/" && pwd -P)"
55 |
56 | if [[ -f "${CMD_PATH}" ]]
57 | then
58 | CMD_FULL_PATH="${CMD_PATH}"
59 | else
60 | CMD_FULL_PATH="$SHELL_FILE_DIRECTORY/${CMD_PATH}"
61 | fi
62 |
63 | if [[ -d "${CONFIG_DIRECTORY}" ]]
64 | then
65 | CONFIG_DIR_FULL_PATH="${CONFIG_DIRECTORY}"
66 | else
67 | CONFIG_DIR_FULL_PATH="$SHELL_FILE_DIRECTORY/${CONFIG_DIRECTORY}"
68 | fi
69 |
70 | if [[ -f "${LOG_FILE}" ]]
71 | then
72 | LOG_FILE_FULL_PATH="${LOG_FILE}"
73 | else
74 | LOG_FILE_FULL_PATH="$SHELL_FILE_DIRECTORY/${LOG_FILE}"
75 | fi
76 |
77 | if ! [[ -f "${CMD_FULL_PATH}" ]]
78 | then
79 | odie "Command $CMD_FULL_PATH not exists"
80 | fi
81 |
82 | if ! [[ -d "${CONFIG_DIR_FULL_PATH}" ]]
83 | then
84 | odie "Directory $CONFIG_DIR_FULL_PATH not exists"
85 | fi
86 |
87 | if [[ -f "${LOG_FILE_FULL_PATH}" ]]
88 | then
89 | onwarn "Log file $LOG_FILE_FULL_PATH exists"
90 | fi
91 |
92 |
93 | if [[ -n "$DAEMON_RUNNABLE" ]]
94 | then
95 | echo "Daemon run"
96 | nohup ${CMD_FULL_PATH} agent -config-dir=${CONFIG_DIR_FULL_PATH} 2>&1 > ${LOG_FILE_FULL_PATH} &
97 | else
98 | ${CMD_FULL_PATH} agent -config-dir=${CONFIG_DIR_FULL_PATH}
99 | fi
100 |
101 |
102 |
--------------------------------------------------------------------------------
/init_scripts/jenkins.init:
--------------------------------------------------------------------------------
1 | #!/bin/sh
2 | #
3 | # chkconfig: 345 99 01
4 | # description: jenkins
5 | #
6 |
7 | #JENKINS_HOME=/data/appsoft/jenkins
8 | JENKINS_ROOT=/data/appsoft/jenkins
9 | JENKINS_WAR=$JENKINS_ROOT/jenkins.war
10 |
11 | PORT=8080
12 |
13 | PS_NAME=jenkins.war
14 |
15 | EXEC_USER=jenkins
16 |
17 | JENKINS_LOGFILE=/data/applogs/jenkins/jenkins.log
18 |
19 | OPTIONS="--daemon --httpPort=$PORT --logfile=$JENKINS_LOGFILE"
20 |
21 | # Source function library.
22 | INITD=/etc/rc.d/init.d
23 | source $INITD/functions
24 |
25 | # Find the name of the script
26 | NAME=`basename $0`
27 | if [ ${NAME:0:1} = "S" -o ${NAME:0:1} = "K" ]
28 | then
29 | NAME=${NAME:3}
30 | fi
31 |
32 | # For SELinux we need to use 'runuser' not 'su'
33 | if [ -x /sbin/runuser ]
34 | then
35 | SU=runuser
36 | else
37 | SU=su
38 | fi
39 |
40 | start(){
41 | echo -n "Starting ${NAME} service: "
42 | $SU -l ${EXEC_USER} -c "java -jar $JENKINS_WAR ${OPTIONS}"
43 | ret=$?
44 | if [ $ret -eq 0 ]
45 | then
46 | echo_success
47 | else
48 | echo_failure
49 | script_result=1
50 | fi
51 | echo
52 | }
53 |
54 | stop(){
55 | echo -n "Stopping ${NAME} service: "
56 | $SU -l ${EXEC_USER} -c "ps -ef | grep $PS_NAME | grep -v grep | awk '{print \$2}' | xargs kill"
57 | ret=$?
58 | if [ $ret -eq 0 ]
59 | then
60 | echo_success
61 | else
62 | echo_failure
63 | script_result=1
64 | fi
65 | echo
66 | }
67 |
68 | hardstop(){
69 | echo -n "Stopping (hard) ${NAME} service: "
70 | $SU -l ${EXEC_USER} -c "ps -ef | grep $PS_NAME | grep -v grep | awk '{print \$2}' | xargs kill -9"
71 | ret=$?
72 | if [ $ret -eq 0 ]
73 | then
74 | echo_success
75 | else
76 | echo_failure
77 | script_result=1
78 | fi
79 | echo
80 | }
81 |
82 | status(){
83 | c_pid=`ps -ef | grep $PS_NAME | grep -v grep | awk '{print $2}'`
84 | if [ "$c_pid" = "" ] ; then
85 | echo "Stopped"
86 | exit 3
87 | else
88 | echo "Running $c_pid"
89 | exit 0
90 | fi
91 | }
92 |
93 | # See how we were called.
94 | case "$1" in
95 |
96 | start|stop|hardstop|status)
97 | $1
98 | ;;
99 | *)
100 | echo "Usage: $0 {start|stop|hardstop|status}"
101 | exit 2
102 | ;;
103 | esac
104 |
105 | exit $script_result
106 |
--------------------------------------------------------------------------------
/clickhouse/Engines/MergeTree.md:
--------------------------------------------------------------------------------
1 | # MergeTree
2 |
3 | MergeTree引擎支持一个按primary key和date的索引,并提供了实时更新数据的可能性。这是ClickHouse中最先进的表引擎。不要把它和Merge引擎搞混淆。
4 |
5 | MergeTree引擎接受参数: 一个包含date类型的列名、一个采样表达式(可选)、定义主键的元组和索引粒度(index granularity)。例子:
6 |
7 | ```
8 | Example without sampling support:
9 | #> MergeTree(EventDate, (CounterID, EventDate), 8192)
10 |
11 | Example with sampling support:
12 | #> MergeTree(EventDate, intHash32(UserID), (CounterID, EventDate, intHash32(UserID)), 8192)
13 | ```
14 |
15 | Datek列:MergeTree类型的表必须有一个单独包含date的列。在这个示例中,它是EventDate。date列的类型必须是Date(不是DateTime)。
16 |
17 | 主键:可以是来自任何表达式的元组(通常这是一个组列名),或者一个表达式。
18 |
19 | 采样表达式(可选):可以是任何表达式。它还必须存在于主键中。该示例使用UserID的哈希值对表中的每个CounterID和EventDatee散布数据。
20 | 换句话说,当查询示例时,您会得到一个UserID子集的数据均匀的伪随机样本。
21 |
22 | MergeTree表会分为很多part,然后通过part的合集实现。每个part都按主键排序。此外,每个part都具有分配的最小和最大date。
23 | 当往表中插入数据时,将创建一个新的排序part。合并进程会在后台定期启动执行。在合并时,选择几个part,通常是数据量最小的part,然后合并成一个大的排序part。
24 |
25 | 换句话说,在插入到表时会发生增量排序。因此表总是由较少的排序part组成,合并本身不会做太多的工作。
26 |
27 | 在插入期间,属于不同月份的数据被分为不同的part。不同月份对应的part从不合并。其目的是提供本地数据修改(以方便备份)。
28 | part合并后会有一定大小的threshold(阈值)限制,因此不会有耗时太长的合并发生。
29 |
30 | 对于每个part,对应生成一个索引文件。索引文件包含表中的每个'index_granularity(索引粒度)'行的主键值。换句话说,这是排序数据的简要索引(abbreviated index)。
31 | 对于列,每个'index_granularity(索引粒度)'行的'marks'也会写入,以便可以在特定范围内读取数据。
32 |
33 | 从表中读取时,SELECT查询会被分析是否可以使用索引。如果WHERE或PREWHERE子句具有等式操作或不等式比较操作的表达式(作为一个或全部的连接元素),
34 | 或者主键、日期的以上列中有IN、Boolean运算符,则可以使用索引。
35 |
36 | 因此,可以对主键的一个或多个范围快速运行查询。查询很快的例子:
37 | ```
38 | SELECT count() FROM table WHERE EventDate = toDate(now()) AND CounterID = 34
39 | SELECT count() FROM table WHERE EventDate = toDate(now()) AND (CounterID = 34 OR CounterID = 42)
40 | SELECT count() FROM table WHERE ((EventDate >= toDate('2014-01-01') AND EventDate <= toDate('2014-01-31')) OR EventDate = toDate('2014-05-01')) AND CounterID IN (101500, 731962, 160656) AND (CounterID = 101500 OR EventDate != toDate('2014-05-01'))
41 | ```
42 | 所有上面的例子都使用索引(日期和主键)。甚至复杂表达式都用了索引。对表的读取顺序是重新组织过的,以便使用索引的速度不会慢于全表扫描。
43 |
44 |
45 | 在下面的例中,无法使用索引:
46 | ```
47 | SELECT count() FROM table WHERE CounterID = 34 OR URL LIKE '%upyachka%'
48 | ```
49 |
50 | date索引从所需范围中仅仅读取包含此date的part。但是,数据部分可能包含其他date的数据(最多整个月),而在单个part中,数据按主键排序,
51 | 主键可能不包含日期作为第一列。因此,使用仅具有未指定主键前缀的日期条件的查询将导致读取的数据多于单个日期的数据。
52 |
53 | 对于并发表查询,我们使用多版本控制。换句话说,当同时读取和更新表时,数据从当前正在查询的一组part中读取数据。没有长锁。插入不会妨碍读取操作。
54 |
55 | 从表中读取数据将自动并行化。
56 |
57 | 支持优化查询,这将调用额外的合并步骤。
58 |
59 | 您可以使用单个大表,并以chunks(小块)的形式向其连续添加数据,这就是MergeTree的设计目标。
60 |
61 | MergeTree系列中所有类型的表都支持数据复制
62 |
--------------------------------------------------------------------------------
/ELK/logstash/config.md:
--------------------------------------------------------------------------------
1 |
2 | ## Logstash
3 |
4 | vi logstash.yml
5 | ```
6 | input {
7 | file {
8 | path => "/var/log/test.log"
9 | start_position => "beginning"
10 | codec => multiline { # 使用codec/multiline插件
11 | pattern => "^%{TIMESTAMP_ISO8601}" # 指定匹配的表达式
12 | negate => true # 是否匹配到
13 | what => "previous" # 可选previous或next, previous是合并到匹配的上一行末尾
14 | max_lines => 1000 # 最大允许的行
15 | max_bytes => "10MiB" # 允许的大小
16 | auto_flush_interval => 30 # 如果在规定时候内没有新的日志事件就不等待后面的日志事件
17 | }
18 |
19 | }
20 | }
21 | ```
22 |
23 | ### test config
24 | ```
25 | input {
26 | stdin {}
27 | }
28 |
29 | filter {
30 | grok {
31 | match => { "message" => "%{TIMESTAMP_ISO8601:logtime} %{USERNAME:appname},%{USERNAME:traceid},%{USERNAME:spanid} %{LOGLEVEL:loglevel} %{USERNAME:thread} %{JAVACLASS:logclass} - %{JAVALOGMESSAGE:message}" }
32 | }
33 | geoip {
34 | source => "clientip"
35 | }
36 | }
37 |
38 | output {
39 | stdout {
40 | codec => rubydebug
41 | }
42 | }
43 | ```
44 |
45 | ### practice filebeat config
46 |
47 | For log Pattern `[%d{yyyy-MM-dd HH:mm:ss.SSS}][${spring.application.name:-},%X{X-B3-TraceId:-},%X{X-B3-SpanId:-}] %level %thread %logger{32}:%line - %msg%n`
48 |
49 | ```
50 | input {
51 | beats {
52 | port => 5044
53 | }
54 | }
55 |
56 | filter {
57 | grok {
58 | match => { "message" => "\[%{TIMESTAMP_ISO8601:logtime}\]\[%{USERNAME:appname}?,%{USERNAME:traceid}?,%{USERNAME:spanid}?\] %{LOGLEVEL:loglevel} (?[0-9a-zA-Z.+-_$#@]+) (?[0-9a-zA-Z.]+:[0-9]+) - %{JAVALOGMESSAGE:message}" }
59 | }
60 | geoip {
61 | source => "clientip"
62 | }
63 | }
64 |
65 | output {
66 | elasticsearch {
67 | hosts => ["http://127.0.0.1:9200"]
68 | index => "log-main-%{+YYYY.MM.dd}"
69 | # index in weekly
70 | # index => "applog-main-%{+xxxx.ww}"
71 | #user => "elastic"
72 | #password => "changeme"
73 | }
74 | }
75 |
76 | ```
77 |
78 |
79 | ## filebeat
80 |
81 | cat filebeat.yml
82 | ```
83 | # for log multiline meld to pervious
84 | multiline.pattern: ^\[[0-9]{4}-[0-9]{2}-[0-9]{2}
85 | multiline.negate: true
86 | multiline.match: after
87 | multiline.timeout: 30s
88 |
89 | output.logstash.hosts: ["10.10.xx.xx:5044"]
90 |
91 | logging.to_files: true
92 | logging.files:
93 | path: /data/applogs/filebeat
94 | name: filebeat
95 | keepfiles: 7
96 | permissions: 0644
97 | ```
98 |
--------------------------------------------------------------------------------
/web/named_css.md:
--------------------------------------------------------------------------------
1 | # DIV+CSS规范命名大全集合
2 |
3 | ## 一、命名规则说明
4 |
5 | 1)、所有的命名最好都小写
6 | 2)、属性的值一定要用双引号("")括起来,且一定要有值如class="divcss5",id="divcss5"
7 | 3)、每个标签都要有开始和结束,且要有正确的层次,排版有规律工整
8 | 4)、空元素要有结束的tag或于开始的tag后加上"/"
9 | 5)、表现与结构完全分离,代码中不涉及任何的表现元素,如style、font、bgColor、border等
10 | 6)、``到``的定义,应遵循从大到小的原则,体现文档的结构,并有利于搜索引擎的查询。
11 | 7)、给每一个表格和表单加上一个唯一的、结构标记id
12 | 8)、给图片加上alt标签
13 | 9)、尽量使用英文命名原则
14 | 10)、尽量不缩写,除非一看就明白的单词
15 |
16 | ## 二、相对网页外层重要部分CSS样式命名
17 |
18 | * 外套 wrap ------------------用于最外层
19 | * 头部 header ----------------用于头部
20 | * 主要内容 main ------------用于主体内容(中部)
21 | * 左侧 main-left -------------左侧布局
22 | * 右侧 main-right -----------右侧布局
23 | * 导航条 nav -----------------网页菜单导航条
24 | * 内容 content ---------------用于网页中部主体
25 | * 底部 footer -----------------用于底部
26 | ```
27 | CSS样式命名 说明
28 | 网页公共命名
29 | #wrapper 页面外围控制整体布局宽度
30 | #container或#content 容器,用于最外层
31 | #layout 布局
32 | #head, #header 页头部分
33 | #foot, #footer 页脚部分
34 | #nav 主导航
35 | #subnav 二级导航
36 | #menu 菜单
37 | #submenu 子菜单
38 | #sideBar 侧栏
39 | #sidebar_a, #sidebar_b 左边栏或右边栏
40 | #main 页面主体
41 | #tag 标签
42 | #msg #message 提示信息
43 | #tips 小技巧
44 | #vote 投票
45 | #friendlink 友情连接
46 | #title 标题
47 | #summary 摘要
48 | #loginbar 登录条
49 | #searchInput 搜索输入框
50 | #hot 热门热点
51 | #search 搜索
52 | #search_output 搜索输出和搜索结果相似
53 | #searchBar 搜索条
54 | #search_results 搜索结果
55 | #copyright 版权信息
56 | #branding 商标
57 | #logo 网站LOGO标志
58 | #siteinfo 网站信息
59 | #siteinfoLegal 法律声明
60 | #siteinfoCredits 信誉
61 | #joinus 加入我们
62 | #partner 合作伙伴
63 | #service 服务
64 | #regsiter 注册
65 | arr/arrow 箭头
66 | #guild 指南
67 | #sitemap 网站地图
68 | #list 列表
69 | #homepage 首页
70 | #subpage 二级页面子页面
71 | #tool, #toolbar 工具条
72 | #drop 下拉
73 | #dorpmenu 下拉菜单
74 | #status 状态
75 | #scroll 滚动
76 | .tab 标签页
77 | .left .right .center 居左、中、右
78 | .news 新闻
79 | .download 下载
80 | .banner 广告条(顶部广告条)
81 | 电子贸易相关
82 | .products 产品
83 | .products_prices 产品价格
84 | .products_description 产品描述
85 | .products_review 产品评论
86 | .editor_review 编辑评论
87 | .news_release 最新产品
88 | .publisher 生产商
89 | .screenshot 缩略图
90 | .faqs 常见问题
91 | .keyword 关键词
92 | .blog 博客
93 | .forum 论坛
94 | ```
95 |
96 | #### CSS文件命名 说明
97 | * master.css,style.css 主要的
98 | * module.css 模块
99 | * base.css 基本共用
100 | * layout.css 布局,版面
101 | * themes.css 主题
102 | * columns.css 专栏
103 | * font.css 文字、字体
104 | * forms.css 表单
105 | * mend.css 补丁
106 | * print.css 打印
107 |
--------------------------------------------------------------------------------
/kafka/docker-compose.yml:
--------------------------------------------------------------------------------
1 | version: '3.8'
2 |
3 | services:
4 | kafka:
5 | image: swr.cn-north-4.myhuaweicloud.com/ddn-k8s/docker.io/apache/kafka:4.0.0
6 | ports:
7 | - "9092:9092"
8 | - "9093:9093"
9 | container_name: kafka_broker
10 | restart: always
11 | environment:
12 | KAFKA_NODE_ID: 1 # 每个节点的唯一标识符
13 | KAFKA_PROCESS_ROLES: broker,controller
14 | KAFKA_LISTENERS: PLAINTEXT://0.0.0.0:9092,CONTROLLER://0.0.0.0:9093 # 广播的地址
15 | KAFKA_ADVERTISED_LISTENERS: PLAINTEXT://192.168.150.10:9092,CONTROLLER://192.168.150.10:9093 # 每个节点的监听地址和端口
16 | KAFKA_CONTROLLER_LISTENER_NAMES: CONTROLLER
17 | KAFKA_LISTENER_SECURITY_PROTOCOL_MAP: CONTROLLER:PLAINTEXT,PLAINTEXT:PLAINTEXT
18 | KAFKA_CONTROLLER_QUORUM_VOTERS: 1@192.168.150.8:9093 # 列出所有控制器节点的地址和端口, 格式NodeID@host:port,NodeID@host:port,
19 | KAFKA_OFFSETS_TOPIC_REPLICATION_FACTOR: 1 # 副本数 高可用为 3
20 | KAFKA_TRANSACTION_STATE_LOG_REPLICATION_FACTOR: 1 # 事务状态日志 高可用为 3
21 | KAFKA_TRANSACTION_STATE_LOG_MIN_ISR: 1 # 事务状态日志ISR(In-Sync Replicas) 高可用为 2
22 | KAFKA_GROUP_INITIAL_REBALANCE_DELAY_MS: 0
23 | KAFKA_NUM_PARTITIONS: 16
24 | volumes:
25 | - ./data/kafka-config:/opt/kafka/config
26 | - ./data/kafka-data:/var/lib/kafka
27 | - ./data/kafka-logs:/var/log/kafka
28 |
29 | kafka_cluster:
30 | image: swr.cn-north-4.myhuaweicloud.com/ddn-k8s/docker.io/apache/kafka:4.0.0
31 | ports:
32 | - "9092:9092"
33 | - "9093:9093"
34 | container_name: kafka_broker
35 | restart: always
36 | environment:
37 | KAFKA_NODE_ID: 3
38 | KAFKA_PROCESS_ROLES: broker,controller
39 | KAFKA_LISTENERS: PLAINTEXT://0.0.0.0:9092,CONTROLLER://0.0.0.0:9093
40 | KAFKA_ADVERTISED_LISTENERS: PLAINTEXT://192.168.150.10:9092,CONTROLLER://192.168.150.10:9093
41 | KAFKA_CONTROLLER_LISTENER_NAMES: CONTROLLER
42 | KAFKA_LISTENER_SECURITY_PROTOCOL_MAP: CONTROLLER:PLAINTEXT,PLAINTEXT:PLAINTEXT
43 | KAFKA_CONTROLLER_QUORUM_VOTERS: 1@192.168.150.8:9093,2@192.168.150.9:9093,3@192.168.150.10:9093
44 | KAFKA_OFFSETS_TOPIC_REPLICATION_FACTOR: 3
45 | KAFKA_TRANSACTION_STATE_LOG_REPLICATION_FACTOR: 3
46 | KAFKA_TRANSACTION_STATE_LOG_MIN_ISR: 2
47 | KAFKA_GROUP_INITIAL_REBALANCE_DELAY_MS: 0
48 | KAFKA_NUM_PARTITIONS: 16
49 | volumes:
50 | - ./data/kafka-config:/opt/kafka/config
51 | - ./data/kafka-data:/var/lib/kafka
52 | - ./data/kafka-logs:/var/log/kafka
53 |
54 |
--------------------------------------------------------------------------------
/ZooKeeper/README.md:
--------------------------------------------------------------------------------
1 | # ZooKeeper
2 |
3 | ## 简介
4 |
5 | https://zookeeper.apache.org/doc/r3.1.2/zookeeperProgrammers.html
6 |
7 | ZooKeeper(动物园管理员),顾名思义,是用来管理Hadoop(大象)、Hive(蜜蜂)、Pig(小猪)的管理员,同时Apache HBase、Apache Solr、LinkedIn Sensei等众多项目中都采用了ZooKeeper。
8 |
9 | ZooKeeper曾是Hadoop的正式子项目,后发展成为Apache顶级项目,与Hadoop密切相关但却没有任何依赖。
10 | 它是一个针对大型应用提供高可用的数据管理、应用程序协调服务的分布式服务框架,基于对Paxos算法的实现,
11 | 使该框架保证了分布式环境中数据的强一致性,提供的功能包括:配置维护、统一命名服务、状态同步服务、集群管理等。
12 |
13 | 在分布式应用中,由于工程师不能很好地使用锁机制,以及基于消息的协调机制不适合在某些应用中使用,因此需要有一种可靠的、可扩展的、分布式的、可配置的协调机制来统一系统的状态。Zookeeper的目的就在于此。
14 |
15 | ## 特点
16 |
17 | * ZooKeeper的核心是一个精简文件系统,它提供一些简单的操作和一些额外的抽象操作,例如:排序和通知。
18 | * ZooKeeper具有高可用性:ZooKeeper运行在集群上,被设计成具有较高的可用性,因此应用程序可以完全依赖它。ZooKeeper可以帮助系统避免出现单点故障,从而构建一个可靠的应用。
19 |
20 |
21 | ## 重要概念
22 | 理解ZooKeeper的一种方法是将其看做一个具有高可用性的文件系统
23 |
24 | 但这个文件系统中没有文件和目录,而是统一使用节点(node)的概念,称为znode。
25 | znode既可以保存数据(如同文件),也可以保存其他znode(如同目录)。所有的znode构成一个层次化的数据结构,。
26 | * Regular Nodes: 永久有效地节点,除非client显式的删除,否则一直存在
27 | * Ephemeral Nodes: 临时节点,仅在创建该节点client保持连接期间有效,一旦连接丢失,自动删除该节点。并且不能创建子节点。
28 | * Sequence Nodes: 顺序节点,client申请创建该节点时,zk会自动在节点路径末尾添加递增序号,这种类型是实现分布式锁,分布式queue等特殊功能的关键
29 |
30 | ## 典型使用场景
31 |
32 |
33 | ## 查看日志
34 | Sample
35 | ```
36 | // Read snapshot file
37 | java -cp zookeeper-3.4.6.jar:lib/log4j-1.2.16.jar:lib/slf4j-log4j12-1.6.1.jar:lib/slf4j-api-1.6.1.jar org.apache.zookeeper.server.SnapshotFormatter version-2/snapshot.xxx
38 |
39 | // Read log file
40 | java -cp zookeeper-3.4.6.jar:lib/slf4j-api-1.6.1.jar org.apache.zookeeper.server.LogFormatter version-2/log.xxx
41 | ```
42 | ## 配置参数
43 |
44 | #### maxClientCnxns
45 | ZooKeeper关于maxClientCnxns参数的官方解释:
46 | > 单个客户端与单台服务器之间的连接数的限制,是ip级别的,默认是60,如果设置为0,那么表明不作任何限制。请注意这个限制的使用范围,仅仅是单台客户端机器与单台ZK服务器之间的连接数限制,不是针对指定客户端IP,也不是ZK集群的连接数限制,也不是单台ZK对所有客户端的连接数限制。
47 |
48 | > Limits the number of concurrent connections (at the socket level) that a single client, identified by IP address, may make to a single member of the ZooKeeper ensemble. This is used to prevent certain classes of DoS attacks, including file descriptor exhaustion. The default is 60. Setting this to 0 entirely removes the limit on concurrent connections.
49 |
50 | 限制的是单个ip上最多能连接zk的个数,而不是总连接个数。
51 |
52 | # Misc
53 | http://blog.csdn.net/liuxinghao/article/details/42747625
54 | http://www.jianshu.com/p/fa204ba67ced
55 | http://www.jianshu.com/p/7faf4783ee5b
56 | https://www.ibm.com/developerworks/cn/opensource/os-cn-zookeeper/
57 |
58 | http://www.cnblogs.com/sunddenly/p/4033574.html
59 | http://www.cnblogs.com/sunddenly/p/4018459.html
60 |
--------------------------------------------------------------------------------
/init_scripts/redis.init:
--------------------------------------------------------------------------------
1 | #!/bin/sh
2 | #
3 | # redis init file for starting up the redis daemon
4 | #
5 | # chkconfig: - 20 80
6 | # description: Starts and stops the redis daemon.
7 | #
8 | ### BEGIN INIT INFO
9 | # Provides: redis-server
10 | # Required-Start: $local_fs $remote_fs $network
11 | # Required-Stop: $local_fs $remote_fs $network
12 | # Short-Description: start and stop Redis server
13 | # Description: A persistent key-value database
14 | ### END INIT INFO
15 |
16 | # Source function library.
17 | . /etc/rc.d/init.d/functions
18 |
19 | name="redis-server"
20 | exec="/usr/bin/$name"
21 | shut="/usr/libexec/redis-shutdown"
22 | pidfile="/var/run/redis/redis.pid"
23 | REDIS_CONFIG="/etc/redis.conf"
24 |
25 | [ -e /etc/sysconfig/redis ] && . /etc/sysconfig/redis
26 |
27 | lockfile=/var/lock/subsys/redis
28 |
29 | start() {
30 | [ -f $REDIS_CONFIG ] || exit 6
31 | [ -x $exec ] || exit 5
32 | echo -n $"Starting $name: "
33 | daemon --user ${REDIS_USER-redis} "$exec $REDIS_CONFIG --daemonize yes --pidfile $pidfile"
34 | retval=$?
35 | echo
36 | [ $retval -eq 0 ] && touch $lockfile
37 | return $retval
38 | }
39 |
40 | stop() {
41 | echo -n $"Stopping $name: "
42 | [ -x $shut ] && $shut
43 | retval=$?
44 | if [ -f $pidfile ]
45 | then
46 | # shutdown haven't work, try old way
47 | killproc -p $pidfile $name
48 | retval=$?
49 | else
50 | success "$name shutdown"
51 | fi
52 | echo
53 | [ $retval -eq 0 ] && rm -f $lockfile
54 | return $retval
55 | }
56 |
57 | restart() {
58 | stop
59 | start
60 | }
61 |
62 | rh_status() {
63 | status -p $pidfile $name
64 | }
65 |
66 | rh_status_q() {
67 | rh_status >/dev/null 2>&1
68 | }
69 |
70 |
71 | case "$1" in
72 | start)
73 | rh_status_q && exit 0
74 | $1
75 | ;;
76 | stop)
77 | rh_status_q || exit 0
78 | $1
79 | ;;
80 | restart)
81 | $1
82 | ;;
83 | reload)
84 | rh_status_q || exit 7
85 | $1
86 | ;;
87 | force-reload)
88 | force_reload
89 | ;;
90 | status)
91 | rh_status
92 | ;;
93 | condrestart|try-restart)
94 | rh_status_q || exit 0
95 | restart
96 | ;;
97 | *)
98 | echo $"Usage: $0 {start|stop|status|restart|condrestart|try-restart}"
99 | exit 2
100 | esac
101 | exit $?
102 |
--------------------------------------------------------------------------------
/python/install.md:
--------------------------------------------------------------------------------
1 | Python
2 | -----------
3 |
4 | Install in manaul
5 | ---------
6 |
7 | ### Pre-install
8 | ```sh
9 | yum install readline-devel
10 | yum install zlib-devel
11 | yum install openssl-devel
12 | yum install sqlite-devel
13 | yum install bzip2-devel
14 | ```
15 | ### Install Python
16 | wget https://www.python.org/ftp/python/2.7.8/Python-2.7.8.tgz
17 |
18 | ```sh
19 | tar xf Python-2.7.7.tgz
20 | cd Python-2.7.7
21 | ./configure --prefix=/usr/local/python27 --enable-shared
22 | make && make install
23 | ls /usr/local/bin/python2.7
24 | ```
25 | ### Install setuptools + pip
26 |
27 | 1. setuptools
28 |
29 | ```
30 | > wget https://bootstrap.pypa.io/ez_setup.py -O - | python
31 | ```
32 | For more to reference: https://pypi.python.org/pypi/setuptools
33 | 2. pip
34 |
35 | Download from https://pypi.python.org/pypi/pip#download
36 | ```
37 | # tar -xzvf pip-x.x.x.tar.gz
38 | # cd pip-x.x.x
39 | # python setup.py install
40 | ```
41 | For more to reference:
42 | https://pypi.python.org/pypi/pip
43 | https://pip.pypa.io/en/latest/installing/#id7
44 | 3. After Installed
45 |
46 | ```
47 | # With pip installed you can now do things like this:
48 | pip install [packagename]
49 | pip install --upgrade [packagename]
50 | pip uninstall [packagename]
51 | ```
52 |
53 |
54 | #### Misc
55 |
56 | 无论报错信息如何,意思很明确,我们编译的时候,系统没有办法找到对应的模块信息,为了解决这些报错,我们就需要提前安装依赖包,这些依赖包对应列表如下(不一定完全):
57 |
58 | 模块 | 依赖 | 说明
59 | ---- | ---- | ----
60 | _bsddb | bsddb | Interface to Berkeley DB library。Berkeley数据库的接口
61 | _curses | ncurses | Terminal handling for character-cell displays。
62 | _curses_panel | ncurses | A panel stack extension for curses。
63 | _sqlite3 | sqlite | DB-API 2.0 interface for SQLite databases。SqlLite,CentOS可以安装sqlite-devel
64 | _ssl | openssl-devel | TLS/SSL wrapper for socket objects。
65 | _tkinter | N/A | a thin object-oriented layer on top of Tcl/Tk。如果不使用桌面程序可以忽略TKinter
66 | bsddb185 | old bsddb module | 老的bsddb模块,可忽略。
67 | bz2 | bzip2-devel | Compression compatible with bzip2。bzip2-devel
68 | dbm | bsddb | Simple “database” interface。
69 | dl | N/A | Call C functions in shared objects.Python2.6开始,已经弃用。
70 | gdbm | gdbm-devel | GNU’s reinterpretation of dbm
71 | imageop | N/A | Manipulate raw image data。已经弃用。
72 | readline | readline-devel | GNU readline interface
73 | sunaudiodev | N/A | Access to Sun audio hardware。这个是针对Sun平台的,CentOS下可以忽略
74 | zlib | Zlib | Compression compatible with gzip
75 |
76 |
--------------------------------------------------------------------------------
/PostgreSQL/show_bloat.sql:
--------------------------------------------------------------------------------
1 |
2 | # taken from http://bucardo.org/check_postgres/
3 | # Please reference https://wiki.postgresql.org/wiki/Show_database_bloat for detail
4 |
5 | SELECT
6 | current_database(), schemaname, tablename, /*reltuples::bigint, relpages::bigint, otta,*/
7 | ROUND((CASE WHEN otta=0 THEN 0.0 ELSE sml.relpages::FLOAT/otta END)::NUMERIC,1) AS tbloat,
8 | CASE WHEN relpages < otta THEN 0 ELSE bs*(sml.relpages-otta)::BIGINT END AS wastedbytes,
9 | iname, /*ituples::bigint, ipages::bigint, iotta,*/
10 | ROUND((CASE WHEN iotta=0 OR ipages=0 THEN 0.0 ELSE ipages::FLOAT/iotta END)::NUMERIC,1) AS ibloat,
11 | CASE WHEN ipages < iotta THEN 0 ELSE bs*(ipages-iotta) END AS wastedibytes
12 | FROM (
13 | SELECT
14 | schemaname, tablename, cc.reltuples, cc.relpages, bs,
15 | CEIL((cc.reltuples*((datahdr+ma-
16 | (CASE WHEN datahdr%ma=0 THEN ma ELSE datahdr%ma END))+nullhdr2+4))/(bs-20::FLOAT)) AS otta,
17 | COALESCE(c2.relname,'?') AS iname, COALESCE(c2.reltuples,0) AS ituples, COALESCE(c2.relpages,0) AS ipages,
18 | COALESCE(CEIL((c2.reltuples*(datahdr-12))/(bs-20::FLOAT)),0) AS iotta -- very rough approximation, assumes all cols
19 | FROM (
20 | SELECT
21 | ma,bs,schemaname,tablename,
22 | (datawidth+(hdr+ma-(CASE WHEN hdr%ma=0 THEN ma ELSE hdr%ma END)))::NUMERIC AS datahdr,
23 | (maxfracsum*(nullhdr+ma-(CASE WHEN nullhdr%ma=0 THEN ma ELSE nullhdr%ma END))) AS nullhdr2
24 | FROM (
25 | SELECT
26 | schemaname, tablename, hdr, ma, bs,
27 | SUM((1-null_frac)*avg_width) AS datawidth,
28 | MAX(null_frac) AS maxfracsum,
29 | hdr+(
30 | SELECT 1+COUNT(*)/8
31 | FROM pg_stats s2
32 | WHERE null_frac<>0 AND s2.schemaname = s.schemaname AND s2.tablename = s.tablename
33 | ) AS nullhdr
34 | FROM pg_stats s, (
35 | SELECT
36 | (SELECT current_setting('block_size')::NUMERIC) AS bs,
37 | CASE WHEN SUBSTRING(v,12,3) IN ('8.0','8.1','8.2') THEN 27 ELSE 23 END AS hdr,
38 | CASE WHEN v ~ 'mingw32' THEN 8 ELSE 4 END AS ma
39 | FROM (SELECT version() AS v) AS foo
40 | ) AS constants
41 | GROUP BY 1,2,3,4,5
42 | ) AS foo
43 | ) AS rs
44 | JOIN pg_class cc ON cc.relname = rs.tablename
45 | JOIN pg_namespace nn ON cc.relnamespace = nn.oid AND nn.nspname = rs.schemaname AND nn.nspname <> 'information_schema'
46 | LEFT JOIN pg_index i ON indrelid = cc.oid
47 | LEFT JOIN pg_class c2 ON c2.oid = i.indexrelid
48 | ) AS sml
49 | ORDER BY wastedbytes DESC
50 |
--------------------------------------------------------------------------------
/starrocks/install.md:
--------------------------------------------------------------------------------
1 | # 手动安装 Starrocks/doris
2 |
3 | # 修改配置文件。所有be的机器
4 | cat >> /etc/sysctl.conf << EOF
5 | vm.swappiness=0
6 | EOF
7 | # 使修改生效。
8 | sysctl -p
9 |
10 |
11 | cat >> /etc/security/limits.conf << EOF
12 | * soft nproc 65535
13 | * hard nproc 65535
14 | * soft nofile 655350
15 | * hard nofile 655350
16 | * soft stack unlimited
17 | * hard stack unlimited
18 | * hard memlock unlimited
19 | * soft memlock unlimited
20 | EOF
21 |
22 | cat >> /etc/security/limits.d/20-nproc.conf << EOF
23 | * soft nproc 65535
24 | root soft nproc 65535
25 | EOF
26 |
27 |
28 | >$ cat >> /etc/sysctl.conf << EOF
29 | vm.max_map_count = 2000000
30 | EOF
31 |
32 | >$ vi /etc/profile
33 | export JAVA_HOME=/usr/lib/jvm/java-17-openjdk-amd64
34 |
35 |
36 |
37 | wget https://downloads.apache.org/doris/3.1/3.1.1/apache-doris-3.1.1-bin-x64.tar.gz
38 | tar -zxvf apache-doris-3.1.1-bin-x64.tar.gz -C /opt/doris
39 | OR
40 | wget https://releases.starrocks.io/starrocks/StarRocks-3.5.8-ubuntu-amd64.tar.gz
41 | tar -zxvf StarRocks-3.5.8-ubuntu-amd64.tar.gz -C /opt/starrocks
42 |
43 |
44 | cd /opt/starrocks
45 |
46 | > vi ./fe/conf/fe.conf
47 | ```
48 | # 每台机器都要改
49 | priority_networks = 172.31.0.0/16 # 根据你内网网段填写
50 | meta_dir = /data/fe/meta # 文件地址
51 | log_dir = /data/fe/log # 日志地址
52 | ```
53 |
54 | ## 启动
55 | ```
56 | ./fe/bin/start_fe.sh --daemon
57 | ```
58 |
59 | 检查
60 | ```
61 | http://172.31.37.145:8030
62 |
63 | ```
64 |
65 | -- 注册 Follower FE
66 | ALTER SYSTEM ADD FOLLOWER "172.31.39.114:9010";
67 | ALTER SYSTEM ADD FOLLOWER "172.31.44.59:9010";
68 |
69 |
70 | -- 注册 Observer FE(可选/只读)
71 | ALTER SYSTEM ADD OBSERVER "172.31.44.59:9010";
72 |
73 | 启动其他 FE
74 | ```
75 | ./fe/bin/start_fe.sh --daemon --helper "172.31.37.145:9010"
76 | ```
77 |
78 | mysql -h172.31.37.145 -P9030 -uroot
79 |
80 | SHOW FRONTENDS\G;
81 |
82 |
83 | 六、配置 BE
84 |
85 | > vi ./be/conf/be.conf:
86 | ```
87 | priority_networks = 172.31.0.0/16
88 | storage_root_path = /data/be/storage
89 | sys_log_dir = /data/be/log
90 | ```
91 |
92 | 🧱 七、启动 BE
93 |
94 | 在每台机器上执行:
95 | ```
96 | ./be/bin/start_be.sh --daemon
97 | ```
98 |
99 | 注册 BE 到 FE
100 |
101 | 在 FE 主节点的 SQL 控制台执行:
102 |
103 | ALTER SYSTEM ADD BACKEND "172.31.37.145:9050";
104 | ALTER SYSTEM ADD BACKEND "172.31.39.114:9050";
105 | ALTER SYSTEM ADD BACKEND "172.31.44.59:9050";
106 |
107 | SHOW BACKENDS;
108 |
109 |
110 | 出现三条 Alive = true,说明集群成功。
111 |
112 |
113 |
114 |
115 |
116 |
117 |
118 |
119 |
120 |
--------------------------------------------------------------------------------
/linux/drop_caches.md:
--------------------------------------------------------------------------------
1 |
2 | ## 简介
3 | 在查看以下内容之前需要注意:
4 | 1、本篇所涉及内容只在cache占用大量内存时导致系统内存不够用,系统运行缓慢的情况下使用;
5 | 2、强制回收前需要先进行sync 同步数据到硬盘操作,避免强制回收时造成数据丢失;
6 | 3、当buffer/cached使用的内存并不大时,而系统本身确实不足时无法回收。
7 |
8 | ## 清理
9 | 使用内存回收用到的主要为drop_caches参数,具体文档如下:
10 | ```
11 | Writing to this will cause the kernel to drop clean caches,
12 | dentries and inodes from memory, causing that memory to become free.
13 | To free pagecache:
14 | * echo 1 > /proc/sys/vm/drop_caches
15 | To free dentries and inodes:
16 | * echo 2 > /proc/sys/vm/drop_caches
17 | To free pagecache, dentries and inodes:
18 | * echo 3 > /proc/sys/vm/drop_caches
19 | As this is a non-destructive operation, and dirty objects are notfreeable,
20 | the user should run "sync" first in order to make sure allcached objects are freed.
21 | This tunable was added in 2.6.16.
22 | ```
23 | 这里有三个级别可以使用。使用1时只清理pagecahe ,使用2清理dentries和inodes ,使用3时三者都清理。操作方法是:
24 | ```
25 | $echo 3 > /proc/sys/vm/drop_caches
26 | ```
27 |
28 | ## 设置
29 | 和内存相关的tcp/ip参数以下部分,在/etc/sysctl.conf中添加以下选项后就不会内存持续增加
30 | ```
31 | vm.dirty_ratio = 1
32 | vm.dirty_background_ratio=1
33 | vm.dirty_writeback_centisecs=2
34 | vm.dirty_expire_centisecs=3
35 | vm.drop_caches=3
36 | vm.swappiness =100
37 | vm.vfs_cache_pressure=163
38 | vm.overcommit_memory=2
39 | vm.lowmem_reserve_ratio=32 32 8
40 | kern.maxvnodes=3
41 | ```
42 | 上面的设置比较粗暴,使cache的作用基本无法发挥。需要根据机器的状况进行适当的调节寻找最佳的折衷。
43 |
44 | ### 解释
45 | * `/proc/sys/vm/dirty_ratio`
46 | 这个参数控制文件系统的文件系统写缓冲区的大小,单位是百分比,表示系统内存的百分比,表示当写缓冲使用到系统内存多少的时候,
47 | 开始向磁盘写出数据。增大之会使用更多系统内存用于磁盘写缓冲,也可以极大提高系统的写性能。
48 | 但是,当你需要持续、恒定的写入场合时,应该降低其数值,一般启动上缺省是10。设1加速程序速度。
49 |
50 | * `/proc/sys/vm/dirty_background_ratio`
51 | 这个参数控制文件系统的pdflush进程,在何时刷新磁盘。单位是百分比,表示系统内存的百分比,意思是当写缓冲使用到系统内存多少的时候,pdflush开始向磁盘写出数据。
52 | 增大之会使用更多系统内存用于磁盘写缓冲,也可以极大提高系统的写性能。但是,当你需要持续、恒定的写入场合时,应该降低其数值,一般启动上缺省是 5
53 |
54 | * `/proc/sys/vm/dirty_writeback_centisecs`
55 | 这个参数控制内核的脏数据刷新进程pdflush的运行间隔。单位是 1/100 秒。缺省数值是500,也就是 5 秒。
56 | 如果你的系统是持续地写入动作,那么实际上还是降低这个数值比较好,这样可以把尖峰的写操作削平成多次写操
57 |
58 | * `/proc/sys/vm/dirty_expire_centisecs`
59 | 这个参数声明Linux内核写缓冲区里面的数据多“旧”了之后,pdflush进程就开始考虑写到磁盘中去。单位是 1/100秒。
60 | 缺省是30000,也就是 30秒的数据就算旧了,将会刷新磁盘。
61 | 对于特别重载的写操作来说,这个值适当缩小也是好的,但也不能缩小太多,因为缩小太多也会导致IO提高太快。建议设置为1500,也就是15秒算旧。
62 |
63 | * `/proc/sys/vm/drop_caches`
64 | 释放已经使用的cache
65 |
66 | * `/proc/sys/vm/page-cluster`
67 | 该文件表示在写一次到swap区的时候写入的页面数量,0表示1页,1表示2页,2表示4页。
68 |
69 | * `/proc/sys/vm/swapiness`
70 | 该文件表示系统进行交换行为的程度,数值(0-100)越高,越可能发生磁盘交换。
71 |
72 | * `/proc/sys/vm/vfs_cache_pressure`
73 | 该文件表示内核回收用于directory和inode cache内存的倾向
74 |
--------------------------------------------------------------------------------
/Mac/rw_ntfs.md:
--------------------------------------------------------------------------------
1 | # Mac OS X读写NTFS磁盘的命令
2 |
3 | ## 方法一
4 | 配置/etc/fstab,此方法让系统开机自动以读写权限挂载NTFS分区,推荐用此法来挂载本地硬盘。
5 | 1.执行下面命令找出NTFS分区:
6 | ```bash
7 | diskutil list | grep NTFS
8 | # Sample:
9 | # /dev/disk3 (external, physical):
10 | # #: TYPE NAME SIZE IDENTIFIER
11 | # 0: FDisk_partition_scheme *1.0 TB disk3
12 | # 1: Windows_NTFS Elements 1.0 TB disk3s1
13 | ```
14 | 命令输出的第三列`Elements`就是NTFS分区的卷标。
15 |
16 | 2.执行下面命令修改/etc/fstab:
17 | ```bash
18 | vifs
19 | # OR
20 | vi /etc/fstab
21 | ```
22 | 比如我有个NTFS分区的卷标是Elements,我就在/etc/fstab加上一行:
23 | ```
24 | LABEL=Elements none ntfs rw,nobrowse,noowners,noatime,nosuid
25 | # LABEL="卷标"。同理,其它分区也这么配置。
26 | ```
27 |
28 | ## 方法二
29 | 手工操作挂载,推荐用来挂载USB移动硬盘,这个方法总共分3个步骤:
30 | 1.找出NTFS磁盘和挂载点
31 | 2.卸载NTFS磁盘
32 | 3.加上读写参数重新挂载
33 |
34 | 3个步骤的详细操作:
35 | 1.找出NTFS磁盘和挂载点,输入以下命令:
36 | ```bash
37 | mount | grep ntfs
38 |
39 | 输出如下:
40 | /dev/disk0s1 on /Volumes/Win7boot (ntfs, local, noowners, read-only, nosuid)
41 | /dev/disk0s2 on /Volumes/Windows7 (ntfs, local, noowners, read-only, nosuid)
42 | /dev/disk0s3 on /Volumes/Programs (ntfs, local, noowners, read-only, nosuid)
43 | /dev/disk0s5 on /Volumes/Data1 (ntfs, local, noowners, read-only, nosuid)
44 | /dev/disk0s6 on /Volumes/Data2 (ntfs, local, noowners, read-only, nosuid)
45 | ```
46 | 第一列是NTFS格式磁盘,第三列是挂载点,括号内的是挂载参数
47 | 2.根据以上的信息,来卸载当前挂载的NTFS磁盘,比如要卸载/dev/disk0s1,就执行下面的命令:
48 | ```bash
49 | umount /dev/disk0s1
50 | ```
51 |
52 | 用同样的方法来卸载其它的磁盘。这里要*注意*如果磁盘上有文件被打开,那么这个磁盘是卸载不了的。
53 | 3.还是以/dev/disk0s1为例说明怎么以读写方式挂载NTFS。从步骤1中的第三列找到默认的挂载点,执行下面命令创建它:
54 | ```bash
55 | mkdir -p /Volumes/Win7boot
56 | ```
57 |
58 | 执行下面命令来以读写方式挂载:
59 | ```bash
60 | mount_ntfs -o rw,auto,nobrowse,noowners,noatime /dev/disk0s1 /Volumes/Win7boot
61 | ```
62 | 以上命令的 rw 选项添加了读写权限,到这里完成一个磁盘的挂载,其它的用同样的方法。如果是移动硬盘,在-o后再加一个nodev选项。
63 |
64 | 最后,
65 | 1.此方法挂载的磁盘不会显示在Finder边栏的“设备”里。所以我把/Volumes添加到Finder的“个人收藏”了。
66 | 2.系统读写NTFS有时会“弄脏”磁盘,windows开机的时候需要检查磁盘,一般不会损坏文件,如果担心损坏那就不要让系统读写NTFS磁盘了。
67 | 3.教程的步骤在10.8.4验证过,使用过程中没有出现损坏文件的情况,如果使用过程中你的文件损坏了与作者无关
68 |
69 | PS:添加//Volumes下的磁盘到个人收藏的:
70 | Finder-前往-前往文件夹-输入“/Volumes”,然后把各个磁盘拖到个人收藏。
71 |
72 | ## 解決「正由 Mac OS X 使用 所以无法打开」的方法
73 | 背景:used by osx and cannot be opened (正由 Mac OS X 使用 所以无法打开)
74 |
75 | 由于Mac OS X 并沒有正式支持到 NTFS 磁盘的写入,所以可能在某些情况下产生,写入的数据无法使用。
76 | 其实是因为 Mac OS X 在复制出来的资料中加了标记,这些标记在运行时做了特别处理。
77 |
78 | #### 解决方法
79 | 使用`xattr`命令查看信息,如果有,则用`xattr -d`指令來把它刪除
80 | ```
81 | ->$ xattr test_file
82 | com.apple.FinderInfo
83 |
84 | -> xattr -d com.apple.FinderInfo test_file
85 | ```
86 |
87 |
--------------------------------------------------------------------------------
/DNS/README.md:
--------------------------------------------------------------------------------
1 | DNS
2 | ============
3 | 域名系统(英文:Domain Name System,缩写:DNS)是因特网的一项服务。
4 | 它作为将域名和IP地址相互映射的一个分布式数据库,能够使人更方便地访问互联网。DNS使用TCP和UDP端口53。
5 | 当前,对于每一级域名长度的限制是63个字符,域名总长度则不能超过253个字符。
6 |
7 | 简介
8 | ------------
9 | [维基百科 英文](https://en.wikipedia.org/wiki/Domain_Name_System)
10 | [维基百科 中文](https://zh.wikipedia.org/wiki/域名系统)
11 |
12 | DNS系统中,常见的资源记录类型有:
13 |
14 | * `主机记录(A记录):` RFC 1035定义,A记录是用于名称解析的重要记录,它将特定的主机名映射到对应主机的IP地址上。
15 | * `别名记录(CNAME记录):` RFC 1035定义,CNAME记录用于将某个别名指向到某个A记录上,这样就不需要再为某个新名字另外创建一条新的A记录。
16 | * `IPv6主机记录(AAAA记录):` RFC 3596定义,与A记录对应,用于将特定的主机名映射到一个主机的IPv6地址。
17 | * `服务位置记录(SRV记录):` RFC 2782定义,用于定义提供特定服务的服务器的位置,如主机(hostname),端口(port number)等。
18 | * `NAPTR记录:` RFC 3403定义,它提供了正则表达式方式去映射一个域名。NAPTR记录非常著名的一个应用是用于ENUM查询。
19 |
20 | 调试查看命令
21 | ----------------
22 | Linux: dig www.google.com @127.0.0.1
23 | ```
24 | ; <<>> DiG 9.8.2rc1-RedHat-9.8.2-0.17.rc1.el6_4.6 <<>> www.google.com @223.5.5.5
25 | ;; global options: +cmd
26 | ;; Got answer:
27 | ;; ->>HEADER<<- opcode: QUERY, status: NOERROR, id: 25396
28 | ;; flags: qr rd ra; QUERY: 1, ANSWER: 1, AUTHORITY: 0, ADDITIONAL: 0
29 |
30 | ;; QUESTION SECTION:
31 | ;www.google.com. IN A
32 |
33 | ;; ANSWER SECTION:
34 | www.google.com. 232 IN A 216.58.221.132
35 |
36 | ;; Query time: 7 msec
37 | ;; SERVER: 223.5.5.5#53(223.5.5.5)
38 | ;; WHEN: Tue Jan 12 14:29:21 2016
39 | ;; MSG SIZE rcvd: 48
40 | ```
41 |
42 | 开源实现 (Linux)
43 | -------------
44 | ### dnspod-sr
45 | dnspod-sr 是一个运行在 Linux 平台上的高性能的递归 DNS 服务器软件,强烈公司内网或者服务器内网使用dnspod-sr。
46 | 具备高性能、高负载、易扩展的优势,非 BIND、powerdns 等软件可以比拟。
47 | 但是dnspod-sr不具备授权功能。也只能用在内部。
48 |
49 | Code: https://github.com/DNSPod/dnspod-sr
50 | Wiki: https://github.com/DNSPod/dnspod-sr/wiki
51 | FAQ: https://github.com/DNSPod/dnspod-sr/wiki/FAQ
52 |
53 | 参考:
54 | http://skypegnu1.blog.51cto.com/8991766/1635563
55 | http://blog.dnspod.cn/2014/07/kaiyuan/
56 | http://www.ttlsa.com/linux/dnspod-sr-little-dns/
57 | http://blog.chinaunix.net/uid-29762534-id-4536608.html
58 |
59 |
60 | ### Bind
61 | Bind-DLZ主页:http://bind-dlz.sourceforge.net/
62 | DLZ(Dynamically Loadable Zones)与传统的BIND9不同,BIND的不足之处:
63 |
64 | * BIND从文本文件中获取数据,这样容易因为编辑错误出现问题。
65 | * BIND需要将数据加载到内存中,如果域或者记录较多,会消耗大量的内存。
66 | * BIND启动时解析Zone文件,对于一个记录较多的DNS来说,会耽误更多的时间。
67 | * 如果近修改一条记录,那么要重新加载或者重启BIND才能生效,那么需要时间,可能会影响客户端查询。
68 |
69 | 而Bind-dlz 即将帮你解决这些问题, 对Zone文件操作也更方便了,直接对数据库操作,可以很方便扩充及开发管理程序。
70 |
71 | 参考:
72 | http://bbs.linuxtone.org/thread-2081-1-1.html
73 | http://blog.csdn.net/liangyuannao/article/details/41076521
74 | http://sweetpotato.blog.51cto.com/533893/1598225
75 | http://blog.csdn.net/zhu_tianwei/article/details/45045431
76 |
--------------------------------------------------------------------------------
/apisix/介绍.md:
--------------------------------------------------------------------------------
1 | # 介绍
2 |
3 | ## 限流限速
4 | APISIX 内置了三个限流限速插件:
5 |
6 | limit-count:基于“固定窗口”的限速实现。
7 | limit-req:基于漏桶原理的请求限速实现。
8 | limit-conn:限制并发请求(或并发连接)。
9 | 本小节,我们来演示使用 limit-req 插件,毕竟基于漏桶的限流算法,是目前较为常用的限流方式。
10 |
11 | 漏桶算法(Leaky Bucket)是网络世界中流量整形(Traffic Shaping)或速率限制(Rate Limiting)时经常使用的一种算法,它的主要目的是控制数据注入到网络的速率,平滑网络上的突发流量。
12 | 漏桶算法提供了一种机制,通过它,突发流量可以被整形以便为网络提供一个稳定的流量。
13 |
14 |
15 | 漏桶算法
16 |
17 | 5.1 配置 limit-req 插件
18 | 在「4. 动态负载均衡」小节中,我们已经创建了一个 APISIX Route。这里,我们给该 Route 配置下 limit-req 插件。
19 |
20 | 配置 limit-req 插件
21 |
22 | rate:指定的请求速率(以秒为单位),请求速率超过 rate 但没有超过 (rate + brust)的请求会被加上延时
23 | burst:请求速率超过 (rate + brust)的请求会被直接拒绝
24 | rejected_code:当请求超过阈值被拒绝时,返回的 HTTP 状态码
25 | key:是用来做请求计数的依据,当前接受的 key 有:"remote_addr"(客户端 IP 地址), "server_addr"(服务端 IP 地址), 请求头中的"X-Forwarded-For" 或 "X-Real-IP"。
26 | 上述配置限制了每秒请求速率为 1,大于 1 小于 3 的会被加上延时,速率超过 3 就会被拒绝。
27 |
28 |
29 | 5.2 简单测试
30 | 快速多次请求 http://172.16.48.185:9080/demo/echo 地址,我们会看到页面返回 503 错误码,成功被 APISIX 所限流。如下图所示:
31 |
32 | ## 身份验证
33 | APISIX 内置了四个身份验证插件:
34 |
35 | key-auth:基于 Key Authentication 的用户认证。
36 | JWT-auth:基于 JWT (JSON Web Tokens) Authentication 的用户认证。
37 | basic-auth:基于 basic auth 的用户认证。
38 | wolf-rbac:基于 RBAC 的用户认证及授权。
39 | 需要额外搭建 wolf 服务,提供用户、角色、资源等信息。
40 | 本小节,我们来演示使用 JWT-auth 插件,大家比较熟知的认证方式。不了解的胖友,可以阅读如下文章:
41 |
42 | 《JSON Web Token - 在Web应用间安全地传递信息》
43 | 《八幅漫画理解使用 JSON Web Token 设计单点登录系统》
44 |
45 | 6.1 配置 JWT-auth 插件
46 | ① 在 APISIX 控制台的「Consumer」菜单中,创建一个 APISIX Consumer,使用 JWT-auth 插件。如下图所示:
47 |
48 | Consumer 是某类服务的消费者,需与用户认证体系配合才能使用。
49 | 更多 Consumer 的介绍,可以看《APISIX 官方文档 —— 架构设计(Consumer)》。
50 |
51 |
52 | 创建 Consumer 02其中每个属性的作用如下:
53 | key: 不同的 consumer 对象应有不同的值,它应当是唯一的。不同 consumer 使用了相同的 key ,将会出现请求匹配异常。
54 | secret: 可选字段,加密秘钥。如果您未指定,后台将会自动帮您生成。
55 | algorithm:可选字段,加密算法。目前支持 HS256, HS384, HS512, RS256 和 ES256,如果未指定,则默认使用 HS256。
56 | exp: 可选字段,token 的超时时间,以秒为单位的计时。比如有效期是 5 分钟,那么就应设置为 5 * 60 = 300。
57 |
58 | ② 在「4. 动态负载均衡」小节中,我们已经创建了一个 APISIX Route。这里,我们给该 Route 配置下 JWT-auth 插件。如下图所示:
59 |
60 |
61 | 配置 JWT-auth 插件
62 |
63 | 友情提示:是不是觉得配置过程有点怪怪的,淡定~
64 |
65 | 6.2 简单测试
66 | ① 调用 jwt-auth 插件提供的签名接口,获取 Token。
67 |
68 |
69 | ```sh
70 | # key 参数,为我们配置 jwt-auth 插件时,设置的 key 属性。
71 | $ curl http://172.16.48.185:9080/apisix/plugin/jwt/sign?key=yunai
72 | eyJhbGciOiJIUzI1NiIsInR5cCI6IkpXVCJ9.eyJrZXkiOiJ5dW5haSIsImV4cCI6MTU4ODQ3MzA5NX0.WlLhM_gpr-zWKXCcXEuSuw-7JosU9mnHwfeSPtspCGo
73 | ```
74 | ② 使用 Postman 模拟调用示例 /demo/echo 接口,并附带上 JWT。如下图所示:
75 |
76 |
77 | Postman 模拟请求
78 |
79 | 友情提示:至此,我们已经完成了 JWT-auth 插件的学习。
80 | 胖友可以先删除示例 Route 配置的 JWT-auth 插件,方便模拟请求哈。
81 |
82 | ## 健康检查
83 | 因为 APISIX 控制台暂未提供健康检查的配置功能,艿艿等后续有了在补充。
84 |
85 | 胖友可以先阅读《APISIX 官方文档 —— 健康检查》,使用 APISIX Admin API 进行添加健康检查的配置
86 |
87 |
--------------------------------------------------------------------------------
/apisix/introduce.md:
--------------------------------------------------------------------------------
1 | # 介绍
2 |
3 | ## 限流限速
4 | APISIX 内置了三个限流限速插件:
5 |
6 | limit-count:基于“固定窗口”的限速实现。
7 | limit-req:基于漏桶原理的请求限速实现。
8 | limit-conn:限制并发请求(或并发连接)。
9 | 本小节,我们来演示使用 limit-req 插件,毕竟基于漏桶的限流算法,是目前较为常用的限流方式。
10 |
11 | 漏桶算法(Leaky Bucket)是网络世界中流量整形(Traffic Shaping)或速率限制(Rate Limiting)时经常使用的一种算法,它的主要目的是控制数据注入到网络的速率,平滑网络上的突发流量。
12 | 漏桶算法提供了一种机制,通过它,突发流量可以被整形以便为网络提供一个稳定的流量。
13 |
14 |
15 | 漏桶算法
16 |
17 | 5.1 配置 limit-req 插件
18 | 在「4. 动态负载均衡」小节中,我们已经创建了一个 APISIX Route。这里,我们给该 Route 配置下 limit-req 插件。
19 |
20 | 配置 limit-req 插件
21 |
22 | rate:指定的请求速率(以秒为单位),请求速率超过 rate 但没有超过 (rate + brust)的请求会被加上延时
23 | burst:请求速率超过 (rate + brust)的请求会被直接拒绝
24 | rejected_code:当请求超过阈值被拒绝时,返回的 HTTP 状态码
25 | key:是用来做请求计数的依据,当前接受的 key 有:"remote_addr"(客户端 IP 地址), "server_addr"(服务端 IP 地址), 请求头中的"X-Forwarded-For" 或 "X-Real-IP"。
26 | 上述配置限制了每秒请求速率为 1,大于 1 小于 3 的会被加上延时,速率超过 3 就会被拒绝。
27 |
28 |
29 | 5.2 简单测试
30 | 快速多次请求 http://172.16.48.185:9080/demo/echo 地址,我们会看到页面返回 503 错误码,成功被 APISIX 所限流。如下图所示:
31 |
32 | ## 身份验证
33 | APISIX 内置了四个身份验证插件:
34 |
35 | key-auth:基于 Key Authentication 的用户认证。
36 | JWT-auth:基于 JWT (JSON Web Tokens) Authentication 的用户认证。
37 | basic-auth:基于 basic auth 的用户认证。
38 | wolf-rbac:基于 RBAC 的用户认证及授权。
39 | 需要额外搭建 wolf 服务,提供用户、角色、资源等信息。
40 | 本小节,我们来演示使用 JWT-auth 插件,大家比较熟知的认证方式。不了解的胖友,可以阅读如下文章:
41 |
42 | 《JSON Web Token - 在Web应用间安全地传递信息》
43 | 《八幅漫画理解使用 JSON Web Token 设计单点登录系统》
44 |
45 | 6.1 配置 JWT-auth 插件
46 | ① 在 APISIX 控制台的「Consumer」菜单中,创建一个 APISIX Consumer,使用 JWT-auth 插件。如下图所示:
47 |
48 | Consumer 是某类服务的消费者,需与用户认证体系配合才能使用。
49 | 更多 Consumer 的介绍,可以看《APISIX 官方文档 —— 架构设计(Consumer)》。
50 |
51 |
52 | 创建 Consumer 02其中每个属性的作用如下:
53 | key: 不同的 consumer 对象应有不同的值,它应当是唯一的。不同 consumer 使用了相同的 key ,将会出现请求匹配异常。
54 | secret: 可选字段,加密秘钥。如果您未指定,后台将会自动帮您生成。
55 | algorithm:可选字段,加密算法。目前支持 HS256, HS384, HS512, RS256 和 ES256,如果未指定,则默认使用 HS256。
56 | exp: 可选字段,token 的超时时间,以秒为单位的计时。比如有效期是 5 分钟,那么就应设置为 5 * 60 = 300。
57 |
58 | ② 在「4. 动态负载均衡」小节中,我们已经创建了一个 APISIX Route。这里,我们给该 Route 配置下 JWT-auth 插件。如下图所示:
59 |
60 |
61 | 配置 JWT-auth 插件
62 |
63 | 友情提示:是不是觉得配置过程有点怪怪的,淡定~
64 |
65 | 6.2 简单测试
66 | ① 调用 jwt-auth 插件提供的签名接口,获取 Token。
67 |
68 |
69 | ```sh
70 | # key 参数,为我们配置 jwt-auth 插件时,设置的 key 属性。
71 | $ curl http://172.16.48.185:9080/apisix/plugin/jwt/sign?key=yunai
72 | eyJhbGciOiJIUzI1NiIsInR5cCI6IkpXVCJ9.eyJrZXkiOiJ5dW5haSIsImV4cCI6MTU4ODQ3MzA5NX0.WlLhM_gpr-zWKXCcXEuSuw-7JosU9mnHwfeSPtspCGo
73 | ```
74 | ② 使用 Postman 模拟调用示例 /demo/echo 接口,并附带上 JWT。如下图所示:
75 |
76 |
77 | Postman 模拟请求
78 |
79 | 友情提示:至此,我们已经完成了 JWT-auth 插件的学习。
80 | 胖友可以先删除示例 Route 配置的 JWT-auth 插件,方便模拟请求哈。
81 |
82 | ## 健康检查
83 | 因为 APISIX 控制台暂未提供健康检查的配置功能,艿艿等后续有了在补充。
84 |
85 | 胖友可以先阅读《APISIX 官方文档 —— 健康检查》,使用 APISIX Admin API 进行添加健康检查的配置
86 |
87 |
--------------------------------------------------------------------------------
/mattermost/docker-compose.yml:
--------------------------------------------------------------------------------
1 | # https://docs.docker.com/compose/environment-variables/
2 | services:
3 | postgres:
4 | image: postgres:17.7
5 | restart: unless-stopped
6 | security_opt:
7 | - no-new-privileges:true
8 | tmpfs:
9 | - /tmp
10 | - /var/run/postgresql
11 | volumes:
12 | - ./postgresql/data:/var/lib/postgresql/data
13 | environment:
14 | # timezone inside container
15 | - TZ
16 |
17 | # necessary Postgres options/variables
18 | - POSTGRES_USER
19 | - POSTGRES_PASSWORD
20 | - POSTGRES_DB
21 |
22 | mattermost:
23 | depends_on:
24 | - postgres
25 | image: mattermost/mattermost-enterprise-edition:10.5.9 # 'mattermost-enterprise-edition' or 'mattermost-team-edition'
26 | restart: unless-stopped
27 | security_opt:
28 | - no-new-privileges:true
29 | pids_limit: 200
30 | read_only: false
31 | tmpfs:
32 | - /tmp
33 | ports:
34 | - 8065:8065
35 | - 8443:8443/udp
36 | - 8443:8443/tcp
37 | volumes:
38 | - ./app/mattermost/config:/mattermost/config:rw
39 | - ./app/mattermost/data:/mattermost/data:rw
40 | - ./app/mattermost/logs:/mattermost/logs:rw
41 | - ./app/mattermost/plugins:/mattermost/plugins:rw
42 | - ./app/mattermost/client/plugins:/mattermost/client/plugins:rw
43 | - ./app/mattermost/bleve-indexes:/mattermost/bleve-indexes:rw
44 | # When you want to use SSO with GitLab, you have to add the cert pki chain of GitLab inside Alpine
45 | # to avoid Token request failed: certificate signed by unknown authority
46 | # (link: https://github.com/mattermost/mattermost-server/issues/13059 and https://github.com/mattermost/docker/issues/34)
47 | # - ${GITLAB_PKI_CHAIN_PATH}:/etc/ssl/certs/pki_chain.pem:ro
48 | environment:
49 | # timezone inside container
50 | - TZ
51 |
52 | # necessary Mattermost options/variables (see env.example)
53 | - MM_SQLSETTINGS_DRIVERNAME
54 | - MM_SQLSETTINGS_DATASOURCE
55 |
56 | # necessary for bleve
57 | - MM_BLEVESETTINGS_INDEXDIR
58 |
59 | # additional settings
60 | - MM_SERVICESETTINGS_SITEURL
61 |
62 | # If you use rolling image tags and feel lucky watchtower can automatically pull new images and
63 | # instantiate containers from it. https://containrrr.dev/watchtower/
64 | # Please keep in mind watchtower will have access on the docker socket. This can be a security risk.
65 | #
66 | # watchtower:
67 | # container_name: watchtower
68 | # image: containrrr/watchtower:latest
69 | # restart: unless-stopped
70 | # volumes:
71 | # - /var/run/docker.sock:/var/run/docker.sock
--------------------------------------------------------------------------------