 8 |
8 |  9 |
8 |
9 |
9 |
8 |
9 |  15 |
15 |  16 |
16 | 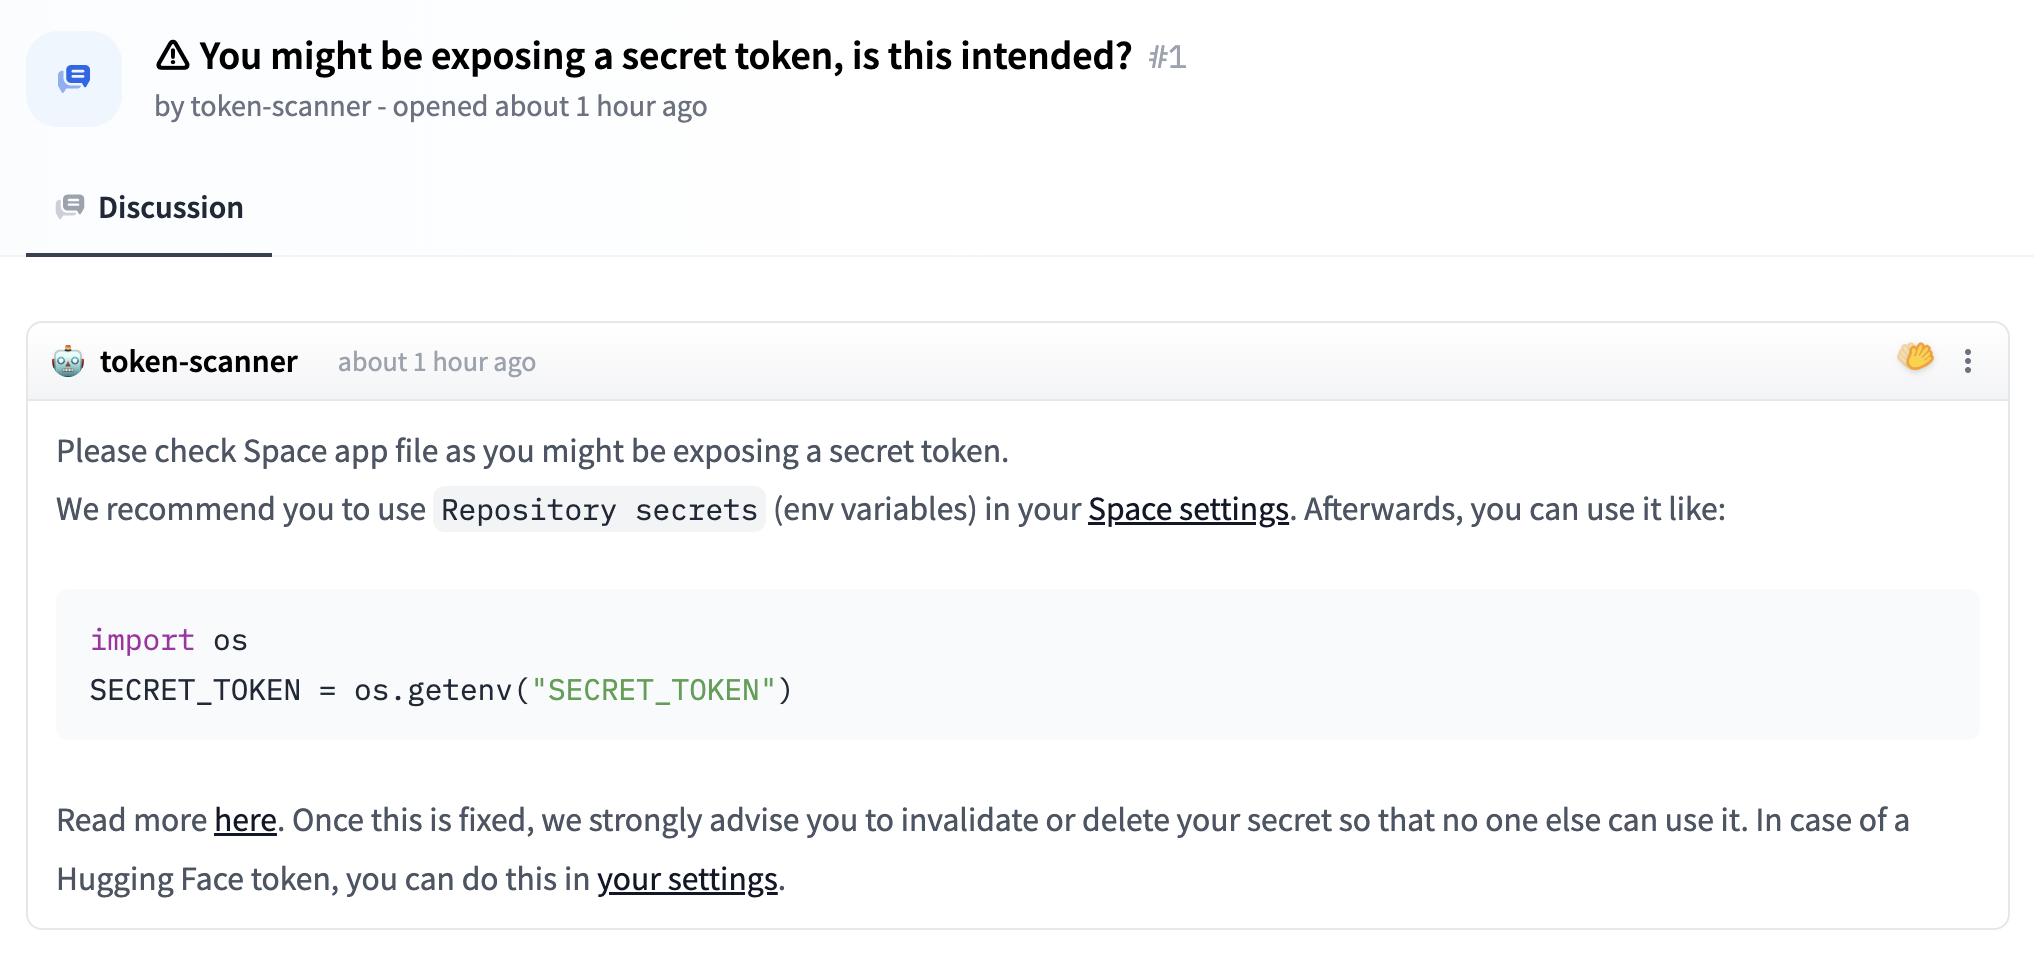 22 |
22 | 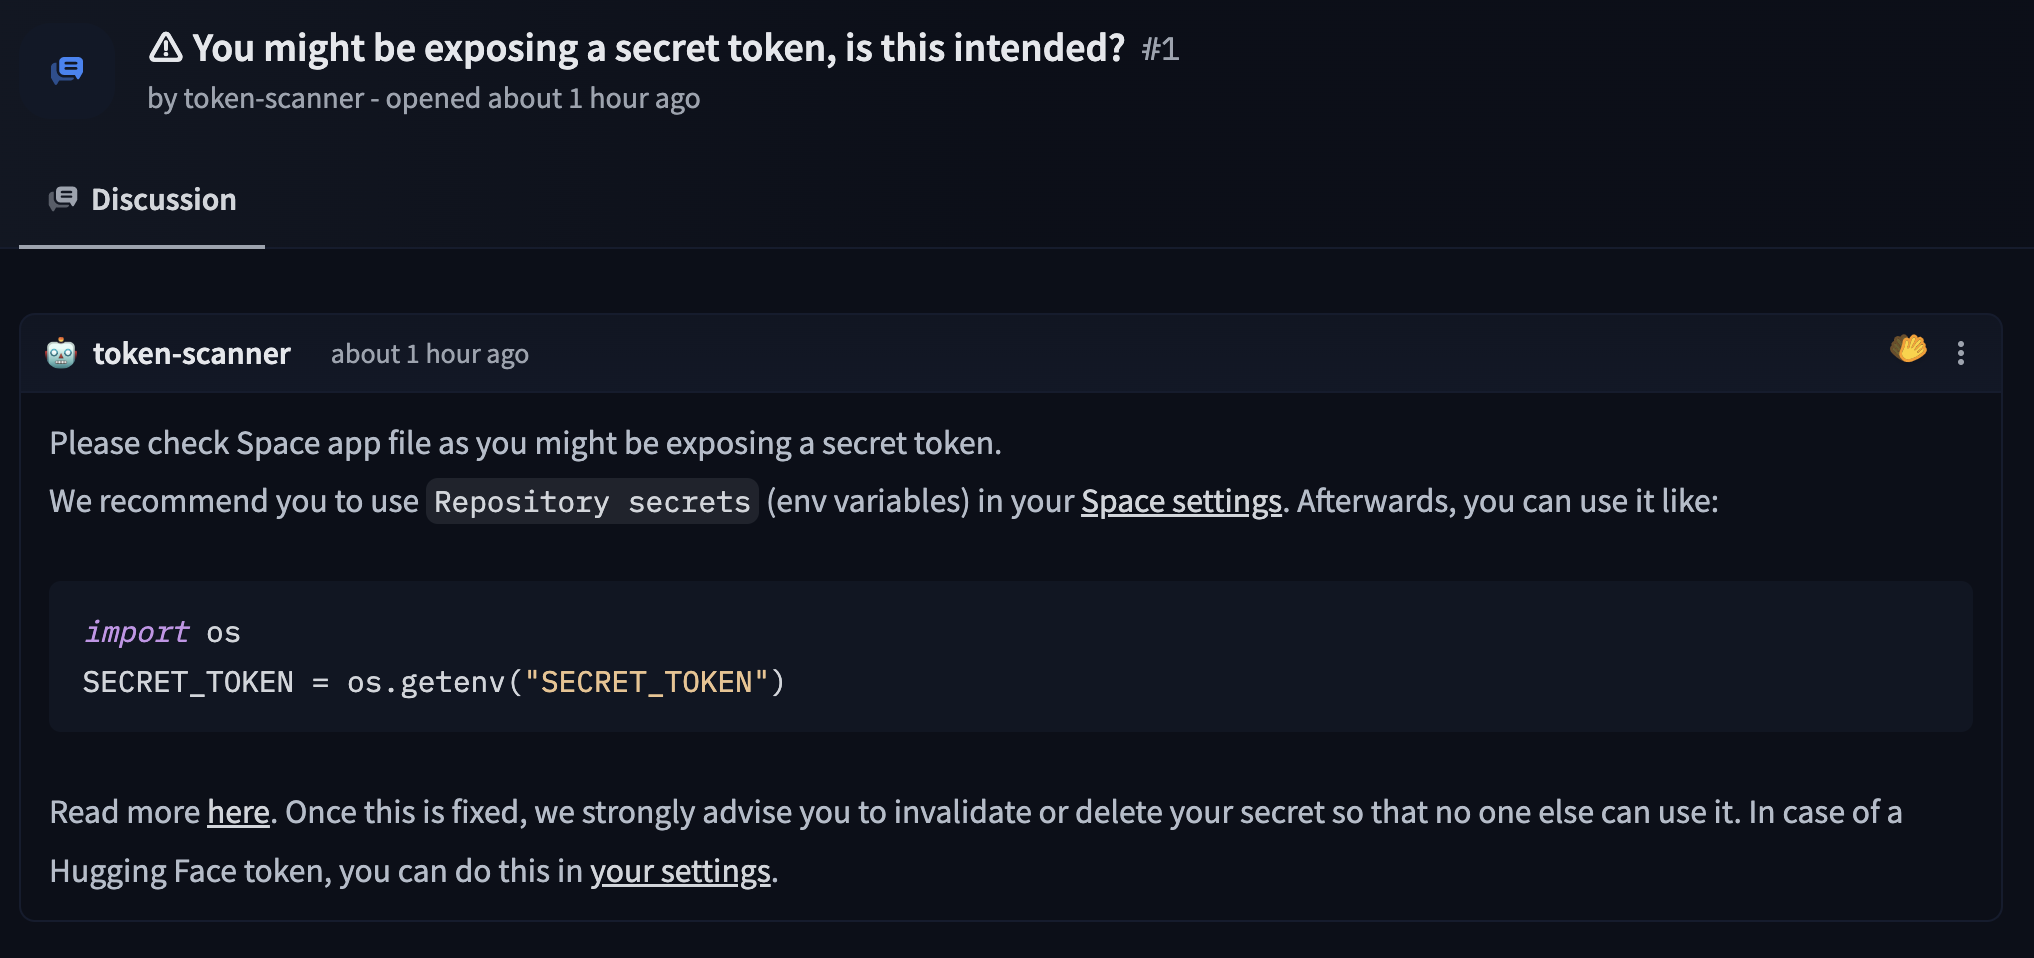 23 |
23 |  13 |
13 |  14 |
14 |  11 |
11 | 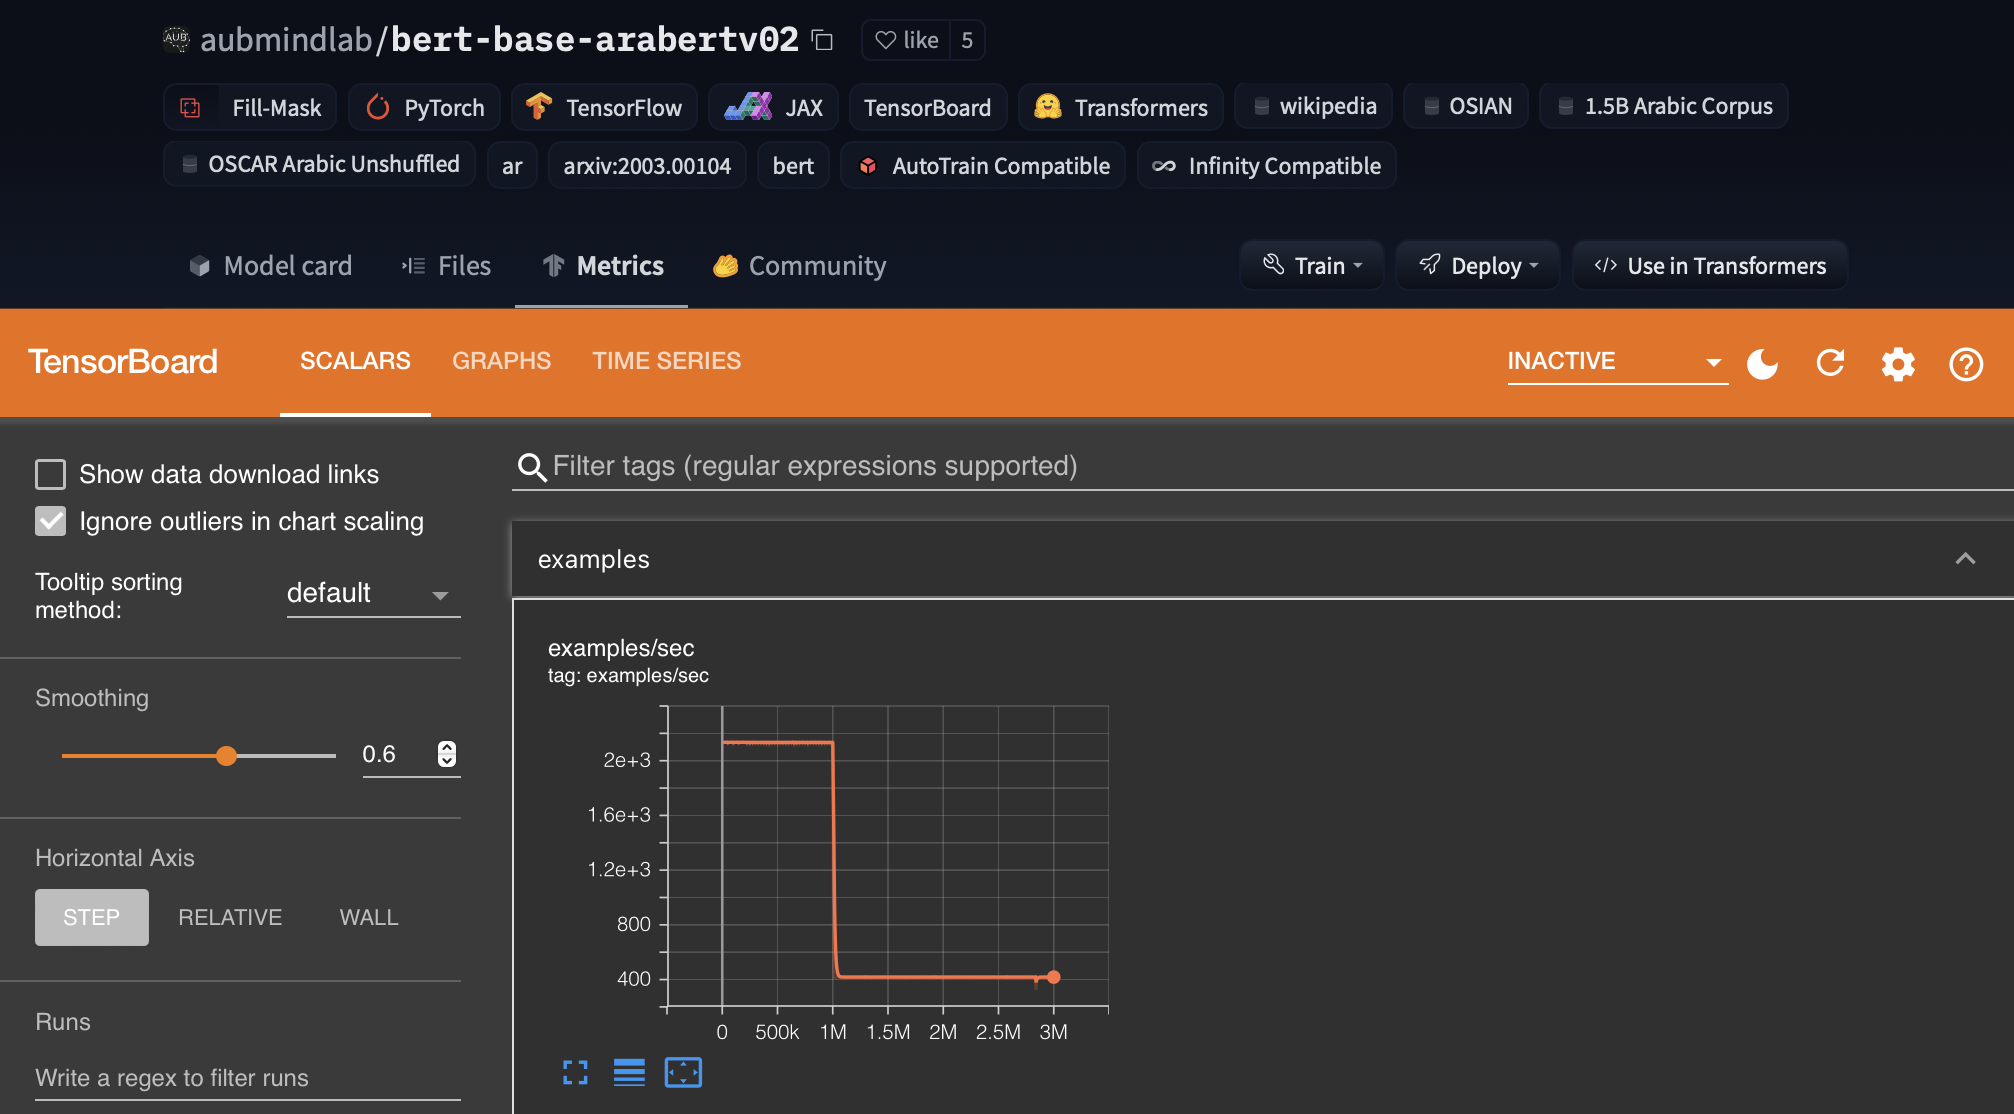 12 |
12 |  15 |
15 |  16 |
16 |  24 |
24 |  25 |
25 |  10 |
11 | For any other security questions, please feel free to send us an email at security@huggingface.co.
12 |
13 | ## Contents
14 |
15 | - [User Access Tokens](./security-tokens)
16 | - [Two-Factor Authentication (2FA)](./security-2fa)
17 | - [Git over SSH](./security-git-ssh)
18 | - [Signing commits with GPG](./security-gpg)
19 | - [Single Sign-On (SSO)](./security-sso)
20 | - [Malware Scanning](./security-malware)
21 | - [Pickle Scanning](./security-pickle)
22 | - [Secrets Scanning](./security-secrets)
23 | - [Resource Groups](./security-resource-groups)
24 |
--------------------------------------------------------------------------------
/docs/hub/organizations-cards.md:
--------------------------------------------------------------------------------
1 | # Organization cards
2 |
3 | You can create an organization card to help users learn more about what your organization is working on and how users can use your libraries, models, datasets, and Spaces.
4 |
5 | An organization card is displayed on an organization's profile:
6 |
7 |
10 |
11 | For any other security questions, please feel free to send us an email at security@huggingface.co.
12 |
13 | ## Contents
14 |
15 | - [User Access Tokens](./security-tokens)
16 | - [Two-Factor Authentication (2FA)](./security-2fa)
17 | - [Git over SSH](./security-git-ssh)
18 | - [Signing commits with GPG](./security-gpg)
19 | - [Single Sign-On (SSO)](./security-sso)
20 | - [Malware Scanning](./security-malware)
21 | - [Pickle Scanning](./security-pickle)
22 | - [Secrets Scanning](./security-secrets)
23 | - [Resource Groups](./security-resource-groups)
24 |
--------------------------------------------------------------------------------
/docs/hub/organizations-cards.md:
--------------------------------------------------------------------------------
1 | # Organization cards
2 |
3 | You can create an organization card to help users learn more about what your organization is working on and how users can use your libraries, models, datasets, and Spaces.
4 |
5 | An organization card is displayed on an organization's profile:
6 |
7 |  9 |
9 | 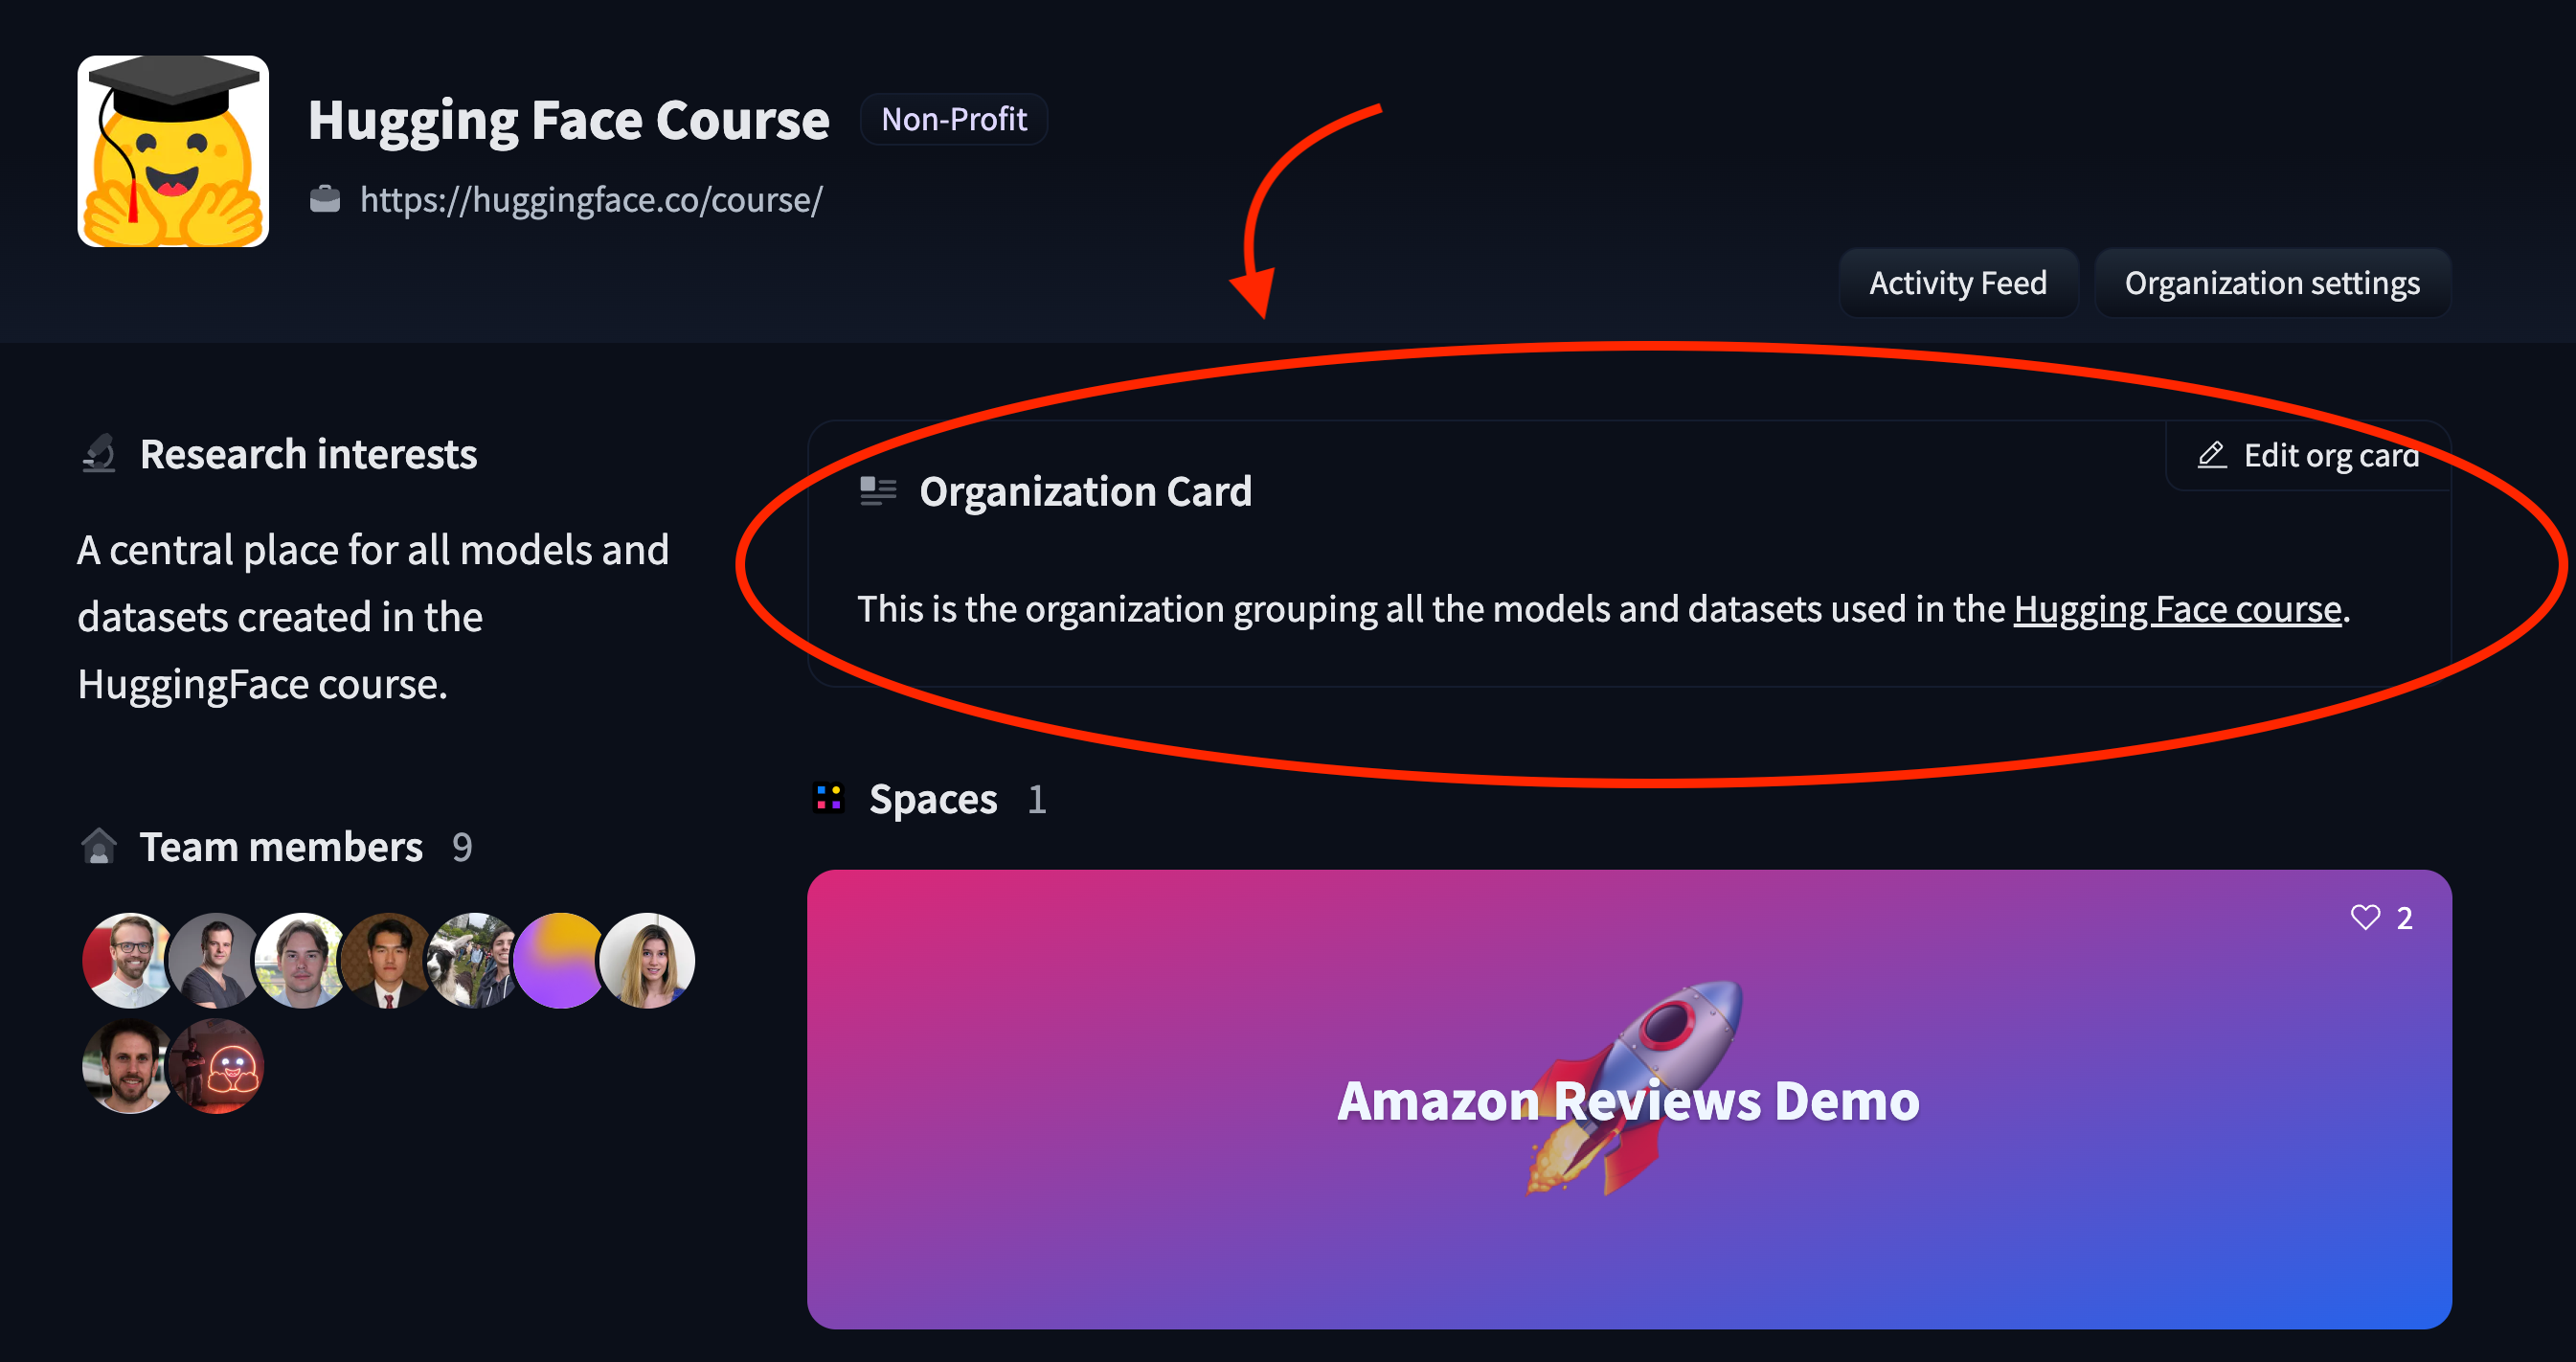 10 |
10 | 19 | This is the organization grouping all the models and datasets used in the Hugging Face course. 20 |
21 | ``` 22 | 23 | For more examples, take a look at: 24 | 25 | * [Amazon's](https://huggingface.co/spaces/amazon/README/blob/main/README.md) organization card source code 26 | * [spaCy's](https://huggingface.co/spaces/spacy/README/blob/main/README.md) organization card source code. 27 | -------------------------------------------------------------------------------- /docs/hub/spaces-cookie-limitations.md: -------------------------------------------------------------------------------- 1 | # Cookie limitations in Spaces 2 | 3 | In Hugging Face Spaces, applications have certain limitations when using cookies. This is primarily due to the structure of the Spaces' pages (`https://huggingface.co/spaces/ 23 |
23 |  24 |
24 |  11 |
11 | 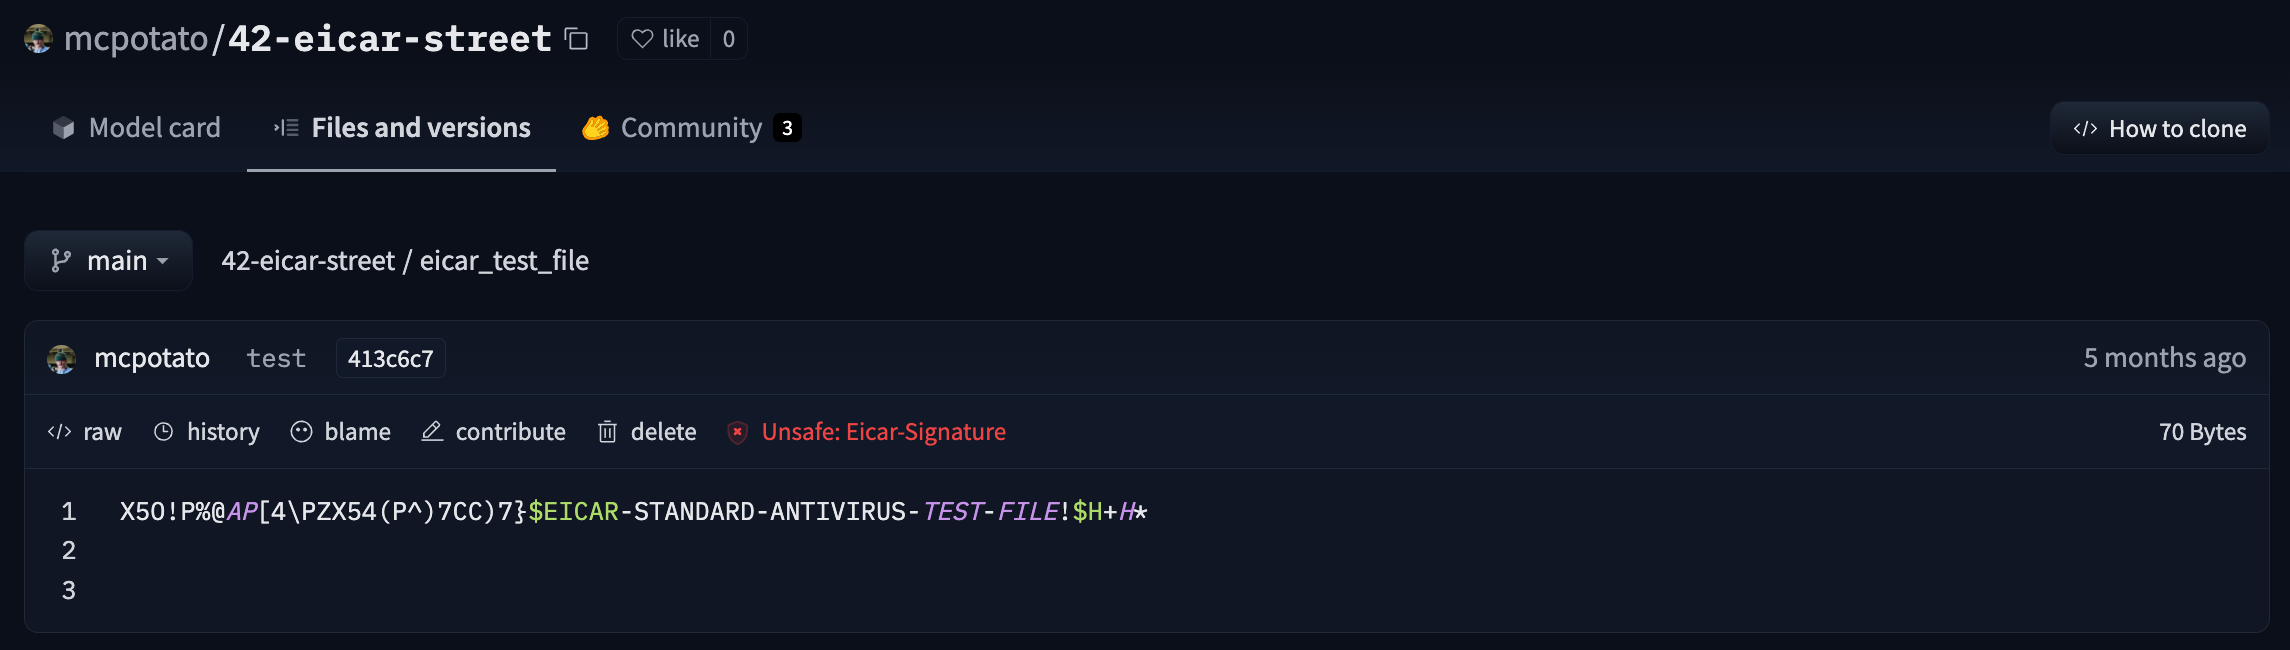 12 |
12 | 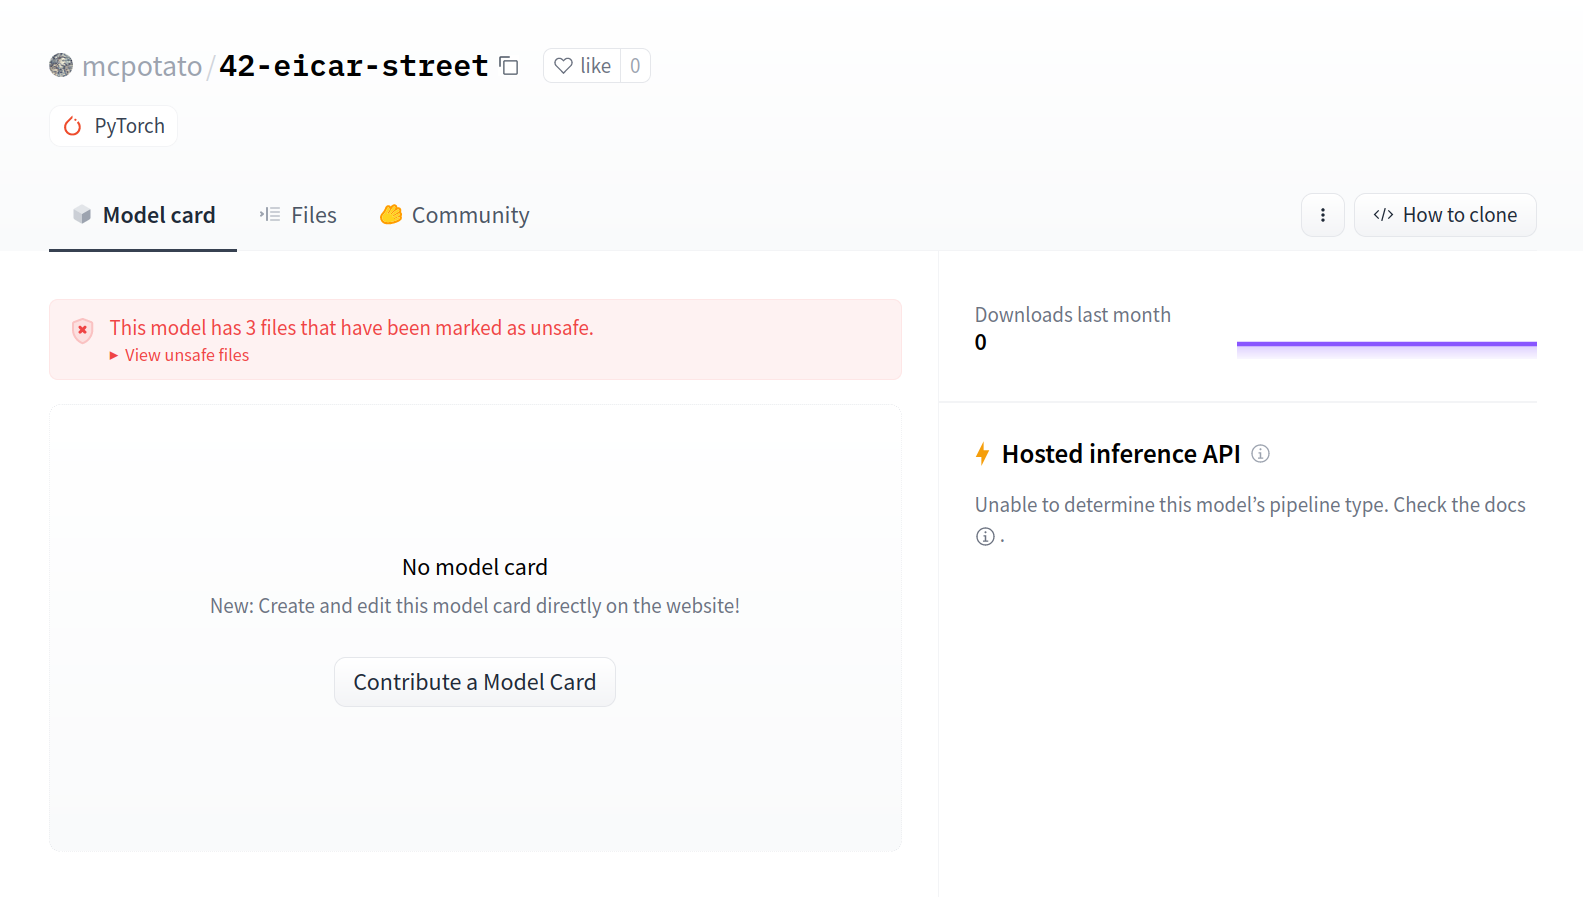 22 |
22 | 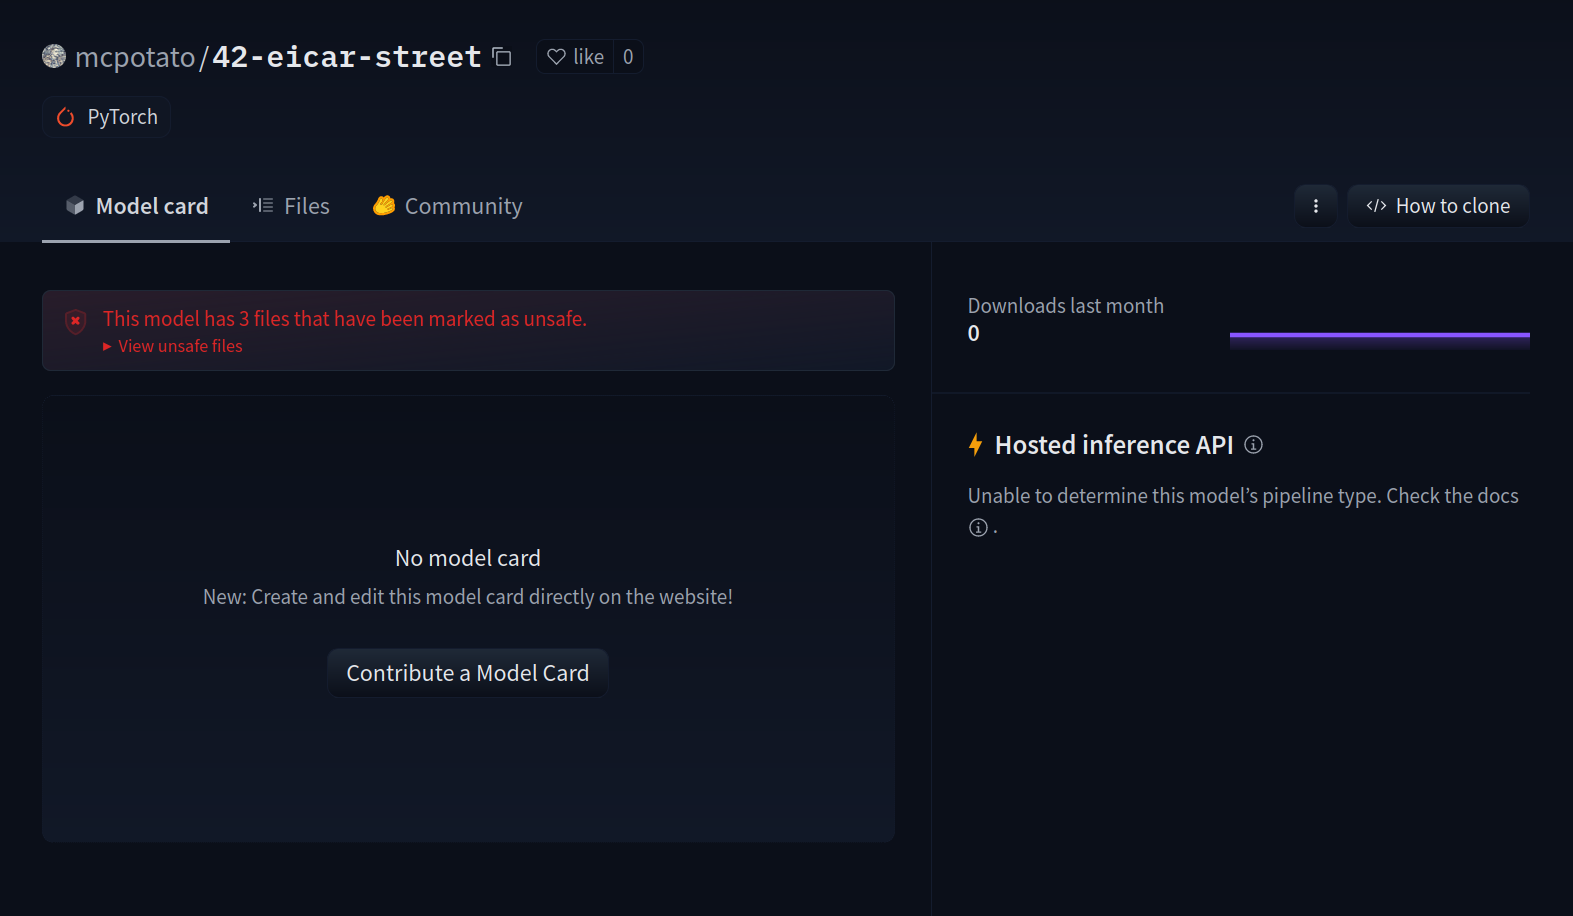 23 |
23 | 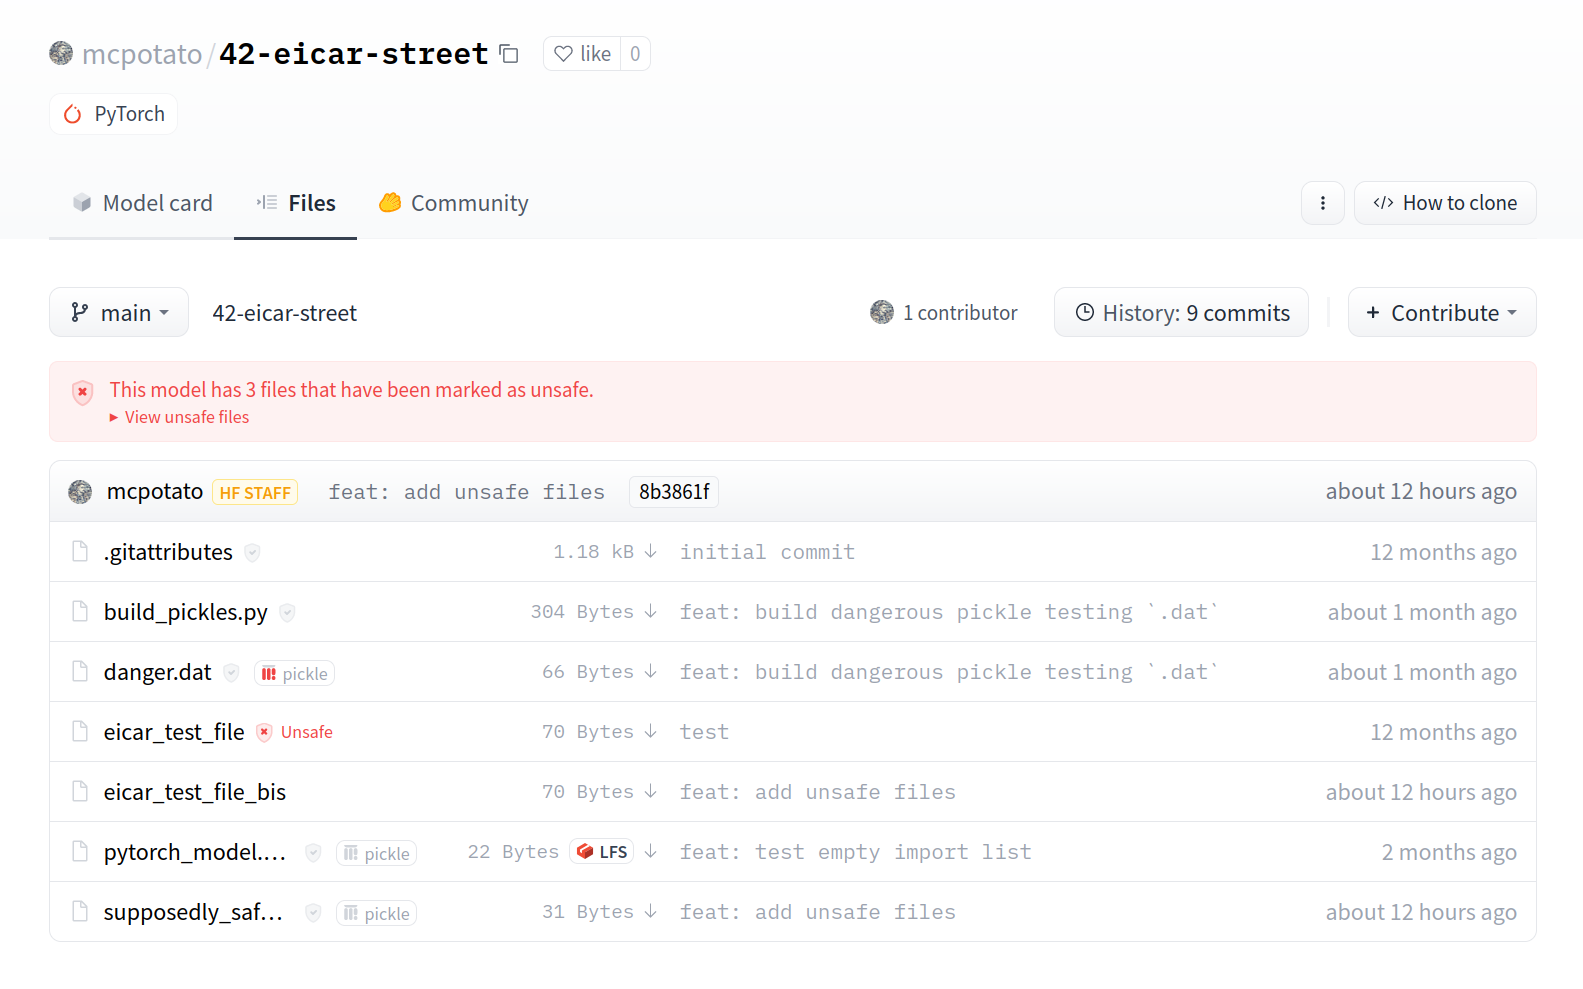 26 |
26 |  27 |
27 |  9 |
9 |  10 |
10 |  14 |
14 |  15 |
15 |  23 |
23 |  24 |
24 |  15 |
15 |  16 |
16 |  9 |
9 |  10 |
10 |  16 |
16 |  17 |
17 |  23 |
23 |  24 |
24 |  19 |
19 |  20 |
20 |  9 |
9 |  10 |
10 |  14 |
14 |  15 |
15 |  9 |
9 |  10 |
10 |  14 |
14 |  15 |
15 |  37 |
37 |  11 |
12 |
13 | Spaces requires you to define:
14 |
15 | * An **Owner**: either your personal account or an organization you're a
16 | part of.
17 |
18 | * A **Space name**: the name of the Space within the account
19 | you're creating the Space.
20 |
21 | * The **Visibility**: _private_ if you want the
22 | Space to be visible only to you or your organization, or _public_ if you want
23 | it to be visible to other users.
24 |
25 | * The **Hardware**: the hardware you want to use for your JupyterLab instance. This goes from CPUs to H100s.
26 |
27 | * You can optionally configure a `JUPYTER_TOKEN` password to protect your JupyterLab workspace. When unspecified, defaults to `huggingface`. We strongly recommend setting this up if your Space is public or if the Space is in an organization.
28 |
29 |
11 |
12 |
13 | Spaces requires you to define:
14 |
15 | * An **Owner**: either your personal account or an organization you're a
16 | part of.
17 |
18 | * A **Space name**: the name of the Space within the account
19 | you're creating the Space.
20 |
21 | * The **Visibility**: _private_ if you want the
22 | Space to be visible only to you or your organization, or _public_ if you want
23 | it to be visible to other users.
24 |
25 | * The **Hardware**: the hardware you want to use for your JupyterLab instance. This goes from CPUs to H100s.
26 |
27 | * You can optionally configure a `JUPYTER_TOKEN` password to protect your JupyterLab workspace. When unspecified, defaults to `huggingface`. We strongly recommend setting this up if your Space is public or if the Space is in an organization.
28 |
29 | | Python (original) | 19 |Javascript (ours) | 20 |
|---|---|
| 23 | 24 | ```python 25 | from transformers import pipeline 26 | 27 | # Allocate a pipeline for sentiment-analysis 28 | pipe = pipeline('sentiment-analysis') 29 | 30 | out = pipe('I love transformers!') 31 | # [{'label': 'POSITIVE', 'score': 0.999806941}] 32 | ``` 33 | 34 | | 35 |36 | 37 | ```javascript 38 | import { pipeline } from '@xenova/transformers'; 39 | 40 | // Allocate a pipeline for sentiment-analysis 41 | let pipe = await pipeline('sentiment-analysis'); 42 | 43 | let out = await pipe('I love transformers!'); 44 | // [{'label': 'POSITIVE', 'score': 0.999817686}] 45 | ``` 46 | 47 | | 48 |
 35 |
35 |  36 |
36 | 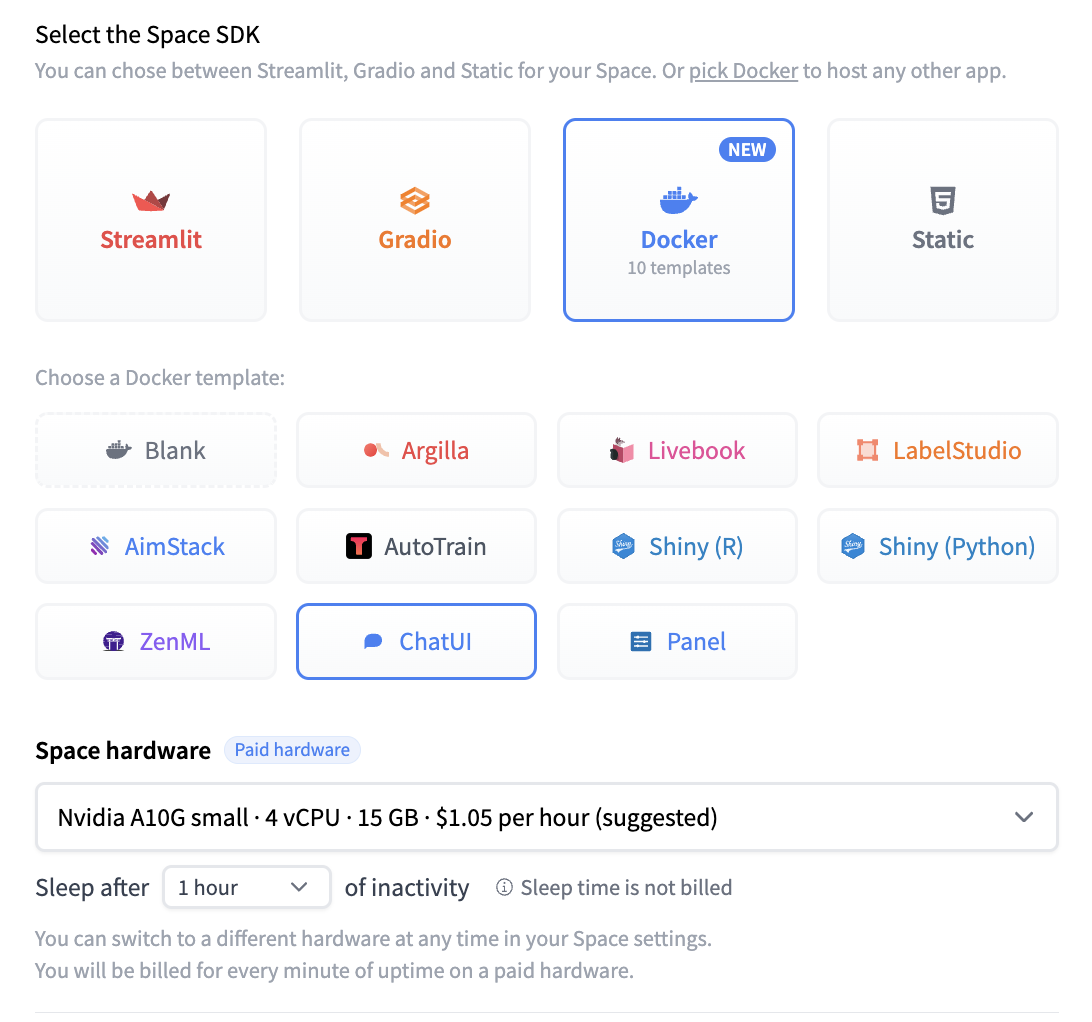 11 |
12 |
13 | You should provide a MongoDB endpoint where your chats will be written. If you leave this section blank, your logs will be persisted to a database inside the Space. Note that Hugging Face does not have access to your chats. You can configure the name and the theme of the Space by providing the application name and application color parameters.
14 | Below this, you can select the Hugging Face Hub ID of the model you wish to serve. You can also change the generation hyperparameters in the dictionary below in JSON format.
15 |
16 | _Note_: If you'd like to deploy a model with gated access or a model in a private repository, you can simply provide `HF_TOKEN` in repository secrets. You need to set its value to an access token you can get from [here](https://huggingface.co/settings/tokens).
17 |
18 |
19 |
11 |
12 |
13 | You should provide a MongoDB endpoint where your chats will be written. If you leave this section blank, your logs will be persisted to a database inside the Space. Note that Hugging Face does not have access to your chats. You can configure the name and the theme of the Space by providing the application name and application color parameters.
14 | Below this, you can select the Hugging Face Hub ID of the model you wish to serve. You can also change the generation hyperparameters in the dictionary below in JSON format.
15 |
16 | _Note_: If you'd like to deploy a model with gated access or a model in a private repository, you can simply provide `HF_TOKEN` in repository secrets. You need to set its value to an access token you can get from [here](https://huggingface.co/settings/tokens).
17 |
18 |
19 | 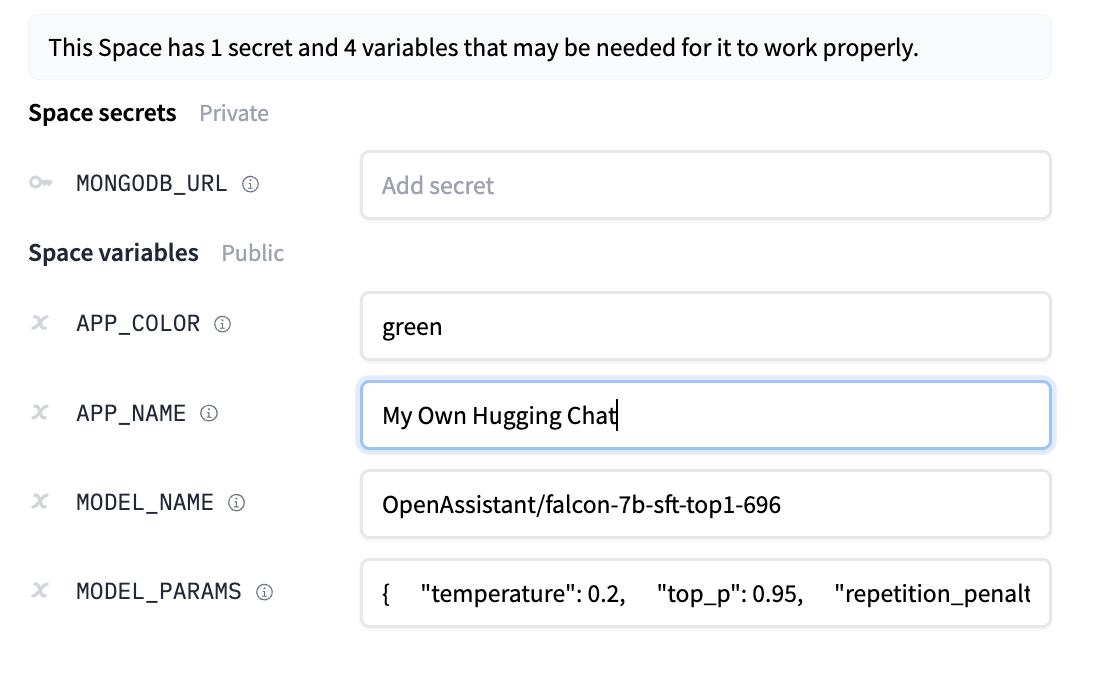 20 |
21 |
22 | Once the creation is complete, you will see `Building` on your Space. Once built, you can try your own HuggingChat!
23 |
24 |
25 |
20 |
21 |
22 | Once the creation is complete, you will see `Building` on your Space. Once built, you can try your own HuggingChat!
23 |
24 |
25 | 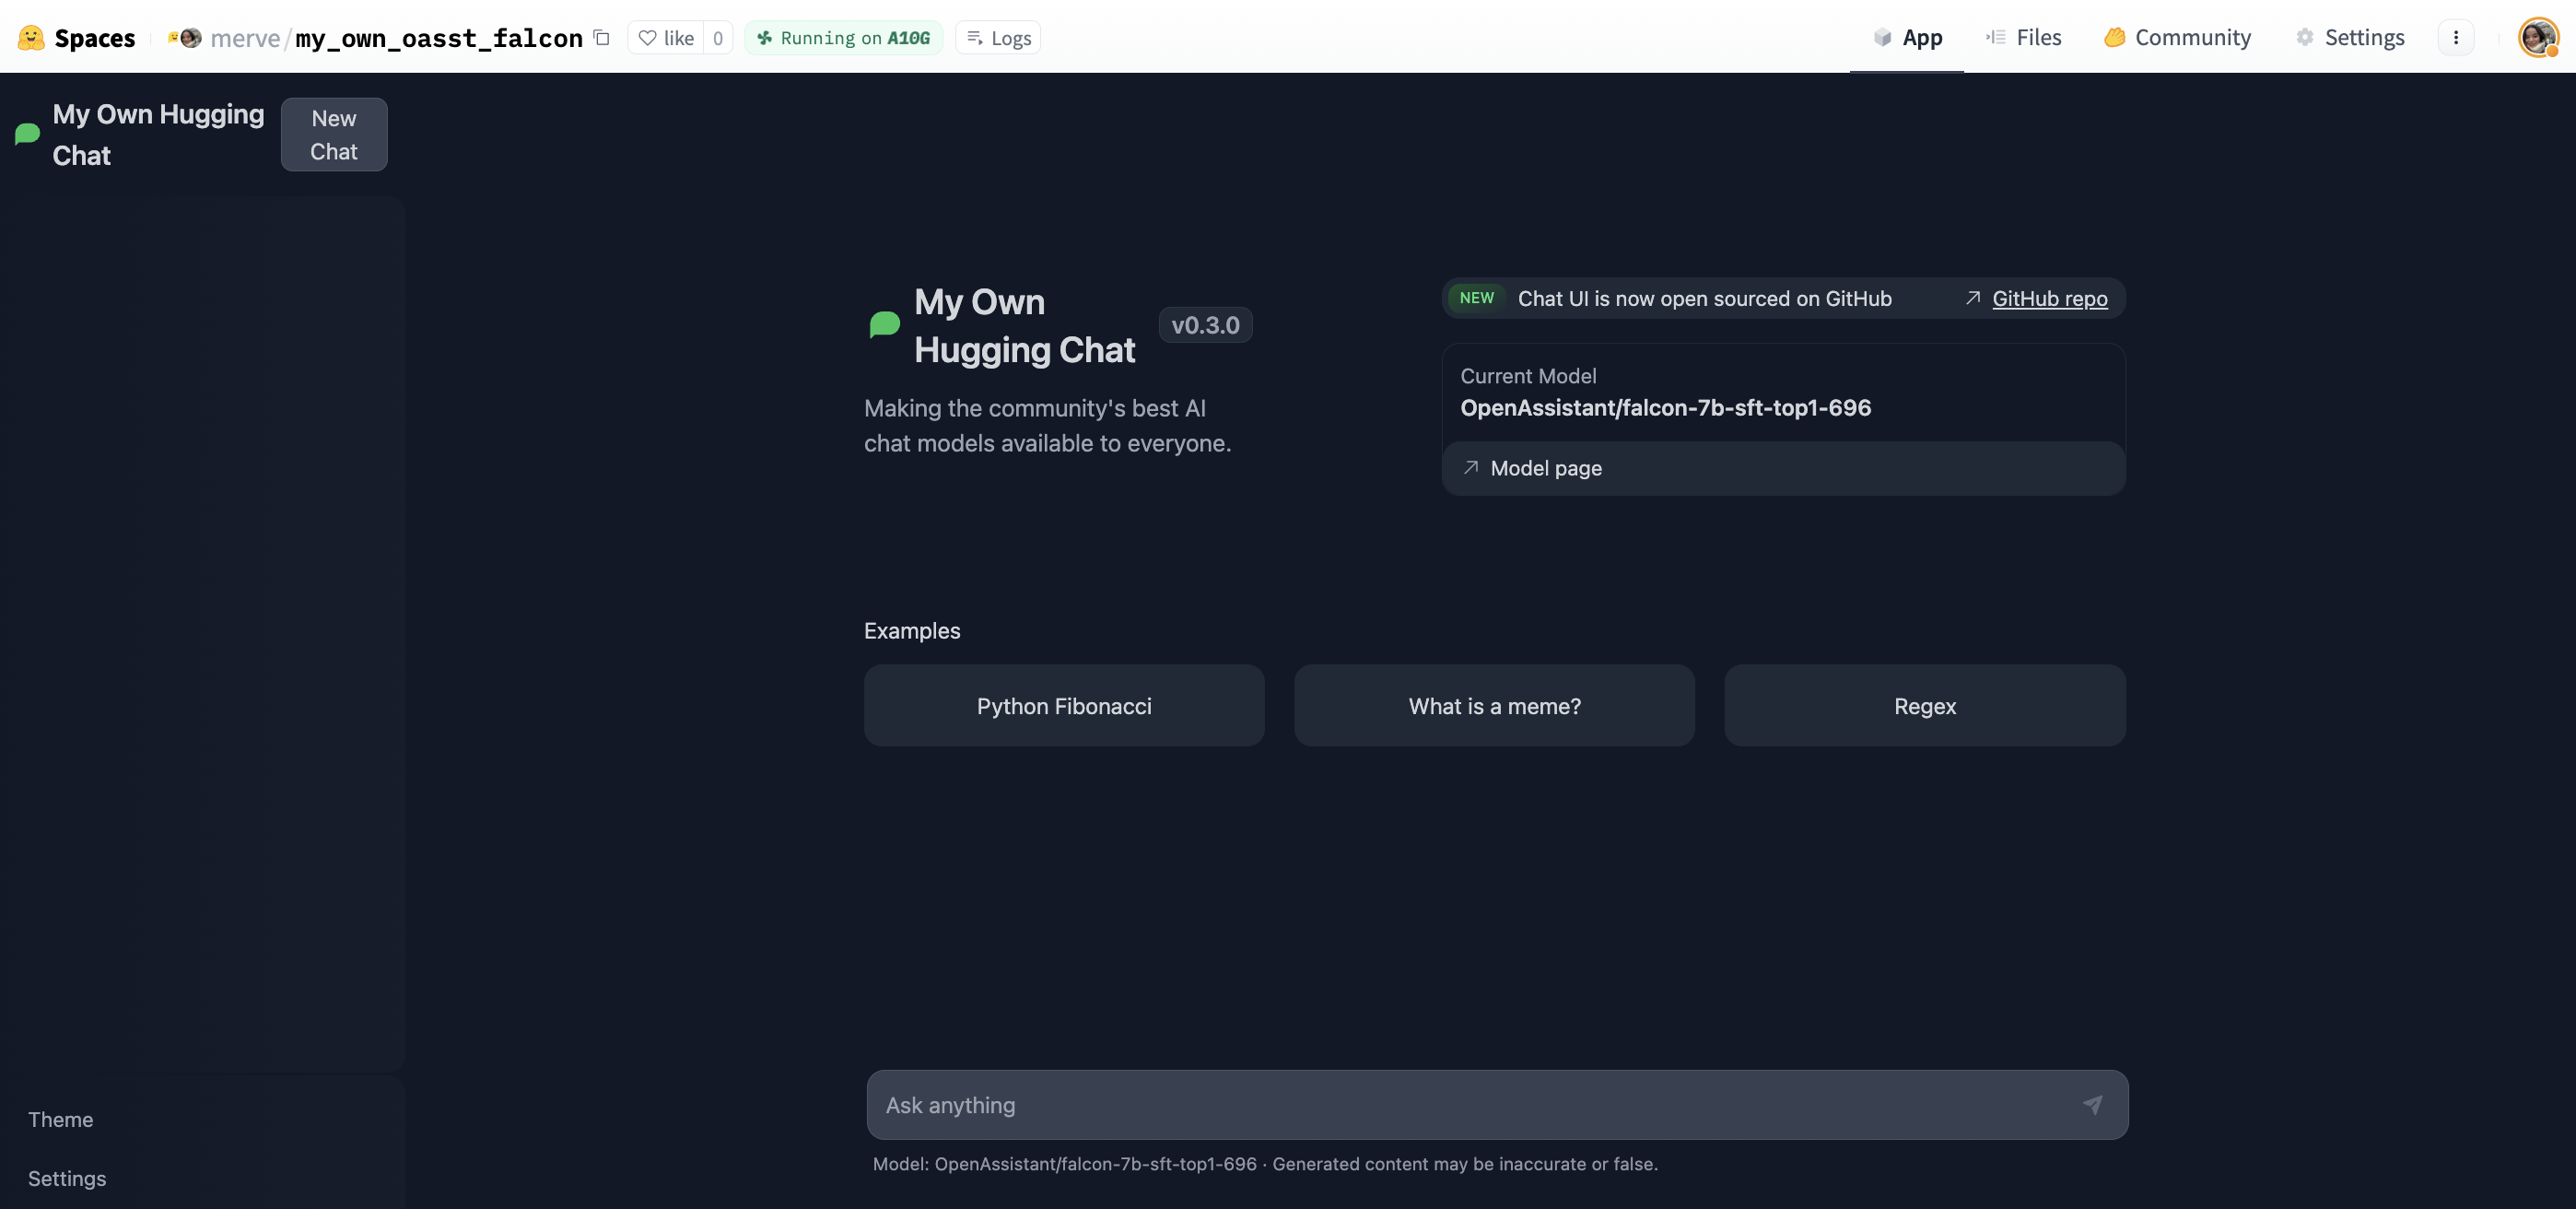 26 |
27 |
28 | Start chatting!
29 |
30 |
31 |
26 |
27 |
28 | Start chatting!
29 |
30 |
31 | 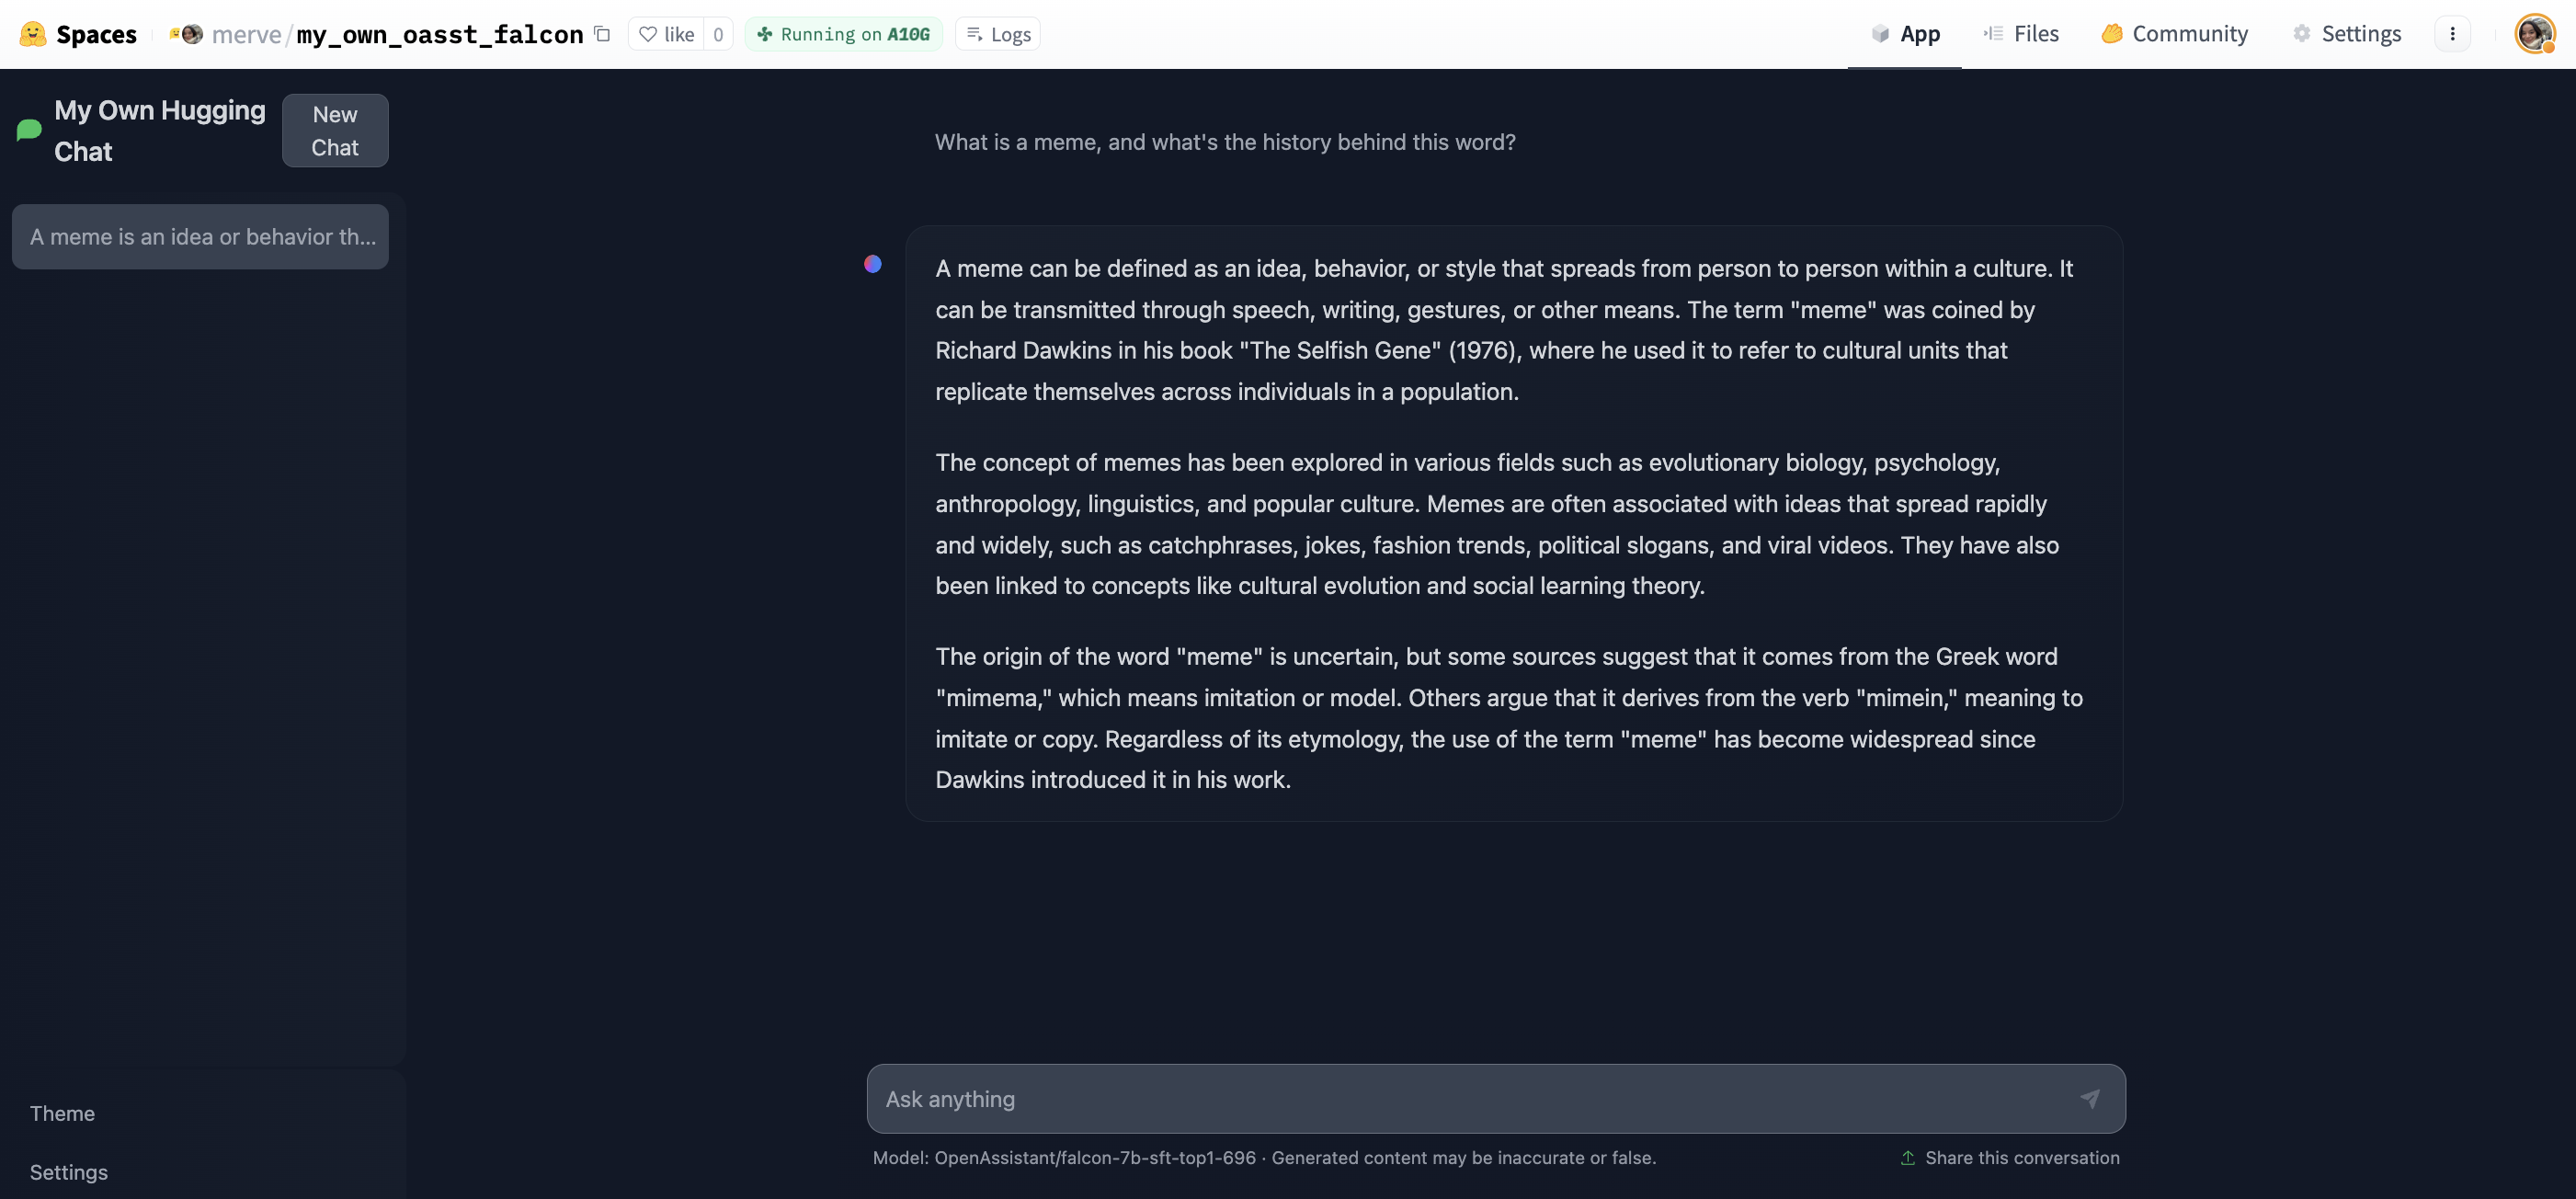 32 |
33 |
34 | ## Read more
35 |
36 | - [HF Docker Spaces](https://huggingface.co/docs/hub/spaces-sdks-docker)
37 | - [chat-ui GitHub Repository](https://github.com/huggingface/chat-ui)
38 | - [text-generation-inference GitHub repository](https://github.com/huggingface/text-generation-inference)
39 |
--------------------------------------------------------------------------------
/docs/hub/speechbrain.md:
--------------------------------------------------------------------------------
1 | # Using SpeechBrain at Hugging Face
2 |
3 | `speechbrain` is an open-source and all-in-one conversational toolkit for audio/speech. The goal is to create a single, flexible, and user-friendly toolkit that can be used to easily develop state-of-the-art speech technologies, including systems for speech recognition, speaker recognition, speech enhancement, speech separation, language identification, multi-microphone signal processing, and many others.
4 |
5 | ## Exploring SpeechBrain in the Hub
6 |
7 | You can find `speechbrain` models by filtering at the left of the [models page](https://huggingface.co/models?library=speechbrain).
8 |
9 | All models on the Hub come up with the following features:
10 | 1. An automatically generated model card with a brief description.
11 | 2. Metadata tags that help for discoverability with information such as the language, license, paper, and more.
12 | 3. An interactive widget you can use to play out with the model directly in the browser.
13 | 4. An Inference API that allows to make inference requests.
14 |
15 | ## Using existing models
16 |
17 | `speechbrain` offers different interfaces to manage pretrained models for different tasks, such as `EncoderClassifier`, `EncoderClassifier`, `SepformerSeperation`, and `SpectralMaskEnhancement`. These classes have a `from_hparams` method you can use to load a model from the Hub
18 |
19 | Here is an example to run inference for sound recognition in urban sounds.
20 |
21 | ```py
22 | import torchaudio
23 | from speechbrain.pretrained import EncoderClassifier
24 |
25 | classifier = EncoderClassifier.from_hparams(
26 | source="speechbrain/urbansound8k_ecapa"
27 | )
28 | out_prob, score, index, text_lab = classifier.classify_file('speechbrain/urbansound8k_ecapa/dog_bark.wav')
29 | ```
30 |
31 | If you want to see how to load a specific model, you can click `Use in speechbrain` and you will be given a working snippet that you can load it!
32 |
33 |
32 |
33 |
34 | ## Read more
35 |
36 | - [HF Docker Spaces](https://huggingface.co/docs/hub/spaces-sdks-docker)
37 | - [chat-ui GitHub Repository](https://github.com/huggingface/chat-ui)
38 | - [text-generation-inference GitHub repository](https://github.com/huggingface/text-generation-inference)
39 |
--------------------------------------------------------------------------------
/docs/hub/speechbrain.md:
--------------------------------------------------------------------------------
1 | # Using SpeechBrain at Hugging Face
2 |
3 | `speechbrain` is an open-source and all-in-one conversational toolkit for audio/speech. The goal is to create a single, flexible, and user-friendly toolkit that can be used to easily develop state-of-the-art speech technologies, including systems for speech recognition, speaker recognition, speech enhancement, speech separation, language identification, multi-microphone signal processing, and many others.
4 |
5 | ## Exploring SpeechBrain in the Hub
6 |
7 | You can find `speechbrain` models by filtering at the left of the [models page](https://huggingface.co/models?library=speechbrain).
8 |
9 | All models on the Hub come up with the following features:
10 | 1. An automatically generated model card with a brief description.
11 | 2. Metadata tags that help for discoverability with information such as the language, license, paper, and more.
12 | 3. An interactive widget you can use to play out with the model directly in the browser.
13 | 4. An Inference API that allows to make inference requests.
14 |
15 | ## Using existing models
16 |
17 | `speechbrain` offers different interfaces to manage pretrained models for different tasks, such as `EncoderClassifier`, `EncoderClassifier`, `SepformerSeperation`, and `SpectralMaskEnhancement`. These classes have a `from_hparams` method you can use to load a model from the Hub
18 |
19 | Here is an example to run inference for sound recognition in urban sounds.
20 |
21 | ```py
22 | import torchaudio
23 | from speechbrain.pretrained import EncoderClassifier
24 |
25 | classifier = EncoderClassifier.from_hparams(
26 | source="speechbrain/urbansound8k_ecapa"
27 | )
28 | out_prob, score, index, text_lab = classifier.classify_file('speechbrain/urbansound8k_ecapa/dog_bark.wav')
29 | ```
30 |
31 | If you want to see how to load a specific model, you can click `Use in speechbrain` and you will be given a working snippet that you can load it!
32 |
33 |  35 |
35 |  36 |
36 | 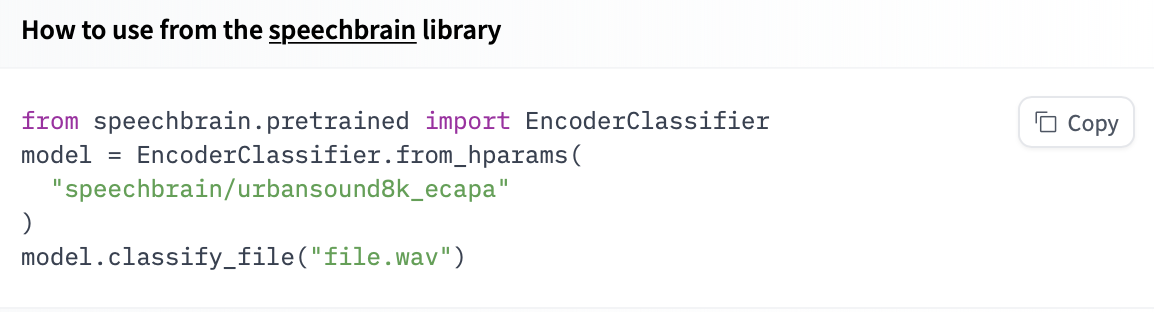 39 |
39 |  40 |
40 |  19 |
19 |  20 |
20 |  45 |
45 |  17 |
17 |  57 |
57 |  58 |
58 |  61 |
61 |  62 |
62 |  31 |
31 |  32 |
32 |  49 |
49 |  50 |
50 |  41 |
41 |  42 |
42 |  45 |
45 |  46 |
46 |  17 |
17 |  18 |
18 |  44 |
44 |  45 |
45 |  20 |
20 |  64 |
64 |  65 |
65 |  68 |
68 |  69 |
69 |  7 |
7 |  8 |
8 |  19 |
19 |  20 |
20 |  28 |
28 |  29 |
29 |  35 |
35 |  36 |
36 |  11 |
11 |  12 |
12 |  17 |
17 |  18 |
18 |  24 |
24 |  25 |
25 |  34 |
34 |  35 |
35 |  66 |
66 |  67 |
67 |  70 |
70 |  71 |
71 |  37 |
37 |  38 |
57 |
58 |
38 |
57 |
58 |  13 |
13 |  14 |
14 |  30 |
30 |  31 |
31 |  64 |
64 |  65 |
17 |
18 |
19 | Once you have created the Space, you'll see the `Building` status, and once it becomes `Running,` your Space is ready to go!
20 |
21 |
65 |
17 |
18 |
19 | Once you have created the Space, you'll see the `Building` status, and once it becomes `Running,` your Space is ready to go!
20 |
21 |  22 |
23 | Now, when you navigate to your Space's **App** section, you can access the Aim UI.
24 |
25 | ## Compare your experiments with Aim on Spaces
26 |
27 | Let's use a quick example of a PyTorch CNN trained on MNIST to demonstrate end-to-end Aim on Spaces deployment.
28 | The full example is in the [Aim repo examples folder](https://github.com/aimhubio/aim/blob/main/examples/pytorch_track.py).
29 |
30 | ```python
31 | from aim import Run
32 | from aim.pytorch import track_gradients_dists, track_params_dists
33 |
34 | # Initialize a new Run
35 | aim_run = Run()
36 | ...
37 | items = {'accuracy': acc, 'loss': loss}
38 | aim_run.track(items, epoch=epoch, context={'subset': 'train'})
39 |
40 | # Track weights and gradients distributions
41 | track_params_dists(model, aim_run)
42 | track_gradients_dists(model, aim_run)
43 | ```
44 |
45 | The experiments tracked by Aim are stored in the `.aim` folder. **To display the logs with the Aim UI in your Space, you need to compress the `.aim` folder to a `tar.gz` file and upload it to your Space using `git` or the Files and Versions sections of your Space.**
46 |
47 | Here's a bash command for that:
48 |
49 | ```bash
50 | tar -czvf aim_repo.tar.gz .aim
51 | ```
52 |
53 | That’s it! Now open the App section of your Space and the Aim UI is available with your logs.
54 | Here is what to expect:
55 |
56 | 
57 |
58 | Filter your runs using Aim’s Pythonic search. You can write pythonic [queries against](https://aimstack.readthedocs.io/en/latest/using/search.html) EVERYTHING you have tracked - metrics, hyperparams etc. Check out some [examples](https://huggingface.co/aimstack) on HF Hub Spaces.
59 |
60 |
22 |
23 | Now, when you navigate to your Space's **App** section, you can access the Aim UI.
24 |
25 | ## Compare your experiments with Aim on Spaces
26 |
27 | Let's use a quick example of a PyTorch CNN trained on MNIST to demonstrate end-to-end Aim on Spaces deployment.
28 | The full example is in the [Aim repo examples folder](https://github.com/aimhubio/aim/blob/main/examples/pytorch_track.py).
29 |
30 | ```python
31 | from aim import Run
32 | from aim.pytorch import track_gradients_dists, track_params_dists
33 |
34 | # Initialize a new Run
35 | aim_run = Run()
36 | ...
37 | items = {'accuracy': acc, 'loss': loss}
38 | aim_run.track(items, epoch=epoch, context={'subset': 'train'})
39 |
40 | # Track weights and gradients distributions
41 | track_params_dists(model, aim_run)
42 | track_gradients_dists(model, aim_run)
43 | ```
44 |
45 | The experiments tracked by Aim are stored in the `.aim` folder. **To display the logs with the Aim UI in your Space, you need to compress the `.aim` folder to a `tar.gz` file and upload it to your Space using `git` or the Files and Versions sections of your Space.**
46 |
47 | Here's a bash command for that:
48 |
49 | ```bash
50 | tar -czvf aim_repo.tar.gz .aim
51 | ```
52 |
53 | That’s it! Now open the App section of your Space and the Aim UI is available with your logs.
54 | Here is what to expect:
55 |
56 | 
57 |
58 | Filter your runs using Aim’s Pythonic search. You can write pythonic [queries against](https://aimstack.readthedocs.io/en/latest/using/search.html) EVERYTHING you have tracked - metrics, hyperparams etc. Check out some [examples](https://huggingface.co/aimstack) on HF Hub Spaces.
59 |
60 | 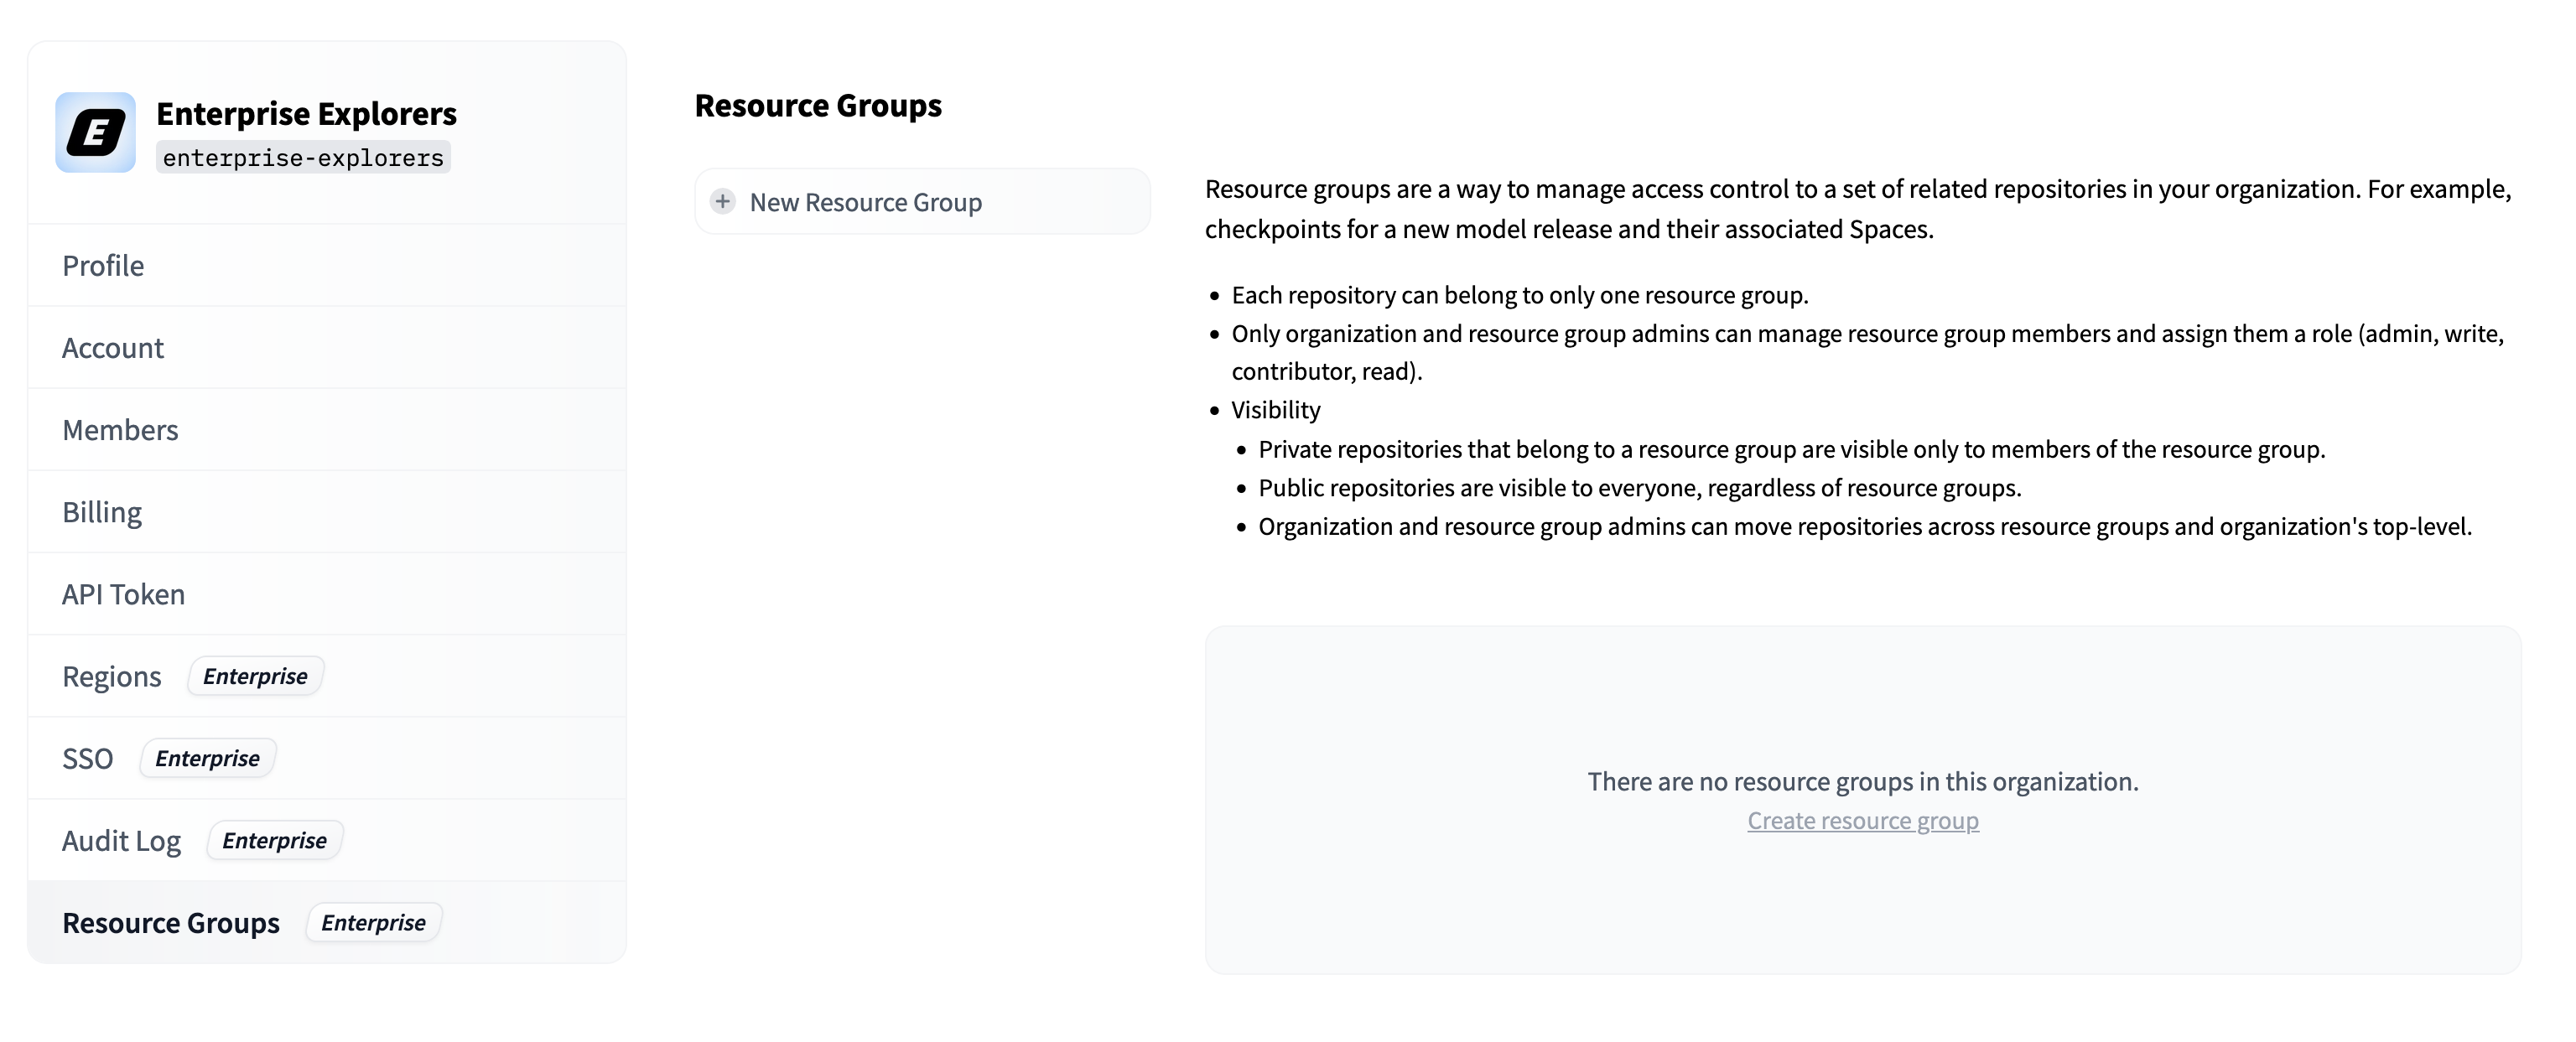 36 |
36 | 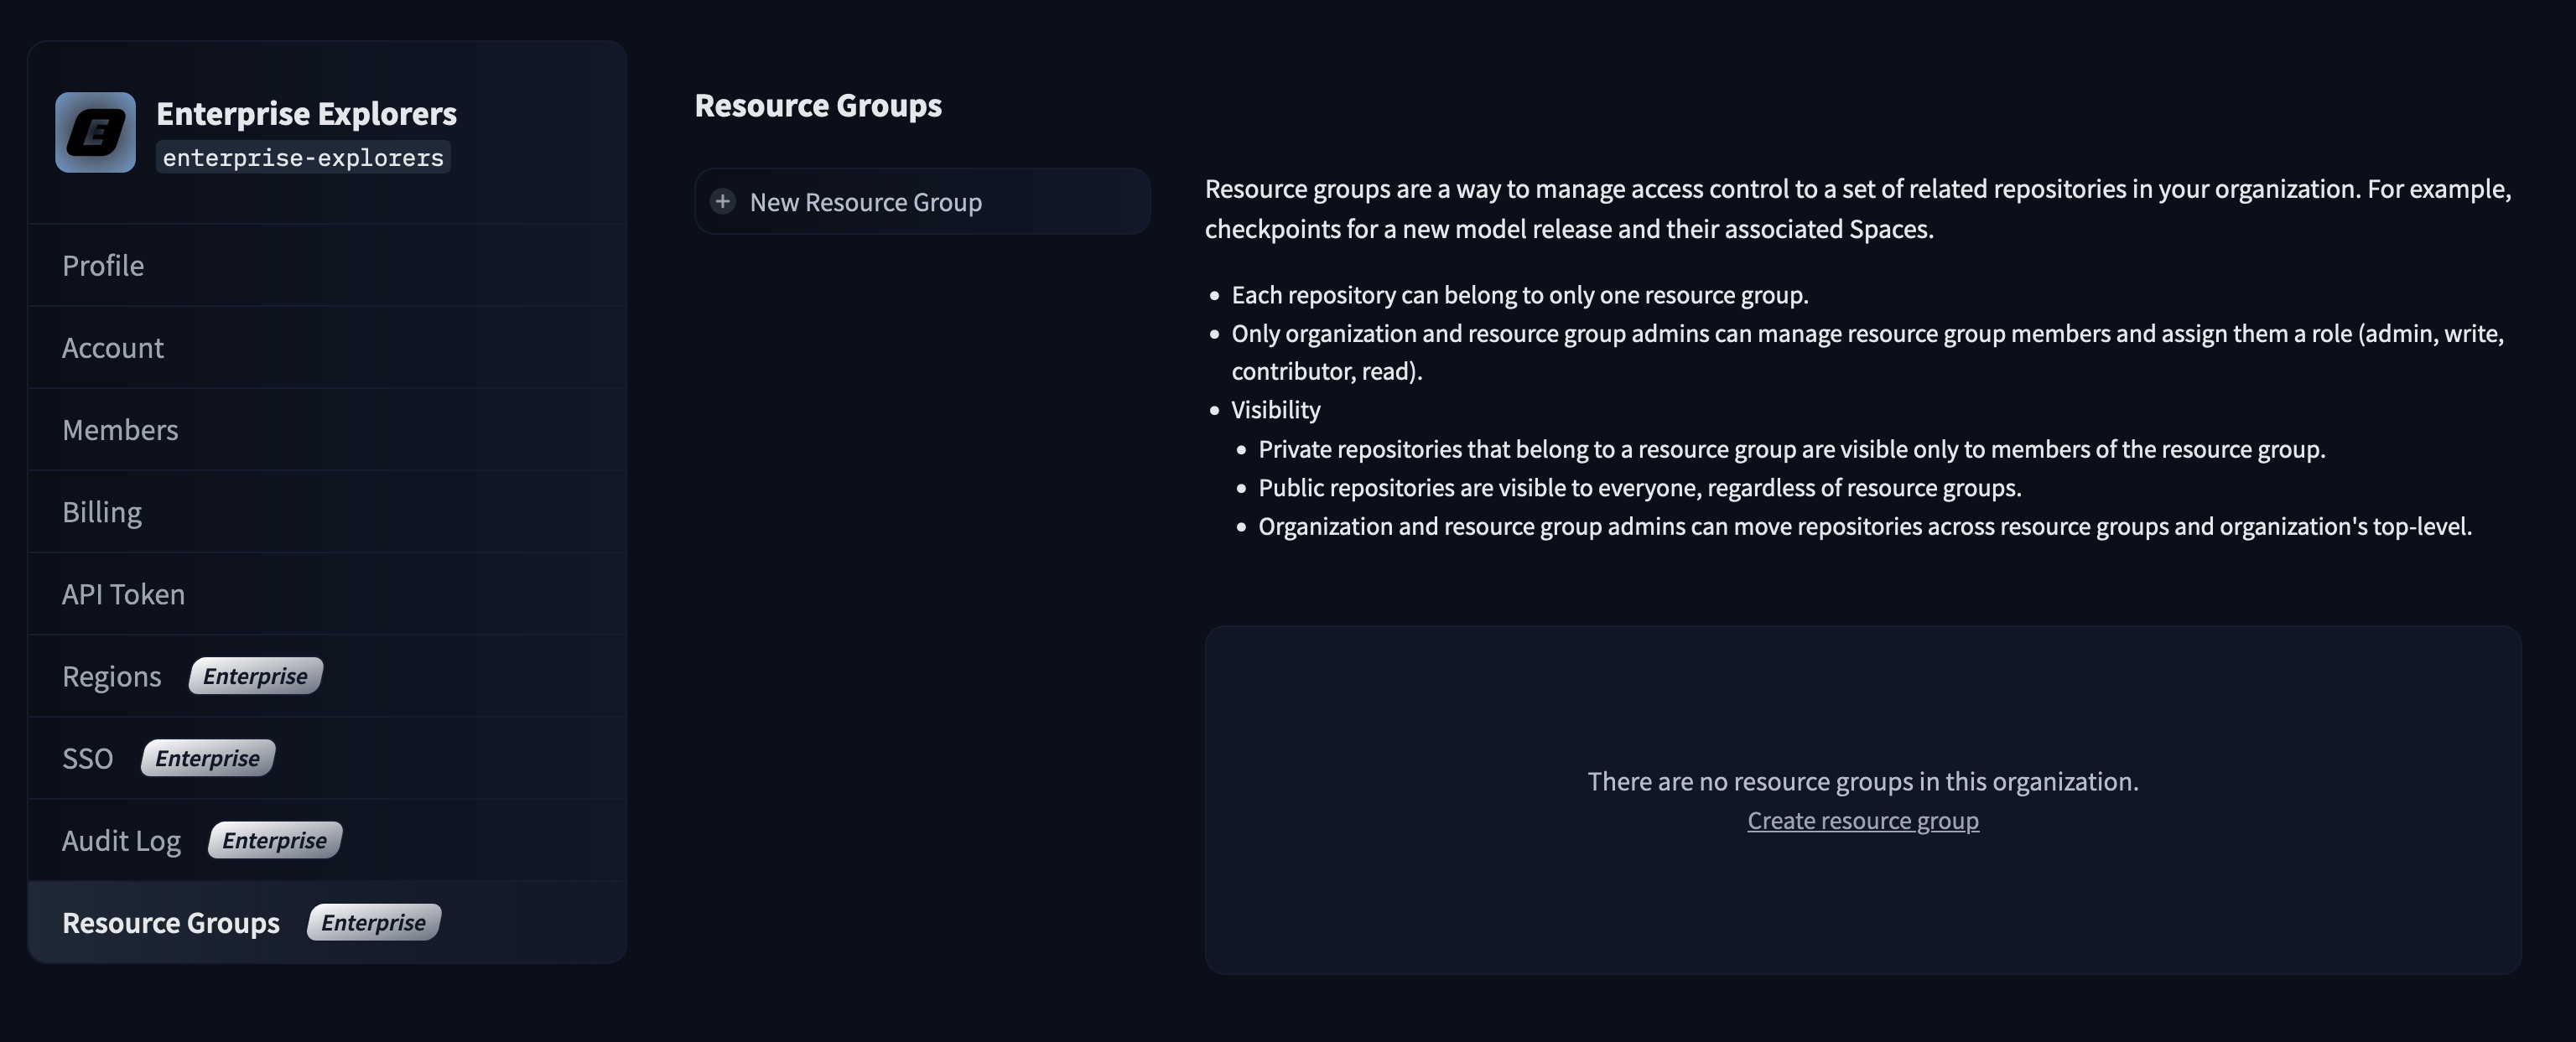 37 |
37 | 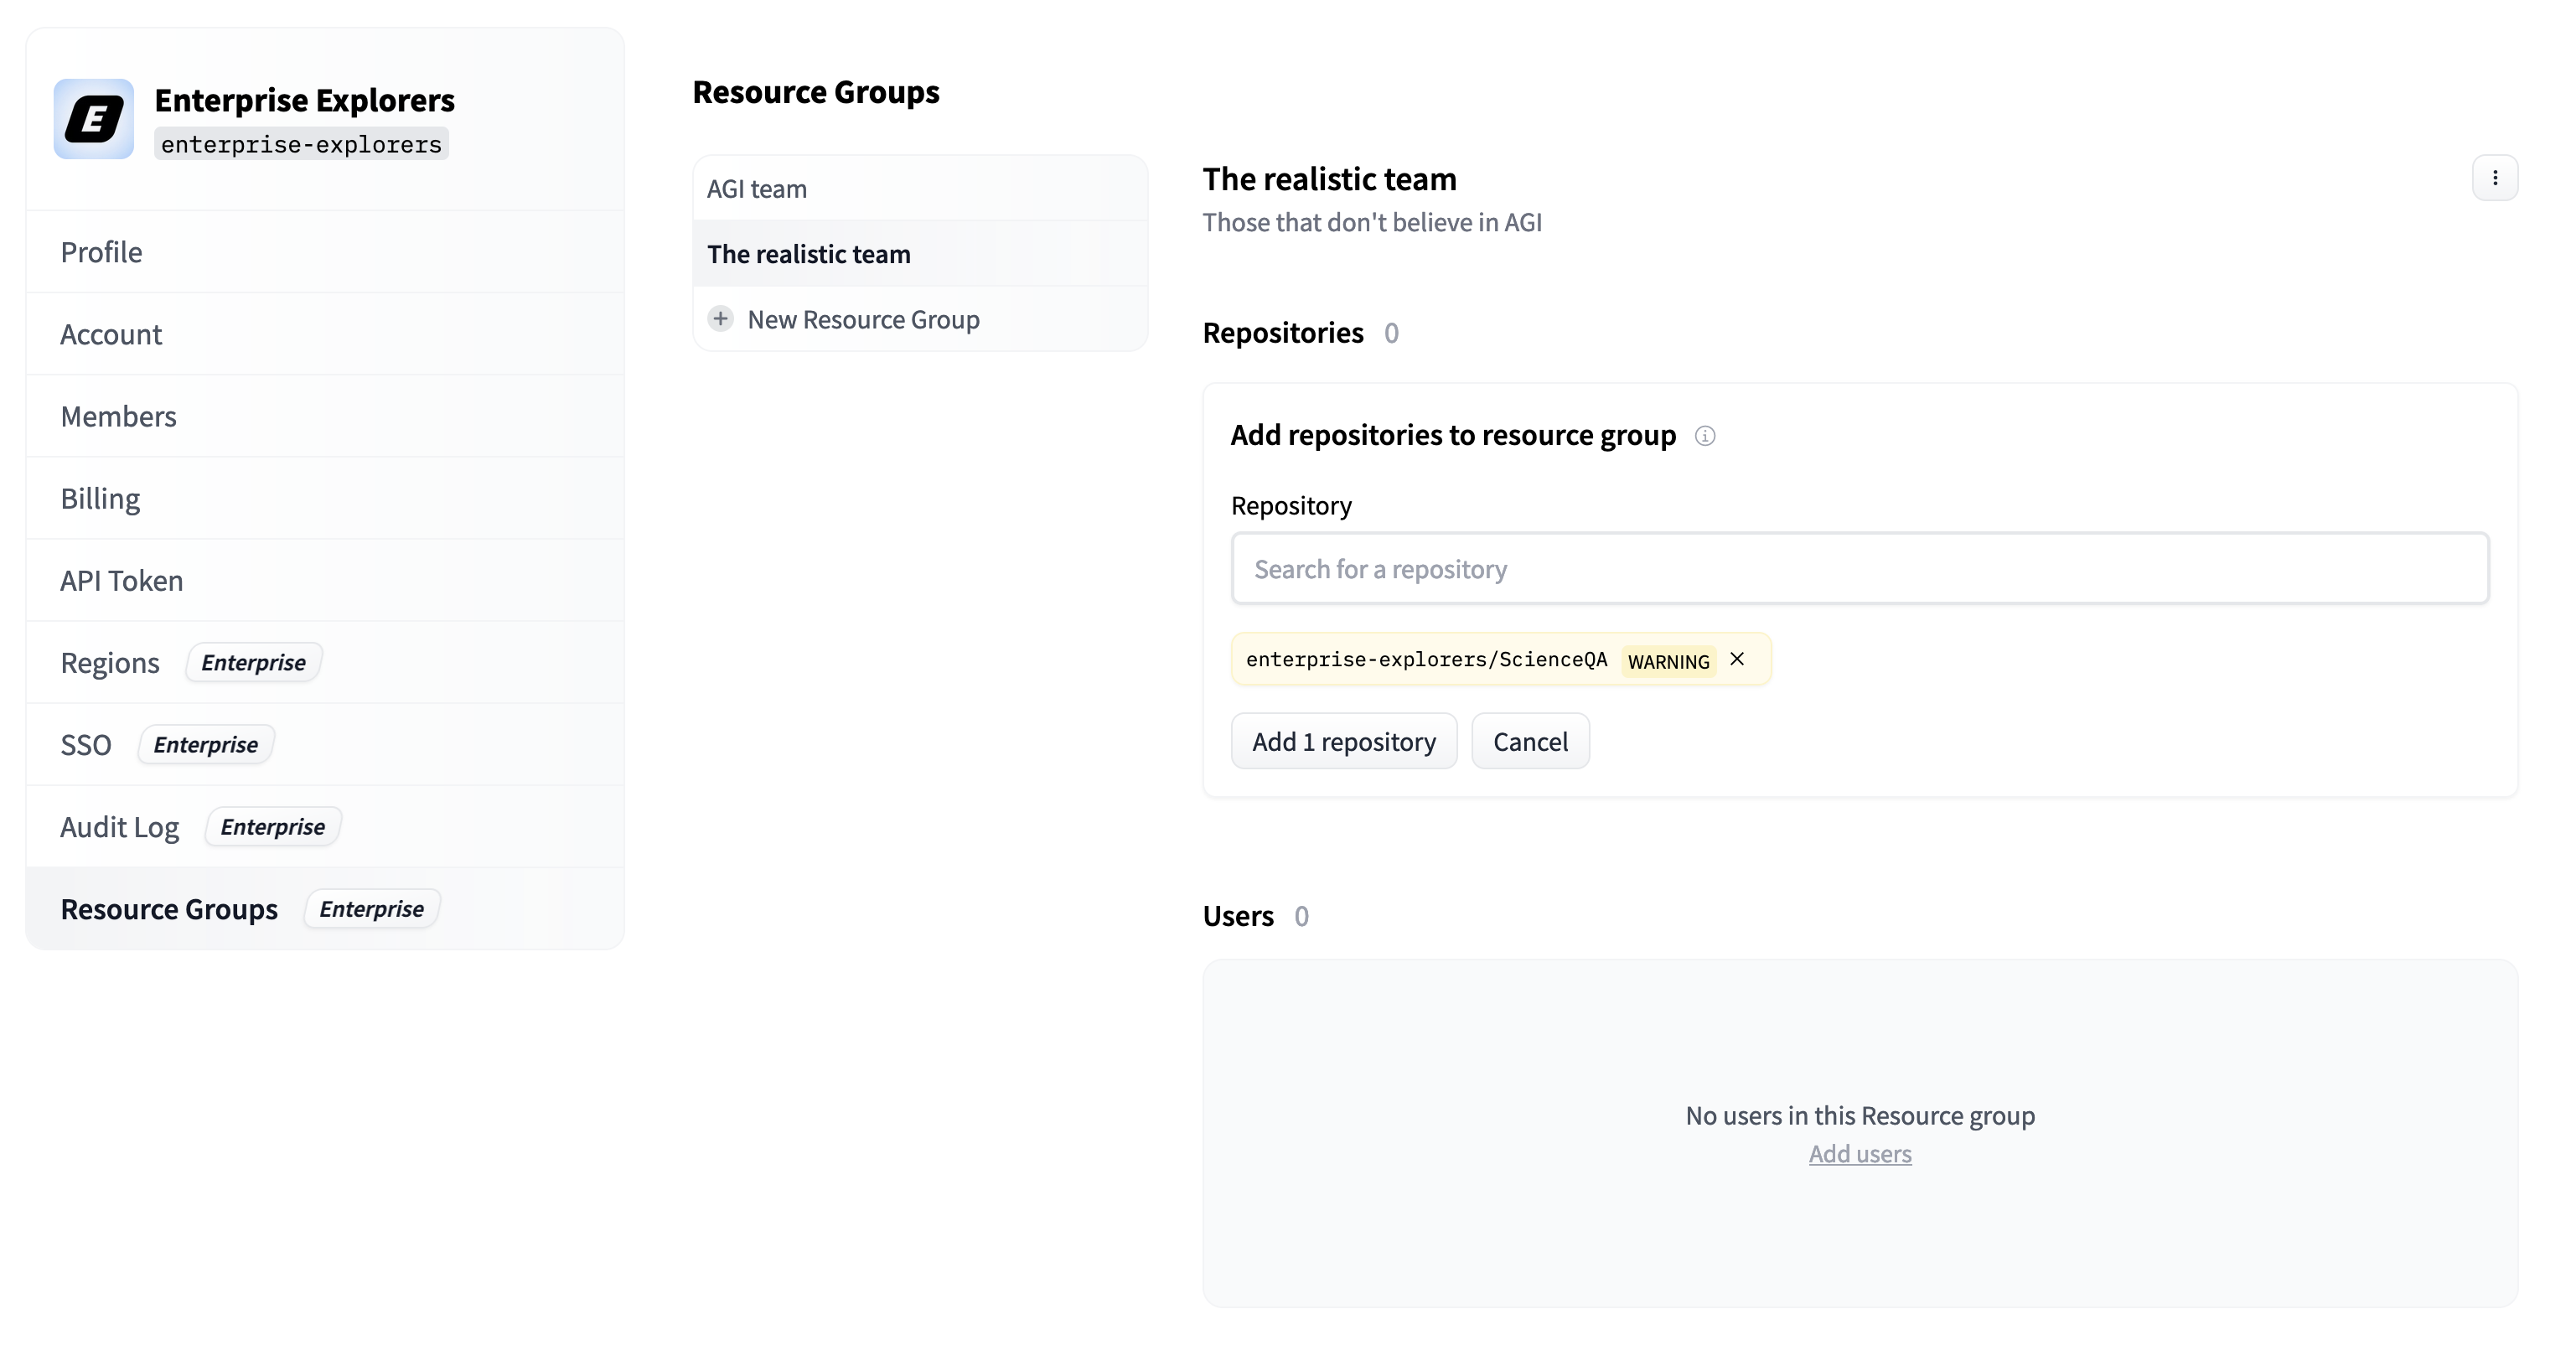 52 |
52 |  53 |
53 |  15 |
15 |  16 |
16 |  9 |
9 |  10 |
10 |  20 |
20 |  21 |
42 |
43 |
21 |
42 |
43 |  21 |
21 |  22 |
22 |  45 |
45 | 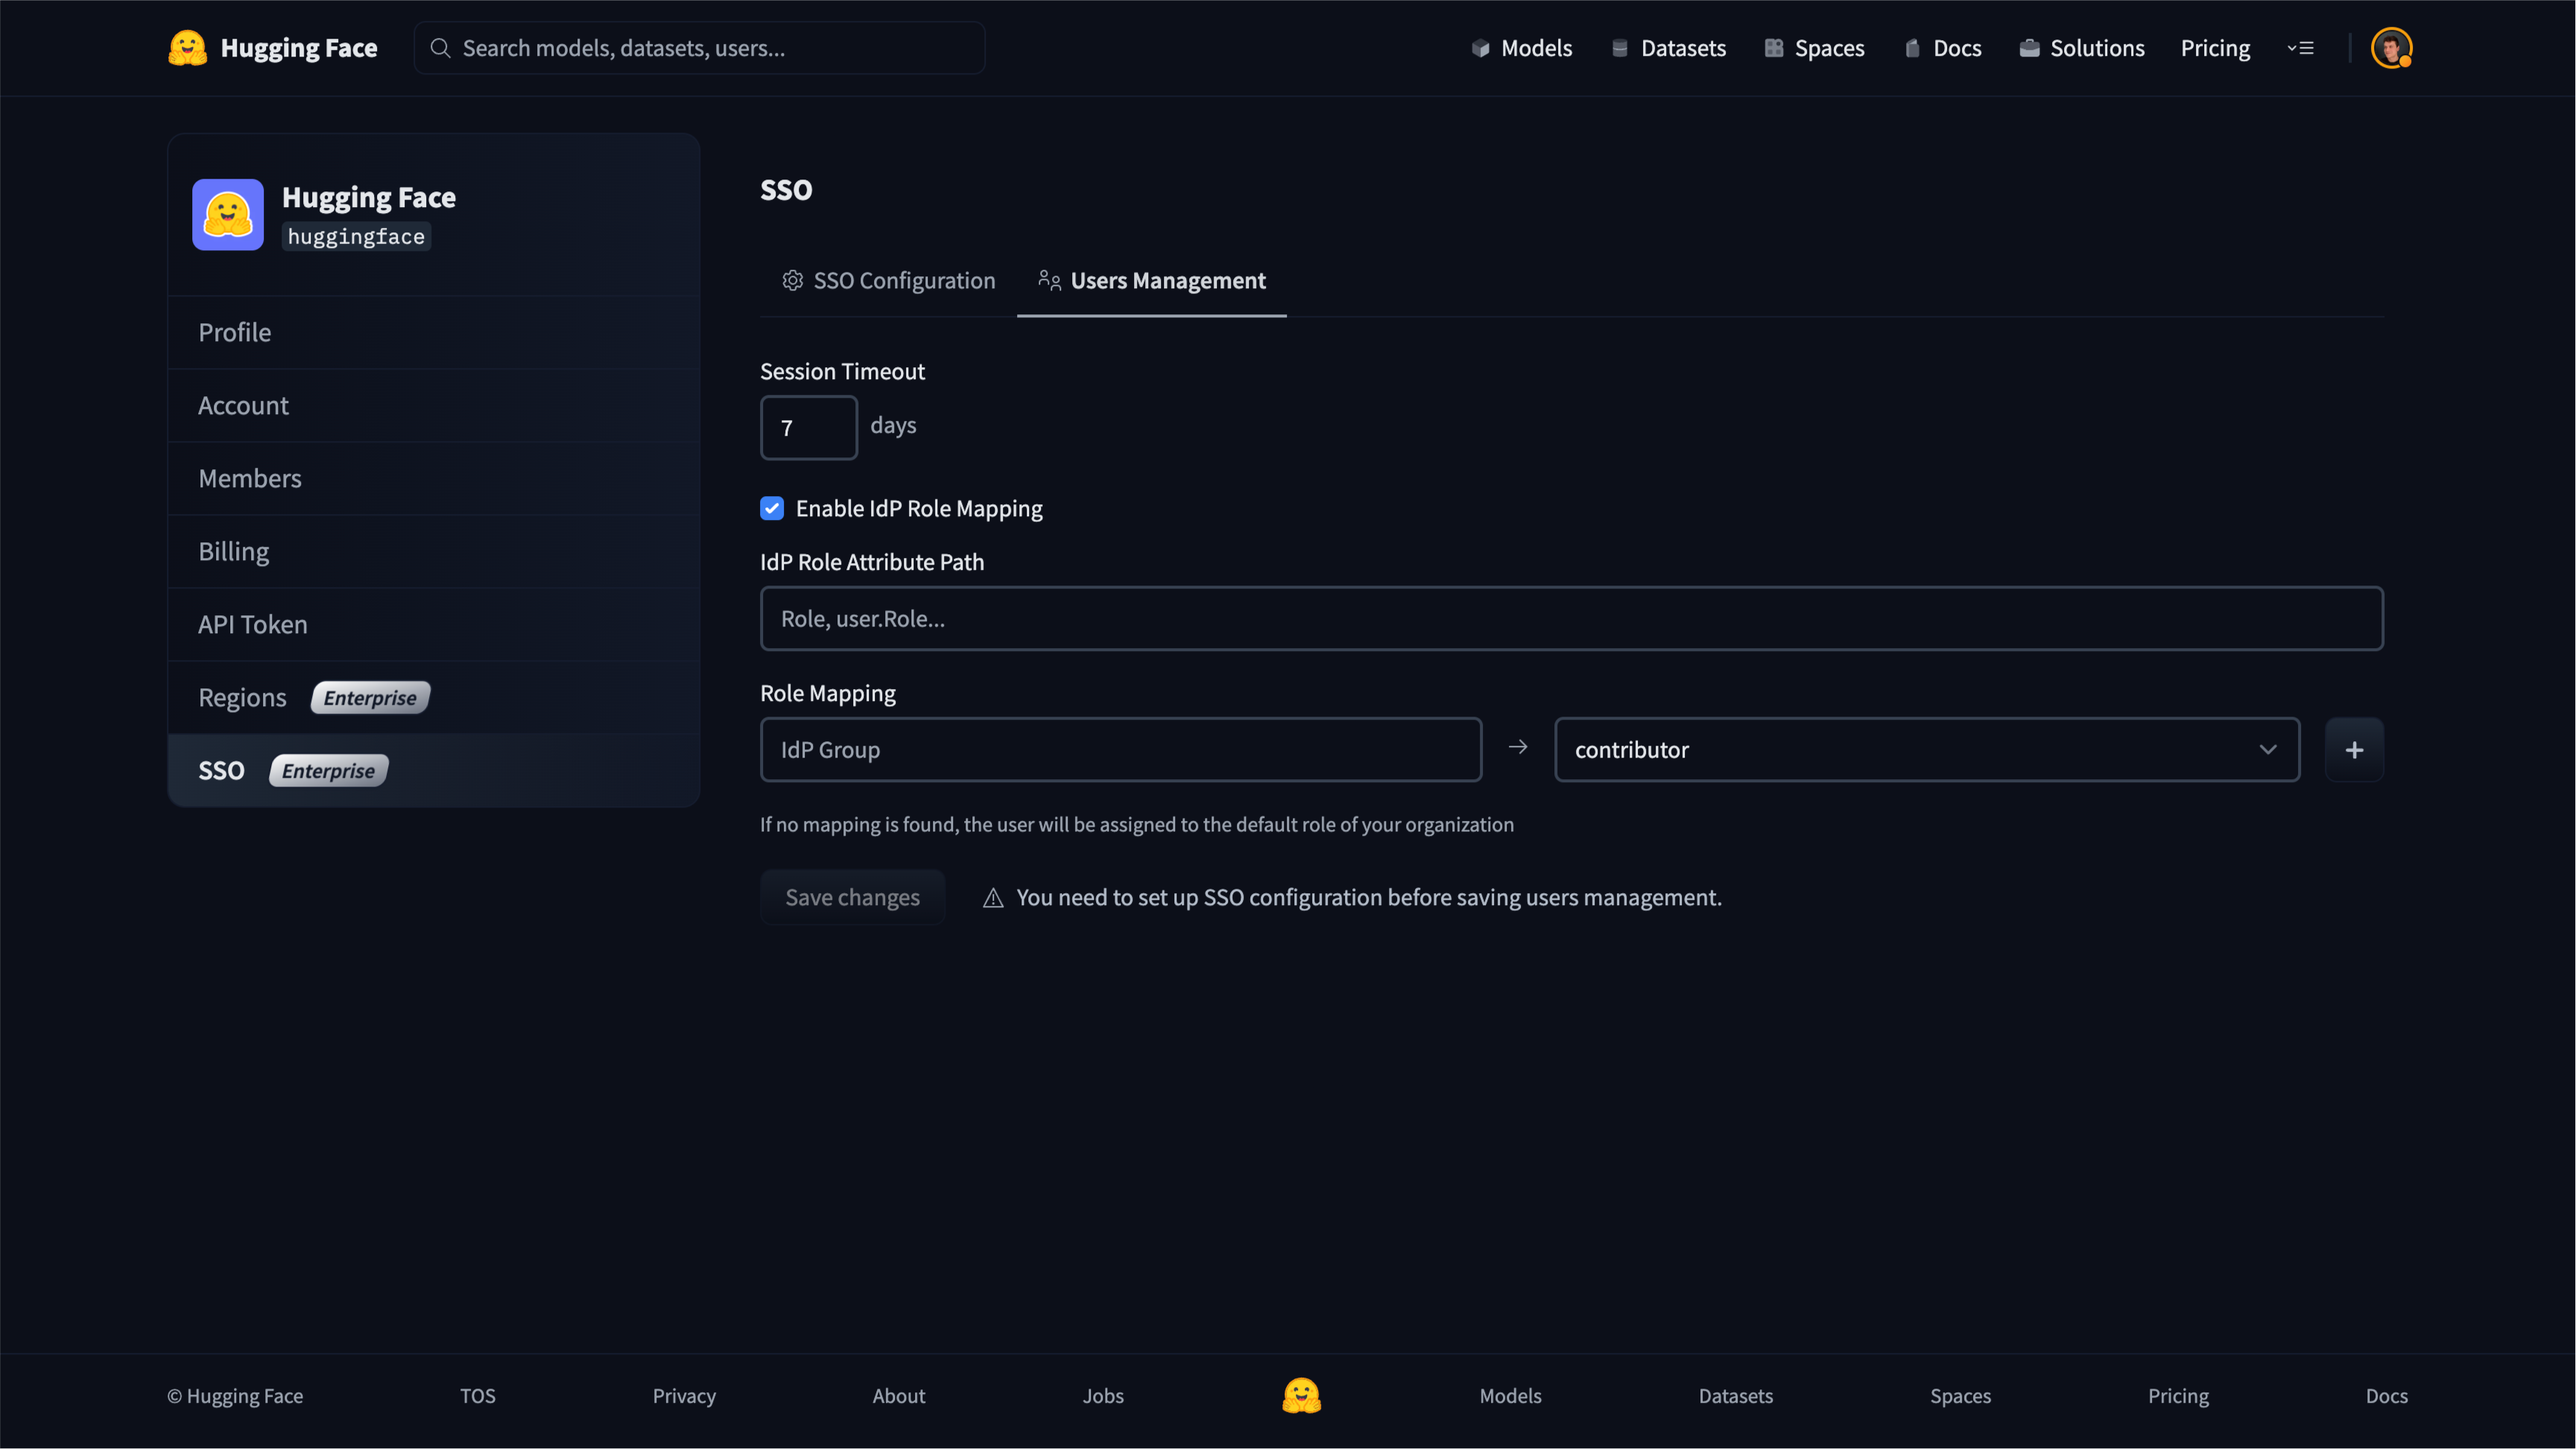 46 |
12 |
13 | There are a few key parameters you need to define: the Owner (either your personal account or an organization), a Space name, and Visibility. In case you intend to execute computationally intensive deep learning models, consider upgrading to a GPU to boost performance.
14 |
15 |
46 |
12 |
13 | There are a few key parameters you need to define: the Owner (either your personal account or an organization), a Space name, and Visibility. In case you intend to execute computationally intensive deep learning models, consider upgrading to a GPU to boost performance.
14 |
15 | 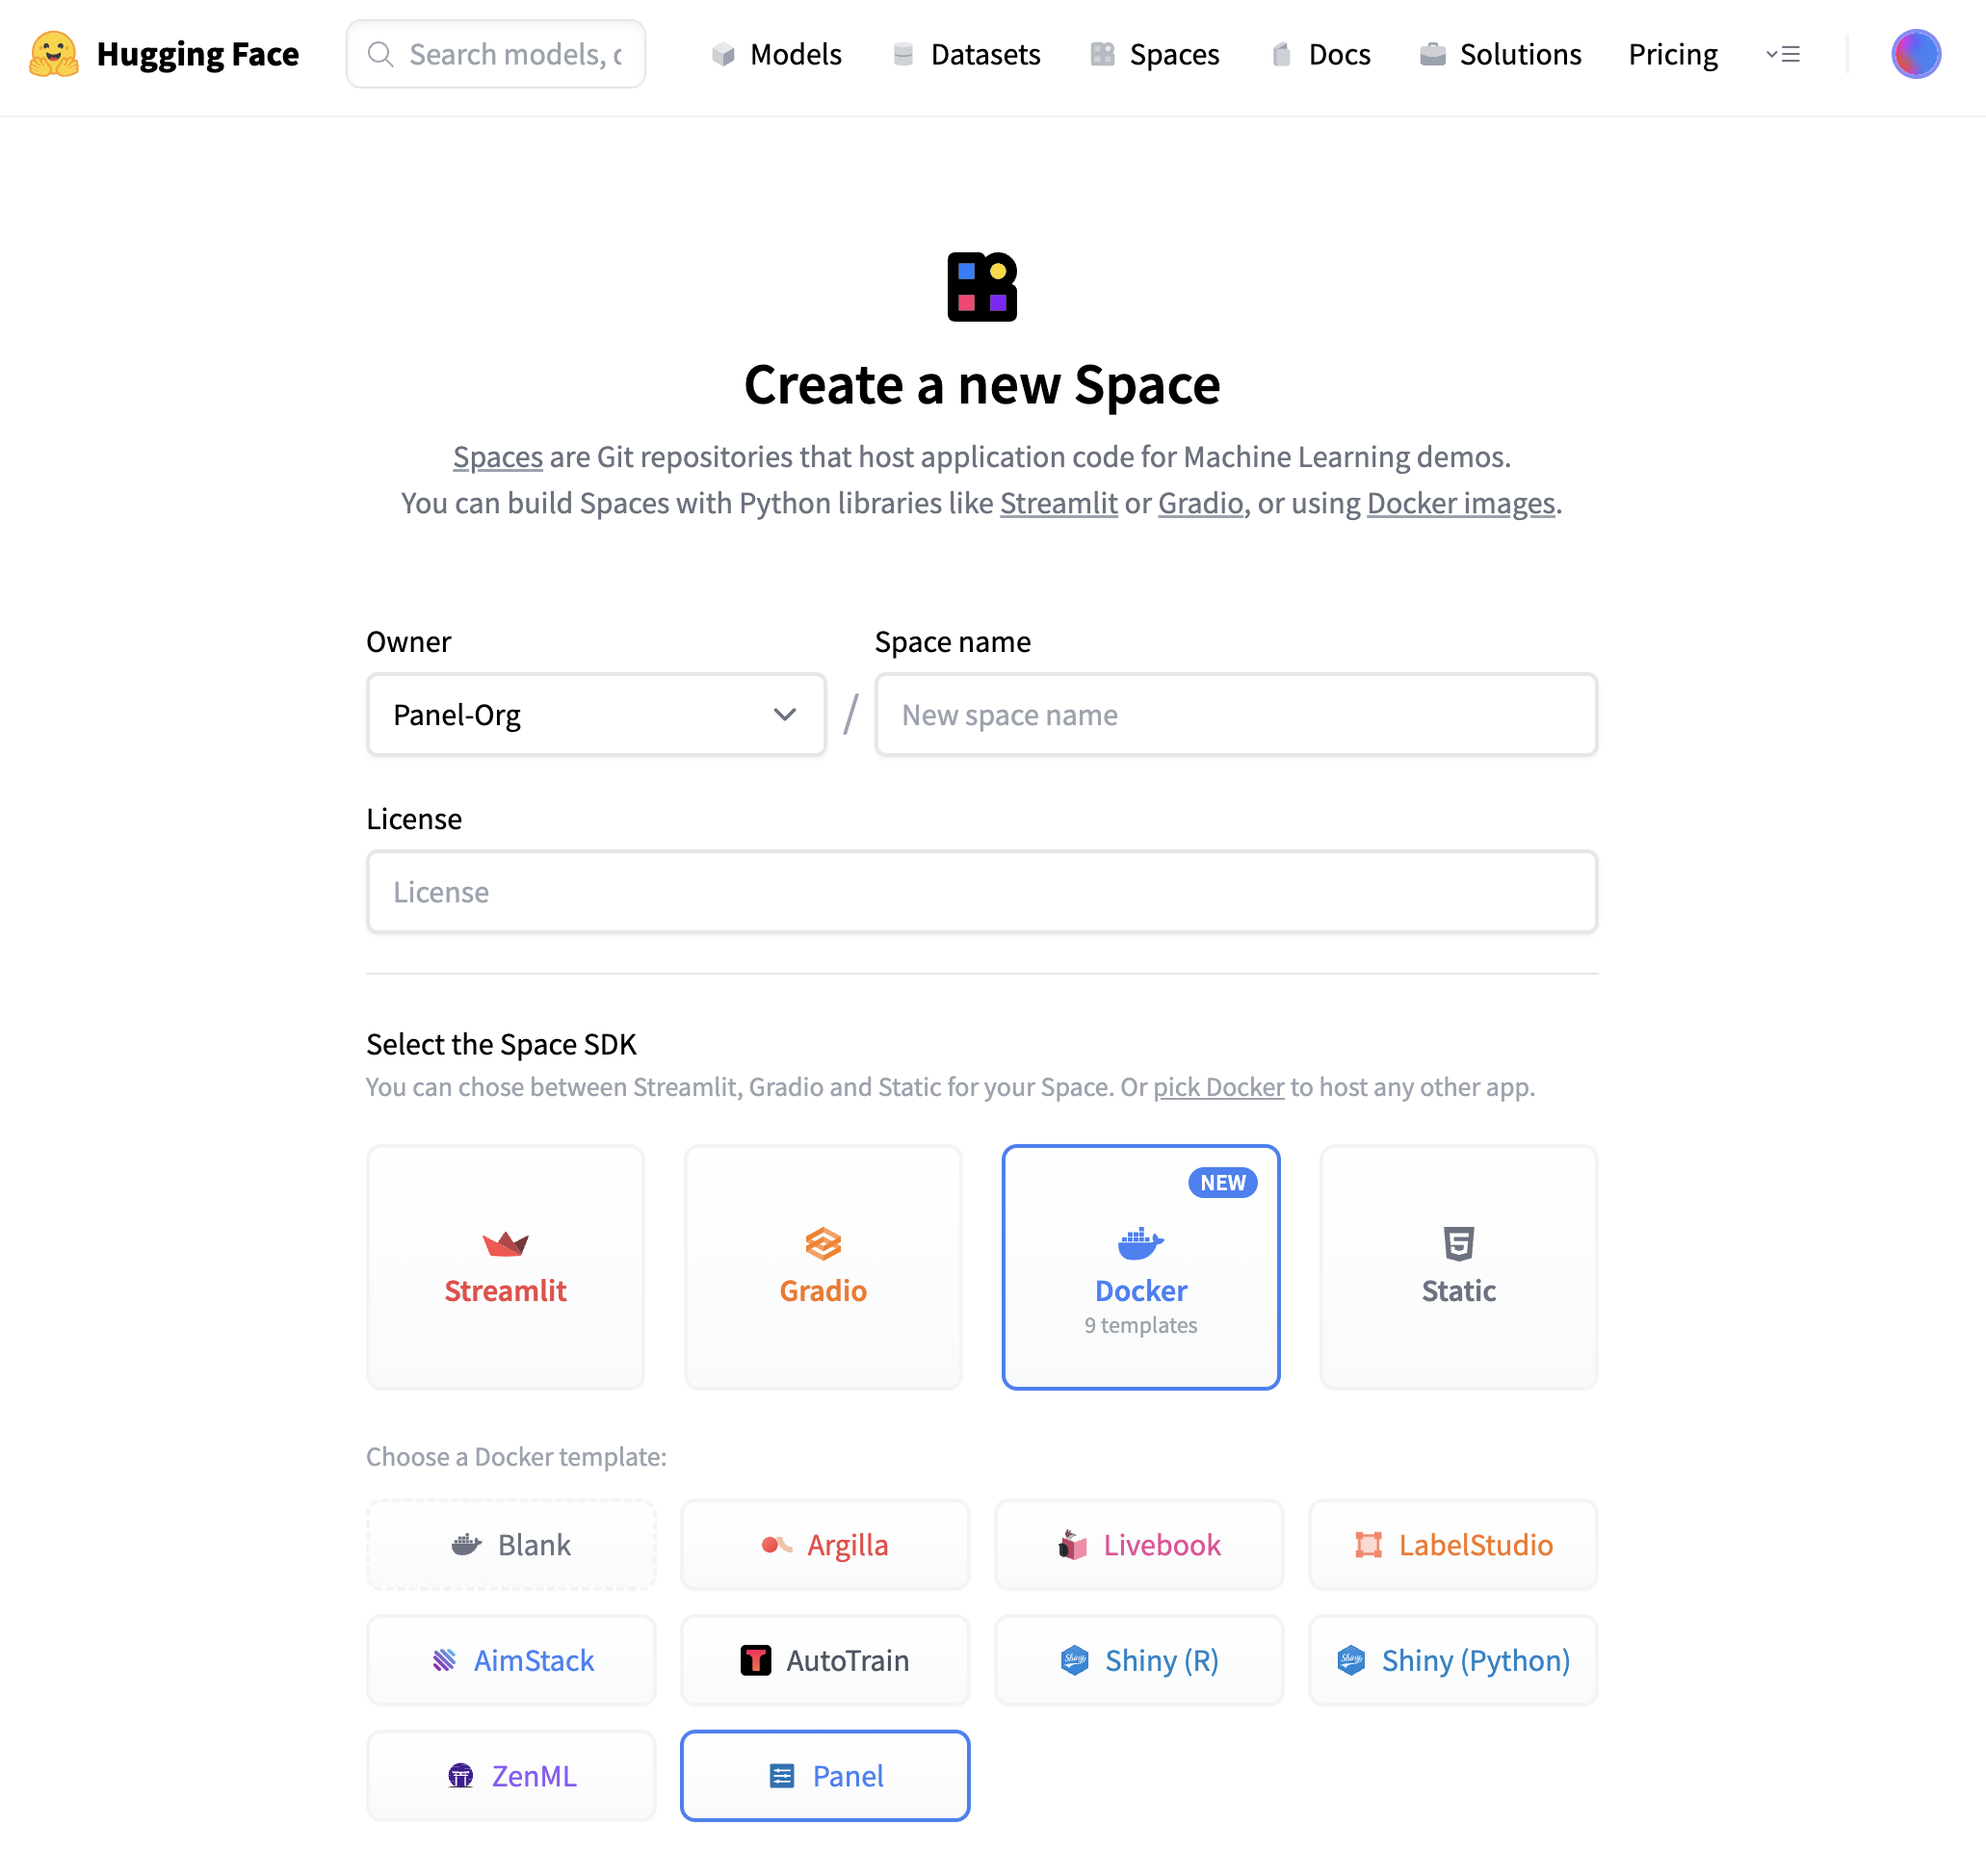 16 |
17 | Once you have created the Space, it will start out in “Building” status, which will change to “Running” once your Space is ready to go.
18 |
19 | ## ⚡️ What will you see?
20 |
21 | When your Space is built and ready, you will see this image classification Panel app which will let you fetch a random image and run the OpenAI CLIP classifier model on it. Check out our [blog post](https://blog.holoviz.org/building_an_interactive_ml_dashboard_in_panel.html) for a walkthrough of this app.
22 |
23 |
16 |
17 | Once you have created the Space, it will start out in “Building” status, which will change to “Running” once your Space is ready to go.
18 |
19 | ## ⚡️ What will you see?
20 |
21 | When your Space is built and ready, you will see this image classification Panel app which will let you fetch a random image and run the OpenAI CLIP classifier model on it. Check out our [blog post](https://blog.holoviz.org/building_an_interactive_ml_dashboard_in_panel.html) for a walkthrough of this app.
22 |
23 | 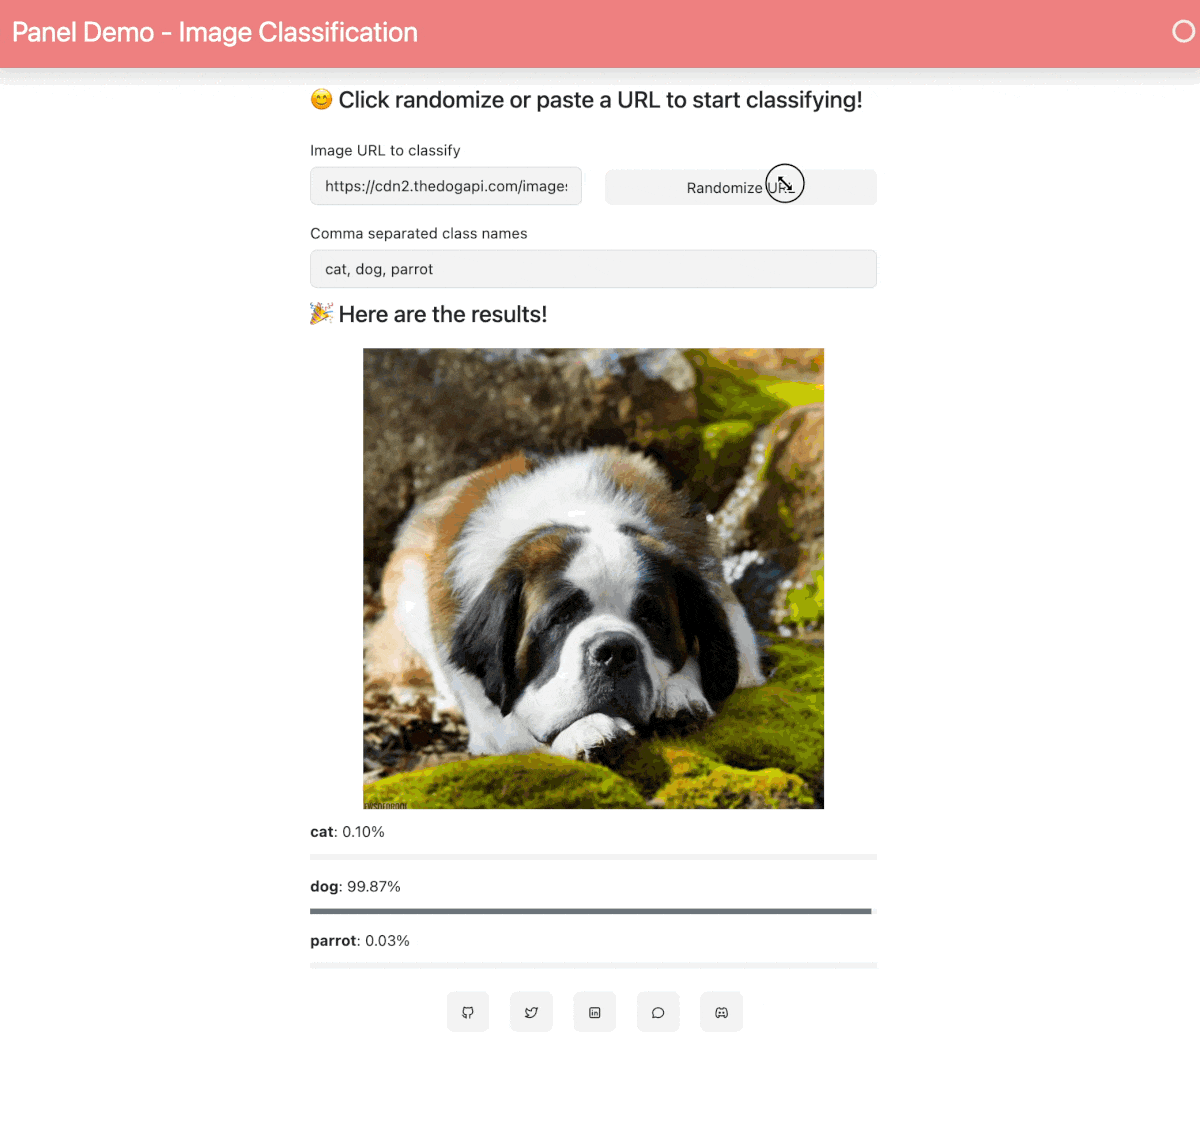 24 |
25 | ## 🛠️ How to customize and make your own app?
26 |
27 | The Space template will populate a few files to get your app started:
28 |
29 |
24 |
25 | ## 🛠️ How to customize and make your own app?
26 |
27 | The Space template will populate a few files to get your app started:
28 |
29 |  30 |
31 | Three files are important:
32 |
33 | ### 1. app.py
34 |
35 | This file defines your Panel application code. You can start by modifying the existing application or replace it entirely to build your own application. To learn more about writing your own Panel app, refer to the [Panel documentation](https://panel.holoviz.org/).
36 |
37 | ### 2. Dockerfile
38 |
39 | The Dockerfile contains a sequence of commands that Docker will execute to construct and launch an image as a container that your Panel app will run in. Typically, to serve a Panel app, we use the command `panel serve app.py`. In this specific file, we divide the command into a list of strings. Furthermore, we must define the address and port because Hugging Face will expect to serve your application on port 7860. Additionally, we need to specify the `allow-websocket-origin` flag to enable the connection to the server's websocket.
40 |
41 |
42 | ### 3. requirements.txt
43 |
44 | This file defines the required packages for our Panel app. When using Space, dependencies listed in the requirements.txt file will be automatically installed. You have the freedom to modify this file by removing unnecessary packages or adding additional ones that are required for your application. Feel free to make the necessary changes to ensure your app has the appropriate packages installed.
45 |
46 | ## 🌐 Join Our Community
47 | The Panel community is vibrant and supportive, with experienced developers and data scientists eager to help and share their knowledge. Join us and connect with us:
48 |
49 | - [Discord](https://discord.gg/aRFhC3Dz9w)
50 | - [Discourse](https://discourse.holoviz.org/)
51 | - [Twitter](https://twitter.com/Panel_Org)
52 | - [LinkedIn](https://www.linkedin.com/company/panel-org)
53 | - [Github](https://github.com/holoviz/panel)
54 |
--------------------------------------------------------------------------------
/docs/hub/mlx-image.md:
--------------------------------------------------------------------------------
1 | # Using mlx-image at Hugging Face
2 |
3 | [`mlx-image`](https://github.com/riccardomusmeci/mlx-image) is an image models library developed by [Riccardo Musmeci](https://github.com/riccardomusmeci) built on Apple [MLX](https://github.com/ml-explore/mlx). It tries to replicate the great [timm](https://github.com/huggingface/pytorch-image-models), but for MLX models.
4 |
5 |
6 | ## Exploring mlx-image on the Hub
7 |
8 | You can find `mlx-image` models by filtering using the `mlx-image` library name, like in [this query](https://huggingface.co/models?library=mlx-image&sort=trending).
9 | There's also an open [mlx-vision](https://huggingface.co/mlx-vision) community for contributors converting and publishing weights for MLX format.
10 |
11 | ## Installation
12 |
13 | ```bash
14 | pip install mlx-image
15 | ```
16 |
17 | ## Models
18 |
19 | Model weights are available on the [`mlx-vision`](https://huggingface.co/mlx-vision) community on HuggingFace.
20 |
21 | To load a model with pre-trained weights:
22 | ```python
23 | from mlxim.model import create_model
24 |
25 | # loading weights from HuggingFace (https://huggingface.co/mlx-vision/resnet18-mlxim)
26 | model = create_model("resnet18") # pretrained weights loaded from HF
27 |
28 | # loading weights from local file
29 | model = create_model("resnet18", weights="path/to/resnet18/model.safetensors")
30 | ```
31 |
32 | To list all available models:
33 |
34 | ```python
35 | from mlxim.model import list_models
36 | list_models()
37 | ```
38 | > [!WARNING]
39 | > As of today (2024-03-15) mlx does not support `group` param for nn.Conv2d. Therefore, architectures such as `resnext`, `regnet` or `efficientnet` are not yet supported in `mlx-image`.
40 |
41 | ## ImageNet-1K Results
42 |
43 | Go to [results-imagenet-1k.csv](https://github.com/riccardomusmeci/mlx-image/blob/main/results/results-imagenet-1k.csv) to check every model converted to `mlx-image` and its performance on ImageNet-1K with different settings.
44 |
45 | > **TL;DR** performance is comparable to the original models from PyTorch implementations.
46 |
47 |
48 | ## Similarity to PyTorch and other familiar tools
49 |
50 | `mlx-image` tries to be as close as possible to PyTorch:
51 | - `DataLoader` -> you can define your own `collate_fn` and also use `num_workers` to speed up data loading
52 | - `Dataset` -> `mlx-image` already supports `LabelFolderDataset` (the good and old PyTorch `ImageFolder`) and `FolderDataset` (a generic folder with images in it)
53 |
54 | - `ModelCheckpoint` -> keeps track of the best model and saves it to disk (similar to PyTorchLightning). It also suggests early stopping
55 |
56 | ## Training
57 |
58 | Training is similar to PyTorch. Here's an example of how to train a model:
59 |
60 | ```python
61 | import mlx.nn as nn
62 | import mlx.optimizers as optim
63 | from mlxim.model import create_model
64 | from mlxim.data import LabelFolderDataset, DataLoader
65 |
66 | train_dataset = LabelFolderDataset(
67 | root_dir="path/to/train",
68 | class_map={0: "class_0", 1: "class_1", 2: ["class_2", "class_3"]}
69 | )
70 | train_loader = DataLoader(
71 | dataset=train_dataset,
72 | batch_size=32,
73 | shuffle=True,
74 | num_workers=4
75 | )
76 | model = create_model("resnet18") # pretrained weights loaded from HF
77 | optimizer = optim.Adam(learning_rate=1e-3)
78 |
79 | def train_step(model, inputs, targets):
80 | logits = model(inputs)
81 | loss = mx.mean(nn.losses.cross_entropy(logits, target))
82 | return loss
83 |
84 | model.train()
85 | for epoch in range(10):
86 | for batch in train_loader:
87 | x, target = batch
88 | train_step_fn = nn.value_and_grad(model, train_step)
89 | loss, grads = train_step_fn(x, target)
90 | optimizer.update(model, grads)
91 | mx.eval(model.state, optimizer.state)
92 | ```
93 |
94 | ## Additional Resources
95 |
96 | * [mlx-image repository](https://github.com/riccardomusmeci/mlx-image)
97 | * [mlx-vision community](https://huggingface.co/mlx-vision)
98 |
99 | ## Contact
100 |
101 | If you have any questions, please email `riccardomusmeci92@gmail.com`.
102 |
103 |
--------------------------------------------------------------------------------
/docs/hub/keras.md:
--------------------------------------------------------------------------------
1 | # Using Keras at Hugging Face
2 |
3 | `keras` is an open-source machine learning library that uses a consistent and simple API to build models leveraging TensorFlow and its ecosystem.
4 |
5 | ## Exploring Keras in the Hub
6 |
7 | You can find over 200 `keras` models by filtering at the left of the [models page](https://huggingface.co/models?library=keras&sort=downloads).
8 |
9 | All models on the Hub come up with useful feature:
10 | 1. An automatically generated model card with a description, a plot of the model, and more.
11 | 2. Metadata tags that help for discoverability and contain information such as license.
12 | 3. If provided by the model owner, TensorBoard logs are hosted on the Keras repositories.
13 |
14 |
15 | ## Using existing models
16 |
17 | The `huggingface_hub` library is a lightweight Python client with utility functions to download models from the Hub.
18 |
19 | ```
20 | pip install huggingface_hub["tensorflow"]
21 | ```
22 |
23 | Once you have the library installed, you just need to use the `from_pretrained_keras` method. Read more about `from_pretrained_keras` [here](https://huggingface.co/docs/huggingface_hub/main/en/package_reference/mixins#huggingface_hub.from_pretrained_keras).
24 |
25 | ```py
26 | from huggingface_hub import from_pretrained_keras
27 |
28 | model = from_pretrained_keras("keras-io/mobile-vit-xxs")
29 | prediction = model.predict(image)
30 | prediction = tf.squeeze(tf.round(prediction))
31 | print(f'The image is a {classes[(np.argmax(prediction))]}!')
32 |
33 | # The image is a sunflower!
34 | ```
35 |
36 | If you want to see how to load a specific model, you can click **Use in keras** and you will be given a working snippet that you can load it!
37 |
38 |
30 |
31 | Three files are important:
32 |
33 | ### 1. app.py
34 |
35 | This file defines your Panel application code. You can start by modifying the existing application or replace it entirely to build your own application. To learn more about writing your own Panel app, refer to the [Panel documentation](https://panel.holoviz.org/).
36 |
37 | ### 2. Dockerfile
38 |
39 | The Dockerfile contains a sequence of commands that Docker will execute to construct and launch an image as a container that your Panel app will run in. Typically, to serve a Panel app, we use the command `panel serve app.py`. In this specific file, we divide the command into a list of strings. Furthermore, we must define the address and port because Hugging Face will expect to serve your application on port 7860. Additionally, we need to specify the `allow-websocket-origin` flag to enable the connection to the server's websocket.
40 |
41 |
42 | ### 3. requirements.txt
43 |
44 | This file defines the required packages for our Panel app. When using Space, dependencies listed in the requirements.txt file will be automatically installed. You have the freedom to modify this file by removing unnecessary packages or adding additional ones that are required for your application. Feel free to make the necessary changes to ensure your app has the appropriate packages installed.
45 |
46 | ## 🌐 Join Our Community
47 | The Panel community is vibrant and supportive, with experienced developers and data scientists eager to help and share their knowledge. Join us and connect with us:
48 |
49 | - [Discord](https://discord.gg/aRFhC3Dz9w)
50 | - [Discourse](https://discourse.holoviz.org/)
51 | - [Twitter](https://twitter.com/Panel_Org)
52 | - [LinkedIn](https://www.linkedin.com/company/panel-org)
53 | - [Github](https://github.com/holoviz/panel)
54 |
--------------------------------------------------------------------------------
/docs/hub/mlx-image.md:
--------------------------------------------------------------------------------
1 | # Using mlx-image at Hugging Face
2 |
3 | [`mlx-image`](https://github.com/riccardomusmeci/mlx-image) is an image models library developed by [Riccardo Musmeci](https://github.com/riccardomusmeci) built on Apple [MLX](https://github.com/ml-explore/mlx). It tries to replicate the great [timm](https://github.com/huggingface/pytorch-image-models), but for MLX models.
4 |
5 |
6 | ## Exploring mlx-image on the Hub
7 |
8 | You can find `mlx-image` models by filtering using the `mlx-image` library name, like in [this query](https://huggingface.co/models?library=mlx-image&sort=trending).
9 | There's also an open [mlx-vision](https://huggingface.co/mlx-vision) community for contributors converting and publishing weights for MLX format.
10 |
11 | ## Installation
12 |
13 | ```bash
14 | pip install mlx-image
15 | ```
16 |
17 | ## Models
18 |
19 | Model weights are available on the [`mlx-vision`](https://huggingface.co/mlx-vision) community on HuggingFace.
20 |
21 | To load a model with pre-trained weights:
22 | ```python
23 | from mlxim.model import create_model
24 |
25 | # loading weights from HuggingFace (https://huggingface.co/mlx-vision/resnet18-mlxim)
26 | model = create_model("resnet18") # pretrained weights loaded from HF
27 |
28 | # loading weights from local file
29 | model = create_model("resnet18", weights="path/to/resnet18/model.safetensors")
30 | ```
31 |
32 | To list all available models:
33 |
34 | ```python
35 | from mlxim.model import list_models
36 | list_models()
37 | ```
38 | > [!WARNING]
39 | > As of today (2024-03-15) mlx does not support `group` param for nn.Conv2d. Therefore, architectures such as `resnext`, `regnet` or `efficientnet` are not yet supported in `mlx-image`.
40 |
41 | ## ImageNet-1K Results
42 |
43 | Go to [results-imagenet-1k.csv](https://github.com/riccardomusmeci/mlx-image/blob/main/results/results-imagenet-1k.csv) to check every model converted to `mlx-image` and its performance on ImageNet-1K with different settings.
44 |
45 | > **TL;DR** performance is comparable to the original models from PyTorch implementations.
46 |
47 |
48 | ## Similarity to PyTorch and other familiar tools
49 |
50 | `mlx-image` tries to be as close as possible to PyTorch:
51 | - `DataLoader` -> you can define your own `collate_fn` and also use `num_workers` to speed up data loading
52 | - `Dataset` -> `mlx-image` already supports `LabelFolderDataset` (the good and old PyTorch `ImageFolder`) and `FolderDataset` (a generic folder with images in it)
53 |
54 | - `ModelCheckpoint` -> keeps track of the best model and saves it to disk (similar to PyTorchLightning). It also suggests early stopping
55 |
56 | ## Training
57 |
58 | Training is similar to PyTorch. Here's an example of how to train a model:
59 |
60 | ```python
61 | import mlx.nn as nn
62 | import mlx.optimizers as optim
63 | from mlxim.model import create_model
64 | from mlxim.data import LabelFolderDataset, DataLoader
65 |
66 | train_dataset = LabelFolderDataset(
67 | root_dir="path/to/train",
68 | class_map={0: "class_0", 1: "class_1", 2: ["class_2", "class_3"]}
69 | )
70 | train_loader = DataLoader(
71 | dataset=train_dataset,
72 | batch_size=32,
73 | shuffle=True,
74 | num_workers=4
75 | )
76 | model = create_model("resnet18") # pretrained weights loaded from HF
77 | optimizer = optim.Adam(learning_rate=1e-3)
78 |
79 | def train_step(model, inputs, targets):
80 | logits = model(inputs)
81 | loss = mx.mean(nn.losses.cross_entropy(logits, target))
82 | return loss
83 |
84 | model.train()
85 | for epoch in range(10):
86 | for batch in train_loader:
87 | x, target = batch
88 | train_step_fn = nn.value_and_grad(model, train_step)
89 | loss, grads = train_step_fn(x, target)
90 | optimizer.update(model, grads)
91 | mx.eval(model.state, optimizer.state)
92 | ```
93 |
94 | ## Additional Resources
95 |
96 | * [mlx-image repository](https://github.com/riccardomusmeci/mlx-image)
97 | * [mlx-vision community](https://huggingface.co/mlx-vision)
98 |
99 | ## Contact
100 |
101 | If you have any questions, please email `riccardomusmeci92@gmail.com`.
102 |
103 |
--------------------------------------------------------------------------------
/docs/hub/keras.md:
--------------------------------------------------------------------------------
1 | # Using Keras at Hugging Face
2 |
3 | `keras` is an open-source machine learning library that uses a consistent and simple API to build models leveraging TensorFlow and its ecosystem.
4 |
5 | ## Exploring Keras in the Hub
6 |
7 | You can find over 200 `keras` models by filtering at the left of the [models page](https://huggingface.co/models?library=keras&sort=downloads).
8 |
9 | All models on the Hub come up with useful feature:
10 | 1. An automatically generated model card with a description, a plot of the model, and more.
11 | 2. Metadata tags that help for discoverability and contain information such as license.
12 | 3. If provided by the model owner, TensorBoard logs are hosted on the Keras repositories.
13 |
14 |
15 | ## Using existing models
16 |
17 | The `huggingface_hub` library is a lightweight Python client with utility functions to download models from the Hub.
18 |
19 | ```
20 | pip install huggingface_hub["tensorflow"]
21 | ```
22 |
23 | Once you have the library installed, you just need to use the `from_pretrained_keras` method. Read more about `from_pretrained_keras` [here](https://huggingface.co/docs/huggingface_hub/main/en/package_reference/mixins#huggingface_hub.from_pretrained_keras).
24 |
25 | ```py
26 | from huggingface_hub import from_pretrained_keras
27 |
28 | model = from_pretrained_keras("keras-io/mobile-vit-xxs")
29 | prediction = model.predict(image)
30 | prediction = tf.squeeze(tf.round(prediction))
31 | print(f'The image is a {classes[(np.argmax(prediction))]}!')
32 |
33 | # The image is a sunflower!
34 | ```
35 |
36 | If you want to see how to load a specific model, you can click **Use in keras** and you will be given a working snippet that you can load it!
37 |
38 |  40 |
40 |  41 |
41 | 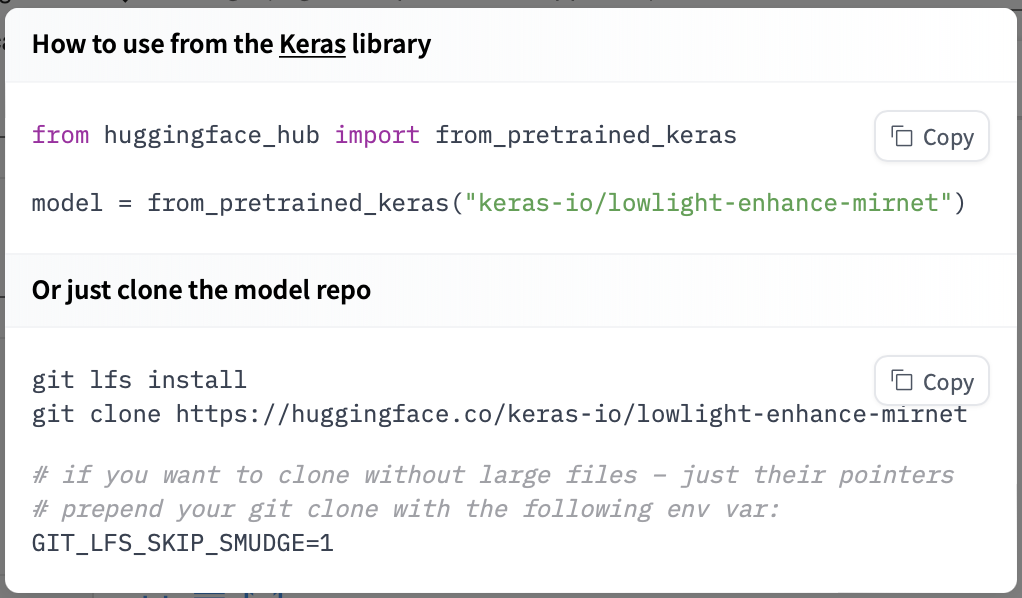 44 |
44 |  45 |
45 | 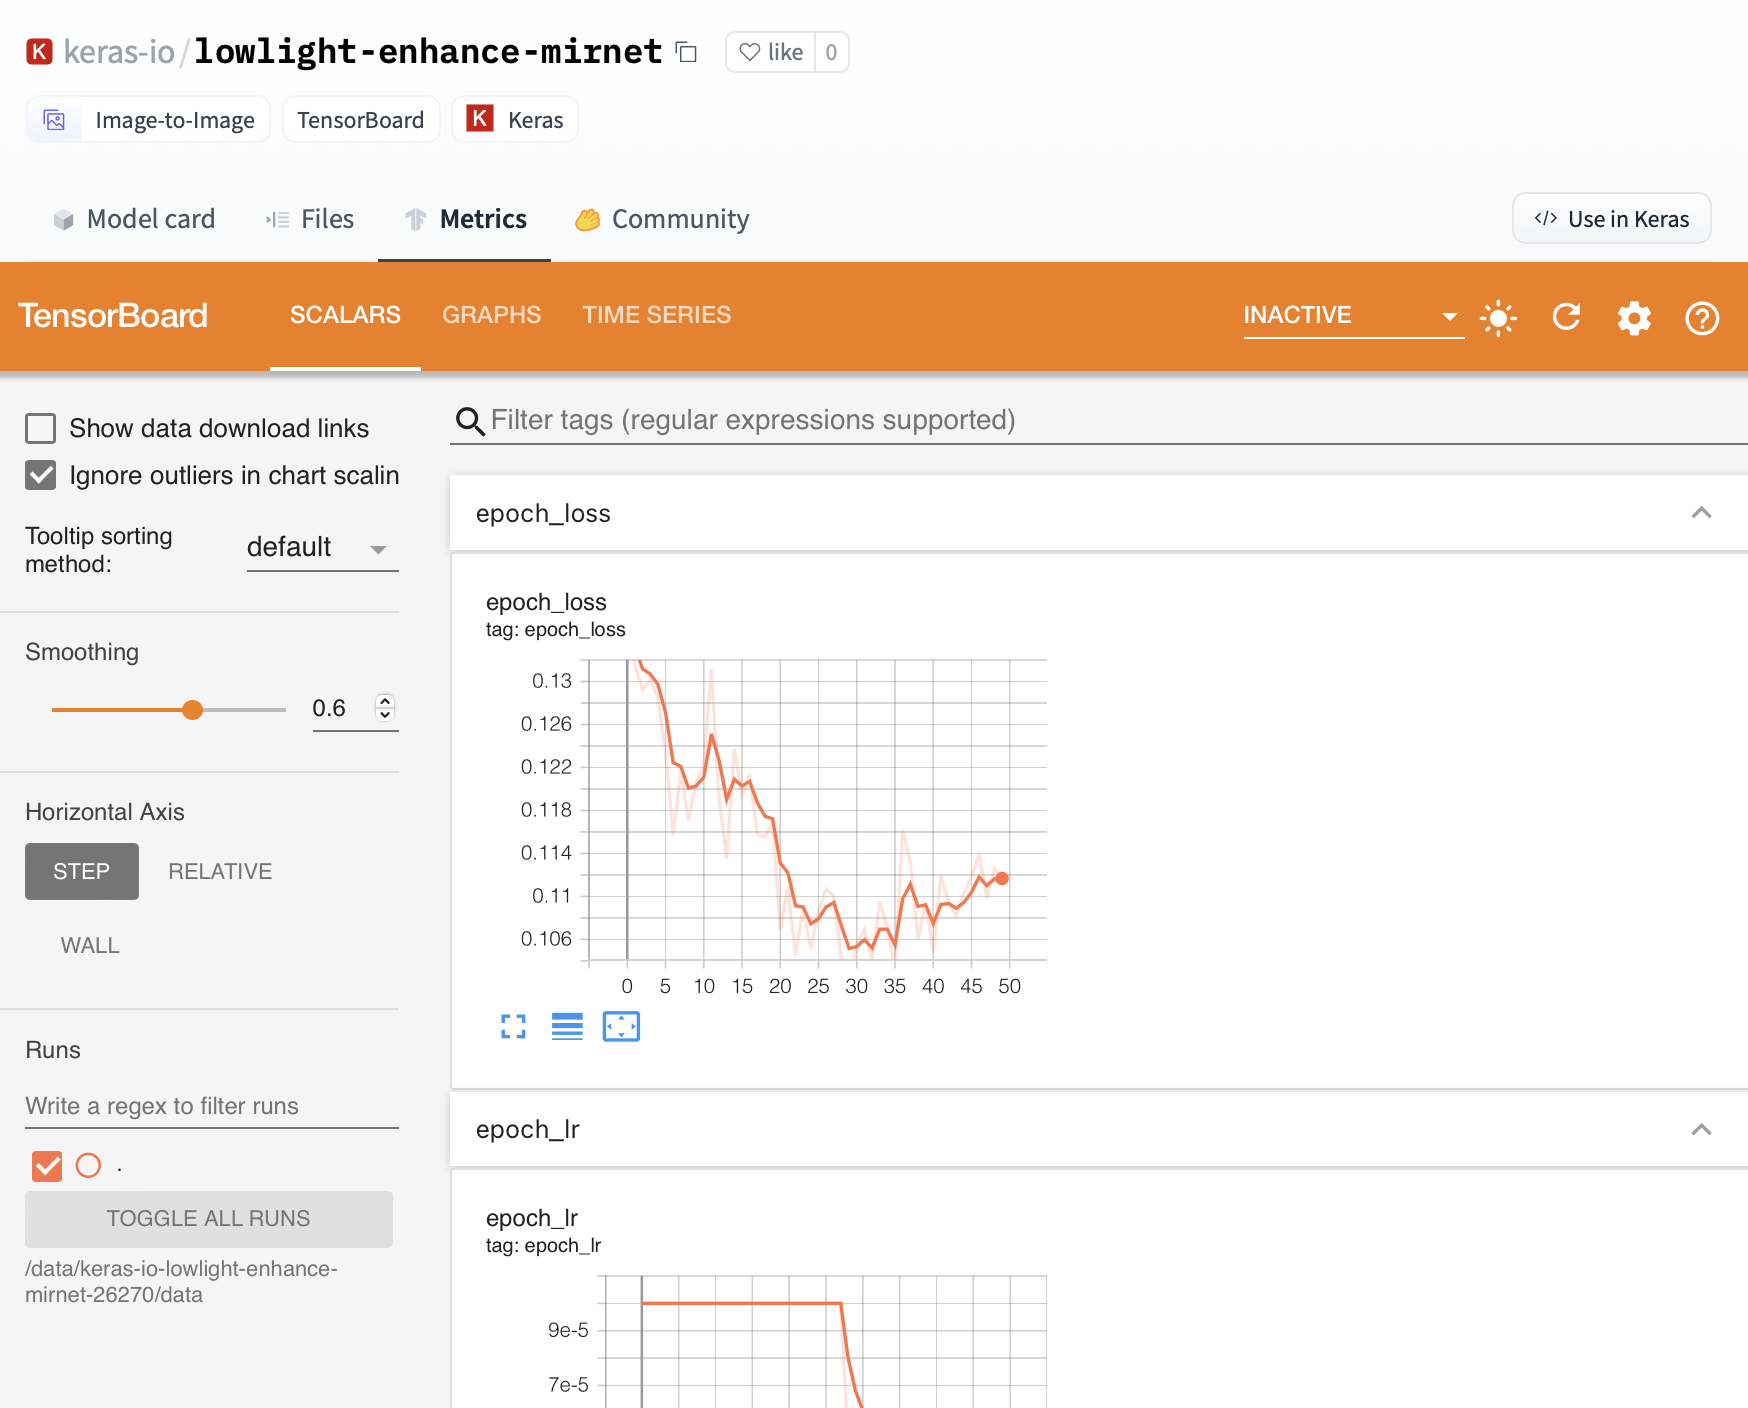 65 |
65 |  66 |
66 |