
The relatively simple voltage bias source illustrated in “Measuring AC Voltage with an AC to AC power adapter” does have some limitations if high accuracy is required. It can be improved by adding an operational amplifier. The op.amp isolates the mid-point voltage at the junction of R3 & R4 from the AC-AC adapter and voltage divider. This significantly reduces the impedance of the voltage source, resulting in enhanced performance. Only one op.amp is needed, the current sensors can share the bias supply and connect to amplifier output (“mid-point”) with little fear of interaction between the inputs (which can be troublesome in some circumstances).
6 | 7 |
Notes:
10 | 11 |15 |
[This design was originally published by calypso_rae at node/673]
19 | -------------------------------------------------------------------------------- /archive/attiny.html: -------------------------------------------------------------------------------- 1 |This doesn't actually burn a bootloader to enable any sort of serial sketch uploading as in the case of the ATmega328, it just sets the fuses on the ATtiny:
23 | 24 |30 | 31 |
This guide is a condensed version of the info from these sites:
32 | 33 |http://hlt.media.mit.edu/?p=1695
34 | 35 |http://harizanov.com/2012/08/setting-up-arduino-ide-for-working-with-attinys/
36 | 37 |38 | -------------------------------------------------------------------------------- /archive/EmonTx-measurement-and-power.html: -------------------------------------------------------------------------------- 1 |
This post is to complement the blog post: http://openenergymonitor.blogspot.com/2012/05/emontx-single-ac-power-supply.html
2 |See attached (at the bottom) for the LTspice simulation files. LTspice is a free download and runs well under WINE on Linux Ubuntu. The simulation circuit looks a little different to Fig.1. Since there was no simulation block for the MCP1702 voltage regulator Robert rolled his own!
3 |Big thank you to Robert Wall for his help with this.
4 |5 |
For easy reference here are the diagrams from the blog post again:
6 |
8 |

Fig2. Simulation waveforms under normal operating conditions
10 |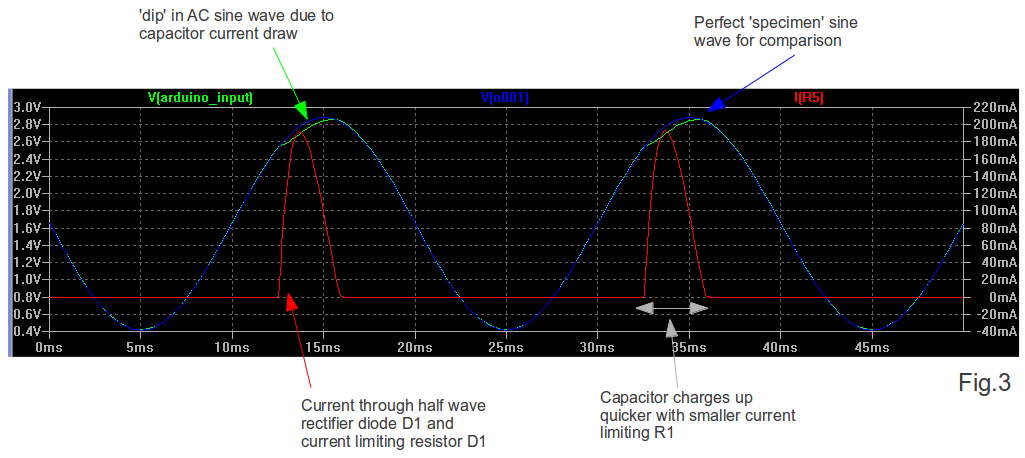
Fig. 3 Demonstrating the effect of low value current limiting resistor R1
-------------------------------------------------------------------------------- /archive/avrisp.html: -------------------------------------------------------------------------------- 1 |AVR ISP programmers are used to flash data to AVR microcontrollers that are not running an Arduino bootloader.
4 | 5 |We use ISP programmers to get the Arduino bootloder onto the chip and to upload sketches to ATtiny chips which don't support uploading via FTDI.
6 | 7 |When choosing an ISP programmer, it's important to consider the voltage of the chip you are uploading to.
8 | 9 |Here is a list of programmers we have used, and our experiences with them:
10 | 11 |1. Arduino as ISP: This is the most basic form of ISP programmer. There are instructions on the Arduino website for this (http://arduino.cc/en/Tutorial/ArduinoISP). We have had variable results when using Arduino as ISP. We have found using the Sparkfun ISP shield improves things (it has a built in reset capacitor): https://www.sparkfun.com/products/11168. It also has a nice ZIF socket.
12 | 13 |2. USB Tiny: This seems to be a popular cheap ISP programmer used by many people. However, we failed to get it working on Ubuntu Linux 12.04.
14 | 15 |3. AVR ISP V2 - Pololu USB AVR Programmer (http://www.pololu.com/catalog/product/1300). This is quite a cheap programmer that works well onUbuntu Linux, it can only program at 5v (needs 4V on MOSI pin to initialize) and requires the board to be externally powered. The following lines need to be added to programmers.txt in the Arduino Hardware folder:
16 | 17 |avrispv2.name=AVR ISP v2
18 | avrispv2.communication=serial
19 | avrispv2.protocol=avrispv2
4. ATmel AVR MK2 - this is the official ATmel ISP programmer. It supports programming between 1.8V - 5.5V. It works out of the box with Ubuntu Linux 12.04 as long as you run Arduino or avrdude as the root user. I'm pretty sure there is a fix for this but this works ok for us. The AVR MKII does not supply power to the ISP VCC pin The target board will need to be externally powered. This is good, as it allows you to choose the voltage level.
22 | 23 |As an example this is the avrdude command line required to program an ATtiny84 to run at 8Mhz with BOD disabled and flash the RF12 demo sketch using an AVR MKII programmer:
24 | 25 |sudo avrdude -c avrispmkII -p t84 -P usb -e -Uefuse:w:0xFF:m -Uhfuse:w:0xD7:m -Ulfuse:w:0xE2:m -U flash:w:ATtiny84_RF12_Demo.cpp.hex
26 | -------------------------------------------------------------------------------- /archive/uploading-arduino-firmware.html: -------------------------------------------------------------------------------- 1 |In this example, we will install the emonTxFirmware, however the same procedure is used for the EmonGLCD and NanodeRF firmware, and is applicable for most Arduino sketches.
4 | 5 |Most of the steps below are the same for Linux, Windows and Mac.
6 | 7 |Make sure you have installed the relevant Arduino libraries first: installing-arduino-libraries
8 | 9 |Click on zip to get a zip file download:
14 | 15 |
You may want to place it in a subfolder called OpenEnergyMonitor to make things a little easier to navigate. Not shown in the screenshot below, is the libraries folder that should also be in your sketchbook folder. See step 3 of setting up the Arduino environment for a summary of the final directory structure you should have: setting up the arduino environment
20 | 21 |
Notice how there are two files in the folder emonTx_CT123_Voltage: emonTx_CT123_Voltage.ino and emontx_lib.ino. Open emonTx_CT123_Voltage.ino
26 | 27 |
If the file opened sucessfully, you should now see emonTx_CT123_Voltage in the first tab and emontx_lib should be in the second tab. Make sure that emontx_lib is there, otherwise the code will not compile.
32 | 33 |
6 | $ sudo apt-get install git-core7 | 8 |
Follow this tutorial on creating SSH keys:
9 | https://help.github.com/articles/generating-ssh-keys
Helpful tip: If doing this via SSH, use cat /home/pi/.ssh/id_rsa.pub to display the SSH key in the terminal window, then select and copy to clipboard with Ctrl-Shift-C so you'll be ready to paste it into the Github settings page.
12 | 13 |Before continuing, ina terminal window, locate your Arduino sketchbook directory.
16 | 17 |CD to the libraries folder in sketchbook that should have been created automatically by the Arduino IDE:
18 | 19 |20 | $ cd libraries21 | 22 |
Download the jeelib library from jeelabs.(contains everything for operating the RFM12 wireless board as well jeenode ports) Recent changes introduce a conflict with GLCDLib. See node/3850 for more information.
23 | 24 |25 | $ git clone https://github.com/jcw/jeelib.git 26 | 27 | Openenergymonitor emonlib library, contains the ac power calculations for electricity monitoring.28 | 29 |
30 | $ git clone https://github.com/openenergymonitor/EmonLib.git31 | 32 |
One wire DS18B20 temperature sensor library
33 | 34 |35 | $ git clone https://github.com/milesburton/Arduino-Temperature-Control-Library.git36 | 37 |
Real time clock library
38 | 39 |40 | $ git clone https://github.com/jcw/rtclib.git41 | 42 |
LCD Display library for EmonGLCD (see note re. JeeLib above.)
43 | 44 |45 | $ git clone https://github.com/jcw/glcdlib.git46 | 47 |
Ethercard library for the NanodeRF and Open Kontrol Gateway
48 | 49 |50 | $ git clone https://github.com/jcw/ethercard.git51 | 52 |
This one can't be done with git as it's not on github. Download the OneWire library from pjrc.com and unzip it into the libraries folder in your sketchbook:
53 | 54 |55 | http://www.pjrc.com/teensy/td_libs_OneWire.html56 | 57 |
Again, start by locating your Arduino sketchbook directory in a terminal window.
60 | 61 |Create a new folder to hold the firmware. (makes navigation easier)
62 | 63 |64 | $ mkdir OpenEnergyMonitor65 | 66 |
67 | $ cd OpenEnergyMonitor68 | 69 |
Download the emonTxFirmware:
70 | 71 |72 | $ git clone https://github.com/openenergymonitor/emonTxFirmware.git73 | 74 |
The EmonGLCD Firmware
75 | 76 |77 | $ git clone https://github.com/openenergymonitor/EmonGLCD.git78 | 79 |
The NanodeRF firmware (if your using a NanodeRF basestation)
80 | 81 |82 | $ git clone https://github.com/openenergymonitor/NanodeRF.git83 | 84 |
85 | 86 |
That should be everything, check step 3 of setting up the arduino programming environment here to ensure your directory structure is the same,
87 | -------------------------------------------------------------------------------- /archive/application-notes.html: -------------------------------------------------------------------------------- 1 |Application notes are a great source of useful information on how to design whole systems. They are probably one of the first places to look when designing a new piece of hardware. Here is a quick list of energy monitor/meter application notes that look useful:
3 |AVR465: Single-Phase Power/Energy Meter with Tamper Detection
4 |Current measurement done with CT sensors. Voltage measurement is direct. Interesting use of switchable gain amplifiers to increase accuracy at smaller currents.
5 |Special function Energy meter/monitoring IC's
6 |As well as the IC's themselves there's quite a bit of info here about how to connect up CT's and voltage measurement.
7 |SINGLE-PHASE ENERGY MEASUREMENT IC WITH 8052 MCU, RTC, AND LCD DRIVER (Thanks to Hendrik for the link)
8 |Analog Devices Technical Documentation page (wish I'd looked for this earlier, looks full of useful info)
9 |AN-758: Creating a Reactive Energy Pulse Output Based on the ADE7753
10 |AN-564: A Power Meter Reference Design Based on the ADE7756
11 |ADE7753 Evaluation Board Documentation
12 |A 3-Phase Power Meter Based on the ADE7752 Application Note (AN-641)
13 |Microchip: IEC Compliant Active-Energy Meter Design Using the MCP3905A/6A
14 |Microchip: PIC18F2520 MCP3909 3-Phase Energy Meter Reference Design
15 |Maxim: Using the MAXQ3180 Analog Front-End in a Single-Phase Configuration
16 |Other useful info
17 |Article on sizing Current transformers and discussion of errors:
18 |http://www.datatronics.com/pdf/current_sense_article.pdf
19 |20 |
21 |Are there others that should be added?
22 |23 |
-------------------------------------------------------------------------------- /archive/Installing-the-Arduino-IDE-Windows-8.1.html: -------------------------------------------------------------------------------- 1 |
Follow Arduino windows install guide: https://www.arduino.cc/en/Guide/Windows
4 | 5 |This will download a file with a name like “Arduino-1.0.5-r2-windows.exe” (the name will change depending on the version) to your usual location. Double-click on that file and allow it to install in the normal way. Part way through the installation, it will ask for the components to install. It does not appear to make any difference whether you select Install USB driver or not, you still need later to install the SILabs drivers.
6 | 7 |
When the installation finishes, the screen will show “Arduino Setup:Completed”.
10 | 11 |If you are using USB to UART programming cable sold through the OpenEnergyMonitor shop, do not follow the instructions for installing the drivers on the Arduino website, instead download the drivers from http://www.silabs.com/products/mcu/Pages/USBtoUARTBridgeVCPDrivers.aspx
14 | Click on “Download VCP…”

This will download a zip file “CP210x_VCP_Windows” to your usual location. Extract the contents to a convenient place and you will find two installers, one for 32-bit computers (CP210xVCPInstaller_x86.exe) and one for 64-bit (CP210xVCPInstaller_x64.exe). Double-click on the correct one for your machine and allow it to install the drivers in the normal way.
19 | 20 |Make sure you restart the Arduino IDE after installing the drivers. Before you connect the programmer, check Tools > Serial Port. If Serial Port is greyed out, that’s OK, if not and any serial ports are listed, make a note of which they are. Now connect the programmer and your module (emonTx, NanodeRF or emonGLCD). Go back to the main menu and select Tools again. Serial Port should be available and showing a new port. Select that port. Under Tools > Board ensure “Arduino Uno” is selected.
21 | 22 |If you have a favorite text editor, you can use it instead of the built-in editor. Select File > Preferences and tick the box “Use external editor”. When you use an external editor, your workflow is slightly different. You must still open the sketch in the IDE, but the IDE does not open your editor - you must yourself open the sketch file in your external editor, and save the file when editing is done. Then you switch to the IDE, where you can click “Verify” or “Upload”. The IDE will read the file again and then proceed to compile it (“Verify”) or compile and upload it (“Upload”).
23 | 24 |Read the section on Installing the Libraries under Windows and install the libraries before you set your Sketchbook location (under Preferences).
25 | -------------------------------------------------------------------------------- /archive/acac-component-tolerances.html: -------------------------------------------------------------------------------- 1 |When designing any circuit, it is necessary to take account of the unavoidable variations that arise as part of the manufacturing process which lead to the value of some characteristic of the component - the resistance of a resistor or the voltage of a regulator - differing from the desired value.
4 | 5 |We'll use the voltage input circuit as an example.
6 | 7 |
To enable the best use of the Arduino analog input range, the input voltage should swing between 0 V and the supply voltage, nominally +5 V. To do that successfully, we must take the worst case conditions into account when we do the calculation.
10 | 11 |How does this work in practice? Let us assume we have a Mascot adapter and we are in the UK. The highest UK mains voltage is 240 V + 6%, or 254.4 V. The adapter is labelled "Input: 230 V, Output 9 V", so the output voltage might be as high as 9 × 254.4 / 230 = 9.95 V, to which we must add 20% because there is no load, so 11.95 V. This is the rms value, the peak value is 11.95 V × √2 = 16.9 V.
25 | 26 |The voltage we want at the Arduino input is 4.8 V peak-to-peak, but the entire range is available only if the bias is exactly at the midpoint of 2.4 V. The midpoint may be as low as 2.376 or as high as 2.424 V (it doesn't matter which), so our peak AC voltage is restricted to 2.376 V.
27 | 28 |Let's choose an R1 value of 10 kΩ, except of course, it isn't, it is high by 1%, so the actual value is 10.1 kΩ. That means the peak current in R1 is 2.376 V ÷ 10.1 kΩ = 0.235 mA. This current also flows in R2 and the voltage across R2 is 16.9 V - 2.376 V, so the exact value for R2 is (16.9 - 2.376) V ÷ 0.235 mA = 61.8 kΩ. Under our worst-case conditions, this is 1% low, so the ideal resistor should be 62.42 kΩ. Unfortunately, this is a little above a standard value. If it is acceptable to risk clipping the waveform under very worst case conditions, a 62 kΩ resistor could be used. Otherwise the next higher, standard value, 68 kΩ, must be chosen.
29 | -------------------------------------------------------------------------------- /archive/STM32-Nucleo.html: -------------------------------------------------------------------------------- 1 |2 | 3 |
13 | 1. GNU ARM Tool Chain
14 | 2. IDE Eclipse
15 | 3. STmicro libraries
16 | 4. GDB Server
17 |
18 | 1. GNU ARM Tool Chain
19 | https://launchpad.net/~terry.guo/+archive/ubuntu/gcc-arm-embedded
20 | $ sudo add-apt-repository ppa:terry.guo/gcc-arm-embedded
21 | (if using 14.04 follow extras steps when adding PPA)
22 | $ sudo apt-get update
23 | $ sudo apt-get install gcc-arm-none-eabi
24 | if 64bit, we need 32-bit libs
25 | $ sudo apt-get install lib32z1 lib32ncurses5 lib32bz2-1.0
26 |
27 | 2. Eclipse IDE & ARM plugin
28 | Verify Java version is 1.7 or newer
29 | $ java -version
30 | http://www.eclipse.org/downloads/
31 | Choose IDE for C/C++ for 32 / 64 bit
32 | Extract and run $ ./eclipse
33 | http://gnuarmeclipse.livius.net/blog/plugins-install/
34 | Add c++ dev tools
35 | Help → Install New Software > releases
36 | Select 'Luna' eclipse release
37 | Group by category > programming languages > C/C++ dev tools
38 | Add ARM plugin
39 | Help → Install New Software > releases
40 | http://gnuarmeclipse.sourceforge.net/updates
41 |
42 | 3. STmicro libraries
43 | firmware: http://www.st.com/web/en/catalog/tools/PF257890#
44 | template makefile compile environment:
45 | git clone git://github.com/geoffreymbrown/STM32-Template.git
4. GDB Server
48 | GDB Server - debugging - ST link is not native compatible with Linux however, it's been reverse engineered:
49 | git clone git://github.com/texane/stlink.git
50 | $ sudo apt-get install libusb-1.0
51 | $ sudo apt-get install autoreconf
52 | $ cd stlink
53 | $ ./autogen.sh
54 | $ ./configure
55 | $ make
56 | $ sudo cp 49-stlinkv2-1.rules /etc/udev/rules.d
57 | $ sudo udevadm control --reload-rules
58 | $ sudo udevadm trigger
59 | $ sudo ./st-util
62 | GUI - QSTLink2
63 | https://github.com/fpoussin/QStlink2
64 | https://launchpad.net/~fpoussin/+archive/ubuntu/ppa
65 | $ sudo add-apt-repository ppa:fpoussin/ppa
66 | $ sudo apt-get install qstlink2
67 | To flash code to the board
68 | http://stackoverflow.com/questions/2427011/what-is-the-difference-between-elf-files-and-bin-files
Binary Flash
71 | ./st-flash write blinky.bin 0x8000000
72 |
73 | ELF Executable Linkable Format
74 | 1. Start ST-link server on port 4242
75 | $ ./st-util #check ST link is connected ok
76 | $ ./st-util 4242 /dev/stlink
77 | 2. Start GDB and connect to ST-link server on port 4242
78 | start an instance of arm-noneeabi-gdb
79 | in a separate window and execute the following
80 | $ arm-none-eabi-gdb BlinkingLights.elf
81 | $(gdb) target extended-remote :4242
82 | $(gdb) load
83 | $(gdb) continue
86 | Serial Output
87 | Nucleo board serial output can be viewed by opening serial port /dev/ttyACM0
Getting started wtih Eclipse
90 | 1. Select new C++ project for STMF10x project
91 | 2. Check through default options
92 | 3. select blinky example
93 | 4. in BlinkLed.h change port number to be '0' for A and pin number to be 5 (on the necleo board the LED is on A5)
94 | 5. Click build
95 | 6. .elf file is now in the debug folder
Draft created 2 August 2010 by Trystan Lea
4 | 5 |This page details an ongoing investigation into the possibility of inferring what appliances are on and how much energy they use (especially their kwh per day usage) from one measurement point at the supply to the house/building. If this can be done effectively it would be a much cheaper and less intrusive way to find out such information than placing a separate meter on each appliance.
8 | 9 |Measuring changes in power consumption and power factor
10 | 11 |A 40W incandescent light bulb should be distinguishable because it would cause a power consumption change of ~ 40W of power, it is a resistive load so its effect on power factor should be either no change or positive change (depending on overall electricity use magnitude and power factor).
12 | 13 |A 3kW immersion heater should be distinguishable because it would cause a power consumption change of ~ 3000W of power, it is a resistive load so its effect on power factor should be either no change or positive change (depending on overall electricity use magnitude and power factor).
14 | 15 |My refrigerator uses 142W when it starts, then gradually drops to 105W.
16 | 17 |The washing machine has a heating element that uses ~2kW for a couple of minutes, and a spin cycle that is highly reactive causing power factor changes of approximately ±0.45
18 | 19 |By building up a profile of the types of power consumption and power factor changes that happen in a building, it may be possible to make a rough breakdown of energy used by the different appliances.
20 | 21 |
Example of it running here
26 | 27 |This is both a description of the solution as it currently stands, and a how-to-set-it-up guide. There are still lots of errors and lots of work to do!
28 | 29 |1) Set up a database on a server to log events with the following columns: timestamp (TIME), real power change (RP), power factor change (PF), current real power (CRP).
30 | 31 |
2) Create a script to relay this data from an Arduino GET request, to the database. Place the script on the server.
34 | 35 |Download the php script: emonphp.tar.gz
36 | 37 |3) Get the energy monitoring hardware to send this GET request to the server (minus timestamp which is generated in the script)
38 | 39 |Download the ethernet arduino sketch: inferSketch.tar.gz
40 | 41 |Download EmonEvent Library (detects step changes in a value): EmonEvent.tar.gz
42 | 43 |4) Create a table that stores event types.
44 | 45 |
5) Create a php script that:
48 | 49 |Download the event analysis php scripts: appInfer.tar.gz
57 | 58 |Download the page theme files: theme.zip
59 | 60 |61 | 62 |
ToDo
63 | 64 |73 | -------------------------------------------------------------------------------- /archive/emontxv3-to-pi-serial.html: -------------------------------------------------------------------------------- 1 |
The standard OEM system setup is to use a RaspberryPI base station next to your internet router connected via Ethernet, and an emonTx near your meter cabinet with a wireless link between them. In some instances it may make sense to connect the emonTx directly to the RaspberryPI via a serial link.
4 | 5 |Both the RaspberryPI and emonTx v3 run at 3.3V, so the serial RX and TX lines can be connected without issue. The RaspberryPI can power the emonTx as well.
6 | 7 |In the picture below, the RaspberryPI's 5V supply is connected via the red wire to the emontx 5V input, which is then regulated by the emonTx to 3.3V. The ground connection is the black wire, and the data going from the emonTx to the RaspberryPI is the green wire. An additional wire could be connected to allow the RaspberryPI to send data to the emonTx, but in this example, it's not needed.
8 | 9 |Note: connecting the emonTx via serial to the RaspberryPI is not part of the standard configuration, so this documentation may go out of date as changes are made to the emonTx and RaspberryPI over time, and may be a bit more involved than the wireless rfm12/69 approach.
10 | 11 |
Useful hardware pin-out reference documentation
14 | 15 |Reference design for the RaspberryPI adapter board which connects via serial to the RaspberryPI
16 | https://github.com/openenergymonitor/rfm2pi
RaspberryPi GPIO pinout:
19 | http://www.cl.cam.ac.uk/projects/raspberrypi/tutorials/turing-machine/two.html
EmonTx v3.2 schematic
22 | files/emonTxV3.2_sch.png
EmonTx v3.4 schematic
25 | https://github.com/openenergymonitor/Hardware/blob/master/emonTxV3/emonTx_V3.4/schematic.jpg
26 | Note: The FTDI connector Tx and Rx pins are reversed on the EmonTx v3.4 PCB legend and on the Schematic. Data is received by the emonTx on the Tx pin and transmitted by the emonTx on the Rx pin.
A simple, direct serial output Arduino sketch/firmware for the emonTx v3 can be found here:
31 | 32 | 33 | 34 |This prints power values and mains voltage to the serial port as space separated values:
35 | 36 |100 100 200 240
37 | 105 100 200 242
...
40 | 41 |Where the values are: CT1 Power, CT2 Power, CT3 Power, CT4 Power, Mains Voltage
42 | 43 |The direct serial output Arduino sketch/firmware for the emonTx v3 can be uploaded with a USB-to- serial adapter. Once uploaded, use the Arduino IDE serial monitor - set to 9600 bps - to verify the emonTx is printing values to the serial port.
44 | 45 |If you just want to forward the emonTx data to a remote emoncms, thiat can be done with emonHub on the RaspberryPi
48 | 49 |To install emonHub on the RaspberryPi run:
50 | 51 |git clone https://github.com/emonhub/dev-emonhub.git ~/dev-emonhub && ~/dev-emonhub/install
52 | 53 |See the emonHub Github page if the above does not work.
54 | 55 |The next part involves setting up emonHub in a manner similar to the way emonHub is used in the HomeEnergyMonitor documentation here: https://github.com/openenergymonitor/documentation/blob/master/Applications/HomeEnergyMonitor/HomeEnergyMonitor.md
56 | 57 |If you have an pre-built OpenEnergyMonitor sd card, you will find the emonHub configuration file on the boot partition. To edit it, enter:
58 | 59 |sudo nano /boot/emonhub.conf
60 | 61 |If you installed emonHub yourself on a generic raspbian install, the emonhub.conf file can be found in the /etc/emonhub directory.
62 | 63 |sudo nano /etc/emonhub/emonhub.conf
64 | 65 |Add the serial config to the emonhub.conf interfacers section:
66 | 67 |68 | [[Serial]] 69 | type = EmonHubSerialInterfacer 70 | [[[init_settings]]] 71 | com_port = /dev/ttyAMA0 72 | com_baud = 9600 73 | [[[runtime_settings]]]74 | 75 |
Next, add the location and apikey of the emoncms server you're posting to in the reporters section.
76 | 77 |78 | [[emonCMS]] 79 | type = EmonHubEmoncmsReporter 80 | [[[init_settings]]] 81 | [[[runtime_settings]]] 82 | url = http://localhost/emoncms 83 | apikey = xxxxxxxxxxxxxxxxxxxxxxxxxxxxxxxx 84 |85 | 86 |
It's worth noting the standard emonTx firmware which has all the rfm12b radio packet sending code, also prints a space separated string to its serial port which should work the same as the cut down serial only example above, although you'll still be transmitting radio packets.
87 | 88 |Here's a picture of both units in their cases, connected, a tidy system!
89 | 90 |Pi case: http://shop.pimoroni.com/products/blackberry-case-for-raspberry-pi
91 | 92 |
A long-time member of the OEM forums, Vster, asked:
4 | 5 |“Obviously lots of different people are measuring lots of different 'things' with official and unofficial OEM modules, but there doesn't appear to be a big list/directory somewhere where all these 'things' are listed. We've all done the 'usual', electricity usage and house temperature, some have gone further to monitor the output of their solar PV systems and heat pumps. I was wondering what others were monitoring and today I came across a chap who has temperature sensors in the flow/return pipes of his gas boiler to monitor efficiency. But I was wondering what others are doing?”
6 | 7 |8 | 9 |
To prevent the list from getting buried in the forum, here it is in consolidated form. Thanks to all who contributed.
10 | 11 | [JD]
[JD]If you have, or have heard of, an application that should be added to this list, please contribute in the original thread. This page will be updated from time to time as necessary.
70 | -------------------------------------------------------------------------------- /archive/setting-up-the-arduino-environment.html: -------------------------------------------------------------------------------- 1 |This guide details how prepare your computer for uploading firmware to the OpenEnergyMonitor hardware modules after you've assembled them. The hardware modules are all based on an open source prototyping platform called Arduino.
4 | 5 |Arduino is one of the projects that really kickstarted the open hardware movement. The simplicity of programming and uploading code to the ATMEL microcontroller made possible by the Arduino hardware and Arduino IDE (Integrated Development Environment) made electronics accessible to a much wider audience, from programmers to artists. The decision to open source it inspired and enabled others, including us, to do so in turn.
6 | 7 |If your OS is Windows, there's a dedicated guide here: Installing the Arduino IDE – Windows 8.1 & 10
10 | 11 |The "Get Started" section of the Arduino website has a wealth of information on installing the IDE on most operating systems: http://arduino.cc/en/Guide/HomePage. Be sure to read that before continuing.
12 | 13 |USB to UART cable drivers
14 | 15 |If you're using the cable sold through the OpenEnergyMonitor Shop, the drivers for Windows and Mac can be downloaded here: http://www.silabs.com/products/mcu/Pages/USBtoUARTBridgeVCPDrivers.aspx .
16 | 17 |No drivers are needed for Linux.
18 | 19 |Make sure you restart the Arduino IDE after installing the drivers.
20 | 21 |Set the sketchbook location
22 | 23 |When you first start the IDE, you may be asked if you would like it to create a sketchbook. Arduino calls the programs you write sketches and the sketchbook is the default folder that holds them. The sketchbook will likely be located in your home directory on Linux, and your "My Documents" folder on Windows.
24 | 25 |If you need to check or change the location e.g. moving it to your desktop for easy access, go to File > Preferences and set the location. When you click OK at this point, the IDE will automatically create a libraries folder in your sketchbook if one does not already exist,
26 | 27 |There are two different ways of installing the required libraries and firmware. The first is the familiar method of using your internet browser to download the required files, The second, which may seem complicated, will save you a great deal of time, is using a software tool called git. Once you are familiar with git, it's easy to keep the software up to date.
30 | 31 |a) Installing Arduino Libraries
34 | 35 |b) Downloading and Uploading Firmware
36 | 37 |Introduction to git: A gentle guide to Git and GitHub
40 | 41 |Step by step guide to downloading all the libraries and firmware using git on ubuntu linux
42 | 43 |To update any of the libraries or downloaded firmware with git, execute the command git pull origin master in the library or firmware folder, via a terminal session.
44 | 45 |Git clients for windows and mac: http://git-scm.com/downloads
46 | 47 |Make sure the Board is set to Arduino UNO and that tools Serial Port is set to the serial port that appeared when you connected your emonTx.
52 | 53 |
Click on the 'arrow pointing to the right' button.
58 | 59 |Troubleshooting
60 | 61 |On Linux, if Serial Port is disabled, make sure you have permissions to access serial ports. On Ubuntu 12.04 I had to add my user to the "dialout" group.
62 | 63 |There is a wealth of information online regarding installing Ubuntu. A Google search of: Arduino + your OS + version may help you resolve problems.
64 | 65 |You should now have the Arduino IDE installed on your computer (version 1.0.3 or later) and a folder called sketchbook with the following items in it:
68 | 69 |sketchbook
70 | 71 |If they are all there, restart the Arduino IDE, then you'll be ready to upload code to the hardware modules.
95 | 96 |Setting up Arduino IDE for use with ATtiny's
99 | 100 | 101 | -------------------------------------------------------------------------------- /archive/interfacing-with-sma-sunnyboy-pv-inverters-bluetooth.html: -------------------------------------------------------------------------------- 1 |SMA is a German company who produces DC to AC inverters used with PV systems and other renewable energy sources (for grid connection etc.). Many models include a Bluetooth interface.
4 | 5 |Two approaches have been used to make this data available to Open Energy Monitor:
8 | 9 |?The choice of which one to use will be determined by the other components in use in your Open Energy Monitor system, and whether they can reliably communicate with the Inverter using the Bluetooth protocol.
15 | 16 |I've just ordered a Nanode in preparation for my contribution to the OpenEnergyMonitor project. (Oct 2011)
19 | 20 |I'm going to be looking at interfacing a Nanode to the SMA SunnyBoy range of PV inverters (http://www.sma.de/en/products/solar-inverters/sunny-boy.html)
21 | 22 |Newer inverters have a Bluetooth interface for accessing their internal readings, including measurements for DC voltage/current (from solar panels) mains AC, current, voltage and generation history.
23 | 24 |Most of the inverters also contain an inbuilt relay which can be toggled via bluetooth by issuing the proper commands.
25 | 26 |Unfortunately the protocols used via Bluetooth have not been released to the public, but I've managed to create a working prototype (written in C# also ported to Python) that exports PV data to my website (www.solarstats.co.uk) every 10 minutes.
27 | 28 |Hopefully, OpenEnergyMonitor can eventually display PV performance on its gLCD display as well as the other measurements.
29 | 30 |31 | 32 |
Update Feb 7th 2012
33 | 34 |I've uploaded the first version of my monitoring code to Github https://github.com/stuartpittaway/nanodesmapvmonitor
35 | 36 |Its a big sketch - compiles to nearly 30.5Kbytes !
37 | 38 |https://github.com/stuartpittaway/nanodesmapvmonitor/blob/master/README on GITHUB has more detail.
39 | 40 |Tested with SMA3000HF, 3000TL, 4000TL - but in theory should work with all Bluetooth enabled inverters. Please email me your success/failure stories and I'll update/fix!
41 | 42 |You will need to modify the code (see APIKey.h for constants) to configure your passwords/keys for Pachube/SolarStats.co.uk and PVOutput.org sites and disable the ones you don’t need.
43 |
44 | You can set your location's lat/long and the code will automatically determine when to start monitoring your PV system.
45 |
46 | Once the code is uploaded to the Arduino/nanode device, make PIN14 high, and power on the board. This forces an automatic SMA inverter Bluetoth scan/discovery. Once the address has been retrieved, it is stored in EEPROM.
47 |
48 | Connect a serial cable to the Nanode board (115000,8,n,1 baud rates) to see debug messages.
49 |
50 | You should see messages like...
51 | PWR UP
52 | free mem=401
53 | MAC=0004A32C1F88
54 | DHCP
55 | IP:192.168.1.102
56 | GW:192.168.1.1
57 | DNS:8.8.8.8
58 | LOOP..
59 | free mem=341
60 | *Logon*
61 | Fake time resync
62 | *LOOP*
63 | 22:16:27 20120207
64 | 22:16:29 20120207
65 | 22:16:32 20120207
66 | 22:16:34 20120207
67 |
68 | The code needs integration with OpenEnergyMonitor and heavy reduction in program space. Approximately 300 bytes of RAM are free during operation.
69 |
70 | Its currently updating emonCMS, Pachube, SolarStats.co.uk and PVOutput.org at the same time 
On Pachube, I'm uploading the free RAM and millis() counter once per minut. So far, I've managed to go 4 days without a restart.
73 | 74 |You can see the output at
75 | 76 |http://pvoutput.org/list.jsp?userid=4206
77 | 78 |https://pachube.com/feeds/40789
79 | 80 | 
83 | 84 |
Update 21 Feb
85 | 86 |Happy to report my code and Nanode 5 have been running continuously for 10 days straight now without a single reboot or restart of the BT chip. I'm using Pachube to monitor uptime. http://binaereoptionen.over-blog.com/
87 | 88 |You can see where the code "goes to sleep" (dotted line) then wakes up at sunrise to begin data capture - during this time, the Bluetooth and Ethernet are kept awake, although I plan to shut both of them down and put the CPU in sleep mode.
89 | 90 |There's no RAM leaks. I'm also logging this to Pachube, and the value has been constant for 10 days.
91 | 92 |
95 | 96 |
Your chosen hardware will require a Bluetooth radio (a £5 GPB USB <-> Bluetooth adaptor has been used successfully). Known-working on Debian 8.0 i386.
99 | 100 |Download
3 |Voltage Synthesis Arduino Sketch
4 |The voltage synthesis method works for resistive loads and loads with switched mode power supplies that give an apparent power factor of less than 1.0. It does not however work for “real” reactive loads like washing machines and fridges.
6 |For household use were there is a mix of laptops, lights, washing machines and fridges, etc it is probably better to go with a method that measures the voltage waveform directly using a power adapter or other method which will be one of the next steps of development.
7 |If your loads are only laptops and lights then voltage synthesis does add a little extra functionality without the added cost and complication of measuring the voltage directly and so I will leave the details of this method and investigation here in-case it is of any use.
8 |Laptops (switched mode power supplies) and all the resistive loads connected gave the correct real power and power factor. Switched mode power supplies if I understand correctly have what is called apparent power factor were the power factor can be less than 1.0 yet the voltage and current waveforms are still completely in -phase which is due to non-linear current draw as described in this article:
10 |Understanding power factor and input current harmonics in switched mode power supplies
11 |Food mixers were not reactive enough to be a visible problem, they gave power factors of around 0.92
12 |The fridge and washing machine were highly reactive, causing the voltage synthesis method to give completely erroneous results due to the fact that the voltage synthesis method was aligning the synthesised voltage waveform to be in phase with the current waveform that was out of phase with the real voltage phase. In the first test I performed I did not check fridges or washing machines ... a large error :)
13 |Further significant errors that should not have been present were present in the results for Irms and Apparent power that are likely to be due to crude experimental method.
14 |Below is a discussion of the power factor graph and the Irms graph, real power and apparent power graphs can be found at the end.
15 |

Left: power factor comparison the first time around with a mixture of laptops and incandescent light bulbs.
18 |Right: power factor comparison showing results of laptop, small light bulb, food mixers, fridge and washing machine.
19 |The results clearly show that voltage synthesis does not work well for “real” reactive loads like fridges and washing machines but does work for appliances with switched mode power supplies that have apparent power factor.
20 |An interesting point to note though is that when the fridge is measured by itself the power factor calculated is much more erroneous than when it is measured alongside the laptop. This is due to the current spike of the laptop being higher than the highest point on the fridges current waveform, and so the voltage synthesis method which aligns the synthesised voltage waveform with the overall peak of the current waveform aligns to the laptop spike which is in phase with the real voltage waveform. As long as the peak of the current waveform is in phase the voltage synthesis method works.
21 |The first investigation tested many variations of different light bulbs and laptops and heating elements and hence the linearity is a lot more evident. In the second experiment the only thing connected with a power factor of 1.0 was a toasty maker that had a large enough current draw to drown out the effects of the laptop.
22 |and discussion of errors arising from crude experimental method.
24 |Measurements from the mains AC non-invasive method were compared with measurements from a cheap commercial plug in power meter.
25 |The mains AC non-invasive method calculated values for real power apparent power, power factor, irms and vrms twice a second. These values are then fed into KST graphing software and a mean is calculated for the last 10 measurements of each value. This makes it easier to note the values down by hand since they don't change so much.
26 |The mains plug meter updates once a second and appears to be more stable than the AC non-invasive method, although its stability varies significantly with the type of load connected as does the AC non-invasive method.
27 |Measurements were recorded in OpenOffice Calc manually one after the other in the following order:
28 |Mains AC non invasive method:
29 |Vrms (set manually) → Irms → Power Factor → Real Power → Apparent Power
30 |and then straight on to Commercial plug in meter
31 |Vrms → Irms → Power Factor → Real Power
32 |The plug in meter does not display apparent power and so apparent power was calculated by dividing real power by the power factor.
33 |I tried to note down the values as quick as I could but there was I think about 2 to 3 second between each measurement.
34 |This delay between each measurement meant that the Irms calculated by the non-invasive method which is already an average of the preceding 5 seconds was compared to an Irms about 10 seconds later on the power meter.
35 |This wasn't a large problem when the values displayed by both methods were quite stable but became a problem with the washing machine since it kept changing the spin speed and kept switching various things on and off. The washing machine also seemed to have significant variation over the second time scale going from 1.05A to 1.79A and then back down randomly. The data points circled in red in the figure below of rms current of the power meter against the rms current calculated by the non-invasive method are all washing machine data points, I would expect them to all fall on the line had I been able to take simultaneous measurement, this problem also afflicts the apparent power graph which one would also expect the data points to fall on the straight line.
36 |
Real Power
39 |erroneous result from reactive loads are clearly visible as discussed in the section on the power factor graph.
40 |
Apparent power
42 |Errors due to crude experimental method as discussed above are clearly visible.
43 |
First investigation - no "real" reactive loads Results01.ods
46 |Second investigation - with fridge and washing machine Results02.ods
-------------------------------------------------------------------------------- /index.php: -------------------------------------------------------------------------------- 1 | "electricity-monitoring", 38 | "electricity-monitoring"=>"electricity-monitoring", 39 | 40 | "sustainable-energy"=>"sustainable-energy/introduction.html", 41 | "sustainable-energy/introduction"=>"sustainable-energy/introduction.html", 42 | "sustainable-energy/energy/introduction"=>"sustainable-energy/introduction.html", 43 | 44 | "electricity-monitoring/ac-power-theory"=>"electricity-monitoring/ac-power-theory/index.html", 45 | "electricity-monitoring/arduino-ide"=>"electricity-monitoring/arduino-ide/index.html", 46 | "electricity-monitoring/ctac"=>"electricity-monitoring/ctac/index.html", 47 | "electricity-monitoring/ct-sensors"=>"electricity-monitoring/ct-sensors/index.html", 48 | "electricity-monitoring/networking"=>"electricity-monitoring/networking/index.html", 49 | "electricity-monitoring/programmers"=>"electricity-monitoring/programmers/index.html", 50 | "electricity-monitoring/pulse-counting"=>"electricity-monitoring/pulse-counting/index.html", 51 | "electricity-monitoring/temperature"=>"electricity-monitoring/temperature/index.html", 52 | "electricity-monitoring/voltage-sensing"=>"electricity-monitoring/voltage-sensing/index.html", 53 | 54 | "pv-diversion"=>"pv-diversion", 55 | "pv-diversion/mk2"=>"pv-diversion/mk2", 56 | "pv-diversion/mk2/intro"=>"pv-diversion/mk2/index.html", 57 | "pv-diversion/mk2/modes"=>"pv-diversion/mk2/modes.html", 58 | "pv-diversion/mk2/pvmeasurement"=>"pv-diversion/mk2/index.html", 59 | "pv-diversion/mk2/switchdev"=>"pv-diversion/mk2/index.html", 60 | "pv-diversion/mk2/diversion"=>"pv-diversion/mk2/index.html", 61 | "pv-diversion/mk2/calibration"=>"pv-diversion/mk2/index.html", 62 | "pv-diversion/mk2/build"=>"pv-diversion/mk2/index.html#building-a-mk2-pv-router", 63 | "pv-diversion/mk2/switchdev"=>"pv-diversion/mk2/index.html", 64 | "pv-diversion/mk2/versions"=>"pv-diversion/mk2/index.html", 65 | "pv-diversion/mk2/vimeasurement"=>"pv-diversion/mk2/index.html", 66 | 67 | "pv-diversion/pll"=>"pv-diversion/pll/index.html", 68 | "pv-diversion/pll/adcinterrupts"=>"pv-diversion/pll/index.html", 69 | "pv-diversion/pll/advantagesoveremonlib"=>"pv-diversion/pll/index.html", 70 | "pv-diversion/pll/derivatives"=>"pv-diversion/pll/index.html", 71 | "pv-diversion/pll/features"=>"pv-diversion/pll/index.html", 72 | "pv-diversion/pll/hardware"=>"pv-diversion/pll/index.html", 73 | "pv-diversion/pll/implementation"=>"pv-diversion/pll/index.html", 74 | "pv-diversion/pll/integermaths"=>"pv-diversion/pll/index.html", 75 | "pv-diversion/pll/operatingprinciple"=>"pv-diversion/pll/index.html", 76 | "pv-diversion/pll/pll"=>"pv-diversion/pll/index.html", 77 | "pv-diversion/pll/references"=>"pv-diversion/pll/index.html", 78 | "pv-diversion/pll/sketchdetail"=>"pv-diversion/pll/index.html", 79 | "pv-diversion/pll/softwaredesign"=>"pv-diversion/pll/index.html" 80 | ); 81 | 82 | if (isset($redirects[$q])) learn_redirect($redirects[$q]); 83 | 84 | $valid_pages = array( 85 | "electricity-monitoring/ac-power-theory/3-phase-power", 86 | "electricity-monitoring/ac-power-theory/advanced-maths", 87 | "electricity-monitoring/ac-power-theory/arduino-maths", 88 | "electricity-monitoring/ac-power-theory/introduction", 89 | "electricity-monitoring/ac-power-theory/use-in-north-america", 90 | "electricity-monitoring/arduino-ide/macoside", 91 | "electricity-monitoring/arduino-ide/macoslib", 92 | "electricity-monitoring/arduino-ide/ubuntuide", 93 | "electricity-monitoring/arduino-ide/ubuntulib", 94 | "electricity-monitoring/arduino-ide/windows10ide", 95 | "electricity-monitoring/arduino-ide/windows10lib", 96 | "electricity-monitoring/ctac/acac-buffered-voltage-bias", 97 | "electricity-monitoring/ctac/calibration", 98 | "electricity-monitoring/ctac/ct-and-ac-power-adaptor-installation-and-calibration-theory", 99 | "electricity-monitoring/ctac/digital-filters-for-offset-removal", 100 | "electricity-monitoring/ctac/emonlib-calibration-theory", 101 | "electricity-monitoring/ctac/emontx-error-sources", 102 | "electricity-monitoring/ctac/explanation-of-the-phase-correction-algorithm", 103 | "electricity-monitoring/ctac/how-good-is-your-multimeter", 104 | "electricity-monitoring/ctac/how-to-build-an-arduino-energy-monitor", 105 | "electricity-monitoring/ct-sensors/extending-ct-cable", 106 | "electricity-monitoring/ct-sensors/how-to-build-an-arduino-energy-monitor-measuring-current-only", 107 | "electricity-monitoring/ct-sensors/installation", 108 | "electricity-monitoring/ct-sensors/interface-with-arduino", 109 | "electricity-monitoring/ct-sensors/introduction", 110 | "electricity-monitoring/ct-sensors/measurement-implications-of-adc-resolution-at-low-current-values", 111 | "electricity-monitoring/ct-sensors/yhdc-sct006-ct-sensor-report", 112 | "electricity-monitoring/ct-sensors/yhdc-sct-013-000-ct-sensor-report", 113 | "electricity-monitoring/networking/rfm12_69", 114 | "electricity-monitoring/networking/sending-data-between-nodes-rfm", 115 | "electricity-monitoring/networking/which-radio-module", 116 | "electricity-monitoring/programmers/ftdi-programmer", 117 | "electricity-monitoring/programmers/wicked-device", 118 | "electricity-monitoring/pulse-counting/accuracy-and-precision", 119 | "electricity-monitoring/pulse-counting/gas-meter-monitoring", 120 | "electricity-monitoring/pulse-counting/introduction-to-pulse-counting", 121 | "electricity-monitoring/temperature/DS18B20-temperature-sensing", 122 | "electricity-monitoring/temperature/DS18B20-temperature-sensing-2", 123 | "electricity-monitoring/temperature/rtd-temperature-sensing", 124 | "electricity-monitoring/voltage-sensing/acac-component-tolerances", 125 | "electricity-monitoring/voltage-sensing/different-acac-power-adapters", 126 | "electricity-monitoring/voltage-sensing/measuring-voltage-with-an-acac-power-adapter", 127 | "electricity-monitoring/voltage-sensing/report-idealpower-9v-acac-adaptor", 128 | "electricity-monitoring/voltage-sensing/report-mascot-9v-acac-adaptor", 129 | "electricity-monitoring/voltage-sensing/why-cant-i-use-a-single-transformer", 130 | "pv-diversion/background/meters", 131 | "pv-diversion/background/overload-protection-of-mains-electrical-circuits", 132 | "pv-diversion/introduction/choosing-an-energy-diverter", 133 | "pv-diversion/usingmultiplediverters/usingmultiplediverters" 134 | ); 135 | 136 | // If a known page 137 | if (in_array($q,$valid_pages)) { 138 | header("Location: https://docs.openenergymonitor.org/$q.html"); 139 | die(); 140 | } 141 | 142 | // ELSE 143 | 144 | echo "In this example we will install the EmonLib Library which is an OpenEnergyMonitor library used by the emonTX for doing AC Voltage and Current sampling and calculations. The OEM project requires several libraries, from Ethernet to LCD, and 1 wire temperature sensing, most of these are listed at the bottom of this page for quick reference, but always check the Arduino sketch and accompanying docs for latest versions and links.
4 | 5 |In this example, we use Ubuntu Linux. The procedure is exactly the same on a Mac. The Windows procedure follows in the next section.
6 | 7 |
Note: Version 1.6.7 of the Arduino IDE (and probably some earlier versions too) assumes that the folder, which it calls "Sketchbook", must be the parent of both the user's top level sketch directory and the "libraries" directory. This can be (but need not be) the "Arduino" directory. If this convention is not observed, the libraries that you are about to install will not be found.
16 | 17 |When downloading from github, some extra folders are added that need to be removed.
18 | 19 |
Only ASCII characters are valid in Arduino library names, so you have to rename after extracting.
24 | 25 | 
For this example click on File>Examples>EmonLib>Voltage_and_current to load the EmonLib Voltage and current measurement example. Click on the tick button or Sketch>Verify/Compile. If everything is setup correctly it should compile and show the message Done Compiling as in the screenshot below.
30 | 31 |
|
39 | JeeLib 40 | 41 |RFu_JeeLib 42 | 43 |44 | |
45 |
46 |
47 |
48 | https://github.com/openenergymonitor/RFu_jeelib 49 | 50 |RFu JeeLib is used for emonTx V3 and emonTH using the RFu328 module 51 | |
52 |
| EmonLib | 55 |https://github.com/openenergymonitor/EmonLib | 56 |
| OneWire | 59 |http://www.pjrc.com/teensy/td_libs_OneWire.html | 60 |
| DallasTemperature | 63 |
64 | https://github.com/milesburton/Arduino-Temperature-Control-Library 65 | |
66 |
| RTClib | 69 |https://github.com/jcw/rtclib | 70 |
| GLCD_ST7565 | 73 |https://github.com/jcw/glcdlib | 74 |
|
77 | EtherCard 78 | 79 |DHT22 80 | 81 |82 | |
83 | 84 | 85 | 86 | 87 | | 88 |
Update: if you want an easy install all the required libraries can be downloaded from our Dropbox folder.
93 | 94 |95 | 96 | 97 | 98 |
Although this guide shows screenshots from both Windows 8.1 & Windows 10, there are no significant differences between the versions.
101 | 102 |Before you install the libraries, it would be a good idea to think about how you will organise your Emon data.
103 | 104 |When you install the Arduino IDE (V1.6.7 and later), it creates an "Arduino" folder in your files area "This PC > Documents > Arduino". You may utilise this structure, in which case the "Arduino" folder becomes your "Sketchbook" and you create a hierarchy for your sketches starting below the Arduino folder and at the same level as the "libraries" folder. You may choose to keep your sketches elsewhere, but the relationship between the "Sketchbook" folder, your sketches and your libraries must be preserved, otherwise the libraries that you are about to install will not be found.
105 | 106 |This is the structure:
107 | 
[Important Note: This is NOT the same ‘libraries’ folder that is part of the Arduino IDE. If you put the OEM libraries in there, they will work, but when you update the Arduino IDE, by default it completely deletes the old installation including any other files you might have put there, and you will have to download and install these libraries again. For that reason, it is not recommended.]
110 | 111 |My preference is to have a folder that contains everything related to OpenEnergyMonitor. That folder, which I’ve called ‘OEM’ is at the top level in my personal area, i.e. …\Documents and Settings\[user]\OEM. Contained in the OEM folder, I have folders for Drawings, Manuals & Leaflets, and importantly, Software. That Software folder is the equivalent of the "Arduino" folder in the default configuration and is my "Sketchbook" folder.
112 | 113 |Many libraries are required, this is the full list again:
116 | 117 || 121 | 122 | 123 | 124 | 125 | 126 | | 127 |
128 |
129 |
130 | https://github.com/openenergymonitor/RFu_jeelib 131 | 132 |RFu JeeLib is used for emonTx V3 and emonTH using the RFu328 module 133 | |
134 |
| EmonLib | 137 |https://github.com/openenergymonitor/EmonLib | 138 |
| OneWire | 141 |http://www.pjrc.com/teensy/td_libs_OneWire.html | 142 |
| DallasTemperature | 145 |
146 | https://github.com/milesburton/Arduino-Temperature-Control-Library 147 | |
148 |
| RTClib | 151 |https://github.com/jcw/rtclib | 152 |
| GLCD_ST7565 | 155 |https://github.com/jcw/glcdlib | 156 |
| EtherCard | 159 |https://github.com/jcw/ethercard/ | 160 |
Go to each of the websites in turn. The OneWire library is not on GitHub, all the rest are. Download the zip file for each to your usual place – on GitHub the button is on the right-hand side and you may need to scroll down the page to see it:
165 | 166 |167 | 168 |

When you have downloaded all the files, go to your download location and extract the contents of each Zip file in turn: Double-click on the zip file, a window will open showing the contents. Drag that folder into the “libraries” folder.
173 | 174 |The Arduino IDE does not allow hyphens ‘-’ in the library folder names. You must rename the folders to the names in this screen-shot. You should end up with:
177 | 178 |
[If you wish, you can now delete the zip files you downloaded.]
181 | 182 |If your Arduino IDE is running, shut it down. Start (or restart) the IDE. First you must tell the IDE where your ‘Sketchbook’ is located. Click on File > Preferences and at the top for “Sketchbook location” browse to, and select your “Software” folder, then click OK. Click on Sketch > Include Library and you should see the list of your libraries listed below "Contributed libraries". Note: The IDE only checks the libraries at start-up. Each time you change or add a library, you must shut down and restart the IDE.
185 | -------------------------------------------------------------------------------- /archive/faq.html: -------------------------------------------------------------------------------- 1 |Q: There's a lot of info here. It's overwhelming! Where do I start?
2 | 3 |A:
4 | 5 |12 | 13 |
Q: I'm having trouble with... Can you help me?
14 | 15 |A:
16 | 17 |37 | 38 |
39 | 40 |
Q: Do I need any special skills, knowledge, tools, etc. to use OEM?
41 | 42 |A:
43 | 44 |62 | 63 |
Q: I want to ask a question about my electricity supply. What information do you need to know?
64 | 65 |A:
66 | 67 |73 | 74 |
Q: Why doesn't my CT work?
75 | 76 |A:
83 | 84 |92 | 93 |
Q: Why are my readings negative when they should be positive? (or vice-versa)
94 | 95 |A:
96 | 97 |105 | 106 |
Q: Why do I see power readings when the CT is not clipped around a wire?
107 | 108 |A:
109 | 110 |118 | 119 |
Q: The YHDC CT sold in the shop won't fit my wires. Are CTs with larger openings available?
120 | 121 |A:
122 | 123 |129 | 130 |
Q: I'm trying to calibrate my system with a 60 Watt lamp. Why are my readings wrong?
131 | 132 |A:
133 | 134 |140 | 141 |
Q: I calibrated my system with a 2000 Watt heater, but my low power readings are still wrong!
142 | 143 |A:
144 | 145 |151 | 152 |
Q: I can't buy an AC - AC adapter with the correct plug. Will an ordinary transformer work?
153 | 154 |A:
155 | 156 |161 | 162 |
Q: Can I use a voltage divider and connect straight to the mains instead of using an A.C. - A.C. adapter? Surely it would be more accurate and cheaper.
163 | 164 |A:
165 | 166 |171 | 172 |
Q: I want to monitor multiple circuits, but the emonTx has only four inputs.
173 | 174 |A:
175 | 176 |184 | 185 |
Q: I deleted the mysql database and the emoncms folder, then reinstalled emoncms. I still have the inputs from the previous installation. How do I delete them?
186 | 187 |A:
188 | 189 |194 | 195 |
Q: Where can I find the emonCMS installation instructions?
196 | 197 |A:
198 | 199 |204 | 205 |
Q: Ubuntu Linux gives me this error: The requested URL /emoncms was not found on this server.
206 | 207 |A: See this forum thread.
208 | -------------------------------------------------------------------------------- /archive/labs.html: -------------------------------------------------------------------------------- 1 |Links to current development topics:
8 | 9 |April 2016
10 | 11 |March 2016
18 | 19 |29 | 30 |
February 2016
31 | 32 |January 2016?
54 | 55 |December 2015
64 | 65 |November 2015
78 | 79 |October 2015
80 | 81 |September 2015
94 | 95 |August 2015
105 | 106 |July 2015
114 | 115 |June 2015
125 | 126 |May 2015
136 | 137 |April 2015
144 | 145 |March 2015
150 | 151 |February 2015
161 | 162 |January 2015
173 | 174 | 177 | 178 |December 2014
179 | 180 |November 2014
185 | 186 |October 2014
191 | 192 |September 2014
198 | 199 |Emoncms development plan: https://github.com/emoncms/emoncms/issues/244
204 | 205 |June-July 2014
206 | 207 |May 2014
219 | 220 |April 2014
229 | 230 |March 2014
237 | 238 |February 2014
274 | 275 |See forums and blog posts for historical development going back to 2009.
282 | 283 |Gas meter monitoring (from pulse output meter)
286 | Gas Meter Types
Water monitoring (from pulse output meter)
291 | -------------------------------------------------------------------------------- /LICENSE: -------------------------------------------------------------------------------- 1 | Attribution-ShareAlike 4.0 International 2 | 3 | ======================================================================= 4 | 5 | Creative Commons Corporation ("Creative Commons") is not a law firm and 6 | does not provide legal services or legal advice. Distribution of 7 | Creative Commons public licenses does not create a lawyer-client or 8 | other relationship. Creative Commons makes its licenses and related 9 | information available on an "as-is" basis. Creative Commons gives no 10 | warranties regarding its licenses, any material licensed under their 11 | terms and conditions, or any related information. Creative Commons 12 | disclaims all liability for damages resulting from their use to the 13 | fullest extent possible. 14 | 15 | Using Creative Commons Public Licenses 16 | 17 | Creative Commons public licenses provide a standard set of terms and 18 | conditions that creators and other rights holders may use to share 19 | original works of authorship and other material subject to copyright 20 | and certain other rights specified in the public license below. The 21 | following considerations are for informational purposes only, are not 22 | exhaustive, and do not form part of our licenses. 23 | 24 | Considerations for licensors: Our public licenses are 25 | intended for use by those authorized to give the public 26 | permission to use material in ways otherwise restricted by 27 | copyright and certain other rights. Our licenses are 28 | irrevocable. Licensors should read and understand the terms 29 | and conditions of the license they choose before applying it. 30 | Licensors should also secure all rights necessary before 31 | applying our licenses so that the public can reuse the 32 | material as expected. Licensors should clearly mark any 33 | material not subject to the license. This includes other CC- 34 | licensed material, or material used under an exception or 35 | limitation to copyright. More considerations for licensors: 36 | wiki.creativecommons.org/Considerations_for_licensors 37 | 38 | Considerations for the public: By using one of our public 39 | licenses, a licensor grants the public permission to use the 40 | licensed material under specified terms and conditions. If 41 | the licensor's permission is not necessary for any reason--for 42 | example, because of any applicable exception or limitation to 43 | copyright--then that use is not regulated by the license. Our 44 | licenses grant only permissions under copyright and certain 45 | other rights that a licensor has authority to grant. Use of 46 | the licensed material may still be restricted for other 47 | reasons, including because others have copyright or other 48 | rights in the material. A licensor may make special requests, 49 | such as asking that all changes be marked or described. 50 | Although not required by our licenses, you are encouraged to 51 | respect those requests where reasonable. More_considerations 52 | for the public: 53 | wiki.creativecommons.org/Considerations_for_licensees 54 | 55 | ======================================================================= 56 | 57 | Creative Commons Attribution-ShareAlike 4.0 International Public 58 | License 59 | 60 | By exercising the Licensed Rights (defined below), You accept and agree 61 | to be bound by the terms and conditions of this Creative Commons 62 | Attribution-ShareAlike 4.0 International Public License ("Public 63 | License"). To the extent this Public License may be interpreted as a 64 | contract, You are granted the Licensed Rights in consideration of Your 65 | acceptance of these terms and conditions, and the Licensor grants You 66 | such rights in consideration of benefits the Licensor receives from 67 | making the Licensed Material available under these terms and 68 | conditions. 69 | 70 | 71 | Section 1 -- Definitions. 72 | 73 | a. Adapted Material means material subject to Copyright and Similar 74 | Rights that is derived from or based upon the Licensed Material 75 | and in which the Licensed Material is translated, altered, 76 | arranged, transformed, or otherwise modified in a manner requiring 77 | permission under the Copyright and Similar Rights held by the 78 | Licensor. For purposes of this Public License, where the Licensed 79 | Material is a musical work, performance, or sound recording, 80 | Adapted Material is always produced where the Licensed Material is 81 | synched in timed relation with a moving image. 82 | 83 | b. Adapter's License means the license You apply to Your Copyright 84 | and Similar Rights in Your contributions to Adapted Material in 85 | accordance with the terms and conditions of this Public License. 86 | 87 | c. BY-SA Compatible License means a license listed at 88 | creativecommons.org/compatiblelicenses, approved by Creative 89 | Commons as essentially the equivalent of this Public License. 90 | 91 | d. Copyright and Similar Rights means copyright and/or similar rights 92 | closely related to copyright including, without limitation, 93 | performance, broadcast, sound recording, and Sui Generis Database 94 | Rights, without regard to how the rights are labeled or 95 | categorized. For purposes of this Public License, the rights 96 | specified in Section 2(b)(1)-(2) are not Copyright and Similar 97 | Rights. 98 | 99 | e. Effective Technological Measures means those measures that, in the 100 | absence of proper authority, may not be circumvented under laws 101 | fulfilling obligations under Article 11 of the WIPO Copyright 102 | Treaty adopted on December 20, 1996, and/or similar international 103 | agreements. 104 | 105 | f. Exceptions and Limitations means fair use, fair dealing, and/or 106 | any other exception or limitation to Copyright and Similar Rights 107 | that applies to Your use of the Licensed Material. 108 | 109 | g. License Elements means the license attributes listed in the name 110 | of a Creative Commons Public License. The License Elements of this 111 | Public License are Attribution and ShareAlike. 112 | 113 | h. Licensed Material means the artistic or literary work, database, 114 | or other material to which the Licensor applied this Public 115 | License. 116 | 117 | i. Licensed Rights means the rights granted to You subject to the 118 | terms and conditions of this Public License, which are limited to 119 | all Copyright and Similar Rights that apply to Your use of the 120 | Licensed Material and that the Licensor has authority to license. 121 | 122 | j. Licensor means the individual(s) or entity(ies) granting rights 123 | under this Public License. 124 | 125 | k. Share means to provide material to the public by any means or 126 | process that requires permission under the Licensed Rights, such 127 | as reproduction, public display, public performance, distribution, 128 | dissemination, communication, or importation, and to make material 129 | available to the public including in ways that members of the 130 | public may access the material from a place and at a time 131 | individually chosen by them. 132 | 133 | l. Sui Generis Database Rights means rights other than copyright 134 | resulting from Directive 96/9/EC of the European Parliament and of 135 | the Council of 11 March 1996 on the legal protection of databases, 136 | as amended and/or succeeded, as well as other essentially 137 | equivalent rights anywhere in the world. 138 | 139 | m. You means the individual or entity exercising the Licensed Rights 140 | under this Public License. Your has a corresponding meaning. 141 | 142 | 143 | Section 2 -- Scope. 144 | 145 | a. License grant. 146 | 147 | 1. Subject to the terms and conditions of this Public License, 148 | the Licensor hereby grants You a worldwide, royalty-free, 149 | non-sublicensable, non-exclusive, irrevocable license to 150 | exercise the Licensed Rights in the Licensed Material to: 151 | 152 | a. reproduce and Share the Licensed Material, in whole or 153 | in part; and 154 | 155 | b. produce, reproduce, and Share Adapted Material. 156 | 157 | 2. Exceptions and Limitations. For the avoidance of doubt, where 158 | Exceptions and Limitations apply to Your use, this Public 159 | License does not apply, and You do not need to comply with 160 | its terms and conditions. 161 | 162 | 3. Term. The term of this Public License is specified in Section 163 | 6(a). 164 | 165 | 4. Media and formats; technical modifications allowed. The 166 | Licensor authorizes You to exercise the Licensed Rights in 167 | all media and formats whether now known or hereafter created, 168 | and to make technical modifications necessary to do so. The 169 | Licensor waives and/or agrees not to assert any right or 170 | authority to forbid You from making technical modifications 171 | necessary to exercise the Licensed Rights, including 172 | technical modifications necessary to circumvent Effective 173 | Technological Measures. For purposes of this Public License, 174 | simply making modifications authorized by this Section 2(a) 175 | (4) never produces Adapted Material. 176 | 177 | 5. Downstream recipients. 178 | 179 | a. Offer from the Licensor -- Licensed Material. Every 180 | recipient of the Licensed Material automatically 181 | receives an offer from the Licensor to exercise the 182 | Licensed Rights under the terms and conditions of this 183 | Public License. 184 | 185 | b. Additional offer from the Licensor -- Adapted Material. 186 | Every recipient of Adapted Material from You 187 | automatically receives an offer from the Licensor to 188 | exercise the Licensed Rights in the Adapted Material 189 | under the conditions of the Adapter's License You apply. 190 | 191 | c. No downstream restrictions. You may not offer or impose 192 | any additional or different terms or conditions on, or 193 | apply any Effective Technological Measures to, the 194 | Licensed Material if doing so restricts exercise of the 195 | Licensed Rights by any recipient of the Licensed 196 | Material. 197 | 198 | 6. No endorsement. Nothing in this Public License constitutes or 199 | may be construed as permission to assert or imply that You 200 | are, or that Your use of the Licensed Material is, connected 201 | with, or sponsored, endorsed, or granted official status by, 202 | the Licensor or others designated to receive attribution as 203 | provided in Section 3(a)(1)(A)(i). 204 | 205 | b. Other rights. 206 | 207 | 1. Moral rights, such as the right of integrity, are not 208 | licensed under this Public License, nor are publicity, 209 | privacy, and/or other similar personality rights; however, to 210 | the extent possible, the Licensor waives and/or agrees not to 211 | assert any such rights held by the Licensor to the limited 212 | extent necessary to allow You to exercise the Licensed 213 | Rights, but not otherwise. 214 | 215 | 2. Patent and trademark rights are not licensed under this 216 | Public License. 217 | 218 | 3. To the extent possible, the Licensor waives any right to 219 | collect royalties from You for the exercise of the Licensed 220 | Rights, whether directly or through a collecting society 221 | under any voluntary or waivable statutory or compulsory 222 | licensing scheme. In all other cases the Licensor expressly 223 | reserves any right to collect such royalties. 224 | 225 | 226 | Section 3 -- License Conditions. 227 | 228 | Your exercise of the Licensed Rights is expressly made subject to the 229 | following conditions. 230 | 231 | a. Attribution. 232 | 233 | 1. If You Share the Licensed Material (including in modified 234 | form), You must: 235 | 236 | a. retain the following if it is supplied by the Licensor 237 | with the Licensed Material: 238 | 239 | i. identification of the creator(s) of the Licensed 240 | Material and any others designated to receive 241 | attribution, in any reasonable manner requested by 242 | the Licensor (including by pseudonym if 243 | designated); 244 | 245 | ii. a copyright notice; 246 | 247 | iii. a notice that refers to this Public License; 248 | 249 | iv. a notice that refers to the disclaimer of 250 | warranties; 251 | 252 | v. a URI or hyperlink to the Licensed Material to the 253 | extent reasonably practicable; 254 | 255 | b. indicate if You modified the Licensed Material and 256 | retain an indication of any previous modifications; and 257 | 258 | c. indicate the Licensed Material is licensed under this 259 | Public License, and include the text of, or the URI or 260 | hyperlink to, this Public License. 261 | 262 | 2. You may satisfy the conditions in Section 3(a)(1) in any 263 | reasonable manner based on the medium, means, and context in 264 | which You Share the Licensed Material. For example, it may be 265 | reasonable to satisfy the conditions by providing a URI or 266 | hyperlink to a resource that includes the required 267 | information. 268 | 269 | 3. If requested by the Licensor, You must remove any of the 270 | information required by Section 3(a)(1)(A) to the extent 271 | reasonably practicable. 272 | 273 | b. ShareAlike. 274 | 275 | In addition to the conditions in Section 3(a), if You Share 276 | Adapted Material You produce, the following conditions also apply. 277 | 278 | 1. The Adapter's License You apply must be a Creative Commons 279 | license with the same License Elements, this version or 280 | later, or a BY-SA Compatible License. 281 | 282 | 2. You must include the text of, or the URI or hyperlink to, the 283 | Adapter's License You apply. You may satisfy this condition 284 | in any reasonable manner based on the medium, means, and 285 | context in which You Share Adapted Material. 286 | 287 | 3. You may not offer or impose any additional or different terms 288 | or conditions on, or apply any Effective Technological 289 | Measures to, Adapted Material that restrict exercise of the 290 | rights granted under the Adapter's License You apply. 291 | 292 | 293 | Section 4 -- Sui Generis Database Rights. 294 | 295 | Where the Licensed Rights include Sui Generis Database Rights that 296 | apply to Your use of the Licensed Material: 297 | 298 | a. for the avoidance of doubt, Section 2(a)(1) grants You the right 299 | to extract, reuse, reproduce, and Share all or a substantial 300 | portion of the contents of the database; 301 | 302 | b. if You include all or a substantial portion of the database 303 | contents in a database in which You have Sui Generis Database 304 | Rights, then the database in which You have Sui Generis Database 305 | Rights (but not its individual contents) is Adapted Material, 306 | 307 | including for purposes of Section 3(b); and 308 | c. You must comply with the conditions in Section 3(a) if You Share 309 | all or a substantial portion of the contents of the database. 310 | 311 | For the avoidance of doubt, this Section 4 supplements and does not 312 | replace Your obligations under this Public License where the Licensed 313 | Rights include other Copyright and Similar Rights. 314 | 315 | 316 | Section 5 -- Disclaimer of Warranties and Limitation of Liability. 317 | 318 | a. UNLESS OTHERWISE SEPARATELY UNDERTAKEN BY THE LICENSOR, TO THE 319 | EXTENT POSSIBLE, THE LICENSOR OFFERS THE LICENSED MATERIAL AS-IS 320 | AND AS-AVAILABLE, AND MAKES NO REPRESENTATIONS OR WARRANTIES OF 321 | ANY KIND CONCERNING THE LICENSED MATERIAL, WHETHER EXPRESS, 322 | IMPLIED, STATUTORY, OR OTHER. THIS INCLUDES, WITHOUT LIMITATION, 323 | WARRANTIES OF TITLE, MERCHANTABILITY, FITNESS FOR A PARTICULAR 324 | PURPOSE, NON-INFRINGEMENT, ABSENCE OF LATENT OR OTHER DEFECTS, 325 | ACCURACY, OR THE PRESENCE OR ABSENCE OF ERRORS, WHETHER OR NOT 326 | KNOWN OR DISCOVERABLE. WHERE DISCLAIMERS OF WARRANTIES ARE NOT 327 | ALLOWED IN FULL OR IN PART, THIS DISCLAIMER MAY NOT APPLY TO YOU. 328 | 329 | b. TO THE EXTENT POSSIBLE, IN NO EVENT WILL THE LICENSOR BE LIABLE 330 | TO YOU ON ANY LEGAL THEORY (INCLUDING, WITHOUT LIMITATION, 331 | NEGLIGENCE) OR OTHERWISE FOR ANY DIRECT, SPECIAL, INDIRECT, 332 | INCIDENTAL, CONSEQUENTIAL, PUNITIVE, EXEMPLARY, OR OTHER LOSSES, 333 | COSTS, EXPENSES, OR DAMAGES ARISING OUT OF THIS PUBLIC LICENSE OR 334 | USE OF THE LICENSED MATERIAL, EVEN IF THE LICENSOR HAS BEEN 335 | ADVISED OF THE POSSIBILITY OF SUCH LOSSES, COSTS, EXPENSES, OR 336 | DAMAGES. WHERE A LIMITATION OF LIABILITY IS NOT ALLOWED IN FULL OR 337 | IN PART, THIS LIMITATION MAY NOT APPLY TO YOU. 338 | 339 | c. The disclaimer of warranties and limitation of liability provided 340 | above shall be interpreted in a manner that, to the extent 341 | possible, most closely approximates an absolute disclaimer and 342 | waiver of all liability. 343 | 344 | 345 | Section 6 -- Term and Termination. 346 | 347 | a. This Public License applies for the term of the Copyright and 348 | Similar Rights licensed here. However, if You fail to comply with 349 | this Public License, then Your rights under this Public License 350 | terminate automatically. 351 | 352 | b. Where Your right to use the Licensed Material has terminated under 353 | Section 6(a), it reinstates: 354 | 355 | 1. automatically as of the date the violation is cured, provided 356 | it is cured within 30 days of Your discovery of the 357 | violation; or 358 | 359 | 2. upon express reinstatement by the Licensor. 360 | 361 | For the avoidance of doubt, this Section 6(b) does not affect any 362 | right the Licensor may have to seek remedies for Your violations 363 | of this Public License. 364 | 365 | c. For the avoidance of doubt, the Licensor may also offer the 366 | Licensed Material under separate terms or conditions or stop 367 | distributing the Licensed Material at any time; however, doing so 368 | will not terminate this Public License. 369 | 370 | d. Sections 1, 5, 6, 7, and 8 survive termination of this Public 371 | License. 372 | 373 | 374 | Section 7 -- Other Terms and Conditions. 375 | 376 | a. The Licensor shall not be bound by any additional or different 377 | terms or conditions communicated by You unless expressly agreed. 378 | 379 | b. Any arrangements, understandings, or agreements regarding the 380 | Licensed Material not stated herein are separate from and 381 | independent of the terms and conditions of this Public License. 382 | 383 | 384 | Section 8 -- Interpretation. 385 | 386 | a. For the avoidance of doubt, this Public License does not, and 387 | shall not be interpreted to, reduce, limit, restrict, or impose 388 | conditions on any use of the Licensed Material that could lawfully 389 | be made without permission under this Public License. 390 | 391 | b. To the extent possible, if any provision of this Public License is 392 | deemed unenforceable, it shall be automatically reformed to the 393 | minimum extent necessary to make it enforceable. If the provision 394 | cannot be reformed, it shall be severed from this Public License 395 | without affecting the enforceability of the remaining terms and 396 | conditions. 397 | 398 | c. No term or condition of this Public License will be waived and no 399 | failure to comply consented to unless expressly agreed to by the 400 | Licensor. 401 | 402 | d. Nothing in this Public License constitutes or may be interpreted 403 | as a limitation upon, or waiver of, any privileges and immunities 404 | that apply to the Licensor or You, including from the legal 405 | processes of any jurisdiction or authority. 406 | 407 | 408 | ======================================================================= 409 | 410 | Creative Commons is not a party to its public 411 | licenses. Notwithstanding, Creative Commons may elect to apply one of 412 | its public licenses to material it publishes and in those instances 413 | will be considered the “Licensor.” The text of the Creative Commons 414 | public licenses is dedicated to the public domain under the CC0 Public 415 | Domain Dedication. Except for the limited purpose of indicating that 416 | material is shared under a Creative Commons public license or as 417 | otherwise permitted by the Creative Commons policies published at 418 | creativecommons.org/policies, Creative Commons does not authorize the 419 | use of the trademark "Creative Commons" or any other trademark or logo 420 | of Creative Commons without its prior written consent including, 421 | without limitation, in connection with any unauthorized modifications 422 | to any of its public licenses or any other arrangements, 423 | understandings, or agreements concerning use of licensed material. For 424 | the avoidance of doubt, this paragraph does not form part of the 425 | public licenses. 426 | 427 | Creative Commons may be contacted at creativecommons.org. 428 | -------------------------------------------------------------------------------- /archive/Pin-reference.html: -------------------------------------------------------------------------------- 1 |2 | 3 |
| 7 | | EmonTx | 8 |EmonTH | 9 |EmonPi | 10 |RFM2Pi | 11 |Shield | 12 ||||||||||
|---|---|---|---|---|---|---|---|---|---|---|---|---|---|---|
| 2.2 | 15 |3.2 | 16 |3.4 | 17 |1.4 | 18 |1.5 | 19 |1.5 | 20 |1.6 | 21 |2.6 | 22 |3.1 | 23 |1.0 | 24 |2.5 | 25 |||||
| 0 | 30 |RX | 31 |RX | 32 |RX | 33 |RX | 34 |RX | 35 |RX | 36 |RX | 37 |RX | 38 |RX | 39 |RX | 40 |RX | 41 |RX | 42 |||
| 1 | 45 |TX | 46 |TX | 47 |TX | 48 |TX | 49 |TX | 50 |TX | 51 |TX | 52 |TX | 53 |TX | 54 |TX | 55 |TX | 56 |TX | 57 |||
| 2 | 60 |RFM_IRQ | 61 |RFM IRQ | 62 |PULSE | 63 |RFM IRQ | 64 |PULSE | 65 |RFM IRQ | 66 |RFM IRQ | 67 |RFM IRQ | 68 |RFM IRQ | 69 |RFM IRQ | 70 |RFM IRQ | 71 |RFM IRQ | 72 |||
| 3 | 75 |PULSE | 76 |PULSE | 77 |RFM IRQ | 78 |PULSE | 79 |RFM IRQ | 80 |PULSE | 81 |PULSE | 82 |PULSE | 83 |NC | 84 |85 | | RFM IRQa | 86 |RFM IRQa | 87 |||
| 4 | 90 |1W_IO | 91 |1W IO | 92 |RFM SEL | 93 |NC | 94 |RFM SEL | 95 |NC | 96 |1W IO | 97 |1W IO | 98 |NC | 99 |100 | | 1W IO | 101 |1W IO | 102 |||
| 5 | 105 |1W_PWR | 106 |107 | | 1W IO | 108 |1W IO | 109 |1W PWR | 110 |1W PWR | 111 |1W PWR | 112 |1W PWR | 113 |NC | 114 |115 | | RFM SELb | 116 |RFM SELb | 117 |||
| 6 | 120 |DHT_PWR / OOK | 121 |122 | | LED | 123 |LED | 124 |DHT PWR | 125 |DHT PWR | 126 |OOK | 127 |NC | 128 |NC | 129 |130 | | NC | 131 |RFM FFS | 132 |||
| 7 | 135 |SW1 | 136 |137 | | NC | 138 |NC | 139 |NC | 140 |SW1 | 141 |NC | 142 |NC | 143 |NC | 144 |145 | | NC | 146 |NC | 147 |||
| 8 | 150 |SW2 / BTN | 151 |152 | | NC | 153 |SW1 | 154 |NC | 155 |SW2 | 156 |BTN | 157 |BTN | 158 |NC | 159 |160 | | NC | 161 |NC | 162 |||
| 9 | 165 |LED | 166 |LED | 167 |168 | | SW2 | 169 |LED | 170 |LED | 171 |LED | 172 |LED | 173 |LED | 174 |LED | 175 |LED | 176 |LED | 177 |||
| 10 | 180 |RFM_SEL | 181 |RFM SEL | 182 |SS | 183 |RFM SEL | 184 |SS | 185 |RFM SEL | 186 |RFM SEL | 187 |RFM SEL | 188 |RFM SEL | 189 |RFM SEL | 190 |RFM SEL | 191 |RFM SEL | 192 |||
| 11 | 195 |RFM_SDI | 196 |RFM SDI | 197 |RFM SDI | 198 |RFM SDI | 199 |RFM SDI | 200 |RFM SDI | 201 |RFM SDI | 202 |RFM SDI | 203 |RFM SDI | 204 |RFM SDI | 205 |RFM SDI | 206 |RFM SDI | 207 |||
| 12 | 210 |RFM_SDO | 211 |RFM SDO | 212 |RFM SDO | 213 |RFM SDO | 214 |RFM SDO | 215 |RFM SDO | 216 |RFM SDO | 217 |RFM SDO | 218 |RFM SDO | 219 |RFM SDO | 220 |RFM SDO | 221 |RFM SDO | 222 |||
| 13 | 225 |RFM_SCK | 226 |RFM SCK | 227 |RFM SCK | 228 |RFM SCK | 229 |RFM SCK | 230 |RFM SCK | 231 |RFM SCK | 232 |RFM SCK | 233 |RFM SCK | 234 |RFM SCK | 235 |RFM SCK | 236 |RFM SCK | 237 |||
| 14 | 240 |VAC | 241 |CT2 | 242 |VAC | 243 |VAC | 244 |NC | 245 |NC | 246 |VAC | 247 |VAC | 248 |NC | 249 |250 | | VAC | 251 |VAC | 252 |||
| 15 | 255 |CT1 | 256 |CT3 | 257 |CT1 | 258 |CT1 | 259 |BATT | 260 |BATT | 261 |CT1 | 262 |CT1 | 263 |NC | 264 |265 | | CT1 | 266 |CT1 | 267 |||
| 16 | 270 |CT2 | 271 |VAC | 272 |CT2 | 273 |CT2 | 274 |NC | 275 |NC | 276 |CT2 | 277 |CT2 | 278 |NC | 279 |280 | | CT2 | 281 |CT2 | 282 |||
| 17 | 285 |CT3 | 286 |CT1 | 287 |CT3 | 288 |CT3 | 289 |NC | 290 |NC | 291 |NC | 292 |NC | 293 |NC | 294 |295 | | CT3 | 296 |CT3 | 297 |||
| 18 | 300 |SCL | 301 |SCL | 302 |CT4 | 303 |CT4 | 304 |DHT IO | 305 |DHT IO | 306 |SCL | 307 |SCL | 308 |NC | 309 |310 | | CT4 | 311 |CT4 | 312 |||
| 19 | 315 |SDA | 316 |SDA | 317 |1W PWR | 318 |1W PWR | 319 |1W IO | 320 |1W IO | 321 |SDA | 322 |SDA | 323 |NC | 324 |325 | | NC | 326 |NC | 327 |||
| 20 | 330 |CT4 / DHT_IO | 331 |NA | 332 |NA | 333 |RJ45p8 | 334 |NA | 335 |NC | 336 |RJ45p8 | 337 |RJ45p8 | 338 |NC | 339 |340 | | NA | 341 |NA | 342 |||
| 21 | 345 |BATT / RJ45p8 | 346 |NA | 347 |NA | 348 |BATT | 349 |NA | 350 |NC | 351 |NC | 352 |NC | 353 |NC | 354 |355 | | NA | 356 |NA | 357 |||
362 | -------------------------------------------------------------------------------- /archive/Digital-pin-reference.html: -------------------------------------------------------------------------------- 1 |
This lookup table provides a quick way to find the "Arduino" digital pin numbers used in firmware sketches, most of these designations are defined either by the internal makeup of the ATmega328P or by the device's hardware circuitry and components.
4 | 5 |Digital pins 14 and up are ADC inputs that can be referenced by an analog pin number by subtracting 14
6 | 7 || 11 | | EmonTx | 12 |EmonTH | 13 |EmonPi | 14 |RFM2Pi | 15 |Shield | 16 |||||||||
|---|---|---|---|---|---|---|---|---|---|---|---|---|---|
| 2.2 | 19 |3.2 | 20 |3.4 | 21 |1.4 | 22 |1.5 | 23 |1.5 | 24 |1.6 | 25 |2.6 | 26 |3.1 | 27 |1.0 | 28 |2.5 | 29 ||||
| RX | 34 |0 | 35 |0 | 36 |0 | 37 |0 | 38 |0 | 39 |0 | 40 |0 | 41 |0 | 42 |0 | 43 |0 | 44 |0 | 45 |0 | 46 ||
| TX | 49 |1 | 50 |1 | 51 |1 | 52 |1 | 53 |1 | 54 |1 | 55 |1 | 56 |1 | 57 |1 | 58 |1 | 59 |1 | 60 |1 | 61 ||
| RFM_IRQ | 64 |2 | 65 |2 | 66 |3 | 67 |2 | 68 |3 | 69 |2 | 70 |2 | 71 |2 | 72 |2 | 73 |2 | 74 |2/3 | 75 |2/3 | 76 ||
| PULSE | 79 |3 | 80 |3 | 81 |2 | 82 |3 | 83 |2 | 84 |3 | 85 |3 | 86 |3 | 87 |- | 88 |- | 89 |- | 90 |- | 91 ||
| 1W_IO | 94 |4 | 95 |4 | 96 |5 | 97 |5 | 98 |19 | 99 |19 | 100 |4 | 101 |4 | 102 |- | 103 |- | 104 |- | 105 |- | 106 ||
| 1W_PWR | 109 |5 | 110 |- | 111 |19 | 112 |19 | 113 |5 | 114 |5 | 115 |- | 116 |- | 117 |- | 118 |- | 119 |- | 120 |- | 121 ||
| DHT_PWR | 124 |6 | 125 |- | 126 |- | 127 |- | 128 |6 | 129 |6 | 130 |- | 131 |- | 132 |- | 133 |- | 134 |- | 135 |- | 136 ||
| OOK | 139 |- | 140 |- | 141 |- | 142 |- | 143 |- | 144 |6 | 145 |- | 146 |- | 147 |- | 148 |- | 149 |- | 150 |||
| SW1 | 153 |7 | 154 |- | 155 |- | 156 |8 | 157 |- | 158 |7 | 159 |- | 160 |- | 161 |- | 162 |- | 163 |- | 164 |- | 165 ||
| SW2 | 168 |8 | 169 |- | 170 |- | 171 |9 | 172 |- | 173 |8 | 174 |- | 175 |- | 176 |- | 177 |- | 178 |- | 179 |- | 180 ||
| BTN | 183 |- | 184 |- | 185 |- | 186 |- | 187 |- | 188 |8 | 189 |8 | 190 |- | 191 |- | 192 |- | 193 |- | 194 |||
| LED | 197 |9 | 198 |9 | 199 |6 | 200 |6 | 201 |9 | 202 |9 | 203 |9 | 204 |9 | 205 |9 | 206 |9 | 207 |9 | 208 |9 | 209 ||
| RFM_SEL | 212 |10 | 213 |10 | 214 |4 | 215 |10 | 216 |4 | 217 |10 | 218 |10 | 219 |10 | 220 |10 | 221 |10 | 222 |10/5 | 223 |10/5 | 224 ||
| RFM_SDI | 227 |11 | 228 |11 | 229 |11 | 230 |11 | 231 |11 | 232 |11 | 233 |11 | 234 |11 | 235 |11 | 236 |11 | 237 |11 | 238 |11 | 239 ||
| RFM_SDO | 242 |12 | 243 |12 | 244 |12 | 245 |12 | 246 |12 | 247 |12 | 248 |12 | 249 |12 | 250 |12 | 251 |12 | 252 |12 | 253 |12 | 254 ||
| RFM_SCK | 257 |13 | 258 |13 | 259 |13 | 260 |13 | 261 |13 | 262 |13 | 263 |13 | 264 |13 | 265 |13 | 266 |13 | 267 |13 | 268 |13 | 269 ||
| VAC | 272 |14 | 273 |16 | 274 |14 | 275 |14 | 276 |- | 277 |- | 278 |14 | 279 |14 | 280 |- | 281 |- | 282 |14 | 283 |14 | 284 ||
| CT1 | 287 |15 | 288 |17 | 289 |15 | 290 |15 | 291 |- | 292 |- | 293 |15 | 294 |15 | 295 |- | 296 |- | 297 |15 | 298 |15 | 299 ||
| CT2 | 302 |16 | 303 |14 | 304 |16 | 305 |16 | 306 |- | 307 |- | 308 |16 | 309 |16 | 310 |- | 311 |- | 312 |16 | 313 |16 | 314 ||
| CT3 | 317 |17 | 318 |15 | 319 |17 | 320 |17 | 321 |- | 322 |- | 323 |- | 324 |- | 325 |- | 326 |- | 327 |17 | 328 |17 | 329 ||
| SCL | 332 |18 | 333 |18 | 334 |- | 335 |- | 336 |- | 337 |- | 338 |18 | 339 |18 | 340 |- | 341 |18 | 342 |- | 343 |- | 344 ||
| SDA | 347 |19 | 348 |19 | 349 |- | 350 |- | 351 |- | 352 |- | 353 |19 | 354 |19 | 355 |- | 356 |19 | 357 |- | 358 |- | 359 ||
| CT4 | 362 |20 | 363 |NA | 364 |18 | 365 |18 | 366 |- | 367 |- | 368 |- | 369 |- | 370 |- | 371 |- | 372 |18 | 373 |18 | 374 ||
| DHT_IO | 377 |NA | 378 |- | 379 |- | 380 |18 | 381 |18 | 382 |- | 383 |- | 384 |- | 385 |- | 386 |- | 387 |- | 388 |||
| BATT | 391 |21 | 392 |NA | 393 |394 | | 21 | 395 |15 | 396 |15 | 397 |- | 398 |- | 399 |- | 400 |- | 401 |- | 402 |- | 403 ||
| RJ45p8 | 406 |NA | 407 |- | 408 |20 | 409 |- | 410 |- | 411 |20 | 412 |20 | 413 |- | 414 |- | 415 |- | 416 |- | 417 |||
422 | --------------------------------------------------------------------------------