 15 |
16 | ## Benchmark studies
17 | Collections of runs can be published as _benchmarking studies_. They contain the results of all runs (possibly millions) executed on a specific benchmarking suite. OpenML allows you to easily download all such results at once via the APIs, but also visualized them online in the Analysis tab (next to the complete list of included tasks and runs). Below is an example of a benchmark study for AutoML algorithms.
18 |
19 |
15 |
16 | ## Benchmark studies
17 | Collections of runs can be published as _benchmarking studies_. They contain the results of all runs (possibly millions) executed on a specific benchmarking suite. OpenML allows you to easily download all such results at once via the APIs, but also visualized them online in the Analysis tab (next to the complete list of included tasks and runs). Below is an example of a benchmark study for AutoML algorithms.
18 |
19 |  --------------------------------------------------------------------------------
/docs/concepts/data.md:
--------------------------------------------------------------------------------
1 | # Data
2 | ## Discovery
3 | OpenML allows fine-grained search over thousands of machine learning datasets. Via the website, you can filter by many dataset properties, such as size, type, format, and many more. Via the [APIs](https://www.openml.org/apis) you have access to many more filters, and you can download a complete table with statistics of all datasest. Via the APIs you can also load datasets directly into your preferred data structures such as numpy ([example in Python](https://openml.github.io/openml-python/main/examples/20_basic/simple_datasets_tutorial.html#sphx-glr-examples-20-basic-simple-datasets-tutorial-py)). We are also working on better organization of all datasets by topic
4 |
5 |
6 | 
7 |
8 | ## Sharing
9 | You can upload and download datasets through the website or though the [APIs](https://www.openml.org/apis) (recommended). You can share data directly from common data science libraries, e.g. from Python or R dataframes, in a few lines of code. The OpenML APIs will automatically extract lots of meta-data and store all datasets in a uniform format.
10 |
11 | ``` python
12 | import pandas as pd
13 | import openml as oml
14 |
15 | # Create an OpenML dataset from a pandas dataframe
16 | df = pd.DataFrame(data, columns=attribute_names)
17 | my_data = oml.datasets.functions.create_dataset(
18 | name="covertype", description="Predicting forest cover ...",
19 | licence="CC0", data=df
20 | )
21 |
22 | # Share the dataset on OpenML
23 | my_data.publish()
24 | ```
25 |
26 | Every dataset gets a dedicated page on OpenML with all known information, and can be edited further online.
27 |
28 |
29 | 
30 |
31 | Data hosted elsewhere can be referenced by URL. We are also working on interconnecting OpenML with other machine learning data set repositories
32 |
33 | ## Automated analysis
34 | OpenML will automatically analyze the data and compute a range of data quality characteristics. These include simple statistics such as the number of examples and features, but also potential quality issues (e.g. missing values) and more advanced statistics (e.g. the mutual information in the features and benchmark performances of simple models). These can be useful to find, filter and compare datasets, or to automate data preprocessing. We are also working on simple metrics and automated dataset quality reports
35 |
36 | The Analysis tab (see image below, or try it live) also shows an automated and interactive analysis of all datasets. This runs on open-source Python code via Dash and we welcome all contributions
37 |
38 |
39 | 
40 |
41 | The third tab, 'Tasks', lists all tasks created on the dataset. More on that below.
42 |
43 | ## Dataset ID and versions
44 | A dataset can be uniquely identified by its dataset ID, which is shown on the website and returned by the API. It's `1596` in the `covertype` example above. They can also be referenced by name and ID. OpenML assigns incremental version numbers per upload with the same name. You can also add a free-form `version_label` with every upload.
45 |
46 | ## Dataset status
47 | When you upload a dataset, it will be marked `in_preparation` until it is (automatically) verified. Once approved, the dataset will become `active` (or `verified`). If a severe issue has been found with a dataset, it can become `deactivated` (or `deprecated`) signaling that it should not be used. By default, dataset search only returns verified datasets, but you can access and download datasets with any status.
48 |
49 | ## Special attributes
50 | Machine learning datasets often have special attributes that require special handling in order to build useful models. OpenML marks these as special attributes.
51 |
52 | A `target` attribute is the column that is to be predicted, also known as dependent variable. Datasets can have a default target attribute set by the author, but OpenML tasks can also overrule this. Example: The default target variable for the MNIST dataset is to predict the class from pixel values, and most supervised tasks will have the class as their target. However, one can also create a task aimed at predicting the value of pixel257 given all the other pixel values and the class column.
53 |
54 | `Row id` attributes indicate externally defined row IDs (e.g. `instance` in dataset 164). `Ignore` attributes are other columns that should not be included in training data (e.g. `Player` in dataset 185). OpenML will clearly mark these, and will (by default) drop these columns when constructing training sets.
--------------------------------------------------------------------------------
/docs/concepts/flows.md:
--------------------------------------------------------------------------------
1 | # Flows
2 |
3 | Flows are machine learning pipelines, models, or scripts. They are typically uploaded directly from machine learning libraries (e.g. scikit-learn, pyTorch, TensorFlow, MLR, WEKA,...) via the corresponding [APIs](https://www.openml.org/apis). Associated code (e.g., on GitHub) can be referenced by URL.
4 |
5 | ## Analysing algorithm performance
6 |
7 | Every flow gets a dedicated page with all known information. The Analysis tab shows an automated interactive analysis of all collected results. For instance, below are the results of a scikit-learn pipeline including missing value imputation, feature encoding, and a RandomForest model. It shows the results across multiple tasks, and how the AUC score is affected by certain hyperparameters.
8 |
9 |
10 | 
11 |
12 | This helps to better understand specific models, as well as their strengths and weaknesses.
13 |
14 | ## Automated sharing
15 |
16 | When you evaluate algorithms and share the results, OpenML will automatically extract all the details of the algorithm (dependencies, structure, and all hyperparameters), and upload them in the background.
17 |
18 | ``` python
19 | from sklearn import ensemble
20 | from openml import tasks, runs
21 |
22 | # Build any model you like.
23 | clf = ensemble.RandomForestClassifier()
24 |
25 | # Evaluate the model on a task
26 | run = runs.run_model_on_task(clf, task)
27 |
28 | # Share the results, including the flow and all its details.
29 | run.publish()
30 | ```
31 |
32 | ## Reproducing algorithms and experiments
33 |
34 | Given an OpenML run, the exact same algorithm or model, with exactly the same hyperparameters, can be reconstructed within the same machine learning library to easily reproduce earlier results.
35 |
36 | ``` python
37 | from openml import runs
38 |
39 | # Rebuild the (scikit-learn) pipeline from run 9864498
40 | model = openml.runs.initialize_model_from_run(9864498)
41 | ```
42 |
43 | !!! note
44 | You may need the exact same library version to reconstruct flows. The API will always state the required version. We aim to add support for VMs so that flows can be easily (re)run in any environment
--------------------------------------------------------------------------------
/docs/concepts/index.md:
--------------------------------------------------------------------------------
1 | # Concepts
2 |
3 | ## OpenML concepts
4 | OpenML operates on a number of core concepts which are important to understand:
5 |
6 | **:fontawesome-solid-database: Datasets**
7 | Datasets are pretty straight-forward. Tabular datasets are self-contained, consisting of a number of rows (_instances_) and columns (features), including their data types. Other
8 | modalities (e.g. images) are included via paths to files stored within the same folder.
9 | Datasets are uniformly formatted ([S3](https://min.io/product/s3-compatibility) buckets with [Parquet](https://parquet.apache.org/) tables, [JSON](https://developer.mozilla.org/en-US/docs/Learn/JavaScript/Objects/JSON) metadata, and media files), and are auto-converted and auto-loaded in your desired format by the [APIs](https://www.openml.org/apis) (e.g. in [Python](https://openml.github.io/openml-python/main/)) in a single line of code.
10 | _Example: The Iris dataset or the Plankton dataset_
11 |
12 |
13 | **:fontawesome-solid-trophy: Tasks**
14 | A task consists of a dataset, together with a machine learning task to perform, such as classification or clustering and an evaluation method. For
15 | supervised tasks, this also specifies the target column in the data.
16 | _Example: Classifying different iris species from other attributes and evaluate using 10-fold cross-validation._
17 |
18 | **:material-cogs: Flows**
19 | A flow identifies a particular machine learning algorithm (a pipeline or untrained model) from a particular library or framework, such as scikit-learn, pyTorch, or MLR. It contains details about the structure of the model/pipeline, dependencies (e.g. the library and its version) and a list of settable hyperparameters. In short, it is a serialized description of the algorithm that in many cases can also be deserialized to reinstantiate the exact same algorithm in a particular library.
20 | _Example: scikit-learn's RandomForest or a simple TensorFlow model_
21 |
22 | **:fontawesome-solid-star: Runs**
23 | A run is an experiment - it evaluates a particular flow (pipeline/model) with particular hyperparameter settings, on a particular task. Depending on the task it will include certain results, such as model evaluations (e.g. accuracies), model predictions, and other output files (e.g. the trained model).
24 | _Example: Classifying Gamma rays with scikit-learn's RandomForest_
--------------------------------------------------------------------------------
/docs/concepts/runs.md:
--------------------------------------------------------------------------------
1 | # Runs
2 |
3 | ## Automated reproducible evaluations
4 | Runs are experiments (benchmarks) evaluating a specific flows on a specific task. As shown above, they are typically submitted automatically by machine learning
5 | libraries through the OpenML [APIs](https://www.openml.org/apis)), including lots of automatically extracted meta-data, to create reproducible experiments. With a few for-loops you can easily run (and share) millions of experiments.
6 |
7 | ## Online organization
8 | OpenML organizes all runs online, linked to the underlying data, flows, parameter settings, people, and other details. See the many examples above, where every dot in the scatterplots is a single OpenML run.
9 |
10 | ## Independent (server-side) evaluation
11 | OpenML runs include all information needed to independently evaluate models. For most tasks, this includes all predictions, for all train-test splits, for all instances in the dataset, including all class confidences. When a run is uploaded, OpenML automatically evaluates every run using a wide array of evaluation metrics. This makes them directly comparable with all other runs shared on OpenML. For completeness, OpenML will also upload locally computed evaluation metrics and runtimes.
12 |
13 | New metrics can also be added to OpenML's evaluation engine, and computed for all runs afterwards. Or, you can download OpenML runs and analyse the results any way you like.
14 |
15 | !!! note
16 | Please note that while OpenML tries to maximise reproducibility, exactly reproducing all results may not always be possible because of changes in numeric libraries, operating systems, and hardware.
--------------------------------------------------------------------------------
/docs/concepts/sharing.md:
--------------------------------------------------------------------------------
1 | # Sharing (under construction)
2 | Currently, anything on OpenML can be shared publicly or kept private to a single user. We are working on sharing features that allow you to share your materials with other users without making them entirely public. Watch this space
3 |
--------------------------------------------------------------------------------
/docs/concepts/tagging.md:
--------------------------------------------------------------------------------
1 | # Tagging
2 | Datasets, tasks, runs and flows can be assigned tags, either via the web
3 | interface or the API. These tags can be used to search and annotate datasets, or simply to better organize your own datasets and experiments.
4 |
5 | For example, the tag OpenML-CC18 refers to all tasks included in the OpenML-CC18 benchmarkign suite.
7 |
--------------------------------------------------------------------------------
/docs/concepts/tasks.md:
--------------------------------------------------------------------------------
1 | # Tasks
2 | Tasks describe what to do with the data. OpenML covers several task types, such as classification and clustering. Tasks are containers including the data and other information such as train/test splits, and define what needs to be returned. They are machine-readable so that you can automate machine learning experiments, and easily compare algorithms evaluations (using the exact same train-test splits) against all other benchmarks shared by others on OpenML.
4 |
5 | ## Collaborative benchmarks
6 |
7 | Tasks are real-time, collaborative benchmarks (e.g. see
8 | MNIST below). In the Analysis tab, you can view timelines and leaderboards, and learn from all prior submissions to design even better algorithms.
9 |
10 |
11 | 
12 |
13 | ## Discover the best algorithms
14 | All algorithms evaluated on the same task (with the same train-test splits) can be directly compared to each other, so you can easily look up which algorithms perform best overall, and download their exact configurations. Likewise, you can look up the best algorithms for _similar_ tasks to know what to try first.
15 |
16 |
17 | 
18 |
19 | ## Automating benchmarks
20 | You can search and download existing tasks, evaluate your algorithms, and automatically share the results (which are stored in a _run_). Here's what this looks like in the Python API. You can do the same across hundreds of tasks at once.
21 |
22 | ``` python
23 | from sklearn import ensemble
24 | from openml import tasks, runs
25 |
26 | # Build any model you like
27 | clf = ensemble.RandomForestClassifier()
28 |
29 | # Download any OpenML task (includes the datasets)
30 | task = tasks.get_task(3954)
31 |
32 | # Automatically evaluate your model on the task
33 | run = runs.run_model_on_task(clf, task)
34 |
35 | # Share the results on OpenML.
36 | run.publish()
37 | ```
38 |
39 | You can create new tasks via the website or [via the APIs](https://www.openml.org/apis) as well.
--------------------------------------------------------------------------------
/docs/contributing/OpenML-Docs.md:
--------------------------------------------------------------------------------
1 | ## General Documentation
2 | High-quality and up-to-date documentation are crucial. If you notice any mistake in these documentation pages, click the :material-pencil: button (on the top right). It will open up an editing page on [GitHub](https://github.com/) (you do need to be logged in). When you are done, add a small message explaining the change and click 'commit changes'. On the next page, just launch the pull request. We will then review it and approve the changes, or discuss them if necessary.
3 |
4 | The sources are generated by [MkDocs](http://www.mkdocs.org/), using the [Material theme](https://squidfunk.github.io/mkdocs-material/).
5 | Check these docs to see what is possible in terms of styling.
6 |
7 | OpenML is a big project with multiple repositories. To keep the documentation close to the code, it will always be kept in the relevant repositories (see below), and
8 | combined into these documentation pages using [MkDocs multirepo](https://github.com/jdoiro3/mkdocs-multirepo-plugin/issues/3).
9 |
10 | !!! note "Developer note"
11 | To work on the documentation locally, do the following:
12 | ```
13 | git clone https://github.com/openml/docs.git
14 | pip install -r requirements.txt
15 | ```
16 | To build the documentation, run `mkdocs serve` in the top directory (with the `mkdocs.yml` file). Any changes made after that will be hot-loaded.
17 |
18 | The documentation will be auto-deployed with every push or merge with the master branch of `https://www.github.com/openml/docs/`. In the background, a CI job
19 | will run `mkdocs gh-deploy`, which will build the HTML files and push them to the gh-pages branch of openml/docs. `https://docs.openml.org` is just a reverse proxy for `https://openml.github.io/docs/`.
20 |
21 |
22 | ## Python API
23 | To edit the tutorial, you have to edit the `reStructuredText` files on [openml-python/doc](https://github.com/openml/openml-python/tree/master/doc). When done, you can do a pull request.
24 |
25 | To edit the documentation of the python functions, edit the docstrings in the [Python code](https://github.com/openml/openml-python/openml). When done, you can do a pull request.
26 |
27 | !!! note "Developer note"
28 | A CircleCI job will automatically render the documentation on every GitHub commit, using [Sphinx](http://www.sphinx-doc.org/en/stable/).
29 | For inclusion in these documentation pages, it will also be rendered in markdown and imported.
30 |
31 | ## R API
32 | To edit the tutorial, you have to edit the `Rmarkdown` files on [openml-r/vignettes](https://github.com/openml/openml-r/tree/master/vignettes).
33 |
34 | To edit the documentation of the R functions, edit the Roxygen documention next to the functions in the [R code](https://github.com/openml/openml-r/R).
35 |
36 | !!! note "Developer note"
37 | A Travis job will automatically render the documentation on every GitHub commit, using [knitr](https://yihui.name/knitr/). The Roxygen documentation is updated every time a new version is released on CRAN.
38 |
39 | ## Java API
40 | The Java Tutorial is written in markdown and can be edited the usual way (see above).
41 |
42 | To edit the documentation of the Java functions, edit the documentation next to the functions in the [Java code](https://github.com/openml/java/apiconnector).
43 |
44 | - Javadocs: https://www.openml.org/docs/
45 |
46 | !!! note "Developer note"
47 | A Travis job will automatically render the documentation on every GitHub commit, using [Javadoc](http://www.oracle.com/technetwork/java/javase/tech/index-137868.html).
48 |
49 | ## REST API
50 | The REST API is documented using Swagger.io, in YAML. This generates a nice web interface that also allows trying out the API calls using your own API key (when you are logged in).
51 |
52 | You can edit the sources on [SwaggerHub](https://app.swaggerhub.com/apis/openml/openml/1.0.0). When you are done, export to json and replace the [downloads/swagger.json](https://github.com/openml/OpenML/blob/master/downloads/swagger.json) file in the OpenML main GitHub repository. You need to do a pull request that is then reviewed by us. When we merge the new file the changes are immediately available.
53 |
54 | The [data API](https://app.swaggerhub.com/apis/openml/openml_file/1.0.0) can be edited in the same way.
55 |
--------------------------------------------------------------------------------
/docs/contributing/Style.md:
--------------------------------------------------------------------------------
1 | # Style guide
2 |
3 | These are some (non-mandatory) style guidelines to make the OpenML experience more pleasant and consistent for everyone.
4 |
5 | ## Logos
6 |
--------------------------------------------------------------------------------
/docs/concepts/data.md:
--------------------------------------------------------------------------------
1 | # Data
2 | ## Discovery
3 | OpenML allows fine-grained search over thousands of machine learning datasets. Via the website, you can filter by many dataset properties, such as size, type, format, and many more. Via the [APIs](https://www.openml.org/apis) you have access to many more filters, and you can download a complete table with statistics of all datasest. Via the APIs you can also load datasets directly into your preferred data structures such as numpy ([example in Python](https://openml.github.io/openml-python/main/examples/20_basic/simple_datasets_tutorial.html#sphx-glr-examples-20-basic-simple-datasets-tutorial-py)). We are also working on better organization of all datasets by topic
4 |
5 |
6 | 
7 |
8 | ## Sharing
9 | You can upload and download datasets through the website or though the [APIs](https://www.openml.org/apis) (recommended). You can share data directly from common data science libraries, e.g. from Python or R dataframes, in a few lines of code. The OpenML APIs will automatically extract lots of meta-data and store all datasets in a uniform format.
10 |
11 | ``` python
12 | import pandas as pd
13 | import openml as oml
14 |
15 | # Create an OpenML dataset from a pandas dataframe
16 | df = pd.DataFrame(data, columns=attribute_names)
17 | my_data = oml.datasets.functions.create_dataset(
18 | name="covertype", description="Predicting forest cover ...",
19 | licence="CC0", data=df
20 | )
21 |
22 | # Share the dataset on OpenML
23 | my_data.publish()
24 | ```
25 |
26 | Every dataset gets a dedicated page on OpenML with all known information, and can be edited further online.
27 |
28 |
29 | 
30 |
31 | Data hosted elsewhere can be referenced by URL. We are also working on interconnecting OpenML with other machine learning data set repositories
32 |
33 | ## Automated analysis
34 | OpenML will automatically analyze the data and compute a range of data quality characteristics. These include simple statistics such as the number of examples and features, but also potential quality issues (e.g. missing values) and more advanced statistics (e.g. the mutual information in the features and benchmark performances of simple models). These can be useful to find, filter and compare datasets, or to automate data preprocessing. We are also working on simple metrics and automated dataset quality reports
35 |
36 | The Analysis tab (see image below, or try it live) also shows an automated and interactive analysis of all datasets. This runs on open-source Python code via Dash and we welcome all contributions
37 |
38 |
39 | 
40 |
41 | The third tab, 'Tasks', lists all tasks created on the dataset. More on that below.
42 |
43 | ## Dataset ID and versions
44 | A dataset can be uniquely identified by its dataset ID, which is shown on the website and returned by the API. It's `1596` in the `covertype` example above. They can also be referenced by name and ID. OpenML assigns incremental version numbers per upload with the same name. You can also add a free-form `version_label` with every upload.
45 |
46 | ## Dataset status
47 | When you upload a dataset, it will be marked `in_preparation` until it is (automatically) verified. Once approved, the dataset will become `active` (or `verified`). If a severe issue has been found with a dataset, it can become `deactivated` (or `deprecated`) signaling that it should not be used. By default, dataset search only returns verified datasets, but you can access and download datasets with any status.
48 |
49 | ## Special attributes
50 | Machine learning datasets often have special attributes that require special handling in order to build useful models. OpenML marks these as special attributes.
51 |
52 | A `target` attribute is the column that is to be predicted, also known as dependent variable. Datasets can have a default target attribute set by the author, but OpenML tasks can also overrule this. Example: The default target variable for the MNIST dataset is to predict the class from pixel values, and most supervised tasks will have the class as their target. However, one can also create a task aimed at predicting the value of pixel257 given all the other pixel values and the class column.
53 |
54 | `Row id` attributes indicate externally defined row IDs (e.g. `instance` in dataset 164). `Ignore` attributes are other columns that should not be included in training data (e.g. `Player` in dataset 185). OpenML will clearly mark these, and will (by default) drop these columns when constructing training sets.
--------------------------------------------------------------------------------
/docs/concepts/flows.md:
--------------------------------------------------------------------------------
1 | # Flows
2 |
3 | Flows are machine learning pipelines, models, or scripts. They are typically uploaded directly from machine learning libraries (e.g. scikit-learn, pyTorch, TensorFlow, MLR, WEKA,...) via the corresponding [APIs](https://www.openml.org/apis). Associated code (e.g., on GitHub) can be referenced by URL.
4 |
5 | ## Analysing algorithm performance
6 |
7 | Every flow gets a dedicated page with all known information. The Analysis tab shows an automated interactive analysis of all collected results. For instance, below are the results of a scikit-learn pipeline including missing value imputation, feature encoding, and a RandomForest model. It shows the results across multiple tasks, and how the AUC score is affected by certain hyperparameters.
8 |
9 |
10 | 
11 |
12 | This helps to better understand specific models, as well as their strengths and weaknesses.
13 |
14 | ## Automated sharing
15 |
16 | When you evaluate algorithms and share the results, OpenML will automatically extract all the details of the algorithm (dependencies, structure, and all hyperparameters), and upload them in the background.
17 |
18 | ``` python
19 | from sklearn import ensemble
20 | from openml import tasks, runs
21 |
22 | # Build any model you like.
23 | clf = ensemble.RandomForestClassifier()
24 |
25 | # Evaluate the model on a task
26 | run = runs.run_model_on_task(clf, task)
27 |
28 | # Share the results, including the flow and all its details.
29 | run.publish()
30 | ```
31 |
32 | ## Reproducing algorithms and experiments
33 |
34 | Given an OpenML run, the exact same algorithm or model, with exactly the same hyperparameters, can be reconstructed within the same machine learning library to easily reproduce earlier results.
35 |
36 | ``` python
37 | from openml import runs
38 |
39 | # Rebuild the (scikit-learn) pipeline from run 9864498
40 | model = openml.runs.initialize_model_from_run(9864498)
41 | ```
42 |
43 | !!! note
44 | You may need the exact same library version to reconstruct flows. The API will always state the required version. We aim to add support for VMs so that flows can be easily (re)run in any environment
--------------------------------------------------------------------------------
/docs/concepts/index.md:
--------------------------------------------------------------------------------
1 | # Concepts
2 |
3 | ## OpenML concepts
4 | OpenML operates on a number of core concepts which are important to understand:
5 |
6 | **:fontawesome-solid-database: Datasets**
7 | Datasets are pretty straight-forward. Tabular datasets are self-contained, consisting of a number of rows (_instances_) and columns (features), including their data types. Other
8 | modalities (e.g. images) are included via paths to files stored within the same folder.
9 | Datasets are uniformly formatted ([S3](https://min.io/product/s3-compatibility) buckets with [Parquet](https://parquet.apache.org/) tables, [JSON](https://developer.mozilla.org/en-US/docs/Learn/JavaScript/Objects/JSON) metadata, and media files), and are auto-converted and auto-loaded in your desired format by the [APIs](https://www.openml.org/apis) (e.g. in [Python](https://openml.github.io/openml-python/main/)) in a single line of code.
10 | _Example: The Iris dataset or the Plankton dataset_
11 |
12 |
13 | **:fontawesome-solid-trophy: Tasks**
14 | A task consists of a dataset, together with a machine learning task to perform, such as classification or clustering and an evaluation method. For
15 | supervised tasks, this also specifies the target column in the data.
16 | _Example: Classifying different iris species from other attributes and evaluate using 10-fold cross-validation._
17 |
18 | **:material-cogs: Flows**
19 | A flow identifies a particular machine learning algorithm (a pipeline or untrained model) from a particular library or framework, such as scikit-learn, pyTorch, or MLR. It contains details about the structure of the model/pipeline, dependencies (e.g. the library and its version) and a list of settable hyperparameters. In short, it is a serialized description of the algorithm that in many cases can also be deserialized to reinstantiate the exact same algorithm in a particular library.
20 | _Example: scikit-learn's RandomForest or a simple TensorFlow model_
21 |
22 | **:fontawesome-solid-star: Runs**
23 | A run is an experiment - it evaluates a particular flow (pipeline/model) with particular hyperparameter settings, on a particular task. Depending on the task it will include certain results, such as model evaluations (e.g. accuracies), model predictions, and other output files (e.g. the trained model).
24 | _Example: Classifying Gamma rays with scikit-learn's RandomForest_
--------------------------------------------------------------------------------
/docs/concepts/runs.md:
--------------------------------------------------------------------------------
1 | # Runs
2 |
3 | ## Automated reproducible evaluations
4 | Runs are experiments (benchmarks) evaluating a specific flows on a specific task. As shown above, they are typically submitted automatically by machine learning
5 | libraries through the OpenML [APIs](https://www.openml.org/apis)), including lots of automatically extracted meta-data, to create reproducible experiments. With a few for-loops you can easily run (and share) millions of experiments.
6 |
7 | ## Online organization
8 | OpenML organizes all runs online, linked to the underlying data, flows, parameter settings, people, and other details. See the many examples above, where every dot in the scatterplots is a single OpenML run.
9 |
10 | ## Independent (server-side) evaluation
11 | OpenML runs include all information needed to independently evaluate models. For most tasks, this includes all predictions, for all train-test splits, for all instances in the dataset, including all class confidences. When a run is uploaded, OpenML automatically evaluates every run using a wide array of evaluation metrics. This makes them directly comparable with all other runs shared on OpenML. For completeness, OpenML will also upload locally computed evaluation metrics and runtimes.
12 |
13 | New metrics can also be added to OpenML's evaluation engine, and computed for all runs afterwards. Or, you can download OpenML runs and analyse the results any way you like.
14 |
15 | !!! note
16 | Please note that while OpenML tries to maximise reproducibility, exactly reproducing all results may not always be possible because of changes in numeric libraries, operating systems, and hardware.
--------------------------------------------------------------------------------
/docs/concepts/sharing.md:
--------------------------------------------------------------------------------
1 | # Sharing (under construction)
2 | Currently, anything on OpenML can be shared publicly or kept private to a single user. We are working on sharing features that allow you to share your materials with other users without making them entirely public. Watch this space
3 |
--------------------------------------------------------------------------------
/docs/concepts/tagging.md:
--------------------------------------------------------------------------------
1 | # Tagging
2 | Datasets, tasks, runs and flows can be assigned tags, either via the web
3 | interface or the API. These tags can be used to search and annotate datasets, or simply to better organize your own datasets and experiments.
4 |
5 | For example, the tag OpenML-CC18 refers to all tasks included in the OpenML-CC18 benchmarkign suite.
7 |
--------------------------------------------------------------------------------
/docs/concepts/tasks.md:
--------------------------------------------------------------------------------
1 | # Tasks
2 | Tasks describe what to do with the data. OpenML covers several task types, such as classification and clustering. Tasks are containers including the data and other information such as train/test splits, and define what needs to be returned. They are machine-readable so that you can automate machine learning experiments, and easily compare algorithms evaluations (using the exact same train-test splits) against all other benchmarks shared by others on OpenML.
4 |
5 | ## Collaborative benchmarks
6 |
7 | Tasks are real-time, collaborative benchmarks (e.g. see
8 | MNIST below). In the Analysis tab, you can view timelines and leaderboards, and learn from all prior submissions to design even better algorithms.
9 |
10 |
11 | 
12 |
13 | ## Discover the best algorithms
14 | All algorithms evaluated on the same task (with the same train-test splits) can be directly compared to each other, so you can easily look up which algorithms perform best overall, and download their exact configurations. Likewise, you can look up the best algorithms for _similar_ tasks to know what to try first.
15 |
16 |
17 | 
18 |
19 | ## Automating benchmarks
20 | You can search and download existing tasks, evaluate your algorithms, and automatically share the results (which are stored in a _run_). Here's what this looks like in the Python API. You can do the same across hundreds of tasks at once.
21 |
22 | ``` python
23 | from sklearn import ensemble
24 | from openml import tasks, runs
25 |
26 | # Build any model you like
27 | clf = ensemble.RandomForestClassifier()
28 |
29 | # Download any OpenML task (includes the datasets)
30 | task = tasks.get_task(3954)
31 |
32 | # Automatically evaluate your model on the task
33 | run = runs.run_model_on_task(clf, task)
34 |
35 | # Share the results on OpenML.
36 | run.publish()
37 | ```
38 |
39 | You can create new tasks via the website or [via the APIs](https://www.openml.org/apis) as well.
--------------------------------------------------------------------------------
/docs/contributing/OpenML-Docs.md:
--------------------------------------------------------------------------------
1 | ## General Documentation
2 | High-quality and up-to-date documentation are crucial. If you notice any mistake in these documentation pages, click the :material-pencil: button (on the top right). It will open up an editing page on [GitHub](https://github.com/) (you do need to be logged in). When you are done, add a small message explaining the change and click 'commit changes'. On the next page, just launch the pull request. We will then review it and approve the changes, or discuss them if necessary.
3 |
4 | The sources are generated by [MkDocs](http://www.mkdocs.org/), using the [Material theme](https://squidfunk.github.io/mkdocs-material/).
5 | Check these docs to see what is possible in terms of styling.
6 |
7 | OpenML is a big project with multiple repositories. To keep the documentation close to the code, it will always be kept in the relevant repositories (see below), and
8 | combined into these documentation pages using [MkDocs multirepo](https://github.com/jdoiro3/mkdocs-multirepo-plugin/issues/3).
9 |
10 | !!! note "Developer note"
11 | To work on the documentation locally, do the following:
12 | ```
13 | git clone https://github.com/openml/docs.git
14 | pip install -r requirements.txt
15 | ```
16 | To build the documentation, run `mkdocs serve` in the top directory (with the `mkdocs.yml` file). Any changes made after that will be hot-loaded.
17 |
18 | The documentation will be auto-deployed with every push or merge with the master branch of `https://www.github.com/openml/docs/`. In the background, a CI job
19 | will run `mkdocs gh-deploy`, which will build the HTML files and push them to the gh-pages branch of openml/docs. `https://docs.openml.org` is just a reverse proxy for `https://openml.github.io/docs/`.
20 |
21 |
22 | ## Python API
23 | To edit the tutorial, you have to edit the `reStructuredText` files on [openml-python/doc](https://github.com/openml/openml-python/tree/master/doc). When done, you can do a pull request.
24 |
25 | To edit the documentation of the python functions, edit the docstrings in the [Python code](https://github.com/openml/openml-python/openml). When done, you can do a pull request.
26 |
27 | !!! note "Developer note"
28 | A CircleCI job will automatically render the documentation on every GitHub commit, using [Sphinx](http://www.sphinx-doc.org/en/stable/).
29 | For inclusion in these documentation pages, it will also be rendered in markdown and imported.
30 |
31 | ## R API
32 | To edit the tutorial, you have to edit the `Rmarkdown` files on [openml-r/vignettes](https://github.com/openml/openml-r/tree/master/vignettes).
33 |
34 | To edit the documentation of the R functions, edit the Roxygen documention next to the functions in the [R code](https://github.com/openml/openml-r/R).
35 |
36 | !!! note "Developer note"
37 | A Travis job will automatically render the documentation on every GitHub commit, using [knitr](https://yihui.name/knitr/). The Roxygen documentation is updated every time a new version is released on CRAN.
38 |
39 | ## Java API
40 | The Java Tutorial is written in markdown and can be edited the usual way (see above).
41 |
42 | To edit the documentation of the Java functions, edit the documentation next to the functions in the [Java code](https://github.com/openml/java/apiconnector).
43 |
44 | - Javadocs: https://www.openml.org/docs/
45 |
46 | !!! note "Developer note"
47 | A Travis job will automatically render the documentation on every GitHub commit, using [Javadoc](http://www.oracle.com/technetwork/java/javase/tech/index-137868.html).
48 |
49 | ## REST API
50 | The REST API is documented using Swagger.io, in YAML. This generates a nice web interface that also allows trying out the API calls using your own API key (when you are logged in).
51 |
52 | You can edit the sources on [SwaggerHub](https://app.swaggerhub.com/apis/openml/openml/1.0.0). When you are done, export to json and replace the [downloads/swagger.json](https://github.com/openml/OpenML/blob/master/downloads/swagger.json) file in the OpenML main GitHub repository. You need to do a pull request that is then reviewed by us. When we merge the new file the changes are immediately available.
53 |
54 | The [data API](https://app.swaggerhub.com/apis/openml/openml_file/1.0.0) can be edited in the same way.
55 |
--------------------------------------------------------------------------------
/docs/contributing/Style.md:
--------------------------------------------------------------------------------
1 | # Style guide
2 |
3 | These are some (non-mandatory) style guidelines to make the OpenML experience more pleasant and consistent for everyone.
4 |
5 | ## Logos
6 | 


https://www.openml.org/api/v1/
9 | * The default endpoint returns data in XML. If you prefer JSON, use the endpoint https://www.openml.org/api/v1/json/. Note that, to upload content, you still need to use XML (at least for now).
10 |
11 | ## Testing
12 | For continuous integration and testing purposes, we have a test server offering the same API, but which does not affect the production server.
13 |
14 | * The test server REST Endpoint URL is https://test.openml.org/api/v1/
15 |
16 | ## Error messages
17 | Error messages will look like this:
18 |
19 | ```xml
20 | dataset id is typically part of a task, or can be found on OpenML.org.
39 | * OpenML returns a description of the dataset as an XML file (or JSON). Try it now
40 | * The dataset description contains the URL where the dataset can be downloaded. The user calls that URL to download the dataset.
41 | * The dataset is returned by the server hosting the dataset. This can be OpenML, but also any other data repository. Try it now
42 |
43 | ### Download a flow
44 | 
45 |
46 | * User asks for a flow using the /flow/{id} service and a flow id. The flow id can be found on OpenML.org.
47 | * OpenML returns a description of the flow as an XML file (or JSON). Try it now
48 | * The flow description contains the URL where the flow can be downloaded (e.g. GitHub), either as source, binary or both, as well as additional information on history, dependencies and licence. The user calls the right URL to download it.
49 | * The flow is returned by the server hosting it. This can be OpenML, but also any other code repository. Try it now
50 |
51 | ### Download a task
52 | 
53 |
54 | * User asks for a task using the /task/{id} service and a task id. The task id is typically returned when searching for tasks.
55 | * OpenML returns a description of the task as an XML file (or JSON). Try it now
56 | * The task description contains the dataset id(s) of the datasets involved in this task. The user asks for the dataset using the /data/{id} service and the dataset id.
57 | * OpenML returns a description of the dataset as an XML file (or JSON). Try it now
58 | * The dataset description contains the URL where the dataset can be downloaded. The user calls that URL to download the dataset.
59 | * The dataset is returned by the server hosting it. This can be OpenML, but also any other data repository. Try it now
60 | * The task description may also contain links to other resources, such as the train-test splits to be used in cross-validation. The user calls that URL to download the train-test splits.
61 | * The train-test splits are returned by OpenML. Try it now
--------------------------------------------------------------------------------
/docs/contributing/clients/metadata_definition.md:
--------------------------------------------------------------------------------
1 | OpenML is at its core a meta-database, from which datasets, pipelines (flows), experiments (runs) and other entities can be downloaded and uploaded,
2 | all described using a clearly defined meta-data standard. In this document, we describe the standard how to upload entities to OpenML and what the resulting database state will be.
3 |
4 | !!! tip ":croissant: Croissant"
5 | OpenML has partnered with MLCommons, Google, Kaggle, HuggingFace, and a consortium of other partners to define a new metadata standard for machine
6 | learning datasets: :croissant: [Croissant](https://mlcommons.org/working-groups/data/croissant/)!
7 | You can already download all OpenML datasets in the Croissant format, and we're working further supporting and extending Croissant.
8 |
9 | Below is the OpenML metadata standard for version 1 of the API.
10 |
11 | ## Data
12 |
13 | Data is uploaded through the function [post data](https://www.openml.org/api_docs#!/data/post_data). The following files are needed:
14 |
15 | - `description`: An XML adhiring to the [XSD schema](https://www.openml.org/api_new/v1/xsd/openml.data.upload).
16 | - `dataset`: An [ARFF file](https://www.cs.waikato.ac.nz/ml/weka/arff.html) containing the data (optional, if not set, there should be an URL in the description, pointing to this file).
17 | Uploading any other files will result in an error.
18 |
19 | ## Tasks
20 |
21 | Tasks are uploaded through the function [post task](https://www.openml.org/api_docs#!/task/post_task). The following files are needed:
22 |
23 | - `description`: An XML adhering to the [XSD schema](https://www.openml.org/api_new/v1/xsd/openml.task.upload).
24 | Uploading any other files will result in an error.
25 |
26 | The task file should contain several input fields. These are a name and value combination of fields that are marked to be relevant by the task type definition. There are several task type definitions, e.g.:
27 |
28 | - [Supervised Classification](https://www.openml.org/api/v1/tasktype/1)
29 | - [Supervised Regression](https://www.openml.org/api/v1/tasktype/2)
30 | - [Learning Curve](https://www.openml.org/api/v1/tasktype/3)
31 | - [Data Stream Classification](https://www.openml.org/api/v1/tasktype/4)
32 |
33 | Note that the task types themselves are flexible content (ideally users can contribute task types) and therefore the documents are not part of the OpenML definition. The task types define which input fields should be set, when creating a task.
34 |
35 | Duplicate tasks (i.e., same value for `task_type_id` and all `input` fields equal) will be rejected.
36 |
37 | When creating a task, the API checks for all of the input fields whether the input is legitimate. (Todo: describe the checks and what they depend on).
38 |
39 | ## Flow
40 |
41 | Flows are uploaded through the function [post flow](https://www.openml.org/api_docs#!/flow/post_flow). The following file is needed:
42 |
43 | - `description`: An XML adhering to the [XSD schema](https://www.openml.org/api_new/v1/xsd/openml.implementation.upload).
44 | Uploading any other files will result in an error.
45 |
46 | Duplicate flows (i.e., same values for `name` and `external_version`) will be rejected.
47 |
48 | ## Runs
49 |
50 | Runs are uploaded through the function [post run](https://www.openml.org/api_docs#!/run/post_run). The following files are needed:
51 |
52 | - `description`: An XML adhering to the [XSD schema](https://www.openml.org/api_new/v1/xsd/openml.run.upload).
53 | - `predictions`: An [ARFF file](https://www.cs.waikato.ac.nz/ml/weka/arff.html) containing the predictions (optional, depending on the task).
54 | - `trace`: An [ARFF file](https://www.cs.waikato.ac.nz/ml/weka/arff.html) containing the run trace (optional, depending on the flow).
55 | Uploading any other files will result in an error.
56 |
57 | ### Predictions
58 |
59 | The contents of the prediction file depends on the task type.
60 |
61 | #### Task type: Supervised classification
62 |
63 | [Example predictions file](https://www.openml.org/api/v1/arff_example/predictions)
64 |
65 | - repeat NUMERIC
66 | - fold NUMERIC
67 | - row_id NUMERIC
68 | - confidence.{\$classname}: optional. various columns, describing the confidence per class. The values of these columns should add to 1 (precision 1e-6).
69 | - (proposal) decision_function.{\$classname}: optional. various columns, describing decision function per class.
70 | - prediction {\$classname}
71 | Runs that have a different set of columns will be rejected.
72 |
73 | ### Trace
74 |
75 | [Example trace file](https://www.openml.org/api/v1/arff_example/trace)
76 |
77 | - repeat: cross-validation repeat
78 | - fold: cross-validation fold
79 | - iteration: the index order within this repeat/fold combination
80 | - evaluation (float): the evaluation score that was attached based on the validation set
81 | - selected {True, False}: Whether in this repeat/run combination this was the selected hyperparameter configuration (exactly one should be tagged with True)
82 | - Per optimized parameter a column that has the name of the parameter and the prefix "parameter_"
83 | - setup_string: Due to legacy reasons accepted, but will be ignored by the default evaluation engine
84 |
85 | Traces that have a different set of columns will be rejected.
--------------------------------------------------------------------------------
/docs/contributing/index.md:
--------------------------------------------------------------------------------
1 | ---
2 | icon: fontawesome/solid/laptop-code
3 | ---
4 |
5 | OpenML is an open source project, hosted on GitHub. We welcome everybody to help improve OpenML, and make it more useful for everyone.
6 |
7 | !!! tip "Mission"
8 | We want to make machine learning **open** and **accessible** for the benefit of all of humanity.
9 | OpenML offers an **entirely open online platform** for machine learning datasets, models, and experiments,
10 | making them **easy to use and share** to facilitate global collaboration and extensive automation.
11 |
12 | ## Want to get involved?
13 |
14 | Awesome, we're happy to have you! :tada:
15 |
16 | ### Who are we?
17 |
18 | We are a group of friendly people who are excited about open science and machine learning.
19 |
20 | [Read more about who we are, what we stand for, and how to get in touch](https://www.openml.org/about).
21 |
22 | ### We need help!
23 |
24 | We are currently looking for help with:
25 |
26 | :octicons-comment-discussion-16: User feedback (best via [GitHub issues](https://github.com/openml), but email or Slack is also fine)
27 |
28 | - Frontend / UX / Design of the website
29 | - Backend / API
30 | - Outreach / making OpenML better known (especially in non-ML-communities, where people have data but no analysis experise)
31 | - Helping with the interfaces (Python,R,Julia,Java) and tool integrations
32 | - Helping with documenting the interfaces or the API
33 | - What could we do better to get new users started? Help us to figure out what is difficult to understand about OpenML. If you _are_ a new user, you are the perfect person for this!
34 |
35 | ### Beginner issues
36 |
37 | Check out the issues labeled [Good first issue](https://github.com/issues?q=is%3Aopen+is%3Aissue+user%3Aopenml++label%3A%22Good+first+issue%22+) or [help wanted](https://github.com/issues?q=is%3Aopen+is%3Aissue+user%3Aopenml++label%3A%22help+wanted%22+) (you need to be logged into GitHub to see these)
38 |
39 | ### Change the world
40 |
41 | If you have your own ideas on how you want to contribute, please get in touch! We are very friendly and open to new ideas :wink:
42 |
43 | ## Communication channels:
44 |
45 | We have several communication channels set up for different purposes:
46 |
47 | ### GitHub
48 |
49 | https://github.com/openml
50 |
51 | - Issues (members and users can complain)
52 | - Request new features
53 |
54 | Anyone with a GitHub account can write issues. We are happy if people get involved by writing issues, so don't be shy :smiley:
55 |
56 | Please post issues in the relevant issue tracker.
57 |
58 | - :simple-github: OpenML Core - Web services and API
59 | - :simple-github: Website - The (new) OpenML website
60 | - :simple-github: Docs - The documentation pages
61 | - :simple-github: Python API - The Python API
62 | - :simple-github: R API - The OpenML R package
63 | - :simple-github: Java API - The Java API and Java-based plugins
64 | - :simple-github: Datasets - For issues about datasets
65 | - :simple-github: Blog - The OpenML Blog
66 |
67 | ### Slack
68 |
69 | https://openml.slack.com
70 |
71 | - Informal communication
72 |
73 | We use slack for day to day discussions and news. If you want to join the OpenML slack chat, please message us (openmlHQ@googlegroups.com).
74 |
75 | ### Twitter (@open_ml)
76 |
77 | https://twitter.com/open_ml
78 |
79 | - News
80 | - Publicly relevant information
81 |
82 | ### Blog
83 |
84 | https://blog.openml.org
85 |
86 | - Tutorials
87 | - News
88 | - Open discussions
89 |
90 | ## Contributors bot
91 |
92 | We use all contributors bot to add contributors to the repository README. You can check how to use this here. You can contribute in a lot of ways including code, blogs, content, design and talks. You can find the emoji key here .
93 |
--------------------------------------------------------------------------------
/docs/contributing/resources.md:
--------------------------------------------------------------------------------
1 |
2 |
3 | # Resources
4 |
5 | ## Database snapshots
6 |
7 | Everything uploaded to OpenML is available to the community. The nightly snapshot of the public database contains all experiment runs, evaluations and links to datasets, implementations and result files. In SQL format (gzipped). You can also download the Database schema.
8 |
9 | Nightly database SNAPSHOT
10 |
11 | If you want to work on the website locally, you'll also need the schema for the 'private' database with non-public information.
12 |
13 | Private database schema
14 |
15 | ## Legacy Resources
16 |
17 | OpenML is always evolving, but we keep hosting the resources that were used in prior publications so that others may still build on them.
18 |
19 | :material-database: The experiment database used in Vanschoren et al. (2012) Experiment databases. Machine Learning 87(2), pp 127-158. You'll need to import this database (we used MySQL) to run queries. The database structure is described in the paper. Note that most of the experiments in this database have been rerun using OpenML, using newer algorithm implementations and stored in much more detail.
20 |
21 | :fontawesome-solid-share-nodes: The Exposé ontology used in the same paper, and described in more detail here and here. Exposé is used in designing our databases, and we aim to use it to export all OpenML data as Linked Open Data.
22 |
23 | ## Other dataset repositories
24 |
25 | We keep a list of [other dataset repositories all over the world](./backend/Datasets.md)
--------------------------------------------------------------------------------
/docs/contributing/website/Dash.md:
--------------------------------------------------------------------------------
1 | # Dash visualization
2 |
3 | Dash is a python framework which is suitable for building data visualization dashboards using pure python. Dash is written on top of plotly, react and flask and the graphs are defined using plotly python. The dash application is composed of two major parts :
4 |
5 | - `Layout` - Describes how the dashboard looks like
6 | - `Callbacks` - Used to update graphs, tables in the layout and makes the dashboard interactive.
7 |
8 | # Files
9 |
10 | The dash application is organized as follows:
11 |
12 | - `dashapp.py`
13 |
14 | - Creates the dash application
15 | - The dash app is embedded in the flask app passed to `create_dash_app` function
16 | - This file need not be modified to create a new plot
17 |
18 | - `layouts.py`
19 |
20 | - contains the layout for all the pages
21 | - `get_layout_from_data`- returns layout of data visualization
22 | - `get_layout_from_task`- returns layout of taskvisualization
23 | - `get_layout_from_flow`- returns layout of flow visualization
24 | - `get_layout_from_run` - returns layout of run visualization
25 | - This file needs to be modified to add a new plot (data, task, flow, run)
26 |
27 | - `callbacks.py`
28 | - Registers all the callbacks for the dash application
29 | - This file needs to be modified to add a new plot, especially if the plot needs to be interactive
30 |
31 | ## How the dashboard works
32 |
33 | In this dash application, we need to create the layout of the page dynamically based on the entered URL.
34 | For example, [http://127.0.0.1:5000/dashboard/data/5] needs to return the layout for dataset id #5 whereas
35 | [http://127.0.0.1:5000/dashboard/run/5] needs to return the layout for run id #5.
36 |
37 | Hence , the dash app is initially created with a dummy `app.layout` by dashapp.py and
38 | the callbacks are registered for the app using `register_callbacks` function.
39 |
40 | - **render_layout** is the callback which dynamically renders layout. Once the dash app is running, the first callback which is fired is `render_layout.`
41 | This is the main callback invoked when a URL with a data , task, run or flow ID is entered.
42 | Based on the information in the URL, this method returns the layout.
43 |
44 | - Based on the URL, get_layout_from_data, get_layout_from_task, get_layout_from_flow, get_layout_from_run are called.
45 | These functions define the layout of the page - tables, html Divs, tabs, graphs etc.
46 |
47 | - The callbacks corresponding to each component in the layout are invoked to update the components dynamically and
48 | make the graphs interactive. For example, **update_scatter_plot** in `data_callbacks.py` updates the scatter plot
49 | component in the data visualization dashboard.
50 |
--------------------------------------------------------------------------------
/docs/contributing/website/Flask.md:
--------------------------------------------------------------------------------
1 | We use [Flask](http://flask.pocoo.org/) as our web framework. It handles user
2 | authentication, dataset upload, task creation, and other aspects that require
3 | server-side interaction. It is designed to be _independent_ from the OpenML API.
4 | This means that you can use it to create your own personal frontend for OpenML,
5 | using the main OpenML server to provide the data. Of course, you can also link
6 | it to your own [local OpenML setup](../backend/Local-Installation.md).
7 |
8 | ### Design
9 | Out flask app follows [Application factories design pattern](https://flask.palletsprojects.com/en/1.1.x/patterns/appfactories/).
10 | A new app instance can be created by:
11 | ``` python
12 | from autoapp import create_app
13 | app = create_app(config_object)
14 | ```
15 |
16 | The backend is designed in a modular fashion with flask [Blueprints](https://flask.palletsprojects.com/en/1.0.x/blueprints/). Currently,
17 | the flask app consists of two blueprints public and user:
18 | New blueprints can be registered in `server/app.py` with register_blueprints function:
22 | 23 | ``` python 24 | def register_blueprints(app): 25 | app.register_blueprint(new_blueprint) 26 | ``` 27 | 28 | 29 | ### Database setup 30 | If you want o setup a local user database similar to OpenML then follow these steps: 31 |JWT is registered as an extension in `server/extensions.py`. 52 | All the user password hash are saved in Argon2 format with the new backend.
53 | 54 | ### Registering Extensions 55 | To register a new extension to flask backend extension has to be added in `server/extensions.py` and initialized in server/app.py. 56 | Current extensions are : flask_argon2, flask_bcrypt, flask_jwt_extended and flask_sqlalchemy. 57 | 58 | ### Configuring App 59 | Configuration variables like secret keys, Database URI and extension configurations are specified in 60 | `server/config.py` with Config object, which is supplied to the flask app during initialization. 61 | 62 | ### Creating a new route 63 | To create a new route in backend you can add the route in `server/public/views.py` or `server/user/views.py` (if it requires user authorisation or JWT usage in any way). 64 | 65 | ### Bindings to OpenML server 66 | You can specify which OpenML server to connect to. 67 | This is stored in the `.env` file in the main directory. It is set to the main OpenML server by default: 68 | 69 | ``` python 70 | ELASTICSEARCH_SERVER=https://www.openml.org/es 71 | OPENML_SERVER=https://www.openml.org 72 | ``` 73 | 74 | The ElasticSearch server is used to download information about datasets, tasks, flows and runs, as well as to power the frontend search. The OpenML server is used for uploading datasets, tasks, and anything else that requires calls to the OpenML API. 75 | 76 | ### Bindings to frontend 77 | The frontend is generated by [React](https://reactjs.org/). See below for more information. The React app is loaded as a static website. This is done in Flask setup in file `server.py`. 78 | 79 | ``` python 80 | app = Flask(__name__, static_url_path='', static_folder='src/client/app/build') 81 | ``` 82 | 83 | It will find the React app there and load it. 84 | 85 | ### Email Server 86 | OpenML uses its own mail server, You can use basically any mail server compatible with python SMTP library. Our suggestion is to use mailtrap.io for local testing. You can configure email server configurations in .env file. Currently we only use emails for confirmation email and forgotten password emails. 87 | -------------------------------------------------------------------------------- /docs/contributing/website/Website.md: -------------------------------------------------------------------------------- 1 | ## Installation 2 | The OpenML website runs on [Flask](http://flask.pocoo.org/), [React](https://reactjs.org/), and [Dash](https://dash.plot.ly/). You need to install these first. 3 | 4 | * Download or clone the source code for the OpenML website from [GitHub](https://github.com/openml/openml.org). 5 | Then, go into that folder (it should have the `requirements.txt` and `package.json` files). 6 | ``` python 7 | git clone https://github.com/openml/openml.org.git 8 | cd openml.org 9 | ``` 10 | 11 | * Install Flask, Dash, and dependencies using [PIP](https://pip.pypa.io/en/stable/installing/) 12 | ``` python 13 | pip install -r requirements.txt 14 | ``` 15 | 16 | * Install React and dependencies using [NPM (8 or higher)](https://nodejs.org/en/download/) 17 | ``` python 18 | cd server/src/client/app/ 19 | npm install 20 | ``` 21 | 22 | ## Building and running 23 | 24 | Go back to the home directory. Build a production version of the website with: 25 | 26 | ``` python 27 | npm run build --prefix server/src/client/app/ 28 | ``` 29 | 30 | Start the server by running: 31 | 32 | ``` python 33 | flask run 34 | ``` 35 | 36 | You should now see the app running in your browser at `localhost:5000` 37 | 38 | Note: If you run the app using HTTPS, add the SSL context or use 'adhoc' to use on-the-fly certificates or you can specify your own certificates. 39 | 40 | ``` python 41 | flask run --cert='adhoc' 42 | ``` 43 | 44 | As flask server is not suitable for production we recommend you to use some other server if you want to deploy 45 | your openml installation in production. We currently use gunicorn for production server. You can install the gunicorn server and run it: 46 | ``` 47 | gunicorn --certfile cert.pem --keyfile key.pem -b localhost:5000 autoapp:app 48 | ``` 49 | 50 | ## Development 51 | 52 | To start the React frontend in developer mode, go to `server/src/client/app` and run: 53 | 54 | ``` python 55 | npm run start 56 | ``` 57 | 58 | The app should automatically open at `localhost:3000` and any changes made to 59 | the code will automatically reload the website (hot loading). 60 | 61 | For the new Next.js frontend, install and run like this: 62 | ``` python 63 | cd app 64 | npm install 65 | npm run dev 66 | ``` 67 | 68 | ## Structure 69 | 70 |
71 |
72 | The website is built on the following components:
73 |
74 | * A [Flask backend](Flask.md). Written in Python, the backend takes care of all communication with the OpenML server. It builds on top of the OpenML Python API. It also takes care of user authentication and keeps the search engine (ElasticSearch) up to date with the latest information from the server. Files are located in the `server` folder.
75 | * A [React frontend](React.md). Written in JavaScript, this takes care of rendering the website. It pulls in information from the search engine, and shows plots rendered by Dash. It also contains forms (e.g. for logging in or uploading new datasets), which will be sent off to the backend for processing. Files are located in `server/src/client/app`.
76 | * [Dash dashboards](Dash.md). Written in Python, Dash is used for writing interactive plots. It pulls in data from the Python API, and renders the plots as React components. Files are located in `server/src/dashboard`.
77 |
--------------------------------------------------------------------------------
/docs/css/extra.css:
--------------------------------------------------------------------------------
1 | .md-footer-meta {
2 | display: none !important;
3 | }
4 |
5 | .md-header-nav__source {
6 | display: none !important;
7 | }
8 |
9 | .md-header__source {
10 | width: 0px;
11 | }
12 |
13 | .md-source__icon {
14 | display: none !important;
15 | }
16 |
17 | .md-grid {
18 | max-width: 122rem !important;
19 | }
20 |
21 | .md-header__button.md-logo img, .md-header__button.md-logo svg {
22 | height: 2rem;
23 | }
24 |
25 | .md-source__repository {
26 | display: none;
27 | }
28 |
29 | .framed-python {
30 | margin-top: -70px;
31 | overflow: hidden;
32 | }
33 |
34 | .framed-r {
35 | margin-top: 0px;
36 | overflow: hidden;
37 | }
38 |
39 | .framed-r-api {
40 | margin-top: -50px;
41 | overflow: hidden;
42 | }
43 |
44 | .framed-github {
45 | height: 100vh !important;
46 | width: 100% !important;
47 | }
48 |
49 | img[alt="icon"] {
50 | width: 50px;
51 | }
52 |
53 | @media only screen and (min-width: 76.25em) {
54 | .framed-python {
55 | margin-left: -45px;
56 | }
57 | .framed-r-api {
58 | margin-left: -45px;
59 | }
60 | }
61 | table {
62 | display: block;
63 | max-width: -moz-fit-content;
64 | max-width: fit-content;
65 | margin: 0 auto;
66 | overflow-x: auto;
67 | white-space: nowrap;
68 | }
69 |
70 | :root {
71 | --md-primary-fg-color: #1E88E5;
72 | --md-primary-fg-color--light: #000482;
73 | --md-primary-fg-color--dark: #b5b7ff;
74 | }
75 |
76 | .card-container {
77 | display: flex;
78 | flex-wrap: wrap;
79 | gap: 20px;
80 | justify-content: center;
81 | }
82 |
83 | .card {
84 | border: 1px solid #ccc;
85 | border-radius: 5px;
86 | padding: 20px;
87 | width: 300px;
88 | box-shadow: 0 4px 8px rgba(0, 0, 0, 0.1);
89 | }
90 |
91 | .card h2 {
92 | margin-top: 0;
93 | }
94 |
95 | .card p {
96 | margin-bottom: 0;}
97 |
98 | .github-logo {
99 | height: 15px;
100 | width: 13px;
101 | margin-left: 10px;
102 | }
103 |
104 | iframe[seamless] {
105 | border: none;
106 | }
107 |
108 | .green{
109 | color: #4caf50
110 | }
111 | .red{
112 | color: #f44336
113 | }
114 | .yellow{
115 | color: #ffc107
116 | }
117 | .blue{
118 | color: #2196f3
119 | }
120 | .purple{
121 | color: #4caf50
122 | }
123 | .pink{
124 | color: #4caf50
125 | }
--------------------------------------------------------------------------------
/docs/data/specs.md:
--------------------------------------------------------------------------------
1 | # Technical specifications
2 |
3 | ## Data formatting
4 | OpenML converts datasets to a uniform format based on Parquet. Read [this blog post](https://blog.openml.org/openml/data/2020/03/23/Finding-a-standard-dataset-format-for-machine-learning.html) for a detailed explanation for this approach. You will usually never notice this since OpenML libraries will take care of transferring data from Parquet to your favorite data structures. See the [using datasets](use.md) page for details.
5 |
6 | Datasets that depend on included files (e.g. a dataset of images) are defined by create a dataframe with all the dataset information, and columns with paths to local files, as well as a folder with all the local files (e.g. images, video, audio) according to the paths in main dataframe.
7 |
8 | In the backend, datasets are stored in an S3 object store, with one bucket per dataset. We currently allow datasets to be up to 200GB in size.
9 |
10 | ## Dataset ID and versions
11 | A dataset can be uniquely identified by its dataset ID, which is shown on the website and returned by the API. It's `1596` in the `covertype` example above. They can also be referenced by name and ID. OpenML assigns incremental version numbers per upload with the same name. You can also add a free-form `version_label` with every upload.
12 |
13 | ## Dataset status
14 | When you upload a dataset, it will be marked `in_preparation` until it is (automatically) verified. Once approved, the dataset will become `active` (or `verified`). If a severe issue has been found with a dataset, it can become `deactivated` (or `deprecated`) signaling that it should not be used. By default, dataset search only returns verified datasets, but you can access and download datasets with any status.
15 |
16 | ## Caching
17 | When downloading datasets, tasks, runs and flows, OpenML will automatically cache them locally. By default, OpenML will use ~/.openml/cache as the cache directory
18 |
19 | The cache directory can be either specified through the OpenML config file. To do this, add the line `cachedir = ‘MYDIR’` to the config file, replacing ‘MYDIR’ with the path to the cache directory.
20 |
21 | You can also set the cache dir temporarily via the Python API:
22 |
23 | ``` python
24 | import os
25 | import openml
26 |
27 | openml.config.cache_directory = os.path.expanduser('YOURDIR')
28 | ```
29 |
30 |
31 |
--------------------------------------------------------------------------------
/docs/ecosystem/MOA.md:
--------------------------------------------------------------------------------
1 | OpenML features extensive support for MOA. However currently this is implemented as a stand alone MOA compilation, using the latest version (as of May, 2014).
2 |
3 | [Download MOA for OpenML](https://www.openml.org/downloads/openmlmoa.beta.jar)
4 |
5 | ## Quick Start
6 | 
7 |
8 | * Download the standalone MOA environment above.
9 | * Find your [API key](https://www.openml.org/u#!api) in your profile (log in first). Create a config file called
70 |
71 |
72 | The website is built on the following components:
73 |
74 | * A [Flask backend](Flask.md). Written in Python, the backend takes care of all communication with the OpenML server. It builds on top of the OpenML Python API. It also takes care of user authentication and keeps the search engine (ElasticSearch) up to date with the latest information from the server. Files are located in the `server` folder.
75 | * A [React frontend](React.md). Written in JavaScript, this takes care of rendering the website. It pulls in information from the search engine, and shows plots rendered by Dash. It also contains forms (e.g. for logging in or uploading new datasets), which will be sent off to the backend for processing. Files are located in `server/src/client/app`.
76 | * [Dash dashboards](Dash.md). Written in Python, Dash is used for writing interactive plots. It pulls in data from the Python API, and renders the plots as React components. Files are located in `server/src/dashboard`.
77 |
--------------------------------------------------------------------------------
/docs/css/extra.css:
--------------------------------------------------------------------------------
1 | .md-footer-meta {
2 | display: none !important;
3 | }
4 |
5 | .md-header-nav__source {
6 | display: none !important;
7 | }
8 |
9 | .md-header__source {
10 | width: 0px;
11 | }
12 |
13 | .md-source__icon {
14 | display: none !important;
15 | }
16 |
17 | .md-grid {
18 | max-width: 122rem !important;
19 | }
20 |
21 | .md-header__button.md-logo img, .md-header__button.md-logo svg {
22 | height: 2rem;
23 | }
24 |
25 | .md-source__repository {
26 | display: none;
27 | }
28 |
29 | .framed-python {
30 | margin-top: -70px;
31 | overflow: hidden;
32 | }
33 |
34 | .framed-r {
35 | margin-top: 0px;
36 | overflow: hidden;
37 | }
38 |
39 | .framed-r-api {
40 | margin-top: -50px;
41 | overflow: hidden;
42 | }
43 |
44 | .framed-github {
45 | height: 100vh !important;
46 | width: 100% !important;
47 | }
48 |
49 | img[alt="icon"] {
50 | width: 50px;
51 | }
52 |
53 | @media only screen and (min-width: 76.25em) {
54 | .framed-python {
55 | margin-left: -45px;
56 | }
57 | .framed-r-api {
58 | margin-left: -45px;
59 | }
60 | }
61 | table {
62 | display: block;
63 | max-width: -moz-fit-content;
64 | max-width: fit-content;
65 | margin: 0 auto;
66 | overflow-x: auto;
67 | white-space: nowrap;
68 | }
69 |
70 | :root {
71 | --md-primary-fg-color: #1E88E5;
72 | --md-primary-fg-color--light: #000482;
73 | --md-primary-fg-color--dark: #b5b7ff;
74 | }
75 |
76 | .card-container {
77 | display: flex;
78 | flex-wrap: wrap;
79 | gap: 20px;
80 | justify-content: center;
81 | }
82 |
83 | .card {
84 | border: 1px solid #ccc;
85 | border-radius: 5px;
86 | padding: 20px;
87 | width: 300px;
88 | box-shadow: 0 4px 8px rgba(0, 0, 0, 0.1);
89 | }
90 |
91 | .card h2 {
92 | margin-top: 0;
93 | }
94 |
95 | .card p {
96 | margin-bottom: 0;}
97 |
98 | .github-logo {
99 | height: 15px;
100 | width: 13px;
101 | margin-left: 10px;
102 | }
103 |
104 | iframe[seamless] {
105 | border: none;
106 | }
107 |
108 | .green{
109 | color: #4caf50
110 | }
111 | .red{
112 | color: #f44336
113 | }
114 | .yellow{
115 | color: #ffc107
116 | }
117 | .blue{
118 | color: #2196f3
119 | }
120 | .purple{
121 | color: #4caf50
122 | }
123 | .pink{
124 | color: #4caf50
125 | }
--------------------------------------------------------------------------------
/docs/data/specs.md:
--------------------------------------------------------------------------------
1 | # Technical specifications
2 |
3 | ## Data formatting
4 | OpenML converts datasets to a uniform format based on Parquet. Read [this blog post](https://blog.openml.org/openml/data/2020/03/23/Finding-a-standard-dataset-format-for-machine-learning.html) for a detailed explanation for this approach. You will usually never notice this since OpenML libraries will take care of transferring data from Parquet to your favorite data structures. See the [using datasets](use.md) page for details.
5 |
6 | Datasets that depend on included files (e.g. a dataset of images) are defined by create a dataframe with all the dataset information, and columns with paths to local files, as well as a folder with all the local files (e.g. images, video, audio) according to the paths in main dataframe.
7 |
8 | In the backend, datasets are stored in an S3 object store, with one bucket per dataset. We currently allow datasets to be up to 200GB in size.
9 |
10 | ## Dataset ID and versions
11 | A dataset can be uniquely identified by its dataset ID, which is shown on the website and returned by the API. It's `1596` in the `covertype` example above. They can also be referenced by name and ID. OpenML assigns incremental version numbers per upload with the same name. You can also add a free-form `version_label` with every upload.
12 |
13 | ## Dataset status
14 | When you upload a dataset, it will be marked `in_preparation` until it is (automatically) verified. Once approved, the dataset will become `active` (or `verified`). If a severe issue has been found with a dataset, it can become `deactivated` (or `deprecated`) signaling that it should not be used. By default, dataset search only returns verified datasets, but you can access and download datasets with any status.
15 |
16 | ## Caching
17 | When downloading datasets, tasks, runs and flows, OpenML will automatically cache them locally. By default, OpenML will use ~/.openml/cache as the cache directory
18 |
19 | The cache directory can be either specified through the OpenML config file. To do this, add the line `cachedir = ‘MYDIR’` to the config file, replacing ‘MYDIR’ with the path to the cache directory.
20 |
21 | You can also set the cache dir temporarily via the Python API:
22 |
23 | ``` python
24 | import os
25 | import openml
26 |
27 | openml.config.cache_directory = os.path.expanduser('YOURDIR')
28 | ```
29 |
30 |
31 |
--------------------------------------------------------------------------------
/docs/ecosystem/MOA.md:
--------------------------------------------------------------------------------
1 | OpenML features extensive support for MOA. However currently this is implemented as a stand alone MOA compilation, using the latest version (as of May, 2014).
2 |
3 | [Download MOA for OpenML](https://www.openml.org/downloads/openmlmoa.beta.jar)
4 |
5 | ## Quick Start
6 | 
7 |
8 | * Download the standalone MOA environment above.
9 | * Find your [API key](https://www.openml.org/u#!api) in your profile (log in first). Create a config file called openml.conf in a .openml directory in your home dir. It should contain the following lines:
10 | >api_key = YOUR_KEY
11 | * Launch the JAR file by double clicking on it, or launch from command-line using the following command:
12 | > java -cp openmlmoa.beta.jar moa.gui.GUI
13 | * Select the task moa.tasks.openml.OpenmlDataStreamClassification to evaluate a classifier on an OpenML task, and send the results to OpenML.
14 | * Optionally, you can generate new streams using the Bayesian Network Generator: select the moa.tasks.WriteStreamToArff task, with moa.streams.generators.BayesianNetworkGenerator.
15 |
--------------------------------------------------------------------------------
/docs/ecosystem/Rest.md:
--------------------------------------------------------------------------------
1 | # REST tutorial
2 |
3 | OpenML offers a RESTful Web API, with predictive URLs, for uploading and downloading machine learning resources. Try the API Documentation to see examples of all calls, and test them right in your browser.
4 |
5 | ## Getting started
6 |
7 | * REST services can be called using simple HTTP GET or POST actions.
8 | * The REST Endpoint URL is https://www.openml.org/api/v1/
9 | * The default endpoint returns data in XML. If you prefer JSON, use the endpoint https://www.openml.org/api/v1/json/. Note that, to upload content, you still need to use XML (at least for now).
10 |
11 | ## Testing
12 | For continuous integration and testing purposes, we have a test server offering the same API, but which does not affect the production server.
13 |
14 | * The test server REST Endpoint URL is https://test.openml.org/api/v1/
15 |
16 | ## Error messages
17 | Error messages will look like this:
18 |
19 | ```xml
20 | dataset id is typically part of a task, or can be found on OpenML.org.
39 | * OpenML returns a description of the dataset as an XML file (or JSON). Try it now
40 | * The dataset description contains the URL where the dataset can be downloaded. The user calls that URL to download the dataset.
41 | * The dataset is returned by the server hosting the dataset. This can be OpenML, but also any other data repository. Try it now
42 |
43 | ### Download a flow
44 | 
45 |
46 | * User asks for a flow using the /flow/{id} service and a flow id. The flow id can be found on OpenML.org.
47 | * OpenML returns a description of the flow as an XML file (or JSON). Try it now
48 | * The flow description contains the URL where the flow can be downloaded (e.g. GitHub), either as source, binary or both, as well as additional information on history, dependencies and licence. The user calls the right URL to download it.
49 | * The flow is returned by the server hosting it. This can be OpenML, but also any other code repository. Try it now
50 |
51 | ### Download a task
52 | 
53 |
54 | * User asks for a task using the /task/{id} service and a task id. The task id is typically returned when searching for tasks.
55 | * OpenML returns a description of the task as an XML file (or JSON). Try it now
56 | * The task description contains the dataset id(s) of the datasets involved in this task. The user asks for the dataset using the /data/{id} service and the dataset id.
57 | * OpenML returns a description of the dataset as an XML file (or JSON). Try it now
58 | * The dataset description contains the URL where the dataset can be downloaded. The user calls that URL to download the dataset.
59 | * The dataset is returned by the server hosting it. This can be OpenML, but also any other data repository. Try it now
60 | * The task description may also contain links to other resources, such as the train-test splits to be used in cross-validation. The user calls that URL to download the train-test splits.
61 | * The train-test splits are returned by OpenML. Try it now
62 |
--------------------------------------------------------------------------------
/docs/ecosystem/Scikit-learn/basic_tutorial.ipynb:
--------------------------------------------------------------------------------
1 | {
2 | "cells": [
3 | {
4 | "cell_type": "code",
5 | "execution_count": 12,
6 | "metadata": {},
7 | "outputs": [
8 | {
9 | "data": {
10 | "text/html": [
11 | "\n",
12 | " openml.conf in a new directory called .openml in your home dir. It should contain the following line:
32 | > api_key = YOUR_KEY
33 | * Execute the following command:
34 | > java -cp weka.jar openml.experiment.TaskBasedExperiment -T OpenML AutoML Benchmarking Framework
7 |OpenML's Python API for a World of Data and More 💫
14 |R package to interface with OpenML
21 |A rust interface to http://openml.org/
28 |Partial implementation of the OpenML API for Julia
35 |Adaptations of AutoML libraries H2O, Autosklearn and GAMA for stream learning
42 |Pytorch extension for openml-python
49 |.NET API
56 |RapidMiner plugin
63 |Tensorflow extension for openml-python
70 |Openml Cortana connector
77 |Keras extension for openml-python
84 |Converting dataset metadata from OpenML to Croissant format
91 |Tools for interfacing with Azure
98 |onnx extension for openml
105 |MXNet extension for openml
112 |Tool to convert openml flows to ONNX and visualize them via Netron
119 |Models and pipelines automatically uploaded from machine learning libraries
12 |Extensive APIs to integrate OpenML into your tools and scripts
13 |Easily reproducible results (e.g. models, evaluations) for comparison and reuse
14 |Stand on the shoulders of giants, and collaborate in real time
15 |Make your work more visible and reusable
16 |Built for automation: streamline your experiments and model building
17 | 18 | ## Installation 19 | 20 | The OpenML package is available in many languages and across libraries. For more information about them, see the [Integrations](./ecosystem/index.md) page.By joining OpenML, you join a special worldwide community of data scientists building on each other's results and connecting their minds as efficiently as possible. This community depends on your motivation to share data, tools and ideas, and to do so with honesty. In return, you will gain trust, visibility and reputation, igniting online collaborations and studies that otherwise may not have happened.
3 | 4 | 5 | 6 |By using any part of OpenML, you agree to:
7 |You agree that you are responsible for your own use of OpenML.org and all content submitted by you, in accordance with the Honor Code and all applicable local, state, national and international laws.
18 |By submitting or distributing content from OpenML.org, you affirm that you have the necessary rights, licenses, consents and/or permissions to reproduce and publish this content. You cannot upload sensitive or confidential data. You, and not the developers of OpenML.org, are solely responsible for your submissions.
19 |By submitting content to OpenML.org, you grant OpenML.org the right to host, transfer, display and use this content, in accordance with your sharing settings and any licences granted by you. You also grant to each user a non-exclusive license to access and use this content for their own research purposes, in accordance with any licences granted by you.
20 |You may maintain one user account and not let anyone else use your username and/or password. You may not impersonate other persons.
21 |You will not intend to damage, disable, or impair any OpenML server or interfere with any other party's use and enjoyment of the service. You may not attempt to gain unauthorized access to the Site, other accounts, computer systems or networks connected to any OpenML server. You may not obtain or attempt to obtain any materials or information not intentionally made available through OpenML.
22 |Strictly prohibited are content that defames, harasses or threatens others, that infringes another's intellectual property, as well as indecent or unlawful content, advertising, or intentionally inaccurate information posted with the intent of misleading others. It is also prohibited to post code containing viruses, malware, spyware or any other similar software that may damage the operation of another's computer or property.
23 | -------------------------------------------------------------------------------- /docs/js/extra.js: -------------------------------------------------------------------------------- 1 | element = document.getElementsByClassName("md-header-nav__topic")[0]; 2 | element.innerHTML = "OpenML Documentation"; 3 | 4 | (function() { 5 | var startingTime = new Date().getTime(); 6 | // Load the script 7 | var script = document.createElement("SCRIPT"); 8 | script.src = 'https://code.jquery.com/jquery-3.3.1.slim.min.js'; 9 | script.type = 'text/javascript'; 10 | script.onload = function() { 11 | var $ = window.jQuery; 12 | $(function() { 13 | $(document).ready(function() { 14 | if($('.framed-content').length == 1){ 15 | $(".md-content").css('margin-right',0); 16 | $(".md-content__inner").css('margin-left',0); 17 | $(".md-content__inner").css('margin-right',0); 18 | $(".md-content__inner:before").css('display','none'); 19 | $("article").find("h1").css('display','none'); 20 | $("article > a").attr('target','_blank'); 21 | } 22 | if($('.framed-python-guide').length == 1){ 23 | $("article > a").attr('href','https://github.com/openml/openml-python/edit/master/doc/usage.rst'); 24 | } 25 | if($('.framed-python-api').length == 1){ 26 | $("article > a").attr('href','https://github.com/openml/openml-python/edit/master/doc/api.rst'); 27 | } 28 | if($('.framed-python-start').length == 1){ 29 | $("article > a").attr('href','https://github.com/openml/openml-python/edit/master/doc/index.rst'); 30 | } 31 | if($('.framed-r').length == 1){ 32 | $("article > a").attr('href','https://github.com/openml/openml-r/edit/master/vignettes/OpenML.Rmd'); 33 | } 34 | if($('.framed-r-api').length == 1){ 35 | $("article > a").css('display','none'); 36 | } 37 | if($('.framed-java-api').length == 1){ 38 | $("article > a").css('display','none'); 39 | } 40 | }); 41 | }); 42 | }; 43 | document.getElementsByTagName("head")[0].appendChild(script); 44 | })(); 45 | -------------------------------------------------------------------------------- /docs/old/altmetrics.md: -------------------------------------------------------------------------------- 1 | To encourage open science, OpenML now includes a score system to track and reward scientific activity, reach and impact, and in the future will include further gamification features such as badges. Because the system is still experimental and very much in development, the details are subject to change. Below, the score system is described in more detailed followed by our rationale for this system for those interested. If anything is unclear or you have any feedback of the system do not hesitate to let us know. 2 | 3 | ## The scores 4 | 5 | All scores are awarded to users and involve datasets, flows, tasks and runs, or knowledge pieces in short. 6 |Activity score is awarded to users for contributing to the knowledge base of OpenML. This includes uploading knowledge pieces, leaving likes and downloading new knowledge pieces. Uploads are rewarded strongest, with 3 activity, followed by likes, with 2 activity, and downloads are rewarded the least, with 1 activity.
10 |Reach score is awarded to knowledge pieces and by extension their uploaders for the expressed interest of other users. It is increased by 2 for every user that leaves a like on a knowledge piece and increased by 1 for every user that downloads it for the first time.
14 |Impact score is awarded to knowledge pieces and by extension their uploaders for the reuse of these knowledge pieces. A dataset is reused if when it is used as input in a task while flows and tasks are reused in runs. 1 Impact is awarded for every reuse by a user that is not the uploader. Impact of a reused knowledge piece is further increased by half of the acquired reach and half of the acquired impact of a reuse, usually rounded down. So the impact of a dataset that is used in a single task with reach 10 and impact 5, is 8 (⌊1+0.5*10+0.5*5 ⌋).
18 |


{info['description']}
103 |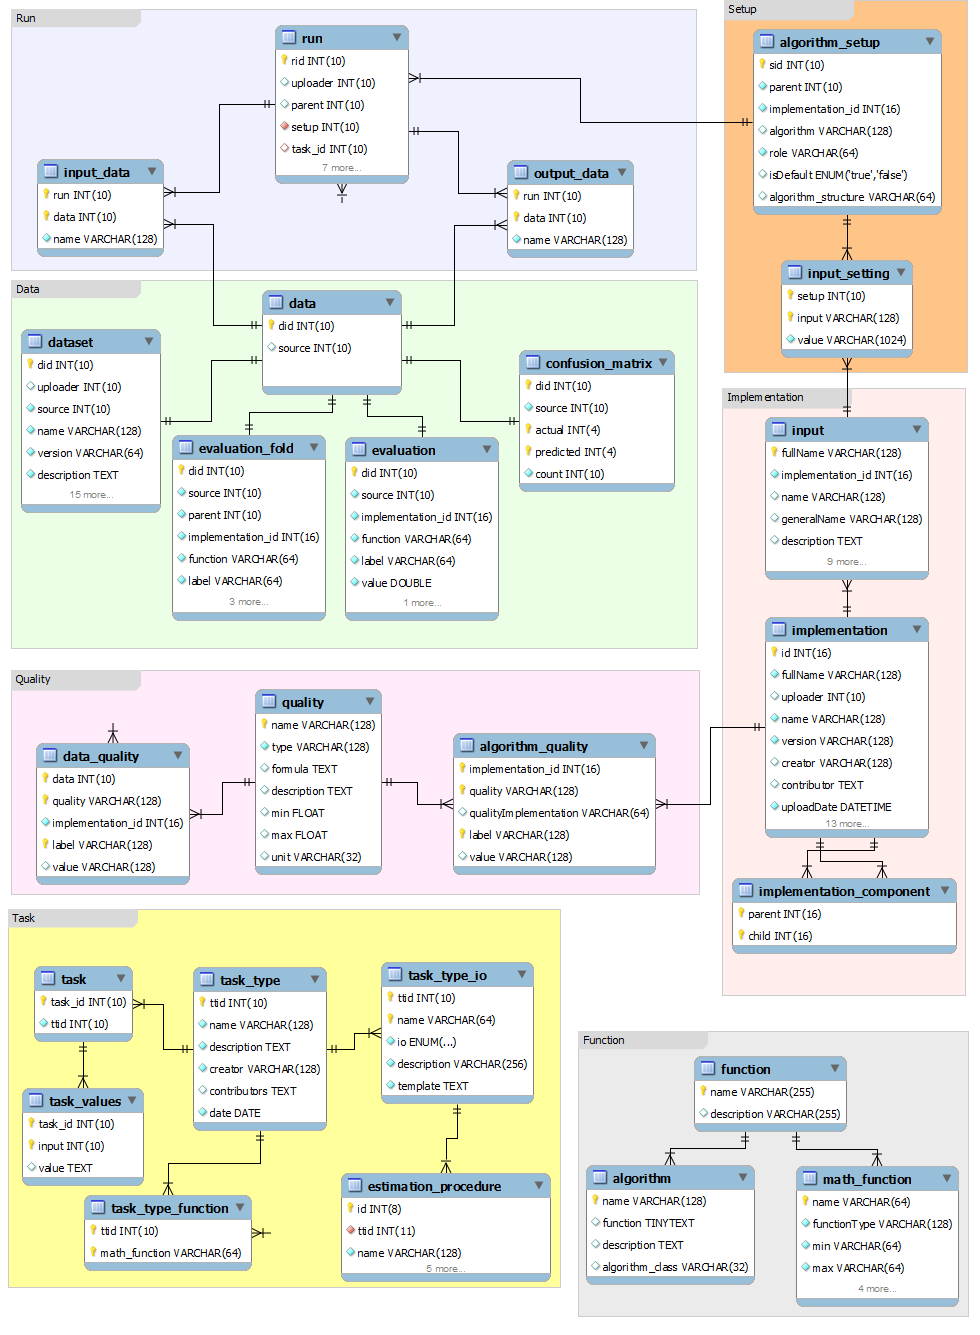