hello, world 之后,已经将数据读取完毕了,如果再去读取,预期的行为是会遇到 end-of-file 的错误。这样的测试用例需要单独一个 case 来完成,不需要硬凑出 Table-Driven 的形式。
126 |
127 | 简单来说,如果你测试某一个函数需要拷贝大部分代码时,理论上这些测试代码都可以抽出来,并使用 Table-Driven 的方式来组织测试用例,Don`t Repeat Yourself 是我们遵守的原则。
128 |
129 | > NOTE: Table-Driven 组织方式是 golang 社区所推荐,详情请查看[这里](https://github.com/golang/go/wiki/TableDrivenTests)。
130 |
131 | ## 2.2 Mock - 模拟外部依赖
132 |
133 | 在测试过程经常会遇到依赖的问题,比如 PouchContainer client 需要 HTTP server ,但这对于单元而言太重,而且这属于集成测试的范畴。那么该如何完成这部分的单元测试呢?
134 |
135 | 在 golang 的世界里,interface 的实现属于 [Duck Type](https://en.wikipedia.org/wiki/Duck_typing) 。某一个接口可以有各式各样的实现,只要实现能符合接口定义。如果外部依赖是通过 interface 来约束,那么单元测试里就模拟这些依赖行为。接下来的内容将分享两种常见的测试场景。
136 |
137 | ### 2.2.1 RoundTripper
138 |
139 | 还是以 PouchContainer client 测试为例。PouchContainer client 所使用的是 [http.Client](https://golang.org/pkg/net/http/#Client)。其中 http.Client 中使用了 [RoundTripper](https://golang.org/pkg/net/http/#RoundTripper) 接口来执行一次 HTTP 请求,它允许开发者自定义发送 HTTP 请求的逻辑,这也是 golang 能在原有基础上完美支持 HTTP 2 协议的重要原因。
140 |
141 | ```plain
142 | http.Client -> http.RoundTripper [http.DefaultTransport]
143 | ```
144 |
145 | 对于 PouchContainer client 而言,测试关注点主要在于传入目的地址是否正确、传入的 query 是否合理,以及是否能正常返回结果等。因此在测试之前,开发者需要准备好对应的 RoundTripper 实现,该实现并不负责实际的业务逻辑,它只是用来判断输入是否符合预期即可。
146 |
147 | 如接下来的代码所示,PouchContainer `newMockClient` 可接受自定义的请求处理逻辑。在测试删除镜像的用例中,开发者在自定义的逻辑里判断了目的地址和 HTTP Method 是否为 DELETE,这样就可以在不启动 HTTP Server 的情况下完成该有的功能测试。
148 |
149 | ```go
150 | // https://github.com/alibaba/pouch/blob/master/client/client_mock_test.go#L12-L22
151 | type transportFunc func(*http.Request) (*http.Response, error)
152 |
153 | func (transFunc transportFunc) RoundTrip(req *http.Request) (*http.Response, error) {
154 | return transFunc(req)
155 | }
156 |
157 | func newMockClient(handler func(*http.Request) (*http.Response, error)) *http.Client {
158 | return &http.Client{
159 | Transport: transportFunc(handler),
160 | }
161 | }
162 |
163 | // https://github.com/alibaba/pouch/blob/master/client/image_remove_test.go
164 | func TestImageRemove(t *testing.T) {
165 | expectedURL := "/images/image_id"
166 |
167 | httpClient := newMockClient(func(req *http.Request) (*http.Response, error) {
168 | if !strings.HasPrefix(req.URL.Path, expectedURL) {
169 | return nil, fmt.Errorf("expected URL '%s', got '%s'", expectedURL, req.URL)
170 | }
171 | if req.Method != "DELETE" {
172 | return nil, fmt.Errorf("expected DELETE method, got %s", req.Method)
173 | }
174 |
175 | return &http.Response{
176 | StatusCode: http.StatusNoContent,
177 | Body: ioutil.NopCloser(bytes.NewReader([]byte(""))),
178 | }, nil
179 | })
180 |
181 | client := &APIClient{
182 | HTTPCli: httpClient,
183 | }
184 |
185 | err := client.ImageRemove(context.Background(), "image_id", false)
186 | if err != nil {
187 | t.Fatal(err)
188 | }
189 | }
190 | ```
191 |
192 | ### 2.2.2 MockImageManager
193 |
194 | 对于内部 package 之间的依赖,比如 PouchContainer Image API Bridge 依赖于 PouchContainer Daemon ImageManager,而其中的依赖行为由 interface 来约定。如果想要测试 Image Bridge 的逻辑,我们不必启动 containerd ,我们只需要像 RoundTripper 那样,实现对应的 Daemon ImageManager 即可。
195 |
196 | ```go
197 | // https://github.com/alibaba/pouch/blob/master/apis/server/image_bridge_test.go
198 | type mockImgePull struct {
199 | mgr.ImageMgr
200 | handler func(ctx context.Context, imageRef string, authConfig *types.AuthConfig, out io.Writer) error
201 | }
202 |
203 | func (m *mockImgePull) PullImage(ctx context.Context, imageRef string, authConfig *types.AuthConfig, out io.Writer) error {
204 | return m.handler(ctx, imageRef, authConfig, out)
205 | }
206 |
207 | func Test_pullImage_without_tag(t *testing.T) {
208 | var s Server
209 |
210 | s.ImageMgr = &mockImgePull{
211 | ImageMgr: &mgr.ImageManager{},
212 | handler: func(ctx context.Context, imageRef string, authConfig *types.AuthConfig, out io.Writer) error {
213 | assert.Equal(t, "reg.abc.com/base/os:7.2", imageRef)
214 | return nil
215 | },
216 | }
217 | req := &http.Request{
218 | Form: map[string][]string{"fromImage": {"reg.abc.com/base/os:7.2"}},
219 | Header: map[string][]string{},
220 | }
221 | s.pullImage(context.Background(), nil, req)
222 | }
223 | ```
224 |
225 | ### 2.2.3 小结
226 |
227 | ImageManager 和 RoundTripper 除了接口定义的函数数目不同以外,模拟的方式是一致的。通常情况下,开发者可以手动定义一个将方法作为字段的结构体,如接下来的代码所示。
228 |
229 | ```go
230 | type Do interface {
231 | Add(x int, y int) int
232 | Sub(x int, y int) int
233 | }
234 |
235 | type mockDo struct {
236 | addFunc func(x int, y int) int
237 | subFunc func(x int, y int) int
238 | }
239 |
240 | // Add implements Do.Add function.
241 | type (m *mockDo) Add(x int, y int) int {
242 | return m.addFunc(x, y)
243 | }
244 |
245 | // Sub implements Do.Sub function.
246 | type (m *mockDo) Sub(x int, y int) int {
247 | return m.subFunc(x, y)
248 | }
249 | ```
250 |
251 | 当接口比较大、比较复杂的时候,手动的方式会给开发者带来测试上的负担,所以社区提供了自动生成的工具,比如 [mockery](https://github.com/vektra/mockery) ,减轻开发者的负担。
252 |
253 | ## 2.3 其他偏门
254 |
255 | 有些时候依赖的是第三方的服务,比如 PouchContainer client 就是一个很典型的案例。上文介绍 Duck Type 可以完成该案例的测试。除此之外,我们还可以通过注册 http.Handler 的方式,并启动 mockHTTPServer 来完成请求处理。这样测试方式比较重,建议在不能通过 Duck Type 方式测试时再考虑使用,或者是放到集成测试中完成。
256 |
257 | > NOTE: golang 社区有人通过修改二进制代码的方式来完成 [monkeypatch](https://github.com/bouk/monkey) 。这个工具不建议使用,还是建议开发者设计和编写出可测试的代码。
258 |
259 | ## 2.4 小结
260 |
261 | PouchContainer 将单元测试用例集成到代码审阅阶段,审阅者可以随时查看测试用例的运行情况。
262 |
263 |
264 | # 3. 总结
265 |
266 | 在代码审阅阶段,应该通过持续集成的方式,将代码风格检查、单元测试和集成测试跑起来,这样才能帮助审阅者作出准确的决定,而目前 PouchContainer 主要通过 TravisCI/CircleCI 和 [pouchrobot](https://github.com/pouchcontainer/pouchrobot) 来完成代码风格检查和测试等操作。
267 |
--------------------------------------------------------------------------------
/blog-cn/PouchContainer_CRI的设计与实现.md:
--------------------------------------------------------------------------------
1 | ### 1. CRI简介
2 |
3 | 在每个Kubernetes节点的最底层都有一个程序负责具体的容器创建删除工作,Kubernetes会对其接口进行调用,从而完成容器的编排调度。我们将这一层软件称之为容器运行时(Container Runtime),大名鼎鼎的Docker就是其中的代表。
4 |
5 | 当然,容器运行时并非只有Docker一种,包括CoreOS的rkt,hyper.sh的runV,Google的gvisor,以及本文的主角PouchContainer,都包含了完整的容器操作,能够用来创建特性各异的容器。不同的容器运行时有着各自独特的优点,能够满足不同用户的需求,因此Kubernetes支持多种容器运行时势在必行。
6 |
7 | 最初,Kubernetes原生内置了对Docker的调用接口,之后社区又在Kubernetes 1.3中集成了rkt的接口,使其成为了Docker以外,另一个可选的容器运行时。不过,此时不论是对于Docker还是对于rkt的调用都是和Kubernetes的核心代码强耦合的,这无疑会带来如下两方面的问题:
8 |
9 | 1. 新兴的容器运行时,例如PouchContainer这样的后起之秀,加入Kubernetes生态难度颇大。容器运行时的开发者必须对于Kubernetes的代码(至少是Kubelet)有着非常深入的理解,才能顺利完成两者之间的对接。
10 | 2. Kubernetes的代码将更加难以维护,这也体现在两方面:(1)将各种容器运行时的调用接口全部硬编码进Kubernetes,会让Kubernetes的核心代码变得臃肿不堪,(2)容器运行时接口细微的改动都会引发Kubernetes核心代码的修改,增加Kubernetes的不稳定性
11 |
12 | 为了解决这些问题,社区在Kubernetes 1.5引入了CRI(Container Runtime Interface),通过定义一组容器运行时的公共接口将Kubernetes对于各种容器运行时的调用接口屏蔽至核心代码以外,Kubernetes核心代码只对该抽象接口层进行调用。而对于各种容器运行时,只要满足了CRI中定义的各个接口就能顺利接入Kubernetes,成为其中的一个容器运行时选项。方案虽然简单,但是对于Kubernetes社区维护者和容器运行时开发者来说,都是一种解放。
13 |
14 | ### 2. CRI设计概述
15 |
16 |
17 |
18 | 
19 |
20 |
21 | 如上图所示,左边的Kubelet是Kubernetes集群的Node Agent,它会对本节点上容器的状态进行监控,保证它们都按照预期状态运行。为了实现这一目标,Kubelet会不断调用相关的CRI接口来对容器进行同步。
22 |
23 | CRI shim则可以认为是一个接口转换层,它会将CRI接口,转换成对应底层容器运行时的接口,并调用执行,返回结果。对于有的容器运行时,CRI shim是作为一个独立的进程存在的,例如当选用Docker为Kubernetes的容器运行时,Kubelet初始化时,会附带启动一个Docker shim进程,它就是Docker的CRI shime。而对于PouchContainer,它的CRI shim则是内嵌在Pouchd中的,我们将其称之为CRI manager。关于这一点,我们会在下一节讨论PouchContainer相关架构时再详细叙述。
24 |
25 | CRI本质上是一套gRPC接口,Kubelet内置了一个gRPC Client,CRI shim中则内置了一个gRPC Server。Kubelet每一次对CRI接口的调用,都将转换为gRPC请求由gRPC Client发送给CRI shim中的gRPC Server。Server调用底层的容器运行时对请求进行处理并返回结果,由此完成一次CRI接口调用。
26 |
27 | CRI定义的gRPC接口可划分两类,ImageService和RuntimeService:其中ImageService负责管理容器的镜像,而RuntimeService则负责对容器生命周期进行管理以及与容器进行交互(exec/attach/port-forward)。
28 |
29 | ### 3. CRI Manager架构设计
30 |
31 |
32 |
33 | 
34 |
35 |
36 | 在PouchContainer的整个架构体系中,CRI Manager实现了CRI定义的全部接口,担任了PouchContainer中CRI shim的角色。当Kubelet调用一个CRI接口时,请求就会通过Kubelet的gRPC Client发送到上图的gRPC Server中。Server会对请求进行解析,并调用CRI Manager相应的方法进行处理。
37 |
38 | 我们先通过一个例子来简单了解一下各个模块的功能。例如,当到达的请求为创建一个Pod,那么CRI Manager会先将获取到的CRI格式的配置转换成符合PouchContainer接口要求的格式,调用Image Manager拉取所需的镜像,再调用Container Manager创建所需的容器,并调用CNI Manager,利用CNI插件对Pod的网络进行配置。最后,Stream Server会对交互类型的CRI请求,例如exec/attach/portforward进行处理。
39 |
40 | 值得注意的是,CNI Manager和Stream Server是CRI Manager的子模块,而CRI Manager,Container Manager以及Image Manager是三个平等的模块,它们都位于同一个二进制文件Pouchd中,因此它们之间的调用都是最为直接的函数调用,并不存在例如Docker shim与Docker交互时,所需要的远程调用开销。下面,我们将进入CRI Manager内部,对其中重要功能的实现做更为深入的理解。
41 |
42 | ### 4. Pod模型的实现
43 |
44 | 在Kubernetes的世界里,Pod是最小的调度部署单元。简单地说,一个Pod就是由一些关联较为紧密的容器构成的容器组。作为一个整体,这些“亲密”的容器之间会共享一些东西,从而让它们之间的交互更为高效。例如,对于网络,同一个Pod中的容器会共享同一个IP地址和端口空间,从而使它们能直接通过localhost互相访问。对于存储,Pod中定义的volume会挂载到其中的每个容器中,从而让每个容器都能对其进行访问。
45 |
46 | 事实上,只要一组容器之间共享某些Linux Namespace以及挂载相同的volume就能实现上述的所有特性。下面,我们就通过创建一个具体的Pod来分析PouchContainer中的CRI Manager是如何实现Pod模型的:
47 |
48 | 1. 当Kubelet需要新建一个Pod时,首先会对`RunPodSandbox`这一CRI接口进行调用,而CRI Manager对该接口的实现是创建一个我们称之为"infra container"的特殊容器。从容器实现的角度来看,它并不特殊,无非是调用Container Manager,创建一个镜像为`pause-amd64:3.0`的普通容器。但是从整个Pod容器组的角度来看,它是有着特殊作用的,正是它将自己的Linux Namespace贡献出来,作为上文所说的各容器共享的Linux Namespace,将容器组中的所有容器联结到一起。它更像是一个载体,承载了Pod中所有其他的容器,为它们的运行提供基础设施。而一般我们也用infra container代表一个Pod。
49 | 2. 在infra container创建完成之后,Kubelet会对Pod容器组中的其他容器进行创建。每创建一个容器就是连续调用`CreateContainer`和`StartContainer`这两个CRI接口。对于`CreateContainer`,CRI Manager仅仅只是将CRI格式的容器配置转换为PouchContainer格式的容器配置,再将其传递给Container Manager,由其完成具体的容器创建工作。这里我们唯一需要关心的问题是,该容器如何加入上文中提到的infra container的Linux Namespace。其实真正的实现非常简单,在Container Manager的容器配置参数中有`PidMode`, `IpcMode`以及`NetworkMode`三个参数,分别用于配置容器的Pid Namespace,Ipc Namespace和Network Namespace。笼统地说,对于容器的Namespace的配置一般都有两种模式:"None"模式,即创建该容器自己独有的Namespace,另一种即为"Container"模式,即加入另一个容器的Namespace。显然,我们只需要将上述三个参数配置为"Container"模式,加入infra container的Namespace即可。具体是如何加入的,CRI Manager并不需要关心。对于`StartContainer`,CRI Manager仅仅只是做了一层转发,从请求中获取容器ID并调用Container Manager的`Start`接口启动容器。
50 | 3. 最后,Kubelet会不断调用`ListPodSandbox`和`ListContainers`这两个CRI接口来获取本节点上容器的运行状态。其中`ListPodSandbox`罗列的其实就是各个infra container的状态,而`ListContainer`罗列的是除了infra container以外其他容器的状态。现在问题是,对于Container Manager来说,infra container和其他container并不存在任何区别。那么CRI Manager是如何对这些容器进行区分的呢?事实上,CRI Manager在创建容器时,会在已有容器配置的基础之上,额外增加一个label,标志该容器的类型。从而在实现`ListPodSandbox`和`ListContainers`接口的时候,以该label的值作为条件,就能对不同类型的容器进行过滤。
51 |
52 | 综上,对于Pod的创建,我们可以概述为先创建infra container,再创建pod中的其他容器,并让它们加入infra container的Linux Namespace。
53 |
54 | ### 5. Pod网络配置
55 |
56 | 因为Pod中所有的容器都是共享Network Namespace的,因此我们只需要在创建infra container的时候,对它的Network Namespace进行配置即可。
57 |
58 | 在Kubernetes生态体系中容器的网络功能都是由CNI实现的。和CRI类似,CNI也是一套标准接口,各种网络方案只要实现了该接口就能无缝接入Kubernetes。CRI Manager中的CNI Manager就是对CNI的简单封装。它在初始化的过程中会加载目录`/etc/cni/net.d`下的配置文件,如下所示:
59 |
60 | ```sh
61 | $ cat >/etc/cni/net.d/10-mynet.conflist < 13 |
14 |
15 | 2.物理硬盘选择动态分配大小,点击创建:
16 |
17 |
13 |
14 |
15 | 2.物理硬盘选择动态分配大小,点击创建:
16 |
17 |  18 |
19 | 3.安装完毕,在VirtualBox中出现创建的虚拟机。右键单击它并选择打开:
20 |
21 |
22 |
23 | 4.进入CentOS安装界面,随后弹出可视化安装界面,注意设置密码:
24 |
25 |
18 |
19 | 3.安装完毕,在VirtualBox中出现创建的虚拟机。右键单击它并选择打开:
20 |
21 |
22 |
23 | 4.进入CentOS安装界面,随后弹出可视化安装界面,注意设置密码:
24 |
25 |  26 |
27 | 5.首次安装完成并重启后,输入在安装时设定的密码进入CentOS命令行,执行命令:
28 | ``` bash
29 | ip ad
30 | ```
31 | 由于新装的系统没有ip地址,此时ip地址如图所示:
32 |
33 |
26 |
27 | 5.首次安装完成并重启后,输入在安装时设定的密码进入CentOS命令行,执行命令:
28 | ``` bash
29 | ip ad
30 | ```
31 | 由于新装的系统没有ip地址,此时ip地址如图所示:
32 |
33 |  34 |
35 | 没有ip地址就无法进行后续的操作,所以此时首先要开启动态ip
36 | ``` bash
37 | cd /etc/sysconfig/network-scripts/
38 | ```
39 |
34 |
35 | 没有ip地址就无法进行后续的操作,所以此时首先要开启动态ip
36 | ``` bash
37 | cd /etc/sysconfig/network-scripts/
38 | ```
39 |  40 |
41 | 不同的系统配置文件放置位置可能存在不同,此处配置文件名为`ifcfg-enp0s3`,有些系统中可能为`ifcfg-eth0`,`ifcfg-etchs33`,使用`vi`命令编辑配置文件,修改文件后请记得使用`wq`命令保存并退出:
42 | ``` bash
43 | vi ifcfg-enp0s3
44 | ```
45 |
40 |
41 | 不同的系统配置文件放置位置可能存在不同,此处配置文件名为`ifcfg-enp0s3`,有些系统中可能为`ifcfg-eth0`,`ifcfg-etchs33`,使用`vi`命令编辑配置文件,修改文件后请记得使用`wq`命令保存并退出:
42 | ``` bash
43 | vi ifcfg-enp0s3
44 | ```
45 |  46 |
47 | 将`ONBOOT=no`修改为`ONBOOT=yes`后,执行命令重启网络:
48 | ``` bash
49 | service network restart
50 | ```
51 | 至此环境ip配置完毕,可以使用`yum`指令进行后续环境配置。
52 | ## 2.在虚拟机环境中安装PouchContainer
53 | PouchContainer相关的rpm包已经放在了阿里云镜像上,您可以将目录配置到`yum`的配置文件中,以方便快速下载安装。在安装pouch前,首先需要安装`yum-utils`以更新`yum-config-manager`:
54 | ``` bash
55 | sudo yum install -y yum-utils
56 | ```
57 | 随后请配置更新PouchContainer的目录:
58 | ``` bash
59 | sudo yum-config-manager --add-repo http://mirrors.aliyun.com/opsx/opsx-centos7.repo
60 | sudo yum update
61 | ```
62 | 上述指令执行成功后,安装PouchContainer的准备工作就全部完成了,执行安装命令:
63 | ``` bash
64 | sudo yum install pouch
65 | ```
66 | 该命令自动安装最新版本PouchContainer,在首次安装时您会收到接受`GPG key`的提示,`key`的秘钥指纹会显示供您参考。
67 | ## 3.在虚拟机环境中开启一个PouchContainer的实例
68 | 本小节主要内容为在一个新安装好的虚拟机环境中开启一个PouchContainer的实例,供验证环境是否安装成功。首先执行命令启动PouchContainer:
69 | ``` bash
70 | sudo systemctl start pouch
71 | ```
72 | 启动PouchContainer后还需要加载一个镜像文件以启动一个PouchContainer实例,可以下载`busybox`镜像用以测试:
73 | ``` bash
74 | pouch pull busybox
75 | ```
76 |
46 |
47 | 将`ONBOOT=no`修改为`ONBOOT=yes`后,执行命令重启网络:
48 | ``` bash
49 | service network restart
50 | ```
51 | 至此环境ip配置完毕,可以使用`yum`指令进行后续环境配置。
52 | ## 2.在虚拟机环境中安装PouchContainer
53 | PouchContainer相关的rpm包已经放在了阿里云镜像上,您可以将目录配置到`yum`的配置文件中,以方便快速下载安装。在安装pouch前,首先需要安装`yum-utils`以更新`yum-config-manager`:
54 | ``` bash
55 | sudo yum install -y yum-utils
56 | ```
57 | 随后请配置更新PouchContainer的目录:
58 | ``` bash
59 | sudo yum-config-manager --add-repo http://mirrors.aliyun.com/opsx/opsx-centos7.repo
60 | sudo yum update
61 | ```
62 | 上述指令执行成功后,安装PouchContainer的准备工作就全部完成了,执行安装命令:
63 | ``` bash
64 | sudo yum install pouch
65 | ```
66 | 该命令自动安装最新版本PouchContainer,在首次安装时您会收到接受`GPG key`的提示,`key`的秘钥指纹会显示供您参考。
67 | ## 3.在虚拟机环境中开启一个PouchContainer的实例
68 | 本小节主要内容为在一个新安装好的虚拟机环境中开启一个PouchContainer的实例,供验证环境是否安装成功。首先执行命令启动PouchContainer:
69 | ``` bash
70 | sudo systemctl start pouch
71 | ```
72 | 启动PouchContainer后还需要加载一个镜像文件以启动一个PouchContainer实例,可以下载`busybox`镜像用以测试:
73 | ``` bash
74 | pouch pull busybox
75 | ```
76 |  77 |
78 | 下载好busybox镜像后执行命令以启动busybox基础容器:
79 | ``` bash
80 | pouch run -t -d busybox sh
81 | ```
82 | 执行该命令后如图所示:
83 |
84 |
77 |
78 | 下载好busybox镜像后执行命令以启动busybox基础容器:
79 | ``` bash
80 | pouch run -t -d busybox sh
81 | ```
82 | 执行该命令后如图所示:
83 |
84 |  85 |
86 | 登录该基础容器:
87 | ``` bash
88 | pouch exec -it {ID} sh
89 | // ID 为上图中串码的前6位,在本示例中 ID = 67430c
90 | // 指令为 pouchexec -it 67430c sh
91 | ```
92 | 登录后如图所示:
93 |
94 |
85 |
86 | 登录该基础容器:
87 | ``` bash
88 | pouch exec -it {ID} sh
89 | // ID 为上图中串码的前6位,在本示例中 ID = 67430c
90 | // 指令为 pouchexec -it 67430c sh
91 | ```
92 | 登录后如图所示:
93 |
94 |  95 |
96 | 开心的享受您的PouchContainer容器吧 :D
97 |
--------------------------------------------------------------------------------
/blog-cn/基于VirtualBox和Ubuntu16.04搭建PouchContainer环境-罗离.md:
--------------------------------------------------------------------------------
1 | ## 1. PouchContainer简介
2 | PouchContainer是阿里巴巴集团开源的高效、轻量级企业级富容器引擎技术,可以帮助企业快速提升服务器的利用效率。PouchContainer在阿里内部经过多年的使用,已经具有较强的可靠性和稳定性。目前PouchContainer仅支持在Ubuntu和CentOS上运行。下面将介绍如何在Mac中通过VirtualBox和Ubuntu16.04快速搭建PouchContainer的运行环境,帮助用户在其他的操作系统中也可以使用PouchContainer。Windows系统也可以通过这种方式使用PouchContainer。
3 |
4 | ## 2. VirtualBox安装
5 | 1. VitualBox可以在 https://download.virtualbox.org/virtualbox/5.2.16/VirtualBox-5.2.16-123759-OSX.dmg 这个链接中下载。下载完成后打开VirtualBox-5.2.16-123759-OSX.dmg文件,双击VirtualBox.pkg即可安装。如果需要自定义安装可以选择自定义安装。
6 | 
7 |
8 | ## 3. VirtualBox中使用Ubuntu16.04
9 | 1. 打开安装好的VirtualBox,首先点击标题栏的New按钮,新建一个操作系统,name可以自定义,type选择Linux,Version选择Ubuntu(64-bit)。
10 | 
11 | 2. 点击Continue按钮进入内存的选择页面。内存选择1024MB,当然也可以根据需要加大内存。
12 | 
13 | 3. 点击Continue按钮进入硬盘选择页面,选中"Create a virtual hard disk now"。
14 | 
15 | 4. 点击Create按钮,选择VDI(VirtualBox Disk Image)。
16 | 
17 | 5. 点击Continue按钮,选择Dynamically allocated,这样虚拟机可以动态分配空间。
18 | 
19 | 6. 点击Continue按钮,将文件保存在自己选择的目录下,点击Create按钮,一个虚拟机成功。
20 | 
21 | 7. 进入创建的虚拟机设置页面,在Storage下将自己下载的ISO文件加载进来。
22 | 
23 | 8. 点击启动虚拟机,Ubuntu首次启动需要根据自己的偏好对系统进行配置(设置语言,用户名,密码等)。
24 |
25 | ## 4. 安装PouchContainer
26 | 1. 打开virtualBox中已经安装好的ubuntu,输入用户名和密码登录。
27 | 2. PouchContainer依赖LXCFS来提供强依赖的保证,因此首先需要安装LXCFS,命令如下所示:
28 | ```
29 | sudo apt-get install lxcfs
30 | ```
31 | 
32 | 3. 允许“apt”通过HTTPS下载软件,命令如下所示:
33 | ```
34 | sudo apt-get install curl apt-transport-https ca-certificates software-properties-common
35 | ```
36 | 
37 | 4. 添加PouchContainer的官方GPG key,命令如下所示:
38 | ```
39 | curl -fsSL http://mirrors.aliyun.com/opsx/pouch/linux/debian/opsx@service.alibaba.com.gpg.key | sudo apt-key add -
40 | ```
41 | 5. 通过搜索密钥的最后8位BE2F475F来验证是否具有F443 EDD0 4A58 7E8B F645 9C40 CF68 F84A BE2F 475F这个密钥。命令如下:
42 | ```
43 | apt-key fingerprint BE2F475F
44 | ```
45 | 
46 | 6. 在新的主机上安装PouchContainer时,需要设置默认的镜像存储库。PouchContainer允许将stable库设为默认的库。命令如下:
47 | ```
48 | sudo add-apt-repository "deb http://mirrors.aliyun.com/opsx/pouch/linux/debian/ pouch stable"
49 | ```
50 | 
51 | 7. 通过apt-get下载最新的PouchContainer,命令如下:
52 | ```
53 | sudo apt-get update
54 | sudo apt-get install pouch
55 | ```
56 | 
57 | 8. 启动PouchContainer,命令如下:
58 | ```
59 | sudo service pouch start
60 | ```
61 | 9. 下载busybox镜像文件,命令如下:
62 | ```
63 | pouch pull busybox
64 | ```
65 | 10. 运行busybox,命令如下:
66 | ```
67 | pouch run -t -d busybox sh
68 | ```
69 | 11. 容器运行成功后会输出这个容器的ID, 根据这个ID进入busybox的容器中,命令如下:
70 | ```
71 | pouch exec -it 23f06f sh
72 | ```
73 | 
74 | 12. 这样就可以在容器内部对容器进行交互。交互完成后输入Exit退出容器。
75 |
76 | ## 5. 注意事项
77 | 1. PouchContainer与Docker冲突,安装PouchContainer前需先检查是否有Docker,否则安装会失败。
78 |
79 | ## 6. 总结
80 | 1. 通过上面的教程,我们可以很轻松的在非Linux电脑上体验PouchContainer。
--------------------------------------------------------------------------------
/blog-cn/基于VirtualBox和Ubuntu的PouchContainer环境配置.md:
--------------------------------------------------------------------------------
1 | # 基于VirtualBox和Ubuntu的PouchContainer环境配置(for Mac)
2 |
3 | 本文主要介绍容器开发者在VirtualBox和Ubuntu基础上的PouchContainer环境配置。文章从两部分来介绍,希望您能顺利掌握。
4 |
5 | # PouchContainer下载
6 | 在这个部分,我们分步骤介绍从github上下载PouchContainer文件,这个部分默认使用者有个人github账号,并在本机安装完成git(访问[https://www.git-scm.com/download/](https://www.git-scm.com/download/)下载对应git版本并安装。)
7 | ## 1. 从github源fork repo
8 | 访问[https://github.com/alibaba/pouch](https://github.com/alibaba/pouch),并登陆个人github,点击右上角'Fork'。
95 |
96 | 开心的享受您的PouchContainer容器吧 :D
97 |
--------------------------------------------------------------------------------
/blog-cn/基于VirtualBox和Ubuntu16.04搭建PouchContainer环境-罗离.md:
--------------------------------------------------------------------------------
1 | ## 1. PouchContainer简介
2 | PouchContainer是阿里巴巴集团开源的高效、轻量级企业级富容器引擎技术,可以帮助企业快速提升服务器的利用效率。PouchContainer在阿里内部经过多年的使用,已经具有较强的可靠性和稳定性。目前PouchContainer仅支持在Ubuntu和CentOS上运行。下面将介绍如何在Mac中通过VirtualBox和Ubuntu16.04快速搭建PouchContainer的运行环境,帮助用户在其他的操作系统中也可以使用PouchContainer。Windows系统也可以通过这种方式使用PouchContainer。
3 |
4 | ## 2. VirtualBox安装
5 | 1. VitualBox可以在 https://download.virtualbox.org/virtualbox/5.2.16/VirtualBox-5.2.16-123759-OSX.dmg 这个链接中下载。下载完成后打开VirtualBox-5.2.16-123759-OSX.dmg文件,双击VirtualBox.pkg即可安装。如果需要自定义安装可以选择自定义安装。
6 | 
7 |
8 | ## 3. VirtualBox中使用Ubuntu16.04
9 | 1. 打开安装好的VirtualBox,首先点击标题栏的New按钮,新建一个操作系统,name可以自定义,type选择Linux,Version选择Ubuntu(64-bit)。
10 | 
11 | 2. 点击Continue按钮进入内存的选择页面。内存选择1024MB,当然也可以根据需要加大内存。
12 | 
13 | 3. 点击Continue按钮进入硬盘选择页面,选中"Create a virtual hard disk now"。
14 | 
15 | 4. 点击Create按钮,选择VDI(VirtualBox Disk Image)。
16 | 
17 | 5. 点击Continue按钮,选择Dynamically allocated,这样虚拟机可以动态分配空间。
18 | 
19 | 6. 点击Continue按钮,将文件保存在自己选择的目录下,点击Create按钮,一个虚拟机成功。
20 | 
21 | 7. 进入创建的虚拟机设置页面,在Storage下将自己下载的ISO文件加载进来。
22 | 
23 | 8. 点击启动虚拟机,Ubuntu首次启动需要根据自己的偏好对系统进行配置(设置语言,用户名,密码等)。
24 |
25 | ## 4. 安装PouchContainer
26 | 1. 打开virtualBox中已经安装好的ubuntu,输入用户名和密码登录。
27 | 2. PouchContainer依赖LXCFS来提供强依赖的保证,因此首先需要安装LXCFS,命令如下所示:
28 | ```
29 | sudo apt-get install lxcfs
30 | ```
31 | 
32 | 3. 允许“apt”通过HTTPS下载软件,命令如下所示:
33 | ```
34 | sudo apt-get install curl apt-transport-https ca-certificates software-properties-common
35 | ```
36 | 
37 | 4. 添加PouchContainer的官方GPG key,命令如下所示:
38 | ```
39 | curl -fsSL http://mirrors.aliyun.com/opsx/pouch/linux/debian/opsx@service.alibaba.com.gpg.key | sudo apt-key add -
40 | ```
41 | 5. 通过搜索密钥的最后8位BE2F475F来验证是否具有F443 EDD0 4A58 7E8B F645 9C40 CF68 F84A BE2F 475F这个密钥。命令如下:
42 | ```
43 | apt-key fingerprint BE2F475F
44 | ```
45 | 
46 | 6. 在新的主机上安装PouchContainer时,需要设置默认的镜像存储库。PouchContainer允许将stable库设为默认的库。命令如下:
47 | ```
48 | sudo add-apt-repository "deb http://mirrors.aliyun.com/opsx/pouch/linux/debian/ pouch stable"
49 | ```
50 | 
51 | 7. 通过apt-get下载最新的PouchContainer,命令如下:
52 | ```
53 | sudo apt-get update
54 | sudo apt-get install pouch
55 | ```
56 | 
57 | 8. 启动PouchContainer,命令如下:
58 | ```
59 | sudo service pouch start
60 | ```
61 | 9. 下载busybox镜像文件,命令如下:
62 | ```
63 | pouch pull busybox
64 | ```
65 | 10. 运行busybox,命令如下:
66 | ```
67 | pouch run -t -d busybox sh
68 | ```
69 | 11. 容器运行成功后会输出这个容器的ID, 根据这个ID进入busybox的容器中,命令如下:
70 | ```
71 | pouch exec -it 23f06f sh
72 | ```
73 | 
74 | 12. 这样就可以在容器内部对容器进行交互。交互完成后输入Exit退出容器。
75 |
76 | ## 5. 注意事项
77 | 1. PouchContainer与Docker冲突,安装PouchContainer前需先检查是否有Docker,否则安装会失败。
78 |
79 | ## 6. 总结
80 | 1. 通过上面的教程,我们可以很轻松的在非Linux电脑上体验PouchContainer。
--------------------------------------------------------------------------------
/blog-cn/基于VirtualBox和Ubuntu的PouchContainer环境配置.md:
--------------------------------------------------------------------------------
1 | # 基于VirtualBox和Ubuntu的PouchContainer环境配置(for Mac)
2 |
3 | 本文主要介绍容器开发者在VirtualBox和Ubuntu基础上的PouchContainer环境配置。文章从两部分来介绍,希望您能顺利掌握。
4 |
5 | # PouchContainer下载
6 | 在这个部分,我们分步骤介绍从github上下载PouchContainer文件,这个部分默认使用者有个人github账号,并在本机安装完成git(访问[https://www.git-scm.com/download/](https://www.git-scm.com/download/)下载对应git版本并安装。)
7 | ## 1. 从github源fork repo
8 | 访问[https://github.com/alibaba/pouch](https://github.com/alibaba/pouch),并登陆个人github,点击右上角'Fork'。9 | 10 |
11 |  12 |
12 |
12 | 13 | 14 | ## 2 repo下载 15 | ### 2.1 通过git命令下载 16 | 点击“Clone or download”并复制路径。
17 | 18 |
19 |  20 |
20 |
21 |
20 | 22 | 23 | 在mac下打开terminal,通过cd命令进入到本地的目标文件夹路径,并输入: 24 | ``` javascript?linenums 25 | git clone https://github.com/alibaba/pouch.git 26 | ``` 27 | ## 2.2 通过zip打包文件下载 28 | 点击Download ZIP,这种方法更加简单。
29 | 30 |
31 |  32 |
32 |
33 |
32 | 34 | 35 | 然后解压到目标文件夹即可。 36 | 37 | # 虚拟机和容器配置 38 | ## 1. 虚拟机安装配置 39 | 下载安装VirtualBox,下载虚拟机备份ubuntuPouch.vdi
40 | 打开VirtualBox,新建-名称自定义-类型选择【Linux】-版本选择【Ubuntu (64-bit)】
41 | 
42 | 继续-内存选择【1024M】
43 | 
44 | 继续-使用【已有的虚拟硬盘文件】-选择ubuntuPouch.vdi-创建
45 | 
46 | 启动新建实例,等待进入到登录阶段,登陆并切换到root用户: 47 | 48 | ``` javascript?linenums 49 | sudo -i 50 | ``` 51 | ## 2. 共享文件夹挂载 52 | 配置环境需要将个人repo通过共享文件夹挂至Ubuntu,为此需要首先安装增强工具。 53 | ### 2.1 增强工具安装 54 | 安装VBoxLinuxAdditions,点击虚拟机菜单【设备】-点击【安装增强功能…】,然后分别输入: 55 | 56 | ``` javascript?linenums 57 | sudo apt-get install virtualbox-guest-dkms 58 | sudo mount /dev/cdrom /mnt/ 59 | cd /mnt 60 | ./VBoxLinuxAdditions.run 61 | ``` 62 |  63 | 64 |  65 | 66 |  67 | 68 |  69 |
70 | 71 | 显示“Do you want to continue?”时,输入Y
72 | 若出现“VirtualBox Guest Additions: modprobe vboxsf failed”,通过reboot重启虚拟机,并按照2.1步骤切换root用户: 73 | 74 | ``` javascript?linenums 75 | reboot 76 | ``` 77 | 78 | ### 2.2 共享文件夹设置和挂载 79 | 设置共享文件夹,点击【设备】-选择【共享文件夹】,设置“共享文件夹路径”为个人repo的文件夹,“共享文件夹名称”设置为“share”-【自动挂载】,【固定分配】-【确定】
80 | 
81 | 挂载共享文件夹,输入: 82 | 83 | ``` javascript?linenums 84 | sudo mount -t vboxsf share /root/gopath/src/github.com/alibaba/ 85 | ``` 86 | 其中“share”与“共享文件夹名称”保持一致
87 | 
88 | 89 | ## 3. 启动容器 90 | 检查网络是否正常: 91 | 92 | ``` javascript?linenums 93 | ping www.alibaba-inc.com 94 | ``` 95 | 启动pouch服务(默认开机启动): 96 | 97 | ``` javascript?linenums 98 | systemctl start pouch 99 | ``` 100 |  101 |
102 | 启动一个busybox基础容器: 103 | 104 | ``` javascript?linenums 105 | pouch run -t -d busybox sh 106 | ``` 107 |  108 |
109 | 登入启动的容器,其中ID是上条命令输出的完整ID中的前六位 110 | 111 | ``` javascript?linenums 112 | pouch exec -it {ID} sh 113 | ``` 114 |  115 |
116 | 117 | # 顺利完成 118 | 至此,开发配置环境完成。 -------------------------------------------------------------------------------- /blog-cn/安装说明.md: -------------------------------------------------------------------------------- 1 | 原文链接:[INSTALLATION.md](https://github.com/alibaba/pouch/blob/master/INSTALLATION.md) 2 | # 快速入门 3 | 4 | 总共提供了两个快速入门,一个用于终端用户,另一个用于开发人员。 5 | 6 | 希望使用PouchContainer的终端用户,请阅读 [终端用户快速入门](#终端用户快速入门)以安装和探索PouchContainer。 7 | 8 | 希望开发PouchContainer的开发人员,请阅读[开发人员快速入门](#开发人员快速入门)以开始开发并参与项目! 9 | 10 | ##
终端用户快速入门
11 |
12 | 只需很少的步骤,您就可以在您的机器上自动安装PouchContainer。目前我们支持两种Linux发行版:Ubuntu和CentOS。
13 |
14 | ### Ubuntu
15 |
16 | 要安装PouchContainer,您需要一个Ubuntu 16.04(Xenial LTS)在维护的版本。不支持存档和测试版本。
17 |
18 | PouchContainer与Docker冲突,因此您必须在安装PouchContainer之前卸载Docker。
19 |
20 | **准备工作**
21 |
22 | PouchContainer支持LXCFS以提供强隔离,因此您应首先安装LXCFS。默认情况下,LXCFS是被启用的。
23 |
24 | ``` bash
25 | sudo apt-get install lxcfs
26 | ```
27 |
28 | 安装下列包以允许'apt'通过HTTPS使用仓库:
29 |
30 | ``` bash
31 | sudo apt-get install curl apt-transport-https ca-certificates software-properties-common
32 | ```
33 |
34 | **1. 添加PouchContainer的官方GPG密钥**
35 |
36 | ``` bash
37 | curl -fsSL http://mirrors.aliyun.com/opsx/pouch/linux/debian/opsx@service.alibaba.com.gpg.key | sudo apt-key add -
38 | ```
39 |
40 | 通过搜索指纹的最后8个字符,验证您现在是否具有指纹 `F443 EDD0 4A58 7E8B F645 9C40 CF68 F84A BE2F 475F`的密钥。
41 |
42 | ``` bash
43 | $ apt-key fingerprint BE2F475F
44 | pub 4096R/BE2F475F 2018-02-28
45 | Key fingerprint = F443 EDD0 4A58 7E8B F645 9C40 CF68 F84A BE2F 475F
46 | uid opsx-admin 开发人员快速入门
151 |
152 | 本指南提供了在裸机服务器或虚拟机上部署PouchContainer的步骤说明。作为开发人员,您需要通过源代码构建和测试PouchContainer二进制文件。要构建被称为"PouchContainer Daemon"的pouchd和被称为"PouchContainer CLI"的pouch,需要安装以下系统依赖项:
153 |
154 | * Linux Kernel 3.10+
155 | * Go 1.9.0+
156 | * containerd: 1.0.3
157 | * runc: 1.0.0-rc4
158 | * runv: 1.0.0 (option)
159 |
160 |
161 | ### 预安装
162 |
163 | 由于pouchd是一种容器引擎,而pouch是一个CLI工具,如果您希望通过pouch体验容器的管理能力,还需要几个额外的二进制文件:
164 |
165 | * [containerd](https://github.com/containerd/containerd): 行业标准的容器运行时环境;
166 | * [runc](https://github.com/opencontainers/runc): 用于根据OCI规范生成和运行容器的CLI工具;
167 | * [runv](https://github.com/hyperhq/runv): 基于监管服务的OCI运行时环境;
168 |
169 | 以下是安装 `containerd` 和runc的shell脚本:
170 |
171 | ``` shell
172 | # install containerd
173 | $ wget https://github.com/containerd/containerd/releases/download/v1.0.3/containerd-1.0.3.linux-amd64.tar.gz
174 | $ tar -xzvf containerd-1.0.3.linux-amd64.tar.gz -C /usr/local
175 | $
176 | # install runc
177 | $ wget https://github.com/opencontainers/runc/releases/download/v1.0.0-rc4/runc.amd64 -P /usr/local/bin
178 | $ chmod +x /usr/local/bin/runc.amd64
179 | $ mv /usr/local/bin/runc.amd64 /usr/local/bin/runc
180 | ```
181 |
182 | ### runV安装
183 |
184 | 如果您希望额外体验基于监管服务的虚拟化,您需要安装[runV](https://github.com/hyperhq/runv)。
185 |
186 | 有关使用runV体验PouchContainer的更多指南,包括runv安装,请参考[PouchContainer run with runv guide](docs/features/pouch_with_runV.md)。
187 |
188 | ### PouchContainer的构建和安装
189 |
190 | 安装完所有依赖后,您可以构建和安装PouchContainer Daemo和PouchContainer CLI。克隆仓库并检出任意您选择的分支(在以下示例中,检出的是主干分支):
191 |
192 | ``` shell
193 | mkdir -p $GOPATH/src/github.com/alibaba/
194 | cd $GOPATH/src/github.com/alibaba/; git clone https://github.com/alibaba/pouch.git
195 | cd pouch; git checkout master
196 | ```
197 |
198 | 名为 `build` 的Makefile target将编译当前工作目录中的pouch和pouchd二进制文件。或者您可以执行 `make install` 来构建二进制文件并将它们安装在目标目录中(默认情况下为 `/usr/local/bin` )。
199 |
200 | ``` shell
201 | make install
202 | ```
203 |
204 | ### 启动PouchContainer
205 | 安装了所有需要的二进制文件后,您可以通过以下方式启动pouchd:
206 |
207 | ``` shell
208 | $ pouchd
209 | INFO[0000] starting containerd module=containerd revision=773c489c9c1b21a6d78b5c538cd395416ec50f88 version=v1.0.3
210 | INFO[0000] setting subreaper... module=containerd
211 | INFO[0000] loading plugin "io.containerd.content.v1.content"... module=containerd type=io.containerd.content.v1
212 | INFO[0000] loading plugin "io.containerd.snapshotter.v1.btrfs"... module=containerd type=io.containerd.snapshotter.v1
213 | WARN[0000] failed to load plugin io.containerd.snapshotter.v1.btrfs error="path /var/lib/containerd/io.containerd.snapshotter.v1.btrfs must be a btrfs filesystem to be used with the btrfs snapshotter" module=containerd
214 | INFO[0000] loading plugin "io.containerd.snapshotter.v1.overlayfs"... module=containerd type=io.containerd.snapshotter.v1
215 | INFO[0000] loading plugin "io.containerd.metadata.v1.bolt"... module=containerd type=io.containerd.metadata.v1
216 | WARN[0000] could not use snapshotter btrfs in metadata plugin error="path /var/lib/containerd/io.containerd.snapshotter.v1.btrfs must be a btrfs filesystem to be used with the btrfs snapshotter" module="containerd/io.containerd.metadata.v1.bolt"
217 | INFO[0000] loading plugin "io.containerd.differ.v1.walking"... module=containerd type=io.containerd.differ.v1
218 | INFO[0000] loading plugin "io.containerd.grpc.v1.containers"... module=containerd type=io.containerd.grpc.v1
219 | ```
220 |
221 | 在pouchd运行之后,您可以通过PouchContainer CLI与pouchd进行交互:
222 |
223 | ```bash
224 | $ pouch images
225 | IMAGE ID IMAGE NAME SIZE
226 | 3e8fa85ddfef docker.io/library/busybox:latest 2699
227 | 504cf109b492 docker.io/library/redis:alpine 2035
228 | ```
229 |
230 | ## 反馈
231 |
232 | 我们希望本指南可以帮助您使用和运行PouchContainer。如果您有任何疑问,请随时通过[ISSUE](https://github.com/alibaba/pouch/issues/new)发送反馈。如果您希望在本指南中为PouchContainer做出贡献,请提交PR。
233 |
--------------------------------------------------------------------------------
/blog-cn/富容器技术.md:
--------------------------------------------------------------------------------
1 | # 富容器技术
2 |
3 | 当容器化应用程序时,富容器是一种非常有用的容器模式。此模式可帮助技术人员几乎毫不费力地打包粗壮应用程序。它提供了有效的方法来装备更多基本软件或系统服务除了目标应用程序在单个容器中。然后,容器中的应用程序可以像通常在虚拟机或物理机中一样平滑运行。这是一种更通用的以应用程序为中心的模式,该模式对开发人员和运营商都没有任何侵略性。特别是对于运营商而言,他们可以像往常一样使用他们可能需要的所有必要工具或服务流程来维护容器中的应用程序。
4 |
5 | PouchContainer 提供的富容器模式不是默认模式。拓展用户的容器体验是 PouchContainer 带来的一种额外模式。用户仍然可以通过关闭富容器标志来管理普通容器。
6 |
7 | 总之,富容器可以帮助企业实现以下两个目标:
8 |
9 | * 与传统操作系统兼容;
10 | * 仍然利用镜像概念的优势来加快应用程序交互。
11 |
12 | ## 脚本
13 |
14 | 容器技术和编排平台现在变得非常流行。它们都为应用程序提供了更好的环境。尽管如此,我们不得不说容器化是企业采用容器相关技术的第一步,例如容器,编排,服务网等。将传统应用程序转移到容器中是一个非常实际的问题。虽然一些简单的应用程序总是对容器显示友好,但更传统和复杂的企业应用程序可能不那么幸运。这些传统应用程序通常与底层基础架构相耦合,例如机器架构,旧内核,甚至某些软件也不需要维护。当然,强耦合不是每个人的菜。它是企业数字化转型之路的发起者。因此,所有行业都在寻求一种可行的方法来解决这个问题。 docker提供的方式是一种,但不是最好的。在过去的7年里,阿里巴巴也遇到了同样的问题。幸运的是,富容器模式是一种更好的处理方式。
15 |
16 | 开发人员有自己的编程风格。他们的工作是创建有用的应用程序,而不是设计绝对解耦的应用程序,因此他们通常利用工具或系统服务来实现它。当容器化这些应用程序时,如果仅在容器中设置一个应用程序一个进程,则相当薄弱。富容器模式找出了使用户在容器中配置进程的内部启动顺序的方法,包括应用程序和系统服务。
17 |
18 | 运营商富有保护应用程序正常运行的神圣职责。为了使业务在应用程序中运行,技术必须充分尊重运营商的传统。在线调试和解决问题时,环境变化不是一个好消息。富容器模式可以确保富容器中的环境与传统VM或物理机中的环境完全相同。如果操作员需要一些系统工具,它们仍然定位于那里。如果某些前后挂钩应该生效,只需在启动富容器时设置它们即可。 如果内部发生了一些问题,富容器启动的系统服务可以像自我修复一样修复它们。
19 |
20 | ## 架构
21 |
22 | 富容器模式与运营团队的传统操作方式兼容。 以下架构图显示了如何实现:
23 |
24 | 
25 |
26 | 更详细的说,富容器承诺与oci适配镜像兼容。在运行富容器时,pouchd 会将镜像文件系统作为富容器本身的根文件系统。在内部容器的运行时,除了内部应用程序和系统服务之外,还有一些hook如prestart hook 和 poststop hook。前者重点在于如何在 systmed 和相关进程运行之前准备或初始化环境。后者主要是当容器停止时进行清理工作。
27 |
28 | ## 启动
29 |
30 | 用户可以很容易地在 PouchContainer 中启动富容器模式。 如果我们需要通过 PouchContainer 在富容器模式下运行普通镜像,我们可以添加两个标志:`--rich`,`--rich-mode`和 `--initscript`。 以下是关于这两个标志的更多描述:
31 |
32 | * `--rich`:标识是否打开富容器模式。此标志的类型为`boolean`,默认值为`false`。
33 |
34 | * `--rich-mode`:选择初始化容器的方式,当前支持 systemd,/ sbin / init 和 dumb-init 的方式。默认情况下是 dumb-init。
35 |
36 | * `--initscript`:标识在容器中执行的初始脚本。该脚本将在入口点或命令之前执行。有时,它被称为 prestart hook。在 prestart hook 中可以做很多工作,例如环境检查,环境准备,网络路由准备,各种代理设置,安全设置等。如果 pouchd 无法在由从镜像和实际位于容器外部的潜在挂载卷提供的容器文件系统中找到此 initscript 标志,则该脚本可能会失败并且用户会收到相关的错误消息。如果 initscript 正常工作,容器进程的控制将由进程 pid 1接管,主要是`/ sbin / init`或`dumbinit`。
37 |
38 |
39 |
40 | 事实上,PouchContainer 团队计划添加另一个标志`--initcmd`以使用户输入 prestart hook。实际上它是`--initscript`的简化版。同时它比`--initscript`更便捷。 `--initcmd`可以根据用户的意愿设置任何命令,并且不需要事先将其放置在镜像中。可以说实现了命令与镜像解耦。但是对于`--initscript`,脚本文件必须首先位于镜像中,这是某种耦合。
41 |
42 | 如果用户指定`--rich`标志并且未提供`--initscript`标志,则仍将启用富容器模式,但不会执行initscript。 如果`--rich`标志在命令行中丢失,而`--initscript`存在,PouchContainer CLI 或Pouchd 将返回错误以显示`--initscipt`只能与`--rich`标志一起使用。
43 |
44 | 如果容器正在运行`--rich`标志,那么每次启动或重启此容器都会触发相应的 initscipt。
45 |
46 | ### 使用 dumb-init
47 |
48 | 以下是富容器模式的使用 dumb-init 来初始化容器的简单示例:
49 |
50 | 1.按如下步骤安装 dumb-init:
51 |
52 | ```shell
53 | # wget -O /usr/bin/dumb-init https://github.com/Yelp/dumb-init/releases/download/v1.2.1/dumb-init_1.2.1_amd64
54 | # chmod +x /usr/bin/dumb-init
55 | ```
56 |
57 | 2.运行富模式的容器:
58 |
59 | ```shell
60 | #pouch run -d --rich --rich-mode dumb-init registry.hub.docker.com/library/busybox:latest sleep 10000
61 | f76ac1e49e9407caf5ad33c8988b44ff3690c12aa98f7faf690545b16f2a5cbd
62 |
63 | #pouch exec f76ac1e49e9407caf5ad33c8988b44ff3690c12aa98f7faf690545b16f2a5cbd ps -ef
64 | PID USER TIME COMMAND
65 | 1 root 0:00 /usr/bin/dumb-init -- sleep 10000
66 | 7 root 0:00 sleep 10000
67 | 8 root 0:00 ps -ef
68 | ```
69 |
70 | ### 使用 systemd 或 sbin-init
71 |
72 | 为了使用systemd或/ sbin / init初始化容器,请确保将它们安装在镜像文件上。
73 |
74 | 如下图所示,centos镜像两者都有。
75 |
76 | 此外,在这种情况下需要`--privileged` 。 systemd 和 sbin-init的示例如下:
77 |
78 | ```
79 | #cat /tmp/1.sh
80 | #! /bin/sh
81 | echo $(cat) >/tmp/xxx
82 |
83 | #pouch run -d -v /tmp:/tmp --privileged --rich --rich-mode systemd --initscript /tmp/1.sh registry.hub.docker.com/library/centos:latest /usr/bin/sleep 10000
84 | 3054125e44443fd5ee9190ee49bbca0a842724f5305cb05df49f84fd7c901d63
85 |
86 | #pouch exec 3054125e44443fd5ee9190ee49bbca0a842724f5305cb05df49f84fd7c901d63 ps aux
87 | USER PID %CPU %MEM VSZ RSS TTY STAT START TIME COMMAND
88 | root 1 7.4 0.0 42968 3264 ? Ss 05:29 0:00 /usr/lib/systemd/systemd
89 | root 17 0.0 0.0 10752 756 ? Ss 05:29 0:00 /usr/lib/systemd/systemd-readahead collect
90 | root 18 3.2 0.0 32740 2908 ? Ss 05:29 0:00 /usr/lib/systemd/systemd-journald
91 | root 34 0.0 0.0 22084 1456 ? Ss 05:29 0:00 /usr/lib/systemd/systemd-logind
92 | root 36 0.0 0.0 7724 608 ? Ss 05:29 0:00 /usr/bin/sleep 10000
93 | dbus 37 0.0 0.0 24288 1604 ? Ss 05:29 0:00 /bin/dbus-daemon --system --address=systemd: --nofork --nopidfile --systemd-activation
94 | root 45 0.0 0.0 47452 1676 ? Rs 05:29 0:00 ps aux
95 |
96 | #cat /tmp/xxx
97 | {"ociVersion":"1.0.0","id":"3054125e44443fd5ee9190ee49bbca0a842724f5305cb05df49f84fd7c901d63","status":"","pid":125745,"bundle":"/var/lib/pouch/containerd/state/io.containerd.runtime.v1.linux/default/3054125e44443fd5ee9190ee49bbca0a842724f5305cb05df49f84fd7c901d63"}
98 |
99 | #pouch run -d -v /tmp:/tmp --privileged --rich --rich-mode sbin-init --initscript /tmp/1.sh registry.hub.docker.com/library/centos:latest /usr/bin/sleep 10000
100 | c5b5eef81749ce00fb68a59ee623777bfecc8e07c617c0601cc56e4ae8b1e69f
101 |
102 | #pouch exec c5b5eef81749ce00fb68a59ee623777bfecc8e07c617c0601cc56e4ae8b1e69f ps aux
103 | USER PID %CPU %MEM VSZ RSS TTY STAT START TIME COMMAND
104 | root 1 7.4 0.0 42968 3260 ? Ss 05:30 0:00 /sbin/init
105 | root 17 0.0 0.0 10752 752 ? Ss 05:30 0:00 /usr/lib/systemd/systemd-readahead collect
106 | root 20 3.2 0.0 32740 2952 ? Ss 05:30 0:00 /usr/lib/systemd/systemd-journald
107 | root 34 0.0 0.0 22084 1452 ? Ss 05:30 0:00 /usr/lib/systemd/systemd-logind
108 | root 35 0.0 0.0 7724 612 ? Ss 05:30 0:00 /usr/bin/sleep 10000
109 | dbus 36 0.0 0.0 24288 1608 ? Ss 05:30 0:00 /bin/dbus-daemon --system --address=systemd: --nofork --nopidfile --systemd-activation
110 | root 45 0.0 0.0 47452 1676 ? Rs 05:30 0:00 ps aux
111 |
112 | #cat /tmp/xxx
113 | {"ociVersion":"1.0.0","id":"c5b5eef81749ce00fb68a59ee623777bfecc8e07c617c0601cc56e4ae8b1e69f","status":"","pid":127183,"bundle":"/var/lib/pouch/containerd/state/io.containerd.runtime.v1.linux/default/c5b5eef81749ce00fb68a59ee623777bfecc8e07c617c0601cc56e4ae8b1e69f"}
114 | ```
115 |
116 | ## 底层实现
117 |
118 | 在学习底层实现之前,我们将简要回顾一下`systemd`,`entrypoint`和`cmd`。 另外,prestart hook 由runC 执行。
119 |
120 | ### systemd,entrypoint 和 cmd
121 |
122 | 待补充。
123 |
124 | ### initscript 和 runC
125 |
126 | `initscript`将被添加。
127 |
128 | `runc`是一个CLI工具,用于根据OCI规范生成和运行容器。
129 |
130 |
131 |
132 |
--------------------------------------------------------------------------------
/blog-cn/深入解析PouchContainer如何实现容器原地升级.md:
--------------------------------------------------------------------------------
1 | # 背景
2 |
3 | 阿里巴巴集团内部,容器使用方式有很大一部分是富容器模式,像这种基于传统虚拟机运维模式下的富容器,其中也有一定数量容器仍然是有状态的。有状态服务的更新和升级是企业内部频率很高的一个日常操作,对于以镜像为交付的容器技术来说,服务的更新和升级,对应的容器操作实际上是两步:旧镜像容器的删除,以及新镜像容器的创建。而有状态服务的升级,则要求保证新容器必须继承旧容器所有的资源,比如网络、存储等信息。下面给出两个实际的业务案例来直观阐述富容器业务发布场景需求:
4 |
5 | * 客户案例一:某数据库业务,在第一次创建容器服务时,会将远程的数据下载到本地,作为数据库的初始数据。因为数据库初始化过程会比较长,所以在之后可能存在的服务升级过程中,新容器需要继承旧容器的存储数据,来降低业务发布的时间;
6 | * 客户案例二:某中间件服务,业务采取服务注册的模式,即所有新扩容的容器 IP 必须首先注册到服务器列表中,否则新扩容业务容器不可用。在业务容器每次升级发布时,需要保证新容器继承旧容器 IP,否则会导致新发布的服务不可用。
7 |
8 | 现在很多企业都是使用 Moby 作为容器引擎,但 Moby 的所有 API 中并没有一个接口来对标容器升级这一操作。而组合 API 的方式,必然会增加很多 API 请求次数,比如需要请求容器的增删 API,需要请求 IP 保留的 API 等等,还可能增加升级操作失败的风险。
9 |
10 | 基于以上背景,PouchContainer 在容器引擎层面提供了一个 `upgrade` 接口,用于实现容器的原地升级功能。将容器升级功能下沉到容器引擎这一层来做,对于操作容器相关资源更加方便,并且减少很多 API 请求,让容器升级操作变得更加高效。
11 |
12 | # Upgrade 功能具体实现
13 |
14 | ## 容器底层存储介绍
15 |
16 | PouchContainer 底层对接的是 Containerd v1.0.3 ,对比 Moby,在容器存储架构上有很大的差别,所以在介绍 PouchContainer 如何实现容器原地升级功能之前,有必要先简单介绍一下在 PouchContainer 中一个容器的存储架构:
17 |
18 |
19 | 
20 |
21 |
22 | 对比 Moby 中容器存储架构,PouchContainer 主要不一样的地方:
23 | * PouchContainer 中没有了 GraphDriver 和 Layer 的概念,新的存储架构里引入了 Snapshotter 和 Snapshot,从而更加拥抱 CNCF 项目 containerd 的架构设计。Snapshotter 可以理解为存储驱动,比如 overlay、devicemapper、btrfs 等。Snapshot 为镜像快照,分为两种:一种只读的,即容器镜像的每一层只读数据;一种为可读写的,即容器可读写层,所有容器增量数据都会存储在可读写 Snapshot 中;
24 | * Containerd 中容器和镜像元数据都存储在 boltdb 中,这样的好处是每次服务重启不需要通过读取宿主机文件目录信息来初始化容器和镜像数据,而是只需要初始化 boltdb。
25 |
26 | ## Upgrade 功能需求
27 |
28 | 每一个系统和功能设计之初,都需要详细调研该系统或功能需要为用户解决什么疼点。经过调研阿里内部使用容器原地升级功能的具体业务场景,我们对 `upgrade` 功能设计总结了三点要求:
29 | * 数据一致性
30 | * 灵活性
31 | * 鲁棒性
32 |
33 | 数据一致性指 `upgrade` 前后需要保证一些数据不变:
34 | * 网络:升级前后,容器网络配置要保持不变;
35 | * 存储:新容器需要继承旧容器的所有 volume ;
36 | * Config:新容器需要继承旧容器的某一些配置信息,比如 Env, Labels 等信息;
37 |
38 | 灵活性指 `upgrade` 操作在旧容器的基础上,允许引入新的配置:
39 | * 允许修改新容器的 cpu、memory 等信息;
40 | * 对新的镜像,即要支持指定新的 `Entrypoint` ,也要允许继承旧容器的 `Entrypoint` ;
41 | * 支持给容器增加新的 volume,新的镜像中可能会包含新的 volume 信息,在新建容器时,需要对这部分 volume 信息进行解析,并创建新的 volume。
42 |
43 | 鲁棒性是指在进行容器原地升级操作期间,需要对可能出现的异常情况进行处理,支持回滚策略,升级失败可以回滚到旧容器。
44 |
45 | ## Upgrade 功能具体实现
46 | ### Upgrade API 定义
47 |
48 | 首先说明一下 `upgrade` API 入口层定义,用于定义升级操作可以对容器的哪些参数进行修改。如下 `ContainerUpgradeConfig` 的定义,容器升级操作可以对容器 `ContainerConfig` 和 `HostConfig` 都可以进行操作,如果在 PouchContainer github 代码仓库的 `apis/types` 目录下参看这两个参数的定义,可以发现实际上,`upgrade` 操作可以修改旧容器的__所有__相关配置。
49 | ```go
50 | // ContainerUpgradeConfig ContainerUpgradeConfig is used for API "POST /containers/upgrade".
51 | // It wraps all kinds of config used in container upgrade.
52 | // It can be used to encode client params in client and unmarshal request body in daemon side.
53 | //
54 | // swagger:model ContainerUpgradeConfig
55 |
56 | type ContainerUpgradeConfig struct {
57 | ContainerConfig
58 |
59 | // host config
60 | HostConfig *HostConfig `json:"HostConfig,omitempty"`
61 | }
62 | ```
63 |
64 | ### Upgrade 详细操作流程
65 |
66 | 容器 `upgrade` 操作,实际上是在保证网络配置和原始 volume 配置不变的前提下,进行旧容器的删除操作,以及使用新镜像创建新容器的过程,如下给出了 `upgrade` 操作流程的详细说明:
67 | * 首先需要备份原有容器的所有操作,用于升级失败之后,进行回滚操作;
68 | * 更新容器配置参数,将请求参数中新的配置参数合并到旧的容器参数中,使新配置生效;
69 | * 镜像 `Entrypoint` 参数特殊处理:如果新的参数中指定了 `Entrypoint` 参数,则使用新的参数;否则查看旧容器的 `Entrypoint` ,如果该参数是通过配置参数指定,而不是旧镜像中自带的,则使用旧容器的 `Entrypoint` 作为新容器的 `Entrypoint` ;如果都不是,最后使用新镜像中的 `Entrypoint` 最为新创建容器的 `Entrypoint` 。对新容器 `Entrypoint` 这样处理的原因是为了保持容器服务入口参数的连续性。
70 | * 判断容器的状态,如果是 running 状态的容器,首先 stop 容器;之后基于新的镜像创建一个新的 Snapshot 作为新容器读写层;
71 | * 新的 Snapshot 创建成功之后,再次判断旧容器升级之前的状态,如果是 running 状态,则需要启动新的容器,否则不需要做任何操作;
72 | * 最后进行容器升级清理工作,删掉旧的 Snapshot,并将最新配置进行存盘。
73 |
74 | ### Upgrade 操作回滚
75 |
76 | `upgrade` 操作可能会出现一些异常情况,现在的升级策略是在出现异常情况时,会进行回滚操作,恢复到原来旧容器的状态,在这里我们需要首先定义一下 __升级失败情况__ :
77 | * 给新容器创建新的资源时失败,需要执行回滚操作:当给新容器创建新的 Snapshot,Volumes 等资源时,会执行回滚操作;
78 | * 启动新容器出现系统错误时,需要执行回滚操作:即在调用 containerd API 创建新的容器时如果失败则会执行回滚操作。如果 API 返回正常,但容器内的程序运行异常导致容器退出的情况,不会执行回滚操作。
79 | 如下给出了回滚操作的一个基本操作:
80 | ```go
81 | defer func() {
82 | if !needRollback {
83 | return
84 | }
85 |
86 | // rollback to old container.
87 | c.meta = &backupContainerMeta
88 |
89 | // create a new containerd container.
90 | if err := mgr.createContainerdContainer(ctx, c); err != nil {
91 | logrus.Errorf("failed to rollback upgrade action: %s", err.Error())
92 | if err := mgr.markStoppedAndRelease(c, nil); err != nil {
93 | logrus.Errorf("failed to mark container %s stop status: %s", c.ID(), err.Error())
94 | }
95 | }
96 | }()
97 | ```
98 |
99 | 在升级过程中,如果出现异常情况,会将新创建的 Snapshot 等相关资源进行清理操作,在回滚阶段,只需要恢复旧容器的配置,然后用恢复后的配置文件启动一个新容器既可。
100 |
101 | ### Upgrade 功能演示
102 |
103 | * 使用 `ubuntu` 镜像创建一个新容器:
104 | ```bash
105 | $ pouch run --name test -d -t registry.hub.docker.com/library/ubuntu:14.04 top
106 | 43b75002b9a20264907441e0fe7d66030fb9acedaa9aa0fef839ccab1f9b7a8f
107 |
108 | $ pouch ps
109 | Name ID Status Created Image Runtime
110 | test 43b750 Up 3 seconds 3 seconds ago registry.hub.docker.com/library/ubuntu:14.04 runc
111 | ```
112 |
113 | * 将 `test` 容器的镜像升级为 `busybox` :
114 | ```bash
115 | $ pouch upgrade --name test registry.hub.docker.com/library/busybox:latest top
116 | test
117 | $ pouch ps
118 | Name ID Status Created Image Runtime
119 | test 43b750 Up 3 seconds 34 seconds ago registry.hub.docker.com/library/busybox:latest runc
120 | ```
121 |
122 | 如上功能演示,通过 `upgrade` 接口,直接将容器的镜像替换为新的镜像,而其他配置都没有变化。
123 |
124 | # 总结
125 |
126 | 在企业生产环境中,容器 `upgrade` 操作和容器扩容、缩容操作一样也是的一个高频操作,但是,不管是在现在的 Moby 社区,还是 Containerd 社区都没有一个与该操作对标的 API,PouchContainer 率先实现了这个功能,解决了容器技术在企业环境中有状态服务更新发布的一个痛点问题。PouchContainer 现在也在尝试与其下游依赖组件服务如 Containerd 保持紧密的联系,所以后续也会将 `upgrade` 功能回馈给 Containerd 社区,增加 Containerd 的功能丰富度。
127 |
--------------------------------------------------------------------------------
/blog-cn/深度解析PouchContainer的富容器技术.md:
--------------------------------------------------------------------------------
1 | PouchContainer 是阿里巴巴集团开源的高效、轻量级企业级富容器引擎技术,拥有隔离性强、可移植性高、资源占用少等特性。可以帮助企业快速实现存量业务容器化,同时提高超大规模下数据中心的物理资源利用率。
2 |
3 | PouchContainer 源自阿里巴巴内部场景,诞生初期,在如何为互联网应用保驾护航方面,倾尽了阿里巴巴工程师们的设计心血。PouchContainer 的强隔离、富容器等技术特性是最好的证明。在阿里巴巴的体量规模下,PouchContainer 对业务的支撑得到双 11 史无前例的检验,开源之后,阿里容器成为一项普惠技术,定位于「助力企业快速实现存量业务容器化」。
4 |
5 |
11 |
12 |
13 | 初次接触容器技术时,阿里巴巴内部有着惊人规模的存量业务,如何通过技术快速容器化存量业务,是阿里容器技术当年在内部铺开时的重点难题。发展到今天,开源容器技术逐渐普及,面对落地,相信不少存在大量存量业务的企业,同样为这些业务的如何容器化而犯愁。云原生领域,CNCF 基金会推崇的众多先进理念,绝大多数都建立在业务容器化的基础之上。倘若企业业务在云原生的入口容器化方面没有踩准步点,后续的容器编排、Service Mesh 等行业开源技术红利更是无从谈起。
14 |
15 | 通过七年的实践经验,阿里巴巴容器技术 PouchContainer 用事实向行业传递这样的信息 —— 富容器是实现企业存量业务快速容器化的首选技术。
16 |
17 | ## 什么是富容器
18 |
19 | 富容器是企业打包业务应用、实现业务容器化过程中,采用的一种容器模式。此模式可以帮助企业IT技术人员打包业务应用时,几乎不费吹灰之力。通过富容器技术打包的业务应用可以达到以下两个目的:
20 |
21 | * 容器镜像实现业务的快速交付
22 | * 容器环境兼容企业原有运维体系
23 |
24 | 技术角度而言,富容器提供了有效路径,帮助业务在单个容器镜像中除了业务应用本身之外,还打包更多业务所需的运维套件、系统服务等;同时相比于较为简单的单进程容器,富容器在进程组织结构层面,也有着巨大的变革:容器运行时内部自动运行 systemd 等管家进程。如此一来,富容器模式下的应用,有能力在不改变任何业务代码、运维代码的情况下,像在物理机上运行一模一样。可以说,这是一种更为通用的「面向应用」的模式。
25 |
26 | 换言之,富容器在保障业务交付效率的同时,在开发和运维层面对应用没有任何的侵入性,从而有能力帮助 IT 人员更多聚焦业务创新。
27 |
28 | ## 适用场景
29 |
30 | 富容器的适用场景极广。可以说企业几乎所有的存量业务,都可以采纳富容器作为容器化方案首选。容器技术流行之前,有接近二十年的时间,企业 IT 服务运行在裸金属或者虚拟机中。企业业务的稳定运行,有非常大的功劳来源于运维工作,如果细分,包括「基础设施运维」以及「业务运维」。所有的应用运行,都依赖于物理资源;所有的业务稳定,都仰仗于监控系统、日志服务等运维体系。那么,我们有理由相信,在业务容器化过程中,企业坚决不能对运维体系置之不理,否则后果可想而知。
31 |
32 | 因此,存量业务容器化过程中,需要考虑兼容企业原有运维体系的场景,都在 PouchContainer 富容器技术的使用范围之内。
33 |
34 | ## 富容器技术实现
35 |
36 | 既然可以业务兼容原有运维体系,那么富容器技术又是通过什么样的技术来实现的呢?下图清晰的描述了富容器技术的内部情况。
37 |
38 |
39 | 
40 |
41 |
42 | 富容器技术可以完全百分百兼容社区的 OCI 镜像,容器启动时将镜像的文件系统作为容器的 rootfs。运行模式上,功能层面,除了内部运行进程,同时还包括容器启停时的钩子方法(prestart hook 和 poststop hook)。
43 |
44 | ### 富容器内部运行进程
45 |
46 | 如果从内部运行进程的角度来看待 PouchContainer 的富容器技术,我们可以把内部运行进程分为 4 类:
47 |
48 | * pid=1 的 init 进程
49 | * 容器镜像的 CMD
50 | * 容器内部的系统 service 进程
51 | * 用户自定义运维组件
52 |
53 | #### pid=1 的 init 进程
54 |
55 | 富容器技术与传统容器最明显的差异点,即容器内部运行一个 init 进程,而传统的容器(如 docker 容器等)将容器镜像中指定的 CMD 作为容器内 pid=1 的进程。PouchContainer 的富容器模式可以运行从三种 init 进程中选择:
56 |
57 | * systemd
58 | * sbin/init
59 | * dumb-init
60 |
61 | 众所周知,传统容器作为一个独立运行环境,内部进程的管理存在一定的弊端:比如无法回收僵尸进程,导致容器消耗太多进程数、消耗额外内存等;比如无法友好管理容器内部的系统服务进程,导致一些业务应用所需要的基本能力欠缺等,比如 cron 系统服务、syslogd 系统服务等;比如,无法支持一些系统应用的正常运行,主要原因是某些系统应用需要调用 systemd 来安装 RPM 包……
62 |
63 | 富容器的 init 进程在运维模式上,毫无疑问可以解决以上问题,给应用带来更好的体验。init 进程在设计时就加入了可以 wait 消亡进程的能力,即可以轻松解决上图中业务进程运行过程中诞生的 Zombie 僵尸进程;同时管理系统服务也是它的本职工作之一。如果一来,一些最为基本的传统运维能力,init 进程即帮助用户解决了大半,为运维体系做好了坚实的基础。
64 |
65 | #### 容器镜像的CMD
66 |
67 | 容器镜像的 CMD,也就是传统意义上我们希望在容器内部运行的业务。比如,用户在容器化一个 Golang 的业务系统打包成镜像时,肯定会在 Dockerfile 中将该业务系统的启动命令指定为 CMD,从而保证未来通过该镜像运行容器起,会执行这条 CMD 命令运行业务系统。
68 |
69 | 当然,容器镜像的 CMD 代表业务应用,是整个富容器的核心部分,所有的运维适配都是为了保障业务应用更加稳定的运行。
70 |
71 | #### 容器内系统 service 进程
72 |
73 | 服务器编程发展了数十年,很多的业务系统开发模式均基于裸金属上的 Linux 操作系统,或者虚拟化环境的下的 Linux 环境。长此以往,很多业务应用的开发范式,会非常频繁地与系统服务进程交互。比如,使用 Java 编程语言编写的应用程序,很有可能通过 log4j 来配置日志的管理方式,也可以通过 log4j.properties 配置把应用日志重定向到运行环境中的 syslogd,倘若应用运行环境中没有 syslogd 的运行,则极有可能影响业务的启动运行;再比如,业务应用需要通过 crond 来管理业务需要的周期性任务,倘若应用运行环境中没有 crond 系统守护进程,业务应用也就不可能通过 crontab 来配置周期任务;再比如,容器内部的 sshd 系统服务系统,可以快速帮助运维工程师快速进度应用运行现场,定位并解决问题等。
74 |
75 | PouchContainer 的富容器模式,考虑到了行业大量有需求和系统服务交付的应用,富容器内部的 init 进程有能力非常方面的原生管理多种系统服务进程。
76 |
77 | #### 用户自定义运维组件
78 |
79 | 系统服务的存在可以辅助业务的正常运行,但是很多情况下这还不够,企业自身针对基础设施以及应用配备的运维组件,同时起到为业务保驾护航的作用。比如,企业运维团队需要统一化的为业务应用贴近配置监控组件;运维团队必须通过自定义的日志 agent 来管理容器内部的应用日志;运维团队需要自定义自己的基础运维工具,以便要求应用运行环境符合内部的审计要求等。
80 |
81 | 正因为富容器内部存在 init 进程,用户自定义的运维组件,可以如往常健康稳定的运行,提供运维能力。
82 |
83 | ### 富容器启停执行 hook
84 |
85 | 最终富容器内部运行的任务进程,可以保障应用的运行时稳定正常,然而对于运维团队而言,负责内容的范畴往往要比单一的运行时广得多。通俗而言,运维的职责还需要覆盖运行时之前的环境准备工作,以及运行时结束后的善后工作。对于应用而言,也就是我们通常意义上提到的 prestart hook 以及 poststop hook。
86 |
87 | PouchContainer 的富容器模式,可以允许用户非常方便的指定应用的启停执行 hook: prestart hook 以及 poststop hook。 运维团队指定 prestart hook,可以帮助应用在运行之前,在容器内部做符合运维需求的一些初始化操作,比如:初始化网络路由表、获取应用执行权限、下载运行时所需的证书等。运维团队指定 poststop hook,可以帮助应用在运行结束或者异常退出之后,执行统一的善后工作,比如,对中间数据的清理以便下一次启动时的纯净环境;倘若是异常退出的话,可以即时汇报出错信息,满足运维需求等。
88 |
89 | 我们可以发现,富容器内部的启停 hook,对容器的运维能力又做了一层拔高,大大释放了运维团队对应用的灵活管理能力。
90 |
91 | ## 总结
92 |
93 | 经过阿里巴巴内部大量业务的锤炼,PouchContainer 已经帮助超大体量的互联网公司实现了所有在线业务的容器化。毫无疑问,富容器技术是最为实用、对应用开发以及应用运维没有任何侵入性的一项技术。开源的PouchContainer 更是希望技术可以普惠行业,帮助大量的企业在存量业务的容器化方面,赢得自己的时间,快速拥抱云原生技术,大步迈向数字化转型。
94 |
95 |
96 |
--------------------------------------------------------------------------------
/blog-cn/附加翻译.md:
--------------------------------------------------------------------------------
1 | # 路线图
2 |
3 | 路线图提供了PouchContainer决定优先排序的项目的详细说明。这有助于PouchContainer的贡献者更多地了解不断发展的方向以及一个潜在的贡献是否偏离了方向。
4 |
5 | 如果一个功能未被列出,并不意味着我们永远不会考虑它。我们一直热情欢迎所有的贡献。请理解,对此类贡献,提交者可能需要一些更多的时间进行审核。
6 |
7 | 我们在路线图中设计了三个部分:
8 |
9 | * 容器常规管理
10 | * 强隔离
11 | * 向生态系统开放
12 |
13 |
14 | ## 容器常规管理
15 |
16 | 我们的第一要素是优化用户在容器管理方面的体验。[Moby](https://github.com/moby/moby)在业界中推广了容器API标准。并且PouchContainer将遵循此API标准来提供容器服务。此外,PouchContainer将更多地关注如何在各种隔离单元之上运行容器等方面。涉及应用程序方面更好的体验也在此范围之内。
17 |
18 | ## 强隔离
19 |
20 | 业界在提高容器安全性方面已经做了很多工作。但容器技术尚未达到目标。无论是在软件方面还是在硬件方面,PouchContainer将在强隔离方面做出更多的努力。由于安全性是技术应用于生产环境的最大障碍,PouchContainer将在以下领域提高隔离性:隔离资源的用户空间LXCFS,基于监管服务程序的容器,基于kvm的容器等。
21 |
22 | ## 生态系统的增强
23 |
24 | 为了对容器生态系统开源,PouchContainer被设计为可扩展的。作为一个容器引擎,PouchContainer将支持pod并能够集成更上层的编排层与[kubernetes](https://github.com/kubernetes/kubernetes)。对于基础架构管理,PouchContainer将采用[CNI](https://github.com/containernetworking/cni)和[CSI](https://github.com/container-storage-interface)。在监控、日志等方面,PouchContainer则扮演了一个开放性的角色,使自身更加接近云原生。
25 |
26 |
27 |
--------------------------------------------------------------------------------
/blog-en/Building a PouchContainer environment based on VirtualBox and Ubuntu 16.04-Oliver.md:
--------------------------------------------------------------------------------
1 | ## 1. PouchContainer Introduction
2 | 1. PouchContainer is Alibaba Group's open source, efficient and lightweight enterprise class rich container engine technology, which can help enterprises quickly improve server utilization efficiency. PouchContainer has been used in Alibaba for many years and has strong reliability and stability.
3 |
4 | ## 2. Install VirtualBox
5 | 1. VirtualBox can be downloaded at https://download.virtualbox.org/virtualbox/5.2.16/VirtualBox-5.2.16-123759-OSX.dmg . After the download is complete, open the VirtualBox-5.2.16-123759-OSX.dmg file and double-click VirtualBox.pkg to install it. If you need a custom installation, you can choose a custom installation.
6 | 
7 |
8 | ## 3. Install Ubuntu16.04 in VirtualBox
9 | 1. Open VirtualBox, first click the New button in the title bar, create a new operating system, name can be customized, type select Linux, version select Ubuntu (64-bit).
10 | 
11 | 2. Click the Continue button to enter the memory selection page. The default memory is 1024MB, of course, you can also increase the memory as needed.
12 | 
13 | 3. Click the Continue button to enter the hard disk selection page and select "Create a virtual hard disk now".
14 | 
15 | 4. Click the Create button and select VDI (VirtualBox Disk Image).
16 | 
17 | 5. Click the Continue button and select Dynamically allocated so that the virtual machine can dynamically allocate space.
18 | 
19 | 6. Click the Continue button to save the file in the directory of your choice. Click the Create button and a virtual machine will succeed.
20 | 
21 | 7. Go to the created virtual machine settings page and load the ISO file you downloaded from Storage.
22 | 
23 | 8. Click to start the virtual machine. Ubuntu needs to configure the system according to its own preferences (setting the language, username, password, etc.).
24 |
25 | ## 4. Install PouchContainer
26 | 1. Open the already installed ubuntu in the virtualBox and enter the username and password to log in.
27 | 2. PouchContainer relies on LXCFS to provide strong dependency guarantees, so you first need to install LXCFS, the command is as follows:
28 | ```
29 | sudo apt-get install lxcfs
30 | ```
31 | 
32 | 3. Install packages to allow 'apt' to use a repository over HTTPS, the command is as follows:
33 | ```
34 | sudo apt-get install curl apt-transport-https ca-certificates software-properties-common
35 | ```
36 | 
37 | 4. Add the official GPG key for PouchContainer. The command is as follows:
38 | ```
39 | curl -fsSL http://mirrors.aliyun.com/opsx/pouch/linux/debian/opsx@service.alibaba.com.gpg.key | sudo apt-key add -
40 | ```
41 | 5. Verify that you have the F443 EDD0 4A58 7E8B F645 9C40 CF68 F84A BE2F 475F key by searching for the last 8 bits of the key BE2F475F. The command is as follows:
42 | ```
43 | apt-key fingerprint BE2F475F
44 | ```
45 | 
46 | 6. When installing PouchContainer on a new host, you need to set the default mirror repository. PouchContainer allows the stable repository to be set as the default repository. The command is as follows:
47 | ```
48 | sudo add-apt-repository "deb http://mirrors.aliyun.com/opsx/pouch/linux/debian/ pouch stable"
49 | ```
50 | 
51 | 7. Download the latest PouchContainer via apt-get, the command is as follows:
52 | ```
53 | sudo apt-get update
54 | sudo apt-get install pouch
55 | ```
56 | 
57 | 8. Start PouchContainer with the following command:
58 | ```
59 | sudo service pouch start
60 | ```
61 | 9. Download the busybox image file with the following command:
62 | ```
63 | pouch pull busybox
64 | ```
65 | 10. Run busybox, the command is as follows:
66 | ```
67 | pouch run -t -d busybox sh
68 | ```
69 | 11. After the container runs successfully, it will output the ID of the container. According to this ID, enter the container of the busybox. The command is as follows:
70 | ```
71 | pouch exec -it 23f06f sh
72 | ```
73 | 
74 | 12. This allows you to interact with the container inside the container. Enter Exit to exit the container after the interaction is complete.
75 |
76 | ## 5. Precautions
77 | 1. PouchContainer conflicts with Docker. Before installing PouchContainer, you need to check if there is Docker, otherwise the installation will fail.
78 |
79 | ## 6. Summary
80 | 1. Through the above tutorial, we can easily experience PouchContainer on non-Linux computers.
--------------------------------------------------------------------------------
/blog-en/Design and Implementation of PouchContainer CRI.md:
--------------------------------------------------------------------------------
1 | ### 1. Brief introduction to CRI
2 |
3 | At the bottom of each Kubernetes node, a program is responsible for the creation and deletion of specific container, and Kubernetes calls its interface to complete the container scheduling. We call this layer of software the Container Runtime, which is represented by the famous Docker.
4 |
5 | Of course, Docker is not the only container runtime, including the RKT of CoreOS, the runV of hyper.sh, the gvisor of Google, and the PouchContainer of this article. All of them contain complete container operations that can be used to create containers with different characteristics. Different kinds of container runtime have their own unique advantages and can meet the needs of different users. Therefore, it is imperative for Kubernetes to support multiple container runtimes.
6 |
7 | Initially, Kubernetes had a built-in call interface to Docker, and then the community integrated the RKT interface in Kubernetes 1.3, making it an optional container runtime in addition to Docker. However, at this time, both calls to Docker and to RKT are strongly coupled to Kubernetes' core code, which undoubtedly brings the following two problems:
8 |
9 | 1. Emerging container operators, such as PouchContainer, are struggling to add Kubernetes to their ecosystem. Developers of the container runtime must have a very deep understanding of Kubernetes's code (at least Kubelet) in order to successfully connect the two.
10 | 2. Kubernetes' code will be more difficult to maintain, which is reflected in two aspects:(1)If hard-coding all the call interfaces of the various container runtime into Kubernetes, the core code of Kubernetes will be bloated,(2)Minor changes to the container runtime interface will trigger changes to the core code of Kubernetes and increase its instability.
11 |
12 | In order to solve these problems, the community introduced the Container Runtime Interface in Kubernetes 1.5. By defining a set of common interfaces of the Container Runtime, the calling Interface of Kubernetes for various container runtimes was shielded from the core code. The core code of Kubernetes only called the abstract Interface layer. However, for various containers, Kubernetes can be accessed smoothly as long as the interfaces defined in CRI are satisfied, which makes it one of the container runtime options. The solution, while simple, is a liberation for the Kubernetes community maintainers and container runtime developers.
13 |
14 | ### 2. CRI设计概述
15 |
16 |
17 |
18 | 
19 |
20 |
21 | 如上图所示,左边的Kubelet是Kubernetes集群的Node Agent,它会对本节点上容器的状态进行监控,保证它们都按照预期状态运行。为了实现这一目标,Kubelet会不断调用相关的CRI接口来对容器进行同步。
22 |
23 | CRI shim则可以认为是一个接口转换层,它会将CRI接口,转换成对应底层容器运行时的接口,并调用执行,返回结果。对于有的容器运行时,CRI shim是作为一个独立的进程存在的,例如当选用Docker为Kubernetes的容器运行时,Kubelet初始化时,会附带启动一个Docker shim进程,它就是Docker的CRI shime。而对于PouchContainer,它的CRI shim则是内嵌在Pouchd中的,我们将其称之为CRI manager。关于这一点,我们会在下一节讨论PouchContainer相关架构时再详细叙述。
24 |
25 | CRI本质上是一套gRPC接口,Kubelet内置了一个gRPC Client,CRI shim中则内置了一个gRPC Server。Kubelet每一次对CRI接口的调用,都将转换为gRPC请求由gRPC Client发送给CRI shim中的gRPC Server。Server调用底层的容器运行时对请求进行处理并返回结果,由此完成一次CRI接口调用。
26 |
27 | CRI定义的gRPC接口可划分两类,ImageService和RuntimeService:其中ImageService负责管理容器的镜像,而RuntimeService则负责对容器生命周期进行管理以及与容器进行交互(exec/attach/port-forward)。
28 |
29 | ### 3. CRI Manager架构设计
30 |
31 |
32 |
33 | 
34 |
35 |
36 | 在PouchContainer的整个架构体系中,CRI Manager实现了CRI定义的全部接口,担任了PouchContainer中CRI shim的角色。当Kubelet调用一个CRI接口时,请求就会通过Kubelet的gRPC Client发送到上图的gRPC Server中。Server会对请求进行解析,并调用CRI Manager相应的方法进行处理。
37 |
38 | 我们先通过一个例子来简单了解一下各个模块的功能。例如,当到达的请求为创建一个Pod,那么CRI Manager会先将获取到的CRI格式的配置转换成符合PouchContainer接口要求的格式,调用Image Manager拉取所需的镜像,再调用Container Manager创建所需的容器,并调用CNI Manager,利用CNI插件对Pod的网络进行配置。最后,Stream Server会对交互类型的CRI请求,例如exec/attach/portforward进行处理。
39 |
40 | 值得注意的是,CNI Manager和Stream Server是CRI Manager的子模块,而CRI Manager,Container Manager以及Image Manager是三个平等的模块,它们都位于同一个二进制文件Pouchd中,因此它们之间的调用都是最为直接的函数调用,并不存在例如Docker shim与Docker交互时,所需要的远程调用开销。下面,我们将进入CRI Manager内部,对其中重要功能的实现做更为深入的理解。
41 |
42 | ### 4. Pod模型的实现
43 |
44 | 在Kubernetes的世界里,Pod是最小的调度部署单元。简单地说,一个Pod就是由一些关联较为紧密的容器构成的容器组。作为一个整体,这些“亲密”的容器之间会共享一些东西,从而让它们之间的交互更为高效。例如,对于网络,同一个Pod中的容器会共享同一个IP地址和端口空间,从而使它们能直接通过localhost互相访问。对于存储,Pod中定义的volume会挂载到其中的每个容器中,从而让每个容器都能对其进行访问。
45 |
46 | 事实上,只要一组容器之间共享某些Linux Namespace以及挂载相同的volume就能实现上述的所有特性。下面,我们就通过创建一个具体的Pod来分析PouchContainer中的CRI Manager是如何实现Pod模型的:
47 |
48 | 1. 当Kubelet需要新建一个Pod时,首先会对`RunPodSandbox`这一CRI接口进行调用,而CRI Manager对该接口的实现是创建一个我们称之为"infra container"的特殊容器。从容器实现的角度来看,它并不特殊,无非是调用Container Manager,创建一个镜像为`pause-amd64:3.0`的普通容器。但是从整个Pod容器组的角度来看,它是有着特殊作用的,正是它将自己的Linux Namespace贡献出来,作为上文所说的各容器共享的Linux Namespace,将容器组中的所有容器联结到一起。它更像是一个载体,承载了Pod中所有其他的容器,为它们的运行提供基础设施。而一般我们也用infra container代表一个Pod。
49 | 2. 在infra container创建完成之后,Kubelet会对Pod容器组中的其他容器进行创建。每创建一个容器就是连续调用`CreateContainer`和`StartContainer`这两个CRI接口。对于`CreateContainer`,CRI Manager仅仅只是将CRI格式的容器配置转换为PouchContainer格式的容器配置,再将其传递给Container Manager,由其完成具体的容器创建工作。这里我们唯一需要关心的问题是,该容器如何加入上文中提到的infra container的Linux Namespace。其实真正的实现非常简单,在Container Manager的容器配置参数中有`PidMode`, `IpcMode`以及`NetworkMode`三个参数,分别用于配置容器的Pid Namespace,Ipc Namespace和Network Namespace。笼统地说,对于容器的Namespace的配置一般都有两种模式:"None"模式,即创建该容器自己独有的Namespace,另一种即为"Container"模式,即加入另一个容器的Namespace。显然,我们只需要将上述三个参数配置为"Container"模式,加入infra container的Namespace即可。具体是如何加入的,CRI Manager并不需要关心。对于`StartContainer`,CRI Manager仅仅只是做了一层转发,从请求中获取容器ID并调用Container Manager的`Start`接口启动容器。
50 | 3. 最后,Kubelet会不断调用`ListPodSandbox`和`ListContainers`这两个CRI接口来获取本节点上容器的运行状态。其中`ListPodSandbox`罗列的其实就是各个infra container的状态,而`ListContainer`罗列的是除了infra container以外其他容器的状态。现在问题是,对于Container Manager来说,infra container和其他container并不存在任何区别。那么CRI Manager是如何对这些容器进行区分的呢?事实上,CRI Manager在创建容器时,会在已有容器配置的基础之上,额外增加一个label,标志该容器的类型。从而在实现`ListPodSandbox`和`ListContainers`接口的时候,以该label的值作为条件,就能对不同类型的容器进行过滤。
51 |
52 | 综上,对于Pod的创建,我们可以概述为先创建infra container,再创建pod中的其他容器,并让它们加入infra container的Linux Namespace。
53 |
54 | ### 5. Pod Network Configuration
55 |
56 | Since all containers inside Pod share a Network Namespace, we only need to configure Network Namespace when creating the infra container.
57 |
58 | All network functions of containers in Kubernetes ecosystem are implemented via CNI. Similar to CRI, CNI is a set of standard interfaces and any network schema implementing these interfaces can be integrated into Kubernetes seamlessly. CNI Manager in CRI Manager is a simple encapsulation of CNI. It will load configuration files under `/etc/cni/net.d` during initialization, as follows:
59 |
60 | ```sh
61 | $ cat >/etc/cni/net.d/10-mynet.conflist <
6 |
10 |
7 |  8 |
8 |
9 |
8 |
8 |
14 |
15 | Ali had a surprisingly large scale of inventory business when container technology first came into the sight of engineers. How to quickly containerize the inventory business through technology was the main problem when applying ali container technology in ali. Today, open source container technology is gaining popularity and we believe that there are certain enterprises troubled by the difficulty of containerizing inventory business when using such technology. In the cloud native field, most of the advanced concepts advocated by CNCF foundation are based on business containerization. If the enterprise does not choose the right entrance to the containerization when applying the cloud native, it is even more out of the question to consider the subsequent container layout, Service Mesh and other open source technology dividends of the industry.
16 |
17 | After the seven-year practical experience, PouchContainer--alibaba container technology, has used facts to convey such message to the whole industry that rich container is the preferred technology for rapid containerization of an enterprise's inventory business.
18 |
19 | ## 1. What is rich container
20 |
21 | Rich container is a container pattern adopted in the enterprises during the procedure of packaging business application and realizing business containerization. This pattern can help IT technicians package business applications with little effort. Business applications packaged with rich container technology can achieve the following two purposes:
22 |
23 | * container mirroring enables rapid business delivery
24 | * container environment is compatible with the original operation and maintenance system of the enterprise
25 |
26 | From a technical perspective, a rich container provides an efficient path to help package more operational and maintenance packages, system services and other components required by the business in a single container image in addition to the business application itself. At the same time, compared with simpler single-process containers, the rich container also has a huge change in the organization structure of the process: the systemd and other stewardship processes are automatically run inside the container when it is running. In this way, applications in rich container mode have the ability to run exactly as they would on a physical machine without changing any business code or operational code. Arguably, this is a more generic "application-oriented" model.
27 |
28 | In other words, while ensuring the efficiency of business delivery, a rich container has no invasiveness to the application at the development and operational level, thus enabling IT technicians to focus more on business innovation.
29 |
30 | ## 2. Applicable scenarios
31 |
32 | Rich containers can be used in a wide range of scenarios. It can be said that almost all the inventory business of an enterprise can adopt rich containers as the first choice for containerization. Before the popularity of container technology, corporate IT services ran in bare metal or virtual machines for nearly two decades. The stable operation of enterprise business is largely attributed to operation work. If subdivided, it includes "infrastructure operation" and "business operation". All applications run on physical resources and all business stability depends on operational maintenance systems such as monitoring systems and logging services. There is reason to believe, then, that in the process of business containerization, enterprises must not ignore the operation system, or the consequences are too serious to imagine.
33 |
34 | Therefore, in the process of containerization of inventory business, it is necessary to consider scenarios that are compatible with the original operation system of enterprises, which are within the scope of application of PouchContainer's rich container technology.
35 |
36 | ## 3. The implementation of rich container
37 |
38 | Since the rich container can make business compatiable with original operation system. So what kind of technology is used to implement rich container technology? The figure below clearly describes the internals.
39 |
40 | 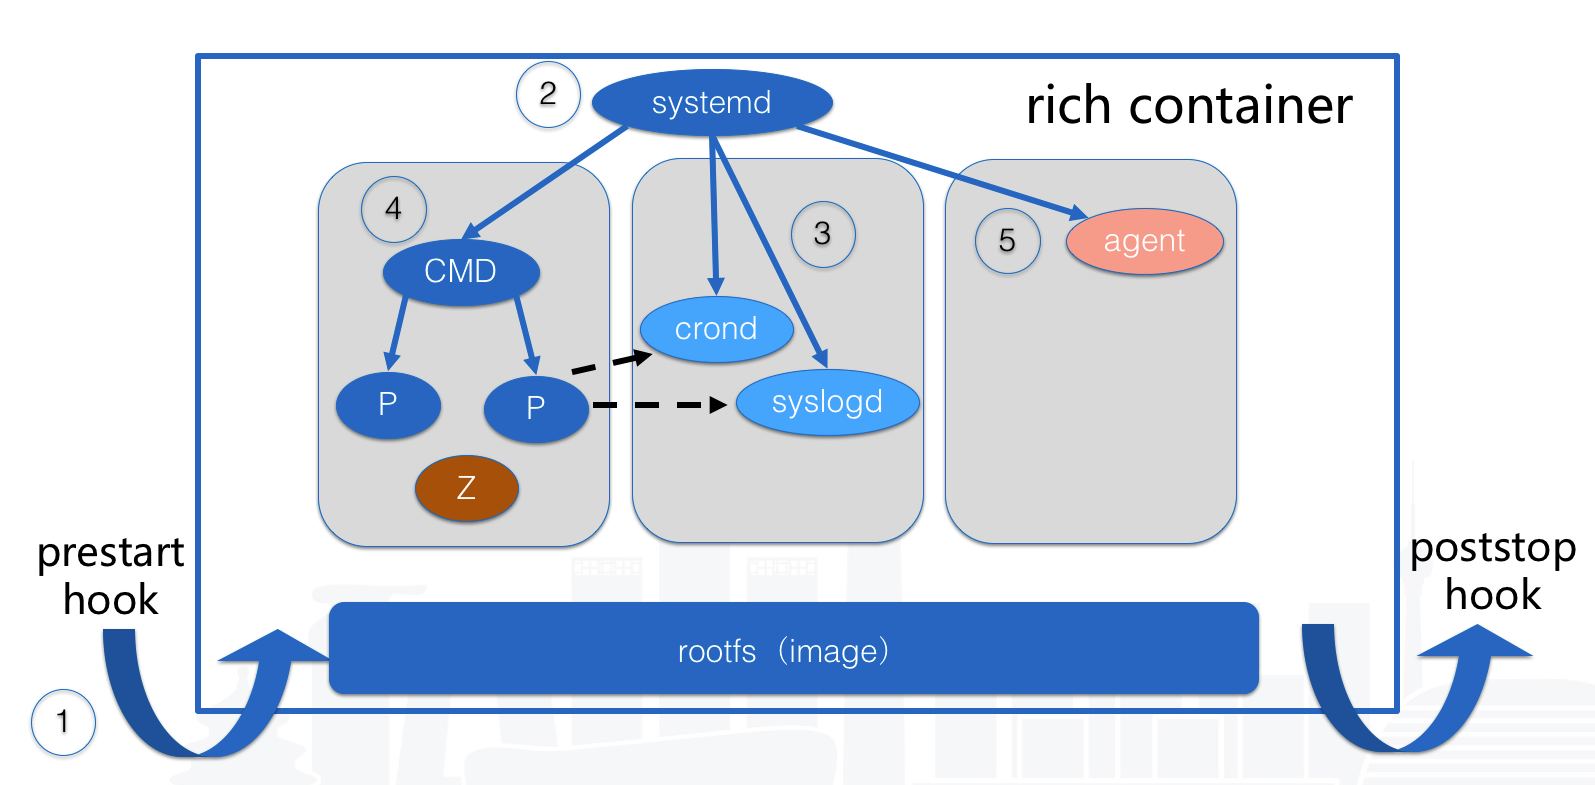
41 |
42 | Rich container is 100 percent compatible with the community's OCI image, and the image's file system will be used as the container's rootfs when the container starts. In the operating mode, the functional level, in addition to the internal running process, also includes the hook method (prestart hook and poststop hook) when the container starts and stops.
43 |
44 | ### 3.1 Internal running processes of rich container
45 | If we treat PouchContainer's rich container technology from the perspective of internally running processes, we can classify the internal running processes into four categories:
46 |
47 | * the init process (pid=1)
48 | * the 'CMD' of the container mirror
49 | * the internal service process of container
50 | * user defined custom operation components
51 |
52 | #### 3.1.1 The init process
53 |
54 | Unlike traditional container (docker etc.) those who choose the specific CMD of container image as the process whose pid=1, there is a init process(pid=1) running in rich container, that is the most obvious difference between rich container and traditional container.PouchContainer's rich container mode could be choose from three types below:
55 |
56 | * systemd
57 | * sbin/init
58 | * dumb-init
59 |
60 | As we all know, as a stand-alone running environment,the traditional container's internal process management has some disadvantages. For example, the zombie process cannot be recycled, causing the container to consume too many processes and consume extra memory; The system service process inside the container cannot be managed friendly, which lead to the lack of fundamental capabilities such as cron system services, syslogd system services in some business applications; Failed to provide the essential environment for some system applications: some system applications need to call systemd to install RPM packages......
61 |
62 | All the issues listed above can be solved by rich container's init process with no doubt, and meanwhile performing a better experience.The init process is capable to waiting for perished processes, so that zombie process can no longer exists.Another basic feature of the init process is system service management which provides almost 50% fundamental traditional operation capabilities for users.It is a solid foundation for the whole operation architecture.
63 |
64 | #### 3.1.2 The CMD of the container image
65 |
66 | The CMD of a container image is what we want to run in the container.For example, a user will set the start command of the business system as the CMD in Dockerfile when containerizing a Golang business system, so that the startup of the business system can be gurateened by executing this CMD command when the image is loaded by container in future.
67 |
68 | It's obverse that the CMD command of container image is the key part of rich container, all the adaption of operation is moving around to make our business applications run more stable.
69 |
70 | #### 3.1.3 The internal service process of container system
71 |
72 | Server side programming has evolved for decades, most of server side programming modes are based on Linux running above physical machine or virtual environment.Over time, many business application development paradigms interact with system service processes very frequently.For example, Java applications are likely to use log4j to configure log management; It is also possible to redirect application logs to syslogd in the running environment through log4j.properties configuration. If there is no syslogd in the application environment, it will affect the startup of the service; The business application needs to use crond to manage the periodic tasks required by the business, If there is no crond in the application running environment, the periodic task configuration of the business application will be invalid. The internal sshd of the container can help the operation engineers to quickly Enter the application runtime, locate and solve problems...
73 |
74 | PouchContainer's rich container model takes the frequent interactions between applications and system services into account, and the init process inside the rich container has the ability to natively manage multiple system service processes.
75 |
76 | #### 3.1.4 User defined custom operation components
77 | Although system services can assist the normal operation of the business, it is still not enough in many cases. The enterprise itself needs to equip the infrastructure and applications with operation components to escort the business.For example, the operation team not only needs to uniformly configure the monitoring component for the business application but also need to manage the application log inside the container through a customized log agent; besides, they also need to customize the basic operation tool to make the application running environment conform internal auditing standards.
78 |
79 | Because of the init process inside the rich container, the user-defined operation components can run healthily and stably, providing continuous operation capabilities.
80 |
81 | ### 3.2 Hooks to start/stop rich container
82 | The task process running inside the rich container can ensure that the application runtime is stable and normal, but the operation team is not only responsible for the stable running of a single runtime, but also for the environment initialization before the runtime and clean-ups after the runtime.For applications, it is the prestart hook and poststop hook that we usually refer to.
83 |
84 | PouchContainer's rich container mode is very convenient for users to configure the prestart hook and poststart hook of applications. Prestart hook can help the application to perform some customerize initialization operations before running, such as: initializing the network routing table, obtaining the application execution permission, and downloading the certificate required for the runtime. Poststop hook can help the application to perform unified clean-up tasks when the task finished exited with exception. For example, the intermediate data is cleaned up to provide a pure environment at the next startup; Errors can be reported immediately when application crashes.
85 |
86 | It shows that the start hook and stop hook of rich container makes the operation capability of the container further increased, which makes it more flexible for operation team to manage applications
87 |
88 | ## 4.Conclusion
89 |
90 | After a lot of tests in Alibaba's internal business systems, PouchContainer has helped the oversized Internet companies to containerize all online businesses. There is no doubt that rich container technology is the most practical technology that is not invasive for application development and operation. The open source PouchContainer hopes that the technology can benefit the industry, helping a large number of enterprises to win their own time in the containerization of the old stacked business, quickly embrace the cloud native technology, and make great strides toward digital transformation.
--------------------------------------------------------------------------------
/blog-en/PouchContainer Engineering Quality Practice.md:
--------------------------------------------------------------------------------
1 | # 0.Preface
2 |
3 |
4 |
5 | As the function of [PouchContainer](https://github.com/alibaba/pouch) continues to be iterated and refined, the project has grown in size, attracting a number of external developers to participate in the development of the project. Because each contributor's coding habits are different, the code reviewer's responsibility is not only to focus on logical correctness and performance issues, but also on code style, since a uniform code specification is a prerequisite for maintaining project code maintainability. In addition to unifying the project code style, the coverage and stability of test cases is also the focus of the project. In a nutshell, in the absence of regression test cases, how do you ensure that each code update does not affect existing functions?
6 |
7 | This article shares PouchContainer's practices in code style specifications and golang unit test cases.
8 |
9 | # 1.Unified coding style specification
10 |
11 | PouchContainer is a project built by the golang language, which uses shell scripts to perform automated operations such as compiling and packaging. In addition to golang and shell scripts, PouchContainer also contains a large number of Markdown-style documents, which is the entry point for users to understand and understand PouchContainer. Its standard layout and correct spelling are also the focus of the project. The following sections will describe the tools and usage scenarios that PouchContainer uses in coding style specifications.
12 |
13 | ## 1.1 Golinter - Unicode format
14 |
15 | Golang's grammar design is simple, and the community has a complete [CodeReview](https://github.com/golang/go/wiki/CodeReviewComments) guide from the beginning, so most of the golang projects have the same code style, and rarely fall into the unnecessary __religious__ dispute. On the basis of the community, PouchContainer also defines some specific rules to stipulate the developer. In order to ensure the readability of the code, the specific content can be read [here](https://github.com/alibaba/pouch/blob/master/docs/contributions/code_styles.md#additional-style-rules).
16 |
17 | However, it is difficult to ensure that the project code style is consistent with the written protocol alone. Therefore, like other languages, golang provides the official tool chain, such as [golint](https://github.com/golang/lint), [gofmt](https://golang.org/cmd/gofmt), [goimports](https://github.com/golang/tools/blob/master/cmd/goimports/doc.go), and [go vet](https://golang.org/cmd/vet), which can be used to check and unify code styles before compilation, and to automate subsequent processes such as code review. may. Currently, PouchContainer runs the above code checking tool in CircleCI __every__ Pull Request submitted by the developer. If the inspection tool displays an exception, the code reviewer has the right to __refuse__ the review and may even reject the merge code.
18 |
19 | In addition to the official tools provided, we can also select third-party code inspection tools in the open source community, such as [errcheck](https://github.com/kisielk/errcheck) to check if the developer has processed the error returned by the function. However, these tools do not have a uniform output format, which makes it difficult to integrate the output of different tools. Fortunately, some people in the open source community have implemented this unified interface that is [gometalinter](https://github.com/alecthomas/gometalinter), which can integrate various code checking tools. The recommended combination is:
20 |
21 | * [golint](https://github.com/golang/lint) - Google's (mostly stylistic) linter.
22 | * [gofmt -s](https://golang.org/cmd/gofmt/) - Checks if the code is properly formatted and could not be further simplified.
23 | * [goimports](https://godoc.org/golang.org/x/tools/cmd/goimports) - Checks missing or unreferenced package imports.
24 | * [go vet](https://golang.org/cmd/vet/) - Reports potential errors that otherwise compile.
25 | * [varcheck](https://github.com/opennota/check) - Find unused global variables and constants.
26 | * [structcheck](https://github.com/opennota/check) - Find unused struct fields
27 | * [errcheck](https://github.com/kisielk/errcheck) - Check that error return values are used.
28 | * [misspell](https://github.com/client9/misspell) - Finds commonly misspelled English words.
29 |
30 | Each project can customize the gometalinter package according to its own needs.
31 |
32 | ## 1.2 Shellcheck - Reduce potential problems with shell scripts
33 |
34 | Although shell scripts are powerful, they still require syntax checking to avoid potential and unpredictable errors. For example, the definition of unused variables, although it does not affect the use of the script, its existence will become a burden on the project maintainer.
35 |
36 | ```powershell
37 | #!/usr/bin/env bash
38 |
39 | pouch_version=0.5.x
40 |
41 | dosomething() {
42 | echo "do something"
43 | }
44 |
45 | dosomething
46 | ```
47 |
48 | PouchContainer will use [shellcheck](https://github.com/koalaman/shellcheck) to check the shell script in the current project. Taking the above code as an example, shellcheck detection will get a warning of unused variables. This tool can detect potential problems with shell scripts during the code review phase, reducing the chance of runtime errors.
49 |
50 | ```plain
51 | In test.sh line 3:
52 | pouch_version=0.5.x
53 | ^-- SC2034: pouch_version appears unused. Verify it or export it.
54 | ```
55 |
56 | PouchContainer's current continuous integration task scans the ` .sh` scripts in the project and checks them one by one using shellcheck, as shown [here](https://github.com/alibaba/pouch/blob/master/.circleci/config.yml#L21-L24).
57 |
58 | > NOTE: When the shellcheck check is too strict, the project can be bypassed by a comment, or a check can be closed in the project. Specific inspection rules can be found [here](https://github.com/koalaman/shellcheck/wiki).
59 |
60 | ## 1.3 Markdownlint - uniform document formatting
61 |
62 | PouchContainer is an open source project whose documentation is as important as the code, because documentation is the best way for users to understand PouchContainer. The document is written in the form of markdown, and its formatting and spelling errors are the focus of the project.
63 |
64 | Like the code, there is a text convention or a missed judgment, so PouchContainer uses [markdownlint](https://github.com/markdownlint/markdownlint) and [misspell](https://github.com/client9/misspell) to check the document format and spelling errors. These checks have the same status as `golint` and will run in CircleCI every time Pull Request occurs. Code reviewers have the right to __ refuse__ to review or merge the code Once an abnormality occurs.
65 |
66 | PouchContainer's current continuous integration task checks the markdown document formatting in the project and also checks the spelling in all files. The configuration can be found [here](https://github.com/alibaba/pouch/blob/master/.circleci/config.yml#L13-L20).
67 |
68 | > NOTE: When the markdownlint requirement is too strict, the corresponding check can be closed in the project. Specific inspection items can be found [here](https://github.com/markdownlint/markdownlint/blob/master/docs/RULES.md).
69 |
70 | ## 1.4 Summary
71 |
72 | All of the above are style discipline issues, and PouchContainer automates code specification detection and integrates into each code review to help reviewers identify potential problems.
73 |
74 | # 2. How to write a unit test for golang
75 |
76 | Unit tests can be used to ensure the correctness of a single module. In the pyramid of test areas, the wider and more comprehensive the unit test coverage, the more it can reduce the debugging costs of integration testing and end-to-end testing. The complex System have the longer the link processed by the task, the higher the cost of the location problem, especially the problems caused by small modules. The following sections share a summary of PouchContainer's preparation of golang unit test cases.
77 |
78 | ## 2.1 Table-Driven Test - DRY
79 |
80 | A simple understanding of unit testing is to give a given input to a function to determine if the expected output can be obtained. When the function being tested has a variety of input scenarios, we can organize our test cases in the form of Table-Driven, as shown in the next code. Table-Driven uses arrays to organize test cases and validate the correctness of the function by loop execution.
81 |
82 | ```go
83 | // from https://golang.org/doc/code.html#Testing
84 | package stringutil
85 |
86 | import "testing"
87 |
88 | func TestReverse(t *testing.T) {
89 | cases := []struct {
90 | in, want string
91 | }{
92 | {"Hello, world", "dlrow ,olleH"},
93 | {"Hello, 世界", "界世 ,olleH"},
94 | {"", ""},
95 | }
96 | for _, c := range cases {
97 | got := Reverse(c.in)
98 | if got != c.want {
99 | t.Errorf("Reverse(%q) == %q, want %q", c.in, got, c.want)
100 | }
101 | }
102 | }
103 | ```
104 |
105 | To facilitate debugging and maintaining of test cases, we can add some auxiliary information to describe the current test. Such as the [reference](https://github.com/alibaba/pouch/blob/master/pkg/reference/parse_test.go#L54) to test the [punycode](https://en.wikipedia.org/wiki/Punycode) input, if you don't include the word punycode, they may not know the difference between `xn--bcher-kva.tld/redis:3` and `docker.io/library/redis: 3` for code reviewers or project maintainers.
106 |
107 | ```go
108 | {
109 | name: "Normal",
110 | input: "docker.io/library/nginx:alpine",
111 | expected: taggedReference{
112 | Named: namedReference{"docker.io/library/nginx"},
113 | tag: "alpine",
114 | },
115 | err: nil,
116 | }, {
117 | name: "Punycode",
118 | input: "xn--bcher-kva.tld/redis:3",
119 | expected: taggedReference{
120 | Named: namedReference{"xn--bcher-kva.tld/redis"},
121 | tag: "3",
122 | },
123 | err: nil,
124 | }
125 | ```
126 |
127 | However, some functions have complex behavior, and one input cannot be used as a complete test case. For example, [TestTeeReader](https://github.com/golang/go/blob/release-branch.go1.9/src/io/io_test.go#L284) and TeeReader read the
9 |
13 |
10 |
11 |
12 |
11 | hello, world from the buffer, and the data has been read. If you read it again, the expected behavior is an end-of-file error. Such a test case needs to be done in a single case, without the need to hard-bake the form of Table-Driven.
128 |
129 | In simple terms, if you test a function that needs to copy most of the code, theoretically the test code can be extracted and used to organize test cases using Table-Driven. Don`t Repeat Yourself
130 |
131 | > NOTE: The Table-Driven organization is recommended by the golang community. Please check [here](https://github.com/golang/go/wiki/TableDrivenTests) for details.
132 |
133 | ## 2.2 Mock - Simulating external dependence
134 |
135 | There are often problems with dependencies during the testing process. For example, the PouchContainer client requires an HTTP server, but this is too heavy for the unit, and this is a category of integration testing. So how to complete this part of the unit test?
136 |
137 | In the world of golang, the implementation of the interface belongs to [Duck Type](https://en.wikipedia.org/wiki/Duck_typing). An interface can have a variety of implementations, as long as the implementation conforms to the interface definition. If the external dependencies are constrained by the interface, then the dependency behavior is simulated in the unit test. The following content will share two common test scenarios.
138 |
139 | ### 2.2.1 RoundTripper
140 |
141 | Take the PouchContainer client test as an example. The PouchContainer client uses [http.Client](https://golang.org/pkg/net/http/#Client), http.Client uses the [RoundTripper](https://golang.org/pkg/net/http/#RoundTripper) interface to execute an HTTP request, which allows developers to customize the logic of sending HTTP requests. It is also an important reason why golang can perfectly support the HTTP 2 protocol on an original basis.
142 |
143 | ```plain
144 | http.Client -> http.RoundTripper [http.DefaultTransport]
145 | ```
146 |
147 | For the PouchContainer client, the test focus is mainly on whether the incoming destination address is correct, whether the incoming query is reasonable, and whether the result can be returned normally and so on. So before testing, developers need to prepare the corresponding RoundTripper implementation, which is not responsible for the actual business logic, it is only used to determine whether the input meets expectations or not.
148 |
149 | As shown in the followings, PouchContainer `newMockClient` accepts customized request processing logic. In the test case of removing the image, the developer determines whether the destination address and the HTTP Method are DELETE in the customized logic, so that the functional test can be completed without starting the HTTP Server.
150 |
151 | ```go
152 | // https://github.com/alibaba/pouch/blob/master/client/client_mock_test.go#L12-L22
153 | type transportFunc func(*http.Request) (*http.Response, error)
154 |
155 | func (transFunc transportFunc) RoundTrip(req *http.Request) (*http.Response, error) {
156 | return transFunc(req)
157 | }
158 |
159 | func newMockClient(handler func(*http.Request) (*http.Response, error)) *http.Client {
160 | return &http.Client{
161 | Transport: transportFunc(handler),
162 | }
163 | }
164 |
165 | // https://github.com/alibaba/pouch/blob/master/client/image_remove_test.go
166 | func TestImageRemove(t *testing.T) {
167 | expectedURL := "/images/image_id"
168 |
169 | httpClient := newMockClient(func(req *http.Request) (*http.Response, error) {
170 | if !strings.HasPrefix(req.URL.Path, expectedURL) {
171 | return nil, fmt.Errorf("expected URL '%s', got '%s'", expectedURL, req.URL)
172 | }
173 | if req.Method != "DELETE" {
174 | return nil, fmt.Errorf("expected DELETE method, got %s", req.Method)
175 | }
176 |
177 | return &http.Response{
178 | StatusCode: http.StatusNoContent,
179 | Body: ioutil.NopCloser(bytes.NewReader([]byte(""))),
180 | }, nil
181 | })
182 |
183 | client := &APIClient{
184 | HTTPCli: httpClient,
185 | }
186 |
187 | err := client.ImageRemove(context.Background(), "image_id", false)
188 | if err != nil {
189 | t.Fatal(err)
190 | }
191 | }
192 | ```
193 |
194 |
195 |
196 | ### 2.2.2 MockImageManager
197 |
198 | For dependencies between internal packages, such as the PouchContainer Image API Bridge depends on the PouchContainer Daemon ImageManager, and the dependency behavior is defined by interface. If we want to test the logic of Image Bridge, we don't have to start containerd, we just need to implement the corresponding Daemon ImageManager like RoundTripper.
199 |
200 | ```go
201 | // https://github.com/alibaba/pouch/blob/master/apis/server/image_bridge_test.go
202 | type mockImgePull struct {
203 | mgr.ImageMgr
204 | handler func(ctx context.Context, imageRef string, authConfig *types.AuthConfig, out io.Writer) error
205 | }
206 |
207 | func (m *mockImgePull) PullImage(ctx context.Context, imageRef string, authConfig *types.AuthConfig, out io.Writer) error {
208 | return m.handler(ctx, imageRef, authConfig, out)
209 | }
210 |
211 | func Test_pullImage_without_tag(t *testing.T) {
212 | var s Server
213 |
214 | s.ImageMgr = &mockImgePull{
215 | ImageMgr: &mgr.ImageManager{},
216 | handler: func(ctx context.Context, imageRef string, authConfig *types.AuthConfig, out io.Writer) error {
217 | assert.Equal(t, "reg.abc.com/base/os:7.2", imageRef)
218 | return nil
219 | },
220 | }
221 | req := &http.Request{
222 | Form: map[string][]string{"fromImage": {"reg.abc.com/base/os:7.2"}},
223 | Header: map[string][]string{},
224 | }
225 | s.pullImage(context.Background(), nil, req)
226 | }
227 | ```
228 |
229 |
230 |
231 | ### 2.2.3 Summary
232 |
233 | ImageManager and RoundTripper are modeled in the same way except for the number of functions defined by the interface. In general, developers can manually define a structure that uses methods as fields, as shown in the followings.
234 |
235 | ```go
236 | type Do interface {
237 | Add(x int, y int) int
238 | Sub(x int, y int) int
239 | }
240 |
241 | type mockDo struct {
242 | addFunc func(x int, y int) int
243 | subFunc func(x int, y int) int
244 | }
245 |
246 | // Add implements Do.Add function.
247 | type (m *mockDo) Add(x int, y int) int {
248 | return m.addFunc(x, y)
249 | }
250 |
251 | // Sub implements Do.Sub function.
252 | type (m *mockDo) Sub(x int, y int) int {
253 | return m.subFunc(x, y)
254 | }
255 | ```
256 |
257 | When the interface is large and complex, the manual method will impose a test burden on the developer, so the community provides automatically generated tools, such as [mockery](https://github.com/vektra/mockery), to ease the burden on the developer.
258 |
259 | ## 2.3 Others
260 |
261 | Sometimes it relies on third-party services, such as the PouchContainer client, which is a typical case. The above describes Duck Type to complete the test of this case. In addition, we can also complete the request processing by registering the http.Handler and starting mockHTTPServer. This way of testing is relatively heavy, which is not recommended to use until the Duck Type can not test, or put it into the integration test.
262 |
263 | > NOTE: Someone in the golang community has accomplished [monkeypatch](https://github.com/bouk/monkey) by modifying the binary code. This tool is not recommended to use, it is still more advisable for developers to design and write testable code.
264 |
265 | ## 2.4 Summary
266 |
267 | PouchContainer integrates unit test cases into the code review phase, and reviewers can view the running of test cases at any time.
268 |
269 |
270 |
271 | # 3. Summary
272 |
273 | In the code review phase, code style checking, unit testing, and integration testing should be run through continuous integration to help reviewers make accurate decisions. Currently, PouchContainer performs operations such as code style checks and tests primarily through TravisCI/CircleCI and [pouchrobot](https://github.com/pouchcontainer/pouchrobot).
--------------------------------------------------------------------------------
/blog-en/PouchContainer Environment Building and Started Guide based on VirtualBox and CentOS7 for Mac.md:
--------------------------------------------------------------------------------
1 | # PouchContainer Environment Building and Started Guide based on VirtualBox and CentOS7 for Mac
2 |
3 | This article is mainly to guide for container developers to build pouch container environment on virtual box and centos. There are mainly devided into three parts which are be detailed next. Hopefully you will finish this task smoothly and enjoy your container travelling.
4 |
5 | ## Install Virtual Box and Create Virtual host
6 |
7 | **In this part , it will guide you to create a virtual host step by step.**
8 |
9 | ***1.Create virtual host.***
10 | Click "new" button to Create Virtual host and input name,typically it will automatically load the corresponding type and version.
11 |
12 |  13 |
14 | ***2.Set memory size.***
15 | The memory size can be set based on the memory size of the machine itself and the actual situation of the number of virtual hosts installed on the VirtualBox virtual machine, where I set it to 1024M.
16 |
17 |
13 |
14 | ***2.Set memory size.***
15 | The memory size can be set based on the memory size of the machine itself and the actual situation of the number of virtual hosts installed on the VirtualBox virtual machine, where I set it to 1024M.
16 |
17 |  18 |
19 | ***3.Set virtual hard disk file type, distribute disk size, file postion and file size and then click next.***
20 |
21 |
22 |
23 | ***4.Set virtual host.***
24 |
25 | Select the virtual host that you want to set and click "setting","system","Main bord" in turn. In the startup sequence item, select the "floppy disk", point the right button , put "" floppy disk" "in the last of the startup sequence. Then click ok.
26 |
27 |
18 |
19 | ***3.Set virtual hard disk file type, distribute disk size, file postion and file size and then click next.***
20 |
21 |
22 |
23 | ***4.Set virtual host.***
24 |
25 | Select the virtual host that you want to set and click "setting","system","Main bord" in turn. In the startup sequence item, select the "floppy disk", point the right button , put "" floppy disk" "in the last of the startup sequence. Then click ok.
26 |
27 |  28 |
29 | Then, click "Memory", select "no disk" and click the optical disc icon on the right, click "select a virtual disc", and then select the image file of centos in the popup file selection window.
30 |
31 |
28 |
29 | Then, click "Memory", select "no disk" and click the optical disc icon on the right, click "select a virtual disc", and then select the image file of centos in the popup file selection window.
30 |
31 |  32 |
33 |
32 |
33 |  34 |
35 | ***5.Boot virtual host.***
36 |
37 | Select the virtual host and click "start".
38 |
39 |
34 |
35 | ***5.Boot virtual host.***
36 |
37 | Select the virtual host and click "start".
38 |
39 |  40 |
41 | Set the language.
42 |
43 |
40 |
41 | Set the language.
42 |
43 |  44 |
45 | Set Date & Time and INSTALLATION DESTINATION.
46 |
47 |
44 |
45 | Set Date & Time and INSTALLATION DESTINATION.
46 |
47 |  48 |
49 |
48 |
49 |  50 |
51 |
52 | Set Root password and click "reboot" after configuration.
53 |
54 |
55 |
56 | After the virtual machine reboot, login through the password you set just now.
57 |
58 |
50 |
51 |
52 | Set Root password and click "reboot" after configuration.
53 |
54 |
55 |
56 | After the virtual machine reboot, login through the password you set just now.
57 |
58 |  59 |
60 | ***6.Set dynamic ip address***
61 | The above mentioned steps guide us to install CentOS in Virtual Box. However, there are nothing to show about ip information when we input **"ip addr"**.
62 |
63 |
64 |
65 | Input command:
66 | ```bash
67 | cd /etc/sysconfig/network-scripts/
68 | ```
69 | to enter the directory, check and confirm the network interface name of your own computer, here mine is enp0s3, everyone's computer may be different, some are eth0, some are etchs33. Then, input:
70 | ```bash
71 | vi ifcfg-en0s3
72 | ```
73 | to check and edit network configuration information.
74 |
75 |
76 |
77 | Here, change the ONBOOT=no to ONBOOT=yes and input `:wq` to save and exit.
78 |
79 |
80 |
81 | Input
82 | ```bash
83 | service network restart
84 | ```
85 | to restart network and input `ip addr` again, here we are able to see the dynamic ip address.
86 |
87 |
59 |
60 | ***6.Set dynamic ip address***
61 | The above mentioned steps guide us to install CentOS in Virtual Box. However, there are nothing to show about ip information when we input **"ip addr"**.
62 |
63 |
64 |
65 | Input command:
66 | ```bash
67 | cd /etc/sysconfig/network-scripts/
68 | ```
69 | to enter the directory, check and confirm the network interface name of your own computer, here mine is enp0s3, everyone's computer may be different, some are eth0, some are etchs33. Then, input:
70 | ```bash
71 | vi ifcfg-en0s3
72 | ```
73 | to check and edit network configuration information.
74 |
75 |
76 |
77 | Here, change the ONBOOT=no to ONBOOT=yes and input `:wq` to save and exit.
78 |
79 |
80 |
81 | Input
82 | ```bash
83 | service network restart
84 | ```
85 | to restart network and input `ip addr` again, here we are able to see the dynamic ip address.
86 |
87 |  88 |
89 | ## Install PouchContainer
90 |
91 | **1.Install yum-utils**
92 |
93 | To install PouchContainer, you need a maintained version of CentOS 7. WE are able to install PouchContainer through Aliyun mirrors. If you install PouchContainer for the first on a new host machine, you need to set up the PouchContainer repository. Then, you can install and update PouchContainer from repository.
94 | ``` bash
95 | sudo yum install -y yum-utils
96 | ```
97 |
98 |
88 |
89 | ## Install PouchContainer
90 |
91 | **1.Install yum-utils**
92 |
93 | To install PouchContainer, you need a maintained version of CentOS 7. WE are able to install PouchContainer through Aliyun mirrors. If you install PouchContainer for the first on a new host machine, you need to set up the PouchContainer repository. Then, you can install and update PouchContainer from repository.
94 | ``` bash
95 | sudo yum install -y yum-utils
96 | ```
97 |
98 |  99 |
100 | **2.Set up the PouchContainer repository**
101 |
102 | Use the following command to add PouchContainer repository.
103 |
104 | ```bash
105 | sudo yum-config-manager --add-repo http://mirrors.aliyun.com/opsx/opsx-centos7.repo
106 | sudo yum update
107 | ```
108 |
99 |
100 | **2.Set up the PouchContainer repository**
101 |
102 | Use the following command to add PouchContainer repository.
103 |
104 | ```bash
105 | sudo yum-config-manager --add-repo http://mirrors.aliyun.com/opsx/opsx-centos7.repo
106 | sudo yum update
107 | ```
108 |  109 |
110 |
109 |
110 |  111 |
112 | **3. Install PouchContainer**
113 |
114 | Run the following command to install the latest version of PouchContainer.
115 | ```bash
116 | sudo yum install pouch
117 | ```
118 |
119 |
120 | ##Run an pouchContainer instantiation
121 |
122 | **1.Start the pouch container**
123 |
124 | Run the following command to start a pouch container instantiation.
125 | ```bash
126 | sudo systemctl start pouch
127 | ```
128 |
129 | **2.Load a iso file to boot a pouchcontainer instantiation**
130 | ```bash
131 | pouch pull busybox
132 | ```
133 |
134 |
135 |
136 | **3.Start a busybox container**
137 |
138 | Run the fllowing command to start a busybox base container.
139 | ```bash
140 | pouch run -t -d busybox sh
141 | ```
142 |
143 |
144 |
145 | **4.Login container**
146 |
147 | Input the following command:
148 | ```bash
149 | pouch exec -it {ID} sh
150 | ```
151 | to login container, the ID is the first six byte of the previous output ID.
152 |
153 |
111 |
112 | **3. Install PouchContainer**
113 |
114 | Run the following command to install the latest version of PouchContainer.
115 | ```bash
116 | sudo yum install pouch
117 | ```
118 |
119 |
120 | ##Run an pouchContainer instantiation
121 |
122 | **1.Start the pouch container**
123 |
124 | Run the following command to start a pouch container instantiation.
125 | ```bash
126 | sudo systemctl start pouch
127 | ```
128 |
129 | **2.Load a iso file to boot a pouchcontainer instantiation**
130 | ```bash
131 | pouch pull busybox
132 | ```
133 |
134 |
135 |
136 | **3.Start a busybox container**
137 |
138 | Run the fllowing command to start a busybox base container.
139 | ```bash
140 | pouch run -t -d busybox sh
141 | ```
142 |
143 |
144 |
145 | **4.Login container**
146 |
147 | Input the following command:
148 | ```bash
149 | pouch exec -it {ID} sh
150 | ```
151 | to login container, the ID is the first six byte of the previous output ID.
152 |
153 |  154 |
155 | After login, it shows like below:
156 |
157 |
158 |
159 | ## Congratulation
160 |
161 | We hope this guide would help you get up and run with PouchContainer. Enjoy it!
--------------------------------------------------------------------------------
/blog-en/PouchContainer Environment Building and Started Guide based on VirtualBox and Ubuntu for Mac.md:
--------------------------------------------------------------------------------
1 | # title: PouchContainer Environment Building and Started Guide based on VirtualBox and Ubuntu for Mac
2 |
3 | This article is mainly to guide for container developers to build pouch container environment on virtual box and Ubuntu. There are mainly devided into two parts which are be detailed next. Hopefully you will finish this task smoothly and enjoy your container travelling.
4 |
5 | # PouchContainer download
6 | In this part , it will guide you to download PouchContainer files step by step. Personal github and git are required. git can be downloaded at:[https://www.git-scm.com/download/](https://www.git-scm.com/download/)
7 | ## 1. Fork repo from github source
8 | Visit [https://github.com/alibaba/pouch](https://github.com/alibaba/pouch)and sign in your personal github, click 'Fork' button at the upper right corner.
154 |
155 | After login, it shows like below:
156 |
157 |
158 |
159 | ## Congratulation
160 |
161 | We hope this guide would help you get up and run with PouchContainer. Enjoy it!
--------------------------------------------------------------------------------
/blog-en/PouchContainer Environment Building and Started Guide based on VirtualBox and Ubuntu for Mac.md:
--------------------------------------------------------------------------------
1 | # title: PouchContainer Environment Building and Started Guide based on VirtualBox and Ubuntu for Mac
2 |
3 | This article is mainly to guide for container developers to build pouch container environment on virtual box and Ubuntu. There are mainly devided into two parts which are be detailed next. Hopefully you will finish this task smoothly and enjoy your container travelling.
4 |
5 | # PouchContainer download
6 | In this part , it will guide you to download PouchContainer files step by step. Personal github and git are required. git can be downloaded at:[https://www.git-scm.com/download/](https://www.git-scm.com/download/)
7 | ## 1. Fork repo from github source
8 | Visit [https://github.com/alibaba/pouch](https://github.com/alibaba/pouch)and sign in your personal github, click 'Fork' button at the upper right corner.9 | 10 |
11 |
12 |
12 | 13 | 14 | ## 2. Download repo 15 | ### 2.1 Download by git command 16 | Click 'Clone or download' and copy the url which will be used in the git command.
17 | 18 |
19 |
20 |
21 |
20 | 22 | 23 | Open terminal in mac, choose object folder by 'cd' command and input: 24 | 25 | ``` javascript?linenums 26 | git clone https://github.com/alibaba/pouch.git 27 | ``` 28 | ## 2.2 download by ZIP files 29 | This is a easier way to download.on your github click 'Download ZIP'.
30 | 31 |
32 |
33 |
34 |
33 | 35 | 36 | Unzip the the downloaded zip file in your object folder which will be shared to the Ubuntu. 37 | 38 | # Install Virtualbox and PouchContainer 39 | ## 1. Virtualbox configuration 40 | Download and install VirtualBox, download Virtualbox disk file ubuntuPouch.vdi
41 | Launch VirtualBox, click 'New' button - customize'Name' - 'Type': 'Linux' - 'Version': 'Ubuntu (64-bit)'
42 | 
43 | 'Continue' - 'Memory': 1024M
44 | 
45 | 'Continue' - choose'Use an existing virtual hard disk file' - choose ubuntuPouch.vdi - 'Create'
46 | 
47 | Start the mechine, after signing in, switch to root user by typing: 48 | 49 | ``` javascript?linenums 50 | sudo -i 51 | ``` 52 | ## 2. Shared folder mounting 53 | To mount the shared folder in Ubuntu, guest additions are required to installed which will take you a few minutes. 54 | ### 2.1 Guest additions installatin 55 | 56 | Install VBoxLinuxAdditions,click menu'Devices'-'Insert Guest Additions CD image…', then input the commands by oder: 57 | 58 | ``` javascript?linenums 59 | sudo apt-get install virtualbox-guest-dkms 60 | sudo mount /dev/cdrom /mnt/ 61 | cd /mnt 62 | ./VBoxLinuxAdditions.run 63 | ``` 64 |  65 | 66 |  67 | 68 |  69 | 70 |  71 |
72 | 73 | When 'Do you want to continue?' occurs, just input Y
74 | 75 | When 'VirtualBox Guest Additions: modprobe vboxsf failed' occurs, just reboot and switch to root user as the first part introduced: 76 | 77 | ``` javascript?linenums 78 | reboot 79 | ``` 80 | 81 | ### 2.2 Shared folder setting and mounting 82 | Now, we can start the mounting. Click'Devices' - choose 'Shared Folders Settings', set your container files address as 'Folder Path', 'Folder Name' as 'share' - then tick 'Auto-mount' and 'Make Permanent' - 'OK'
83 | 
84 | Mount Shared folder by typing: 85 | 86 | ``` javascript?linenums 87 | sudo mount -t vboxsf share /root/gopath/src/github.com/alibaba/ 88 | ``` 89 | 'share' should be the same as 'Folder Name'.
90 | 
91 | 92 | ## 3. PouchContainer launching 93 | Test network: 94 | 95 | ``` javascript?linenums 96 | ping www.alibaba-inc.com 97 | ``` 98 | Launch pouch service (Default boot): 99 | 100 | ``` javascript?linenums 101 | systemctl start pouch 102 | ``` 103 |  104 |
105 | 106 | Launch a busybox basic container: 107 | 108 | ``` javascript?linenums 109 | pouch run -t -d busybox sh 110 | ``` 111 |  112 |
113 | 114 | Log in the launched container, where ID is the first six digits of the complete ID of the previous command output: 115 | 116 | ``` javascript?linenums 117 | pouch exec -it {ID} sh 118 | ``` 119 |  120 |
121 | 122 | # congratulations 123 | We hope this guide would help you get up and run with PouchContainer. Enjoy it! -------------------------------------------------------------------------------- /blog-en/PouchContainerSupportsLXCFSForhighlyreliablecontainerisolation.md: -------------------------------------------------------------------------------- 1 | # PouchContainer supports LXCFS for highly reliable container isolation 2 | 3 | ## Introduction 4 | 5 | PouchContainer is an open source runtime product of Alibaba. The latest version is 0.3.0 and code address is: [https://github.com/alibaba/pouch](https://github.com/alibaba/pouch). PouchContainer initially designed to support LXCFS to achieve highly reliable container isolation. Linux uses cgroup technology to achieve resource isolation, in the meantime, the host's /proc file system is still mounted in the container. When users read files like /proc/meminfo in the container, it will obtain the information of the host. The lack of `/proc view isolation` in the container can cause series of problems, which will slow down or block the containerization of enterprise business . LXCFS ([https://github.com/lxc/lxcfs](https://github.com/lxc/lxcfs)) is an open source FUSE file system and is use to solve `/proc view isolation` problem and make the container look more like a traditional virtual machine in presentation layer. This article will firstly introduce the applicable business scenarios of LXCFS, secondly, it will briefly introduce the integration of LXCFS within PouchContainer. 6 | 7 | ## Lxcfs Business Scenario 8 | 9 | In the era of physical and virtual machines, our company gradually form our own sets of tool chains, such as compiling and packaging, application deployment, unified monitoring, etc., which provides stable services for applications that are deployed in physical machines and virtual machines. Next, we are going to demonstrate the use of LXCFS in the aspects of monitoring, tools of operation and maintenance and application deployment. 10 | 11 | ### Monitoring and Operation Tools 12 | 13 | Most monitor tools rely on /proc file system to obtain system information. Take Alibaba as an example, some basic monitoring tools of Alibaba collect information through tsar ([https://github.com/alibaba/tsar](https://github.com/alibaba/tsar)),while, tsar relies on /proc file system to collect the information of memory and CPU. We can download source code of tsar and check the use of documents under /proc directory: 14 | ``` 15 | $ git remote -v 16 | origin https://github.com/alibaba/tsar.git (fetch) 17 | origin https://github.com/alibaba/tsar.git (push) 18 | $ grep -r cpuinfo . 19 | ./modules/mod_cpu.c: if ((ncpufp = fopen("/proc/cpuinfo", "r")) == NULL) { 20 | :tsar letty$ grep -r meminfo . 21 | ./include/define.h:#define MEMINFO "/proc/meminfo" 22 | ./include/public.h:#define MEMINFO "/proc/meminfo" 23 | ./info.md:内存的计数器在/proc/meminfo,里面有一些关键项 24 | ./modules/mod_proc.c: /* read total mem from /proc/meminfo */ 25 | ./modules/mod_proc.c: fp = fopen("/proc/meminfo", "r"); 26 | ./modules/mod_swap.c: * Read swapping statistics from /proc/vmstat & /proc/meminfo. 27 | ./modules/mod_swap.c: /* read /proc/meminfo */ 28 | $ grep -r diskstats . 29 | ./include/public.h:#define DISKSTATS "/proc/diskstats" 30 | ./info.md:IO的计数器文件是:/proc/diskstats,比如: 31 | ./modules/mod_io.c:#define IO_FILE "/proc/diskstats" 32 | ./modules/mod_io.c:FILE *iofp; /* /proc/diskstats*/ 33 | ./modules/mod_io.c: handle_error("Can't open /proc/diskstats", !iofp); 34 | ``` 35 | 36 | As we can see, tsar relies on the /proc file system to monitor processes, IO, and CPU. 37 | 38 | When /proc file system provides host resource information in the container, these kinds of monitors cannot monitor the information in the container. In order to meet business requirements, it is necessary to adapt container monitor, even to develop another monitoring tool independently for in-container monitoring. This kind of changes will definitely slow down or even block the development of existing business containerization. The container technology should be compatible with original tool chains of company as much as possible and taking the habits of engineers into consideration. 39 | 40 | PouchContainer supports LXCFS to solve above problems, relaying on monitoring, operation and maintenance tools of /proc file system. It is transparent to the tools deployed in the container or on the host. The existing monitoring and operation tools can be smoothly migrated into container without adaptation or redevelopment and monitor, achieving monitoring and maintains. 41 | 42 | Let's take a look at the example and install PouchContainer 0.3.0 in an Ubuntu virtual machine: 43 | 44 | ``` 45 | # uname -a 46 | Linux p4 4.13.0-36-generic #40~16.04.1-Ubuntu SMP Fri Feb 16 23:25:58 UTC 2018 x86_64 x86_64 x86_64 GNU/Linux 47 | ``` 48 | 49 | Systemd pulls up pouchd , and LXCFS is not enabled by default. The container created cannot use the function of LXCFS at this time . Let's take a look at the contents of the relevant /proc file in the container: 50 | 51 | ``` 52 | # systemctl start pouch 53 | # head -n 5 /proc/meminfo 54 | MemTotal: 2039520 kB 55 | MemFree: 203028 kB 56 | MemAvailable: 777268 kB 57 | Buffers: 239960 kB 58 | Cached: 430972 kB 59 | root@p4:~# cat /proc/uptime 60 | 2594341.81 2208722.33 61 | # pouch run -m 50m -it registry.hub.docker.com/library/busybox:1.28 62 | / # head -n 5 /proc/meminfo 63 | MemTotal: 2039520 kB 64 | MemFree: 189096 kB 65 | MemAvailable: 764116 kB 66 | Buffers: 240240 kB 67 | Cached: 433928 kB 68 | / # cat /proc/uptime 69 | 2594376.56 2208749.32 70 | ``` 71 | 72 | We can see, the output of /proc/meminfo and uptime files is the same as the host. The memory is assigned to be 50M as the container starts, the /proc/meminfo file does not reflect the memory limitation in the container. 73 | 74 | Launching LXCFS services in host machine and the pouchd process and assigning LXCFS arguments. 75 | ``` 76 | # systemctl start lxcfs 77 | # pouchd -D --enable-lxcfs --lxcfs /usr/bin/lxcfs >/tmp/1 2>&1 & 78 | [1] 32707 79 | # ps -ef |grep lxcfs 80 | root 698 1 0 11:08 ? 00:00:00 /usr/bin/lxcfs /var/lib/lxcfs/ 81 | root 724 32144 0 11:08 pts/22 00:00:00 grep --color=auto lxcfs 82 | root 32707 32144 0 11:05 pts/22 00:00:00 pouchd -D --enable-lxcfs --lxcfs /usr/bin/lxcfs 83 | ``` 84 | 85 | Boot container and obtain relative file contents. 86 | ``` 87 | # pouch run --enableLxcfs -it -m 50m registry.hub.docker.com/library/busybox:1.28 88 | / # head -n 5 /proc/meminfo 89 | MemTotal: 51200 kB 90 | MemFree: 50804 kB 91 | MemAvailable: 50804 kB 92 | Buffers: 0 kB 93 | Cached: 4 kB 94 | / # cat /proc/uptime 95 | 10.00 10.00 96 | ``` 97 | 98 | use LXCFS to boot container and read /proc file to obtain relevant information in container. 99 | 100 | ### Business Applications 101 | 102 | As to the applications that have strong system reliance, initiator needs obtain memory, CPU and other relative information to set up. 103 | If /proc fle cannot reflect the resouces condition of container, it will have hug impact on above applications. 104 | 105 | For example, for some Java applications, there is also a startup script that looks at the stack size of the /proc/meminfo dynamic allocation runner. When the container memory limit is less than the host memory, a program startup failure occurs caused by a memory allocation failure. For DPDK-related applications, the application tool needs to obtain CPU information based on /proc/cpuinfo to get the CPU logic core used by the application to initialize the EAL layer. If the above information cannot be accurately obtained in the container, the DPDK application needs to modify the corresponding tool. 106 | 107 | ## PouchContainer Integrates LXCFS 108 | 109 | PouchContainer supports LXCFS from version 0.1.0. For details, see: [https://github.com/alibaba/pouch/pull/502] (https://github.com/alibaba/pouch/pull/502) . 110 | 111 | In short, when the container starts, mount the LXCFS mount point /var/lib/lxc/lxcfs/proc/ on the host to the virtual /proc filesystem directory inside the container via -v. At this point you can see in the /proc directory of the container, some column proc files, including meminfo, uptime, swaps, stat, diskstats, cpuinfo and so on. The specific use parameters are as follows: 112 | 113 | ``` 114 | -v /var/lib/lxc/:/var/lib/lxc/:shared 115 | -v /var/lib/lxc/lxcfs/proc/uptime:/proc/uptime 116 | -v /var/lib/lxc/lxcfs/proc/swaps:/proc/swaps 117 | -v /var/lib/lxc/lxcfs/proc/stat:/proc/stat 118 | -v /var/lib/lxc/lxcfs/proc/diskstats:/proc/diskstats 119 | -v /var/lib/lxc/lxcfs/proc/meminfo:/proc/meminfo 120 | -v /var/lib/lxc/lxcfs/proc/cpuinfo:/proc/cpuinfo 121 | ``` 122 | 123 | To simplify use, the pouch create and run command lines provide the parameter `--enableLxcfs`. Specifying the above parameters when creating the container can omits the complicated `-v` parameter. 124 | 125 | After a period of use and testing, we found that the restart of lxcfs, the proc and cgroup will be rebuilt, resulting in a `connect failed` error in accessing /proc in the container. To enhance LXCFS stability, in PR:[https://github.com/alibaba/pouch/pull/885] (https://github.com/alibaba/pouch/pull/885),the guarantee method of refine LXCFS is change to systemd. The specific implementation method is to remount the lxcfs.service plus ExecStartPost, and traverse the container using LXCFS and remount it in the container. 126 | 127 | ## Summary 128 | PouchContainer supports LXCFS to implement view isolation of the /proc file system in the container, which will greatly reduce the changes of the original tool chain and operation and maintenance habits in the process of containerizing the enterprise inventory, and speed up the containerization process. Strong support for the smooth transition of enterprises from traditional virtualization to container virtualization. 129 | -------------------------------------------------------------------------------- /blog-en/PouchContainer_volume_mechanism_analysis.md: -------------------------------------------------------------------------------- 1 | > PouchContainer volume is a mechanism specifically designed to solve the data persistence of the container. To understand the mechanism of the volume, you may need to understand the image mechanism of PouchContainer. 2 | 3 | > PouchContainer, like Docker, implements a layered mechanism for image. The so-called mirror layering mechanism means that the mirror image of the container is actually superimposed by multiple read-only mirror layers, so that different mirror images can reuse the mirror layer, which greatly speeds up the efficiency of image distribution and reduces container startup time. 4 | 5 | > When the container needs to be started, pouchd (pouchd mentioned below refers to the PouchContainer daemon) will add a read-write layer at the top level of the boot image, and all subsequent read and write operations in the container will be recorded in the read-write layer. 6 | However, this also introduces a problem, that is, HOW-TO persist container data. If we delete the container and start it again through the image, the history changes about the container are lost, which is fatal for stateful applications such as databases. 7 | 8 | > Volume bypasses the mirroring mechanism, so that the data in the container are stored on the host machine in the form of a normal file or directory. 9 | 10 | > The data in the volume will not be affected even though the container is stopped or deleted, thereby implementing container data persistence feature. Moreover, volume data can be shared between different containers. 11 | 12 | ## 1. PouchContainer Volume Overview 13 | 14 | This part of the content may involve PouchContainer Volume source code. 15 | 16 | The PouchContainer volume overall architecture currently consists of the following components: 17 | 18 | - **VolumeManager** : the entrance of volume related operations. 19 | - **Core**: the core module of volume, which contains the business logic of the volume operation. 20 | - **Store**: the module be responsible for storing volume meta data, and the meta data is currently stored in the local boltdb file. 21 | - **Driver**: the interfaces of volume driver, which contains volume related driver basic feature convention. 22 | - **Module**: the specific volume driver, there currently exists four volume drives: local, tmpfs, volume plugin, and ceph. 23 | 24 |  25 | 26 | `VolumeManager` is a storage component in `PouchContainer` (other components include`ContainerManager`, `ImageManager`, `NetworkManager`, etc.), which is the entry point for all volume related operations. Currently, the `Create`, `Remove`, `List`, `Get`, `Attach `and `Detach` interface is provided. 27 | 28 | The `Core` module contains the core implementation of the volume operation. It is responsible for calling the underlying specific volume driver to execute the `Creat`, `Delete`, ` Attach`and `Detach` operations and manages volume metadata by calling the `Store` module. 29 | 30 | The `Store`module is specifically responsible for the volume metadata management. The relevant state of the volume will be stored through the `Store` module. The reason why the metadata management is designed as a single module is to extend easily in the future. Currently, the volume metadata is stored in the boltdb file, and may introduce `etcd` in the future. 31 | 32 | `Driver` module abstracts the interface that the volume driver needs to implement. A specific volume driver needs to implement the following interfaces: 33 | 34 | ```go 35 | type Driver interface { 36 | // Name returns backend driver's name. 37 | Name(Context) string 38 | 39 | // StoreMode defines backend driver's store model. 40 | StoreMode(Context) VolumeStoreMode 41 | 42 | // Create a volume. 43 | Create(Context, *types.Volume, *types.Storage) error 44 | 45 | // Remove a volume. 46 | Remove(Context, *types.Volume, *types.Storage) error 47 | 48 | // Path returns volume's path. 49 | Path(Context, *types.Volume) (string, error) 50 | } 51 | ``` 52 | 53 | ## 2. supported volume type 54 | 55 | PouchContainer currently supports three specific volume types, namely local volume, tmpfs volume and ceph volume. PouchContainer also supports more third-party storage through the volume plugin. 56 | 57 | 58 | ### 2.1 local volume 59 | 60 | The default volume type of PouchContainer is local volume, which is proper for storing persistent data and has an independent life cycle from that of the Pouchcontainer. 61 | 62 | The local volume is essentially a subdirectory created by ` pouchd` under `/var/lib/pouch/volume` directory. PouchContainer's local volume has more userful features than docker's does, including: 63 | 64 | * creating volume under specific mount directory 65 | * specifying the size fo volume 66 | 67 | Firstly, a local volume can be created under a specified local volume. This feature is quite practical in production. In applications such as database, a specialized block device is needed for storing database data. Usually, a block device can be formatted and then mounted to a specific directory. For example, by executing the following instruction, a new volume mounted to directory `/mnt/mysql\_data` will be created, then the created volume will be mounted to specific container directory, finally container initialized. 68 | 69 | 70 | ```powershell 71 | pouch volume create --driver local --option mount=/mnt/mysql_data --name mysql_data 72 | ``` 73 | 74 | Secondly, the size of volume can be limited. This feature relies on the quato functionality of the underlying file system. For now, the supported file systems include ext4 and xfs, specific kernel versions of which are also required. 75 | 76 | ```powershell 77 | pouch volume create --driver local --option size=10G --name test_quota 78 | ``` 79 | 80 | ### 2.2 tmpfs volume 81 | 82 | Data in tmpfs volume stays only in memory(or swap when memory is insufficient). This provides high access speed, however all the data is going to disapper when container terminates. Therefore, `tmpfs` volume is only proper for storing some temporary or sensitive data. 83 | 84 | The `tmpfs` volume is placed by default under the `/mnt/tmpfs` directory. The mount path can also be specified with option *-o mount*. However, specifying mount path for `tmpfs` volume makes no sense because `tmpfs` volume stores data directly in memory. 85 | 86 | ```powershell 87 | pouch volume create --driver tmpfs --name tmpfs_test 88 | ``` 89 | ### 2.3 ceph volume 90 | 91 | `ceph` volume is a special type of volume where data is stored in a `ceph` cluster(`ceph` rbd storage), making the migration of volumes across physical machines possible. 92 | 93 | `ceph` volume is unavailale at present. From the PouchContainer volume architecture diagram, there is a layer of alibaba storage controller between the ceph driver and the parent driver layer, which is an alibaba internal container storage management platform, docking many storage solutions such as ceph, pangu and nas. PouchContainer can directly use `ceph` to provide volume by docking with the container storage management platform. The container storage management platform is going to be open sourcing in the future. 94 | 95 | 96 | ### 2.4 volume plugin 97 | 98 | 99 | Volume plugin is a general-purpose volume, which is exactly a volume extension mechanism. At present, docker can manage many third-party storage through the plug-in mechanism. PouchContainer also implements the volume plugin mechanism, which can seamlessly connect to the existing volume plugin of the existing docker. 100 | 101 | A volume plugin should implement [volume plugin protocal](https://docs.docker.com/engine/extend/plugins_volume/#volume-plugin-protocol)。The volume plugin is essentially a web server who implements the following services(all requests are POST requests): 102 | 103 | ```plain 104 | /VolumeDriver.Create 105 | 106 | /VolumeDriver.Remove 107 | 108 | /VolumeDriver.Mount 109 | 110 | /VolumeDriver.Path 111 | 112 | /VolumeDriver.Unmount 113 | 114 | /VolumeDriver.Get 115 | 116 | /VolumeDriver.List 117 | /VolumeDriver.Capabilities 118 | ``` 119 | ## 3. bind mounts and volumes 120 | 121 | PouchContainer currently supports two methods for data persistence. In addition to the above` volume` approach, you can also adapt **bind mounts** approach, which implies directly mounting the host's directory to the container. 122 | 123 | ```powershell 124 | pouch run -d -t -v /hostpath/data:/containerpath/data:ro ubuntu sh 125 | ``` 126 | The above command will mount the `/hostpath/data` directory on the host to the `/containerpath/data` directory of the container in a read-only manner. 127 | 128 | Binding mount approach depends on the underlaying host file system directory structure, while volume approach provided by `PouchContainer`has a special mechanism to manage these differences. 129 | 130 | volume approach has the following advantages over binding mounts: 131 | 132 | - volumes are easier for back up and management than binding mounts. 133 | - `PouchContainer` provides specialized `CLI` and `API` for managing volumes. 134 | - volumes are suitable for secure sharing between multiple containers. 135 | - volumes provide a plugin mechanism for docking easily third party storage. 136 | 137 | ## 4. Future work on PouchContainer volume 138 | 139 | [CSI](https://github.com/container-storage-interface/spec), the Container Storage Interface (which defines the storage interface between the container scheduling layer and the container), has been released for version 0.2. 140 | 141 | In the future, Pouch may add a generic type of driver for docking storage systems that have implemented `CSI` interfaces. 142 | 143 | ## 5. Summary 144 | 145 | This article introduces the volume mechanism in `PouchContainer`. The volume mechanism is mainly to solve data persistence problems of pouch container. `PouchContainer` currently supports `local`, `tmpfs` and `ceph` driver, moreover, `PouchContainer ` also supports more third-party storage by volume plugins. -------------------------------------------------------------------------------- /blog-en/Testing of Goroutine Leak in PouchContainer.md: -------------------------------------------------------------------------------- 1 | ## 0. Introduction 2 | 3 | [PouchContainer](https://github.com/alibaba/pouch) is an open-source project created by Alibaba Group. It provides strong isolation and high portability, which can help enterprises quickly containerize their stock business and improve the utilization of internal physical resources. 4 | 5 | PouchContainer is also a golang project in which goroutine has been widely used to implement management of various modules including containers, images, and logs. goroutine is an user-mode 'thread' supported by golang at the language level. This built-in feature can help developers build high-concurrency services at a rapid pace. 6 | 7 | Though it's pretty handy to write concurrent programs with goroutine, it does bring a new problem often known as __goroutine leak__, which would occur when the receiver side of a channel was blocked for a long time but cannot wake up. goroutine leak is just as terrible as memory leak -- leaking goroutines constantly consume resources and slow down (or even break) the whole system. Hence developers should avoid goroutine leak to ensure the health of the system. This article will introduce the detection practice of goroutine leak used in PouchContainer project, by explaining the definition of goroutine leak and common analyzing tools used to detect the leak. 8 | 9 | ## 1. Goroutine Leak 10 | 11 | In the world of golang, there are many groundhogs at your disposal -- they can either handle a large amount of problems of the same type individually , or work together on one single task. And works can be done quickly as long as you give them the right order. As you may guess, these groundhogs are, as we often mentioned, goroutine. Each time you 'go', you will get a groundhog which can be ordered by you to execute some task. 12 | 13 | ```go 14 | func main() { 15 | waitCh := make(chan struct{}) 16 | go func() { 17 | fmt.Println("Hi, Pouch. I'm new gopher!") 18 | waitCh <- struct{}{} 19 | }() 20 | 21 | <-waitCh 22 | } 23 | ``` 24 | 25 | In most cases, a groundhog will return to its cage after finishing the designated task, waiting for your next call. But chances are that this groundhog has not been returned for a very long time. 26 | 27 | ```go 28 | func main() { 29 | // /exec?cmd=xx&args=yy runs the shell command in the host 30 | http.HandleFunc("/exec", func(w http.ResponseWriter, r *http.Request) { 31 | defer func() { log.Printf("finish %v\n", r.URL) }() 32 | out, err := genCmd(r).CombinedOutput() 33 | if err != nil { 34 | w.WriteHeader(500) 35 | w.Write([]byte(err.Error())) 36 | return 37 | } 38 | w.Write(out) 39 | }) 40 | log.Fatal(http.ListenAndServe(":8080", nil)) 41 | } 42 | 43 | func genCmd(r *http.Request) (cmd *exec.Cmd) { 44 | var args []string 45 | if got := r.FormValue("args"); got != "" { 46 | args = strings.Split(got, " ") 47 | } 48 | 49 | if c := r.FormValue("cmd"); len(args) == 0 { 50 | cmd = exec.Command(c) 51 | } else { 52 | cmd = exec.Command(c, args...) 53 | } 54 | return 55 | } 56 | ``` 57 | 58 | The above code will start an HTTP server which allows clients to execute shell commands remotely via HTTP requests. For instance, `curl "{ip}:8080/exec?cmd=ps&args=-ef"` can be used to check the processes running on the server. After the code has been executed, the groundhog will print logs to indicate the completion of execution. 59 | 60 | However, in some cases, the request takes a really long time to process, while the requester doesn't have much patience to wait. Take this command as an example, `curl -m 3 "{ip}:8080/exec?cmd=dosomething"`, the requester will disconnect after 3 seconds regardless of the execution status. Since the above code didn't check the possible disconnection, if the requester choose to disconnect instead of waiting for the execution with patience, then this groundhog will not return its cage until the completion of execution. Then it comes the most horrible thing, think about this kind of command, `curl -m 1 "{ip}:8080/exec?cmd=sleep&args=10000"`, groundhogs won't be able to return their cage for a long time and will continuously consume system resources. 61 | 62 | These wandering, uncontrolled groundhogs are, as we often mentioned, __goroutine leak__. There are many reasons for goroutine leak, such as a channel without sender. After running the following code, you will see that 2 goroutine will be shown constantly in runtime, one is 'main' function itself, the other is a groundhog waiting for data. 63 | 64 | ```go 65 | func main() { 66 | logGoNum() 67 | 68 | // without sender and blocking.... 69 | var ch chan int 70 | go func(ch chan int) { 71 | <-ch 72 | }(ch) 73 | 74 | for range time.Tick(2 * time.Second) { 75 | logGoNum() 76 | } 77 | } 78 | 79 | func logGoNum() { 80 | log.Printf("goroutine number: %d\n", runtime.NumGoroutine()) 81 | } 82 | ``` 83 | 84 | goroutine leak can happen in many different contexts. This following section will introduce how to detect goroutine leak and the corresponding solution to it, through the scenario of Pouch Logs API. 85 | 86 | ## 2. Pouch Logs API practice 87 | ### 2.1 specific scenario 88 | 89 | For better description of the problem, the code of Pouch Logs HTTP Handler has been simplified: 90 | 91 | ```go 92 | func logsContainer(ctx context.Context, w http.ResponseWriter, r *http.Request) { 93 | ... 94 | writeLogStream(ctx, w, msgCh) 95 | return 96 | } 97 | 98 | func writeLogStream(ctx context.Context, w http.ResponseWriter, msgCh <-chan Message) { 99 | for { 100 | select { 101 | case <-ctx.Done(): 102 | return 103 | case msg, ok := <-msgCh: 104 | if !ok { 105 | return 106 | } 107 | w.Write(msg.Byte()) 108 | } 109 | } 110 | } 111 | ``` 112 | 113 | Logs API Handler will launch goroutine to read logs and send data to `writeLogStream` via channel, then `writeLogStream` will return data back to the caller. This Logs API provides a tracking functionality, which will continuously show new content of logs until the container stops. But note that the caller can terminate the request at any time, at its discretion. So how can we detect such remaining goroutine? 114 | 115 | > Upon disconnection, the handler still tries to send data to client, which will cause an error of write: broken pipe, normally the goroutine will then exit. But if the handler is waiting data for a long time, it results in goroutine leak. 116 | 117 | ### 2.2 How to detect goroutine leak? 118 | 119 | For HTTP Server, we usually check the status of running processes by importing `net/http/pprof` package, in which there is one line used to check status of goroutine stack, `{ip}:{port}/debug/pprof/goroutine?debug=2`. Let's see what's the status of goroutine stack after the caller actively disconnect the server. 120 | 121 | ```powershell 122 | # step 1: create background job 123 | pouch run -d busybox sh -c "while true; do sleep 1; done" 124 | 125 | # step 2: follow the log and stop it after 3 seconds 126 | curl -m 3 {ip}:{port}/v1.24/containers/{container_id}/logs?stdout=1&follow=1 127 | 128 | # step 3: after 3 seconds, dump the stack info 129 | curl -s "{ip}:{port}/debug/pprof/goroutine?debug=2" | grep -A 10 logsContainer 130 | github.com/alibaba/pouch/apis/server.(*Server).logsContainer(0xc420330b80, 0x251b3e0, 0xc420d93240, 0x251a1e0, 0xc420432c40, 0xc4203f7a00, 0x3, 0x3) 131 | /tmp/pouchbuild/src/github.com/alibaba/pouch/apis/server/container_bridge.go:339 +0x347 132 | github.com/alibaba/pouch/apis/server.(*Server).(github.com/alibaba/pouch/apis/server.logsContainer)-fm(0x251b3e0, 0xc420d93240, 0x251a1e0, 0xc420432c40, 0xc4203f7a00, 0x3, 0x3) 133 | /tmp/pouchbuild/src/github.com/alibaba/pouch/apis/server/router.go:53 +0x5c 134 | github.com/alibaba/pouch/apis/server.withCancelHandler.func1(0x251b3e0, 0xc420d93240, 0x251a1e0, 0xc420432c40, 0xc4203f7a00, 0xc4203f7a00, 0xc42091dad0) 135 | /tmp/pouchbuild/src/github.com/alibaba/pouch/apis/server/router.go:114 +0x57 136 | github.com/alibaba/pouch/apis/server.filter.func1(0x251a1e0, 0xc420432c40, 0xc4203f7a00) 137 | /tmp/pouchbuild/src/github.com/alibaba/pouch/apis/server/router.go:181 +0x327 138 | net/http.HandlerFunc.ServeHTTP(0xc420a84090, 0x251a1e0, 0xc420432c40, 0xc4203f7a00) 139 | /usr/local/go/src/net/http/server.go:1918 +0x44 140 | github.com/alibaba/pouch/vendor/github.com/gorilla/mux.(*Router).ServeHTTP(0xc4209fad20, 0x251a1e0, 0xc420432c40, 0xc4203f7a00) 141 | /tmp/pouchbuild/src/github.com/alibaba/pouch/vendor/github.com/gorilla/mux/mux.go:133 +0xed 142 | net/http.serverHandler.ServeHTTP(0xc420a18d00, 0x251a1e0, 0xc420432c40, 0xc4203f7800) 143 | ``` 144 | 145 | We can see that the `logsContainer` goroutine is still in the current running process. Since this container doesn't have any logs being output, this goroutine cannot exit via `write: broken pipe` error, instead it will consume system resources indefinitely. So how can we fix this problem? 146 | 147 | ### 2.3 How to fix it? 148 | 149 | The `net/http` package in golang provides a feature to listen disconnection: 150 | 151 | ```go 152 | // HTTP Handler Interceptors 153 | func withCancelHandler(h handler) handler { 154 | return func(ctx context.Context, rw http.ResponseWriter, req *http.Request) error { 155 | // https://golang.org/pkg/net/http/#CloseNotifier 156 | if notifier, ok := rw.(http.CloseNotifier); ok { 157 | var cancel context.CancelFunc 158 | ctx, cancel = context.WithCancel(ctx) 159 | 160 | waitCh := make(chan struct{}) 161 | defer close(waitCh) 162 | 163 | closeNotify := notifier.CloseNotify() 164 | go func() { 165 | select { 166 | case <-closeNotify: 167 | cancel() 168 | case <-waitCh: 169 | } 170 | }() 171 | } 172 | return h(ctx, rw, req) 173 | } 174 | } 175 | ``` 176 | 177 | When the client disconnects before the request being processed, `CloseNotify()` will receive the corresponding message and cancel it via `context.Context`. In this way, we can fix the goroutine leak. In the world of golang, often times you will see goroutine for __read__ and __write__. This kind of function often has `context.Context` in their first argument, which can be used to reclaim goroutine via `WithTimeout` and `WithCancel`, avoiding any leaking. 178 | 179 | > CloseNotify cannot be applied in the context of Hijack connection since after Hijack, everything related to the connection will be handled by the actual Handler. In other words, HTTP Server has relinquished the management of data. 180 | 181 | So can this kind of detection be automated? The below section will demonstrate this with some common analyzing tools. 182 | 183 | ## 3. Common analyzing tools 184 | 185 | ### 3.1 net/http/pprof 186 | 187 | When developing an HTTP Server, we can turn on debug mode by importing `net/http/pprof` package, then access goroutine stack information via `/debug/pprof/goroutine`. Normally the goroutine stack is something like this: 188 | 189 | ```plain 190 | goroutine 93 [chan receive]: 191 | github.com/alibaba/pouch/daemon/mgr.NewContainerMonitor.func1(0xc4202ce618) 192 | /tmp/pouchbuild/src/github.com/alibaba/pouch/daemon/mgr/container_monitor.go:62 +0x45 193 | created by github.com/alibaba/pouch/daemon/mgr.NewContainerMonitor 194 | /tmp/pouchbuild/src/github.com/alibaba/pouch/daemon/mgr/container_monitor.go:60 +0x8d 195 | 196 | goroutine 94 [chan receive]: 197 | github.com/alibaba/pouch/daemon/mgr.(*ContainerManager).execProcessGC(0xc42037e090) 198 | /tmp/pouchbuild/src/github.com/alibaba/pouch/daemon/mgr/container.go:2177 +0x1a5 199 | created by github.com/alibaba/pouch/daemon/mgr.NewContainerManager 200 | /tmp/pouchbuild/src/github.com/alibaba/pouch/daemon/mgr/container.go:179 +0x50b 201 | ``` 202 | 203 | The first line of goroutine stack usually contains Goroutine ID, and the next a few lines are detailed stacktrace. With stacktrace, we can search for potential leaking via __keyword matching__. 204 | 205 | During the integration test of Pouch, Pouch Logs API pays additional attention to goroutine stack including `(*Server).logsContainer`. So as the tracking mode completes, it will invoke `debug` interface to check if there is any stacktrace containing `(*Server).logsContainer`. Once found such stacktrace, we know that some goroutines have not been reclaimed yet and may cause goroutine leak. 206 | 207 | In conclusion, this way of using `debug` interface is more suitable for __integration test__, since the testing instance is not in the same process as the target service and need to dump the goroutine stack of target process to obtain leaking information. 208 | 209 | ### 3.2 runtime.NumGoroutine 210 | 211 | When the testing instance and target function/service are in the same process, number of goroutines can be used to detect leaking. 212 | 213 | ```go 214 | func TestXXX(t *testing.T) { 215 | orgNum := runtime.NumGoroutine() 216 | defer func() { 217 | if got := runtime.NumGoroutine(); orgNum != got { 218 | t.Fatalf("xxx", orgNum, got) 219 | } 220 | }() 221 | 222 | ... 223 | } 224 | ``` 225 | 226 | 227 | ### 3.3 github.com/google/gops 228 | 229 | [gops](https://github.com/google/gops) is similar to `net/http/pprof` package. It puts an agent in your processes and provides command line interface for checking status of running processes. In particular, `gops stack ${PID}` can be used to check current state of goroutine stack. 230 | 231 | ## 4. Summary 232 | 233 | When developing an HTTP Server, `net/http/pprof` is helpful for analyzing code. In case that your code has complicated logic or potential leaking exists, you can mark up some functions with potential leaks and take it as part of testing so that automated CI can detect problems before code review. 234 | 235 | ## 5. Links 236 | 237 | * [Original Doc](https://github.com/pouchcontainer/blog/blob/master/blog-cn/PouchContainer%20Goroutine%20Leak%20检测实践.md) 238 | * [Concurrency is not Parallelism](https://talks.golang.org/2012/waza.slide#1) 239 | * [Go Concurrency Patterns: Context](https://blog.golang.org/context) 240 | * [Profilling Go Programs](https://blog.golang.org/profiling-go-programs) 241 | 242 | -------------------------------------------------------------------------------- /blog-en/addtional_p4.md: -------------------------------------------------------------------------------- 1 | In the world of Kubernetes, Pod is the smallest scheduling deployment unit. Simply put, a Pod is a group of containers made up of closely related containers. As a whole, these "intimate" containers share something to make the interaction between them more efficient. For example, for a network, containers in the same Pod share the same IP address and port space, allowing them to access each other directly via localhost. For storage, the volume defined in the Pod is mounted to each of its containers so that each container can access it. 2 | 3 | In fact, all of the above features can be implemented as long as a certain set of containers share some Linux Namespaces and mount the same volume. Below, we will analyze how the CRI Manager in PouchContainer implements the Pod model by creating a concrete Pod: 4 | 5 | 1. When Kubelet needs to create a new Pod, it first calls the CRI interface of RunPodSandbox, and the implementation of the interface by CRI Manager is to create a special container we call "infra container". From the perspective of container implementation, it is not special, it is nothing more than calling Container Manager to create a normal container mirrored as pause-amd64:3.0. But from the perspective of the entire Pod container group, it has a special role, it is to contribute its own Linux Namespace, as the above mentioned Linux shared namespace of the container, the container in the container group is connected Come together. It is more like a carrier that carries all the other containers in the Pod and provides the infrastructure for their operation. In general, we also use an infra container to represent a Pod. 6 | 7 | 2. After the infra container is created, Kubelet creates other containers in the pod container group.Each time a container is created, the two `CRI` interfaces `CreateContainer` and `StartContainer` will be called.For `CreateContainer`, `CRIManager` simply converts the `CRI` format container configuration to a PouchContainer format container configuration and passes it to the Container Manager, which completes the specific container creation work.The only thing we need to care about here is how the container joins the Linux Namespace of the infra container mentioned above. In fact, the real implementation is very simple. There are three parameters `PidMode`, `IpcMode` and `NetworkMode` in the container configuration parameters of the Container Manager, which are used to configure the Pid Namespace, Ipc Namespace and Network Namespace of the container. In general terms, the configuration of the container's Namespace generally has two modes: "None" mode, which creates the container's own unique Namespace, and the other is the "Container" mode, that is, the Namespace of another container. Obviously, we only need to configure the above three parameters as "Container" mode, and add the Namespace of the infra container. Specifically, CRI Manager does not need to care about how to join. For the `StartContainer`, the CRI Manager simply does a forwarding, gets the container ID from the request and calls the Container Manager's Start interface to start the container. 8 | 9 | 10 | 3. Finally, Kubelet will continuously call the two CRI interfaces ListPodSandbox and ListContainers to get the running status of the container on this node. ListPodSandbox lists the status of each infra container, while ListContainer lists the status of other containers except the infra container. The problem is that there is no difference between the infra container and the other containers for the Container Manager. So how does CRI Manager distinguish between these containers? In fact, when creating a container, CRI Manager adds an additional label to the existing container configuration to indicate the type of the container. Therefore, when the `ListPodSandbox` and `ListContainers` interfaces are implemented, different types of containers can be filtered by using the value of the label as a condition. 11 | 12 | 13 | 14 | In summary, for the creation of Pod, we can outline the process to create the infra container first, then create other containers in the pod, and let them join the Linux Namespace of the infra container. -------------------------------------------------------------------------------- /blog-en/pouch_with_rich_container_modify.md: -------------------------------------------------------------------------------- 1 | # Rich Container 2 | 3 | Rich container is a very useful container mode when containerizing applications. This mode helps technical staff to complete packaging fat applications almost with no effort. It provides efficient ways to equip more basic software or system services except for target application in a single container. Then applications in containers could be running as smoothly as usual in VM or physical machine. This is a more generalized application-centric mode. This mode brings no invasiveness at all to both developers and operators. Especially for operators, they could have abilities to maintain applications in container with all essential tools or service processes they may need as usual. 4 | 5 | Rich container mode is not the default mode PouchContainer provides. It is an additional mode PouchContainer brings to extend users' container experience. Users can still manage ordinary containers by switching rich container flag off. 6 | 7 | In a word, rich container can help enterprise to achieve the following two goals: 8 | 9 | * be compatible with legacy operating system; 10 | * still take advantanges of image concept to speed up application delivery. 11 | 12 | ## Scenario 13 | 14 | Container technology and orchestration platforms have turned quite popular right now. They both offer much better environment for applications. Despite this, we have to say containerization is the first step for enterprises to embrace container-related technologies, such as container, orchestration, service mesh and so on. It is quite a real problem to move traditional application into containers. Although some simple applications are always showing friendly to container, more traditional and complicated enterprise applications may not so lucky. These traditional applications are usually coupled with underlying infrastructure, such as architecture of machine, old kernels, even certain software out of maintenance as well. Definitely, strong coupling is not everyone's dish. It is the initiator on the road of digital transformation in enterprises. So, all the industry is seeking one possible way to work it out. The way docker provides is one, but not the best. In the past 7 years, Alibaba has also experienced the same issue. Fortunately, rich container mode is a much better way to handle this. 15 | 16 | Developers have their own programming style. Their work is to create useful applications, not to design absolute decoupled ones, so they usually take advantages of tools or system services to make it. When containerizing these applications, it is quite weak if only setting one application one process in container. Rich container mode finds out ways to make users configure the inner startup sequence of processes in container including application and system services around. 17 | 18 | Operators have a sacred duty to guard normal running of the applications. For the sake of business running in applications, technology must show enough respect for operator's tradition. Environment change is not a good message when debugging and solving issue online. Rich container mode can ensure that environment in rich container in totally the same as that in traditional VM or physical machine. If operator needs some system tools, they are located there still. If some pre and post hooks should take effect, just set them when starting rich containers. If some issues happen inside, system services started by rich container can fix them just like self-healing. 19 | 20 | ## Architecture 21 | 22 | Rich container mode is compatible with the legacy operation ways for operation team. The following architecture graph shows how to achieve this: 23 | 24 |  25 | 26 | To be more detailed, rich container promises to be compatible with oci-compatible image. When running a rich container, pouchd would take image filesystem as the rootfs of rich container itself. In the runtime of inner container, besides inner applications and system servcies, there are also some hooks like prestart hook and poststop hook. The previous one focuses on how to prepare or intialize the environment before systemd and related process run. And the latter one is almost on cleanup work when container stops. 27 | 28 | ## Get started 29 | 30 | Users can start rich container mode in PouchContainer quite easily. Provided that we need to running an ordinary image in rich container mode via PouchContainer, there are only two flags we may add: `--rich`,`--rich-mode`and `--initscript`. Here are more description about both flags: 31 | 32 | * `--rich`: identifies whether to switch on rich container mode or not. This flag has a type of `boolean`, and the default value is `false`. 33 | * `--rich-mode`: select which manner to init container, currently systemd, /sbin/init and dumb-init are supported. By default, it is dumb-init. 34 | * `--initscript`: identifies initial script executed in container. The script will be executed before entrypoint or command. Sometimes, it is called prestart hook. Lots of work can be done in this prestart hook, such as environment checking, environment preparation, network routes preparation, all kinds of agent settings, security setting and so on. This initscript may fail and user gets an related error message, if pouchd cannot find this initscript in container's filesystem which is provided by the rootfs constructed from image and potential mount volumes actually outside the container. If initscript works fine, the control of container process would be taken over by process pid 1, mainly `/sbin/init` or `dumbinit`. 35 | 36 | In fact, PouchContainer team plans to add another flag `--initcmd` to make users input prestart hook. Actually it is a simplified one of `--initscript`. Meanwhile it brings more convenience than `--initscript`. `--initcmd` can set any command as user's wish, and things do not need to be located in image in advance. We can say command is decoupled with image. But for `--initscript`, script file must be located in image first. It is some kind of coupling. 37 | 38 | If user specifies `--rich` flag and no `--initscript` flag is provided, rich container mode will still be enabled, but no initscript will be executed. If `--rich` flag misses in command line, while `--initscript` is there, PouchContainer CLI or pouchd will return an error to show that `--initscipt` can only be used along with `--rich` flag. 39 | 40 | If a container is running with `--rich` flag, then every start or restart of this container will trigger the corresponding initscipt if there is any. 41 | 42 | ### Using dumb-init 43 | 44 | Here is a simple example for rich container mode using dumb-init to init container: 45 | 46 | 1. Install dumb-init as following: 47 | 48 | ```shell 49 | # wget -O /usr/bin/dumb-init https://github.com/Yelp/dumb-init/releases/download/v1.2.1/dumb-init_1.2.1_amd64 50 | # chmod +x /usr/bin/dumb-init 51 | ``` 52 | 53 | 2. Run a container with rich mode: 54 | 55 | ```shell 56 | #pouch run -d --rich --rich-mode dumb-init registry.hub.docker.com/library/busybox:latest sleep 10000 57 | f76ac1e49e9407caf5ad33c8988b44ff3690c12aa98f7faf690545b16f2a5cbd 58 | 59 | #pouch exec f76ac1e49e9407caf5ad33c8988b44ff3690c12aa98f7faf690545b16f2a5cbd ps -ef 60 | PID USER TIME COMMAND 61 | 1 root 0:00 /usr/bin/dumb-init -- sleep 10000 62 | 7 root 0:00 sleep 10000 63 | 8 root 0:00 ps -ef 64 | ``` 65 | 66 | ### Using systemd or sbin-init 67 | 68 | In order to use systemd or /sbin/init to init container, please make sure install them on image. 69 | As shown below, centos image has both of them. 70 | Also `--privileged` is required in this situation. An example of systemd and sbin-init is as following: 71 | 72 | ``` 73 | #cat /tmp/1.sh 74 | #! /bin/sh 75 | echo $(cat) >/tmp/xxx 76 | 77 | #pouch run -d -v /tmp:/tmp --privileged --rich --rich-mode systemd --initscript /tmp/1.sh registry.hub.docker.com/library/centos:latest /usr/bin/sleep 10000 78 | 3054125e44443fd5ee9190ee49bbca0a842724f5305cb05df49f84fd7c901d63 79 | 80 | #pouch exec 3054125e44443fd5ee9190ee49bbca0a842724f5305cb05df49f84fd7c901d63 ps aux 81 | USER PID %CPU %MEM VSZ RSS TTY STAT START TIME COMMAND 82 | root 1 7.4 0.0 42968 3264 ? Ss 05:29 0:00 /usr/lib/systemd/systemd 83 | root 17 0.0 0.0 10752 756 ? Ss 05:29 0:00 /usr/lib/systemd/systemd-readahead collect 84 | root 18 3.2 0.0 32740 2908 ? Ss 05:29 0:00 /usr/lib/systemd/systemd-journald 85 | root 34 0.0 0.0 22084 1456 ? Ss 05:29 0:00 /usr/lib/systemd/systemd-logind 86 | root 36 0.0 0.0 7724 608 ? Ss 05:29 0:00 /usr/bin/sleep 10000 87 | dbus 37 0.0 0.0 24288 1604 ? Ss 05:29 0:00 /bin/dbus-daemon --system --address=systemd: --nofork --nopidfile --systemd-activation 88 | root 45 0.0 0.0 47452 1676 ? Rs 05:29 0:00 ps aux 89 | 90 | #cat /tmp/xxx 91 | {"ociVersion":"1.0.0","id":"3054125e44443fd5ee9190ee49bbca0a842724f5305cb05df49f84fd7c901d63","status":"","pid":125745,"bundle":"/var/lib/pouch/containerd/state/io.containerd.runtime.v1.linux/default/3054125e44443fd5ee9190ee49bbca0a842724f5305cb05df49f84fd7c901d63"} 92 | 93 | #pouch run -d -v /tmp:/tmp --privileged --rich --rich-mode sbin-init --initscript /tmp/1.sh registry.hub.docker.com/library/centos:latest /usr/bin/sleep 10000 94 | c5b5eef81749ce00fb68a59ee623777bfecc8e07c617c0601cc56e4ae8b1e69f 95 | 96 | #pouch exec c5b5eef81749ce00fb68a59ee623777bfecc8e07c617c0601cc56e4ae8b1e69f ps aux 97 | USER PID %CPU %MEM VSZ RSS TTY STAT START TIME COMMAND 98 | root 1 7.4 0.0 42968 3260 ? Ss 05:30 0:00 /sbin/init 99 | root 17 0.0 0.0 10752 752 ? Ss 05:30 0:00 /usr/lib/systemd/systemd-readahead collect 100 | root 20 3.2 0.0 32740 2952 ? Ss 05:30 0:00 /usr/lib/systemd/systemd-journald 101 | root 34 0.0 0.0 22084 1452 ? Ss 05:30 0:00 /usr/lib/systemd/systemd-logind 102 | root 35 0.0 0.0 7724 612 ? Ss 05:30 0:00 /usr/bin/sleep 10000 103 | dbus 36 0.0 0.0 24288 1608 ? Ss 05:30 0:00 /bin/dbus-daemon --system --address=systemd: --nofork --nopidfile --systemd-activation 104 | root 45 0.0 0.0 47452 1676 ? Rs 05:30 0:00 ps aux 105 | 106 | #cat /tmp/xxx 107 | {"ociVersion":"1.0.0","id":"c5b5eef81749ce00fb68a59ee623777bfecc8e07c617c0601cc56e4ae8b1e69f","status":"","pid":127183,"bundle":"/var/lib/pouch/containerd/state/io.containerd.runtime.v1.linux/default/c5b5eef81749ce00fb68a59ee623777bfecc8e07c617c0601cc56e4ae8b1e69f"} 108 | ``` 109 | 110 | ## Underlying Implementation 111 | 112 | Before learning underlying implementation we shall take a brief review of `systemd`, `entrypoint` and `cmd`. In addition, prestart hook is executed by runC. 113 | 114 | ### systemd, entrypoint and cmd 115 | 116 | To be added 117 | 118 | ### initscript and runC 119 | 120 | `initscript` is to be added. 121 | 122 | `runc` is a CLI tool for spawning and running containers according to the OCI specification. 123 | -------------------------------------------------------------------------------- /img/1.2-1.png: -------------------------------------------------------------------------------- https://raw.githubusercontent.com/pouchcontainer/blog/c965b003edbbe8548e50860a093276c871253bdb/img/1.2-1.png -------------------------------------------------------------------------------- /img/1.2-2.png: -------------------------------------------------------------------------------- https://raw.githubusercontent.com/pouchcontainer/blog/c965b003edbbe8548e50860a093276c871253bdb/img/1.2-2.png -------------------------------------------------------------------------------- /img/1.2-3.png: -------------------------------------------------------------------------------- https://raw.githubusercontent.com/pouchcontainer/blog/c965b003edbbe8548e50860a093276c871253bdb/img/1.2-3.png -------------------------------------------------------------------------------- /img/2.0-1.png: -------------------------------------------------------------------------------- https://raw.githubusercontent.com/pouchcontainer/blog/c965b003edbbe8548e50860a093276c871253bdb/img/2.0-1.png -------------------------------------------------------------------------------- /img/2.0-2.png: -------------------------------------------------------------------------------- https://raw.githubusercontent.com/pouchcontainer/blog/c965b003edbbe8548e50860a093276c871253bdb/img/2.0-2.png -------------------------------------------------------------------------------- /img/2.0-3.png: -------------------------------------------------------------------------------- https://raw.githubusercontent.com/pouchcontainer/blog/c965b003edbbe8548e50860a093276c871253bdb/img/2.0-3.png -------------------------------------------------------------------------------- /img/2.1-1.png: -------------------------------------------------------------------------------- https://raw.githubusercontent.com/pouchcontainer/blog/c965b003edbbe8548e50860a093276c871253bdb/img/2.1-1.png -------------------------------------------------------------------------------- /img/2.2.1-1.png: -------------------------------------------------------------------------------- https://raw.githubusercontent.com/pouchcontainer/blog/c965b003edbbe8548e50860a093276c871253bdb/img/2.2.1-1.png -------------------------------------------------------------------------------- /img/2.2.1-2.png: -------------------------------------------------------------------------------- https://raw.githubusercontent.com/pouchcontainer/blog/c965b003edbbe8548e50860a093276c871253bdb/img/2.2.1-2.png -------------------------------------------------------------------------------- /img/2.2.1-3.png: -------------------------------------------------------------------------------- https://raw.githubusercontent.com/pouchcontainer/blog/c965b003edbbe8548e50860a093276c871253bdb/img/2.2.1-3.png -------------------------------------------------------------------------------- /img/2.2.1-4.png: -------------------------------------------------------------------------------- https://raw.githubusercontent.com/pouchcontainer/blog/c965b003edbbe8548e50860a093276c871253bdb/img/2.2.1-4.png -------------------------------------------------------------------------------- /img/2.2.2-1.png: -------------------------------------------------------------------------------- https://raw.githubusercontent.com/pouchcontainer/blog/c965b003edbbe8548e50860a093276c871253bdb/img/2.2.2-1.png -------------------------------------------------------------------------------- /img/2.3-1.png: -------------------------------------------------------------------------------- https://raw.githubusercontent.com/pouchcontainer/blog/c965b003edbbe8548e50860a093276c871253bdb/img/2.3-1.png -------------------------------------------------------------------------------- /img/2.3-2.png: -------------------------------------------------------------------------------- https://raw.githubusercontent.com/pouchcontainer/blog/c965b003edbbe8548e50860a093276c871253bdb/img/2.3-2.png -------------------------------------------------------------------------------- /img/2.3-3.png: -------------------------------------------------------------------------------- https://raw.githubusercontent.com/pouchcontainer/blog/c965b003edbbe8548e50860a093276c871253bdb/img/2.3-3.png --------------------------------------------------------------------------------