7 | {{ config.repo_name }}
8 |
9 |
10 |
--------------------------------------------------------------------------------
/docs/basic-om-next-project/index.md:
--------------------------------------------------------------------------------
1 | # Basic Om-Next project
2 |
3 | ## What is Om
4 |
5 | * V in MVC
6 | * Immediate mode rendering
7 | * Components
8 |
9 | ## Updating the DOM
10 |
11 | Om (and react) compares the latest changes to the virtual dom with the previous version of the dom, essentially creating a diff. This diff is then applied to the DOM in the browser. This approach avoids having to query the DOM in the browser which is an incredibly slow process.
12 |
13 |
--------------------------------------------------------------------------------
/.gitignore:
--------------------------------------------------------------------------------
1 | # Exclude all files from root directory
2 | /*
3 |
4 | # ------------------------
5 | # Common project files
6 | !CHANGELOG.md
7 | !README.md
8 | !LICENSE
9 |
10 | # ------------------------
11 | # Include MkDocs files
12 | !docs/
13 | !includes/
14 | !overrides/
15 | !mkdocs.yml
16 |
17 | # ------------------------
18 | # Project automation
19 | !Makefile
20 |
21 | # ------------------------
22 | # Version Control
23 | !.gitignore
24 | !.gitattributes
25 | !.github/
26 |
27 |
--------------------------------------------------------------------------------
/CHANGELOG.md:
--------------------------------------------------------------------------------
1 | # Changelog
2 |
3 | ## Unreleased
4 |
5 | ### Added
6 | ### Changed
7 | - ci: spell lychee & repository trufflehog linters warn only (false positives)
8 | - dev: ci scheduled stale issue & pr check (monthly)
9 |
10 | * 2023-03-10
11 | ### Added
12 | - started a changelog
13 | ### Changed
14 | - [#90](https://github.com/practicalli/clojurescript/issues/90) convert ClojureScript book to MkDocs
15 | - Update figwheel logo name
16 | - Update ClojureScript REPL workflow image
17 |
--------------------------------------------------------------------------------
/docs/reagent-projects/tic-tac-toe/detecting-victory.md:
--------------------------------------------------------------------------------
1 | # Detecting Victory
2 |
3 | So far we can play the game until all the cells contain either a nought or cross.
4 |
5 | Lets add some code to detect winning moves.
6 |
7 | A winning move is one of either
8 |
9 | * a row of 3 consecutive noughts or crosses
10 | * a column of 3 consecutive noughts or crosses
11 | * a diagonal line of 3 consecutive noughts or crosses
12 |
13 |
14 | 
15 |
--------------------------------------------------------------------------------
/docs/overview/react-reagent.md:
--------------------------------------------------------------------------------
1 | # Reagent
2 |
3 | [Reagent](https://reagent-project.github.io/) provides a minimalistic interface between ClojureScript and React. It allows you to define efficient React components using nothing but plain ClojureScript functions and data, that describe your UI using a Hiccup-like syntax.
4 |
5 | The goal of Reagent is to make it possible to define arbitrarily complex UIs using just a couple of basic concepts, and to be fast enough by default that you rarely have to care about performance.
6 |
--------------------------------------------------------------------------------
/docs/quickstart/create-basic-project.md:
--------------------------------------------------------------------------------
1 | # Create basic project
2 |
3 |
4 | > **TODO** Lets take a look at the fundamentals of running ClojureScript using the standalone ClojureScript compiler.
5 |
6 | Create a directory structure as follows:
7 |
8 | ```
9 | cljs_compiler
10 | |_ src
11 | |_ hello_world
12 | ```
13 |
14 | [Download the standalone ClojureScript JAR](https://github.com/clojure/clojurescript/releases/download/r1.7.228/cljs.jar) and copy the JAR into the `cljs_compiler` directory
15 |
16 |
17 |
--------------------------------------------------------------------------------
/docs/web-design-basics/clojurebridge-london-website/add-welcome-section.md:
--------------------------------------------------------------------------------
1 | # Refactor welcome to a specific component
2 |
3 | Rename the `landing-page` function to `welcome-message`.
4 |
5 | Below the `welcome-message` function, create a new `landing-page` function definition as follows
6 |
7 |
8 | ```clojure
9 | (defn landing-page []
10 | [welcome-message])
11 | ```
12 |
13 | The `welcome-message` function needs to be defined above the `landing-page` function, as it `welcome-message` is call this new `landing-page` function.
14 |
--------------------------------------------------------------------------------
/docs/why-clojurescript/react-native.md:
--------------------------------------------------------------------------------
1 | # React Native
2 |
3 | 
4 |
5 | [React Native](http://www.reactnative.com/) enables you to build world-class application experiences on native platforms using a consistent developer experience based on JavaScript and React. The focus of React Native is on developer efficiency across all the platforms you care about — learn once, write anywhere. Facebook uses React Native in multiple production apps and will continue investing in React Native.
6 |
--------------------------------------------------------------------------------
/docs/reagent-projects/tic-tac-toe/interact-with-the-repl.md:
--------------------------------------------------------------------------------
1 | # Interact with the REPL
2 |
3 | Using the REPL gives you instant feedback as it evaluates your code.
4 |
5 | When Figwheel is running it sends any saved changes to the REPL and automatically updates your application in the web browser, instantly showing you the results or bugs :)
6 |
7 | You can develop the game with the REPL by saving code changes in your editor or entering code in the REPL directly (or a combination of both).
8 |
9 | This section shows you how to interact with the REPL.
10 |
--------------------------------------------------------------------------------
/.github/config/markdown-link-check.json:
--------------------------------------------------------------------------------
1 | {
2 | "ignorePatterns": [
3 | {
4 | "pattern": "^http://localhost"
5 | },
6 | {
7 | "pattern": "^mailto:*"
8 | },
9 | {
10 | "pattern": "^#*"
11 | },
12 | {
13 | "pattern": "^https://127.0.0.0/"
14 | }
15 | ],
16 | "timeout": "20s",
17 | "retryOn429": true,
18 | "retryCount": 5,
19 | "fallbackRetryDelay": "30s",
20 | "aliveStatusCodes": [
21 | 200,
22 | 206
23 | ]
24 | }
25 |
--------------------------------------------------------------------------------
/docs/figwheel-project/web-page.md:
--------------------------------------------------------------------------------
1 | # Web Page
2 |
3 | In order to run the **hello figwheel** project, we will need an HTML file to load the compiled JavaScript code into in the browser.
4 |
5 | Edit the `index.html` file to look like this:
6 |
7 | ```html
8 |
9 |
10 |
11 |
12 | Hello Figwheel
13 |Dont look for answers in this webpage, seek out the JavaScript console in your browsers dev tools...
14 | 15 | 16 | 17 | ``` 18 | -------------------------------------------------------------------------------- /docs/clojure-syntax/index.md: -------------------------------------------------------------------------------- 1 | # Some Basic Clojure 2 | 3 | We are going to use the LightTable Instarepl to try out some Clojure, giving you a basic introduction to the syntax. 4 | 5 | > **Note** Run LightTable. Open the command bar, `Ctrl-space`, and type `Instarepl`. Select `Instarepl: Open a Clojure Instarepl` 6 | 7 |  8 | 9 | For more examples of Clojure, take a look at the [Clojure Through Code github repository](https://github.com/practicalli/clojure-through-code) 10 | -------------------------------------------------------------------------------- /docs/production/externs.md: -------------------------------------------------------------------------------- 1 | # Externs 2 | 3 | The ClojureScript compiler optimizes names by replacing them with shorter names. This makes for much smaller Javascript files, minimising the time it takes to load them. 4 | 5 | This type of optimisation works very well for your own Clojurescript, however it can cause problems when optimising Javascript libraries. 6 | 7 | By specifying Externs for your project you tell the Clojurescript compiler which parts of your project are unsafe to optimize. 8 | 9 | * [Clojurescript Externs - LispCast](http://www.lispcast.com/clojurescript-externs) 10 | 11 | -------------------------------------------------------------------------------- /docs/reagent-projects/tic-tac-toe/refactor--empty-cell.md: -------------------------------------------------------------------------------- 1 | # Refactor: Empty Cell 2 | 3 | 4 | ```clojure 5 | (defn cell-empty 6 | "Generate a cell that has not yet been clicked on" 7 | [x-cell y-cell] 8 | ^{:key (str x-cell y-cell)} 9 | [:rect {:width 0.9 10 | :height 0.9 11 | :fill "grey" 12 | :x x-cell 13 | :y y-cell 14 | :on-click 15 | (fn rectangle-click [e] 16 | (println "Cell" x-cell y-cell "was clicked!") 17 | (println 18 | (swap! app-state assoc-in [:board y-cell x-cell] :cross)))}]) 19 | ``` 20 | -------------------------------------------------------------------------------- /docs/reagent-projects/tic-tac-toe/code-review-initial-project.md: -------------------------------------------------------------------------------- 1 | # Tic-tac-toe: Code Review - Initial Project 2 | 3 | Lets take a quick look at the project files to see what the figwheel template created when we ran `lein new figwheel tictactoe-reagent -- --reagent` 4 | 5 | ## Project configuration 6 | 7 | The `project.clj` contains all the configuration for the ClojureScript project. This included the libraries (dependencies) that the project uses. 8 | 9 | 10 | 11 | 12 | ## Main ClojureScript file 13 | 14 | The `src/tictactoe-reagent/core.cljs` file contains the code that the project will call when run. 15 | -------------------------------------------------------------------------------- /.github/config/gitleaks.toml: -------------------------------------------------------------------------------- 1 | title = "gitleaks config" 2 | 3 | [allowlist] 4 | description = "global allow lists" 5 | paths = [ 6 | '''gitleaks.toml''', 7 | '''(.*?)(jpg|gif|doc|docx|zip|xls|pdf|bin|svg|socket)$''', 8 | '''(go.mod|go.sum)$''', 9 | '''gradle.lockfile''', 10 | '''node_modules''', 11 | '''package-lock.json''', 12 | '''pnpm-lock.yaml''', 13 | '''Database.refactorlog''', 14 | '''vendor''', 15 | ] 16 | 17 | [[rules]] 18 | description = "AWS Example API Key" 19 | id = "aws-example-api-key" 20 | regex = '''AKIAIOSFODNN7EXAMPLE''' 21 | keywords = [ 22 | "awstoken", 23 | ] 24 | -------------------------------------------------------------------------------- /docs/twilight-zone.md: -------------------------------------------------------------------------------- 1 | 2 | 3 | You unlock this door with the key of imagination, beyond it is another dimention 4 | a dimension of sound (sound design of a language) 5 | a dimension of sight (the repl lets you see clearly what is going on in your code) 6 | a dimention of mind (thinking functionally, thinking about pure functions and immutablility, thinking about data) 7 | 8 | Your moving into a land of both shadow and substance (javascript & Clojurescript) 9 | of things and ideas (data structures and functions) 10 | 11 | you just crossed over to the Clojurescript Zone... 12 | 13 | The boundaries are only your imagination 14 | -------------------------------------------------------------------------------- /docs/figwheel-project/project-build-file.md: -------------------------------------------------------------------------------- 1 | # Project Build file 2 | 3 | Create a file called `project.clj` and add the following Clojure code: 4 | 5 | ```clojure 6 | (defproject hello-figwheel "0.1.0-SNAPSHOT" 7 | :dependencies [[org.clojure/clojure "1.7.0"] 8 | [org.clojure/clojurescript "1.7.170"]] 9 | :plugins [[lein-figwheel "0.5.0-1"]] 10 | :clean-targets [:target-path "out"] 11 | :cljsbuild { 12 | :builds [{:id "dev" 13 | :source-paths ["src"] 14 | :figwheel true 15 | :compiler {:main "hello-figwheel.core"} 16 | }] 17 | }) 18 | ``` 19 | 20 | -------------------------------------------------------------------------------- /docs/figwheel/features.md: -------------------------------------------------------------------------------- 1 | # Features 2 | 3 | ## Broadcasting to multiple REPLs 4 | 5 | Figwheel broadcasts changes to all connected clients. This means you can see code and CSS changes take place in real time on your phone and in your laptop 6 | 7 | Its possible to run multiple browser REPLs by connecting a new browser to figwheel, by visiting http://localhost:3449/ 8 | 9 | This allows you to run **dev** and **test** repl's side by side. 10 | 11 | For the **test** repl, Figwheel shows a test results indicator in the browser tab. If all the tests pass, a green square is shown. If one or more tests fail, a red square is shown. 12 | -------------------------------------------------------------------------------- /docs/quickstart/hello-world.md: -------------------------------------------------------------------------------- 1 | # Hello World 2 | 3 | 4 | Create a new file called `src/hello_world/core.cljs` and add the following code: 5 | 6 | ```clojure 7 | (ns hello-world.core) 8 | 9 | (enable-console-print!) 10 | 11 | (println "Hello world!") 12 | ``` 13 | 14 | * The first line declares the namespace, defining a named scope for our code.. Every ClojureScript file must declare a namespace and this namespace must match a path on disk. 15 | 16 | * The second line enables direct printing to the JavaScript `console` object in your browser 17 | 18 | * The third line is what should be a familiar print message. 19 | 20 | 21 | -------------------------------------------------------------------------------- /docs/why-clojurescript/who-uses-clojurescript.md: -------------------------------------------------------------------------------- 1 | # Who uses ClojureScript 2 | 3 | There are a growing number of companies using Clojure already and a similarly growing list of companies using Clojurescript 4 | 5 | * Funding Circle 6 | * Circle CI 7 | 8 | ## Circle CI 9 | 10 | Circle CI is a hosted continuous integration service and they have used ClojureScript for their front end web app (and many other apps). 11 | 12 |  13 | 14 | You can see examples of their Clojurescript [front end code on Github](https://github.com/circleci/frontend), which uses the Om reactive framework. 15 | -------------------------------------------------------------------------------- /docs/om-project-clojurex/testing.md: -------------------------------------------------------------------------------- 1 | ## Testing 2 | 3 | Tests can be written using `clojure.test` and `clojurescript.test`, which are both built into the language. 4 | 5 | https://clojurescript.org/tools/testing 6 | 7 | > **fixme** This section needs expanding upon 8 | 9 | To run the Clojure tests, use 10 | 11 | ``` shell 12 | lein test 13 | ``` 14 | 15 | To run the Clojurescript you use [doo](https://github.com/bensu/doo). 16 | 17 | Doo can run your tests against a variety of JavaScript implementations, but in the browser and "headless". For example, to test with PhantomJS, use 18 | 19 | ``` shell 20 | lein doo phantom 21 | ``` 22 | 23 | -------------------------------------------------------------------------------- /docs/om-project-clojurex/index.md: -------------------------------------------------------------------------------- 1 | # Om Project: ClojureX conference application 2 | 3 | > #### WARNING::Out of date 4 | > This tutorial is probably out of date and may have bugs. 5 | > 6 | > Try the TicTacToe project with reagnent. If you prefer the Om approach, then try [Rum](https://github.com/tonsky/rum) or [Fulcro](https://github.com/fulcrologic/fulcro) 7 | 8 | Creating a full stack clojurescript app with Om that will provide an interactive experience for conference attendees. 9 | 10 | * Browse the schedule of sessions 11 | * Star sessions that you want to attend 12 | * Show your schedule (sessions you have stared) 13 | * Show sessions by topic 14 | -------------------------------------------------------------------------------- /docs/web-design-basics/bootstrap-jumbotron.md: -------------------------------------------------------------------------------- 1 | # Bootstrap: Jumbotron 2 | 3 | Jumbotron is a simple banner style header to the web page. 4 | 5 | Use this in your main component to help draw the page 6 | 7 | We wrap the jumbotron in a bootstrap container (see previous section) 8 | 9 | ```clojure 10 | (defn conference [app-state] 11 | [:div {:className "container"} 12 | [:div {:className "jumbotron"} 13 | [:h1 (:conference-name app-state)] 14 | [:h2 (:community app-state)] 15 | [:h3 (:slogan app-state)]]]) 16 | ``` 17 | 18 |  19 | 20 | 21 | ## Jumbotron styles 22 | 23 | Inline or added to local styles.css 24 | -------------------------------------------------------------------------------- /docs/figwheel/using-figwheel.md: -------------------------------------------------------------------------------- 1 | # Using Figwheel 2 | 3 | 4 | If you are new to Figwheel here is a [Quick Start](https://github.com/bhauman/lein-figwheel/wiki/Quick-Start) tutorial. Working through this Quick Start will probably save you a tremendous amount of time. 5 | 6 | ## Usage 7 | 8 | Make sure you have the [latest version of leiningen installed](https://github.com/technomancy/leiningen#installation). 9 | 10 | Then include the following `:dependencies` in your `project.clj` file. 11 | 12 | ```clojure 13 | [org.clojure/clojure "1.7.0"] 14 | [org.clojure/clojurescript "1.7.170"] 15 | ``` 16 | 17 | Then include `lein-figwheel` in the `:plugins` 18 | section of your project.clj. 19 | 20 | ```clojure 21 | [lein-figwheel "0.5.0-3"] 22 | ``` 23 | -------------------------------------------------------------------------------- /docs/overview/react-facebook.md: -------------------------------------------------------------------------------- 1 | # React 2 | 3 | React is a new approach in synchronising client-side state and the Document Object Model (DOM) 4 | 5 | In the react API, HTML & DOM elements are constructed form similarly named React API functions. 6 | 7 | ## Om 8 | 9 | uses Facebooks React API and requires developers to learn that API when developing with Om. 10 | 11 | 12 | ## Reagent 13 | 14 | provides a programming & templating interface for facebooks react library. 15 | 16 | Rather than the steep learning curve that the React API requires, reagent uses the more familiar HTML templates via JavaScript language extensions (JSX). This is Facebooks recommended way of using React. 17 | 18 | 19 | ## Om-Next 20 | 21 | does this use the API or JSX ? 22 | -------------------------------------------------------------------------------- /docs/figwheel-workflow/check-configuration.md: -------------------------------------------------------------------------------- 1 | # Check figwheel configuration 2 | 3 | Ensure figwheel is configured correctly by calling `figwheel.main` without a build configuration. The ClojureScript code for the project is not compiled so cannot be the cause of any failure or warnings. 4 | 5 | This is quick way to identify if issues are from figwheel configuration or from ClojureScript code. 6 | 7 | ```shell 8 | clojure -M:fig -m figwheel.main 9 | ``` 10 | 11 | A web browser window will open showing the figwheel website, contains the fundamental documentation for developing with Figwheel. 12 | 13 | 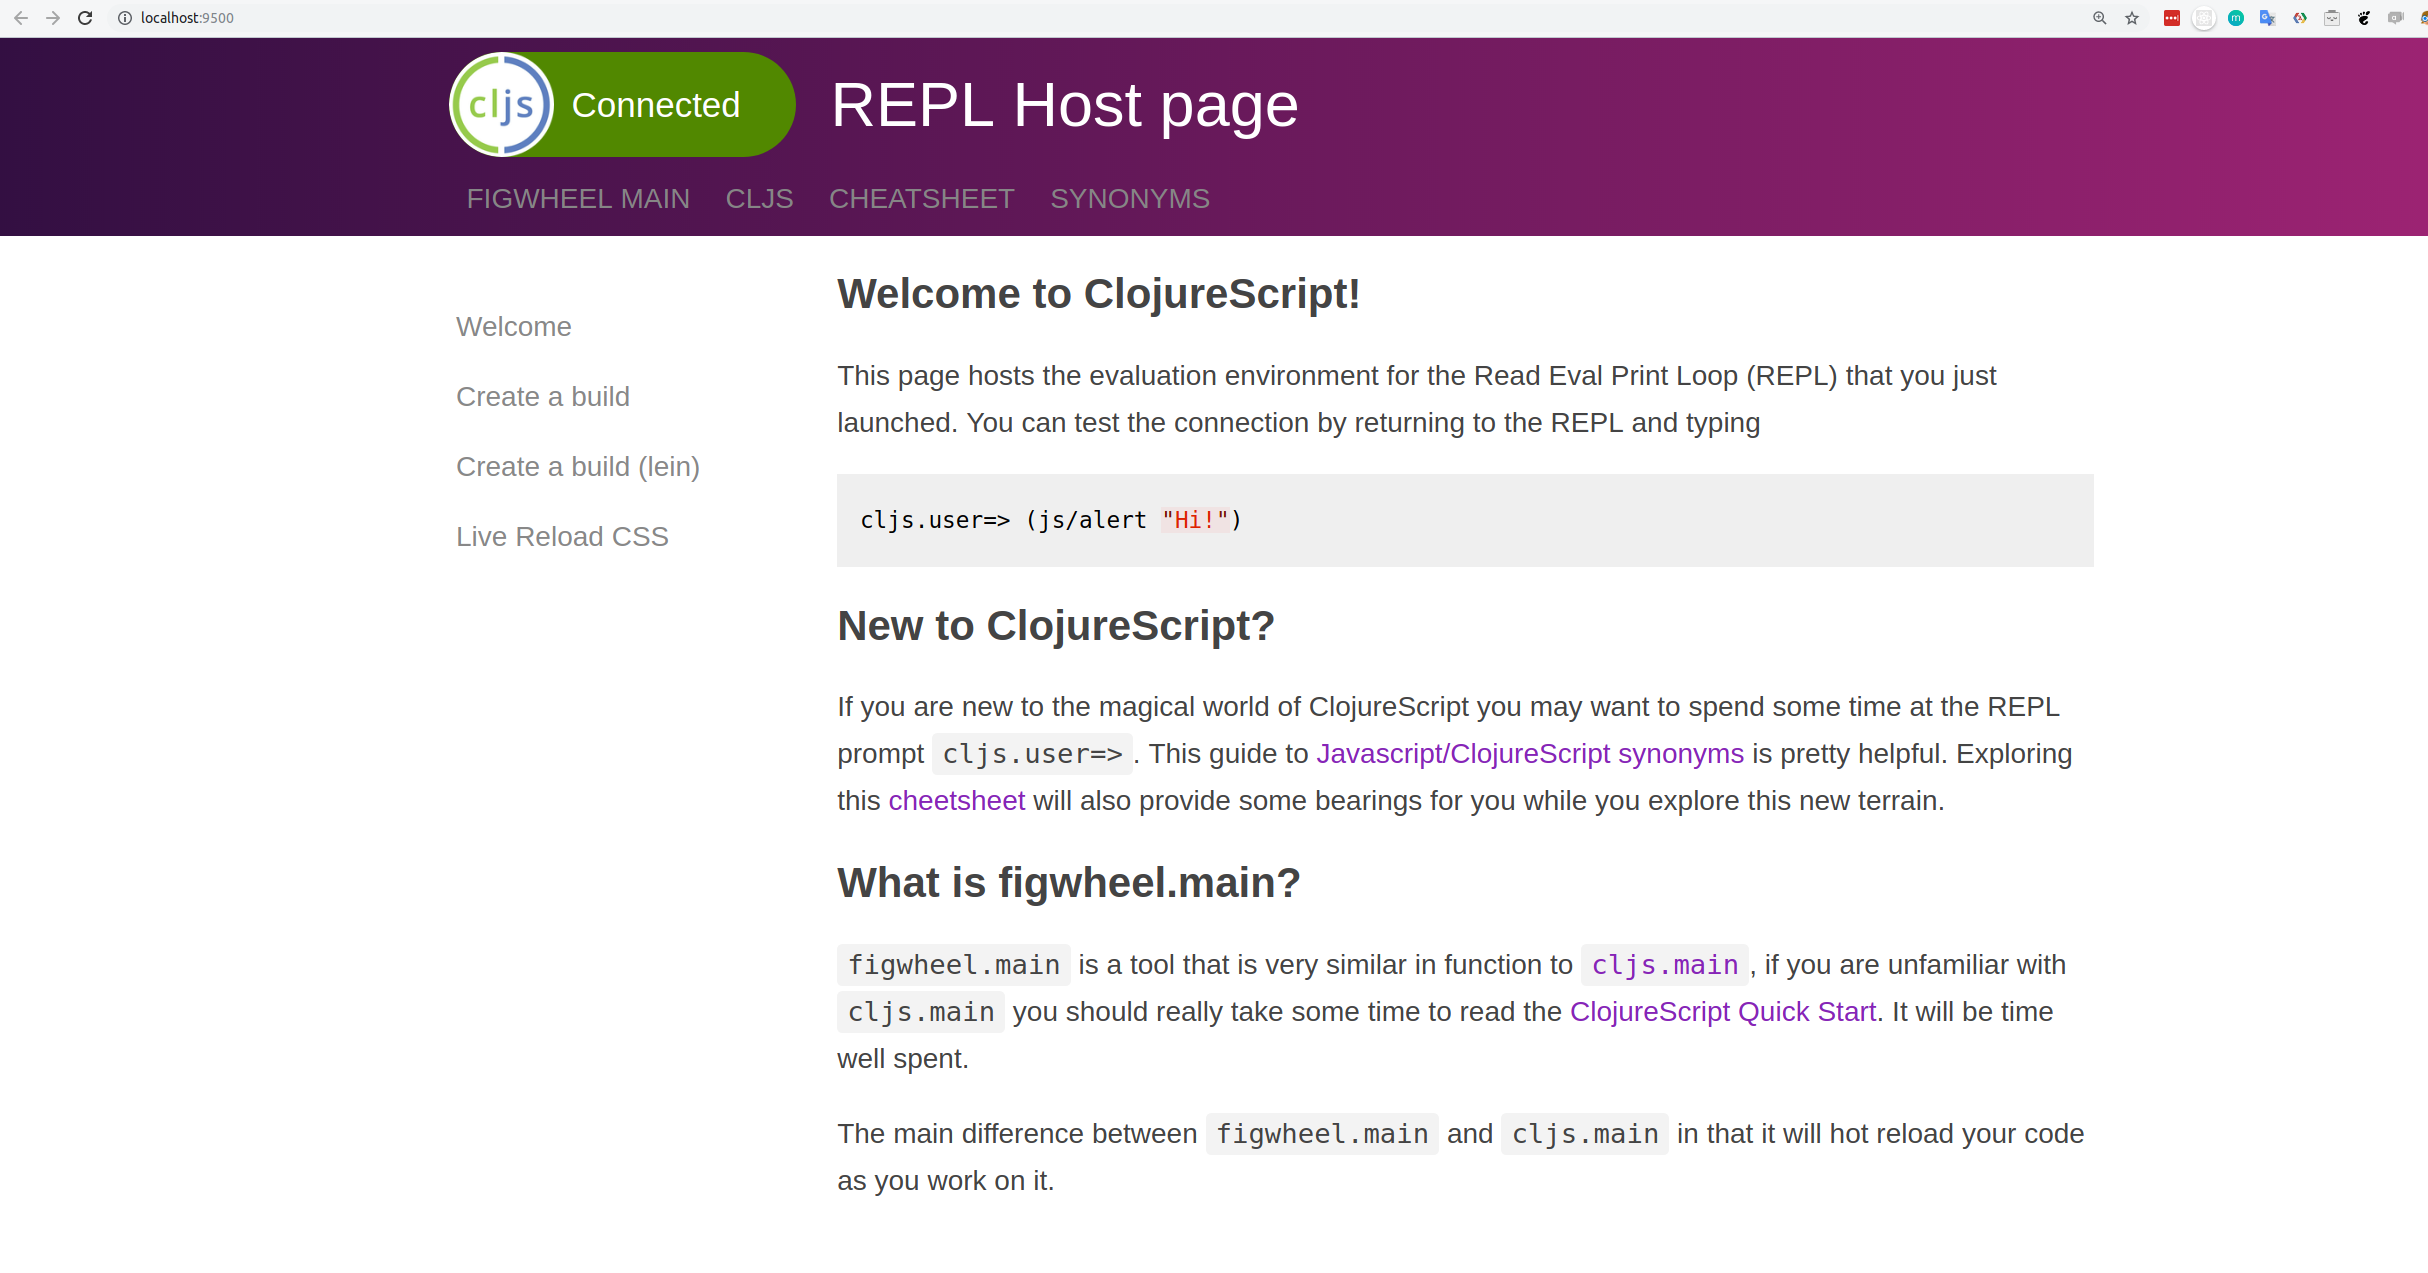 14 | -------------------------------------------------------------------------------- /docs/om-project-clojurex/create-conference-title.md: -------------------------------------------------------------------------------- 1 | # Create A Conference Title 2 | 3 | Our project already has application state, bound to the name `app-state`. 4 | 5 | ```clojure 6 | (defonce app-state (atom {:text "Hello Chestnut"})) 7 | ``` 8 | 9 | > #### Note::Refactor app-state to hold a conference name 10 | > Create a key called `:conference` 11 | > 12 | > Add a value as a string that holds the tile of the conference 13 | > 14 | > The `:title` key is no longer needed in our state. 15 | 16 | 17 | 18 | ```clojure 19 | (defonce app-state (atom {:conference-name "ClojureX"})) 20 | ``` 21 | 22 | Saving the file with this change will update the text on the website. 23 | 24 | 25 | -------------------------------------------------------------------------------- /docs/reagent-projects/tic-tac-toe/refactor-into-components.md: -------------------------------------------------------------------------------- 1 | # Refactor Into Components 2 | 3 | Keep the `tictactoe-game` component fairly simple by creating functions to generate the graphics for different cells. 4 | 5 | 6 | ```clojure 7 | (defn tictactoe-game [] 8 | [:div 9 | [:div 10 | [:h1 (:text @app-state)] 11 | [:p "Do you want to play a game?"]] 12 | [:center 13 | [:svg {:view-box "0 0 3 3" 14 | :width 500 15 | :height 500} 16 | (for [x-cell (range (count (:board @app-state))) 17 | y-cell (range (count (:board @app-state)))] 18 | (case (get-in @app-state [:board y-cell x-cell]) 19 | :empty [cell-empty x-cell y-cell] 20 | :cross [cell-cross x-cell y-cell] 21 | :nought [cell-nought x-cell y-cell]))]]]) 22 | ``` 23 | -------------------------------------------------------------------------------- /overrides/404.html: -------------------------------------------------------------------------------- 1 | 4 | 5 | 6 | {% extends "main.html" %} 7 | 8 | 9 | {% block content %} 10 |This is not the page you are looking for
11 | 12 |13 | Sorry we have arrived at a page that does not exist... 14 |
15 | 16 |17 | Practicalli website are published using Material for MkDocs 18 |
19 | 20 |21 | Use the Search bar at the top of the page or left navigation to find the relevant content. 22 |
23 | 24 |
25 |
26 |  27 |
28 |
27 |
28 |
11 | (require '[reagent.core :as r])
12 | 14 | 15 | ## Take a look at the project structure 16 | 17 | To see how our project is layed out, change into the `todo-list` directory created by this command and see the project structure that has been created. 18 | 19 | * `project.clj` - the project definition, written in Clojure 20 | * `src` for all the source code 21 | * `test` for unit test code 22 | 23 | 24 | Here is an example of what our project looks like using the `tree` command (you could use `ls -R` or a graphical file browser if you wish) 25 | 26 |  27 | 28 | 29 | > **Hint** Look closer at the directory hierachy and you will see something has happend to our `todo-list` name. Unfortunately Java does not like dashes '-' in directory or file names, so Leiningen changes the directory names to `src/todo_list/co` & `test/todo_list` and the initial test to `src/todo_list/core_test.clj`. 30 | 31 | -------------------------------------------------------------------------------- /docs/introduction/google-closure-library.md: -------------------------------------------------------------------------------- 1 | # Google Closure Library 2 | 3 | The Closure Library is a broad, well-tested, modular, and cross-browser JavaScript library. You can pull just what you need from a large set of reusable UI widgets and controls, and from lower-level utilities for DOM manipulation, server communication, animation, data structures, unit testing, rich-text editing, and more. 4 | 5 | The Closure Library is server-agnostic, and is intended for use with the Closure Compiler. 6 | Who uses Closure Library? 7 | 8 | The Closure Library serves as the base JavaScript library for many Google products, including: 9 | 10 |  11 | 12 | Now that the Closure Library is open source, more and more developers outside Google are integrating the library in their own projects. 13 | What can the Closure Library do for me? 14 | 15 | If you are developing a large or growing application, you may benefit from the Closure Library's breadth. A well-tested library can insulate you from cross-browser compatibility issues and the minutiae of client-side programming, letting you focus on the fun stuff. 16 | 17 | Find out more at: 18 | 19 | * [Google Clojure Library](https://developers.google.com/closure/library) 20 | * [Google Clojure tooling](https://developers.google.com/closure) 21 | 22 | -------------------------------------------------------------------------------- /overrides/partials/palette.html: -------------------------------------------------------------------------------- 1 | 2 | 3 | 4 | 5 | 37 | -------------------------------------------------------------------------------- /docs/reagent/wip.md: -------------------------------------------------------------------------------- 1 | # Work In Progress 2 | 3 | 4 | ## Do not deref inside lazy sequences 5 | 6 | Hey, any idea why this doesn't work? Clicking on the button doesn't update the component 7 | 8 | ```clojure 9 | (defn root-component [] 10 | (let [selected (r/atom 0)] 11 | (fn [] 12 | [:p [:button {:on-click #(reset! selected 1)} "Click me"] 13 | (map 14 | (fn [x] (str (= x @selected))) 15 | [0 1 2])]))) 16 | 17 | ``` 18 | However, this works and update the component correctly: 19 | 20 | 21 | ```clojure 22 | (defn root-component [] 23 | (let [selected (r/atom 0)] 24 | (fn [] 25 | [:p [:button {:on-click #(reset! selected 1)} "Click me"] 26 | (str (map 27 | (fn [x] (= x @selected)) 28 | [0 1 2]))]))) 29 | ``` 30 | 31 | (note the difference of where I put the str function) 32 | 33 | dereferencing the selected atom inside of a lazy sequence, so reagent isn’t able to capture the dereference and set up its tracking magic for you 34 | if you lift the dereference out of the map you should see it work: 35 | 36 | ```clojure 37 | (defn root-component [] 38 | (let [selected (r/atom 0)] 39 | (fn [] 40 | [:p [:button {:on-click #(reset! selected 1)} "Click me"] 41 | (let [selected-val @selected] 42 | (map 43 | (fn [x] (str (= x selected-val))) 44 | [0 1 2])])))) 45 | ``` 46 | -------------------------------------------------------------------------------- /docs/web-design-basics/clojurebridge-london-website/create-project.md: -------------------------------------------------------------------------------- 1 | # Create a ClojureScript project 2 | 3 | Create a new ClojureScript project for the development of a website for ClojureBridge London 4 | 5 | Use the figwheel-main template with the reagent library to create the the foundation of the project code. 6 | 7 | {% tabs deps="deps.edn projects", lein="Leiningnen projects" %} 8 | 9 | {% content "deps" %} 10 | 11 | [Clojure CLI tools](https://practical.li/clojure/clojure-cli/) and [clj-new](https://github.com/seancorfield/clj-new), for example using the `:project/new` alias from [practicalli/clojure-deps-edn](https://practical.li/clojure/clojure-cli/install/community-tools.html) user-level aliases for community tools. 12 | ```shell 13 | clj -M:project/new figwheel-main clojurebridge/landing-page -- --reagent 14 | ``` 15 | 16 | 17 | {% content "lein" %} 18 | 19 | Using [Leiningen](https://github.com/technomancy/leiningen) 20 | 21 | ```shell 22 | lein new figwheel-main clojurebridge/landing-page -- --reagent 23 | ``` 24 | 25 | {% endtabs %} 26 | 27 | 28 | A working project is created and when run will show a very basic web page 29 | 30 | > #### Hint::figwheel-main template 31 | > [figwheel-main-template](https://github.com/bhauman/figwheel-main-template) project provides a simple way to create a minimal ClojureScript project, optionally using reagent, rum, or react to create a react-style single page app (SPA) 32 | -------------------------------------------------------------------------------- /docs/quickstart/index.md: -------------------------------------------------------------------------------- 1 | # ClojureScript Quickstart 2 | 3 | In this section we will create a simple project that uses the ClojureScript compiler to generate JavaScript code from our ClojureScript code. 4 | 5 | * [Create basic project](create-basic-project.md) 6 | * [Hello World](hello-world.md) 7 | * [Create build file](create-build-file.md) 8 | * [Build Project](build-project.md) 9 | * [Create a web page](create-a-web-page.md) 10 | * [Google Closure](google-clojure.md) 11 | * [Reduce boilerplate](reduce-boilerplate.md) 12 | * [Auto-building](auto-building.md) 13 | * [Browser REPL](browser-repl.md) 14 | * [Production Build](production-build.md) 15 | * [Dependencies](dependencies.md) 16 | * [node.js](nodejs.md) 17 | * [Java Nashorn](nashorn.md) 18 | 19 | The [standalone ClojureScript JAR](https://github.com/clojure/clojurescript/releases/download/r1.7.170/cljs.jar) bundles [Clojure](http://clojure.org) 1.7.0. . ClojureScript itself only requires Java 7 but the standalone JAR comes bundled with useful [Nashorn](http://www.oracle.com/technetwork/articles/java/jf14-nashorn-2126515.html) integration that requires Java 8. 20 | 21 | 22 | > **Hint** Once you start creating ClojureScript projects you will use a build tool like [Leiningen](http://leiningen.org), [Boot](http://boot-clj.com), [Figwheel](https://github.com/bhauman/lein-figwheel), or [Maven](https://maven.apache.org/what-is-maven.html). 23 | 24 | 25 | -------------------------------------------------------------------------------- /docs/clojurescript-examples/buttons.md: -------------------------------------------------------------------------------- 1 | # Buttons 2 | 3 | A button is created using the hiccup syntax. A button is a type of input. 4 | 5 | TODO: what are all the button options? 6 | 7 | 8 | ```clojure 9 | (defn on-click-function [] 10 | ,,,) 11 | 12 | (defn reagent-component-funciton 13 | ,,, 14 | [:input {:type "button" 15 | :value "Thumbs Up!" 16 | :on-click (on-click-function)}] 17 | ``` 18 | 19 | When this button is clicked on the function `on-click` is called. 20 | 21 | The `on-click` function should be called after the data you are creating or changing. 22 | 23 | 24 | ## :on-click in-line anonymous function 25 | 26 | Instead of calling a named function, you can define an anonymous function. The longer this anonymous function becomes, the more it should be changed to a named function. 27 | 28 | ```clojure 29 | [:input {:type "button" 30 | :value "Thumbs Up!" 31 | :on-click (fn [] ,,,) ]) 32 | ``` 33 | 34 | 35 | Or using the syntax sugar for an anonymous function you can use `#()` 36 | 37 | ```clojure 38 | [:input {:type "button" 39 | :value "Thumbs Up!" 40 | :on-click #(,,,)]) 41 | ``` 42 | 43 | > #### Hint:: Use syntax sugar and anonymous functions sparingly 44 | > To keep the code as readable as possible, use named functions as the default approach for click handlers. 45 | > If the on-click function is very short then its more acceptable to use an anonymous function instead. 46 | -------------------------------------------------------------------------------- /docs/reagent-projects/tic-tac-toe/test-figwheel.md: -------------------------------------------------------------------------------- 1 | # Test Figwheel 2 | 3 | > ####Note::Test Figwheel via the REPL 4 | > Verify figwheel is working by entering the following code at the REPL prompt in the terminal window. 5 | > 6 | > This will be the same terminal window in which you ran `lein figwheel` 7 | ```clojure 8 | (js/alert "Am I connected to the browser repl with figwheel?") 9 | ``` 10 | 11 | 12 | [](/images/clojurescript-project-reagent-tictactoe--js-alert-test-code.png) 13 | 14 | 15 | An alert box should appear in the browser window that opened when figwheel was run. 16 | 17 | [](/images/clojurescript-project-reagent-tictactoe--js-alert-test.png) 18 | 19 | 20 |
21 | 22 | > ####Note::Test Figwheel from source code changes 23 | > Verify figwheel is working by editing the code in the file `src/tictactoe-reagent/core.cljs`. 24 | > 25 | > Find the `hello-world` function and change the last line to show a different message 26 | ```clojure 27 | (defn hello-world [] 28 | [:div 29 | [:h1 (:text @app-state)] 30 | [:h3 "Changes in the code are loaded as soon as you save the file!"]]) 31 | ``` 32 | 33 | 34 | [](/images/) 35 | -------------------------------------------------------------------------------- /.github/pull_request_template.md: -------------------------------------------------------------------------------- 1 | :memo: Description 2 | 3 | 4 | :white_check_mark: Checklist 5 | 6 | - [ ] Commits should be cryptographically signed (SSH or GPG) 7 | 8 | 9 | ## Practicalli Guidelines 10 | 11 | Please follow these guidelines when submitting a pull request 12 | 13 | - refer to all relevant issues, using `#` followed by the issue number (or paste full link to the issue) 14 | - PR should contain the smallest possible change 15 | - PR should contain a very specific change 16 | - PR should contain only a single commit (squash your commits locally if required) 17 | - Avoid multiple changes across multiple files (raise an issue so we can discuss) 18 | - Avoid a long list of spelling or grammar corrections. These take too long to review and cherry pick. 19 | 20 | ## Submitting articles 21 | 22 | [Create an issue using the article template](https://github.com/practicalli/blog-content/issues/new?assignees=&labels=article&template=article.md&title=Suggested+article+title), 23 | providing as much detail as possible. 24 | 25 | ## Website design 26 | 27 | Suggestions about website design changes are most welcome, especially in terms of usability and accessibility. 28 | 29 | Please raise an issue so we can discuss changes first, especially changes related to aesthetics. 30 | 31 | ## Review process 32 | 33 | All pull requests are reviewed by @practicalli-johnny and feedback provided, usually the same day but please be patient. 34 | -------------------------------------------------------------------------------- /.github/workflows/changelog-check.yaml: -------------------------------------------------------------------------------- 1 | --- 2 | # Check CHANGELOG.md file updated for every pull request 3 | 4 | name: Changelog Check 5 | on: 6 | pull_request: 7 | paths-ignore: 8 | - "README.md" 9 | types: [opened, synchronize, reopened, ready_for_review, labeled, unlabeled] 10 | 11 | jobs: 12 | changelog: 13 | name: Changelog Update Check 14 | runs-on: ubuntu-latest 15 | steps: 16 | - run: echo "🚀 Job automatically triggered by ${{ github.event_name }}" 17 | - run: echo "🐧 Job running on ${{ runner.os }} server" 18 | - run: echo "🐙 Using ${{ github.ref }} branch from ${{ github.repository }} repository" 19 | 20 | # Git Checkout 21 | - name: Checkout Code 22 | uses: actions/checkout@v5 23 | with: 24 | fetch-depth: 0 25 | sparse-checkout: | 26 | docs 27 | overrides 28 | .github 29 | CHANGELOG.md 30 | - run: echo "🐙 Sparse Checkout of ${{ github.repository }} repository to the CI runner." 31 | 32 | # Changelog Enforcer 33 | - name: Changelog Enforcer 34 | uses: dangoslen/changelog-enforcer@v3 35 | with: 36 | changeLogPath: "CHANGELOG.md" 37 | skipLabels: "skip-changelog-check" 38 | 39 | # Summary and status 40 | - run: echo "🎨 Changelog Enforcer quality checks completed" 41 | - run: echo "🍏 Job status is ${{ job.status }}." 42 | -------------------------------------------------------------------------------- /docs/create-a-project/add-ring-dependency.md: -------------------------------------------------------------------------------- 1 | # Add Ring Dependency 2 | 3 | As we are using the Ring library for our Clojure project we need to add that library as a dependency. Just like other build tools (i.e. Maven, Gradle) we include this dependency in our build file, `project.clj` 4 | 5 | > **Note** Edit the `project.clj` file and add the ring dependency. For bonus points write a simple description of the project 6 | 7 | ```clojure 8 | (defproject todo-list "0.1.0-SNAPSHOT" 9 | :description "A simple webapp using Ring" 10 | :url "http://example.com/FIXME" 11 | :license {:name "Eclipse Public License" 12 | :url "http://www.eclipse.org/legal/epl-v10.html"} 13 | :dependencies [[org.clojure/clojure "1.7.0"] 14 | [ring "1.4.0"]]) 15 | ``` 16 | 17 | > **Hint** Read the [dependencies secion of the Leiningen documentation](https://github.com/technomancy/leiningen/blob/stable/doc/TUTORIAL.md#dependencies) to learn more about adding libraries. 18 | 19 | ## Looking up Libraries & current versions 20 | 21 | There are a large number of Clojure libraries available via Clojars.org, an online repository similar to Maven Central. 22 | 23 | To look up the latest version of a library, visit the Clojars.org website and search for the library name. 24 | 25 | 26 |  27 | 28 | The dependency notation for Leiningen and Maven are documented for each library. 29 | -------------------------------------------------------------------------------- /docs/om-project-clojurex/om-cursors.md: -------------------------------------------------------------------------------- 1 | # Om Cursors 2 | 3 | Cursors are a fundamental part of Om. They let components refer to pieces of the app state without knowing where they are in the state tree. 4 | 5 | A cursor is an atom and a path to a specific part of the data structure inside that atom. For example, a cursor would be: 6 | 7 | * [app-state :sessions] - a cursor pointing to the whole of the session data 8 | * [app-state :sessions 0] - a cursor pointing to the first session in the collection of sessions 9 | * [app-state :sessions 2 :title] - a cursor pointing to the third session's title 10 | 11 | ## Om/update! 12 | 13 | call om/update! with the cursor and the part of the model to update then the app-state will be updated in the correct place. 14 | 15 | ## om/transact! 16 | 17 | A component doesn’t know exactly where in the app state data tree its data comes from. It’s the cursor‘s job to keep track of that. The cursor also lets you modify the data in the app state atom without knowing where it is. You do that with `om/transact!`. 18 | 19 | `om/transact!` needs the cursor as the first argument. The second argument is a key to grab a subvalue from the cursor. So if the current value of the cursor is {:name "Samantha" :favourite-colour "Green"}, you can grab just the name by calling `transact!` with the key `:name`. That means the function will just be called with the string "Samantha" and work on only that part of the model. 20 | 21 | 22 | -------------------------------------------------------------------------------- /docs/figwheel-workflow/rebel.md: -------------------------------------------------------------------------------- 1 | # Rich REPL UI with Rebel 2 | 3 | Figwheel will run Rebel readline to start the REPL, as the `:fig` alias includes `com.bhauman/rebel-readline-cljs` as an extra dependency. 4 | 5 | Rebel provides syntax highlighted code, auto-completion, commands to manage the REPL and Clojure documentation help, all within its rich command line. 6 | 7 | 8 |  9 | 10 | 11 | Typing `:repl/help` as a command at the Rebel prompt shows characters are syntax highlighted. The command provides a quick reference for Rebels capabilities. 12 | 13 |  14 | 15 | 16 | Evaluate expressions by typing them at the Rebel prompt and pressing `RET`, e.g. `(map inc [2 4 6 8])` 17 | 18 | JavaScript interop code also works from the Rebel prompt, e.g. `(js/alert "Notification from the command line")` will display an alert in the browser. 19 | 20 | > Practicalli Clojure provides examples of [using Rebel as a rich terminal UI for the Clojure REPL](https://practical.li/clojure/clojure-cli/repl/) 21 | > 22 | > The `clojure` command should be used to run Rebel. The `clj` wrapper script calls `rlwrap` which conflicts with Rebel, as they are both readline tools. 23 | -------------------------------------------------------------------------------- /docs/figwheel/editor-repls-nrepl.md: -------------------------------------------------------------------------------- 1 | # Editor REPLs & nREPL 2 | 3 | 4 | You may want a REPL in your editor. This makes it much easier to ship code 5 | from your buffer to be evaluated. 6 | 7 | > If you use `lein repl` or something that invokes it like CIDER, you 8 | > are using nREPL. A ClojureScript REPL will not just run over an nREPL 9 | > connection without Piggieback. 10 | 11 | If you are just starting out I would use the Figwheel console REPL because it's 12 | aready set up and ready to go, complexity conquered! 13 | 14 | If you want to integrate a REPL into your editor, here are my top 15 | recommendations: 16 | 17 | **Emacs**: 18 | * use `inf-clojure` as described on the [wiki page](https://github.com/bhauman/lein-figwheel/wiki/Running-figwheel-with-Emacs-Inferior-Clojure-Interaction-Mode) 19 | * alternatively use [Cider and nREPL](https://github.com/bhauman/lein-figwheel/wiki/Using-the-Figwheel-REPL-within-NRepl). *Using the ClojureScript REPL over an nREPL connection is considered advanced* 20 | 21 | **Cursive**: use the instructions on the [wiki page](https://github.com/bhauman/lein-figwheel/wiki/Running-figwheel-in-a-Cursive-Clojure-REPL) 22 | 23 | **Vi**: use `tmux` mode to interact with the figwheel REPL, still trying to get a wiki page for this if you can help that would be great 24 | 25 | If you are going to use nREPL with Figwheel please see: 26 | 27 | [Using Figwheel within NRepl](https://github.com/bhauman/lein-figwheel/wiki/Using-the-Figwheel-REPL-within-NRepl) 28 | -------------------------------------------------------------------------------- /docs/om-project-clojurex/adding-session-data-to-state.md: -------------------------------------------------------------------------------- 1 | # Adding Session Data to State 2 | 3 | Use the sessions defined for `john`, `kris` and `bug` and add them to the state. 4 | 5 | > #### Note::Add sessions to the state 6 | > Using the names of the session we just defined, add the sessions to the state using the REPL or add to the `core.cljs` and evaluate the code. 7 | > 8 | > Use the [swap!](https://clojuredocs.org/clojure.core/swap!) function to update the `app-state`. See the section on [interacting with the REPL](interact-with-project.html) 9 | > 10 | > The [update](https://clojuredocs.org/clojure.core/update) function can be used to add values to an existing key. 11 | 12 | 13 | 14 | ```clojure 15 | (swap! app-state update :sessions conj john) 16 | 17 | (swap! app-state update :sessions conj kris) 18 | 19 | (swap! app-state update :sessions conj bug) 20 | ``` 21 | 22 | 23 | 24 | > #### Hint:: 25 | > Using the comment reader macro, `#_`, you can add code to your Clojurescript file for test the application and avoid that code being evaluated each time the file is saved. 26 | > 27 | > Placing your cursor at the end of the expression will allow you to evaluate it in your editor, even though it is commented out. 28 | > 29 | > If the state gets messy or something goes wrong, then you can also reset the state: 30 | > 31 | > `(reset! app-state {:conference-name "ClojureX" :sessions []})` 32 | -------------------------------------------------------------------------------- /docs/install/lumo.md: -------------------------------------------------------------------------------- 1 | # Lumo - Fast, cross-platform, standalone ClojureScript environment 2 | 3 | Read the [announcement blog post](https://anmonteiro.com/2016/11/the-fastest-clojure-repl-in-the-world/). 4 | 5 | ## Contents 6 | 7 | - [Installation](#installation) 8 | - [Using Lumo](#using-lumo) 9 | - [Building](#building) 10 | - [Copyright & License](#copyright--license) 11 | 12 | ## Installation 13 | 14 | ### Via [NPM](https://www.npmjs.com/package/lumo-cljs) 15 | 16 | ```shell 17 | $ npm install -g lumo-cljs 18 | ``` 19 | 20 | Note: the installed binary will be named `lumo` rather than `lumo-cljs`_ 21 | 22 | ### Via [Homebrew](http://brew.sh/) (macOS) 23 | 24 | ```shell 25 | $ brew install lumo 26 | ``` 27 | 28 | **Note:** If you want to install a binary built from master, run `brew install --HEAD lumo` 29 | (at your own responsibility). 30 | 31 | ### Manual 32 | 33 | 1. Download the [latest release](https://github.com/anmonteiro/lumo/releases/latest). 34 | 2. Move it to somewhere in your `$PATH`. 35 | 36 | ## Using Lumo 37 | 38 | Enter `lumo` at the command line to launch it. 39 | 40 | Check out `lumo -h` for usage instructions and supported command line options. 41 | 42 | ## Building 43 | 44 | To build Lumo from source: 45 | 46 | 1. Make sure you have installed [Boot](http://boot-clj.com/) and [Yarn](https://yarnpkg.com/). 47 | 2. At the root of the repository, run: `boot release`. 48 | 3. The resulting binary can be found in `build/lumo` (or `build\lumo.exe` if you're 49 | on Windows). 50 | -------------------------------------------------------------------------------- /docs/web-design-basics/clojurebridge-london-website/add-bluma-css.md: -------------------------------------------------------------------------------- 1 | # Add Bulma CSS library 2 | 3 | Bulma is a CSS only framework (no JavaScript) that provides a range of easy to apply styles using meaningful style names. Its quite lightweight and therefore fast to load along with your website. 4 | 5 | Bulma also recommends using FontAwesome library, to add common logos such at GitHub. 6 | 7 | ## Add Bulma CSS and FontAwesome icons to project web page 8 | 9 | Edit the `resources/public/index.html` file in your project 10 | 11 | Add the following line of code inside the `` tag: 12 | 13 | ```html 14 | 15 | 16 | ``` 17 | 18 | See the [Practicalli Landing page index.html file](https://github.com/practicalli/practicalli.github.io/blob/master/resources/public/index.html) for an example 19 | 20 | 21 | ## Bulma via Clojure Hiccup code 22 | 23 | When using Clojure Hiccup code to generate the HTML page that loads the application (or any other HTML pages), Bulma CSS and FontAwesome can also be included using the [hiccup style syntax](/hiccup-style-syntax.md). 24 | 25 | ```clojure 26 | [:link {:rel "stylesheet" 27 | :href "https://cdn.jsdelivr.net/npm/bulma@0.9.4/css/bulma.min.css"}] 28 | [:script {:defer true 29 | :src "https://cdnjs.cloudflare.com/ajax/libs/font-awesome/6.2.0/css/all.min.css"}] 30 | ``` 31 | -------------------------------------------------------------------------------- /docs/reagent-projects/tic-tac-toe/start-the-repl.md: -------------------------------------------------------------------------------- 1 | # Tic-tac-toe: Start the REPL with Figwheel 2 | 3 | [Figwheel](https://github.com/bhauman/lein-figwheel) provides the connection between your ClojureScript code and the REPL in your browser. 4 | 5 | When you save changes to your code (ClojureScript, HTML or CSS) then figwheel will push those changes into the browser REPL and update the page in the browser. 6 | 7 | > ####Note::Run Figwheel 8 | > In your terminal window, run figwheel from the project root directory: 9 | ```bash 10 | lein figwheel 11 | ``` 12 | > 13 | > Alternatively: 14 | > start the repl in your Clojure editor, eg in Spacemacs its `clojurescript-jack-in` 15 | 16 | {% youtube %} 17 | https://www.youtube.com/watch?v=7QUz81C0hz0 18 | {% endyoutube %} 19 | 20 | ## What just happened ? 21 | 22 | Dependencies for the project were checked and any missing libraries were downloaded (nothing missing in the video above). 23 | 24 | The ClojureScript code in the project is compiled. Once compiled, a new browser window or tab will automatically open at http://localhost:3449/index.html 25 | 26 | When figwheel connects to the browser, a ClojureScript REPL prompt connected to the browser appears in the terminal window. 27 | 28 | 29 | [](/images/clojurescript-project-reagent-tictactoe--cli-repl-connected.png) 30 | 31 | 32 | Figwheel is now running and will auto compile and send all changes to the browser without the need to manually reload the page in the browser. 33 | -------------------------------------------------------------------------------- /docs/create-a-project/run-webserver.md: -------------------------------------------------------------------------------- 1 | # Run webserver 2 | 3 | > **Note** Run the webserver we use Leiningen, the Clojure build automation tool. In the root of your Clojure project, the directory that contains `project.clj` 4 | 5 | In a command line terminal, navigate to the root of your project and type the following command 6 | 7 | ```bash 8 | lein run 8000 9 | ``` 10 | 11 | This command should start up a Jetty web server that listens on http://localhost:8000. 12 | 13 |  14 | 15 | > **Note** Open http://localhost:8000 in your browser and try out different pages, such at [/hello]( http://localhost:8000/hello), [/goodbye]( http://localhost:8000/goodbye) or [/complete-indifference]( http://localhost:8000/complete-indifference). It should not matter what page you visit, you should get the same response. 16 | 17 |  18 | 19 | --- 20 | 21 | ## The project so far 22 | 23 | The code and configuration we have created so far are in the [clojure-webapps-example](https://github.com/practicalli/clojure-webapps-example) github repository, specifically the branch called `01-create-a-webserver` 24 | 25 | If something is not working or you want to speed up, simply clone the project into a new directory using the command: 26 | 27 | ```bash 28 | git clone https://github.com/practicalli/clojure-webapps-example 29 | ``` 30 | Once you have cloned the project, checkout the `01-create-a-webserver` branch 31 | 32 | ``` 33 | git checkout 01-create-a-webserver 34 | ``` 35 | -------------------------------------------------------------------------------- /docs/why-clojurescript/index.md: -------------------------------------------------------------------------------- 1 | # Why ClojureScript 2 | 3 | Clojurescript is a well designed, general purpose programming language that generates highly optimised Javascript output. 4 | 5 | The Clojurescript syntax is small and simple to learn, although becoming used to thinking functionally will take a little more effort. Functional programming will make your applications simpler to understand and therefore easier to maintain and extend. 6 | 7 | Clojurescript also provides an easy way to use Javascript and its vast array of libraries. You can call Javascript functions using the same syntax as Clojurescript. 8 | 9 | Application design is simple and yet powerfull, with a focus on managing data with immutable data structures (list, vector, map & set). 10 | 11 |  12 | 13 | 14 | ## Leaning Clojurescript is valuable 15 | 16 | So in this section we will cover the aspects that make learning ClojureScript valuable. 17 | 18 | * [Community](community.html) 19 | * [Google Closure](google-clojure.html) 20 | * [Build Tools](build-tools.html) 21 | * [Source Maps](source-maps.html) 22 | * [CLJSJS](cljsjs.html) 23 | * [cljx & cljc](cljx-cljc.html) 24 | * [Transit](transit.html) 25 | * [Using Bootstrap](using-bootstrap.html) 26 | * [Devcards](devcards.html) 27 | * [Functional Reactive Apps](functional-reactive-apps.html) 28 | 29 | 30 | > **Hint** Many ideas and imagery were used from the Clojure Conj talk: [Clojure for Skeptics by Derek Slager](https://www.youtube.com/watch?v=gsffg5xxFQI) on Youtube.com. 31 | 32 | -------------------------------------------------------------------------------- /docs/clojure-syntax/control-flow.md: -------------------------------------------------------------------------------- 1 | # Control Flow 2 | 3 | 4 | 5 | ## If this then that, else the other 6 | 7 | Using the `if` funtion you can test if an expression evaluates to true. If it is true, the first value is returned, if its false the second value is returned. 8 | 9 | Here is a simple example to see if one number is bigger that another 10 | 11 | ```clojure 12 | (if (> 3 2) "Higher" "Lower") 13 | 14 | => "Higher" 15 | ``` 16 | 17 | ```clojure 18 | (fn [x] 19 | (if (even? x) 20 | (inc x) 21 | (dec x))) 22 | ``` 23 | 24 | ``` 25 | (doc if) 26 | (doc if-not) 27 | ``` 28 | 29 | ## When 30 | 31 | ```clojure 32 | (when ( (when (> 3 2) 33 | (println "3 is greater than 2") 34 | "Higher"))) 35 | 36 | => 3 is greater than 2 37 | => "Higher" 38 | ``` 39 | You can use Lighttable to see the docs for a function by placing the cursor over the function name and pressing `Cntrl-d` - or search the Clojure docs in the command window 40 | ``` 41 | (doc when) 42 | (doc when-not) 43 | ``` 44 | 45 | 46 | ## Conditional - Case 47 | 48 | ```clojure 49 | (case (inc 3) 50 | 3 "Uh oh" 51 | 4 "Yep!" 52 | "Not so sure...") 53 | ``` 54 | ``` 55 | "Yep!" 56 | ``` 57 | 58 | ```clojure 59 | (cond 60 | (= 4 (inc 2)) "(inc 2) is 4" 61 | (= 4 (/ 8 2)) "Cond picks the first correct case" 62 | (zero? (- (* 4 2) 8) "This is true, but we won't get here" 63 | :otherwise "None of the above." 64 | ``` 65 | ``` 66 | "Cond picks the first correct case" 67 | ``` 68 | 69 | ``` 70 | (doc cond) 71 | (doc condp) 72 | ``` 73 | -------------------------------------------------------------------------------- /docs/reagent-projects/tic-tac-toe/design-game-board.md: -------------------------------------------------------------------------------- 1 | # Designing the Game Board 2 | 3 | Using the REPL we can experiment with different ways to model the game board. 4 | 5 | ## How to represent a cell 6 | 7 | A cell is either going to be empty, or contain a nought or cross. For simplicity, we will start with three keywords 8 | 9 | ```clojure 10 | :empty 11 | :nought 12 | :cross 13 | ``` 14 | 15 | ## Representing the whole board 16 | 17 | We could just hard code the board as a vector of rows, with each row being a vector. In this example we set all the board cells to `:empty` 18 | 19 | ```clojure 20 | [[:empty :empty :empty] 21 | [:empty :empty :empty] 22 | [:empty :empty :empty]] 23 | ``` 24 | 25 | Generating a data structure to represet the game board 26 | 27 | To create a row is simple to do using the repeat function to generate 3 :empty keywords and return them as a list 28 | 29 | ```eval-clojure 30 | (repeat 3 :empty) 31 | ``` 32 | 33 | To make this a vector we can just wrap that in a vec function 34 | 35 | ```eval-clojure 36 | (vec (repeat 3 :empty)) 37 | ``` 38 | 39 | To create three rows we just repeat the code above 3 times 40 | 41 | ```eval-clojure 42 | (vec (repeat 3 (vec (repeat 3 :empty)))) 43 | ``` 44 | 45 | We can use the above code in a function and replace 3 with a local name that takes the value of the argument passed in so lets write a game-board function. 46 | 47 | 48 | ------------------------------------------ 49 | 50 | If you need a quick break while modeling your game board, here is a very silly distraction 51 | 52 | {% youtube %} 53 | https://youtu.be/0h9jN12QbdE 54 | {% endyoutube %} 55 | -------------------------------------------------------------------------------- /docs/reagent-project-clojurex/create-project.md: -------------------------------------------------------------------------------- 1 | # Create the project 2 | 3 | Create the project using the Leiningen Chestnut template 4 | 5 | ``` 6 | lein new chestnut conference-reagent -- --reagent 7 | ``` 8 | 9 | This will create a new project that includes the Reagent libraries (rather than the default om libraries). 10 | 11 | > #### Hint::Passing Options to Leiningen 12 | > The `--` after the project name is needed to tell the command line to pass the option `--reagent` to the `lein` command, rather than be interpreted by the command line shell itself. 13 | 14 | Open the `conference-reagent/project.clj` file to review the dependencies already added to the project. 15 | 16 | The only difference in dependencies is `[reagent "0.6.0-rc"]` instead of `omcljs/om`. 17 | 18 | ```clojure 19 | :dependencies [[org.clojure/clojure "1.8.0"] 20 | [org.clojure/clojurescript "1.9.89" :scope "provided"] 21 | [com.cognitect/transit-clj "0.8.285"] 22 | [ring "1.4.0"] 23 | [ring/ring-defaults "0.2.0"] 24 | [bk/ring-gzip "0.1.1"] 25 | [ring.middleware.logger "0.5.0"] 26 | [compojure "1.5.0"] 27 | [environ "1.0.3"] 28 | [reagent "0.6.0-rc"]] 29 | ``` 30 | 31 | > #### Hint::Running multiple projects 32 | 33 | > To use Figwheel with multiple projects we will need to change the `:server-port` configuration to use a different port number. 34 | 35 | > Edit the `project.clj`. 36 | 37 | > Find the `:figwheel` section. 38 | 39 | > Uncomment the `:server-port` configuration and change the number to something unique, eg. 3450 40 | 41 | -------------------------------------------------------------------------------- /docs/install/leiningen.md: -------------------------------------------------------------------------------- 1 | # Leiningen Build tool 2 | 3 | [Leiningen](http://leiningen.org/) (pronounced line-ing) is the build automation tool used to manage Clojure projects. Features include: 4 | 5 | * Creating Clojure Projects 6 | * Dependency Management 7 | * Running browser-REPL interactive environment (figwheel plugin) 8 | 9 |
10 | 
11 |
12 |
13 | ## Install Leiningen
14 |
15 | Install Leiningen by saving the Leiningen install script to somewhere on your operating system path, eg `~/bin`and then running that script from the command line.
16 |
17 | * [Install script for Linux & MacOSX](https://raw.githubusercontent.com/technomancy/leiningen/stable/bin/lein)
18 | * [Install script for Microsoft Windows](https://raw.githubusercontent.com/technomancy/leiningen/stable/bin/lein.bat)
19 |
20 |
21 | On Linux and MacOSX, make the script executable first and then run the `lein` script
22 |
23 | ```bash
24 | chmod a+x ~/bin/lein
25 | lein
26 | ```
27 |
28 | > **hint** I create a `~/bin` directory and add it to my operating system execution path ($PATH), placing the `lein` script in `~/bin` so I can call it from anywhere on the filesystem.
29 |
30 |
31 | The first time you run this script it downloads a Java archive file (JAR) of the latest version of Leiningen. When you run the script again, you have a working Leiningen build tool.
32 |
33 | ## Testing Leiningen
34 |
35 | Test that Leiningen is installed with the following command
36 |
37 | lein version
38 |
39 | Output should look similar to:
40 |
41 | Leiningen 2.7.1 on Java 1.8.0 Java HotSpot(TM) 64-Bit Server VM
42 |
--------------------------------------------------------------------------------
/docs/figwheel-project/run-figwheel.md:
--------------------------------------------------------------------------------
1 | # Run Figwheel
2 |
3 | At this point make sure you are in the project root directory `hello_figwheel` and run Figwheel as follows:
4 |
5 | ```
6 | lein figwheel
7 | ```
8 |
9 | You should see a bunch of clojure libraries get downloaded and installed into your local maven repository (which happens to be in `~/.m2` on my Mac).
10 |
11 | After that Figwheel will start up, compile your `hello-seymore.core` library and try to start a repl, BUT THE REPL WILL NOT START. Sorry for the caps, but this behavior is expected.
12 |
13 | Type **Ctrl-C** to quit the Figwheel process.
14 |
15 | If you list your project directory you should see this:
16 | ```
17 | $ ls
18 | figwheel_server.log
19 | index.html
20 | main.js
21 | out
22 | project.clj
23 | src
24 | target
25 | ```
26 |
27 | Some new files have been created. The `main.js` file and the `out` directory contain your compiled ClojureScript code.
28 |
29 | If you look at the contents of `main.js` you will see:
30 |
31 | ```
32 | if(typeof goog == "undefined") document.write('');
33 | document.write('');
34 | document.write('');
35 |
36 | document.write("");
37 | ```
38 |
39 | The last line of `main.js` loads the code that will connect to the Figwheel server. This is what enables the Figwheel server to communicate with the application, which is running in the browser.
40 |
41 |
--------------------------------------------------------------------------------
/docs/reagent-projects/tic-tac-toe/interact-with-the-repl-via-editor.md:
--------------------------------------------------------------------------------
1 | # Interact with the REPL via your editor
2 |
3 | > ####Hint::
4 | > Your editor should either be running the Clojure/ClojureScript REPL's or connected to the REPLs run with `lein figwheel`
5 |
6 | ------------------------------------------
7 |
8 | > ####Note::Edit welcome message
9 | > Edit the message [:h3] in the `hello-world` component and see how it changes in the web browser
10 | ```clojure
11 | (defn hello-world []
12 | [:div
13 | [:h1 (:text @app-state)]
14 | [:h3 "Edit this and watch it change!"]])
15 | ```
16 |
17 |
18 | ```clojure
19 | (defn tictactoe-game []
20 | [:div
21 | [:h1 (:text @app-state)]
22 | [:p "Do you want to play a game?"]])
23 | ```
24 |
25 |
26 |
27 | ------------------------------------------
28 |
29 | > ####Note::Change the title by editing the `app-state`
30 | > Change the :text message in `app-state` and see what happens in the browser
31 | ```clojure
32 | (defonce app-state (atom {:text "Hello World"}))
33 | ```
34 |
35 |
36 |
37 | ```clojure
38 | (defonce app-state (atom {:text "Lets Play TicTacToe"}))
39 | ```
40 |
41 | When you save a change to the `app-state` nothing happens in the browser.
42 |
43 | As we use `defonce` rather than `def`, then Clojure does not update the definition if it already exists. This prevents your app state from being cleared every time you save a change in your editor.
44 |
45 | To see the change of a `defonce` you need to refresh your browser page.
46 |
47 |
48 |
--------------------------------------------------------------------------------
/docs/web-design-basics/clojurebridge-london-website/index.md:
--------------------------------------------------------------------------------
1 | # Simple ClojureScript websites
2 |
3 | Create a relatively simple, responsive website that is deployed live on the Internet (or privately if preferred).
4 |
5 | Discover how to use the following tools:
6 |
7 | - ClojureScript - writing functions for sections of content
8 | - Reagent - add basic state management to the website
9 | - Bulma - a CSS only framework for responsive design
10 | - Figwheel-main - an interactive development environment for ClojureScript
11 | - GitHub / GitLab Pages - free services for deploying websites on the Internet
12 |
13 |
14 | ### Example ClojureScript websites
15 | * [ClojureBridge London](https://clojurebridgelondon.github.io/), a landing page for the event using Bulma CSS, global navigation and responsive design.
16 | * [ClojureBridge London source code](https://github.com/ClojureBridgeLondon/clojurebridge-landing-page)
17 | * [Practicalli](https://practicalli.github.io/), a landing page using Bulma CSS (similar to the above)
18 | * [Clojure Study Group project](https://github.com/practicalli/clojure-study-group-website) a ClojureScript and bootstrap website
19 |
20 |
21 | ## Looking for something more?
22 |
23 | [pesterhazy/cljs-spa-example](https://github.com/pesterhazy/cljs-spa-example.git) is a more involved example of a Single Page Application in ClojureScript. This project uses figwheel-main, reagent, webpack, router5, yarn package management for npms,
24 |
25 |
26 | ## References
27 | * [Reagent Mysteries - part 1: vectors and sequences](https://presumably.de/reagent-mysteries-part-1-vectors-and-sequences.html)
28 | * [SVG in reagent](https://www.mattgreer.org/articles/embedding-svg-into-a-reagent-component/)
29 |
--------------------------------------------------------------------------------
/docs/om-project-clojurex/add-session-style.md:
--------------------------------------------------------------------------------
1 | # Add Session Style
2 |
3 | To make it easier to read the individual sessions, add a style called [panel](https://www.w3schools.com/bootstrap/bootstrap_panels.asp). To make it interesting use a `primary-panel` style or one of the other coloured panels.
4 |
5 | > #### Note::Add the Panel Prime style to each session
6 | > Edit the `src/clojurex/cljs/core.cljs` file and update the `root-component` to include the `panel` style for each session
7 |
8 |
9 |
10 |
11 |
12 | ```clojure
13 | (defn root-component [app owner]
14 | (reify
15 | om/IRender
16 | (render [_]
17 | (dom/div #js {:className "container"}
18 | (dom/h1 #js {:className "jumbotron"} (:conference-name app))
19 | (for [session (:sessions app)]
20 | (dom/div #js {:className "panel panel-primary"}
21 | (dom/h1 #js {:className "panel-heading"} (:title session))
22 | (dom/div #js {:className "panel-body"}
23 | (dom/h3 nil (str "By " (:speaker-name session)))
24 | (dom/div nil (:description session))
25 | (dom/hr nil)
26 | (dom/div nil (str "About " (:speaker-name session) ":"))
27 | (dom/div nil (:speaker-biography session))
28 | (dom/div nil (:twitter-handle session))
29 | (dom/div nil (:github-handle session))
30 | (dom/div nil (:speakers-website session)))))))))
31 | ```
32 |
33 |
34 |
35 |
36 | Take a look at your page and the sessions should all be wrapped by a panel.
37 |
38 | 
39 |
40 |
--------------------------------------------------------------------------------
/docs/figwheel-project/index.md:
--------------------------------------------------------------------------------
1 | # Figwheel Project
2 |
3 | In this section we will create a ClojureScript project using Figwheel to manage the build and auto-reloading of changes into the project
4 |
5 | * [Create Project](create-project.md)
6 | * [ClojureScript file](clojurescript-file.md)
7 | * [Project Build file](project-build-file.md)
8 | * [Run Figwheel](run-figwheel.md)
9 | * [Web Page](web-page.md)
10 | * [Run Figwheel again](run-figwheel-again.md)
11 | * [Add a counter](add-a-counter.md)
12 | * [Auto Reloading](auto-reloading.md)
13 | * [Serving assets](serving-assets.md)
14 | * [Using the REPL](using-the-repl.md)
15 |
16 |
17 | > Understanding how Figwheel works provides clarity should a change to the project build file be required
18 |
19 |
20 | The figwheel-main template will create the configuration files and directory structure for a project, including a simple working app.
21 |
22 | === "Practicalli Clojure CLI Config"
23 | `:project/create` alias is provided by [Practicalli Clojure CLI Config](https://practical.li/clojure/clojure-cli/practicalli-config/) and uses the [deps-new]() tool to create projects, optionally with [Practicalli Project Templates](https://practical.li/clojure/clojure-cli/projects/templates/practicalli/)
24 |
25 | Create a new project using the [`practicalli/landing-page` template](https://practical.li/clojure/clojure-cli/projects/templates/practicalli/landing-page/){target=_blank}.
26 |
27 | ```shell
28 | clojure -T:project/create :template practicalli/landing-page :name practicalli/website-name
29 | ```
30 |
31 | `src/practicalli/landing_page.clj` is the main ClojureScript source code file which is used to generate the JavaScript app loaded into the browser.
32 |
33 |
--------------------------------------------------------------------------------
/docs/reagent-projects/tic-tac-toe/computer-move--basic.md:
--------------------------------------------------------------------------------
1 | # Computer Move: Basic
2 |
3 | Lets assume that the human player always goes first for now.
4 |
5 | Once the human player has taken their turn, we will call a function for the computer to take their turn.
6 |
7 | So we add a call to `computer-move` to the `:on-click` option of the `cell-empty` function.
8 |
9 | ```clojure
10 | (defn cell-empty
11 | "Generate a cell that has not yet been clicked on"
12 | [x-cell y-cell]
13 | ^{:key (str x-cell y-cell)}
14 | [:rect {:width 0.9
15 | :height 0.9
16 | :fill "grey"
17 | :x x-cell
18 | :y y-cell
19 | :on-click
20 | (fn rectangle-click [e]
21 | (println "Cell" x-cell y-cell "was clicked!")
22 | (println
23 | (swap! app-state assoc-in [:board y-cell x-cell] :nought))
24 | (computer-move))}])
25 | ```
26 |
27 | Then add the `computer-move` function
28 |
29 | ```clojure
30 | (defn computer-move
31 | "Takes a turn for the computer, adding an X shape to the board"
32 | []
33 | (swap! app-state assoc-in [:board 0 0] :cross))
34 | ```
35 |
36 | 
37 |
38 |
39 | > #### Hint:: Thinking time
40 | > We could add some artificial thinking time to the computer move using `js/setTimeout`. If you do set some thinking time, then you should also visualise that the computer is thinking, so the human player knows what is going on.
41 | ```clojure
42 | (js/setTimeout (fn []) timeout)
43 | ```
44 |
45 | 
46 |
--------------------------------------------------------------------------------
/docs/reagent-projects/tic-tac-toe/chrome-devtools.md:
--------------------------------------------------------------------------------
1 | # Chrome DevTools
2 |
3 | The [Chrome Developer Tools](https://developers.google.com/web/tools/chrome-devtools/) (DevTools for short), are a set of web authoring and debugging tools built into Google Chrome. The DevTools provide web developers deep access into the internals of the browser and their web application. Use the DevTools to efficiently track down layout issues, set JavaScript breakpoints, and get insights for code optimization.
4 |
5 | As our ClojureScript generates JavaScript, then the Chrome DevTools provide an additional feedback tool for when our code is running in the browser.
6 |
7 | Whilst we build the Tic Tac Toe game we will use the [Console Panel](https://developers.google.com/web/tools/chrome-devtools/console/), [Elements Panel](https://developers.google.com/web/tools/chrome-devtools/css/) and [Sources Panel](https://developers.google.com/web/tools/chrome-devtools/javascript).
8 |
9 | > #### Note::Open the DevTools Console
10 | > You can open the DevTools using one of the following ways
11 | >
12 | > * Keyboard shortcut: Press Ctrl-Shift-i
13 | > * Mouse context menu: Right click on the Hello World page and select Inspect from the menu.
14 | > * The Chrome browser menu: Select "More tools" > "Developer tools"
15 | >
16 | > When the DevTools window opens, select the Console tab.
17 |
18 |
19 | [](/images/clojurescript-project-reagent-tictactoe--devtools-console.png)
20 |
21 |
22 | > ####Info::
23 | > If you see a warning message saying "some customer formaters were not rendered", this is fixed on the next page when we "Enable custom formatters"
24 |
--------------------------------------------------------------------------------
/docs/figwheel-workflow/index.md:
--------------------------------------------------------------------------------
1 | # Figwheel-main Workflow
2 |
3 | {align=right loading=lazy}
4 |
5 | [Figwheel-main](https://figwheel.org/) build tool and [Rebel rich terminal UI](https://practical.li/clojure/clojure-cli/repl/) is a simple way to get started with ClojureScript development
6 |
7 | The [figwheel-main template](https://github.com/bhauman/figwheel-main-template) creates a project with Clojure CLI configuration, providing example code and build configurations for development, testing and deployment workflows which are explored in some detail.
8 |
9 |
10 | ## Overview
11 |
12 | Using Figwheel provides an simple way to develop, test and deploy ClojureScript projects, providing instant feedback as you develop to see exactly what the code does and help minimise bugs and avoid inappropriate design choices.
13 |
14 | Add aliases and build configurations customise the workflows for greater flexibility. The configuration files are EDN, so are Clojure maps that are simple to work with and understand.
15 |
16 | There are more examples of options for figwheel-main projects on the https://figwheel.org/ website.
17 |
18 | > lambdaisland/kaocha-cljs enables using kaocha test runner with ClojureScript project, although I am still working on an example once I've resolved [an issue with the configuration](https://github.com/lambdaisland/kaocha-cljs/issues/48)
19 |
20 |
21 | 
22 |
23 |
24 |
25 | ??? INFO "Current version"
26 | ```clojure
27 | com.bhauman/figwheel-main {:mvn/version "0.2.18"}
28 | ```
29 |
--------------------------------------------------------------------------------
/docs/reagent-projects/tic-tac-toe/update-game-board.md:
--------------------------------------------------------------------------------
1 | # Update Game Board
2 |
3 | When we click on a cell with the mouse we want to change that cell to be a nought or cross (depending on which side we are playing).
4 |
5 | To change a cell we add an `:on-click` event to each cell in the board game. The `:on-click` event is an option on the `[rect ,,,]` that defines the cell.
6 |
7 | In this example we just change the `app-state` to `:clicked` and add some basic debugging so we can see the results in the developer console.
8 |
9 | ```clojure
10 | :on-click
11 | (fn rectangle-click [e]
12 | (println "Cell" x-cell y-cell "was clicked!")
13 | (println
14 | (swap! app-state assoc-in [:board y-cell x-cell] :clicked)))}])]]])
15 | ```
16 |
17 |
18 | We could add a simple if condition to determine which colour to fill the cell
19 |
20 | ```clojure
21 | (defn tictactoe-game []
22 | [:div
23 | [:div
24 | [:h1 (:text @app-state)]
25 | [:p "Do you want to play a game?"]]
26 | [:center
27 | [:svg {:view-box "0 0 3 3"
28 | :width 500
29 | :height 500}
30 | (for [x-cell (range (count (:board @app-state)))
31 | y-cell (range (count (:board @app-state)))]
32 | ^{:key (str x-cell y-cell)}
33 | [:rect {:width 0.9
34 | :height 0.9
35 | :fill (if (= :empty (get-in @app-state [:board y-cell x-cell]))
36 | "green"
37 | "purple")
38 | :x x-cell
39 | :y y-cell
40 | :on-click
41 | (fn rectangle-click [e]
42 | (println "Cell" x-cell y-cell "was clicked!")
43 | (println
44 | (swap! app-state assoc-in [:board y-cell x-cell] :clicked)))}])]]])
45 | ```
46 |
--------------------------------------------------------------------------------
/docs/reagent-projects/tic-tac-toe/detecting-victory-repl-experiments.md:
--------------------------------------------------------------------------------
1 | # Detecting Victory: REPL Experiments
2 |
3 |
4 | ## Find a winning row
5 |
6 | To find a winning row we can compare the values in the vector with each other
7 |
8 | ```clojure
9 | #_(apply = [:cross :cross :cross])
10 | ;; => true
11 |
12 | #_(apply = [:nought :nought :nought])
13 | ;; => true
14 |
15 | #_(apply = [:empty :cross :empty])
16 | ;; => false
17 |
18 | #_(apply = [:cross :nought :empty])
19 | ;; => false
20 | ```
21 |
22 | However, this approach also matches an :empty row or column
23 |
24 | ```clojure
25 | #_(apply = [:empty :empty :empty])
26 | ;; => true
27 | ```
28 |
29 | Using an anonymous function over the collection allows us to compare each value, if all values are not= :empty then we can return true
30 |
31 | ```clojure
32 | (apply (fn [cell-value] (not= :empty cell-value))[:empty :cross :cross])
33 | ```
34 |
35 | As we will probably call this multiple times, lets convert it into a named function.
36 |
37 | ```clojure
38 | (defn cell-empty?
39 | [cell-value] (not= :empty cell-value))
40 | ```
41 |
42 | Hmm, still not idea, as any combination that does not contain :empty will return true
43 |
44 | ```clojure
45 | (cell-empty? [[:cross :nought :cross]])
46 | ```
47 |
48 | Applying both checks will give the right results
49 |
50 | ```clojure
51 | (defn winning-line? [cell-row]
52 | (and
53 | (apply = cell-row)
54 | (apply cell-empty? cell-row)))
55 |
56 | #_(winning-line? [:cross :cross :cross])
57 | ;; => true
58 |
59 | #_(winning-line? [:nought :nought :nought])
60 | ;; => true
61 |
62 | #_(winning-line? [:cross :nought :cross])
63 | ;; => false
64 |
65 | #_(winning-line? [:empty :empty :empty])
66 | ;; => false
67 |
68 | #_(winning-line? [:empty :nought :cross])
69 | ;; => false
70 | ```
71 |
--------------------------------------------------------------------------------
/docs/install/lighttable.md:
--------------------------------------------------------------------------------
1 | # LightTable
2 |
3 | This workshop will use LightTable to help you discover Clojure.
4 |
5 | I have found LightTable to be one of the best tools to help you learn Clojure, especially the highly interactive Instarepl that evaluates your Clojure code as you type.
6 |
7 | LightTable is a modern development tool that supports Clojure, ClojureScript, JavaScript and Python languages. The tool is open source and written in Clojure & ClojureScript (with a little JavaScript & CSS)
8 |
9 | 
10 |
11 | > **Note** Install Lighttable from [lighttable.com](http://lighttable.com)
12 |
13 | **Linux**
14 | Extract the contents of the downloaded lighttable file to a suitable directory (`/usr/local` or `/opt` or `~/apps`). Make sure the `LightTable` file in the extracted folder is accessible via the system `$PATH`.
15 |
16 | **MacOSX**
17 | Install the `lighttable.dmg` file just as any other MacOSX package
18 |
19 | **Windows**
20 | Download the windows zip file for LightTable and extract the installer, following the instructions inside the installer.
21 |
22 | ## Using LightTable
23 |
24 | LightTable has an online tutorial entitled [Getting started with LightTable](http://docs.lighttable.com/tutorials/full/)
25 |
26 | > **Comment** I mainly use the Instarepl in LightTable. I create a project first with Leiningen, open the project directory in the LightTable workspace and oopen any files I want to work with. I then connect the open editor window for the file to an Instarepl.
27 |
28 | ---
29 |
30 | > **fixme** my approach is documented in the [quick demo section of my Clojure & LightTable slides](http://jr0cket.co.uk/slides/jax-london-2013-light-table.html#/sec-12) from JAXLondon 2013. This should be pulled into this workshop into its own section
31 |
--------------------------------------------------------------------------------
/.github/workflows/scheduled-version-check.yaml:
--------------------------------------------------------------------------------
1 | ---
2 | # ------------------------------------------
3 | # Scheduled check of versions
4 | # - use as non-urgent report on versions
5 | # - Uses POSIX Cron syntax
6 | # - Minute [0,59]
7 | # - Hour [0,23]
8 | # - Day of the month [1,31]
9 | # - Month of the year [1,12]
10 | # - Day of the week ([0,6] with 0=Sunday)
11 | #
12 | # Using liquidz/anta to check:
13 | # - GitHub workflows
14 | # - deps.edn
15 | # ------------------------------------------
16 |
17 | name: "Scheduled Version Check"
18 | on:
19 | schedule:
20 | # - cron: "0 4 * * *" # at 04:04:04 ever day
21 | # - cron: "0 4 * * 5" # at 04:04:04 ever Friday
22 | - cron: "0 4 1 * *" # at 04:04:04 on first day of month
23 | workflow_dispatch: # Run manually via GitHub Actions Workflow page
24 |
25 | jobs:
26 | scheduled-version-check:
27 | name: "Scheduled Version Check"
28 | runs-on: ubuntu-latest
29 | steps:
30 | - run: echo "🚀 Job automatically triggered by ${{ github.event_name }}"
31 | - run: echo "🐧 Job running on ${{ runner.os }} server"
32 | - run: echo "🐙 Using ${{ github.ref }} branch from ${{ github.repository }} repository"
33 |
34 | - name: Checkout Code
35 | uses: actions/checkout@v5
36 | with:
37 | fetch-depth: 0
38 | sparse-checkout: |
39 | .github
40 | - run: echo "🐙 ${{ github.repository }} repository sparse-checkout to the CI runner."
41 | - name: "Antq Check versions"
42 | uses: liquidz/antq-action@main
43 | with:
44 | excludes: ""
45 | skips: "boot clojure-cli pom shadow-cljs leiningen"
46 |
47 | # Summary
48 | - run: echo "🎨 library versions checked with liquidz/antq"
49 | - run: echo "🍏 Job status is ${{ job.status }}."
50 |
--------------------------------------------------------------------------------
/docs/overview/reactive-apps.md:
--------------------------------------------------------------------------------
1 | # Reactive apps
2 |
3 | Reactive applications are about responding rapidly to events or streams of changes.
4 |
5 | The most obvious examples of reactive apps include:
6 |
7 | - Web page: clicking a button on a web page and seeing the results instantly
8 | - Mobile App: pressing an area on your mobile app and instantly sseing the results
9 | - Spreadsheet App: updating a cell in a spreadsheet and seeing the data change instantly
10 | - A developers IDE: running a compiler or unit tests on your code and seeing the failing lines of code highlighted in your code editor
11 |
12 |
13 | ## The React Manifesto
14 |
15 | The interest in React has grown considerably and now they have created the [React Manifesto](http://www.reactivemanifesto.org/). The most important paragraph for me is:
16 |
17 | _Systems built as Reactive Systems are more flexible, loosely-coupled and scalable. This makes them easier to develop and amenable to change. They are significantly more tolerant of failure and when failure does occur they meet it with elegance rather than disaster. Reactive Systems are highly responsive, giving users effective interactive feedback._
18 |
19 | 
20 |
21 | Read more and potentially sign the [React Manifesto](http://www.reactivemanifesto.org/)
22 |
23 |
24 | ## Virtual Dom
25 |
26 | Reading from a DOM is inefficient
27 |
28 | Continuous random updates to the DOM is inefficient
29 |
30 |
31 | ## Batch updating the DOM
32 |
33 | ## Clojure Immuatable Data structures
34 |
35 | Immutable data structures are really fast when it comes to comparison
36 |
37 |
38 | ## Replay from root
39 |
40 | Playback all the changes that have been made to your app
41 |
42 | ? Does this work in the same way as CQRS - does it make sense to make a comparison ?
43 |
44 |
--------------------------------------------------------------------------------
/.github/workflows/publish-book.yaml:
--------------------------------------------------------------------------------
1 | ---
2 | name: Publish Book
3 | on:
4 | # Manually trigger workflow
5 | workflow_dispatch:
6 |
7 | # Run work flow conditional on linter workflow success
8 | workflow_run:
9 | workflows:
10 | - "MegaLinter"
11 | paths:
12 | - "docs/**"
13 | - "includes/**"
14 | - "overrides/**"
15 | - "mkdocs.yaml"
16 | branches:
17 | - main
18 | types:
19 | - completed
20 |
21 | permissions:
22 | contents: write
23 |
24 | jobs:
25 | publish-book:
26 | name: MkDocs Publish
27 | runs-on: ubuntu-latest
28 | steps:
29 | - run: echo "🚀 Job automatically triggered by ${{ github.event_name }}"
30 | - run: echo "🐧 Job running on ${{ runner.os }} server"
31 | - run: echo "🐙 Using ${{ github.ref }} branch from ${{ github.repository }} repository"
32 |
33 | - name: Checkout Code
34 | uses: actions/checkout@v5
35 | with:
36 | fetch-depth: 0
37 | sparse-checkout: |
38 | docs
39 | includes
40 | overrides
41 | - run: echo "🐙 ${{ github.repository }} repository sparse-checkout to the CI runner."
42 |
43 | - name: Setup Python
44 | uses: actions/setup-python@v6
45 | with:
46 | python-version: 3.x
47 |
48 | - name: Cache
49 | uses: actions/cache@v4
50 | with:
51 | key: ${{ github.ref }}
52 | path: .cache
53 |
54 | - run: pip install mkdocs-material mkdocs-callouts mkdocs-glightbox mkdocs-git-revision-date-localized-plugin mkdocs-redirects pillow cairosvg
55 | - run: mkdocs gh-deploy --force
56 | - run: echo "🐙 ."
57 |
58 | # Summary and status
59 | - run: echo "🎨 MkDocs Publish Book workflow completed"
60 | - run: echo "🍏 Job status is ${{ job.status }}."
61 |
--------------------------------------------------------------------------------
/docs/web-design-basics/clojurebridge-london-website/further-ideas.md:
--------------------------------------------------------------------------------
1 | # Further content ideas
2 |
3 | The site could be developed further as an exercise by the reader. Suggested ideas for new content sections include
4 |
5 | - Registration (sign up button, date, location, etc.)
6 | - Current sponsor (details of the current sponsor, sponsor messaging)
7 | - ClojureBridge overview (description of the event)
8 | - Clojure Showcase (some projects that demonstrate what Clojure can do)
9 | - Learning paths (links to the various curriculums)
10 | - Clojure Installation (how to set up a development environment)
11 | - ClojureBridge Schedule (what happens and when)
12 | - Resources (documentation, how to practice clojure, books, videos, etc)
13 | - Coaching guide (documentation to help coaches coach the students)
14 | - Sponsors guide (how to sponsor ClojureBridge and what to get out of it)
15 | - Past events (overview of all previous events, date, location, sponsors, etc.)
16 | - Models of learning (ideas on how to learn more effectively)
17 |
18 | Create a function for each content section that will be developed and add call that function from the `landing-page` function.
19 |
20 | > ####HINT::Reagent examples
21 | > [Introduction to Reagent](https://reagent-project.github.io/) has many simple examples of functions you can include in the website
22 | >
23 | > [Guide to Reagent](https://purelyfunctional.tv/guide/reagent/) has even more examples
24 |
25 |
26 | ## Create a banner heading using Bootstrap hero style
27 |
28 | CSS frameworks have a `hero` or `jumbotron` class for creating a large banner area on a page, highlighting the main concept or theme of the website.
29 |
30 | ```clojure
31 | (defn website-title []
32 | [:section {:class "hero"}
33 | [:h1 (get-in @app-state [:website :title])]
34 | [:h4 (get-in @app-state [:website :description])]])
35 | ```
36 |
--------------------------------------------------------------------------------
/docs/quickstart/production-build.md:
--------------------------------------------------------------------------------
1 | # Production Build
2 |
3 |
4 | You may have noticed that `out` contains a lot of
5 | JavaScript. Fortunately the ClojureScript compiler generates output
6 | optimized for the Google Closure Compiler. The Google Closure Compiler
7 | performs many optimizations, but the most significant for browser-based
8 | clients are minification and dead code elimination.
9 |
10 | Let's make a new helper build script `release.clj`, it should
11 | look like the following:
12 |
13 | ```clojure
14 | (require 'cljs.build.api)
15 |
16 | (cljs.build.api/build "src"
17 | {:output-to "out/main.js"
18 | :optimizations :advanced})
19 |
20 | (System/exit 0)
21 | ```
22 |
23 | Under `:advanced` optimizations `:main` is not needed as advanced
24 | compilation creates a single JavaScript artifact. We also add a
25 | `(System/exit 0)` as the Google Closure Compiler creates a thread pool
26 | that isn't shutdown - we know we're done we can just exit.
27 |
28 | Let's remove the dev time REPL bits from `src/hello_world/core.cljs`:
29 |
30 | ```clojure
31 | (ns hello-world.core)
32 |
33 | (enable-console-print!)
34 |
35 | (println "Hello world!")
36 | ```
37 |
38 | Let's create a release build:
39 |
40 | ```clojure
41 | java -cp cljs.jar:src clojure.main release.clj
42 | ```
43 |
44 | This process will take significantly longer which is why we don't use
45 | this compilation mode for development.
46 |
47 | Open `index.html`, you should still see `"Hello world!"` printed.
48 |
49 | Examine `out/main.js`, the file size should be around 80K. If you zip
50 | this file you'll see that it's around 19K. This is significantly
51 | smaller than a jQuery dependency yet when using ClojureScript you have
52 | implicit dependencies on the entire ClojureScript standard library
53 | (10KLOC) and the Google Closure Library (300KLOC). You can thank
54 | dead code elimination.
55 |
--------------------------------------------------------------------------------
/docs/web-design-basics/clojurebridge-london-website/hiccup-for-html.md:
--------------------------------------------------------------------------------
1 | # Writing html in Clojure with hiccup
2 |
3 | Rather than write ``, `
` pairs of tags in html, we define our content using a syntax called hiccup. 4 | 5 | A vector, `[]` is used to hold the name of the html tag, represented by a keyword such as `:div` 6 | 7 | Defining our content in this way makes it easier to generate and transform using Clojure, so you can generate structure and content dynamically too. 8 | 9 | For example this simple html code uses open and closing tags to define the scope of where to apply that tag. 10 | 11 | ```html 12 |
13 |
16 | ```
17 |
18 | In Clojure, we only have the one tag, which is represented by a keyword that has the same name as the HTML tag. The vector defines the scope of the tag.
19 |
20 | Using vectors for scope its trivial to use structured editing to organise and refactor the structure of your web page content.
21 |
22 |
23 | ```clojure
24 | (defn hello-world []
25 | [:div
26 | [:h1 (:text @app-state)]
27 | [:h3 "Live reloading in the repl makes web development fun!"]])
28 | ```
29 |
30 | ## Using state for dynamic content
31 |
32 | We can also use dynamic information from the application state, defined as an atom called `app-state`. As this name refers to an atom, we need to use the `@` character or the `deref` function to access its values
33 |
34 | In this example, the atom contains a Clojure map with a key called `text`. We can get the value associated with `text` in the map by de-referencing the atom.
35 | ```clojure
36 | [:h1 (get @app-state :text)]
37 | ```
38 |
39 | Its quite common to use the short form when the key of a map is the keyword type
40 | ```clojure
41 | [:h1 (:text @app-state)]
42 | ```
43 |
--------------------------------------------------------------------------------
/docs/why-clojurescript/source-maps.md:
--------------------------------------------------------------------------------
1 | # HTML Source Maps
2 |
3 | When you have a highly interactive development environment set up with Clojure & Figwheel, the last thing you want to do is to try and pick through the JavaScript code and figure out which bit of Clojurescript is causing the problem. With Source Maps you dont have to.
4 |
5 | Source Maps allows you to see your Clojurescript code in the browser and see where your code is failing.
6 |
7 | 
8 |
9 | You can set breakpoints in your Clojurescript code and they will appear in the source maps view in your browser. You will also notice that the code is syntax highlighted, as browsers like Google Chrome support syntax highlighting directly (possibly through [CodeMirror](https://codemirror.net/))
10 |
11 | ## How source maps work
12 |
13 | ClojureScript now supports HTML source maps so that you can debug ClojureScript directly in the browser, using the configuration option :source-map.
14 |
15 | `:source-map` can be either a boolean, or if optimizations are enabled, a path to a file for the map.
16 |
17 | If you are building using leiningen, the Clojurescript build section in `project.clj` would look like:
18 |
19 | ```clojure
20 | :cljsbuild {
21 | :builds [{:id "main"
22 | :source-paths ["src"]
23 | :compiler {
24 | :output-to "main.js"
25 | :output-dir "out"
26 | :optimizations :none
27 | :source-map true}}]})
28 | ```
29 |
30 | After compilation, when you open an HTML file linking to the generated js file in your browser ensure that source maps are enabled via the Developer Tools settings.
31 |
32 | For more details, see the [Clojure.org page on Source Maps](https://github.com/clojure/clojurescript/wiki/Source-maps)
33 |
--------------------------------------------------------------------------------
/docs/om-project-clojurex/refactor-to-multi-session-model.md:
--------------------------------------------------------------------------------
1 | # Refactor To Multi Session Model
2 |
3 | It would be a very short conference if there were only one session, so lets use the data model that holds multiple sessions
4 |
5 | > #### Note::Model multiple sessions
6 | > Update the model for the conference session to hold multiple sessions
7 |
8 |
9 |
10 | A parent map is added to the model with a key called `:sessions` pointing to a vector. Each session is an element of this vector
11 |
12 | Modelling an empty collection of sessions
13 |
14 | ```clojure
15 | {:sessions []}
16 | ```
17 |
18 | Modelling a collection with one session
19 |
20 | ```clojure
21 | {:sessions [{:title "Opening Keynote"
22 | :description "Something very inspirational"
23 | :speaker-name "John Stevenson"
24 | :speaker-biography "There's a frood who really knows where his towel is."
25 | :twitter-handle "jr0cket"
26 | :github-handle "jr0cket"
27 | :speakers-website "http://jr0cket.co.uk"}]}
28 | ```
29 |
30 | Refactor the example session to give it a name
31 |
32 | ```clojure
33 | (def john {:title "Opening Keynote"
34 | :description "Something very inspirational"
35 | :speaker-name "John Stevenson"
36 | :speaker-biography "There's a frood who really knows where his towel is."
37 | :twitter-handle "jr0cket"
38 | :github-handle "jr0cket"
39 | :speakers-website "http://jr0cket.co.uk"})
40 | ```
41 |
42 | Now use that name inside the collection of sessions to make the example data easier to work with
43 |
44 | ```clojure
45 | {:sessions [john]}
46 | ```
47 |
48 |
49 |
50 | > #### Hint::
51 | > A common way to create a collection of things in Clojure is to use a vector, `[]`.
52 |
--------------------------------------------------------------------------------
/docs/overview/clojurescript-platforms.md:
--------------------------------------------------------------------------------
1 | # Theory: ClojureScript platforms
2 |
3 | ClojureScript can be developed and deployed to three main platforms
4 |
5 | 
6 |
7 | ## Browser JavaScript Engine
8 |
9 | Modern browsers all contain a JavaScript Engine and are a platform for front-end ClojuresScript apps. For example, single page apps like react.js.
10 |
11 |
12 | ### Source maps
13 |
14 | Browsers also provide inspection for your Clojurescript within the Browser. Sourcemaps provide a link from the running JavaScript to the ClojureScript that generated it. If you receive an error or are debugging you will see the relevant ClojureScript code (rather than have to work with the generated JavaScript).
15 |
16 | ### Google Closure compiler & tools
17 |
18 | As ClojureScript used the [Google Closure compiler]() to generate JavaScript, then you can set options to generate JavaScript that will run on many browsers (even back to IE 6).
19 |
20 |
21 | ## NodeJS
22 |
23 | NodeJS is a server-side application that can act as web application server for your ClojureScript applications
24 |
25 | You can also connect to a ClojureScript REPL for your application running on NodeJS
26 |
27 |
28 | ### Compiling ClojureScript with NodeJS
29 |
30 | work in progress
31 |
32 |
33 | ## Java Nashorn
34 |
35 | The Java platform also includes a JavaScript engine called [Nashorn](https://en.wikipedia.org/wiki/Nashorn_(JavaScript_engine)).
36 |
37 | Nashorn is not widely used for ClojureScript development or deployment. However, it could be useful if you do not have access to node.js or a browser environment.
38 |
39 | Nashorn is developed as part of the Java Open JDK and is advertised as a much faster JavaScript engine than the previous [Rhino](https://en.wikipedia.org/wiki/Rhino_(JavaScript_engine)) project.
40 |
41 |
42 | ## Vert.x
43 |
44 | ???
45 |
--------------------------------------------------------------------------------
/docs/why-clojurescript/lightweight.md:
--------------------------------------------------------------------------------
1 | # Lightweight
2 |
3 | Clojurescript is very lightweight, just like Clojure itself. Clojurescript is much more lightweight when you compare it to other libraries
4 |
5 |
6 | 
7 |
8 | jQuery is bigger than Clojurescript and if you add persistent data structures via immutable.js then the Javascript app is nearly twice as big.
9 |
10 |
11 | ## Size matters
12 |
13 | The size of your client-side and mobile web apps really matters. Even 5G networks will not really fix the problem for mobile web apps.
14 |
15 | 
16 |
17 | Its ironic that the article that talks about how broken the mobile web is provides a perfect example of why it is broken. When looking at the contents of this page there is 7Mb of Javascript to download.
18 |
19 | Its a common pattern to just ship the whole libraries
20 |
21 |
22 | ## Optimised Clojurescript - eliminating dead code
23 |
24 | By changing the Clojurescript `project.clj` configuration file to include `optimisation` set to true, the compiler (Google Closure compiler) with eliminate any code that is not used. Typically reducing the size of the Javascript files generated by a huge factor.
25 |
26 | 
27 |
28 | See the section on [Google Clojure library and tools](google-clojure) to know more.
29 |
30 |
31 | ## Modularised code
32 |
33 | As you build bigger apps and especially single page apps, then you need to break up your Javascript into different sections to that you only need to load what you are using. By using modules in Clojurescript you can easily optimise your code for deployment
34 |
35 | 
36 |
--------------------------------------------------------------------------------
/docs/figwheel/repl-control.md:
--------------------------------------------------------------------------------
1 | # REPL Control
2 |
3 |
4 | The Figwheel REPL has the following control functions:
5 |
6 | ```
7 | Figwheel Controls:
8 | (stop-autobuild) ;; stops Figwheel autobuilder
9 | (start-autobuild [id ...]) ;; starts autobuilder focused on optional ids
10 | (switch-to-build id ...) ;; switches autobuilder to different build
11 | (reset-autobuild) ;; stops, cleans, and starts autobuilder
12 | (build-once [id ...]) ;; builds source one time
13 | (clean-builds [id ..]) ;; deletes compiled cljs target files
14 | (fig-status) ;; displays current state of system
15 | ```
16 |
17 | These functions are special functions that poke through the
18 | ClojureScript env into the underlying Clojure process. As such you
19 | can't compose them.
20 |
21 | You can think of these functions having an implicit set of build ids
22 | that they operate on.
23 |
24 | If you call `(reset-autobuild)` it will stop the figwheel autobuilder,
25 | clean the builds, reload the build configuration from your
26 | `project.clj` and then restart the autobuild process.
27 |
28 | If you call `(stop-autobuild)` it will stop the figwheel autobuilder.
29 |
30 | If you call `(start-autobuild)` it will start the figwheel autobuilder
31 | with the current implicit build ids.
32 |
33 | If you call `(start-autobuild example)` it will start the figwheel
34 | autobuilder on the provided build id `example`. It will also make
35 | `[example]` the implicit set of build ids.
36 |
37 | `start-autobuild` and `switch-to-build` are the only functions that
38 | update the build-id set.
39 |
40 | `clean-builds` and `build-once` both allow you to do one off builds and
41 | cleans. They do not alter the implicit build ids.
42 |
43 | `fig-status` displays information on the current Figwheel system state,
44 | including whether the autobuilder is running, which build ids are in
45 | focus, and the number of client connections.
46 |
--------------------------------------------------------------------------------
/docs/figwheel-main-projects/nrepl-editors.md:
--------------------------------------------------------------------------------
1 | # Editor support with ClojureScript Figwheel-main projects
2 | Using an editor provides the full REPL driven development experience,
3 |
4 | Clojure aware editors can connect to an existing REPL or start a REPL for a ClojureScript project and then connect, referred to as jack-in.
5 |
6 |
7 | ## Jack-in
8 | The editor will inject the required libraries as dependencies, start the REPL and connect the editor to the REPL process
9 |
10 | Open the ClojureScript project in the editor, a `.cljs` or `.edn` file.
11 |
12 | {% tabs spacemacs="spacemacs", calva="VSCode Calva" %}
13 |
14 | {% content "spacemacs" %}
15 |
16 | `, '` to run the `sesman-start` command
17 |
18 | Select `cider-jack-in-cljs`
19 |
20 | Select `figwheel-main`
21 |
22 | Select the `dev` build
23 |
24 | {% content "lein" %}
25 | `, '` to run the `sesman-start` command
26 |
27 | Select `cider-jack-in-cljs`
28 |
29 | Select `Leiningen`
30 |
31 | Select the `dev` build
32 |
33 |
34 |
35 | {% endtabs %}
36 |
37 |
38 | ## Connect
39 | Run the project from the command line, adding in an alias that includes the libraries needed to run
40 |
41 | [`practicalli/clojure-deps-edn`]({{book.P9IClojureDepsEdn}})
42 |
43 | ```shell
44 | clojure -M:figwheel:build:middleware/cider-cljs
45 | ```
46 |
47 | > Not sure if the :build alias is required
48 |
49 | Open the ClojureScript project in the editor
50 |
51 | Run the **connect** command (Cider: `cider-connect-cljs`, Calva: )
52 |
53 | Select `figwheel-main`
54 |
55 | Select `dev` build
56 |
57 |
58 |
59 | > Conjure should connect automatically when it detects a `.nrepl-port` file in the root of the project
60 |
61 |
62 |
63 | I've been tidying up the Practicalli ClojureScript book and deprecating much of the content (which might still work but needs reviewing). The focus of the book over the next few months will be building websites with reagent (maybe some simple reframe) using figwheel-main.
64 |
--------------------------------------------------------------------------------
/intro-to-clojurescript.org:
--------------------------------------------------------------------------------
1 | * Introduction to Clojurescript
2 | - By: Jon Pither, JUXT
3 | - Twiiter: @jonpither
4 |
5 |
6 | ** Why clojurescript
7 | We want to build a rich experience with our apps that give a rewarding user experience
8 |
9 | Lots of languages compile to Javascript now, wo why not Clojure
10 |
11 |
12 |
13 |
14 | ** The project
15 |
16 | Clojurescript is compiled into `public/index.html`
17 |
18 | Hello World
14 |Live reloading in the repl makes web development fun!
15 |Where Clojurescript fills in the blanks
19 |
20 | in app.cljs
21 |
22 | route function
23 |
24 | ** dommy
25 | wraps the dom so you can play around with it
26 |
27 | * Reagent
28 | - Malcom Sparks
29 |
30 | ** Reagent atom
31 |
32 | ** Reframe
33 | An idiom on top of reagent
34 | - single app state (single map)
35 | - state flows through your application
36 | - event dispatch facility is a back channel to update your app state
37 |
38 | ** Modularity
39 |
40 | * Clojurescript project ideas
41 |
42 | ** Clojure Trivia
43 | Build a game that has a series of cards, each with a question hidden on the reverse side of the question.
44 |
45 | When you click on a card the question is revealed. Then the audience has a chance to answer the question.
46 |
47 | When the card is clicked again, the card shows the answer.
48 |
49 | When the card is clicked for a third time the card is marked as answered and the card is shaded.
50 |
51 | Additional aspects
52 | - add a timer to answer the question
53 | - mark if the card was answered correctly
54 | - group cards by topic & show the topic in one column
55 | - assign values to each card, eg, 50, 100, 200, 500, 1000
56 | -- the higher the card value the harder the question should be
57 | - total points earned by a player is recorded and shown
58 | - add players to the game
59 | - players take turns answering questions
60 | -- if a player answers a question correctly they have another turn
61 |
62 | *** Example projects to help
63 | - Parens of the dead - a tile matching game
64 |
--------------------------------------------------------------------------------
/docs/figwheel/flappy-birds-demo.md:
--------------------------------------------------------------------------------
1 | # Figwheel Demo
2 |
3 | > #### Note::Discover the basic concept of Figwheel by experimenting with the flappy birds demo project
4 |
5 | 
6 |
7 | Clone the flappy bird demo from Github:
8 |
9 | git clone https://github.com/bhauman/flappy-bird-demo.git
10 |
11 | Change into the `flappy-bird-demo` directory on the command line and run:
12 |
13 | lein figwheel
14 |
15 | In your browser, open `http://localhost:3449/index.html` and once flappy birds has loaded, open your browsers development tools / console
16 |
17 | In your editor, open `src/flappy_bird_demo/core.cljs` and make changes to the code.
18 |
19 | As soon as you save your code you see the changes in the browser window. You will also see the ClojureScript logo briefly display in the browser window, to indicate that the new changes have been added
20 |
21 | ![Image of browser window with Cljs logo signifying a change is being made]()
22 |
23 | Make sure you open your browser's development console so you can get feedback about code reloads.
24 |
25 | > **Hint** Place your browser window and code editor window side by side so you can see the changes as you save them. The changes should apply instantly.
26 |
27 |
28 | ## Suggested changes
29 |
30 | Try and change some of the following aspects of the game
31 |
32 | - the Start and Restart button names
33 | - remove the start button
34 | - the size and speed of the birds bounce (based on a sine wave)
35 | - the jump velocity of the bird
36 | - turn off collision detection
37 | - stop the rendering of the pillars
38 | - the gap between the pillars
39 |
40 | Some suggested changes have been added to a [Github Gist of the ClojureScript code](https://gist.github.com/jr0cket/166a9ef7e717e9c348c9).
41 |
--------------------------------------------------------------------------------
/docs/figwheel/server-side-config.md:
--------------------------------------------------------------------------------
1 | # Server-side Config
2 |
3 |
4 | This is not neccessary but you can configure the figwheel system. At
5 | the root level of your `project.clj` you can add the following server
6 | side configuration parameters:
7 |
8 | ```clojure
9 | :figwheel {
10 | :http-server-root "public" ;; this will be in resources/
11 | :server-port 3449 ;; default
12 | :server-ip "0.0.0.0" ;; default
13 |
14 | ;; CSS reloading (optional)
15 | ;; :css-dirs has no default value
16 | ;; if :css-dirs is set figwheel will detect css file changes and
17 | ;; send them to the browser
18 | :css-dirs ["resources/public/css"]
19 |
20 | ;; Server Ring Handler (optional)
21 | ;; if you want to embed a ring handler into the figwheel http-kit
22 | ;; server
23 | :ring-handler example.server/handler
24 |
25 | ;; Clojure Macro reloading
26 | ;; disable clj file reloading
27 | ; :reload-clj-files false
28 | ;; or specify which suffixes will cause the reloading
29 | ; :reload-clj-files {:clj true :cljc false}
30 |
31 | ;; To be able to open files in your editor from the heads up display
32 | ;; you will need to put a script on your path.
33 | ;; that script will have to take a file path and a line number
34 | ;; ie. in ~/bin/myfile-opener
35 | ;; #! /bin/sh
36 | ;; emacsclient -n +$2 $1
37 | ;;
38 | :open-file-command "myfile-opener"
39 |
40 | ;; if you want to disable the REPL
41 | ;; :repl false
42 |
43 | ;; to configure a different figwheel logfile path
44 | ;; :server-logfile "tmp/logs/figwheel-logfile.log"
45 |
46 | ;; Start an nREPL server into the running figwheel process
47 | ;; :nrepl-port 7888
48 |
49 | ;; Load CIDER, refactor-nrepl and piggieback middleware
50 | ;; :nrepl-middleware ["cider.nrepl/cider-middleware"
51 | ;; "refactor-nrepl.middleware/wrap-refactor"
52 | ;; "cemerick.piggieback/wrap-cljs-repl"]
53 | }
54 | ```
55 |
--------------------------------------------------------------------------------
/work-in-progress.md:
--------------------------------------------------------------------------------
1 | # CSS
2 | ## SVG
3 | ### z-index experiements
4 | https://codepen.io/GarySiu/pen/YBqxjL
5 | ## Flexbox layout
6 | https://css-tricks.com/snippets/css/a-guide-to-flexbox/
7 | https://flexboxfroggy.com/
8 |
9 |
10 |
11 | # Github
12 | ## Github code for the workshop
13 |
14 | The code for this workshop is contained in the Github repository [ClojureScript example](https://github.com/practicalli/clojure-webapps-example), the code for each section is in a specific branch.
15 |
16 | To get a copy of the repository, use the following git clone command which creates a new directory called clojure-webapps-example that contains the cloned code.
17 |
18 | `git clone https://github.com/practicalli/clojurescript-example.git`
19 |
20 | Once you have the repository, use `git checkout branch-name` to get the code for each section. Each branch is a working application with all the features covered in that section
21 |
22 | Use `git branch` to show all the branches available, they should match the names of the sections in this workshop.
23 |
24 | Enjoy.
25 |
26 |
27 |
28 | ## Deploying to Heroku
29 |
30 | This assumes you have a
31 | [Heroku account](https://signup.heroku.com/dc), have installed the
32 | [Heroku toolbelt](https://toolbelt.heroku.com/), and have done a
33 | `heroku login` before.
34 |
35 | ```bash
36 | git init
37 | git add -A
38 | git commit
39 | heroku create
40 | git push heroku master:master
41 | heroku open
42 | ```
43 |
44 | ## Running with Foreman
45 |
46 | Heroku uses [Foreman](http://ddollar.github.io/foreman/) to run your
47 | app, which uses the `Procfile` in your repository to figure out which
48 | server command to run. Heroku also compiles and runs your code with a
49 | Leiningen "production" profile, instead of "dev". To locally simulate
50 | what Heroku does you can do:
51 |
52 | ```bash
53 | lein with-profile -dev,+production uberjar && foreman start
54 | ```
55 |
56 | Now your app is running at
57 | [http://localhost:5000](http://localhost:5000) in production mode.
58 |
--------------------------------------------------------------------------------
/docs/figwheel/file-reloads.md:
--------------------------------------------------------------------------------
1 | # File Reloads
2 |
3 |
4 | Figwheel normally reloads any file that has changed. If you want to
5 | prevent certain files from being **reloaded** by figwheel, you can add
6 | meta-data to the namespace declaration like so:
7 |
8 | ```clojure
9 | (ns ^:figwheel-no-load example.core)
10 | ```
11 |
12 | Figwheel will not load or reload files that haven't been required by
13 | your application. If you want to force a file to be loaded when it
14 | changes add the follwoing meta-data the namespace declaration of the file:
15 |
16 | ```clojure
17 | (ns ^:figwheel-load example.core)
18 | ```
19 |
20 | It can be very helpful to have a file reload every time a file changes
21 | in your ClojureScript source tree. This can facilitate reloading your
22 | main app and running tests on change.
23 |
24 | To force a file to reload on every change:
25 |
26 | ```clojure
27 | (ns ^:figwheel-always example.test-runner)
28 | ```
29 |
30 |
31 | #### Using the ClojureScript REPL
32 |
33 | When you run `lein figwheel` a REPL will be launched into your application.
34 |
35 | You will need to open your application in a browser in order for the
36 | REPL to connect and show its prompt.
37 |
38 | This REPL is a little different than other REPLs in that it has live
39 | compile information from the build process. This effectively means
40 | that you will not have to call `(require` or `(load-namesapce` unless
41 | it is a namespace that isn't in your loaded application's required
42 | dependencies. In many cases you can just `(in-ns 'my.namespace)` and
43 | everything you need to access will be there already.
44 |
45 | The REPL doesn't currently have built-in readline support. To have a
46 | better experience please install **rlwrap**. You can do this on OSX
47 | using brew: `brew install rlwrap`.
48 |
49 | When `rlwrap` is installed you can now execute lein figwheel as so:
50 |
51 | ```
52 | $ rlwrap lein figwheel
53 | ```
54 |
55 | This will give you a much nicer REPL experience with history and line
56 | editing.
57 |
--------------------------------------------------------------------------------
/docs/figwheel-workflow/pages-deploy.md:
--------------------------------------------------------------------------------
1 | # Deploying to GitHub and GitLab pages
2 |
3 | [GitHub pages](https://pages.github.com/) and [GitLab pages](https://docs.gitlab.com/ee/user/project/pages/) provide fast and free service for running an HTML website, serving HTML, CSS and JavaScript files.
4 |
5 | By placing all the web pages and asset files in a `docs` directory, these services can be configured to serve those assets publicly.
6 |
7 | Create a new build configuration to output the single JavaScript file to the `docs` directory, typically in a `js` sub-folder or any preferred directory structure.
8 |
9 | Create a file called `pages.cljs.edn` to represent a new build and add the following configuration
10 |
11 | ```clojure
12 | {:main practicalli.hello-world
13 | :output-to "docs/js/hello-world.js"}
14 | ```
15 |
16 | Edit the project `deps.edn` file and add a new alias to deploy to GitHub/GitLab pages directory
17 |
18 | ```clojure
19 | :pages {:main-opts ["-m" "figwheel.main" "-O" "advanced" "-bo" "pages"]}
20 | ```
21 |
22 | Create the deployable JavaScript file using the following command:
23 |
24 | ```shell
25 | clojure -M:fig:pages
26 | ```
27 |
28 | Copy the `/resources/public/index.html` and any other web assets to the `/docs` directory and update the `/docs/index.html` to refer to the correct location of the JavaScript file generated by Figwheel.
29 |
30 | ```html
31 |
32 |
33 |
34 |
35 |
36 |
37 |
38 |
39 |
40 |
41 |
42 |
43 |
44 |
45 | ```
46 |
47 | > See [package a single file for production](https://figwheel.org/tutorial#packaging-up-a-single-compiled-artifact-for-production) for more details.
48 |
--------------------------------------------------------------------------------
/docs/om-project-clojurex/defining-session-data.md:
--------------------------------------------------------------------------------
1 | # Defining Session Data
2 |
3 | Now we can display multiple sessions, lets define some more sessions so we have more test data to experiment with.
4 |
5 | Here is the full set of sample session data, with each session
6 |
7 | ```clojure
8 | (def john {:title "My Spacemacs Obsession"
9 | :description "Feel the power of Emacs, without the RSI"
10 | :speaker-name "John Stevenson"
11 | :speaker-biography "There's a frood who really knows where his towel is."
12 | :twitter-handle "jr0cket"
13 | :github-handle "jr0cket"
14 | :speakers-website "http://jr0cket.co.uk"})
15 |
16 | (def kris {:title "Opening Keynote"
17 | :description "Something very inspirational"
18 | :speaker-name "Kris Jenkins"
19 | :speaker-biography "The most fantastically dressed developer in the world"
20 | :twitter-handle "krisajenkins"
21 | :github-handle "krisajenkins"
22 | :speakers-website "http://krisajenkins.co.uk"})
23 |
24 | (def bug {:title "A Glass of CIDER"
25 | :description "Unleashing the power of Clojure with Emacs"
26 | :speaker-name "Bozhidar Batsov"
27 | :speaker-biography
28 | "Bozhidar is the maintainer of CIDER and the editor of the community Clojure style guide. Most people would probably describe him as an Emacs zealot (and they would be right). He's also quite fond of the Lisp family of languages, functional programming in general and Clojure in particular. Believe it or not, Bozhidar has hobbies and interests outside the realm of computers, but we won't bore with those here."
29 | :twitter-handle "bbatsov"
30 | :github-handle "bbatsov"
31 | :speakers-website "http://batsov.com/"})
32 | ```
33 |
34 | > #### Hint::
35 | > `clojure.spec` can be used to define your test data and functions that work on that data to give you a testable specification for your application.
36 | >
37 | > https://clojure.org/guides/spec
38 |
--------------------------------------------------------------------------------
/docs/reagent/index.md:
--------------------------------------------------------------------------------
1 | # Reagent
2 |
3 | [Reagent](https://reagent-project.github.io/) provides a ClojureScript interface to React.js, simplifying the development of single page apps and web user interfactes. Reagent apps are very fast as immutable data structures makes calculating virtual dom changes extremely efficient.
4 |
5 | React components are ClojureScript functions, state is held in ClojureScript data structures and the user interface can be generated using a [Hiccup-like syntax](hiccup-style-syntax.md).
6 |
7 |
8 | > #### TODO::work in progress, sorry
9 |
10 | ## Designing a Reagent app
11 | A simple reagent app consists of 3 main sections
12 |
13 | * state - shared between one or more components
14 | * components - behavior of the application, such as rendering content
15 | * rendering - render components and update them when state changes
16 |
17 |
18 | ### State
19 | The application state is modeled using Clojure data structures, e.g. hash-maps, vectors, contained within a reagent atom.
20 |
21 | A reagent atom is a mutable container into which new values can be swapped or reset in a controlled way (Software Transactional Memory)
22 |
23 | ### Components are Clojure functions
24 |
25 |
26 | ```clojure
27 | (defn hello []
28 | [:div "I am a reagent component, defining HTML content using the hiccup style syntax"])
29 | ```
30 |
31 |
32 | ### Rendering
33 |
34 |
35 |
36 |
37 |
38 |
39 |
40 |
41 |
42 | * [Reagent Rocks tutorial](http://www.mattgreer.org/articles/reagent-rocks/#on-to-reagent)
43 |
--------------------------------------------------------------------------------
/docs/web-design-basics/clojurebridge-london-website/app-state-section.md:
--------------------------------------------------------------------------------
1 | # App State driven section
2 |
3 | The sponsor section of the website will change the sponsor details each time we have a new event. Rather than _hard code_ the sponsor details, we can add them to the application state. Then each time we have a new event, all we need to do is update that state with new sponsor details.
4 |
5 | Update the map to contain a `:sponsors` key whose value is a map.
6 |
7 | That map containes `:current` and `:past` sponsors (past sponsors will be a map that has the number of the event and the sponsor details copied from the :current map).
8 |
9 | ```clojure
10 | (defonce
11 | app-state
12 | (atom
13 | {:text "Hello world!"
14 | :sponsors
15 | {:current
16 | {:name "Functional Works"
17 | :logo "images/functional-works-logo.svg"
18 | :website "https://functional.works-hub.com/"
19 | :message "Breaking down the barriers to hiring the right software engineers,
20 | providing a platform to managing the whole process (written in ClojureScript)."}
21 | :past {:9 {,,,}}}}))
22 | ```
23 |
24 | Here is an example of a current sponsor component.
25 |
26 | ```clojure
27 | (defn sponsor-current
28 | "Sponsors for our current event, to help that sponsor get some exposure
29 |
30 | Argument: hash-map of strings - :name, :website, :logo, :message"
31 | [sponsor-details]
32 | [:div {:class "container"}
33 | [:div {:class "box"}
34 | [:div {:class "column is-half is-8 is-offset-2"}
35 | [:a {:href (get sponsor-details :website)}
36 | [:h3 {:class "title is-5 has-text-centered"} (str "Our Sponsors:" " " (get sponsor-details :name))]]
37 | [:div {:class "columns"}
38 | [:div {:class "column"}
39 | [:figure {:class "image"}
40 | [:a {:href (get sponsor-details :website)}
41 | [:img {:src "images/functional-works-logo.png"}]]]]
42 | [:div {:class "column"}
43 | [:div {:class "content"}
44 | [:p (get sponsor-details :message)]]]]]]])
45 | ```
46 |
--------------------------------------------------------------------------------
/docs/clojure-syntax/destructuring.md:
--------------------------------------------------------------------------------
1 | # Destructuring
2 |
3 | Destructuring is a powerful way to get data from a collection using positional or key based pattern matching.
4 |
5 | In our examples We are using the `let` function to create local bindings (labeling data with a specific name). The let function has two arguments, the first is the name to be used for the binding and the second argument is the value the name will be assigned to.
6 |
7 | When the value passed to the `let` function is a collection, you can use destructuring to do the assignments.
8 |
9 | **Example 1:**
10 | Here we have data in a vector (an array like collection) and we want one or more names to reference the individual elements.
11 |
12 | ```clojure
13 | (let [[a b c & d :as e] [1 2 3 4 5 6 7]]
14 | [a b c d e])
15 | ```
16 |
17 | The let function creates the local names `a`, `b`, `c`, `d` and `e`. The names a to d take the corresponding positional value in the collection: a is bound to 1, b is bound to 2, etc.
18 |
19 | The `:as` keyword tells the `let` function to bind everything else remaining to `e`.
20 |
21 |
22 | **Example 2:**
23 | We now have a nested collection, a vector that contains two vectors. We can still use positional destructuring to pull out the values into names
24 |
25 | ```clojure
26 | (let [[[x1 y1][x2 y2]] [[1 2] [3 4]]]
27 | [x1 y1 x2 y2])
28 | ```
29 |
30 | **Example 3:**
31 | This distructuring also works with strings
32 |
33 | ```clojure
34 | (let [[a b & c :as str] "asdjhhfdas"]
35 | [a b c str])
36 | ```
37 |
38 | **Example 4**
39 | And finally destructuring with maps. Here we are also using the `:or` directive to set a default value if there is no match.
40 |
41 | ```clojure
42 | (let [{a :a, b :b, c :c, :as m :or {a 2 b 3}} {:a 5 :c 6}]
43 | [a b c m])
44 | ```
45 |
46 | It is often the case that you will want to bind same-named symbols to the map keys. The :keys directive allows you to avoid the redundancy:
47 |
48 | ```clojure
49 | (let [{fred :fred ethel :ethel lucy :lucy} m] )
50 | ```
51 | can be factored to:
52 |
53 | ```clojure
54 | (let [{:keys [fred ethel lucy]} m] )
55 | ```
56 |
--------------------------------------------------------------------------------
/docs/om-project-clojurex/create-sessions-component.md:
--------------------------------------------------------------------------------
1 | # Create Sessions Component
2 |
3 | To keep components simple, we can factor out the specifics of displaying the session into its own component.
4 |
5 | `om/build` builds a new instance of a component. It takes two arguments: the component function and the data to render with that component.
6 |
7 | Whenever data changes, the built component will be rerendered. So if you call om/build a second time with different data, it will render again.
8 |
9 |
10 |
11 | > #### Note::Create a new component to display session details
12 | > Create a new component called `session-details` and move the code inside the for iteration to this new component.
13 |
14 |
15 |
16 |
17 | ```clojure
18 | (defn session-details [session owner]
19 | (reify
20 | om/IRender
21 | (render [_]
22 | (dom/div #js {:className "panel panel-primary"}
23 | (dom/h1 #js {:className "panel-heading"} (:title session))
24 | (dom/div #js {:className "panel-body"}
25 | (dom/h3 nil (str "By " (:speaker-name session)))
26 | (dom/div nil (:description session))
27 | (dom/hr nil)
28 | (dom/div nil (str "About " (:speaker-name session) ":"))
29 | (dom/div nil (:speaker-biography session))
30 | (dom/div nil (:twitter-handle session))
31 | (dom/div nil (:github-handle session))
32 | (dom/div nil (:speakers-website session)))))))
33 |
34 |
35 | (defn root-component [app owner]
36 | (reify
37 | om/IRender
38 | (render [_]
39 | (dom/div #js {:className "container"}
40 | (dom/h1 #js {:className "jumbotron"} (:conference-name app))
41 | (for [session (:sessions app)]
42 | (om/build session-details session))))))
43 | ```
44 |
45 | There should be no difference in the look and feel of your application. Your code is a little more modular now.
46 |
47 |
48 |
49 |
--------------------------------------------------------------------------------
/.github/workflows/scheduled-stale-check.yaml:
--------------------------------------------------------------------------------
1 | # ----------------------------------------
2 | # Scheduled stale issue & pull request check
3 | #
4 | # Adds 'stale' label after a set piece of time,
5 | # then closes stale issues & pull requests a short period after
6 | #
7 | # Using "Close Stale Issues" action
8 | # https://github.com/marketplace/actions/close-stale-issues
9 | # ----------------------------------------
10 |
11 | name: 'Scheduled stale check'
12 | on:
13 | workflow_dispatch:
14 | schedule:
15 | - cron: "0 1 1 * *" # at 01:00 on first day of month
16 |
17 | jobs:
18 | stale:
19 | runs-on: ubuntu-latest
20 | steps:
21 | - run: echo "🚀 Job automatically triggered by ${{ github.event_name }}"
22 | - run: echo "🐧 Job running on ${{ runner.os }} server"
23 | - run: echo "🐙 Using ${{ github.ref }} branch from ${{ github.repository }} repository"
24 |
25 | - uses: actions/stale@v10
26 | with:
27 | stale-issue-message: 'After 30 days with no activity, the issue was automatically marked stale. Remove stale label or add a comment to prevent the issue being closed in 5 days.'
28 | stale-pr-message: 'After 45 days with no activity, the Pull Request was automatically marked stale. Remove stale label or comment to prevent the PR being closed in 10 days.'
29 | close-issue-message: 'This issue was closed because it has been stalled for 5 days with no activity.'
30 | close-pr-message: 'This PR was closed because it has been stalled for 10 days with no activity.'
31 | days-before-issue-stale: 30
32 | days-before-pr-stale: 45
33 | days-before-issue-close: 5
34 | days-before-pr-close: 10
35 | start-date: '2025-04-05T00:00:00Z' # only affect issues/PRs from date created (ISO 8601 or RFC 2822 format)
36 | any-of-labels: 'future,keep' # labels to keep
37 | exempt-issue-assignees: 'practicalli-johnny'
38 | exempt-pr-assignees: 'practicalli-johnny'
39 |
40 | # Summary
41 | - run: echo "🎨 Issues & Pull Request checked with actions/stale"
42 | - run: echo "🍏 Job status is ${{ job.status }}."
43 |
--------------------------------------------------------------------------------
/docs/web-design-basics/clojurebridge-london-website/deploy-build.md:
--------------------------------------------------------------------------------
1 | # Creating a Deploy build configuration
2 |
3 | Create a build configuration for deployment, to remove the need to copy the `.js` file to the deploy location.
4 |
5 | These instructions assume the `/docs` directory is used by GitHub pages for deploying the website.
6 |
7 | ## Create a deploy build configuration file
8 |
9 | Copy the `dev.cljs.edn` to `deploy.cljs.edn`.
10 |
11 | Edit `deploy.cljs.edn` and add the `ouptput-to:` configuration option
12 |
13 | ```clojure
14 | ^{:watch-dirs ["test" "src"]
15 | :css-dirs ["resources/public/css"]
16 | :auto-testing true}
17 | {:main clojurebridge-landing-page.core
18 | :output-to "docs/cljs-out/dev-main.js"}
19 | ```
20 |
21 | > #### Hint::Adjust file and path if required
22 | > This configuration assumes GitHub pages has been configured to use the `/docs` directory in the master branch to serve the website.
23 |
24 |
25 | ## Create a new alias
26 |
27 | Edit the `project.clj` file.
28 |
29 | Add a new `:aliases` line, the same as the `fig:min` line, except using `deploy` at the end.
30 |
31 | ```clojure
32 | :aliases {"fig" ["trampoline" "run" "-m" "figwheel.main"]
33 | "fig:build" ["trampoline" "run" "-m" "figwheel.main" "-b" "dev" "-r"]
34 | "fig:min" ["run" "-m" "figwheel.main" "-O" "advanced" "-bo" "dev"]
35 | "fig:deploy" ["run" "-m" "figwheel.main" "-O" "advanced" "-bo" "deploy"]
36 | "fig:test" ["run" "-m" "figwheel.main" "-co" "test.cljs.edn" "-m" juxt-edge.test-runner]}
37 | ```
38 |
39 | ## Deploying updates
40 |
41 | `lein fig:deploy` will now deploy any changes to your ClojureScript app without the need to copy any files.
42 |
43 | In a terminal window open in the root of your project, run the commands:
44 |
45 | ```shell
46 | lein clean
47 | lein fig:deploy
48 | ```
49 |
50 | Then commit the new file and push to GitHub
51 |
52 | ```shell
53 | git commit -a "Deploy version 4.2"
54 | git push origin master
55 | ```
56 |
57 | If you make any changes to the index.html or css/styles.css files, then still need to copy them into `/docs` directory manually, then commit those changes too.
58 |
--------------------------------------------------------------------------------
/docs/om-project-clojurex/include-bootstrap.md:
--------------------------------------------------------------------------------
1 | # Include Bootstrap
2 |
3 | Lets make our website look better by adding some styling to the page. Rather than spend days creating the perfect design, lets simply use Bootstrap.
4 |
5 | > #### Note::Include Bootstrap CSS, Theme and Javascript to the project
6 | > Edit the `resources/public/index.html` file and link the Bootstrap stylesheets and add the minified javascript.
7 |
8 |
9 |
10 | Bootstrap has been added to the `resources/public/index.html` page, in the header section. To simplify things we have copied the CDN settings from [Getting Started with Bootstrap](http://getbootstrap.com/getting-started/).
11 |
12 | ```html
13 |
14 |
15 |
16 |
17 |
18 |
19 |
20 |
21 |
22 |
23 |
24 |
25 |
26 |
27 |
28 |
29 |
30 |
31 |
32 |
33 | ```
34 |
35 |
36 |
37 | > #### Hint::
38 | > Adding Bootstrap from CDN is quicker than downloading it locally
39 | >
40 | > If you want to develop offline, then download the bootstrap CSS and Javascript files and place them in the `om-clojure/resources/public/` folder
41 |
--------------------------------------------------------------------------------
/docs/reagent-projects/tic-tac-toe/figwheel-helper-functions.md:
--------------------------------------------------------------------------------
1 | # Figwheel Helper Functions
2 |
3 | > #### WARNING::Content relates to the classic figwheel version
4 | > This approach is not require when using `figwheel-main`, only for older projects that were created using the original version of figwheel
5 |
6 |
7 | The [lein-figwheel](https://github.com/bhauman/lein-figwheel) template provides several helper functions in `dev/user.clj` to start Figwheel and a Clojurescript REPL from a Clojure REPL.
8 |
9 | In a development environment a Clojure REPL will start in `user` namespace, so the functions in `dev/user.clj` are available when you run a Clojure REPl in Spacemacs - `SPC m '`
10 |
11 |
12 | ```clojure
13 | (ns user
14 | (:require
15 | [figwheel-sidecar.repl-api :as f]))
16 |
17 | ;; user is a namespace that the Clojure REPL loads if its available
18 |
19 | ;; Helper functions can also be added for starting and stopping a webserver or other development services
20 |
21 |
22 | (defn fig-start
23 | "This starts the figwheel server and watch based auto-compiler."
24 | []
25 | (f/start-figwheel!))
26 |
27 | (defn fig-stop
28 | "Stop the figwheel server and watch based auto-compiler."
29 | []
30 | (f/stop-figwheel!))
31 |
32 | ;; com.cemerick/piggieback is added as a :profile :dev :dependency to support an nREPL environment
33 | (defn cljs-repl
34 | "Launch a ClojureScript REPL that is connected to your build and host environment."
35 | []
36 | (f/cljs-repl))
37 | ```
38 |
39 |
40 | ## Emacs jack-in
41 |
42 | You can use these Figwheel helper functions with Emacs & Cider (and Spacemacs) by adding the following function in your `init.el` configuration file (or ~/.spacmacs file in the `dotspacemacs/user-config` section)
43 |
44 | ```elisp
45 | (setq cider-cljs-lein-repl
46 | "(do
47 | (user/fig-start)
48 | (user/cljs-repl))")
49 | ```
50 |
51 | When you run the Emacs command `clojurescript-jack-in` the `cider-cljs-lein-repl` name is evaluated and the two helper functions are run one after the other.
52 |
53 |
54 | ## Atom and ProtoREPL
55 |
56 | See the [ClojureScript section on Practicalli, ProtoREPL](https://practicalli.github.io/atom-protorepl/clojurescript/)
57 |
--------------------------------------------------------------------------------
/docs/figwheel-workflow/run-tests.md:
--------------------------------------------------------------------------------
1 | # Running tests once
2 |
3 | The `test` directory contains source code for unit tests, using a directory path matching the namespace they are testing from the `src` directory. `-test` is added to the end of the test namespaces. For example, if we have a source namespace of `practicalli.hello-world`, the tests would be in `practicalli.hello-world-test`.
4 |
5 | 
6 |
7 | Use the `:test` alias with the `:fig` alias to run the Figwheel test runner
8 |
9 | ```shell
10 | clojure -M:fig:test
11 | ```
12 |
13 | This will open a browser and connect to its JavaScript REPL and run the tests.
14 |
15 | 
16 |
17 | The results of the test run are printed to the terminal
18 |
19 | 
20 |
21 | > Running tests this way may not be as fast as using the continuous testing approach (covered next)
22 |
23 |
24 | ## Test configuration
25 |
26 | The `:test` alias uses the `test.cljs.edn` build configuration to start the Figwheel test runner and runs all the test namespaces under the `test` directory.
27 |
28 | `:test {:main-opts ["-m" "figwheel.main" "-co" "test.cljs.edn" "-m" practicalli.test-runner]}`
29 |
30 | The `test.cljs.edn` build configuration defines a separate URL to open the test host page, to avoid clashing with the URL to connect to the ClojureScript application itself.
31 |
32 | ```clojure
33 | ^{
34 | ;; alternative landing page for the tests to avoid launching the application
35 | :open-url "http://[[server-hostname]]:[[server-port]]/test.html"
36 |
37 | ;; launch tests in a headless environment - update path to chrome on operating system
38 | ;; :launch-js ["/Applications/Google Chrome.app/Contents/MacOS/Google Chrome" "--headless" "--disable-gpu" "--repl" :open-url]
39 | }
40 | {:main practicalli.test-runner}
41 | ```
42 |
--------------------------------------------------------------------------------
/docs/figwheel-workflow/project-configuration.md:
--------------------------------------------------------------------------------
1 | # Project configuration
2 |
3 | A new project is created in the `hello-world` directory and contains a `deps.edn` configuration
4 |
5 | ```clojure
6 | {:deps {org.clojure/clojure {:mvn/version "1.10.0"}
7 | org.clojure/clojurescript {:mvn/version "1.11.4"}
8 | cljsjs/react {:mvn/version "17.0.2-0"}
9 | cljsjs/react-dom {:mvn/version "17.0.2-0"}
10 | reagent/reagent {:mvn/version "1.1.1" }}
11 | :paths ["src" "resources"]
12 | :aliases {:fig {:extra-deps
13 | {com.bhauman/rebel-readline-cljs {:mvn/version "0.1.4"}
14 | org.slf4j/slf4j-nop {:mvn/version "1.7.30"}
15 | com.bhauman/figwheel-main {:mvn/version "0.2.17"}}
16 | :extra-paths ["target" "test"]}
17 | :build {:main-opts ["-m" "figwheel.main" "-b" "dev" "-r"]}
18 | :min {:main-opts ["-m" "figwheel.main" "-O" "advanced" "-bo" "dev"]}
19 | :test {:main-opts ["-m" "figwheel.main" "-co" "test.cljs.edn" "-m" "practicalli.test-runner"]}}}
20 | ```
21 |
22 | Aliases were added by the template to run figwheel and build the ClojureScript code:
23 |
24 | * `:fig` adds figwheel-main and rebel-readline libraries as dependencies, slf4j-nop provides a no-operation logger (suppresses default logger warning)
25 | * `:build` runs figwheel-main which generates JavaScript from the ClojureScript code in the project
26 | * `:min` creates a minified single JavaScript file for deployment
27 | * `:test` runs all tests under `tests/practicalli` directory using the figwheel-main test-runner
28 |
29 |
30 | `dev.cljs.edn` is the build configuration referred to by the `:build` and `:min` aliases using the `dev` name
31 |
32 | ```clojure
33 | ^{:watch-dirs ["test" "src"]
34 | :css-dirs ["resources/public/css"]
35 | :auto-testing true
36 | }
37 | {:main practicalli.hello-world}
38 | ```
39 |
40 | * `:watch-dirs` defines the directories to monitor files for saved changes
41 | * `:css-dirs` defines the location of the CSS configuration
42 | * `:auto-testng` to [automatically discover and run tests](https://figwheel.org/docs/testing.html)
43 | * `:main` defines the main namespace for the application
44 |
--------------------------------------------------------------------------------
/docs/om-project-clojurex/refactor-root-component-for-sessions.md:
--------------------------------------------------------------------------------
1 | # Refactor Root Component for Multiple Sessions
2 |
3 | There are now multiple sessions in the data model, so lets refactor that holds multiple sessions
4 |
5 | > #### Note::Update `root-component` to display details from multiple session
6 |
7 | > Add React DOM elements using `dom/div`, `dom/h2` and `dom/p`.
8 | >
9 | > See the [React DOM Elements](https://facebook.github.io/react/docs/dom-elements.html) documentation for more details.
10 |
11 | > Assume the data you need is contained within the `app-state` which is passed as the argument `app` to the `root-component`.
12 |
13 |
14 |
15 | After the h1 for conference name, add a `div` element. Inside this `div` the `for` function is used to iterate over the vector of sessions. Each session creates a `h1` for `:title` and `p` for `:description` and `:twitter-handle`
16 |
17 |
18 | ```clojure
19 | (defn root-component [app owner]
20 | (reify
21 | om/IRender
22 | (render [_]
23 | (dom/div nil
24 | (dom/h1 nil (:conference-name app))
25 | (for [session (:sessions app)]
26 | (dom/div nil
27 | (dom/h1 nil (:title session))
28 | (dom/h3 nil (str "By " (:speaker-name session)))
29 | (dom/p nil (:description session))
30 | (dom/hr nil)
31 | (dom/p nil (str "About " (:speaker-name session) ":"))
32 | (dom/p nil (:speaker-biography session))
33 | (dom/p nil (:twitter-handle session))
34 | (dom/p nil (:github-handle session))
35 | (dom/p nil (:speakers-website session))))))))
36 | ```
37 |
38 |
39 |
40 | > #### Hint::
41 | > Clojure can iterate over a collection using functions such as `for`
42 | >
43 | > Remember that React likes div tags around things too (as React does not render lists like list of DOM children)
44 |
45 | 46 | 47 | ## Resulting web page 48 | 49 | The web page with multiple sessions should look something like this: 50 | 51 |  52 | 53 | -------------------------------------------------------------------------------- /docs/figwheel/configure-build.md: -------------------------------------------------------------------------------- 1 | # Configure Build 2 | 3 | 4 | You also need to have your `:cljsbuild` configuration set up in your `project.clj`. 5 | 6 | Here is an example: 7 | 8 | ```clojure 9 | :cljsbuild { 10 | :builds [ { :id "example" 11 | :source-paths ["src/"] 12 | :figwheel true 13 | :compiler { :main "example.core" 14 | :asset-path "js/out" 15 | :output-to "resources/public/js/example.js" 16 | :output-dir "resources/public/js/out" } } ] 17 | } 18 | ``` 19 | 20 | The important part here is that you have to have at least one `build` that has `:optimizations` set to `:none` or `nil`. 21 | 22 | If you leave out the `:optimizations` key the ClojureScript compiler will default to `:none`. 23 | 24 | Setting `:figwheel true` or `:figwheel { :on-jsload "example.core/reload-hook" }` will automagically insert the figwheel client code into your application. If you supply `:on-jsload` the name of a function, that function will be called after new code gets reloaded. 25 | 26 | > **Hint** If you want to serve the HTML file that will host your application from figwheel's built in server, then the output directory has to be in a directory that can be served by the static webserver. The default for the webserver root is "resources/public" so your output files need to be in a subdirectory "resources/public" unless you change the webserver root. For now the webserver root has to be in a subdirectory of `resources`. 27 | 28 | If you are serving your application HTML from your own server you can configure `:output-to` and `:output-dir` as you like. 29 | 30 | Start the figwheel server. (This will get the first `:optimizations` `:none` build) 31 | 32 | $ lein figwheel 33 | 34 | or optionally give the name of the build 35 | 36 | $ lein figwheel example 37 | 38 | This will start a server at `http://localhost:3449` with your resources being served via the compojure `resources` ring handler. 39 | 40 | So you can load the HTML file thats hosting your ClojureScript app by going to `http://localhost:3449/