 4 |
5 | - Documentation and blog site for Lamby
6 | - Uses Docusaurus as our static site generator.
7 | - Leverages development containers & Codespaces.
8 | - Easily contribute by opening a pull request.
9 |
10 | **[Lamby: Simple Rails & AWS Lambda Integration using Rack.](https://lamby.cloud)**
11 |
12 | ## Contributing
13 |
14 | This project is built for [GitHub Codespcaes](https://github.com/features/codespaces) using the [Development Container](https://containers.dev) specification. Once you have the repo cloned and setup with a dev container using either Codespaces or [VS Code](#using-vs-code), run the following commands. This will install packages and run tests.
15 |
16 | ```shell
17 | npm start
18 | ```
19 |
20 | #### Using VS Code
21 |
22 | If you have the [Visual Studio Code Dev Container](https://marketplace.visualstudio.com/items?itemName=ms-vscode-remote.remote-containers) extension installed you can easily clone this repo locally, use the "Open Folder in Container..." command. This allows you to use the integrated terminal for the commands above.
23 |
--------------------------------------------------------------------------------
/src/pages/index.js:
--------------------------------------------------------------------------------
1 | import React from 'react';
2 | import clsx from 'clsx';
3 | import Link from '@docusaurus/Link';
4 | import useDocusaurusContext from '@docusaurus/useDocusaurusContext';
5 | import Layout from '@theme/Layout';
6 | import HomepageFeatures from '@site/src/components/HomepageFeatures';
7 | import styles from './index.module.css';
8 |
9 | function HomepageHeroImage({name}) {
10 | const {siteConfig} = useDocusaurusContext();
11 | return (
12 |
4 |
5 | - Documentation and blog site for Lamby
6 | - Uses Docusaurus as our static site generator.
7 | - Leverages development containers & Codespaces.
8 | - Easily contribute by opening a pull request.
9 |
10 | **[Lamby: Simple Rails & AWS Lambda Integration using Rack.](https://lamby.cloud)**
11 |
12 | ## Contributing
13 |
14 | This project is built for [GitHub Codespcaes](https://github.com/features/codespaces) using the [Development Container](https://containers.dev) specification. Once you have the repo cloned and setup with a dev container using either Codespaces or [VS Code](#using-vs-code), run the following commands. This will install packages and run tests.
15 |
16 | ```shell
17 | npm start
18 | ```
19 |
20 | #### Using VS Code
21 |
22 | If you have the [Visual Studio Code Dev Container](https://marketplace.visualstudio.com/items?itemName=ms-vscode-remote.remote-containers) extension installed you can easily clone this repo locally, use the "Open Folder in Container..." command. This allows you to use the integrated terminal for the commands above.
23 |
--------------------------------------------------------------------------------
/src/pages/index.js:
--------------------------------------------------------------------------------
1 | import React from 'react';
2 | import clsx from 'clsx';
3 | import Link from '@docusaurus/Link';
4 | import useDocusaurusContext from '@docusaurus/useDocusaurusContext';
5 | import Layout from '@theme/Layout';
6 | import HomepageFeatures from '@site/src/components/HomepageFeatures';
7 | import styles from './index.module.css';
8 |
9 | function HomepageHeroImage({name}) {
10 | const {siteConfig} = useDocusaurusContext();
11 | return (
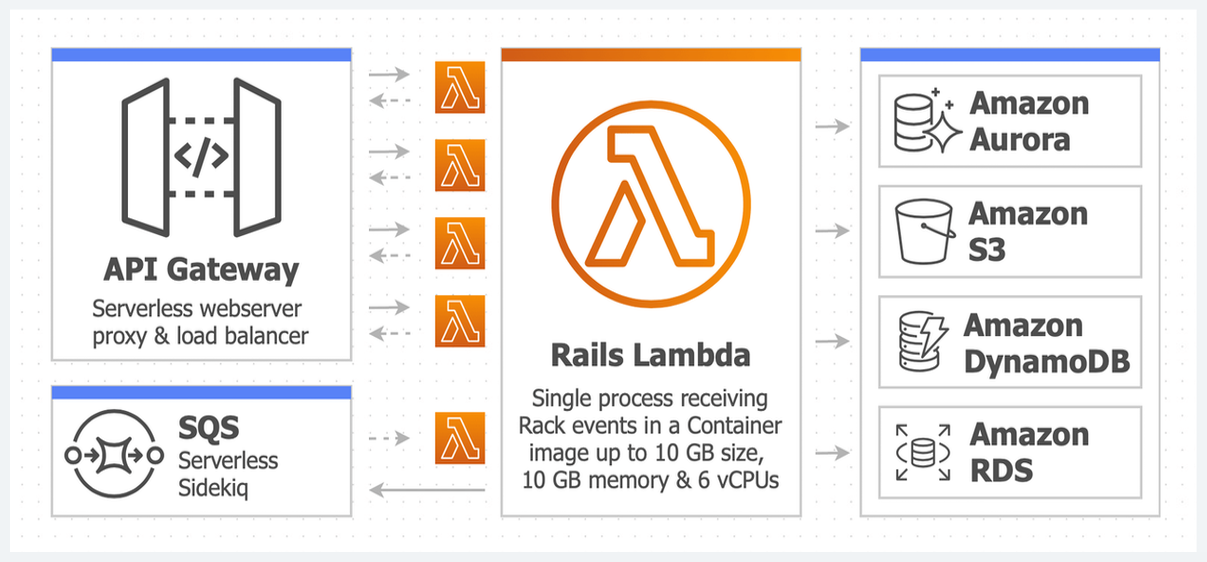
12 | Event-driven and deeply integrated within AWS, Lambda allows your Rails architecture to be completely reimagined atop fully managed infrastructure resources like Aurora, SQS, S3, CloudWatch, IAM, and much more. Using Lamby can help your engineering teams learn to "program the cloud".
27 |{description}
38 |.default}) 24 |
25 |
26 | Using ActiveJob on AWS Lambda is a reimagination of the problem for Rails. Instead of starting up long running process that polls for work, we instead use the event-driven architecture of AWS Lambda to our advantage using a gem named [Lambdakiq](https://github.com/rails-lambda/lambdakiq) which is mostly a drop-in replacement for [Sidekiq](https://github.com/mperham/sidekiq).
27 |
28 | It allows you to leverage AWS' managed infrastructure to the fullest extent. Gone are the days of managing pods and long polling processes. Instead AWS delivers messages directly to your Rails' job functions and scales it up and down as needed. Observability is built in using AWS CloudWatch Metrics, Dashboards, and Alarms. Key Features:
29 |
30 | - Distinct web & jobs Lambda functions.
31 | - AWS fully managed polling. Event-driven.
32 | - Maximum 12 retries. Per job configurable.
33 | - Mirror Sidekiq's retry [backoff](https://github.com/mperham/sidekiq/wiki/Error-Handling#automatic-job-retry) timing.
34 | - Last retry is at 11 hours 30 minutes.
35 | - Supports ActiveJob's wait/delay. Up to 15 minutes.
36 | - Dead messages are stored for up to 14 days.
37 |
38 | Learn more on GitHub: https://github.com/rails-lambda/lambdakiq
39 |
40 | ## LambdaPunch
41 |
42 |
43 |
24 |
25 |
26 | Using ActiveJob on AWS Lambda is a reimagination of the problem for Rails. Instead of starting up long running process that polls for work, we instead use the event-driven architecture of AWS Lambda to our advantage using a gem named [Lambdakiq](https://github.com/rails-lambda/lambdakiq) which is mostly a drop-in replacement for [Sidekiq](https://github.com/mperham/sidekiq).
27 |
28 | It allows you to leverage AWS' managed infrastructure to the fullest extent. Gone are the days of managing pods and long polling processes. Instead AWS delivers messages directly to your Rails' job functions and scales it up and down as needed. Observability is built in using AWS CloudWatch Metrics, Dashboards, and Alarms. Key Features:
29 |
30 | - Distinct web & jobs Lambda functions.
31 | - AWS fully managed polling. Event-driven.
32 | - Maximum 12 retries. Per job configurable.
33 | - Mirror Sidekiq's retry [backoff](https://github.com/mperham/sidekiq/wiki/Error-Handling#automatic-job-retry) timing.
34 | - Last retry is at 11 hours 30 minutes.
35 | - Supports ActiveJob's wait/delay. Up to 15 minutes.
36 | - Dead messages are stored for up to 14 days.
37 |
38 | Learn more on GitHub: https://github.com/rails-lambda/lambdakiq
39 |
40 | ## LambdaPunch
41 |
42 |
43 | .default}) 53 |
54 |
55 | You may need lightweight background job processing similiar to how [SuckerPunch](https://github.com/brandonhilkert/sucker_punch) gem works. The only way to do this for Lambda is to use the [LambdaPunnch](https://github.com/rails-lambda/lambda_punch) gem. LambdaPunch is a [Lambda Extensions](https://docs.aws.amazon.com/lambda/latest/dg/runtimes-extensions-api.html) that works with the Lambda invoke model. This solution is required if you are using New Relic as described in our
70 |
71 |
--------------------------------------------------------------------------------
/docs/cpu-architecture.mdx:
--------------------------------------------------------------------------------
1 | ---
2 | id: cpu
3 | title: CPU Architecture
4 | toc_max_heading_level: 2
5 | ---
6 |
7 | import DocLink from "../src/components/DocLink.js";
8 |
9 | # CPU Architecture
10 |
11 | Our [cookiecutter](https://github.com/rails-lambda/lamby-cookiecutter) project defaults to building a Linux container image targeting the `arm64` architecture vs the traditional `x86_64` cpu type. Applications that use arm64 (AWS Graviton2 processor) can achieve significantly better price and performance than the equivalent workloads running an on x86_64 architecture.
12 |
13 | Deploying arm64 applications is still a relatively new process and requires a few special considerations from local development to your CI/CD tooling. AWS Lambda makes this easy using the [Architectures](https://docs.aws.amazon.com/AWSCloudFormation/latest/UserGuide/aws-resource-lambda-function.html#cfn-lambda-function-architectures) setting of the `AWS::Lambda::Function` CloudFormation resource. However, here are a few things you should know.
14 |
15 | ## Docker Images
16 |
17 | Most base Docker images are now build for [multiple platforms](https://www.docker.com/blog/faster-multi-platform-builds-dockerfile-cross-compilation-guide/). Consider the following `Dockerfile`:
18 |
19 | ```dockerfile
20 | FROM ruby:3.2-bullseye
21 | ```
22 |
23 | How does Docker know which platform to use? The anwser is to use the default platform of the host. If you are on a M1 or M2 Mac, arm64 would be the platform used. Which platforms are in a specific base image? We can find out using the `docker manifest` command. For example:
24 |
25 | ```shell
26 | $ docker manifest inspect ruby:3.2 | grep arch
27 | "architecture": "amd64",
28 | "architecture": "arm64",
29 | $ docker manifest inspect | grep arch
30 | "architecture": "amd64",
31 | "architecture": "arm64",
32 | ```
33 |
34 | All the images in our starter project are multi-platform. This means any host can be used for development. Your computer, Codespaces, etc will use the proper platform image variants.
35 |
36 | ## Deployment Gotchas
37 |
38 | Though there are numerous ways to deploy containers using techniques such as emulation. However, we recommend you following one simple rule. Matching your “Development Host OS/Arch” to that of your target “Deployment Host OS/Arch” provides the least development friction. Use a CI/CD platform that matches your deployment target.
39 |
40 | :::caution
41 | Currently GitHub Actions does not support native arm64 runners. They are [working to add](https://github.com/actions/runner-images/issues/5631) this feature.
42 | :::
43 |
44 | Our
53 |
54 |
55 | You may need lightweight background job processing similiar to how [SuckerPunch](https://github.com/brandonhilkert/sucker_punch) gem works. The only way to do this for Lambda is to use the [LambdaPunnch](https://github.com/rails-lambda/lambda_punch) gem. LambdaPunch is a [Lambda Extensions](https://docs.aws.amazon.com/lambda/latest/dg/runtimes-extensions-api.html) that works with the Lambda invoke model. This solution is required if you are using New Relic as described in our
70 |
71 |
--------------------------------------------------------------------------------
/docs/cpu-architecture.mdx:
--------------------------------------------------------------------------------
1 | ---
2 | id: cpu
3 | title: CPU Architecture
4 | toc_max_heading_level: 2
5 | ---
6 |
7 | import DocLink from "../src/components/DocLink.js";
8 |
9 | # CPU Architecture
10 |
11 | Our [cookiecutter](https://github.com/rails-lambda/lamby-cookiecutter) project defaults to building a Linux container image targeting the `arm64` architecture vs the traditional `x86_64` cpu type. Applications that use arm64 (AWS Graviton2 processor) can achieve significantly better price and performance than the equivalent workloads running an on x86_64 architecture.
12 |
13 | Deploying arm64 applications is still a relatively new process and requires a few special considerations from local development to your CI/CD tooling. AWS Lambda makes this easy using the [Architectures](https://docs.aws.amazon.com/AWSCloudFormation/latest/UserGuide/aws-resource-lambda-function.html#cfn-lambda-function-architectures) setting of the `AWS::Lambda::Function` CloudFormation resource. However, here are a few things you should know.
14 |
15 | ## Docker Images
16 |
17 | Most base Docker images are now build for [multiple platforms](https://www.docker.com/blog/faster-multi-platform-builds-dockerfile-cross-compilation-guide/). Consider the following `Dockerfile`:
18 |
19 | ```dockerfile
20 | FROM ruby:3.2-bullseye
21 | ```
22 |
23 | How does Docker know which platform to use? The anwser is to use the default platform of the host. If you are on a M1 or M2 Mac, arm64 would be the platform used. Which platforms are in a specific base image? We can find out using the `docker manifest` command. For example:
24 |
25 | ```shell
26 | $ docker manifest inspect ruby:3.2 | grep arch
27 | "architecture": "amd64",
28 | "architecture": "arm64",
29 | $ docker manifest inspect | grep arch
30 | "architecture": "amd64",
31 | "architecture": "arm64",
32 | ```
33 |
34 | All the images in our starter project are multi-platform. This means any host can be used for development. Your computer, Codespaces, etc will use the proper platform image variants.
35 |
36 | ## Deployment Gotchas
37 |
38 | Though there are numerous ways to deploy containers using techniques such as emulation. However, we recommend you following one simple rule. Matching your “Development Host OS/Arch” to that of your target “Deployment Host OS/Arch” provides the least development friction. Use a CI/CD platform that matches your deployment target.
39 |
40 | :::caution
41 | Currently GitHub Actions does not support native arm64 runners. They are [working to add](https://github.com/actions/runner-images/issues/5631) this feature.
42 | :::
43 |
44 | Our .default}) 119 |
120 | As your application grows you may end up adding Resources like EventBridge Rules, SQS, S3 Buckets, and IAM Policies. Please take some time to learn how SAM & CloudFormation work.
121 |
122 | - [What Is the AWS Serverless Application Model (AWS SAM)?](https://docs.aws.amazon.com/serverless-application-model/latest/developerguide/what-is-sam.html)
123 | - [Quick Intro & Tech Spec for SAM File](https://github.com/awslabs/serverless-application-model/blob/master/versions/2016-10-31.md)
124 | - [What is AWS CloudFormation?](https://docs.aws.amazon.com/AWSCloudFormation/latest/UserGuide/Welcome.html)
125 |
126 | ## Development Container
127 |
128 | Described in the
119 |
120 | As your application grows you may end up adding Resources like EventBridge Rules, SQS, S3 Buckets, and IAM Policies. Please take some time to learn how SAM & CloudFormation work.
121 |
122 | - [What Is the AWS Serverless Application Model (AWS SAM)?](https://docs.aws.amazon.com/serverless-application-model/latest/developerguide/what-is-sam.html)
123 | - [Quick Intro & Tech Spec for SAM File](https://github.com/awslabs/serverless-application-model/blob/master/versions/2016-10-31.md)
124 | - [What is AWS CloudFormation?](https://docs.aws.amazon.com/AWSCloudFormation/latest/UserGuide/Welcome.html)
125 |
126 | ## Development Container
127 |
128 | Described in the .default}) 182 |
--------------------------------------------------------------------------------
/docs/cold-starts.mdx:
--------------------------------------------------------------------------------
1 | ---
2 | id: cold-starts
3 | toc_max_heading_level: 2
4 | ---
5 |
6 | # Cold Starts
7 |
8 | import DocLink from "../src/components/DocLink.js";
9 | import ThemedImage from "@theme/ThemedImage";
10 | import useBaseUrl from "@docusaurus/useBaseUrl";
11 |
12 | Cold starts (or init times) are an [incredibly addictive](https://docs.aws.amazon.com/lambda/latest/dg/runtimes-context.html#runtimes-lifecycle) topic. In many cases they can be ignored as an optimization to perform when the time and data suggests action. In practice, the more traffic your function handles the less likely cold starts are an issue since they statistically disappear under the [99th percentile](https://aws.amazon.com/blogs/aws/amazon-cloudwatch-update-percentile-statistics-and-new-dashboard-widgets/). However in rare cases, you may want to optimize for them. This guide can help you make decisions on how to go about it. It also descibes how AWS may be doing this for you already with [Proactive Initialization](#proactive-initialization).
13 |
14 | :::info
15 | Modest sized Rails applications generally boot within 3 to 5 seconds. This happens exactly once for the duration of the function's lifecycle which could last for 30 minutes or more and service a huge amount of traffic with no latency.
16 | :::
17 |
18 | ## Monitoring with CloudWatch
19 |
20 | You can not optimize what you do not measure. Thankfully, AWS Lambda logs initialization time of your function to CloudWatch logs which you can query using [CloudWatch Insights](https://docs.aws.amazon.com/AmazonCloudWatch/latest/logs/AnalyzingLogData.html).
21 |
22 | This query below will give you a nice percentile breakdown for your application's init duration which is the code outside the handler method. Feel free to change the bin bucket from 1 hour to whatever time helps you. For example, using `1d` (1 day) over a longer duration (weeks) allows you to see statistical trends. In general, your `p50` should be under 5 seconds.
23 |
24 | ```coffee
25 | fields @initDuration
26 | | filter ispresent(@initDuration)
27 | | stats pct(@initDuration, 5) as p5,
28 | pct(@initDuration, 50) as p50,
29 | pct(@initDuration, 95) as p95,
30 | pct(@initDuration, 99) as p99
31 | by bin(1h)
32 | ```
33 |
34 |
182 |
--------------------------------------------------------------------------------
/docs/cold-starts.mdx:
--------------------------------------------------------------------------------
1 | ---
2 | id: cold-starts
3 | toc_max_heading_level: 2
4 | ---
5 |
6 | # Cold Starts
7 |
8 | import DocLink from "../src/components/DocLink.js";
9 | import ThemedImage from "@theme/ThemedImage";
10 | import useBaseUrl from "@docusaurus/useBaseUrl";
11 |
12 | Cold starts (or init times) are an [incredibly addictive](https://docs.aws.amazon.com/lambda/latest/dg/runtimes-context.html#runtimes-lifecycle) topic. In many cases they can be ignored as an optimization to perform when the time and data suggests action. In practice, the more traffic your function handles the less likely cold starts are an issue since they statistically disappear under the [99th percentile](https://aws.amazon.com/blogs/aws/amazon-cloudwatch-update-percentile-statistics-and-new-dashboard-widgets/). However in rare cases, you may want to optimize for them. This guide can help you make decisions on how to go about it. It also descibes how AWS may be doing this for you already with [Proactive Initialization](#proactive-initialization).
13 |
14 | :::info
15 | Modest sized Rails applications generally boot within 3 to 5 seconds. This happens exactly once for the duration of the function's lifecycle which could last for 30 minutes or more and service a huge amount of traffic with no latency.
16 | :::
17 |
18 | ## Monitoring with CloudWatch
19 |
20 | You can not optimize what you do not measure. Thankfully, AWS Lambda logs initialization time of your function to CloudWatch logs which you can query using [CloudWatch Insights](https://docs.aws.amazon.com/AmazonCloudWatch/latest/logs/AnalyzingLogData.html).
21 |
22 | This query below will give you a nice percentile breakdown for your application's init duration which is the code outside the handler method. Feel free to change the bin bucket from 1 hour to whatever time helps you. For example, using `1d` (1 day) over a longer duration (weeks) allows you to see statistical trends. In general, your `p50` should be under 5 seconds.
23 |
24 | ```coffee
25 | fields @initDuration
26 | | filter ispresent(@initDuration)
27 | | stats pct(@initDuration, 5) as p5,
28 | pct(@initDuration, 50) as p50,
29 | pct(@initDuration, 95) as p95,
30 | pct(@initDuration, 99) as p99
31 | by bin(1h)
32 | ```
33 |
34 |