├── img
├── 01.png
├── 02.png
├── 03.png
├── 04.png
├── 05.png
├── 06.png
├── 07.png
├── 08.png
├── 09.png
└── 10.png
├── README.md
└── index.html
/img/01.png:
--------------------------------------------------------------------------------
https://raw.githubusercontent.com/renancaldas/aws-ec2-guide/HEAD/img/01.png
--------------------------------------------------------------------------------
/img/02.png:
--------------------------------------------------------------------------------
https://raw.githubusercontent.com/renancaldas/aws-ec2-guide/HEAD/img/02.png
--------------------------------------------------------------------------------
/img/03.png:
--------------------------------------------------------------------------------
https://raw.githubusercontent.com/renancaldas/aws-ec2-guide/HEAD/img/03.png
--------------------------------------------------------------------------------
/img/04.png:
--------------------------------------------------------------------------------
https://raw.githubusercontent.com/renancaldas/aws-ec2-guide/HEAD/img/04.png
--------------------------------------------------------------------------------
/img/05.png:
--------------------------------------------------------------------------------
https://raw.githubusercontent.com/renancaldas/aws-ec2-guide/HEAD/img/05.png
--------------------------------------------------------------------------------
/img/06.png:
--------------------------------------------------------------------------------
https://raw.githubusercontent.com/renancaldas/aws-ec2-guide/HEAD/img/06.png
--------------------------------------------------------------------------------
/img/07.png:
--------------------------------------------------------------------------------
https://raw.githubusercontent.com/renancaldas/aws-ec2-guide/HEAD/img/07.png
--------------------------------------------------------------------------------
/img/08.png:
--------------------------------------------------------------------------------
https://raw.githubusercontent.com/renancaldas/aws-ec2-guide/HEAD/img/08.png
--------------------------------------------------------------------------------
/img/09.png:
--------------------------------------------------------------------------------
https://raw.githubusercontent.com/renancaldas/aws-ec2-guide/HEAD/img/09.png
--------------------------------------------------------------------------------
/img/10.png:
--------------------------------------------------------------------------------
https://raw.githubusercontent.com/renancaldas/aws-ec2-guide/HEAD/img/10.png
--------------------------------------------------------------------------------
/README.md:
--------------------------------------------------------------------------------
1 | # AWS EC2 Guide
2 |
3 | A step-by-step guide for setting up a linux server with [NodeJS](https://nodejs.org/en/), [Nginx](https://nginx.org/) and [Git hook listener](https://github.com/renancaldas/git-hook-listener).
4 |
5 | Web version: [http://renancaldas.github.io/aws-ec2-guide](http://renancaldas.github.io/aws-ec2-guide)
6 |
7 |
8 |
9 | ### Summary
10 | ---
11 | 1. Creating the AWS EC2 instance
12 | 2. Connecting to server and installing NodeJS
13 | 3. Nginx and configuration
14 | 4. Git hook listener
15 | 5. Author
16 |
17 |
18 |
19 | ### 1. Creating the AWS EC2 instance
20 | ---
21 | You should have an [AWS](aws.amazon.com) registration. They give a free year of VPS server! 😃
22 |
23 | - Login into your AWS account and choose EC2 in AWS dashboard:
24 |
25 | 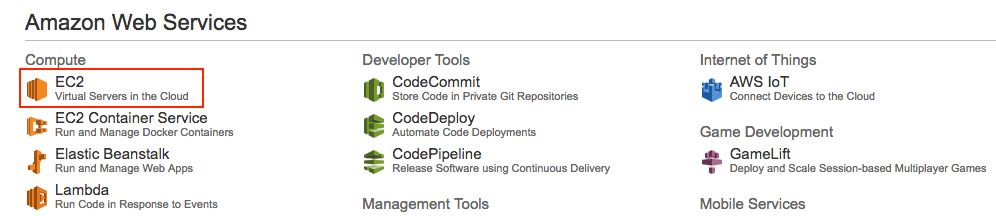
26 |
27 | - Click in the "Launch Instance" button:
28 |
29 | 
30 |
31 |
32 | - Select **Ubuntu Server**
33 |
34 | 
35 |
36 | - Choose **"t2.micro"** tier, click on **"Review and Launch"** button
37 |
38 | 
39 |
40 | - Then click on **"Launch"** button, which will open a poup asking for a key pair creation. Choose **"Create a new key pair"**, name it, **download** it and then click on **"Launch instances"**.
41 |
42 | 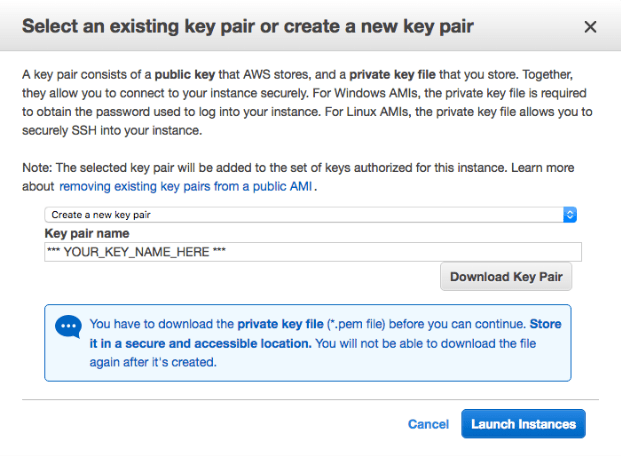
43 |
44 | - Finally, your server will be initialized! Obs.: Copy and paste the **"Public DNS"** or **"Public IP"** in a separated document for further instructions! 📝
45 |
46 | 
47 |
48 | 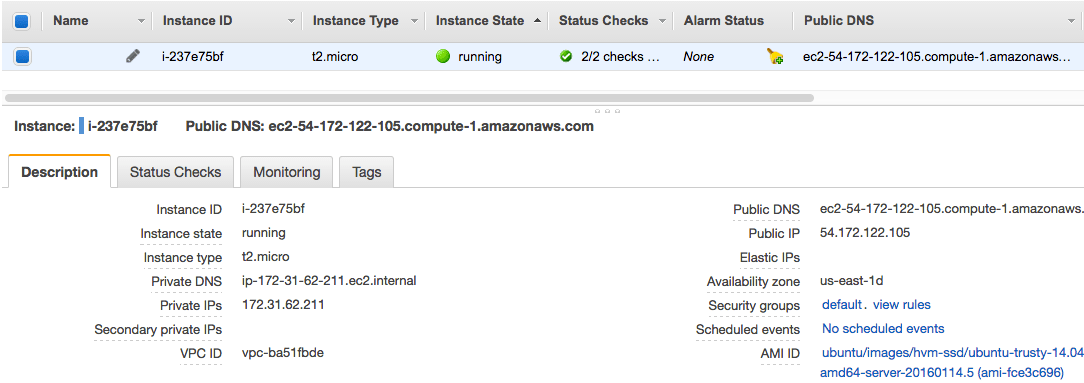
49 |
50 | - Next, you should open the some ports in order to expose your server to external requests from the internet. Click on the link close to **"Security groups"**, from the previous picture. Then add the **inbound** request ports **80, 22 and 443**, clicking on **"Edit"** button, as the follow image:
51 |
52 | 
53 |
54 | - Now you are ready for connecting to your server! 👍
55 |
56 |
57 |
58 |
59 |
60 | ### 2. Connecting to server and initializing it
61 | ---
62 | I will be using bash commands (Mac or Linux). For Windows, [check this out](https://msdn.microsoft.com/en-us/commandline/wsl/about). So I think you should be fine... Please give me a feedback on this.
63 |
64 | 1. Open **terminal** and connect via ssh to your server. Obs.: here we need the ***"Public DNS"*** or ***"Public IP"*** and the **key pair file** (.pem) mentioned before.
65 | ```
66 | $ chmod 400 [path to .pem file]
67 | $ ssh ubuntu@[your server ip or dns] -i [path to .pem file]
68 | ```
69 | 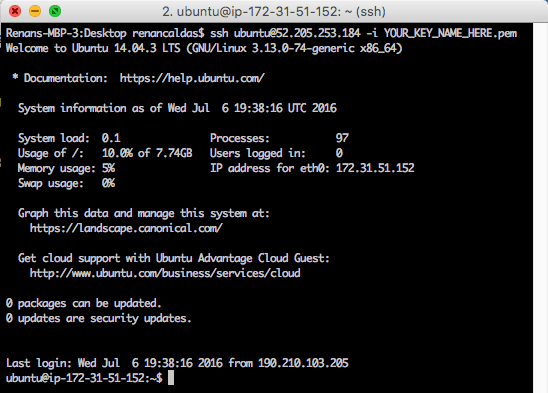
70 |
71 |
72 | 2. Install [NodeJS](https://nodejs.org/en/) (in this example, version 6):
73 | ```
74 | $ curl -sL https://deb.nodesource.com/setup_6.x | sudo -E bash -
75 | $ sudo apt-get install -y nodejs
76 | ```
77 |
78 |
79 | 3. Set npm path to user's home and install packages: [PM2](http://pm2.keymetrics.io/), [Nodemon](https://github.com/remy/nodemon), [Git](https://git-scm.com/):
80 | ```
81 | $ npm config set prefix ~/npm
82 | $ export PATH="$PATH:$HOME/npm/bin"
83 |
84 | $ npm install pm2 -g
85 | $ pm2 startup
86 | // If show "You have to run this command as root", run the given command!
87 |
88 | $ npm install nodemon -g
89 | $ sudo apt install git
90 | ```
91 | 4. Store NPM path in user's profile file. This will keep the previous NPM changes.
92 | ```
93 | $ nano ~/.profile
94 |
95 | // Add these lines at the end:
96 | # set NPM path to user's home
97 | npm config set prefix ~/npm
98 | export PATH="$PATH:$HOME/npm/bin"
99 |
100 | // Save it using: CTRL + o, ENTER
101 | // And exit using: CTRL + x, ENTER
102 | ```
103 |
104 | 5. Store your Git user credentials. This will prevent the login prompt when using [Git](https://git-scm.com/) commands.
105 | ```
106 | $ nano ~/.netrc
107 |
108 | // And add these lines:
109 | machine github.com (or bitbucket.org)
110 | login [YOUR_USER]
111 | password [YOUR_PASS]
112 |
113 | // Save it using: CTRL + o, ENTER
114 | // And exit using: CTRL + x, ENTER
115 | ```
116 |
117 |
118 |
119 |
120 |
121 |
122 | ### 3. Nginx
123 | ---
124 | Here we will install Nginx, configure it to router external requests from port 80 (remember that we have open this port before?) to server's local port 3000, which could be a NodeJS application running in this port. We will setup a NodeJS application in next step.
125 |
126 | - First, install nginx:
127 | ```
128 | $ sudo apt-get update
129 | $ sudo apt-get install nginx
130 | ```
131 |
132 | - Then we need to edit the config default file in order to forward requests:
133 | ```
134 | $ sudo nano /etc/nginx/sites-available/default
135 |
136 | // In "server" block, put a # character at these lines:
137 | # root /usr/share/nginx/html;
138 | # index index.html index.htm;
139 |
140 | // Clear everything inside "location /" block , and set it like this
141 | location / {
142 | proxy_pass http://localhost:3000;
143 | }
144 |
145 | // Save it using: CTRL + o, ENTER
146 | // And exit using: CTRL + x, ENTER
147 | ```
148 | It should look like this:
149 | 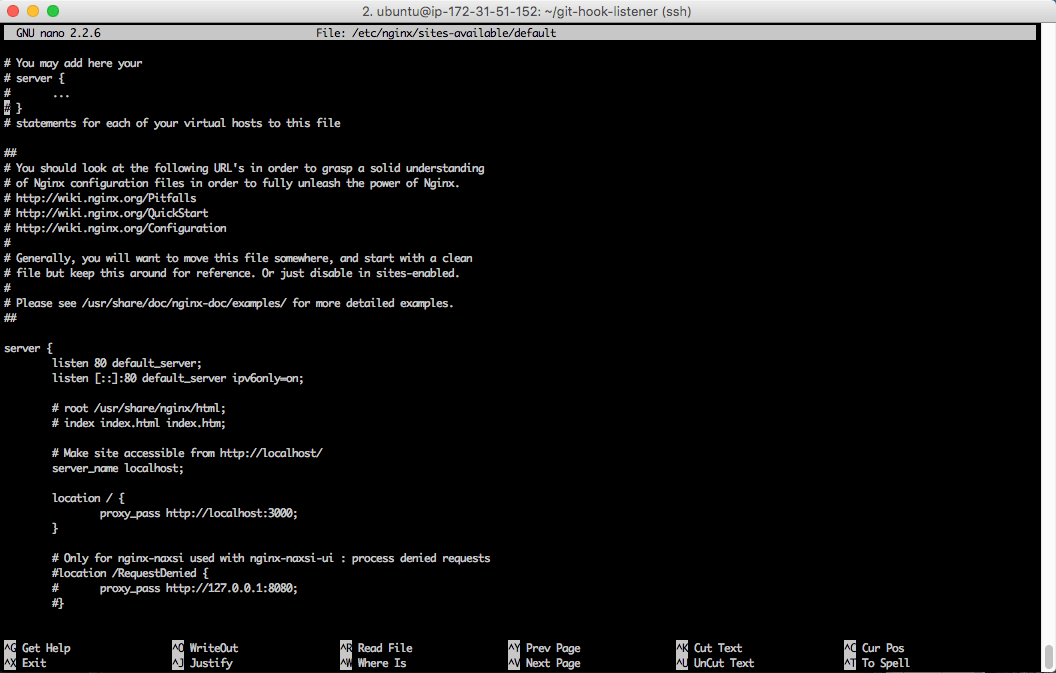
150 |
151 |
152 | - And reload Nginx with new configuration redirecting requests from port 80 (http) to local port 3000
153 | ```
154 | $ sudo service nginx restart
155 | ```
156 |
157 |
158 |
159 |
160 |
161 | ### 4. Git Hook Listener
162 | ---
163 | This is a project that I have done in order to use the continuous deployment concept that automatizes the process of uploading project files to multiple servers and environments. This is a daily used component in the companies that I have worked.
164 |
165 | **Please continue by reading the [step-by-step guide](https://github.com/renancaldas/git-hook-listener), like this one.**
166 |
167 |
168 |
169 |
170 |
171 | ### 5. Author
172 | ---
173 | Renan Caldas de Oliveira
174 |
175 | - Web: http://www.renancaldas.com
176 |
--------------------------------------------------------------------------------
/index.html:
--------------------------------------------------------------------------------
1 |
2 |
3 | AWS EC2 Guide
4 |
5 |  6 |
7 |
8 | # AWS EC2 Guide
9 |
10 | A step-by-step guide for setting up a linux server with [NodeJS](https://nodejs.org/en/), [Nginx](https://nginx.org/) and [Git hook listener](https://github.com/renancaldas/git-hook-listener).
11 |
12 | Web version: [http://renancaldas.github.io/aws-ec2-guide](http://renancaldas.github.io/aws-ec2-guide)
13 |
14 |  
15 |
16 | ### Summary
17 | ---
18 | 1. Creating the AWS EC2 instance
19 | 2. Connecting to server and installing NodeJS
20 | 3. Nginx and configuration
21 | 4. Git hook listener
22 | 5. Author
23 |
24 |  
25 |
26 | ### 1. Creating the AWS EC2 instance
27 | ---
28 | You should have an [AWS](aws.amazon.com) registration. They give a free year of VPS server! 😃
29 |
30 | - Login into your AWS account and choose EC2 in AWS dashboard:
31 |
32 | 
33 |
34 | - Click in the "Launch Instance" button:
35 |
36 | 
37 |
38 |
39 | - Select **Ubuntu Server**
40 |
41 | 
42 |
43 | - Choose **"t2.micro"** tier, click on **"Review and Launch"** button
44 |
45 | 
46 |
47 | - Then click on **"Launch"** button, which will open a poup asking for a key pair creation. Choose **"Create a new key pair"**, name it, **download** it and then click on **"Launch instances"**.
48 |
49 | 
50 |
51 | - Finally, your server will be initialized! Obs.: Copy and paste the **"Public DNS"** or **"Public IP"** in a separated document for further instructions! 📝
52 |
53 | 
54 |
55 | 
56 |
57 | - Next, you should open the some ports in order to expose your server to external requests from the internet. Click on the link close to **"Security groups"**, from the previous picture. Then add the **inbound** request ports **80, 22 and 443**, clicking on **"Edit"** button, as the follow image:
58 |
59 | 
60 |
61 | - Now you are ready for connecting to your server! 👍
62 |
63 |  
64 |
65 |  
66 |
67 | ### 2. Connecting to server and initializing it
68 | ---
69 | I will be using bash commands (Mac or Linux). For Windows, [check this out](https://msdn.microsoft.com/en-us/commandline/wsl/about). So I think you should be fine... Please give me a feedback on this.
70 |
71 | 1. Open **terminal** and connect via ssh to your server. Obs.: here we need the ***"Public DNS"*** or ***"Public IP"*** and the **key pair file** (.pem) mentioned before.
72 | ```
73 | $ chmod 400 [path to .pem file]
74 | $ ssh ubuntu@[your server ip or dns] -i [path to .pem file]
75 | ```
76 | 
77 |
78 |
79 | 2. Install [NodeJS](https://nodejs.org/en/) (in this example, version 6):
80 | ```
81 | $ curl -sL https://deb.nodesource.com/setup_6.x | sudo -E bash -
82 | $ sudo apt-get install -y nodejs
83 | ```
84 |
85 |
86 | 3. Set npm path to user's home and install packages: [PM2](http://pm2.keymetrics.io/), [Nodemon](https://github.com/remy/nodemon), [Git](https://git-scm.com/):
87 | ```
88 | $ npm config set prefix ~/npm
89 | $ export PATH="$PATH:$HOME/npm/bin"
90 |
91 | $ npm install pm2 -g
92 | $ pm2 startup
93 | // If show "You have to run this command as root", run the given command!
94 |
95 | $ npm install nodemon -g
96 | $ sudo apt install git
97 | ```
98 | 4. Store NPM path in user's profile file. This will keep the previous NPM changes.
99 | ```
100 | $ nano ~/.profile
101 |
102 | // Add these lines at the end:
103 | # set NPM path to user's home
104 | npm config set prefix ~/npm
105 | export PATH="$PATH:$HOME/npm/bin"
106 |
107 | // Save it using: CTRL + o, ENTER
108 | // And exit using: CTRL + x, ENTER
109 | ```
110 |
111 | 5. Store your Git user credentials. This will prevent the login prompt when using [Git](https://git-scm.com/) commands.
112 | ```
113 | $ nano ~/.netrc
114 |
115 | // And add these lines:
116 | machine github.com (or bitbucket.org)
117 | login [YOUR_USER]
118 | password [YOUR_PASS]
119 |
120 | // Save it using: CTRL + o, ENTER
121 | // And exit using: CTRL + x, ENTER
122 | ```
123 |
124 |
125 |  
126 |
127 |  
128 |
129 | ### 3. Nginx
130 | ---
131 | Here we will install Nginx, configure it to router external requests from port 80 (remember that we have open this port before?) to server's local port 3000, which could be a NodeJS application running in this port. We will setup a NodeJS application in next step.
132 |
133 | - First, install nginx:
134 | ```
135 | $ sudo apt-get update
136 | $ sudo apt-get install nginx
137 | ```
138 |
139 | - Then we need to edit the config default file in order to forward requests:
140 | ```
141 | $ sudo nano /etc/nginx/sites-available/default
142 |
143 | // In "server" block, put a # character at these lines:
144 | # root /usr/share/nginx/html;
145 | # index index.html index.htm;
146 |
147 | // Clear everything inside "location /" block , and set it like this
148 | location / {
149 | proxy_pass http://localhost:3000;
150 | }
151 |
152 | // Save it using: CTRL + o, ENTER
153 | // And exit using: CTRL + x, ENTER
154 | ```
155 | It should look like this:
156 | 
157 |
158 |
159 | - And reload Nginx with new configuration redirecting requests from port 80 (http) to local port 3000
160 | ```
161 | $ sudo service nginx restart
162 | ```
163 |
164 |  
165 |
166 |  
167 |
168 | ### 4. Git Hook Listener
169 | ---
170 | This is a project that I have done in order to use the continuous deployment concept that automatizes the process of uploading project files to multiple servers and environments. This is a daily used component in the companies that I have worked.
171 |
172 | **Please continue by reading the [step-by-step guide](https://github.com/renancaldas/git-hook-listener), like this one.**
173 |
174 |  
175 |
176 |  
177 |
178 | ### 5. Author
179 | ---
180 | Renan Caldas de Oliveira
181 |
182 | - Web: http://www.renancaldas.com
183 | - E-mail: renan.caldas@outlook.com
184 | - Twitter: https://twitter.com/renanzeirah
185 | - Github: https://github.com/renancaldas
186 | - Facebook: https://www.facebook.com/renan.caldas.oliveira
187 |
188 |
189 |
190 |
--------------------------------------------------------------------------------
6 |
7 |
8 | # AWS EC2 Guide
9 |
10 | A step-by-step guide for setting up a linux server with [NodeJS](https://nodejs.org/en/), [Nginx](https://nginx.org/) and [Git hook listener](https://github.com/renancaldas/git-hook-listener).
11 |
12 | Web version: [http://renancaldas.github.io/aws-ec2-guide](http://renancaldas.github.io/aws-ec2-guide)
13 |
14 |  
15 |
16 | ### Summary
17 | ---
18 | 1. Creating the AWS EC2 instance
19 | 2. Connecting to server and installing NodeJS
20 | 3. Nginx and configuration
21 | 4. Git hook listener
22 | 5. Author
23 |
24 |  
25 |
26 | ### 1. Creating the AWS EC2 instance
27 | ---
28 | You should have an [AWS](aws.amazon.com) registration. They give a free year of VPS server! 😃
29 |
30 | - Login into your AWS account and choose EC2 in AWS dashboard:
31 |
32 | 
33 |
34 | - Click in the "Launch Instance" button:
35 |
36 | 
37 |
38 |
39 | - Select **Ubuntu Server**
40 |
41 | 
42 |
43 | - Choose **"t2.micro"** tier, click on **"Review and Launch"** button
44 |
45 | 
46 |
47 | - Then click on **"Launch"** button, which will open a poup asking for a key pair creation. Choose **"Create a new key pair"**, name it, **download** it and then click on **"Launch instances"**.
48 |
49 | 
50 |
51 | - Finally, your server will be initialized! Obs.: Copy and paste the **"Public DNS"** or **"Public IP"** in a separated document for further instructions! 📝
52 |
53 | 
54 |
55 | 
56 |
57 | - Next, you should open the some ports in order to expose your server to external requests from the internet. Click on the link close to **"Security groups"**, from the previous picture. Then add the **inbound** request ports **80, 22 and 443**, clicking on **"Edit"** button, as the follow image:
58 |
59 | 
60 |
61 | - Now you are ready for connecting to your server! 👍
62 |
63 |  
64 |
65 |  
66 |
67 | ### 2. Connecting to server and initializing it
68 | ---
69 | I will be using bash commands (Mac or Linux). For Windows, [check this out](https://msdn.microsoft.com/en-us/commandline/wsl/about). So I think you should be fine... Please give me a feedback on this.
70 |
71 | 1. Open **terminal** and connect via ssh to your server. Obs.: here we need the ***"Public DNS"*** or ***"Public IP"*** and the **key pair file** (.pem) mentioned before.
72 | ```
73 | $ chmod 400 [path to .pem file]
74 | $ ssh ubuntu@[your server ip or dns] -i [path to .pem file]
75 | ```
76 | 
77 |
78 |
79 | 2. Install [NodeJS](https://nodejs.org/en/) (in this example, version 6):
80 | ```
81 | $ curl -sL https://deb.nodesource.com/setup_6.x | sudo -E bash -
82 | $ sudo apt-get install -y nodejs
83 | ```
84 |
85 |
86 | 3. Set npm path to user's home and install packages: [PM2](http://pm2.keymetrics.io/), [Nodemon](https://github.com/remy/nodemon), [Git](https://git-scm.com/):
87 | ```
88 | $ npm config set prefix ~/npm
89 | $ export PATH="$PATH:$HOME/npm/bin"
90 |
91 | $ npm install pm2 -g
92 | $ pm2 startup
93 | // If show "You have to run this command as root", run the given command!
94 |
95 | $ npm install nodemon -g
96 | $ sudo apt install git
97 | ```
98 | 4. Store NPM path in user's profile file. This will keep the previous NPM changes.
99 | ```
100 | $ nano ~/.profile
101 |
102 | // Add these lines at the end:
103 | # set NPM path to user's home
104 | npm config set prefix ~/npm
105 | export PATH="$PATH:$HOME/npm/bin"
106 |
107 | // Save it using: CTRL + o, ENTER
108 | // And exit using: CTRL + x, ENTER
109 | ```
110 |
111 | 5. Store your Git user credentials. This will prevent the login prompt when using [Git](https://git-scm.com/) commands.
112 | ```
113 | $ nano ~/.netrc
114 |
115 | // And add these lines:
116 | machine github.com (or bitbucket.org)
117 | login [YOUR_USER]
118 | password [YOUR_PASS]
119 |
120 | // Save it using: CTRL + o, ENTER
121 | // And exit using: CTRL + x, ENTER
122 | ```
123 |
124 |
125 |  
126 |
127 |  
128 |
129 | ### 3. Nginx
130 | ---
131 | Here we will install Nginx, configure it to router external requests from port 80 (remember that we have open this port before?) to server's local port 3000, which could be a NodeJS application running in this port. We will setup a NodeJS application in next step.
132 |
133 | - First, install nginx:
134 | ```
135 | $ sudo apt-get update
136 | $ sudo apt-get install nginx
137 | ```
138 |
139 | - Then we need to edit the config default file in order to forward requests:
140 | ```
141 | $ sudo nano /etc/nginx/sites-available/default
142 |
143 | // In "server" block, put a # character at these lines:
144 | # root /usr/share/nginx/html;
145 | # index index.html index.htm;
146 |
147 | // Clear everything inside "location /" block , and set it like this
148 | location / {
149 | proxy_pass http://localhost:3000;
150 | }
151 |
152 | // Save it using: CTRL + o, ENTER
153 | // And exit using: CTRL + x, ENTER
154 | ```
155 | It should look like this:
156 | 
157 |
158 |
159 | - And reload Nginx with new configuration redirecting requests from port 80 (http) to local port 3000
160 | ```
161 | $ sudo service nginx restart
162 | ```
163 |
164 |  
165 |
166 |  
167 |
168 | ### 4. Git Hook Listener
169 | ---
170 | This is a project that I have done in order to use the continuous deployment concept that automatizes the process of uploading project files to multiple servers and environments. This is a daily used component in the companies that I have worked.
171 |
172 | **Please continue by reading the [step-by-step guide](https://github.com/renancaldas/git-hook-listener), like this one.**
173 |
174 |  
175 |
176 |  
177 |
178 | ### 5. Author
179 | ---
180 | Renan Caldas de Oliveira
181 |
182 | - Web: http://www.renancaldas.com
183 | - E-mail: renan.caldas@outlook.com
184 | - Twitter: https://twitter.com/renanzeirah
185 | - Github: https://github.com/renancaldas
186 | - Facebook: https://www.facebook.com/renan.caldas.oliveira
187 |
188 |
189 |
190 |
--------------------------------------------------------------------------------