├── requirements.txt
├── README.md
├── .DS_Store
├── docs
├── CZ
│ └── index.rst
├── .DS_Store
├── DE
│ ├── .DS_Store
│ ├── einrichten.rst
│ ├── index.rst
│ ├── homescreen.md
│ ├── community.rst
│ └── wasistandroidaps.rst
├── images
│ ├── PR0.png
│ ├── PR1.png
│ ├── PR2.png
│ ├── PR3.png
│ ├── PR4.png
│ ├── PR5.png
│ ├── PR6.png
│ ├── PR7.png
│ ├── git.png
│ ├── loop.png
│ ├── play.png
│ ├── wear.png
│ ├── danar1.png
│ ├── merge.png
│ ├── temps.png
│ ├── xdrip1.png
│ ├── aapslog.png
│ ├── actions.png
│ ├── checkout.png
│ ├── cob_aaps.png
│ ├── cob_oref0.png
│ ├── gitfetch.png
│ ├── nsclient1.png
│ ├── openapsma.png
│ ├── overview.png
│ ├── AndroidAPS1.png
│ ├── AndroidAPS2.png
│ ├── AndroidAPS3.png
│ ├── Home_screen.png
│ ├── app_desing.png
│ ├── careportal.png
│ ├── nightscout1.png
│ ├── objectives.png
│ ├── treatments.png
│ ├── virtualpump.png
│ ├── androidstudio1.png
│ ├── androidstudio2.png
│ ├── androidstudio3.png
│ ├── branchintray.png
│ ├── configbuilder.png
│ ├── connectedphone.png
│ ├── Screenshot_profile.png
│ ├── Screenshot_pump_Combo.png
│ ├── Screenshot_Home_screen.png
│ ├── Screenshot_care_portal.png
│ ├── combo
│ │ ├── combo-tbr-settings.png
│ │ ├── combo-bolus-settings.png
│ │ ├── combo-menu-settings.png
│ │ ├── combo-bolus-settings-de.png
│ │ ├── combo-insulin-settings.png
│ │ ├── combo-menu-settings-de.png
│ │ ├── combo-tbr-settings-de.png
│ │ ├── combo-insulin-settings-de.png
│ │ ├── combo-pump-options-settings.png
│ │ └── combo-pump-options-settings-de.png
│ ├── Screenshot_config_builder.png
│ ├── Screenshot_insulin_profile.png
│ ├── Example_batch_images_upload.png
│ └── Screenshot_Bolus_calculator.png
├── български
│ ├── .DS_Store
│ ├── Конфигуриране
│ │ ├── DanaR-инсулинова-помпа.md
│ │ ├── Найтскаут-(Nightscout).md
│ │ └── Източник-на-данни-за-КЗ.md
│ ├── Използване
│ │ ├── Достъп-до-лог-файлове.md
│ │ ├── Процентен-профил.md
│ │ ├── Работа-с-профили-след-v1.5.md
│ │ ├── SMS-Команди.md
│ │ ├── Open-APS-функции.md
│ │ └── Съвети-и-похвати.md
│ ├── Източници
│ │ └── Връзка-с-други-потребители.md
│ ├── Инсталиране
│ │ ├── Обновяване-до-последна-версия.md
│ │ └── Създаване-на-APK.md
│ └── Подкрепа
│ │ └── Как-може-да-помогна.md
├── ES
│ ├── Inicio
│ │ ├── Glosario.md
│ │ ├── Teléfonos.md
│ │ ├── Pantallazos.md
│ │ ├── La seguridad primero.md
│ │ ├── Opciones de Bombas de insulina.md
│ │ ├── Todo empieza aquí.md
│ │ ├── Cómo puedo ayudar.md
│ │ └── Futuros controladores de bombas.md
│ ├── inicio
│ │ ├── glosario.md
│ │ ├── telefonos.md
│ │ ├── pantallazos.md
│ │ ├── seguridad.md
│ │ ├── bombas.md
│ │ ├── ayudar.md
│ │ └── futurosbombas.md
│ ├── Donde buscar ayuda
│ │ ├── Conectarse con otros usuarios.md
│ │ └── Lecturas recomendadas.md
│ ├── uso
│ │ ├── logs.md
│ │ ├── openaps.md
│ │ ├── sms.md
│ │ ├── extcarbs.md
│ │ ├── perfiles.md
│ │ └── desarrollo.md
│ ├── Uso
│ │ ├── Acceder a los logs.md
│ │ ├── Funcionalidades OpenAPS.md
│ │ ├── Comandos SMS.md
│ │ ├── Carbohidratos extendidos.md
│ │ ├── Perfiles.md
│ │ └── Rama Dev.md
│ ├── instalando
│ │ ├── install.md
│ │ ├── nightscout.md
│ │ └── compilando.md
│ ├── Instalando AndroidAPS
│ │ ├── Actualizar a una nueva versión.md
│ │ ├── Nightscout.md
│ │ └── Compilando la APK.md
│ ├── configuracion
│ │ ├── sens.md
│ │ ├── watchfaces.md
│ │ ├── fuentes-glucemia.md
│ │ └── configbuilder.md
│ ├── ayuda.md
│ └── Configuracion
│ │ ├── Detección de sensibilidad y COB.md
│ │ ├── Watchfaces.md
│ │ ├── Fuente de datos Glucemia.md
│ │ └── Conf Builder.md
├── EN
│ ├── Getting-Started
│ │ ├── Glossary.md
│ │ ├── Phones.md
│ │ ├── index.rst
│ │ ├── Safety-first.md
│ │ ├── Pump-Choices.md
│ │ ├── How-can-I-help.md
│ │ └── Future-possible-Pump-Drivers.md
│ ├── Usage
│ │ ├── Accessing-logfiles.md
│ │ ├── Open-APS-features.md
│ │ ├── SMS-Commands.md
│ │ ├── Dev-branch.md
│ │ ├── Profiles.md
│ │ └── Extended-Carbs.md
│ ├── Where-To-Go-For-Help
│ │ ├── Connect-with-other-users.md
│ │ └── Background-reading.md
│ ├── Configuration
│ │ ├── DanaRS-Insulin-Pump.md
│ │ ├── Sensitivity-detection-and-COB.md
│ │ ├── DanaR-Insulin-Pump.md
│ │ ├── Watchfaces.md
│ │ ├── BG-Source.md
│ │ └── Config-Builder.md
│ ├── Installing-AndroidAPS
│ │ ├── Update-to-new-version.md
│ │ ├── Nightscout.md
│ │ ├── Building-APK.md
│ │ └── Releasenotes.md
│ └── index.rst
├── index.rst
└── BG
│ ├── Скрийншоти.md
│ ├── Безопасност.md
│ ├── Начало.md
│ ├── Терминология.md
│ └── index.rst
└── readthedocs.yml
/requirements.txt:
--------------------------------------------------------------------------------
1 | recommonmark==0.4.0
2 | sphinx==1.5.6
3 |
--------------------------------------------------------------------------------
/README.md:
--------------------------------------------------------------------------------
1 | # AndroidAPSdocs
2 | Documentation for AndroidAPS
3 |
--------------------------------------------------------------------------------
/.DS_Store:
--------------------------------------------------------------------------------
https://raw.githubusercontent.com/rifkyprayoga/AndroidAPSdocs/HEAD/.DS_Store
--------------------------------------------------------------------------------
/docs/CZ/index.rst:
--------------------------------------------------------------------------------
1 | Instrukce v češtině
2 | ======================================
3 |
--------------------------------------------------------------------------------
/docs/.DS_Store:
--------------------------------------------------------------------------------
https://raw.githubusercontent.com/rifkyprayoga/AndroidAPSdocs/HEAD/docs/.DS_Store
--------------------------------------------------------------------------------
/docs/DE/.DS_Store:
--------------------------------------------------------------------------------
https://raw.githubusercontent.com/rifkyprayoga/AndroidAPSdocs/HEAD/docs/DE/.DS_Store
--------------------------------------------------------------------------------
/docs/images/PR0.png:
--------------------------------------------------------------------------------
https://raw.githubusercontent.com/rifkyprayoga/AndroidAPSdocs/HEAD/docs/images/PR0.png
--------------------------------------------------------------------------------
/docs/images/PR1.png:
--------------------------------------------------------------------------------
https://raw.githubusercontent.com/rifkyprayoga/AndroidAPSdocs/HEAD/docs/images/PR1.png
--------------------------------------------------------------------------------
/docs/images/PR2.png:
--------------------------------------------------------------------------------
https://raw.githubusercontent.com/rifkyprayoga/AndroidAPSdocs/HEAD/docs/images/PR2.png
--------------------------------------------------------------------------------
/docs/images/PR3.png:
--------------------------------------------------------------------------------
https://raw.githubusercontent.com/rifkyprayoga/AndroidAPSdocs/HEAD/docs/images/PR3.png
--------------------------------------------------------------------------------
/docs/images/PR4.png:
--------------------------------------------------------------------------------
https://raw.githubusercontent.com/rifkyprayoga/AndroidAPSdocs/HEAD/docs/images/PR4.png
--------------------------------------------------------------------------------
/docs/images/PR5.png:
--------------------------------------------------------------------------------
https://raw.githubusercontent.com/rifkyprayoga/AndroidAPSdocs/HEAD/docs/images/PR5.png
--------------------------------------------------------------------------------
/docs/images/PR6.png:
--------------------------------------------------------------------------------
https://raw.githubusercontent.com/rifkyprayoga/AndroidAPSdocs/HEAD/docs/images/PR6.png
--------------------------------------------------------------------------------
/docs/images/PR7.png:
--------------------------------------------------------------------------------
https://raw.githubusercontent.com/rifkyprayoga/AndroidAPSdocs/HEAD/docs/images/PR7.png
--------------------------------------------------------------------------------
/docs/images/git.png:
--------------------------------------------------------------------------------
https://raw.githubusercontent.com/rifkyprayoga/AndroidAPSdocs/HEAD/docs/images/git.png
--------------------------------------------------------------------------------
/docs/images/loop.png:
--------------------------------------------------------------------------------
https://raw.githubusercontent.com/rifkyprayoga/AndroidAPSdocs/HEAD/docs/images/loop.png
--------------------------------------------------------------------------------
/docs/images/play.png:
--------------------------------------------------------------------------------
https://raw.githubusercontent.com/rifkyprayoga/AndroidAPSdocs/HEAD/docs/images/play.png
--------------------------------------------------------------------------------
/docs/images/wear.png:
--------------------------------------------------------------------------------
https://raw.githubusercontent.com/rifkyprayoga/AndroidAPSdocs/HEAD/docs/images/wear.png
--------------------------------------------------------------------------------
/docs/images/danar1.png:
--------------------------------------------------------------------------------
https://raw.githubusercontent.com/rifkyprayoga/AndroidAPSdocs/HEAD/docs/images/danar1.png
--------------------------------------------------------------------------------
/docs/images/merge.png:
--------------------------------------------------------------------------------
https://raw.githubusercontent.com/rifkyprayoga/AndroidAPSdocs/HEAD/docs/images/merge.png
--------------------------------------------------------------------------------
/docs/images/temps.png:
--------------------------------------------------------------------------------
https://raw.githubusercontent.com/rifkyprayoga/AndroidAPSdocs/HEAD/docs/images/temps.png
--------------------------------------------------------------------------------
/docs/images/xdrip1.png:
--------------------------------------------------------------------------------
https://raw.githubusercontent.com/rifkyprayoga/AndroidAPSdocs/HEAD/docs/images/xdrip1.png
--------------------------------------------------------------------------------
/docs/images/aapslog.png:
--------------------------------------------------------------------------------
https://raw.githubusercontent.com/rifkyprayoga/AndroidAPSdocs/HEAD/docs/images/aapslog.png
--------------------------------------------------------------------------------
/docs/images/actions.png:
--------------------------------------------------------------------------------
https://raw.githubusercontent.com/rifkyprayoga/AndroidAPSdocs/HEAD/docs/images/actions.png
--------------------------------------------------------------------------------
/docs/images/checkout.png:
--------------------------------------------------------------------------------
https://raw.githubusercontent.com/rifkyprayoga/AndroidAPSdocs/HEAD/docs/images/checkout.png
--------------------------------------------------------------------------------
/docs/images/cob_aaps.png:
--------------------------------------------------------------------------------
https://raw.githubusercontent.com/rifkyprayoga/AndroidAPSdocs/HEAD/docs/images/cob_aaps.png
--------------------------------------------------------------------------------
/docs/images/cob_oref0.png:
--------------------------------------------------------------------------------
https://raw.githubusercontent.com/rifkyprayoga/AndroidAPSdocs/HEAD/docs/images/cob_oref0.png
--------------------------------------------------------------------------------
/docs/images/gitfetch.png:
--------------------------------------------------------------------------------
https://raw.githubusercontent.com/rifkyprayoga/AndroidAPSdocs/HEAD/docs/images/gitfetch.png
--------------------------------------------------------------------------------
/docs/images/nsclient1.png:
--------------------------------------------------------------------------------
https://raw.githubusercontent.com/rifkyprayoga/AndroidAPSdocs/HEAD/docs/images/nsclient1.png
--------------------------------------------------------------------------------
/docs/images/openapsma.png:
--------------------------------------------------------------------------------
https://raw.githubusercontent.com/rifkyprayoga/AndroidAPSdocs/HEAD/docs/images/openapsma.png
--------------------------------------------------------------------------------
/docs/images/overview.png:
--------------------------------------------------------------------------------
https://raw.githubusercontent.com/rifkyprayoga/AndroidAPSdocs/HEAD/docs/images/overview.png
--------------------------------------------------------------------------------
/docs/български/.DS_Store:
--------------------------------------------------------------------------------
https://raw.githubusercontent.com/rifkyprayoga/AndroidAPSdocs/HEAD/docs/български/.DS_Store
--------------------------------------------------------------------------------
/docs/images/AndroidAPS1.png:
--------------------------------------------------------------------------------
https://raw.githubusercontent.com/rifkyprayoga/AndroidAPSdocs/HEAD/docs/images/AndroidAPS1.png
--------------------------------------------------------------------------------
/docs/images/AndroidAPS2.png:
--------------------------------------------------------------------------------
https://raw.githubusercontent.com/rifkyprayoga/AndroidAPSdocs/HEAD/docs/images/AndroidAPS2.png
--------------------------------------------------------------------------------
/docs/images/AndroidAPS3.png:
--------------------------------------------------------------------------------
https://raw.githubusercontent.com/rifkyprayoga/AndroidAPSdocs/HEAD/docs/images/AndroidAPS3.png
--------------------------------------------------------------------------------
/docs/images/Home_screen.png:
--------------------------------------------------------------------------------
https://raw.githubusercontent.com/rifkyprayoga/AndroidAPSdocs/HEAD/docs/images/Home_screen.png
--------------------------------------------------------------------------------
/docs/images/app_desing.png:
--------------------------------------------------------------------------------
https://raw.githubusercontent.com/rifkyprayoga/AndroidAPSdocs/HEAD/docs/images/app_desing.png
--------------------------------------------------------------------------------
/docs/images/careportal.png:
--------------------------------------------------------------------------------
https://raw.githubusercontent.com/rifkyprayoga/AndroidAPSdocs/HEAD/docs/images/careportal.png
--------------------------------------------------------------------------------
/docs/images/nightscout1.png:
--------------------------------------------------------------------------------
https://raw.githubusercontent.com/rifkyprayoga/AndroidAPSdocs/HEAD/docs/images/nightscout1.png
--------------------------------------------------------------------------------
/docs/images/objectives.png:
--------------------------------------------------------------------------------
https://raw.githubusercontent.com/rifkyprayoga/AndroidAPSdocs/HEAD/docs/images/objectives.png
--------------------------------------------------------------------------------
/docs/images/treatments.png:
--------------------------------------------------------------------------------
https://raw.githubusercontent.com/rifkyprayoga/AndroidAPSdocs/HEAD/docs/images/treatments.png
--------------------------------------------------------------------------------
/docs/images/virtualpump.png:
--------------------------------------------------------------------------------
https://raw.githubusercontent.com/rifkyprayoga/AndroidAPSdocs/HEAD/docs/images/virtualpump.png
--------------------------------------------------------------------------------
/docs/images/androidstudio1.png:
--------------------------------------------------------------------------------
https://raw.githubusercontent.com/rifkyprayoga/AndroidAPSdocs/HEAD/docs/images/androidstudio1.png
--------------------------------------------------------------------------------
/docs/images/androidstudio2.png:
--------------------------------------------------------------------------------
https://raw.githubusercontent.com/rifkyprayoga/AndroidAPSdocs/HEAD/docs/images/androidstudio2.png
--------------------------------------------------------------------------------
/docs/images/androidstudio3.png:
--------------------------------------------------------------------------------
https://raw.githubusercontent.com/rifkyprayoga/AndroidAPSdocs/HEAD/docs/images/androidstudio3.png
--------------------------------------------------------------------------------
/docs/images/branchintray.png:
--------------------------------------------------------------------------------
https://raw.githubusercontent.com/rifkyprayoga/AndroidAPSdocs/HEAD/docs/images/branchintray.png
--------------------------------------------------------------------------------
/docs/images/configbuilder.png:
--------------------------------------------------------------------------------
https://raw.githubusercontent.com/rifkyprayoga/AndroidAPSdocs/HEAD/docs/images/configbuilder.png
--------------------------------------------------------------------------------
/docs/images/connectedphone.png:
--------------------------------------------------------------------------------
https://raw.githubusercontent.com/rifkyprayoga/AndroidAPSdocs/HEAD/docs/images/connectedphone.png
--------------------------------------------------------------------------------
/docs/images/Screenshot_profile.png:
--------------------------------------------------------------------------------
https://raw.githubusercontent.com/rifkyprayoga/AndroidAPSdocs/HEAD/docs/images/Screenshot_profile.png
--------------------------------------------------------------------------------
/docs/images/Screenshot_pump_Combo.png:
--------------------------------------------------------------------------------
https://raw.githubusercontent.com/rifkyprayoga/AndroidAPSdocs/HEAD/docs/images/Screenshot_pump_Combo.png
--------------------------------------------------------------------------------
/docs/images/Screenshot_Home_screen.png:
--------------------------------------------------------------------------------
https://raw.githubusercontent.com/rifkyprayoga/AndroidAPSdocs/HEAD/docs/images/Screenshot_Home_screen.png
--------------------------------------------------------------------------------
/docs/images/Screenshot_care_portal.png:
--------------------------------------------------------------------------------
https://raw.githubusercontent.com/rifkyprayoga/AndroidAPSdocs/HEAD/docs/images/Screenshot_care_portal.png
--------------------------------------------------------------------------------
/docs/images/combo/combo-tbr-settings.png:
--------------------------------------------------------------------------------
https://raw.githubusercontent.com/rifkyprayoga/AndroidAPSdocs/HEAD/docs/images/combo/combo-tbr-settings.png
--------------------------------------------------------------------------------
/docs/images/Screenshot_config_builder.png:
--------------------------------------------------------------------------------
https://raw.githubusercontent.com/rifkyprayoga/AndroidAPSdocs/HEAD/docs/images/Screenshot_config_builder.png
--------------------------------------------------------------------------------
/docs/images/Screenshot_insulin_profile.png:
--------------------------------------------------------------------------------
https://raw.githubusercontent.com/rifkyprayoga/AndroidAPSdocs/HEAD/docs/images/Screenshot_insulin_profile.png
--------------------------------------------------------------------------------
/docs/images/combo/combo-bolus-settings.png:
--------------------------------------------------------------------------------
https://raw.githubusercontent.com/rifkyprayoga/AndroidAPSdocs/HEAD/docs/images/combo/combo-bolus-settings.png
--------------------------------------------------------------------------------
/docs/images/combo/combo-menu-settings.png:
--------------------------------------------------------------------------------
https://raw.githubusercontent.com/rifkyprayoga/AndroidAPSdocs/HEAD/docs/images/combo/combo-menu-settings.png
--------------------------------------------------------------------------------
/docs/images/Example_batch_images_upload.png:
--------------------------------------------------------------------------------
https://raw.githubusercontent.com/rifkyprayoga/AndroidAPSdocs/HEAD/docs/images/Example_batch_images_upload.png
--------------------------------------------------------------------------------
/docs/images/Screenshot_Bolus_calculator.png:
--------------------------------------------------------------------------------
https://raw.githubusercontent.com/rifkyprayoga/AndroidAPSdocs/HEAD/docs/images/Screenshot_Bolus_calculator.png
--------------------------------------------------------------------------------
/docs/images/combo/combo-bolus-settings-de.png:
--------------------------------------------------------------------------------
https://raw.githubusercontent.com/rifkyprayoga/AndroidAPSdocs/HEAD/docs/images/combo/combo-bolus-settings-de.png
--------------------------------------------------------------------------------
/docs/images/combo/combo-insulin-settings.png:
--------------------------------------------------------------------------------
https://raw.githubusercontent.com/rifkyprayoga/AndroidAPSdocs/HEAD/docs/images/combo/combo-insulin-settings.png
--------------------------------------------------------------------------------
/docs/images/combo/combo-menu-settings-de.png:
--------------------------------------------------------------------------------
https://raw.githubusercontent.com/rifkyprayoga/AndroidAPSdocs/HEAD/docs/images/combo/combo-menu-settings-de.png
--------------------------------------------------------------------------------
/docs/images/combo/combo-tbr-settings-de.png:
--------------------------------------------------------------------------------
https://raw.githubusercontent.com/rifkyprayoga/AndroidAPSdocs/HEAD/docs/images/combo/combo-tbr-settings-de.png
--------------------------------------------------------------------------------
/docs/images/combo/combo-insulin-settings-de.png:
--------------------------------------------------------------------------------
https://raw.githubusercontent.com/rifkyprayoga/AndroidAPSdocs/HEAD/docs/images/combo/combo-insulin-settings-de.png
--------------------------------------------------------------------------------
/docs/images/combo/combo-pump-options-settings.png:
--------------------------------------------------------------------------------
https://raw.githubusercontent.com/rifkyprayoga/AndroidAPSdocs/HEAD/docs/images/combo/combo-pump-options-settings.png
--------------------------------------------------------------------------------
/docs/images/combo/combo-pump-options-settings-de.png:
--------------------------------------------------------------------------------
https://raw.githubusercontent.com/rifkyprayoga/AndroidAPSdocs/HEAD/docs/images/combo/combo-pump-options-settings-de.png
--------------------------------------------------------------------------------
/docs/DE/einrichten.rst:
--------------------------------------------------------------------------------
1 | AndroidAPS einrichten & nutzen
2 | ==============
3 |
4 | .. toctree::
5 | :maxdepth: 6
6 |
7 | homescreen
8 | konfigurations-generator
9 | einstellungen
10 |
--------------------------------------------------------------------------------
/readthedocs.yml:
--------------------------------------------------------------------------------
1 | # Formats in addition to HTML
2 |
3 | formats:
4 | - none
5 |
6 | # Pip requirements
7 | requirements_file: ./requirements.txt
8 |
9 | # Build Container
10 | build:
11 | image: latest
12 |
--------------------------------------------------------------------------------
/docs/български/Конфигуриране/DanaR-инсулинова-помпа.md:
--------------------------------------------------------------------------------
1 | * От основното меню изберете **"Setting"**, а след това **"User Option"**
2 |
3 | * Разрешете удължен болус **"8. Extended Bolus: ON"**
4 |
5 | [[https://github.com/MilosKozak/AndroidAPS/wiki/images/danar1.png]]
--------------------------------------------------------------------------------
/docs/ES/Inicio/Glosario.md:
--------------------------------------------------------------------------------
1 | # Glosario
2 |
3 | Para la mayoría de términos ver: https://openaps.readthedocs.io/en/latest/docs/Resources/glossary.html
4 |
5 | ALgunos términos específicos están incluye:
6 |
7 | [[Perfíl circadiano]] - cambios en tus perfil basal basado en cambios horarios o porcentage.
8 |
--------------------------------------------------------------------------------
/docs/ES/inicio/glosario.md:
--------------------------------------------------------------------------------
1 | # Glosario
2 |
3 | Para la mayoría de términos ver: https://openaps.readthedocs.io/en/latest/docs/Resources/glossary.html
4 |
5 | ALgunos términos específicos están incluye:
6 |
7 | [[Perfíl circadiano]] - cambios en tus perfil basal basado en cambios horarios o porcentage.
8 |
--------------------------------------------------------------------------------
/docs/EN/Getting-Started/Glossary.md:
--------------------------------------------------------------------------------
1 | # Glossary
2 |
3 | For most looping terms see here: https://openaps.readthedocs.io/en/latest/docs/Resources/glossary.html
4 |
5 | Some AndroidAPS specific terms include:
6 |
7 | [[Circadian Percentage Profile]] - changes your base profile based on either a timeshift or a percentage.
8 |
9 |
--------------------------------------------------------------------------------
/docs/български/Използване/Достъп-до-лог-файлове.md:
--------------------------------------------------------------------------------
1 | За да откриете лог файловете е необходимо да:
2 | * Свържете мобилният телефон с компютър посредством USB кабел
3 | * Да влезете в директория с местоположение като посоченото долу (възможно е да има малка разлика в различните телефони)
4 |
5 | 
--------------------------------------------------------------------------------
/docs/ES/inicio/telefonos.md:
--------------------------------------------------------------------------------
1 | # Teléfonos
2 |
3 | Una lista de teléfonos que se han reportado que funcionan bien la puedes encontrar [aquí](
4 | https://docs.google.com/spreadsheets/d/1gZAsN6f0gv6tkgy9EBsYl0BQNhna0RDqA9QGycAqCQc/edit#gid=698881435)
5 |
6 | Puedes usar filtros en el archivos pero por favor cuando termines vuelve a dejarlo como estaba para la próxima persona.
7 |
8 |
--------------------------------------------------------------------------------
/docs/ES/Inicio/Teléfonos.md:
--------------------------------------------------------------------------------
1 |
2 | # Teléfonos
3 |
4 | Una lista de teléfonos que se han reportado que funcionan bien la puedes encontrar [aquí](
5 | https://docs.google.com/spreadsheets/d/1gZAsN6f0gv6tkgy9EBsYl0BQNhna0RDqA9QGycAqCQc/edit#gid=698881435)
6 |
7 | Puedes usar filtros en el archivos pero por favor cuando termines vuelve a dejarlo como estaba para la próxima persona.
8 |
9 |
--------------------------------------------------------------------------------
/docs/index.rst:
--------------------------------------------------------------------------------
1 | AndroidAPS
2 | =======================
3 |
4 | .. toctree::
5 | :maxdepth: 8
6 | :caption: AndroidAPS documentation
7 | :glob:
8 |
9 | English
10 | Българска
11 | Deutsch
12 | Español
13 |
14 | .. toctree::
15 | :maxdepth: 1
16 | :glob:
17 | :caption: How to edit these docs
18 |
19 | Instructions to edit the wiki
20 |
--------------------------------------------------------------------------------
/docs/EN/Getting-Started/Phones.md:
--------------------------------------------------------------------------------
1 | # Phones
2 |
3 | List of tested phones can be found here
4 | [https://docs.google.com/spreadsheets/d/1gZAsN6f0gv6tkgy9EBsYl0BQNhna0RDqA9QGycAqCQc/edit#gid=698881435](https://docs.google.com/spreadsheets/d/1gZAsN6f0gv6tkgy9EBsYl0BQNhna0RDqA9QGycAqCQc/edit#gid=698881435)
5 |
6 | You can use filters to display particular pumps or phones but please set back to view all when you've finished looking, ready for the next person to view all.
7 |
--------------------------------------------------------------------------------
/docs/EN/Getting-Started/index.rst:
--------------------------------------------------------------------------------
1 |
2 | .. toctree::
3 | :maxdepth: 2
4 | :glob:
5 | :caption: Getting Started
6 |
7 | Safety First
8 | Screenshots
9 | Architcture, security implementation
10 | Phone
11 | Pump choices
12 | Future possible pump drivers
13 | Glossary
14 | How to help
15 |
--------------------------------------------------------------------------------
/docs/EN/Usage/Accessing-logfiles.md:
--------------------------------------------------------------------------------
1 | # Accessing logfiles
2 |
3 | * Connect phone to a computer in file transfer mode
4 | * Locate log files in this directory or similiar (may little bit vary on different phones)
5 |
6 |
7 | 
8 |
9 | * The current log is a .log file which can be viewed in a number of ways such as [LogCat](https://developer.android.com/studio/debug/am-logcat.html) in Android Studio, Log Viewer android app, or simply plain text. Previous log files are zipped and stored in folders in date/time order. If sharing your log in [gitter](https://gitter.im/MilosKozak/AndroidAPS) when talking about a potential bug then unzip and upload the folder dated before the error occurred.
10 |
--------------------------------------------------------------------------------
/docs/ES/Donde buscar ayuda/Conectarse con otros usuarios.md:
--------------------------------------------------------------------------------
1 | # Conectarse con otros usuarios AndroidAPS
2 |
3 | Quién está usando AndroidAPS? Añádete a tí mismo al [mapa aquí](https://www.zeemaps.com/map?group=2617973) pinchando en Additions > Add Marker - Simple. Escoge la opción lo tengo!" o la naranja para "lo quiero". Añade tu nombre como lo tienes en Facebook y en descripción información extra como bomba,MCG y tu clínica o endo si es pro DIY PA. Puedes añadir tambien la ciudad no tienes por qué poner tu dirección actual.
4 |
5 | ## Asegúrate de unirte al grupo AndroidAPS en Facebook!
6 |
7 | [Grupo Facebook](https://www.facebook.com/groups/1900195340201874/) si quieres contactar con alguien con cuestiones específicas.
8 |
--------------------------------------------------------------------------------
/docs/български/Източници/Връзка-с-други-потребители.md:
--------------------------------------------------------------------------------
1 | Кой използва AndroidAPS? Добавете и себе си [на тази карта](https://www.zeemaps.com/map?group=2617973) като отидете на Additions > Add Marker - Simple. Изберете зелен цвят за "Аз го ползвам!" или оранжев за "Искам да го ползвам". Напишете името си както сте го изписали във Facebook, а в 'description' опишете допълнителната информация като това каква помпа ползвате, типа на сензор, коя клиника по ендокринология посещавате и дали те приемат добре идеята. Адресът не е задължително да бъде вашият точен, като можете да дадете само град или адреса на клиниката. Присъединете се към [Facebook групата](https://www.facebook.com/groups/1900195340201874/) ако искате да се свържете с някой на картата или да попитате нещо ( само на английски ).
--------------------------------------------------------------------------------
/docs/EN/Where-To-Go-For-Help/Connect-with-other-users.md:
--------------------------------------------------------------------------------
1 | # Connect with others Using AndroidAPS
2 |
3 | Who is using AndroidAPS? Add yourself to [the map here](https://www.zeemaps.com/map?group=2617973) by going to Additions > Add Marker - Simple. Choose a green pin for "I've got it!" or an orange pin for "I want it". List your name as your facebook name and in the description record extra info such as your pump, CGM and your endo/clinic name if they're supportive. The address does not have to be your actual house, you can just add town name or even your clinic address if you prefer.
4 |
5 | ## Make sure to join the AndroidAPS users group on Facebook!
6 |
7 | Join the [Facebook group](https://www.facebook.com/groups/1900195340201874/) if you want to contact anyone on the map to ask country specific questions.
8 |
--------------------------------------------------------------------------------
/docs/EN/Configuration/DanaRS-Insulin-Pump.md:
--------------------------------------------------------------------------------
1 | # DanaRS Pump
2 |
3 | _These instructions are for configuring the app and your pump if you have a DanaRS from 2017 onwards. Visit [DanaR Insulin Pump](docs/Configuration/DanaR-Insulin-Pump.md) if you have the original DanaR instead._
4 |
5 | * In AndroidAPS go to Config Builder and select 'DanaRS'
6 |
7 | * Select Menu by tapping the 3 dots in the top right. Select Preferences.
8 |
9 | * Select DanaRS Pair New Pump, and click your DanaRS serial number.
10 |
11 | * Select Pump password, and input your password. (Default password is either 1234 or 0000)
12 |
13 | * Select Bolus Speed to change the default bolus speed used (12sec per 1u, 30sec per 1u or 60sec per 1u).
14 |
15 | * Restart your phone.
16 |
17 | * Set basal step on pump to 0.01 U/h using Doctors menu (see pump user guide)
18 |
--------------------------------------------------------------------------------
/docs/ES/uso/logs.md:
--------------------------------------------------------------------------------
1 | # Acceder a los logs
2 |
3 | * Conecte el teléfono a una computadora en modo de transferencia de archivos
4 | * Ubique los archivos de registro en este directorio o de manera similar (puede variar un poco en los diferentes teléfonos)
5 |
6 | 
7 |
8 | * El registro actual es un archivo .log que se puede ver de varias maneras, como [LogCat](https://developer.android.com/studio/debug/am-logcat.html) en Android Studio, la aplicación de Android Log Viewer, o simplemente texto sin formato. Los archivos de registro anteriores se comprimen y almacenan en carpetas en orden de fecha / hora. Si comparte su registro en [gitter](https://gitter.im/MilosKozak/AndroidAPS) cuando hable de un error potencial, descomprima y cargue la carpeta con fecha anterior al error.
9 |
--------------------------------------------------------------------------------
/docs/ES/Uso/Acceder a los logs.md:
--------------------------------------------------------------------------------
1 |
2 | # Acceder a los logs
3 |
4 | * Conecte el teléfono a una computadora en modo de transferencia de archivos
5 | * Ubique los archivos de registro en este directorio o de manera similar (puede variar un poco en los diferentes teléfonos)
6 |
7 | 
8 |
9 | * El registro actual es un archivo .log que se puede ver de varias maneras, como [LogCat](https://developer.android.com/studio/debug/am-logcat.html) en Android Studio, la aplicación de Android Log Viewer, o simplemente texto sin formato. Los archivos de registro anteriores se comprimen y almacenan en carpetas en orden de fecha / hora. Si comparte su registro en [gitter](https://gitter.im/MilosKozak/AndroidAPS) cuando hable de un error potencial, descomprima y cargue la carpeta con fecha anterior al error.
10 |
11 |
12 |
13 |
--------------------------------------------------------------------------------
/docs/BG/Скрийншоти.md:
--------------------------------------------------------------------------------
1 | 
2 | 
3 | 
4 | 
5 | 
6 | 
7 | 
8 | 
9 | 
10 | 
11 | 
12 |
--------------------------------------------------------------------------------
/docs/EN/Installing-AndroidAPS/Update-to-new-version.md:
--------------------------------------------------------------------------------
1 | # Installing AndroidAPS
2 |
3 | ## Install git (if you don't have it)
4 | * Any git version should work. For example https://git-scm.com/download/win
5 | * Let Studio know where is git.exe located: File - Settings - Version Control - Git
6 | 
7 |
8 | ## Update your local copy
9 | * Click: VCS->Git->Fetch
10 |
11 | ## Selecting branch
12 | * If you want to change branch select another branch from tray: master (latest release) or dev (developement version)
13 |
14 | 
15 |
16 | and then checkout
17 |
18 | 
19 |
20 | ## Updating branch from Github
21 | * Press Ctrl+T, select Merge method and press OK
22 |
23 | 
24 |
25 | On the tray you'll see green message about updated project
26 |
27 | ## Upload to phone
28 | * Connect phone now
29 | * Press "Play" button on top toolbar
30 |
31 | 
32 |
33 | * Select connected phone and press OK
34 |
35 | 
36 |
37 |
38 |
--------------------------------------------------------------------------------
/docs/български/Използване/Процентен-профил.md:
--------------------------------------------------------------------------------
1 | * За да активирате Процентен профил отидете в таб Конфигурация иберете го и изберете да е видим
2 | * В таб Процентен профил въведете вашият базален профил към момента. Това ще е профилът по подразбиране, той ще бъде използван, когато AndroidAPS не работи. Този профил може да бъде променян по два начина:
3 | * Timeshift - Тази опция премества целият профил с толкова часа, колкото са зададени. Например ако работите нощна смяна можете да въведете като стойност колко часа по-рано/по-късно лягате.
4 | * Percentage - Тази опция прилага процентна корекция върху всички стойности в профила. Ако го зададете на 130% (което ще означава 30% по-резистентни към инсулина), ще завиши базалните нива с 30%. Също така ще намали ISF и IC със същия процент (ще ги раздели на 1.3 в нашия пример). Трябва да бъде изпратен към помпата ( от бутона ) за да влезе в действие като текущ профил. Алгоритъмът ще работи в допълнение на зададения процентен профил. Така например отделни процентни профили могат да бъдат дефинирани за отделните етапи на хормонален цикъл.
5 |
--------------------------------------------------------------------------------
/docs/EN/Where-To-Go-For-Help/Background-reading.md:
--------------------------------------------------------------------------------
1 | # Background reading and articles about DIY closed looping
2 |
3 | [http://hackaday.com/2016/12/19/closing-the-loop-on-an-artificial-pancreas/](http://hackaday.com/2016/12/19/closing-the-loop-on-an-artificial-pancreas/)
4 |
5 | [http://www.diabettech.com/artificial-pancreas/looping-do-i-choose-openaps-or-loop-either-way-wearenotwaiting/](http://www.diabettech.com/artificial-pancreas/looping-do-i-choose-openaps-or-loop-either-way-wearenotwaiting/)
6 |
7 | [http://www.healthline.com/diabetesmine/dana-rs-insulin-pump-embraces-wearenotwaiting](http://www.healthline.com/diabetesmine/dana-rs-insulin-pump-embraces-wearenotwaiting)
8 |
9 | [https://btvnovinite.bg/video/bulgaria/dnes-e-svetovnijat-den-za-borba-s-diabeta.html](https://btvnovinite.bg/video/bulgaria/dnes-e-svetovnijat-den-za-borba-s-diabeta.html)
10 |
11 | [https://www.ndr.de/fernsehen/sendungen/visite/Diabetes-Blutzucker-automatisch-einstellen,visite13788.html](https://www.ndr.de/fernsehen/sendungen/visite/Diabetes-Blutzucker-automatisch-einstellen,visite13788.html)
12 |
13 |
--------------------------------------------------------------------------------
/docs/ES/Inicio/Pantallazos.md:
--------------------------------------------------------------------------------
1 | # Pantallazos
2 |
3 |
4 | 
5 | 
6 |
--------------------------------------------------------------------------------
/docs/ES/inicio/pantallazos.md:
--------------------------------------------------------------------------------
1 | # Pantallazos
2 |
3 |
4 | 
5 | 
6 |
--------------------------------------------------------------------------------
/docs/ES/Donde buscar ayuda/Lecturas recomendadas.md:
--------------------------------------------------------------------------------
1 | # Lecturas recomedadas sobre lazos cerrados "hazlo tú mismo" o DIY PA
2 |
3 | [http://hackaday.com/2016/12/19/closing-the-loop-on-an-artificial-pancreas/](http://hackaday.com/2016/12/19/closing-the-loop-on-an-artificial-pancreas/)
4 |
5 | [http://www.diabettech.com/artificial-pancreas/looping-do-i-choose-openaps-or-loop-either-way-wearenotwaiting/](http://www.diabettech.com/artificial-pancreas/looping-do-i-choose-openaps-or-loop-either-way-wearenotwaiting/)
6 |
7 | [http://www.healthline.com/diabetesmine/dana-rs-insulin-pump-embraces-wearenotwaiting](http://www.healthline.com/diabetesmine/dana-rs-insulin-pump-embraces-wearenotwaiting)
8 |
9 | [https://btvnovinite.bg/video/bulgaria/dnes-e-svetovnijat-den-za-borba-s-diabeta.html](https://btvnovinite.bg/video/bulgaria/dnes-e-svetovnijat-den-za-borba-s-diabeta.html)
10 |
11 | [https://www.ndr.de/fernsehen/sendungen/visite/Diabetes-Blutzucker-automatisch-einstellen,visite13788.html](https://www.ndr.de/fernsehen/sendungen/visite/Diabetes-Blutzucker-automatisch-einstellen,visite13788.html)
12 |
--------------------------------------------------------------------------------
/docs/ES/inicio/seguridad.md:
--------------------------------------------------------------------------------
1 | # La seguridad es lo primero
2 |
3 | **Cuando decides hacer un sistema de lazo cerrado siempre piensa en la seguridad y el impacto de todas tus acciones**
4 |
5 | ## En general
6 |
7 | * AndroidAPS es una herramienta de ayuda al manejo de la diabetes. No algo para instalar y olvidarte
8 | * Nunca confíes en un dispositivo que controla la infusión de insulina. Obsérvalo permanentemente, aprende cómo funciona y cómo predice las acciones.
9 | * Recuerda que el teléfono emparejado con la bomba hace todas las acciones. Dedica ese teléfono al APS y a la comunicación con tu hij@. NO permitas la instalación de juegos o otras apps para evitar virus, troyanos...
10 | * Instala las actualizaciones del fabricante de tu teléfono y de Google.
11 |
12 |
13 | ## Comunicador SMS
14 |
15 | * Si habilitas la comunicación SMS considera que podría pasar si el móvil se pierde o roba, por lo que protege siempre el móvil con código PIN
16 | * Desde AndroidAPS 1.1 recibirás notificaciones de acciones importantes como bolos, o cambios en perfil. Configura al menos 2 números para la comunicación SMS en caso que un teléfono sea robado o perdido.
17 |
18 |
--------------------------------------------------------------------------------
/docs/български/Инсталиране/Обновяване-до-последна-версия.md:
--------------------------------------------------------------------------------
1 | # Обновяване до последна версия
2 |
3 | ## Инсталирайте git (ако го нямате)
4 | * Всяка git версия би трябвало да работи. Например https://git-scm.com/download/win
5 | * Посочете в Android Studio къде се намира git.exe. За целта изберете File - Settings - Version Control - Git
6 | 
7 |
8 | ## Избиране на клон
9 | * Ако вие искате да промените клона изберете го най-долу: master (последна версия) или dev (версия в разработка)
10 |
11 | 
12 |
13 | и след това checkout
14 |
15 | 
16 |
17 | ## Обновяване на клон от Github
18 | * Натиснете Ctrl+T, изберете Merge и натиснете OK
19 |
20 | 
21 |
22 | В долната част на прозореца на Android Studio ще видите съобщение в зелено за направеното обновяване
23 |
24 | ## Качване на обновената версия в телефона
25 | * Свържете телефона си към компютъра чрез USB кабел
26 | * Натиснете "Play" бутона от горната част на екрана (зелената стрелка)
27 |
28 | 
29 |
30 | * Изберете вашият телефон и потвърдете с OK
31 |
32 | 
33 |
--------------------------------------------------------------------------------
/docs/ES/Inicio/La seguridad primero.md:
--------------------------------------------------------------------------------
1 |
2 | # La seguridad es lo primero
3 |
4 | **Cuando decides hacer un sistema de lazo cerrado siempre piensa en la seguridad y el impacto de todas tus acciones**
5 |
6 | ## En general
7 |
8 | * AndroidAPS es una herramienta de ayuda al manejo de la diabetes. No algo para instalar y olvidarte
9 | * Nunca confíes en un dispositivo que controla la infusión de insulina. Obsérvalo permanentemente, aprende cómo funciona y cómo predice las acciones.
10 | * Recuerda que el teléfono emparejado con la bomba hace todas las acciones. Dedica ese teléfono al APS y a la comunicación con tu hij@. NO permitas la instalación de juegos o otras apps para evitar virus, troyanos...
11 | * Instala las actualizaciones del fabricante de tu teléfono y de Google.
12 |
13 |
14 | ## Comunicador SMS
15 |
16 | * Si habilitas la comunicación SMS considera que podría pasar si el móvil se pierde o roba, por lo que protege siempre el móvil con código PIN
17 | * Desde AndroidAPS 1.1 recibirás notificaciones de acciones importantes como bolos, o cambios en perfil. Configura al menos 2 números para la comunicación SMS en caso que un teléfono sea robado o perdido.
18 |
19 |
--------------------------------------------------------------------------------
/docs/EN/Getting-Started/Safety-first.md:
--------------------------------------------------------------------------------
1 | # Safety first
2 |
3 | **When you decide to build your own closed loop always think about security and impact of all your actions**
4 |
5 | ## General
6 |
7 | * AndroidAPS is a just a tool to help you manage diabetes. Not something you can install and forget!
8 | * Don't absolutely trust any device taking control of insulin delivery. Watch it all the time, learn how it works and learn how to predict it's actions.
9 | * Remember the phone paired with pump can do anything with the pump. Dedicate this phone for APS and communication with your child. Do not allow to install other apps and games (!!!) to prevent installing together some unwanted code like trojans, viruses or bots.
10 | * Install all security updates provided by phone manufacter and Google.
11 |
12 | ## SMS Communicator
13 |
14 | * If you enable SMS Communicator, consider what could happen when the phone enabled for remote commands is stolen! So always protect it at least by PIN code
15 | * Since AndoridAPS 1.1 you will receive SMS notification of important remote actions like bolus or profile change. Setup at least 2 numbers for SMS communication to be notified about actions of second phone (for case it's stolen)
16 |
--------------------------------------------------------------------------------
/docs/български/Конфигуриране/Найтскаут-(Nightscout).md:
--------------------------------------------------------------------------------
1 | Предполага се, че вие вече имате Nightscout сайт, ако нямате посетете [Nightscout](http://www.nightscout.info/wiki/welcome/set-up-nightscout-using-heroku) за пълни инструкции относно създаването и, а настройките по-долу вие ще добавите към вашият Nightscout сайт.
2 |
3 | * Отворете https://portal.azure.com/ или https://herokuapp.com/
4 |
5 | * Изберете вашето App Service име.
6 |
7 | * Щракнете върху Application settings (за azure) или Settings > "Reveal Config Variables (за heroku)
8 |
9 | * Добавете или редактирайте променливите както е показано:
10 | * `ENABLE` = `careportal boluscalc food bwp cage sage iage iob cob basal ar2 rawbg pushover bgi pump openaps`
11 | * `DEVICESTATUS_ADVANCED` = `true`
12 | * `PUMP_FIELDS` = `reservoir battery clock`
13 | * Можете да си добавите различни аларми за [наблюдение на помпата](https://github.com/nightscout/cgm-remote-monitor#pump-pump-monitoring), % заряд на батерията е препоръчителен:
14 | * `PUMP_WARN_BATT_P` = `51`
15 | * `PUMP_URGENT_BATT_P` = `26`
16 |
17 | [[https://github.com/MilosKozak/AndroidAPS/wiki/images/nightscout1.png]]
18 |
19 | * Натиснете "Save" в долния край на панела за да запазите направените промени.
--------------------------------------------------------------------------------
/docs/DE/index.rst:
--------------------------------------------------------------------------------
1 | Herzlich willkommen zur AndroidAPS-Dokumentation
2 | ===================
3 |
4 | .. toctree::
5 | :maxdepth: 8
6 | :glob:
7 |
8 | wasistandroidaps
9 | voraussetzungen
10 | installieren
11 | einrichten
12 | tippstricks
13 | community
14 |
15 | .. note::
16 |
17 | **Disclaimer und Warnung**
18 |
19 | * Sämtliche Informationen, Gedanken und der Quellcode sind nur für informatorische und wissenschaftliche Zwecke. Nightscout erfüllt keinerlei Anforderungen des Datenschutzes im Gesundheitswesen. Verwenden Sie Nightscout und AndroidAPS auf eigenes Risiko und setzen Sie es nicht ein, um Behandlungsentscheidungen zu treffen.
20 |
21 | * Bei Nutzung des Quellcodes von github.com bestehen keinerlei Gewährleistungs- und Garantieansprüche. Es gibt keinen Support. Im Übrigen wird auf die Lizenz verwiesen, die im Repository abgerufen werden kann.
22 |
23 | * Sämtliche Produkt- und Herstellernamen, Handelsmarken, Servicemarken, geschützte Handelsmarken und geschützte Servicemarken werden nur zu Informationszwecken genutzt und nicht für Werbung oder Marketing.
24 |
25 | * Bitte beachten: Dieses Projekt steht in keinerlei Verbindung mit: SOOIL (http://www.sooil.com/eng/), Dexcom (http://www.dexcom.com/), Accu-Chek Roche Diabetes Care (http://www.accu-chek.com/).
26 |
--------------------------------------------------------------------------------
/docs/ES/instalando/install.md:
--------------------------------------------------------------------------------
1 | # Instalando AndroidAPS
2 |
3 |
4 | ## Instala Git (si no lo tienes ya)
5 | * Cualquier versión de git debe funcionar. Por ejemplo https://git-scm.com/download/win
6 | * Ve a la ubicación del archivos git.exe: Archivo- ajustes- version control- Git
7 |
8 | 
9 |
10 | ## Actualiza tu copia local
11 | * Pincha en VCS-> Git-> Fetch
12 |
13 | ## Selecciona la rama
14 | * si quiere cambiar rama seleccionala de la lista: master (última versión) o dev (rama en desarrollo)
15 |
16 | 
17 |
18 | a continuación salga
19 |
20 | 
21 |
22 | ## Actualiza la rama desde Github
23 | * pulse Ctrl+T, seleccione Merge y luego OK
24 |
25 | 
26 |
27 | Verás un aviso de proyecto actualizado
28 |
29 | ## Súbela a tu móvil
30 | * Conecte el teléfono ahora
31 |
32 | * pulse "Play" en la barra
33 |
34 | 
35 |
36 | * Seleccionar el teléfono conectado y pulsar OK
37 |
38 | 
39 |
40 |
41 |
42 |
43 |
44 |
45 |
--------------------------------------------------------------------------------
/docs/ES/Instalando AndroidAPS/Actualizar a una nueva versión.md:
--------------------------------------------------------------------------------
1 | # Instalando AndroidAPS
2 |
3 |
4 | ## Instala Git (si no lo tienes ya)
5 | * Cualquier versión de git debe funcionar. Por ejemplo https://git-scm.com/download/win
6 | * Ve a la ubicación del archivos git.exe: Archivo- ajustes- version control- Git
7 |
8 | 
9 |
10 | ## Actualiza tu copia local
11 | * Pincha en VCS-> Git-> Fetch
12 |
13 | ## Selecciona la rama
14 | * si quiere cambiar rama seleccionala de la lista: master (última versión) o dev (rama en desarrollo)
15 |
16 | 
17 |
18 | a continuación salga
19 |
20 | 
21 |
22 | ## Actualiza la rama desde Github
23 | * pulse Ctrl+T, seleccione Merge y luego OK
24 |
25 | 
26 |
27 | Verás un aviso de proyecto actualizado
28 |
29 | ## Súbela a tu móvil
30 | * Conecte el teléfono ahora
31 |
32 | * pulse "Play" en la barra
33 |
34 | 
35 |
36 | * Seleccionar el teléfono conectado y pulsar OK
37 |
38 | 
39 |
40 |
41 |
42 |
43 |
44 |
45 |
--------------------------------------------------------------------------------
/docs/BG/Безопасност.md:
--------------------------------------------------------------------------------
1 | Безопасност
2 | ============
3 |
4 | ** Когато решите да изградите свой собствен Closed Loop (затворен режим) винаги мислете за сигурността и последиците от всяко ваше действие **
5 |
6 | ## Обща безопасност
7 |
8 | * AndroidAPS е просто инструмент, който да ви помага да управлявате диабета. Не е нещо, което можете да инсталирате и да забравите за него!
9 | * Не се доверявайте изцяло на всяко устройство, което контролира доставянето на инсулин. Наблюдавайте го през цялото време, научете как работи и научете как може да предвидите резултата от него.
10 | * Запомнете, че телефон свързан с помпата, може да направи всичко с вашата помпа. Използвате телефон само за APS и комуникация с детето си. Не позволявайте инсталиране на други приложения и игри (!!!), за да предотвратите инсталирането на някои нежелани приложения като троянски коне, вируси или ботове.
11 | * Инсталирайте всички актуализации на защитата, предоставени от телефонния производител и Google.
12 |
13 | SMS комуникатор
14 |
15 | * Ако активирате SMS Communicator, помислете какво може да се случи, когато телефонът, активиран за отдалечени команди, е откраднат! Винаги го пазете, защитете го поне с PIN код
16 | * След AndoridAPS 1.1 вие ще получавате SMS известяване за важни дистанционни действия като болус или промяна на профила. Настройте най-малко 2 номера за SMS комуникация, за да бъдете уведомявани за действията на втория телефонен номер (в случай, че първият е откраднат и от него се изпращат SMS команди)
17 |
--------------------------------------------------------------------------------
/docs/EN/Configuration/Sensitivity-detection-and-COB.md:
--------------------------------------------------------------------------------
1 | # Sensitivity Detection and COB options
2 |
3 | * Currently we have 3 sensitivity detection models
4 | * Sensitivity Oref0
5 | * Sensitivity AAPS
6 | * Sensitivity WeightedAverage
7 |
8 | ### Sensitivity Oref0
9 |
10 | Similiar to Oref0 described in [Oref0 documentation](https://openaps.readthedocs.io/en/2017-05-21/docs/walkthrough/phase-4/advanced-features.html). Basically sensitivity is calculated from 24h data in the past and carbs (if not absorbed) are cutted after time specified in preferences
11 |
12 | ### Sensitivity AAPS
13 |
14 | Sensitivity is calculated the same way like Oref0 but you can specify time to the past. Minimal carbs absorption is calculated from max carbs absorption time from preferences
15 |
16 | ### Sensitivity WeightedAverage
17 |
18 | Sensitivity is calculated as a weighted average from deviations. Newer deviations have higher weight. Minimal carbs absorption is calculated from max carbs absorption time from preferences. This algorithm is fastest in following sensitivity changes.
19 |
20 | ### COB Examples
21 |
22 | Oref0 - unabsorbed carbs are cutted after specified time
23 |
24 | 
25 |
26 | AAPS, WeightedAverage - absorption is calculated to have `COB == 0` after specified time
27 |
28 | 
29 |
30 | If minimal carbs absorption is used instead of value calculated from deviations, a green dot appears on COB graph
31 |
--------------------------------------------------------------------------------
/docs/EN/Configuration/DanaR-Insulin-Pump.md:
--------------------------------------------------------------------------------
1 | # DanaR Pump
2 |
3 | _These instructions are for configuring the app and your pump if you have a DanaR. Visit [DanaRS Insulin Pump](/docs/Configuration/DanaRS-Insulin-Pump.md) if you have the DanaRS launched in 2017 instead._
4 |
5 | * In the pump go to Main Menu > Setting > User Option
6 | * Turn on "8. Extended Bolus"
7 |
8 | 
9 |
10 | * Go to Main Menu > Setting > Discovery
11 | * In phone settings go to Bluetooth, scan for nearby devices, select your DanaR serial number and input your password (Default password is either 1234 or 0000). If DanaR is not showing in scan then restart phone and take DanaR battery out, replace and start these two steps again.
12 |
13 | * In AndroidAPS go to Config Builder and select the type of DanaR you have (DanaR, DanaR Korean, DanaRv2)
14 | * Select Menu by tapping the 3 dots in the top right. Select Preferences.
15 | * Select DanaR Bluetooth device, and click your DanaR serial number.
16 | * Select Pump password, and input your password. (Default password is either 1234 or 0000)
17 | * If you want AndroidAPS to allow basal rate above 200%, enable Use extended boluses for >200%. Note this means you cannot loop with high TBRs whilst using extended boluses for food.
18 | * In Preferences under DanaR pump settings you can change the default bolus speed used (12sec per 1u, 30sec per 1u or 60sec per 1u).
19 | * Set basal step on pump to 0.01 U/h
20 |
--------------------------------------------------------------------------------
/docs/EN/Installing-AndroidAPS/Nightscout.md:
--------------------------------------------------------------------------------
1 | # Nightscout setup
2 |
3 | It is assumed you already have a Nightscout site, if not visit the [Nightscout](http://www.nightscout.info/wiki/welcome/set-up-nightscout-using-heroku) page for full instructions on set up, the instructions below are then settings you will also need to add to your Nightscout site. Your Nightscout site needs to be at least version 10, so please check you are running the [latest version](http://www.nightscout.info/wiki/welcome/how-to-update-to-latest-cgm-remote-monitor-aka-cookie) otherwise you will get an error message on your AAPS app. Some people find looping uses more than the azure free quota allowed, so heroku is the preferred choice.
4 |
5 | * Go to https://herokuapp.com/
6 |
7 | * Click your App Service name.
8 |
9 | * Click Application settings (azure) or Settings > "Reveal Config Variables (heroku)
10 |
11 | * Add or edit the variables as follows:
12 | * `ENABLE` = `careportal boluscalc food bwp cage sage iage iob cob basal ar2 rawbg pushover bgi pump openaps`
13 | * `DEVICESTATUS_ADVANCED` = `true`
14 | * `PUMP_FIELDS` = `reservoir battery clock`
15 | * Various alarms can be set for [monitoring the pump](https://github.com/nightscout/cgm-remote-monitor#pump-pump-monitoring), battery % in particular is encouraged:
16 | * `PUMP_WARN_BATT_P` = `51`
17 | * `PUMP_URGENT_BATT_P` = `26`
18 |
19 | [[https://github.com/MilosKozak/AndroidAPS/wiki/images/nightscout1.png]]
20 |
21 | * Click "Save" at the top of the panel.
22 |
--------------------------------------------------------------------------------
/docs/български/Използване/Работа-с-профили-след-v1.5.md:
--------------------------------------------------------------------------------
1 | От версия 1.5 нататък логиката на работа с профили е променена.
2 |
3 | До версия 1.46 всяка промяна влизаше в сила от момента на въвеждането й.
4 |
5 | AAPS може още да работи по този начин, до момента в който зададете "Смяна на профил"("Profile switch") с нулева продължителност ( обяснено по-долу ). След като се случи това AAPS започва да следи историята на профилите и всяка промяна в тях ще изисква нова "Смяна на профил"("Profile switch")дори ако смените съдържанието на профила в NS. Обновеният профил е видим в AAPS веднага, но ще трябва да има събитие "Смяна на профил"("Profile switch") за да започне използването ба променената версия.
6 |
7 | Вътрешно AAPS си създава копие на профила със стартова дата и продължителност и го използва за избрания период. Нулева продължителност означава - вечно и такъв профил би бил валиден до следващата смяна.
8 |
9 | Ако зададете продължителност при "Смяна на профил"("Profile switch"), то при изтичане на зададения период програмта автоматично ще превключи обратно към предишният профил.
10 |
11 | Ако използвате локален тип AAPS профили ( Процентен, Опростен, Локален ) ще се наложи да натиснете бутона в съответния профил за да приложите промените ( което ще създаде "Смяна на профил"("Profile switch") автоматично ).
12 |
13 | Този начин на действие позволява по-точни калкулации и по-добро следене в промените.
14 |
15 | В режим 'closed loop' се препоръчва да активирате автоматичното обновяване на профила в помпата(от меню Опции).
--------------------------------------------------------------------------------
/docs/ES/instalando/nightscout.md:
--------------------------------------------------------------------------------
1 | # Nightscout
2 |
3 | Se presume que ya usas Nightscout, sino visita la página [Nightscout](http://www.nightscout.info/wiki/welcome/set-up-nightscout-using-heroku) para seguir las instrucciones de montaje. Las siguientes instrucciones son las adiciones que debes hacer a tu sitio.
4 |
5 | Tu sitio debe ser versión 10 o superior, por lo que comprueba que tengas la [última versión](http://www.nightscout.info/wiki/welcome/how-to-update-to-latest-cgm-remote-monitor-aka-cookie) de lo contrario recibirás mensajes de error en tu AAPS app. Algunas personas comentan que el lazo cerrado usa más cuota que la gratuita en Azure, por lo que Heroku es la opción preferida.
6 |
7 | * Ve a https://herokuapp.com/
8 |
9 | * Pincha en App Service name
10 |
11 | * Pincha en Application settings (azure) or Settings(ajustes) > "Reveal Config Variables (heroku)
12 |
13 | * Añade o edita las variables siguientes:
14 |
15 | * `ENABLE` = `careportal boluscalc food bwp cage sage iage iob cob basal ar2 rawbg pushover bgi pump openaps`
16 | * `DEVICESTATUS_ADVANCED` = `true`
17 | * `PUMP_FIELDS` = `reservoir battery clock`
18 | * Multitud de alarmas pueden ser configuradas para [monitorizar la bomba](https://github.com/nightscout/cgm-remote-monitor#pump-pump-monitoring) El % de batería es recomendable:
19 |
20 | * `PUMP_WARN_BATT_P` = `51`
21 | * `PUMP_URGENT_BATT_P` = `26`
22 |
23 | 
24 |
25 | * Pinchar en guardar arriba en el panel.
26 |
--------------------------------------------------------------------------------
/docs/ES/Instalando AndroidAPS/Nightscout.md:
--------------------------------------------------------------------------------
1 | # Nightscout
2 |
3 | Se presume que ya usas Nightscout, sino visita la página [Nightscout](http://www.nightscout.info/wiki/welcome/set-up-nightscout-using-heroku) para seguir las instrucciones de montaje. Las siguientes instrucciones son las adiciones que debes hacer a tu sitio.
4 |
5 | Tu sitio debe ser versión 10 o superior, por lo que comprueba que tengas la [última versión](http://www.nightscout.info/wiki/welcome/how-to-update-to-latest-cgm-remote-monitor-aka-cookie) de lo contrario recibirás mensajes de error en tu AAPS app. Algunas personas comentan que el lazo cerrado usa más cuota que la gratuita en Azure, por lo que Heroku es la opción preferida.
6 |
7 | * Ve a https://herokuapp.com/
8 |
9 | * Pincha en App Service name
10 |
11 | * Pincha en Application settings (azure) or Settings(ajustes) > "Reveal Config Variables (heroku)
12 |
13 | * Añade o edita las variables siguientes:
14 |
15 | * `ENABLE` = `careportal boluscalc food bwp cage sage iage iob cob basal ar2 rawbg pushover bgi pump openaps`
16 | * `DEVICESTATUS_ADVANCED` = `true`
17 | * `PUMP_FIELDS` = `reservoir battery clock`
18 | * Multitud de alarmas pueden ser configuradas para [monitorizar la bomba](https://github.com/nightscout/cgm-remote-monitor#pump-pump-monitoring) El % de batería es recomendable:
19 |
20 | * `PUMP_WARN_BATT_P` = `51`
21 | * `PUMP_URGENT_BATT_P` = `26`
22 |
23 | 
24 |
25 | * Pinchar en guardar arriba en el panel.
26 |
--------------------------------------------------------------------------------
/docs/ES/configuracion/sens.md:
--------------------------------------------------------------------------------
1 | # Detección de sensibilidad y COB
2 | Actualmente hay 3 modelos de detección de sensbilidad:
3 | * Sensibilidad Oref0
4 | * Sensiblidad AAPS
5 | * Sensibilidad PesoPromedio
6 |
7 | ## Sensibilidad Oref0
8 | Similar al descrito en documentación [Oref0](https://openaps.readthedocs.io/en/2017-05-21/index.html). Básicamente la sensibilidad es calculada a partir de 24h pasadas y carbohidratos (si no están absorbidos) se cortan a partir del tiempo especificado en las preferencias.
9 |
10 | ## Sensibilidad AAPS
11 | La sensibilidad es calculada de misma manera que Ore0 pero puedes especificar el tiempo desde el cual se calcula. La absorción mínima de
12 | carbohidratos se calcula a partir del tiempo máximo de aborsción de carbohidratos de las preferencias.
13 |
14 | ## Sensibilidad PesoPromedio
15 | La sensibilidad se calcula como promedio ponderado de las desviaciones. Las nuevas desviaciones tienen un mayor peso. La absorción mínima de carbohidratos se calcula a partir del tiempo máximo de la absorción de carbohidratos de las preferencias. Este algotimo es más rápido en los siguientes cambios de sensbilidad.
16 |
17 | ## Ejemplos COB
18 | Oref0- los carbohidratos no absorbidos son cortados después de tiempo específico.
19 |
20 | 
21 |
22 | AAPS, peso ponderado – absorción es calculada para tener COB =0 despues de tiempo específico.
23 |
24 | 
25 |
26 | Si absorción mínima de Carbs es usada en lugar del valor calculado de las desviaciones, un punto verde aparece en la gráfica COB.
27 |
--------------------------------------------------------------------------------
/docs/български/Използване/SMS-Команди.md:
--------------------------------------------------------------------------------
1 | # SMS Команди
2 |
3 | ## BG
4 | - Дава информация за последната КЗ и IOB
5 | - Last BG: 5.6 4min ago, Delta: -0,2 mmol, IOB: 0.20U (Bolus: 0.10U Basal: 0.10U)
6 |
7 | ## LOOP STOP/DISABLE
8 | - Спиране на Loop (автоматичният режим)
9 |
10 | ## LOOP START/ENABLE
11 | - Loop стартиране
12 |
13 | ## LOOP STATUS
14 | - Ще получите отговор от рода на:
15 | - Loop is disabled - (Loop изключен)
16 | - Loop is enabled - (Loop активен)
17 | - Suspended (10 min) (Loop изключен за следващите 10 мин)
18 |
19 | ## LOOP SUSPEND 20
20 | - Изключи Loop за 20 минути
21 |
22 | ## LOOP RESUME
23 | - Loop възстанови
24 |
25 | ## TREATMENTS REFRESH
26 | - Обнови леченията от NightScout
27 |
28 | ## NSCLIENT RESTART
29 | - Рестартирай NSCLIENT
30 |
31 | ## DANAR
32 | - Данни за статуса на Dana R помпата, отговорът ще бъде от типа
33 | - Last conn: 1 minago Temp: 0.00U/h @11:38 5/30min IOB: 0.5U Reserv: 34U Batt: 100
34 |
35 | ## BASAL STOP/CANCEL
36 | - За да спрете базал (ще трябва да отговорите с код EmF)
37 |
38 | ## BASAL 0.3
39 | - Стартиране на базал от 0.3Ед/ч ( ще трябва да отговорите с код Swe )
40 | - Няма да бъде изпълнено ако _(не са разрешени отдалечените команди)_
41 | ## BOLUS 1.2
42 | - Стартирай болус от 1.2 единици ( ще трябва да отговорите с код Rrt )
43 | - Стартирането на болус няма да бъде изпълнено ако _(не са изминали 15 от последния болус или не са разрешени отдалечените команди)_
44 |
45 | ## CAL 5.6
46 | - За да изпратите калибрация със стойност 5.6 ( ще трябва да отговорите с код Rrt )
47 | - Ще бъде изпълнено _(ако xDrip е инсталиран на съшият телефон. и е разрешено 'Accepting calibrations' в xDrip+)_
48 |
--------------------------------------------------------------------------------
/docs/ES/uso/openaps.md:
--------------------------------------------------------------------------------
1 | # Características OpenAPS
2 |
3 | * [Advanced Meal Assist (AMA)](http://openaps.readthedocs.io/en/latest/docs/walkthrough/phase-4/advanced-features.html#advanced-meal-assist-or-ama): después de darse un bolo comida, el sistema puede establecer una basal temp alta más rápidamente después de un bolo si se introduce los carbohidratos ingeridos de manera exacta. Habilítalo o en la pestaña de Configuración, necesitará haber completado el Objetivo 7 para usar esta función.
4 | * [Autosens](http://openaps.readthedocs.io/en/latest/docs/walkthrough/phase-4/advanced-features.html#auto-sensitivity-mode): analiza los datos históricos sobre la marcha y realiza ajustes si reconoce que está reaccionando de forma más sensible (o, a la inversa, más resistente) a la insulina que de costumbre. Actívela en el menú Preferencias, deberá completar el Objetivo 6 para usar esta función.
5 | * [Objetivos temporales (eating soon and activity mode)](http://openaps.readthedocs.io/en/latest/docs/walkthrough/phase-4/advanced-features.html#eating-soon-and-activity-mode-temporary-targets): Los objetivos temporales son ideales para cuando desea que el lazo se ajuste a un nivel objetivo diferente durante un período corto (temporalmente), por ejemplo, cuando planea comer o hacer ejercicio. Puede establecer objetivos temporales con la opción TempT del reloj, el botón Objetivo temporal en la pestaña Acciones o manteniendo presionado el objetivo actual que se muestra en la pantalla de inicio. Los objetivos temporales tienen una duración predefinida, por lo que no es necesario que recuerdes volver a la configuración habitual. La página de inicio mostrará el objetivo actual en azul, y los temporales en verde.
6 |
--------------------------------------------------------------------------------
/docs/EN/Usage/Open-APS-features.md:
--------------------------------------------------------------------------------
1 | # OpenAPS Features
2 |
3 | Some of the features in AndroidAPS are from OpenAPS oref0 code so please refer to the OpenAPS docs for these:
4 | * [Advanced Meal Assist (AMA)](http://openaps.readthedocs.io/en/latest/docs/walkthrough/phase-4/advanced-features.html#advanced-meal-assist-or-ama) after you give yourself a meal bolus, the system can high-temp more quickly after a meal bolus IF you enter carbs reliably. Turn it on in the Config tab, you will need to have completed Objective 7 to use this feature.
5 | * [Autosens](http://openaps.readthedocs.io/en/latest/docs/walkthrough/phase-4/advanced-features.html#auto-sensitivity-mode) analyze historical data on the go and make adjustments if it recognizes that you are reacting more sensitively (or conversely, more resistant) to insulin than usual. Turn it on in the Preferences menu, you will need to have completed Objective 6 to use this feature.
6 | * [Temporary Targets (Eating Soon and Activity Mode)](http://openaps.readthedocs.io/en/latest/docs/walkthrough/phase-4/advanced-features.html#eating-soon-and-activity-mode-temporary-targets) Temporary or “temp” targets are ideal for when you want the loop to adjust to a different target level for a short period of time (temporarily) for example when you plan on eating or exercising. You can set temp targets either by the TempT option on the watch, Temporary Target button on the Actions tab, or by pressing and holding the current target displayed on the home screen. Temporary targets have a pre-defined duration so you don't need to remember to turn it back to usual. The homepage will show the current target as blue is your usual target, and green if a temporary target.
7 |
--------------------------------------------------------------------------------
/docs/ES/Uso/Funcionalidades OpenAPS.md:
--------------------------------------------------------------------------------
1 | # Características OpenAPS
2 |
3 |
4 |
5 | * [Advanced Meal Assist (AMA)](http://openaps.readthedocs.io/en/latest/docs/walkthrough/phase-4/advanced-features.html#advanced-meal-assist-or-ama): después de darse un bolo comida, el sistema puede establecer una basal temp alta más rápidamente después de un bolo si se introduce los carbohidratos ingeridos de manera exacta. Habilítalo o en la pestaña de Configuración, necesitará haber completado el Objetivo 7 para usar esta función.
6 | * [Autosens](http://openaps.readthedocs.io/en/latest/docs/walkthrough/phase-4/advanced-features.html#auto-sensitivity-mode): analiza los datos históricos sobre la marcha y realiza ajustes si reconoce que está reaccionando de forma más sensible (o, a la inversa, más resistente) a la insulina que de costumbre. Actívela en el menú Preferencias, deberá completar el Objetivo 6 para usar esta función.
7 | * [Objetivos temporales (eating soon and activity mode)](http://openaps.readthedocs.io/en/latest/docs/walkthrough/phase-4/advanced-features.html#eating-soon-and-activity-mode-temporary-targets): Los objetivos temporales son ideales para cuando desea que el lazo se ajuste a un nivel objetivo diferente durante un período corto (temporalmente), por ejemplo, cuando planea comer o hacer ejercicio. Puede establecer objetivos temporales con la opción TempT del reloj, el botón Objetivo temporal en la pestaña Acciones o manteniendo presionado el objetivo actual que se muestra en la pantalla de inicio. Los objetivos temporales tienen una duración predefinida, por lo que no es necesario que recuerdes volver a la configuración habitual. La página de inicio mostrará el objetivo actual en azul, y los temporales en verde.
8 |
--------------------------------------------------------------------------------
/docs/EN/Usage/SMS-Commands.md:
--------------------------------------------------------------------------------
1 | # SMS Commands
2 |
3 | In your android phone setting go to Applications > AndroidAPS > Permissions and enable SMS
4 |
5 | In AndroidAPS go to Preferences > SMS Communicator and enter the phone number(s) that you will allow SMS commands to come from and also enable 'Allow remote commands via SMS'
6 |
7 | Send a SMS to the phone with AndroidAPS running from your approved phone number(s) using any of the commands below in **bold**, the phone will respond to confirm success of command or status requested.
8 |
9 | ## BG
10 | - Last BG: 5.6 4min ago, Delta: -0,2 mmol, IOB: 0.20U (Bolus: 0.10U Basal: 0.10U)
11 | ## LOOP STOP/DISABLE
12 | - Loop has been disabled
13 | ## LOOP START/ENABLE
14 | - Loop has been enabled
15 | ## LOOP STATUS
16 | - Loop is disabled
17 | - Loop is enabled
18 | - Suspended (10 min)
19 | ## LOOP SUSPEND 20
20 | - Loop suspended for 20 minutes
21 | ## LOOP RESUME
22 | - Loop resumed
23 | ## TREATMENTS REFRESH
24 | - TERATMENTS REFRESH 1 receivers
25 | ## NSCLIENT RESTART
26 | - NSCLIENT RESTART 1 receivers
27 | ## DANAR / PUMP (since 1.60)
28 | - Last conn: 1 minago Temp: 0.00U/h @11:38 5/30min IOB: 0.5U Reserv: 34U Batt: 100
29 | ## BASAL STOP/CANCEL
30 | - To stop temp basal reply with code EmF
31 | ## BASAL 0.3
32 | - To start basal 0.3U/h reply with code Swe
33 | - Remote basal setting is not allowed (if remote commands not allowed)
34 | ## BOLUS 1.2
35 | - To deliver bolus 1.2U reply with code Rrt
36 | - Remote bolus not allowed (_if within 15 min after last bolus command or remote commands not allowed_)
37 | ## CAL 5.6
38 | - To send calibration 5.6 reply with code Rrt
39 | - Calibration sent (_if xDrip is installed. Accepting calibrations must be enabled in xDrip+_)
40 |
41 |
--------------------------------------------------------------------------------
/docs/български/Използване/Open-APS-функции.md:
--------------------------------------------------------------------------------
1 | Някои от функците на AndroidAPS са взаимствани от OpenAPS oref0 и преглд на OpenAPS документацията ще Ви даде по-пълна представа за тях:
2 |
3 | * [Advanced Meal Assist (AMA)](http://openaps.readthedocs.io/en/latest/docs/walkthrough/phase-4/advanced-features.html#advanced-meal-assist-or-ama) - след поставянето на болус за хранене(meal bolus), ситемата може да вдигне базалните нива по-бързо, ако въглехидратите са правилно въведени. За да включите тази опция в таб Конфигурация ще трябва да сте преминали цел 7.
4 | * [Autosens](http://openaps.readthedocs.io/en/latest/docs/walkthrough/phase-4/advanced-features.html#auto-sensitivity-mode) - анализ в реално време на това до колко тялото Ви е чувствително/резистентно на провежданото лечение с инсулин в сравнение със зададените в профила параметри. Можете да го включите от меню Опции, като за да го направите ще е необходимо да сте преминали цел 6.
5 | * [Temporary Targets -(Eating Soon и Activity Mode)](http://openaps.readthedocs.io/en/latest/docs/walkthrough/phase-4/advanced-features.html#eating-soon-and-activity-mode-temporary-targets) - Временни цели или “темп” са идеални за ситуации в които желаете AndroidAPS да приложи други целеви нива на КЗ за кратък период от време(1-2 часа). Например когато планирате да се храните или спортувате. Можете да задавате временни цели по няколко начина - чрез избор на TempT опцията на часовника, 'Временна цел' бутона в таб Действия, или чрез натискане и задържане върху текущата цел на главния екран. Временните цели имат продължителност по подразбиране, така няма да е необходимо да ги изключвате всеки път. В главната страница целевата захар ще бъде в син фон, ако е взета от профила, и в зелен ако е временна такава.
--------------------------------------------------------------------------------
/docs/ES/ayuda.md:
--------------------------------------------------------------------------------
1 | # Ayunda
2 |
3 | ## Conectarse con otros usuarios AndroidAPS
4 |
5 | Quién está usando AndroidAPS? Añádete a tí mismo al [mapa aquí](https://www.zeemaps.com/map?group=2617973) pinchando en Additions > Add Marker - Simple. Escoge la opción lo tengo!" o la naranja para "lo quiero". Añade tu nombre como lo tienes en Facebook y en descripción información extra como bomba,MCG y tu clínica o endo si es pro DIY PA. Puedes añadir tambien la ciudad no tienes por qué poner tu dirección actual.
6 |
7 | ## Asegúrate de unirte al grupo AndroidAPS en Facebook!
8 |
9 | [Grupo Facebook](https://www.facebook.com/groups/1900195340201874/) si quieres contactar con alguien con cuestiones específicas.
10 |
11 | ## Lecturas recomedadas sobre lazos cerrados "hazlo tú mismo" o DIY PA
12 |
13 | [http://hackaday.com/2016/12/19/closing-the-loop-on-an-artificial-pancreas/](http://hackaday.com/2016/12/19/closing-the-loop-on-an-artificial-pancreas/)
14 |
15 | [http://www.diabettech.com/artificial-pancreas/looping-do-i-choose-openaps-or-loop-either-way-wearenotwaiting/](http://www.diabettech.com/artificial-pancreas/looping-do-i-choose-openaps-or-loop-either-way-wearenotwaiting/)
16 |
17 | [http://www.healthline.com/diabetesmine/dana-rs-insulin-pump-embraces-wearenotwaiting](http://www.healthline.com/diabetesmine/dana-rs-insulin-pump-embraces-wearenotwaiting)
18 |
19 | [https://btvnovinite.bg/video/bulgaria/dnes-e-svetovnijat-den-za-borba-s-diabeta.html](https://btvnovinite.bg/video/bulgaria/dnes-e-svetovnijat-den-za-borba-s-diabeta.html)
20 |
21 | [https://www.ndr.de/fernsehen/sendungen/visite/Diabetes-Blutzucker-automatisch-einstellen,visite13788.html](https://www.ndr.de/fernsehen/sendungen/visite/Diabetes-Blutzucker-automatisch-einstellen,visite13788.html)
22 |
--------------------------------------------------------------------------------
/docs/ES/Configuracion/Detección de sensibilidad y COB.md:
--------------------------------------------------------------------------------
1 |
2 | # Detección de sensibilidad y COB
3 |
4 | * Actualmente hay 3 modelos de detección de sensbilidad:
5 | * Sensibilidad Oref0
6 | * Sensiblidad AAPS
7 | * Sensibilidad PesoPromedio
8 |
9 | ### Sensibilidad Oref0
10 | Similar al descrito en documentación [Oref0](https://openaps.readthedocs.io/en/2017-05-21/index.html). Básicamente la sensibilidad es calculada a partir de 24h pasadas y carbohidratos (si no están absorbidos) se cortan a partir del tiempo especificado en las preferencias.
11 |
12 | ### Sensibilidad AAPS
13 | La sensibilidad es calculada de misma manera que Ore0 pero puedes especificar el tiempo desde el cual se calcula. La absorción mínima de
14 | carbohidratos se calcula a partir del tiempo máximo de aborsción de carbohidratos de las preferencias.
15 |
16 | ### Sensibilidad PesoPromedio
17 | La sensibilidad se calcula como promedio ponderado de las desviaciones. Las nuevas desviaciones tienen un mayor peso. La absorción mínima de carbohidratos se calcula a partir del tiempo máximo de la absorción de carbohidratos de las preferencias. Este algotimo es más rápido en los siguientes cambios de sensbilidad.
18 |
19 |
20 | ### Ejemplos COB
21 |
22 | Oref0- los carbohidratos no absorbidos son cortados después de tiempo específico.
23 |
24 | 
25 |
26 | AAPS, peso ponderado – absorción es calculada para tener COB =0 despues de tiempo específico.
27 |
28 | 
29 |
30 | Si absorción mínima de Carbs es usada en lugar del valor calculado de las desviaciones, un punto verde aparece en la gráfica COB.
31 |
32 |
--------------------------------------------------------------------------------
/docs/BG/Начало.md:
--------------------------------------------------------------------------------
1 | # Какво е AndroidAPS?
2 |
3 | ### Основни цели при създаването на това приложение
4 |
5 | * модулно приложение с възможност лесно да се добавят нови модули, без да се променя останалата част от кода
6 | * приложение, което позволява локализация на различни езици
7 | * приложение, където можем лесно да изберем това, което ще бъде включено в окончателния apk файл чрез промяна на варианта на компилацията
8 | * приложение, което поддържа отворен и затворен режим на APS
9 | * приложение, където можете да видите как работи APS: параметри на входа, резултати и окончателно решение
10 | * позволява да се добавят още алгоритми за APS, като потребителя има възможност да избира кой от тях да използва
11 | * приложение, независимо от драйвера на помпата, съдържащо и "Виртуална помпа", което позволява на потребителите безопасно да изпробват APS
12 | * приложение с плътна интеграция с Nightscout
13 | * приложение, където е възможно лесно да се добавят / премахват ограничения за безопасността на потребителите
14 | * приложение "всичко в едно" за управление на Диабет с APS и Nightscout
15 |
16 | ### Какво е нужно за да започнете
17 |
18 | * Android телефон (5.0 или по-нова версия)
19 | * [xDrip](http://stephenblackwasalreadytaken.github.io/xDrip/)/[xDrip+](https://github.com/jamorham/xDrip-plus) или [Glimp](http://www.nightscout.info/wiki/welcome/nightscout-for-libre) или [600SeriesAndroidUploader](https://github.com/pazaan/600SeriesAndroidUploader)
20 | * [AndroidAPS](https://github.com/MilosKozak/AndroidAPS)
21 | * [Nightscout](https://github.com/nightscout/cgm-remote-monitor) 0.10.2 или по-нова
22 | * Инсулинова помпа Dana-R (освен ако не създадете свой собствен драйвер за друга инсулинова помпа)
23 | * Източник на данни за непрекъснат мониторинг на кръвната захар (CGM)
24 | * Dexcom G4/G5 или Freestyle Libre или Medtronic Guardian
25 |
--------------------------------------------------------------------------------
/docs/ES/uso/sms.md:
--------------------------------------------------------------------------------
1 | # Comandos SMS
2 |
3 | En los ajustes de tu móvil Android ve a aplicaciones- AndroidAPS- permisos y habilitar SMS
4 |
5 | En AndroidAPD ve a preferencias- Comunicaciones SMS (SMS comunicator) e introduce el número de teléfono con el que permitirás las comunicaciones SMS y habilita también “allow remote commands via SMS”.
6 |
7 | Envía un SMS al teléfono con AndroidAPS desde el teléfono autorizado para usar comandos SMS usando algún comando en negrita abajo, el teléfono responderá para confirmar el comando pedido.
8 |
9 | ## BG
10 |
11 | - Último valor de glucemia: 5.6 4min ago, Delta: -0,2 mmol, IOB: 0.20U (Bolus: 0.10U Basal: 0.10U)
12 |
13 | ## LOOP STOP/DISABLE
14 |
15 | - Lazo se ha deshabilitado
16 |
17 | ## LOOP START/ENABLE
18 |
19 | - Lazo se ha habilitado
20 |
21 | ## LOOP STATUS Estados:
22 |
23 | - lazo deshabilitado,
24 | - habilitado,
25 | - suspendido (10 min)
26 |
27 | ## LOOP SUSPEND 20
28 |
29 | - Lazo suspendido durante 20 minutos
30 |
31 | ## LOOP RESUME Lazo
32 |
33 | - reiniciado
34 |
35 | ## TREATMENTS REFRESH
36 |
37 | - Refresca tratamiento
38 |
39 | ## NSCLIENT RESTART
40 |
41 | - Reinicia NSclient
42 |
43 | ## DANAR/PUMP (since 1.60)
44 |
45 | - Última conexión: 1 minago Temp: 0.00U/h @11:38 5/30min IOB: 0.5U Reserv: 34U Batt: 100
46 |
47 | ## BASAL STOP/CANCEL
48 |
49 | - Para cancelar un basal temporal responder con código EmF
50 |
51 | ## BASAL 0.3
52 |
53 | - Para poner basal 0.3u/h responder con código Swe.
54 | - No está permitido comandar basales remotamente (si comandos remotos no están permitidos)
55 |
56 | ## BOLUS 1.2
57 |
58 | - Para poner bolo 1.2 responder con código Rrt.
59 | - Los bolos remotos no están permitidos (si ha habido otro bolo en últimos 15 minutos o si remoto no habilitado)
60 |
61 | ## CAL 5.6
62 |
63 | - Para enviar calibración 5.6 enviar código Rrt
64 |
65 |
--------------------------------------------------------------------------------
/docs/ES/Uso/Comandos SMS.md:
--------------------------------------------------------------------------------
1 | # Comandos SMS
2 |
3 | En los ajustes de tu móvil Android ve a aplicaciones- AndroidAPS- permisos y habilitar SMS
4 |
5 | En AndroidAPD ve a preferencias- Comunicaciones SMS (SMS comunicator) e introduce el número de teléfono con el que permitirás las comunicaciones SMS y habilita también “allow remote commands via SMS”.
6 |
7 | Envía un SMS al teléfono con AndroidAPS desde el teléfono autorizado para usar comandos SMS usando algún comando en negrita abajo, el teléfono responderá para confirmar el comando pedido.
8 |
9 | ## BG
10 |
11 | - Último valor de glucemia: 5.6 4min ago, Delta: -0,2 mmol, IOB: 0.20U (Bolus: 0.10U Basal: 0.10U)
12 |
13 | ## LOOP STOP/DISABLE
14 |
15 | - Lazo se ha deshabilitado
16 |
17 | ## LOOP START/ENABLE
18 |
19 | - Lazo se ha habilitado
20 |
21 | ## LOOP STATUS Estados:
22 |
23 | - lazo deshabilitado,
24 | - habilitado,
25 | - suspendido (10 min)
26 |
27 | ## LOOP SUSPEND 20
28 |
29 | - Lazo suspendido durante 20 minutos
30 |
31 | ## LOOP RESUME Lazo
32 |
33 | - reiniciado
34 |
35 | ## TREATMENTS REFRESH
36 |
37 | - Refresca tratamiento
38 |
39 | ## NSCLIENT RESTART
40 |
41 | - Reinicia NSclient
42 |
43 | ## DANAR/PUMP (since 1.60)
44 |
45 | - Última conexión: 1 minago Temp: 0.00U/h @11:38 5/30min IOB: 0.5U Reserv: 34U Batt: 100
46 |
47 | ## BASAL STOP/CANCEL
48 |
49 | - Para cancelar un basal temporal responder con código EmF
50 |
51 | ## BASAL 0.3
52 |
53 | - Para poner basal 0.3u/h responder con código Swe.
54 | - No está permitido comandar basales remotamente (si comandos remotos no están permitidos)
55 |
56 | ## BOLUS 1.2
57 |
58 | - Para poner bolo 1.2 responder con código Rrt.
59 | - Los bolos remotos no están permitidos (si ha habido otro bolo en últimos 15 minutos o si remoto no habilitado)
60 |
61 | ## CAL 5.6
62 |
63 | - Para enviar calibración 5.6 enviar código Rrt
64 |
65 |
--------------------------------------------------------------------------------
/docs/DE/homescreen.md:
--------------------------------------------------------------------------------
1 | # Home-Screen
2 |
3 | 
4 |
5 | * **Dev**: Deviation (= Abweichung). Zeigt an, um wie viele Einheiten sich der tatsächliche Anstieg/Senkung des BZ gegenüber des vorhergesagten Wertes (durch OpenAPS und eingegebener Daten) unterscheidet.
6 | * **Profilwechsel**: AAPS kann immer noch nach der alten Funktion funktionieren, bis du ein "Profile switch" mit einer Dauer von null (später erklärt) einstellst. Wenn man das macht, beginnt AAPS die Historie der Profile zu verfolgen, und jede neue Profiländerung benötigt ein neues "Profile switch" Event, auch wenn du das Profil in Nightscout änderst. Das geupdatete Profil wird sofort an AAPS gesendet, aber du musst ein "Profile switch" Event eingeben um die Änderungen verwenden zu können.
7 | Internaly AAPS creates snapshot of profile with start date and duration and is using it within selected period. Duration of zero means infinite. Such profile is valid until new "Profile switch". Falls du einen "Profile switch" mit einer Dauer einstellst, wird nach Ablauf auf das letzte Profil zurück gegriffen.
8 | * [Temporary Targets/temporäre Ziele (Eating Soon and Activity Mode)](http://openaps.readthedocs.io/en/latest/docs/walkthrough/phase-4/advanced-features.html#eating-soon-and-activity-mode-temporary-targets) temporäre Ziele (Temp Targets) sind ideal wenn du möchtest, dass der Loop auf einen anderen BZ Wert korrigiert, z.B. beim Sport (höheres Ziel), oder wenn du essen willst (niedrigeres Ziel -> BZ steigt nach dem Essen nicht so stark). Man kann die Temp Targets entweder über die Uhr, im Actions Reiter, oder indem man im Overview Reiter auf das aktuelle Ziel länger drückt. Im Overview Reiter wird das Standard Ziel blau dargestellt, und das temporäre grün.
9 | * BZ-Vorhersage:
10 | * Orange: COB
11 | * Dunkelblau: IOB
12 | * Hellblau: zero-temp
13 | * Dunkelgelb: UAM
14 |
--------------------------------------------------------------------------------
/docs/ES/instalando/compilando.md:
--------------------------------------------------------------------------------
1 | # Compilando la APK
2 |
3 | 1. Instalar [Android Studio](https://developer.android.com/studio/install.html)
4 |
5 | 2. Usar git clone en Android Studio según las siguientes fotos para clonar el repositorio.
6 |
7 | 
8 | 
9 |
10 | 3. Abrir Android Studio y seleccionar “abrir un proyecto Android Studio existente”, seleccionando la localización y extrayendo los ficheros.
11 |
12 | 4. Puede que salte mensaje de error “not finding build tolos”- Click en el link de Android Studio para instalar el software de actualización sugerido.
13 |
14 | 5. Ir al Build menú y click en “Generate Signed APK”
15 |
16 | 6. Seleccionar “app” como módulo
17 | 
18 | 
19 |
20 |
21 | 7. Selecciona un un keystore y password, si es la primera vez al crear esto, o completando los detalles de uno existente. Para más información sobre uso de Keysore [ir aquí](https://developer.android.com/studio/publish/app-signing.html#generate-key)
22 |
23 | 8. “Release” debe ser tu opción por defecto para “build Type”, la opción “debug” es para desarrolladores.
24 |
25 | 9. Selecciona la opción Build que quieres
26 | * Full
27 | * Openloop
28 | * Pumpcontrol
29 | * Nsclient
30 |
31 | 10. Selecciona V1 “Jar Signature” (V2 es opcional) y pincha en finalizar.
32 |
33 | 
34 |
35 | 11. Espera a que se cree la APK. Recibirás un pop-up cuando termine.
36 |
37 | 
38 |
39 | 12. Pincha en “mostrar en explorer”. Encontrarás que la APK está generada, a veces tarda un tiempo en aparecer.
40 |
41 | 13. Copia la APK con el mismo nombre del fichero con el que construiste al móvil Android e instálala. Si tu APK no se instala y tienes una versión anterior de AndroidAPS en tu móvil que fue verificada con una Key diferente necesitarás desinstalar esta primero, recuerdo exportar los ajustes que tengas.
42 |
--------------------------------------------------------------------------------
/docs/DE/community.rst:
--------------------------------------------------------------------------------
1 | Hilfe in der Community
2 | =================
3 |
4 | Facebook-Gruppen
5 | -----------
6 | Die Looper-Community tauscht sich intensiv über (geschlossene) Facebook-Gruppen aus, in denen dir bei Problemen meist auch sehr schnell durch andere Nutzer geholfen wird:
7 |
8 | * **AndroidAPSusers** (englisch, zu AndroidAPS): https://www.facebook.com/groups/AndroidAPSUsers/
9 | * **Looped-DE** (deutsch, zum Loopen an sich): https://www.facebook.com/groups/loopedDE/
10 | * **Freestyle Libre Freaks** (deutsch, zum Thema Libre als CGM/FGM): https://www.facebook.com/groups/FreestyleLibreFreaks/
11 | * **xDrip** (englisch, zu xDrip+): https://www.facebook.com/groups/xDripG5/
12 | * **NightscoutDE** (deutsch, zu Nightscout): https://www.facebook.com/groups/nightscoutDE/
13 | * **CGM in the cloud** (englisch, zu CGM allgemein): https://www.facebook.com/groups/cgminthecloud/
14 | * **Diabetes Typ 1** (deutsch, zu T1D allgemein): https://www.facebook.com/groups/195335457152446/
15 |
16 | Github-Channels
17 | -----------
18 | In Github gibt es die Möglichkeit, direkten Kontakt zu Entwicklern aufzunehmen, Bugs/Issues zu melden und sich mit anderen aus der Community auszutauschen (grundsätzlich in Englisch):
19 |
20 | * AndroidAPS (Milos Kozak): https://github.com/MilosKozak/AndroidAPS
21 | * AndroidAPS Dokumentation: https://github.com/openaps/AndroidAPSdocs
22 | * xDrip+: https://github.com/NightscoutFoundation/xDrip
23 | * Nightscout-Website: https://github.com/nightscout/cgm-remote-monitor
24 |
25 | Gitter-Chats
26 | ------------
27 | In folgenden Chats kannst du Fragen an andere Nutzer richten, beispielsweise wenn du nicht bei Facebook bist (grundsätzlich in Englisch):
28 |
29 | * Thema AndroidAPS: https://gitter.im/MilosKozak/AndroidAPS
30 | * Thema AndroidAPS Dokumentation: https://gitter.im/AndroidAPSwiki/Lobby
31 |
32 | Looper-Treffen vor Ort
33 | ---------
34 | Einige Mitglieder der Community organisieren regelmäßig oder unregelmäßig Treffen in ganz Deutschland. Eine Übersicht mit den jeweiligen Terminen findest du unter http://loopertreffen.androidaps.de
35 |
36 | Kontakt zu Loopern in deiner Nähe
37 | ----------
38 | Unter https://www.zeemaps.com/map?group=2617973 [derzeit ist die Karte leider nicht verfügbar] kannst du eine interaktive Landkarte anschauen, auf der einige Looper aus deiner Nähe eingezeichnet sind. Du kannst dich selbst auch dort eintragen, damit andere Looper dich auch finden.
39 |
--------------------------------------------------------------------------------
/docs/ES/Instalando AndroidAPS/Compilando la APK.md:
--------------------------------------------------------------------------------
1 | # Compilando la APK
2 |
3 | 1. Instalar [Android Studio](https://developer.android.com/studio/install.html)
4 |
5 | 2. Usar git clone en Android Studio según las siguientes fotos para clonar el repositorio.
6 |
7 | 
8 | 
9 |
10 | 3. Abrir Android Studio y seleccionar “abrir un proyecto Android Studio existente”, seleccionando la localización y extrayendo los ficheros.
11 |
12 | 4. Puede que salte mensaje de error “not finding build tolos”- Click en el link de Android Studio para instalar el software de actualización sugerido.
13 |
14 | 5. Ir al Build menú y click en “Generate Signed APK”
15 |
16 | 6. Seleccionar “app” como módulo
17 | 
18 | 
19 |
20 |
21 | 7. Selecciona un un keystore y password, si es la primera vez al crear esto, o completando los detalles de uno existente. Para más información sobre uso de Keysore [ir aquí](https://developer.android.com/studio/publish/app-signing.html#generate-key)
22 |
23 | 8. “Release” debe ser tu opción por defecto para “build Type”, la opción “debug” es para desarrolladores.
24 |
25 | 9. Selecciona la opción Build que quieres
26 | * Full
27 | * Openloop
28 | * Pumpcontrol
29 | * Nsclient
30 |
31 | 10. Selecciona V1 “Jar Signature” (V2 es opcional) y pincha en finalizar.
32 |
33 | 
34 |
35 | 11. Espera a que se cree la APK. Recibirás un pop-up cuando termine.
36 |
37 | 
38 |
39 | 12. Pincha en “mostrar en explorer”. Encontrarás que la APK está generada, a veces tarda un tiempo en aparecer.
40 |
41 | 13. Copia la APK con el mismo nombre del fichero con el que construiste al móvil Android e instálala. Si tu APK no se instala y tienes una versión anterior de AndroidAPS en tu móvil que fue verificada con una Key diferente necesitarás desinstalar esta primero, recuerdo exportar los ajustes que tengas.
42 |
--------------------------------------------------------------------------------
/docs/български/Подкрепа/Как-може-да-помогна.md:
--------------------------------------------------------------------------------
1 | **AndroidAPS се разработва изцяло на доброволни начала и няма платен персонал. Разработчиците са родители, грижещи се за децата си, за свои роднини и хора с диабет, които работят заедно за развитието и подобряването на програмата. Разработчиците даряват своето свободно време, но е малко несправедливо да се очаква те да бъдат изправени пред допълнителни разходи, за да правят нещо, което е толкова невероятно, но с отворен код и безплатно за всички._
2 |
3 | _За да тестват напълно нова платформа, разработчиците трябва да имат резервен телефон и резервна помпа, тъй като тя не може да бъде използвана върху човек, докато не бъде стабилна. По-новите модели се нуждаят от тестване, докато станат достъпни. Част от дарените пари са необходими и за логистичните разходи за доставката на тези устройства и части между отделните страни до разработчиците. Понякога също е приятно да се подпомогнат разходите на разработчиците да напуснат затъмнените помещения и да се срещнат на конференции и събития с други хора, за да може техният творчески и аналитичен потенциал да достигне до всеки._
4 |
5 | **Аз съм разработчик. Как мога да участвам?** Погледнете отворените issues, попитайте в gitter канала, винаги има много работа!
6 | Първоначално изберете малка задача и направете първият си pull request! :)
7 |
8 | **Искам да даря пари, как може да го направя?** PayPal: donations@androidaps.org
9 | **За какво се използват тези пари?** С тези пари НЕ СЕ ПЛАЩА на никого за неговата работа. Те се използват за намаляване на разходите за разработчиците при организиране на срещи. Опитваме се да бъдем много прозрачни. Това е, което понастоящем е планирано:
10 | * European Dev Meetup in Prague end of May 2018:
11 | * Наемане на помещение с интернет
12 | * оборудване
13 | * храна / кафе
14 | * ако все пак останат пари след горните разходи: покриване на част от пътните разноски на пътуващите от далечни дистанции.
15 |
16 | **Аз имам резервно оборудване, къде може да го изпратя?** Ако вие имате резервно и ненужно оборудване може да пишете на e-mail developers@androidaps.org и ние ще Ви изпратим адрес. В края на процеса, всяко останало оборудване ще бъде дарено на една от групите "Pay-it-Forward" на Facebook, които съществуват в подкрепа на диабетната общност.
17 |
18 | **Аз не мога да даря пари и оборудване, как да помогна?** Необходими умения включват графичен дизайн, UX design, преводачи, редактори на wiki или просто да помагате, като отговаряте на простите въпроси в Gitter & Facebook, за да позволите на разработчиците време и пространство да се фокусират върху по-трудните задачи.
--------------------------------------------------------------------------------
/docs/EN/Installing-AndroidAPS/Building-APK.md:
--------------------------------------------------------------------------------
1 | # Installing AndroidAPS - Build the APK
2 |
3 | * Install [Android Studio](https://developer.android.com/studio/install.html).
4 | * Use git clone in Android Studio as shown in screenshot below.
5 |
6 | 
7 | 
8 |
9 |
10 | * Run Android Studio and select 'Open an existing Android Studio project', selecting the location of the extracted files.
11 |
12 | * You might get an error message about not finding build tools - click on the links Android Studio provides to download all the software updates suggested.
13 |
14 | * Go to Build Menu and click on Generate Signed APK
15 |
16 | * Select 'app' as Module
17 | 
18 |
19 | * Set a keystore and password, if this is your first time then Create new, or fill in the details of your existing one. For more information about using the keystore see [https://developer.android.com/studio/publish/app-signing.html#generate-key](https://developer.android.com/studio/publish/app-signing.html#generate-key)
20 |
21 | [[https://github.com/gempickfordwaugh/AndroidAPS/raw/b09d7dc444f59b799888bcd596e36e1d562a9674/generate%20signed%20APK.png]]
22 |
23 | * 'Release' should be your default choice for "Build Type", 'Debug' is just for people coding.
24 | * Select the build type you want to build.
25 | * full (i.e. recommendations automatically enacted in closed looping)
26 | * openloop (i.e. recommendations given to user to manually enact)
27 | * pumpcontrol (i.e. remote control for pump, no looping)
28 | * nsclient (i.e. looping data of another user is displayed and careportal entries can be added)
29 |
30 | * Select V1 "Jar Signature" (V2 is optional) and click Finish.
31 |
32 | 
33 |
34 | * Please wait for some time until the APK is created. You will get the pop-up below when the process is done.
35 |
36 | [[https://github.com/MilosKozak/AndroidAPS/wiki/images/androidstudio3.png]]
37 |
38 | * Click on 'Show in Explorer'. You'll find the APK is generated, sometimes it may take time to display.
39 |
40 | * Copy the APK with the same filename as the buildtype you chose to your android phone, and install it. If the apk does not install and you have an older version of AndroidAPS on your phone that was signed with a different key then you will need to uninstall this first, remember to export your settings if so.
41 |
--------------------------------------------------------------------------------
/docs/EN/Configuration/Watchfaces.md:
--------------------------------------------------------------------------------
1 | # Watchfaces
2 |
3 | AndroidAPS is designed to be _controlled_ by Android Wear watches. To achieve this you needed to select the build variant "fullRelease" when [building the APK](/docs/Installing-AndroidAPS/Building-APK) (or "pumpRelease" will allow you to just remote control the pump without looping). Within AndroidAPS, in the ConfigBuilder you need to enable Wear. You can access the setting by clicking on the cog. If you want to bolus etc from the watch then within Wear Setting you need to enable "Controls from Watch".
4 |
5 | There are several watchfaces to choose from that include average delta, IOB, currently active temp basal rate and basal profiles + CGM readings graph. You can also use the AAPS app on the watch to set a temporary target, administer a bolus, use the bolus wizard, prime/fill, and check the status of loop and pump. Ensure notifications from AndroidAPS are not blocked on the watch. Confirmation of action (e.g. bolus, tempt target) comes via notification which you will need to swipe and tick. To get faster to the AAPS menu, do a double tap on your BG. When doing a double tap onto the BG curve, it will show older/ just newer BG's.
6 |
7 | Troubleshooting the wear app:
8 | * On Android Wear 2.0 the watch screen does not install by itself anymore. You need to go into the playstore on the watch (not the same as the phone playstore) and find it in the category apps installed on your phone, from there you can activate it. Also enable auto update.
9 | * Sometimes it helps to re-sync the apps to the watch as it can be a bit slow to do it itself: Android Wear > Cog icon > Watch name > Resync apps.
10 | * Enable ADB debugging in Developer Options (on watch), connect the watch via USB and start the Wear app once in Android Studio.
11 |
12 | If you are using another looping system and want to _view_ your looping detail on an AndroidWear watch, or want to watch your child's looping, then you can build/download just the NSClient APK. To do this follow the [build APK instructions](/docs/Installing-AndroidAPS/Building-APK) selecting the build variant "NSClientRelease". There are several watchfaces to choose from that include average delta, IOB, currently active temp basal rate and basal profiles + CGM readings graph.
13 |
14 | Pebble users can use the [Urchin watchface](https://github.com/mddub/urchin-cgm) to _view_ looping data (if uploaded to nightscout), but you will not be able to interact with AndroidAPS through the watch. You can choose fields to display such as IOB and currently active temp basal rate and predictions. If open looping you can use [IFTTT](https://ifttt.com/) to create an applet that says if Notification received from AndroidAPS then send either SMS or pushover notification.
15 |
--------------------------------------------------------------------------------
/docs/български/Инсталиране/Създаване-на-APK.md:
--------------------------------------------------------------------------------
1 | * Изтеглете [AndroidAPS архив](https://github.com/MilosKozak/AndroidAPS) и разархивирайте файловете.
2 |
3 | * Стартирайте Android Studio и изберете 'Open an existing Android Studio project', като изберете местоположението на разархивираните файлове.
4 |
5 | * Щракнете върху бутона BuildVariants в долния ляв ъгъл на Android Studio и ще видите, че имате няколко различни варианта.
6 |
7 |
8 | [[https://github.com/gempickfordwaugh/AndroidAPS/raw/b09d7dc444f59b799888bcd596e36e1d562a9674/fullwearcontrolrelease.png]]
9 |
10 | * Изберете типа на приложението, който искате да създадете. Има различни модулни опции, като различните части на името са описани по-долу. За да ви помогнем да изберете препоръчваме означените с **bold** щрифт за AndroidAPS по подразбиране (**fullRelease**), а за родители за дистанционно следене на програмата вариантите означени с _italic_ шрифт (_nsclientWearRelease_).
11 | * **full - цялото приложение**
12 | * _nsclient - за изтегляне на събития от NS и вписвания на лечения в Careportal (без APS, просто за отдалечено наблюдение)_
13 | * openloop - само частта OpenAPS на приложението (без драйвер на помпата)
14 | * pumpcontrol - само контрол на помпа DanaR дистанционното от приложението (без loop функция, но с възможност за болус)
15 |
16 | * Debug - само за хора, които биха работили върху кода на приложението
17 |
18 | * От Build Menu кликнете върху Generate Signed APK
19 |
20 | * Задайте keystore и парола, ако това ви е за пръв път изберете Create new и попълнете детайлите. За повече информация относно използването на keystore вижте [https://developer.android.com/studio/publish/app-signing.html#generate-key](https://developer.android.com/studio/publish/app-signing.html#generate-key)
21 |
22 | [[https://github.com/gempickfordwaugh/AndroidAPS/raw/b09d7dc444f59b799888bcd596e36e1d562a9674/generate%20signed%20APK.png]]
23 |
24 | * Изберете същия тип за създаване, както преди, изберете V1 (Jar Signature) и кликнете върху Finish.
25 |
26 | [[https://github.com/gempickfordwaugh/AndroidAPS/raw/b09d7dc444f59b799888bcd596e36e1d562a9674/generate%20signed%20APK%20select%20buildtype%20v1.png]]
27 |
28 | * Моля, изчакайте известно време, докато се създаде APK. Ще се появи изскачащ прозорец, когато процесът е приключил.
29 |
30 | [[https://github.com/MilosKozak/AndroidAPS/wiki/images/androidstudio3.png]]
31 |
32 | * Кликнете върху "Show in Explorer". Ще видите генерираният APK файл. Понякога показването му може да отнеме известно време.
33 |
34 | * Копирайте APK файла със същото име като типа buildtype, който сте избрали на вашия Android телефон и го инсталирайте. Ако apk не инсталира и имате по-стара версия на AndroidAPS на телефона си, който е бил подписан с друг ключ, първо ще трябва да го деинсталирате, не забравяйте да експортирате настройките си, ако това се налага.
--------------------------------------------------------------------------------
/docs/ES/inicio/bombas.md:
--------------------------------------------------------------------------------
1 | # Bombas de insulina compatibles con AndroidAPS
2 |
3 | AndroidAPS actualmente funciona con bombas de insulina DanaR, DanaRS y Roche Combo. DanaR y Combo llevan un tiempo en el mercado y disponibles para usuarios de bomba de insulina, la DanaRS es versión superior a DanaR que se espera estará disponible. Detalles sobre distribuidores puede encontrarlos [aquí](https://drive.google.com/open?id=1CRfmmjA-0h_9nkRViP3J9FyflT9eu-a8HeMrhrKzKz0), por favor comparte los detalles de la tuya si no están en las opciones mencionadas.
4 |
5 | La Roche Combo es una bomba confiable y loopeable.
6 |
7 | Las ventajas de DanaRS como bomba de insulina, sin embargo, son:
8 |
9 | * Sooil ha declarado que controlar la bomba desde un móvil (no específicamente Loop) no elimina la garantía de la misma. IME-DC ha declarado que reemplazará la bomba simplemente en caso de rotura o necesidad de reemplazo por lo que Sooil nunca sabrá si ha sido usada para lazos cerrados. Esto hace la DanaR/RS las únicas bombas que pueden usarse para lazos cerrados con garantía del fabricante. (Roche excluye cualquier uso que no esté en el manual)
10 |
11 | * DanaR/RS conecta con casi cualquier móvil con Android>=5.1 sin necesidad de flash Lineage. Si tu teléfono se rompe puede ser sustituido fácilmente no así con la Combo (esto puede cambiar en el futuro cuando Android 8.1 sea más popular)
12 |
13 | * El emparejamiento inicial es más fácil con DanaRS. Pero esto se realiza normalmente solo una vez, por lo que solo impacta si quieres probar nuevas características con bombas diferentes.
14 |
15 | * Hasta ahora Combo funciona con análisis de pantalla. En general funciona bien, pero es lento. Para lazo cerrado eso no es crucial puesto que trabaja en segundo plano, sin embargo, usa más tiempo la conexión bluetooth aumentando la probabilidad de fallo de conexión, lo cual no es fácil si te lejas del móvil mientras pones un bolo y cocinas.
16 |
17 | * Combo vibra cuando termina una basal temporal, la DanaR vibra (o hace sonido) con SMB. Por la noche, preferirás usar TBR sobre SMB. DanaRS se puede configurar para que ni haga sonido ni vibre.
18 |
19 | * Leyendo el histórico de la bomba Dana RS en unos segundo junto con los carbohidratos hace posible cambiar fácilmente entre modo offline y continuar el lazo cerrado en cuanto tenga datos de MCG.
20 |
21 | * Todas las bombas AndroidAPS compatibles son waterproof. Aunque solo la Dana es tiene garantizado waterproof debido a su sellado en el compartimento de la batería y el reservorio.
22 |
23 | La Combo es una buena bomba y loopeable, teniendo la ventaja de más tipos de equipos de infusión entre los que escoger teniendo el estándar luer lock. La batería es común por lo que se puede comprar en cualquier parte.
24 | Detalles del estado de [Futuros controladores de bombas](Futuros-controladores-de-bombas.md) que pudieran usarse con AndroidAPS están en esta página.
25 |
--------------------------------------------------------------------------------
/docs/ES/Inicio/Opciones de Bombas de insulina.md:
--------------------------------------------------------------------------------
1 | # Bombas de insulina compatibles con AndroidAPS
2 |
3 | AndroidAPS actualmente funciona con bombas de insulina DanaR, DanaRS y Roche Combo. DanaR y Combo llevan un tiempo en el mercado y disponibles para usuarios de bomba de insulina, la DanaRS es versión superior a DanaR que se espera estará disponible. Detalles sobre distribuidores puede encontrarlos [aquí](https://drive.google.com/open?id=1CRfmmjA-0h_9nkRViP3J9FyflT9eu-a8HeMrhrKzKz0), por favor comparte los detalles de la tuya si no están en las opciones mencionadas.
4 |
5 | La Roche Combo es una bomba confiable y loopeable.
6 |
7 | Las ventajas de DanaRS como bomba de insulina, sin embargo, son:
8 |
9 | * Sooil ha declarado que controlar la bomba desde un móvil (no específicamente Loop) no elimina la garantía de la misma. IME-DC ha declarado que reemplazará la bomba simplemente en caso de rotura o necesidad de reemplazo por lo que Sooil nunca sabrá si ha sido usada para lazos cerrados. Esto hace la DanaR/RS las únicas bombas que pueden usarse para lazos cerrados con garantía del fabricante. (Roche excluye cualquier uso que no esté en el manual)
10 |
11 | * DanaR/RS conecta con casi cualquier móvil con Android>=5.1 sin necesidad de flash Lineage. Si tu teléfono se rompe puede ser sustituido fácilmente no así con la Combo (esto puede cambiar en el futuro cuando Android 8.1 sea más popular)
12 |
13 | * El emparejamiento inicial es más fácil con DanaRS. Pero esto se realiza normalmente solo una vez, por lo que solo impacta si quieres probar nuevas características con bombas diferentes.
14 |
15 | * Hasta ahora Combo funciona con análisis de pantalla. En general funciona bien, pero es lento. Para lazo cerrado eso no es crucial puesto que trabaja en segundo plano, sin embargo, usa más tiempo la conexión bluetooth aumentando la probabilidad de fallo de conexión, lo cual no es fácil si te lejas del móvil mientras pones un bolo y cocinas.
16 |
17 | * Combo vibra cuando termina una basal temporal, la DanaR vibra (o hace sonido) con SMB. Por la noche, preferirás usar TBR sobre SMB. DanaRS se puede configurar para que ni haga sonido ni vibre.
18 |
19 | * Leyendo el histórico de la bomba Dana RS en unos segundo junto con los carbohidratos hace posible cambiar fácilmente entre modo offline y continuar el lazo cerrado en cuanto tenga datos de MCG.
20 |
21 | * Todas las bombas AndroidAPS compatibles son waterproof. Aunque solo la Dana es tiene garantizado waterproof debido a su sellado en el compartimento de la batería y el reservorio.
22 |
23 | La Combo es una buena bomba y loopeable, teniendo la ventaja de más tipos de equipos de infusión entre los que escoger teniendo el estándar luer lock. La batería es común por lo que se puede comprar en cualquier parte.
24 | Detalles del estado de [Futuros controladores de bombas](Futuros-controladores-de-bombas.md) que pudieran usarse con AndroidAPS están en esta página.
25 |
--------------------------------------------------------------------------------
/docs/ES/Inicio/Todo empieza aquí.md:
--------------------------------------------------------------------------------
1 |
2 | Bienvenido a la documentación AndroidAPS
3 | ==============================================
4 |
5 | **Qué es AndroidAPS?**
6 |
7 | AndroidAPS es una app que puede comunicar las bombas de insulina con bluetooth y ejecuta una versión del algoritmo “oref0” de OpenAPS.
8 |
9 | ** Objetivos principales **
10 |
11 | * App modular que sea usable para añadir más módulos sin tocar el resto de código
12 | * App que permita la localización
13 | * App que permita la fácil selección de lo que queremos que la apk final
14 | * App que permita lazo abierto y cerrado de APS
15 | * App donde puedas ver cómo funciona APS: los parámetros de entrada, los resultados y las decisiones que toma.
16 | * Que permita añadir más algoritmos y permita usuario decidir cuál usar
17 | * App independiente del driver de la bomba y que contenga una bomba virtual que permita al usuario testear con seguridad APS
18 | * App con integración con Nightscout
19 | * App en la que sea posible añadir o eliminar limitaciones para seguridad del usuario
20 | * Todo en uno-app que necesitas para manejar la diabetes tipo 1 con APS y Nightscout
21 |
22 |
23 | **Qué necesitas para empezar:**
24 |
25 | * Teléfono Android 5.0 o superior. Revisar esta [lista](https://docs.google.com/spreadsheets/d/1gZAsN6f0gv6tkgy9EBsYl0BQNhna0RDqA9QGycAqCQc/edit?usp=sharing)
26 | * Una app que reciba datos de tu MCG: [xDrip](http://stephenblackwasalreadytaken.github.io/xDrip/) / [xDrip+](https://github.com/jamorham/xDrip-plus), [Glimp](http://www.nightscout.info/wiki/welcome/nightscout-for-libre) o [600SeriesAndroidUploader](https://github.com/pazaan/600SeriesAndroidUploader)
27 | * [AndroidAPS](https://github.com/MilosKozak/AndroidAPS) app
28 | * [Nightscout](https://github.com/nightscout/cgm-remote-monitor) 0.10.2 o posterior
29 | * Bomba de insulina compatible: Dana-R, Dana-RS o Accu-Check Combo
30 | * Un monitor continuo de glucosa (MCG): Dexcom G4/G5, Freestyle Libre, Eversense o Medtronic Guardian
31 |
32 |
33 | .. nota::
34 | **Advertencia**
35 |
36 | * Toda la información y el código descrito aquí solo es de carácter informativo y de educación.
37 | Actualmente Nightscout no dispone de HIPAA privacy compliance. Use Nightscout y AndroidAPS bajo su responsabilidad,
38 | no use esta información para o código para tomar decisiones médicas.
39 |
40 | * El uso del código de github.com no tiene garantía o soporte formal de ningún tipo.
41 | Por favor revise el repositorio de Licencia para más detalles.
42 |
43 | * Todos los productos y nombres de compañias, marcas, servicios, marcas registradas y servicios registrados son propiedad de sus respectivos tenedores. Su uso aquí es informativo y no implica afiliación o pago por ello.
44 |
45 | NOTA- este proyecto no tiene asociación o contraprestación alguna por parte
46 | de: [SOOIL](http://www.sooil.com/eng/), [Dexcom](http://www.dexcom.com/), [Accu-Chek, Roche Diabetes Care]( http://www.accu-chek.com/).
47 |
--------------------------------------------------------------------------------
/docs/EN/Getting-Started/Pump-Choices.md:
--------------------------------------------------------------------------------
1 | # Pumps compatible with AndroidAPS
2 |
3 | AndroidAPS currently works with the Dana* R, Dana* RS and Combo pumps. The Dana* R and Combo have been available on the market for a while so many people already have access to these, and Dana* RS as an upgrade to the Dana* R is becoming a more common choice. If you need to choose a pump to upgrade to or buy then people often ask which to choose. Details of the various distributors is in [this spreadsheet](https://drive.google.com/open?id=1CRfmmjA-0h_9nkRViP3J9FyflT9eu-a8HeMrhrKzKz0), please share the details of yours if not already listed.
4 |
5 | The Combo is a solid pump. And loopable.
6 |
7 | The advantages of the Dana* RS as the pump of choice however are:
8 |
9 | * Sooil did state that controlling the pump from a phone (didn't not-specifically state looping) would NOT void the warranty. IME-DC stated they would just hand out a replacement send the pump to Sooil - so they wouldn't even know if you were looping or not. This makes the Dana* R/RS pumps the only pumps that are under warranty while looping. (Roche excludes any use that is not in their manual.)
10 |
11 | * The Dana*R/RS connects to almost any phone with Android >= 5.1 without the need to flash lineage. If your phone breaks you usually can find easily any phone that works with the Dana*R/RS pumps as quick replacement... not so easy with the Combo. (This might change in the future when Android 8.1 gets more popular)
12 |
13 | * Initial pairing is simpler with the Dana* RS. But you usually only do this once so it only impacts if you want to test a new feature with different pumps.
14 |
15 | * So far the Combo works with screen parsing. In general that works great but it is slow. For looping this does not matter much as everything works in the background. Still there is much more time you need to be connected so more time where the BT connection might break, which isn't so easy if you walk away from your phone whilst bolusing & cooking.
16 |
17 | * The Combo vibrates on the end of TBRs, the Dana* R vibrates (or beeps) on SMB. At night time you are likely to be using TBRs more than SMB. The Dana* RS is configurable that it does neither beeps or vibrates.
18 |
19 | * Reading the history on the RS in a few seconds with carbs makes it possible to switch phones easily while offline and continue looping as soon a soon as some CGM values are in.
20 |
21 | * All pumps AndroidAPS can talk with are waterproof on delivery. Only the Dana pumps are also "waterproof by warranty" due to the sealed battery compartment and reservoir filling system.
22 |
23 | The Combo of course is a very good pump. And loopable. It also has the advantage of many more infusion set types to chose from as it has a standard luer lock. And the battery is a default one you can buy at any gas station, 24 hour convenience store and if you really need one, you can steal/borrow it from the remote control in the hotel room ;-)
24 |
25 | Details of the status of other pumps that may have the potential to work with AndroidAPS are listed on the [Future (possible) Pumps](Future-possible-Pump-Drivers.md) page.
26 |
--------------------------------------------------------------------------------
/docs/ES/configuracion/watchfaces.md:
--------------------------------------------------------------------------------
1 | # Watchfaces
2 |
3 | AndroidAPS está diseñado para ser controlado por los relojes Android Wear. Para lograr esto, necesitas seleccionar la variante de compilación "fullRelease" cuando [construyes the APK](/docs/Installing-AndroidAPS/Building-APK) (o "pumpRelease" te permitirá simplemente controlar la bomba a distancia sin hacer lazos cerrados). Dentro de AndroidAPS, en ConfigBuilder debe habilitar Wear. Puede acceder a la configuración haciendo clic en el icono
4 | de rueda dentada. Si deseas bolo, etc. desde el reloj, entonces dentro de la configuración de Wear debe habilitar "Controles desde reloj".
5 |
6 |
7 | Hay varias esferas watchfaces para elegir que incluyen delta promedio, IOB, tasa basal de temporal activa y perfiles basales además del gráfico de lecturas de MCG. También puede usar la aplicación AAPS en el reloj para establecer un objetivo temporal, administrar un bolo, usar el asistente de bolo, cebar/rellenar y verificar el estado del lazo y la bomba. Asegúrate de que las notificaciones de AndroidAPS no estén bloqueadas en el reloj. La confirmación de la acción (por ejemplo, bolo, objetivo temporal) viene a través de una notificación que deberá deslizar y marcar. Para ir más rápido al menú de AAPS, haz doble toque en tu BG. Al hacer doble toque en la curva BG, se mostrarán BG más antiguas/más reciente BG.
8 |
9 |
10 | Solución de problemas de la aplicación Wear:
11 |
12 |
13 | * En Android Wear 2.0, la pantalla del reloj ya no se instala sola. Tienes que ir a la playstore en el reloj (no es lo mismo que la playstore del teléfono) y encontrarlo en la categoría de aplicaciones instaladas en tu teléfono, desde allí puedes activarlo. También habilite la actualización automática.
14 |
15 | * A veces, ayuda a volver a sincronizar las aplicaciones con el reloj, ya que puede ser un poco lento hacerlo por sí mismo: Android Wear> Cog icon>Watch name> Resync apps.
16 |
17 | * Habilite la depuración de ADB en Opciones de desarrollador (en teléfono), conecte el reloj a través de USB e inicie la aplicación Wear una vez en Android
18 | Studio.
19 |
20 |
21 | Si está utilizando otro sistema de lazo cerrado y desea ver sus detalles del mismo en un reloj AndroidWear, o quiere ver el lazo
22 | cerrado de su hijo, entonces puede compilar / descargar solo la APK de NSClient. Para ello, siga las instrucciones de creación de APK seleccionando la variante de compilación "NSClientRelease". Hay varias esferas watchfaces para elegir que incluyen delta promedio, IOB, tasa basal temporal activa actual y perfiles basales + gráfico de lecturas de MCG.
23 |
24 |
25 | Los usuarios de Pebble pueden usar la esfera de reloj de [Urchin watchface](https://github.com/mddub/urchin-cgm) para ver los datos de los lazos (si se cargan en Nightscout), pero no podrás interactuar con AndroidAPS a través del reloj. Puede elegir campos para visualizar tales como IOB y la tasa basal de temp en activo y las predicciones. Si es un lazo abierto, puede usar [IFTTT](https://ifttt.com/) para crear un applet que diga si la notificación recibida de AndroidAPS ha sido enviada o bien por notificación SMS o por notificación pushover.
26 |
27 |
28 |
--------------------------------------------------------------------------------
/docs/EN/Usage/Dev-branch.md:
--------------------------------------------------------------------------------
1 | # Development branch
2 |
3 | **Attention:** The dev version of AndroidAPS is only for developers and testers comfortable dealing with stacktraces, looking through log files and maybe firing up the debugger to produce bug reports that are helpful to the developers (in short: people that know what they are doing without being assisted!). Therefore many unfinished features are disabled. To enable these features enter **Engineering Mode** by creating a file named `engineering_mode` in the same directory where you would find the log files. Enabling the engineering mode might break the loop entirely.
4 |
5 | ***
6 |
7 | The most stable version of AndroidAPS to use is that in the [Master branch](https://github.com/MilosKozak/AndroidAPS/tree/master). It is advised to stay on the Master branch while you complete the Objectives and get practiced at looping.
8 |
9 | However, the [Dev branch](https://github.com/MilosKozak/AndroidAPS/tree/dev) is a good place to see what features are being tested and to help iron out the bugs and give feedback on how the new features work in practice. Often people will test the Dev branch on an old phone and pump until they are confident it is stable - any use of it is at your own risk.
10 |
11 | A short summary of some of the changes to old features or development of new features currently in the Dev branch is listed below, and links to any key issues known will be shared (if applicable).
12 |
13 | **Super Micro Bolus (SMB)**
14 | More can be read on [Super Micro Boluses (SMB) on OpenAPS docs](https://openaps.readthedocs.io/en/latest/docs/Customize-Iterate/oref1.html#understanding-smb).
15 | Remember that you are choosing to test a still-in-development feature. Do so at your own risk & with due diligence to keep yourself safe.
16 | You should have run basic closed looping for more than four weeks (having completed Objective 7), and be very aware of all the types of situations in which your APS might fail.
17 | You may need to adjust your settings to allow SMB to work effectively. A good place to start is increasing your max IOB to normal meal bolus + 3x max daily basal. But remain vigilant and adjust settings with care.
18 |
19 |
20 | As with all updates, previous code has been cleaned, improved and bugs fixed.
21 |
22 | If you find a bug or think something wrong has happened when using the Dev branch, then view the [issues tab](https://github.com/MilosKozak/AndroidAPS/issues) to check whether anyone else has found it, or add it yourself if not. The more information you can share here the better (don't forget you may need to share your [log files](https://github.com/MilosKozak/AndroidAPS/wiki/Accessing-logfiles)). The new features can also be discussed in the [gitter room](https://gitter.im/MilosKozak/AndroidAPS).
23 |
24 | If you would like to be up-to-date on the Dev Branch you can use the same steps as already outlined in the [[Update to new version|Update-to-new-version]] page. You just need to change to the corresponding "dev"-Branch in Android Studio. See [[Selecting Branch|Update to new version#selecting branch]] for details.
25 |
--------------------------------------------------------------------------------
/docs/ES/Configuracion/Watchfaces.md:
--------------------------------------------------------------------------------
1 |
2 | # Watchfaces
3 |
4 | AndroidAPS está diseñado para ser controlado por los relojes Android Wear. Para lograr esto, necesitas seleccionar la variante de compilación "fullRelease" cuando [construyes the APK](/docs/Installing-AndroidAPS/Building-APK) (o "pumpRelease" te permitirá simplemente controlar la bomba a distancia sin hacer lazos cerrados). Dentro de AndroidAPS, en ConfigBuilder debe habilitar Wear. Puede acceder a la configuración haciendo clic en el icono
5 | de rueda dentada. Si deseas bolo, etc. desde el reloj, entonces dentro de la configuración de Wear debe habilitar "Controles desde reloj".
6 |
7 |
8 | Hay varias esferas watchfaces para elegir que incluyen delta promedio, IOB, tasa basal de temporal activa y perfiles basales además del gráfico de lecturas de MCG. También puede usar la aplicación AAPS en el reloj para establecer un objetivo temporal, administrar un bolo, usar el asistente de bolo, cebar/rellenar y verificar el estado del lazo y la bomba. Asegúrate de que las notificaciones de AndroidAPS no estén bloqueadas en el reloj. La confirmación de la acción (por ejemplo, bolo, objetivo temporal) viene a través de una notificación que deberá deslizar y marcar. Para ir más rápido al menú de AAPS, haz doble toque en tu BG. Al hacer doble toque en la curva BG, se mostrarán BG más antiguas/más reciente BG.
9 |
10 |
11 | Solución de problemas de la aplicación Wear:
12 |
13 |
14 | * En Android Wear 2.0, la pantalla del reloj ya no se instala sola. Tienes que ir a la playstore en el reloj (no es lo mismo que la playstore del teléfono) y encontrarlo en la categoría de aplicaciones instaladas en tu teléfono, desde allí puedes activarlo. También habilite la actualización automática.
15 |
16 | * A veces, ayuda a volver a sincronizar las aplicaciones con el reloj, ya que puede ser un poco lento hacerlo por sí mismo: Android Wear> Cog icon>Watch name> Resync apps.
17 |
18 | * Habilite la depuración de ADB en Opciones de desarrollador (en teléfono), conecte el reloj a través de USB e inicie la aplicación Wear una vez en Android
19 | Studio.
20 |
21 |
22 | Si está utilizando otro sistema de lazo cerrado y desea ver sus detalles del mismo en un reloj AndroidWear, o quiere ver el lazo
23 | cerrado de su hijo, entonces puede compilar / descargar solo la APK de NSClient. Para ello, siga las instrucciones de creación de APK seleccionando la variante de compilación "NSClientRelease". Hay varias esferas watchfaces para elegir que incluyen delta promedio, IOB, tasa basal temporal activa actual y perfiles basales + gráfico de lecturas de MCG.
24 |
25 |
26 | Los usuarios de Pebble pueden usar la esfera de reloj de [Urchin watchface](https://github.com/mddub/urchin-cgm) para ver los datos de los lazos (si se cargan en Nightscout), pero no podrás interactuar con AndroidAPS a través del reloj. Puede elegir campos para visualizar tales como IOB y la tasa basal de temp en activo y las predicciones. Si es un lazo abierto, puede usar [IFTTT](https://ifttt.com/) para crear un applet que diga si la notificación recibida de AndroidAPS ha sido enviada o bien por notificación SMS o por notificación pushover.
27 |
28 |
29 |
--------------------------------------------------------------------------------
/docs/EN/Getting-Started/How-can-I-help.md:
--------------------------------------------------------------------------------
1 | # How to help with AndroidAPS
2 |
3 | _**AndroidAPS operates entirely on volunteer efforts and has no paid staff.** Developers are parents, caregivers, loved ones and people with diabetes working together to development and improve a solution to a very common want. Developers donate their spare time for free, but it's a bit unfair to expect them to face additional costs to make something so amazing open source and free for all._
4 |
5 | _To fully test a new rig developers need to have a spare phone and a spare pump as it cannot be used on a human until it is stable. Newer models need testing as they become available. Some of the money donated is needed also for the logistical costs of shipping these supplies across countries to the developers. Sometimes it's also nice to contribute towards the developers costs to leave their darkened rooms and meet each other at conferences and events to let their creative and analytical brains bounce off each other._
6 |
7 | **I can write code! How do I participate?** Yay! Look at the issues, ask in the gitter channel, there is always a lot to do!
8 | Pick a small task at first and do your first pull request! :)
9 |
10 | **I know the system and can write documentation!** or **I do speak multiple languages and whant to translate the documentation** < br/>
11 | Great, this is a highly appreciated thing and a good way to pay it foreward!
12 | < br/> The gitter channel regarding the wiki can be found here: [AndroidAPSwiki/Lobby](https://gitter.im/AndroidAPSwiki/Lobby)
13 | < br/> A guide how to do commits can be found here: [Openaps/my-first-pr](https://openaps.readthedocs.io/en/latest/docs/Resources/my-first-pr.html#making-your-first-pr-pull-request) (OpenAPS documentation but same applies for AndroidAPS).
14 |
15 | **I've got cash I'd like to donate, how do I do that?** PayPal: donations@androidaps.org
16 | **What is the money used for?** The money is NOT paid to anyone for their work! It is used to keep the costs for the developers low when organizing meetings. We try to be very transparent. This is what is currently planned:
17 | * European Dev Meetup in Prague end of May 2018:
18 | * hiring a room plus internet
19 | * equipment
20 | * food / coffee
21 | * in the unlikely case the above will be fully covered and some money remains: travel expenses for those who have to travel a longer distance. (Some devs from other continents will attend but are in Europe already at that time, so travel costs will be kept low.)
22 |
23 | **I've got spare equipment, where do I send it?** We are currently collecting "will be provided later" to begin distributing them for testing. At the end of the process, any leftover equipment will be donated to one of the Pay-it-Forward facebook groups that exist to support the T1 community. If you want to donate spare equipment, e-mail developers@androidaps.org and we'll send you an address.
24 |
25 | **I've not got cash or equipment, how can I help?** Skills needed include graphic design, UX design, translators, wiki editors or simply paying it forwards by answering the simple questions in gitter & Facebook to allow the developers the time and space to focus on the harder stuff.
26 |
--------------------------------------------------------------------------------
/docs/EN/Usage/Profiles.md:
--------------------------------------------------------------------------------
1 | # Profile switch
2 |
3 | On starting your AndroidAPS and selecting your profile, you will need to do a "Profile switch" event with zero duration (explained later). By doing this AAPS starts tracking history of profiles and every new profile change requires another "Profile switch" even when you change content of the profile in NS. Updated profile is pushed to AAPS immediately but you need to switch the same profile again (in NS or AAPS) to start using these changes.
4 |
5 | Internaly AAPS creates snapshot of profile with start date and duration and is using it within selected period. Duration of zero means infinite. Such profile is valid until new "Profile switch".
6 |
7 | If you use "Profile switch" with duration profile is switched back to previous valid "Profile switch"
8 |
9 | If you use local AAPS profiles (Simple, Local, CPP) you have to press button there to apply these changes (it creates proper "Profile switch" event).
10 |
11 | Within the "profile switch" you can choose two changes which used to be part of the Circadian Percentage Profile:
12 | * Percentage - this applies the same percentage to all parameters. If you set it to 130% (meaning you are 30% more insulin resistant), it will up the basal rate by 30%. It will also lower the ISF and IC accordingly (divide by 1.3 in this example). It will be sent to the pump and then be the default basal rate. The loop algorithm (open or closed) will continue to work on top of the selected percentage profile. So for example separate percentage profiles can be set up for different stages of the hormone cycle.
13 | * Timeshift - this moves everything round the clock by the number of hours entered. So for example, when working night shifts change the number of hours to how much later/earlier you go to bed or wake up.
14 |
15 | This mechanism allows much precise calculations to the past and track profile changes.
16 |
17 | In closed loop mode is recommended to turn on automatic update of profile in pump (in settings), this will mean any updated you make to your profile will be copied locally to the pump in case of failure.
18 |
19 | Troubleshooting Profile Errors
20 | * 'Invalid profile' or 'Basal Profile not aligned to hours' error message will appear if you have any basal rates or I:C rates not on the hour. The DanaR and DanaRS pumps do not support changes on the half hour.
21 | * 'Received profile switch from NS but profile does not exist locally' or
22 | Go either to Treatments tab in AndoridAPS and select Profile Switch, 'remove' the date and time that was mentioned in the error message. Or go to your mlab collection, search in the treatments for profile switch and delete the date and time that was mentioned in the error message.
23 | 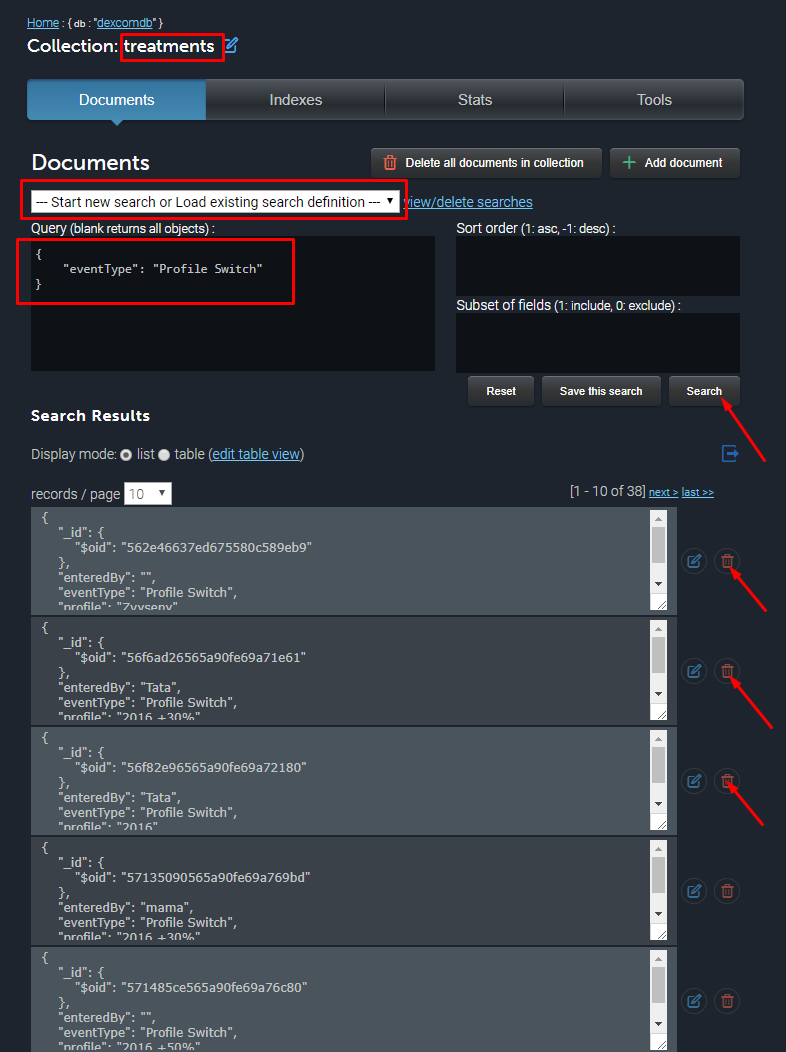
24 | * 'DIA 3hr too short' error message will appear if your duration of insulin action in your profile is listed at a value that AndroidAPS doesn't believe will be accurate. Read about [selecting the right DIA](http://www.diabettech.com/insulin/why-we-are-regularly-wrong-in-the-duration-of-insulin-action-dia-times-we-use-and-why-it-matters/), and edit it in your profile then do a Profile Switch to continue.
25 |
--------------------------------------------------------------------------------
/docs/ES/uso/extcarbs.md:
--------------------------------------------------------------------------------
1 | # Carbohidratos Extendidos/eCarbs
2 |
3 | Con una terapia de bomba normal, los bolos extendidos son una buena manera de tratar comidas grasas o de absorción lenta que aumentan la glucosa en sangre por más tiempo que el efecto de la insulina. En un contexto de lazo cerrado, sin embargo, los bolos extendidos no tienen tanto sentido (y plantean dificultades técnicas), ya que son básicamente una basal temporal alta fija, que va en contra de cómo funciona el lazo, que está ajustando la tasa basal de forma dinámica. La necesidad de lidiar con tales comidas todavía existe. Por eso, AndroidAPS a partir de la versión 2.0 es compatible con los llamados carbohidratos extendidos o eCarbs.
4 |
5 |
6 | Los eCarbs son carbohidratos que se introducen durante varias horas. Esto simula cómo se absorben los carbohidratos e influye en la glucosa en sangre. Con esta información, el lazo puede administrar SMB para tratar esos carbohidratos, lo que se puede ver como
7 | un bolo extendido dinámico (esto también debería funcionar sin SMB, pero probablemente sea menos efectivo). Sin embargo, los eCarbs no se limitan a las comidas grasas, sino que se pueden usar para ayudar en cualquier situación en la que existan influencias que aumenten el nivel de azúcar en la sangre, por ej: medicamentos como cortisona.
8 |
9 |
10 | Para introducir eCarbs, establezca una duración en el cuadro de diálogo Carbohidratos en la pestaña de información general, los carbohidratos totales y opcionalmente un tiempo:
11 |
12 |  13 |
14 |
15 | Los eCarbs en la pestaña de información general, tenga en cuenta los carbohidratos entre paréntesis en el campo COB, que muestra los carbohidratos en el futuro:
16 |
17 |
13 |
14 |
15 | Los eCarbs en la pestaña de información general, tenga en cuenta los carbohidratos entre paréntesis en el campo COB, que muestra los carbohidratos en el futuro:
16 |
17 |  18 |
19 | Las entradas de carbohidratos en el futuro están coloreadas en naranja oscuro en la pestaña de tratamiento:
20 |
21 |
18 |
19 | Las entradas de carbohidratos en el futuro están coloreadas en naranja oscuro en la pestaña de tratamiento:
20 |
21 | 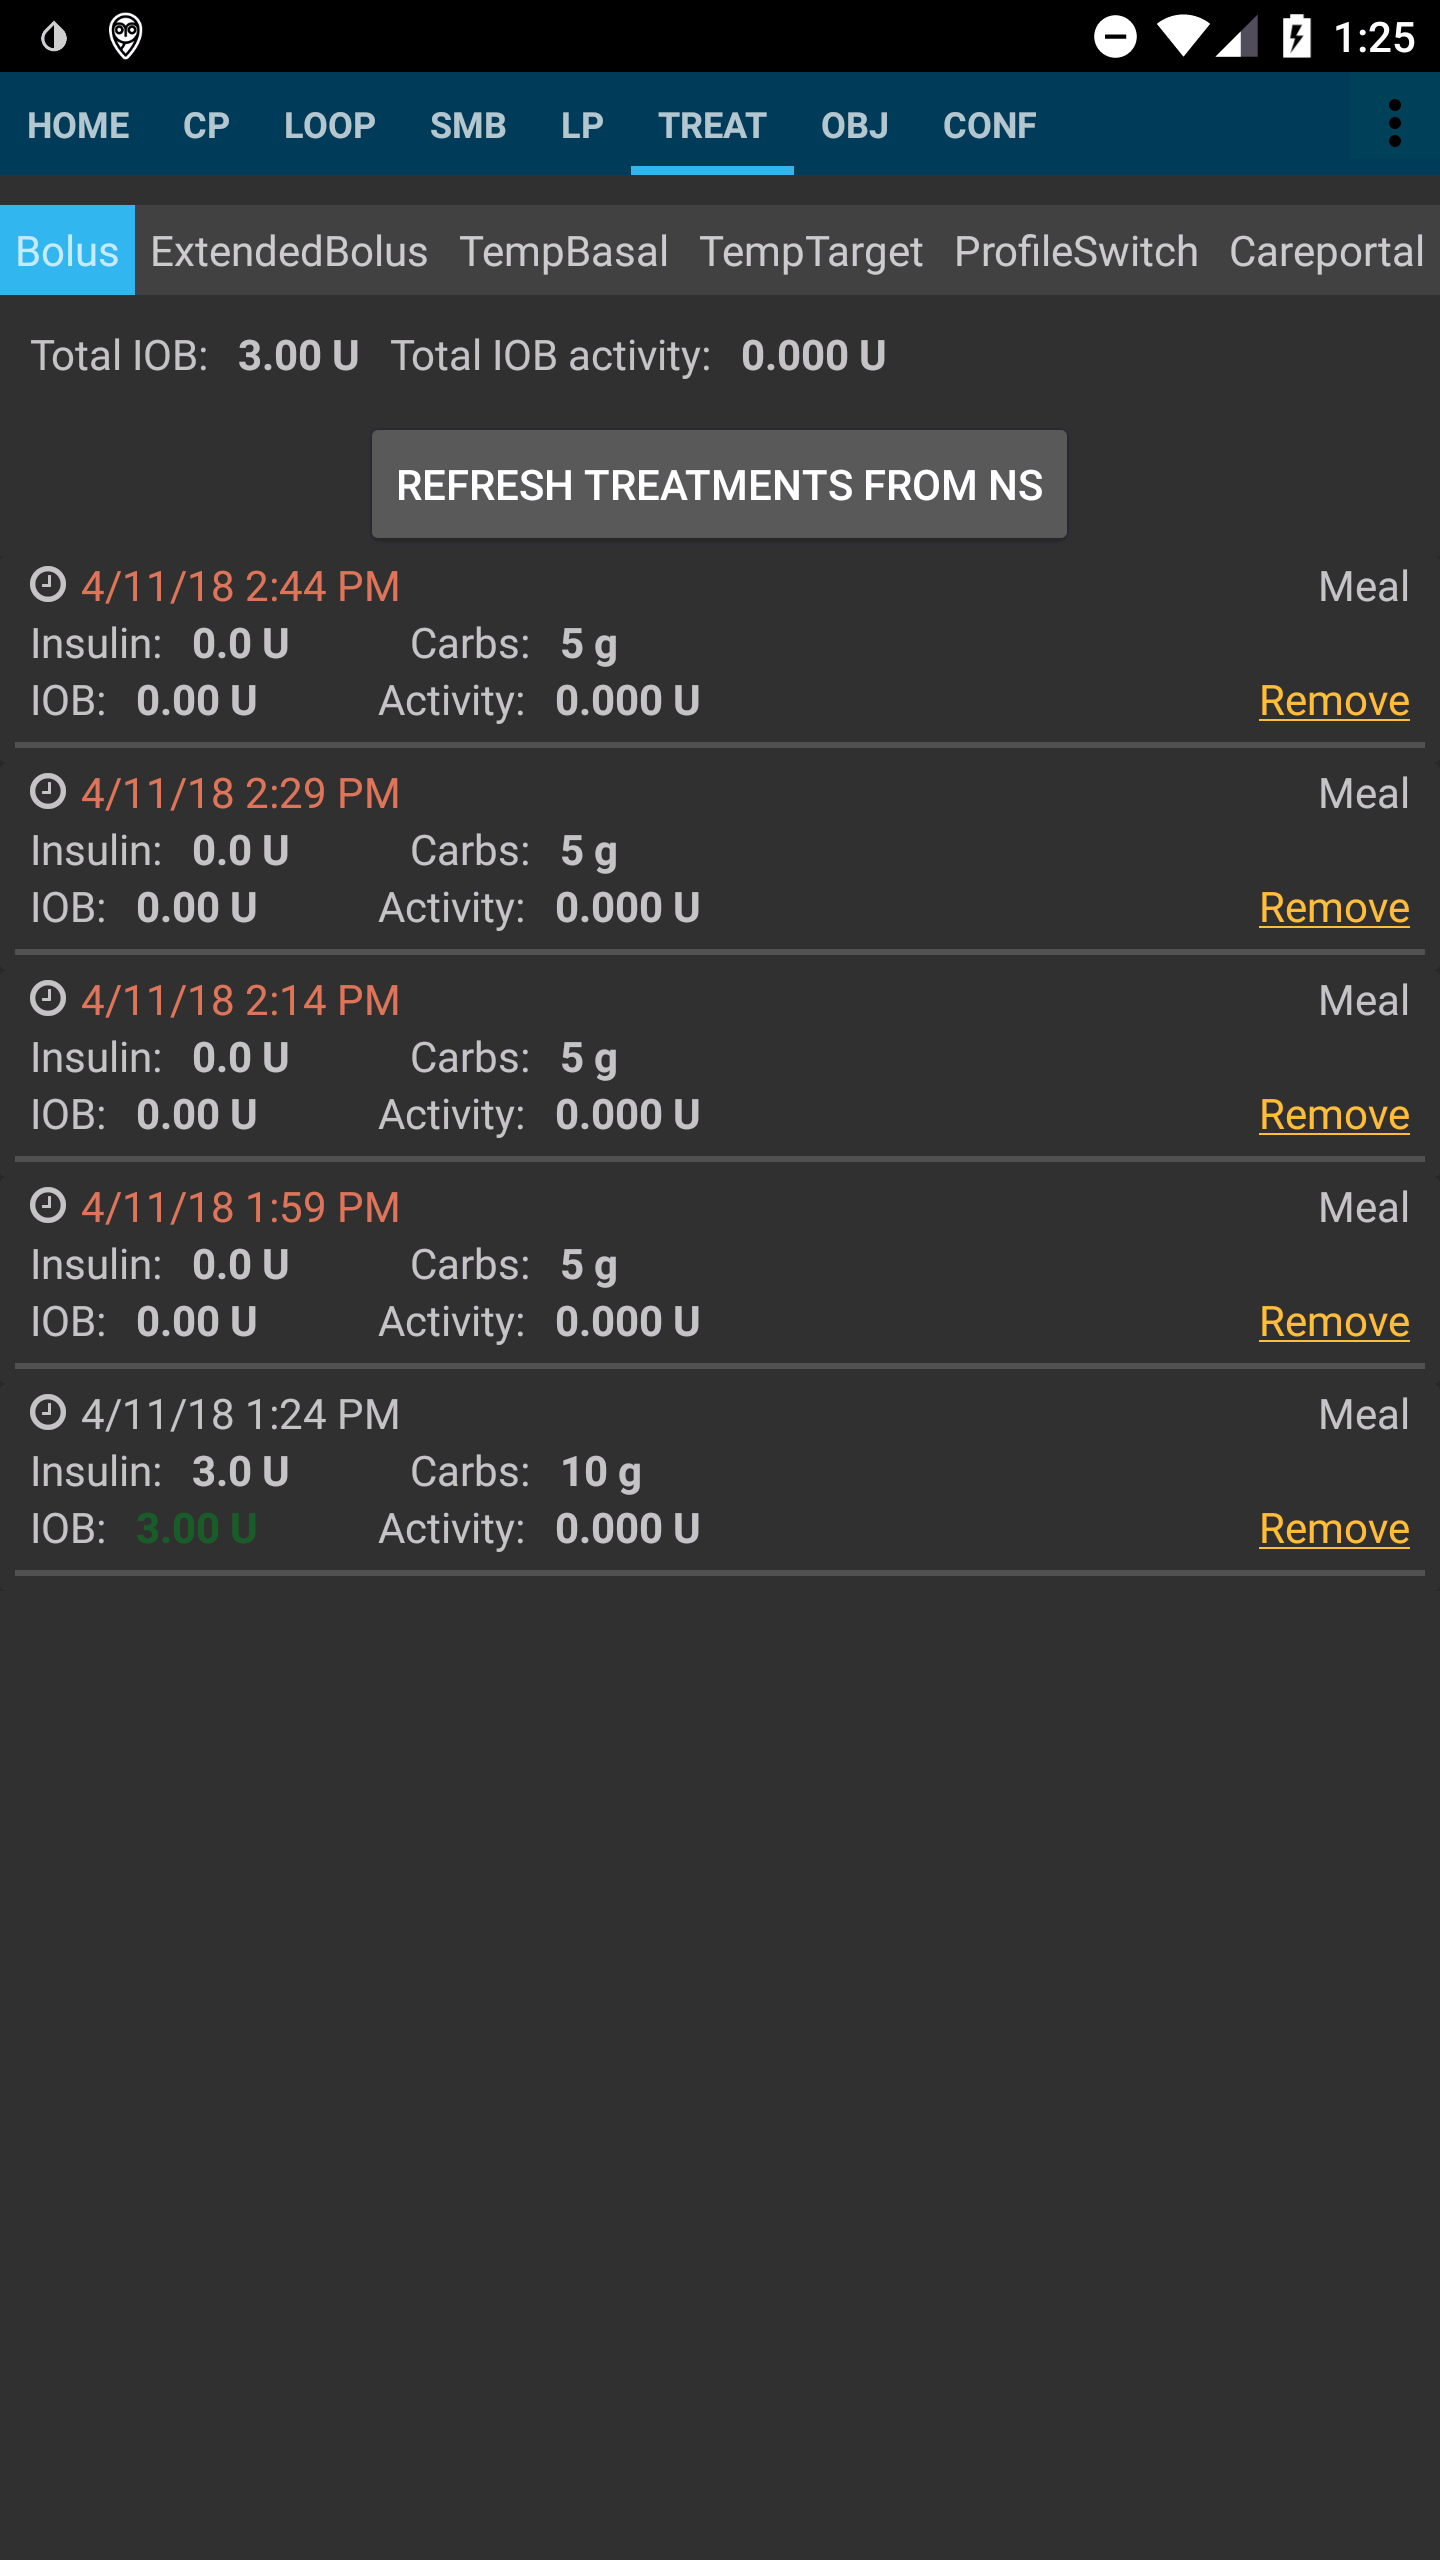 22 |
23 | ***
24 | Aquí se describe una forma de manejar la grasa y las proteínas con esta característica: https://adriansloop.blogspot.co.at/2018/04/page-margin-0.html
25 | ***
26 |
27 | La configuración recomendada es utilizar el complemento OpenAPS SMB APS, con las SMB habilitadas y la habilitación de SMB con COB habilitada.
28 |
29 | Un escenario, por ej una pizza, puede dar un bolo (parcial) por adelantado a través de la calculadora y luego usar el botón de carbohidratos para ingresar los carbohidratos restantes durante un período de 4 a 6 horas, comenzando después de 1 o 2 horas. Tendrá que probar y ver qué valores concretos funcionan para usted, por supuesto. También puede ajustar cuidadosamente la configuración
30 | de minutos máximos de basal para limitar SMB a para que el algoritmo sea más o menos agresivo. Con comidas bajas en carbohidratos, altas en grasas y proteínas, puede ser suficiente usar solo eCarbs sin bolos manuales (consulte el post arriba mencionado)
31 |
32 |
--------------------------------------------------------------------------------
/docs/ES/Uso/Carbohidratos extendidos.md:
--------------------------------------------------------------------------------
1 |
2 | # Carbohidratos Extendidos/eCarbs
3 |
4 | Con una terapia de bomba normal, los bolos extendidos son una buena manera de tratar comidas grasas o de absorción lenta que aumentan la glucosa en sangre por más tiempo que el efecto de la insulina. En un contexto de lazo cerrado, sin embargo, los bolos extendidos no tienen tanto sentido (y plantean dificultades técnicas), ya que son básicamente una basal temporal alta fija, que va en contra de cómo funciona el lazo, que está ajustando la tasa basal de forma dinámica. La necesidad de lidiar con tales comidas todavía existe. Por eso, AndroidAPS a partir de la versión 2.0 es compatible con los llamados carbohidratos extendidos o eCarbs.
5 |
6 |
7 | Los eCarbs son carbohidratos que se introducen durante varias horas. Esto simula cómo se absorben los carbohidratos e influye en la glucosa en sangre. Con esta información, el lazo puede administrar SMB para tratar esos carbohidratos, lo que se puede ver como
8 | un bolo extendido dinámico (esto también debería funcionar sin SMB, pero probablemente sea menos efectivo). Sin embargo, los eCarbs no se limitan a las comidas grasas, sino que se pueden usar para ayudar en cualquier situación en la que existan influencias que aumenten el nivel de azúcar en la sangre, por ej: medicamentos como cortisona.
9 |
10 |
11 | Para introducir eCarbs, establezca una duración en el cuadro de diálogo Carbohidratos en la pestaña de información general, los carbohidratos totales y opcionalmente un tiempo:
12 |
13 |
14 |
15 |
16 | Los eCarbs en la pestaña de información general, tenga en cuenta los carbohidratos entre paréntesis en el campo COB, que muestra los carbohidratos en el futuro:
17 |
18 |
19 |
20 | Las entradas de carbohidratos en el futuro están coloreadas en naranja oscuro en la pestaña de tratamiento:
21 |
22 |
23 |
24 | ***
25 | Aquí se describe una forma de manejar la grasa y las proteínas con esta característica: https://adriansloop.blogspot.co.at/2018/04/page-margin-0.html
26 | ***
27 |
28 | La configuración recomendada es utilizar el complemento OpenAPS SMB APS, con las SMB habilitadas y la habilitación de SMB con COB habilitada.
29 |
30 | Un escenario, por ej una pizza, puede dar un bolo (parcial) por adelantado a través de la calculadora y luego usar el botón de carbohidratos para ingresar los carbohidratos restantes durante un período de 4 a 6 horas, comenzando después de 1 o 2 horas. Tendrá que probar y ver qué valores concretos funcionan para usted, por supuesto. También puede ajustar cuidadosamente la configuración
31 | de minutos máximos de basal para limitar SMB a para que el algoritmo sea más o menos agresivo. Con comidas bajas en carbohidratos, altas en grasas y proteínas, puede ser suficiente usar solo eCarbs sin bolos manuales (consulte el post arriba mencionado)
32 |
33 |
--------------------------------------------------------------------------------
/docs/български/Конфигуриране/Източник-на-данни-за-КЗ.md:
--------------------------------------------------------------------------------
1 | **За потребители на Dexcom:**
22 |
23 | ***
24 | Aquí se describe una forma de manejar la grasa y las proteínas con esta característica: https://adriansloop.blogspot.co.at/2018/04/page-margin-0.html
25 | ***
26 |
27 | La configuración recomendada es utilizar el complemento OpenAPS SMB APS, con las SMB habilitadas y la habilitación de SMB con COB habilitada.
28 |
29 | Un escenario, por ej una pizza, puede dar un bolo (parcial) por adelantado a través de la calculadora y luego usar el botón de carbohidratos para ingresar los carbohidratos restantes durante un período de 4 a 6 horas, comenzando después de 1 o 2 horas. Tendrá que probar y ver qué valores concretos funcionan para usted, por supuesto. También puede ajustar cuidadosamente la configuración
30 | de minutos máximos de basal para limitar SMB a para que el algoritmo sea más o menos agresivo. Con comidas bajas en carbohidratos, altas en grasas y proteínas, puede ser suficiente usar solo eCarbs sin bolos manuales (consulte el post arriba mencionado)
31 |
32 |
--------------------------------------------------------------------------------
/docs/ES/Uso/Carbohidratos extendidos.md:
--------------------------------------------------------------------------------
1 |
2 | # Carbohidratos Extendidos/eCarbs
3 |
4 | Con una terapia de bomba normal, los bolos extendidos son una buena manera de tratar comidas grasas o de absorción lenta que aumentan la glucosa en sangre por más tiempo que el efecto de la insulina. En un contexto de lazo cerrado, sin embargo, los bolos extendidos no tienen tanto sentido (y plantean dificultades técnicas), ya que son básicamente una basal temporal alta fija, que va en contra de cómo funciona el lazo, que está ajustando la tasa basal de forma dinámica. La necesidad de lidiar con tales comidas todavía existe. Por eso, AndroidAPS a partir de la versión 2.0 es compatible con los llamados carbohidratos extendidos o eCarbs.
5 |
6 |
7 | Los eCarbs son carbohidratos que se introducen durante varias horas. Esto simula cómo se absorben los carbohidratos e influye en la glucosa en sangre. Con esta información, el lazo puede administrar SMB para tratar esos carbohidratos, lo que se puede ver como
8 | un bolo extendido dinámico (esto también debería funcionar sin SMB, pero probablemente sea menos efectivo). Sin embargo, los eCarbs no se limitan a las comidas grasas, sino que se pueden usar para ayudar en cualquier situación en la que existan influencias que aumenten el nivel de azúcar en la sangre, por ej: medicamentos como cortisona.
9 |
10 |
11 | Para introducir eCarbs, establezca una duración en el cuadro de diálogo Carbohidratos en la pestaña de información general, los carbohidratos totales y opcionalmente un tiempo:
12 |
13 |
14 |
15 |
16 | Los eCarbs en la pestaña de información general, tenga en cuenta los carbohidratos entre paréntesis en el campo COB, que muestra los carbohidratos en el futuro:
17 |
18 |
19 |
20 | Las entradas de carbohidratos en el futuro están coloreadas en naranja oscuro en la pestaña de tratamiento:
21 |
22 |
23 |
24 | ***
25 | Aquí se describe una forma de manejar la grasa y las proteínas con esta característica: https://adriansloop.blogspot.co.at/2018/04/page-margin-0.html
26 | ***
27 |
28 | La configuración recomendada es utilizar el complemento OpenAPS SMB APS, con las SMB habilitadas y la habilitación de SMB con COB habilitada.
29 |
30 | Un escenario, por ej una pizza, puede dar un bolo (parcial) por adelantado a través de la calculadora y luego usar el botón de carbohidratos para ingresar los carbohidratos restantes durante un período de 4 a 6 horas, comenzando después de 1 o 2 horas. Tendrá que probar y ver qué valores concretos funcionan para usted, por supuesto. También puede ajustar cuidadosamente la configuración
31 | de minutos máximos de basal para limitar SMB a para que el algoritmo sea más o menos agresivo. Con comidas bajas en carbohidratos, altas en grasas y proteínas, puede ser suficiente usar solo eCarbs sin bolos manuales (consulte el post arriba mencionado)
32 |
33 |
--------------------------------------------------------------------------------
/docs/български/Конфигуриране/Източник-на-данни-за-КЗ.md:
--------------------------------------------------------------------------------
1 | **За потребители на Dexcom:**
2 | _Ако вие използвате xdrip…_
3 | * Ако все още нямате приложението xdrip изтеглете [xdrip](https://github.com/NightscoutFoundation/xDrip) и следвайте инструкиите за nightscout ([G4 without share](http://www.nightscout.info/wiki/welcome/nightscout-with-xdrip-wireless-bridge), [G4 share](http://www.nightscout.info/wiki/welcome/nightscout-with-xdrip-and-dexcom-share-wireless), [G5](http://www.nightscout.info/wiki/welcome/nightscout-with-xdrip-and-dexcom-share-wireless/xdrip-with-g5-support)).
4 | * В xdrip отворете Settings > Interapp Compatibility > Broadcast Data Locally и изберете ON.
5 | * В xdrip отворете Settings > Interapp Compatibility > Accept Treatments и изберете OFF.
6 | * Ако вие искате да може да използвате AndroidAPS за калибриране в xdrip отворете Settings > Interapp Compatibility > Accept Calibrations и изберете ON. You may also want to review the options in Settings > Less Common Settings > Advanced Calibration Settings.
7 | * Изберете xdrip в Конфигурация в AndroidAPS.
8 |
9 | _Ако вие използвате OTG кабел за Nightscout_
10 | * If not already set up then download Nightscout Uploader app from the Play Store and follow instructions on [Nightscout](http://www.nightscout.info/wiki/welcome/basic-requirements).
11 | * In AndroidAPS Preferences enter your nightscout website and API secret.
12 | * Select NSClient in ConfigBuilder (setting in AndroidAPS).
13 |
14 |
15 | **For users of Libre:**
16 |
17 | _If using xdrip..._
18 | * If not already set up then download xdrip and follow instructions on [LimiTTEer](https://github.com/JoernL/LimiTTer), [Libre Alarm](https://github.com/pimpimmi/LibreAlarm/wiki) or [BlueReader](https://unendlichkeit.net/wordpress/?p=680&lang=en)([Hardware](https://bluetoolz.de/wordpress/)).
19 | * In xdrip go to Settings > Interapp Compatibility > Broadcast Data Locally and select ON.
20 | * In xdrip go to Settings > Interapp Compatibility > Accept Treatments and select OFF.
21 | * If you want to be able to use AndroidAPS to calibrate then in xdrip go to Settings > Interapp Compatibility > Accept Calibrations and select ON. You may also want to review the options in Settings > Less Common Settings > Advanced Calibration Settings.
22 | * Select xdrip in ConfigBuilder (setting in AndroidAPS).
23 |
24 | _If using Glimp..._
25 | * If not already set up then download Glimp and follow instructions on [nightscout](http://www.nightscout.info/wiki/welcome/nightscout-for-libre).
26 | * Select Glimp in ConfigBuilder (setting in AndroidAPS).
27 |
28 | **For users of MM640g or MM630g:**
29 | * If not already set up then download [600SeriesAndroidUploaer](http://pazaan.github.io/600SeriesAndroidUploader/) and follow instructions on [nightscout](http://www.nightscout.info/wiki/welcome/nightscout-and-medtronic-640g).
30 | * In 600 Series Uploader go to Settings > Send to xdrip+ and select ON (tick).
31 | * Select MM640g in ConfigBuilder (setting in AndroidAPS).
32 |
33 |
34 | **For users of other CGM uploaded to nightscout:**
35 | If you have any other CGM set up that sends your data to [Nightscout](http://www.nightscout.info) then
36 | * In AndroidAPS Preferences enter your nightscout website and API secret.
37 | * Select NSClient in ConfigBuilder (setting in AndroidAPS).
--------------------------------------------------------------------------------
/docs/EN/Usage/Extended-Carbs.md:
--------------------------------------------------------------------------------
1 | # Extended carbs / "eCarbs"
2 |
3 | With a regular pump therapy, extended boluses are a good way to deal with fatty or otherwise slowly-absorbed meals which increase blood glucose longer than the insulin is in effect. In a loop context, however, extended boluses don't make as much sense (and pose technical difficulties), since they're basically a fixed high temporary basal rate, which goes against how the loop works, which is adjusting the basal rate dynamically.
4 | The need to deal with such meals still exists though. Which is why AndroidAPS as of version 2.0 supports so called extended carbs or eCarbs.
5 |
6 | eCarbs are carbs that are spilt up over several hours. For standard meals with more carbohydrates than fat/protein, entering the carbs up front (and reducing the initial bolus if needed) is usually sufficient to prevent too-early insulin delivery. But for slower-absorbing meals where full carb entry up front results in too much IOB from SMB, eCarbs can be used to more accurately simulate how the carbs (and any carb equivalents you enter for other macronutrients) are absorbed and influence the blood glucose. With this information, the loop can administer SMBs more gradually to deal with those carbs, which can be seen as a dynamic extended bolus (this should also work without SMBs, but is probably less effective).
7 |
8 | eCarbs aren't limited to fatty / protein heavy meals: they can be also be used to help in any situation where there are influences that increase the blood sugar, e.g. other medication like corticosteroids.
9 |
10 | To enter eCarbs, set a duration in the _Carbs_ dialog on the overview tab, the total carbs and optionally a time shift:
11 |
12 |
13 |
14 | The eCarbs on the overview tab, note the carbs in brackets at the COB field, which shows the carbs in the future:
15 |
16 |
17 |
18 | Carb entries which are in the future are coloured in dark orange on the treatment tab:
19 |
20 |
21 |
22 | ***
23 | A way to handle fat and protein with that feature is described here: https://adriansloop.blogspot.co.at/2018/04/page-margin-0.html
24 | ***
25 |
26 | The recommended setup is to use the OpenAPS SMB APS plugin, with SMBs enabled as well as the _Enable SMB with COB_ preference being enabled.
27 |
28 | A scenario e.g. for a Pizza might be to give a (partial) bolus up front via the _calculator_ and then use the _carbs_ button to enter the remaining carbs for a duration of 4-6 hours, starting after 1 or 2 hours. You'll need to try out and see which concrete values work for you of course. You might also carefully adjust the setting _max minutes of basal to limit SMB to_ to make the algorithm more or less aggressive.
29 | With low carb, high fat/protein meals it may be enough to only use eCarbs without manual boluses (see the blog post above).
30 |
31 | When eCarbs are generated, a Careportal note is also created to document all inputs, to make it easier to iterate and improve inputs.
32 |
--------------------------------------------------------------------------------
/docs/EN/Installing-AndroidAPS/Releasenotes.md:
--------------------------------------------------------------------------------
1 | # Release notes
2 |
3 | ## Version 2.0
4 |
5 | Release date: xx-xx-xxxx
6 |
7 | ### Major new features
8 |
9 | * oref1/SMB support ([oref1 documentation](https://openaps.readthedocs.io/en/latest/docs/Customize-Iterate/oref1.html)) Be sure to read the documentation to know what to expect of SMB, how it will behave, what it can achive and how to use it so it can operate smoothly.
10 | * Accu-check Combo pump support ([setup instructions](http://androidaps.readthedocs.io/en/latest/EN/Configuration/Accu-Chek-Combo-Pump.html))
11 | * Setup wizard: guides you through the process of setting up AndroidAPS
12 |
13 | ### Settings to adjust when switching from AMA to SMB
14 |
15 | * Objective 8 must be started for SMBs to be enabled (SMB tab generally shows what restrictions apply)
16 | * maxIOB now includes _all_ IOB, not just added basal. That is, if given a bolus of 8 U for a meal and maxIOB is 7 U, no SMBs will be delivered until IOB drops below 7 U.
17 | * min_5m_carbimpact default has changed from 3 to 8 going from AMA to SMB. If you are upgrading from AMA to SMB, you have to change it manualy
18 |
19 | ### Overview tab
20 |
21 | * Top ribbon gives access to suspend/disable loop, view/adjust profile and to start/stop temporary targets (TTs). TTs use defaults set in preferences. The new Hypo TT option is a high temp TT to prevent the loop from too aggressively overcorrection rescue carbs.
22 | * Treatment buttons: old treatment button still available, but hidden by default. Visibility of buttons can now be configured. New insulin button, new carbs button (including [eCarbs/extended carbs](http://androidaps.readthedocs.io/en/latest/EN/Usage/Extended-Carbs.html))
23 | * Colored prediction lines:
24 | * Orange: COB (colour is used generally to represent COB and carbs)
25 | * Dark blue: IOB (colour is used generally to represent IOB and insulin)
26 | * Light blue: zero-temp
27 | * Dark yellow: UAM
28 | * Option to show a notes field in insulin/carbs/calculator/prime+fill dialogs, which are uploaded to NS
29 | * Updated prime/fill dialog allows priming and creating careportal entries for site change and cartridge change
30 |
31 | ### Watch
32 |
33 | * Separate build variant dropped, included in regular full build now. To use bolus controls from watch, enable this setting on the phone
34 | * Wizard now only asks for carbs (and percentage if enabled in watch settings). Which parameters are included in the calculation can be configured in the settings on the phone
35 | * confirmations and info dialogs now work on wear 2.0 as well
36 | * Added eCarbs menu entry
37 |
38 | ### New plugins
39 |
40 | * PocTech app as BG source
41 | * Dexcom patched app as BG source
42 | * oref1 sensitivity plugin
43 |
44 | ### Misc
45 |
46 | * App now uses drawer to show all plugins; plugins selected as visible in config builder are shown as tabs on top (favourites)
47 | * Overhaul for config builder and objectives tabs, adding descriptions
48 | * New app icon
49 | * Lots of improvements and bugfixes
50 | * Nightscout-independant alerts if pump is unreachable for a longer time (e.g. depleted pump battery) and missed BG readings ( see _Local alerts_ in settings)
51 | * Option to keep screen on
52 | * Option to show notification as Android notification
53 | * Advanced filtering (allowing to always enable SMB and 6h after meals) supported with patched Dexcom app or xDrip with G5 native mode as BG source.
54 |
--------------------------------------------------------------------------------
/docs/ES/Uso/Perfiles.md:
--------------------------------------------------------------------------------
1 | # Perfiles
2 |
3 | Al iniciar su AndroidAPS y seleccionar su perfil, tendrá que hacer un evento de "Cambio de perfil" con duración cero (explicado más adelante). Al hacer esto, AAPS comienza a rastrear el historial de perfiles y cada nuevo cambio de perfil requiere otro "cambio de perfil" incluso cuando se cambia el contenido del perfil en NS. El perfil actualizado se envía a AAPS inmediatamente, pero debe volver a cambiar el mismo perfil (en NS o AAPS) para comenzar a utilizar estos cambios.
4 |
5 | Internamente AAPS crea una instantánea del perfil con fecha de inicio y duración que será usado en el período seleccionado. La duración de cero significa infinito. Dicho perfil es válido hasta el nuevo "Cambio de perfil".
6 |
7 | Si utiliza el "Cambio de perfil" con el perfil de duración, se vuelve a cambiar a "Cambio de perfil" válido anterior.
8 |
9 | Si usa perfiles AAPS locales (Simple, Local, CPP), debe presionar el botón allí para aplicar estos cambios (crea el evento adecuado de "Cambio de Perfil").
10 |
11 | Dentro del "cambio de perfil" puede elegir dos cambios que solían ser parte del Perfil de porcentaje circadiano:
12 | * Porcentaje: aplica el mismo porcentaje a todos los parámetros. Si lo configura en 130% (lo que significa que es un 30% más resistente a la insulina), aumentará la tasa basal en un 30%. También reducirá el ISF y el IC en consecuencia (divida por 1.3 en este ejemplo). Se enviará a la bomba y luego será la tasa basal predeterminada. El algoritmo del lazo (abierto o cerrado) continuará funcionando sobre el perfil de porcentaje seleccionado. Por ejemplo, se pueden establecer perfiles porcentuales separados para las diferentes etapas del ciclo hormonal.
13 | * Timeshift: mueve todo según el tiempo de horas ingresadas. Así que, por ejemplo, cuando se trabaja en turnos nocturnos, el número de horas cambia a la cantidad de horas más tarde o antes de acostarse o se despierta.
14 |
15 | Este mecanismo permite realizar cálculos más precisos del pasado y rastrear los cambios de perfil.
16 |
17 | En el modo de lazo cerrado, se recomienda activar la actualización automática del perfil en la bomba (en la configuración), esto significa que cualquier actualización que haga a su perfil se copiará localmente en la bomba en caso de fallo de la misma.
18 |
19 | Solución a los Errores más habituales de perfil
20 |
21 | * Aparecerá el mensaje de error "Perfil no válido" o "Perfil basal no alineado con las horas" si tiene tasas basales o tasas I: C no en horas. Las bombas DanaR y DanaRS no admiten cambios en la media hora.
22 | * 'Cambio de perfil recibido de NS pero el perfil no existe localmente' o Vaya a la pestaña Tratamientos en AndoridAPS y seleccione Cambio de perfil, 'eliminar' la fecha y la hora que se mencionaron en el mensaje de error. O vaya a su colección de mlab, busque los tratamientos para el cambio de perfil y elimine la fecha y la hora que es mencionada en el mensaje de error.
23 | 
24 | * Aparecerá el mensaje de error "DIA 3 h demasiado corto" si la duración de la acción de la insulina en su perfil es un valor que AndroidAPS no considera exacto. Lea acerca de cómo seleccionar el [DIA correcto](http://www.diabettech.com/insulin/why-we-are-regularly-wrong-in-the-duration-of-insulin-action-dia-times-we-use-and-why-it-matters/) y edítelo en su perfil, luego haga un Cambio de perfil para continuar.
25 |
26 |
27 |
--------------------------------------------------------------------------------
/docs/ES/uso/perfiles.md:
--------------------------------------------------------------------------------
1 | # Perfiles
2 |
3 | Al iniciar su AndroidAPS y seleccionar su perfil, tendrá que hacer un evento de "Cambio de perfil" con duración cero (explicado más adelante). Al hacer esto, AAPS comienza a rastrear el historial de perfiles y cada nuevo cambio de perfil requiere otro "cambio de perfil" incluso cuando se cambia el contenido del perfil en NS. El perfil actualizado se envía a AAPS inmediatamente, pero debe volver a cambiar el mismo perfil (en NS o AAPS) para comenzar a utilizar estos cambios.
4 |
5 | Internamente AAPS crea una instantánea del perfil con fecha de inicio y duración que será usado en el período seleccionado. La duración de cero significa infinito. Dicho perfil es válido hasta el nuevo "Cambio de perfil".
6 |
7 | Si utiliza el "Cambio de perfil" con el perfil de duración, se vuelve a cambiar a "Cambio de perfil" válido anterior.
8 |
9 | Si usa perfiles AAPS locales (Simple, Local, CPP), debe presionar el botón allí para aplicar estos cambios (crea el evento adecuado de "Cambio de Perfil").
10 |
11 | Dentro del "cambio de perfil" puede elegir dos cambios que solían ser parte del Perfil de porcentaje circadiano:
12 | * Porcentaje: aplica el mismo porcentaje a todos los parámetros. Si lo configura en 130% (lo que significa que es un 30% más resistente a la insulina), aumentará la tasa basal en un 30%. También reducirá el ISF y el IC en consecuencia (divida por 1.3 en este ejemplo). Se enviará a la bomba y luego será la tasa basal predeterminada. El algoritmo del lazo (abierto o cerrado) continuará funcionando sobre el perfil de porcentaje seleccionado. Por ejemplo, se pueden establecer perfiles porcentuales separados para las diferentes etapas del ciclo hormonal.
13 | * Timeshift: mueve todo según el tiempo de horas ingresadas. Así que, por ejemplo, cuando se trabaja en turnos nocturnos, el número de horas cambia a la cantidad de horas más tarde o antes de acostarse o se despierta.
14 |
15 | Este mecanismo permite realizar cálculos más precisos del pasado y rastrear los cambios de perfil.
16 |
17 | En el modo de lazo cerrado, se recomienda activar la actualización automática del perfil en la bomba (en la configuración), esto significa que cualquier actualización que haga a su perfil se copiará localmente en la bomba en caso de fallo de la misma.
18 |
19 | Solución a los Errores más habituales de perfil
20 |
21 | * Aparecerá el mensaje de error "Perfil no válido" o "Perfil basal no alineado con las horas" si tiene tasas basales o tasas I: C no en horas. Las bombas DanaR y DanaRS no admiten cambios en la media hora.
22 | * 'Cambio de perfil recibido de NS pero el perfil no existe localmente' o Vaya a la pestaña Tratamientos en AndoridAPS y seleccione Cambio de perfil, 'eliminar' la fecha y la hora que se mencionaron en el mensaje de error. O vaya a su colección de mlab, busque los tratamientos para el cambio de perfil y elimine la fecha y la hora que es mencionada en el mensaje de error.
23 | 
24 | * Aparecerá el mensaje de error "DIA 3 h demasiado corto" si la duración de la acción de la insulina en su perfil es un valor que AndroidAPS no considera exacto. Lea acerca de cómo seleccionar el [DIA correcto](http://www.diabettech.com/insulin/why-we-are-regularly-wrong-in-the-duration-of-insulin-action-dia-times-we-use-and-why-it-matters/) y edítelo en su perfil, luego haga un Cambio de perfil para continuar.
25 |
26 |
27 |
--------------------------------------------------------------------------------
/docs/ES/inicio/ayudar.md:
--------------------------------------------------------------------------------
1 | # Cómo puedo ayudar
2 |
3 | **AndroidAPS opera completamente con esfuerzo de voluntarios y no tiene personal pagado**. Los desarrolladores son padres, cuidadores, seres queridos y personas con diabetes que trabajan juntos para el desarrollo y mejoran una solución para un deseo muy común. Los desarrolladores donan su tiempo libre de forma gratuita, pero es un poco injusto esperar que se enfrenten a costos adicionales para hacer algo tan increíble de código abierto y gratuito para todo
4 | **AndroidAPS opera completamente con esfuerzo de voluntarios y no tiene personal pagado**. Los desarrolladores son padres, cuidadores, seres queridos y personas con diabetes que trabajan juntos para el desarrollo y mejoran una solución para un deseo muy común. Los desarrolladores donan su tiempo libre de forma gratuita, pero es un poco injusto esperar que se enfrenten a costos adicionales para hacer algo tan increíble de código abierto y gratuito para todos.
5 |
6 | Para probar completamente una plataforma nueva, los desarrolladores deben tener un teléfono de repuesto y una bomba de repuesto, ya que no se puede utilizar en un humano hasta que sea estable. Los modelos más nuevos necesitan pruebas a medida que estén disponibles. Parte del dinero donado es necesario también para los costos logísticos de enviar estos suministros a los desarrolladores a través de los países. A veces también es bueno contribuir con los costos de los desarrolladores para salir de sus habitaciones oscuras y reunirse en conferencias y eventos para dejar que sus cerebros creativos y analíticos reboten unos contra otros.
7 |
8 |
9 | **¡Puedo escribir código! ¿Cómo participo?** ¡Hurra! Mira los problemas, pregunta en el canal gitter, ¡siempre hay mucho que hacer! Elija una tarea pequeña al principio y ¡haga su primera solicitud de extracción! :)
10 |
11 |
12 | **Me gustaría donar efectivo, ¿cómo puedo hacerlo?** PayPal: donations@androidaps.org
13 | **¿Para qué se usa el dinero?** ¡NO se paga el dinero a nadie por su trabajo! Se usa para mantener bajos los costos para los desarrolladores al organizar reuniones. Tratamos de ser muy transparentes. Esto es lo que está planeado actualmente:
14 |
15 | * European Dev Meetup en Praga a finales de mayo de 2018:
16 | * contratación de una ubicación e internet para realizar el meeting
17 | * equipos
18 | * comida / café
19 | En el caso improbable, que lo anterior esté completamente cubierto y queda algo de dinero: gastos de viaje para aquellos que tienen que viajar una distancia más larga. (Algunos desarrolladores de otros continentes asistirán, pero ya están en Europa en ese momento, por lo que los costos de viaje se mantendrán bajos).
20 |
21 |
22 | **Tengo equipo de repuesto, ¿a dónde lo envío?** Actualmente estamos recopilando "se proporcionará más tarde" para comenzar a distribuirlos para la prueba. Al final del proceso, cualquier equipo sobrante será donado a uno de los grupos de Facebook Pay-for-Forward que existen para apoyar a la comunidad T1. Si desea donar equipo de repuesto, envíe un correo electrónico a developers@androidaps.org y le enviaremos una dirección.
23 |
24 | **No tengo efectivo ni equipo, ¿cómo puedo ayudar?** Las habilidades necesarias incluyen diseño gráfico, diseño UX, traductores, editores de wiki o simplemente pagarlo al responder las preguntas simples en gitter y Facebook para permitir a los desarrolladores el tiempo y el espacio para enfocarse en las cosas más duras.
25 |
26 |
27 |
--------------------------------------------------------------------------------
/docs/ES/Inicio/Cómo puedo ayudar.md:
--------------------------------------------------------------------------------
1 | # Cómo puedo ayudar
2 |
3 | **AndroidAPS opera completamente con esfuerzo de voluntarios y no tiene personal pagado**. Los desarrolladores son padres, cuidadores, seres queridos y personas con diabetes que trabajan juntos para el desarrollo y mejoran una solución para un deseo muy común. Los desarrolladores donan su tiempo libre de forma gratuita, pero es un poco injusto esperar que se enfrenten a costos adicionales para hacer algo tan increíble de código abierto y gratuito para todo
4 | **AndroidAPS opera completamente con esfuerzo de voluntarios y no tiene personal pagado**. Los desarrolladores son padres, cuidadores, seres queridos y personas con diabetes que trabajan juntos para el desarrollo y mejoran una solución para un deseo muy común. Los desarrolladores donan su tiempo libre de forma gratuita, pero es un poco injusto esperar que se enfrenten a costos adicionales para hacer algo tan increíble de código abierto y gratuito para todos.
5 |
6 | Para probar completamente una plataforma nueva, los desarrolladores deben tener un teléfono de repuesto y una bomba de repuesto, ya que no se puede utilizar en un humano hasta que sea estable. Los modelos más nuevos necesitan pruebas a medida que estén disponibles. Parte del dinero donado es necesario también para los costos logísticos de enviar estos suministros a los desarrolladores a través de los países. A veces también es bueno contribuir con los costos de los desarrolladores para salir de sus habitaciones oscuras y reunirse en conferencias y eventos para dejar que sus cerebros creativos y analíticos reboten unos contra otros.
7 |
8 |
9 | **¡Puedo escribir código! ¿Cómo participo?** ¡Hurra! Mira los problemas, pregunta en el canal gitter, ¡siempre hay mucho que hacer! Elija una tarea pequeña al principio y ¡haga su primera solicitud de extracción! :)
10 |
11 |
12 | **Me gustaría donar efectivo, ¿cómo puedo hacerlo?** PayPal: donations@androidaps.org
13 | **¿Para qué se usa el dinero?** ¡NO se paga el dinero a nadie por su trabajo! Se usa para mantener bajos los costos para los desarrolladores al organizar reuniones. Tratamos de ser muy transparentes. Esto es lo que está planeado actualmente:
14 |
15 | * European Dev Meetup en Praga a finales de mayo de 2018:
16 | * contratación de una ubicación e internet para realizar el meeting
17 | * equipos
18 | * comida / café
19 | En el caso improbable, que lo anterior esté completamente cubierto y queda algo de dinero: gastos de viaje para aquellos que tienen que viajar una distancia más larga. (Algunos desarrolladores de otros continentes asistirán, pero ya están en Europa en ese momento, por lo que los costos de viaje se mantendrán bajos).
20 |
21 |
22 | **Tengo equipo de repuesto, ¿a dónde lo envío?** Actualmente estamos recopilando "se proporcionará más tarde" para comenzar a distribuirlos para la prueba. Al final del proceso, cualquier equipo sobrante será donado a uno de los grupos de Facebook Pay-for-Forward que existen para apoyar a la comunidad T1. Si desea donar equipo de repuesto, envíe un correo electrónico a developers@androidaps.org y le enviaremos una dirección.
23 |
24 | **No tengo efectivo ni equipo, ¿cómo puedo ayudar?** Las habilidades necesarias incluyen diseño gráfico, diseño UX, traductores, editores de wiki o simplemente pagarlo al responder las preguntas simples en gitter y Facebook para permitir a los desarrolladores el tiempo y el espacio para enfocarse en las cosas más duras.
25 |
26 |
27 |
--------------------------------------------------------------------------------
/docs/EN/Configuration/BG-Source.md:
--------------------------------------------------------------------------------
1 | # BG sources
2 |
3 | **For users of Dexcom:**
4 | _If using xdrip…_
5 | * If not already set up then download [xdrip](https://github.com/NightscoutFoundation/xDrip) and follow instructions on nightscout ([G4 without share](http://www.nightscout.info/wiki/welcome/nightscout-with-xdrip-wireless-bridge), [G4 share](http://www.nightscout.info/wiki/welcome/nightscout-with-xdrip-and-dexcom-share-wireless), [G5](http://www.nightscout.info/wiki/welcome/nightscout-with-xdrip-and-dexcom-share-wireless/xdrip-with-g5-support)).
6 | * In xdrip go to Settings > Interapp Compatibility > Broadcast Data Locally and select ON.
7 | * In xdrip go to Settings > Interapp Compatibility > Accept Treatments and select OFF.
8 | * If you want to be able to use AndroidAPS to calibrate then in xdrip go to Settings > Interapp Compatibility > Accept Calibrations and select ON. You may also want to review the options in Settings > Less Common Settings > Advanced Calibration Settings.
9 | * Select xdrip in ConfigBuilder (setting in AndroidAPS).
10 |
11 | _If using Dexcom G5 App..._
12 | * Just dev.
13 | * Download the apk from [here](https://github.com/dexcomapp/dexcomapp), just this versions works whether mg/dl or mmol/l.
14 | * Deinstall original Dexcom app, if not allready done.
15 | * Select Dexcom G5 App in ConfigBuilder
16 |
17 | _If using OTG cable ('traditional' Nightscout)…_
18 | * If not already set up then download Nightscout Uploader app from the Play Store and follow instructions on [Nightscout](http://www.nightscout.info/wiki/welcome/basic-requirements).
19 | * In AndroidAPS Preferences enter your nightscout website and API secret.
20 | * Select NSClient in ConfigBuilder (setting in AndroidAPS).
21 |
22 |
23 | **For users of Libre:**
24 |
25 | _If using xdrip..._
26 | * If not already set up then download xdrip and follow instructions on [LimiTTEer](https://github.com/JoernL/LimiTTer), [Libre Alarm](https://github.com/pimpimmi/LibreAlarm/wiki) or [BlueReader](https://unendlichkeit.net/wordpress/?p=680&lang=en)([Hardware](https://bluetoolz.de/wordpress/)).
27 | * In xdrip go to Settings > Interapp Compatibility > Broadcast Data Locally and select ON.
28 | * In xdrip go to Settings > Interapp Compatibility > Accept Treatments and select OFF.
29 | * If you want to be able to use AndroidAPS to calibrate then in xdrip go to Settings > Interapp Compatibility > Accept Calibrations and select ON. You may also want to review the options in Settings > Less Common Settings > Advanced Calibration Settings.
30 | * Select xdrip in ConfigBuilder (setting in AndroidAPS).
31 |
32 | _If using Glimp..._
33 | * If not already set up then download Glimp and follow instructions on [nightscout](http://www.nightscout.info/wiki/welcome/nightscout-for-libre).
34 | * Select Glimp in ConfigBuilder (setting in AndroidAPS).
35 |
36 | **For users of MM640g or MM630g:**
37 | * If not already set up then download [600SeriesAndroidUploaer](http://pazaan.github.io/600SeriesAndroidUploader/) and follow instructions on [nightscout](http://www.nightscout.info/wiki/welcome/nightscout-and-medtronic-640g).
38 | * In 600 Series Uploader go to Settings > Send to xdrip+ and select ON (tick).
39 | * Select MM640g in ConfigBuilder (setting in AndroidAPS).
40 |
41 |
42 | **For users of other CGM uploaded to nightscout:**
43 | If you have any other CGM set up that sends your data to [Nightscout](http://www.nightscout.info) then
44 | * In AndroidAPS Preferences enter your nightscout website and API secret.
45 | * Select NSClient in ConfigBuilder (setting in AndroidAPS).
46 |
--------------------------------------------------------------------------------
/docs/ES/Uso/Rama Dev.md:
--------------------------------------------------------------------------------
1 | # Rama en desarrollo
2 |
3 | **Atención** : la versión dev de AndroidAPS es solo para desarrolladores y evaluadores que manejan stacktraces, revisan los archivos de registro y quizás activan el depurador para producir informes de fallos que son útiles para los desarrolladores (en resumen: ¡personas que saben lo que están haciendo sin ser asistido!). Por lo tanto, muchas características sin finalizar están deshabilitadas. Para habilitar estas funciones, ingrese al modo de **“engineering mode”** creando un archivo llamado `engineering_mode` en el mismo directorio donde encontraría los archivos de registro. Habilitar el modo de ingeniería podría romper el lazo cerrado por completo.
4 |
5 | ***
6 |
7 | La versión más estable de AndroidAPS para usar es la [rama Master](https://github.com/MilosKozak/AndroidAPS/tree/master). Se aconseja permanecer en la rama Master mientras completas los Objetivos y practicas el lazo cerrado.
8 |
9 | Sin embargo, la [rama Dev](https://github.com/MilosKozak/AndroidAPS/tree/dev) es un buen lugar para ver qué características se están probando y para ayudar a resolver los errores y brindar comentarios sobre cómo funcionan las nuevas funciones en la práctica. A menudo las personas probarán la rama Dev en un teléfono antiguo y la bomba hasta que estén seguros de que es estable; cualquier uso de la misma es bajo su propio riesgo.
10 |
11 | A continuación, se enumera un breve resumen de algunos de los cambios en las características anteriores o el desarrollo de nuevas funciones que se encuentran actualmente en la rama Dev, y enlaces a cuestiones principales a compartir (si aplica)
12 |
13 | **Super Micro Bolus (SMB)**
14 |
15 | Se puede leer más en Super Micro Bolus (SMB) en los [documentos OpenAPS Super Micro Boluses (SMB)](https://openaps.readthedocs.io/en/latest/docs/Customize-Iterate/oref1.html#understanding-smb).
16 |
17 | Recuerde que está eligiendo probar una función que aún está en desarrollo. Hágalo bajo su propio riesgo y con la debida diligencia para mantenerse a salvo.
18 |
19 | Deberías haber ejecutado el lazo cerrado básico durante más de cuatro semanas (habiendo completado el Objetivo 7), y estar muy atento a todos los tipos de situaciones en las que tu APS podría fallar.
20 |
21 | Es posible que deba ajustar su configuración para permitir que SMB funcione de manera efectiva. Una buena manera de comenzar es aumentar su IOB máximo a un bolo de comida normal + 3 veces el máximo basal diaria. Pero permanezca vigilante y ajuste la configuración con cuidado.
22 |
23 |
24 | Al igual que con todas las actualizaciones, el código anterior se ha limpiado, mejorado y depurado.
25 |
26 |
27 | Si encuentra un error o cree que hay algún error al usar la rama Dev, entonces vea la pestaña de [problemas/barra issues](https://github.com/MilosKozak/AndroidAPS/issues) para verificar si alguien más lo ha encontrado, o añádalo usted mismo de no ser así. Cuanta más información pueda compartir aquí, mejor (no olvide que puede necesitar compartir sus [logs](https://github.com/Lillycgm/AndroidAPSdocs/blob/master/docs/ES/Uso/Acceder%20a%20los%20logs.md) ). Las nuevas características también se pueden discutir en la sala de [gitter](https://gitter.im/MilosKozak/AndroidAPS).
28 |
29 |
30 | Si desea estar actualizado en la sucursal de Dev, puede seguir los mismos pasos que se describen en la página [Actualizar a la nueva versión](https://github.com/Lillycgm/AndroidAPSdocs/blob/master/docs/ES/Instalando%20AndroidAPS/Actualizar%20a%20una%20nueva%20versi%C3%B3n.md). Solo tiene que cambiar al correspondiente "dev" -Branch en Android Studio. Ver Seleccionar rama para más detalles.
31 |
32 |
33 |
--------------------------------------------------------------------------------
/docs/ES/uso/desarrollo.md:
--------------------------------------------------------------------------------
1 | # Rama en desarrollo
2 |
3 | **Atención** : la versión dev de AndroidAPS es solo para desarrolladores y evaluadores que manejan stacktraces, revisan los archivos de registro y quizás activan el depurador para producir informes de fallos que son útiles para los desarrolladores (en resumen: ¡personas que saben lo que están haciendo sin ser asistido!). Por lo tanto, muchas características sin finalizar están deshabilitadas. Para habilitar estas funciones, ingrese al modo de **“engineering mode”** creando un archivo llamado `engineering_mode` en el mismo directorio donde encontraría los archivos de registro. Habilitar el modo de ingeniería podría romper el lazo cerrado por completo.
4 |
5 | ***
6 |
7 | La versión más estable de AndroidAPS para usar es la [rama Master](https://github.com/MilosKozak/AndroidAPS/tree/master). Se aconseja permanecer en la rama Master mientras completas los Objetivos y practicas el lazo cerrado.
8 |
9 | Sin embargo, la [rama Dev](https://github.com/MilosKozak/AndroidAPS/tree/dev) es un buen lugar para ver qué características se están probando y para ayudar a resolver los errores y brindar comentarios sobre cómo funcionan las nuevas funciones en la práctica. A menudo las personas probarán la rama Dev en un teléfono antiguo y la bomba hasta que estén seguros de que es estable; cualquier uso de la misma es bajo su propio riesgo.
10 |
11 | A continuación, se enumera un breve resumen de algunos de los cambios en las características anteriores o el desarrollo de nuevas funciones que se encuentran actualmente en la rama Dev, y enlaces a cuestiones principales a compartir (si aplica)
12 |
13 | **Super Micro Bolus (SMB)**
14 |
15 | Se puede leer más en Super Micro Bolus (SMB) en los [documentos OpenAPS Super Micro Boluses (SMB)](https://openaps.readthedocs.io/en/latest/docs/Customize-Iterate/oref1.html#understanding-smb).
16 |
17 | Recuerde que está eligiendo probar una función que aún está en desarrollo. Hágalo bajo su propio riesgo y con la debida diligencia para mantenerse a salvo.
18 |
19 | Deberías haber ejecutado el lazo cerrado básico durante más de cuatro semanas (habiendo completado el Objetivo 7), y estar muy atento a todos los tipos de situaciones en las que tu APS podría fallar.
20 |
21 | Es posible que deba ajustar su configuración para permitir que SMB funcione de manera efectiva. Una buena manera de comenzar es aumentar su IOB máximo a un bolo de comida normal + 3 veces el máximo basal diaria. Pero permanezca vigilante y ajuste la configuración con cuidado.
22 |
23 |
24 | Al igual que con todas las actualizaciones, el código anterior se ha limpiado, mejorado y depurado.
25 |
26 |
27 | Si encuentra un error o cree que hay algún error al usar la rama Dev, entonces vea la pestaña de [problemas/barra issues](https://github.com/MilosKozak/AndroidAPS/issues) para verificar si alguien más lo ha encontrado, o añádalo usted mismo de no ser así. Cuanta más información pueda compartir aquí, mejor (no olvide que puede necesitar compartir sus [logs](https://github.com/Lillycgm/AndroidAPSdocs/blob/master/docs/ES/Uso/Acceder%20a%20los%20logs.md) ). Las nuevas características también se pueden discutir en la sala de [gitter](https://gitter.im/MilosKozak/AndroidAPS).
28 |
29 |
30 | Si desea estar actualizado en la sucursal de Dev, puede seguir los mismos pasos que se describen en la página [Actualizar a la nueva versión](https://github.com/Lillycgm/AndroidAPSdocs/blob/master/docs/ES/Instalando%20AndroidAPS/Actualizar%20a%20una%20nueva%20versi%C3%B3n.md). Solo tiene que cambiar al correspondiente "dev" -Branch en Android Studio. Ver Seleccionar rama para más detalles.
31 |
32 |
33 |
--------------------------------------------------------------------------------
/docs/български/Използване/Съвети-и-похвати.md:
--------------------------------------------------------------------------------
1 | * Задължително правило за добрата работа на APS система от затворен тип е това базалният профил и въглехидратните числа да бъдат абсолютно точни. Всички препоръки направени от нея ще предполагат, че спадовете/пиковете, които виждате, са резултат от други фактори, които изискват еднократна намеса ( спортуване, стрес и т.н.). Промените правени от системата са лимитирани ( виж 'maximum allowed temporary basal rate' в [OpenAPS Reference Design](https://openaps.org/reference-design/)), което означава, че не бихте желали да хабите лимита за да правите корекции в неправилен базал. Ако примерно често се налага ситемата да сваля нивото на базала преди хранене, това най-вероятно означава, че базалът в този час има нужда от корекция. Може да използвате [autotune](https://openaps.readthedocs.io/en/latest/docs/walkthrough/phase-4/autotune.html) върху по-голям период, за да предложи доколко има нужда от корекции в базалите и/или чувствителността. Или просто можете да тествате базалният профил по [стария способ](http://integrateddiabetes.com/basal-testing/).
2 |
3 | * Използването на AndroidAPS може да ускори изтощаването на батерията на помпата в сравнение с обичайната употреба. Ако ви се случи неочаквано, то може да използвате батерията от дистанционното(глюкомера) или сетъра. Най-сигурно е да сменяте батерията при остатък от 25% като комуникацията с помпата става трудна при това число. Можете да заложите аларма и за нивото на батерията ( като използвате PUMP_WARN_BATT_P във вашия nightscout сайт). Други трикове за удължаване живота на батерията са:
4 | * Намаляване на времето на включен дисплей на помпата - LCD on (от DANA settings менюто)
5 | * Намаляване на времето на включена подсветка (от DANA settings менюто)
6 | * избиране на звук (beep) вместо вибрация за нотификация на помпата (от DANA settings менюто)
7 | * Използване на бутоните на помпата само за презареждане, а AndroidAPS за преглед на история, батерия и ниво на резервоар.
8 |
9 | * Ако не желаете промяна на 'Опции' в AndroidAPS можете да зададете парола по ваш избор от същото меню. Така при следващото влизане в това меню първо ще бъдете попитани за паролата, преди да можете да направите някаква промяна. Премахването на паролата става с изтриването на текста в полето 'Парола'.
10 |
11 | * Ако планирате да използвате часовник с Андроид за болуси или промяна в настройките трябва да се убедите, че нотификациите от AndroidAPS не са блокирани. Всяко потвърждение става чрез нотификация.
12 |
13 | * Ако сваляте помпата за душ/вана/плуване/спорт и т.н. тогава натиснете и задръжте върху "Closed Loop" в началния екран и изберете "Разкачи за ..." и колкото минути/часове очаквате да бъде разкачена помпата. Това ще приложи базал 0 за този период. Ако закачите помпата по-рано от очакваното то задъжте върху "Suspended (X mins)" и изберете "Resume". По този начин вашият IOB ще бъде правилен при последващите изчисления на алгоритъма.
14 |
15 | * Поради съображения за сигурност препоръките се правят не само върху текущите данни за КЗ но и върху средната делта. За това може да отнеме малко повече време да се задейства системата при пропуски в четенията на сензора.
16 |
17 | * В самият Процентен профил има допълнителна промяна на мерните единици на КЗ от mg/dl на mmol/l отделно от тази в меню "Опции". Не забравяйте да го направите и на двете места!
18 |
19 | * Има няколко добри блога с безценни практически съвети за closed loop системите:
20 | * [Why DIA matters](http://seemycgm.com/2017/08/09/why-dia-matters/)
21 | * [Limiting meal spikes](https://diyps.org/2016/07/11/picture-this-how-to-do-eating-soon-mode/)
22 | * [Hormones and autosens](http://seemycgm.com/2017/06/06/hormones-2/)
23 |
24 | Допълнителни съвети (на английски) можете да откриете във нашата [Facebook група](https://www.facebook.com/groups/1900195340201874/)
25 |
--------------------------------------------------------------------------------
/docs/ES/configuracion/fuentes-glucemia.md:
--------------------------------------------------------------------------------
1 | # Fuentes de datos de glucemia
2 |
3 | **Para los usuarios de Dexcom**
4 |
5 | _Si usa xdrip ..._
6 |
7 | * Si aún no está configurado, descargue [xdrip](https://github.com/NightscoutFoundation/xDrip) y siga las instrucciones en nightscout ([G4 sin share](http://www.nightscout.info/wiki/welcome/nightscout-with-xdrip-wireless-bridge), [G4 con share](http://www.nightscout.info/wiki/welcome/nightscout-with-xdrip-and-dexcom-share-wireless), [G5](http://www.nightscout.info/wiki/welcome/nightscout-with-xdrip-and-dexcom-share-wireless/xdrip-with-g5-support)).
8 | * En xdrip, vaya a Configuración> Compatibilidad de Interapp> Transmitir datos localmente y seleccione ON.
9 | * En xdrip, vaya a Configuración> Compatibilidad de Interapp> Aceptar tratamientos y seleccione OFF.
10 | * Si desea poder usar AndroidAPS para calibrar, en xdrip vaya a Configuración> Compatibilidad de Interapp> Aceptar calibraciones y seleccione ON. También es posible que desee revisar las opciones en Configuración> Configuración menos común> Configuración de calibración avanzada.
11 | * Seleccione xdrip en ConfigBuilder (configuración en AndroidAPS).
12 |
13 | _Si usa la aplicación Dexcom G5 ..._
14 |
15 | * Sólo dev.
16 | * Descarga el apk de [aquí](https://github.com/dexcomapp/dexcomapp), solo esta versión funciona ya sea mg/dl o mmol/l.
17 | * Desinstale la aplicación original de Dexcom, si todavía no lo ha hecho.
18 | * Seleccione la aplicación Dexcom G5 en ConfigBuilder
19 |
20 | _Si usa un cable OTG ('tradicional' Nightscout) ..._
21 |
22 | * Si aún no está configurado, descargue la aplicación Nightscout Uploader de Play Store y siga las instrucciones en [Nightscout](http://www.nightscout.info/wiki/welcome/basic-requirements).
23 | * En las preferencias de AndroidAPS, ingrese su sitio web nightscout y el APIsecret.
24 | * Seleccione NSClient en ConfigBuilder (configuración en AndroidAPS).
25 |
26 | **Para usuarios de Libre**
27 |
28 | _Si usa xdrip ..._
29 |
30 | * Si aún no está configurado, descargue xdrip y siga las instrucciones en [LimiTTEer](https://github.com/JoernL/LimiTTer), [Libre Alarm](https://github.com/pimpimmi/LibreAlarm/wiki) o [BlueReader](https://unendlichkeit.net/wordpress/?p=680&lang=en)([Hardware](https://bluetoolz.de/wordpress/)).
31 | * En xdrip, vaya a Configuración> Compatibilidad de Interapp> Transmitir datos localmente y seleccione ON.
32 | * En xdrip, vaya a Configuración> Compatibilidad de Interapp> Aceptar tratamientos y seleccione OFF.
33 | * Si desea poder usar AndroidAPS para calibrar, en xdrip vaya a Configuración> Compatibilidad de Interapp> Aceptar calibraciones y seleccione ON. También es posible que desee revisar las opciones en Configuración> Configuración menos común> Configuración de calibración avanzada.
34 | * Seleccione xdrip en ConfigBuilder (configuración en AndroidAPS).
35 |
36 | _Si usa Glimp ..._
37 |
38 | * Si aún no está configurado, descargue Glimp y siga las instrucciones en [nightscout](http://www.nightscout.info/wiki/welcome/nightscout-for-libre).
39 | * Seleccione Glimp en ConfigBuilder (configuración en AndroidAPS).
40 |
41 | **Para usuarios de MM640g o MM630g**
42 |
43 | * Si aún no está configurado, descargue [600SeriesAndroidUploaer](http://pazaan.github.io/600SeriesAndroidUploader/) y siga las instrucciones en [nightscout](http://www.nightscout.info/wiki/welcome/nightscout-and-medtronic-640g).
44 | * En el cargador de la serie 600, vaya a Configuración> Enviar a Xdrip + y seleccione ON (marque).
45 | * Seleccione MM640g en ConfigBuilder (configuración en AndroidAPS).
46 |
47 | **Para usuarios de otros CGM cargados en nightscout**
48 | Si tiene alguna otra configuración de CGM que envíe sus datos a [Nightscout](http://www.nightscout.info) entonces
49 |
50 | * En las preferencias de AndroidAPS, ingrese su sitio web nightscout y el APIsecret.
51 | * Seleccione NSClient en ConfigBuilder (configuración en AndroidAPS)
52 |
--------------------------------------------------------------------------------
/docs/ES/Configuracion/Fuente de datos Glucemia.md:
--------------------------------------------------------------------------------
1 | # Fuentes de datos de glucemia
2 |
3 | **Para los usuarios de Dexcom**
4 |
5 | _Si usa xdrip ..._
6 |
7 | * Si aún no está configurado, descargue [xdrip](https://github.com/NightscoutFoundation/xDrip) y siga las instrucciones en nightscout ([G4 sin share](http://www.nightscout.info/wiki/welcome/nightscout-with-xdrip-wireless-bridge), [G4 con share](http://www.nightscout.info/wiki/welcome/nightscout-with-xdrip-and-dexcom-share-wireless), [G5](http://www.nightscout.info/wiki/welcome/nightscout-with-xdrip-and-dexcom-share-wireless/xdrip-with-g5-support)).
8 | * En xdrip, vaya a Configuración> Compatibilidad de Interapp> Transmitir datos localmente y seleccione ON.
9 | * En xdrip, vaya a Configuración> Compatibilidad de Interapp> Aceptar tratamientos y seleccione OFF.
10 | * Si desea poder usar AndroidAPS para calibrar, en xdrip vaya a Configuración> Compatibilidad de Interapp> Aceptar calibraciones y seleccione ON. También es posible que desee revisar las opciones en Configuración> Configuración menos común> Configuración de calibración avanzada.
11 | * Seleccione xdrip en ConfigBuilder (configuración en AndroidAPS).
12 |
13 | _Si usa la aplicación Dexcom G5 ..._
14 |
15 | * Sólo dev.
16 | * Descarga el apk de [aquí](https://github.com/dexcomapp/dexcomapp), solo esta versión funciona ya sea mg/dl o mmol/l.
17 | * Desinstale la aplicación original de Dexcom, si todavía no lo ha hecho.
18 | * Seleccione la aplicación Dexcom G5 en ConfigBuilder
19 |
20 | _Si usa un cable OTG ('tradicional' Nightscout) ..._
21 |
22 | * Si aún no está configurado, descargue la aplicación Nightscout Uploader de Play Store y siga las instrucciones en [Nightscout](http://www.nightscout.info/wiki/welcome/basic-requirements).
23 | * En las preferencias de AndroidAPS, ingrese su sitio web nightscout y el APIsecret.
24 | * Seleccione NSClient en ConfigBuilder (configuración en AndroidAPS).
25 |
26 | **Para usuarios de Libre**
27 |
28 | _Si usa xdrip ..._
29 |
30 | * Si aún no está configurado, descargue xdrip y siga las instrucciones en [LimiTTEer](https://github.com/JoernL/LimiTTer), [Libre Alarm](https://github.com/pimpimmi/LibreAlarm/wiki) o [BlueReader](https://unendlichkeit.net/wordpress/?p=680&lang=en)([Hardware](https://bluetoolz.de/wordpress/)).
31 | * En xdrip, vaya a Configuración> Compatibilidad de Interapp> Transmitir datos localmente y seleccione ON.
32 | * En xdrip, vaya a Configuración> Compatibilidad de Interapp> Aceptar tratamientos y seleccione OFF.
33 | * Si desea poder usar AndroidAPS para calibrar, en xdrip vaya a Configuración> Compatibilidad de Interapp> Aceptar calibraciones y seleccione ON. También es posible que desee revisar las opciones en Configuración> Configuración menos común> Configuración de calibración avanzada.
34 | * Seleccione xdrip en ConfigBuilder (configuración en AndroidAPS).
35 |
36 | _Si usa Glimp ..._
37 |
38 | * Si aún no está configurado, descargue Glimp y siga las instrucciones en [nightscout](http://www.nightscout.info/wiki/welcome/nightscout-for-libre).
39 | * Seleccione Glimp en ConfigBuilder (configuración en AndroidAPS).
40 |
41 | **Para usuarios de MM640g o MM630g**
42 |
43 | * Si aún no está configurado, descargue [600SeriesAndroidUploaer](http://pazaan.github.io/600SeriesAndroidUploader/) y siga las instrucciones en [nightscout](http://www.nightscout.info/wiki/welcome/nightscout-and-medtronic-640g).
44 | * En el cargador de la serie 600, vaya a Configuración> Enviar a Xdrip + y seleccione ON (marque).
45 | * Seleccione MM640g en ConfigBuilder (configuración en AndroidAPS).
46 |
47 | **Para usuarios de otros CGM cargados en nightscout**
48 | Si tiene alguna otra configuración de CGM que envíe sus datos a [Nightscout](http://www.nightscout.info) entonces
49 |
50 | * En las preferencias de AndroidAPS, ingrese su sitio web nightscout y el APIsecret.
51 | * Seleccione NSClient en ConfigBuilder (configuración en AndroidAPS)
52 |
--------------------------------------------------------------------------------
/docs/BG/Терминология.md:
--------------------------------------------------------------------------------
1 | Ето и малко от специфичната за APS системите терминология:
2 |
3 | **APS or AP - artificial pancreas system** - **система за изкуствен панкреас**. Термин използван за системи управляващи доставката на инсулин от затворен тип, които използват временни промени в базалите за да поддържат КЗ в границите зададени от потребителя.
4 |
5 | **Basal - базал** - основното ниво на инсулин, което е предварително въведено в инсулиновата помпа и трябва да е равно на това, което панкреаса би произвеждал.
6 |
7 | **Basal IOB -** Базален инсулин действащ в момента - разликата (положителна или отрицателна) между количеството инсулин действащо в момента от стойностите на базала (включително временните базали ), и стойността конфигурирана в базалният профил.
8 |
9 | **BG - Blood Glucose - КЗ** - Кръвна захар/глюкоза
10 |
11 | **BGI (BG Impact) -** Степента до която КЗ "би трябвало" да се повиши или понижи. OpenAPS/AndroidAPS изчислява тази стойност за да определи **Евентуална КЗ ‘Eventual BG’**. След това тази стойност може да бъде използвана за определянето на нивото на високи/ниски стойности на базал в по-сложните части на алгоритъма на OpenAPS.
12 |
13 | **Bolus - болус**- допълнителен инсулин подаден на помпата, обикновено с цел да покрият въглехидрати или коригира по-висока КЗ.
14 |
15 | **CGM - continuous glucose monitor - система за продължително следене на КЗ** чрез сензор за глюкоза, който е инжектиран подкожно за 3-7 дни и обикновено чрез двукратна калибрация на ден, предоставя стойностите на КЗ на всеки 5 минути.
16 |
17 | **closed-loop - closed-loop - затворен цикъл** - closed loop системите правят автоматично настройки на базалните нива на базата на алгоритъм, без да е необходимо потвърждение от страна на потребителя.
18 |
19 | **COB - Carbs-on-board** - действащи въглехидрати
20 |
21 | **CR - carb ratio, or carbohydrate ratio - въглехидратно число** - количеството въглехидрати, които се покриват от една инсулинова единица. Примерно 1 единица инсулин покрива 10 грама въглехидрати.
22 |
23 | **DIA -** продължителност на инсулиновото действие, или това колко дълго инсулинът ще бъде активен в тялото (обикновено е между 3 и 6 часа).
24 |
25 | **IOB - Insulin On Board** - действащ инсулин в тялото. Забележка: повечето помпи на пазара включват само болусния инсулин в изчисленията на IOB. Обикновено, но не винаги, Nightscout показва Net IOB като 'IOB', обикновено не е добра практика да разчитате на тази стойност ( IOB хапчето в NS ).
26 |
27 | **ISF - фактор на инсулиновата чувствителност -** очакваното понижение в КЗ от една единица инсулин. Пример: 1 единица инсулин за 40 мг/дл( 2.2 ммол/л).
28 |
29 | **Net IOB - сумарното количество на действащ инсулин**, като се включват и коригираните ( повишени или понижени ) базални нива плюс болусите.
30 |
31 | **NS, или Nightscout -** уеб сайт използван за визуализация и отдалечено наблюдение.
32 |
33 | **OpenAPS** - Примерно изградена система, когато се използва без етикет (#)
34 |
35 | **openaps** - основният комплект от софтуерни инструменти, които се разработват от това общество с цел използването им във всякo OpenAPS приложение
36 |
37 | **#OpenAPS** - е абревиатура на Open(Отворена) A(rtificial-изкуствена) P(ancreas-панкреасна) S(ystem-система). Това е движение за отворен код с цел разработването на изкуствен панкреас чрез използването на комерсиални медицински устройства, някой хардуерни устройства(нескъпи), както и свободно-достъпен софтуер. Пълното описание на #OpenAPS проекта може да бъде намерено на адрес openaps.org. #OpenAPS (изписано с етикет) обикновено е обръщение към проекта и изграждащото го общество.
38 |
39 | **open-loop - отворен цикъл** този тип системи ще дават предложения за корекции в базалните нива, но ще е одобряване на всяко предложение преди прилагането му.
40 |
41 | **oref0 - “reference design implementation version 0”** - референтен дизайн за вграждане версия 0 на OpenAPS референтния дизайн. С други думи основният алгоритъм седящ зад OpenAPS.
42 |
43 | **Treatments IOB** - количеството действащ инсулин на база болуси. Някой помпи го показват като 'активен инсулин'(‘active insulin’).
44 |
--------------------------------------------------------------------------------
/docs/ES/configuracion/configbuilder.md:
--------------------------------------------------------------------------------
1 | # Conf Builder
2 |
3 | El Conf Builder (configurador) es la barra donde se activa o desactiva las características modulares. Las cajas a la izquierda permiten seleccionar cual usar, las cajas a la derecha visualizan estas como barra en AndroidAPS. Cuando haya ajustes adicionales disponibles en el módulo, puedes pinchar en la gráfica que te llevará a los ajustes específicos dentro de preferencias.
4 |
5 |
6 | ## Perfil
7 |
8 | Selecciona la basal que deseas usar:
9 |
10 | * NS profile usa los perfiles guardados en tu página Nightscout (https://[yournightscoutsiteaddress]/profile). Puedes cambiar el perfil activo con profile switch, esto escribe el perfil de la bomba en caso de fallo en AndroidAPS.
11 |
12 | * Simple Profile
13 |
14 | * Local Profile usa la basal de tu perfil de la bomba de insulina. Para Dana R/RS y Combo solo funciona el perfil 1 de la bomba
15 |
16 | * Perfil & circadian o esta característica está incluida en profile swtich y ha sido un éxito, no necesitas seleccionar un. Ver la página de perfiles para más información.
17 |
18 |
19 | ## Insulina
20 | Selecciona el tipo de curva de insulina a usar.
21 |
22 | ## Fuente datos de glucemia
23 | Selecciona la fuente de datos de glucosa que usarás – ver Fuente de BG para más información
24 |
25 | ## Bomba de insulina
26 | Selecciona la bomba de insulina que usarás. Para aquellos en lazo abierto debes seleccionar “virtual pump”(bomba virtual). Ver las páginas de DanaR , Dana RS y Accu check combo para más información.
27 |
28 | ## Detección de sensibilidad
29 | Seleccionar el tipo de detección de sensibilidad. Esta analizará los datos históricos y hará ajustes si detecta que estás reaccionando con más sensibilidad o más resistencia a la insulina que lo habitual. Los detalles al respecto de la sensibilidad en el algoritmo Oref0 pueden leerse aquí. Puedes ver la sensibilidad en la pantalla Home seleccionando SEN y observando la línea blanca. Nota: necesitas el objetivo 6 para poder usar Autosenses
30 |
31 | ## APS
32 | Seleccionar bien OpenAPS MA (asistente ingesta) o OpenaAPS AMA (asistente ingesta avanzado). Más detalles sobre OpenAPS AMA pueden leerse en doc Openaps; de manera sencilla los beneficios son después de poner bolo comida el sistema se ajusta mejor si se introducen carbohidratos precisos. Puedes ver el algoritmo seleccionado en la barra OpenAPS (OAPS). Debe tener el objetivo 7 para usar OpenAPS AMA.
33 |
34 | ## Loop
35 | Si quieres abrir o cerrar el lazo necesitarás habilitar la opción aquí. Puede visualizar la opción actual en la barra Loop.
36 |
37 | ## Restricciones
38 | Si observas la barra de objetivos (Obj), puede ver la información del progreso y qué acciones faltan por completar. Ver página de objetivos para más información.
39 |
40 | ## Tratamientos
41 | SI observas la barra de tratamientos (treat) puedes ver los tratamientos que han sido subidos a Nightscout. Si deseas editar o borrar una entrada (por ej: si has comida menos carbohidratos de lo esperado) entonces selecciona “remove” e introduce el nuevo valor (cambia la hora si es necesario) a través de la barra Careportal.
42 |
43 | ## General
44 | * Acciones permite hacer cambios de perfiles (ver perfiles para más info), objetivos temporales, y para aquellos que usan Dana R/RS o Combo para establecer una basal temporal manual o purgar la cánula.
45 | * Careportal permite registrar entradas de tratamiento específicas y ver el tiempo del sensor actual, insulina, cánula y bomba en la barra de Careportal.
46 | * Comunicador SMS permite a cuidadores controlar algunas funciones de AndroidAPS vía SMS, ver Comandos SMS para más info.
47 | * Comida permite ver y usar la base de datos de NS, ver Nightscout Readme para más información sobre configuración o http://[yournightscoutsiteaddress]/food para acceder a tu base de datos.
48 | * Wear permite ver y controlar AndroidAPS desde Android Wear, ver watchfaces para más info.
49 | * Xdrip
50 | * Notifiaciones muestra un resumen de valor glucosa actual, delta, basal temporal activa, perfil basal activo, iob y su distribución entre basal iob e iob de bolos en las pantallas del móvil o pantalla de bloqueo.
51 | * NS Client
52 |
53 |
54 |
--------------------------------------------------------------------------------
/docs/ES/Configuracion/Conf Builder.md:
--------------------------------------------------------------------------------
1 |
2 | # Conf Builder
3 |
4 | El Conf Builder (configurador) es la barra donde se activa o desactiva las características modulares. Las cajas a la izquierda permiten seleccionar cual usar, las cajas a la derecha visualizan estas como barra en AndroidAPS. Cuando haya ajustes adicionales disponibles en el módulo, puedes pinchar en la gráfica que te llevará a los ajustes específicos dentro de preferencias.
5 |
6 |
7 | ## Perfil
8 |
9 | Selecciona la basal que deseas usar:
10 |
11 | * NS profile usa los perfiles guardados en tu página Nightscout (https://[yournightscoutsiteaddress]/profile). Puedes cambiar el perfil activo con profile switch, esto escribe el perfil de la bomba en caso de fallo en AndroidAPS.
12 |
13 | * Simple Profile
14 |
15 | * Local Profile usa la basal de tu perfil de la bomba de insulina. Para Dana R/RS y Combo solo funciona el perfil 1 de la bomba
16 |
17 | * Perfil & circadian o esta característica está incluida en profile swtich y ha sido un éxito, no necesitas seleccionar un. Ver la página de perfiles para más información.
18 |
19 |
20 | ## Insulina
21 | Selecciona el tipo de curva de insulina a usar.
22 |
23 | ## Fuente datos de glucemia
24 | Selecciona la fuente de datos de glucosa que usarás – ver Fuente de BG para más información
25 |
26 | ## Bomba de insulina
27 | Selecciona la bomba de insulina que usarás. Para aquellos en lazo abierto debes seleccionar “virtual pump”(bomba virtual). Ver las páginas de DanaR , Dana RS y Accu check combo para más información.
28 |
29 | ## Detección de sensibilidad
30 | Seleccionar el tipo de detección de sensibilidad. Esta analizará los datos históricos y hará ajustes si detecta que estás reaccionando con más sensibilidad o más resistencia a la insulina que lo habitual. Los detalles al respecto de la sensibilidad en el algoritmo Oref0 pueden leerse aquí. Puedes ver la sensibilidad en la pantalla Home seleccionando SEN y observando la línea blanca. Nota: necesitas el objetivo 6 para poder usar Autosenses
31 |
32 | ## APS
33 | Seleccionar bien OpenAPS MA (asistente ingesta) o OpenaAPS AMA (asistente ingesta avanzado). Más detalles sobre OpenAPS AMA pueden leerse en doc Openaps; de manera sencilla los beneficios son después de poner bolo comida el sistema se ajusta mejor si se introducen carbohidratos precisos. Puedes ver el algoritmo seleccionado en la barra OpenAPS (OAPS). Debe tener el objetivo 7 para usar OpenAPS AMA.
34 |
35 | ## Loop
36 | Si quieres abrir o cerrar el lazo necesitarás habilitar la opción aquí. Puede visualizar la opción actual en la barra Loop.
37 |
38 | ## Restricciones
39 | Si observas la barra de objetivos (Obj), puede ver la información del progreso y qué acciones faltan por completar. Ver página de objetivos para más información.
40 |
41 | ## Tratamientos
42 | SI observas la barra de tratamientos (treat) puedes ver los tratamientos que han sido subidos a Nightscout. Si deseas editar o borrar una entrada (por ej: si has comida menos carbohidratos de lo esperado) entonces selecciona “remove” e introduce el nuevo valor (cambia la hora si es necesario) a través de la barra Careportal.
43 |
44 | ## General
45 | * Acciones permite hacer cambios de perfiles (ver perfiles para más info), objetivos temporales, y para aquellos que usan Dana R/RS o Combo para establecer una basal temporal manual o purgar la cánula.
46 | * Careportal permite registrar entradas de tratamiento específicas y ver el tiempo del sensor actual, insulina, cánula y bomba en la barra de Careportal.
47 | * Comunicador SMS permite a cuidadores controlar algunas funciones de AndroidAPS vía SMS, ver Comandos SMS para más info.
48 | * Comida permite ver y usar la base de datos de NS, ver Nightscout Readme para más información sobre configuración o http://[yournightscoutsiteaddress]/food para acceder a tu base de datos.
49 | * Wear permite ver y controlar AndroidAPS desde Android Wear, ver watchfaces para más info.
50 | * Xdrip
51 | * Notifiaciones muestra un resumen de valor glucosa actual, delta, basal temporal activa, perfil basal activo, iob y su distribución entre basal iob e iob de bolos en las pantallas del móvil o pantalla de bloqueo.
52 | * NS Client
53 |
54 |
55 |
--------------------------------------------------------------------------------
/docs/EN/Getting-Started/Future-possible-Pump-Drivers.md:
--------------------------------------------------------------------------------
1 | # Future (possible) Pump Drivers
2 |
3 | This is list of some Pumps floating around there, and status of support for them in any of Looping systems and then status in AAPS. On end there is some info, what is required for a pump to be "Loop capable".
4 |
5 | ## Medtronic
6 |
7 | **Loop status:** Some of older versions of pumps are loopable, but not the newer models (see down)
8 |
9 | **Other implementations:** OpenAPS, Loop
10 |
11 | **Java implementations:** Partial implementation available [Rountrip2](https://github.com/TC2013/Roundtrip2)
12 |
13 | **AAPS implementation status:** Starting. See [Andy's AndroidAPS fork](https://github.com/andyrozman/AndroidAPS), branch riley_link_medtronic (default branch). Status: Base integration done (Medtronic Tab), we have now Medtronic virtual pump. At the moment most of work is being done on [RileyLinkAAPS](https://github.com/andyrozman/RileyLinkAAPS) to get framework and commands working. There is project (Medtronic) and tickets opened for future development on that repository, development is being done on branch dev_medtronic (which is default branch there). There is also gitter room: RileyLinkAAPS/Lobby
14 |
15 | **Hardware requirement for AAPS:** RileyLink with Medtronic firmware (RileyLink 1.0 - 900 Mhz)
16 |
17 | **Loopable versions:** 512-522, 523 (Fw 2.4A or lower), 554 (EU firmware 2.6A or lower, CA firmware 2.7A or lower). Same for 7xx versions. All other devices are not supported, and probably won't be.
18 |
19 |
20 | ***
21 |
22 |
23 | ## Insulet Omnipod
24 |
25 | **Loop status:** Not supported at the moment, but there is a lot of work going on on decoding the Omnipod protocol - [OpenOmni](http://www.openomni.org/).
26 |
27 | **Other implementations:** None available yet. See [Openomni on github](https://github.com/openaps/openomni)
28 |
29 | **Java implementations:** None.
30 |
31 | **AAPS implementation status:** We are waiting for:
32 | - Medtronic AAPS driver to implement RileyLink layer
33 | - Hacking the protocol is done for Minimal requirements commands (see down in document)
34 |
35 | **Hardware requirement for AAPS:** RileyLink with Omnipod firmware (400 Mhz) - Not available yet
36 |
37 |
38 | ***
39 |
40 |
41 | ## Ypsomed Pump
42 |
43 | **Loop status:** Version 1 - 1.5 (2Q/2018) are not Loop candidates. While they do have BT communication, it seems that communication is very limited (uni directional: Pump->App). Maybe this will change in next versions.
44 |
45 | **Hardware requirement for AAPS:** Probably none. It's BT enabled.
46 |
47 | ***
48 |
49 |
50 | ## Cellnovo Pump
51 |
52 | **Loop status:** Currently not supported by any of loop system. Pump is Loop candidate, but since protocol is unknown at the time, I am not seeing this pump supported very soon.
53 |
54 | **Hardware requirement for AAPS:** Probably none. It's BT enabled.
55 |
56 | ***
57 |
58 |
59 | ## Animas Vibe
60 |
61 | **Loop status:** Not loopable. No remote control possibility.
62 |
63 |
64 |
65 | ***
66 |
67 |
68 | ## Animas Ping
69 |
70 | **Loop status:** Currently not supported by any of Loop systems, but it might be a candidate, since it does have some kind of remote possibility. Since its much older pump, it might never get supported anywhere.
71 |
72 |
73 | ***
74 |
75 |
76 | ## Requirements for pump being loopable
77 |
78 | **Prerequisite**
79 | - Pump has to support some kind of remote control. (BT, Radio frequency, etc)
80 | - Protocol is hacked/documented/etc.
81 |
82 | **Minimal requirement**
83 | - Set Temporary Basal Rate
84 | - Get Status
85 | - Cancel Temporary Basal Rate
86 |
87 | **For oref1(SMB) or Bolusing:**
88 | - Set Bolus
89 |
90 | **Good to have**
91 | - Cancel Bolus
92 | - Get Basal Profile
93 | - Set Basal Profile
94 | - Read History
95 |
96 | **Other**
97 | - Set Extended Bolus
98 | - Cancel Extended Bolus
99 |
100 |
101 | ***
102 |
103 |
104 | ## Other pumps support
105 |
106 | If you have any other pumps you would like to see status on, please contact me (@andyrozman on gitter). In future release a lot of Pump configurations will be added to be Open loopable (you will be able to select Virtual Pump Type in configuration and your settings will be loaded - [Feature request #863](https://github.com/MilosKozak/AndroidAPS/issues/863)).
107 |
--------------------------------------------------------------------------------
/docs/ES/inicio/futurosbombas.md:
--------------------------------------------------------------------------------
1 | # Posibles Futuros controladores de bombas de insulina
2 |
3 | Esta es una lista de algunas bombas que hay en el mercado, y el estado de soporte para ellas en cualquiera de los sistemas de lazo cerrado así como su estado en AAPS. Al final hay algo de información sobre lo que se requiere para que una bomba tenga "capacidad de lazo cerrado" o loopeable.
4 |
5 | ## Medtronic
6 |
7 | **Estado del lazo:** algunas versiones anteriores de bombas son loopables, pero no los modelos más nuevos (consulte abajo)
8 |
9 | **Otras implementaciones:** OpenAPS, Loop
10 |
11 | **Implementaciones Java:** implementación parcial disponible [Rountrip2](https://github.com/TC2013/Roundtrip2)
12 |
13 | **Estado de implementación de AAPS:** Empezando. Vea el [Andy's AndroidAPS fork](https://github.com/andyrozman/AndroidAPS), rama riley_link_medtronic (rama predeterminada).
14 |
15 | **Estado:** Integración base realizada (ficha de Medtronic), ahora tenemos la bomba virtual de Medtronic. Por el momento, la mayor parte del trabajo se está haciendo en [RileyLinkAAPS](https://github.com/andyrozman/RileyLinkAAPS) para que funcione el marco y los comandos. Hay un proyecto (Medtronic) y entradas abiertas para el desarrollo futuro en ese repositorio, el desarrollo se está realizando en la rama dev_medtronic (que es la rama predeterminada allí). También hay sala de gitter: RileyLinkAAPS/Lobby
16 |
17 | **Requisito de hardware para AAPS:** RileyLink con firmware de Medtronic (RileyLink 1.0 - 900 Mhz)
18 |
19 | Versiones en lazo: 512-522, 523 (Fw 2.4A o inferior), 554 (firmware de la UE 2.6A o inferior, firmware de CA 2.7A o inferior). Lo mismo para las versiones 7xx. El resto de los dispositivos no son compatibles, y probablemente no lo sean.
20 |
21 | ***
22 | ## Insulet Omnipod
23 |
24 | **Estado:** no es compatible en este momento con lazo cerrado, pero hay mucho trabajo en proceso de decodificación del protocolo Omnipod - [OpenOmni](http://www.openomni.org/).
25 |
26 | **Otras implementaciones:** ninguna disponible todavía. Ver [Openomni en github](https://github.com/openaps/openomni)
27 |
28 | **Implementaciones Java:** ninguna.
29 |
30 | **Estado de implementación AAPS:** estamos esperando:
31 |
32 | * Controlador Medtronic AAPS para implementar la capa RileyLink
33 | * El pirateo del protocolo se realiza para comandos de requisitos mínimos (ver abajo en el documento)
34 |
35 | **Requisito de hardware para AAPS:** RileyLink con firmware Omnipod (400 Mhz) - No disponible todavía
36 | ***
37 |
38 | ## Bomba Ypsomed
39 |
40 | **Estado:** Versión 1 - 1.5 (2Q / 2018) no son candidatos para lazo cerrado. Si bien tienen comunicación BT, parece que la comunicación es muy limitada (unidireccional: Bomba-> Aplicación). Tal vez esto cambie en las próximas versiones.
41 |
42 | **Requisito de hardware para AAPS:** Probablemente ninguno. Está BT habilitado.
43 |
44 | ***
45 | ## Bomba Cellnovo
46 |
47 | **Estado:** actualmente no es compatible con ninguno de los sistemas de lazos cerrados. Pump es un candidato de Loop, pero como el protocolo se desconoce en ese momento, no veo que esta bomba sea compatible muy pronto.
48 |
49 | **Requisito de hardware para AAPS:** Probablemente ninguno. Está BT habilitado.
50 | ***
51 |
52 | ## Animas Vibe
53 |
54 | **Estado:** no loopable. Sin posibilidad de control remoto.
55 |
56 | ***
57 | ## Animas Ping
58 |
59 | **Estado:** actualmente no es compatible con ninguno de los sistemas de lazo cerrado, pero podría ser un candidato, ya que tiene algún tipo de posibilidad remota. Dado que su bomba es mucho más antigua, es posible que nunca tenga soporte en ninguna parte.
60 |
61 |
62 | ***
63 | ## Requisitos para que la bomba sea loopable o candidata a lazo cerrado##
64 |
65 | **Requisito previo**
66 |
67 | * La bomba tiene que soportar algún tipo de control remoto. (BT, frecuencia de radio, etc.)
68 | * El protocolo debe estar pirateado / documentado / etc.
69 |
70 | **Requisitos mínimos**
71 |
72 | * Establecer la frecuencia basal temporal
73 | * Obtener el estado
74 | * Cancelar tasa basal temporal
75 |
76 | **Para oref1 (SMB) o Bolusing:**
77 |
78 | * Establecer Bolus
79 |
80 | **Es bueno que tenga:**
81 |
82 | * Cancelar Bolus
83 | * Obtener perfil basal
84 | * Establecer perfil basal
85 | * Leer historial
86 |
87 | **Otro**
88 |
89 | * Establecer bolo extendido
90 | * Cancelar bolo extendido
91 |
92 | ## Otras bombas de insulina
93 |
94 | Si tiene otras bombas en las que le gustaría ver el estado, contácteme (@andyrozman en gitter). En futuras versiones, se agregará una gran cantidad de configuraciones de la bomba para que estén abiertas en lazo (podrá seleccionar el tipo de bomba virtual en la configuración y se cargará su configuración [ Ver Solicitud de función n.º 863](https://github.com/MilosKozak/AndroidAPS/issues/863)).
95 |
96 |
--------------------------------------------------------------------------------
/docs/DE/wasistandroidaps.rst:
--------------------------------------------------------------------------------
1 | Was ist AndroidAPS?
2 | ===========
3 |
4 | AndroidAPS steht für "Android Artificial Pancreas System", ist also eine App für Android Smartphones, die als künstliche Bauchspeicheldrüse fungiert. Sie kann mit bestimmten bluetoothfähigen Insulinpumpen und Blutzucker-Mess-Systemen kommunizieren. Mit Hilfe der OpenAPS-Algorithmen "Oref0"/"Oref1" ist die App in der Lage, den Blutzuckerspiegel bei insulinpflichtigem Diabetes automatisch zu regeln, sofern alle gegessenen Kohlenhydrate eingegeben werden (sog. Hybrid closed loop).
5 |
6 | Das Programm steht nicht als fertige App und auch nicht im Google Play Store zur Verfügung. Es gibt auch keinen Support. Der Quellcode ist jedoch kostenlos und frei verfügbar. Daraus können Interessierte sich im "Eigenbau" selbst und auf eigene Verantworung die App erstellen (strictly do it yourself - DIY).
7 |
8 | Ein konkretes Beispiel, wie du dir ein Closed loop System selbst bauen kannst, findest du unter http://androidaps.readthedocs.io/en/latest/DE/Galaxy-S7-DanaR-Dexcom-G5-und-SWR50.html
9 |
10 | Ziele
11 | --------
12 | Die Ziele, die zur Entstehung führten:
13 |
14 | - App mit „modularer Basis“, es soll leicht sein, neue Module hinzuzufügen
15 | - Eine App, bei der es bei der Erstellung möglich ist zu entscheiden, welche Funktionen die App später hat (Wear Control, NsClient)
16 | - Eine App, die es ermöglicht, einen Open- oder Closed-Loop-Modus zu wählen
17 | - Eine App, die die Funktionen eines APS (Automatic Pancreas System) visualisiert (Parameter, Ergebnis und Umsetzung)
18 | - Die Möglichkeit, andere Algorithmen zu verwenden
19 | - Eine „Virtuelle Pumpe“, mit der man „herumspielen“ kann, bevor man startet
20 | - Eine App mit enger Nightscout-Integration
21 | - Die Möglichkeit zum Hinzufügen/Entfernen von Beschränkungen
22 | - Eine App, die alles enthält, um mit dem Diabetes klar zu kommen (APS+Nightscout)
23 |
24 | Was man benötigt
25 | ---------
26 |
27 | - Android Smartphone (5.1 oder neuer). Informationen dazu, welche Smartphones gut laufen gibt es hier: https://docs.google.com/spreadsheets/d/1gZAsN6f0gv6tkgy9EBsYl0BQNhna0RDqA9QGycAqCQc/edit?usp=sharing
28 | - DanaR / DanaRS / Akku Chek Combo Insulinpumpe (in Zukunft auch die Insight)
29 | - Ein CGM (Dexcom G4/G5/G6, Freestyle Libre mit Bluetooth-Aufsatz, Eversense oder Medtronic Guardian)
30 | - xDrip/xDrip+ oder Glimp oder 600SeriesAndroidUploader
31 | - AndroidAPS
32 | - Nightscout 0.10.2 oder aktueller
33 |
34 | Glossar
35 | -------------
36 | Für das meiste "Looper Vokabular": https://openaps.readthedocs.io/en/latest/docs/Resources/glossary.html (auf englisch)
37 |
38 | Screenshot
39 | -----------
40 |
41 | .. image:: https://img1.picload.org/image/dgdgcorw/aaps-overview-small.jpg.png
42 |
43 | Sicherheitshinweise
44 | -------
45 |
46 | * AndroidAPS ist nur ein Programm zur Unterstützung deiner Diabetestherapie, nicht um den Diabetes zu vergessen!
47 | * Vertraue niemals blind auf ein Gerät bei der Anpassung der Dosierung. Kontrolliere die Ergebnisse und verstehe, wie der Algorithmus auf diese kommt.
48 | * Dein Smartphone, welches die Pumpe kontrolliert, sollte ausschließlich für diese Aufgabe verwendet werden, installiere keine Apps, um die Gefahr von Trojanern zu minimieren.
49 | * Installiere regelmäßig alle Sicherheitsupdates, damit du vor Angriffen bestmöglich geschützt bist!
50 |
51 | SMS-Steuerung:
52 |
53 | * Wenn du diese Option verwendest, behalte im Hinterkopf, was passieren könnte, falls das Handy, welches zur Fernsteuerung verwendet wird, gestohlen wird. Schütze dieses mit einem sicheren Code.
54 | * Seit AndroidAPS 1.1 wirst du über wichtige ferngesteuerte Aktionen (z.B. Bolus, Profiländerung) eine SMS erhalten. Deswegen solltest du mindestens 2 Telefonnummern hinzufügen (für den Fall, dass ein Handy gestohlen wird).
55 |
56 | .. note::
57 | **Disclaimer und Warnung**
58 |
59 | * Sämtliche Informationen, Gedanken und der Quellcode sind nur für informatorische und wissenschaftliche Zwecke. Nightscout erfüllt keinerlei Anforderungen des Datenschutzes im Gesundheitswesen. Verwenden Sie Nightscout und AndroidAPS auf eigenes Risiko und setzen Sie es nicht ein, um Behandlungsentscheidungen zu treffen.
60 |
61 | * Bei Nutzung des Quellcodes von github.com bestehen keinerlei Gewährleistungs- und Garantieansprüche. Es gibt keinen Support. Im Übrigen wird auf die Lizenz verwiesen, die im Repository abgerufen werden kann.
62 |
63 | * Sämtliche Produkt- und Herstellernamen, Handelsmarken, Servicemarken, geschützte Handelsmarken und geschützte Servicemarken werden nur zu Informationszwecken genutzt und nicht für Werbung oder Marketing.
64 |
65 | * Bitte beachten: Dieses Projekt steht in keinerlei Verbindung mit: SOOIL (http://www.sooil.com/eng/), Dexcom (http://www.dexcom.com/), Accu-Chek Roche Diabetes Care (http://www.accu-chek.com/).
66 |
--------------------------------------------------------------------------------
/docs/ES/Inicio/Futuros controladores de bombas.md:
--------------------------------------------------------------------------------
1 | # Posibles Futuros controladores de bombas de insulina
2 |
3 | Esta es una lista de algunas bombas que hay en el mercado, y el estado de soporte para ellas en cualquiera de los sistemas de lazo cerrado así como su estado en AAPS. Al final hay algo de información sobre lo que se requiere para que una bomba tenga "capacidad de lazo cerrado" o loopeable.
4 |
5 | ## Medtronic
6 |
7 | **Estado del lazo:** algunas versiones anteriores de bombas son loopables, pero no los modelos más nuevos (consulte abajo)
8 |
9 | **Otras implementaciones:** OpenAPS, Loop
10 |
11 | **Implementaciones Java:** implementación parcial disponible [Rountrip2](https://github.com/TC2013/Roundtrip2)
12 |
13 | **Estado de implementación de AAPS:** Empezando. Vea el [Andy's AndroidAPS fork](https://github.com/andyrozman/AndroidAPS), rama riley_link_medtronic (rama predeterminada).
14 |
15 | **Estado:** Integración base realizada (ficha de Medtronic), ahora tenemos la bomba virtual de Medtronic. Por el momento, la mayor parte del trabajo se está haciendo en [RileyLinkAAPS](https://github.com/andyrozman/RileyLinkAAPS) para que funcione el marco y los comandos. Hay un proyecto (Medtronic) y entradas abiertas para el desarrollo futuro en ese repositorio, el desarrollo se está realizando en la rama dev_medtronic (que es la rama predeterminada allí). También hay sala de gitter: RileyLinkAAPS/Lobby
16 |
17 | **Requisito de hardware para AAPS:** RileyLink con firmware de Medtronic (RileyLink 1.0 - 900 Mhz)
18 |
19 | Versiones en lazo: 512-522, 523 (Fw 2.4A o inferior), 554 (firmware de la UE 2.6A o inferior, firmware de CA 2.7A o inferior). Lo mismo para las versiones 7xx. El resto de los dispositivos no son compatibles, y probablemente no lo sean.
20 |
21 | ***
22 | ## Insulet Omnipod
23 |
24 | **Estado:** no es compatible en este momento con lazo cerrado, pero hay mucho trabajo en proceso de decodificación del protocolo Omnipod - [OpenOmni](http://www.openomni.org/).
25 |
26 | **Otras implementaciones:** ninguna disponible todavía. Ver [Openomni en github](https://github.com/openaps/openomni)
27 |
28 | **Implementaciones Java:** ninguna.
29 |
30 | **Estado de implementación AAPS:** estamos esperando:
31 |
32 | * Controlador Medtronic AAPS para implementar la capa RileyLink
33 | * El pirateo del protocolo se realiza para comandos de requisitos mínimos (ver abajo en el documento)
34 |
35 | **Requisito de hardware para AAPS:** RileyLink con firmware Omnipod (400 Mhz) - No disponible todavía
36 | ***
37 |
38 | ## Bomba Ypsomed
39 |
40 | **Estado:** Versión 1 - 1.5 (2Q / 2018) no son candidatos para lazo cerrado. Si bien tienen comunicación BT, parece que la comunicación es muy limitada (unidireccional: Bomba-> Aplicación). Tal vez esto cambie en las próximas versiones.
41 |
42 | **Requisito de hardware para AAPS:** Probablemente ninguno. Está BT habilitado.
43 |
44 | ***
45 | ## Bomba Cellnovo
46 |
47 | **Estado:** actualmente no es compatible con ninguno de los sistemas de lazos cerrados. Pump es un candidato de Loop, pero como el protocolo se desconoce en ese momento, no veo que esta bomba sea compatible muy pronto.
48 |
49 | **Requisito de hardware para AAPS:** Probablemente ninguno. Está BT habilitado.
50 | ***
51 |
52 | ## Animas Vibe
53 |
54 | **Estado:** no loopable. Sin posibilidad de control remoto.
55 |
56 | ***
57 | ## Animas Ping
58 |
59 | **Estado:** actualmente no es compatible con ninguno de los sistemas de lazo cerrado, pero podría ser un candidato, ya que tiene algún tipo de posibilidad remota. Dado que su bomba es mucho más antigua, es posible que nunca tenga soporte en ninguna parte.
60 |
61 |
62 | ***
63 | ## Requisitos para que la bomba sea loopable o candidata a lazo cerrado##
64 |
65 | **Requisito previo**
66 |
67 | * La bomba tiene que soportar algún tipo de control remoto. (BT, frecuencia de radio, etc.)
68 | * El protocolo debe estar pirateado / documentado / etc.
69 |
70 | **Requisitos mínimos**
71 |
72 | * Establecer la frecuencia basal temporal
73 | * Obtener el estado
74 | * Cancelar tasa basal temporal
75 |
76 | **Para oref1 (SMB) o Bolusing:**
77 |
78 | * Establecer Bolus
79 |
80 | **Es bueno que tenga:**
81 |
82 | * Cancelar Bolus
83 | * Obtener perfil basal
84 | * Establecer perfil basal
85 | * Leer historial
86 |
87 | **Otro**
88 |
89 | * Establecer bolo extendido
90 | * Cancelar bolo extendido
91 |
92 | ## Otras bombas de insulina
93 |
94 | Si tiene otras bombas en las que le gustaría ver el estado, contácteme (@andyrozman en gitter). En futuras versiones, se agregará una gran cantidad de configuraciones de la bomba para que estén abiertas en lazo (podrá seleccionar el tipo de bomba virtual en la configuración y se cargará su configuración [ Ver Solicitud de función n.º 863](https://github.com/MilosKozak/AndroidAPS/issues/863)).
95 |
96 |
--------------------------------------------------------------------------------
/docs/BG/index.rst:
--------------------------------------------------------------------------------
1 | Въведение
2 | ===============
3 |
4 | .. toctree::
5 | :maxdepth: 2
6 | :glob:
7 |
8 | Начало
9 | Безопасност
10 | Скрийншоти
11 | Архитектура, security implementation
12 | Терминология
13 |
14 | Инсталиране
15 | -----------
16 | .. toctree::
17 | :maxdepth: 2
18 | :glob:
19 |
20 | Създаване на APK
21 | Обновяване до последна версия
22 |
23 | Конфигуриране
24 | -----------
25 | .. toctree::
26 | :maxdepth: 2
27 | :glob:
28 |
29 | DanaR инсулинова помпа
30 | Найтскаут (Nightscout)
31 | Източник на данни за КЗ
32 | Опции
33 |
34 | Използване
35 | -----------
36 | .. toctree::
37 | :maxdepth: 2
38 | :glob:
39 |
40 | Open APS функции
41 | Процентен профил
42 | Работа с профили след v1.5
43 | SMS Команди
44 | Съвети и похвати
45 | Достъп до лог файлове
46 |
47 | Източници
48 | -----------
49 | .. toctree::
50 | :maxdepth: 2
51 | :glob:
52 |
53 | Връзка с други потребители
54 |
55 | Примери
56 | -----------
57 | .. toctree::
58 | :maxdepth: 2
59 | :glob:
60 |
61 | Примерна конфигурация: Galaxy S7, DanaR, Dexcom G5 и SWR50
62 |
63 | Подкрепа
64 | -----------
65 | .. toctree::
66 | :maxdepth: 2
67 | :glob:
68 |
69 | **Как мога да помогна**
70 | AndroidAPS се разработва изцяло на доброволни начала и няма платен персонал. Разработчиците са родители, грижещи се за диабетици, близки на или хора с диабет, които работят заедно за развитието и подобряват решаването на много често срещаните проблеми. Разработчиците даряват свободното си време, но е малко несправедливо да очаквате от тях да бъдат изправени пред допълнителни разходи, за да правят нещо толкова невероятно, отворено и безплатно за всички.
71 |
72 | За да тестват дали е напълно сигурна новата версия на софтуера, разработчиците трябва да имат резервен телефон и резервна помпа, тъй като тя не може да бъде използвана върху човек, докато не бъде стабилна. По-новите модели помпи се нуждаят от тестване, когато станат използваеми в програмата. Някои от дарените пари са необходими и за логистичните разходи за доставка на тези устройства между разработчиците. Понякога също е приятно да се помогне с разходите на разработчиците да напуснат затъмнените помещения и да се срещнат на конференции и събития, за да срещнат своя творчески и аналитичен мозък с тези на другите разработчици.
73 |
74 | **Мога да пиша код - програмирам! Как да участвам?**
75 | Супер! Погледнете проблемите (Issues), попитайте в канала в gitter, винаги има много работа! Първо изберете малка задача и направете първия си Pull request! :)
76 |
77 | **Имам пари, които бих искал да дари, как да го направя?**
78 | PayPal: donations@androidaps.org
79 | **За какво се използват парите?**
80 | Парите не се плащат на никого за работата му! Използват се за поддържане на ниски разходи за организиране на срещи на разработчиците. Опитваме се да бъдем много прозрачни. Това е, което понастоящем е планирано:
81 |
82 | Европейска среща в Прага в края на май 2018 г .:
83 | наемане на стая и интернет
84 | оборудване
85 | храна / кафе
86 | в невероятния случай горепосоченото ще бъде изцяло покрито и остават пари: пътни разходи за тези, които трябва да пътуват на по-голямо разстояние. (Някои от компаниите от други континенти ще присъстват, но вече са в Европа по това време, така че пътните разходи ще останат ниски.)
87 | **Имам излишно оборудване, къде да го изпратя?** Понастоящем събираме "ще бъде предоставен по-късно", за да започне да се разпространява за тестване. В края на процеса, останалото оборудване ще бъде дарено на една от групите Pay-it-Forward на facebook, които съществуват в подкрепа на общността Т1. Ако искате да дарите резервно оборудване, изпратете e-mail на developers@androidaps.org и ще ви изпратим адрес.
88 |
89 | **Нямам пари или оборудване, как мога да помогна?** Необходими умения включват графичен дизайн, дизайн на UX, преводачи, редактори на wiki или просто да предадете нататък наученото, като отговорите на простите въпроси в Gitter или Facebook, за да позволите на разработчиците време и пространство да се фокусират върху по-трудните неща.
90 |
91 |
--------------------------------------------------------------------------------
/docs/EN/index.rst:
--------------------------------------------------------------------------------
1 | Welcome to the Android APS documentation
2 | ==============================================
3 |
4 | **What is AndroidAPS?**
5 |
6 | AndroidAPS is an app that can communicate with bluetooth-enabled insulin pumps, and runs a version of OpenAPS "oref0" algorithm.
7 |
8 | **Primary goals behind AndroidAPS:**
9 |
10 | * modular app where is possible to easy add new modules without touching the rest of code
11 | * app that allow localization
12 | * app where we can easy select what will be included in final apk just by easy change and compilation
13 | * app which support open and closed APS mode
14 | * app where you can see how APS works: input params, result and final decision
15 | * allow to add more APS algorithms and let user decide what to use
16 | * app independent to pump driver and containing "Virtual pump" to allow users safely play with APS
17 | * app with tight Nightscout integration
18 | * app where is possible easy to add/remove constraints for user safety
19 | * all-in-one app you need for managing T1D with APS and Nightscout
20 |
21 | **What you need to get started:**
22 |
23 | * An Android Smartphone with Android 5.0 or later. See `this spreadsheet `_ for reports on how well a phone works with AndroidAPS.
24 | * An app to receive CGM data: `xDrip `_/ `xDrip+ `_, `Glimp `_ or `600SeriesAndroidUploader `_
25 | * `AndroidAPS `_ itself
26 | * `Nightscout `_ 0.10.2 or later
27 | * A supported pump: Dana-R or Dana-RS Insulin Pump (unless you build your own driver for other insulin pump) or Accu-Chek Combo (currently in wider testing)
28 | * A Continuous Glucose Monitor (CGM) data source: Dexcom G4/G5, Freestyle Libre, Eversense or Medtronic Guardian
29 |
30 |
31 | .. note::
32 | **Disclaimer And Warning**
33 |
34 | * All information, thought, and code described here is intended for informational and educational purposes only. Nightscout currently makes no attempt at HIPAA privacy compliance. Use Nightscout and AndroidAPS at your own risk, and do not use the information or code to make medical decisions.
35 |
36 | * Use of code from github.com is without warranty or formal support of any kind. Please review this repository's LICENSE for details.
37 |
38 | * All product and company names, trademarks, servicemarks, registered trademarks, and registered servicemarks are the property of their respective holders. Their use is for information purposes and does not imply any affiliation with or endorsement by them.
39 |
40 | Please note - this project has no association with and is not endorsed by: `SOOIL `_, `Dexcom `_, `Accu-Chek, Roche Diabetes Care `_.
41 |
42 | Getting Started with AndroidAPS
43 | ----------------
44 | .. toctree::
45 | :maxdepth: 1
46 | :glob:
47 |
48 | Safety First
49 | Screenshots
50 | Architcture, security implementation
51 | Phone
52 | Pump choices
53 | Future possible pump drivers
54 | Glossary
55 | How to help
56 |
57 |
58 | How to Install AndroidAPS
59 | ------------
60 | .. toctree::
61 | :maxdepth: 1
62 | :glob:
63 |
64 | Building the APK
65 | How to update to a new version
66 | Release notes
67 | Nightscout
68 |
69 |
70 | Configuration
71 | ---------------
72 | .. toctree::
73 | :maxdepth: 1
74 | :glob:
75 |
76 | Config Builder
77 | BG Source
78 | DanaR
79 | DanaRS
80 | Accu Chek Combo
81 | Watchfaces
82 | Preferences
83 | Sensitivity Detection and COB
84 |
85 | Usage
86 | ------------
87 | .. toctree::
88 | :maxdepth: 1
89 | :glob:
90 |
91 | Objectives
92 | OpenAPS Features
93 | Profiles
94 | SMS Commands
95 | Extended Carbs
96 | Tips and Tricks
97 | Accessing log files
98 | Dev branch
99 |
100 | Where to go for help
101 | ------------
102 | .. toctree::
103 | :maxdepth: 1
104 | :glob:
105 |
106 | Background reading & interesting articles
107 | Where to go for help
108 |
109 |
--------------------------------------------------------------------------------
/docs/EN/Configuration/Config-Builder.md:
--------------------------------------------------------------------------------
1 | # Config Builder
2 |
3 | Config Builder (Conf) is the tab where you turn the modular features on and off. The boxes on the left hand side allow you to select which one to use, the boxes on the right hand side allow you to view these as a tab in AndroidAPS. Where there are additional settings available within the module, you can click on the cog graphic which will take you to the specific settings within Preferences.
4 |
5 | ## Profile
6 | Select the basal profile you wish to use:
7 | * NS Profile uses the profiles you have saved on your nightscout site (https://[yournightscoutsiteaddress]/profile). You can use the Profile Switch to change which of those profiles is active, this writes the profile to the pump in case of AndroidAPS failure.
8 | * Simple Profile _needs detail_
9 | * Local Profile uses the basal profile manually entered on the pump. For both DanaR/RS and Combo pumps this only works with the pump Profile 1.
10 | * Circadian Percentage Profile this feature is now included within Profile Switch and has been superceeded, you do not need to select this one.
11 | See [[Profiles]] page for more setup information.
12 |
13 | ## Insulin
14 | Select the type of insulin curve you are using. Basic AndroidAPS options are bilinear 'Fast Acting Insulin' for an insulin with DIA of less than 5 hours, or 'Fast Acting Insulin Prolonged' for an insulin with DIA of greater than 5 hours. These curves will only vary based on the duration of the DIA. The Oref options 'Rapid-Acting Oref', Ultra-Rapid Oref' and 'Free-Peak Oref' are exponential and more information is listed in the [OpenAPS docs](http://openaps.readthedocs.io/en/latest/docs/While%20You%20Wait%20For%20Gear/understanding-insulin-on-board-calculations.html#understanding-the-new-iob-curves-based-on-exponential-activity-curves), the curves will vary based on the DIA and the time to peak. You will need to enter additional settings for these. You can view the insulin curve graph on the Insulin (Ins) tab to help you understand which curve fits you.
15 |
16 | ## BG Source
17 | Select the blood glucose source you are using - see [[BG Source]] page for more setup information.
18 |
19 | ## Pump
20 | Select the pump you are using. For people wanting to open loop this needs to be 'Virtual Pump'. See [[DanaR Insulin Pump]], [[DanaRS Insulin Pump]] or [[Accu Chek Combo Pump]] pages for more setup information.
21 |
22 | ## Sensitivity Detection
23 | Select the type of sensitivity detection. This will analyse historical data on the go and make adjustments if it recognizes that you are reacting more sensitively (or conversely, more resistant) to insulin than usual. Details about the Sensitivity Oref0 algorithm can be read in the [OpenAPS docs](http://openaps.readthedocs.io/en/latest/docs/walkthrough/phase-4/advanced-features.html#auto-sensitivity-mode). You can view your sensistivity on the homescreen by selecting SEN and watching the white line. Note, you need to be in [Objective 6](https://github.com/MilosKozak/AndroidAPS/wiki/Objectives) in order to use Sensitivity Detection/autosens.
24 |
25 | ## APS
26 | Select either OpenAPS MA (meal assist) or OpenAPS AMA (advanced meal assist). More detail about OpenAPS AMA can be found in the [OpenAPS docs](http://openaps.readthedocs.io/en/latest/docs/Customize-Iterate/autosens.html#advanced-meal-assist-or-ama); in simple terms the benefits are after you give yourself a meal bolus the system can high-temp more quickly IF you enter carbs reliably. You can view the active detail of the chosen algorithm in the OpenAPS(OAPS) tab.
27 | Note you need to be in [Objective 7](https://github.com/MilosKozak/AndroidAPS/wiki/Objectives) in order to use OpenAPS AMA.
28 |
29 | ## Loop
30 | If you wish to use open or closed looping you will need to enable this here. You can see the active request and success of enactment in the Loop tab.
31 |
32 | ## Constraints
33 | If you view the Objectives (Obj) tab, you can see more information about how far you have progressed and what actions you still need to complete. See [[Objectives]] page for more information.
34 |
35 | ## Treatments
36 | If you view the Treatments (Treat) tab, you can see the treatments that have been uploaded to nightscout. Should you wish to edit or delete an entry (e.g. you ate less carbs than you expected) then select 'Remove' and enter the new value (change the time if necessary) through the Careportal (CP) tab.
37 |
38 | ## General
39 | * Actions allows you to make Profiles Switches (see [[Profiles]] for more setup information), Temporary Targets, and for those using DanaR/RS or Combo pump to set a manual TBR or prime the canula.
40 | * Careportal allows you to record any specific care entries and view the current sensor, insulin, canula and pump batter ages in the Careportal (CP) tab.
41 | * SMS Communicator allows remote caregivers to control some AndroidAPS features via SMS, see [[SMS Commands]] for more setup information.
42 | * Food allows you to view and use the Nightscout food database, see [Nightscout Readme](https://github.com/nightscout/cgm-remote-monitor#food-custom-foods) for more setup information or http://[yournightscoutsiteaddress]/food to access your database.
43 | * Wear allows you to view and control AndroidAPS from the Android Wear watch, see [[watchfaces]] for more setup information.
44 | * xDrip Statusline (watch)
45 | * Ongoing Notification displays a summary of current BG, delta, active TBR%, active basal u/hr and profile, IOB and split into bolus IOB and basal IOB on the phones dropdown screen and phonelock screen.
46 | * NS Client
47 |
--------------------------------------------------------------------------------