9 |
10 |
11 | This repo serves Scarf's documentation site located at https://docs.scarf.sh.
12 |
13 | The site uses [MkDocs](https://www.mkdocs.org/) to generate the doc site from markdown.
14 |
15 | ### Running locally
16 |
17 | #### pip
18 |
19 | ```bash
20 | # Setup
21 | pip install -r requirements.txt
22 | # Serve
23 | mkdocs serve
24 | ```
25 |
26 | ### Deploy
27 |
28 | GitHub Actions are configured for this repository to deploy changes on every update to the master branch.
29 |
30 | ### Community
31 |
32 | Join the [Scarf-Community workspace](https://tinyurl.com/scarf-community-slack) on Slack to learn more about our products and plans. We'll keep an eye out for your questions and concerns. And if you have issues that aren't covered in Scarf Docs, we'd love to hear from you.
33 |
--------------------------------------------------------------------------------
/docs/CNAME:
--------------------------------------------------------------------------------
1 | docs.scarf.sh
2 |
--------------------------------------------------------------------------------
/docs/api-v2.md:
--------------------------------------------------------------------------------
1 | # API V2
2 |
3 | !!swagger api-v2-public.json!!
4 |
--------------------------------------------------------------------------------
/docs/assets/.DS_Store:
--------------------------------------------------------------------------------
https://raw.githubusercontent.com/scarf-sh/docs/a6f70e6e4d692ee6d285f387d781918c62fed561/docs/assets/.DS_Store
--------------------------------------------------------------------------------
/docs/assets/icon.svg:
--------------------------------------------------------------------------------
1 |
4 |
--------------------------------------------------------------------------------
/docs/assets/new_scarf.svg:
--------------------------------------------------------------------------------
1 |
4 |
--------------------------------------------------------------------------------
/docs/assets/pics/.DS_Store:
--------------------------------------------------------------------------------
https://raw.githubusercontent.com/scarf-sh/docs/a6f70e6e4d692ee6d285f387d781918c62fed561/docs/assets/pics/.DS_Store
--------------------------------------------------------------------------------
/docs/assets/pics/auto-creation/.DS_Store:
--------------------------------------------------------------------------------
https://raw.githubusercontent.com/scarf-sh/docs/a6f70e6e4d692ee6d285f387d781918c62fed561/docs/assets/pics/auto-creation/.DS_Store
--------------------------------------------------------------------------------
/docs/assets/pics/auto-creation/collections-menu.png:
--------------------------------------------------------------------------------
https://raw.githubusercontent.com/scarf-sh/docs/a6f70e6e4d692ee6d285f387d781918c62fed561/docs/assets/pics/auto-creation/collections-menu.png
--------------------------------------------------------------------------------
/docs/assets/pics/auto-creation/collections-page.png:
--------------------------------------------------------------------------------
https://raw.githubusercontent.com/scarf-sh/docs/a6f70e6e4d692ee6d285f387d781918c62fed561/docs/assets/pics/auto-creation/collections-page.png
--------------------------------------------------------------------------------
/docs/assets/pics/data-export/export-packages-data.png:
--------------------------------------------------------------------------------
https://raw.githubusercontent.com/scarf-sh/docs/a6f70e6e4d692ee6d285f387d781918c62fed561/docs/assets/pics/data-export/export-packages-data.png
--------------------------------------------------------------------------------
/docs/assets/pics/event-import/import-log-ui.png:
--------------------------------------------------------------------------------
https://raw.githubusercontent.com/scarf-sh/docs/a6f70e6e4d692ee6d285f387d781918c62fed561/docs/assets/pics/event-import/import-log-ui.png
--------------------------------------------------------------------------------
/docs/assets/pics/gateway-diagrams/gateway-containers.png:
--------------------------------------------------------------------------------
https://raw.githubusercontent.com/scarf-sh/docs/a6f70e6e4d692ee6d285f387d781918c62fed561/docs/assets/pics/gateway-diagrams/gateway-containers.png
--------------------------------------------------------------------------------
/docs/assets/pics/gateway-diagrams/gateway-files.png:
--------------------------------------------------------------------------------
https://raw.githubusercontent.com/scarf-sh/docs/a6f70e6e4d692ee6d285f387d781918c62fed561/docs/assets/pics/gateway-diagrams/gateway-files.png
--------------------------------------------------------------------------------
/docs/assets/pics/gateway-diagrams/gateway-full.png:
--------------------------------------------------------------------------------
https://raw.githubusercontent.com/scarf-sh/docs/a6f70e6e4d692ee6d285f387d781918c62fed561/docs/assets/pics/gateway-diagrams/gateway-full.png
--------------------------------------------------------------------------------
/docs/assets/pics/gateway-diagrams/gateway-python.png:
--------------------------------------------------------------------------------
https://raw.githubusercontent.com/scarf-sh/docs/a6f70e6e4d692ee6d285f387d781918c62fed561/docs/assets/pics/gateway-diagrams/gateway-python.png
--------------------------------------------------------------------------------
/docs/assets/pics/orgs/.DS_Store:
--------------------------------------------------------------------------------
https://raw.githubusercontent.com/scarf-sh/docs/a6f70e6e4d692ee6d285f387d781918c62fed561/docs/assets/pics/orgs/.DS_Store
--------------------------------------------------------------------------------
/docs/assets/pics/orgs/acting-as-organisation.png:
--------------------------------------------------------------------------------
https://raw.githubusercontent.com/scarf-sh/docs/a6f70e6e4d692ee6d285f387d781918c62fed561/docs/assets/pics/orgs/acting-as-organisation.png
--------------------------------------------------------------------------------
/docs/assets/pics/orgs/convert-account-spash.png:
--------------------------------------------------------------------------------
https://raw.githubusercontent.com/scarf-sh/docs/a6f70e6e4d692ee6d285f387d781918c62fed561/docs/assets/pics/orgs/convert-account-spash.png
--------------------------------------------------------------------------------
/docs/assets/pics/orgs/convert-to-organization.png:
--------------------------------------------------------------------------------
https://raw.githubusercontent.com/scarf-sh/docs/a6f70e6e4d692ee6d285f387d781918c62fed561/docs/assets/pics/orgs/convert-to-organization.png
--------------------------------------------------------------------------------
/docs/assets/pics/orgs/create-new-organization.png:
--------------------------------------------------------------------------------
https://raw.githubusercontent.com/scarf-sh/docs/a6f70e6e4d692ee6d285f387d781918c62fed561/docs/assets/pics/orgs/create-new-organization.png
--------------------------------------------------------------------------------
/docs/assets/pics/orgs/enable-clearbit.png:
--------------------------------------------------------------------------------
https://raw.githubusercontent.com/scarf-sh/docs/a6f70e6e4d692ee6d285f387d781918c62fed561/docs/assets/pics/orgs/enable-clearbit.png
--------------------------------------------------------------------------------
/docs/assets/pics/orgs/new-org-menu.png:
--------------------------------------------------------------------------------
https://raw.githubusercontent.com/scarf-sh/docs/a6f70e6e4d692ee6d285f387d781918c62fed561/docs/assets/pics/orgs/new-org-menu.png
--------------------------------------------------------------------------------
/docs/assets/pics/orgs/new-organization.png:
--------------------------------------------------------------------------------
https://raw.githubusercontent.com/scarf-sh/docs/a6f70e6e4d692ee6d285f387d781918c62fed561/docs/assets/pics/orgs/new-organization.png
--------------------------------------------------------------------------------
/docs/assets/pics/orgs/organization-button.png:
--------------------------------------------------------------------------------
https://raw.githubusercontent.com/scarf-sh/docs/a6f70e6e4d692ee6d285f387d781918c62fed561/docs/assets/pics/orgs/organization-button.png
--------------------------------------------------------------------------------
/docs/assets/pics/orgs/organization-edit-page.png:
--------------------------------------------------------------------------------
https://raw.githubusercontent.com/scarf-sh/docs/a6f70e6e4d692ee6d285f387d781918c62fed561/docs/assets/pics/orgs/organization-edit-page.png
--------------------------------------------------------------------------------
/docs/assets/pics/orgs/organization-page.png:
--------------------------------------------------------------------------------
https://raw.githubusercontent.com/scarf-sh/docs/a6f70e6e4d692ee6d285f387d781918c62fed561/docs/assets/pics/orgs/organization-page.png
--------------------------------------------------------------------------------
/docs/assets/pics/orgs/organization-splash-screen.png:
--------------------------------------------------------------------------------
https://raw.githubusercontent.com/scarf-sh/docs/a6f70e6e4d692ee6d285f387d781918c62fed561/docs/assets/pics/orgs/organization-splash-screen.png
--------------------------------------------------------------------------------
/docs/assets/pics/orgs/welcome-to-scarf.png:
--------------------------------------------------------------------------------
https://raw.githubusercontent.com/scarf-sh/docs/a6f70e6e4d692ee6d285f387d781918c62fed561/docs/assets/pics/orgs/welcome-to-scarf.png
--------------------------------------------------------------------------------
/docs/assets/pics/qs-file-packages/create-file.png:
--------------------------------------------------------------------------------
https://raw.githubusercontent.com/scarf-sh/docs/a6f70e6e4d692ee6d285f387d781918c62fed561/docs/assets/pics/qs-file-packages/create-file.png
--------------------------------------------------------------------------------
/docs/assets/pics/qs-file-packages/create-new-package.png:
--------------------------------------------------------------------------------
https://raw.githubusercontent.com/scarf-sh/docs/a6f70e6e4d692ee6d285f387d781918c62fed561/docs/assets/pics/qs-file-packages/create-new-package.png
--------------------------------------------------------------------------------
/docs/assets/pics/qs-file-packages/file-package-aditional-route.png:
--------------------------------------------------------------------------------
https://raw.githubusercontent.com/scarf-sh/docs/a6f70e6e4d692ee6d285f387d781918c62fed561/docs/assets/pics/qs-file-packages/file-package-aditional-route.png
--------------------------------------------------------------------------------
/docs/assets/pics/qs-file-packages/file-package-incoming.png:
--------------------------------------------------------------------------------
https://raw.githubusercontent.com/scarf-sh/docs/a6f70e6e4d692ee6d285f387d781918c62fed561/docs/assets/pics/qs-file-packages/file-package-incoming.png
--------------------------------------------------------------------------------
/docs/assets/pics/qs-file-packages/file-package-menu-packages.png:
--------------------------------------------------------------------------------
https://raw.githubusercontent.com/scarf-sh/docs/a6f70e6e4d692ee6d285f387d781918c62fed561/docs/assets/pics/qs-file-packages/file-package-menu-packages.png
--------------------------------------------------------------------------------
/docs/assets/pics/qs-file-packages/file-package-name.png:
--------------------------------------------------------------------------------
https://raw.githubusercontent.com/scarf-sh/docs/a6f70e6e4d692ee6d285f387d781918c62fed561/docs/assets/pics/qs-file-packages/file-package-name.png
--------------------------------------------------------------------------------
/docs/assets/pics/qs-file-packages/file-package-new-route.png:
--------------------------------------------------------------------------------
https://raw.githubusercontent.com/scarf-sh/docs/a6f70e6e4d692ee6d285f387d781918c62fed561/docs/assets/pics/qs-file-packages/file-package-new-route.png
--------------------------------------------------------------------------------
/docs/assets/pics/qs-file-packages/file-package-outgoing-url.png:
--------------------------------------------------------------------------------
https://raw.githubusercontent.com/scarf-sh/docs/a6f70e6e4d692ee6d285f387d781918c62fed561/docs/assets/pics/qs-file-packages/file-package-outgoing-url.png
--------------------------------------------------------------------------------
/docs/assets/pics/qs-file-packages/file-package-select-owner.png:
--------------------------------------------------------------------------------
https://raw.githubusercontent.com/scarf-sh/docs/a6f70e6e4d692ee6d285f387d781918c62fed561/docs/assets/pics/qs-file-packages/file-package-select-owner.png
--------------------------------------------------------------------------------
/docs/assets/pics/qs-file-packages/file-package-view-details.png:
--------------------------------------------------------------------------------
https://raw.githubusercontent.com/scarf-sh/docs/a6f70e6e4d692ee6d285f387d781918c62fed561/docs/assets/pics/qs-file-packages/file-package-view-details.png
--------------------------------------------------------------------------------
/docs/assets/pics/qs-file-packages/packages-filter.png:
--------------------------------------------------------------------------------
https://raw.githubusercontent.com/scarf-sh/docs/a6f70e6e4d692ee6d285f387d781918c62fed561/docs/assets/pics/qs-file-packages/packages-filter.png
--------------------------------------------------------------------------------
/docs/assets/pics/quick-start/create-docker.png:
--------------------------------------------------------------------------------
https://raw.githubusercontent.com/scarf-sh/docs/a6f70e6e4d692ee6d285f387d781918c62fed561/docs/assets/pics/quick-start/create-docker.png
--------------------------------------------------------------------------------
/docs/assets/pics/quick-start/create-pixel-page.png:
--------------------------------------------------------------------------------
https://raw.githubusercontent.com/scarf-sh/docs/a6f70e6e4d692ee6d285f387d781918c62fed561/docs/assets/pics/quick-start/create-pixel-page.png
--------------------------------------------------------------------------------
/docs/assets/pics/quick-start/docker-copy-pull-command.png:
--------------------------------------------------------------------------------
https://raw.githubusercontent.com/scarf-sh/docs/a6f70e6e4d692ee6d285f387d781918c62fed561/docs/assets/pics/quick-start/docker-copy-pull-command.png
--------------------------------------------------------------------------------
/docs/assets/pics/quick-start/docker-create-pixel-1.png:
--------------------------------------------------------------------------------
https://raw.githubusercontent.com/scarf-sh/docs/a6f70e6e4d692ee6d285f387d781918c62fed561/docs/assets/pics/quick-start/docker-create-pixel-1.png
--------------------------------------------------------------------------------
/docs/assets/pics/quick-start/docker-create-pixel-2.png:
--------------------------------------------------------------------------------
https://raw.githubusercontent.com/scarf-sh/docs/a6f70e6e4d692ee6d285f387d781918c62fed561/docs/assets/pics/quick-start/docker-create-pixel-2.png
--------------------------------------------------------------------------------
/docs/assets/pics/quick-start/docker-package-pull-command.png:
--------------------------------------------------------------------------------
https://raw.githubusercontent.com/scarf-sh/docs/a6f70e6e4d692ee6d285f387d781918c62fed561/docs/assets/pics/quick-start/docker-package-pull-command.png
--------------------------------------------------------------------------------
/docs/assets/pics/quick-start/docker-package-view-details.png:
--------------------------------------------------------------------------------
https://raw.githubusercontent.com/scarf-sh/docs/a6f70e6e4d692ee6d285f387d781918c62fed561/docs/assets/pics/quick-start/docker-package-view-details.png
--------------------------------------------------------------------------------
/docs/assets/pics/quick-start/docker-packages-succces-screen.png:
--------------------------------------------------------------------------------
https://raw.githubusercontent.com/scarf-sh/docs/a6f70e6e4d692ee6d285f387d781918c62fed561/docs/assets/pics/quick-start/docker-packages-succces-screen.png
--------------------------------------------------------------------------------
/docs/assets/pics/quick-start/package-analytics.png:
--------------------------------------------------------------------------------
https://raw.githubusercontent.com/scarf-sh/docs/a6f70e6e4d692ee6d285f387d781918c62fed561/docs/assets/pics/quick-start/package-analytics.png
--------------------------------------------------------------------------------
/docs/assets/pics/quick-start/pixel-copy-embeded.png:
--------------------------------------------------------------------------------
https://raw.githubusercontent.com/scarf-sh/docs/a6f70e6e4d692ee6d285f387d781918c62fed561/docs/assets/pics/quick-start/pixel-copy-embeded.png
--------------------------------------------------------------------------------
/docs/assets/pics/quick-start/terminal_pull.png:
--------------------------------------------------------------------------------
https://raw.githubusercontent.com/scarf-sh/docs/a6f70e6e4d692ee6d285f387d781918c62fed561/docs/assets/pics/quick-start/terminal_pull.png
--------------------------------------------------------------------------------
/docs/assets/pics/scarf-pixels/create-a-pixel-with-custom-domain.png:
--------------------------------------------------------------------------------
https://raw.githubusercontent.com/scarf-sh/docs/a6f70e6e4d692ee6d285f387d781918c62fed561/docs/assets/pics/scarf-pixels/create-a-pixel-with-custom-domain.png
--------------------------------------------------------------------------------
/docs/assets/pics/scarf-pixels/pixel-custom-domain-instructions.png:
--------------------------------------------------------------------------------
https://raw.githubusercontent.com/scarf-sh/docs/a6f70e6e4d692ee6d285f387d781918c62fed561/docs/assets/pics/scarf-pixels/pixel-custom-domain-instructions.png
--------------------------------------------------------------------------------
/docs/assets/pics/scarf-pixels/pixel-domain-verified.png:
--------------------------------------------------------------------------------
https://raw.githubusercontent.com/scarf-sh/docs/a6f70e6e4d692ee6d285f387d781918c62fed561/docs/assets/pics/scarf-pixels/pixel-domain-verified.png
--------------------------------------------------------------------------------
/docs/assets/pics/scarf-pixels/tracking-pixel-add-delete-domain.png:
--------------------------------------------------------------------------------
https://raw.githubusercontent.com/scarf-sh/docs/a6f70e6e4d692ee6d285f387d781918c62fed561/docs/assets/pics/scarf-pixels/tracking-pixel-add-delete-domain.png
--------------------------------------------------------------------------------
/docs/assets/pics/user-guide/High_Confidence_Example.png:
--------------------------------------------------------------------------------
https://raw.githubusercontent.com/scarf-sh/docs/a6f70e6e4d692ee6d285f387d781918c62fed561/docs/assets/pics/user-guide/High_Confidence_Example.png
--------------------------------------------------------------------------------
/docs/assets/pics/user-guide/Low_Confidence_Example.png:
--------------------------------------------------------------------------------
https://raw.githubusercontent.com/scarf-sh/docs/a6f70e6e4d692ee6d285f387d781918c62fed561/docs/assets/pics/user-guide/Low_Confidence_Example.png
--------------------------------------------------------------------------------
/docs/assets/pics/user-guide/Medium_Confidence_Example.png:
--------------------------------------------------------------------------------
https://raw.githubusercontent.com/scarf-sh/docs/a6f70e6e4d692ee6d285f387d781918c62fed561/docs/assets/pics/user-guide/Medium_Confidence_Example.png
--------------------------------------------------------------------------------
/docs/assets/scarf-tm-logo-white.svg:
--------------------------------------------------------------------------------
1 |
11 |
--------------------------------------------------------------------------------
/docs/assets/scarf.svg:
--------------------------------------------------------------------------------
1 |
2 |
3 |
49 |
--------------------------------------------------------------------------------
/docs/assets/scarf_text.svg:
--------------------------------------------------------------------------------
1 |
9 |
--------------------------------------------------------------------------------
/docs/crm-overview.md:
--------------------------------------------------------------------------------
1 | # CRM Integrations Overview
2 |
3 | ## Introduction
4 |
5 | Connecting Scarf to your CRM platform allows your internal Sales and Marketing teams to build business operations and Go-To-Market strategies leveraging the organization-level activity and adoption information collected using the Scarf Platform. Combining Scarf Insights with existing CRM Account profiles can help your team focus their efforts using the tools they’re already familiar with.
6 |
7 | ## Matching and Syncing Scarf Companies to CRM Accounts
8 |
9 | Once a CRM Integration has been initialized, a `CRM Controls` button will be added to your Company Insights table, both on the Organization Dashboard and on the Insights page. Clicking on `CRM Controls` expands a "CRM Connection" column in the Insights table which displays the current CRM account paired to the Scarf Company (green dot) and allows you to search, edit and assign a match manually (empty check box). The `CRM Controls` button allows you to add multiple CRM connections as needed.
10 |
11 | The Company Insights table now also will display a "Status" column, allowing you to quickly observe which companies have been synced to the CRM, those which have been queued for the next sync run or any for which the sync has failed. Hovering over the status indicator will open a tool tip with more detail of the current status
12 |
13 | ## Matching vs. Syncing
14 |
15 | Scarf’s CRM integration allows for both reading and writing data, but these actions are distinct and configurable.
16 |
17 | ### Matching
18 |
19 | Matching refers to the process reading records from the CRM and associating a Scarf Company with an existing CRM Account.
20 |
21 | - If **Auto-Match** is enabled, Scarf will attempt to automatically find and pair Scarf Companies with CRM Accounts based on text pattern matching.
22 | - If **Auto-Match** is disabled, or if no automatic match is found, you can manually match a Scarf Company to the correct CRM Account.
23 |
24 | ### Syncing
25 | Syncing is the process of writing Scarf Company engagement data into the matched CRM Account.
26 |
27 | - If **Auto-Sync** is enabled, all matched Scarf Companies will be included in sync operations automatically.
28 | - If **Auto-Sync** is disabled, sync operations must be triggered manually.
29 | - If a company is not matched, it will not be included in any sync.
30 | - If **Automatically Create New Accounts** is enabled, any unmatched Scarf Companies will be created as new Accounts in your CRM and included in the sync.
31 |
32 | ## Unmatching Scarf Companies from CRM Accounts
33 |
34 | You may need to unmatch a company from your CRM in the following cases:
35 | - The wrong CRM account was matched to a Scarf Company, and it needs to be corrected.
36 | - The company is no longer relevant for tracking and should not receive future updates.
37 | - A duplicate or incorrect record was created in the CRM and needs to be removed from the sync process.
38 | - The company structure has changed, and the existing match no longer applies.
39 |
40 | To unmatch or unsync a Scarf Company from a CRM account:
41 | - Navigate to the `Homepage` or `Insights page`.
42 | - Click the `CRM Controls` button to enable CRM management.
43 | - Use either the `Edit` button to update the match or the `x` (Remove) button to unmatch the company.
44 |
45 | Unmatching a company does not remove previously synced data from the CRM. However, Scarf will no longer attempt to update that record in future syncs.
46 |
47 | ## Monitoring CRM Sync Status
48 |
49 | While the CRM Connection is established, a history of sync activity is available on your Settings -> Integrations page. The table **Recent CRM Sync history** provides a summary of the actions performed in each sync.
50 |
51 | Each configured CRM will have its own **Recent CRM Sync history** list, allowing you to track sync activity for multiple CRM connections separately.
52 |
53 | You may also click on `View logs` for the verbose output of the synchronization run.
54 |
55 | **NOTE:** Sync history is retained for 30 days, after which records will be automatically deleted.
56 |
57 | The **Recent CRM Sync History** table provides a summary of each synchronization event. It includes the following columns:
58 |
59 | - **Date** – The timestamp of when the sync event occurred.
60 | - **Total** – A breakdown of the actions performed during the sync. This includes:
61 | - **Created** – The number of new accounts created in your CRM.
62 | - **Synced** – The number of accounts matched and synced with an existing record.
63 | - **Fetched** – The number of account records retrieved from the CRM.
64 | - **Auto-Matched** – The number of companies surfaces by Scarf mapped to one of the fetched CRM accounts.
65 | - **Marked for Sync** – A company surfaced by Scarf set to sync activity to the CRM, either through auto-matching or manual selection in the Scarf Insights page.
66 | - **Success** – The number of actions that were completed successfully.
67 | - **Failures** – A breakdown of actions that failed, categorized into:
68 | - **Create** – Number of new accounts that failed to be created in the CRM.
69 | - **Sync** – Number of existing accounts that failed to update.
70 | - **Ambiguous Auto-Matches** – Cases where a company surfaced by Scarf matches multiple CRM accounts, but the system cannot determine which one should receive the Scarf activity.
71 |
72 |
73 |
74 |
75 |
76 | For a detailed guide on how to make the most of your CRM integration, check out our CRM Integration Playbook. It walks you through configuring the connection, matching and syncing companies.
77 |
--------------------------------------------------------------------------------
/docs/custom-telemetry.md:
--------------------------------------------------------------------------------
1 | ## Custom Telemetry With Scarf’s HTTP API
2 |
3 | Scarf provides you the ability to collect custom telemetry from within your application by utilizing our API. To enable this you'll need a Scarf account and a File Package created. Enable Event Collection Only.
4 |
5 | Once this has been done, you can send telemetry data and associate it with the Scarf package you just created via HTTP requests to your configured endpoint. Here is a real world example from Unstructured.io in Python:
6 |
7 |
8 | ```python
9 | # Copyright 2022 Unstructured Technologies, Inc
10 | # Licensed under the Apache License, Version 2.0
11 | def scarf_analytics():
12 | try:
13 | # If either environment variable is set, do not collect metrics and exit.
14 | if os.getenv("SCARF_NO_ANALYTICS") != "true" and os.getenv("DO_NOT_TRACK") != "true":
15 | requests.get(
16 | # ENDPOINT is a DNS CNAME configured within your Scarf account
17 | # FILE_PACKAGE_NAME is the Scarf collection under which these data points will be collected
18 | "https://ENDPOINT.scarf.sh/FILE_PACKAGE_NAME?version="
19 | + __version__
20 | + "&platform="
21 | + platform.system()
22 | + "&python="
23 | + python_version
24 | + "&arch="
25 | + platform.machine(),
26 | )
27 | except Exception:
28 | pass
29 | ```
30 | Scarf has also published and maintains an example in [bash or shell](https://github.com/scarf-sh/scarf-shell/blob/main/scarf.sh).
31 |
32 | **Description:**
33 |
34 | This function, `scarf_analytics()`, is responsible for collecting and sending telemetry data about the current system environment to a server you host. This data helps users understand how their Python library is being used across different platforms and configurations.
35 |
36 | **Functionality:**
37 |
38 | 1. The URL we are making a request to is configured by the corresponding Scarf package entry. In this case, this is configured to be `https://packages.unstructured.io/python-telemetry`
39 |
40 | 2. Custom data parameters for the event can be sent via configured URL path segments or query parameters, depending on how your Scarf package routes are configured.
41 |
42 | **Important Notes:**
43 |
44 | It’s important to have mechanisms to track user opt-in/out. This function respects user privacy preferences according to multiple standards. Users can set the `DO_NOT_TRACK` environment variable or the `SCARF_NO_ANALYTICS` environment variable.
45 |
--------------------------------------------------------------------------------
/docs/data-export.md:
--------------------------------------------------------------------------------
1 | # Data Export
2 |
3 | ## Introduction
4 |
5 | Scarf provides a robust platform for tracking package downloads and pixel views. The ability to export this data is crucial for analytics, reporting, and integrating with other tools. This guide aims to provide a clear and concise explanation of how to export data from Scarf, what data is exported, and how to make use of any available integrations.
6 |
7 | ## Prerequisites
8 |
9 | Exporting data from Scarf will only work if you are on a [Scarf Basic or Premium Plan](https://about.scarf.sh/pricing).
10 |
11 | ## How to Export Event Data
12 |
13 | ### Scarf Dashboard
14 |
15 | To export data out of Scarf,
16 |
17 | 1. go to the main dashboard and
18 | 2. click "Export packages data".
19 |
20 | This will export all data, for the default period, over the past month.
21 |
22 | 
23 |
24 | The data you can export from Scarf includes all events (defined as package downloads and pixel views) from every user that has interacted with your Scarf-enabled artifacts (packages and pixels). Upon clicking "Export packages data", this data will download as a .csv file.
25 |
26 | ### Scarf API
27 |
28 | You can also export this data using [the Scarf API](https://api-docs.scarf.sh/v2.html).
29 |
30 | ## What Data is Exported
31 |
32 | ### Export Fields
33 |
34 | The event data export includes the following data fields
35 |
36 | | name | type | description |
37 | | ---- | ---- | ----------- |
38 | | **id** | `text` | This uniquely identifies the event (pixel view or package download) that occurred. |
39 | | **type** | `text` | This categorizes the type of event that occurred (e.g. *pixel-fetch*, *manifest-fetch*, *binary-download*, etc.). |
40 | | **package** | `text` | For Scarf package downloads, this specifies which package has been downloaded. |
41 | | **pixel** | `text` | For Scarf page views, this specifies which pixel has been downloaded. |
42 | | **version** | `text` | For Scarf package downloads, this specifies which version of the package has been downloaded. |
43 | | **time** | `timestamp` | This refers to the time in UTC that the event occurred. |
44 | | **referer** | `text` | For Scarf pixel views, this refers to the page that was viewed. |
45 | | **user_agent** | `text` | This refers to the User-Agent, which provides information around the method of installation, often including information such as operating system, device, browser, architecture, and client. |
46 | | **variables** | `text` | This refers to any custom-specified variables that you might use Scarf to track in [file package downloads](/packages/#files). |
47 | | **origin_id** | `text` | This uniquely identifies the user (through a specific device) who has interacted with a Scarf event. |
48 | | **origin_latitude** | `numeric` | This is the latitude of the location Scarf is able to identify for the event. |
49 | | **origin_longitude** | `numeric` | This is the longitude of the location Scarf is able to identify for the event. |
50 | | **origin_country** | `text` | This is the country of the location Scarf is able to identify for the event. |
51 | | **origin_city** | `text` | This is the city of the location Scarf is able to identify for the event. |
52 | | **origin_state** | `text` | This is the state of the location Scarf is able to identify for the event. |
53 | | **origin_postal** | `text` | This is the postal code (ZIP code, in the US) of the location Scarf is able to identify for the event. |
54 | | **origin_connection_type** | `text` | This categorizes the type of IP address Scarf is able to identify (e.g. business, isp, hosting, etc.). |
55 | | **origin_company** | `text` | If Scarf is able to associate the event with a known business entity, that business entity is listed here. |
56 | | **origin_domain** | `text` | If Scarf is able to associate the event with a known business entity, that business entity's web domain address is listed here. |
57 | | **dnt** | `boolean` | If the user includes a DNT request in their header, that is logged here and [they will not be tracked](/gateway/#do-not-track). |
58 | | **confidence** | `numeric` | The probability of correct identification of the data. |
59 | | **endpoint_id** | `text` | This uniquely identifies the public-facing device that has interacted with a Scarf event. Unlike origin_id, it is notably not sensitive to changes in device information like client, user agent, etc. |
60 | | **mtc_quota_exceeded** | `boolean` | A value of `true` indicates the company information from the event data row was scrubbed due to exceeding the MTC limit. |
61 |
62 | ## How to Export Aggregate Data
63 |
64 | The documentation for exporting aggregates can be found in [Export aggregates](https://api-docs.scarf.sh/v2.html#tag/Packages/operation/exportEntityAggregates).
65 | Here's an example curl request to download aggregate data. The output is newline delimited json.
66 | ```sh
67 | curl -o {filename}.jsonl \
68 | -H "Authorization: Bearer {token}" \
69 | -H "Content-Type: application/x-ndjson" \
70 | "https://api.scarf.sh/v2/packages/{owner}/aggregates?start_date={start_date}&end_date={end_date}&breakdown=by-company"
71 | ```
72 |
73 | ## How to Export Company Data
74 | The documentation for exporting company data that is rolled up with a daily interval can be found in [Export Company Data](https://api-docs.scarf.sh/v2.html#tag/Company/operation/exportCompanyRollup)
75 |
76 | Here's an example curl request to download company rolled up data.
77 | ```sh
78 | curl -o company-rollup.csv \
79 | -H "Authorization: Bearer {token} \
80 | -H "Content-Type: text/csv" \
81 | https://api.scarf.sh/v2/packages/{owner}/company-rollup
82 | ```
83 |
84 | The company data export includes the following data fields.
85 |
86 | | name | type | description |
87 | |--------------------------------|-----------------------------|------------------------------------------------------------------------------------------------------|
88 | | **company_name** | `text` | Name of the company |
89 | | **company_domain** | `text` | Domain of the company. Eg. scarf.sh |
90 | | **funnel_stage** | `text` | Stage of a company's journey in using your software |
91 | | **total_events** | `numeric` | Count of total events |
92 | | **unique_sources** | `numeric` | Number of distinct sources of traffic that comprise the total event count from this organization. |
93 | | **first_seen** | `text` | Date of when the first event occured |
94 | | **last_seen** | `text` | Date of when the last event occured |
95 | | **company_linkedin_url** | `text` | A company's LinkedIn link |
96 | | **company_industry** | `text` | A company's industry. Eg. Tech, Government, etc. |
97 | | **company_size** | `text` | A company's approximated employee count |
98 | | **company_country** | `text` | A company's country location |
99 | | **company_state** | `text` | A company's state location |
100 | | **interest_start_date** | `text` `format: yyyy-mm-dd` | Date when a company started in the *interest* funnel_stage |
101 | | **investigation_start_date** | `text` `format: yyyy-mm-dd` | Date when a company started in the *investigation* funnel_stage |
102 | | **experimentation_start_date** | `text` `format: yyyy-mm-dd` | Date when a company started in the *experimentation* funnel_stage |
103 | | **ongoing_usage_start_date** | `text` `format: yyyy-mm-dd` | Date when a company started in the *ongoing usage* funnel_stage |
104 | | **inactive_start_date** | `text` `format: yyyy-mm-dd` | Date when a company started in the *inactive* funnel_stage |
105 | | **scarf_url** | `text` `format: uri` | URL to the Scarf dashboard page for this company's activity |
106 | | **package_totals** | `text` | A string of `=` pairs, in query parameter format (i.e., `&` delimited) |
107 | | **tracking_pixel_totals** | `text` | A string of `=` pairs, in query parameter format (i.e., `&` delimited) |
108 |
109 | ## How to Export Company Events
110 |
111 | The documentation for exporting company events can be found in [Export Company Events](https://api-docs.scarf.sh/v2.html#tag/Company/operation/exportEntityCompanyEvents).
112 | Here's and exampe curl request to download company events data.
113 | ```sh
114 | curl -o company-events.csv \
115 | -H "Authorization: Bearer {token}" \
116 | -H "Content-Type: text/csv" \
117 | "https://api.scarf.sh/v2/companies/{owner}/{domain}/events?start_date={start_date}&end_date={end_date}"
118 | ```
119 | The fields for this export can be found [here](#export-fields)
120 |
121 | ## Integrations
122 |
123 | ### Scarf to PostgreSQL
124 |
125 | [GitHub: https://github.com/scarf-sh/scarf-postgres-exporter](https://github.com/scarf-sh/scarf-postgres-exporter)
126 |
127 | #### Overview
128 |
129 | The Scarf to PostgreSQL Exporter is a script designed to pull down your raw Scarf data and send it into a PostgreSQL database. This script is intended to be run as a daily batch job. It provides an automated way to backfill and update your PostgreSQL database with Scarf's enhanced data.
130 |
131 | #### Prerequisites
132 |
133 | - `psql` must be installed and available in your environment (or use the Docker container with everything you need).
134 | - A [Scarf Account](https://app.scarf.sh).
135 | - Your Scarf API token. You can find your API Token from your [user settings page](https://app.scarf.sh/account).
136 |
137 | #### Settings
138 |
139 | The following environment variables are **required**:
140 |
141 | - `SCARF_API_TOKEN`: Your Scarf API access token.
142 | - `SCARF_ENTITY_NAME`: Your Scarf username or the name of your organization.
143 | - `PSQL_CONN_STRING`: The PostgreSQL connection string.
144 |
145 | **optional**
146 |
147 | - `BACKFILL_DAYS`: Number of days to backfill data. Defaults to 31 if not set.
148 |
149 | #### Getting Started
150 |
151 | For more details, you can visit the [GitHub repository](https://github.com/scarf-sh/scarf-postgres-exporter).
152 |
153 | ### Future Integrations
154 |
155 | Integrations are in development, if you have particular data sources you'd like Scarf to integrate with, we'd love to hear from you.
156 |
157 | ## Daily Scheduled Exports
158 | In your organization settings, fill in the details for the export.
159 |
160 | Scheduling an export can also be done with our REST endpoint [https://api.scarf.sh/v2/exports/{owner}/schedule-export](https://api-docs.scarf.sh/v2.html#tag/Packages/operation/scheduleExport)
161 |
162 | We can export both raw events and company rollups.
163 |
164 | After scheduling the export, we send a test file named `scarf-test.csv` to verify connectivity to your bucket. This file will only contain CSV headers. Once connectivity is confirmed, the export process will automatically begin sending files to your bucket at midnight UTC.
165 |
166 | ### AWS S3 Integration
167 |
168 | **Setting up your S3 account**
169 |
170 | The S3 uri that you submit will be considered as the bucket name. Do not specify an object key. The service will generate the object key with the format `-scarf-export--.csv`.
171 |
172 | Create a policy that states we can assume a role. Here's an example of that policy. This example is a highly permissive role. If you want to customize the role, please refer to the proper [AWS documentation](https://docs.aws.amazon.com/AmazonS3/latest/userguide/access-policy-language-overview.html).
173 | ```json
174 | {
175 | "Version": "2012-10-17",
176 | "Statement": [
177 | {
178 | "Effect": "Allow",
179 | "Action": [
180 | "sts:AssumeRole",
181 | "sts:*"
182 | ],
183 | "Resource": "*"
184 | },
185 | {
186 | "Effect": "Allow",
187 | "Action": [
188 | "s3:*"
189 | ],
190 | "Resource": [
191 | "arn:aws:s3:::///*"
192 | ]
193 | }
194 | ]
195 | }
196 | ```
197 | After creating the policy, create a role and attach the policy. Once you've created the role, you should have an ARN that looks like this
198 | ```
199 | arn:aws:iam:::role/
200 | ```
201 | The easiest way to create a role is to pick "AWS Account" in the "Select trusted entity" section. Then in the "An AWS Account", pick "Another AWS Account". This will ask for an account aws account id. This is where you will put in scarf's account id `032190491485`.
202 |
203 | After creating the role, go to the "Trust relationships" and add the following trust policy
204 | ```json
205 | {
206 | "Version": "2012-10-17",
207 | "Statement": [
208 | {
209 | "Effect": "Allow",
210 | "Principal": {
211 | "AWS": "arn:aws:iam::032190491485:user/production-v2-scarf-server"
212 | },
213 | "Action": "sts:AssumeRole"
214 | }
215 | ]
216 | }
217 | ```
218 |
219 | If you want to use an `ExternalId`, your trust policy should be modified to look like the example below:
220 | ```json
221 | {
222 | "Version": "2012-10-17",
223 | "Statement": [
224 | {
225 | "Effect": "Allow",
226 | "Principal": {
227 | "AWS": "arn:aws:iam::032190491485:user/production-v2-scarf-server"
228 | },
229 | "Action": "sts:AssumeRole",
230 | "Condition": {
231 | "StringEquals": {
232 | "sts:ExternalId": ""
233 | }
234 | }
235 | }
236 | ]
237 | }
238 | ```
239 |
240 | The ARN role is what you will need in the `arn_role` [api field](https://api-docs.scarf.sh/v2.html#tag/Packages/operation/scheduleExport).
241 |
242 | This is not an exhaustive documentation of how to setup a shared s3 bucket. Please refer to the [AWS documentation](https://docs.aws.amazon.com/AmazonS3/latest/userguide/access-policy-language-overview.html) for more information.
243 |
244 | ### Google Storage Integration
245 |
246 | Before going through the steps of setting up an integration with scarf, ensure your google cloud account has `Service Account Credentials API` enabled. We will be using [service account impersonation](https://cloud.google.com/docs/authentication/use-service-account-impersonation) so we can integrate with your google account.
247 |
248 | Create a service account. You can can do this by following these steps.
249 |
250 | 1. Go to the `IAM & Admin` page.
251 | 2. Select `Service Accounts`.
252 | 3. Click on `+ CREATE SERVICE ACCOUNT`.
253 | 4. Fill in the details.
254 | 5. Grant the service account with the following roles:
255 | * Storage Object User
256 | 6. Click done, and you should be done creating the service account 🎉
257 |
258 | After creating the service account, grant scarf access to that service account by doing the following.
259 |
260 | 1. Select the service account.
261 | 2. Under the `PERMISSIONS` tab, you should see `GRANT ACCESS`. Click on it.
262 | 3. After clicking `GRANT ACCESS`, you should see an input box for `New principals`.
263 | 4. Add our account `storage@scarf-integration.iam.gserviceaccount.com`.
264 | 5. Grant the scarf account the following role:
265 | * Service Account Token Creator
266 |
267 | We will be streaming the content of the exports in chunks and using google storage's [compose api](https://cloud.google.com/storage/docs/composing-objects) to stitch all the chunks in a file. So for a brief moment you might see multiple temporary objects in the bucket you have provided us.
268 |
--------------------------------------------------------------------------------
/docs/event-import.json:
--------------------------------------------------------------------------------
1 | {
2 | "openapi": "3.0.0",
3 | "info": {
4 | "version": "2.0.0",
5 | "title": "External event import API",
6 | "description": "The purpose of this API specification is to facilitate the import of external event data into Scarf."
7 | },
8 | "servers": [
9 | {
10 | "url": "http://api.scarf.sh"
11 | }
12 | ],
13 | "tags": [
14 | {
15 | "name": "External event import",
16 | "description": ""
17 | }
18 | ],
19 | "paths": {
20 | "/v2/packages/{owner}/{package_id}/import": {
21 | "parameters": [
22 | {
23 | "name": "owner",
24 | "in": "path",
25 | "required": true,
26 | "schema": {
27 | "type": "string"
28 | },
29 | "description": "Owner of the event import\n"
30 | },
31 | {
32 | "name": "package_id",
33 | "in": "path",
34 | "required": true,
35 | "schema": {
36 | "type": "string"
37 | },
38 | "description": "Identifies the package to import events for.\n"
39 | }
40 | ],
41 | "post": {
42 | "tags": [
43 | "External event import"
44 | ],
45 | "operationId": "importPackageEvents",
46 | "summary": "Import external package events in bulk\n",
47 | "description": "",
48 | "requestBody": {
49 | "description": "The request body should be a stream of newline-delimited JSON values, where each line in the stream represents a valid JSON object that adheres to the `Event` schema. An `Event` is represented by a JSON object that permits any valid key-value pairs, with the exception of properties prefixed by `$`, which are handled in a distinct manner by Scarf. For additional information, please refer to the `Event` properties.\n",
50 | "x-tie-haskell-request-body-as-stream": true,
51 | "required": true,
52 | "content": {
53 | "application/x-ndjson": {
54 | "schema": {
55 | "$ref": "#/components/schemas/Event"
56 | }
57 | }
58 | }
59 | },
60 | "responses": {
61 | "200": {
62 | "description": "Event import status",
63 | "content": {
64 | "application/json": {
65 | "schema": {
66 | "$ref": "#/components/schemas/EventImport"
67 | }
68 | }
69 | }
70 | },
71 | "403": {
72 | "$ref": "#/components/responses/Unauthorized"
73 | },
74 | "404": {
75 | "$ref": "#/components/responses/NotFound"
76 | }
77 | }
78 | }
79 | },
80 | "/v2/tracking-pixels/{owner}/{tracking_pixel_id}/import": {
81 | "parameters": [
82 | {
83 | "name": "owner",
84 | "in": "path",
85 | "required": true,
86 | "schema": {
87 | "type": "string"
88 | },
89 | "description": "Owner of the event import\n"
90 | },
91 | {
92 | "name": "tracking_pixel_id",
93 | "in": "path",
94 | "required": true,
95 | "schema": {
96 | "type": "string"
97 | },
98 | "description": "Identifies the tracking-pixel to import events for.\n"
99 | }
100 | ],
101 | "post": {
102 | "tags": [
103 | "External event import"
104 | ],
105 | "operationId": "importTrackingPixelEvents",
106 | "summary": "Import external tracking-pixel events in bulk\n",
107 | "description": "",
108 | "requestBody": {
109 | "description": "The request body should be a stream of newline-delimited JSON values, where each line in the stream represents a valid JSON object that adheres to the `Event` schema. An `Event` is represented by a JSON object that permits any valid key-value pairs, with the exception of properties prefixed by `$`, which are handled in a distinct manner by Scarf. For additional information, please refer to the `Event` properties.\n",
110 | "x-tie-haskell-request-body-as-stream": true,
111 | "required": true,
112 | "content": {
113 | "application/x-ndjson": {
114 | "schema": {
115 | "$ref": "#/components/schemas/Event"
116 | }
117 | }
118 | }
119 | },
120 | "responses": {
121 | "200": {
122 | "description": "Event import status",
123 | "content": {
124 | "application/json": {
125 | "schema": {
126 | "$ref": "#/components/schemas/EventImport"
127 | }
128 | }
129 | }
130 | },
131 | "403": {
132 | "$ref": "#/components/responses/Unauthorized"
133 | },
134 | "404": {
135 | "$ref": "#/components/responses/NotFound"
136 | }
137 | }
138 | }
139 | },
140 | "/v2/imports/{owner}/{event_import_id}/abort": {
141 | "parameters": [
142 | {
143 | "name": "owner",
144 | "in": "path",
145 | "required": true,
146 | "schema": {
147 | "type": "string"
148 | },
149 | "description": "Owner of the event import\n"
150 | },
151 | {
152 | "name": "event_import_id",
153 | "in": "path",
154 | "required": true,
155 | "schema": {
156 | "type": "string",
157 | "x-tie-haskell-type": "Data.UUID.UUID"
158 | },
159 | "description": "Id of the event import to be aborted\n"
160 | }
161 | ],
162 | "post": {
163 | "tags": [
164 | "External event import"
165 | ],
166 | "operationId": "abortEventImport",
167 | "summary": "Abort event import\n",
168 | "responses": {
169 | "204": {
170 | "description": "Aborts the an event import"
171 | },
172 | "403": {
173 | "$ref": "#/components/responses/Unauthorized"
174 | },
175 | "404": {
176 | "$ref": "#/components/responses/NotFound"
177 | }
178 | }
179 | }
180 | },
181 | "/v2/imports/{owner}/{event_import_id}/log": {
182 | "parameters": [
183 | {
184 | "name": "owner",
185 | "in": "path",
186 | "required": true,
187 | "schema": {
188 | "type": "string"
189 | },
190 | "description": "Owner of the event import.\n"
191 | },
192 | {
193 | "name": "event_import_id",
194 | "in": "path",
195 | "required": true,
196 | "schema": {
197 | "type": "string"
198 | },
199 | "description": "Id of the event import to retrieve logs for.\n"
200 | }
201 | ],
202 | "get": {
203 | "tags": [
204 | "External event import"
205 | ],
206 | "summary": "Retrieve the import log for an event import",
207 | "description": "The import log records any errors or warnings that occur during the import process, such as missing required fields\nor deserialization errors.\n",
208 | "operationId": "getImportLogs",
209 | "responses": {
210 | "200": {
211 | "description": "Retrieve the logs for an import.",
212 | "content": {
213 | "application/x-ndjson": {
214 | "schema": {
215 | "$ref": "#/components/schemas/ImportLog"
216 | }
217 | }
218 | }
219 | },
220 | "403": {
221 | "$ref": "#/components/responses/Unauthorized"
222 | },
223 | "404": {
224 | "$ref": "#/components/responses/NotFound"
225 | }
226 | }
227 | }
228 | },
229 | "/v2/imports/{owner}": {
230 | "parameters": [
231 | {
232 | "name": "owner",
233 | "in": "path",
234 | "required": true,
235 | "schema": {
236 | "type": "string"
237 | },
238 | "description": "Owner of the event import.\n"
239 | },
240 | {
241 | "name": "status",
242 | "in": "query",
243 | "required": false,
244 | "style": "form",
245 | "explode": true,
246 | "schema": {
247 | "type": "array",
248 | "items": {
249 | "$ref": "#/components/schemas/EventImportStatus"
250 | }
251 | },
252 | "description": "An optional filter to specify the status of the event import.\n"
253 | },
254 | {
255 | "name": "after",
256 | "in": "query",
257 | "schema": {
258 | "type": "string",
259 | "x-tie-haskell-type": "Data.UUID.UUID"
260 | },
261 | "description": "A cursor that is used for pagination.\n"
262 | },
263 | {
264 | "name": "per_page",
265 | "in": "query",
266 | "required": false,
267 | "schema": {
268 | "type": "integer",
269 | "example": 30
270 | },
271 | "description": "A cursor used for pagination\n"
272 | }
273 | ],
274 | "get": {
275 | "tags": [
276 | "External event import"
277 | ],
278 | "operationId": "getEventImports",
279 | "summary": "Retrieve a list of event imports\n",
280 | "responses": {
281 | "200": {
282 | "description": "A list of event imports",
283 | "content": {
284 | "application/json": {
285 | "schema": {
286 | "$ref": "#/components/schemas/EventImports"
287 | }
288 | }
289 | }
290 | },
291 | "403": {
292 | "$ref": "#/components/responses/Unauthorized"
293 | },
294 | "404": {
295 | "$ref": "#/components/responses/NotFound"
296 | }
297 | }
298 | }
299 | },
300 | "/v2/imports/{owner}/{event_import_id}": {
301 | "parameters": [
302 | {
303 | "name": "owner",
304 | "in": "path",
305 | "required": true,
306 | "schema": {
307 | "type": "string"
308 | },
309 | "description": "Owner of the event import.\n"
310 | },
311 | {
312 | "name": "event_import_id",
313 | "in": "path",
314 | "required": true,
315 | "schema": {
316 | "type": "string",
317 | "x-tie-haskell-type": "Data.UUID.UUID"
318 | },
319 | "description": "Id of the event import to retrieve.\n"
320 | }
321 | ],
322 | "get": {
323 | "tags": [
324 | "External event import"
325 | ],
326 | "operationId": "getEventImport",
327 | "summary": "Retrieve a specific event import\n",
328 | "responses": {
329 | "200": {
330 | "description": "The Event import that matches the specified event import id.\n",
331 | "content": {
332 | "application/json": {
333 | "schema": {
334 | "$ref": "#/components/schemas/EventImport"
335 | }
336 | }
337 | }
338 | },
339 | "403": {
340 | "$ref": "#/components/responses/Unauthorized"
341 | },
342 | "404": {
343 | "$ref": "#/components/responses/NotFound"
344 | }
345 | }
346 | }
347 | }
348 | },
349 | "components": {
350 | "schemas": {
351 | "EventImports": {
352 | "type": "object",
353 | "properties": {
354 | "event_imports": {
355 | "type": "array",
356 | "items": {
357 | "$ref": "#/components/schemas/EventImport"
358 | }
359 | }
360 | }
361 | },
362 | "EventImport": {
363 | "type": "object",
364 | "required": [
365 | "id"
366 | ],
367 | "properties": {
368 | "id": {
369 | "type": "string"
370 | },
371 | "owner": {
372 | "type": "string"
373 | },
374 | "status": {
375 | "$ref": "#/components/schemas/EventImportStatus"
376 | },
377 | "events_total": {
378 | "type": "integer"
379 | },
380 | "events_successfully_imported": {
381 | "type": "integer"
382 | },
383 | "events_failed_to_import": {
384 | "type": "integer"
385 | },
386 | "error_log_sample": {
387 | "type": "array",
388 | "items": {
389 | "$ref": "#/components/schemas/ImportLog"
390 | }
391 | },
392 | "warning_log_sample": {
393 | "type": "array",
394 | "items": {
395 | "$ref": "#/components/schemas/ImportLog"
396 | }
397 | },
398 | "created_at": {
399 | "type": "string",
400 | "format": "date-time"
401 | },
402 | "updated_at": {
403 | "type": "string",
404 | "format": "date-time"
405 | }
406 | }
407 | },
408 | "EventImportStatus": {
409 | "type": "string",
410 | "enum": [
411 | "importing",
412 | "done",
413 | "aborted"
414 | ]
415 | },
416 | "Event": {
417 | "type": "object",
418 | "required": [
419 | "$time"
420 | ],
421 | "properties": {
422 | "$time": {
423 | "type": "string",
424 | "format": "date-time",
425 | "description": "Timestamp indicating when the event occurred.\n",
426 | "x-tie-haskell-name": "time"
427 | },
428 | "$unique_id": {
429 | "type": "string",
430 | "description": "Unique identifier that uniquely identifies the event and is used \nfor de-duplication purposes, if provided.\n",
431 | "x-tie-haskell-name": "unique_id"
432 | },
433 | "$package": {
434 | "type": "string",
435 | "description": "Package identifier that identifies the package to which this event belongs.\n",
436 | "x-tie-haskell-name": "package"
437 | },
438 | "$tracking_pixel": {
439 | "type": "string",
440 | "description": "Tracking pixel identifier that identifies the tracking pixel to which this event belongs.\n",
441 | "x-tie-haskell-name": "tracking_pixel"
442 | },
443 | "$version": {
444 | "type": "string",
445 | "description": "If provided, this field tracks the version of the package download.\n",
446 | "x-tie-haskell-name": "version"
447 | },
448 | "$type": {
449 | "type": "string",
450 | "description": "A flexible event type that allows for free-form values.\n",
451 | "x-tie-haskell-name": "type_"
452 | },
453 | "$remote_address": {
454 | "type": "string",
455 | "description": "Remote address of the event, which is used to retrieve IP-related metadata.\n",
456 | "x-tie-haskell-name": "remote_address"
457 | },
458 | "$user_agent": {
459 | "type": "string",
460 | "description": "Value of the client's user-agent header, which is used to extract metadata related to the client.\n",
461 | "x-tie-haskell-name": "user_agent"
462 | },
463 | "$domain": {
464 | "type": "string",
465 | "description": "Domain on which the event occurred.\n",
466 | "x-tie-haskell-name": "domain"
467 | },
468 | "$referrer": {
469 | "type": "string",
470 | "description": "Referrer of the client when the event occurred.\n",
471 | "x-tie-haskell-name": "referrer"
472 | },
473 | "$headers": {
474 | "type": "array",
475 | "items": {
476 | "type": "object",
477 | "properties": {
478 | "name": {
479 | "type": "string"
480 | },
481 | "value": {
482 | "type": "string"
483 | }
484 | }
485 | },
486 | "description": "Headers of the client's request when the event occurred.\n",
487 | "x-tie-haskell-name": "headers"
488 | }
489 | },
490 | "additionalProperties": true
491 | },
492 | "ImportLog": {
493 | "discriminator": {
494 | "propertyName": "type",
495 | "mapping": {
496 | "progress": "#/components/schemas/ImportLogProgressReport",
497 | "failed-to-decode": "#/components/schemas/ImportLogFailedToDecode",
498 | "artifact-not-found": "#/components/schemas/ImportLogArtifactNotFound"
499 | }
500 | },
501 | "oneOf": [
502 | {
503 | "$ref": "#/components/schemas/ImportLogProgressReport"
504 | },
505 | {
506 | "$ref": "#/components/schemas/ImportLogFailedToDecode"
507 | },
508 | {
509 | "$ref": "#/components/schemas/ImportLogArtifactNotFound"
510 | }
511 | ]
512 | },
513 | "ImportLogType": {
514 | "type": "string",
515 | "enum": [
516 | "progress",
517 | "failed-to-decode",
518 | "artifact-not-found"
519 | ]
520 | },
521 | "ImportLogClass": {
522 | "type": "string",
523 | "enum": [
524 | "info",
525 | "warning",
526 | "error"
527 | ]
528 | },
529 | "ImportLogBase": {
530 | "required": [
531 | "type",
532 | "class"
533 | ],
534 | "properties": {
535 | "type": {
536 | "$ref": "#/components/schemas/ImportLogType"
537 | },
538 | "class": {
539 | "$ref": "#/components/schemas/ImportLogClass"
540 | },
541 | "line": {
542 | "type": "integer"
543 | },
544 | "human_friendly_message": {
545 | "type": "string"
546 | }
547 | }
548 | },
549 | "ImportLogProgressReport": {
550 | "allOf": [
551 | {
552 | "$ref": "#/components/schemas/ImportLogBase"
553 | },
554 | {
555 | "type": "object",
556 | "properties": {
557 | "events_count": {
558 | "type": "integer"
559 | },
560 | "failed_events_count": {
561 | "type": "integer"
562 | }
563 | }
564 | }
565 | ]
566 | },
567 | "ImportLogFailedToDecode": {
568 | "allOf": [
569 | {
570 | "$ref": "#/components/schemas/ImportLogBase"
571 | }
572 | ]
573 | },
574 | "ImportLogArtifactNotFound": {
575 | "allOf": [
576 | {
577 | "$ref": "#/components/schemas/ImportLogBase"
578 | },
579 | {
580 | "type": "object",
581 | "properties": {
582 | "package_id": {
583 | "type": "string"
584 | },
585 | "tracking_pixel_id": {
586 | "type": "string"
587 | }
588 | }
589 | }
590 | ]
591 | }
592 | },
593 | "responses": {
594 | "NotFound": {
595 | "description": "Not found"
596 | },
597 | "Unauthorized": {
598 | "description": "Unauthorized access"
599 | }
600 | }
601 | }
602 | }
603 |
--------------------------------------------------------------------------------
/docs/event-import.md:
--------------------------------------------------------------------------------
1 | # Importing Events
2 |
3 | _See API Docs here: [api-docs.scarf.sh/v2.html#tag/External-event-import](https://api-docs.scarf.sh/v2.html#tag/External-event-import)_
4 |
5 | You can bring your events from other applications and platforms into Scarf with the Event Import API. Your imported events will be enriched by Scarf asynchronously, and your enriched data will be available through the app and the [Data Export.](/data-export)
6 |
7 | We provide three main ways to import events:
8 |
9 | - Importing into [a single package](https://api-docs.scarf.sh/v2.html#tag/External-event-import/operation/importPackageEvents)
10 | - Importing into [a single pixel](https://api-docs.scarf.sh/v2.html#tag/External-event-import/operation/importTrackingPixelEvents)
11 | - Importing into [multiple packages and pixels by providing IDs in each row](https://api-docs.scarf.sh/v2.html#tag/External-event-import/operation/importEvents)
12 |
13 |
14 | !!! Warning
15 | The Event Import system looks for fields **prefixed with `$`** as specific pre-defined fields which may impact the behavior of how the event is imported. Some `$` fields are required. For instance, you will be required to provide date-time using the **`$time` field** at minimum (ISO or timestamp), and you may want to provide a unique identifier for each event using `$unique_id` . Note that this `$unique_id` will override previous events if reused. For importing multiple packages and pixels, you will have to provide the relevant ID through the `$package` and `$pixel` fields. Any fields that are not prefixed with a `$` are treated as custom variables that will not impact any data processing otherwise. See the API docs for more details: [https://api-docs.scarf.sh/v2.html#tag/External-event-import/operation/importEvents](https://api-docs.scarf.sh/v2.html#tag/External-event-import/operation/importEvents)
16 |
17 |
18 |
19 | !!! Danger
20 | The Event Import API is meant to handle large, bundled imports, and is limited to **15 concurrent imports**. Past this limit, you will get a *422: too many active imports* error. To avoid running into this problem, make sure to batch your imports if you have automation to bring data into Scarf.
21 |
22 |
23 | ## Getting Started
24 |
25 | To get started, create packages and pixels in your account to import data into them. You will need to get IDs from the packages and pixels you want to import data into.
26 |
27 | ### Importing into a single package
28 |
29 | You will need to get the ID of your package from Scarf from the app or the [List packages endpoint](https://api-docs.scarf.sh/v2.html#tag/Packages/operation/getPackages). Once you have your ID, you can start sending your events to Scarf from our [Package Event Import endpoint.](https://api-docs.scarf.sh/v2.html#tag/External-event-import/operation/importPackageEvents)
30 |
31 |
32 | !!! Info
33 | You may want to save the ID returned from the Imports API, in case you need to cancel the import or see its status later. You can also call the imports list endpoint to get a list of your imports and their statuses even if you don’t save the ID from here.
34 |
35 |
36 | _Example_
37 |
38 | [api.scarf.sh/v2/packages/{owner}/{package_id}/import](https://api-docs.scarf.sh/v2.html#tag/External-event-import/operation/importPackageEvents)
39 |
40 | _events.ndjson_
41 |
42 | ```json
43 | {"$remote_address":"152.241.796.177","$time":"2024-06-04T00:00:00Z","$unique_id":"c20b1271-fb3f-abfa-df12-ef3cda4b2aa0"}
44 | {"$remote_address":"600.188.717.651","$time":"2024-06-01T00:00:00Z","$unique_id":"9053a19a-15a9-3695-bd37-b055a45949c1"}
45 | {"$remote_address":"665.921.984.205","$time":"2024-06-25T00:00:00Z","$unique_id":"09b5b69a-0af0-8002-2c2b-39df3d5685a4"}
46 | ```
47 |
48 | _import-to-package.bash_
49 |
50 | ```bash
51 | #!/usr/bin/env bash
52 |
53 | curl -v \
54 | -H "Authorization: Bearer {token}" \
55 | -H "Content-Type: application/ndjson" \
56 | -X POST https://api.scarf.sh/v2/packages/YourOrg/abc01234-0000-0000-0000-000000000000/import \
57 | --data-binary @events.ndjson
58 | ```
59 |
60 | This will import three events into the package with ID `abc01234-…` .
61 |
62 | ### Importing into multiple packages and pixels
63 |
64 | Importing into multiple packages and pixels is the same as above, but require IDs from your packages and pixels. Make sure to include them in your events when your bring them into Scarf through the [Multi-Artifact Event Import endpoint.](https://api-docs.scarf.sh/v2.html#tag/External-event-import/operation/importEvents)
65 |
66 | _Example_
67 |
68 | [api.scarf.sh/v2/{owner}/import](https://api-docs.scarf.sh/v2.html#tag/External-event-import/operation/importEvents)
69 |
70 | _events.ndjson_
71 |
72 | ```json
73 | {"$package":"970493a1-4ca0-4a4d-a085-fdce578e5a08","$remote_address":"152.241.796.177","$time":"2024-06-04T00:00:00Z","$unique_id":"c20b1271-fb3f-abfa-df12-ef3cda4b2aa0"}
74 | {"$package":"970493a1-4ca0-4a4d-a085-fdce578e5a08","$remote_address":"600.188.717.651","$time":"2024-06-01T00:00:00Z","$unique_id":"9053a19a-15a9-3695-bd37-b055a45949c1"}
75 | {"$package":"970493a1-4ca0-4a4d-a085-fdce578e5a08","$remote_address":"665.921.984.205","$time":"2024-06-25T00:00:00Z","$unique_id":"09b5b69a-0af0-8002-2c2b-39df3d5685a4"}
76 | ```
77 |
78 | _import-multiple-artifacts.bash_
79 |
80 | ```bash
81 | #!/usr/bin/env bash
82 |
83 | curl -v \
84 | -H "Authorization: Bearer {token}" \
85 | -H "Content-Type: application/ndjson" \
86 | -X POST https://api.scarf.sh/v2/YourOrg/import
87 | --data-binary @events.ndjson
88 | ```
89 |
90 | This will import three events into the package with ID `abc01234-…` .
91 |
92 | ### Importing compressed files
93 | Compress your file by doing the following command
94 | ```bash
95 | gzip -k events.ndjson
96 | ```
97 | This will output `events.ndjson.gz` and retain the uncompressed file.
98 |
99 | Here's an example of how to import a compressed file via curl. Reference the compressed file and make sure to specify the `Content-Encoding` header to `gzip` so our api will recognize that a compressed file is being imported.
100 | ```bash
101 | #!/usr/bin/env bash
102 |
103 | curl -v \
104 | -H "Authorization: Bearer {token}" \
105 | -H "Content-Type: application/ndjson" \
106 | -H "Content-Encoding: gzip" \
107 | -X POST https://api.scarf.sh/v2/packages/YourOrg/abc01234-0000-0000-0000-000000000000/import \
108 | --data-binary @events.ndjson.gz
109 | ```
110 |
111 | ## Checking Import Status
112 |
113 | To check the status of your imports, you can use the [Event Imports List endpoint.](https://api-docs.scarf.sh/v2.html#tag/External-event-import/operation/getEventImports)
114 |
115 | _Example_
116 |
117 | [api.scarf.sh/v2/imports/{owner}](https://api-docs.scarf.sh/v2.html#tag/External-event-import/operation/getEventImports)
118 |
119 | `curl [...] "https://api.scarf.sh/v2/imports/YourOrg"`
120 |
121 | ```js
122 | {
123 | "event_imports": [
124 | {
125 | "created_at": "2023-08-04T13:58:26.021037Z",
126 | "error_log_sample": [
127 | {
128 | "class": "error",
129 | "human_friendly_message": "Not a valid JSON object",
130 | "line": 1,
131 | "type": "failed-to-decode"
132 | }
133 | ],
134 | "events_failed_to_import": 1,
135 | "events_successfully_imported": 0,
136 | "events_total": 1,
137 | "id": "0c4f966c-b715-497a-83e2-467254c95e40",
138 | "owner": "YourOrg",
139 | "status": "done",
140 | "updated_at": "2023-08-04T13:58:26.784432Z",
141 | "warning_log_sample": []
142 | }
143 | ]
144 | }
145 | ```
146 |
147 | Alternatively, you can go to the [Imports page](https://app.scarf.sh/organizations/default/imports) in your organization settings to see a history of imports and see sample of warning and error logs:
148 |
149 | 
150 |
151 | ## Cancelling Imports
152 |
153 | If you need to cancel an existing import, you can reference the import by its ID and call the [Abort Event Import endpoint.](https://api-docs.scarf.sh/v2.html#tag/External-event-import/operation/abortEventImport)
154 |
155 | If you haven’t saved the ID from the import request, you can still find it from the [Event Imports List endpoint.](https://api-docs.scarf.sh/v2.html#tag/External-event-import/operation/getEventImports)
156 |
157 | _Example_
158 |
159 | [api.scarf.sh/v2/imports/{owner}/{event_import_id}/abort](https://api-docs.scarf.sh/v2.html#tag/External-event-import/operation/abortEventImport)
160 |
161 | ```bash
162 | $ curl […] -I -X POST "https://api.scarf.sh/v2/imports/YourOrg/abc01234-0000-0000-0000-000000000000/abort"
163 | HTTP/2 204
164 | ```
165 |
--------------------------------------------------------------------------------
/docs/funnel-stages.md:
--------------------------------------------------------------------------------
1 | # Open Source Adoption Funnel Stages
2 |
3 | Scarf analyzes how companies interact with your open-source project to infer their progress toward adopting it. Funnel Stages represent the portion of the user journey that best describes any given company or lead, from the moment they learn of your project, to when they deploy it to production, and beyond.
4 |
5 | All paid subscribers and active trial participants will see a **Funnel Stage** on Company Views/Downloads in your Package and Pixel Analytics. Funnel Stages begin at the most basic level with interest, increasing all the way to ongoing usage.
6 |
7 | 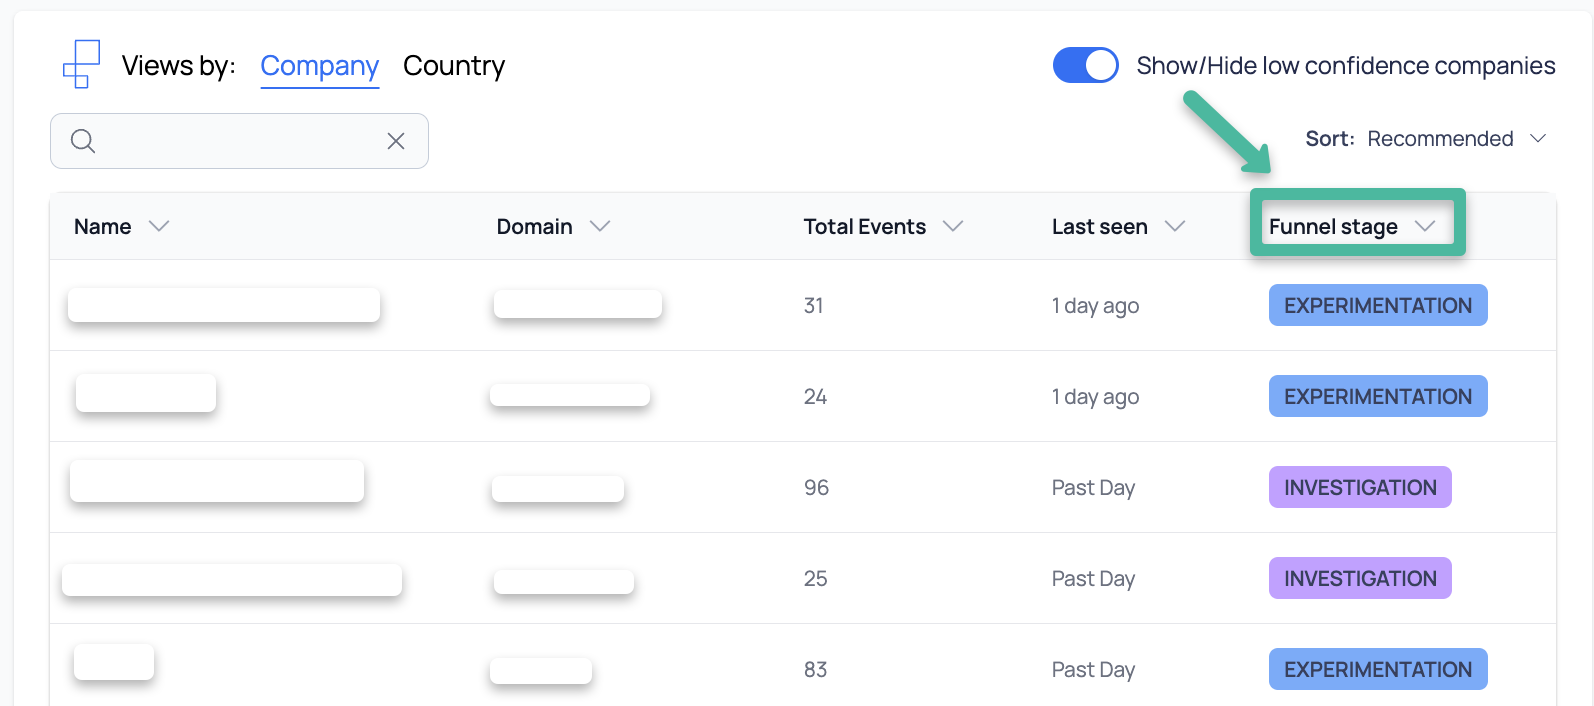
8 |
9 | As events by a user/organization occur, such as views or downloads, Scarf assigns point values to them. Those points add up over time as a user moves into different stages of the funnel. The frequency of activity is also considered, and points can be removed as the time between activities increases and the perceived interest or likelihood to adopt decreases.
10 |
11 | **Scarf’s funnel stages are as follows:**
12 |
13 |
14 | ## Interest
15 |
16 | A company enters this stage following initial events such as viewing your documentation, README, or site (pixel activity only - a download would trigger the investigation stage).
17 |
18 |
19 | ## Investigation
20 |
21 | Enough activity has occurred for us to suspect the user/organization is actively investigating your OSS. This stage includes the occurrence of multiple events such as at least one package download with multiple docs views or at least two weeks of consecutive pixel view activity, and the company has been active in the last 30 days.
22 |
23 |
24 | ## Experimentation
25 |
26 | Sufficient activity has occurred for us to suspect the company is actively trying your OSS, but might not be relying on it in a production workload yet. Events such as multiple downloads and page views will have occurred over 30 days, or a single download and multiple page views over 60 days. The origanization may be in the development with your OSS, or prototyping, or running internal tests. We don't yet have enough evidence to make stronger conclusions about production usage.
27 |
28 |
29 | ## Ongoing Usage
30 |
31 | By this stage, Scarf has enough data to conclude the company is using your software in an ongoing manner, potentially in a production environment. Companies in this stage may be ready to become paying customers and should be moved into your sales/marketing pipeline where available. For non-commercial open-source projects, companies in this stage may be good sponsorship targets or valuable advocates in the community. These companies will have event activity over the course of the past 90 days, such as continued downloads or views.
32 |
33 |
34 | ## Inactive
35 |
36 | Companies may move into an inactive stage when activity drops off and does not resume over 60 or more days. If activity resumes, the company will return to the last active stage.
37 |
38 |
39 | # Recommended Sort
40 |
41 | The **Recommended Sort** reorders the list of companies in the activity table in descending order, first by their point value, then by number of events, and finally by most recent to oldest last seen value. This sort option lets you view the companies most worthy of your attention first.
42 |
43 | 
44 |
45 |
46 | # Company Journey
47 |
48 | When selecting a company to view in greater detail from any of the Company analytics charts, Administrators will see greater detail within the **Company Journey**. The company’s current funnel stage will be displayed in the top left, next to STATUS. Hover over the graphical calendar in the Company Journey to see details of the views and downloads that occurred over time. Below the graphical calendar are aggregated views of the total activity within each stage, including the current stage.
49 |
50 | 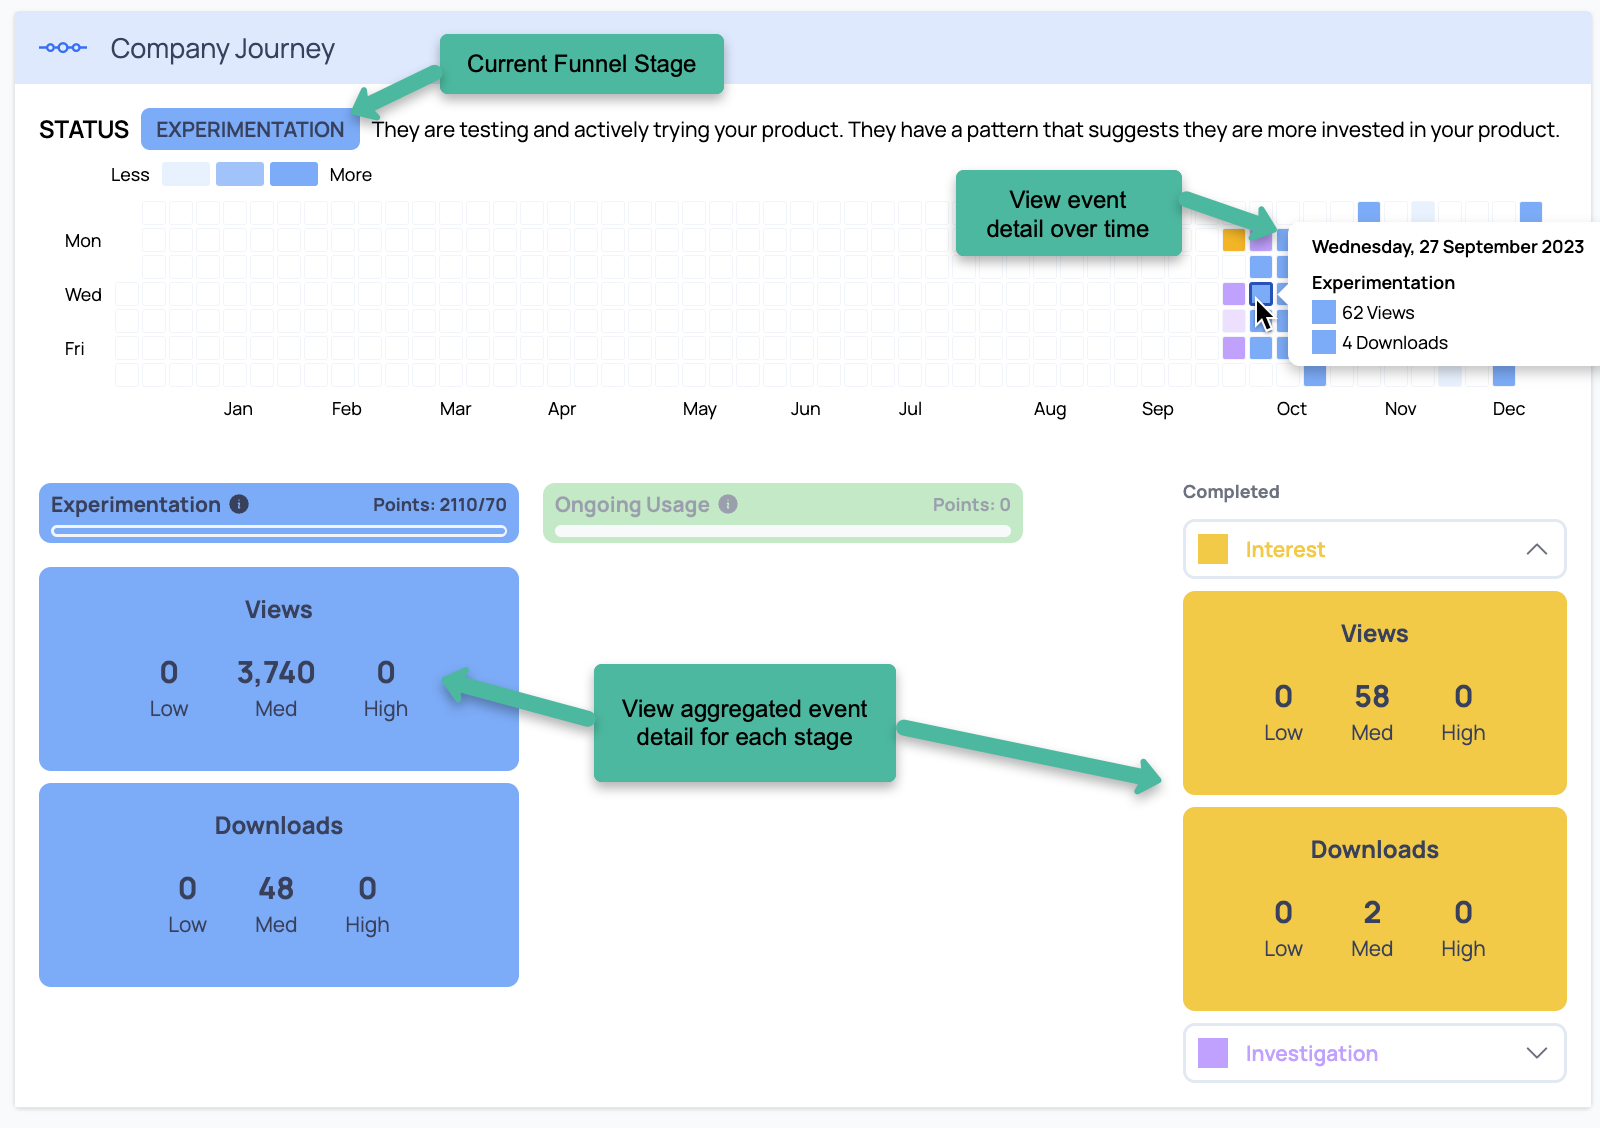
51 |
52 |
53 | # Event Importance
54 |
55 | **Event Importance** allows you to determine the weight that certain events carry over others. For instance, a download should carry more weight than a page view on your public website as it shows higher interest. This importance can be defined when setting up a new pixel or package and can be edited anytime. The importance will default to medium.
56 |
57 | You’ll see the Event Importance noted on the Events detail charts.
58 |
59 | 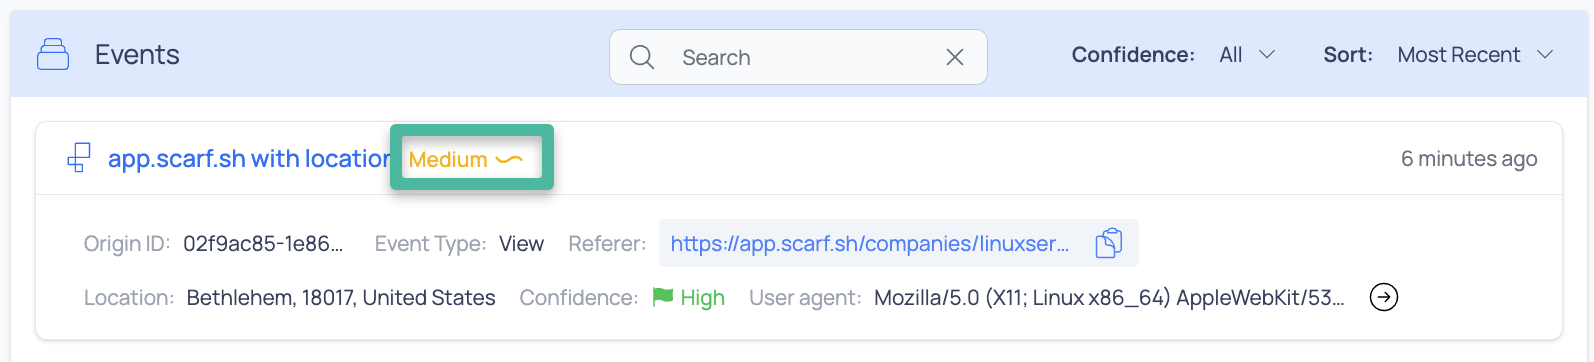
60 |
61 | Use the Event Importance slider to set or edit the importance of a Package or Pixel.
62 |
63 | 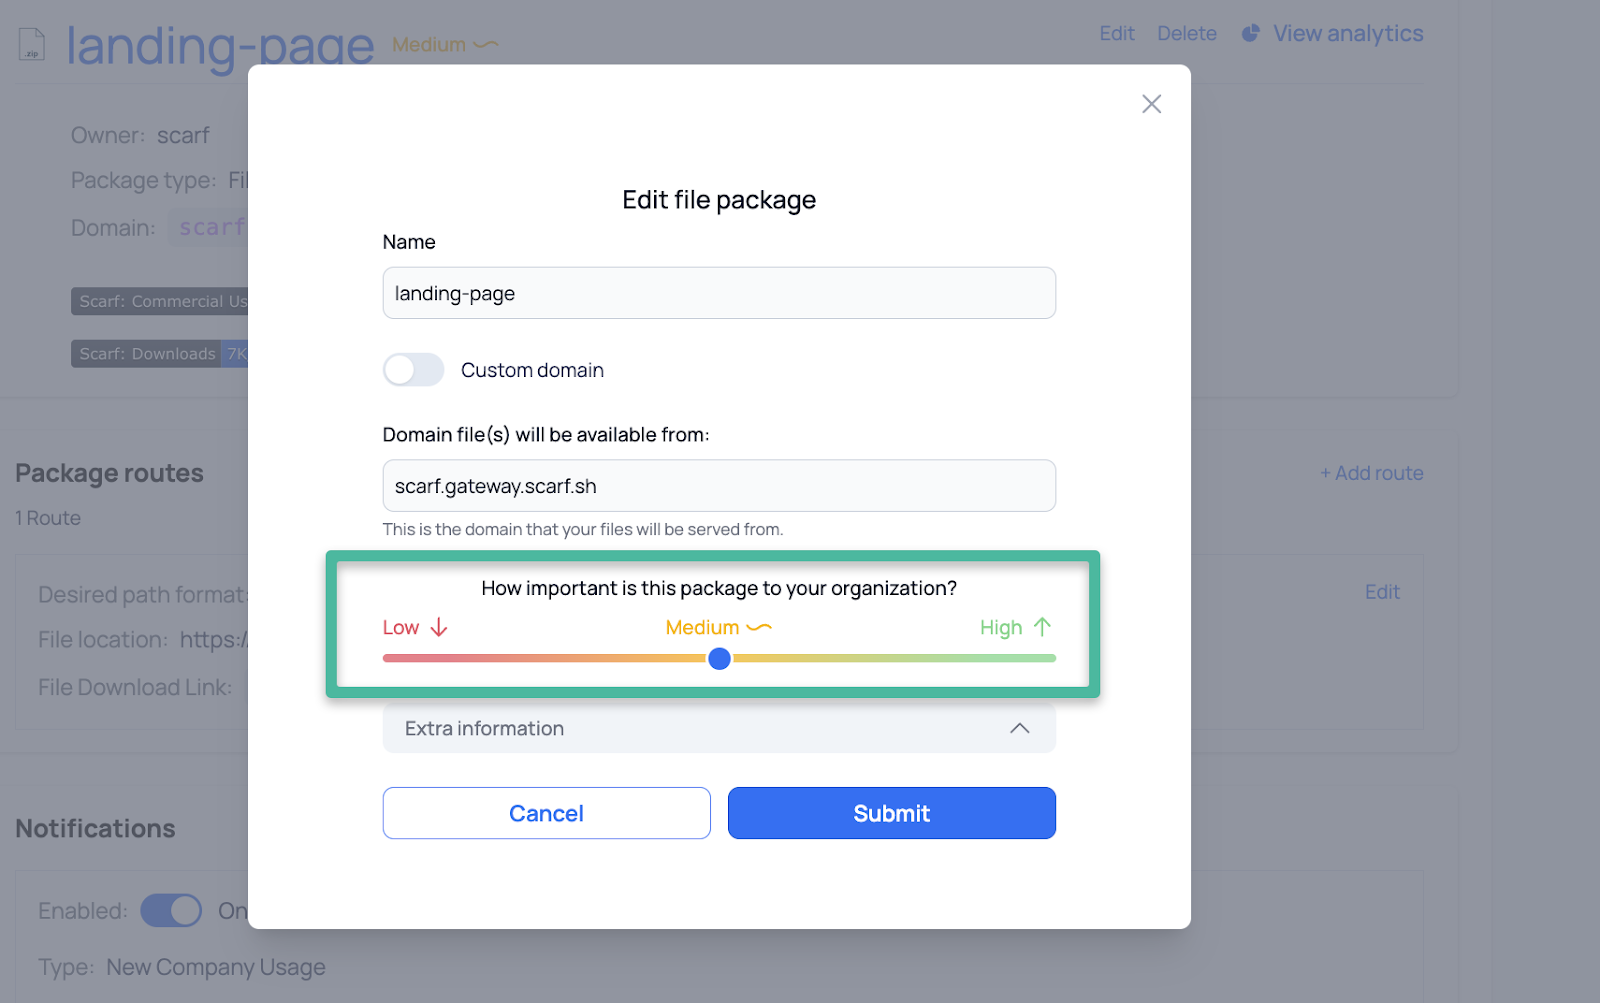
64 |
65 |
66 | # Using Your Scarf Funnel Stage Data
67 |
68 | Scarf's data combines lead scoring's best features with intent data. Real-time activity highlights the companies actively researching and testing your open-source software. This data facilitates operationalizing the usage and intent data provided by your Scarf Gateway. Utilize the data to track trends in usage over time to indicate your ideal customer profile, highlight opportunities and risks, such as early indicators of potential churn, or documentation that needs more frequent updating.
69 |
70 | Sudden and/or unexpected changes in activity levels or types may indicate a company looking to make a change. While this change may be good or bad, it is worthy of attention and investigation. Key examples include:
71 |
72 | - A previously consistent user goes inactive
73 |
74 | - An existing paying customer of yours becomes very active with OSS, potentially indicating a downgrade before it actually happens
75 |
76 | - You begin to see more traffic to documents explaining data export by certain users
77 |
78 |
79 | ## Go Even Further with Your Outreach
80 |
81 | If you’re interested in going beyond the company-level data that Scarf provides in our [OQLs](https://docs.scarf.sh/oql/#definition) and Funnel Stages, Scarf can help you procure a list of individuals with contact information that may be good target leads at your target companies. If interested, please [contact Scarf Support](https://cal.com/team/scarf/solutions) to discuss our Lead Generation services.
82 |
--------------------------------------------------------------------------------
/docs/gateway-diagram-end-user-docker.dot:
--------------------------------------------------------------------------------
1 | digraph {
2 | subgraph external_user {
3 | "User" -> "docker.acme.come" [label = "docker pull docker.acme.come/acme/rocket-skates"];
4 | }
5 |
6 | subgraph external_scarf {
7 | "docker.acme.come" -> "gateway.scarf.sh" [label="Via maintainer's CNAME"]
8 | }
9 |
10 | subgraph cluster_internal_scarf {
11 | label = "Scarf Infrastructure"
12 | "gateway.scarf.sh" -> "Scarf Gateway" [label="Request hits Scarf Gateway"];
13 | }
14 |
15 | subgraph cluster_external_deps {
16 | subgraph cluster_registries {
17 | "Scarf Gateway" -> {"GitHub"} [style=dashed]
18 | "Scarf Gateway" -> {"DockerHub"} [label="The request is redirected to the registry configured by the maintainer"]
19 | "Scarf Gateway" -> {"Quay"} [style=dashed]
20 | }
21 | "Scarf Gateway" -> "Let's Encrypt CA" [label="SSL Cert Issuance"]
22 | }
23 | }
24 |
--------------------------------------------------------------------------------
/docs/gateway-diagram-end-user-docker.png:
--------------------------------------------------------------------------------
https://raw.githubusercontent.com/scarf-sh/docs/a6f70e6e4d692ee6d285f387d781918c62fed561/docs/gateway-diagram-end-user-docker.png
--------------------------------------------------------------------------------
/docs/gateway-diagram-end-user-file.dot:
--------------------------------------------------------------------------------
1 | digraph {
2 | subgraph external_user {
3 | "User" -> "downloads.acme.com" [label = "curl -LO https://downloads.acme.com/files/2.2.1/amd64/rocket-skates-amd64-2.2.1.tar.gz"];
4 | }
5 |
6 | subgraph external_scarf {
7 | "downloads.acme.com" -> "gateway.scarf.sh" [label="Via maintainer's CNAME"]
8 | }
9 |
10 | subgraph cluster_internal_scarf {
11 | label = "Scarf Infrastructure"
12 | "gateway.scarf.sh" -> "Scarf Gateway" [label="Request hits Scarf Gateway"];
13 | }
14 |
15 | subgraph cluster_external_deps {
16 | subgraph cluster_registries {
17 | "Scarf Gateway" -> {"AWS S3"} [style=dashed]
18 | "Scarf Gateway" -> {"GitHub Releases"} [label="The request is redirected to the hosting provider configured by the maintainer"]
19 | "Scarf Gateway" -> {"Google Cloud Storage"} [style=dashed]
20 | }
21 | "Scarf Gateway" -> "Let's Encrypt CA" [label="SSL Cert Issuance"]
22 | }
23 | }
24 |
--------------------------------------------------------------------------------
/docs/gateway-diagram-end-user-file.png:
--------------------------------------------------------------------------------
https://raw.githubusercontent.com/scarf-sh/docs/a6f70e6e4d692ee6d285f387d781918c62fed561/docs/gateway-diagram-end-user-file.png
--------------------------------------------------------------------------------
/docs/gateway-diagram-internal-docker.dot:
--------------------------------------------------------------------------------
1 | digraph {
2 | subgraph external_user {
3 | "User" -> "docker.acme.come" [label = "docker pull docker.acme.come/acme/rocket-skates"];
4 | "docker.acme.come" -> "gateway.scarf.sh" [label=""];
5 | }
6 |
7 | subgraph external_scarf {
8 | "Maintainer" -> "Scarf Dashboard";
9 | "Scarf Analytics" -> "Scarf Dashboard" [label="Data is processed and insights are made available to the maintainer"];
10 | "Maintainer" -> "DNS Provider" -> "docker.acme.come" [style=dashed];
11 | "docker.acme.come" -> "gateway.scarf.sh" [style=dashed label="Maintainer set a CNAME from their own domain to Scarf"]
12 | }
13 |
14 | subgraph cluster_internal_scarf {
15 | label = "Scarf Infrastructure"
16 | "gateway.scarf.sh" -> "Scarf Gateway" [label="Request hits Scarf gateway"];
17 | "Scarf Gateway" -> "Scarf Configuration";
18 | "Scarf Configuration" -> "Scarf Gateway";
19 | "Scarf Gateway" -> "Scarf Analytics" [label="Requests aggregated to be asynchronously processed"];
20 | "Scarf Dashboard" -> "Scarf Configuration" [style=dashed label="Maintainers configure the Scarf Gateway to redirect to the correct registry"];
21 | }
22 |
23 | subgraph cluster_external_deps {
24 | subgraph cluster_registries {
25 | "Scarf Gateway" -> {"GitHub"} [style=dashed]
26 | "Scarf Gateway" -> {"DockerHub"} [label="The request is redirected to the registry configured by the maintainer"]
27 | "Scarf Gateway" -> {"Quay"} [style=dashed]
28 | }
29 | "Scarf Gateway" -> "Let's Encrypt CA" [label="SSL Cert Issuance"]
30 | }
31 | }
32 |
--------------------------------------------------------------------------------
/docs/gateway-diagram-internal-docker.png:
--------------------------------------------------------------------------------
https://raw.githubusercontent.com/scarf-sh/docs/a6f70e6e4d692ee6d285f387d781918c62fed561/docs/gateway-diagram-internal-docker.png
--------------------------------------------------------------------------------
/docs/gateway-diagram-internal-file.dot:
--------------------------------------------------------------------------------
1 | digraph {
2 | subgraph external_user {
3 | "User" -> "downloads.acme.com" [label = "curl -LO https://downloads.acme.com/files/2.2.1/amd64/rocket-skates-amd64-2.2.1.tar.gz"];
4 | "downloads.acme.com" -> "gateway.scarf.sh" [label=""];
5 | }
6 |
7 | subgraph external_scarf {
8 | "Maintainer" -> "Scarf Dashboard";
9 | "Scarf Analytics" -> "Scarf Dashboard" [label="Data is processed and insights are made available to the maintainer"];
10 | "Maintainer" -> "DNS Provider" -> "downloads.acme.com" [style=dashed];
11 | "downloads.acme.com" -> "gateway.scarf.sh" [style=dashed label="Maintainer set a CNAME from their own domain to Scarf"]
12 | }
13 |
14 | subgraph cluster_internal_scarf {
15 | label = "Scarf Infrastructure"
16 | "gateway.scarf.sh" -> "Scarf Gateway" [label="Request hits Scarf gateway"];
17 | "Scarf Gateway" -> "Scarf Configuration";
18 | "Scarf Configuration" -> "Scarf Gateway";
19 | "Scarf Gateway" -> "Scarf Analytics" [label="Requests aggregated to be asynchronously processed"];
20 | "Scarf Dashboard" -> "Scarf Configuration" [style=dashed label="Maintainers configure the Scarf Gateway to redirect to the correct hosting provider"];
21 | }
22 |
23 | subgraph cluster_external_deps {
24 | subgraph cluster_registries {
25 | "Scarf Gateway" -> {"AWS S3"} [style=dashed]
26 | "Scarf Gateway" -> {"GitHub Releases"} [label="The request is redirected to the hosting provider configured by the maintainer"]
27 | "Scarf Gateway" -> {"Google Cloud Storage"} [style=dashed]
28 | }
29 | "Scarf Gateway" -> "Let's Encrypt CA" [label="SSL Cert Issuance"]
30 | }
31 | }
32 |
--------------------------------------------------------------------------------
/docs/gateway-diagram-internal-file.png:
--------------------------------------------------------------------------------
https://raw.githubusercontent.com/scarf-sh/docs/a6f70e6e4d692ee6d285f387d781918c62fed561/docs/gateway-diagram-internal-file.png
--------------------------------------------------------------------------------
/docs/gateway-diagram-maintainer-docker.dot:
--------------------------------------------------------------------------------
1 | digraph {
2 | subgraph external_scarf {
3 | "Maintainer" -> "Scarf Dashboard";
4 | "Scarf Analytics" -> "Scarf Dashboard" [label="Data is processed and insights are made available to the maintainer"];
5 | "Maintainer" -> "DNS Provider" [style=dashed label="Maintainer set a CNAME from their own domain to Scarf"];
6 | }
7 |
8 | subgraph cluster_internal_scarf {
9 | label = "Scarf Infrastructure"
10 | "Scarf Configuration" -> "Scarf Gateway";
11 | "Scarf Gateway" -> "Scarf Analytics" [label="Access logs from end-user downloads are aggregated to be asynchronously processed"];
12 | "Scarf Dashboard" -> "Scarf Configuration" [style=dashed label="Maintainers configure the Scarf Gatway to redirect traffic to the correct registry"];
13 | }
14 | }
15 |
--------------------------------------------------------------------------------
/docs/gateway-diagram-maintainer-docker.png:
--------------------------------------------------------------------------------
https://raw.githubusercontent.com/scarf-sh/docs/a6f70e6e4d692ee6d285f387d781918c62fed561/docs/gateway-diagram-maintainer-docker.png
--------------------------------------------------------------------------------
/docs/gateway-diagram-maintainer-file.dot:
--------------------------------------------------------------------------------
1 | digraph {
2 | subgraph external_scarf {
3 | "Maintainer" -> "Scarf Dashboard";
4 | "Scarf Analytics" -> "Scarf Dashboard" [label="Data is processed and insights are made available to the maintainer"];
5 | "Maintainer" -> "DNS Provider" [style=dashed label="Maintainer set a CNAME from their own domain to Scarf"];
6 | }
7 |
8 | subgraph cluster_internal_scarf {
9 | label = "Scarf Infrastructure"
10 | "Scarf Dashboard" -> "Scarf Configuration" [style=dashed label="Maintainers configure the Scarf Gatway to redirect traffic to the correct URL"];
11 | "Scarf Configuration" -> "Scarf Gateway";
12 | "Scarf Gateway" -> "Scarf Analytics" [label="Access logs from user downloads are aggregated to be asynchronously processed"];
13 | }
14 | }
15 |
--------------------------------------------------------------------------------
/docs/gateway-diagram-maintainer-file.png:
--------------------------------------------------------------------------------
https://raw.githubusercontent.com/scarf-sh/docs/a6f70e6e4d692ee6d285f387d781918c62fed561/docs/gateway-diagram-maintainer-file.png
--------------------------------------------------------------------------------
/docs/gcp.md:
--------------------------------------------------------------------------------
1 | # Working with Scarf on Google Cloud
2 |
3 | Scarf offers a variety of ways to integrate into your workflows on Google Cloud, from monitoring your artifacts that are GCP-hosted, eg [Google Artifact Registry](https://cloud.google.com/artifact-registry/docs), to getting data and insights into your GCP-hosted storage systems.
4 |
5 | ## Enhanced download tracking from Google Artifact Registry
6 |
7 | ### Configure your collection
8 |
9 | Scarf offers a way to track container downloads across your entire project and repository by configuring a *Collection*
10 |
11 | To acces Collections, in the top menu click `Tools` > `Collections`.
12 |
13 | 
14 |
15 | You will now be presented with the `Collections` page that give you the options to edit, delete, and create new collections.
16 |
17 | 
18 |
19 | To create a new collection:
20 |
21 | 1. Insert the `Path` that will be matched against on your domain. Artifact Registry images take the form `{project_id}/{repository}/{image}`; well-formed Scarf path patterns will take the form of `your-project-id/*/*` to match against any repository and image in your project_id.
22 | 2. Next, insert a fully concrete `Backend Domain` of the form: `{your-location}-docker.pkg.dev`, eg `us-west1-docker.pkg.dev`. This is where Scarf will redirect your traffic that match the `Public Domain` and `Path` template you set.
23 | 3. Finally, enter the `Public Domain` you'd like to use. This can be `your-organization.docker.scarf.sh` or a custom domain of your choice.
24 |
25 | As soon as your images are pulled, Scarf will create your package entries automatically. No additional configuration is needed as you push new containers to Artifact Registry.
26 |
27 | [Learn more about collections here.](../gateway/#creating-collections)
28 |
29 | ## Enhanced download tracking from Google Cloud Storage
30 |
31 | Create a File Package [as described](../packages/#file-packages) with a few GCP specific attributes.
32 |
33 | For your `File location` template, enter `https://storage.googleapis.com/{bucket_name}/{object_name}`.
34 |
35 | In your `Desired path format`, you can specify arbitrary formats, as long as any variables in your `File location` are also specified. For instance something as simple as:
36 |
37 | ```
38 | /{bucket_name}/{object}
39 | ```
40 |
41 | This can be customized further as needed, or made more concrete for specific buckets or objects. Read more about [File Packages](../gateway/#file-packages) for more information.
42 |
43 |
--------------------------------------------------------------------------------
/docs/getting-started-checklist.md:
--------------------------------------------------------------------------------
1 | # Getting Started Checklist
2 |
3 |
4 | 1. Create a [Scarf account](https://app.scarf.sh/login).
5 | 2. Set up a Scarf Organization for your project. You will see each Organization you belong by clicking on “Organizations” in the top nav or under the dropdown menu at the top right.
6 | 4. Track downloads with Scarf Packages:
7 | 1. **WHAT IS A PACKAGE:** Packages sit in front of downloads creating a redirect (new URL) through the Scarf Gateway to track information about Docker containers, files, npm packages, or Python packages.
8 | 2. Set up a [new package URL](/packages) via the [Scarf Gateway](/gateway) within your Scarf Dashboard.
9 | 4. Point this URL to your current download endpoints.
10 | 5. **IMPORTANT:** Update installation and setup documentation to direct users to use the gateway.
11 | 6. Check that the Package is set up properly by the arifact and seeing that it shows up in your Scarf Dashboard.
12 | 5. Documentation and/or website tracking with a Scarf Pixel:
13 | 1. Create a Scarf [Pixel](/web-traffic)
14 | 2. Embed the Pixel in the HTML for the pages you want analytics for (whether on your site or on third-party sites).
15 | 3. Check that the Pixel is loading by opening the page you’ve embedded it on and seeing that it shows up in your Scarf Dashboard.
16 | 6. Link tracking and social monitoring:
17 | 1. Create a new URL in the [Scarf Gateway](/gateway) as a redirect/link shortener to your website, YouTube, Hacker News, or other sites.
18 | 2. When posting links on social media, use the new Scarf URL instead of the main link. Usage data will then be available in the Scarf Dashboard.
19 | 7. Basic call home functionality:
20 | 1. Create a basic URL in [Scarf Gateway](/gateway) that will act as an endpoint for your applications to ping.
21 | 2. Point the Scarf URL to any page you want to track.
22 | 3. In your software, issue an async web call/ping/or page load using (your favorite tool/library/or command, i.e., curl/libcurl, etc.). **Note:** You can call this on start, daily, every time something runs, up to you. You can throw away the result; the mere background call to open the URL is enough.
23 | 8. After testing the various methods you can use to measure downloads, views, and access with Scarf, build a plan for what you want to track and what sort of data you want to see.
24 | 1. Roll out Scarf tracking to all your projects/sites.
25 | 2. **Protip:** Update your documentation and tutorials to point to your custom Scarf URL.
26 |
--------------------------------------------------------------------------------
/docs/hubspot.md:
--------------------------------------------------------------------------------
1 | # Hubspot
2 |
3 | ## HubSpot Requirements
4 |
5 | - A Scarf account with an Organization set-up and an active Premium Subscription.
6 | - A HubSpot instance.
7 |
8 | ## Required Permissions
9 |
10 | - **Scarf:**
11 | - Owner or Admin Permissions
12 | - **HubSpot:**
13 | - Account with Super Admin permissions
14 |
15 |
16 | ## Implementation Process
17 |
18 | ### Creation of a Scarf Application in HubSpot
19 |
20 | The Scarf integration to HubSpot is a [Private App](https://developers.hubspot.com/docs/guides/apps/private-apps/overview).
21 |
22 | 1. Login to HubSpot as a user with App Marketplace and Developer tools permissions
23 |
24 | 2. Navigate to your `Settings` by clicking the gear icon on the top right.
25 |
26 | 3. In the left sidebar, click on `Integrations` -> then click `Private apps` -> and select `Create a private app`.
27 |
28 |
29 |
30 |
31 |
32 | 4. Provide a name for your application such as “Scarf Connection”, optionally enter a Description such as “Scarf Connection to import usage analytics”.
33 |
34 |
35 |
36 |
37 |
38 | 5. Navigate to the `Scopes` tab and configure the desired scopes for the integration.
39 |
40 |
41 |
42 |
43 |
44 | | Scope Area | Scope Name | Required | Explanation |
45 | |------------|--------------------------------|----------|--------------------------------------------------|
46 | | CRM | `crm.objects.companies.read` | Yes | Required for Scarf to read company objects |
47 | | CRM | `crm.objects.companies.write` | No | Required for Scarf to Create or Update Companies |
48 | | CRM | `crm.objects.contacts.read` | Yes | Required for Scarf to read company objects |
49 | | CRM | `crm.objects.owners.read` | Yes | Required for Scarf to read company objects |
50 | | Other | `sales-email-read` | Yes | Required for Scarf to read company objects |
51 |
52 | 6. Click the `Create App` button in the top right.
53 |
54 | 7. Copy the API token presented and make note of it for the Connection and Authentication step below.
55 |
56 |
57 |
58 |
59 |
60 |
61 | ### Connection and Authentication
62 |
63 | 1. Login to Scarf as a user with Owner or Admin permissions.
64 |
65 | 2. Navigate to `Organization Settings` -> `Integrations`.
66 |
67 |
68 |
69 |
70 |
71 | 3. Select `Connect CRM Instance`, confirm you want to sync companies and click `Finish linking CRM`.
72 |
73 |
74 |
75 |
76 |
77 | 4. Click `HubSpot` from the `Select integration` menu.
78 |
79 |
80 |
81 |
82 | 5. Review the presented data permissions, and click `Next`.
83 |
84 |
85 |
86 |
87 |
88 | 6. When prompted enter your HubSpot Company ID, and click `Next`.
89 |
90 |
91 |
92 |
93 |
94 | 8. You will now be prompted to enter the API Key generated in the Scarf Application stage, if required this can be retrieved from the `Private App Settings` page.
95 |
96 |
97 |
98 |
99 |
100 | 9. Click `Next` and Scarf is now connected to your HubSpot instance.
101 |
102 |
103 | ### Scarf Field Configuration
104 |
105 | The HubSpot connection allows you to pair Scarf Surfaced Companies with Account records in HubSpot, and optionally to create new Account records when Company Matches are surfaced. In addition to account records, Scarf will attempt to publish metrics to the HubSpot Account record if a matching Field is found on the account. If no matching Fields are found on an Account Object, Scarf will not update the record. The Fields Scarf will attempt to publish are enumerated here:
106 |
107 | | Property Label (suggested) | Internal Name (**required**) | Object Type | Description |
108 | |----------------------------|------------------------------------------------|-------------|---------------------------------------------------------------------|
109 | | Scarf Company | `scarf_company_name` | string | Company Name as determined by Scarf Enrichment |
110 | | Scarf Domain | `scarf_company_domain` | string | Primary Internet Domain of the Company |
111 | | Scarf First Seen | `scarf_first_seen` | date | Date of First Event Scarf observed attributed to this Company |
112 | | Scarf Last Seen | `scarf_last_seen` | date | Date of most recent Event Scarf observed attributed to this Company |
113 | | Scarf Funnel Stage | `scarf_funnel_stage` | string | Current [Adoption Funnel Stage](https://docs.scarf.sh/funnel-stages/) of the Company |
114 | | Scarf Total Events | `scarf_total_events_last_30_days` | number | Total observed events in the last 30 days |
115 | | Scarf Total Uniques | `scarf_total_unique_sources_last_30_days` | number | Unique observed Event Sources (endpoints) in the last 30 days |
116 | | Scarf Events MoM | `scarf_total_events_mom` | number | Change in Total Events over the previous Month |
117 | | Scarf Events WoW | `scarf_total_events_wow` | number | Change in Total Events over the previous Week |
118 | | Scarf Sources MoM | `scarf_total_unique_sources_mom` | number | Change in Unique Sources over the previous Month |
119 | | Scarf Sources WoW | `scarf_total_unique_sources_wow` | number | Change in Unique Sources over the Previous Week |
120 |
121 |
122 | ### Create Scarf data fields in HubSpot
123 |
124 | If present and if Write scope has been granted, Scarf will update HubSpot Company records with Scarf [custom properties](https://knowledge.hubspot.com/properties/create-and-edit-properties).
125 |
126 | While logged in as a user with Edit property settings permissions:
127 |
128 | 1. In your HubSpot account, click the `Settings` icon in the top navigation bar.
129 |
130 | 2. In the left sidebar menu, navigate to `Properties`.
131 |
132 | 3. Click the `Select an object` dropdown menu, then select `Company properties`.
133 |
134 |
135 |
136 |
137 |
138 | 4. Create a `Property Label` for each of the fields described above, as desired.
139 |
140 |
141 |
142 |
143 |
144 |
145 | ### Synchronization Frequency
146 |
147 | Scarf currently synchronizes with your CRM nightly. The duration of the sync is dependent on the volume of records paired. Manual Company matches are queued for the next nightly sync.
148 |
149 | ### Configuring the Connection
150 |
151 | Once the CRM connection has been initialized, the Integrations menu will add three configuration options:
152 |
153 | **Enable Scarf to connect Insights to this CRM**
154 | Toggling this to **off** will temporarily disable the CRM integration. While **off** no reading or writing will be attempted.
155 |
156 | **Auto-match to known Accounts from Scarf**
157 | With the integration **enabled**, you have the option to set Scarf to to use text pattern matching to pair existing CRM Accounts with surfaced Scarf Companies. If the setting is **off** then all mapping will be performed manually.
158 |
159 | **Automatically create new Accounts in your CRM**
160 | With the integration **enabled**, you also have the option to set Scarf to attempt to create a new Account record in your CRM when the sync process encounters a Company without a match in the CRM. This will include historical matches as well as any newly surfaced companies.
161 |
162 |
163 |
164 |
165 |
166 |
167 | **NOTE:** By default, all options will be turned on except for Auto-Sync, which will be off. Since Auto-Sync automatically creates records, it is disabled by default to prevent unintended data updates. Users can enable it manually once they have reviewed their setup.
168 |
--------------------------------------------------------------------------------
/docs/index.md:
--------------------------------------------------------------------------------
1 | # Introduction
2 |
3 | Welcome to Scarf's documentation, your one-stop guide for understanding and leveraging our platform's powerful tools to track usage metrics for your open-source software projects.
4 |
5 | ## About
6 |
7 | Scarf provides open-source software maintainers with deep insights about their project's usage. With best-in-class open-source usage analytics and tracking capabilities, Scarf uncovers how and where your software is being utilized, which companies are relying on it, and much more. This data helps maintainers understand their project's reach, identify growth opportunities, and make informed strategic decisions. With its ethos firmly rooted in the open-source community, Scarf is not just a platform but a partner in your software project's journey toward success.
8 |
9 | ## Documentation Sections Overview
10 |
11 | 1. **[Getting Started Checklist](/getting-started-checklist):** Preview the high-level Scarf set up process.
12 | 2. **[Quick Start](/quick-start):** Jumpstart your journey with Scarf. A concise guide to get you up and running with our platform quickly.
13 | 3. **[Scarf Gateway](/gateway):** Understand the nuances of Scarf's secure and powerful gateway.
14 | 4. **[Organizations](/organizations):** Learn how to manage and collaborate with your teams within Scarf's platform.
15 | 5. **[Monthly Tracked Companies (MTCs)](/mtc):** Understand what MTCs are, how MTC quotas work, and how they apply to your organization.
16 | 6. **[Packages](/packages):** Delve into the specifics of working with various Scarf package types, such as Docker, Helm, npm, Python, and more.
17 | 7. **[Scarf SDKs](/package-analytics):** Discover how our Software Development Kits (SDKs) can accelerate your development process.
18 | 8. **[Custom Telemetry](/custom-telemetry):** Track any custom behaviors by sending event data to Scarf from your code.
19 | 9. **[Documentation Insights (Pixels)](/web-traffic):** Uncover insights about your product's usage and onboarding through Scarf's cookie-free pixel tracking.
20 | 10. **[Open Source Qualified Leads (OQLs)](/oql):** Identify organizations and individuals that have engaged with your OSS.
21 | 11. **[Open Source Adoption Funnel Stages](/funnel-stages):** Understand the level of engagement of potential leads.
22 | 12. **[Lead Generation ](/sales-prospecting):** Learn how Scarf can help you connect with key contacts in companies using your OSS to drive revenue growth.
23 | 13. **[Event Import](/event-import):** Bring event data from other applications and platforms into Scarf using the Event Import API.
24 | 14. **[Data Export](/data-export):** Export your data for customized analysis. Explore the potential of data manipulation to suit your needs.
25 | 15. **[CRM Integrations Overview](/crm-overview):** Understand the core concepts that apply to all CRM integrations.
26 | 16. **[Salesforce](/salesforce):** Set up and configure Scarf's native integration with Salesforce.
27 | 17. **[Hubspot](/hubspot):** Set up and configure Scarf's native integration with Hubspot.
28 | 18. **[User Guide & Best Practices](/user_best_practices):** Make a plan to use the data uncovered in your OQLs.
29 | 19. **[Troubleshooting](/troubleshooting):** Find solutions to common issues and questions.
30 | 20. **[API Docs](https://api-docs.scarf.sh/v2.html):** Understand the capabilities of a specific API version and its available endpoints.
31 |
32 | ## Contribution
33 |
34 | Our documentation is an open-source resource hosted on [GitHub](https://github.com/scarf-sh/docs). We welcome and appreciate your contributions to make it even better.
35 |
36 | For engaging discussions, interactive Q&A sessions, and to meet our dynamic community of staff, open-source maintainers, and end-users, join the [Scarf-Community workspace on Slack](https://tinyurl.com/scarf-community-slack).
37 |
38 | Stay updated with Scarf's system status and uptime on our status page [here](https://status.scarf.sh).
39 |
40 | ### Welcome aboard, and happy exploring!
41 |
--------------------------------------------------------------------------------
/docs/mtc.md:
--------------------------------------------------------------------------------
1 | # Monthly Tracked Companies (MTCs)
2 |
3 | Scarf identifies which companies are viewing your documents, downloading your packages, or executing your software, and tracks their activity across the organization. These are referred to as Monthly Tracked Companies (MTCs). Scarf enriches IP addresses with several metadata sources to provide the most accurate data possible.
4 |
5 | ## Consumption of MTCs
6 | MTCs are consumed any time a company is seen for the first time in a given month. For example, if you have purchased 100 MTCs, you will see the first 100 companies that interact with your open source and no further companies will be surfaced for the remainder of the month. MTCs reset on a monthly basis at the start of the calendar month.
7 |
8 | NOTE: There is no way to predict which companies will surface, or how quickly. Companies are surfaced in the order they are seen, until your MTC limit is reached.
9 |
10 | Scarf will always show you the total number of companies interacting with your project at the bottom of the Company Insights page. You can update your plan's MTC quota in your Organization settings. You can also track your MTC usage by day in your Organization settings.
11 |
12 | ## Match Feedback
13 | Match Feedback allows you to confirm, deny, or fix your company matches. Companies marked with negative match feedback will not consume MTCs the following month.
14 |
15 | 
16 |
17 | ## FAQ
18 | Q: How do I know how much of my MTC quota I’ve used?
19 | A: You will see a count of the currently used MTCs at the bottom of the Company Insights page.
20 |
21 | 
22 |
23 | It is also available on the Organization settings page.
24 |
25 | 
26 | 
27 |
28 |
29 | Q: What if I want to see more companies?
30 | A: You can always increase the number of MTCs on your account to see more. If you are using the Scarf Starter package you can add up to 500 MTCs by going into your account Settings > Billing/Subscription and adding more. If you are using any other Scarf package, contact sales or your customer success manager for more information.
31 |
32 | 
33 |
34 | Q: Why do I occasionally see fewer companies on my Scarf home page than I am allocated?
35 | A: Scarf’s home page will always show you metrics from the last 30 days. Because the MTC quota resets at the beginning of each month, there is sometimes a perceived “gap” in the number of companies shown on the home page in the “Events by Company” chart. While the home page is designed to provide an “at-a-glance” overview of overall activity, it may be easier to get the full picture of the companies present within a given period (within the MTC quota) by visiting the Company Insights page.
36 |
37 | Q: When I look at the results on the Company Insights page for last month (using the custom time range), I see that 3,045 of my 5,000 allocated companies are being shown. Why do I not see all 5,000 of my MTCs?
38 | A: Scarf displays the companies present at that point in time that are also present in the current month’s quota. In other words, 3,045 of the companies present last month are also in this month’s data. The remaining companies we matched last month are inactive in the current month’s data. As companies interact with your project in that given month, they will be added to the count until you reach your full MTC quota.
39 |
--------------------------------------------------------------------------------
/docs/oql.md:
--------------------------------------------------------------------------------
1 | # Open Source Qualified Leads ( OQLs )
2 |
3 | ## Definition
4 |
5 | ### What is an Open Source Qualified Lead (OQL)?
6 |
7 | An Open Source Qualified Lead (OQL) is an individual or organization that has shown a measurable level of engagement in open-source communities or projects, indicating a likely interest in a particular product or service that adds value to their open-source activities. This data-driven insight is crucial for identifying growth strategies, developer relations initiatives, and targeted sales or marketing campaigns.
8 |
9 | ### Relevant Content for Further Understanding
10 |
11 | By incorporating these broader concepts into the definition of an OQL, it becomes easier for everyone in an organization to understand and utilize the term effectively.
12 |
13 | #### Lead Generation
14 |
15 | In marketing, lead generation stimulates interest in a product or service to develop a sales pipeline. In the context of open source, this could involve tracking contributions, forum activity, or other community engagement metrics.
16 |
17 | #### Lead Scoring
18 |
19 | This involves assigning a numerical value to each lead based on various factors like their level of interest, fit with the target market, and likelihood of becoming a customer. This could be based on the number of pull requests, issues raised, or other community contributions in the open-source context.
20 |
21 | #### Lead Qualification
22 |
23 | This is the process of filtering leads based on specific criteria such as demographic information and behavioral actions. For OQL, this could involve analyzing the types of open-source projects they are involved in, their level of activity, and their expressed needs or pain points.
24 |
25 | ### Why should you track OQLs?
26 |
27 | - Building a baseline and tracking the growth of your user base
28 | - Planning activities to accelerate the adoption of your open source
29 | - Enriching and expanding the sales pipeline
30 | - Determining potential risk from users leaving your ecosystem
31 |
32 | ### OQL Point System
33 |
34 | #### Page Views
35 |
36 | | Event Value | Points | Limits | Example(s) |
37 | |-------------|--------|--------------------------------------|-------------------|
38 | | Low | 0.25 | ≤ 2 points/day ≤ 10 points/month | Blog post view |
39 | | Medium | 0.5 | ≤ 3 points/day ≤ 20 points/month | Home page view |
40 | | High | 1 | ≤ 5 points/day ≤ 30 points/month | Pricing page view |
41 |
42 | #### Download/Pull/Installs
43 |
44 | | Event Value | Points | Limits | Example(s) |
45 | |-------------|--------|---------------------------------------|-----------------------------------------|
46 | | Low | 2 | ≤ 6 points/day ≤ 30 points/month | Pull `latest` |
47 | | Medium | 5 | ≤ 10 points/day ≤ 50 points/month | Pull a stable community edition release |
48 | | High | 8 | ≤ 16 points/day ≤ 42 points/month | Pull an enterprise edition |
49 |
50 | #### Community activities
51 |
52 | Additional recommended activities and events to be tracked based on community activity.
53 |
54 | | Event Value | Points | Limits | Example(s) |
55 | |-------------|--------|---------------------------------------|-----------------------------|
56 | | Low | 2 | ≤ 2 points/day ≤ 10 points/month | Issue comment reaction |
57 | | Medium | 5 | ≤ 10 points/day ≤ 50 points/month | Slack signup, open an issue |
58 | | High | 8 | ≤ 24 points/day ≤ 48 points/month | Pull Request submitted |
59 |
60 | ### OQL Status Levels
61 |
62 | 1. **Interest** - Just viewing docs or site, any downloads immediately trigger Investigation stage.
63 | 1. Less than 10 points.
64 | 2. Just pixel activity - any downloads trigger Investigation stage.
65 | 2. **Investigation** - Enough activity has occurred for us to suspect the company is actively investigating this open source
66 | 1. Has activily reached more than 10 points but less then 40.
67 | 2. They have downloaded at least 1 package and poked around the docs (multiple pixels).
68 | 3. Or, we see 2 consecutive weeks of pixel activity.
69 | 3. **Experimentation** - Enough activity has occurred for us to suspect the company is actively using this open source software for one or more production systems
70 | 1. Has activity that has reached 40 to 70 points.
71 | 2. Multiple downloads and pixels over the course of 30 days.
72 | 3. Or, single download and multiple pixels over the course of 60 days.
73 | 4. and Active in the last 30 days.
74 | 4. **Ongoing Usage** - Enough activity has been detected for us to suggest that this user may be ready to be a customer and should feed into the sales/marketing pipeline if available. If this is not a commercial open-source project, OQL3 would be a good indicator that this company may be a good sponsorship target or may prove to be a valuable advocate in the in the community.
75 | 1. Has activity that has reached 70+ points.
76 | 2. Continued downloads or pixel fetches, over 90 days of history, active in the last 90 days.
77 | 5. **Inactive** - Former OQL that qualified, but overtime has gone cold or is unverified.
78 | 1. We saw activity at some point, but we haven’t seen anything in 60 days.
79 | 2. Previously reach an Investigation, Experimentation, or Ongoing Usage status, but no longer meets this requirement.
80 |
81 | ## Practical Example:
82 |
83 | There are different ways to build an OQL depending on the project, outcome, and needs. But for our example, let’s say that we determine an OQL should perform the following:
84 |
85 | - Download the software packages more than once over the course of more than 3 days
86 | - Indicating more than merely a passive one-time download.
87 | - Viewing the docs over the course of multiple days
88 | - The more unique people from the same company the better.
89 | - Active participation in 1 or more community channels (Github, Slack, forums, etc)
90 | - This shows more investment in understanding and using the software… but often only 1 out of 10 users will show up here.
91 | - Activity (either downloads, documentation views, Slack messages, etc) within the last 31 days
92 |
93 | Assuming you have seen a single company or person do the above activities, you have high confidence that this company is at least investigating your software.
94 |
95 | We could enrich this data even further by looking at things like:
96 |
97 | - Activities over a 3 month or 6 month period
98 | - This would indicate ongoing usage.
99 | - Ongoing or repeated page views or searches for a specific feature or solution
100 | - This would help identify a potential desire to use or better understand a specific feature. This could also represent a place where they are stuck.
101 | - Page views to pricing or signup pages
102 | - This, combined with ongoing activities over a sustained period, would indicate a strong potential interest for a commercial relationship.
103 |
104 | If you are tracking a company's OQL status over time, this can help you estimate churn and understand potential changes in the sentiment of your project. Consider if you have a user who reached an Ongoing Usage and purchased something from your company. For 2 years this company has maintained this status. Then, for the last 2 months, they have not reached the same status. Why has their download pattern changed? Why did they stop participating in your community? Are they going to move to something else? Knowing this enables you to get ahead of any potential issue.
105 |
106 | ## Sample Setup
107 |
108 | Below we will outline a basic setup for scoring and qualifying OQL’s. We recommend starting with a simple point system to qualify leads over a 30/60/90 day period. In a point system each activity is worth a certain amount of points, once you reach a certain number of points and/or logic gates that moves a lead to the appropriate lead level. We also recommend that you track OQL’s at the company level. Many of the activities will occur from servers and won’t be associated with end user accounts.
109 |
110 | ## FAQ
111 |
112 | ### How is an OQL different from an MQL?
113 |
114 | A marketing qualified lead (MQL) is similar to an OQL but contains different activities and is focused on a different part of a user's journey. While an OQL is tracking user and community activities, the MQL will track interactions with marketing activities. We recommend overlapping webpage visits for both MQL’s and OQL’s, but other than that the OQL is focused on open source adoption, and then the MQL is focused on closing new commercial customers.
115 |
116 | An OQL could become an MQL which could eventually become an sales qualified lead (SQL).
117 |
--------------------------------------------------------------------------------
/docs/organizations.md:
--------------------------------------------------------------------------------
1 | # Organizations
2 |
3 | ## Creating an organization
4 |
5 | If you’re part of a company, open-source team, or have multiple stakeholders managing packages, converting to a Scarf Organization simplifies management and scales better than an individual account.
6 |
7 | To create an organization, in the header menu click on the `Organization` button,
8 |
9 | 
10 |
11 | alternatively, you can access it via the plus icon and selecting `New Organization`
12 |
13 | 
14 |
15 | If you haven't already setup an organization you will be presented with the following screen:
16 |
17 | 
18 |
19 | As you can see you are presented with two options:
20 |
21 | 1. Create Organization: This is if you are happy to keep your user and create a free standing organization.
22 |
23 | 2. Convert Account to organization: If it happens that you've added lots of new packages and found that you'd like to put these under an organization umbrella this is the perfect way to achieve that.
24 |
25 | ## Converting your current account to an organization
26 |
27 | If your current username is what you would like your organization to be called, you can convert your account into an organization. To do this, please follow the steps below:
28 |
29 | From the splash screen shown above click on `Convert Account to organization`. You will be presented with the following:
30 |
31 | 
32 | Click on `Get Started` and you will see:
33 |
34 | 
35 |
36 | You now need to select a new username as your current username will be converted into an organization and the new username will be the owner of this newly created organization. Fill in the other inputs as required.
37 |
38 | Lastly before clicking `Save` be mindful that all of your account’s packages will be transferred to the organization.
39 |
40 | That's it you have now converted your account into an organization, the next screen you will see is the organization screen.
41 |
42 | 
43 |
44 | Now as previously prompted log out and back into your account. You will be presented with the following home page just like when you first open your account. Do not be alarmed, not all is lost it's just that all your data/packages have been transferred to your new organization.
45 | 
46 |
47 | To access these you now have access to new menu items in the top right header menu, it will look as follows:
48 |
49 | 
50 |
51 | Now select the organization and you will see all of your previously created packages and data.
52 |
53 | A little helpful feature is when looking at the top right header menu you will now see two circles. The larger being what organization you are accessing and the smaller one being the user you are doing it with.
54 |
55 | 
56 |
57 | If you ever want to go back to your user then simply select it in the dropdown menu.
58 |
59 |
60 | ## Directly creating an organization
61 | In a very similar fashion to the converting you current account to an organization, simply select the option from the plus icon dropdown menu.
62 | 
63 |
64 | The next screen will prompt you to add your new organization name and other details, click `Save`
65 | 
66 |
67 | Et voilà! You now have new organization
68 |
69 | 
70 |
71 | ## Managing your Organization
72 |
73 | ### Filter Settings
74 |
75 | You can manage Filter settings for your Organization by clicking into Filter Settings on your organization overview.
76 |
77 | ### Data providers
78 |
79 | Scarf partners with 3rd party data providers in order to surface IP-address metadata like the location or company behind any event in your account.
80 |
81 | Scarf's enhanced company matching capabilities feature a Clearbit integration to help us offer best-in-class data quality. Enabling Clearbit for your organization is free! Additional terms apply.
82 |
83 | To enable this Clearbit for your organization, navigate to your organization overview page, and find the section `Toggle Data Providers`. It is not enabled by default.
84 |
85 | 
86 |
87 | **Complementary Clearbit access is already included in your Scarf plan**
88 |
89 | | Scarf Tier | Included Clearbit calls per month |
90 | |------------|----------------------------------------------------------|
91 | | Basic | 10,000 calls/month included |
92 | | Premium | 25,000 calls/month included, with pay-per-usage upgrades |
93 |
94 | For more information about enhanced company insights, [contact our sales team](mailto:help@scarf.sh).
95 |
96 |
97 |
--------------------------------------------------------------------------------
/docs/package-analytics.md:
--------------------------------------------------------------------------------
1 | # Scarf SDKs for library and package authors
2 |
3 | Scarf's programming language SDKs provide observability into the usage of your libraries and language-specific packages. By adding a dependency to scarf-js or another Scarf language-level library, you can gain better data insights into how your package is used, and by which companies.
4 |
5 | ## JavaScript
6 |
7 | ### Features
8 |
9 | - Collects basic installation statistics on `npm install`.
10 | - No dependencies
11 | - Fully transparent to the user. Scarf will log its behavior to the console during installation. It will never silently report analytics for someone that hasn't explictly given permission to do so.
12 | - Never interrupts your package installation. Reporting is done on a best effort basis.
13 |
14 | You can find scarf-js on [GitHub](https://github.com/scarf-sh/scarf-js) or on
15 | [npm](https://www.npmjs.com/package/@scarf/scarf) directly.
16 |
17 | ### Installation
18 |
19 | You'll first need to create a package entry on Scarf. Be sure to select "External library", and set the package type to "npm".
20 |
21 | Once created, add a dependency on this library to your own:
22 |
23 | ```bash
24 | npm i --save @scarf/scarf
25 | ```
26 |
27 | Once your library is published to npm with this change, Scarf will automatically
28 | collect stats on install, no additional code is required!
29 |
30 | Head to your package's dashboard on Scarf to see your reports when available.
31 |
32 | #### How does it work?
33 |
34 | `scarf-js` registers a `postInstall` hook that sends telemetry information. This library has no runtime footprint, it only runs at installation time, when a developer runs `npm install` Continue reading below [here](#what-information-does-scarf-js-send?)
35 |
36 | #### Configuration
37 |
38 | Users of your package will be opted in by default and can opt out by setting the
39 | `SCARF_ANALYTICS=false` environment variable. If you'd prefer to set Scarf analytics
40 | such that users will be opted out by default instead, you can set this by adding an entry
41 | to your `package.json`
42 |
43 |
44 | ```json5
45 | // your-package/package.json
46 |
47 | {
48 | // ...
49 | "scarfSettings": {
50 | "defaultOptIn": false
51 | }
52 | // ...
53 | }
54 | ```
55 |
56 | Scarf will now be opt-out by default, and users can set `SCARF_ANALYTICS=true`
57 | to opt in.
58 |
59 | Regardless of the default state, Scarf will log what it is doing to users who
60 | haven't explictly opted in or out.
61 |
62 | By default, scarf-js will only trigger analytics when your package is installed as a dependency of another package, or is being installed globally. This ensures that scarf-js analytics will not be triggered on `npm install` being run _within your project_. To change this, you can add:
63 |
64 | ```json5
65 | // your-package/package.json
66 |
67 | {
68 | // ...
69 | "scarfSettings": {
70 | "allowTopLevel": true
71 | }
72 | // ...
73 | }
74 | ```
75 |
76 | ### FAQ
77 |
78 | #### What information does scarf-js provide me as a package author?
79 |
80 | - Understanding your user-base
81 | - Which companies and organizations are using your package?
82 | - Is your project growing or shrinking? Where? On which platforms?
83 | - Which versions of your package are being used?
84 |
85 | #### What information does scarf-js send?
86 |
87 | See more [here](#data-collection-and-privacy).
88 |
89 | #### As a user of a package using scarf-js, how can I opt out of analytics?
90 |
91 | Scarf's analytics help support developers of the open source packages you are
92 | using, and provide data insights to help improve their software, so your opt-in is appreciated. However, if you'd like to opt out,
93 | you can add your preference to your project's `package.json`:
94 |
95 |
96 | ```json5
97 | // your-package/package.json
98 |
99 | {
100 | // ...
101 | "scarfSettings": {
102 | "enabled": false
103 | }
104 | // ...
105 | }
106 | ```
107 |
108 | Alternatively, you can set this variable in your environment:
109 |
110 | ```shell
111 | export SCARF_ANALYTICS=false
112 | ```
113 |
114 | Either route will disable Scarf for all packages.
115 |
116 | #### How can I inspect the JSON payload that scarf-js sends?
117 |
118 | scarf-js will run in verbose mode depending on the `SCARF_VERBOSE` environment variable:
119 |
120 | ```shell
121 | export SCARF_VERBOSE=true
122 | ```
123 |
124 | It will print out the JSON payload, as well as any debugging information.
125 |
126 |
127 | #### I distribute a package on npm, and scarf-js is in our dependency tree. Can I disable the analytics for my downstream dependents?
128 |
129 | Yes. By opting out of analytics via `package.json`, any package upstream will have analytics disabled.
130 |
131 | ```json5
132 | // your-package/package.json
133 |
134 | {
135 | // ...
136 | "scarfSettings": {
137 | "enabled": false
138 | }
139 | // ...
140 | }
141 | ```
142 |
143 | Installers of your packages will have scarf-js disabled for all dependencies upstream from yours.
144 |
145 |
146 | #### I have more questions, where is the best place to ask
147 |
148 | [Join us in Slack](https://tinyurl.com/scarf-community-slack), we're more than happy to help.
149 |
150 |
151 | ### Developing
152 |
153 | Setting the environment variable `SCARF_LOCAL_PORT=8080` will configure Scarf to
154 | use http://localhost:8080 as the analytics endpoint host.
155 |
156 | ## Data collection and privacy
157 |
158 | **Scarf does not store any personally identifying information from SDK telemetry data.** Scarf only collects information that is helpful for:
159 |
160 | - Package maintenance
161 | - Identifying which companies are using a particular package, in order to enable support agreements between developers and commercial entities.
162 |
163 | Specifically, scarf-js sends:
164 |
165 | - The operating system you are using.
166 | - Your IP address will be used to look up any available company information. _Scarf does not store the actual IP address_
167 | - Limited dependency tree information. Scarf sends the name and version of the package(s) that directly depend on scarf-js. Additionally, scarf-js will send SHA256-hashed name and version for the following packages in the dependency tree:
168 | - Packages that depend on a package that depends on scarf-js.
169 | - The root package of the dependency tree.
170 | This allows Scarf to provide maintainers with information about which public packages are using theirs, without exposing identifying details of non-public packages.
171 |
172 | ## More languages coming soon
173 |
174 | We're working to build out sibling libraries for various languages beyond JavaScript. If you're
175 | interested in using Scarf in a language we haven't released yet, let us know!
176 |
--------------------------------------------------------------------------------
/docs/packages.md:
--------------------------------------------------------------------------------
1 | # Setting up Scarf Packages
2 |
3 | ## Prerequisites
4 |
5 | - You will need to sign up for a [Scarf account](https://app.scarf.sh/register).
6 |
7 | > **Note:** You can sign up with a valid email address or your GitHub account.
8 |
9 | - To track a container, it must be published to a public registry; eg Docker Hub, GitHub Container Registry.
10 |
11 | > **Note:** This guide will use the `hello-world` [docker image](https://hub.docker.com/_/hello-world).
12 |
13 | ## Docker Packages
14 |
15 | ### Creating a Docker Package
16 |
17 | Using Scarf, users can pull your Docker container images via Scarf Gateway using your custom domain.
18 |
19 | 1. Once signed in to Scarf, navigate to the home page.
20 | 2. Click plus icon in the top navigation, then select `New Package`.
21 | 
22 | 3. In the first drop-down click on the package type you would like to create. For this section you will click `Docker`.
23 | 
24 | 4. Enter the current pull command for your Docker container.
25 |
26 | ```bash
27 | # `hello-world` package
28 |
29 | docker pull hello-world
30 | ```
31 |
32 | 
33 |
34 | 5. Optional: You can add a custom domain or use the domain provided by Scarf Gateway.
35 | 6. Click the `Submit` button to be redirected to a success screen with some additional information as to what you can do next.
36 | 7. Click on on `Go to your package` to view your package details view.
37 |
38 | 
39 |
40 | Now you’re all set to start tracking your Docker images with Scarf.
41 | Any time your image is downloaded, Scarf will report the following information:
42 |
43 | - System and OS statistics of your users
44 | - Company information of your users
45 | - Downloads by versions/tags
46 |
47 | In the next section, you will create a tracking pixel that can be added to your project’s documentation or any other web properties associated with your project.
48 |
49 | ### Downloading Docker Packages
50 |
51 | In this section you will download your package with the pull command found in your package dashboard to start fetching data.
52 |
53 | 1. Navigate to your package details view.
54 |
55 | 
56 |
57 | 3. Copy the Pull command.
58 | 4. Navigate to a terminal on your computer and run the Pull command.
59 |
60 | 
61 |
62 | _**Note:** Make sure the docker daemon is running on your computer._
63 | 6. Back to the package details view and click on `View Analytics`. You should now see the Package Insights starting to populate with data.
64 | It will usually take 30 minutes and up to 2-3 hours before you see data pulled in. Every time a user pulls your Docker container images from Scarf Gateway the data in your Package Insights will be updated.
65 | 
66 |
67 | ## File Packages
68 |
69 | File Packages on Scarf are a flexible and low-level package type that can track visits and downloads on arbitrary URLs. File packages were originally created to track published tar balls, but it has since expanded to many other use cases. You can think of File Packages as a powerful and fully customizable link shortener. Common use cases include:
70 |
71 | - Tracking downloads of GitHub release artifacts
72 | - Tracking downloads of every artifact on your company/project "downloads" page
73 | - Tracking downloads of Homebrew packages from a tap/formula that you control
74 | - Sending custom telemetry or other events from your application
75 | - Tracking and attributing visits to marketing and sales content on your site.
76 |
77 | ### Creating a File Package
78 | 1. Log in to your Scarf account.
79 |
80 | 2. Click the plus icon in the top right navigation, then select New Package.
81 | 
82 |
83 | 3. In the first drop-down click on the package type you would like to create. For this section you will click `New File`.
84 | 
85 |
86 | 4. Select a package owner from the dropdown of Organizations you belong to.
87 | 
88 |
89 | 5. Give your package a name.
90 | 
91 |
92 | ### Adding an Outgoing and Incoming URL
93 | This section explains what the Outgoing and Incoming URLs are and how to use a URL template.
94 |
95 | 1.) Add the URL path where your files are currently located. You can add a simple URL or a URL template like in the example. `https://www.example.com/mypath/{version}/{platform}.tar.gz`
96 | This example uses 2 variables `{version}` and `{platform}`.
97 | > Note: The Outgoing URL is the full URL to your asset on your HTTP/S hosting provider. It can be a URL template but if you use variables in your URL they need to also be used in your Incoming Path that define in the next step.
98 |
99 | 
100 |
101 | 2.) Choose the domain where your files will be available from. You may choose to use your own domain for serving files. You may also choose to use `.gateway.scarf.sh` provided by default by Scarf.
102 |
103 | 3.) Add the Incoming URL Path where Scarf will direct requests to fetch a file asset.
104 |
105 | > Note: Any variables used in your Outgoing URL path need to match your Incoming URL.
106 |
107 | 
108 |
109 | 4.) Click **Submit**.
110 |
111 | ### Adding Additional Routes
112 | This example will show how to add an additional route. For curl-runnings an additional route that redirects to a specific version will be added, in this case, the most recent package release.
113 |
114 | 1.) In the top menu click on Tools then in the drop down menu click on Packages.
115 | 
116 |
117 | 2.) In the package list dashboard there will be a list of all your packages. These can be filtered by type of packages by selecting the package types you'd like to see. In our example as we just created a file package we're going to want to select File.
118 |
119 | 3.) Navigate to our newly create file package and in the top right of the box click the `View Details` button.
120 | 
121 |
122 | 4.) In the popup modal, use the `File location` input to add a new host URL. You can use a template URL here.
123 |
124 | Example:
125 |
126 | `https://www.example.com/mypath/latest/{platform}.tar.gz`
127 |
128 | 5.) Next, add the desired path format for your files. Make sure the variables from your Outgoing and Incoming URLs match if you use a template URL.
129 |
130 | Example:
131 |
132 | `/latest/{platform}`
133 |
134 | 
135 |
136 | 6.) Click the `Submit` button.
137 |
138 | 7.) The modal will close and you will see the additional route you just added.
139 |
140 | 
141 |
142 | ## npm Packages
143 |
144 | NPM Packages on Scarf are a convenient way to collect usage and event telemetry from your npm packages by adding a dependency on `[scarf-js](https://www.npmjs.com/package/@scarf/scarf)`.
145 |
146 | 1. Log in to your Scarf account.
147 |
148 | 2. Click the plus icon in the navigation, then select New Package.
149 | 
150 |
151 | 3. In the first drop-down, select `npm` as the package type.
152 | 
153 |
154 | 4. Select the package owner from the dropdown list of Organizations you belong to.
155 | 
156 |
157 | 5. Give your npm package a name.
158 | This name should match the name of your package on npm, or the same as the `name` in your `package.json`.
159 | 
160 |
161 | 6. Click **Submit**.
162 |
163 | ### Configuring Telemetry for npm packages
164 | Once an npm entry has been created, you are ready to configure your package by adding scarf as a dependency
165 | ```bash
166 | npm i --save @scarf/scarf
167 | ```
168 | Once your library is published to npm with this change, Scarf will automatically
169 | receive stats on install, no additional code is required! For additional details on configuration of the scarf-js library please refer to the [scarf-js NPM entry](https://www.npmjs.com/package/@scarf/scarf).
170 |
171 | ## Event Collection
172 |
173 | ## Event Collection Packages
174 |
175 | Event Collection Packages on Scarf are another flexible package type which can be used to collect event telemetry by fetching a URL or by importing event history. Event Collection Packages are an alias of File packages and share all the same traits. Common use cases include:
176 |
177 | - Sending custom telemetry or other events from your application
178 | - Importing log or event history from your hosted installations to Scarf
179 |
180 | ### Creating an Event Collection Package
181 | 1. Log in to your Scarf acccount.
182 |
183 | ## Event Collection Packages
184 |
185 | Event Collection Packages on Scarf are another flexible package type purpose built for telemetry data in general. Event data can be sent to a public Scarf Gateway URL of your choice, or by bulk ingesting events through our authenticated API. Event Collection Packages are an alias of File packages and share all the same traits. Common use cases include:
186 |
187 | - Sending custom telemetry or other events from your application
188 | - Importing historical event data from an external application into to Scarf
189 |
190 | ### Creating an Event Collection Package
191 | 1. Once signed in to Scarf, navigate to the home page.
192 |
193 | 2. Click plus icon in the navigation, then select New Package.
194 | 
195 |
196 | 3. In the first drop-down click on the package type you would like to create. For this section you will click `Event Collection`.
197 | 
198 |
199 | 4. Select the package owner from the dropdown.
200 | 
201 |
202 | 5. Give your package a name.
203 | 
204 |
205 | ### Adding an Incoming URL
206 |
207 | This section explains what the Incoming URLs are and how to use a URL template for Event Collection.
208 |
209 | 1.) Add the URL path where your events will be collected. This is the user visible endpoint your application will connect to for event submission. This setting while required is not relevant when submitting events via the [Event Import API](https://docs.scarf.sh/event-import/).
210 | > Note: You can use a URL template, but if you use variables in your URL they need to also be used in your Incoming Path that is defined in the next step.
211 |
212 | 
213 |
214 | 2.) Choose the domain where your events will be submitted. You may choose to use your own domain or you may choose to use `.gateway.scarf.sh` provided by default by Scarf.
215 |
216 | 3.) Click **Submit**.
217 |
218 | 4.) Configuring Telemetry
219 | Once an Event Collection package has been created, you are ready to collect [Custom telemetry](https://docs.scarf.sh/custom-telemetry/)
220 |
221 | ### Configuring Event Collection
222 | Once an Event Collection package has been created, you are ready to collect [Custom telemetry](https://docs.scarf.sh/custom-telemetry/)
223 |
224 | ## Python Packages
225 | Scarf Gateway configuration for a Python package entry has three main considerations:
226 |
227 | - pip Command: This is the current pip command used to install your package. For packages on PyPI.org, this will be of the form pip install my-pkg and will include the `--extra-index-url https://my-python-project-domain.com` if your package is hosted elsewhere. This defines the location where the users will be redirected to when installing your package.
228 | - Domain: This can be your own domain, or a Scarf-supplied domain, of the form `.gateway.scarf.sh`. By default, your Scarf domain will be used if this field is left empty.
229 | - Telemetry: This allows you to gather insights into how your package is used without collecting any personally identifiable information.
230 |
231 | Installing Python packages via requirements.txt
232 | Add the `--extra-index-url` option at the top of your requirements.txt:
233 |
234 | ```
235 | --extra-index-url https://my-python-project-domain.com/simple/
236 | my-pkg==0.0.1
237 | ```
238 |
239 | NOTE: We have noticed indeterminate behavior in some versions of Pip that have resulted in the public registry being used for download regardless of the `--extra-index-url` addition.
240 |
241 | If you elect to use your own domain, you'll need to add a CNAME for that domain to `gateway.scarf.sh`. Additionally we require you to verify your ownership of the domain by setting a TXT with a value that Scarf provides upon package creation. See your DNS provider's instructions for how to add CNAME and TXT records.
242 |
243 | If you have questions or need help, join our [Slack community](https://tinyurl.com/scarf-community-slack).
244 |
--------------------------------------------------------------------------------
/docs/project-status.md:
--------------------------------------------------------------------------------
1 | # Project status
2 |
3 | Scarf is still in its early stages and is under heavy development. Feedback of
4 | any kind of welcome. Tell us what you think! Reach out to feedback@scarf.sh or
5 | open an issue on [GitHub](https://github.com/aviaviavi/scarf) for feature
6 | requests, bug reports, questions and comments.
7 |
--------------------------------------------------------------------------------
/docs/quick-start.md:
--------------------------------------------------------------------------------
1 | # Quick Start
2 |
3 | ## Introduction
4 |
5 | Scarf is a platform that helps you track download and usage analytics for your open source project. Scarf can collect analytics for you by:
6 |
7 | - Tracking the downloads of your software at the point of distribution, regardless of how they are distributed (Docker containers, binaries, Python packages, npm packages, and more).
8 | - Tracking user interactions with your web artifacts (your marketing site, your documentation, and your READMEs), without introducing cookies or JavaScript.
9 | - Enriching any existing data you're already collecting on software usage.
10 |
11 | In this guide, you will learn:
12 |
13 | - How to track artifact downloads with Scarf -- **we will use a Docker container as an example**.
14 | - How to create a tracking pixel to track views of your package's documentation
15 | - How to configure Scarf packages
16 |
17 | ## Prerequisites
18 |
19 | - You will need to sign up for a [Scarf account](http://app.scarf.sh/register).
20 | You can sign up with a valid email address or your GitHub account.
21 | - The container you're looking to track must be published to an existing public registry (e.g., Docker Hub or GitHub Container Registry).
22 | This guide will use the `hello-world` [docker image](https://hub.docker.com/_/hello-world).
23 |
24 | ### Creating a Docker Package
25 |
26 | **NOTE:** This quickstart outlines the process for tracking downloads of a Docker container via Scarf Gateway, but you can track downloads of many other types of OSS artifacts as well, such as files, npm or Python packages. Learn more about other package types on Scarf [here](/packages).
27 |
28 | Scarf Gateway is a service that provides a central access point to your containers and packages, no matter where you host them. Users can pull your containers via a Scarf provided domain, or custom domain that you CNAME to Scarf.
29 |
30 | 1. Once logged in to Scarf:
31 |
32 | 2. Click the plus icon in the top right navigation bar, or under the "Tools" pull-down, then select `New Package`.
33 | 
34 |
35 | 3. In the first dropdown, click on the package type you would like to create. For this section, you will click `Docker`.
36 | 
37 |
38 |
39 | 4. Enter the current pull command for your Docker container.
40 | The Docker command for the `hello-world` package is `docker pull hello-world`.
41 |
42 | 
43 |
44 | 5. **Optional:** You can add a custom domain or use the domain provided by Scarf Gateway. If you choose to create a custom domain, you will need to [CNAME your custom domain to the domain provided by Scarf Gateway](https://www.cloudflare.com/learning/dns/dns-records/dns-cname-record/).
45 |
46 | 6. Click the `Submit` button to be redirected to a success screen with some additional information as to what you can do next.
47 |
48 | 7. Click on `Go to your package` to view the Package Details.
49 | 
50 |
51 | Now you’re all set to start tracking your Docker images with Scarf.
52 | Any time your image is downloaded, Scarf will report some basic information:
53 |
54 | - System and OS statistics of your users
55 | - Company information of your users
56 | - Downloads by versions/tags
57 |
58 | In the next section, you will create a tracking pixel that can be added to your project’s documentation or any other web properties associated with your project.
59 |
60 | ### Creating a Tracking Pixel for Your Package
61 |
62 | How the Package-Pixel Pair Works:
63 |
64 | - Package Distribution: When users install your package, metadata like download source, volume, and timing can be routed through Scarf's infrastructure (e.g., via Scarf Gateway).
65 | - Pixel Integration: The pixel is included in the package or its associated documentation. When the pixel is triggered, it records usage events, similar to a web analytics tracker.
66 |
67 | 1. Navigate to the [Scarf homepage](https://app.scarf.sh/home/).
68 |
69 | 2. Pixels can be created from two locations, one is directly from the packages details view. In top menu click on `Tools` > `Packages`. Then in the next screen find our package `hello-world` and click on `View details`.
70 | 
71 | on the next screen scroll down to the `Tracking Pixel` box and click `Create pixel`.
72 | 
73 | The second way is to click plus icon in the top navigation, then select `New Pixel`.
74 | 
75 |
76 | 3. You will now see the create pixel page. For this example we'll name our pixel `readme`.
77 |
78 | 4. Then attach it to our the newly created `hello-world` package. (if you came to the `create pixel page` via `package details page` this will be automatically selected)
79 | 
80 |
81 | 4. Finally click `Submit`
82 |
83 | 5. Copy the newly created pixel `` tag and add it to your website, documentation, or any other web properties associated with your project.
84 |
85 | 
86 |
87 | For more information on Tracking Pixels see the [Documentation Insights](../web-traffic/) section of our docs.
88 |
89 | ### Downloading Packages and Fetching Associated Pixels
90 |
91 | In this section you will download your package with the pull command found in your package dashboard to start fetching data.
92 |
93 | 1. Navigate to your package details view.
94 | 
95 | 2. Copy the Pull command.
96 | 3. Navigate to a terminal on your computer and run the Pull command.
97 | 
98 | **Note:** Make sure the docker daemon is running on your computer.
99 |
100 | 4. Back to the package details view and click on `View Analytics`. You should now see the Package Insights starting to populate with data.
101 | It will usually take 30 minutes and up to 2-3 hours before you see data pulled in.
102 | 
103 | Every time a user pulls your Docker container images from Scarf Gateway the data in your Package Insights will be updated.
104 |
105 | ## What’s Next?
106 |
107 | For more detailed information, please see the relevant documentation;
108 |
109 | - [Packages](/packages)
110 | - [Scarf Gateway](/gateway)
111 |
112 | If you have questions or need help, join our [Slack community](https://tinyurl.com/scarf-community-slack).
113 |
--------------------------------------------------------------------------------
/docs/sales-prospecting.md:
--------------------------------------------------------------------------------
1 | # Lead Generation - Scarf’s Sales Prospecting Service
2 |
3 | In addition to identifying open-source qualified leads (OQLs), which are the companies already engaging with your OSS, Scarf can help you operationalize that data so you can focus on growing your revenue.
4 |
5 | Companies familiar with your OSS are more likely to respond to sales outreach; they are truly warm leads who have already tested and are actively using your OSS.
6 |
7 | By identifying contacts at these companies, you can better prospect for upgrades to a paid version or a commercial support plan.
8 |
9 | *This is where Scarf’s (Lead Generation) Sales Prospecting Service comes in.*
10 |
11 | ### What is it?
12 | - In addition to the company names provided by Scarf, users also get a custom report of contacts at those companies who meet your ideal customer profile (ICP) and key buyer personas.
13 |
14 | ### How does it work?
15 | - Scarf’s Prospecting Service is bespoke and highly customizable. Our team pulls your list of actively engaged companies and then narrows it based on your specified ICP and persona.
16 | - We identify key contacts at those organizations that meet your buyer persona criteria.
17 | - We aim to provide at least 3 contacts per company interacting with your OSS, working very closely with you to iterate on criteria together.
18 |
19 | ### How long does it take to get started?
20 | - There is generally a 1 week lead time to begin prospecting.
21 |
22 | ### When are leads delivered?
23 | - Leads are delivered in a report at an agreed-upon cadence at least once weekly.
24 |
25 | ### What information is provided with the contacts?
26 | - While we can accommodate some customizations to the information provided, generally, the following information is provided for each contact:
27 | - First & Last Name
28 | - Title
29 | - Contact’s LinkedIn Profile URL
30 | - Contact Location (City, State, Country where available)
31 | - Contact Phone (where available) & Email
32 | - Company Name
33 | - Company Domain
34 | - Activity Counts (Downloads, Telemetry, Pixel Views)
35 | - Company HQ Country
36 | - Company Size
37 | - Company Industry
38 | - Funnel Stage (Level of Engagement)
39 |
40 | ### How do I use it?
41 | - Contacts discovered through Scarf are OQLs for your sales development efforts.
42 | - We recommend adding contacts to sales outreach campaigns based on the level of engagement (funnel stage).
43 | - Contacts in early stages, such as Interest or Investigation, likely aren’t ready for a meeting. Instead, we would suggest advertising (targeted to the company) on LinkedIn or other social media where you have a strong presence to create blanket awareness.
44 | - Invite them to follow your LinkedIn page, X (Twitter) account, or other social media accounts.
45 | - Share your content (case studies/blog posts/podcasts, etc).
46 | - Invite them to sign up for a newsletter.
47 | - Contacts in the Experimentation stage are good targets to invite to events such as conferences or webinars you’ll be participating in or attending.
48 | - Direct, personalized sales outreach is more appropriate for contacts in the Ongoing Usage stage, as these contacts likely have your OSS in use in production and have been actively researching and/or utilizing it for at least 90 days.
49 |
50 | ### What if I need to make changes to my criteria?
51 | - You can change your ICP or buyer personas anytime by updating your Prospecting Service form (available under your Settings menu, Lead Generation) or by contacting your Client Success Manager.
52 | - Note: Depending on when they are received, changes to your criteria may take up to 5 business days to incorporate into your lead report.
53 | 
54 |
55 |
56 | ## Is it effective?
57 | To answer this question, we offer customer feedback…
58 |
59 | > “Outbound outreach to Open Source Qualified Leads saw 2x higher response rates as compared to our outreach campaigns without Scarf data” - Dave Donahue, Head of Global Strategy @ Unstructured.
60 |
--------------------------------------------------------------------------------
/docs/salesforce.md:
--------------------------------------------------------------------------------
1 | # Salesforce
2 |
3 | ## Salesforce Requirements
4 |
5 | - A Scarf account with an Organization set-up and an active Premium Subscription.
6 | - A Salesforce account with API access; API access is included with Force.com, Enterprise, Developer, Performance, and Unlimited Editions. If you are on a different Salesforce plan, you may be required to purchase additional features to enable API access.
7 | - It is suggested that a dedicated Salesforce integration user be created ([Salesforce documentation](https://help.salesforce.com/s/articleView?id=platform.integration_user.htm&type=5)). However, any user account that has the necessary Salesforce permissions can be used to initiate the connection.
8 |
9 | ## Required Permissions
10 |
11 | - **Scarf:**
12 | - Owner or Admin Permissions
13 | - **Salesforce:**
14 | - Permission to read the org ID in Salesforce
15 | - Permission to “view setup and configuration”
16 | - Read/write access to standard objects
17 | - Optional: Permissions to Create Fields on Account Records – this permission is not required for the CRM sync to function, but Scarf specific Fields must be created in the CRM instance for full metadata to be written.
18 |
19 | ## Implementation Process
20 |
21 | ### Connection and Authentication
22 | 1. Login to Scarf as a user with Owner or Admin permissions.
23 | 2. Navigate to `Organization Settings` -> `Integrations`.
24 |
25 |
26 |
27 |
28 |
29 | 3. Select `Connect CRM Instance`, confirm you want to sync companies and click `Finish linking CRM`.
30 |
31 |
32 |
33 |
34 |
35 | 4. Click `Salesforce` from the `Select integration` menu.
36 |
37 |
38 |
39 |
40 |
41 | 5. Review the presented data permissions, and click `Next`.
42 |
43 |
44 |
45 |
46 |
47 | 6. When prompted, enter your Salesforce subdomain, and click `Next`.
48 |
49 |
50 |
51 |
52 |
53 | 7. You will now be prompted to log in to your Salesforce account.
54 |
55 |
56 |
57 |
58 |
59 | 8. Once you enter your Salesforce credentials, Scarf will establish a connection with your Salesforce instance.
60 |
61 |
62 |
63 |
64 |
65 |
66 | ### Synchronization Frequency
67 |
68 | Scarf currently synchronizes with your CRM nightly. The duration of the sync is dependent on the volume of records paired. Manual Company matches are queued for the next nightly sync.
69 |
70 | ### Configuring the Connection
71 |
72 | Once the CRM connection has been initialized, the `Integrations` menu will add three configuration options:
73 |
74 | **Enable Scarf to connect Insights to this CRM**
75 | Toggling this to **off** will temporarily disable the CRM integration. While **off**, no reading or writing will be attempted until the toggle is switched back **on**.
76 |
77 | **Auto-match to known Accounts from Scarf**
78 | With the integration **enabled**, you have the option to set Scarf to use text pattern matching to pair existing CRM Accounts with surfaced Scarf Companies. If the setting is **off**, then all mapping will be performed manually.
79 |
80 | **Auto-sync**
81 | When **enabled**, Auto-Sync ensures that any Scarf Company matched to a CRM Account is automatically included in the next sync cycle. While **off**, matched companies will not be included in the sync unless manually triggered.
82 |
83 | **Automatically create new Accounts in your CRM**
84 | You also have the option to set Scarf to attempt to create a new Account record in your CRM when the sync process encounters a Company without a match in the CRM. This will include historical matches as well as any newly surfaced companies.
85 |
86 |
 74 |
74 |  30 |
30 |  36 |
36 |  42 |
42 |  58 |
58 |  69 |
69 |  75 |
75 |  80 |
80 |  86 |
86 |  92 |
92 | 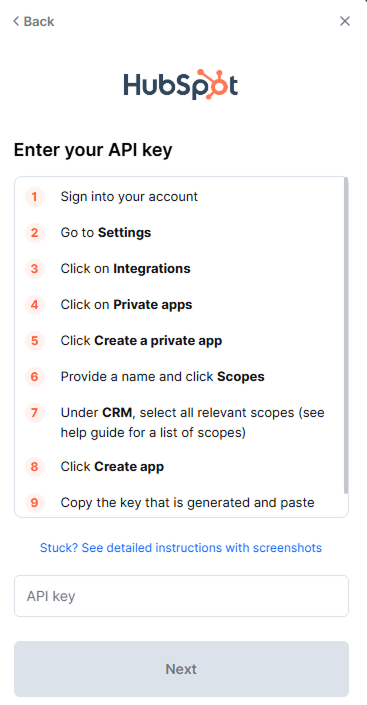 98 |
98 |  136 |
136 |  142 |
142 |  164 |
164 |  39 |
39 |  45 |
45 | 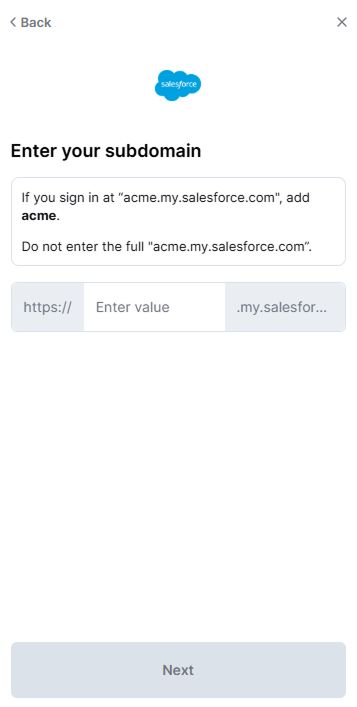 51 |
51 |  57 |
57 |  63 |
63 |  88 |
88 |  6 |
7 | # Repository
8 | repo_name: scarf-sh/docs
9 | repo_url: https://github.com/scarf-sh/docs
10 |
11 | # Config
12 | theme:
13 | name: material
14 | logo: assets/scarf-tm-logo-white.svg
15 | custom_dir: overrides
16 | palette:
17 | # Palette toggle for light mode
18 | - media: "(prefers-color-scheme: light)"
19 | scheme: default
20 | toggle:
21 | icon: material/brightness-7
22 | name: Switch to dark mode
23 |
24 | # Palette toggle for dark mode
25 | - media: "(prefers-color-scheme: dark)"
26 | scheme: slate
27 | toggle:
28 | icon: material/brightness-4
29 | name: Switch to light mode
30 | font:
31 | text: Roboto
32 | code: Roboto Mono
33 | favicon: assets/icon.svg
34 | icon:
35 | logo: assets/new_scarf.svg
36 |
37 | # Styles
38 | extra_css:
39 | - "stylesheets/extra.css"
40 |
41 | # Docs Navigation
42 | nav:
43 | - index.md
44 | - getting-started-checklist.md
45 | - quick-start.md
46 | - gateway.md
47 | - Organizations:
48 | - Setting up your organization: organizations.md
49 | - mtc.md
50 | - packages.md
51 | - package-analytics.md
52 | - custom-telemetry.md
53 | - web-traffic.md
54 | - oql.md
55 | - funnel-stages.md
56 | - sales-prospecting.md
57 | - event-import.md
58 | - data-export.md
59 | - CRM Integrations:
60 | - crm-overview.md
61 | - salesforce.md
62 | - hubspot.md
63 | - user_best_practices.md
64 | - troubleshooting.md
65 | - API Docs: https://api-docs.scarf.sh/v2.html
66 |
67 | # Analytics
68 | google_analytics:
69 | - auto
70 | - G-GH3EXW7112
71 |
72 | # Extensions
73 | markdown_extensions:
74 | meta: {}
75 | admonition: {}
76 | pymdownx.superfences: {}
77 | tables: {}
78 | sane_lists: {}
79 |
80 | # Customization
81 | extra:
82 | social:
83 | - icon: fontawesome/brands/github
84 | link: https://github.com/scarf-sh
85 | - icon: fontawesome/brands/twitter
86 | link: https://twitter.com/scarf_oss
87 | - icon: fontawesome/brands/linkedin
88 | link: https://www.linkedin.com/company/scarf-sh
89 | - icon: fontawesome/brands/slack
90 | link: https://tinyurl.com/scarf-community-slack
91 | - icon: fontawesome/brands/youtube
92 | link: https://www.youtube.com/channel/UCiJRrlBKBOgYFRO9eb6pfdg
93 |
94 | # Plugins
95 | plugins:
96 | - render_swagger
97 | - search
98 |
--------------------------------------------------------------------------------
/overrides/main.html:
--------------------------------------------------------------------------------
1 | {% extends "base.html" %}
2 |
3 | {% block extrahead %}
4 | {% set title = config.site_name %}
5 | {% if page and page.meta and page.meta.title %}
6 | {% set title = title ~ " - " ~ page.meta.title %}
7 | {% elif page and page.title and not page.is_homepage %}
8 | {% set title = title ~ " - " ~ page.title | striptags %}
9 | {% endif %}
10 |
11 |
12 |
13 |
14 |
15 |
16 | {% endblock %}
17 |
18 | {% block libs %}
19 |
20 | {% endblock %}
21 |
--------------------------------------------------------------------------------
/requirements.txt:
--------------------------------------------------------------------------------
1 | mkdocs==1.4.2
2 | mkdocs-material>=9.0.6
3 | mkdocs_custom_fences
4 | mkdocs-render-swagger-plugin>=0.0.4
5 | pyyaml>=6.0
6 |
--------------------------------------------------------------------------------
6 |
7 | # Repository
8 | repo_name: scarf-sh/docs
9 | repo_url: https://github.com/scarf-sh/docs
10 |
11 | # Config
12 | theme:
13 | name: material
14 | logo: assets/scarf-tm-logo-white.svg
15 | custom_dir: overrides
16 | palette:
17 | # Palette toggle for light mode
18 | - media: "(prefers-color-scheme: light)"
19 | scheme: default
20 | toggle:
21 | icon: material/brightness-7
22 | name: Switch to dark mode
23 |
24 | # Palette toggle for dark mode
25 | - media: "(prefers-color-scheme: dark)"
26 | scheme: slate
27 | toggle:
28 | icon: material/brightness-4
29 | name: Switch to light mode
30 | font:
31 | text: Roboto
32 | code: Roboto Mono
33 | favicon: assets/icon.svg
34 | icon:
35 | logo: assets/new_scarf.svg
36 |
37 | # Styles
38 | extra_css:
39 | - "stylesheets/extra.css"
40 |
41 | # Docs Navigation
42 | nav:
43 | - index.md
44 | - getting-started-checklist.md
45 | - quick-start.md
46 | - gateway.md
47 | - Organizations:
48 | - Setting up your organization: organizations.md
49 | - mtc.md
50 | - packages.md
51 | - package-analytics.md
52 | - custom-telemetry.md
53 | - web-traffic.md
54 | - oql.md
55 | - funnel-stages.md
56 | - sales-prospecting.md
57 | - event-import.md
58 | - data-export.md
59 | - CRM Integrations:
60 | - crm-overview.md
61 | - salesforce.md
62 | - hubspot.md
63 | - user_best_practices.md
64 | - troubleshooting.md
65 | - API Docs: https://api-docs.scarf.sh/v2.html
66 |
67 | # Analytics
68 | google_analytics:
69 | - auto
70 | - G-GH3EXW7112
71 |
72 | # Extensions
73 | markdown_extensions:
74 | meta: {}
75 | admonition: {}
76 | pymdownx.superfences: {}
77 | tables: {}
78 | sane_lists: {}
79 |
80 | # Customization
81 | extra:
82 | social:
83 | - icon: fontawesome/brands/github
84 | link: https://github.com/scarf-sh
85 | - icon: fontawesome/brands/twitter
86 | link: https://twitter.com/scarf_oss
87 | - icon: fontawesome/brands/linkedin
88 | link: https://www.linkedin.com/company/scarf-sh
89 | - icon: fontawesome/brands/slack
90 | link: https://tinyurl.com/scarf-community-slack
91 | - icon: fontawesome/brands/youtube
92 | link: https://www.youtube.com/channel/UCiJRrlBKBOgYFRO9eb6pfdg
93 |
94 | # Plugins
95 | plugins:
96 | - render_swagger
97 | - search
98 |
--------------------------------------------------------------------------------
/overrides/main.html:
--------------------------------------------------------------------------------
1 | {% extends "base.html" %}
2 |
3 | {% block extrahead %}
4 | {% set title = config.site_name %}
5 | {% if page and page.meta and page.meta.title %}
6 | {% set title = title ~ " - " ~ page.meta.title %}
7 | {% elif page and page.title and not page.is_homepage %}
8 | {% set title = title ~ " - " ~ page.title | striptags %}
9 | {% endif %}
10 |
11 |
12 |
13 |
14 |
15 |
16 | {% endblock %}
17 |
18 | {% block libs %}
19 |
20 | {% endblock %}
21 |
--------------------------------------------------------------------------------
/requirements.txt:
--------------------------------------------------------------------------------
1 | mkdocs==1.4.2
2 | mkdocs-material>=9.0.6
3 | mkdocs_custom_fences
4 | mkdocs-render-swagger-plugin>=0.0.4
5 | pyyaml>=6.0
6 |
--------------------------------------------------------------------------------