├── .gitignore
├── Codenundrum
└── codenundrum0.md
├── LICENSE.md
├── README.md
├── Week01
├── README.md
├── assets
│ ├── fancy_zsh.png
│ ├── rocky.jpg
│ └── wsl_bash.png
├── commandline.md
├── environment_setup.md
└── resources.md
├── Week02
├── README.md
├── assets
│ ├── Agc.jpg
│ ├── analog_digital.jpg
│ ├── ascii.png
│ ├── morse_code.png
│ ├── rocky_bed.png
│ ├── rothko.png
│ ├── rur-1250.txt
│ ├── rur.txt
│ ├── shannon.jpg
│ ├── sleeping_hazel.jpeg
│ └── unicode_linear-a.pdf
└── intro_data.md
├── Week03
├── README.md
├── assets
│ ├── TheAddamsFamily_morse.webm
│ └── rocky_eyes.jpg
└── structured_data.md
├── Week04
├── README.md
└── assets
│ ├── git_workflow.avif
│ └── rocky_popcorn.jpg
├── Week05
├── README.md
├── assets
│ ├── 10kinds.jpeg
│ ├── MissionImpossible.m4v
│ ├── badpunhazel.jpeg
│ ├── dymo.jpeg
│ ├── montypython.jpg
│ ├── overlords.jpg
│ └── sleeping_hazel.jpeg
├── intro_python.md
└── types_cheatsheet.md
├── Week06
├── README.md
├── assets
│ ├── deadline.gif
│ ├── hazel_bed.jpg
│ └── invincible.gif
└── lesson.md
├── Week07
├── ExtraExercises
│ ├── dictionary_exercises.md
│ └── list_exercises.md
├── README.md
├── assets
│ ├── hazel_sleeping.jpg
│ ├── looper.gif
│ ├── maple_loop.jpg
│ └── racoon_highfive.gif
└── lesson.md
├── Week08
├── README.md
├── answers
│ └── exactchange.py
├── assets
│ ├── 20170126.jpg
│ ├── function.gif
│ └── nesting.gif
└── lesson.md
├── Week09
├── README.md
├── answers
│ ├── 1519-0.txt
│ └── assignment.py
├── assets
│ ├── eva.jpg
│ ├── hazel_romantic_hero.jpg
│ └── maple_snooze.JPG
└── lesson.md
├── Week10
├── README.md
├── assets
│ ├── hazel3.jpg
│ ├── hazel_snooze.jpg
│ ├── maple_jerm.jpg
│ └── structure.gif
└── lesson.md
├── Week11
├── MAAN_dialog.json
├── README.md
├── assets
│ ├── depends.gif
│ ├── fatdog.jpg
│ └── hazel_hi.jpg
└── lesson.md
├── Week12
├── README.md
├── assets
│ ├── bender.gif
│ ├── dogs.gif
│ ├── hazel_snooze.jpeg
│ ├── jason.gif
│ └── netscape.gif
└── lesson.md
├── Week13
├── README.md
├── assets
│ ├── Yahoo_screenshot_1994.png
│ ├── fatdog.jpg
│ ├── imdbot_cuba.png
│ ├── maple.jpg
│ ├── rocky_voter.jpg
│ └── toby.jpg
└── lesson.md
├── WeekClasses
├── README.md
├── assets
│ ├── bad_pun_hazel.jpg
│ ├── bart_class.gif
│ ├── bofur.jpg
│ ├── efficiency.png
│ ├── hazel_pet.jpg
│ └── security.png
└── lesson.md
├── WeekData
├── README.md
├── assets
│ ├── ascii.png
│ ├── bug.jpg
│ ├── data.jpg
│ ├── shannon.jpg
│ └── ultimate_machine.gif
├── basic_data_types.md
├── data_flow.md
├── data_structures.md
└── lesson.md
├── WeekW
├── README.md
├── answers
│ └── part_alpha.py
└── assets
│ └── hazel_sniff.jpg
├── WeekX
├── README.md
└── answers
│ ├── partI.py
│ └── partII.py
├── WeekY
├── Assignment_answer.md
├── CLASSES_CHEATSHEET.md
├── README.md
├── answers.py
├── classes_resources.md
└── lesson.md
├── WeekZ
├── README12.md
├── assets
│ ├── save_img.png
│ └── zoidberg.gif
├── homework.md
├── intro_html.md
└── intro_web_scraping.md
└── debugging
├── 2020
├── 1.py
├── 2.py
├── 4.py
├── 5.py
├── 6.py
├── 7.py
└── answers
│ ├── 1.py
│ ├── 2.py
│ ├── 3.py
│ ├── 4.py
│ ├── 5.py
│ ├── 6.py
│ ├── 7.py
│ └── woolf.txt
├── 1.py
├── 10.py
├── 11.py
├── 2.py
├── 3.py
├── 4.py
├── 5.py
├── 6.py
├── 7.py
├── 8.py
├── 9.py
├── ado.txt
├── answers
├── 1.py
├── 10.py
├── 11.py
├── 2.py
├── 3.py
├── 4.py
├── 5.py
├── 6.py
├── 7.py
├── 8.py
├── 9.py
├── runtime0.py
├── runtime1.py
└── runtime2.py
├── runtime0.py
├── runtime1.py
├── runtime2.py
└── woolf.txt
/.gitignore:
--------------------------------------------------------------------------------
1 | .DS_Store
--------------------------------------------------------------------------------
/Codenundrum/codenundrum0.md:
--------------------------------------------------------------------------------
1 | # Scholars' Lab Codenundrum no. 0
2 | ## Challenge
3 | You are traveling and find a novel bag of Doritos of a variety only available abroad. You desire to taste of its extreme flavor but, as a numismatist, also wish to spend the fewest number of individual units (bills or coins) as possible.
4 |
5 | Produce a short bit of code in the modern programing language of your choice that takes as input a set of currency denominations and a target value and returns as output combinations of the fewest units that add up to that value. For example, assuming standard US currency denominations, the expected output for $4.75 is 2,2,0.50,0.25 because those 4 bills/coins constitute the least number that can exactly cover the payment.
6 |
7 | Don't assume that the input values will be based on US currency or, in fact, any reasonable real-world currency. I will only guarantee that all values are valid real numbers.
8 |
9 | Order does not matter for the output as "1 penny and 1 nickel" (`[0.01, 0.05]`) is equivalent to "1 nickel and 1 penny" (`[0.05, 0.01]`).
10 |
11 | If the value cannot be reached with the input denominations, indicate an error. Please document input/output mode (interactive console, file, web form), dependencies, etc.
12 |
13 |
14 | ## Input Format
15 | Input will be provided as a UTF-8 encoded JSON object in the following format:
16 |
17 | ```javascript
18 | {
19 | "denominations": [100, 50, 20, 10, 5, 2, 1, 0.5, 0.25, 0.10, 0.05, 0.01],
20 | "value": 4.75
21 | }
22 | ```
23 |
24 | Inputs are guaranteed to be valid JSON.
25 |
26 | ## Examples (and Hints!)
27 | Here are some example inputs:
28 | ```javascript
29 | {
30 | "denominations": [1, 0.75, .01],
31 | "value": 2.50
32 | }
33 | ```
34 | ```javascript
35 | {
36 | "denominations": [1, 0.75, .01],
37 | "value": 1.50
38 | }
39 | ```
40 |
41 | ```javascript
42 | {
43 | "denominations": [0.01],
44 | "value": 1000.01
45 | }
46 | ```
47 |
48 | ```javascript
49 | {
50 | "denominations": [10000, 0.0000001],
51 | "value": 10000.0000001
52 | }
53 | ```
54 | ```javascript
55 | {
56 | "denominations": [1, 0.75, .01, -0.05],
57 | "value": 1.45
58 | }
59 | ```
60 |
61 | ## "Scoring"
62 | There's no actual scoring of course, but consider the ways that we might evaluate answers: general correctness, edge case handling, speed.
63 |
--------------------------------------------------------------------------------
/README.md:
--------------------------------------------------------------------------------
1 | # CodeLab
2 | ## *Where the magic happens...*
3 |
4 | 
5 |
6 | Welcome to Codelab, a course on the foundations of coding and digital humanities technics designed by the Scholars' Lab at the University of Virginia Library for the Praxis Fellowship.
7 |
8 | Codelab is broadly divided into two sections: _Codelab Fundamentals_, which introduces basic computing, data, and algorithmic concepts without coding directly, and _Codelab Code Lab_, which uses Python to teach practical programming skills.
9 |
10 | ## Schedule
11 |
12 | ### Codelab Fundamentals
13 | * [Week 01: Introduction to CodeLab](Week01/README.md)
14 | * Environment setup
15 | * What is Code?
16 | * Algorithmic thinking
17 | * Why is Code?
18 | * [Week 02: Introduction to Data](Week02/README.md)
19 | * What is data?
20 | * How do we represent data?
21 | * Digital vs analog
22 | * Text encoding
23 | * Colors and images
24 | * [Week 03: Structured Data](Week03/README.md)
25 | * Limitations of simple data
26 | * Lists (simple and complicated)
27 | * Tabular data and CSV
28 | * XML
29 | * JSON
30 | * [Week 04: Version Control](Week04/README.md)
31 | * How do we collaborate on digital project?
32 | * Version control systems
33 | * Git and Github
34 |
35 | ### Codelab Code Lab
36 | * [Week 05: Introduction to Python](Week05/README.md)
37 | * Python interactive interpreter
38 | * Saving and running Python files
39 | * Hello World
40 | * Variables
41 | * Classes, Objects, and Instances
42 | * Simple types
43 | * Documentation
44 | * `input()`
45 | * Lists
46 | * [Week 06: Functions and Methods](Week06/README.md)
47 | * Types and `type()`
48 | * Type conversion
49 | * Function calls, arguments, return values.
50 | * Built-in functions
51 | * Methods
52 | * Defining Functions
53 | * [Week 07: Control Flow](Week07/README.md)
54 | * Conditionals
55 | * `if`, `elif`, and `else`
56 | * Booleans in conditions
57 | * Loops
58 | * `while` vs `for`
59 | * Exit conditions
60 | * [Week 08: Control Flow (ctd)](Week08/README.md)
61 | * `continue` and `break`
62 | * Nested loops
63 | * [Week 09: Algorithms and File Operations](Week09/README.md)
64 | * Algorithms (ctd)
65 | * Sorting
66 | * File input/output
67 | * [Week 10: Dictionaries, CSV, JSON](Week10/README.md)
68 | * Basic and Complex Data Types
69 | * Dictionaries
70 | * Structured data review
71 | * CSV and JSON in Python
72 | * Week 11: Show and Tell!
73 | * Week 12: Web scraping?!
74 | * Week 13: HTML/CSS/Design
75 | * Week 14: More of the same
76 |
--------------------------------------------------------------------------------
/Week01/README.md:
--------------------------------------------------------------------------------
1 | # Week 1: Introduction to CodeLab
2 |
3 | ## Outline
4 |
5 | 
6 |
7 | 1. Introduction
8 | 2. A note about local environment setup
9 | 3. What is Code?
10 | 4. Exercises in Code thinking
11 | 5. Why is Code?
12 | 1. Code as utility
13 | 2. Code as scholarship
14 | 3. Code as labor
15 |
16 | ## Welcome to CodeLab
17 |
18 | Hi there. Welcome to CodeLab. This is Shane, writing from various times in the past (and occasionally Zoe, writing generally from even longer ago). I'm a younger, slightly less experienced, probably slightly more handsome version of Shane from right now, so you'll have to excuse me if I'm unclear or rambly or factually wrong. Don't blame it on Shane Prime. I'm sure he knows better by now. The two of us (Shane and Zoe) and the Scholars' Lab staff created Code Lab back in 2018 as a way to ensure that that year's Praxis cohort would have a good technical foundation on which to build their DH projects and later humanities careers and I've been doing it ever since. Hopefully, you'll be getting all this from a presentation that current-timeline-me has given, is giving, or will shortly give.
19 |
20 | We're going to start off our Code Lab journey without actually writing any code. This first week we'll be talking a little bit about what code is and a lot about a very long debate within the Digital Humanities community about the relationship between coding knowledge and practice and DH scholarship. It's a debate that people are generally sick of having, but I'm going to keep at it because 1) I have very strong feels about it and 2) I am, in a lot of ways, on the losing side of the debate.
21 |
22 | As part of this discussion, I'm going to encourage all of you to think about what computation is and how to "think" like a computer: in discreet and unambiguous steps. As we progress through the year, keep these ideas in mind; imagine how a computer does the kinds of things it does "under the hood" and try to get a feel for what kinds of problems might be easy or hard for a computer to do.
23 |
24 | ## CodeLab Resources
25 | * [Environment Setup Instructions](environment_setup.md)
26 | * [Command Line Cheatsheet](commandline.md)
27 |
28 | ## New Terms
29 | (see: [Command Line Glossary](https://github.com/scholarslab/CodeLab/blob/master/Week01/commandline.md#glossary)
30 |
31 |
32 | ## Homework for Week 1
33 |
34 | * Schedule a 1 on 1 with me to talk about your dreams, your discontents, and your computer. We'll also use this time to set up your [development environment](environment_setup.md).
35 | * Afterward, complete Ian Milligan and James Baker, "Introduction to the Bash Command Line," The Programming Historian 3 (2014), [https://programminghistorian.org/en/lessons/intro-to-bash](https://programminghistorian.org/en/lessons/intro-to-bash). This is an introduction to the Bash shell, which will serve well enough as an introduction to other shells like Zsh as well.
36 | * For Windows users, skip the "Windows Only: Installing Git Bash" section - we're going a different direction. Use the VSCode Terminal or Windows Terminal, as recommended in the Code Lab environment setup.
37 | * Set up an account at [Github](http://www.github.com) and post your username on the Slack praxis channel.
38 |
39 | ### Readings
40 |
41 | If you haven't read through the pre-readings, now's a good time to do that:
42 | * [Section 1](https://www.bloomberg.com/graphics/2015-paul-ford-what-is-code/#the-man-in-the-taupe-blazer) and [section 2](https://www.bloomberg.com/graphics/2015-paul-ford-what-is-code/#lets-begin) from Paul Ford's *What is Code?*, Businessweek June 11 2015
43 | * Ben Schmidt's ["Do Digital Humanists Need to Understand Algorithms?"](https://dhdebates.gc.cuny.edu/read/untitled/section/557c453b-4abb-48ce-8c38-a77e24d3f0bd#ch48)
44 |
45 | Hopefully I'll have passed out copies of Julia Evans's lovely [So You Want to be a Wizard](https://wizardzines.com/zines/wizard/) zine. That's something written for someone who is already a programmer, but it'll be useful for you to skim through now to gleen some meta-strategies for navigating tech. Review it again once you have a few `for loops` under your belt.
46 |
47 | For a bit of counter-programming, Miriam Posner's ["Some things to think about before you exhort everyone to code"](https://miriamposner.com/blog/some-things-to-think-about-before-you-exhort-everyone-to-code/) is good to think about (and perhaps even to critique).
48 |
--------------------------------------------------------------------------------
/Week01/assets/fancy_zsh.png:
--------------------------------------------------------------------------------
https://raw.githubusercontent.com/scholarslab/CodeLab/6ac7385197639beae35c094038e68b9aa4bf2f23/Week01/assets/fancy_zsh.png
--------------------------------------------------------------------------------
/Week01/assets/rocky.jpg:
--------------------------------------------------------------------------------
https://raw.githubusercontent.com/scholarslab/CodeLab/6ac7385197639beae35c094038e68b9aa4bf2f23/Week01/assets/rocky.jpg
--------------------------------------------------------------------------------
/Week01/assets/wsl_bash.png:
--------------------------------------------------------------------------------
https://raw.githubusercontent.com/scholarslab/CodeLab/6ac7385197639beae35c094038e68b9aa4bf2f23/Week01/assets/wsl_bash.png
--------------------------------------------------------------------------------
/Week01/commandline.md:
--------------------------------------------------------------------------------
1 | # The Command Line Interface
2 |
3 | ## Introduction
4 |
5 | This will be a quick guide and cheatsheet that you can refer back to for reference. I'll leave the heavy lifting of teaching mostly for the Programming Historian lesson in the homework.
6 |
7 | Let's get some terminology out of the way first. Often you'll see a few terms used in seemingly interchangeable ways: command line interface/CLI, terminal, shell, console. They are subtley different, but it's probably not useful to dwell overlong on their differences, but here's a quick summary: Early computers were big room-sized things. Operators would interact with these machines through a smaller device dedicated to input and output, called a console or terminal. In the very early days, these consoles would use literal printers to print out output from the computer onto paper. In modern computing, "console" and "terminal" are analogies for software programs that replicate these technologies. The application "Terminal" on MacOS is a terminal software.
8 |
9 | A "shell" is a program that lives within a terminal that interprets commands from users and parses output from the computer. The name Shell comes out of the influential Unix operating system and is intended to convey the idea that shell programs completely surround and hide away the complex details of different underlying computer systems from users to provide a simplified and common interface. BASH (Bourne Again SHell) and Zsh (Z Shell) are the most popular shell programs. For our purposes, the commands you type into each should be functionally identical.
10 |
11 | This general mode of operation, using terminals and shells to interact with a computer through text commands and largely text output, is called the command line interface. It is typically contrasted with the more familiar Graphical User Interface, which visual analogues like cursors and icons to accomplish the same interactions.
12 |
13 | So, okay. Here's what we're talking about:
14 |
15 | 
16 |
17 | Here's a basic terminal window on one of my computers (running Ubuntu through WSL on a Windows machine). Yours may look different (hopefully it's prettier than the garish colors in this default shell). Before Graphical User Interfaces (GUI) like the one that you're almost certainly reading this on became ubiquitous, Command Line Interfaces (CLI) were how people used computers. So why learn any of this now? GUIs often abstract and simplify, but CLI lets you tell a computer to do exactly what you want it to do. It facilitates an understanding of what's happening "under the hood" (or at least a little bit more under the hood than usual). The output of our coding efforts and the data that we'll use and produce will mostly be text, which suits CLIs. It's also the most common way to connect to remote computers, a common circumstance when you want to control a distant web server or virtual cloud host. Finally, CLIs are long-lived. The shell that we're going to teach you to use traces its roots to the 1970s. Whatever new technology is around the corner, it'll still be useful to know how to drive a command line.
18 |
19 | In the example above, the "shanelin@ADAGIO-PC" part is my user name and the name of my computer (excuse the tempo joke). This is useful to see because the command line lets us easily switch between users and computers. The parts after the colon ("~" and "~/projects/CodeLab/Week01") are the current working directory path. The $ sign, which might be something else on your terminal, separates the directory path from the command. In this case, I've simply entered `cd projects/CodeLab/Week01` to change directory to the projects/CodeLab/Week01 directory and `ls` to list the contents of that directory. For commands with output (in this case, `ls`), the output appears below the command.
20 |
21 | ## A few random notes
22 |
23 | * You may or may not be able to change where the cursor is by clicking your mouse, which isn't so surprising since they're not supposed to be graphic interfaces.
24 | * Copy and pasting can also be tricky. The usual keyboard shotcuts (ctrl/cmd-C and ctrl/cmd-V) might not work. Try adding a shift to the shortcut. Some terminals also support pasting by right-clicking on the window.
25 | * Depending on circumstance, files and directory names may or may not be case sensitive. Try not to create files or directories that differ in name only in case (i.e. don't make a foo.txt and also a Foo.txt).
26 |
27 | ## Glossary
28 |
29 | | Term | Description |
30 | | --- | --- |
31 | | Bash | "Bourne Again SHell", a common default shell in many Unix-like operating systems |
32 | | CLI | Command Line Interface, a general term for text input/output interfaces, dating back to the 1950s |
33 | | Console | Nowadays, synonymous with "Terminal". Long ago, the console was the hardware that ran the terminal software. |
34 | | Delimiter | A character that separates different blocks of text, e.g. directory names in a path or columns in a CSV. |
35 | | Directory | Also called a folder, something that holds files and other directories. A file system organizational abstraction. |
36 | | File | A discrete piece of data, often encountered as a digital photo, video, document, web page, spreadsheet, etc. |
37 | | File System | The software that controls how files and directories are stored in a computer. Different operating systems. |
38 | | Home | In a Unix-like system, each user has a home directory intended to store that user's personal files. The home directory is the default working directory and can be accessed with the path shortcut `~` (e.g. `cd ~`). |
39 | | Host | Another way to say "computer", somewhat complicated by modern computing where hosts can be virtual. |
40 | | Linux | A family of free, open source Unix-like operating system. Extremely popular in a variety of computing applications (>95% of web servers run some flavor of Linux), but unpopular in personal computers. Ubuntu is one kind ("distribution") of Linux. |
41 | | Operating system | The fundamental software that runs other software in a computer. Handles common tasks like input/output and system infrastructure like the management of shared resources. MacOS, Windows, and Ubuntu are kinds of operating systems. |
42 | | Path | A way to address a file or directory in a file system. `/home/shanelin/`,`~`, and `.gitignore` are examples of absolute and relative paths. |
43 | | Prompt | Also, "Command Prompt". A character that indicates that a CLI is ready to accept input. Commonly includes a `$`,`:`,`#`, or `>` characters, but can be customized. In Unix-like systems, the prompt will often include the username, hostname, and the working directory path. |
44 | | Shell | Software that lives in the terminal and proccesses user commands. |
45 | | Super User | In Unix-like systems, an administrative account that has the ultimate, unrestricted permission to change the system. Sometimes named (or merely called) "root" or "admin". |
46 | | Terminal | Oriignally hardware, now software that hosts shells. Examples are MacOS's Terminal.app, Windows Terminal, the Powershell terminal that runs the Powershell shell. Interchangable with "console". |
47 | | Unix | Influential operating system from the 1970s, now largely relevant for establishing the conventions and idioms of Unix-like operating systems like Linux and MacOS. |
48 | | Wildcard | A special character that stands in for any other character (and sometimes characters). Often `?` or `*`. |
49 | | Zsh | Z shell, a common shell in many Unix-like operating systems, including recent versions of MacOS. |
50 |
51 | ## Shell/Terminal Shortcuts
52 |
53 | Might depend on the terminal or the shell.
54 |
55 | | Command | Description |
56 | | ------------- | ------------- |
57 | | `Tab` | Auto-complete files and folder names |
58 | | `Up Arrow`| Scroll through previous commands |
59 | | `Ctrl + A` | Go to the beginning of the line you are currently typing on |
60 | | `Ctrl + E` | Go to the end of the line you are currently typing on |
61 | | `Ctrl + R` | Lets you search through previously used commands |
62 | | `Ctrl + C` | Kill whatever you are running |
63 | | `Ctrl + D` | Exit the current shell |
64 |
65 | ## Paths
66 |
67 | A computer stores files and directories (folders) in a "tree" structure. Under this analogy, directories can contain files and other directories in a branching pattern. Each directory therefore has zero or more "child" directories and always a single "parent" directory, all the way up to the lowest, "root" level.
68 |
69 | In the command line, we traverse this structure using the [path](https://en.wikipedia.org/wiki/Path_(computing)). Linux, MacOS, and WSL on Windows use Unix-style path notation, so directories and filenames are separated ("delimited") by a forward slash `/`.
70 |
71 | Paths that begin with a forward slash (e.g. `/usr/bin`) are absolute paths, which means that the first element is at the root (lowest level) of the tree.
72 |
73 | Paths that begin with a directory of file name (e.g. `README.md`) are relative paths that will depend on the current working directory.
74 |
75 | Files that start with "." are often supposed to be hidden files, which just means that they're intended to be kept out of sight.
76 |
77 | Special path symbols:
78 |
79 | | Symbol | Description |
80 | | ------------- | ------------- |
81 | | `.` | Current folder |
82 | | `..` | One directory level up |
83 | | `~` | home directory |
84 |
85 | Any command that takes a filename will also allow you to specify a relative or absolute path to that file, e.g. `touch ../file.txt` or `rm /temp/error.log`.
86 |
87 | ## Shell Commands
88 |
89 | | Command | Description |
90 | | ------------- | ------------- |
91 | | `pwd` | Print full working path |
92 | | `cd [folder]` | Change into a directory |
93 | | `cd ..` | Change directory upwards |
94 | | `ls` | List contents of a directory |
95 | | `ls -la` | List all contents including hidden files |
96 | | `clear` | Clear the view |
97 | | `open [file]` | Opens a file |
98 | | `open .` | Opens the directory |
99 | | `touch [file name]`| Creates a new file |
100 | | `rm [file name]`| Remove a single file |
101 | | `mkdir [directory name]` | Make a new directory |
102 | | `cp [file] [new file/new directory]` | Copy file to file or new directory |
103 | | `mv [file] [new file/new directory]` | Move file into new file or directory |
104 | | `rmdir [directory]` | Remove directory ( only operates on empty directories ) |
105 | | `rm -rf [directory name]` | Force remove a directory and all its contents |
106 |
107 |
108 | ## Some Examples of Advanced Commands
109 | | Command | Description |
110 | | ------------- | ------------- |
111 | | `sudo [command]` | Run command with the security privileges of the superuser (Super User DO) |
112 | | `cp *.js`| Use wildcards to get all files of a certain type when moving or copying|
113 | | `!!` | Use double bang to repeat last command |
114 | | `nano [file]` | Opens file in Terminal editor |
115 | | `q` | Exit |
116 |
--------------------------------------------------------------------------------
/Week01/environment_setup.md:
--------------------------------------------------------------------------------
1 | # Code Lab Week 1: Environment Setup
2 |
3 | If you're using a Mac, you're most of the way there already. You almost certainly have the shell that we'll be using already (more on what that means later). Python, the programming language we'll be using is already built into your computer. But we'll want to set it up so it works just like we want it to. Follow the **MacOS** track below.
4 |
5 | If you're using a Windows machine, there's a few more steps. Hopefully you're using Windows 10 (or later, if you're reading this far, far into the future), otherwise things might be a bit troublesome. If you are, we'll be installing the puzzlingly named Windows Subsystem for Linux (WSL), which is a Subsystem _in_ Windows that provides Linux functionality, not the other way around. It's basically a little Linux computer that runs inside of Windows. It's very cool. We'll be using WSL to run our code and do all our coding work. This isn't necessarily better than developing directly in Windows, but it lets us (Windows, Mac, and Linux users) all be on the same page. Follow the **Windows** track below.
6 |
7 | If you're using Linux, I'm going to assume that you know what you're doing. Please let me know if this is a faulty assumption. Install Python 3, pip, and pipenv.
8 |
9 | If you're using FreeBSD, MS-DOS, OS/2, Solaris, Sony Playstation 2, Amiga Research OS, Windows CE/Pocket PC, or other unusual or outmoded operating systems, there exist [legacy Python interpreters](https://legacy.python.org/download/other/) across a wide (typically dismal) range of contemporaneity. This paragraph is a funny joke that's just for computer historians; Scholars' Lab support for these platforms is limited.
10 |
11 | After all the shell and Python setup is done, you'll install Microsoft Visual Studio Code, which is a free editor that we'll be using to write our code. It's pretty good, but it isn't mandatory.
12 |
13 | ## MacOS
14 |
15 | ### Step 0-M: Install Homebrew and Xcode Command Line Tools
16 |
17 | * Install [Homebrew](https://brew.sh/) (should also install Xcode command line tools)
18 |
19 | ### Step 1-M: Install Python and Pip
20 |
21 | Mac: [Python 3](https://docs.python-guide.org/starting/install3/osx/), including Pip.
22 |
23 | The instructions say to add `export PATH="/usr/local/opt/python/libexec/bin:$PATH"` to `~/.profile`. This is out of date as zsh is the MacOS default shell and also homebrew should set up the correct paths anyways, so you should ignore that part. However, you will want to add `export PIPENV_VENV_IN_PROJECT=1` to your .zshrc, which will simplify some VS Code integration. You can do this manually with a text editor or through this shell command through the terminal: `echo 'export PIPENV_VENV_IN_PROJECT=1' >> $HOME/.zshrc`
24 |
25 | At the end of this step, you should be able to input the command `python3 --version` and have it not return an error. The version should also be 3.12 or higher.
26 |
27 | ### Step 2-M: Install Pipenv
28 |
29 | In the terminal, run: `brew install pipenv`
30 |
31 | At the end of this step, you should be able to enter the command `pipenv --version` and have it not return an error.
32 |
33 | ### Step 3-M: Visual Studio Code
34 |
35 | Visual Studio Code is what's called an IDE, an integrated development environment, which is a text editor software specifically designed for coding. Just like English doesn't care if you write it in pen on the back of a napkin or on an electric typewriter, the things we'll write don't care what IDE or even regular, plain text editor (it has to be *plain* text though, which we'll talk about next week) you write it on. But unless you have a real reason not to, VS Code will make your life easier, so that's what we're going to teach.
36 |
37 | * Install [VS Code](https://code.visualstudio.com/)
38 | * Install the [Python extension for VS Code](https://marketplace.visualstudio.com/items?itemName=ms-python.python)
39 | * Install the [Live Server extension for VS Code](https://marketplace.visualstudio.com/items?itemName=ritwickdey.LiveServer)
40 |
41 | ### Step X-M: Customize Zsh (strictly optional)
42 |
43 | MacOS has defaulted to Zsh for a while, which is good because I like some of its conveniences. To make it prettier, you can install Oh My Zsh and pick a theme (I rather like the agnoster theme highlighted in the installation instructions, though it will require installing a powerline font).
44 |
45 | * [Oh My Zsh](https://github.com/robbyrussell/oh-my-zsh)
46 |
47 | ## Windows
48 |
49 | ### Step 0-W: Install WSL
50 |
51 | * Install the confusingly name [Windows Subsystem for Linux 2](https://learn.microsoft.com/en-us/windows/wsl/install) (WSL2), which is actually a Linux Subsystem *for* Windows.
52 |
53 | These instructions walk you through the default installation of the Ubuntu Linux distribution, which is a good choice for us. When you choose a Linux user and password, don't forget what you put in. Now you have mostly-Linux running inside of Windows!
54 |
55 | The WSL installation processed probably required the use of Powershell. After you install WSL, forget about Powershell for now - most of the time we use the command line, we should use a WSL Ubuntu shell, either through the Ubuntu terminal or the built-in VSCode terminal.
56 |
57 | Ubuntu uses a "package manager" application called `apt` to install common software. We should tell it to update itself with `sudo apt-get update; sudo apt-get upgrade` and accepting (Y) all the packages.
58 |
59 | ### Step 1-W: Install Python and Pip
60 |
61 | * WSL comes with Python3, but you still need to install pip. In the Ubuntu terminal, run: `sudo apt-get install -y python3-pip`
62 | * At the end of this step, you should be able to input the command `pip3 --version` and have it not return an error.
63 | * Install Debian development tools, openSSL, and Python extension headers, run: `sudo apt-get install build-essential libssl-dev libffi-dev python3-dev`
64 |
65 | ### Step 2-W: Install Pipenv
66 |
67 | In your terminal, run: `pip3 install --user pipenv` (if that doesn't work, try `pip install --user pipenv`)
68 |
69 | At the end of this step, you should be able to input the command `pipenv --version` and have it not return an error.
70 |
71 | ### Step 3-W: Visual Studio Code
72 |
73 | Unless you have another preference, VSCode is a pretty good code editor.
74 |
75 | * Install [VS Code](https://code.visualstudio.com/)
76 | * Install the [Python extension for VS Code](https://marketplace.visualstudio.com/items?itemName=ms-python.python)
77 | * Install the [Remote WSL extension for VS Code](https://marketplace.visualstudio.com/items?itemName=ms-vscode-remote.remote-wsl)
78 | * Install the [Remote Development Pack for VS Code](https://marketplace.visualstudio.com/items?itemName=ms-vscode-remote.vscode-remote-extensionpack)
79 |
80 | ### Step 4-W: The WSL file system
81 |
82 | WSL is like a separate computer inside of Windows. Which means that it has its own little corner of your hard drive that's a little hard for other Windows software to access. Makes it difficult to, for example, download a meme gif from your browser and add it to your codelab working directory. For this reason, I suggest going the other way and accessing the Windows file system through WSL. Hard drives in Windows are mounted in WSL at `/mnt/c/` where "c" can be any drive letter. For CodeLab, I recommend setting up a directory in Windows to store your files and then creating what's called a symbolic link (basically a shortcut) in WSL to more easily access it.
83 |
84 | For example, if you create a `codelab` directory on your root C drive, it will show up in WSL under `/mnt/c/codelab/`. We can enter this commend in the WSL terminal under your home directory (`~/`) to create the link: `ln -s /mnt/c/codelab codelab`. After this, you'll be able to access your code directory from your home directory with a simple `cd codelab`.
85 |
86 | ### Step X-W: Switch from Bash to Zsh (strictly optional)
87 |
88 | This isn't really necessary and the process is more convoluted than anything we've done so far, but it results in a much prettier terminal that has some nice conveniences.
89 |
90 | * Follow [these instructions](https://pascalnaber.wordpress.com/2019/10/05/have-a-great-looking-terminal-and-a-more-effective-shell-with-oh-my-zsh-on-wsl-2-using-windows/).
91 | * I recommend setting up [Windows Terminal](https://www.microsoft.com/en-us/p/windows-terminal/9n0dx20hk701) or just the VSCode integrated terminal instead of using the default Ubuntu Terminal.
92 |
--------------------------------------------------------------------------------
/Week01/resources.md:
--------------------------------------------------------------------------------
1 | ## Resources for Command Line and the Shell
2 |
3 | ## What is a Shell?
4 |
5 | At its base, a shell is simply a macro processor that executes commands. The term macro processor means functionality where text and symbols are expanded to create larger expressions.
6 |
7 | A bash shell is both a command interpreter and a programming language. As a command interpreter, the shell provides the user interface to the rich set of utilities for your operating system. The programming language features allow these utilities to be combined. Files containing commands can be created, and become commands themselves. These new commands have the same status as system commands in directories such as /bin, allowing users or groups to establish custom environments to automate their common tasks.
8 |
9 | Shells may be used interactively or non-interactively. In interactive mode, they accept input typed from the keyboard. When executing non-interactively, shells execute commands read from a file.
10 |
11 | Shells also provide a small set of built-in commands (builtins) implementing functionality impossible or inconvenient to obtain via separate utilities. For example, cd, break, continue, and exec cannot be implemented outside of the shell because they directly manipulate the shell itself. The history, getopts, kill, or pwd builtins, among others, could be implemented in separate utilities, but they are more convenient to use as builtin commands. All of the shell builtins are described in subsequent sections.
12 |
13 | While executing commands is essential, most of the power (and complexity) of shells is due to their embedded programming languages. Like any high-level language, the shell provides variables, flow control constructs, quoting, and functions.
14 |
15 | Shells offer features geared specifically for interactive use rather than to augment the programming language. These interactive features include job control, command line editing, command history and aliases.
16 |
17 | ## Videos to Watch
18 |
19 | 1. [Bash Basics Part 1 of 8 | Access and Navigation](https://youtu.be/eH8Z9zeywq0?t=885)
20 | 1. [Beginner's Guide to the Bash Terminal](https://www.youtube.com/watch?v=oxuRxtrO2Ag)
21 | 1. [The Most Important Thing You'll Learn in the Command Line](https://www.youtube.com/watch?v=q7-aEspwwEI)
22 | 1. Go through the CodeAcademy [command line course](https://www.codecademy.com/learn/learn-the-command-line).
23 | 1. [Shell Scripting Tutorial](https://www.youtube.com/watch?v=hwrnmQumtPw)
24 |
--------------------------------------------------------------------------------
/Week02/README.md:
--------------------------------------------------------------------------------
1 | # Week 2: Introduction to Data
2 |
3 | 
4 |
5 | ## Lesson
6 | [Lesson document](intro_data.md)
7 | 1. What is data?
8 | 2. How to data
9 | 3. Basic data representations
10 |
11 | ## New Terms
12 | * **Analog**: Relating to continuous numerical values of infitesimal granularity
13 | * **Binary**: Base-2 numeral system, consisting only of 0 and 1. Counting up from 0, the binary numbers are: 0, 1, 10, 11, 100, 101, 110, 111, 1000...
14 | * **Boolean**: A data type that has two possible values: True and False. These are often used with and associated with the binary values 1 and 0. Boolean values in Python are often used in conditionals and loops (which we'll talk about in the future)
15 | * **Digital**: Relating to discrete numerical systems
16 | * **Floating Point Number (Float)**: A number with a decimal point (e.g. `3.0` rather than `3`). Because computers use binary numbers internally to represent numbers with decimal points, we often run into very small and unexpected rounding errors when using floats.
17 | * **Integer**: A positive, negative, or zero whole number (e.g. `3` rather than `3.0`).
18 | * **String**: Text data. We can think of it as a list of this as a list of characters. For example, `"Hazel"[2]` is `'z'`.
19 |
20 | ---
21 | ## Homework to do before Week 3
22 |
23 | ## Do:
24 |
25 | 1. Let's flex our algorithmic thinking muscles some more. Write out in plain English an algorithm to sort a deck of cards.
26 |
27 | 2. And: Write out in plain English an algorithm for a cashier to find exact change.
28 |
29 |
30 | ## Read:
31 | Posner, Miriam (2015), [Humanities Data, a Necessary Contradiction ](http://miriamposner.com/blog/humanities-data-a-necessary-contradiction/)
32 |
33 | Horgan, John (2017), [Profile of Claude Shannon, Inventor of Information Theory](https://blogs.scientificamerican.com/cross-check/profile-of-claude-shannon-inventor-of-information-theory/)
34 |
35 | Atwood, Jeff (2010), [The Great Newline Schism](https://blog.codinghorror.com/the-great-newline-schism/)
36 |
--------------------------------------------------------------------------------
/Week02/assets/Agc.jpg:
--------------------------------------------------------------------------------
https://raw.githubusercontent.com/scholarslab/CodeLab/6ac7385197639beae35c094038e68b9aa4bf2f23/Week02/assets/Agc.jpg
--------------------------------------------------------------------------------
/Week02/assets/analog_digital.jpg:
--------------------------------------------------------------------------------
https://raw.githubusercontent.com/scholarslab/CodeLab/6ac7385197639beae35c094038e68b9aa4bf2f23/Week02/assets/analog_digital.jpg
--------------------------------------------------------------------------------
/Week02/assets/ascii.png:
--------------------------------------------------------------------------------
https://raw.githubusercontent.com/scholarslab/CodeLab/6ac7385197639beae35c094038e68b9aa4bf2f23/Week02/assets/ascii.png
--------------------------------------------------------------------------------
/Week02/assets/morse_code.png:
--------------------------------------------------------------------------------
https://raw.githubusercontent.com/scholarslab/CodeLab/6ac7385197639beae35c094038e68b9aa4bf2f23/Week02/assets/morse_code.png
--------------------------------------------------------------------------------
/Week02/assets/rocky_bed.png:
--------------------------------------------------------------------------------
https://raw.githubusercontent.com/scholarslab/CodeLab/6ac7385197639beae35c094038e68b9aa4bf2f23/Week02/assets/rocky_bed.png
--------------------------------------------------------------------------------
/Week02/assets/rothko.png:
--------------------------------------------------------------------------------
https://raw.githubusercontent.com/scholarslab/CodeLab/6ac7385197639beae35c094038e68b9aa4bf2f23/Week02/assets/rothko.png
--------------------------------------------------------------------------------
/Week02/assets/rur-1250.txt:
--------------------------------------------------------------------------------
https://raw.githubusercontent.com/scholarslab/CodeLab/6ac7385197639beae35c094038e68b9aa4bf2f23/Week02/assets/rur-1250.txt
--------------------------------------------------------------------------------
/Week02/assets/shannon.jpg:
--------------------------------------------------------------------------------
https://raw.githubusercontent.com/scholarslab/CodeLab/6ac7385197639beae35c094038e68b9aa4bf2f23/Week02/assets/shannon.jpg
--------------------------------------------------------------------------------
/Week02/assets/sleeping_hazel.jpeg:
--------------------------------------------------------------------------------
https://raw.githubusercontent.com/scholarslab/CodeLab/6ac7385197639beae35c094038e68b9aa4bf2f23/Week02/assets/sleeping_hazel.jpeg
--------------------------------------------------------------------------------
/Week02/assets/unicode_linear-a.pdf:
--------------------------------------------------------------------------------
https://raw.githubusercontent.com/scholarslab/CodeLab/6ac7385197639beae35c094038e68b9aa4bf2f23/Week02/assets/unicode_linear-a.pdf
--------------------------------------------------------------------------------
/Week03/README.md:
--------------------------------------------------------------------------------
1 | # Week 3: Structured Data
2 |
3 | 
4 |
5 | ## Lesson
6 | [Lesson document](structured_data.md)
7 | 1. Making data more complicated
8 | 2. Text files and binary files
9 | 3. Lists
10 | 4. CSV
11 | 5. XML
12 |
13 |
14 | ---
15 | ## Homework to do before Week 4
16 |
17 | ## Do:
18 |
19 | 0. Do or review the [Programming Historian command line tutorial](https://programminghistorian.org/en/lessons/intro-to-bash) because we'll be doing a lot of stuff in the command line next week!
20 |
21 | 1. Let's continue to practice algorithmic thinking. Write out in plain English an algorithm to guess whether a text represents English, French, Portugese, Urdu, Simplified Chinese, or "other".
22 |
23 | 2. Manually write out an XML document that contains the data in your CV.
24 |
25 | 3. Watch ["Git Explained in 100 Seconds"](https://www.youtube.com/watch?v=hwP7WQkmECE) without paying too close attention for now to all the commands that get brought up. We're going to do way more Git stuff next week, so don't worry about the details for now!
--------------------------------------------------------------------------------
/Week03/assets/TheAddamsFamily_morse.webm:
--------------------------------------------------------------------------------
https://raw.githubusercontent.com/scholarslab/CodeLab/6ac7385197639beae35c094038e68b9aa4bf2f23/Week03/assets/TheAddamsFamily_morse.webm
--------------------------------------------------------------------------------
/Week03/assets/rocky_eyes.jpg:
--------------------------------------------------------------------------------
https://raw.githubusercontent.com/scholarslab/CodeLab/6ac7385197639beae35c094038e68b9aa4bf2f23/Week03/assets/rocky_eyes.jpg
--------------------------------------------------------------------------------
/Week03/structured_data.md:
--------------------------------------------------------------------------------
1 | # Week 03 Lesson: Structured Data
2 |
3 | ## The Limitations of Unstructured Text
4 |
5 | When we use virtually any natural language, we don't just use words. We also use a rich array of punctuation marks, spacing, pauses, intonations, and all the accompanying accoutrement of language. Think about the stereotypical telegram message in a movie: there's a lot of use of the word "stop", meaning a period, as in "full stop." Which is interesting, since Morse code actually encodes punctuation, including the period symbol. But instead of using it, the general convention was to spell out the word "stop" in order to have more redundancy because punctuation was so important to the understanding of messages.
6 |
7 | [TheAddamsFamily_morse.webm](https://github.com/scholarslab/CodeLab/assets/2342131/b699d2b9-c03c-4340-b30d-f1a3b7f2cc5e)
8 |
9 | Punctuation and spacing are pretty important for most natural languages. The standard joke about comma usage is the difference between "Let's eat, Grandpa!" and "Let's eat Grandpa!" When we use them, it's often a way to add _structure_ to the linear flow of words, in the most basic sense to help break up clauses so that semantically proximate words are also physically or temporally proximate. Without this structure, we have a stream that must mostly be understood ambiguously through interpretation.
10 |
11 | **What are other ways that we structure text? Think about different kinds of documents.**
12 |
13 | ## Lists
14 |
15 | One of the simpliest ways we can structure text is using lists, which is just an ordered, linear collection of items. Let's break that down. Collection, as in there's a set of zero or more items. Ordered, as in there's an order to the elements; the second item comes after the first and before the third. Linear, as in like a line, so there's a single dimension to that order. This one's pretty straightforward, but there's a few wrinkles.
16 |
17 | **How do we write out a list? How do we distinguish between different elements?**
18 |
19 | We have *elements*, which are the items of a list, and we have what's called *delimiters* which separate them. We can define special characters to act only as delimiters, which are not allowed to be used inside of elements, but in practice we'd rather not define the whole system of our text around the particular implementations. We want to create a *text file*, that is to say a way to structure data using the characters in a text character encoding without having to resort to special data outside of it. This is important because text files are readable by software that implement the particular character encoding without having to know the special, specific rules that we would need to define if we e.g. wanted to have a special marking for delimiters. Text files are also useful because they're also typically much easier to read for humans directly. Files which are only readable with those special rules that put them outside of a standard character encoding (i.e. not text files) are called "binary files." For now and maybe forever, it's more useful to know what those are abstractly than to know how those are constructed. Let's continue with text files.
20 |
21 | Since we're making all of this out of the same set of characters, we run into the problem that we'd like to also use the characters we're using as delimiters in our elements. So we have to think of ways to tell people (and computers) when to and when not to take a particular character literally. One way to do this is to treat certain characters, like commas or quotation marks, as special unless we "escape" them (indicate that they're actually just mundane text) by using an **escape character**.
22 |
23 | So, for example, maybe we can enclose all our elements with quotation marks:
24 |
25 | `"Bofur", "Maple","Rocky"`
26 |
27 | And if we need to use quotation marks inside of our elements, we can just double them up:
28 |
29 | `"Bofur ""the brave""", "Maple ""the kind""", "Rocky ""the anxious"""`
30 |
31 | ## CSVs
32 |
33 | Now that we have a way to do lists, which are one-dimensional. **How would we turn it into two dimensions? What would that look like?**
34 |
35 | Let's make a list of lists by putting each one on a new line:
36 |
37 | ```
38 | "Dog", "Breed", "Owner"
39 | "Bofur", "corgi", "Ronda"
40 | "Maple", "hound", "Amanda"
41 | "Rocky", "cattle dog", "Shane"
42 | ```
43 |
44 | So now we have tabular data, data in tables. Which is probably pretty familiar as spreadsheet data. This format, the list of lists, with double quotation mark escape characters, is actually the text file format called Comma Separated Values (CSV). There's also a similar, but less common format called Tab Separated Values (TSV).
45 |
46 | These are most often used to move spreadsheet data around outside of the more proprietary and specialized spreadsheet software formats like XLS/XLSX (Excel), so that it can be exchanged between people who use different software or want to read and parse it with code more easily. CSV is a very popular way to exchange [public datasets](https://catalog.data.gov/dataset/?res_format=CSV).
47 |
48 | **What are the limitations of CSVs and tabular data in general?**
49 |
50 | Let's consider a CSV or spreadsheet representing data for job candidates. One candidate to a row, with columns representing common data such as name, contact information, etc. What happens if we add a section for education or work experience? How many columns should we add to represent degrees or previous positions? We can add new columns whenever we have to add a candidate with more degrees or positions than any prior one, but this makes the data more difficult to parse, either as a human or by computer. Each degree or position also has a number of subsidiary fields: the years and place for an educational program or job are properties of those programs and jobs, but every column is functionally a top level field of the candidate.
51 |
52 | For more complex data, we need a more robust, and somewhat more verbose form of structured data.
53 |
54 | ## XML
55 |
56 | Tabular data is useful when we have fixed columns and more rigidly consistent data. There are properties that most dogs or bags of coffee or countries share that we can build columns around. But how do we express more data more flexibly? How could we better express arbitrary length lists or "contains"/"child" relationships? XML, eXtensible Markup Language, was created as a means of **serialization**, allowing it to serve as an intermediary between different applications like a *lingua franca*. This has made it a popular basis for many different softwares that need to represent complex data.
57 |
58 | XML comprises a set of nested **elements** that comprise opening and closing **tags** that contain a mix zero or more of: **attributes**, text, and child elements.
59 |
60 | Let's look at some example XML. I made up the structure and content of this snippet, but the syntax that it follows can be used to describe many different kinds of other structures. The line breaks and spacing/tabs are optional, but they make it easier for humans to read.
61 |
62 | ```xml
63 |
64 |
65 | Lin
66 | Shane
67 |
68 | Senior Developer
69 |
70 |
71 | Rocky
72 | Rock Ness Monster
73 | Dimitri Rockmaninoff
74 | Rockminster Fuller
75 | Australian Cattle Dog
76 | Australian Shepherd
77 |
78 |
79 | Hazelnut
80 | Australian Cattledog
81 | Beagle
82 |
83 |
84 |
85 | ```
86 |
87 | In this XML, "person", "name", "first", "last", etc are all elements. They start with an opening tag (e.g. '') and end with a closing tag (e.g. ''). Here, we can see that the Person element encompasses all the other elements.
88 |
89 | "id" is an attribute of the person element. Attributes are defined inside of the opening tag and describe some metadata about the element.
90 |
91 | Between the opening and closing tags, we have the element content. Here, we see that "name" is a _child_ element of the person element. Child elements are used to provide subsidiary information about its parent element and are useful for describing more complex structures. Element content can also have simple text, useful for when there isn't a need to further structure its data using children. The "last" and "first" elements inside of "name" contain just text content.
92 |
93 | Sometimes, we don't actually need to have any content at all, only attributes or even just the tag itself. In those cases, we can use the convention of the self-closing tag: ``.
94 |
95 | We can use multiple elements of the same type inside of an element (e.g. "dog", "alias") but not multiple attributes of the same name in the same tag.
96 |
97 | After you've parsed this example XML, you might think to yourself: "this isn't the only way to describe this information!" And you'd be right!
98 |
99 | Let's take a look at four different XML structures:
100 |
101 | ```xml
102 |
103 |
104 | Lin
105 | Shane
106 |
107 |
108 | ```
109 |
110 | ```xml
111 |
112 | Lin
113 | Shane
114 |
115 | ```
116 |
117 | ```xml
118 |
119 |
120 |
121 | ```
122 |
123 | ```xml
124 |
125 | ```
126 |
127 | These four elements all describe the same basic data. Whether you use attributes or child elements or text is often a matter of personal preference. It's not a good idea to cram data into attributes or text where we might benefit from the additional structure provided by child elements. It's also not a good idea to use attributes where the number of attributes may be uncertain or which contains too much data; the "dog" elements in the original example XML is better suited to be elemental children.
128 |
129 | ## Validation / Parsing
130 |
131 | The point of having these well-defined and consistent formats is that computers can both produce and read them back in. We will usually define the structures of these documents manually (e.g. the columns of a CSV or the order and definitions of the elements in XML), but more frequently the actual documents that conform to those structures are produced by computer programs.
132 |
133 | The process of reading a text file of a particular format into a way that is legible to a computer (which we might anthropomorphize as "understanding" the file) is called parsing and the software that does this is a parser. We can write our own parsers for some of these formats easily enough, but there are enough edge cases and this is a common enough of a problem that we should use one of the many parsers available to us. In Python, there are CSV and XML parsers built into the language (and also for some other formats).
134 |
135 | When we write formatted text by hand, it's easy to make mistakes. When we have to keep track of nested tags or complex arrangements of escape characters, it helps to have mechanical assistance. Validators and linters are related software tools to help check the syntax and, in some cases, the style of formats. When we use these tools, they help us ensure that our documents are *well-formed*, meaning that they conform to the basic rules of the format (e.g. every XML element is closed). But well-formedness only ensures that a computer can unambiguously read the document, not that it'll make sense to a human.
136 |
--------------------------------------------------------------------------------
/Week04/README.md:
--------------------------------------------------------------------------------
1 | # Week 4: Version Control
2 |
3 | 
4 |
5 | ## Lesson
6 |
7 | [Git for Humanists](https://shane-et-al.github.io/git_slab/)
8 |
9 | 
10 |
11 | 1. Review Codelab to this point
12 | 2. How to collaborate digitally?
13 | 3. Version Control Systems
14 | 4. Git and Github
15 |
16 |
17 | ## Setup
18 | There's a bit of setup for git that I forgot to have y'all do. First, we need to set up name and email in Git. You don't have to use your real identity, but if it might be useful to have people be able to contact you about your change. [Github has some strategies](https://docs.github.com/en/account-and-profile/setting-up-and-managing-your-personal-account-on-github/managing-email-preferences/setting-your-commit-email-address) for maintaining some privacy for this step.
19 |
20 | ```console
21 | git config --global user.email user@domain.com
22 | git config --global user.name 'Public Name'
23 | ```
24 |
25 | Then, we'll want to set the default text editor if you end up using git through the command line. Vim is the default and it's another thing to learn if you don't already know how to use it, so I would suggest nano as an easier to use option:
26 |
27 | ```console
28 | git config --global core.editor "nano"
29 | ```
30 |
31 | ## New Terms
32 |
33 | * **Clone/Fork**: A version control operation to create a duplicate repository. In Git, "clone" is the command to duplicate a repository to your local computer; in Github, fork is the mechanism to duplicate a repository to your own Github account. These are functionally the same. Forking has a more permanent implication in traditional version control systems, but it can be much more transient in Git.
34 | * **Commit**: A set of changes that can be referenced later (and reverted or reverted to). We can think of a commit as a milestone or version of a repository. It should be organized such that the change itself is legible (ideally, a specific and interrelated set of updates and not just a disordered mess of revisions) and the state of the repo it represents is sensible (in that the state is comprehensible if you ever have to go back to it).
35 | * **Git**: The most popular version control system in use today and the software command (`git`) used to interact with it.
36 | * **GitHub**: A website and web service that hosts and manages git repositories online. Often used as the canonical, remote repository to coordinate the work of individuals local repositories. Purchased by Microsoft in 2018, to much hand-wringing.
37 | * **Merge**: An important version control function, which multiple, concurrent changes to the same file to be rectified. A file that cannot be automatically rectified is said to be in a "merge conflict."
38 | * **Repository** ("repo"): The basic data store that contains all the files for a particular project.
39 | * **Staging**: In Git and other similar version control systems that use changesets, we explicitly stage specific files that we intend to be part of a commit before committing them. In git, the command to stage a file is `git add `. Wildcards are allowed (e.g. `git add *`). We can stage all updated files that git is tracking already (i.e. older versions of the files are already in git) using the -p flag: `git add -A`).
40 | * **Version Control**: A software system that allows programmers (and other people who work with digital files) to track their work and collaborate with others by providing Concurrency (maintaining consistancy despite multiple editors), Reservibility (keeping track of changes and allowing work to be undone), and Annotation (describing changes through labels, timestamps, and author information).
41 |
42 | ---
43 | ## Homework for Week 5
44 |
45 | ## Do:
46 |
47 | 1. Add an icebreaker question (or questions) to the [icebreaker git practice document](https://github.com/scholarslab/gitpractice/blob/master/Praxis2023.md) and check back on it every few days to answer all the previous, unanswered questions.
48 |
--------------------------------------------------------------------------------
/Week04/assets/git_workflow.avif:
--------------------------------------------------------------------------------
https://raw.githubusercontent.com/scholarslab/CodeLab/6ac7385197639beae35c094038e68b9aa4bf2f23/Week04/assets/git_workflow.avif
--------------------------------------------------------------------------------
/Week04/assets/rocky_popcorn.jpg:
--------------------------------------------------------------------------------
https://raw.githubusercontent.com/scholarslab/CodeLab/6ac7385197639beae35c094038e68b9aa4bf2f23/Week04/assets/rocky_popcorn.jpg
--------------------------------------------------------------------------------
/Week05/README.md:
--------------------------------------------------------------------------------
1 | # Week 5: Introduction to Python
2 | 
3 |
4 | ## Lesson
5 | [Lesson document](intro_python.md)
6 | 1. Let's get coding
7 | 2. Python interactive interpreter
8 | 3. Data structures
9 | 4. Documentation
10 | 5. Dogs
11 |
12 | ## Resources
13 | [Python data types cheatsheet](types_cheatsheet.md)
14 |
15 | ## Terms
16 | * **Binary**: Base-2 numeral system, consisting only of 0 and 1. Counting up from 0, the binary numbers are: 0, 1, 10, 11, 100, 101, 110, 111, 1000...
17 | * **Boolean**: A data type that has two possible values: True and False. These are often used with and associated with the binary values 1 and 0. Boolean values in Python are often used in conditionals and loops (which we'll talk about in the future)
18 | * **Comment**: Parts of the code that are ignored by the computer and are intended as explanatory text for humans.
19 | * **Documentation**: Writing about code. Often, these are formal desciptions of all of the different functions, modules, classes, and methods in a piece of code, such as the [documentation for Python itself](https://docs.python.org/3/). Sometimes, it's less formal instructions and tutorials.
20 | * **Floating Point Number (Float)**: A number with a decimal point (e.g. `3.0` rather than `3`). Because computers use binary numbers internally, we often run into very small and unexpected rounding errors when using floats.
21 | * **Function**: A piece of code that does a specific task. Larger functions can be broken down into smaller ones. Familiar built-in Python functions include `print` and `len`. Functions are defined using the `def` keyword and then can be "called" (executed) by other code at will later on using the `function_name(parameter)` format.
22 | * **Index**: The position of a value inside of a list or other sequence, typically referenced using square brackets. Python is "zero-indexed", which means that the first index of a list is 0. `numbers[0]` references the *first* value of the list `numbers` whereas `numbers[3]` is the *4th* value. So if `numbers = [1,2,3,4,5]`, then `numbers[0]` is `1` and `numbers[3]` is 4.
23 | * **Integer**: A whole number (e.g. `3` rather than `3.0`).
24 | * **List**: A useful built-in Python data structure that represents a linear and ordered collection of data (i.e. data arranged in a row, in a certain order). We define lists using square brackets (e.g. `numbers = [1,2,3]` or `numbers=[]` to create an empty list). We can access an individual item inside of a list using square brackets and its list index (e.g. `numbers[2]`) or a range of indices (e.g. `numbers[2:5]` or `numbers[3:]`).
25 | * **Method**: A function that belongs to a class. Don't worry about that part for now; if you see it mentioned, just treat it as meaning the same as a function.
26 | * **Parameter/Argument**: We can use these terms interchangeably. Parameters are data that's passed into a function or a method (i.e. the `text` part of `print(text)`). We define what parameters a function should expect in the function definition and then we have to pass in the right number and kind of data in the function call.
27 | * **String**: Text data. We can think of it as a list of this as a list of characters. For example, `"Hazel"[2]` is `'z'`.
28 | * **Variable**: A container for data. Variables let us squirrel away a piece of data using a variable name and the assignment operator (`a = 5`) and then refer back to it later (`a + 10`). Any piece of data that we want to keep track of, we have to store away as a variable.
29 |
30 | ---
31 | ## Homework for Week 5
32 |
33 | ### Coding Assignment 0: Simplified Pig Latin
34 | Produce a simple program to accept a single word as text input and then print out the [pig latin](https://en.wikipedia.org/wiki/Pig_Latin) translation.
35 |
36 | When I first assigned this homework, I didn't actually know that Pig Latin is a more complicated and potentially more ambiguous algorithm than I thought! Because of this, we can implement the simplest case for the word provided: just shift the first letter to the end and add "ay" to it.
37 |
38 | Taking into consideration words starting with consonant clusters or vowels requires some conditional logic, which we haven't gone over yet, but feel free to jump ahead if you really want to show off.
39 |
40 | Your code should be structured something like this:
41 |
42 | ```python
43 | word = input("Enter word: ")
44 | # Pig latin code goes here
45 | print(pig_latin)
46 | ```
47 |
48 | ### Natural Language Coding
49 | Once again, let's write, in plain English, precise and detailed step-by-step instructions for a task: given a list of students, pair off each student with a partner, making sure to not double-book anyone and to not assign anyone to be their own partner. What kinds of "edge cases" (unexpected conditions) do we have to watch out for? What's missing from these instructions?
50 |
51 | ## Read:
52 | Posner, Miriam (2015), [Humanities Data, a Necessary Contradiction ](http://miriamposner.com/blog/humanities-data-a-necessary-contradiction/)
53 |
--------------------------------------------------------------------------------
/Week05/assets/10kinds.jpeg:
--------------------------------------------------------------------------------
https://raw.githubusercontent.com/scholarslab/CodeLab/6ac7385197639beae35c094038e68b9aa4bf2f23/Week05/assets/10kinds.jpeg
--------------------------------------------------------------------------------
/Week05/assets/MissionImpossible.m4v:
--------------------------------------------------------------------------------
https://raw.githubusercontent.com/scholarslab/CodeLab/6ac7385197639beae35c094038e68b9aa4bf2f23/Week05/assets/MissionImpossible.m4v
--------------------------------------------------------------------------------
/Week05/assets/badpunhazel.jpeg:
--------------------------------------------------------------------------------
https://raw.githubusercontent.com/scholarslab/CodeLab/6ac7385197639beae35c094038e68b9aa4bf2f23/Week05/assets/badpunhazel.jpeg
--------------------------------------------------------------------------------
/Week05/assets/dymo.jpeg:
--------------------------------------------------------------------------------
https://raw.githubusercontent.com/scholarslab/CodeLab/6ac7385197639beae35c094038e68b9aa4bf2f23/Week05/assets/dymo.jpeg
--------------------------------------------------------------------------------
/Week05/assets/montypython.jpg:
--------------------------------------------------------------------------------
https://raw.githubusercontent.com/scholarslab/CodeLab/6ac7385197639beae35c094038e68b9aa4bf2f23/Week05/assets/montypython.jpg
--------------------------------------------------------------------------------
/Week05/assets/overlords.jpg:
--------------------------------------------------------------------------------
https://raw.githubusercontent.com/scholarslab/CodeLab/6ac7385197639beae35c094038e68b9aa4bf2f23/Week05/assets/overlords.jpg
--------------------------------------------------------------------------------
/Week05/assets/sleeping_hazel.jpeg:
--------------------------------------------------------------------------------
https://raw.githubusercontent.com/scholarslab/CodeLab/6ac7385197639beae35c094038e68b9aa4bf2f23/Week05/assets/sleeping_hazel.jpeg
--------------------------------------------------------------------------------
/Week05/types_cheatsheet.md:
--------------------------------------------------------------------------------
1 | # Types and Objects
2 |
3 | How to test for types in python. Write `type`!
4 |
5 | ```
6 | >>> type(True)
7 |
8 | >>> type(1)
9 |
10 | >>> dictionary = { "color":"blue", "size":9090 }
11 | >>> type(dictionary)
12 |
13 | >>> tuple = ( "blue", 9090 )
14 | >>> type(tuple)
15 |
16 | >>> reindeer = ["dasher", "dancer", "prancer", "vixen", "olive"]
17 | >>> type(reindeer)
18 |
19 | >>> boy_bands = { "nsync", "one direction", "boyz II men" }
20 | >>> type(boy_bands)
21 |
22 | ```
23 |
24 | ## Lists
25 |
26 | A [Python list](https://docs.python.org/3.6/tutorial/datastructures.html) is an unordered, untyped collection of any values. The example below is storing strings, an integer, and even another list inside a list.
27 |
28 | ```python
29 | junk = list()
30 | junk = ['carrots', 'celery', 'kale', 2, ['peas', 'corn']]
31 | junk.insert(1, 'kidney beans')
32 | junk.extend([True, 'tornado'])
33 | junk.append('hurricane')
34 | print(junk)
35 | ```
36 |
37 | ## Dictionary
38 |
39 | A dictionary is a collection of key/value pairs.
40 |
41 | ```python
42 | junk = dict()
43 | junk = { 'name': 'Steve', 'age': 47, 'role': 'Head Coach' }
44 | junk['kids'] = 2
45 | print(junk)
46 | ```
47 |
48 | ## Set
49 |
50 | A set is sort of like a list, except that each item is enforced to be unique. If you try to add an item that already exists in the set, no operation occurs.
51 |
52 | ```python
53 | junk = set()
54 | junk.add('Scott')
55 | print(junk)
56 | { 'Scott' }
57 |
58 | junk.add('Scott')
59 | print(junk)
60 | { 'Scott' }
61 | ```
62 |
63 | ## Tuple
64 |
65 | A tuple is like a list except that it's immutable. You can't add or remove things from it. What makes them useful is that iterating over the elements is faster than a list.
66 |
67 | ```python
68 | junk = tuple()
69 | junk = ('Joe', 'Instructor', 'Awesome')
70 | print(junk)
71 | ```
72 |
--------------------------------------------------------------------------------
/Week06/README.md:
--------------------------------------------------------------------------------
1 | # Week 6: Functions and Methods
2 | 
3 |
4 | ---
5 | ## Lesson
6 | [Lesson document](lesson.md)
7 | 1. Discuss homework assignments
8 | 2. Types
9 | 3. Functions and methods
10 |
11 | ---
12 | ## Homework for Week 6
13 |
14 | ### Coding assignment 1a
15 |
16 | Just like in the lesson, convert your own Pig Latin code from last week into a function in this form:
17 |
18 | ```python
19 | # Your function definition here
20 |
21 | print(pig_latin(input("Enter input: ")))
22 | ```
23 |
24 | ### Coding assignment 1b
25 |
26 | Add the function we defined in the lesson to repeate words (`repeat()`)to your code and call it to print the output from part 1a one hundred times.
27 |
28 | The expected output for the input "praxis" should be "praxis praxis praxis ..." (100 Praxes).
29 |
30 |
31 | ### Coding assignment 1c
32 |
33 | Modify your code in part 1a to `split()` the input into a list of multiple words. If there is only one word, it'll just be a list with one element. Then, only print the Pig Latin for the first word. The [Python documentation for a particualr string method](https://docs.python.org/3/library/stdtypes.html#str.split) will be very useful here!
34 |
35 | As an example, the expected output for the input "praxis codelab code lab" should be "raxispay".
36 |
37 | ### Coding assignment 1d
38 |
39 | Modify your code in part 1c to repeat just the first word in pig latin ten times, but also print the rest of the words after that.
40 |
41 | As an example, the expected output for the input "praxis codelab code lab" should be "raxispay raxispay raxispay raxispay raxispay raxispay raxispay raxispay raxispay raxispay codelab code lab".
42 |
--------------------------------------------------------------------------------
/Week06/assets/deadline.gif:
--------------------------------------------------------------------------------
https://raw.githubusercontent.com/scholarslab/CodeLab/6ac7385197639beae35c094038e68b9aa4bf2f23/Week06/assets/deadline.gif
--------------------------------------------------------------------------------
/Week06/assets/hazel_bed.jpg:
--------------------------------------------------------------------------------
https://raw.githubusercontent.com/scholarslab/CodeLab/6ac7385197639beae35c094038e68b9aa4bf2f23/Week06/assets/hazel_bed.jpg
--------------------------------------------------------------------------------
/Week06/assets/invincible.gif:
--------------------------------------------------------------------------------
https://raw.githubusercontent.com/scholarslab/CodeLab/6ac7385197639beae35c094038e68b9aa4bf2f23/Week06/assets/invincible.gif
--------------------------------------------------------------------------------
/Week07/ExtraExercises/dictionary_exercises.md:
--------------------------------------------------------------------------------
1 | # Python Dictionary
2 |
3 | ## Setup
4 | Make a directory in your workspace, `cd` into it, and create a file called `slab_dict.py`
5 |
6 | ```
7 | mkdir -p ~/workspace/python/exercises
8 | cd exercises
9 | touch slab_dict.py
10 | ```
11 |
12 | ## References
13 |
14 | * [Python dictionaries](https://docs.python.org/3.6/tutorial/datastructures.html#dictionaries)
15 | * [Learn Python - Dictionaries](https://www.learnpython.org/en/Dictionaries)
16 | * [Introducing Dictionries](http://www.diveintopython.net/native_data_types/index.html#odbchelper.dict)
17 |
18 |
19 | ## Instructions
20 |
21 | In the Scholars' Lab, each employee has a title. We can store that information in a dictionary.
22 |
23 | ##### Example
24 |
25 | ```python
26 | slab_staff = { 'Zoe_LeBlanc':'DH_Developer' ,
27 | 'Jeremy_Boggs':'Head_RnD', 'Brandon_Walsh' :'Head_GradPrograms' }
28 | ```
29 |
30 | We can print out each person's title by using either bracket notation
31 | ```python
32 | print(slab_staff['Zoe_LeBlanc'])
33 | ```
34 | or dot notation.
35 | ```python
36 | print(slab_staff.Zoe_LeBlanc)
37 | ```
38 |
39 | ##### Try this
40 | 1. Try creating a dictionary with all your fellow praxis student names and departments.
41 | 2. Then try using bracket or dot notation to print out their department.
--------------------------------------------------------------------------------
/Week07/ExtraExercises/list_exercises.md:
--------------------------------------------------------------------------------
1 | # Python Lists
2 |
3 | ## Setup
4 | Make a directory in your workspace, `cd` into it, and create a file called `slab_list.py`
5 |
6 | ```
7 | mkdir -p ~/workspace/python/exercises
8 | cd exercises
9 | touch slab_list.py
10 | ```
11 |
12 | ## Reference
13 |
14 | * [Python Lists](https://docs.python.org/3.6/tutorial/datastructures.html)
15 | * [Learn Python - Lists](http://www.learnpython.org/en/Lists)
16 |
17 |
18 | ## Instructions
19 |
20 | In the Scholars' Lab, we offer instruction in many sub-fields of DH. We can store our offerings in a list
21 |
22 | ##### Example
23 |
24 | ```python
25 | slab_specialties = ['mapping', 'makerspace', 'text_analysis', '3D_printing', 'VR_AR', 'computer_vision', 'machine_learning', 'programming' ]
26 | ```
27 |
28 | We can print out each type of specialty by using the index of the list
29 | ```python
30 | print(slab_specialties[0])
31 | ```
32 | We can get the final value of the list by using the index `-1`
33 | ```python
34 | print(slab_specialties[-1])
35 | ```
36 | We can get a range of items in the list by using `:` to specify the range. In this example we should get the first two items.
37 | ```python
38 | print(slab_specialties[0:2])
39 | ```
40 | Finally we can figure out how long are list is by using the built in function `len()`, which should be 7.
41 | ```python
42 | print(len(slab_specialties))
43 | ```
44 |
45 | *REMEBER: when indexing a list, the first index is always zero!!! *
46 |
47 | ##### Try this
48 | 1. Try printing out the above examples and changing the index number. (** hint: if you get an index out of range error, you might have used a number greater than the number of items in the list **)
49 | 2. Then try creating your own list of your research interests, and then try using indexes to print out each one.
50 |
--------------------------------------------------------------------------------
/Week07/README.md:
--------------------------------------------------------------------------------
1 | # Week 07: Control Flow
2 | You guys are all doing great!
3 |
4 | 
5 |
6 | ## Outline
7 | 1. Discuss homework assignments
8 | 2. [Conditions and Loops](./lesson.md)
9 |
10 | ## Terms
11 |
12 | * **Library/Module/Package**: External code can be brought into your code using the `import` keyword. These are all terms to refer to different levels of code (a Python package is a collection of related modules, a library is less formally defined).
13 |
14 | ## What's What With Walsh
15 |
16 | > One thing programming offers digital humanists is the ability to work at scale. Many of the activities we do as humanists work on a fairly small scale - we read closely, we analyze, we write. But how would you read ten million texts? Programming can help us address great quantities of data, and looping, the application of a particular set of programming texts to many different elements, is fundamental to large scale work. They can be useful for, say, bulk assigning different metadata labels to particular chunks of work. For example, we used loops when working on Michelle Morgenstern's tumblr data to preprocess a variety of social media posts to make them ready for analysis. Digital text analysis commonly lowers the case of all words in a text to make quantifying them easier and more accurate, so we could have used a loop to say "go over every word in this post and lowercase it." But, as a linguistic anthropologist, Michelle actually cared about capitalization in some cases as it could be a rhetorically interesting. Whether or not we wanted all words to be lower cased depended on the context. So we actually implemented a version of "when looking at raw word counts, lower the case of all words except in a set of predefined instances." Combining conditional statements with loops like this meant that we could flexibility build up a project that reflected her needs as a scholar.
17 | > - Brandon
18 |
19 | ---
20 | ## Homework for Week 07
21 |
22 | Try pair programming with a buddy!
23 |
24 | ## Assignment 0:
25 |
26 | What is the output of this code?
27 |
28 | ```python
29 | x = 0
30 | if x == 0:
31 | x = 1
32 | if x == 1:
33 | x = 2
34 | if x == 2:
35 | x = 3
36 | print(x)
37 | ```
38 |
39 | And this?
40 |
41 | ```python
42 | x = 0
43 | if x == 0:
44 | x = 1
45 | elif x == 1:
46 | x = 2
47 | else:
48 | x = 3
49 | print(x)
50 | ```
51 |
52 | ### Assignment 1: Improved pig latin
53 |
54 | Let's go back to our very basic pig latin code again. It probably looks something like this:
55 |
56 | ```python
57 | word = input("Enter word: ")
58 | print(word[1:]+word[0]+"ay")
59 | ```
60 |
61 | This time, add a conditional to handle the case where the first letter is a vowel (Wikipedia says: "For words that begin with vowel sounds, generally only a syllable 'yay' is appended to the end, with no modifications to the beginning onset.").
62 |
63 | ### Assignment 2: Filter evens
64 |
65 | Write a function, `filter_evens()` that takes in a list of integers as an argument and returns a list of integers comprising only the even numbers.
66 |
67 | ```python
68 | def filter_evens(numbers):
69 | # Your function definition here
70 |
71 | nums = [0,-2,3,14]
72 | print(filter_evens(nums))
73 | ```
74 |
75 | ### Assignment 3: FizzBuzz
76 |
77 | This is a classic coding puzzle, another rite of passage. Write a program that takes as input a number and then plays the [FizzBuzz game](https://en.wikipedia.org/wiki/Fizz_buzz) until that number is reached. This is a classic programming puzzle and, very helpfully, Wikipedia actually has a list of solutions, including one in Python. But if you use it, be prepared to explain how it works in front of the Fellowship in the next Codelab. It's not the simplest answer (and, in fact, it's Python 2 code), but it might be useful to reverse-engineer!
78 |
79 | Sample code:
80 | ```python
81 | # We're not going to worry about invalid input for this...
82 | i = int(input("Enter a number: "))
83 |
84 | # Your code here
85 | # Example output: "1 2 fizz 4 buzz fizz 7"
86 | # (all on one line or on multiple lines are both fine)
87 | ```
88 |
89 | Sample output:
90 | ```
91 | Enter a number: 7
92 | 1
93 | 2
94 | Fizz
95 | 4
96 | Buzz
97 | Fizz
98 | 7
99 | ```
100 |
101 | Hint:
102 | There's a number of built-in operators in Python that may be helpful for this excercise which are [covered in the documentation](https://docs.python.org/3/reference/expressions.html). Take a look at the "modulo" operator in particular. You'll probably want to use a loop of some kind, so I would suggest peeking at the Python [Control Flow documentation](https://docs.python.org/3/tutorial/controlflow.html).
103 |
104 | Remember to test your code. Try to see if your output matches the sample output above. Does it have the right number of prints? Try it out with other inputs too. What is the correct output if the user enters the value 15?
105 |
--------------------------------------------------------------------------------
/Week07/assets/hazel_sleeping.jpg:
--------------------------------------------------------------------------------
https://raw.githubusercontent.com/scholarslab/CodeLab/6ac7385197639beae35c094038e68b9aa4bf2f23/Week07/assets/hazel_sleeping.jpg
--------------------------------------------------------------------------------
/Week07/assets/looper.gif:
--------------------------------------------------------------------------------
https://raw.githubusercontent.com/scholarslab/CodeLab/6ac7385197639beae35c094038e68b9aa4bf2f23/Week07/assets/looper.gif
--------------------------------------------------------------------------------
/Week07/assets/maple_loop.jpg:
--------------------------------------------------------------------------------
https://raw.githubusercontent.com/scholarslab/CodeLab/6ac7385197639beae35c094038e68b9aa4bf2f23/Week07/assets/maple_loop.jpg
--------------------------------------------------------------------------------
/Week07/assets/racoon_highfive.gif:
--------------------------------------------------------------------------------
https://raw.githubusercontent.com/scholarslab/CodeLab/6ac7385197639beae35c094038e68b9aa4bf2f23/Week07/assets/racoon_highfive.gif
--------------------------------------------------------------------------------
/Week07/lesson.md:
--------------------------------------------------------------------------------
1 | ## Week 07: Control Flow
2 |
3 | 
4 |
5 | The order of instructions which a computer program executes is known as "control flow" and we can think it as like a river with a strangely winding, branching, looping course. Functions are our first step in working with code that doesn't simply run linearly, one line after the next. After we define them, we can call back on functions again and again, from anywhere. With functions, just because a line of code appears before a later one doesn't mean that it isn't executed later.
6 |
7 | But functions are still... functionally linear: we're basically copying out a block of code and pasting it back in elsewhere and so we know every time that a particular function will be called. The river always winds one way, the same way, every time.
8 |
9 | But sometimes we want to change things up, to make decisions based on what input we provide or what time of day we run our code or even just randomly. Sometimes we want the river to fork. Sometimes we want to take a different path this time than the next and the last. To accomplish this, we must use conditionals and loops.
10 |
11 | This is where we start to get to the fun stuff!
12 |
13 | ### Conditionals
14 |
15 | A conditional is a simple way for a computer program to make a choice about flow. The basic syntax of the conditional in many programming languages is the `if` statement. In Python, it looks like this:
16 |
17 | ```python
18 | x = 5
19 | if x>0:
20 | print("Positive")
21 | elif x<0:
22 | print("Negative")
23 | else:
24 | print("Zero")
25 | ```
26 |
27 | Let's take a look at the actual *conditions*: `x>0` and `x<0`. These are valid Python statements. If you define a variable `x` and then execute `x>0` in the Python interactive interpreter, we can see that they return Boolean values, `True` or `False`:
28 |
29 | ```python
30 | >>> x = 5
31 | >>> x > 0
32 | True
33 | >>> x = -5
34 | >>> x > 0
35 | False
36 | ```
37 |
38 | Around the conditions are the conditional keywords: `if`, `elif` (else if), and `else`. They're what they sound like. Each of the conditional blocks (the three `print()` statements) are only run if the associated conditional statement is `True` (in the boolean logic sense). We can have multiple `elif` blocks if we want. We can also omit `elif` and `else` blocks altogether.
39 |
40 | In each of these examples, note the colon at the end of each conditional line. Here, as with function definitions, a colon is a signal that we're going to start a new code block (indicated by the indentation). The different code blocks (the "Positive", "Negative", and "Zero" print statements here) delineate the conditional flow.
41 |
42 | For numbers, we can use `>`, `>=`, `==`, `<`, and `<=` to make numeric comparisons.
43 |
44 | In our first example, because we assign `x=5`, the first condition (`if x>0:`) is met and we print out "positive." Because the other statements are `elif` and `else` and we have already met a condition, we do not even evaluate those statements.
45 |
46 | ### More complex conditions
47 |
48 | If we want to modify or chain together boolean statements, we can use `and`, `or`, and `not`:
49 |
50 | ```python
51 | if not(x>0 or x<0):
52 | print("ZERO")
53 | ```
54 |
55 | For strings, we can use use `==` for comparison and some special operators like `in` to see if one string exists inside of another.
56 |
57 | ```python
58 | if "I" in "TEAM":
59 | s = "at least one"
60 | else:
61 | s = "no"
62 | print("There is "+s+" I in TEAM")
63 | ```
64 |
65 | If a variable is the special `None` object, an empty string (""), or the numeric value zero, it evaluates as boolean `False`. Otherwise, it is `True`.
66 |
67 | ```python
68 | dog = ""
69 | if dog:
70 | print("Yay!")
71 | else:
72 | print("Nooo...")
73 | ```
74 |
75 | ### Constructing Conditionals
76 |
77 | Let's take another look at our example:
78 |
79 | ```python
80 | x = 5
81 | if x>0:
82 | print("Positive")
83 | elif x<0:
84 | print("Negative")
85 | else:
86 | print("Zero")
87 | ```
88 |
89 | Why is this structured the way that it is? Is it functionally the same as this version?
90 |
91 | ```python
92 | x = 5
93 | if x>0:
94 | print("Positive")
95 | if x<0:
96 | print("Negative")
97 | if x==0:
98 | print("Zero")
99 | ```
100 |
101 | Because numbers in Python cannot simultaneously be positive, negative, or zero (and ignoring concurrency for now), these two bits of code are actually equivalent. Only one of `x>0`, `x<0`, and `x==0` can be true at one time.
102 |
103 | But this is a simple scenario where we are not only covering all our bases and can be confident that we have thought of all scenarios, but also one in which there are no complicated overlaps between the conditions. Additionally, using `elif` explicitly excludes conflicting code blocks and `else` is often a way to catch unexpected conditions. These are strategies that are useful for writing more legible and robust code.
104 |
105 | ### Looping
106 |
107 | Functions are neat in part because they let you write a bit of code once and then refer back to that code over and over again in the future. Loops do that too, but let you repeat code dynamically, with the program flow varying depending on inputs. Let's take a look at what sort of problems these structures help with.
108 |
109 | Say we want to write a piece of code to sum up all the numbers in a list of integers, like totaling up a column in a spreadsheet. Without Python's loop features, we could add up a set number of elements:
110 |
111 | ```python
112 | def sum(number_list):
113 | return number_list[0]+number_list[1]+number_list[2]
114 | ```
115 |
116 | That's no good. It works, but only for inputs with exactly 3 numbers. It'd fail if we passed in a list with 5 numbers or with 2. We want a way to let Python decide when to repeat and when to stop repeating, based on conditions that we give it.
117 |
118 | 
119 |
120 | We need a way to loop through code, round and round.
121 |
122 | #### while loops
123 |
124 | Conveniently, Python's `while` loops let you repeat a code block so long as a condition you specify holds true. Let's take a look at how we could implement the summation code from before with `while`:
125 |
126 | ```python
127 | def sum(number_list):
128 | x = 0
129 | sum = 0
130 | while x 0:
11 | # keep looping as long as we owe more than the smallest denomination...
12 | while change_owed >= DENOMINATIONS[-1]:
13 | # Go down the list of denominations...
14 | for denomination in DENOMINATIONS:
15 | # ... until we hit a denomination that is smaller or equal to the amount owed
16 | # This will be the largest denomination that "fits" into the change
17 | if denomination <= change_owed:
18 | # Add the denomination to the list of change to return and...
19 | list_of_change.append(denomination)
20 | # ... subtract the denomination amount from the amount owed
21 | change_owed -= denomination
22 | # break out of the for look to go through the list of denomination so we start again at the top
23 | break
24 | #return the change
25 | return list_of_change
26 | # We don't need to return change
27 | elif change_owed == 0:
28 | return []
29 | # Otherwise, there's not enough payment!
30 | else:
31 | print("Hey there, what are you trying to pull?")
32 | return None
33 |
34 | # Test cases
35 | print(change(5,2.55))
36 | print(change(2.55,5))
37 | print(change(5,5))
38 | print(change(0,5))
--------------------------------------------------------------------------------
/Week08/assets/20170126.jpg:
--------------------------------------------------------------------------------
https://raw.githubusercontent.com/scholarslab/CodeLab/6ac7385197639beae35c094038e68b9aa4bf2f23/Week08/assets/20170126.jpg
--------------------------------------------------------------------------------
/Week08/assets/function.gif:
--------------------------------------------------------------------------------
https://raw.githubusercontent.com/scholarslab/CodeLab/6ac7385197639beae35c094038e68b9aa4bf2f23/Week08/assets/function.gif
--------------------------------------------------------------------------------
/Week08/assets/nesting.gif:
--------------------------------------------------------------------------------
https://raw.githubusercontent.com/scholarslab/CodeLab/6ac7385197639beae35c094038e68b9aa4bf2f23/Week08/assets/nesting.gif
--------------------------------------------------------------------------------
/Week08/lesson.md:
--------------------------------------------------------------------------------
1 | ## Week 08: Program flow (loop around)
2 |
3 | #### Redirecting flow
4 |
5 | Sometimes, it can be hard to construct a `while` loop conditional ahead of time. Sometimes, the flow isn't dependent on sequences. We might have complex logic that needs to break out of a loop in the middle of our loop code block. Or we might want to write out each distinct condition for reasons of legibility. Other times, we need to skip past the rest of the code block, to continue on with the loop rather than break out of it entirely.
6 |
7 | To illustrate how we might want to accomplish these things, let's play the children's game Duck Duck Goose. Every cycle, we ask the user to type in "Duck" or "Goose". If the input is "Duck", we continue the loop from the top. If it's "Goose", we break out of it. We could write this in a simpler way, but this will help illustrate our new keywords.
8 |
9 | ```python
10 | while 1:
11 | word = input("What do you say? ")
12 | if word.upper() == "DUCK":
13 | continue
14 | elif word.upper() == "GOOSE":
15 | break
16 | print("Maybe I should explain the rules again...")
17 | ```
18 |
19 | At the top, `while 1` tells Python to loop forever because 1 (and every other non-zero integer) evaluates as `True` and so it's just equivalent to `while True`. We can do this a lot of other ways because many things evaluate to `True`: `while "Hazel"`, etc. But `while 1` or `while True` are the most common in Python and the most intelligible across different programming languages.
20 |
21 | If the input word is "Duck", the `continue` tells Python to continue looping, back from the top, *without* going through the rest of the code. If we `continue`, we never reach the `print()` on line 7.
22 |
23 | If the input word is "Goose", we hit the `break` and Python breaks out of the entire loop. If we have an infinite loop like `while 1`, we probably want to hit a `break` at some point.
24 |
25 | `continue` and `break` can be used in any `for` or `while` loop. But be careful about overusing them, because they can make code hard to read.
26 |
27 |
28 | ### Nested Loops: Loops, But More.
29 |
30 | 
31 |
32 | If we want to really master loops, we have to learn how to nest them. Nesting means that we can have one loop inside of another. One reason we might want to do this is if we need to compare different elements in a list with each other.
33 |
34 | How might we write a function to check whether a list contains duplicate numbers? With a single layer of looping, it's not so easy. But with two, it's simple. Well. Simple once you get the hang of it.
35 |
36 | One good strategy for solving problems like this is to ask: how would we do this as a person? What discrete steps can we break this into?
37 |
38 | So, as a person, how would we check this list for duplicates? `[3,5,7,9,5]`
39 |
40 | To start, we need to look at each number in the list individually, to have something to compare all the other numbers to. Let's start with the first number there: 3.
41 |
42 | What next? We're at that first number. We should see if there are any other 3s in the list. There aren't.
43 |
44 | So we move on to the next number, 5, and repeat. There is another 5, so we can say: "yes, there is a duplicate."
45 |
46 | Good, now how do we abstract this in code? Our basic strategy involves two levels of looping: in the first level, we want to take a look at each number; in the other, we want to compare that number against all the other numbers. In Python, this is easier to construct using a `while` loop (`for` loops abstract away some of the index data we want to use).
47 |
48 | This is a simple case where we're doing basically the same thing on both levels: just iterating through some numbers. This kind of loop should look familiar:
49 |
50 | ```python
51 | i = 0 # we're going to use i as a counter to keep track of the index
52 | while i < len(numbers):
53 | #do some stuff
54 | i+=1 #increment the index counter
55 | ```
56 |
57 | So, if we stack one inside of the other, we get something like this:
58 |
59 | ```python
60 | def got_dupes(numbers):
61 | i = 0 # i is the first counter, for the outer loop
62 | while i < len(numbers)-1: #we don't need to loop at the very last number on the outside loop because there's nothing to compare it to
63 | j = 0 # j is the second counter, for the inner loop
64 | while j < len(numbers):
65 | if numbers[i] == numbers[j]:
66 | return True #duplicate found! Returning True.
67 | j+=1
68 | i+=1
69 | return False #if we complete all the looping without returning, there must not have been any duplicates
70 | ```
71 |
72 | What's wrong with this code?
73 |
74 | We want to loop through all the numbers on the outer loop, but do we want to loop through them all on the inner one too?
75 |
76 | Here's the correct code:
77 |
78 | ```python
79 | def got_dupes(numbers):
80 | i = 0
81 | while i < len(numbers)-1:
82 | j = i+1 # j starts at the next number after i on every loop
83 | while j < len(numbers):
84 | if numbers[i] == numbers[j]:
85 | return True
86 | j+=1
87 | i+=1
88 | return False
89 | ```
--------------------------------------------------------------------------------
/Week09/README.md:
--------------------------------------------------------------------------------
1 | # Week 09: Algorithms and File Operations
2 |
3 | 
4 |
5 | ## Outline
6 | 1. Discuss homework assignments
7 | 2. Sorting
8 | 3. File input/output
9 |
10 | [Lesson document](./lesson.md)
11 |
12 | ## Homework
13 |
14 | ### Assignment 0
15 |
16 | [Download the plain text of Much Ado About Nothing from Project Gutenberg](http://www.gutenberg.org/ebooks/1519)
17 |
18 | Write a program to read in this file and count the total lines of dialog and the length (character count) of those lines for the two main characters: Benedick and Beatrice. Write that data out to a second file.
19 |
20 | Feel free to modify the text file before loading it into Python if it'd be easier, for example, you want to strip out the starting and ending Project Gutenberg text, the scenes list, the dramatis personae, etc.
21 |
22 |
23 | ### Assignment BONUS:
24 |
25 | Implement a sorting algorithm for sorting a list of numbers. Don't use any built-in sort. It can be as simple or complicated as you want. Feel free to look at the innumerable other examples on the Internet, but be prepared to explain your code!
26 |
27 | Think back to what we talked about, to mapping human processes to code. Try your best, but don't bang your head against a wall if you get stuck. I'm happy to chat about any of this material, of course.
28 |
29 | ```python
30 | def sort_numbers(numbers):
31 | # your code here
32 | return sorted_list
33 |
34 | numbers = [6,3,7,8,1,3]
35 | print(sort_numbers(numbers))
36 | ```
37 |
--------------------------------------------------------------------------------
/Week09/answers/assignment.py:
--------------------------------------------------------------------------------
1 | with open("1519-0.txt",mode="r") as infile:
2 | text = infile.read()
3 | # Instead of reading the file line by line (text lines, not dialog lines), we want to read it in all at once.
4 | # This is because each text line is associated with other lines (multiple lines form a single dialog line), and so that we can perform string operations like split on it.
5 | # Once we read the file into text, we don't need it open anymore
6 |
7 | # Set all our variables to zero
8 | ben_lines = 0
9 | ben_len = 0
10 | bea_lines = 0
11 | bea_len = 0
12 |
13 | for line in text.split("\n\n"):
14 | # We can split on two newline characters because each line of dialog is separated by an empty text line
15 | # This isn't strictly correct because of stage directions, but it's good enough for this purpose
16 | if line.startswith("BENEDICK."):
17 | ben_lines+=1
18 | ben_len += len(line)-9 #9 is the length of "BENEDICK." and, again, it's a close enough aproximation
19 | elif line.startswith("BEATRICE."):
20 | bea_lines += 1
21 | bea_len += len(line)-9 #9 is also the length of "BEATRICE."
22 |
23 | with open("MAAN_lines.txt", mode="w") as outfile:
24 | outfile.write("Benedick has "+str(ben_lines)+" lines totalling length "+str(ben_len)+" characters\n") #\n is the special new line character
25 | outfile.write("Beatrice has "+str(bea_lines) +
26 | " lines totalling length "+str(bea_len))
27 |
--------------------------------------------------------------------------------
/Week09/assets/eva.jpg:
--------------------------------------------------------------------------------
https://raw.githubusercontent.com/scholarslab/CodeLab/6ac7385197639beae35c094038e68b9aa4bf2f23/Week09/assets/eva.jpg
--------------------------------------------------------------------------------
/Week09/assets/hazel_romantic_hero.jpg:
--------------------------------------------------------------------------------
https://raw.githubusercontent.com/scholarslab/CodeLab/6ac7385197639beae35c094038e68b9aa4bf2f23/Week09/assets/hazel_romantic_hero.jpg
--------------------------------------------------------------------------------
/Week09/assets/maple_snooze.JPG:
--------------------------------------------------------------------------------
https://raw.githubusercontent.com/scholarslab/CodeLab/6ac7385197639beae35c094038e68b9aa4bf2f23/Week09/assets/maple_snooze.JPG
--------------------------------------------------------------------------------
/Week09/lesson.md:
--------------------------------------------------------------------------------
1 | ## Week 09: Algorithms and File Operations
2 |
3 | ### Candidate Obama Speaks at Google (a lesson of Sorts)
4 |
5 | By combining these basic components of comparison and loop logic, we've created an algorithm. Algorithms are ways to solve problems using an unambiguous set of instructions. So, "Knight to Queen's Bishop 3" rather than a more vague instruction like "attack the center".
6 |
7 | There are some rather formal definitions for this term, but we can informally and facilely say that all computer programs, including all the ones that you've written, are algorithms. More usefully, we use the term to describe more generalized ways to solve problems: we can think of the function that we wrote last week as an implementation of, let's call it the nested-loop duplication detection algorithm.
8 |
9 | There are [a lot of algorithms](https://en.wikipedia.org/wiki/List_of_algorithms).
10 |
11 | ### Sorting
12 |
13 | Different algorithms can solve the same problem. A very common class of algorithms that do functionally the same thing is sorting. In Python, we have a few built-in ways to sort things. For example:
14 |
15 | ```
16 | >>> a = [1,3,2,5]
17 | >>> a.sort()
18 | >>> a
19 | [1, 2, 3, 5]
20 | ```
21 |
22 | But here, Python is doing the hard work under the table, hiding it through a method so you don't have to know how it works. But behind that method is an algorithm. The sorting algorithm [TimSort](https://en.wikipedia.org/wiki/Timsort) to be exact. People have been sorting things for tens or maybe hundreds of thousands of years of human history and we're still figuring out new ways to do it. TimSort was invented in 2002 and it's a good one. But it's also a lot more complicated than I'd like to get into, so let's take a look at a different one.
23 |
24 | How would we sort a list of numbers?
25 |
26 | *Insert insightful class discussion*
27 |
28 | Here's a photo of Hazel as a Romantic Hero while we do this.
29 |
30 | 
31 |
32 | Good, good. So, for variety, let's look at another way to sort. To introduce it, let's turn to Presidential candidate Barrack Obama, being interviewed at Google Headquarters in late 2007.
33 |
34 | [](https://www.youtube.com/watch?v=k4RRi_ntQc8)
35 |
36 | I'd say that he's got pretty competent campaign staff.
37 |
38 | Bubble sort is, in fact, usually a less efficient way to sort. But it's easy to implement and it's often used for teaching.
39 |
40 | [Bubble sort animation](https://upload.wikimedia.org/wikipedia/commons/c/c8/Bubble-sort-example-300px.gif)
41 |
42 | Or, let's consider a much worse sorting algorithm: we can just use Python's built-in random shuffle method to scramble the list and then check whether it's sorted. If not, repeat the shuffle.
43 |
44 | Obviously, this is much less efficient (time-wise at least) than the other sorts we've looked at. In the same way, there are more efficient ways to sort than Bubble Sort or Insertion Sort. In fact, there's a fairly long [Wikipedia article](https://en.wikipedia.org/wiki/Sorting_algorithm) that just lists different sorting algorithms.
45 |
46 | This is all to suggest that there can be different ways to solve the same problem, and that those different ways can have quite different performance properties. "Naive" algorithms that mimic human thinking are a good way to start thinking about problems, but they may or may not get you very far if you want to optimize performance.
47 |
48 | Having given you a taste for all that, I want to say that there's often no... real good reason for us as digital humanists to dive too deeply into algorithms or efficiency. Whether it takes 30 seconds to run our text analysis or 3 seconds isn't as consequential as whether Google returns search results in 30 seconds or 3 seconds. And so much of this, like Python's hidden sort, is just already done for us by things like the Python built-in library and third-party modules (which we'll talk about later).
49 |
50 | It's useful to look at the broad contours of these things even if we don't understand them in any depth.
51 |
52 | ## Files
53 |
54 | Let's do one useful new thing this week. User input from the command line is useful sometimes, but sometimes we want to do some heavier lifting.
55 |
56 | Let's read in a text file.
57 |
58 | In Python, there's a number of ways to do this. One of the easiest is to use the `open` function, which returns a "file object" that represents that file.
59 |
60 | [(Here are the Python docs for this)](https://docs.python.org/3/tutorial/inputoutput.html#reading-and-writing-files)
61 |
62 | The code for `open` is very simple. To read a file, we can do:
63 |
64 | ```python
65 | infile = open('file.txt', "r")
66 | text = infile.read()
67 | infile.close()
68 | ```
69 |
70 | Text will then be a string that holds the text of the input file.
71 |
72 | The call at the end to `close` isn't even strictly necessary. It's good practice to do it for optimal resource management, but Python will do it for you if you forget.
73 |
74 | A common idiom to use for Python file handling that you'll often see in examples is to use a with-as block. The last example is:
75 |
76 | ```python
77 | with open('file.txt', "r") as infile:
78 | text = infile.read()
79 | ```
80 |
81 | All this does is structure the code so that you don't forget to close the file.
82 |
83 | The file object is also magically iterable, so we can treat it as a list that we can loop through. Another common idiom is to use a for loop to go through it line by line.
84 |
85 | ```python
86 | infile = open('file.txt', "r")
87 | for line in infile:
88 | print(line.upper())
89 | infile.close()
90 | ```
91 |
92 | The "r" argument that you pass in to `open` tells Python that you want to read the file. To write, we can use "w" mode. This will overwrite the file if it already exists. We can use "a" for append to keep the existing content and just add to the end instead.
93 |
94 | ```python
95 | outfile = open('file.txt', "w")
96 | outfile.write("Hazel is a good dog.\n")
97 | outfile.close()
98 | ```
99 |
100 | The `\n` at the end of that string indicates a new line.
101 |
102 | See? Easy!
103 |
104 | 
105 |
--------------------------------------------------------------------------------
/Week10/README.md:
--------------------------------------------------------------------------------
1 | # Week 10: Working with Structured Data
2 | 
3 |
4 | ## Agenda
5 | - Review homework (if it exists)
6 | - [Hands on with structured data ](lesson.md)
7 |
8 | ## Assignment
9 |
10 | ### Part 0
11 | Now that you have a handle on composite data structures like lists and dictionaries, we can put them to practical use. Create a representation of your Praxis cohort in Python. You can include whatever data you want: basic data like name, year, department, but maybe consider the icebreaker questions from the [git practice](https://github.com/scholarslab/gitpractice). Then use the Python json module to dump it into a json formatted text file.
12 |
13 | ### Part 1
14 | Okay! The meat of this week's homework. It's another kinda amorphous, experimental one. Working alone or in groups (or a single super-group), find an interesting dataset, read it into Python, and use Python to extract some interesting facts from it.
15 |
16 | Happily, there are a lot of interesting datasets out floating out there, often in CSV-like formats. FiveThirtyEight, for example, has a ton of csv-formatted data on their [Github](https://github.com/fivethirtyeight/data). Buzzfeed has a similar [Github repo](https://github.com/BuzzFeedNews). IMDB has big, big datasets in tab-separated-values format (CSV, but with tabs) [on their site](https://www.imdb.com/interfaces/). The Government has an enormous clearinghouse of public data on the appropriately-named [data.gov](https://catalog.data.gov/dataset) website, in a variety of formats. The sky's the limit!
17 |
18 | Even though the CSV module makes reading the data into Python pretty easy, this is potentially a really tricky assignment because keeping different related data fields together can be challenging (e.g. sorting a column and also sorting the other fields for each row together). Google is definitely your friend here ("sorting dictionary by key python"). Literally millions of people have had to do the same thing you're trying to do. If you're having some trouble, ping me on Slack any time. It might be useful to read the CSV data into another data structure to make this easier.
19 |
20 | Plan for 0-5 minute shows-and-tell next week!
21 |
--------------------------------------------------------------------------------
/Week10/assets/hazel3.jpg:
--------------------------------------------------------------------------------
https://raw.githubusercontent.com/scholarslab/CodeLab/6ac7385197639beae35c094038e68b9aa4bf2f23/Week10/assets/hazel3.jpg
--------------------------------------------------------------------------------
/Week10/assets/hazel_snooze.jpg:
--------------------------------------------------------------------------------
https://raw.githubusercontent.com/scholarslab/CodeLab/6ac7385197639beae35c094038e68b9aa4bf2f23/Week10/assets/hazel_snooze.jpg
--------------------------------------------------------------------------------
/Week10/assets/maple_jerm.jpg:
--------------------------------------------------------------------------------
https://raw.githubusercontent.com/scholarslab/CodeLab/6ac7385197639beae35c094038e68b9aa4bf2f23/Week10/assets/maple_jerm.jpg
--------------------------------------------------------------------------------
/Week10/assets/structure.gif:
--------------------------------------------------------------------------------
https://raw.githubusercontent.com/scholarslab/CodeLab/6ac7385197639beae35c094038e68b9aa4bf2f23/Week10/assets/structure.gif
--------------------------------------------------------------------------------
/Week11/README.md:
--------------------------------------------------------------------------------
1 | # Week 11
2 |
3 | 
4 |
5 | ## Agenda
6 | - Review homework
7 | - [External Dependencies](lesson.md)
8 |
9 | ## Assignment
10 |
11 | Show and Tell! I'm turning things over to all of you next week. Find an interesting Python package/library, either on [PyPI](https://pypi.org/) or just through searching on the Internet. It can be something that you think could be useful to your research interests or really anything that you think is neat. If you'd like, you can write some code to demonstrate what it does and tell us how you think it could be useful or why it appeals to you.
12 |
--------------------------------------------------------------------------------
/Week11/assets/depends.gif:
--------------------------------------------------------------------------------
https://raw.githubusercontent.com/scholarslab/CodeLab/6ac7385197639beae35c094038e68b9aa4bf2f23/Week11/assets/depends.gif
--------------------------------------------------------------------------------
/Week11/assets/fatdog.jpg:
--------------------------------------------------------------------------------
https://raw.githubusercontent.com/scholarslab/CodeLab/6ac7385197639beae35c094038e68b9aa4bf2f23/Week11/assets/fatdog.jpg
--------------------------------------------------------------------------------
/Week11/assets/hazel_hi.jpg:
--------------------------------------------------------------------------------
https://raw.githubusercontent.com/scholarslab/CodeLab/6ac7385197639beae35c094038e68b9aa4bf2f23/Week11/assets/hazel_hi.jpg
--------------------------------------------------------------------------------
/Week11/lesson.md:
--------------------------------------------------------------------------------
1 | # Week 11: Depedencies
2 |
3 | 
4 |
5 |
6 | ## Outside help
7 |
8 | The Python Standard Library provides a pretty wide set of tools. It comes with every Python install and that's one of its main strengths - you don't have to worry about whether someone has `itertools` or `random` installed.
9 |
10 | But sometimes, the thing we need is a little bit more obscure or specific. We couldn't include all these things with every Python install, because otherwise that install would be enormous. Instead, there's something like an app store for Python code (except that it's all free, because Python is all free) called the [Python Package Index, or PyPI](https://pypi.org/). Not to be confused with PyPy (groan), which is something else.
11 |
12 | It's pretty big. Anyone can submit projects to it and so there are more than a quarter-million individual ones.
13 |
14 | We can install any one of these packages through [Pipenv](https://pipenv-fork.readthedocs.io/en/latest/), which all of you should already have since we did the environment setup at the beginning of the year.
15 |
16 | Pipenv coordinates the function of two important tools, Pip and Virtualenv. Pip is Python's package manager, which means that it downloads and installs Python packages. But it downloads them either to the whole system or to a single user's space. This means that when we grab a package, we could override packages that are being used by other projects. This is potentially really bad, because we're not the only ones on our computers that use Python. We could break applications or even our operating system.
17 |
18 | To solve this, Virtualenv walls off "virtual" environments for particular programs. These virtualenvs are like independent Python installations that don't affect other things that use Python.
19 |
20 | Pipenv combines these functions together into one tool. It works at the directory level. We can create a new pipenv environment inside of a directory so long as it doesn't live in another another directory with a pipenv environment. You can choose to have, for example, all your Codelab assignments live inside a single directory like `~/projects/Codelab` or you can choose to have each week have its own environment like `~/projects/Codelab/Week10`. It doesn't matter too much since you probably won't have dependency conflicts between different weeks. But you can't have both an environment in both because one is inside of the other.
21 |
22 | To create a pipenv environment, we can just run `pipenv install X` to install a package from PyPI and it will automatically create a virtualenv for that directory and install package "X" in that virtualenv. After we do that, we can then use `pipenv shell` to spawn a subshell to use Python in that directory. To quit out of the subshell, we can just use the `exit` command.
23 |
24 | It's a bit clunky, but it works really well for most DH work.
25 |
26 | You can browse through PyPI and see if there's anything interesting. Of course, the first thing I did was find this: [getname](https://pypi.org/project/getname/).
27 |
28 | So, let's take that for a spin.
29 |
30 | ## Using Pipenv
31 |
32 | First, let's go into whatever directory where we're going to set up our pipenv environment. For me, that's going to be...
33 |
34 | ```
35 | cd ~/projects/sandbox
36 | ```
37 |
38 | Now, let's set up our pipenv environment and install that package.
39 |
40 | ```
41 | pipenv install getname
42 | ```
43 |
44 | That'll take a little bit to run. After it finishes, we have our environment set up. We can see that there are two new files inside our directory: Pipfile and Pipfile.lock.
45 |
46 | Looking inside Pipfile, we can see something like:
47 |
48 | ```
49 | [[source]]
50 | name = "pypi"
51 | url = "https://pypi.org/simple"
52 | verify_ssl = true
53 |
54 | [dev-packages]
55 |
56 | [packages]
57 | getname = "*"
58 |
59 | [requires]
60 | python_version = "3.7"
61 | ```
62 |
63 | We can see that there's some basic information about the package we specified. In this case, the line `getname = "*"` indicates that we want to grab some version of the `getname` package (* is often used as a wildcard character, standing in for "any").
64 |
65 | The Pipfile.lock file has similar information, but with the specific version of the packages that we grabbed.
66 |
67 | Don't worry about the particular formats for these files. It's only really important to understand that by distributing them (for example, by committing them to git), we can tell other people that grab our code what external dependencies they need (and potentially what versions of those dependencies).
68 |
69 | Everything is set up now.
70 |
71 | We can run the `which python` command to show us what the default system Python is. We'll get back something like `/usr/local/bin/python`.
72 |
73 | Now, we can activate the shell using:
74 |
75 | ```
76 | pipenv shell
77 | ```
78 |
79 | If we try the `which python` command again, it'll be something different. Something like: `/Users/shane/.local/share/virtualenvs/sandbox-2UjlHtLl/bin/python`
80 |
81 | That tells us that we're actually using a totally different Python from before. A Python that has access to the package that we just told pipenv to grab.
82 |
83 | Which allows us to do...
84 |
85 | ```python
86 | from getname import random_name
87 |
88 | dogs = []
89 | while len(dogs)<6:
90 | dogs.append(random_name('dog'))
91 | print(dogs)
92 | ```
93 |
94 | Without all the pipenv steps, we wouldn't have access to our new package and that first import line would fail.
95 |
96 | ## Example: NLTK
97 |
98 | Still with us? Great!
99 |
100 | 
101 |
102 | Okay, so let's do another, real example using the very useful and powerful NLTK package.
103 |
104 | I've included the dialog frm Much Ado About Nothing in [a nicely formatted JSON file](MAAN_dialog.json). Let's make use of that now.
105 |
106 | We can start by using pipenv to install nltk and activating the pipenv shell.
107 |
108 | ```
109 | pipenv install nltk
110 | pipenv shell
111 | ```
112 |
113 | Just for NLTK, we need to prime the module by downloading a few key bits of data. So we should jump into the Python interactive interpreter and just run these lines:
114 |
115 | ```python
116 | import nltk
117 | nltk.download('stopwords')
118 | ```
119 |
120 | This is specific to nltk and actually kind of an unusual way of working in Python. We only need to do this once for our environment.
121 |
122 | Now we can work on our actual Python code. Let's read in our json file.
123 |
124 | ```python
125 | import json
126 |
127 | with open("MAAN_dialog.json","r") as infile:
128 | dialog = json.loads(infile.read())
129 | ```
130 |
131 | This imports and json-loads our text file as a list of dictionaries. Because we've put the work into formatting our data, we can easily manipulate it to our purposes. Let's say we have a scholarly interest in, specifically, how the dialog of Beatrice and Benedick differ.
132 |
133 | Let's collate their lines now.
134 |
135 | ```python
136 | import json
137 |
138 | with open("MAAN_dialog.json","r") as infile:
139 | dialog = json.loads(infile.read())
140 |
141 | bea = ""
142 | ben = ""
143 |
144 | for line in dialog:
145 | if line["role"] == "BEATRICE":
146 | bea+=" "+line["dialog"]
147 | elif line["role"] == "BENEDICK":
148 | ben+=" "+line["dialog"]
149 | ```
150 |
151 | This gives us two variables, `bea` and `ben`, that contain all of those characters' lines.
152 |
153 | How might nltk give us insight into these lines? Let's do something simple and see out how the words that Shakespeare put into their mouths differ by looking at frequency distribution.
154 |
155 | First, we need to tokenize the dialog (i.e. break up the dialog into words). We can use one of nltk's built-in tokenizers for this. And then let's remove *stopwords*, which are common English words like articles that don't provide much insight in this sort of analysis.
156 |
157 | Stopwords are one of the wordlists provided by nltk. You can see all the English stopwords and read up on the other wordlists in the [NLTK book](https://www.nltk.org/book/ch02.html#wordlist-corpora). The little bit of code we ran in the interactive interpreter downloaded the stopword wordlist.
158 |
159 | Here's what the code to tokenize the dialog and strip out the stopwords looks like:
160 |
161 | ```python
162 | import nltk
163 | import json
164 |
165 | with open("MAAN_dialog.json","r") as infile:
166 | dialog = json.loads(infile.read())
167 |
168 | bea = ""
169 | ben = ""
170 |
171 | for line in dialog:
172 | if line["role"] == "BEATRICE":
173 | bea+=" "+line["dialog"]
174 | elif line["role"] == "BENEDICK":
175 | ben+=" "+line["dialog"]
176 |
177 | bea_tokens = []
178 | ben_tokens = []
179 |
180 | tokenizer = nltk.tokenize.RegexpTokenizer(r'\w+')
181 | for token in tokenizer.tokenize(bea):
182 | if token.lower() not in nltk.corpus.stopwords.words('english'):
183 | bea_tokens.append(token.lower())
184 | for token in tokenizer.tokenize(ben):
185 | if token.lower() not in nltk.corpus.stopwords.words('english'):
186 | ben_tokens.append(token.lower())
187 |
188 | print(bea_tokens)
189 | print(ben_tokens)
190 | ```
191 |
192 | `bea_tokens` and `ben_tokens` are now lists of words with stopwords stripped out.
193 |
194 | We can pass these lists back to NLTK's frequency distribution function to see how often distinct words appear.
195 |
196 | ```python
197 | import nltk
198 | import json
199 |
200 | with open("MAAN_dialog.json","r") as infile:
201 | dialog = json.loads(infile.read())
202 |
203 | bea = ""
204 | ben = ""
205 |
206 | for line in dialog:
207 | if line["role"] == "BEATRICE":
208 | bea+=" "+line["dialog"]
209 | elif line["role"] == "BENEDICK":
210 | ben+=" "+line["dialog"]
211 |
212 | bea_tokens = []
213 | ben_tokens = []
214 |
215 | tokenizer = nltk.tokenize.RegexpTokenizer(r'\w+')
216 | for token in tokenizer.tokenize(bea):
217 | if token.lower() not in nltk.corpus.stopwords.words('english'):
218 | bea_tokens.append(token.lower())
219 | for token in tokenizer.tokenize(ben):
220 | if token.lower() not in nltk.corpus.stopwords.words('english'):
221 | ben_tokens.append(token.lower())
222 |
223 | bea_freq = nltk.FreqDist(bea_tokens)
224 | print("Beatrice word frequencies:")
225 | for key, val in bea_freq.most_common(10):
226 | print(str(key) + ':' + str(val))
227 |
228 | ben_freq = nltk.FreqDist(ben_tokens)
229 | print("\n\n Benedick word frequencies:")
230 | for key, val in ben_freq.most_common(10):
231 | print(str(key) + ':' + str(val))
232 | ```
233 |
234 | And since a big list of words is maybe less useful, let's install a plotting library that nltk uses through pipenv:
235 |
236 | ```
237 | pipenv install matplotlib
238 | ```
239 |
240 | Which will allow us to get some pretty graphs:
241 |
242 | ```python
243 | import nltk
244 | import json
245 |
246 | with open("MAAN_dialog.json","r") as infile:
247 | dialog = json.loads(infile.read())
248 |
249 | bea = ""
250 | ben = ""
251 |
252 | for line in dialog:
253 | if line["role"] == "BEATRICE":
254 | bea+=" "+line["dialog"]
255 | elif line["role"] == "BENEDICK":
256 | ben+=" "+line["dialog"]
257 |
258 | bea_tokens = []
259 | ben_tokens = []
260 |
261 | tokenizer = nltk.tokenize.RegexpTokenizer(r'\w+')
262 | for token in tokenizer.tokenize(bea):
263 | if token.lower() not in nltk.corpus.stopwords.words('english'):
264 | bea_tokens.append(token.lower())
265 | for token in tokenizer.tokenize(ben):
266 | if token.lower() not in nltk.corpus.stopwords.words('english'):
267 | ben_tokens.append(token.lower())
268 |
269 | bea_freq = nltk.FreqDist(bea_tokens)
270 | ben_freq = nltk.FreqDist(ben_tokens)
271 |
272 | bea_freq.plot(20, cumulative=False)
273 | ben_freq.plot(20, cumulative=False)
274 | ```
275 |
276 | NLTK is a big and complicated piece of software designed to do (kind of) complicated analysis. This is still a unit on external dependencies and not on natural language processing or text analysis. Don't fret too much about how NLTK works or how to use it - the important part is that you now have the knowledge and the means and the wherewithall to exploit a vast universe of external python tools.
277 |
--------------------------------------------------------------------------------
/Week12/README.md:
--------------------------------------------------------------------------------
1 | # Week 12: Web Scraping
2 | 
3 |
4 | ## Agenda:
5 | - [Python Libraries, revisited](lesson.md#python-libraries-revisited)
6 | - [Introduction to XML: the Extensible, Monstrous Language](lesson.md#xml)
7 | - [Web scraping with Beautiful Soup](lesson.md#web-scraping)
8 |
9 | 
10 |
11 | ## Assignment
12 |
13 | Scrape all the Scholars' Lab blog posts and figure out who has published the most words and why is it Brandon? Export a CSV of how many words Brandon has written for each month and we can try to unprofessionally infer things about his private life. Try out some of your ideas for text analysis on his posts if you'd like.
14 |
--------------------------------------------------------------------------------
/Week12/assets/bender.gif:
--------------------------------------------------------------------------------
https://raw.githubusercontent.com/scholarslab/CodeLab/6ac7385197639beae35c094038e68b9aa4bf2f23/Week12/assets/bender.gif
--------------------------------------------------------------------------------
/Week12/assets/dogs.gif:
--------------------------------------------------------------------------------
https://raw.githubusercontent.com/scholarslab/CodeLab/6ac7385197639beae35c094038e68b9aa4bf2f23/Week12/assets/dogs.gif
--------------------------------------------------------------------------------
/Week12/assets/hazel_snooze.jpeg:
--------------------------------------------------------------------------------
https://raw.githubusercontent.com/scholarslab/CodeLab/6ac7385197639beae35c094038e68b9aa4bf2f23/Week12/assets/hazel_snooze.jpeg
--------------------------------------------------------------------------------
/Week12/assets/jason.gif:
--------------------------------------------------------------------------------
https://raw.githubusercontent.com/scholarslab/CodeLab/6ac7385197639beae35c094038e68b9aa4bf2f23/Week12/assets/jason.gif
--------------------------------------------------------------------------------
/Week12/assets/netscape.gif:
--------------------------------------------------------------------------------
https://raw.githubusercontent.com/scholarslab/CodeLab/6ac7385197639beae35c094038e68b9aa4bf2f23/Week12/assets/netscape.gif
--------------------------------------------------------------------------------
/Week13/README.md:
--------------------------------------------------------------------------------
1 | # Week 13: APIs
2 |
3 | 
4 |
5 | ## Agenda
6 | - Finally: [Application Programming Interfaces](lesson.md)
7 |
8 | ## Assignments
9 |
10 | Internalize all the virtues of the digital humanities, achieve self-fullfillment, fight injustice, and become a complete human being.
11 |
12 | 
--------------------------------------------------------------------------------
/Week13/assets/Yahoo_screenshot_1994.png:
--------------------------------------------------------------------------------
https://raw.githubusercontent.com/scholarslab/CodeLab/6ac7385197639beae35c094038e68b9aa4bf2f23/Week13/assets/Yahoo_screenshot_1994.png
--------------------------------------------------------------------------------
/Week13/assets/fatdog.jpg:
--------------------------------------------------------------------------------
https://raw.githubusercontent.com/scholarslab/CodeLab/6ac7385197639beae35c094038e68b9aa4bf2f23/Week13/assets/fatdog.jpg
--------------------------------------------------------------------------------
/Week13/assets/imdbot_cuba.png:
--------------------------------------------------------------------------------
https://raw.githubusercontent.com/scholarslab/CodeLab/6ac7385197639beae35c094038e68b9aa4bf2f23/Week13/assets/imdbot_cuba.png
--------------------------------------------------------------------------------
/Week13/assets/maple.jpg:
--------------------------------------------------------------------------------
https://raw.githubusercontent.com/scholarslab/CodeLab/6ac7385197639beae35c094038e68b9aa4bf2f23/Week13/assets/maple.jpg
--------------------------------------------------------------------------------
/Week13/assets/rocky_voter.jpg:
--------------------------------------------------------------------------------
https://raw.githubusercontent.com/scholarslab/CodeLab/6ac7385197639beae35c094038e68b9aa4bf2f23/Week13/assets/rocky_voter.jpg
--------------------------------------------------------------------------------
/Week13/assets/toby.jpg:
--------------------------------------------------------------------------------
https://raw.githubusercontent.com/scholarslab/CodeLab/6ac7385197639beae35c094038e68b9aa4bf2f23/Week13/assets/toby.jpg
--------------------------------------------------------------------------------
/Week13/lesson.md:
--------------------------------------------------------------------------------
1 | # Application Programming Interfaces
2 |
3 | 
4 |
5 | ## Interfacing with Applications through Programming
6 |
7 | API stands for Application Programming Interface, which is a sort of almost meaninglessly broad set of words. The important part is "interface": APIs are a broad set of concepts that involve defining the boundaries between things.
8 |
9 | In a programing sense, an interface for describes what something should do while an implementation describes how that something will do it. This should be familiar already, since it's been a common theme in CodeLab: we can think of a function call as the basic components of an interface and, so long as we know what arguments to pass it, we don't have to know how to actually do it. We'll talk a little more about this in a moment. Often, the documentation for, say, a software library is referred to interchangably with "API" since the interface is most of what users of a library care about.
10 |
11 | So, APIs is a pretty big tent of different ideas. They are used for such different things as:
12 | Programming languages ([Oracle v. Google](https://en.wikipedia.org/wiki/Google_LLC_v._Oracle_America,_Inc.))
13 | Libraries
14 | Databases
15 | Hardware and hardware-adjacent things
16 | File systems
17 | Operating systems
18 | Web APIs
19 |
20 | As we can see from this list, APIs are often defined in common ways so as to function as formal or de facto standards. But they don't have to be - they can be totally customized to unique purposes. They're also useful for hiding away the complex inner-workings of code from users who don't need to know about them by exposing a "public" interface that almost all users will use exclusively.
21 |
22 | So, "API" is a big, generic term. What we're interested in today is the important subset of Web APIs, designed to be accessed through the Web.
23 |
24 | # Web APIs
25 | The Internet was originally intended to be a collection of static documents with unique addresses, the URL (uniform resource locator). Static content is "baked in" and unchanging, at least in the short term. The same document on a server is the same to one person as it is to another and material that hasn't been explicitly created or material that depends on user input could not be sent (we're going to overlook client-side code for now; dynamic code running in the browser can mimic a lot of what dynamic code running on the server can do). A good example of an early static website was Yahoo.com. Its first versions were largely static directories of content that the creators organized and curated by hand and was originally named "Jerry and David's Guide to the World Wide Web". It took a year to add a search mechanism and that was too demanding to use during daytime, when more people had access to the Internet through work.
26 |
27 | [Take a look](https://www.webdesignmuseum.org/gallery/yahoo-1994).
28 |
29 | 
30 |
31 | Serving dynamic content over the Internet was a significant challenge. Beyond the teething issues of any new technology (such as a lack of established standards), there were fundamental problems with the distributed nature of the Internet itself. There was no way to ensure that messages between local clients and remote servers were received or else were received in order. Multiple clients trying to read and manipulate the same data easily ran afoul of consistency issues (think of the issues with version control, but multipled by potentially tens or hundreds of thousands of clients). Beyond basic engineering hurdles, there were [theoretical limits to distributed computing](https://en.wikipedia.org/wiki/CAP_theorem) what could never be overcome.
32 |
33 | Remote computing was nothing new, of course. Some of the terminology and concepts that we've become familiar with over the course of Code Lab--the terminal, most obviously--suggest past computing paradigms that had similar topologies. However, the more open nature of the Internet and its explosive popularity overwhelmed older solutions. They were simply impracticable to scale. Through the 1990s, as the Web exploded, the problem of dynamic websites and Web services yielded a variety of incompatible solutions that provided some relief, but also increased the complexity and fragility of the Web. These designs exacerbated the very sort of problems that we promote minimal, static sites to avoid.
34 |
35 | Into the 2000s, developers adopted a variety of methods to make dynamic websites more sustainable, resiliant, and secure. Ultimately, the most dominant of these was REST. REST (for REpresentational State Transfer) (adjective: RESTful) can be thought of as an architectural style for the design of Internet resources, rather than a specific technical standard. Echoing Claude Shannon's groundbreaking master's thesis that fundamentally theorized digital computing, REST was proposed through computer scientist Roy Fielding's doctoral dissertation.
36 |
37 | REST specifies many things; for our purposes, the most important way that it simplified the Web was its enforcement of statelessness, meaning that:
38 |
39 | > [...] each request from client to server must contain all of the information necessary to understand the request, and cannot take advantage of any stored context on the server. Session state is therefore kept entirely on the client. ([Fielding](https://ics.uci.edu/~fielding/pubs/dissertation/rest_arch_style.htm#sec_5_1_3))
40 |
41 | This allowed Web services to scale more easily and for clients to recover from communications errors and uncertainty. A good common counterexample of unRESTful design are the dreaded "ONLY CLICK THIS BUTTON ONCE" or "DO NOT PRESS BACK ON YOUR BROWSER" admonitions of (often, but not always) older sites. Statelessness also implied another attribute of REST: uniform, unchanging identifiers. Since state is stored in the client, it was important that remote resources could be addressed in a consistant way, much like how well-designed websites have permalinks.
42 |
43 | While REST has been very influential, it also ran directly counter to some of the other prevailing treads of the 2000s Internet: social media and targetted advertising (may be thought of as the same trend). It suddenly became big money to capture not just the information about the specific purpose of a web service but everything about users and to bridge different digital identities across Web services. So while some aspects of REST were widely adopted by larger websites, others were not.
44 |
45 | But the reason why we're talking about REST today is that it is more popular for APIs than for websites, especially for services that functionally resemble the sort of thing that the Web and HTTP were originally designed for.
46 |
47 | Here is a [list of free, public Web APIs](https://github.com/public-apis/public-apis) to give you a sense of what's out there.
48 |
49 | There are APIs for everything from the [Library of Congress](https://www.loc.gov/apis/) to [Libretranslate](https://libretranslate.com/docs/) (natural language translation) to the sadly defunct Owen Wilson Wow: the API for actor Owen Wilson's "wow" exclamations in movies. Years ago, before I got sweet Rocky, I used the [Petfinder API](https://www.petfinder.com/developers/) to regularly download hundreds of photos of nearby adoptable dogs and then had my screensaver show them.
50 |
51 | 
52 |
53 | All the APIs on that list are supposed to be both public and free, and we can see three useful columns in addition to the name and description: Auth, HTTPS, and CORS. Some APIs have gated access, either to restrict access to only authorized users or, more relevant to this list, to enforce rate limits (how often requests are made). Some are not gated at all and do not require user authentication (though they may still enforce rate limits in a less granular fashion through IP). Authentication can be performed through either API keys (a sort of long password generated by the service used just for access to that specific API) or OAuth (authentication through a third-party, like "log in with Facebook"). HTTPS means that the service supports encrypted requests and responses. This should be almost universal by now and the lack of support implies that the API is poorly supported and not up to date. CORS is for embedding API access into other sites, through javascript. That's very powerful, but we won't be doing any of that today. API authentication is fairly easy, at least the ones that support API keys, but for the ease of those following along at home, we'll pick an example without any authentication at all.
54 |
55 | Let's try out [IMDbOT, the Free Movie Series DB API](https://github.com/TelegramPlayground/Free-Movie-Series-DB-API). This is a good example because it is extremely simple and the documentation very helpfully provides us code directly.
56 |
57 | On the API documentation page, if we go to the [Search Movies on IMDb](https://imdb.iamidiotareyoutoo.com/docs/index.html#tag/default/GET/search) section, we can see that the kind of parameters it accepts are quite limited: `q` for keyword search query and `tt` to fetch the details for a specific IMDb ID. Let's try it out by hitting "Test Request".
58 |
59 | Here, we can just fill in the `q` parameter field and hit the "Send" button up top and we get a familiar sight: our good friend JSON!
60 |
61 | 
62 |
63 | It also shows us the URL of this particular action, what we call an API endpoint: `https://imdb.iamidiotareyoutoo.com/search`. If we were to manually add in the query parameter by appending `?q=cuba` to the end of that, we get the full API request url: [https://imdb.iamidiotareyoutoo.com/search?q=cuba](https://imdb.iamidiotareyoutoo.com/search?q=cuba), which we can actually open up directly in a web browser. This is the sort of magical simplicity of REST APIs, especially those that don't bother with authentication.
64 |
65 | Let's bring this into Python. There's a dropdown with the default value "shell curl" (cURL, "client for URL", is a common shell command for transferring data across networks) and we can choose one of the Python options there instead. We can use the Requests package from last week, but this API is simple enough that we can also just use the built-in Python http module instead:
66 |
67 | ```python
68 | import http.client
69 |
70 | conn = http.client.HTTPSConnection("imdb.iamidiotareyoutoo.com")
71 |
72 | conn.request("GET", "/search")
73 |
74 | res = conn.getresponse()
75 | data = res.read()
76 |
77 | print(data.decode("utf-8"))
78 | ```
79 |
80 | Here, we can see that it's making a secure connection to the server (`imdb.iamidiotareyoutoo.com`) and then making an HTTP GET request for the `/search` URL. If we run this, it'll complain that we're missing either the `q` query parameter or the `tt` IMDb ID parameter. So let's just add that to the request URL and maybe load it into the `json` module and dump it to a string in order to pretty up the output.
81 |
82 | ```python
83 | import http.client
84 | import json
85 |
86 | conn = http.client.HTTPSConnection("imdb.iamidiotareyoutoo.com")
87 |
88 | conn.request("GET", "/search?q=vampire")
89 |
90 | res = conn.getresponse()
91 | data = res.read()
92 |
93 | response = json.loads(data.decode("utf-8")))
94 | print(json.dumps(response,indent=4))
95 | ```
96 |
97 | As with web scraping, we can use our impressive Python coding skills to automate additional tasks for each result. We could maybe code up a program to figure out a particular actor's Degrees of Kevin Bacon, although that might be very expensive or even impossible using this API (it looks like they only return a maximum number of results per query). Or we can download each movie poster from our search results (file downloads can be tricky to do with the basic Python httpd.client module, so let's just use Requests again). The stateless nature the API call and the file download means that using two different means to make the API call and download the file is just fine.
98 |
99 | ```python
100 | import http.client
101 | import json
102 | import requests
103 | import time
104 |
105 | conn = http.client.HTTPSConnection("imdb.iamidiotareyoutoo.com")
106 |
107 | conn.request("GET", "/search?q=vampire")
108 |
109 | res = conn.getresponse()
110 | data = res.read()
111 |
112 | response = json.loads(data.decode("utf-8"))
113 | for i in response["description"]:
114 | poster_url = i["#IMG_POSTER"]
115 | print("Downloading... ",poster_url)
116 | r = requests.get(poster_url, allow_redirects=True)
117 | open(i["#IMDB_ID"]+'.jpg', 'wb').write(r.content)
118 | time.sleep(0.5)
119 | ```
120 |
121 | Just to play it safe, since file downloads can suck up a lot of bandwidth, I added a `time.sleep(0.5)` to wait half a second before loading each image.
122 |
123 | IMDbot is a nice toy example for teaching purposes. For more serious use, you might want to use something like [Open Movie Database](https://www.omdbapi.com/), which is also free but requires a user account to generate an API key. Since that's also a REST API, we can just pass the key in as a parameter, like so:
124 |
125 | ```python
126 | import requests
127 | import json
128 |
129 | API_KEY = 'KEY'
130 |
131 | p = {'apikey': API_KEY, 's': 'Top Gun'}
132 | r = requests.get('http://www.omdbapi.com/',params=p)
133 | if r.status_code != 200:
134 | print("Bad response code!")
135 | exit()
136 | for movie in json.loads(r.text)["Search"]:
137 | print(movie["Title"]+" ("+movie["Year"]+")")
138 | p_movie = {'apikey': API_KEY, 'i': movie["imdbID"]}
139 | r_movie = requests.get('http://www.omdbapi.com/',params=p_movie)
140 | print("\t"+json.loads(r_movie.text)["Plot"])
141 | ```
142 |
143 | But you need actually need your own account's API key for this! It won't work without it.
--------------------------------------------------------------------------------
/WeekClasses/README.md:
--------------------------------------------------------------------------------
1 | # Week CLASSES: Class is in Session
2 | 
3 |
4 | ## Agenda:
5 | - Present Adventures in Data
6 | - [Let's talk about classes!](lesson.md)
7 | - Next week's homework
8 |
9 | ## Homework
10 |
11 | Classes are useful ways to encapsulate data. In the lesson document, we created a new class named Dog, created a constructor that defined some data fields about dogs, and a method that borks out some dog talk. For this assignment, let's define an DogOwner class that contains some dogs to try out ways that classes can interact with each other.
12 |
13 | #### Assignment Part 0:
14 |
15 | Let's create the base class code. Create a DogOwner class that contains a name and a constructor to populate that name.
16 |
17 | ```python
18 | class DogOwner:
19 | def __init__(self,name):
20 | #set the name of the DogOwner
21 |
22 | shane = DogOwner("Shane")
23 | ```
24 |
25 | #### Assignment Part 1:
26 |
27 | Add a list to keep track of the owner's dogs to the class. You can copy and paste the Dog class definition from the lesson document. In your constructor code, be sure to set all the owners in the list of Dogs to the name of the DogOwner.
28 |
29 | ```python
30 | class Dog:
31 | #copy from lesson doc
32 |
33 | class DogOwner:
34 | def __init__(self,name,dogs):
35 | self.name = name
36 | # set DogOwner's dogs list
37 | for dog in dogs:
38 | #set each of the dogs' owners to the name of the DogOwner
39 |
40 | hazel = Dog("Hazel","Beagle/Heeler","NotShane",["treats","naps","raccoons"],["thunder"])
41 | shane = DogOwner("Shane",[hazel])
42 | print(hazel.owner) #Should be 'Shane'
43 | ```
44 |
45 | #### Assignment Part 2:
46 |
47 | Now, let's make things interesting. Write a function to rate the compatibility of dogs based on their likes and dislikes. For every shared like and dislike, add one point to the compatibility score. For every like that appears in another dog's dislike list, subtract one point.
48 |
49 | We can use nested loops to make these comparisons, but we can also just use a single loop and the python keyword `in` (e.g. `if element in list:`).
50 |
51 | ```python
52 | class Dog:
53 | #copy from lesson doc
54 |
55 | def dog_compatibility(dog1,dog2):
56 | compatibility = 0
57 | # your code here
58 | return compatibility
59 |
60 | hazel = Dog("Hazel","Beagle/Heeler","Shane",["treats","naps","raccoons"],["thunder"])
61 | maple = Dog("Maple","Hound","Amanda",["treats","zooms","ducks"],["thunder"])
62 |
63 | print(dog_compatibility(hazel,maple)) #Should be 2, because they both like treats and dislike thunder
64 | ```
--------------------------------------------------------------------------------
/WeekClasses/assets/bad_pun_hazel.jpg:
--------------------------------------------------------------------------------
https://raw.githubusercontent.com/scholarslab/CodeLab/6ac7385197639beae35c094038e68b9aa4bf2f23/WeekClasses/assets/bad_pun_hazel.jpg
--------------------------------------------------------------------------------
/WeekClasses/assets/bart_class.gif:
--------------------------------------------------------------------------------
https://raw.githubusercontent.com/scholarslab/CodeLab/6ac7385197639beae35c094038e68b9aa4bf2f23/WeekClasses/assets/bart_class.gif
--------------------------------------------------------------------------------
/WeekClasses/assets/bofur.jpg:
--------------------------------------------------------------------------------
https://raw.githubusercontent.com/scholarslab/CodeLab/6ac7385197639beae35c094038e68b9aa4bf2f23/WeekClasses/assets/bofur.jpg
--------------------------------------------------------------------------------
/WeekClasses/assets/efficiency.png:
--------------------------------------------------------------------------------
https://raw.githubusercontent.com/scholarslab/CodeLab/6ac7385197639beae35c094038e68b9aa4bf2f23/WeekClasses/assets/efficiency.png
--------------------------------------------------------------------------------
/WeekClasses/assets/hazel_pet.jpg:
--------------------------------------------------------------------------------
https://raw.githubusercontent.com/scholarslab/CodeLab/6ac7385197639beae35c094038e68b9aa4bf2f23/WeekClasses/assets/hazel_pet.jpg
--------------------------------------------------------------------------------
/WeekClasses/assets/security.png:
--------------------------------------------------------------------------------
https://raw.githubusercontent.com/scholarslab/CodeLab/6ac7385197639beae35c094038e68b9aa4bf2f23/WeekClasses/assets/security.png
--------------------------------------------------------------------------------
/WeekData/README.md:
--------------------------------------------------------------------------------
1 | # Week 08: The Ultimate Machine
2 |
3 | 
4 |
5 | ## Agenda:
6 | - Review homework
7 | - Big Data Talk
8 | - Dictionaries
9 |
10 | [Lesson document](./lesson.md)
11 |
12 | ## HOMEWORK
13 |
14 | #### Review
15 |
16 | We've covered a lot of concepts really quickly and everything *seems* to be going well. However, it'll still probably be useful to read through a quick review of all the basic Python concepts we've covered to this point:
17 |
18 | - [Basic data types review](basic_data_types.md)
19 | - [Data structures review](data_structures.md)
20 | - [Data flow review](data_flow.md)
21 |
22 | #### Assignment 0
23 | Take the code you wrote last week to analyze the Much Ado About Nothing text and change it to build a dictionary that stores every character's lines keyed to that character's name. Something that looks like this...
24 |
25 | ```python
26 | {"BENEDICK":["Were you in doubt, sir, that you asked her?","..."],"BEATRICE":["I pray you, is Signior Mountanto returned from the wars or no?","..."]}
27 | ```
28 |
29 | #### Assignment 1
30 |
31 | We have in our programming quiver a number of tools now (basic types, lists, dictionaries) and we just had a big talk on data. Think about everything you know about your Praxis cohort (the icebreakers doc is fair game). Think about the kind of questions that might interest you about such a corpus and the best way to structure that information to answer those questions. Write some Python code in the vein of the Scholars Lab example in the data structures review that represents the model you come up with. This one is intentionally a bit amorphous, but any practice in thinking about the shape of data is useful.
32 |
33 |
--------------------------------------------------------------------------------
/WeekData/assets/ascii.png:
--------------------------------------------------------------------------------
https://raw.githubusercontent.com/scholarslab/CodeLab/6ac7385197639beae35c094038e68b9aa4bf2f23/WeekData/assets/ascii.png
--------------------------------------------------------------------------------
/WeekData/assets/bug.jpg:
--------------------------------------------------------------------------------
https://raw.githubusercontent.com/scholarslab/CodeLab/6ac7385197639beae35c094038e68b9aa4bf2f23/WeekData/assets/bug.jpg
--------------------------------------------------------------------------------
/WeekData/assets/data.jpg:
--------------------------------------------------------------------------------
https://raw.githubusercontent.com/scholarslab/CodeLab/6ac7385197639beae35c094038e68b9aa4bf2f23/WeekData/assets/data.jpg
--------------------------------------------------------------------------------
/WeekData/assets/shannon.jpg:
--------------------------------------------------------------------------------
https://raw.githubusercontent.com/scholarslab/CodeLab/6ac7385197639beae35c094038e68b9aa4bf2f23/WeekData/assets/shannon.jpg
--------------------------------------------------------------------------------
/WeekData/assets/ultimate_machine.gif:
--------------------------------------------------------------------------------
https://raw.githubusercontent.com/scholarslab/CodeLab/6ac7385197639beae35c094038e68b9aa4bf2f23/WeekData/assets/ultimate_machine.gif
--------------------------------------------------------------------------------
/WeekData/basic_data_types.md:
--------------------------------------------------------------------------------
1 | # Basic Data Types Review
2 |
3 | ### Variables
4 | A variable is simply a way to put a label on a piece of data in Python. You assign a value to a variable using the `=` sumbol.
5 |
6 | ```python
7 | var = 'Hello world'
8 | ```
9 | What happens if you try and use a number for your variable?
10 | ```python
11 | 1 = 'Hello world'
12 | ```
13 | You'll get a syntax error 😅! That's because Python has rules for how to name variables.
14 |
15 | - A variable can have a short name (like x and y) or a more descriptive name (age, carname, total_volume) |
16 | - A variable name must start with a letter or the underscore character |
17 | - A variable name cannot start with a number |
18 | - A variable name can only contain alpha-numeric characters and underscores (A-z, 0-9, and _ ) |
19 | - Variable names are case-sensitive (age, Age and AGE are three different variables)|
20 |
21 |
22 | So our previous example could work if we changed the variable name to:
23 | ```python
24 | one_1 = 'Hello World'
25 | ```
26 |
27 | ### Data Types
28 | These variables above all hold *strings*. Strings are sequences of characters that are marked by being in single or double quotations.
29 |
30 | Strings are just one of many data types accepted in Python.
31 |
32 | There's also numbers, called *integers*. We can take our variables that we assigned before and assign them their actual numbers.
33 | ```python
34 | one = 1
35 | two = 2
36 | ```
37 | Once we do this though, our strings that were stored in these variables will be erased!
38 |
39 |
40 |
41 | Python also has a special name for decimal numbers, called *floats*.
42 | ```python
43 | one = 1.0
44 | ```
45 |
46 | What if we decided that we wanted to combine variable one and two? We could use a Python *method* for manipulating variables and data.
47 |
48 | 1. To join variables together use the `+` symbol, this is called concatenation.
49 |
50 | ```python
51 | one + two
52 | ```
53 | You should see `3.0` as your answer. We just added the data in variable one and two together.
54 | What would happend if we added variables `var` and `one_1` togther?
55 | ```python
56 |
57 | var + one_1
58 | ```
59 | You should see `Hello worldHello world` as your answer because the strings were concatenated together!
60 |
61 |
62 | 2. Other methods that you can use on integers and floats:
63 | division:
64 | ```python
65 | one / two
66 | ```
67 |
68 | multiplication:
69 | ```python
70 | one * two
71 | ```
72 |
73 | We can also assign a truth value to a variable, called a *boolean*.
74 | ```python
75 | var_true = True
76 | var_false = False
77 | ```
78 | We can then check if these two variables contain the same truth value.
79 | ```python
80 | var_true == var_false
81 | ```
82 |
83 | In Python `=` is used to assign values to a variable, and `==` is used to check if two variables contain the same value.
--------------------------------------------------------------------------------
/WeekData/data_flow.md:
--------------------------------------------------------------------------------
1 | # Control Flow Review
2 |
3 | Computers read code line by line, top to bottom of a script. But what if you want to have code run not in sequential order, or you want your code to do something depending on a value, or you want to reuse your code and run it multiple times?
4 |
5 | We can solve all those problems with control flow.
6 |
7 | #### For Loops
8 | **For Loops** are one of the most common ways in python to loop over a sequence.
9 |
10 | 
11 |
12 | For loops can iterate through the items in a list.
13 | ```python
14 | slab = ['Jeremy', 'Ronda', 'Laura']
15 |
16 | for person in scholars_lab:
17 | print(person) # This should print out each person's name individually
18 | ```
19 |
20 | We can also use For Loops on dictionaries, but it's a little bit different. Review the [Data Structures review](data_structures.md) if you need to.
21 |
22 | #### Conditionals
23 | Earlier we learned about *booleans* (`True or False`). In Python, we can test the truth value of code to decide how we want our code to run.
24 |
25 | 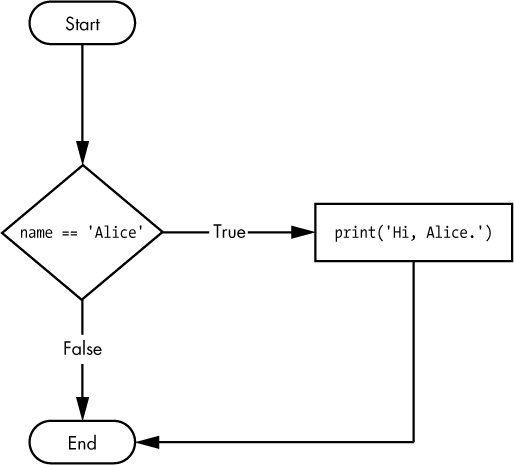
26 |
27 | Taking our list again, instead of printing out each name. Let's only print if the name equals Zoe.
28 | ```python
29 | slab = ['Zoe', 'Shane', 'Brandon']
30 |
31 | for person in scholars_lab:
32 | if person == 'Zoe':
33 | print(person)
34 | ```
35 |
36 | We can also test the equality of two variables in an if statement:
37 | ```python
38 | shane = 'Shane'
39 | brandon = 'Brandon'
40 | if shane != brandon:
41 | print('not the same person')
42 | else:
43 | print('twins')
44 | ```
45 |
46 | There's lots of ways to test equality with what we call **logical operators**.
47 |
48 | 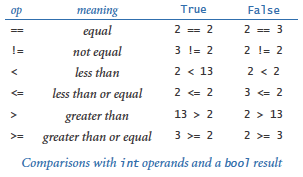
49 |
50 | #### Functions
51 | Essentially functions are a way to wrap your code into blocks so that way you can call your code when you need it to run. You can check out the materials from past weeks on functions [here](../../Week03/lesson.md)
52 |
53 | 
54 |
55 | To create a function, we define using `def` and a unique name and finally parentheses, followed by colon. Then we can pass *arguments* (also called parameters) in the parentheses, that we can that use *inside* of the functions. Those arguments will be *variables* and so we can do anything you would normally do to a value. Finally we can *return* the result of our manipulation.
56 |
57 | Here's an example of just returning a simple function
58 | ```python
59 | def get_fundamentals():
60 | fundamentals = 'Having fun'
61 | return fundamentals
62 |
63 | get_fundamentals()
64 | ```
65 |
66 | This function will work but doesn't really do anything. Let's figure out how to output `fundamentals`.
67 |
68 | ```python
69 | def get_fundamentals():
70 | fundamentals = 'Having fun'
71 | print('inside function value', fundamentals)
72 | return fundamentals
73 |
74 | fun = get_fundamentals()
75 | print('returned value', fun)
76 | ```
77 | Here we're outputting twice the value, once inside and once outside of the function.
78 |
79 | Let's try passing an argument and manipulating it!
80 |
81 | ```python
82 | def get_fundamentals(fundamentals):
83 | fundamentals = fundamentals + 'fun'
84 | print('inside function value', fundamentals)
85 | return fundamentals
86 |
87 | fundamentals = 'Having '
88 | fun = get_fundamentals(fundamentals)
89 | print('returned value', fun)
90 | ```
91 | So here we pass an argument, and then add another string to our `fundamentals` variable and re-assign the combined strings back to `fundamentals`.
92 |
93 | We can also use for loops in a functions.
94 | ```python
95 | slab = ['Jeremy', 'Chris', 'Arin']
96 |
97 | def get_person(people):
98 | for person in people:
99 | print('person', person)
100 | return people
101 |
102 | get_person(slab)
103 | ```
104 | Here we're passing in the list of `slab`. Notice we call the argument we're passing `people`. Arguments can be named anything independent of the variables you pass into the function. Then we loop through the list, print out each person, and return the list unchanged.
105 |
106 | If you want to do more with functions, here is a good (optional!) tutorial: [https://www.datacamp.com/community/tutorials/functions-python-tutorial](https://www.datacamp.com/community/tutorials/functions-python-tutorial).
107 |
--------------------------------------------------------------------------------
/WeekData/data_structures.md:
--------------------------------------------------------------------------------
1 | # Data Structures Review
2 |
3 | ### Lists
4 | If you need a refresher, check out the [resources](data_structures_resources.md).
5 |
6 | 1. How do we create a list?
7 |
8 | 1. What can we store in a list?
9 |
10 | 1. How do we get the first item, last item, and first three items to output from a list?
11 |
12 | 1. How can we arrange a list alphabetically? (**hint: search for python's built-in method for manipulating lists**)
13 |
14 | 1. How can we check what types of data are in our list? (**hint: search for python's built-in method for checking types**, also read up on data types in the [data types folder](../data_types/))
15 |
16 | 1. How can we replace a value in our list with another value?
17 |
18 | *Lists are great. But what if we wanted to store information not just in a sequence, but in a way that let's us keep certain values together?*
19 |
20 | ### Dictionaries
21 | We can use a *dictionary*, which is a collection of key/value pairs to store this information. When defining in place, keys and values are separated by a colon.
22 |
23 | ```python
24 | shane = { 'name': 'Shane Lin', 'DH methods': ['programming', 'dog petting']}
25 | ```
26 | To access our values in dictionaries, we don't use indexing. Instead, we use the keys of dictionary. Keys are always the values that come before the colon.
27 | ```python
28 | shane['DH method']
29 | ```
30 |
31 | We write the key inside of brackets and quotations, called *bracket notation*.
32 |
33 | How do we add a new key/value pair to a dictionary?
34 |
35 | How do we change the value for an existing key in a dictionary?
36 |
37 | In a dictionary, *keys must be unique!*
38 |
39 | Just like lists though we can store a dictionary inside of other data structures, like another dictionary or a list.
40 |
41 | ```python
42 | shane = { 'name': 'Shane Lin', 'DH methods': ['programming', 'dog petting']}
43 | brandon = { 'name': 'Brandon Walsh', 'DH methods': ['programming', 'innovative pedagogy', 'neoliberalism']}
44 | slab_staff = [shane,brandon]
45 | ```
46 |
47 | How can we loop through each of Brandon's DH methods?
48 |
49 | Just like lists there are many ways to manipulate dictionaries: [Python dictionary reference](https://www.w3schools.com/python/python_ref_dictionary.asp)
50 |
51 |
52 | ### For Loops and dictionaries
53 |
54 | **For Loops** are one of the most common ways in python to loop over a sequence. We've already used for loops in lists before, like this:
55 | ```python
56 | slab = ['Amanda', 'Shane', 'Brandon']
57 |
58 | for person in scholars_lab:
59 | print(person) # This should print out each person's name individually
60 | ```
61 |
62 | We can also use For Loops on dictionaries. The syntax is slightly different because dictionaries are not one long sequence, but rather a sequence of key/value pairs.
63 | ```python
64 | shane = { 'name': 'Shane Lin', 'DH methods': ['programming', 'dog petting']}
65 | brandon = { 'name': 'Brandon Walsh', 'DH methods': ['programming', 'innovative pedagogy', 'neoliberalism']}
66 | amanda = { 'name': 'Amanda Visconti', 'DH methods': ['leadership', 'quiet nobility', 'toilet humor']}
67 |
68 | scholars_lab = {"boss":amanda, "programmer": shane, "pedagog":brandon}
69 |
70 | for key, value in scholars_lab.items():
71 | print('key', key)
72 | print('value', value)
73 | ```
74 |
75 | This script should print out each of the employee keys and then the dictionaries those keys contain.
--------------------------------------------------------------------------------
/WeekW/README.md:
--------------------------------------------------------------------------------
1 | # Weeks 13+14: HTML/CSS/Design
2 |
3 | 
4 |
5 | Even though I've lost custody of all of you these two weeks, I'm still going to assign homework.
6 |
7 | ## Assignment
8 | ### Part Alpha
9 |
10 | Write a script to download the list of Scholars' Lab blog posts (https://scholarslab.lib.virginia.edu/blog/) and then print out a list of how many blog posts each author has.
11 |
12 | The page highlights the most recent four posts. These are optional because they don't conform to the standard structure of the majority of older posts below.
13 |
14 | You can assume there aren't people with identical names. You don't have to sort the results, but it might be useful to figure out how such a thing could be done.
15 |
16 | ### Part Bravo
17 |
18 | If you wanted to work on more HTML/CSS over break, you could take a swing and mocking up a personal website for yourself. I’m (Brandon) happy to answer questions and also to help you get up and running with the thing live if you desire after break (or sooner if you’re keen on it). I highly recommend drawing what you want first and then trying to implement your drawing with HTML/CSS. And if you want inspiration in the form of my first attempt, here is a link to the [site I made in Praxis back in the day](http://walshbr.com/old-site/).
19 |
20 | ### Part Charlie
21 |
22 | Have a good break and keep on hacking!
23 |
--------------------------------------------------------------------------------
/WeekW/answers/part_alpha.py:
--------------------------------------------------------------------------------
1 | from bs4 import BeautifulSoup
2 | import requests
3 |
4 |
5 | url = "https://scholarslab.lib.virginia.edu/blog/"
6 | html = requests.get(url).text
7 | soup = BeautifulSoup(html, features="html.parser")
8 |
9 | # We're going to use a dictionary to store our counter.
10 | # Dictionaries map keys to values, like how a phone book maps names to numbers.
11 | # The key is unique, so using a dictionary as a counter makes it easy
12 | # to keep track of people by using their names as keys.
13 | # Their post count will be the value.
14 | counter = {}
15 | total = 0
16 | # We can use the nth-child CSS selector to select the
17 | # *second* link for each blog post or we can just get
18 | # the tag for each post and use BS4's DOM traversal
19 | # mechanisms like find_all() to get to that second
20 | # tag
21 | for link in soup.select("ul.page-previous_posts li a:nth-child(2)"):
22 | # Because of how we constructed our soup.select, the link
23 | # variable in each for loop cycle is a specific link to a
24 | # blog post author's profile page and link.get_text() is
25 | # the author's name.
26 | author = link.get_text()
27 | total += 1
28 | if author in counter:
29 | # if the author is already in the list of authors,
30 | # increment the counter
31 | counter[author]+=1
32 | else:
33 | # if they're not, set the counter to 1 (to reprsent)
34 | # the blog post we're looking at
35 | counter[author] = 1
36 |
37 | # Here's a bit of extra code to sort the dictionary by number of posts
38 | # You don't have to do this or spend too much time understanding how this works
39 | sorted_counter = {author:count for author, count in sorted(counter.items(), key=lambda x: x[1], reverse=True)}
40 |
41 | # Counter and sorted_counter are dictionaries that map the name to number of posts
42 | # We can print each author and their posts using a for loop.
43 | # In a for loop, the iteration cycles through keys (authors, in this case).
44 | print("Total Posts:",total,"\n")
45 | for author in sorted_counter:
46 | print(author, ":", sorted_counter[author])
47 |
--------------------------------------------------------------------------------
/WeekW/assets/hazel_sniff.jpg:
--------------------------------------------------------------------------------
https://raw.githubusercontent.com/scholarslab/CodeLab/6ac7385197639beae35c094038e68b9aa4bf2f23/WeekW/assets/hazel_sniff.jpg
--------------------------------------------------------------------------------
/WeekX/README.md:
--------------------------------------------------------------------------------
1 | # Week 11
2 |
3 | ## Show and Tell!
4 | 
5 |
6 | ## Assignments (Review)
7 |
8 | ### Part I
9 | 
10 |
11 | Let's do some straightforward algorithm practice. I'll give you a list of numbers and a target number and you return a list of all the pairs of numbers in the list that add up to the target.
12 |
13 | So:
14 |
15 | ```python
16 | def adds_up(nums,target):
17 | # your code here
18 | return pairs
19 |
20 | print(adds_up([1,7,5,3,4,2],7)) #Should return [[5,2],[3,4]]
21 | ```
22 |
23 | ### Part II
24 | 
25 |
26 | Let's use the [Much Ado About Nothing json file](answers/MAAN_dialog.json) we created in previous weeks again and switch up the analysis a bit. This time, let's find out which words that Beatrice and Benedick use exclusively are the most common.
27 |
28 | So, write a script to load the json file, collate all the words that each character speaks, and then take out out all the words that appear in both Beatrice's and Benedick's lines.
29 |
30 | A good place to start is the tokenization part of the code in the [Week10 lesson's NLTK example](https://github.com/scholarslab/CodeLab/blob/master/Week10/lesson.md#example-nltk).
31 |
32 | ```python
33 | import json
34 | import nltk # useful for the word frequency part, but not strictly necessary.
35 |
36 | with open("MAAN_dialog.json","r") as infile:
37 | dialog = json.loads(infile.read())
38 |
39 | bea = ""
40 | ben = ""
41 |
42 | # Collate the dialog lines for each role
43 | for line in dialog:
44 | if line["role"] == "BEATRICE":
45 | bea+=" "+line["dialog"]
46 | elif line["role"] == "BENEDICK":
47 | ben+=" "+line["dialog"]
48 |
49 | # Optional: add some code to remove punctuation marks because they don't matter to us
50 | # Searching for "replace punctuation with whitespace python" is probably a good idea here.
51 |
52 | # Tokenize (split into separate words) each dialog collection
53 | # For this exercise, we don't care about stopwords
54 | bea_tokens = bea.split()
55 | ben_tokens = ben.split()
56 |
57 | bea_unique_words = []
58 | ben_unique_words = []
59 |
60 | # Here's where most of your code should go. Figure out a way to add words from bea_tokens to bea_unique_words only if they don't also appear in ben_tokens.
61 |
62 |
63 | # Now, figure out which are the most frequent. You can do this yourself or just take it from the nltk example.
64 | ```
65 | ### Part III
66 | There's no part III. Enjoy this photo of Fat Dog.
67 |
68 | 
--------------------------------------------------------------------------------
/WeekX/answers/partI.py:
--------------------------------------------------------------------------------
1 | def adds_up(nums, target):
2 | pairs = [] # initialize an empty list to hold the return values
3 | i = 0 # counter to keep track of the index of the first number
4 | while i < len(nums)-1: # loop to the end
5 | j = i+1
6 | while j < len(nums):
7 | if nums[i]+nums[j] == target:
8 | pairs.append([nums[i],nums[j]])
9 | j += 1
10 | i += 1
11 | return pairs
12 |
13 |
14 | print(adds_up([1, 7, 5, 3, 4, 2], 7))
15 | print(adds_up([1, 7, 0, 9, -2, 2], 7))
--------------------------------------------------------------------------------
/WeekX/answers/partII.py:
--------------------------------------------------------------------------------
1 | import json
2 | import nltk # useful for the word frequency part, but not strictly necessary.
3 | import string
4 |
5 | with open("MAAN_dialog.json", "r") as infile:
6 | dialog = json.loads(infile.read())
7 |
8 | bea = ""
9 | ben = ""
10 |
11 | # Collate the dialog lines for each role
12 | for line in dialog:
13 | if line["role"] == "BEATRICE":
14 | bea += " "+line["dialog"]
15 | elif line["role"] == "BENEDICK":
16 | ben += " "+line["dialog"]
17 |
18 | # Optional: add some code to remove punctuation marks because they don't matter to us
19 | # Searching for "replace punctuation with whitespace python" is probably a good idea here.
20 |
21 | # map punctuation to space
22 | translator = str.maketrans(string.punctuation, ' '*len(string.punctuation))
23 | bea = bea.translate(translator)
24 | ben = ben.translate(translator)
25 |
26 | # Tokenize (split into separate words) each dialog collection
27 | # For this exercise, we don't care about stopwords
28 | bea_tokens = bea.split()
29 | ben_tokens = ben.split()
30 |
31 | bea_unique_words = []
32 | ben_unique_words = []
33 |
34 | # Loop through the bea and ben tokens and only add them
35 | # to the unique list if they don't appear in the other character's token list
36 | for word in bea_tokens:
37 | if word not in ben_tokens:
38 | bea_unique_words.append(word)
39 |
40 | for word in ben_tokens:
41 | if word not in bea_tokens:
42 | ben_unique_words.append(word)
43 |
44 | # Load into NLTK and plot frequencies.
45 | # Don't forget to run `pipenv install matplotlib` for the plots
46 | bea_freq = nltk.FreqDist(bea_unique_words)
47 | ben_freq = nltk.FreqDist(ben_unique_words)
48 | bea_freq.plot(20, cumulative=False)
49 | ben_freq.plot(20, cumulative=False)
50 |
--------------------------------------------------------------------------------
/WeekY/Assignment_answer.md:
--------------------------------------------------------------------------------
1 | # Assignment 1 Answer
2 |
3 | ```python
4 | import datetime
5 |
6 | class Fellow:
7 | # Constructor. Name (in "firstname lastname" format) and department are self-explanatory. Start_year is the year that the student started grad school.
8 | def __init__(self, name, department, start_year):
9 | # "self" refers to the instance of a class. This simple version just saves the parameters passed in to the constructor to the instance variables.
10 | self.name = name
11 | self.department = department
12 | self.start_year = start_year
13 |
14 | # But also initialize some internal instance variables that aren't passed in, but which we'll need to keep track of.
15 | # Here, we're going to assume that all fellows are students until we explicitly graduate() them.
16 | self.status = "student"
17 |
18 | def get_name(self):
19 | # Get the student's name that we stored to the instance in the constructor.
20 | return(self.name)
21 |
22 | def get_department(self):
23 | # Do the same for the department
24 | return(self.department)
25 |
26 | # Get the current status of the fellow. Fellows all start as "student", but can eventually become a "graduate". Let's not mention the third possibility.
27 | def get_status(self):
28 | return(self.status)
29 |
30 | # Sets the status of the student to "graduate" and caps get_year at a certain value
31 | def set_graduate(self, year):
32 | # Store year as instance variable graduate_year
33 | self.graduate_year = year
34 | # Set status to "graduate"
35 | self.status = "graduate"
36 |
37 | # Returns how many years the fellow has spent in their program (1 = "first year", etc) using the current, actual date. If the fellow has graduated, return how many years it took to graduate.
38 | # But if the student has already graduated, use that date instead of now.
39 | def get_year(self):
40 | # This is a little tricky. The computer knows what time it is and we can access it through the datetime module. But only use this if the student is a student
41 | if self.status == "student":
42 | end_date = datetime.date.today()
43 | else:
44 | # Here's the code for graduates. Not everyone graduates in the spring semester, but so this is not exactly right. But let's pretend that it is.
45 | end_date = datetime.datetime(self.graduate_year, 6, 1)
46 | # Create a date representing when the fellow started
47 | # datetime objects have built in arithmatic operator methods
48 | start_date = datetime.date(self.start_year, 9, 1)
49 | time_as_student = end_date - start_date
50 | # Return the days component of the time delta floor-divided by 365
51 | return(time_as_student.days // 365)
52 |
53 | # Invent a secret algorithm to based on some combination of the fellow's data (number of vowels in name, heiarchy of departments, etc) to generate a secret rating from 0-10 for a fellow. Be creative.
54 | def get_rating(self):
55 | if self.department == "History":
56 | return(11)
57 | return(10)
58 |
59 | # Return a string representing all the data for a student in as a single row of a CSV file.
60 | def printout(self):
61 | # There's a CSV module in the Python standard library, but let's just output it manually since it's easy enough.
62 | # Let's enumerate all the data in a list, cast as strings
63 | data = [self.name, self.department, self.status, str(self.start_year), str(self.get_year())]
64 | # Then let's use the string join method to render the list as a long string delimited by quotes and commas.
65 | return '"'+'","'.join(data)+'"'
66 |
67 | # Compare two fellows. If they have all the same data, return true.
68 | def equals(self, f):
69 | # We just wrote a method to output all the data for a Fellow.
70 | # Let's be lazy and just compare that output.
71 | if self.printout() == f.printout():
72 | return(True)
73 | return(False)
74 |
75 |
76 | class Fellowship:
77 |
78 |
79 | # Name is the name of the fellowship
80 | def __init__(self, name):
81 | self.name = name
82 | # initialize an empty dictionary to keep track of cohorts and fellows
83 | self.fellows = {}
84 |
85 | # Audit the program to check that there's been a cohort of 6 students every year and that no person appears multiple times in each cohort. Return True if the fellowship passes, False if it fails.
86 | def audit(self):
87 | # Cycle through all keys in the fellows dictionary
88 | for cohort_year in self.fellows:
89 | # if the number of fellows in the cohort isn't six, fail audit
90 | if len(self.fellows[cohort_year]) != 6:
91 | return False
92 | # nested-loop through the cohort to make sure that no fellow is equal to another
93 | for i in range(0, len(self.fellows[cohort_year])):
94 | for j in range(i+1, len(self.fellows[cohort_year])):
95 | if self.fellows[cohort_year][i].equals(self.fellows[cohort_year][j]):
96 | return(False)
97 | # If all that passes, return True to pass the audit.
98 | return(True)
99 |
100 | #Add fellow f to the fellowship in the cohort for year year
101 | def add_fellow(self, f, year):
102 | # Initialize the cohort as an empty list if the year is not a key in fellows
103 | if year not in self.fellows:
104 | self.fellows[year] = []
105 | # append the fellow to the end of the cohort list for that year
106 | self.fellows[year].append(f)
107 |
108 | # Return all the fellows for a particular year's cohort in a list. Figure out what to return if the cohort doesn't exist.
109 | def get_cohort(self, year):
110 | return(self.fellows[year])
111 |
112 | # Return the total rating for a cohort (add up all the students' individual ratings)
113 | def get_cohort_rating(self, year):
114 | rating = 0
115 | # Loop through the fellows for the cohort...
116 | for fellow in self.fellows[year]:
117 | # ... and add up all their ratings
118 | rating += fellow.get_rating()
119 | return(rating)
120 |
121 | # Return the best cohort or cohorts
122 | def get_best_cohort(self):
123 | # initialize best as None to start
124 | best_cohorts = None
125 | # Loop through the cohort
126 | for cohort_year in self.fellows:
127 | # if best is still None (e.g. this is the first iteration of this loop)
128 | if best_cohorts is None:
129 | # assign a list containing the current loop's cohort_year as the best
130 | best_cohorts = [cohort_year]
131 | else:
132 | # Otherwise, compare the current cohort_year to the best year's rating
133 | # and if it's better, replace best with a list containing the current
134 | if self.get_cohort_rating(cohort_year) > self.get_cohort_rating(best_cohorts[0]):
135 | best_cohorts = [cohort_year]
136 | # If it's equal in rating, append that cohort_year
137 | elif self.get_cohort_rating(cohort_year) == self.get_cohort_rating(best_cohorts[0]):
138 | best_cohorts.append(cohort_year)
139 | return(best_cohorts)
140 |
141 | # A new method for getting the departmental diversity (number of distinct departments) for each cohort.
142 | def get_diversity(self, year):
143 | # Create a set, which is like a list but only contains distinct members
144 | departments = set()
145 | # For each fellow in the cohort, add their department to the departments set.
146 | for fellow in self.fellows[year]:
147 | # Because of how the set works, duplicates are ignored
148 | departments.add(fellow.get_department())
149 | # return the length of the departments set, e.g. the number of nonduplicate departments
150 | return(len(departments))
151 |
152 |
153 | # Return the cohort or cohorts with fellows from the most number of departments
154 | def get_most_diverse(self):
155 | # Do the same flow as above, but for diversity
156 | # initialize most_diverse_year as None to start
157 | most_diverse_year = None
158 | for cohort_year in self.fellows:
159 | if most_diverse_year is None:
160 | most_diverse_year = [cohort_year]
161 | else:
162 | # Call the get_diversity method we defined above
163 | if self.get_diversity(cohort_year) > self.get_diversity(most_diverse_year[0]):
164 | most_diverse_year = [cohort_year]
165 | # Call the get_diversity method we defined above
166 | if self.get_diversity(cohort_year) == self.get_diversity(most_diverse_year[0]):
167 | most_diverse_year.append(cohort_year)
168 | return(most_diverse_year)
169 |
170 | # Return the cohort or cohorts with fellows from the least number of departments
171 | def get_least_diverse(self):
172 | # Do the same flow as above, but with < rather than >
173 | least_diverse_year = None
174 | for cohort_year in self.fellows:
175 | if least_diverse_year is None:
176 | least_diverse_year = [cohort_year]
177 | else:
178 | if self.get_diversity(cohort_year) < self.get_diversity(most_diverse):
179 | least_diverse_year = [cohort_year]
180 | if self.get_diversity(cohort_year) == self.get_diversity(most_diverse):
181 | least_diverse_year.append(cohort_year)
182 | return(least_diverse_year)
183 |
184 | # Return the department whose students are most frequently chosen
185 | def get_top_department(self):
186 | # Initialize a new dictionary for all departments to keep count of how many are in that department
187 | departments = {}
188 | # We're interested in fellows across all departments, so get all the values from the fellows dictionary and loop through them
189 | for fellow in self.fellows.values():
190 | # if fellow is found in departments, add one to its count
191 | if fellow.get_department() in departments:
192 | departments[fellow.get_department()] += 1
193 | # otherwise, assign it to 1, to reflect the fellow that we're currently cycling through
194 | else:
195 | departments[fellow.get_department()] == 1
196 |
197 | # Write the data for all the students to a CSV file using the filename parameter
198 | def write_to_file(self, filename):
199 | f = open(filename,"w")
200 | for cohort_year in self.fellows:
201 | for fellow in self.fellows[cohort_year]:
202 | # the "\n" is a charactger signalling a carriage return or new line.
203 | f.write(fellow.printout() + "\n")
204 | f.close()
205 |
206 |
207 | praxis = Fellowship("Praxis")
208 | praxis.add_fellow(Fellow("Brandon 'The Breaker' Walsh", "English", 2011), 2012)
209 | praxis.add_fellow(Fellow("Shane Lin", "History", 2011), 2012)
210 | praxis.add_fellow(Fellow("Chris Peck", "Music", 2010), 2012)
211 | praxis.add_fellow(Fellow("Claire Maiers", "Sociology", 2010), 2012)
212 | praxis.add_fellow(Fellow("Cecilia Márquez", "History", 2011), 2012)
213 | praxis.add_fellow(Fellow("Gwen Nally", "Philosophy", 2007), 2012)
214 |
215 | # I'm not actually sure when you all started
216 | praxis.add_fellow(Fellow("Catherine Addington", "Spanish", 2016), 2018)
217 | praxis.add_fellow(Fellow("Cho Jiang", "Urban and Environmental Planning", 2016), 2018)
218 | praxis.add_fellow(Fellow("Chris Whitehead", "History", 2016), 2018)
219 | praxis.add_fellow(
220 | Fellow("Eleanore Neumann", "Art and Architectural History", 2016), 2018)
221 | praxis.add_fellow(Fellow("Emily Mellen", "Music", 2016), 2018)
222 | praxis.add_fellow(Fellow("Mathilda Shepherd", "Spanish", 2016), 2018)
223 |
224 |
225 | print(praxis.audit())
226 | print(praxis.get_cohort(2012))
227 | print(praxis.get_cohort_rating(2018))
228 | print(praxis.get_best_cohort())
229 | print(praxis.get_most_diverse())
230 | praxis.write_to_file("praxis.txt")
231 | ```
232 |
--------------------------------------------------------------------------------
/WeekY/CLASSES_CHEATSHEET.md:
--------------------------------------------------------------------------------
1 | # Python Classes
2 | Python classes are great for storing complex data structures, but they can also be simple.
3 |
4 | Here's how you define a simple class that does nothing.
5 |
6 | ```python
7 | # Define a class
8 | class noop:
9 | pass # Pass means "Move along, please. Nothing to see here."
10 |
11 | # Create an instance of the class and invoke it
12 | noop()
13 | ```
14 |
15 | What exactly gets invoked in this case since the class has no actual logic in it. For any class, when you invoke it, it executes the `__init__` method. Since our simplistic example above didn't define any logic for the built-in `__init__` method, nothing happened.
16 |
17 | ## Simple Class
18 |
19 | Let's define a class that actually does something when it's initialized.
20 |
21 | ```python
22 | class Zoo:
23 | def __init__(self, name):
24 | self.zoo_name = name
25 |
26 | a_zoo = Zoo("Zoolandia")
27 | a_zoo.zoo_name
28 | ```
29 |
30 | The class instance is the first argument to **_any_** function defined in a class.
31 |
32 | ```python
33 |
34 | class Zoo:
35 | """Contains methods for maintaining a Zoo
36 |
37 | Methods:
38 | --------
39 | build_habitat
40 | sell_family_ticket
41 | purchase_animal
42 | """
43 | def __init__(self, name):
44 | self.zoo_name = name
45 | self.animals = dict()
46 | self.habitats = set()
47 | self.visitors = list()
48 |
49 |
50 | def build_habitat(self, name, type):
51 | """Adds tuples to the habitats set in the format (name, type)
52 |
53 | Method arguments:
54 | -----------------
55 | name(string) -- The marketing name of the habitat
56 | type(string) -- The type of habitat (e.g. Saltwater, Savanna, Swamp, etc.)
57 | """
58 |
59 | self.habitats.add((name, type))
60 |
61 |
62 | def sell_family_ticket(self, family):
63 | """Adds an entire family to the list of visitors
64 |
65 | Method argument:
66 | -----------------
67 | family(list) -- A list of people in a family of visitors
68 | """
69 |
70 | self.visitors.extend(family)
71 |
72 |
73 | def purchase_animal(self, type, name):
74 | """Add an animal to the zoo
75 |
76 | Method arguments:
77 | -----------------
78 | type(string) -- The type of animal to add
79 | name(string) -- The given name of the animal
80 | """
81 |
82 | self.animals[name] = type
83 |
84 |
85 | def list_animals(self):
86 | """Lists all animals in the zoo
87 |
88 | Method arguments:
89 | n/a
90 | """
91 |
92 | [print(k + ' the ' + v) for k, v in self.animals.items()]
93 |
94 |
95 | a_zoo = Zoo("Zoolandia")
96 | a_zoo.purchase_animal("Tortoise", "Tommy")
97 | a_zoo.list_animals()
98 |
99 | print(a_zoo.list_animals.__doc__) # To view the docstring for the method
100 | ```
101 |
102 | ## Subclassing
103 |
104 | In the previous example, we used strings to define an animal. Let's be more detailed in what an animal is by defining an `Animal` class.
105 |
106 | ```python
107 | class Animal:
108 | def __init__(self, name = None, species = None):
109 | self.name = name
110 | self.species = species
111 | self.speed = 0
112 | self.legs = 0
113 |
114 | def get_name(self):
115 | return self.name
116 |
117 | def walk(self):
118 | print("Parent class walk method")
119 | self.speed = self.speed + (0.1 * self.legs)
120 |
121 | def set_species(self, species):
122 | self.species = species
123 |
124 | def get_species(self):
125 | return self.species
126 |
127 | # __str__ is a special function equivalent to toString() in JavaScript
128 | def __str__(self):
129 | return "%s is a %s" % (self.name, self.species)
130 |
131 |
132 | class Dog(Animal):
133 | def __init__(self, name):
134 | Animal.__init__(name, "Dog")
135 |
136 | def walk(self):
137 | self.speed = self.speed + (0.2 * self.legs)
138 | ```
139 |
140 |
141 |
142 | # Additional Reading
143 |
144 | 1. [An Introduction to Python Classes and Inheritance](http://www.jesshamrick.com/2011/05/18/an-introduction-to-classes-and-inheritance-in-python/)
145 | 2. [Here is a very helpful video series on class inheritance](https://www.youtube.com/playlist?list=PL-osiE80TeTsqhIuOqKhwlXsIBIdSeYtc)
--------------------------------------------------------------------------------
/WeekY/README.md:
--------------------------------------------------------------------------------
1 | # Week 8
2 | 
3 |
4 | ## Agenda
5 | - Review homework.
6 | - [Imports and modules](lesson.md)
7 |
8 | ## Assignment
9 |
10 | ### Part 0.A:
11 |
12 | Once upon a time, we talked about different ways to sort a list of numbers. There were good ways and bad ways. And some really, really bad ways. One really, really bad way is to just kind of throw all the numbers up in the air, figure out whether or not the resulting scramble is sorted, and then just redo it if it isn't. Now that you guys are all random number masters, let's try to implement that sorting algorithm outselves.
13 |
14 | Write a function to receive a list of integers and sort them in this inefficient way using Python's random module. `import` statements can technically go anywhere, but it's usually a good practice to keep them at the top of the file, so you have access to it anywhere in your code.
15 |
16 | Remember that since we're mixing up the list *randomly*, it can potentially run an infinite number of times. We should construct our loops accordingly and use statements like `continue` and `break` wisely.
17 |
18 | ```python
19 | #import statement goes here
20 | def random_sort(nums):
21 | #your code here
22 |
23 | random_sort([7,4,2,7,8,1])
24 | ```
25 |
26 | This algorithm is actually one variation of the famous ["bogosort"](https://en.wikipedia.org/wiki/Bogosort) (AKA stupidsort, shotgunsort, monkeysort) sorting algorithm.
27 |
28 | ### Part 0.B
29 |
30 | Is that a bad way to sort? How do we prove it? Write the same kind of sort function using one of [Python's built-in sorting mechanisms](https://docs.python.org/3/howto/sorting.html).
31 |
32 | ```python
33 | def good_sort(nums):
34 | #python sort
35 | return nums
36 | ```
37 |
38 | Now, save both sorts as different .py files and run both sorts through the command line tool `time`. Instead of running something like `python3 random_sort.py`, you can run `time python3 random_sort.py` and it'll tell you how long it took to run. For example, running our dog names script took me 0.075 total seconds to start up Python, load the script, and then perform the dog name generation.
39 |
40 | ```
41 | ~/projects/sandbox > time python dog_names.py
42 | ['Sammy', 'Thor', 'Bear', 'Lulu', 'Rex', 'Sparky']
43 | python dog_names.py 0.04s user 0.01s system 74% cpu 0.075 total
44 | ```
45 |
46 | Most of this time is spent loading Python and the script and printing the output to the screen. So if I generate 600 names instead of 6, it still only takes a little bit longer (0.104 seconds).
47 |
48 | Let's see how fast the good and bad sorts are by using `time` from the command line to run each script. Make sure that your scripts run correctly for a small list (say, with 3 or 4 numbers) before trying it for larger ones. Now, try the scripts with lists of 9, 10, and 11 numbers. The random sort can... take a while to do this. How much longer will vary depending on sheer luck, because we're depending on random chance, after all. The times for the good sort will vary much less, because the people who wrote Python are pretty smart.
49 |
50 | #### slight bit of unnecessary math detail ahead ####
51 |
52 | If we want to be real big (and, for DHers, really unnecessarily big) nerds, we can see that every additional number in a list that we try to sort using a bogosort increases the average number of random shuffles by a multiple of that length. So, the average number of shuffles for a list of `n` length is the factorial of `n`: `n!`. As the length of the list increased from 9 to 10, we had to do, on average, 10 times more sorts. This is a curve that goes up *real* quick.
53 |
54 | A computer scientist would say that this algorithm has an average *time complexity* of `O(n!)`, a best-case of O(n) (because if might already be sorted and we can verify it by reading through the list once), and a worst-case of never, because if we're *really* unlucky, we'll just never shuffle into the right order. To compare, the built-in Python sort, which uses the [timsort](https://en.wikipedia.org/wiki/Timsort) algorithm, has an average time complexity of `O(n log n)`, which is as good as it gets for a generalized sorting algorithm.
55 |
56 | Here's how `n!` diverges from `n log n` for even small values of `n`:
57 |
58 | 
59 |
60 | (thanks, [Wolfram Alpha](https://www.wolframalpha.com/input/?i=plot+y+%3D+x%21%3B+y+%3D+x+log+x+from+x+%3D+0+to+7))
61 |
62 | The blue line is the bogosort's `n!` performance, the red is Python's `n log n` performance. They both start out small, but the blue line quickly splits off from the red and just zooms up into the stratosphere. This is why we can easily sort large (length 10000+) lists using Python's built-in sort, but bogosort just completely chokes for those much longer than a dozen or so elements.
63 |
64 | Congratulations on still reading this. You basically have a named chair in computer science at this point. All of this is to say that while digital humanists don't often have to worry too much about things like efficiency, it is still entirely possible even for beginning programmers to write code that will only complete after the life cycle of the sun. And to suggest that if there's already a module that does a thing, especially if that module is part of Python's standard library, it's usually a good idea to use that one instead of rolling your own.
65 |
--------------------------------------------------------------------------------
/WeekY/answers.py:
--------------------------------------------------------------------------------
1 | # Answer for Week08 Assignment 0.A
2 |
3 | import random # usually, a good idea to keep imports at the top
4 |
5 | def is_sorted(nums):
6 | i = 1 # 1, because we want to start by comparing nums[1] and nums[0]
7 | while i < len(nums):
8 | if nums[i]My first page!
9 | ```
10 | Save it and open the file in Chrome, what do you see? What happened to our element's tags? Let's right click on our page and select `inspect`. What we're using is called the Chrome DevTools Console.[You can find more info about Chrome Devtools Console here](https://developers.google.com/web/tools/chrome-devtools/console/)
11 |
12 | Let's take a look at some of the more common HTML tags that we can use to create HTML elements [https://www.w3schools.com/tags/ref_byfunc.asp](https://www.w3schools.com/tags/ref_byfunc.asp)
13 |
14 | What tag are we currently using?
15 | How would we make it into an HTML heading?
16 |
17 | HTML elements can also have [attributes](https://developer.mozilla.org/en-US/docs/Learn/HTML/Introduction_to_HTML/Getting_started#Attributes)
18 |
19 | Let's try using the `anchor` tag and `href` attribute to create an HTML element that links to `https://twitter.com/`
20 |
21 | You can find a list of HTML attributes here [https://www.w3schools.com/tags/ref_attributes.asp](https://www.w3schools.com/tags/ref_attributes.asp)
22 |
23 | We'll be going over more HTML and the web next week, let's hop back to [web scrapping](intro_web_scraping.md)
24 | 
--------------------------------------------------------------------------------
/WeekZ/intro_web_scraping.md:
--------------------------------------------------------------------------------
1 | ## Intro to Web Scraping
2 | 
3 |
4 | #### What is web scraping?
5 | Web scraping is extracting data from web pages, using the syntax of a web page. It's great for compiling datasets when you don't already have them in a database somewhere. For more information about web scraping, I highly recommend [Intro to Beautiful Soup by Jeri Wieringa's from the Programming Historian](https://programminghistorian.org/en/lessons/intro-to-beautiful-soup)
6 |
7 | #### So how do we scrape the web?
8 | In python, there's a few different libraries we could use, but today we're going to focus on Beautiful Soup.
9 |
10 | First we need to install the library:
11 | ```python
12 | pip3 install beautifulsoup4
13 | ```
14 |
15 | Now let's make sure we have the library. Start up your python interpreter and we'll import the library
16 | ```python
17 | import bs4
18 | print(bs4.__version__)
19 | ```
20 | Now we see that we have the library installed and it should be version `'4.6.3'`. Any time you download a python library onto your computer, unless you're using a virtual environment, it will accessible in every directory.
21 |
22 | Now let's figure out how to use BeautifulSoup by going to the [documentation for the library](https://www.crummy.com/software/BeautifulSoup/bs4/doc/). Let's go through their quick start example using our interpreters.
23 |
24 | [Let's talk about HTML](intro_html.md)
25 |
26 | ----
27 |
28 | Now let's create a new python script called `web_scraper.py` and try scraping the Scholars' Lab blog page. Go to the soon to be released [Scholars' Lab blog page](http://maybe.scholarslab.org/blog/)
29 |
30 | *Downloaded page instructions*
31 | Save the page to your workspace as `slab_blog.html`.
32 | 
33 |
34 |
35 | First import beautiful soup
36 | ```python
37 | from bs4 import BeautifulSoup
38 | ```
39 |
40 | Next, instantiate a Beautiful Soup instance and pass it our webpage and then print out the results
41 | ```python
42 | soup = BeautifulSoup(open('slab_blog.html'))
43 | print(soup.prettify())
44 | ```
45 |
46 | *In class assignment*
47 |
48 | How would we get the title of the web page?
49 |
50 | How would we get the text of the web page?
51 |
52 | How would we get the links of the web page?
53 |
54 | 
55 |
56 | ----
57 |
58 | *Reading urls instructions*
59 | If you don't want to download each web page, we can use a different library to read the urls of our webpages and store the html. This library is called `requests` and you can find [the documentation here](http://docs.python-requests.org/en/master/).
60 |
61 | Again we have to install the library
62 | ```python
63 | pip3 install requests
64 | ```
65 |
66 | Then we import it using `import requests` into our script where we imported BeautifulSoup. Now instead of downloading our webpage we can use requests to get the contents
67 |
68 | ```python
69 | result = requests.get('http://maybe.scholarslab.org/blog/')
70 | print(result.content)
71 | ```
72 | We should now see the entire web page like earlier.
73 |
74 | Then we can store the result and pass it to BeautifulSoup
75 | ```python
76 | slab_blog = result.content
77 | soup = BeautifulSoup(slab_blog)
78 | ```
79 |
80 |
--------------------------------------------------------------------------------
/debugging/1.py:
--------------------------------------------------------------------------------
1 | # For these exercises, you should focus on debugging - looking for errors. You should not write new code.
2 | # for each exercise, we'll comment what the code is supposed to do and then debug it together
3 | # Stores "hello world" to the screen and prints it to the screen
4 |
5 | greeting = "hello world
6 | print(greeting
--------------------------------------------------------------------------------
/debugging/10.py:
--------------------------------------------------------------------------------
1 | # open the text of much ado about nothing and read it in line by line
2 | # count the number of lines by Beatrice
3 |
4 | # for this one, let's just annotate the lines with what is happening
5 |
6 | file_path = "ado.txt
7 | with open (file_path, 'w') as file_input:
8 | text = file_input.readline()
9 |
10 | benedickt_lines = {}
11 | counters = 0
12 | for line in texts:
13 | if line.startswith('BENEDICK'):
14 | line_counter = 1
15 | while text[counter + line_counter] != '\n':
16 | benedick_lines.append(text[counter + line_counter])
17 | line_counter = line_counter + 1
18 | counter = counter + 1
19 | print(benedick_lines)
--------------------------------------------------------------------------------
/debugging/11.py:
--------------------------------------------------------------------------------
1 | # open the text of much ado about nothing and read it in line by line
2 | # count the number of lines by Beatrice
3 | # Jennifer's version
4 |
5 | # if we happen to get this far we can work on counting and then adding beatrice
6 |
7 | txt_doc = open("Much_Ado_About_Noting.txt","r")
8 | txt_lines = txt_doc.readlines
9 | txt_lines = [ line.strip("\n") for line in txt_lines ]
10 | txt_doc.closed()
11 |
12 | get_lined_data(name)
13 | line_count = 0
14 | char_count = 0
15 | indices = [ i for i, x in enumerate(txt_lines) if x == name + "." ]
16 | for i in indices:
17 | j = 0
18 | while not txt_lines[i+j+1] == "":
19 | j+=1
20 | line_count = line_count + 1
21 | char_count += len(txt_lines[i+j])
22 | return name, line_count, char_count
23 |
24 | names = [ "BENEDICK" "BEATRICE" ]
25 | out_lines = [ "{0} has {1} lines and {2} characters to read.\n".format(*get_line_data(name)) for name in names ]
26 |
27 | out_doc = open("Line_Info.txt", "w")
28 | out_docs.writelines(out_lines)
29 | out_doc.close()
--------------------------------------------------------------------------------
/debugging/2.py:
--------------------------------------------------------------------------------
1 | def pig_latin(word):
2 | return word[1:] + word[0].lower() + "ay"
3 |
4 | def repeat(word, number):
5 | return (word+" ")*number
6 |
7 | s = "praxis codelab code lab"
8 | l = s.split(" ")
9 | print(repeat(pig_latin(l[0]),10) + " ".join(l[1:]))
--------------------------------------------------------------------------------
/debugging/2020/1.py:
--------------------------------------------------------------------------------
1 | # NOTE: FOR THESE YOU ARE NOT TRYING TO CHANGE THE UNDERLYING PROCESS OF THE CODE
2 |
3 | # Produce a simple program to accept a single word as text input and then print
4 | # out a pig latin translation.
5 |
6 | # Request word & store as variable "bacon"
7 | bacon = input("Gimme a word to tarrrrrrnslate to pig latin. Please: ")
8 |
9 | # For "bacon", remove character at position[0], suffix with that character,
10 | # suffix with "ay"
11 | # Could do more lines to remove, assign, suffix, suffix but let's see if we can do this more concisely
12 | # It's called string slicing!
13 |
14 |
15 | print(bacon[1:]+bacon[0] + "ay")
16 |
--------------------------------------------------------------------------------
/debugging/2020/2.py:
--------------------------------------------------------------------------------
1 | # fizzbuzzattemptsLV
2 | # Example output: "1 2 fizz 4 buzz fizz 7"
3 | # fizz for numbers divisible by three
4 | # buzz for numbers divisible by five
5 |
6 |
7 | num = str(input("Enter a number: ''))
8 | count = 0
9 | while counter < stored_num:
10 | counter ++= 1
11 | if counter = 0:
12 | continue
13 | if counter % 3 == 0
14 | print("fizzzzz")
15 | continued
16 | if counter % 5 == 0:
17 | print("buzz")
18 | kantinue
19 | print('counter')
--------------------------------------------------------------------------------
/debugging/2020/4.py:
--------------------------------------------------------------------------------
1 | # given a file path, store and print it
2 |
3 | text_path = 'woolf.txte'
4 |
5 | # hint - it might have worked, but is the output correct? Not all errors are errors Python can detect!
6 |
7 | print(text_pathed)
8 |
--------------------------------------------------------------------------------
/debugging/2020/5.py:
--------------------------------------------------------------------------------
1 | # given a text file, print the first 100 text characters of it
2 |
3 |
4 | def read_file[path_to_text]:
5 | # take a file path and return the raw text from it
6 | with open(path_to_text, 'read') as fin
7 | raw-text = fin.read
8 | return raw_text
9 |
10 |
11 | text_path = 'woolf.txte'
12 | raw_text = reads_file(text_path)
13 | print(raw_text)
--------------------------------------------------------------------------------
/debugging/2020/6.py:
--------------------------------------------------------------------------------
1 | # given a text file, print the first 100 text characters of it
2 | def readfile(path_to_text):
3 | # take a file path and return the raw text from it
4 | with open(path_to_text, 'w') as fin
5 | raw-text = fin.read()
6 | return raw_text
7 |
8 |
9 | def split_text (raw_text):
10 | # takes a text and splits it into a series of tokens (words in text
11 | # analysis lingo)
12 | tokens = raw_text.split[' ']
13 | return my_tokens
14 |
15 |
16 | text_path = 'woolf.taxt'
17 | raw_text = reads_file(text_path)
18 | print(raw_text[0-20])
19 | tokens == split_text(raw_text)
20 | print(token[0:20])
--------------------------------------------------------------------------------
/debugging/2020/7.py:
--------------------------------------------------------------------------------
1 | import nltk
2 | # given a text file, print the first 100 text characters of it
3 | def read_file(path_to_text):
4 | # take a file path and return the raw text from it
5 | with open(path_to_text, r) as fin:
6 | raw_text = fin.read{}
7 | return raw_text
8 |
9 |
10 | def splits_text(raw_text)
11 | # takes a text and splits it into a series of tokens (words in text
12 | # analysis lingo) by splitting on a space
13 | token = raw_text.split('')
14 | return tokens
15 |
16 |
17 | def does_something_interesting(tokens):
18 | # takes a list of tokens and creates a frequency dispersion plot
19 | words_to_chart = ['he', 'she', 'the', 'said', 'boat']
20 | nltk.Text(my_tokens).dispersion_plot(words_to_chart)
21 |
22 |
23 | text_path = 'wolves.txt'
24 | print(text_path)
25 | raw_text = read_file(texts_path)
26 | print(raw_texts[0:15])
27 | tokens = split_text(raw_text)
28 | print(tokens[0-15])
29 | does_something_interesting(tokens)
30 |
31 |
32 | # hint: make sure you read the output the terminal gives you. If it says something needs to be installed, something might need to be installed…
--------------------------------------------------------------------------------
/debugging/2020/answers/1.py:
--------------------------------------------------------------------------------
1 | # Produce a simple program to accept a single word as text input and then print
2 | # out the pig latin translation.
3 |
4 | # Request word & store as variable "bacon"
5 | bacon = input("Gimme a word to translate to pig latin. Please: ")
6 |
7 | # For "bacon", remove character at position[0], suffix with that character,
8 | # suffix with "ay"
9 | # Could do more lines to remove, assign, suffix, suffix but let's see if we can do this more concisely
10 | # It's called string slicing!
11 |
12 |
13 | print(bacon[1:]+bacon[0] + "ay")
--------------------------------------------------------------------------------
/debugging/2020/answers/2.py:
--------------------------------------------------------------------------------
1 | # fizzbuzzattemptsLV
2 | # Example output: "1 2 fizz 4 buzz fizz 7"
3 | # fizz for numbers divisible by three
4 | # buzz for numbers divisible by five
5 |
6 |
7 | stored_num = int(input("Enter a number: "))
8 | counter = 0
9 | while counter < stored_num:
10 | counter += 1
11 | if counter == 0:
12 | continue
13 | if counter % 3 == 0:
14 | print("fizz")
15 | continue
16 | if counter % 5 == 0:
17 | print("buzz")
18 | continue
19 | print(counter)
--------------------------------------------------------------------------------
/debugging/2020/answers/3.py:
--------------------------------------------------------------------------------
1 | # takes a word and series of words and turns it into pig lattin.
2 |
3 | def piglatin(word):
4 | if " " in word:
5 | first_word = word.split(" ")[0]
6 | other_words = word.split(" ")[1:]
7 | first_word = first_word[1:] + first_word[0].lower()+"ay"
8 | first_word = first_word + " " + " ".join(other_words)
9 | elif ", " in word:
10 | first_word = word.split(", ")[0]
11 | other_words = word.split(", ")[1:]
12 | first_word = first_word[1:] + first_word[0].lower() + "ay"
13 | first_word = first_word + ", " + " ".join(other_words)
14 | elif "-" in word:
15 | first_word = word.split("-")[0]
16 | other_words = word.split("-")[1:]
17 | first_word = first_word[1:] + first_word[0].lower() + "ay"
18 | first_word = first_word + " " + "-".join(other_words)
19 | else:
20 | first_word = word
21 | first_word = first_word[1:] + first_word[0].lower() + "ay"
22 |
23 | return first_word
24 |
25 | print (piglatin(input("Enter input: Translate ")))
--------------------------------------------------------------------------------
/debugging/2020/answers/4.py:
--------------------------------------------------------------------------------
1 | # given a file path, store and print it
2 |
3 | text_path = 'woolf.txt'
4 |
5 | print(text_path)
6 |
--------------------------------------------------------------------------------
/debugging/2020/answers/5.py:
--------------------------------------------------------------------------------
1 | # given a text file, print the first 100 text characters of it
2 |
3 |
4 | def read_file(path_to_text):
5 | # take a file path and return the raw text from it
6 | with open(path_to_text, 'r') as fin:
7 | raw_text = fin.read()
8 | return raw_text
9 |
10 |
11 | text_path = 'woolf.txt'
12 | raw_text = read_file(text_path)
13 | print(raw_text)
--------------------------------------------------------------------------------
/debugging/2020/answers/6.py:
--------------------------------------------------------------------------------
1 | # given a text file, print the first 100 text characters of it
2 | def read_file(path_to_text):
3 | # take a file path and return the raw text from it
4 | with open(path_to_text, 'r') as fin:
5 | raw_text = fin.read()
6 | return raw_text
7 |
8 |
9 | def split_text(raw_text):
10 | # takes a text and splits it into a series of tokens (words in text
11 | # analysis lingo)
12 | tokens = raw_text.split(' ')
13 | return tokens
14 |
15 |
16 | text_path = 'woolf.txt'
17 | raw_text = read_file(text_path)
18 | print(raw_text[0:20])
19 | tokens = split_text(raw_text)
20 | print(tokens[0:20])
--------------------------------------------------------------------------------
/debugging/2020/answers/7.py:
--------------------------------------------------------------------------------
1 | import nltk
2 | # given a text file, print the first 100 text characters of it
3 | def read_file(path_to_text):
4 | # take a file path and return the raw text from it
5 | with open(path_to_text, 'r') as fin:
6 | raw_text = fin.read()
7 | return raw_text
8 |
9 |
10 | def split_text(raw_text):
11 | # takes a text and splits it into a series of tokens (words in text
12 | # analysis lingo)
13 | tokens = raw_text.split(' ')
14 | return tokens
15 |
16 |
17 | def does_something_interesting(tokens):
18 | # takes a list of tokens and creates a frequency dispersion plot
19 | words_to_chart = ['he', 'she', 'the', 'said', 'boat']
20 | nltk.Text(tokens).dispersion_plot(words_to_chart)
21 |
22 |
23 | text_path = 'woolf.txt'
24 | print(text_path)
25 | raw_text = read_file(text_path)
26 | print(raw_text[0:15])
27 | tokens = split_text(raw_text)
28 | print(tokens[0:15])
29 | does_something_interesting(tokens)
--------------------------------------------------------------------------------
/debugging/3.py:
--------------------------------------------------------------------------------
1 | # Create a function that will filter evens from a list of numbers
2 |
3 | def filter_evens(list):
4 | # take a list of numbers and return only the even ones
5 | even_numbers=[]
6 | for num in list:
7 | if num / 2 == 0:
8 | even_numbers + num
9 | return even_numbers
10 |
11 | nums = [0,-2,3,14]
12 | print(filter_evens(nums))
13 |
--------------------------------------------------------------------------------
/debugging/4.py:
--------------------------------------------------------------------------------
1 | # pig latinize
2 |
3 | vowel = ["a","e","i","o","u"]
4 | consonant = ("b","c","d","f","g","h","j","k","l","m","n","p","w","r","s","t","v","w","x","y","z")
5 | ay = "ay"
6 | yay = "yay"
7 |
8 | #why does the input variable not work in the function. i.e. program only works if the function placeholder is differnt from imput variable
9 |
10 | def pig_latinize(user_word):
11 | user_word=user_word.lower()
12 | first_letter = user_word[0]
13 | second_letter = user_word[1]
14 |
15 | if first_letter in vowel
16 | return user_word[0:]+yay
17 |
18 | else if first_letter in consonant and second_letter in consonant:
19 | return user_word[2:]+user_word[0:2]+ay
20 |
21 | else:
22 | return user_word[1:]+user_word[0]+ay
23 |
24 | users_word = input("Enter a word to translate to Pig Latin?: ")
25 | output = pig_latinize(user_word)
26 |
27 | print(output.title())
28 | # alternatively, you can also use print(output)
29 |
--------------------------------------------------------------------------------
/debugging/5.py:
--------------------------------------------------------------------------------
1 | # count from 1 to 10
2 |
3 | counter = 1
4 | while counter < 11:
5 | print("counter")
6 | counter = counter + 1
--------------------------------------------------------------------------------
/debugging/6.py:
--------------------------------------------------------------------------------
1 | # count from 1 to 15 and say fizz if the number is divisible by 3, otherwise print the current number.
2 |
3 | counter = 0
4 | while counter < 18:
5 | counter = counter + 1
6 | if counter % 3 == 0:
7 | print('fizz')
8 | else:
9 | print(counter)
--------------------------------------------------------------------------------
/debugging/7.py:
--------------------------------------------------------------------------------
1 | # count from 1 to the input number and say fizz if the number is divisible by 3, otherwise print the current number.
2 |
3 | counter = 0
4 | n = input("Enter number:")
5 | while counter < n:
6 | if counter % 5 == 0:
7 | print('buzz')
8 | elif counter % 3 == 0:
9 | print('fizz')
10 | else:
11 | print(counter)
12 | counter += 1
--------------------------------------------------------------------------------
/debugging/8.py:
--------------------------------------------------------------------------------
1 | # count from 1 to the input number and say fizz if the number is divisible by 3, otherwise print the current number.
2 |
3 | counter = 0
4 | while counter < int(input("Enter number:")):
5 | if counter % 5 == 0:
6 | print('buzz')
7 | elif counter % 3 == 0:
8 | print('fizz')
9 | else:
10 | print(counter)
11 | counter += 1
--------------------------------------------------------------------------------
/debugging/9.py:
--------------------------------------------------------------------------------
1 | # count from 1 to the input number and say fizz if the number is divisible by 3, otherwise print the current number.
2 |
3 | counter = 0
4 | n = int(input("Enter number:"))
5 | while counter < n:
6 | if counter % 5 == 0:
7 | print('buzz')
8 | elif counter % 3 == 0:
9 | print('fizz')
10 | else:
11 | print(counter)
12 | counter += 1
--------------------------------------------------------------------------------
/debugging/answers/1.py:
--------------------------------------------------------------------------------
1 | # For these exercises, you should focus on debugging - looking for errors. You should not write new code.
2 |
3 | # Stores "hello world" to the screen and prints it to the screen
4 |
5 | greeting = "hello world"
6 | print(greeting)
--------------------------------------------------------------------------------
/debugging/answers/10.py:
--------------------------------------------------------------------------------
1 | # open the text of much ado about nothing and read it in line by line
2 | # count the number of lines by Beatrice
3 |
4 | file_path = "ado.txt"
5 | with open (file_path, 'r') as file_input:
6 | text = file_input.readlines()
7 |
8 | benedick_lines = []
9 | counter = 0
10 | for line in text:
11 | if line.startswith('BENEDICK'):
12 | line_counter = 1
13 | while text[counter + line_counter] != '\n':
14 | benedick_lines.append(text[counter + line_counter])
15 | line_counter = line_counter + 1
16 | counter = counter + 1
17 | print(benedick_lines)
--------------------------------------------------------------------------------
/debugging/answers/11.py:
--------------------------------------------------------------------------------
1 | # open the text of much ado about nothing and read it in line by line
2 | # count the number of lines by Beatrice
3 | # Jennifer's version
4 |
5 | # if we happen to get this far we can work on counting and then adding beatrice
6 |
7 | txt_doc = open("Much_Ado_About_Nothing.txt","r")
8 | txt_lines = txt_doc.readlines()
9 | txt_lines = [ line.strip("\n") for line in txt_lines ]
10 | txt_doc.close()
11 |
12 | def get_line_data(name):
13 | line_count = 0
14 | char_count = 0
15 | indices = [ i for i, x in enumerate(txt_lines) if x == name + "." ]
16 | for i in indices:
17 | j = 0
18 | while not txt_lines[i+j+1] == "":
19 | j+=1
20 | line_count += 1
21 | char_count += len(txt_lines[i+j])
22 | return name, line_count, char_count
23 |
24 | names = [ "BENEDICK", "BEATRICE" ]
25 | out_lines = [ "{0} has {1} lines and {2} characters to read.\n".format(*get_line_data(name)) for name in names ]
26 |
27 | out_doc = open("Line_Info.txt", "w")
28 | out_doc.writelines(out_lines)
29 | out_doc.close()
--------------------------------------------------------------------------------
/debugging/answers/2.py:
--------------------------------------------------------------------------------
1 | # Produce a simple program to accept a single word as text input and then print
2 | # out a pig latin translation.
3 |
4 | # Request word & store as variable "bacon"
5 | piglatin=input("Which word do you want to translate?\n")
6 |
7 | # For "pig", remove character at position[0], suffix with that character,
8 | # suffix with "ay"
9 |
10 | print(piglatin[1:]+piglatin[0]+"ay")
11 |
--------------------------------------------------------------------------------
/debugging/answers/3.py:
--------------------------------------------------------------------------------
1 | # Create a function that will take a name and generate a greeting for you.
2 |
3 | def filter_evens(list):
4 | even_numbers=[]
5 | for num in list:
6 | if num % 2 == 0:
7 | even_numbers.append(num)
8 | return even_numbers
9 | nums = [0,-2,3,14]
10 | print(filter_evens(nums))
--------------------------------------------------------------------------------
/debugging/answers/4.py:
--------------------------------------------------------------------------------
1 | # pig latinize
2 |
3 | vowel = ("a","e","i","o","u")
4 | consonant = ("b","c","d","f","g","h","j","k","l","m","n","p","w","r","s","t","v","w","x","y","z")
5 | ay = "ay"
6 | yay = "yay"
7 |
8 | #why does the input variable not work in the function. i.e. program only works if the function placeholder is differnt from imput variable
9 |
10 | def pig_latinize(user_word):
11 | user_word=user_word.lower()
12 | first_letter = user_word[0]
13 | second_letter = user_word[1]
14 |
15 | if first_letter in vowel:
16 | return user_word[0:]+yay
17 |
18 | elif first_letter in consonant and second_letter in consonant:
19 | return user_word[2:]+user_word[0:2]+ay
20 |
21 | else:
22 | return user_word[1:]+user_word[0]+ay
23 |
24 | user_word = input("Enter a word to translate to Pig Latin?: ")
25 | output = pig_latinize(user_word)
26 |
27 | print(output.title())
28 | # alternatively, you can also use print(output)
--------------------------------------------------------------------------------
/debugging/answers/5.py:
--------------------------------------------------------------------------------
1 | # count from 1 to 10
2 |
3 | counter = 1
4 | while counter < 11:
5 | print(counter)
6 | counter = counter + 1
--------------------------------------------------------------------------------
/debugging/answers/6.py:
--------------------------------------------------------------------------------
1 | # count from 1 to 15 and say fizz if the number is divisible by 3, otherwise print the current number.
2 |
3 | counter = 1
4 | while counter < 16:
5 | if counter % 3 == 0:
6 | print('fizz')
7 | else:
8 | print(counter)
9 | counter = counter + 1
--------------------------------------------------------------------------------
/debugging/answers/7.py:
--------------------------------------------------------------------------------
1 | # count from 1 to 15 and say fizz if the number is divisible by 3, otherwise print the current number.
2 |
3 | counter = 1
4 | while counter < 16:
5 | if counter % 5 == 0:
6 | print('buzz')
7 | elif counter % 3 == 0:
8 | print('fizz')
9 | else:
10 | print(counter)
11 | counter = counter + 1
--------------------------------------------------------------------------------
/debugging/answers/8.py:
--------------------------------------------------------------------------------
1 | # open the text of much ado about nothing and read it in line by line
2 |
3 | file_path = "ado.txt"
4 | with open (file_path, 'r') as file_input:
5 | text = file_input.read()
6 |
7 | print(text)
--------------------------------------------------------------------------------
/debugging/answers/9.py:
--------------------------------------------------------------------------------
1 | # open the text of much ado about nothing and read it in line by line
2 | # count the number of lines by Beatrice
3 |
4 | file_path = "ado.txt"
5 | with open (file_path, 'r') as file_input:
6 | text = file_input.readlines()
7 |
8 | counter = 0
9 | for line in text:
10 | if line.startswith('BENEDICK'):
11 | print ('It is a Benedick line!')
12 | counter = counter + 1
13 |
--------------------------------------------------------------------------------
/debugging/answers/runtime0.py:
--------------------------------------------------------------------------------
1 | # Returns True if the list is sorted
2 | # Returns False if the list is not sorted
3 | def is_sorted(numbers):
4 | i = 0
5 | while i < len(numbers)-1:
6 | if numbers[i] > numbers[i+1]:
7 | return(False)
8 | i+=1
9 | return(True)
10 |
11 | print("This should be True: ", is_sorted([1,4,6,7,8,9]))
12 | print("This should be False: ", is_sorted([3,6,2,5,7]))
--------------------------------------------------------------------------------
/debugging/answers/runtime1.py:
--------------------------------------------------------------------------------
1 | # Find the highest point
2 | # Input: a matrix of height values,
3 | # representing a topographic map
4 | # Output: the highest point in the map
5 | def find_peak(map):
6 | # Starting coordinates
7 | x = 0
8 | y = 0
9 | # floor height
10 | peak = 0
11 | while y < len(map):
12 | x = 0
13 | while x < len(map[y]):
14 | if map[x][y] > peak:
15 | peak = map[x][y]
16 | x+=1
17 | y+=1
18 | return(peak)
19 |
20 | # A topographic map
21 | map = [[5,3,1,3,4],
22 | [1,3,3,5,4],
23 | [3,2,4,5,6],
24 | [6,4,1,7,4],
25 | [3,4,4,5,3]]
26 | print(find_peak(map))
--------------------------------------------------------------------------------
/debugging/answers/runtime2.py:
--------------------------------------------------------------------------------
1 | # Find the first pair of numbers in a list that add up to the target
2 | # Input: A list of numbers and a target number
3 | # Output: A pair of numbers from that list that add up to the target
4 |
5 | def sum_pair(numbers, target):
6 | i = 0
7 | while i < len(numbers)-1:
8 | j = i+1
9 | while j < len(numbers):
10 | if numbers[i]+numbers[j] == target:
11 | return (numbers[i],numbers[j])
12 | j+=1
13 | i+=1
14 | return(None)
15 |
16 | input1 = [1,5,6,3]
17 | print(sum_pair(input1,8))
18 | print(sum_pair(input1,10))
--------------------------------------------------------------------------------
/debugging/runtime0.py:
--------------------------------------------------------------------------------
1 | # Returns True if the list is sorted
2 | # Returns False if the list is not sorted
3 | def is_sorted(numbers):
4 | i = 0
5 | while i < len(numbers):
6 | if numbers[i] > numbers[i+1]:
7 | return(False)
8 | return(True)
9 |
10 | print("This should be True: ", is_sorted([1,4,6,7,8,9]))
11 | print("This should be False: ", is_sorted([3,6,2,5,7]))
--------------------------------------------------------------------------------
/debugging/runtime1.py:
--------------------------------------------------------------------------------
1 | # Find the highest point
2 | # Input: a matrix of height values,
3 | # representing a topographic map
4 | # Output: the highest point in the map
5 | def find_peak(map):
6 | # Starting coordinates
7 | x = 0
8 | y = 0
9 | # floor height
10 | peak = 0
11 | while y < len(map):
12 | while x < len(map[y]):
13 | if map[x][y] > peak:
14 | peak = map[x][y]
15 | x+=1
16 | y+=1
17 | return(peak)
18 |
19 | # A topographic map
20 | map = [[5,3,1,3,4],
21 | [1,3,3,5,4],
22 | [3,2,4,5,6],
23 | [6,4,1,7,4],
24 | [3,4,4,5,3]]
25 | print(find_peak(map))
--------------------------------------------------------------------------------
/debugging/runtime2.py:
--------------------------------------------------------------------------------
1 | # Find the first pair of numbers in a list that add up to the target
2 | # Input: A list of numbers and a target number
3 | # Output: A pair of numbers from that list that add up to the target
4 | def sum_pair(numbers, target):
5 | i = 0
6 | while i < len(numbers):
7 | j = i
8 | while j < len(numbers):
9 | # Do the two numbers at indices i and j add up to the target?
10 | if numbers[i]+numbers[j] == target:
11 | # return them as a tuple
12 | return (numbers[i],numbers[j])
13 | return(None)
14 |
15 | input1 = [1,5,6,3]
16 | print(sum_pair(input1,8))
17 | print(sum_pair(input1,10))
--------------------------------------------------------------------------------