├── .gitbook
└── assets
│ └── adsb-docker-flowchart.png
├── .github
├── dependabot.yaml
└── workflows
│ ├── check_links.yml
│ ├── linting.yml
│ └── spellcheck.yml
├── .gitignore
├── .markdown-link-check.json
├── .spelling
├── LICENSE
├── README.md
├── SUMMARY.md
├── feeder-containers
├── feeding-ads-b-exchange.md
├── feeding-adsbhub.md
├── feeding-airnavradar.md
├── feeding-flightaware-piaware.md
├── feeding-flightradar24.md
├── feeding-new-aggregators.md
├── feeding-opensky-network.md
├── feeding-plane-watch.md
├── feeding-planefinder.md
├── feeding-radarplane.md
└── feeding-radarvirtuel.md
├── foundations
├── common-tasks-and-info.md
├── deploy-dump978-usa-only.md
├── deploy-readsb-container.md
├── deploy-ultrafeeder-container.md
└── prepare-the-project-environment.md
├── intro
├── equipment-needed.md
├── how-to-get-help.md
├── information-needed.md
├── overview.md
├── what-is-docker.md
└── why-docker.md
├── setting-up-rtl-sdrs
├── blacklist-kernel-modules.md
└── re-serialise-sdrs.md
├── setting-up-the-host-system
├── preparing-your-system.md
└── running-docker-install.md
└── useful-extras
├── alternative-graphing-with-influx-grafana.md
├── alternative-graphing-with-prometheus-grafana.md
├── auto-restart-unhealthy-containers.md
├── auto-upgrade-containers.md
├── improved-visualisation-with-tar1090.md
├── managing-a-remote-station.md
└── storing-time-series-data.md
/.gitbook/assets/adsb-docker-flowchart.png:
--------------------------------------------------------------------------------
https://raw.githubusercontent.com/sdr-enthusiasts/gitbook-adsb-guide/9dd27d00dc6f4ddd3384e6796d5c06a8ae87d729/.gitbook/assets/adsb-docker-flowchart.png
--------------------------------------------------------------------------------
/.github/dependabot.yaml:
--------------------------------------------------------------------------------
1 | ---
2 | version: 2
3 |
4 | updates:
5 | # Maintain dependencies for GitHub Actions
6 | - package-ecosystem: "github-actions"
7 | directory: "/"
8 | schedule:
9 | interval: "weekly"
10 | day: "saturday"
11 | time: "00:00"
12 | timezone: "Etc/UTC"
13 | assignees:
14 | - "mikenye"
15 | - "fredclausen"
16 |
17 | # Maintain dependencies for GitHub Actions
18 | - package-ecosystem: "github-actions"
19 | directory: "/"
20 | schedule:
21 | interval: "weekly"
22 | day: "saturday"
23 | time: "00:00"
24 | timezone: "Etc/UTC"
25 | assignees:
26 | - "fredclausen"
27 |
--------------------------------------------------------------------------------
/.github/workflows/check_links.yml:
--------------------------------------------------------------------------------
1 | name: Check Links
2 |
3 | on:
4 | pull_request:
5 | branches:
6 | - master
7 | - main
8 | workflow_dispatch:
9 |
10 | jobs:
11 | generate-matrix:
12 | name: Find markdown files to check
13 | runs-on: ubuntu-latest
14 | outputs:
15 | matrix: ${{ steps.set-matrix.outputs.matrix }}
16 | steps:
17 | - uses: actions/checkout@v4.2.2
18 | - id: set-matrix
19 | run: |
20 | set -x
21 | echo "matrix=$(find "$(pwd)" -type f -iname \*.md | jq -R -s -c 'split("\n")[:-1]')" >> $GITHUB_OUTPUT
22 |
23 | check:
24 | runs-on: ubuntu-latest
25 | needs: [generate-matrix]
26 | strategy:
27 | fail-fast: false
28 | matrix:
29 | file_to_check: ${{ fromJson(needs.generate-matrix.outputs.matrix) }}
30 | steps:
31 | - name: Install markdown-link-check
32 | run: sudo npm install -g markdown-link-check
33 |
34 | - uses: actions/checkout@v4.2.2
35 |
36 | - name: Run markdown-link-check against *.md files
37 | run: markdown-link-check --config "$(pwd)/.markdown-link-check.json" --verbose --quiet "${{ matrix.file_to_check }}"
38 |
--------------------------------------------------------------------------------
/.github/workflows/linting.yml:
--------------------------------------------------------------------------------
1 | name: Linting
2 |
3 | on:
4 | pull_request:
5 | branches:
6 | - master
7 | - main
8 | workflow_dispatch:
9 |
10 | jobs:
11 | markdownlint:
12 | runs-on: ubuntu-latest
13 | steps:
14 | - uses: actions/checkout@v4.2.2
15 | - name: Pull markdownlint/markdownlint:latest Image
16 | run: docker pull markdownlint/markdownlint:latest
17 | - name: Run markdownlint against *.md files
18 | run: docker run --rm -i -v "$(pwd)":/workdir --workdir /workdir markdownlint/markdownlint:latest --rules ~MD033,~MD013,~MD026,~MD029,~MD012,~MD007 $(find . -type f -iname '*.md' | grep -v '/.git/')
19 | # Ignoring MD013 - Line length
20 | # Ignoring MD026 - Trailing punctuation in header
21 |
--------------------------------------------------------------------------------
/.github/workflows/spellcheck.yml:
--------------------------------------------------------------------------------
1 | name: Check Spelling
2 | on:
3 | pull_request:
4 | branches:
5 | - master
6 | - main
7 | workflow_dispatch:
8 |
9 | jobs:
10 | spellcheck:
11 | runs-on: ubuntu-latest
12 | steps:
13 | - uses: actions/checkout@v4.2.2
14 | - name: Pull pipelinecomponents/markdown-spellcheck Image
15 | run: docker pull pipelinecomponents/markdown-spellcheck
16 | - name: Spellcheck Markdown Files
17 | run: docker run --rm -i -v "$PWD:/github/workspace" --workdir /github/workspace -e FORCE_COLOR=1 pipelinecomponents/markdown-spellcheck --report "**/*.md" -n -a
18 | # spelling:
19 | # runs-on: ubuntu-latest
20 | # steps:
21 | # - uses: actions/checkout@v4.2.2
22 | # - name: Set up Python
23 | # uses: actions/setup-python@v5.1.0
24 | # with:
25 | # python-version: 3.9
26 | # - name: Install dependencies
27 | # run: |
28 | # python3 -m pip install --upgrade pip setuptools
29 | # - name: Install Aspell
30 | # run: sudo apt-get install -y aspell aspell-en
31 | # - name: Install pyspelling
32 | # run: |
33 | # git clone https://github.com/facelessuser/pyspelling.git /tmp/pyspelling
34 | # pushd /tmp/pyspelling || exit 1
35 | # git checkout $(git tag --sort='-creatordate' | head -1)
36 | # python3 ./setup.py install
37 | # popd || exit 1
38 | # - name: Spell check
39 | # run: pyspelling
40 |
--------------------------------------------------------------------------------
/.gitignore:
--------------------------------------------------------------------------------
1 | .DS_Store
2 |
--------------------------------------------------------------------------------
/.markdown-link-check.json:
--------------------------------------------------------------------------------
1 | {
2 | "ignorePatterns": [
3 | {"pattern": "^http://influxdb:8086"},
4 | {"pattern": "^http://prometheus:9090"}
5 | ],
6 | "httpHeaders": [
7 | {
8 | "urls": ["https://planefinder.net"],
9 | "headers": {
10 | "Accept": "text/html,application/xhtml+xml,application/xml;q=0.9,*/*;q=0.8",
11 | "User-Agent": "Mozilla/5.0 (Macintosh; Intel Mac OS X 10_15_7) AppleWebKit/605.1.15 (KHTML, like Gecko) Version/16.2 Safari/605.1.15",
12 | "Accept-Language": "en-AU,en;q=0.9",
13 | "Accept-Encoding": "gzip, deflate, br",
14 | "Connection": "keep-alive"
15 | }
16 | }
17 | ],
18 | "aliveStatusCodes": [200,206,403]
19 | }
20 |
--------------------------------------------------------------------------------
/.spelling:
--------------------------------------------------------------------------------
1 | # Format - lines beginning # are comments
2 | # global dictionary is at the start, file overrides afterwards
3 | # markdown-spellcheck spelling configuration file
4 | # one word per line, to define a file override use ' - filename'
5 | # where filename is relative to this configuration file
6 | 1090MHz
7 | 20m
8 | 978MHz
9 | acars
10 | adsb
11 | ADSB_SDR_PPM
12 | adsb.exposed
13 | adsb.fi
14 | adsb.im
15 | adsb.lol
16 | adsb.one
17 | ADSBExchange
18 | ADSBExchange.com
19 | ADSBHub
20 | ADSBNetwork
21 | adsbnetwork.com
22 | AirBand
23 | AirNav
24 | airplanes.live
25 | Airplanes.live
26 | amd
27 | arm32v7
28 | arm64v8
29 | autogain
30 | autoheal
31 | bandpass
32 | barebones
33 | BaseStation
34 | bda
35 | beastreduce
36 | BeastReduce
37 | bladeRF
38 | BY-NC
39 | callsign
40 | center
41 | collectd
42 | CPython
43 | dBFS
44 | dev
45 | DietPi
46 | docker-adsb-ultrafeeder
47 | docker-radarplane
48 | dockerfile
49 | DockerHub
50 | dump1090
51 | dump978
52 | Duval
53 | dvb
54 | eg
55 | env
56 | ethernet
57 | favorite
58 | feed.adsb.fi
59 | feed.adsb.lol
60 | feed.adsb.one
61 | feed.planespotters.net
62 | feed.theairtraffic.com
63 | FlightAirMap
64 | FlightAware
65 | FlightRadar24
66 | fr24
67 | fr24key
68 | GitBook
69 | Github
70 | grafana
71 | graphs1090
72 | healthcheck
73 | healthchecks
74 | heatmap
75 | Het
76 | heywhatsthat
77 | hostname
78 | HPRadar
79 | htm
80 | InfluxData
81 | InfluxDB
82 | InfluxQL
83 | initramfs
84 | io
85 | JetNet
86 | json
87 | KerberosSDR
88 | KrakenSDR
89 | LAN
90 | Lat
91 | linuxserver
92 | linuxserver.io
93 | LiveTraffic
94 | Lon
95 | ls
96 | Luchtruim
97 | macOS
98 | maps.google.com
99 | METARs
100 | Mictronics
101 | mikenye
102 | mlat
103 | mlat_port
104 | mlat_url
105 | mlat.planespotters.net
106 | Multilateration
107 | ommercial
108 | OpenSky
109 | OpenSSL
110 | OwnCloud
111 | piaware
112 | PiAware
113 | Pis
114 | plane.watch
115 | Plane.watch
116 | PlaneFinder
117 | planefinder.net
118 | Planespotters
119 | planespotters.net
120 | Planespotters.net
121 | plex
122 | plugin
123 | protobuf
124 | ps
125 | ps
126 | py
127 | radarbox
128 | RadarBox
129 | RadarPlane
130 | RadarPlane.com
131 | radarvirtuel
132 | RadarVirtuel
133 | radarvirtuel.com
134 | rbfeeder
135 | readsb
136 | readsb_port
137 | readsb_url
138 | readsbpb
139 | realtek
140 | replug
141 | rrd
142 | rtl
143 | rtlsdr
144 | SBCs
145 | sdr
146 | SDRs
147 | SegFault
148 | SkyAware
149 | Spd
150 | spec
151 | SSH'ing
152 | standalone
153 | statistic.php
154 | stdout
155 | sudo
156 | tar1090
157 | tcp
158 | Telegraf
159 | theairtraffic.com
160 | timezone
161 | TIS-B
162 | Todo
163 | Trak
164 | tty
165 | tz
166 | uat
167 | ubuntu
168 | ultrafeeder
169 | usb
170 | uuid
171 | v1
172 | v2
173 | vi
174 | viewadsb
175 | VirtualRadarServer
176 | vm
177 | vrs
178 | wakeup
179 | wiedehopf
180 | writable
181 | www.adsbhub.org
182 | www.flightradar24.com
183 | www.freemaptools.com
184 | www.planefinder.net
185 | www.radarbox.com
186 | www.airnavradar.com
187 | x86_64
188 | xx.xxxxx
189 | xxxx
190 | xxxxxxxxxxxxxxxx
191 | yaml
192 | ZeroTier
193 | Zulip
194 | u
195 | o
196 |
--------------------------------------------------------------------------------
/LICENSE:
--------------------------------------------------------------------------------
1 | This guide is made available under CC BY-NC 4.0.
2 | https://creativecommons.org/licenses/by-nc/4.0/
3 |
--------------------------------------------------------------------------------
/README.md:
--------------------------------------------------------------------------------
1 | # ADS-B Reception, Decoding & Sharing with Docker
2 |
3 | Automatic Dependent Surveillance-Broadcast \(ADS-B\) is a safety and surveillance technology in which an aircraft determines its position via satellite navigation and periodically broadcasts it, enabling it to be tracked.
4 |
5 | These ADS-B data can be received by ~~nerds~~ enthusiasts using Software Defined Radio \(SDR\), and shared with aggregators, which collect, combine, and redistribute flight information for fun and profit.
6 |
7 | ## Fun and Non-Profit Aggregators
8 |
9 | * [ADSBHub](https://www.adsbhub.org)
10 | * [adsb.exposed](https://adsb.exposed/)
11 | * [adsb.fi](https://adsb.fi/)
12 | * [ADSB.lol](https://adsb.lol/)
13 | * [Airplanes.live](https://airplanes.live/)
14 | * [OpenSky Network](https://opensky-network.org/)
15 | * [Planespotters.net](https://www.planespotters.net/)
16 | * [Plane Watch](https://plane.watch/)
17 | * [The Air Traffic](https://theairtraffic.com/)
18 | * [RadarPlane.com](https://radarplane.com/)
19 | * [HPRadar](https://skylink.hpradar.com)
20 | * [Fly Italy ADSB](https://flyitalyadsb.com/)
21 |
22 | ## For-Profit Aggregators
23 |
24 | * [FlightAware](https://flightaware.com/adsb/piaware/)
25 | * [FlightRadar24](https://www.flightradar24.com/share-your-data)
26 | * [Plane Finder](https://planefinder.net)
27 | * [Airnav Radar](https://www.airnavradar.com)
28 | * [radarvirtuel.com](https://www.radarvirtuel.com)
29 | * [AV Delphi](https://avdelphi.com)
30 | * [ADS-B Exchange](https://adsbexchange.com)
31 |
32 | ## Objective
33 |
34 | This guide will walk you through the process to deploy and configure Docker containers to allow reception and decoding of ADS-B data, as well as submission to various flight tracking services, both open and commercial, and the visualisation of this data.
35 |
36 | This document is best viewed on GitBook. If you're reading it elsewhere, we humbly suggest going here: [https://sdr-enthusiasts.gitbook.io/ads-b/](https://sdr-enthusiasts.gitbook.io/ads-b/)
37 |
38 | This document is intended to be "living". Please feel free to fork the [GitHub repository](https://github.com/sdr-enthusiasts/gitbook-adsb-guide), contribute and submit pull requests! We value your input!
39 |
40 | ## License and Contributors
41 |
42 | This guide is made available under [CC BY-NC 4.0](https://creativecommons.org/licenses/by-nc/4.0/) and maintained by members of the SDR-Enthusiasts community.
43 |
44 | [](https://github.com/sdr-enthusiasts/gitbook-adsb-guide/graphs/contributors)
45 |
--------------------------------------------------------------------------------
/SUMMARY.md:
--------------------------------------------------------------------------------
1 | # Table of contents
2 |
3 | * [ADS-B Reception, Decoding & Sharing with Docker](README.md)
4 |
5 | ## Intro
6 |
7 | * [Overview](intro/overview.md)
8 | * [How to Get Help](intro/how-to-get-help.md)
9 | * [What is Docker?](intro/what-is-docker.md)
10 | * [Why Docker?](intro/why-docker.md)
11 | * [Equipment Needed](intro/equipment-needed.md)
12 | * [Information Needed](intro/information-needed.md)
13 |
14 | ## Setting Up The Host System
15 |
16 | * [Preparing Your System](setting-up-the-host-system/preparing-your-system.md)
17 | * [Install Docker](setting-up-the-host-system/running-docker-install.md)
18 |
19 | ## Setting Up RTL-SDRs
20 |
21 | * [Blacklist Kernel Modules](setting-up-rtl-sdrs/blacklist-kernel-modules.md)
22 | * [Re-Serialise SDRs](setting-up-rtl-sdrs/re-serialise-sdrs.md)
23 |
24 | ## Foundations
25 |
26 | * [Prepare the Application Environment](foundations/prepare-the-project-environment.md)
27 | * [Deploy "ultrafeeder"](foundations/deploy-ultrafeeder-container.md)
28 | * [Deploy "dump978" \(USA Only\)](foundations/deploy-dump978-usa-only.md)
29 | * [Container Monitoring and Management](foundations/common-tasks-and-info.md)
30 |
31 | ## Feeder Containers
32 |
33 | * [Feeding Plane.watch](feeder-containers/feeding-plane-watch.md)
34 | * [Feeding FlightAware \(piaware\)](feeder-containers/feeding-flightaware-piaware.md)
35 | * [Feeding FlightRadar24](feeder-containers/feeding-flightradar24.md)
36 | * [Feeding Airnav Radar](feeder-containers/feeding-airnavradar.md)
37 | * [Feeding PlaneFinder](feeder-containers/feeding-planefinder.md)
38 | * [Feeding ADSBHub](feeder-containers/feeding-adsbhub.md)
39 | * [Feeding OpenSky Network](feeder-containers/feeding-opensky-network.md)
40 | * [Feeding RadarVirtuel](feeder-containers/feeding-radarvirtuel.md)
41 |
42 | ## Useful Extras
43 |
44 | * [Storing Data and Metrics in a Time Series Database](useful-extras/storing-time-series-data.md)
45 | * [Graphing Data and Metrics with Influx and Grafana](useful-extras/alternative-graphing-with-influx-grafana.md)
46 | * [Graphing Data and Metrics with Prometheus and Grafana](useful-extras/alternative-graphing-with-prometheus-grafana.md)
47 | * [Auto-Restart Unhealthy Containers](useful-extras/auto-restart-unhealthy-containers.md)
48 | * [Auto-Upgrade Containers](useful-extras/auto-upgrade-containers.md)
49 | * [Managing a remote station using ZeroTier](useful-extras/managing-a-remote-station.md)
50 |
--------------------------------------------------------------------------------
/feeder-containers/feeding-ads-b-exchange.md:
--------------------------------------------------------------------------------
1 | ---
2 | description: 'If you wish to feed ADS-B Exchange, follow the steps below.'
3 | ---
4 |
5 | # Feeding ADS-B Exchange
6 |
7 | [ADSBExchange.com](https://adsbexchange.com/) collects data from over 10,000 receivers located around the world, aggregating the data onto a real-time web-based display for enthusiasts, and raw-data products for professional and commercial usage. It has recently been sold to a private firm called JETNET, for more information, please see:
8 |
9 | *
10 | *
11 |
12 |
13 | ## Update `ultrafeeder` container configuration
14 |
15 | Before running `docker compose`, we also want to update the configuration of the `ultrafeeder` container, so that it generates MLAT data for ADSBExchange.
16 |
17 | Open the `docker-compose.yml` and make the following environment value is part of the `ULTRAFEEDER_CONFIG` variable to the `ultrafeeder` service:
18 |
19 | ```yaml
20 | - ULTRAFEEDER_CONFIG=
21 | adsb,feed1.adsbexchange.com,30004,beast_reduce_plus_out;
22 | mlat,feed.adsbexchange.com,31090,39005;
23 | ```
24 |
25 |
26 | ## Refresh running containers
27 |
28 | Once the file has been updated, issue the command `docker compose up -d` in the application directory to apply the changes to the `ultrafeeder` container.
29 |
30 | After a few minutes, point your browser at [https://adsbexchange.com/myip/](https://adsbexchange.com/myip/). You should see green smiley faces indicating that you are successfully sending data.
31 | Also check if your MLAT is synchronized:
32 |
--------------------------------------------------------------------------------
/feeder-containers/feeding-adsbhub.md:
--------------------------------------------------------------------------------
1 | ---
2 | description: 'If you wish to feed ADSBHub, follow the steps below.'
3 | ---
4 |
5 | # Feeding ADSBHub
6 |
7 | The main goal of [ADSBHub](https://adsbhub.org/) is to become a ADS-B data sharing centre and valuable data source for all enthusiasts and professionals interested in development of ADS-B related software.
8 |
9 | The docker image [`ghcr.io/sdr-enthusiasts/docker-adsbhub`](https://github.com/sdr-enthusiasts/docker-adsbhub) contains the required feeder software and all required prerequisites and libraries. This needs to run in conjunction with `ultrafeeder` \(or another Beast provider\).
10 |
11 | ## Getting a Station Key
12 |
13 | ### Obtaining an ADSBHub Station Key
14 |
15 | First-time users should obtain a ADSBHub Station dynamic IP key. Follow the directions for steps 1 and 2 at [ADSBHub how to feed](https://www.adsbhub.org/howtofeed.php), ensuring your station is set up as a client and the data protocol set as "SBS" (see below.)
16 |
17 | Existing users should sign in to their ADSBHub account, go to their "Settings" page, click on their station \(in the bar at the top of the settings table\) and retrieve their station key.
18 |
19 | ### Setting up Your Station
20 |
21 | In your station preferences, you should set the following:
22 |
23 | * Feeder type: `Linux`
24 | * Data Protocol: `SBS`
25 | * Station mode: `Client`
26 |
27 | ## Update `.env` file with ADSBHub Station Key
28 |
29 | Inside your application directory \(`/opt/adsb`\), edit the `.env` file using your favourite text editor. Beginners may find the editor `nano` easy to use:
30 |
31 | ```shell
32 | nano /opt/adsb/.env
33 | ```
34 |
35 | This file holds all of the commonly used variables \(such as our latitude, longitude and altitude\). We're going to add our ADSBHub Station Key to this file. Add the following line to the file:
36 |
37 | ```shell
38 | ADSBHUB_STATION_KEY='YOURSTATIONKEY'
39 | ```
40 |
41 | * Replace `YOURSTATIONKEY` with the station key you retrieved earlier.
42 | * The single quotes \(`'`\) are important, as the station key from ADSBHub contains special characters that would confuse `docker compose` if the single quotes were missing.
43 |
44 | For example:
45 |
46 | ```shell
47 | ADSBHUB_STATION_KEY='vrMr@AZn660X0H^0Usn~rcj$UJA7VlR.vEu4c;uh7mfU-J9ZUBXpJiUuWj37DTa5BtL'
48 | ```
49 |
50 | ## Deploying feeder container
51 |
52 | Open the `docker-compose.yml` file that was created when deploying `ultrafeeder`.
53 |
54 | Append the following lines to the end of the file \(inside the `services:` section\):
55 |
56 | ```yaml
57 | adsbhub:
58 | image: ghcr.io/sdr-enthusiasts/docker-adsbhub:latest
59 | container_name: adsbhub
60 | restart: unless-stopped
61 | environment:
62 | - TZ=${FEEDER_TZ}
63 | - SBSHOST=ultrafeeder
64 | - CLIENTKEY=${ADSBHUB_STATION_KEY}
65 | ```
66 |
67 | To explain what's going on in this addition:
68 |
69 | * We're creating a container called `adsbhub`, from the image `ghcr.io/sdr-enthusiasts/docker-adsbhub/adsbhub:latest`.
70 | * We're passing several environment variables to the container:
71 | * `SBSHOST=ultrafeeder` to inform the feeder to get its ADSB data from the container `ultrafeeder`
72 | * `TZ` will use the `FEEDER_TZ` variable from your `.env` file.
73 | * `CLIENTKEY` will use the `ADSBHUB_STATION_KEY` variable from your `.env` file.
74 |
75 | Once the file has been updated, issue the command `docker compose up -d` in the application directory to apply the changes and bring up the `adsbhub` container. You should see the following output:
76 |
77 | ```text
78 | ✔ Container ultrafeeder Running
79 | ✔ Container piaware Running
80 | ✔ Container fr24 Running
81 | ✔ Container adsbhub Started
82 | ```
83 |
84 | We can view the logs for the environment with the command `docker logs adsbhub`, or continually "tail" them with `docker logs -f adsbhub`. The logs will be fairly unexciting and look like this:
85 |
86 | ```text
87 | [s6-init] making user provided files available at /var/run/s6/etc...exited 0.
88 | [s6-init] ensuring user provided files have correct perms...exited 0.
89 | [fix-attrs.d] applying ownership & permissions fixes...
90 | [fix-attrs.d] 01-adsbhubclient: applying...
91 | [fix-attrs.d] 01-adsbhubclient: exited 0.
92 | [fix-attrs.d] done.
93 | [cont-init.d] executing container initialization scripts...
94 | [cont-init.d] 01-adsbhubclient: executing...
95 | [cont-init.d] 01-adsbhubclient: exited 0.
96 | [cont-init.d] done.
97 | [services.d] starting services
98 | [services.d] done.
99 | not connected
100 | d3aae607bf68183e4a39be14fa4117144
101 | connected
102 | connected
103 | connected
104 | ```
105 |
106 | Once running, you can visit [https://www.adsbhub.org/statistic.php](https://www.adsbhub.org/statistic.php) to view the data you are feeding to ADSBHub.
107 |
108 | ## Advanced
109 |
110 | If you want to look at more options and examples for the `adsbhub` container, you can find the repository [here](https://github.com/sdr-enthusiasts/docker-adsbhub)
111 |
--------------------------------------------------------------------------------
/feeder-containers/feeding-airnavradar.md:
--------------------------------------------------------------------------------
1 | ---
2 | description: 'If you wish to feed AirNav Radar, follow the steps below.'
3 | ---
4 |
5 | # Feeding Airnav Radar
6 |
7 | [Airnav Radar](https://www.airnavradar.com/) is a flight tracking company that displays aircraft & flight information in real-time on a map. Airnav Radar offers flight data such as latitude and longitude positions, origins and destinations, flight numbers, aircraft types, altitudes, headings and speeds. Based in Tampa, Florida, with a R&D center in Europe, Airnav Radar’s business operations include providing related data to aviation service providers worldwide.
8 |
9 | `rbfeeder` is a Airnav Radar's client program to transmit ADS-B and Mode S data to Airnav Radar.
10 |
11 | In exchange for your data, Airnav Radar will give you a Business Plan. If this is something of interest, you may wish to feed your data to them.
12 |
13 | The docker image [`ghcr.io/sdr-enthusiasts/docker-airnavradar`](https://github.com/sdr-enthusiasts/docker-airnavradar) contains `rbfeeder` and all of its required prerequisites and libraries. This needs to run in conjunction with `ultrafeeder` \(or another Beast provider\).
14 |
15 | ## Getting a Sharing Key
16 |
17 | ### Already running `rbfeeder`?
18 |
19 | If you're not a first time user and are migrating from another installation, you can retrieve your sharing key using either of the following methods:
20 |
21 | * SSH onto your existing receiver and run the command `rbfeeder --showkey --no-start`
22 | * SSH onto your existing receiver and run the command `grep key= /etc/rbfeeder.ini`
23 |
24 | ### New to `rbfeeder`?
25 |
26 | You'll need a _sharing key_. To get one, you can temporarily run the container, to allow it to communicate with the Airnav Radar servers generate a new sharing key.
27 |
28 | Inside your application directory \(`/opt/adsb`\), run the following commands:
29 |
30 | ```shell
31 | source ./.env
32 | timeout 60 docker run \
33 | --rm \
34 | -it \
35 | --network adsb_default \
36 | -e BEASTHOST=ultrafeeder \
37 | -e LAT=${FEEDER_LAT} \
38 | -e LONG=${FEEDER_LONG} \
39 | -e ALT=${FEEDER_ALT_M} \
40 | ghcr.io/sdr-enthusiasts/docker-airnavradar:latest
41 | ```
42 |
43 | The command will run the container for one minute, which should be ample time for the container to connect to Airnav Radar receive a sharing key.
44 |
45 | For example:
46 |
47 | ```text
48 | [s6-init] making user provided files available at /var/run/s6/etc...exited 0.
49 | [s6-init] ensuring user provided files have correct perms...exited 0.
50 | [fix-attrs.d] applying ownership & permissions fixes...
51 | [fix-attrs.d] done.
52 | [cont-init.d] executing container initialization scripts...
53 | [cont-init.d] 01-rbfeeder: executing...
54 | WARNING: TZ environment variable not set
55 |
56 | WARNING: SHARING_KEY environment variable was not set!
57 | Please make sure you note down the key generated.
58 | Pass the key as environment var SHARING_KEY on next launch!
59 |
60 | [cont-init.d] 01-rbfeeder: exited 0.
61 | [cont-init.d] done.
62 | [services.d] starting services
63 | [services.d] done.
64 | [mlat-client] Delaying mlat-client startup until rbfeeder receives station sn...
65 | [rbfeeder] [2020-11-20 08:55:03] Starting RBFeeder Version 0.3.5 (build 20200727132301)
66 | [rbfeeder] [2020-11-20 08:55:03] Using configuration file: /etc/rbfeeder.ini
67 | [rbfeeder] [2020-11-20 08:55:03] Network-mode enabled.
68 | [rbfeeder] [2020-11-20 08:55:03] Remote host to fetch data: 172.30.0.12
69 | [rbfeeder] [2020-11-20 08:55:03] Remote port: 30005
70 | [rbfeeder] [2020-11-20 08:55:03] Remote protocol: BEAST
71 | [rbfeeder] [2020-11-20 08:55:03] System: raspberry
72 | [rbfeeder] [2020-11-20 08:55:03] Start date/time: 2020-11-20 08:55:03
73 | [rbfeeder] [2020-11-20 08:55:03] Socket for ANRB created. Waiting for connections on port 32088
74 | [rbfeeder] [2020-11-20 08:55:04] Connection established.
75 | [rbfeeder] [2020-11-20 08:55:04] Empty sharing key. We will try to create a new one for you!
76 | [rbfeeder] [2020-11-20 08:55:05] Your new key is g45643ab345af3c5d5g923a99ffc0de9. Please save this key for future use. You will have to know this key to link this receiver to your account in RadarBox24.com. This key is also saved in configuration file (/etc/rbfeeder.ini)
77 | [mlat-client] Delaying mlat-client startup until rbfeeder receives station sn...
78 | [rbfeeder] [2020-11-20 08:55:35] Connection established.
79 | [rbfeeder] [2020-11-20 08:55:36] Connection with RadarBox24 server OK! Key accepted by server.
80 | [cont-finish.d] executing container finish scripts...
81 | [cont-finish.d] done.
82 | [s6-finish] waiting for services.
83 | [s6-finish] sending all processes the TERM signal.
84 | [s6-finish] sending all processes the KILL signal and exiting.
85 | ```
86 |
87 | In the output above, see the line:
88 |
89 | ```text
90 | [rbfeeder] [2020-11-20 08:55:05] Your new key is g45643ab345af3c5d5g923a99ffc0de9.
91 | ```
92 |
93 | As you can see from the output above, the sharing key given to us from Airnav Radar is `g45643ab345af3c5d5g923a99ffc0de9`.
94 |
95 | If the script doesn't output the sharing key, it can be found by using the following command:
96 |
97 | ```shell
98 | docker exec -it rbfeeder /bin/sh -c "cat /etc/rbfeeder.ini" | grep key
99 | ```
100 |
101 | Command output:
102 |
103 | ```shell
104 | key=g45643ab345af3c5d5g923a99ffc0de9
105 | ```
106 |
107 | ## Claiming Your Receiver
108 |
109 | 1. Go to [https://www.airnavradar.com/](https://www.airnavradar.com/)
110 | 2. Create an account or sign in
111 | 3. Claim your receiver by visiting [https://www.airnavradar.com/raspberry-pi/claim](https://www.airnavradar.com/raspberry-pi/claim) and following the instructions
112 |
113 | ## Update `.env` file with sharing key
114 |
115 | Inside your application directory \(`/opt/adsb`\), edit the `.env` file using your favourite text editor. Beginners may find the editor `nano` easy to use:
116 |
117 | ```shell
118 | nano /opt/adsb/.env
119 | ```
120 |
121 | This file holds all of the commonly used variables \(such as our latitude, longitude and altitude\). We're going to add our `rbfeeder` sharing key to this file. Add the following line to the file:
122 |
123 | ```shell
124 | AIRNAVRADAR_SHARING_KEY=YOURSHARINGKEY
125 | ```
126 |
127 | * Replace `YOURSHARINGKEY` with the sharing key that was generated in the previous step.
128 |
129 | For example:
130 |
131 | ```shell
132 | AIRNAVRADAR_SHARING_KEY=g45643ab345af3c5d5g923a99ffc0de9
133 | ```
134 |
135 | ## Deploying `rbfeeder`
136 |
137 | ### Create `rbfeeder` container
138 |
139 | Open the `docker-compose.yml` file that was created when deploying `ultrafeeder`.
140 |
141 | Append the following lines to the end of the file \(inside the `services:` section\):
142 |
143 | ```yaml
144 | rbfeeder:
145 | image: ghcr.io/sdr-enthusiasts/docker-airnavradar:latest
146 | container_name: rbfeeder
147 | restart: always
148 | environment:
149 | - BEASTHOST=ultrafeeder
150 | - LAT=${FEEDER_LAT}
151 | - LONG=${FEEDER_LONG}
152 | - ALT=${FEEDER_ALT_M}
153 | - TZ=${FEEDER_TZ}
154 | - SHARING_KEY=${AIRNAVRADAR_SHARING_KEY}
155 | tmpfs:
156 | - /run:exec,size=64M
157 | - /var/log
158 | ```
159 |
160 | If you are in the USA and are also running the `dump978` container with a second SDR, add the following additional lines to the `environment:` section:
161 |
162 | ```yaml
163 | - UAT_RECEIVER_HOST=dump978
164 | ```
165 |
166 | To explain what's going on in this addition:
167 |
168 | * We're creating a container called `rbfeeder`, from the image `ghcr.io/sdr-enthusiasts/docker-airnavradar:latest`.
169 | * We're passing several environment variables to the container:
170 | * `BEASTHOST=ultrafeeder` to inform the feeder to get its ADSB data from the container `ultrafeeder` over our private `adsbnet` network.
171 | * `LAT` will use the `FEEDER_LAT` variable from your `.env` file.
172 | * `LONG` will use the `FEEDER_LONG` variable from your `.env` file.
173 | * `ALT` will use the `FEEDER_ALT_M` variable from your `.env` file.
174 | * `TZ` will use the `FEEDER_TZ` variable from your `.env` file.
175 | * `SHARING_KEY` will use the `AIRNAVRADAR_SHARING_KEY` variable from your `.env` file.
176 | * For people running `dump978`:
177 | * `UAT_RECEIVER_HOST=dump978` specifies the host to pull UAT data from; in this instance our `dump978` container.
178 | * We're using `tmpfs` for volumes that have regular I/O. Any files stored in a `tmpfs` mount are temporarily stored outside the container's writable layer. This helps to reduce:
179 | * The size of the container, by not writing changes to the underlying container; and
180 | * SD Card or SSD wear
181 |
182 | ## Update `ultrafeeder` container configuration
183 |
184 | Before running `docker compose`, we also want to update the configuration of the `ultrafeeder` container, so that it generates MLAT data for Airnav Radar.
185 |
186 | **NOTE: If you are using the sample `docker-compose.yml` provided, this step has already been done for you.**
187 |
188 | Open the `docker-compose.yml` and make the following environment value is part of the `ULTRAFEEDER_CONFIG` variable to the `ultrafeeder` service:
189 |
190 | ```yaml
191 | - ULTRAFEEDER_CONFIG=mlathub,rbfeeder,30105,beast_in;
192 | ```
193 |
194 | To explain this addition, the `ultrafeeder` container will connect to the `rbfeeder` container on port `30105` and receive MLAT data. This data will then be included in any outbound data streams from `ultrafeeder`.
195 |
196 | ## Refresh running containers
197 |
198 | Once the file has been updated, issue the command `docker compose up -d` in the application directory to apply the changes and bring up the `rbfeeder` container. You should see the following output:
199 |
200 | ```text
201 | ✔ Container ultrafeeder Running
202 | ✔ Container piaware Running
203 | ✔ Container fr24 Running
204 | ✔ Container rbfeeder Started
205 | ```
206 |
207 | We can view the logs for the environment with the command `docker compose logs`, or continually "tail" them with `docker compose logs -f`. At this stage, the logs will be fairly unexciting and look like this:
208 |
209 | ```text
210 | [s6-init] making user provided files available at /var/run/s6/etc...exited 0.
211 | [s6-init] ensuring user provided files have correct perms...exited 0.
212 | [fix-attrs.d] applying ownership & permissions fixes...
213 | [fix-attrs.d] done.
214 | [cont-init.d] executing container initialization scripts...
215 | [cont-init.d] 01-rbfeeder: executing...
216 | [cont-init.d] 01-rbfeeder: exited 0.
217 | [cont-init.d] done.
218 | [services.d] starting services
219 | [services.d] done.
220 | [mlat-client] Delaying mlat-client startup until rbfeeder receives station sn...
221 | [rbfeeder] [2020-11-20 17:04:26] Starting RBFeeder Version 0.3.5 (build 20200727132301)
222 | [rbfeeder] [2020-11-20 17:04:26] Using configuration file: /etc/rbfeeder.ini
223 | [rbfeeder] [2020-11-20 17:04:26] Network-mode enabled.
224 | [rbfeeder] [2020-11-20 17:04:26] Remote host to fetch data: 192.168.69.35
225 | [rbfeeder] [2020-11-20 17:04:26] Remote port: 30005
226 | [rbfeeder] [2020-11-20 17:04:26] Remote protocol: BEAST
227 | [rbfeeder] [2020-11-20 17:04:26] System: raspberry
228 | [rbfeeder] [2020-11-20 17:04:26] Start date/time: 2020-11-20 17:04:26
229 | [rbfeeder] [2020-11-20 17:04:26] Socket for ANRB created. Waiting for connections on port 32088
230 | [rbfeeder] [2020-11-20 17:04:27] Connection established.
231 | [rbfeeder] [2020-11-20 17:04:28] Connection with RadarBox24 server OK! Key accepted by server.[mlat-client] Fri Nov 20 17:04:56 2020 mlat-client 0.2.11 starting up
232 | [mlat-client] Fri Nov 20 17:04:56 2020 Listening for Beast-format results connection on port 30105
233 | [mlat-client] Fri Nov 20 17:04:56 2020 Connected to multilateration server at mlat1.rb24.com:40900, handshaking
234 | [mlat-client] Fri Nov 20 17:04:57 2020 Server says:
235 | [mlat-client]
236 | [mlat-client] AirNAv Server
237 | [mlat-client]
238 | [mlat-client] The multilateration server source code is available under
239 | [mlat-client] the terms of the Affero GPL (v3 or later). You may obtain
240 | [mlat-client] a copy of this server's source code at the following
241 | [mlat-client] location: https://github.com/mutability/mlat-server
242 | [mlat-client]
243 | [mlat-client] Fri Nov 20 17:04:57 2020 Handshake complete.
244 | [mlat-client] Fri Nov 20 17:04:57 2020 Compression: zlib2
245 | [mlat-client] Fri Nov 20 17:04:57 2020 UDP transport: disabled
246 | [mlat-client] Fri Nov 20 17:04:57 2020 Split sync: disabled
247 | [mlat-client] Fri Nov 20 17:04:57 2020 Input connected to 192.168.69.35:30005
248 | [mlat-client] Fri Nov 20 17:04:57 2020 Input format changed to BEAST, 12MHz clock
249 | [mlat-client] Fri Nov 20 17:05:25 2020 Accepted Beast-format results connection from ::ffff:172.30.0.11:60196
250 | ```
251 |
252 | We can see our container running with the command `docker ps`.
253 |
254 | Once running, you can visit the Airnav Radar website, and go to "Account" > "Stations" and click your station to see your live data.
255 |
256 | ## Advanced
257 |
258 | If you want to look at more options and examples for the `rbfeeder` container, you can find the repository [here](https://github.com/sdr-enthusiasts/docker-airnavradar)
259 |
--------------------------------------------------------------------------------
/feeder-containers/feeding-flightaware-piaware.md:
--------------------------------------------------------------------------------
1 | ---
2 | description: 'If you wish to feed FlightAware, follow the steps below.'
3 | ---
4 |
5 | # Feeding FlightAware \(piaware\)
6 |
7 | [FlightAware](https://flightaware.com/) is a digital aviation company and operates the world's largest flight tracking and data platform.
8 |
9 | `piaware` is a client program to securely transmit ADS-B and Mode S data to FlightAware.
10 |
11 | In exchange for your data, FlightAware will give you an Enterprise Membership. If this is something of interest, you may wish to feed your data to them.
12 |
13 | The docker image [`ghcr.io/sdr-enthusiasts/docker-piaware`](https://github.com/sdr-enthusiasts/docker-piaware) contains `piaware` and all of its required prerequisites and libraries. This can run standalone \(without the `ultrafeeder` container\), however for flexibility it is recommended to run with `ultrafeeder`, and this is the deployment method that will be used in this guide.
14 |
15 | ## Getting a Feeder ID
16 |
17 | ### Already running PiAware?
18 |
19 | You'll need your _feeder-id_ from your existing feeder.
20 |
21 | To get your _feeder-id_, log onto your feeder via SSH and issue the command:
22 |
23 | ```shell
24 | piaware-config -show feeder-id
25 | ```
26 |
27 | ### New to PiAware?
28 |
29 | If you're already running PiAware and you've followed the steps in the previous command, you can skip this section.
30 |
31 | You'll need a _feeder-id_. To get one, you can temporarily run the container, to allow it to communicate with the FlightAware servers and get a new feeder ID.
32 |
33 | Inside your application directory \(`/opt/adsb`\), run the following commands:
34 |
35 | ```shell
36 | docker pull ghcr.io/sdr-enthusiasts/docker-piaware:latest
37 | source ./.env
38 | timeout 60 docker run --rm -e LAT="$FEEDER_LAT" -e LONG="$FEEDER_LONG" ghcr.io/sdr-enthusiasts/docker-piaware:latest | grep "my feeder ID"
39 | ```
40 |
41 | The command will run the container for 60 seconds, which should be ample time for the container to receive a feeder-id.
42 |
43 | For example:
44 |
45 | ```ShellSession
46 | $ timeout 60 docker run --rm LAT="$FEEDER_LAT" -e LONG="$FEEDER_LONG" ghcr.io/sdr-enthusiasts/docker-piaware:latest | grep "my feeder ID"
47 | Set allow-mlat to yes in /etc/piaware.conf:1
48 | Set allow-modeac to yes in /etc/piaware.conf:2
49 | Set allow-auto-updates to no in /etc/piaware.conf:3
50 | Set allow-manual-updates to no in /etc/piaware.conf:4
51 | 2020-03-06 06:16:11.860212500 [piaware] my feeder ID is acbf1f88-09a4-3a47-a4a0-10ae138d0c1g
52 | write /dev/stdout: broken pipe
53 | Terminated
54 | ```
55 |
56 | As you can see from the output above, the feeder-id given to us from FlightAware is `acbf1f88-09a4-3a47-a4a0-10ae138d0c1g`.
57 |
58 | You'll now want to "claim" this feeder.
59 |
60 | To do this, go to: [https://flightaware.com/adsb/piaware/claim](https://flightaware.com/adsb/piaware/claim) and follow the instructions there.
61 |
62 | Note - for PiAware/FlightAware feeding to work correctly, you MUST accurately set your latitude, longitude, and altitude on the `My ADS-B` dashboard page of the FlightAware website. Without doing this, feeding will NOT work!
63 |
64 | ## Update `.env` file with feeder-id
65 |
66 | Inside your application directory \(`/opt/adsb`\), edit the `.env` file using your favourite text editor. Beginners may find the editor `nano` easy to use:
67 |
68 | ```shell
69 | nano /opt/adsb/.env
70 | ```
71 |
72 | This file holds all of the commonly used variables \(such as our latitude, longitude and altitude\). We're going to add our `piaware` feeder-id to this file. Add the following line to the file:
73 |
74 | ```shell
75 | PIAWARE_FEEDER_ID=YOURFEEDERID
76 | ```
77 |
78 | * Replace `YOURFEEDERID` with the feeder-id that was generated in the previous step.
79 |
80 | For example:
81 |
82 | ```shell
83 | PIAWARE_FEEDER_ID=acbf1f88-09a4-3a47-a4a0-10ae138d0c1g
84 | ```
85 |
86 | ## Deploying piaware feeder
87 |
88 | Open the `docker-compose.yml` file that was created when deploying `ultrafeeder`.
89 |
90 | Append the following lines to the end of the file \(inside the `services:` section\):
91 |
92 | ```yaml
93 | piaware:
94 | image: ghcr.io/sdr-enthusiasts/docker-piaware:latest
95 | container_name: piaware
96 | restart: unless-stopped
97 | ports:
98 | - 8081:8080
99 | environment:
100 | - BEASTHOST=ultrafeeder
101 | - TZ=${FEEDER_TZ}
102 | - FEEDER_ID=${PIAWARE_FEEDER_ID}
103 | tmpfs:
104 | - /run:exec,size=64M
105 | - /var/log
106 | ```
107 |
108 | If you are in the USA and are also running the `dump978` container with a second SDR, add the following additional lines to the `environment:` section:
109 |
110 | ```yaml
111 | - UAT_RECEIVER_TYPE=relay
112 | - UAT_RECEIVER_HOST=dump978
113 | ```
114 |
115 | To explain what's going on in this addition:
116 |
117 | * We're creating a container called `piaware`, from the image `ghcr.io/sdr-enthusiasts/docker-piaware:latest`.
118 | * We're passing several environment variables to the container:
119 | * `BEASTHOST=ultrafeeder` to inform the feeder to get its ADSB data from the container `ultrafeeder` over our private `adsbnet` network.
120 | * `TZ` will use the `FEEDER_TZ` variable from your `.env` file.
121 | * `FEEDER_ID` will use the `PIAWARE_FEEDER_ID` variable from your `.env` file.
122 | * For people running `dump978`:
123 | * `UAT_RECEIVER_TYPE=relay` tells the container to pull UAT data from another host over the network.
124 | * `UAT_RECEIVER_HOST=dump978` specifies the host to pull UAT data from; in this instance our `dump978` container.
125 | * We're using `tmpfs` for volumes that have regular I/O. Any files stored in a `tmpfs` mount are temporarily stored outside the container's writable layer. This helps to reduce:
126 | * The size of the container, by not writing changes to the underlying container; and
127 | * SD Card or SSD wear
128 |
129 | ## Update `ultrafeeder` container configuration
130 |
131 | Before running `docker compose`, we also want to update the configuration of the `ultrafeeder` container, so that it generates MLAT data for piaware.
132 |
133 | **NOTE: If you are using the sample `docker-compose.yml` provided, this step has already been done for you.**
134 |
135 | Open the `docker-compose.yml` and make the following environment value is part of the `ULTRAFEEDER_CONFIG` variable to the `ultrafeeder` service:
136 |
137 | ```yaml
138 | - ULTRAFEEDER_CONFIG=mlathub,piaware,30105,beast_in;
139 | ```
140 |
141 | To explain this addition, the `ultrafeeder` container will connect to the `piaware` container on port `30105` and receive MLAT data. This data will then be included in any outbound data streams from `ultrafeeder`.
142 |
143 | ## Refresh running containers
144 |
145 | Once the file has been updated, issue the command `docker compose up -d` in the application directory to apply the changes and bring up the `piaware` container. You should see the following output:
146 |
147 | ```text
148 | ✔ Container ultrafeeder Running
149 | ✔ Container piaware Started
150 | ```
151 |
152 | We can view the logs for the environment with the command `docker compose logs`, or continually "tail" them with `docker compose logs -f`. At this stage, the logs will be fairly unexciting and look like this:
153 |
154 | ```text
155 | piaware | [s6-init] making user provided files available at /var/run/s6/etc...exited 0.
156 | piaware | [s6-init] ensuring user provided files have correct perms...exited 0.
157 | piaware | [fix-attrs.d] applying ownership & permissions fixes...
158 | piaware | [fix-attrs.d] done.
159 | piaware | [cont-init.d] executing container initialization scripts...
160 | piaware | [cont-init.d] 01-piaware: executing...
161 | piaware | Set feeder-id to acbf1f88-09a4-3a47-a4a0-10ae138d0c1g in /etc/piaware.conf:1
162 | piaware | Set allow-auto-updates to no in /etc/piaware.conf:2
163 | piaware | Set allow-manual-updates to no in /etc/piaware.conf:3
164 | piaware | Set allow-mlat to yes in /etc/piaware.conf:4
165 | piaware | Set mlat-results to yes in /etc/piaware.conf:5
166 | piaware | Set receiver-type to relay in /etc/piaware.conf:6
167 | piaware | Set receiver-host to ultrafeeder in /etc/piaware.conf:7
168 | piaware | Set receiver-port to 30005 in /etc/piaware.conf:8
169 | piaware | [cont-init.d] 01-piaware: exited 0.
170 | piaware | [cont-init.d] done.
171 | piaware | [services.d] starting services
172 | piaware | [services.d] done.
173 | piaware | [skyaware] 2020/11/20 14:51:15 2020-11-20 14:51:15: (plugin.c.190) Cannot load plugin mod_setenv more than once, please fix your config (lighttpd may not accept such configs in future releases)
174 | piaware | [skyaware] 2020/11/20 14:51:15 2020-11-20 14:51:15: (server.c.1464) server started (lighttpd/1.4.53)
175 | piaware | [dump1090] 2020/11/20 14:51:15 Fri Nov 20 14:51:15 2020 AWST dump1090-fa unknown starting up.
176 | piaware | [dump1090] 2020/11/20 14:51:15 Net-only mode, no SDR device or file open.
177 | piaware | [beast-splitter] 2020/11/20 14:51:15 127.0.0.1:30004: connected to 127.0.0.1:30004 with settings
178 | piaware | [beast-splitter] 2020/11/20 14:51:15 net(ultrafeeder:30005): connected to 172.30.0.12:30005
179 | piaware | [beast-splitter] 2020/11/20 14:51:15 net(ultrafeeder:30005): configured with settings: BCdfGijk
180 | piaware | [piaware] 2020/11/20 14:51:15 ****************************************************
181 | piaware | [piaware] 2020/11/20 14:51:15 piaware version 4.0 is running, process ID 329
182 | piaware | [piaware] 2020/11/20 14:51:15 your system info is: Linux 4e041cdad755 4.4.0-179-generic #209-Ubuntu SMP Fri Apr 24 17:48:44 UTC 2020 x86_64 GNU/Linux
183 | piaware | [piaware] 2020/11/20 14:51:17 Connecting to FlightAware adept server at piaware.flightaware.com/1200
184 | piaware | [piaware] 2020/11/20 14:51:17 Connection with adept server at piaware.flightaware.com/1200 established
185 | piaware | [piaware] 2020/11/20 14:51:18 TLS handshake with adept server at piaware.flightaware.com/1200 completed
186 | piaware | [piaware] 2020/11/20 14:51:18 FlightAware server certificate validated
187 | piaware | [piaware] 2020/11/20 14:51:18 encrypted session established with FlightAware
188 | piaware | [beast-splitter] 2020/11/20 14:51:18 net(ultrafeeder:30005): connected to a Beast-style receiver
189 | piaware | [piaware] 2020/11/20 14:51:18 ADS-B data program 'dump1090' is listening on port 30005, so far so good
190 | piaware | [piaware] 2020/11/20 14:51:18 Starting faup1090: /usr/lib/piaware/helpers/faup1090 --net-bo-ipaddr localhost --net-bo-port 30005 --stdout --lat -33.333 --lon 111.111
191 | piaware | [piaware] 2020/11/20 14:51:18 Started faup1090 (pid 354) to connect to dump1090
192 | piaware | [piaware] 2020/11/20 14:51:18 UAT support disabled by local configuration setting: uat-receiver-type
193 | piaware | [piaware] 2020/11/20 14:51:18 piaware received a message from dump1090!
194 | piaware | [piaware] 2020/11/20 14:51:18 adept reported location: -33.33333, 111.11111, 100ft AMSL
195 | piaware | [piaware] 2020/11/20 14:51:18 logged in to FlightAware as user mikenye
196 | piaware | [piaware] 2020/11/20 14:51:18 my feeder ID is acbf1f88-09a4-3a47-a4a0-10ae138d0c1g
197 | piaware | [piaware] 2020/11/20 14:51:18 site statistics URL: https://flightaware.com/adsb/stats/user/planetracker#stats-12345
198 | piaware | [piaware] 2020/11/20 14:51:18 multilateration data requested
199 | piaware | [piaware] 2020/11/20 14:51:19 Starting multilateration client: /usr/lib/piaware/helpers/fa-mlat-client --input-connect localhost:30005 --input-type auto --results beast,connect,localhost:30104 --results beast,listen,30105 --results ext_basestation,listen,30106 --udp-transport 70.42.6.232:12262:477609216
200 | piaware | [piaware] 2020/11/20 14:51:19 mlat-client(356): fa-mlat-client 0.2.11 starting up
201 | piaware | [piaware] 2020/11/20 14:51:19 mlat-client(356): Using UDP transport to 70.42.6.232 port 12262
202 | piaware | [piaware] 2020/11/20 14:51:19 mlat-client(356): Listening for Beast-format results connection on port 30105
203 | piaware | [piaware] 2020/11/20 14:51:19 mlat-client(356): Listening for Extended Basestation-format results connection on port 30106
204 | piaware | [piaware] 2020/11/20 14:51:19 mlat-client(356): Route MTU changed to 1500
205 | piaware | [piaware] 2020/11/20 14:51:19 mlat-client(356): Input connected to localhost:30005
206 | piaware | [piaware] 2020/11/20 14:51:19 mlat-client(356): Detected BEAST format input
207 | piaware | [piaware] 2020/11/20 14:51:19 mlat-client(356): Input format changed to BEAST, 12MHz clock
208 | piaware | [piaware] 2020/11/20 14:51:19 mlat-client(356): Beast-format results connection with 127.0.0.1:30104: connection established
209 | piaware | [piaware] 2020/11/20 14:51:19 piaware has successfully sent several msgs to FlightAware!
210 | ```
211 |
212 | We can see our container running with the command `docker ps`.
213 |
214 | Once running, you can visit `http://docker.host.ip.addr:8081/` to access PiAware's "SkyAware". From there you need to configure your location and altitude on the FlightAware's website. To do this, click on the blue button marked `Go to my ADS-B Statistics Page` on your "SkyAware". When the FA website loads, click on the gear icon near your feeder name and configure your location and height _using the same values you set in your .env file_. If you do not configure these values via the FA website MLAT will not work for your PiAware feeder. You can also log onto FlightAware's website and click on the `My ADSB` link at the top of the page, and see your statistics, configure your location and altitude and other settings.
215 |
216 | Remember, if you change your location and altitude on FlightAware's website, you'll need to update your `.env` file locally \(and re-run `docker compose up -d` from your application directory\)!
217 |
218 | ## Advanced
219 |
220 | If you want to look at more options and examples for the `piaware` container, you can find the repository [here](https://github.com/sdr-enthusiasts/docker-piaware).
221 |
--------------------------------------------------------------------------------
/feeder-containers/feeding-flightradar24.md:
--------------------------------------------------------------------------------
1 | ---
2 | description: 'If you wish to feed FlightRadar24, follow the steps below.'
3 | ---
4 |
5 | # Feeding FlightRadar24
6 |
7 | [FlightRadar24](https://www.flightradar24.com/) is a global flight tracking service that provides real-time information about thousands of aircraft around the world. Their service is currently available online and their mobile app is quite good. In order to access the features of the mobile app, you'll need to feed your ADS-B data to them for a free business plan.
8 |
9 | `fr24` is a FlightRadar24 client program to securely transmit ADS-B and Mode S data to the commercial entity FlightRadar24.
10 |
11 | We've created a docker image [`ghcr.io/sdr-enthusiasts/docker-flightradar24`](https://github.com/sdr-enthusiasts/docker-flightradar24) that contains `fr24` and all of its required prerequisites and libraries.
12 |
13 | ## Getting a Sharing Key
14 |
15 | ### Already running `fr24`?
16 |
17 | You'll need your _fr24key_ from your existing feeder.
18 |
19 | To get your _fr24key_, log onto your feeder and issue the command:
20 |
21 | ```shell
22 | cat /etc/fr24feed.ini | grep fr24key
23 | ```
24 |
25 | You can also find it in the data sharing section on the fr24 website if you have an account with the email address that was used when creating the key.
26 |
27 | ### New to `fr24`?
28 |
29 | If you're already feeding FlightRadar24 and you've followed the steps in the previous command, you can skip this section.
30 |
31 | First-time users should obtain a FlightRadar24 sharing key \(a _fr24key_\). To get one, you can run through the sign-up process. This will ask a series of questions allowing you to sign up with FlightRadar24 and get a _fr24key_.
32 | Use the same email address as for your fr24 account if you already have one or plan on creating one.
33 |
34 |
35 | #### Obtaining a Sharing Key for ADSB
36 |
37 | Run the command:
38 |
39 | ```shell
40 | docker run -it --rm ghcr.io/sdr-enthusiasts/docker-baseimage:qemu bash -c "$(curl -sSL https://raw.githubusercontent.com/sdr-enthusiasts/docker-flightradar24/main/get_adsb_key.sh)"
41 | ```
42 |
43 | This will start up a container. After installing a bunch of software (which may take a while depending on the speed of your machine and internet connection), it will take you through the sign-up process. Most of the answers don't matter as during normal operation the configuration will be set with environment variables. I would suggest answering as follows:
44 |
45 | - `Step 1.1 - Enter your email address (username@domain.tld)`: Enter your FlightRadar24 account email address
46 | - `Step 1.2 - If you used to feed FR24 with ADS-B data before, enter your sharing key.`: Leave blank and press enter
47 | - `Step 1.3 - Would you like to participate in MLAT calculations?`: Answer `no`
48 | - `Would you like to continue using these settings?`: Answer `yes`
49 | - `Step 4.1 - Receiver selection (in order to run MLAT please use DVB-T stick with dump1090 utility bundled with fr24feed)... Enter your receiver type (1-7)`: Answer `4`.
50 | - `Enter your connection type`: Answer `1`.
51 | - `host`: Answer: 127.0.0.1
52 | - `port`: Answer: 30005
53 | - `Step 5`: Answer: `no` twice.
54 |
55 | Note that there is a limit of 3 feeders per FR24 account. ADSB and UAT (see below) each count as 1 feeder. If you have more than 3 feeders, you will need to contact to request an additional Feeder Key. Make sure to send them your account email-address, latitude, longitude, altitude, and if the key is for an ADSB or UAT feeder.
56 |
57 | At the end of the sign-up process, you'll be presented with:
58 |
59 | ```text
60 | Congratulations! You are now registered and ready to share ADS-B data with Flightradar24.
61 | + Your sharing key (xxxxxxxxxxxx) has been configured and emailed to you for backup purposes.
62 | + Your radar id is X-XXXXXXX, please include it in all email communication with us.
63 | ```
64 |
65 | Copy the sharing key you are given, and add the following line to your `.env` file:
66 |
67 | ```shell
68 | FR24_SHARING_KEY=YOURSHARINGKEY
69 | ```
70 |
71 | - Replace `YOURSHARINGKEY` with the sharing key from the output of the manual sign-up process.
72 |
73 | For example:
74 |
75 | ```shell
76 | FR24_SHARING_KEY=10ae138d0c1g
77 | ```
78 |
79 | #### UAT key and configuration (USA only, requires 2nd SDR and dump978 container already configured)
80 |
81 | Get a separate sharing key for UAT as described [here](https://github.com/sdr-enthusiasts/docker-flightradar24?tab=readme-ov-file#uat-configuration-usa-only):
82 |
83 | Copy the UAT sharing key you are given, and add the following line to your `.env` file:
84 |
85 | ```shell
86 | FR24_SHARING_KEY_UAT=YOURSHARINGKEYUAT
87 | ```
88 |
89 | - Replace `YOURSHARINGKEYUAT` with the sharing key from the output of the sign-up process.
90 |
91 | ## Deploying `fr24` container
92 |
93 | Open the `docker-compose.yml` file that was created when deploying `ultrafeeder`.
94 |
95 | Append the following lines to the end of the file \(inside the `services:` section\):
96 |
97 | ```yaml
98 | fr24:
99 | image: ghcr.io/sdr-enthusiasts/docker-flightradar24:latest
100 | container_name: fr24
101 | restart: unless-stopped
102 | ports:
103 | - 8754:8754
104 | environment:
105 | - BEASTHOST=ultrafeeder
106 | - FR24KEY=${FR24_SHARING_KEY}
107 | - FR24KEY_UAT=${FR24_SHARING_KEY_UAT}
108 | tmpfs:
109 | - /var/log
110 | ```
111 |
112 | To explain what's going on in this addition:
113 |
114 | - We're creating a container called `fr24`, from the image `ghcr.io/sdr-enthusiasts/docker-flightradar24:latest`.
115 | - We're passing several environment variables to the container:
116 | - `BEASTHOST=ultrafeeder` to inform the feeder to get its ADSB data from the container `ultrafeeder` network.
117 | - `FR24KEY` will use the `FR24_SHARING_KEY` variable from your `.env` file.
118 | - We're using `tmpfs` for volumes that have regular I/O. Any files stored in a `tmpfs` mount are temporarily stored outside the container's writable layer. This helps to reduce:
119 | - The size of the container, by not writing changes to the underlying container; and
120 | - SD Card or SSD wear
121 |
122 | Once the file has been updated, issue the command `docker compose up -d` in the application directory to apply the changes and bring up the `fr24` container. You should see the following output:
123 |
124 | ```text
125 | ✔ Container ultrafeeder Running
126 | ✔ Container piaware Running
127 | ✔ Container fr24 Started
128 | ```
129 |
130 | We can view the logs for the environment with the command `docker compose logs`, or continually "tail" them with `docker compose logs -f`. At this stage, the logs will be fairly unexciting and look like this:
131 |
132 | ```text
133 | [s6-init] making user provided files available at /var/run/s6/etc...exited 0.
134 | [s6-init] ensuring user provided files have correct perms...exited 0.
135 | [fix-attrs.d] applying ownership & permissions fixes...
136 | [fix-attrs.d] done.
137 | [cont-init.d] executing container initialization scripts...
138 | [cont-init.d] 01-fr24feed: executing...
139 | [cont-init.d] 01-fr24feed: exited 0.
140 | [cont-init.d] done.
141 | [services.d] starting services
142 | [services.d] done.
143 | 2020-11-20 16:35:53 | ______ _ _ _ _ _ _____ ___
144 | 2020-11-20 16:35:53 | | ___|| |(_) | | | | | | / __ \ / |
145 | 2020-11-20 16:35:53 | | |_ | | _ __ _ | |__ | |_ _ __ __ _ __| | __ _ _ __`' / /' / /| |
146 | 2020-11-20 16:35:53 | | _| | || | / _` || '_ \ | __|| '__|/ _` | / _` | / _` || '__| / / / /_| |
147 | 2020-11-20 16:35:53 | | | | || || (_| || | | || |_ | | | (_| || (_| || (_| || | ./ /___\___ |
148 | 2020-11-20 16:35:53 | \_| |_||_| \__, ||_| |_| \__||_| \__,_| \__,_| \__,_||_| \_____/ |_/
149 | 2020-11-20 16:35:53 | __/ |
150 | 2020-11-20 16:35:53 | |___/
151 | 2020-11-20 16:35:53 | info | [httpd]Server started, listening on 0.0.0.0:8754
152 | 2020-11-20 16:35:54 | [i]PacketSenderConfiguration::fetch_config(): Yoda configuration for this receiver is disabled
153 | 2020-11-20 16:35:54 | [d]TLSConnection::ctor(): Enable verify_peer in production code!
154 | 2020-11-20 16:35:55 | [feed][d]fetching configuration
155 | 2020-11-20 16:35:56 | [feed][c]Max range AIR: 350.0nm
156 | 2020-11-20 16:35:56 | [feed][c]Max range GND: 100.0nm
157 | 2020-11-20 16:35:56 | [feed][c]Timestamps: optional
158 | 2020-11-20 16:35:56 | info | [stats]Stats thread started
159 | 2020-11-20 16:35:56 | info | Stopping ReceiverACSender threads for feed
160 | 2020-11-20 16:35:56 | info | Configured ReceiverACSender: 185.218.24.22:8099,185.218.24.23:8099,185.218.24.24:8099, feed: XXXX1234, send_interval: 5s, max age: 15s, send metadata: true, mode: 1, filtering: true
161 | 2020-11-20 16:35:56 | info | Network thread connecting to 185.218.24.22:8099 for feed XXXX1234
162 | ```
163 |
164 | Once running, you can visit `http://docker.host.ip.addr:8754` to access the `fr24` web interface. You can also log onto FlightRadar24's website and click on the your profile button, and then "My data sharing" link to see your statistics.
165 |
166 | ## Advanced
167 |
168 | If you want to look at more options and examples for the `fr24` container, you can find the repository [here](https://github.com/sdr-enthusiasts/docker-flightradar24)
169 |
--------------------------------------------------------------------------------
/feeder-containers/feeding-new-aggregators.md:
--------------------------------------------------------------------------------
1 | ---
2 | description: 'If you wish to feed the new ADS-B aggregators, follow the steps below.'
3 | ---
4 |
5 | # New Aggregators
6 |
7 | After ADSBExchange was acquired by a data aggregator, several of the collaborators of this group split off and started their own ADS-B aggregation services based on @wiedehopf's open source software. Rather than developing a separate container for each of them, we created a `multifeeder` container that can be configured to feed them all.
8 |
9 | `multifeeder` supports:
10 |
11 | * feeding ADS-B data to these aggregators
12 | * feeding MLAT data to the aggregators
13 | * receiving MLAT results from each of the aggregators
14 |
15 | The docker image [`ghcr.io/sdr-enthusiasts/docker-multifeeder`](https://github.com/sdr-enthusiasts/docker-multifeeder) contains the required feeder software and all required prerequisites and libraries. This needs to run in conjunction with `ultrafeeder`, `tar1090`, or another Beast format data provider.
16 |
17 | ## Setting up Your Station
18 |
19 | ### Deploying feeder container
20 |
21 | Open the `docker-compose.yml` file that was created when deploying `ultrafeeder`.
22 |
23 | Append the following lines to the end of the file \(inside the `services:` section\). Please edit the following parameters:
24 |
25 | * `READSB_NET_CONNECTOR`
26 | * remove `dump978,37981,raw_in;` if you don't have a UAT (978MHz) dongle
27 | * add any additional "new aggregators" to the end of the line separated by `;`. The format is `feeder_hostname,feeder_beast_port,beast_out`
28 | * `UUID` - enter your UUID here -- see below on how to generate this
29 | * `MLAT_CONFIG` - add any additional "new aggregators" to the end of the line separated by `;`. The format is `feeder_mlat_hostname,feeder_mlat_port,local_mlat_results_port`
30 | * The `FEEDER_LAT`, `FEEDER_LONG`, and `FEEDER_ALT_M` variables should already exist in your `.env` file, but if they don't feel free to replace these values with your station's Latitude, Longitude (in decimal degrees), and Altitude above the ground (in (whole) meters)
31 |
32 | ```yaml
33 | multifeeder:
34 | image: ghcr.io/sdr-enthusiasts/docker-multifeeder
35 | container_name: multifeeder
36 | hostname: multifeeder
37 | restart: unless-stopped
38 | environment:
39 | - TZ=${FEEDER_TZ}
40 | - READSB_NET_CONNECTOR=readsb,30005,beast_in;dump978,37981,raw_in;feed.adsb.fi,30004,beast_reduce_plus_out;feed.adsb.one,64004,beast_reduce_plus_out;in.adsb.lol,30004,beast_reduce_plus_out;feed.theairtraffic.com,30004,beast_out;feed.planespotters.net,30004,beast_reduce_plus_out
41 | - UUID=00000000-0000-0000-0000-000000000000
42 | - MLAT_CONFIG=feed.adsb.fi,31090,39000;feed.adsb.one,64006,39001;in.adsb.lol,31090,39002;feed.theairtraffic.com,31090,39003;mlat.planespotters.net,31090,39004
43 | - READSB_LAT=${FEEDER_LAT}
44 | - READSB_LON=${FEEDER_LONG}
45 | - READSB_ALT=${FEEDER_ALT_M}m
46 | tmpfs:
47 | - /run/readsb
48 | - /var/log
49 | ```
50 |
51 | ### How to generate a UUID
52 |
53 | If you already have a `UUID` that was generated for the ADSBExchange service, feel free to reuse that one. If you don't have one, you can generate one by logging onto you Linux machine (Raspberry Pi, etc.) and giving this command:
54 |
55 | ```shell
56 | cat /proc/sys/kernel/random/uuid
57 | ```
58 |
59 | You can use the output string of this command (in format of `00000000-0000-0000-0000-000000000000`) as your UUID. Please use the same UUID consistently for all feeders of your station.
60 |
61 | ### Using the MLAT results
62 |
63 | See [https://github.com/sdr-enthusiasts/docker-multifeeder#receiving-mlat-results](https://github.com/sdr-enthusiasts/docker-multifeeder#receiving-mlat-results) for more details on how to configure this.
64 |
65 | ### What's going on?
66 |
67 | To explain what's going on in this addition:
68 |
69 | * We're creating a container called `multifeeder`, from the image `ghcr.io/sdr-enthusiasts/docker-multifeeder`.
70 | * We're passing several environment variables to the container (see above)one as your host system
71 |
72 | Once the file has been updated, issue the command `docker compose pull && docker compose up -d` in the application directory to apply the changes and bring up the `multifeeder` container. You should see the following output:
73 |
74 | ```text
75 | readsb is up-to-date
76 | adsbx is up-to-date
77 | piaware is up-to-date
78 | fr24 is up-to-date
79 | pfclient is up-to-date
80 | Creating multifeeder...
81 | ```
82 |
83 | We can view the logs for the environment with the command `docker logs multifeeder`, or continually "tail" them with `docker logs -f multifeeder`. The logs will be fairly unexciting and look like this:
84 |
85 | ```text
86 | [s6-init] making user provided files available at /var/run/s6/etc...exited 0.
87 | [s6-init] ensuring user provided files have correct perms...exited 0.
88 | ...
89 | [cont-init.d] 01-print-container-version: executing...
90 | [Wed Feb 1 16:38:50 EST 2023][INIT] Container Version: 20230201-184212_489b3d0_main, build date 2023-02-01 13:42:12 -0500
91 | [cont-init.d] 01-print-container-version: exited 0.
92 | [cont-init.d] done.
93 | [services.d] starting services
94 | [Wed Feb 1 16:38:50 EST 2023][multifeeder/mlat-client] Started as an s6 service
95 | [2023/02/01 16:38:50][readsb] invoked by: /usr/local/bin/readsb --net --quiet --lat 42.40487 --lon -71.16615 --uuid-file=/run/uuid --write-json=/run/readsb --json-trace-interval 15 --json-reliable 1 --net-ri-port=30001 --net-ro-port=30002 --net-sbs-port=30003 --net-bi-port=30004,30104 --net-bo-port=30005 --net-beast-reduce-out-port=30006 --net-json-port=30047 --net-api-port=30152 --net-sbs-in-port=32006 --net-connector=readsb,30105,beast_in --net-connector=feed.adsb.fi,30004,beast_out --net-connector=feed.adsb.one,64004,beast_out --net-connector=in.adsb.lol,30004,beast_out
96 | [2023/02/01 16:38:50][readsb] Wed Feb 1 16:38:50 2023 EST readsb starting up.
97 | ...
98 | [Wed Feb 1 16:38:50 EST 2023][./run] starting: /usr/bin/mlat-client --input-type auto --input-connect localhost:30005 --server feed.adsb.fi:31090 --lat 42.40487 --lon -71.16615 --alt 18m --user kx1t-test --results beast,listen,39000
99 | [2023/02/01 16:38:50][readsb] Beast TCP input: Connection established: readsb port 30105
100 | [2023/02/01 16:38:50][readsb] Raw TCP input: Connection established: dump978 port 30978
101 | [2023/02/01 16:38:50][./run][feed.adsb.fi] mlat-client 0.4.2 starting up
102 | [2023/02/01 16:38:50][./run][feed.adsb.fi] Listening for Beast-format results connection on port 39000
103 | [2023/02/01 16:38:50][readsb] Beast TCP output: Connection established: feed.adsb.one (198.50.158.1) port 64004
104 | [2023/02/01 16:38:50][readsb] Beast TCP output: Connection established: in.adsb.lol (142.132.241.63) port 30004
105 | [2023/02/01 16:38:50][readsb] Beast TCP output: Connection established: feed.adsb.fi (65.109.2.208) port 30004
106 | [2023/02/01 16:38:50][./run][feed.adsb.fi] Connected to multilateration server at feed.adsb.fi:31090, handshaking
107 | ...
108 | ```
109 |
110 | ## List of Aggregators
111 |
112 | | **Site** | **readsb_url** | **readsb_port** | **mlat_url** | **mlat_port** |
113 | |-------------------|------------------------|-----------------|------------------------|---------------|
114 | | [adsb.fi](https://adsb.fi/) | feed.adsb.fi | 30004 | feed.adsb.fi | 31090 |
115 | | [ADSB.lol](https://adsb.lol/) | feed.adsb.lol | 1337 | feed.adsb.lol | 1338 |
116 | | [ADSB One](https://adsb.one/) | feed.adsb.one | 64004 | feed.adsb.one | 64006 |
117 | | [Planespotters.net](https://www.planespotters.net/) | feed.planespotters.net | 30004 | mlat.planespotters.net | 31090 |
118 | | [The Air Traffic](https://theairtraffic.com/) | feed.theairtraffic.com | 30004 | feed.theairtraffic.com | 31090 |
119 |
120 | ## More information and support
121 |
122 | * There is extensive documentation available on the container's [GitHub](https://github.com/sdr-enthusiasts/docker-multifeeder) page.
123 | * You can always find help on the #adsb-containers channel on the [SDR Enthusiasts Discord server](https://discord.gg/m42azbZydy). This channel is meant for Noobs (beginners) and Experts alike.
124 |
--------------------------------------------------------------------------------
/feeder-containers/feeding-opensky-network.md:
--------------------------------------------------------------------------------
1 | ---
2 | description: 'If you wish to feed OpenSky Network, follow the steps below.'
3 | ---
4 |
5 | # Feeding OpenSky Network
6 |
7 | The [OpenSky Network](https://opensky-network.org/) is a non-profit association based in Switzerland. It aims at improving the security, reliability and efficiency of the air space usage by providing open access of real-world air traffic control data to the public.
8 |
9 | The docker image [`ghcr.io/sdr-enthusiasts/docker-opensky-network`](https://github.com/sdr-enthusiasts/docker-opensky-network) contains the required feeder software and all required prerequisites and libraries. This needs to run in conjunction with `ultrafeeder` \(or another Beast provider\).
10 |
11 | ## Obtaining an OpenSky Network Feeder Serial Number
12 |
13 | First-time users should obtain a feeder serial number.
14 |
15 | Firstly, make sure you have registered for an account on the [OpenSky Network website](https://opensky-network.org/), and have your username on-hand.
16 |
17 | In order to obtain a feeder serial number, we will start a temporary container running `opensky-feeder`, which will connect to OpenSky Network and be issued a serial number. The temporary container will automatically be stopped and deleted after 60 seconds.
18 |
19 | Inside your application directory \(`/opt/adsb`\), edit the `.env` file using your favourite text editor. Beginners may find the editor `nano` easy to use:
20 |
21 | ```shell
22 | nano /opt/adsb/.env
23 | ```
24 |
25 | This file holds all of the commonly used variables \(such as our latitude, longitude and altitude\). We're going to add our OpenSky username to this file. Add the following line to the file:
26 |
27 | ```shell
28 | OPENSKY_USERNAME='YOUROPENSKYUSERNAME'
29 | ```
30 |
31 | * Replace `YOUROPENSKYUSERNAME` with the station key you retrieved earlier.
32 |
33 | For example:
34 |
35 | ```shell
36 | OPENSKY_USERNAME=johnnytightlips
37 | ```
38 |
39 | To do this, run the command:
40 |
41 | ```shell
42 | source ./.env
43 | timeout 60s docker run \
44 | --rm \
45 | -it \
46 | -e LAT=${FEEDER_LAT} \
47 | -e LONG=${FEEDER_LONG} \
48 | -e ALT=${FEEDER_ALT_M} \
49 | -e BEASTHOST=ultrafeeder\
50 | -e OPENSKY_USERNAME=${OPENSKY_USERNAME} \
51 | ghcr.io/sdr-enthusiasts/docker-opensky-network:latest
52 | ```
53 |
54 | Once the container has started, you should see output similar to the following:
55 |
56 | ```text
57 | [s6-init] making user provided files available at /var/run/s6/etc...exited 0.
58 | [s6-init] ensuring user provided files have correct perms...exited 0.
59 | [fix-attrs.d] applying ownership & permissions fixes...
60 | [fix-attrs.d] done.
61 | [cont-init.d] executing container initialization scripts...
62 | [cont-init.d] 01-opensky-network: executing...
63 |
64 | WARNING: OPENSKY_SERIAL environment variable was not set!
65 | Please make sure you note down the serial generated.
66 | Pass the key as environment var OPENSKY_SERIAL on next launch!
67 |
68 | [cont-init.d] 01-opensky-network: exited 0.
69 | [cont-init.d] done.
70 | [services.d] starting services
71 | [services.d] done.
72 | [opensky-feeder] [INFO] [COMP] Initialize STAT
73 | [opensky-feeder] [INFO] [COMP] Initialize POS
74 | [opensky-feeder] [INFO] [COMP] Initialize DEVTYPE
75 | [opensky-feeder] [INFO] [COMP] Initialize NET
76 | [opensky-feeder] [INFO] [COMP] Initialize TB
77 | [opensky-feeder] [INFO] [COMP] Initialize SERIAL
78 | [opensky-feeder] [INFO] [COMP] Initialize BUF
79 | [opensky-feeder] [INFO] [COMP] Initialize RELAY
80 | [opensky-feeder] [INFO] [COMP] Initialize RC
81 | [opensky-feeder] [INFO] [COMP] Initialize FILTER
82 | [opensky-feeder] [INFO] [COMP] Initialize RECV
83 | [opensky-feeder] [INFO] [COMP] Start STAT
84 | [opensky-feeder] [INFO] [COMP] Start POS
85 | [opensky-feeder] [INFO] [COMP] Start DEVTYPE
86 | [opensky-feeder] [INFO] [COMP] Start NET
87 | [opensky-feeder] [INFO] [COMP] Start TB
88 | [opensky-feeder] [INFO] [COMP] Start SERIAL
89 | [opensky-feeder] [INFO] [COMP] Start RELAY
90 | [opensky-feeder] [INFO] [COMP] Start RC
91 | [opensky-feeder] [INFO] [COMP] Start FILTER
92 | [opensky-feeder] [INFO] [COMP] Start RECV
93 | [opensky-feeder] [INFO] [INPUT] Trying to connect to '10.0.0.1': [10.0.0.1]:30005
94 | [opensky-feeder] [INFO] [INPUT] connected to '10.0.0.1'
95 | [opensky-feeder] [INFO] [NET] Trying to connect to 'collector.opensky-network.org': [194.209.200.6]:10004
96 | [opensky-feeder] [INFO] [NET] connected to 'collector.opensky-network.org'
97 | [opensky-feeder] [INFO] [LOGIN] Sending Device ID 5, Version 2.1.7
98 | [opensky-feeder] [INFO] [SERIAL] Requesting new serial number
99 | [opensky-feeder] [INFO] [SERIAL] Got a new serial number: -1408234269
100 | [opensky-feeder] [INFO] [LOGIN] Sending Serial Number -1408234269
101 | [opensky-feeder] [INFO] [GPS] Sending position -33.3333°, +111.1111°, +100.8m
102 | [opensky-feeder] [INFO] [LOGIN] Sending Username 'johnnytightlips'
103 | [cont-finish.d] executing container finish scripts...
104 | [cont-finish.d] done.
105 | [s6-finish] waiting for services.
106 | [s6-finish] sending all processes the TERM signal.
107 | [s6-finish] sending all processes the KILL signal and exiting.
108 | ```
109 |
110 | As you can see from the output above, we've been allocated a serial number of `-1408234269`.
111 |
112 | ```text
113 | [opensky-feeder] [INFO] [SERIAL] Got a new serial number: -1408234269
114 | ```
115 |
116 | ## Update `.env` file with OpenSky-Network details
117 |
118 | Inside your application directory \(`/opt/adsb`\), edit the `.env` file using your favourite text editor. Beginners may find the editor `nano` easy to use:
119 |
120 | ```shell
121 | nano /opt/adsb/.env
122 | ```
123 |
124 | This file holds all of the commonly used variables \(such as our latitude, longitude and altitude\). We're going to add our OpenSky-Network username and serial to this file. Add the following lines to the file:
125 |
126 | ```shell
127 | OPENSKY_USERNAME=YOUROPENSKYUSERNAME
128 | OPENSKY_SERIAL=YOUROPENSKYSERIAL
129 | ```
130 |
131 | * Replace `YOUROPENSKYUSERNAME` with your OpenSky Network username. Yo should have already done this in the previous step.
132 | * Replace `YOUROPENSKYSERIAL` with your OpenSky Network serial
133 |
134 | For example:
135 |
136 | ```shell
137 | OPENSKY_USERNAME=johnnytightlips
138 | OPENSKY_SERIAL=-1408234269
139 | ```
140 |
141 | Failure to specify the `OPENSKY_SERIAL` environment variable will cause a new feeder serial to be created every time the container is started. Please do the right thing and set `OPENSKY_SERIAL`!
142 |
143 | ## Deploying feeder container
144 |
145 | Open the `docker-compose.yml` file that was created when deploying `ultrafeeder`.
146 |
147 | Append the following lines to the end of the file \(inside the `services:` section\):
148 |
149 | ```yaml
150 | opensky:
151 | image: ghcr.io/sdr-enthusiasts/docker-opensky-network:latest
152 | container_name: opensky
153 | restart: unless-stopped
154 | environment:
155 | - TZ=${FEEDER_TZ}
156 | - BEASTHOST=ultrafeeder
157 | - LAT=${FEEDER_LAT}
158 | - LONG=${FEEDER_LONG}
159 | - ALT=${FEEDER_ALT_M}
160 | - OPENSKY_USERNAME=${OPENSKY_USERNAME}
161 | - OPENSKY_SERIAL=${OPENSKY_SERIAL}
162 | tmpfs:
163 | - /run:exec,size=64M
164 | - /var/log
165 | ```
166 |
167 | To explain what's going on in this addition:
168 |
169 | * We're creating a container called `opensky`, from the image `ghcr.io/sdr-enthusiasts/docker-opensky-network:latest`.
170 | * We're passing several environment variables to the container:
171 | * `BEASTHOST=ultrafeeder` to inform the feeder to get its ADSB data from the container `ultrafeeder`
172 | * `TZ` will use the `FEEDER_TZ` variable from your `.env` file.
173 | * `LAT` will use the `FEEDER_LAT` variable from your `.env` file.
174 | * `LONG` will use the `FEEDER_LONG` variable from your `.env` file.
175 | * `ALT` will use the `FEEDER_ALT_M` variable from your `.env` file \(as metres are required for this feeder\).
176 | * `OPENSKY_USERNAME` will use the `OPENSKY_USERNAME` variable from your `.env` file.
177 | * `OPENSKY_SERIAL` will use the `OPENSKY_SERIAL` variable from your `.env` file.
178 | * We're using `tmpfs` for volumes that have regular I/O. Any files stored in a `tmpfs` mount are temporarily stored outside the container's writable layer. This helps to reduce:
179 | * The size of the container, by not writing changes to the underlying container; and
180 | * SD Card or SSD wear
181 |
182 | Once the file has been updated, issue the command `docker compose up -d` in the application directory to apply the changes and bring up the `adsbhub` container. You should see the following output:
183 |
184 | ```text
185 | ✔ Container ultrafeeder Running
186 | ✔ Container piaware Running
187 | ✔ Container fr24 Running
188 | ✔ Container adsbhub Running
189 | ✔ Container opensky Started
190 | ```
191 |
192 | We can view the logs for the environment with the command `docker logs opensky`, or continually "tail" them with `docker logs -f opensky`. The logs will be fairly unexciting and look like this:
193 |
194 | ```text
195 | [s6-init] making user provided files available at /var/run/s6/etc...exited 0.
196 | [s6-init] ensuring user provided files have correct perms...exited 0.
197 | [fix-attrs.d] applying ownership & permissions fixes...
198 | [fix-attrs.d] done.
199 | [cont-init.d] executing container initialization scripts...
200 | [cont-init.d] 01-opensky-network: executing...
201 | [cont-init.d] 01-opensky-network: exited 0.
202 | [cont-init.d] done.
203 | [services.d] starting services
204 | [services.d] done.
205 | [opensky-feeder] [INFO] [COMP] Initialize STAT
206 | [opensky-feeder] [INFO] [COMP] Initialize POS
207 | [opensky-feeder] [INFO] [COMP] Initialize DEVTYPE
208 | [opensky-feeder] [INFO] [COMP] Initialize NET
209 | [opensky-feeder] [INFO] [COMP] Initialize TB
210 | [opensky-feeder] [INFO] [COMP] Initialize SERIAL
211 | [opensky-feeder] [INFO] [COMP] Initialize BUF
212 | [opensky-feeder] [INFO] [COMP] Initialize RELAY
213 | [opensky-feeder] [INFO] [COMP] Initialize RC
214 | [opensky-feeder] [INFO] [COMP] Initialize FILTER
215 | [opensky-feeder] [INFO] [COMP] Initialize RECV
216 | [opensky-feeder] [INFO] [COMP] Start STAT
217 | [opensky-feeder] [INFO] [COMP] Start POS
218 | [opensky-feeder] [INFO] [COMP] Start DEVTYPE
219 | [opensky-feeder] [INFO] [COMP] Start NET
220 | [opensky-feeder] [INFO] [COMP] Start TB
221 | [opensky-feeder] [INFO] [COMP] Start SERIAL
222 | [opensky-feeder] [INFO] [COMP] Start RELAY
223 | [opensky-feeder] [INFO] [COMP] Start RC
224 | [opensky-feeder] [INFO] [COMP] Start FILTER
225 | [opensky-feeder] [INFO] [COMP] Start RECV
226 | [opensky-feeder] [INFO] [INPUT] Trying to connect to 'ultrafeeder': [172.30.0.6]:30005
227 | [opensky-feeder] [INFO] [INPUT] connected to 'ultrafeeder'
228 | [opensky-feeder] [INFO] [NET] Trying to connect to 'collector.opensky-network.org': [194.209.200.4]:10004
229 | [opensky-feeder] [INFO] [NET] connected to 'collector.opensky-network.org'
230 | [opensky-feeder] [INFO] [LOGIN] Sending Device ID 5, Version 2.1.7
231 | [opensky-feeder] [INFO] [LOGIN] Sending Serial Number -1408234269
232 | [opensky-feeder] [INFO] [GPS] Sending position -33.3333°, +111.1111°, +100.8m
233 | [opensky-feeder] [INFO] [LOGIN] Sending Username 'johnnytightlips'
234 | [opensky-feeder] [INFO] [TB] Setting sync filter: 0
235 | [opensky-feeder] [INFO] [TB] Setting ext squitter only filter: 1
236 | ```
237 |
238 | Once running, you can visit [https://opensky-network.org/receiver-profile](https://opensky-network.org/receiver-profile) to view the data you are feeding to OpenSky-Network.
239 |
240 | ## Advanced
241 |
242 | If you want to look at more options and examples for the `opensky` container, you can find the repository [here](https://github.com/sdr-enthusiasts/docker-opensky-network)
243 |
--------------------------------------------------------------------------------
/feeder-containers/feeding-plane-watch.md:
--------------------------------------------------------------------------------
1 | ---
2 | description: 'If you wish to feed Plane.watch, follow the steps below.'
3 | ---
4 |
5 | # Feeding plane.watch
6 |
7 | Plane.watch is the end product of a ***Wouldn't it be cool if?*** statement. It is an ADS-B aggregation project by members of SDR-Enthusiasts. It is currently completely non-commercial, run by members of the community as a passion project, and backed by an Australian-based Not-for-Profit association.
8 |
9 | The docker image [`ghcr.io/plane-watch/docker-plane-watch`](https://github.com/plane-watch/docker-plane-watch) contains the plane.watch feeder software and all of its required prerequisites and libraries. This needs to run in conjunction with `ultrafeeder` \(or another Beast provider\).
10 |
11 | ## plane.watch Feeder Registration
12 |
13 | ### Register for a plane.watch feeder account
14 |
15 | Head over to and sign up for an account.
16 |
17 | ### Create your feeder
18 |
19 | Login to , click on **Feeders**, **+ New Feeder**. Fill out your details.
20 |
21 | When you save your feeder, an **API Key** will be generated. Take note of this, as it will be required below.
22 |
23 | ## Update `.env` file
24 |
25 | Inside your application directory \(`/opt/adsb`\), edit the `.env` file using your favourite text editor. Beginners may find the editor `nano` easy to use:
26 |
27 | ```shell
28 | nano /opt/adsb/.env
29 | ```
30 |
31 | This file holds all of the commonly used variables \(such as our latitude, longitude and altitude\). We're going to add our plane.watch variables to this file. Add the following lines to the file:
32 |
33 | ```shell
34 | PW_API_KEY=YOURAPIKEY
35 | ```
36 |
37 | * Replace `YOURAPIKEY` with the API KEY that was provided the previous step.
38 |
39 | For example:
40 |
41 | ```shell
42 | PW_API_KEY=4e8413e6-52eb-11ea-8681-1c1b0d925d3g
43 | ```
44 |
45 | ## Deploying plane.watch feeder
46 |
47 | Open the `docker-compose.yml` file that was created when deploying `ultrafeeder`.
48 |
49 | Append the following lines to the end of the file \(inside the `services:` section\):
50 |
51 | ```yaml
52 | planewatch:
53 | image: ghcr.io/plane-watch/docker-plane-watch:latest
54 | container_name: planewatch
55 | restart: unless-stopped
56 | environment:
57 | - BEASTHOST=ultrafeeder
58 | - LAT=${FEEDER_LAT}
59 | - LONG=${FEEDER_LONG}
60 | - ALT=${FEEDER_ALT_M}m
61 | - TZ=${FEEDER_TZ}
62 | - API_KEY=${PW_API_KEY}
63 | tmpfs:
64 | - /run:exec,size=64M
65 | - /var/log
66 | ```
67 |
68 | To explain what's going on in this addition:
69 |
70 | * We're creating a container called `planewatch`, from the image `ghcr.io/plane-watch/docker-plane-watch:latest`.
71 | * We're passing several environment variables to the container:
72 | * `BEASTHOST=ultrafeeder` to inform the feeder to get its ADSB data from the container `ultrafeeder` over our private `adsbnet` network.
73 | * `LAT` will use the `FEEDER_LAT` variable from your `.env` file.
74 | * `LONG` will use the `FEEDER_LONG` variable from your `.env` file.
75 | * `ALT` will use the `FEEDER_ALT_M` variable from your `.env` file.
76 | * `TZ` will use the `FEEDER_TZ` variable from your `.env` file.
77 | * `API_KEY` will use the `PW_API_KEY` variable from your `.env` file.
78 | * We're using `tmpfs` for volumes that have regular I/O. Any files stored in a `tmpfs` mount are temporarily stored outside the container's writable layer. This helps to reduce:
79 | * The size of the container, by not writing changes to the underlying container; and
80 | * SD Card or SSD wear
81 |
82 | Once the file has been updated, issue the command `docker compose up -d` in the application directory to apply the changes and bring up the `planewatch` container. You should see the following output:
83 |
84 | ```text
85 | ✔ Container ultrafeeder Running
86 | ✔ Container planewatch Started
87 | ```
88 |
89 | You can see from the output above that the `ultrafeeder` container was left alone \(as the configuration for this container did not change\), and a new container `planewatch` was created.
90 |
91 | We can view the logs for the environment with the command `docker compose logs`, or continually "tail" them with `docker compose logs -f`. We should now see logs from our newly created `planewatch` container:
92 |
93 | ```text
94 | [s6-init] making user provided files available at /var/run/s6/etc...exited 0.
95 | [s6-init] ensuring user provided files have correct perms...exited 0.
96 | [fix-attrs.d] applying ownership & permissions fixes...
97 | [fix-attrs.d] done.
98 | [cont-init.d] executing container initialization scripts...
99 | [cont-init.d] 01-timezone: executing...
100 | [cont-init.d] 01-timezone: exited 0.
101 | [cont-init.d] 02-sanity_check: executing...
102 | [cont-init.d] 02-sanity_check: exited 0.
103 | [cont-init.d] done.
104 | [services.d] starting services
105 | 2023-05-27T09:09:49+08:00 INF plane.watch feeder started version=20230526
106 | 2023-05-27T09:09:49+08:00 INF listening for incoming connections dst=feed.push.plane.watch:12346 listen=127.0.0.1:12346 proto=MLAT
107 | 2023-05-27T09:09:49+08:00 INF starting tunnel dst=feed.push.plane.watch:12345 proto=BEAST src=readsb:30005
108 | [services.d] done.
109 | 2023-05-27T09:09:49+08:00 INF connection established dst=feed.push.plane.watch:12345 proto=BEAST src=readsb:30005
110 | [mlat-client] Sat May 27 09:09:54 2023 mlat-client 0.2.11 starting up
111 | [mlat-client] Sat May 27 09:09:54 2023 Listening for Beast-format results connection on port 30105
112 | 2023-05-27T09:09:54+08:00 INF connection established dst=feed.push.plane.watch:12346 listen=127.0.0.1:12346 proto=MLAT src=127.0.0.1:35492
113 | [mlat-client] Sat May 27 09:09:54 2023 Connected to multilateration server at 127.0.0.1:12346, handshaking
114 | [mlat-client] Sat May 27 09:09:59 2023 Server says:
115 | [mlat-client] Sat May 27 09:09:59 2023 Handshake complete.
116 | [mlat-client] Sat May 27 09:09:59 2023 Compression: zlib2
117 | [mlat-client] Sat May 27 09:09:59 2023 UDP transport: disabled
118 | [mlat-client] Sat May 27 09:09:59 2023 Split sync: disabled
119 | [mlat-client] Sat May 27 09:09:59 2023 Input connected to readsb:30005
120 | [mlat-client] Sat May 27 09:09:59 2023 Input format changed to BEAST, 12MHz clock
121 | 2023-05-27T09:14:49+08:00 INF statistics bytesRxLocal=247548 bytesRxRemote=0 bytesTxLocal=0 bytesTxRemote=247548 proto=BEAST
122 | 2023-05-27T09:14:49+08:00 INF statistics bytesRxLocal=38354 bytesRxRemote=785 bytesTxLocal=785 bytesTxRemote=38354 proto=MLAT
123 | ```
124 |
125 | After a few minutes, browse to [https://atc.plane.watch/](https://atc.plane.watch/). Your feeder should be listed as "online". It can take up to 10 minutes for the status to update.
126 |
127 | ## Advanced
128 |
129 | If you want to look at more options and examples for the `plane.watch` container, you can find the repository [here](https://github.com/plane-watch/docker-plane-watch).
130 |
--------------------------------------------------------------------------------
/feeder-containers/feeding-planefinder.md:
--------------------------------------------------------------------------------
1 | ---
2 | description: 'If you wish to feed PlaneFinder, follow the steps below.'
3 | ---
4 |
5 | # Feeding PlaneFinder
6 |
7 | [PlaneFinder](https://planefinder.net/) provides live flight tracking data to industries around the world with customised products for aviation, business intelligence and emerging markets alongside world class apps.
8 |
9 | The docker image [`ghcr.io/sdr-enthusiasts/docker-planefinder`](https://github.com/sdr-enthusiasts/docker-planefinder) contains PlaneFinder's `pfclient` feeder software and all of its required prerequisites and libraries. This needs to run in conjunction with `ultrafeeder` \(or another Beast provider\).
10 |
11 | ## Getting a Share Code
12 |
13 | ### Already running `pfclient`
14 |
15 | You'll need your _share code_ from your existing feeder.
16 |
17 | To get your _share code_, log into your [planefinder.net](https://planefinder.net) account, and go to "Your Receivers". Your share code will be listed next to your existing receiver.
18 |
19 | You will need to make sure your existing receiver is shutdown prior to continuing.
20 |
21 | ### New to `pfclient`
22 |
23 | If you're already running `pfclient` and you've followed the steps in the previous command, you can skip this section.
24 |
25 | You'll need a _share code_. In order to obtain a PlaneFinder Share Code, we will start a temporary container running `pfclient`, which will run through a configuration wizard and generate a share code.
26 |
27 | Run the command:
28 |
29 | ```shell
30 | docker run \
31 | --rm \
32 | -it \
33 | --name pfclient_temp \
34 | --entrypoint pfclient \
35 | -p 30053:30053 \
36 | ghcr.io/sdr-enthusiasts/docker-planefinder
37 | ```
38 |
39 | Once the container has started, you should see a message such as:
40 |
41 | ```text
42 | 2020-04-11 06:45:25.823307 [-] We were unable to locate a configuration file and have entered configuration mode by default. Please visit: http://172.22.7.12:30053 to complete configuration.
43 | ```
44 |
45 | At this point, open a web browser and go to `http://docker.host.ip.addr:30053` You won't be able to use the URL given in the log output, as the IP address in the log output will show the private, internal IP of the docker container.
46 |
47 | In your browser, follow the steps in the configuration wizard. When finished, you'll be given a PlaneFinder Share Code. Save this in safe place.
48 |
49 | You can now kill the temporary container by pressing `CTRL-C`.
50 |
51 | You should now claim your receiver:
52 |
53 | 1. Go to [https://www.planefinder.net/](https://www.planefinder.net/)
54 | 2. Create an account and/or sign in
55 | 3. Go to "Account" > "Manage Receivers"
56 | 4. Click "Add receiver" and enter your share code when prompted
57 |
58 | ## Update `.env` file with sharing key
59 |
60 | Inside your application directory \(`/opt/adsb`\), edit the `.env` file using your favourite text editor. Beginners may find the editor `nano` easy to use:
61 |
62 | ```shell
63 | nano /opt/adsb/.env
64 | ```
65 |
66 | This file holds all of the commonly used variables \(such as our latitude, longitude and altitude\). We're going to add our `pfclient` share code to this file. Add the following line to the file:
67 |
68 | ```shell
69 | PLANEFINDER_SHARECODE=YOURSHARECODE
70 | ```
71 |
72 | * Replace `YOURSHARECODE` with the share code that was generated in the previous step.
73 |
74 | For example:
75 |
76 | ```shell
77 | PLANEFINDER_SHARECODE=zg84632abhf231
78 | ```
79 |
80 | ## Deploying `pfclient` container
81 |
82 | Open the `docker-compose.yml` file that was created when deploying `ultrafeeder`.
83 |
84 | Append the following lines to the end of the file \(inside the `services:` section\):
85 |
86 | ```yaml
87 | pfclient:
88 | image: ghcr.io/sdr-enthusiasts/docker-planefinder:latest
89 | # If you are running on a Raspberry Pi 5, uncomment the below line and comment out the above
90 | #ghcr.io/sdr-enthusiasts/docker-planefinder:5.0.161_arm64
91 | container_name: pfclient
92 | restart: unless-stopped
93 | ports:
94 | - 30053:30053
95 | environment:
96 | - TZ=${FEEDER_TZ}
97 | - BEASTHOST=ultrafeeder
98 | - LAT=${FEEDER_LAT}
99 | - LONG=${FEEDER_LONG}
100 | - SHARECODE=${PLANEFINDER_SHARECODE}
101 | tmpfs:
102 | - /run:exec,size=64M
103 | - /var/log/pfclient
104 | ```
105 |
106 | To explain what's going on in this addition:
107 |
108 | * We're creating a container called `pfclient`, from the image `ghcr.io/sdr-enthusiasts/docker-planefinder:latest`.
109 | * We're passing several environment variables to the container:
110 | * `BEASTHOST=ultrafeeder` to inform the feeder to get its ADSB data from the container `ultrafeeder`
111 | * `TZ` will use the `FEEDER_TZ` variable from your `.env` file.
112 | * `LAT` will use the `FEEDER_LAT` variable from your `.env` file.
113 | * `LONG` will use the `FEEDER_LONG` variable from your `.env` file.
114 | * `SHARECODE` will use the `PLANEFINDER_SHARECODE` variable from your `.env` file.
115 | * We're using `tmpfs` for volumes that have regular I/O. Any files stored in a `tmpfs` mount are temporarily stored outside the container's writable layer. This helps to reduce:
116 | * The size of the container, by not writing changes to the underlying container; and
117 | * SD Card or SSD wear
118 |
119 | Once the file has been updated, issue the command `docker compose up -d` in the application directory to apply the changes and bring up the `pfclient` container. You should see the following output:
120 |
121 | ```text
122 | ✔ Container ultrafeeder Running
123 | ✔ Container piaware Running
124 | ✔ Container fr24 Running
125 | ✔ Container pfclient Started
126 | ```
127 |
128 | We can view the logs for the environment with the command `docker compose logs`, or continually "tail" them with `docker compose logs -f`. At this stage, the logs will be fairly unexciting and look like this:
129 |
130 | ```text
131 | pfclient | [s6-init] making user provided files available at /var/run/s6/etc...exited 0.
132 | pfclient | [s6-init] ensuring user provided files have correct perms...exited 0.
133 | pfclient | [fix-attrs.d] applying ownership & permissions fixes...
134 | pfclient | [fix-attrs.d] done.
135 | pfclient | [cont-init.d] executing container initialization scripts...
136 | pfclient | [cont-init.d] 01-pfclient: executing...
137 | pfclient | [cont-init.d] 01-pfclient: exited 0.
138 | pfclient | [cont-init.d] done.
139 | pfclient | [services.d] starting services
140 | pfclient | [services.d] done.
141 | pfclient | 2020-04-11 09:14:33.361261 [-] pfclient (4.1.1 i386) started with the following options:
142 | pfclient | 2020-04-11 09:14:33.361432 [-] connection_type = 1
143 | pfclient | 2020-04-11 09:14:33.361437 [-] tcp_address = ultrafeeder
144 | pfclient | 2020-04-11 09:14:33.361440 [-] tcp_port = 30005
145 | pfclient | 2020-04-11 09:14:33.361442 [-] data_format = 1
146 | pfclient | 2020-04-11 09:14:33.361445 [-] aircraft_timeout = 30
147 | pfclient | 2020-04-11 09:14:33.361448 [-] select_timeout = 10
148 | pfclient | 2020-04-11 09:14:33.361450 [-] web_server_port = 30053
149 | pfclient | 2020-04-11 09:14:33.361454 [-] user_latitude = -33.33333
150 | pfclient | 2020-04-11 09:14:33.361458 [-] user_longitude = 111.11111
151 | pfclient | 2020-04-11 09:14:33.361539 [V] Performing NTP sync (1.planefinder.pool.ntp.org)...
152 | pfclient | 2020-04-11 09:14:33.361679 [-] Web server is now listening on: http://172.99.7.64:30053
153 | pfclient | 2020-04-11 09:14:33.361698 [-] Echo port is now listening on: 172.99.7.64:30054
154 | pfclient | 2020-04-11 09:14:33.362179 [-] TCP connection established: ultrafeeder:30005
155 | pfclient | 2020-04-11 09:14:33.723215 [V] NTP sync succeeded with settings:
156 | pfclient | 2020-04-11 09:14:33.723269 [V] Stratum: 3
157 | pfclient | 2020-04-11 09:14:33.723287 [V] System clock time: 1586596473.7232
158 | pfclient | 2020-04-11 09:14:33.723299 [V] Corrected clock time: 1586596473.7181
159 | pfclient | 2020-04-11 09:14:33.723310 [V] NTP offset: -0.0052s
160 | pfclient | 2020-04-11 09:15:38.239652 [-] User location has been verified.
161 | pfclient | 2020-04-11 09:16:23.809962 [-] Successfully sent 46 aircraft updates across 10 packets (8.00KB)
162 | pfclient | 2020-04-11 09:18:14.117198 [-] Successfully sent 57 aircraft updates across 10 packets (9.00KB)
163 | pfclient | 2020-04-11 09:20:04.389081 [-] Successfully sent 53 aircraft updates across 10 packets (8.00KB)
164 | ```
165 |
166 | Once running, you can visit `http://docker.host.ip.addr:30053` to access the `pfclient` web interface. You can also visit the PlaneFinder website, and go to "Account" > "Manage Receivers" and click your receiver to see your live data and statistics.
167 |
168 | ## Troubleshooting
169 |
170 | If you are running a Raspberry Pi 5, then you may see the following messages in your Docker Compose log output:
171 |
172 | ```text
173 | pfclient | [pfclient_daemon] /usr/local/bin/pfclient: error while loading shared libraries:
174 | pfclient | [pfclient_daemon] /usr/local/bin/pfclient: error while loading shared libraries:
175 | pfclient | [pfclient_daemon] /usr/local/bin/pfclient: error while loading shared libraries:
176 | ```
177 |
178 | This is due to an architecture change with the Raspberry Pi 5 and can be worked around by using this Docker image in your `docker-compose.yml` file: `ghcr.io/sdr-enthusiasts/docker-planefinder:5.0.161_arm64`
179 |
180 | This is noted in the sample provided above. See [here](https://github.com/sdr-enthusiasts/docker-planefinder/issues/34) for more information.
181 |
182 | ## Advanced
183 |
184 | If you want to look at more options and examples for the `pfclient` container, you can find the repository [here](https://github.com/sdr-enthusiasts/docker-planefinder)
185 |
--------------------------------------------------------------------------------
/feeder-containers/feeding-radarplane.md:
--------------------------------------------------------------------------------
1 | ---
2 | description: 'If you wish to feed RadarPlane.com, follow the steps below.'
3 | ---
4 |
5 | # RadarPlane/docker-radarplane
6 |
7 | Docker container to feed ADS-B data into [RadarPlane](https://radarplane.com). Designed to work in tandem
8 | with [sdr-enthusiasts/docker-readsb-protobuf][docker-readsb-protobuf] or another BEAST provider. Builds and runs on x86,
9 | x86_64, arm32v7 & arm64v8.
10 |
11 | The container pulls ADS-B information from a BEAST provider and sends data to [RadarPlane](https://radarplane.com).
12 |
13 | For more information on [RadarPlane](https://radarplane.com), see
14 | here: [RadarPlane Feeding Instructions](https://radarplane.com/feed). This container uses a modified version of the "
15 | script method" outlined on that page.
16 |
17 | ## Configuring `RadarPlane/docker-radarplane` Container
18 |
19 | * If you're using this container with the [sdr-enthusiasts/docker-readsb-protobuf][docker-readsb-protobuf] container to
20 | provide ModeS/BEAST data, and the containers are on different docker networks or on different hosts:
21 | * You'll need to ensure you've opened port `30005` (or whatever port is serving BEAST data) into
22 | the [sdr-enthusiasts/docker-readsb-protobuf][docker-readsb-protobuf] container.
23 | * The IP address or hostname of the docker host running
24 | the [sdr-enthusiasts/docker-readsb-protobuf][docker-readsb-protobuf] container should be passed to
25 | the `RadarPlane/docker-radarplane` container via the `BEASTHOST` environment variable shown below. The port can be
26 | changed from the default of `30005` with the optional `BEASTPORT` environment variable if required.
27 | * The latitude and longitude of your antenna must be passed via the `LAT` and `LONG` environment variables respectively.
28 | * The altitude of your antenna must be passed via the `ALT` environment variable respectively. Defaults to metres, but
29 | units may specified with a 'ft' or 'm' suffix.
30 | * A UUID for this feeder must be passed via the `UUID` environment variable (see below).
31 | * Lastly, you should specify a site name via the `SITENAME` environment variable. This field supports letters,
32 | numbers, `-` & `_` only. Any other characters will be stripped upon container initialization.
33 |
34 | ## Generating a site UUID Number
35 |
36 | First-time users should generate a static UUID using this command:
37 |
38 | ```shell
39 | cat /proc/sys/kernel/random/uuid
40 | ```
41 |
42 | Inside your application directory \(`/opt/adsb`\), edit the `.env` file using your favourite text editor. Beginners may find the editor `nano` easy to use:
43 |
44 | ```shell
45 | nano /opt/adsb/.env
46 | ```
47 |
48 | This file holds all of the commonly used variables \(such as our latitude, longitude and altitude\). We're going to add our OpenSky username to this file. Add the following line to the file:
49 |
50 | ```shell
51 | RADARPLANE_UUID='YOURUUID'
52 | ```
53 |
54 | * Replace `RADARPLANE_UUID` with the station UUID you generated earlier.
55 |
56 | For example:
57 |
58 | ```shell
59 | RADARPLANE_UUID=00000000-0000-0000-0000-000000000000
60 | ```
61 |
62 | ## Up-and-Running with `docker run`
63 |
64 | ```shell
65 | source ./.env
66 | docker run \
67 | -d \
68 | --rm \
69 | --name radarplane \
70 | -e TZ=${FEEDER_TZ} \
71 | -e BEASTHOST=readsb \
72 | -e LAT=${FEEDER_LAT} \
73 | -e LONG=${FEEDER_LONG} \
74 | -e ALT=50m \
75 | -e SITENAME=${FEEDER_NAME} \
76 | -e UUID=${RADARPLANE_UUID} \
77 | --tmpfs=/run:rw,nosuid,nodev,exec,relatime,size=64M,uid=1000,gid=1000 \
78 | ghcr.io/RadarPlane/docker-radarplane:main
79 | ```
80 |
81 | ## Up-and-Running with Docker Compose
82 |
83 | First timers are encouraged to
84 | read [ADS-B Reception, Decoding & Sharing with Docker](https://mikenye.gitbook.io/ads-b/).
85 |
86 | An example docker compose service definition is below:
87 |
88 | ```yaml
89 | radarplane:
90 | image: ghcr.io/radarplane/docker-radarplane:main
91 | container_name: radarplane
92 | restart: unless-stopped
93 | environment:
94 | - BEASTHOST=readsb
95 | - TZ=${FEEDER_TZ}
96 | - LAT=${FEEDER_LAT}
97 | - LONG=${FEEDER_LONG}
98 | - ALT=50m
99 | - SITENAME=${FEEDER_NAME}
100 | - UUID=${RADARPLANE_UUID}
101 | tmpfs:
102 | - /run:rw,nosuid,nodev,exec,relatime,size=64M,uid=1000,gid=1000
103 | ```
104 |
105 | ## Runtime Environment Variables
106 |
107 | There are a series of available environment variables:
108 |
109 | | Environment Variable | Purpose | Default |
110 | |----------------------------------|------------------------------------------------------------------------------------------------------------------------------------------------------------------------------------------------------------------------------------------------------|-------------------------|
111 | | `BEASTHOST` | Required. IP/Hostname of a Mode-S/BEAST provider (dump1090) | |
112 | | `BEASTPORT` | Optional. TCP port number of Mode-S/BEAST provider (dump1090) | `30005` |
113 | | `UUID` | Required. Your static UUID | |
114 | | `LAT` | Required. The latitude of the antenna | |
115 | | `LONG` | Required. The longitude of the antenna | |
116 | | `ALT` | Required. The altitude of the antenna above sea level. If positive (above sea level), must include either 'm' or 'ft' suffix to indicate metres or feet. If negative (below sea level), must have no suffix, and the value is interpreted in metres. | |
117 | | `SITENAME` | Required. The name of your site (A-Z, a-z, `-`, `_`) | |
118 | | `TZ` | Optional. Your local timezone | `GMT` |
119 | | `REDUCE_INTERVAL` | Optional. How often beastreduce data is transmitted to ADSBExchange. For low bandwidth feeds, this can be increased to `5` or even `10` | `0.5` |
120 | | `PRIVATE_MLAT` | Optional. Setting this to true will prevent feeder being shown on the feeder maps | `false` |
121 | | `MLAT_INPUT_TYPE` | Optional. Sets the input receiver type. Run `docker run --rm -it --entrypoint mlat-client ghcr.io/RadarPlane/docker-radarplane:latest --help` and see `--input-type` for valid values. | `dump1090` |
122 | | `STATS_DISABLE` | Optional. Set to any value to disable stats module / anywhere map (if you don't like lots of DNS lookups, set this to 1) | unset |
123 | | `ADSB_FEED_DESTINATION_HOSTNAME` | Optional. Allows changing the hostname that ADS-B data is fed to. | `feed.radarplane.com` |
124 | | `ADSB_FEED_DESTINATION_PORT` | Optional. Allows changing the TCP port that ADS-B data is fed to. | `30001` |
125 | | `ADSB_FEED_DESTINATION_TYPE` | Optional. Allows changing the `readsb` output data type. | `beast_reduce_plus_out` |
126 | | `MLAT_FEED_DESTINATION_HOSTNAME` | Optional. Allows changing the MLAT server hostname. | `feed.radarplane.com` |
127 | | `MLAT_FEED_DESTINATION_PORT` | Optional. Allows changing the MLAT server TCP port. | `31090` |
128 |
129 | ## Ports
130 |
131 | | Port | Purpose |
132 | |---------|---------------------------------------------------------------------------------------------------------------------------------------------|
133 | | `30105` | MLAT data in Beast format for tools such as [`graphs1090`](https://github.com/mikenye/docker-graphs1090) and/or [`tar1090`][docker-tar1090]
134 |
135 | ## Logging
136 |
137 | * All processes are logged to the container's stdout, and can be viewed with `docker logs [-f] container`.
138 |
139 | [docker-readsb-protobuf]: https://github.com/sdr-enthusiasts/docker-readsb-protobuf
140 |
141 | [docker-tar1090]: https://github.com/sdr-enthusiasts/docker-tar1090
142 |
--------------------------------------------------------------------------------
/feeder-containers/feeding-radarvirtuel.md:
--------------------------------------------------------------------------------
1 | ---
2 | description: 'If you wish to feed RadarVirtuel, follow the steps below.'
3 | ---
4 |
5 | # Feeding RadarVirtuel
6 |
7 | The main goal of [RadarVirtuel](https://www.radarvirtuel.com/) is to collect data about flights. Although RadarVirtuel welcomes feeding stations from all over the world, their differentiator is to collect information about traffic around smaller airports around the world.
8 |
9 | The docker image [`ghcr.io/sdr-enthusiasts/docker-radarvirtuel`](https://github.com/sdr-enthusiasts/docker-radarvirtuel) contains the required feeder software and all required prerequisites and libraries. This needs to run in conjunction with `ultrafeeder`, `tar1090`, or another RAW provider.
10 |
11 | ## Setting up Your Station
12 |
13 | ### Obtaining an RadarVirtuel Feeder Key
14 |
15 | First-time users should obtain a RadarVirtuel Feeder key. To request one, email [support@adsbnetwork.com](mailto:support@adsbnetwork.com) with the following information:
16 |
17 | * Your name
18 | * The Lat/Lon and nearest airport of your station
19 | * Your Raspberry Pi model (or other hardware if not Raspberry Pi)
20 | * Mention that you will feed using a Docker container.
21 |
22 | ### Update `.env` file with RadarVirtuel Feeder Key
23 |
24 | Inside your application directory (`/opt/adsb`), edit the `.env` file using your favorite text editor. Beginners may find the editor `nano` easy to use:
25 |
26 | ```shell
27 | nano /opt/adsb/.env
28 | ```
29 |
30 | This file holds all of the commonly used variables (such as our latitude, longitude and altitude). We're going to add our RadarVirtuel Feeder Key to this file. Add the following line to the file:
31 |
32 | ```shell
33 | RV_FEEDER_KEY=YOURFEEDERKEY
34 | ```
35 |
36 | * Replace `YOURFEEDERKEY` with the key you received in response to your email.
37 |
38 | For example:
39 |
40 | ```shell
41 | RV_FEEDER_KEY=xxxx:432143214473214732017432014747382140723
42 | ```
43 |
44 | ### Deploying feeder container
45 |
46 | Open the `docker-compose.yml` file that was created when deploying `ultrafeeder`.
47 |
48 | Append the following lines to the end of the file (inside the `services:` section).
49 |
50 | ```yaml
51 | radarvirtuel:
52 | image: ghcr.io/sdr-enthusiasts/docker-radarvirtuel:latest
53 | container_name: radarvirtuel
54 | hostname: radarvirtuel
55 | restart: unless-stopped
56 | environment:
57 | - FEEDER_KEY=${RV_FEEDER_KEY}
58 | - SOURCE_HOST=ultrafeeder:30002
59 | - RV_SERVER=mg22.adsbnetwork.com:50050
60 | - VERBOSE=OFF
61 | - MLAT_SERVER=mlat.adsbnetwork.com:50000
62 | - MLAT_HOST=ultrafeeder:30005
63 | - LAT=${FEEDER_LAT}
64 | - LON=${FEEDER_LONG}
65 | - ALT=${FEEDER_ALT_M}
66 | tmpfs:
67 | - /tmp:rw,nosuid,nodev,noexec,relatime,size=128M
68 | volumes:
69 | - "/etc/localtime:/etc/localtime:ro"
70 | - "/etc/timezone:/etc/timezone:ro"
71 | ```
72 |
73 | To explain what's going on in this addition:
74 |
75 | * We're creating a container called `radarvirtuel`, from the image `ghcr.io/sdr-enthusiasts/docker-radarvirtuel`.
76 | * We're passing several environment variables to the container:
77 | * `FEEDER_KEY` contains the key that you added to `.env` as per the instructions above
78 | * `SOURCE_HOST` indicates where to get the RAW data from
79 | * `RV_SERVER` is the address of the RadarVirtuel server where your data will be sent. Please do not change this unless you're specifically instructed to
80 | * `VERBOSE` can be `ON` (meaning: show lots of information in the docker logs) or `OFF` (show only errors in the docker logs)
81 | * Enabling receiving MLAT RAW data and sending latitude, longitude and altitude from the .env file
82 | * The mounted volumes make sure that the container will use the same timezone as your host system
83 |
84 | ## Update `ultrafeeder` container configuration
85 |
86 | Before running `docker compose`, we also want to update the configuration of the `ultrafeeder` container, so that it generates MLAT data for radarvirtuel.
87 |
88 | **NOTE: If you are using the sample `docker-compose.yml` provided, this step has already been done for you.**
89 |
90 | Open the `docker-compose.yml` and make the following environment value is part of the `ULTRAFEEDER_CONFIG` variable to the `ultrafeeder` service:
91 |
92 | ```yaml
93 | - ULTRAFEEDER_CONFIG=mlathub,radarvirtuel,30105,beast_in;
94 | ```
95 |
96 | To explain this addition, the `ultrafeeder` container will connect to the `radarvirtuel` container on port `30105` and receive MLAT data. This data will then be included in any outbound data streams from `ultrafeeder`.
97 |
98 | ## Refresh running containers
99 |
100 | Once the file has been updated, issue the command `docker compose pull radarvirtuel && docker compose up -d` in the application directory to apply the changes and bring up the `radarvirtuel` container. You should see the following output:
101 |
102 | ```text
103 | ✔ Container ultrafeeder Running
104 | ✔ Container piaware Running
105 | ✔ Container fr24 Running
106 | ✔ Container adsbhub Running
107 | ✔ Container radarvirtuel Started
108 | ```
109 |
110 | We can view the logs for the environment with the command `docker logs radarvirtuel`, or continually "tail" them with `docker logs -f radarvirtuel`. The logs will be fairly unexciting and look like this:
111 |
112 | ```text
113 | [s6-init] making user provided files available at /var/run/s6/etc...exited 0.
114 | [s6-init] ensuring user provided files have correct perms...exited 0.
115 | [fix-attrs.d] applying ownership & permissions fixes...
116 | [fix-attrs.d] done.
117 | [cont-init.d] executing container initialization scripts...
118 | [cont-init.d] done.
119 | [services.d] starting services
120 | [radarvirtuel/radarvirtuel][Tue May 4 17:06:32 EDT 2021] RadarVirtuel was started as an s6 service
121 | [services.d] done.
122 | [radarvirtuel/imalive][Tue May 4 17:06:32 EDT 2021] Started as an s6 service
123 | ```
124 |
125 | Once running, you can visit (replace "xxxx" with the name of your station, which is the first part of the Feeder Key you received) to view the data you are feeding to RadarVirtuel. For example: .
126 |
127 | ## Troubleshooting
128 |
129 | Most log messages are self-explanatory and have suggestions on how to trouble-shoot your issue. Here is some additional information that may help:
130 |
131 | * Sometimes, the logs may show error messages that it cannot connect to your `SOURCE_HOST`. If these messages show every few seconds, you have a problem (read below). If there are no new messages after a bit, it means that your station finally connected to the `SOURCE_HOST`. This connection delay is often caused by RadarVirtuel becoming "up and running" before `tar1090` or `ultrafeeder` do. This will fix itself within less than a minute.
132 | * This message keeps on scrolling and it doesn't stop after a while. In that case, `tar1090` or `ultrafeeder` cannot be reached.
133 | * If you configured `tar1090`, there's nothing else to configure. Make sure the `tar1090` container is up and running and is receiving data!
134 | * You see log messages about the Feeder Key being incorrect. This is quite self-explanatory: check your feeder key.
135 | * You see messages about not being able to reach the RadarVirtuel Server. This may be a temporary outage. If the message consists for several hours, please contact [support@adsbnetwork.com](mailto:support@adsbnetwork.com) to see if there's something going on.
136 |
137 | ## Advanced
138 |
139 | If you want to look at more options and examples for the `radarvirtuel` container, you can find the repository [here](https://github.com/sdr-enthusiasts/docker-radarvirtuel)
140 |
141 | ## More information and support
142 |
143 | * RadarVirtuel and ADSBNetwork are owned and operated by Laurent Duval, who can be reached at [support@adsbnetwork.com](mailto:support@adsbnetwork.com)
144 | * You can always find help on the #adsb-containers channel on the [SDR Enthusiasts Discord server](https://discord.gg/m42azbZydy). This channel is meant for Noobs (beginners) and Experts alike.
145 |
--------------------------------------------------------------------------------
/foundations/common-tasks-and-info.md:
--------------------------------------------------------------------------------
1 | ---
2 | description: >-
3 | Now that we have our first container up and running, common management and
4 | monitoring tasks and information are outlined below and will apply to the
5 | remainder of this guide.
6 | ---
7 |
8 | # Common Tasks and Information
9 |
10 | The following tasks and information will be useful as you continue through this guide. Familiarise yourself with the commands and information on this page.
11 |
12 | ## Controlling our `adsb` application
13 |
14 | ### Stopping the `adsb` application
15 |
16 | If you need to bring the environment down \(for example, if you need to unplug the RTL-SDR USB dongle for maintenance\), you can issue the command `docker compose down` from the application directory \(the directory containing your `docker-compose.yml` file\).
17 |
18 | ### Starting the `adsb` application
19 |
20 | To start the environment, or apply any changes made to your `docker-compose.yml` file, you can issue the command `docker compose up -d` from the application directory.
21 |
22 | ### Viewing container logs
23 |
24 | To "tail" the consolidated logs of all containers that make up the `adsb` application, you can issue the command `docker compose logs -f` from the application directory.
25 |
26 | Individual container logs can be "tailed" with `docker logs -f `.
27 |
28 | If you want to limit the output to, for example, the last 100 lines, you can add `--tail=100` to either of the logs commands above. If you want to search for a specific word or phrase in the output, you can add a `| grep ` to the end of the commands.
29 |
30 | ### Updating containers to latest version
31 |
32 | If you would like to manually update your containers to the latest versions of their images, you can run the following commands from the application directory:
33 |
34 | ```shell
35 | docker compose pull
36 | docker compose up -d
37 | ```
38 |
39 | ### Updating container configuration
40 |
41 | If you need to update a container's configuration in `docker-compose.yml` or in the `.env` file, once complete, issue the command `docker compose up -d` \(in the `docker-compose.yml` file's directory\) and the affected containers will be recreated by `docker compose` to reflect the updated configuration.
42 |
43 | ### Start containers on system boot
44 |
45 | All of the containers defined within this document will be configured with the directive `restart: unless-stopped`. This will ensure the containers are automatically started if the host is rebooted unless you have manually stopped the container(s) previously.
46 |
47 | ## Information on Healthchecks
48 |
49 | Images can implement [healthchecks](https://docs.docker.com/engine/reference/builder/). A healthcheck is a script that docker runs within the container periodically that tells docker whether the container is operating as expected.
50 |
51 | For example, in the `ghcr.io/sdr-enthusiasts/docker-tar1090` container, the [healthcheck script](https://github.com/sdr-enthusiasts/docker-tar1090/blob/main/rootfs/healthcheck.sh) does the following:
52 |
53 | * For each expected network connection, make sure the connection exists
54 | * Make sure that messages are being received from the SDR
55 | * Make sure that the services running within the container aren't dying over and over for some reason
56 |
57 | If all of the checks above pass, the container is considered healthy. If any fail, the container is considered unhealthy.
58 |
59 | Earlier, we ran the command `docker ps`, to see our newly created `ultrafeeder` container up and running:
60 |
61 | ```text
62 | CONTAINER ID IMAGE COMMAND CREATED STATUS PORTS NAMES
63 | 7b9c4be5a410 ghcr.io/sdr-enthusiasts/docker-adsb-ultrafeeder:latest "/init" 17 hours ago Up 17 hours (healthy) 0.0.0.0:8080->8080/tcp, :::8080->8080/tcp ultrafeeder
64 | ```
65 |
66 | Notice that next to the container status, there is some information about the container's health. This may be one of the following:
67 |
68 | * No health information: Not all images have healthchecks implemented. If an image doesn't report health, this is why.
69 | * `(health: starting)`: The container will wait up to a predefined start-period \(defined in the [Dockerfile](https://github.com/sdr-enthusiasts/docker-tar1090/blob/main/Dockerfile#L179)\) or until the healthcheck script returns a healthy result.
70 | * `(healthy)`: The container is operating as expected.
71 | * `(unhealthy)`: The container is not operating as expected.
72 |
73 | Later in this guide we will implement a method to automatically restart any unhealthy containers. This way, if your SDR "wedges", the container will eventually go unhealthy and be restarted.
74 |
75 | Where practical, we try to include healthchecks in all our images, so as you go through this guide and deploy more containers, you should see a health status whenever you issue the `docker ps` command.
76 |
77 | ### Reason for healthy/unhealthy?
78 |
79 | You can inspect the container for some \(hopefully\) meaningful output from the healthcheck script.
80 |
81 | If you issue the command `docker inspect ` \(replacing `` with the name of the container you're interested in\), you'll see lots of information about the container, including the output of the most recent run of the healthcheck script. This output is in JSON format, so with the help of the `jq` utility we can easily find our `ultrafeeder` container's most recent health information. First make sure `jq` is installed with `sudo apt install -y jq`, then we can check the `ultrafeeder` container's health with the following command:
82 |
83 | ```shell
84 | docker inspect ultrafeeder | jq .[0].State.Health.Log | jq .[-1].Output | awk '{gsub(/\\n/,"\n")}1'
85 | ```
86 |
87 | Which will return something like this:
88 |
89 | ```text
90 | "readsb last updated: 1683575756.737, now: 1683575757.348255120, delta: .611255120. HEALTHY
91 | nginx deaths: 0. HEALTHY
92 | readsb deaths: 0. HEALTHY
93 | tar1090 deaths: 0. HEALTHY
94 | "
95 | ```
96 |
97 | An `ExitCode` of `0` represents a healthy result. An `ExitCode` of `1` represents an unhealthy result.
98 | The first line is showing that we've received messages from the SDR in the past 15 minutes. The remaining lines show the number of times a service has had an "abnormal death" \(crashed for some reason\).
99 |
100 | ### Disabling Healthchecks
101 |
102 | On systems with with low spec CPU/memory, you may wish to disable healthchecks to gain back some precious CPU cycles. There are ways to disable the docker healthchecks in the `docker-compose.yml` file. However, versions of these images have been published that have the healthcheck removed, so it may be easier to simply change the image's `latest` tag to `latest_nohealthcheck`.
103 |
--------------------------------------------------------------------------------
/foundations/deploy-dump978-usa-only.md:
--------------------------------------------------------------------------------
1 | ---
2 | description: >-
3 | The "dump978" container receives 978MHz UAT signals from your SDR (a different SDR from the one receiving 1090MHz signals), and
4 | demodulates ADS-B UAT messages, making them available for all other containers.
5 | ---
6 |
7 | # Deploy "dump978" \(USA Only\)
8 |
9 | ## USA Only
10 |
11 | The FAA has adopted 1090MHz for all flight levels, and UAT only for operations below 18,000 feet. UAT supports two-way links, and the FAA provides additional services on the uplink including [TIS-B](https://www.faa.gov/air_traffic/technology/equipadsb/capabilities/ins_outs/#tisb), and [ADS-R](https://www.faa.gov/air_traffic/technology/equipadsb/capabilities/ins_outs#adsr), as well as [FIS-B](https://www.faa.gov/air_traffic/technology/equipadsb/capabilities/ins_outs#fisb), for weather and aeronautical information. Dual 1090/UAT systems have not been adopted in any other country.
12 |
13 | **If you live outside of the USA \(or only have one SDR\), you can skip this section!**
14 |
15 | ## Identify your UAT dongle's optimal PPM
16 |
17 | Every RTL-SDR dongle will have a small frequency error as it is cheaply mass produced and not tested for accuracy. This frequency error is linear across the spectrum, and can be adjusted in most SDR programs by entering a PPM (parts per million) offset value. This allows you to adjust the PPM figure using the ADSB_SDR_PPM environment variable.
18 |
19 | Unplug all SDRs, leaving only the SDR to be used for 978MHz reception plugged in. Issue the following command:
20 |
21 | ```shell
22 | docker run --rm -it --entrypoint /scripts/estimate_rtlsdr_ppm.sh --device /dev/bus/usb ghcr.io/sdr-enthusiasts/docker-readsb-protobuf:latest
23 | ```
24 |
25 | This takes about 30 minutes and will print a numerical value for estimated optimum PPM setting.
26 |
27 | ## Update the .env file for UAT
28 |
29 | Inside your application directory \(`/opt/adsb`\), edit the `.env` file using your favourite text editor. Beginners may find the editor `nano` easy to use:
30 |
31 | ```shell
32 | nano /opt/adsb/.env
33 | ```
34 |
35 | This file holds all of the commonly used variables \(such as our latitude, longitude and altitude\). We're going to add more variables associated our UAT dongle.
36 |
37 | ```shell
38 | UAT_SDR_SERIAL=978
39 | UAT_SDR_GAIN=
40 | UAT_SDR_PPM=
41 | ```
42 |
43 | * `UAR_SDR_SERIAL` is set to the serial number for your ADS-B dongle; the previous serialization steps set this to 978 by default but if you have used a different serial number enter it here
44 | * `UAT_SDR_GAIN` is set to your desired dongle gain in dB, or `autogain` if you would like the software to determine the optimal gain
45 | * `UAT_SDR_PPM` is set to your desired dongle PPM setting. Enter the number from the PPM estimation step earlier on this page.
46 |
47 | For example:
48 |
49 | ```shell
50 | UAT_SDR_SERIAL=978
51 | UAT_SDR_GAIN=autogain
52 | UAT_SDR_PPM=1
53 | ```
54 |
55 | ## Deploying `dump978` container
56 |
57 | Open the `docker-compose.yml` file that was created when deploying `ultrafeeder`.
58 |
59 | Append the following lines to the end of the file \(under the `services:` section\):
60 |
61 | ```yaml
62 | dump978:
63 | image: ghcr.io/sdr-enthusiasts/docker-dump978:latest
64 | container_name: dump978
65 | restart: unless-stopped
66 | device_cgroup_rules:
67 | - 'c 189:* rwm'
68 | environment:
69 | - TZ=${FEEDER_TZ}
70 | - LAT=${FEEDER_LAT}
71 | - LON=${FEEDER_LONG}
72 | - DUMP978_RTLSDR_DEVICE=${UAT_SDR_SERIAL}
73 | - DUMP978_SDR_GAIN=${UAT_SDR_GAIN}
74 | - DUMP978_SDR_PPM=${UAT_SDR_PPM}
75 | volumes:
76 | - /opt/adsb/dump978:/var/globe_history
77 | - /dev:/dev:ro
78 | ports:
79 | - 30980:80
80 | tmpfs:
81 | - /run:exec,size=64M
82 | - /tmp:size=64M
83 | - /var/log:size=32M
84 | ```
85 |
86 | To explain what's going on in this addition:
87 |
88 | * Create a service named `dump978` that will run the `ghcr.io/sdr-enthusiasts/docker-dump978` container.
89 | * We're presenting the USB bus through to this container \(so `dump978` can talk to the USB-attached SDR\).
90 | * We're passing several environment variables to the container:
91 | * `TZ` will use the `FEEDER_TZ` variable from your `.env` file
92 | * `DUMP978_RTLSDR_DEVICE=${UAT_SDR_SERIAL}` tells `dump978` to use the RTL-SDR device with the serial from your `.env` file
93 | * The container will use the SDR gain and PPM values from your `.env` file (`${UAT_SDR_GAIN}` and `${UAT_SDR_PPM}`)
94 |
95 | ## Update `ultrafeeder` container configuration
96 |
97 | Before running `docker compose`, we also want to update the configuration of the `ultrafeeder` container, so that it pulls the demodulated UAT data from the `dump978` container. If you used the sample `docker-compose.yml` provided this has already been done.
98 |
99 | Open the `docker-compose.yml` and add the following environment value to the `ULTRAFEEDER_CONFIG` variable under the `ultrafeeder` service:
100 |
101 | ```yaml
102 | - ULTRAFEEDER_CONFIG=adsb,dump978,30978,uat_in;
103 | ```
104 |
105 | In addition, add these lines in the `GRAPHS1090` section of the `ultrafeeder` service:
106 |
107 | ```yaml
108 | # GRAPHS1090 (Decoder and System Status Web Page) parameters:
109 | - ENABLE_978=yes
110 | - URL_978=http://dump978/skyaware978
111 | ```
112 |
113 | To explain this addition, the `ultrafeeder` container will connect to the `dump978` container on port `30978` and receive UAT data. This UAT data will then be included in any outbound data streams sent from `ultrafeeder`.
114 |
115 | ## Refresh running containers
116 |
117 | At this point, you can issue the command `docker compose up -d` to refresh both the `ultrafeeder` and `dump978` containers.
118 |
119 | ## Viewing Live Data
120 |
121 | Firstly, it should be noted that there is generally vastly less UAT traffic than ADS-B 1090MHz traffic, so don't immediately assume the `dump978` container isn't working if you can't immediately see UAT flights. Provided the container is running and healthy, to see the data being received and decoded by our new container, run the command `docker exec -it dump978 viewadsb`. This should display a real-time departure-lounge-style screen showing all the aircraft being tracked.
122 |
123 | For example:
124 |
125 | ```text
126 | Hex Mode Sqwk Flight Alt Spd Hdg Lat Long RSSI Msgs Ti |
127 | ─-------------------------------------------------------------------------------
128 | A646B3 S 3000 83 295 42.106 -71.352 -24.7 22 0
129 | ... other aircraft removed from output for brevity ...
130 | ```
131 |
132 | Press `CTRL-C` to escape this screen.
133 |
134 | You should also be able to point your web browser at `http://docker.host.ip.addr:30980/skyaware978` to view the web interface \(change `docker.host.ip.addr` to the IP address of your docker host\). You should see a map showing your currently tracked aircraft by the docker-dump978 container; these may include both aircraft received via UAT as well as TIS-B/ADS-R repeated transmissions that you receive at 978 MHz.
135 |
136 | ## Feeder Configuration
137 |
138 | The majority of feeders will happily accept a combined 1090MHz & 978MHz feed coming from `ultrafeeder`, so there should be nothing further to do.
139 |
140 | The current exceptions are:
141 |
142 | * `piaware` - FlightAware has separate feeder binaries for 1090MHz and 978MHz.
143 | * `Airnav Radar` - Airnav Radar needs some additional parameters to support both 1090MHz and 978MHz.
144 |
145 | The additional configuration directives are discussed on each container's page.
146 |
147 | ## Advanced
148 |
149 | If you want to look at more options and examples for the `dump978` container, you can find the repository [here](https://github.com/sdr-enthusiasts/docker-dump978).
150 |
--------------------------------------------------------------------------------
/foundations/deploy-readsb-container.md:
--------------------------------------------------------------------------------
1 | ---
2 | description: >-
3 | The "readsb" container is the heart of our "adsb" application. It receives
4 | 1090MHz ADS-B ES RF signals from your SDR, and demodulates ADS-B messages,
5 | making them available for all other containers.
6 | ---
7 |
8 | # Deploy "readsb"
9 |
10 | In your favourite text editor, create a file named `docker-compose.yml` in your application directory \(`/opt/adsb`\) if following along verbatim.
11 |
12 | ```shell
13 | nano docker-compose.yml
14 | ```
15 |
16 | ```yaml
17 | version: '3.8'
18 |
19 | volumes:
20 | readsbpb_rrd:
21 | readsbpb_autogain:
22 |
23 | services:
24 | readsb:
25 | image: ghcr.io/sdr-enthusiasts/docker-readsb-protobuf:latest
26 | container_name: readsb
27 | hostname: readsb
28 | restart: unless-stopped
29 | devices:
30 | - /dev/bus/usb:/dev/bus/usb
31 | ports:
32 | - 8080:8080
33 | environment:
34 | - TZ=${FEEDER_TZ}
35 | - READSB_DEVICE_TYPE=rtlsdr
36 | - READSB_RTLSDR_DEVICE=1090
37 | - READSB_GAIN=autogain
38 | - READSB_LAT=${FEEDER_LAT}
39 | - READSB_LON=${FEEDER_LONG}
40 | - READSB_RX_LOCATION_ACCURACY=2
41 | - READSB_STATS_RANGE=true
42 | - READSB_NET_ENABLE=true
43 | volumes:
44 | - readsbpb_rrd:/run/collectd
45 | - readsbpb_autogain:/run/autogain
46 | tmpfs:
47 | - /run/readsb
48 | - /var/log
49 | ```
50 |
51 | The above will:
52 |
53 | * Create two docker volumes, `readsbpb_rrd` and `readsb_autogain`, which are used to store the RRD files and autogain state files respectively.
54 | * Create a service named `readsb` that will run the `ghcr.io/sdr-enthusiasts/docker-readsb-protobuf` container.
55 | * We're presenting the USB bus through to this container \(so `readsb` can talk to the USB-attached SDR\).
56 | * We're mapping TCP port `8080` through to the container so we can access the web interface.
57 | * The variable `READSB_RTLSDR_DEVICE` tells `readsb` to look for an RTLSDR device with the serial of `1090` (that we re-serialized in an earlier step).
58 | * We're passing several environment variables through, including our timezone, latitude and longitude from the `.env` file \(denoted by `${VARIABLE}`\).
59 | * We're using `tmpfs` for volumes that have regular I/O. Any files stored in a `tmpfs` mount are temporarily stored outside the container's writable layer. This helps to reduce:
60 | * The size of the container, by not writing changes to the underlying container; and
61 | * SD Card or SSD wear
62 |
63 | Once this file is created, issue the command `docker compose up -d` to bring up the environment.
64 |
65 | ```shell
66 | docker compose up -d
67 | ```
68 |
69 | You should see the following output:
70 |
71 | ```shell
72 | Creating network "adsb_default" with the default driver
73 | Creating readsb ... done
74 | ```
75 |
76 | We can view the logs for the environment with the command `docker compose logs`, or continually "tail" them with `docker compose logs -f`. At this stage, the logs will be fairly unexciting and look like this:
77 |
78 | ```text
79 | [s6-init] making user provided files available at /var/run/s6/etc...exited 0.
80 | [s6-init] ensuring user provided files have correct perms...exited 0.
81 | [fix-attrs.d] applying ownership & permissions fixes...
82 | [fix-attrs.d] done.
83 | [cont-init.d] executing container initialization scripts...
84 | [cont-init.d] 01-timezone: executing...
85 | [cont-init.d] 01-timezone: exited 0.
86 | [cont-init.d] 02-sanity-check: executing...
87 | [cont-init.d] 02-sanity-check: exited 0.
88 | [cont-init.d] 03-initialise-gain: executing...
89 | [cont-init.d] 03-initialise-gain: exited 0.
90 | [cont-init.d] 04-telegraf: executing...
91 | [cont-init.d] 04-telegraf: exited 0.
92 | [cont-init.d] 05-rtlsdr-biastee: executing...
93 | [cont-init.d] 05-rtlsdr-biastee: exited 0.
94 | [cont-init.d] done.
95 | [services.d] starting services
96 | [services.d] done.
97 | [readsb] 2020/11/09 13:23:47 Mon Nov 9 13:23:47 2020 AWST Mictronics v4.0.1 starting up.
98 | [autogain] 2020/11/09 13:23:47 Entering auto-gain stage: init
99 | [collectd] 2020/11/09 13:23:47 [2020-11-09 13:23:47] plugin_load: plugin "logfile" successfully loaded.
100 | [readsb] 2020/11/09 13:23:47 rtlsdr: using device #0: Generic RTL2832U (Realtek, RTL2832U, SN 00001090)
101 | [lighttpd] 2020/11/09 13:23:47 2020-11-09 13:23:47: (server.c.1464) server started (lighttpd/1.4.53)
102 | [readsb] 2020/11/09 13:23:47 Found Rafael Micro R820T tuner
103 | [readsb] 2020/11/09 13:23:47 rtlsdr: tuner gain set to 49.6 dB
104 | ```
105 |
106 | We can see our container running with the command `docker ps`:
107 |
108 | ```text
109 | $ docker ps
110 | CONTAINER ID IMAGE COMMAND CREATED STATUS PORTS NAMES
111 | 7b9c4be5a410 ghcr.io/sdr-enthusiasts/docker-readsb-protobuf:latest "/init" 17 hours ago Up 17 hours (healthy) 0.0.0.0:8080->8080/tcp, :::8080->8080/tcp readsb
112 | ```
113 |
114 | We can see the `adsb_default` network with the command `docker network ls`:
115 |
116 | ```text
117 | NETWORK ID NAME DRIVER SCOPE
118 | 2a4ef415c4d3 adsb_adsbnet bridge local
119 | ```
120 |
121 | We can see the `adsb_readsbpb_*` volumes with the command `docker volume ls`:
122 |
123 | ```text
124 | DRIVER VOLUME NAME
125 | local adsb_readsbpb_autogain
126 | local adsb_readsbpb_rrd
127 | ```
128 |
129 | ## Viewing Live Data
130 |
131 | To see the data being received and decoded by our new container, run the command `docker exec -it readsb viewadsb`. This should display a real-time departure-lounge-style screen showing all the aircraft being tracked, for example:
132 |
133 | ```text
134 | Hex Mode Sqwk Flight Alt Spd Hdg Lat Long RSSI Msgs Ti -
135 | ────────────────────────────────────────────────────────────────────────────────
136 | 7CF86F S 2061 BFRT22 10025 219 286 -31.871 116.586 -28.6 14 1
137 | 7C79CA S 1200 YCC 2975 126 152 -32.490 115.887 -28.2 68 0
138 | 7C79CB S 3000 YCD 1525 118 352 -32.221 115.948 -25.6 269 0
139 | 7C79D1 S 1200 YCJ 3575 113 185 -32.375 115.837 -29.2 289 1
140 | 7C79DB S 3000 YCT 1375 119 358 -32.176 115.940 -25.1 126 0
141 | 7C79DC S 1200 YCU 3000 96 229 -32.437 115.929 -28.5 260 5
142 | 7CF9E1 S 2055 1250 178 084 -29.8 18 0
143 | 7C822A S 3730 ZZW 1500 -23.5 258 0
144 | 7C7A3F S 1273 VOZ1485 grnd 0 -25.4 11 3
145 | 7C7A6E S 1200 YGW 2575 99 191 -32.296 115.813 -20.3 522 0
146 | 7C1ABD S 4265 UTY6071 33125 398 197 -30.535 116.638 -23.6 363 0
147 | 7C42D2 S 3664 NWK1663 grnd 59 239 -31.936 115.968 -21.6 258 12
148 | 7C1B35 S grnd 9 281 -28.3 4 15
149 | 7C1B3C S 4306 VOZ9224 34000 405 192 -30.804 116.239 -22.5 150 0
150 | 7C1C68 S 3646 FWA 5000 191 253 -31.803 116.299 -25.4 396 0
151 | 7C6CA2 S 3760 NWK1885 7825 239 193 -31.609 116.244 -13.1 509 0
152 | 7C6CA4 S 4035 NWK2873 3075 141 239 -31.846 116.143 -20.8 566 0
153 | 7C4518 S 1464 QJE1928 13225 437 037 -31.840 116.316 -10.7 516 0
154 | 7C0DAB S 3000 CZH 800 71 303 -32.085 115.923 -18.3 273 0
155 | 7C6DB5 S 36975 -31.8 11 32
156 | 7C3F19 S 4063 MQZ 1325 105 240 -31.898 116.043 -16.8 601 0
157 | 7C7F72 S -31.5 7 37
158 | 7C7796 S 4310 UTY734 34000 381 181 -30.327 116.639 -25.8 82 0
159 | 7CF7C4 S PHRX1A -20.3 22 1
160 | 7CF7C5 S PHRX1B -21.6 15 9
161 | 7CF7C6 S PHRX2A -21.3 15 1
162 | 7CF7C7 S PHRX2B -28.1 3 2
163 | 7C2FD6 S 4223 NWK2878 4025 212 176 -32.006 115.948 -2.1 831 0
164 | ```
165 |
166 | Press `CTRL-C` to escape this screen.
167 |
168 | You should also be able to point your web browser at `http://docker.host.ip.addr:8080/` to view the web interface \(change `docker.host.ip.addr` to the IP address of your docker host\). You should see a map showing your currently tracked aircraft, and a link to the "Performance Graphs".
169 |
170 | It is possible that you won't see any planes, either with the docker command above or when pointing your web browser at the readsb container. This can have a number of root causes - a common one being that active radio transmissions in other frequency bands that are reasonably "close" to the ADS-B band are completely overwhelming your SDR at the default starting gain of 49.6. It may be necessary to lower the starting point for the autogain script to at least allow the detection of some planes in order for the script to work. So if even after a few minutes you don't see any planes at all (and no ADS-B messages in the "Performance Graphs"), you may want to try to force a lower starting gain value into the autogain algorithm. To do this, please execute the following command. You may have to try different values instead of the value of `34` suggested here:
171 |
172 | ```shell
173 | docker exec -it readsb sh -c "/bin/echo 34 > /run/autogain/autogain_current_value"
174 | docker restart readsb
175 | ```
176 |
177 | This first changes the gain value that the autogain script should try next and then stops and restarts the `readasb` container.
178 |
--------------------------------------------------------------------------------
/foundations/deploy-ultrafeeder-container.md:
--------------------------------------------------------------------------------
1 | ---
2 | description: >-
3 | The "ultrafeeder" container is the heart of our "adsb" application. It receives
4 | 1090MHz ADS-B ES signals from your SDR, and demodulates ADS-B messages,
5 | making them available for all other containers.
6 | ---
7 |
8 | # Deploy "ultrafeeder"
9 |
10 | It also provides a website with a map based on tar1090, station statistics (graphs1090), mlat-client, and an mlat-hub to aggregate MLAT results.
11 |
12 | In your favorite text editor, create a file named `docker-compose.yml` in your application directory (`/opt/adsb` if you've been following along verbatim).
13 |
14 | ```shell
15 | nano docker-compose.yml
16 | ```
17 |
18 | ```yaml
19 | services:
20 | ultrafeeder:
21 | # ultrafeeder combines a number of functions:
22 | # - it retrieves and decodes 1090MHz Mode A/C/S data from the SDR(s) using Wiedehopf's branch of readsb
23 | # - it implements a `tar1090` based map on port 80 (mapped to port 8080 on the host)
24 | # - it includes graph1090 (system statistics website) on http://xxxxx/graphs1090
25 | # - it sends ADSB data directly (without the need of additional containers) to the
26 | # "new" aggregators, and, if desired, also to ADSBExchange
27 | # - it includes mlat-client to send MLAT data to these aggregators
28 | # - it includes an MLAT Hub to consolidate MLAT results and make them available to the built-in map and other services
29 |
30 | image: ghcr.io/sdr-enthusiasts/docker-adsb-ultrafeeder
31 | container_name: ultrafeeder
32 | hostname: ultrafeeder
33 | restart: unless-stopped
34 | device_cgroup_rules:
35 | - 'c 189:* rwm'
36 | ports:
37 | - 8080:80 # to expose the web interface
38 | environment:
39 | # --------------------------------------------------
40 | # general parameters:
41 | - LOGLEVEL=error
42 | - TZ=${FEEDER_TZ}
43 | # --------------------------------------------------
44 | # SDR related parameters:
45 | - READSB_DEVICE_TYPE=rtlsdr
46 | - READSB_RTLSDR_DEVICE=${ADSB_SDR_SERIAL}
47 | - READSB_RTLSDR_PPM=${ADSB_SDR_PPM}
48 | #
49 | # --------------------------------------------------
50 | # readsb/decoder parameters:
51 | - READSB_LAT=${FEEDER_LAT}
52 | - READSB_LON=${FEEDER_LONG}
53 | - READSB_ALT=${FEEDER_ALT_M}m
54 | - READSB_RX_LOCATION_ACCURACY=2
55 | - READSB_STATS_RANGE=true
56 | #
57 | # --------------------------------------------------
58 | # Sources and Aggregator connections:
59 | # Note - remove the ones you are not using / feeding
60 | # Make sure that each line ends with a semicolon ";"
61 | # if you are not using dump978, feel free to remove the first line
62 | - ULTRAFEEDER_CONFIG=
63 | adsb,dump978,30978,uat_in;
64 | adsb,feed.adsb.fi,30004,beast_reduce_plus_out;
65 | adsb,in.adsb.lol,30004,beast_reduce_plus_out;
66 | adsb,feed.airplanes.live,30004,beast_reduce_plus_out;
67 | adsb,feed.planespotters.net,30004,beast_reduce_plus_out;
68 | adsb,feed.theairtraffic.com,30004,beast_reduce_plus_out;
69 | adsb,data.avdelphi.com,24999,beast_reduce_plus_out;
70 | adsb,skyfeed.hpradar.com,30004,beast_reduce_plus_out;
71 | adsb,feed.radarplane.com,30001,beast_reduce_plus_out;
72 | adsb,dati.flyitalyadsb.com,4905,beast_reduce_plus_out;
73 | adsb,feed1.adsbexchange.com,30004,beast_reduce_plus_out;
74 | mlat,feed.adsb.fi,31090;
75 | mlat,in.adsb.lol,31090;
76 | mlat,feed.airplanes.live,31090;
77 | mlat,mlat.planespotters.net,31090;
78 | mlat,feed.theairtraffic.com,31090;
79 | mlat,skyfeed.hpradar.com,31090;
80 | mlat,feed.radarplane.com,31090;
81 | mlat,dati.flyitalyadsb.com,30100;
82 | mlat,feed.adsbexchange.com,31090;
83 | mlathub,piaware,30105,beast_in;
84 | mlathub,rbfeeder,30105,beast_in;
85 | mlathub,radarvirtuel,30105,beast_in;
86 | mlathub,planewatch,30105,beast_in;
87 | # --------------------------------------------------
88 | - UUID=${ULTRAFEEDER_UUID}
89 | - MLAT_USER=${FEEDER_NAME}
90 | - READSB_FORWARD_MLAT_SBS=true
91 | #
92 | # --------------------------------------------------
93 | # TAR1090 (Map Web Page) parameters:
94 | - UPDATE_TAR1090=true
95 | - TAR1090_DEFAULTCENTERLAT=${FEEDER_LAT}
96 | - TAR1090_DEFAULTCENTERLON=${FEEDER_LONG}
97 | - TAR1090_MESSAGERATEINTITLE=true
98 | - TAR1090_PAGETITLE=${FEEDER_NAME}
99 | - TAR1090_PLANECOUNTINTITLE=true
100 | - TAR1090_ENABLE_AC_DB=true
101 | - TAR1090_FLIGHTAWARELINKS=true
102 | - HEYWHATSTHAT_PANORAMA_ID=${FEEDER_HEYWHATSTHAT_ID}
103 | - HEYWHATSTHAT_ALTS=${FEEDER_HEYWHATSTHAT_ALTS}
104 | - TAR1090_SITESHOW=true
105 | - TAR1090_RANGE_OUTLINE_COLORED_BY_ALTITUDE=true
106 | - TAR1090_RANGE_OUTLINE_WIDTH=2.0
107 | - TAR1090_RANGERINGSDISTANCES=50,100,150,200
108 | - TAR1090_RANGERINGSCOLORS='#1A237E','#0D47A1','#42A5F5','#64B5F6'
109 | - TAR1090_USEROUTEAPI=true
110 | #
111 | # --------------------------------------------------
112 | # GRAPHS1090 (Decoder and System Status Web Page) parameters:
113 | - GRAPHS1090_DARKMODE=true
114 | #
115 | # --------------------------------------------------
116 | volumes:
117 | - /opt/adsb/ultrafeeder/globe_history:/var/globe_history
118 | - /opt/adsb/ultrafeeder/graphs1090:/var/lib/collectd
119 | - /proc/diskstats:/proc/diskstats:ro
120 | - /dev/bus/usb:/dev/bus/usb:rw
121 | tmpfs:
122 | - /run:exec,size=256M
123 | - /tmp:size=128M
124 | - /var/log:size=32M
125 | ```
126 |
127 | In the file above, you will find several parameters that have values denoted as `${xxxx}`. These values are read from a file in the same directory named `.env` that we created earlier. Alternatively, you can simply replace `${xxxx}` with the value you want to use, for example `READSB_RTLSDR_DEVICE=${ADSB_SDR_SERIAL}` --> `READSB_RTLSDR_DEVICE=0000001090`.
128 |
129 | The `docker-compose.yml` file above will:
130 |
131 | * Create a few mapped docker volumes to store historic message values (`/var/globe_history`), statistics for the graphs (`/var/lib/collectd`), and make the disk statistics (`/proc/diskstats`) and USB devices (`/dev`) available to the container.
132 | * Create a service named `ultrafeeder` that will run the `ghcr.io/sdr-enthusiasts/docker-adsb-ultrafeeder` container.
133 | * We're mapping TCP port `8080` through to the container so we can access the web interface.
134 | * The variable `READSB_RTLSDR_DEVICE` tells `readsb` to look for an RTL-SDR device with the serial of `1090` (that we re-serialized in an earlier step).
135 | * We're passing several environment variables through, including our timezone, latitude and longitude from the `.env` file \(denoted by `${VARIABLE}`\).
136 | * We're using `tmpfs` for volumes that have regular I/O. Any files stored in a `tmpfs` mount are temporarily stored outside the container's writable layer. This helps to reduce:
137 | * The size of the container, by not writing changes to the underlying container; and
138 | * SD Card or SSD wear
139 |
140 | You can find an expanded example of the `docker-compose.yml` file that you can download and edit [here](https://github.com/sdr-enthusiasts/docker-install/blob/main/sample-docker-compose.yml) if you want to see other options, but the sample above is a good start.
141 |
142 | ## Feeding directly from Ultrafeeder
143 |
144 | There are several aggregators, both non-profit and commercial, that can directly be sent data from ultrafeeder without the need for an additional feeder container. We have added them in the example `docker-compose.yml` file above. Here is a partial list of these aggregators. All of them use the `beast_reduce_plus` format for feeding ADS-B data, and `mlat-client` for feeding MLAT:
145 |
146 | | Name | (C)ommercial/
(N)on-profit | Description | Feed details |
147 | | --------------- | ------------------------------ | --------------------------------------------------------- | ------------------------------------------------------------------------------------------ |
148 | | Airplanes.live | N | Run by volunteers that used to be related to adsbexchange | adsb:`feed.airplanes.live` port `30004`
mlat: `feed.airplanes.live` port `31090` |
149 | | ADSB.fi | N | Run by a Finnish IT and aviation enthusiast | adsb:`feed.adsb.fi` port `30004`
mlat: `feed.adsb.fi` port `31090` |
150 | | ADSB.lol | N | Run by an aviation enthusiast located in the Netherlands | adsb:`in.adsb.lol` port `30004`
mlat: `in.adsb.lol` port `31090` |
151 | | Planespotters | N | planespotters.net | adsb:`feed.planespotters.net` port `30004`
mlat: `mlat.planespotters.net` port `31090` |
152 | | The Air Traffic | N | Run by an aviation enthusiast | adsb:`feed.theairtraffic.com` port `30004`
mlat: `mlat.theairtraffic.com` port `31090` |
153 | | AVDelphi | N | Aviation data-science company (non-profit) | adsb:`data.avdelphi.com` port `24999`
mlat: no MLAT |
154 | | ADSB Exchange | C | Large aggregator owned by JetNet | adsb:`feed1.adsbexchange.com` port `30004`
mlat: `feed.adsbexchange.com` port `31090` |
155 | | RadarPlane | N | Run by a few aviation enthusiasts in Canada and Portugal | adsb: `feed.radarplane.com` port `30001`
mlat: `feed.radarplane.com` port `31090` |
156 | | Fly Italy ADSB | N | Run by a few aviation enthusiasts in Italy | adsb: `dati.flyitalyadsb.com` port `4905`
mlat: `dati.flyitalyadsb.com` port `30100` |
157 |
158 | When feeding AdsbExchange, Ultrafeeder will send statistics to adsbexchange.com by default. See the description of the `ADSBX_STATS` parameter on how to disable this.
159 |
160 | ## Using the MLAT results
161 |
162 | A working MLAT configuration is already provided in the example above. See [https://github.com/sdr-enthusiasts/docker-adsb-ultrafeeder/blob/main/README.md#configuring-the-built-in-mlat-hub](https://github.com/sdr-enthusiasts/docker-adsb-ultrafeeder/blob/main/README.md#configuring-the-built-in-mlat-hub) for more details on how to configure more advanced features.
163 |
164 | ## Deploying `ultrafeeder`
165 |
166 | Once the `docker-compose.yml` file is created, issue the command `docker compose up -d` to bring up the environment.
167 |
168 | ```shell
169 | docker compose up -d
170 | ```
171 |
172 | You should see the following output:
173 |
174 | ```text
175 | ⠴ Network adsb_default Created
176 | ✔ Container ultrafeeder Started
177 | ```
178 |
179 | We can view the logs for the environment with the command `docker compose logs`, or continually "tail" them with `docker compose logs -f`. At this stage, the logs will be fairly extensive and unexciting and look like this:
180 |
181 | ```text
182 | [s6-init] making user provided files available at /var/run/s6/etc...exited 0.
183 | [s6-init] ensuring user provided files have correct perms...exited 0.
184 | [fix-attrs.d] applying ownership & permissions fixes...
185 | [fix-attrs.d] done.
186 | [cont-init.d] executing container initialization scripts...
187 | [cont-init.d] 00-libsecomp2: executing...
188 | [cont-init.d] 00-libsecomp2: exited 0.
189 | [cont-init.d] 01-print-container-version: executing...
190 | [2023-05-08 13:15:51.203][01-print-container-version] Container Version: 20230505-190743_9e4ed76_main, build date 2023-05-05 15:07:43 -0400
191 | [cont-init.d] 01-print-container-version: exited 0.
192 | ... (more logs here)
193 | [cont-init.d] done.
194 | [services.d] starting services
195 | [2023-05-08 13:15:53.482][mlat-client] Started as an s6 service
196 | [services.d] done.
197 | [2023-05-08 13:15:53.542][graphs1090] 646 (process ID) old priority 0, new priority 10
198 | [2023-05-08 13:15:53.568][graphs1090-readback] copying DB from disk to /run/collectd
199 | [2023-05-08 13:15:53.612][readsb] WARNING -- READSB_FORWARD_MLAT_SBS has been set! Do not feed the SBS (BaseStation) output of this container to any aggregators!
200 | [2023-05-08 13:15:53.631][readsb] invoked by: /usr/local/bin/readsb --net --quiet --lat ...etc
201 | ```
202 |
203 | We can see our container running with the command `docker ps`:
204 |
205 | ```text
206 | CONTAINER ID IMAGE COMMAND CREATED STATUS PORTS NAMES
207 | 548becf06f0f ghcr.io/sdr-enthusiasts/docker-adsb-ultrafeeder:latest "/init" 2 days ago Up 2 days (healthy) 0.0.0.0:8080->80/tcp ultrafeeder
208 | ```
209 |
210 | We can see the `adsb_default` network with the command `docker network ls`:
211 |
212 | ```text
213 | NETWORK ID NAME DRIVER SCOPE
214 | 9950236691cc adsb_default bridge local
215 | 2facb5a2ac76 bridge bridge local
216 | 0c73e1072dfc host host local
217 | 74247d059bbb none null local
218 | ```
219 |
220 | ## Ultrafeeder Web Pages
221 |
222 | If configured and started using the example above, the container will make a website available at port 8080 of your host machine. Here are a few web pages that are generated (replace `my_host_ip` with the name or IP address of your host machine):
223 |
224 | * `http://my_host_ip:8080/` : `tar1090` map and table of all aircraft received
225 | * `http://my_host_ip:8080/graphs1090/` : page with graphs and operations statistics of your station
226 | * `http://my_host_ip:8080?pTracks` : showing all aircraft tracks received in the last 24 hours
227 | * `http://my_host_ip:8080?heatmap&realheat` : showing a heatmap of all aircraft in the last 24 hours
228 | * `http://my_host_ip:8080?replay` : showing a time-lapse replay of the past few days
229 |
230 | ## Viewing Live Data in Text Format
231 |
232 | To see the data being received and decoded by our new container, run the command `docker exec -it ultrafeeder viewadsb`. This should display a real-time departure-lounge-style screen showing all the aircraft being tracked, for example:
233 |
234 | ```text
235 | Hex Mode Sqwk Flight Alt Spd Hdg Lat Long RSSI Msgs Ti -
236 | ────────────────────────────────────────────────────────────────────────────────
237 | 7CF86F S 2061 BFRT22 10025 219 286 -31.871 116.586 -28.6 14 1
238 | 7C79CA S 1200 YCC 2975 126 152 -32.490 115.887 -28.2 68 0
239 | 7C79CB S 3000 YCD 1525 118 352 -32.221 115.948 -25.6 269 0
240 | 7C79D1 S 1200 YCJ 3575 113 185 -32.375 115.837 -29.2 289 1
241 | 7C79DB S 3000 YCT 1375 119 358 -32.176 115.940 -25.1 126 0
242 | 7C79DC S 1200 YCU 3000 96 229 -32.437 115.929 -28.5 260 5
243 | 7CF9E1 S 2055 1250 178 084 -29.8 18 0
244 | 7C822A S 3730 ZZW 1500 -23.5 258 0
245 | 7C7A3F S 1273 VOZ1485 grnd 0 -25.4 11 3
246 | 7C7A6E S 1200 YGW 2575 99 191 -32.296 115.813 -20.3 522 0
247 | 7C1ABD S 4265 UTY6071 33125 398 197 -30.535 116.638 -23.6 363 0
248 | 7C42D2 S 3664 NWK1663 grnd 59 239 -31.936 115.968 -21.6 258 12
249 | 7C1B35 S grnd 9 281 -28.3 4 15
250 | 7C1B3C S 4306 VOZ9224 34000 405 192 -30.804 116.239 -22.5 150 0
251 | 7C1C68 S 3646 FWA 5000 191 253 -31.803 116.299 -25.4 396 0
252 | 7C6CA2 S 3760 NWK1885 7825 239 193 -31.609 116.244 -13.1 509 0
253 | 7C6CA4 S 4035 NWK2873 3075 141 239 -31.846 116.143 -20.8 566 0
254 | 7C4518 S 1464 QJE1928 13225 437 037 -31.840 116.316 -10.7 516 0
255 | 7C0DAB S 3000 CZH 800 71 303 -32.085 115.923 -18.3 273 0
256 | 7C6DB5 S 36975 -31.8 11 32
257 | 7C3F19 S 4063 MQZ 1325 105 240 -31.898 116.043 -16.8 601 0
258 | 7C7F72 S -31.5 7 37
259 | 7C7796 S 4310 UTY734 34000 381 181 -30.327 116.639 -25.8 82 0
260 | 7CF7C4 S PHRX1A -20.3 22 1
261 | 7CF7C5 S PHRX1B -21.6 15 9
262 | 7CF7C6 S PHRX2A -21.3 15 1
263 | 7CF7C7 S PHRX2B -28.1 3 2
264 | 7C2FD6 S 4223 NWK2878 4025 212 176 -32.006 115.948 -2.1 831 0
265 | ```
266 |
267 | Press `CTRL-C` to escape this screen.
268 |
269 | You should also be able to point your web browser to `http://docker.host.ip.addr:8080/` to view the web interface \(change `docker.host.ip.addr` to the IP address or hostname of your docker host\). You should see a map showing your currently tracked aircraft, and a link to the "Performance Graphs".
270 |
271 | ## UUID security
272 |
273 | The example files above use the same UUID for all feeders. Doing so makes it possible that your information from one site could be tracked on another. An alternative approach is to generate a unique UUID for each website, load those into a variable in .env, and append the UUID to the row in the `ULTRAFEEDER_CONFIG` section. For example:
274 |
275 | ```yaml
276 | - ULTRAFEEDER_CONFIG=
277 | adsb,feed.adsb.fi,30004,beast_reduce_plus_out,uuid=${ADSBFI_UUID};
278 | adsb,in.adsb.lol,30004,beast_reduce_plus_out,uuid=${ADSBLOL_UUID};
279 | mlat,feed.adsb.fi,31090,uuid=${ADSBFI_UUID};
280 | mlat,in.adsb.lol,31090,uuid=${ADSBLOL_UUID};
281 | ```
282 |
283 | ## Preparing and setting up `ultrafeeder` with Prometheus and Grafana
284 |
285 | See [`readme-grafana.MD`](https://github.com/sdr-enthusiasts/docker-adsb-ultrafeeder/blob/main/README-grafana.md) at the container's Github repository web page.
286 |
287 | ## Minimalist setup
288 |
289 | If you want to use `ultrafeeder` *only* as a SDR decoder but without any mapping or stats/graph websites, without MLAT connections or MLAT-hub, etc., for example to minimize CPU and RAM needs on a low CPU/memory single board computer, then do the following:
290 |
291 | * in the `ULTRAFEEDER_CONFIG` parameter, remove any entry that starts with `mlat` or `mlathub`. This will prevent any `mlat-client`s or `mlathub` instances to be launched. If you want to connect the `mlat-client`(s) to external MLAT servers but you don't want to run the overhead of a MLATHUB, you can leave any entries starting with `mlat` in the `ULTRAFEEDER_CONFIG` parameter, and set `MLATHUB_DISABLE=true`
292 | * Set the parameter `TAR1090_DISABLE=true`. This will prevent the `nginx` web server and any websites from being launched
293 | * Make sure *not* to use the `ghcr.io/sdr-enthusiasts/docker-adsb-ultrafeeder:telegraf` label as Telegraf adds a LOT of CPU, disk, and memory use to the container
294 |
295 | ## Advanced
296 |
297 | If you want to look at more options and examples for the `ultrafeeder` container, you can find the repository [here](https://github.com/sdr-enthusiasts/docker-adsb-ultrafeeder).
298 |
--------------------------------------------------------------------------------
/foundations/prepare-the-project-environment.md:
--------------------------------------------------------------------------------
1 | ---
2 | description: >-
3 | In this step, we prepare the folder structure for our "adsb" application, and
4 | create a ".env" file containing our basic details.
5 | ---
6 |
7 | # Prepare the Application Environment
8 |
9 | ## Create a directory to host our project
10 |
11 | We need a directory to host our application. The name of this directory will be the name of our application. Accordingly, we prefer to use `/opt/adsb`, so our application is called "adsb":
12 |
13 | ```shell
14 | sudo mkdir -p -m 777 /opt/adsb
15 | cd /opt/adsb
16 | ```
17 |
18 | ## Generate a UUID
19 |
20 | A UUID is a unique identifier that will identify you to various feeding servers. If you already have a `UUID` that was generated for the ADSBExchange service, feel free to reuse that one. If you don't have one, you can generate one by logging into your Linux machine (Raspberry Pi, etc.) and giving this command:
21 |
22 | ```shell
23 | cat /proc/sys/kernel/random/uuid
24 | ```
25 |
26 | You can use the output string of this command (in format of `00000000-0000-0000-0000-000000000000`) as your UUID. Please use the same UUID consistently for each feeder of your station.
27 |
28 | ## Identify your ADS-B dongle's optimal PPM
29 |
30 | Every RTL-SDR dongle that does not have TXCO\(temperature compensated crystal oscillators\) will have a small frequency error as it is cheaply mass produced and not tested for accuracy. This frequency error is linear across the spectrum, and can be adjusted in most SDR programs by entering a PPM (parts per million) offset value. This allows you to adjust the PPM figure using the ADSB_SDR_PPM environment variable.
31 |
32 | This step is considered optional and mostly legacy/unnecessary at this point, as modern SDRs have TXCO and are likely to be accurate enough for ADS-B reception. However, if you wish to determine the PPM value for your SDR, you can do so by following the instructions below.
33 |
34 | Unplug all SDRs, leaving only the SDR to be used for 1090MHz reception plugged in. Issue the following command:
35 |
36 | ```shell
37 | docker run --rm -it --entrypoint /scripts/estimate_rtlsdr_ppm.sh --device /dev/bus/usb ghcr.io/sdr-enthusiasts/docker-readsb-protobuf:latest
38 | ```
39 |
40 | This takes about 30 minutes and will print a numerical value for Estimated optimum PPM setting once it completes.
41 |
42 | If you decide not to include a PPM value, then you can either set `ADSB_SDR_PPM=` to an empty value in `.env` as shown here, or remove the `READSB_RTLSDR_PPM` parameter from environment section of the `ultrafeeder` or `tar1090` service definition in your `docker-compose.yml` file. (You can also simply remove the `ADSB_SDR_PPM` from your `.env` file, but `docker compose` will show a warning about it that is safe to ignore.)
43 |
44 | ## Create a heywhatsthat Panorama ID
45 |
46 | [Heywhatsthat](https://www.heywhatsthat.com) is a website that can generate an overlay on your map that will show the theoretical range of your location based on obstacles and the curvature of the earth. Follow step 1 at the instructions [here](https://github.com/wiedehopf/tar1090#heywhatsthatcom-range-outline) to generate a panorama for your feeder's location and altitude. In the upper left of the panorama page there will be a URL that will look like this: `https://www.heywhatsthat.com/?view=NN3NNNN1`. That code will be used later in the setup instructions.
47 |
48 | ## Create a `.env` file to hold our environment's variables
49 |
50 | Inside this directory, create a file named `.env` using your favourite text editor. Beginners may find the editor `nano` easy to use:
51 |
52 | ```shell
53 | nano /opt/adsb/.env
54 | ```
55 |
56 | This file will hold all of the commonly used variables \(such as our latitude, longitude, and altitude\). Initially, add the contents of the file as follows (replacing the values enclosed in `<>` with values for your environment):
57 |
58 | ```shell
59 | FEEDER_ALT_FT=
60 | FEEDER_ALT_M=
61 | FEEDER_LAT=
62 | FEEDER_LONG=
63 | FEEDER_TZ=
64 | FEEDER_NAME=
65 | ADSB_SDR_SERIAL=1090
66 | ADSB_SDR_PPM=
67 | ULTRAFEEDER_UUID=
68 | FEEDER_HEYWHATSTHAT_ID=
69 | FEEDER_HEYWHATSTHAT_ALTS=
70 |
71 | ```
72 |
73 | ...where:
74 |
75 | * `FEEDER_ALT_FT` is set your your antenna's height in feet above [mean sea level](https://www.freemaptools.com/elevation-finder.htm)
76 | * `FEEDER_ALT_M` is set to your antenna's height in metres above [mean sea level](https://www.freemaptools.com/elevation-finder.htm)
77 | * `FEEDER_LAT` is set to your antenna's latitude (also available at link above)
78 | * `FEEDER_LONG` is set to your antenna's longitude (also available at link above)
79 | * `FEEDER_TZ` is set to your timezone, in ["TZ database name" format](https://en.wikipedia.org/wiki/List_of_tz_database_time_zones). You can also see your Pi's timezone by giving this command: `cat /etc/timezone`
80 | * `FEEDER_NAME` is set to a location name. This is only used in the title of the map's web page.
81 | * `ADSB_SDR_SERIAL` is set to the serial number for your ADS-B dongle; the previous steps set this to 1090 by default but if you have used a different serial number enter it here
82 | * `ADSB_SDR_PPM` is set to your desired dongle PPM setting. Enter the number from the PPM estimation step earlier on this page.
83 | * `ULTRAFEEDER_UUID` is set to the UUID you generated above
84 | * `FEEDER_HEYWHATSTHAT_ID` is set to the code in the URL generated above
85 | * `FEEDER_HEYWHATSTHAT_ALTS` is a comma delimited list of altitudes in meters for which the map will display a theoretical maximum range; a common starting position is 3000 meters and 12000 meters
86 |
87 | For example:
88 |
89 | ```shell
90 | FEEDER_ALT_FT=103.3465
91 | FEEDER_ALT_M=31.5
92 | FEEDER_LAT=-31.9505
93 | FEEDER_LONG=115.8605
94 | FEEDER_TZ=Australia/Perth
95 | ADSB_SDR_SERIAL=1090
96 | ADSB_SDR_PPM=1
97 | ULTRAFEEDER_UUID=00000000-0000-0000-0000-000000000000
98 | FEEDER_HEYWHATSTHAT_ID=NN3NNNN1
99 | FEEDER_HEYWHATSTHAT_ALTS=3000,12000
100 | ```
101 |
102 | **Note for beginners:** If you run an `ls` command in that directory, you won't see your `.env` file. Files beginning with a period are treated as hidden files. To see the file, you can run `ls -a` \(`-a` for all files\).
103 |
--------------------------------------------------------------------------------
/intro/equipment-needed.md:
--------------------------------------------------------------------------------
1 | # Equipment Needed
2 |
3 | To get started, you'll need:
4 |
5 | ## **A SDR that can receive 1090MHz**
6 |
7 | I started with a [FlightAware Pro Stick Plus](https://flightaware.com/adsb/prostick/). However, eventually you may wish to expand into other areas of SDR. I have moved onto a [KerberosSDR](https://othernet.is/products/kerberossdr-4x-coherent-rtlsdr), which is four RTL-SDRs in one. This lets me dedicate one SDR to ADS-B reception, and three others for things like [AirBand](https://en.wikipedia.org/wiki/Airband), [ACARS](https://app.airframes.io), etc. Note that KerberosSDR is no longer available. It has been replaced by the [KrakenSDR](https://www.crowdsupply.com/krakenrf/krakensdr) now has five SDRs.
8 |
9 | If you're just getting started and don't want to spend a lot of cash, a [cheap DVB-T RTL2832U WITH R820T2 dongle](https://www.amazon.com/dp/B07K47P7XD) will do the job.
10 |
11 | ## An antenna optimised for 1090MHz
12 |
13 | I use a cheap eBay "vertical collinear" antenna. You could also [make your own](https://discussions.flightaware.com/t/three-easy-diy-antennas-for-beginners/16348). An indoor antenna works to get started, but in most cases an outdoor antenna will give you far better results.
14 |
15 | ## A computer running Linux
16 |
17 | Capable of running Docker, with at least one free USB port. This can be a Raspberry Pi (or similar single board computer (SBC), given frequent supply issues with the Pi) or an x86.
18 |
19 | ## Cables
20 |
21 | USB cable to connect the SDR to the computer. I use a 20m active USB cable \(similar to [this](https://www.amazon.com/BlueRigger-Female-Active-Extension-Repeater/dp/B005LJKEXS/ref=sr_1_4?keywords=active+usb+cable&qid=1582085965&sr=8-4)\) which runs from the Linux computer in my study up into my roof void, where the SDR and antenna are located.
22 |
23 | Coaxial cable to connect the antenna to the SDR. As my SDR is located just below my antenna, I use a "pigtail" similar to [this](https://www.amazon.com/DZS-Elec-Connecting-Coaxial-Extender/dp/B072C6CJBC/ref=sr_1_13?keywords=SMA+to+N+male&qid=1582086024&sr=8-13).
24 |
25 | ## Other Stuff
26 |
27 | There's a whole bunch of additional equipment that you could purchase and use, such as 1090MHz bandpass filters \(recommended\), amplifiers, etc etc. This is somewhat outside the scope of this document. If you want more information, we'd recommend you read this guide: [https://flightaware.com/adsb/piaware/build](https://flightaware.com/adsb/piaware/build)
28 |
29 | ## **Optional: A SDR that can receive 978MHz (and antenna)**
30 |
31 | **Note:** USA-only
32 |
33 | In the USA, the FAA operates a supplemental data service on 978MHz aimed at the General Aviation community, called Universal Access Transmitter/Transceiver (UAT). This service is similar to ADS-B on 1090MHz, but provides additional services beyond position reporting. GA aircraft are able to broadcast their position data just like aircraft utilizing ADS-B on 1090ES. However, UAT ground stations that receive position reports from airborne aircraft respond with data packages containing all other traffic located within 15 nm and 3,500 vertical feet of the reporting aircraft. All UAT receivers within range are able to process the position reports directly from reporting aircraft as well as the custom data packages (called "pucks" due to the shape of the included airspace) that are transmitted by ADS-B/UAT ground stations, regardless of the intended recipient.
34 |
35 | This is particularly helpful to the hobbyist community as there are still thousands of airborne aircraft whose positions are only known to the National Airspace System (NAS). Multilateration (MLAT) is an attempt at recreating the positions of that hidden traffic. These traffic packages being broadcast by the ground stations expose the precise locations of the aircraft that would normally be estimated via MLAT or completely hidden in areas not covered by enough hobbyist receivers. It only takes one receiver near a tower to cover hundreds of square miles of airspace.
36 |
37 | UAT ground stations also broadcast NEXRAD weather radar and METARs to all UAT receivers, although this data may not be particularly useful to the average hobbyist.
38 |
39 | It should be noted that pucks are only generated when aircraft of any type is located within 15 nm and 3,500 vertical feet of GA aircraft that are reporting their position via UAT. Receiving UAT services from a tower does not guarantee "seeing" every single aircraft in your area. Also, the signals being broadcast by ADS-B ground stations typically only reach 5 nm from the tower at ground level. Therefore, most UAT receivers will only receive position data from nearby airborne GA aircraft unless they are themselves airborne or located especially close to a ground station.
40 |
--------------------------------------------------------------------------------
/intro/how-to-get-help.md:
--------------------------------------------------------------------------------
1 | # How to Get Help
2 |
3 | You can get help by [joining our Discord](https://discord.gg/sTf9uYF), and asking your question in the `#adsb-containers` channel. There are a bunch of friendly and knowledgeable people there who would be happy to help.
4 |
5 | Furthermore, we welcome any feedback on this document. If you think a section needs better instructions or further explanation, or if anything doesn't work for you, please let us know in the Discord's `#adsb-bitbook` channel so that we can continue to improve this document. You can also [open an issue on GitHub](https://github.com/sdr-enthusiasts/gitbook-adsb-guide/issues) or [submit a pull request](https://github.com/sdr-enthusiasts/gitbook-adsb-guide/pulls) with suggested changes!
6 |
7 | ## All This Feels Like Too Much
8 |
9 | While following this guide is a great way to learn more about Docker and to better understand a fairly complex system with many interconnected components, some people might prefer the __easy__ button. You can get a simple to use image designed for common single board computers, including most of the recent Raspberry Pis, that comes with a straight forward Web UI and hides all of the complexity described here from you. You can find more about this at the [adsb.im Feeder Image website](https://adsb.im/home). This project is built on top of the containers described in this document and actively maintained in collaboration with the maintainers of these containers (as well as the authors of some of the underlying tools).
10 |
11 | Or, as sort of a middle ground, you can install the same well maintained software stack on most current Linux distributions, and especially easily on any DietPi system, where it is directly available through the `dietpi-software` app (as application #141).
12 |
13 | Questions about this project can be posted at the Discord mentioned above or in the [dedicated Zulip channel](https://adsblol.zulipchat.com/#narrow/stream/391168-adsb-feeder-image).
14 |
15 | But now back to the in-depth technical information about how to set up your own feeder.
16 |
--------------------------------------------------------------------------------
/intro/information-needed.md:
--------------------------------------------------------------------------------
1 | # Information Needed
2 |
3 | During this guide, you'll need the following information at hand:
4 |
5 | * The altitude \(above sea level\) of your antenna. To find this, you can either use a GPS, or use something like [https://www.freemaptools.com/elevation-finder.htm](https://www.freemaptools.com/elevation-finder.htm) to zoom in on the exact spot of your antenna, and then add the distance above ground level your antenna is located.
6 | * The latitude and longitude of your antenna \(to at least five decimal places\). To find this, you can use the output from the elevation finder above, or you can use a GPS, or use maps.google.com to zoom in on the exact spot of your antenna, and click to get the latitude and longitude.
7 |
--------------------------------------------------------------------------------
/intro/overview.md:
--------------------------------------------------------------------------------
1 | # Overview
2 |
3 | This document aims to guide you through:
4 |
5 | * **Receiving** ADS-B data with [`adsb-ultrafeeder`](https://github.com/sdr-enthusiasts/docker-adsb-ultrafeeder)
6 | * **Feeding** data to online services using [`adsbexchange`](https://github.com/sdr-enthusiasts/docker-adsbexchange), [`piaware`](https://github.com/sdr-enthusiasts/docker-piaware), [`fr24feed`](https://github.com/sdr-enthusiasts/docker-flightradar24) and others...
7 | * **Storing** data in a time series database such as [InfluxDB](https://docs.influxdata.com/influxdb/) or [Prometheus](https://prometheus.io/)
8 | * **Visualising** data with various tools such as [`tar1090`](https://github.com/sdr-enthusiasts/docker-tar1090) and [Grafana](https://grafana.com)
9 |
10 | ...whilst also building a basic understanding of Docker.
11 |
12 | The core set of containers consists of: [`adsb-ultrafeeder`](https://github.com/sdr-enthusiasts/docker-adsb-ultrafeeder), one or more feeder containers and [`tar1090`](https://github.com/sdr-enthusiasts/docker-tar1090). This will provide you with:
13 |
14 | * ADS-B reception via `ultrafeeder`
15 | * Feeder containers to feed your preferred services
16 | * Local visualisation of ADS-B and MLAT data with `tar1090`
17 |
18 | These are deployed \(in conjunction with RTL-SDR hardware\) as follows:
19 |
20 | 
21 |
22 | To explain the flowchart above:
23 |
24 | * ADS-B transmissions are received via the 1090MHz antenna and RTL-SDR dongle
25 | * The RTL-SDR dongle device is mapped through to an `ultrafeeder` container, this container's function is to decode the ADS-B transmissions and makes them available via several protocols \(BaseStation, Beast, BeastReduce, raw, VRS\)
26 | * There are then three feeder containers:
27 | * `piaware` - this container reads Beast protocol data from `ultrafeeder` and submits flight data to the [FlightAware](https://flightaware.com) service, and get their "Enterprise" feature set in return.
28 | * `adsbx` - this container reads Beast protocol data from `ultrafeeder` and submits flight data to the [ADSBExchange](https://www.adsbexchange.com) service.
29 | * `fr24` - this container reads Beast protocol data from `ultrafeeder` and submits flight data to the [FlightRadar24](https://www.flightradar24.com) service, and get their "Business Plan" in return.
30 | * Flight data is visualised using `tar1090`, presenting a web interface allowing you to view the flight data received by you set-up in real time.
31 |
32 | There are other feeder packages available \(eg: Plane.watch, OpenSky Network, Airnav Radar, etc.\) that you may wish to consider too. They are all explained in this document.
33 |
34 | There are also other visualisation packages available \(eg: FlightAirMap/VirtualRadarServer/Grafana\) that you may wish to consider, however keep in mind that these may require more horsepower than a humble Raspberry Pi can provide. `tar1090` is very lightweight which is why it is recommended here.
35 |
36 | All of the containers in this guide will run on:
37 |
38 | * `linux/amd64` \("modern" Intel/AMD PCs/servers\)
39 | * `linux/arm/v7` \(Most Raspberry Pis operating systems\)
40 | * `linux/arm64` \(Raspberry Pis running 64-bit operating systems\)
41 |
42 | This mix of architectures allows you to run this set-up this on almost any Linux machine.
43 |
44 | If there's another feeder you'd like added as a container, please reach out to me via the methods outlined below.
45 |
46 | ## Shortcuts
47 |
48 | Following this guide is not very hard, but it does require some familiarity with the command line, editing files, and some patience as you work through the details.
49 |
50 | If you are looking for an easier option, the [How To Get Help](how-to-get-help.md) section introduces the [adsb.im Feeder Image](https://adsb.im/home) which is designed to make things even easier.
51 |
--------------------------------------------------------------------------------
/intro/what-is-docker.md:
--------------------------------------------------------------------------------
1 | # Docker Overview
2 |
3 | ## What is Docker?
4 |
5 | [Docker](https://www.docker.com/) is a popular containerization platform used to package and deploy software applications. It allows developers to create self-contained, portable environments that can be easily shared and run on any machine, regardless of its underlying operating system or infrastructure. Docker uses a layered file system and minimal resource overhead, making it fast and efficient for creating, deploying and managing applications. For more details about Docker, please check out their [documentation](https://docs.docker.com/get-started/overview/).
6 |
7 | ## What is Docker Compose?
8 |
9 | [Docker Compose](https://docs.docker.com/compose/) is a tool for defining and running multi-container Docker applications. With Compose, you use a YAML file to configure your application’s services. Then, with a single command, you create, start, stop, update, etc all the services defined for your application.
10 |
--------------------------------------------------------------------------------
/intro/why-docker.md:
--------------------------------------------------------------------------------
1 | # Why Docker?
2 |
3 | Mainly for **Isolation**. Dependencies or settings within a container will not affect any installations or configurations on the host computer, or on any other containers that may be running. By using separate containers for different parts of the ADS-B reception/decode/submission processes, it means the multiple types and versions of software used for each process will not interfere with each other. Bringing online the ability to feed your ADS-B data to another service becomes very simple - just starting another container without having to worry about software conflicts.
4 |
5 | Additionally, well crafted containers that take all of their configuration options via environment variables make it really easy to have a single file on the host system that contains all of the settings - instead of having to hunt down various files in various places across the filesystems - sometimes even different places, depending on the host OS or how a specific component was installed. Using Docker Compose allows a very centralized and easy to manage approach to setting up ADS-B - hopefully making it easier for people with any level of skill around computers.
6 |
7 | Furthermore, the machine running ADS-B containers can also function as a Plex Server, an OwnCloud Server, a VM Host etc, meaning that you don't need a separate machine just for feeding ADSB data. This means there's less equipment to break and less power used.
8 |
--------------------------------------------------------------------------------
/setting-up-rtl-sdrs/blacklist-kernel-modules.md:
--------------------------------------------------------------------------------
1 | ---
2 | description: >-
3 | In this step we blacklist the RTL-SDR kernel modules, to ensure the devices
4 | are available to be used by our containers. You can skip this step if you're
5 | not using an RTL-SDR radio (eg: bladeRF).
6 | ---
7 |
8 | # Kernel Module Configuration
9 |
10 | **NOTE: If you used the [docker-install.sh](https://github.com/sdr-enthusiasts/docker-install) script, you can skip this section.**
11 |
12 | Before we can plug in our RTL-SDR dongle, we need to blacklist the kernel modules for the RTL-SDR USB device from being loaded into the host's kernel and taking ownership of the device.
13 |
14 | ## **There are four parts to this.**
15 |
16 | 1. Blacklist modules from being directly loaded AND blacklist modules from being loaded as a dependency of other modules
17 | 1. Unload any of our blacklisted modules from memory
18 | 1. Rebuild module dependency database
19 | 1. Updating the initramfs boot image to remove any references to our now blacklisted modules
20 |
21 | ### 1. Blacklist Modules
22 |
23 | To do this, we will create a blacklist file at `/etc/modprobe.d/exclusions-rtl2832.conf` with the following command. While logged in as root, please copy and paste all lines at once, and press enter after to ensure the final line is given allowing it to run.
24 |
25 | ```shell
26 | sudo tee /etc/modprobe.d/exclusions-rtl2832.conf <-
3 | In this step we set the serial numbers of our RTL-SDR device(s). You can skip
4 | this step if you're not using an RTL-SDR radio (for example: bladeRF).
5 | ---
6 |
7 | # Re-Serialise SDRs
8 |
9 | As most RTL-SDRs ship with the same serial number, confusion may be caused if more than one SDR is present. It is a good rule of thumb to change your SDR serial numbers to match the frequencies they receive for.
10 |
11 | The remainder of this guide assumes that:
12 |
13 | * The SDR used for ADS-B Mode-S \(1090MHz\) reception will have a serial number of `1090`
14 | * The SDR used for ADS-B UAT \(978MHz\) reception \(if used\) will have a serial number of `978`.
15 |
16 | To set these serial numbers:
17 |
18 | Unplug all SDRs, leaving only the SDR to be used for 1090MHz reception plugged in. Issue the following command:
19 |
20 | ```shell
21 | docker run --rm -it --device /dev/bus/usb --entrypoint rtl_eeprom ghcr.io/sdr-enthusiasts/docker-adsb-ultrafeeder -s 1090
22 | ```
23 |
24 | You should be presented with the following. Your details may differ slightly, however ensure the device's new serial number will be `1090`. Press `y` to proceed.
25 |
26 | ```text
27 | Found 1 device(s):
28 | 0: Generic RTL2832U
29 |
30 | Using device 0: Generic RTL2832U
31 | Found Rafael Micro R820T tuner
32 |
33 | Current configuration:
34 | __________________________________________
35 | Vendor ID: 0x0bda
36 | Product ID: 0x2832
37 | Manufacturer: Realtek
38 | Product: RTL2832U
39 | Serial number: 00001000
40 | Serial number enabled: yes
41 | IR endpoint enabled: no
42 | Remote wakeup enabled: no
43 | __________________________________________
44 |
45 | New configuration:
46 | __________________________________________
47 | Vendor ID: 0x0bda
48 | Product ID: 0x2832
49 | Manufacturer: Realtek
50 | Product: RTL2832U
51 | Serial number: 1090
52 | Serial number enabled: yes
53 | IR endpoint enabled: no
54 | Remote wakeup enabled: no
55 | __________________________________________
56 | Write new configuration to device [y/n]? y
57 |
58 | Configuration successfully written.
59 | Please replug the device for changes to take effect.
60 | ```
61 |
62 | Next, if you intend on receiving ADS-B UAT \(978MHz\) data with a second SDR, Unplug all SDRs, leaving only the SDR to be used for 978MHz reception plugged in. Issue the following command:
63 |
64 | ```shell
65 | docker run --rm -it --device /dev/bus/usb --entrypoint rtl_eeprom ghcr.io/sdr-enthusiasts/docker-adsb-ultrafeeder -s 978
66 | ```
67 |
68 | You should be presented with the following. Your details may differ slightly, however ensure the device's new serial number will be `978`. Press `y` to proceed.
69 |
70 | ```text
71 | Found 1 device(s):
72 | 0: Generic RTL2832U
73 |
74 | Using device 0: Generic RTL2832U
75 | Found Rafael Micro R820T tuner
76 |
77 | Current configuration:
78 | __________________________________________
79 | Vendor ID: 0x0bda
80 | Product ID: 0x2832
81 | Manufacturer: Realtek
82 | Product: RTL2832U
83 | Serial number: 00001000
84 | Serial number enabled: yes
85 | IR endpoint enabled: no
86 | Remote wakeup enabled: no
87 | __________________________________________
88 |
89 | New configuration:
90 | __________________________________________
91 | Vendor ID: 0x0bda
92 | Product ID: 0x2832
93 | Manufacturer: Realtek
94 | Product: RTL2832U
95 | Serial number: 978
96 | Serial number enabled: yes
97 | IR endpoint enabled: no
98 | Remote wakeup enabled: no
99 | __________________________________________
100 | Write new configuration to device [y/n]? y
101 |
102 | Configuration successfully written.
103 | Please replug the device for changes to take effect.
104 | ```
105 |
106 | Unplug all SDRs and then plug them back in again to make the system aware of the new serials. A reboot will not accomplish this. If you have more SDRs, repeat the above process with each of them, replacing the last number in the command with your desired serial number.
107 |
--------------------------------------------------------------------------------
/setting-up-the-host-system/preparing-your-system.md:
--------------------------------------------------------------------------------
1 | # Preparing Your System
2 |
3 | ## Raspberry Pi
4 |
5 | Raspberry Pi single-board computers (SBCs) are a popular choice for flight data enthusiasts running this software.
6 |
7 | If you're generally unfamiliar with Linux or working with Raspberry Pi, the [official Getting started guide](https://www.raspberrypi.com/documentation/computers/getting-started.html) is a great place to start, and will walk you through the process of installing Raspberry Pi OS - you'll want to enable SSH.
8 |
9 | If SSH'ing into a server and editing a text file with nano or vi is something you've done before, you might consider installing [DietPi](https://dietpi.com/docs/install/).
10 |
11 | ## Hints for Linux Newbies
12 |
13 | Collecting ADS-B data with an SDR is a great project to learn about Linux. While this guide isn't a Linux crash course, it's worth pointing out a few basic concepts to ease into things.
14 |
15 | ### Entering Commands
16 |
17 | Throughout this guide, you'll be presented with commands to copy/paste into your new device. If you're accessing your new Linux device directly with a keyboard, mouse, and display like a traditional desktop PC, you'll be entering these via the "terminal," "command line," or "command prompt." If you're using something with a fancy graphical user interface, such as Raspberry Pi OS with a mouse, keyboard, and display plugged in like a traditional desktop computer, it's likely there's a "Terminal" app you can access with a few clicks.
18 |
19 | ### Remote Access: SSH
20 |
21 | Once you've connected your Linux device to your network, it's possible to access and manage it with SSH. On macOS, you can do this via the Terminal app, on Windows, you can use [PuTTY](https://www.putty.org/). You can connect to your new device via SSH entering this command `ssh username@new.device.ip.addresss` in Terminal/PuTTY.
22 |
23 | ### Raspberry Pi DHCPCD Issue
24 |
25 | Some users have reported issues with Raspberry Pi devices loosing network connectivity when running multiple containers. In effort to prevent this, run the following command `echo "denyinterfaces veth*" >> /etc/dhcpcd.conf`. This will append the line `denyinterfaces veth*` to end of the file. The file will look something like this (note the last line):
26 |
27 | ```properties
28 | # A sample configuration for dhcpcd.
29 | # See dhcpcd.conf(5) for details.
30 |
31 | # Allow users of this group to interact with dhcpcd via the control socket.
32 | #controlgroup wheel
33 |
34 | # Inform the DHCP server of our hostname for DDNS.
35 | hostname
36 |
37 | # Use the hardware address of the interface for the Client ID.
38 | clientid
39 | # or
40 | # Use the same DUID + IAID as set in DHCPv6 for DHCPv4 ClientID as per RFC4361.
41 | # Some non-RFC compliant DHCP servers do not reply with this set.
42 | # In this case, comment out duid and enable clientid above.
43 | #duid
44 |
45 | # Persist interface configuration when dhcpcd exits.
46 | persistent
47 |
48 | # Rapid commit support.
49 | # Safe to enable by default because it requires the equivalent option set
50 | # on the server to actually work.
51 | option rapid_commit
52 |
53 | # A list of options to request from the DHCP server.
54 | option domain_name_servers, domain_name, domain_search, host_name
55 | option classless_static_routes
56 | # Respect the network MTU. This is applied to DHCP routes.
57 | option interface_mtu
58 |
59 | # Most distributions have NTP support.
60 | #option ntp_servers
61 |
62 | # A ServerID is required by RFC2131.
63 | require dhcp_server_identifier
64 |
65 | # Generate SLAAC address using the Hardware Address of the interface
66 | #slaac hwaddr
67 | # OR generate Stable Private IPv6 Addresses based from the DUID
68 | slaac private
69 |
70 | # Example static IP configuration:
71 | #interface eth0
72 | #static ip_address=192.168.0.10/24
73 | #static ip6_address=fd51:42f8:caae:d92e::ff/64
74 | #static routers=192.168.0.1
75 | #static domain_name_servers=192.168.0.1 8.8.8.8 fd51:42f8:caae:d92e::1
76 |
77 | # It is possible to fall back to a static IP if DHCP fails:
78 | # define static profile
79 | #profile static_eth0
80 | #static ip_address=192.168.1.23/24
81 | #static routers=192.168.1.1
82 | #static domain_name_servers=192.168.1.1
83 |
84 | # fallback to static profile on eth0
85 | #interface eth0
86 | #fallback static_eth0
87 | denyinterfaces veth*
88 | ```
89 |
90 | After saving this file, restart DHCPCD
91 |
92 | ```shell
93 | sudo systemctl restart dhcpcd
94 | ```
95 |
--------------------------------------------------------------------------------
/setting-up-the-host-system/running-docker-install.md:
--------------------------------------------------------------------------------
1 | # Installing Docker
2 |
3 | ## docker-install
4 |
5 | The [docker-install.sh](https://github.com/sdr-enthusiasts/docker-install) script helps users get ready to use the SDR-Enthusiasts' Docker containers.
6 | The script is written to be used on a Debian (Ubuntu, Raspberry Pi OS, or DietPi OS) system that is "barebones", i.e., where Docker has not yet been installed. Debian OS versions Stretch, Buster, and Bullseye are supported.
7 |
8 | It will **check**, and if necessary **install** the following components and settings:
9 |
10 | - `docker`
11 | - install Docker
12 | - (optional) add the current user to the `sudoers` group and enable password-free use of `sudo`
13 | - configure log limits for Docker
14 | - configure $PATH environment for Docker
15 | - add current user to `docker` group
16 | - `docker compose`
17 | - Install latest stable `docker compose` plugin
18 | - Make sure that `libseccomp2` is of a new enough version to support Bullseye-based Docker containers
19 | - Update `udev` rules for use with RTL-SDR dongles
20 | - Blacklist SDR drivers so the `SDR-Enthusiasts`' ADSB and ACARS containers can access the RTL-SDR dongles. Unload any preloaded drivers.
21 | - on `dhcpd` based systems, exclude Docker Container-based virtual ethernet interfaces from using DHCP
22 |
23 | After running this script, your system should be ready to use `docker` and `docker compose`. A sample `docker-compose.yml` has been included in the `docker-install` repository if you want to explore extra options after following this guide.
24 |
25 | ### How to run it?
26 |
27 | - Feel free to inspect the script [here](https://raw.githubusercontent.com/sdr-enthusiasts/docker-install/main/docker-install.sh). You should really not blindly run other people's scripts - make sure you feel comfortable with what it does before executing it.
28 | - To use it, you can enter the following command:
29 |
30 | ```shell
31 | bash <(curl -s https://raw.githubusercontent.com/sdr-enthusiasts/docker-install/main/docker-install.sh)
32 | ```
33 |
34 | ### Troubleshooting
35 |
36 | This script is a work of love, and we don't currently provide support for alternative platforms or configurations.
37 | Feel free to reuse those parts of the script that fit your purpose, subject to the License grant provided with the script.
38 | If you need help or find a bug, please raise an issue on [Github](https://github.com/sdr-enthusiasts/docker-install/issues).
39 | If you have improvements that you'd like to contribute, please submit a PR.
40 |
41 | ### Errors and how to deal with them
42 |
43 | - ISSUE: The script fails with the message below:
44 |
45 | ```text
46 | E: Repository 'http://raspbian.raspberrypi.org/raspbian buster InRelease' changed its 'Suite' value from 'stable' to 'oldstable'
47 | E: Repository 'http://archive.raspberrypi.org/debian buster InRelease' changed its 'Suite' value from 'testing' to 'oldstable'
48 | ```
49 |
50 | - SOLUTION: First run `sudo apt-get update --allow-releaseinfo-change && sudo apt-get upgrade -y` and then run the install script again.
51 |
--------------------------------------------------------------------------------
/useful-extras/alternative-graphing-with-influx-grafana.md:
--------------------------------------------------------------------------------
1 | ---
2 | description: >-
3 | If you wish to deploy Grafana for alternative graphs, follow the steps below.
4 | ---
5 |
6 | # Alternative graphs with Grafana
7 |
8 | [`Grafana`](https://grafana.com/) is an analytics platform that can provide alternative graphs for `ultrafeeder`.
9 |
10 | In this guide we will be using [`InfluxDB`](https://www.influxdata.com/) as the data repository.
11 |
12 | Using Grafana and InfluxDB in this configuration does not require a plan, account, or credentials for their respective cloud offerings.
13 |
14 | ## Create docker volumes
15 |
16 | Open the `docker-compose.yml` file that was created when deploying `ultrafeeder`.
17 |
18 | Add the following lines to the `volumes:` section at the top of the file \(below the `version:` section, and before the `services:` section\):
19 |
20 | ```yaml
21 | influxdb_data:
22 | influxdb_config:
23 | grafana_data:
24 | ```
25 |
26 | This creates the volumes that will contain `influxdb` and `grafana`’s application data.
27 |
28 | ## Deploying `influxdb` and `grafana` containers
29 |
30 | Open the `.env` file that was created when deploying `ultrafeeder`.
31 |
32 | Append the following lines to the end of the file; avoid using surrounding "" for the variables, which can be set to any value you like and token should be thought of as a very strong password:
33 |
34 | ```properties
35 | INFLUXDB_USER=
36 | INFLUXDB_PASSWORD=
37 | INFLUXDB_ADMIN_TOKEN=
38 | ```
39 |
40 | Open the `docker-compose.yml` file that was created when deploying `ultrafeeder`.
41 |
42 | Add the following lines to the `environment` section of the `ultrafeeder` container definition \(in the `ultrafeeder:` section, below `environment:` and before the `volumes:` section\):
43 |
44 | ```yaml
45 | - INFLUXDBV2_URL=http://influxdb:8086
46 | - INFLUXDBV2_BUCKET=ultrafeeder
47 | - INFLUXDBV2_ORG=ultrafeeder
48 | - INFLUXDBV2_TOKEN=${INFLUXDB_ADMIN_TOKEN}
49 | ```
50 |
51 | Append the following lines to the end of the file:
52 |
53 | ```yaml
54 | influxdb:
55 | image: influxdb:latest
56 | container_name: influxdb
57 | hostname: influxdb
58 | restart: unless-stopped
59 | environment:
60 | - DOCKER_INFLUXDB_INIT_MODE=setup
61 | - DOCKER_INFLUXDB_INIT_BUCKET=ultrafeeder
62 | - DOCKER_INFLUXDB_INIT_ORG=ultrafeeder
63 | - DOCKER_INFLUXDB_INIT_RETENTION=52w
64 | - DOCKER_INFLUXDB_INIT_USERNAME=${INFLUXDB_USER}
65 | - DOCKER_INFLUXDB_INIT_PASSWORD=${INFLUXDB_PASSWORD}
66 | - DOCKER_INFLUXDB_INIT_ADMIN_TOKEN=${INFLUXDB_ADMIN_TOKEN}
67 | ports:
68 | - 8086:8086
69 | volumes:
70 | - influxdb_data:/var/lib/influxdb2
71 | - influxdb_config:/etc/influxdb2
72 |
73 | grafana:
74 | image: grafana/grafana-oss:latest
75 | container_name: grafana
76 | hostname: grafana
77 | restart: unless-stopped
78 | ports:
79 | - 3000:3000
80 | volumes:
81 | - grafana_data:/var/lib/grafana
82 | ```
83 |
84 | Once the file has been updated, issue the command `docker compose up -d` in the application directory to apply the changes and bring up the `influxdb` and `grafana` containers. This will also restart the `ultrafeeder` container, which will now use `telegraf` to feed data to `influxdb`.
85 |
86 | You should also be able to point your web browser at:
87 |
88 | * `http://docker.host.ip.addr:8086/` to access the `influxdb` console, use the credentials from your `.env` file.
89 | * `http://docker.host.ip.addr:3000/` to access the `grafana` console, use admin/admin as initial credentials, you should be prompted to change the password on first login.
90 |
91 | Remember to change `docker.host.ip.addr` to the IP address of your docker host.
92 |
93 | ## Configuring data source and dashboard in Grafana
94 |
95 | After you have logged into the `grafana` console the following manual steps are required to connect to `influxdb` as the data source
96 |
97 | 1. Click `Add your first data source` in the main panel
98 | 2. Click `InfluxDB` from the list of options provided
99 | 3. Input or select the following options, if the option is not listed, do not input anything for that option (for `Value` the word `Token` must be included in the input:
100 |
101 | Option | Input
102 | ------------- | -------------
103 | Name | ultrafeeder
104 | Query Language | InfluxQL
105 | URL | `http://influxdb:8086`
106 | Custom HTTP Headers | Click `+ Add header`
107 | Header | Authorization
108 | Value | Token \
109 | Database | ultrafeeder
110 | User | \
111 | Password | \
112 | HTTP Method | GET
113 |
114 | Clicking `Save & Test` should return a green message indicating success. The dashboard can now be imported with the following steps
115 |
116 | 1. Hover over the `four squares` icon in the sidebar, click `+ Import`
117 | 2. Enter `13168` into the `Import via grafana.com` section and click `Load`
118 | 3. Select `ultrafeeder` from the bottom drop down list
119 | 4. Click `Import` on the subsequent dialogue box
120 |
121 | At this point you should see a very nice dashboard that was created by [Mike](https://github.com/mikenye) \(Thanks!\). The final step is to add the radar plugin required by this dashboard:
122 |
123 | 1. Hover over the `cog` icon in the lower area of the sidebar, click `Plugins`
124 | 2. Enter `radar` into the `Search Grafana plugins` box, at this point `Radar Graph` should appear below
125 | 3. Click on `Radar Graph` in the main section
126 | 4. Click `Install`
127 |
128 | Full functionality of the dashboard is now available, you can find it under `General` in the `Dashboards` section.
129 |
--------------------------------------------------------------------------------
/useful-extras/alternative-graphing-with-prometheus-grafana.md:
--------------------------------------------------------------------------------
1 | ---
2 | description: >-
3 | If you wish to deploy Grafana and Prometheus for alternative graphs, follow the steps below.
4 | ---
5 |
6 | # Alternative graphs with Grafana using Prometheus
7 |
8 | [`Grafana`](https://grafana.com/) is an analytics platform that can provide alternative graphs for `ultrafeeder`. It reads data from database; here we will be using [`Prometheus`](https://prometheus.io/) as the database.
9 |
10 | Using Grafana and Prometheus in this configuration does not require a plan, account, or credentials for their respective cloud offerings.
11 |
12 | At the bottom of this page, you can see an example of what a Grafana dashboard can look like.
13 |
14 | ## Setting up and using Prometheus and Grafana
15 |
16 | As a prerequisite, we will assume that you already have a working deployment of the [docker-tar1090](https://github.com/sdr-enthusiasts/docker-tar1090) or [docker-adsb-ultrafeeder](https://github.com/sdr-enthusiasts/docker-adsb-ultrafeeder) container to receive ADSB data. Optionally, if you are using [docker-dump978](https://github.com/sdr-enthusiasts/docker-dump978) to receive UAT data, you can also include this in your Grafana setup.
17 |
18 | For Grafana to work, you will need to install and configure a few extra things:
19 |
20 | - ensuring that your `docker-tar1090`, `docker-adsb-ultrafeeder`, and/or `docker-dump978` containers are set up so they make data available to Prometheus
21 | - a (containerized) Prometheus database instance that reads data from `docker-tar1090`, `docker-adsb-ultrafeeder`, and/or `docker-dump978`
22 | - a (containerized) Grafana instance that is the platform for creating and hosting the graphs
23 | - a Grafana Dashboard that contains the actual graphs
24 |
25 | For step-by-step instructions on how to implement this, please see the [Grafana-specific README](https://github.com/sdr-enthusiasts/docker-adsb-ultrafeeder/blob/main/README-grafana.md) in the [docker-adsb-ultrafeeder](https://github.com/sdr-enthusiasts/docker-adsb-ultrafeeder) repository.
26 |
27 | 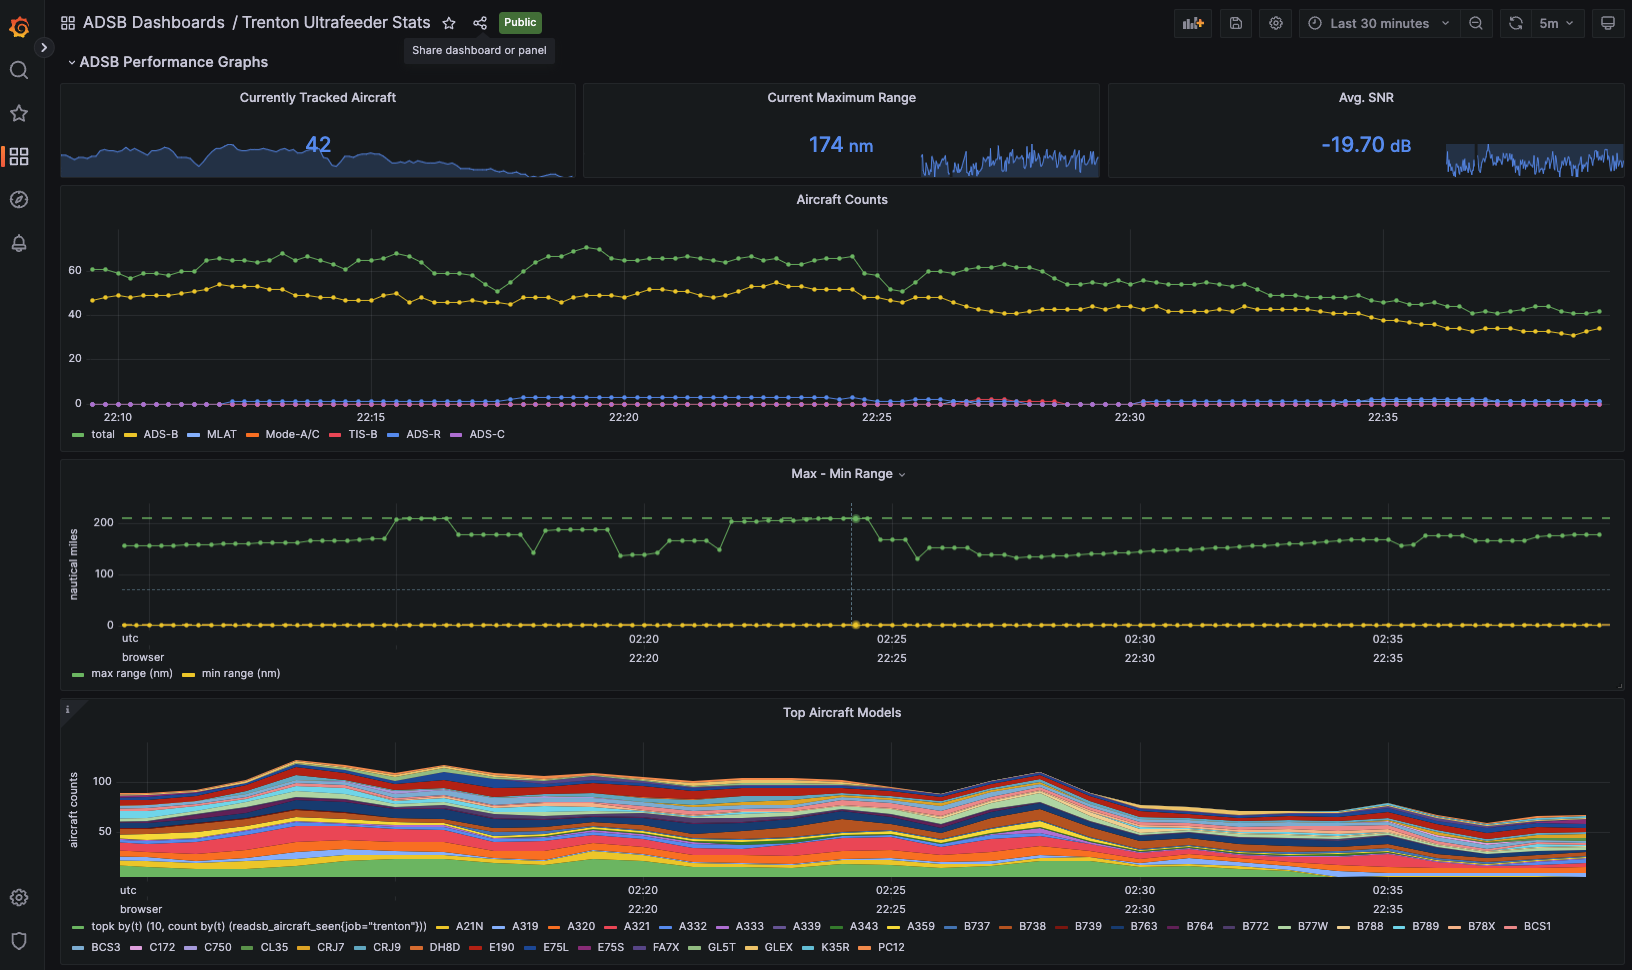
28 | 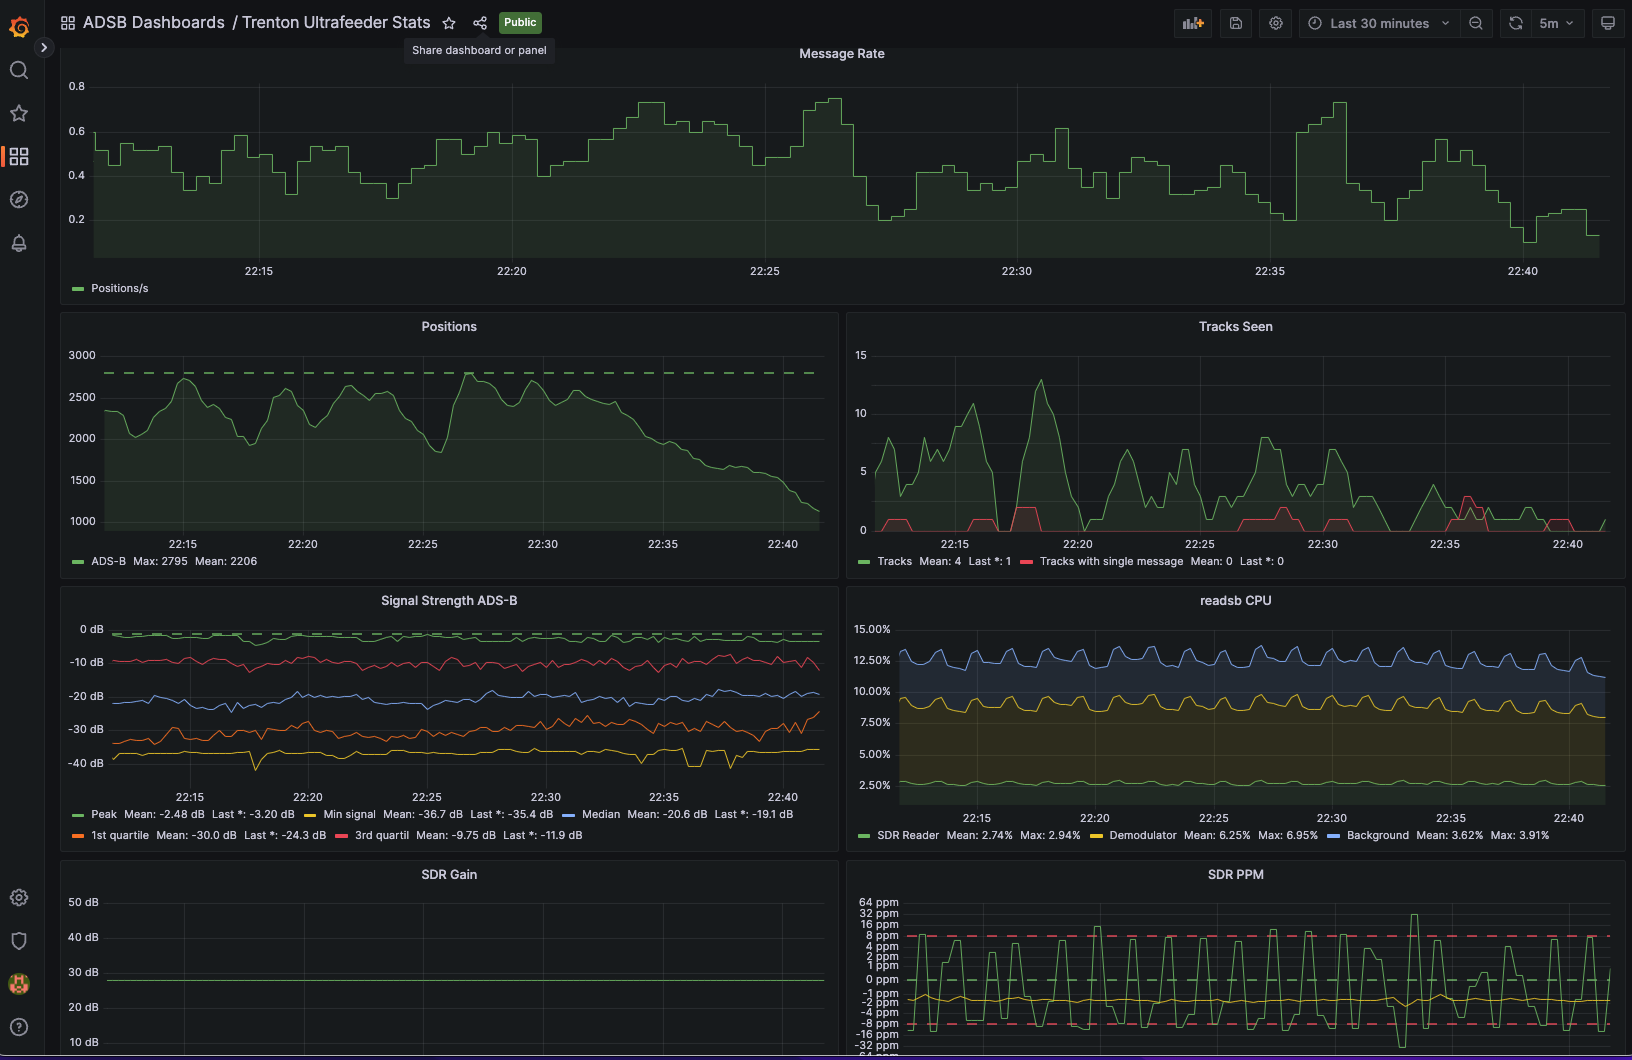
29 | 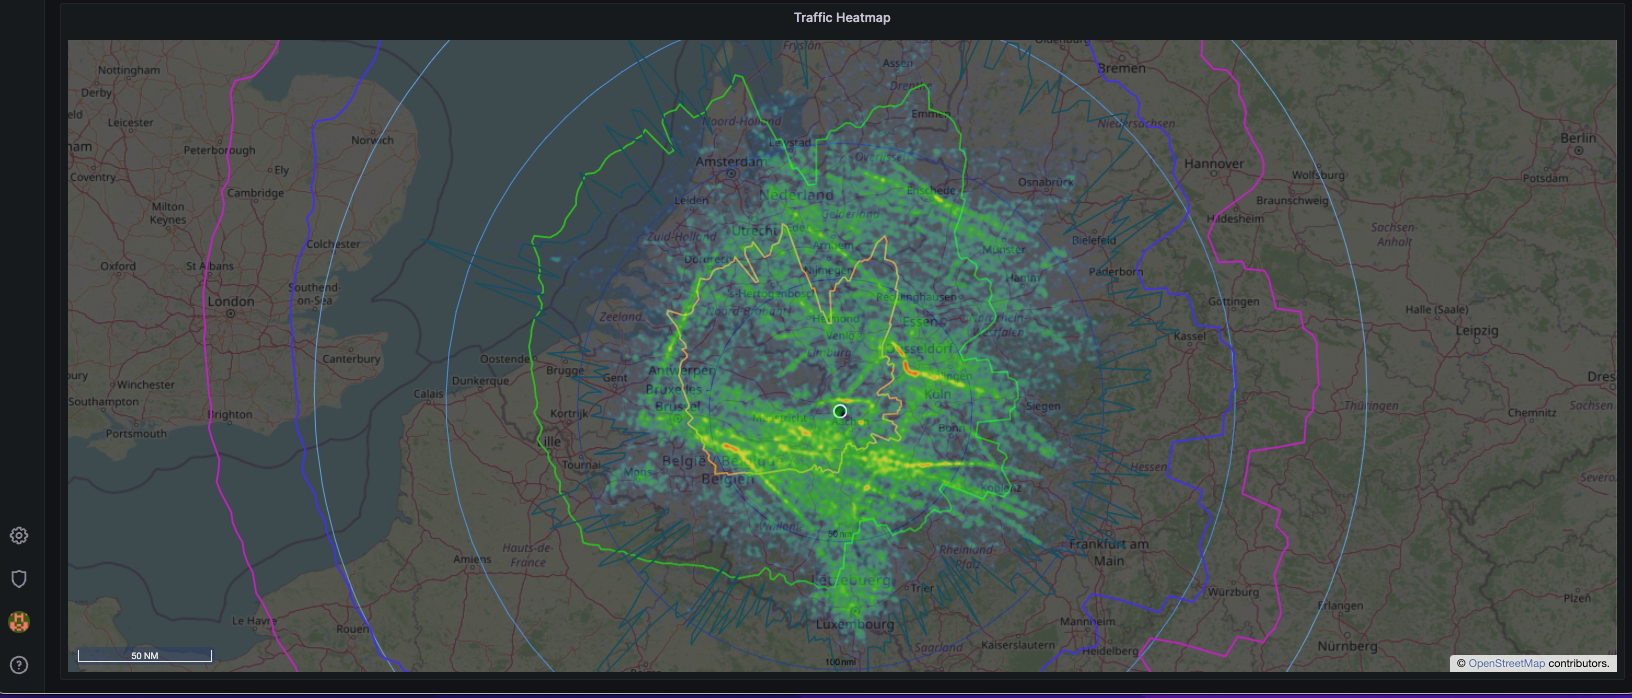
30 |
--------------------------------------------------------------------------------
/useful-extras/auto-restart-unhealthy-containers.md:
--------------------------------------------------------------------------------
1 | ---
2 | description: >-
3 | The following steps will guide you through deploying the
4 | "willfarrell/autoheal" container, which will restart any containers that
5 | become unhealthy.
6 | ---
7 |
8 | # Auto-Restart Unhealthy Containers
9 |
10 | [As previously discussed](../foundations/common-tasks-and-info.md#information-on-healthchecks), we try to include [healthchecks](https://docs.docker.com/engine/reference/builder/) in all our images. You should see a health status in the `STATUS` column of each container created in this guide whenever you issue the `docker ps` command.
11 |
12 | For example:
13 |
14 | ```text
15 | STATUS
16 | Up 2 hours (healthy)
17 | ```
18 |
19 | If a container becomes unhealthy for any reason \(for example: perhaps the SDR hardware "wedges", perhaps a program running in a container becomes deadlocked, etc\), then we would naturally want to restart it. Ideally, we'd want this to happen automatically.
20 |
21 | Unfortunately, Docker does not yet offer this functionality. [It has been proposed but not yet implemented](https://github.com/moby/moby/issues/28400).
22 |
23 | Thankfully, the container `willfarrell/autoheal` has been created that will regularly check containers and restart any with an unhealthy status.
24 |
25 | There are two ways to implement `willfarrell/autoheal`:
26 |
27 | 1. Monitor all containers and restart any in an unhealthy state
28 | 2. Only monitor and restart a specific set of containers
29 |
30 | This page will discuss both methods.
31 |
32 | ## A Word About Security
33 |
34 | The `willfarrell/autoheal` image requires that the container has access to the host's docker socket: `/var/run/docker.sock`.
35 |
36 | Mounting `/var/run/docker.sock` inside a container effectively gives the container and anything running within it root privileges on the underlying host, since now you can do anything that a root user and a member of the `docker` group can.
37 |
38 | For example, you could create a container, mount the host's `/etc`, modify configurations to open an attack vector to take over the host.
39 |
40 | The image has been around since 2017, has several hundred stars, [the source code is available](https://github.com/willfarrell/docker-autoheal/blob/main/docker-entrypoint) for public scrutiny and many people run it \(myself included\), so the risk of nefarious behaviour by the author is \(in my opinion\) fairly low. Nevertheless, if you decide to give this container access to the host's `/var/run/docker.sock`, you do so at your own risk.
41 |
42 | ## Monitor and Restart All Containers
43 |
44 | Open the `docker-compose.yml` file that was created when deploying `ultrafeeder`.
45 |
46 | Append the following lines to the end of the file \(inside the `services:` section\):
47 |
48 | ```yaml
49 | autoheal:
50 | image: willfarrell/autoheal:latest
51 | container_name: autoheal
52 | restart: unless-stopped
53 | environment:
54 | - AUTOHEAL_CONTAINER_LABEL=all
55 | volumes:
56 | - /var/run/docker.sock:/var/run/docker.sock
57 | ```
58 |
59 | To explain what's going on in this addition:
60 |
61 | * We're creating a container called `autoheal`, from the image `willfarrell/autoheal:latest`.
62 | * We're passing several environment variables to the container:
63 | * `AUTOHEAL_CONTAINER_ALL=all` to inform autoheal to monitor all containers
64 | * We're passing through the docker socket `/var/run/docker.sock` so that autoheal can control docker \(to restart containers\).
65 |
66 | Once the file has been updated, issue the command `docker compose up -d` in the application directory to apply the changes and bring up the `autoheal` container. You should see the following output:
67 |
68 | ```text
69 | ultrafeeder is up-to-date
70 | piaware is up-to-date
71 | fr24 is up-to-date
72 | pfclient is up-to-date
73 | rbfeeder is up-to-date
74 | adsbhub is up-to-date
75 | opensky is up-to-date
76 | Creating autoheal
77 | ```
78 |
79 | The container does not log any output, so check it is running by issuing the command `docker ps` and finding the `autoheal` container. It should have a status of `Up 20 seconds (healthy)` or similar.
80 |
81 | The `autoheal` container logs when it restarts an unhealthy container, for example:
82 |
83 | ```text
84 | 15-12-2020 20:17:06 Container /fr24 (51bc3e3511f5) found to be unhealthy - Restarting container now with 10s timeout
85 | ```
86 |
87 | ## Only monitor and restart a specific set of containers
88 |
89 | In order for us to inform`autoheal` which containers to monitor, we need to apply a label to them.
90 |
91 | ### Label Existing Containers
92 |
93 | To tell `autoheal` to monitor your `ultrafeeder` container, you would add the following configuration directive under its service definition in your `docker-compose.yml` file:
94 |
95 | ```yaml
96 | labels:
97 | - "autoheal=true"
98 | ```
99 |
100 | Thus, your updated `ultrafeeder` service may then look like this \(note the added `labels:` section\):
101 |
102 | ```yaml
103 | version: '3.8'
104 |
105 | volumes:
106 | readsbpb_rrd:
107 | readsbpb_autogain:
108 |
109 | services:
110 | readsb:
111 | image: ghcr.io/sdr-enthusiasts/docker-readsb-protobuf:latest
112 | container_name: readsb
113 | hostname: readsb
114 | restart: unless-stopped
115 | labels:
116 | - "autoheal=true"
117 | devices:
118 | - /dev/bus/usb
119 | ports:
120 | - 8080:8080
121 | environment:
122 | - TZ=${FEEDER_TZ}
123 | - READSB_DEVICE_TYPE=rtlsdr
124 | - READSB_RTLSDR_DEVICE=00001090
125 | - READSB_GAIN=autogain
126 | - READSB_LAT=${FEEDER_LAT}
127 | - READSB_LON=${FEEDER_LONG}
128 | - READSB_RX_LOCATION_ACCURACY=2
129 | - READSB_STATS_RANGE=true
130 | - READSB_NET_ENABLE=true
131 | volumes:
132 | - readsbpb_rrd:/run/collectd
133 | - readsbpb_autogain:/run/autogain
134 | ```
135 |
136 | Update the service definitions for all of the containers you want `autoheal` to monitor.
137 |
138 | ### Deploy the `autoheal` container
139 |
140 | Open the `docker-compose.yml` file that was created when deploying `ultrafeeder`.
141 |
142 | Append the following lines to the end of the file \(inside the `services:` section\):
143 |
144 | ```yaml
145 | autoheal:
146 | image: willfarrell/autoheal:latest
147 | container_name: autoheal
148 | restart: unless-stopped
149 | volumes:
150 | - /var/run/docker.sock:/var/run/docker.sock
151 | ```
152 |
153 | To explain what's going on in this addition:
154 |
155 | * We're creating a container called `autoheal`, from the image `willfarrell/autoheal:latest`.
156 | * We're passing through the docker socket `/var/run/docker.sock` so that autoheal can control docker \(to restart containers\).
157 |
158 | Once the file has been updated, issue the command `docker compose up -d` in the application directory to apply the changes and bring up the `autoheal` container. You should see the following output:
159 |
160 | ```text
161 | Recreating ultrafeeder
162 | piaware is up-to-date
163 | fr24 is up-to-date
164 | pfclient is up-to-date
165 | rbfeeder is up-to-date
166 | adsbhub is up-to-date
167 | opensky is up-to-date
168 | Creating autoheal
169 | ```
170 |
171 | Note that any containers you added the `label:` directive to were recreated by `docker compose` to reflect the updated configuration. Cool huh?
172 |
173 | The container does not log any output, so check it is running by issuing the command `docker ps` and finding the `autoheal` container. It should have a status of `Up 20 seconds (healthy)` or similar.
174 |
175 | The `autoheal` container logs messages when it restarts an unhealthy container, for example:
176 |
177 | ```text
178 | 15-12-2020 20:17:06 Container /adsbx (51bc3e3511f5) found to be unhealthy - Restarting container now with 10s timeout
179 | ```
180 |
--------------------------------------------------------------------------------
/useful-extras/auto-upgrade-containers.md:
--------------------------------------------------------------------------------
1 | ---
2 | description: >-
3 | The following steps will guide you through deploying the
4 | "containrrr/watchtower" container, which will upgrade any containers whenever
5 | a new version of the image is released.
6 | ---
7 |
8 | # Auto-Upgrade Containers
9 |
10 | The containers used in this guide are regularly updated - most of them daily. This ensures that:
11 |
12 | * Any security updates of the underlying containers \(for example: `debian/stable-slim`\) are captured in these containers.
13 | * Receiver \(`ultrafeeder`\), feeders, visualisation services \(`tar1090`\) etc are also regularly updated. This ensures that updates are captured in these containers.
14 | * As issues are raised and fixed, it ensures that fixes are present in these containers.
15 |
16 | We can configure a container to regularly \(daily\) check DockerHub for new versions of underlying images, automatically pull the new versions and recreate your containers.
17 |
18 | This can be a double-edged sword, as container functionality may change between versions \(for example, if a feeder drastically changes how their application behaves\). Rest assured that if behaviour does change, we will make every effort to ensure backwards compatibility. Accordingly, if you implement auto-upgrade, we'd suggest a regular check of your environment to ensure it is operating as expected.
19 |
20 | The container `containrrr/watchtower` has been created to automatically update containers when a new image is released.
21 |
22 | There are two ways to implement `containrrr/watchtower`:
23 |
24 | 1. Monitor all containers and upgrade any that have a new image released
25 | 2. Only monitor and upgrade a specific set of containers
26 |
27 | This page will discuss both methods.
28 |
29 | ## A Word About Security
30 |
31 | The `containrrr/watchtower` image requires that the container has access to the host's docker socket: `/var/run/docker.sock`.
32 |
33 | Mounting `/var/run/docker.sock` inside a container effectively gives the container and anything running within it root privileges on the underlying host, since now you can do anything that a root user and a member of the `docker` group can.
34 |
35 | For example, you could create a container, mount the host's `/etc`, modify configurations to open an attack vector to take over the host.
36 |
37 | The image has been around since 2015, has several thousand stars, [the source code is available for public scrutiny](https://github.com/containrrr/watchtower) and many people run it \(myself included\), so the risk of nefarious behaviour by the authors is \(in my opinion\) fairly low. Nevertheless, if you decide to give this container access to the host's `/var/run/docker.sock`, you do so at your own risk.
38 |
39 | ## Monitor and Upgrade All Containers
40 |
41 | Open the `docker-compose.yml` file that was created when deploying `ultrafeeder`.
42 |
43 | Append the following lines to the end of the file \(inside the `services:` section\):
44 |
45 | ```yaml
46 | watchtower:
47 | image: containrrr/watchtower:latest
48 | container_name: watchtower
49 | restart: unless-stopped
50 | environment:
51 | - TZ=${FEEDER_TZ}
52 | - WATCHTOWER_CLEANUP=true
53 | - WATCHTOWER_POLL_INTERVAL=86400
54 | - WATCHTOWER_ROLLING_RESTART=true
55 | volumes:
56 | - /var/run/docker.sock:/var/run/docker.sock
57 | ```
58 |
59 | To explain what's going on in this addition:
60 |
61 | * We're creating a container called `watchtower`, from the image `containrrr/watchtower:latest`.
62 | * We're passing several environment variables to the container:
63 | * `WATCHTOWER_CLEANUP=true` Removes old images after updating. When this flag is specified, watchtower will remove the old image after restarting a container with a new image. This prevents the accumulation of orphaned images on your system as containers are updated.
64 | * `WATCHTOWER_POLL_INTERVAL=86400` Poll interval \(in seconds\). This value controls how frequently watchtower will poll for new images. This is set to 24 hours to prevent hitting DockerHub's [new pull limits](https://www.docker.com/increase-rate-limits?utm_source=docker&utm_medium=web%20referral&utm_campaign=pull%20limits%20hub%20home%20page&utm_budget=).
65 | * `WATCHTOWER_ROLLING_RESTART=true` Restart one image at time instead of stopping and starting all at once. Prevents clobbering the CPU if you run a low power system.
66 | * `TZ=${FEEDER_TZ}` So that the container's logs are in our local timezone.
67 | * We're passing through the docker socket `/var/run/docker.sock` so that autoheal can control docker \(to restart containers\).
68 |
69 | Once the file has been updated, issue the command `docker compose up -d` in the application directory to apply the changes and bring up the `watchtower` container. You should see the following output:
70 |
71 | ```text
72 | ultrafeeder is up-to-date
73 | piaware is up-to-date
74 | fr24 is up-to-date
75 | pfclient is up-to-date
76 | rbfeeder is up-to-date
77 | adsbhub is up-to-date
78 | opensky is up-to-date
79 | autoheal is up-to-date
80 | Creating watchtower
81 | ```
82 |
83 | We can view the logs for this container with the command `docker logs watchtower`, or continually "tail" them with `docker logs -f watchtower`. The logs will be fairly unexciting initially and look like this:
84 |
85 | ```text
86 | INFO[0001] Starting Watchtower and scheduling first run: 2020-12-17 18:19:28 +0800 AWST m=+86401.067704768
87 | ```
88 |
89 | The `watchtower` container logs messages when it upgrades a container, for example:
90 |
91 | ```text
92 | INFO[864207] Found new ghcr.io/sdr-enthusiasts/docker-adsb-ultrafeeder:latest image (cc3a1b572023)
93 | INFO[864334] Stopping /ultrafeeder (38bd04997c8d) with SIGTERM
94 | INFO[864339] Creating /ultrafeeder
95 | ```
96 |
--------------------------------------------------------------------------------
/useful-extras/improved-visualisation-with-tar1090.md:
--------------------------------------------------------------------------------
1 | ---
2 | description: >-
3 | If you wish to deploy tar1090 for improved visualisation, follow the steps
4 | below.
5 | ---
6 |
7 | # Improved Visualisation with tar1090
8 |
9 | [`tar1090`](https://github.com/wiedehopf/tar1090) is a visualisation tool by [wiedehopf](https://github.com/wiedehopf) that provides some additional functionality over and above the `ultrafeeder` web interface.
10 |
11 | This is my personal preference for displaying real-time ADS-B information.
12 |
13 | ## Create docker volumes
14 |
15 | Open the `docker-compose.yml` file that was created when deploying `ultrafeeder`.
16 |
17 | Add the following lines to the `volumes:` section at the top of the file \(below the `version:` section, and before the `services:` section\):
18 |
19 | ```yaml
20 | tar1090_heatmap:
21 | ```
22 |
23 | This creates the volumes that will contain `tar1090`’s application data.
24 |
25 | ## Deploying `tar1090` container
26 |
27 | Open the `docker-compose.yml` file that was created when deploying `ultrafeeder`.
28 |
29 | Append the following lines to the end of the file:
30 |
31 | ```yaml
32 | tar1090:
33 | image: ghcr.io/sdr-enthusiasts/docker-tar1090:latest
34 | container_name: tar1090
35 | restart: unless-stopped
36 | environment:
37 | - UPDATE_TAR1090=false
38 | - TZ=${FEEDER_TZ}
39 | - BEASTHOST=ultrafeeder
40 | - LAT=${FEEDER_LAT}
41 | - LONG=${FEEDER_LONG}
42 | - TAR1090_DEFAULTCENTERLAT=${FEEDER_LAT}
43 | - TAR1090_DEFAULTCENTERLON=${FEEDER_LONG}
44 | ports:
45 | - 8082:80
46 | volumes:
47 | - "tar1090_heatmap:/var/globe_history"
48 | tmpfs:
49 | - /run:exec,size=64M
50 | - /var/log
51 | ```
52 |
53 | Once the file has been updated, issue the command `docker compose up -d` in the application directory to apply the changes and bring up the `tar1090` container.
54 |
55 | You should also be able to point your web browser at:
56 |
57 | * `http://docker.host.ip.addr:8082/` to view the map showing your currently tracked aircraft.
58 | * After a few hours: `http://docker.host.ip.addr:8082/?heatmap` to see the heatmap for the past 24 hours.
59 | * After a few hours: `http://docker.host.ip.addr:8082/?heatmap&realHeat` to see a different heatmap for the past 24 hours.
60 |
61 | Remember to change `docker.host.ip.addr` to the IP address of your docker host.
62 |
63 | ## Displaying MLAT aircraft in tar1090
64 |
65 | Add the following line to the environment section of the `tar1090` section of `docker-compose.yml`:
66 |
67 | ```yaml
68 | - MLATHOST=adsbx
69 | ```
70 |
71 | The above assumes you wish to display MLAT from the `adsbx` image. You could use `MLATHOST=piaware` if you wish to use the `piaware` image.
72 |
--------------------------------------------------------------------------------
/useful-extras/managing-a-remote-station.md:
--------------------------------------------------------------------------------
1 | ---
2 | description: >-
3 | If you wish to manage and view data from a remote adsb station, follow the steps
4 | below before you deploy to the remote location
5 | ---
6 |
7 | # Managing a remote station using ZeroTier
8 |
9 | [`ZeroTier`](https://www.zerotier.com/) is a peer to peer networking tool that is free (for up to 10 devices). Unlike other tools such as [`OpenVpn`](https://openvpn.net/) which route all traffic over the VPN, ZeroTier selectively routes only some of your traffic. In practice if both your remote station and local computer are 'members' of the same ZeroTier network then they appear to be on the same local LAN. This guide assumes you have physical access to the machine you wish to install ZeroTier on.
10 |
11 | ## Getting Started - Install ZeroTier on your local machine
12 |
13 | You should create a ZeroTier Account, and install the ZeroTier client on the machine you intend to use to connect to your remote station as per these [`instructions`](https://www.zerotier.com/download/).
14 |
15 | Note - it is possible to deploy ZeroTier as a container, but we recommend against it. If your station is remote-managed only, you'd want your VPN network to be managed and established as close as possible to the hardware. Putting it in a Docker Container is risky, as your station may become unreachable via ZT if the docker service crashes or exhibits issues.
16 |
17 | ## Create a ZeroTier network
18 |
19 | Now you need to create a ZeroTier 'network' for your devices to connect to - this is as simple as clicking on the `Create a Network` button once you have logged in to ZeroTier. If you need help, have a look at the [`Getting Started`](https://docs.zerotier.com/start) guide.
20 |
21 | You should now have a unique 16 character Network ID e.g. `253ef24d630f06682`. Make a note of this as you will need it in the next steps.
22 |
23 | ## Joining your Network
24 |
25 | Join your network from your machine's command line:
26 |
27 | ```shell
28 | sudo zerotier-cli join xxxxxxxxxxxxxxxx
29 | ```
30 |
31 | ## Authorising your station
32 |
33 | Now that your remote station has joined the network you need to authorise it. Logon to your ZeroTier account in a browser, click on the network you created earlier and scroll down to the `Members` section. Check the box marked `Auth` for your remote station and take note of the `Managed IPs` Section.
34 |
35 | You can now use the Managed IPs to communicate as if your devices were on the same network.
36 |
37 | More detail on this step is available on this [`link`](https://docs.zerotier.com/start#authorize-your-device).
38 |
--------------------------------------------------------------------------------
/useful-extras/storing-time-series-data.md:
--------------------------------------------------------------------------------
1 | ---
2 | description: >-
3 | If you wish to store data from readsb in a time series database such as
4 | InfluxDB or Prometheus, review the information below.
5 | ---
6 |
7 | # Storing Data and Metrics in a Time Series Database
8 |
9 | The `readsb-protobuf` container also contains InfluxData's [Telegraf](https://docs.influxdata.com/telegraf/), and can send flight data and `readsb` metrics to [InfluxDB](https://docs.influxdata.com/influxdb/) or [Prometheus](https://prometheus.io). [Telegraf](https://docs.influxdata.com/telegraf/) is not started by default. `INFLUXDBURL` must be set in order to start the built-in [Telegraf](https://docs.influxdata.com/telegraf/) instance.
10 |
11 | ## InfluxDB Options
12 |
13 | These variables control the sending of flight data and readsb metrics to [InfluxDB](https://docs.influxdata.com/influxdb/) (via a built-in instance of [Telegraf](https://docs.influxdata.com/telegraf/)).
14 |
15 | | Variable | Description | Default |
16 | |----------|-------------|---------|
17 | | `INFLUXDBURL` | The full HTTP URL for your InfluxDB instance. Not required for both InfluxDB v2. | Unset |
18 | | `INFLUXDBUSERNAME` | If using authentication, a username for your InfluxDB instance. If not using authentication, leave unset. Not required for InfluxDB v2. | Unset |
19 | | `INFLUXDBPASSWORD` | If using authentication, a password for your InfluxDB instance. If not using authentication, leave unset. Not required for InfluxDB v2. | Unset |
20 | | `INFLUXDBV2_URL` | The full HTTP URL for your InfluxDB v2 instance. Required for v2. | Unset |
21 | | `INFLUXDBV2_BUCKET` | Required if `INFLUXDB_V2` is set; bucket must already exist in your InfluxDB v2 instance. | Unset |
22 | | `INFLUXDBV2_ORG` | Required if `INFLUXDB_V2` is set. | Unset |
23 | | `INFLUXDBV2_TOKEN` | Required if `INFLUXDB_V2` is set. | Unset |
24 | | `INFLUXDB_SKIP_AIRCRAFT` | Set to any value to skip publishing aircraft data to InfluxDB to minimize bandwidth and database size. | Unset |
25 |
26 | ## InfluxDB Schema
27 |
28 | The database `readsb` will be created if it does not exist.
29 |
30 | Within this database are the following measurements:
31 |
32 | ### `aircraft` Measurement
33 |
34 | Tags and fields used for this measurement should match [Virtual Radar Server's JSON response ("the new way")](https://www.virtualradarserver.co.uk/Documentation/Formats/AircraftList.aspx).
35 |
36 | | Tag Key | Type | Description |
37 | |----------|------|-------------|
38 | | `Call` | String | The aircraft's callsign. |
39 | | `Gnd` | Boolean | True if the aircraft is on the ground. |
40 | | `Icao` | String | The ICAO of the aircraft. |
41 | | `Mlat` | Boolean | True if the latitude and longitude appear to have been calculated by an MLAT server and were not transmitted by the aircraft. |
42 | | `SpdTyp` | Number | The type of speed that Spd represents. Only used with raw feeds. `0`/`missing` = ground speed, `1` = ground speed reversing, `2` = indicated air speed, `3` = true air speed. |
43 | | `Sqk` | Number | The squawk as a decimal number (e.g. a squawk of `7654` is passed as `7654`, not `4012`).
44 | | `Tisb` | Boolean | True if the last message received for the aircraft was from a TIS-B source. |
45 | | `TrkH` | Boolean | True if Trak is the aircraft's heading, false if it's the ground track. Default to ground track until told otherwise. |
46 | | `VsiT` | Number | `0` = vertical speed is barometric, `1` = vertical speed is geometric. Default to barometric until told otherwise. |
47 | | `host` | String | The hostname of the container. |
48 |
49 | | Field Key | Type | Description |
50 | |-----------|-------|-------------|
51 | | `Alt` | float | The altitude in feet at standard pressure. |
52 | | `Cmsgs` | float | The count of messages received for the aircraft. |
53 | | `GAlt` | float | The altitude adjusted for local air pressure, should be roughly the height above mean sea level. |
54 | | `InHg` | float | The air pressure in inches of mercury that was used to calculate the AMSL altitude from the standard pressure altitude. |
55 | | `Lat` | float | The aircraft's latitude over the ground. |
56 | | `Long` | float | The aircraft's longitude over the ground. |
57 | | `PosTime` | float | The time (at UTC in JavaScript ticks) that the position was last reported by the aircraft. |
58 | | `Sig` | float | The signal level for the last message received from the aircraft, as reported by the receiver. Not all receivers pass signal levels. The value's units are receiver-dependent. |
59 | | `Spd` | float | The ground speed in knots. |
60 | | `TAlt` | float | The target altitude, in feet, set on the autopilot / FMS etc. |
61 | | `TTrk` | float | The track or heading currently set on the aircraft's autopilot or FMS. |
62 | | `Trak` | float | Aircraft's track angle across the ground clockwise from 0° north. |
63 | | `Trt` | float | Transponder type - `0`=Unknown, `1`=Mode-S, `2`=ADS-B (unknown version), `3`=ADS-B 0, `4`=ADS-B 1, `5`=ADS-B 2. |
64 | | `Vsi` | float | Vertical speed in feet per minute. |
65 |
66 | ### `autogain` Measurement
67 |
68 | | Tag Key | Type | Description |
69 | |---------|------|-------|
70 | | `host` | String | The hostname of the container. |
71 |
72 | | Field Key | Type | Description |
73 | |-----------|-------|-------------|
74 | | `autogain_current_value` | float | The current gain level as set by autogain. |
75 | | `autogain_max_value` | float | The maximum gain level as set by autogain. |
76 | | `autogain_min_value` | float | The minimum gain level as set by autogain. |
77 | | `autogain_pct_strong_messages_max` | float | The maximum percentage of strong messages. |
78 | | `autogain_pct_strong_messages_min` | float | The minimum percentage of strong messages. |
79 |
80 | ### `polar_range` Measurement
81 |
82 | | Tag Key | Type | Description |
83 | |---------|------|-------|
84 | | `bearing` | Number | The bearing value is between `00` and `71`. Each bearing represents 5° on the compass, with `00` as North. |
85 | | `host` | String | The hostname of the container. |
86 |
87 | | Field Key | Type | Description |
88 | |-----------|-------|-------------|
89 | | `range` | float | The range (in metres) at a specific bearing.
90 |
91 | ### `readsb` Measurement
92 |
93 | | Tag Key | Type | Description |
94 | |---------|------|-------|
95 | | `host` | String | The hostname of the container. |
96 |
97 | Field keys should be as-per the `StatisticEntry` message schema from [`readsb.proto`](https://github.com/Mictronics/readsb-protobuf/blob/dev/readsb.proto).
98 |
99 | | Field Key | Type | Description |
100 | |---------|------|-------|
101 | | `cpr_airborne` | float | Total number of airborne CPR messages received |
102 | | `cpr_global_bad` | float | Global positions that were rejected because they were inconsistent |
103 | | `cpr_global_ok` | float | Global positions successfully derived |
104 | | `cpr_global_range` | float | Global positions that were rejected because they exceeded the receiver max range |
105 | | `cpr_global_skipped` | float | Global position attempts skipped because we did not have the right data (e.g. even/odd messages crossed a zone boundary) |
106 | | `cpr_global_speed` | float | Global positions that were rejected because they failed the inter-position speed check |
107 | | `cpr_local_aircraft_relative` | float | Local positions found relative to a previous aircraft position |
108 | | `cpr_local_ok` | float | Local (relative) positions successfully found |
109 | | `cpr_local_range` | float | Local positions not used because they exceeded the receiver max range or fell into the ambiguous part of the receiver range |
110 | | `cpr_local_skipped` | float | Local (relative) positions not used because we did not have the right data |
111 | | `cpr_local_speed` | float | Local positions not used because they failed the inter-position speed check |
112 | | `cpr_surface` | float | Total number of surface CPR messages received |
113 | | `cpu_background` | float | Milliseconds spent doing network I/O, processing received network messages, and periodic tasks. |
114 | | `cpu_demod` | float | Milliseconds spent doing demodulation and decoding in response to data from a SDR dongle. |
115 | | `cpu_reader` | float | Milliseconds spent reading sample data over USB from a SDR dongle. |
116 | | `local_accepted` | float | The number of valid Mode S messages accepted from a local SDR with N-bit errors corrected. |
117 | | `local_modeac` | float | Number of Mode A / C messages decoded. |
118 | | `local_modes` | float | Number of Mode S preambles received. This is *not* the number of valid messages! |
119 | | `local_noise` | float | Calculated receiver noise floor level. |
120 | | `local_peak_signal` | float | Peak signal power of a successfully received message, in dBFS; always negative. |
121 | | `local_samples_dropped` | float | Number of sample blocks dropped before processing. A non-zero value means CPU overload. |
122 | | `local_samples_processed` | float | Number of sample blocks processed. |
123 | | `local_signal` | float | Mean signal power of successfully received messages, in dBFS; always negative. |
124 | | `local_strong_signals` | float | Number of messages received that had a signal power above -3 dBFS. |
125 | | `local_unknown_icao` | float | Number of Mode S messages which looked like they might be valid but we didn't recognize the ICAO address and it was one of the message types where we can't be sure it's valid in this case. |
126 | | `max_distance_in_metres` | float | Maximum range in metres |
127 | | `max_distance_in_nautical_miles`| float | Maximum range in nautical miles |
128 | | `messages` | float | Total number of messages accepted by readsb from any source |
129 | | `remote_accepted` | float | Number of valid Mode S messages accepted over the network with N-bit errors corrected. |
130 | | `remote_modeac` | float | Number of Mode A / C messages received. |
131 | | `remote_modes` | float | Number of Mode S messages received. |
132 | | `tracks_mlat_position` | float | Tracks consisting of a position derived from MLAT |
133 | | `tracks_new` | float | Total tracks (aircraft) created. Each track represents a unique aircraft and persists for up to 5 minutes. |
134 | | `tracks_single_message` | float | Tracks consisting of only a single message. These are usually due to message decoding errors that produce a bad aircraft address. |
135 | | `tracks_with_position` | float | Tracks consisting of a position. |
136 |
137 | ## Prometheus Options
138 |
139 | These variables control exposing flight data and `readsb` metrics to [Prometheus](https://prometheus.io) (via a built-in instance of [Telegraf](https://docs.influxdata.com/telegraf/)). The metrics will be available under any path on the chosen port.
140 |
141 | | Variable | Description | Default |
142 | |----------|-------------|---------|
143 | | `PROMETHEUS_ENABLE` | Set to any string to enable Prometheus support | Unset |
144 | | `PROMETHEUSPORT` | The port that the Prometheus client will listen on | `9274` |
145 |
--------------------------------------------------------------------------------