├── README.md ├── collection └── README.md ├── week-four ├── README.md ├── image.png ├── index.html └── outpul.png ├── week-one ├── README.md ├── chai.jpeg ├── index.html └── main.css ├── week-react ├── README.md ├── images │ ├── 1.jpg │ ├── 10.jpg │ ├── 11.jpg │ ├── 12.jpg │ ├── 13.jpg │ ├── 14.jpg │ ├── 15.jpg │ ├── 2.jpg │ ├── 3.jpg │ ├── 4.jpg │ ├── 5.jpg │ ├── 6.jpg │ ├── 7.jpg │ ├── 8.jpg │ └── 9.jpg └── reactapp │ ├── .eslintrc.cjs │ ├── .gitignore │ ├── index.html │ ├── package.json │ ├── public │ └── vite.svg │ ├── src │ ├── App.css │ ├── App.jsx │ ├── Recepie │ │ ├── RecipeDetails.jsx │ │ ├── RecipeHome.jsx │ │ ├── RecipeItem.jsx │ │ └── data.js │ ├── assets │ │ ├── deleteicon.png │ │ ├── done.png │ │ └── react.svg │ ├── index.css │ ├── main.jsx │ └── todolist │ │ ├── AddTodo.jsx │ │ ├── TodoItem.jsx │ │ ├── TodoList.jsx │ │ └── todo.css │ ├── vite.config.js │ └── yarn.lock ├── week-seven ├── QUIZ.md ├── README.md ├── assignment.md ├── grocery_bill.js ├── index.html └── marksheet.js ├── week-three ├── README.md ├── index.html └── main.css ├── week-two ├── README.md ├── index.html ├── main.css ├── pasta-bg.jpeg └── whatsappicon.png ├── week-zero ├── README.md └── program.js ├── week_bonus_git └── README.md └── week_eight ├── README.md ├── deleteicon.png ├── index.html ├── learning.js └── script.js /README.md: -------------------------------------------------------------------------------- 1 | # MEAN Stack Classes for Beginners - Tutorial 2 | 3 | Its a tutorial for MEAN Stack classes. 4 | Each class has a README.md file with the class description. 5 | 6 | ## Suggested Extensions for VSCode 7 | 8 | - [Live Server](https://marketplace.visualstudio.com/items?itemName=ritwickdey.LiveServer) 9 | - [Prettier](https://marketplace.visualstudio.com/items?itemName=esbenp.prettier-vscode) 10 | - [Auto Rename Tag](https://marketplace.visualstudio.com/items?itemName=formulahendry.auto-rename-tag) 11 | - [HTML CSS Support](https://marketplace.visualstudio.com/items?itemName=ecmel.vscode-html-css) 12 | - [HTML Snippets](https://marketplace.visualstudio.com/items?itemName=abusaidm.html-snippets) 13 | - [HTML Boilerplate](https://marketplace.visualstudio.com/items?itemName=sidthesloth.html5-boilerplate) 14 | - [Spell Checker](https://marketplace.visualstudio.com/items?itemName=streetsidesoftware.code-spell-checker) 15 | - [Github Markdown Preview](https://marketplace.visualstudio.com/items?itemName=bierner.github-markdown-preview) 16 | 17 | --- 18 | 19 | Books and Resources for the course: 20 | 21 | - [HTML AND CSS Book](https://drive.google.com/file/d/1sqBCqMaBSvRHlB01bW13KbdPjAZjZnri/view?usp=share_link) 22 | - W3Schools - [HTML](https://www.w3schools.com/html/) 23 | - Code Academy - [HTML](https://www.codecademy.com/learn/learn-html) 24 | 25 | --- 26 | 27 | Made with ❤️ By [Muzammil Bilwani](https://muzammilbilwani.com) 28 | -------------------------------------------------------------------------------- /collection/README.md: -------------------------------------------------------------------------------- 1 | ## Different website for free resources 2 | 3 | ### Illustrations 4 | 5 | - [UnDraw](https://undraw.co/illustrations) 6 | - [Humaaans](https://www.humaaans.com/) 7 | - [Open Doodles](https://www.opendoodles.com/) 8 | - [Blush](https://blush.design/) 9 | - [DrawKit](https://www.drawkit.io/) 10 | - [Lukasz Adam](https://lukaszadam.com/illustrations) 11 | - [Open Peeps](https://www.openpeeps.com/) 12 | - [Absurd Design](https://absurd.design/) 13 | - [Manypixels](https://www.manypixels.co/gallery) 14 | 15 | ### Icons 16 | 17 | - [Feather](https://feathericons.com/) 18 | - [Heroicons](https://heroicons.com/) 19 | - [Tabler Icons](https://tablericons.com/) 20 | - [Remix Icon](https://remixicon.com/) 21 | - [Boxicons](https://boxicons.com/) 22 | - [Simple Icons](https://simpleicons.org/) 23 | - [Iconscout](https://iconscout.com/unicons) 24 | - [Streamline](https://streamlinehq.com/) 25 | - [Iconfinder](https://www.iconfinder.com/) 26 | - [Flaticon](https://www.flaticon.com/) 27 | - [Font Awesome](https://fontawesome.com/) 28 | - [IcoMoon](https://icomoon.io/) 29 | - [IconJar](https://geticonjar.com/) 30 | - [Iconify](https://iconify.design/) 31 | - [Icons8](https://icons8.com/) 32 | - [Iconmonstr](https://iconmonstr.com/) 33 | - [Icon Icons](https://icon-icons.com/) 34 | 35 | ### Photos 36 | 37 | - [Unsplash](https://unsplash.com/) 38 | - [Pexels](https://www.pexels.com/) 39 | - [Pixabay](https://pixabay.com/) 40 | - [StockSnap](https://stocksnap.io/) 41 | - [Reshot](https://www.reshot.com/) 42 | - [Gratisography](https://gratisography.com/) 43 | - [SplitShire](https://www.splitshire.com/) 44 | - [PicJumbo](https://picjumbo.com/) 45 | - [Life of Pix](https://www.lifeofpix.com/) 46 | 47 | ### Videos 48 | 49 | - [Coverr](https://coverr.co/) 50 | - [Mixkit](https://mixkit.co/) 51 | - [Pexels Videos](https://videos.pexels.com/) 52 | - [Videezy](https://www.videezy.com/) 53 | - [Videvo](https://www.videvo.net/) 54 | 55 | ### Fonts 56 | 57 | - [Google Fonts](https://fonts.google.com/) 58 | - [Font Squirrel](https://www.fontsquirrel.com/) 59 | - [DaFont](https://www.dafont.com/) 60 | 61 | ### Colors 62 | 63 | - [Coolors](https://coolors.co/) 64 | - [Color Hunt](https://colorhunt.co/) 65 | - [Color Space](https://mycolor.space/) 66 | 67 | ### Patterns 68 | 69 | - [Subtle Patterns](https://www.toptal.com/designers/subtlepatterns/) 70 | - [Hero Patterns](https://www.heropatterns.com/) 71 | - [Patternify](https://patternify.com/) 72 | - [Pattern Lab](https://www.patternlab.io/) 73 | - [Patternity](https://patternity.design/) 74 | 75 | ### Tools 76 | 77 | - [Canva](https://www.canva.com/) 78 | - [Photopea](https://www.photopea.com/) 79 | 80 | ### CSS Helpers 81 | 82 | - [Tailwind CSS](https://tailwindcss.com/) 83 | - [Bootstrap](https://getbootstrap.com/) 84 | - [Bulma](https://bulma.io/) 85 | - [Materialize](https://materializecss.com/) 86 | - [Semantic UI](https://semantic-ui.com/) 87 | - [UIKit](https://getuikit.com/) 88 | - [Milligram](https://milligram.io/) 89 | - [Skeleton](http://getskeleton.com/) 90 | - [Pure](https://purecss.io/) 91 | 92 | ### CSS Generators 93 | 94 | - [CSS Gradient](https://cssgradient.io/) 95 | - [CSS Button Generator](https://cssbuttongenerator.com/) 96 | - [CSS Border Radius](https://9elements.github.io/fancy-border-radius/) 97 | - [CSS Shadow](https://getcssscan.com/css-box-shadow-examples) 98 | 99 | ### CSS Animations 100 | 101 | - [Animate CSS](https://animate.style/) 102 | - [Hover CSS](http://ianlunn.github.io/Hover/) 103 | - [Magic Animations](https://minimamente.com/example/magic_animations/) 104 | - [CSShake](https://elrumordelaluz.github.io/csshake/) 105 | - [CSS Spinners](https://projects.lukehaas.me/css-loaders/) 106 | - [Loading Animations](https://loading.io/) 107 | - [Loading Icons](https://loading.io/icon/) 108 | -------------------------------------------------------------------------------- /week-four/README.md: -------------------------------------------------------------------------------- 1 | # Week Four - Lets learn Tailwind and make our life easier 2 | 3 |
4 | 5 |

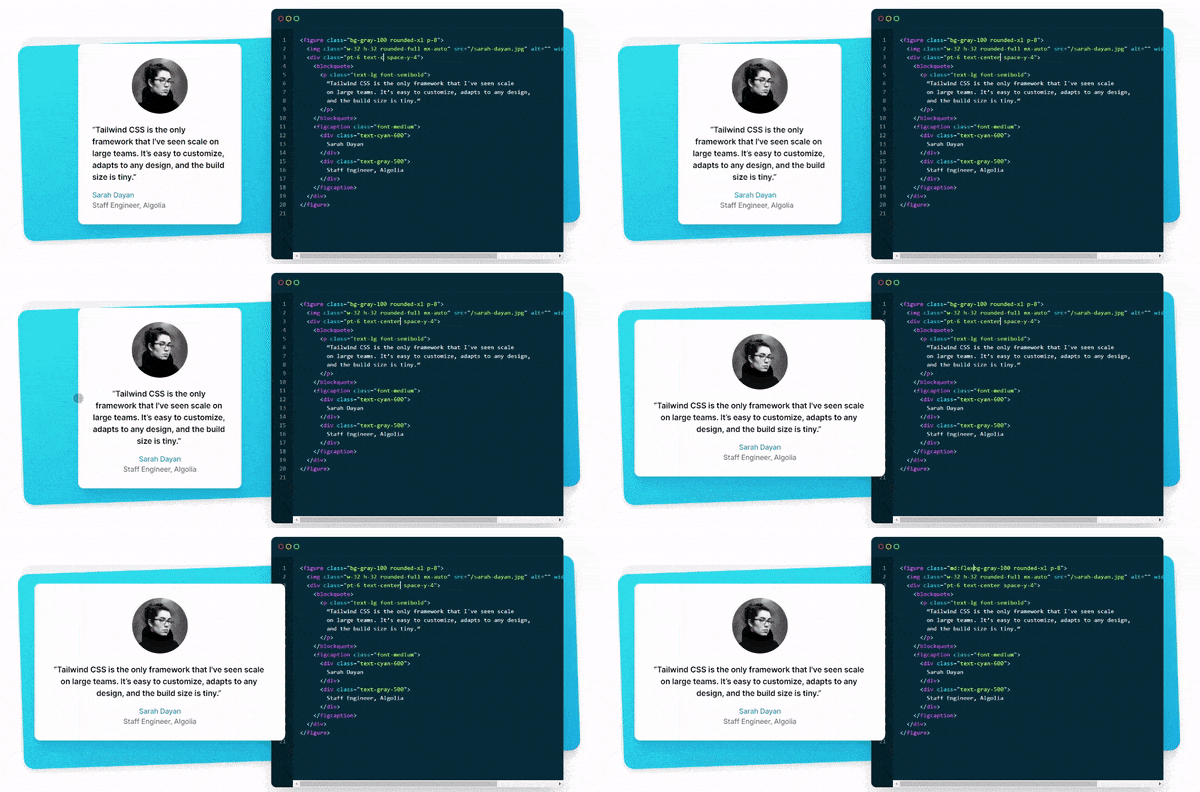
6 | 7 | 8 | 9 | 10 | Tailwind CSS 11 | 12 | 13 |

14 | 15 |
16 | 17 | ## What is Tailwind? 18 | 19 | Tailwind is a utility-first CSS framework for rapidly building custom user interfaces. It's completely customizable, completely accessible, and as low-level or high-level as you need it to be. 20 | 21 | ## Why Tailwind? 22 | 23 | Rapidly build modern websites without ever leaving your HTML. 24 | 25 | A utility-first CSS framework packed with classes like `flex`, `pt-4`, `text-center` and `rotate-90` that can be composed to build any design, directly in your markup. 26 | 27 | 28 | 29 | ## How to use Tailwind? 30 | 31 | ### Installation 32 | 33 | ```bash 34 | npm install tailwindcss 35 | ``` 36 | 37 | or 38 | 39 | ```bash 40 | yarn add tailwindcss 41 | ``` 42 | 43 | or add as a CDN 44 | 45 | ```html 46 | 47 | 48 | 49 | 50 | 51 | 52 | 53 | 54 | 55 | 56 | 57 | 58 |

Hello world!

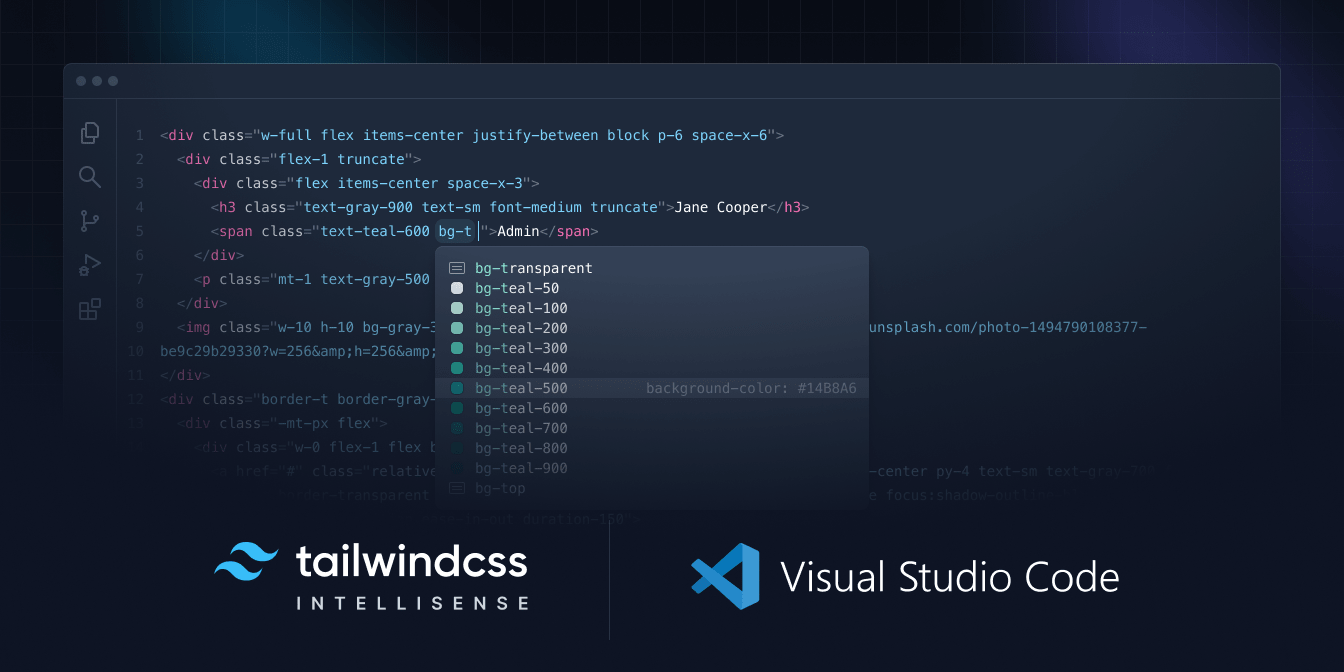
59 | 60 | 61 | ``` 62 | 63 | More ways to install can check here [https://tailwindcss.com/docs/installation](https://tailwindcss.com/docs/installation) 64 | 65 | ## Editor Setup 66 | 67 | Plugins and configuration settings that can improve the developer experience when working with Tailwind CSS. 68 | 69 | ### IntelliSense for VS Code 70 | 71 | The official Tailwind CSS IntelliSense extension for Visual Studio Code enhances the Tailwind development experience by providing users with advanced features such as autocomplete, syntax highlighting, and linting. 72 | 73 | 74 |
75 | 76 | - _Autocomplete_. Intelligent suggestions for class names, as well as CSS functions and directives. 77 | - _Linting_. Highlights errors and potential bugs in both your CSS and your markup. 78 | - _Hover Previews_. See the complete CSS for a Tailwind class name by hovering over it. 79 | - _Syntax Highlighting._ Provides syntax definitions so that Tailwind features are highlighted correctly. 80 | 81 | ### Example for Tailwind CSS 82 | 83 | ```html 84 | 85 | 86 | 87 | My Website 88 | 89 | 90 | 91 |

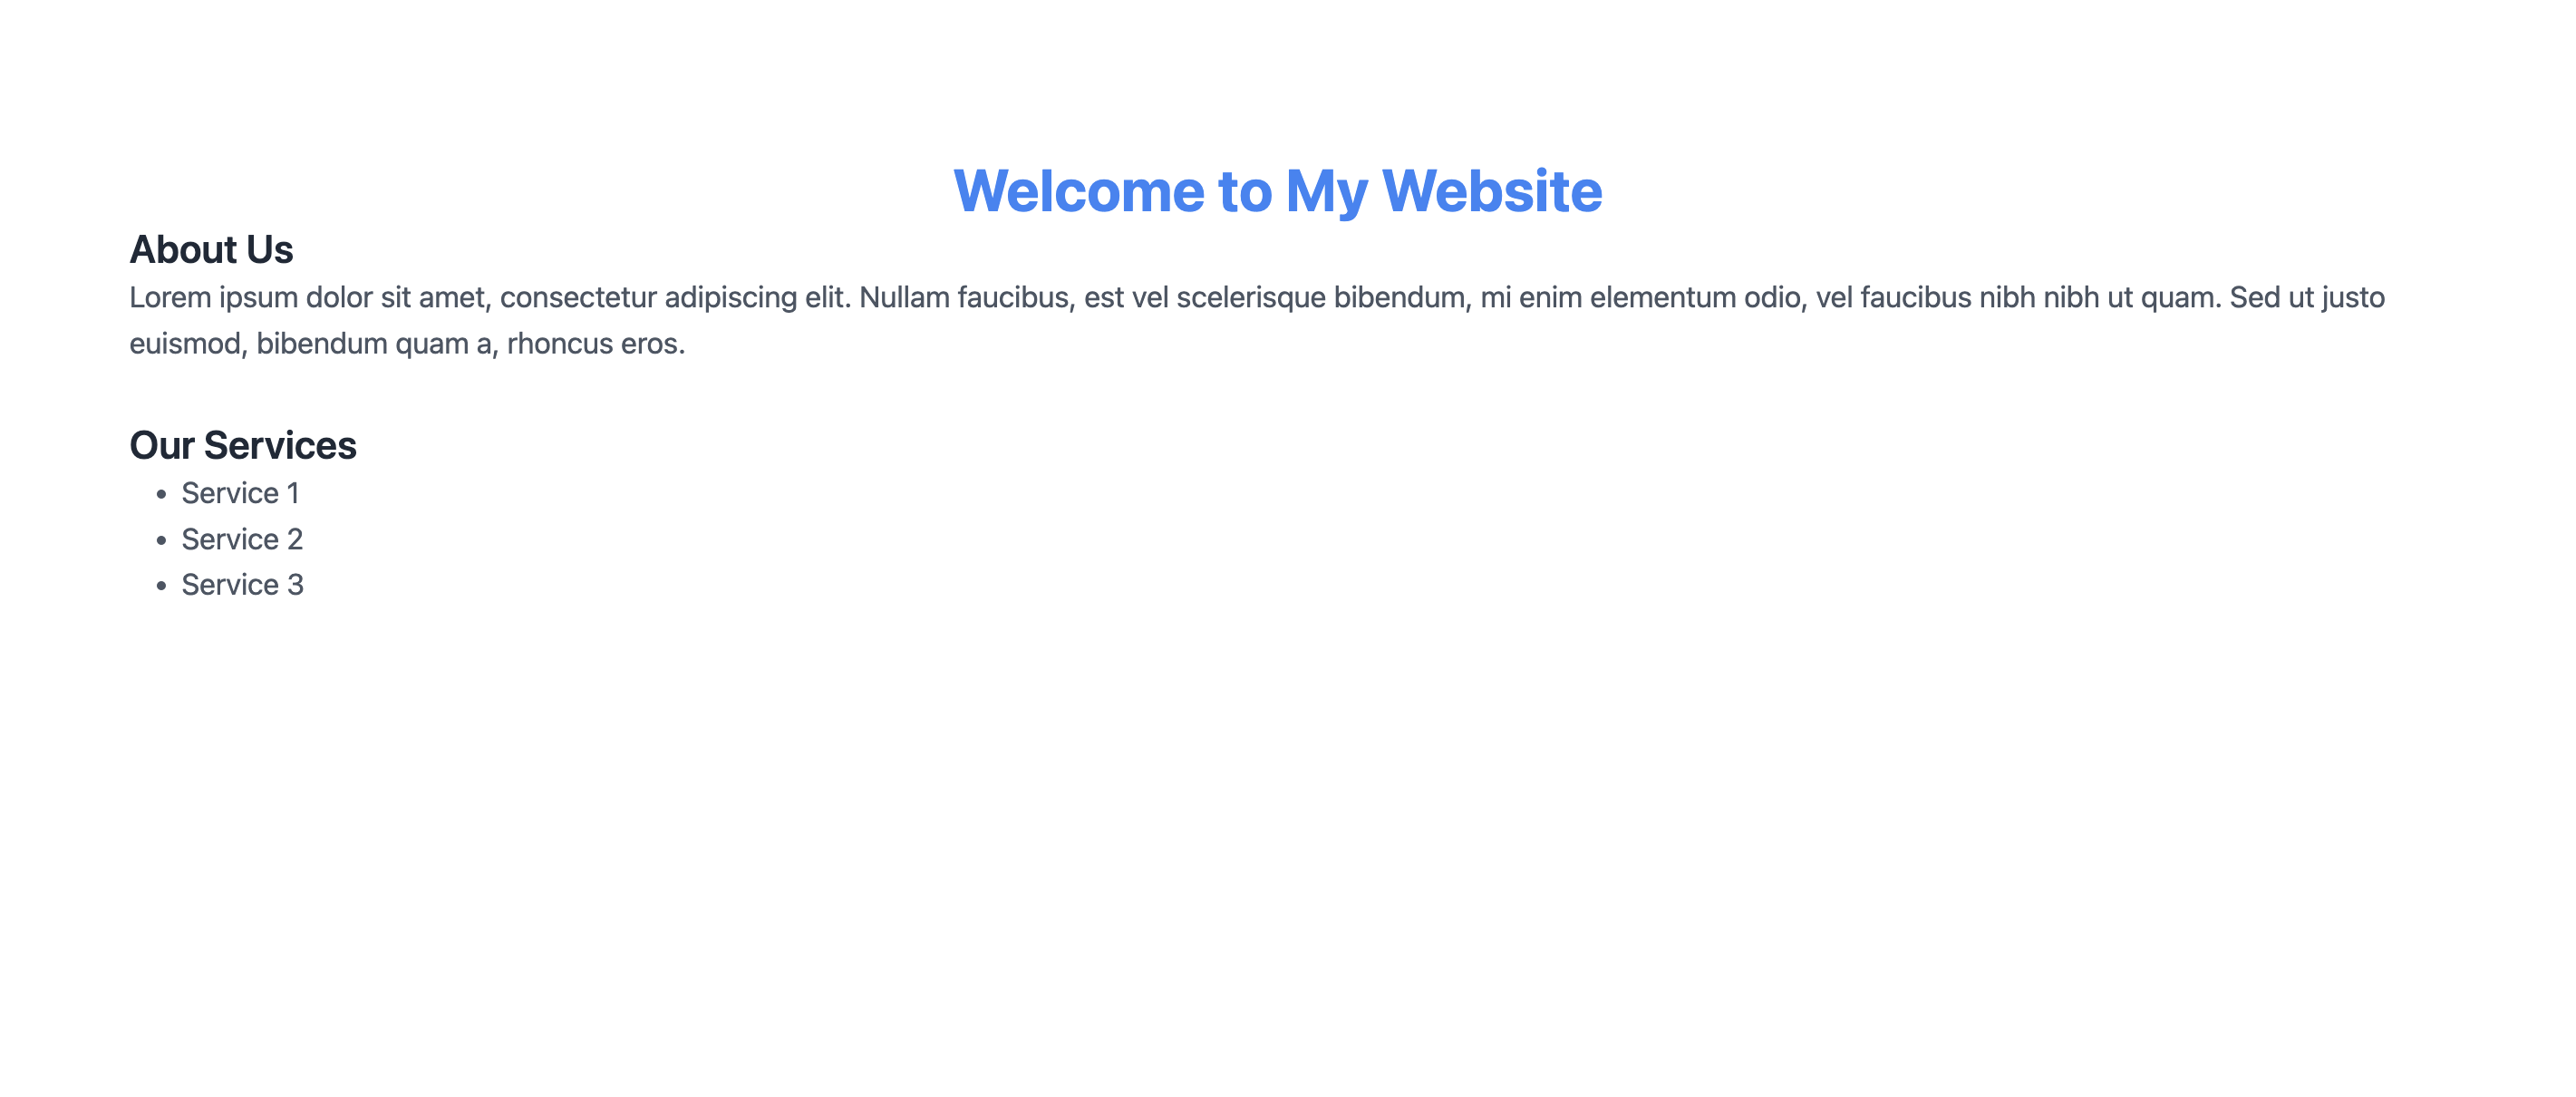
92 | Welcome to My Website 93 |

94 |

About Us

95 |

96 | Lorem ipsum dolor sit amet, consectetur adipiscing elit. Nullam faucibus, 97 | est vel scelerisque bibendum, mi enim elementum odio, vel faucibus nibh 98 | nibh ut quam. Sed ut justo euismod, bibendum quam a, rhoncus eros. 99 |

100 |

Our Services

101 | 106 | 107 | 108 | ``` 109 | 110 | In this example, we're using a few of the many utility classes available in Tailwind CSS to style the headings in our HTML document. Here's a breakdown of what each class does: 111 | 112 | - `text-4xl`: Sets the font size of the h1 element to 4xl (equivalent to 2.25rem or 36px). 113 | - `font-bold`: Makes the text of the h1 element bold. 114 | - `text-center`: Centers the text of the h1 element horizontally. 115 | - `text-blue-500`: Sets the text color of the h1 element to a shade of blue with a 500 opacity value. 116 | - `text-2xl`: Sets the font size of the h2 elements to 2xl (equivalent to 1.5rem or 24px). 117 | - `font-semibold`: Makes the text of the h2 elements semi-bold. 118 | - `text-gray-800`: Sets the text color of the h2 elements to a shade of gray with an 800 opacity value. 119 | - `text-lg`: Sets the font size of the p and li elements to lg (equivalent to 1.125rem or 18px). 120 | - `text-gray-600`: Sets the text color of the p and li elements to a shade of gray with a 600 opacity value. 121 | - `mt-8`: Adds a margin top of 8 to the second h2 element. 122 | 123 | Using utility classes like this allows us to quickly and easily style our HTML elements without having to write custom CSS. By combining multiple classes, we can create complex styles and layouts with minimal effort. 124 | 125 | _Output_ 126 | 127 | 128 | 129 | ### Best way to learn Tailwind CSS 130 | 131 | Tailwind can be easily learn by its documentation and by watching videos. I have listed some of the best videos to learn Tailwind CSS. 132 | 133 | [Tailwind CSS Crash Course](https://www.youtube.com/watch?v=UBOj6rqRUME) 134 | 135 | --- 136 | 137 | For full documentation, visit [tailwindcss.com](https://tailwindcss.com/). 138 | 139 | For cheat sheet visit [tailwind-cheat-sheet](https://tailwindcomponents.com/cheatsheet/) 140 | -------------------------------------------------------------------------------- /week-four/image.png: -------------------------------------------------------------------------------- https://raw.githubusercontent.com/syproo/MEAN-Stack-tutorial/585557b594afb002e02c574d4164a89f0ab25c60/week-four/image.png -------------------------------------------------------------------------------- /week-four/index.html: -------------------------------------------------------------------------------- 1 | 2 | 3 | 4 | My Website 5 | 10 | 11 | 12 | 13 | 56 | 57 |
58 |
59 |

60 | Study anytime you are where 61 |

62 |

65 | Study anytime you want and where you want. We have a lot of courses 66 |

67 |
68 |
69 | 70 |
71 |
72 |
73 |
74 |

133+

75 |

Courses and subject

76 |
77 |
78 |

304+

79 |

Courses and subject

80 |
81 |
82 |

56k+

83 |

Courses and subject

84 |
85 |
86 |

11m+

87 |

Courses and subject

88 |
89 |
90 | 91 | 92 | -------------------------------------------------------------------------------- /week-four/outpul.png: -------------------------------------------------------------------------------- https://raw.githubusercontent.com/syproo/MEAN-Stack-tutorial/585557b594afb002e02c574d4164a89f0ab25c60/week-four/outpul.png -------------------------------------------------------------------------------- /week-one/README.md: -------------------------------------------------------------------------------- 1 | ## Week 2 - Lets write some mark up - HTML 2 | 3 | - What is HTML 4 | - Basic Structure of an HTML Document 5 | - Common HTML Elements 6 | - Headings, Paragraphs, Lists, Links, Images, Tables, etc. 7 | - Element Attributes 8 | - id, class, style, etc. 9 | - Semantic HTML Elements 10 | - header, nav, article, section, etc. 11 | - Text Formatting 12 | - Bold, Italic, Underline, etc. 13 | - Styles with CSS 14 | - Internal, External, Inline CSS 15 | - CSS Selectors & Properties 16 | - Classes, IDs, Elements, Backgrounds, Borders, etc. 17 | - Adding Images & Videos 18 | - Embedding Audio & YouTube Videos 19 | - HTML5 Multimedia Elements 20 | - audio, video, etc. 21 | - Form Elements & Attributes 22 | - input, textarea, select, button, etc. 23 | - HTML Best Practices & Accessibility 24 | - Writing Clean & Valid HTML Code 25 | 26 | ### Tags 27 | 28 | - `` : The root element of an HTML document 29 | - `` : Contains meta information about the document 30 | - `` : Specifies a title for the document 31 | - `<body>` : Defines the document's body 32 | - `<h1>` to `<h6>` : Defines HTML headings 33 | - `<p>` : Defines a paragraph 34 | - `<br>` : Inserts a single line break 35 | - `<hr>` : Defines a thematic change in the content 36 | - `<pre>` : Defines preformatted text 37 | - `<b>` : Defines bold text 38 | - `<strong>` : Defines important text 39 | - `<i>` : Defines a part of text in an alternate voice or mood 40 | - `<em>` : Defines emphasized text 41 | - `<mark>` : Defines marked/highlighted text 42 | - `<small>` : Defines smaller text 43 | - `<del>` : Defines deleted text 44 | - `<ins>` : Defines inserted text 45 | - `<sub>` : Defines subscripted text 46 | - `<sup>` : Defines superscripted text 47 | - `<blockquote>` : Defines a section that is quoted from another source 48 | - `<q>` : Defines a short quotation 49 | - `<abbr>` : Defines an abbreviation or an acronym 50 | - `<img>` : Defines an image 51 | - `<a>` : Defines a hyperlink 52 | - `<ul>` : Defines an unordered list 53 | - `<ol>` : Defines an ordered list 54 | - `<li>` : Defines a list item 55 | - `<dl>` : Defines a description list 56 | - `<dt>` : Defines a term/name in a description list 57 | - `<dd>` : Defines a description of a term/name in a description list 58 | - `<table>` : Defines a table 59 | - `<tr>` : Defines a row in a table 60 | - `<th>` : Defines a header cell in a table 61 | - `<td>` : Defines a cell in a table 62 | - `<caption>` : Defines a table caption 63 | - `<thead>` : Groups the header content in a table 64 | - `<tbody>` : Groups the body content in a table 65 | - `<tfoot>` : Groups the footer content in a table 66 | - `<col>` : Specifies column properties for each column within a `<colgroup>` element 67 | - `<colgroup>` : Specifies a group of one or more columns in a table for formatting 68 | - `<iframe>` : Defines an inline frame 69 | - `<div>` : Defines a section in a document 70 | - `<span>` : Defines a section in a document 71 | - `<header>` : Defines a header for a document or a section 72 | - `<nav>` : Defines a set of navigation links 73 | - `<main>` : Specifies the main content of a document 74 | - `<section>` : Defines a section in a document 75 | - `<article>` : Defines an independent self-contained content 76 | - `<aside>` : Defines content aside from the page content 77 | - `<footer>` : Defines a footer for a document or a section 78 | - `<details>` : Defines additional details that the user can view or hide 79 | - `<summary>` : Defines a visible heading for a `<details>` element 80 | - `<dialog>` : Defines a dialog box or window 81 | - `<figure>` : Specifies self-contained content 82 | - `<figcaption>` : Defines a caption for a `<figure>` element 83 | - `<time>` : Defines a date/time 84 | - `<progress>` : Represents the progress of a task 85 | - `<meter>` : Defines a scalar measurement within a known range (a gauge) 86 | - `<data>` : Links the given content with a machine-readable translation 87 | - `<ruby>` : Defines a ruby annotation (for East Asian typography) 88 | - `<rt>` : Defines an explanation/pronunciation of characters (for East Asian typography) 89 | - `<input>` : Defines an input control 90 | - `<textarea>` : Defines a multiline input control (text area) 91 | - `<select>` : Defines a drop-down list 92 | - `<option>` : Defines an option in a drop-down list 93 | - `<button>` : Defines a clickable button 94 | - `<label>` : Defines a label for an `<input>` element 95 | - `<fieldset>` : Groups related elements in a form 96 | - `<legend>` : Defines a caption for a `<fieldset>` element 97 | - `<datalist>` : Specifies a list of pre-defined options for input controls 98 | - `<optgroup>` : Defines a group of related options in a drop-down list 99 | - `<form>` : Defines an HTML form for user input 100 | - `<audio>` : Defines sound, such as music or other audio streams 101 | - `<video>` : Defines a video or movie 102 | - `<source>` : Defines multiple media resources for media elements (`<video>` and `<audio>`) 103 | - `<track>` : Defines text tracks for media elements (`<video>` and `<audio>`) 104 | - `<embed>` : Defines a container for an external (non-HTML) application 105 | - `<object>` : Defines an embedded object 106 | 107 | ### Attributes 108 | 109 | - `id` : Specifies a unique id for an HTML element 110 | - `class` : Specifies one or more classnames for an HTML element 111 | - `style` : Specifies an inline CSS style for an HTML element 112 | - `src` : Specifies the URL of the media file 113 | - `href` : Specifies the URL of the page the link goes to 114 | - `alt` : Specifies an alternate text for an image, when the image cannot be displayed 115 | - `title` : Specifies extra information about an element 116 | - `width` : Specifies the width of an element 117 | - `height` : Specifies the height of an element 118 | - `target` : Specifies where to open the linked document 119 | - `rel` : Specifies the relationship between the current document and the linked document 120 | - `type` : Specifies the media type of the linked document 121 | - `value` : Specifies the value of an input element 122 | - `placeholder` : Specifies a short hint that describes the expected value of an input field 123 | - `disabled` : Specifies that an input element should be disabled 124 | 125 | ### Practice Questions & Exercises 126 | 127 | - [HTML Practice Questions](https://www.w3schools.com/html/html_quiz.asp) 128 | - [HTML Exercises](https://www.w3schools.com/html/exercise.asp) 129 | 130 | - Create a webpage that displays information about a conference. Use h1 tags to define the conference title, p tags to add information about the conference, and ul tags to list the conference schedule. Use a tags to link to the conference registration page and img tags to display the conference logo. 131 | - Create a webpage that displays a portfolio of work. Use div tags to group the work into categories (e.g. graphic design, web development) and img tags to display samples of the work. Use p tags to add descriptions for each piece of work and a tags to link to the full project. 132 | - Create a webpage that displays a product catalog. Use ul tags to list the products and li tags to define each product. Use img tags to display product images, h2 tags to add product names, and p tags to add product descriptions. Use a tags to link to the product page and span tags to add pricing information. 133 | - Create a webpage that displays information about a city. Use h1 tags to define the city name, img tags to display city photos, and p tags to add information about the city. Use table tags to list city attractions and a tags to link to the attraction pages. Use span tags to add pricing information for the attractions. 134 | - Create a webpage that displays a blog. Use h1 tags to define the blog title, p tags to add blog posts, and ul tags to list recent posts. Use img tags to display post images, h2 tags to add post titles, and p tags to add post descriptions. Use a tags to link to the full post. 135 | -------------------------------------------------------------------------------- /week-one/chai.jpeg: -------------------------------------------------------------------------------- https://raw.githubusercontent.com/syproo/MEAN-Stack-tutorial/585557b594afb002e02c574d4164a89f0ab25c60/week-one/chai.jpeg -------------------------------------------------------------------------------- /week-one/index.html: -------------------------------------------------------------------------------- 1 | <!DOCTYPE html> 2 | <html lang="en"> 3 | <head> 4 | <meta charset="UTF-8" /> 5 | <meta http-equiv="X-UA-Compatible" content="IE=edge" /> 6 | <meta name="viewport" content="width=device-width, initial-scale=1.0" /> 7 | <title>Recipe For Kashmiri Tea 8 | 9 | 14 | 15 | 16 |

Kashmiri Tea

17 |

Here is my recipe for Kashmiri Tea:

18 | 23 | A cup of chai 24 |

Ingredients

25 | 36 |
37 |

How to make tea

38 |

39 | In kettle, add water,kashimiri tea leaves,star anise,cloves,cardamom 40 | seeds,salt and baking soda,bring it to boil. Let it simmer for 20-30 41 | minutes until it reduces to half. Add chilled water and mix well for 8 42 | to 10 minutes and cook for 5 minutes. Strain and set aside, kehwa is 43 | ready and can be refrigerated for up to 4-5 days. For Kashmiri tea,in 44 | kettle,add milk,almonds(crushed),pistachio(crushed),sugar (optional)and 45 | give it a good mix. Add kehwa and cook for few minutes. Finally pour the 46 | tea in cups,add almonds(crushed) and pistachio(crushed). Kashmiri tea is 47 | ready. 48 |

49 |
50 |

Nutrition's

51 | 52 | 53 | 54 | 55 | 56 | 57 | 58 | 59 | 60 | 61 | 62 | 63 | 64 | 65 | 66 | 67 | 68 | 69 | 70 | 71 | 72 | 73 |
CaloriesProteinCarbohydratesFat
100102030
74 | 75 | Strong 76 | Emphasized 77 |
78 | Italic 79 |
80 | Small 81 |
82 | Big 83 |
84 | H 2 O 85 |
86 | Superscript 87 |
88 | Deleted 89 |
90 | Inserted 91 |
92 | Marked 93 |
94 | Abbreviation 95 |
96 | Quoted 97 |
98 | Cited 99 |
100 | Code 101 |
102 | Keyboard 103 |
104 | Sample 105 |
106 | Variable 107 |
108 | 109 |
110 | 111 | 120 | 121 |

Feedback please

122 | 123 |
124 | 125 |
126 | 127 |
128 | 129 |
130 | 131 | 132 | 137 |
138 | 139 |
140 | 141 |

142 | Made with reference to 143 | 147 | Food Fusion 149 |

150 | 151 | 152 | -------------------------------------------------------------------------------- /week-one/main.css: -------------------------------------------------------------------------------- 1 | .text { 2 | color: brown; 3 | } -------------------------------------------------------------------------------- /week-react/README.md: -------------------------------------------------------------------------------- 1 | ## Week - Do you know React? Let's learn from the start to advance 2 | 3 | ### Small Introduction 4 | 5 | 6 | 7 | 8 | 9 | 10 | 11 | 12 | 13 | 14 | 15 | 16 | 17 | 18 | 19 | 20 | 21 | ### Lets get start with setup 22 | 23 | - Install Yarn 24 | 25 | ```bash 26 | npm install --global yarn 27 | ``` 28 | 29 | ### Create React with Vite 30 | 31 | #### Why Vite? 32 | 33 | Vite is a build tool that aims to provide a faster and leaner development experience for modern web projects. It consists of two major parts: 34 | 35 | 1. A dev server that serves your source files over native ES modules, with rich built-in features and astonishingly fast Hot Module Replacement (HMR). 36 | 2. A build command that bundles your code with Rollup, pre-configured to output highly optimized static assets for production. 37 | 38 | Read More here: 39 | https://muzammilbilwani.medium.com/why-you-should-prefer-vite-over-create-react-app-cra-5adf3e71771f 40 | 41 | #### Create React App with Vite 42 | 43 | Guide by Vite: 44 | https://vitejs.dev/guide/ 45 | 46 | ```bash 47 | yarn create vite my-app --template react 48 | ``` 49 | 50 | You can replace `my-app` with your project name 51 | 52 | Now run: 53 | 54 | ```bash 55 | cd my-app 56 | ``` 57 | 58 | ```bash 59 | yarn 60 | ``` 61 | 62 | ```bash 63 | yarn dev 64 | ``` 65 | 66 | Open your project in your favorite code editor and start coding. 67 | 68 | ### React Project Structure 69 | 70 | - node_modules 71 | packages installed by yarn or npm 72 | - public 73 | static files 74 | - src 75 | - assets 76 | - components 77 | - App.js 78 | - index.js 79 | - .gitignore 80 | - index.html 81 | index.html is the entry point of your app and it is the only HTML file you need to create. 82 | - package.json 83 | package.json is the manifest file for Node.js projects, which includes things like metadata (the project’s name, author, etc). It also includes the list of dependencies to install from yarn when running yarn install. 84 | - README.md 85 | - yarn.lock 86 | yarn.lock is an automatically generated file based on the exact versions of your npm dependencies that were installed for your project. This ensures that all people using your project will get the same set of dependencies. 87 | - vite.config.js 88 | vite.config.js is the config file for Vite. It is optional and you can delete it if you don’t need it. 89 | 90 | ### React Components 91 | 92 | Components are the building blocks of any React app and a typical React app will have many of these. Simply put, a component is a JavaScript class or function that optionally accepts inputs i.e. properties(props) and returns a React element that describes how a section of the UI (User Interface) should appear. 93 | 94 | #### Types of Components 95 | 96 | There are two types of components in React: 97 | 98 | 1. Class Components ( Old way of writing components ) 99 | 2. Functional Components ( New way of writing components ) 100 | 101 | #### Functional Components 102 | 103 | Functional components are basic JavaScript functions. These are typically arrow functions but can also be created with the regular function keyword. 104 | 105 | ```js 106 | import React from "react" 107 | 108 | const App = () => { 109 | return
Hello World
110 | } 111 | 112 | export default App 113 | ``` 114 | 115 | ### JSX 116 | 117 | JSX is a syntax extension to JavaScript. It is similar to a template language, but it has full power of JavaScript. JSX gets compiled to React.createElement() calls which return plain JavaScript objects called “React elements”. React elements are then rendered to the DOM. 118 | 119 | ```js 120 | import React from "react" 121 | 122 | const App = () => { 123 | return
Hello World
124 | } 125 | 126 | export default App 127 | ``` 128 | 129 | ### Props 130 | 131 | Props are inputs to a React component. They are data passed down from a parent component to a child component. Props are passed to components via HTML attributes. 132 | 133 | ```js 134 | import React from "react" 135 | 136 | const App = () => { 137 | return 138 | } 139 | 140 | const Greeting = (props) => { 141 | return
Hello {props.name}
142 | } 143 | 144 | export default App 145 | ``` 146 | 147 | ### State 148 | 149 | State is a JavaScript object that stores a component’s dynamic data and determines the component’s behavior. Because state is dynamic, it enables a component to keep track of changing information in between renders and for it to be dynamic and interactive. 150 | 151 | ```js 152 | import React, { useState } from "react" 153 | 154 | const App = () => { 155 | const [name, setName] = useState("Muzammil") 156 | 157 | return ( 158 |
159 | 160 | setName(e.target.value)} 164 | /> 165 |
166 | ) 167 | } 168 | ``` 169 | 170 | ### Hooks 171 | 172 | Hooks are functions that let you “hook into” React state and lifecycle features from function components. Hooks don’t work inside classes — they let you use React without classes. 173 | 174 | #### Code Example 175 | 176 | ```js 177 | import React, { useState } from "react" 178 | 179 | const App = () => { 180 | const [name, setName] = useState("Muzammil") 181 | 182 | return ( 183 |
184 | 185 | setName(e.target.value)} 189 | /> 190 |
191 | ) 192 | } 193 | ``` 194 | 195 | ### useEffect 196 | 197 | The Effect Hook lets you perform side effects in function components: 198 | 199 | ```js 200 | import React, { useState, useEffect } from "react" 201 | 202 | const App = () => { 203 | const [name, setName] = useState("Muzammil") 204 | 205 | useEffect(() => { 206 | console.log("Component Mounted") 207 | }, []) 208 | 209 | return ( 210 |
211 | 212 | setName(e.target.value)} 216 | /> 217 |
218 | ) 219 | } 220 | ``` 221 | 222 | ### React Router 223 | 224 | React Router is a collection of navigational components that compose declaratively with your application. Whether you want to have bookmarkable URLs for your web app or a composable way to navigate in React Native, React Router works wherever React is rendering. 225 | -------------------------------------------------------------------------------- /week-react/images/1.jpg: -------------------------------------------------------------------------------- https://raw.githubusercontent.com/syproo/MEAN-Stack-tutorial/585557b594afb002e02c574d4164a89f0ab25c60/week-react/images/1.jpg -------------------------------------------------------------------------------- /week-react/images/10.jpg: -------------------------------------------------------------------------------- https://raw.githubusercontent.com/syproo/MEAN-Stack-tutorial/585557b594afb002e02c574d4164a89f0ab25c60/week-react/images/10.jpg -------------------------------------------------------------------------------- /week-react/images/11.jpg: -------------------------------------------------------------------------------- https://raw.githubusercontent.com/syproo/MEAN-Stack-tutorial/585557b594afb002e02c574d4164a89f0ab25c60/week-react/images/11.jpg -------------------------------------------------------------------------------- /week-react/images/12.jpg: -------------------------------------------------------------------------------- https://raw.githubusercontent.com/syproo/MEAN-Stack-tutorial/585557b594afb002e02c574d4164a89f0ab25c60/week-react/images/12.jpg -------------------------------------------------------------------------------- /week-react/images/13.jpg: -------------------------------------------------------------------------------- https://raw.githubusercontent.com/syproo/MEAN-Stack-tutorial/585557b594afb002e02c574d4164a89f0ab25c60/week-react/images/13.jpg -------------------------------------------------------------------------------- /week-react/images/14.jpg: -------------------------------------------------------------------------------- https://raw.githubusercontent.com/syproo/MEAN-Stack-tutorial/585557b594afb002e02c574d4164a89f0ab25c60/week-react/images/14.jpg -------------------------------------------------------------------------------- /week-react/images/15.jpg: -------------------------------------------------------------------------------- https://raw.githubusercontent.com/syproo/MEAN-Stack-tutorial/585557b594afb002e02c574d4164a89f0ab25c60/week-react/images/15.jpg -------------------------------------------------------------------------------- /week-react/images/2.jpg: -------------------------------------------------------------------------------- https://raw.githubusercontent.com/syproo/MEAN-Stack-tutorial/585557b594afb002e02c574d4164a89f0ab25c60/week-react/images/2.jpg -------------------------------------------------------------------------------- /week-react/images/3.jpg: -------------------------------------------------------------------------------- https://raw.githubusercontent.com/syproo/MEAN-Stack-tutorial/585557b594afb002e02c574d4164a89f0ab25c60/week-react/images/3.jpg -------------------------------------------------------------------------------- /week-react/images/4.jpg: -------------------------------------------------------------------------------- https://raw.githubusercontent.com/syproo/MEAN-Stack-tutorial/585557b594afb002e02c574d4164a89f0ab25c60/week-react/images/4.jpg -------------------------------------------------------------------------------- /week-react/images/5.jpg: -------------------------------------------------------------------------------- https://raw.githubusercontent.com/syproo/MEAN-Stack-tutorial/585557b594afb002e02c574d4164a89f0ab25c60/week-react/images/5.jpg -------------------------------------------------------------------------------- /week-react/images/6.jpg: -------------------------------------------------------------------------------- https://raw.githubusercontent.com/syproo/MEAN-Stack-tutorial/585557b594afb002e02c574d4164a89f0ab25c60/week-react/images/6.jpg -------------------------------------------------------------------------------- /week-react/images/7.jpg: -------------------------------------------------------------------------------- https://raw.githubusercontent.com/syproo/MEAN-Stack-tutorial/585557b594afb002e02c574d4164a89f0ab25c60/week-react/images/7.jpg -------------------------------------------------------------------------------- /week-react/images/8.jpg: -------------------------------------------------------------------------------- https://raw.githubusercontent.com/syproo/MEAN-Stack-tutorial/585557b594afb002e02c574d4164a89f0ab25c60/week-react/images/8.jpg -------------------------------------------------------------------------------- /week-react/images/9.jpg: -------------------------------------------------------------------------------- https://raw.githubusercontent.com/syproo/MEAN-Stack-tutorial/585557b594afb002e02c574d4164a89f0ab25c60/week-react/images/9.jpg -------------------------------------------------------------------------------- /week-react/reactapp/.eslintrc.cjs: -------------------------------------------------------------------------------- 1 | module.exports = { 2 | env: { browser: true, es2020: true }, 3 | extends: [ 4 | 'eslint:recommended', 5 | 'plugin:react/recommended', 6 | 'plugin:react/jsx-runtime', 7 | 'plugin:react-hooks/recommended', 8 | ], 9 | parserOptions: { ecmaVersion: 'latest', sourceType: 'module' }, 10 | settings: { react: { version: '18.2' } }, 11 | plugins: ['react-refresh'], 12 | rules: { 13 | 'react-refresh/only-export-components': 'warn', 14 | }, 15 | } 16 | -------------------------------------------------------------------------------- /week-react/reactapp/.gitignore: -------------------------------------------------------------------------------- 1 | # Logs 2 | logs 3 | *.log 4 | npm-debug.log* 5 | yarn-debug.log* 6 | yarn-error.log* 7 | pnpm-debug.log* 8 | lerna-debug.log* 9 | 10 | node_modules 11 | dist 12 | dist-ssr 13 | *.local 14 | 15 | # Editor directories and files 16 | .vscode/* 17 | !.vscode/extensions.json 18 | .idea 19 | .DS_Store 20 | *.suo 21 | *.ntvs* 22 | *.njsproj 23 | *.sln 24 | *.sw? 25 | -------------------------------------------------------------------------------- /week-react/reactapp/index.html: -------------------------------------------------------------------------------- 1 | 2 | 3 | 4 | 5 | 6 | 7 | Bano Qabil Project 8 | 9 | 10 |
11 | 12 | 13 | 14 | 15 | -------------------------------------------------------------------------------- /week-react/reactapp/package.json: -------------------------------------------------------------------------------- 1 | { 2 | "name": "reactapp", 3 | "private": true, 4 | "version": "0.0.0", 5 | "type": "module", 6 | "scripts": { 7 | "dev": "vite", 8 | "build": "vite build", 9 | "lint": "eslint src --ext js,jsx --report-unused-disable-directives --max-warnings 0", 10 | "preview": "vite preview" 11 | }, 12 | "dependencies": { 13 | "react": "^18.2.0", 14 | "react-dom": "^18.2.0", 15 | "react-router-dom": "^6.13.0" 16 | }, 17 | "devDependencies": { 18 | "@types/react": "^18.0.37", 19 | "@types/react-dom": "^18.0.11", 20 | "@vitejs/plugin-react": "^4.0.0", 21 | "eslint": "^8.38.0", 22 | "eslint-plugin-react": "^7.32.2", 23 | "eslint-plugin-react-hooks": "^4.6.0", 24 | "eslint-plugin-react-refresh": "^0.3.4", 25 | "vite": "^4.3.9" 26 | } 27 | } 28 | -------------------------------------------------------------------------------- /week-react/reactapp/public/vite.svg: -------------------------------------------------------------------------------- 1 | -------------------------------------------------------------------------------- /week-react/reactapp/src/App.css: -------------------------------------------------------------------------------- 1 | #root { 2 | max-width: 1280px; 3 | margin: 0 auto; 4 | padding: 2rem; 5 | text-align: center; 6 | } 7 | 8 | .logo { 9 | height: 6em; 10 | padding: 1.5em; 11 | will-change: filter; 12 | transition: filter 300ms; 13 | } 14 | .logo:hover { 15 | filter: drop-shadow(0 0 2em #646cffaa); 16 | } 17 | .logo.react:hover { 18 | filter: drop-shadow(0 0 2em #61dafbaa); 19 | } 20 | 21 | @keyframes logo-spin { 22 | from { 23 | transform: rotate(0deg); 24 | } 25 | to { 26 | transform: rotate(360deg); 27 | } 28 | } 29 | 30 | @media (prefers-reduced-motion: no-preference) { 31 | a:nth-of-type(2) .logo { 32 | animation: logo-spin infinite 20s linear; 33 | } 34 | } 35 | 36 | .card { 37 | padding: 2em; 38 | } 39 | 40 | .read-the-docs { 41 | color: #888; 42 | } 43 | -------------------------------------------------------------------------------- /week-react/reactapp/src/App.jsx: -------------------------------------------------------------------------------- 1 | import "./App.css" 2 | import { createBrowserRouter, RouterProvider } from "react-router-dom" 3 | import { RecipeDetails } from "./Recepie/RecipeDetails" 4 | import { RecipeHome } from "./Recepie/RecipeHome" 5 | 6 | const router = createBrowserRouter([ 7 | { 8 | path: "/", 9 | element: , 10 | errorElement: ( 11 | <> 12 |

Oops!

13 |

Sorry, an unexpected error has occurred.

14 | 15 | ) 16 | }, 17 | { 18 | path: "/details/:id", 19 | element: 20 | } 21 | ]) 22 | function App() { 23 | return 24 | } 25 | 26 | export default App 27 | -------------------------------------------------------------------------------- /week-react/reactapp/src/Recepie/RecipeDetails.jsx: -------------------------------------------------------------------------------- 1 | import { useParams, useNavigate } from "react-router-dom" 2 | import { recipeList } from "./data" 3 | 4 | export const RecipeDetails = () => { 5 | const { id } = useParams() 6 | const navigate = useNavigate() 7 | 8 | const recipe = recipeList[id - 1] 9 | 10 | return ( 11 |
12 |
13 | 21 |

{recipe.name}

22 |
23 |
24 |
25 | {recipe.name} 32 |
33 | 34 |
35 |

Ingredients

36 |
    37 | {recipe.ingredients.map((ingredient, index) => ( 38 |
  • {ingredient}
  • 39 | ))} 40 |
41 |
42 |
43 | 44 |
45 |
46 |

Instructions

47 |
    53 | {recipe.instructions.map((instruction, index) => ( 54 |
  • {instruction}
  • 55 | ))} 56 |
57 |
58 |
59 |
60 | ) 61 | } 62 | -------------------------------------------------------------------------------- /week-react/reactapp/src/Recepie/RecipeHome.jsx: -------------------------------------------------------------------------------- 1 | import { RecipeItem } from "./RecipeItem" 2 | import { recipeList } from "./data" 3 | 4 | export const RecipeHome = () => { 5 | return ( 6 |
7 |

Recipe

8 |
9 | {recipeList.map((recipe, index) => ( 10 | 11 | ))} 12 |
13 |
14 | ) 15 | } 16 | -------------------------------------------------------------------------------- /week-react/reactapp/src/Recepie/RecipeItem.jsx: -------------------------------------------------------------------------------- 1 | import PropTypes from "prop-types" 2 | import { Link } from "react-router-dom" 3 | 4 | export const RecipeItem = ({ recipe }) => { 5 | return ( 6 | 7 |
8 | {recipe.name} 16 |
{recipe.name}
17 |
18 | 19 | ) 20 | } 21 | 22 | RecipeItem.propTypes = { 23 | recipe: PropTypes.shape({ 24 | id: PropTypes.number.isRequired, 25 | name: PropTypes.string.isRequired, 26 | image: PropTypes.string.isRequired 27 | }) 28 | } 29 | -------------------------------------------------------------------------------- /week-react/reactapp/src/Recepie/data.js: -------------------------------------------------------------------------------- 1 | export const recipeList = [ 2 | { 3 | id: 1, 4 | name: "Tikka Boti Paratha Roll", 5 | image: 6 | "https://www.foodfusion.com/wp-content/uploads/2023/05/YT_01-3-600x449.jpg?v=1686660324", 7 | ingredients: [ 8 | "Chicken Boneless ½ kg", 9 | "Adrak Lehsan Paste 1 tbs", 10 | "Lal Mirch Powder 1 tsp", 11 | "Zeera Powder 1 tsp", 12 | "Dhania Powder 1 tsp", 13 | "Garam Masala Powder ½ tsp", 14 | "Namak 1 tsp or to taste", 15 | "Lemon Juice 1 tbs", 16 | "Dahi 2 tbs", 17 | "Oil 2 tbs", 18 | "Pyaz (Onion) Chopped 1 medium", 19 | "Hara Dhania (Fresh Coriander) Chopped 2 tbs", 20 | "Hari Mirch (Green Chilies) Chopped 2 tbs" 21 | ], 22 | instructions: [ 23 | "1. In bowl,add chicken boneless,ginger garlic paste,red chili powder,cumin powder,coriander powder,garam masala powder,salt,lemon juice,yogurt and mix well,cover and marinate for 30 minutes.", 24 | "2. In frying pan,add oil and marinated chicken,mix well and cook until chicken is done (approx. 8-10 minutes) then cook on high flame until oil separates.", 25 | "3. Add onion,fresh coriander,green chilies and mix well.", 26 | "4. On paratha,add prepared chicken tikka,roll and serve." 27 | ] 28 | }, 29 | { 30 | id: 2, 31 | name: "Roti Triangles/Samosa", 32 | image: 33 | "https://www.foodfusion.com/wp-content/uploads/2023/05/YT3-5-600x449.jpg?v=1686553309", 34 | ingredients: [ 35 | "Chicken Boneless ½ kg", 36 | "Adrak Lehsan Paste 1 tbs", 37 | "Lal Mirch Powder 1 tsp", 38 | "Zeera Powder 1 tsp", 39 | "Dhania Powder 1 tsp", 40 | "Garam Masala Powder ½ tsp", 41 | "Namak 1 tsp or to taste", 42 | "Lemon Juice 1 tbs", 43 | "Dahi 2 tbs", 44 | "Oil 2 tbs", 45 | "Pyaz (Onion) Chopped 1 medium", 46 | "Hara Dhania (Fresh Coriander) Chopped 2 tbs", 47 | "Hari Mirch (Green Chilies) Chopped 2 tbs" 48 | ], 49 | instructions: [ 50 | "1. In bowl,add chicken boneless,ginger garlic paste,red chili powder,cumin powder,coriander powder,garam masala powder,salt,lemon juice,yogurt and mix well,cover and marinate for 30 minutes.", 51 | "2. In frying pan,add oil and marinated chicken,mix well and cook until chicken is done (approx. 8-10 minutes) then cook on high flame until oil separates.", 52 | "3. Add onion,fresh coriander,green chilies and mix well.", 53 | "4. On paratha,add prepared chicken tikka,roll and serve." 54 | ] 55 | }, 56 | { 57 | id: 3, 58 | name: "Egg & Cheese Toast", 59 | image: 60 | "https://www.foodfusion.com/wp-content/uploads/2023/05/YT_01-2-600x449.jpg?v=1686122618", 61 | ingredients: [ 62 | "Chicken Boneless ½ kg", 63 | "Adrak Lehsan Paste 1 tbs", 64 | "Lal Mirch Powder 1 tsp", 65 | "Zeera Powder 1 tsp", 66 | "Dhania Powder 1 tsp", 67 | "Garam Masala Powder ½ tsp", 68 | "Namak 1 tsp or to taste", 69 | "Lemon Juice 1 tbs", 70 | "Dahi 2 tbs", 71 | "Oil 2 tbs", 72 | "Pyaz (Onion) Chopped 1 medium", 73 | "Hara Dhania (Fresh Coriander) Chopped 2 tbs", 74 | "Hari Mirch (Green Chilies) Chopped 2 tbs" 75 | ], 76 | instructions: [ 77 | "1. In bowl,add chicken boneless,ginger garlic paste,red chili powder,cumin powder,coriander powder,garam masala powder,salt,lemon juice,yogurt and mix well,cover and marinate for 30 minutes.", 78 | "2. In frying pan,add oil and marinated chicken,mix well and cook until chicken is done (approx. 8-10 minutes) then cook on high flame until oil separates.", 79 | "3. Add onion,fresh coriander,green chilies and mix well.", 80 | "4. On paratha,add prepared chicken tikka,roll and serve." 81 | ] 82 | }, 83 | { 84 | id: 4, 85 | name: "Chicken Manchurian", 86 | image: 87 | "https://www.foodfusion.com/wp-content/uploads/2017/04/P1090008-600x450.jpg?v=1587767800", 88 | ingredients: [ 89 | "Chicken Boneless ½ kg", 90 | "Adrak Lehsan Paste 1 tbs", 91 | "Lal Mirch Powder 1 tsp", 92 | "Zeera Powder 1 tsp", 93 | "Dhania Powder 1 tsp", 94 | "Garam Masala Powder ½ tsp", 95 | "Namak 1 tsp or to taste", 96 | "Lemon Juice 1 tbs", 97 | "Dahi 2 tbs", 98 | "Oil 2 tbs", 99 | "Pyaz (Onion) Chopped 1 medium", 100 | "Hara Dhania (Fresh Coriander) Chopped 2 tbs", 101 | "Hari Mirch (Green Chilies) Chopped 2 tbs" 102 | ], 103 | instructions: [ 104 | "1. In bowl,add chicken boneless,ginger garlic paste,red chili powder,cumin powder,coriander powder,garam masala powder,salt,lemon juice,yogurt and mix well,cover and marinate for 30 minutes.", 105 | "2. In frying pan,add oil and marinated chicken,mix well and cook until chicken is done (approx. 8-10 minutes) then cook on high flame until oil separates.", 106 | "3. Add onion,fresh coriander,green chilies and mix well.", 107 | "4. On paratha,add prepared chicken tikka,roll and serve." 108 | ] 109 | } 110 | ] 111 | -------------------------------------------------------------------------------- /week-react/reactapp/src/assets/deleteicon.png: -------------------------------------------------------------------------------- https://raw.githubusercontent.com/syproo/MEAN-Stack-tutorial/585557b594afb002e02c574d4164a89f0ab25c60/week-react/reactapp/src/assets/deleteicon.png -------------------------------------------------------------------------------- /week-react/reactapp/src/assets/done.png: -------------------------------------------------------------------------------- https://raw.githubusercontent.com/syproo/MEAN-Stack-tutorial/585557b594afb002e02c574d4164a89f0ab25c60/week-react/reactapp/src/assets/done.png -------------------------------------------------------------------------------- /week-react/reactapp/src/assets/react.svg: -------------------------------------------------------------------------------- 1 | -------------------------------------------------------------------------------- /week-react/reactapp/src/index.css: -------------------------------------------------------------------------------- 1 | :root { 2 | font-family: Inter, system-ui, Avenir, Helvetica, Arial, sans-serif; 3 | line-height: 1.5; 4 | font-weight: 400; 5 | } 6 | 7 | body { 8 | background-color: #f8f8f8; 9 | display: flex; 10 | flex-direction: column; 11 | align-items: center; 12 | justify-content: center; 13 | height: 100vh; 14 | } 15 | 16 | h1 { 17 | font-size: 3.2em; 18 | line-height: 1.1; 19 | } 20 | 21 | button { 22 | border-radius: 8px; 23 | border: 1px solid transparent; 24 | padding: 8px; 25 | font-size: 3em; 26 | font-weight: 500; 27 | font-family: inherit; 28 | background-color: #1a1a1a; 29 | cursor: pointer; 30 | color: white; 31 | transition: border-color 0.25s; 32 | } 33 | 34 | button:hover { 35 | border-color: #646cff; 36 | } 37 | 38 | button:focus, 39 | button:focus-visible { 40 | outline: 4px auto -webkit-focus-ring-color; 41 | } 42 | 43 | @media (prefers-color-scheme: light) { 44 | :root { 45 | color: #213547; 46 | background-color: #ffffff; 47 | } 48 | 49 | a:hover { 50 | color: #747bff; 51 | } 52 | 53 | button { 54 | background-color: #f9f9f9; 55 | } 56 | } -------------------------------------------------------------------------------- /week-react/reactapp/src/main.jsx: -------------------------------------------------------------------------------- 1 | import React from "react" 2 | import ReactDOM from "react-dom/client" 3 | import App from "./App.jsx" 4 | import "./index.css" 5 | 6 | ReactDOM.createRoot(document.getElementById("root")).render( 7 | 8 | 9 | 10 | ) 11 | -------------------------------------------------------------------------------- /week-react/reactapp/src/todolist/AddTodo.jsx: -------------------------------------------------------------------------------- 1 | /* eslint-disable react/prop-types */ 2 | import { useState } from "react" 3 | import "./todo.css" 4 | 5 | export const AddTodo = ({ addTodo }) => { 6 | const [newTask, setNewTask] = useState("") 7 | 8 | const onChange = (e) => { 9 | setNewTask(e.target.value) 10 | } 11 | 12 | return ( 13 |
14 | 21 | 30 |
31 | ) 32 | } 33 | -------------------------------------------------------------------------------- /week-react/reactapp/src/todolist/TodoItem.jsx: -------------------------------------------------------------------------------- 1 | /* eslint-disable react/prop-types */ 2 | import DeleteIcon from "../assets/deleteicon.png" 3 | import DoneIcon from "../assets/done.png" 4 | import "./todo.css" 5 | 6 | export const TodoItem = ({ title, isDone, deleteTodo, completeTodo }) => { 7 | return ( 8 |
9 |

19 | {title} 20 |

21 |
26 | 27 | 28 |
29 |
30 | ) 31 | } 32 | -------------------------------------------------------------------------------- /week-react/reactapp/src/todolist/TodoList.jsx: -------------------------------------------------------------------------------- 1 | import { useEffect, useState } from "react" 2 | import "./todo.css" 3 | import { TodoItem } from "./TodoItem" 4 | import { AddTodo } from "./AddTodo" 5 | 6 | export const TodoList = () => { 7 | const [items, setItems] = useState([ 8 | { 9 | id: 1, 10 | title: "Learn React", 11 | isDone: false 12 | }, 13 | { 14 | id: 2, 15 | title: "Learn Node", 16 | isDone: false 17 | }, 18 | { 19 | id: 3, 20 | title: "Learn Mongo", 21 | isDone: false 22 | }, 23 | { 24 | id: 4, 25 | title: "Learn to be Insan", 26 | isDone: false 27 | } 28 | ]) 29 | 30 | const [doneCount, setDoneCount] = useState(0) 31 | 32 | useEffect(() => { 33 | const doneItems = items.filter((item) => item.isDone) 34 | setDoneCount(doneItems.length) 35 | }, [items]) 36 | 37 | const deleteTodo = (id) => { 38 | const toBeDeletedIndex = items.findIndex((item) => item.id === id) 39 | items.splice(toBeDeletedIndex, 1) 40 | setItems([...items]) 41 | } 42 | 43 | const addTask = (title) => { 44 | if (!title) { 45 | return 46 | } 47 | const newTask = { id: items.length + 1, title, isDone: false } 48 | const newItems = [...items, newTask] 49 | setItems(newItems) 50 | } 51 | 52 | const doneTodo = (id) => { 53 | const todoItem = items.find((item) => item.id === id) 54 | todoItem.isDone = true 55 | setItems([...items]) 56 | } 57 | 58 | return ( 59 |
60 |
61 |

Website Todo

62 |
63 |
64 |

Done Task: {doneCount}

65 |
66 |
67 | {items.map((item) => ( 68 | { 73 | deleteTodo(item.id) 74 | }} 75 | completeTodo={() => { 76 | doneTodo(item.id) 77 | }} 78 | /> 79 | ))} 80 |
81 | 82 |
83 | ) 84 | } 85 | -------------------------------------------------------------------------------- /week-react/reactapp/src/todolist/todo.css: -------------------------------------------------------------------------------- 1 | .bar { 2 | background-color: #af7eeb; 3 | height: 60px; 4 | display: flex; 5 | justify-content: center; 6 | align-items: center; 7 | padding: 0 20px; 8 | width: 400px; 9 | border-radius: 5px; 10 | color: white; 11 | font-size: 18px; 12 | } 13 | 14 | .todo-icon { 15 | width: 20px; 16 | height: 20px; 17 | cursor: pointer; 18 | } 19 | 20 | .todo-list { 21 | width: 400px; 22 | margin-top: 20px; 23 | background-color: white; 24 | } 25 | 26 | .todo-item { 27 | display: flex; 28 | justify-content: space-between; 29 | align-items: center; 30 | padding: 0 20px; 31 | height: 40px; 32 | } 33 | 34 | .todo-add-btn { 35 | background-color: #af7eeb; 36 | color: white; 37 | padding: 10px 20px; 38 | margin-top: 12px; 39 | font-size: 16px; 40 | } 41 | 42 | .input-field { 43 | width: 400px; 44 | height: 40px; 45 | outline: none; 46 | padding: 0 20px; 47 | font-size: 16px; 48 | border-radius: 12px; 49 | } 50 | 51 | .add-todo { 52 | margin-top: 12px; 53 | display: flex; 54 | justify-content: space-between; 55 | flex-direction: column; 56 | align-items: center; 57 | } -------------------------------------------------------------------------------- /week-react/reactapp/vite.config.js: -------------------------------------------------------------------------------- 1 | import { defineConfig } from 'vite' 2 | import react from '@vitejs/plugin-react' 3 | 4 | // https://vitejs.dev/config/ 5 | export default defineConfig({ 6 | plugins: [react()], 7 | }) 8 | -------------------------------------------------------------------------------- /week-seven/QUIZ.md: -------------------------------------------------------------------------------- 1 | ### Practice Questions 2 | 3 | 1. Write a function that takes two parameters, an array of numbers and a target number. The function should return a pair of numbers from the array that adds up to the target number. If no such pair is found, the function should return null. 4 | 5 | Example input: findPair([1, 2, 3, 4], 5) 6 | Example output: [1, 4] 7 | 8 | 2. Write a function that takes a string as input and returns the reverse of the string. 9 | 10 | Example input: reverseString("hello") 11 | Example output: "olleh" 12 | 13 | 3. Write a function that takes an array of numbers as input and returns the sum of the two largest numbers in the array. 14 | 15 | Example input: sumLargest([1, 2, 3, 4]) 16 | Example output: 7 17 | 18 | 4. Write a function that takes an array of strings as input and returns a new array that contains only the strings that have more than three characters. 19 | 20 | Example input: filterStrings(["hi", "hello", "hey", "howdy"]) 21 | Example output: ["hello", "howdy"] 22 | 23 | 5. Write a function that takes an array of numbers as input and returns a new array that contains only the even numbers. 24 | 25 | Example input: filterEven([1, 2, 3, 4, 5, 6]) 26 | Example output: [2, 4, 6] 27 | 28 | 6. Write a function that takes an array of objects and a key name as input and returns a new array that contains only the values of the specified key from each object in the array. 29 | 30 | Example input: pluck([{name: "John", age: 30}, {name: "Jane", age: 25}], "name") 31 | Example output: ["John", "Jane"] 32 | 33 | 7. Write a function that takes a string as input and returns true if the string is a palindrome (reads the same backwards as forwards), and false otherwise. 34 | 35 | Example input: isPalindrome("racecar") 36 | Example output: true 37 | 38 | 8. Write a function that takes a string as input and returns the most frequent character in the string. If there are multiple characters that appear with the same frequency, return the one that appears first. 39 | 40 | Example input: mostFrequent("hello world") 41 | Example output: "l" 42 | 43 | 9. Write a function that takes an array of strings as input and returns a new array that contains the length of each string in the original array. 44 | 45 | Example input: stringLengths(["hi", "hello", "hey", "howdy"]) 46 | Example output: [2, 5, 3, 5] 47 | 48 | 10. Write a function that takes an array of numbers as input and returns the index of the first number in the array that is greater than or equal to 10. 49 | 50 | Example input: firstGreater([1, 5, 15, 20]) 51 | Example output: 2 52 | -------------------------------------------------------------------------------- /week-seven/README.md: -------------------------------------------------------------------------------- 1 | # Week 7: JavaScript Lets Start 2 | 3 | ### Introduction to JavaScript: 4 | 5 | JavaScript is a scripting language used for creating interactive web pages. It was created in 1995 by Brendan Eich while working for Netscape. JavaScript is a lightweight language and can be used on both the client-side and server-side. It is the most popular programming language and is supported by all modern web browsers. 6 | 7 | ### Overview of the JavaScript language: 8 | 9 | JavaScript is a high-level, dynamic, and interpreted programming language. It supports object-oriented, functional, and procedural programming styles. It is used for creating interactive web pages, web applications, and server-side applications. JavaScript is an event-driven language, which means that it responds to user actions such as mouse clicks and keystrokes. 10 | 11 | ### Importance of JavaScript in web development: 12 | 13 | JavaScript is an essential part of web development. It is used for creating interactive and dynamic web pages. It allows web developers to create complex web applications and user interfaces. It can be used to validate user input, manipulate the Document Object Model (DOM), and handle events. JavaScript is a versatile language and can be used for both front-end and back-end web development. 14 | 15 | ### Setting up a development environment: 16 | 17 | To get started with JavaScript development, you need a text editor and a web browser. Some popular text editors for JavaScript development include Visual Studio Code, Sublime Text, and Atom. To test your JavaScript code, you can use the web console in your web browser. 18 | 19 | ### JavaScript console: 20 | 21 | The JavaScript console is a tool for debugging JavaScript code. It is used to display error messages and log information to the browser's console. It can be accessed by pressing F12 in most web browsers. 22 | 23 | ### Online JavaScript console: 24 | 25 | - [https://jsconsole.com/](https://jsconsole.com/) 26 | - [https://repl.it/languages/javascript](https://repl.it/languages/javascript) 27 | - [https://jsfiddle.net/](https://jsfiddle.net/) 28 | - [https://www.programiz.com/javascript/online-compiler/](https://www.programiz.com/javascript/online-compiler/) 29 | - [https://onecompiler.com/javascript](https://onecompiler.com/javascript) 30 | - [https://www.mycompiler.io/new/nodejs](https://www.mycompiler.io/new/nodejs) 31 | 32 | #### Installing NodeJS: 33 | 34 | NodeJS is a JavaScript runtime environment that allows you to run JavaScript code outside of a web browser. It is used for creating server-side applications and is the most popular JavaScript runtime environment. It is available for Windows, Mac, and Linux. 35 | 36 | #### Steps to install nodeJs 37 | 38 | - Download the NodeJS installer from the official [NodeJS website](https://nodejs.org/en). 39 | - Run the installer and follow the on-screen instructions. 40 | - Verify the installation by opening a command prompt and typing `node -v`. 41 | 42 | ### JavaScript syntax: 43 | 44 | JavaScript is a case-sensitive language. It uses the Unicode character set and supports both single-line and multi-line comments. It uses the semicolon (;) to mark the end of a statement. 45 | 46 | ### JavaScript statements: 47 | 48 | JavaScript statements are used to perform actions in a program. JavaScript statements are separated by semicolons (;). JavaScript statements can be grouped into three categories: declarations, assignments, and expressions. 49 | 50 | ## Variables & Data Types: 51 | 52 | ### Understanding variables in JavaScript: 53 | 54 | A variable is a container for storing data values. In JavaScript, variables are declared using the "var", "let", or "const" keyword. The "var" keyword is used to declare variables with global or function scope. The "let" keyword is used to declare variables with block scope. The "const" keyword is used to declare variables that cannot be reassigned. 55 | 56 | ### Declaring variables and assigning values: 57 | 58 | ```js 59 | // Declaring a variable with the var keyword 60 | var age 61 | ``` 62 | 63 | ```js 64 | // Assigning a value to a variable 65 | age = 25 66 | ``` 67 | 68 | ```js 69 | // Declaring and assigning a value to a variable 70 | var name = "John" 71 | ``` 72 | 73 | ### Data types in JavaScript: numbers, strings, booleans, etc.: 74 | 75 | JavaScript supports various data types, including numbers, strings, booleans, null, undefined, and objects. 76 | 77 | ```js 78 | // Number 79 | var age = 25 80 | 81 | // String 82 | var name = "John" 83 | 84 | // Boolean 85 | var isMarried = true 86 | 87 | // Null 88 | var car = null 89 | 90 | // Undefined 91 | var bike 92 | 93 | // Object 94 | var person = { name: "John", age: 25 } 95 | ``` 96 | 97 | ### Converting between data types: 98 | 99 | JavaScript provides built-in functions for converting between data types. For example, the "parseInt()" function can be used to convert a string to a number. 100 | 101 | var num = "10"; 102 | var result = parseInt(num); 103 | 104 | ### Operators & Expressions: 105 | 106 | #### Arithmetic operators: +, -, \*, /, %, etc.: 107 | 108 | JavaScript supports various arithmetic operators, including addition (+), subtraction (-), multiplication (\*), division (/), and modulus (%). 109 | 110 | ```js 111 | // Addition 112 | var sum = 2 + 3; 113 | 114 | // Subtraction 115 | var difference = 5 - 2; 116 | 117 | // Multiplication 118 | var product = 2 \* 3; 119 | 120 | // Division 121 | var quotient = 10 / 2; 122 | 123 | // Modulus 124 | var remainder = 10 % 3; 125 | ``` 126 | 127 | #### Assignment operators: =, +=, -=, etc.: 128 | 129 | Assignment operators are used to assign values to variables. JavaScript supports various assignment operators, including the equal (=) operator, addition assignment (+=) operator, and subtraction assignment (-=) operator. 130 | 131 | ```js 132 | // Equal operator 133 | var x = 5 134 | 135 | // Addition assignment operator 136 | var y = 10 137 | y += 5 138 | 139 | // Subtraction assignment operator 140 | var z = 10 141 | z -= 3 142 | ``` 143 | 144 | #### Comparison operators: ==, ===,!=, !==, etc.: 145 | 146 | Comparison operators are used to compare values in JavaScript. JavaScript supports various comparison operators, including the equal (==) operator, strict equal (===) operator, not equal (!=) operator, and strict not equal (!==) operator. 147 | 148 | ```js 149 | // Equal operator 150 | var x = 5 151 | if (x == 5) { 152 | console.log("x is equal to 5") 153 | } 154 | 155 | // Strict equal operator 156 | var y = "5" 157 | if (y === 5) { 158 | console.log("y is equal to 5") 159 | } else { 160 | console.log("y is not equal to 5") 161 | } 162 | 163 | // Not equal operator 164 | var z = 10 165 | if (z != 5) { 166 | console.log("z is not equal to 5") 167 | } 168 | 169 | // Strict not equal operator 170 | var a = "5" 171 | if (a !== 5) { 172 | console.log("a is not equal to 5") 173 | } 174 | ``` 175 | 176 | #### Logical operators: &&, ||, !: 177 | 178 | Logical operators are used to combine multiple conditions in JavaScript. JavaScript supports various logical operators, including the AND (&&) operator, OR (||) operator, and NOT (!) operator. 179 | 180 | ```js 181 | // AND operator 182 | var x = 5 183 | var y = 10 184 | if (x < 10 && y > 5) { 185 | console.log("Both conditions are true") 186 | } 187 | 188 | // OR operator 189 | var z = 3 190 | if (z < 5 || z > 10) { 191 | console.log("At least one condition is true") 192 | } 193 | 194 | // NOT operator 195 | var a = true 196 | if (!a) { 197 | console.log("a is not true") 198 | } 199 | ``` 200 | 201 | #### Evaluating expressions and order of operations: 202 | 203 | JavaScript follows the order of operations when evaluating expressions. Parentheses are used to specify the order of operations. 204 | 205 | ```js 206 | // Example expression 207 | var result = (2 + 3) \* 4; 208 | ``` 209 | 210 | ### Conditional Statements: 211 | 212 | #### If...else statements: 213 | 214 | If...else statements are used to execute different code blocks based on a condition in JavaScript. 215 | 216 | ```js 217 | // Example if...else statement 218 | var age = 18 219 | if (age >= 18) { 220 | console.log("You are eligible to vote") 221 | } else { 222 | console.log("You are not eligible to vote") 223 | } 224 | ``` 225 | 226 | #### Switch statements: 227 | 228 | Switch statements are used to execute different code blocks based on multiple conditions in JavaScript. 229 | 230 | ```js 231 | // Example switch statement 232 | var day = "Monday" 233 | switch (day) { 234 | case "Monday": 235 | console.log("Today is Monday") 236 | break 237 | case "Tuesday": 238 | console.log("Today is Tuesday") 239 | break 240 | default: 241 | console.log("Today is neither Monday nor Tuesday") 242 | break 243 | } 244 | ``` 245 | 246 | #### Ternary operator: 247 | 248 | The ternary operator is a shorthand way of writing an if...else statement in JavaScript. 249 | 250 | ```js 251 | // Example ternary operator 252 | var age = 18 253 | var message = 254 | age >= 18 ? "You are eligible to vote" : "You are not eligible to vote" 255 | console.log(message) 256 | ``` 257 | 258 | ### Loops: 259 | 260 | #### For loops: 261 | 262 | For loops are used to execute code a specific number of times in JavaScript. 263 | 264 | ```js 265 | // Example for loop 266 | for (var i = 0; i < 5; i++) { 267 | console.log(i) 268 | } 269 | ``` 270 | 271 | #### For...in loops: 272 | 273 | For...in loops are used to loop through the properties of an object in JavaScript. 274 | 275 | ```js 276 | // Example for...in loop 277 | var person = { name: "John", age: 25 } 278 | for (var prop in person) { 279 | console.log(prop + ": " + person[prop]) 280 | } 281 | ``` 282 | 283 | #### For...of loops: 284 | 285 | For...of loops are used to loop through the elements of an array in JavaScript. 286 | 287 | ```js 288 | // Example for...of loop 289 | var numbers = [1, 2, 3, 4, 5] 290 | for (var number of numbers) { 291 | console.log(number) 292 | } 293 | ``` 294 | 295 | #### While loops: 296 | 297 | While loops are used to execute code as long as a condition is true in JavaScript. 298 | 299 | ```js 300 | // Example while loop 301 | var i = 0 302 | while (i < 5) { 303 | console.log(i) 304 | i++ 305 | } 306 | ``` 307 | 308 | #### Do...while loops: 309 | 310 | Do...while loops are used to execute code at least once and then as long as a condition is true in JavaScript. 311 | 312 | ```js 313 | // Example do...while loop 314 | var i = 0 315 | do { 316 | console.log(i) 317 | i++ 318 | } while (i < 5) 319 | ``` 320 | 321 | ### Functions: 322 | 323 | #### Defining and calling functions: 324 | 325 | Functions are used to group code together and execute it multiple times in JavaScript. 326 | 327 | ```js 328 | // Example function 329 | function greet(name) { 330 | console.log("Hello, " + name + "!") 331 | } 332 | greet("John") 333 | greet("Jane") 334 | ``` 335 | 336 | #### Arguments and return values: 337 | 338 | Functions can take arguments and return values in JavaScript. 339 | 340 | ```js 341 | // Example function with arguments and return value 342 | function add(a, b) { 343 | return a + b 344 | } 345 | var result = add(2, 3) 346 | console.log(result) 347 | ``` 348 | 349 | #### Function scope and closure: 350 | 351 | Variables declared inside a function are only accessible inside that function in JavaScript. Closures allow functions to access variables from their parent functions. 352 | 353 | ```js 354 | // Example function with closure 355 | function outer() { 356 | var x = 5 357 | function inner() { 358 | console.log(x) 359 | } 360 | return inner 361 | } 362 | var closure = outer() 363 | closure() 364 | ``` 365 | 366 | ### Arrays: 367 | 368 | #### Declaring and initializing arrays: 369 | 370 | Arrays are used to store multiple values in JavaScript. 371 | 372 | ```js 373 | // Example array 374 | var numbers = [1, 2, 3, 4, 5] 375 | ``` 376 | 377 | #### Accessing and modifying array elements: 378 | 379 | Array elements can be accessed and modified using their index in JavaScript. 380 | 381 | ```js 382 | // Example accessing and modifying array elements 383 | var numbers = [1, 2, 3, 4, 5] 384 | console.log(numbers[0]) // Output: 1 385 | numbers[0] = 10 386 | console.log(numbers[0]) // Output: 10 387 | ``` 388 | 389 | #### Array methods: push, pop, shift, unshift, etc.: 390 | 391 | Arrays have various built-in methods in JavaScript, including push(), pop(), shift(), and unshift(). 392 | 393 | ```js 394 | // Example array methods 395 | var numbers = [1, 2, 3, 4, 5] 396 | numbers.push(6) 397 | console.log(numbers) // Output: [1, 2, 3, 4, 5, 6] 398 | numbers.pop() 399 | console.log(numbers) // Output: [1, 2, 3, 4, 5] 400 | numbers.shift() 401 | console.log(numbers) // Output: [2, 3, 4, 5] 402 | numbers.unshift(0) 403 | console.log(numbers) // Output: [0, 2, 3, 4, 5] 404 | ``` 405 | 406 | ### Objects: 407 | 408 | #### Declaring and initializing objects: 409 | 410 | Objects are used to store key-value pairs in JavaScript. 411 | 412 | ```js 413 | // Example object 414 | var person = { name: "John", age: 25 } 415 | ``` 416 | 417 | #### Accessing and modifying object properties: 418 | 419 | Object properties can be accessed and modified using their key in JavaScript. 420 | 421 | ```js 422 | // Example accessing and modifying object properties 423 | var person = { name: "John", age: 25 } 424 | console.log(person.name) // Output: John 425 | person.name = "Jane" 426 | console.log(person.name) // Output: Jane 427 | ``` 428 | 429 | #### Understanding object-oriented programming in JavaScript: 430 | 431 | Object-oriented programming is a programming paradigm that uses objects to represent real-world entities in code. JavaScript supports object-oriented programming through prototypes. 432 | 433 | ```js 434 | // Example object-oriented programming in JavaScript 435 | function Person(name, age) { 436 | this.name = name 437 | this.age = age 438 | } 439 | Person.prototype.greet = function () { 440 | console.log("Hello, my name is " + this.name) 441 | } 442 | 443 | var person = new Person("John", 25) 444 | person.greet() 445 | ``` 446 | 447 | ### DOM Manipulation & Event Handling: 448 | 449 | #### Understanding the Document Object Model (DOM): 450 | 451 | The Document Object Model (DOM) is a programming interface for web documents in JavaScript. It represents the HTML and XML documents as a tree of objects. 452 | 453 | #### Selecting elements in the DOM: 454 | 455 | Elements in the DOM can be selected using various methods in JavaScript, including getElementById(), getElementsByClassName(), and querySelector(). 456 | 457 | ```js 458 | // Example selecting elements in the DOM 459 | var elementById = document.getElementById("my-element") 460 | var elementsByClass = document.getElementsByClassName("my-class") 461 | var elementByQuery = document.querySelector(".my-selector") 462 | ``` 463 | 464 | #### Modifying element styles and content: 465 | 466 | Elements in the DOM can be modified using their properties and methods in JavaScript, including style and innerHTML. 467 | 468 | ```js 469 | // Example modifying element styles and content 470 | var element = document.getElementById("my-element") 471 | element.style.backgroundColor = "red" 472 | element.innerHTML = "Hello, world!" 473 | ``` 474 | 475 | #### Handling events such as clicks, hover, etc.: 476 | 477 | Events in the DOM can be handled using event listeners in JavaScript, including click, mouseover, and keydown. 478 | 479 | ```js 480 | // Example handling events in the DOM 481 | var element = document.getElementById("my-element") 482 | element.addEventListener("click", function () { 483 | console.log("Element clicked!") 484 | }) 485 | element.addEventListener("mouseover", function () { 486 | console.log("Mouse over element!") 487 | }) 488 | element.addEventListener("keydown", function (event) { 489 | console.log("Key pressed: " + event.key) 490 | }) 491 | ``` 492 | 493 | ### Conclusion: 494 | 495 | JavaScript is a powerful programming language used for web development. It has various features and constructs, including variables and data types, operators and expressions, conditional statements, loops, functions, arrays, objects, and DOM manipulation and event handling. By understanding and mastering these concepts, you can create dynamic and interactive web applications using JavaScript. 496 | -------------------------------------------------------------------------------- /week-seven/assignment.md: -------------------------------------------------------------------------------- 1 | 2 | ## Assignment Questions 3 | 4 | 1. Write a function that takes an array of numbers as input and returns the sum of all even numbers in the array. 5 | 6 | 2. Write a function that takes a string as input and returns the number of vowels in the string. 7 | 8 | 3. Write a function that takes an array of strings as input and returns the length of the longest string in the array. 9 | 10 | 4. Write a function that takes an array of numbers as input and returns the average of all the numbers in the array. 11 | 12 | 5. Write a function that takes an object as input and returns an array of all the keys in the object. 13 | 14 | 6. Write a function that takes an array of objects as input and returns an array of all the values for a specified key in each object. 15 | 16 | 7. Write a function that takes an array of strings as input and returns an array of all the unique strings in the array. 17 | 18 | 8. Write a function that takes an array of numbers as input and returns the product of all the numbers in the array. 19 | 20 | ## Example for Input and Output 21 | 22 | 1. Function to sum all even numbers in an array: 23 | Input: [1, 2, 3, 4, 5, 6, 7, 8, 9, 10] 24 | Output: 30 25 | 26 | 2. Function to count the number of vowels in a string: 27 | Input: "hello world" 28 | Output: 3 29 | 30 | 3. Function to find the length of the longest string in an array: 31 | Input: ["apple", "banana", "pear", "grapefruit"] 32 | Output: 10 33 | 34 | 4. Function to find the average of all the numbers in an array: 35 | Input: [1, 2, 3, 4, 5] 36 | Output: 3 37 | 38 | 5. Function to return an array of all the keys in an object: 39 | Input: { name: "John", age: 30, city: "New York" } 40 | Output: ["name", "age", "city"] 41 | 42 | 6. Function to return an array of all the values for a specified key in each object: 43 | Input: [{ name: "John", age: 30 }, { name: "Mary", age: 25 }, { name: "Peter", age: 35 }] 44 | Output: ["John", "Mary", "Peter"] 45 | 46 | 7. Function to return an array of all the unique strings in an array: 47 | Input: ["apple", "banana", "apple", "pear", "pear", "orange"] 48 | Output: ["apple", "banana", "pear", "orange"] 49 | 50 | 8. Function to return the product of all the numbers in an array: 51 | Input: [1, 2, 3, 4, 5] 52 | Output: 120 53 | 54 | ### How to do it. 55 | 56 | - Create a single file with name `main.js` 57 | - Create different function for each question 58 | - For Example: 59 | 60 | ```js 61 | // Write a function that takes an array of numbers as input and returns the sum of all even numbers in the array. 62 | function sumOfEvenNumbers(numbers) { 63 | // Your code goes here 64 | } 65 | ``` 66 | 67 | - Write your code in the function 68 | - Call the function with the input and print the output 69 | - For Example: 70 | 71 | ```js 72 | // Write a function that takes an array of numbers as input and returns the sum of all even numbers in the array. 73 | sumOfEvenNumbers([1,2,3,4,5,7,7,3]) 74 | ``` 75 | 76 | - Run the code using `node main.js` command 77 | - You should see the output in the terminal 78 | - Upload the code over github. 79 | - Share your URL in slack. 80 | 81 | -------------------------------------------------------------------------------- /week-seven/grocery_bill.js: -------------------------------------------------------------------------------- 1 | console.log("Grocery Bill") 2 | console.log("-----------------") 3 | // Write a grocery bill for 3 items 4 | 5 | const ricePrice = 3.99 6 | const beansPrice = 2.99 7 | const eggsPrice = 1.99 8 | 9 | const riceQty = 2 10 | const beansQty = 3 11 | const eggsQty = 12 12 | 13 | const riceTotal = ricePrice * riceQty 14 | const beansTotal = beansPrice * beansQty 15 | const eggsTotal = eggsPrice * eggsQty 16 | 17 | console.log(`Rice: $${ricePrice} x ${riceQty}: $` + riceTotal) 18 | console.log(`Beans: $${beansPrice} x ${beansQty}: $` + beansTotal) 19 | console.log(`Eggs: $${eggsPrice} x ${eggsQty}: $` + eggsTotal) 20 | console.log("-----------------") 21 | 22 | const subtotal = riceTotal + beansTotal + eggsTotal 23 | let discount = 0 24 | if (subtotal > 20) { 25 | console.log("You qualify for Discount that is 5% off") 26 | discount = subtotal * 0.05 27 | } 28 | const tax = subtotal * 0.13 29 | 30 | const total = subtotal + tax - discount 31 | console.log("-----------------") 32 | 33 | console.log("Subtotal: $" + subtotal) 34 | console.log("Tax: $" + tax) 35 | if (discount > 0) { 36 | console.log("Discount: $" + discount) 37 | } 38 | console.log("-----------------") 39 | 40 | console.log("Total: $" + total) 41 | console.log("-----------------") 42 | -------------------------------------------------------------------------------- /week-seven/index.html: -------------------------------------------------------------------------------- 1 | 2 | 3 | 4 | 5 | 6 | 7 | 8 | Grocery Bill 9 | 10 | 11 |
12 |
13 |
14 | 19 |
20 | 26 |
27 |
28 |
29 | 34 |
35 | 41 |
42 |
43 |
44 | 49 |
50 | 56 |
57 |
58 | 63 |
64 |
65 |
66 |

Price Card

67 |

Rice Price: 4$

68 |

Beans Price: 3$

69 |

Chicken Price: 7$

70 |

Total Price:

71 |
72 |
73 |
74 | 75 | 95 | 96 | -------------------------------------------------------------------------------- /week-seven/marksheet.js: -------------------------------------------------------------------------------- 1 | const totalMarks = 200 2 | const students = [ 3 | { 4 | name: "Ali", 5 | scienceMarks: 90, 6 | englishMarks: 70 7 | }, 8 | { 9 | name: "Huzaifa", 10 | scienceMarks: 10, 11 | englishMarks: 40 12 | }, 13 | { 14 | name: "Asim", 15 | scienceMarks: 40, 16 | englishMarks: 60 17 | } 18 | ] 19 | 20 | function calculateMarks(student) { 21 | const total = student.scienceMarks + student.englishMarks 22 | const percentage = total / totalMarks * 100 23 | return { percentage, total } 24 | } 25 | 26 | 27 | for (let index = 0; index < students.length; index++) { 28 | const result = calculateMarks(students[index]) 29 | console.log("-------------------------------------") 30 | console.log("-------------------------------------") 31 | console.log("Name: " + students[index].name) 32 | console.log("Science: " + students[index].scienceMarks) 33 | console.log("English: " + students[index].englishMarks) 34 | console.log("Total Marks: " + result.total) 35 | console.log("Percentage: " + result.percentage) 36 | result.percentage >= 40 ? console.log("PASSED") : console.log("FAILED") 37 | 38 | } 39 | -------------------------------------------------------------------------------- /week-three/README.md: -------------------------------------------------------------------------------- 1 | ### Week 4 - Advance CSS 2 | 3 | - Introduction to Advanced CSS 4 | - Understanding CSS layouts in depth 5 | - Importance of CSS in modern web development 6 | - CSS Grid Layout 7 | - Understanding the Grid Container & Grid Items 8 | - Setting up Grid Columns & Rows 9 | - Spanning & Placing Grid Items 10 | - Implicit & Explicit Grid Tracks 11 | - Using Grid Templates 12 | - Grid Gap & Grid Auto Flow 13 | - CSS Flexbox Layout 14 | - Understanding Flexbox Containers & Items 15 | - Setting Flexbox Properties for the Container 16 | - Setting Flexbox Properties for the Items 17 | - Flexbox Flow Direction, Alignment & Sizing 18 | - Flexbox Wrap & Order 19 | 20 | #### Introduction to Advanced CSS 21 | 22 | ##### Understanding CSS layouts in depth 23 | 24 | CSS is a language that is used to style web pages. It is a language that is used to describe the presentation of web pages. It is a language that is used to describe the layout of web pages. It is a language that is used to describe the design of web pages. It is a language that is used to describe the look and feel of web pages. It is a language that is used to describe the appearance of web pages. It is a language that is used to describe the behavior of web pages. It is a language that is used to describe the structure of web pages. It is a language that is used to describe the content of web pages. It is a language that is used to describe the style of web pages. It is a language that is used to describe the color of web pages. It is a language that is used to describe the font of web pages. It is a language that is used to describe the size of web pages. It is a language that is used to describe the position of web pages. It is a language that is used to describe the spacing of web pages. It is a language that is used to describe the margin of web pages. It is a language that is used to describe the padding of web pages. It is a language that is used to describe the border of web pages. It is a language that is used to describe the background of web pages. It is a language that is used to describe the animation of web pages. It is a language that is used to describe the transition of web pages. It is a language that is used to describe the transform of web pages. It is a language that is used to describe the perspective of web pages. It is a language that is used to describe the perspective-origin of web pages. It is a language that is used to describe the backface-visibility of web pages. It is a language that is used to describe the animation-delay of web pages. It is a language that is used to describe the animation-direction of web pages. It is a language that is used to describe the animation-duration of web pages. It is a language that is used to describe the animation-fill-mode of web pages. It is a language that is used to describe the animation-iteration-count of web pages. It is a language that is used to describe the animation-name of web pages. It is a language that is used to describe the animation-play-state of web pages. It is a language that is used to describe the animation-timing-function of web pages. It is a language that is used to describe the animation of web pages. It is a language that is used to describe the transition-delay of web pages. It is a language that is used to describe the transition-duration of web pages. It is a language that is used to describe the transition-property of web pages. It is a language that is used to describe the transition-timing-function of web pages. It is a language that is used to describe the transform of web pages. 25 | 26 | ### CSS Grid Layout 27 | 28 | CSS Grid Layout is a powerful tool for creating complex layouts on the web. It allows you to easily define a grid container and place grid items within it. With CSS Grid, you can create both rows and columns and specify their size, position, and order. 29 | 30 | #### Understanding the Grid Container & Grid Items 31 | 32 | To create a grid layout, you first need to define a container element and set its display property to "grid". This container will become the grid parent element, and all of its direct children will be grid items. 33 | 34 | ``` 35 | .container { 36 | display: grid; 37 | } 38 | ``` 39 | 40 | By default, all grid items will be placed in a single cell of the grid. To control where they appear, you can use grid-specific properties like "grid-row" and "grid-column". 41 | 42 | #### Setting up Grid Columns & Rows 43 | 44 | To define the columns and rows of your grid, you can use the "grid-template-columns" and "grid-template-rows" properties, respectively. These properties take a series of values, separated by spaces or commas, that specify the size of each grid track. 45 | 46 | ``` 47 | .container { 48 | display: grid; 49 | grid-template-columns: 1fr 1fr 1fr; 50 | grid-template-rows: 50px 100px 50px; 51 | } 52 | ``` 53 | 54 | In this example, we've created a grid with three columns of equal width (using "fr" units) and three rows with different heights. 55 | 56 | #### Spanning & Placing Grid Items 57 | 58 | To place grid items in specific cells of the grid, you can use the "grid-row-start", "grid-row-end", "grid-column-start", and "grid-column-end" properties. Alternatively, you can use the shorthand "grid-area" property to specify all four values at once. 59 | 60 | ``` 61 | .item { 62 | grid-row-start: 1; 63 | grid-row-end: 3; 64 | grid-column-start: 2; 65 | grid-column-end: 4; 66 | } 67 | ``` 68 | 69 | In this example, we've positioned a grid item in the second and third rows and the second to fourth columns. 70 | 71 | #### Implicit & Explicit Grid Tracks 72 | 73 | When you add grid items to your layout, the grid will automatically create new grid tracks as needed to accommodate them. These are known as implicit grid tracks. You can also define explicit grid tracks that aren't associated with any particular grid item. 74 | 75 | ``` 76 | .container { 77 | display: grid; 78 | grid-template-columns: 1fr 1fr; 79 | grid-template-rows: auto 1fr; 80 | grid-auto-columns: 50px; 81 | grid-auto-rows: 100px; 82 | } 83 | ``` 84 | 85 | In this example, we've defined two explicit columns and two explicit rows, and also set a size for the implicit grid tracks that will be created when new items are added. 86 | 87 | #### Using Grid Templates 88 | 89 | CSS Grid provides several shorthand properties for defining grid templates, including "grid-template" (which combines "grid-template-rows" and "grid-template-columns"), "grid-template-areas" (which lets you define the layout of the grid using named grid areas), and "grid-template-columns" (which lets you specify the width of each column using a repeat() function). 90 | 91 | ``` 92 | 93 | .container { 94 | display: grid; 95 | grid-template: 96 | "header header header" 50px 97 | "nav main aside" 1fr 98 | "footer footer footer" 50px / 99 | 1fr 3fr 1fr; 100 | } 101 | ``` 102 | 103 | In this example, we've used a grid template to create a layout with a header, navigation, main content area, and sidebar. 104 | 105 | #### Grid Gap & Grid Auto Flow 106 | 107 | The "grid-gap" property is a shorthand for "grid-row-gap" and "grid-column-gap". It lets you specify the size of the gap between rows and columns in your grid. 108 | 109 | ``` 110 | .container { 111 | display: grid; 112 | grid-gap: 10px; 113 | } 114 | ``` 115 | 116 | In this example, we've added a 10px gap between all grid items. You can also use "grid-row-gap" and "grid-column-gap" to specify different gaps for rows and columns. 117 | 118 | Finally, the "grid-auto-flow" property controls how new grid items are placed within the grid. The default value is "row", which means that new items will be added to the next available row. However, you can also set it to "column" to add items to the next available column instead. 119 | 120 | ``` 121 | .container { 122 | display: grid; 123 | grid-auto-flow: column; 124 | } 125 | ``` 126 | 127 | In this example, we've changed the auto flow to "column", so new items will be added to the next available column instead of the next available row. 128 | 129 | CSS Grid Layout is a powerful tool for creating complex layouts on the web. With just a few lines of CSS, you can define a grid container, specify its columns and rows, and place grid items exactly where you want them. By combining these techniques with other CSS properties and features, you can create sophisticated, responsive designs that work on any device. 130 | 131 | ### CSS Flexbox Layout 132 | 133 | CSS Flexbox Layout is a powerful tool for creating flexible and responsive layouts on the web. It allows you to easily control the size, position, and flow of elements within a container. In this section, we'll cover the basics of Flexbox layout and how to use it to create dynamic designs. 134 | 135 | Understanding Flexbox Containers & Items 136 | The first thing to understand about Flexbox layout is that it works with two types of elements: containers and items. The container is the parent element that holds all the child elements or items. The items are the child elements that are laid out within the container. 137 | 138 | ``` 139 |
140 |
Item 1
141 |
Item 2
142 |
Item 3
143 |
144 | ``` 145 | 146 | In this example, the "container" is the parent element and the "items" are the child elements. 147 | 148 | Setting Flexbox Properties for the Container 149 | To create a Flexbox layout, you need to set the "display" property of the container to "flex". This tells the browser to treat the container as a Flexbox container. 150 | 151 | ``` 152 | .container { 153 | display: flex; 154 | } 155 | ``` 156 | 157 | You can also use the "flex-direction" property to control the flow direction of the items within the container. The default value is "row", which means that the items are laid out from left to right. You can set it to "column" to lay out the items from top to bottom. 158 | 159 | ``` 160 | .container { 161 | display: flex; 162 | flex-direction: column; 163 | } 164 | ``` 165 | 166 | In this example, the items are laid out vertically instead of horizontally. 167 | 168 | Setting Flexbox Properties for the Items 169 | Once you've set up the container as a Flexbox container, you can use Flexbox properties to control the size, position, and flow of the items within the container. 170 | 171 | The "flex-grow" property controls how much the item should grow to fill the available space. The default value is 0, which means that the item will not grow. You can set it to a value greater than 0 to make the item grow proportionally to the other items. 172 | 173 | ``` 174 | .item { 175 | flex-grow: 1; 176 | } 177 | ``` 178 | 179 | In this example, all the items will grow to fill the available space equally. 180 | 181 | The "flex-shrink" property controls how much the item should shrink when there is not enough space available. The default value is 1, which means that the item will shrink proportionally to the other items. You can set it to 0 to prevent the item from shrinking. 182 | 183 | ``` 184 | .item { 185 | flex-shrink: 0; 186 | } 187 | ``` 188 | 189 | In this example, all the items will maintain their original size and not shrink. 190 | 191 | The "flex-basis" property sets the initial size of the item before it grows or shrinks. By default, it is set to "auto", which means that the item will take its size from its content. You can set it to a specific value or a percentage to give the item an initial size. 192 | 193 | ``` 194 | .item { 195 | flex-basis: 50%; 196 | } 197 | ``` 198 | 199 | In this example, all the items will have an initial size of 50% of the available space. 200 | 201 | Flexbox Flow Direction, Alignment & Sizing 202 | 203 | Flexbox also provides properties to control the flow direction, alignment, and sizing of the items within the container. 204 | 205 | The "justify-content" property controls the horizontal alignment of the items within the container. The default value is "flex-start", which means that the items are aligned to the left. You can set it to "center" to center the items, "flex-end" to align them to the right, or "space-between" to distribute the items evenly along the main axis. 206 | 207 | ``` 208 | .container { 209 | display: flex; 210 | justify-content: center; 211 | } 212 | ``` 213 | 214 | In this example, the items are centered within the container. 215 | 216 | The "align-items" property controls the vertical alignment of the items within the container. The default value is "stretch", which means that the items are stretched to fill the height of the container. You can set it to "center" to center the items, "flex-start" to align them to the top, or "flex-end" to align them to the bottom. 217 | 218 | ``` 219 | .container { 220 | display: flex; 221 | align-items: center; 222 | } 223 | ``` 224 | 225 | In this example, the items are centered vertically within the container. 226 | 227 | The "align-self" property allows you to override the vertical alignment of an individual item within the container. 228 | 229 | ``` 230 | .item { 231 | align-self: flex-end; 232 | } 233 | ``` 234 | 235 | In this example, the item will be aligned to the bottom of the container. 236 | 237 | The "flex-wrap" property controls whether the items should wrap to a new line if there is not enough space. The default value is "nowrap", which means that the items will not wrap. You can set it to "wrap" to allow the items to wrap to a new line. 238 | 239 | ``` 240 | 241 | .container { 242 | display: flex; 243 | flex-wrap: wrap; 244 | } 245 | 246 | ``` 247 | 248 | In this example, the items will wrap to a new line if there is not enough space. 249 | 250 | Flexbox Wrap & Order 251 | Flexbox also provides a property to control the order in which the items are laid out within the container. 252 | 253 | The "order" property allows you to specify the order of an individual item within the container. 254 | 255 | ``` 256 | .item { 257 | order: 1; 258 | } 259 | ``` 260 | 261 | In this example, the item will be laid out after all the other items with an order value of 0. 262 | 263 | Overall, CSS Flexbox Layout provides a powerful set of tools for creating flexible and responsive layouts on the web. By understanding the properties and how they work together, you can create dynamic designs that adapt to different screen sizes and devices. 264 | 265 | Good to Read: 266 | 267 | - https://www.w3schools.com/css/css3_flexbox.asp 268 | - https://www.w3schools.com/css/css\_grid.asp 269 | - https://blog.logrocket.com/css-flexbox-vs-css-grid/ 270 | - https://webdesign.tutsplus.com/articles/flexbox-vs-css-grid-which-should-you-use--cms-30184 271 | - https://developer.mozilla.org/en-US/docs/Web/CSS/CSS_Grid_Layout/Relationship_of_Grid_Layout 272 | - https://blog.hubspot.com/website/css-grid-vs-flexbox 273 | 274 | Games for CSS 275 | 276 | - https://flukeout.github.io/ 277 | - https://rupl.github.io/unfold/ 278 | - https://cssgridgarden.com/ 279 | - https://flexboxfroggy.com/ 280 | - https://cssbattle.dev/ 281 | - https://cssgridgarden.com/ 282 | - https://css-diner.netlify.com/ 283 | -------------------------------------------------------------------------------- /week-three/index.html: -------------------------------------------------------------------------------- 1 | 2 | 3 | 4 | 5 | 6 | 7 | 8 | Document 9 | 10 | 11 |
12 |
1
13 |
2
14 |
3
15 |
4
16 |
17 | 18 | 19 | -------------------------------------------------------------------------------- /week-three/main.css: -------------------------------------------------------------------------------- 1 | body { 2 | margin: 0; 3 | } 4 | 5 | .container { 6 | display: flex; 7 | width: 100vw; 8 | text-align: center; 9 | flex-wrap: wrap; 10 | } 11 | 12 | .item { 13 | width: 20vw; 14 | margin: 4px; 15 | padding: 24px; 16 | color: white; 17 | flex-grow: 1; 18 | font-size: 24px; 19 | background-color: blue; 20 | } 21 | 22 | .item3 { 23 | flex-grow: 5; 24 | } -------------------------------------------------------------------------------- /week-two/README.md: -------------------------------------------------------------------------------- 1 | ## Week 3 -- Beauty is CSS - Basic CSS 2 | 3 | - What is CSS 4 | - The relationship between HTML & CSS 5 | - The role of CSS in web design 6 | - The syntax of CSS rules 7 | - CSS Selectors 8 | - Element Selectors, Class Selectors, ID Selectors 9 | - CSS Properties 10 | - Common properties for text, color, background, margin, padding, border, etc. 11 | - CSS Values 12 | - Length units, color codes, keywords, etc. 13 | - CSS Box Model Properties 14 | - Content, Padding, Border, Margin 15 | - width, height, border-width, padding, margin 16 | - Static, Relative, Absolute, Fixed, Flex, Grid 17 | - CSS Text Properties 18 | - font-family, font-size, line-height, text-align, etc. 19 | - Web Fonts & Google Fonts 20 | - Color & Backgrounds 21 | - CSS Color Properties 22 | - color, background-color, etc. 23 | - Color Values 24 | - RGB, RGBA, HEX, HSL, etc. 25 | - CSS Background Properties 26 | - background-image, background-repeat, etc. 27 | - Pseudo-Classes & Elements 28 | - Understanding Pseudo-Classes & Elements 29 | - :hover, :active, :focus, :first-child, etc. 30 | - Transitions & Animations 31 | - CSS Transitions 32 | - transition-property, transition-duration, transition-timing-function, etc. 33 | - CSS Animations 34 | - @keyframes, animation-name, animation-duration, etc. 35 | - Best Practices & Debugging 36 | - Code Organization & Reusability 37 | - Debugging CSS with DevTools 38 | 39 | ### What is CSS 40 | 41 | CSS stands for Cascading Style Sheets. CSS describes how HTML elements are to be displayed on screen, paper, or in other media. CSS saves a lot of work. It can control the layout of multiple web pages all at once. External stylesheets are stored in CSS files. 42 | 43 | ### The relationship between HTML & CSS 44 | 45 | HTML is the structure of the page. CSS is the design of the page. HTML is the content of the page. CSS is the presentation of the page. HTML is the skeleton of the page. CSS is the skin of the page. 46 | 47 | ### The role of CSS in web design 48 | 49 | CSS is a language for specifying how documents are presented to users — how they are styled, laid out, etc. CSS is a cornerstone technology of the World Wide Web, alongside HTML and JavaScript. 50 | 51 | ### The syntax of CSS rules 52 | 53 | A CSS rule-set consists of a selector and a declaration block: 54 | 55 | ```css 56 | selector { 57 | property: value; 58 | } 59 | ``` 60 | 61 | ### CSS Selectors 62 | 63 | CSS selectors are used to "find" (or select) the HTML elements you want to style. 64 | 65 | #### Element Selectors 66 | 67 | Element selectors select elements based on the element name. 68 | 69 | ```css 70 | p { 71 | color: red; 72 | } 73 | ``` 74 | 75 | #### Class Selectors 76 | 77 | Class selectors select elements with a specific class attribute. 78 | 79 | ```css 80 | .center { 81 | text-align: center; 82 | } 83 | ``` 84 | 85 | #### ID Selectors 86 | 87 | ID selectors select elements with a specific id attribute. 88 | 89 | ```css 90 | #intro { 91 | color: blue; 92 | } 93 | ``` 94 | 95 | ### CSS Properties 96 | 97 | CSS properties are used to set the different parts of an element's style. 98 | 99 | #### Common properties for text, color, background, margin, padding, border, etc. 100 | 101 | ```css 102 | p { 103 | color: red; 104 | background-color: yellow; 105 | margin: 20px; 106 | padding: 30px; 107 | border: 1px solid black; 108 | } 109 | ``` 110 | 111 | ### CSS Values 112 | 113 | CSS values are used to set the different parts of an element's style. 114 | 115 | #### Length units, color codes, keywords, etc. 116 | 117 | CSS Length Unit 118 | 119 | - px - pixels 120 | - em - relative to the font-size of the element (2em means 2 times the size of the current font) 121 | - rem - relative to font-size of the root element 122 | - % - relative to the parent element 123 | - vw - relative to 1% of the width of the viewport 124 | - vh - relative to 1% of the height of the viewport 125 | - vmin - relative to 1% of viewport's smaller dimension 126 | - vmax - relative to 1% of viewport's larger dimension 127 | 128 | Color Codes 129 | 130 | - #ff0000 - red 131 | - #00ff00 - green 132 | - #0000ff - blue 133 | - #ffff00 - yellow 134 | - #00ffff - cyan 135 | - #ff00ff - magenta 136 | - #ffffff - white 137 | - #000000 - black 138 | 139 | - RGB - rgb(255,0,0) 140 | - RGBA - rgba(255,0,0,0.5) 141 | - HSL - hsl(0,100%,50%) 142 | - HSLA - hsla(0,100%,50%,0.5) 143 | - HEX - #ff0000 144 | - Color Keywords - red, green, blue, yellow, cyan, magenta, white, black 145 | 146 | ### CSS Box Model Properties 147 | 148 | The CSS box model is essentially a box that wraps around every HTML element. It consists of: margins, borders, padding, and the actual content. 149 | 150 | #### Content, Padding, Border, Margin 151 | 152 | Margin - Clears an area outside the border. The margin is transparent. 153 | Padding - Clears an area around the content. The padding is transparent. 154 | Border - A border that goes around the padding and content. 155 | 156 | #### Static, Relative, Absolute, Fixed, Flex, Grid 157 | 158 | - Static - The default value. An element with position: static; is not positioned in any special way; it is always positioned according to the normal flow of the page. 159 | - Relative - An element with position: relative; is positioned relative to its normal position. 160 | - Absolute - An element with position: absolute; is positioned relative to the nearest positioned ancestor (instead of positioned relative to the viewport, like fixed). 161 | - Fixed - An element with position: fixed; is positioned relative to the viewport, which means it always stays in the same place even if the page is scrolled. 162 | - Flex - An element with display: flex; is a flexible container, providing a flexible way to lay out, align and distribute space among items in a container, even when their size is unknown and/or dynamic. 163 | - Grid - An element with display: grid; is a grid container, providing a grid-based layout system, with rows and columns, making it easier to design web pages without having to use floats and positioning. 164 | 165 | ### CSS Text Properties 166 | 167 | #### Font family, size 168 | 169 | Font family - Specifies the font family for text. 170 | 171 | ```css 172 | p { 173 | font-family: "Times New Roman", Times, serif; 174 | } 175 | ``` 176 | 177 | More Read here: 178 | 179 | - https://www.w3schools.com/cssref/css_websafe_fonts.asp 180 | 181 | How to use Fonts 182 | 183 | ```css 184 | @import url('https://fonts.googleapis.com/css2?family=Roboto:wght@100;300;400;500;700;900&display=swap'); 185 | ``` 186 | 187 | Where to find fonts? 188 | 189 | - https://fonts.google.com/ 190 | - https://fonts.adobe.com/ 191 | 192 | #### Line height 193 | 194 | Line height - Specifies the line height. 195 | 196 | ```css 197 | p { 198 | line-height: 30px; 199 | } 200 | ``` 201 | 202 | #### Text align 203 | 204 | Text align - Specifies the horizontal alignment of text. 205 | 206 | ```css 207 | p { 208 | text-align: center; 209 | } 210 | ``` 211 | 212 | #### Text transform 213 | 214 | Text transform - Specifies how to capitalize text. 215 | 216 | ```css 217 | p { 218 | text-transform: uppercase; 219 | } 220 | ``` 221 | 222 | ### Pseudo-Classes & Elements 223 | 224 | #### Understanding Pseudo-Classes & Elements 225 | 226 | Pseudo-classes are used to define a special state of an element. 227 | 228 | ```css 229 | a:link { 230 | color: #FF0000; 231 | } 232 | ``` 233 | 234 | | Selector | Example | Example description | | | 235 | | -------------------- | --------------------- | ---------------------------------------------------------------------------------------------------- | --- | --- | 236 | | :active | a:active | Selects the active link | | | 237 | | :checked | input:checked | Selects every checked `` element | | | 238 | | :disabled | input:disabled | Selects every disabled `` element | | | 239 | | :empty | p:empty | Selects every `

` element that has no children | | | 240 | | :enabled | input:enabled | Selects every enabled `` element | | | 241 | | :first-child | p:first-child | Selects every `

` elements that is the first child of its parent | | | 242 | | :first-of-type | p:first-of-type | Selects every

element that is the first `

` element of its parent | | | 243 | | :focus | input:focus | Selects the element that has focus | | | 244 | | :hover | a:hover | Selects links on mouse over | | | 245 | | :in-range | input:in-range | Selects elements with a value within a specified range | | | 246 | | :invalid | input:invalid | Selects all elements with an invalid value | | | 247 | | :lang(language) | p:lang(it) | Selects every

element with a lang attribute value starting with "it" | | | 248 | | :last-child | p:last-child | Selects every

elements that is the last child of its parent | | | 249 | | :last-of-type | p:last-of-type | Selects every

element that is the last

element of its parent | | | 250 | | :link | a:link | Selects all unvisited links | | | 251 | | :not(selector) | :not(p) | Selects every element that is not a

element | | | 252 | | :nth-child(n) | p:nth-child(2) | Selects every

element that is the second child of its parent | | | 253 | | :nth-last-child(n) | p:nth-last-child(2) | Selects every

element that is the second child of its parent, counting from the last child | | | 254 | | :nth-last-of-type(n) | p:nth-last-of-type(2) | Selects every

element that is the second

element of its parent, counting from the last child | | | 255 | | :nth-of-type(n) | p:nth-of-type(2) | Selects every

element that is the second

element of its parent | | | 256 | | :only-of-type | p:only-of-type | Selects every

element that is the only

element of its parent | | | 257 | | :only-child | p:only-child | Selects every

element that is the only child of its parent | | | 258 | | :optional | input:optional | Selects elements with no "required" attribute | | | 259 | | :out-of-range | input:out-of-range | Selects elements with a value outside a specified range | | | 260 | | :read-only | input:read-only | Selects elements with a "readonly" attribute specified | | | 261 | | :read-write | input:read-write | Selects elements with no "readonly" attribute | | | 262 | | :required | input:required | Selects elements with a "required" attribute specified | | | 263 | | :root | root | Selects the document's root element | | | 264 | | :target | #news:target | Selects the current active #news element (clicked on a URL containing that anchor name) | | | 265 | | :valid | input:valid | Selects all elements with a valid value | | | 266 | | :visited | a:visited | Selects all visited links | | | 267 | 268 | ### Transitions & Animations 269 | 270 | #### Understanding Transitions & Animations 271 | 272 | Transitions - A transition effect lets an element gradually change from one style to another. 273 | 274 | _How to Use CSS Transitions?_ 275 | To create a transition effect, you must specify two things: 276 | 277 | the CSS property you want to add an effect to 278 | the duration of the effect 279 | Note: If the duration part is not specified, the transition will have no effect, because the default value is 0. 280 | 281 | The following example shows a 100px \* 100px red

element. The
element has also specified a transition effect for the width property, with a duration of 2 seconds: 282 | 283 | ``` 284 | div { 285 | width: 100px; 286 | height: 100px; 287 | background: red; 288 | transition: width 2s; 289 | } 290 | ``` 291 | 292 | Read more: 293 | 294 | - https://www.w3schools.com/css/css3_transitions.asp 295 | 296 | ### CSS Animations 297 | 298 | CSS Animations - CSS animations allow animation of HTML elements without using JavaScript or Flash! 299 | 300 | _How to Use CSS Animations?_ 301 | To create a CSS animation, you must specify two things: 302 | 303 | the CSS properties you want to add an animation to (the animation itself) the duration of the animation (how long it should take to complete one cycle) Note: If the duration part is not specified, the animation will have no effect, because the default value is 0. The following example shows a 100px \* 100px red
element. The
element has also specified an animation effect for the width property, with a duration of 4 seconds: 304 | 305 | ``` 306 | div { 307 | width: 100px; 308 | height: 100px; 309 | background: red; 310 | animation: mymove 4s infinite; 311 | } 312 | 313 | @keyframes mymove { 314 | from {left: 0px;} 315 | to {left: 200px;} 316 | } 317 | 318 | ``` 319 | 320 | Read more: 321 | https://www.w3schools.com/css/css3_animations.asp 322 | 323 | Resources to read for CSS 324 | 325 | - https://developer.mozilla.org/en-US/docs/Web/CSS 326 | - https://www.w3schools.com/css/default.asp 327 | - https://www.w3.org/Style/CSS/Overview.en.html 328 | 329 | Playgrounds 330 | 331 | - https://playcode.io/css 332 | 333 | Games for CSS 334 | 335 | - https://flukeout.github.io/ 336 | - https://rupl.github.io/unfold/ 337 | - https://cssgridgarden.com/ 338 | - https://flexboxfroggy.com/ 339 | - https://cssbattle.dev/ 340 | - https://cssgridgarden.com/ 341 | - https://css-diner.netlify.com/ 342 | -------------------------------------------------------------------------------- /week-two/index.html: -------------------------------------------------------------------------------- 1 | 2 | 3 | 4 | 5 | 6 | 7 | 8 | World famous pasta 9 | 10 | 11 |
12 |
13 |

Delicious Food

14 |

15 | Lorem ipsum dolor sit amet consectetur adipisicing elit. Quisquam 16 | voluptates, quod, quia, voluptate quae voluptatem quibusdam 17 | necessitatibus quidem voluptatum quos quas. Quisquam, quae. Quisquam 18 | voluptates, quod, quia, voluptate quae voluptatem quibusdam 19 | necessitatibus quidem voluptatum quos quas. Quisquam, quae. 20 | Get yours now 23 |

24 | 25 |
26 | 27 | 32 |
33 |
34 |
35 | 36 | 37 | 38 | -------------------------------------------------------------------------------- /week-two/main.css: -------------------------------------------------------------------------------- 1 | body { 2 | background-color: black; 3 | background-image: url("./pasta-bg.jpeg"); 4 | background-repeat: no-repeat; 5 | background-size: cover; 6 | height: 100vh; 7 | transition: 0.3s ease-in-out; 8 | backdrop-filter: blur(5px); 9 | } 10 | 11 | .title, 12 | .text { 13 | color: white; 14 | } 15 | 16 | #container { 17 | height: 100%; 18 | } 19 | 20 | .center { 21 | height: 100%; 22 | display: flex; 23 | flex-direction: column; 24 | justify-content: center; 25 | align-items: center; 26 | text-align: center; 27 | width: 50%; 28 | margin: auto; 29 | } 30 | 31 | .orderBtn { 32 | background-color: transparent; 33 | color: white; 34 | border: 1px solid white; 35 | border-radius: 5px; 36 | padding: 10px; 37 | margin: 10px; 38 | font-size: 1.2em; 39 | font-weight: bold; 40 | cursor: pointer; 41 | transition: 0.3s ease-in-out; 42 | animation: blink 1s ease-in-out infinite; 43 | } 44 | 45 | @keyframes blink { 46 | 0% { 47 | opacity: 0; 48 | } 49 | 50 | 50% { 51 | opacity: 1; 52 | } 53 | 54 | 100% { 55 | opacity: 0; 56 | } 57 | } 58 | 59 | .orderBtn:hover { 60 | background-color: white; 61 | color: black; 62 | } 63 | 64 | .title { 65 | padding: 0; 66 | padding-left: 20px; 67 | padding-right: 20px; 68 | /* padding: top right bottom left */ 69 | /* padding: topbottom leftright */ 70 | margin: 12px; 71 | } 72 | 73 | .previewLink { 74 | color: #A9482A; 75 | } 76 | 77 | .previewLink:hover { 78 | font-weight: bold; 79 | } 80 | 81 | .form { 82 | display: flex; 83 | flex-direction: column; 84 | justify-content: center; 85 | align-items: center; 86 | text-align: center; 87 | } 88 | 89 | .form>label { 90 | color: white; 91 | font-size: 1.2em; 92 | font-weight: bold; 93 | margin: 10px; 94 | } 95 | 96 | .input-phone { 97 | width: 200px; 98 | background-color: transparent; 99 | height: 30px; 100 | border-radius: 5px; 101 | border: 1px solid white; 102 | padding: 5px; 103 | margin: 10px; 104 | } 105 | 106 | .input-phone:focus { 107 | outline: none; 108 | background-color: whitesmoke; 109 | } 110 | 111 | .input-phone::placeholder { 112 | color: white; 113 | } 114 | 115 | .whatsapp-icon { 116 | width: 30px; 117 | height: 30px; 118 | margin: 10px; 119 | border-radius: 10px; 120 | cursor: pointer; 121 | position: absolute; 122 | transition: 0.3s ease-in-out; 123 | } 124 | 125 | .whatsapp-icon:hover { 126 | width: 40px; 127 | height: 40px; 128 | } -------------------------------------------------------------------------------- /week-two/pasta-bg.jpeg: -------------------------------------------------------------------------------- https://raw.githubusercontent.com/syproo/MEAN-Stack-tutorial/585557b594afb002e02c574d4164a89f0ab25c60/week-two/pasta-bg.jpeg -------------------------------------------------------------------------------- /week-two/whatsappicon.png: -------------------------------------------------------------------------------- https://raw.githubusercontent.com/syproo/MEAN-Stack-tutorial/585557b594afb002e02c574d4164a89f0ab25c60/week-two/whatsappicon.png -------------------------------------------------------------------------------- /week-zero/README.md: -------------------------------------------------------------------------------- 1 | ## Week 0 - Introduction to Programming 2 | 3 | - A basic introduction to the course and programming languages 4 | - Getting into code with JS/Python/Dart ( Anyone ) 5 | - Basic Environment Setup 6 | - If-else, loops and basic DS for the course 7 | - Small programming riddles for hands-on programming (https://code.org) 8 | 9 | ### Resources 10 | 11 | - [Code.org](https://code.org) - A great resource for learning programming 12 | - [Environment Setup for VSCODE](https://code.visualstudio.com/docs/setup/setup-overview) - Setup VSCODE for JS/Python/Dart 13 | - [Online JS Editor](https://jsbin.com/?html,output) - A great online editor for JS 14 | - [Online Python Editor](https://www.programiz.com/python-programming/online-compiler/) - A great online editor for Python 15 | - [Online Dart Editor](https://dartpad.dev/) - A great online editor for Dart 16 | - [Online VSCode](https://vscode.dev) - A great online editor for VSCode 17 | -------------------------------------------------------------------------------- /week-zero/program.js: -------------------------------------------------------------------------------- 1 | function main() { 2 | const text = "BANO QABIL" 3 | 4 | console.log(`Text Before Reversing: ${text}`) 5 | 6 | // text length -> 9 7 | // text length - 1 -> 8 8 | for (var i = text.length - 1; i >= 0; i--) { 9 | console.log(text[i]) 10 | } 11 | } 12 | 13 | main() 14 | -------------------------------------------------------------------------------- /week_bonus_git/README.md: -------------------------------------------------------------------------------- 1 | # Lets Learn Git 2 | 3 | 4 | 5 | ## What is Git? 6 | 7 | Git is a version control system for tracking changes in computer files and coordinating work on those files among multiple people. It is primarily used for source code management in software development, but it can be used to keep track of changes in any set of files. As a distributed revision control system it is aimed at speed, data integrity, and support for distributed, non-linear workflows. 8 | 9 | ## What is GitHub? 10 | 11 | GitHub is a web-based hosting service for version control using Git. It is mostly used for computer code. It offers all of the distributed version control and source code management (SCM) functionality of Git as well as adding its own features. It provides access control and several collaboration features such as bug tracking, feature requests, task management, and wikis for every project. 12 | 13 | ## What is Git used for? 14 | 15 | Git is a version control system that is used for tracking changes in source code during software development. It allows developers to collaborate on the same codebase, keep track of changes made to the code over time, and easily revert back to previous versions if necessary. Git is also used to manage project workflows and to facilitate communication between team members. 16 | 17 | Here's an example of how Git might be used in real life: 18 | 19 | Imagine a team of developers working on a web application. They use Git to keep track of all changes made to the codebase, which is stored on a central repository. Each developer works on their own local copy of the codebase and pushes their changes to the central repository when they are ready to be shared. 20 | 21 | If a developer makes a mistake or introduces a bug into the code, they can use Git to easily revert back to a previous version of the code to fix the issue. Git also allows developers to collaborate on the same codebase without overwriting each other's changes. This means that multiple developers can work on different features of the application simultaneously, without interfering with each other's work. 22 | 23 | Overall, Git is an essential tool for software development teams, helping to improve collaboration, productivity, and code quality. 24 | 25 |
26 | 27 |
28 | 29 | ## Lets start learning Git 30 | 31 | ### 1. Install Git 32 | 33 | - [Download Git](https://git-scm.com/downloads) 34 | - Install Git and check the version 35 | 36 | ```bash 37 | git --version 38 | ``` 39 | 40 | ### 2. Configure Git 41 | 42 | - Configure your name and email 43 | 44 | ```bash 45 | git config --global user.name "Your Name" 46 | git config --global user.email " 47 | ``` 48 | 49 | - Check the configuration 50 | 51 | ```bash 52 | git config --list 53 | ``` 54 | 55 | ### 3. Create a repository 56 | 57 | - Create a new directory 58 | 59 | ```bash 60 | mkdir git-test 61 | ``` 62 | 63 | - Change the current working directory to the newly created directory 64 | 65 | ```bash 66 | cd git-test 67 | ``` 68 | 69 | - Initialize an empty Git repository 70 | 71 | ```bash 72 | git init 73 | ``` 74 | 75 | - Create a new file 76 | 77 | ```bash 78 | touch README.md 79 | ``` 80 | 81 | - Add some content to the file 82 | 83 | ```bash 84 | echo "# Git Test" >> README.md 85 | ``` 86 | 87 | - Check the status of the repository 88 | 89 | ```bash 90 | git status 91 | ``` 92 | 93 | - Add the file to the staging area 94 | 95 | ```bash 96 | git add README.md 97 | ``` 98 | 99 | - Commit the file 100 | 101 | ```bash 102 | git commit -m "Add README.md" 103 | ``` 104 | 105 | - Check the log 106 | 107 | ```bash 108 | git log 109 | ``` 110 | 111 | ### 4. Clone a repository 112 | 113 | - Clone a repository 114 | 115 | ```bash 116 | git clone 117 | ``` 118 | 119 | - Change the current working directory to the newly created directory 120 | 121 | ```bash 122 | cd 123 | ``` 124 | 125 | ### 5. Add a remote 126 | 127 | - Add a remote 128 | 129 | ```bash 130 | git remote add origin 131 | ``` 132 | 133 | - Check the remote 134 | 135 | ```bash 136 | git remote -v 137 | ``` 138 | 139 | ### 6. Push to remote 140 | 141 | - Push to remote 142 | 143 | ```bash 144 | git push origin master 145 | ``` 146 | 147 | ### 7. Pull from remote 148 | 149 | - Pull from remote 150 | 151 | ```bash 152 | git pull origin master 153 | ``` 154 | 155 | ### 8. Branching 156 | 157 | - Create a new branch 158 | 159 | ```bash 160 | git branch 161 | ``` 162 | 163 | - Switch to the newly created branch 164 | 165 | ```bash 166 | git checkout 167 | ``` 168 | 169 | - Create a new branch and switch to it 170 | 171 | ```bash 172 | git checkout -b 173 | ``` 174 | 175 | - Merge a branch 176 | 177 | ```bash 178 | git merge 179 | ``` 180 | 181 | - Delete a branch 182 | 183 | ```bash 184 | git branch -d 185 | ``` 186 | 187 | ### 9. Stashing 188 | 189 | - Stash changes 190 | 191 | ```bash 192 | git stash 193 | ``` 194 | 195 | - List stashed changes 196 | 197 | ```bash 198 | git stash list 199 | ``` 200 | 201 | - Apply stashed changes 202 | 203 | ```bash 204 | git stash apply 205 | ``` 206 | 207 | - Delete a stash 208 | 209 | ```bash 210 | git stash drop 211 | ``` 212 | 213 | ## Git Cheat Sheet 214 | 215 | [Git Cheat Sheet](https://education.github.com/git-cheat-sheet-education.pdf) 216 | 217 | ## Git Commands 218 | 219 | [Git Commands](https://git-scm.com/docs) 220 | 221 | ## GIT Tutorial 222 | 223 | - [Git Tutorial](https://www.tutorialspoint.com/git/index.htm) 224 | - [Muzammil Bilwani - Git Tutorial](https://gitgoahead.muzammilbilwani.com/) 225 | -------------------------------------------------------------------------------- /week_eight/README.md: -------------------------------------------------------------------------------- 1 | ## Time for level up - Advance JS 2 | 3 | ### Closures and IIFEs 4 | 5 | #### Understanding closures 6 | 7 | - A closure is a function that makes use of variables defined in outer functions that have previously returned. 8 | 9 | In JavaScript, a closure is created when a function is defined inside another function, and the inner function has access to the outer function's variables and parameters. The inner function can access these variables even after the outer function has returned. Here's an example: 10 | 11 | ```js 12 | function outer() { 13 | var message = "Hello" 14 | 15 | function inner() { 16 | console.log(message) 17 | } 18 | 19 | return inner 20 | } 21 | 22 | var innerFunction = outer() 23 | innerFunction() // outputs "Hello" 24 | ``` 25 | 26 | In this example, outer is a function that defines a variable message and returns an inner function inner. When outer is called, it returns inner, which is assigned to the variable innerFunction. When innerFunction is called, it outputs the value of message, which is "Hello". This is possible because of closures. The inner function inner has access to the message variable even though outer has already returned. 27 | 28 | #### Private Variables using Closures 29 | 30 | Closures can be used to create private variables in JavaScript. A private variable is a variable that can only be accessed by the functions defined in the same scope. Here's an example: 31 | 32 | ```js 33 | function counter() { 34 | var count = 0 35 | 36 | function increment() { 37 | count++ 38 | console.log(count) 39 | } 40 | 41 | function decrement() { 42 | count-- 43 | console.log(count) 44 | } 45 | 46 | return { 47 | increment: increment, 48 | decrement: decrement 49 | } 50 | } 51 | 52 | var counterObject = counter() 53 | counterObject.increment() // outputs 1 54 | counterObject.increment() // outputs 2 55 | counterObject.decrement() // outputs 1 56 | ``` 57 | 58 | In this example, counter is a function that defines a variable count and returns an object with two methods increment and decrement. The increment and decrement methods both have access to the count variable because of closures. However, the count variable is not accessible outside of the counter function. This means that count is a private variable. 59 | 60 | #### IIFEs 61 | 62 | IIFE stands for Immediately Invoked Function Expression. An IIFE is a function that is defined and immediately executed. Here's an example: 63 | 64 | ```js 65 | ;(function () { 66 | console.log("Hello, world!") 67 | })() 68 | ``` 69 | 70 | In this example, an anonymous function is defined and immediately executed. The function simply outputs "Hello, world!" to the console. The () at the end of the function definition is what executes the function immediately. 71 | 72 | IIFEs are often used to create a new scope for variables and functions, so they don't interfere with the global scope. Here's an example: 73 | 74 | ```js 75 | ;(function () { 76 | var message = "Hello, world!" 77 | 78 | function printMessage() { 79 | console.log(message) 80 | } 81 | 82 | printMessage() 83 | })() 84 | ``` 85 | 86 | In this example, an anonymous function is defined and immediately executed. Inside the function, a variable message and a function printMessage are defined. These variables and functions are only accessible inside the anonymous function and do not interfere with the global scope. The printMessage function is called at the end of the anonymous function, which outputs the value of message. 87 | 88 | here's a simple real-world example of an IIFE: 89 | 90 | ```js 91 | ;(function () { 92 | var currentYear = new Date().getFullYear() 93 | console.log("Welcome to my website! © " + currentYear) 94 | })() 95 | ``` 96 | 97 | In this example, we define an IIFE that sets the currentYear variable to the current year using the Date() function. The IIFE then logs a welcome message to the console, including the copyright symbol and the current year. 98 | 99 | This is a simple example, but you'll often see IIFEs used in real-world applications to encapsulate code and prevent naming conflicts, particularly in larger codebases or when using third-party libraries. They can also be used to initialize variables, set up event listeners, or perform other tasks that should only happen once at the beginning of the script. 100 | 101 | #### Real Word Example 102 | 103 | ```js 104 | function createPerson(name, age) { 105 | var privateData = { 106 | address: "Unknown", 107 | phone: "Unknown" 108 | } 109 | 110 | function getPrivateData() { 111 | return privateData 112 | } 113 | 114 | return { 115 | getName: function () { 116 | return name 117 | }, 118 | getAge: function () { 119 | return age 120 | }, 121 | setAddress: function (address) { 122 | privateData.address = address 123 | }, 124 | setPhone: function (phone) { 125 | privateData.phone = phone 126 | }, 127 | getPrivateData: getPrivateData 128 | } 129 | } 130 | 131 | var person = createPerson("John", 30) 132 | console.log(person.getName()) // outputs "John" 133 | console.log(person.getAge()) // outputs 30 134 | person.setAddress("123 Main St") 135 | person.setPhone("555-555-1212") 136 | console.log(person.getPrivateData()) // outputs { address: '123 Main St', phone: '555-555-1212' } 137 | ``` 138 | 139 | In this example, createPerson is a function that returns an object with methods to get and set the person's name, age, address, and phone. The private data (the person's address and phone number) is stored in a closure that can only be accessed by the object's methods. The getPrivateData method returns the private data, but it can only be called from within the closure. 140 | 141 | This use of closures allows us to create objects with private data and methods, which can be useful in situations where we want to restrict access to certain information or functionality. 142 | 143 | ### Asynchronous Programming 144 | 145 | #### Synchronous vs asynchronous code 146 | 147 | Synchronous code executes one instruction at a time, waiting for each instruction to complete before moving on to the next one. Here's an example of synchronous code that logs a message to the console: 148 | 149 | ```js 150 | console.log("Hello") 151 | console.log("World") 152 | ``` 153 | 154 | In this example, the first `console.log()` statement is executed before the second one, and the output is: 155 | 156 | ``` 157 | Hello 158 | World 159 | ``` 160 | 161 | Asynchronous code, on the other hand, allows multiple instructions to be executed at the same time, without waiting for each instruction to complete before moving on to the next one. Here's an example of asynchronous code that uses the setTimeout() function to delay the execution of a function: 162 | 163 | ```js 164 | console.log("Hello") 165 | setTimeout(function () { 166 | console.log("World") 167 | }, 1000) 168 | ``` 169 | 170 | In this example, the `console.log()` statement is executed first, and then the setTimeout() function is called with a delay of 1000 milliseconds (1 second). After 1 second, the callback function is executed, logging "World" to the console. The output is: 171 | 172 | ``` 173 | Hello 174 | World 175 | ``` 176 | 177 | 178 | 179 | ### Callbacks for Handling Async Behavior 180 | 181 | Callbacks are functions that are passed as arguments to other functions and are executed when certain actions are completed. Callbacks are commonly used in asynchronous programming to handle the completion of an async operation. Here's an example of using a callback to log the contents of a file: 182 | 183 | ```js 184 | const fs = require("fs") 185 | 186 | fs.readFile("file.txt", "utf-8", function (err, data) { 187 | if (err) throw err 188 | console.log(data) 189 | }) 190 | ``` 191 | 192 | In this example, the `readFile()` function takes a file path, encoding type, and a callback function as arguments. When the file is read, the callback function is executed, logging the contents of the file to the console. If there's an error reading the file, the callback function throws an error. 193 | 194 | ### Promises for Async Operations 195 | 196 | Promises are a way of handling async operations in JavaScript. Promises represent a value that may not be available yet, but will be resolved in the future. Promises can be in one of three states: pending, fulfilled, or rejected. Heres an example of using a Promise to fetch data from an API: 197 | 198 | ```js 199 | fetch("https://jsonplaceholder.typicode.com/todos/1") 200 | .then((response) => response.json()) 201 | .then((data) => console.log(data)) 202 | .catch((error) => console.error(error)) 203 | ``` 204 | 205 | In this example, we use the `fetch()` function to make an HTTP request to an API. The `fetch()` function returns a Promise, which we can chain with `.then()` and `.catch()` methods. The first `.then()` method parses the response body as JSON. The second `.then()` method logs the data to the console. The `.catch()` method logs any errors to the console. 206 | 207 | 208 | 209 | ### Using Async/Await for Simplifying Async Code 210 | 211 | Async/await is a way of handling async operations in JavaScript that allows you to write asynchronous code that looks like synchronous code. Here's an example of using async/await to fetch data from an API: 212 | 213 | ```js 214 | async function fetchData() { 215 | try { 216 | const response = await fetch("https://jsonplaceholder.typicode.com/todos/1") 217 | const data = await response.json() 218 | console.log(data) 219 | } catch (error) { 220 | console.error(error) 221 | } 222 | } 223 | 224 | fetchData() 225 | ``` 226 | 227 | In this example, we define an async function called `fetchData()` that uses the await keyword to wait for the Promise returned by `fetch()` to resolve. We then use the await keyword again to wait for the Promise returned by response.json() to resolve. We can then use the retrieved data as if it were synchronous code. The try...catch block allows us to handle any errors that may occur during the async operation. 228 | 229 | Heres another example that uses async/await to read a file: 230 | 231 | ```js 232 | const fs = require("fs") 233 | 234 | async function readFile() { 235 | try { 236 | const data = await fs.promises.readFile("file.txt", "utf-8") 237 | console.log(data) 238 | } catch (error) { 239 | console.error(error) 240 | } 241 | } 242 | 243 | readFile() 244 | ``` 245 | 246 | In this example, we use the `fs.promises.readFile()` function to read a file asynchronously. We define an async function called `readFile()` that uses the await keyword to wait for the Promise returned by `fs.promises.readFile()` to resolve. We can then use the retrieved data as if it were synchronous code. The try...catch block allows us to handle any errors that may occur during the async operation. 247 | 248 | Async/await is a powerful tool for simplifying async code and making it easier to read and understand. 249 | 250 | 251 | ## Template Literals and Destructuring 252 | 253 | ### Interpolating strings with template literals: 254 | 255 | Template literals, introduced in ES6, provide a convenient way to interpolate variables and expressions within strings. Instead of concatenating strings and variables using the plus (+) operator, you can enclose the string within backticks (`) and use placeholders (${expression}) to embed variables or expressions directly into the string. Here's an example: 256 | 257 | ```javascript 258 | const name = 'John'; 259 | const age = 25; 260 | console.log(`My name is ${name} and I'm ${age} years old.`); 261 | ``` 262 | 263 | The output will be: "My name is John and I'm 25 years old." 264 | 265 | ### Extracting data from objects and arrays using destructuring: 266 | Destructuring is a way to extract individual values from objects or arrays into separate variables. It provides a concise syntax to access nested data structures easily. Here are a couple of examples: 267 | 268 | ```javascript 269 | 270 | // Destructuring objects 271 | const person = { name: 'John', age: 25 }; 272 | const { name, age } = person; 273 | console.log(name); // Output: John 274 | console.log(age); // Output: 25 275 | 276 | // Destructuring arrays 277 | const numbers = [1, 2, 3]; 278 | const [first, second, third] = numbers; 279 | console.log(first); // Output: 1 280 | console.log(second); // Output: 2 281 | console.log(third); // Output: 3 282 | ``` 283 | 284 | ## Map, Set, and WeakMap: 285 | 286 | ### Understanding the Map data structure 287 | 288 | The Map data structure in JavaScript allows you to store key-value pairs. It differs from objects in that the keys can be of any type, and it maintains the insertion order of elements. Here's an example: 289 | ```javascript 290 | const myMap = new Map(); 291 | myMap.set('name', 'John'); 292 | myMap.set('age', 25); 293 | 294 | console.log(myMap.get('name')); // Output: John 295 | console.log(myMap.size); // Output: 2 296 | console.log(myMap.has('age')); // Output: true 297 | myMap.delete('name'); 298 | console.log(myMap.size); // Output: 1 299 | ``` 300 | 301 | ### Using Map, Set, and WeakMap collections 302 | 303 | - Maps: Maps are useful for scenarios where you need to associate values with specific keys and perform operations based on those keys. 304 | - Sets: Sets store unique values and can be helpful when you need to track a collection of distinct elements or perform operations like union, intersection, or difference. 305 | - WeakMaps: WeakMaps are similar to Maps but have some differences in behavior. They only accept objects as keys, and the references to the keys are weak, allowing them to be garbage collected if no other references exist. 306 | 307 | ### Array Methods and Iterators 308 | 309 | Array methods such as map, reduce, and filter: 310 | Array methods in JavaScript provide powerful tools for manipulating and transforming arrays. Here are a few commonly used methods: 311 | 312 | - `map()`: Applies a function to each element of an array and returns a new array with the results. 313 | - `reduce()`: Reduces an array to a single value by applying a function to each element and accumulating the result. 314 | - `filter()`: Creates a new array with all elements that pass a test specified by a provided function. 315 | 316 | Iterating over arrays with forEach and others: 317 | JavaScript provides multiple ways to iterate over arrays: 318 | 319 | - forEach(): Calls a provided function once for each element in an array. 320 | - for...of: A loop construct introduced in ES6 that allows iterating over iterable objects, including arrays. 321 | - Other methods like map(), reduce(), and filter() mentioned earlier also involve iteration over arrays implicitly. 322 | 323 | ## Error Handling: 324 | 325 | ### Understanding try-catch blocks: 326 | Error handling is crucial in JavaScript to handle and manage unexpected issues that may arise during program execution. The try-catch block provides a structured way to catch and handle errors. The code within the try block is executed, and if an exception occurs, it's caught by the corresponding catch block. Here's an example: 327 | 328 | ```javascript 329 | try { 330 | // Code that might throw an error 331 | } catch (error) { 332 | // Code to handle the error 333 | } 334 | ``` 335 | 336 | ### Throwing and catching errors: 337 | You can manually throw errors using the throw statement, which allows you to create custom error messages or propagate built-in errors. The thrown error can be caught and handled using the try-catch block. Example: 338 | 339 | ```javascript 340 | try { 341 | throw new Error('Something went wrong!'); 342 | } catch (error) { 343 | console.log(error.message); // Output: Something went wrong! 344 | } 345 | ``` 346 | 347 | ### Debugging with stack traces: 348 | When an error occurs, JavaScript provides a stack trace that shows the sequence of function calls leading to the error. It can be helpful for debugging by identifying the exact location and order of function calls. Stack traces can be accessed through the stack property of an Error object. 349 | 350 | 351 | Good Reads: 352 | 353 | - https://dev.to/lydiahallie/javascript-visualized-promises-async-await-5gke 354 | - https://dmitripavlutin.com/javascript-closure/ 355 | - https://blog.hubspot.com/website/javascript-closure 356 | - https://www.freecodecamp.org/news/learn-promise-async-await-in-20-minutes/ 357 | -------------------------------------------------------------------------------- /week_eight/deleteicon.png: -------------------------------------------------------------------------------- https://raw.githubusercontent.com/syproo/MEAN-Stack-tutorial/585557b594afb002e02c574d4164a89f0ab25c60/week_eight/deleteicon.png -------------------------------------------------------------------------------- /week_eight/index.html: -------------------------------------------------------------------------------- 1 | 2 | 3 | 4 | 5 | 6 | 7 | Todo Application 8 | 53 | 54 | 55 | 56 |
57 |

Website Todo

58 |
59 |
60 |
61 |

Sent Emails

62 | 63 |
64 |
65 |

Buy Coffe

66 | 67 |
68 |
69 |

Go Home

70 | 71 |
72 |
73 |

Read book

74 | 75 |
76 |
77 | 80 | 81 | 82 | 83 | -------------------------------------------------------------------------------- /week_eight/learning.js: -------------------------------------------------------------------------------- 1 | const fs = require("fs") 2 | 3 | // // Learning Call backs 4 | const printFunc = function () { 5 | console.log("I am writing by own without co pilot") 6 | setTimeout(printFunc, 1000) 7 | } 8 | 9 | setTimeout(printFunc, 1000) 10 | 11 | // Learning Recursion 12 | 13 | function printNumber(number) { 14 | console.log(number) 15 | 16 | if (number > 10) { 17 | return printNumber(number - 1) 18 | } else { 19 | return number 20 | } 21 | } 22 | printNumber(20) 23 | 24 | // Learning Promises 25 | const promise = new Promise((resolve, reject) => { 26 | if (1 > 2) { 27 | reject("Error") 28 | } else { 29 | resolve("Success") 30 | } 31 | }) 32 | 33 | promise.then( 34 | (data) => console.log(data), 35 | (err) => { 36 | console.log(err) 37 | } 38 | ) 39 | // Learning Async Await 40 | 41 | const findUsers = new Promise((resolve, reject) => { 42 | resolve(["Ali", "Nasir"]) 43 | }) 44 | 45 | const updateUser = new Promise((resolve, reject) => { 46 | resolve("User Updated") 47 | }) 48 | 49 | const runWithPromise = function () { 50 | findUsers.then((users) => { 51 | const user = users.find((user) => user === "Ali") 52 | updateUser.then((result) => { 53 | console.log(result) 54 | }) 55 | }) 56 | } 57 | 58 | const run = async function () { 59 | const users = await findUsers 60 | const user = users.find((user) => user === "Ali") 61 | const result = await updateUser 62 | console.log(result) 63 | } 64 | 65 | runWithPromise() 66 | run() 67 | -------------------------------------------------------------------------------- /week_eight/script.js: -------------------------------------------------------------------------------- 1 | function deleteTodo(todoNumber) { 2 | const todoElement = document.getElementById("todo-" + todoNumber) 3 | todoElement.remove() 4 | } 5 | 6 | function addNewsTask() { 7 | const name = "This is new task" 8 | const todoList = document.getElementsByClassName("todo-list") 9 | const todoElement = document.createElement("div") 10 | todoElement.id = "todo-5" 11 | todoElement.className = "todo-item" 12 | todoElement.innerHTML = ` 13 |

${name}

14 | 15 | ` 16 | todoList[0].appendChild(todoElement) 17 | } 18 | --------------------------------------------------------------------------------