├── .env_example
├── .gitignore
├── app.js
├── gateways
├── apigee
│ ├── apiproxy.zip
│ ├── apiproxy
│ │ ├── okta-verify-jwt.xml
│ │ ├── policies
│ │ │ ├── AV-OktaJwks.xml
│ │ │ ├── CacheInsert-OktaJwks.xml
│ │ │ ├── CacheLookup-OktaJwks.xml
│ │ │ ├── EV-JWT.xml
│ │ │ ├── RF-MissingHeader.xml
│ │ │ ├── RF-MissingRequiredScope.xml
│ │ │ ├── RF-TestTokenOK.xml
│ │ │ ├── RF-UnknownRequest.xml
│ │ │ ├── SC-RetrieveOktaJwks.xml
│ │ │ └── Verify-JWT-1.xml
│ │ ├── proxies
│ │ │ └── default.xml
│ │ └── targets
│ │ │ └── default.xml
│ └── readme.md
├── aws
│ ├── lambda.md
│ └── readme.md
├── kong
│ └── readme.md
├── mulesoft
│ ├── jwt_validation.raml
│ ├── jwt_validation_readme.md
│ ├── mulesoft.raml
│ └── readme.md
├── swag
│ └── readme.md
└── tyk
│ └── readme.md
├── html
└── index.html
├── okta.json
├── okta_setup_manual.md
├── package.json
├── readme.md
└── routes.js
/.env_example:
--------------------------------------------------------------------------------
1 |
2 | AUD=api://default
3 |
4 | OKTA_TENANT=https://dev-399486.okta.com
5 | ISSUER=https://dev-399486.okta.com/oauth2/default
6 |
7 | CLIENT_ID=0oa1opaydr1bnvBKL357
8 | CLIENT_SECRET=
9 |
10 | # Valid values: APIGEE || AWS_JWT || AWS_LAMBDA || KONG || MULESOFT || || SWAG || TYK
11 | GATEWAY=
12 | GATEWAY_URI=
13 |
14 | # App settings
15 | PORT=8080
16 | REDIRECT_URI=http://localhost:8080
17 |
18 | SESSION_SECRET="some random phrase"
19 | SESSION_MAX_AGE=60000
20 |
--------------------------------------------------------------------------------
/.gitignore:
--------------------------------------------------------------------------------
1 | .DS_Store
2 | /config/instances
3 | /node_modules
4 | npm-debug.log
5 | .env*
6 | !.env_example*
7 | package-lock.json
8 | /okta_bootstrap/output/*
9 | *snapshot_*.json
--------------------------------------------------------------------------------
/app.js:
--------------------------------------------------------------------------------
1 | // Okta API Access Management
2 |
3 | ////////////////////////////////////////////////////
4 | require('dotenv').config()
5 |
6 | var bodyParser = require('body-parser')
7 |
8 | const express = require('express')
9 |
10 | var fs = require("fs")
11 |
12 | var session = require("express-session")
13 |
14 | ///////////////////////////////////////////////////
15 |
16 | const app = express()
17 |
18 | app.use(session({
19 | secret: process.env.SESSION_SECRET,
20 | cookie: { maxAge: parseInt(process.env.SESSION_MAX_AGE) },
21 | resave: true,
22 | saveUninitialized: true
23 | }))
24 |
25 | app.use(bodyParser.json())
26 |
27 | require('./routes.js')(app)
28 |
29 | app.listen(process.env.PORT, function () {
30 | console.log('App listening on port ' + process.env.PORT + "...")
31 | })
--------------------------------------------------------------------------------
/gateways/apigee/apiproxy.zip:
--------------------------------------------------------------------------------
https://raw.githubusercontent.com/tom-smith-okta/okta-api-center/0740206e671031169384174934e6292f23f2f44f/gateways/apigee/apiproxy.zip
--------------------------------------------------------------------------------
/gateways/apigee/apiproxy/okta-verify-jwt.xml:
--------------------------------------------------------------------------------
1 |
2 |
3 | /solar-system
4 |
5 | 1517281941236
6 | tom.smith@okta.com
7 |
8 | solar-system
9 | 1517281941236
10 | tom.smith@okta.com
11 |
12 | AV-OktaJwks
13 | CacheInsert-OktaJwks
14 | CacheLookup-OktaJwks
15 | EV-JWT
16 | RF-MissingHeader
17 | RF-MissingRequiredScope
18 | RF-TestTokenOK
19 | RF-UnknownRequest
20 | SC-RetrieveOktaJwks
21 | Verify-JWT-1
22 |
23 |
24 | default
25 |
26 |
27 |
28 |
29 |
30 | default
31 |
32 |
33 |
--------------------------------------------------------------------------------
/gateways/apigee/apiproxy/policies/AV-OktaJwks.xml:
--------------------------------------------------------------------------------
1 |
2 |
3 | AV-OktaJwks
4 |
5 |
6 |
7 | cached.okta.jwks
8 | oktaJwksResponse.content
9 |
10 | false
11 |
--------------------------------------------------------------------------------
/gateways/apigee/apiproxy/policies/CacheInsert-OktaJwks.xml:
--------------------------------------------------------------------------------
1 |
2 |
3 | CacheInsert-OktaJwks
4 |
5 |
6 |
7 | oktajwks
8 | 1
9 |
10 | cache1
11 | Application
12 |
13 | 3600
14 |
15 | oktaJwksResponse.content
16 |
--------------------------------------------------------------------------------
/gateways/apigee/apiproxy/policies/CacheLookup-OktaJwks.xml:
--------------------------------------------------------------------------------
1 |
2 |
3 | CacheLookup-OktaJwks
4 |
5 |
6 |
7 | oktajwks
8 | 1
9 |
10 | cache1
11 | Application
12 | cached.okta.jwks
13 |
--------------------------------------------------------------------------------
/gateways/apigee/apiproxy/policies/EV-JWT.xml:
--------------------------------------------------------------------------------
1 |
2 |
3 | EV-JWT
4 |
5 |
6 |
7 | Bearer {jwt}
8 |
9 | false
10 | request
11 | inbound
12 |
--------------------------------------------------------------------------------
/gateways/apigee/apiproxy/policies/RF-MissingHeader.xml:
--------------------------------------------------------------------------------
1 |
2 |
3 | RF-MissingHeader
4 |
5 |
6 |
7 |
8 |
9 | Missing Authorization Header
10 | 400
11 | Bad Request
12 |
13 |
14 | true
15 |
--------------------------------------------------------------------------------
/gateways/apigee/apiproxy/policies/RF-MissingRequiredScope.xml:
--------------------------------------------------------------------------------
1 |
2 |
3 | RF-MissingRequiredScope
4 |
5 |
6 |
7 | {
8 | "error" : {
9 | "code" : 403,
10 | "message" : "missing required scope for that endpoint"
11 | }
12 | }
13 |
14 | 403
15 | Not Authorized
16 |
17 |
18 | true
19 |
--------------------------------------------------------------------------------
/gateways/apigee/apiproxy/policies/RF-TestTokenOK.xml:
--------------------------------------------------------------------------------
1 |
2 |
3 | RF-TestTokenOK
4 |
5 |
6 |
7 | {
8 | "jti" : "{jwt.Verify-JWT-1.id}",
9 | "secondsRemaining" : {jwt.Verify-JWT-1.seconds_remaining},
10 | "timeRemainingFormatted" : "{jwt.Verify-JWT-1.time_remaining_formatted}"
11 | }
12 |
13 | 200
14 | OK
15 |
16 |
17 | true
18 |
--------------------------------------------------------------------------------
/gateways/apigee/apiproxy/policies/RF-UnknownRequest.xml:
--------------------------------------------------------------------------------
1 |
2 |
3 | RF-UnknownRequest
4 |
5 |
6 |
7 |
8 | {
9 | "error" : {
10 | "code" : 404.01,
11 | "message" : "that request was unknown"
12 | }
13 | }
14 |
15 | 404
16 | Not Found
17 |
18 |
19 | true
20 |
--------------------------------------------------------------------------------
/gateways/apigee/apiproxy/policies/SC-RetrieveOktaJwks.xml:
--------------------------------------------------------------------------------
1 |
2 |
3 | SC-RetrieveOktaJwks
4 |
5 |
6 |
7 |
8 | GET
9 |
10 | false
11 |
12 | oktaJwksResponse
13 |
14 |
15 | 2xx
16 |
17 | https://partnerpoc.oktapreview.com/oauth2/ausce8ii5wBzd0zvQ0h7/v1/keys
18 |
19 |
--------------------------------------------------------------------------------
/gateways/apigee/apiproxy/policies/Verify-JWT-1.xml:
--------------------------------------------------------------------------------
1 |
2 |
3 | Verify-JWT-1
4 |
5 |
6 | RS256
7 |
8 |
9 | false
10 | https://partnerpoc.oktapreview.com/oauth2/ausce8ii5wBzd0zvQ0h7
11 |
12 |
13 |
14 | inbound.jwt
15 |
--------------------------------------------------------------------------------
/gateways/apigee/apiproxy/proxies/default.xml:
--------------------------------------------------------------------------------
1 |
2 |
3 |
4 |
5 |
6 |
7 | Parse / Verify a JWT created by Okta
8 |
9 |
10 | request.header.authorization = null
11 |
12 | RF-MissingHeader
13 |
14 |
15 |
16 | EV-JWT
17 |
18 |
19 |
20 | CacheLookup-OktaJwks
21 |
22 |
23 | cached.okta.jwks = null
24 |
25 | SC-RetrieveOktaJwks
26 |
27 |
28 | cached.okta.jwks = null
29 |
30 | CacheInsert-OktaJwks
31 |
32 |
33 | cached.okta.jwks = null
34 |
35 | AV-OktaJwks
36 |
37 |
38 |
39 | Verify-JWT-1
40 |
41 |
42 |
43 | (proxy.pathsuffix MatchesPath "/planets") and (jwt.Verify-JWT-1.claim.scp !~ "*http://myapp.com/scp/silver*"
44 | RF-MissingRequiredScope
45 |
46 |
47 |
48 | (proxy.pathsuffix MatchesPath "/moons") and (jwt.Verify-JWT-1.claim.scp !~ "*http://myapp.com/scp/gold*"
49 | RF-MissingRequiredScope
50 |
51 |
52 |
53 | proxy.pathsuffix MatchesPath "/test"
54 | RF-TestTokenOK
55 |
56 |
57 | (request.verb = "GET") and
58 | (
59 | (proxy.pathsuffix MatchesPath "/moons") or
60 | (proxy.pathsuffix MatchesPath "/planets") or
61 | (proxy.pathsuffix MatchesPath "/test")
62 | )
63 |
64 |
65 |
66 |
67 |
68 |
69 | RF-UnknownRequest
70 |
71 |
72 |
73 |
74 |
75 |
76 |
77 |
78 |
79 |
80 |
81 |
82 |
83 |
84 | /solar-system
85 |
86 | default
87 | secure
88 |
89 |
90 | default
91 |
92 |
--------------------------------------------------------------------------------
/gateways/apigee/apiproxy/targets/default.xml:
--------------------------------------------------------------------------------
1 |
2 |
3 |
4 |
5 |
6 |
7 |
8 |
9 |
10 |
11 |
12 |
13 |
14 |
15 |
16 | https://okta-solar-system.herokuapp.com
17 |
18 |
--------------------------------------------------------------------------------
/gateways/apigee/readme.md:
--------------------------------------------------------------------------------
1 | # Okta API Access Management + Apigee
2 |
3 | These instructions will explain how to set up Okta as an external OAuth authorization server for Apigee. In this architecture, the application will obtain an access token from Okta's authorization server, and pass that access token to Apigee as a bearer token (jwt). Apigee will evaluate the bearer token to determine whether the token is valid, and whether it contains the proper scopes for the requested resource.
4 |
5 | It is also possible to set up Okta as (only) an identity provider and instead use Apigee itself as the authorization server. Instructions for setting up that flow are [here](https://github.com/zeekhoo-okta/generator-okta-oidc-apigee).
6 |
7 | ## Prerequisites
8 | - An Okta tenant. These instructions assume that you have already set up your Okta tenant and can acquire access tokens from Okta by following the instructions in the [main readme of this repo](readme.md).
9 | - An Apigee tenant. If you do not already have an Apigee tenant, you can get a free trial [here](https://apigee.com/about/cp/apigee-edge-free-trial).
10 | - An API. In this example setup, we'll be using a mock "solar system" API, which is publicly available. You can substitute your own API if you wish.
11 |
12 | ## Setup: Apigee
13 |
14 | * This is an Okta-fied version of the more general Apigee repo created [here](https://github.com/DinoChiesa/ApigeeEdge-JWT-Demonstration). You are encouraged to explore the more comprehensive Apigee repo for more context.
15 |
16 | * There is also an excellent accompanying video overview of how Apigee handles JWTs [here](https://community.apigee.com/articles/49280/jwt-policies-in-apigee-edge.html).
17 |
18 | ### Overview
19 |
20 | Setting up the proxy in Apigee is very straightforward. This repo contains an `apiproxy.zip` archive that contains all of the setup info needed for this example.
21 |
22 | If you wish, you can make changes to any of the files and values in the `apiproxy` directory, and then zip the directory before uploading. You might want to just start with the pre-built archive first.
23 |
24 | The only values that need to be updated in the proxy are the `URL` value in the `SC-RetrieveOktaJwks.xml` file and the `Issuer` value in the `Verify-JWT-1.xml` file.
25 |
26 | These values are easily updated in Apigee after uploading the pre-built proxy.
27 |
28 | ### Steps
29 |
30 | - Before you deploy the proxy you need to create a cache on the Apigee environment. The cache should be named `cache1`.
31 |
32 | To deploy the proxy to your Apigee tenant:
33 | - in your Apigee tenant, go to "API Proxies" and click the `+Proxy` button
34 | - select "Proxy bundle" then click Next
35 | - upload the `apiproxy.zip` file
36 | - choose a name for the proxy or just keep the default, then click Next
37 | - click Build
38 | - your proxy will load.
39 | - click the link to view the proxy in the API editor
40 | - click the "develop" tab to view the flows and source XML
41 | - open the Verify-JWT-1 policy
42 | - update the Issuer value with your authorization server URL
43 |
44 | 
45 |
46 | - deploy your proxy to test, dev, or prod, depending on your preference.
47 |
48 | you are now deployed!
49 |
50 | Your API proxy tenant should now be deployed at {{your Apigee env}}/solar-system
51 |
52 | Take note of your API proxy URL.
53 |
54 | There are three built-in proxy endpoints that you can test against. All of these endpoints will expect a valid access token minted by your Okta authorization server. The access token must be included in the header of the request. (The sample app will do this for you.)
55 |
56 | * {{your Apigee env}}/solar-system/test
57 | * if the access token is valid, this endpoint will return a 200 status OK
58 | * {{your Apigee env}}/solar-system/planets
59 | * if the access token is valid AND includes the scope `http://myapp.com/scp/silver`, this proxy endpoint will pass on the request to the target endpoint, which will return a list of planets.
60 | * {{your Apigee env}}/solar-system/moons
61 | * if the access token is valid AND includes the scope `http://myapp.com/scp/gold`, this proxy endpoint will pass on the request to the target endpoint, which will return a list of moons.
62 |
63 | These policies are expressed in the main Apigee proxy flow: `parse + validate a JWT obtained from Okta`.
64 |
65 | 
66 |
67 | You can of course adjust the values here to suit your own use-case.
68 |
69 | ## Testing
70 |
71 | Now that you have set up Apigee as an API proxy, you can test out the whole flow. Take note of the URL of your Apigee deployment, jump back to the main `readme` in this repo, and go to the `Test your application and access tokens` section.
72 |
--------------------------------------------------------------------------------
/gateways/aws/lambda.md:
--------------------------------------------------------------------------------
1 | # Integrating Okta with Amazon API Gateway - Lambda authorizer
2 |
3 | This integration guide describes how to integrate Okta's API Access Management (OAuth as a Service) with Amazon API Gateway.
4 |
5 | AWS has recently (Spring 2020) released a new way to integrate Amazon API Gateway with external OAuth providers such as Okta: [JWT authorizers](https://docs.aws.amazon.com/apigateway/latest/developerguide/http-api-jwt-authorizer.html).
6 |
7 | This new way of integrating Okta is much simpler than setting up a custom authorizer using a Lambda function. The lambda authorizer approach is of course much more powerful and flexible, but you should start with the [JWT authorizer approach](readme.md) unless you're certain that you need a lambda authorizer.
8 |
9 | The basic flow is that Amazon API Gateway will accept incoming requests and pass them on to a custom Lambda authorizer. The Lambda authorizer (which we will set up) will evaluate the access token included in the request and determine whether the access token is 1) valid and 2) contains the appropriate scopes for the requested resource.
10 |
11 | We will set up the Lambda authorizer to validate the access tokens against Okta.
12 |
13 | We'll be using a mock "solar system" API that is publicly available, so you don't need to worry about setting up the API itself.
14 |
15 | ## Prerequisites
16 |
17 | ### Okta
18 |
19 | These instructions assume that you have already set up your Okta tenant and can acquire access tokens from Okta by following the instructions in the [main readme of this repo](readme.md).
20 |
21 | As a result of those setup steps, you should have the following values on hand before proceeding:
22 |
23 | ISSUER
24 | example: https://dev-399486.okta.com/oauth2/default
25 | this value will be `{{OKTA_TENANT}}/oauth2/default` unless you've set up a different authorization server in Okta.
26 |
27 | ### AWS
28 |
29 | You will also of course need an AWS account.
30 |
31 | ### Overview
32 |
33 | The high-level process we are going to follow is:
34 |
35 | 1. Set up your API in Amazon API Gateway
36 | 2. Add a Lambda function to your AWS account to handle authorization (this step includes setting up an IAM role)
37 | 3. Add the Lambda authorization function to selected resources in your API Gateway
38 |
39 | ## Set up your API in Amazon API Gateway
40 |
41 | In your AWS Management Console, go to API Gateway.
42 |
43 | Click “Create API”
44 |
45 | 
46 |
47 | Select *New API* and choose a name and description for your API:
48 |
49 | 
50 |
51 | Click **Create API**
52 |
53 | We now have an “empty” API
54 |
55 | 
56 |
57 | Now create a method: Actions->Create Method->GET
58 |
59 | 
60 |
61 | Click the checkmark to save the new method.
62 |
63 | In the GET - Setup screen, choose the following options:
64 |
65 | * Integration type: HTTP
66 | * Use HTTP Proxy integration: yes
67 | * HTTP method: GET
68 | * Endpoint URL: https://okta-solar-system.herokuapp.com
69 | * Content Handling: Passthrough
70 | * Use Default Timeout: yes
71 |
72 | 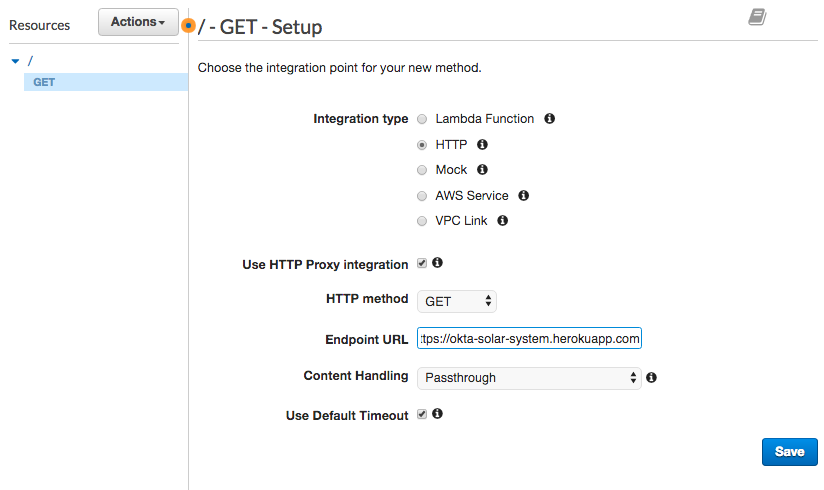
73 |
74 | Click **Save**.
75 |
76 | Your GET request should now look like this:
77 |
78 | 
79 |
80 | At this point, test the gateway to ensure that it's properly proxying requests:
81 |
82 | Click the **Actions** button, then *Deploy API*.
83 |
84 | 
85 |
86 | For *Deployment Stage*, choose **[New Stage]**, and for *Stage name*, enter `test`
87 |
88 | You don't need to enter anything for the *Stage description* and *Deployment description* fields, but you can if you wish.
89 |
90 | 
91 |
92 | Now click **Deploy**
93 |
94 | You will now have an *Invoke URL* where you can test the proxy.
95 |
96 | 
97 |
98 | Click the Invoke URL, and you should arrive at a simple page with the text "Okta solar system api":
99 |
100 | 
101 |
102 | This Invoke URL is important; we're going to use it as the GATEWAY_URI for our sample application.
103 |
104 | Now, let's add a couple of "real" endpoints to the proxy.
105 |
106 | Go back to the API Gateway, and under your API name in the left-hand side, click *Resources*.
107 |
108 | 
109 |
110 | Click the **Actions** button and select *Create Resource*.
111 |
112 | Leave the *Configure as proxy resource* box unchecked.
113 | *Resource Name*: `planets`
114 | *Resource Path*: `planets`
115 |
116 | 
117 |
118 | Click **Create Resource**.
119 |
120 | Now let's add a method to that Resource. Click Actions -> Create Method -> GET->checkmark.
121 |
122 | Just as we did for the previous definition of GET, we're going to choose:
123 |
124 | *Integration type*: HTTP
125 |
126 | *Use HTTP Proxy integration*: **Yes**
127 |
128 | *HTTP Method*: GET
129 |
130 | *Endpoint URL*: `https://okta-solar-system.herokuapp.com/planets`
131 |
132 | *Content Handling*: Passthrough
133 |
134 | *Use Default Timeout*: Yes
135 |
136 | 
137 |
138 | Click **Save**.
139 |
140 | The sample application will test two endpoints:
141 |
142 | `/planets`
143 | and
144 | `/moons`
145 |
146 | If you would like to add the `/moons` endpoint, go ahead and do that now, using the same steps you did for `/planets`. The `/moons` endpoint is not required, but it helps to show how different users can have access to different resources. We'll assign the different scopes required to access these endpoints when we set up the Lambda authorization function.
147 |
148 | ## Set up the Lambda authorizer
149 |
150 | Amazon API Gateway uses a Lambda function to inspect access tokens. So, we need to set up a Lambda function as an authorizer for this API.
151 |
152 | Follow the instructions [here](https://github.com/tom-smith-okta/node-lambda-oauth2-jwt-authorizer) to set up the Lambda authorizer.
153 |
154 | > Stop when you get to the *Testing* section, and come back to this document.
155 |
156 | Now that you have set up your authorizer, we can add it to the `/planets` method we created earlier.
157 |
158 | ## Add the Lambda Authorizer to API Resources
159 |
160 | Click on the *Resources* section of your API, then click on the GET method that is a child of /planets:
161 |
162 | 
163 |
164 | Click *Method Request*
165 |
166 | In Settings->Authorization, choose the Lambda Authorizer that you set up.
167 |
168 | 
169 |
170 | Click the checkmark to save the authorizer.
171 |
172 | ## Deploy the API
173 |
174 | Now that we've added authorization to one of our resources, we can deploy the API again and test it.
175 |
176 | Click the **Actions** button, then *Deploy API*.
177 |
178 | Click **Deploy**.
179 |
180 | If you click on the *Invoke URL* as-is, then you will again arrive at the home for the solar system API.
181 |
182 | If you append */planets* to the Invoke URL, you will get an *Unauthorized* message. This means that our authorizer is doing its job and blocking attempts to reach the `/planets` resource without a valid access token.
183 |
184 | ## Testing
185 |
186 | Now that you have set up Amazon API Gateway as an API proxy, you can test out the whole flow. Take note of the Invoke URL, jump back to the main `readme` in this repo, and go to the `Test your application and access tokens` section.
187 |
--------------------------------------------------------------------------------
/gateways/aws/readme.md:
--------------------------------------------------------------------------------
1 | # Integrating Okta with Amazon API Gateway - JWT authorizer
2 |
3 | This integration guide describes how to integrate Okta's API Access Management (OAuth as a Service) with Amazon API Gateway.
4 |
5 | AWS has recently (Spring 2020) released a new way to integrate Amazon API Gateway with external OAuth providers such as Okta: [JWT authorizers](https://docs.aws.amazon.com/apigateway/latest/developerguide/http-api-jwt-authorizer.html).
6 |
7 | These setup instructions will use this new way of integrating Okta, which is much simpler than setting up a custom authorizer using a Lambda function. The [Lambda authorizer approach](lambda.md) is of course much more powerful and flexible, but you should start with the JWT authorizer approach unless you're certain that you need a Lambda authorizer.
8 |
9 | We'll be using a mock "solar system" API that is publicly available, so you don't need to worry about setting up the API itself.
10 |
11 | ## Prerequisites
12 |
13 | ### Okta
14 |
15 | These instructions assume that you have already set up your Okta tenant and can acquire access tokens from Okta by following the instructions in the [main readme of this repo](/readme.md).
16 |
17 | As a result of those setup steps, you should have the following values on hand before proceeding:
18 |
19 | ISSUER
20 |
21 | example: https://dev-399486.okta.com/oauth2/default
22 |
23 | this value will be `{{OKTA_TENANT}}/oauth2/default` unless you've set up a different authorization server in Okta.
24 |
25 | ### AWS
26 |
27 | You will also of course need an AWS account.
28 |
29 | ### Overview
30 |
31 | We are going to set up an "HTTP" type API in API gateway, and add Okta as a JWT source for authorization.
32 |
33 | We will also add JWT policies to the API gateway so that specific endpoints will be protected by specific scopes.
34 |
35 | ## Set up your API in Amazon API Gateway
36 |
37 | In your AWS Management Console, go to API Gateway and click **Create API**.
38 |
39 | On the "Choose an API type" screen:
40 |
41 | We are going to build an HTTP API, so click **Build** inside the HTTP API box.
42 |
43 | 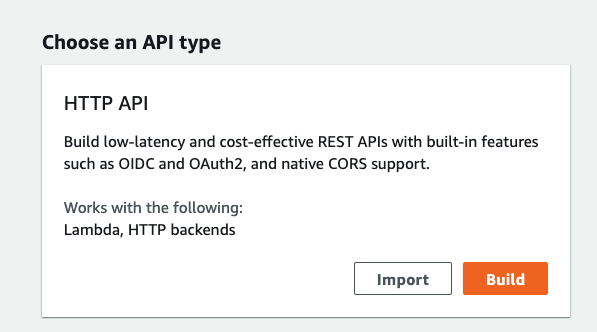
44 |
45 | In the **Create and configure integrations** box, click **Add integration**, then assign the following values:
46 |
47 | Integrations: HTTP
48 |
49 | Method: ANY
50 |
51 | URL endpoint: https://okta-solar-system.herokuapp.com
52 |
53 | API name: okta solar system
54 |
55 | 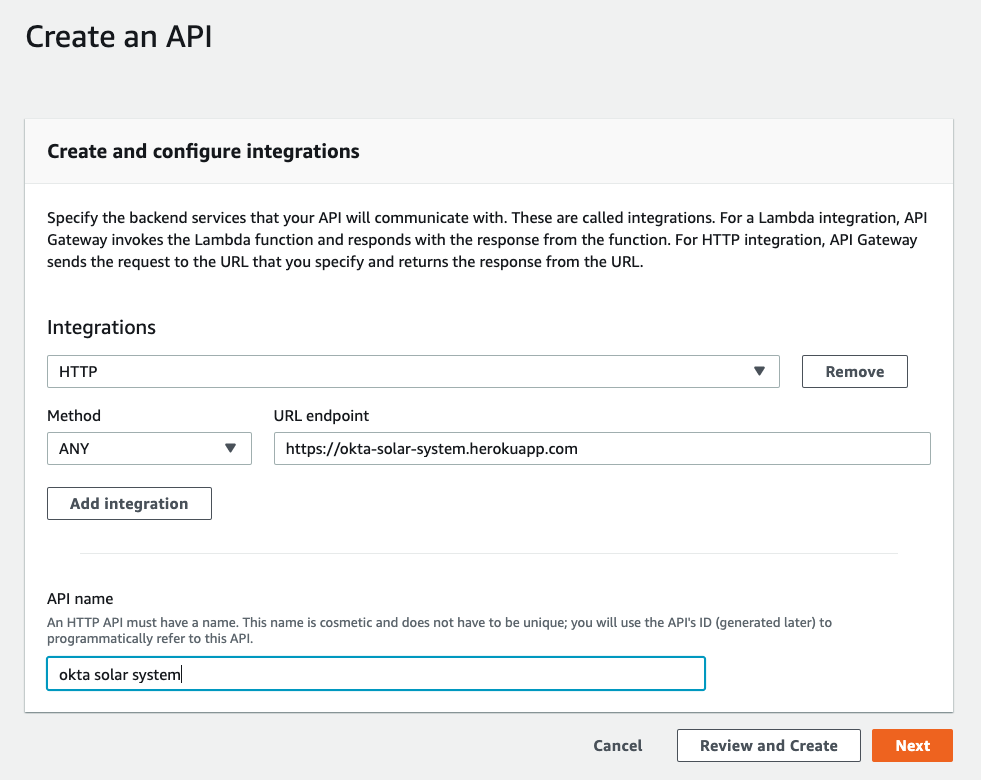
56 |
57 | Click **Review and Create**.
58 |
59 | You should now see an overview screen of your API.
60 |
61 | Click **Create**.
62 |
63 | Wait a second for a value to appear in the "Attached deployment" column, so you know that your API is deployed.
64 |
65 | 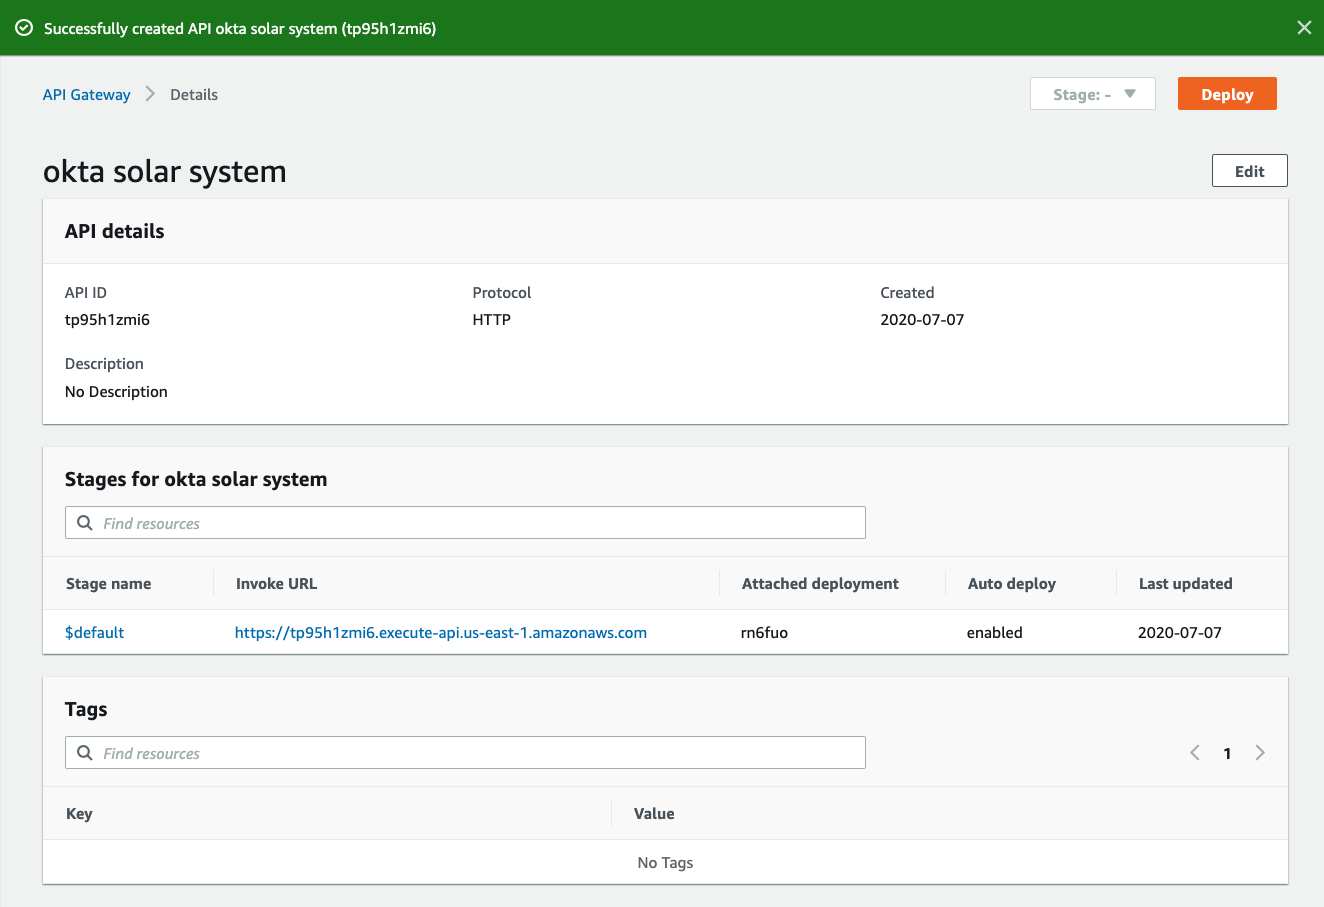
66 |
67 | At this point, you can click on the **Invoke URL** and you will see that you are successfully proxying the solar system API home page:
68 |
69 | 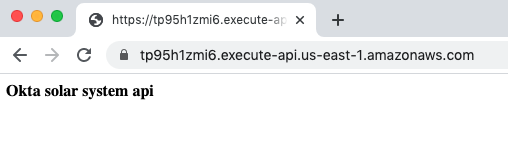
70 |
71 | >Note: stash your **Invoke URL** somewhere handy.
72 |
73 | >Note: throughout this project, we are just going to use the default Stage for this API, which means that updates will deploy automatically. So, you should not have to click the **Deploy** button to successfully complete this setup.
74 |
75 | ### Add a route
76 |
77 | Now let's add a route to our solar system API, so we can start getting some actual data back and see how authorization works.
78 |
79 | For this first route, we're just going to do some validation of the access token. We'll add scopes to the equation later, after we know that our authorization integration is working.
80 |
81 | Click on Develop->Routes, then **Create**.
82 |
83 | On the **Create a route** screen, choose GET as your method, and enter
84 |
85 | `/asteroids`
86 |
87 | in the path field:
88 |
89 | 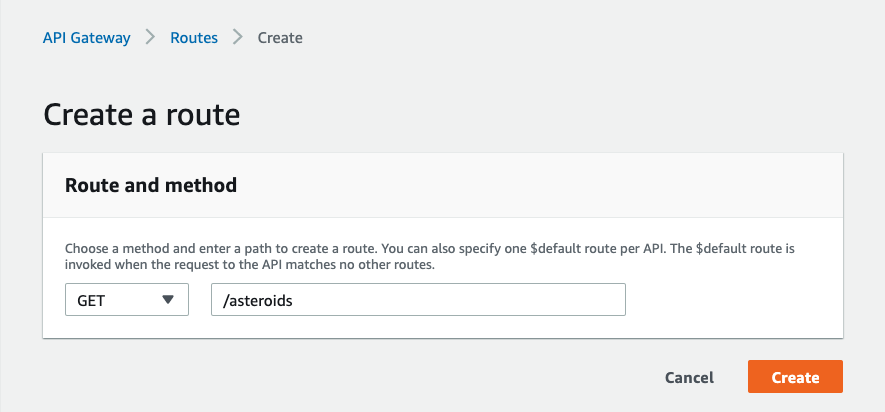
90 |
91 | Click **Create** to create the route.
92 |
93 | On the **Routes** screen, click on **GET** underneath the `/asteroids` path, and you will see options to **Attach authorizer** and **Attach integration**:
94 |
95 | 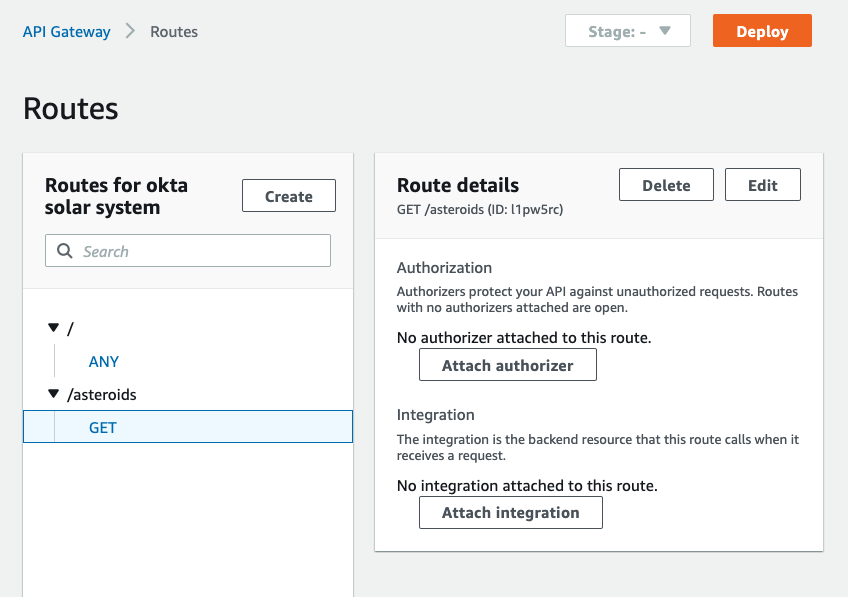
96 |
97 | Click **Attach authorizer** and you will go to the Authorization screen:
98 |
99 | 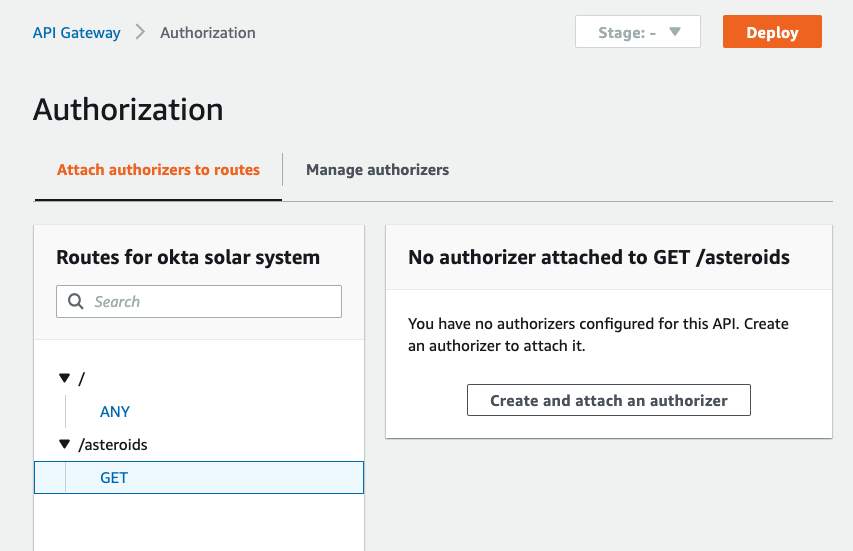
100 |
101 | Click **Create and attach an authorizer**
102 |
103 | On the **Create JWT authorizer** screen, populate the **Authorizer settings** with the following values:
104 |
105 | Name: Okta
106 |
107 | Identity source: $request.header.Authorization
108 |
109 | Issuer URL: {{ISSUER}}
110 |
111 | (example: https://dev-399486.okta.com/oauth2/default)
112 |
113 | Audience: api://default
114 |
115 | 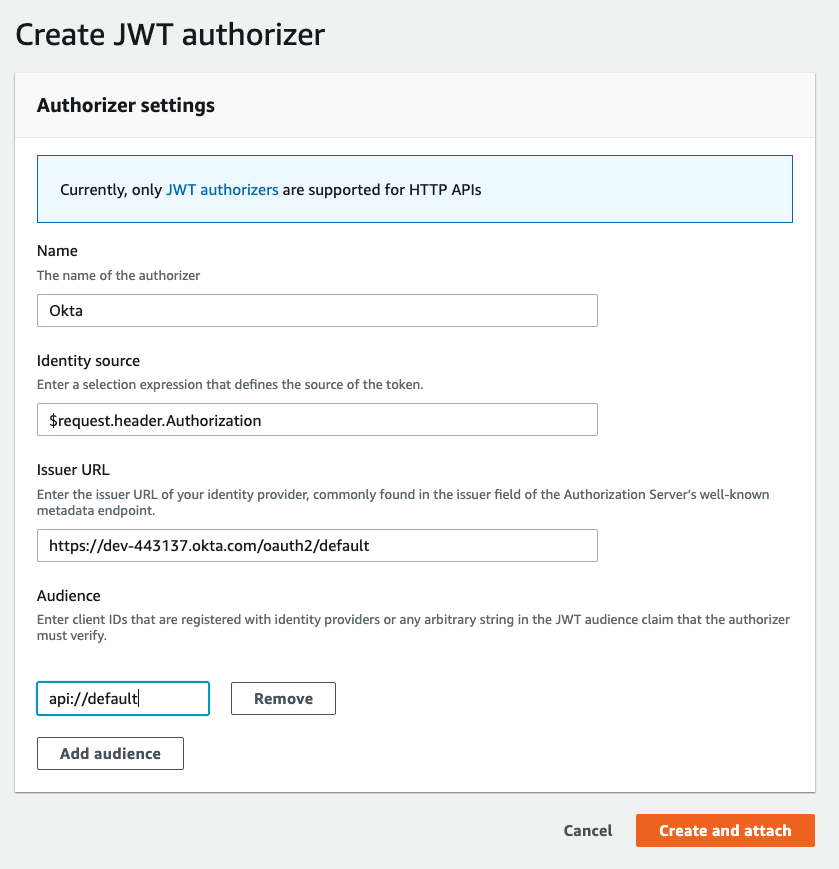
116 |
117 | Click **Create and attach**.
118 |
119 | Your **Authorization** screen should look something like this:
120 |
121 | 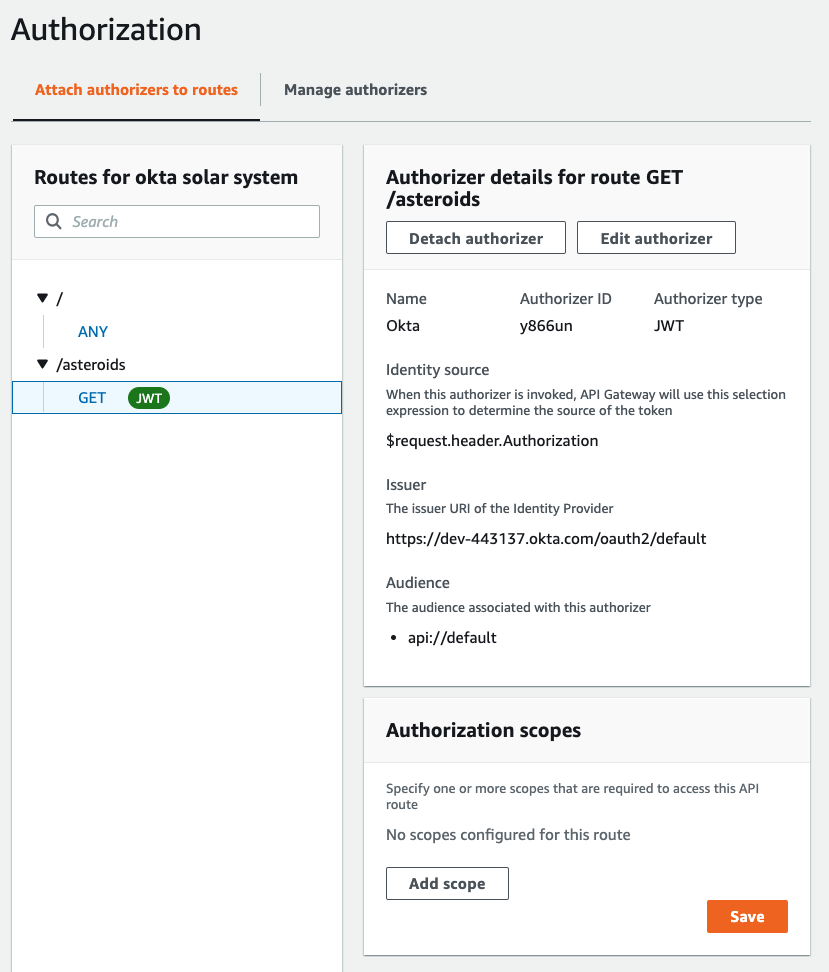
122 |
123 | Now, we need to attach an "integration" to the `/asteroids` route.
124 |
125 | Click Develop->Routes and select the **GET** method of your `/asteroids` route (it may already be selected.)
126 |
127 | 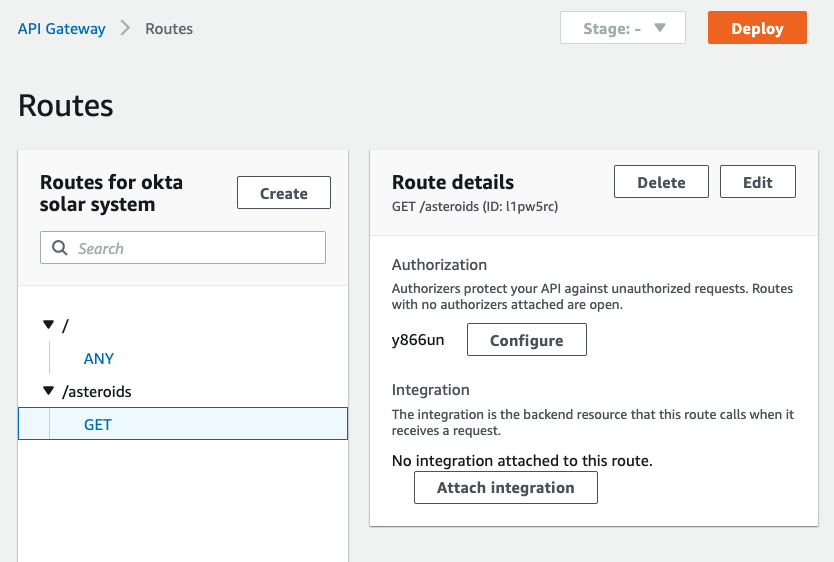
128 |
129 | Click **Attach integration**.
130 |
131 | 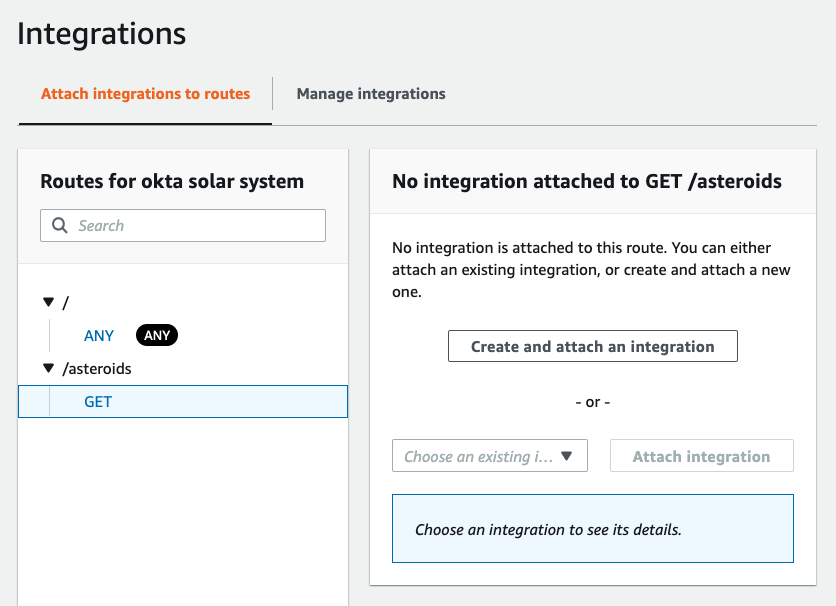
132 |
133 | Click **Create and attach an integration**.
134 |
135 | On the **Create an integration** screen, populate the form with the following values:
136 |
137 | Integration with: HTTP URI
138 |
139 | HTTP method: GET
140 |
141 | URL: https://okta-solar-system.herokuapp.com/asteroids
142 |
143 | 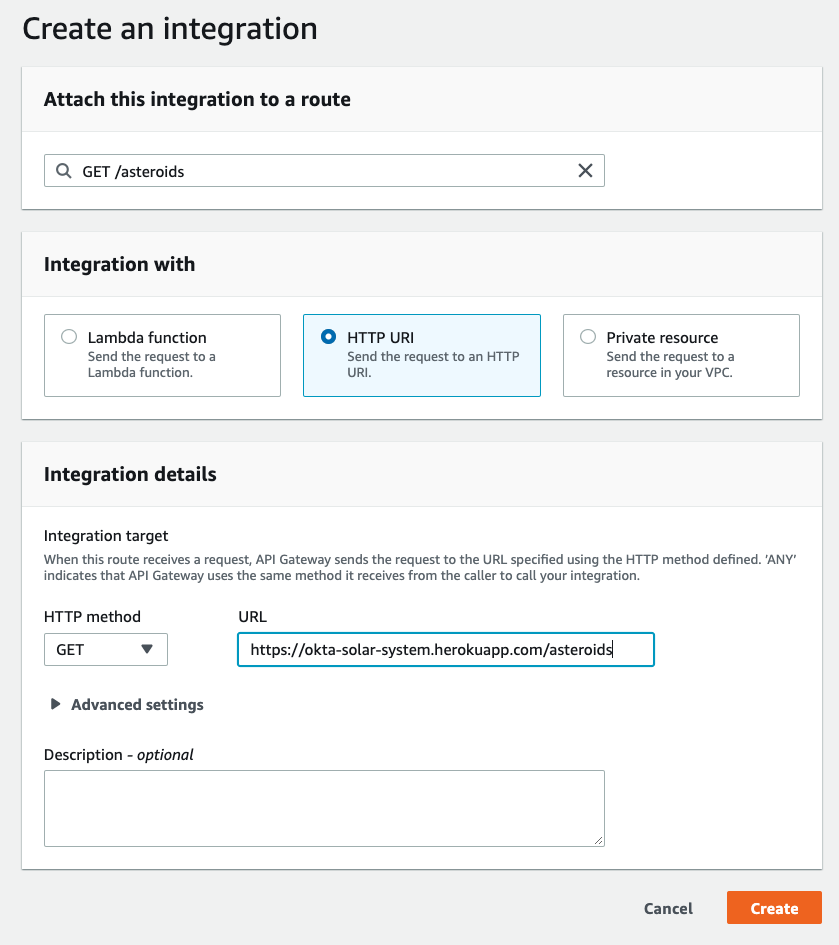
144 |
145 | Click **Create**.
146 |
147 | Your integration should look something like this:
148 |
149 | 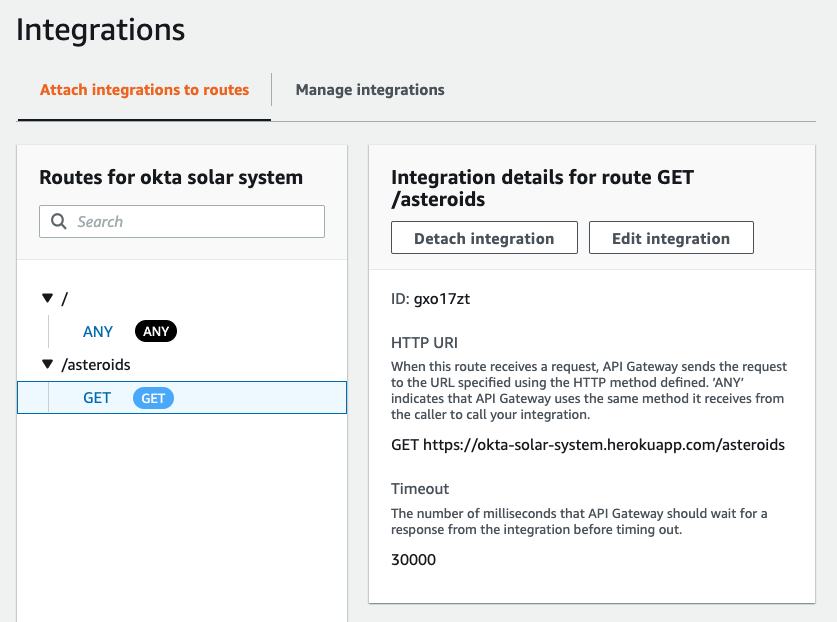
150 |
151 | ### Test the first route
152 |
153 | When we initially set up the API, we verified that the **Invoke URL** loads the home page of the target solar system API.
154 |
155 | Now, if we try to get data from a route (/asteroids) that we've attached an authorizer to (without including an access token), we should get an "Unauthorized" error:
156 |
157 | 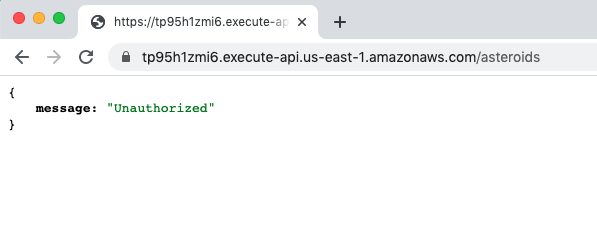
158 |
159 | So, the API gateway is successfully blocking the request because it doesn't have an access token.
160 |
161 | Let's get an access token and see if the authorization process works.
162 |
163 | In the `.env` file of the test application, add "AWS_JWT" as the value for GATEWAY, and add your Invoke URL as the value for GATEWAY_URI.
164 |
165 | Restart the node app.
166 |
167 | Load the web page again, and click on "authenticate" in the Bronze access box to get an access token. Then, click on the **show me some asteroids!** button to get a selected list of asteroids.
168 |
169 | Once you're able to successfully get a list of asteroids, we can move on to adding more routes to the gateway, and these new routes will require scopes to allow access.
170 |
171 | ### Add the /planets route
172 |
173 | Go to your API Gateway and click Develop->Routes.
174 |
175 | On the **Routes** screen, click **Create**.
176 |
177 | On the **Create a route** screen, add a new route with:
178 |
179 | Method: GET
180 |
181 | Route: /planets
182 |
183 | 
184 |
185 | Click **Create**.
186 |
187 | On the **Routes** screen, select the GET method of the `/planets` endpoint.
188 |
189 | Click **Attach authorizer**.
190 |
191 | On the **Authorization** screen, click on the **Select existing authorizer** box, and choose Okta.
192 |
193 | 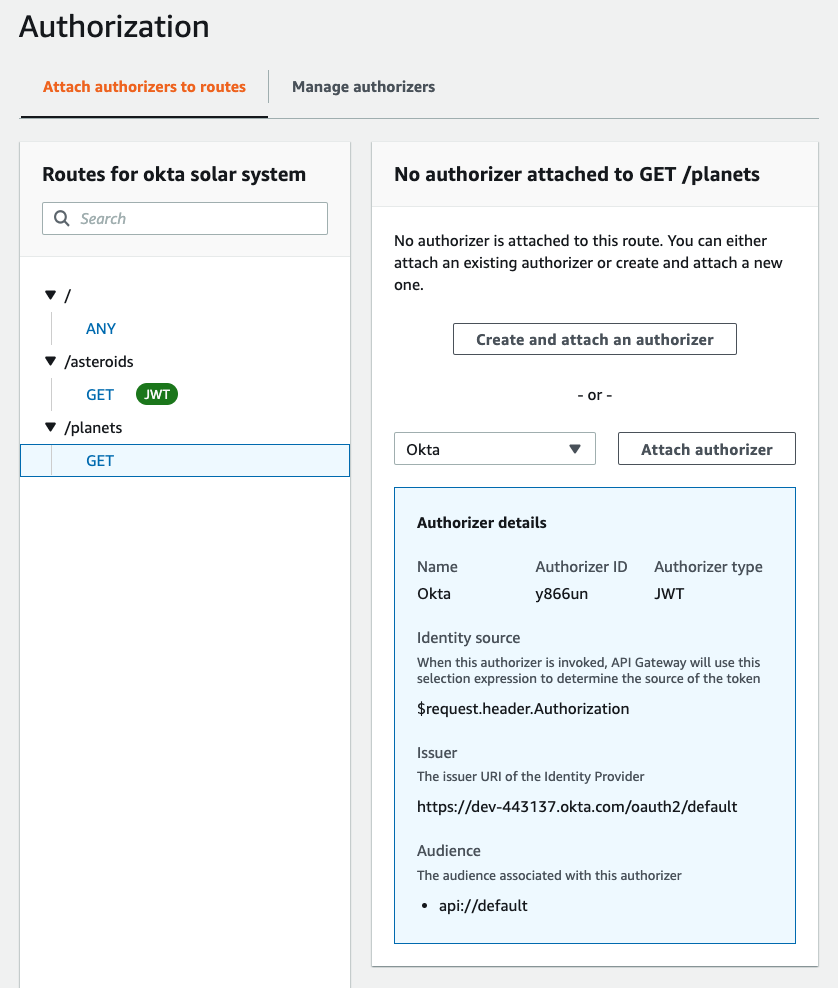
194 |
195 | Click **Attach authorizer**.
196 |
197 | The **Authorization** screen should now look something like this:
198 |
199 | 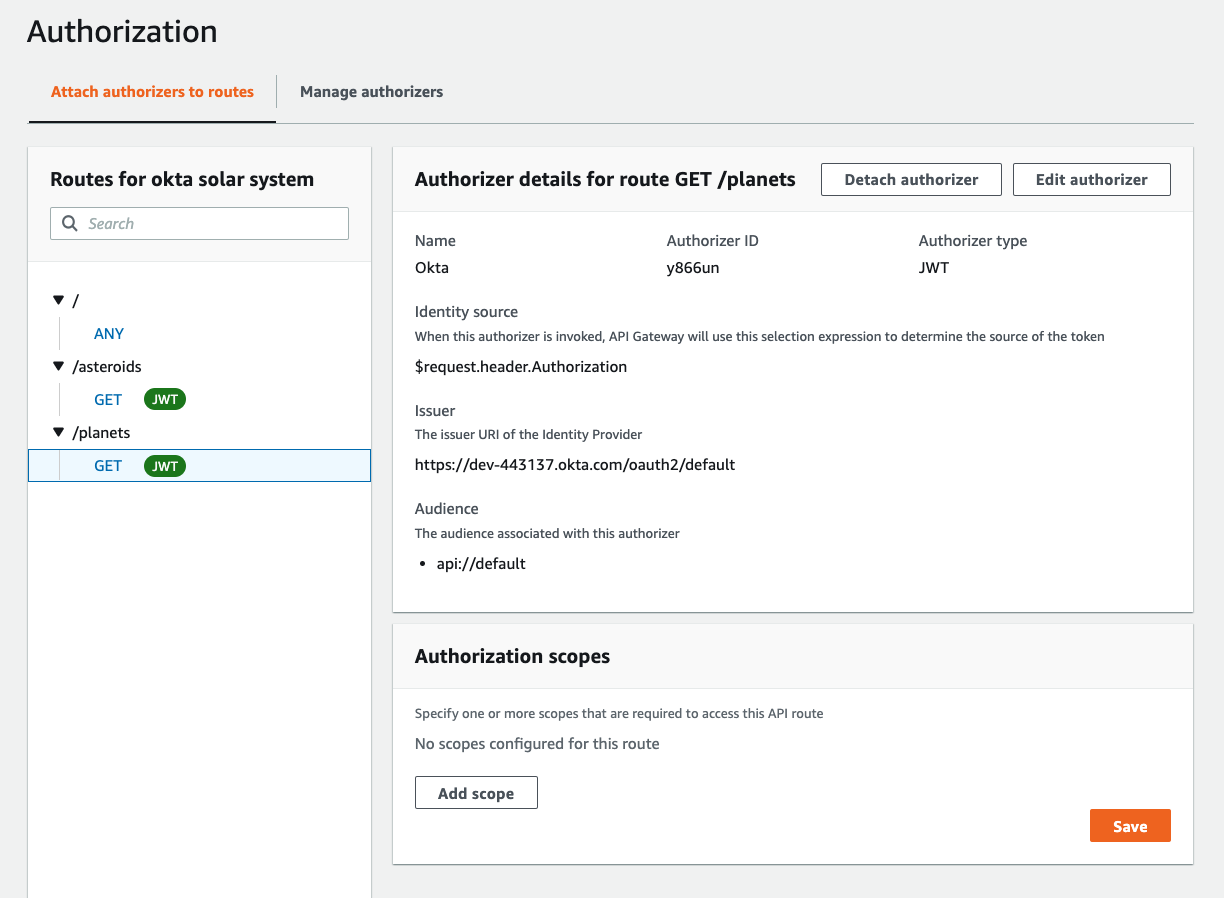
200 |
201 | Now, let's add a scope to further protect this route.
202 |
203 | Click **Add scope**.
204 |
205 | Enter http://myapp.com/scp/silver in the scope field, then click **Save**.
206 |
207 | We still need to add an "integration" for this route, so click on Develop->Routes.
208 |
209 | Select the GET method of the `/planets` endpoint.
210 |
211 | Click **Attach integration**.
212 |
213 | On the **Integrations** screen, click **Create and attach an integration**.
214 |
215 | 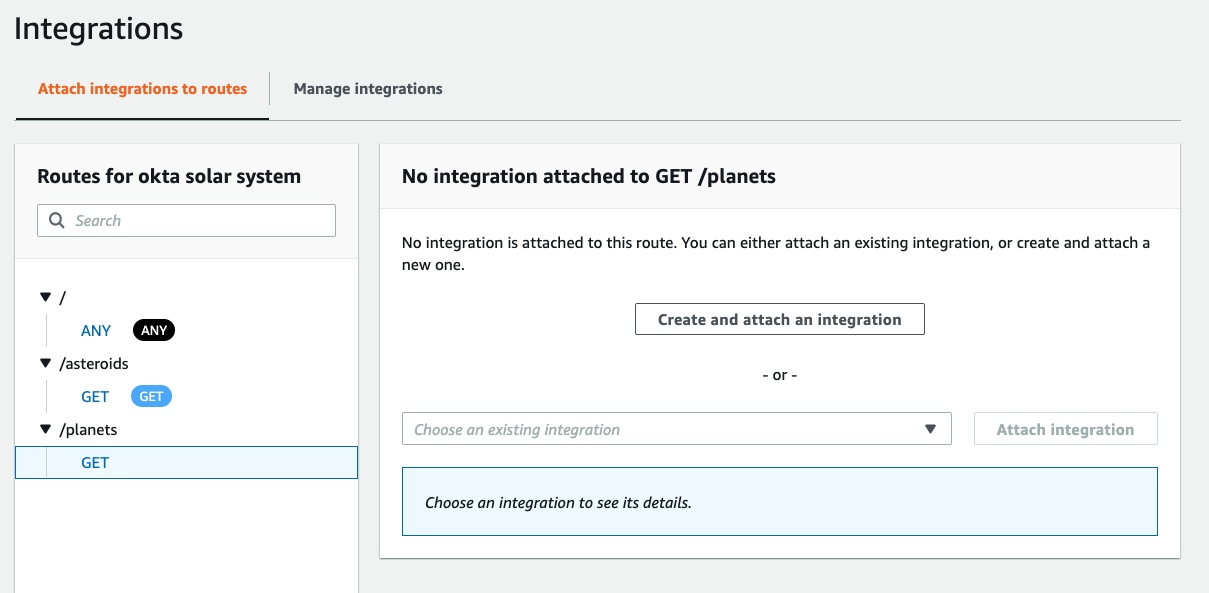
216 |
217 | On the **Create an integration** screen, enter the following values:
218 |
219 | Integration target: HTTP URI
220 |
221 | HTTP method: GET
222 |
223 | URL: https://okta-solar-system.herokuapp.com/planets
224 |
225 | 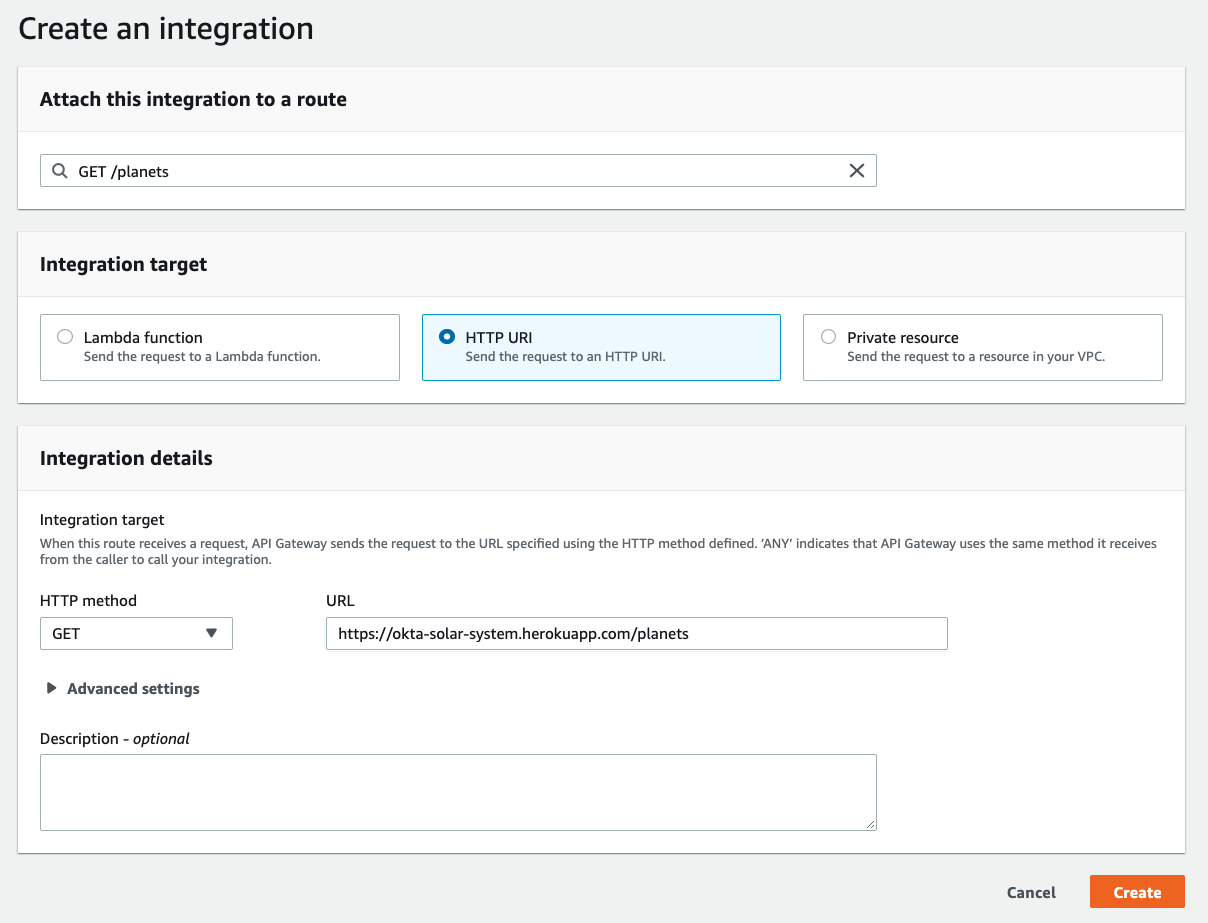
226 |
227 | Click **Create**.
228 |
229 | You now have another route set up for your API gateway. The `/planets` route points to https://okta-solar-system.herokuapp.com/planets. Okta is the authorizer for this route, and the access token must include the http://myapp.com/scp/silver scope for the request to be honored.
230 |
231 | ### Add the /moons route
232 |
233 | To see how different scopes can align with Okta groups, routes, and scopes, you can add another route: `/moons`.
234 |
235 | Follow the same steps as the `/planets` route, but for the integration use the URI https://okta-solar-system.herokuapp.com/moons, and for the scope use http://myapp.com/scp/gold.
236 |
237 | ## Testing
238 |
239 | Now you can go back to the test application and see if the "show me the planets!" and "show me some moons!" buttons work.
240 |
--------------------------------------------------------------------------------
/gateways/kong/readme.md:
--------------------------------------------------------------------------------
1 | # Integrating Okta + Kong
2 |
3 | This integration guide describes how to integrate Okta's API Access Management (OAuth as a Service) with Kong API Gateway.
4 |
5 | The integration described here is an authorization-tier integration; authentication will be happening outside of Kong. A web application will handle authentication vs. Okta, acquiring an access token, and sending that access token to Kong on behalf of the end-user.
6 |
7 | If you are instead interested in a scenario where Kong itself handles authentication vs. Okta, and passes user info to upstream apps, please see the blog post [here](https://developer.okta.com/blog/2017/12/04/use-kong-gateway-to-centralize-authentication).
8 |
9 | ## What You'll Build
10 |
11 | At the end of this setup, you'll have an architecture where:
12 |
13 | 1. Users will be able to authenticate against Okta and receive an access token (via the app)
14 | 2. Users will have different scopes in their access token, depending on their group assignments
15 | 3. The application will send the access token to Kong
16 | 4. Kong will check the validity of the access token locally
17 | 5. If the token and scopes are valid, Kong will send the request on to the API
18 | 6. The API will send the data payload to the gateway, which will send it on to the application
19 |
20 | ## Prerequisites for integrating Okta + Kong
21 |
22 | 1. **An Okta account.** If you don't already have one, you can get a free-forever account at [developer.okta.com](https://developer.okta.com/signup/)
23 | 2. **Kong Enterprise.** In this example we'll be using the [OpenID Connect (OIDC) plug-in for Kong](https://docs.konghq.com/plugins/ee-openid-connect/), which is only available for Kong Enterprise. If you don't already have a Kong Enterprise account, you can get a 30-day trial [here](https://konghq.com/free-trial/).
24 |
25 | ### Step-by-step
26 | The high-level process we are going to follow is:
27 |
28 | 1. Set up your Okta tenant
29 | 2. Set up your API in Kong
30 | 3. Set up and launch your application
31 |
32 | In the last step, we'll launch the sample application that will show the end-to-end flow. This sample application requires a few settings - environment variables - to launch. To manage these environment variables, the application uses the [dotenv npm package](https://www.npmjs.com/package/dotenv). There is an example .env file in the repo called `.env_example`. Copy the `.env_example` file now to a file called `.env`.
33 |
34 | This is what the .env_example file looks like:
35 |
36 | ```
37 | # Okta settings
38 |
39 | # example: https://dev-511902.oktapreview.com
40 | OKTA_TENANT=""
41 |
42 | OKTA_API_TOKEN=""
43 | AUTHN_CLIENT_ID=""
44 | AUTHN_CLIENT_SECRET=""
45 |
46 | # example: https://dev-511902.oktapreview.com/oauth2/ausfqw42xrkmpfDHI0h7
47 | OKTA_AZ_SERVER_ISSUER=""
48 |
49 | # Gateway/Proxy base url
50 | # example: http://52.14.100.89:8080/solar-system
51 | PROXY_URI=""
52 |
53 | # App settings
54 | PORT="8080"
55 | REDIRECT_URI="http://localhost:8080"
56 | SILVER_USERNAME=""
57 | GOLD_USERNAME=""
58 | FAKE_USER_PASSWORD=""
59 | SESSION_SECRET="some random phrase"
60 | SESSION_MAX_AGE=60000
61 |
62 | # Supported values: aws, kong, mulesoft, swag, tyk
63 | GATEWAY=""
64 | ```
65 |
66 | There are a couple of values you should fill in now, such as `OKTA_TENANT` and `GATEWAY`. I will point out when we generate the other values along the way; you can either enter them in your `.env` file as you go, or do it all at the end. There is a helper script that will gather the settings for you at the end.
67 |
68 | ## Set up Kong
69 |
70 | Make sure you have Kong up and running. If you have not yet set up your Kong tenant, you might want to check out their [5-minute quickstart](https://docs.konghq.com/enterprise/latest/getting-started/quickstart/).
71 |
72 | For now, you just need the URL of your Kong instance. The Kong API gateway typically runs on port 8000, so your url should look something like this:
73 |
74 | http://localhost:8000
75 |
76 | or
77 |
78 | http://ec2-18-24-32-111.us-east-2.compute.amazonaws.com:8000
79 |
80 | This is the `PROXY_URI` that you need to enter in the `.env` file.
81 |
82 | ## Set up your Okta tenant
83 |
84 | To properly demonstrate OAuth as a Service, you need a number of elements in your Okta tenant: a client, users, groups, an authorization server, scopes, policies, and rules. And, you need to establish the proper relationships among them.
85 |
86 | You have a couple of options to set these up:
87 |
88 | * You can use the Okta bootstrap tool. The Okta bootstrap tool is a "labs" type project. It is the fastest and easiest way to get your tenant set up. Instructions are [here](../../okta_setup/okta_setup_bootstrap.md).
89 | * You can set up your Okta tenant "manually", with Okta's easy-to-use admin UI. Instructions are available [here](../../okta_setup/okta_setup_manual.md).
90 |
91 | Go ahead and set up your Okta tenant, then come back to these instructions.
92 |
93 | ## Configure Kong
94 |
95 | To set up your API on Kong, it's easiest to use curl commands. Issue the following commands to set up your API with the example endpoints and scopes.
96 |
97 | ### Create the service (API)
98 | ```
99 | curl -i -X POST \
100 | --url http://localhost:8001/services/ \
101 | --data 'name=solar-system' \
102 | --data 'url=https://okta-solar-system.herokuapp.com'
103 | ```
104 | ### Add a route (resource) - /planets
105 | ```
106 | curl -i -X POST \
107 | --url http://localhost:8001/services/solar-system/routes/ \
108 | --data 'paths[]=/planets' \
109 | --data 'strip_path=false'
110 | ```
111 | You will get a json object as a result:
112 | ```
113 | {"created_at":1531761136,"strip_path":false,"hosts":null,"preserve_host":false,"regex_priority":0,"updated_at":1531761136,"paths":["\/planets"],"service":{"id":"950db7a0-ae97-48ac-9327-89c8ee71034b"},"methods":null,"protocols":["http","https"],"id":"64640aa5-14ab-47a2-a75d-a93fa447be26"}
114 | ```
115 | Copy the `id` value from the result. Note: make sure you copy the _route_ id, which is the last value, and not the _service_ id.
116 |
117 | ### Add the OIDC plugin to the /planets route
118 | Update the values for route_id, config.issuer, and config.client_id in the command below. You can find the OKTA_AZ_SERVER_ISSUER and the AUTHN_CLIENT_ID values in the bootstrap output file:
119 | `/okta_bootstrap/output/standard.json`
120 |
121 | and then execute this command:
122 | ```
123 | curl -i -X POST \
124 | --url http://localhost:8001/services/solar-system/plugins/ \
125 | --data 'name=openid-connect' \
126 | --data 'route_id={{ROUTE_ID}}' \
127 | --data 'config.issuer={{OKTA_AZ_SERVER_ISSUER}}' \
128 | --data 'config.client_id={{AUTHN_CLIENT_ID}}' \
129 | --data 'config.ssl_verify=false' \
130 | --data 'config.cache_ttl=60' \
131 | --data 'config.scopes_required=http://myapp.com/scp/silver' \
132 | --data 'config.scopes_claim=scp'
133 | ```
134 | Note: we're disabling the `ssl_verify` option here for demo purposes, but you would not do that in production.
135 |
136 | ### Add another route - /moons
137 | ```
138 | curl -i -X POST \
139 | --url http://localhost:8001/services/solar-system/routes/ \
140 | --data 'paths[]=/moons' \
141 | --data 'strip_path=false'
142 | ```
143 | again, capture the route id from the result.
144 |
145 | ### Add the OIDC plugin to the /moons route
146 | Use the same command as above, but make sure you update the `route_id` and `scopes_required` values.
147 |
148 | ```
149 | curl -i -X POST \
150 | --url http://localhost:8001/services/solar-system/plugins/ \
151 | --data 'name=openid-connect' \
152 | --data 'route_id={{ROUTE_ID}}' \
153 | --data 'config.issuer={{OKTA_AZ_SERVER_ISSUER}}' \
154 | --data 'config.client_id={{AUTHN_CLIENT_ID}}' \
155 | --data 'config.ssl_verify=false' \
156 | --data 'config.cache_ttl=60' \
157 | --data 'config.scopes_required=http://myapp.com/scp/gold' \
158 | --data 'config.scopes_claim=scp'
159 | ```
160 |
161 | That completes the setup for Kong. We now have an API gateway (Service) and two resources (Routes) that are secured with scopes.
162 |
163 | ## Get the app settings
164 |
165 | If you used the Okta bootstrap tool for setup, you can run a script to gather the remaining settings that the app will need.
166 |
167 | The script will display the settings on the screen and also save them to an output file so that you can refer to them later if you need to.
168 |
169 | ```bash
170 | node get_settings.js --kong
171 | ```
172 |
173 | Take these settings and update your `.env` file with any values that still need to be added.
174 |
175 | You can now launch your app:
176 |
177 | ```bash
178 | node app.js
179 | ```
180 |
181 | When you load the web app, first try clicking on the "show me the planets" and/or the "show me the moons" buttons. You'll get an error notifying you that you need an access token.
182 |
183 | Next, try authenticating as one of the users. You'll get an id token and an access token displayed in the browser (in a production environment, you would not do this). The raw tokens are also available in the console if you want to check them out.
184 |
185 | Now that the user has a token (actually the token is sitting on the server), you can click on one of the "show me" buttons again to see if you get the requested resource.
186 |
--------------------------------------------------------------------------------
/gateways/mulesoft/jwt_validation.raml:
--------------------------------------------------------------------------------
1 | #%RAML 1.0
2 | title: Okta API
3 | version: 1
4 | baseUri: https://okta-solar-system.herokuapp.com
5 |
6 | traits:
7 | jwt:
8 | headers:
9 | authorization:
10 | description: Bearer
11 | type: string
12 | responses:
13 | 400:
14 | description: Token was not provided.
15 | 401:
16 | description: Bad or expired token. To fix, you should re-authenticate the user.
17 | 403:
18 | description: The client id validation failed.
19 | 503:
20 | description: Error communicating with JWKS server.
21 |
22 | /asteroids:
23 | get:
24 | is: [jwt]
25 | description: retrieve a selected list of the asteroids
26 | responses:
27 | 200:
28 | body:
29 | application/json:
30 | example: |
31 | {
32 | "data": [
33 | "ceres", "vesta", "pallas", "hygiea"
34 | ],
35 | "success": true,
36 | "status": 200
37 | }
38 |
39 | /moons:
40 | get:
41 | is: [jwt]
42 | description: retrieve a list of the moons
43 | responses:
44 | 200:
45 | body:
46 | application/json:
47 | example: |
48 | {
49 | "data": [
50 | "callisto", "europa"
51 | ],
52 | "success": true,
53 | "status": 200
54 | }
55 |
56 | /planets:
57 | get:
58 | is: [jwt]
59 | description: retrieve a list of the planets
60 | responses:
61 | 200:
62 | body:
63 | application/json:
64 | example: |
65 | {
66 | "data": [
67 | "jupiter", "mars"
68 | ],
69 | "success": true,
70 | "status": 200
71 | }
72 |
73 | /visitors:
74 | get:
75 | description: retrieve a list of interstellar visitors
76 | responses:
77 | 200:
78 | body:
79 | application/json:
80 | example: |
81 | {
82 | "data": [
83 | "example1", "example2"
84 | ],
85 | "success": true,
86 | "status": 200
87 | }
--------------------------------------------------------------------------------
/gateways/mulesoft/jwt_validation_readme.md:
--------------------------------------------------------------------------------
1 | # Integrating Okta with MuleSoft Anypoint
2 |
3 | There are two ways to integrate Okta as an authorization server with MuleSoft Anypoint:
4 |
5 | 1. Integrate Okta as an OpenID Connect Client Provider
6 | 2. Integrate Okta as an authorization server server via MuleSoft's JWT validation policy (requires Mule 4.1 or above)
7 |
8 | Broadly speaking, the OIDC client provider integration is deeper and more robust, including dynamic client registration, while the JWT validation method is lighter weight.
9 |
10 | If you're not sure which you need, or are not sure where to start, start with the JWT validation method.
11 |
12 | This readme describes the JWT validation method.
13 |
14 | The readme for the OIDC Connect Client Provider method is [here](readme.md).
15 |
16 | ## Prerequisites for this integration
17 |
18 | 1. **An Okta tenant.** These instructions assume that you have already set up your Okta tenant and can acquire access tokens from Okta by following the instructions in the [main readme of this repo](../readme.md).
19 | 2. **An API Gateway.** If you don't already have a Mulesoft Anypoint account, you can get a free 30-day trial version [here](https://anypoint.mulesoft.com/login/#/signup).
20 |
21 | ## Load the API definition to Exchange
22 |
23 | In your MuleSoft Anypoint tenant, click on the three small bars in the top left corner and go to Design Center
24 |
25 | 
26 |
27 | Click on + Create New and select Create API specification
28 |
29 | 
30 |
31 | 
32 |
33 | Give your API a name (like "okta solar system") and click "Create Specification".
34 |
35 | You now have an (almost) empty RAML file to design your API.
36 |
37 | 
38 |
39 | Next, copy the RAML template from the Okta API Center repo into the Mulesoft editor.
40 |
41 | ```
42 | /gateways/mulesoft/jwt_validation.raml
43 | ```
44 |
45 | Click Publish, then Publish to Exchange
46 |
47 | Assign asset version `1.0.0` then click Publish to Exchange
48 |
49 | ## Ingest API into API Manager
50 |
51 | Go to Anypoint API Manager.
52 |
53 | Click on Manage API, then Manage API from Exchange.
54 |
55 | In the API name field, enter `okta solar system` (or whatever you named your API) and click on the API name to autofill the fields.
56 |
57 | For "Managing type:" choose Endpoint with Proxy
58 |
59 | For "Mule version:" check the box for "Select if you are managing this API using Mule 4 or above."
60 |
61 | Your implementation should be pre-filled to be https://okta-solar-system.herokuapp.com
62 |
63 | Click Save.
64 |
65 | You should arrive at the Settings screen for your API.
66 |
67 | In the Deployment Configuration section:
68 |
69 | Runtime version: 4.3.0
70 |
71 | Proxy application name: {{some_unique_name}}
72 |
73 | Click Deploy.
74 |
75 | It will take a couple of minutes for Mule to deploy your API.
76 |
77 | After your API has deployed, scroll to the top of the page to find your Proxy URL.
78 |
79 | For example: http://my-api.us-e2.cloudhub.io/
80 |
81 | >Note: take note now of this cloudhub proxy URL. You'll need it later and it can sometimes be hard to find again.
82 |
83 | First, test to see that the API is being proxied correctly.
84 |
85 | Load the following url in a web browser:
86 |
87 | ```
88 | {{cloudhub proxy url}}/visitors
89 | ```
90 |
91 | We have defined this endpoint in the RAML file to be completely open, so you should see a simple json object listing two of the recent visitors to the solar system.
92 |
93 | Now let's see if the authorization layer is working.
94 |
95 | Load the following url in a web browser:
96 |
97 | ```
98 | {{cloudhub proxy url}}/asteroids
99 | ```
100 |
101 | We have defined this endpoint in the RAML file to be protected by a JWT, so you should see a response like the following:
102 |
103 | ```
104 | error: "Required header 'authorization' not specified"
105 | ```
106 |
107 | You can now do a test to see if your proxy has deployed correctly.
108 |
109 | ## Add Your Okta JWKS URI to Mulesoft
110 |
111 | ### Get Your JWKS URI
112 |
113 | Now we need to add the JSON Web Key Set (JWKS) URL from your Okta authorization server to MuleSoft.
114 |
115 | Go to the well-known endpoint of your authorization server, which has the following pattern:
116 |
117 | ```
118 | https://{{my_okta_domain}}/oauth2/{{authorization_server_id}}/.well-known/oauth-authorization-server
119 | ```
120 |
121 | If you are using the developer edition of Okta, you're probably using the default authorization server, so your well-known endpoint is:
122 |
123 | ```
124 | https://{{my_okta_domain}}/oauth2/default/.well-known/oauth-authorization-server
125 | ```
126 |
127 | Once you have loaded your well-known endpoint, copy the `jwks_uri`.
128 |
129 | ### Create a JWKS validation policy
130 |
131 | On your MuleSoft API Administration screen, click on Policies.
132 |
133 | Click on Apply New Policy.
134 |
135 | Select JWT Validation->1.1.3 then click Configure Policy.
136 |
137 | Use the following values:
138 |
139 | (default) JWT origin: HTTP Bearer Authentication Header
140 |
141 | (default) JWT Signing Method: RSA
142 |
143 | (default) JWT Signing Key Length: 256
144 |
145 | JWT Key origin: JWKS
146 |
147 | JWKS Url: {{your JWKS URL}}
148 |
149 | (default) JWKS Caching TTL (minutes): 60
150 |
151 | Skip Client Id Validation: check
152 |
153 | Validate Audience Claim: leave blank for now
154 |
155 | Expiration Claim Mandatory: leave blank for now
156 |
157 | Not Before Claim Mandatory: leave blank for now
158 |
159 | Validate Custom Claim: leave blank for now
160 |
161 | Method & Resource conditions:
162 | * Apply configurations to specific methods & resources
163 |
164 | We're going to do just one endpoint for now.
165 |
166 | Method:
167 | GET
168 |
169 | URI template regex:
170 | /asteroids
171 |
172 | Click Apply
173 |
174 | Using Postman or some other API client, you can now try sending a GET request with an access token to the `/asteroids` endpoint.
175 |
176 | You should get a list of a few asteroids in return.
177 |
178 | If that flow works out, you can add two more policies to your API.
179 |
180 | Click on Apply New Policy.
181 |
182 | Select JWT Validation->1.1.3 then click Configure Policy.
183 |
184 | Use the same values as above, with the exception of:
185 |
186 | Validate Custom Claim: check
187 |
188 | In the Mandatory Custom Claim Validations section, add the following key-value pair:
189 |
190 | ```
191 | scp : #[vars.claimSet.scp == ['http://myapp.com/scp/silver']]
192 | ```
193 |
194 | 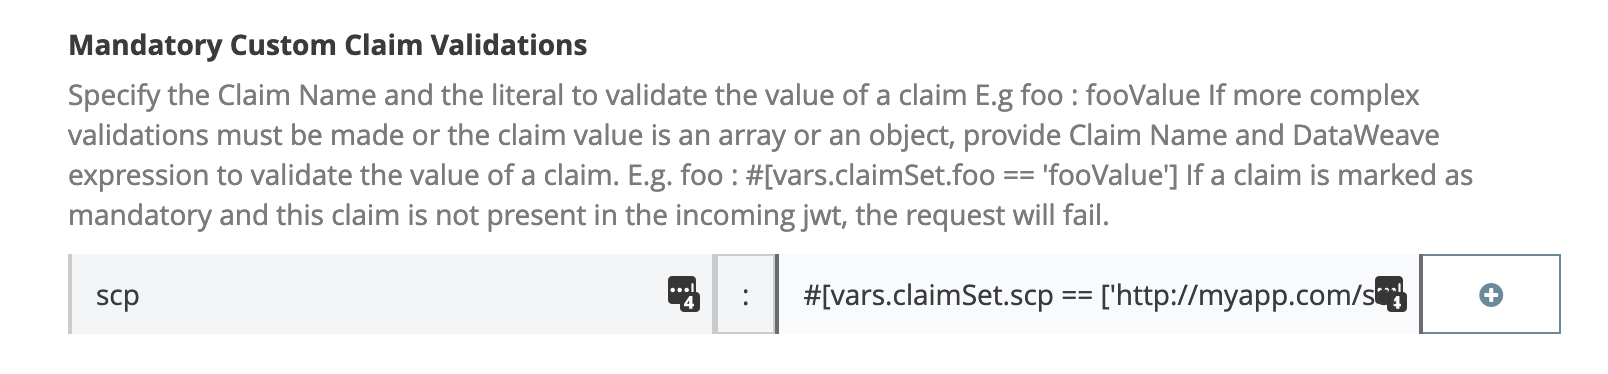
195 |
196 | make sure you click the + button on the right to lock in the key-value pair.
197 |
198 | 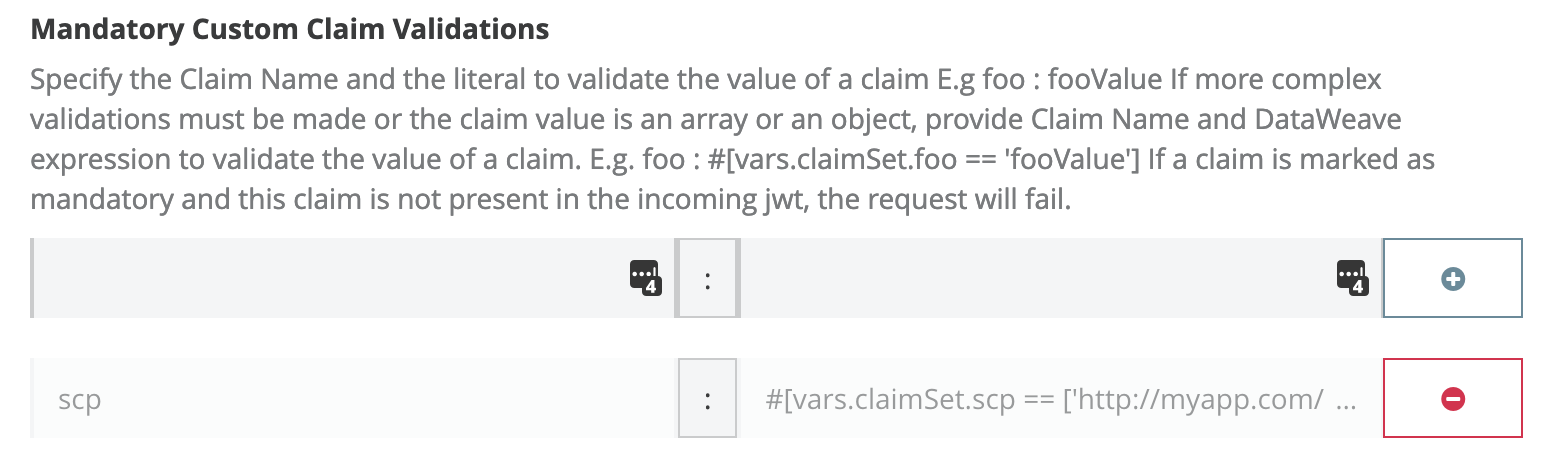
199 |
200 | Method & Resource conditions:
201 | * Apply configurations to specific methods & resources
202 |
203 | Method: GET
204 |
205 | URI template regex: /planets
206 |
207 | Click Apply
208 |
209 | Repeat the same procedure for the /moons endpoint, but use the scp:
210 |
211 | ```
212 | scp : #[vars.claimSet.scp == ['http://myapp.com/scp/gold']]
213 |
214 | ```
215 |
216 | ## Testing
217 |
218 | Now you can go back to the test application and see if the "show me the planets!" and "show me some moons!" buttons work.
219 |
--------------------------------------------------------------------------------
/gateways/mulesoft/mulesoft.raml:
--------------------------------------------------------------------------------
1 | #%RAML 1.0
2 | title: Okta solar system API
3 | version: 1
4 | baseUri: https://okta-solar-system.herokuapp.com
5 |
6 | traits:
7 | client-id-required:
8 | queryParameters:
9 | client_id:
10 | type: string
11 | client_secret:
12 | type: string
13 |
14 | securitySchemes:
15 | oauth_2_0:
16 | description: |
17 | Okta supports OAuth 2.0 for authenticating all API requests.
18 | type: OAuth 2.0
19 | describedBy:
20 | headers:
21 | Authorization:
22 | description: |
23 | Used to send a valid OAuth 2 access token. Do not use
24 | with the "access_token" query string parameter.
25 | type: string
26 | queryParameters:
27 | access_token:
28 | description: |
29 | Used to send a valid OAuth 2 access token. Do not use with
30 | the "Authorization" header.
31 | type: string
32 | responses:
33 | 401:
34 | description: |
35 | Bad or expired token. This can happen if the user or Okta
36 | revoked or expired an access token. To fix, re-authenticate
37 | the user.
38 | 403:
39 | description: |
40 | Bad OAuth request (wrong consumer key, bad nonce, expired
41 | timestamp...). Unfortunately, re-authenticating the user won't help here.
42 | settings:
43 | authorizationUri: AUTHORIZE_URL
44 | accessTokenUri: TOKEN_URL
45 | authorizationGrants: [ authorization_code, implicit ]
46 |
47 | /planets:
48 | get:
49 | is: [client-id-required]
50 | securedBy: [oauth_2_0]
51 |
52 | /moons:
53 | get:
54 | is: [client-id-required]
55 | securedBy: [oauth_2_0]
--------------------------------------------------------------------------------
/gateways/mulesoft/readme.md:
--------------------------------------------------------------------------------
1 | # Integrating Okta with MuleSoft Anypoint
2 |
3 | There are two ways to integrate Okta as an authorization server with MuleSoft Anypoint:
4 |
5 | 1. Integrate Okta as an OpenID Connect Client Provider
6 | 2. Integrate Okta as an authorization server server via MuleSoft's JWT validation policy (requires Mule 4.1 or above)
7 |
8 | Broadly speaking, the OIDC client provider integration is deeper and more robust, including dynamic client registration, while the JWT validation method is lighter weight.
9 |
10 | If you're not sure which you need, or are not sure where to start, start with the JWT validation method.
11 |
12 | This readme describes the OIDC Connect Client Provider method.
13 |
14 | The readme for the JWT validation method is [here](jwt_validation_readme.md).
15 |
16 | ## Prerequisites for this integration
17 |
18 | 1. **An Okta tenant.** These instructions assume that you have already set up your Okta tenant and can acquire access tokens from Okta by following the instructions in the [main readme of this repo](../readme.md).
19 | 2. **An API Gateway.** If you don't already have a Mulesoft Anypoint account, you can get a free 30-day trial version [here](https://anypoint.mulesoft.com/login/#/signup).
20 |
21 | ## Configure your Mulesoft Account
22 | In your Mulesoft Anypoint tenant, click on the three small bars in the top left corner and go to Access Management (Below Management Center)
23 | click Client Providers
24 | click Add Client Provider -> OpenID Connect Dynamic Client Registration
25 |
26 | 
27 |
28 | 
29 |
30 | The `Client Registration URL` is: {{OKTA_TENANT}}/oauth2/v1/clients
31 |
32 | The `Authorization Header` is: SSWS {{OKTA_API_KEY}}
33 |
34 | You can use the client ID and client secret that you set up during your Okta set-up as the Client ID and Client Secret for the Token Introspection Client.
35 |
36 | The Authorize URL, Token URL, and Token Introspection URL are all available from your Okta authorization server settings.
37 |
38 | If you are using the default settings, these URLs will look something like this:
39 |
40 | https://partnerpoc.oktapreview.com/oauth2/default/v1/token
41 |
42 | Click **Create**.
43 |
44 | Keep the values for `AUTHORIZE_URL` and `TOKEN_URL` handy, because you will need them in a moment.
45 |
46 | ## Add client provider to Environments
47 |
48 | In your Mulesoft Anypoint tenant, in the Access Management menu, click Environments
49 |
50 | Click on the Design environment
51 |
52 | Click on the Client provider pull-down item and select your client provider
53 |
54 | Click Update
55 |
56 | Repeat these steps to add your client provider to the Sandbox environment
57 |
58 | 
59 |
60 | Repeat these steps to add your client provider to the Sandbox environment
61 |
62 | ## Deploy Your Mulesoft API
63 |
64 | In your Mulesoft Anypoint tenant, click on the three small bars in the top left corner and go to Design Center
65 |
66 | 
67 |
68 | Click on + Create New and select Create API specification
69 |
70 | 
71 |
72 | 
73 |
74 | Give your API a name (like "okta solar system") and click "Create Specification".
75 |
76 | You now have an (almost) empty RAML file to design your API.
77 |
78 | 
79 |
80 | Next, copy the RAML template from the Okta API Center repo into the Mulesoft editor.
81 |
82 | ```
83 | /gateways/mulesoft/mulesoft.raml
84 | ```
85 |
86 | Update the values for `AUTHORIZE_URL` and `TOKEN_URL`.
87 |
88 | The file should save automatically; you can do command-s to force the save.
89 |
90 | Now click the “Publish” button in the upper right and select "Publish to Exchange"
91 |
92 | 
93 |
94 | Enter am Asset version 1.0.0 and an API version 1 and click "Publish to Exchange". When it is complete, click Done
95 |
96 | 
97 |
98 | In your Mulesoft Anypoint tenant, click on the three small bars in the top left corner and go to API Manager
99 |
100 | Click the “Manage API" dropdown, and then “Manage API from Exchange”
101 |
102 | Start typing your API name (“okta solar system”) in the API name field to search for it.
103 |
104 | Choose the following options and click "Save". (Note that you might need to click somewhere in the Path field to activate the Save button.)
105 |
106 | ```
107 | Asset type: RAML/OAS
108 | API version: 1
109 | Asset version: 1.0.0
110 | Managing type: Endpoint with Proxy
111 | Implementation URI: https://okta-solar-system.herokuapp.com
112 | Proxy deployment target: CloudHub
113 | Path: /
114 | ```
115 |
116 | 
117 |
118 | You now have a Settings screen for your API. Scroll down to the Deployment Configuration section, choose a runtime version (3.9.x works well), and enter a unique name for your cloudhub deployment. Make sure you save this url now.
119 |
120 | 
121 |
122 | Click "Deploy" to deploy your API to cloudhub. The deployment can take a few seconds or sometimes longer. You should see a successful deployment message when you are done:
123 |
124 | 
125 |
126 | Save the path of your cloudhub.io deployment (example: "http://my-api.cloudhub.io") - you'll need it later.
127 |
128 | Click Close
129 |
130 | ## Set up Mulesoft Access Policies for Your API
131 |
132 | On the main settings screen of your API, click on "Policies",
133 |
134 | 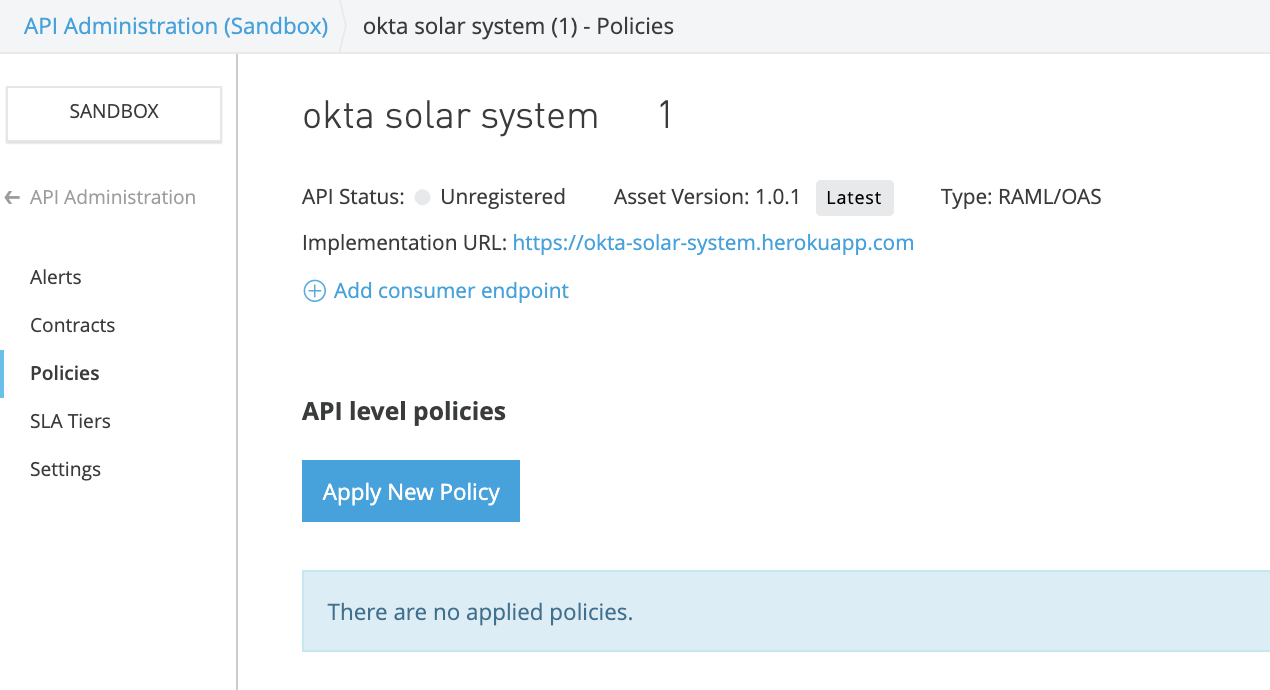
135 |
136 | Then, click on “Apply New Policy” and select "OpenID Connect access token enforcement".
137 |
138 | 
139 |
140 | Click **Configure Policy**
141 |
142 | On the *Apply OpenId Connect access token enforcement policy* screen, add one scope to the list of scopes:
143 | `http://myapp.com/scp/silver`.
144 |
145 | Select "Apply configurations to specific methods & resources".
146 |
147 | For Methods, choose GET and for the URI template regex, enter:
148 |
149 | ```
150 | /planets
151 | ```
152 |
153 | 
154 |
155 | Be sure to click "Apply".
156 |
157 | We need to set up one more policy to show how different users get different access. Click **Apply New Policy** and this time use the scope `http://myapp.com/scp/gold` and the resource:
158 |
159 | ```
160 | /moons
161 | ```
162 |
163 | ## Set up a Mulesoft Authentication Client
164 |
165 | Any access tokens sent to Mulesoft need to be minted by a client that Mulesoft recognizes. Mulesoft supports dynamic client registration with Okta, which is pretty cool.
166 |
167 | In your Mulesoft Anypoint tenant, click on the three small bars in the top left corner and go to Exchange, where you will see a list of assets. Generally, the quickest way to find your API is to click on your organization name in the left-hand column.
168 |
169 | 
170 |
171 | Click on your REST API
172 |
173 | You will see the portal home screen of your API.
174 |
175 | 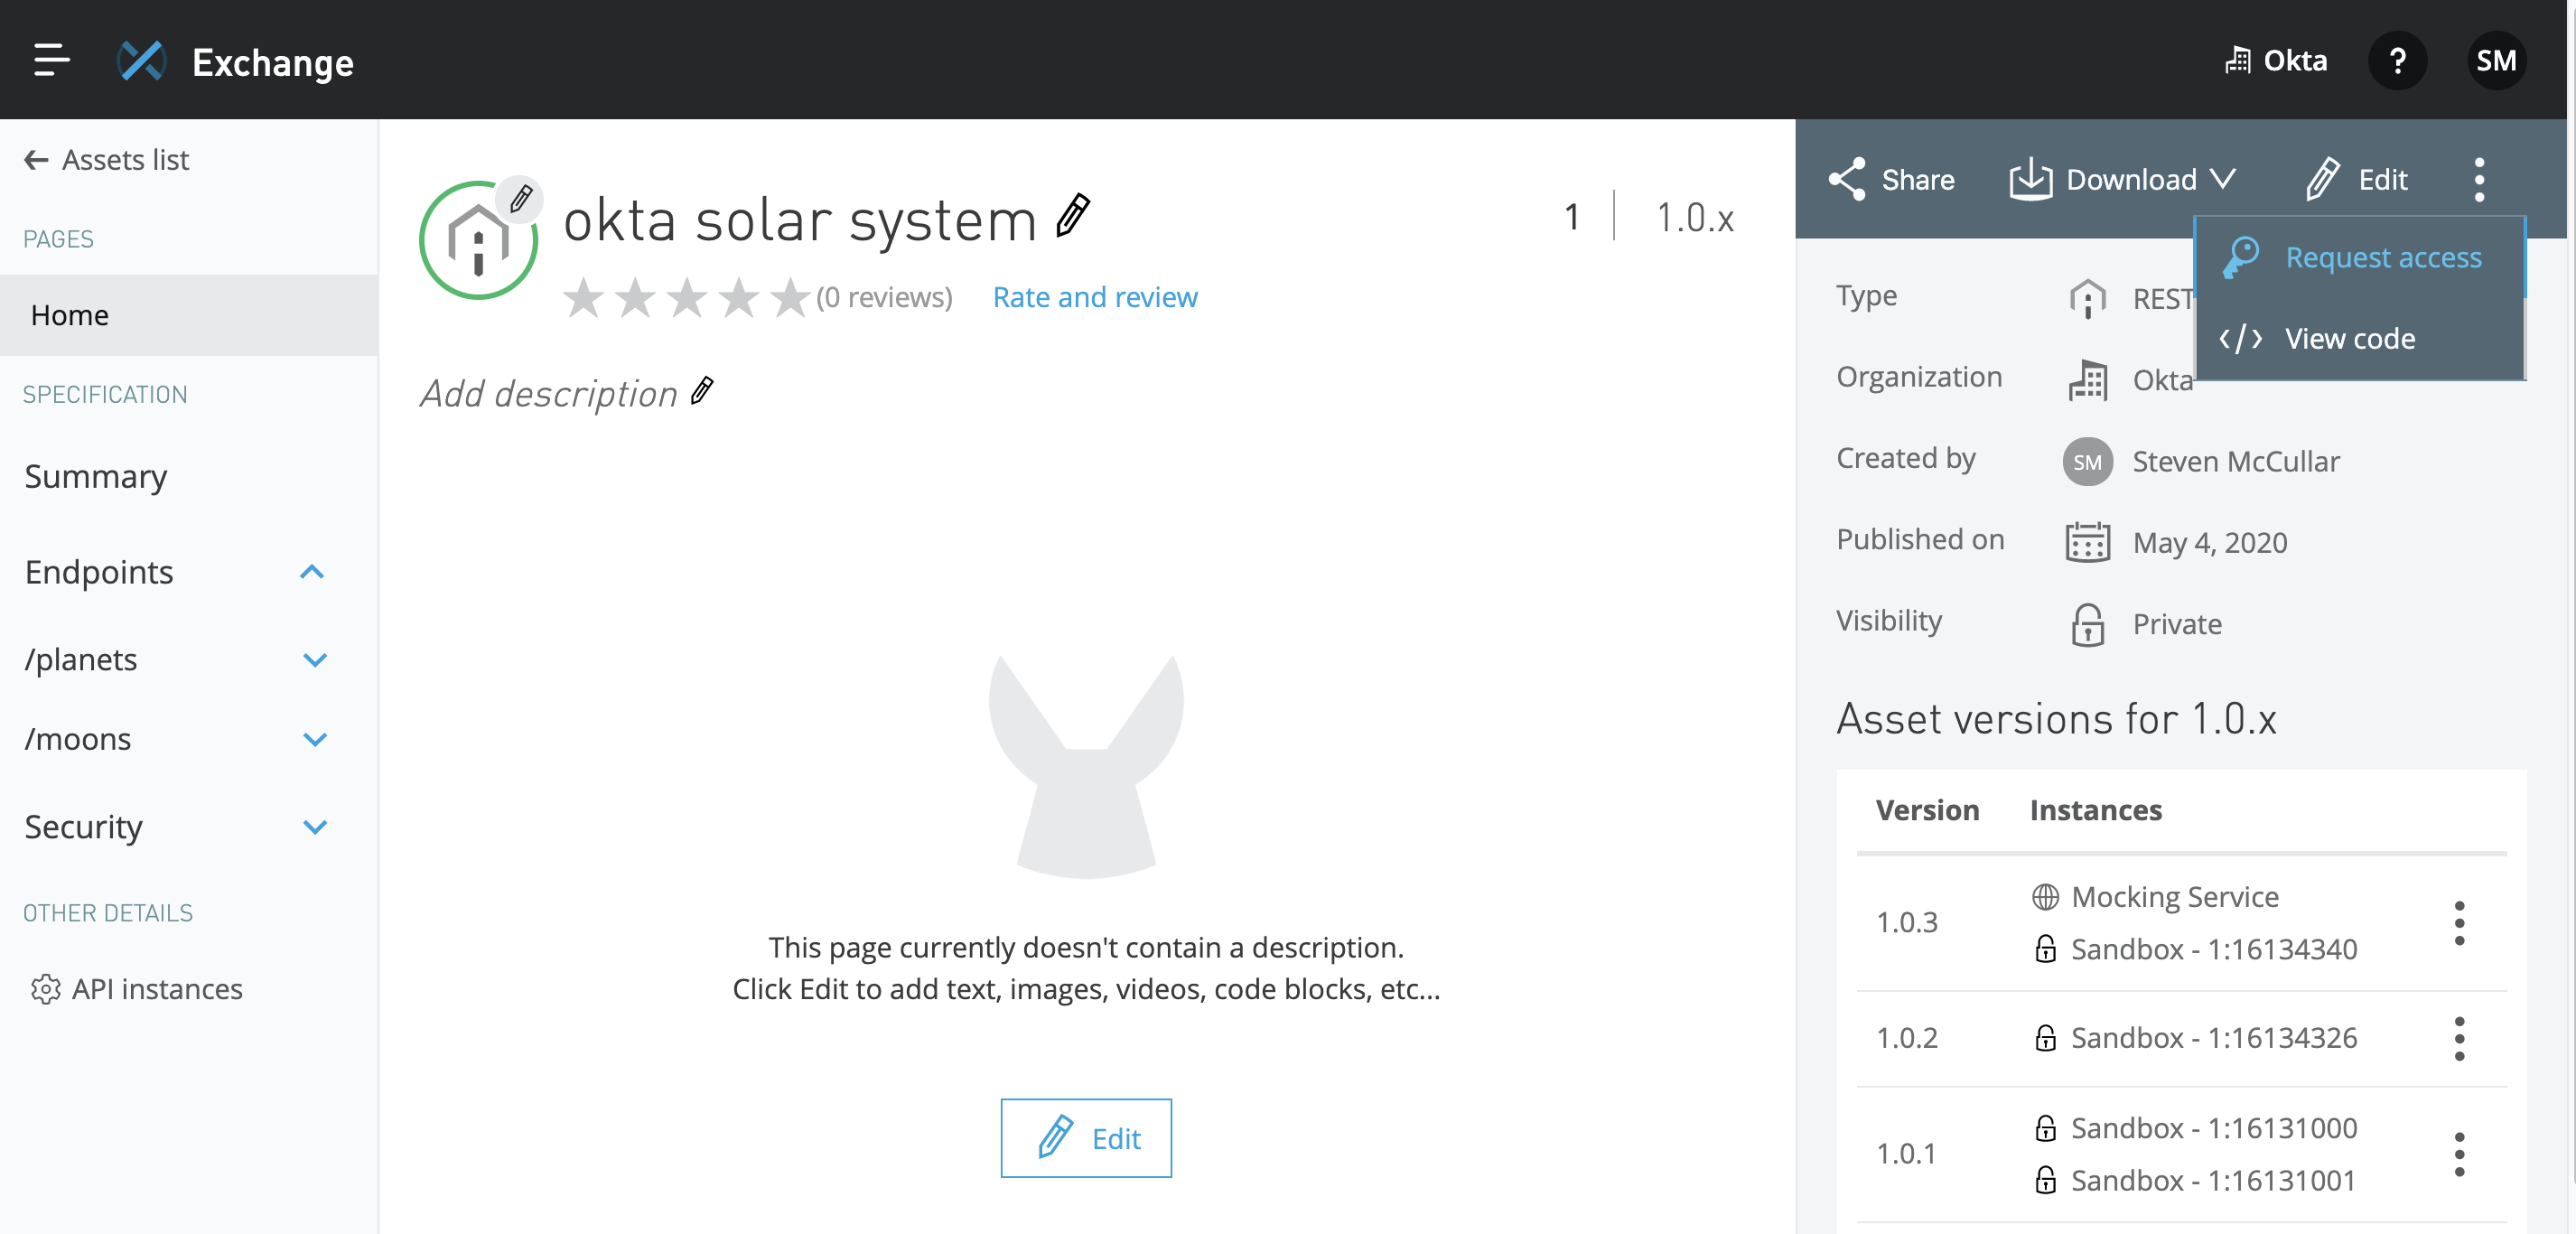
176 |
177 | You will now see the *Request API access* screen:
178 |
179 | 
180 |
181 | Click the API Instance pull-down and select your API Instance
182 | Click the Application pull-down and select + Create a new application
183 | Enter the following values when prompted:
184 |
185 | Application Name: Solar System Authn
186 | OAuth 2.0 Grant type: Authorization Code Grant
187 | OAuth 2.0 redirect URIs: http://localhost:8080 (or whatever REDIRECT_URI you established at the beginning of the process).
188 |
189 | 
190 |
191 | Click **Create** to create your new client.
192 |
193 | You will see the *Request API access* screen. Select your API instance and click **Request access**.
194 |
195 | 
196 |
197 | You will see an "Your request has been received and approved." message on your screen, and an additional tab will be opened that shows details and statistics about your application.
198 |
199 | 
200 |
201 | ## Wrapping up
202 |
203 | You're now almost ready to test the end-to-end flow with the sample app. Before jumping back to the instructions for the sample application, there are just a couple of things to take care of:
204 |
205 | * In that last step, you created a new client in Okta via the Mulesoft UI, which, again, is pretty cool.
206 | -- Go to your Okta tenant, find that new client, and assign it to the Everyone group - or at least to the sample users for this app.
207 | -- update the CLIENT_ID and CLIENT_SECRET values in the `.env` file with the client_id and client_secret from the client that you just created via the Mulesoft UI.
208 |
209 | * the Mulesoft Cloudhub URL - this will be the "GATEWAY_URI" value
210 |
211 | ## Testing
212 |
213 | Now that you have set up Mulesoft as an API proxy, you can test out the whole flow. Take note of the Invoke URL, jump back to the main `readme` in this repo, and go to the `Test your application and access tokens` section.
214 |
--------------------------------------------------------------------------------
/gateways/swag/readme.md:
--------------------------------------------------------------------------------
1 | # Integrating Okta with Software AG
2 |
3 | Okta can integrate with Software AG in several different ways:
4 |
5 | * End-user authentication (OIDC)
6 | * JWT validation
7 | * OAuth 2
8 |
9 | Software AG's OAuth 2 integration is relatively broad and deep, including capabilities such as dynamic client registration, and creating scopes in Okta via the Software AG UI. Okta is a predefined third-party OAuth 2 provider in Software AG.
10 |
11 | That integration is most likely the integration you would want to use in production, and it is described [here](http://techcommunity.softwareag.com/web/guest/pwiki/-/wiki/Main/Securing+APIs+using+thirdparty+OAuth2+identity+provider+in+API+Gateway).
12 |
13 | If you want to get familiar with the basics of Software AG and Okta, this guide will describe the lighter-weight jwt validation integration. Software AG will be evaluating an access token (jwt) minted by Okta, to see whether the access token is valid before granting access to the requested endpoint.
14 |
15 | >*Note*: in a production environment, it is extremely important that the API itself also check the validity of the access token when it is passed on from Software AG. The API must inspect the access token for scopes (if applicable), and also at minimum check the values in the `exp` and `aud` fields.
16 |
17 | Again, if you are more interested in the full capabilities of the OAuth 2 integration between Software AG and Okta, please see their tutorial: [Securing APIs using thirdparty OAuth2 identity provider in API Gateway](http://techcommunity.softwareag.com/web/guest/pwiki/-/wiki/Main/Securing+APIs+using+thirdparty+OAuth2+identity+provider+in+API+Gateway).
18 |
19 | ## What You'll Build
20 |
21 | At the end of this setup, you'll have an architecture where:
22 |
23 | 1. End-users will be able to authenticate against Okta and receive an access token (via the app)
24 | 2. End-users will have different scopes in their access token, depending on their group assignments
25 | 3. The application will send the access token to the Software AG Gateway
26 | 4. Software AG will check the structural validity and signature of the access token
27 | 5. If the token is valid, Software AG will send the request on to the API
28 | 6. The API must also check the token for validity, and determine whether it has the appropriate scopes for the requested endpoint
29 | 7. The API will send the data payload to the gateway, which will send it on to the application
30 |
31 | Please note that step 6 is not actually shown in the code or in the demo, but it's something that should be applied in production.
32 |
33 | ## Prerequisites for integrating Okta + Software AG API Gateway
34 |
35 | 1. **An Okta account.** If you don't already have one, you can get a free-forever account at [developer.okta.com](https://developer.okta.com/signup/)
36 | 2. **A Software AG account.** If you don't already have a Software AG account, you can get a free trial [here](https://www.softwareag.com/corporate/products/downloads/free_downloads/default.html).
37 |
38 | ### Step-by-step
39 | The high-level process we are going to follow is:
40 |
41 | 1. Set up your API in Software AG
42 | * key outputs: PROXY_URI / Audience
43 | 2. Set up your Okta tenant
44 | * key outputs: OKTA_AZ_SERVER_ISSUER
45 | 3. Set up Okta as a JWT provider in your Software AG tenant
46 | 5. Set up and launch your application
47 |
48 | In the last step, we'll launch a sample application that will show the end-to-end flow. This sample application requires a few settings - environment variables - to launch. To manage these environment variables, the application uses the [dotenv npm package](https://www.npmjs.com/package/dotenv). There is an example .env file in the repo called `.env_example`. Copy the `.env_example` file now to a file called `.env`.
49 |
50 | This is what the .env_example file looks like:
51 |
52 | ```
53 | # Okta settings
54 |
55 | # example: https://dev-511902.oktapreview.com
56 | OKTA_TENANT=""
57 |
58 | OKTA_API_TOKEN=""
59 | AUTHN_CLIENT_ID=""
60 | AUTHN_CLIENT_SECRET=""
61 |
62 | # example: https://dev-511902.oktapreview.com/oauth2/ausfqw42xrkmpfDHI0h7
63 | OKTA_AZ_SERVER_ISSUER=""
64 |
65 | # Gateway/Proxy base url
66 | # example: http://52.14.100.89:8080/solar-system
67 | PROXY_URI=""
68 |
69 | # App settings
70 | PORT="8080"
71 | REDIRECT_URI="http://localhost:8080"
72 | SILVER_USERNAME=""
73 | SILVER_PASSWORD=""
74 | GOLD_USERNAME=""
75 | GOLD_PASSWORD=""
76 | SESSION_SECRET="some random phrase"
77 | SESSION_MAX_AGE=60000
78 |
79 | # Supported values: aws, kong, mulesoft, swag, tyk
80 | # swag = Software AG
81 | GATEWAY=""
82 | ```
83 |
84 | There are a couple of values you should fill in now, such as `OKTA_TENANT` and `GATEWAY`. I will point out when we generate the other values along the way; you can either enter them in your `.env` file as you go, or do it all at the end. There is a helper script that will gather the settings for you at the end.
85 |
86 | ## Configure Software AG
87 |
88 | ### API details
89 |
90 | Go to your Software AG webMethods API Gateway console
91 |
92 | Click *APIs*
93 |
94 | Click **Create APIs**
95 |
96 | Choose *Create API from scratch*, then **Create**
97 |
98 | In the API details screen, enter:
99 |
100 | *Name*: solar-system
101 |
102 | 
103 |
104 | Click *Continue to provide Technical information for this API*
105 |
106 | For the *Protocol* choices, select *HTTPS*
107 |
108 | In the *Host* field, enter the value for the Okta solar system API:
109 |
110 | `okta-solar-system.herokuapp.com`
111 |
112 | >*Note*: don't put the protocol in the host field
113 |
114 | and
115 |
116 | *Base path*: `/`
117 |
118 | 
119 |
120 | Then, click *Continue to provide Resource & Methods for this API*
121 |
122 | We are going to add two resources to this API: `/planets` and `/moons`
123 |
124 | *Resource name*: Planets
125 | *Resource path*: /planets
126 | *Supported methods*: GET
127 |
128 | Click **Add**
129 |
130 | Click the **Add Resources** button to add the `/moons` resource:
131 |
132 | *Resource name*: Moons
133 | *Resource path*: /moons
134 | *Supported methods*: GET
135 |
136 | Click **Add**
137 |
138 | Now, scroll to the bottom of the page and click
139 |
140 | *Continue to provide Mocking information for this API*
141 |
142 | You'll see a screen that says "API mocking is not enabled".
143 |
144 | 
145 |
146 | Click the **Save** button to save your API.
147 |
148 | Now click the **Activate** button to activate your API.
149 |
150 | Click **Yes** on the "are you sure?" prompt.
151 |
152 | You now have a Gateway endpoint for your API.
153 |
154 | 
155 |
156 | Enter the value of your Gateway endpoint in your `.env` file as the `PROXY_URI` value.
157 |
158 | ### Scopes
159 |
160 | Software AG does not check for scopes in access tokens, so we're going to skip the Scopes section and move straight to Policies.
161 |
162 | ### Policies
163 |
164 | Click on the *Policies* tab
165 |
166 | If necessary, click **Deactivate**
167 |
168 | Click **Edit**
169 |
170 | Click *Identify & Access*, then *Inbound Authentication - Transport*
171 |
172 | In the menu that pops up in the right-hand column, check the box for *JWT Authentication*
173 |
174 | 
175 |
176 | Click **Save**
177 |
178 | That finishes setting up the Software AG API for the moment. Now we need to set up our Okta tenant, and then we'll come back to Software AG to add Okta as a JWT provider.
179 |
180 | ## Set up your Okta tenant
181 |
182 | To properly demonstrate OAuth as a Service, you need a number of elements in your Okta tenant: a client, users, groups, an authorization server, scopes, policies, and rules. And, you need to establish the proper relationships among them.
183 |
184 | You have a couple of options to set these up:
185 |
186 | * You can use the Okta bootstrap tool. The Okta bootstrap tool is a "labs" type project. It is the fastest and easiest way to get your tenant set up. Instructions are [here](../../okta_setup/okta_setup_bootstrap.md).
187 | * You can set up your Okta tenant "manually", with Okta's easy-to-use admin UI. Instructions are available [here](../../okta_setup/okta_setup_manual.md).
188 |
189 | Go ahead and set up your Okta tenant, then come back to these instructions.
190 |
191 | ### Get your `issuer` value
192 |
193 | If you used the Okta bootstrap tool to set up your Okta tenant, you can run a helper script to get you the settings you'll need the rest of the way:
194 |
195 | ```bash
196 | node get_settings.js --swag
197 | ```
198 |
199 | This will output some values to the screen. For the next step in our set-up, we'll need the following values:
200 |
201 | * `ISSUER`
202 | * `JWKS_URI`
203 | * `AUDIENCE`
204 |
205 | ## Add Okta as JWT Issuer to Software AG
206 |
207 | Now that you've set up your Okta tenant with an authorization server, we can set up your Software AG tenant with Okta as a recognized JWT issuer.
208 |
209 | Go to the Administration section of Software AG.
210 |
211 | Click on the *Security* tab.
212 |
213 | 
214 |
215 | In the left-hand column, click on *JWT*.
216 |
217 | In the *External JWT configuration* section, click **Add issuer**
218 |
219 | In the *Issuer* field, enter your value for `ISSUER`
220 |
221 | In the JWKS URI field, enter your value for `JWKS_URI`
222 |
223 | In the Audience field, enter your value for `AUDIENCE`
224 |
225 | 
226 |
227 | Click **Save** to save the configuration.
228 |
229 | That completes setting up Okta as an authorizer for your API. Now we can launch the sample application to test.
230 |
231 | ## Get the app settings
232 |
233 | If you used the bootstrap tool for setup, and you haven't run the helper script yet to extract the relevant settings, go ahead and run it now:
234 |
235 | ```bash
236 | node get_settings.js --swag
237 | ```
238 |
239 | The script will display the settings on the screen, and also save them to an output file so that you can refer to them later if you need to.
240 |
241 | Take these settings and update your `.env` file with any values that still need to be added.
242 | >Note: you don't need to copy every setting from the output, but it's no harm if you do.
243 |
244 | If you did not user the bootstrap tool for setup, refer to your Okta tenant for the appropriate values to enter into the `.env` file.
245 |
246 | ## Launch the app
247 |
248 | You can now launch your app:
249 |
250 | ```bash
251 | node app.js
252 | ```
253 |
254 | When you load the web app, first try clicking on the "show me the planets" and/or the "show me the moons" buttons. You'll get an error from the API Gateway.
255 |
256 | Next, try authenticating as one of the users. You'll get an id token and an access token displayed in the browser (in a production environment, you would not do this). The raw tokens are also available in the console if you want to check them out.
257 |
258 | Now that the user has a token (actually the token is sitting on the server), you can click on one of the "show me" buttons again to see if you get the requested resource.
259 |
260 | Enjoy the solar system!
261 |
262 | ----------------
--------------------------------------------------------------------------------
/gateways/tyk/readme.md:
--------------------------------------------------------------------------------
1 | # Integration guide: Okta + Tyk
2 |
3 | Okta integrates with Tyk in several different ways:
4 |
5 | * Dashboard SSO
6 | * Developer Portal SSO
7 | * API Authentication
8 | ** OIDC - Open ID Connect
9 | ** JWT with scope claims
10 |
11 | This guide will describe the API Access Management integration in detail, but we will briefly touch on the Admin SSO integration and the OIDC integration.
12 |
13 | ### Admin SSO
14 |
15 | Tyk supports SSO to the admin dashboard and developer portal via OIDC. Instructions are here: [https://tyk.io/docs/integrate/sso/dashboard-login-okta-tib/](https://tyk.io/docs/integrate/sso/dashboard-login-okta-tib/)
16 |
17 | Note: you must install [Tyk Identity Broker](https://tyk.io/docs/integrate/sso/dashboard-login-ldap-tib/) as part of this process
18 |
19 | ### OIDC
20 |
21 | Tyk can enforce a policy that requires a valid OIDC ID Token in order to access an endpoint. Set up Okta as an OIDC provider and Tyk will check for a valid id token before passing on the request to an endpoint.
22 |
23 | Instructions are here: [https://tyk.io/docs/basic-config-and-security/security/authentication-authorization/openid-connect/](https://tyk.io/docs/basic-config-and-security/security/authentication-authorization/openid-connect/)
24 |
25 | ## API Access Management
26 |
27 | Tyk supports the evaluation of JSON web tokens (JWTs) to control access to endpoints.
28 |
29 | Before going in to the step-by-step process to enable this capability, it’s important to highlight an optional Tyk feature in regards to JWTs, such as OAuth Access Tokens or OIDC ID tokens, which is different from many other API gateways.
30 |
31 | A JWT passed to Tyk can include a “policy id” claim. This policy ID tells Tyk which Tyk policy is valid for that JWT. Alternatively, Tyk can extract scopes from the claims and apply policies based on them. Tyk will use this policy to determine if a JWT has access to the API it is attempting to access.
32 |
33 | So, in using Okta with Tyk, you can populate the policy id in a JWT in two primary ways, depending on your needs and your setup. This is just an overview for now, we'll go through the step-by-step a little later on:
34 |
35 | 1. In the user profile (i.e. user-level): create a custom attribute in the Okta user profile using the Okta Profile editor. This custom attribute must have the same name as the policy id field name in Tyk. Set up a custom claim in your Okta authorization server to always include this claim from the user profile.
36 |
37 | 2. In an application profile (i.e. group-level): go to the Okta Profile editor and create a custom attribute for the OIDC application that your users are authenticating against. Again, this custom attribute must have the same name as the policy id field name in Tyk. Set up a custom claim in your Okta authorization server to always include this claim from the application profile. Now, when you assign this application to groups in Okta, you can choose different policy IDs for different groups, and then end-users will inherit these policy ids when they are assigned to that group/application.
38 |
39 | ## What You'll Build
40 |
41 | At the end of this setup, you'll have an architecture where:
42 |
43 | 1. Users will be able to authenticate against Okta and receive an access token (via the app)
44 | 2. Users will have a "policy id" claim in their access token. The value of this claim will be derived from the user's group membership in Okta, and the policy id will map to a policy id in Tyk.`
45 | 3. The application will send the access token to the Tyk.
46 | 4. Tyk will check the validity of the access token locally.
47 | 5. If the token and scopes are valid, Tyk will send the request on to the API
48 | 6. The API will send the data payload to the gateway, which will send it on to the application
49 |
50 |
51 | ## Prerequisites for integrating Okta + Tyk
52 |
53 | 1. **An Okta account.** If you don't already have one, you can get a free-forever account at [developer.okta.com](https://developer.okta.com/signup/)
54 | 2. **Tyk** If you don't already have a Tyk tenant set up, you can create a forever free developer account on Tyk SaaS [here](https://tyk.io/api-gateway/saas/) or use [docker-compose to launch an on-prem stack](https://github.com/TykTechnologies/tyk-pro-docker-demo).
55 |
56 | ### Step-by-step
57 | The high-level process we are going to follow is:
58 |
59 | 1. Set up your API in Tyk
60 | 2. Set up your Okta tenant
61 | 3. Add your JWKS to Tyk
62 | 4. Set up and launch your application
63 |
64 | In the last step, we'll launch the sample application that will show the end-to-end flow. This sample application requires a few settings - environment variables - to launch. To manage these environment variables, the application uses the [dotenv npm package](https://www.npmjs.com/package/dotenv). There is an example .env file in the repo called `.env_example`. Copy the `.env_example` file now to a file called `.env`.
65 |
66 | This is what the .env_example file looks like:
67 |
68 | ```
69 | # Okta settings
70 |
71 | # example: https://dev-511902.oktapreview.com
72 | OKTA_TENANT=""
73 |
74 | OKTA_API_TOKEN=""
75 | AUTHN_CLIENT_ID=""
76 | AUTHN_CLIENT_SECRET=""
77 |
78 | # example: https://dev-511902.oktapreview.com/oauth2/ausfqw42xrkmpfDHI0h7
79 | OKTA_AZ_SERVER_ISSUER=""
80 |
81 | # Gateway/Proxy base url
82 | # example: http://52.14.100.89:8080/solar-system
83 | PROXY_URI=""
84 |
85 | # App settings
86 | PORT="8080"
87 | REDIRECT_URI="http://localhost:8080"
88 | SILVER_USERNAME=""
89 | GOLD_USERNAME=""
90 | FAKE_USER_PASSWORD=""
91 | SESSION_SECRET="some random phrase"
92 | SESSION_MAX_AGE=60000
93 |
94 | # Supported values: aws, kong, mulesoft, swag, tyk
95 | GATEWAY=""
96 | ```
97 |
98 | There are a couple of values you can fill in now, such as `OKTA_TENANT` and `GATEWAY`. I will point out when we generate the other values along the way; you can either enter them in your `.env` file as you go, or do it all at the end.
99 |
100 | ### Set up your API in Tyk
101 | Go to the Tyk dashboard and click on the APIs section.
102 |
103 | Click the **+ Add New API** button.
104 |
105 | In the API designer, for API Name, enter `solar-system`
106 |
107 | 
108 |
109 | scroll down, and in the **Target URL** field, enter:
110 |
111 | `https://okta-solar-system.herokuapp.com`
112 |
113 | 
114 |
115 | Leave the Authentication section as-is for right now; we'll come back to it later.
116 |
117 | Click **Save** to save your new API.
118 |
119 | At the top of your API home screen you'll now have an API URL. Copy this value and save it for later, it will be the basis of the PROXY_URI we will use when we set up the application. Note: Tyk by default listens on port 8080 for API calls, so your PROXY_URI will be something like this:
120 |
121 | http://52.14.100.89:8080/solar-system
122 |
123 | 
124 |
125 | ### Set up policies
126 | We're going to set up two policies in Tyk.
127 |
128 | One policy will control access to the /planets resource (which we will create) and the other will control access to the /moons resource (which we will also create).
129 |
130 | Click **Policies** to go to the Policies section.
131 |
132 | Click the **+ Add Policy** button.
133 |
134 | In the *Policy Name* field, enter
135 |
136 | `silver - access to /planets`
137 |
138 | 
139 |
140 | In the *Access Rights* section, go to the *Add access rule* dropdown and select
141 |
142 | `SOLAR-SYSTEM: DEFAULT`
143 |
144 | 
145 |
146 | Now, under the *Path-based permissions* section, click **+ Add Path**
147 |
148 | In the *URL* field, enter
149 |
150 | `/planets`
151 |
152 | and in the *Allowed methods* field, choose
153 |
154 | `GET`
155 |
156 | Click the gray **Add** button next to the GET method.
157 |
158 | 
159 |
160 | Click the green **Add** button to add the path.
161 |
162 | >**IMPORTANT**: in the *Trial period* section, set the *ExpiresAfter* value to "Do not expire key". This essentially tells Tyk that we want to use the session length in the access token (jwt) rather than the internal token that Tyk generates.
163 |
164 | 
165 |
166 | Click **Create** to create this policy.
167 |
168 | You will now have a Policy ID for this policy. Copy it so you can use it later. (We don't need this value in the .env file.)
169 |
170 | 
171 |
172 | If you want to follow along fully with the sample application, create another policy, using the same steps, with a couple of exceptions:
173 |
174 | * In the *Name* field, enter
175 |
176 | `gold - access to /moons`
177 |
178 | * and in the *URL* field add *both*
179 | `/planets`
180 |
181 | and
182 |
183 | `/moons`
184 |
185 | (and use the GET method for /moons as well)
186 |
187 | Don't forget to set the *ExpiresAfter* value to "Do not expire key", and after you click **Create**, copy the Policy ID.
188 |
189 | That's it for now for Tyk. We're going to come back to Tyk later to set up Okta as a jwt provider. But, now that we have our policy IDs, we can set up our Okta tenant.
190 |
191 | ### Set up your Okta Tenant
192 |
193 | #### Add an OIDC application
194 |
195 | Applications->Add Application->Web->Next
196 |
197 | 
198 |
199 | Use the following settings for your application:
200 |
201 | *Name*: solar system client app
202 |
203 | *Base URIs*: http://localhost:8080 (leave as-is)
204 |
205 | *Login redirect URIs*: http://localhost:8080 (important!)
206 | If you plan on using a different home page for the application, enter the url here. For this integration, we'll set up an application that assumes your application lives at http://localhost:8080
207 |
208 | *Group Assignments*: None (remove the "Everyone" group)
209 |
210 | *Grant Type Allowed*: Authorization code
211 |
212 | 
213 |
214 | Click **Done** to save your application.
215 |
216 | You will now have a client id and client secret. In your `.env` file, these are:
217 |
218 | * AUTHN_CLIENT_ID
219 | * AUTHN_CLIENT_SECRET
220 |
221 | #### Add a custom attribute to the Okta user profile
222 |
223 | We need to add a custom attribute to the user profile to store the Tyk policy_id.
224 |
225 | Users->Profile Editor
226 |
227 | Click the **Profile** button next to the application that you just created.
228 |
229 | Click **Add Attribute**
230 |
231 | 
232 |
233 | On the *Add Attribute* screen, enter the following values:
234 |
235 | *Display name*: Tyk policy id
236 |
237 | *Variable name*: pol
238 |
239 | Leave the rest of the settings as-is.
240 |
241 | 
242 |
243 | Click **Save**.
244 |
245 | #### Add groups
246 |
247 | We're going to create two groups in Okta to store users with different authorizations.
248 |
249 | Users->Groups->Add Group
250 |
251 | enter the name
252 |
253 | `silver subscribers`
254 |
255 | for the *name* and *description*
256 |
257 | 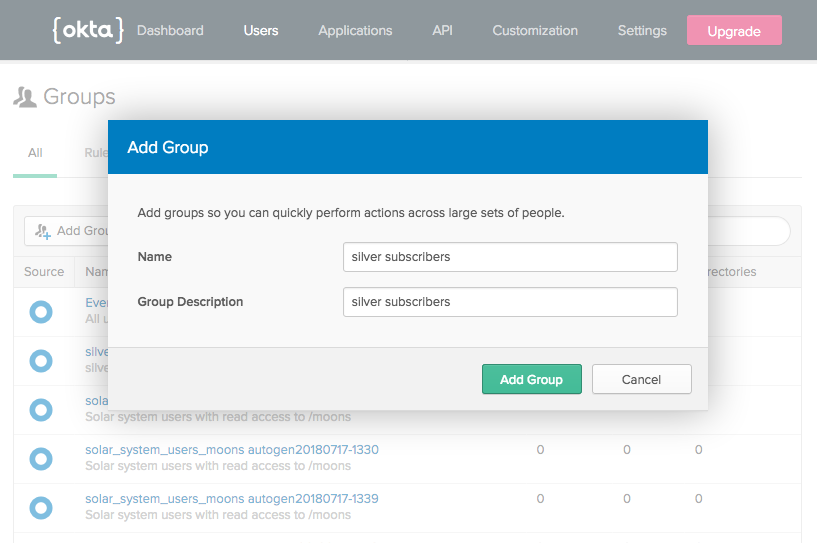
258 |
259 | Click **Add Group** to create the group.
260 |
261 | Now click on the group name to open the group properties page.
262 |
263 | 
264 |
265 | Click **Manage Apps** and find your solar system client application.
266 |
267 | 
268 |
269 | Click *Assign*, and you will be prompted to add the Tyk policy id to this group.
270 |
271 | 
272 |
273 | Add the "silver" Tyk Policy ID that you created earlier, and click **Save and Go Back**.
274 |
275 | Click **Done**.
276 |
277 | Now, create a group for the gold subscribers, following the same steps as above, but of course add the gold policy id that you created in Tyk.
278 |
279 | #### Create users
280 |
281 | Now we can add a sample user to the silver group and another user to the gold group. When these users authenticate, they will get different policy ids in their access token.
282 |
283 | Users->People->Add Person
284 |
285 | You can use whatever values you want for first name, last name, etc.
286 |
287 | *Groups*: add the user to the silver group
288 |
289 | Since this is a proof-of-concept, we're going to change the *Password* option to
290 |
291 | `Set by Admin`
292 |
293 | and we're going to de-select the box "User must change password on first login"
294 |
295 | >*Note*: the first time this user logs in, they will be prompted to set up a "forgot password" question. It's just one screen, it only happens once, and the overall flow continues as normal.
296 |
297 | Of course, choose a password that you'll remember for demo purposes.
298 |
299 | 
300 |
301 | In your .env file, the username and password that you've just created correspond to the
302 |
303 | SILVER_USERNAME
304 | and
305 | SILVER_PASSWORD
306 |
307 | fields. These fields are optional, just for UI convenience.
308 |
309 | Click **Save and Add Another**, and follow the same steps to add a sample Gold user.
310 |
311 | #### Set up the authorization server
312 |
313 | Now we have sample users, sample groups, and a custom user attribute that stores the Tyk policy id based on a user's group membership.
314 |
315 | Now we need to tell the authorization server to include the policy id claim in the access token.
316 |
317 | API->Authorization Servers->Default
318 |
319 | While you're on this screen, take note of the `Issuer URI` of your default authorization server. This corresponds to the
320 |
321 | OKTA_AZ_SERVER_ISSUER
322 |
323 | value in your `.env` file.
324 |
325 | 
326 |
327 | First we're going to add a custom scope.
328 |
329 | Scopes->Add Scope
330 |
331 | *Name*: pol
332 | *Description*: Tyk policy
333 | *Default scope*: yes
334 |
335 | 
336 |
337 | Click **Create** to create this scope.
338 |
339 | Now we're going to add a claim.
340 |
341 | Click on the *Claims* tab, then **Add Claim**
342 |
343 | *Name*: pol
344 | *Mapping*: appuser.pol
345 |
346 | Leave the other settings as-is
347 |
348 | 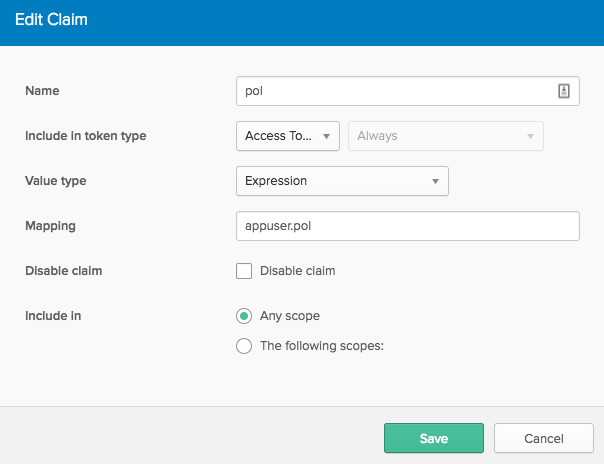
349 |
350 | Click **Save**.
351 |
352 | We need to have at least one access policy in order for the authorization server to work, so we're going to set up a default policy that is open. Obviously, this is for demo purposes only; in a production environment you would lock down your policies to least privilege.
353 |
354 | Click on the *Access Policies* tab, then **Add Policy**
355 |
356 | *Name*: default
357 | *Description*: default policy
358 |
359 | Leave assigned to all clients (again, this is something you would change for prod)
360 |
361 | 
362 |
363 | Click **Create Policy**.
364 |
365 | Now we just need to add a rule to our policy to make it active.
366 |
367 | Click **Add Rule**
368 |
369 | *Rule Name*: default
370 |
371 | You can leave all of the other settings as-is for demo purposes.
372 |
373 | 
374 |
375 | Click **Create Rule**.
376 |
377 | Now we can test to see if we're going to get that custom claim in the access token.
378 |
379 | Click on *Token Preview*
380 |
381 | *OAuth/OIDC client*: `solar system client app`
382 |
383 | *Grant type*: Authorization Code
384 |
385 | *User*: {{your silver user name}}
386 |
387 | *Scopes*: pol
388 |
389 | Then click **Preview Token** to see what the access token for this user will look like. You should see the correct Tyk policy ID in the `pol` claim for your user.
390 |
391 |
392 | 
393 |
394 | Next, we're going to add your Okta authorization server as a jwt provider for your Tyk API instance. We're going to need the JSON Web Key Set (JWKS) from your authorization server, so while you're in your authorization server:
395 |
396 | Click *Settings*, then click on the Metadata URI. You'll get a list of settings. Click on the jwks_uri, and you'll see something like this:
397 |
398 | ```
399 | {"keys":[{"alg":"RS256","e":"AQAB","n":"zGLom7s1dsiYQwo-ckNKUt6c1eEeqT-yvHc4a-3Hg1hbNUKhzFA42Yadzzlr-TobSrkjgtzUfxd3U7LiiKyXheFfmW5MGZlSrJ-SWk1ZfU_TY0BjnFY3_yxnppG8IYEh66xgXqz25d0adwUDweskSq4Z_YVJoZArHXKaXHdr00tar3LRpWyTldQyhQsQNFMjEE_F4ER83xJPKyr3HxRjz_mkMysGndBQHiXTi-kGNzOKVz3KRqMZjhG_h0ShctwzK2ox3n6giq2sRQJGN94PB2K88vHgsYhdW-axitpEcrbTL3I-r-zGLfBp3xOciDCZ_8sIyKRgtwo2ZIbYHIK7OQ","kid":"jh0M4QndoJU531l-17x_WGjw88SXxlZu9kdW8IGdpkI","kty":"RSA","use":"sig"}]}
400 | ```
401 |
402 | You might have one or two keys. Using one of these keys, we need to create a public key (.pem format) for Tyk to use.
403 |
404 | We strongly recommend using the [jwk-to-pem npm library](https://www.npmjs.com/package/jwk-to-pem) to create your .pem.
405 |
406 | Your mileage may vary if you use another library.
407 |
408 | #### Add Okta as a jwt provider for your Tyk API
409 |
410 | Go to your API and scroll to the “Authentication” section.
411 |
412 | *Authentication mode*: JSON Web Token (JWT)
413 | *JWT Signing method*: RSA public Key
414 | *Public Key*: your .pem file
415 | *Identity Source*: sub (note that you need to actually key this in)
416 | *Policy Field name*: pol (note that you need to actually key this in)
417 |
418 | 
419 |
420 | Click **Update** to update your API.
421 |
422 | Now, we have our Okta tenant set up, and the Tyk API Gateway is set up to accept jwts from Okta. We just need an application to coordinate the flow among the end-user, Okta, and Tyk.
423 |
424 | ### Setting up the application
425 |
426 | At this point, if you haven't been updating your `.env` file as you've gone through these instructions, it's time to update the file now.
427 |
428 | This is the file, with fields indicated as to whether they are required for the app:
429 |
430 | ```
431 | # Okta settings
432 |
433 | # example: https://dev-511902.oktapreview.com
434 | OKTA_TENANT="" # required
435 |
436 | OKTA_API_TOKEN="" # not necessary
437 | AUTHN_CLIENT_ID="" # required
438 | AUTHN_CLIENT_SECRET="" # required
439 |
440 | # example: https://dev-511902.oktapreview.com/oauth2/default
441 | OKTA_AZ_SERVER_ISSUER="" # required
442 |
443 | # Gateway/Proxy base url
444 | # example: http://52.14.100.89:8080/solar-system
445 | PROXY_URI="" # required
446 |
447 | # App settings
448 | PORT="8080" # required
449 | REDIRECT_URI="http://localhost:8080" # required
450 | SILVER_USERNAME="" # optional
451 | SILVER_PASSWORD="" # optional
452 | GOLD_USERNAME="" # optional
453 | GOLD_PASSWORD="" # optional
454 | SESSION_SECRET="some random phrase" # required
455 | SESSION_MAX_AGE=60000 # required
456 |
457 | # Supported values: kong, mulesoft, tyk
458 | GATEWAY="" # required
459 | ```
460 |
461 | Refer to the instructions above if you can't find a value.
462 |
463 | If you haven't already installed the Node application, go ahead and install:
464 |
465 | ```
466 | npm install
467 | ```
468 |
469 | Now you can launch the application:
470 |
471 | ```
472 | node app.js
473 | ```
474 |
475 | When you load the web app, first try clicking on the "show me the planets" and/or the "show me the moons" buttons. You'll get an error notifying you that you need an access token, or that the request is forbidden.
476 |
477 | Next, try authenticating as one of the users. You'll get an id token and an access token displayed in the browser (in a production environment, you would not do this). The raw tokens are also available in the console if you want to check them out.
478 |
479 | Now that the user has a token (actually the token is sitting on the server), you can click on one of the "show me" buttons again to see if you get the requested resource.
480 |
--------------------------------------------------------------------------------
/html/index.html:
--------------------------------------------------------------------------------
1 |
2 |
3 |
4 |
5 |
6 |
7 |
8 |
9 |
10 | Okta API Center
11 |
12 |
13 |
14 |
15 |
16 |
17 |
18 |
19 |
20 |
21 |
25 |
26 |
27 |
28 |
29 |
30 |
31 |
32 |
118 |
119 |
213 |
214 |
215 |
216 |
217 |
218 |
219 |
220 |
242 |
243 |
244 |
245 |
246 |
247 |
The currently logged-in Okta user is:
248 |
249 |
The gateway is:
250 |
251 |
252 |
253 | BRONZE Access: A list of (selected) asteroids
254 |
The user is authenticating using the authorization code grant type.
341 |
After authentication, you can see the authorization code in the address bar, and it's also in the developer console.
342 |
The access token and id token are availabile in the console. These would not typically be sent to the browser in an authorization code flow, unless you're using PKCE.
343 |
They are shown here for demo purposes.
344 |
345 |
346 |
347 |
348 |
Access token, decoded:
349 |
[none]
350 |
351 |
352 |
353 |
ID token, decoded:
354 |
[none]
355 |
356 |
357 |
358 |
359 |
360 |
361 |
362 |
363 |
--------------------------------------------------------------------------------
/okta.json:
--------------------------------------------------------------------------------
1 | {
2 | "name": "Okta API Center",
3 | "description": "Tools and docs to integrate Okta with API Gateways",
4 | "url": "https://okta-api-am.herokuapp.com",
5 | "categories": [
6 | "authentication",
7 | "authorization",
8 | "api-authentication"
9 | ]
10 | }
--------------------------------------------------------------------------------
/okta_setup_manual.md:
--------------------------------------------------------------------------------
1 | # Setting up your Okta tenant for the Solar System sample application
2 |
3 | These instructions are specific to the "solar system" use-case described above, but after completing the setup, hopefully you will see how it can be applied to your own use-case.
4 |
5 | ## Prerequisites
6 |
7 | * An Okta tenant. If you don't already have an Okta tenant, you can sign up for a free-forever [Okta developer edition](https://developer.okta.com/).
8 |
9 | > Note: These instructions assume that you are using the developer edition of Okta. If you are using the Enterprise version, some of the menus may be a little different.
10 |
11 | > Note: Also, we’re going to use the default authorization server that is built in to the developer edition. This is what the default authorization server looks like on the Okta API screen:
12 |
13 | 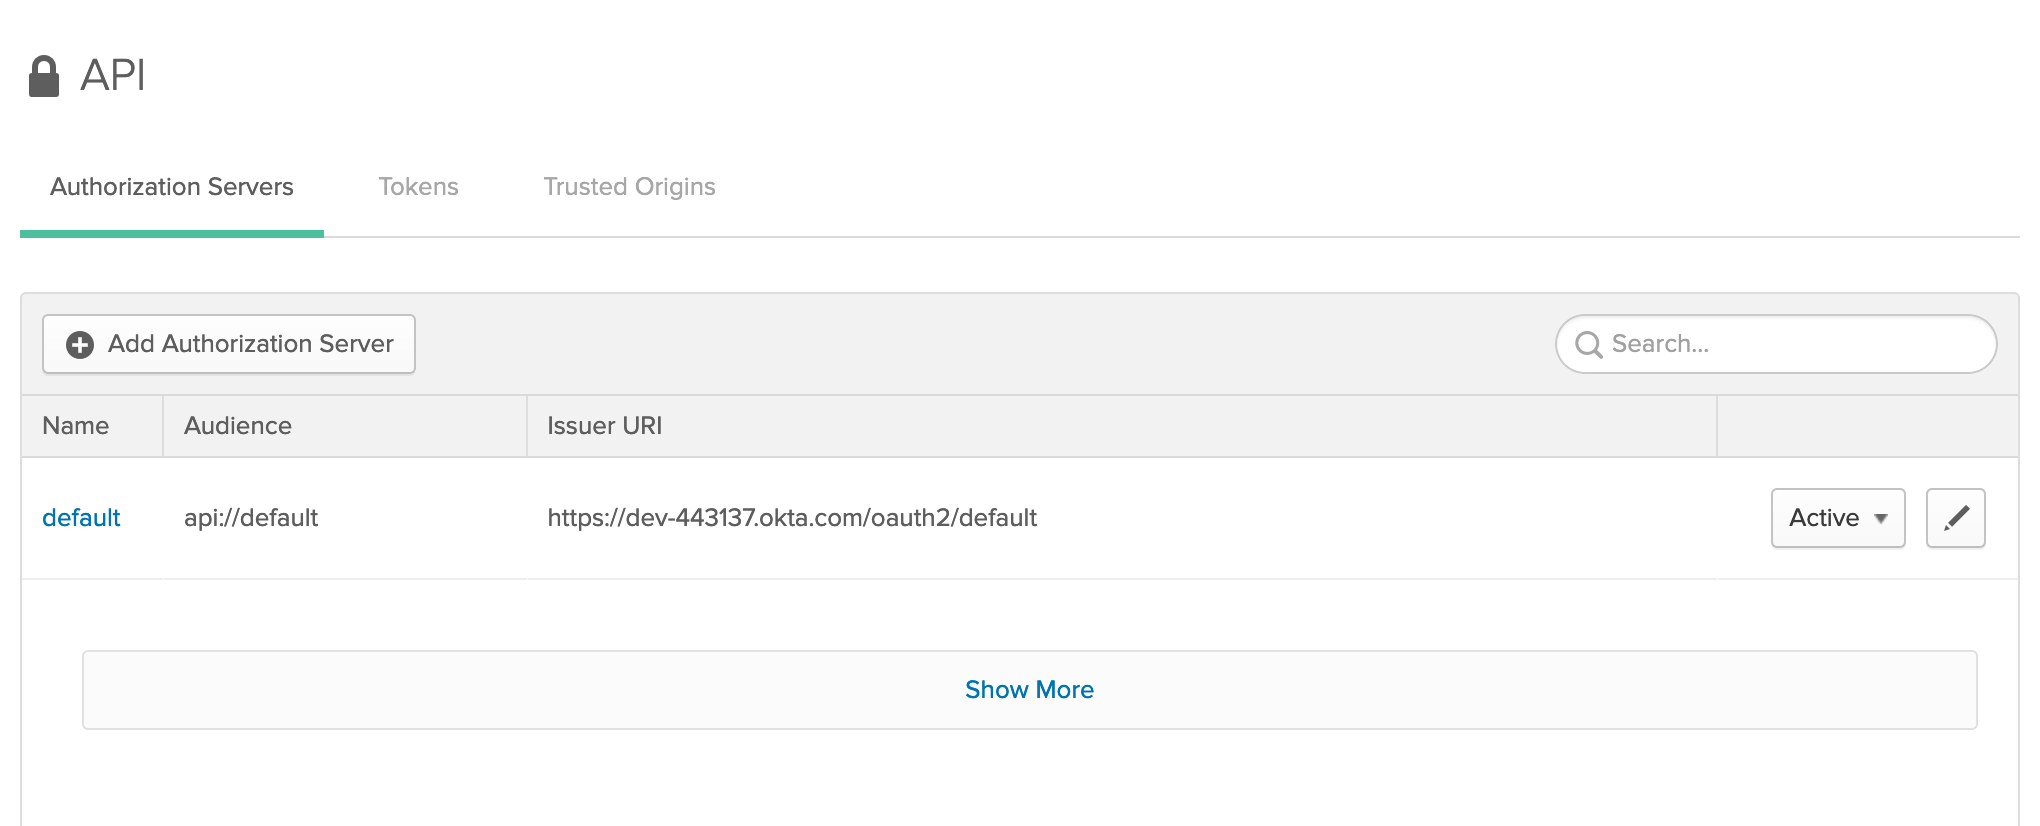
14 |
15 | If you don't have a default authorization server, you can [set one up](https://developer.okta.com/docs/guides/customize-authz-server/create-authz-server/).
16 |
17 | ## Outputs
18 |
19 | At the end of this setup, you will have the following values, which will be needed to set up the test application and the API gateway:
20 |
21 | client_id
22 |
23 | client_secret
24 |
25 | ## Setup
26 |
27 | ### Create an OIDC Application
28 |
29 | 1. Click “Applications” and then “Add Application”.
30 | 2. Choose “Web”, then Next.
31 | 3. The following login redirect URI is created for you by default:
32 | `http://localhost:8080/authorization-code/callback`
33 | 4. Add another login redirect URI:
34 | `http://localhost:8080`
35 | 5. Leave all of the other default settings as-is. Click Done.
36 |
37 | > You've created an OIDC client in your Okta tenant. Take note of your `Client ID` and `Client secret`, because we'll need those later.
38 |
39 | > Note: the developer edition assigns new OIDC applications to the Everyone group by default. If you're not using the developer edition, take a moment to assign your new application to the Everyone group.
40 |
41 | ### Create Groups
42 |
43 | Create one group that will contain silver-level subscribers, and another group that will contain gold-level subscribers.
44 |
45 | 1. Set up a group: Directory->Groups->Add Group
46 | 2. Name the group “silver subscribers”; you can use the same for the description
47 | 3. Click Add Group
48 |
49 | > Repeat the same steps for the "gold subscribers" group.
50 |
51 | ### Create Users
52 |
53 | Create one user who is a member of the silver subscribers group, and another user who is a member of the gold subscribers group.
54 |
55 | 1. Add a user: Users->People->Add Person
56 |
57 | | Field | Value |
58 | | :--- | :--- |
59 | | First name: | Carl |
60 | | Last name: | Sagan |
61 | | Username: | carl.sagan@mailinator.com |
62 | | Primary email: | carl.sagan@mailinator.com |
63 | | Secondary email: | {{your email}} |
64 | | Groups: | silver subscribers |
65 | | Password: | you can choose to either set the user's password now (set by admin) or send the user an activation email. The activation email will go to both the primary and secondary email addresses. |
66 |
67 | 2. Add another user: Users->People->Add Person
68 |
69 | | Field | Value |
70 | | :--- | :--- |
71 | | First name: | Jodie |
72 | | Last name: | Foster |
73 | | Username: | jodie.foster@mailinator.com |
74 | | Primary email: | jodie.foster@mailinator.com |
75 | | Secondary email: | {{your email}} |
76 | | Groups: | gold subscribers |
77 | | Password: | you can choose to either set the user's password now (set by admin) or send the user an activation email. The activation email will go to both the primary and secondary email addresses. |
78 |
79 | ### Add a CORS Trusted Origin
80 |
81 | You need to add a CORS Trusted Origin for http://localhost:8080 if you don't already have one.
82 |
83 | 1. Security->API
84 | 2. Click Trusted Origins
85 | 3. Click Add Origin
86 | 4. On the Add Origin Screen, give a name such as "Solar" and add http://localhost:8080 as the Origin URL
87 | 5. Check the boxes for CORS and Redirect
88 | 6. Click Save
89 |
90 | ### Add Custom Scopes
91 |
92 | Create custom scopes in your authorization server to represent "gold" privileges and "silver" privileges.
93 |
94 | >Note: we are going to structure scopes as URLs per [API best practices](https://developer.okta.com/docs/concepts/api-access-management).
95 |
96 | 1. API->Authorization Servers->default
97 | 2. Click the Scopes tab
98 | 3. Click Add Scope
99 | | Field | Value |
100 | | :--- | :--- |
101 | | Name: | http://myapp.com/scp/silver |
102 | | Description: | silver scope |
103 | | Default scope: | [non checked] |
104 | | Metadata: | [checked] |
105 |
106 | 4. Click Create
107 |
108 | > Repeat the same steps for the "gold" scope, using `http://myapp.com/scp/gold` as the name.
109 |
110 | ### Add an Authorization Policy
111 |
112 | > IMPORTANT: By default, the authorization server has a Default Policy that honors all requests for all scopes. This is great for development and troubleshooting, but to test that users are being accurately denied access to certain scopes, you need to make the Default Policy inactive.
113 |
114 | Create an authorization policy that will govern when scopes are granted.
115 |
116 | 1. API->Authorization Servers->default
117 | 2. Click the Access Policies tab
118 | 3. Click Add New Access Policy
119 | | Field | Value |
120 | | :--- | :--- |
121 | | Name: | Solar system API access |
122 | | Description: | Solar system API access |
123 | | Assign to: | My Web App (also OK to leave assigned to `All clients` for demo purposes) |
124 | 4. Click Create Policy
125 |
126 | ### Add Rules
127 |
128 | Add rules to your policy.
129 |
130 | 1. In your policy, click the Add Rule button
131 |
132 | | Field | Value |
133 | | :--- | :--- |
134 | | Rule Name: | silver access to solar system API |
135 | | Grant Type: | Authorization Code (also OK to leave all selected for demo purposes) |
136 | | User is: | Assigned the app and a member of the following:
137 | | | Groups: silver subscribers
138 | | Scopes requested: | Select "The following scopes:" |
139 | | | Click "OIDC default scopes" to populate the OIDC default scopes |
140 | | | Then add following scopes: "http://myapp.com/scp/silver" |
141 |
142 | 2. Click Create Rule
143 |
144 | Now the gold access rule. Note that we are adding both silver *and* gold scopes to the gold subscribers group.
145 |
146 | 1. In your policy, click the Add Rule button
147 |
148 | | Field | Value |
149 | | :--- | :--- |
150 | | Rule Name: | gold access to solar system API |
151 | | Grant Type: | Authorization Code (also OK to leave all selected for demo purposes) |
152 | | User is: | Assigned the app and a member of the following: |
153 | | | Groups: gold subscribers |
154 | | Scopes requested: | Select "The following scopes:" |
155 | | | Click "OIDC default scopes" to populate the OIDC default scopes |
156 | | | Then add following scopes: |
157 | | | http://myapp.com/scp/gold |
158 | | | http://myapp.com/scp/silver |
159 |
160 | 2. Click Create Rule
161 |
162 | ### What we've done
163 |
164 | Your authorization server is now set up so that when an application asks for an access token on behalf of a user:
165 |
166 | * if the user is a member of the _silver subscribers_ group and the application requests the `http://myapp.com/scp/silver` scope, then the authorization server will honor the request and include the `http://myapp.com/scp/silver` scope in the access token.
167 |
168 | * if the user is a member of the _gold subscribers_ group and the application requests the `http://myapp.com/scp/silver` scope *or* the `http://myapp.com/scp/gold` scope, then the authorization server will honor the request and include the requested scope(s) in the access token.
169 |
170 | The application can then send this access token to an API to request resources on behalf of the user. The API (or API gateway) will verify that the access is valid, and ensure that it has the appropriate scope(s) for the resource that is being requested.
171 |
172 | You can now return to the main setup and move to "Set up the test application".
173 |
--------------------------------------------------------------------------------
/package.json:
--------------------------------------------------------------------------------
1 | {
2 | "name": "okta-api-am",
3 | "version": "1.0.0",
4 | "description": "okta integrations with api gateways",
5 | "main": "app.js",
6 | "scripts": {
7 | "start": "node app.js"
8 | },
9 | "engines": {
10 | "node": "6.11.3"
11 | },
12 | "author": "tom.smith@okta.com",
13 | "dependencies": {
14 | "@okta/jwt-verifier": "^1.0.0",
15 | "body-parser": "^1.19.0",
16 | "dotenv": "^8.2.0",
17 | "express": "^4.17.1",
18 | "express-session": "^1.17.0"
19 | }
20 | }
21 |
--------------------------------------------------------------------------------
/readme.md:
--------------------------------------------------------------------------------
1 | # Okta API Center
2 |
3 | ## Overview
4 |
5 | The Okta API Center gives developers tools to see how easily Okta's API Access Management (OAuth as a Service) capabilities integrate with leading API gateways and application proxies.
6 |
7 | This project includes:
8 |
9 | 1. Instructions for setting up various leading API gateways to use Okta as an authorization server
10 | 2. Instructions for setting up Okta with users, groups, authorization policies, and custom scopes
11 | 3. A sample Node.js application that will allow sample end-users to get access tokens, and pass those access tokens to protected endpoints in your API gateway
12 |
13 | If you want to see what these flows can look like from an end-user perspective, you can check out the [public demo site](https://okta-api-am.herokuapp.com) and [video](https://youtu.be/n8r-9Gpoods).
14 |
15 | Okta is a standards-compliant OAuth 2.0 authorization server and a certified OpenID Provider.
16 |
17 | ## Quick setup
18 | 1. follow the [step-by-step instructions](okta_setup_manual.md) to set up your Okta tenant with all of the objects that you need to generate access tokens with scopes
19 | 2. use the sample application `app.js` to enable sample users to get access tokens (with scopes) from your Okta authorization server
20 | 3. set up your API Gateway to validate access tokens issued by Okta
21 | 4. test your setup by using the sample application to send requests with access tokens to your API gateway.
22 |
23 | ## Prerequisites
24 |
25 | * __An Okta tenant__ - If you don't already have an Okta tenant, you can sign up for a free-forever [Okta developer edition](https://developer.okta.com/).
26 |
27 | * __Node.js__ - the test application for this setup runs on Node.
28 |
29 | * __An API Gateway__ - if you want to test the API gateway piece of this setup, you'll need an API gateway. Okta will work with any gateway that supports an external OAuth provider; a list of gateways that have been proven out follows.
30 |
31 | ## Gateways
32 |
33 | Okta is a standards-compliant OAuth 2.0 authorization server and a certified OpenID Provider, so Okta will work with any API gateway or service that supports an external OAuth provider. As of today (July 2020), we have directly proven out compatibility with the following gateways (and reverse proxies):
34 |
35 | * Amazon API gateway
36 | * Apigee
37 | * Google Cloud Endpoints
38 | * Kong
39 | * Mulesoft
40 | * NGINX
41 | * Software AG
42 | * Tyk
43 |
44 | ## Overview of setup
45 |
46 | The overall setup has the following components:
47 |
48 | 1. Set up your Okta tenant
49 | 2. Set up the sample application (and test it)
50 | 3. Set up your API (a mock API is available) and API Gateway
51 | 4. Test the application -> API gateway connection
52 |
53 | You may find it helpful to read the following overview before jumping in to the setup steps.
54 |
55 | ## Overview of API access management & sample application
56 |
57 | An API access management workflow typically includes the following components:
58 | * An API
59 | * An API gateway
60 | * An application
61 | * An OAuth authorization server
62 | * An identity provider
63 |
64 | And, of course, a use-case to drive the configuration of all of those components.
65 |
66 | This setup uses a simple use-case to illustrate how the overall flow works:
67 |
68 | * You are managing a "solar system" API and a viewing application.
69 | * You want to control access to the API so that only users with a silver-level subscription (scope) get access to a list of the planets, and only users with a gold-level subscription (scope) get access to a (partial) list of the moons.
70 |
71 | With that use-case as context, the detailed setup instructions follow.
72 |
73 | ### Set up your Okta tenant
74 |
75 | To illustrate this use-case, you need to set up a number of different objects (users, groups, clients, policies, etc.) in your Okta tenant. Instructions for setting up your Okta tenant are [here](okta_setup_manual.md).
76 |
77 | After you've set up your Okta tenant, come back here and move on to testing your setup against the test application.
78 |
79 | ### Set up the test application
80 |
81 | The test application allows your end-users to authenticate against your Okta tenant and get an access token (via the authorization code grant flow). The application can then send the access token to protected endpoints on your chosen API Gateway.
82 |
83 | ### Prerequisites for the sample application
84 |
85 | You'll need the following values from setting up your Okta tenant:
86 |
87 | OKTA_TENANT
88 |
89 | example: https://dev-399486.okta.com
90 |
91 | ISSUER
92 |
93 | example: https://dev-399486.okta.com/oauth2/default
94 |
95 | this value will be `{{OKTA_TENANT}}/oauth2/default` unless you've set up a different authorization server in Okta.
96 |
97 | CLIENT_ID
98 |
99 | CLIENT_SECRET
100 |
101 | ### Setup for sample application
102 |
103 | 1. Download this repo:
104 |
105 | `git clone https://github.com/tom-smith-okta/okta-api-center`
106 |
107 | 2. Change to the application directory:
108 |
109 | `cd okta-api-center`
110 |
111 | 3. Install the node modules:
112 |
113 | `npm install`
114 |
115 | 4. This app uses the `dotenv` npm package to manage configuration settings.
116 |
117 | Copy the `.env_example` file to a file called
118 |
119 | `.env`
120 |
121 | Open the `.env` file and update the settings for your environment. If you've followed all of the instructions so far and accepted all of the defaults, then you'll only need to update the following values:
122 |
123 | OKTA_TENANT
124 |
125 | ISSUER
126 |
127 | CLIENT_ID
128 |
129 | CLIENT_SECRET
130 |
131 | If you're using Tyk as your gateway, change GATEWAY_IS_TYK to `true`.
132 |
133 | There is a sample value for `GATEWAY_URI` that you can ignore for now; you'll update that after you set up your API Gateway.
134 |
135 | Save the `.env` file.
136 |
137 | #### Launch and test the application
138 |
139 | With your settings updated in the `.env` file, go ahead and launch the application:
140 |
141 | `node app.js`
142 |
143 | Open a web browser and go to
144 |
145 | `http://localhost:8080`
146 |
147 | The happy path is to click the `authenticate` button in the "silver access" box and authenticate as carl.sagan. If all goes well, you will see a decoded access token in the access token box.
148 |
149 | Similarly, if you click the authenticate button in the "gold access" box and authenticate as jodie.foster, you will see a decoded access token in the access token box.
150 |
151 | The "raw" access token is available in the developer console if you want to inspect it.
152 |
153 | > Note: a "real world" web application that is using the authorization code grant flow would not typically send the access token to the browser, but would rather keep it server-side. We're sending it back to the browser here for demo purposes.
154 |
155 | > Note: if you authenticate as carl.sagan when you click on the authenticate button in the "gold access" box, you will successfully authenticate (get an Okta session) but you will not get an access token because the requested scopes do not line up with the policy you've set up in the authorization server.
156 |
157 | > Note: if you've followed the default Okta setup instructions, your default access policy will still be active in your tenant. The default access policy actually allows any user to be granted any scope (as long as the scope is requested in the authorization request). If you want to see if the authorization policies are "really" working, then just make the default policy for the authorization server inactive.
158 |
159 | If you click on the "show me" links now, they won't work, because we haven't set up the `gateway_uri` in our app yet. That's the next step.
160 |
161 | ### Set up your API Gateway + API
162 |
163 | Each API Gateway accommodates external OAuth providers slightly differently. Follow the instructions in the 'gateways' folder of this repo for the gateway that you are using. Instructions are available for the following gateways:
164 |
165 | * Apigee
166 | * Amazon API gateway
167 | * Kong
168 | * Mulesoft
169 | * Software AG
170 | * Tyk
171 |
172 | Please note that I have provided a very simple solar system API here: https://okta-solar-system.herokuapp.com
173 |
174 | This API echoes a list (json object) of the planets: https://okta-solar-system.herokuapp.com/planets
175 |
176 | And a (partial!) list of the moons: https://okta-solar-system.herokuapp.com//moons
177 |
178 | For demo purposes, the API is wide open. In a real-world use-case you would of course lock down the API so that it could be accessed only through your gateway.
179 |
180 | When you have finished setting up your API Gateway, come back to this doc to test your application and access tokens.
181 |
182 | You will need the URI of your gateway for the next step.
183 |
184 | ### Test your application and access tokens
185 |
186 | Now that you have set up your API Gateway, you should have a gateway uri. Enter that value in the `.env` file and restart the Node application.
187 |
188 | Now, after you authenticate, you should be able to click on one of the "show me" buttons and get a list of the moons and/or planets, depending on the scopes in your access token.
189 |
--------------------------------------------------------------------------------
/routes.js:
--------------------------------------------------------------------------------
1 |
2 | var bodyParser = require("body-parser")
3 |
4 | var fs = require("fs")
5 |
6 | const OktaJwtVerifier = require('@okta/jwt-verifier')
7 |
8 | var request = require("request")
9 |
10 | var session = require("express-session")
11 |
12 | //*******************************************/
13 |
14 | const oktaJwtVerifier = new OktaJwtVerifier({
15 | issuer: process.env.ISSUER
16 | })
17 |
18 | module.exports = function (app) {
19 |
20 | app.get('/', function(req, res, next) {
21 |
22 | fs.readFile('./html/index.html', 'utf8', (error, page) => {
23 |
24 | evaluate_vars(page, (error, page) => {
25 | if (error) { throw new Error(error) }
26 |
27 | res.send(page)
28 |
29 | })
30 | })
31 | })
32 |
33 | app.post('/endSession', function(req, res, next) {
34 |
35 | delete req.session.access_token
36 |
37 | res.send("removed access token from server-side session");
38 | })
39 |
40 | app.post('/getAccessToken', function(req, res, next) {
41 | var code = req.body.code;
42 |
43 | console.log("the authorization code is: " + code);
44 |
45 | // exchange the authorization code
46 | // for an access token
47 |
48 | var options = {
49 | method: 'POST',
50 | url: process.env.ISSUER + "/v1/token",
51 | qs: {
52 | grant_type: 'authorization_code',
53 | code: code,
54 | redirect_uri: process.env.REDIRECT_URI
55 | },
56 | headers: {
57 | 'cache-control': 'no-cache',
58 | authorization: 'Basic ' + getBasicAuthString(),
59 | 'content-type': 'application/x-www-form-urlencoded'
60 | }
61 | }
62 |
63 | request(options, function (error, response, body) {
64 | if (error) throw new Error(error);
65 |
66 | console.log(body);
67 |
68 | var obj = JSON.parse(body);
69 |
70 | if (obj.hasOwnProperty("access_token")) {
71 | req.session.access_token = obj.access_token;
72 | console.log("the access token is: " + req.session.access_token);
73 | }
74 | if (obj.hasOwnProperty("id_token")) {
75 | req.session.id_token = obj.id_token;
76 | }
77 |
78 | var response_to_browser = {}
79 |
80 | response_to_browser.access_token = obj.access_token
81 | response_to_browser.id_token = obj.id_token
82 |
83 | oktaJwtVerifier.verifyAccessToken(obj.id_token, process.env.CLIENT_ID)
84 | .then(jwt => {
85 | response_to_browser.id_token_decoded = jwt.claims
86 | console.log(jwt.claims)
87 |
88 | oktaJwtVerifier.verifyAccessToken(obj.access_token, process.env.AUD)
89 | .then(jwt => {
90 | response_to_browser.access_token_decoded = jwt.claims
91 |
92 | console.log(jwt.claims)
93 |
94 | console.log("the response to the browser is: ")
95 | console.dir(response_to_browser)
96 |
97 | res.json(JSON.stringify(response_to_browser))
98 | })
99 | .catch(err => {
100 | console.log("something went wrong with the access_token validation")
101 | console.log(err)
102 |
103 | })
104 | })
105 | .catch(err => {
106 | console.log("something went wrong with the id_token validation")
107 | console.log(err)
108 | })
109 | })
110 | })
111 |
112 | app.post('/getData', function(req, res, next) {
113 | var endpoint = req.body.endpoint;
114 |
115 | console.log("the requested endpoint is: " + endpoint);
116 |
117 | console.log("the access_token token is: \n" + req.session.access_token + "\n");
118 |
119 | // send the access token to the requested API endpoint
120 |
121 | if (process.env.hasOwnProperty("GATEWAY_URI") && process.env.GATEWAY_URI != "") {
122 |
123 | var url = process.env.GATEWAY_URI + "/" + req.body.endpoint
124 |
125 | console.log("sending request to: " + url)
126 |
127 | var options = {
128 | method: 'GET',
129 | url: url,
130 | headers: {
131 | 'cache-control': 'no-cache',
132 | authorization: "Bearer " + req.session.access_token,
133 |
134 | accept: 'application/json',
135 | 'content-type': 'application/x-www-form-urlencoded'
136 | }
137 | }
138 |
139 | request(options, function (error, response, body) {
140 | if (error) throw new Error(error)
141 |
142 | console.log("******\nresponse from API gateway: ")
143 | console.log("the status code is: " + response.statusCode)
144 |
145 | console.log("the body is:")
146 | console.log(body)
147 |
148 | if (response.statusCode == 403) {
149 | res.json({message: 'forbidden'})
150 | console.log("the request is forbidden")
151 | }
152 | else if (response.statusCode == 401) {
153 | res.json({ message: 'unauthorized' })
154 | console.log("the request is unauthorized")
155 | }
156 | // Add ec here for 504
157 | else {
158 | res.json(body)
159 | }
160 | })
161 | }
162 | else {
163 | res.json({message: 'gateway_uri not yet defined.'})
164 | }
165 | })
166 |
167 | function getBasicAuthString() {
168 |
169 | var x = process.env.CLIENT_ID + ":" + process.env.CLIENT_SECRET
170 |
171 | var y = new Buffer(x).toString('base64')
172 |
173 | return y
174 | }
175 | }
176 |
177 | function evaluate_vars(page, callback) {
178 | var regex
179 | for (var key in process.env) {
180 | regex = new RegExp('{{' + key + '}}', 'g')
181 |
182 | page = page.replace(regex, process.env[key])
183 | }
184 | return callback(null, page)
185 | }
--------------------------------------------------------------------------------