└── qstash
├── overall
├── llms-txt.mdx
├── pricing.mdx
├── roadmap.mdx
├── usecases.mdx
├── compare.mdx
├── enterprise.mdx
└── getstarted.mdx
├── sdks
├── py
│ ├── examples
│ │ ├── overview.mdx
│ │ ├── receiver.mdx
│ │ ├── keys.mdx
│ │ ├── events.mdx
│ │ ├── dlq.mdx
│ │ ├── messages.mdx
│ │ ├── queues.mdx
│ │ ├── url-groups.mdx
│ │ ├── schedules.mdx
│ │ └── publish.mdx
│ ├── overview.mdx
│ └── gettingstarted.mdx
└── ts
│ ├── examples
│ ├── overview.mdx
│ ├── receiver.mdx
│ ├── dlq.mdx
│ ├── logs.mdx
│ ├── messages.mdx
│ ├── queues.mdx
│ ├── url-groups.mdx
│ ├── schedules.mdx
│ └── publish.mdx
│ ├── overview.mdx
│ └── gettingstarted.mdx
├── howto
├── reset-token.mdx
├── roll-signing-keys.mdx
├── delete-schedule.mdx
├── receiving.mdx
├── debug-logs.mdx
├── handling-failures.mdx
├── url-group-endpoint.mdx
├── local-tunnel.mdx
├── webhook.mdx
├── signature.mdx
├── publishing.mdx
└── local-development.mdx
├── api
├── authentication.mdx
└── api-ratelimiting.mdx
├── features
├── dlq.mdx
├── security.mdx
├── url-groups.mdx
├── deduplication.mdx
├── delay.mdx
├── queues.mdx
├── flowcontrol.mdx
├── background-jobs.mdx
├── schedules.mdx
├── retry.mdx
├── batch.mdx
└── callbacks.mdx
├── integrations
├── n8n.mdx
├── prometheus.mdx
├── resend.mdx
├── datadog.mdx
├── anthropic.mdx
├── llm.mdx
└── pipedream.mdx
├── misc
└── license.mdx
├── quickstarts
├── deno-deploy.mdx
├── python-vercel.mdx
├── fly-io
│ └── go.mdx
├── cloudflare-workers.mdx
└── aws-lambda
│ ├── python.mdx
│ └── nodejs.mdx
└── recipes
└── periodic-data-updates.mdx
/qstash/overall/llms-txt.mdx:
--------------------------------------------------------------------------------
1 | ---
2 | title: llms.txt
3 | url: https://context7.com/context7/upstash-qstash/llms.txt?tokens=60000
4 | ---
5 |
--------------------------------------------------------------------------------
/qstash/overall/pricing.mdx:
--------------------------------------------------------------------------------
1 | ---
2 | title: Pricing & Limits
3 | url: https://upstash.com/pricing/qstash
4 | ---
5 |
6 | Please check our [pricing page](https://upstash.com/pricing/qstash) for the most up-to-date information on pricing and limits.
--------------------------------------------------------------------------------
/qstash/sdks/py/examples/overview.mdx:
--------------------------------------------------------------------------------
1 | ---
2 | title: Overview
3 | ---
4 |
5 | These are example usages of each method in the QStash SDK. You can also reference the
6 | [examples repo](https://github.com/upstash/qstash-py/tree/main/examples) and [API examples](/qstash/overall/apiexamples) for more.
7 |
--------------------------------------------------------------------------------
/qstash/sdks/ts/examples/overview.mdx:
--------------------------------------------------------------------------------
1 | ---
2 | title: Overview
3 | ---
4 |
5 | These are example usages of each method in the QStash SDK. You can also reference the
6 | [examples repo](https://github.com/upstash/sdk-qstash-ts/tree/main/examples) and [API examples](/qstash/overall/apiexamples) for more.
7 |
--------------------------------------------------------------------------------
/qstash/overall/roadmap.mdx:
--------------------------------------------------------------------------------
1 | ---
2 | title: "Roadmap"
3 | url: https://github.com/orgs/upstash/discussions
4 | ---
5 |
6 |
7 | We have moved the roadmap and the changelog to [Github Discussions](https://github.com/orgs/upstash/discussions) starting from October 2025.Now you can follow `In Progress` features. You can see that your `Feature Requests` are recorded. You can vote for them and comment your specific use-cases to shape the feature to your needs.
8 |
9 |
--------------------------------------------------------------------------------
/qstash/sdks/py/overview.mdx:
--------------------------------------------------------------------------------
1 | ---
2 | title: Overview
3 | ---
4 |
5 | `qstash` is an Python SDK for QStash, allowing for easy access to the QStash API.
6 |
7 | Using `qstash` you can:
8 |
9 | - Publish a message to a URL/URL group/API
10 | - Publish a message with a delay
11 | - Schedule a message to be published
12 | - Access logs for the messages that have been published
13 | - Create, read, update, or delete URL groups.
14 | - Read or remove messages from the [DLQ](/qstash/features/dlq)
15 | - Read or cancel messages
16 | - Verify the signature of a message
17 |
18 | You can find the Github Repository [here](https://github.com/upstash/qstash-py).
19 |
--------------------------------------------------------------------------------
/qstash/sdks/py/examples/receiver.mdx:
--------------------------------------------------------------------------------
1 | ---
2 | title: Receiver
3 | ---
4 |
5 | When receiving a message from QStash, you should [verify the signature](/qstash/howto/signature).
6 | The QStash Python SDK provides a helper function for this.
7 |
8 | ```python
9 | from qstash import Receiver
10 |
11 | receiver = Receiver(
12 | current_signing_key="YOUR_CURRENT_SIGNING_KEY",
13 | next_signing_key="YOUR_NEXT_SIGNING_KEY",
14 | )
15 |
16 | # ... in your request handler
17 |
18 | signature, body = req.headers["Upstash-Signature"], req.body
19 |
20 | receiver.verify(
21 | body=body,
22 | signature=signature,
23 | url="YOUR-SITE-URL",
24 | )
25 | ```
26 |
--------------------------------------------------------------------------------
/qstash/sdks/ts/overview.mdx:
--------------------------------------------------------------------------------
1 | ---
2 | title: Overview
3 | ---
4 |
5 | `@upstash/qstash` is a Typescript SDK for QStash, allowing for easy access to the QStash API.
6 |
7 | Using `@upstash/qstash` you can:
8 |
9 | - Publish a message to a URL/URL Group
10 | - Publish a message with a delay
11 | - Schedule a message to be published
12 | - Access logs for the messages that have been published
13 | - Create, read, update, or delete URL groups.
14 | - Read or remove messages from the [DLQ](/qstash/features/dlq)
15 | - Read or cancel messages
16 | - Verify the signature of a message
17 |
18 | You can find the Github Repository [here](https://github.com/upstash/sdk-qstash-ts).
19 |
--------------------------------------------------------------------------------
/qstash/howto/reset-token.mdx:
--------------------------------------------------------------------------------
1 | ---
2 | title: "Reset Token"
3 | ---
4 |
5 | Your token is used to interact with the QStash API. You need it to publish
6 | messages as well as create, read, update or delete other resources, such as
7 | URL Groups and endpoints.
8 |
9 | Resetting your token will invalidate your current token and all future requests
10 | with the old token will be rejected.
11 |
12 | To reset your token, simply click on the "Reset token" button at the bottom in
13 | the [QStash UI](https://console.upstash.com/qstash) and confirm the dialog.
14 |
15 | 
16 |
17 | Afterwards you should immediately update your token in all your applications.
18 |
--------------------------------------------------------------------------------
/qstash/sdks/py/examples/keys.mdx:
--------------------------------------------------------------------------------
1 | ---
2 | title: Keys
3 | ---
4 |
5 |
6 | You can run the async code by importing `AsyncQStash` from `qstash`
7 | and awaiting the methods.
8 |
9 |
10 | #### Retrieve your signing Keys
11 |
12 | ```python
13 | from qstash import QStash
14 |
15 | client = QStash("")
16 | signing_key = client.signing_key.get()
17 |
18 | print(signing_key.current, signing_key.next)
19 | ```
20 |
21 | #### Rotate your signing Keys
22 |
23 | ```python
24 | from qstash import QStash
25 |
26 | client = QStash("")
27 | new_signing_key = client.signing_key.rotate()
28 |
29 | print(new_signing_key.current, new_signing_key.next)
30 | ```
31 |
--------------------------------------------------------------------------------
/qstash/sdks/py/examples/events.mdx:
--------------------------------------------------------------------------------
1 | ---
2 | title: Events
3 | ---
4 |
5 |
6 | You can run the async code by importing `AsyncQStash` from `qstash`
7 | and awaiting the methods.
8 |
9 |
10 | #### Get all events with pagination using cursor
11 |
12 | Since there can be a large number of events, they are paginated.
13 | You can go through the results using the `cursor`.
14 |
15 | ```python
16 | from qstash import QStash
17 |
18 | client = QStash("")
19 |
20 | all_events = []
21 | cursor = None
22 | while True:
23 | res = client.event.list(cursor=cursor)
24 | all_events.extend(res.events)
25 | cursor = res.cursor
26 | if cursor is None:
27 | break
28 | ```
29 |
--------------------------------------------------------------------------------
/qstash/sdks/ts/examples/receiver.mdx:
--------------------------------------------------------------------------------
1 | ---
2 | title: Receiver
3 | ---
4 |
5 | When receiving a message from QStash, you should [verify the signature](/qstash/howto/signature).
6 | The QStash Typescript SDK provides a helper function for this.
7 |
8 | ```typescript
9 | import { Receiver } from "@upstash/qstash";
10 |
11 | const receiver = new Receiver({
12 | currentSigningKey: "YOUR_CURRENT_SIGNING_KEY",
13 | nextSigningKey: "YOUR_NEXT_SIGNING_KEY",
14 | });
15 |
16 | // ... in your request handler
17 |
18 | const signature = req.headers["Upstash-Signature"];
19 | const body = req.body;
20 |
21 | const isValid = await receiver.verify({
22 | body,
23 | signature,
24 | url: "YOUR-SITE-URL",
25 | });
26 | ```
27 |
--------------------------------------------------------------------------------
/qstash/sdks/ts/examples/dlq.mdx:
--------------------------------------------------------------------------------
1 | ---
2 | title: DLQ
3 | ---
4 |
5 | #### Get all messages with pagination using cursor
6 |
7 | Since the DLQ can have a large number of messages, they are paginated.
8 | You can go through the results using the `cursor`.
9 |
10 | ```typescript
11 | import { Client } from "@upstash/qstash";
12 |
13 | const client = new Client("");
14 | const dlq = client.dlq;
15 | const all_messages = [];
16 | let cursor = null;
17 | while (true) {
18 | const res = await dlq.listMessages({ cursor });
19 | all_messages.push(...res.messages);
20 | cursor = res.cursor;
21 | if (!cursor) {
22 | break;
23 | }
24 | }
25 | ```
26 |
27 | #### Delete a message from the DLQ
28 |
29 | ```typescript
30 | import { Client } from "@upstash/qstash";
31 |
32 | const client = new Client({ token: "" });
33 | const dlq = client.dlq;
34 | await dlq.delete("dlqId");
35 | ```
36 |
--------------------------------------------------------------------------------
/qstash/api/authentication.mdx:
--------------------------------------------------------------------------------
1 | ---
2 | title: "Authentication"
3 | description: "Authentication for the QStash API"
4 | ---
5 |
6 | You'll need to authenticate your requests to access any of the endpoints in the
7 | QStash API. In this guide, we'll look at how authentication works.
8 |
9 | ## Bearer Token
10 |
11 | When making requests to QStash, you will need your `QSTASH_TOKEN` — you will
12 | find it in the [console](https://console.upstash.com/qstash). Here's how to add
13 | the token to the request header using cURL:
14 |
15 | ```bash
16 | curl https://qstash.upstash.io/v2/publish/... \
17 | -H "Authorization: Bearer "
18 | ```
19 |
20 | ## Query Parameter
21 |
22 | In environments where setting the header is not possible, you can use the `qstash_token` query parameter instead.
23 |
24 | ```bash
25 | curl https://qstash.upstash.io/v2/publish/...?qstash_token=
26 | ```
27 |
28 | Always keep your token safe and reset it if you suspect it has been compromised.
29 |
--------------------------------------------------------------------------------
/qstash/sdks/ts/examples/logs.mdx:
--------------------------------------------------------------------------------
1 | ---
2 | title: Logs
3 | ---
4 |
5 | #### Get all logs with pagination using cursor
6 |
7 | Since there can be a large number of logs, they are paginated.
8 | You can go through the results using the `cursor`.
9 |
10 | ```typescript
11 | import { Client } from "@upstash/qstash";
12 |
13 | const client = new Client({ token: "" });
14 | const logs = [];
15 | let cursor = null;
16 | while (true) {
17 | const res = await client.logs({ cursor });
18 | logs.push(...res.logs);
19 | cursor = res.cursor;
20 | if (!cursor) {
21 | break;
22 | }
23 | }
24 | ```
25 |
26 | #### Filter logs by state and only return the first 50.
27 |
28 |
29 | More filters can be found in the [API Reference](/qstash/api/events/list).
30 |
31 |
32 | ```typescript
33 | import { Client } from "@upstash/qstash";
34 |
35 | const client = new Client({ token: "" });
36 | const res = await client.logs({
37 | filter: {
38 | state: "DELIVERED",
39 | count: 50
40 | }
41 | });
42 | ```
--------------------------------------------------------------------------------
/qstash/sdks/py/examples/dlq.mdx:
--------------------------------------------------------------------------------
1 | ---
2 | title: DLQ
3 | ---
4 |
5 |
6 | You can run the async code by importing `AsyncQStash` from `qstash`
7 | and awaiting the methods.
8 |
9 |
10 | #### Get all messages with pagination using cursor
11 |
12 | Since the DLQ can have a large number of messages, they are paginated.
13 | You can go through the results using the `cursor`.
14 |
15 | ```python
16 | from qstash import QStash
17 |
18 | client = QStash("")
19 |
20 | all_messages = []
21 | cursor = None
22 | while True:
23 | res = client.dlq.list(cursor=cursor)
24 | all_messages.extend(res.messages)
25 | cursor = res.cursor
26 | if cursor is None:
27 | break
28 | ```
29 |
30 | #### Get a message from the DLQ
31 |
32 | ```python
33 | from qstash import QStash
34 |
35 | client = QStash("")
36 | msg = client.dlq.get("")
37 | ```
38 |
39 | #### Delete a message from the DLQ
40 |
41 | ```python
42 | from qstash import QStash
43 |
44 | client = QStash("")
45 | client.dlq.delete("")
46 | ```
47 |
--------------------------------------------------------------------------------
/qstash/sdks/py/examples/messages.mdx:
--------------------------------------------------------------------------------
1 | ---
2 | title: Messages
3 | ---
4 |
5 |
6 | You can run the async code by importing `AsyncQStash` from `qstash`
7 | and awaiting the methods.
8 |
9 |
10 | Messages are removed from the database shortly after they're delivered, so you
11 | will not be able to retrieve a message after. This endpoint is intended to be used
12 | for accessing messages that are in the process of being delivered/retried.
13 |
14 | #### Retrieve a message
15 |
16 | ```python
17 | from qstash import QStash
18 |
19 | client = QStash("")
20 | msg = client.message.get("")
21 | ```
22 |
23 | #### Cancel/delete a message
24 |
25 | ```python
26 | from qstash import QStash
27 |
28 | client = QStash("")
29 | client.message.cancel("")
30 | ```
31 |
32 | #### Cancel messages in bulk
33 |
34 | Cancel many messages at once or cancel all messages
35 |
36 | ```python
37 | from qstash import QStash
38 |
39 | client = QStash("")
40 |
41 | # cancel more than one message
42 | client.message.cancel_many(["", ""])
43 |
44 | # cancel all messages
45 | client.message.cancel_all()
46 | ```
47 |
--------------------------------------------------------------------------------
/qstash/features/dlq.mdx:
--------------------------------------------------------------------------------
1 | ---
2 | title: "Dead Letter Queues"
3 | ---
4 |
5 | At times, your API may fail to process a request. This could be due to a bug in your code, a temporary issue with a third-party service, or even network issues.
6 | QStash automatically retries messages that fail due to a temporary issue but eventually stops and moves the message to a dead letter queue to be handled manually.
7 |
8 | Read more about retries [here](/qstash/features/retry).
9 |
10 | ## How to Use the Dead Letter Queue
11 |
12 | You can manually republish messages from the dead letter queue in the console.
13 |
14 |
15 |
16 |
17 |
18 | 1. **Retry** - Republish the message and remove it from the dead letter queue. Republished messages are just like any other message and will be retried automatically if they fail.
19 | 2. **Delete** - Delete the message from the dead letter queue.
20 |
21 | ## Limitations
22 |
23 | Dead letter queues are subject only to a retention period that depends on your plan. Messages are deleted when their retention period expires. See the “Max DLQ Retention” row on the [QStash Pricing](https://upstash.com/pricing/qstash) page.
24 |
--------------------------------------------------------------------------------
/qstash/overall/usecases.mdx:
--------------------------------------------------------------------------------
1 | ---
2 | title: Use Cases
3 | ---
4 |
5 | TODO: andreas: rework and reenable this page after we have 2 use cases ready
6 | https://linear.app/upstash/issue/QSTH-84/use-cases-summaryhighlights-of-recipes
7 |
8 | This section is still a work in progress.
9 |
10 | We will be adding detailed tutorials for each use case soon.
11 |
12 | Tell us on [Discord](https://discord.gg/w9SenAtbme) or
13 | [X](https://x.com/upstash) what you would like to see here.
14 |
15 | ### Triggering Nextjs Functions on a schedule
16 |
17 | Create a schedule in QStash that runs every hour and calls a Next.js serverless
18 | function hosted on Vercel.
19 |
20 | ### Reset Billing Cycle in your Database
21 |
22 | Once a month, reset database entries to start a new billing cycle.
23 |
24 | ### Fanning out alerts to Slack, email, Opsgenie, etc.
25 |
26 | Createa QStash URL Group that receives alerts from a single source and delivers them
27 | to multiple destinations.
28 |
29 | ### Send delayed message when a new user signs up
30 |
31 | Publish delayed messages whenever a new user signs up in your app. After a
32 | certain delay (e.g. 10 minutes), QStash will send a request to your API,
33 | allowing you to email the user a welcome message.
34 |
--------------------------------------------------------------------------------
/qstash/sdks/ts/examples/messages.mdx:
--------------------------------------------------------------------------------
1 | ---
2 | title: Messages
3 | ---
4 |
5 | Messages are removed from the database shortly after they're delivered, so you
6 | will not be able to retrieve a message after. This endpoint is intended to be used
7 | for accessing messages that are in the process of being delivered/retried.
8 |
9 | #### Retrieve a message
10 |
11 | ```typescript
12 | import { Client } from "@upstash/qstash";
13 |
14 | const client = new Client({ token: "" });
15 | const messages = client.messages
16 | const msg = await messages.get("msgId");
17 | ```
18 |
19 | #### Cancel/delete a message
20 |
21 | ```typescript
22 | import { Client } from "@upstash/qstash";
23 |
24 | const client = new Client({ token: "" });
25 | const messages = client.messages
26 | const msg = await messages.delete("msgId");
27 | ```
28 |
29 | #### Cancel messages in bulk
30 |
31 | Cancel many messages at once or cancel all messages
32 |
33 | ```typescript
34 | import { Client } from "@upstash/qstash";
35 |
36 | const client = new Client({ token: "" });
37 |
38 | // deleting two messages at once
39 | await client.messages.deleteMany([
40 | "message-id-1",
41 | "message-id-2",
42 | ])
43 |
44 |
45 | // deleting all messages
46 | await client.messages.deleteAll()
47 | ```
48 |
--------------------------------------------------------------------------------
/qstash/sdks/py/examples/queues.mdx:
--------------------------------------------------------------------------------
1 | ---
2 | title: Queues
3 | ---
4 |
5 | #### Create a queue with parallelism
6 |
7 | ```python
8 | from qstash import QStash
9 |
10 | client = QStash("")
11 |
12 | queue_name = "upstash-queue"
13 | client.queue.upsert(queue_name, parallelism=2)
14 |
15 | print(client.queue.get(queue_name))
16 | ```
17 |
18 | #### Delete a queue
19 |
20 | ```python
21 | from qstash import QStash
22 |
23 | client = QStash("")
24 |
25 | queue_name = "upstash-queue"
26 | client.queue.delete(queue_name)
27 | ```
28 |
29 |
30 | Resuming or creating a queue may take up to a minute.
31 | Therefore, it is not recommended to pause or delete a queue during critical operations.
32 |
33 |
34 | #### Pause/Resume a queue
35 |
36 | ```python
37 | from qstash import QStash
38 |
39 | client = QStash("")
40 |
41 | queue_name = "upstash-queue"
42 | client.queue.upsert(queue_name, parallelism=1)
43 |
44 | client.queue.pause(queue_name)
45 |
46 | queue = client.queue.get(queue_name)
47 | print(queue.paused) # prints True
48 |
49 | client.queue.resume(queue_name)
50 | ```
51 |
52 |
53 | Resuming or creating a queue may take up to a minute.
54 | Therefore, it is not recommended to pause or delete a queue during critical operations.
55 |
56 |
--------------------------------------------------------------------------------
/qstash/integrations/n8n.mdx:
--------------------------------------------------------------------------------
1 | ---
2 | title: "n8n with QStash"
3 | sidebarTitle: "n8n"
4 | ---
5 |
6 | Leverage your n8n workflow with Upstash Qstash, here is how you can make those requests using HTTP Request node.
7 |
8 | ### Step 1: Set Up an n8n Project
9 |
10 | 1. Go to https://n8n.io and create a new project
11 | 2. Create a Trigger as Webhook with default settings, this will be our entry point.
12 | 3. Create a HTTP Request Node
13 |
14 |
15 | ---
16 |
17 | ### Step 2: Import QStash Configurations to HTTP Node
18 |
19 | 1. Go to Upstash Console and open QStash Request Builder Tab.
20 | 2. Fill out the fields to create an QStash Request. (Publish, Enqueue, Schedule)
21 |
22 | 3. Copy the cURL snippet created for you, representing your request.
23 |
24 | 4. Back to the n8n, in HTTP Request Parameters tab, use import cURL.
25 |
26 | 5. Paste the cURL snippet that you copied in the console, and let n8n to fill out the form for you.
27 |
28 |
29 | ---
30 |
31 | ### Step 3: Test the Workflow
32 |
33 | 1. Execute workflow.
34 | 2. Visit the Webhook URL.
35 | 3. That's it! You can check the logs in the Qstash Console to confirm your QStash Request is working.
36 |
37 |
--------------------------------------------------------------------------------
/qstash/sdks/py/gettingstarted.mdx:
--------------------------------------------------------------------------------
1 | ---
2 | title: Getting Started
3 | ---
4 |
5 | ## Install
6 |
7 | ### PyPI
8 |
9 | ```bash
10 | pip install qstash
11 | ```
12 |
13 | ## Get QStash token
14 |
15 | Follow the instructions [here](/qstash/overall/getstarted) to get your QStash token and signing keys.
16 |
17 | ## Usage
18 |
19 | #### Synchronous Client
20 |
21 | ```python
22 | from qstash import QStash
23 |
24 | client = QStash("")
25 | client.message.publish_json(...)
26 | ```
27 |
28 | #### Asynchronous Client
29 |
30 | ```python
31 | import asyncio
32 |
33 | from qstash import AsyncQStash
34 |
35 |
36 | async def main():
37 | client = AsyncQStash("")
38 | await client.message.publish_json(...)
39 |
40 |
41 | asyncio.run(main())
42 | ```
43 |
44 | #### RetryConfig
45 |
46 | You can configure the retry policy of the client by passing the configuration to the client constructor.
47 |
48 | Note: This isn for sending the request to QStash, not for the retry policy of QStash.
49 |
50 | The default number of retries is **5** and the default backoff function is `lambda retry_count: math.exp(retry_count) * 50`.
51 |
52 | You can also pass in `False` to disable retrying.
53 |
54 | ```python
55 | from qstash import QStash
56 |
57 | client = QStash(
58 | "",
59 | retry={
60 | "retries": 3,
61 | "backoff": lambda retry_count: (2**retry_count) * 20,
62 | },
63 | )
64 | ```
65 |
--------------------------------------------------------------------------------
/qstash/howto/roll-signing-keys.mdx:
--------------------------------------------------------------------------------
1 | ---
2 | title: "Roll Your Signing Keys"
3 | ---
4 |
5 | Because your API needs to be publicly accessible from the internet, you should
6 | make sure to verify the authenticity of each request.
7 |
8 | Upstash provides a JWT with each request. This JWT is signed by your individual
9 | secret signing keys. [Read more](/qstash/howto/signature).
10 |
11 | We are using 2 signing keys:
12 |
13 | - current: This is the key used to sign the JWT.
14 | - next: This key will be used to sign after you have rolled your keys.
15 |
16 | If we were using only a single key, there would be some time between when you
17 | rolled your keys and when you can edit the key in your applications. In order to
18 | minimize downtime, we use 2 keys and you should always try to verify with both
19 | keys.
20 |
21 | ## What happens when I roll my keys?
22 |
23 | When you roll your keys, the current key will be replaced with the next key and
24 | a new next key will be generated.
25 |
26 | ```
27 | currentKey = nextKey
28 | nextKey = generateNewKey()
29 | ```
30 |
31 |
32 |
33 | Rolling your keys twice without updating your applications will cause your apps
34 | to reject all requests, because both the current and next keys will have been
35 | replaced.
36 |
37 |
38 |
39 | ## How to roll your keys
40 |
41 | Rolling your keys can be done by going to the
42 | [QStash UI](https://console.upstash.com/qstash) and clicking on the "Roll keys"
43 | button.
44 |
45 | 
46 |
--------------------------------------------------------------------------------
/qstash/howto/delete-schedule.mdx:
--------------------------------------------------------------------------------
1 | ---
2 | title: "Delete Schedules"
3 | ---
4 |
5 |
6 | Deleting schedules can be done using the [schedules api](/qstash/api/schedules/remove).
7 |
8 |
9 | ```shell cURL
10 | curl -XDELETE \
11 | -H 'Authorization: Bearer XXX' \
12 | 'https://qstash.upstash.io/v2/schedules/'
13 | ```
14 |
15 | ```typescript Typescript
16 | import { Client } from "@upstash/qstash";
17 |
18 | const client = new Client({ token: "" });
19 | await client.schedules.delete("");
20 | ```
21 |
22 | ```python Python
23 | from qstash import QStash
24 |
25 | client = QStash("")
26 | client.schedule.delete("")
27 | ```
28 |
29 |
30 |
31 | Deleting a schedule does not stop existing messages from being delivered. It
32 | only stops the schedule from creating new messages.
33 |
34 | ## Schedule ID
35 |
36 | If you don't know the schedule ID, you can get a list of all of your schedules
37 | from [here](/qstash/api/schedules/list).
38 |
39 |
40 | ```shell cURL
41 | curl \
42 | -H 'Authorization: Bearer XXX' \
43 | 'https://qstash.upstash.io/v2/schedules'
44 | ```
45 | ```typescript Typescript
46 | import { Client } from "@upstash/qstash";
47 |
48 | const client = new Client({ token: "" });
49 | const allSchedules = await client.schedules.list();
50 | ```
51 | ```python Python
52 | from qstash import QStash
53 |
54 | client = QStash("")
55 | client.schedule.list()
56 | ```
57 |
58 |
--------------------------------------------------------------------------------
/qstash/sdks/py/examples/url-groups.mdx:
--------------------------------------------------------------------------------
1 | ---
2 | title: URL Groups
3 | ---
4 |
5 |
6 | You can run the async code by importing `AsyncQStash` from `qstash`
7 | and awaiting the methods.
8 |
9 |
10 | #### Create a URL group and add 2 endpoints
11 |
12 | ```python
13 | from qstash import QStash
14 |
15 | client = QStash("")
16 | client.url_group.upsert_endpoints(
17 | url_group="my-url-group",
18 | endpoints=[
19 | {"url": "https://my-endpoint-1"},
20 | {"url": "https://my-endpoint-2"},
21 | ],
22 | )
23 | ```
24 |
25 | #### Get URL group by name
26 |
27 | ```python
28 | from qstash import QStash
29 |
30 | client = QStash("")
31 | url_group = client.url_group.get("my-url-group")
32 |
33 | print(url_group.name, url_group.endpoints)
34 | ```
35 |
36 | #### List URL groups
37 |
38 | ```python
39 | from qstash import QStash
40 |
41 | client = QStash("")
42 | all_url_groups = client.url_group.list()
43 |
44 | for url_group in all_url_groups:
45 | print(url_group.name, url_group.endpoints)
46 | ```
47 |
48 | #### Remove an endpoint from a URL group
49 |
50 | ```python
51 | from qstash import QStash
52 |
53 | client = QStash("")
54 | client.url_group.remove_endpoints(
55 | url_group="my-url-group",
56 | endpoints=[
57 | {"url": "https://my-endpoint-1"},
58 | ],
59 | )
60 | ```
61 |
62 | #### Delete a URL group
63 |
64 | ```python
65 | from qstash import QStash
66 |
67 | client = QStash("")
68 | client.url_group.delete("my-url-group")
69 | ```
70 |
--------------------------------------------------------------------------------
/qstash/sdks/ts/examples/queues.mdx:
--------------------------------------------------------------------------------
1 | ---
2 | title: Queues
3 | ---
4 |
5 | #### Create a queue with parallelism 2
6 |
7 | ```typescript
8 | import { Client } from "@upstash/qstash";
9 | const client = new Client({ token: "" });
10 |
11 | const queueName = "upstash-queue";
12 | await client.queue({ queueName }).upsert({ parallelism: 2 });
13 |
14 | const queueDetails = await client.queue({ queueName }).get();
15 | ```
16 |
17 | #### Delete Queue
18 |
19 | ```typescript
20 | import { Client } from "@upstash/qstash";
21 | const client = new Client({ token: "" });
22 |
23 | const queueName = "upstash-queue";
24 | await client.queue({ queueName: queueName }).delete();
25 | ```
26 |
27 |
28 | Resuming or creating a queue may take up to a minute.
29 | Therefore, it is not recommended to pause or delete a queue during critical operations.
30 |
31 |
32 | #### Pause/Resume a queue
33 |
34 | ```typescript
35 | import { Client } from "@upstash/qstash";
36 | const client = new Client({ token: "" });
37 |
38 | const name = "upstash-pause-resume-queue";
39 | const queue = client.queue({ queueName: name });
40 | await queue.upsert({ parallelism: 1 });
41 |
42 | // pause queue
43 | await queue.pause();
44 |
45 | const queueInfo = await queue.get();
46 | console.log(queueInfo.paused); // prints true
47 |
48 | // resume queue
49 | await queue.resume();
50 | ```
51 |
52 |
53 | Resuming or creating a queue may take up to a minute.
54 | Therefore, it is not recommended to pause or delete a queue during critical operations.
55 |
56 |
--------------------------------------------------------------------------------
/qstash/overall/compare.mdx:
--------------------------------------------------------------------------------
1 | ---
2 | title: Compare
3 | ---
4 |
5 | In this section, we will compare QStash with alternative solutions.
6 |
7 | ### BullMQ
8 |
9 | BullMQ is a message queue for NodeJS based on Redis. BullMQ is open source
10 | project, you can run BullMQ yourself.
11 |
12 | - Using BullMQ in serverless environments is problematic due to stateless nature
13 | of serverless. QStash is designed for serverless environments.
14 |
15 | - With BullMQ, you need to run a stateful application to consume messages.
16 | QStash calls the API endpoints, so you do not need your application to consume
17 | messages continuously.
18 |
19 | - You need to run and maintain BullMQ and Redis yourself. QStash is completely
20 | serverless, you maintain nothing and pay for just what you use.
21 |
22 | ### Zeplo
23 |
24 | Zeplo is a message queue targeting serverless. Just like QStash it allows users
25 | to queue and schedule HTTP requests.
26 |
27 | While Zeplo targets serverless, it has a fixed monthly price in paid plans which
28 | is \$39/month. In QStash, price scales to zero, you do not pay if you are not
29 | using it.
30 |
31 | With Zeplo, you can send messages to a single endpoint. With QStash, in addition
32 | to endpoint, you can submit messages to a URL Group which groups one or more
33 | endpoints into a single namespace. Zeplo does not have URL Group functionality.
34 |
35 | ### Quirrel
36 |
37 | Quirrel is a job queueing service for serverless. It has a similar functionality
38 | with QStash.
39 |
40 | Quirrel is acquired by Netlify, some of its functionality is available as
41 | Netlify scheduled functions. QStash is platform independent, you can use it
42 | anywhere.
43 |
--------------------------------------------------------------------------------
/qstash/sdks/ts/gettingstarted.mdx:
--------------------------------------------------------------------------------
1 | ---
2 | title: Getting Started
3 | ---
4 |
5 | ## Install
6 |
7 | ### NPM
8 |
9 | ```bash
10 | npm install @upstash/qstash
11 | ```
12 |
13 | ## Get QStash token
14 |
15 | Follow the instructions [here](/qstash/overall/getstarted) to get your QStash token and signing keys.
16 |
17 | ## Usage
18 |
19 | ```typescript
20 | import { Client } from "@upstash/qstash";
21 |
22 | const client = new Client({
23 | token: "",
24 | });
25 | ```
26 |
27 | #### RetryConfig
28 |
29 | You can configure the retry policy of the client by passing the configuration to the client constructor.
30 |
31 | Note: This is for sending the request to QStash, not for the retry policy of QStash.
32 |
33 | The default number of attempts is **6** and the default backoff function is `(retry_count) => (Math.exp(retry_count) * 50)`.
34 |
35 | You can also pass in `false` to disable retrying.
36 |
37 | ```typescript
38 | import { Client } from "@upstash/qstash";
39 |
40 | const client = new Client({
41 | token: "",
42 | retry: {
43 | retries: 3,
44 | backoff: retry_count => 2 ** retry_count * 20,
45 | },
46 | });
47 | ```
48 |
49 | ## Telemetry
50 |
51 | This sdk sends anonymous telemetry headers to help us improve your experience.
52 | We collect the following:
53 |
54 | - SDK version
55 | - Platform (Cloudflare, AWS or Vercel)
56 | - Runtime version (node@18.x)
57 |
58 | You can opt out by setting the `UPSTASH_DISABLE_TELEMETRY` environment variable
59 | to any truthy value. Or setting `enableTelemetry: false` in the client options.
60 |
61 | ```ts
62 | const client = new Client({
63 | token: "",
64 | enableTelemetry: false,
65 | });
66 | ```
67 |
--------------------------------------------------------------------------------
/qstash/sdks/ts/examples/url-groups.mdx:
--------------------------------------------------------------------------------
1 | ---
2 | title: URL Groups
3 | ---
4 |
5 | #### Create a URL Group and add 2 endpoints
6 |
7 | ```typescript
8 | import { Client } from "@upstash/qstash";
9 |
10 | const client = new Client({ token: "" });
11 | const urlGroups = client.urlGroups;
12 | await urlGroups.addEndpoints({
13 | name: "url_group_name",
14 | endpoints: [
15 | { url: "https://my-endpoint-1" },
16 | { url: "https://my-endpoint-2" },
17 | ],
18 | });
19 | ```
20 |
21 | #### Get URL Group by name
22 |
23 | ```typescript
24 | import { Client } from "@upstash/qstash";
25 |
26 | const client = new Client({ token: "" });
27 | const urlGroups = client.urlGroups;
28 | const urlGroup = await urlGroups.get("urlGroupName");
29 | console.log(urlGroup.name, urlGroup.endpoints);
30 | ```
31 |
32 | #### List URL Groups
33 |
34 | ```typescript
35 | import { Client } from "@upstash/qstash";
36 |
37 | const client = new Client({ token: "" });
38 | const allUrlGroups = await client.urlGroups.list();
39 | for (const urlGroup of allUrlGroups) {
40 | console.log(urlGroup.name, urlGroup.endpoints);
41 | }
42 | ```
43 |
44 | #### Remove an endpoint from a URL Group
45 |
46 | ```typescript
47 | import { Client } from "@upstash/qstash";
48 |
49 | const client = new Client({ token: "" });
50 | const urlGroups = client.urlGroups;
51 | await urlGroups.removeEndpoints({
52 | name: "urlGroupName",
53 | endpoints: [{ url: "https://my-endpoint-1" }],
54 | });
55 | ```
56 |
57 | #### Delete a URL Group
58 |
59 | ```typescript
60 | import { Client } from "@upstash/qstash";
61 |
62 | const client = new Client({ token: "" });
63 | const urlGroups = client.urlGroups;
64 | await urlGroups.delete("urlGroupName");
65 | ```
66 |
--------------------------------------------------------------------------------
/qstash/howto/receiving.mdx:
--------------------------------------------------------------------------------
1 | ---
2 | title: "Receiving Messages"
3 | description: "What do we send to your API?"
4 | ---
5 |
6 | When you publish a message, QStash will deliver it to your chosen destination. This is a brief overview of how a request to your API looks like.
7 |
8 | ## Headers
9 |
10 | We are forwarding all headers that have been prefixed with `Upstash-Forward-` to your API. [Learn more](/qstash/howto/publishing#sending-custom-http-headers)
11 |
12 | In addition to your custom headers, we're sending these headers as well:
13 |
14 | | Header | Description |
15 | | ----------------------| -------------------------------------------------------------------- |
16 | | `User-Agent` | Will be set to `Upstash-QStash` |
17 | | `Content-Type` | The original `Content-Type` header |
18 | | `Upstash-Topic-Name` | The URL Group (topic) name if sent to a URL Group |
19 | | `Upstash-Signature` | The signature you need to verify [See here](/qstash/howto/signature) |
20 | | `Upstash-Retried` | How often the message has been retried so far. Starts with 0. |
21 | | `Upstash-Message-Id` | The message id of the message. |
22 | | `Upstash-Schedule-Id` | The schedule id of the message if it is related to a schedule. |
23 | | `Upstash-Caller-Ip` | The IP address of the publisher of this message. |
24 |
25 | ## Body
26 |
27 | The body is passed as is, we do not modify it at all. If you send a JSON body, you will receive a JSON body. If you send a string, you will receive a string.
28 |
29 | ## Verifying the signature
30 |
31 | [See here](/qstash/howto/signature)
32 |
--------------------------------------------------------------------------------
/qstash/integrations/prometheus.mdx:
--------------------------------------------------------------------------------
1 | ---
2 | title: "Prometheus - Upstash QStash Integration"
3 | sidebarTitle: "Prometheus"
4 | ---
5 |
6 | To monitor your QStash metrics in Prometheus and visualize in Grafana, follow these steps:
7 |
8 |
9 | **Integration Scope**
10 |
11 | Upstash Prometheus Integration covers Prod Pack.
12 |
13 |
14 |
15 | ## **Step 1: Enable Prometheus in Upstash Console**
16 |
17 | 1. Open the Upstash Console and navigate to QStash.
18 | 2. Go to Settings → Monitoring.
19 | 3. Enable Prometheus to allow scraping QStash metrics.
20 |
21 | 
22 |
23 | ## **Step 2: Copy Monitoring Token**
24 |
25 | 1. After enabling, a monitoring token is generated and displayed.
26 | 2. Copy the token. It will be used to authenticate Prometheus requests.
27 |
28 |
29 | **Header Format**
30 |
31 | Send the token as `Authorization: Bearer `.
32 |
33 |
34 |
35 | 
36 |
37 | ## **Step 3: Configure Prometheus (via Grafana Data Source)**
38 |
39 | 1. In Grafana, add a Prometheus data source.
40 | 2. Set the address to `https://api.upstash.com/monitoring/prometheus`.
41 | 3. In HTTP headers, add the monitoring token.
42 |
43 | 
44 |
45 | 
46 |
47 | Click Test and Save.
48 |
49 | 
50 |
51 | ## **Step 4: Import Dashboard**
52 |
53 | You can use the Upstash Grafana dashboard to visualize QStash metrics.
54 |
55 | Open the import dialog and use: Upstash QStash Dashboard
56 |
57 | 
58 |
59 | ## **Conclusion**
60 |
61 | You’ve integrated QStash with Prometheus. Use Grafana to explore message throughput, retries, DLQ, schedules, and Upstash Workflows.
62 |
63 | If you encounter issues, contact support.
64 |
65 |
66 |
--------------------------------------------------------------------------------
/qstash/integrations/resend.mdx:
--------------------------------------------------------------------------------
1 | ---
2 | title: "Email - Resend"
3 | sidebarTitle: "Emails with Resend"
4 | ---
5 |
6 | The `qstash-js` SDK offers an integration to easily send emails using [Resend](https://resend.com/), streamlining email delivery in your applications.
7 |
8 | ## Basic Email Sending
9 |
10 | To send a single email, use the `publishJSON` method with the `resend` provider. Ensure your `QSTASH_TOKEN` and `RESEND_TOKEN` are set for authentication.
11 |
12 | ```typescript
13 | import { Client, resend } from "@upstash/qstash";
14 | const client = new Client({ token: "" });
15 |
16 | await client.publishJSON({
17 | api: {
18 | name: "email",
19 | provider: resend({ token: "" }),
20 | },
21 | body: {
22 | from: "Acme ",
23 | to: ["delivered@resend.dev"],
24 | subject: "Hello World",
25 | html: "
It works!
",
26 | },
27 | });
28 | ```
29 |
30 | In the `body` field, specify any parameters supported by [the Resend Send Email API](https://resend.com/docs/api-reference/emails/send-email), such as `from`, `to`, `subject`, and `html`.
31 |
32 | ## Sending Batch Emails
33 |
34 | To send multiple emails at once, use Resend’s [Batch Email API](https://resend.com/docs/api-reference/emails/send-batch-emails). Set the `batch` option to `true` to enable batch sending. Each email configuration is defined as an object within the `body` array.
35 |
36 | ```typescript
37 | await client.publishJSON({
38 | api: {
39 | name: "email",
40 | provider: resend({ token: "", batch: true }),
41 | },
42 | body: [
43 | {
44 | from: "Acme ",
45 | to: ["foo@gmail.com"],
46 | subject: "Hello World",
47 | html: "
",
54 | },
55 | ],
56 | });
57 | ```
58 |
59 | Each entry in the `body` array represents an individual email, allowing customization of `from`, `to`, `subject`, `html`, and any other Resend-supported fields.
60 |
--------------------------------------------------------------------------------
/qstash/howto/debug-logs.mdx:
--------------------------------------------------------------------------------
1 | ---
2 | title: "Debug Logs"
3 | ---
4 |
5 | To debug the logs, first you need to understand the different states a message can
6 | be in.
7 |
8 | Only the last 10.000 logs are kept and older logs are removed automatically.
9 |
10 | ## Lifecycle of a Message
11 |
12 | To understand the lifecycle of each message, we'll look at the following chart:
13 |
14 | [comment]: # (https://mermaid.live/edit#pako:eNptU9uO2jAQ_RXLjxVXhyTED5UQpBUSZdtAK7VNtfLGTmIpsZHjrEoR_17HBgLdztPMmXPm4ssJZpIyiGGjiWYrTgpF6uErSgUw9vPdLzAcvgfLJF7s45UDL4FNbEnN6FLWB9lwzVz-EbO0xXK__hb_L43Bevv8OXn6mMS7nSPYSf6tcgIXc5zOkniffH9TvrM4SZ4Sm3GcXne-rLDYLuPNcxJ_-Rrvrrs4cGMiRxLS9K1YroHM3yowqFnTkIKBjIiMVYA3xqsqRp3azWQLu3EwaFUFFNOtEg3ICa9uU91xV_HGuIltcM9v2iwz_fpN-u0_LNYbyzdcdQQVr7k2PsnK6yx90Y5vLtXBF-ED1h_CA5wKOICF4hRirVo2gDVTNelCeOoYKdQlq1kKsXEpy0lb6RSm4mxkByJ-SFlflUq2RQlxTqrGRO2B9u_uhpJWy91RZFeNY8WUa6lupEoSykx4gvp46J5wwRtt-mVS5LzocHOABi61PjR4PO7So4Lrsn0ZZbIeN5yWROnyNQrGAQrmBHksCD3iex7NXqbRPEezaU7DyRQReD4PILP9P7n_Yr-N2YYJM8RStkJDHHqRXbfr_RviaDbyQg9NJz7yg9ksCAfwCHGARn6AfC9CKJqiiT83lf_Y85mM5uEsurfzX7VrENs)
15 |
16 |
17 |
18 |
19 | Either you or a previously setup schedule will create a message.
20 |
21 | When a message is ready for execution, it will be become `ACTIVE` and a delivery to
22 | your API is attempted.
23 |
24 | If you API responds with a status code between `200 - 299`, the task is
25 | considered successful and will be marked as `DELIVERED`.
26 |
27 | Otherwise the message is being retried if there are any retries left and moves to `RETRY`. If all retries are exhausted, the task has `FAILED` and the message will be moved to the DLQ.
28 |
29 | During all this a message can be cancelled via [DELETE /v2/messages/:messageId](https://docs.upstash.com/qstash/api/messages/cancel). When the request is received, `CANCEL_REQUESTED` will be logged first.
30 | If retries are not exhausted yet, in the next deliver time, the message will be marked as `CANCELLED` and will be completely removed from the system.
31 |
32 | ## Console
33 |
34 | Head over to the [Upstash Console](https://console.upstash.com/qstash) and go to
35 | the `Logs` tab, where you can see the latest status of your messages.
36 |
--------------------------------------------------------------------------------
/qstash/howto/handling-failures.mdx:
--------------------------------------------------------------------------------
1 | ---
2 | title: "Handling Failures"
3 | ---
4 |
5 | Sometimes, endpoints fail due to various reasons such as network issues or server issues.
6 | In such cases, QStash offers a few options to handle these failures.
7 |
8 | ## Failure Callbacks
9 |
10 | When publishing a message, you can provide a failure callback that will be called if the message fails to be published.
11 | You can read more about callbacks [here](/qstash/features/callbacks).
12 |
13 | With the failure callback, you can add custom logic such as logging the failure or sending an alert to the team.
14 | Once you handle the failure, you can [delete it from the dead letter queue](/qstash/api/dlq/deleteMessage).
15 |
16 |
17 | ```bash cURL
18 | curl -X POST \
19 | https://qstash.upstash.io/v2/publish/ \
20 | -H 'Content-Type: application/json' \
21 | -H 'Authorization: Bearer ' \
22 | -H 'Upstash-Failure-Callback: ' \
23 | -d '{ "hello": "world" }'
24 | ```
25 |
26 | ```typescript Typescript
27 | import { Client } from "@upstash/qstash";
28 |
29 | const client = new Client({ token: "" });
30 | const res = await client.publishJSON({
31 | url: "https://my-api...",
32 | body: { hello: "world" },
33 | failureCallback: "https://my-callback...",
34 | });
35 | ```
36 |
37 | ```python Python
38 | from qstash import QStash
39 |
40 | client = QStash("")
41 | client.message.publish_json(
42 | url="https://my-api...",
43 | body={
44 | "hello": "world",
45 | },
46 | failure_callback="https://my-callback...",
47 | )
48 | ```
49 |
50 |
51 | ## Dead Letter Queue
52 |
53 | If you don't want to handle the failure immediately, you can use the dead letter queue (DLQ) to store the failed messages.
54 | You can read more about the dead letter queue [here](/qstash/features/dlq).
55 |
56 | Failed messages are automatically moved to the dead letter queue upon failure, and can be retried from the console or
57 | the API by [retrieving the message](/qstash/api/dlq/getMessage) then [publishing it](/qstash/api/publish).
58 |
59 |
60 |
61 |
--------------------------------------------------------------------------------
/qstash/howto/url-group-endpoint.mdx:
--------------------------------------------------------------------------------
1 | ---
2 | title: "Create URL Groups and Endpoints"
3 | ---
4 |
5 | QStash allows you to group multiple APIs together into a single namespace,
6 | called a `URL Group` (Previously, it was called `Topics`).
7 | Read more about URL Groups [here](/qstash/features/url-groups).
8 |
9 | There are two ways to create endpoints and URL Groups: The UI and the REST API.
10 |
11 | ## UI
12 |
13 | Go to [console.upstash.com/qstash](https://console.upstash.com/qstash) and click
14 | on the `URL Groups` tab. Afterwards you can create a new URL Group by giving it a name.
15 | Keep in mind that URL Group names are restricted to alphanumeric, underscore, hyphen
16 | and dot characters.
17 |
18 | 
19 |
20 | After creating the URL Group, you can add endpoints to it:
21 |
22 | 
23 |
24 | ## API
25 |
26 | You can create a URL Group and endpoint using the [console](https://console.upstash.com/qstash) or [REST API](/qstash/api/url-groups/add-endpoint).
27 |
28 |
29 | ```bash cURL
30 | curl -XPOST https://qstash.upstash.io/v2/topics/:urlGroupName/endpoints \
31 | -H "Authorization: Bearer " \
32 | -H "Content-Type: application/json" \
33 | -d '{
34 | "endpoints": [
35 | {
36 | "name": "endpoint1",
37 | "url": "https://example.com"
38 | },
39 | {
40 | "name": "endpoint2",
41 | "url": "https://somewhere-else.com"
42 | }
43 | ]
44 | }'
45 | ```
46 | ```typescript Typescript
47 | import { Client } from "@upstash/qstash";
48 |
49 | const client = new Client({ token: "" });
50 | const urlGroups = client.urlGroups;
51 | await urlGroups.addEndpoints({
52 | name: "urlGroupName",
53 | endpoints: [
54 | { name: "endpoint1", url: "https://example.com" },
55 | { name: "endpoint2", url: "https://somewhere-else.com" },
56 | ],
57 | });
58 | ```
59 | ```python Python
60 | from qstash import QStash
61 |
62 | client = QStash("")
63 | client.url_group.upsert_endpoints(
64 | url_group="url-group-name",
65 | endpoints=[
66 | {"name": "endpoint1", "url": "https://example.com"},
67 | {"name": "endpoint2", "url": "https://somewhere-else.com"},
68 | ],
69 | )
70 | ```
71 |
72 |
--------------------------------------------------------------------------------
/qstash/api/api-ratelimiting.mdx:
--------------------------------------------------------------------------------
1 | ---
2 | title: "API Rate Limit Response"
3 | description: "This page documents the rate limiting behavior of our API and explains how to handle different types of rate limit errors."
4 | ---
5 |
6 | ## Overview
7 |
8 | There is no request per second limit for operational API's as listed below:
9 |
10 | - trigger, publish, enqueue, notify, wait, batch
11 | - Other endpoints (like logs,listing flow-controls, queues, schedules etc) have rps limit. This is a short-term limit **per second** to prevent rapid bursts of requests.
12 |
13 | **Headers**:
14 |
15 | - `Burst-RateLimit-Limit`: Maximum number of requests allowed in the burst window (1 second)
16 | - `Burst-RateLimit-Remaining`: Remaining number of requests in the burst window (1 second)
17 | - `Burst-RateLimit-Reset`: Time (in unix timestamp) when the burst limit will reset
18 |
19 | ### Example Rate Limit Error Handling
20 |
21 | ```typescript Handling Daily Rate Limit Error
22 | import { QstashDailyRatelimitError } from "@upstash/qstash";
23 |
24 | try {
25 | // Example of a publish request that could hit the daily rate limit
26 | const result = await client.publishJSON({
27 | url: "https://my-api...",
28 | // or urlGroup: "the name or id of a url group"
29 | body: {
30 | hello: "world",
31 | },
32 | });
33 | } catch (error) {
34 | if (error instanceof QstashDailyRatelimitError) {
35 | console.log("Daily rate limit exceeded. Retry after:", error.reset);
36 | // Implement retry logic or notify the user
37 | } else {
38 | console.error("An unexpected error occurred:", error);
39 | }
40 | }
41 | ```
42 |
43 | ```typescript Handling Burst Rate Limit Error
44 | import { QstashRatelimitError } from "@upstash/qstash";
45 |
46 | try {
47 | // Example of a request that could hit the burst rate limit
48 | const result = await client.publishJSON({
49 | url: "https://my-api...",
50 | // or urlGroup: "the name or id of a url group"
51 | body: {
52 | hello: "world",
53 | },
54 | });
55 | } catch (error) {
56 | if (error instanceof QstashRatelimitError) {
57 | console.log("Burst rate limit exceeded. Retry after:", error.reset);
58 | // Implement exponential backoff or delay before retrying
59 | } else {
60 | console.error("An unexpected error occurred:", error);
61 | }
62 | }
63 | ```
64 |
--------------------------------------------------------------------------------
/qstash/integrations/datadog.mdx:
--------------------------------------------------------------------------------
1 | ---
2 | title: "Datadog - Upstash QStash Integration"
3 | sidebarTitle: "Datadog"
4 | ---
5 |
6 | This guide walks you through connecting your Datadog account with Upstash QStash for monitoring and analytics of your message delivery, retries, DLQ, and schedules.
7 |
8 |
9 | **Integration Scope**
10 |
11 | Upstash Datadog Integration covers Prod Pack.
12 |
13 |
14 |
15 | ## **Step 1: Log in to Your Datadog Account**
16 |
17 | 1. Go to [Datadog](https://www.datadoghq.com/) and sign in.
18 |
19 | ## **Step 2: Install Upstash Application**
20 |
21 | 1. In Datadog, open the Integrations page.
22 | 2. Search for "Upstash" and open the integration.
23 |
24 | 
25 |
26 | Click "Install" to add Upstash to your Datadog account.
27 |
28 | 
29 |
30 | ## **Step 3: Connect Accounts**
31 |
32 | After installing Upstash, click "Connect Accounts". Datadog will redirect you to Upstash to complete account linking.
33 |
34 | 
35 |
36 | ## **Step 4: Select Account to Integrate**
37 |
38 | 1. On Upstash, select the Datadog account to integrate.
39 | 2. Personal and team accounts are supported.
40 |
41 | **Caveats**
42 |
43 | - The integration can be established once at a time. To change the account scope (e.g., add/remove teams), re-establish the integration from scratch.
44 |
45 | 
46 |
47 | 
48 |
49 | ## **Step 5: Wait for Metrics Availability**
50 |
51 | Once the integration is completed, metrics from QStash (publish counts, success/error rates, retries, DLQ, schedule executions) will start appearing in Datadog dashboards shortly.
52 |
53 | 
54 |
55 | ## **Step 6: Datadog Integration Removal Process**
56 |
57 | From Datadog → Integrations → Upstash, press "Remove" to break the connection.
58 |
59 | ### Confirm Removal
60 |
61 | Upstash will stop publishing metrics after removal. Ensure any Datadog API keys/configurations for this integration are also removed on the Datadog side.
62 |
63 | ## **Conclusion**
64 |
65 | You’ve connected Datadog with Upstash QStash. Explore Datadog dashboards to monitor message delivery performance and reliability.
66 |
67 | If you need help, contact support.
68 |
69 |
70 |
--------------------------------------------------------------------------------
/qstash/misc/license.mdx:
--------------------------------------------------------------------------------
1 | ---
2 | title: "Development Server License Agreement"
3 | ---
4 |
5 | ## 1. Purpose and Scope
6 | This software is a development server implementation of QStash API ("Development Server") provided for testing and development purposes only. It is not intended for production use, commercial deployment, or as a replacement for the official QStash service.
7 |
8 | ## 2. Usage Restrictions
9 | By using this Development Server, you agree to the following restrictions:
10 |
11 | a) The Development Server may only be used for:
12 | - Local development and testing
13 | - Continuous Integration (CI) testing
14 | - Educational purposes
15 | - API integration development
16 |
17 | b) The Development Server may NOT be used for:
18 | - Production environments
19 | - Commercial service offerings
20 | - Public-facing applications
21 | - Operating as a Software-as-a-Service (SaaS)
22 | - Reselling or redistributing as a service
23 |
24 | ## 3. Restrictions on Modification and Reverse Engineering
25 | You may not:
26 | - Decompile, reverse engineer, disassemble, or attempt to derive the source code of the Development Server
27 | - Modify, adapt, translate, or create derivative works based upon the Development Server
28 | - Remove, obscure, or alter any proprietary rights notices within the Development Server
29 | - Attempt to bypass or circumvent any technical limitations or security measures in the Development Server
30 |
31 | ## 4. Technical Limitations
32 | Users acknowledge that the Development Server:
33 | - Operates entirely in-memory without persistence
34 | - Provides limited functionality compared to the official service
35 | - Offers no data backup or recovery mechanisms
36 | - Has no security guarantees
37 | - May have performance limitations
38 | - Does not implement all features of the official service
39 |
40 | ## 5. Warranty Disclaimer
41 | THE DEVELOPMENT SERVER IS PROVIDED "AS IS" WITHOUT WARRANTY OF ANY KIND, EXPRESS OR IMPLIED. THE AUTHORS OR COPYRIGHT HOLDERS SHALL NOT BE LIABLE FOR ANY CLAIMS, DAMAGES, OR OTHER LIABILITY ARISING FROM THE USE OF THE SOFTWARE IN VIOLATION OF THIS LICENSE.
42 |
43 | ## 6. Termination
44 | Your rights under this license will terminate automatically if you fail to comply with any of its terms. Upon termination, you must cease all use of the Development Server.
45 |
46 | ## 7. Acknowledgment
47 | By using the Development Server, you acknowledge that you have read this license, understand it, and agree to be bound by its terms.
48 |
49 |
50 |
--------------------------------------------------------------------------------
/qstash/features/security.mdx:
--------------------------------------------------------------------------------
1 | ---
2 | title: "Security"
3 | ---
4 |
5 | ### Request Authorization
6 |
7 | When interacting with the QStash API, you will need an authorization token. You
8 | can get your token from the [Console](https://console.upstash.com/qstash).
9 |
10 |
11 |
12 |
13 |
14 | Send this token along with every request made to `QStash` inside the
15 | `Authorization` header like this:
16 |
17 | ```
18 | "Authorization": "Bearer "
19 | ```
20 |
21 | ### Request Signing (optional)
22 |
23 | Because your endpoint needs to be publicly available, we recommend you verify
24 | the authenticity of each incoming request.
25 |
26 | #### The `Upstash-Signature` header
27 |
28 | With each request we are sending a JWT inside the `Upstash-Signature` header.
29 | You can learn more about them [here](https://jwt.io).
30 |
31 | An example token would be:
32 |
33 | **Header**
34 |
35 | ```json
36 | {
37 | "alg": "HS256",
38 | "typ": "JWT"
39 | }
40 | ```
41 |
42 | **Payload**
43 |
44 | ```json
45 | {
46 | "iss": "Upstash",
47 | "sub": "https://qstash-remote.requestcatcher.com/test",
48 | "exp": 1656580612,
49 | "nbf": 1656580312,
50 | "iat": 1656580312,
51 | "jti": "jwt_67kxXD6UBAk7DqU6hzuHMDdXFXfP",
52 | "body": "qK78N0k3pNKI8zN62Fq2Gm-_LtWkJk1z9ykio3zZvY4="
53 | }
54 | ```
55 |
56 | The JWT is signed using `HMAC SHA256` algorithm with your current signing key
57 | and includes the following claims:
58 |
59 | #### Claims
60 |
61 | ##### `iss`
62 |
63 | The issuer field is always `Upstash`.
64 |
65 | ##### `sub`
66 |
67 | The url of your endpoint, where this request is sent to.
68 |
69 | For example when you are using a nextjs app on vercel, this would look something
70 | like `https://my-app.vercel.app/api/endpoint`
71 |
72 | ##### `exp`
73 |
74 | A unix timestamp in seconds after which you should no longer accept this
75 | request. Our JWTs have a lifetime of 5 minutes by default.
76 |
77 | ##### `iat`
78 |
79 | A unix timestamp in seconds when this JWT was created.
80 |
81 | ##### `nbf`
82 |
83 | A unix timestamp in seconds before which you should not accept this request.
84 |
85 | ##### `jti`
86 |
87 | A unique id for this token.
88 |
89 | ##### `body`
90 |
91 | The body field is a base64 encoded sha256 hash of the request body. We use url
92 | encoding as specified in
93 | [RFC 4648](https://datatracker.ietf.org/doc/html/rfc4648#section-5).
94 |
95 | #### Verifying the signature
96 |
97 | See [how to verify the signature](/qstash/howto/signature).
98 |
--------------------------------------------------------------------------------
/qstash/quickstarts/deno-deploy.mdx:
--------------------------------------------------------------------------------
1 | ---
2 | title: "Deno Deploy"
3 | ---
4 |
5 | [Source Code](https://github.com/upstash/qstash-examples/tree/main/deno-deploy)
6 |
7 | This is a step by step guide on how to receive webhooks from QStash in your Deno
8 | deploy project.
9 |
10 | ### 1. Create a new project
11 |
12 | Go to [https://dash.deno.com/projects](https://dash.deno.com/projects) and
13 | create a new playground project.
14 |
15 | ### 2. Edit the handler function
16 |
17 | Then paste the following code into the browser editor:
18 |
19 | ```ts
20 | import { serve } from "https://deno.land/std@0.142.0/http/server.ts";
21 | import { Receiver } from "https://deno.land/x/upstash_qstash@v0.1.4/mod.ts";
22 |
23 | serve(async (req: Request) => {
24 | const r = new Receiver({
25 | currentSigningKey: Deno.env.get("QSTASH_CURRENT_SIGNING_KEY")!,
26 | nextSigningKey: Deno.env.get("QSTASH_NEXT_SIGNING_KEY")!,
27 | });
28 |
29 | const isValid = await r
30 | .verify({
31 | signature: req.headers.get("Upstash-Signature")!,
32 | body: await req.text(),
33 | })
34 | .catch((err: Error) => {
35 | console.error(err);
36 | return false;
37 | });
38 |
39 | if (!isValid) {
40 | return new Response("Invalid signature", { status: 401 });
41 | }
42 |
43 | console.log("The signature was valid");
44 |
45 | // do work
46 |
47 | return new Response("OK", { status: 200 });
48 | });
49 | ```
50 |
51 | ### 3. Add your signing keys
52 |
53 | Click on the `settings` button at the top of the screen and then click
54 | `+ Add Variable`
55 |
56 | Get your current and next signing key from
57 | [Upstash](https://console.upstash.com/qstash) and then set them in deno deploy.
58 |
59 | 
60 |
61 | ### 4. Deploy
62 |
63 | Simply click on `Save & Deploy` at the top of the screen.
64 |
65 | ### 5. Publish a message
66 |
67 | Make note of the url displayed in the top right. This is the public url of your
68 | project.
69 |
70 | ```bash
71 | curl --request POST "https://qstash.upstash.io/v2/publish/https://early-frog-33.deno.dev" \
72 | -H "Authorization: Bearer " \
73 | -H "Content-Type: application/json" \
74 | -d "{ \"hello\": \"world\"}"
75 | ```
76 |
77 | In the logs you should see something like this:
78 |
79 | ```basheurope-west3isolate start time: 2.21 ms
80 | Listening on http://localhost:8000/
81 | The signature was valid
82 | ```
83 |
84 | ## Next Steps
85 |
86 | That's it, you have successfully created a secure deno API, that receives and
87 | verifies incoming webhooks from qstash.
88 |
89 | Learn more about publishing a message to qstash [here](/qstash/howto/publishing)
90 |
--------------------------------------------------------------------------------
/qstash/sdks/py/examples/schedules.mdx:
--------------------------------------------------------------------------------
1 | ---
2 | title: Schedules
3 | ---
4 |
5 |
6 | You can run the async code by importing `AsyncQStash` from `qstash`
7 | and awaiting the methods.
8 |
9 |
10 | #### Create a schedule that runs every 5 minutes
11 |
12 | ```python
13 | from qstash import QStash
14 |
15 | client = QStash("")
16 | schedule_id = client.schedule.create(
17 | destination="https://my-api...",
18 | cron="*/5 * * * *",
19 | )
20 |
21 | print(schedule_id)
22 | ```
23 |
24 | #### Create a schedule that runs every hour and sends the result to a [callback URL](/qstash/features/callbacks)
25 |
26 | ```python
27 | from qstash import QStash
28 |
29 | client = QStash("")
30 | client.schedule.create(
31 | destination="https://my-api...",
32 | cron="0 * * * *",
33 | callback="https://my-callback...",
34 | failure_callback="https://my-failure-callback...",
35 | )
36 | ```
37 |
38 | #### Create a schedule to a URL group that runs every minute
39 |
40 | ```python
41 | from qstash import QStash
42 |
43 | client = QStash("")
44 | client.schedule.create(
45 | destination="my-url-group",
46 | cron="0 * * * *",
47 | )
48 | ```
49 |
50 | #### Get a schedule by schedule id
51 |
52 | ```python
53 | from qstash import QStash
54 |
55 | client = QStash("")
56 | schedule = client.schedule.get("")
57 |
58 | print(schedule.cron)
59 | ```
60 |
61 | #### List all schedules
62 |
63 | ```python
64 | from qstash import QStash
65 |
66 | client = QStash("")
67 | all_schedules = client.schedule.list()
68 |
69 | print(all_schedules)
70 | ```
71 |
72 | #### Delete a schedule
73 |
74 | ```python
75 | from qstash import QStash
76 |
77 | client = QStash("")
78 | client.schedule.delete("")
79 | ```
80 |
81 | #### Create a schedule with timeout
82 |
83 | Timeout value to use when calling a schedule URL ([See `Upstash-Timeout` in Create Schedule page](/qstash/api/schedules/create)).
84 |
85 | ```python
86 | from qstash import QStash
87 |
88 | client = QStash("")
89 | schedule_id = client.schedule.create(
90 | destination="https://my-api...",
91 | cron="*/5 * * * *",
92 | timeout="30s",
93 | )
94 |
95 | print(schedule_id)
96 | ```
97 |
98 | #### Pause/Resume a schedule
99 |
100 | ```python
101 | from qstash import QStash
102 |
103 | client = QStash("")
104 | schedule_id = "scd_1234"
105 |
106 | client.schedule.pause(schedule_id)
107 |
108 | schedule = client.schedule.get(schedule_id)
109 | print(schedule.paused) # prints True
110 |
111 | client.schedule.resume(schedule_id)
112 | ```
113 |
--------------------------------------------------------------------------------
/qstash/howto/local-tunnel.mdx:
--------------------------------------------------------------------------------
1 | ---
2 | title: "Local Tunnel"
3 | ---
4 |
5 | QStash requires a publicly available API to send messages to.
6 | The recommended approach is to run a [development server](/qstash/howto/local-development) locally and use it for development purposes.
7 |
8 | Alternatively, you can set up a local tunnel to expose your API, enabling QStash to send requests directly to your application during development.
9 |
10 | ## localtunnel.me
11 |
12 | [localtunnel.me](https://github.com/localtunnel/localtunnel) is a free service to provide
13 | a public endpoint for your local development.
14 |
15 | It's as simple as running
16 |
17 | ```
18 | npx localtunnel --port 3000
19 | ```
20 | replacing `3000` with the port your application is running on.
21 |
22 | This will give you a public URL like `https://good-months-leave.loca.lt` which can be used
23 | as your QStash URL.
24 |
25 | If you run into issues, you may need to set the `Upstash-Forward-bypass-tunnel-reminder` header to
26 | any value to bypass the reminder message.
27 |
28 | ## ngrok
29 |
30 | [ngrok](https://ngrok.com) is a free service, that provides you with a public
31 | endpoint and forwards all traffic to your localhost.
32 |
33 | ### Sign up
34 |
35 | Create a new account on
36 | [dashboard.ngrok.com/signup](https://dashboard.ngrok.com/signup) and follow the
37 | [instructions](https://dashboard.ngrok.com/get-started/setup) to download the
38 | ngrok CLI and connect your account:
39 |
40 | ```bash
41 | ngrok config add-authtoken XXX
42 | ```
43 |
44 | ### Start the tunnel
45 |
46 | Choose the port where your application is running. Here I'm forwarding to port
47 | 3000, because Next.js is using it.
48 |
49 | ```bash
50 | $ ngrok http 3000
51 |
52 |
53 |
54 | Session Status online
55 | Account Andreas Thomas (Plan: Free)
56 | Version 3.1.0
57 | Region Europe (eu)
58 | Latency -
59 | Web Interface http://127.0.0.1:4040
60 | Forwarding https://e02f-2a02-810d-af40-5284-b139-58cc-89df-b740.eu.ngrok.io -> http://localhost:3000
61 |
62 | Connections ttl opn rt1 rt5 p50 p90
63 | 0 0 0.00 0.00 0.00 0.00
64 | ```
65 |
66 | ### Publish a message
67 |
68 | Now copy the `Forwarding` url and use it as destination in QStash. Make sure to
69 | add the path of your API at the end. (`/api/webhooks` in this case)
70 |
71 | ```
72 | curl -XPOST \
73 | -H 'Authorization: Bearer XXX' \
74 | -H "Content-type: application/json" \
75 | -d '{ "hello": "world" }' \
76 | 'https://qstash.upstash.io/v2/publish/https://e02f-2a02-810d-af40-5284-b139-58cc-89df-b740.eu.ngrok.io/api/webhooks'
77 | ```
78 |
79 | ### Debug
80 |
81 | In case messages are not delivered or something else doesn't work as expected,
82 | you can go to [http://127.0.0.1:4040](http://127.0.0.1:4040) to see what ngrok
83 | is doing.
84 |
--------------------------------------------------------------------------------
/qstash/howto/webhook.mdx:
--------------------------------------------------------------------------------
1 | ---
2 | title: "Use as Webhook Receiver"
3 | ---
4 |
5 | You can configure QStash to receive and process your webhook calls.
6 |
7 | Instead of having the webhook service call your endpoint directly, QStash acts as an intermediary, receiving the request and forwarding it to your endpoint.
8 | QStash provides additional control over webhook requests, allowing you to configure properties such as delay, retries, timeouts, callbacks, and flow control.
9 |
10 | There are multiple ways to configure QStash to receive webhook requests.
11 |
12 | ## 1. Publish
13 |
14 | You can configure your webhook URL as a QStash publish request.
15 |
16 | For example, if your webhook endpoint is:
17 |
18 | `
19 | https://example.com/api/webhook
20 | `
21 |
22 | Instead of using this URL directly as the webhook address, use:
23 |
24 | `
25 | https://qstash.upstash.io/v2/publish/https://example.com/api/webhook?qstash_token=
26 | `
27 |
28 |
29 | Request configurations such as custom retries, timeouts, and other settings can be specified using HTTP headers in the publish request.
30 | Refer to the [REST API documentation](/qstash/api/publish) for a full list of available configuration headers.
31 |
32 | It’s also possible to pass configuration via query parameters. You can use the lowercase format of headers as the key, such as ?upstash-retries=3&upstash-delay=100s. This makes it easier to configure webhook messages.
33 |
34 |
35 |
36 | By default, any headers in the publish request that are prefixed with `Upstash-Forward-` will be forwarded to your endpoint.
37 |
38 | However, since most webhook services do not allow header prefixing, we introduced a configuration option to enable forwarding all incoming request headers.
39 |
40 | To enable this, set `Upstash-Header-Forward: true` in the publish request or append the query parameter `?upstash-header-forward=true` to the request URL. This ensures that all headers are forwarded to your endpoint without requiring the `Upstash-Forward-` prefix.
41 |
42 |
43 |
44 | ## 2. URL Group
45 |
46 | URL Groups allow you to define server-side templates for publishing messages. You can create a URL Group either through the UI or programmatically.
47 |
48 | For example, if your webhook endpoint is:
49 |
50 | `https://example.com/api/webhook`
51 |
52 | Instead of using this URL directly, you can create a URL Group and add this URL as an endpoint.
53 |
54 | `
55 | https://qstash.upstash.io/v2/publish/?qstash_token=
56 | `
57 |
58 | You can define default headers for a URL Group, which will automatically apply to all requests sent to that group.
59 |
60 | ```
61 | curl -X PATCH https://qstash.upstash.io/v2/topics/ \
62 | -H "Authorizarion: Bearer "
63 | -d '{
64 | "headers": {
65 | "Upstash-Header-Forward": ["true"],
66 | "Upstash-Retries": "3"
67 | }
68 | }'
69 | ```
70 |
71 | When you save this header for your URL Group, it ensures that all headers are forwarded as needed for your webhook processing.
72 |
73 | A URL Group also enables you to define multiple endpoints within group.
74 | When a publish request is made to a URL Group, all associated endpoints will be triggered, allowing you to fan-out a single webhook call to multiple destinations.
75 |
--------------------------------------------------------------------------------
/qstash/overall/enterprise.mdx:
--------------------------------------------------------------------------------
1 | ---
2 | title: Prod Pack & Enterprise
3 | ---
4 |
5 | Upstash has Prod Pack and Enterprise plans for customers with critical production workloads. Prod Pack and Enterprise plans include additional monitoring and security features in addition to higher capacity limits and more powerful resources.
6 |
7 | Prod Pack add-on is available for both pay-as-you-go and fixed-price plans. Enterprise plans are custom plans with additional features and higher limits.
8 |
9 | All features of Prod Pack and Enterprise plan for Upstash QStash are detailed below.
10 |
11 | ## How to Upgrade
12 |
13 | You can activate Prod Pack in the QStash settings page in the [Upstash Console](https://upstash.com/dashboard/qstash). For the Enterprise plan, please create a request through the Upstash Console or contact [support@upstash.com](mailto:support@upstash.com).
14 |
15 | # Prod Pack Features
16 | Below QStash features are enabled with Prod Pack.
17 |
18 | ### Uptime SLA
19 | All Prod Pack accounts come with an SLA guaranteeing 99.99% uptime. For mission-critical messaging where uptime is crucial, we recommend Prod Pack plans. Learn more about [Uptime SLA](/common/help/sla).
20 |
21 | ### SOC-2 Type 2 Compliance & Report
22 | Upstash QStash is SOC-2 Type 2 compliant with Prod Pack. Once you enable Prod Pack, you can request access to the report by going to [Upstash Trust Center](https://trust.upstash.com/) or contacting [support@upstash.com](mailto:support@upstash.com).
23 |
24 | ### Encryption at Rest
25 | Encrypts the storage where your QStash message data is persisted and stored.
26 |
27 | ### Prometheus Metrics
28 |
29 | Prometheus is an open-source monitoring system widely used for monitoring and alerting in cloud-native and containerized environments.
30 |
31 | Upstash Prod Pack and Enterprise plans offer Prometheus metrics collection, enabling you to monitor your QStash messages with Prometheus in addition to console metrics. Learn more about [Prometheus integration](/qstash/integrations/prometheus).
32 |
33 | ### Datadog Integration
34 |
35 | Upstash Prod Pack and Enterprise plans include integration with Datadog, allowing you to monitor your QStash messages with Datadog in addition to console metrics. Learn more about [Datadog integration](/qstash/integrations/datadog).
36 |
37 |
38 | # Enterprise Features
39 |
40 | All Prod Pack features are included in the Enterprise plan. Additionally, Enterprise plans include:
41 |
42 | ### 100M+ Messages Daily
43 | Enterprise plans support 100 million or more messages per day, suitable for high-volume production workloads.
44 |
45 | ### Unlimited Bandwidth
46 | Enterprise plans include unlimited bandwidth, ensuring no data transfer limits for your messaging needs.
47 |
48 | ### SAML SSO
49 | Single Sign-On (SSO) allows you to use your existing identity provider to authenticate users for your Upstash account. This feature is available upon request for Enterprise customers.
50 |
51 | ### Professional Support with SLA
52 | Enterprise plans include access to our professional support with response time SLAs and priority access to our support team. Check out the [support page](/common/help/prosupport) for more details.
53 |
54 | ### Dedicated Resources for Isolation
55 | Enterprise customers receive dedicated resources to ensure isolation and consistent performance for their messaging workloads.
--------------------------------------------------------------------------------
/qstash/features/url-groups.mdx:
--------------------------------------------------------------------------------
1 | ---
2 | title: "URL Groups"
3 | ---
4 |
5 | Sending messages to a single endpoint and not having to worry about retries is
6 | already quite useful, but we also added the concept of URL Groups to QStash.
7 |
8 | In short, a URL Group is just a namespace where you can publish messages to, the
9 | same way as publishing a message to an endpoint directly.
10 |
11 | After creating a URL Group, you can create one or multiple endpoints. An endpoint is
12 | defined by a publicly available URL where the request will be sent to each
13 | endpoint after it is published to the URL Group.
14 |
15 | When you publish a message to a URL Group, it will be fanned out and sent to all the
16 | subscribed endpoints.
17 |
18 | ## When should I use URL Groups?
19 |
20 | URL Groups decouple your message producers from consumers by grouping one or more
21 | endpoints into a single namespace.
22 |
23 | Here's an example: You have a serverless function which is invoked with each
24 | purchase in your e-commerce site. You want to send email to the customer after
25 | the purchase. Inside the function, you submit the URL `api/sendEmail` to the
26 | QStash. Later, if you want to send a Slack notification, you need to update the
27 | serverless function adding another call to QStash to submit
28 | `api/sendNotification`. In this example, you need to update and redeploy the
29 | Serverless function at each time you change (or add) the endpoints.
30 |
31 | If you create a URL Group `product-purchase` and produce messages to that URL Group in
32 | the function, then you can add or remove endpoints by only updating the URL Group.
33 | URL Groups give you freedom to modify endpoints without touching the backend
34 | implementation.
35 |
36 | Check [here](/qstash/howto/publishing#publish-to-url-group) to learn how to publish
37 | to URL Groups.
38 |
39 | ## How URL Groups work
40 |
41 | When you publish a message to a URL Group, we will enqueue a unique task for each
42 | subscribed endpoint and guarantee successful delivery to each one of them.
43 |
44 | [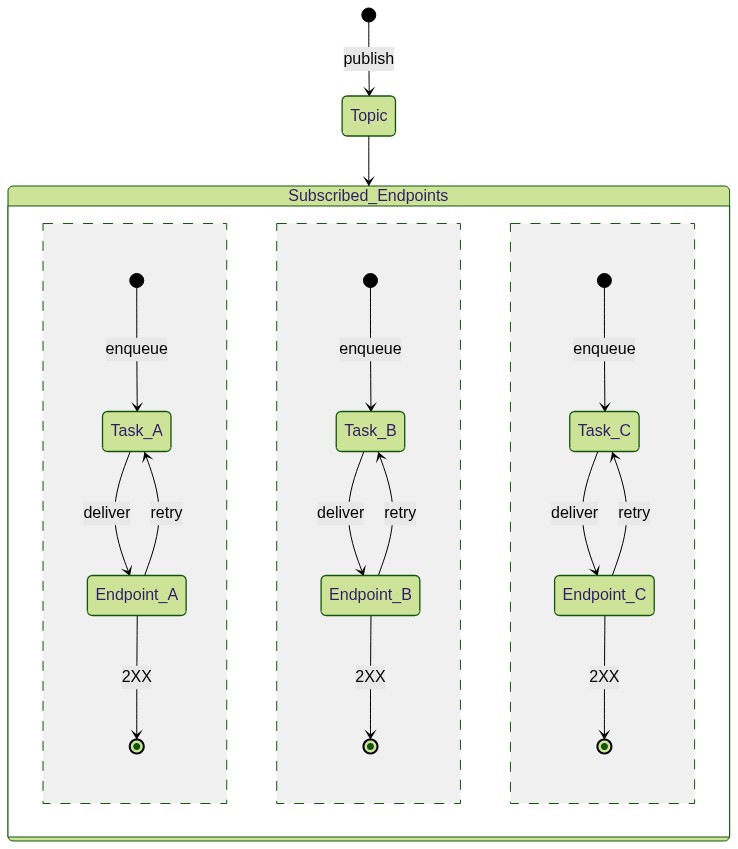](https://mermaid.live/edit#pako:eNp1kl1rgzAUhv9KyOWoddXNtrkYVNdf0F0U5ijRHDVMjctHoRT_-2KtaztUQeS8j28e8JxxKhhggpWmGt45zSWtnKMX13GN7PX59IUc5w19iIanBDUmKbkq-qwfXuKdSVQqeQLssK1ZI3itVQ9dekdzdO6Ja9ntKKq-DxtEoP4xYGCIr-OOGCoOG4IYlPwIcqBu0V0XQRK0PE0w9lyCvP1-iB1n1CgcNwofjcJpo_Cua8ooHDWadIrGnaJHp2jaKbrrmnKK_jl1d9s98AxXICvKmd2fy8-MsS6gghgT-5oJCUrH2NKWNA2zi7BlXAuJSUZLBTNMjRa7U51ioqWBAbpu4R9VCsrAfnTG-tR0u5pzpW1lKuqM593cyNKOC60bRVy3i-c514VJ5qmoXMVZQaUujuvADbxgRT0fgqVPX32fpclivcq8l0XGls8Lj-K2bX8Bx2nzPg)
45 |
46 | Consider this scenario: You have a URL Group and 3 endpoints that are subscribed to
47 | it. Now when you publish a message to the URL Group, internally we will create a
48 | task for each subscribed endpoint and handle all retry mechanism isolated from
49 | each other.
50 |
51 | ## How to create a URL Group
52 |
53 | Please refer to the howto [here](/qstash/howto/url-group-endpoint).
54 |
--------------------------------------------------------------------------------
/qstash/features/deduplication.mdx:
--------------------------------------------------------------------------------
1 | ---
2 | title: "Deduplication"
3 | ---
4 |
5 | Messages can be deduplicated to prevent duplicate messages from being sent. When
6 | a duplicate message is detected, it is accepted by QStash but not enqueued. This
7 | can be useful when the connection between your service and QStash fails, and you
8 | never receive the acknowledgement. You can simply retry publishing and can be
9 | sure that the message will enqueued only once.
10 |
11 | In case a message is a duplicate, we will accept the request and return the
12 | messageID of the existing message. The only difference will be the response
13 | status code. We'll send HTTP `202 Accepted` code in case of a duplicate message.
14 |
15 | ## Deduplication ID
16 |
17 | To deduplicate a message, you can send the `Upstash-Deduplication-Id` header
18 | when publishing the message.
19 |
20 |
21 | ```shell cURL
22 | curl -XPOST \
23 | -H 'Authorization: Bearer XXX' \
24 | -H "Content-type: application/json" \
25 | -H "Upstash-Deduplication-Id: abcdef" \
26 | -d '{ "hello": "world" }' \
27 | 'https://qstash.upstash.io/v2/publish/https://my-api..."'
28 | ```
29 |
30 | ```typescript TypeScript
31 | import { Client } from "@upstash/qstash";
32 |
33 | const client = new Client({ token: "" });
34 | const res = await client.publishJSON({
35 | url: "https://my-api...",
36 | body: { hello: "world" },
37 | deduplicationId: "abcdef",
38 | });
39 | ```
40 |
41 | ```python Python
42 | from qstash import QStash
43 |
44 | client = QStash("")
45 | client.message.publish_json(
46 | url="https://my-api...",
47 | body={
48 | "hello": "world",
49 | },
50 | deduplication_id="abcdef",
51 | )
52 | ```
53 |
54 |
55 | ## Content Based Deduplication
56 |
57 | If you want to deduplicate messages automatically, you can set the
58 | `Upstash-Content-Based-Deduplication` header to `true`.
59 |
60 |
61 | ```shell cURL
62 | curl -XPOST \
63 | -H 'Authorization: Bearer XXX' \
64 | -H "Content-type: application/json" \
65 | -H "Upstash-Content-Based-Deduplication: true" \
66 | -d '{ "hello": "world" }' \
67 | 'https://qstash.upstash.io/v2/publish/...'
68 | ```
69 |
70 | ```typescript TypeScript
71 | import { Client } from "@upstash/qstash";
72 |
73 | const client = new Client({ token: "" });
74 | const res = await client.publishJSON({
75 | url: "https://my-api...",
76 | body: { hello: "world" },
77 | contentBasedDeduplication: true,
78 | });
79 | ```
80 |
81 | ```python Python
82 | from qstash import QStash
83 |
84 | client = QStash("")
85 | client.message.publish_json(
86 | url="https://my-api...",
87 | body={
88 | "hello": "world",
89 | },
90 | content_based_deduplication=True,
91 | )
92 | ```
93 |
94 |
95 | Content based deduplication creates a unique deduplication ID for the message
96 | based on the following fields:
97 |
98 | - **Destination**: The URL Group or endpoint you are publishing the message to.
99 |
100 | - **Body**: The body of the message.
101 |
102 | - **Header**: This includes the `Content-Type` header and all headers, that you
103 | forwarded with the `Upstash-Forward-` prefix. See
104 | [custom HTTP headers section](/qstash/howto/publishing#sending-custom-http-headers).
105 |
106 |
107 | The deduplication window is 10 minutes. After that, messages with the same ID or content can be sent again.
108 |
109 |
--------------------------------------------------------------------------------
/qstash/sdks/ts/examples/schedules.mdx:
--------------------------------------------------------------------------------
1 | ---
2 | title: Schedules
3 | ---
4 |
5 | #### Create a schedule that runs every 5 minutes
6 |
7 | ```typescript
8 | import { Client } from "@upstash/qstash";
9 |
10 | const client = new Client({ token: "" });
11 | await client.schedules.create({
12 | destination: "https://my-api...",
13 | cron: "*/5 * * * *",
14 | });
15 | ```
16 |
17 | #### Create a schedule that runs every hour and sends the result to a [callback URL](/qstash/features/callbacks)
18 |
19 | ```typescript
20 | import { Client } from "@upstash/qstash";
21 |
22 | const client = new Client({ token: "" });
23 | await client.schedules.create({
24 | destination: "https://my-api...",
25 | cron: "0 * * * *",
26 | callback: "https://my-callback...",
27 | failureCallback: "https://my-failure-callback...",
28 | });
29 | ```
30 |
31 | #### Create a schedule to a URL Group that runs every minute
32 |
33 | ```typescript
34 | import { Client } from "@upstash/qstash";
35 |
36 | const client = new Client({ token: "" });
37 | await client.schedules.create({
38 | destination: "my-url-group",
39 | cron: "* * * * *",
40 | });
41 | ```
42 |
43 | #### Get a schedule by schedule id
44 |
45 | ```typescript
46 | import { Client } from "@upstash/qstash";
47 |
48 | const client = new Client({ token: "" });
49 |
50 | const res = await client.schedules.get("scheduleId");
51 | console.log(res.cron);
52 | ```
53 |
54 | #### List all schedules
55 |
56 | ```typescript
57 | import { Client } from "@upstash/qstash";
58 |
59 | const client = new Client({ token: "" });
60 | const allSchedules = await client.schedules.list();
61 | console.log(allSchedules);
62 | ```
63 |
64 | #### Create/overwrite a schedule with a user chosen schedule id
65 |
66 | Note that if a schedule exists with the same id, the old one will be discarded
67 | and new schedule will be used.
68 |
69 | ```typescript Typescript
70 | import { Client } from "@upstash/qstash";
71 |
72 | const client = new Client({ token: "" });
73 | await client.schedules.create({
74 | destination: "https://example.com",
75 | scheduleId: "USER_PROVIDED_SCHEDULE_ID",
76 | cron: "* * * * *",
77 | });
78 | ```
79 |
80 | #### Delete a schedule
81 |
82 | ```typescript
83 | import { Client } from "@upstash/qstash";
84 |
85 | const client = new Client({ token: "" });
86 | await client.schedules.delete("scheduleId");
87 | ```
88 |
89 | #### Create a schedule with timeout
90 |
91 | Timeout value in seconds to use when calling a schedule URL ([See `Upstash-Timeout` in Create Schedule page](/qstash/api/schedules/create)).
92 |
93 | ```typescript
94 | import { Client } from "@upstash/qstash";
95 |
96 | const client = new Client({ token: "" });
97 | await client.schedules.create({
98 | url: "https://my-api...",
99 | cron: "* * * * *",
100 | timeout: "30" // 30 seconds timeout
101 | });
102 | ```
103 |
104 | #### Pause/Resume a schedule
105 |
106 | ```typescript
107 | import { Client } from "@upstash/qstash";
108 | const client = new Client({ token: "" });
109 | const scheduleId = "my-schedule"
110 |
111 | // pause schedule
112 | await client.schedules.pause({ schedule: scheduleId });
113 |
114 | // check if paused
115 | const result = await client.schedules.get(scheduleId);
116 | console.log(getResult.isPaused) // prints true
117 |
118 | // resume schedule
119 | await client.schedules.resume({ schedule: scheduleId });
120 | ```
121 |
--------------------------------------------------------------------------------
/qstash/features/delay.mdx:
--------------------------------------------------------------------------------
1 | ---
2 | title: "Delay"
3 | ---
4 |
5 | When publishing a message, you can delay it for a certain amount of time before
6 | it will be delivered to your API. See the [pricing table](https://upstash.com/pricing/qstash) for more information
7 |
8 |
9 | For free: The maximum allowed delay is **7 days**.
10 |
11 | For pay-as-you-go: The maximum allowed delay is **1 year**.
12 |
13 | For fixed pricing: The maximum allowed delay is **Custom(you may delay as much as needed)**.
14 |
15 |
16 | ## Relative Delay
17 |
18 | Delay a message by a certain amount of time relative to the time the message was
19 | published.
20 |
21 | The format for the duration is ``. Here are some examples:
22 |
23 | - `10s` = 10 seconds
24 | - `1m` = 1 minute
25 | - `30m` = half an hour
26 | - `2h` = 2 hours
27 | - `7d` = 7 days
28 |
29 | You can send this duration inside the `Upstash-Delay` header.
30 |
31 |
32 | ```shell cURL
33 | curl -XPOST \
34 | -H 'Authorization: Bearer XXX' \
35 | -H "Content-type: application/json" \
36 | -H "Upstash-Delay: 1m" \
37 | -d '{ "hello": "world" }' \
38 | 'https://qstash.upstash.io/v2/publish/https://my-api...'
39 | ```
40 |
41 | ```typescript Typescript
42 | import { Client } from "@upstash/qstash";
43 |
44 | const client = new Client({ token: "" });
45 | const res = await client.publishJSON({
46 | url: "https://my-api...",
47 | body: { hello: "world" },
48 | delay: 60,
49 | });
50 | ```
51 |
52 | ```python Python
53 | from qstash import QStash
54 |
55 | client = QStash("")
56 | client.message.publish_json(
57 | url="https://my-api...",
58 | body={
59 | "hello": "world",
60 | },
61 | headers={
62 | "test-header": "test-value",
63 | },
64 | delay="60s",
65 | )
66 | ```
67 |
68 |
69 |
70 |
71 | `Upstash-Delay` will get overridden by `Upstash-Not-Before` header when both are
72 | used together.
73 |
74 |
75 |
76 | ## Absolute Delay
77 |
78 | Delay a message until a certain time in the future. The format is a unix
79 | timestamp in seconds, based on the UTC timezone.
80 |
81 | You can send the timestamp inside the `Upstash-Not-Before` header.
82 |
83 |
84 | ```shell cURL
85 | curl -XPOST \
86 | -H 'Authorization: Bearer XXX' \
87 | -H "Content-type: application/json" \
88 | -H "Upstash-Not-Before: 1657104947" \
89 | -d '{ "hello": "world" }' \
90 | 'https://qstash.upstash.io/v2/publish/https://my-api...'
91 | ```
92 |
93 | ```typescript Typescript
94 | import { Client } from "@upstash/qstash";
95 |
96 | const client = new Client({ token: "" });
97 | const res = await client.publishJSON({
98 | url: "https://my-api...",
99 | body: { hello: "world" },
100 | notBefore: 1657104947,
101 | });
102 | ```
103 |
104 | ```python Python
105 | from qstash import QStash
106 |
107 | client = QStash("")
108 | client.message.publish_json(
109 | url="https://my-api...",
110 | body={
111 | "hello": "world",
112 | },
113 | headers={
114 | "test-header": "test-value",
115 | },
116 | not_before=1657104947,
117 | )
118 | ```
119 |
120 |
121 |
122 |
123 | `Upstash-Not-Before` will override the `Upstash-Delay` header when both are used
124 | together.
125 |
126 |
127 |
128 | ## Delays in Schedules
129 |
130 | Adding a delay in schedules is only possible via `Upstash-Delay`. The
131 | delay will affect the messages that will be created by the schedule and not the
132 | schedule itself.
133 |
134 | For example when you create a new schedule with a delay of `30s`, the messages
135 | will be created when the schedule triggers but only delivered after 30 seconds.
136 |
--------------------------------------------------------------------------------
/qstash/sdks/py/examples/publish.mdx:
--------------------------------------------------------------------------------
1 | ---
2 | title: Publish
3 | ---
4 |
5 |
6 | You can run the async code by importing `AsyncQStash` from `qstash`
7 | and awaiting the methods.
8 |
9 |
10 | #### Publish to a URL with a 3 second delay and headers/body
11 |
12 | ```python
13 | from qstash import QStash
14 |
15 | client = QStash("")
16 | res = client.message.publish_json(
17 | url="https://my-api...",
18 | body={
19 | "hello": "world",
20 | },
21 | headers={
22 | "test-header": "test-value",
23 | },
24 | delay="3s",
25 | )
26 |
27 | print(res.message_id)
28 | ```
29 |
30 | #### Publish to a URL group with a 3 second delay and headers/body
31 |
32 | You can make a URL group on the QStash console or using the [URL group API](/qstash/sdks/py/examples/url-groups)
33 |
34 | ```python
35 | from qstash import QStash
36 |
37 | client = QStash("")
38 | res = client.message.publish_json(
39 | url_group="my-url-group",
40 | body={
41 | "hello": "world",
42 | },
43 | headers={
44 | "test-header": "test-value",
45 | },
46 | delay="3s",
47 | )
48 |
49 | # When publishing to a URL group, the response is an array of messages for each URL in the group
50 | print(res[0].message_id)
51 | ```
52 |
53 | #### Publish a method with a callback URL
54 |
55 | [Callbacks](/qstash/features/callbacks) are useful for long running functions. Here, QStash will return the response
56 | of the publish request to the callback URL.
57 |
58 | We also change the `method` to `GET` in this use case so QStash will make a `GET` request to the `url`. The default
59 | is `POST`.
60 |
61 | ```python
62 | from qstash import QStash
63 |
64 | client = QStash("")
65 | client.message.publish_json(
66 | url="https://my-api...",
67 | body={
68 | "hello": "world",
69 | },
70 | callback="https://my-callback...",
71 | failure_callback="https://my-failure-callback...",
72 | method="GET",
73 | )
74 | ```
75 |
76 | #### Configure the number of retries
77 |
78 | The max number of retries is based on your [QStash plan](https://upstash.com/pricing/qstash)
79 |
80 | ```python
81 | from qstash import QStash
82 |
83 | client = QStash("")
84 | client.message.publish_json(
85 | url="https://my-api...",
86 | body={
87 | "hello": "world",
88 | },
89 | retries=1,
90 | )
91 | ```
92 |
93 | By default, the delay between retries is calculated using an exponential backoff algorithm. You can customize this using the `retryDelay` parameter. Check out [the retries page to learn more about custom retry delay values](/qstash/features/retry#custom-retry-delay).
94 |
95 | #### Publish HTML content instead of JSON
96 |
97 | ```python
98 | from qstash import QStash
99 |
100 | client = QStash("")
101 | client.message.publish(
102 | url="https://my-api...",
103 | body="
Hello World
",
104 | content_type="text/html",
105 | )
106 | ```
107 |
108 | #### Publish a message with [content-based-deduplication](/qstash/features/deduplication)
109 |
110 | ```python
111 | from qstash import QStash
112 |
113 | client = QStash("")
114 | client.message.publish_json(
115 | url="https://my-api...",
116 | body={
117 | "hello": "world",
118 | },
119 | content_based_deduplication=True,
120 | )
121 | ```
122 |
123 | #### Publish a message with timeout
124 |
125 | Timeout value to use when calling a url ([See `Upstash-Timeout` in Publish Message page](/qstash/api/publish#request))
126 |
127 | ```python
128 | from qstash import QStash
129 |
130 | client = QStash("")
131 | client.message.publish_json(
132 | url="https://my-api...",
133 | body={
134 | "hello": "world",
135 | },
136 | timeout="30s",
137 | )
138 | ```
--------------------------------------------------------------------------------
/qstash/howto/signature.mdx:
--------------------------------------------------------------------------------
1 | ---
2 | title: "Verify Signatures"
3 | ---
4 |
5 | We send a JWT with each request. This JWT is signed by your individual secret
6 | signing key and sent in the `Upstash-Signature` HTTP header.
7 |
8 | You can use this signature to verify the request is coming from QStash.
9 |
10 | 
11 |
12 |
13 | You need to keep your signing keys in a secure location.
14 | Otherwise some malicious actor could use them to send requests to your API as if they were coming from QStash.
15 |
16 |
17 | ## Verifying
18 |
19 | You can use the official QStash SDKs or implement a custom verifier either by using [an open source library](https://jwt.io/libraries) or by processing the JWT manually.
20 |
21 | ### Via SDK (Recommended)
22 |
23 | QStash SDKs provide a `Receiver` type that simplifies signature verification.
24 |
25 |
26 | ```typescript Typescript
27 | import { Receiver } from "@upstash/qstash";
28 |
29 | const receiver = new Receiver({
30 | currentSigningKey: "YOUR_CURRENT_SIGNING_KEY",
31 | nextSigningKey: "YOUR_NEXT_SIGNING_KEY",
32 | });
33 |
34 | // ... in your request handler
35 |
36 | const signature = req.headers["Upstash-Signature"];
37 | const body = req.body;
38 |
39 | const isValid = await receiver.verify({
40 | body,
41 | signature,
42 | url: "YOUR-SITE-URL",
43 | });
44 | ```
45 |
46 | ```python Python
47 | from qstash import Receiver
48 |
49 | receiver = Receiver(
50 | current_signing_key="YOUR_CURRENT_SIGNING_KEY",
51 | next_signing_key="YOUR_NEXT_SIGNING_KEY",
52 | )
53 |
54 | # ... in your request handler
55 |
56 | signature, body = req.headers["Upstash-Signature"], req.body
57 |
58 | receiver.verify(
59 | body=body,
60 | signature=signature,
61 | url="YOUR-SITE-URL",
62 | )
63 | ```
64 |
65 | ```go Golang
66 | import "github.com/qstash/qstash-go"
67 |
68 | receiver := qstash.NewReceiver("", "NEXT_SIGNING_KEY")
69 |
70 | // ... in your request handler
71 |
72 | signature := req.Header.Get("Upstash-Signature")
73 | body, err := io.ReadAll(req.Body)
74 | // handle err
75 |
76 | err := receiver.Verify(qstash.VerifyOptions{
77 | Signature: signature,
78 | Body: string(body),
79 | Url: "YOUR-SITE-URL", // optional
80 | })
81 | // handle err
82 | ```
83 |
84 |
85 | Depending on the environment, the body might be parsed into an object by the HTTP handler if it is JSON.
86 | Ensure you use the raw body string as is. For example, converting the parsed object back to a string (e.g., JSON.stringify(object)) may cause inconsistencies and result in verification failure.
87 |
88 | ### Manual verification
89 |
90 | If you don't want to use the SDKs, you can implement your own verifier either by using an open-source library or by manually processing the JWT.
91 |
92 | The exact implementation depends on the language of your choice and the library if you use one.
93 | Instead here are the steps you need to follow:
94 |
95 | 1. Split the JWT into its header, payload and signature
96 | 2. Verify the signature
97 | 3. Decode the payload and verify the claims
98 | - `iss`: The issuer must be`Upstash`.
99 | - `sub`: The subject must the url of your API.
100 | - `exp`: Verify the token has not expired yet.
101 | - `nbf`: Verify the token is already valid.
102 | - `body`: Hash the raw request body using `SHA-256` and compare it with the
103 | `body` claim.
104 |
105 | You can also reference the implementation in our
106 | [Typescript SDK](https://github.com/upstash/sdk-qstash-ts/blob/main/src/receiver.ts#L82).
107 |
108 | After you have verified the signature and the claims, you can be sure the
109 | request came from Upstash and process it accordingly.
110 |
111 | ## Claims
112 |
113 | All claims in the JWT are listed [here](/qstash/features/security#claims)
--------------------------------------------------------------------------------
/qstash/sdks/ts/examples/publish.mdx:
--------------------------------------------------------------------------------
1 | ---
2 | title: Publish
3 | ---
4 |
5 | #### Publish to a URL with a 3 second delay and headers/body
6 |
7 | ```typescript
8 | import { Client } from "@upstash/qstash";
9 |
10 | const client = new Client({ token: "" });
11 | const res = await client.publishJSON({
12 | url: "https://my-api...",
13 | body: { hello: "world" },
14 | headers: { "test-header": "test-value" },
15 | delay: "3s",
16 | });
17 | ```
18 |
19 | #### Publish to a URL group with a 3 second delay and headers/body
20 |
21 | You create URL group on the QStash console or using the [URL Group API](/qstash/sdks/ts/examples/url-groups#create-a-url-group-and-add-2-endpoints)
22 |
23 | ```typescript
24 | import { Client } from "@upstash/qstash";
25 |
26 | const client = new Client({ token: "" });
27 | const res = await client.publishJSON({
28 | urlGroup: "my-url-group",
29 | body: { hello: "world" },
30 | headers: { "test-header": "test-value" },
31 | delay: "3s",
32 | });
33 |
34 | // When publishing to a URL Group, the response is an array of messages for each URL in the URL Group
35 | console.log(res[0].messageId);
36 | ```
37 |
38 | #### Publish a method with a callback URL
39 |
40 | [Callbacks](/qstash/features/callbacks) are useful for long running functions. Here, QStash will return the response
41 | of the publish request to the callback URL.
42 |
43 | We also change the `method` to `GET` in this use case so QStash will make a `GET` request to the `url`. The default
44 | is `POST`.
45 |
46 | ```typescript
47 | import { Client } from "@upstash/qstash";
48 |
49 | const client = new Client({ token: "" });
50 | const res = await client.publishJSON({
51 | url: "https://my-api...",
52 | body: { hello: "world" },
53 | callback: "https://my-callback...",
54 | failureCallback: "https://my-failure-callback...",
55 | method: "GET",
56 | });
57 | ```
58 |
59 | #### Configure the number of retries
60 |
61 | The max number of retries is based on your [QStash plan](https://upstash.com/pricing/qstash)
62 |
63 | ```typescript
64 | import { Client } from "@upstash/qstash";
65 |
66 | const client = new Client({ token: "" });
67 | const res = await client.publishJSON({
68 | url: "https://my-api...",
69 | body: { hello: "world" },
70 | retries: 1,
71 | });
72 | ```
73 |
74 | By default, the delay between retries is calculated using an exponential backoff algorithm. You can customize this using the `retry_delay` parameter. Check out [the retries documentation to learn more about custom retry delay values](/qstash/features/retry#custom-retry-delay).
75 |
76 | #### Publish HTML content instead of JSON
77 |
78 | ```typescript
79 | import { Client } from "@upstash/qstash";
80 |
81 | const client = new Client({ token: "" });
82 | const res = await client.publish({
83 | url: "https://my-api...",
84 | body: "
Hello World
",
85 | headers: {
86 | "Content-Type": "text/html",
87 | },
88 | });
89 | ```
90 |
91 | #### Publish a message with [content-based-deduplication](/qstash/features/deduplication)
92 |
93 | ```typescript
94 | import { Client } from "@upstash/qstash";
95 |
96 | const client = new Client({ token: "" });
97 | const res = await client.publishJSON({
98 | url: "https://my-api...",
99 | body: { hello: "world" },
100 | contentBasedDeduplication: true,
101 | });
102 | ```
103 |
104 | #### Publish a message with timeout
105 |
106 | Timeout value in seconds to use when calling a url ([See `Upstash-Timeout` in Publish Message page](/qstash/api/publish#request))
107 |
108 | ```typescript
109 | import { Client } from "@upstash/qstash";
110 |
111 | const client = new Client({ token: "" });
112 | const res = await client.publishJSON({
113 | url: "https://my-api...",
114 | body: { hello: "world" },
115 | timeout: "30s" // 30 seconds timeout
116 | });
117 | ```
118 |
--------------------------------------------------------------------------------
/qstash/integrations/anthropic.mdx:
--------------------------------------------------------------------------------
1 | ---
2 | title: LLM with Anthropic
3 | ---
4 |
5 | QStash integrates smoothly with Anthropic's API, allowing you to send LLM requests and leverage QStash features like retries, callbacks, and batching. This is especially useful when working in serverless environments where LLM response times vary and traditional timeouts may be limiting. QStash provides an HTTP timeout of up to 2 hours, which is ideal for most LLM cases.
6 |
7 | ### Example: Publishing and Enqueueing Requests
8 |
9 | Specify the `api` as `llm` with the provider set to `anthropic()` when publishing requests. Use the `Upstash-Callback` header to handle responses asynchronously, as streaming completions aren’t supported for this integration.
10 |
11 | #### Publishing a Request
12 |
13 | ```typescript
14 | import { anthropic, Client } from "@upstash/qstash";
15 |
16 | const client = new Client({ token: "" });
17 | await client.publishJSON({
18 | api: { name: "llm", provider: anthropic({ token: "" }) },
19 | body: {
20 | model: "claude-3-5-sonnet-20241022",
21 | messages: [{ role: "user", content: "Summarize recent tech trends." }],
22 | },
23 | callback: "https://example.com/callback",
24 | });
25 | ```
26 |
27 | ### Enqueueing a Chat Completion Request
28 |
29 | Use `enqueueJSON` with Anthropic as the provider to enqueue requests for asynchronous processing.
30 |
31 | ```typescript
32 | import { anthropic, Client } from "@upstash/qstash";
33 |
34 | const client = new Client({ token: "" });
35 |
36 | const result = await client.queue({ queueName: "your-queue-name" }).enqueueJSON({
37 | api: { name: "llm", provider: anthropic({ token: "" }) },
38 | body: {
39 | model: "claude-3-5-sonnet-20241022",
40 | messages: [
41 | {
42 | role: "user",
43 | content: "Generate ideas for a marketing campaign.",
44 | },
45 | ],
46 | },
47 | callback: "https://example.com/callback",
48 | });
49 |
50 | console.log(result);
51 | ```
52 |
53 | ### Sending Chat Completion Requests in Batches
54 |
55 | Use `batchJSON` to send multiple requests at once. Each request in the batch specifies the same Anthropic provider and includes a callback URL.
56 |
57 | ```typescript
58 | import { anthropic, Client } from "@upstash/qstash";
59 |
60 | const client = new Client({ token: "" });
61 |
62 | const result = await client.batchJSON([
63 | {
64 | api: { name: "llm", provider: anthropic({ token: "" }) },
65 | body: {
66 | model: "claude-3-5-sonnet-20241022",
67 | messages: [
68 | {
69 | role: "user",
70 | content: "Describe the latest in AI research.",
71 | },
72 | ],
73 | },
74 | callback: "https://example.com/callback1",
75 | },
76 | {
77 | api: { name: "llm", provider: anthropic({ token: "" }) },
78 | body: {
79 | model: "claude-3-5-sonnet-20241022",
80 | messages: [
81 | {
82 | role: "user",
83 | content: "Outline the future of remote work.",
84 | },
85 | ],
86 | },
87 | callback: "https://example.com/callback2",
88 | },
89 | // Add more requests as needed
90 | ]);
91 |
92 | console.log(result);
93 | ```
94 |
95 | #### Analytics with Helicone
96 |
97 | To monitor usage, include Helicone analytics by passing your Helicone API key under `analytics`:
98 |
99 | ```typescript
100 | await client.publishJSON({
101 | api: {
102 | name: "llm",
103 | provider: anthropic({ token: "" }),
104 | analytics: { name: "helicone", token: process.env.HELICONE_API_KEY! },
105 | },
106 | body: { model: "claude-3-5-sonnet-20241022", messages: [{ role: "user", content: "Hello!" }] },
107 | callback: "https://example.com/callback",
108 | });
109 | ```
110 |
111 | With this setup, Anthropic can be used seamlessly in any LLM workflows in QStash.
--------------------------------------------------------------------------------
/qstash/howto/publishing.mdx:
--------------------------------------------------------------------------------
1 | ---
2 | title: "Publish Messages"
3 | ---
4 |
5 |
6 | Publishing a message is as easy as sending a HTTP request to the `/publish`
7 | endpoint. All you need is a valid url of your destination.
8 |
9 |
10 |
11 |
12 |
13 |
14 | Destination URLs must always include the protocol (`http://` or `https://`)
15 |
16 |
17 | ## The message
18 |
19 | The message you want to send is passed in the request body. Upstash does not
20 | use, parse, or validate the body, so you can send any kind of data you want. We
21 | suggest you add a `Content-Type` header to your request to make sure your
22 | destination API knows what kind of data you are sending.
23 |
24 | ## Sending custom HTTP headers
25 |
26 | In addition to sending the message itself, you can also forward HTTP headers.
27 | Simply add them prefixed with `Upstash-Forward-` and we will include them in the
28 | message.
29 |
30 | #### Here's an example
31 |
32 |
33 | ```shell cURL
34 | curl -XPOST \
35 | -H 'Authorization: Bearer XXX' \
36 | -H 'Upstash-Forward-My-Header: my-value' \
37 | -H "Content-type: application/json" \
38 | -d '{ "hello": "world" }' \
39 | 'https://qstash.upstash.io/v2/publish/https://example.com'
40 | ```
41 | ``` typescript Typescript
42 | import { Client } from "@upstash/qstash";
43 |
44 | const client = new Client({ token: "" });
45 | const res = await client.publishJSON({
46 | url: "https://example.com",
47 | body: { "hello": "world" },
48 | headers: { "my-header": "my-value" },
49 | });
50 | ```
51 | ``` python Python
52 | from qstash import QStash
53 |
54 | client = QStash("")
55 | client.message.publish_json(
56 | url="https://my-api...",
57 | body={
58 | "hello": "world",
59 | },
60 | headers={
61 | "my-header": "my-value",
62 | },
63 | )
64 | ```
65 |
66 |
67 | In this case, we would deliver a `POST` request to `https://example.com` with
68 | the following body and headers:
69 |
70 | ```json
71 | // body
72 | { "hello": "world" }
73 |
74 | // headers
75 | My-Header: my-value
76 | Content-Type: application/json
77 | ```
78 |
79 | #### What happens after publishing?
80 |
81 | When you publish a message, it will be durably stored in an
82 | [Upstash Redis database](https://upstash.com/redis). Then we try to deliver the
83 | message to your chosen destination API. If your API is down or does not respond
84 | with a success status code (200-299), the message will be retried and delivered
85 | when it comes back online. You do not need to worry about retrying messages or
86 | ensuring that they are delivered.
87 |
88 | By default, the multiple messages published to QStash are sent to your API in parallel.
89 |
90 | ## Publish to URL Group
91 |
92 | URL Groups allow you to publish a single message to more than one API endpoints. To
93 | learn more about URL Groups, check [URL Groups section](/qstash/features/url-groups).
94 |
95 | Publishing to a URL Group is very similar to publishing to a single destination. All
96 | you need to do is replace the `URL` in the `/publish` endpoint with the URL Group
97 | name.
98 |
99 | ```
100 | https://qstash.upstash.io/v2/publish/https://example.com
101 | https://qstash.upstash.io/v2/publish/my-url-group
102 | ```
103 |
104 |
105 | ```shell cURL
106 | curl -XPOST \
107 | -H 'Authorization: Bearer XXX' \
108 | -H "Content-type: application/json" \
109 | -d '{ "hello": "world" }' \
110 | 'https://qstash.upstash.io/v2/publish/my-url-group'
111 | ```
112 | ``` typescript Typescript
113 | import { Client } from "@upstash/qstash";
114 |
115 | const client = new Client({ token: "" });
116 | const res = await client.publishJSON({
117 | urlGroup: "my-url-group",
118 | body: { "hello": "world" },
119 | });
120 | ```
121 | ``` python Python
122 | from qstash import QStash
123 |
124 | client = QStash("")
125 | client.message.publish_json(
126 | url_group="my-url-group",
127 | body={
128 | "hello": "world",
129 | },
130 | )
131 | ```
132 |
133 |
134 | ## Optional parameters and configuration
135 |
136 | QStash supports a number of optional parameters and configuration that you can
137 | use to customize the delivery of your message. All configuration is done using
138 | HTTP headers.
139 |
--------------------------------------------------------------------------------
/qstash/howto/local-development.mdx:
--------------------------------------------------------------------------------
1 | ---
2 | title: "Local Development"
3 | ---
4 |
5 | QStash requires a publicly available API to send messages to.
6 | During development when applications are not yet deployed, developers typically need to expose their local API by creating a public tunnel.
7 | While local tunneling works seamlessly, it requires code changes between development and production environments and increase friction for developers.
8 | To simplify the development process, Upstash provides QStash CLI, which allows you to run a development server locally for testing and development.
9 |
10 | The development server fully supports all QStash features including Schedules, URL Groups, Workflows, and Event Logs.
11 |
12 | Since the development server operates entirely in-memory, all data is reset when the server restarts.
13 |
14 | You can download and run the QStash CLI executable binary in several ways:
15 |
16 | ## NPX (Node Package Executable)
17 |
18 | Install the binary via the `@upstash/qstash-cli` NPM package:
19 |
20 | ```javascript
21 | npx @upstash/qstash-cli dev
22 |
23 | // Start on a different port
24 | npx @upstash/qstash-cli dev -port=8081
25 | ```
26 |
27 | Once you start the local server, you can go to the QStash tab on Upstash Console and enable local mode, which will allow you to publish requests and monitor messages with the local server.
28 |
29 |
30 |
31 | ## Docker
32 |
33 | QStash CLI is available as a Docker image through our public AWS ECR repository:
34 |
35 | ```javascript
36 | // Pull the image
37 | docker pull public.ecr.aws/upstash/qstash:latest
38 |
39 | // Run the image
40 | docker run -p 8080:8080 public.ecr.aws/upstash/qstash:latest qstash dev
41 | ```
42 |
43 | ## Artifact Repository
44 |
45 | You can download the binary directly from our artifact repository without using a package manager:
46 |
47 | https://artifacts.upstash.com/#qstash/versions/
48 |
49 | Select the appropriate version, architecture, and operating system for your platform.
50 | After extracting the archive file, run the executable:
51 |
52 | ```
53 | $ ./qstash dev
54 | ```
55 |
56 | ## QStash CLI
57 |
58 | Currently, the only available command for QStash CLI is `dev`, which starts a development server instance.
59 |
60 | ```
61 | $ ./qstash dev --help
62 | Usage of dev:
63 | -port int
64 | The port to start HTTP server at [env QSTASH_DEV_PORT] (default 8080)
65 | -quota string
66 | The quota of users [env QSTASH_DEV_QUOTA] (default "payg")
67 | ```
68 |
69 |
70 | There are predefined test users available. You can configure the quota type of users using the `-quota` option, with available options being `payg` and `pro`.
71 | These quotas don't affect performance but allow you to simulate different server limits based on the subscription tier.
72 |
73 | After starting the development server using any of the methods above, it will display the necessary environment variables.
74 | Select and copy the credentials from one of the following test users:
75 |
76 |
77 |
78 | ```javascript User 1
79 | QSTASH_URL="http://localhost:8080"
80 | QSTASH_TOKEN="eyJVc2VySUQiOiJkZWZhdWx0VXNlciIsIlBhc3N3b3JkIjoiZGVmYXVsdFBhc3N3b3JkIn0="
81 | QSTASH_CURRENT_SIGNING_KEY="sig_7kYjw48mhY7kAjqNGcy6cr29RJ6r"
82 | QSTASH_NEXT_SIGNING_KEY="sig_5ZB6DVzB1wjE8S6rZ7eenA8Pdnhs"
83 | ```
84 |
85 | ```javascript User 2
86 | QSTASH_URL="http://localhost:8080"
87 | QSTASH_TOKEN="eyJVc2VySUQiOiJ0ZXN0VXNlcjEiLCJQYXNzd29yZCI6InRlc3RQYXNzd29yZCJ9"
88 | QSTASH_CURRENT_SIGNING_KEY="sig_7GVPjvuwsfqF65iC8fSrs1dfYruM"
89 | QSTASH_NEXT_SIGNING_KEY="sig_5NoELc3EFnZn4DVS5bDs2Nk4b7Ua"
90 | ```
91 |
92 | ```javascript User 3
93 | QSTASH_URL="http://localhost:8080"
94 | QSTASH_TOKEN="eyJVc2VySUQiOiJ0ZXN0VXNlcjIiLCJQYXNzd29yZCI6InRlc3RQYXNzd29yZCJ9"
95 | QSTASH_CURRENT_SIGNING_KEY="sig_6jWGaWRxHsw4vMSPJprXadyvrybF"
96 | QSTASH_NEXT_SIGNING_KEY="sig_7qHbvhmahe5GwfePDiS5Lg3pi6Qx"
97 | ```
98 |
99 | ```javascript User 4
100 | QSTASH_URL="http://localhost:8080"
101 | QSTASH_TOKEN="eyJVc2VySUQiOiJ0ZXN0VXNlcjMiLCJQYXNzd29yZCI6InRlc3RQYXNzd29yZCJ9"
102 | QSTASH_CURRENT_SIGNING_KEY="sig_5T8FcSsynBjn9mMLBsXhpacRovJf"
103 | QSTASH_NEXT_SIGNING_KEY="sig_7GFR4YaDshFcqsxWRZpRB161jguD"
104 | ```
105 |
106 |
107 |
108 | Currently, there is no GUI client available for the development server. You can use QStash SDKs to fetch resources like event logs.
109 |
110 | ## License
111 |
112 | The QStash development server is licensed under the [Development Server License](/qstash/misc/license), which restricts its use to development and testing purposes only.
113 | It is not permitted to use it in production environments. Please refer to the full license text for details.
--------------------------------------------------------------------------------
/qstash/features/queues.mdx:
--------------------------------------------------------------------------------
1 | ---
2 | title: "Queues"
3 | ---
4 |
5 | The queue concept in QStash allows ordered delivery (FIFO).
6 | See the [API doc](/qstash/api/queues/upsert) for the full list of related Rest APIs.
7 | Here we list common use cases for Queue and how to use them.
8 |
9 | ## Ordered Delivery
10 |
11 | With Queues, the ordered delivery is guaranteed by default.
12 | This means:
13 |
14 | - Your messages will be queued without blocking the REST API and sent one by one in FIFO order. Queued means [CREATED](/qstash/howto/debug-logs) event will be logged.
15 | - The next message will wait for retries of the current one if it can not be delivered because your endpoint returns non-2xx code.
16 | In other words, the next message will be [ACTIVE](/qstash/howto/debug-logs) only after the last message is either [DELIVERED](/qstash/howto/debug-logs) or
17 | [FAILED](/qstash/howto/debug-logs).
18 | - Next message will wait for [callbacks](/qstash/features/callbacks#what-is-a-callback) or [failure callbacks](/qstash/features/callbacks#what-is-a-failure-callback) to finish.
19 |
20 |
21 |
22 | ```bash cURL
23 | curl -XPOST -H 'Authorization: Bearer XXX' \
24 | -H "Content-type: application/json" \
25 | 'https://qstash.upstash.io/v2/enqueue/my-queue/https://example.com' -d '{"message":"Hello, World!"}'
26 | ```
27 |
28 | ```typescript TypeScript
29 | const client = new Client({ token: "" });
30 |
31 | const queue = client.queue({
32 | queueName: "my-queue"
33 | })
34 |
35 | await queue.enqueueJSON({
36 | url: "https://example.com",
37 | body: {
38 | "Hello": "World"
39 | }
40 | })
41 | ```
42 |
43 | ```python Python
44 | from qstash import QStash
45 |
46 | client = QStash("")
47 | client.message.enqueue_json(
48 | queue="my-queue",
49 | url="https://example.com",
50 | body={
51 | "Hello": "World",
52 | },
53 | )
54 | ```
55 |
56 |
57 | ## Controlled Parallelism
58 |
59 |
60 | For the parallelism limit, we introduced an easier and less limited API with publish.
61 | Please check the [Flow Control](/qstash/features/flowcontrol) page for the detailed information.
62 |
63 | Setting parallelism with queues will be deprecated at some point.
64 |
65 |
66 | To ensure that your endpoint is not overwhelmed and also you want more than one-by-one delivery for better throughput,
67 | you can achieve controlled parallelism with queues.
68 |
69 | By default, queues have parallelism 1.
70 | Depending on your [plan](https://upstash.com/pricing/qstash), you can configure the parallelism of your queues as follows:
71 |
72 |
73 |
74 | ```bash cURL
75 | curl -XPOST https://qstash.upstash.io/v2/queues/ \
76 | -H "Authorization: Bearer " \
77 | -H "Content-Type: application/json" \
78 | -d '{
79 | "queueName": "my-queue",
80 | "parallelism": 5,
81 | }'
82 | ```
83 |
84 | ```typescript TypeScript
85 | const client = new Client({ token: "" });
86 |
87 | const queue = client.queue({
88 | queueName: "my-queue"
89 | })
90 |
91 | await queue.upsert({
92 | parallelism: 1,
93 | })
94 | ```
95 |
96 | ```python Python
97 | from qstash import QStash
98 |
99 | client = QStash("")
100 | client.queue.upsert("my-queue", parallelism=5)
101 | ```
102 |
103 |
104 |
105 | After that, you can use the `enqueue` path to send your messages.
106 |
107 |
108 |
109 | ```bash cURL
110 | curl -XPOST -H 'Authorization: Bearer XXX' \
111 | -H "Content-type: application/json" \
112 | 'https://qstash.upstash.io/v2/enqueue/my-queue/https://example.com' -d '{"message":"Hello, World!"}'
113 | ```
114 |
115 | ```typescript TypeScript
116 | const client = new Client({ token: "" });
117 |
118 | const queue = QStashClient.queue({
119 | queueName: "my-queue"
120 | })
121 |
122 | await queue.enqueueJSON({
123 | url: "https://example.com",
124 | body: {
125 | "Hello": "World"
126 | }
127 | })
128 | ```
129 |
130 | ```python Python
131 | from qstash import QStash
132 |
133 | client = QStash("")
134 | client.message.enqueue_json(
135 | queue="my-queue",
136 | url="https://example.com",
137 | body={
138 | "Hello": "World",
139 | },
140 | )
141 | ```
142 |
143 |
144 | You can check the parallelism of your queues with the following API:
145 |
146 |
147 | ```bash cURL
148 | curl https://qstash.upstash.io/v2/queues/my-queue \
149 | -H "Authorization: Bearer "
150 | ```
151 |
152 | ```typescript TypeScript
153 | const client = new Client({ token: "" });
154 |
155 | const queue = client.queue({
156 | queueName: "my-queue"
157 | })
158 |
159 | const res = await queue.get()
160 | ```
161 |
162 | ```python Python
163 | from qstash import QStash
164 |
165 | client = QStash("")
166 | client.queue.get("my-queue")
167 | ```
168 |
169 |
--------------------------------------------------------------------------------
/qstash/features/flowcontrol.mdx:
--------------------------------------------------------------------------------
1 | ---
2 | title: "Flow Control"
3 | ---
4 |
5 | FlowControl enables you to limit the number of messages sent to your endpoint via delaying the delivery.
6 | There are two limits that you can set with the FlowControl feature: [Rate](#rate-limit) and [Parallelism](#parallelism-limit).
7 | And if needed both parameters can be [combined](#rate-and-parallelism-together).
8 |
9 | For the `FlowControl`, you need to choose a key first. This key is used to count the number of calls made to your endpoint.
10 |
11 | There are not limits to number of keys you can use.
12 |
13 | The rate/parallelism limits are not applied per `url`, they are applied per `Flow-Control-Key`.
14 |
15 |
16 |
17 | Keep in mind that rate/period and parallelism info are kept on each publish separately. That means
18 | if you change the rate/period or parallelism on a new publish, the old fired ones will not be affected. They will keep their flowControl config.
19 | During the period that old `publishes` has not delivered but there are also the `publishes` with the new rates, QStash will effectively allow
20 | the highest rate/period or highest parallelism. Eventually(after the old publishes are delivered), the new rate/period and parallelism will be used.
21 |
22 |
23 | ## Rate and Period Parameters
24 |
25 | The `rate` parameter specifies the maximum number of calls allowed within a given period. The `period` parameter allows you to specify the time window over which the rate limit is enforced. By default, the period is set to 1 second, but you can adjust it to control how frequently calls are allowed. For example, you can set a rate of 10 calls per minute as follows:
26 |
27 |
28 | ```typescript TypeScript
29 | const client = new Client({ token: "" });
30 |
31 | await client.publishJSON({
32 | url: "https://example.com",
33 | body: { hello: "world" },
34 | flowControl: { key: "USER_GIVEN_KEY", rate: 10, period: "1m" },
35 | });
36 | ```
37 |
38 | ```bash cURL
39 | curl -XPOST -H 'Authorization: Bearer XXX' \
40 | -H "Content-type: application/json" \
41 | -H "Upstash-Flow-Control-Key:USER_GIVEN_KEY" \
42 | -H "Upstash-Flow-Control-Value:rate=10,period=1m" \
43 | 'https://qstash.upstash.io/v2/publish/https://example.com' \
44 | -d '{"message":"Hello, World!"}'
45 | ```
46 |
47 |
48 | ## Parallelism Limit
49 |
50 | The parallelism limit is the number of calls that can be active at the same time.
51 | Active means that the call is made to your endpoint and the response is not received yet.
52 |
53 | You can set the parallelism limit to 10 calls active at the same time as follows:
54 |
55 |
56 | ```typescript TypeScript
57 | const client = new Client({ token: "" });
58 |
59 | await client.publishJSON({
60 | url: "https://example.com",
61 | body: { hello: "world" },
62 | flowControl: { key: "USER_GIVEN_KEY", parallelism: 10 },
63 | });
64 | ```
65 |
66 | ```bash cURL
67 | curl -XPOST -H 'Authorization: Bearer XXX' \
68 | -H "Content-type: application/json" \
69 | -H "Upstash-Flow-Control-Key:USER_GIVEN_KEY" \
70 | -H "Upstash-Flow-Control-Value:parallelism=10" \
71 | 'https://qstash.upstash.io/v2/publish/https://example.com' \
72 | -d '{"message":"Hello, World!"}'
73 | ```
74 |
75 |
76 | You can also use the Rest API to get information how many messages waiting for parallelism limit.
77 | See the [API documentation](/qstash/api/flow-control/get) for more details.
78 |
79 | ## Rate, Parallelism, and Period Together
80 |
81 | All three parameters can be combined. For example, with a rate of 10 per minute, parallelism of 20, and a period of 1 minute, QStash will trigger 10 calls in the first minute and another 10 in the next. Since none of them will have finished, the system will wait until one completes before triggering another.
82 |
83 |
84 | ```typescript TypeScript
85 | const client = new Client({ token: "" });
86 |
87 | await client.publishJSON({
88 | url: "https://example.com",
89 | body: { hello: "world" },
90 | flowControl: { key: "USER_GIVEN_KEY", rate: 10, parallelism: 20, period: "1m" },
91 | });
92 | ```
93 |
94 | ```bash cURL
95 | curl -XPOST -H 'Authorization: Bearer XXX' \
96 | -H "Content-type: application/json" \
97 | -H "Upstash-Flow-Control-Key:USER_GIVEN_KEY" \
98 | -H "Upstash-Flow-Control-Value:rate=10,parallelism=20,period=1m" \
99 | 'https://qstash.upstash.io/v2/publish/https://example.com' \
100 | -d '{"message":"Hello, World!"}'
101 | ```
102 |
103 |
104 | ## Monitor
105 |
106 | You can monitor wait list size of your flow control key's from the console `FlowControl` tab.
107 |
108 |
109 |
110 |
111 |
112 | Also you can get the same info using the REST API.
113 | - [List All Flow Control Keys](/qstash/api/flow-control/list).
114 | - [Single Flow Control Key](/qstash/api/flow-control/get).
115 |
--------------------------------------------------------------------------------
/qstash/quickstarts/python-vercel.mdx:
--------------------------------------------------------------------------------
1 | ---
2 | title: "Python on Vercel"
3 | ---
4 |
5 | ## Introduction
6 |
7 | This quickstart will guide you through setting up QStash to run a daily script
8 | to clean up your database. This is useful for testing and development environments
9 | where you want to reset the database every day.
10 |
11 | ## Prerequisites
12 |
13 | - Create an Upstash account and get your [QStash token](https://console.upstash.com/qstash)
14 |
15 |
16 |
17 | First, we'll create a new directory for our Python app. We'll call it `clean-db-cron`.
18 |
19 | The database we'll be using is Redis, so we'll need to install the `upstash_redis` package.
20 |
21 | ```bash
22 | mkdir clean-db-cron
23 | ```
24 | ```bash
25 | cd clean-db-cron
26 | ```
27 | ```bash
28 | pip install upstash-redis
29 | ```
30 |
31 |
32 |
33 | Let's write the Python code to clean up the database. We'll use the `upstash_redis`
34 | package to connect to the database and delete all keys.
35 |
36 |
37 | ```python index.py
38 | from upstash_redis import Redis
39 |
40 | redis = Redis(url="https://YOUR_REDIS_URL", token="YOUR_TOKEN")
41 |
42 | def delete_all_entries():
43 | keys = redis.keys("*") # Match all keys
44 | redis.delete(*keys)
45 |
46 |
47 | delete_all_entries()
48 | ```
49 |
50 | Try running the code to see if it works. Your database keys should be deleted!
51 |
52 |
53 |
54 | In order to use QStash, we need to make the Python code into a public endpoint. There
55 | are many ways to do this such as using Flask, FastAPI, or Django. In this example, we'll
56 | use the Python `http.server` module to create a simple HTTP server.
57 |
58 | ```python api/index.py
59 | from http.server import BaseHTTPRequestHandler
60 | from upstash_redis import Redis
61 |
62 | redis = Redis(url="https://YOUR_REDIS_URL", token="YOUR_TOKEN")
63 |
64 | def delete_all_entries():
65 | keys = redis.keys("*") # Match all keys
66 | redis.delete(*keys)
67 |
68 |
69 | class handler(BaseHTTPRequestHandler):
70 | def do_POST(self):
71 | delete_all_entries()
72 | self.send_response(200)
73 | self.end_headers()
74 | ```
75 |
76 | For the purpose of this tutorial, I'll deploy the application to Vercel using the
77 | [Python Runtime](https://vercel.com/docs/functions/runtimes/python), but feel free to
78 | use any other hosting provider.
79 |
80 |
81 | There are many ways to [deploy to Vercel](https://vercel.com/docs/deployments/overview), but
82 | I'm going to use the Vercel CLI.
83 |
84 | ```bash
85 | npm install -g vercel
86 | ```
87 |
88 | ```bash
89 | vercel
90 | ```
91 |
92 |
93 | Once deployed, you can find the public URL in the dashboard.
94 |
95 |
96 |
97 | There are two ways we can go about configuring QStash. We can either use the QStash dashboard
98 | or the QStash API. In this example, it makes more sense to utilize the dashboard since we
99 | only need to set up a singular cronjob.
100 |
101 | However, you can imagine a scenario where you have a large number of cronjobs and you'd
102 | want to automate the process. In that case, you'd want to use the QStash Python SDK.
103 |
104 | To create the schedule, go to the [QStash dashboard](https://console.upstash.com/qstash) and enter
105 | the URL of the public endpoint you created. Then, set the type to schedule and change the
106 | `Upstash-Cron` header to run daily at a time of your choosing.
107 |
108 | ```
109 | URL: https://your-vercel-app.vercel.app/api
110 | Type: Schedule
111 | Every: every day at midnight (feel free to customize)
112 | ```
113 |
114 |
115 |
116 |
117 |
118 | Once you start the schedule, QStash will invoke the endpoint at the specified time. You can
119 | scroll down and verify the job has been created!
120 |
121 |
122 | If you have a use case where you need to automate the creation of jobs, you can use the SDK instead.
123 |
124 | ```python
125 | from qstash import QStash
126 |
127 | client = QStash("")
128 | client.schedule.create(
129 | destination="https://YOUR_URL.vercel.app/api",
130 | cron="0 12 * * *",
131 | )
132 | ```
133 |
134 |
135 |
136 |
137 | Now, go ahead and try it out for yourself! Try using some of the other features of QStash, such as
138 | [callbacks](/qstash/features/callbacks) and [URL Groups](/qstash/features/url-groups).
--------------------------------------------------------------------------------
/qstash/features/background-jobs.mdx:
--------------------------------------------------------------------------------
1 | ---
2 | title: "Background Jobs"
3 | ---
4 |
5 | ## When do you need background jobs
6 | Background jobs are essential for executing tasks that are too time-consuming to run in the
7 | main execution thread without affecting the user experience.
8 |
9 | These tasks might include data processing, sending batch emails, performing scheduled maintenance,
10 | or any other operations that are not immediately required to respond to user requests.
11 |
12 | Utilizing background jobs allows your application to remain responsive and scalable, handling more requests simultaneously by offloading
13 | heavy lifting to background processes.
14 |
15 |
16 | In Serverless frameworks, your hosting provider will likely have a limit for how long each task can last. Try searching
17 | for the maximum execution time for your hosting provider to find out more.
18 |
19 |
20 | ## How to use QStash for background jobs
21 | QStash provides a simple and efficient way to run background jobs, you can understand it as a 2 step process:
22 |
23 | 1. **Public API** Create a public API endpoint within your application. The endpoint should contain the logic for the background job.
24 |
25 | QStash requires a public endpoint to trigger background jobs, which means it cannot directly access localhost APIs.
26 | To get around this, you have two options:
27 | - Run QStash [development server](/qstash/howto/local-development) locally
28 | - Set up a [local tunnel](/qstash/howto/local-tunnel) for your API
29 |
30 | 2. **QStash Request** Invoke QStash to start/schedule the execution of the API endpoint.
31 |
32 | Here's what this looks like in a simple Next.js application:
33 |
34 |
35 | ```tsx app/page.tsx
36 | "use client"
37 |
38 | export default function Home() {
39 | async function handleClick() {
40 | // Send a request to our server to start the background job.
41 | // For proper error handling, refer to the quick start.
42 | // Note: This can also be a server action instead of a route handler
43 | await fetch("/api/start-email-job", {
44 | method: "POST",
45 | body: JSON.stringify({
46 | users: ["a@gmail.com", "b@gmail.com", "c.gmail.com"]
47 | }),
48 | })
49 |
50 | }
51 |
52 | return (
53 |
54 |
55 |
56 | );
57 | }
58 | ```
59 |
60 | ```typescript app/api/start-email-job/route.ts
61 | import { Client } from "@upstash/qstash";
62 |
63 | const qstashClient = new Client({
64 | token: "YOUR_TOKEN",
65 | });
66 |
67 | export async function POST(request: Request) {
68 | const body = await request.json();
69 | const users: string[] = body.users;
70 | // If you know the public URL of the email API, you can use it directly
71 | const rootDomain = request.url.split('/').slice(0, 3).join('/');
72 | const emailAPIURL = `${rootDomain}/api/send-email`; // ie: https://yourapp.com/api/send-email
73 |
74 | // Tell QStash to start the background job.
75 | // For proper error handling, refer to the quick start.
76 | await qstashClient.publishJSON({
77 | url: emailAPIURL,
78 | body: {
79 | users
80 | }
81 | });
82 |
83 | return new Response("Job started", { status: 200 });
84 | }
85 |
86 | ```
87 |
88 | ```typescript app/api/send-email/route.ts
89 | // This is a public API endpoint that will be invoked by QStash.
90 | // It contains the logic for the background job and may take a long time to execute.
91 | import { sendEmail } from "your-email-library";
92 |
93 | export async function POST(request: Request) {
94 | const body = await request.json();
95 | const users: string[] = body.users;
96 |
97 | // Send emails to the users
98 | for (const user of users) {
99 | await sendEmail(user);
100 | }
101 |
102 | return new Response("Job started", { status: 200 });
103 | }
104 | ```
105 |
106 |
107 | To better understand the application, let's break it down:
108 |
109 | 1. **Client**: The client application contains a button that, when clicked, sends a request to the server to start the background job.
110 | 2. **Next.js server**: The first endpoint, `/api/start-email-job`, is invoked by the client to start the background job.
111 | 3. **QStash**: The QStash client is used to invoke the `/api/send-email` endpoint, which contains the logic for the background job.
112 |
113 | Here is a visual representation of the process:
114 |
115 |
116 |
117 |
118 |
119 |
120 | To view a more detailed Next.js quick start guide for setting up QStash, refer to the [quick start](/qstash/quickstarts/vercel-nextjs) guide.
121 |
122 | It's also possible to schedule a background job to run at a later time using [schedules](/qstash/features/schedules).
123 |
124 | If you'd like to invoke another endpoint when the background job is complete, you can use [callbacks](/qstash/features/callbacks).
125 |
--------------------------------------------------------------------------------
/qstash/recipes/periodic-data-updates.mdx:
--------------------------------------------------------------------------------
1 | ---
2 | title: "Periodic Data Updates"
3 | ---
4 |
5 |
6 |
7 | - Code:
8 | [Repository](https://github.com/upstash/qstash-examples/tree/main/periodic-data-updates)
9 | - App:
10 | [qstash-examples-periodic-data-updates.vercel.app](https://qstash-examples-periodic-data-updates.vercel.app)
11 |
12 |
13 |
14 | This recipe shows how to use QStash as a trigger for a Next.js api route, that
15 | fetches data from somewhere and stores it in your database.
16 |
17 | For the database we will use Redis because it's very simple to setup and is not
18 | really the main focus of this recipe.
19 |
20 | ## What will be build?
21 |
22 | Let's assume there is a 3rd party API that provides some data. One approach
23 | would be to just query the API whenever you or your users need it, however that
24 | might not work well if the API is slow, unavailable or rate limited.
25 |
26 | A better approach would be to continuously fetch fresh data from the API and
27 | store it in your database.
28 |
29 | Traditionally this would require a long running process, that would continuously
30 | call the API. With QStash you can do this inside your Next.js app and you don't
31 | need to worry about maintaining anything.
32 |
33 | For the purpose of this recipe we will build a simple app, that scrapes the
34 | current Bitcoin price from a public API, stores it in redis and then displays a
35 | chart in the browser.
36 |
37 | ## Setup
38 |
39 | If you don't have one already, create a new Next.js project with
40 | `npx create-next-app@latest --ts`.
41 |
42 | Then install the required packages
43 |
44 | ```bash
45 | npm install @upstash/qstash @upstash/redis
46 | ```
47 |
48 | You can replace `@upstash/redis` with any kind of database client you want.
49 |
50 | ## Scraping the API
51 |
52 | Create a new serverless function in `/pages/api/cron.ts`
53 |
54 | ````ts
55 | import { NextApiRequest, NextApiResponse } from "next";
56 | import { Redis } from "@upstash/redis";
57 |
58 | import { verifySignature } from "@upstash/qstash/nextjs";
59 |
60 | /**
61 | * You can use any database you want, in this case we use Redis
62 | */
63 | const redis = Redis.fromEnv();
64 |
65 | /**
66 | * Load the current bitcoin price in USD and store it in our database at the
67 | * current timestamp
68 | */
69 | async function handler(_req: NextApiRequest, res: NextApiResponse) {
70 | try {
71 | /**
72 | * The API returns something like this:
73 | * ```json
74 | * {
75 | * "USD": {
76 | * "last": 123
77 | * },
78 | * ...
79 | * }
80 | * ```
81 | */
82 | const raw = await fetch("https://blockchain.info/ticker");
83 | const prices = await raw.json();
84 | const bitcoinPrice = prices["USD"]["last"] as number;
85 |
86 | /**
87 | * After we have loaded the current bitcoin price, we can store it in the
88 | * database together with the current time
89 | */
90 | await redis.zadd("bitcoin-prices", {
91 | score: Date.now(),
92 | member: bitcoinPrice,
93 | });
94 |
95 | res.send("OK");
96 | } catch (err) {
97 | res.status(500).send(err);
98 | } finally {
99 | res.end();
100 | }
101 | }
102 |
103 | /**
104 | * Wrap your handler with `verifySignature` to automatically reject all
105 | * requests that are not coming from Upstash.
106 | */
107 | export default verifySignature(handler);
108 |
109 | /**
110 | * To verify the authenticity of the incoming request in the `verifySignature`
111 | * function, we need access to the raw request body.
112 | */
113 | export const config = {
114 | api: {
115 | bodyParser: false,
116 | },
117 | };
118 | ````
119 |
120 | ## Deploy to Vercel
121 |
122 | That's all we need to fetch fresh data. Let's deploy our app to Vercel.
123 |
124 | You can either push your code to a git repository and deploy it to Vercel, or
125 | you can deploy it directly from your local machine using the
126 | [vercel cli](https://vercel.com/docs/cli).
127 |
128 | For a more indepth tutorial on how to deploy to Vercel, check out this
129 | [quickstart](/qstash/quickstarts/vercel-nextjs#4-deploy-to-vercel).
130 |
131 | After you have deployed your app, it is time to add your secrets to your
132 | environment variables.
133 |
134 | ## Secrets
135 |
136 | Head over to [QStash](https://console.upstash.com/qstash) and copy the
137 | `QSTASH_CURRENT_SIGNING_KEY` and `QSTASH_NEXT_SIGNING_KEY` to vercel's
138 | environment variables. 
139 |
140 | If you are not using a custom database, you can quickly create a new
141 | [Redis database](https://console.upstash.com/redis). Afterwards copy the
142 | `UPSTASH_REDIS_REST_URL` and `UPSTASH_REDIS_REST_TOKEN` to vercel.
143 |
144 | In the near future we will update our
145 | [Vercel integration](https://vercel.com/integrations/upstash) to do this for
146 | you.
147 |
148 | ## Redeploy
149 |
150 | To use the environment variables, you need to redeploy your app. Either with
151 | `npx vercel --prod` or in the UI.
152 |
153 | ## Create cron trigger in QStash
154 |
155 | The last part is to add the trigger in QStash. Go to
156 | [QStash](https://console.upstash.com/qstash) and create a new schedule.
157 |
158 | 
159 |
160 | Now we will call your api function whenever you schedule is triggered.
161 |
162 | ## Adding frontend UI
163 |
164 | This part is probably the least interesting and would require more dependencies
165 | for styling etc. Check out the
166 | [index.tsx](https://github.com/upstash/qstash-examples/blob/main/periodic-data-updates/pages/index.tsx)
167 | file, where we load the data from the database and display it in a chart.
168 |
169 | ## Hosted example
170 |
171 | You can find a running example of this recipe
172 | [here](https://qstash-examples-periodic-data-updates.vercel.app/).
173 |
--------------------------------------------------------------------------------
/qstash/features/schedules.mdx:
--------------------------------------------------------------------------------
1 | ---
2 | title: "Schedules"
3 | ---
4 |
5 | In addition to sending a message once, you can create a schedule, and we will
6 | publish the message in the given period. To create a schedule, you simply need
7 | to add the `Upstash-Cron` header to your `publish` request.
8 |
9 | Schedules can be configured using `cron` expressions.
10 | [crontab.guru](https://crontab.guru/) is a great tool for understanding and
11 | creating cron expressions.
12 |
13 | By default, we evaluate cron expressions in `UTC`.
14 | If you want to run your schedule in a specific timezone, see the section on
15 | [Timezones](#timezones).
16 |
17 | The following request would create a schedule that will automatically publish
18 | the message every minute:
19 |
20 |
21 | ```typescript Typescript
22 | import { Client } from "@upstash/qstash";
23 |
24 | const client = new Client({ token: "" });
25 | await client.schedules.create({
26 | destination: "https://example.com",
27 | cron: "* * * * *",
28 | });
29 | ```
30 | ```python Python
31 | from qstash import QStash
32 |
33 | client = QStash("")
34 | client.schedule.create(
35 | destination="https://example.com",
36 | cron="* * * * *",
37 | )
38 | ```
39 | ```shell cURL
40 | curl -XPOST \
41 | -H 'Authorization: Bearer XXX' \
42 | -H "Content-type: application/json" \
43 | -H "Upstash-Cron: * * * * *" \
44 | -d '{ "hello": "world" }' \
45 | 'https://qstash.upstash.io/v2/schedules/https://example.com'
46 | ```
47 |
48 |
49 | All of the [other config options](/qstash/howto/publishing#optional-parameters-and-configuration)
50 | can still be used.
51 |
52 |
53 |
54 | It can take up to 60 seconds for the schedule to be loaded on an active node and
55 | triggered for the first time.
56 |
57 |
58 |
59 | You can see and manage your schedules in the
60 | [Upstash Console](https://console.upstash.com/qstash).
61 |
62 | ### Scheduling to a URL Group
63 |
64 | Instead of scheduling a message to a specific URL, you can also create a
65 | schedule, that publishes to a URL Group. Simply use either the URL Group name or its id:
66 |
67 |
68 | ```typescript Typescript
69 | import { Client } from "@upstash/qstash";
70 |
71 | const client = new Client({ token: "" });
72 | await client.schedules.create({
73 | destination: "urlGroupName",
74 | cron: "* * * * *",
75 | });
76 | ```
77 | ```python Python
78 | from qstash import QStash
79 |
80 | client = QStash("")
81 | client.schedule.create(
82 | destination="url-group-name",
83 | cron="* * * * *",
84 | )
85 | ```
86 | ```bash cURL
87 | curl -XPOST \
88 | -H 'Authorization: Bearer XXX' \
89 | -H "Content-type: application/json" \
90 | -H "Upstash-Cron: * * * * *" \
91 | -d '{ "hello": "world" }' \
92 | 'https://qstash.upstash.io/v2/schedules/'
93 | ```
94 |
95 |
96 | ### Scheduling to a Queue
97 |
98 | You can schedule an item to be added to a queue at a specified time.
99 |
100 |
101 | ```bash typescript
102 | curl -XPOST \
103 | import { Client } from "@upstash/qstash";
104 |
105 | const client = new Client({ token: "" });
106 | await client.schedules.create({
107 | destination: "https://example.com",
108 | cron: "* * * * *",
109 | queueName: "yourQueueName",
110 | });
111 | ```
112 | ```bash cURL
113 | curl -XPOST \
114 | -H 'Authorization: Bearer XXX' \
115 | -H "Content-type: application/json" \
116 | -H "Upstash-Cron: * * * * *" \
117 | -H "Upstash-Queue-Name: yourQueueName" \
118 | -d '{ "hello": "world" }' \
119 | 'https://qstash.upstash.io/v2/schedules/https://example.com'
120 | ```
121 |
122 |
123 | ### Overwriting an existing schedule
124 |
125 | You can pass scheduleId explicitly to overwrite an existing schedule or just simply create the schedule
126 | with the given schedule id.
127 |
128 |
129 | ```typescript Typescript
130 | import { Client } from "@upstash/qstash";
131 |
132 | const client = new Client({ token: "" });
133 | await client.schedules.create({
134 | destination: "https://example.com",
135 | scheduleId: "existingScheduleId",
136 | cron: "* * * * *",
137 | });
138 | ```
139 | ```shell cURL
140 | curl -XPOST \
141 | -H 'Authorization: Bearer XXX' \
142 | -H "Content-type: application/json" \
143 | -H "Upstash-Cron: * * * * *" \
144 | -H "Upstash-Schedule-Id: existingScheduleId" \
145 | -d '{ "hello": "world" }' \
146 | 'https://qstash.upstash.io/v2/schedules/https://example.com'
147 | ```
148 |
149 |
150 |
151 | ### Timezones
152 |
153 | By default, cron expressions are evaluated in `UTC`.
154 | You can specify a different timezone using the `CRON_TZ` prefix directly inside
155 | the cron expression. All [IANA timezones](https://en.wikipedia.org/wiki/List_of_tz_database_time_zones)
156 | are supported.
157 |
158 | For example, this schedule runs every day at `04:00 AM` in New York time:
159 |
160 |
161 | ```typescript Typescript
162 | import { Client } from "@upstash/qstash";
163 |
164 | const client = new Client({ token: "" });
165 | await client.schedules.create({
166 | destination: "https://example.com",
167 | cron: "CRON_TZ=America/New_York 0 4 * * *",
168 | });
169 | ```
170 | ```python Python
171 | from qstash import QStash
172 |
173 | client = QStash("")
174 | client.schedule.create(
175 | destination="https://example.com",
176 | cron="CRON_TZ=America/New_York 0 4 * * *",
177 | )
178 | ```
179 | ```shell cURL
180 | curl -XPOST \
181 | -H 'Authorization: Bearer XXX' \
182 | -H "Content-type: application/json" \
183 | -H "Upstash-Cron: CRON_TZ=America/New_York 0 4 * * *" \
184 | -d '{ "hello": "world" }' \
185 | 'https://qstash.upstash.io/v2/schedules/https://example.com'
186 | ```
187 |
188 |
--------------------------------------------------------------------------------
/qstash/overall/getstarted.mdx:
--------------------------------------------------------------------------------
1 | ---
2 | title: "Getting Started"
3 | ---
4 |
5 | QStash is a **serverless messaging and scheduling solution**. It fits easily into your existing workflow and allows you to build reliable systems without managing infrastructure.
6 |
7 | Instead of calling an endpoint directly, QStash acts as a middleman between you and an API to guarantee delivery, perform automatic retries on failure, and more.
8 |
9 |
10 |
11 |
12 |
13 |
14 |
15 | We have a new SDK called [Upstash Workflow](/workflow/getstarted).
16 |
17 | **Upstash Workflow SDK** is **QStash** simplified for your complex applications
18 |
19 | - Skip the details of preparing a complex dependent endpoints.
20 | - Focus on the essential parts.
21 | - Enjoy automatic retries and delivery guarantees.
22 | - Avoid platform-specific timeouts.
23 |
24 | Check out [Upstash Workflow Getting Started](/workflow/getstarted) for more.
25 |
26 |
27 |
28 | ## Quick Start
29 |
30 | Check out these Quick Start guides to get started with QStash in your application.
31 |
32 |
33 |
34 | Build a Next application that uses QStash to start a long-running job on your platform
35 |
36 |
37 | Build a Python application that uses QStash to schedule a daily job that clean up a database
38 |
39 |
40 |
41 | Or continue reading to learn how to send your first message!
42 |
43 | ## Send your first message
44 |
45 |
46 | **Prerequisite**
47 |
48 | You need an Upstash account before publishing messages, create one
49 | [here](https://console.upstash.com).
50 |
51 |
52 |
53 | ### Public API
54 |
55 | Make sure you have a publicly available HTTP API that you want to send your
56 | messages to. If you don't, you can use something like
57 | [requestcatcher.com](https://requestcatcher.com/), [webhook.site](https://webhook.site/) or
58 | [webhook-test.com](https://webhook-test.com/) to try it out.
59 |
60 | For example, you can use this URL to test your messages: [https://firstqstashmessage.requestcatcher.com](https://firstqstashmessage.requestcatcher.com)
61 |
62 | ### Get your token
63 |
64 | Go to the [Upstash Console](https://console.upstash.com/qstash) and copy the
65 | `QSTASH_TOKEN`.
66 |
67 |
68 |
69 |
70 |
71 | ### Publish a message
72 |
73 | A message can be any shape or form: json, xml, binary, anything, that can be
74 | transmitted in the http request body. We do not impose any restrictions other
75 | than a size limit of 1 MB (which can be customized at your request).
76 |
77 | In addition to the request body itself, you can also send HTTP headers. Learn
78 | more about this in the [message publishing section](/qstash/howto/publishing).
79 |
80 |
81 | ```bash cURL
82 | curl -XPOST \
83 | -H 'Authorization: Bearer ' \
84 | -H "Content-type: application/json" \
85 | -d '{ "hello": "world" }' \
86 | 'https://qstash.upstash.io/v2/publish/https://'
87 | ```
88 |
89 | ```bash cURL RequestCatcher
90 | curl -XPOST \
91 | -H 'Authorization: Bearer ' \
92 | -H "Content-type: application/json" \
93 | -d '{ "hello": "world" }' \
94 | 'https://qstash.upstash.io/v2/publish/https://firstqstashmessage.requestcatcher.com/test'
95 | ```
96 |
97 |
98 |
99 | Don't worry, we have SDKs for different languages so you don't
100 | have to make these requests manually.
101 |
102 | ### Check Response
103 |
104 | You should receive a response with a unique message ID.
105 |
106 |
107 |
108 |
109 |
110 | ### Check Message Status
111 |
112 | Head over to [Upstash Console](https://console.upstash.com/qstash) and go to the
113 | `Logs` tab where you can see your message activities.
114 |
115 |
116 |
117 |
118 |
119 | Learn more about different states [here](/qstash/howto/debug-logs).
120 |
121 | ## Features and Use Cases
122 |
123 |
124 |
125 | Run long-running tasks in the background, without blocking your application
126 |
127 |
128 | Schedule messages to be delivered at a time in the future
129 |
130 |
131 | Publish messages to multiple endpoints, in parallel, using URL Groups
132 |
133 |
134 | Enqueue messages to be delivered one by one in the order they have enqueued.
135 |
136 |
141 | Custom rate per second and parallelism limits to avoid overflowing your endpoint.
142 |
143 |
144 | Get a response delivered to your API when a message is delivered
145 |
146 |
147 | Use a Dead Letter Queue to have full control over failed messages
148 |
149 |
150 | Prevent duplicate messages from being delivered
151 |
152 |
157 | Publish, enqueue, or batch chat completion requests using large language models with QStash
158 | features.
159 |
160 |
161 |
162 |
--------------------------------------------------------------------------------
/qstash/features/retry.mdx:
--------------------------------------------------------------------------------
1 | ---
2 | title: "Retry"
3 | ---
4 |
5 |
6 | QStash will abort a delivery attempt if **the HTTP call to your endpoint does not return within the plan-specific Max HTTP Response Duration**.
7 | See the current limits on the QStash pricing page.
8 |
9 |
10 | Many things can go wrong in a serverless environment. If your API does not
11 | respond with a success status code (2XX), we retry the request to ensure every
12 | message will be delivered.
13 |
14 | The maximum number of retries depends on your current plan. By default, we retry
15 | the maximum amount of times, but you can set it lower by sending the
16 | `Upstash-Retries` header:
17 |
18 |
19 | ```shell cURL
20 | curl -XPOST \
21 | -H 'Authorization: Bearer XXX' \
22 | -H "Content-type: application/json" \
23 | -H "Upstash-Retries: 2" \
24 | -d '{ "hello": "world" }' \
25 | 'https://qstash.upstash.io/v2/publish/https://my-api...'
26 | ```
27 |
28 | ```typescript TypeScript
29 | import { Client } from "@upstash/qstash";
30 |
31 | const client = new Client({ token: "" });
32 | const res = await client.publishJSON({
33 | url: "https://my-api...",
34 | body: { hello: "world" },
35 | retries: 2,
36 | });
37 | ```
38 |
39 | ```python Python
40 | from qstash import QStash
41 |
42 | client = QStash("")
43 | client.message.publish_json(
44 | url="https://my-api...",
45 | body={
46 | "hello": "world",
47 | },
48 | retries=2,
49 | )
50 | ```
51 |
52 |
53 | The backoff algorithm calculates the retry delay based on the number of retries.
54 | Each delay is capped at 1 day.
55 |
56 | ```
57 | n = how many times this request has been retried
58 | delay = min(86400, e ** (2.5*n)) // in seconds
59 | ```
60 |
61 | | n | delay |
62 | | --- | ------ |
63 | | 1 | 12s |
64 | | 2 | 2m28s |
65 | | 3 | 30m8ss |
66 | | 4 | 6h7m6s |
67 | | 5 | 24h |
68 | | 6 | 24h |
69 |
70 | ## Custom Retry Delay
71 |
72 | You can customize the delay between retry attempts by using the `Upstash-Retry-Delay` header when publishing a message. This allows you to override the default exponential backoff with your own mathematical expressions.
73 |
74 |
75 | ```shell cURL
76 | curl -XPOST \
77 | -H 'Authorization: Bearer XXX' \
78 | -H "Content-type: application/json" \
79 | -H "Upstash-Retries: 3" \
80 | -H "Upstash-Retry-Delay: pow(2, retried) * 1000" \
81 | -d '{ "hello": "world" }' \
82 | 'https://qstash.upstash.io/v2/publish/https://my-api...'
83 | ```
84 |
85 | ```typescript TypeScript
86 | import { Client } from "@upstash/qstash";
87 |
88 | const client = new Client({ token: "" });
89 | const res = await client.publishJSON({
90 | url: "https://my-api...",
91 | body: { hello: "world" },
92 | retries: 3,
93 | retryDelay: "pow(2, retried) * 1000", // 2^retried * 1000ms
94 | });
95 | ```
96 |
97 | ```python Python
98 | from qstash import QStash
99 |
100 | client = QStash("")
101 | client.message.publish_json(
102 | url="https://my-api...",
103 | body={
104 | "hello": "world",
105 | },
106 | retries=3,
107 | retry_delay="pow(2, retried) * 1000", # 2^retried * 1000ms
108 | )
109 | ```
110 |
111 |
112 | The `retryDelay` expression can use mathematical functions and the special variable `retried` (current retry attempt count starting from 0).
113 |
114 | **Supported functions:**
115 | - `pow` - Power function
116 | - `sqrt` - Square root
117 | - `abs` - Absolute value
118 | - `exp` - Exponential
119 | - `floor` - Floor function
120 | - `ceil` - Ceiling function
121 | - `round` - Rounding function
122 | - `min` - Minimum of values
123 | - `max` - Maximum of values
124 |
125 | **Examples:**
126 | - `1000` - Fixed 1 second delay
127 | - `1000 * (1 + retried)` - Linear backoff: 1s, 2s, 3s, 4s...
128 | - `pow(2, retried) * 1000` - Exponential backoff: 1s, 2s, 4s, 8s...
129 | - `max(1000, pow(2, retried) * 100)` - Exponential with minimum 1s delay
130 |
131 | ## Retry-After Headers
132 |
133 | Instead of using the default backoff algorithm, you can specify when QStash should retry your message.
134 | To do this, include one of the following headers in your response to QStash request.
135 | - Retry-After
136 | - X-RateLimit-Reset
137 | - X-RateLimit-Reset-Requests
138 | - X-RateLimit-Reset-Tokens
139 |
140 | These headers can be set to a value in seconds, the RFC1123 date format, or a duration format (e.g., 6m5s).
141 | For the duration format, valid time units are "ns", "us" (or "µs"), "ms", "s", "m", "h".
142 |
143 | Note that you can only delay retries up to the maximum value of the default backoff algorithm, which is one day.
144 | If you specify a value beyond this limit, the backoff algorithm will be applied.
145 |
146 | This feature is particularly useful if your application has rate limits, ensuring retries are scheduled appropriately without wasting attempts during restricted periods.
147 |
148 | ```
149 | Retry-After: 0 // Next retry will be scheduled immediately without any delay.
150 | Retry-After: 10 // Next retry will be scheduled after a 10-second delay.
151 | Retry-After: 6m5s // Next retry will be scheduled after 6 minutes 5 seconds delay.
152 | Retry-After: Sun, 27 Jun 2024 12:16:24 GMT // Next retry will be scheduled for the specified date, within the allowable limits.
153 | ```
154 |
155 | ## Upstash-Retried Header
156 |
157 | QStash adds the `Upstash-Retried` header to requests sent to your API. This
158 | indicates how many times the request has been retried.
159 |
160 | ```
161 | Upstash-Retried: 0 // This is the first attempt
162 | Upstash-Retried: 1 // This request has been sent once before and now is the second attempt
163 | Upstash-Retried: 2 // This request has been sent twice before and now is the third attempt
164 | ```
165 |
166 | ## Non-Retryable Error
167 |
168 | By default, QStash retries requests for any response that does not return a successful 2XX status code.
169 | To explicitly disable retries for a given message, respond with a 489 status code and include the header `Upstash-NonRetryable-Error: true`.
170 |
171 | When this header is present, QStash will immediately mark the message as failed and skip any further retry attempts. The message will then be forwarded to the Dead Letter Queue (DLQ) for manual review and resolution.
172 |
173 | This mechanism is particularly useful in scenarios where retries are generally enabled but should be bypassed for specific known errors—such as invalid payloads or non-recoverable conditions.
174 |
--------------------------------------------------------------------------------
/qstash/quickstarts/fly-io/go.mdx:
--------------------------------------------------------------------------------
1 | ---
2 | title: "Golang"
3 | ---
4 |
5 | [Source Code](https://github.com/upstash/qstash-examples/tree/main/fly.io/go)
6 |
7 | This is a step by step guide on how to receive webhooks from QStash in your
8 | Golang application running on [fly.io](https://fly.io).
9 |
10 | ## 0. Prerequisites
11 |
12 | - [flyctl](https://fly.io/docs/getting-started/installing-flyctl/) - The fly.io
13 | CLI
14 |
15 | ## 1. Create a new project
16 |
17 | Let's create a new folder called `flyio-go` and initialize a new project.
18 |
19 | ```bash
20 | mkdir flyio-go
21 | cd flyio-go
22 | go mod init flyio-go
23 | ```
24 |
25 | ## 2. Creating the main function
26 |
27 | In this example we will show how to receive a webhook from QStash and verify the
28 | signature using the popular [golang-jwt/jwt](https://github.com/golang-jwt/jwt)
29 | library.
30 |
31 | First, let's import everything we need:
32 |
33 | ```go
34 | package main
35 |
36 | import (
37 | "crypto/sha256"
38 | "encoding/base64"
39 | "fmt"
40 | "github.com/golang-jwt/jwt/v4"
41 | "io"
42 | "net/http"
43 | "os"
44 | "time"
45 | )
46 | ```
47 |
48 | Next we create `main.go`. Ignore the `verify` function for now. We will add that
49 | next. In the handler we will prepare all necessary variables that we need for
50 | verification. This includes the signature and the signing keys. Then we try to
51 | verify the request using the current signing key and if that fails we will try
52 | the next one. If the signature could be verified, we can start processing the
53 | request.
54 |
55 | ```go
56 | func main() {
57 | port := os.Getenv("PORT")
58 | if port == "" {
59 | port = "8080"
60 | }
61 |
62 | http.HandleFunc("/", func(w http.ResponseWriter, r *http.Request) {
63 | defer r.Body.Close()
64 |
65 | currentSigningKey := os.Getenv("QSTASH_CURRENT_SIGNING_KEY")
66 | nextSigningKey := os.Getenv("QSTASH_NEXT_SIGNING_KEY")
67 | tokenString := r.Header.Get("Upstash-Signature")
68 |
69 | body, err := io.ReadAll(r.Body)
70 | if err != nil {
71 | http.Error(w, err.Error(), http.StatusInternalServerError)
72 | return
73 | }
74 |
75 | err = verify(body, tokenString, currentSigningKey)
76 | if err != nil {
77 | fmt.Printf("Unable to verify signature with current signing key: %v", err)
78 | err = verify(body, tokenString, nextSigningKey)
79 | }
80 |
81 | if err != nil {
82 | http.Error(w, err.Error(), http.StatusUnauthorized)
83 | return
84 | }
85 |
86 | // handle your business logic here
87 |
88 | w.WriteHeader(http.StatusOK)
89 |
90 | })
91 |
92 | fmt.Println("listening on", port)
93 | err := http.ListenAndServe(":"+port, nil)
94 | if err != nil {
95 | panic(err)
96 | }
97 | }
98 | ```
99 |
100 | The `verify` function will handle verification of the [JWT](https://jwt.io),
101 | that includes claims about the request. See
102 | [here](/qstash/features/security#claims).
103 |
104 | ```go
105 | func verify(body []byte, tokenString, signingKey string) error {
106 | token, err := jwt.Parse(
107 | tokenString,
108 | func(token *jwt.Token) (interface{}, error) {
109 | if _, ok := token.Method.(*jwt.SigningMethodHMAC); !ok {
110 | return nil, fmt.Errorf("Unexpected signing method: %v", token.Header["alg"])
111 | }
112 | return []byte(signingKey), nil
113 | })
114 |
115 | if err != nil {
116 | return err
117 | }
118 |
119 | claims, ok := token.Claims.(jwt.MapClaims)
120 | if !ok || !token.Valid {
121 | return fmt.Errorf("Invalid token")
122 | }
123 |
124 | if !claims.VerifyIssuer("Upstash", true) {
125 | return fmt.Errorf("invalid issuer")
126 | }
127 | if !claims.VerifyExpiresAt(time.Now().Unix(), true) {
128 | return fmt.Errorf("token has expired")
129 | }
130 | if !claims.VerifyNotBefore(time.Now().Unix(), true) {
131 | return fmt.Errorf("token is not valid yet")
132 | }
133 |
134 | bodyHash := sha256.Sum256(body)
135 | if claims["body"] != base64.URLEncoding.EncodeToString(bodyHash[:]) {
136 | return fmt.Errorf("body hash does not match")
137 | }
138 |
139 | return nil
140 | }
141 | ```
142 |
143 | You can find the complete file
144 | [here](https://github.com/upstash/qstash-examples/blob/main/fly.io/go/main.go).
145 |
146 | That's it, now we can deploy our API and test it.
147 |
148 | ## 3. Create app on fly.io
149 |
150 | [Login](https://fly.io/docs/getting-started/log-in-to-fly/) with `flyctl` and
151 | then `flyctl launch` the new app. This will create the necessary `fly.toml` for
152 | us. It will ask you a bunch of questions. I chose all defaults here except for
153 | the last question. We do not want to deploy just yet.
154 |
155 | ```bash
156 | $ flyctl launch
157 | Creating app in /Users/andreasthomas/github/upstash/qstash-examples/fly.io/go
158 | Scanning source code
159 | Detected a Go app
160 | Using the following build configuration:
161 | Builder: paketobuildpacks/builder:base
162 | Buildpacks: gcr.io/paketo-buildpacks/go
163 | ? App Name (leave blank to use an auto-generated name):
164 | Automatically selected personal organization: Andreas Thomas
165 | ? Select region: fra (Frankfurt, Germany)
166 | Created app winer-cherry-9545 in organization personal
167 | Wrote config file fly.toml
168 | ? Would you like to setup a Postgresql database now? No
169 | ? Would you like to deploy now? No
170 | Your app is ready. Deploy with `flyctl deploy`
171 | ```
172 |
173 | ## 4. Set Environment Variables
174 |
175 | Get your current and next signing key from the
176 | [Upstash Console](https://console.upstash.com/qstash)
177 |
178 | Then set them using `flyctl secrets set ...`
179 |
180 | ```bash
181 | flyctl secrets set QSTASH_CURRENT_SIGNING_KEY=...
182 | flyctl secrets set QSTASH_NEXT_SIGNING_KEY=...
183 | ```
184 |
185 | ## 5. Deploy the app
186 |
187 | Fly.io made this step really simple. Just `flyctl deploy` and enjoy.
188 |
189 | ```bash
190 | flyctl deploy
191 | ```
192 |
193 | ## 6. Publish a message
194 |
195 | Now you can publish a message to QStash. Note the destination url is basically
196 | your app name, if you are not sure what it is, you can go to
197 | [fly.io/dashboard](https://fly.io/dashboard) and find out. In my case the app is
198 | named "winter-cherry-9545" and the public url is
199 | "https://winter-cherry-9545.fly.dev".
200 |
201 | ```bash
202 | curl --request POST "https://qstash.upstash.io/v2/publish/https://winter-cherry-9545.fly.dev" \
203 | -H "Authorization: Bearer " \
204 | -H "Content-Type: application/json" \
205 | -d "{ \"hello\": \"world\"}"
206 | ```
207 |
208 | ## Next Steps
209 |
210 | That's it, you have successfully created a Go API hosted on fly.io, that
211 | receives and verifies incoming webhooks from qstash.
212 |
213 | Learn more about publishing a message to qstash [here](/qstash/howto/publishing)
214 |
--------------------------------------------------------------------------------
/qstash/integrations/llm.mdx:
--------------------------------------------------------------------------------
1 | ---
2 | title: "LLM - OpenAI"
3 | sidebarTitle: "LLM with OpenAI"
4 | ---
5 |
6 | QStash has built-in support for calling LLM APIs. This allows you to take advantage of QStash features such as retries, callbacks, and batching while using LLM APIs.
7 |
8 | QStash is especially useful for LLM processing because LLM response times are often highly variable. When accessing LLM APIs from serverless runtimes, invocation timeouts are a common issue. QStash offers an HTTP timeout of 2 hours, which is sufficient for most LLM use cases. By using callbacks and the workflows, you can easily manage the asynchronous nature of LLM APIs.
9 |
10 | ## QStash LLM API
11 |
12 | You can publish (or enqueue) single LLM request or batch LLM requests using all existing QStash features natively. To do this, specify the destination `api` as `llm` with a valid provider. The body of the published or enqueued message should contain a valid chat completion request. For these integrations, you must specify the `Upstash-Callback` header so that you can process the response asynchronously. Note that streaming chat completions cannot be used with them. Use [the chat API](#chat-api) for streaming completions.
13 |
14 | All the examples below can be used with **OpenAI-compatible LLM providers**.
15 |
16 | ### Publishing a Chat Completion Request
17 |
18 |
19 | ```js JavaScript
20 | import { Client, upstash } from "@upstash/qstash";
21 |
22 | const client = new Client({
23 | token: "",
24 | });
25 |
26 | const result = await client.publishJSON({
27 | api: { name: "llm", provider: openai({ token: "_OPEN_AI_TOKEN_"}) },
28 | body: {
29 | model: "gpt-3.5-turbo",
30 | messages: [
31 | {
32 | role: "user",
33 | content: "Write a hello world program in Rust.",
34 | },
35 | ],
36 | },
37 | callback: "https://abc.requestcatcher.com/",
38 | });
39 |
40 | console.log(result);
41 | ```
42 |
43 | ```python Python
44 | from qstash import QStash
45 | from qstash.chat import upstash
46 |
47 | q = QStash("")
48 |
49 | result = q.message.publish_json(
50 | api={"name": "llm", "provider": openai("")},
51 | body={
52 | "model": "gpt-3.5-turbo",
53 | "messages": [
54 | {
55 | "role": "user",
56 | "content": "Write a hello world program in Rust.",
57 | }
58 | ],
59 | },
60 | callback="https://abc.requestcatcher.com/",
61 | )
62 |
63 | print(result)
64 | ```
65 |
66 |
67 | ### Enqueueing a Chat Completion Request
68 |
69 |
70 | ```js JavaScript
71 | import { Client, upstash } from "@upstash/qstash";
72 |
73 | const client = new Client({
74 | token: "",
75 | });
76 |
77 | const result = await client.queue({ queueName: "queue-name" }).enqueueJSON({
78 | api: { name: "llm", provider: openai({ token: "_OPEN_AI_TOKEN_"}) },
79 | body: {
80 | "model": "gpt-3.5-turbo",
81 | messages: [
82 | {
83 | role: "user",
84 | content: "Write a hello world program in Rust.",
85 | },
86 | ],
87 | },
88 | callback: "https://abc.requestcatcher.com",
89 | });
90 |
91 | console.log(result);
92 | ```
93 |
94 | ```python Python
95 | from qstash import QStash
96 | from qstash.chat import upstash
97 |
98 | q = QStash("")
99 |
100 | result = q.message.enqueue_json(
101 | queue="queue-name",
102 | api={"name": "llm", "provider": openai("")},
103 | body={
104 | "model": "gpt-3.5-turbo",
105 | "messages": [
106 | {
107 | "role": "user",
108 | "content": "Write a hello world program in Rust.",
109 | }
110 | ],
111 | },
112 | callback="https://abc.requestcatcher.com",
113 | )
114 |
115 | print(result)
116 | ```
117 |
118 |
119 |
120 | ### Sending Chat Completion Requests in Batches
121 |
122 |
123 | ```js JavaScript
124 | import { Client, upstash } from "@upstash/qstash";
125 |
126 | const client = new Client({
127 | token: "",
128 | });
129 |
130 | const result = await client.batchJSON([
131 | {
132 | api: { name: "llm", provider: openai({ token: "_OPEN_AI_TOKEN_" }) },
133 | body: { ... },
134 | callback: "https://abc.requestcatcher.com",
135 | },
136 | ...
137 | ]);
138 |
139 | console.log(result);
140 | ```
141 |
142 | ```python Python
143 | from qstash import QStash
144 | from qstash.chat import upstash
145 |
146 | q = QStash("")
147 |
148 | result = q.message.batch_json(
149 | [
150 | {
151 | "api":{"name": "llm", "provider": openai("")},
152 | "body": {...},
153 | "callback": "https://abc.requestcatcher.com",
154 | },
155 | ...
156 | ]
157 | )
158 |
159 | print(result)
160 | ```
161 |
162 | ```shell curl
163 | curl "https://qstash.upstash.io/v2/batch" \
164 | -X POST \
165 | -H "Authorization: Bearer QSTASH_TOKEN" \
166 | -H "Content-Type: application/json" \
167 | -d '[
168 | {
169 | "destination": "api/llm",
170 | "body": {...},
171 | "callback": "https://abc.requestcatcher.com"
172 | },
173 | ...
174 | ]'
175 | ```
176 |
177 |
178 | ### Retrying After Rate Limit Resets
179 |
180 | When the rate limits are exceeded, QStash automatically schedules the retry of
181 | publish or enqueue of chat completion tasks depending on the reset time
182 | of the rate limits. That helps with not doing retries prematurely
183 | when it is definitely going to fail due to exceeding rate limits.
184 |
185 |
186 |
187 | ## Analytics via Helicone
188 |
189 | Helicone is a powerful observability platform that provides valuable insights into your LLM usage. Integrating Helicone with QStash is straightforward.
190 |
191 | To enable Helicone observability in QStash, you simply need to pass your Helicone API key when initializing your model. Here's how to do it for both custom models and OpenAI:
192 |
193 |
194 | ```ts
195 | import { Client, custom } from "@upstash/qstash";
196 |
197 | const client = new Client({
198 | token: "",
199 | });
200 |
201 | await client.publishJSON({
202 | api: {
203 | name: "llm",
204 | provider: custom({
205 | token: "XXX",
206 | baseUrl: "https://api.together.xyz",
207 | }),
208 | analytics: { name: "helicone", token: process.env.HELICONE_API_KEY! },
209 | },
210 | body: {
211 | model: "meta-llama/Llama-3-8b-chat-hf",
212 | messages: [
213 | {
214 | role: "user",
215 | content: "hello",
216 | },
217 | ],
218 | },
219 | callback: "https://oz.requestcatcher.com/",
220 | });
221 | ```
222 |
223 |
--------------------------------------------------------------------------------
/qstash/quickstarts/cloudflare-workers.mdx:
--------------------------------------------------------------------------------
1 | ---
2 | title: "Cloudflare Workers"
3 | ---
4 |
5 | This is a step by step guide on how to receive webhooks from QStash in your
6 | Cloudflare Worker.
7 |
8 | ### Project Setup
9 |
10 | We will use **C3 (create-cloudflare-cli)** command-line tool to create our functions. You can open a new terminal window and run C3 using the prompt below.
11 |
12 |
13 |
14 | ```shell npm
15 | npm create cloudflare@latest
16 | ```
17 |
18 | ```shell yarn
19 | yarn create cloudflare@latest
20 | ```
21 |
22 |
23 |
24 | This will install the `create-cloudflare` package, and lead you through setup. C3 will also install Wrangler in projects by default, which helps us testing and deploying the projects.
25 |
26 | ```text
27 | ➜ npm create cloudflare@latest
28 | Need to install the following packages:
29 | create-cloudflare@2.52.3
30 | Ok to proceed? (y) y
31 |
32 | using create-cloudflare version 2.52.3
33 |
34 | ╭ Create an application with Cloudflare Step 1 of 3
35 | │
36 | ├ In which directory do you want to create your application?
37 | │ dir ./cloudflare_starter
38 | │
39 | ├ What would you like to start with?
40 | │ category Hello World example
41 | │
42 | ├ Which template would you like to use?
43 | │ type Worker only
44 | │
45 | ├ Which language do you want to use?
46 | │ lang TypeScript
47 | │
48 | ├ Do you want to use git for version control?
49 | │ yes git
50 | │
51 | ╰ Application created
52 | ```
53 |
54 | We will also install the **Upstash QStash library**.
55 |
56 | ```bash
57 | npm install @upstash/qstash
58 | ```
59 |
60 | ### 3. Use QStash in your handler
61 |
62 | First we import the library:
63 |
64 | ```ts src/index.ts
65 | import { Receiver } from "@upstash/qstash";
66 | ```
67 |
68 | Then we adjust the `Env` interface to include the `QSTASH_CURRENT_SIGNING_KEY`
69 | and `QSTASH_NEXT_SIGNING_KEY` environment variables.
70 |
71 | ```ts src/index.ts
72 | export interface Env {
73 | QSTASH_CURRENT_SIGNING_KEY: string;
74 | QSTASH_NEXT_SIGNING_KEY: string;
75 | }
76 | ```
77 |
78 | And then we validate the signature in the `handler` function.
79 |
80 | First we create a new receiver and provide it with the signing keys.
81 |
82 | ```ts src/index.ts
83 | const receiver = new Receiver({
84 | currentSigningKey: env.QSTASH_CURRENT_SIGNING_KEY,
85 | nextSigningKey: env.QSTASH_NEXT_SIGNING_KEY,
86 | });
87 | ```
88 |
89 | Then we verify the signature.
90 |
91 | ```ts src/index.ts
92 | const body = await request.text();
93 |
94 | const isValid = await receiver.verify({
95 | signature: request.headers.get("Upstash-Signature")!,
96 | body,
97 | });
98 | ```
99 |
100 | The entire file looks like this now:
101 |
102 | ```ts src/index.ts
103 | import { Receiver } from "@upstash/qstash";
104 |
105 | export interface Env {
106 | QSTASH_CURRENT_SIGNING_KEY: string;
107 | QSTASH_NEXT_SIGNING_KEY: string;
108 | }
109 |
110 | export default {
111 | async fetch(request, env, ctx): Promise {
112 | const receiver = new Receiver({
113 | currentSigningKey: env.QSTASH_CURRENT_SIGNING_KEY,
114 | nextSigningKey: env.QSTASH_NEXT_SIGNING_KEY,
115 | });
116 |
117 | const body = await request.text();
118 |
119 | const isValid = await receiver.verify({
120 | signature: request.headers.get("Upstash-Signature")!,
121 | body,
122 | });
123 |
124 | if (!isValid) {
125 | return new Response("Invalid signature", { status: 401 });
126 | }
127 |
128 | // signature is valid
129 |
130 | return new Response("Hello World!");
131 | },
132 | } satisfies ExportedHandler;
133 | ```
134 |
135 | ### Configure Credentials
136 |
137 | There are two methods for setting up the credentials for QStash. One for worker level, the other for account level.
138 |
139 | #### Using Cloudflare Secrets (Worker Level Secrets)
140 |
141 | This is the common way of creating secrets for your worker, see [Workflow Secrets](https://developers.cloudflare.com/workers/configuration/secrets/)
142 |
143 | - Navigate to [Upstash Console](https://console.upstash.com) and get your QStash credentials.
144 |
145 | - In [Cloudflare Dashboard](https://dash.cloudflare.com/), Go to **Compute (Workers)** > **Workers & Pages**.
146 |
147 | - Select your worker and go to **Settings** > **Variables and Secrets**.
148 |
149 | - Add your QStash credentials as secrets here:
150 |
151 |
152 |
153 |
154 |
155 | #### Using Cloudflare Secrets Store (Account Level Secrets)
156 |
157 | This method requires a few modifications in the worker code, see [Access to Secret on Env Object](https://developers.cloudflare.com/secrets-store/integrations/workers/#3-access-the-secret-on-the-env-object)
158 |
159 | ```ts src/index.ts
160 | import { Receiver } from "@upstash/qstash";
161 |
162 | export interface Env {
163 | QSTASH_CURRENT_SIGNING_KEY: SecretsStoreSecret;
164 | QSTASH_NEXT_SIGNING_KEY: SecretsStoreSecret;
165 | }
166 |
167 | export default {
168 | async fetch(request, env, ctx): Promise {
169 | const c = new Receiver({
170 | currentSigningKey: await env.QSTASH_CURRENT_SIGNING_KEY.get(),
171 | nextSigningKey: await env.QSTASH_NEXT_SIGNING_KEY.get(),
172 | });
173 |
174 | // Rest of the code
175 | },
176 | };
177 | ```
178 |
179 | After doing these modifications, you can deploy the worker to Cloudflare with `npx wrangler deploy`, and
180 | follow the steps below to define the secrets:
181 |
182 | - Navigate to [Upstash Console](https://console.upstash.com) and get your QStash credentials.
183 |
184 | - In [Cloudflare Dashboard](https://dash.cloudflare.com/), Go to **Secrets Store** and add QStash credentials as secrets.
185 |
186 |
187 |
188 |
189 |
190 | - Under **Compute (Workers)** > **Workers & Pages**, find your worker and add these secrets as bindings.
191 |
192 |
193 |
194 |
195 |
196 | ### Deployment
197 |
198 |
199 | Newer deployments may revert the configurations you did in the dashboard.
200 | While worker level secrets persist, the bindings will be gone!
201 |
202 |
203 | Deploy your function to Cloudflare with `npx wrangler deploy`
204 |
205 | The endpoint of the function will be provided to you, once the deployment is done.
206 |
207 | ### Publish a message
208 |
209 | Open a different terminal and publish a message to QStash. Note the destination
210 | url is the same that was printed in the previous deploy step.
211 |
212 | ```bash
213 | curl --request POST "https://qstash.upstash.io/v2/publish/https://..workers.dev" \
214 | -H "Authorization: Bearer " \
215 | -H "Content-Type: application/json" \
216 | -d "{ \"hello\": \"world\"}"
217 | ```
218 |
219 | In the logs you should see something like this:
220 |
221 | ```bash
222 | $ npx wrangler tail
223 |
224 | ⛅️ wrangler 4.43.0
225 | --------------------
226 |
227 | Successfully created tail, expires at 2025-10-16T00:25:17Z
228 | Connected to , waiting for logs...
229 | POST https://..workers.dev/ - Ok @ 10/15/2025, 10:34:55 PM
230 | ```
231 |
232 | ## Next Steps
233 |
234 | That's it, you have successfully created a secure Cloudflare Worker, that
235 | receives and verifies incoming webhooks from qstash.
236 |
237 | Learn more about publishing a message to qstash [here](/qstash/howto/publishing).
238 |
239 | You can find the source code [here](https://github.com/upstash/qstash-examples/tree/main/cloudflare-workers).
240 |
--------------------------------------------------------------------------------
/qstash/quickstarts/aws-lambda/python.mdx:
--------------------------------------------------------------------------------
1 | ---
2 | title: "AWS Lambda (Python)"
3 | ---
4 |
5 | [Source Code](https://github.com/upstash/qstash-examples/tree/main/aws-lambda/python-example)
6 |
7 | This is a step by step guide on how to receive webhooks from QStash in your
8 | Lambda function on AWS.
9 |
10 | ### 1. Create a new project
11 |
12 | Let's create a new folder called `aws-lambda` and initialize a new project by
13 | creating `lambda_function.py` This example uses Makefile, but the scripts can
14 | also be written for `Pipenv`.
15 |
16 | ```bash
17 | mkdir aws-lambda
18 | cd aws-lambda
19 | touch lambda_function.py
20 | ```
21 |
22 | ### 2. Dependencies
23 |
24 | We are using `PyJwt` for decoding the JWT token in our code. We will install the
25 | package in the zipping stage.
26 |
27 | ### 3. Creating the handler function
28 |
29 | In this example we will show how to receive a webhook from QStash and verify the
30 | signature.
31 |
32 | First, let's import everything we need:
33 |
34 | ```python
35 | import json
36 | import os
37 | import hmac
38 | import hashlib
39 | import base64
40 | import time
41 | import jwt
42 | ```
43 |
44 | Now, we create the handler function. In the handler we will prepare all
45 | necessary variables that we need for verification. This includes the signature,
46 | the signing keys and the url of the lambda function. Then we try to verify the
47 | request using the current signing key and if that fails we will try the next
48 | one. If the signature could be verified, we can start processing the request.
49 |
50 | ```python
51 | def lambda_handler(event, context):
52 |
53 | # parse the inputs
54 | current_signing_key = os.environ['QSTASH_CURRENT_SIGNING_KEY']
55 | next_signing_key = os.environ['QSTASH_NEXT_SIGNING_KEY']
56 |
57 | headers = event['headers']
58 | signature = headers['upstash-signature']
59 | url = "https://{}{}".format(event["requestContext"]["domainName"], event["rawPath"])
60 | body = None
61 | if 'body' in event:
62 | body = event['body']
63 |
64 |
65 | # check verification now
66 | try:
67 | verify(signature, current_signing_key, body, url)
68 | except Exception as e:
69 | print("Failed to verify signature with current signing key:", e)
70 | try:
71 | verify(signature, next_signing_key, body, url)
72 | except Exception as e2:
73 | return {
74 | "statusCode": 400,
75 | "body": json.dumps({
76 | "error": str(e2),
77 | }),
78 | }
79 |
80 |
81 | # Your logic here...
82 |
83 | return {
84 | "statusCode": 200,
85 | "body": json.dumps({
86 | "message": "ok",
87 | }),
88 | }
89 | ```
90 |
91 | The `verify` function will handle the actual verification of the signature. The
92 | signature itself is actually a [JWT](https://jwt.io) and includes claims about
93 | the request. See [here](/qstash/features/security#claims).
94 |
95 | ```python
96 | # @param jwt_token - The content of the `upstash-signature` header
97 | # @param signing_key - The signing key to use to verify the signature (Get it from Upstash Console)
98 | # @param body - The raw body of the request
99 | # @param url - The public URL of the lambda function
100 | def verify(jwt_token, signing_key, body, url):
101 | split = jwt_token.split(".")
102 | if len(split) != 3:
103 | raise Exception("Invalid JWT.")
104 |
105 | header, payload, signature = split
106 |
107 | message = header + '.' + payload
108 | generated_signature = base64.urlsafe_b64encode(hmac.new(bytes(signing_key, 'utf-8'), bytes(message, 'utf-8'), digestmod=hashlib.sha256).digest()).decode()
109 |
110 | if generated_signature != signature and signature + "=" != generated_signature :
111 | raise Exception("Invalid JWT signature.")
112 |
113 | decoded = jwt.decode(jwt_token, options={"verify_signature": False})
114 | sub = decoded['sub']
115 | iss = decoded['iss']
116 | exp = decoded['exp']
117 | nbf = decoded['nbf']
118 | decoded_body = decoded['body']
119 |
120 | if iss != "Upstash":
121 | raise Exception("Invalid issuer: {}".format(iss))
122 |
123 | if sub.rstrip("/") != url.rstrip("/"):
124 | raise Exception("Invalid subject: {}".format(sub))
125 |
126 | now = time.time()
127 | if now > exp:
128 | raise Exception("Token has expired.")
129 |
130 | if now < nbf:
131 | raise Exception("Token is not yet valid.")
132 |
133 |
134 | if body != None:
135 | while decoded_body[-1] == "=":
136 | decoded_body = decoded_body[:-1]
137 |
138 | m = hashlib.sha256()
139 | m.update(bytes(body, 'utf-8'))
140 | m = m.digest()
141 | generated_hash = base64.urlsafe_b64encode(m).decode()
142 |
143 | if generated_hash != decoded_body and generated_hash != decoded_body + "=" :
144 | raise Exception("Body hash doesn't match.")
145 | ```
146 |
147 | You can find the complete file
148 | [here](https://github.com/upstash/qstash-examples/tree/main/aws-lambda/python-example/lambda_function.py).
149 |
150 | That's it, now we can create the function on AWS and test it.
151 |
152 | ### 4. Create a Lambda function on AWS
153 |
154 | Create a new Lambda function from scratch by going to the
155 | [AWS console](https://us-east-1.console.aws.amazon.com/lambda/home?region=us-east-1#/create/function).
156 | (Make sure you select your desired region)
157 |
158 | Give it a name and select `Python 3.8` as runtime, then create the function.
159 |
160 |
161 |
162 |
163 |
164 | Afterwards we will add a public URL to this lambda by going to the
165 | `Configuration` tab:
166 |
167 |
168 |
169 |
170 |
171 | Select `Auth Type = NONE` because we are handling authentication ourselves.
172 |
173 | After creating the url, you should see it on the right side of the overview of
174 | your function:
175 |
176 |
177 |
178 |
179 |
180 | ### 5. Set Environment Variables
181 |
182 | Get your current and next signing key from the
183 | [Upstash Console](https://console.upstash.com/qstash)
184 |
185 | On the same `Configuration` tab from earlier, we will now set the required
186 | environment variables:
187 |
188 |
189 |
190 |
191 |
192 | ### 6. Deploy your Lambda function
193 |
194 | We need to bundle our code and zip it to deploy it to AWS.
195 |
196 | Add the following script to your `Makefile` file (or corresponding pipenv
197 | script):
198 |
199 | ```yaml
200 | zip:
201 | rm -rf dist
202 | pip3 install --target ./dist pyjwt
203 | cp lambda_function.py ./dist/lambda_function.py
204 | cd dist && zip -r lambda.zip .
205 | mv ./dist/lambda.zip ./
206 | ```
207 |
208 | When calling `make zip` this will install PyJwt and zip the code.
209 |
210 | Afterwards we can click the `Upload from` button in the lower right corner and
211 | deploy the code to AWS. Select `lambda.zip` as upload file.
212 |
213 |
214 |
215 |
216 |
217 | ### 7. Publish a message
218 |
219 | Open a different terminal and publish a message to QStash. Note the destination
220 | url is the URL from step 4.
221 |
222 | ```bash
223 | curl --request POST "https://qstash.upstash.io/v2/publish/https://urzdbfn4et56vzeasu3fpcynym0zerme.lambda-url.eu-west-1.on.aws" \
224 | -H "Authorization: Bearer " \
225 | -H "Content-Type: application/json" \
226 | -d "{ \"hello\": \"world\"}"
227 | ```
228 |
229 | ## Next Steps
230 |
231 | That's it, you have successfully created a secure AWS lambda function, that
232 | receives and verifies incoming webhooks from qstash.
233 |
234 | Learn more about publishing a message to qstash [here](/qstash/howto/publishing)
235 |
--------------------------------------------------------------------------------
/qstash/integrations/pipedream.mdx:
--------------------------------------------------------------------------------
1 | ---
2 | title: "Pipedream"
3 | description: "Build and run workflows with 1000s of open source triggers and actions across 900+ apps."
4 | ---
5 |
6 | [Pipedream](https://pipedream.com) allows you to build and run workflows with
7 | 1000s of open source triggers and actions across 900+ apps.
8 |
9 | Check out the [official integration](https://pipedream.com/apps/qstash).
10 |
11 | ## Trigger a Pipedream workflow from a QStash topic message
12 |
13 | This is a step by step guide on how to trigger a Pipedream workflow from a
14 | QStash topic message.
15 |
16 | Alternatively [click here](https://pipedream.com/new?h=tch_3egfAX) to create a
17 | new workflow with this QStash topic trigger added.
18 |
19 | ### 1. Create a Topic in QStash
20 |
21 | If you haven't yet already, create a **Topic** in the
22 | [QStash dashboard](https://console.upstash.com/qstash?tab=topics).
23 |
24 | ### 2. Create a new Pipedream workflow
25 |
26 | Sign into [Pipedream](https://pipedream.com) and create a new workflow.
27 |
28 | ### 3. Add QStash Topic Message as a trigger
29 |
30 | In the workflow **Trigger** search for QStash and select the **Create Topic
31 | Endpoint** trigger.
32 |
33 | 
34 |
35 | Then, connect your QStash account by clicking the QStash prop and retrieving
36 | your token from the
37 | [QStash dashboard](https://console.upstash.com/qstash?tab=details).
38 |
39 | After connecting your QStash account, click the **Topic** prop, a dropdown will
40 | appear containing the QStash topics on your account.
41 |
42 | Then _click_ on a specific topic to listen for new messages on.
43 |
44 | 
45 |
46 | Finally, _click_ **Continue**. Pipedream will create a unique HTTP endpoint and
47 | add it to your QStash topic.
48 |
49 | ### 4. Test with a sample message
50 |
51 | Use the _Request Builder_ in the
52 | [QStash dashboard](https://console.upstash.com/qstash?tab=details) to publish a
53 | test message to your topic.
54 |
55 | Alternatively, you can use the **Create topic message** action in a Pipedream
56 | workflow to send a message to your topic.
57 |
58 | _Don't forget_ to use this action in a separate workflow, otherwise you might
59 | cause an infinite loop of messages between QStash and Pipedream.
60 |
61 | ### 5. Add additional steps
62 |
63 | Add additional steps to the workflow by clicking the plus icon beneath the
64 | Trigger step.
65 |
66 | Build a workflow with the 1,000+ pre-built components available in Pipedream,
67 | including [Airtable](https://pipedream.com/apps/airtable),
68 | [Google Sheets](https://pipedream.com/apps/google-sheets),
69 | [Slack](https://pipedream.com/apps/slack) and many more.
70 |
71 | Alternatively, use [Node.js](https://pipedream.com/docs/code/nodejs) or
72 | [Python](https://pipedream.com/docs/code/python) code steps to retrieve,
73 | transform, or send data to other services.
74 |
75 | ### 6. Deploy your Pipedream workflow
76 |
77 | After you're satisfied with your changes, click the **Deploy** button in the
78 | top right of your Pipedream workflow. Your deployed workflow will not
79 | automatically process new messages to your QStash topic. Collapse
80 | quickstart-trigger-pipedream-workflow-from-topic.md 3 KB
81 |
82 | ### Video tutorial
83 |
84 | If you prefer video, you can check out this tutorial by
85 | [pipedream](https://pipedream.com).
86 |
87 | [](https://www.youtube.com/watch?v=-oXlWuxNG5A)
88 |
89 | ## Trigger a Pipedream workflow from a QStash topic message
90 |
91 | This is a step by step guide on how to trigger a Pipedream workflow from a
92 | QStash endpoint message.
93 |
94 | Alternatively [click here](https://pipedream.com/new?h=tch_m5ofX6) to create a
95 | pre-configured workflow with the HTTP trigger and QStash webhook verification
96 | step already added.
97 |
98 | ### 1. Create a new Pipedream workflow
99 |
100 | Sign into [Pipedream](https://pipedream.com) and create a new workflow.
101 |
102 | ### 2. Configure the workflow with an HTTP trigger
103 |
104 | In the workflow **Trigger** select the **New HTTP / Webhook Requests** option.
105 |
106 | 
107 |
108 | Pipedream will create a unique HTTP endpoint for your workflow.
109 |
110 | Then configure the HTTP trigger to _return a custom response_. By default
111 | Pipedream will always return a 200 response, which allows us to return a non-200
112 | response to QStash to retry the workflow again if there's an error during the
113 | execution of the QStash message.
114 |
115 | 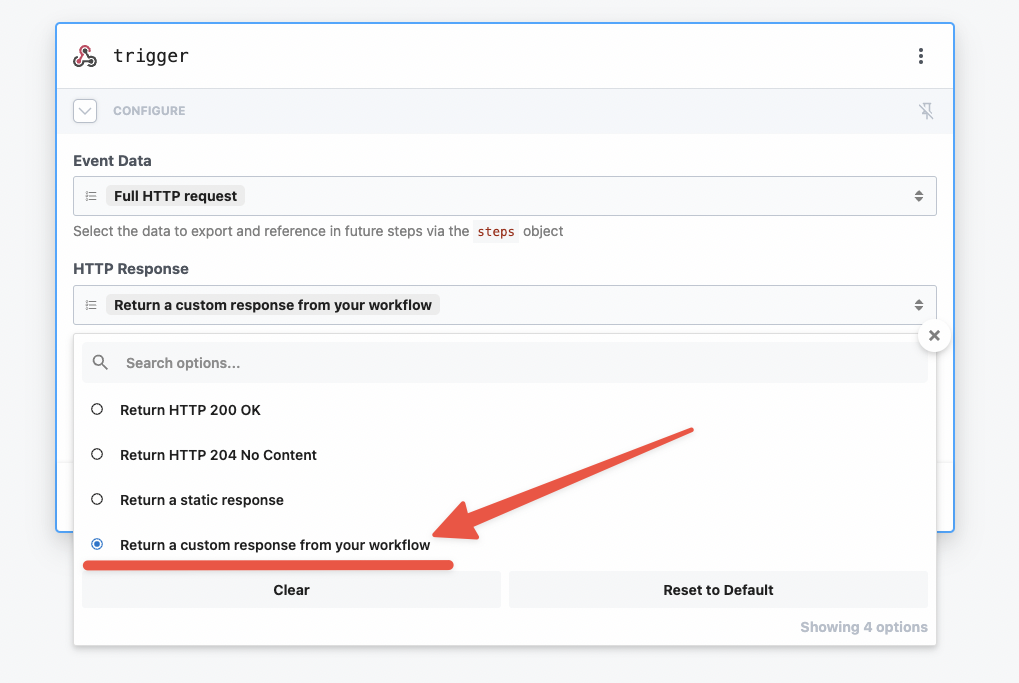
116 |
117 | Lastly, set the **Event Body** to be a **Raw request**. This will make sure the
118 | QStash verify webhook action receives the data in the correct format.
119 |
120 | 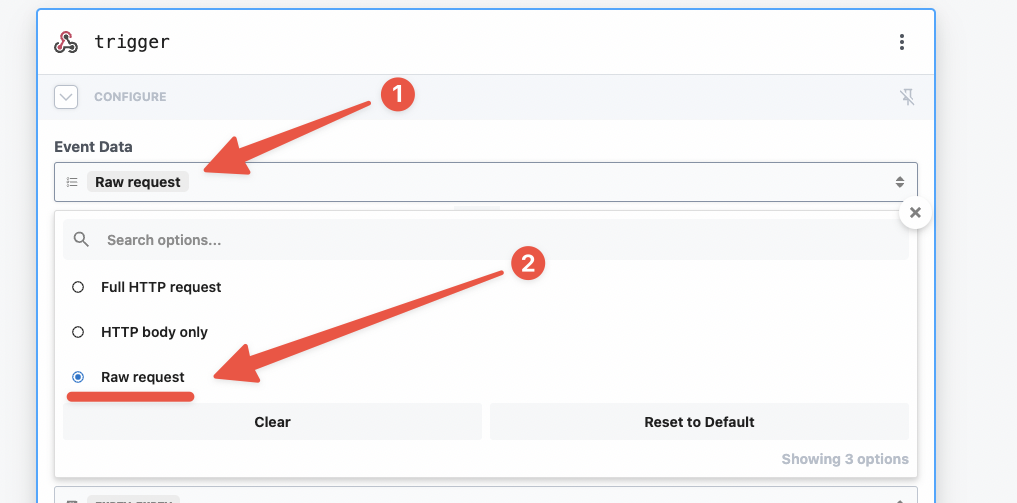
121 |
122 | ### 3. Test with a sample message
123 |
124 | Use the _Request Builder_ in the
125 | [QStash dashboard](https://console.upstash.com/qstash?tab=details) to publish a
126 | test message to your topic.
127 |
128 | Alternatively, you can use the **Create topic message** action in a Pipedream
129 | workflow to send a message to your topic.
130 |
131 | _Don't forget_ to use this action in a separate workflow, otherwise you might
132 | cause an infinite loop of messages between QStash and Pipedream.
133 |
134 | ### 4. Verify the QStash webhook
135 |
136 | Pipedream has a pre-built QStash action that will verify the content of incoming
137 | webhooks from QStash.
138 |
139 | First, search for **QStash** in the step search bar, then select the QStash app.
140 |
141 | Of the available actions, select the **Verify Webhook** action.
142 |
143 | Then connect your QStash account and select the **HTTP request** prop. In the
144 | dropdown, click **Enter custom expression** and then paste in
145 | `{{ steps.trigger.event }}`.
146 |
147 | This step will automatically verify the incoming HTTP requests and exit the
148 | workflow early if requests are not from QStash.
149 |
150 | ### 5. Add additional steps
151 |
152 | Add additional steps to the workflow by clicking the plus icon beneath the
153 | Trigger step.
154 |
155 | Build a workflow with the 1,000+ pre-built components available in Pipedream,
156 | including [Airtable](https://pipedream.com/apps/airtable),
157 | [Google Sheets](https://pipedream.com/apps/google-sheets),
158 | [Slack](https://pipedream.com/apps/slack) and many more.
159 |
160 | Alternatively, use [Node.js](https://pipedream.com/docs/code/nodejs) or
161 | [Python](https://pipedream.com/docs/code/python) code steps to retrieve,
162 | transform, or send data to other services.
163 |
164 | ### 6. Return a 200 response
165 |
166 | In the final step of your workflow, return a 200 response by adding a new step
167 | and selecting **Return an HTTP Response**.
168 |
169 | 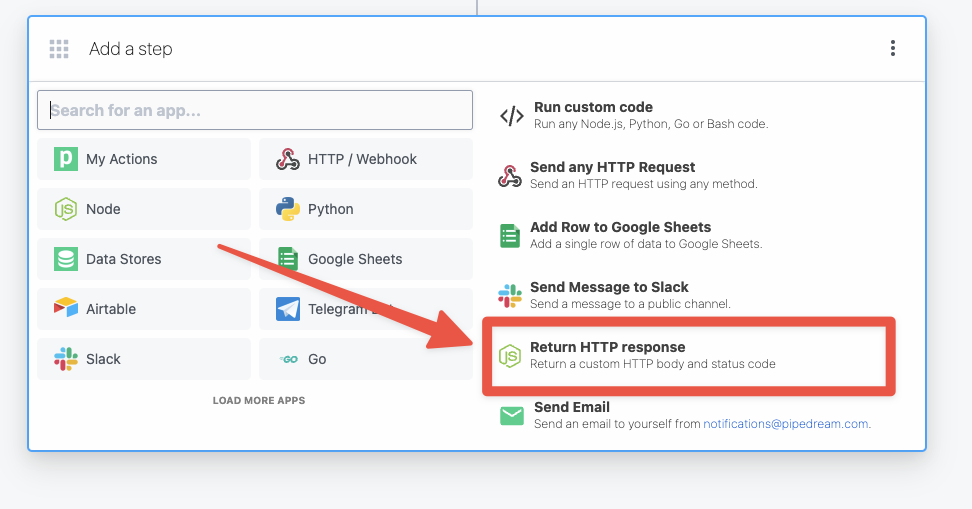
170 |
171 | This will generate Node.js code to return an HTTP response to QStash using the
172 | `$.respond` helper in Pipedream.
173 |
174 | ### 7. Deploy your Pipedream workflow
175 |
176 | After you're satisfied with your changes, click the **Deploy** button in the
177 | top right of your Pipedream workflow. Your deployed workflow will not
178 | automatically process new messages to your QStash topic.
179 |
180 | ### Video tutorial
181 |
182 | If you prefer video, you can check out this tutorial by
183 | [pipedream](https://pipedream.com).
184 |
185 | [](https://youtu.be/uG8eO7BNok4)
186 |
--------------------------------------------------------------------------------
/qstash/features/batch.mdx:
--------------------------------------------------------------------------------
1 | ---
2 | title: "Batching"
3 | ---
4 |
5 | [Publishing](/qstash/howto/publishing) is great for sending one message
6 | at a time, but sometimes you want to send a batch of messages at once.
7 |
8 | This can be useful to send messages to a single or multiple destinations.
9 | QStash provides the `batch` endpoint to help
10 | you with this.
11 |
12 | If the format of the messages are valid, the response will be an array of
13 | responses for each message in the batch. When batching URL Groups, the response
14 | will be an array of responses for each destination in the URL Group. If one
15 | message fails to be sent, that message will have an error response, but the
16 | other messages will still be sent.
17 |
18 | You can publish to destination, URL Group or queue in the same batch request.
19 |
20 | ## Batching messages with destinations
21 |
22 | You can also send messages to the same destination!
23 |
24 |
25 | ```shell cURL
26 | curl -XPOST https://qstash.upstash.io/v2/batch \
27 | -H 'Authorization: Bearer XXX' \
28 | -H "Content-type: application/json" \
29 | -d '
30 | [
31 | {
32 | "destination": "https://example.com/destination1"
33 | },
34 | {
35 | "destination": "https://example.com/destination2"
36 | }
37 | ]'
38 | ```
39 |
40 | ```typescript TypeScript
41 | import { Client } from "@upstash/qstash";
42 |
43 | // Each message is the same as the one you would send with the publish endpoint
44 | const client = new Client({ token: "" });
45 | const res = await client.batchJSON([
46 | {
47 | url: "https://example.com/destination1",
48 | },
49 | {
50 | url: "https://example.com/destination2",
51 | },
52 | ]);
53 | ```
54 |
55 | ```python Python
56 | from qstash import QStash
57 |
58 | client = QStash("")
59 | client.message.batch_json(
60 | [
61 | {"url": "https://example.com/destination1"},
62 | {"url": "https://example.com/destination2"},
63 | ]
64 | )
65 | ```
66 |
67 |
68 |
69 | ## Batching messages with URL Groups
70 |
71 | If you have a [URL Group](/qstash/howto/url-group-endpoint), you can batch send with
72 | the URL Group as well.
73 |
74 |
75 | ```shell cURL
76 | curl -XPOST https://qstash.upstash.io/v2/batch \
77 | -H 'Authorization: Bearer XXX' \
78 | -H "Content-type: application/json" \
79 | -d '
80 | [
81 | {
82 | "destination": "myUrlGroup"
83 | },
84 | {
85 | "destination": "https://example.com/destination2"
86 | }
87 | ]'
88 | ```
89 |
90 | ```typescript TypeScript
91 | const client = new Client({ token: "" });
92 |
93 | // Each message is the same as the one you would send with the publish endpoint
94 | const res = await client.batchJSON([
95 | {
96 | urlGroup: "myUrlGroup",
97 | },
98 | {
99 | url: "https://example.com/destination2",
100 | },
101 | ]);
102 | ```
103 |
104 | ```python Python
105 | from qstash import QStash
106 |
107 | client = QStash("")
108 | client.message.batch_json(
109 | [
110 | {"url_group": "my-url-group"},
111 | {"url": "https://example.com/destination2"},
112 | ]
113 | )
114 | ```
115 |
116 |
117 |
118 | ## Batching messages with queue
119 |
120 | If you have a [queue](/qstash/features/queues), you can batch send with
121 | the queue. It is the same as publishing to a destination, but you need to set the queue name.
122 |
123 |
124 | ```shell cURL
125 | curl -XPOST https://qstash.upstash.io/v2/batch \
126 | -H 'Authorization: Bearer XXX' \
127 | -H "Content-type: application/json" \
128 | -d '
129 | [
130 | {
131 | "queue": "my-queue",
132 | "destination": "https://example.com/destination1"
133 | },
134 | {
135 | "queue": "my-second-queue",
136 | "destination": "https://example.com/destination2"
137 | }
138 | ]'
139 | ```
140 |
141 | ```typescript TypeScript
142 | const client = new Client({ token: "" });
143 |
144 | const res = await client.batchJSON([
145 | {
146 | queueName: "my-queue",
147 | url: "https://example.com/destination1",
148 | },
149 | {
150 | queueName: "my-second-queue",
151 | url: "https://example.com/destination2",
152 | },
153 | ]);
154 | ```
155 |
156 | ```python Python
157 | from upstash_qstash import QStash
158 | from upstash_qstash.message import BatchRequest
159 |
160 | qstash = QStash("")
161 |
162 | messages = [
163 | BatchRequest(
164 | queue="my-queue",
165 | url="https://httpstat.us/200",
166 | body=f"hi 1",
167 | retries=0
168 | ),
169 | BatchRequest(
170 | queue="my-second-queue",
171 | url="https://httpstat.us/200",
172 | body=f"hi 2",
173 | retries=0
174 | ),
175 | ]
176 |
177 | qstash.message.batch(messages)
178 | ```
179 |
180 |
181 |
182 | ## Batching messages with headers and body
183 |
184 | You can provide custom headers and a body for each message in the batch.
185 |
186 |
187 | ```shell cURL
188 | curl -XPOST https://qstash.upstash.io/v2/batch -H "Authorization: Bearer XXX" \
189 | -H "Content-Type: application/json" \
190 | -d '
191 | [
192 | {
193 | "destination": "myUrlGroup",
194 | "headers":{
195 | "Upstash-Delay":"5s",
196 | "Upstash-Forward-Hello":"123456"
197 | },
198 | "body": "Hello World"
199 | },
200 | {
201 | "destination": "https://example.com/destination1",
202 | "headers":{
203 | "Upstash-Delay":"7s",
204 | "Upstash-Forward-Hello":"789"
205 | }
206 | },
207 | {
208 | "destination": "https://example.com/destination2",
209 | "headers":{
210 | "Upstash-Delay":"9s",
211 | "Upstash-Forward-Hello":"again"
212 | }
213 | }
214 | ]'
215 | ```
216 |
217 | ```typescript TypeScript
218 | const client = new Client({ token: "" });
219 |
220 | // Each message is the same as the one you would send with the publish endpoint
221 | const msgs = [
222 | {
223 | urlGroup: "myUrlGroup",
224 | delay: 5,
225 | body: "Hello World",
226 | headers: {
227 | hello: "123456",
228 | },
229 | },
230 | {
231 | url: "https://example.com/destination1",
232 | delay: 7,
233 | headers: {
234 | hello: "789",
235 | },
236 | },
237 | {
238 | url: "https://example.com/destination2",
239 | delay: 9,
240 | headers: {
241 | hello: "again",
242 | },
243 | body: {
244 | Some: "Data",
245 | },
246 | },
247 | ];
248 |
249 | const res = await client.batchJSON(msgs);
250 | ```
251 |
252 | ```python Python
253 | from qstash import QStash
254 |
255 | client = QStash("")
256 | client.message.batch_json(
257 | [
258 | {
259 | "url_group": "my-url-group",
260 | "delay": "5s",
261 | "body": {"hello": "world"},
262 | "headers": {"random": "header"},
263 | },
264 | {
265 | "url": "https://example.com/destination1",
266 | "delay": "1m",
267 | },
268 | {
269 | "url": "https://example.com/destination2",
270 | "body": {"hello": "again"},
271 | },
272 | ]
273 | )
274 | ```
275 |
276 |
277 |
278 | #### The response for this will look like
279 |
280 | ```json
281 | [
282 | [
283 | {
284 | "messageId": "msg_...",
285 | "url": "https://myUrlGroup-endpoint1.com"
286 | },
287 | {
288 | "messageId": "msg_...",
289 | "url": "https://myUrlGroup-endpoint2.com"
290 | }
291 | ],
292 | {
293 | "messageId": "msg_..."
294 | },
295 | {
296 | "messageId": "msg_..."
297 | }
298 | ]
299 | ```
300 |
--------------------------------------------------------------------------------
/qstash/features/callbacks.mdx:
--------------------------------------------------------------------------------
1 | ---
2 | title: "Callbacks"
3 | ---
4 |
5 | All serverless function providers have a maximum execution time for each
6 | function. Usually you can extend this time by paying more, but it's still
7 | limited. QStash provides a way to go around this problem by using callbacks.
8 |
9 | ## What is a callback?
10 |
11 | A callback allows you to call a long running function without having to wait for
12 | its response. Instead of waiting for the request to finish, you can add a
13 | callback url to your published message and when the request finishes, we will
14 | call your callback URL with the response.
15 |
16 |
17 |
18 |
19 |
20 |
21 | 1. You publish a message to QStash using the `/v2/publish` endpoint
22 | 2. QStash will enqueue the message and deliver it to the destination
23 | 3. QStash waits for the response from the destination
24 | 4. When the response is ready, QStash calls your callback URL with the response
25 |
26 | Callbacks publish a new message with the response to the callback URL. Messages
27 | created by callbacks are charged as any other message.
28 |
29 | ## How do I use Callbacks?
30 |
31 | You can add a callback url in the `Upstash-Callback` header when publishing a
32 | message. The value must be a valid URL.
33 |
34 |
35 | ```bash cURL
36 | curl -X POST \
37 | https://qstash.upstash.io/v2/publish/https://my-api... \
38 | -H 'Content-Type: application/json' \
39 | -H 'Authorization: Bearer ' \
40 | -H 'Upstash-Callback: ' \
41 | -d '{ "hello": "world" }'
42 | ```
43 |
44 | ```typescript Typescript
45 | import { Client } from "@upstash/qstash";
46 |
47 | const client = new Client({ token: "" });
48 | const res = await client.publishJSON({
49 | url: "https://my-api...",
50 | body: { hello: "world" },
51 | callback: "https://my-callback...",
52 | });
53 | ```
54 |
55 | ```python Python
56 | from qstash import QStash
57 |
58 | client = QStash("")
59 | client.message.publish_json(
60 | url="https://my-api...",
61 | body={
62 | "hello": "world",
63 | },
64 | callback="https://my-callback...",
65 | )
66 | ```
67 |
68 |
69 | The callback body sent to you will be a JSON object with the following fields:
70 |
71 | ```json
72 | {
73 | "status": 200,
74 | "header": { "key": ["value"] }, // Response header
75 | "body": "YmFzZTY0IGVuY29kZWQgcm9keQ==", // base64 encoded response body
76 | "retried": 2, // How many times we retried to deliver the original message
77 | "maxRetries": 3, // Number of retries before the message assumed to be failed to delivered.
78 | "sourceMessageId": "msg_xxx", // The ID of the message that triggered the callback
79 | "topicName": "myTopic", // The name of the URL Group (topic) if the request was part of a URL Group
80 | "endpointName": "myEndpoint", // The endpoint name if the endpoint is given a name within a topic
81 | "url": "http://myurl.com", // The destination url of the message that triggered the callback
82 | "method": "GET", // The http method of the message that triggered the callback
83 | "sourceHeader": { "key": "value" }, // The http header of the message that triggered the callback
84 | "sourceBody": "YmFzZTY0kZWQgcm9keQ==", // The base64 encoded body of the message that triggered the callback
85 | "notBefore": "1701198458025", // The unix timestamp of the message that triggered the callback is/will be delivered in milliseconds
86 | "createdAt": "1701198447054", // The unix timestamp of the message that triggered the callback is created in milliseconds
87 | "scheduleId": "scd_xxx", // The scheduleId of the message if the message is triggered by a schedule
88 | "callerIP": "178.247.74.179" // The IP address where the message that triggered the callback is published from
89 | }
90 | ```
91 |
92 | In Next.js you could use the following code to handle the callback:
93 |
94 | ```js
95 | // pages/api/callback.js
96 |
97 | import { verifySignature } from "@upstash/qstash/nextjs";
98 |
99 | function handler(req, res) {
100 | // responses from qstash are base64-encoded
101 | const decoded = atob(req.body.body);
102 | console.log(decoded);
103 |
104 | return res.status(200).end();
105 | }
106 |
107 | export default verifySignature(handler);
108 |
109 | export const config = {
110 | api: {
111 | bodyParser: false,
112 | },
113 | };
114 | ```
115 |
116 | We may truncate the response body if it exceeds your plan limits. You can check
117 | your `Max Message Size` in the
118 | [console](https://console.upstash.com/qstash?tab=details).
119 |
120 | Make sure you verify the authenticity of the callback request made to your API
121 | by
122 | [verifying the signature](/qstash/features/security/#request-signing-optional).
123 |
124 | # What is a Failure-Callback?
125 |
126 | Failure callbacks are similar to callbacks but they are called only when all the retries are exhausted and still
127 | the message can not be delivered to the given endpoint.
128 |
129 | This is designed to be an serverless alternative to [List messages to DLQ](/qstash/api/dlq/listMessages).
130 |
131 | You can add a failure callback URL in the `Upstash-Failure-Callback` header when publishing a
132 | message. The value must be a valid URL.
133 |
134 |
135 | ```bash cURL
136 | curl -X POST \
137 | https://qstash.upstash.io/v2/publish/ \
138 | -H 'Content-Type: application/json' \
139 | -H 'Authorization: Bearer ' \
140 | -H 'Upstash-Failure-Callback: ' \
141 | -d '{ "hello": "world" }'
142 | ```
143 |
144 | ```typescript Typescript
145 | import { Client } from "@upstash/qstash";
146 |
147 | const client = new Client({ token: "" });
148 | const res = await client.publishJSON({
149 | url: "https://my-api...",
150 | body: { hello: "world" },
151 | failureCallback: "https://my-callback...",
152 | });
153 | ```
154 |
155 | ```python Python
156 | from qstash import QStash
157 |
158 | client = QStash("")
159 | client.message.publish_json(
160 | url="https://my-api...",
161 | body={
162 | "hello": "world",
163 | },
164 | failure_callback="https://my-callback...",
165 | )
166 | ```
167 |
168 |
169 | The callback body sent to you will be a JSON object with the following fields:
170 |
171 | ```json
172 | {
173 | "status": 400,
174 | "header": { "key": ["value"] }, // Response header
175 | "body": "YmFzZTY0IGVuY29kZWQgcm9keQ==", // base64 encoded response body
176 | "retried": 3, // How many times we retried to deliver the original message
177 | "maxRetries": 3, // Number of retries before the message assumed to be failed to delivered.
178 | "dlqId": "1725323658779-0", // Dead Letter Queue id. This can be used to retrieve/remove the related message from DLQ.
179 | "sourceMessageId": "msg_xxx", // The ID of the message that triggered the callback
180 | "topicName": "myTopic", // The name of the URL Group (topic) if the request was part of a topic
181 | "endpointName": "myEndpoint", // The endpoint name if the endpoint is given a name within a topic
182 | "url": "http://myurl.com", // The destination url of the message that triggered the callback
183 | "method": "GET", // The http method of the message that triggered the callback
184 | "sourceHeader": { "key": "value" }, // The http header of the message that triggered the callback
185 | "sourceBody": "YmFzZTY0kZWQgcm9keQ==", // The base64 encoded body of the message that triggered the callback
186 | "notBefore": "1701198458025", // The unix timestamp of the message that triggered the callback is/will be delivered in milliseconds
187 | "createdAt": "1701198447054", // The unix timestamp of the message that triggered the callback is created in milliseconds
188 | "scheduleId": "scd_xxx", // The scheduleId of the message if the message is triggered by a schedule
189 | "callerIP": "178.247.74.179" // The IP address where the message that triggered the callback is published from
190 | }
191 | ```
192 |
193 | You can also use a callback and failureCallback together!
194 |
195 | ## Configuring Callbacks
196 |
197 | Publishes/enqueues for callbacks can also be configured with the same HTTP headers that are used to configure direct publishes/enqueues.
198 |
199 | You can refer to headers that are used to configure `publishes` [here](/qstash/api/publish) and for `enqueues`
200 | [here](/qstash/api/enqueue)
201 |
202 | Instead of the `Upstash` prefix for headers, the `Upstash-Callback`/`Upstash-Failure-Callback` prefix can be used to configure callbacks as follows:
203 |
204 | ```
205 | Upstash-Callback-Timeout
206 | Upstash-Callback-Retries
207 | Upstash-Callback-Delay
208 | Upstash-Callback-Method
209 | Upstash-Failure-Callback-Timeout
210 | Upstash-Failure-Callback-Retries
211 | Upstash-Failure-Callback-Delay
212 | Upstash-Failure-Callback-Method
213 | ```
214 |
215 | You can also forward headers to your callback endpoints as follows:
216 | ```
217 | Upstash-Callback-Forward-MyCustomHeader
218 | Upstash-Failure-Callback-Forward-MyCustomHeader
219 | ```
220 |
--------------------------------------------------------------------------------
/qstash/quickstarts/aws-lambda/nodejs.mdx:
--------------------------------------------------------------------------------
1 | ---
2 | title: "AWS Lambda (Node)"
3 | ---
4 |
5 | ## Setting up a Lambda
6 |
7 | The [AWS CDK](https://aws.amazon.com/cdk/) is the most convenient way to create a new project on AWS Lambda. For example, it lets you directly define integrations such as APIGateway, a tool to make our lambda publicly available as an API, in your code.
8 |
9 | ```bash Terminal
10 | mkdir my-app
11 | cd my-app
12 | cdk init app -l typescript
13 | npm i esbuild @upstash/qstash
14 | mkdir lambda
15 | touch lambda/index.ts
16 | ```
17 |
18 | ## Webhook verification
19 |
20 | ### Using the SDK (recommended)
21 |
22 | Edit `lambda/index.ts`, the file containing our core lambda logic:
23 |
24 | ```ts lambda/index.ts
25 | import { Receiver } from "@upstash/qstash"
26 | import type { APIGatewayProxyEvent, APIGatewayProxyResult } from "aws-lambda"
27 |
28 | const receiver = new Receiver({
29 | currentSigningKey: process.env.QSTASH_CURRENT_SIGNING_KEY ?? "",
30 | nextSigningKey: process.env.QSTASH_NEXT_SIGNING_KEY ?? "",
31 | })
32 |
33 | export const handler = async (
34 | event: APIGatewayProxyEvent
35 | ): Promise => {
36 | const signature = event.headers["upstash-signature"]
37 | const lambdaFunctionUrl = `https://${event.requestContext.domainName}`
38 |
39 | if (!signature) {
40 | return {
41 | statusCode: 401,
42 | body: JSON.stringify({ message: "Missing signature" }),
43 | }
44 | }
45 |
46 | try {
47 | await receiver.verify({
48 | signature: signature,
49 | body: event.body ?? "",
50 | url: lambdaFunctionUrl,
51 | })
52 | } catch (err) {
53 | return {
54 | statusCode: 401,
55 | body: JSON.stringify({ message: "Invalid signature" }),
56 | }
57 | }
58 |
59 | // Request is valid, perform business logic
60 |
61 | return {
62 | statusCode: 200,
63 | body: JSON.stringify({ message: "Request processed successfully" }),
64 | }
65 | }
66 | ```
67 |
68 | We'll set the `QSTASH_CURRENT_SIGNING_KEY` and `QSTASH_NEXT_SIGNING_KEY` environment variables together when deploying our Lambda.
69 |
70 | ### Manual Verification
71 |
72 | In this section, we'll manually verify our incoming QStash requests without additional packages. Also see our [manual verification example](https://github.com/upstash/qstash-examples/tree/main/aws-lambda).
73 |
74 | 1. Implement the handler function
75 |
76 | ```ts lambda/index.ts
77 | import type { APIGatewayEvent, APIGatewayProxyResult } from "aws-lambda"
78 | import { createHash, createHmac } from "node:crypto"
79 |
80 | export const handler = async (
81 | event: APIGatewayEvent,
82 | ): Promise => {
83 | const signature = event.headers["upstash-signature"] ?? ""
84 | const currentSigningKey = process.env.QSTASH_CURRENT_SIGNING_KEY ?? ""
85 | const nextSigningKey = process.env.QSTASH_NEXT_SIGNING_KEY ?? ""
86 |
87 | const url = `https://${event.requestContext.domainName}`
88 |
89 | try {
90 | // Try to verify the signature with the current signing key and if that fails, try the next signing key
91 | // This allows you to roll your signing keys once without downtime
92 | await verify(signature, currentSigningKey, event.body, url).catch((err) => {
93 | console.error(
94 | `Failed to verify signature with current signing key: ${err}`
95 | )
96 |
97 | return verify(signature, nextSigningKey, event.body, url)
98 | })
99 | } catch (err) {
100 | const message = err instanceof Error ? err.toString() : err
101 |
102 | return {
103 | statusCode: 400,
104 | body: JSON.stringify({ error: message }),
105 | }
106 | }
107 |
108 | // Add your business logic here
109 |
110 | return {
111 | statusCode: 200,
112 | body: JSON.stringify({ message: "Request processed successfully" }),
113 | }
114 | }
115 | ```
116 |
117 | 2. Implement the `verify` function:
118 |
119 | ```ts lambda/index.ts
120 | /**
121 | * @param jwt - The content of the `upstash-signature` header (JWT)
122 | * @param signingKey - The signing key to use to verify the signature (Get it from Upstash Console)
123 | * @param body - The raw body of the request
124 | * @param url - The public URL of the lambda function
125 | */
126 | async function verify(
127 | jwt: string,
128 | signingKey: string,
129 | body: string | null,
130 | url: string
131 | ): Promise {
132 | const split = jwt.split(".")
133 | if (split.length != 3) {
134 | throw new Error("Invalid JWT")
135 | }
136 | const [header, payload, signature] = split
137 |
138 | if (
139 | signature !=
140 | createHmac("sha256", signingKey)
141 | .update(`${header}.${payload}`)
142 | .digest("base64url")
143 | ) {
144 | throw new Error("Invalid JWT signature")
145 | }
146 |
147 | // JWT is verified, start looking at payload claims
148 | const p: {
149 | sub: string
150 | iss: string
151 | exp: number
152 | nbf: number
153 | body: string
154 | } = JSON.parse(Buffer.from(payload, "base64url").toString())
155 |
156 | if (p.iss !== "Upstash") {
157 | throw new Error(`invalid issuer: ${p.iss}, expected "Upstash"`)
158 | }
159 | if (p.sub !== url) {
160 | throw new Error(`invalid subject: ${p.sub}, expected "${url}"`)
161 | }
162 |
163 | const now = Math.floor(Date.now() / 1000)
164 | if (now > p.exp) {
165 | throw new Error("token has expired")
166 | }
167 | if (now < p.nbf) {
168 | throw new Error("token is not yet valid")
169 | }
170 |
171 | if (body != null) {
172 | if (
173 | p.body.replace(/=+$/, "") !=
174 | createHash("sha256").update(body).digest("base64url")
175 | ) {
176 | throw new Error("body hash does not match")
177 | }
178 | }
179 | }
180 | ```
181 |
182 | You can find the complete example
183 | [here](https://github.com/upstash/qstash-examples/blob/main/aws-lambda/typescript-example/index.ts).
184 |
185 |
186 | ## Deploying a Lambda
187 | ### Using the AWS CDK (recommended)
188 |
189 | Because we used the AWS CDK to initialize our project, deployment is straightforward. Edit the `lib/.ts` file the CDK created when bootstrapping the project. For example, if our lambda webhook does video processing, it could look like this:
190 |
191 | ```ts lib/.ts
192 | import * as cdk from "aws-cdk-lib";
193 | import * as lambda from "aws-cdk-lib/aws-lambda";
194 | import { NodejsFunction } from "aws-cdk-lib/aws-lambda-nodejs";
195 | import { Construct } from "constructs";
196 | import path from "path";
197 | import * as apigateway from 'aws-cdk-lib/aws-apigateway';
198 |
199 | export class VideoProcessingStack extends cdk.Stack {
200 | constructor(scope: Construct, id: string, props?: cdk.StackProps) {
201 | super(scope, id, props)
202 |
203 | // Create the Lambda function
204 | const videoProcessingLambda = new NodejsFunction(this, 'VideoProcessingLambda', {
205 | runtime: lambda.Runtime.NODEJS_20_X,
206 | handler: 'handler',
207 | entry: path.join(__dirname, '../lambda/index.ts'),
208 | });
209 |
210 | // Create the API Gateway
211 | const api = new apigateway.RestApi(this, 'VideoProcessingApi', {
212 | restApiName: 'Video Processing Service',
213 | description: 'This service handles video processing.',
214 | defaultMethodOptions: {
215 | authorizationType: apigateway.AuthorizationType.NONE,
216 | },
217 | });
218 |
219 | api.root.addMethod('POST', new apigateway.LambdaIntegration(videoProcessingLambda));
220 | }
221 | }
222 | ```
223 |
224 | Every time we now run the following deployment command in our terminal, our changes are going to be deployed right to a publicly available API, authorized by our QStash webhook logic from before.
225 |
226 | ```bash Terminal
227 | cdk deploy
228 | ```
229 |
230 | You may be prompted to confirm the necessary AWS permissions during this process, for example allowing APIGateway to invoke your lambda function.
231 |
232 | Once your code has been deployed to Lambda, you'll receive a live URL to your endpoint via the CLI and can see the new APIGateway connection in your AWS dashboard:
233 |
234 |
235 |
236 |
237 |
238 | The URL you use to invoke your function typically follows this format, especially if you follow the same stack configuration as shown above:
239 |
240 | `https://.execute-api..amazonaws.com/prod/`
241 |
242 | To provide our `QSTASH_CURRENT_SIGNING_KEY` and `QSTASH_NEXT_SIGNING_KEY` environment variables, navigate to your QStash dashboard:
243 |
244 |
245 |
246 |
247 |
248 | and make these two variables available to your Lambda in your function configuration:
249 |
250 |
251 |
252 |
253 |
254 | Tada, we just deployed a live Lambda with the AWS CDK! 🎉
255 |
256 | ### Manual Deployment
257 |
258 | 1. Create a new Lambda function by going to the [AWS dashboard](https://us-east-1.console.aws.amazon.com/lambda/home?region=us-east-1#/create/function) for your desired lambda region. Give your new function a name and select `Node.js 20.x` as runtime, then create the function.
259 |
260 |
261 |
262 |
263 |
264 | 2. To make this Lambda available under a public URL, navigate to the `Configuration` tab and click `Function URL`:
265 |
266 |
267 |
268 |
269 |
270 | 3. In the following dialog, you'll be asked to select one of two authentication types. Select `NONE`, because we are handling authentication ourselves. Then, click `Save`.
271 |
272 | You'll see the function URL on the right side of your function overview:
273 |
274 |
275 |
276 |
277 |
278 | 4. Get your current and next signing key from the
279 | [Upstash Console](https://console.upstash.com/qstash).
280 |
281 |
282 |
283 |
284 |
285 | 5. Still under the `Configuration` tab, set the `QSTASH_CURRENT_SIGNING_KEY` and `QSTASH_NEXT_SIGNING_KEY`
286 | environment variables:
287 |
288 |
289 |
290 |
291 |
292 | 6. Add the following script to your `package.json` file to build and zip your code:
293 |
294 | ```json package.json
295 | {
296 | "scripts": {
297 | "build": "rm -rf ./dist; esbuild index.ts --bundle --minify --sourcemap --platform=node --target=es2020 --outfile=dist/index.js && cd dist && zip -r index.zip index.js*"
298 | }
299 | }
300 | ```
301 |
302 | 7. Click the `Upload from` button for your Lambda and
303 | deploy the code to AWS. Select `./dist/index.zip` as the upload file.
304 |
305 |
306 |
307 |
308 |
309 | Tada, you've manually deployed a zip file to AWS Lambda! 🎉
310 |
311 | ## Testing the Integration
312 |
313 | To make sure everything works as expected, navigate to your QStash request builder and send a request to your freshly deployed Lambda function:
314 |
315 |
316 |
317 |
318 |
319 | Alternatively, you can also send a request via CURL:
320 |
321 | ```bash Terminal
322 | curl --request POST "https://qstash.upstash.io/v2/publish/" \
323 | -H "Authorization: Bearer " \
324 | -H "Content-Type: application/json" \
325 | -d "{ \"hello\": \"world\"}"
326 | ```
327 |
--------------------------------------------------------------------------------
 16 |
17 |
18 | 1. **Retry** - Republish the message and remove it from the dead letter queue. Republished messages are just like any other message and will be retried automatically if they fail.
19 | 2. **Delete** - Delete the message from the dead letter queue.
20 |
21 | ## Limitations
22 |
23 | Dead letter queues are subject only to a retention period that depends on your plan. Messages are deleted when their retention period expires. See the “Max DLQ Retention” row on the [QStash Pricing](https://upstash.com/pricing/qstash) page.
24 |
--------------------------------------------------------------------------------
/qstash/overall/usecases.mdx:
--------------------------------------------------------------------------------
1 | ---
2 | title: Use Cases
3 | ---
4 |
5 | TODO: andreas: rework and reenable this page after we have 2 use cases ready
6 | https://linear.app/upstash/issue/QSTH-84/use-cases-summaryhighlights-of-recipes
7 |
8 | This section is still a work in progress.
9 |
10 | We will be adding detailed tutorials for each use case soon.
11 |
12 | Tell us on [Discord](https://discord.gg/w9SenAtbme) or
13 | [X](https://x.com/upstash) what you would like to see here.
14 |
15 | ### Triggering Nextjs Functions on a schedule
16 |
17 | Create a schedule in QStash that runs every hour and calls a Next.js serverless
18 | function hosted on Vercel.
19 |
20 | ### Reset Billing Cycle in your Database
21 |
22 | Once a month, reset database entries to start a new billing cycle.
23 |
24 | ### Fanning out alerts to Slack, email, Opsgenie, etc.
25 |
26 | Createa QStash URL Group that receives alerts from a single source and delivers them
27 | to multiple destinations.
28 |
29 | ### Send delayed message when a new user signs up
30 |
31 | Publish delayed messages whenever a new user signs up in your app. After a
32 | certain delay (e.g. 10 minutes), QStash will send a request to your API,
33 | allowing you to email the user a welcome message.
34 |
--------------------------------------------------------------------------------
/qstash/sdks/ts/examples/messages.mdx:
--------------------------------------------------------------------------------
1 | ---
2 | title: Messages
3 | ---
4 |
5 | Messages are removed from the database shortly after they're delivered, so you
6 | will not be able to retrieve a message after. This endpoint is intended to be used
7 | for accessing messages that are in the process of being delivered/retried.
8 |
9 | #### Retrieve a message
10 |
11 | ```typescript
12 | import { Client } from "@upstash/qstash";
13 |
14 | const client = new Client({ token: "
16 |
17 |
18 | 1. **Retry** - Republish the message and remove it from the dead letter queue. Republished messages are just like any other message and will be retried automatically if they fail.
19 | 2. **Delete** - Delete the message from the dead letter queue.
20 |
21 | ## Limitations
22 |
23 | Dead letter queues are subject only to a retention period that depends on your plan. Messages are deleted when their retention period expires. See the “Max DLQ Retention” row on the [QStash Pricing](https://upstash.com/pricing/qstash) page.
24 |
--------------------------------------------------------------------------------
/qstash/overall/usecases.mdx:
--------------------------------------------------------------------------------
1 | ---
2 | title: Use Cases
3 | ---
4 |
5 | TODO: andreas: rework and reenable this page after we have 2 use cases ready
6 | https://linear.app/upstash/issue/QSTH-84/use-cases-summaryhighlights-of-recipes
7 |
8 | This section is still a work in progress.
9 |
10 | We will be adding detailed tutorials for each use case soon.
11 |
12 | Tell us on [Discord](https://discord.gg/w9SenAtbme) or
13 | [X](https://x.com/upstash) what you would like to see here.
14 |
15 | ### Triggering Nextjs Functions on a schedule
16 |
17 | Create a schedule in QStash that runs every hour and calls a Next.js serverless
18 | function hosted on Vercel.
19 |
20 | ### Reset Billing Cycle in your Database
21 |
22 | Once a month, reset database entries to start a new billing cycle.
23 |
24 | ### Fanning out alerts to Slack, email, Opsgenie, etc.
25 |
26 | Createa QStash URL Group that receives alerts from a single source and delivers them
27 | to multiple destinations.
28 |
29 | ### Send delayed message when a new user signs up
30 |
31 | Publish delayed messages whenever a new user signs up in your app. After a
32 | certain delay (e.g. 10 minutes), QStash will send a request to your API,
33 | allowing you to email the user a welcome message.
34 |
--------------------------------------------------------------------------------
/qstash/sdks/ts/examples/messages.mdx:
--------------------------------------------------------------------------------
1 | ---
2 | title: Messages
3 | ---
4 |
5 | Messages are removed from the database shortly after they're delivered, so you
6 | will not be able to retrieve a message after. This endpoint is intended to be used
7 | for accessing messages that are in the process of being delivered/retried.
8 |
9 | #### Retrieve a message
10 |
11 | ```typescript
12 | import { Client } from "@upstash/qstash";
13 |
14 | const client = new Client({ token: " 14 |
15 | ---
16 |
17 | ### Step 2: Import QStash Configurations to HTTP Node
18 |
19 | 1. Go to Upstash Console and open QStash Request Builder Tab.
20 | 2. Fill out the fields to create an QStash Request. (Publish, Enqueue, Schedule)
21 |
14 |
15 | ---
16 |
17 | ### Step 2: Import QStash Configurations to HTTP Node
18 |
19 | 1. Go to Upstash Console and open QStash Request Builder Tab.
20 | 2. Fill out the fields to create an QStash Request. (Publish, Enqueue, Schedule)
21 |  22 | 3. Copy the cURL snippet created for you, representing your request.
23 |
22 | 3. Copy the cURL snippet created for you, representing your request.
23 |  24 | 4. Back to the n8n, in HTTP Request Parameters tab, use import cURL.
25 |
24 | 4. Back to the n8n, in HTTP Request Parameters tab, use import cURL.
25 |  26 | 5. Paste the cURL snippet that you copied in the console, and let n8n to fill out the form for you.
27 |
26 | 5. Paste the cURL snippet that you copied in the console, and let n8n to fill out the form for you.
27 |  28 |
29 | ---
30 |
31 | ### Step 3: Test the Workflow
32 |
33 | 1. Execute workflow.
34 | 2. Visit the Webhook URL.
35 | 3. That's it! You can check the logs in the Qstash Console to confirm your QStash Request is working.
36 |
28 |
29 | ---
30 |
31 | ### Step 3: Test the Workflow
32 |
33 | 1. Execute workflow.
34 | 2. Visit the Webhook URL.
35 | 3. That's it! You can check the logs in the Qstash Console to confirm your QStash Request is working.
36 |  37 |
--------------------------------------------------------------------------------
/qstash/sdks/py/gettingstarted.mdx:
--------------------------------------------------------------------------------
1 | ---
2 | title: Getting Started
3 | ---
4 |
5 | ## Install
6 |
7 | ### PyPI
8 |
9 | ```bash
10 | pip install qstash
11 | ```
12 |
13 | ## Get QStash token
14 |
15 | Follow the instructions [here](/qstash/overall/getstarted) to get your QStash token and signing keys.
16 |
17 | ## Usage
18 |
19 | #### Synchronous Client
20 |
21 | ```python
22 | from qstash import QStash
23 |
24 | client = QStash("
37 |
--------------------------------------------------------------------------------
/qstash/sdks/py/gettingstarted.mdx:
--------------------------------------------------------------------------------
1 | ---
2 | title: Getting Started
3 | ---
4 |
5 | ## Install
6 |
7 | ### PyPI
8 |
9 | ```bash
10 | pip install qstash
11 | ```
12 |
13 | ## Get QStash token
14 |
15 | Follow the instructions [here](/qstash/overall/getstarted) to get your QStash token and signing keys.
16 |
17 | ## Usage
18 |
19 | #### Synchronous Client
20 |
21 | ```python
22 | from qstash import QStash
23 |
24 | client = QStash(" 17 |
18 |
19 | Either you or a previously setup schedule will create a message.
20 |
21 | When a message is ready for execution, it will be become `ACTIVE` and a delivery to
22 | your API is attempted.
23 |
24 | If you API responds with a status code between `200 - 299`, the task is
25 | considered successful and will be marked as `DELIVERED`.
26 |
27 | Otherwise the message is being retried if there are any retries left and moves to `RETRY`. If all retries are exhausted, the task has `FAILED` and the message will be moved to the DLQ.
28 |
29 | During all this a message can be cancelled via [DELETE /v2/messages/:messageId](https://docs.upstash.com/qstash/api/messages/cancel). When the request is received, `CANCEL_REQUESTED` will be logged first.
30 | If retries are not exhausted yet, in the next deliver time, the message will be marked as `CANCELLED` and will be completely removed from the system.
31 |
32 | ## Console
33 |
34 | Head over to the [Upstash Console](https://console.upstash.com/qstash) and go to
35 | the `Logs` tab, where you can see the latest status of your messages.
36 |
--------------------------------------------------------------------------------
/qstash/howto/handling-failures.mdx:
--------------------------------------------------------------------------------
1 | ---
2 | title: "Handling Failures"
3 | ---
4 |
5 | Sometimes, endpoints fail due to various reasons such as network issues or server issues.
6 | In such cases, QStash offers a few options to handle these failures.
7 |
8 | ## Failure Callbacks
9 |
10 | When publishing a message, you can provide a failure callback that will be called if the message fails to be published.
11 | You can read more about callbacks [here](/qstash/features/callbacks).
12 |
13 | With the failure callback, you can add custom logic such as logging the failure or sending an alert to the team.
14 | Once you handle the failure, you can [delete it from the dead letter queue](/qstash/api/dlq/deleteMessage).
15 |
16 |
17 |
18 |
19 | Either you or a previously setup schedule will create a message.
20 |
21 | When a message is ready for execution, it will be become `ACTIVE` and a delivery to
22 | your API is attempted.
23 |
24 | If you API responds with a status code between `200 - 299`, the task is
25 | considered successful and will be marked as `DELIVERED`.
26 |
27 | Otherwise the message is being retried if there are any retries left and moves to `RETRY`. If all retries are exhausted, the task has `FAILED` and the message will be moved to the DLQ.
28 |
29 | During all this a message can be cancelled via [DELETE /v2/messages/:messageId](https://docs.upstash.com/qstash/api/messages/cancel). When the request is received, `CANCEL_REQUESTED` will be logged first.
30 | If retries are not exhausted yet, in the next deliver time, the message will be marked as `CANCELLED` and will be completely removed from the system.
31 |
32 | ## Console
33 |
34 | Head over to the [Upstash Console](https://console.upstash.com/qstash) and go to
35 | the `Logs` tab, where you can see the latest status of your messages.
36 |
--------------------------------------------------------------------------------
/qstash/howto/handling-failures.mdx:
--------------------------------------------------------------------------------
1 | ---
2 | title: "Handling Failures"
3 | ---
4 |
5 | Sometimes, endpoints fail due to various reasons such as network issues or server issues.
6 | In such cases, QStash offers a few options to handle these failures.
7 |
8 | ## Failure Callbacks
9 |
10 | When publishing a message, you can provide a failure callback that will be called if the message fails to be published.
11 | You can read more about callbacks [here](/qstash/features/callbacks).
12 |
13 | With the failure callback, you can add custom logic such as logging the failure or sending an alert to the team.
14 | Once you handle the failure, you can [delete it from the dead letter queue](/qstash/api/dlq/deleteMessage).
15 |
16 |  61 |
--------------------------------------------------------------------------------
/qstash/howto/url-group-endpoint.mdx:
--------------------------------------------------------------------------------
1 | ---
2 | title: "Create URL Groups and Endpoints"
3 | ---
4 |
5 | QStash allows you to group multiple APIs together into a single namespace,
6 | called a `URL Group` (Previously, it was called `Topics`).
7 | Read more about URL Groups [here](/qstash/features/url-groups).
8 |
9 | There are two ways to create endpoints and URL Groups: The UI and the REST API.
10 |
11 | ## UI
12 |
13 | Go to [console.upstash.com/qstash](https://console.upstash.com/qstash) and click
14 | on the `URL Groups` tab. Afterwards you can create a new URL Group by giving it a name.
15 | Keep in mind that URL Group names are restricted to alphanumeric, underscore, hyphen
16 | and dot characters.
17 |
18 | 
19 |
20 | After creating the URL Group, you can add endpoints to it:
21 |
22 | 
23 |
24 | ## API
25 |
26 | You can create a URL Group and endpoint using the [console](https://console.upstash.com/qstash) or [REST API](/qstash/api/url-groups/add-endpoint).
27 |
28 |
61 |
--------------------------------------------------------------------------------
/qstash/howto/url-group-endpoint.mdx:
--------------------------------------------------------------------------------
1 | ---
2 | title: "Create URL Groups and Endpoints"
3 | ---
4 |
5 | QStash allows you to group multiple APIs together into a single namespace,
6 | called a `URL Group` (Previously, it was called `Topics`).
7 | Read more about URL Groups [here](/qstash/features/url-groups).
8 |
9 | There are two ways to create endpoints and URL Groups: The UI and the REST API.
10 |
11 | ## UI
12 |
13 | Go to [console.upstash.com/qstash](https://console.upstash.com/qstash) and click
14 | on the `URL Groups` tab. Afterwards you can create a new URL Group by giving it a name.
15 | Keep in mind that URL Group names are restricted to alphanumeric, underscore, hyphen
16 | and dot characters.
17 |
18 | 
19 |
20 | After creating the URL Group, you can add endpoints to it:
21 |
22 | 
23 |
24 | ## API
25 |
26 | You can create a URL Group and endpoint using the [console](https://console.upstash.com/qstash) or [REST API](/qstash/api/url-groups/add-endpoint).
27 |
28 |  12 |
13 |
14 | Send this token along with every request made to `QStash` inside the
15 | `Authorization` header like this:
16 |
17 | ```
18 | "Authorization": "Bearer
12 |
13 |
14 | Send this token along with every request made to `QStash` inside the
15 | `Authorization` header like this:
16 |
17 | ```
18 | "Authorization": "Bearer  11 |
12 |
13 |
11 |
12 |
13 |  30 |
31 | ## Docker
32 |
33 | QStash CLI is available as a Docker image through our public AWS ECR repository:
34 |
35 | ```javascript
36 | // Pull the image
37 | docker pull public.ecr.aws/upstash/qstash:latest
38 |
39 | // Run the image
40 | docker run -p 8080:8080 public.ecr.aws/upstash/qstash:latest qstash dev
41 | ```
42 |
43 | ## Artifact Repository
44 |
45 | You can download the binary directly from our artifact repository without using a package manager:
46 |
47 | https://artifacts.upstash.com/#qstash/versions/
48 |
49 | Select the appropriate version, architecture, and operating system for your platform.
50 | After extracting the archive file, run the executable:
51 |
52 | ```
53 | $ ./qstash dev
54 | ```
55 |
56 | ## QStash CLI
57 |
58 | Currently, the only available command for QStash CLI is `dev`, which starts a development server instance.
59 |
60 | ```
61 | $ ./qstash dev --help
62 | Usage of dev:
63 | -port int
64 | The port to start HTTP server at [env QSTASH_DEV_PORT] (default 8080)
65 | -quota string
66 | The quota of users [env QSTASH_DEV_QUOTA] (default "payg")
67 | ```
68 |
69 |
70 | There are predefined test users available. You can configure the quota type of users using the `-quota` option, with available options being `payg` and `pro`.
71 | These quotas don't affect performance but allow you to simulate different server limits based on the subscription tier.
72 |
73 | After starting the development server using any of the methods above, it will display the necessary environment variables.
74 | Select and copy the credentials from one of the following test users:
75 |
76 |
30 |
31 | ## Docker
32 |
33 | QStash CLI is available as a Docker image through our public AWS ECR repository:
34 |
35 | ```javascript
36 | // Pull the image
37 | docker pull public.ecr.aws/upstash/qstash:latest
38 |
39 | // Run the image
40 | docker run -p 8080:8080 public.ecr.aws/upstash/qstash:latest qstash dev
41 | ```
42 |
43 | ## Artifact Repository
44 |
45 | You can download the binary directly from our artifact repository without using a package manager:
46 |
47 | https://artifacts.upstash.com/#qstash/versions/
48 |
49 | Select the appropriate version, architecture, and operating system for your platform.
50 | After extracting the archive file, run the executable:
51 |
52 | ```
53 | $ ./qstash dev
54 | ```
55 |
56 | ## QStash CLI
57 |
58 | Currently, the only available command for QStash CLI is `dev`, which starts a development server instance.
59 |
60 | ```
61 | $ ./qstash dev --help
62 | Usage of dev:
63 | -port int
64 | The port to start HTTP server at [env QSTASH_DEV_PORT] (default 8080)
65 | -quota string
66 | The quota of users [env QSTASH_DEV_QUOTA] (default "payg")
67 | ```
68 |
69 |
70 | There are predefined test users available. You can configure the quota type of users using the `-quota` option, with available options being `payg` and `pro`.
71 | These quotas don't affect performance but allow you to simulate different server limits based on the subscription tier.
72 |
73 | After starting the development server using any of the methods above, it will display the necessary environment variables.
74 | Select and copy the credentials from one of the following test users:
75 |
76 |  110 |
111 |
112 | Also you can get the same info using the REST API.
113 | - [List All Flow Control Keys](/qstash/api/flow-control/list).
114 | - [Single Flow Control Key](/qstash/api/flow-control/get).
115 |
--------------------------------------------------------------------------------
/qstash/quickstarts/python-vercel.mdx:
--------------------------------------------------------------------------------
1 | ---
2 | title: "Python on Vercel"
3 | ---
4 |
5 | ## Introduction
6 |
7 | This quickstart will guide you through setting up QStash to run a daily script
8 | to clean up your database. This is useful for testing and development environments
9 | where you want to reset the database every day.
10 |
11 | ## Prerequisites
12 |
13 | - Create an Upstash account and get your [QStash token](https://console.upstash.com/qstash)
14 |
15 |
110 |
111 |
112 | Also you can get the same info using the REST API.
113 | - [List All Flow Control Keys](/qstash/api/flow-control/list).
114 | - [Single Flow Control Key](/qstash/api/flow-control/get).
115 |
--------------------------------------------------------------------------------
/qstash/quickstarts/python-vercel.mdx:
--------------------------------------------------------------------------------
1 | ---
2 | title: "Python on Vercel"
3 | ---
4 |
5 | ## Introduction
6 |
7 | This quickstart will guide you through setting up QStash to run a daily script
8 | to clean up your database. This is useful for testing and development environments
9 | where you want to reset the database every day.
10 |
11 | ## Prerequisites
12 |
13 | - Create an Upstash account and get your [QStash token](https://console.upstash.com/qstash)
14 |
15 |  116 |
117 |
118 | Once you start the schedule, QStash will invoke the endpoint at the specified time. You can
119 | scroll down and verify the job has been created!
120 |
121 |
116 |
117 |
118 | Once you start the schedule, QStash will invoke the endpoint at the specified time. You can
119 | scroll down and verify the job has been created!
120 |
121 |  117 |
117 |  118 |
119 |
120 | To view a more detailed Next.js quick start guide for setting up QStash, refer to the [quick start](/qstash/quickstarts/vercel-nextjs) guide.
121 |
122 | It's also possible to schedule a background job to run at a later time using [schedules](/qstash/features/schedules).
123 |
124 | If you'd like to invoke another endpoint when the background job is complete, you can use [callbacks](/qstash/features/callbacks).
125 |
--------------------------------------------------------------------------------
/qstash/recipes/periodic-data-updates.mdx:
--------------------------------------------------------------------------------
1 | ---
2 | title: "Periodic Data Updates"
3 | ---
4 |
5 |
118 |
119 |
120 | To view a more detailed Next.js quick start guide for setting up QStash, refer to the [quick start](/qstash/quickstarts/vercel-nextjs) guide.
121 |
122 | It's also possible to schedule a background job to run at a later time using [schedules](/qstash/features/schedules).
123 |
124 | If you'd like to invoke another endpoint when the background job is complete, you can use [callbacks](/qstash/features/callbacks).
125 |
--------------------------------------------------------------------------------
/qstash/recipes/periodic-data-updates.mdx:
--------------------------------------------------------------------------------
1 | ---
2 | title: "Periodic Data Updates"
3 | ---
4 |
5 |  11 |
12 |
13 |
11 |
12 |
13 |  108 |
109 |
110 | ### Check Message Status
111 |
112 | Head over to [Upstash Console](https://console.upstash.com/qstash) and go to the
113 | `Logs` tab where you can see your message activities.
114 |
115 |
116 |
108 |
109 |
110 | ### Check Message Status
111 |
112 | Head over to [Upstash Console](https://console.upstash.com/qstash) and go to the
113 | `Logs` tab where you can see your message activities.
114 |
115 |
116 |  117 |
118 |
119 | Learn more about different states [here](/qstash/howto/debug-logs).
120 |
121 | ## Features and Use Cases
122 |
123 |
117 |
118 |
119 | Learn more about different states [here](/qstash/howto/debug-logs).
120 |
121 | ## Features and Use Cases
122 |
123 |  153 |
154 |
155 | #### Using Cloudflare Secrets Store (Account Level Secrets)
156 |
157 | This method requires a few modifications in the worker code, see [Access to Secret on Env Object](https://developers.cloudflare.com/secrets-store/integrations/workers/#3-access-the-secret-on-the-env-object)
158 |
159 | ```ts src/index.ts
160 | import { Receiver } from "@upstash/qstash";
161 |
162 | export interface Env {
163 | QSTASH_CURRENT_SIGNING_KEY: SecretsStoreSecret;
164 | QSTASH_NEXT_SIGNING_KEY: SecretsStoreSecret;
165 | }
166 |
167 | export default {
168 | async fetch(request, env, ctx): Promise
153 |
154 |
155 | #### Using Cloudflare Secrets Store (Account Level Secrets)
156 |
157 | This method requires a few modifications in the worker code, see [Access to Secret on Env Object](https://developers.cloudflare.com/secrets-store/integrations/workers/#3-access-the-secret-on-the-env-object)
158 |
159 | ```ts src/index.ts
160 | import { Receiver } from "@upstash/qstash";
161 |
162 | export interface Env {
163 | QSTASH_CURRENT_SIGNING_KEY: SecretsStoreSecret;
164 | QSTASH_NEXT_SIGNING_KEY: SecretsStoreSecret;
165 | }
166 |
167 | export default {
168 | async fetch(request, env, ctx): Promise 188 |
189 |
190 | - Under **Compute (Workers)** > **Workers & Pages**, find your worker and add these secrets as bindings.
191 |
192 |
193 |
188 |
189 |
190 | - Under **Compute (Workers)** > **Workers & Pages**, find your worker and add these secrets as bindings.
191 |
192 |
193 |  194 |
195 |
196 | ### Deployment
197 |
198 |
194 |
195 |
196 | ### Deployment
197 |
198 |  162 |
163 |
164 | Afterwards we will add a public URL to this lambda by going to the
165 | `Configuration` tab:
166 |
167 |
168 |
162 |
163 |
164 | Afterwards we will add a public URL to this lambda by going to the
165 | `Configuration` tab:
166 |
167 |
168 |  169 |
170 |
171 | Select `Auth Type = NONE` because we are handling authentication ourselves.
172 |
173 | After creating the url, you should see it on the right side of the overview of
174 | your function:
175 |
176 |
177 |
169 |
170 |
171 | Select `Auth Type = NONE` because we are handling authentication ourselves.
172 |
173 | After creating the url, you should see it on the right side of the overview of
174 | your function:
175 |
176 |
177 |  178 |
179 |
180 | ### 5. Set Environment Variables
181 |
182 | Get your current and next signing key from the
183 | [Upstash Console](https://console.upstash.com/qstash)
184 |
185 | On the same `Configuration` tab from earlier, we will now set the required
186 | environment variables:
187 |
188 |
189 |
178 |
179 |
180 | ### 5. Set Environment Variables
181 |
182 | Get your current and next signing key from the
183 | [Upstash Console](https://console.upstash.com/qstash)
184 |
185 | On the same `Configuration` tab from earlier, we will now set the required
186 | environment variables:
187 |
188 |
189 |  190 |
191 |
192 | ### 6. Deploy your Lambda function
193 |
194 | We need to bundle our code and zip it to deploy it to AWS.
195 |
196 | Add the following script to your `Makefile` file (or corresponding pipenv
197 | script):
198 |
199 | ```yaml
200 | zip:
201 | rm -rf dist
202 | pip3 install --target ./dist pyjwt
203 | cp lambda_function.py ./dist/lambda_function.py
204 | cd dist && zip -r lambda.zip .
205 | mv ./dist/lambda.zip ./
206 | ```
207 |
208 | When calling `make zip` this will install PyJwt and zip the code.
209 |
210 | Afterwards we can click the `Upload from` button in the lower right corner and
211 | deploy the code to AWS. Select `lambda.zip` as upload file.
212 |
213 |
214 |
190 |
191 |
192 | ### 6. Deploy your Lambda function
193 |
194 | We need to bundle our code and zip it to deploy it to AWS.
195 |
196 | Add the following script to your `Makefile` file (or corresponding pipenv
197 | script):
198 |
199 | ```yaml
200 | zip:
201 | rm -rf dist
202 | pip3 install --target ./dist pyjwt
203 | cp lambda_function.py ./dist/lambda_function.py
204 | cd dist && zip -r lambda.zip .
205 | mv ./dist/lambda.zip ./
206 | ```
207 |
208 | When calling `make zip` this will install PyJwt and zip the code.
209 |
210 | Afterwards we can click the `Upload from` button in the lower right corner and
211 | deploy the code to AWS. Select `lambda.zip` as upload file.
212 |
213 |
214 |  215 |
216 |
217 | ### 7. Publish a message
218 |
219 | Open a different terminal and publish a message to QStash. Note the destination
220 | url is the URL from step 4.
221 |
222 | ```bash
223 | curl --request POST "https://qstash.upstash.io/v2/publish/https://urzdbfn4et56vzeasu3fpcynym0zerme.lambda-url.eu-west-1.on.aws" \
224 | -H "Authorization: Bearer
215 |
216 |
217 | ### 7. Publish a message
218 |
219 | Open a different terminal and publish a message to QStash. Note the destination
220 | url is the URL from step 4.
221 |
222 | ```bash
223 | curl --request POST "https://qstash.upstash.io/v2/publish/https://urzdbfn4et56vzeasu3fpcynym0zerme.lambda-url.eu-west-1.on.aws" \
224 | -H "Authorization: Bearer  18 |
18 |  19 |
20 |
21 | 1. You publish a message to QStash using the `/v2/publish` endpoint
22 | 2. QStash will enqueue the message and deliver it to the destination
23 | 3. QStash waits for the response from the destination
24 | 4. When the response is ready, QStash calls your callback URL with the response
25 |
26 | Callbacks publish a new message with the response to the callback URL. Messages
27 | created by callbacks are charged as any other message.
28 |
29 | ## How do I use Callbacks?
30 |
31 | You can add a callback url in the `Upstash-Callback` header when publishing a
32 | message. The value must be a valid URL.
33 |
34 |
19 |
20 |
21 | 1. You publish a message to QStash using the `/v2/publish` endpoint
22 | 2. QStash will enqueue the message and deliver it to the destination
23 | 3. QStash waits for the response from the destination
24 | 4. When the response is ready, QStash calls your callback URL with the response
25 |
26 | Callbacks publish a new message with the response to the callback URL. Messages
27 | created by callbacks are charged as any other message.
28 |
29 | ## How do I use Callbacks?
30 |
31 | You can add a callback url in the `Upstash-Callback` header when publishing a
32 | message. The value must be a valid URL.
33 |
34 |  236 |
237 |
238 | The URL you use to invoke your function typically follows this format, especially if you follow the same stack configuration as shown above:
239 |
240 | `https://
236 |
237 |
238 | The URL you use to invoke your function typically follows this format, especially if you follow the same stack configuration as shown above:
239 |
240 | `https:// 246 |
247 |
248 | and make these two variables available to your Lambda in your function configuration:
249 |
250 |
251 |
246 |
247 |
248 | and make these two variables available to your Lambda in your function configuration:
249 |
250 |
251 |  262 |
263 |
264 | 2. To make this Lambda available under a public URL, navigate to the `Configuration` tab and click `Function URL`:
265 |
266 |
267 |
262 |
263 |
264 | 2. To make this Lambda available under a public URL, navigate to the `Configuration` tab and click `Function URL`:
265 |
266 |
267 |  276 |
277 |
278 | 4. Get your current and next signing key from the
279 | [Upstash Console](https://console.upstash.com/qstash).
280 |
281 |
282 |
276 |
277 |
278 | 4. Get your current and next signing key from the
279 | [Upstash Console](https://console.upstash.com/qstash).
280 |
281 |
282 |  317 |
318 |
319 | Alternatively, you can also send a request via CURL:
320 |
321 | ```bash Terminal
322 | curl --request POST "https://qstash.upstash.io/v2/publish/
317 |
318 |
319 | Alternatively, you can also send a request via CURL:
320 |
321 | ```bash Terminal
322 | curl --request POST "https://qstash.upstash.io/v2/publish/