├── linux-masterclass
├── 07-kernel
│ ├── notes.pdf
│ └── README.md
├── 05-processes
│ ├── notes.pdf
│ └── README.md
├── 06-partitions
│ ├── notes.pdf
│ └── README.md
├── 02-introduction
│ ├── notes.pdf
│ └── README.md
├── 03-streams-and-files
│ ├── notes.pdf
│ └── README.md
├── 04-users-and-permissions
│ ├── notes.pdf
│ └── README.md
├── 08-resource-utilization
│ ├── notes.pdf
│ └── README.md
└── 01-setup
│ └── README.md
├── frontend-101
├── 03-css-grids
│ ├── ASSIGNMENT.md
│ └── README.md
├── 04-resume
│ └── ASSIGNMENT.md
├── 05-bootstrap
│ ├── ASSIGNMENT.md
│ └── README.md
├── 02-block-and-inline
│ └── README.md
└── 01-html-basics
│ └── README.md
├── README.md
└── git-masterclass
├── 03-branches
└── README.md
├── 04-practical-uses
└── README.md
├── 01-introduction
└── README.md
└── 02-basic-commands
└── README.md
/linux-masterclass/07-kernel/notes.pdf:
--------------------------------------------------------------------------------
https://raw.githubusercontent.com/virtual-tech-school/virtual-tech-notes/HEAD/linux-masterclass/07-kernel/notes.pdf
--------------------------------------------------------------------------------
/linux-masterclass/05-processes/notes.pdf:
--------------------------------------------------------------------------------
https://raw.githubusercontent.com/virtual-tech-school/virtual-tech-notes/HEAD/linux-masterclass/05-processes/notes.pdf
--------------------------------------------------------------------------------
/linux-masterclass/06-partitions/notes.pdf:
--------------------------------------------------------------------------------
https://raw.githubusercontent.com/virtual-tech-school/virtual-tech-notes/HEAD/linux-masterclass/06-partitions/notes.pdf
--------------------------------------------------------------------------------
/linux-masterclass/02-introduction/notes.pdf:
--------------------------------------------------------------------------------
https://raw.githubusercontent.com/virtual-tech-school/virtual-tech-notes/HEAD/linux-masterclass/02-introduction/notes.pdf
--------------------------------------------------------------------------------
/linux-masterclass/03-streams-and-files/notes.pdf:
--------------------------------------------------------------------------------
https://raw.githubusercontent.com/virtual-tech-school/virtual-tech-notes/HEAD/linux-masterclass/03-streams-and-files/notes.pdf
--------------------------------------------------------------------------------
/linux-masterclass/04-users-and-permissions/notes.pdf:
--------------------------------------------------------------------------------
https://raw.githubusercontent.com/virtual-tech-school/virtual-tech-notes/HEAD/linux-masterclass/04-users-and-permissions/notes.pdf
--------------------------------------------------------------------------------
/linux-masterclass/08-resource-utilization/notes.pdf:
--------------------------------------------------------------------------------
https://raw.githubusercontent.com/virtual-tech-school/virtual-tech-notes/HEAD/linux-masterclass/08-resource-utilization/notes.pdf
--------------------------------------------------------------------------------
/frontend-101/03-css-grids/ASSIGNMENT.md:
--------------------------------------------------------------------------------
1 | # CSS Grids and Box Model
2 | ### Task 1
3 | Create a wireframe of the entire [website](https://virtualtechschool.org) including all the pages following the box model, as showcased in the [course video](https://www.youtube.com/watch?v=WEZJvQf3nH0&list=PL2kSRH_DmWVbKFpYn3drI8Qf66ZpvZ_3L&index=4).
4 | ### Task 2
5 | Try to create grids based on your wireframe using boxes. Just try to replicate the layout in boxes, no styling needed for this task.
6 | ### Getting it reviewed
7 | To get it reviewed, share your work in the #assignments channel on our discord server ([Join here](https://discord.gg/EYB8tQxjxH)).
8 |
--------------------------------------------------------------------------------
/frontend-101/04-resume/ASSIGNMENT.md:
--------------------------------------------------------------------------------
1 | # Resume
2 | ### Task 1
3 | Create a wireframe using CSS box model for your resume as demonstrated in [this video](https://www.youtube.com/watch?v=O6xiTUjkNIw&list=PL2kSRH_DmWVbKFpYn3drI8Qf66ZpvZ_3L&index=5), and code your resume using CSS Grids. If you're not comfortable with CSS Grids, checkout this [course video](https://www.youtube.com/watch?v=WEZJvQf3nH0&list=PL2kSRH_DmWVbKFpYn3drI8Qf66ZpvZ_3L&index=4).
4 |
5 | ### Getting it reviewed
6 | To get it reviewed, share your work in the #assignments channel on our discord server ([Join here](https://discord.gg/EYB8tQxjxH)). Also, share your newly coded Resume on LinkedIn/Twitter using #LearningWithApoorv.
--------------------------------------------------------------------------------
/frontend-101/05-bootstrap/ASSIGNMENT.md:
--------------------------------------------------------------------------------
1 | # Grids With Bootstrap
2 | ### Task 1
3 | Based on the wireframe you created for our [website](https://virtualtechschool.org) in [this](https://github.com/virtual-tech-school/virtual-tech-notes/blob/main/frontend-101/03-css-grids/ASSIGNMENT.md) assignment, create the home page of the website using Bootstrap Grid classes .row and .col as showcased in the [course video](https://www.youtube.com/watch?v=tiUy-0GpUlY&list=PL2kSRH_DmWVbKFpYn3drI8Qf66ZpvZ_3L&index=6). No heavy styling needed for this task.
4 | ### Getting it reviewed
5 | To get it reviewed, share your work in the #assignments channel on our discord server ([Join here](https://discord.gg/EYB8tQxjxH)).
6 |
--------------------------------------------------------------------------------
/frontend-101/03-css-grids/README.md:
--------------------------------------------------------------------------------
1 | # CSS Grids and Box Model
2 |
3 | ## Grid Layout In CSS
4 |
5 | It offers grid based layout system, with rows and columns, making it easier to design web pages.
6 |
7 | With them, you can divide a page into major regions.
8 |
9 |
10 |
11 | ## CSS Box Model
12 |
13 | The term "box model" is used when talking about the design & layout.
14 |
15 | Everything in CSS is a box, square or rectangle
16 |
17 | The CSS Box Model is essentially a box that wraps around every HTML element consisting ->
18 |
19 | 1. Margins
20 |
21 | 2. Borders
22 |
23 | 3. Padding
24 |
25 | 4. Content
26 |
27 | Content -> The content of the box, where the text & images appear. Padding -> Clears an area around the content. It is transparent.
28 |
29 | Border -> Goes around the padding and content.
30 |
31 | Margin -> Clears an area outside the border. The margin is transparent.
32 |
33 |
--------------------------------------------------------------------------------
/linux-masterclass/01-setup/README.md:
--------------------------------------------------------------------------------
1 | # Context
2 |
3 | Linux is the most widely used Operating System for software engineers. Most of us still prefer Windows for our day to day tasks, and dual booting can be tricky. There are a few ways in which you can still use Linux without letting go of Windows or go through the hassle of dual booting.
4 |
5 | ## WSL (Windows Subsystem Linux)
6 |
7 | It can be that your system is not powerful enough to run a virtual machine, but you still want to get started with Linux.
8 |
9 | WSL is a lightweight Linux subsystem that can help you in that scenario.
10 |
11 | WSL command is available by default. You can simply run the following command in your command prompt (CMD) to check the distributions available to install -
12 |
13 | `wsl --list --online`
14 |
15 | This displays 2 columns -
16 |
17 | 1. The name of the distribution.
18 | 2. Friendly name for it.
19 |
20 | You can then simply run -
21 |
22 | `wsl --install -d `
23 |
--------------------------------------------------------------------------------
/linux-masterclass/08-resource-utilization/README.md:
--------------------------------------------------------------------------------
1 | Improve notes based on [this](https://www.youtube.com/watch?v=m52OeR-mfYo&list=PL2kSRH_DmWVZp_cu6MMPWkgYh7GZVFS6i&index=8) video now!
2 |
3 | # Resource utilization
4 | ```
5 | top
6 | ```
7 | If we run the above command ,we can observe the resource utilization by process running currently.
8 | 
9 |
10 | When we run this command , we can observe that how many tasks are running ,sleeping ,stopped and zombie process. And how much CPU memory used by system (sy) ,nice (ni), otherthan nice (us),hardware (hi), software (si) , virtual machine (st) processes , waiting for system calls (ws).
11 | ```
12 | top -p PID
13 | ```
14 | This commands list resourse utilization of specific process . Here PID stands for process id.
15 |
16 | ## List of files
17 | ```
18 | lsof
19 | ```
20 | 
21 |
22 | tells us about the files that are currently in use and associate process with them.
23 |
24 | ## Threads
25 |
26 | It is an execution unit that is a part of process. A process can have multiple threads all executing at same time.
27 | ```
28 | ps -m
29 | ```
30 | The above command to check the threads of process.
31 |
32 | ## Load Average
33 | Load Average in Linux takes into account the waiting threads and tasks along with processes being executed. Also, it is an average value instead of being an instantaneous value.
34 | 
35 |
36 | ### CPU load
37 | Average number of processes waiting to be executed by CPU.
38 | ## Logging
39 |
40 | Whatever happening in our system is getting saved as logs in `/var` directory .
41 | ```
42 | ls /var/log
43 | ```
44 | 
45 |
46 | logs are created via service `syslog` which is implemented by syslogd daemon and sends all info to system logger.
47 |
48 | ## Logrotate
49 | Designed to ease administration of system that generates large no.of log files by allowing removal ,rotation ,compression and maling of log files.
50 |
51 | ```
52 | ls /etc/logrotate.log
53 | ```
54 | This directory contains the configuration for log rotation of files.
55 |
56 | ```
57 | cat /etc/logrotate.log/apt
58 | ```
59 | 
60 |
61 | 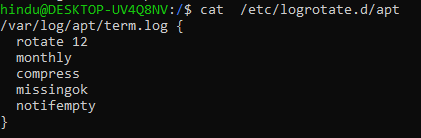
62 |
63 | In the above example when we observe the apt log file ,we can observe configuration settings.
64 |
--------------------------------------------------------------------------------
/linux-masterclass/03-streams-and-files/README.md:
--------------------------------------------------------------------------------
1 | Contribute notes based on [this](https://www.youtube.com/watch?v=xVaC_G6aeH0&list=PL2kSRH_DmWVZp_cu6MMPWkgYh7GZVFS6i&index=3) video now!
2 |
3 | ## **3 standard streams.** ##
4 |
5 | What happens when we execute a command? Linux by default has 3 standard streams:
6 |
7 |
stdin (standard input) code - 0
8 |
stdout (standard output) code - 1
9 |
stderr (standard error) code - 2
10 |
11 | Stream's job is to transfer data (simple text), takes input and gives output.
12 |
13 |
output can be in terminal.
14 |
in some file.
15 |
or in pipe which redirects it.
16 |
17 | If you want to redirect, (>) this symbol is used.
18 | Eg : ls > output.txt
19 | this command overwrites the data. To append the data,
20 | ls >> output.txt is used.
21 |
22 | ## **stderr**
23 | Now the lg > output.txt command gives an error, to tackle this
24 | lg 2> output.txt is used because error is denoted by 2.
25 |
26 | > lg 2> /dev/null : to nullify error.
27 |
28 | ## **less**
29 | Opens output in seperate window.
30 | Eg: less /var/log/syslog
31 |
32 | To view large files without populating your terminal. Do ls -la /etc | less
33 | to close the seperate window press "q"
34 |
35 | ## **pipe**
36 | Takes standard output of one command and feeds it to the next command as standard input.
37 |
38 | ## **Environment Variables**
39 | It store and provide useful information that shells and processes can use.
40 |
41 | **pwd** - gives present working directory.
42 | Maintains a present working directory.
43 | **Path environment variable** - contains all the path that your pc
44 | will search whenever you enter a command.
45 | > Everything in linux is file even the commands.
46 |
47 | ## **Some commands.**
48 |
49 |
head : prints first 10 lines of file.
50 | eg : head output.txt.
51 | eg : head -n 15 output.txt (prints first 15 lines of file)
52 |
53 |
tail : prints last 10 lines of file .
54 | eg : tail output.txt
55 | eg : tail -n 15 output.txt (prints last 15 lines of file)
56 |
57 |
sort gives sorted version of the file.
58 | eg : sort testing.txt
59 | eg : sort -r testing.txt is for reverse sorting.
uniq gives unique value in a file.
65 | eg : uniq testing.txt
66 | eg : uniq -c testing.txt (gives number of occurances).
67 |
68 | >Drawback: only works when the duplicate words are next to each other.
69 |
70 |
wc (word count)
71 | eg : wc testing.txt (gives no of lines, words in the file & size of the file in Bytes)
72 |
73 |
grep used in searching and matching text files contained in the regular expressions.
74 | eg : env | grep PWD
75 |
76 |
77 |
78 |
--------------------------------------------------------------------------------
/README.md:
--------------------------------------------------------------------------------
1 | # Virtual Tech Notes 📖
2 |
3 | 
4 |
5 | These notes are based on our videos [here](https://youtube.com/c/ApoorvGoyalMain). In order to contribute, please take note of the following -
6 |
7 | 1. All the notes should be added/modified in the relevant README.md files. This is specifically because our website will look for the README.md files to display them.
8 | 2. Please refrain from adding any images into the project directory for displaying them in the README file. Keep everything text-based to keep the size of this repository in check.
9 | 3. If you, however, feel the need to add images of diagrams, please host them elsewhere, and add their links into the README files to display them.
10 | 4. You're free to add PDFs of handwritten notes for the relevant topics/videos, however the naming convention for that PDF should be "notes.pdf" so that our website can identify it. Also, do make sure that the PDF does not exceed the size of 1MB.
11 | 5. When making a PR, if a markdown or PDF version for that topic already exists, please tell us what improvements did you make in the PR.
12 |
13 | ## Connect with our mentor
14 |
15 |
16 |
17 |
18 |
19 |
20 |
21 |
22 |
23 |
24 |
25 |
26 |
27 |
28 |
29 |
30 |
31 |
32 |
33 |
34 | ## Join Virtual Tech School
35 |
36 |
37 |
38 |
39 |
40 |
41 |
42 |
43 |
44 |
45 | ## Our Contributors
46 |
47 |
48 |
49 |
50 |
51 |
--------------------------------------------------------------------------------
/linux-masterclass/07-kernel/README.md:
--------------------------------------------------------------------------------
1 | Contribute notes based on [this](https://www.youtube.com/watch?v=08SwnaMhL1k&list=PL2kSRH_DmWVZp_cu6MMPWkgYh7GZVFS6i&index=7) video now!
2 |
3 | # Boot Process
4 |
5 | ## Stages of boot process
6 | ### 1. BIOS
7 | basic input output system. It initialises the hardware, it makes sures the hardware is good to go , by running self tests in which it checks , memory is good , hdd, ssd etc.
8 | Main job of Bios is to load the bootloader.
9 |
10 | ### 2. Bootloader
11 | loads the kernel into the memory. Whatever RAM you have , this bootloader is going to load the code of that kernel in the memory based on whatever kernel parameters you are having.
12 | Commonly used boot loader --> GRUB bootloader
13 |
14 | ### 3. Kernel
15 | As soon as it is loaded, it immediately initialises the memory and the devices that are there in the system.
16 | Main job is to load the init process or mother process.
17 | Init process- starts and stops all the essential process is it is very first process (mother process)
18 |
19 | # Levels of abstraction of Linux OS
20 | ### 1. Hardware
21 | CPU,memory ports , HDD , SSD etc.Physical layer which computes what our system is doing.
22 | ### 2. Kernel
23 | Responsible for handling processes, memory, device communication, setting up entire file system,also responsible for for system calls.
24 | ### 3. User Space
25 | All we see in front of us, apps comes under user space.
26 |
27 | ## Privilege levels and protection rings
28 |
29 | Kernel- operates kernel mode
30 | User- operates on user mode
31 |
32 | For security reasons whenever we do anything related to hardware , something as easy as reading/writing, controlling networking port it is done in kernel mode.
33 |
34 | ### System call
35 | Allows us to perform some privileged instruction in the kernel mode then it let's you get back to the user mode. (also known as syscalls)
36 |
37 | System call API- provides user space application, processes, a way to request kernel to do something for us they make some services available to us this service is known as system callAPI.
38 |
39 | # Implementation of init process
40 |
41 | ## 1. System V 2. upstart 3. Systemd
42 | Traditional used earlier in ubuntu New Standard
43 |
44 | ## System V implementation
45 | Start and stops process sequentially.
46 | Disadvantage- performance is not great as processes are starting stopping one at a time.
47 | ### System V runlevels
48 | 0 - shutdown
49 | 1 - single user
50 | 2 - multiuser without networking
51 | 3 - multiuser with networking
52 | 4 - unused
53 | 5 - multiple users with networking & GUI
54 | 6 - Rebooting
55 |
56 | ### command To check all services
57 | service --status-all
58 |
59 | To start stop restart service
60 | sudo whoopsie start/stop/restart
61 |
62 | ## Upstart init implementation
63 | Created to improve system V implementation
64 | Upstart- events in jobs model
65 |
66 | Jobs- actions performed
67 | Events- messages received from other processes
68 |
69 | ## Systemd
70 | Uses goals to get your system up and running.
71 | Goals- targets which needs to be achieved.
72 |
73 | ## Targets
74 |
75 | 1 poweroff.target - shutdown
76 | 2 rescue.target - single user
77 | 3 multiuser.target - for multiusers with networking
78 | 4 graphical.target - multiuser with networking & GUI
79 | 5 reboot.target - reboot
80 |
81 | ### Managing power status of the system
82 | sudo shutdown -h now (to shutdown rightnow)
83 | sudo reboot (to reboot)
84 |
85 |
86 |
87 |
88 |
89 |
90 |
--------------------------------------------------------------------------------
/git-masterclass/03-branches/README.md:
--------------------------------------------------------------------------------
1 | Contribute notes based on [this](https://www.youtube.com/watch?v=SFLpVkF0obY&list=PL2kSRH_DmWVajYgFoP-HVKK5VKkzFYyzp&index=3) video now!
2 |
3 | ## Commit Objects
4 | As we have studied earlier about committing changes, let's know what is commit object.
5 | A commit object contains :
6 | - reference to commit objects and tree objects.
7 | - reference to blob objects.
8 | - commit message.
9 | - also stores pointer to its parent(s) commit(s).
10 |
11 | #### About parent commits
12 | 1. 0 parent = initial commit
13 | 2. 1 parent = usual commit
14 | 3. multiple parents = commit resulting from merging 2 or more branches
15 | ---------------------------------------------------------------------------------------
16 |
17 | ## What happens when we stage a file?
18 | Let's see what happens at the staging time:
19 | - computes the checksum for each file
20 | - stores a version of file in a git repo(blob)
21 | - adds checksum into staging area
22 | ----------------------------------------------------------------------------------------
23 |
24 | ## What happens when we commit a file?
25 | When you make a commit, git stores a commit object that contains a pointer to the snapshot of the content you staged.
26 | Following happens upon committing a file:
27 | - checksums each subdirectory
28 | - stores it as a tree object in git repo
29 | --------------------------------------------------------------
30 | ## What is this commit, tree and blob?
31 | 1. **commit** : The files which are present in the staging area and needs to be committed. It has some size, some SHA-1 hash ID of tree, author and committer, and is the first commit of the project pointing towards something called tree.
32 |
33 | 2. **tree** : A Git tree object creates the hierarchy between files in a Git repository. You can use the Git tree object to create the relationship between directories and the files they contain. These endpoints allow you to read and write tree objects to your Git database on GitHub. We can again see size and some blobs and their SHA-1 hash ID and their names pointing towards multiple blobs.
34 |
35 | 3. **blob** : A Git blob(binary large object) is the object type used to store the contents of each file in a repository. The file's SHA-1 hash is computed and stored in the blob object.
36 | ---
37 |
38 | ## Branches
39 |
40 | Git branches are effectively a pointer to a snapshot of your changes. When you want to add a new feature or fix a bug(no matter how big or small) you spawn a new branch to encapsulate your changes. Branches are cheap and easy to merge. Switching back and forth the branches is also very easy.
41 | #### Some commands related to branches
42 | - `git branch` : list all branches in your repository
43 | - `git branch ` : create a new branch called <branch>. This does not check out the new branch.
44 | - `git checkout ` : lets you navigate between the branches created by git branch
45 | - `git switch ` : allows you to switch your current HEAD branch
46 | - `git branch -d ` : Delete the specified branch. This is a “safe” operation in that Git prevents you from deleting the branch if it has unmerged changes
47 | - `git branch -D ` : Force delete the specified branch, even if it has unmerged changes. This is the command to use if you want to permanently throw away all of the commits associated with a particular line of development
48 | - `git branch -m ` : rename the current branch to "branch"
49 | - `git branch -a` : list all the remote branches
50 |
51 | >HEAD : it points out the last commit in the current checkout branch. It is like a pointer to any reference. The HEAD can be understood as the "current branch." When you switch branches with 'checkout,' the HEAD is transferred to the new branch.
52 |
53 |
54 |
--------------------------------------------------------------------------------
/linux-masterclass/06-partitions/README.md:
--------------------------------------------------------------------------------
1 | No notes available. Contribute notes based on [this](https://www.youtube.com/watch?v=PbMT53jaUaU&list=PL2kSRH_DmWVZp_cu6MMPWkgYh7GZVFS6i&index=6) video now!
2 | # File System
3 | ## Type Characteristics
4 |
5 | | Symbol | Type Characteristic | description |
6 | | ------------- | ------------- |-----------|
7 | | d | directory | collection of files|
8 | | l | link | link to a directory of file |
9 | | - | file | stream of data |
10 | | c | character |a character device which passes/shares data char by char|
11 | | b | block | a block device transfer data in big size of blocks |
12 | | p | pipe |transfer one process input to another process output|
13 | | s | socket |same as a pipe but handles more than one process |
14 |
15 | ### Common commands
16 | ```
17 | ls -l /dev
18 | ```
19 | ## Filesystem Hierarchy
20 | * / -> root directory
21 | * /bin -> contains essential & ready to run binaries
22 | * /boot -> contains bootloader files
23 | * /dev -> contains device files
24 | * /etc -> contains configuration files
25 | * /home -> home directory
26 | * /lib -> contains libraries
27 | * /mnt -> temp mounted FS
28 | * /opt -> optional software packages
29 | * /proc -> process info
30 | * /root -> home directory for root
31 | * /sbin -> system binaries which are run by the root
32 | ## Journaling
33 | Used to repair any inconsistencies that occur as the result of an improper shutdown of the computer
34 | Suppose you were copying a file, if the system then also we can able to identify the currupt file by using *journaling*.
35 |
36 | ## Desktop file types
37 | |Destop file types| Description|
38 | |---|---|
39 | | ext 4 | latest & standard choice of file system which support disk space of 1exabyte of file sixe 16 TB|
40 | | Btrfs| Butter/Better file system and it is not stable than other|
41 | | XFS | high performance journaling file system generally good for servers|
42 | | NTFS & FAT| windows file system|
43 | | HFS | MAC file system |
44 |
45 | To check filesystem of linux :-
46 | ```
47 | df -T
48 | ```
49 | We can create multiple partitions in any disk and each parttion act as an individual **block device**.And each block system can act as different filesystem.
50 |
51 | ## Nodes and innodes
52 | Nodes tables are just like dtabase to manage files .In this table each file or directory has innode and contains the information about the file.
53 |
54 | ### Partition Table
55 | To check how a disk is partitioned.
56 | THere are two main parttion schemes
57 | * MBR -> Mast er Boot Record
58 | * GRT -> GUID partition table
59 | ## MBR
60 | It is a traditional partition table ,supports the disk upto *2TB*. WHich has linmitations of 4 parts only known as *primary partitions*. Out of these 4 we can create one extended partition & in that can create multiple logical partitions same as creating primary partitions.
61 |
62 | ### GPT
63 |
64 | This is new standard each partition has globally unique ID(GUID) and usually used with UEFI based looting .
65 |
66 | ## Filesystem Structure
67 |
68 | FS is part of an organized collection of files & directives. It's like a database to manage files.
69 |
70 | FS has 4 major components
71 |
72 | * Bootblock
73 | * SuperBlock
74 | * Innode table
75 | * Data Blocks
76 |
77 | # Inode
78 | Inode, short of index node tables are just like database to manage files in this table each file or directory has inode & it generally describes all the info about file. Contains everything execpt for file & it's name , also contains pointers to datablocks of file.
79 | When file system is created ,some space for the innodes is also allocated as well.
80 | ```
81 | df -i
82 | ```
83 | This is the command to check how many innodes are availabele.
84 |
85 | ```
86 | ls -li
87 | ```
88 | This is the command to check inodes number.
89 | ### How do inodes work and locate file
90 | 
91 | Innode points to the actual data block of file in the file system. Each and every innode contains 15 pointers.When a file is created on a file system, the file system allocates a new inode and stores the file's metadata in the inode data structure. The file system also allocates the necessary data blocks to store the file's contents and links them to the inode by storing their addresses in the inode's data block pointers.
92 |
--------------------------------------------------------------------------------
/git-masterclass/04-practical-uses/README.md:
--------------------------------------------------------------------------------
1 | Contribute notes based on [this](https://www.youtube.com/watch?v=jp_fOkie4gs&list=PL2kSRH_DmWVajYgFoP-HVKK5VKkzFYyzp&index=4) video now!
2 |
3 | # CONTENT:
4 | - [COMMIT HISTORY](#commit-history)
5 | - [CREATING A NEW BRANCH & COMMITTING CHANGES](#CREATING-A-NEW-BRANCH-&-COMMITTING-CHANGES)
6 | - [MERGING BRANCHES](#MERGING-BRANCHES)
7 | - ["FAST-FORWARD" MERGING]("FAST-FORWARD"-MERGING)
8 | - ["3 WAY" MERGING]("3-WAY"-MERGING)
9 | - [RESOLVE MERGE CONFLICTS](#RESOLVE-MERGE-CONFLICTS)
10 | - [BRANCH MANAGEMENT COMMANDS](#BRANCH-MANAGEMENT-COMMANDS)
11 | - [DELETE A BRANCH THAT IS NOT MERGED](#DELETE-A-BRANCH-THAT-IS-NOT-MERGED)
12 | - [COMMIT HISTORY](#COMMIT-HISTORY)
13 | - [NOTE](#NOTE)
14 | ## COMMIT HISTORY:
15 | *starting with some commits in the **main** branch.*
16 | ## CREATING A NEW BRANCH & COMMITTING CHANGES:
17 | ### CREATING "01-INTRODUCTION" BRANCH:
18 | ```sh
19 | //create a new branch "01-introduction",
20 | git branch 01-introduction
21 | //switch HEAD from "main" branch to "01-introduction",
22 | git checkout 01-introduction
23 |
24 | //done with changes to "01-introduction", now commit the changes.
25 |
26 | // to stage the changes,
27 | git add .
28 | // commit changes.
29 | git commit -m "commit on 01-introduction"
30 | ```
31 | ```sh
32 | Switch to main branch:
33 | git switch main
34 | ```
35 |
36 | ### CREATING "02-BASIC-COMMANDS" BRANCH:
37 | ```sh
38 | Create "02-basic-commands":
39 |
40 | // create a new branch "02-basic-commands",
41 | git branch 02-basic-commands
42 |
43 | //switch HEAD from main branch to "Branch2",
44 | git checkout 02-basic-commands
45 |
46 | //done with changes to "02-basic-commands", now commit the changes.
47 |
48 | // to stage the changes,
49 | git add .
50 | // commit changes.
51 | git commit -m "commit on Branch2"
52 | ```
53 |
54 | ```sh
55 | Switch to main branch:
56 | git switch main
57 | ```
58 |
59 | **Now we have 2 new branches diverging from the main branch,
60 | And the git HEAD will be pointing to main.**
61 |
62 | ## MERGING BRANCHES:
63 | ### "FAST FORWARD" MERGING:
64 | ```sh
65 | -As we are in "main" branch,
66 | -if we merge the "01-introduction" with the current branch,
67 | //git merge 01-introduction
68 | -then the "main" branch pointer points to the commit that "01-introduction" branch is pointing to.
69 | -This is also called as "Fast-Forward".
70 |
71 | // delete "01-introduction" branch.
72 | git branch -d 01-introduction
73 | ```
74 | ### "3 WAY" MERGING:
75 | ```sh
76 | - If we merge the "02-basic-commands" with "main" branch ,
77 | // git merge 02-basic-commands
78 | - As these two branches are diverged (commits these branches are pointing are not direct ancestors) ,
79 | - 3 way merge takes place, also called "merge made by the 'ort' strategy",
80 | - git will create a new commit by taking the snapshot from the commits of two branches.
81 | - The main branch points to the new commit.
82 | - Now we can delete the "02-basic-commands" branch, as it is merged with the "main" branch.
83 |
84 | // delete "02-basic-commands" branch.
85 | git branch -d 02-basic-commands
86 | ```
87 |
88 |
89 | ## RESOLVE MERGE CONFLICTS:
90 | - While doing **3 way merges** , we may encounter conflict that the two commits may have different data in the same lines from some files.
91 | - Git cannot decide on what data has to be taken for the new commit.
92 | - In that case we have to remove the conflict data , and manual commit the changes.
93 |
94 | ## BRANCH MANAGEMENT COMMANDS:
95 | git branch
96 | - will show all the branches.
97 | git branch -v
98 | - will show all the branches with the last commit message.
99 | git branch --merged
100 | - will show the branches that are merged with the current branch.
101 |
102 |
103 | ## DELETE A BRANCH THAT IS MERGED:
104 | git branch -d BranchName
105 | ## DELETE A BRANCH THAT IS NOT MERGED:
106 | git branch -D BranchName
107 |
108 | ## COMMIT HISTORY:
109 |
110 | git log
111 | - all the commits with author details, time and check-sum.
112 | git log --stat
113 | - git logs along with files that are modified in that commit.
114 | git log --pretty=oneline
115 | - presents each commit details in a single line.
116 |
117 | # NOTE:
118 | 1) When we are switching to new branch,
119 | there should be no pending changes in the working tree of present branch,
120 | otherwise git will not allow us to switch.
121 | 2) But in-case ,
122 | if we don’t want to commit changes in the current branch for now,
123 | but want to switch to other branch, we can store the changes temporarily using stash.
124 |
125 |
126 |
--------------------------------------------------------------------------------
/linux-masterclass/05-processes/README.md:
--------------------------------------------------------------------------------
1 | Those who would like to make improvements in the future - You can help us improve notes based on [this](https://www.youtube.com/watch?v=cnbvsWKf-qM&list=PL2kSRH_DmWVZp_cu6MMPWkgYh7GZVFS6i&index=5) video.
2 | # Processes
3 | Processes are just programs that are running on linux machine. This processes are generally managed by kernel and each process have a **PID**(process id). Process
4 | are terminated when terminal associated with it is closed.
5 |
6 | ## General commands of processes
7 |
8 | | command | description | |
9 | | ------------- | ------------- |---------------------- |
10 | | `ps` | list current processes of shell |  |
11 | | `ps aux` | list all processes |  |
12 | | `top` | list all real time processes |  |
13 |
14 | ## How process starts
15 |
16 | New process in the linux system starts by mechanism know as **Fork System Call**. In this the new process(child) **clone** the **present process**(parent
17 | process) by requesting the kernel. Kernel decides the resources to the process.
18 |
19 | ```mermaid
20 | graph TD;
21 | init-->|fork system call|gnemeProcess
22 | gnemeProcess-->|fork system call|BashProcess;
23 | BashProcess-->|fork system call| process;
24 | ```
25 | ### Mother Process
26 |
27 | Mother Process is the **first process** initiated by the kernel when system **boot up** which has PID of **1**. Mother process is also known as **init** and this process runs on **root** previledge.
28 |
29 | ### Demon Process
30 |
31 | Demon process are the **child process** of mother. This are responsible for keeping the system running.
32 |
33 | ```mermaid
34 | graph TD;
35 | init-->DemonProcess1;
36 | init-->DemonProcess2;
37 | init-->DemonProcess3;
38 | init-->DemonProcess4;
39 | ```
40 |
41 | ## How process terminates
42 | Termination of process is done by **exit system call** and **wait system call** . Kernel known whether the process is terminated or not by **termination status**. For the successful process termination status is **0**. Termination process includes the cleaning of resources utilized by the process.
43 |
44 | ### Wait system call
45 | Parent process should acknowledge the kernel by **wait system call** for completion of termination process of child. The wait system call is used by a parent process to wait for its child process to terminate and obtain its termination status.
46 |
47 | ### Orphan Process
48 | If parent process dies,then the child process of it is adoped to the **mother**(init) by the kernel for termination of the process. So, that mother can able to acknowlegde the termination process by wait system call. In this case, the child process is known as **orphan process**.
49 |
50 | ```mermaid
51 | graph TD;
52 | Parent-->|X|Child;
53 | Child-->init;
54 | init-->|wait system call|Child;
55 | ```
56 |
57 | ### Zombie Process
58 | When the child process termination is not acknowledge by the parent ,then the child process is treated as **zombie process** by the kernel.Further,if parent process acknowlegde the zombie process termination then this is known as **reaping**. If reaping didn't occurs then the **wait system call** is done by mother to terminate **zombie process**.
59 |
60 | # Signals
61 | It is a notification to the process that something has happened.
62 |
63 | ### Common signals
64 |
65 | | Signal | Description |
66 | | ------------- | ------------- |
67 | | `SIGHUP/HUP/1` | HangUp |
68 | | `SIGINT/INT/2` | Interput |
69 | | `SIGKILL/KILL/9` | Kill |
70 | | `SIGSEGV/SEGV/11` | Segmentation fault |
71 | | `SIGTER/TERM/15` | Terminate |
72 | | `SIGSTOP/STOP/19` | Stop |
73 |
74 |
75 | ### Nice & Renice
76 |
77 | Processes aren't continously run by the system.They are know in timeslots known as time slice in CPU and as cyclic as shown in below example. So, the process will take almost same time. But, we can prioritize the process by **nice & renice** command. And every process has nice which indicates priority value. If the nice value is less,the system will prioritize more or vice versa.
78 |
79 | ---
80 | Process cycle in CPU
81 | ---
82 | ```mermaid
83 | flowchart LR
84 | P1 -->|t1| P2
85 | P2 -->|t2| P3
86 | P3 -->|t3| P4
87 | P4 -->|t4| P1
88 | ```
89 | | Command | Description |
90 | | ------------- | ------------- |
91 | | `nice -n priorityValue newProcess` | for new process |
92 | | `renice priorityValue -p processId` | for already exit process |
93 |
94 | ### Signal Mask
95 |
96 | Signal mask is used to block signals but there are some signals like *kill* cann't be blocked.
97 |
98 | # States of process
99 |
100 | | State of process | Description |
101 | | ------------- | ------------- |
102 | | `R` | The process is running |
103 | | `S` | Interruptable sleep |
104 | | `D` | Uninterruptable sleep |
105 | | `Z` | Zombie |
106 | | `T` | Stopped |
107 |
108 |
--------------------------------------------------------------------------------
/frontend-101/02-block-and-inline/README.md:
--------------------------------------------------------------------------------
1 | Contribute notes based on [this](https://www.youtube.com/watch?v=ZYbajSqMrN4&list=PL2kSRH_DmWVbKFpYn3drI8Qf66ZpvZ_3L&index=3) video now!
2 |
3 | # Block and Inline Elements
4 |
5 | Every HTML element has a default display value, depending on what type of element it is.
6 |
7 | ## There are 2 display values-
8 |
9 | 1. Block level elements
10 | 2. Inline elements
11 |
12 |
13 |
14 | ## Block Level Elements
15 |
16 | A block level element always starts on a new line, and the browser automatically adds some space (a margin) on top and bottom of it.
17 |
18 | A block level element also would always take full width available to it.
19 |
20 | ### Some block level elements are -
21 |
22 | ``````html
23 |
24 |
25 | 1.
26 |
27 | 2.
28 |
29 | 3.
 16 |
17 |
18 |
16 |
17 |
18 |  22 |
23 |
24 |
22 |
23 |
24 |  28 |
29 |
30 |
28 |
29 |
30 |  37 |
38 |
39 |
37 |
38 |
39 |