├── docs
├── live_plot.png
├── drift_example.png
├── one_dimension.png
├── double_integration.png
├── error_client_interval.png
└── different_mean_strategies.png
├── requirements.txt
├── test_imu.py
├── test_server.py
├── .gitignore
├── server.py
├── imu.py
├── draw.py
├── templates
└── index.html
└── README.md
/docs/live_plot.png:
--------------------------------------------------------------------------------
https://raw.githubusercontent.com/vtalpaert/phone-imu/HEAD/docs/live_plot.png
--------------------------------------------------------------------------------
/docs/drift_example.png:
--------------------------------------------------------------------------------
https://raw.githubusercontent.com/vtalpaert/phone-imu/HEAD/docs/drift_example.png
--------------------------------------------------------------------------------
/docs/one_dimension.png:
--------------------------------------------------------------------------------
https://raw.githubusercontent.com/vtalpaert/phone-imu/HEAD/docs/one_dimension.png
--------------------------------------------------------------------------------
/docs/double_integration.png:
--------------------------------------------------------------------------------
https://raw.githubusercontent.com/vtalpaert/phone-imu/HEAD/docs/double_integration.png
--------------------------------------------------------------------------------
/docs/error_client_interval.png:
--------------------------------------------------------------------------------
https://raw.githubusercontent.com/vtalpaert/phone-imu/HEAD/docs/error_client_interval.png
--------------------------------------------------------------------------------
/requirements.txt:
--------------------------------------------------------------------------------
1 | flask-socketio
2 | Flask-APScheduler
3 | gevent-websocket
4 | numpy
5 | matplotlib
6 | seaborn
7 |
--------------------------------------------------------------------------------
/docs/different_mean_strategies.png:
--------------------------------------------------------------------------------
https://raw.githubusercontent.com/vtalpaert/phone-imu/HEAD/docs/different_mean_strategies.png
--------------------------------------------------------------------------------
/test_imu.py:
--------------------------------------------------------------------------------
1 | # python modules
2 | import unittest
3 | import queue
4 | import time
5 | import random
6 |
7 | # local code
8 | import imu
9 |
10 | random.seed(1)
11 |
12 |
13 | def get_random_device_data():
14 | return [
15 | int(1000 * time.time()), # [ms]
16 | random.gauss(0, 1), # ax
17 | random.gauss(0, 1), # ay
18 | random.gauss(0, 1) - 9.8, # az
19 | random.gauss(0, 1), # ax_lin
20 | random.gauss(0, 1), # ay_lin
21 | random.gauss(0, 1), # az_lin
22 | random.gauss(0, 1), # gx
23 | random.gauss(0, 1), # gy
24 | random.gauss(0, 1), # gz
25 | random.gauss(0, 1), # rx
26 | random.gauss(0, 1), # ry
27 | random.gauss(0, 1), # rz
28 | ]
29 |
30 |
31 | class TestImu(unittest.TestCase):
32 | def setUp(self):
33 | self.imu = imu.IMU()
34 |
35 | def tearDown(self):
36 | self.imu.close()
37 |
38 | def test_ignore_empty_data(self):
39 | self.assertRaises(queue.Empty, self.imu.data_queue.get_nowait)
40 | self.imu.add_data([1] + 12 * [0])
41 | self.assertRaises(queue.Empty, self.imu.data_queue.get_nowait)
42 |
43 | def test_last_data(self):
44 | for _ in range(10):
45 | data_in = get_random_device_data()
46 | self.imu.add_data(data_in)
47 | data_out = self.imu.get_last_data()
48 | self.assertEqual(data_in, data_out)
49 |
50 | def test_mean_data(self):
51 | for _ in range(10):
52 | data_in = get_random_device_data()
53 | self.imu.add_data(data_in)
54 | # TODO by students
55 |
56 |
57 | if __name__ == '__main__':
58 | unittest.main()
59 |
--------------------------------------------------------------------------------
/test_server.py:
--------------------------------------------------------------------------------
1 | # python modules
2 | import unittest
3 | import time
4 | import random
5 |
6 | # dependencies
7 | import flask_socketio
8 |
9 | # local code
10 | import server
11 |
12 |
13 | def get_test_clients():
14 | server.app.testing = True
15 | flask_client = server.app.test_client()
16 | client = flask_socketio.test_client.SocketIOTestClient(
17 | server.app,
18 | server.socketio,
19 | flask_test_client=flask_client
20 | )
21 | return flask_client, client
22 |
23 |
24 | class TestServerCommunication(unittest.TestCase):
25 | def setUp(self):
26 | # all test will have a client
27 | server.app.testing = True
28 | self.flask_client, self.client = get_test_clients()
29 |
30 | @classmethod
31 | def tearDownClass(self):
32 | # after all tests are done, close imu background thread
33 | # do not close after each test since the imu object is shared
34 | # and unique for the server
35 | server.imu.close()
36 |
37 | def test_home(self):
38 | result = self.flask_client.get('/')
39 |
40 | def test_connect(self):
41 | self.assertTrue(self.client.is_connected())
42 | received = self.client.get_received()
43 | # [{'name': 'server_response', 'args': [{'text': 'Client is connected'}], 'namespace': '/'}]
44 | self.assertEqual(len(received), 2)
45 | self.assertEqual(received[0]['args'][0]['text'], 'Client is connected')
46 | self.assertEqual(received[1]['args'][0]['interval'], server.imu.client_send_interval)
47 | self.client.disconnect()
48 | self.assertFalse(self.client.is_connected())
49 |
50 | def test_action_request(self):
51 | #self.client.get_received() # flush connection message
52 | for i in range(1, 11):
53 | self.client.emit('action_request')
54 | received = self.client.get_received()
55 | #print('received', received)
56 | self.assertGreaterEqual(len(received), 1)
57 | self.assertEqual(len(received[-1]['args'][0]), 2)
58 | self.assertEqual(received[-1]['name'], 'server_response')
59 | self.assertListEqual(list(received[-1]['args'][0].keys()), ['text', 'recording'])
60 |
61 | def test_emit_data(self):
62 | self.client.emit('incoming_data', {'data': ['Latest data!']})
63 |
64 | if __name__ == '__main__':
65 | unittest.main()
66 |
--------------------------------------------------------------------------------
/.gitignore:
--------------------------------------------------------------------------------
1 | # Byte-compiled / optimized / DLL files
2 | __pycache__/
3 | *.py[cod]
4 | *$py.class
5 |
6 | # C extensions
7 | *.so
8 |
9 | # Distribution / packaging
10 | .Python
11 | build/
12 | develop-eggs/
13 | dist/
14 | downloads/
15 | eggs/
16 | .eggs/
17 | lib/
18 | lib64/
19 | parts/
20 | sdist/
21 | var/
22 | wheels/
23 | pip-wheel-metadata/
24 | share/python-wheels/
25 | *.egg-info/
26 | .installed.cfg
27 | *.egg
28 | MANIFEST
29 |
30 | # PyInstaller
31 | # Usually these files are written by a python script from a template
32 | # before PyInstaller builds the exe, so as to inject date/other infos into it.
33 | *.manifest
34 | *.spec
35 |
36 | # Installer logs
37 | pip-log.txt
38 | pip-delete-this-directory.txt
39 |
40 | # Unit test / coverage reports
41 | htmlcov/
42 | .tox/
43 | .nox/
44 | .coverage
45 | .coverage.*
46 | .cache
47 | nosetests.xml
48 | coverage.xml
49 | *.cover
50 | *.py,cover
51 | .hypothesis/
52 | .pytest_cache/
53 |
54 | # Translations
55 | *.mo
56 | *.pot
57 |
58 | # Django stuff:
59 | *.log
60 | local_settings.py
61 | db.sqlite3
62 | db.sqlite3-journal
63 |
64 | # Flask stuff:
65 | instance/
66 | .webassets-cache
67 |
68 | # Scrapy stuff:
69 | .scrapy
70 |
71 | # Sphinx documentation
72 | docs/_build/
73 |
74 | # PyBuilder
75 | target/
76 |
77 | # Jupyter Notebook
78 | .ipynb_checkpoints
79 |
80 | # IPython
81 | profile_default/
82 | ipython_config.py
83 |
84 | # pyenv
85 | .python-version
86 |
87 | # pipenv
88 | # According to pypa/pipenv#598, it is recommended to include Pipfile.lock in version control.
89 | # However, in case of collaboration, if having platform-specific dependencies or dependencies
90 | # having no cross-platform support, pipenv may install dependencies that don't work, or not
91 | # install all needed dependencies.
92 | #Pipfile.lock
93 |
94 | # PEP 582; used by e.g. github.com/David-OConnor/pyflow
95 | __pypackages__/
96 |
97 | # Celery stuff
98 | celerybeat-schedule
99 | celerybeat.pid
100 |
101 | # SageMath parsed files
102 | *.sage.py
103 |
104 | # Environments
105 | .env
106 | .venv
107 | env/
108 | venv/
109 | ENV/
110 | env.bak/
111 | venv.bak/
112 |
113 | # Spyder project settings
114 | .spyderproject
115 | .spyproject
116 |
117 | # Rope project settings
118 | .ropeproject
119 |
120 | # mkdocs documentation
121 | /site
122 |
123 | # mypy
124 | .mypy_cache/
125 | .dmypy.json
126 | dmypy.json
127 |
128 | # Pyre type checker
129 | .pyre/
130 |
131 | .vscode
132 |
--------------------------------------------------------------------------------
/server.py:
--------------------------------------------------------------------------------
1 | #!/usr/bin/env python
2 |
3 | # dependencies
4 | from flask import Flask, render_template, copy_current_request_context
5 | from flask_socketio import SocketIO, emit
6 | from flask_apscheduler import APScheduler
7 |
8 | # local files
9 | from imu import IMU
10 |
11 |
12 | imu = IMU() # unique instance of IMU
13 |
14 |
15 | class Config(object):
16 | JOBS = [
17 | {
18 | 'id': 'run',
19 | 'func': imu.run,
20 | 'args': (),
21 | 'trigger': 'interval',
22 | 'seconds': imu.thread_update_delay
23 | }
24 | ]
25 |
26 | SCHEDULER_API_ENABLED = True
27 | SECRET_KEY = 'secret!'
28 |
29 |
30 | # Set this variable to "threading", "eventlet" or "gevent" to test the
31 | # different async modes, or leave it set to None for the application to choose
32 | # the best option based on installed packages.
33 | async_mode = None # should probably always be gevent
34 |
35 | app = Flask(__name__)
36 | app.config.from_object(Config())
37 | scheduler = APScheduler()
38 | scheduler.init_app(app)
39 | scheduler.start()
40 | socketio = SocketIO(app, async_mode=async_mode)
41 |
42 |
43 | @app.route('/')
44 | def index():
45 | return render_template('index.html', async_mode=socketio.async_mode)
46 |
47 |
48 | @socketio.on('incoming_data')
49 | def incoming_data(message):
50 | imu.add_data(message['data'])
51 | #emit('server_response', {'text': 'Got {}'.format(message['data'])})
52 |
53 |
54 | @socketio.on('action_request')
55 | def action_request():
56 | is_recording = imu.action()
57 | if is_recording:
58 | emit('server_response', {'text': 'IMU is now recording', 'recording': True})
59 | else:
60 | emit('server_response', {'text': 'IMU has stopped recording', 'recording': False})
61 |
62 |
63 | @socketio.on('connect')
64 | def connect():
65 | print('Client connected')
66 | emit('server_response', {'text': 'Client is connected'})
67 | @copy_current_request_context
68 | def set_interval(interval):
69 | # this method has an identified client to emit set_interval towards thanks to copy_current_request_context
70 | print('set interval to', interval)
71 | emit('set_interval', {'interval': interval})
72 | imu.set_interval = set_interval
73 | imu.set_interval(imu.client_send_interval)
74 | imu.clear_queue()
75 |
76 |
77 | @socketio.on('disconnect')
78 | def disconnect():
79 | print('Client disconnected')
80 |
81 |
82 | if __name__ == '__main__':
83 | try:
84 | socketio.run(app, use_reloader=False, host= '0.0.0.0', debug=True)
85 | finally:
86 | imu.close() # always close IMU when script is done
87 |
--------------------------------------------------------------------------------
/imu.py:
--------------------------------------------------------------------------------
1 | # python base modules
2 | import threading
3 | from queue import Queue, Empty
4 |
5 | # dependencies
6 | from gevent import monkey, sleep
7 | monkey.patch_all() # fix gevent "this operation would block forever" depending on async_mode from server.py
8 | # use sleep from gevent instead of time.sleep
9 | import numpy as np
10 |
11 | # local files
12 | #from threads import BackgroundThread
13 | import draw
14 |
15 |
16 | class IMU(object):
17 | thread_update_delay = 0.001 # [s]
18 | client_send_interval = 20 # [ms]
19 | live_plot = None # holder
20 |
21 | def __init__(self):
22 | self.data_queue = Queue(maxsize=0) # maxsize=0 is infinite size queue
23 | self.is_recording = True # start recording by default
24 | self.steps = 0 # step counter
25 | self.live_plot = draw.LivePlot(n_values=3, title='Absolute orientation in (x, y, z)', ylabel='Value in [deg]', ylim_low=-180, ylim_high=360)
26 |
27 | def close(self):
28 | if self.live_plot is not None:
29 | self.live_plot.close()
30 |
31 | def clear_queue(self):
32 | while not self.data_queue.empty():
33 | self.data_queue.get()
34 |
35 | def get_last_data(self):
36 | """Will clear the queue and keep only last element"""
37 | data = self.data_queue.get() # waiting here until some data is in
38 | while not self.data_queue.empty():
39 | # update data with the latest value
40 | data = self.data_queue.get() # consume queue
41 | return data
42 |
43 | def get_first_data(self):
44 | return self.data_queue.get()
45 |
46 | def get_first_data_or_none(self):
47 | try:
48 | return self.data_queue.get_nowait()
49 | except Empty:
50 | return None
51 |
52 | def add_data(self, data):
53 | if data[1:4] != [0, 0, 0] and self.is_recording: # non zero acceleration means sensors are working
54 | # pass empty data
55 | self.data_queue.put(data)
56 |
57 | def run(self):
58 | """This method is executed in a loop by the background thread
59 | """
60 | data = self.get_first_data_or_none()
61 | if data is not None:
62 | self.live_plot.update(np.array(data[10:13]) * 180 / np.pi)
63 | self.live_plot.draw()
64 | self.steps += 1
65 |
66 | def action(self):
67 | self.is_recording = not self.is_recording # invert value
68 | return self.is_recording # return current value
69 |
70 | def set_interval(self, interval):
71 | # this method is replaced when the client is connected (see server.py on('connect'))
72 | # we do this because we don't know who the client is when this file is compiled
73 | raise NotImplementedError('This method can only be called if a server is running')
74 |
--------------------------------------------------------------------------------
/draw.py:
--------------------------------------------------------------------------------
1 | # python base modules
2 | from collections import deque
3 |
4 | # dependencies
5 | from gevent import time
6 | import numpy as np
7 | import pandas as pd
8 | import seaborn as sns
9 | import matplotlib.pyplot as plt
10 |
11 | sns.set(style='darkgrid') # seaborn style one of darkgrid, whitegrid, dark, white, ticks
12 |
13 |
14 | def plot(x_y_pairs, legend=None, fig=0, block=False, title=''):
15 | plt.figure(fig)
16 | for x, y in x_y_pairs:
17 | plt.plot(x, y)
18 | if title:
19 | plt.title(title)
20 | if legend:
21 | plt.legend(legend)
22 | plt.xlabel('timestamp')
23 | plt.ylabel('value')
24 | plt.show(block=block)
25 |
26 |
27 | def plot_time_series(data, fig=1, xlabel='', ylabel='', title=''):
28 | df = pd.DataFrame(data, columns = ['index', 'value', 'legend'])
29 | df = df.set_index(df.index)
30 | print(df)
31 | plt.figure(fig)
32 | sns.lineplot(x='index', y='value', hue='legend', data=df)
33 | if xlabel:
34 | plt.xlabel(xlabel)
35 | if ylabel:
36 | plt.ylabel(ylabel)
37 | if title:
38 | plt.title(title)
39 | plt.show(block=True)
40 |
41 |
42 | class LivePlot:
43 | # from https://stackoverflow.com/a/40139416
44 |
45 | def __init__(
46 | self,
47 | xsize = 100,
48 | n_values=1,
49 | blit = True,
50 | fig=2,
51 | title='',
52 | xlabel='',
53 | ylabel='',
54 | show_frame_rate = True,
55 | ylim_low = -12,
56 | ylim_high = 12):
57 | """blit is the fastest
58 | """
59 | self.blit, self.frame_rate, self.n_values = blit, show_frame_rate, n_values
60 | self.x = np.array(list(range(xsize)))
61 | self.fig = plt.figure(fig)
62 | self.ax = self.fig.add_subplot(1, 1, 1, label="main")
63 | self.values = {}
64 | for i in range(n_values):
65 | self.values[i] = {'y': deque(xsize*[0], maxlen=xsize)}
66 | self.values[i]['line'], = self.ax.plot([], lw=3)
67 | if self.frame_rate:
68 | self.text = self.ax.text(0.8,0.5, "")
69 |
70 | self.ax.set_xlim(self.x.min(), self.x.max())
71 | self.ax.set_ylim([ylim_low, ylim_high])
72 |
73 | self.fig.canvas.draw() # note that the first draw comes before setting data
74 |
75 | if self.blit:
76 | # cache the background
77 | self.axbackground = self.fig.canvas.copy_from_bbox(self.ax.bbox)
78 |
79 | plt.title(title)
80 | plt.xlabel(xlabel)
81 | plt.ylabel(ylabel)
82 | plt.show(block=False)
83 | self.t_start = time.time()
84 | self.i = 0
85 |
86 | def update(self, values):
87 | for i, value in zip(range(self.n_values), values):
88 | self.values[i]['y'].append(value)
89 |
90 | def draw(self):
91 | for i in range(self.n_values):
92 | self.values[i]['line'].set_data(self.x, np.array(self.values[i]['y']))
93 | if self.frame_rate:
94 | tx = 'Mean Frame Rate:\n {fps:.3f}FPS'.format(fps= ((self.i+1) / (time.time() - self.t_start)) )
95 | self.text.set_text(tx)
96 | if self.blit:
97 | # restore background
98 | self.fig.canvas.restore_region(self.axbackground)
99 | # redraw just the points
100 | for i in range(self.n_values):
101 | self.ax.draw_artist(self.values[i]['line'])
102 | if self.frame_rate:
103 | self.ax.draw_artist(self.text)
104 | # fill in the axes rectangle
105 | self.fig.canvas.blit(self.ax.bbox)
106 | else:
107 | # redraw everything
108 | self.fig.canvas.draw()
109 | self.fig.canvas.flush_events()
110 | #alternatively you could use
111 | #plt.pause(0.000000000001)
112 | # however plt.pause calls canvas.draw(), as can be read here:
113 | #http://bastibe.de/2013-05-30-speeding-up-matplotlib.html
114 | self.i += 1
115 |
116 | def close(self):
117 | plt.close(self.fig)
118 |
119 |
120 | if __name__ == "__main__":
121 | # this is a demo not a proper test
122 | x = list(range(100))
123 | y = [t % 50 for t in x]
124 | x2 = list(range(0, 100, 2))
125 | y2 = [t % 20 for t in x2]
126 | x_y_pairs = [(x, y), (x2, y2)]
127 | plot(x_y_pairs, legend=('1', '2'), block=False, title='Test')
128 |
129 | data = {
130 | 'index': [1, 1, 1, 4, 5, 4],
131 | 'value': [0, 10, 11, 5, 4, 4],
132 | 'legend': ['first', 'first', 'second', 'first', 'second', 'first']
133 | }
134 | plot_time_series(data, xlabel='timestamp', title='Another test with confidence interval')
135 |
--------------------------------------------------------------------------------
/templates/index.html:
--------------------------------------------------------------------------------
1 |
2 |
3 |
4 | Phone IMU
5 |
6 |
7 |
197 |
198 |
199 | Phone Inertial Measurement Unit
200 | Async mode is: {{ async_mode }}
201 | Send:
202 |
203 |
206 |
207 |
208 |
209 | | API used |
210 | |
211 |
212 |
213 | | linear acceleration (excl. gravity) |
214 | |
215 |
216 |
217 | | acceleration incl. gravity |
218 | |
219 |
220 |
221 | | rotation rate |
222 | |
223 |
224 |
225 | | abs orientation |
226 | |
227 |
228 |
229 | | interval (ms) |
230 | |
231 |
232 |
233 |
234 | Receive:
235 |
236 |
237 |
238 |
--------------------------------------------------------------------------------
/README.md:
--------------------------------------------------------------------------------
1 | # phone-imu, a student project for data fusion
2 |
3 | This code declares a webserver to run on your computer. Open the page on your mobile device to stream IMU data back to the host. Use this data to calculate the device relative position, orientation, etc.
4 |
5 | ## Project description
6 |
7 | [Inertial Measurement Units]((https://en.wikipedia.org/wiki/Inertial_measurement_unit)) (IMUs) are used everywhere; in planes, autonomous vehicles, submarines, smart watches, computers ... and your mobile phone. They are general purpose modules constructor add to products everytime position, orientation, speed or motion capture is necessary. As future engineers, you ought to be able to interact with the typical sensor and present results in nice visualisation. From my experience at AKKA Technologies, demonstrating your involvement in projects mixing low level data, physics and software would help you get hired pretty fast !
8 |
9 | Some examples using IMUs are :
10 |
11 | - All autonomous cars use an IMU, see Apollo 2 ([link to specs](https://github.com/ApolloAuto/apollo/blob/master/docs/quickstart/apollo_2_0_hardware_system_installation_guide_v1.md#key-hardware-components))
12 | - Open Source Autonomous Driving projects such as Autoware use some ([link](https://gitlab.com/autowarefoundation/autoware.ai/autoware/-/wikis/home))
13 | - Robotics manufacturer ([example](https://www.ceva-dsp.com/app/motion-sensing/))
14 | - IMUs price go from a 2€ (like a [MPU-6050](https://invensense.tdk.com/products/motion-tracking/6-axis/mpu-6050/)) to 20€ (like a [BNO080](https://github.com/jps2000/BNO080)) to ks€ (see GPS-RTK) !!
15 |
16 | 
17 |
18 | But where will we find an IMU for each student, and that you already have at home (#stayhome) ? Thankfully your smartphones have good IMUs, so let's push them at their maximum and find out how good they are. What works for the phones will work for Autonomous Vehicles as well.
19 |
20 | We will stream the phone accelerometer and gyroscope data to the computer and experiment with data fusion. Beneath is what high level sensor fusion looks like ([source](https://github.com/koide3/hdl_graph_slam)), so keep up !
21 | 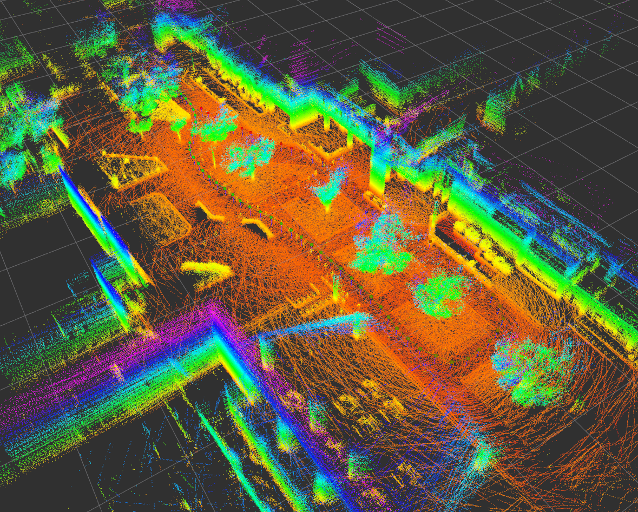 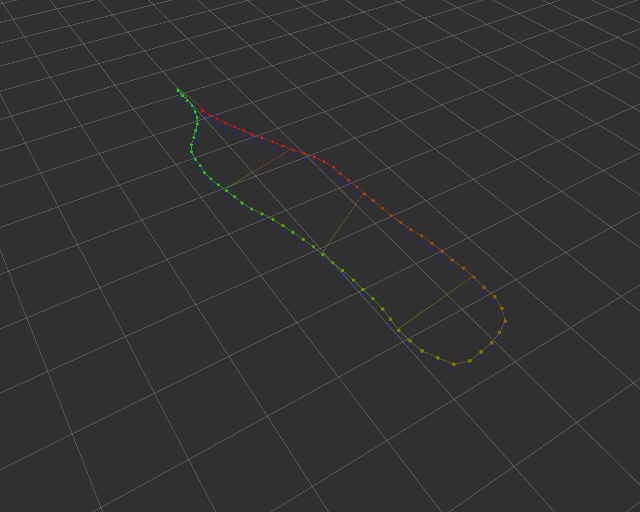
22 |
23 | ### Description
24 |
25 | We will turn the internal accelerometer, gyroscope and magnetometer in an Inertial Measurement Unit as an introduction to robotics.
26 | You will be measuring the relative position of your device through sensor fusion and use it to measure distances at home.
27 |
28 | ## Deliverables
29 |
30 | ### Timetable
31 |
32 | L3: 10 Apr 8.30-11.45 (NOTE SAME DAY TWO LECTURES!)
33 |
34 | L4: 10 Apr 13.30-15.30
35 |
36 | L5: 24 April 13.30-15.30
37 |
38 | L6: 15 May 13.30-15.30
39 |
40 | L7: 18 May 8.30-11.45
41 |
42 | L8: 22 May 13.30-15.30 EXAM
43 |
44 | ### Instruction
45 |
46 | Objective: run the code, handle the data and write `test_imu.TestImu.test_mean_data`.
47 |
48 | Preparations:
49 |
50 | 1. Join the telegram chat (link on moodle)
51 | 1. Create a private repository named IN104_Project_Name_Name
52 | 1. Invite me as contributor (on gitlab, maintainer)
53 | 1. Clone your repository on your computer
54 | 1. Add my repo as a new remote `git remote add teacher https://github.com/vtalpaert/phone-imu`
55 | 1. List your remotes for verification `git remote -v`, you should see `origin` and `teacher`
56 | 1. Pull my code `git pull teacher master`
57 | 1. In case your repo was not empty, merge incoming commits
58 | 1. Create environment using the install instructions below
59 |
60 | ### First deliverable
61 |
62 | Deadline April 16th. In `imu.py`, change the method `run` to :
63 |
64 | 1. calculate mean over last 100 values (use get_first_data in this case). Tip: try `deque`, the same as `list` but with fixed length
65 |
66 | ```python
67 | >>> import collections
68 | >>> help(collections.deque)
69 | ```
70 |
71 | 1. calculate mean and std of time difference between two samples (with get_first_data as well). Tip: Define a `mean` function for clearer code, it will use the built-ins `sum` and `len`
72 | 1. explain the difference between taking the mean every hundred values ('slow average'), and updating the mean at each value ('running average'). Bonus, try other smoothing functions than the mean. See bellow for example.
73 |
74 | Example of the plot to include in your report :
75 |
76 | 
77 |
78 | To plot this, you can use my first function from `draw.py`.
79 |
80 | How to submit homework :
81 |
82 | 1. Write some code
83 | 1. Commit and push to your repo
84 | 1. Your teammate pulls your modifications
85 | 1. Your teammate writes some code as well
86 | 1. Your teammate pushes his code
87 | 1. You pull his code
88 | 1. When your code completes the mean of 100 values, comment your last commit on github with a sample of the output and tag me (@vtalpaert)
89 | 1. Same when you did the mean time difference
90 |
91 | ### Second deliverable
92 |
93 | Deadline April 23rd.
94 |
95 | Control time !
96 |
97 | 1. Pull and merge the latest changes from my repo `git pull teacher master`.
98 | 1. Is there an error ? Read carefully the git output, if there is a merge conflict, this is a normal and expected error. You must manually correct the conflicting files before commiting the merge
99 | 1. Are there new requirements ? `pip3 install -r requirements.txt` again.
100 | 1. Write a test for calculating the mean on a data list, put it in `test_imu.TestImu.test_mean_data`
101 | 1. Speed up your code ! In `imu.py` class `IMU`, change `thread_update_delay` to `0.01` or `0.1`. Now measure the new effective time delay using what you did last week. Comment your results on the commits. Does it change something when you use `get_first_data` ? With `get_last_data` ? Why ?
102 | 1. Now change `client_send_interval`. Change the interval length to 1 millisecond, try 0 as well. What happens ?
103 | 1. (The refresh rate question does not apply anymore since I removed the separate thread, I you want to go back to this question and the `thread.py` code, use `git checkout b3128338f84efb6c3845586d089fd797e08f7433` then `git checkout -b thread-question`. Don't forget to push this new branch as well if you want me to see it)
104 | 1. Now we want to run the computer side code as fast as possible, so we will keep `thread_update_delay = 0.01`. Use now only `client_send_interval` and measure the mean delta between two data pieces. Include in your report a table with different intervals (between 0 and 50ms), the mean delta and standard deviation
105 | 1. Add to your report a plot that looks like this:
106 |
107 | 
108 |
109 | You can use the second function from the current `draw.py`. It will take care of the mean and std by itself. I used 500 measures for each interval in `[100, 50, 20, 15, 10, 9, 8, 7, 6, 5, 4, 3, 2, 1, 0]`. For me, 20 milliseconds seems the most stable settings. Tip: you need the same exact number of measures at each index (500 values for each interval) for the draw function to work.
110 |
111 | ### Third deliverable
112 |
113 | Deadline May 5th, 2020.
114 |
115 | Control space !
116 |
117 | For your convenience, I added a live plotting tool in `draw.py`, here is me plotting 100 acceleration raw values in X, Y, and Z. Keep in mind that plotting slows your code down, so you may only call `live_plot.draw()` every 10 iterations for example. Tip: use the disk button to save a clean picture, the graph will not update in the meantime.
118 | (To reset the code at this example, use `git checkout 783955fceae81eee06b19614b81640a66529daa3`)
119 |
120 | 
121 |
122 | We will now try to find the position of the device on one axis. As you can guess, using the acceleration we should in theory be able to calculate the position, but in practice this won't work. Let's experience first hand exactly what is happening with the following instructions, and keep our observations in our final report.
123 |
124 | 1. Intialize the IMU with a position and velocity of 0s. Keep your device on a table or any plane surface.
125 | 1. Visualize the acceleration, and find your X-axis by moving the phone. How does the acceleration change over time ? Is it centered on zero when immobile ? If you slightly tilt the device, is it centered on another value ? Why is the acceleration non-zero ? (Write the answers in your report)
126 | 1. Calculate the `delta_t` the difference in two samples. For me it was not exactly my `client_send_interval` value of 20ms, but rather 21.5ms.
127 | 1. In the IMU `run` function, use the acceleration to update the position. If you integrate the acceleration over time, you get a velocity, do it a second time and you get the relative position. I used the formula `delta_p = v * delta_t + 0.5 * a * delta_t ** 2`
128 | When I did it, the position would drift linearly after a very short time even if the device was not moving, see my example :
129 | 
130 | By carefully moving the phone in a translation along the X-axis for around 20cm, then back to the initial position and so forth, I got :
131 | 
132 | Include your own version of this plot in your report.
133 | 1. The first problem to solve, if that the acceleration is not necessarily centered on zero. Correct the raw value by substracting a base value. This is where your mean function may come in handy. This is loosely equivalent to using a high-pass filter if your mean is recalculated over time (so `filtered = raw - mean`)
134 | 1. Then get rid of the noise in the acceleration with a low pass filter. If you look at the very first image on this page, you see that taking the mean is a low pass (orange vs blue). Tip : you can also update a value using `current_value = 0.1 * observed_value + 0.9 * current_value` for slow changes.
135 | 1. Plot the raw acceleration, high-pass, low-pass and combined low and high pass values. Experiment different parameters in your filters and explain what worked best for you.
136 | 1. With the two filters on the acceleration, I moved the phone to the left, to the right and back at the start position. I calculated the velocity and position to be :
137 | 
138 | For cleaning the velocity value, I made the assumption it would (very) slowly go back to zero over time (again, equivalent to a high pass).
139 | Furthermore, only specific values of acceleration are taking into account due to the cutoff frequencies of my combined filters. Looking at the orange/velocity and green/position lines, you can verify the velocity is null when the position is at a maximum. This is the kind of plot you must include in your report for this deliverable.
140 |
141 | That's it for the homework. Keep in mind the drift is bound to happen whatever you try, so you will need to restart the calculations quite often. Finding the right parameters in your filters is crucial. In the end, the parameters will work for a specific motion (in my case: 0cm, +20cm, -20cm, 0cm in approx 3 seconds). So find one you like and stick to it while tuning your parameters.
142 |
143 | ### Fourth deliverable
144 |
145 | ### etc
146 |
147 | Task 1 dimension : basic ruler
148 |
149 | Task 2 dimensions : circular movement
150 |
151 | Task 3 dimensions : free displacement
152 |
153 | ### Last deliverable
154 |
155 | Final presentations
156 |
157 | #### How to write your report
158 |
159 | Will come soon
160 |
161 | ## Install and run
162 |
163 | 1. Create a python environment, with Anaconda or Virtual Env. With Anaconda, use for example `conda create -n imu python=3.7`
164 | 1. Source your env. With Anaconda, use `conda activate imu`
165 | 1. Verify you are using Python 3 : `python --version`
166 | 1. Install dependencies `pip install -r requirements.txt`, read the output to check everything went well
167 | 1. Note your local IP address, such as `192.168.1.64` for me. On linux, use `ifconfig`
168 | 1. Run tests with `python -m unittest`
169 | 1. Run server with `python server.py`. Pro tip: you can stop the script with `Ctrl-C`
170 | 1. On your device, open the address `192.168.1.64:5000` to visit the server homepage
171 | 1. On some browser, the timestamp has a reduced precision ([explanation](https://developer.mozilla.org/en-US/docs/Web/JavaScript/Reference/Global_Objects/Date/now)), on Firefox you need for example to disable `privacy.reduceTimerPrecision` in `about:config`
172 |
173 | ### Common issues
174 |
175 | - `socket.error: [Errno 98] Address already in use` means another flask instance is still running. Restart your terminal or type `fuser 5000/tcp -k` (might need a sudo) for linux ([source](https://stackoverflow.com/questions/41393384/flask-running-issue-socket-error-errno-98-address-already-in-use))
176 |
177 | ## Sources
178 |
179 | - FlaskIO documentation and [example](https://github.com/miguelgrinberg/Flask-SocketIO/tree/master/example)
180 | - Device motion capture [reference](https://whatwebcando.today/device-motion.html)
181 |
--------------------------------------------------------------------------------