 13 |
14 | - Download the official **ESP Flash Download Tool**: https://www.espressif.com/en/support/download/other-tools
15 | - Start it and select **Developer Mode > ESP32 Download Tool**.
16 | - Prepare files and memory addresses according picture below:
17 |
13 |
14 | - Download the official **ESP Flash Download Tool**: https://www.espressif.com/en/support/download/other-tools
15 | - Start it and select **Developer Mode > ESP32 Download Tool**.
16 | - Prepare files and memory addresses according picture below:
17 |  18 |
19 | - Click button “**CombineBin**”.
18 |
19 | - Click button “**CombineBin**”. 21 |
22 | Also, support was recently added for ArtNet virtual LEDs.
23 |
--------------------------------------------------------------------------------
/LICENSE:
--------------------------------------------------------------------------------
1 | MIT License
2 |
3 | Copyright (c) 2021 Christian Schwinne
4 |
5 | Permission is hereby granted, free of charge, to any person obtaining a copy
6 | of this software and associated documentation files (the "Software"), to deal
7 | in the Software without restriction, including without limitation the rights
8 | to use, copy, modify, merge, publish, distribute, sublicense, and/or sell
9 | copies of the Software, and to permit persons to whom the Software is
10 | furnished to do so, subject to the following conditions:
11 |
12 | The above copyright notice and this permission notice shall be included in all
13 | copies or substantial portions of the Software.
14 |
15 | THE SOFTWARE IS PROVIDED "AS IS", WITHOUT WARRANTY OF ANY KIND, EXPRESS OR
16 | IMPLIED, INCLUDING BUT NOT LIMITED TO THE WARRANTIES OF MERCHANTABILITY,
17 | FITNESS FOR A PARTICULAR PURPOSE AND NONINFRINGEMENT. IN NO EVENT SHALL THE
18 | AUTHORS OR COPYRIGHT HOLDERS BE LIABLE FOR ANY CLAIM, DAMAGES OR OTHER
19 | LIABILITY, WHETHER IN AN ACTION OF CONTRACT, TORT OR OTHERWISE, ARISING FROM,
20 | OUT OF OR IN CONNECTION WITH THE SOFTWARE OR THE USE OR OTHER DEALINGS IN THE
21 | SOFTWARE.
22 |
--------------------------------------------------------------------------------
/docs/interfaces/websocket.md:
--------------------------------------------------------------------------------
1 | ---
2 | title: WebSocket
3 | hide:
4 | # - navigation
5 | # - toc
6 | ---
7 |
8 | !!! info "Version Info"
9 | Since WLED 0.10.2, a WebSocket server is enabled by default and can be used to access a subset of the [JSON API](/interfaces/json-api).
10 |
11 | The server is available at the `/ws` endpoint, you can access it like `ws://[WLED-IP]/ws`.
12 |
13 | You may send any JSON state update to the socket.
14 | On change of the lighting state, the server will send a JSON object containing the state and info objects (this is equivalent to HTTP GET `/json/si`) to all connected clients. This object will also be sent to a client upon connecting.
15 |
16 | You can also request a live stream of the LED values (e.g. the "Peek" feature of WLED-UI) by sending `{"lv":true}` to the websocket. The returned format is the same as for `/json/live`. Only one client can receive this at a time, if a new client requests it the stream will stop for the previous client (but the websocket will stay connected).
17 |
18 | There can be a maximum of 4 clients connected at a time. If a fifth client connects, a different client will be disconnected. On ESP8266, it is recommended to have no more than 2 clients connected simultaneously.
19 |
--------------------------------------------------------------------------------
/docs/assets/stylesheets/extra.css:
--------------------------------------------------------------------------------
1 |
2 | /* Custom color scheme */
3 |
4 | [data-md-color-scheme="wled"] {
5 | --md-hue: 232; /* [0, 360] */
6 | --md-primary-fg-color: #FFA000; /*WLED Orange*/
7 | /*--md-primary-fg-color: #7289DA; /*Blurple*/
8 | --md-primary-fg-color--light: #555;
9 | --md-primary-fg-color--dark: #999;
10 | --md-default-fg-color: hsla(var(--md-hue),75%,95%,1); /*text*/
11 | --md-typeset-color: var(--md-default-fg-color); /*text*/
12 | --md-default-fg-color--light: hsla(var(--md-hue),5%,70%,1); /*heading*/
13 | --md-default-fg-color--lighter: hsla(var(--md-hue),75%,90%,0.32); /*edit pen*/
14 | --md-default-fg-color--lightest: hsla(var(--md-hue),75%,90%,0.12); /*?*/
15 | --md-default-bg-color: #2c2f33; /* discord */
16 | --ac-header-color: #1d1f21; /* title header */
17 | --md-footer-bg-color: #1d1f21; /* discord link header and footer */
18 | --md-code-bg-color: #42464c;
19 | --md-code-fg-color: #FFF;
20 | --md-admonition-bg-color: #35383d;
21 | --md-admonition-fg-color: var(--md-default-fg-color);
22 | --md-typeset-table-color: #42464c;
23 | --md-code-hl-keyword-color: #a5d6ff;
24 | --md-code-hl-number-color: #79c0ff;
25 | --md-code-hl-name-color: #79c0ff;
26 | --md-code-hl-string-color: #23995e;
27 | }
28 |
29 | .md-tabs {
30 | background-color: var(--ac-header-color, var(--md-primary-fg-color));
31 | }
32 |
33 | .md-header {
34 | background-color: var(--ac-header-color, var(--md-primary-fg-color));
35 | }
36 |
--------------------------------------------------------------------------------
/docs/interfaces/blynk.md:
--------------------------------------------------------------------------------
1 | ---
2 | title: Blynk
3 | hide:
4 | # - navigation
5 | # - toc
6 | ---
7 |
8 | !!! warning
9 | The official Blynk v1 server is shut down as of January 2023. WLED v0.14.0-b1 binaries no longer have Blynk support enabled by default.
10 | This only works with the _legacy_ Blynk app, for which new signups have been closed by the Blynk developer. WLED will either move to Blynk 2.0 or a different solution soon.
11 |
12 | You can use the free (if you only use it for 1 WLED light) IoT cloud Blynk to control your WLED Lights with the beautiful Blynk app for Android and iOS!
13 |
14 | With Blynk, you can also even control your lights when you are not connected to your home network!
15 |
16 | ## Installation
17 |
18 | - Download the Blynk (legacy) app from the [Play Store](https://play.google.com/store/apps/details?id=cc.blynk) or the [App Store](https://itunes.apple.com/us/app/blynk-iot-for-arduino-esp32/id808760481?mt=8)
19 | - Scan this QR code with the app:
20 |
21 | 
22 |
23 | - Paste the device auth token Blynk sends to your e-mail into the WLED sync settings (only one ESP!)
24 |
25 | You can use the sync button in Blynk to sync other WLED ESPs, just like with the web UIs!
26 |
27 | If you have doubts about the security of using a 3rd party IoT cloud, don't worry. WLED will only attempt to connect to Blynk if you put the device token string into Sync settings! Keep in mind that your ESP needs to connect to an external server, which may cause lag.
28 |
--------------------------------------------------------------------------------
/docs/advanced/2d-1d-Mixed-Setup.md:
--------------------------------------------------------------------------------
1 | ---
2 | title: 2D and 1D Mixed Setup
3 | hide:
4 | # - navigation
5 | # - toc
6 | ---
7 |
8 | ## Overview
9 |
10 | WLED supports mixing 2D and 1D setup on the same unit, the expected result is that you could use 2D fixture and still chain a strip after or setup a strip and then a matrix after on the same pin.
11 |
12 | 1. Setup your total LED count in Config -> LED Preferences as usual. For example a 8x8 matrix and a strip of 30 pixels chained to the end of your matrix. The total count should be 64 + 30 = 94. This also works with virtual LEDs via DDP or ArtNet.
13 |
21 |
22 | Also, support was recently added for ArtNet virtual LEDs.
23 |
--------------------------------------------------------------------------------
/LICENSE:
--------------------------------------------------------------------------------
1 | MIT License
2 |
3 | Copyright (c) 2021 Christian Schwinne
4 |
5 | Permission is hereby granted, free of charge, to any person obtaining a copy
6 | of this software and associated documentation files (the "Software"), to deal
7 | in the Software without restriction, including without limitation the rights
8 | to use, copy, modify, merge, publish, distribute, sublicense, and/or sell
9 | copies of the Software, and to permit persons to whom the Software is
10 | furnished to do so, subject to the following conditions:
11 |
12 | The above copyright notice and this permission notice shall be included in all
13 | copies or substantial portions of the Software.
14 |
15 | THE SOFTWARE IS PROVIDED "AS IS", WITHOUT WARRANTY OF ANY KIND, EXPRESS OR
16 | IMPLIED, INCLUDING BUT NOT LIMITED TO THE WARRANTIES OF MERCHANTABILITY,
17 | FITNESS FOR A PARTICULAR PURPOSE AND NONINFRINGEMENT. IN NO EVENT SHALL THE
18 | AUTHORS OR COPYRIGHT HOLDERS BE LIABLE FOR ANY CLAIM, DAMAGES OR OTHER
19 | LIABILITY, WHETHER IN AN ACTION OF CONTRACT, TORT OR OTHERWISE, ARISING FROM,
20 | OUT OF OR IN CONNECTION WITH THE SOFTWARE OR THE USE OR OTHER DEALINGS IN THE
21 | SOFTWARE.
22 |
--------------------------------------------------------------------------------
/docs/interfaces/websocket.md:
--------------------------------------------------------------------------------
1 | ---
2 | title: WebSocket
3 | hide:
4 | # - navigation
5 | # - toc
6 | ---
7 |
8 | !!! info "Version Info"
9 | Since WLED 0.10.2, a WebSocket server is enabled by default and can be used to access a subset of the [JSON API](/interfaces/json-api).
10 |
11 | The server is available at the `/ws` endpoint, you can access it like `ws://[WLED-IP]/ws`.
12 |
13 | You may send any JSON state update to the socket.
14 | On change of the lighting state, the server will send a JSON object containing the state and info objects (this is equivalent to HTTP GET `/json/si`) to all connected clients. This object will also be sent to a client upon connecting.
15 |
16 | You can also request a live stream of the LED values (e.g. the "Peek" feature of WLED-UI) by sending `{"lv":true}` to the websocket. The returned format is the same as for `/json/live`. Only one client can receive this at a time, if a new client requests it the stream will stop for the previous client (but the websocket will stay connected).
17 |
18 | There can be a maximum of 4 clients connected at a time. If a fifth client connects, a different client will be disconnected. On ESP8266, it is recommended to have no more than 2 clients connected simultaneously.
19 |
--------------------------------------------------------------------------------
/docs/assets/stylesheets/extra.css:
--------------------------------------------------------------------------------
1 |
2 | /* Custom color scheme */
3 |
4 | [data-md-color-scheme="wled"] {
5 | --md-hue: 232; /* [0, 360] */
6 | --md-primary-fg-color: #FFA000; /*WLED Orange*/
7 | /*--md-primary-fg-color: #7289DA; /*Blurple*/
8 | --md-primary-fg-color--light: #555;
9 | --md-primary-fg-color--dark: #999;
10 | --md-default-fg-color: hsla(var(--md-hue),75%,95%,1); /*text*/
11 | --md-typeset-color: var(--md-default-fg-color); /*text*/
12 | --md-default-fg-color--light: hsla(var(--md-hue),5%,70%,1); /*heading*/
13 | --md-default-fg-color--lighter: hsla(var(--md-hue),75%,90%,0.32); /*edit pen*/
14 | --md-default-fg-color--lightest: hsla(var(--md-hue),75%,90%,0.12); /*?*/
15 | --md-default-bg-color: #2c2f33; /* discord */
16 | --ac-header-color: #1d1f21; /* title header */
17 | --md-footer-bg-color: #1d1f21; /* discord link header and footer */
18 | --md-code-bg-color: #42464c;
19 | --md-code-fg-color: #FFF;
20 | --md-admonition-bg-color: #35383d;
21 | --md-admonition-fg-color: var(--md-default-fg-color);
22 | --md-typeset-table-color: #42464c;
23 | --md-code-hl-keyword-color: #a5d6ff;
24 | --md-code-hl-number-color: #79c0ff;
25 | --md-code-hl-name-color: #79c0ff;
26 | --md-code-hl-string-color: #23995e;
27 | }
28 |
29 | .md-tabs {
30 | background-color: var(--ac-header-color, var(--md-primary-fg-color));
31 | }
32 |
33 | .md-header {
34 | background-color: var(--ac-header-color, var(--md-primary-fg-color));
35 | }
36 |
--------------------------------------------------------------------------------
/docs/interfaces/blynk.md:
--------------------------------------------------------------------------------
1 | ---
2 | title: Blynk
3 | hide:
4 | # - navigation
5 | # - toc
6 | ---
7 |
8 | !!! warning
9 | The official Blynk v1 server is shut down as of January 2023. WLED v0.14.0-b1 binaries no longer have Blynk support enabled by default.
10 | This only works with the _legacy_ Blynk app, for which new signups have been closed by the Blynk developer. WLED will either move to Blynk 2.0 or a different solution soon.
11 |
12 | You can use the free (if you only use it for 1 WLED light) IoT cloud Blynk to control your WLED Lights with the beautiful Blynk app for Android and iOS!
13 |
14 | With Blynk, you can also even control your lights when you are not connected to your home network!
15 |
16 | ## Installation
17 |
18 | - Download the Blynk (legacy) app from the [Play Store](https://play.google.com/store/apps/details?id=cc.blynk) or the [App Store](https://itunes.apple.com/us/app/blynk-iot-for-arduino-esp32/id808760481?mt=8)
19 | - Scan this QR code with the app:
20 |
21 | 
22 |
23 | - Paste the device auth token Blynk sends to your e-mail into the WLED sync settings (only one ESP!)
24 |
25 | You can use the sync button in Blynk to sync other WLED ESPs, just like with the web UIs!
26 |
27 | If you have doubts about the security of using a 3rd party IoT cloud, don't worry. WLED will only attempt to connect to Blynk if you put the device token string into Sync settings! Keep in mind that your ESP needs to connect to an external server, which may cause lag.
28 |
--------------------------------------------------------------------------------
/docs/advanced/2d-1d-Mixed-Setup.md:
--------------------------------------------------------------------------------
1 | ---
2 | title: 2D and 1D Mixed Setup
3 | hide:
4 | # - navigation
5 | # - toc
6 | ---
7 |
8 | ## Overview
9 |
10 | WLED supports mixing 2D and 1D setup on the same unit, the expected result is that you could use 2D fixture and still chain a strip after or setup a strip and then a matrix after on the same pin.
11 |
12 | 1. Setup your total LED count in Config -> LED Preferences as usual. For example a 8x8 matrix and a strip of 30 pixels chained to the end of your matrix. The total count should be 64 + 30 = 94. This also works with virtual LEDs via DDP or ArtNet.
13 |  14 | 2. Go to Config -> 2D setup and create the 8x8 matrix
15 |
14 | 2. Go to Config -> 2D setup and create the 8x8 matrix
15 |  16 | 3. Go back to edit the segments. The 8x8 segments should be created automatically. Add a new Segment. Initially the form will be for creating a new Matrix.
17 |
16 | 3. Go back to edit the segments. The 8x8 segments should be created automatically. Add a new Segment. Initially the form will be for creating a new Matrix.
17 |  18 | 4. In the "Start X" field enter a number larger or equal to the total LEDS in the matrix. In this example you should enter 64 (8 x 8). The form will automatically change to display that of a 1D segment.
19 |
18 | 4. In the "Start X" field enter a number larger or equal to the total LEDS in the matrix. In this example you should enter 64 (8 x 8). The form will automatically change to display that of a 1D segment.
19 |  20 |
21 | Note: If the matrix is chained after the strip, then use reversing at the bus level, i.e. check Reversed (rotated 180°) in LED & Hardware setup. This may also require you reverse segment.
22 |
--------------------------------------------------------------------------------
/docs/basics/install-wled-flasher.md:
--------------------------------------------------------------------------------
1 | ---
2 | title: Installation using ESP GUI
3 | hide:
4 | # - navigation
5 | # - toc
6 | ---
7 |
8 | ## 1. Downloading WLED firmware bin file
9 |
10 | You can find precompiled .bin files on the [official release page](https://bin.wled.me). Also available [alternative with precompiled usermods](https://github.com/srg74/WLED-wemos-shield/tree/master/resources/Firmware)
11 |
12 | If you are not sure what binary you should use look at this page:
13 | [What binary should I use?](/basics/install-binary#what-binary-should-i-use)
14 |
15 | ## 2. Downloading the ESP WLED Flasher
16 |
17 | You can find and download flasher [here](https://github.com/srg74/WLED-wemos-shield/tree/master/resources/Firmware/WLED_%20ESP_Flasher)!
18 |
19 | After downloading a file, unzip it and start
20 |
21 | ## 3. Flashing firmware bin files
22 |
23 | When flasher start, choose `Serial port` (it must be a port your board is connected to).
24 |
25 | 
26 |
27 | Next , choose `downloaded BIN file`.
28 |
29 | 
30 |
31 | Click on `Flash ESP`.
32 |
33 | 
34 |
35 | Now WLED firmware will be flashed to the ESP. Wait until process is finished and you will see `ADA` message.
36 |
37 | 
38 |
39 | **Next steps:** [Quick start guide](/basics/getting-started)
40 |
--------------------------------------------------------------------------------
/docs/interfaces/json-ir/18-key-ir.json:
--------------------------------------------------------------------------------
1 | {
2 | "desc": "18-key Silver Presets",
3 | "0x1FE48B7": { "label": "on", "pos": "1x1", "cmnt": "On/Mode", "cmd": "T=1" }
4 | "0x1FE58A7": { "label": "off", "pos": "1x2", "cmnt": "Off", "cmd": "T=0" }
5 | "0x1FE807F": { "label": "4H", "pos": "2x1", "cmnt": "Change effect", "cmd": "FX=~" }
6 | "0x1FE40BF": { "label": "8H", "pos": "2x2", "cmnt": "Change palette", "cmd": "FP=~" }
7 | "0x1FE7887": { "label": "+", "pos": "1x3", "cmnt": "Brightness +", "cmd": "A=~8" }
8 | "0x1FEC03F": { "label": "-", "pos": "2x3", "cmnt": "Brightness -", "cmd": "A=~-8" }
9 | "0x1FE20DF": { "label": "Red", "pos": "3x1", "cmnt": "Preset 1", "cmd": "PL=1" }
10 | "0x1FEA05F": { "label": "Green", "pos": "3x2", "cmnt": "Preset 2", "cmd": "PL=2" }
11 | "0x1FE609F": { "label": "Blue", "pos": "3x3", "cmnt": "Preset 3", "cmd": "PL=3" }
12 | "0x1FEE01F": { "label": "Orange", "pos": "4x1", "cmnt": "Preset 4", "cmd": "PL=4" }
13 | "0x1FE10EF": { "label": "Lime", "pos": "4x2", "cmnt": "Preset 5", "cmd": "PL=5" }
14 | "0x1FE906F": { "label": "Violet", "pos": "4x3", "cmnt": "Preset 6", "cmd": "PL=6" }
15 | "0x1FE50AF": { "label": "Yellow", "pos": "5x1", "cmnt": "Preset 7", "cmd": "PL=7" }
16 | "0x1FED827": { "label": "Cyan", "pos": "5x2", "cmnt": "Preset 8", "cmd": "PL=8" }
17 | "0x1FEF807": { "label": "Magenta", "pos": "5x3", "cmnt": "Preset 9", "cmd": "PL=9" }
18 | "0x1FE30CF": { "label": "Warm White", "pos": "6x1", "cmnt": "Preset 10", "cmd": "PL=10" }
19 | "0x1FEB04F": { "label": "Aqua", "pos": "6x2", "cmnt": "Preset 11", "cmd": "PL=11" }
20 | "0x1FE708F": { "label": "Purple", "pos": "6x3", "cmnt": "Preset 12", "cmd": "PL=12" }
21 | }
--------------------------------------------------------------------------------
/docs/interfaces/philips-hue.md:
--------------------------------------------------------------------------------
1 | ---
2 | title: Philips Hue
3 | hide:
4 | # - navigation
5 | # - toc
6 | ---
7 |
8 | WLED can sync to your Philips hue lights.
9 |
10 | !!! info
11 | This feature allows your WLED light to set it color to that of one of your Hue lights. It does NOT enable individual control of your WLED light from the hue app.
12 |
13 | To activate it, please go to Sync settings, fill in the IP of your hue bridge. Also you need to fill in the numeric ID of the hue light you want to sync to.
14 | Newer versions of the Hue app do not display light IDs in the "About" section of the app anymore, to find it, the app `Hue Config Viewer` is highly recommended.
15 | It is available on the [Play Store](https://play.google.com/store/apps/details?id=com.life4hue.hueconfigviewer) as well as the [App Store](https://apps.apple.com/app/id1145977453).
16 | After pairing the app to your Hue bridge, you can see the numeric IDs of all your Hue lights in the `Lights` menu.
17 |
18 | The poll interval specifies how often WLED asks the hue bridge for a light change. Lower values will mean a quicker response of WLED to hue light changes, but also decrease responsiveness and stability of WLED and potentially the hue bridge. It is recommended to set it to 1000-2000ms.
19 |
20 | Due to the nature of the hue protocol, WLED can only sync itself to a native hue bulb. At this time, there is no way to add WLED to the hue bridge and control it individually as if it was a native light.
21 |
22 | Please don't expect the same level of stability with this feature active, the ESP may reset itself because of the increased traffic it needs to handle.
23 |
24 | With DiyHue you can emulate a hue bridge that will show all WLED strips as Hue Strip Plus which will work with Hue Sync in realtime.
25 |
--------------------------------------------------------------------------------
/docs/assets/overrides/main.html:
--------------------------------------------------------------------------------
1 | {% extends "base.html" %}
2 | {% block announce %}
3 |
20 |
21 | Note: If the matrix is chained after the strip, then use reversing at the bus level, i.e. check Reversed (rotated 180°) in LED & Hardware setup. This may also require you reverse segment.
22 |
--------------------------------------------------------------------------------
/docs/basics/install-wled-flasher.md:
--------------------------------------------------------------------------------
1 | ---
2 | title: Installation using ESP GUI
3 | hide:
4 | # - navigation
5 | # - toc
6 | ---
7 |
8 | ## 1. Downloading WLED firmware bin file
9 |
10 | You can find precompiled .bin files on the [official release page](https://bin.wled.me). Also available [alternative with precompiled usermods](https://github.com/srg74/WLED-wemos-shield/tree/master/resources/Firmware)
11 |
12 | If you are not sure what binary you should use look at this page:
13 | [What binary should I use?](/basics/install-binary#what-binary-should-i-use)
14 |
15 | ## 2. Downloading the ESP WLED Flasher
16 |
17 | You can find and download flasher [here](https://github.com/srg74/WLED-wemos-shield/tree/master/resources/Firmware/WLED_%20ESP_Flasher)!
18 |
19 | After downloading a file, unzip it and start
20 |
21 | ## 3. Flashing firmware bin files
22 |
23 | When flasher start, choose `Serial port` (it must be a port your board is connected to).
24 |
25 | 
26 |
27 | Next , choose `downloaded BIN file`.
28 |
29 | 
30 |
31 | Click on `Flash ESP`.
32 |
33 | 
34 |
35 | Now WLED firmware will be flashed to the ESP. Wait until process is finished and you will see `ADA` message.
36 |
37 | 
38 |
39 | **Next steps:** [Quick start guide](/basics/getting-started)
40 |
--------------------------------------------------------------------------------
/docs/interfaces/json-ir/18-key-ir.json:
--------------------------------------------------------------------------------
1 | {
2 | "desc": "18-key Silver Presets",
3 | "0x1FE48B7": { "label": "on", "pos": "1x1", "cmnt": "On/Mode", "cmd": "T=1" }
4 | "0x1FE58A7": { "label": "off", "pos": "1x2", "cmnt": "Off", "cmd": "T=0" }
5 | "0x1FE807F": { "label": "4H", "pos": "2x1", "cmnt": "Change effect", "cmd": "FX=~" }
6 | "0x1FE40BF": { "label": "8H", "pos": "2x2", "cmnt": "Change palette", "cmd": "FP=~" }
7 | "0x1FE7887": { "label": "+", "pos": "1x3", "cmnt": "Brightness +", "cmd": "A=~8" }
8 | "0x1FEC03F": { "label": "-", "pos": "2x3", "cmnt": "Brightness -", "cmd": "A=~-8" }
9 | "0x1FE20DF": { "label": "Red", "pos": "3x1", "cmnt": "Preset 1", "cmd": "PL=1" }
10 | "0x1FEA05F": { "label": "Green", "pos": "3x2", "cmnt": "Preset 2", "cmd": "PL=2" }
11 | "0x1FE609F": { "label": "Blue", "pos": "3x3", "cmnt": "Preset 3", "cmd": "PL=3" }
12 | "0x1FEE01F": { "label": "Orange", "pos": "4x1", "cmnt": "Preset 4", "cmd": "PL=4" }
13 | "0x1FE10EF": { "label": "Lime", "pos": "4x2", "cmnt": "Preset 5", "cmd": "PL=5" }
14 | "0x1FE906F": { "label": "Violet", "pos": "4x3", "cmnt": "Preset 6", "cmd": "PL=6" }
15 | "0x1FE50AF": { "label": "Yellow", "pos": "5x1", "cmnt": "Preset 7", "cmd": "PL=7" }
16 | "0x1FED827": { "label": "Cyan", "pos": "5x2", "cmnt": "Preset 8", "cmd": "PL=8" }
17 | "0x1FEF807": { "label": "Magenta", "pos": "5x3", "cmnt": "Preset 9", "cmd": "PL=9" }
18 | "0x1FE30CF": { "label": "Warm White", "pos": "6x1", "cmnt": "Preset 10", "cmd": "PL=10" }
19 | "0x1FEB04F": { "label": "Aqua", "pos": "6x2", "cmnt": "Preset 11", "cmd": "PL=11" }
20 | "0x1FE708F": { "label": "Purple", "pos": "6x3", "cmnt": "Preset 12", "cmd": "PL=12" }
21 | }
--------------------------------------------------------------------------------
/docs/interfaces/philips-hue.md:
--------------------------------------------------------------------------------
1 | ---
2 | title: Philips Hue
3 | hide:
4 | # - navigation
5 | # - toc
6 | ---
7 |
8 | WLED can sync to your Philips hue lights.
9 |
10 | !!! info
11 | This feature allows your WLED light to set it color to that of one of your Hue lights. It does NOT enable individual control of your WLED light from the hue app.
12 |
13 | To activate it, please go to Sync settings, fill in the IP of your hue bridge. Also you need to fill in the numeric ID of the hue light you want to sync to.
14 | Newer versions of the Hue app do not display light IDs in the "About" section of the app anymore, to find it, the app `Hue Config Viewer` is highly recommended.
15 | It is available on the [Play Store](https://play.google.com/store/apps/details?id=com.life4hue.hueconfigviewer) as well as the [App Store](https://apps.apple.com/app/id1145977453).
16 | After pairing the app to your Hue bridge, you can see the numeric IDs of all your Hue lights in the `Lights` menu.
17 |
18 | The poll interval specifies how often WLED asks the hue bridge for a light change. Lower values will mean a quicker response of WLED to hue light changes, but also decrease responsiveness and stability of WLED and potentially the hue bridge. It is recommended to set it to 1000-2000ms.
19 |
20 | Due to the nature of the hue protocol, WLED can only sync itself to a native hue bulb. At this time, there is no way to add WLED to the hue bridge and control it individually as if it was a native light.
21 |
22 | Please don't expect the same level of stability with this feature active, the ESP may reset itself because of the increased traffic it needs to handle.
23 |
24 | With DiyHue you can emulate a hue bridge that will show all WLED strips as Hue Strip Plus which will work with Hue Sync in realtime.
25 |
--------------------------------------------------------------------------------
/docs/assets/overrides/main.html:
--------------------------------------------------------------------------------
1 | {% extends "base.html" %}
2 | {% block announce %}
3 | 
 After starting `flash_download_tools_v[...].exe` there should pop up two small windows. Now just click on the `Developer Mode` and`ESP8266 DownloadTool` button.
31 | Now a new window opens.
32 |
33 | - Under the SPIDownload section select the `WLED_[...]_ESP[...].bin` file by clicking on the first `...` button
34 | - In the Textfield next to the "@" char put in this adress: `0x0`
35 | - Than make sure that the file is checked (click on the checkbox)
36 | - **Click on the `Default` button**
37 | - Set SPI Speed to `80Mhz`
38 | - Set Flash Size to `32Mbit`
39 | - Select the COM Port of your ESP (usually it's **not** `COM1`)
40 | - BAUD can be set to `921600`
41 | - Verify that everything looks like the two picture below
42 | °[ESPTool settings](https://i.ibb.co/1qk16XL/esptool.png)
43 |
44 | - _(optionally)_ click on **ERASE** to erase the entire flash chip
45 | - click on `START`
46 |
47 | Now the firmware will be flashed to the ESP. When the firmware flashing was successful you see this: . Finally restart your board.
48 |
49 | **Next steps:** [Quick start guide](/basics/getting-started)
50 |
--------------------------------------------------------------------------------
/docs/interfaces/infrared.md:
--------------------------------------------------------------------------------
1 | ---
2 | title: Infrared
3 | hide:
4 | # - navigation
5 | # - toc
6 | ---
7 |
8 |
9 | !!! info "Version Info"
10 | Since v0.8.2, infrared control from various IR remotes is supported for ESP8266 and since v0.9.0 for ESP32, too.
11 |
12 | A dedicated infrared receiver module is required and must be connected to the WLED Controller. For example, KY-022 or TSOP38238 are confirmed to work and inexpensive. These receivers each have three pins: 3.3V, GND and IR data. IR data pin must be connected to a free GPIO pin. This GPIO must then be set as IR GPIO under "Config->LED Preferences" (The default sensor pin is GPIO4).
13 | 
14 |
15 | !!! warning
16 | IR receiving will not work on ESP8266 if you use any LED pin other than GPIO 1, 2, or 3 for _digital_ LED strips.
17 |
18 | ### Supported IR remotes
19 |
20 | To use IR remote go to `Settings`, `Sync Interfaces` and change the value for `Infrared receiver type` according to the IR remote type of the following list:
21 |
22 | 1. white 24-key IR remote with R,G,B + 12 color-tones
23 | 2. white 24-key IR remote with CT+ / CT- buttons
24 | 3. blue 40-key IR remote with keys for 25%, 50%, 75% and 100%
25 | 4. white 44-key IR remote with up/down arrows for the colors R,G and B
26 | 5. white 21-key IR remote with R,G,B + 9 color-tones
27 | 6. black 6-key IR remote with CH up/down + Vol up/down
28 | 7. [JSON IR remote](json-ir/json_infrared.md) - Easily configure and use any IR remote.
29 |
30 | ## ESP-NOW based remote control
31 | Since version WLED 14.0-beta3: An ESP-NOW compatible remote control is supported. An example of this is the „WIZmote“ remote control. This is based on an ESP microcontroller. ESP-NOW can be activated in WLED settings. You have to enter the Hardware MAC address of the remote control. This is determined by clicking on any button on the remote control and copying the last received MAC address from the "Last Seen" field to the "Hardware MAC" field in WLED ESP-NOW settings (“Config->WiFi Setup”) and saving it with "Save". Advantages: no special receiver needs to be attached to the WLED controller and the signals are transmitted via radio network. Therefore there is no line of sight between the remote control and the WLED controller required, as is the case with an IR remote control.
32 | 
33 | The 4 buttons "1"-"4" of the WIZmote remote control are linked to presets 1 to 4. The meaning of other keys is self-explanatory. Attention: WIZmote needs two good quality AAA batteries to work properly. If the batteries are too weak, the correct signal will not be sent, even if the blue LED on the remote control lights up briefly, actually indicating signal transmission.
34 |
--------------------------------------------------------------------------------
/docs/basics/top5_mistakes.md:
--------------------------------------------------------------------------------
1 | ---
2 | title: TOP 5 mistakes
3 | hide:
4 | # - navigation
5 | # - toc
6 | ---
7 |
8 | ### Asking for help
9 |
10 | Before asking for help on Discord or on other platforms, check the following top 5 most common mistakes while setting up WLED.
11 | If you then still have troubles and are going to ask for help, provide as much informtion as possile: describe your setup, make photos, provide screenshots of your settings.
12 |
13 | ### TOP 5 mistakes:
14 |
15 | 1. LED strip is connected from the back side: addressable LED strips have a direction indicated by small arrows on the strip. The data line must be connected from the side where the arrow begins:
16 | 
17 | 2. Incorrect GPIO is set: check in WLED settings whether the correct GPIO number is set as data output. Take care while using ESP8266 D1 mini: the pin labels like "D0", "D1" etc. are not the same numbers as GPIOs. In WLED preferences you have to use GPIO numbers:
18 | 
19 | The ready-to-use controllers usually have the correct settings printed either on the housing or on the circuit board as in this example:
20 | 
21 | 3. LED strip with many LEDs is connected and configures, but the current limiter is still at the default value (850 mA). This often has the effect that LEDs either remain dark or flash briefly when the color changes and then go out immediately or light up very dimly. Check and, if necessary, correct the settings in WLED:
22 | 
23 | 4. Wrong LED type is set. The correct LED type and the correct color sequence (RGB, BGR, etc.) must be set in WLED LED preferences. Check that these settings are correct. You have to know the LED type, but you can simply try out the color sequence to see which is the right one. Special attention must be paid for example to the WS2814 LED strip, which must be set as SK6812 and not as WS281x in the LED preferences.
24 | 
25 | 5. Wiring is bad. Wiring must be done thoroughly. Loose contacts, cold solder joints etc. must be avoided. You also need to be careful about the correct sizing of the cables: too thin wires can not only cause high voltage drop but also lead to an overheating and fire! For wire sizing you may use this [LED power, wiring and fuse calculator](https://wled-calculator.github.io/). If many power sources are used (for example separate one for ESP and separate one for the LED strip), then all their grounds (GND, V-) must be connected together (but do not connect their V+ together!).
26 |
--------------------------------------------------------------------------------
/docs/interfaces/json-ir/24-key v2_ir.json:
--------------------------------------------------------------------------------
1 | {
2 | "remote": "24-key v2",
3 | "0xF700FF": {
4 | "label": "Speed +",
5 | "cmd": "SX=~16"
6 | },
7 | "0xF7807F": {
8 | "label": "Speed -",
9 | "cmd": "SX=~-16"
10 | },
11 | "0xF740BF": {
12 | "label": "On/Off",
13 | "cmd": "T=2"
14 | },
15 | "0xF7C03F": {
16 | "label": "W",
17 | "cmnt": "Cycle color palette",
18 | "cmd": "FP=~"
19 | },
20 | "0xF720DF": {
21 | "label": "Red",
22 | "cmnt": "Lava",
23 | "cmd": "FP=8&CL=hFF0000&C2=hFF7F00&C3=hCC3D60"
24 | },
25 | "0xF7A05F": {
26 | "label": "Green",
27 | "cmnt": "Forest",
28 | "cmd": "FP=10&CL=h8000&C2=h8040&C3=h30661E"
29 | },
30 | "0xF7609F": {
31 | "label": "Blue",
32 | "cmnt": "Breeze",
33 | "cmd": "FP=15&CL=hFF&C2=h7F00FF&C3=h3D60CC"
34 | },
35 | "0xF7E01F": {
36 | "label": "Bright -",
37 | "cmd": "!decBrightness"
38 | },
39 | "0xF710EF": {
40 | "label": "Timer1H",
41 | "cmnt": "Timer 60 min",
42 | "cmd": "NL=60&NT=0"
43 | },
44 | "0xF7906F": {
45 | "label": "Timer4H",
46 | "cmnt": "Timer 30 min",
47 | "cmd": "NL=30&NT=0"
48 | },
49 | "0xF750AF": {
50 | "label": "Timer8H",
51 | "cmnt": "Timer 15 min",
52 | "cmd": "NL=15&NT=0"
53 | },
54 | "0xF7D02F": {
55 | "label": "Bright128",
56 | "cmnt": "Bright 128",
57 | "cmd": "A=128"
58 | },
59 | "0xF730CF": {
60 | "label": "Music1",
61 | "cmnt": "Cycle FX +",
62 | "cmd": "FX=~"
63 | },
64 | "0xF7B04F": {
65 | "label": "Music2",
66 | "cmnt": "Cycle FX -",
67 | "cmd": "FX=~-"
68 | },
69 | "0xF7708F": {
70 | "label": "Music3",
71 | "cmnt": "Reset FX and FP",
72 | "cmd": "FX=1&PF=6"
73 | },
74 | "0xF7F00F": {
75 | "label": "Bright+",
76 | "cmnt": "Bright +",
77 | "cmd": "!incBrightness"
78 | },
79 | "0xF708F7": {
80 | "label": "Mode1",
81 | "cmnt": "Preset 1",
82 | "cmd": "PL=1"
83 | },
84 | "0xF78877": {
85 | "label": "Mode2",
86 | "cmnt": "Preset 2",
87 | "cmd": "PL=2"
88 | },
89 | "0xF748B7": {
90 | "label": "Mode3",
91 | "cmnt": "Preset 3",
92 | "cmd": "PL=3"
93 | },
94 | "0xF7C837": {
95 | "label": "Intensity +",
96 | "cmd": "IX=~16"
97 | },
98 | "0xF728D7": {
99 | "label": "Mode4",
100 | "cmnt": "Preset 4",
101 | "cmd": "PL=4"
102 | },
103 | "0xF7A857": {
104 | "label": "Mode5",
105 | "cmnt": "Preset 5",
106 | "cmd": "PL=5"
107 | },
108 | "0xF76897": {
109 | "label": "Cycle",
110 | "cmnt": "Toggle preset cycle",
111 | "cmd": "CY=1&PT=60000"
112 | },
113 | "0xF7E817": {
114 | "label": "Intensity -",
115 | "cmd": "IX=~-16"
116 | }
117 | }
--------------------------------------------------------------------------------
/docs/interfaces/json-ir/24-key-v3_ir.json:
--------------------------------------------------------------------------------
1 | {
2 | "remote": "24-key-v3",
3 | "0xF700FF": {
4 | "label": "Speed +",
5 | "cmd": "SX=~16"
6 | },
7 | "0xF7807F": {
8 | "label": "Speed -",
9 | "cmd": "SX=~-16"
10 | },
11 | "0xF740BF": {
12 | "label": "On/Off",
13 | "cmd": "T=2"
14 | },
15 | "0xF7C03F": {
16 | "label": "W",
17 | "cmnt": "Cycle color palette",
18 | "cmd": "FP=~"
19 | },
20 | "0xF720DF": {
21 | "label": "Red",
22 | "cmnt": "Lava",
23 | "cmd": "FP=8&CL=hFF0000&C2=hFF7F00&C3=hCC3D60"
24 | },
25 | "0xF7A05F": {
26 | "label": "Green",
27 | "cmnt": "Forest",
28 | "cmd": "FP=10&CL=h8000&C2=h8040&C3=h30661E"
29 | },
30 | "0xF7609F": {
31 | "label": "Blue",
32 | "cmnt": "Breeze",
33 | "cmd": "FP=15&CL=hFF&C2=h7F00FF&C3=h3D60CC"
34 | },
35 | "0xF7E01F": {
36 | "label": "Bright -",
37 | "cmd": "!decBrightness"
38 | },
39 | "0xF710EF": {
40 | "label": "Timer1H",
41 | "cmnt": "Timer 60 min",
42 | "cmd": "NL=60&NT=0"
43 | },
44 | "0xF7906F": {
45 | "label": "Timer4H",
46 | "cmnt": "Timer 30 min",
47 | "cmd": "NL=30&NT=0"
48 | },
49 | "0xF750AF": {
50 | "label": "Timer8H",
51 | "cmnt": "Timer 15 min",
52 | "cmd": "NL=15&NT=0"
53 | },
54 | "0xF7D02F": {
55 | "label": "Bright128",
56 | "cmnt": "Bright 128",
57 | "cmd": "A=128"
58 | },
59 | "0xF730CF": {
60 | "label": "Music1",
61 | "cmnt": "Cycle FX +",
62 | "cmd": "FX=~"
63 | },
64 | "0xF7B04F": {
65 | "label": "Music2",
66 | "cmnt": "Cycle FX -",
67 | "cmd": "FX=~-"
68 | },
69 | "0xF7708F": {
70 | "label": "Music3",
71 | "cmnt": "Reset FX and FP",
72 | "cmd": "FX=1&PF=6"
73 | },
74 | "0xF7F00F": {
75 | "label": "Bright+",
76 | "cmnt": "Bright +",
77 | "cmd": "!incBrightness"
78 | },
79 | "0xF708F7": {
80 | "label": "Mode1",
81 | "cmnt": "Preset 1",
82 | "cmd": "PL=1"
83 | },
84 | "0xF78877": {
85 | "label": "Mode2",
86 | "cmnt": "Preset 2",
87 | "cmd": "PL=2"
88 | },
89 | "0xF748B7": {
90 | "label": "Mode3",
91 | "cmnt": "Preset 3",
92 | "cmd": "PL=3"
93 | },
94 | "0xF7C837": {
95 | "label": "Intensity +",
96 | "cmd": "IX=~16"
97 | },
98 | "0xF728D7": {
99 | "label": "Mode4",
100 | "cmnt": "Preset 4",
101 | "cmd": "PL=4"
102 | },
103 | "0xF7A857": {
104 | "label": "Mode5",
105 | "cmnt": "Preset 5",
106 | "cmd": "PL=5"
107 | },
108 | "0xF76897": {
109 | "label": "Cycle",
110 | "cmnt": "Toggle preset cycle",
111 | "cmd": "CY=2&PT=60000"
112 | },
113 | "0xF7E817": {
114 | "label": "Intensity -",
115 | "cmd": "IX=~-16"
116 | }
117 | }
--------------------------------------------------------------------------------
/docs/interfaces/mqtt.md:
--------------------------------------------------------------------------------
1 | ---
2 | title: MQTT
3 | hide:
4 | # - navigation
5 | # - toc
6 | ---
7 |
8 | !!! important
9 | **Notice:** The MQTT implementation is currently being **restructured** to provide a better experience for users of Home Assistant and other automation software. **This will be a breaking change**. For details regarding the rework, please see [#207](https://github.com/Aircoookie/WLED/issues/207)!
10 |
11 | WLED versions from 0.8.0 up are able to connect to an MQTT broker for smart home control.
12 | Connection to both domains and IP servers is supported on port 1883.
13 |
14 | !!! warning
15 | Secure connections are not currently supported. I recommend only connecting to local MQTT brokers.
16 | In v0.8.4-0.8.6 only, WLED supports MQTT autodiscovery by the HomeAssistant software. This has been removed because of bootloop issues and in favor of the native HomeAssistant integration.
17 |
18 | WLED will subscribe to up to six topics to change the state of the lights.
19 |
20 | - **[mqttDeviceTopic]**
21 | -> Send brightness as ASCII number 0-255 or the strings "ON", "OFF", and "T" (for toggle)
22 | - **[mqttDeviceTopic]/col**
23 | -> Send color as HEX (#WWRRGGBB or #RRGGBB) or 32bit DEC. Hex has '#','h' or 'H' as prefix.
24 | - **[mqttDeviceTopic]/api**
25 | -> Send an API call (using the [HTTP API](/interfaces/http-api) or, since 0.11, [JSON API](https://kno.wled.ge/interfaces/json-api) syntax). You may omit the "win" and just send e.g. "FX=73"
26 |
27 | - **[mqttGroupTopic]**
28 | - **[mqttGroupTopic]/col**
29 | - **[mqttGroupTopic]/api**
30 |
31 | The topic paths [mqttDeviceTopic] and [mqttGroupTopic] are customizable in Sync settings.
32 | If [mqttGroupTopic] is left empty, it will not subscribe to anything. An empty [mqttDeviceTopic] will instead be replaced with the default "wled/macaddr".
33 | [mqttDeviceTopic] is intended to be unique to one WLED device and just control that device.
34 | [mqttGroupTopic] is intended to control a group of or all WLED devices.
35 |
36 | UDP notifications will be sent just as if the change was done via the UI or HTTP API.
37 |
38 | Additionally, on light change, WLED will publish to 3 topics for MQTT clients to query the state of the light.
39 |
40 | - **[mqttDeviceTopic]/g**
41 | -> Contains current brightness as ASCII number 0-255
42 |
43 | - **[mqttDeviceTopic]/c**
44 | -> Contains current color as HEX (#RRGGBB if white is 0, else #WWRRGGBB)
45 |
46 | - **[mqttDeviceTopic]/v**
47 | -> Contains XML API response (same as HTTP API)
48 |
49 | There is support for client ID and authentication, but this is presently transmitted over an unencrypted connection, so please **do not** use the same password for other services.
50 |
51 | !!! warning "Attention"
52 | The maximum length of an MQTT message for WLED is only limited by free RAM.
53 |
--------------------------------------------------------------------------------
/docs/interfaces/json-ir/21-key_ir.json:
--------------------------------------------------------------------------------
1 | {
2 | "remote": "21-key",
3 | "0xFFA25D": {
4 | "label": "On",
5 | "pos": "1x1",
6 | "cmd": "T=1"
7 | },
8 | "0xFF629D": {
9 | "label": "Auto",
10 | "pos": "1x2",
11 | "cmd": "CY=2&PT=60000"
12 | },
13 | "0xFFE21D": {
14 | "label": "Off",
15 | "pos": "1x3",
16 | "cmd": "T=0"
17 | },
18 | "0xFF22DD": {
19 | "label": "Speed+",
20 | "pos": "2x1",
21 | "cmd": "SX=~16"
22 | },
23 | "0xFF02FD": {
24 | "label": "Effect+",
25 | "pos": "2x2",
26 | "cmd": "FX=~"
27 | },
28 | "0xFFC23D": {
29 | "label": "Bright+",
30 | "pos": "2x3",
31 | "cmd": "!incBrightness"
32 | },
33 | "0xFFE01F": {
34 | "label": "Speed-",
35 | "pos": "3x1",
36 | "cmd": "SX=~-16"
37 | },
38 | "0xFFA857": {
39 | "label": "Effect-",
40 | "pos": "3x2",
41 | "cmd": "FX=~-"
42 | },
43 | "0xFF906F": {
44 | "label": "Bright-",
45 | "pos": "3x3",
46 | "cmd": "!decBrightness"
47 | },
48 | "0xFF6897": {
49 | "label": "Red",
50 | "pos": "4x1",
51 | "cmnt": "Lava",
52 | "cmd": "FP=8&CL=hFF0000&C2=hFF7F00&C3=hCC3D60"
53 | },
54 | "0xFF9867": {
55 | "label": "Green",
56 | "pos": "4x2",
57 | "cmnt": "Forest",
58 | "cmd": "FP=10&CL=h8000&C2=h8040&C3=h30661E"
59 | },
60 | "0xFFB04F": {
61 | "label": "Blue",
62 | "pos": "4x3",
63 | "cmnt": "Cloud",
64 | "cmd": "FP=7&CL=hFF&C2=h7F00FF&C3=h3D60CC"
65 | },
66 | "0xFF30CF": {
67 | "label": "LightYellow",
68 | "pos": "5x1",
69 | "cmd": "FP=5&CL=hFFFFE0&C2=hEFFFE0&C3=hCCC7BA"
70 | },
71 | "0xFF18E7": {
72 | "label": "Moccasin",
73 | "pos": "5x2",
74 | "cmd": "FP=5&CL=hFFE4B5&C2=hF5FFB4&C3=hCCB2A2"
75 | },
76 | "0xFF7A85": {
77 | "label": "Yellow",
78 | "pos": "5x3",
79 | "cmnt": "Yellowout",
80 | "cmd": "FP=17&CL=hFFFF00&C2=h7FFF00&C3=hCCA83D"
81 | },
82 | "0xFF10EF": {
83 | "label": "Orange",
84 | "pos": "6x1",
85 | "cmnt": "Orangery",
86 | "cmd": "FP=47&CL=hFFA500&C2=hD9FF00&C3=hCC753D"
87 | },
88 | "0xFF38C7": {
89 | "label": "GhostWhite",
90 | "pos": "6x2",
91 | "cmd": "FP=5&CL=hF8F8FF&C2=hFBF8FF&C3=hC8C9CC"
92 | },
93 | "0xFF5AA5": {
94 | "label": "SkyBlue",
95 | "pos": "6x3",
96 | "cmnt": "Breeze",
97 | "cmd": "FP=15&CL=h87CEEB&C2=h879CEB&C3=h84B9BC"
98 | },
99 | "0xFF42BD": {
100 | "label": "Pink",
101 | "pos": "7x1",
102 | "cmnt": "LightPink",
103 | "cmd": "FP=38&CL=hFFC0CB&C2=hFFD4C0&C3=hCCA8B7"
104 | },
105 | "0xFF4AB5": {
106 | "label": "LightGreen",
107 | "pos": "7x2",
108 | "cmnt": "Rivendale",
109 | "cmd": "FP=14&CL=h90EE90&C2=h90EEBF&C3=h96BE89"
110 | },
111 | "0xFF52AD": {
112 | "label": "FloralWhite",
113 | "pos": "7x3",
114 | "cmd": "FP=5&CL=hFFFAF0&C2=hFCFFF0&C3=hCCC7C3"
115 | }
116 | }
--------------------------------------------------------------------------------
/docs/interfaces/json-ir/21-key v2_ir.json:
--------------------------------------------------------------------------------
1 | {
2 | "remote": "21-key v2",
3 | "0xFFA25D": {
4 | "label": "On",
5 | "pos": "1x1",
6 | "cmd": "T=1"
7 | },
8 | "0xFF629D": {
9 | "label": "Off",
10 | "pos": "1x2",
11 | "cmd": "T=0"
12 | },
13 | "0xFFE21D": {
14 | "label": "Flash",
15 | "pos": "1x3",
16 | "cmnt": "Cycle Effects",
17 | "cmd": "FX=~"
18 | },
19 | "0xFF22DD": {
20 | "label": "Strobe",
21 | "pos": "2x1",
22 | "cmnt": "Sinelon Dual",
23 | "cmd": "FX=93"
24 | },
25 | "0xFF02FD": {
26 | "label": "Fade",
27 | "pos": "2x2",
28 | "cmnt": "Rain",
29 | "cmd": "FX=43"
30 | },
31 | "0xFFC23D": {
32 | "label": "Smooth",
33 | "pos": "2x3",
34 | "cmnt": "Aurora",
35 | "cmd": "FX=38"
36 | },
37 | "0xFFE01F": {
38 | "label": "Bright+",
39 | "pos": "3x1",
40 | "cmd": "!incBrightness"
41 | },
42 | "0xFFA857": {
43 | "label": "Bright -",
44 | "pos": "3x2",
45 | "cmd": "!decBrightness"
46 | },
47 | "0xFF906F": {
48 | "label": "White",
49 | "pos": "3x3",
50 | "cmd": "FP=5&CL=hFFFFFF&C2=hFFFFFF&C3=hCCCCCC"
51 | },
52 | "0xFF6897": {
53 | "label": "Red",
54 | "pos": "4x1",
55 | "cmnt": "Lava",
56 | "cmd": "FP=8&CL=hFF0000&C2=hFF7F00&C3=hCC3D60"
57 | },
58 | "0xFF9867": {
59 | "label": "Green",
60 | "pos": "4x2",
61 | "cmnt": "Forest",
62 | "cmd": "FP=10&CL=h8000&C2=h8040&C3=h30661E"
63 | },
64 | "0xFFB04F": {
65 | "label": "Blue",
66 | "pos": "4x3",
67 | "cmnt": "Breeze",
68 | "cmd": "FP=15&CL=hFF&C2=h7F00FF&C3=h3D60CC"
69 | },
70 | "0xFF30CF": {
71 | "label": "Tomato",
72 | "pos": "5x1",
73 | "cmd": "FP=5&CL=hFF6347&C2=hFFBF47&C3=hCC646F"
74 | },
75 | "0xFF18E7": {
76 | "label": "LightGreen",
77 | "pos": "5x2",
78 | "cmnt": "Rivendale",
79 | "cmd": "FP=14&CL=h90EE90&C2=h90EEBF&C3=h96BE89"
80 | },
81 | "0xFF7A85": {
82 | "label": "SkyBlue",
83 | "pos": "5x3",
84 | "cmnt": "Ocean",
85 | "cmd": "FP=9&CL=h87CEEB&C2=h879CEB&C3=h84B9BC"
86 | },
87 | "0xFF10EF": {
88 | "label": "Orange",
89 | "pos": "6x1",
90 | "cmnt": "Orangery",
91 | "cmd": "FP=47&CL=hFFA500&C2=hD9FF00&C3=hCC753D"
92 | },
93 | "0xFF38C7": {
94 | "label": "Aqua",
95 | "pos": "6x2",
96 | "cmnt": "Hult64",
97 | "cmd": "FP=29&CL=hFFFF&C2=h7FFF&C3=h3DCCA8"
98 | },
99 | "0xFF5AA5": {
100 | "label": "Purple",
101 | "pos": "6x3",
102 | "cmd": "FP=5&CL=h800080&C2=h800040&C3=h541E66"
103 | },
104 | "0xFF42BD": {
105 | "label": "Yellow",
106 | "pos": "7x1",
107 | "cmnt": "Yellowout",
108 | "cmd": "FP=17&CL=hFFFF00&C2=h7FFF00&C3=hCCA83D"
109 | },
110 | "0xFF4AB5": {
111 | "label": "Cyan",
112 | "pos": "7x2",
113 | "cmnt": "Beech",
114 | "cmd": "FP=22&CL=hFFFF&C2=h7FFF&C3=h3DCCA8"
115 | },
116 | "0xFF52AD": {
117 | "label": "Pink",
118 | "pos": "7x3",
119 | "cmnt": "LightPink",
120 | "cmd": "FP=38&CL=hFFC0CB&C2=hFFD4C0&C3=hCCA8B7"
121 | }
122 | }
--------------------------------------------------------------------------------
/docs/interfaces/json-ir/24-key-grey_ir.json:
--------------------------------------------------------------------------------
1 | {
2 | "desc": "24-key Grey",
3 | "0xFFA05F": {
4 | "label": "+",
5 | "pos": "1x1",
6 | "cmnt": "Bright +",
7 | "cmd": "A=~8"
8 | },
9 | "0xFF20DF": {
10 | "label": "-",
11 | "pos": "1x2",
12 | "cmnt": "Bright -",
13 | "cmd": "A=~-8"
14 | },
15 | "0xFF609F": {
16 | "label": "Off",
17 | "pos": "1x3",
18 | "cmnt": "Switch Off",
19 | "cmd": "T=0&FX=0&FP=0&IX=128&SX=128"
20 | },
21 | "0xFFE01F": {
22 | "label": "On",
23 | "pos": "1x4",
24 | "cmnt": "Switch On",
25 | "cmd": "T=1"
26 | },
27 | "0xFF906F": {
28 | "label": "R0",
29 | "pos": "2x1",
30 | "cmnt": "Red",
31 | "cmd": "R=255&G=0&B=0"
32 | },
33 | "0xFF10EF": {
34 | "label": "G0",
35 | "pos": "2x2",
36 | "cmnt": "Green",
37 | "cmd": "R=0&G=255&B=0"
38 | },
39 | "0xFF50AF": {
40 | "label": "B0",
41 | "pos": "2x3",
42 | "cmnt": "Blue",
43 | "cmd": "R=0&G=0&B=255"
44 | },
45 | "0xFFD02F": {
46 | "label": "W0",
47 | "pos": "2x4",
48 | "cmnt": "White",
49 | "cmd": "R=255&G=255&B=255"
50 | },
51 | "0xFFB04F": {
52 | "label": "R",
53 | "pos": "3x1",
54 | "cmnt": "Red",
55 | "cmd": "R=255&G=0&B=0"
56 | },
57 | "0xFF30CF": {
58 | "label": "G",
59 | "pos": "3x2",
60 | "cmnt": "Green",
61 | "cmd": "R=0&G=255&B=0"
62 | },
63 | "0xFF708F": {
64 | "label": "B",
65 | "pos": "3x3",
66 | "cmnt": "Blue",
67 | "cmd": "R=0&G=0&B=255"
68 | },
69 | "0xFFF00F": {
70 | "label": "FX",
71 | "pos": "3x4",
72 | "cmnt": "Cycle FX +",
73 | "cmd": "FX=~"
74 | },
75 | "0xFFA857": {
76 | "label": "O",
77 | "pos": "4x1",
78 | "cmnt": "Orange",
79 | "cmd": "R=255&G=160&B=0"
80 | },
81 | "0xFF28D7": {
82 | "label": "C",
83 | "pos": "4x2",
84 | "cmnt": "Cyan",
85 | "cmd": "R=0&G=255&B=200"
86 | },
87 | "0xFF6897": {
88 | "label": "V",
89 | "pos": "4x3",
90 | "cmnt": "Violet",
91 | "cmd": "R=160&G=0&B=255"
92 | },
93 | "0xFFE817": {
94 | "label": "Speed",
95 | "pos": "4x4",
96 | "cmnt": "Cycle FX Speed +",
97 | "cmd": "SX=~"
98 | },
99 | "0xFF9867": {
100 | "label": "YO",
101 | "pos": "5x1",
102 | "cmnt": "Yellow Orange",
103 | "cmd": "R=255&G=160&B=0"
104 | },
105 | "0xFF18E7": {
106 | "label": "CB",
107 | "pos": "5x2",
108 | "cmnt": "Cyan Blue",
109 | "cmd": "R=0&G=160&B=255"
110 | },
111 | "0xFF58A7": {
112 | "label": "M",
113 | "pos": "5x3",
114 | "cmnt": "Magenta",
115 | "cmd": "R=200&G=0&B=255"
116 | },
117 | "0xFFD827": {
118 | "label": "Intensity",
119 | "pos": "5x4",
120 | "cmnt": "Cycle FX Intensity",
121 | "cmd": "IX=~"
122 | },
123 | "0xFF8877": {
124 | "label": "Y",
125 | "pos": "6x1",
126 | "cmnt": "Yellow",
127 | "cmd": "R=255&G=200&B=0"
128 | },
129 | "0xFF08F7": {
130 | "label": "DC",
131 | "pos": "6x2",
132 | "cmnt": "Dark Cyan",
133 | "cmd": "R=0&G=96&B=255"
134 | },
135 | "0xFF48B7": {
136 | "label": "P",
137 | "pos": "6x3",
138 | "cmnt": "Pink",
139 | "cmd": "R=255&G=0&B=255"
140 | },
141 | "0xFFC837": {
142 | "label": "Palette",
143 | "pos": "6x4",
144 | "cmnt": "Cycle Palette",
145 | "cmd": "FP=~"
146 | }
147 | }
148 |
--------------------------------------------------------------------------------
/docs/advanced/security.md:
--------------------------------------------------------------------------------
1 | ---
2 | title: Security
3 | hide:
4 | # - navigation
5 | # - toc
6 | ---
7 |
8 | WLED was designed in a way that you should be safe to have a [router port forwarding](/advanced/remote-access-ifttt) to control the system from the public internet. This page will tell you what you can expect by WLEDs security.
9 |
10 | ### TLDR - what to do?
11 |
12 | A: If you just operate WLED within a local network and/or with a secured Access Point (change the default password "wled1234"!!) you are fine.
13 |
14 | If you have configured a port forwarding to control WLED from outside your local subnet, **please make sure the setting "OTA Lock" is enabled and you have changed the default OTA password "wledota"! Also, NEVER edit sensitive data (like WiFi credentials) while connected via the port forwarding!**
15 |
16 | ### 1: Is the connection itself safe?
17 |
18 | A: Technically not. The ESP8266 uses unencrypted HTTP traffic. Implementing HTTPS would take too much processing power and memory on this little device. This means an attacker could read your passwords during transmit. Therefore, to be safe, please do NOT change the AP/Client WiFi/OTA password from outside of your LAN via a forwarded port. If you are at home, you should be safe if your WiFi is secured. You can change any other setting while you're away, though. WLED doesn't send your actual password to the settings page, just its length.
19 |
20 | ### 2: What do you mean by secure then?
21 |
22 | A: WLED comes with the ability to carry out a software update via WiFi (OTA). However, no one must be able to flash a malicious new binary firmware to steal your WiFi credentials or make your ESP part of a botnet. Therefore, you should enable the "OTA Lock" setting and change its default passphrase "wledota".
23 |
24 | ### 3: Can I protect the light configuration or the settings page?
25 |
26 | A: Currently not. This is not sensitive information like your WiFi password. Anyone with your IP and port can control the lights. Open an issue if it should ever happen that somebody plays with your lights. I might consider adding an optional password lock then. For now, it is way too cumbersome for what it does.
27 |
28 | ### 4: I want to do a software update, but it says "OTA lock active"?
29 |
30 | A: You need to go to the settings page. Untick the "OTA Lock" setting and input your passphrase in the field below it.
31 | Now apply the settings and reboot. After that you can carry out the software update. Don't forget to re-enable OTA Lock afterwards! To enable, you don't have to enter the passphrase, unless you want to change it. For the lock to work you need to apply and reboot again.
32 |
33 | ### 5: Why is this OTA lock stuff that important?
34 |
35 | A: Your unencrypted WiFi password is stored in the module's EEPROM. It would be easy to "update" the software to a malicious version which sends your password to the attacker. OTA Lock makes sure only those with the passphrase may carry out a software update. And yes, while you can disable OTA lock by doing a factory reset, this would also kill the WiFi connection to the attacker.
36 |
37 | ### 6: Anything else?
38 |
39 | A: A personal tip from me is not to give anyone your IP to control the software who you do not wish to do so on a regular basis. It is not critical from a security standpoint, but it can be very annoying if someone plays with your lights, or even worse, change your AP credentials to the point where you can no longer access the module except via USB.
--------------------------------------------------------------------------------
/docs/features/multi-strip.md:
--------------------------------------------------------------------------------
1 | ---
2 | title: Multi-strip Support
3 | hide:
4 | # - navigation
5 | # - toc
6 | ---
7 |
8 | ## Multi strip support
9 |
10 | Starting in WLED 0.12.0, you are able to use multiple LED outputs from one ESP board!
11 | Pins and LED numbers can be easily configured in LED settings, you don't need to re-compile code for your specific setup. Custom binaries for multiple pins are now also a thing of the past!
12 |
13 | There are a few tips and recomendations to keep in mind when designing your setup:
14 |
15 | ### General
16 |
17 | - It is highly recommended to use an ESP32 when using more than 1 output
18 | - You may freely choose the LEDs type, pin numbers, length and color order of your LED strips at runtime in the LED settings page
19 | - Highly recommeded to size power supply correctly according to your setup and disable the WLED brightness limiter setting to increase framerate with very large LED counts
20 | - Most strip types have yet to be tested. Add confirmed working below:
21 | - Confirmed working: WS281x, SK6812 RGBW, PWM white
22 |
23 | ### ESP8266
24 |
25 | - There is a maximum of 3 strips supported.
26 | - It is highly recommended to use two specific LED pins, GPIO1 (TX) and GPIO2 (D4), since they allow for hardware driving.
27 | - It is recommended to use 512 LEDs/pin for good performance for a total of 1024 LEDs.
28 | - 800 LEDs/pin for a total of 1600 has been confirmed working, but is not recommended for good performance and reliability.
29 | - Using GPIO1 will disable serial debugging. If you need it, you can't use a strip on this pin.
30 | - GPIO3 (RX) is the third pin that allows hardware driving on ESP8266. However, it uses 5 times as much memory per LED as GPIO 1 and 2, so use it only for low LED counts (recommended <50)
31 | - You can use any other pin, but it will use the bitbang method, which is not recommended for reliability. It is best to stick to GPIO 1, 2, and if need be, 3.
32 | - Using pin GPIO16 for WS2812b LEDs did not work in my testing.
33 | - ESP8266 can calculate about 15k LEDs per second (that means 250LEDs @~60fps, 500 LEDs @~30fps, 1000 LEDs @~15fps)
34 | - The LED settings will give you a bar that shows how much memory you can allocate.
35 |
36 | ### ESP32
37 |
38 | - There is a maximum of 10 strips supported on "classic" ESP32 (dual core) boards. In audioreactive builds, you can use up to 9, because the audio input driver needs one of the hardware units that is normally available for driving LEDs.
39 | - * "classic" ESP32: 10 led strips (9 with audioreactive)
40 | - * ESP32-S3: 4 led strips
41 | - * ESP32-S2: 5 led strips (4 with audioreactive)
42 | - * ESP32-C3: 2 led strips
43 | - Contrary to the ESP8266, the pin usage does not matter on ESP32, feel free to use any available pin
44 | - For perfect performance, it is recommeded to use 512 LEDs/pin with 4 outputs for a total of 2048 LEDs.
45 | - For very good performance, it is recommended to use 800 LEDs/pin with 4 outputs for a total of 3200 LEDs.
46 | - For good performance, you can use 1000 LEDs/pin with 4 outputs for a total of 4000 LEDs.
47 | - For okay performance, you can use 1000 LEDs/pin with 5 outputs for a total of 5000 LEDs.
48 | - For okay performance, you can use 800 LEDs/pin with 6 outputs for a total of 4800 LEDs.
49 | - ESP32 can calculate about 65k-85k LEDs per second (that means 1000 LEDs @~70fps, 2000 LEDs @~35fps, 4000 LEDs @~18fps)
50 | - 4 outputs seem to be the sweet spot.
51 |
52 | ### Virtual LEDs (DDP)
53 |
54 | See [Virtual Leds](/advanced/ddp)
55 |
--------------------------------------------------------------------------------
/docs/advanced/custom-ap.md:
--------------------------------------------------------------------------------
1 | ---
2 | title: Custom Access Point SSID and Password
3 | hide:
4 | # - navigation
5 | # - toc
6 | ---
7 |
8 | !!! warning
9 | _Note: These options change the documented access point name and password. The WLED community does not recommend changing these settings unless you are familiar with the risks._
10 |
11 | Three compile time defines are available to modify the access point name. These are `WLED_AP_SSID`, `WLED_AP_PASS`, and `WLED_AP_SSID_UNIQUE`. Defining `WLED_AP_SSID` will set the SSID to the value of the define. Defining `WLED_AP_PASS` will set the password to the value of the define. Defining `WLED_AP_SSID_UNIQUE` will append the last 6 digits of the MAC address to the SSID.
12 |
13 | `WLED_AP_SSID` and `WLED_AP_PASS` are string values, and as such need to be defined with `"` surrounding them. For example, `#define WLED_AP_SSID "MyWLED"` or `-D WLED_AP_SSID='"MyWLED"'` in the `build_flags` of `platformio.ini`.
14 |
15 | ### Modifying the Access Point SSID
16 | Defining `WLED_AP_SSID` will set the SSID to the value of the define. This is useful to set a device specific access point name. For example, if you have multiple WLED devices, you can set the SSID to the device name.
17 |
18 | `WLED_AP_SSID` is a string value, and as such needs to be defined with `"` surrounding it. For example, `#define WLED_AP_SSID "MyWLED"` or `-D WLED_AP_SSID='"MyWLED"'` in the `build_flags` of `platformio.ini`.
19 |
20 | ### Modifying the Access Point Password
21 | Defining `WLED_AP_PASS` will set the password to the value of the define. This is useful to set a device specific access point password. For example, if you have multiple WLED devices, you can set the password to the device name.
22 |
23 | !!! tip
24 | If `WLED_AP_PASS` is defined, but `WLED_AP_SSID` is not, the compilation will fail. Ensure you define both `WLED_AP_SSID` and `WLED_AP_PASS` if you wish to change the access point password. Please also change the SSID if you wish to set a custom password.
25 |
26 | `WLED_AP_PASS` is a string value, and as such needs to be defined with `"` surrounding it. For example, `#define WLED_AP_PASS "MyWLEDPass"` or `-D WLED_AP_PASS='"MyWLEDPass"'` in the `build_flags` of `platformio.ini`.
27 |
28 | ### Modifying the Access Point SSID to be Unique
29 | Defining `WLED_AP_SSID_UNIQUE` will append the last 6 digits of the MAC address to the SSID. This is useful to set a device specific access point name with a common prefix. For example, if you have multiple WLED devices, you can set the SSID to `ChristmasTree-` followed by the last 6 digits of the MAC address.
30 |
31 | `WLED_AP_SSID_UNIQUE` is a boolean value, and as such only needs to be defined or not. For example, `#define WLED_AP_SSID_UNIQUE` or `-D WLED_AP_SSID_UNIQUE` in the `build_flags` of `platformio.ini`.
32 |
33 | ### Example
34 |
35 | For custom devices in `platformio_override.ini`:
36 |
37 | ```ini
38 | [env:mywled]
39 | board = esp32dev
40 | platform = ${esp32.platform}
41 | platform_packages = ${esp32.platform_packages}
42 | build_unflags = ${common.build_unflags}
43 | build_flags =
44 | ${common.build_flags_esp32}
45 | -D WLED_AP_SSID_UNIQUE
46 | -D WLED_AP_SSID='"MyWLED"'
47 | -D WLED_AP_PASS='"MyWLEDPass"'
48 | lib_deps = ${esp32.lib_deps}
49 | monitor_filters = esp32_exception_decoder
50 | board_build.partitions = ${esp32.default_partitions}
51 | ```
52 |
53 | In `my_config.h`:
54 |
55 | ```cpp
56 | #define WLED_AP_SSID_UNIQUE
57 | #define WLED_AP_SSID "MyWLED"
58 | #define WLED_AP_PASS "MyWLEDPass"
59 | ```
60 |
--------------------------------------------------------------------------------
/docs/interfaces/json-ir/24-key_ir.json:
--------------------------------------------------------------------------------
1 | {
2 | "remote": "24-key",
3 | "0xF700FF": {
4 | "label": "Bright+",
5 | "pos": "1x1",
6 | "cmd": "!incBrightness"
7 | },
8 | "0xF7807F": {
9 | "label": "Bright-",
10 | "pos": "1x2",
11 | "cmd": "!decBrightness"
12 | },
13 | "0xF740BF": {
14 | "label": "Off",
15 | "pos": "1x3",
16 | "cmd": "T=0"
17 | },
18 | "0xF7C03F": {
19 | "label": "On",
20 | "pos": "1x4",
21 | "cmd": "T=1"
22 | },
23 | "0xF720DF": {
24 | "label": "Red",
25 | "pos": "2x1",
26 | "cmnt": "Lava",
27 | "cmd": "FP=8&CL=hFF0000&C2=hFF7F00&C3=hCC3D60"
28 | },
29 | "0xF7A05F": {
30 | "label": "Green",
31 | "pos": "2x2",
32 | "cmnt": "Forest",
33 | "cmd": "FP=10&CL=h8000&C2=h8040&C3=h30661E"
34 | },
35 | "0xF7609F": {
36 | "label": "Blue",
37 | "pos": "2x3",
38 | "cmnt": "Breeze",
39 | "cmd": "FP=15&CL=hFF&C2=h7F00FF&C3=h3D60CC"
40 | },
41 | "0xF7E01F": {
42 | "label": "White",
43 | "pos": "2x4",
44 | "cmd": "FP=5&CL=hFFFFFF&C2=hFFFFFF&C3=hCCCCCC"
45 | },
46 | "0xF710EF": {
47 | "label": "Tomato",
48 | "pos": "3x1",
49 | "cmnt": "Yelmag",
50 | "cmd": "FP=5&CL=hFF6347&C2=hFFBF47&C3=hCC646F"
51 | },
52 | "0xF7906F": {
53 | "label": "LightGreen",
54 | "pos": "3x2",
55 | "cmnt": "Rivendale",
56 | "cmd": "FP=14&CL=h90EE90&C2=h90EEBF&C3=h96BE89"
57 | },
58 | "0xF750AF": {
59 | "label": "SkyBlue",
60 | "pos": "3x3",
61 | "cmnt": "Ocean",
62 | "cmd": "FP=9&CL=h87CEEB&C2=h879CEB&C3=h84B9BC"
63 | },
64 | "0xF7D02F": {
65 | "label": "Flash",
66 | "pos": "3x4",
67 | "cmnt": "Preset 1",
68 | "cmd": "PL=1"
69 | },
70 | "0xF730CF": {
71 | "label": "OrangeRed",
72 | "pos": "4x1",
73 | "cmnt": "Sakura",
74 | "cmd": "FP=49&CL=hFF4500&C2=hFFC400&C3=hCC403D"
75 | },
76 | "0xF7B04F": {
77 | "label": "Cyan",
78 | "pos": "4x2",
79 | "cmnt": "Beech",
80 | "cmd": "FP=22&CL=hFFFF&C2=h7FFF&C3=h3DCCA8"
81 | },
82 | "0xF7708F": {
83 | "label": "RebeccaPurple",
84 | "pos": "4x3",
85 | "cmd": "FP=5&CL=h663399&C2=h993399&C3=h4F417A"
86 | },
87 | "0xF7F00F": {
88 | "label": "Strobe",
89 | "pos": "4x4",
90 | "cmnt": "Preset 2",
91 | "cmd": "PL=2"
92 | },
93 | "0xF708F7": {
94 | "label": "Orange",
95 | "pos": "5x1",
96 | "cmnt": "Orangery",
97 | "cmd": "FP=47&CL=hFFA500&C2=hD9FF00&C3=hCC753D"
98 | },
99 | "0xF78877": {
100 | "label": "Turquoise",
101 | "pos": "5x2",
102 | "cmd": "FP=5&CL=h40E0D0&C2=h40A0E0&C3=h59B393"
103 | },
104 | "0xF748B7": {
105 | "label": "Purple",
106 | "pos": "5x3",
107 | "cmd": "FP=5&CL=h800080&C2=h800040&C3=h541E66"
108 | },
109 | "0xF7C837": {
110 | "label": "Fade",
111 | "pos": "5x4",
112 | "cmnt": "Preset 3",
113 | "cmd": "PL=3"
114 | },
115 | "0xF728D7": {
116 | "label": "Yellow",
117 | "pos": "6x1",
118 | "cmd": "FP=5&CL=hFFFF00&C2=hFFC800&C3=hFDFFDE"
119 | },
120 | "0xF7A857": {
121 | "label": "DarkCyan",
122 | "pos": "6x2",
123 | "cmd": "FP=5&CL=h8B8B&C2=h458B&C3=h216F5B"
124 | },
125 | "0xF76897": {
126 | "label": "Plum",
127 | "pos": "6x3",
128 | "cmnt": "Magenta",
129 | "cmd": "FP=40&CL=hDDA0DD&C2=hDDA0BE&C3=hA88EB0"
130 | },
131 | "0xF7E817": {
132 | "label": "Smooth",
133 | "pos": "6x4",
134 | "cmnt": "Preset 4",
135 | "cmd": "PL=4"
136 | }
137 | }
--------------------------------------------------------------------------------
/docs/interfaces/json-ir/24-key-v2_ir.json:
--------------------------------------------------------------------------------
1 | {
2 | "remote": "24-key-v2",
3 | "0xF700FF": {
4 | "label": "Bright+",
5 | "pos": "1x1",
6 | "cmd": "!incBrightness"
7 | },
8 | "0xF7807F": {
9 | "label": "Bright-",
10 | "pos": "1x2",
11 | "cmd": "!decBrightness"
12 | },
13 | "0xF740BF": {
14 | "label": "Off",
15 | "pos": "1x3",
16 | "cmd": "T=0"
17 | },
18 | "0xF7C03F": {
19 | "label": "On",
20 | "pos": "1x4",
21 | "cmd": "T=1"
22 | },
23 | "0xF720DF": {
24 | "label": "Red",
25 | "pos": "2x1",
26 | "cmnt": "Lava",
27 | "cmd": "FP=8&CL=hFF0000&C2=hFF7F00&C3=hCC3D60"
28 | },
29 | "0xF7A05F": {
30 | "label": "Green",
31 | "pos": "2x2",
32 | "cmnt": "Forest",
33 | "cmd": "FP=10&CL=h8000&C2=h8040&C3=h30661E"
34 | },
35 | "0xF7609F": {
36 | "label": "Blue",
37 | "pos": "2x3",
38 | "cmnt": "Breeze",
39 | "cmd": "FP=15&CL=hFF&C2=h7F00FF&C3=h3D60CC"
40 | },
41 | "0xF7E01F": {
42 | "label": "White",
43 | "pos": "2x4",
44 | "cmd": "FP=5&CL=hFFFFFF&C2=hFFFFFF&C3=hCCCCCC"
45 | },
46 | "0xF710EF": {
47 | "label": "Tomato",
48 | "pos": "3x1",
49 | "cmnt": "Yelmag",
50 | "cmd": "FP=5&CL=hFF6347&C2=hFFBF47&C3=hCC646F"
51 | },
52 | "0xF7906F": {
53 | "label": "LightGreen",
54 | "pos": "3x2",
55 | "cmnt": "Rivendale",
56 | "cmd": "FP=14&CL=h90EE90&C2=h90EEBF&C3=h96BE89"
57 | },
58 | "0xF750AF": {
59 | "label": "SkyBlue",
60 | "pos": "3x3",
61 | "cmnt": "Ocean",
62 | "cmd": "FP=9&CL=h87CEEB&C2=h879CEB&C3=h84B9BC"
63 | },
64 | "0xF7D02F": {
65 | "label": "Flash",
66 | "pos": "3x4",
67 | "cmnt": "Cycle effects",
68 | "cmd": "FX=~"
69 | },
70 | "0xF730CF": {
71 | "label": "OrangeRed",
72 | "pos": "4x1",
73 | "cmnt": "Sakura",
74 | "cmd": "FP=49&CL=hFF4500&C2=hFFC400&C3=hCC403D"
75 | },
76 | "0xF7B04F": {
77 | "label": "Cyan",
78 | "pos": "4x2",
79 | "cmnt": "Beech",
80 | "cmd": "FP=22&CL=hFFFF&C2=h7FFF&C3=h3DCCA8"
81 | },
82 | "0xF7708F": {
83 | "label": "RebeccaPurple",
84 | "pos": "4x3",
85 | "cmd": "FP=5&CL=h663399&C2=h993399&C3=h4F417A"
86 | },
87 | "0xF7F00F": {
88 | "label": "Strobe",
89 | "pos": "4x4",
90 | "cmnt": "Cycle palette",
91 | "cmd": "FP=~"
92 | },
93 | "0xF708F7": {
94 | "label": "Orange",
95 | "pos": "5x1",
96 | "cmnt": "Orangery",
97 | "cmd": "FP=47&CL=hFFA500&C2=hD9FF00&C3=hCC753D"
98 | },
99 | "0xF78877": {
100 | "label": "Turquoise",
101 | "pos": "5x2",
102 | "cmd": "FP=5&CL=h40E0D0&C2=h40A0E0&C3=h59B393"
103 | },
104 | "0xF748B7": {
105 | "label": "Purple",
106 | "pos": "5x3",
107 | "cmd": "FP=5&CL=h800080&C2=h800040&C3=h541E66"
108 | },
109 | "0xF7C837": {
110 | "label": "Fade",
111 | "pos": "5x4",
112 | "cmnt": "Speed +",
113 | "cmd": "SX=~16"
114 | },
115 | "0xF728D7": {
116 | "label": "Yellow",
117 | "pos": "6x1",
118 | "cmd": "FP=5&CL=hFFFF00&C2=hFFC800&C3=hFDFFDE"
119 | },
120 | "0xF7A857": {
121 | "label": "DarkCyan",
122 | "pos": "6x2",
123 | "cmd": "FP=5&CL=h8B8B&C2=h458B&C3=h216F5B"
124 | },
125 | "0xF76897": {
126 | "label": "Plum",
127 | "pos": "6x3",
128 | "cmnt": "Magenta",
129 | "cmd": "FP=40&CL=hDDA0DD&C2=hDDA0BE&C3=hA88EB0"
130 | },
131 | "0xF7E817": {
132 | "label": "Smooth",
133 | "pos": "6x4",
134 | "cmnt": "Speed -",
135 | "cmd": "SX=~-16"
136 | }
137 | }
--------------------------------------------------------------------------------
/docs/interfaces/serial.md:
--------------------------------------------------------------------------------
1 | ---
2 | title: Serial
3 | hide:
4 | # - navigation
5 | # - toc
6 | ---
7 |
8 | WLED 0.13.0 supports multiple protocols over Serial.
9 | Serial is available via USB, and on most boards, GPIO1 for TX and GPIO3 for RX.
10 |
11 | !!! info "Pin usage limitation"
12 | If GPIO3 is allocated (e.g. for LED output), all Serial functionality except debug output is unavailable.
13 | If GPIO1 is allocated, all Serial output is disabled, including the JSON API response, Improv, and tpm2 output.
14 |
15 | ### Adalight and tpm2
16 |
17 | Both these protocols are supported and can be used to stream realtime LED data to WLED for direct display, e.g. from an bias lighting program. For tpm2, only data packets are supported and data in 24-bit RGB format is expected.
18 | If you want to drive a large amount of LEDs, you may need to increase the Baud rate in WLED Sync settings, as the default baud rate of `115200` is only sufficient for about 50-100 LEDs depending on the refresh rate.
19 | Adalight is supported since WLED 0.6.3, tpm2 since version 0.10.2.
20 |
21 | ### JSON over Serial
22 |
23 | You can send commands to the WLED instance via Serial using the [JSON API](/interfaces/json-api).
24 | To request a JSON response containing the `state` and `info` objects, send `{"v":true}`.
25 |
26 | ### Improv
27 |
28 | Improv Serial is supported and can be used to check the installed software version as well as connect your device to WiFi without needing to connect to the WLED access point.
29 | Improv is used by the [WLED web installer](https://install.wled.me) for an easy installation and setup process.
30 | Note that the baud rate must remain at the default `115200` setting for the device to be detected as Improv-capable.
31 |
32 | ### Other
33 |
34 | #### Version query
35 |
36 | Send a lowercase `'v'` character (byte `0x76`) to obtain the ID of the installed WLED version.
37 |
38 | #### LED data query
39 |
40 | To get the colors currently displayed by LEDs:
41 |
42 | - Send an uppercase `'L'` (byte `0x4C`) to request the current LED data as a [tpm2](https://gist.github.com/jblang/89e24e2655be6c463c56) data packet in 24-bit RGB format.
43 |
44 | - Send a lowercase `'l'` (byte `0x6C`) to request the current LED data in JSON format. This returns the LED colors as 32-bit integers, of which the lowest byte is the Blue value, then Green, then Red, and the highest byte is the White channel value.
45 |
46 | For both of these methods, you may need to increase the baud rate if you have a large amount of LEDs.
47 | However, tpm2 requires on average 2-4x less bandwidth than JSON, and should therefore be preferred if your application can parse binary data.
48 |
49 | #### Changing Baud Rate
50 |
51 | There are 2 main method for changing Baud Rate for the serial connection
52 | - Persistant: Configure in App under [Sync Interfaces](/features/settings/#sync-settings). This setting will persist, and WLED will use specified Baud Rate from this point forward.
53 | - Temporary: Utilizing the serial connection at the existing Baud Rate, send the specific command byte to have WLED temporarily change to new Baud Rate. This Baud Rate is temporary and will be reset to default or peristant setting on reboot.
54 |
55 | Byte | Baud Rate
56 | --- | ---
57 | `0xB0` | 115200
58 | `0xB1` | 230400
59 | `0xB2` | 460800
60 | `0xB3` | 500000
61 | `0xB4` | 576000
62 | `0xB5` | 921600
63 | `0xB6` | 1000000
64 | `0xB7` | 1500000
65 | - *Note:* Keep at 115200 to use Improv. Some boards may not support high rates.
66 |
67 |
68 |
69 |
70 | #### Debugging
71 |
72 | Compile with the `-D WLED_DEBUG` build flag to enable serial debugging using `DEBUG_PRINTLN(x)` macros.
73 | This will reserve pin GPIO1, therefore it cannot be used for other purposes when debugging.
74 |
--------------------------------------------------------------------------------
/README.md:
--------------------------------------------------------------------------------
1 | # knoWLEDge
2 |
3 | The official documentation page for the WLED project!
4 | [To live page](https://kno.wled.ge)
5 |
6 | Community improvements are encouraged! Just click the little pencil mark on the page you'd like to change and submit a pull request.
7 | If you'd like to do more advanced changes (e.g. adding a page), the [Material for MkDocs documentation](https://squidfunk.github.io/mkdocs-material/getting-started/) is very helpful.
8 |
9 | ### Images
10 |
11 | If possible, it is preferable to store image content within this repository at `/docs/assets/images/content`. With external links, there is always a chance that the resource is deleted accidentally by the external hoster.
12 |
13 | ### How to add a new page
14 |
15 | Let’s consider an example. Let’s imagine we want to add a page called `Top 5 mistakes` in section `Basics` after the `Getting Started` page. This page already exists, so you can already see the results in WLED Docs, but let’s imagine the page is not there and we will go steps needed to add it:
16 |
17 | 1) Create a file that should contain the documentation. As we want to place the new page in section `Basics` it makes sense to put this file in subfolder `docs/basics/`. In our example we call the file `top5_mistakes.md`. You can use another .md file as an example. Important is to have the following few lines at the beginning of the file:
18 | ```
19 | ---
20 | title: TOP 5 mistakes
21 | hide:
22 | # - navigation
23 | # - toc
24 | ---
25 | ```
26 | Don’t forget to adapt the title.
27 |
28 | 2) Edit `mkdocs.yml` file. Take care that indentations play an important role in .yml files. Go to `nav:` section in this file and add a new line after the line `- Getting Started: basics/getting-started.md` as we want to add a new page after the `Getting Started` page. The new line must have the same indentation as the previous line and the content is `- Top 5 mistakes: basics/top5_mistakes.md`. By this we say that the new page must be called `Top 5 mistakes` and its content is in the file `top5_mistakes.md` we created before in subfolder `basics`.
29 | That is!
30 |
31 | ### How to add a new section
32 |
33 | It is even easier. Take a look at `nav:` section in `mkdoks.yml` file. To add a new section you just have to add a new line at a position where the new section must be. Then write a section name like this: `- Compatibility:`. TAKE CARE on indentations! After this line you can then add new pages as described above.
34 |
35 | ### How to test the representation of the documentation in web locally (on Windows, MAC OS X or Linux)
36 |
37 | You would need to install some tools:
38 |
39 | 1) WEB Server. The probably easiest way is to use [XAMPP](https://www.apachefriends.org/index.html) to run local WEB server on your PC/Laptop. After installing you would need to start XAMPP Control Panel and run Apache Server. In the folder where XAMPP is installed to you will find a subfolder called `htdocs`. This is the content of the WEB Server and you have to put WLED Docs web pages there, for example in subfolder called `wled-docs`. Later, after generating pages using mkdocs, you will be able to access them via `http://localhost/wled-docs/site/`
40 | 2) [Python](https://www.python.org/)
41 | 3) [MkDocs](https://www.mkdocs.org/user-guide/installation/#mkdocs-installation)
42 |
43 | Now you can downlaod WLED Docs sources from the repository to subfolder `wled-docs` in the folder `htdocs` in your XAMPP installation (or if you have git installed you can use git command to clone like `git clone --branch main https://github.com/Aircoookie/WLED-Docs`). To "compile" the resulting web pages you have to run `mkdocs build` command in the `wled-docs` folder using command line. It generates subfolder 'site' with the resulting web pages and you can access them in your browser via `http://localhost/wled-docs/site/`
44 |
--------------------------------------------------------------------------------
/docs/features/ethernet-lan.md:
--------------------------------------------------------------------------------
1 | ---
2 | title: Ethernet (LAN) compatibility
3 | hide:
4 | # - navigation
5 | # - toc
6 | ---
7 |
8 | ## Introduction
9 |
10 | WLED controllers are usually integrated into local network wirelessly (via WiFi). But there is also possibility to integrate WLED Controller into your network via Ethernet (LAN). Currently only ESP32 based controllers support Ethernet (classic, NOT new types like -S2, -C3, -S3 etc.).
11 |
12 | ## Preconditions and important notes
13 | - ESP32 based controller with integrated Ethernet or with Ethernet adapter is required.
14 | - The controller / adapter type must be supported by WLED. The list of supported controllers / adapters can be found below.
15 | - WLED Software must be compiled with Ethernet support included. Web-based WLED installer have special option for this. Be sure you use right WLED version with Ethernet support.
16 | - Ethernet requires many GPIOs (see table below). You cannot use them for other purposes at the same time.
17 | - If you switch from WiFi to Ethernet and you use dynamic (not static) IP addresses via DHCP (that is true in most cases), your WiFi/LAN Router will most likely grant new IP address to the WLED Controller. If you don’t delete WiFi credentials, your Controller will be accessible via WiFi and Ethernet at the same time by two different IP addresses.
18 | - Ethernet standard requires that the ethernet lines including shield are isolated form the electronics and for EMC reason ceramic capacitor (rated for 2 kV) is connected between Ethernet shield and electronics ground. Unfortunately, many simple/cheap ethernet adapters do not fulfill these requirements. Be careful using them.
19 | - Most of Ethernet based controllers/ adapters are based on LAN87xx IC. It requires proper reset line. Unfortunately, some simple/cheap adapters do not implement this line correctly that might lead to instabilities especially during boot up.
20 | - If you connect Ethernet adapter via wires, keep them as short as possible. The communication between ESP32 controller and the adapter is on high speed of 50 MHz that requires proper connection to avoid instabilities.
21 |
22 | ## Ethernet setup
23 | Go to "Config" and then to "WiFi Setup". At the bottom of this page select the Ethernet type you use. Then click on "Save & Connect". Ready!
24 | 
25 |
26 | ## Ethernet controllers and adapters supported by WLED (as of November 2023)
27 | Note: all controllers use GPIOs 19, 21, 22, 25, 26, 27 as they are required for ethernet and can not be changed. GPIOs additionally used are given in the table.
28 |
29 | | Name | Features | additional GPIOs used |
30 | |---|---|---|
31 | [ABC! WLED V43 & compatible](https://shop.myhome-control.de/Ethernet-Adapter-fuer-WLED-Controller/HW10016) | Isolated shield in accordance with IEEE 802.3 standard; LAN8720 based with proper reset line; adapter developed as Plug& Play solution for [ABC! WLED Controller V43](https://shop.myhome-control.de/ABC-WLED-Controller-Board-5-24V/HW10015) but also might be used with other ESP32 boards | 5, 17, 23, 33
32 | [ESP32-POE](https://github.com/OLIMEX/ESP32-POE/) | General purpose controller with integrated Ethernet | 12, 17, 18, 23
33 | ESP32Deux | | 17, 18, 23
34 | [KIT-VE](https://docs.espressif.com/projects/esp-idf/en/latest/esp32/hw-reference/esp32/get-started-ethernet-kit.html) | Board from Espressif (ESP microcontroller manufacture company) | 0, 5, 18, 23
35 | [QuinLED-Dig-Octa](https://quinled.info/quinled-dig-octa/) & [T-ETH-POE](https://www.lilygo.cc/products/t-internet-poe) | | 17, 18, 23
36 | [QuinLED-ESP32](https://quinled.info/quinled-esp32-ethernet/) | | 5, 17, 18, 23
37 | [Serg74-ETH32](https://github.com/srg74/ESP32_ethernet) | | 5, 17, 18, 23
38 | [TwilightLord-ESP32](https://www.hackster.io/news/twilightlord-s-esp32-dev-board-aims-to-improve-on-the-wemos-d1-mini-esp32-and-its-various-clones-3bf449c30d1e) | | 5, 17, 18, 23
39 | [WESP32](https://wesp32.com/) | | 0, 16, 17
40 | [WT32-ETH01](https://www.seeedstudio.com/Ethernet-module-based-on-ESP32-series-WT32-ETH01-p-4736.html) | | 0, 16, 18, 23
41 |
42 |
43 |
44 |
--------------------------------------------------------------------------------
/docs/features/relay-control.md:
--------------------------------------------------------------------------------
1 | ---
2 | title: Control a Relay
3 | hide:
4 | # - navigation
5 | # - toc
6 | ---
7 |
8 | Digital LED strips still use power when seemingly switched off, about 1W per 200 LEDs. In case you want to prevent that, you can completely cut power to the LEDs by adding a relay to your circuit. It is toggled by WLED when WLED is turned on/off (in the UI, or through other interfaces).
9 | No pin is allocated for a relay by default, but can be easily set in the LED preferences page.
10 | Previously, GPIO12 (Pin D6 on many devices) was set as the default and is confirmed to work well on most boards except the ESP32-C3.
11 |
12 | When you decide that you want WLED to control a relay, make sure you buy a suitable relay board. Check what voltage you can supply from your controller to relay (available 3.3V or 5V pin or different voltage from external power source), and make sure the relay can be controlled by voltage level your board is providing (3.3V CMOS, 5V TTL). Note, some relays come with a jumper that lets you configure whether the relay switches at high or low level of signal, giving you maximum flexibility.
13 |
14 | [This page](https://www.geekering.com/?p=187) gives a clear description using a light bulb instead of a LED strip. And instead of the D1 mentioned there, with WLED, you use the pin you set.
15 |
16 | The default WLED behavior is to turn the relay pin on (high) when the LEDs are on and off (low) when the LEDs are off. This can be changed in the LED Preferences page. Many relays are powered when the signal is LOW. See [this thread](https://github.com/Aircoookie/WLED/issues/631#issuecomment-605512524).
17 |
18 | Sometimes people ask whether they can control more than one relay through WLED, including controlling this all via Alexa. Controlling an extra relay separately from the RGB lights is not something WLED is designed to do, however you can modify the code to add that functionality. For that, make sure you can compile WLED from source unmodified first. Then, change #define ESPALEXA_MAXDEVICES 1 in line 71 of the wled.h file to 2. After that, just follow the API documentation on https://github.com/Aircoookie/Espalexa to add a new EspalexaDevice to the alexa.cpp file
19 |
20 | Second option for controlling multiple relays is using a Multi Relay usermod. As with Alexa you will need to compile WLED from source an include Multi Relay usermod either by including `-D USERMOD_MULTI_RELAY` in PlatformIO.ini or adding `#define USERMOD_MULTI_RELAY` in `wled.h` or `my_config.h`. You can also override default number of relays by defining `MULTI_RELAY_MAX_RELAYS`. Configuring usermod is done using Usermod settings page where you can define GPIO pins used, wether relay activates on HIGH or LOW logic, if the activation has any delay and if the relay can be controlled from the outside using MQTT message (external).
21 | MQTT topic for controlling relays is `wled/[device]/relay/[relay_id]/command` and accepts `on`, `off` and `toggle` messages. When the relay changes state a message with `on` or `off` is sent with the topic `wled/[device]/relay/[relay_id]`.
22 |
23 | How To: Use WLED to switch external relay with PIR sensor without affecting WLED state
24 |
25 | If you do not want PIR (motion) sensor attached to WLED controller to trigger change of WLED state, but still want to control a legacy light, fan, etc. use the Multi Relay usermod and another relay attached to WLED controller. Create two presets for relay control (shown for switching relay off) and set up PIR and multi relay usermods as shown.
26 |
27 | 
28 |
29 | If you do not want button relay control just leave relay button at -1, the same goes for PIR sensor parameters (leave nighttime-only and/or off-only unchecked). Adjust preset numbers and GPIO pins to your liking. Multi relay usermod can also switch relay using MQTT messages or HTTP requests (check source code for available commands). Of course if you configured MQTT on your WLED device PIR sensor usermod will publish /motion topic to MQTT broker for your HA integration.
30 |
31 | 
32 |
33 | 
34 |
--------------------------------------------------------------------------------
/docs/features/pixel-art-converter.md:
--------------------------------------------------------------------------------
1 | ---
2 | title: Pixel Art Converter
3 | hide:
4 | # - navigation
5 | # - toc
6 | ---
7 |
8 | The Pixel Art Converter tool aims to make it easier to show pixel art on a LED matrix panel, by converting any image to 2D pixel art and sending it to the WLED device. The file types PNG, JPG, WEBP and GIF have been tested to work with the tool.
9 |
10 | ## Installation Approaches
11 |
12 | There are three ways to install the pixel art converter:
13 |
14 | 1. Local web browser. Will a web page run on the local machine connecting to the WLED device but will require fetching an extra file. Supported from WLED release [v0.14.0-b1](https://github.com/Aircoookie/WLED/blob/main/CHANGELOG.md#wled-release-0140-b1) or later
15 | 2. Include the pixel art converter in the binary and compile it from the source code. Allows access to the pixel art converter on any device that has a connection to the WLED device. Supported from WLED release [v0.14.0-b2](https://github.com/Aircoookie/WLED/blob/main/CHANGELOG.md#build-2301240) (PR [#3042](https://github.com/Aircoookie/WLED/pull/3042))
16 | 3. WLED editor mode. Upload the web page to your WLED device while it is running
17 |
18 | ### Approach 1: Local Browser
19 |
20 | 1. Download the `pixartmin.htm` from the [WLED-PixelArtConverter](https://github.com/werkstrom/WLED-PixelArtConverter/) repository
21 | 2. Open `pixartmin.htm` in a browser
22 | 3. Head over to the [Setup 2D Matrix](#setup-2d-matrix) point
23 |
24 |
25 |
26 | ### Approach 2: Include Pixart Converter In Build Files
27 | !!! warning "Compilation required"
28 | Compiling WLED from the source code is required. Follow the instructions on [compiling WLED](../../advanced/compiling-wled) to do this.
29 |
30 | 1. Follow the instructions under [Making a custom environment](../../advanced/compiling-wled/#making-a-custom-environment) and set the flag `-D WLED_ENABLE_PIXART` under the line that starts with `build_flags =` in `platformio_override.ini`
31 | 2. Compile and flash the binary to the ESP board
32 | 3. Power on board and connect via WiFi using the [default login](../../basics/getting-started/)
33 | 4. It is now time to [Setup the 2D Matrix](#setup-2d-matrix)
34 |
35 | ### Approach 3: WLED Editor Mode
36 |
37 | !!! note "Network connection"
38 | A network connection is required to connect to the CDN, hosting the JS library [Ace](https://github.com/ajaxorg/ace), an embedded code editor.
39 |
40 | 1. Download the `pixartmin.html` file from the [WLED-PixelArtConverter](https://github.com/werkstrom/WLED-PixelArtConverter/) repository
41 | 2. Go to the URL `http://[device_ip_address]/edit`
42 | 3. Upload the `pixartmin.html` file using the UI
43 | 4. Go to `http://[device_ip_address]/pixartmin.html`
44 | 5. Now head to the [Setup 2D Matrix](#setup-2d-matrix) point
45 |
46 | ## Setup 2D Matrix
47 | 2D LED panels are natively supported by WLED but need some configuration for the software to show the 2D grid correctly.
48 |
49 | 1. Head into the `2D Configuration` settings menu in WLED
50 | 2. Set the option "Strip or panel" to `2D Matrix`
51 | 3. Setup rest of the LED panel layout according to the specifics of your LED panel
52 |
53 | !!! tip "Serpentine option"
54 | Setting the serpentine LED panel option incorrectly can lead to very confusing results that look almost correct but not quite. Enabling or Disabling the option depends on the characteristics of the 2D matrix
55 |
56 | ## Usage
57 | The Pixel Art Generator does not yet have a link in the WLED front-end, therefore head over to the web page: `http://[device_ip_address]/pixart.htm` (default DHCP IP-address [link](http://4.3.2.1/pixart.htm)).
58 |
59 | On the web page:
60 |
61 | 1. Set the option "LED setup" to 2D matrix or serpentine accordingly.
62 | 2. Select an image that should be shown on the matrix display
63 |
64 | 
65 |
66 | This example uses a 16x16 pixel, happy version of the WLED mascot Akemi by [Aircoookie](https://github.com/Aircoookie/Akemi).
67 |
68 | 3. A preview is displayed further down the web page.
69 |
70 | !!! tip "Scaling option"
71 | It can help to use the `Scale image` option, depending on the image size used.
72 |
73 | 
74 |
75 | 4. Click on "Send to device" to push the generated image to the WLED device.
--------------------------------------------------------------------------------
/docs/interfaces/udp-realtime.md:
--------------------------------------------------------------------------------
1 | ---
2 | title: UDP Realtime / tpm2.net
3 | hide:
4 | # - navigation
5 | # - toc
6 | ---
7 |
8 | ### Hyperion
9 |
10 | You can now use WLED with the popular Ambilight software Hyperion.
11 | Just configure Hyperion to use an UDP device with protocol 0 on port 19446!
12 | The maximum number of LEDs supported in this mode is 490. (WLED 0.8.0 and lower: 341)
13 |
14 | ### Prismatik
15 |
16 | [Prismatik](https://github.com/psieg/Lightpack) is another Ambilight option.
17 | Select one of the UDP options in the device configuration wizard.
18 |
19 | ### TPM2.NET
20 |
21 | Supported in latest master and will be available in WLED 0.10.1.
22 | Please set the WLED broadcast UDP port to 65506 in Sync settings to enable receiving TPM2.NET data.
23 |
24 | ### UDP Realtime
25 |
26 | Additionally, WLED offers a way to directly drive the connected LEDs via UDP. The protocol is referred to as WLED [Audio-Reactive-Led-Strip](https://github.com/scottlawsonbc/audio-reactive-led-strip) (WARLS), since the support of that project was its primary goal. However, it can also be used for other realtime applications like an ambilight.
27 |
28 | WARLS uses the same UDP port the notifier uses (default 21324, can be changed in settings).
29 | At the moment, the web UI will be disabled while active, the HTTP API, Alexa and button control remains functional.
30 | It uses the current brightness and gamma correction settings.
31 |
32 | Byte 0 of the UDP packet tells the server which realtime protocol to use.
33 |
34 | Value | Description | Max. LEDs
35 | --- | --- | ---
36 | 1 | WARLS | 255
37 | 2 | DRGB | 490
38 | 3 | DRGBW | 367
39 | 4 | DNRGB | 489/packet
40 | 0 | WLED Notifier | -
41 |
42 | In every protocol, Byte 1 tells the server how many seconds to wait after the last received packet before returning to normal mode, in practice you should use 1-2 (seconds) here in most cases so that the module returns to normal mode quickly after the end of transmission. Use 255 to stay on the UDP data without a timeout until a request is requested via another method.
43 |
44 | After this the LED color information is transmitted like this:
45 |
46 | WARLS
47 |
48 | Byte | Description
49 | --- | ---
50 | 2 + n*4 | LED Index
51 | 3 + n*4 | Red Value
52 | 4 + n*4 | Green Value
53 | 5 + n*4 | Blue Value
54 |
55 | DRGB:
56 | This mode has the difference that the LED indices are not part of the packet, instead every LED is updated. This leads to a higher speed when all LEDs are changed, but a drastically lower speed if only one LED is updated per packet.
57 |
58 | Byte | Description
59 | --- | ---
60 | 2 + n*3 | Red Value
61 | 3 + n*3 | Green Value
62 | 4 + n*3 | Blue Value
63 |
64 | DRGBW:
65 | Like DRGB, but supports the White value for RGBW strips.
66 |
67 | Byte | Description
68 | --- | ---
69 | 2 + n*4 | Red Value
70 | 3 + n*4 | Green Value
71 | 4 + n*4 | Blue Value
72 | 5 + n*4 | White Value
73 |
74 | DNRGB:
75 | DRGB, but with 2 additional bytes that signify the starting LED index.
76 | This allows for more than 490 LEDs in realtime mode by sending multiple packets.
77 |
78 | Byte | Description
79 | --- | ---
80 | 2 | Start index high byte
81 | 3 | Start index low byte
82 | 4 + n*3 | Red Value
83 | 5 + n*3 | Green Value
84 | 6 + n*3 | Blue Value
85 |
86 | When realtime mode starts, all LEDs will be black. However, you don't have to change all LEDs using one packet.
87 | Changing a single LED therefore only requires a packet of 2+4 bytes. All LEDs maintain their color until it is changed or the module exits WARLS mode because of a timeout.
88 |
89 | ### Setup with ARLS
90 |
91 | The software now supports audio-reactive-led-strip!
92 |
93 | 1. Download [audio-reactive-led-strip](https://github.com/scottlawsonbc/audio-reactive-led-strip) and follow its installation instruction. You can also use my (untested) [fork](https://github.com/Aircoookie/audio-reactive-led-strip). In that case, you can skip step 2.
94 | 2. Insert the following code in led.py after line 66:
95 | m.append(1);
96 | m.append(2);
97 | These are the first two bytes of the protocol.
98 | 3. In config.py set your led amount, ESP IP and WLED UDP notifier port. For FPS, a setting between 15-30 is recommended.
99 | 4. Run visualization.py! If you have a low amount of LEDS (e.g. 10) try lowering the sigma values in line 129-131.
100 | 5. If you have multiple WLED devices, you can sync them all with music.
101 | Use the led count of your largest device and set the IP to X.X.X.255 (UDP broadcast).
102 | You can adjust the position of the amplitude with the WARLS offset setting.
103 | Note that web control currently does not work while it is active.
104 |
--------------------------------------------------------------------------------
/docs/interfaces/json-ir/32-key_ir.json:
--------------------------------------------------------------------------------
1 | {
2 | "remote": "32-key",
3 | "0xFF08F7": {
4 | "label": "On",
5 | "pos": "1x1",
6 | "cmd": "T=1"
7 | },
8 | "0xFFC03F": {
9 | "label": "Off",
10 | "pos": "1x2",
11 | "cmd": "T=0"
12 | },
13 | "0xFF807F": {
14 | "label": "Auto",
15 | "pos": "1x3",
16 | "cmnt": "Toggle preset cycle",
17 | "cmd": "CY=2&PT=60000"
18 | },
19 | "0xFF609F": {
20 | "label": "Mode",
21 | "pos": "1x4",
22 | "cmnt": "Cycle effects",
23 | "cmd": "FX=~"
24 | },
25 | "0xFF906F": {
26 | "label": "4H",
27 | "pos": "2x1",
28 | "cmnt": "Timer 60min",
29 | "cmd": "NL=60&NT=0"
30 | },
31 | "0xFFB847": {
32 | "label": "6H",
33 | "pos": "2x2",
34 | "cmnt": "Timer 90min",
35 | "cmd": "NL=90&NT=0"
36 | },
37 | "0xFFF807": {
38 | "label": "8H",
39 | "pos": "2x3",
40 | "cmnt": "Timer 120min",
41 | "cmd": "NL=120&NT=0"
42 | },
43 | "0xFFB04F": {
44 | "label": "Timer Off",
45 | "pos": "2x4",
46 | "cmd": "NL=0"
47 | },
48 | "0xFF9867": {
49 | "label": "Red",
50 | "pos": "3x1",
51 | "cmnt": "Lava",
52 | "cmd": "FP=8&CL=hFF0000&C2=hFF7F00&C3=hCC3D60"
53 | },
54 | "0xFFD827": {
55 | "label": "Green",
56 | "pos": "3x2",
57 | "cmnt": "Forest",
58 | "cmd": "FP=10&CL=h8000&C2=h8040&C3=h30661E"
59 | },
60 | "0xFF8877": {
61 | "label": "Blue",
62 | "pos": "3x3",
63 | "cmnt": "Breeze",
64 | "cmd": "FP=15&CL=hFF&C2=h7F00FF&C3=h3D60CC"
65 | },
66 | "0xFFA857": {
67 | "label": "White",
68 | "pos": "3x4",
69 | "cmd": "FP=5&CL=hFFFFFF&C2=hFFE4CD&C3=hE4E4FF"
70 | },
71 | "0xFFE817": {
72 | "label": "OrangeRed",
73 | "pos": "4x1",
74 | "cmnt": "Sakura",
75 | "cmd": "FP=49&CL=hFF4500&C2=hFFC400&C3=hCC403D"
76 | },
77 | "0xFF48B7": {
78 | "label": "SeaGreen",
79 | "pos": "4x2",
80 | "cmnt": "Rivendale",
81 | "cmd": "FP=14&CL=h2E8B57&C2=h2E8B85&C3=h3B6F45"
82 | },
83 | "0xFF6897": {
84 | "label": "RoyalBlue",
85 | "pos": "4x3",
86 | "cmnt": "Ocean",
87 | "cmd": "FP=9&CL=h4169E1&C2=h6941E1&C3=h5A87B4"
88 | },
89 | "0xFFB24D": {
90 | "label": "DarkBlue",
91 | "pos": "4x4",
92 | "cmnt": "Breeze",
93 | "cmd": "FP=15&CL=h8B&C2=h45008B&C3=h21346F"
94 | },
95 | "0xFF02FD": {
96 | "label": "Orange",
97 | "pos": "5x1",
98 | "cmnt": "Orangery",
99 | "cmd": "FP=47&CL=hFFA500&C2=hD9FF00&C3=hCC753D"
100 | },
101 | "0xFF32CD": {
102 | "label": "YellowGreen",
103 | "pos": "5x2",
104 | "cmnt": "Aurora",
105 | "cmd": "FP=37&CL=h9ACD32&C2=h4CCD32&C3=h9DA44D"
106 | },
107 | "0xFF20DF": {
108 | "label": "SkyBlue",
109 | "pos": "5x3",
110 | "cmnt": "Beech",
111 | "cmd": "FP=22&CL=h87CEEB&C2=h879CEB&C3=h84B9BC"
112 | },
113 | "0xFF00FF": {
114 | "label": "Orchid",
115 | "pos": "5x4",
116 | "cmd": "FP=5&CL=hDA70D6&C2=hDA70A0&C3=hA173AE"
117 | },
118 | "0xFF50AF": {
119 | "label": "Yellow",
120 | "pos": "6x1",
121 | "cmnt": "Yellowout",
122 | "cmd": "FP=17&CL=hFFFF00&C2=h7FFF00&C3=hCCA83D"
123 | },
124 | "0xFF7887": {
125 | "label": "DarkGreen",
126 | "pos": "6x2",
127 | "cmnt": "Orange and Teal",
128 | "cmd": "FP=44&CL=h6400&C2=h6432&C3=h265018"
129 | },
130 | "0xFF708F": {
131 | "label": "RebeccaPurple",
132 | "pos": "6x3",
133 | "cmd": "FP=5&CL=h663399&C2=h993399&C3=h4F417A"
134 | },
135 | "0xFF58A7": {
136 | "label": "Plum",
137 | "pos": "6x4",
138 | "cmd": "FP=5&CL=hDDA0DD&C2=hDDA0BE&C3=hA88EB0"
139 | },
140 | "0xFF38C7": {
141 | "label": "Strobe",
142 | "pos": "7x1",
143 | "cmnt": "Dancing Shadows",
144 | "cmd": "FX=112"
145 | },
146 | "0xFF28D7": {
147 | "label": "In Waves",
148 | "pos": "7x2",
149 | "cmnt": "Noise 1",
150 | "cmd": "FX=70"
151 | },
152 | "0xFFF00F": {
153 | "label": "Speed +",
154 | "pos": "7x3",
155 | "cmd": "SX=~16"
156 | },
157 | "0xFF30CF": {
158 | "label": "Speed -",
159 | "pos": "7x4",
160 | "cmd": "SX=~-16"
161 | },
162 | "0xFF40BF": {
163 | "label": "Jump",
164 | "pos": "8x1",
165 | "cmnt": "Colortwinkles",
166 | "cmd": "FX=74"
167 | },
168 | "0xFF12ED": {
169 | "label": "Fade",
170 | "pos": "8x2",
171 | "cmnt": "Sunrise",
172 | "cmd": "FX=104"
173 | },
174 | "0xFF2AD5": {
175 | "label": "Flash",
176 | "pos": "8x3",
177 | "cmnt": "Railway",
178 | "cmd": "FX=78"
179 | },
180 | "0xFFA05F": {
181 | "label": "Chase Flash",
182 | "pos": "8x4",
183 | "cmnt": "Washing Machine",
184 | "cmd": "FX=113"
185 | }
186 | }
--------------------------------------------------------------------------------
/docs/features/cct.md:
--------------------------------------------------------------------------------
1 | ---
2 | title: White handling
3 | hide:
4 | # - navigation
5 | # - toc
6 | ---
7 |
8 | ### White channel(s) handling
9 |
10 | Besides addressable RGB and RGBW bus types, WLED 0.13.0 also supports PWM CCT (correlated color temperature) lights.
11 |
12 | #### Auto white handling
13 |
14 | Many effects and realtime sources are based on an RGB color model, which necessitates a method to calculate a white channel value from the RGB value for lights that support more than RGB.
15 |
16 | WLED offers four auto white modes, one of which can be selected in LED settings using the option `Auto-calculate white channel from RGB`. This option is only shown if at least one bus with White channel support is present.
17 |
18 | | Auto White mode | Description |
19 | |---|---|
20 | Accurate | This mode subtracts the calculated white value from the RGB channels. This gets rid of the "RGB-white" but means that the light is less bright with only the white channel and not the RGB channels being utilized for pure white.
21 | Brighter | This does the exact opposite and not touch the RGB channels at all, just mix in the dedicated white.
22 | None | No auto white calculation is performed. The white channel of colors can be manually set using the `White channel` slider in the user interface, RGB-only effects and most realtime sources will leave the white channel off.
23 | Dual | The `White channel` slider is present in the UI and works the same as in `None` mode, however if the slider value is 0 (far left), the `Brighter` mode is used for auto white calculation. This is the default auto white mode.
24 |
25 | `Accurate` and `Brighter` methods are applied on a per-pixel basis, so they also work in color palettes and realtime effects!
26 |
27 | #### White Balance correction
28 |
29 | If enabled in LED settings, WB correction allows either making all pixels colder or warmer on a per-segment basis using a slider in the main user interface.
30 | This is applied to the RGB color only, after the auto white channel calculation.
31 |
32 | #### CCT handling
33 |
34 | WLED starting with version 0.13.0 also supports bus types with two white channels, one with a warm color temperature (e.g. 2700 Kelvin, reddish white) and one with a cold white color temperature (e.g. 8000 Kelvin, bluish white).
35 |
36 | Since as of the release of version 0.13.0 no adjustable CCT addressable LEDs are supported*, this only applies to PWM analog LED outputs.
37 |
38 | _*SK6812 WWA (with 3 channels, warm white, cold white and amber) are supported, but treated as if RGB using the `WS281x` bus type. White spectrum support for this LED type will be added at a later point._
39 |
40 | The overall brightness of the white channels is determined from the auto-white calculation outlined above, and as such is identical in behavior to that of single white channel busses.
41 |
42 | The color temperature is set either on a per-segment basis via a dedicated slider in the UI, or if `Calculate CCT from RGB` is enabled in LED settings, is estimated on a per-pixel basis from the set RGB color (e.g. setting Red results in the warmest, setting Blue results in the coldest possible white).
43 | The former has the advantage of granular white spectrum control independent of the set RGB color, while the latter enables control of the color temperature from all effects and realtime sources.
44 |
45 | #### CCT additive blending
46 |
47 | Setting this to 0% results in a more even brightness output across the supported temperature range, as the fading between the warm and cold white channels is linear.
48 |
49 | Setting this to 100% results in the highest peak brightness output at the neutral white point (CCT value `127`), as both white channels are active at 100%.
50 |
51 | 
52 |
53 | !!! warning
54 | Make sure your setup can handle driving both white channels at maximum output simultaneously. This results in a higher heat output and might reduce the lifetime of your LEDs. For example, bulbs by Athom are designed for linear blending (0%) and may be damaged by attempting to use additive blending.
55 |
56 | You can limit the maximum allowed additive blending at build time using the `WLED_MAX_CCT_BLEND` macro.
57 | For example, add `-D WLED_MAX_CCT_BLEND=0` to your build flags to force linear blending only.
58 |
59 | #### IC CCT
60 |
61 | By default, PWM CCT bus types set the value of the warm and cold white channels.
62 | If your hardware uses an IC that controls the color temperature based on one PWM signal and the overall brightness on the other, please use the build flag `-D WLED_USE_IC_CCT` in a custom compilation. (the 15W bulb by Athom uses this method)
63 |
64 | #### CCT in the JSON API
65 |
66 | Please see [here](/interfaces/json-api/#cct-control) for more info on how to handle WLED CCT from integrations.
--------------------------------------------------------------------------------
/docs/basics/compatible-software.md:
--------------------------------------------------------------------------------
1 | ---
2 | title: Compatible Software
3 | hide:
4 | # - navigation
5 | # - toc
6 | ---
7 |
8 | !!! note ""
9 | Still under construction, feel free to add to the list!
10 |
11 | This page lists some third-party software that can interface with WLED!
12 |
13 | ## Controllers
14 |
15 | Controllers use the WLED API to change the current light settings.
16 |
17 | | Name | Description |
18 | |---|---|
19 | [Home Assistant](https://www.home-assistant.io/integrations/wled/) | Versatile and feature rich home automation system. Out-of-the-box WLED integration with automatic discovery.
20 | [Homey pro with the D.A.L.O.R App](https://homey.app/en-us/app/com.sdn.neopixel-on-rest/D.A.L.O.R/) | Home automation system, WLED integration via the D.A.L.O.R. app with automatic discovery.
21 | [ioBroker adapter](https://github.com/iobroker-community-adapters/ioBroker.wled) | Versatile and feature rich home automation system. Out-of-the-box WLED integration with automatic discovery.
22 | | [Lumia Stream](https://lumiastream.com/) | Allows for control of your lights from streaming software |
23 | | [node-red-contrib-wled](https://flows.nodered.org/node/node-red-contrib-wled) | [Node-RED](https://nodered.org) nodes for WLED |
24 | | [OctoPrint-WLED](https://plugins.octoprint.org/plugins/wled) | Connect your [OctoPrint](https://octoprint.org) install to your WLED install using this plugin to show things like printer status, progress and more! |
25 | [openHAB](https://community.openhab.org/t/wled-a-binding-for-controlling-led-strips-and-strings-from-an-opensource-esp8266-project/87286) | Another more professional feature rich home automation system. WLED integration made easy. [Link 2](https://community.openhab.org/t/solved-wled-please-make-this-work-in-openhab/82783) |
26 | [WLED-GUI](https://github.com/WoodyLetsCode/WLED-GUI) | This is a cross-platform desktop app for WLED. You can use it on Windows, Linux and Mac.
27 | [WLED Native for Android](https://github.com/Moustachauve/WLED-Native-Android)
After starting `flash_download_tools_v[...].exe` there should pop up two small windows. Now just click on the `Developer Mode` and`ESP8266 DownloadTool` button.
31 | Now a new window opens.
32 |
33 | - Under the SPIDownload section select the `WLED_[...]_ESP[...].bin` file by clicking on the first `...` button
34 | - In the Textfield next to the "@" char put in this adress: `0x0`
35 | - Than make sure that the file is checked (click on the checkbox)
36 | - **Click on the `Default` button**
37 | - Set SPI Speed to `80Mhz`
38 | - Set Flash Size to `32Mbit`
39 | - Select the COM Port of your ESP (usually it's **not** `COM1`)
40 | - BAUD can be set to `921600`
41 | - Verify that everything looks like the two picture below
42 | °[ESPTool settings](https://i.ibb.co/1qk16XL/esptool.png)
43 |
44 | - _(optionally)_ click on **ERASE** to erase the entire flash chip
45 | - click on `START`
46 |
47 | Now the firmware will be flashed to the ESP. When the firmware flashing was successful you see this: . Finally restart your board.
48 |
49 | **Next steps:** [Quick start guide](/basics/getting-started)
50 |
--------------------------------------------------------------------------------
/docs/interfaces/infrared.md:
--------------------------------------------------------------------------------
1 | ---
2 | title: Infrared
3 | hide:
4 | # - navigation
5 | # - toc
6 | ---
7 |
8 |
9 | !!! info "Version Info"
10 | Since v0.8.2, infrared control from various IR remotes is supported for ESP8266 and since v0.9.0 for ESP32, too.
11 |
12 | A dedicated infrared receiver module is required and must be connected to the WLED Controller. For example, KY-022 or TSOP38238 are confirmed to work and inexpensive. These receivers each have three pins: 3.3V, GND and IR data. IR data pin must be connected to a free GPIO pin. This GPIO must then be set as IR GPIO under "Config->LED Preferences" (The default sensor pin is GPIO4).
13 | 
14 |
15 | !!! warning
16 | IR receiving will not work on ESP8266 if you use any LED pin other than GPIO 1, 2, or 3 for _digital_ LED strips.
17 |
18 | ### Supported IR remotes
19 |
20 | To use IR remote go to `Settings`, `Sync Interfaces` and change the value for `Infrared receiver type` according to the IR remote type of the following list:
21 |
22 | 1. white 24-key IR remote with R,G,B + 12 color-tones
23 | 2. white 24-key IR remote with CT+ / CT- buttons
24 | 3. blue 40-key IR remote with keys for 25%, 50%, 75% and 100%
25 | 4. white 44-key IR remote with up/down arrows for the colors R,G and B
26 | 5. white 21-key IR remote with R,G,B + 9 color-tones
27 | 6. black 6-key IR remote with CH up/down + Vol up/down
28 | 7. [JSON IR remote](json-ir/json_infrared.md) - Easily configure and use any IR remote.
29 |
30 | ## ESP-NOW based remote control
31 | Since version WLED 14.0-beta3: An ESP-NOW compatible remote control is supported. An example of this is the „WIZmote“ remote control. This is based on an ESP microcontroller. ESP-NOW can be activated in WLED settings. You have to enter the Hardware MAC address of the remote control. This is determined by clicking on any button on the remote control and copying the last received MAC address from the "Last Seen" field to the "Hardware MAC" field in WLED ESP-NOW settings (“Config->WiFi Setup”) and saving it with "Save". Advantages: no special receiver needs to be attached to the WLED controller and the signals are transmitted via radio network. Therefore there is no line of sight between the remote control and the WLED controller required, as is the case with an IR remote control.
32 | 
33 | The 4 buttons "1"-"4" of the WIZmote remote control are linked to presets 1 to 4. The meaning of other keys is self-explanatory. Attention: WIZmote needs two good quality AAA batteries to work properly. If the batteries are too weak, the correct signal will not be sent, even if the blue LED on the remote control lights up briefly, actually indicating signal transmission.
34 |
--------------------------------------------------------------------------------
/docs/basics/top5_mistakes.md:
--------------------------------------------------------------------------------
1 | ---
2 | title: TOP 5 mistakes
3 | hide:
4 | # - navigation
5 | # - toc
6 | ---
7 |
8 | ### Asking for help
9 |
10 | Before asking for help on Discord or on other platforms, check the following top 5 most common mistakes while setting up WLED.
11 | If you then still have troubles and are going to ask for help, provide as much informtion as possile: describe your setup, make photos, provide screenshots of your settings.
12 |
13 | ### TOP 5 mistakes:
14 |
15 | 1. LED strip is connected from the back side: addressable LED strips have a direction indicated by small arrows on the strip. The data line must be connected from the side where the arrow begins:
16 | 
17 | 2. Incorrect GPIO is set: check in WLED settings whether the correct GPIO number is set as data output. Take care while using ESP8266 D1 mini: the pin labels like "D0", "D1" etc. are not the same numbers as GPIOs. In WLED preferences you have to use GPIO numbers:
18 | 
19 | The ready-to-use controllers usually have the correct settings printed either on the housing or on the circuit board as in this example:
20 | 
21 | 3. LED strip with many LEDs is connected and configures, but the current limiter is still at the default value (850 mA). This often has the effect that LEDs either remain dark or flash briefly when the color changes and then go out immediately or light up very dimly. Check and, if necessary, correct the settings in WLED:
22 | 
23 | 4. Wrong LED type is set. The correct LED type and the correct color sequence (RGB, BGR, etc.) must be set in WLED LED preferences. Check that these settings are correct. You have to know the LED type, but you can simply try out the color sequence to see which is the right one. Special attention must be paid for example to the WS2814 LED strip, which must be set as SK6812 and not as WS281x in the LED preferences.
24 | 
25 | 5. Wiring is bad. Wiring must be done thoroughly. Loose contacts, cold solder joints etc. must be avoided. You also need to be careful about the correct sizing of the cables: too thin wires can not only cause high voltage drop but also lead to an overheating and fire! For wire sizing you may use this [LED power, wiring and fuse calculator](https://wled-calculator.github.io/). If many power sources are used (for example separate one for ESP and separate one for the LED strip), then all their grounds (GND, V-) must be connected together (but do not connect their V+ together!).
26 |
--------------------------------------------------------------------------------
/docs/interfaces/json-ir/24-key v2_ir.json:
--------------------------------------------------------------------------------
1 | {
2 | "remote": "24-key v2",
3 | "0xF700FF": {
4 | "label": "Speed +",
5 | "cmd": "SX=~16"
6 | },
7 | "0xF7807F": {
8 | "label": "Speed -",
9 | "cmd": "SX=~-16"
10 | },
11 | "0xF740BF": {
12 | "label": "On/Off",
13 | "cmd": "T=2"
14 | },
15 | "0xF7C03F": {
16 | "label": "W",
17 | "cmnt": "Cycle color palette",
18 | "cmd": "FP=~"
19 | },
20 | "0xF720DF": {
21 | "label": "Red",
22 | "cmnt": "Lava",
23 | "cmd": "FP=8&CL=hFF0000&C2=hFF7F00&C3=hCC3D60"
24 | },
25 | "0xF7A05F": {
26 | "label": "Green",
27 | "cmnt": "Forest",
28 | "cmd": "FP=10&CL=h8000&C2=h8040&C3=h30661E"
29 | },
30 | "0xF7609F": {
31 | "label": "Blue",
32 | "cmnt": "Breeze",
33 | "cmd": "FP=15&CL=hFF&C2=h7F00FF&C3=h3D60CC"
34 | },
35 | "0xF7E01F": {
36 | "label": "Bright -",
37 | "cmd": "!decBrightness"
38 | },
39 | "0xF710EF": {
40 | "label": "Timer1H",
41 | "cmnt": "Timer 60 min",
42 | "cmd": "NL=60&NT=0"
43 | },
44 | "0xF7906F": {
45 | "label": "Timer4H",
46 | "cmnt": "Timer 30 min",
47 | "cmd": "NL=30&NT=0"
48 | },
49 | "0xF750AF": {
50 | "label": "Timer8H",
51 | "cmnt": "Timer 15 min",
52 | "cmd": "NL=15&NT=0"
53 | },
54 | "0xF7D02F": {
55 | "label": "Bright128",
56 | "cmnt": "Bright 128",
57 | "cmd": "A=128"
58 | },
59 | "0xF730CF": {
60 | "label": "Music1",
61 | "cmnt": "Cycle FX +",
62 | "cmd": "FX=~"
63 | },
64 | "0xF7B04F": {
65 | "label": "Music2",
66 | "cmnt": "Cycle FX -",
67 | "cmd": "FX=~-"
68 | },
69 | "0xF7708F": {
70 | "label": "Music3",
71 | "cmnt": "Reset FX and FP",
72 | "cmd": "FX=1&PF=6"
73 | },
74 | "0xF7F00F": {
75 | "label": "Bright+",
76 | "cmnt": "Bright +",
77 | "cmd": "!incBrightness"
78 | },
79 | "0xF708F7": {
80 | "label": "Mode1",
81 | "cmnt": "Preset 1",
82 | "cmd": "PL=1"
83 | },
84 | "0xF78877": {
85 | "label": "Mode2",
86 | "cmnt": "Preset 2",
87 | "cmd": "PL=2"
88 | },
89 | "0xF748B7": {
90 | "label": "Mode3",
91 | "cmnt": "Preset 3",
92 | "cmd": "PL=3"
93 | },
94 | "0xF7C837": {
95 | "label": "Intensity +",
96 | "cmd": "IX=~16"
97 | },
98 | "0xF728D7": {
99 | "label": "Mode4",
100 | "cmnt": "Preset 4",
101 | "cmd": "PL=4"
102 | },
103 | "0xF7A857": {
104 | "label": "Mode5",
105 | "cmnt": "Preset 5",
106 | "cmd": "PL=5"
107 | },
108 | "0xF76897": {
109 | "label": "Cycle",
110 | "cmnt": "Toggle preset cycle",
111 | "cmd": "CY=1&PT=60000"
112 | },
113 | "0xF7E817": {
114 | "label": "Intensity -",
115 | "cmd": "IX=~-16"
116 | }
117 | }
--------------------------------------------------------------------------------
/docs/interfaces/json-ir/24-key-v3_ir.json:
--------------------------------------------------------------------------------
1 | {
2 | "remote": "24-key-v3",
3 | "0xF700FF": {
4 | "label": "Speed +",
5 | "cmd": "SX=~16"
6 | },
7 | "0xF7807F": {
8 | "label": "Speed -",
9 | "cmd": "SX=~-16"
10 | },
11 | "0xF740BF": {
12 | "label": "On/Off",
13 | "cmd": "T=2"
14 | },
15 | "0xF7C03F": {
16 | "label": "W",
17 | "cmnt": "Cycle color palette",
18 | "cmd": "FP=~"
19 | },
20 | "0xF720DF": {
21 | "label": "Red",
22 | "cmnt": "Lava",
23 | "cmd": "FP=8&CL=hFF0000&C2=hFF7F00&C3=hCC3D60"
24 | },
25 | "0xF7A05F": {
26 | "label": "Green",
27 | "cmnt": "Forest",
28 | "cmd": "FP=10&CL=h8000&C2=h8040&C3=h30661E"
29 | },
30 | "0xF7609F": {
31 | "label": "Blue",
32 | "cmnt": "Breeze",
33 | "cmd": "FP=15&CL=hFF&C2=h7F00FF&C3=h3D60CC"
34 | },
35 | "0xF7E01F": {
36 | "label": "Bright -",
37 | "cmd": "!decBrightness"
38 | },
39 | "0xF710EF": {
40 | "label": "Timer1H",
41 | "cmnt": "Timer 60 min",
42 | "cmd": "NL=60&NT=0"
43 | },
44 | "0xF7906F": {
45 | "label": "Timer4H",
46 | "cmnt": "Timer 30 min",
47 | "cmd": "NL=30&NT=0"
48 | },
49 | "0xF750AF": {
50 | "label": "Timer8H",
51 | "cmnt": "Timer 15 min",
52 | "cmd": "NL=15&NT=0"
53 | },
54 | "0xF7D02F": {
55 | "label": "Bright128",
56 | "cmnt": "Bright 128",
57 | "cmd": "A=128"
58 | },
59 | "0xF730CF": {
60 | "label": "Music1",
61 | "cmnt": "Cycle FX +",
62 | "cmd": "FX=~"
63 | },
64 | "0xF7B04F": {
65 | "label": "Music2",
66 | "cmnt": "Cycle FX -",
67 | "cmd": "FX=~-"
68 | },
69 | "0xF7708F": {
70 | "label": "Music3",
71 | "cmnt": "Reset FX and FP",
72 | "cmd": "FX=1&PF=6"
73 | },
74 | "0xF7F00F": {
75 | "label": "Bright+",
76 | "cmnt": "Bright +",
77 | "cmd": "!incBrightness"
78 | },
79 | "0xF708F7": {
80 | "label": "Mode1",
81 | "cmnt": "Preset 1",
82 | "cmd": "PL=1"
83 | },
84 | "0xF78877": {
85 | "label": "Mode2",
86 | "cmnt": "Preset 2",
87 | "cmd": "PL=2"
88 | },
89 | "0xF748B7": {
90 | "label": "Mode3",
91 | "cmnt": "Preset 3",
92 | "cmd": "PL=3"
93 | },
94 | "0xF7C837": {
95 | "label": "Intensity +",
96 | "cmd": "IX=~16"
97 | },
98 | "0xF728D7": {
99 | "label": "Mode4",
100 | "cmnt": "Preset 4",
101 | "cmd": "PL=4"
102 | },
103 | "0xF7A857": {
104 | "label": "Mode5",
105 | "cmnt": "Preset 5",
106 | "cmd": "PL=5"
107 | },
108 | "0xF76897": {
109 | "label": "Cycle",
110 | "cmnt": "Toggle preset cycle",
111 | "cmd": "CY=2&PT=60000"
112 | },
113 | "0xF7E817": {
114 | "label": "Intensity -",
115 | "cmd": "IX=~-16"
116 | }
117 | }
--------------------------------------------------------------------------------
/docs/interfaces/mqtt.md:
--------------------------------------------------------------------------------
1 | ---
2 | title: MQTT
3 | hide:
4 | # - navigation
5 | # - toc
6 | ---
7 |
8 | !!! important
9 | **Notice:** The MQTT implementation is currently being **restructured** to provide a better experience for users of Home Assistant and other automation software. **This will be a breaking change**. For details regarding the rework, please see [#207](https://github.com/Aircoookie/WLED/issues/207)!
10 |
11 | WLED versions from 0.8.0 up are able to connect to an MQTT broker for smart home control.
12 | Connection to both domains and IP servers is supported on port 1883.
13 |
14 | !!! warning
15 | Secure connections are not currently supported. I recommend only connecting to local MQTT brokers.
16 | In v0.8.4-0.8.6 only, WLED supports MQTT autodiscovery by the HomeAssistant software. This has been removed because of bootloop issues and in favor of the native HomeAssistant integration.
17 |
18 | WLED will subscribe to up to six topics to change the state of the lights.
19 |
20 | - **[mqttDeviceTopic]**
21 | -> Send brightness as ASCII number 0-255 or the strings "ON", "OFF", and "T" (for toggle)
22 | - **[mqttDeviceTopic]/col**
23 | -> Send color as HEX (#WWRRGGBB or #RRGGBB) or 32bit DEC. Hex has '#','h' or 'H' as prefix.
24 | - **[mqttDeviceTopic]/api**
25 | -> Send an API call (using the [HTTP API](/interfaces/http-api) or, since 0.11, [JSON API](https://kno.wled.ge/interfaces/json-api) syntax). You may omit the "win" and just send e.g. "FX=73"
26 |
27 | - **[mqttGroupTopic]**
28 | - **[mqttGroupTopic]/col**
29 | - **[mqttGroupTopic]/api**
30 |
31 | The topic paths [mqttDeviceTopic] and [mqttGroupTopic] are customizable in Sync settings.
32 | If [mqttGroupTopic] is left empty, it will not subscribe to anything. An empty [mqttDeviceTopic] will instead be replaced with the default "wled/macaddr".
33 | [mqttDeviceTopic] is intended to be unique to one WLED device and just control that device.
34 | [mqttGroupTopic] is intended to control a group of or all WLED devices.
35 |
36 | UDP notifications will be sent just as if the change was done via the UI or HTTP API.
37 |
38 | Additionally, on light change, WLED will publish to 3 topics for MQTT clients to query the state of the light.
39 |
40 | - **[mqttDeviceTopic]/g**
41 | -> Contains current brightness as ASCII number 0-255
42 |
43 | - **[mqttDeviceTopic]/c**
44 | -> Contains current color as HEX (#RRGGBB if white is 0, else #WWRRGGBB)
45 |
46 | - **[mqttDeviceTopic]/v**
47 | -> Contains XML API response (same as HTTP API)
48 |
49 | There is support for client ID and authentication, but this is presently transmitted over an unencrypted connection, so please **do not** use the same password for other services.
50 |
51 | !!! warning "Attention"
52 | The maximum length of an MQTT message for WLED is only limited by free RAM.
53 |
--------------------------------------------------------------------------------
/docs/interfaces/json-ir/21-key_ir.json:
--------------------------------------------------------------------------------
1 | {
2 | "remote": "21-key",
3 | "0xFFA25D": {
4 | "label": "On",
5 | "pos": "1x1",
6 | "cmd": "T=1"
7 | },
8 | "0xFF629D": {
9 | "label": "Auto",
10 | "pos": "1x2",
11 | "cmd": "CY=2&PT=60000"
12 | },
13 | "0xFFE21D": {
14 | "label": "Off",
15 | "pos": "1x3",
16 | "cmd": "T=0"
17 | },
18 | "0xFF22DD": {
19 | "label": "Speed+",
20 | "pos": "2x1",
21 | "cmd": "SX=~16"
22 | },
23 | "0xFF02FD": {
24 | "label": "Effect+",
25 | "pos": "2x2",
26 | "cmd": "FX=~"
27 | },
28 | "0xFFC23D": {
29 | "label": "Bright+",
30 | "pos": "2x3",
31 | "cmd": "!incBrightness"
32 | },
33 | "0xFFE01F": {
34 | "label": "Speed-",
35 | "pos": "3x1",
36 | "cmd": "SX=~-16"
37 | },
38 | "0xFFA857": {
39 | "label": "Effect-",
40 | "pos": "3x2",
41 | "cmd": "FX=~-"
42 | },
43 | "0xFF906F": {
44 | "label": "Bright-",
45 | "pos": "3x3",
46 | "cmd": "!decBrightness"
47 | },
48 | "0xFF6897": {
49 | "label": "Red",
50 | "pos": "4x1",
51 | "cmnt": "Lava",
52 | "cmd": "FP=8&CL=hFF0000&C2=hFF7F00&C3=hCC3D60"
53 | },
54 | "0xFF9867": {
55 | "label": "Green",
56 | "pos": "4x2",
57 | "cmnt": "Forest",
58 | "cmd": "FP=10&CL=h8000&C2=h8040&C3=h30661E"
59 | },
60 | "0xFFB04F": {
61 | "label": "Blue",
62 | "pos": "4x3",
63 | "cmnt": "Cloud",
64 | "cmd": "FP=7&CL=hFF&C2=h7F00FF&C3=h3D60CC"
65 | },
66 | "0xFF30CF": {
67 | "label": "LightYellow",
68 | "pos": "5x1",
69 | "cmd": "FP=5&CL=hFFFFE0&C2=hEFFFE0&C3=hCCC7BA"
70 | },
71 | "0xFF18E7": {
72 | "label": "Moccasin",
73 | "pos": "5x2",
74 | "cmd": "FP=5&CL=hFFE4B5&C2=hF5FFB4&C3=hCCB2A2"
75 | },
76 | "0xFF7A85": {
77 | "label": "Yellow",
78 | "pos": "5x3",
79 | "cmnt": "Yellowout",
80 | "cmd": "FP=17&CL=hFFFF00&C2=h7FFF00&C3=hCCA83D"
81 | },
82 | "0xFF10EF": {
83 | "label": "Orange",
84 | "pos": "6x1",
85 | "cmnt": "Orangery",
86 | "cmd": "FP=47&CL=hFFA500&C2=hD9FF00&C3=hCC753D"
87 | },
88 | "0xFF38C7": {
89 | "label": "GhostWhite",
90 | "pos": "6x2",
91 | "cmd": "FP=5&CL=hF8F8FF&C2=hFBF8FF&C3=hC8C9CC"
92 | },
93 | "0xFF5AA5": {
94 | "label": "SkyBlue",
95 | "pos": "6x3",
96 | "cmnt": "Breeze",
97 | "cmd": "FP=15&CL=h87CEEB&C2=h879CEB&C3=h84B9BC"
98 | },
99 | "0xFF42BD": {
100 | "label": "Pink",
101 | "pos": "7x1",
102 | "cmnt": "LightPink",
103 | "cmd": "FP=38&CL=hFFC0CB&C2=hFFD4C0&C3=hCCA8B7"
104 | },
105 | "0xFF4AB5": {
106 | "label": "LightGreen",
107 | "pos": "7x2",
108 | "cmnt": "Rivendale",
109 | "cmd": "FP=14&CL=h90EE90&C2=h90EEBF&C3=h96BE89"
110 | },
111 | "0xFF52AD": {
112 | "label": "FloralWhite",
113 | "pos": "7x3",
114 | "cmd": "FP=5&CL=hFFFAF0&C2=hFCFFF0&C3=hCCC7C3"
115 | }
116 | }
--------------------------------------------------------------------------------
/docs/interfaces/json-ir/21-key v2_ir.json:
--------------------------------------------------------------------------------
1 | {
2 | "remote": "21-key v2",
3 | "0xFFA25D": {
4 | "label": "On",
5 | "pos": "1x1",
6 | "cmd": "T=1"
7 | },
8 | "0xFF629D": {
9 | "label": "Off",
10 | "pos": "1x2",
11 | "cmd": "T=0"
12 | },
13 | "0xFFE21D": {
14 | "label": "Flash",
15 | "pos": "1x3",
16 | "cmnt": "Cycle Effects",
17 | "cmd": "FX=~"
18 | },
19 | "0xFF22DD": {
20 | "label": "Strobe",
21 | "pos": "2x1",
22 | "cmnt": "Sinelon Dual",
23 | "cmd": "FX=93"
24 | },
25 | "0xFF02FD": {
26 | "label": "Fade",
27 | "pos": "2x2",
28 | "cmnt": "Rain",
29 | "cmd": "FX=43"
30 | },
31 | "0xFFC23D": {
32 | "label": "Smooth",
33 | "pos": "2x3",
34 | "cmnt": "Aurora",
35 | "cmd": "FX=38"
36 | },
37 | "0xFFE01F": {
38 | "label": "Bright+",
39 | "pos": "3x1",
40 | "cmd": "!incBrightness"
41 | },
42 | "0xFFA857": {
43 | "label": "Bright -",
44 | "pos": "3x2",
45 | "cmd": "!decBrightness"
46 | },
47 | "0xFF906F": {
48 | "label": "White",
49 | "pos": "3x3",
50 | "cmd": "FP=5&CL=hFFFFFF&C2=hFFFFFF&C3=hCCCCCC"
51 | },
52 | "0xFF6897": {
53 | "label": "Red",
54 | "pos": "4x1",
55 | "cmnt": "Lava",
56 | "cmd": "FP=8&CL=hFF0000&C2=hFF7F00&C3=hCC3D60"
57 | },
58 | "0xFF9867": {
59 | "label": "Green",
60 | "pos": "4x2",
61 | "cmnt": "Forest",
62 | "cmd": "FP=10&CL=h8000&C2=h8040&C3=h30661E"
63 | },
64 | "0xFFB04F": {
65 | "label": "Blue",
66 | "pos": "4x3",
67 | "cmnt": "Breeze",
68 | "cmd": "FP=15&CL=hFF&C2=h7F00FF&C3=h3D60CC"
69 | },
70 | "0xFF30CF": {
71 | "label": "Tomato",
72 | "pos": "5x1",
73 | "cmd": "FP=5&CL=hFF6347&C2=hFFBF47&C3=hCC646F"
74 | },
75 | "0xFF18E7": {
76 | "label": "LightGreen",
77 | "pos": "5x2",
78 | "cmnt": "Rivendale",
79 | "cmd": "FP=14&CL=h90EE90&C2=h90EEBF&C3=h96BE89"
80 | },
81 | "0xFF7A85": {
82 | "label": "SkyBlue",
83 | "pos": "5x3",
84 | "cmnt": "Ocean",
85 | "cmd": "FP=9&CL=h87CEEB&C2=h879CEB&C3=h84B9BC"
86 | },
87 | "0xFF10EF": {
88 | "label": "Orange",
89 | "pos": "6x1",
90 | "cmnt": "Orangery",
91 | "cmd": "FP=47&CL=hFFA500&C2=hD9FF00&C3=hCC753D"
92 | },
93 | "0xFF38C7": {
94 | "label": "Aqua",
95 | "pos": "6x2",
96 | "cmnt": "Hult64",
97 | "cmd": "FP=29&CL=hFFFF&C2=h7FFF&C3=h3DCCA8"
98 | },
99 | "0xFF5AA5": {
100 | "label": "Purple",
101 | "pos": "6x3",
102 | "cmd": "FP=5&CL=h800080&C2=h800040&C3=h541E66"
103 | },
104 | "0xFF42BD": {
105 | "label": "Yellow",
106 | "pos": "7x1",
107 | "cmnt": "Yellowout",
108 | "cmd": "FP=17&CL=hFFFF00&C2=h7FFF00&C3=hCCA83D"
109 | },
110 | "0xFF4AB5": {
111 | "label": "Cyan",
112 | "pos": "7x2",
113 | "cmnt": "Beech",
114 | "cmd": "FP=22&CL=hFFFF&C2=h7FFF&C3=h3DCCA8"
115 | },
116 | "0xFF52AD": {
117 | "label": "Pink",
118 | "pos": "7x3",
119 | "cmnt": "LightPink",
120 | "cmd": "FP=38&CL=hFFC0CB&C2=hFFD4C0&C3=hCCA8B7"
121 | }
122 | }
--------------------------------------------------------------------------------
/docs/interfaces/json-ir/24-key-grey_ir.json:
--------------------------------------------------------------------------------
1 | {
2 | "desc": "24-key Grey",
3 | "0xFFA05F": {
4 | "label": "+",
5 | "pos": "1x1",
6 | "cmnt": "Bright +",
7 | "cmd": "A=~8"
8 | },
9 | "0xFF20DF": {
10 | "label": "-",
11 | "pos": "1x2",
12 | "cmnt": "Bright -",
13 | "cmd": "A=~-8"
14 | },
15 | "0xFF609F": {
16 | "label": "Off",
17 | "pos": "1x3",
18 | "cmnt": "Switch Off",
19 | "cmd": "T=0&FX=0&FP=0&IX=128&SX=128"
20 | },
21 | "0xFFE01F": {
22 | "label": "On",
23 | "pos": "1x4",
24 | "cmnt": "Switch On",
25 | "cmd": "T=1"
26 | },
27 | "0xFF906F": {
28 | "label": "R0",
29 | "pos": "2x1",
30 | "cmnt": "Red",
31 | "cmd": "R=255&G=0&B=0"
32 | },
33 | "0xFF10EF": {
34 | "label": "G0",
35 | "pos": "2x2",
36 | "cmnt": "Green",
37 | "cmd": "R=0&G=255&B=0"
38 | },
39 | "0xFF50AF": {
40 | "label": "B0",
41 | "pos": "2x3",
42 | "cmnt": "Blue",
43 | "cmd": "R=0&G=0&B=255"
44 | },
45 | "0xFFD02F": {
46 | "label": "W0",
47 | "pos": "2x4",
48 | "cmnt": "White",
49 | "cmd": "R=255&G=255&B=255"
50 | },
51 | "0xFFB04F": {
52 | "label": "R",
53 | "pos": "3x1",
54 | "cmnt": "Red",
55 | "cmd": "R=255&G=0&B=0"
56 | },
57 | "0xFF30CF": {
58 | "label": "G",
59 | "pos": "3x2",
60 | "cmnt": "Green",
61 | "cmd": "R=0&G=255&B=0"
62 | },
63 | "0xFF708F": {
64 | "label": "B",
65 | "pos": "3x3",
66 | "cmnt": "Blue",
67 | "cmd": "R=0&G=0&B=255"
68 | },
69 | "0xFFF00F": {
70 | "label": "FX",
71 | "pos": "3x4",
72 | "cmnt": "Cycle FX +",
73 | "cmd": "FX=~"
74 | },
75 | "0xFFA857": {
76 | "label": "O",
77 | "pos": "4x1",
78 | "cmnt": "Orange",
79 | "cmd": "R=255&G=160&B=0"
80 | },
81 | "0xFF28D7": {
82 | "label": "C",
83 | "pos": "4x2",
84 | "cmnt": "Cyan",
85 | "cmd": "R=0&G=255&B=200"
86 | },
87 | "0xFF6897": {
88 | "label": "V",
89 | "pos": "4x3",
90 | "cmnt": "Violet",
91 | "cmd": "R=160&G=0&B=255"
92 | },
93 | "0xFFE817": {
94 | "label": "Speed",
95 | "pos": "4x4",
96 | "cmnt": "Cycle FX Speed +",
97 | "cmd": "SX=~"
98 | },
99 | "0xFF9867": {
100 | "label": "YO",
101 | "pos": "5x1",
102 | "cmnt": "Yellow Orange",
103 | "cmd": "R=255&G=160&B=0"
104 | },
105 | "0xFF18E7": {
106 | "label": "CB",
107 | "pos": "5x2",
108 | "cmnt": "Cyan Blue",
109 | "cmd": "R=0&G=160&B=255"
110 | },
111 | "0xFF58A7": {
112 | "label": "M",
113 | "pos": "5x3",
114 | "cmnt": "Magenta",
115 | "cmd": "R=200&G=0&B=255"
116 | },
117 | "0xFFD827": {
118 | "label": "Intensity",
119 | "pos": "5x4",
120 | "cmnt": "Cycle FX Intensity",
121 | "cmd": "IX=~"
122 | },
123 | "0xFF8877": {
124 | "label": "Y",
125 | "pos": "6x1",
126 | "cmnt": "Yellow",
127 | "cmd": "R=255&G=200&B=0"
128 | },
129 | "0xFF08F7": {
130 | "label": "DC",
131 | "pos": "6x2",
132 | "cmnt": "Dark Cyan",
133 | "cmd": "R=0&G=96&B=255"
134 | },
135 | "0xFF48B7": {
136 | "label": "P",
137 | "pos": "6x3",
138 | "cmnt": "Pink",
139 | "cmd": "R=255&G=0&B=255"
140 | },
141 | "0xFFC837": {
142 | "label": "Palette",
143 | "pos": "6x4",
144 | "cmnt": "Cycle Palette",
145 | "cmd": "FP=~"
146 | }
147 | }
148 |
--------------------------------------------------------------------------------
/docs/advanced/security.md:
--------------------------------------------------------------------------------
1 | ---
2 | title: Security
3 | hide:
4 | # - navigation
5 | # - toc
6 | ---
7 |
8 | WLED was designed in a way that you should be safe to have a [router port forwarding](/advanced/remote-access-ifttt) to control the system from the public internet. This page will tell you what you can expect by WLEDs security.
9 |
10 | ### TLDR - what to do?
11 |
12 | A: If you just operate WLED within a local network and/or with a secured Access Point (change the default password "wled1234"!!) you are fine.
13 |
14 | If you have configured a port forwarding to control WLED from outside your local subnet, **please make sure the setting "OTA Lock" is enabled and you have changed the default OTA password "wledota"! Also, NEVER edit sensitive data (like WiFi credentials) while connected via the port forwarding!**
15 |
16 | ### 1: Is the connection itself safe?
17 |
18 | A: Technically not. The ESP8266 uses unencrypted HTTP traffic. Implementing HTTPS would take too much processing power and memory on this little device. This means an attacker could read your passwords during transmit. Therefore, to be safe, please do NOT change the AP/Client WiFi/OTA password from outside of your LAN via a forwarded port. If you are at home, you should be safe if your WiFi is secured. You can change any other setting while you're away, though. WLED doesn't send your actual password to the settings page, just its length.
19 |
20 | ### 2: What do you mean by secure then?
21 |
22 | A: WLED comes with the ability to carry out a software update via WiFi (OTA). However, no one must be able to flash a malicious new binary firmware to steal your WiFi credentials or make your ESP part of a botnet. Therefore, you should enable the "OTA Lock" setting and change its default passphrase "wledota".
23 |
24 | ### 3: Can I protect the light configuration or the settings page?
25 |
26 | A: Currently not. This is not sensitive information like your WiFi password. Anyone with your IP and port can control the lights. Open an issue if it should ever happen that somebody plays with your lights. I might consider adding an optional password lock then. For now, it is way too cumbersome for what it does.
27 |
28 | ### 4: I want to do a software update, but it says "OTA lock active"?
29 |
30 | A: You need to go to the settings page. Untick the "OTA Lock" setting and input your passphrase in the field below it.
31 | Now apply the settings and reboot. After that you can carry out the software update. Don't forget to re-enable OTA Lock afterwards! To enable, you don't have to enter the passphrase, unless you want to change it. For the lock to work you need to apply and reboot again.
32 |
33 | ### 5: Why is this OTA lock stuff that important?
34 |
35 | A: Your unencrypted WiFi password is stored in the module's EEPROM. It would be easy to "update" the software to a malicious version which sends your password to the attacker. OTA Lock makes sure only those with the passphrase may carry out a software update. And yes, while you can disable OTA lock by doing a factory reset, this would also kill the WiFi connection to the attacker.
36 |
37 | ### 6: Anything else?
38 |
39 | A: A personal tip from me is not to give anyone your IP to control the software who you do not wish to do so on a regular basis. It is not critical from a security standpoint, but it can be very annoying if someone plays with your lights, or even worse, change your AP credentials to the point where you can no longer access the module except via USB.
--------------------------------------------------------------------------------
/docs/features/multi-strip.md:
--------------------------------------------------------------------------------
1 | ---
2 | title: Multi-strip Support
3 | hide:
4 | # - navigation
5 | # - toc
6 | ---
7 |
8 | ## Multi strip support
9 |
10 | Starting in WLED 0.12.0, you are able to use multiple LED outputs from one ESP board!
11 | Pins and LED numbers can be easily configured in LED settings, you don't need to re-compile code for your specific setup. Custom binaries for multiple pins are now also a thing of the past!
12 |
13 | There are a few tips and recomendations to keep in mind when designing your setup:
14 |
15 | ### General
16 |
17 | - It is highly recommended to use an ESP32 when using more than 1 output
18 | - You may freely choose the LEDs type, pin numbers, length and color order of your LED strips at runtime in the LED settings page
19 | - Highly recommeded to size power supply correctly according to your setup and disable the WLED brightness limiter setting to increase framerate with very large LED counts
20 | - Most strip types have yet to be tested. Add confirmed working below:
21 | - Confirmed working: WS281x, SK6812 RGBW, PWM white
22 |
23 | ### ESP8266
24 |
25 | - There is a maximum of 3 strips supported.
26 | - It is highly recommended to use two specific LED pins, GPIO1 (TX) and GPIO2 (D4), since they allow for hardware driving.
27 | - It is recommended to use 512 LEDs/pin for good performance for a total of 1024 LEDs.
28 | - 800 LEDs/pin for a total of 1600 has been confirmed working, but is not recommended for good performance and reliability.
29 | - Using GPIO1 will disable serial debugging. If you need it, you can't use a strip on this pin.
30 | - GPIO3 (RX) is the third pin that allows hardware driving on ESP8266. However, it uses 5 times as much memory per LED as GPIO 1 and 2, so use it only for low LED counts (recommended <50)
31 | - You can use any other pin, but it will use the bitbang method, which is not recommended for reliability. It is best to stick to GPIO 1, 2, and if need be, 3.
32 | - Using pin GPIO16 for WS2812b LEDs did not work in my testing.
33 | - ESP8266 can calculate about 15k LEDs per second (that means 250LEDs @~60fps, 500 LEDs @~30fps, 1000 LEDs @~15fps)
34 | - The LED settings will give you a bar that shows how much memory you can allocate.
35 |
36 | ### ESP32
37 |
38 | - There is a maximum of 10 strips supported on "classic" ESP32 (dual core) boards. In audioreactive builds, you can use up to 9, because the audio input driver needs one of the hardware units that is normally available for driving LEDs.
39 | - * "classic" ESP32: 10 led strips (9 with audioreactive)
40 | - * ESP32-S3: 4 led strips
41 | - * ESP32-S2: 5 led strips (4 with audioreactive)
42 | - * ESP32-C3: 2 led strips
43 | - Contrary to the ESP8266, the pin usage does not matter on ESP32, feel free to use any available pin
44 | - For perfect performance, it is recommeded to use 512 LEDs/pin with 4 outputs for a total of 2048 LEDs.
45 | - For very good performance, it is recommended to use 800 LEDs/pin with 4 outputs for a total of 3200 LEDs.
46 | - For good performance, you can use 1000 LEDs/pin with 4 outputs for a total of 4000 LEDs.
47 | - For okay performance, you can use 1000 LEDs/pin with 5 outputs for a total of 5000 LEDs.
48 | - For okay performance, you can use 800 LEDs/pin with 6 outputs for a total of 4800 LEDs.
49 | - ESP32 can calculate about 65k-85k LEDs per second (that means 1000 LEDs @~70fps, 2000 LEDs @~35fps, 4000 LEDs @~18fps)
50 | - 4 outputs seem to be the sweet spot.
51 |
52 | ### Virtual LEDs (DDP)
53 |
54 | See [Virtual Leds](/advanced/ddp)
55 |
--------------------------------------------------------------------------------
/docs/advanced/custom-ap.md:
--------------------------------------------------------------------------------
1 | ---
2 | title: Custom Access Point SSID and Password
3 | hide:
4 | # - navigation
5 | # - toc
6 | ---
7 |
8 | !!! warning
9 | _Note: These options change the documented access point name and password. The WLED community does not recommend changing these settings unless you are familiar with the risks._
10 |
11 | Three compile time defines are available to modify the access point name. These are `WLED_AP_SSID`, `WLED_AP_PASS`, and `WLED_AP_SSID_UNIQUE`. Defining `WLED_AP_SSID` will set the SSID to the value of the define. Defining `WLED_AP_PASS` will set the password to the value of the define. Defining `WLED_AP_SSID_UNIQUE` will append the last 6 digits of the MAC address to the SSID.
12 |
13 | `WLED_AP_SSID` and `WLED_AP_PASS` are string values, and as such need to be defined with `"` surrounding them. For example, `#define WLED_AP_SSID "MyWLED"` or `-D WLED_AP_SSID='"MyWLED"'` in the `build_flags` of `platformio.ini`.
14 |
15 | ### Modifying the Access Point SSID
16 | Defining `WLED_AP_SSID` will set the SSID to the value of the define. This is useful to set a device specific access point name. For example, if you have multiple WLED devices, you can set the SSID to the device name.
17 |
18 | `WLED_AP_SSID` is a string value, and as such needs to be defined with `"` surrounding it. For example, `#define WLED_AP_SSID "MyWLED"` or `-D WLED_AP_SSID='"MyWLED"'` in the `build_flags` of `platformio.ini`.
19 |
20 | ### Modifying the Access Point Password
21 | Defining `WLED_AP_PASS` will set the password to the value of the define. This is useful to set a device specific access point password. For example, if you have multiple WLED devices, you can set the password to the device name.
22 |
23 | !!! tip
24 | If `WLED_AP_PASS` is defined, but `WLED_AP_SSID` is not, the compilation will fail. Ensure you define both `WLED_AP_SSID` and `WLED_AP_PASS` if you wish to change the access point password. Please also change the SSID if you wish to set a custom password.
25 |
26 | `WLED_AP_PASS` is a string value, and as such needs to be defined with `"` surrounding it. For example, `#define WLED_AP_PASS "MyWLEDPass"` or `-D WLED_AP_PASS='"MyWLEDPass"'` in the `build_flags` of `platformio.ini`.
27 |
28 | ### Modifying the Access Point SSID to be Unique
29 | Defining `WLED_AP_SSID_UNIQUE` will append the last 6 digits of the MAC address to the SSID. This is useful to set a device specific access point name with a common prefix. For example, if you have multiple WLED devices, you can set the SSID to `ChristmasTree-` followed by the last 6 digits of the MAC address.
30 |
31 | `WLED_AP_SSID_UNIQUE` is a boolean value, and as such only needs to be defined or not. For example, `#define WLED_AP_SSID_UNIQUE` or `-D WLED_AP_SSID_UNIQUE` in the `build_flags` of `platformio.ini`.
32 |
33 | ### Example
34 |
35 | For custom devices in `platformio_override.ini`:
36 |
37 | ```ini
38 | [env:mywled]
39 | board = esp32dev
40 | platform = ${esp32.platform}
41 | platform_packages = ${esp32.platform_packages}
42 | build_unflags = ${common.build_unflags}
43 | build_flags =
44 | ${common.build_flags_esp32}
45 | -D WLED_AP_SSID_UNIQUE
46 | -D WLED_AP_SSID='"MyWLED"'
47 | -D WLED_AP_PASS='"MyWLEDPass"'
48 | lib_deps = ${esp32.lib_deps}
49 | monitor_filters = esp32_exception_decoder
50 | board_build.partitions = ${esp32.default_partitions}
51 | ```
52 |
53 | In `my_config.h`:
54 |
55 | ```cpp
56 | #define WLED_AP_SSID_UNIQUE
57 | #define WLED_AP_SSID "MyWLED"
58 | #define WLED_AP_PASS "MyWLEDPass"
59 | ```
60 |
--------------------------------------------------------------------------------
/docs/interfaces/json-ir/24-key_ir.json:
--------------------------------------------------------------------------------
1 | {
2 | "remote": "24-key",
3 | "0xF700FF": {
4 | "label": "Bright+",
5 | "pos": "1x1",
6 | "cmd": "!incBrightness"
7 | },
8 | "0xF7807F": {
9 | "label": "Bright-",
10 | "pos": "1x2",
11 | "cmd": "!decBrightness"
12 | },
13 | "0xF740BF": {
14 | "label": "Off",
15 | "pos": "1x3",
16 | "cmd": "T=0"
17 | },
18 | "0xF7C03F": {
19 | "label": "On",
20 | "pos": "1x4",
21 | "cmd": "T=1"
22 | },
23 | "0xF720DF": {
24 | "label": "Red",
25 | "pos": "2x1",
26 | "cmnt": "Lava",
27 | "cmd": "FP=8&CL=hFF0000&C2=hFF7F00&C3=hCC3D60"
28 | },
29 | "0xF7A05F": {
30 | "label": "Green",
31 | "pos": "2x2",
32 | "cmnt": "Forest",
33 | "cmd": "FP=10&CL=h8000&C2=h8040&C3=h30661E"
34 | },
35 | "0xF7609F": {
36 | "label": "Blue",
37 | "pos": "2x3",
38 | "cmnt": "Breeze",
39 | "cmd": "FP=15&CL=hFF&C2=h7F00FF&C3=h3D60CC"
40 | },
41 | "0xF7E01F": {
42 | "label": "White",
43 | "pos": "2x4",
44 | "cmd": "FP=5&CL=hFFFFFF&C2=hFFFFFF&C3=hCCCCCC"
45 | },
46 | "0xF710EF": {
47 | "label": "Tomato",
48 | "pos": "3x1",
49 | "cmnt": "Yelmag",
50 | "cmd": "FP=5&CL=hFF6347&C2=hFFBF47&C3=hCC646F"
51 | },
52 | "0xF7906F": {
53 | "label": "LightGreen",
54 | "pos": "3x2",
55 | "cmnt": "Rivendale",
56 | "cmd": "FP=14&CL=h90EE90&C2=h90EEBF&C3=h96BE89"
57 | },
58 | "0xF750AF": {
59 | "label": "SkyBlue",
60 | "pos": "3x3",
61 | "cmnt": "Ocean",
62 | "cmd": "FP=9&CL=h87CEEB&C2=h879CEB&C3=h84B9BC"
63 | },
64 | "0xF7D02F": {
65 | "label": "Flash",
66 | "pos": "3x4",
67 | "cmnt": "Preset 1",
68 | "cmd": "PL=1"
69 | },
70 | "0xF730CF": {
71 | "label": "OrangeRed",
72 | "pos": "4x1",
73 | "cmnt": "Sakura",
74 | "cmd": "FP=49&CL=hFF4500&C2=hFFC400&C3=hCC403D"
75 | },
76 | "0xF7B04F": {
77 | "label": "Cyan",
78 | "pos": "4x2",
79 | "cmnt": "Beech",
80 | "cmd": "FP=22&CL=hFFFF&C2=h7FFF&C3=h3DCCA8"
81 | },
82 | "0xF7708F": {
83 | "label": "RebeccaPurple",
84 | "pos": "4x3",
85 | "cmd": "FP=5&CL=h663399&C2=h993399&C3=h4F417A"
86 | },
87 | "0xF7F00F": {
88 | "label": "Strobe",
89 | "pos": "4x4",
90 | "cmnt": "Preset 2",
91 | "cmd": "PL=2"
92 | },
93 | "0xF708F7": {
94 | "label": "Orange",
95 | "pos": "5x1",
96 | "cmnt": "Orangery",
97 | "cmd": "FP=47&CL=hFFA500&C2=hD9FF00&C3=hCC753D"
98 | },
99 | "0xF78877": {
100 | "label": "Turquoise",
101 | "pos": "5x2",
102 | "cmd": "FP=5&CL=h40E0D0&C2=h40A0E0&C3=h59B393"
103 | },
104 | "0xF748B7": {
105 | "label": "Purple",
106 | "pos": "5x3",
107 | "cmd": "FP=5&CL=h800080&C2=h800040&C3=h541E66"
108 | },
109 | "0xF7C837": {
110 | "label": "Fade",
111 | "pos": "5x4",
112 | "cmnt": "Preset 3",
113 | "cmd": "PL=3"
114 | },
115 | "0xF728D7": {
116 | "label": "Yellow",
117 | "pos": "6x1",
118 | "cmd": "FP=5&CL=hFFFF00&C2=hFFC800&C3=hFDFFDE"
119 | },
120 | "0xF7A857": {
121 | "label": "DarkCyan",
122 | "pos": "6x2",
123 | "cmd": "FP=5&CL=h8B8B&C2=h458B&C3=h216F5B"
124 | },
125 | "0xF76897": {
126 | "label": "Plum",
127 | "pos": "6x3",
128 | "cmnt": "Magenta",
129 | "cmd": "FP=40&CL=hDDA0DD&C2=hDDA0BE&C3=hA88EB0"
130 | },
131 | "0xF7E817": {
132 | "label": "Smooth",
133 | "pos": "6x4",
134 | "cmnt": "Preset 4",
135 | "cmd": "PL=4"
136 | }
137 | }
--------------------------------------------------------------------------------
/docs/interfaces/json-ir/24-key-v2_ir.json:
--------------------------------------------------------------------------------
1 | {
2 | "remote": "24-key-v2",
3 | "0xF700FF": {
4 | "label": "Bright+",
5 | "pos": "1x1",
6 | "cmd": "!incBrightness"
7 | },
8 | "0xF7807F": {
9 | "label": "Bright-",
10 | "pos": "1x2",
11 | "cmd": "!decBrightness"
12 | },
13 | "0xF740BF": {
14 | "label": "Off",
15 | "pos": "1x3",
16 | "cmd": "T=0"
17 | },
18 | "0xF7C03F": {
19 | "label": "On",
20 | "pos": "1x4",
21 | "cmd": "T=1"
22 | },
23 | "0xF720DF": {
24 | "label": "Red",
25 | "pos": "2x1",
26 | "cmnt": "Lava",
27 | "cmd": "FP=8&CL=hFF0000&C2=hFF7F00&C3=hCC3D60"
28 | },
29 | "0xF7A05F": {
30 | "label": "Green",
31 | "pos": "2x2",
32 | "cmnt": "Forest",
33 | "cmd": "FP=10&CL=h8000&C2=h8040&C3=h30661E"
34 | },
35 | "0xF7609F": {
36 | "label": "Blue",
37 | "pos": "2x3",
38 | "cmnt": "Breeze",
39 | "cmd": "FP=15&CL=hFF&C2=h7F00FF&C3=h3D60CC"
40 | },
41 | "0xF7E01F": {
42 | "label": "White",
43 | "pos": "2x4",
44 | "cmd": "FP=5&CL=hFFFFFF&C2=hFFFFFF&C3=hCCCCCC"
45 | },
46 | "0xF710EF": {
47 | "label": "Tomato",
48 | "pos": "3x1",
49 | "cmnt": "Yelmag",
50 | "cmd": "FP=5&CL=hFF6347&C2=hFFBF47&C3=hCC646F"
51 | },
52 | "0xF7906F": {
53 | "label": "LightGreen",
54 | "pos": "3x2",
55 | "cmnt": "Rivendale",
56 | "cmd": "FP=14&CL=h90EE90&C2=h90EEBF&C3=h96BE89"
57 | },
58 | "0xF750AF": {
59 | "label": "SkyBlue",
60 | "pos": "3x3",
61 | "cmnt": "Ocean",
62 | "cmd": "FP=9&CL=h87CEEB&C2=h879CEB&C3=h84B9BC"
63 | },
64 | "0xF7D02F": {
65 | "label": "Flash",
66 | "pos": "3x4",
67 | "cmnt": "Cycle effects",
68 | "cmd": "FX=~"
69 | },
70 | "0xF730CF": {
71 | "label": "OrangeRed",
72 | "pos": "4x1",
73 | "cmnt": "Sakura",
74 | "cmd": "FP=49&CL=hFF4500&C2=hFFC400&C3=hCC403D"
75 | },
76 | "0xF7B04F": {
77 | "label": "Cyan",
78 | "pos": "4x2",
79 | "cmnt": "Beech",
80 | "cmd": "FP=22&CL=hFFFF&C2=h7FFF&C3=h3DCCA8"
81 | },
82 | "0xF7708F": {
83 | "label": "RebeccaPurple",
84 | "pos": "4x3",
85 | "cmd": "FP=5&CL=h663399&C2=h993399&C3=h4F417A"
86 | },
87 | "0xF7F00F": {
88 | "label": "Strobe",
89 | "pos": "4x4",
90 | "cmnt": "Cycle palette",
91 | "cmd": "FP=~"
92 | },
93 | "0xF708F7": {
94 | "label": "Orange",
95 | "pos": "5x1",
96 | "cmnt": "Orangery",
97 | "cmd": "FP=47&CL=hFFA500&C2=hD9FF00&C3=hCC753D"
98 | },
99 | "0xF78877": {
100 | "label": "Turquoise",
101 | "pos": "5x2",
102 | "cmd": "FP=5&CL=h40E0D0&C2=h40A0E0&C3=h59B393"
103 | },
104 | "0xF748B7": {
105 | "label": "Purple",
106 | "pos": "5x3",
107 | "cmd": "FP=5&CL=h800080&C2=h800040&C3=h541E66"
108 | },
109 | "0xF7C837": {
110 | "label": "Fade",
111 | "pos": "5x4",
112 | "cmnt": "Speed +",
113 | "cmd": "SX=~16"
114 | },
115 | "0xF728D7": {
116 | "label": "Yellow",
117 | "pos": "6x1",
118 | "cmd": "FP=5&CL=hFFFF00&C2=hFFC800&C3=hFDFFDE"
119 | },
120 | "0xF7A857": {
121 | "label": "DarkCyan",
122 | "pos": "6x2",
123 | "cmd": "FP=5&CL=h8B8B&C2=h458B&C3=h216F5B"
124 | },
125 | "0xF76897": {
126 | "label": "Plum",
127 | "pos": "6x3",
128 | "cmnt": "Magenta",
129 | "cmd": "FP=40&CL=hDDA0DD&C2=hDDA0BE&C3=hA88EB0"
130 | },
131 | "0xF7E817": {
132 | "label": "Smooth",
133 | "pos": "6x4",
134 | "cmnt": "Speed -",
135 | "cmd": "SX=~-16"
136 | }
137 | }
--------------------------------------------------------------------------------
/docs/interfaces/serial.md:
--------------------------------------------------------------------------------
1 | ---
2 | title: Serial
3 | hide:
4 | # - navigation
5 | # - toc
6 | ---
7 |
8 | WLED 0.13.0 supports multiple protocols over Serial.
9 | Serial is available via USB, and on most boards, GPIO1 for TX and GPIO3 for RX.
10 |
11 | !!! info "Pin usage limitation"
12 | If GPIO3 is allocated (e.g. for LED output), all Serial functionality except debug output is unavailable.
13 | If GPIO1 is allocated, all Serial output is disabled, including the JSON API response, Improv, and tpm2 output.
14 |
15 | ### Adalight and tpm2
16 |
17 | Both these protocols are supported and can be used to stream realtime LED data to WLED for direct display, e.g. from an bias lighting program. For tpm2, only data packets are supported and data in 24-bit RGB format is expected.
18 | If you want to drive a large amount of LEDs, you may need to increase the Baud rate in WLED Sync settings, as the default baud rate of `115200` is only sufficient for about 50-100 LEDs depending on the refresh rate.
19 | Adalight is supported since WLED 0.6.3, tpm2 since version 0.10.2.
20 |
21 | ### JSON over Serial
22 |
23 | You can send commands to the WLED instance via Serial using the [JSON API](/interfaces/json-api).
24 | To request a JSON response containing the `state` and `info` objects, send `{"v":true}`.
25 |
26 | ### Improv
27 |
28 | Improv Serial is supported and can be used to check the installed software version as well as connect your device to WiFi without needing to connect to the WLED access point.
29 | Improv is used by the [WLED web installer](https://install.wled.me) for an easy installation and setup process.
30 | Note that the baud rate must remain at the default `115200` setting for the device to be detected as Improv-capable.
31 |
32 | ### Other
33 |
34 | #### Version query
35 |
36 | Send a lowercase `'v'` character (byte `0x76`) to obtain the ID of the installed WLED version.
37 |
38 | #### LED data query
39 |
40 | To get the colors currently displayed by LEDs:
41 |
42 | - Send an uppercase `'L'` (byte `0x4C`) to request the current LED data as a [tpm2](https://gist.github.com/jblang/89e24e2655be6c463c56) data packet in 24-bit RGB format.
43 |
44 | - Send a lowercase `'l'` (byte `0x6C`) to request the current LED data in JSON format. This returns the LED colors as 32-bit integers, of which the lowest byte is the Blue value, then Green, then Red, and the highest byte is the White channel value.
45 |
46 | For both of these methods, you may need to increase the baud rate if you have a large amount of LEDs.
47 | However, tpm2 requires on average 2-4x less bandwidth than JSON, and should therefore be preferred if your application can parse binary data.
48 |
49 | #### Changing Baud Rate
50 |
51 | There are 2 main method for changing Baud Rate for the serial connection
52 | - Persistant: Configure in App under [Sync Interfaces](/features/settings/#sync-settings). This setting will persist, and WLED will use specified Baud Rate from this point forward.
53 | - Temporary: Utilizing the serial connection at the existing Baud Rate, send the specific command byte to have WLED temporarily change to new Baud Rate. This Baud Rate is temporary and will be reset to default or peristant setting on reboot.
54 |
55 | Byte | Baud Rate
56 | --- | ---
57 | `0xB0` | 115200
58 | `0xB1` | 230400
59 | `0xB2` | 460800
60 | `0xB3` | 500000
61 | `0xB4` | 576000
62 | `0xB5` | 921600
63 | `0xB6` | 1000000
64 | `0xB7` | 1500000
65 | - *Note:* Keep at 115200 to use Improv. Some boards may not support high rates.
66 |
67 |
68 |
69 |
70 | #### Debugging
71 |
72 | Compile with the `-D WLED_DEBUG` build flag to enable serial debugging using `DEBUG_PRINTLN(x)` macros.
73 | This will reserve pin GPIO1, therefore it cannot be used for other purposes when debugging.
74 |
--------------------------------------------------------------------------------
/README.md:
--------------------------------------------------------------------------------
1 | # knoWLEDge
2 |
3 | The official documentation page for the WLED project!
4 | [To live page](https://kno.wled.ge)
5 |
6 | Community improvements are encouraged! Just click the little pencil mark on the page you'd like to change and submit a pull request.
7 | If you'd like to do more advanced changes (e.g. adding a page), the [Material for MkDocs documentation](https://squidfunk.github.io/mkdocs-material/getting-started/) is very helpful.
8 |
9 | ### Images
10 |
11 | If possible, it is preferable to store image content within this repository at `/docs/assets/images/content`. With external links, there is always a chance that the resource is deleted accidentally by the external hoster.
12 |
13 | ### How to add a new page
14 |
15 | Let’s consider an example. Let’s imagine we want to add a page called `Top 5 mistakes` in section `Basics` after the `Getting Started` page. This page already exists, so you can already see the results in WLED Docs, but let’s imagine the page is not there and we will go steps needed to add it:
16 |
17 | 1) Create a file that should contain the documentation. As we want to place the new page in section `Basics` it makes sense to put this file in subfolder `docs/basics/`. In our example we call the file `top5_mistakes.md`. You can use another .md file as an example. Important is to have the following few lines at the beginning of the file:
18 | ```
19 | ---
20 | title: TOP 5 mistakes
21 | hide:
22 | # - navigation
23 | # - toc
24 | ---
25 | ```
26 | Don’t forget to adapt the title.
27 |
28 | 2) Edit `mkdocs.yml` file. Take care that indentations play an important role in .yml files. Go to `nav:` section in this file and add a new line after the line `- Getting Started: basics/getting-started.md` as we want to add a new page after the `Getting Started` page. The new line must have the same indentation as the previous line and the content is `- Top 5 mistakes: basics/top5_mistakes.md`. By this we say that the new page must be called `Top 5 mistakes` and its content is in the file `top5_mistakes.md` we created before in subfolder `basics`.
29 | That is!
30 |
31 | ### How to add a new section
32 |
33 | It is even easier. Take a look at `nav:` section in `mkdoks.yml` file. To add a new section you just have to add a new line at a position where the new section must be. Then write a section name like this: `- Compatibility:`. TAKE CARE on indentations! After this line you can then add new pages as described above.
34 |
35 | ### How to test the representation of the documentation in web locally (on Windows, MAC OS X or Linux)
36 |
37 | You would need to install some tools:
38 |
39 | 1) WEB Server. The probably easiest way is to use [XAMPP](https://www.apachefriends.org/index.html) to run local WEB server on your PC/Laptop. After installing you would need to start XAMPP Control Panel and run Apache Server. In the folder where XAMPP is installed to you will find a subfolder called `htdocs`. This is the content of the WEB Server and you have to put WLED Docs web pages there, for example in subfolder called `wled-docs`. Later, after generating pages using mkdocs, you will be able to access them via `http://localhost/wled-docs/site/`
40 | 2) [Python](https://www.python.org/)
41 | 3) [MkDocs](https://www.mkdocs.org/user-guide/installation/#mkdocs-installation)
42 |
43 | Now you can downlaod WLED Docs sources from the repository to subfolder `wled-docs` in the folder `htdocs` in your XAMPP installation (or if you have git installed you can use git command to clone like `git clone --branch main https://github.com/Aircoookie/WLED-Docs`). To "compile" the resulting web pages you have to run `mkdocs build` command in the `wled-docs` folder using command line. It generates subfolder 'site' with the resulting web pages and you can access them in your browser via `http://localhost/wled-docs/site/`
44 |
--------------------------------------------------------------------------------
/docs/features/ethernet-lan.md:
--------------------------------------------------------------------------------
1 | ---
2 | title: Ethernet (LAN) compatibility
3 | hide:
4 | # - navigation
5 | # - toc
6 | ---
7 |
8 | ## Introduction
9 |
10 | WLED controllers are usually integrated into local network wirelessly (via WiFi). But there is also possibility to integrate WLED Controller into your network via Ethernet (LAN). Currently only ESP32 based controllers support Ethernet (classic, NOT new types like -S2, -C3, -S3 etc.).
11 |
12 | ## Preconditions and important notes
13 | - ESP32 based controller with integrated Ethernet or with Ethernet adapter is required.
14 | - The controller / adapter type must be supported by WLED. The list of supported controllers / adapters can be found below.
15 | - WLED Software must be compiled with Ethernet support included. Web-based WLED installer have special option for this. Be sure you use right WLED version with Ethernet support.
16 | - Ethernet requires many GPIOs (see table below). You cannot use them for other purposes at the same time.
17 | - If you switch from WiFi to Ethernet and you use dynamic (not static) IP addresses via DHCP (that is true in most cases), your WiFi/LAN Router will most likely grant new IP address to the WLED Controller. If you don’t delete WiFi credentials, your Controller will be accessible via WiFi and Ethernet at the same time by two different IP addresses.
18 | - Ethernet standard requires that the ethernet lines including shield are isolated form the electronics and for EMC reason ceramic capacitor (rated for 2 kV) is connected between Ethernet shield and electronics ground. Unfortunately, many simple/cheap ethernet adapters do not fulfill these requirements. Be careful using them.
19 | - Most of Ethernet based controllers/ adapters are based on LAN87xx IC. It requires proper reset line. Unfortunately, some simple/cheap adapters do not implement this line correctly that might lead to instabilities especially during boot up.
20 | - If you connect Ethernet adapter via wires, keep them as short as possible. The communication between ESP32 controller and the adapter is on high speed of 50 MHz that requires proper connection to avoid instabilities.
21 |
22 | ## Ethernet setup
23 | Go to "Config" and then to "WiFi Setup". At the bottom of this page select the Ethernet type you use. Then click on "Save & Connect". Ready!
24 | 
25 |
26 | ## Ethernet controllers and adapters supported by WLED (as of November 2023)
27 | Note: all controllers use GPIOs 19, 21, 22, 25, 26, 27 as they are required for ethernet and can not be changed. GPIOs additionally used are given in the table.
28 |
29 | | Name | Features | additional GPIOs used |
30 | |---|---|---|
31 | [ABC! WLED V43 & compatible](https://shop.myhome-control.de/Ethernet-Adapter-fuer-WLED-Controller/HW10016) | Isolated shield in accordance with IEEE 802.3 standard; LAN8720 based with proper reset line; adapter developed as Plug& Play solution for [ABC! WLED Controller V43](https://shop.myhome-control.de/ABC-WLED-Controller-Board-5-24V/HW10015) but also might be used with other ESP32 boards | 5, 17, 23, 33
32 | [ESP32-POE](https://github.com/OLIMEX/ESP32-POE/) | General purpose controller with integrated Ethernet | 12, 17, 18, 23
33 | ESP32Deux | | 17, 18, 23
34 | [KIT-VE](https://docs.espressif.com/projects/esp-idf/en/latest/esp32/hw-reference/esp32/get-started-ethernet-kit.html) | Board from Espressif (ESP microcontroller manufacture company) | 0, 5, 18, 23
35 | [QuinLED-Dig-Octa](https://quinled.info/quinled-dig-octa/) & [T-ETH-POE](https://www.lilygo.cc/products/t-internet-poe) | | 17, 18, 23
36 | [QuinLED-ESP32](https://quinled.info/quinled-esp32-ethernet/) | | 5, 17, 18, 23
37 | [Serg74-ETH32](https://github.com/srg74/ESP32_ethernet) | | 5, 17, 18, 23
38 | [TwilightLord-ESP32](https://www.hackster.io/news/twilightlord-s-esp32-dev-board-aims-to-improve-on-the-wemos-d1-mini-esp32-and-its-various-clones-3bf449c30d1e) | | 5, 17, 18, 23
39 | [WESP32](https://wesp32.com/) | | 0, 16, 17
40 | [WT32-ETH01](https://www.seeedstudio.com/Ethernet-module-based-on-ESP32-series-WT32-ETH01-p-4736.html) | | 0, 16, 18, 23
41 |
42 |
43 |
44 |
--------------------------------------------------------------------------------
/docs/features/relay-control.md:
--------------------------------------------------------------------------------
1 | ---
2 | title: Control a Relay
3 | hide:
4 | # - navigation
5 | # - toc
6 | ---
7 |
8 | Digital LED strips still use power when seemingly switched off, about 1W per 200 LEDs. In case you want to prevent that, you can completely cut power to the LEDs by adding a relay to your circuit. It is toggled by WLED when WLED is turned on/off (in the UI, or through other interfaces).
9 | No pin is allocated for a relay by default, but can be easily set in the LED preferences page.
10 | Previously, GPIO12 (Pin D6 on many devices) was set as the default and is confirmed to work well on most boards except the ESP32-C3.
11 |
12 | When you decide that you want WLED to control a relay, make sure you buy a suitable relay board. Check what voltage you can supply from your controller to relay (available 3.3V or 5V pin or different voltage from external power source), and make sure the relay can be controlled by voltage level your board is providing (3.3V CMOS, 5V TTL). Note, some relays come with a jumper that lets you configure whether the relay switches at high or low level of signal, giving you maximum flexibility.
13 |
14 | [This page](https://www.geekering.com/?p=187) gives a clear description using a light bulb instead of a LED strip. And instead of the D1 mentioned there, with WLED, you use the pin you set.
15 |
16 | The default WLED behavior is to turn the relay pin on (high) when the LEDs are on and off (low) when the LEDs are off. This can be changed in the LED Preferences page. Many relays are powered when the signal is LOW. See [this thread](https://github.com/Aircoookie/WLED/issues/631#issuecomment-605512524).
17 |
18 | Sometimes people ask whether they can control more than one relay through WLED, including controlling this all via Alexa. Controlling an extra relay separately from the RGB lights is not something WLED is designed to do, however you can modify the code to add that functionality. For that, make sure you can compile WLED from source unmodified first. Then, change #define ESPALEXA_MAXDEVICES 1 in line 71 of the wled.h file to 2. After that, just follow the API documentation on https://github.com/Aircoookie/Espalexa to add a new EspalexaDevice to the alexa.cpp file
19 |
20 | Second option for controlling multiple relays is using a Multi Relay usermod. As with Alexa you will need to compile WLED from source an include Multi Relay usermod either by including `-D USERMOD_MULTI_RELAY` in PlatformIO.ini or adding `#define USERMOD_MULTI_RELAY` in `wled.h` or `my_config.h`. You can also override default number of relays by defining `MULTI_RELAY_MAX_RELAYS`. Configuring usermod is done using Usermod settings page where you can define GPIO pins used, wether relay activates on HIGH or LOW logic, if the activation has any delay and if the relay can be controlled from the outside using MQTT message (external).
21 | MQTT topic for controlling relays is `wled/[device]/relay/[relay_id]/command` and accepts `on`, `off` and `toggle` messages. When the relay changes state a message with `on` or `off` is sent with the topic `wled/[device]/relay/[relay_id]`.
22 |
23 | How To: Use WLED to switch external relay with PIR sensor without affecting WLED state
24 |
25 | If you do not want PIR (motion) sensor attached to WLED controller to trigger change of WLED state, but still want to control a legacy light, fan, etc. use the Multi Relay usermod and another relay attached to WLED controller. Create two presets for relay control (shown for switching relay off) and set up PIR and multi relay usermods as shown.
26 |
27 | 
28 |
29 | If you do not want button relay control just leave relay button at -1, the same goes for PIR sensor parameters (leave nighttime-only and/or off-only unchecked). Adjust preset numbers and GPIO pins to your liking. Multi relay usermod can also switch relay using MQTT messages or HTTP requests (check source code for available commands). Of course if you configured MQTT on your WLED device PIR sensor usermod will publish /motion topic to MQTT broker for your HA integration.
30 |
31 | 
32 |
33 | 
34 |
--------------------------------------------------------------------------------
/docs/features/pixel-art-converter.md:
--------------------------------------------------------------------------------
1 | ---
2 | title: Pixel Art Converter
3 | hide:
4 | # - navigation
5 | # - toc
6 | ---
7 |
8 | The Pixel Art Converter tool aims to make it easier to show pixel art on a LED matrix panel, by converting any image to 2D pixel art and sending it to the WLED device. The file types PNG, JPG, WEBP and GIF have been tested to work with the tool.
9 |
10 | ## Installation Approaches
11 |
12 | There are three ways to install the pixel art converter:
13 |
14 | 1. Local web browser. Will a web page run on the local machine connecting to the WLED device but will require fetching an extra file. Supported from WLED release [v0.14.0-b1](https://github.com/Aircoookie/WLED/blob/main/CHANGELOG.md#wled-release-0140-b1) or later
15 | 2. Include the pixel art converter in the binary and compile it from the source code. Allows access to the pixel art converter on any device that has a connection to the WLED device. Supported from WLED release [v0.14.0-b2](https://github.com/Aircoookie/WLED/blob/main/CHANGELOG.md#build-2301240) (PR [#3042](https://github.com/Aircoookie/WLED/pull/3042))
16 | 3. WLED editor mode. Upload the web page to your WLED device while it is running
17 |
18 | ### Approach 1: Local Browser
19 |
20 | 1. Download the `pixartmin.htm` from the [WLED-PixelArtConverter](https://github.com/werkstrom/WLED-PixelArtConverter/) repository
21 | 2. Open `pixartmin.htm` in a browser
22 | 3. Head over to the [Setup 2D Matrix](#setup-2d-matrix) point
23 |
24 |
25 |
26 | ### Approach 2: Include Pixart Converter In Build Files
27 | !!! warning "Compilation required"
28 | Compiling WLED from the source code is required. Follow the instructions on [compiling WLED](../../advanced/compiling-wled) to do this.
29 |
30 | 1. Follow the instructions under [Making a custom environment](../../advanced/compiling-wled/#making-a-custom-environment) and set the flag `-D WLED_ENABLE_PIXART` under the line that starts with `build_flags =` in `platformio_override.ini`
31 | 2. Compile and flash the binary to the ESP board
32 | 3. Power on board and connect via WiFi using the [default login](../../basics/getting-started/)
33 | 4. It is now time to [Setup the 2D Matrix](#setup-2d-matrix)
34 |
35 | ### Approach 3: WLED Editor Mode
36 |
37 | !!! note "Network connection"
38 | A network connection is required to connect to the CDN, hosting the JS library [Ace](https://github.com/ajaxorg/ace), an embedded code editor.
39 |
40 | 1. Download the `pixartmin.html` file from the [WLED-PixelArtConverter](https://github.com/werkstrom/WLED-PixelArtConverter/) repository
41 | 2. Go to the URL `http://[device_ip_address]/edit`
42 | 3. Upload the `pixartmin.html` file using the UI
43 | 4. Go to `http://[device_ip_address]/pixartmin.html`
44 | 5. Now head to the [Setup 2D Matrix](#setup-2d-matrix) point
45 |
46 | ## Setup 2D Matrix
47 | 2D LED panels are natively supported by WLED but need some configuration for the software to show the 2D grid correctly.
48 |
49 | 1. Head into the `2D Configuration` settings menu in WLED
50 | 2. Set the option "Strip or panel" to `2D Matrix`
51 | 3. Setup rest of the LED panel layout according to the specifics of your LED panel
52 |
53 | !!! tip "Serpentine option"
54 | Setting the serpentine LED panel option incorrectly can lead to very confusing results that look almost correct but not quite. Enabling or Disabling the option depends on the characteristics of the 2D matrix
55 |
56 | ## Usage
57 | The Pixel Art Generator does not yet have a link in the WLED front-end, therefore head over to the web page: `http://[device_ip_address]/pixart.htm` (default DHCP IP-address [link](http://4.3.2.1/pixart.htm)).
58 |
59 | On the web page:
60 |
61 | 1. Set the option "LED setup" to 2D matrix or serpentine accordingly.
62 | 2. Select an image that should be shown on the matrix display
63 |
64 | 
65 |
66 | This example uses a 16x16 pixel, happy version of the WLED mascot Akemi by [Aircoookie](https://github.com/Aircoookie/Akemi).
67 |
68 | 3. A preview is displayed further down the web page.
69 |
70 | !!! tip "Scaling option"
71 | It can help to use the `Scale image` option, depending on the image size used.
72 |
73 | 
74 |
75 | 4. Click on "Send to device" to push the generated image to the WLED device.
--------------------------------------------------------------------------------
/docs/interfaces/udp-realtime.md:
--------------------------------------------------------------------------------
1 | ---
2 | title: UDP Realtime / tpm2.net
3 | hide:
4 | # - navigation
5 | # - toc
6 | ---
7 |
8 | ### Hyperion
9 |
10 | You can now use WLED with the popular Ambilight software Hyperion.
11 | Just configure Hyperion to use an UDP device with protocol 0 on port 19446!
12 | The maximum number of LEDs supported in this mode is 490. (WLED 0.8.0 and lower: 341)
13 |
14 | ### Prismatik
15 |
16 | [Prismatik](https://github.com/psieg/Lightpack) is another Ambilight option.
17 | Select one of the UDP options in the device configuration wizard.
18 |
19 | ### TPM2.NET
20 |
21 | Supported in latest master and will be available in WLED 0.10.1.
22 | Please set the WLED broadcast UDP port to 65506 in Sync settings to enable receiving TPM2.NET data.
23 |
24 | ### UDP Realtime
25 |
26 | Additionally, WLED offers a way to directly drive the connected LEDs via UDP. The protocol is referred to as WLED [Audio-Reactive-Led-Strip](https://github.com/scottlawsonbc/audio-reactive-led-strip) (WARLS), since the support of that project was its primary goal. However, it can also be used for other realtime applications like an ambilight.
27 |
28 | WARLS uses the same UDP port the notifier uses (default 21324, can be changed in settings).
29 | At the moment, the web UI will be disabled while active, the HTTP API, Alexa and button control remains functional.
30 | It uses the current brightness and gamma correction settings.
31 |
32 | Byte 0 of the UDP packet tells the server which realtime protocol to use.
33 |
34 | Value | Description | Max. LEDs
35 | --- | --- | ---
36 | 1 | WARLS | 255
37 | 2 | DRGB | 490
38 | 3 | DRGBW | 367
39 | 4 | DNRGB | 489/packet
40 | 0 | WLED Notifier | -
41 |
42 | In every protocol, Byte 1 tells the server how many seconds to wait after the last received packet before returning to normal mode, in practice you should use 1-2 (seconds) here in most cases so that the module returns to normal mode quickly after the end of transmission. Use 255 to stay on the UDP data without a timeout until a request is requested via another method.
43 |
44 | After this the LED color information is transmitted like this:
45 |
46 | WARLS
47 |
48 | Byte | Description
49 | --- | ---
50 | 2 + n*4 | LED Index
51 | 3 + n*4 | Red Value
52 | 4 + n*4 | Green Value
53 | 5 + n*4 | Blue Value
54 |
55 | DRGB:
56 | This mode has the difference that the LED indices are not part of the packet, instead every LED is updated. This leads to a higher speed when all LEDs are changed, but a drastically lower speed if only one LED is updated per packet.
57 |
58 | Byte | Description
59 | --- | ---
60 | 2 + n*3 | Red Value
61 | 3 + n*3 | Green Value
62 | 4 + n*3 | Blue Value
63 |
64 | DRGBW:
65 | Like DRGB, but supports the White value for RGBW strips.
66 |
67 | Byte | Description
68 | --- | ---
69 | 2 + n*4 | Red Value
70 | 3 + n*4 | Green Value
71 | 4 + n*4 | Blue Value
72 | 5 + n*4 | White Value
73 |
74 | DNRGB:
75 | DRGB, but with 2 additional bytes that signify the starting LED index.
76 | This allows for more than 490 LEDs in realtime mode by sending multiple packets.
77 |
78 | Byte | Description
79 | --- | ---
80 | 2 | Start index high byte
81 | 3 | Start index low byte
82 | 4 + n*3 | Red Value
83 | 5 + n*3 | Green Value
84 | 6 + n*3 | Blue Value
85 |
86 | When realtime mode starts, all LEDs will be black. However, you don't have to change all LEDs using one packet.
87 | Changing a single LED therefore only requires a packet of 2+4 bytes. All LEDs maintain their color until it is changed or the module exits WARLS mode because of a timeout.
88 |
89 | ### Setup with ARLS
90 |
91 | The software now supports audio-reactive-led-strip!
92 |
93 | 1. Download [audio-reactive-led-strip](https://github.com/scottlawsonbc/audio-reactive-led-strip) and follow its installation instruction. You can also use my (untested) [fork](https://github.com/Aircoookie/audio-reactive-led-strip). In that case, you can skip step 2.
94 | 2. Insert the following code in led.py after line 66:
95 | m.append(1);
96 | m.append(2);
97 | These are the first two bytes of the protocol.
98 | 3. In config.py set your led amount, ESP IP and WLED UDP notifier port. For FPS, a setting between 15-30 is recommended.
99 | 4. Run visualization.py! If you have a low amount of LEDS (e.g. 10) try lowering the sigma values in line 129-131.
100 | 5. If you have multiple WLED devices, you can sync them all with music.
101 | Use the led count of your largest device and set the IP to X.X.X.255 (UDP broadcast).
102 | You can adjust the position of the amplitude with the WARLS offset setting.
103 | Note that web control currently does not work while it is active.
104 |
--------------------------------------------------------------------------------
/docs/interfaces/json-ir/32-key_ir.json:
--------------------------------------------------------------------------------
1 | {
2 | "remote": "32-key",
3 | "0xFF08F7": {
4 | "label": "On",
5 | "pos": "1x1",
6 | "cmd": "T=1"
7 | },
8 | "0xFFC03F": {
9 | "label": "Off",
10 | "pos": "1x2",
11 | "cmd": "T=0"
12 | },
13 | "0xFF807F": {
14 | "label": "Auto",
15 | "pos": "1x3",
16 | "cmnt": "Toggle preset cycle",
17 | "cmd": "CY=2&PT=60000"
18 | },
19 | "0xFF609F": {
20 | "label": "Mode",
21 | "pos": "1x4",
22 | "cmnt": "Cycle effects",
23 | "cmd": "FX=~"
24 | },
25 | "0xFF906F": {
26 | "label": "4H",
27 | "pos": "2x1",
28 | "cmnt": "Timer 60min",
29 | "cmd": "NL=60&NT=0"
30 | },
31 | "0xFFB847": {
32 | "label": "6H",
33 | "pos": "2x2",
34 | "cmnt": "Timer 90min",
35 | "cmd": "NL=90&NT=0"
36 | },
37 | "0xFFF807": {
38 | "label": "8H",
39 | "pos": "2x3",
40 | "cmnt": "Timer 120min",
41 | "cmd": "NL=120&NT=0"
42 | },
43 | "0xFFB04F": {
44 | "label": "Timer Off",
45 | "pos": "2x4",
46 | "cmd": "NL=0"
47 | },
48 | "0xFF9867": {
49 | "label": "Red",
50 | "pos": "3x1",
51 | "cmnt": "Lava",
52 | "cmd": "FP=8&CL=hFF0000&C2=hFF7F00&C3=hCC3D60"
53 | },
54 | "0xFFD827": {
55 | "label": "Green",
56 | "pos": "3x2",
57 | "cmnt": "Forest",
58 | "cmd": "FP=10&CL=h8000&C2=h8040&C3=h30661E"
59 | },
60 | "0xFF8877": {
61 | "label": "Blue",
62 | "pos": "3x3",
63 | "cmnt": "Breeze",
64 | "cmd": "FP=15&CL=hFF&C2=h7F00FF&C3=h3D60CC"
65 | },
66 | "0xFFA857": {
67 | "label": "White",
68 | "pos": "3x4",
69 | "cmd": "FP=5&CL=hFFFFFF&C2=hFFE4CD&C3=hE4E4FF"
70 | },
71 | "0xFFE817": {
72 | "label": "OrangeRed",
73 | "pos": "4x1",
74 | "cmnt": "Sakura",
75 | "cmd": "FP=49&CL=hFF4500&C2=hFFC400&C3=hCC403D"
76 | },
77 | "0xFF48B7": {
78 | "label": "SeaGreen",
79 | "pos": "4x2",
80 | "cmnt": "Rivendale",
81 | "cmd": "FP=14&CL=h2E8B57&C2=h2E8B85&C3=h3B6F45"
82 | },
83 | "0xFF6897": {
84 | "label": "RoyalBlue",
85 | "pos": "4x3",
86 | "cmnt": "Ocean",
87 | "cmd": "FP=9&CL=h4169E1&C2=h6941E1&C3=h5A87B4"
88 | },
89 | "0xFFB24D": {
90 | "label": "DarkBlue",
91 | "pos": "4x4",
92 | "cmnt": "Breeze",
93 | "cmd": "FP=15&CL=h8B&C2=h45008B&C3=h21346F"
94 | },
95 | "0xFF02FD": {
96 | "label": "Orange",
97 | "pos": "5x1",
98 | "cmnt": "Orangery",
99 | "cmd": "FP=47&CL=hFFA500&C2=hD9FF00&C3=hCC753D"
100 | },
101 | "0xFF32CD": {
102 | "label": "YellowGreen",
103 | "pos": "5x2",
104 | "cmnt": "Aurora",
105 | "cmd": "FP=37&CL=h9ACD32&C2=h4CCD32&C3=h9DA44D"
106 | },
107 | "0xFF20DF": {
108 | "label": "SkyBlue",
109 | "pos": "5x3",
110 | "cmnt": "Beech",
111 | "cmd": "FP=22&CL=h87CEEB&C2=h879CEB&C3=h84B9BC"
112 | },
113 | "0xFF00FF": {
114 | "label": "Orchid",
115 | "pos": "5x4",
116 | "cmd": "FP=5&CL=hDA70D6&C2=hDA70A0&C3=hA173AE"
117 | },
118 | "0xFF50AF": {
119 | "label": "Yellow",
120 | "pos": "6x1",
121 | "cmnt": "Yellowout",
122 | "cmd": "FP=17&CL=hFFFF00&C2=h7FFF00&C3=hCCA83D"
123 | },
124 | "0xFF7887": {
125 | "label": "DarkGreen",
126 | "pos": "6x2",
127 | "cmnt": "Orange and Teal",
128 | "cmd": "FP=44&CL=h6400&C2=h6432&C3=h265018"
129 | },
130 | "0xFF708F": {
131 | "label": "RebeccaPurple",
132 | "pos": "6x3",
133 | "cmd": "FP=5&CL=h663399&C2=h993399&C3=h4F417A"
134 | },
135 | "0xFF58A7": {
136 | "label": "Plum",
137 | "pos": "6x4",
138 | "cmd": "FP=5&CL=hDDA0DD&C2=hDDA0BE&C3=hA88EB0"
139 | },
140 | "0xFF38C7": {
141 | "label": "Strobe",
142 | "pos": "7x1",
143 | "cmnt": "Dancing Shadows",
144 | "cmd": "FX=112"
145 | },
146 | "0xFF28D7": {
147 | "label": "In Waves",
148 | "pos": "7x2",
149 | "cmnt": "Noise 1",
150 | "cmd": "FX=70"
151 | },
152 | "0xFFF00F": {
153 | "label": "Speed +",
154 | "pos": "7x3",
155 | "cmd": "SX=~16"
156 | },
157 | "0xFF30CF": {
158 | "label": "Speed -",
159 | "pos": "7x4",
160 | "cmd": "SX=~-16"
161 | },
162 | "0xFF40BF": {
163 | "label": "Jump",
164 | "pos": "8x1",
165 | "cmnt": "Colortwinkles",
166 | "cmd": "FX=74"
167 | },
168 | "0xFF12ED": {
169 | "label": "Fade",
170 | "pos": "8x2",
171 | "cmnt": "Sunrise",
172 | "cmd": "FX=104"
173 | },
174 | "0xFF2AD5": {
175 | "label": "Flash",
176 | "pos": "8x3",
177 | "cmnt": "Railway",
178 | "cmd": "FX=78"
179 | },
180 | "0xFFA05F": {
181 | "label": "Chase Flash",
182 | "pos": "8x4",
183 | "cmnt": "Washing Machine",
184 | "cmd": "FX=113"
185 | }
186 | }
--------------------------------------------------------------------------------
/docs/features/cct.md:
--------------------------------------------------------------------------------
1 | ---
2 | title: White handling
3 | hide:
4 | # - navigation
5 | # - toc
6 | ---
7 |
8 | ### White channel(s) handling
9 |
10 | Besides addressable RGB and RGBW bus types, WLED 0.13.0 also supports PWM CCT (correlated color temperature) lights.
11 |
12 | #### Auto white handling
13 |
14 | Many effects and realtime sources are based on an RGB color model, which necessitates a method to calculate a white channel value from the RGB value for lights that support more than RGB.
15 |
16 | WLED offers four auto white modes, one of which can be selected in LED settings using the option `Auto-calculate white channel from RGB`. This option is only shown if at least one bus with White channel support is present.
17 |
18 | | Auto White mode | Description |
19 | |---|---|
20 | Accurate | This mode subtracts the calculated white value from the RGB channels. This gets rid of the "RGB-white" but means that the light is less bright with only the white channel and not the RGB channels being utilized for pure white.
21 | Brighter | This does the exact opposite and not touch the RGB channels at all, just mix in the dedicated white.
22 | None | No auto white calculation is performed. The white channel of colors can be manually set using the `White channel` slider in the user interface, RGB-only effects and most realtime sources will leave the white channel off.
23 | Dual | The `White channel` slider is present in the UI and works the same as in `None` mode, however if the slider value is 0 (far left), the `Brighter` mode is used for auto white calculation. This is the default auto white mode.
24 |
25 | `Accurate` and `Brighter` methods are applied on a per-pixel basis, so they also work in color palettes and realtime effects!
26 |
27 | #### White Balance correction
28 |
29 | If enabled in LED settings, WB correction allows either making all pixels colder or warmer on a per-segment basis using a slider in the main user interface.
30 | This is applied to the RGB color only, after the auto white channel calculation.
31 |
32 | #### CCT handling
33 |
34 | WLED starting with version 0.13.0 also supports bus types with two white channels, one with a warm color temperature (e.g. 2700 Kelvin, reddish white) and one with a cold white color temperature (e.g. 8000 Kelvin, bluish white).
35 |
36 | Since as of the release of version 0.13.0 no adjustable CCT addressable LEDs are supported*, this only applies to PWM analog LED outputs.
37 |
38 | _*SK6812 WWA (with 3 channels, warm white, cold white and amber) are supported, but treated as if RGB using the `WS281x` bus type. White spectrum support for this LED type will be added at a later point._
39 |
40 | The overall brightness of the white channels is determined from the auto-white calculation outlined above, and as such is identical in behavior to that of single white channel busses.
41 |
42 | The color temperature is set either on a per-segment basis via a dedicated slider in the UI, or if `Calculate CCT from RGB` is enabled in LED settings, is estimated on a per-pixel basis from the set RGB color (e.g. setting Red results in the warmest, setting Blue results in the coldest possible white).
43 | The former has the advantage of granular white spectrum control independent of the set RGB color, while the latter enables control of the color temperature from all effects and realtime sources.
44 |
45 | #### CCT additive blending
46 |
47 | Setting this to 0% results in a more even brightness output across the supported temperature range, as the fading between the warm and cold white channels is linear.
48 |
49 | Setting this to 100% results in the highest peak brightness output at the neutral white point (CCT value `127`), as both white channels are active at 100%.
50 |
51 | 
52 |
53 | !!! warning
54 | Make sure your setup can handle driving both white channels at maximum output simultaneously. This results in a higher heat output and might reduce the lifetime of your LEDs. For example, bulbs by Athom are designed for linear blending (0%) and may be damaged by attempting to use additive blending.
55 |
56 | You can limit the maximum allowed additive blending at build time using the `WLED_MAX_CCT_BLEND` macro.
57 | For example, add `-D WLED_MAX_CCT_BLEND=0` to your build flags to force linear blending only.
58 |
59 | #### IC CCT
60 |
61 | By default, PWM CCT bus types set the value of the warm and cold white channels.
62 | If your hardware uses an IC that controls the color temperature based on one PWM signal and the overall brightness on the other, please use the build flag `-D WLED_USE_IC_CCT` in a custom compilation. (the 15W bulb by Athom uses this method)
63 |
64 | #### CCT in the JSON API
65 |
66 | Please see [here](/interfaces/json-api/#cct-control) for more info on how to handle WLED CCT from integrations.
--------------------------------------------------------------------------------
/docs/basics/compatible-software.md:
--------------------------------------------------------------------------------
1 | ---
2 | title: Compatible Software
3 | hide:
4 | # - navigation
5 | # - toc
6 | ---
7 |
8 | !!! note ""
9 | Still under construction, feel free to add to the list!
10 |
11 | This page lists some third-party software that can interface with WLED!
12 |
13 | ## Controllers
14 |
15 | Controllers use the WLED API to change the current light settings.
16 |
17 | | Name | Description |
18 | |---|---|
19 | [Home Assistant](https://www.home-assistant.io/integrations/wled/) | Versatile and feature rich home automation system. Out-of-the-box WLED integration with automatic discovery.
20 | [Homey pro with the D.A.L.O.R App](https://homey.app/en-us/app/com.sdn.neopixel-on-rest/D.A.L.O.R/) | Home automation system, WLED integration via the D.A.L.O.R. app with automatic discovery.
21 | [ioBroker adapter](https://github.com/iobroker-community-adapters/ioBroker.wled) | Versatile and feature rich home automation system. Out-of-the-box WLED integration with automatic discovery.
22 | | [Lumia Stream](https://lumiastream.com/) | Allows for control of your lights from streaming software |
23 | | [node-red-contrib-wled](https://flows.nodered.org/node/node-red-contrib-wled) | [Node-RED](https://nodered.org) nodes for WLED |
24 | | [OctoPrint-WLED](https://plugins.octoprint.org/plugins/wled) | Connect your [OctoPrint](https://octoprint.org) install to your WLED install using this plugin to show things like printer status, progress and more! |
25 | [openHAB](https://community.openhab.org/t/wled-a-binding-for-controlling-led-strips-and-strings-from-an-opensource-esp8266-project/87286) | Another more professional feature rich home automation system. WLED integration made easy. [Link 2](https://community.openhab.org/t/solved-wled-please-make-this-work-in-openhab/82783) |
26 | [WLED-GUI](https://github.com/WoodyLetsCode/WLED-GUI) | This is a cross-platform desktop app for WLED. You can use it on Windows, Linux and Mac.
27 | [WLED Native for Android](https://github.com/Moustachauve/WLED-Native-Android)[WLED Native for iOS](https://github.com/Moustachauve/WLED-Native-iOS/) | An alternative version of the WLED app with a similar user interface to the official one that looks close to the native OS style guidelines and has a few more features added on top of it. 28 | [wledQuickControl](https://github.com/satrik/wledQuickControl) | macOS 11.0+ Menu Bar app for controlling power and brightness. 29 | [WinLED](https://github.com/clusterzx/WinLED) | Windows App for controlling WLED Instance (Brighness, Power, Presets, Effects...). Also usable from Traybar for quick actions. 30 | ## Sources 31 | 32 | Source programs generate light data and stream them to WLED in real time. 33 | 34 | | Name | Description | 35 | |---|---| 36 | [LedFx](https://github.com/LedFx/LedFx) | A music visualization tool written in Python. Connects to WLED via E1.31 or UDP. [Dr.Zzs tutorial video](https://www.youtube.com/watch?v=ipSfQdfX4fE) 37 | [Prismatik WLED-WiFi](https://github.com/psieg/Lightpack) (native) | Ambilight via WiFi or serial - natively supports UDP (WARLS, DRGB, DNRGB protocols). 38 | [Prismatik WLED-WiFi](https://github.com/Lord-FEAR/Prismatik-WLED-WiFi) (plugin) | Ambilight via WiFi - a Plugin alternative for Prismatik WLED support. 39 | [xLights](http://xlights.org/) | xLights is a Light Sequencer and Show scheduler which works with WLED. Dr.Zzs has made some videos to set it up. [Intro Video](https://www.youtube.com/watch?v=p7wV6A26Gak) 40 | [Hyperion.ng](https://hyperion-project.org/) | Hyperion is an open-source Bias or Ambient Lighting implementation which you might know from TV manufacturers. It supports many LED devices and video grabbers. Support for WLED through UDPraw at port 19446 or E1.31. [Tutorial video](https://www.youtube.com/watch?v=SudT6AjwwOM), [Dr.Zzs video](https://youtu.be/urOEHzbV48A?t=649) 41 | [Hyperion (Classic)](https://hyperion-project.org/) | Hyperion is an open-source Bias or Ambient Lighting implementation which you might know from TV manufacturers. It supports many LED devices and video grabbers. Support for WLED through UDPraw at port 19446 or E1.31. 42 | Enigmalight | Ambilight clone for broadcom based linux receivers. It supports many LED devices. Support for WLED through USB Adalight/Momo. Download to various forums use the WEB search function of your browser. 43 | [Q Light Controller+](https://www.qlcplus.org/) | QLC+ is a free and cross-platform software to control DMX or analog lighting systems like moving heads, dimmers, scanners etc. QLC+ runs on Linux, Windows (XP+), macOS (10.7+) and the Raspberry Pi. WLED can be used with E1.31 (sACN). use major version 4, as 5 is in development. 44 | 45 | ## Various 46 | 47 | | Name | Description | 48 | |---|---| 49 | [Logitech WLED Sync](https://github.com/hkayy/Logitech-WLED-Sync) | Windows tray application to sync Logitech gaming peripherals to WLED. 50 | -------------------------------------------------------------------------------- /mkdocs.yml: -------------------------------------------------------------------------------- 1 | site_name: WLED Project 2 | site_author: Christian Schwinne (Aircoookie) 3 | #site_url: https://wled.app 4 | repo_name: WLED 5 | repo_url: https://github.com/Aircoookie/WLED 6 | repo_title: WLED Repository 7 | #copyright: Copyright © 2016-2021 Christian Schwinne, Contributors 8 | edit_uri: https://github.com/Aircoookie/WLED-Docs/edit/main/docs 9 | theme: 10 | name: material 11 | custom_dir: docs/assets/overrides 12 | language: en 13 | favicon: assets/images/ui/aircoookie/blurple.png 14 | logo: assets/images/ui/akemi/001_cheerful.png 15 | icon: 16 | repo: fontawesome/brands/github 17 | features: 18 | - navigation.top 19 | # - navigation.expand 20 | - navigation.instant 21 | - navigation.tabs 22 | - content.action.edit 23 | # - toc.integrate 24 | palette: 25 | - scheme: wled 26 | primary: cyan #mostly overriden in extra.css 27 | accent: orange 28 | toggle: 29 | icon: material/weather-sunny 30 | name: Light Mode 31 | - scheme: default 32 | primary: orange 33 | accent: orange 34 | toggle: 35 | icon: material/weather-night 36 | name: Dark Mode 37 | plugins: 38 | - search 39 | markdown_extensions: 40 | - admonition 41 | - attr_list 42 | - pymdownx.highlight 43 | - pymdownx.superfences 44 | - pymdownx.details 45 | - pymdownx.tilde 46 | extra: 47 | social: 48 | - icon: fontawesome/brands/discord 49 | link: https://discord.gg/QAh7wJHrRM 50 | name: Discord 51 | - icon: fontawesome/brands/discourse 52 | link: https://wled.discourse.group/ 53 | name: Forum 54 | - icon: fontawesome/solid/code 55 | link: https://gitpod.io/#https://github.com/Aircoookie/WLED 56 | name: Gitpod 57 | - icon: fontawesome/brands/instagram 58 | link: https://www.instagram.com/wled_project/ 59 | - icon: fontawesome/brands/youtube 60 | link: https://www.youtube.com/results?search_query=WLED 61 | - icon: fontawesome/solid/shirt 62 | link: https://wled.teemill.com/ 63 | - icon: fontawesome/solid/heart 64 | link: https://paypal.me/aircoookie/ 65 | extra_css: 66 | - assets/stylesheets/global.css 67 | - assets/stylesheets/extra.css 68 | extra_javascript: 69 | - assets/js/newtab.js 70 | nav: 71 | - Welcome: index.md 72 | - Basics: 73 | - Getting Started: basics/getting-started.md 74 | - Top 5 mistakes: basics/top5_mistakes.md 75 | - Compatibility: 76 | - LED strips: basics/compatible-led-strips.md 77 | - Controllers: basics/compatible-controllers.md 78 | - Other Hardware: basics/compatible-hardware.md 79 | - Software: basics/compatible-software.md 80 | - Installation: 81 | - Install WLED Binary: basics/install-binary.md 82 | - Install using ESP GUI: basics/install-gui.md 83 | - Compiling WLED: advanced/compiling-wled.md 84 | - Tutorials: basics/tutorials.md 85 | - FAQ: basics/faq.md 86 | - Features: 87 | - Effects: features/effects.md 88 | - Palettes: features/palettes.md 89 | - Macros: features/macros.md 90 | - Presets: features/presets.md 91 | - Segments: features/segments.md 92 | - Settings: features/settings.md 93 | - Multi-strip Support: features/multi-strip.md 94 | - Relay Control: features/relay-control.md 95 | - Web GUI Sitemap: features/subpages.md 96 | - White handling: features/cct.md 97 | - Pixel Art Converter: features/pixel-art-converter.md 98 | - Ethernet (LAN) compatibility: features/ethernet-lan.md 99 | - Interfaces: 100 | - Blynk: interfaces/blynk.md 101 | - DMX: interfaces/dmx-output.md 102 | - E1.31 (DMX) / Art-Net: interfaces/e1.31-dmx.md 103 | - HTTP Request API: interfaces/http-api.md 104 | - Remote Control: interfaces/infrared.md 105 | - JSON API: interfaces/json-api.md 106 | - MQTT: interfaces/mqtt.md 107 | - Philips Hue: interfaces/philips-hue.md 108 | - Serial: interfaces/serial.md 109 | - WLED UDP Sync: interfaces/udp-notifier.md 110 | - UDP Realtime / tpm2.net: interfaces/udp-realtime.md 111 | - Websocket: interfaces/websocket.md 112 | - DDP Realtime: interfaces/ddp.md 113 | - Advanced: 114 | - Audio Reactive WLED: advanced/audio-reactive.md 115 | - Home Automation: advanced/home-automation.md 116 | - Remote Access / IFTTT: advanced/remote-access-ifttt.md 117 | - Security: advanced/security.md 118 | - Wiring Protips: advanced/wiring.md 119 | - Long Data Lines: advanced/longdata.md 120 | - Compiling WLED: advanced/compiling-wled.md 121 | - Custom Features: advanced/custom-features.md 122 | - ESP32 Recovery: advanced/esp32-recovery.md 123 | - Mapping: advanced/mapping.md 124 | - Mixed 2D and 1D Bus: advanced/2d-1d-Mixed-Setup.md 125 | - Virtual LEDs: advanced/ddp.md 126 | - Custom Access Point Configuration: advanced/custom-ap.md 127 | - About: 128 | - Contributors & Credits: about/contributors.md 129 | - Privacy Policy: about/privacy-policy.md 130 | - Upcoming Features: about/roadmap.md 131 | -------------------------------------------------------------------------------- /docs/about/contributors.md: -------------------------------------------------------------------------------- 1 | --- 2 | title: Contributors and Credits 3 | hide: 4 | # - navigation 5 | # - toc 6 | --- 7 | 8 | This page is to honor the work of all the people who helped to make WLED what it is today! 9 | 10 | ### Direct Contributors to WLED code 11 | 12 | Everyone you see on the Contributors page and: 13 | 8bitbrett made the WiFi auto connect QR code with the Aircoookie/WLED logo! 14 | adamo made the animated Discord server logo! 15 | [@blazoncek](https://github.com/blazoncek) makes countless new features and improvements to many parts of WLED! 16 | [@debsahu](https://github.com/debsahu) provided the HomeAssistant autodiscovery and a lot of help with PIO! 17 | [@ewowi](https://github.com/ewoudwijma) numerous optimizations; 2D, audio and various user mod improvements. MoonModules maintainer. 18 | [@frenck](https://github.com/frenck) made an amazing, stable and feature-packed native integration with HomeAssistant! 19 | [@Moustachauve](https://github.com/Moustachauve) added palette visualisation and developped the WLED Native app for Android and iOS! 20 | [@pbolduc](https://github.com/pbolduc) DDP UDP synchronization, UI improvements and user mods. 21 | [@photocromax](https://github.com/photocromax) helped bring the Live visualization feature to life. 22 | [@raymiec](https://github.com/raymiec) is currently working on creating the best clients for Android and iOS! 23 | [@scottrbailey](https://github.com/scottrbailey) added JSON IR remote and gif visualizations for the docs. 24 | [@softhack007](https://github.com/softhack007) audio processing, new MCU support, code reviews, and various optimizations. MoonModules maintainer. 25 | [@StormPie](https://github.com/stormpie), the creator of the awesome mobile UI! 26 | [@timothybrown](https://github.com/timothybrown) added MQTT authentication! 27 | [@viknet365](https://github.com/viknet365) ported the Meteor effect! 28 | [@wiesendaniel](https://github.com/wiesendaniel) added the configuration for the PlatformIO IDE! 29 | [@YeonV](https://github.com/YeonV) provided the initial HomeAssistant MQTT light config! 30 | [@werkstrom](https://github.com/werkstrom) added PixelArt converter 31 | 32 | _This list is incomplete._ 33 | 34 | ### Testing, Contributors and Supporters 35 | 36 | _This list has been redacted for privacy reasons. If you've contributed to the project by testing a lot, helping the community, or sending me a gift, feel free to edit this page and add yourself (maintain alphabetical order)_ 😄 _Thank you very much, your help is truly appreciated!_ 37 | **Put two spaces behind your name, else the line break will not appear in the final page!** 38 | ALDIY - user support, documentation, beta tester 39 | [@Def3nder](https://github.com/Def3nder) 40 | [@DutchmanNL](https://github.com/DutchmanNL) 41 | DrZzs (Justin A.) 42 | Dylan L. 43 | Fil 44 | Quindor (Andries F.) - designed Dig-Quad, Dig-Uno, etc. 45 | [@Serg74](https://github.com/srg74) - designed controllers and shields - contributes code - hosts nightly build binaries 46 | Tonyno - tireless user support and documentation 47 | Wladi - contributes documentation and maintains [WLED FAQ](https://wled-faq.github.io) unofficial documentation. 48 | ### Used Libraries and Dependencies 49 | 50 | [ESP8266](https://github.com/esp8266/Arduino)/[ESP32](https://github.com/espressif/arduino-esp32) Arduino Core 51 | [NeoPixelBus](https://github.com/Makuna/NeoPixelBus) by Makuna 52 | [FastLED](https://github.com/FastLED/FastLED/) library 53 | [ESPAsyncTCP](https://github.com/me-no-dev/ESPAsyncTCP) by me-no-dev 54 | [ESPAsyncUDP](https://github.com/me-no-dev/ESPAsyncUDP) by me-no-dev (as of 0.9.0) 55 | [ESPAsyncWebServer](https://github.com/me-no-dev/ESPAsyncWebServer) by me-no-dev 56 | [ArduinoJSON](https://github.com/bblanchon/ArduinoJson) by bblanchon 57 | [async-mqtt-client](https://github.com/marvinroger/async-mqtt-client) by marvinroger 58 | [WS2812FX](https://github.com/kitesurfer1404/WS2812FX) by kitesurfer1404 (modified) 59 | [IRremoteESP8266](https://github.com/markszabo/IRremoteESP8266) by markszabo (optional) 60 | [Timezone](https://github.com/JChristensen/Timezone) by JChristensen 61 | [Blynk](https://github.com/blynkkk/blynk-library) library (compacted) 62 | [E1.31](https://github.com/forkineye/E131) library by forkineye (modified) 63 | [Espalexa](https://github.com/Aircoookie/Espalexa) by Aircoookie (modified) 64 | Many included FastLED effects are modified versions of [kriegsman](https://gist.github.com/kriegsman/)'s gists! 65 | 66 | WLED implements Art-Net™ Designed by and Copyright Artistic Licence Holdings Ltd 67 | 68 | [WebServer_tng](https://github.com/bbx10/WebServer_tng) by bbx10 (ESP32, up to 0.8.3) 69 | [PubSubClient](https://github.com/knolleary/pubsubclient) by knolleary (modified, up to 0.8.3) 70 | 71 | [](https://shields.io) 72 | [iro.js](https://iro.js.org/) colorpicker by James Daniel! 73 | Classic UI icons by [Linearicons](https://linearicons.com) created by [Perxis](https://perxis.com)! 74 | 75 | If you would like to appear in this list for a contribution you made or be removed from it, feel free to contact me! 76 | -------------------------------------------------------------------------------- /docs/advanced/audio-reactive.md: -------------------------------------------------------------------------------- 1 | --- 2 | title: Audio Reactive WLED 3 | hide: 4 | # - navigation 5 | # - toc 6 | --- 7 | 8 | ## What is Audio Reactive WLED? 9 | 10 | Audio Reactive WLED is a possibility of using WLED controllers in such a way that the LEDs react to music and light up in time. First time this was implemented by a [Sound Reactive Fork](https://github.com/atuline/WLED). As of WLED version 0.14.0-beta1 an usermod is available for original WLED too. 11 | Currently only ESP32 microcontrollers are supported. 12 | 13 | ## Hardware required 14 | 15 | The audio must be "feed" into the microcontroller. There are basically two options: using microphones or line-in adapters. 16 | 17 | ### Microphones supported 18 | 19 | Three microphone types are supported: 20 | 21 | #### 1. Analog microphones 22 | 23 | Examples are MAX4466 (not really good) and MAX9814 (slightly better). These microphones are easy to use: you just have to connect 3.3V, GND and the analog output from the microphone to an ADC input (Analog-to-Digital Converter) of ESP32. However, the big disadvantage is the quality: both from the microphones themselves and from the ADCs integrated into microcontrollers, which are actually not well suited for audio processing and highly influenced by the power supply noise. 24 |  25 | 26 | !!! info "Analog microphones and analog buttons (potentiometers) rule out each other" 27 | WLED can use analog microphones or [analog buttons](/features/macros/#analog-button) but not both at the same time! 28 | 29 | #### 2. I2S digital microphones 30 | 31 | Examples are INMP441 and ICS-43434/ICS-43432. These have an integrated ADC and already output a digital signal. The advantage is the best possible quality. The disadvantage is higher complexity (you need several PINs for a digital signal). For proper trouble-free operation keep wires between the microphone and ESP32 as short as possible and solder them properly. 32 | 33 |  34 | 35 | There are also some commercial controllers with integrated digital microphone or plug-in capability available. Be sure to setup correct GPIOs according to the information you typically will find printed on the board or in user manual. 36 | 37 |  38 | 39 | #### 3. PDM microphones 40 | 41 | An example is SPM1423. In principle, these are also digital microphones with an integrated Sigma-Delta ADC. They are slightly cheaper than I2S microphones, require one PIN less and the quality is quite good. 42 | 43 | ### Line-In options 44 | 45 | Similar to microphones there are options for analog or digital line-in adapters. In both cases you use line-out (AUX) or headphone-out signal of your sound system/TV/Smartphone/etc. 46 | 47 | #### 1. Analog line-in option 48 | 49 | At least a simple analog circuit as shown below is required to prepare the analog line-out signal and to feed it to the ADC converter of ESP32 microcontroller. In this case, the whole thing works like with an analog microphone. The quality is not the best here either because the ESP32 ADC is not particularly good at converting audio signals and the signal conditioning circuitry is very simple, but not very good. In addition, the sensitivity can be quite poor, so that the whole thing only works at a higher volume of the signal. 50 | 51 |  52 | 53 | In some cases, you can do it without this circuit and connect the GND of the audio source and an audio channel (left or right) directly to ESP32 ADC Pin (GND and analog input, e.g. GPIO36 pin on the ESP32). This solution is rather quite dirty workaround and might work well or not at all. 54 | 55 | #### 2. Line-in to I2S adapter 56 | 57 | Line-in to I2S adapter converts the analog line-out or headphone signal into a digital I2S signal that can be proceed by ESP32. There are some general or for WLED specially developed analog-to-I2S adapters based on for example CirrusLogic CS5343, TI PCM1808 or es7243 chips on the market. In this case, the whole thing works like with a digital I2S microphone. The only difference to I2S microphone is that you at least need an extra PIN for MCLK (Master Clock) signal, which can only be generated by the ESP32 on GPIOs 0, 1 or 3. The other complication is that MCLK is a high frequency signal and must be wired extremely accurate and have short wires. Some adapter types also require more additional signals. For stability it is better to use ready-to-use controller with special Line-In to I2S adapter or DIY PCB design where you can integrate general analog-to-I2S adapter directly without long wires. 58 | 59 |  60 | 61 | For some more details please refer to [Sound Reactive WLED WIKI](https://github.com/atuline/WLED/wiki) 62 | 63 | ## Software required 64 | 65 | Because audio reactive capability is currently implemented as a usermod, you need WLED compiled with this usermod included or use Sound Reactive WLED fork. The [official WEB-based WLED installer](https://install.wled.me/) does not include original WLED with audio reactive usermod, but offers Sound Reactive WLED as an option. The [unofficial WEB-based WLED installer](https://wled-install.github.io/) offers more options including original WLED with audio reactive usermod. 66 | -------------------------------------------------------------------------------- /docs/interfaces/json-ir/40-key-blue_ir.json: -------------------------------------------------------------------------------- 1 | { 2 | "remote": "40-key-blue", 3 | "0xFF3AC5": { 4 | "label": "Bright +", 5 | "pos": "1x1", 6 | "cmd": "!incBrightness" 7 | }, 8 | "0xFFBA45": { 9 | "label": "Bright -", 10 | "pos": "1x2", 11 | "cmd": "!decBrightness" 12 | }, 13 | "0xFF827D": { 14 | "label": "Off", 15 | "pos": "1x3", 16 | "cmd": "T=0" 17 | }, 18 | "0xFF02FD": { 19 | "label": "On", 20 | "pos": "1x4", 21 | "cmd": "T=1" 22 | }, 23 | "0xFF1AE5": { 24 | "label": "Red", 25 | "pos": "2x1", 26 | "cmnt": "Lava", 27 | "cmd": "FP=8&CL=hFF0000&C2=hFF7F00&C3=hCC3D60" 28 | }, 29 | "0xFF9A65": { 30 | "label": "Green", 31 | "pos": "2x2", 32 | "cmnt": "Forest", 33 | "cmd": "FP=10&CL=h8000&C2=h8040&C3=h30661E" 34 | }, 35 | "0xFFA25D": { 36 | "label": "Blue", 37 | "pos": "2x3", 38 | "cmnt": "Breeze", 39 | "cmd": "FP=15&CL=hFF&C2=h7F00FF&C3=h3D60CC" 40 | }, 41 | "0xFF22DD": { 42 | "label": "White", 43 | "pos": "2x4", 44 | "cmd": "FP=5&CL=hFFFFFF&C2=hFFFFFF&C3=hCCCCCC" 45 | }, 46 | "0xFF2AD5": { 47 | "label": "Tomato", 48 | "pos": "3x1", 49 | "cmnt": "Yelmag", 50 | "cmd": "FP=5&CL=hFF6347&C2=hFFBF47&C3=hCC646F" 51 | }, 52 | "0xFFAA55": { 53 | "label": "LightGreen", 54 | "pos": "3x2", 55 | "cmnt": "Rivendale", 56 | "cmd": "FP=14&CL=h90EE90&C2=h90EEBF&C3=h96BE89" 57 | }, 58 | "0xFF926D": { 59 | "label": "SkyBlue", 60 | "pos": "3x3", 61 | "cmnt": "Ocean", 62 | "cmd": "FP=9&CL=h87CEEB&C2=h879CEB&C3=h84B9BC" 63 | }, 64 | "0xFF12ED": { 65 | "label": "FloralWhite", 66 | "pos": "3x4", 67 | "cmd": "FP=5&CL=hFFFAF0&C2=hFCFFF0&C3=hCCC7C3" 68 | }, 69 | "0xFF0AF5": { 70 | "label": "OrangeRed", 71 | "pos": "4x1", 72 | "cmnt": "Sakura", 73 | "cmd": "FP=49&CL=hFF4500&C2=hFFC400&C3=hCC403D" 74 | }, 75 | "0xFF8A75": { 76 | "label": "Cyan", 77 | "pos": "4x2", 78 | "cmnt": "Beech", 79 | "cmd": "FP=22&CL=hFFFF&C2=h7FFF&C3=h3DCCA8" 80 | }, 81 | "0xFFB24D": { 82 | "label": "RebeccaPurple", 83 | "pos": "4x3", 84 | "cmd": "FP=5&CL=h663399&C2=h993399&C3=h4F417A" 85 | }, 86 | "0xFF32CD": { 87 | "label": "GhostWhite", 88 | "pos": "4x4", 89 | "cmd": "FP=5&CL=hF8F8FF&C2=hFBF8FF&C3=hC8C9CC" 90 | }, 91 | "0xFF38C7": { 92 | "label": "Orange", 93 | "pos": "5x1", 94 | "cmnt": "Orangery", 95 | "cmd": "FP=47&CL=hFFA500&C2=hD9FF00&C3=hCC753D" 96 | }, 97 | "0xFFB847": { 98 | "label": "Turquoise", 99 | "pos": "5x2", 100 | "cmd": "FP=5&CL=h40E0D0&C2=h40A0E0&C3=h59B393" 101 | }, 102 | "0xFF7887": { 103 | "label": "Purple", 104 | "pos": "5x3", 105 | "cmd": "FP=5&CL=h800080&C2=h800040&C3=h541E66" 106 | }, 107 | "0xFFF807": { 108 | "label": "MedGray", 109 | "pos": "5x4", 110 | "cmnt": "Cycle palette +", 111 | "cmd": "FP=~" 112 | }, 113 | "0xFF18E7": { 114 | "label": "Yellow", 115 | "pos": "6x1", 116 | "cmd": "FP=5&CL=hFFFF00&C2=h7FFF00&C3=hCCA83D" 117 | }, 118 | "0xFF9867": { 119 | "label": "DarkCyan", 120 | "pos": "6x2", 121 | "cmd": "FP=5&CL=h8B8B&C2=h458B&C3=h216F5B" 122 | }, 123 | "0xFF58A7": { 124 | "label": "Plum", 125 | "pos": "6x3", 126 | "cmnt": "Magenta", 127 | "cmd": "FP=40&CL=hDDA0DD&C2=hDDA0BE&C3=hA88EB0" 128 | }, 129 | "0xFFD827": { 130 | "label": "DarkGray", 131 | "pos": "6x4", 132 | "cmnt": "Cycle palette -", 133 | "cmd": "FP=~-&CL=hA9A9A9&C2=hA9A9A9&C3=h878787" 134 | }, 135 | "0xFF28D7": { 136 | "label": "W +", 137 | "pos": "7x1", 138 | "cmd": "W=~16" 139 | }, 140 | "0xFFA857": { 141 | "label": "W -", 142 | "pos": "7x2", 143 | "cmd": "W=-16" 144 | }, 145 | "0xFF6897": { 146 | "label": "W On", 147 | "pos": "7x3", 148 | "cmd": "R=0&G=0&B=0&W=255" 149 | }, 150 | "0xFFE817": { 151 | "label": "W Off", 152 | "pos": "7x4", 153 | "cmd": "W=0" 154 | }, 155 | "0xFF08F7": { 156 | "label": "W25", 157 | "pos": "8x1", 158 | "cmd": "W=64" 159 | }, 160 | "0xFF8877": { 161 | "label": "W50", 162 | "pos": "8x2", 163 | "cmd": "W=127" 164 | }, 165 | "0xFF48B7": { 166 | "label": "W75", 167 | "pos": "8x3", 168 | "cmd": "W=191" 169 | }, 170 | "0xFFC837": { 171 | "label": "W100", 172 | "pos": "8x4", 173 | "cmd": "W=255" 174 | }, 175 | "0xFF30CF": { 176 | "label": "Jump3", 177 | "pos": "9x1", 178 | "cmnt": "Colortwinkles", 179 | "cmd": "FX=74" 180 | }, 181 | "0xFFB04F": { 182 | "label": "Fade3", 183 | "pos": "9x2", 184 | "cmnt": "Rain", 185 | "cmd": "FX=43" 186 | }, 187 | "0xFF708F": { 188 | "label": "Jump7", 189 | "pos": "9x3", 190 | "cmnt": "Sinelon Dual", 191 | "cmd": "FX=93" 192 | }, 193 | "0xFFF00F": { 194 | "label": "Quick", 195 | "pos": "9x4", 196 | "cmnt": "Fx speed +16", 197 | "cmd": "SX=~16" 198 | }, 199 | "0xFF10EF": { 200 | "label": "Fade", 201 | "pos": "10x1", 202 | "cmnt": "Lighthouse", 203 | "cmd": "FX=41" 204 | }, 205 | "0xFF906F": { 206 | "label": "Flash", 207 | "pos": "10x2", 208 | "cmnt": "Cycle Effects", 209 | "cmd": "FX=~" 210 | }, 211 | "0xFF50AF": { 212 | "label": "Auto", 213 | "pos": "10x3", 214 | "cmnt": "Toggle preset cycle", 215 | "cmd": "CY=2&PT=60000" 216 | }, 217 | "0xFFD02F": { 218 | "label": "Slow", 219 | "pos": "10x4", 220 | "cmnt": "Sinelon Dual", 221 | "cmd": "FX=93" 222 | } 223 | } -------------------------------------------------------------------------------- /docs/interfaces/json-ir/38-key_ir.json: -------------------------------------------------------------------------------- 1 | { 2 | "remote": "38-key", 3 | "0xFF3AC5": { 4 | "label": "On", 5 | "pos": "1x1", 6 | "cmd": "T=1" 7 | }, 8 | "0xFF02FD": { 9 | "label": "Off", 10 | "pos": "1x4", 11 | "cmd": "T=0" 12 | }, 13 | "0xFF1AE5": { 14 | "label": "Red", 15 | "pos": "2x1", 16 | "cmnt": "Lava", 17 | "cmd": "FP=8&CL=hFF0000&C2=hFF7F00&C3=hCC3D60" 18 | }, 19 | "0xFF9A65": { 20 | "label": "Green", 21 | "pos": "2x2", 22 | "cmnt": "Forest", 23 | "cmd": "FP=10&CL=h8000&C2=h8040&C3=h30661E" 24 | }, 25 | "0xFFA25D": { 26 | "label": "Blue", 27 | "pos": "2x3", 28 | "cmnt": "Breeze", 29 | "cmd": "FP=15&CL=hFF&C2=h7F00FF&C3=h3D60CC" 30 | }, 31 | "0xFF22DD": { 32 | "label": "White", 33 | "pos": "2x4", 34 | "cmd": "FP=5&CL=hFFFFFF&C2=hFFFFFF&C3=hCCCCCC" 35 | }, 36 | "0xFF2AD5": { 37 | "label": "Tomato", 38 | "pos": "3x1", 39 | "cmnt": "Yelmag", 40 | "cmd": "FP=5&CL=hFF6347&C2=hFFBF47&C3=hCC646F" 41 | }, 42 | "0xFFAA55": { 43 | "label": "LightGreen", 44 | "pos": "3x2", 45 | "cmnt": "Rivendale", 46 | "cmd": "FP=14&CL=h90EE90&C2=h90EEBF&C3=h96BE89" 47 | }, 48 | "0xFF926D": { 49 | "label": "SkyBlue", 50 | "pos": "3x3", 51 | "cmnt": "Ocean", 52 | "cmd": "FP=9&CL=h87CEEB&C2=h879CEB&C3=h84B9BC" 53 | }, 54 | "0xFF12ED": { 55 | "label": "Rainbow", 56 | "pos": "3x4", 57 | "cmnt": "Pride 2015", 58 | "cmd": "FX=63" 59 | }, 60 | "0xFF0AF5": { 61 | "label": "OrangeRed", 62 | "pos": "4x1", 63 | "cmnt": "Sakura", 64 | "cmd": "FP=49&CL=hFF4500&C2=hFFC400&C3=hCC403D" 65 | }, 66 | "0xFF8A75": { 67 | "label": "Cyan", 68 | "pos": "4x2", 69 | "cmnt": "Beech", 70 | "cmd": "FP=22&CL=hFFFF&C2=h7FFF&C3=h3DCCA8" 71 | }, 72 | "0xFFB24D": { 73 | "label": "RebeccaPurple", 74 | "pos": "4x3", 75 | "cmd": "FP=5&CL=h663399&C2=h993399&C3=h4F417A" 76 | }, 77 | "0xFF32CD": { 78 | "label": "Meteor", 79 | "pos": "4x4", 80 | "cmnt": "Meteor Smooth", 81 | "cmd": "FX=77&FP=33" 82 | }, 83 | "0xFF38C7": { 84 | "label": "Orange", 85 | "pos": "5x1", 86 | "cmnt": "Orangery", 87 | "cmd": "FP=47&CL=hFFA500&C2=hD9FF00&C3=hCC753D" 88 | }, 89 | "0xFFB847": { 90 | "label": "Turquoise", 91 | "pos": "5x2", 92 | "cmd": "FP=5&CL=h40E0D0&C2=h40A0E0&C3=h59B393" 93 | }, 94 | "0xFF7887": { 95 | "label": "Purple", 96 | "pos": "5x3", 97 | "cmd": "FP=5&CL=h800080&C2=h800040&C3=h541E66" 98 | }, 99 | "0xFFF807": { 100 | "label": "Stars", 101 | "pos": "5x4", 102 | "cmnt": "TwinkleUp-Magenta", 103 | "cmd": "FX=106&FP=40&C2=h14142e" 104 | }, 105 | "0xFF18E7": { 106 | "label": "Yellow", 107 | "pos": "6x1", 108 | "cmd": "FP=5&CL=hFFFF00&C2=h7FFF00&C3=hCCA83D" 109 | }, 110 | "0xFF9867": { 111 | "label": "DarkCyan", 112 | "pos": "6x2", 113 | "cmd": "FP=5&CL=h8B8B&C2=h458B&C3=h216F5B" 114 | }, 115 | "0xFF58A7": { 116 | "label": "Plum", 117 | "pos": "6x3", 118 | "cmnt": "Magenta", 119 | "cmd": "FP=40&CL=hDDA0DD&C2=hDDA0BE&C3=hA88EB0" 120 | }, 121 | "0xFFD827": { 122 | "label": "Fire", 123 | "pos": "6x4", 124 | "cmnt": "Fire 2012", 125 | "cmd": "FX=66&FP=35" 126 | }, 127 | "0xFF28D7": { 128 | "label": "Effect-", 129 | "pos": "7x1", 130 | "cmd": "FX=~-" 131 | }, 132 | "0xFFA857": { 133 | "label": "Effect+", 134 | "pos": "7x2", 135 | "cmd": "FX=~" 136 | }, 137 | "0xFF6897": { 138 | "label": "Speed-", 139 | "pos": "7x3", 140 | "cmd": "SX=~-16" 141 | }, 142 | "0xFFE817": { 143 | "label": "Speed+", 144 | "pos": "7x4", 145 | "cmd": "SX=~16" 146 | }, 147 | "0xFF08F7": { 148 | "label": "Play", 149 | "pos": "8x1", 150 | "cmnt": "Edit Me!", 151 | "cmd": {"playlist":{"ps":[1,2,3,4,5],"dur":1800,"transition":7,"repeat":0}} 152 | }, 153 | "0xFF8877": { 154 | "label": "Palette+", 155 | "pos": "8x2", 156 | "cmd": "FP=~" 157 | }, 158 | "0xFF48B7": { 159 | "label": "Bright-", 160 | "pos": "8x3", 161 | "cmd": "!decBrightness" 162 | }, 163 | "0xFFC837": { 164 | "label": "Bright+", 165 | "pos": "8x4", 166 | "cmd": "!incBrightness" 167 | }, 168 | "0xFF30CF": { 169 | "label": "Music-", 170 | "pos": "9x1", 171 | "cmd": "!presetFallback", 172 | "PL": 5 173 | }, 174 | "0xFFB04F": { 175 | "label": "Music+", 176 | "pos": "9x2", 177 | "cmd": "!presetFallback", 178 | "PL": 6 179 | }, 180 | "0xFF708F": { 181 | "label": "Intensity-", 182 | "pos": "9x3", 183 | "cmd": "IX=~-16" 184 | }, 185 | "0xFFF00F": { 186 | "label": "Intensity+", 187 | "pos": "9x4", 188 | "cmd": "IX=~16" 189 | }, 190 | "0xFF10EF": { 191 | "label": "DIY1", 192 | "pos": "10x1", 193 | "cmnt": "Preset 1 or Flow-Party", 194 | "cmd": "!presetFallback", 195 | "PL": 1, 196 | "FX": 110, 197 | "FP": 6 198 | }, 199 | "0xFF906F": { 200 | "label": "DIY2", 201 | "pos": "10x2", 202 | "cmnt": "Preset 2 or Aurora-Aurora2", 203 | "cmd": "!presetFallback", 204 | "PL": 2, 205 | "FX": 38, 206 | "FP": 55 207 | }, 208 | "0xFF50AF": { 209 | "label": "DIY3", 210 | "pos": "10x3", 211 | "cmnt": "Preset 3 or Colorwaves-Hult", 212 | "cmd": "!presetFallback", 213 | "PL": 3, 214 | "FX": 67, 215 | "FP": 28 216 | }, 217 | "0xFFD02F": { 218 | "label": "DIY4", 219 | "pos": "10x4", 220 | "cmnt": "Preset 4 or Noise3-Orange/Teal", 221 | "cmd": "!presetFallback", 222 | "PL": 4, 223 | "FX": 72, 224 | "FP": 44 225 | } 226 | } 227 | -------------------------------------------------------------------------------- /docs/basics/getting-started.md: -------------------------------------------------------------------------------- 1 | --- 2 | title: Getting Started 3 | hide: 4 | # - navigation 5 | # - toc 6 | --- 7 | 8 | ## Welcome to the WLED wiki! 9 | 10 | !!! info "Version Info" 11 | Unless noted otherwise, all information applies to the latest release (v0.13.3). 12 | 13 | ### Quick start guide 14 | 15 | **1.** Connect a WS2812B-compatible RGB(W) led strip to `GPIO2`. On most ESP8266 based development boards, this pin is labeled `D4`; on ESP32 based boards, use `IO16` or `G16` or `16`. _If the connecting wire cannot be kept short, use a [level shifter/translator](/basics/compatible-hardware#levelshifters)._ Optionally, connect a normally open pushbutton to `GPIO0` (NodeMCU/Wemos pin `D3`, on ESP32 use `IO17`) and ground for [configurable actions](/features/macros). 16 | **Note:** Board pin naming varies depending on the manufacturer. Please use the board pinout from the _specific_ board you purchased and use the GPIO pins to reference this guide. _Make sure to connect ESP and LED-strip grounds together!_ 17 | 18 |  19 | 20 | While using an ESP8266 and LEDs that have clock and data, you can either use hardware SPI (mostly faster) or software SPI. 21 | 22 | - hardware SPI: use `GPIO14` (SCLK) for clock and `GPIO13` (MOSI) for data. 23 | - software SPI: since all pins can be changed in the Hardware section of LED settings, you can use any pins. Recommend is to use `GPIO1` (TxD) for clock and `GPIO2` (D4) for data. 24 | 25 | For safe operation, it is recommended to size your power wires correctly and to integrate fuses. 26 | For reference, you may use this [LED power, wiring and fuse calculator](https://wled-calculator.github.io/). 27 | 28 | For analog LEDs, the MOSFETs IRLZ44N or STP55NF06L are good candidates. Partial, example circuit: 29 | 30 | 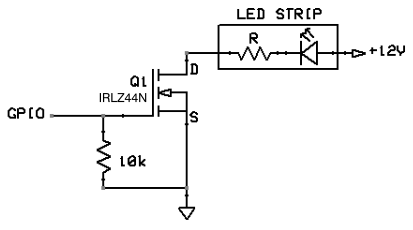 31 |  32 | 33 | **2.** Flash the software to your ESP module! There are two options for this step: 34 | 35 | [I just want to use WLED! (install release binary)](/basics/install-binary) 36 | 37 | [I want to modify WLED (compile from source code)](/advanced/compiling-wled) 38 | 39 | If everything worked the first thirty LEDs will light up in bright orange to stimulate courage, friendliness and success! 40 | 41 | **3.** Use a WiFi device to connect to the access point `WLED-AP` using the default password `wled1234`. 42 | You can also just scan this QR code: 43 | 44 |  45 | 46 | !!! tip "WLED-AP is not showing up!" 47 | If you do not see the `WLED-AP` SSID, the default SSID may have been changed at [compile time](/advanced/custom-ap). 48 | 49 | Go to the IP `4.3.2.1` in your browser to control your lights! You should also be able to connect to `wled.me` if in access point mode (embedded DNS server). 50 | 51 | ### Wifi Setup 52 | 53 | To connect your WLED module to your home Wifi: 54 | 55 | **1.** Click on the _Config_ (gear) icon to edit your WLED module settings and choose "Wifi Setup". 56 | 57 | **2.** For most home networks, simply enter your Wifi network's name and network password. You can also change the mDNS address for your WLED module here. 58 | 59 | **3.** Click Save & Connect at the bottom of the page. 60 | 61 | **4.** Reconnect your device to your home's Wifi network. 62 | 63 | **5.** Check the device list in your router's user interface for the IP of the WLED device within your local network. For easy automatic discovery, use the WLED app! Have fun with the WLED software! 64 | 65 | ### Default GPIO Usage 66 | 67 | !!! info "These are only defaults" 68 | All pins can be changed in the Hardware section of LED settings. Please note that these are GPIO numbers, please consult a pinout for your board to find the labeled pin (e.g `D4` = `GPIO2` on most ESP8266 boards). When using an ESP8266 board, it's recommended to use pins `GPIO1`, `GPIO2`, or `GPIO3` for LED Data; using other pins will require _bit-banging_ and may cause slow performance and/or issues elsewhere (such as with IR decoding). 69 | 70 | | Function | GPIO | Suggested pin | 71 | |---|---|---| 72 | LED Data | 2 | ESP8266: 1, 2 (3 if <= 100 LEDs), ESP32: 1, 2, 3, 4, 16 73 | Button | 0 | 74 | IR Remote| None | 4 75 | Relay | None | 12 76 | 77 | ### Software update procedure 78 | 79 | Method 1: Reflashing the new update like a new install (see above). 80 | 81 | Method 2: The software has an integrated _OTA software update_ capability. 82 | First you have to enable it by typing in the correct OTA passphrase (default: "wledota") in the settings menu. 83 | Remove the tick in the checkbox "OTA locked". Then save settings and reboot the ESP. 84 | Then you can select "Manual OTA update" in Security settings and upload a [release binary](https://github.com/Aircoookie/WLED/releases). 85 | After you are done, it is recommended to lock the OTA function again. 86 | To do so, tick the checkbox again (you can change the passphrase by typing in a new one now). Reboot. 87 | If you try to access the update page now, you should see the message "OTA lock active". 88 | 89 | Method 3: ArduinoOTA is also supported. 90 | 91 | !!! info "If you own multiple devices and want to update them" 92 | Since v0.13 of WLED source code includes shell/command prompt scripts which is allow you to update multiple devices with a single command. Please check `tools` subfolder for `multi-update` scripts (.cmd or .sh). You will need to modify them to include IP addresses of your WLED devices and assign firmware binary file for each device. If you are using Windows, make sure you install `curl` utility somewhere in your `PATH` (curl is included with Windows 10 since build 17063). This will only work if "OTA Lock" is disabled. 93 | -------------------------------------------------------------------------------- /docs/basics/compatible-hardware.md: -------------------------------------------------------------------------------- 1 | --- 2 | title: Other Hardware 3 | hide: 4 | # - navigation 5 | # - toc 6 | --- 7 | 8 | !!! note "" 9 | Still under construction, feel free to add to the list! 10 | 11 | This page lists some third-party hardware and/or tools that are working with WLED! 12 | 13 | Please use a decent and neutral description when adding things to this list. 14 | 15 | !!! tip 16 | Lists are in alphabetical order. The position of an item in the list does not indicate how good it is or if it will fit your use case. 17 | Please carefully compare all items in the category you are interested in, and you should find the one that suits your needs best in just a few minutes! 18 | 19 | ## Useful boards and addons 20 | 21 | | Name | Description | 22 | |---|---| 23 | [ESP32 Ethernet Network Shield](https://www.tindie.com/products/30385/)| Ethernet Shield (10/100Mbps) for ESP32 boards. Stackable with D1 Mini32 form factor boards. 24 | [Wemos D1 mini Level Shifter Shield](https://www.tindie.com/products/jasoncoon/wemos-d1-mini-esp8266-level-shifter-mini-shield/) | A level shifter shield (74HCT125) - by Evil Genius Labs LLC. 25 | [WIZmote remote control](https://www.google.com/search?q=wizmote) | Remote control using radio network. Compatible with WLED (vesions 0.14.0-beta3 and above). No additional receiver required. 26 | 27 | ## Compatible PC RGB Fans and ARGB accessories 28 | 29 | | Brand | Model | Comments | 30 | |---|---|---| 31 | Corsair | HD120 Fan | Uses WS2812B, data-in only 32 | PCCOOLER | Moonlight 5-pack Fans | Uses WS2812B, includes Data-out connector to keep each fan uniquely addressable if wired in series like traditional LED strips 33 | Any | 5v 3-pin ARGB for PC | Any PC RGB device that supports the 5v 3-pin ARGB motherboard header should work fine with WLED. All the major motherboard vendors support the Corsair HD120 and PCCOOLER fans listed, so we can safely assume any device that supports motherboard ARGB 5V 3-Pin standard will work with WLED. 34 | 35 | ## Levelshifters 36 | 37 | | Name | Description | 38 | |---|---| 39 | SN74AHCT125 | Aircoookie's recommended levelshifter. Often used in DIY and commercial controllers. 40 | SN74AHCT32 | Same pinout as above can be used. This is just an OR gate, but any AHCT gate can be used if inputs are connected appropriately. ;) 41 | SN74HCT125N | Slower, cheaper version. Works just as well for WS2812, but not recommended for APA102. 42 | SN74LVC2T45 | Modern bus transceiver with voltage translation [Yet Another WLED Controller](https://github.com/lizardsystems/yawl-controller) 43 | TXS0102, TXS0108 | Bidirectional levelshifters that may work fine with WLED (if possible, 74AHCT gates should be preferred as they support both longer data lines and faster protocols) 44 | [F-Amp](https://pixelcontroller.com/store/accessories/54-famp-xconnect.html) | Level shifter/data booster 45 | 46 | !!! warning 47 | I2C shifters are generally too slow for addressable LEDs, so don't use them. 48 | 49 | Further reading: 50 | [Logic Level Shifters for Driving LED Strips](https://electricfiredesign.com/2021/03/12/logic-level-shifters-for-driving-led-strips/) 51 | 52 | How to connect Levelshifters: 53 |  54 |  55 |  56 | 57 | ## USB/TTL adapters 58 | 59 | | Name | Description | 60 | |---|---| 61 | [CH340](https://www.aliexpress.com/item/32761423124.html) | CH340 module instead of CP2102, PL2303 or FTDI/FTDT. The CH340 can deliver more current which is needed while the flash process depending on the board type. The timing is also much more stable. **For boards with an USB/TTL adapter onboard this is NOT needed** 62 | [ESP uploader](https://github.com/srg74/ESP-uploader) | CP2102N module. Same USB to UART converter as many recent Dev boards using. Featuring latest USB-C connector. For use with many ESP32, ESP8266, ESP8255 and Tuya based modules. 3.3V logic and 5V power pass through for custom boards. 63 | 64 | ## Miscellaneous 65 | 66 | Sorting: Sensors, Displays, Actuators 67 | 68 | | Name | Description | 69 | |---|---| 70 | [HC-SR501](https://www.aliexpress.com/wholesale?catId=0&SearchText=HC-SR501) | PIR sensor with adjustable sensitivity and on time delay (suitable as a button). 71 | [HC-SR602](https://www.aliexpress.com/wholesale?catId=0&SearchText=HC-SR602) | PIR sensor (not suitable as a button but can be used with _PIR sensor_ usermod). 72 | [TSOP38238](https://www.aliexpress.com/item/32834341300.html) | IR receiver compatible with most IR remotes. 73 | [SSD1305](https://www.aliexpress.com/wholesale?catId=0&SearchText=SSD1305) | I2C display, can be used with [_4 Line Display_ usermod](https://github.com/Aircoookie/WLED/tree/master/usermods/usermod_v2_four_line_display). 74 | [SSD1306](https://www.aliexpress.com/wholesale?catId=0&SearchText=SSD1306) | I2C & SPI display, can be used with _4 Line Display_ usermod. 75 | DS18B20 | Recommended temperature sensor for use with WLED. Compatible with the [Temperature usermod](https://github.com/Aircoookie/WLED/tree/master/usermods/Temperature) 76 | [Display shield](https://www.tindie.com/products/27112/) | Various configurations. Compatible with the [ESP32 WLED dev board](https://www.tindie.com/products/27056/) also can be used with ESP32 mini dev boards. 77 | [12V Relay & Fuse board](https://shop.myhome-control.de/Relais-Board-fuer-WLED-Controller-12V/HW10011)|Integrates two relays and two 10 A fuses. Suitable for WLED setups with 12 V LED Strips. 78 | [5V relay](https://www.aliexpress.com/wholesale?catId=0&SearchText=5v+relay+module) | Relay module. Some will require 5V to trigger so you will need level-shifted output (similar as for LEDs) for proper functionality or a circuit with transistor or MOSFET. 79 | [5V Relay & Fuse board](https://shop.myhome-control.de/Relais-Board-fuer-WLED-Controller-5V/HW10005)|Integrates two relays and two 10 A fuses. Suitable for WLED setups with 5V LED Strips. 80 | -------------------------------------------------------------------------------- /docs/interfaces/json-ir/40-key-black_ir.json: -------------------------------------------------------------------------------- 1 | { 2 | "remote": "40-key-black", 3 | "0xFF3AC5": { 4 | "label": "Bright +", 5 | "pos": "1x1", 6 | "cmd": "!incBrightness" 7 | }, 8 | "0xFFBA45": { 9 | "label": "Bright -", 10 | "pos": "1x2", 11 | "cmd": "!decBrightness" 12 | }, 13 | "0xFF827D": { 14 | "label": "Off", 15 | "pos": "1x3", 16 | "cmd": "T=0" 17 | }, 18 | "0xFF02FD": { 19 | "label": "On", 20 | "pos": "1x4", 21 | "cmd": "T=1" 22 | }, 23 | "0xFF1AE5": { 24 | "label": "Red", 25 | "pos": "2x1", 26 | "cmnt": "Lava", 27 | "cmd": "FP=8&CL=hFF0000&C2=hFF7F00&C3=hCC3D60" 28 | }, 29 | "0xFF9A65": { 30 | "label": "Green", 31 | "pos": "2x2", 32 | "cmnt": "Forest", 33 | "cmd": "FP=10&CL=h8000&C2=h8040&C3=h30661E" 34 | }, 35 | "0xFFA25D": { 36 | "label": "Blue", 37 | "pos": "2x3", 38 | "cmnt": "Breeze", 39 | "cmd": "FP=15&CL=hFF&C2=h7F00FF&C3=h3D60CC" 40 | }, 41 | "0xFF22DD": { 42 | "label": "White", 43 | "pos": "2x4", 44 | "cmd": "FP=5&CL=hFFFFFF&C2=hFFFFFF&C3=hCCCCCC" 45 | }, 46 | "0xFF2AD5": { 47 | "label": "Tomato", 48 | "pos": "3x1", 49 | "cmnt": "Yelmag", 50 | "cmd": "FP=5&CL=hFF6347&C2=hFFBF47&C3=hCC646F" 51 | }, 52 | "0xFFAA55": { 53 | "label": "LightGreen", 54 | "pos": "3x2", 55 | "cmnt": "Rivendale", 56 | "cmd": "FP=14&CL=h90EE90&C2=h90EEBF&C3=h96BE89" 57 | }, 58 | "0xFF926D": { 59 | "label": "SkyBlue", 60 | "pos": "3x3", 61 | "cmnt": "Ocean", 62 | "cmd": "FP=9&CL=h87CEEB&C2=h879CEB&C3=h84B9BC" 63 | }, 64 | "0xFF12ED": { 65 | "label": "FloralWhite", 66 | "pos": "3x4", 67 | "cmnt": "Warm White", 68 | "cmd": "FP=5&CL=hFFFAF0&C2=hFCFFF0&C3=hCCC7C3" 69 | }, 70 | "0xFF0AF5": { 71 | "label": "OrangeRed", 72 | "pos": "4x1", 73 | "cmnt": "Sakura", 74 | "cmd": "FP=49&CL=hFF4500&C2=hFFC400&C3=hCC403D" 75 | }, 76 | "0xFF8A75": { 77 | "label": "Cyan", 78 | "pos": "4x2", 79 | "cmnt": "Beech", 80 | "cmd": "FP=22&CL=hFFFF&C2=h7FFF&C3=h3DCCA8" 81 | }, 82 | "0xFFB24D": { 83 | "label": "RebeccaPurple", 84 | "pos": "4x3", 85 | "cmd": "FP=5&CL=h663399&C2=h993399&C3=h4F417A" 86 | }, 87 | "0xFF32CD": { 88 | "label": "Azure", 89 | "pos": "4x4", 90 | "cmnt": "Cool White", 91 | "cmd": "FP=5&CL=hF0FFFF&C2=hF0F7FF&C3=hC3CCC9" 92 | }, 93 | "0xFF38C7": { 94 | "label": "Orange", 95 | "pos": "5x1", 96 | "cmnt": "Orangery", 97 | "cmd": "FP=47&CL=hFFA500&C2=hD9FF00&C3=hCC753D" 98 | }, 99 | "0xFFB847": { 100 | "label": "Turquoise", 101 | "pos": "5x2", 102 | "cmd": "FP=5&CL=h40E0D0&C2=h40A0E0&C3=h59B393" 103 | }, 104 | "0xFF7887": { 105 | "label": "Purple", 106 | "pos": "5x3", 107 | "cmd": "FP=5&CL=h800080&C2=h800040&C3=h541E66" 108 | }, 109 | "0xFFF807": { 110 | "label": "Palette+", 111 | "pos": "5x4", 112 | "cmnt": "Cycle palette +", 113 | "cmd": "FP=~" 114 | }, 115 | "0xFF18E7": { 116 | "label": "Yellow", 117 | "pos": "6x1", 118 | "cmd": "FP=5&CL=hFFFF00&C2=hFFC800&C3=hFDFFDE" 119 | }, 120 | "0xFF9867": { 121 | "label": "DarkCyan", 122 | "pos": "6x2", 123 | "cmd": "FP=5&CL=h8B8B&C2=h458B&C3=h216F5B" 124 | }, 125 | "0xFF58A7": { 126 | "label": "Plum", 127 | "pos": "6x3", 128 | "cmnt": "Magenta", 129 | "cmd": "FP=40&CL=hDDA0DD&C2=hDDA0BE&C3=hA88EB0" 130 | }, 131 | "0xFFD827": { 132 | "label": "Palette-", 133 | "pos": "6x4", 134 | "cmnt": "Cycle palette -", 135 | "cmd": "FP=~-" 136 | }, 137 | "0xFF28D7": { 138 | "label": "Jump3", 139 | "pos": "7x1", 140 | "cmnt": "Colortwinkles", 141 | "cmd": "FX=74" 142 | }, 143 | "0xFFA857": { 144 | "label": "Fade3", 145 | "pos": "7x2", 146 | "cmnt": "Rain", 147 | "cmd": "FX=43" 148 | }, 149 | "0xFF6897": { 150 | "label": "Flash", 151 | "pos": "7x3", 152 | "cmnt": "Cycle Effects", 153 | "cmd": "FX=~" 154 | }, 155 | "0xFFE817": { 156 | "label": "Quick", 157 | "pos": "7x4", 158 | "cmnt": "Fx speed +16", 159 | "cmd": "SX=~16" 160 | }, 161 | "0xFF08F7": { 162 | "label": "Jump7", 163 | "pos": "8x1", 164 | "cmnt": "Sinelon Dual", 165 | "cmd": "FX=93" 166 | }, 167 | "0xFF8877": { 168 | "label": "Fade7", 169 | "pos": "8x2", 170 | "cmnt": "Lighthouse", 171 | "cmd": "FX=41" 172 | }, 173 | "0xFF48B7": { 174 | "label": "Auto", 175 | "pos": "8x3", 176 | "cmnt": "Toggle preset cycle", 177 | "cmd": "CY=2&PT=60000" 178 | }, 179 | "0xFFC837": { 180 | "label": "Slow", 181 | "pos": "8x4", 182 | "cmnt": "FX speed -16", 183 | "cmd": "SX=~-16" 184 | }, 185 | "0xFF30CF": { 186 | "label": "Custom1", 187 | "pos": "9x1", 188 | "cmnt": "Noise 1", 189 | "cmd": "FX=70" 190 | }, 191 | "0xFFB04F": { 192 | "label": "Custom2", 193 | "pos": "9x2", 194 | "cmnt": "Dancing Shadows", 195 | "cmd": "FX=112" 196 | }, 197 | "0xFF708F": { 198 | "label": "Music +", 199 | "pos": "9x3", 200 | "cmnt": "FX Intensity +16", 201 | "cmd": "IX=~16" 202 | }, 203 | "0xFFF00F": { 204 | "label": "Timer60", 205 | "pos": "9x4", 206 | "cmnt": "Timer 60 min", 207 | "cmd": "NL=60&NT=0" 208 | }, 209 | "0xFF10EF": { 210 | "label": "Custom3", 211 | "pos": "10x1", 212 | "cmnt": "Twinklefox", 213 | "cmd": "FX=80" 214 | }, 215 | "0xFF906F": { 216 | "label": "Custom4", 217 | "pos": "10x2", 218 | "cmnt": "Twinklecat", 219 | "cmd": "FX=81" 220 | }, 221 | "0xFF50AF": { 222 | "label": "Music -", 223 | "pos": "10x3", 224 | "cmnt": "FX Intesity -16", 225 | "cmd": "IX=~-16" 226 | }, 227 | "0xFFD02F": { 228 | "label": "Timer120", 229 | "pos": "10x4", 230 | "cmnt": "Timer 120 min", 231 | "cmd": "NL=120&NT=0" 232 | } 233 | } -------------------------------------------------------------------------------- /docs/index.md: -------------------------------------------------------------------------------- 1 | --- 2 | title: Welcome to WLED 3 | hide: 4 | - navigation 5 | - toc 6 | --- 7 | 8 |
9 | ![]() 10 |
10 |  11 |
11 | 

 14 |
14 | ![]() 15 |
15 | ![]() 16 |
16 |
17 |

 70 |
71 | ## 💾 Compatible hardware
72 |
73 | See [here](/basics/compatible-hardware)!
74 |
75 | ## ✌️ Other
76 |
77 | Licensed under the MIT license
78 | Credits [here](/about/contributors)!
79 |
80 | Join the Discord server to discuss everything about WLED!
81 |
82 |
70 |
71 | ## 💾 Compatible hardware
72 |
73 | See [here](/basics/compatible-hardware)!
74 |
75 | ## ✌️ Other
76 |
77 | Licensed under the MIT license
78 | Credits [here](/about/contributors)!
79 |
80 | Join the Discord server to discuss everything about WLED!
81 |
82 |  83 |
84 | Check out the WLED [Discourse forum](https://wled.discourse.group)!
85 | You can also send me mails to [dev.aircoookie@gmail.com](mailto:dev.aircoookie@gmail.com), but please only do so if you want to talk to me privately.
86 | If WLED really brightens up your every day, you can [](https://paypal.me/aircoookie)
87 |
88 | !!! danger "Disclaimer"
89 | If you are sensitive to photosensitive epilepsy it is not recommended that you use this software.
90 | In case you still want to try, don't use strobe, lighting or noise modes or high effect speed settings.
91 | As per the MIT license, I assume no liability for any damage to you or any other person or equipment.
92 |
--------------------------------------------------------------------------------
/docs/interfaces/udp-notifier.md:
--------------------------------------------------------------------------------
1 | ---
2 | title: WLED UDP Sync
3 | hide:
4 | # - navigation
5 | # - toc
6 | ---
7 |
8 | ### Usage
9 |
10 | The UDP notifier function of WLED makes it easy to sync multiple lights to the same color/effect, enabled by default.
11 | You can set the specific behavior of it in Sync settings, also you can choose if all aspects or only brightness/color/effects are applied.
12 |
13 | Additionally, there is a "Sync" quick toggle for it in the main control UI!
14 | In UI settings, you can set whether this button only turns on/off sending (default) or also receiving, with the option `Sync button toggles both send and receive`.
15 |
16 | If your sync settings are not the way you like on boot, check the `WLED Broadcast` section in Sync settings, where you can specify what is sent and received by default:
17 |
18 | #### Receiving settings
19 |
20 | | Setting | Description |
21 | | --- | --- |
22 | Receive Brightness | If there is a sync notification, whether its brightness should be applied
23 | Color | Whether the color of the synced device should be applied
24 | Effects | Whether the effect settings should be applied
25 |
26 | If all checkboxes are disabled, nothing is received by default after each boot. If the sync is toggled on in the main UI _and_ the corresponding checkbox in UI settings is checked, everything is received.
27 |
28 | A sync receiver will not assume the state of the last sender directly after booting, a new packet must be send for it to react.
29 |
30 | #### Sending settings
31 |
32 | | Setting | Description |
33 | | --- | --- |
34 | Send on direct change | Whether to send a sync notification when state changed via the web UI or API
35 | Send on button press | Whether to send sync when toggled by the physical hardware button
36 | Send Alexa notifications | Whether to send sync after changed by Alexa (you may use Alexa groups instead)
37 | Send Hue notifications | Whether to send sync after a connected Philips light changed
38 | Send Macro notifications | Whether to send sync after a macro was triggered
39 | Send notifications twice | Sends notifications twice (if you have issues with UDP packet loss)
40 |
41 | The quick toggle in the main UI will only apply to direct changes (UI + API), all other sync type sending behavior remains unaffected.
42 |
43 | You can easily group WLED devices (for example all in one room) by changing the UDP port of all devices you want in that group.
44 |
45 | #### Sync groups
46 |
47 | From v0.13.0, 8 Sync groups are available. This allows syncing select instances only without changing the UDP port.
48 | For example, you might use one sync group per room you use WLED devices in.
49 | Make sure the sender and receiver you want to sync both have the same sync group ticked (a sender can send to multiple groups and a receiver can listen to multiple groups).
50 |
51 | Sync packets received from pre-0.13.0 instances are treated as if sent in sync group 1 only.
52 |
53 | ### Protocol description
54 |
55 | !!! warning
56 | _Note: this info is partly out of date, see updated functionality in the code ([udp.cpp](https://github.com/Aircoookie/WLED/blob/master/wled00/udp.cpp))_
57 |
58 | When enabled, the module where a value was changed will send an UDP broadcast to a port (default 21324).
59 | Other modules that listen on this port will set themselves to the same color.
60 |
61 | For interoperability, the protocol was designed so that even modules with different WLED versions can sync.
62 | Therefore, if a WLED 0.4 system receives a WLED 0.3 UDP notification it will apply the primary color but keep its current secondary color.
63 |
64 | The UDP packet is currently 24 bytes long. It is laid out in the following:
65 |
66 | | Byte Index | Var Name | Description | Notifier Version |
67 | | --- | --- | --- | --- |
68 | 0 | \- | Packet Purpose Byte* | 0
69 | 1 | callMode | Packet Reason** | 0
70 | 2 | bri | Master Brightness | 0
71 | 3 | col[0] | Primary Red Value | 0
72 | 4 | col[1] | Primary Green Value | 0
73 | 5 | col[2] | Primary Blue Value | 0
74 | 6 | nightlightActive | Nightlight running? | 0
75 | 7 | nightlightDelayMins | Nightlight Time | 0
76 | 8 | effectCurrent | Effect Index | 0
77 | 9 | effectSpeed | Effect Speed | 0
78 | 10 | white | Primary White Value | 1
79 | 11 | \- | Version Byte*** | 1
80 | 12 | colSec[0] | Secondary Red Value | 2
81 | 13 | colSec[1] | Secondary Green Value | 2
82 | 14 | colSec[2] | Secondary Blue Value | 2
83 | 15 | whiteSec | Secondary White Value | 2
84 | 16 | effectIntensity | Effect Intensity | 3
85 | 17 | transitionDelay | Transition Duration Upper | 4
86 | 18 | transitionDelay | Transition Duration Lower | 4
87 | 19 | effectPalette | FastLED palette | 5
88 | 20-23 | - | Zeros | -
89 |
90 | *The notifier protocol is only used if this byte is 0. Otherwise, one of the [UDP Realtime](/interfaces/udp-realtime) protocols will be used.
91 |
92 | **The callMode variable specifies the reason for the notification.
93 | Every color update has the potential to trigger a notification.
94 |
95 | | callMode | Description | Behavior |
96 | | --- | --- | --- |
97 | 0 | Initial Boot | Do not notify
98 | 1 | Direct Change via UI or API | notifyDirect?
99 | 2 | Button was pressed | notifyButton?
100 | 3 | Update by other notification | Do not notify
101 | 4 | Nightlight activated | notifyDirect?
102 | 5 | Other (Req. with &NN) | Do not notify
103 | 6 | Effect changed | notifyDirect?
104 | 7 | Hue light changed | notifyHue?
105 | 8 | Preset Cycle active | notifyDirect?
106 | 9 | Updated via Blynk | notifyDirect?
107 |
108 | ***This is the version of the UDP protocol.
109 |
110 | | UDP Version | Description | WLED Version |
111 | | --- | --- | --- |
112 | 0 | Basic Support | 0.3
113 | 1 | White Value supported | 0.4p
114 | 2 | Secondary Color supported | 0.4
115 | 3 | Effect Intensity supported | 0.5.0
116 | 4 | Transition Time supported | 0.6.0
117 | 5 | Palettes supported | 0.8.0
118 |
--------------------------------------------------------------------------------
/docs/interfaces/json-ir/44-key_ir.json:
--------------------------------------------------------------------------------
1 | {
2 | "remote": "44-key",
3 | "0xFF3AC5": {
4 | "label": "Bright +",
5 | "pos": "1x1",
6 | "cmd": "!incBrightness"
7 | },
8 | "0xFFBA45": {
9 | "label": "Bright -",
10 | "pos": "1x2",
11 | "cmd": "!decBrightness"
12 | },
13 | "0xFF827D": {
14 | "label": "Off",
15 | "pos": "1x3",
16 | "cmd": "T=0"
17 | },
18 | "0xFF02FD": {
19 | "label": "On",
20 | "pos": "1x4",
21 | "cmd": "T=1"
22 | },
23 | "0xFF1AE5": {
24 | "label": "Red",
25 | "pos": "2x1",
26 | "cmnt": "Lava",
27 | "cmd": "FP=8&CL=hFF0000&C2=hFF7F00&C3=hCC3D60"
28 | },
29 | "0xFF9A65": {
30 | "label": "Green",
31 | "pos": "2x2",
32 | "cmnt": "Forest",
33 | "cmd": "FP=10&CL=h8000&C2=h8040&C3=h30661E"
34 | },
35 | "0xFFA25D": {
36 | "label": "Blue",
37 | "pos": "2x3",
38 | "cmnt": "Breeze",
39 | "cmd": "FP=15&CL=hFF&C2=h7F00FF&C3=h3D60CC"
40 | },
41 | "0xFF22DD": {
42 | "label": "White",
43 | "pos": "2x4",
44 | "cmd": "FP=5&CL=hFFFFFF&C2=hFFFFFF&C3=hCCCCCC"
45 | },
46 | "0xFF2AD5": {
47 | "label": "Tomato",
48 | "pos": "3x1",
49 | "cmd": "FP=5&CL=hFF6347&C2=hFFBF47&C3=hCC646F"
50 | },
51 | "0xFFAA55": {
52 | "label": "LightGreen",
53 | "pos": "3x2",
54 | "cmnt": "Rivendale",
55 | "cmd": "FP=14&CL=h90EE90&C2=h90EEBF&C3=h96BE89"
56 | },
57 | "0xFF926D": {
58 | "label": "DeepBlue",
59 | "pos": "3x3",
60 | "cmnt": "Ocean",
61 | "cmd": "FP=9"
62 | },
63 | "0xFF12ED": {
64 | "label": "FloralWhite",
65 | "pos": "3x4",
66 | "cmnt": "Warm White",
67 | "cmd": "FP=5&CL=hFFFAF0&C2=hFCFFF0&C3=hCCC7C3"
68 | },
69 | "0xFF0AF5": {
70 | "label": "Orange",
71 | "pos": "4x1",
72 | "cmnt": "Sakura",
73 | "cmd": "FP=49&CL=hFFA500&C2=hD9FF00&C3=hCC753D"
74 | },
75 | "0xFF8A75": {
76 | "label": "Turquoise",
77 | "pos": "4x2",
78 | "cmnt": "Beech",
79 | "cmd": "FP=22&CL=h40E0D0&C2=h40A0E0&C3=h59B393"
80 | },
81 | "0xFFB24D": {
82 | "label": "Purple",
83 | "pos": "4x3",
84 | "cmd": "FP=5&CL=h800080&C2=h800040&C3=h541E66"
85 | },
86 | "0xFF32CD": {
87 | "label": "LavenderBlush",
88 | "pos": "4x4",
89 | "cmd": "FP=5&CL=hFFF0F5&C2=hFFF2F0&C3=hCCC3C8"
90 | },
91 | "0xFF38C7": {
92 | "label": "Yellowish",
93 | "pos": "5x1",
94 | "cmnt": "Orangery",
95 | "cmd": "FP=47"
96 | },
97 | "0xFFB847": {
98 | "label": "Cyan",
99 | "pos": "5x2",
100 | "cmnt": "Beech",
101 | "cmd": "FP=22&CL=hFFFF&C2=h7FFF&C3=h3DCCA8"
102 | },
103 | "0xFF7887": {
104 | "label": "Magenta",
105 | "pos": "5x3",
106 | "cmd": "FP=5&CL=hFF00FF&C2=hFF007F&C3=hA83DCC"
107 | },
108 | "0xFFF807": {
109 | "label": "GhostWhite",
110 | "pos": "5x4",
111 | "cmd": "FP=5&CL=hF8F8FF&C2=hFBF8FF&C3=hC8C9CC"
112 | },
113 | "0xFF18E7": {
114 | "label": "Yellow",
115 | "pos": "6x1",
116 | "cmd": "FP=5&CL=hFFFF00&C2=hFFC800&C3=hFDFFDE"
117 | },
118 | "0xFF9867": {
119 | "label": "Aqua",
120 | "pos": "6x2",
121 | "cmd": "FP=5&CL=hFFFF&C2=h7FFF&C3=h3DCCA8"
122 | },
123 | "0xFF58A7": {
124 | "label": "Pink",
125 | "pos": "6x3",
126 | "cmd": "FP=5&CL=hFFC0CB&C2=hFFD4C0&C3=hCCA8B7"
127 | },
128 | "0xFFD827": {
129 | "label": "LightCyan",
130 | "pos": "6x4",
131 | "cmd": "FP=5&CL=hE0FFFF&C2=hE0EFFF&C3=hBACCC7"
132 | },
133 | "0xFF28D7": {
134 | "label": "Red +",
135 | "pos": "7x1",
136 | "cmd": "FP=5&R=~16"
137 | },
138 | "0xFFA857": {
139 | "label": "Green +",
140 | "pos": "7x2",
141 | "cmd": "FP=5&G=~16"
142 | },
143 | "0xFF6897": {
144 | "label": "Blue +",
145 | "pos": "7x3",
146 | "cmd": "FP=5&B=~16"
147 | },
148 | "0xFFE817": {
149 | "label": "Quick",
150 | "pos": "7x4",
151 | "cmnt": "Fx speed +16",
152 | "cmd": "SX=~16"
153 | },
154 | "0xFF08F7": {
155 | "label": "Red -",
156 | "pos": "8x1",
157 | "cmd": "FP=5&R=~-16"
158 | },
159 | "0xFF8877": {
160 | "label": "Green -",
161 | "pos": "8x2",
162 | "cmd": "FP=5&G=~-16"
163 | },
164 | "0xFF48B7": {
165 | "label": "Blue -",
166 | "pos": "8x3",
167 | "cmd": "FP=5&B=~-16"
168 | },
169 | "0xFFC837": {
170 | "label": "Slow",
171 | "pos": "8x4",
172 | "cmnt": "FX speed -16",
173 | "cmd": "SX=~-16"
174 | },
175 | "0xFF30CF": {
176 | "label": "Diy1",
177 | "pos": "9x1",
178 | "cmd": "PL=1"
179 | },
180 | "0xFFB04F": {
181 | "label": "Diy2",
182 | "pos": "9x2",
183 | "cmd": "PL=2"
184 | },
185 | "0xFF708F": {
186 | "label": "Diy3",
187 | "pos": "9x3",
188 | "cmd": "PL=3"
189 | },
190 | "0xFFF00F": {
191 | "label": "Auto",
192 | "pos": "9x4",
193 | "cmnt": "Toggle preset cycle",
194 | "cmd": "CY=2&PT=60000"
195 | },
196 | "0xFF10EF": {
197 | "label": "Diy4",
198 | "pos": "10x1",
199 | "cmd": "PL=4"
200 | },
201 | "0xFF906F": {
202 | "label": "Diy5",
203 | "pos": "10x2",
204 | "cmd": "PL=5"
205 | },
206 | "0xFF50AF": {
207 | "label": "Diy6",
208 | "pos": "10x3",
209 | "cmd": "PL=6"
210 | },
211 | "0xFFD02F": {
212 | "label": "Flash",
213 | "pos": "10x4",
214 | "cmnt": "Cycle Effects",
215 | "cmd": "FX=~"
216 | },
217 | "0xFF20DF": {
218 | "label": "Jump3",
219 | "pos": "11x1",
220 | "cmnt": "Colortwinkles",
221 | "cmd": "FX=74"
222 | },
223 | "0xFFA05F": {
224 | "label": "Jump7",
225 | "pos": "11x2",
226 | "cmnt": "Sinelon Dual",
227 | "cmd": "FX=93"
228 | },
229 | "0xFF609F": {
230 | "label": "Fade3",
231 | "pos": "11x3",
232 | "cmnt": "Rain",
233 | "cmd": "FX=43"
234 | },
235 | "0xFFE01F": {
236 | "label": "Fade7",
237 | "pos": "11x4",
238 | "cmnt": "Lighthouse",
239 | "cmd": "FX=41"
240 | }
241 | }
--------------------------------------------------------------------------------
/docs/basics/tutorials.md:
--------------------------------------------------------------------------------
1 | ---
2 | title: Tutorials
3 | hide:
4 | # - navigation
5 | # - toc
6 | ---
7 |
8 | **Don't know yet how to solder? Unsure how to connect your LEDs safely? How to find the perfect power supply?**
9 | No worries, we have collected a few helpful links for you to learn more about these and more topics:
10 |
11 | ### WLED specific tutorials
12 |
13 | | Resource | Maker | Type | Date | Info
14 | | --- | --- | --- | --- | --- |
15 | [Beginner's guide to freak'n cool Holiday LEDs](https://www.youtube.com/watch?v=tXvtxwK3jRk) | DrZzs | Video (23:22) | 12 Oct 2019 | Excellent guide for getting started with WLED!
16 | [How to Set Colors and Effects, Save Presets, Make Sync Groups, add a Button, & Macros for Scheduling](https://www.youtube.com/watch?v=6eCE2BpLaUQ) | DrZzs | Video (23:39) | 29 Oct 2019 | Learn about some cool additional WLED features!
17 | [Make your LEDs dance to music!](https://www.youtube.com/watch?v=ipSfQdfX4fE) | DrZzs | Video (11:30) | 17 Nov 2019 | How to install LedFx and connect it to WLED for quick sound reactive effects!
18 | [Getting started with WLED](https://tynick.com/blog/11-03-2019/getting-started-with-wled-on-esp8266/) | tynick | Article | 11 Mar 2019 | Complete and excellent guide on how to flash and get WLED up and running!
19 | [How to Compile WLED (from scratch)](https://youtu.be/fRxyp5Yhivc) | Quindor | Video (02:15:00) | 22 Dec 2020 | How to compile WLED yourself from scratch (most info in first 30 minutes)
20 | [WLED with QuinLED-Dig-Uno Install Tutorial](https://youtu.be/2X_0Oe24vkA) | Quindor | Video (11:13) | 21 Sept 2019 | Initial flash and setup of WLED on QuinLED-Dig-Uno board
21 | [Integrating WLED into Home Assistant](https://youtu.be/d8RpFupihWc) | Quindor | Video (8:22) | 25 Nov 2019 | How to use a WLED node in Home Assistant
22 | [Holiday LEDs Step-by-step with WLED & Home Assistant](https://youtu.be/zepNvlN4gEc) | KPeyanski | Video (20:38) | 28 Oct 2020 | Complete and great wiring, installation and HA setup tutorial
23 | [HOW-TO: Holiday LED Strip Lights, Home Assistant and WLED](https://peyanski.com/holiday-led-strip-lights-home-assistant-and-wled/) | KPeyanski | Article | 23 Jul 2022 | Same as the above video, but in text form!
24 | [Smart Ping Pong LED Lamp - Quick&Simple DIY](https://www.youtube.com/watch?v=WlkMbNnIECM) | bitluni | Video (18:19) | 13 Sept 2020 | Construction, wiring and flashing of a cool looking and easy to make lamp
25 | [WLED tutorial series (in Russian/на русском)](https://sprut.ai/article/sistema-wled-upravlenie-umnymi-girlyandami-i-lampami-na-adresnyh-svetodiodah-i-ne-tolko) | Gelmer | Article Series | 11 Jun 2023 | Серия руководств по установке
26 | [Инструкция на русском: Как прошить WLED и LED FX в ESP01](https://youtu.be/sdxyzDjiXn8) [Пример применения WLED: Бесконечный зеркальный туннель внутри столика IKEA Lack](https://youtu.be/zL-aq_SqaW8) | Alchemist | Video (9:16) / Video (13:09) | 19 Aug 2022 | Прошивка, установка необходимых драйверов и демонстрация режимов работы. Пример электронной схемы.
27 | [ESP8266 based LED controller for WS2812b strip. WLED Firmware + OpenHAB (in Russian)](https://www.youtube.com/watch?v=K4ioTt3XvGc) | Room31 | Video (17:04) | 11 Mar 2020 |
28 | [How to use WLED on an ESP32 (German)](https://www.adlerweb.info/blog/2020/11/01/bitbastelei-409-ws2812b-neopixel-mit-wled-einfach-steuern/ ) | Bitbastelei/Adlerweb | Video (11:00) | 1 Nov 2020 |
29 | [DIY Ambilight using WLED and a Relay](https://wiki.faked.org/DIY_Ambilight) | jangrewe | Article | ? | Wiki page with schematics and instructions for Hyperion, etc. |
30 | [Adding Smarts and Color to an IKEA Lamp](https://apop.tech/posts/adding-smarts-and-color-to-an-ikea-lamp/) | apop880 | Article | 21 May 2021 | Tutorial on upgrading a basic IKEA lamp with WLED |
31 |
32 | ### Digital LED knowledge
33 |
34 | | Resource | Maker | Type | Info |
35 | | --- | --- | --- | --- |
36 | [Adafruit NeoPixel Überguide](https://learn.adafruit.com/adafruit-neopixel-uberguide) | Adafruit | Article | Everything that's important at a glance. *Highly recommended for newcomers to digital LEDs*
37 | [Digital LED Power Usage](https://quinled.info/2020/03/12/digital-led-power-usage/) | Quindor | Article/Spreadsheet/Video | Helps you plan the power usage of your installation
38 | [Power calculation and injection live stream](https://quinled.info/2020/09/26/power-injection-livestream/) | Quindor | Video (2:24:52) | Tons of great questions and answers. Live calculations, drawings, 5v vs 12v, strip comparisons, etc.
39 | [Difference between LED strip types](https://www.youtube.com/watch?v=QnvircC22hU) | The Hook Up | Video (14:41) | What is the best LED strip for your project?
40 | [7 Common LED Strip FAILS and How To Avoid Them](https://www.youtube.com/watch?v=Fu4qZW0pQm4) | The Hook Up | Video (12:14) | Make your project look much better!
41 | [Power Injection demystified](http://spikerlights.com/pwrinjection.aspx) | Spiker Lights | Article | What is power injection and how much do I need?
42 | [Common(sharing) Ground / Multiple power supplies](https://majenko.co.uk/blog/importance-sharing-grounds) | | Article | When using more than one power supply.
43 |
44 | ### Tools & Skills
45 |
46 | | Resource | Maker | Type | Info |
47 | | --- | --- | --- | --- |
48 | [How to Solder](https://www.youtube.com/watch?v=ZwU9SqO0udU) | Beauty and the Bolt | Video (9:50) | |
49 | [Soldering new leads to LED strip](https://youtu.be/sU1O80WPqpk) | Quindor | Video (8:24) | |
50 | [Soldering Tutorial Part 2](https://www.youtube.com/watch?v=fYz5nIHH0iY) | EEVblog | Video (34:05) | Detailed tutorial on soldering, see parts 1 and 3 for even more info)
51 | [Voltage Drop Calculator](https://www.rapidtables.com/calc/wire/voltage-drop-calculator.html) | | Tool | |
52 | [Another Voltage Drop Calculator](https://www.calculator.net/voltage-drop-calculator.html) | | Tool | |
53 | [Pixel/Bullet Voltage Drop Calc](http://spikerlights.com/calcpower.aspx) | | Tool |5 and 12V|
54 | [Combined Wire Gauge Calculator](https://www.wirebarn.com/Combined-Wire-Gauge-Calculator_ep_42.html) | | Tool | |
55 | [Wire Size/Ampacity](https://www.powerstream.com/Wire_Size.htm)| | Tool|Use chassis wiring
56 |
57 | _Add more categories as needed :)_
58 |
--------------------------------------------------------------------------------
/docs/interfaces/e1.31-dmx.md:
--------------------------------------------------------------------------------
1 | ---
2 | title: E1.31 (DMX) / Art-Net
3 | hide:
4 | # - navigation
5 | # - toc
6 | ---
7 |
8 | ## E1.31
9 |
10 | WLED supports the E1.31 (sACN) realtime light protocol.
11 |
12 | !!! info "Version Info"
13 | **As of WLED v0.10.0, Art-Net is alternatively supported.** All information on this page applies for Art-Net as well.
14 | You will need to switch to Art-Net mode in Sync settings and reboot once.
15 |
16 | !!! info "Version Info"
17 | **As of WLED v0.11.0, DDP is alternatively supported.** Using DDP, the Multi RGB DMX mode is always used regardless of the DMX mode setting (as it is no DMX)
18 | You will need to switch to DDP mode in Sync settings and reboot once.
19 |
20 | !!! info "Version Info"
21 | **As > WLED 0.14.0-b1, DMX Effect mode channel mapping changed.** This is a breaking change in E131 sync behavior. Existing DMX setups using WLED Effect mode are likely to break. Solution: Adopt external DMX channel mappings according to the new Effect mode channel layout.
22 |
23 | ### Features
24 |
25 | * 170 LEDs (510 DMX channels) are supported per universe.
26 | * You can use up to 9 adjacent universes which is a total of more than the maximum 1500 LEDs WLED can drive.
27 | * E1.31 priority handling. [HTP](https://wiki.openlighting.org/index.php/HTP) for multiple senders with same priority is not implemented!
28 |
29 | **Note:** WLED > 0.14.0-b1 implements a basic priority handling. To enable it set E1.31 port priority UI config > 0. Packages < config priority will always be skipped. Higher priority senders will overrule lower priority package senders (timeout 3 seconds). Non-zero start code and E1.31 preview data is ignored.
30 |
31 | **Note:** If you see issued with lag, you may see better performance if you disable Wi-Fi Multimedia (WMM) Mode QoS on your router
32 |
33 | ### General Recommendations
34 |
35 | * For a fluent 25ms (40fps) or more framerate, it is recommended to use no more than 3 universes (510 LEDs).
36 | * Using multiple E1.31 sources to control a single WLED controller will impact performance. If possible it's recommended to avoid this.
37 | * Configure WLED to connect to [a WiFi Network](/features/settings#wifi-settings). It was observed that sending E1.31 from a computer to WLED when accessed as access point (WLED-AP) may not work, see [forum post](https://wled.discourse.group/t/sending-e1-31-when-in-ap-mode-may-not-work/407).
38 | * When using an ESP32, disabling WiFi sleep in the WiFi settings of WLED can reduce/eliminate visual stuttering/lag of effects, and significantly reduce ping times. Note: disabling WiFi sleep will increase power consumption.
39 |
40 | ### Using LedFX
41 |
42 | We highly recommend the [LedFx project](https://github.com/LedFx/LedFx) in combination with WLED!
43 | Configure WLED first, ensure devices are powered on and connected to your WiFi.
44 | To add WLED devices, in the 'Device Management', click on the Find WLED devices button.
45 | If you want to manually add devices, use more than 170 LEDs with LedFx, you need to go to additional settings and set "Universe Size" to 510 when adding the WLED device!
46 |
47 | ## Settings
48 |
49 | ### DMX types
50 |
51 | Select the mode you want to use in Sync settings.
52 |
53 | #### Disabled
54 |
55 | Incoming E1.31 packets will be ignored.
56 |
57 | #### Single RGB
58 |
59 | All LEDs are set to the same color. 3 Channels: Red, Green, Blue
60 |
61 | #### Single DRGB
62 |
63 | All LEDs are set to the same color. 4 Channels: Master Dimmer, Red, Green, Blue
64 |
65 | #### Effect
66 |
67 | Not a realtime mode & only support 1 universe. Allows setting WLED effect properties over E1.31 with 15 channels.
68 |
69 | | Channel | Property |
70 | | --- | --- |
71 | 1 | Master Dimmer
72 | 2 | Effect mode ID
73 | 3 | Effect speed
74 | 4 | Effect intensity
75 | 5 | Effect palette ID
76 | 6 | Effect option
77 | 7 | Red Primary
78 | 8 | Green Primary
79 | 9 | Blue Primary
80 | 10 | Red Secondary
81 | 11 | Green Secondary
82 | 12 | Blue Secondary
83 | 13 | Red Tertiary
84 | 14 | Green Tertiary
85 | 15 | Blue Tertiary
86 |
87 | The `effect option` channel is divided into 4 macro parts to control _mirror_ and _reverse_ states:
88 |
89 | | value | mirror | reverse | |
90 | |----------|----------|---------|-|
91 | | 0..63 | false | false | **none** |
92 | | 64..127 | false | true | **reverse** |
93 | | 128..191 | true | false | **mirror** |
94 | | 192..255 | true | true | **mirror & reverse** |
95 |
96 | #### Effect + White
97 |
98 | Same as `Effect` with additional whites = 18 channels.
99 |
100 | | Channel | Property |
101 | | --- | --- |
102 | .. | ..
103 | 16 | White Primary
104 | 17 | White Secondary
105 | 18 | White Tertiary
106 |
107 | #### Effect Segment
108 |
109 | Same as `Effect` with 15 channels per segment; expect `channel 1 = "Segment Dimmer"`.
110 |
111 | All effect segment modes introduce an additional `DMX segment spacing`. If spacing `s = 0` subsequent DMX addresses for all segments are created. When `s > 0` a gap of `s` DMX addresses between segments is used. To calculate segment DMX fixture addresses:
112 |
113 | Segment DMX Address (i) = DMXAddress + i * (dmxEffectChannels + s)
114 |
115 | Where `DMXAddress` = start address as configured in UI, `dmxEffectChannels` = 15|18 depending on selected effect segment mode, `s` = address gap as configured in UI and `i` is the index id of each segment as existing.
116 |
117 | Note: 1 DMX universe = max 512 DMX addresses. So max number of segments depends on start address, selected segment mode and configured DMX segment spacing. To calculate how many segments can be controlled:
118 |
119 | Max segments = floor[ (512 - DMXAddress) / (dmxEffectChannels + s) ]
120 |
121 | #### Effect Segment + White
122 |
123 | Same as `Effect Segment` including whites, so it uses 18 DMX channels per segment.
124 |
125 | #### Multiple RGB
126 |
127 | 3 Channels per LED in sequence. LED 0 Red, LED 0 Green, LED 0 Blue, LED 1 Red, ...
128 | Default mode, equivalent to pre-0.9.1 E1.31. This is the mode you want to use for xLights and LedFx.
129 |
130 | #### Multiple RGBW
131 |
132 | Like `Multiple RGB` + additional white channels.
133 |
134 | #### Dimmer + Multi RGB
135 |
136 | Like `Multiple RGB`, but the first channel is a brightness control.
137 | Master Dimmer, LED 0 Red, LED 0 Green, ...
138 |
139 | #### Preset
140 |
141 | Trigger presets and control brightness. 2 Channels: Brightness, Preset ID
142 |
--------------------------------------------------------------------------------
/docs/advanced/home-automation.md:
--------------------------------------------------------------------------------
1 | ---
2 | title: Home Automation Integration
3 | hide:
4 | # - navigation
5 | # - toc
6 | ---
7 |
8 | It is possible to interface WLED with home automation systems and other 3rd party software.
9 | You can use any API WLED provides (JSON, HTTP, UDP, MQTT), JSON is preferred. This page is intended for sample code and configs others use to control WLED from various 3rd party software:
10 |
11 | [HomeAssistant and NodeRED flows](https://github.com/Snipercaine/WLED-HomeAssistant)
12 |
13 | ## Domoticz:
14 | Please see [here](https://github.com/frustreermeneer/domoticz-wled-plugin)!
15 |
16 | ## Home Assistant
17 |
18 | ### Using the native integration
19 |
20 | !!! warning "Compatibility notice"
21 | WLED devices are not supported by Home Assistant 2022.2 or later if a CCT bus is configured or `White Balance Correction` is enabled.
22 |
23 | We hope to resolve this issue as soon as possible. As a temporary workaround you can enable the option `Calculate CCT from RGB` in LED settings.
24 |
25 | WLED can be configured using the integrations in the Home Assistant frontend.
26 |
27 | Menu: **Configuration** -> **Integrations**.
28 |
29 | In most cases, the WLED devices will be automatically discovered by Home Assistant. Those automatically discovered WLED devices are listed on the integrations page.
30 |
31 | If for some reason (e.g., due to lack of mDNS support on your network), the WLED device isn't discovered, it can be added manually.
32 |
33 | Click on the `+` sign to add an integration and click on **WLED**. After completing the configuration flow, the WLED
34 | integration will be available.
35 |
36 | [WLED integration documentation](https://www.home-assistant.io/integrations/wled/)
37 |
38 | ### Using MQTT
39 |
40 | Alternatively, MQTT can be used (not recommended).
41 | Auto discovery is no longer supported since version 0.9 of WLED.
42 | In case you want to configure the device manually:
43 |
44 | ??? info "Expand to show MQTT configuration"
45 | ```
46 | light:
47 | - platform: mqtt
48 | name: "Kitchen Floor Lights"
49 | command_topic: "wled/all"
50 | brightness_command_topic: "wled/all"
51 | rgb_command_topic: "wled/all/col"
52 | rgb_command_template: "{{ '#%02x%02x%02x' | format(red, green, blue)}}"
53 | effect_command_topic : "wled/all/api"
54 | effect_list:
55 | - "FX=0"
56 | - "FX=1"
57 | - "FX=2"
58 | - "FX=3"
59 | - "FX=4"
60 | - "FX=5"
61 | - "FX=6"
62 | - "FX=7"
63 | - "FX=8"
64 | - "FX=9"
65 | - "FX=10"
66 | - "FX=11"
67 | - "FX=12"
68 | - "FX=13"
69 | - "FX=14"
70 | - "FX=15"
71 | - "FX=16"
72 | - "FX=17"
73 | - "FX=18"
74 | - "FX=19"
75 | - "FX=20"
76 | - "FX=21"
77 | - "FX=22"
78 | - "FX=23"
79 | - "FX=24"
80 | - "FX=25"
81 | - "FX=26"
82 | - "FX=27"
83 | - "FX=28"
84 | - "FX=29"
85 | - "FX=30"
86 | - "FX=31"
87 | - "FX=32"
88 | - "FX=33"
89 | - "FX=34"
90 | - "FX=35"
91 | - "FX=36"
92 | - "FX=37"
93 | - "FX=38"
94 | - "FX=39"
95 | - "FX=40"
96 | ```
97 | by @acid2000
98 |
99 | Config json which is sent via autodiscovery:
100 | ```json
101 | {
102 | "name": "WLED Light",
103 | "stat_t": "wled/840d8e989815/c",
104 | "cmd_t": "wled/840d8e989815",
105 | "rgb_stat_t": "wled/840d8e989815/c",
106 | "rgb_cmd_t": "wled/840d8e989815/col",
107 | "bri_cmd_t": "wled/840d8e989815",
108 | "bri_stat_t": "wled/840d8e989815/g",
109 | "fx_cmd_t": "wled/840d8e989815/api",
110 | "fx_stat_t": "wled/840d8e989815/api",
111 | "bri_val_tpl": "{{value}}",
112 | "rgb_cmd_tpl": "{{'#%02x%02x%02x' | format(red, green, blue)}}",
113 | "rgb_val_tpl": "{{value[1:3]|int(base=16)}},{{value[3:5]|int(base=16)}},{{value[5:7]|int(base=16)}}",
114 | "qos": 0,
115 | "opt": true,
116 | "pl_on": "ON",
117 | "pl_off": "OFF",
118 | "fx_val_tpl": "{{value}}",
119 | "fx_list": [
120 | "[FX=00] Solid", "[FX=01] Blink", "[FX=02] Breathe", "[FX=03] Wipe", "[FX=04] Wipe Random",
121 | "[FX=05] Random Colors", "[FX=06] Sweep", "[FX=07] Dynamic", "[FX=08] Colorloop",
122 | "[FX=09] Rainbow", "[FX=10] Scan", "[FX=11] Dual Scan", "[FX=12] Fade", "[FX=13] Chase",
123 | "[FX=14] Chase Rainbow", "[FX=15] Running", "[FX=16] Saw", "[FX=17] Twinkle", "[FX=18] Dissolve",
124 | "[FX=19] Dissolve Rnd", "[FX=20] Sparkle", "[FX=21] Dark Sparkle", "[FX=22] Sparkle+",
125 | "[FX=23] Strobe", "[FX=24] Strobe Rainbow", "[FX=25] Mega Strobe", "[FX=26] Blink Rainbow",
126 | "[FX=27] Android", "[FX=28] Chase", "[FX=29] Chase Random", "[FX=30] Chase Rainbow",
127 | "[FX=31] Chase Flash", "[FX=32] Chase Flash Rnd", "[FX=33] Rainbow Runner", "[FX=34] Colorful",
128 | "[FX=35] Traffic Light", "[FX=36] Sweep Random", "[FX=37] Running 2", "[FX=38] Red & Blue",
129 | "[FX=39] Stream", "[FX=40] Scanner", "[FX=41] Lighthouse", "[FX=42] Fireworks", "[FX=43] Rain",
130 | "[FX=44] Merry Christmas", "[FX=45] Fire Flicker", "[FX=46] Gradient", "[FX=47] Loading",
131 | "[FX=48] In Out", "[FX=49] In In", "[FX=50] Out Out", "[FX=51] Out In", "[FX=52] Circus",
132 | "[FX=53] Halloween", "[FX=54] Tri Chase", "[FX=55] Tri Wipe", "[FX=56] Tri Fade",
133 | "[FX=57] Lightning", "[FX=58] ICU", "[FX=59] Multi Comet", "[FX=60] Dual Scanner",
134 | "[FX=61] Stream 2", "[FX=62] Oscillate", "[FX=63] Pride 2015", "[FX=64] Juggle",
135 | "[FX=65] Palette", "[FX=66] Fire 2012", "[FX=67] Colorwaves", "[FX=68] BPM",
136 | "[FX=69] Fill Noise", "[FX=70] Noise 1", "[FX=71] Noise 2", "[FX=72] Noise 3", "[FX=73] Noise 4",
137 | "[FX=74] Colortwinkle", "[FX=75] Lake", "[FX=76] Meteor", "[FX=77] Smooth Meteor",
138 | "[FX=78] Railway", "[FX=79] Ripple"
139 | ]
140 | }
141 | ```
142 | ## Indigo Domotics:
143 | Please see [here](https://www.indigodomo.com/pluginstore/214/)!
144 |
145 | ## openHAB:
146 |
147 | In openHAB 3 based environments you are able to use the native [openHAB WLED Binding](https://www.openhab.org/addons/bindings/wled/), which also supports discovery of your WLED devices.
148 |
149 | For older openHAB (2.5.x) environmantes the connection can be configured via MQTT broker & Openhab MQTT Binding (2.5x) with configuration files
150 | Please find the details [here](https://community.openhab.org/t/wled-control-without-the-binding/101120)
151 |
152 |
153 |
--------------------------------------------------------------------------------
/docs/features/macros.md:
--------------------------------------------------------------------------------
1 | ---
2 | title: Macros
3 | hide:
4 | # - navigation
5 | # - toc
6 | ---
7 | !!! info
8 | Also see [Presets](/features/presets) for 0.11.0+.
9 |
10 | You are able to set custom actions ("Macros") in Time & Macro settings for the following events:
11 |
12 | - Specific time of day
13 | - Button short/long/double press
14 | - HTTP API call executing a macro with `&M=`
15 | - Alexa On/Off
16 | - Countdown over
17 | - Timed light duration over
18 | - Device (re)boot (up to 0.10.2, use LED settings `Boot preset` in 0.11)
19 |
20 | Each macro has the format of a standard [HTTP API call](/interfaces/http-api) without the IP. Optionally, the "win&" may be omitted.
21 | For example, the macro "A=255" sets the brightness to maximum. "R=255&G=160&B=0" sets the color to orange.
22 | You can specify up to 16 macros. (up to 250 in WLED 0.11 since the Macro functionality has been merged into the Presets feature)
23 |
24 | Examples of how to use API-calls and define macros can be found in [this issue](https://github.com/Aircoookie/WLED/issues/801#issuecomment-635600255) and [in this one](https://github.com/Aircoookie/WLED/issues/199#issuecomment-520143239).
25 |
26 | The simplest macro example is getting a button to do your bidding. The default pin to which a button can be connected is GPIO 0 (D3 on NodeMCU, D1 Mini and others). Even though WLED uses the internal pull up resistors on input pins, this pin is ideally externally pulled high to 3.3V with a 10k resistor. The configured macro executes when the pin is pulled low (grounded). The desired macro is entered on the Time/Macros configuration page and then assigned to a short, long or double press. Like this:
27 |
28 | 
29 |
30 |
31 | The "T=2" macro toggles power to the LEDs (in this case long press).
32 | The "FX=~" macro steps through the effects (in this case short press).
33 |
34 | You can set a preset to `P1=1&P2=3&PL=~`, enter the preset number for your button, and this will step through presets 1 and 3. Change the "3" to whatever your highest preset is that you want to include.
35 |
36 | The default (built-in) actions for button 0 are short-press: toggle on/off and long-press: select random color.
37 | Long-pressing for more than 6 seconds will open the WLED-AP with the default password (`wled1234`).
38 | For further buttons, the default action for short press is cycling effects, long press ramp brightness, and double press cycle palettes.
39 |
40 | ## Buttons
41 |
42 | Multiple buttons are implemented since 0.13 and allow a few different types of buttons to be connected to the ESP:
43 |
44 | - momentary push-buttons that are normally open and short GPIO pin to ground (active low)
45 | - momentary push-buttons that are normally closed and release the connection from GPIO pin to GND (inverted, active high)
46 | - switches (be careful with selection of GPIO for switch since some GPIOs will prevent successful boot of ESP if held LOW or HIGH at boot)
47 | - PIR switch AKA motion detection sensor (they set GPIO HIGH when motion is detected, this type of buttons will also trigger MQTT message with /motion topic if "Publish on button press" is set on MQTT config)
48 | - some GPIO pins on ESP32 can act as momentary touch buttons with no additional hardware
49 | - analog "buttons" (also with inverted logic) those can be used as potentiometers or analog input buttons
50 |
51 | Button GPIO pin and type can be selected in the _LED Settings_ page.
52 |
53 | Each momentary button can have 3 different [Presets](/features/presets) assigned, for short press, long press or double press.
54 | Momentary push-buttons by default trigger shortly after the _release_ of a button, to be able to detect if it has been pressed short, long or twice. When configuring the same preset number for short, long and double press, it will trigger directly when being pressed as of WLED 0.14.0-b2-2306020.
55 |
56 | For switch type buttons you can assign only 2 presets, one for transition of switch from LOW to HIGH and second for the opposite transition from HIGH to LOW.
57 |
58 | Selecting 0 for preset will use the _default_ action. If you find that the default action is _inverted_ for switch, please create presets for On and Off actions and assign them appropriately.
59 |
60 | For assigning [Presets](/features/presets) to buttons use _Time & Macros_ settings page.
61 |
62 | Note: Button 0 has two, built-in functions. 1. Hold it down for >6 seconds and the Wi-Fi settings will be reset to default. 2. Hold it down for >12 seconds and flash memory is erased.
63 |
64 | ### Analog button
65 | Starting in WLED 0.13, analog "buttons" (e.g. a potentiometer) are supported.
66 | With the Short and Long columns set to 0, set the Double column in Button Actions to one of these values to configure:
67 |
68 | | Property | Value |
69 | | --- | --- |
70 | Global brightness | 250
71 | Effect speed | 249
72 | Effect intensity | 248
73 | Palette | 247
74 | Primary color hue | 200
75 | Segment N opacity | 0-32
76 |
77 | This potentiometer should be supplied 3.3V and GND, with it's output supplied to A0 (or any other ADC pin you specify), recommended 10KΩ or greater.
78 |
79 | !!! info "Do not use ESP32 ADC2 GPIO pins for analog buttons"
80 | On ESP8266, you can only have a single analog button on pin A0, the pin set in the settings UI is ignored.
81 | On ESP32, only ADC1 pins will work for analog input while WiFi is active (pins 32-39). ADC2 pins will not work.
82 |
83 | ### Global brightness
84 |
85 | Users planning to use a potentiometer for global brightness should be aware that wled is configured to turn off when the potentiometer is adjusted to either extreme - both maximum and minimum adjustments. Users who desire to disable this functionality may do so on the hardware side by adding resistors between the potentiometer and the rails.
86 |
87 | Adding a resistor between the potentiometer and 3.3V prevents A0 from fully reaching 3.3V and allows the potentiometer to be adjusted to the maximum adjustment without powering off wled. A value of 7.5%-10% of the potentiometer value should be sufficient for this (~750Ω for a 10KΩ potentiometer). Similarly, added resistance between the potentiometer and GND prevents A0 from reaching 0V, and allows the potentiometer to be adjusted to the minimum adjustment without powering off wled. A value of 3-5% of the potentiometer value should be sufficient (~500Ω for a 10KΩ potentiomenter).
88 |
89 | In both instances, the added resistances will slightly reduce the overall adjustment range, with a larger reduction for larger resistor choices. As such, A user who desires the maximum possible adjustment range should determine their needed resistance values experimentally by installing the potentiometer, adjusting for stable behavior at the desired extrema, measuring the voltage on A0, using the voltage divider equation to determine the optimal resistance, then retesting for confirmation.
90 |
91 |
--------------------------------------------------------------------------------
/docs/features/segments.md:
--------------------------------------------------------------------------------
1 | ---
2 | title: Segments
3 | hide:
4 | # - navigation
5 | # - toc
6 | ---
7 |
8 | !!! info
9 | Starting in WLED 0.9.0, Segments are supported.
10 |
11 | This feature allows you to set different zones on the LED strip, each running a different effect or color.
12 |
13 | A segment is selected if the checkmark next to the segment number is checked. Changes you make to color or effects will apply to all selected segments. The color/effect that is shown in the web UI is that of the first selected segment.
14 |
15 | There is one _main segment_, Segment 0 by default. This segment has a few important differences to the rest of the segments:
16 |
17 | - Color transitions only work on the main segment
18 | - The main segment's color is the one that will be reported to HTTP and MQTT APIs
19 |
20 | Tip: If you divide your strip into two segments, reverse the second one and select both, you can achieve very nice symmetrical effects!
21 |
22 | Segment 0 has a Start LED of 0 and a Stop LED equal to the LED Count you defined in Configuration, LED Preferences. _The Stop LED is **not** included in the Segment._ Currently you can create a maximum of 10 segments. Presets 1-15 use only Segment 0 by default. Preset 16 is the only Preset that saves settings for Segments 1-10.
23 |
24 | To display segment information select the down arrow in the Segment box. To add a Segment select “+ Add Segment”. Enter the Start and Stop LED as appropriate. Grouping and Spacing control the organization of the LEDs within the selected effect. To reverse the direction of an effect select Reverse Direction. To delete a Segment select the trash can. To save your Segment settings select the checkmark to the right of the Start and Stop LED numbers.
25 |
26 | ## Grouping and Spacing
27 | When an effect changes the color of one LED, it is really changing the color of one LED group. Since the default group size is one, the effect normally only changes a single LED. When Grouping is set to two, the effect will light two LEDs using the same color. The two LEDs are treated as a single _virtual_ LED.
28 |
29 | To illustrate this, we can create a segment with 12 LEDS (physically referred to as LED 0 to LED 11) and select an effect that repeats three colors. When Grouping is set to one we see a repeating pattern of one red LED, one blue LED, and one green LED. When Grouping is set to two the segment of 12 physical LEDs becomes a segment of 6 virtual LEDs (virtualLED 0 to virtualLED 5). The same effect will now set the color of each virtual LED (which consists of two physical LEDs). The pattern becomes two red LEDs followed by two blue LEDs then two green LEDs.
30 |
31 | |Setting|LED Output|
32 | | :---: | --- |
33 | |Grouping 1
83 |
84 | Check out the WLED [Discourse forum](https://wled.discourse.group)!
85 | You can also send me mails to [dev.aircoookie@gmail.com](mailto:dev.aircoookie@gmail.com), but please only do so if you want to talk to me privately.
86 | If WLED really brightens up your every day, you can [](https://paypal.me/aircoookie)
87 |
88 | !!! danger "Disclaimer"
89 | If you are sensitive to photosensitive epilepsy it is not recommended that you use this software.
90 | In case you still want to try, don't use strobe, lighting or noise modes or high effect speed settings.
91 | As per the MIT license, I assume no liability for any damage to you or any other person or equipment.
92 |
--------------------------------------------------------------------------------
/docs/interfaces/udp-notifier.md:
--------------------------------------------------------------------------------
1 | ---
2 | title: WLED UDP Sync
3 | hide:
4 | # - navigation
5 | # - toc
6 | ---
7 |
8 | ### Usage
9 |
10 | The UDP notifier function of WLED makes it easy to sync multiple lights to the same color/effect, enabled by default.
11 | You can set the specific behavior of it in Sync settings, also you can choose if all aspects or only brightness/color/effects are applied.
12 |
13 | Additionally, there is a "Sync" quick toggle for it in the main control UI!
14 | In UI settings, you can set whether this button only turns on/off sending (default) or also receiving, with the option `Sync button toggles both send and receive`.
15 |
16 | If your sync settings are not the way you like on boot, check the `WLED Broadcast` section in Sync settings, where you can specify what is sent and received by default:
17 |
18 | #### Receiving settings
19 |
20 | | Setting | Description |
21 | | --- | --- |
22 | Receive Brightness | If there is a sync notification, whether its brightness should be applied
23 | Color | Whether the color of the synced device should be applied
24 | Effects | Whether the effect settings should be applied
25 |
26 | If all checkboxes are disabled, nothing is received by default after each boot. If the sync is toggled on in the main UI _and_ the corresponding checkbox in UI settings is checked, everything is received.
27 |
28 | A sync receiver will not assume the state of the last sender directly after booting, a new packet must be send for it to react.
29 |
30 | #### Sending settings
31 |
32 | | Setting | Description |
33 | | --- | --- |
34 | Send on direct change | Whether to send a sync notification when state changed via the web UI or API
35 | Send on button press | Whether to send sync when toggled by the physical hardware button
36 | Send Alexa notifications | Whether to send sync after changed by Alexa (you may use Alexa groups instead)
37 | Send Hue notifications | Whether to send sync after a connected Philips light changed
38 | Send Macro notifications | Whether to send sync after a macro was triggered
39 | Send notifications twice | Sends notifications twice (if you have issues with UDP packet loss)
40 |
41 | The quick toggle in the main UI will only apply to direct changes (UI + API), all other sync type sending behavior remains unaffected.
42 |
43 | You can easily group WLED devices (for example all in one room) by changing the UDP port of all devices you want in that group.
44 |
45 | #### Sync groups
46 |
47 | From v0.13.0, 8 Sync groups are available. This allows syncing select instances only without changing the UDP port.
48 | For example, you might use one sync group per room you use WLED devices in.
49 | Make sure the sender and receiver you want to sync both have the same sync group ticked (a sender can send to multiple groups and a receiver can listen to multiple groups).
50 |
51 | Sync packets received from pre-0.13.0 instances are treated as if sent in sync group 1 only.
52 |
53 | ### Protocol description
54 |
55 | !!! warning
56 | _Note: this info is partly out of date, see updated functionality in the code ([udp.cpp](https://github.com/Aircoookie/WLED/blob/master/wled00/udp.cpp))_
57 |
58 | When enabled, the module where a value was changed will send an UDP broadcast to a port (default 21324).
59 | Other modules that listen on this port will set themselves to the same color.
60 |
61 | For interoperability, the protocol was designed so that even modules with different WLED versions can sync.
62 | Therefore, if a WLED 0.4 system receives a WLED 0.3 UDP notification it will apply the primary color but keep its current secondary color.
63 |
64 | The UDP packet is currently 24 bytes long. It is laid out in the following:
65 |
66 | | Byte Index | Var Name | Description | Notifier Version |
67 | | --- | --- | --- | --- |
68 | 0 | \- | Packet Purpose Byte* | 0
69 | 1 | callMode | Packet Reason** | 0
70 | 2 | bri | Master Brightness | 0
71 | 3 | col[0] | Primary Red Value | 0
72 | 4 | col[1] | Primary Green Value | 0
73 | 5 | col[2] | Primary Blue Value | 0
74 | 6 | nightlightActive | Nightlight running? | 0
75 | 7 | nightlightDelayMins | Nightlight Time | 0
76 | 8 | effectCurrent | Effect Index | 0
77 | 9 | effectSpeed | Effect Speed | 0
78 | 10 | white | Primary White Value | 1
79 | 11 | \- | Version Byte*** | 1
80 | 12 | colSec[0] | Secondary Red Value | 2
81 | 13 | colSec[1] | Secondary Green Value | 2
82 | 14 | colSec[2] | Secondary Blue Value | 2
83 | 15 | whiteSec | Secondary White Value | 2
84 | 16 | effectIntensity | Effect Intensity | 3
85 | 17 | transitionDelay | Transition Duration Upper | 4
86 | 18 | transitionDelay | Transition Duration Lower | 4
87 | 19 | effectPalette | FastLED palette | 5
88 | 20-23 | - | Zeros | -
89 |
90 | *The notifier protocol is only used if this byte is 0. Otherwise, one of the [UDP Realtime](/interfaces/udp-realtime) protocols will be used.
91 |
92 | **The callMode variable specifies the reason for the notification.
93 | Every color update has the potential to trigger a notification.
94 |
95 | | callMode | Description | Behavior |
96 | | --- | --- | --- |
97 | 0 | Initial Boot | Do not notify
98 | 1 | Direct Change via UI or API | notifyDirect?
99 | 2 | Button was pressed | notifyButton?
100 | 3 | Update by other notification | Do not notify
101 | 4 | Nightlight activated | notifyDirect?
102 | 5 | Other (Req. with &NN) | Do not notify
103 | 6 | Effect changed | notifyDirect?
104 | 7 | Hue light changed | notifyHue?
105 | 8 | Preset Cycle active | notifyDirect?
106 | 9 | Updated via Blynk | notifyDirect?
107 |
108 | ***This is the version of the UDP protocol.
109 |
110 | | UDP Version | Description | WLED Version |
111 | | --- | --- | --- |
112 | 0 | Basic Support | 0.3
113 | 1 | White Value supported | 0.4p
114 | 2 | Secondary Color supported | 0.4
115 | 3 | Effect Intensity supported | 0.5.0
116 | 4 | Transition Time supported | 0.6.0
117 | 5 | Palettes supported | 0.8.0
118 |
--------------------------------------------------------------------------------
/docs/interfaces/json-ir/44-key_ir.json:
--------------------------------------------------------------------------------
1 | {
2 | "remote": "44-key",
3 | "0xFF3AC5": {
4 | "label": "Bright +",
5 | "pos": "1x1",
6 | "cmd": "!incBrightness"
7 | },
8 | "0xFFBA45": {
9 | "label": "Bright -",
10 | "pos": "1x2",
11 | "cmd": "!decBrightness"
12 | },
13 | "0xFF827D": {
14 | "label": "Off",
15 | "pos": "1x3",
16 | "cmd": "T=0"
17 | },
18 | "0xFF02FD": {
19 | "label": "On",
20 | "pos": "1x4",
21 | "cmd": "T=1"
22 | },
23 | "0xFF1AE5": {
24 | "label": "Red",
25 | "pos": "2x1",
26 | "cmnt": "Lava",
27 | "cmd": "FP=8&CL=hFF0000&C2=hFF7F00&C3=hCC3D60"
28 | },
29 | "0xFF9A65": {
30 | "label": "Green",
31 | "pos": "2x2",
32 | "cmnt": "Forest",
33 | "cmd": "FP=10&CL=h8000&C2=h8040&C3=h30661E"
34 | },
35 | "0xFFA25D": {
36 | "label": "Blue",
37 | "pos": "2x3",
38 | "cmnt": "Breeze",
39 | "cmd": "FP=15&CL=hFF&C2=h7F00FF&C3=h3D60CC"
40 | },
41 | "0xFF22DD": {
42 | "label": "White",
43 | "pos": "2x4",
44 | "cmd": "FP=5&CL=hFFFFFF&C2=hFFFFFF&C3=hCCCCCC"
45 | },
46 | "0xFF2AD5": {
47 | "label": "Tomato",
48 | "pos": "3x1",
49 | "cmd": "FP=5&CL=hFF6347&C2=hFFBF47&C3=hCC646F"
50 | },
51 | "0xFFAA55": {
52 | "label": "LightGreen",
53 | "pos": "3x2",
54 | "cmnt": "Rivendale",
55 | "cmd": "FP=14&CL=h90EE90&C2=h90EEBF&C3=h96BE89"
56 | },
57 | "0xFF926D": {
58 | "label": "DeepBlue",
59 | "pos": "3x3",
60 | "cmnt": "Ocean",
61 | "cmd": "FP=9"
62 | },
63 | "0xFF12ED": {
64 | "label": "FloralWhite",
65 | "pos": "3x4",
66 | "cmnt": "Warm White",
67 | "cmd": "FP=5&CL=hFFFAF0&C2=hFCFFF0&C3=hCCC7C3"
68 | },
69 | "0xFF0AF5": {
70 | "label": "Orange",
71 | "pos": "4x1",
72 | "cmnt": "Sakura",
73 | "cmd": "FP=49&CL=hFFA500&C2=hD9FF00&C3=hCC753D"
74 | },
75 | "0xFF8A75": {
76 | "label": "Turquoise",
77 | "pos": "4x2",
78 | "cmnt": "Beech",
79 | "cmd": "FP=22&CL=h40E0D0&C2=h40A0E0&C3=h59B393"
80 | },
81 | "0xFFB24D": {
82 | "label": "Purple",
83 | "pos": "4x3",
84 | "cmd": "FP=5&CL=h800080&C2=h800040&C3=h541E66"
85 | },
86 | "0xFF32CD": {
87 | "label": "LavenderBlush",
88 | "pos": "4x4",
89 | "cmd": "FP=5&CL=hFFF0F5&C2=hFFF2F0&C3=hCCC3C8"
90 | },
91 | "0xFF38C7": {
92 | "label": "Yellowish",
93 | "pos": "5x1",
94 | "cmnt": "Orangery",
95 | "cmd": "FP=47"
96 | },
97 | "0xFFB847": {
98 | "label": "Cyan",
99 | "pos": "5x2",
100 | "cmnt": "Beech",
101 | "cmd": "FP=22&CL=hFFFF&C2=h7FFF&C3=h3DCCA8"
102 | },
103 | "0xFF7887": {
104 | "label": "Magenta",
105 | "pos": "5x3",
106 | "cmd": "FP=5&CL=hFF00FF&C2=hFF007F&C3=hA83DCC"
107 | },
108 | "0xFFF807": {
109 | "label": "GhostWhite",
110 | "pos": "5x4",
111 | "cmd": "FP=5&CL=hF8F8FF&C2=hFBF8FF&C3=hC8C9CC"
112 | },
113 | "0xFF18E7": {
114 | "label": "Yellow",
115 | "pos": "6x1",
116 | "cmd": "FP=5&CL=hFFFF00&C2=hFFC800&C3=hFDFFDE"
117 | },
118 | "0xFF9867": {
119 | "label": "Aqua",
120 | "pos": "6x2",
121 | "cmd": "FP=5&CL=hFFFF&C2=h7FFF&C3=h3DCCA8"
122 | },
123 | "0xFF58A7": {
124 | "label": "Pink",
125 | "pos": "6x3",
126 | "cmd": "FP=5&CL=hFFC0CB&C2=hFFD4C0&C3=hCCA8B7"
127 | },
128 | "0xFFD827": {
129 | "label": "LightCyan",
130 | "pos": "6x4",
131 | "cmd": "FP=5&CL=hE0FFFF&C2=hE0EFFF&C3=hBACCC7"
132 | },
133 | "0xFF28D7": {
134 | "label": "Red +",
135 | "pos": "7x1",
136 | "cmd": "FP=5&R=~16"
137 | },
138 | "0xFFA857": {
139 | "label": "Green +",
140 | "pos": "7x2",
141 | "cmd": "FP=5&G=~16"
142 | },
143 | "0xFF6897": {
144 | "label": "Blue +",
145 | "pos": "7x3",
146 | "cmd": "FP=5&B=~16"
147 | },
148 | "0xFFE817": {
149 | "label": "Quick",
150 | "pos": "7x4",
151 | "cmnt": "Fx speed +16",
152 | "cmd": "SX=~16"
153 | },
154 | "0xFF08F7": {
155 | "label": "Red -",
156 | "pos": "8x1",
157 | "cmd": "FP=5&R=~-16"
158 | },
159 | "0xFF8877": {
160 | "label": "Green -",
161 | "pos": "8x2",
162 | "cmd": "FP=5&G=~-16"
163 | },
164 | "0xFF48B7": {
165 | "label": "Blue -",
166 | "pos": "8x3",
167 | "cmd": "FP=5&B=~-16"
168 | },
169 | "0xFFC837": {
170 | "label": "Slow",
171 | "pos": "8x4",
172 | "cmnt": "FX speed -16",
173 | "cmd": "SX=~-16"
174 | },
175 | "0xFF30CF": {
176 | "label": "Diy1",
177 | "pos": "9x1",
178 | "cmd": "PL=1"
179 | },
180 | "0xFFB04F": {
181 | "label": "Diy2",
182 | "pos": "9x2",
183 | "cmd": "PL=2"
184 | },
185 | "0xFF708F": {
186 | "label": "Diy3",
187 | "pos": "9x3",
188 | "cmd": "PL=3"
189 | },
190 | "0xFFF00F": {
191 | "label": "Auto",
192 | "pos": "9x4",
193 | "cmnt": "Toggle preset cycle",
194 | "cmd": "CY=2&PT=60000"
195 | },
196 | "0xFF10EF": {
197 | "label": "Diy4",
198 | "pos": "10x1",
199 | "cmd": "PL=4"
200 | },
201 | "0xFF906F": {
202 | "label": "Diy5",
203 | "pos": "10x2",
204 | "cmd": "PL=5"
205 | },
206 | "0xFF50AF": {
207 | "label": "Diy6",
208 | "pos": "10x3",
209 | "cmd": "PL=6"
210 | },
211 | "0xFFD02F": {
212 | "label": "Flash",
213 | "pos": "10x4",
214 | "cmnt": "Cycle Effects",
215 | "cmd": "FX=~"
216 | },
217 | "0xFF20DF": {
218 | "label": "Jump3",
219 | "pos": "11x1",
220 | "cmnt": "Colortwinkles",
221 | "cmd": "FX=74"
222 | },
223 | "0xFFA05F": {
224 | "label": "Jump7",
225 | "pos": "11x2",
226 | "cmnt": "Sinelon Dual",
227 | "cmd": "FX=93"
228 | },
229 | "0xFF609F": {
230 | "label": "Fade3",
231 | "pos": "11x3",
232 | "cmnt": "Rain",
233 | "cmd": "FX=43"
234 | },
235 | "0xFFE01F": {
236 | "label": "Fade7",
237 | "pos": "11x4",
238 | "cmnt": "Lighthouse",
239 | "cmd": "FX=41"
240 | }
241 | }
--------------------------------------------------------------------------------
/docs/basics/tutorials.md:
--------------------------------------------------------------------------------
1 | ---
2 | title: Tutorials
3 | hide:
4 | # - navigation
5 | # - toc
6 | ---
7 |
8 | **Don't know yet how to solder? Unsure how to connect your LEDs safely? How to find the perfect power supply?**
9 | No worries, we have collected a few helpful links for you to learn more about these and more topics:
10 |
11 | ### WLED specific tutorials
12 |
13 | | Resource | Maker | Type | Date | Info
14 | | --- | --- | --- | --- | --- |
15 | [Beginner's guide to freak'n cool Holiday LEDs](https://www.youtube.com/watch?v=tXvtxwK3jRk) | DrZzs | Video (23:22) | 12 Oct 2019 | Excellent guide for getting started with WLED!
16 | [How to Set Colors and Effects, Save Presets, Make Sync Groups, add a Button, & Macros for Scheduling](https://www.youtube.com/watch?v=6eCE2BpLaUQ) | DrZzs | Video (23:39) | 29 Oct 2019 | Learn about some cool additional WLED features!
17 | [Make your LEDs dance to music!](https://www.youtube.com/watch?v=ipSfQdfX4fE) | DrZzs | Video (11:30) | 17 Nov 2019 | How to install LedFx and connect it to WLED for quick sound reactive effects!
18 | [Getting started with WLED](https://tynick.com/blog/11-03-2019/getting-started-with-wled-on-esp8266/) | tynick | Article | 11 Mar 2019 | Complete and excellent guide on how to flash and get WLED up and running!
19 | [How to Compile WLED (from scratch)](https://youtu.be/fRxyp5Yhivc) | Quindor | Video (02:15:00) | 22 Dec 2020 | How to compile WLED yourself from scratch (most info in first 30 minutes)
20 | [WLED with QuinLED-Dig-Uno Install Tutorial](https://youtu.be/2X_0Oe24vkA) | Quindor | Video (11:13) | 21 Sept 2019 | Initial flash and setup of WLED on QuinLED-Dig-Uno board
21 | [Integrating WLED into Home Assistant](https://youtu.be/d8RpFupihWc) | Quindor | Video (8:22) | 25 Nov 2019 | How to use a WLED node in Home Assistant
22 | [Holiday LEDs Step-by-step with WLED & Home Assistant](https://youtu.be/zepNvlN4gEc) | KPeyanski | Video (20:38) | 28 Oct 2020 | Complete and great wiring, installation and HA setup tutorial
23 | [HOW-TO: Holiday LED Strip Lights, Home Assistant and WLED](https://peyanski.com/holiday-led-strip-lights-home-assistant-and-wled/) | KPeyanski | Article | 23 Jul 2022 | Same as the above video, but in text form!
24 | [Smart Ping Pong LED Lamp - Quick&Simple DIY](https://www.youtube.com/watch?v=WlkMbNnIECM) | bitluni | Video (18:19) | 13 Sept 2020 | Construction, wiring and flashing of a cool looking and easy to make lamp
25 | [WLED tutorial series (in Russian/на русском)](https://sprut.ai/article/sistema-wled-upravlenie-umnymi-girlyandami-i-lampami-na-adresnyh-svetodiodah-i-ne-tolko) | Gelmer | Article Series | 11 Jun 2023 | Серия руководств по установке
26 | [Инструкция на русском: Как прошить WLED и LED FX в ESP01](https://youtu.be/sdxyzDjiXn8) [Пример применения WLED: Бесконечный зеркальный туннель внутри столика IKEA Lack](https://youtu.be/zL-aq_SqaW8) | Alchemist | Video (9:16) / Video (13:09) | 19 Aug 2022 | Прошивка, установка необходимых драйверов и демонстрация режимов работы. Пример электронной схемы.
27 | [ESP8266 based LED controller for WS2812b strip. WLED Firmware + OpenHAB (in Russian)](https://www.youtube.com/watch?v=K4ioTt3XvGc) | Room31 | Video (17:04) | 11 Mar 2020 |
28 | [How to use WLED on an ESP32 (German)](https://www.adlerweb.info/blog/2020/11/01/bitbastelei-409-ws2812b-neopixel-mit-wled-einfach-steuern/ ) | Bitbastelei/Adlerweb | Video (11:00) | 1 Nov 2020 |
29 | [DIY Ambilight using WLED and a Relay](https://wiki.faked.org/DIY_Ambilight) | jangrewe | Article | ? | Wiki page with schematics and instructions for Hyperion, etc. |
30 | [Adding Smarts and Color to an IKEA Lamp](https://apop.tech/posts/adding-smarts-and-color-to-an-ikea-lamp/) | apop880 | Article | 21 May 2021 | Tutorial on upgrading a basic IKEA lamp with WLED |
31 |
32 | ### Digital LED knowledge
33 |
34 | | Resource | Maker | Type | Info |
35 | | --- | --- | --- | --- |
36 | [Adafruit NeoPixel Überguide](https://learn.adafruit.com/adafruit-neopixel-uberguide) | Adafruit | Article | Everything that's important at a glance. *Highly recommended for newcomers to digital LEDs*
37 | [Digital LED Power Usage](https://quinled.info/2020/03/12/digital-led-power-usage/) | Quindor | Article/Spreadsheet/Video | Helps you plan the power usage of your installation
38 | [Power calculation and injection live stream](https://quinled.info/2020/09/26/power-injection-livestream/) | Quindor | Video (2:24:52) | Tons of great questions and answers. Live calculations, drawings, 5v vs 12v, strip comparisons, etc.
39 | [Difference between LED strip types](https://www.youtube.com/watch?v=QnvircC22hU) | The Hook Up | Video (14:41) | What is the best LED strip for your project?
40 | [7 Common LED Strip FAILS and How To Avoid Them](https://www.youtube.com/watch?v=Fu4qZW0pQm4) | The Hook Up | Video (12:14) | Make your project look much better!
41 | [Power Injection demystified](http://spikerlights.com/pwrinjection.aspx) | Spiker Lights | Article | What is power injection and how much do I need?
42 | [Common(sharing) Ground / Multiple power supplies](https://majenko.co.uk/blog/importance-sharing-grounds) | | Article | When using more than one power supply.
43 |
44 | ### Tools & Skills
45 |
46 | | Resource | Maker | Type | Info |
47 | | --- | --- | --- | --- |
48 | [How to Solder](https://www.youtube.com/watch?v=ZwU9SqO0udU) | Beauty and the Bolt | Video (9:50) | |
49 | [Soldering new leads to LED strip](https://youtu.be/sU1O80WPqpk) | Quindor | Video (8:24) | |
50 | [Soldering Tutorial Part 2](https://www.youtube.com/watch?v=fYz5nIHH0iY) | EEVblog | Video (34:05) | Detailed tutorial on soldering, see parts 1 and 3 for even more info)
51 | [Voltage Drop Calculator](https://www.rapidtables.com/calc/wire/voltage-drop-calculator.html) | | Tool | |
52 | [Another Voltage Drop Calculator](https://www.calculator.net/voltage-drop-calculator.html) | | Tool | |
53 | [Pixel/Bullet Voltage Drop Calc](http://spikerlights.com/calcpower.aspx) | | Tool |5 and 12V|
54 | [Combined Wire Gauge Calculator](https://www.wirebarn.com/Combined-Wire-Gauge-Calculator_ep_42.html) | | Tool | |
55 | [Wire Size/Ampacity](https://www.powerstream.com/Wire_Size.htm)| | Tool|Use chassis wiring
56 |
57 | _Add more categories as needed :)_
58 |
--------------------------------------------------------------------------------
/docs/interfaces/e1.31-dmx.md:
--------------------------------------------------------------------------------
1 | ---
2 | title: E1.31 (DMX) / Art-Net
3 | hide:
4 | # - navigation
5 | # - toc
6 | ---
7 |
8 | ## E1.31
9 |
10 | WLED supports the E1.31 (sACN) realtime light protocol.
11 |
12 | !!! info "Version Info"
13 | **As of WLED v0.10.0, Art-Net is alternatively supported.** All information on this page applies for Art-Net as well.
14 | You will need to switch to Art-Net mode in Sync settings and reboot once.
15 |
16 | !!! info "Version Info"
17 | **As of WLED v0.11.0, DDP is alternatively supported.** Using DDP, the Multi RGB DMX mode is always used regardless of the DMX mode setting (as it is no DMX)
18 | You will need to switch to DDP mode in Sync settings and reboot once.
19 |
20 | !!! info "Version Info"
21 | **As > WLED 0.14.0-b1, DMX Effect mode channel mapping changed.** This is a breaking change in E131 sync behavior. Existing DMX setups using WLED Effect mode are likely to break. Solution: Adopt external DMX channel mappings according to the new Effect mode channel layout.
22 |
23 | ### Features
24 |
25 | * 170 LEDs (510 DMX channels) are supported per universe.
26 | * You can use up to 9 adjacent universes which is a total of more than the maximum 1500 LEDs WLED can drive.
27 | * E1.31 priority handling. [HTP](https://wiki.openlighting.org/index.php/HTP) for multiple senders with same priority is not implemented!
28 |
29 | **Note:** WLED > 0.14.0-b1 implements a basic priority handling. To enable it set E1.31 port priority UI config > 0. Packages < config priority will always be skipped. Higher priority senders will overrule lower priority package senders (timeout 3 seconds). Non-zero start code and E1.31 preview data is ignored.
30 |
31 | **Note:** If you see issued with lag, you may see better performance if you disable Wi-Fi Multimedia (WMM) Mode QoS on your router
32 |
33 | ### General Recommendations
34 |
35 | * For a fluent 25ms (40fps) or more framerate, it is recommended to use no more than 3 universes (510 LEDs).
36 | * Using multiple E1.31 sources to control a single WLED controller will impact performance. If possible it's recommended to avoid this.
37 | * Configure WLED to connect to [a WiFi Network](/features/settings#wifi-settings). It was observed that sending E1.31 from a computer to WLED when accessed as access point (WLED-AP) may not work, see [forum post](https://wled.discourse.group/t/sending-e1-31-when-in-ap-mode-may-not-work/407).
38 | * When using an ESP32, disabling WiFi sleep in the WiFi settings of WLED can reduce/eliminate visual stuttering/lag of effects, and significantly reduce ping times. Note: disabling WiFi sleep will increase power consumption.
39 |
40 | ### Using LedFX
41 |
42 | We highly recommend the [LedFx project](https://github.com/LedFx/LedFx) in combination with WLED!
43 | Configure WLED first, ensure devices are powered on and connected to your WiFi.
44 | To add WLED devices, in the 'Device Management', click on the Find WLED devices button.
45 | If you want to manually add devices, use more than 170 LEDs with LedFx, you need to go to additional settings and set "Universe Size" to 510 when adding the WLED device!
46 |
47 | ## Settings
48 |
49 | ### DMX types
50 |
51 | Select the mode you want to use in Sync settings.
52 |
53 | #### Disabled
54 |
55 | Incoming E1.31 packets will be ignored.
56 |
57 | #### Single RGB
58 |
59 | All LEDs are set to the same color. 3 Channels: Red, Green, Blue
60 |
61 | #### Single DRGB
62 |
63 | All LEDs are set to the same color. 4 Channels: Master Dimmer, Red, Green, Blue
64 |
65 | #### Effect
66 |
67 | Not a realtime mode & only support 1 universe. Allows setting WLED effect properties over E1.31 with 15 channels.
68 |
69 | | Channel | Property |
70 | | --- | --- |
71 | 1 | Master Dimmer
72 | 2 | Effect mode ID
73 | 3 | Effect speed
74 | 4 | Effect intensity
75 | 5 | Effect palette ID
76 | 6 | Effect option
77 | 7 | Red Primary
78 | 8 | Green Primary
79 | 9 | Blue Primary
80 | 10 | Red Secondary
81 | 11 | Green Secondary
82 | 12 | Blue Secondary
83 | 13 | Red Tertiary
84 | 14 | Green Tertiary
85 | 15 | Blue Tertiary
86 |
87 | The `effect option` channel is divided into 4 macro parts to control _mirror_ and _reverse_ states:
88 |
89 | | value | mirror | reverse | |
90 | |----------|----------|---------|-|
91 | | 0..63 | false | false | **none** |
92 | | 64..127 | false | true | **reverse** |
93 | | 128..191 | true | false | **mirror** |
94 | | 192..255 | true | true | **mirror & reverse** |
95 |
96 | #### Effect + White
97 |
98 | Same as `Effect` with additional whites = 18 channels.
99 |
100 | | Channel | Property |
101 | | --- | --- |
102 | .. | ..
103 | 16 | White Primary
104 | 17 | White Secondary
105 | 18 | White Tertiary
106 |
107 | #### Effect Segment
108 |
109 | Same as `Effect` with 15 channels per segment; expect `channel 1 = "Segment Dimmer"`.
110 |
111 | All effect segment modes introduce an additional `DMX segment spacing`. If spacing `s = 0` subsequent DMX addresses for all segments are created. When `s > 0` a gap of `s` DMX addresses between segments is used. To calculate segment DMX fixture addresses:
112 |
113 | Segment DMX Address (i) = DMXAddress + i * (dmxEffectChannels + s)
114 |
115 | Where `DMXAddress` = start address as configured in UI, `dmxEffectChannels` = 15|18 depending on selected effect segment mode, `s` = address gap as configured in UI and `i` is the index id of each segment as existing.
116 |
117 | Note: 1 DMX universe = max 512 DMX addresses. So max number of segments depends on start address, selected segment mode and configured DMX segment spacing. To calculate how many segments can be controlled:
118 |
119 | Max segments = floor[ (512 - DMXAddress) / (dmxEffectChannels + s) ]
120 |
121 | #### Effect Segment + White
122 |
123 | Same as `Effect Segment` including whites, so it uses 18 DMX channels per segment.
124 |
125 | #### Multiple RGB
126 |
127 | 3 Channels per LED in sequence. LED 0 Red, LED 0 Green, LED 0 Blue, LED 1 Red, ...
128 | Default mode, equivalent to pre-0.9.1 E1.31. This is the mode you want to use for xLights and LedFx.
129 |
130 | #### Multiple RGBW
131 |
132 | Like `Multiple RGB` + additional white channels.
133 |
134 | #### Dimmer + Multi RGB
135 |
136 | Like `Multiple RGB`, but the first channel is a brightness control.
137 | Master Dimmer, LED 0 Red, LED 0 Green, ...
138 |
139 | #### Preset
140 |
141 | Trigger presets and control brightness. 2 Channels: Brightness, Preset ID
142 |
--------------------------------------------------------------------------------
/docs/advanced/home-automation.md:
--------------------------------------------------------------------------------
1 | ---
2 | title: Home Automation Integration
3 | hide:
4 | # - navigation
5 | # - toc
6 | ---
7 |
8 | It is possible to interface WLED with home automation systems and other 3rd party software.
9 | You can use any API WLED provides (JSON, HTTP, UDP, MQTT), JSON is preferred. This page is intended for sample code and configs others use to control WLED from various 3rd party software:
10 |
11 | [HomeAssistant and NodeRED flows](https://github.com/Snipercaine/WLED-HomeAssistant)
12 |
13 | ## Domoticz:
14 | Please see [here](https://github.com/frustreermeneer/domoticz-wled-plugin)!
15 |
16 | ## Home Assistant
17 |
18 | ### Using the native integration
19 |
20 | !!! warning "Compatibility notice"
21 | WLED devices are not supported by Home Assistant 2022.2 or later if a CCT bus is configured or `White Balance Correction` is enabled.
22 |
23 | We hope to resolve this issue as soon as possible. As a temporary workaround you can enable the option `Calculate CCT from RGB` in LED settings.
24 |
25 | WLED can be configured using the integrations in the Home Assistant frontend.
26 |
27 | Menu: **Configuration** -> **Integrations**.
28 |
29 | In most cases, the WLED devices will be automatically discovered by Home Assistant. Those automatically discovered WLED devices are listed on the integrations page.
30 |
31 | If for some reason (e.g., due to lack of mDNS support on your network), the WLED device isn't discovered, it can be added manually.
32 |
33 | Click on the `+` sign to add an integration and click on **WLED**. After completing the configuration flow, the WLED
34 | integration will be available.
35 |
36 | [WLED integration documentation](https://www.home-assistant.io/integrations/wled/)
37 |
38 | ### Using MQTT
39 |
40 | Alternatively, MQTT can be used (not recommended).
41 | Auto discovery is no longer supported since version 0.9 of WLED.
42 | In case you want to configure the device manually:
43 |
44 | ??? info "Expand to show MQTT configuration"
45 | ```
46 | light:
47 | - platform: mqtt
48 | name: "Kitchen Floor Lights"
49 | command_topic: "wled/all"
50 | brightness_command_topic: "wled/all"
51 | rgb_command_topic: "wled/all/col"
52 | rgb_command_template: "{{ '#%02x%02x%02x' | format(red, green, blue)}}"
53 | effect_command_topic : "wled/all/api"
54 | effect_list:
55 | - "FX=0"
56 | - "FX=1"
57 | - "FX=2"
58 | - "FX=3"
59 | - "FX=4"
60 | - "FX=5"
61 | - "FX=6"
62 | - "FX=7"
63 | - "FX=8"
64 | - "FX=9"
65 | - "FX=10"
66 | - "FX=11"
67 | - "FX=12"
68 | - "FX=13"
69 | - "FX=14"
70 | - "FX=15"
71 | - "FX=16"
72 | - "FX=17"
73 | - "FX=18"
74 | - "FX=19"
75 | - "FX=20"
76 | - "FX=21"
77 | - "FX=22"
78 | - "FX=23"
79 | - "FX=24"
80 | - "FX=25"
81 | - "FX=26"
82 | - "FX=27"
83 | - "FX=28"
84 | - "FX=29"
85 | - "FX=30"
86 | - "FX=31"
87 | - "FX=32"
88 | - "FX=33"
89 | - "FX=34"
90 | - "FX=35"
91 | - "FX=36"
92 | - "FX=37"
93 | - "FX=38"
94 | - "FX=39"
95 | - "FX=40"
96 | ```
97 | by @acid2000
98 |
99 | Config json which is sent via autodiscovery:
100 | ```json
101 | {
102 | "name": "WLED Light",
103 | "stat_t": "wled/840d8e989815/c",
104 | "cmd_t": "wled/840d8e989815",
105 | "rgb_stat_t": "wled/840d8e989815/c",
106 | "rgb_cmd_t": "wled/840d8e989815/col",
107 | "bri_cmd_t": "wled/840d8e989815",
108 | "bri_stat_t": "wled/840d8e989815/g",
109 | "fx_cmd_t": "wled/840d8e989815/api",
110 | "fx_stat_t": "wled/840d8e989815/api",
111 | "bri_val_tpl": "{{value}}",
112 | "rgb_cmd_tpl": "{{'#%02x%02x%02x' | format(red, green, blue)}}",
113 | "rgb_val_tpl": "{{value[1:3]|int(base=16)}},{{value[3:5]|int(base=16)}},{{value[5:7]|int(base=16)}}",
114 | "qos": 0,
115 | "opt": true,
116 | "pl_on": "ON",
117 | "pl_off": "OFF",
118 | "fx_val_tpl": "{{value}}",
119 | "fx_list": [
120 | "[FX=00] Solid", "[FX=01] Blink", "[FX=02] Breathe", "[FX=03] Wipe", "[FX=04] Wipe Random",
121 | "[FX=05] Random Colors", "[FX=06] Sweep", "[FX=07] Dynamic", "[FX=08] Colorloop",
122 | "[FX=09] Rainbow", "[FX=10] Scan", "[FX=11] Dual Scan", "[FX=12] Fade", "[FX=13] Chase",
123 | "[FX=14] Chase Rainbow", "[FX=15] Running", "[FX=16] Saw", "[FX=17] Twinkle", "[FX=18] Dissolve",
124 | "[FX=19] Dissolve Rnd", "[FX=20] Sparkle", "[FX=21] Dark Sparkle", "[FX=22] Sparkle+",
125 | "[FX=23] Strobe", "[FX=24] Strobe Rainbow", "[FX=25] Mega Strobe", "[FX=26] Blink Rainbow",
126 | "[FX=27] Android", "[FX=28] Chase", "[FX=29] Chase Random", "[FX=30] Chase Rainbow",
127 | "[FX=31] Chase Flash", "[FX=32] Chase Flash Rnd", "[FX=33] Rainbow Runner", "[FX=34] Colorful",
128 | "[FX=35] Traffic Light", "[FX=36] Sweep Random", "[FX=37] Running 2", "[FX=38] Red & Blue",
129 | "[FX=39] Stream", "[FX=40] Scanner", "[FX=41] Lighthouse", "[FX=42] Fireworks", "[FX=43] Rain",
130 | "[FX=44] Merry Christmas", "[FX=45] Fire Flicker", "[FX=46] Gradient", "[FX=47] Loading",
131 | "[FX=48] In Out", "[FX=49] In In", "[FX=50] Out Out", "[FX=51] Out In", "[FX=52] Circus",
132 | "[FX=53] Halloween", "[FX=54] Tri Chase", "[FX=55] Tri Wipe", "[FX=56] Tri Fade",
133 | "[FX=57] Lightning", "[FX=58] ICU", "[FX=59] Multi Comet", "[FX=60] Dual Scanner",
134 | "[FX=61] Stream 2", "[FX=62] Oscillate", "[FX=63] Pride 2015", "[FX=64] Juggle",
135 | "[FX=65] Palette", "[FX=66] Fire 2012", "[FX=67] Colorwaves", "[FX=68] BPM",
136 | "[FX=69] Fill Noise", "[FX=70] Noise 1", "[FX=71] Noise 2", "[FX=72] Noise 3", "[FX=73] Noise 4",
137 | "[FX=74] Colortwinkle", "[FX=75] Lake", "[FX=76] Meteor", "[FX=77] Smooth Meteor",
138 | "[FX=78] Railway", "[FX=79] Ripple"
139 | ]
140 | }
141 | ```
142 | ## Indigo Domotics:
143 | Please see [here](https://www.indigodomo.com/pluginstore/214/)!
144 |
145 | ## openHAB:
146 |
147 | In openHAB 3 based environments you are able to use the native [openHAB WLED Binding](https://www.openhab.org/addons/bindings/wled/), which also supports discovery of your WLED devices.
148 |
149 | For older openHAB (2.5.x) environmantes the connection can be configured via MQTT broker & Openhab MQTT Binding (2.5x) with configuration files
150 | Please find the details [here](https://community.openhab.org/t/wled-control-without-the-binding/101120)
151 |
152 |
153 |
--------------------------------------------------------------------------------
/docs/features/macros.md:
--------------------------------------------------------------------------------
1 | ---
2 | title: Macros
3 | hide:
4 | # - navigation
5 | # - toc
6 | ---
7 | !!! info
8 | Also see [Presets](/features/presets) for 0.11.0+.
9 |
10 | You are able to set custom actions ("Macros") in Time & Macro settings for the following events:
11 |
12 | - Specific time of day
13 | - Button short/long/double press
14 | - HTTP API call executing a macro with `&M=`
15 | - Alexa On/Off
16 | - Countdown over
17 | - Timed light duration over
18 | - Device (re)boot (up to 0.10.2, use LED settings `Boot preset` in 0.11)
19 |
20 | Each macro has the format of a standard [HTTP API call](/interfaces/http-api) without the IP. Optionally, the "win&" may be omitted.
21 | For example, the macro "A=255" sets the brightness to maximum. "R=255&G=160&B=0" sets the color to orange.
22 | You can specify up to 16 macros. (up to 250 in WLED 0.11 since the Macro functionality has been merged into the Presets feature)
23 |
24 | Examples of how to use API-calls and define macros can be found in [this issue](https://github.com/Aircoookie/WLED/issues/801#issuecomment-635600255) and [in this one](https://github.com/Aircoookie/WLED/issues/199#issuecomment-520143239).
25 |
26 | The simplest macro example is getting a button to do your bidding. The default pin to which a button can be connected is GPIO 0 (D3 on NodeMCU, D1 Mini and others). Even though WLED uses the internal pull up resistors on input pins, this pin is ideally externally pulled high to 3.3V with a 10k resistor. The configured macro executes when the pin is pulled low (grounded). The desired macro is entered on the Time/Macros configuration page and then assigned to a short, long or double press. Like this:
27 |
28 | 
29 |
30 |
31 | The "T=2" macro toggles power to the LEDs (in this case long press).
32 | The "FX=~" macro steps through the effects (in this case short press).
33 |
34 | You can set a preset to `P1=1&P2=3&PL=~`, enter the preset number for your button, and this will step through presets 1 and 3. Change the "3" to whatever your highest preset is that you want to include.
35 |
36 | The default (built-in) actions for button 0 are short-press: toggle on/off and long-press: select random color.
37 | Long-pressing for more than 6 seconds will open the WLED-AP with the default password (`wled1234`).
38 | For further buttons, the default action for short press is cycling effects, long press ramp brightness, and double press cycle palettes.
39 |
40 | ## Buttons
41 |
42 | Multiple buttons are implemented since 0.13 and allow a few different types of buttons to be connected to the ESP:
43 |
44 | - momentary push-buttons that are normally open and short GPIO pin to ground (active low)
45 | - momentary push-buttons that are normally closed and release the connection from GPIO pin to GND (inverted, active high)
46 | - switches (be careful with selection of GPIO for switch since some GPIOs will prevent successful boot of ESP if held LOW or HIGH at boot)
47 | - PIR switch AKA motion detection sensor (they set GPIO HIGH when motion is detected, this type of buttons will also trigger MQTT message with /motion topic if "Publish on button press" is set on MQTT config)
48 | - some GPIO pins on ESP32 can act as momentary touch buttons with no additional hardware
49 | - analog "buttons" (also with inverted logic) those can be used as potentiometers or analog input buttons
50 |
51 | Button GPIO pin and type can be selected in the _LED Settings_ page.
52 |
53 | Each momentary button can have 3 different [Presets](/features/presets) assigned, for short press, long press or double press.
54 | Momentary push-buttons by default trigger shortly after the _release_ of a button, to be able to detect if it has been pressed short, long or twice. When configuring the same preset number for short, long and double press, it will trigger directly when being pressed as of WLED 0.14.0-b2-2306020.
55 |
56 | For switch type buttons you can assign only 2 presets, one for transition of switch from LOW to HIGH and second for the opposite transition from HIGH to LOW.
57 |
58 | Selecting 0 for preset will use the _default_ action. If you find that the default action is _inverted_ for switch, please create presets for On and Off actions and assign them appropriately.
59 |
60 | For assigning [Presets](/features/presets) to buttons use _Time & Macros_ settings page.
61 |
62 | Note: Button 0 has two, built-in functions. 1. Hold it down for >6 seconds and the Wi-Fi settings will be reset to default. 2. Hold it down for >12 seconds and flash memory is erased.
63 |
64 | ### Analog button
65 | Starting in WLED 0.13, analog "buttons" (e.g. a potentiometer) are supported.
66 | With the Short and Long columns set to 0, set the Double column in Button Actions to one of these values to configure:
67 |
68 | | Property | Value |
69 | | --- | --- |
70 | Global brightness | 250
71 | Effect speed | 249
72 | Effect intensity | 248
73 | Palette | 247
74 | Primary color hue | 200
75 | Segment N opacity | 0-32
76 |
77 | This potentiometer should be supplied 3.3V and GND, with it's output supplied to A0 (or any other ADC pin you specify), recommended 10KΩ or greater.
78 |
79 | !!! info "Do not use ESP32 ADC2 GPIO pins for analog buttons"
80 | On ESP8266, you can only have a single analog button on pin A0, the pin set in the settings UI is ignored.
81 | On ESP32, only ADC1 pins will work for analog input while WiFi is active (pins 32-39). ADC2 pins will not work.
82 |
83 | ### Global brightness
84 |
85 | Users planning to use a potentiometer for global brightness should be aware that wled is configured to turn off when the potentiometer is adjusted to either extreme - both maximum and minimum adjustments. Users who desire to disable this functionality may do so on the hardware side by adding resistors between the potentiometer and the rails.
86 |
87 | Adding a resistor between the potentiometer and 3.3V prevents A0 from fully reaching 3.3V and allows the potentiometer to be adjusted to the maximum adjustment without powering off wled. A value of 7.5%-10% of the potentiometer value should be sufficient for this (~750Ω for a 10KΩ potentiometer). Similarly, added resistance between the potentiometer and GND prevents A0 from reaching 0V, and allows the potentiometer to be adjusted to the minimum adjustment without powering off wled. A value of 3-5% of the potentiometer value should be sufficient (~500Ω for a 10KΩ potentiomenter).
88 |
89 | In both instances, the added resistances will slightly reduce the overall adjustment range, with a larger reduction for larger resistor choices. As such, A user who desires the maximum possible adjustment range should determine their needed resistance values experimentally by installing the potentiometer, adjusting for stable behavior at the desired extrema, measuring the voltage on A0, using the voltage divider equation to determine the optimal resistance, then retesting for confirmation.
90 |
91 |
--------------------------------------------------------------------------------
/docs/features/segments.md:
--------------------------------------------------------------------------------
1 | ---
2 | title: Segments
3 | hide:
4 | # - navigation
5 | # - toc
6 | ---
7 |
8 | !!! info
9 | Starting in WLED 0.9.0, Segments are supported.
10 |
11 | This feature allows you to set different zones on the LED strip, each running a different effect or color.
12 |
13 | A segment is selected if the checkmark next to the segment number is checked. Changes you make to color or effects will apply to all selected segments. The color/effect that is shown in the web UI is that of the first selected segment.
14 |
15 | There is one _main segment_, Segment 0 by default. This segment has a few important differences to the rest of the segments:
16 |
17 | - Color transitions only work on the main segment
18 | - The main segment's color is the one that will be reported to HTTP and MQTT APIs
19 |
20 | Tip: If you divide your strip into two segments, reverse the second one and select both, you can achieve very nice symmetrical effects!
21 |
22 | Segment 0 has a Start LED of 0 and a Stop LED equal to the LED Count you defined in Configuration, LED Preferences. _The Stop LED is **not** included in the Segment._ Currently you can create a maximum of 10 segments. Presets 1-15 use only Segment 0 by default. Preset 16 is the only Preset that saves settings for Segments 1-10.
23 |
24 | To display segment information select the down arrow in the Segment box. To add a Segment select “+ Add Segment”. Enter the Start and Stop LED as appropriate. Grouping and Spacing control the organization of the LEDs within the selected effect. To reverse the direction of an effect select Reverse Direction. To delete a Segment select the trash can. To save your Segment settings select the checkmark to the right of the Start and Stop LED numbers.
25 |
26 | ## Grouping and Spacing
27 | When an effect changes the color of one LED, it is really changing the color of one LED group. Since the default group size is one, the effect normally only changes a single LED. When Grouping is set to two, the effect will light two LEDs using the same color. The two LEDs are treated as a single _virtual_ LED.
28 |
29 | To illustrate this, we can create a segment with 12 LEDS (physically referred to as LED 0 to LED 11) and select an effect that repeats three colors. When Grouping is set to one we see a repeating pattern of one red LED, one blue LED, and one green LED. When Grouping is set to two the segment of 12 physical LEDs becomes a segment of 6 virtual LEDs (virtualLED 0 to virtualLED 5). The same effect will now set the color of each virtual LED (which consists of two physical LEDs). The pattern becomes two red LEDs followed by two blue LEDs then two green LEDs.
30 |
31 | |Setting|LED Output|
32 | | :---: | --- |
33 | |Grouping 1Spacing 0|  | 34 | |Grouping 2
Spacing 0|  | 35 | 36 | As the pattern cycles, the group of LEDs will move together. 37 | 38 | |Setting|LED Output| 39 | | :---: | --- | 40 | |Grouping 1
Spacing 0|  | 41 | |Grouping 2
Spacing 0|  | 42 | 43 | Spacing controls the space or gap between LEDs. The default spacing is zero, so normally there is no space between LEDs. When Spacing is set to one, every other LED will be lit. The number of _virtual_ LEDs in the strip will be half the number of physical LEDs. 44 | 45 | Again, we can create a segment with 12 LEDS (physically referred to as LED 0 to LED 11) and select an effect that repeats three colors. When Spacing is set to zero we see a repeating pattern of one red LED, one blue LED, and one green LED. When Spacing is set to one the segment of 12 physical LEDs becomes a segment of 6 virtual LEDs (virtualLED 0 to virtualLED 5). The same effect will now set the color of each virtual LED (which consists of the even numbered physical LEDs). The pattern becomes one red LED followed by a blank LED, one blue LED followed by a blank LED, then one green LED followed by a blank LED. 46 | 47 | |Setting|LED Output| 48 | | :---: | --- | 49 | |Grouping 1
Spacing 0|  | 50 | |Grouping 1
Spacing 1|  | 51 | 52 | As the pattern cycles, only the virtual LEDs will be lit - the blank LEDs in between the virtual LEDs will always be off. 53 | 54 | |Setting|LED Output| 55 | | :---: | --- | 56 | |Grouping 1
Spacing 0|  | 57 | |Grouping 1
Spacing 1|  | 58 | 59 | Grouping and Spacing can be combined to create many different custom LED layouts. In the example below, the strip of 12 physical LEDs has been configured to function as four virtual LEDs with a small gap between them. 60 | 61 | |Setting|LED Output| 62 | | :---: | --- | 63 | |Grouping 2
Spacing 1|  | 64 | |Grouping 2
Spacing 1|  | 65 | 66 | ## Interleaving 67 | This is an easy way to get a repeating pattern of colors using one segment per color. 68 | 69 |  70 | 71 | ## Offset in a segment 72 | By default effects start in the first LED in the segment and finish in the last one. If the offset parameter in a segment is used, the effect start will be moved by the number of positions entered. It will continue to the last LED and then finish with the initial positions that were skipped. 73 | 74 | For instance, let's assume assume a strip of 12 LEDs with the positions numbered as follows (like the examples above): 75 | 76 |  77 | 78 | An offset value of 5 will make the effect start in the physical position 5, continue to position 11 and then finish with positions 0 through 4, like this: 79 | 80 |  81 | 82 | A negative offset value is allowed and represents an offset starting from the last position in the segment. In our previous example, an offset of -2 will start the effect in position 10, like this: 83 | 84 |  85 | 86 | The offset values is prioritized over grouping and/or spacing. For example, if the offset is 2, grouping 4 and spacing 1, the first group of 4 LEDs will start at the physical position number 2. 87 | 88 | ## Effect Overlay 89 | Some effects can be overlaid on the background of another effect. To use overlay, set up 90 | segments with overlapping pixels. The overlay effect must be playing on the segment with the higher id. 91 | If the Overlay option is checked, the background will not be painted and the effect 92 | from the lower segment will be displayed. 93 | --------------------------------------------------------------------------------