├── Android GridLayout.md
├── Android Studio自定义文件模板.md
├── Android启动优化.md
├── Android项目结构的另外一种方式.md
├── Drawable Resources一览.md
├── Gradle依赖.md
├── Gradle的高级技巧.md
├── MVP+Dagger2+Retrofit实现更清晰的架构.md
├── README.md
├── RecycleView 列表显示更多.md
├── RecyclerView之ItemDecoration由浅入深.md
├── SharedPreferences的最佳实践.md
├── Support Library一览.md
├── android内存泄露.md
├── as的个人使用记录.md
├── dagger2:组件依赖和子组件的区别.md
├── images
├── ItemDecoration_2.png
├── ItemDecoration_3.png
├── ItemDecoration_4.png
├── ItemDecoration_5.png
├── ItemDecoration_6.png
├── ItemDecoration_7.png
├── drawable_bitmap.png
├── drawable_clip.png
├── drawable_inset.png
├── drawable_layer.png
├── drawable_level.png
├── drawable_mix.png
├── drawable_nine.png
├── drawable_scale.png
├── drawable_shape.png
├── drawable_state.png
├── drawable_transition.png
├── drawable_transition2.png
├── format01.png
├── format02.png
├── format03.png
├── format04.png
├── format05.png
├── memory_leaks.png
├── plu01.png
├── plu02.png
├── plu03.png
├── plu04.png
├── reuse01.png
├── reuse02.png
├── reuse03.png
├── reuse04.png
├── sep01.png
├── share.gif
├── share_gwl.gif
├── stickyheader.gif
├── wh01.png
├── wh02.png
└── xml_name.png
├── todo
└── todo.txt
├── 一种成功的xml资源命名规范.md
├── 低版本实现共享元素动画.md
├── 低版本实现共享元素动画(二):格瓦拉动画.md
├── 使用Gradle构建多个不同applicationId包.md
├── 使用Gradle管理Debug和Release版本的Key.md
├── 使用retrofit+okhttp实现无缝网络状态监测.md
├── 关于Android strings.xml你要记住的一些事.md
├── 写出高效清晰Layout布局文件的一些技巧.md
├── 在AndroidStudio中给你的代码添加版权声明.md
├── 实现淘宝和QQ ToolBar透明渐变效果.md
├── 实现知乎和简书快速返回效果.md
├── 小总结.md
├── 快速清除app数据.md
├── 教你实现别人家的动画3(淘宝,简书动画效果).md
├── 更新到Retrofit2的一些技巧.md
├── 每个Android开发者都应该知道的开源库(2014版).md
├── 每个android开发者都应该知道的Top 5三方库(2015版).md
└── 用xml drawable替代png.md
/Android GridLayout.md:
--------------------------------------------------------------------------------
1 | >原文:[Android Grid Layout](https://medium.com/google-developer-experts/android-grid-layout-1faf0df8d6f2#.ldtru2yec)
2 |
3 | >译文的GitHub地址:[Android GridLayout](https://github.com/thinkSky1206/android-blog/blob/master/Android%20GridLayout.md)
4 |
5 | >译者注:说实话 我确实没用过GridLayout 好好认识一下吧!
6 |
7 | ###*android开发者每天都在问自己一个问题:我到底应该用哪个layout*
8 |
9 | GridLayout发布已经有一段时间了-[New Layout Widgets: Space and GridLayout](http://android-developers.blogspot.jp/2011/11/new-layout-widgets-space-and-gridlayout.html)
10 |
11 | 然而GridLayout在当前开发中的情况如下:
12 |
13 | - 大多数开发者并不知道这个布局
14 | - 一些开发者知道GridLayout但是因为某些原因没有使用
15 | - 只有少部分开发者花时间了解和积极使用
16 |
17 | 这是我为什么要写这篇文章的原因,因为我觉得这个布局被不公平遗忘了
18 |
19 | #为什么我们需要Grid Layout
20 | GridLayout可以让你用一个简单的根view创建一个表格系统布局
21 | >我可以用LinearLayout嵌套来实现
22 |
23 | 是可以做到,但是你会有性能问题当布局层次太深
24 |
25 | >我可以用RelativeLayout来创建
26 |
27 | 也行,但是RelativeLayout有一些限制,例如:
28 |
29 | - 没法同时控制2个轴线对齐
30 | - 当组件需要的空间超出你预期的时候会跑出屏幕或发生重叠因为你不能使用weight等等
31 |
32 | 换一句话说就是RelativeLayout不够灵活和响应性不足。
33 |
34 | #例子
35 |
36 | 让我们实现一个简单的布局包含一个大图片,2个小图标和跟在图标后面的文本
37 |
38 | 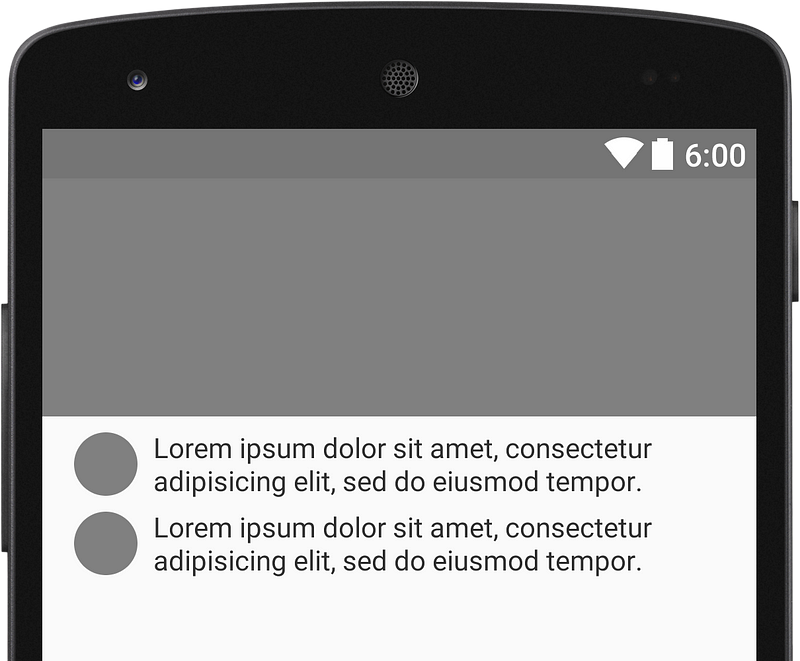
39 |
40 | ###*RelativeLayout*
41 |
42 | 用RelatieveLayout实现起来非常简单,通过关键属性*layout_below*,*layout_toRightOf*和*layout_alignTop*
43 |
44 | 
45 |
46 | 一眼看上去好像很完美,等你用不同字体size进行布局测试就呵呵了
47 |
48 | *问题 1*没法同时控制基于2个轴对齐
49 |
50 | 单行文本应该相对于图标垂直居中,不幸的是RelativeLayout没有提供这个可能性
51 |
52 | 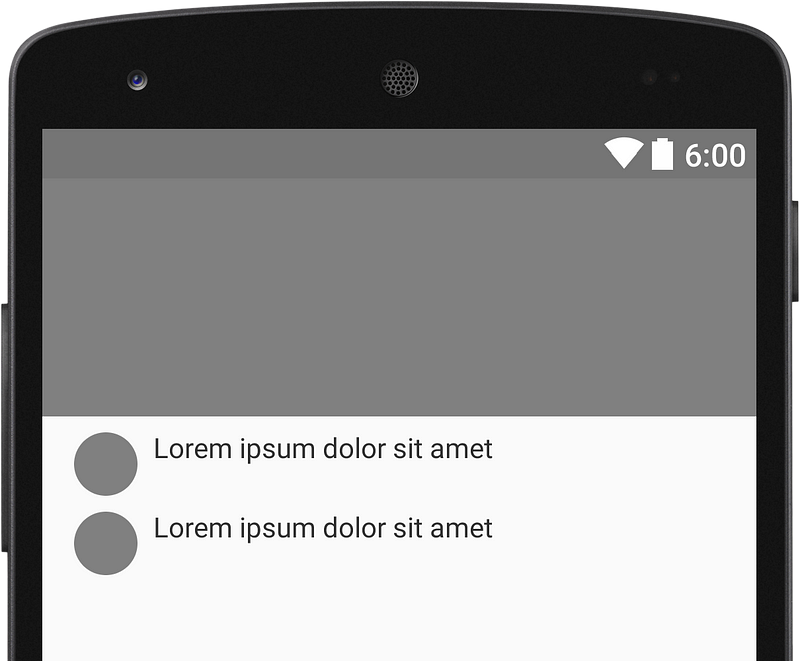
53 |
54 | *问题 2* 组件重叠
55 |
56 | 多行文本会引起重叠,因为text用了layout_alignTop对图标进行对齐
57 |
58 | 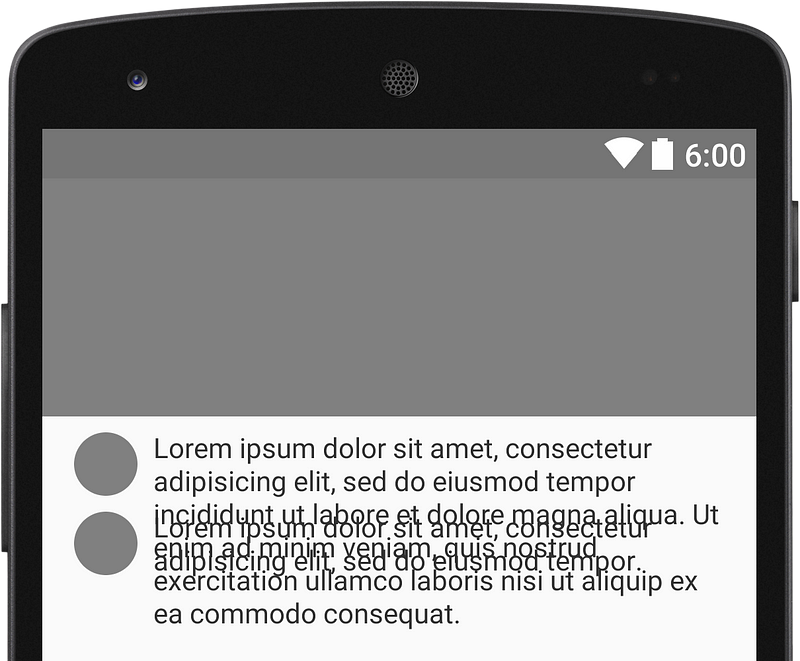
59 |
60 | ###*GridLayout*
61 |
62 | 如你看到的下面图片一样,GridLayout提供更好的表现结果:
63 |
64 | - 文本垂直居中于图标
65 | - 多行文本不会向下移动组件
66 |
67 | 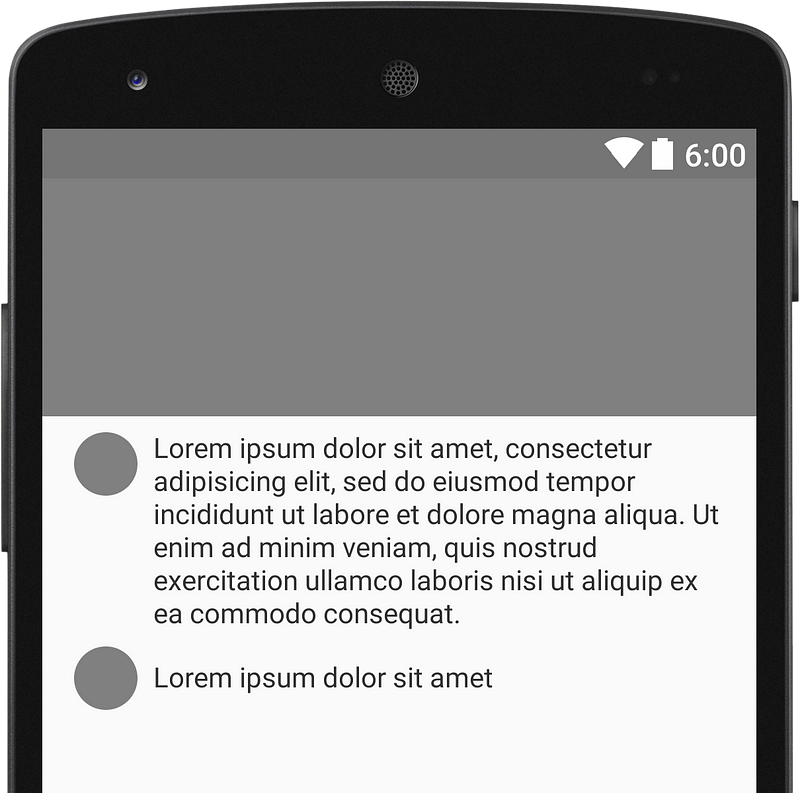
68 |
69 | 那么怎么实现这个效果呢?首先定义GridLayout为根布局。然后计算你要多少列并通过android:columnCount属性定义,在我们的例子中我们有2列。
70 |
71 | 因为GridLayout里面的views是一个接一个被放置的,所以没必要明确定义row和column
72 |
73 | 如果你想撑开view让它占用2行或2列,你可以用*layout_columnSpan*/*layout_rowSpan*属性
74 |
75 | 还有一件重要的事要记住-如果你想你的view使用所有可用的空间,不要设置width为match_parent,应该设置成0dp同时设置属性layout_gravity="fill"
76 |
77 | 
78 |
79 |
80 | #总结
81 |
82 | GridLayout一方面是一个非常强大的工具,它提供了很好的灵活性和性能,另外一方面它需要一些时间来学习了解它如何工作,你通常需要花更多的时间来开发和维护这样的布局。
83 |
84 |
85 |
86 |
87 |
88 |
89 |
90 |
91 |
92 |
93 |
94 |
95 |
96 |
97 |
98 |
--------------------------------------------------------------------------------
/Android Studio自定义文件模板.md:
--------------------------------------------------------------------------------
1 | >原文链接:[How to make your own File Templates in Android Studio](http://riggaroo.co.za/custom-file-templates-android-studio/)
2 |
3 | >译文的GitHub地址:[Android Studio自定义文件模板](https://github.com/thinkSky1206/android-blog/blob/master/Android%20Studio%E8%87%AA%E5%AE%9A%E4%B9%89%E6%96%87%E4%BB%B6%E6%A8%A1%E6%9D%BF.md)
4 |
5 | >译者注:还是挺实用的
6 |
7 | 
8 |
9 | 我最近发现一个可以让我生活更简单的东东:自定义文件模板。什么是文件模板?文件模板是一开始就已经包含了一些代码的源文件。
10 |
11 | 在下面的例子中,我们将为用到时经常要查找的RecycleView adapter实现创建模板文件。
12 |
13 | #How to create your own file template in Android Studio:
14 |
15 | 1.右键代码源文件夹,选择“New” 然后再点击“Edit File Templates”
16 |
17 | 
18 |
19 | 2.点击添加按钮 新建一个新模板
20 |
21 | 
22 |
23 | 3.你需要给模板文件命名,因为我打算创建RecycleView adapter的模板,所以命名成RecyclerViewAdapter.
24 |
25 | 4.然后你要粘贴或填写你的模板代码,这里你可以使用一些变量。下面是一些预定义变量:
26 |
27 | - ${NAME} 文件名字
28 | - ${PACKAGE_NAME} 包名
29 | - ${DATE} 系统当前时间
30 |
31 | 你也可以自定义一些变量让用户输入,在这个例子中,我想要用户提供ViewHolder class所以用${VIEWHOLDER_CLASS} 列表item class用${ITEM_CLASS}
32 |
33 | 现在下面的代码用来创建Recycler Adapter实现模板:
34 |
35 | #if (${PACKAGE_NAME} && ${PACKAGE_NAME} != "")package ${PACKAGE_NAME};#end
36 |
37 | import android.content.Context;
38 | import android.support.v7.widget.RecyclerView;
39 | import android.view.LayoutInflater;
40 | import android.view.View;
41 | import android.view.ViewGroup;
42 | import java.util.List;
43 |
44 | #parse("File Header.java")
45 | public class ${NAME} extends RecyclerView.Adapter<${VIEWHOLDER_CLASS}> {
46 | private final Context context;
47 | private List<${ITEM_CLASS}> items;
48 |
49 | public ${NAME}(List<${ITEM_CLASS}> items, Context context) {
50 | this.items = items;
51 | this.context = context;
52 | }
53 |
54 | @Override
55 | public ${VIEWHOLDER_CLASS} onCreateViewHolder(ViewGroup parent,
56 | int viewType) {
57 | View v = LayoutInflater.from(parent.getContext())
58 | .inflate(R.layout.${LAYOUT_RES_ID}, parent, false);
59 | return new ${VIEWHOLDER_CLASS}(v);
60 | }
61 |
62 | @Override
63 | public void onBindViewHolder(${VIEWHOLDER_CLASS} holder, int position) {
64 | ${ITEM_CLASS} item = items.get(position);
65 | //TODO Fill in your logic for binding the view.
66 | }
67 |
68 | @Override
69 | public int getItemCount() {
70 | if (items == null){
71 | return 0;
72 | }
73 | return items.size();
74 | }
75 | }
76 |
77 | 当你使用这个模板的时候,会被提示输入${VIEWHOLDER_CLASS},${ITEM_CLASS}的值,这些值会替代我们定义的变量占位符,非常方便。
78 |
79 |
80 | 5.想使用你定义好的模板,点击右键 点击“New” 然后就会看到你模板名字出现在列表中。
81 |
82 | 
83 |
84 | 点击模板名字,然后填写你的变量值:
85 |
86 | 
87 |
88 | 然后你就会看到一个漂亮的生成好的class
89 |
90 | 
91 |
92 | 现在我再也不用去查找RecyclerView adapters了!耶!
93 |
94 | 你有其他在用的好用模板吗?分享给我吧。
95 |
--------------------------------------------------------------------------------
/Android启动优化.md:
--------------------------------------------------------------------------------
1 | >原文:[Android strings.xml — things to remember](https://medium.com/@dmytrodanylyk/android-strings-xml-things-to-remember-c155025bb8bb#.jjmb7gqpq)
2 |
3 | >译文的GitHub地址:[关于Android strings.xml你要记住的一些事](https://github.com/thinkSky1206/android-blog/blob/master/%E5%85%B3%E4%BA%8EAndroid%20strings.xml%E4%BD%A0%E8%A6%81%E8%AE%B0%E4%BD%8F%E7%9A%84%E4%B8%80%E4%BA%9B%E4%BA%8B.md)
4 |
5 | >译者注:都是一些很实用的技巧 ,尤其是对于多语言国际化开发,感同身受 。
6 |
7 | [Android应用启动优化:一种DelayLoad的实现和原理(上篇)](http://androidperformance.com/2015/11/18/Android-app-lunch-optimize-delay-load.html)
8 |
9 |
10 | [Android端应用秒开优化体验](http://zhengxiaoyong.me/2016/07/18/Android%E7%AB%AF%E5%BA%94%E7%94%A8%E7%A7%92%E5%BC%80%E4%BC%98%E5%8C%96%E4%BD%93%E9%AA%8C/)
11 |
12 |
13 | [Android性能优化之Splash页应该这样设计](http://zhengxiaoyong.me/2016/07/18/Android%E7%AB%AF%E5%BA%94%E7%94%A8%E7%A7%92%E5%BC%80%E4%BC%98%E5%8C%96%E4%BD%93%E9%AA%8C/)
14 |
15 |
16 | main()->Application:attachBaseContext()->onCreate()->Activity:onCreate()->onStart()->onResume()->performTraversals(layout mesure)->performTraversals(draw绘制)(显示第一帧)
17 |
18 |
19 | 1.点击图标——application.onCreate
20 |
21 | 2.oncreate-activity第一帧
22 |
23 |
--------------------------------------------------------------------------------
/Android项目结构的另外一种方式.md:
--------------------------------------------------------------------------------
1 | >原文:[Android Project Structure — alternative way](https://medium.com/@dmytrodanylyk/android-project-structure-alternative-way-29ce766682f0#.onofequfx)
2 |
3 | >译者注:我很喜欢工工整整的摆放哪些图片什么的,看的舒服,因为真的是太多了 要找或者替换的时候很烦,所以项目中我用了Android File Grouping这个插件 很好用 但是它只是解决了layout文件,没有解决其他资源文件分组,这篇文章提供了非常好的方法,不说了 去把我的项目重构一遍。
4 |
5 | 我们都知道android项目结构长成下面这样:所有的图片放在drawble相应文件夹,所有的布局文件放在layout文件夹。但是随的项目开发文件越来越多,慢慢的会发现导航和查找文件变得非常困难。
6 |
7 | 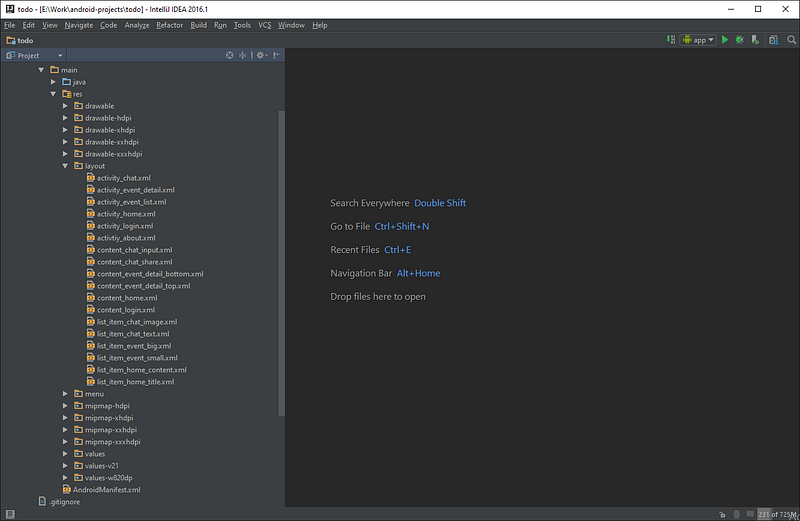
8 |
9 | ###一个界面一个资源文件夹
10 |
11 | 在这种情况下你的界面包含大量的layout,drawable,demension,那么有理由给你的每个界面建立一个单独的资源文件夹
12 |
13 | 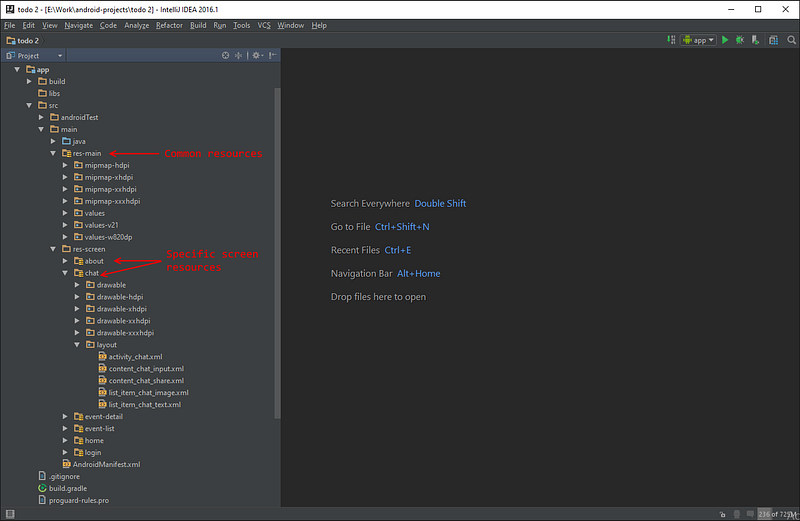
14 |
15 | 从上面的图片我们可以看到2个根文件夹包含在main目录中:
16 |
17 | - *res-main* 包含那些在多个界面中用到的公共资源
18 | - *res-screen* 包含各个界面的资源文件夹 例如:about,chat,event,details,event list,home,login等界面资源文件夹
19 |
20 | 让我们看一下chat界面的资源文件夹
21 |
22 | 
23 |
24 | chat本身包含几个layout xml文件,所以我们创建了chat->layout文件夹并把它们都移到里面。如果还有很多只在chat界面用到的png图片,我们也把它们移到chat->drawable-hdpi,chat->drawable-xhdpi,chat->drawable-xxhdpi和chat->drawable-xxxhdpi对应文件夹里面。
25 |
26 | 当以后chat界面需要实现水平布局或者支持平板的时候,我们会创建layout-land和layout-sw720文件夹放在chat目录下。
27 |
28 | ### 怎么让gradle识别我们的资源文件夹
29 |
30 | 打开app.gradle文件在android块中声明sourceSets.更多资源合并信息请查看[here](http://tools.android.com/tech-docs/new-build-system/resource-merging)
31 |
32 | sourceSets {
33 | main {
34 | res.srcDirs = [
35 | 'src/main/res-main',
36 | 'src/main/res-screen/about',
37 | 'src/main/res-screen/chat',
38 | 'src/main/res-screen/event-detail',
39 | 'src/main/res-screen/event-list',
40 | 'src/main/res-screen/home',
41 | 'src/main/res-screen/login',
42 | ]
43 | }
44 | }
45 |
46 | > **注意**:上面所有的操作确保你在Project模式下进行
47 |
48 | ###总结
49 |
50 | 如果你的项目很大,并且想要组织你的文件夹以便快速查看相关界面的layout,drawables,values等等,最好尝试使用每屏一个资源文件夹的android项目结构。
--------------------------------------------------------------------------------
/Drawable Resources一览.md:
--------------------------------------------------------------------------------
1 |
2 | >文章的GitHub地址:[Drawable Resources一览](https://github.com/thinkSky1206/android-blog/blob/master/Drawable%20Resources%E4%B8%80%E8%A7%88.md)
3 |
4 | >译者注:之前某个国外开发者大会释放出来的,整理一下记录下来,看看你都会么?
5 |
6 |
7 | #Bitmap File
8 |
9 | 
10 |
11 | #Nine-Path File
12 |
13 | 
14 |
15 | #Layer List
16 |
17 |
18 |
24 |