6 |  7 |
7 |
9 | );
10 |
11 | Loader.propTypes = {
12 | message: PropTypes.string
13 | };
14 |
15 | export default Loader;
16 |
--------------------------------------------------------------------------------
/finished/src/components/Header.js:
--------------------------------------------------------------------------------
1 | import React from 'react';
2 | import { Link } from 'react-router-dom';
3 | import PropTypes from 'prop-types';
4 |
5 | class Header extends React.Component {
6 | static propTypes = {
7 | siteName: PropTypes.string
8 | }
9 |
10 | render() {
11 | return (
12 |
7 | {props.message}
8 |13 | {this.props.siteName} 14 |
15 | ); 16 | } 17 | }; 18 | 19 | export default Header; 20 | -------------------------------------------------------------------------------- /starter-files/package.json: -------------------------------------------------------------------------------- 1 | { 2 | "name": "beerme", 3 | "version": "0.1.0", 4 | "private": true, 5 | "devDependencies": { 6 | "react-scripts": "1.1.0" 7 | }, 8 | "dependencies": { 9 | "prop-types": "^15.6.0", 10 | "react": "^16.2.0", 11 | "react-dom": "^16.2.0", 12 | "react-router-dom": "^4.2.2", 13 | "slugify": "^1.2.9" 14 | }, 15 | "scripts": { 16 | "start": "react-scripts start", 17 | "build": "react-scripts build", 18 | "test": "react-scripts test --env=jsdom", 19 | "eject": "react-scripts eject" 20 | } 21 | } 22 | -------------------------------------------------------------------------------- /finished/package.json: -------------------------------------------------------------------------------- 1 | { 2 | "name": "finished", 3 | "version": "0.1.0", 4 | "private": true, 5 | "devDependencies": { 6 | "react-scripts": "1.1.4" 7 | }, 8 | "dependencies": { 9 | "prop-types": "^15.6.0", 10 | "react": "^16.2.0", 11 | "react-dom": "^16.2.0", 12 | "react-router": "^4.2.0", 13 | "react-router-dom": "^4.2.2", 14 | "slugify": "^1.2.9" 15 | }, 16 | "scripts": { 17 | "start": "react-scripts start", 18 | "build": "react-scripts build", 19 | "test": "react-scripts test --env=jsdom", 20 | "eject": "react-scripts eject" 21 | } 22 | } 23 | -------------------------------------------------------------------------------- /finished/public/images/ball.svg: -------------------------------------------------------------------------------- 1 | 2 | -------------------------------------------------------------------------------- /starter-files/public/images/ball.svg: -------------------------------------------------------------------------------- 1 | 2 | -------------------------------------------------------------------------------- /finished/src/index.js: -------------------------------------------------------------------------------- 1 | import React from 'react'; 2 | import { render } from 'react-dom'; 3 | import Main from './components/Main'; 4 | import Single from './components/Single'; 5 | 6 | import { BrowserRouter, Route } from 'react-router-dom'; 7 | 8 | /* Import CSS */ 9 | import './style.css'; 10 | 11 | const Root = function() { 12 | return ( 13 |
15 |
19 |
17 |
18 |  20 |
21 |
20 |
21 |
22 | );
23 | }
24 | }
25 |
26 | export default Beer;
27 |
--------------------------------------------------------------------------------
/finished/src/components/Results.js:
--------------------------------------------------------------------------------
1 | import React from 'react';
2 | import Beer from './Beer';
3 | import Loader from './Loader';
4 | import PropTypes from 'prop-types';
5 |
6 | class Results extends React.Component {
7 | static propTypes = {
8 | loading: PropTypes.bool.isRequired,
9 | beers: PropTypes.array.isRequired
10 | }
11 |
12 | render() {
13 | if (this.props.loading) {
14 | return {name}
19 |
19 |
23 | );
24 | }
25 | };
26 |
27 | export default Results;
28 |
--------------------------------------------------------------------------------
/notes/06 - Exercise.md:
--------------------------------------------------------------------------------
1 | ## Exercise: A few More Components
2 |
3 | We need to create a few more components and scaffold out our application.
4 |
5 | 1. A **Loader.js** component which will take a prop of "message" and display it. Your HTML should look like this:
6 |
7 | ```html
8 |
20 | {this.props.beers.map((details, i) =>
22 |
9 |
10 |
12 | ```
13 |
14 | 2. A **Beer.js** component, for now just render out `
10 | Your Message from props goes here
11 |Beer will go here
`
15 | 3. A **Results.js** component, for how just render out `Results go here
`
16 | 4. A **Search.js** component, for now just render out `Search goes here
`
17 | 4. A **Single.js** component, for now just render out `A single beer goes here
`
18 |
--------------------------------------------------------------------------------
/finished/src/components/Search.js:
--------------------------------------------------------------------------------
1 | import React from 'react';
2 | import PropTypes from 'prop-types';
3 |
4 | class Search extends React.Component {
5 |
6 | static contextTypes = {
7 | router: PropTypes.object.isRequired
8 | }
9 |
10 | searchRef = React.createRef();
11 |
12 | handleSubmit = (e) => {
13 | e.preventDefault();
14 | const searchTerm = this.searchRef.current.value;
15 | this.context.router.history.push(`/search/${searchTerm}`);
16 | }
17 |
18 | render() {
19 | return (
20 |
21 |
25 |
26 | );
27 | }
28 | };
29 |
30 |
31 | export default Search;
32 |
--------------------------------------------------------------------------------
/gulpfile.js:
--------------------------------------------------------------------------------
1 | var gulp = require('gulp');
2 | var markdown = require('gulp-markdown');
3 | var zip = require('gulp-zip');
4 |
5 | var fs = require('fs');
6 | var notesTop = fs.readFileSync('notes/top.html');
7 | var notesBottom = fs.readFileSync('notes/bottom.html');
8 | var insert = require('gulp-insert');
9 |
10 | gulp.task('notes',function() {
11 | return gulp.src('notes/**/*.md')
12 | .pipe(markdown({
13 | gfm: true
14 | }))
15 | .pipe(insert.prepend(notesTop))
16 | .pipe(insert.append(notesBottom))
17 | .pipe(gulp.dest('notes-export'))
18 | .pipe(zip('gulp-notes.zip'))
19 | .pipe(gulp.dest('.'));
20 | });
21 |
22 | // gulp.task('exercises', function() {
23 | // gulp.src('./CODE/*')
24 | // .pipe(zip('gulp-exercises.zip'))
25 | // .pipe(gulp.dest('.'))
26 | // });
27 |
28 | gulp.task('default',['notes']);
29 |
--------------------------------------------------------------------------------
/notes/10 - Working in Beer-js.md:
--------------------------------------------------------------------------------
1 | ## Working in Beer.js
2 |
3 | So far we have passed all beers from `Main.js` → `Results.js` and passed each individual beer from `Results.js` → `Beer.js`.
4 |
5 | Working in `Beer.js`, how do we access the info about that beer? How did we pass it? **Props!** What was it called? **details**!
6 |
7 | So how do we access it inside `Beer.js`? `this.props.details`!
8 |
9 | First, let's import a few dependencies:
10 |
11 | ```js
12 | import slug from 'slugify';
13 | import { Link } from 'react-router-dom';
14 | ```
15 |
16 | Then work through the render function together:
17 |
18 | ```html
19 | render() {
20 | const { name, labels, id } = this.props.details;
21 | const image = labels ? labels.medium : 'notfound.jpg';
22 |
23 | return (
24 |
25 |
26 |
28 |
29 |
30 | );
31 | }
32 | ```
33 |
--------------------------------------------------------------------------------
/notes/12 - Exercise- Working with a Single-js.md:
--------------------------------------------------------------------------------
1 | ## Exercise: Working with a Single.js
2 |
3 | When you click on a beer you should see this:
4 |
5 | 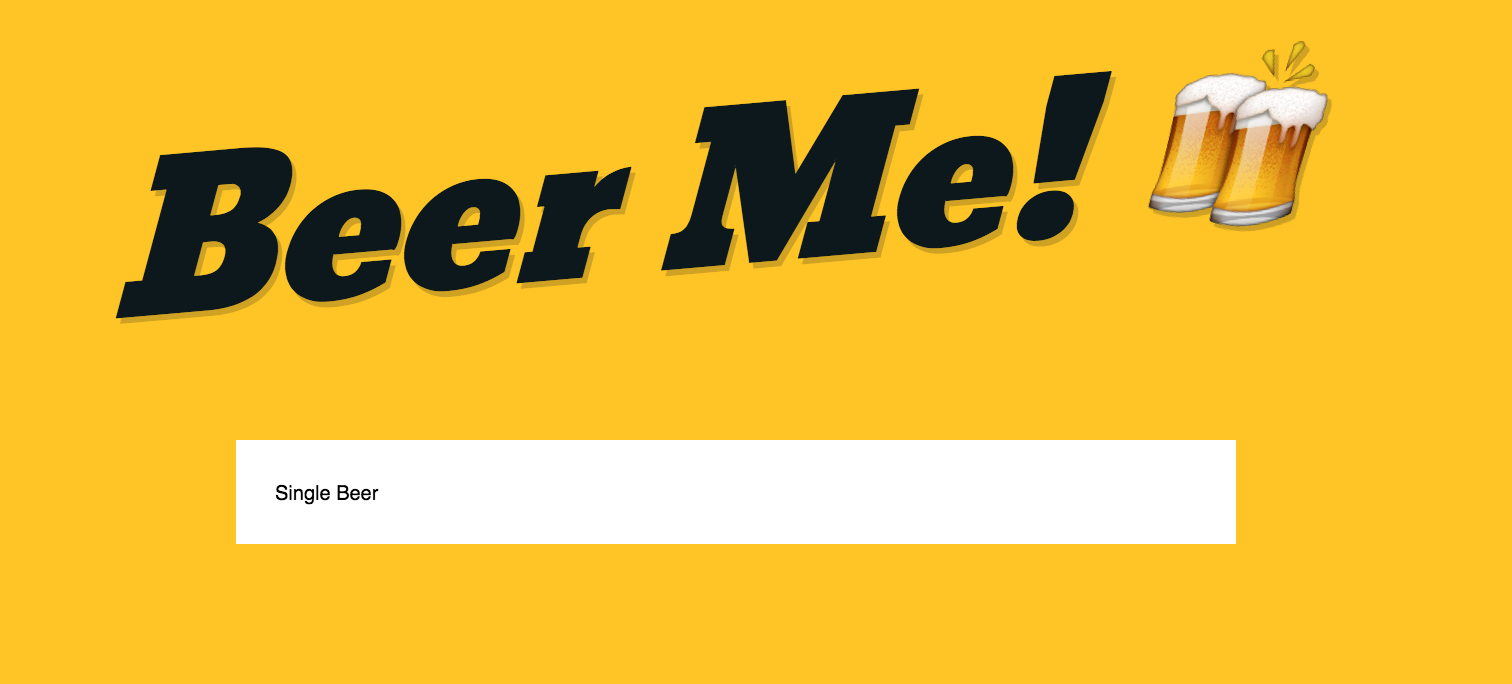
6 |
7 | We need to transform Single.js to display all the info about that beer. We are going to build Single.js as an exercise where you work with each other. Here are some notes:
8 |
9 | 1. Your Single.js will have 2 items in state: `beer` and `loading`
10 | 2. You will fetch the beer's info in a `loadBeer` method that you create for `Single.js` from `http://api.react.beer/v2/beer/${beerId}`.For example {name}
27 |
37 |
39 | )
40 | }
41 | };
42 |
43 | export default Main;
44 | ```
45 |
46 | Now in `index.js` import Main: `import Main from './components/Main';` and switch out `
61 |
65 | )
66 | }
67 | ```
68 |
69 | Finally, you can update your Loader.js to take the message prop:
70 |
71 | ```diff
72 | -
62 | {this.props.beers.map((details, i) => )}
63 |
64 | Your Message from props goes here
73 | +{this.props.message}
74 | ``` 75 | -------------------------------------------------------------------------------- /finished/src/components/Single.js: -------------------------------------------------------------------------------- 1 | import React from "react"; 2 | import Loader from "./Loader"; 3 | import Header from "./Header"; 4 | import PropTypes from "prop-types"; 5 | 6 | class Single extends React.Component { 7 | constructor() { 8 | super(); 9 | this.state = { beer: {}, loading: true }; 10 | } 11 | 12 | static propTypes = { 13 | params: PropTypes.object 14 | }; 15 | 16 | componentDidMount() { 17 | console.log(`searching for ${this.props.match.params.beerId}`); 18 | this.loadBeer(this.props.match.params.beerId); 19 | } 20 | 21 | loadBeer = beerId => { 22 | console.log(`Loading beer ${beerId}`); 23 | this.setState({ loading: true }); 24 | fetch(`http://api.react.beer/v2/beer/${beerId}`) 25 | .then(data => data.json()) 26 | .then(res => { 27 | this.setState({ beer: res.data, loading: false }); 28 | }); 29 | }; 30 | 31 | renderGlass = beer => { 32 | if (!beer.glass) return; 33 | return ( 34 |
35 |  36 |
36 |
38 | );
39 | };
40 |
41 | renderAbv = beer => {
42 | if (!beer.abv) return;
43 | return
36 | {beer.glass.name} Glass
37 |ABV: {beer.abv}%
;
44 | };
45 |
46 | render() {
47 | if (this.state.loading) {
48 | return
55 |
75 | );
76 | }
77 | }
78 |
79 | export default Single;
80 |
--------------------------------------------------------------------------------
/notes/14 - Deploying + Challenges.md:
--------------------------------------------------------------------------------
1 | # Deploying
2 |
3 | To generate a bundle ready for production, simply run `npm build`. This will generate an index.html file and a .js file that contains all your minified code.
4 |
5 | # Challenge Exercises
6 |
7 | ## Stateless Functional Components
8 |
9 | Sometimes we have components that _only include a render()_. There are no custom methods, no lifecycle hooks, though they may have propTypes.
10 |
11 | If this is the case, we use a simple function that simply returns some JSX.
12 |
13 | Let's take out Beer.js component:
14 |
15 | ```js
16 | class Beer extends React.Component {
17 | render() {
18 | const { name, labels, id } = this.props.details;
19 | const image = labels ? labels.medium : 'null.jpg';
20 |
21 | return (
22 |
57 |  63 |
64 |
63 |
64 |
74 |
58 |
61 |
62 | {beer.name}
59 |{beer.description}
60 |
65 | {this.renderGlass(beer)}
66 | {this.renderAbv(beer)}
67 |
68 |
69 |
70 |
73 | More Info on {beer.style.name}
71 |{beer.style.description}
72 |
23 |
24 |
26 |
27 |
28 | );
29 | }
30 | };
31 | ```
32 |
33 | We can convert that to a function that returns some JSX. Notice how we passed in props and replaced `this.props` with just `props`?
34 |
35 | ```js
36 | const Beer = function(props) {
37 |
38 | const { name, labels, id } = props.details;
39 | const image = labels ? labels.medium : 'null.jpg';
40 |
41 | return (
42 | {name}
25 |
43 |
44 |
46 |
47 |
48 | );
49 | };
50 | ```
51 |
52 | You'll often also see it written with a one line arrow function with an implicit return.
53 |
54 | ```js
55 | const Hello = (props) => (
56 | {name}
45 |
57 |
59 | )
60 | ```
61 |
62 | **Challenge:**
63 |
64 | ## Cache Single Beers
65 |
66 | Can you update the `Single.js` file to cache the single beer in localStorage? If I visit the same beer page twice, it should fetch it once.
67 |
68 | ## Modify It - Make it your own
69 |
70 | Now that you have a feel for React.js, what else could you build with it? This workshop should give you head start and the only way to continue learning is to build something that you are invested in.
71 |
72 | What can you build?
73 |
74 | * Use your own API to display it's data
75 | * Add a note taking feature to the beers
76 | * Build a shopping cart from scratch
77 | * re-do your WordPress website with the WP API
78 |
79 |
80 |
--------------------------------------------------------------------------------
/react-workshop.md:
--------------------------------------------------------------------------------
1 | # An Intro to React Workshop
2 |
3 | This is a 1 day, 6-8 hour workshop aimed at understanding the fundamentals of React. Throughout the day we will work to incrementally build an application touching all every major point of React:
4 |
5 | * Creating Components and writing HTML with JSX
6 | * Routing with React Router
7 | * Understanding State and holding data
8 | * Passing data between components with with Props
9 | * Fetching data from an Ajax endpoint
10 | * Persisting data with LocalStorage
11 | * Working with Events in React
12 | * Working with Forms, retrieving data from DOM inputs
13 | * Stateless Functional Components
14 | * React Deployment
15 |
16 | Together we will build Hello {props.name}!
58 |
68 |
72 | );
73 | }
74 | }
75 |
76 | export default Main;
77 |
--------------------------------------------------------------------------------
/finished/src/style.styl:
--------------------------------------------------------------------------------
1 | yellow = #FFC425
2 | black = #0D181C
3 | red = #e13e45
4 | bevan = 'Bevan', cursive;
5 |
6 |
7 | html
8 | font-size 10px
9 |
10 | body
11 | font-family sans-serif
12 | background yellow
13 | background: linear-gradient(to bottom, yellow 50%,darken(yellow,20%) 100%);
14 | background-attachment fixed
15 |
16 | p
17 | font-size 1.8rem
18 | line-height 1.5
19 |
20 | a
21 | color black
22 |
23 | html
24 | box-sizing: border-box;
25 |
26 | *, *:before, *:after
27 | box-sizing: inherit;
28 |
29 | img
30 | max-width 100%
31 |
32 | h1
33 | text-align center
34 | font-family bevan
35 | font-weight normal
36 | transform rotate(-5deg) skew(-20deg)
37 | margin 2rem 0 2rem 0
38 | a
39 | text-decoration none
40 | font-size 10rem
41 | text-shadow 3px 3px 0 alpha(black, 20%)
42 |
43 | .beer
44 | background white
45 | padding 1rem
46 | border-top 1.5rem solid red
47 | flex 1 0 auto
48 | margin 2rem
49 | overflow hidden
50 | width calc(33.3% - 4rem)
51 | box-shadow 0 0 10px alpha(black, 20%)
52 | transition all 0.2s
53 | &:hover
54 | transform scale(1.05)
55 | box-shadow 0 0 20px 2px alpha(black, 30%)
56 | a
57 | text-decoration none
58 | h2
59 | margin 0
60 | font-size 1.5rem
61 | text-align center
62 | margin-bottom 2rem
63 |
64 | .beers
65 | display flex
66 | flex-wrap wrap
67 | max-width 900px
68 | margin 0 auto
69 |
70 |
71 | /*
72 | Search
73 | */
74 |
75 | .search
76 | text-align center
77 | max-width 500px
78 | margin 2rem auto
79 | form
80 | display flex
81 | & > *
82 | flex 1
83 | background white
84 | border 0
85 | padding 2rem
86 | font-size 2rem
87 | &[type="submit"]
88 | flex-grow 2
89 | background red
90 | color white
91 | text-transform uppercase
92 | &[type="text"]
93 | flex-grow 10
94 |
95 | /*
96 | Loader
97 | */
98 |
99 | .loader
100 | margin 0 auto
101 | text-align center
102 | font-size 3rem
103 | font-weight 100
104 |
105 |
106 | /*
107 | Single Beer View
108 | */
109 |
110 | .single-beer
111 | max-width 500px
112 | margin 0 auto
113 | background white
114 | padding 2rem
115 | .label
116 | width 100%
117 | img
118 | max-width 100%
119 |
120 | h3
121 | font-size 2rem
122 |
123 | .glass
124 | img
125 | float left
126 | width 200px
127 |
--------------------------------------------------------------------------------
/finished/public/css/style.styl:
--------------------------------------------------------------------------------
1 | yellow = #FFC425
2 | black = #0D181C
3 | red = #e13e45
4 | bevan = 'Bevan', cursive;
5 |
6 |
7 | html
8 | font-size 10px
9 |
10 | body
11 | font-family sans-serif
12 | background yellow
13 | background: linear-gradient(to bottom, yellow 50%,darken(yellow,20%) 100%);
14 | background-attachment fixed
15 |
16 | p
17 | font-size 1.8rem
18 | line-height 1.5
19 |
20 | a
21 | color black
22 |
23 | html
24 | box-sizing: border-box;
25 |
26 | *, *:before, *:after
27 | box-sizing: inherit;
28 |
29 | img
30 | max-width 100%
31 |
32 | h1
33 | text-align center
34 | font-family bevan
35 | font-weight normal
36 | transform rotate(-5deg) skew(-20deg)
37 | margin 2rem 0 2rem 0
38 | a
39 | text-decoration none
40 | font-size 10rem
41 | text-shadow 3px 3px 0 alpha(black, 20%)
42 |
43 | .beer
44 | background white
45 | padding 1rem
46 | border-top 1.5rem solid red
47 | flex 1 0 auto
48 | margin 2rem
49 | overflow hidden
50 | width calc(33.3% - 4rem)
51 | box-shadow 0 0 10px alpha(black, 20%)
52 | transition all 0.2s
53 | &:hover
54 | transform scale(1.05)
55 | box-shadow 0 0 20px 2px alpha(black, 30%)
56 | a
57 | text-decoration none
58 | h2
59 | margin 0
60 | font-size 1.5rem
61 | text-align center
62 | margin-bottom 2rem
63 |
64 | .beers
65 | display flex
66 | flex-wrap wrap
67 | max-width 900px
68 | margin 0 auto
69 |
70 |
71 | /*
72 | Search
73 | */
74 |
75 | .search
76 | text-align center
77 | max-width 500px
78 | margin 2rem auto
79 | form
80 | display flex
81 | & > *
82 | flex 1
83 | background white
84 | border 0
85 | padding 2rem
86 | font-size 2rem
87 | &[type="submit"]
88 | flex-grow 2
89 | background red
90 | color white
91 | text-transform uppercase
92 | &[type="text"]
93 | flex-grow 10
94 |
95 | /*
96 | Loader
97 | */
98 |
99 | .loader
100 | margin 0 auto
101 | text-align center
102 | font-size 3rem
103 | font-weight 100
104 |
105 |
106 | /*
107 | Single Beer View
108 | */
109 |
110 | .single-beer
111 | max-width 500px
112 | margin 0 auto
113 | background white
114 | padding 2rem
115 | .label
116 | width 100%
117 | img
118 | max-width 100%
119 |
120 | h3
121 | font-size 2rem
122 |
123 | .glass
124 | img
125 | float left
126 | width 200px
127 |
--------------------------------------------------------------------------------
/starter-files/public/css/style.styl:
--------------------------------------------------------------------------------
1 | yellow = #FFC425
2 | black = #0D181C
3 | red = #e13e45
4 | bevan = 'Bevan', cursive;
5 |
6 |
7 | html
8 | font-size 10px
9 |
10 | body
11 | font-family sans-serif
12 | background yellow
13 | background: linear-gradient(to bottom, yellow 50%,darken(yellow,20%) 100%);
14 | background-attachment fixed
15 |
16 | p
17 | font-size 1.8rem
18 | line-height 1.5
19 |
20 | a
21 | color black
22 |
23 | html
24 | box-sizing: border-box;
25 |
26 | *, *:before, *:after
27 | box-sizing: inherit;
28 |
29 | img
30 | max-width 100%
31 |
32 | h1
33 | text-align center
34 | font-family bevan
35 | font-weight normal
36 | transform rotate(-5deg) skew(-20deg)
37 | margin 2rem 0 2rem 0
38 | a
39 | text-decoration none
40 | font-size 10rem
41 | text-shadow 3px 3px 0 alpha(black, 20%)
42 |
43 | .beer
44 | background white
45 | padding 1rem
46 | border-top 1.5rem solid red
47 | flex 1 0 auto
48 | margin 2rem
49 | overflow hidden
50 | width calc(33.3% - 4rem)
51 | box-shadow 0 0 10px alpha(black, 20%)
52 | transition all 0.2s
53 | &:hover
54 | transform scale(1.05)
55 | box-shadow 0 0 20px 2px alpha(black, 30%)
56 | a
57 | text-decoration none
58 | h2
59 | margin 0
60 | font-size 1.5rem
61 | text-align center
62 | margin-bottom 2rem
63 |
64 | .beers
65 | display flex
66 | flex-wrap wrap
67 | max-width 900px
68 | margin 0 auto
69 |
70 |
71 | /*
72 | Search
73 | */
74 |
75 | .search
76 | text-align center
77 | max-width 500px
78 | margin 2rem auto
79 | form
80 | display flex
81 | & > *
82 | flex 1
83 | background white
84 | border 0
85 | padding 2rem
86 | font-size 2rem
87 | &[type="submit"]
88 | flex-grow 2
89 | background red
90 | color white
91 | text-transform uppercase
92 | &[type="text"]
93 | flex-grow 10
94 |
95 | /*
96 | Loader
97 | */
98 |
99 | .loader
100 | margin 0 auto
101 | text-align center
102 | font-size 3rem
103 | font-weight 100
104 |
105 |
106 | /*
107 | Single Beer View
108 | */
109 |
110 | .single-beer
111 | max-width 500px
112 | margin 0 auto
113 | background white
114 | padding 2rem
115 | .label
116 | width 100%
117 | img
118 | max-width 100%
119 |
120 | h3
121 | font-size 2rem
122 |
123 | .glass
124 | img
125 | float left
126 | width 200px
127 |
--------------------------------------------------------------------------------
/finished/src/style.css:
--------------------------------------------------------------------------------
1 | html {
2 | font-size: 10px;
3 | }
4 |
5 | body {
6 | font-family: sans-serif;
7 | background: #ffc425;
8 | background: linear-gradient(to bottom, #ffc425 50%, #eaaa00 100%);
9 | background-attachment: fixed;
10 | }
11 |
12 | p {
13 | font-size: 1.8rem;
14 | line-height: 1.5;
15 | }
16 |
17 | a {
18 | color: #0d181c;
19 | }
20 |
21 | html {
22 | box-sizing: border-box;
23 | }
24 |
25 | *,
26 | *:before,
27 | *:after {
28 | box-sizing: inherit;
29 | }
30 |
31 | img {
32 | max-width: 100%;
33 | }
34 |
35 | h1 {
36 | text-align: center;
37 | font-family: 'Bevan', cursive;
38 | font-weight: normal;
39 | transform: rotate(-5deg) skew(-20deg);
40 | margin: 2rem 0 2rem 0;
41 | }
42 |
43 | h1 a {
44 | text-decoration: none;
45 | font-size: 10rem;
46 | text-shadow: 3px 3px 0 rgba(13,24,28,0.2);
47 | }
48 |
49 | .beer {
50 | background: #fff;
51 | padding: 1rem;
52 | border-top: 1.5rem solid #e13e45;
53 | flex: 1 0 auto;
54 | margin: 2rem;
55 | overflow: hidden;
56 | width: calc(33.3% - 4rem);
57 | box-shadow: 0 0 10px rgba(13,24,28,0.2);
58 | transition: all 0.2s;
59 | }
60 |
61 | .beer:hover {
62 | transform: scale(1.05);
63 | box-shadow: 0 0 20px 2px rgba(13,24,28,0.3);
64 | }
65 |
66 | .beer a {
67 | text-decoration: none;
68 | }
69 |
70 | .beer h2 {
71 | margin: 0;
72 | font-size: 1.5rem;
73 | text-align: center;
74 | margin-bottom: 2rem;
75 | }
76 |
77 | .beers {
78 | display: flex;
79 | flex-wrap: wrap;
80 | max-width: 900px;
81 | margin: 0 auto;
82 | }
83 | /*
84 | Search
85 | */
86 | .search {
87 | text-align: center;
88 | max-width: 500px;
89 | margin: 2rem auto;
90 | }
91 |
92 | .search form {
93 | display: flex;
94 | }
95 |
96 | .search form > * {
97 | flex: 1;
98 | background: #fff;
99 | border: 0;
100 | padding: 2rem;
101 | font-size: 2rem;
102 | }
103 |
104 | .search form > *[type="submit"] {
105 | flex-grow: 2;
106 | background: #e13e45;
107 | color: #fff;
108 | text-transform: uppercase;
109 | }
110 |
111 | .search form > *[type="text"] {
112 | flex-grow: 10;
113 | }
114 | /*
115 | Loader
116 | */
117 | .loader {
118 | margin: 0 auto;
119 | text-align: center;
120 | font-size: 3rem;
121 | font-weight: 100;
122 | }
123 | /*
124 | Single Beer View
125 | */
126 | .single-beer {
127 | max-width: 500px;
128 | margin: 0 auto;
129 | background: #fff;
130 | padding: 2rem;
131 | }
132 |
133 | .single-beer .label {
134 | width: 100%;
135 | }
136 |
137 | .single-beer img {
138 | max-width: 100%;
139 | }
140 |
141 | .single-beer h3 {
142 | font-size: 2rem;
143 | }
144 |
145 | .glass img {
146 | float: left;
147 | width: 200px;
148 | }
149 |
--------------------------------------------------------------------------------
/starter-files/src/style.css:
--------------------------------------------------------------------------------
1 | html {
2 | font-size: 10px;
3 | }
4 |
5 | body {
6 | font-family: sans-serif;
7 | background: #ffc425;
8 | background: linear-gradient(to bottom, #ffc425 50%, #eaaa00 100%);
9 | background-attachment: fixed;
10 | }
11 |
12 | p {
13 | font-size: 1.8rem;
14 | line-height: 1.5;
15 | }
16 |
17 | a {
18 | color: #0d181c;
19 | }
20 |
21 | html {
22 | box-sizing: border-box;
23 | }
24 |
25 | *,
26 | *:before,
27 | *:after {
28 | box-sizing: inherit;
29 | }
30 |
31 | img {
32 | max-width: 100%;
33 | }
34 |
35 | h1 {
36 | text-align: center;
37 | font-family: 'Bevan', cursive;
38 | font-weight: normal;
39 | transform: rotate(-5deg) skew(-20deg);
40 | margin: 2rem 0 2rem 0;
41 | }
42 |
43 | h1 a {
44 | text-decoration: none;
45 | font-size: 10rem;
46 | text-shadow: 3px 3px 0 rgba(13,24,28,0.2);
47 | }
48 |
49 | .beer {
50 | background: #fff;
51 | padding: 1rem;
52 | border-top: 1.5rem solid #e13e45;
53 | flex: 1 0 auto;
54 | margin: 2rem;
55 | overflow: hidden;
56 | width: calc(33.3% - 4rem);
57 | box-shadow: 0 0 10px rgba(13,24,28,0.2);
58 | transition: all 0.2s;
59 | }
60 |
61 | .beer:hover {
62 | transform: scale(1.05);
63 | box-shadow: 0 0 20px 2px rgba(13,24,28,0.3);
64 | }
65 |
66 | .beer a {
67 | text-decoration: none;
68 | }
69 |
70 | .beer h2 {
71 | margin: 0;
72 | font-size: 1.5rem;
73 | text-align: center;
74 | margin-bottom: 2rem;
75 | }
76 |
77 | .beers {
78 | display: flex;
79 | flex-wrap: wrap;
80 | max-width: 900px;
81 | margin: 0 auto;
82 | }
83 | /*
84 | Search
85 | */
86 | .search {
87 | text-align: center;
88 | max-width: 500px;
89 | margin: 2rem auto;
90 | }
91 |
92 | .search form {
93 | display: flex;
94 | }
95 |
96 | .search form > * {
97 | flex: 1;
98 | background: #fff;
99 | border: 0;
100 | padding: 2rem;
101 | font-size: 2rem;
102 | }
103 |
104 | .search form > *[type="submit"] {
105 | flex-grow: 2;
106 | background: #e13e45;
107 | color: #fff;
108 | text-transform: uppercase;
109 | }
110 |
111 | .search form > *[type="text"] {
112 | flex-grow: 10;
113 | }
114 | /*
115 | Loader
116 | */
117 | .loader {
118 | margin: 0 auto;
119 | text-align: center;
120 | font-size: 3rem;
121 | font-weight: 100;
122 | }
123 | /*
124 | Single Beer View
125 | */
126 | .single-beer {
127 | max-width: 500px;
128 | margin: 0 auto;
129 | background: #fff;
130 | padding: 2rem;
131 | }
132 |
133 | .single-beer .label {
134 | width: 100%;
135 | }
136 |
137 | .single-beer img {
138 | max-width: 100%;
139 | }
140 |
141 | .single-beer h3 {
142 | font-size: 2rem;
143 | }
144 |
145 | .glass img {
146 | float: left;
147 | width: 200px;
148 | }
149 |
--------------------------------------------------------------------------------
/notes/03 - Say Hello to JSX.md:
--------------------------------------------------------------------------------
1 | ## Say Hello to JSX
2 |
3 | JSX is the templating language we write in order to create HTML or DOM fragments. It's not technically JavaScript, but Babel and Webpack are able to convert it from the nice syntax that we know and understand into the JavaScript equivalent of `React.createElelement`.
4 |
5 | Writing JSX is very similar to JavaScript except for a few items.
6 |
7 | ### Self Closing Elements
8 |
9 | Elements **must** close. This isn't an issue for most tags:
10 |
11 | ```html
12 | Beer Me!
13 | ``` 14 | 15 | But self-closing elements like `input` and `img` need to have the closing `/` in them: 16 | 17 | ```html 18 | 19 |
20 |
21 |
22 |
23 | ```
24 |
25 | ### Must return only one element
26 |
27 | React expects you to only return one element. You can have as many child elements as you wish, but only one top level element.
28 |
29 | So, if I needed to return the following HTML. You'll get an error saying `Adjacent JSX elements must be wrapped in an enclosing tag (8:6)`.
30 |
31 | ```html
32 |
19 |
20 |
21 |
22 |
23 | ```
24 |
25 | ### Must return only one element
26 |
27 | React expects you to only return one element. You can have as many child elements as you wish, but only one top level element.
28 |
29 | So, if I needed to return the following HTML. You'll get an error saying `Adjacent JSX elements must be wrapped in an enclosing tag (8:6)`.
30 |
31 | ```html
32 | Beer Name
33 |Beer Description goes here
34 | ``` 35 | 36 | An easy fix is to wrap it in a div: 37 | 38 | ```html 39 |
40 |
43 | ```
44 |
45 | One major downside to this is that it interferes with CSS where the parent-child relationship is important. Extra divs can really goof up your Flexbox or CSS Grid code.
46 |
47 | As of React 16.2, we are now able to use something called Fragments which won't render out a containing div:
48 |
49 | ```js
50 | <>
51 | Beer Name
41 |Beer Description goes here
42 |Beer Name
52 |Beer Description goes here
53 | 54 | ``` 55 | 56 | ### Comments 57 | 58 | Comments are a little weird in JSX, since we are _technically_ writing JavaScript, we need to use JavaScript comments, but inside JSX curly braces. 59 | 60 | So a comment in JSX looks like 61 | 62 | ```html 63 |
64 | {/* Comment here */ }
65 |
68 | ```
69 |
70 | Another gotcha is that you may not have a comment at the top level, for the same reason we can only return one element:
71 |
72 | ```html
73 | {/* Comment cannot go here */ }
74 | Beer Name
66 |Beer Description goes here
67 |
75 |
78 | ```
79 |
80 | ### className instead of class
81 |
82 | Because `class` is a reserved word in JavaScript, you must use className instead.
83 |
84 | ```html
85 | Beer Name
76 |Beer Description goes here
77 |Hello
86 | ``` 87 | 88 | is now 89 | 90 | ```html 91 |Hello
92 | ``` 93 | 94 | If you use Emmet, your expansions will be automatically updated for you. 95 | -------------------------------------------------------------------------------- /notes/07 - React Router.md: -------------------------------------------------------------------------------- 1 | 2 | ## Routing with React Router 3 | 4 | Our application is going to have three "routes", or urls that a user can hit. 5 | 6 | 1. `localhost:3000/` for the home page and default beers 7 | 1. `localhost:3000/search/angry` the search results for a specific keyword. In this case `angry` 8 | 1. `http://localhost:3000/beer/OUqh1N/Texas-Craft-Brewers-Guild` the single view page for a specific beer - we pass along the beer ID and the beer name in the url. 9 | 10 | React is just a view library so it doesn't have routing built in like other frameworks might have. That said, the community has primarily standardized on using [React Router](https://github.com/ReactTraining/react-router) 11 | 12 | React router is just a component in itself - it watches for history changes and will render out the correct component for you. 13 | 14 | On every page we want to render either the `` component on the Home page and search page or the `
42 |
46 |
72 |
76 | Hello World
, document.querySelector('#root')); 45 | ``` 46 | 47 | Let's break this down: 48 | 49 | 1. `render()` is the method we just imported 50 | 2.Hello World
is the element we wish to render — this is really something called JSX. More on this in a bit! It's important to note thay we don't have to put it in quotes. 51 | 3. document.querySelector('#root') finds the entry point in the DOM 52 | 53 | Save and refresh your page, you should see the very basic of getting up and running with React. If you open your dev tools now you should see the React tab which you can now inspect: 54 | 55 | 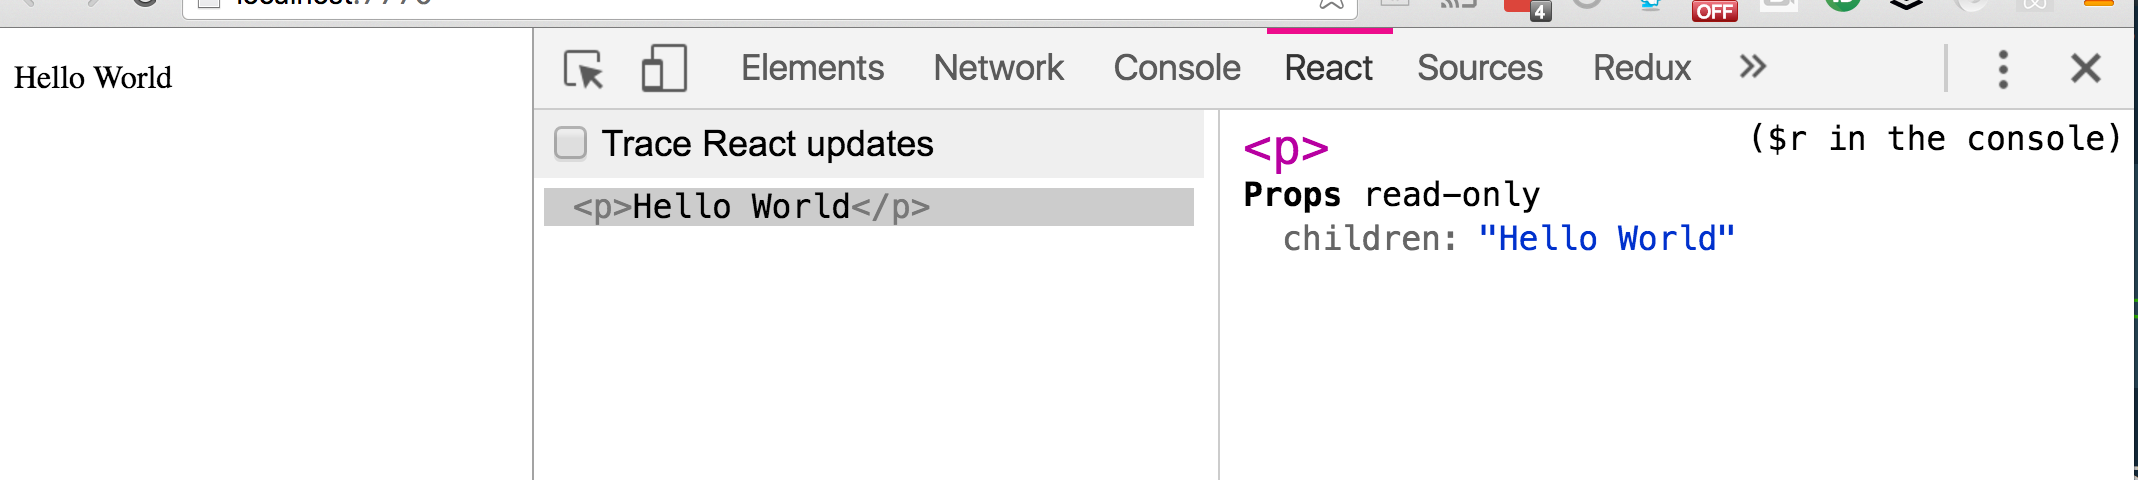 56 | 57 | ## CSS 58 | 59 | We have two options for using CSS with a React app. 60 | 61 | 1. You can load in a `style.css` file all on your own into your index.html and not have React or Webpack play any part of it. 62 | 2. You can let Webpack handle importing the CSS for you. The advantages of this is that you _could_ write CSS the directly relates to each component and only have it imported as you need it. 63 | 64 | This is a very divisive topic in the web development community so I'll let you make your own decisions here. For us, I'm going to import all our CSS at the top level app. 65 | 66 | In your `index.js`, place this just above your render: 67 | 68 | ```js 69 | /* Import CSS */ 70 | import css from './style.css'; 71 | ``` 72 | 73 | I'm using plain cSS here - but you could use Sass, Less, Post CSS or regular CSS if you'd like. 74 | 75 | However, since this all happens inside the WebPack file with something called _loaders_, we would need to _eject_ from `create-react-app`. More on this later. 76 | -------------------------------------------------------------------------------- /notes/02- Our First React Component.md: -------------------------------------------------------------------------------- 1 | ## Our First React Component 2 | 3 | Now - we can't just be writing all of our HTML inside of the render method — we need to break things up into their own components. Let's write our first React component. 4 | 5 | In React, everything is a component. You can think of our application as many parts that we piece together to make an application as a whole. 6 | 7 | Let's look at the front page of our app. What are the components we are going to make? 8 | 9 | 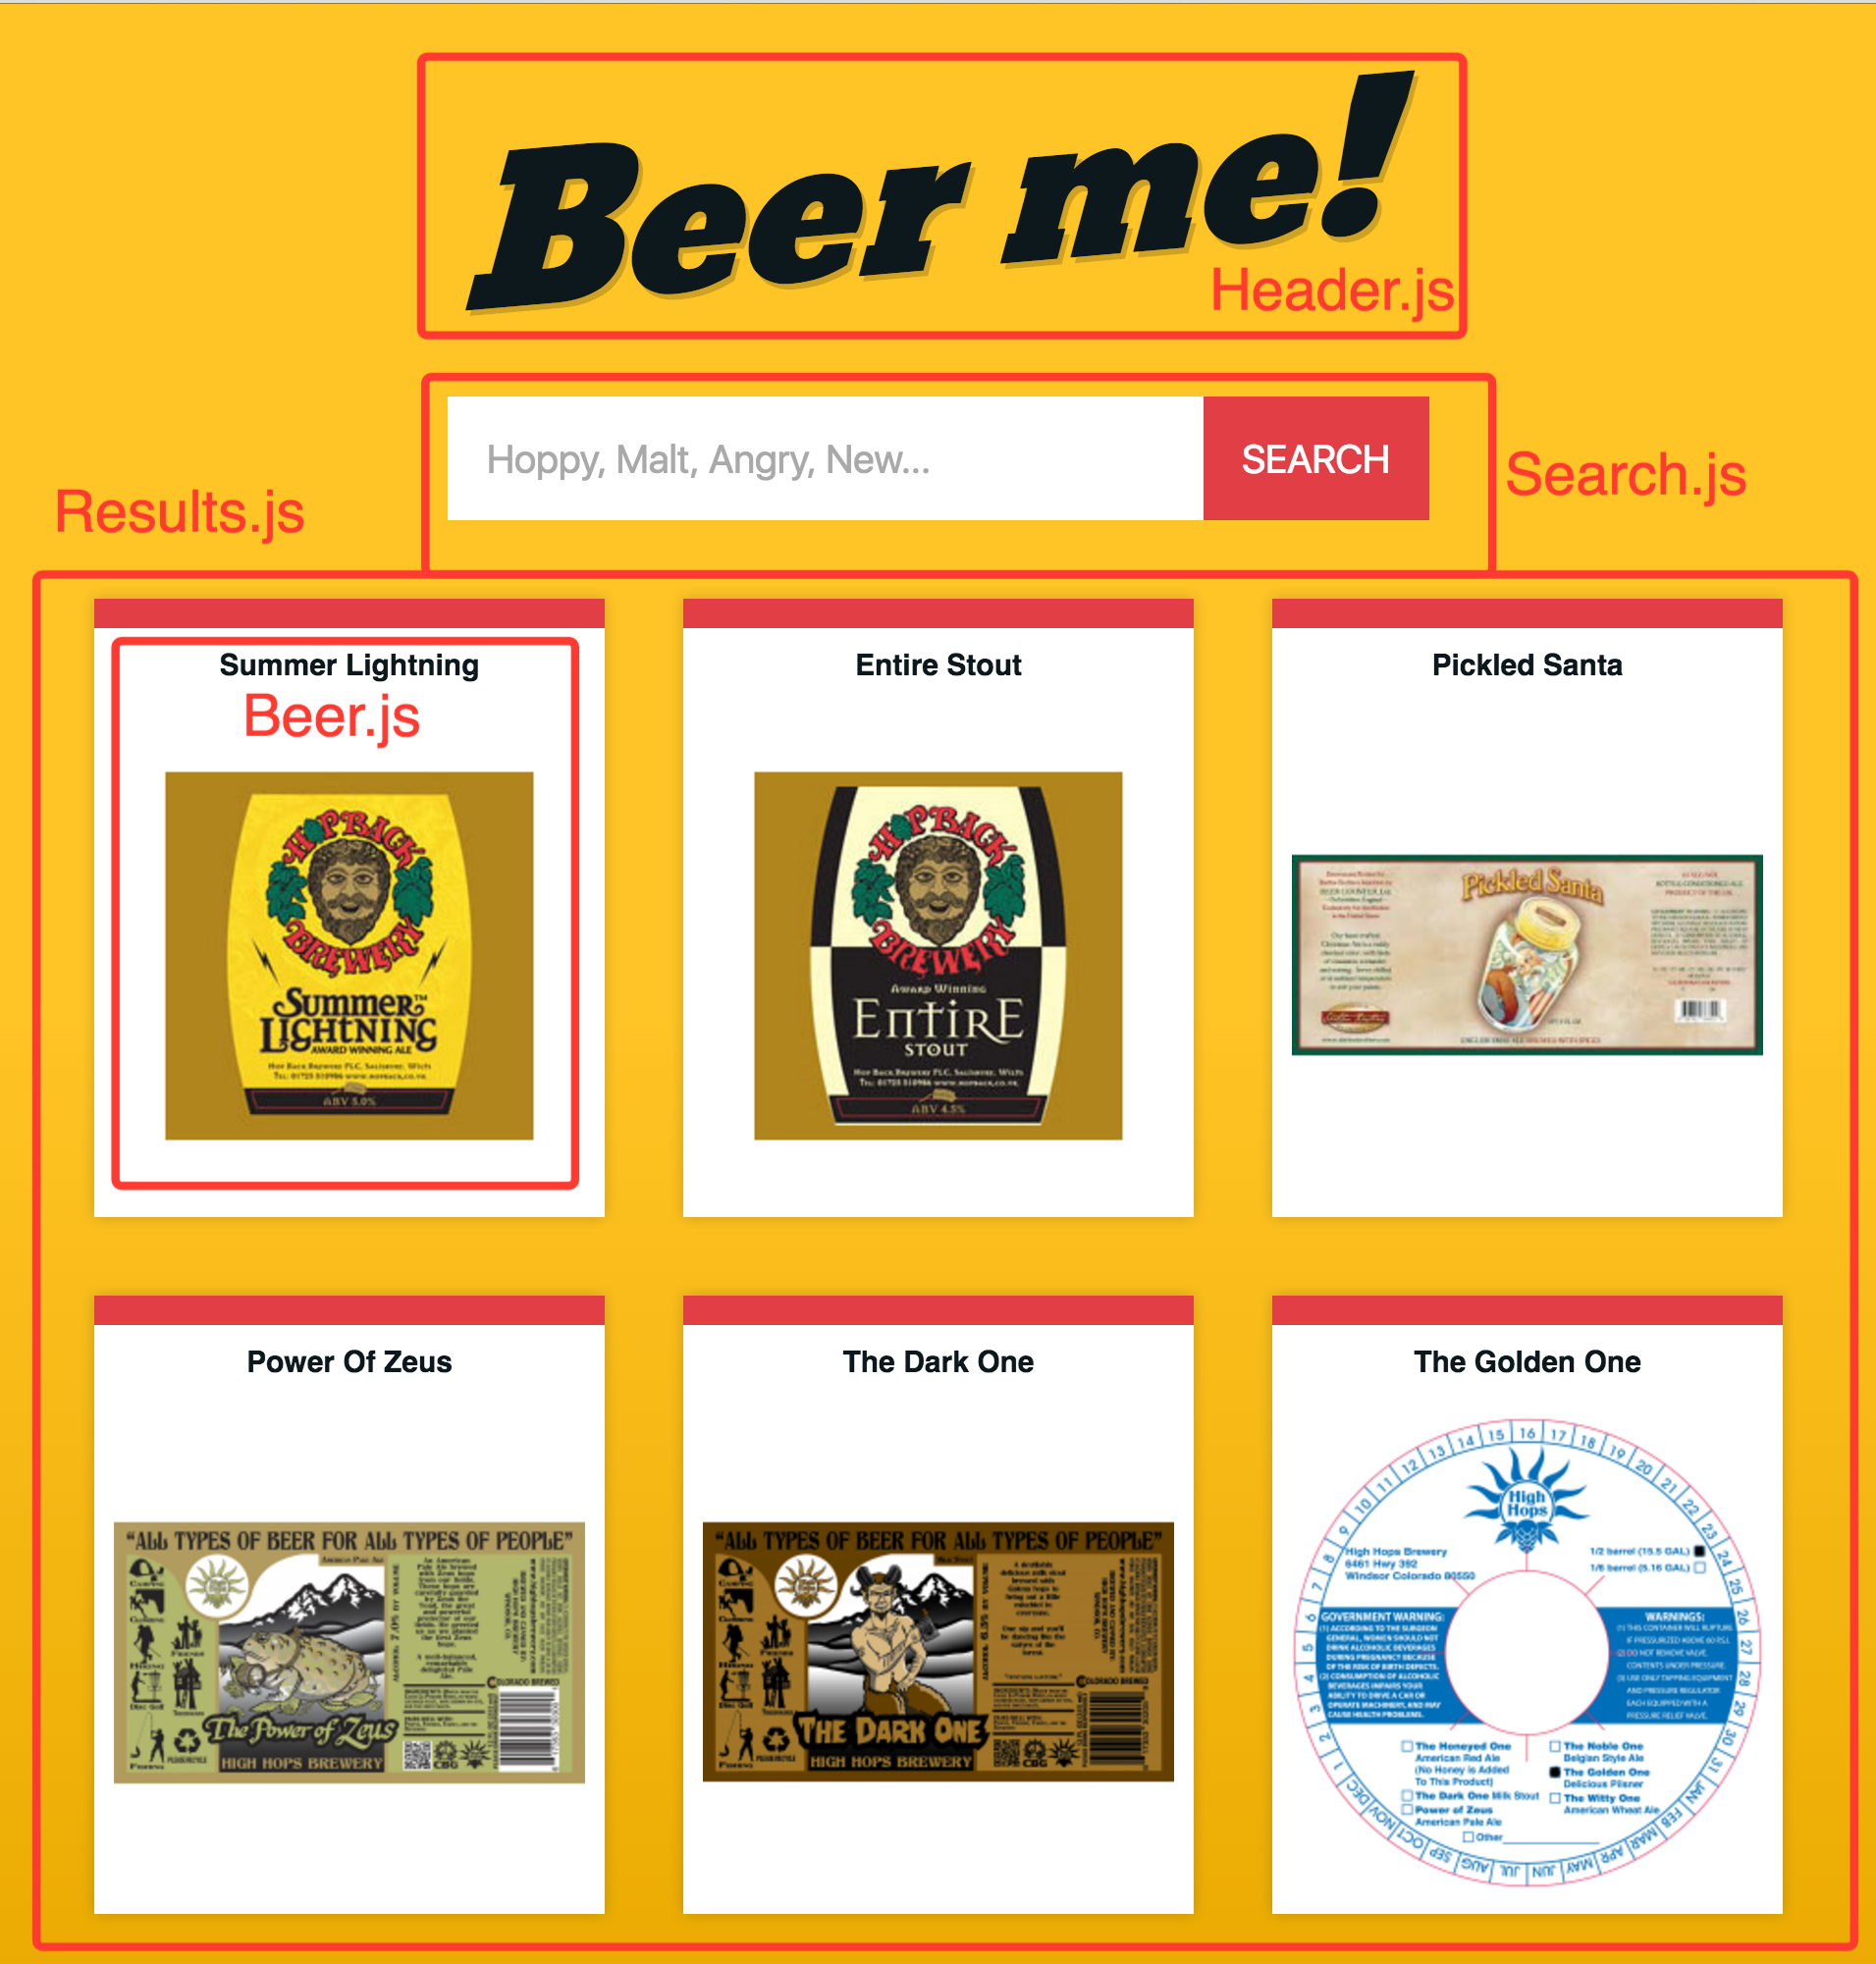 10 | 11 | Let's start with a `Header.js` component. In react, since components are sort of like classes that can be reused over and over, it's a standard practice to name your files and components with a capital. 12 | 13 | So in a folder named `components`, create `components/Header.js`. 14 | 15 | Now there are a few things we need to create a component: 16 | 17 | 1. React itself 18 | 19 | ```js 20 | import React from 'react'; 21 | ``` 22 | 23 | Notice that even though we have imported React into `index.js`, we also import it in here. Modules are not global and you _must_ re-import the react library into every point that you need it. 24 | 25 | Then we create our component and store it in a variable. We extend `React.Component` to create the react class here. 26 | 27 | ## Quick Aside 28 | 29 | We are extending React.Component here with ES6 classes. Since ES6 classes currently fall short of a few much needed properties, we will be using some features that are "soon-to-come" to JavaScript to fill in those holes. 30 | 31 | The major shortcoming of ES6 classes and React is that the keyword `this` is not bound to the component instance. To get around this, we will be using [class properties](https://babeljs.io/docs/plugins/transform-class-properties/) which are not yet in the language but will be compiled down for us. I'll be sure to touch on this as we learn, but this is a heads up that you may see some JS syntax that you have never encountered before. 32 | 33 | ## Back to it 34 | 35 | Every React component will have multiple methods that live inside it, but the one method that we absolutely need is the `render()` method. This is a pre-defined method that React looks for when it displays the content on our page. 36 | 37 | Let's type this one together to get the hang of the syntax and answer the following questions along the way: 38 | 39 | 1. Why do we use `const`? 40 | 2. What is this `render() {}` business? should it not be `render: function() {}`? 41 | 3. Why is there (parens) around everything? 42 | 43 | ```js 44 | class Header extends React.Component { 45 | render() { 46 | return ( 47 |Beer Me!
48 | ) 49 | } 50 | }; 51 | ``` 52 | 53 | Finally, since we will need to import this component into other components, we need to **export it** with `export default Header`. 54 | 55 | Our final code looks like this: 56 | 57 | ```js 58 | import React from 'react'; 59 | 60 | class Header extends React.Component { 61 | render() { 62 | return ( 63 |Beer Me!
64 | ) 65 | } 66 | }; 67 | 68 | export default Header; 69 | 70 | ``` 71 | 72 | 73 | ### Displaying `Hello World
` with our new Header component in `index.js`. We can use the "tag" `Beer Me!
49 | ``` 50 | 51 | turns into: 52 | 53 | ```html 54 |{this.props.siteName}
55 | ``` 56 | 57 | A few things to note: 58 | 59 | 1. Notice how we use `{curly braces}` to access variables inside our JSX? 60 | 2. React automatically binds all methods inside the component to the Component itself. What does that mean? In any method (render for this case) `this` refers to `{this.props.siteName}
78 | ); 79 | } 80 | }; 81 | ``` 82 | 83 | `siteName`! 84 | 85 | And what type is it? A String! 86 | 87 | First we need to import `PropTypes` from the `prop-types` package. 88 | 89 | ``` 90 | import PropTypes from 'prop-types' 91 | // you can also import just the items you need: 92 | import { string, number } from 'prop-types'; 93 | // you may also see an older style React.PropTypes. This is deprecated 94 | import { PropTypes } from 'react'; 95 | ``` 96 | 97 | 98 | So, we can add propTypes to our component: 99 | 100 | ``` 101 | class Header extends React.Component { 102 | 103 | static propTypes = { 104 | siteName: PropTypes.string.isRequired 105 | } 106 | 107 | render() { 108 | return ( 109 |{this.props.siteName}
110 | ); 111 | } 112 | }; 113 | ``` 114 | 115 | A few things: 116 | 1. We use `static propType =` to set the property on the component. 117 | 2. there is no `,` after the object or method. This is part of ES6 Classes and differs from an object where you must put a `,` 118 | 119 | This will now error in your console if you: 120 | 121 | 1) Forget to pass something 122 | 2) Pass a number, boolean, function or object. 123 | 124 | More info on all the available propTypes here: 125 | 126 |
7 |
11 |
12 | ```
13 |
14 | The only thing that may seem out of place here so far is the `ref={(q) => this.q = q}` — we will reference this in just a second.
15 |
16 | When someone submits that form, we need to:
17 |
18 | 1. Stop the form from submitting
19 | 2. Get the value of the input
20 | 3. redirect them to `/search/whatever-they-searched-for`
21 |
22 | Let's take these three things and tackle them step by step:
23 |
24 | ### Stop the form from submitting
25 |
26 | How would you normally stop a form from submitting?
27 |
28 | You listen to for the `submit` event and call `preventDefault` on the event!
29 |
30 | So, we will modify our form tag: `