![]()
Python Study Group
4 | 5 |
6 |
7 |  8 |
9 |
10 |
8 |
9 |
10 |  11 |
12 |
13 |
11 |
12 |
13 |  14 |
15 |
16 |
14 |
15 |
16 |  17 |
18 |
17 |
18 |
21 | Get Started 22 |
23 | 24 |
 27 |
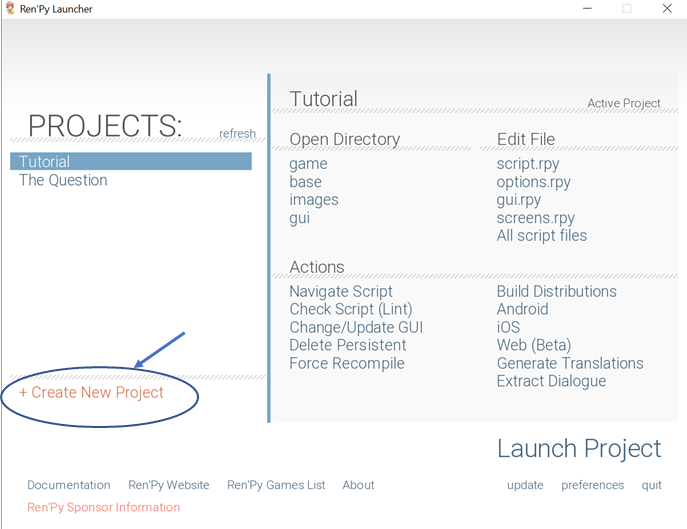
28 | From here you can (1) Create new projects `+ Create New Project`; (2) Access the directories and scripts inside each project; (3) Launch a project or game; (3) Modify the settings of the engine `Preferences`; (4) Package a game for distribution, and many others.
29 |
30 | You can also access both the "Tutorial" and a sample Ren'Py game called "The Question". Check these out to learn more about Ren'Py by selecting the project name under `Projects` then clicking `Launch Project`.
31 |
32 | ## Setup editor
33 |
34 | To link a code editor with Ren'Py files (`*.rpy`), go to `Preferences`. Under `Text Editor`, you can then choose to download one of the editors e.g. *Atom, Editra*, or *jEdit*. Or specify an editor that you have already installed in your system in *System Editor*
35 |
36 |
27 |
28 | From here you can (1) Create new projects `+ Create New Project`; (2) Access the directories and scripts inside each project; (3) Launch a project or game; (3) Modify the settings of the engine `Preferences`; (4) Package a game for distribution, and many others.
29 |
30 | You can also access both the "Tutorial" and a sample Ren'Py game called "The Question". Check these out to learn more about Ren'Py by selecting the project name under `Projects` then clicking `Launch Project`.
31 |
32 | ## Setup editor
33 |
34 | To link a code editor with Ren'Py files (`*.rpy`), go to `Preferences`. Under `Text Editor`, you can then choose to download one of the editors e.g. *Atom, Editra*, or *jEdit*. Or specify an editor that you have already installed in your system in *System Editor*
35 |
36 |  37 |
38 | Once you have finished linking an editor to Ren'Py files, click `Return` to go back to the main screen.
39 |
40 |
41 |
42 | ## Exercise
43 |
44 | Try if you can launch the editor of your choice from the Ren'Py engine by selecting the project "The Question" and then clicking `script.rpy` under `Edit file`. (We'll learn what these scripts are later). You should be able to read the code in your code editor.
45 |
46 | That's it! You have now installed and setup the tools that we'll need in order to make a game (visual novel) using Python.
47 |
48 | [](https://gitter.im/WWCodeManila/Python)
49 |
50 |
--------------------------------------------------------------------------------
/sidebar.md:
--------------------------------------------------------------------------------
1 | - Women Who Code Manila
2 | - [About WWCode Manila](wwcodemanila/about.md)
3 | - [Study Groups](wwcodemanila/study_groups.md)
4 |
5 | - Getting Started
6 | - [Installation](getting_started/installation_guide.md)
7 | - [Run a basic Python program](getting_started/warm_up.md)
8 | - [Sharing your work](getting_started/exercise_upload_step.md)
9 |
10 | - Basic Concepts
11 | - [Variables, Arithmetic Operations, Keyboard Input](basic_concepts/variables.md)
12 | - [Let's go Git!](git/README.md)
13 | - [Strings pa more!](basic_concepts/strings.md)
14 | - [PEP8](basic_concepts/pep8.md)
15 | - [List, tuple, set](basic_concepts/lists.md)
16 | - [Conditional Statements](basic_concepts/conditional_statements.md)
17 | - [Loops](basic_concepts/loops.md)
18 | - [Challenge: I survived Hangman!](basic_concepts/exercises/hangman/README.md)
19 | - [Dictionaries](basic_concepts/dictionaries.md)
20 | - [Functions](basic_concepts/functions.md)
21 | - [Classes and Module](http://introtopython.org/classes.html)
22 | - [Error Handling](basic_concepts/error_handling.md)
23 | - [Challenge: It's 2048!](basic_concepts/exercises/2048/README.md)
24 |
25 | - Advanced Concepts
26 | - [List comprehension](https://hackernoon.com/list-comprehension-in-python-8895a785550b)
27 | - [Generators](https://anandology.com/python-practice-book/iterators.html)
28 | - [Decorators](http://simeonfranklin.com/blog/2012/jul/1/python-decorators-in-12-steps/)
29 |
30 | - Flask
31 | - [Introduction](flask/discussions/01_introduction.md)
32 | - [Setting up Flask and virtual environments](flask/discussions/02_setup.md)
33 | - [Building my first Flask app](flask/discussions/03_my_first_flask_app.md)
34 | - [Creating URL routes](flask/discussions/04_url_routes.md)
35 | - [Styling templates and passing variables](flask/discussions/05_templates_and_variables.md)
36 | - Integrating databases using SQLite :soon:
37 | - Forming forms :soon:
38 | - Using cookies and sessions :soon:
39 | - Deploying my app :soon:
40 | - Wrapping up :soon:
41 |
42 | - Ren'Py
43 | - [Introduction](ren'py/introduction.md)
44 | - [Installation and setting up](ren'py/installation.md)
45 | - [Creating a new game](ren'py/create-new-game.md)
46 | - [Aling Nena VN](ren'py/aling-nena-vn.md)
47 | - [Tutorial Part 1](ren'py/scene1.md)
48 | - [Tutorial Part 2](ren'py/scene2.md)
49 | - [Tutorial Part 3](ren'py/scene3.md)
50 | - [Tutorial Part 4](ren'py/scene4.md)
51 | - [Tutorial Part 5 - Ending](ren'py/scene567.md)
52 |
53 | - Django
54 | - [Introduction](django/01_introduction.md)
55 | - [Setting up Django and virtual environments](django/02_setup.md)
56 | - [Creating your first Django application](django/03_start_project.md)
57 | - [Creating Users module](django/04_create_users_module.md)
58 | - [Creating endpoints](django/05_endpoints.md)
59 | - [Creating Questions module](django/06_create_questions_module.md)
60 |
61 | - Resources
62 | - [References](resources/references.md)
63 |
--------------------------------------------------------------------------------
/basic_concepts/exercises/hangman/hangman.py:
--------------------------------------------------------------------------------
1 | # Hangman Game
2 | #
3 | # Credit to Michael Dawson's "Python Programming for the Absolute Beginner 3rd Edition"
4 | #
5 | # The classic game of Hangman. The computer picks a random word
6 | # and the player wrong to guess it, one letter at a time. If the player
7 | # can't guess the word in time, the little stick figure gets hanged.
8 |
9 | # imports
10 |
11 |
12 | # constants
13 | HANGMAN = (
14 | """
15 | ------
16 | | |
17 | |
18 | |
19 | |
20 | |
21 | |
22 | |
23 | |
24 | ----------
25 | """,
26 | """
27 | ------
28 | | |
29 | | O
30 | |
31 | |
32 | |
33 | |
34 | |
35 | |
36 | ----------
37 | """,
38 | """
39 | ------
40 | | |
41 | | O
42 | | -+-
43 | |
44 | |
45 | |
46 | |
47 | |
48 | ----------
49 | """,
50 | """
51 | ------
52 | | |
53 | | O
54 | | /-+-
55 | |
56 | |
57 | |
58 | |
59 | |
60 | ----------
61 | """,
62 | """
63 | ------
64 | | |
65 | | O
66 | | /-+-/
67 | |
68 | |
69 | |
70 | |
71 | |
72 | ----------
73 | """,
74 | """
75 | ------
76 | | |
77 | | O
78 | | /-+-/
79 | | |
80 | |
81 | |
82 | |
83 | |
84 | ----------
85 | """,
86 | """
87 | ------
88 | | |
89 | | O
90 | | /-+-/
91 | | |
92 | | |
93 | | |
94 | | |
95 | |
96 | ----------
97 | """,
98 | """
99 | ------
100 | | |
101 | | O
102 | | /-+-/
103 | | |
104 | | |
105 | | | |
106 | | | |
107 | |
108 | ----------
109 | """)
110 |
111 | MAX_WRONG = len(HANGMAN)-1
112 | WORDS = ("OCTOPUS", "NEMO", "STARFISH", "ORCA") # Change these as you please
113 |
114 |
115 | # initialize variables
116 | word = "" # pick random word to be guessed
117 | so_far = "-" * len(word) # one dash for each letter in word to be guessed
118 | wrong = 0 # number of wrong guesses player has made
119 | used = [] # letters already guessed
120 |
121 |
122 | print("Welcome to Hangman. Good luck!")
123 |
124 | # Ask for a guess while the game is not yet over
125 | while True:
126 | print(HANGMAN[wrong])
127 | print(f"You have {MAX_WRONG-wrong} guesses left!")
128 | print("\nYou've used the following letters:\n", used)
129 | print("\nSo far, the word is:\n", so_far)
130 |
131 | # Get new user guess with a TWIST :P
132 | guess = input("\n\nEnter your guess: ")
133 |
134 | # Check if guess is right or wrong
135 |
136 | # If right, need to update user_guess
137 |
138 | # If wrong, need to increment wrong count
139 |
140 | # Inform if the user won or lose
141 |
142 | print("\nThe word was", word)
143 |
144 | input("\n\nPress the enter key to exit.")
145 |
146 |
--------------------------------------------------------------------------------
/basic_concepts/loops.md:
--------------------------------------------------------------------------------
1 | Can you tell what the code below does?
2 | ```python
3 | continents = ['Africa', 'Antarctica', 'Asia', 'Australia/Oceania', 'Europe', 'North America', 'South America']
4 | print(continents[0])
5 | print(continents[1])
6 | print(continents[2])
7 | print(continents[3])
8 | print(continents[4])
9 | print(continents[5])
10 | print(continents[6])
11 | ```
12 |
13 | Yes! It prints out the continents of the world! You may have noticed that this is a situation where we want to do some action on each item in a list (in this case, that is to print out the continent name). But what if we have a list containing all the countries of the world and wanted to print out each country? Do we need to painstakingly write a hundred of print statements? Or you started thinking, `Is there a way that allows us to go through the list and execute the same action multiple times`?
14 |
15 | Yes! Python loops allows us to:
16 | * Iterate through the list and perform an action to each element of the list
17 | * Execute a block of code multiple times
18 |
19 | ## Syntax
20 |
21 | ### For loop
22 | The `for` loop has the ff. syntax:
23 | ```shell
24 | for
37 |
38 | Once you have finished linking an editor to Ren'Py files, click `Return` to go back to the main screen.
39 |
40 |
41 |
42 | ## Exercise
43 |
44 | Try if you can launch the editor of your choice from the Ren'Py engine by selecting the project "The Question" and then clicking `script.rpy` under `Edit file`. (We'll learn what these scripts are later). You should be able to read the code in your code editor.
45 |
46 | That's it! You have now installed and setup the tools that we'll need in order to make a game (visual novel) using Python.
47 |
48 | [](https://gitter.im/WWCodeManila/Python)
49 |
50 |
--------------------------------------------------------------------------------
/sidebar.md:
--------------------------------------------------------------------------------
1 | - Women Who Code Manila
2 | - [About WWCode Manila](wwcodemanila/about.md)
3 | - [Study Groups](wwcodemanila/study_groups.md)
4 |
5 | - Getting Started
6 | - [Installation](getting_started/installation_guide.md)
7 | - [Run a basic Python program](getting_started/warm_up.md)
8 | - [Sharing your work](getting_started/exercise_upload_step.md)
9 |
10 | - Basic Concepts
11 | - [Variables, Arithmetic Operations, Keyboard Input](basic_concepts/variables.md)
12 | - [Let's go Git!](git/README.md)
13 | - [Strings pa more!](basic_concepts/strings.md)
14 | - [PEP8](basic_concepts/pep8.md)
15 | - [List, tuple, set](basic_concepts/lists.md)
16 | - [Conditional Statements](basic_concepts/conditional_statements.md)
17 | - [Loops](basic_concepts/loops.md)
18 | - [Challenge: I survived Hangman!](basic_concepts/exercises/hangman/README.md)
19 | - [Dictionaries](basic_concepts/dictionaries.md)
20 | - [Functions](basic_concepts/functions.md)
21 | - [Classes and Module](http://introtopython.org/classes.html)
22 | - [Error Handling](basic_concepts/error_handling.md)
23 | - [Challenge: It's 2048!](basic_concepts/exercises/2048/README.md)
24 |
25 | - Advanced Concepts
26 | - [List comprehension](https://hackernoon.com/list-comprehension-in-python-8895a785550b)
27 | - [Generators](https://anandology.com/python-practice-book/iterators.html)
28 | - [Decorators](http://simeonfranklin.com/blog/2012/jul/1/python-decorators-in-12-steps/)
29 |
30 | - Flask
31 | - [Introduction](flask/discussions/01_introduction.md)
32 | - [Setting up Flask and virtual environments](flask/discussions/02_setup.md)
33 | - [Building my first Flask app](flask/discussions/03_my_first_flask_app.md)
34 | - [Creating URL routes](flask/discussions/04_url_routes.md)
35 | - [Styling templates and passing variables](flask/discussions/05_templates_and_variables.md)
36 | - Integrating databases using SQLite :soon:
37 | - Forming forms :soon:
38 | - Using cookies and sessions :soon:
39 | - Deploying my app :soon:
40 | - Wrapping up :soon:
41 |
42 | - Ren'Py
43 | - [Introduction](ren'py/introduction.md)
44 | - [Installation and setting up](ren'py/installation.md)
45 | - [Creating a new game](ren'py/create-new-game.md)
46 | - [Aling Nena VN](ren'py/aling-nena-vn.md)
47 | - [Tutorial Part 1](ren'py/scene1.md)
48 | - [Tutorial Part 2](ren'py/scene2.md)
49 | - [Tutorial Part 3](ren'py/scene3.md)
50 | - [Tutorial Part 4](ren'py/scene4.md)
51 | - [Tutorial Part 5 - Ending](ren'py/scene567.md)
52 |
53 | - Django
54 | - [Introduction](django/01_introduction.md)
55 | - [Setting up Django and virtual environments](django/02_setup.md)
56 | - [Creating your first Django application](django/03_start_project.md)
57 | - [Creating Users module](django/04_create_users_module.md)
58 | - [Creating endpoints](django/05_endpoints.md)
59 | - [Creating Questions module](django/06_create_questions_module.md)
60 |
61 | - Resources
62 | - [References](resources/references.md)
63 |
--------------------------------------------------------------------------------
/basic_concepts/exercises/hangman/hangman.py:
--------------------------------------------------------------------------------
1 | # Hangman Game
2 | #
3 | # Credit to Michael Dawson's "Python Programming for the Absolute Beginner 3rd Edition"
4 | #
5 | # The classic game of Hangman. The computer picks a random word
6 | # and the player wrong to guess it, one letter at a time. If the player
7 | # can't guess the word in time, the little stick figure gets hanged.
8 |
9 | # imports
10 |
11 |
12 | # constants
13 | HANGMAN = (
14 | """
15 | ------
16 | | |
17 | |
18 | |
19 | |
20 | |
21 | |
22 | |
23 | |
24 | ----------
25 | """,
26 | """
27 | ------
28 | | |
29 | | O
30 | |
31 | |
32 | |
33 | |
34 | |
35 | |
36 | ----------
37 | """,
38 | """
39 | ------
40 | | |
41 | | O
42 | | -+-
43 | |
44 | |
45 | |
46 | |
47 | |
48 | ----------
49 | """,
50 | """
51 | ------
52 | | |
53 | | O
54 | | /-+-
55 | |
56 | |
57 | |
58 | |
59 | |
60 | ----------
61 | """,
62 | """
63 | ------
64 | | |
65 | | O
66 | | /-+-/
67 | |
68 | |
69 | |
70 | |
71 | |
72 | ----------
73 | """,
74 | """
75 | ------
76 | | |
77 | | O
78 | | /-+-/
79 | | |
80 | |
81 | |
82 | |
83 | |
84 | ----------
85 | """,
86 | """
87 | ------
88 | | |
89 | | O
90 | | /-+-/
91 | | |
92 | | |
93 | | |
94 | | |
95 | |
96 | ----------
97 | """,
98 | """
99 | ------
100 | | |
101 | | O
102 | | /-+-/
103 | | |
104 | | |
105 | | | |
106 | | | |
107 | |
108 | ----------
109 | """)
110 |
111 | MAX_WRONG = len(HANGMAN)-1
112 | WORDS = ("OCTOPUS", "NEMO", "STARFISH", "ORCA") # Change these as you please
113 |
114 |
115 | # initialize variables
116 | word = "" # pick random word to be guessed
117 | so_far = "-" * len(word) # one dash for each letter in word to be guessed
118 | wrong = 0 # number of wrong guesses player has made
119 | used = [] # letters already guessed
120 |
121 |
122 | print("Welcome to Hangman. Good luck!")
123 |
124 | # Ask for a guess while the game is not yet over
125 | while True:
126 | print(HANGMAN[wrong])
127 | print(f"You have {MAX_WRONG-wrong} guesses left!")
128 | print("\nYou've used the following letters:\n", used)
129 | print("\nSo far, the word is:\n", so_far)
130 |
131 | # Get new user guess with a TWIST :P
132 | guess = input("\n\nEnter your guess: ")
133 |
134 | # Check if guess is right or wrong
135 |
136 | # If right, need to update user_guess
137 |
138 | # If wrong, need to increment wrong count
139 |
140 | # Inform if the user won or lose
141 |
142 | print("\nThe word was", word)
143 |
144 | input("\n\nPress the enter key to exit.")
145 |
146 |
--------------------------------------------------------------------------------
/basic_concepts/loops.md:
--------------------------------------------------------------------------------
1 | Can you tell what the code below does?
2 | ```python
3 | continents = ['Africa', 'Antarctica', 'Asia', 'Australia/Oceania', 'Europe', 'North America', 'South America']
4 | print(continents[0])
5 | print(continents[1])
6 | print(continents[2])
7 | print(continents[3])
8 | print(continents[4])
9 | print(continents[5])
10 | print(continents[6])
11 | ```
12 |
13 | Yes! It prints out the continents of the world! You may have noticed that this is a situation where we want to do some action on each item in a list (in this case, that is to print out the continent name). But what if we have a list containing all the countries of the world and wanted to print out each country? Do we need to painstakingly write a hundred of print statements? Or you started thinking, `Is there a way that allows us to go through the list and execute the same action multiple times`?
14 |
15 | Yes! Python loops allows us to:
16 | * Iterate through the list and perform an action to each element of the list
17 | * Execute a block of code multiple times
18 |
19 | ## Syntax
20 |
21 | ### For loop
22 | The `for` loop has the ff. syntax:
23 | ```shell
24 | for - :
25 |
- {{ p }} 247 | {% endfor %} 248 |
 10 |
11 | 2. The default language settings is in English. If you're going to use another language, go to to `Preferences` and choose the appropriate language. Otherwise, click `Continue` at the next prompt.
12 |
13 |
10 |
11 | 2. The default language settings is in English. If you're going to use another language, go to to `Preferences` and choose the appropriate language. Otherwise, click `Continue` at the next prompt.
12 |
13 |  14 |
15 | 3. Next, you'll need to input the *Project Name*, then click `Continue`.
16 |
17 |
14 |
15 | 3. Next, you'll need to input the *Project Name*, then click `Continue`.
16 |
17 | 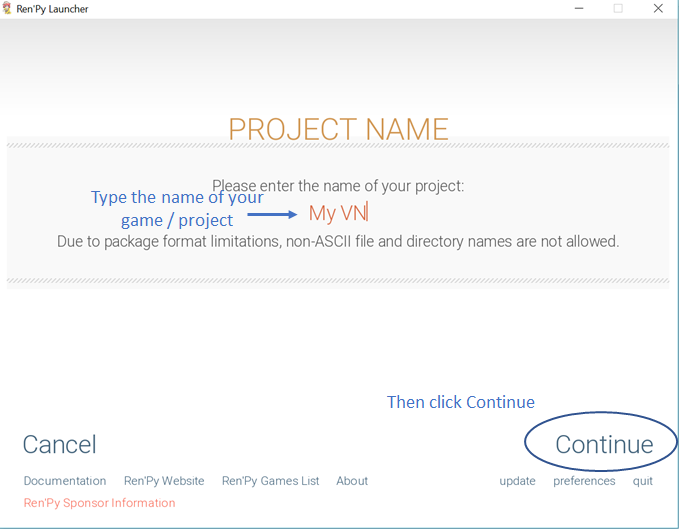 18 |
19 | 4. In the next window, you'll have to specify the *resolution of your game*. Whatever resolution you choose, make sure to fit your assets (backgrounds, character images, and other game images) in this size. Then, click `Continue`.
20 |
21 |
18 |
19 | 4. In the next window, you'll have to specify the *resolution of your game*. Whatever resolution you choose, make sure to fit your assets (backgrounds, character images, and other game images) in this size. Then, click `Continue`.
20 |
21 | 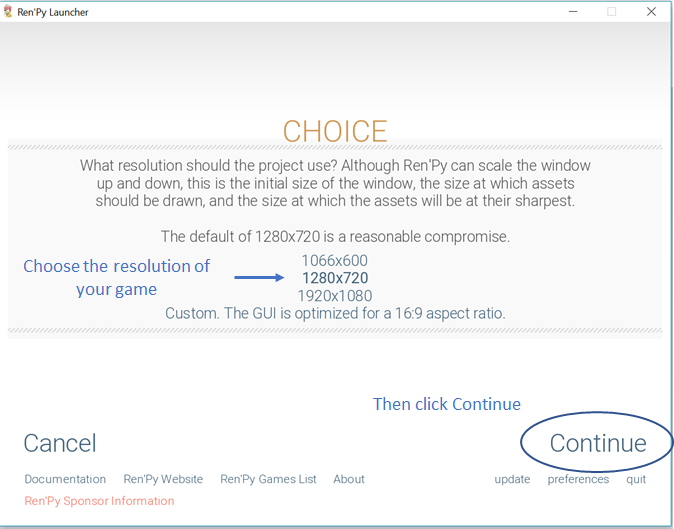 22 |
23 | 5. Choose the *accent and background colors*. You can change these later on in the scripts. Then, click `Continue`.
24 |
25 |
22 |
23 | 5. Choose the *accent and background colors*. You can change these later on in the scripts. Then, click `Continue`.
24 |
25 | 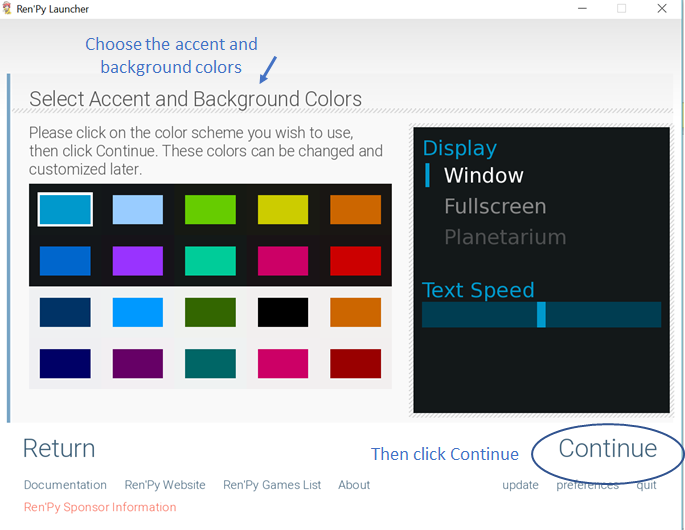 26 |
27 | 6. It will take a few seconds to setup the game environments.
28 |
29 |
26 |
27 | 6. It will take a few seconds to setup the game environments.
28 |
29 |  30 |
31 | 7. Once done, you'll be able to see the Project Name you specified in the main menu of the Ren'Py engine. Ren'Py has preloaded some of the scripts with the default codes and values. Under `Edit File`, click `All script files` to see all of these scripts in your code editor, or click `Launch Project` to see the default game interface.
32 |
33 |
30 |
31 | 7. Once done, you'll be able to see the Project Name you specified in the main menu of the Ren'Py engine. Ren'Py has preloaded some of the scripts with the default codes and values. Under `Edit File`, click `All script files` to see all of these scripts in your code editor, or click `Launch Project` to see the default game interface.
32 |
33 | 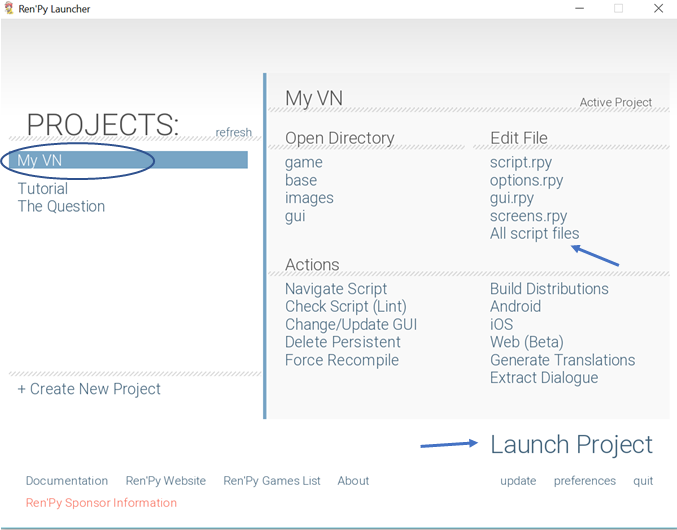 34 |
35 |
36 |
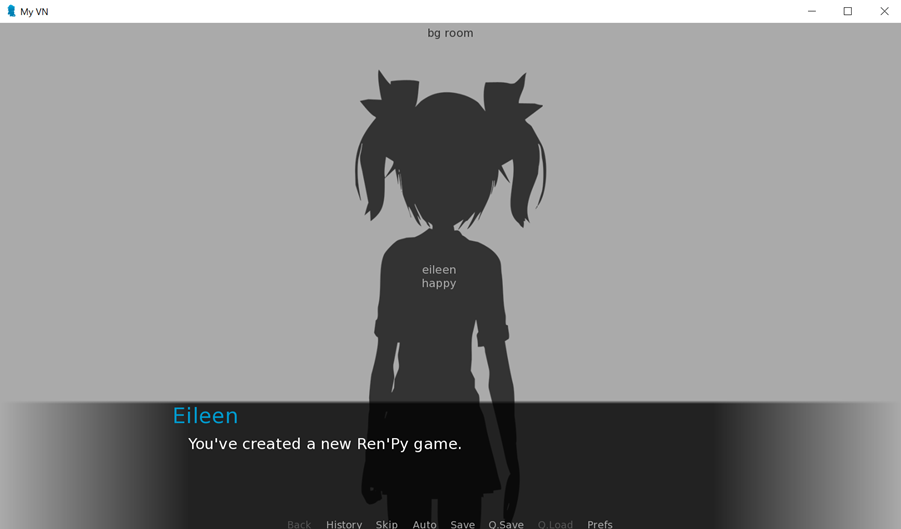
37 | The default game interface will look like this:
38 |
39 |
34 |
35 |
36 |
37 | The default game interface will look like this:
38 |
39 | 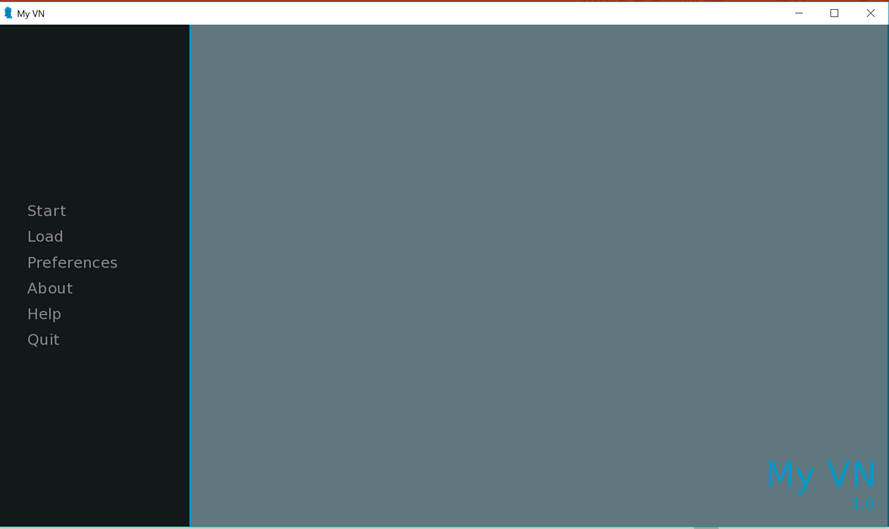
 40 |
41 |
42 |
43 |
44 |
45 | # Exercise
46 |
47 | In order to go ahead with the next parts of this study guide, first create a new Ren'Py game from the launcher. Set the title to `Aling Nena VN` or whatever title you want to put in. Make sure you set the screen size to 1980 px by 720 px.
48 |
49 | Next, we'll know more about the plot of Aling Nena's visual novel.
50 |
51 | [](https://gitter.im/WWCodeManila/Python)
52 |
53 |
--------------------------------------------------------------------------------
/flask/discussions/09_deployment.md:
--------------------------------------------------------------------------------
1 | ## Goals
2 |
3 | - [ ] Deploy your first Flask application to Heroku via GitHub
4 |
5 | ## Heroku
6 |
7 | Heroku is a platform as a service (PaaS) that enables developers to build, run, and operate applications entirely in the cloud.
8 |
9 | While they have a free plan that is ideal for experimenting with cloud applications in a limited sandbox, they also have good pricing options based on dynos consumed. Dynos are smart, lightweight containers built for modern languages and developer productivity. Basically, you only pay for what you use, prorated to the second.
10 |
11 | ## Creating a Heroku application
12 |
13 | After signing up and logging in, you will be redirected to the dashboard.
14 |
15 | It displays your account type, where the default is Personal. You can also create teams to collaborate with other people, although you need to add a valid credit card to do so. Below that, it lists all the applications that you have so far, its name (alyssonalvaran), application type (Python), stack type (heroku-16), and region (United States).
16 |
17 | To create a new app, click the New button across your account type located on the upper right portion of your dashboard and select Create new app.
18 |
19 | You will be asked to provide an app name and region. For demonstration purposes, I created an app named pineapples-on-pizza.
20 |
21 | Once you select Create app, the next screen that will appear is the deploy tab of your newly created application. At this point, you can already access your app by selecting the Open app button on the upper right portion of your dashboard or going to
40 |
41 |
42 |
43 |
44 |
45 | # Exercise
46 |
47 | In order to go ahead with the next parts of this study guide, first create a new Ren'Py game from the launcher. Set the title to `Aling Nena VN` or whatever title you want to put in. Make sure you set the screen size to 1980 px by 720 px.
48 |
49 | Next, we'll know more about the plot of Aling Nena's visual novel.
50 |
51 | [](https://gitter.im/WWCodeManila/Python)
52 |
53 |
--------------------------------------------------------------------------------
/flask/discussions/09_deployment.md:
--------------------------------------------------------------------------------
1 | ## Goals
2 |
3 | - [ ] Deploy your first Flask application to Heroku via GitHub
4 |
5 | ## Heroku
6 |
7 | Heroku is a platform as a service (PaaS) that enables developers to build, run, and operate applications entirely in the cloud.
8 |
9 | While they have a free plan that is ideal for experimenting with cloud applications in a limited sandbox, they also have good pricing options based on dynos consumed. Dynos are smart, lightweight containers built for modern languages and developer productivity. Basically, you only pay for what you use, prorated to the second.
10 |
11 | ## Creating a Heroku application
12 |
13 | After signing up and logging in, you will be redirected to the dashboard.
14 |
15 | It displays your account type, where the default is Personal. You can also create teams to collaborate with other people, although you need to add a valid credit card to do so. Below that, it lists all the applications that you have so far, its name (alyssonalvaran), application type (Python), stack type (heroku-16), and region (United States).
16 |
17 | To create a new app, click the New button across your account type located on the upper right portion of your dashboard and select Create new app.
18 |
19 | You will be asked to provide an app name and region. For demonstration purposes, I created an app named pineapples-on-pizza.
20 |
21 | Once you select Create app, the next screen that will appear is the deploy tab of your newly created application. At this point, you can already access your app by selecting the Open app button on the upper right portion of your dashboard or going to Login`:
11 |
12 | ```
13 |
Share Your Knowledge!
14 | ``` 15 | 16 | Also, add the registration link inside the class `login-form-container` after the `form` tag: 17 | 18 | ``` 19 | 20 | ``` 21 | 22 | The code should look like this: 23 | ``` 24 | {% extends 'auth_layout.html' %} 25 | {% load crispy_forms_tags %} 26 | 27 | {% block content %} 28 |Login
29 |Share Your Knowledge!
30 |
31 |
36 |
37 |
38 | {% endblock %}
39 | ```
40 |
41 | Go to url `http://localhost:8000/accounts/login/` and see the changes.
42 |
43 | ## Create a Login Link on the Registration Page
44 | In this part, we are going to do the same steps. In `templates/django_registration/registration_form.html`, add this code inside the class `registration-form-container`, under the `form` tag.
45 |
46 | ```
47 | Or Login
48 | ``` 49 | The code should look like this: 50 | ``` 51 | {% extends 'auth_layout.html' %} 52 | {% load crispy_forms_tags %} 53 | 54 | {% block content %} 55 |Create Your Account
56 |
57 |
62 |
64 | {% endblock %}
65 | ```
66 |
67 | Then check the changes by accessing this url: `http://localhost:8000/accounts/register/`.
68 |
69 | ## Adding Margins to Layout
70 | In this part, we are going to add some margins to our `registration` page and `login` page.
71 | In `templates/auth_layout.html`, add a css class called `outer-area`. The style would look as follows:
72 | ```
73 | .outer-area {
74 | margin-top: 100px;
75 | }
76 | ```
77 | Then add a new div tag outside the div class `auth-box text-center`. In the newly added div tag, call the `outer-area` class. It should look like this:
78 |
79 | ```
80 |
81 |
82 | Or Login
63 |
83 |
88 |
89 |
90 | ```
91 |
92 | ## Adding a Border
93 | To add a border on registration and login page, add a css class named `auth-box`. Then add these other details:
94 | ```
95 | .auth-box {
96 | border: 3px solid lightgray;
97 | border-radius: 10px;
98 | padding-top: 25px;
99 | padding-bottom: 25px;
100 | width: 600px;
101 | margin: auto;
102 | }
103 | ```
--------------------------------------------------------------------------------
/basic_concepts/conditional_statements.md:
--------------------------------------------------------------------------------
1 | In our everyday living, we perform action based on a decision, situation or condition:
2 | ```shell
3 | Take a taxi if we are already late for work; else, we will take the jeepney.
4 | ```
5 |
6 | Now let's switch to our geeky world and alas, we were in a situation where:
7 | * We only want to execute a block of code depending on a condition:
8 | ```shell
9 | Add points to a customer if s/he presented a reward card.
10 | ```
11 |
12 | * We need to perform different actions based on the situation:
13 | ```shell
14 | Sends out SMS if customer has enough load, else prompt for an insufficient balance message.
15 | ```
16 |
17 | Python offers decision making statements in order for us to conditionally execute a block of code. But before introducing those, let us recall that an action will only be executed if it meets a `condition` or `situation`, expressions that evaluates to `True` or `False`. Let's try to code some expressions!
18 |
19 | ## Conditional Expressions
20 |
21 | !> Conditional expressions are expressions that evaluates to either True or False.
22 |
23 | ```python
24 | # EXPRESSIONS
25 |
26 | # Using literal values
27 | is_late = True
28 | is_card_presented = False
29 | print(is_late, is_card_presented)
30 |
31 | # Null or Zero values evaluates to False
32 | customer_card = None
33 | print(customer_card)
34 |
35 | # Using operations
36 | customer_load = 99
37 |
38 | customer_load == 100 # Evaluates to False
39 | customer_load > 0 # Evaluates to True
40 | "Nissin".startswith("c") # Evaluates to False
41 | ```
42 |
43 | Expressions? Checked! Let's dive to some Python decision making statements:
44 |
45 | ## Conditional Statements
46 |
47 | * If statements
48 |
49 | ```python
50 | is_card_presented = False
51 | customer_points = 10
52 | if is_card_presented:
53 | # Can you shorten the expression below?
54 | customer_points = customer_points + 1
55 | ```
56 |
57 | * If...else statements
58 |
59 | ```python
60 | def send_message(message):
61 | # This is a function, we will learn more about this on our next session!
62 | print('Sending: {}'.format(message))
63 |
64 |
65 | customer_load = 100
66 | message = 'Happy to serve!'
67 | if customer_load > 0:
68 | # call our function
69 | send_message(message)
70 | print('Your message is sent!')
71 | # Again, can you shorten the expression below?
72 | customer_load = customer_load - 1
73 | else:
74 | print('You have insufficient balance.')
75 | ```
76 |
77 |
78 | ## Takeaways
79 | * Notice how we group the actions(block of codes) above? We use the colon `:` to indicate the start of an indented block of code and grouped them by `whitespaces`.
80 | * PEP8 recommends using `4` whitespaces for code indentation.
81 |
82 |
83 | ## Challenge
84 | Aling Nena stores her soft drink stock on two refrigerators.
85 | She stores `Coke, Sprite and Royal` on her Sari-sari store's refrigerator while
86 | `RC and 7UP` can be found on her house's refrigerator.
87 |
88 | Help Aling Nena to properly respond to her customer when buying softdrinks.
89 |
90 | The reply will depend if the soft drink brand is on the store's ref,
91 | on the house's ref or none. If the customer buys a soft drink brand that is:
92 | 1. stored on the store, she will respond `Got it!`
93 | 2. stored on the house, she will respond `Please wait for a while!`
94 | 3. not sold by her, she will respond `Sorry we do not sell that. We only have `
95 |
96 |
97 | !> Please use below template
98 |
99 | [filename](exercises/conditional_statements/conditional01.py ':include :type=code python')
100 |
101 | [challenge_partial](../challenge_partial.md ':include')
102 |
103 | ## Put your thinking cap on!
104 |
105 | - What are the different ways to write conditional statements?
106 |
--------------------------------------------------------------------------------
/django/05_endpoints.md:
--------------------------------------------------------------------------------
1 | ## Goals
2 | - [ ] Create a homepage endpoint
3 | - [ ] Create endpoints for users module
4 |
5 | ## Create a homepage endpoint
6 | We are now going to create our endpoint. Endpoints provide a useful information about the user that is currently connected to the application.
7 |
8 | We saw in the `settings.py` file that the URLs are set to these. Now, we are going to create a path that points to homepage('/') and link a view to render the template.
9 | ```
10 | LOGIN_REDIRECT_URL = '/'
11 | ```
12 |
13 | Create a folder in the root directory called `core`. Inside the folder create `__init__.py` and `views.py`. Inside the view, add this script.
14 | ```
15 | from django.contrib.auth.mixins import LoginRequiredMixin
16 | from django.views.generic.base import TemplateView
17 |
18 |
19 | class IndexTemplateView(LoginRequiredMixin, TemplateView):
20 |
21 | # overwrite the method
22 | def get_template_names(self):
23 | template_name = 'index.html'
24 | return template_name
25 | ```
26 | We have the the `template_name` to `index.html`, but we don't have it yet, so we are going to create it inside the folder `templates`.
27 | ```
28 |
29 |
30 |
31 |
32 |
33 |
34 |
84 | {% block content %}
85 | {% endblock %}
86 |
87 | Vue JS
39 | 40 | 41 | 42 | 43 | 44 | ``` 45 | 46 | Create a path for the class `IndexTemplateView`. Import it inside the `forumapp/urls.py`. 47 | 48 | ``` 49 | from core.views import IndexTemplateView 50 | 51 | # Put this at the end of the urlpatterns 52 | re_path(r"^.*$", IndexTemplateView.as_view(), name='entry-point'), 53 | ``` 54 | 55 | Check again your browser, then go to `localhost:8000` or `http://127.0.0.1:8000/`. You should be seeing Vue JS text. 56 | 57 | ## Create endpoints for users module 58 | We will continue creating endpoints for the users module. Create the folder `api` in `users` module. Inside it, create the ff folders: 59 | ``` 60 | - serializers.py 61 | - urls.py 62 | - views.py 63 | ``` 64 | 65 | Serializers allow complex data such as querysets and model instances to be converted to native Python datatypes, then rendered to `JSON`, or `XML`. 66 | 67 | In `users/api/serializers.py`, add this set of code: 68 | ``` 69 | from rest_framework import serializers 70 | from users.models import CustomUser 71 | 72 | 73 | class UserDisplaySerializer(serializers.ModelSerializer): 74 | 75 | class Meta: 76 | model = CustomUser 77 | fields = ["username"] 78 | ``` 79 | 80 | The view function, takes a web request and returns a web response. It is important to know that views handles the logic that gets processed each time a different URL is visited. 81 | 82 | In `users/api/views.py`, add this block of code: 83 | 84 | ``` 85 | from rest_framework.response import Response 86 | from rest_framework.views import APIView 87 | from users.api.serializers import UserDisplaySerializer 88 | 89 | 90 | class CurrentUserAPIView(APIView): 91 | 92 | def get(self, request): 93 | serializer = UserDisplaySerializer(request.user) 94 | return Response(serializer.data) 95 | ``` 96 | 97 | We need to ensure that our created view is registered in `users/api/urls.py`. 98 | ``` 99 | from django.urls import path 100 | from users.api.views import CurrentUserAPIView 101 | 102 | urlpatterns = [ 103 | path("user/", CurrentUserAPIView.as_view(), name="current-user") 104 | ] 105 | ``` 106 | 107 | And in `forumapp/urls.py`, register the api under users. 108 | ``` 109 | path("api/", include("users.api.urls")), 110 | ``` 111 | 112 | Again reload and check your browser! Access this URL: 113 | `localhost:8000/api/user/` 114 | 115 | As you can see in the browser, the `username` is shown. It is because of what we did earlier in the serializer and view. 116 | 117 | 118 | -------------------------------------------------------------------------------- /flask/discussions/02_setup.md: -------------------------------------------------------------------------------- 1 | ## Goals 2 | 3 | - [ ] Understand the importance of virtual environments 4 | - [ ] Install and create a virtual environment 5 | - [ ] Install and use `virtualenvwrapper` 6 | - [ ] Install Flask through pip 7 | 8 | ## Virtual Environments 9 | 10 | A **virtual environment** is a self-contained directory tree that contains a Python installation for a particular version of Python, plus a number of additional packages. It is used to isolate a particular project to avoid conflicts with the requirements of another project. **`virtualenv`** is a tool used to create Python virtual environments. 11 | 12 | ## Installing 'virtualenv' 13 | 14 | Check if `virtualenv` already exists in your system through your terminal or console: 15 | 16 | ```shell 17 | $ virtualenv --version 18 | ``` 19 | 20 | If you see a version number, that means you already have it installed and may now proceed to the next step. Otherwise, install `virtualenv` through the Python package manager, a.k.a. `pip`: 21 | 22 | ```shell 23 | $ pip install virtualenv 24 | ``` 25 | 26 | Visit this [link](https://packaging.python.org/guides/installing-using-pip-and-virtualenv/) for more info on how to make sure you have the latest version of pip installed. 27 | 28 | ## Working with 'virtualenv' 29 | 30 | To create a virtual environment, go to your project's directory and run `virtualenv`: 31 | 32 | ```shell 33 | cd path/to/directory 34 | virtualenv env 35 | ``` 36 | 37 | The second argument refers to the location where you want to create the `virtualenv`. Generally, you can just create this in your project and call it `env`. `virtualenv` will create a virtual Python installation in the `env` folder. 38 | 39 | **Note**: Don't forget to exclude your `virtualenv` directory from your version control system using .gitignore or similar. 40 | 41 | To activate your `virtualenv`: 42 | 43 | ```shell 44 | Windows 45 | $ .\env\Scripts\activate 46 | 47 | Linux and macOS 48 | $ source env/bin/activate 49 | ``` 50 | 51 | To confirm if you're in the `virtualenv` by checking the location of your Python interpreter, which should point to the `env` directory: 52 | 53 | ```shell 54 | Windows 55 | $ where python 56 | 57 | Linux and macOS 58 | $ which python 59 | ``` 60 | 61 | As long as your `virtualenv` is activated, pip will install packages into that specific environment and you'll be able to import and use packages in your Python application. 62 | 63 | To leave your `virtualenv`, simply run: 64 | 65 | ```shell 66 | $ deactivate 67 | ``` 68 | 69 | ## Bonus: virtualenvwrapper 70 | 71 | To make working with virtual environments easier (especially for Windows uers), you can use [virtualenvwrapper](http://virtualenvwrapper.readthedocs.io/en/latest/), which is a set of extensions to the `virtualenv` tool. It also places all of your virtual environments in a single location. 72 | 73 | ```shell 74 | Mac: 75 | $ pip install virtualenvwrapper 76 | $ export WORKON_HOME=~/Envs 77 | $ source /usr/local/bin/virtualenvwrapper.sh 78 | 79 | Windows: 80 | $ pip install virtualenvwrapper-win 81 | ``` 82 | 83 | Once you've installed `virtualenvwrapper`, create a new isolated development environment: 84 | 85 | ```shell 86 | mkvirtualenv portfolio 87 | ``` 88 | 89 | This produced a folder named `portolio` inside the `Envs` folder with a clean copy of Python inside. 90 | 91 | To activate `virtualenv` with `virtualenvwrapper`: 92 | 93 | ```shell 94 | $ workon portfolio 95 | ``` 96 | 97 | You may also check the list of existing virtual environments in your `Envs` folder by typing: 98 | 99 | ```shell 100 | $ workon 101 | ``` 102 | 103 | ## Installing Flask 104 | 105 | To install flask through `pip`, just run: 106 | 107 | ```shell 108 | $ pip install flask 109 | ``` 110 | 111 | ## Saving packages 112 | 113 | To save the list of packages installed in your environment for easier reproduction: 114 | 115 | ```shell 116 | $ pip freeze > requirements.txt 117 | ``` 118 | 119 | This will save what you've installed so far in a text file named `requirements.txt`. 120 | 121 | To install the packages listed in a `requirements.txt` file: 122 | 123 | ```shell 124 | $ pip install -r requirements.txt 125 | ``` 126 | -------------------------------------------------------------------------------- /basic_concepts/exercises/2048/logic.py: -------------------------------------------------------------------------------- 1 | """ Clone of 2048 game. 2 | Credit to: 3 | http://flothesof.github.io/2048-game.html 4 | https://github.com/enixdark/principlescomputing-001/tree/master/Week0 5 | 6 | Game instruction: 7 | https://github.com/enixdark/principlescomputing-001/blob/master/Week0/Instructions.md 8 | To run: 9 | python logic.py 10 | """ 11 | import poc_2048_gui 12 | 13 | # Directions, DO NOT MODIFY 14 | UP = 1 15 | DOWN = 2 16 | LEFT = 3 17 | RIGHT = 4 18 | 19 | # Offsets for computing tile indices in each direction. 20 | # DO NOT MODIFY this dictionary. 21 | OFFSETS = { 22 | UP: (1, 0), 23 | DOWN: (-1, 0), 24 | LEFT: (0, 1), 25 | RIGHT: (0, -1) 26 | } 27 | 28 | # Symbol for an empty tile, DO NOT MODIFY 29 | EMPTY_TILE = 0 30 | 31 | 32 | def merge(line): 33 | """ 34 | Helper function that merges a single row or column in 2048 35 | Example: 36 | [2 0 2 2] -> [4 2 0 0] 37 | [0 2 2 0] -> [4 0 0 0] 38 | [2 2 2 8] -> [4 2 8 0] 39 | [0 2 2 4] -> [4 4 0 0] 40 | [2 2 2 2] -> [4 4 0 0] 41 | [256 256 2 4] -> [512 2 4 0] 42 | [256 128 64 32] -> [256 128 64 32] 43 | [2 0 2 0] -> [4 0 0 0] 44 | [2 0 2 4] -> [4 4 0 0] 45 | [0 0 2 2] -> [4 0 0 0] 46 | [8 16 16 8] -> [8 32 8 0] 47 | """ 48 | # replace with your code (Phase 1) 49 | return [] 50 | 51 | 52 | class TwentyFortyEight: 53 | """ 54 | Class to run the game logic. 55 | """ 56 | 57 | def __init__(self, grid_height=4, grid_width=4): 58 | # Store the board's height (Phase 2) 59 | 60 | # Store the board's width (Phase 2) 61 | 62 | # Store each direction's initial indices (Phase 3) 63 | 64 | # Initialize your board (Phase 2) 65 | pass 66 | 67 | def __str__(self): 68 | """ 69 | Returns a string representation of the board for debugging. 70 | """ 71 | # replace with your code (Phase 2) 72 | return "" 73 | 74 | def reset(self): 75 | """ 76 | Reset the game so the board is empty except for two 77 | initial tiles. 78 | """ 79 | # Initialize your height * width board with empty tiles (Phase 2) 80 | 81 | # Create two new tiles (Phase 3) 82 | pass 83 | 84 | def get_grid_height(self): 85 | """ 86 | Returns the height of the board. 87 | """ 88 | # replace with your code (Phase 2) 89 | return 0 90 | 91 | def get_grid_width(self): 92 | """ 93 | Returns the width of the board. 94 | """ 95 | # replace with your code (Phase 2) 96 | return 0 97 | 98 | def move(self, direction): 99 | """ 100 | Move all tiles in the given direction and add 101 | a new tile if any tiles moved. 102 | """ 103 | # replace with your code (Phase 3) 104 | pass 105 | 106 | def new_tile(self): 107 | """ 108 | Creates a new tile in a randomly selected empty 109 | square. The tile should be 2 90% of the time and 110 | 4 10% of the time. 111 | """ 112 | # replace with your code (Phase 3) 113 | 114 | # Bonus: Check if board is full and do not generate new tile 115 | 116 | # Generate a random number up to 1 117 | 118 | # Assign new tile depending on generated number 119 | 120 | # Place new tile on randomly selected empty square from board 121 | pass 122 | 123 | def set_tile(self, row, col, value): 124 | """ 125 | Set the tile at position row, col to have the given value. 126 | """ 127 | # replace with your code (Phase 2) 128 | pass 129 | 130 | def get_tile(self, row, col): 131 | """ 132 | Return the value of the tile at position row, col. 133 | """ 134 | # replace with your code (Phase 2) 135 | return 0 136 | 137 | 138 | game = TwentyFortyEight() 139 | 140 | # Try to show your board 141 | # print(game) 142 | 143 | # It is advisable to use the GUI once you are in Phase 3 144 | # poc_2048_gui.run_gui(TwentyFortyEight()) 145 | -------------------------------------------------------------------------------- /django/02_setup.md: -------------------------------------------------------------------------------- 1 | ## Goals 2 | 3 | - [ ] Understand the importance of virtual environments 4 | - [ ] Install and create a virtual environment 5 | - [ ] Install and use `virtualenvwrapper` 6 | - [ ] Install Django and Django Rest Framework through pip 7 | 8 | ## Virtual Environments 9 | 10 | A **virtual environment** is a self-contained directory tree that contains a Python installation for a particular version of Python, plus a number of additional packages. It is used to isolate a particular project to avoid conflicts with the requirements of another project. **`virtualenv`** is a tool used to create Python virtual environments. 11 | 12 | ## Installing 'virtualenv' 13 | 14 | Check if `virtualenv` already exists in your system through your terminal or console: 15 | 16 | ```shell 17 | $ virtualenv --version 18 | ``` 19 | 20 | If you see a version number, that means you already have it installed and may now proceed to the next step. Otherwise, install `virtualenv` through the Python package manager, a.k.a. `pip`: 21 | 22 | ```shell 23 | $ pip install virtualenv 24 | ``` 25 | 26 | Visit this [link](https://packaging.python.org/guides/installing-using-pip-and-virtualenv/) for more info on how to make sure you have the latest version of pip installed. 27 | 28 | ## Working with 'virtualenv' 29 | 30 | To create a virtual environment, go to your project's directory and run `virtualenv`: 31 | 32 | ```shell 33 | cd path/to/directory 34 | virtualenv env 35 | ``` 36 | 37 | The second argument refers to the location where you want to create the `virtualenv`. Generally, you can just create this in your project and call it `env`. `virtualenv` will create a virtual Python installation in the `env` folder. 38 | 39 | **Note**: Don't forget to exclude your `virtualenv` directory from your version control system using .gitignore or similar. 40 | 41 | To activate your `virtualenv`: 42 | 43 | ```shell 44 | Windows 45 | $ .\env\Scripts\activate 46 | 47 | Linux and macOS 48 | $ source env/bin/activate 49 | ``` 50 | 51 | To confirm if you're in the `virtualenv` by checking the location of your Python interpreter, which should point to the `env` directory: 52 | 53 | ```shell 54 | Windows 55 | $ where python 56 | 57 | Linux and macOS 58 | $ which python 59 | ``` 60 | 61 | As long as your `virtualenv` is activated, pip will install packages into that specific environment and you'll be able to import and use packages in your Python application. 62 | 63 | To leave your `virtualenv`, simply run: 64 | 65 | ```shell 66 | $ deactivate 67 | ``` 68 | 69 | ## Bonus: virtualenvwrapper 70 | 71 | To make working with virtual environments easier (especially for Windows uers), you can use [virtualenvwrapper](http://virtualenvwrapper.readthedocs.io/en/latest/), which is a set of extensions to the `virtualenv` tool. It also places all of your virtual environments in a single location. 72 | 73 | ```shell 74 | Mac: 75 | $ pip install virtualenvwrapper 76 | $ export WORKON_HOME=~/Envs 77 | $ source /usr/local/bin/virtualenvwrapper.sh 78 | 79 | Windows: 80 | $ pip install virtualenvwrapper-win 81 | ``` 82 | 83 | Once you've installed `virtualenvwrapper`, create a new isolated development environment: 84 | 85 | ```shell 86 | mkvirtualenv portfolio 87 | ``` 88 | 89 | This produced a folder named `portolio` inside the `Envs` folder with a clean copy of Python inside. 90 | 91 | To activate `virtualenv` with `virtualenvwrapper`: 92 | 93 | ```shell 94 | $ workon portfolio 95 | ``` 96 | 97 | You may also check the list of existing virtual environments in your `Envs` folder by typing: 98 | 99 | ```shell 100 | $ workon 101 | ``` 102 | 103 | ## Installing Django and Django Rest Framework 104 | 105 | To install Django through `pip`, just run: 106 | 107 | ```shell 108 | $ pip install django djangorestframework 109 | ``` 110 | 111 | ## Saving packages 112 | 113 | To save the list of packages installed in your environment for easier reproduction: 114 | 115 | ```shell 116 | $ pip freeze > requirements.txt 117 | ``` 118 | 119 | This will save what you've installed so far in a text file named `requirements.txt`. 120 | 121 | To install the packages listed in a `requirements.txt` file: 122 | 123 | ```shell 124 | $ pip install -r requirements.txt 125 | ``` 126 | -------------------------------------------------------------------------------- /basic_concepts/functions.md: -------------------------------------------------------------------------------- 1 | Let's have a simple USD-PHP converter program! 2 | 3 | ```python 4 | exchange_rate = {'usd': 50.44, 'jpy': 0.45} 5 | dollars = float(input("How much USD?")) 6 | peso = dollars * exchange_rate['usd'] 7 | print("Hello! your {}USD is equivalent to {:.2f}PHP".format(dollars, peso)) 8 | ``` 9 | 10 | But what if we also want make use of the JPY-PHP conversion? Maybe we can tweak some code above? 11 | ```python 12 | exchange_rate = {'usd': 50.44, 'jpy': 0.45} 13 | dollars = float(input("How much USD?")) 14 | peso = dollars * exchange_rate['usd'] 15 | print("Hello! your {}USD is equivalent to {:.2f}PHP".format(dollars, peso)) 16 | 17 | jpy = float(input("How much JPY?")) 18 | peso = jpy * exchange_rate['jpy'] 19 | print("Hello! your {}JPY is equivalent to {:.2f}PHP".format(jpy, peso)) 20 | ``` 21 | 22 | Can you look again and check if there are lines of code that does the same thing? What if we can reuse those to make our code 23 | more [modular](https://www.quora.com/What-is-modular-programming-Where-is-it-used) and [reusable](https://www.quora.com/What-is-code-reusability)? Oh wait, can it also improve readability? 24 | 25 | And we have `functions`! 26 | 27 | ## What is a function 28 | We have encountered functions before! Specifically, [builtin functions](https://docs.python.org/3/library/functions.html) which are functions provided by Python packages and libraries. 29 | Remember this? 30 | 31 | ```python 32 | str = "Banana" 33 | # len and print are actually functions! 34 | print(len(str)) 35 | ``` 36 | 37 | From here can you try to explain to yourself what functions are? `Functions` are just a block of reusable code that does some tasks! 38 | The `len` function accepts an object and returns it length! Now we can reuse that function anywhere in our code to get 39 | the length of objects like strings or dictionaries! 40 | 41 | ## Writing our own function 42 | To write your own function like below: 43 | 44 | ```python 45 | # Declaration 46 | def booster(number, boost=2): 47 | # Block of code (what the function does) 48 | print('Power booster!') 49 | # Return statement is optional 50 | return number * boost 51 | ``` 52 | 53 | 1. **Declare** your function using the `def` keyword followed by your function name. 54 | 2. Write the **arguments** enclosed in parenthesis followed by a colon `:`. Functions can accept arguments/parameters just like the `number` and `boost` in our booster function. We have two types of parameters: 55 | * **Required/Mandatory** - We need to provide the parameter value everytime we call the function just like `number`. 56 | * **Optional** - We can omit to pass the parameter and a default value will be given just like `boost`. 57 | 3. Write the task of the function (the block of code inside the function) 58 | 4. Write the return statement (Optional) 59 | 60 | ## Take aways 61 | * [Playing with function parameters](http://pythoncentral.io/fun-with-python-function-parameters/) 62 | 63 | ## Challenge 64 | Gooood job! You finished basic programming concepts with Python! For your last challenge... 65 | 66 | Aling Nena's Sari-sari store just had a new neighbor! It's Mang Toto's ForEx! 67 | Help Mang Toto to convert `USD, JPY, SGD` to `PHP` by: 68 | * Asking the customer for their currency. 69 | 70 | ```shell 71 | >> Welcome to Mang Toto's ForEx! What is your currency? We accept (usd, jpy, sgd): 72 | ``` 73 | 74 | * If they are not exchanging the currrency, notify the customer. 75 | 76 | ```shell 77 | >> Welcome to Mang Toto's ForEx! What is your currency? We accept (usd, jpy, sgd): 78 | >> aud 79 | >> Sorry! We do not exchange aud! 80 | ``` 81 | 82 | * If they are in their currency list, ask for the amount and inform the original and equivalent PHP amount. 83 | 84 | ```shell 85 | >> Welcome to Mang Toto's ForEx! What is your currency? We accept (usd, jpy, sgd): 86 | >> usd 87 | >> Your 100.50 usd is equivalent to 5069.22 PHP 88 | ``` 89 | 90 | 91 | !> Please use below template 92 | 93 | [functions01](exercises/functions/functions01.py ':include :type=code python') 94 | 95 | [challenge_partial](../challenge_partial.md ':include') 96 | 97 | 98 | ## Put your thinking cap on! 99 | 100 | - What does `:.2f` do during string formatting? 101 | - Should the required parameters be declared first on a function? Or we can order in YOLO the required and optional parameters? 102 | - Are function parameters passed `by value` or `by reference`? 103 | -------------------------------------------------------------------------------- /basic_concepts/variables.md: -------------------------------------------------------------------------------- 1 | ## Variables 2 | 3 | Let's try to store some values! 4 | 5 | Open a terminal 6 | 7 | ```shell 8 | Windows: Click Start -> Type cmd 9 | Mac: Open Applications folder -> Utilities folder 10 | ``` 11 | 12 | After opening the terminal/command prompt(cmd), type the following command to run the Python shell: 13 | 14 | ```shell 15 | python 16 | ``` 17 | 18 | Type the following codes to create variables and to print their values! 19 | 20 | ```python 21 | # Let's store values/data to variables 22 | num = 88 23 | dec = 99.99 24 | is_wwc_great = True 25 | has_forever = False 26 | movie_title = 'superwoman' 27 | # Let's print out their values 28 | print(num, dec, is_wwc_great, has_forever, movie_title) 29 | ``` 30 | 31 | Magic? Nope. Let's explain what happened. 32 | 33 | ### Definition 34 | 35 | Variables are like `containers` that allows us to store values/data. 36 | 37 | ### Data types 38 | We have different types of data in Python! Some are: 39 | * Integer - positive/negative whole numbers 40 | 41 | ```python 42 | # We declare a variable named num 43 | # We assign/store the number 88 to our variable num 44 | num = 88 45 | ``` 46 | 47 | * Float/Decimal - positive/negative numbers with decimal 48 | 49 | ```python 50 | # We declare a variable named dec 51 | # We assigned a decimal value of 99.99 to dec 52 | dec = 99.99 53 | ``` 54 | 55 | * Boolean - `True` or `False` 56 | 57 | ```python 58 | # We declare a variable named is_wwc_great and has_forever 59 | # We assign/store Boolean values to these 60 | is_wwc_great = True 61 | has_forever = False 62 | ``` 63 | 64 | * String - series of characters enclosed in single/double quotes 65 | 66 | ```python 67 | # We declared a variable named movie_title 68 | # We store a string value to it 69 | movie_title = 'superwoman' 70 | ``` 71 | 72 | * Lists/Dictionaries - Meh. Just keep in mind you heard it here. We will discuss it on succeeding sessions :) 73 | 74 | ### Re-assignment 75 | Now, let's try if we can re-assign values for these variables. 76 | 77 | ```python 78 | num = 100 79 | has_forever = True 80 | print(num, has_forever) 81 | 82 | # Let's change the value of our variable num 83 | num = 500 84 | print(num) 85 | 86 | # Let's change the value of our variable has_forever 87 | has_forever = False 88 | print(has_forever) 89 | ``` 90 | 91 | ## Arithmetic Operations 92 | 93 | Let's try to do some arithmetic operations using Python! 94 | 95 | Still using the Python shell, type the following codes and check their results. 96 | 97 | ```python 98 | # Addition: result is 30 99 | 20 + 10 100 | 101 | # Subtraction: result is 10 102 | 20 - 10 103 | 104 | # Multiplication: result is 200 105 | 20 * 10 106 | 107 | # Division: result is 2 108 | 20 / 10 109 | 110 | # Floor divsion: can you explain what it's different with normal division? 111 | 9 // 2 112 | 10 // 3 113 | 114 | # Exponent: result is 16 115 | 4 ** 2 116 | 117 | # Modulo: can you explain what module is? 118 | 10 % 3 119 | 99 % 33 120 | ``` 121 | 122 | ## Keyboard Input 123 | 124 | Let's ask user's for an input! 125 | 126 | Still using the Python shell, type the following codes, answer the input and see the output! 127 | 128 | ```python 129 | name = input('Your name:') 130 | tweet = input('Tweet your day:') 131 | print('{} tweeted {}'.format(name, tweet)) # String formatting replaces {} with variable values 132 | # print(f'{name} tweeted {tweet}') # New string formatting added on Python3.6 133 | ``` 134 | 135 | ### Definition 136 | * Keyboard input will stop the program flow and asks the user for an input. 137 | * Keyboard input has the ff. syntax: `input()` 138 | * It can have an optional prompt string: `input('Enter your age:')` 139 | 140 | ## Challenge 141 | 142 | Let's apply what you have learned! For this topic's challenge: 143 | 144 | Aling Nena’s Sari-sari store wants a robot that will ask the 145 | customer their total bill and payment amount and tell them their change 146 | (for now, we can allow negative change). For example: 147 | 148 | ```shell 149 | >> How much is your total bill? 150 150 | >> How much is your payment? 200 151 | >> Hi! Your change is 50.00 152 | ``` 153 | 154 | !> Please use below template 155 | 156 | [filename](exercises/variables/variables01.py ':include :type=code python') 157 | 158 | [challenge_partial](../challenge_partial.md ':include') 159 | 160 | 161 | 162 | ## Put your thinking cap on! 163 | 164 | - Does a variable really holds values? 165 | - How to know/print a variable's type? 166 | - What is `floor divison`? 167 | - What does the `modulo` operation do? 168 | - Explain the magic of `input()`? 169 | -------------------------------------------------------------------------------- /ren'py/scene4.md: -------------------------------------------------------------------------------- 1 | [](https://gitter.im/WWCodeManila/Python) 2 | 3 | # Scene 4 4 | 5 | This scene takes place inside Aling Nena's store. You're then tasked to assist two customers: Bert and Tasya. The manner with which you answer their concerns will determine the succeeding scenes. 6 | 7 | At this point, we've already covered much of what can be learned in implementing a basic visual novel using Ren'Py. We'll only need to discuss 8 | 9 | - [ ] Custom-defined positions 10 | 11 | You'll first need to add our last two characters before the `label start` block along with the other characters: 12 | 13 | ```python 14 | define r = Character("Bert") 15 | define t = Character("Tasya") 16 | ``` 17 | 18 | And these flags below where you defined the characters and before the `label start` block. 19 | 20 | ```python 21 | define correct_change = False 22 | define correct_item = False 23 | ``` 24 | 25 | Next, copy the assets `bg store.png` , `bert.png`, `tasya.png`, `store prices.png` and `store rewards.png` from the `assets` folder into `game/images`. 26 | 27 | Here is the code that we'll be using. Replace the codes below the`label store` block in your `script.rpy` code and add a new block `label reward` after it: 28 | 29 | ```python 30 | label store: 31 | $ storef = True 32 | scene bg store with fade 33 | 34 | show nena 35 | n "Thanks, [name], for helping me in the store today." 36 | u "It's okay Lola Nena." 37 | 38 | hide nena 39 | show bert with moveinright 40 | 41 | r "Good day, Aling Nena." 42 | n "Good day, Bert. What is your business today?" 43 | show store prices at Position(xpos = 0.10, ypos=0.10, xanchor = 0.0, yanchor = 0.0) with dissolve 44 | r "I need 2 kilos of rice, 2 cans of sardines, and 1 liter of oil, please." 45 | u "I'll help you today, Bert." 46 | 47 | with fade 48 | 49 | u "Here you go." 50 | "You give the items to Bert." 51 | r "Hohoho. Thanks, [name]. Here's Php 100." 52 | u "Wait a minute, Bert..." 53 | "{i}He bought 2 kilos of rice, 2 cans of sardines, and 1 liter of oil ... {w} And he gave me Php 100. That means ... {/i}" 54 | 55 | menu: 56 | "I should give him a change of {b}Php 20{/b}": 57 | u "Your change is Php 20." 58 | "You give the change to Bert." 59 | $ correct_change = True 60 | "I should give him a change of {b}Php 10{/b}": 61 | u "Your change is Php 10." 62 | "You give the change to Bert." 63 | "{b}No change{/b}": 64 | u "Oops. Nothing." 65 | 66 | if correct_change: 67 | "Bert smiles and walks away." 68 | hide store prices 69 | hide bert with moveoutleft 70 | else: 71 | "You pocket the rest of the change." 72 | "Bert frowns and walks away." 73 | hide store prices 74 | hide bert with moveoutleft 75 | 76 | with fade 77 | show tasya with moveinleft 78 | 79 | t "Good day Aling Nena and [name]." 80 | u "What brings you here, Tasya?" 81 | t "I'm here to collect my reward from Aling Nena's Sari-sari store." 82 | u "Congratulations, Tasya! What reward number did you avail?" 83 | show store rewards at Position(xpos = 0.90, ypos=0.10, xanchor = 1.0, yanchor = 0.0) with dissolve 84 | t "It's number 5." 85 | 86 | "You give her ... " 87 | 88 | menu: 89 | "Coke Sakto": 90 | "... Coke Sakto." 91 | "Boy Bawang": 92 | "... Boy Bawang." 93 | "Php 15 load": 94 | "... Php 15 load." 95 | $ correct_item = True 96 | 97 | if correct_item: 98 | "Tasya smiles and walks away." 99 | hide store rewards 100 | hide tasya with moveoutright 101 | else: 102 | "You keep the reward for your self." 103 | "Tasya frowns and walks away." 104 | hide store rewards 105 | hide tasya with moveoutright 106 | 107 | if correct_change and correct_item: 108 | jump reward 109 | else: 110 | jump ending 111 | 112 | label reward: 113 | pass 114 | ``` 115 | 116 | ## Custom-defined image positions 117 | 118 | As mentioned earlier, you can specify where in the screen an image will show instead of using the pre-defined Ren'Py positions. This can be done using the class `Position()`. 119 | 120 | For example: 121 | 122 | ``` 123 | show store prices at Position(xpos = 0.10, ypos=0.10, xanchor = 0.0, yanchor = 0.0) with dissolve 124 | ``` 125 | 126 | In this case you'll need to set the following arguments: 127 | 128 | `xpos` or `ypos`: Point on the screen defined by x (horizontal) and y (vertical) positions 129 | 130 | `xanchor` or `yanchor`: An x and y position of a point on the image. If specified, this point will be positioned on the screen at the location indicated by`xpos` and `ypos`. 131 | 132 | Along the x-axis, `0.0` is on the extreme left, while `1.0` is on the extreme right. Along the y-axis, `0.0` is on the top-most, while a value of `1.0` is the bottom-most of the screen or image. 133 | 134 | # Exercise 135 | 136 | Practice with repositioning the images `store prices.png` and `store rewards.png` somewhere else in the screen by changing the keywords in the `Position()` class. 137 | 138 | [](https://gitter.im/WWCodeManila/Python) 139 | 140 | -------------------------------------------------------------------------------- /ren'py/scene3.md: -------------------------------------------------------------------------------- 1 | [](https://gitter.im/WWCodeManila/Python) 2 | 3 | # Scene 3 4 | 5 | In this scene, you played *bato-bato pik* (rock, paper, scissors) with your friends Lita and Boy who you met previously in Scene 2. 6 | 7 | Here, we'll learn more about 8 | 9 | - [ ] Python equivalent statements in Ren'Py 10 | 11 | ## Exercise 12 | 13 | Try making our own implementation of Rock, Paper, Scissors in Python first . A player wins if he or she scores 2 points first (best of three) against the computer. Only wins or loses count towards any point, ties do not change the scores. 14 | 15 | Replace the code in `batobato.rpy` from the previous section with the following code. Go over the `python` block carefully. We won't be discussing this particular implementation in detail, instead we'll focus on the Ren'Py code. 16 | 17 | ```python 18 | label game: 19 | 20 | $ gamef = True 21 | 22 | scene bg street with fade 23 | 24 | show lita at left with moveinright 25 | show boy at right with moveinleft 26 | 27 | l "Let's play bato-bato pik!" 28 | 29 | show boy at center with moveinright 30 | b "You'll play against me. Best of three!" 31 | 32 | python: 33 | from random import randint 34 | uscore = 0 35 | bscore = 0 36 | while uscore | bscore < 2: 37 | 38 | renpy.say(b, "Bato-bato pik!") 39 | 40 | choices = {"r": "Rock", "p": "Paper", "s": "Scissors"} 41 | uhand = renpy.display_menu([("Rock", "r"), ("Paper", "p"), ("Scissors", "s")]) 42 | bhand = choices.keys()[randint(0,2)] 43 | 44 | uhand_c = choices[uhand] 45 | bhand_c = choices[bhand] 46 | 47 | renpy.say(b, "[bhand_c]") 48 | 49 | hands = (uhand, bhand) 50 | 51 | wins = [ 52 | ('p', 'r'), 53 | ('r', 's'), 54 | ('s', 'p'), 55 | ] 56 | tie = False 57 | if hands[0] == hands[1]: 58 | tie = True 59 | result = "It's a tie!" 60 | elif hands in wins: 61 | result = "wins" 62 | uscore += 1 63 | else: 64 | result = "loses" 65 | bscore += 1 66 | 67 | if not tie: 68 | renpy.say(l, "[name] picked [uhand_c], Boy picked [bhand_c] \n [name] [result]! {w} \n Boy: [bscore], [name]: [uscore]") 69 | else: 70 | renpy.say(l, "[name] picked [uhand_c], Boy picked [bhand_c] \n [result]! {w} \n Boy: [bscore], [name]: [uscore]") 71 | 72 | if uscore > bscore: 73 | renpy.say(l, "[name] is the WINNER!") 74 | winner = True 75 | else: 76 | renpy.say(l, "Boy wins. [name] LOSES!") 77 | winner = False 78 | 79 | if winner: 80 | show boy at right with moveinleft 81 | l "Well done, [name]." 82 | b "You defeated me!" 83 | else: 84 | show boy at right with moveinleft 85 | b "Oh well, there's always a next time, [name]." 86 | 87 | l "Let's play another game!" 88 | "You spend the rest of the day playing." 89 | 90 | jump ending 91 | 92 | ``` 93 | 94 | In `script.py`, add the following `label` statement: 95 | 96 | ```python 97 | label ending: 98 | pass 99 | ``` 100 | 101 | Try to run the game using the Ren'Py launcher. 102 | 103 | !> Tip: You can use `Back` in the game screen to view the dialogue before or `Skip` to go ahead until some decision point is reached. Try these in order to view the different outcomes of your decision. 104 | 105 | ## Python equivalent statements 106 | 107 | The `renpy.Vue JS
175 | 176 | 177 | 178 | {% render_bundle 'app' %} 179 | 180 | 181 | 182 | ``` 183 | 184 | Run server of both django and vue separately. 185 | ``` 186 | python manage.py runserver 187 | 188 | npm run serve 189 | ``` 190 | 191 | 192 | (Optional) You may also explore the vue project by typing this command. 193 | ``` 194 | vue ui 195 | ``` -------------------------------------------------------------------------------- /ren'py/scene567.md: -------------------------------------------------------------------------------- 1 | [](https://gitter.im/WWCodeManila/Python) 2 | 3 | At this point, we've covered all there is to discuss in our simple visual novel. 4 | 5 | We'll just need to complete our game with three more `label` blocks: reward, beach, ending. 6 | 7 | Add these flags below where you defined the characters and before the `label start` block. 8 | 9 | ```python 10 | define baonf = False 11 | define beachf = False 12 | define rewardf = False 13 | ``` 14 | 15 | Copy the assets `bg beach.png` and `nena sad.png` from the `assets` folder into `game/images`. 16 | 17 | # Scene 5 18 | 19 | This scene is only run when both `$ correct_change` and `$ correct_item` are `True`. 20 | 21 | Replace the `pass` statement in the `label reward` block in `script.rpy`: 22 | 23 | ```python 24 | label reward: 25 | 26 | $ rewardf = True 27 | 28 | with fade 29 | show nena 30 | 31 | n "You did well, [name]! Because you helped me a lot today, I will give you a reward." 32 | n "Which will it be?" 33 | 34 | menu: 35 | "I can give you a baon to spend with your friends.": 36 | $ baonf = True 37 | u "Thanks for the allowance, Lola. I'll go play with Lita and Boy now." 38 | n "Go ahead, Apo. You deserve it." 39 | jump game 40 | "We'll go to the beach.": 41 | $ beachf = True 42 | u "Let's go the beach, Lola!" 43 | jump beach 44 | ``` 45 | 46 | Notice that in this scene, if the player decides to have a *baon* (allowance) as a reward, the game will run "back to" Scene 3 wherein we made a mini-game. `jump` statements can be powerful tools to facilitate any loops in the narration or storyline. 47 | 48 | # Scene 6 49 | 50 | Add the following in `script.rpy`: 51 | 52 | ```python 53 | label beach: 54 | $ baonf = True 55 | scene bg beach with fade 56 | 57 | u "Wow, Lola! The beach is so pretty." 58 | n "Yes, it is. Glad you like it here." 59 | 60 | jump ending 61 | ``` 62 | 63 | # Scene 7 / Ending 64 | 65 | Last, add the following in `script.rpy`, replace the statement under the `label ending` block: 66 | 67 | ```python 68 | label ending: 69 | 70 | scene bg inside house with fade 71 | 72 | if rewardf: 73 | if baonf: 74 | "You were able to spend the rest of the day with your friends Lita and Boy." 75 | "You bought snacks for the three of you from the allowance Aling Nena gave you." 76 | elif beachf: 77 | pass 78 | 79 | "And just like that, your summer vacation in the province passed in bliss and happiness." 80 | 81 | with fade 82 | 83 | show nena 84 | 85 | u "Thank you Lola Nena for letting me stay with you for the summer." 86 | n "You're always welcome here, [name]." 87 | u "I'll comeback again next vacation!" 88 | n "Sure, apo!" 89 | 90 | scene bg inside house with fade 91 | 92 | "THE END" 93 | 94 | else: 95 | "You went home after a long day." 96 | show nena sad 97 | "Your Lola Nena is waiting for you. She doesn't look happy." 98 | n "Apo, I have called your Mom and Dad. They will fetch you here tomorrow." 99 | u "But.. but Lola..." 100 | 101 | if gamef: 102 | $ desc = "a lazy" 103 | n "You only played all day with your friends even though you promised to help me." 104 | elif storef: 105 | if correct_change == False: 106 | $ desc = "a dishonest" 107 | n "Bert told me that you did not give him the correct change." 108 | n "Instead, you pocketed the excess amount!" 109 | if correct_item == False: 110 | $ desc = "an untrustworthy" 111 | n "Tasya said that you didn't give her the correct reward." 112 | n "Instead, you kept it to your self!" 113 | 114 | n "I have no use for [desc] grandchild." 115 | 116 | scene bg inside house with fade 117 | 118 | "And just like that, your summer vacation in the province is OVER." 119 | 120 | "THE END" 121 | 122 | return 123 | ``` 124 | 125 | Try to run the game using the Ren'Py launcher. 126 | 127 | !> Tip: You can use `Back` in the game screen to view the dialogue before or `Skip` to go ahead until some decision point is reached. Try these in order to view the different outcomes of your decision. 128 | 129 | Note that in this scene, we have defined a variable by preceeding the variable name with `$ ` and equating it to a value, e.g. 130 | 131 | ```python 132 | $ desc = "a lazy" 133 | ``` 134 | 135 | This is the same as when we previously defined a *flag* variable, although in this case we did not write a `define` statement for the `desc` variable first. You can do the same thing with our flag variables only that, sometimes, it is more readable to write or define the flags first thing in the code. (For instance, it's more efficient to find them after many lines of coding). 136 | 137 | ## Return statement 138 | 139 | The `return` statement, like `label start` is another special statement in Ren'Py which means the end of the game. When this statement is run, no matter where in the game it is, the game immediately terminates. 140 | 141 | For example, if we have inserted `return` in the `label beach` block before the `jump ending` statement: 142 | 143 | ```python 144 | label beach: 145 | $ baonf = True 146 | scene bg beach with fade 147 | 148 | u "Wow, Lola! The beach is so pretty." 149 | n "Yes, it is. Glad you like it here." 150 | 151 | return 152 | jump ending 153 | ``` 154 | 155 | What do you think will happen? Try this by modifying this block as above. The game will immediately terminate without the character ever experiencing the ending! 156 | 157 | That's it! Congratulations on creating a simple virtual novel. 158 | 159 | # Project 160 | 161 | Make a visual novel of your own. Write or choose a story, gather your own assets, build awesome characters, make up interesting dialogues! Share your work! We'll love to play it! :heart: 162 | 163 | [challenge_partial](../challenge_partial.md ':include') 164 | 165 | [](https://gitter.im/WWCodeManila/Python) 166 | 167 | -------------------------------------------------------------------------------- /ren'py/scene2.md: -------------------------------------------------------------------------------- 1 | [](https://gitter.im/WWCodeManila/Python) 2 | 3 | # Scene 2 4 | 5 | Our next scene happens on your way to Aling Nena's store. You bump into your friends Lita and Boy and you're now faced with another decision - will you break your promise to Aling Nena or remain true to your words? 6 | 7 | In implementing this scene, we'll learn about: 8 | 9 | - [ ] Positioning images 10 | - [ ] Transitions 11 | - [ ] Flags and if-else statements 12 | - [ ] Jump statements 13 | 14 | You'll first need to add two characters before the `label start` block along with the previous two characters. 15 | 16 | ```python 17 | define b = Character("Boy") 18 | define l = Character("Lita") 19 | ``` 20 | 21 | In addition, we'll define two other variables called `gamef` and `storef` and set their values to `False`. Write them just below where you defined the characters before the `label start` block. 22 | 23 | ```python 24 | define gamef = False 25 | define storef = False 26 | ``` 27 | 28 | Next, copy the assets `bg street.png` , `lita.png`, and `boy.png` from the `assets` folder into `game/images`. 29 | 30 | Here is the full code for the next scene. Copy the following code into `script.rpy` after the `label start` block. It's a new `label` statement so it *should not be* indented inside the previous block. 31 | 32 | ```python 33 | label street: 34 | 35 | scene bg street with fade 36 | 37 | show nena 38 | 39 | n "Right, let's get started. We need to go to my Sari-sari store. Please help me for the day, Apo." 40 | 41 | hide nena 42 | 43 | show lita at left with moveinright 44 | l "Hi, Aling Nena and [name]!" 45 | 46 | show boy at right with moveinleft 47 | b "Hello po!" 48 | b "Long time no see, [name]! Tara, let's play!" 49 | 50 | show nena 51 | n "Naku apo, you said you'll help me." 52 | 53 | menu: 54 | "Lola, mamaya na. I'll play with my friends first.": 55 | n "Ay naku, apo. Bahala ka." 56 | jump game 57 | "Sorry Lita and Boy, I promised my Lola I'll help her today.": 58 | jump store 59 | 60 | label store: 61 | $ storef = True 62 | pass 63 | ``` 64 | 65 | Create a new script called `batobato.rpy`. Write the following code: 66 | 67 | ```python 68 | label game: 69 | $ gamef = True 70 | pass 71 | ``` 72 | 73 | Try to run the game using the Ren'Py launcher. 74 | 75 | !> Tip: You can use `Back` in the game screen to view the dialogue before or `Skip` to go ahead until some decision point is reached. Try these in order to view the different outcomes of your decision. 76 | 77 | ## Positioning images 78 | 79 | Continuing with our discussion about inserting images to our visual novel, positioning images in Ren'Py is as straight forward as using the `at` preposition, e.g: 80 | 81 | ```python 82 | show lita at left 83 | ``` 84 | 85 | Ren'Py has a pre-defined set of positions: `left`, `right`, `center` (default), and `truecenter` (centered horizontally and vertically). You can also define your own custom position using the `Position()` class. We'll revisit how to use this class later in Scene 4. 86 | 87 | ## Transitions 88 | 89 | Instead of simply popping in a scene or character image, transitions can be used to aide your storytelling. Like positions, this can simply be introduced using `with`: 90 | 91 | ```python 92 | scene bg street with fade 93 | ``` 94 | 95 | Transitions can be combined with positions: 96 | 97 | ```python 98 | show lita at left 99 | with moveinright 100 | ``` 101 | 102 | which is the same as 103 | 104 | ```python 105 | show lita at left with moveinright 106 | ``` 107 | 108 | Like positions, Ren'Py has predefined transitions such as `fade`, `dissolve`, and `pixellate`. Likewise, you can define your own transitions using the different *transition classes*. You can learn more about the different pre-defined transitions and transition classes [here](https://www.renpy.org/doc/html/transitions.html). 109 | 110 | ## Jump statement 111 | 112 | The `jump` statement indicates that a particular `label` statement should be run next: 113 | 114 | ```python 115 | #... 116 | menu: 117 | "Play": 118 | # ... 119 | jump game 120 | "Store": 121 | # ... 122 | jump store 123 | label game: 124 | "Player chooses play" 125 | label store: 126 | pass 127 | ``` 128 | 129 | You can think of the label name as pointers and the jump names as directives to run codes in these pointers next. 130 | 131 | If you haven't decided what to put inside the next `label` block yet, you can prepare a `label` statement beforehand and just use`pass`, just like a regular Python `pass` statement: 132 | 133 | ```python 134 | label store: 135 | pass 136 | ``` 137 | 138 | Otherwise, the game will terminate in an error when it couldn't find the the next labelled block. 139 | 140 | Let's fill out `label game` and `label store` in Scenes 3 and 4. 141 | 142 | ## Flags and If-else statements 143 | 144 | In our game, it is important to remember the choices of the player since some of these choices can determine what happens later on. 145 | 146 | Ren'Py supports the use of *flags*. Just like characters, these can be set using the `define` statement before the `label` block. 147 | 148 | ```python 149 | define flag = False 150 | label game: 151 | $ flag = True 152 | label home: 153 | "Home" 154 | ``` 155 | 156 | Later on in the game, these flags can be used in an `if-else` statement. 157 | 158 | ```python 159 | label evaluate: 160 | if flag: 161 | "You played a game." 162 | else: 163 | "You went home." 164 | ``` 165 | 166 | Notice that you don't have to define an `if-else` statement inside a `python` block and that instead of writing the variable as `$ flag` in the `if` statement, you just use the name of the variable without `$`. If you need this variable outside the `if-else` or even `elif` statements, you'll need to precede it as `$ flag`. 167 | 168 | In our code above for Scene 2, the variables `gamef` and `storef` are first set to `False` and then switched to `True` when the game ran the respective `label` blocks ... which, in turn, depended on the choice of the player under the `menu` block: 169 | 170 | ```python 171 | define gamef = False 172 | define storef = False 173 | 174 | # ... 175 | 176 | label street: 177 | 178 | # ... 179 | 180 | menu: 181 | "Lola, mamaya na. I'll play with my friends first.": 182 | n "Ay naku, apo. Bahala ka." 183 | jump game 184 | "Sorry Lita and Boy, I promised my Lola I'll help her today.": 185 | jump store 186 | 187 | label store: 188 | $ storef = True 189 | pass 190 | ``` 191 | 192 | and in `batobato.rpy` 193 | 194 | ```python 195 | label game: 196 | $ gamef = True 197 | pass 198 | ``` 199 | 200 | This is how the game remembers that a particular choice has been made. It doesn't really matter if you change the value of the flag inside the `menu` block or inside the `label` block, so long as this aides the readability of your code i.e. if you write all other flags in your code in the same manner. 201 | 202 | We'll use this values later on in the `label ending` block, in Scene 7 (the last scene): 203 | 204 | ```python 205 | label ending: 206 | #... 207 | if gamef: 208 | #... 209 | elif storef: 210 | # .. 211 | ``` 212 | 213 | 214 | 215 | In the next part, we'll learn how to use other Python equivalent statements in Ren'Py by making a mini-game *bato-bato pik* (rock, paper, scissors). 216 | 217 | [](https://gitter.im/WWCodeManila/Python) 218 | 219 | -------------------------------------------------------------------------------- /ren'py/game/options.rpy: -------------------------------------------------------------------------------- 1 | ## This file contains options that can be changed to customize your game. 2 | ## 3 | ## Lines beginning with two '#' marks are comments, and you shouldn't uncomment 4 | ## them. Lines beginning with a single '#' mark are commented-out code, and you 5 | ## may want to uncomment them when appropriate. 6 | 7 | 8 | ## Basics ###################################################################### 9 | 10 | ## A human-readable name of the game. This is used to set the default window 11 | ## title, and shows up in the interface and error reports. 12 | ## 13 | ## The _() surrounding the string marks it as eligible for translation. 14 | 15 | define config.name = _("My VN") 16 | 17 | 18 | ## Determines if the title given above is shown on the main menu screen. Set 19 | ## this to False to hide the title. 20 | 21 | define gui.show_name = True 22 | 23 | 24 | ## The version of the game. 25 | 26 | define config.version = "1.0" 27 | 28 | 29 | ## Text that is placed on the game's about screen. Place the text between the 30 | ## triple-quotes, and leave a blank line between paragraphs. 31 | 32 | define gui.about = _p(""" 33 | """) 34 | 35 | 36 | ## A short name for the game used for executables and directories in the built 37 | ## distribution. This must be ASCII-only, and must not contain spaces, colons, 38 | ## or semicolons. 39 | 40 | define build.name = "MyVN" 41 | 42 | 43 | ## Sounds and music ############################################################ 44 | 45 | ## These three variables control which mixers are shown to the player by 46 | ## default. Setting one of these to False will hide the appropriate mixer. 47 | 48 | define config.has_sound = True 49 | define config.has_music = True 50 | define config.has_voice = True 51 | 52 | 53 | ## To allow the user to play a test sound on the sound or voice channel, 54 | ## uncomment a line below and use it to set a sample sound to play. 55 | 56 | # define config.sample_sound = "sample-sound.ogg" 57 | # define config.sample_voice = "sample-voice.ogg" 58 | 59 | 60 | ## Uncomment the following line to set an audio file that will be played while 61 | ## the player is at the main menu. This file will continue playing into the 62 | ## game, until it is stopped or another file is played. 63 | 64 | # define config.main_menu_music = "main-menu-theme.ogg" 65 | 66 | 67 | ## Transitions ################################################################# 68 | ## 69 | ## These variables set transitions that are used when certain events occur. 70 | ## Each variable should be set to a transition, or None to indicate that no 71 | ## transition should be used. 72 | 73 | ## Entering or exiting the game menu. 74 | 75 | define config.enter_transition = dissolve 76 | define config.exit_transition = dissolve 77 | 78 | 79 | ## Between screens of the game menu. 80 | 81 | define config.intra_transition = dissolve 82 | 83 | 84 | ## A transition that is used after a game has been loaded. 85 | 86 | define config.after_load_transition = None 87 | 88 | 89 | ## Used when entering the main menu after the game has ended. 90 | 91 | define config.end_game_transition = None 92 | 93 | 94 | ## A variable to set the transition used when the game starts does not exist. 95 | ## Instead, use a with statement after showing the initial scene. 96 | 97 | 98 | ## Window management ########################################################### 99 | ## 100 | ## This controls when the dialogue window is displayed. If "show", it is always 101 | ## displayed. If "hide", it is only displayed when dialogue is present. If 102 | ## "auto", the window is hidden before scene statements and shown again once 103 | ## dialogue is displayed. 104 | ## 105 | ## After the game has started, this can be changed with the "window show", 106 | ## "window hide", and "window auto" statements. 107 | 108 | define config.window = "auto" 109 | 110 | 111 | ## Transitions used to show and hide the dialogue window 112 | 113 | define config.window_show_transition = Dissolve(.2) 114 | define config.window_hide_transition = Dissolve(.2) 115 | 116 | 117 | ## Preference defaults ######################################################### 118 | 119 | ## Controls the default text speed. The default, 0, is infinite, while any other 120 | ## number is the number of characters per second to type out. 121 | 122 | default preferences.text_cps = 0 123 | 124 | 125 | ## The default auto-forward delay. Larger numbers lead to longer waits, with 0 126 | ## to 30 being the valid range. 127 | 128 | default preferences.afm_time = 15 129 | 130 | 131 | ## Save directory ############################################################## 132 | ## 133 | ## Controls the platform-specific place Ren'Py will place the save files for 134 | ## this game. The save files will be placed in: 135 | ## 136 | ## Windows: %APPDATA\RenPy\ 34 |
35 | 3. Create a file named `about.html` and place it inside the templates folder.
36 |
37 | ```shell
38 |
34 |
35 | 3. Create a file named `about.html` and place it inside the templates folder.
36 |
37 | ```shell
38 | Welcome to the About page.
39 | ``` 40 | 41 | 4. Open `app.py` and render `about.html` inside your `about` function by replacing the return string `About` with `render_template(file_name)`. 42 | 43 | ```shell 44 | from flask import render_template 45 | 46 | @app.route("/about/") 47 | def about(): 48 | return render_template("about.html") 49 | ``` 50 | 51 | If you try to access `Welcome to the Skills page.
146 | ``` 147 | 148 | 14. To utilize the `layout.html` that we made earlier, extend it inside your `skills.html` and put your welcome header inside the `body` block. 149 | 150 | ```shell 151 | {% extends "layout.html" %} 152 | 153 | {% block body %} 154 | 155 |Welcome to the Skills page.
156 | 157 | {% endblock %} 158 | ``` 159 | 160 | Contents added in between the block tags are loaded with the layout page specified. If you try to access `166 | Hi, {{username|title}}! 167 |
168 | ``` 169 | 170 | Use the `title` keyword to make the first letter of each word capitalized. 171 | 172 | 16. What happens when the value of `username` is `None`? Use an if-else statement with Jinja to handle this problem. 173 | 174 | ```shell 175 |176 | {% if username == None %} 177 | Hi, stranger. What\'s your name? 178 | {% else %} 179 | Hi, {{username|title}}! 180 | {% endif %} 181 |
182 | ``` 183 | 184 | If you try to access `Welcome to the Projects page.
236 | 237 | {% endblock %} 238 | ``` 239 | 240 | 22. Finally, use the variables that we created earlier inside the `projects` function while utilizing the for loop statement. 241 | 242 | ```shell 243 |These are what I\'ve done so far:
244 |-
245 | {% for p in projects %}
246 |
... and {{ project }} is the one that I enjoyed coding the most.
251 | ``` 252 | 253 | This displays a bulleted list of projects and the randomly selected project as follows: 254 | 255 | > **There are what I've done so far:** 256 | > * Facebook 257 | > * Twitter 258 | > * Instagram 259 | > * Uber 260 | > * Grab 261 | > 262 | > ... and **Facebook** is the one that I enjoyed coding the most. 263 | 264 | ## Congratulations! 265 | 266 | You're halfway through the entire tutorial. Now try to create a template for all of your existing pages and feel free to customize them and their contents! 267 | --------------------------------------------------------------------------------