├── .DS_Store
├── .gitattributes
├── .gitignore
├── .nojekyll
├── 01~语法基础
├── .DS_Store
├── ECMAScript
│ ├── ES10 特性.md
│ ├── ES6 特性.md
│ ├── ES8 特性.md
│ ├── ES9 特性.md
│ └── README.md
├── 元编程
│ ├── Proxy
│ │ ├── README.md
│ │ └── 案例-状态管理工具.md
│ ├── README.md
│ ├── Reflect.md
│ └── 数据绑定.md
├── 函数
│ ├── README.md
│ ├── 函数声明.md
│ ├── 函数调用与 this 绑定.md
│ ├── 装饰器.md
│ ├── 迭代器与生成器.md
│ ├── 闭包.md
│ └── 限流.md
├── 变量操作
│ ├── README.md
│ ├── 变量作用域.md
│ ├── 变量声明.md
│ ├── 变量拷贝.md
│ ├── 变量赋值.md
│ └── 执行上下文与提升.md
├── 数据结构
│ ├── .DS_Store
│ ├── README.md
│ ├── 基本类型.md
│ ├── 字符串与编码
│ │ ├── README.md
│ │ └── 编解码.md
│ ├── 时间与日期
│ │ ├── Date.md
│ │ ├── Dayjs.md
│ │ ├── Moment.js.md
│ │ └── README.md
│ ├── 正则表达式.md
│ ├── 类型判断与转换.md
│ └── 视图类型.md
├── 模块化
│ ├── ES Modules.md
│ ├── README.md
│ └── 模块演化.md
├── 流程控制
│ ├── 异常处理.md
│ ├── 条件判断.md
│ └── 流程控制.md
└── 类与对象
│ ├── ES6 Class.md
│ ├── README.md
│ ├── 原型链与类的继承.md
│ └── 类的封装与实例化.md
├── 02~TypeScript
├── 01~类型机制
│ ├── 01~类型系统基础
│ │ ├── 01~结构化类型系统.md
│ │ ├── 02~类型兼容性.md
│ │ ├── 03~类型推导机制.md
│ │ ├── 04~类型擦除.md
│ │ └── 类型推断.md
│ ├── 02~类型检查机制
│ │ ├── 01~类型检查器工作原理.md
│ │ ├── 02~类型收窄.md
│ │ ├── 03~类型扩宽与收缩.md
│ │ └── 04~控制流分析.md
│ └── 类型计算
│ │ ├── 01~条件类型.md
│ │ ├── 02~映射类型.md
│ │ ├── 03~模板字面量类型.md
│ │ └── 04~递归类型.md
├── 02~类型使用
│ ├── 01~基础类型
│ │ ├── 函数与类
│ │ │ ├── Mixins.md
│ │ │ ├── useDefineForClassFields 与 class-fields 提案.md
│ │ │ ├── 函数.md
│ │ │ └── 类与接口.md
│ │ └── 基础类型.md
│ ├── 02~高级类型
│ │ ├── 交叉类型(Intersection Types).md
│ │ ├── 类型守卫(Type Guards).md
│ │ ├── 联合类型(Union Types).md
│ │ └── 进阶类型.md
│ ├── 03~类型操作符
│ │ ├── 01~typeof
│ │ │ └── 01~typeof.md
│ │ ├── 02~keyof.md
│ │ ├── 03~instanceof.md
│ │ ├── 04~is.md
│ │ ├── 05~satisfies
│ │ │ └── 2024.11~satisfies 操作符完全指南.md
│ │ └── 类型修饰
│ │ │ ├── Decorator.md
│ │ │ └── 类型修饰.md
│ ├── 04~类型断言
│ │ └── 类型断言.md
│ ├── 05~泛型编程
│ │ ├── 01~泛型基础.md
│ │ ├── 02~泛型约束.md
│ │ ├── 03~泛型工具类型.md
│ │ └── 04~泛型最佳实践.md
│ └── 类型声明.md
├── 03~工程实践
│ ├── ID 类型.md
│ ├── 异常处理
│ │ └── neverthrow
│ │ │ └── README.md
│ └── 类型使用注意.md
├── 04~编译原理
│ ├── README.md
│ ├── 程序与抽象语法树.md
│ └── 编译流程.md
├── 05~类型库
│ ├── type-challenge
│ │ └── README.md
│ ├── type-fest
│ │ └── README.md
│ ├── 内置类型
│ │ ├── Capitalize.md
│ │ ├── Exclude.md
│ │ ├── Extract.md
│ │ ├── InstanceType.md
│ │ ├── Lowercase.md
│ │ ├── NonNullable.md
│ │ ├── Nullable.md
│ │ ├── Omit.md
│ │ ├── Parameters.md
│ │ ├── Partial.md
│ │ ├── Pick.md
│ │ ├── Readonly.md
│ │ ├── Record.md
│ │ ├── Required.md
│ │ ├── ReturnType.md
│ │ ├── Uncapitalize.md
│ │ └── Uppercase.md
│ └── 自定义类型
│ │ └── Branded Types
│ │ └── README.md
├── 99~参考资料
│ ├── 2023~Ruanyf~《TypeScript 新手教程》
│ │ ├── any.md
│ │ ├── array.md
│ │ ├── assert.md
│ │ ├── basic.md
│ │ ├── chapters.yml
│ │ ├── class.md
│ │ ├── comment.md
│ │ ├── d.ts.md
│ │ ├── declare.md
│ │ ├── decorator-legacy.md
│ │ ├── decorator.md
│ │ ├── enum.md
│ │ ├── es6.md
│ │ ├── function.md
│ │ ├── generics.md
│ │ ├── interface.md
│ │ ├── intro.md
│ │ ├── mapping.md
│ │ ├── module.md
│ │ ├── namespace.md
│ │ ├── narrowing.md
│ │ ├── npm.md
│ │ ├── object.md
│ │ ├── operator.md
│ │ ├── react.md
│ │ ├── symbol.md
│ │ ├── tsc.md
│ │ ├── tsconfig.json.md
│ │ ├── tuple.md
│ │ ├── type-operations.md
│ │ ├── types.md
│ │ └── utility.md
│ └── 2023~《The Concise TypeScript Book》
│ │ └── README.md
└── README.md
├── 03~异步并发
├── .DS_Store
├── Event Loop
│ ├── Node 事件循环.md
│ └── README.md
├── README.md
├── RxJS
│ ├── Observable.md
│ ├── Observer.md
│ ├── README.md
│ ├── Scheduler.md
│ ├── Subject.md
│ └── 操作符
│ │ ├── README.md
│ │ ├── 创建操作符.md
│ │ ├── 多播操作符.md
│ │ ├── 工具操作符.md
│ │ ├── 数学和聚合操作符.md
│ │ ├── 条件和布尔操作符.md
│ │ ├── 组合操作符.md
│ │ ├── 转换操作符.md
│ │ ├── 过滤操作符.md
│ │ └── 错误处理操作符.md
└── 异步模式
│ ├── Promise.md
│ ├── async-await.md
│ ├── 异步编程模式.md
│ └── 异步编程综述.md
├── 04~设计模式
├── Clean Code
│ ├── 99~参考资料
│ │ └── ryanmcdermott~JavaScript Clean Code Practices.md
│ └── README.md
├── README.md
└── SOLID.md
├── 10~工程实践
├── 依赖注入
│ └── InversifyJS
│ │ └── README.md
├── 函数式编程
│ ├── README.md
│ ├── 不可变对象
│ │ ├── Immer
│ │ │ ├── README.md
│ │ │ └── 在类中使用.md
│ │ └── 不可变对象.md
│ ├── 函数组合.md
│ ├── 循环改造.md
│ └── 纯函数与副作用.md
├── 工具库
│ ├── Lodash
│ │ └── README.md
│ ├── Radash
│ │ └── README.md
│ ├── Remeda
│ │ └── README.md
│ └── es-toolkit
│ │ └── README.md
├── 插件系统
│ ├── README.md
│ ├── 动态代码执行
│ │ ├── 99~参考资料
│ │ │ └── 2021-苍石-在 Javascript 中安全地执行动态脚本.md
│ │ └── README.md
│ ├── 多个插件协作.md
│ ├── 插件调用.md
│ └── 插件配置与初始化.md
├── 编码规约
│ ├── Clean JavaScript.md
│ ├── README.md
│ ├── 性能规约.md
│ └── 样式指南.md
├── 语法编译
│ ├── AST
│ │ └── README.md
│ ├── Babel
│ │ ├── README.md
│ │ ├── 插件开发.md
│ │ ├── 编译配置.md
│ │ └── 语法转换.md
│ ├── README.md
│ └── 集合类型
│ │ ├── Map.md
│ │ ├── Object.md
│ │ ├── README.md
│ │ ├── 对象比较.md
│ │ ├── 序列化.md
│ │ └── 数组与集合.md
└── 面向对象编程
│ ├── README.md
│ └── 对象校验.md
├── 20~V8 引擎
├── .DS_Store
├── 99~参考资料
│ └── 2021-Google V8 引擎浅析.md
├── JIT
│ └── README.md
├── QuickJS
│ └── README.md
├── README.md
├── V8 纵览.md
├── 内存管理
│ ├── README.md
│ ├── 内存泄露.md
│ ├── 垃圾回收.md
│ └── 对象与数组.md
└── 运行时
│ ├── README.md
│ └── 调用与堆栈.md
├── INTRODUCTION.md
├── LICENSE
├── README.md
├── _sidebar.md
└── index.html
/.DS_Store:
--------------------------------------------------------------------------------
https://raw.githubusercontent.com/wx-chevalier/JavaScript-Notes/2c3c57c322e60a50a553e47b69f03839d95df99f/.DS_Store
--------------------------------------------------------------------------------
/.gitattributes:
--------------------------------------------------------------------------------
1 | *.xmind filter=lfs diff=lfs merge=lfs -text
2 | *.zip filter=lfs diff=lfs merge=lfs -text
3 | *.pdf filter=lfs diff=lfs merge=lfs -text
4 |
--------------------------------------------------------------------------------
/.gitignore:
--------------------------------------------------------------------------------
1 | # Ignore all
2 | *
3 |
4 | # Unignore all with extensions
5 | !*.*
6 |
7 | # Unignore all dirs
8 | !*/
9 |
10 | .DS_Store
11 |
12 | # Logs
13 | logs
14 | *.log
15 | npm-debug.log*
16 | yarn-debug.log*
17 | yarn-error.log*
18 |
19 | # Runtime data
20 | pids
21 | *.pid
22 | *.seed
23 | *.pid.lock
24 |
25 | # Directory for instrumented libs generated by jscoverage/JSCover
26 | lib-cov
27 |
28 | # Coverage directory used by tools like istanbul
29 | coverage
30 |
31 | # nyc test coverage
32 | .nyc_output
33 |
34 | # Grunt intermediate storage (http://gruntjs.com/creating-plugins#storing-task-files)
35 | .grunt
36 |
37 | # Bower dependency directory (https://bower.io/)
38 | bower_components
39 |
40 | # node-waf configuration
41 | .lock-wscript
42 |
43 | # Compiled binary addons (https://nodejs.org/api/addons.html)
44 | build/Release
45 |
46 | # Dependency directories
47 | node_modules/
48 | jspm_packages/
49 |
50 | # TypeScript v1 declaration files
51 | typings/
52 |
53 | # Optional npm cache directory
54 | .npm
55 |
56 | # Optional eslint cache
57 | .eslintcache
58 |
59 | # Optional REPL history
60 | .node_repl_history
61 |
62 | # Output of 'npm pack'
63 | *.tgz
64 |
65 | # Yarn Integrity file
66 | .yarn-integrity
67 |
68 | # dotenv environment variables file
69 | .env
70 |
71 | # next.js build output
72 | .next
73 |
--------------------------------------------------------------------------------
/.nojekyll:
--------------------------------------------------------------------------------
https://raw.githubusercontent.com/wx-chevalier/JavaScript-Notes/2c3c57c322e60a50a553e47b69f03839d95df99f/.nojekyll
--------------------------------------------------------------------------------
/01~语法基础/.DS_Store:
--------------------------------------------------------------------------------
https://raw.githubusercontent.com/wx-chevalier/JavaScript-Notes/2c3c57c322e60a50a553e47b69f03839d95df99f/01~语法基础/.DS_Store
--------------------------------------------------------------------------------
/01~语法基础/ECMAScript/ES10 特性.md:
--------------------------------------------------------------------------------
1 | # ES2019 特性
2 |
3 | # Array.flat()
4 |
5 | You can now flatten nested arrays recursively up to a specified depth. The default value is 1 and if you want to go full depth use Infinity. This method does not modify the original array but creates a new one:
6 |
7 | const arr1 = [1, 2, [3, 4]];
8 | arr1.flat(); // [1, 2, 3, 4]
9 |
10 | const arr2 = [1, 2, [3, 4, [5, 6]]];
11 | arr2.flat(2); // [1, 2, 3, 4, 5, 6]
12 |
13 | const arr3 = [1, 2, [3, 4, [5, 6, [7, 8]]]];
14 | arr3.flat(Infinity); // [1, 2, 3, 4, 5, 6, 7, 8]
15 | If you have an empty slot in your array it is going to be removed:
16 |
17 | const arr4 = [1, 2,, 4, 5];
18 | arr4.flat(); // [1, 2, 4, 5]
19 |
20 | # Array.flatMap()
21 |
22 | A new method that combines the basic map function and then flattens the result to a depth of 1 with the new Array.flat() method:
23 |
24 | const arr1 = [1, 2, 3];
25 |
26 | arr1.map(x => [x * 4]); // [[4], [8], [12]]
27 | arr1.flatMap(x => [x * 4]); // [4, 8, 12]
28 | Another more useful example:
29 |
30 | const sentence = ["This is a", "regular", "sentence"];
31 |
32 | sentence.map(x => x.split(" ")); // [["This","is","a"],["regular"],["sentence"]]
33 | sentence.flatMap(x => x.split(" ")); // ["This","is","a","regular", "sentence"]
34 |
35 | # String.trimStart() and String.trimEnd()
36 |
37 | In addition to String.Trim() which removes whitespaces from both sides of a string there are now separate methods for only removing white spaces from each side:
38 |
39 | const test = " hello ";
40 |
41 | test.trim(); // "hello";
42 | test.trimStart(); // "hello ";
43 | test.trimEnd(); // " hello";
44 |
45 | # Object.fromEntries
46 |
47 | A new method that transforms a list of key-value pairs into an object. It performs the reverse of an already familiar function Object.Entries which is used when transforming objects to arrays for their easier manipulation. After the transformation, you would be left with an array but now you can return the manipulated array back into an object. Let’s try with an example where we want to square the values of all of our object properties:
48 |
49 | const obj = { prop1: 2, prop2: 10, prop3: 15 };
50 |
51 | let array = Object.entries(obj); // [["prop1", 2], ["prop2", 10], ["prop3", 15]]
52 | Let’s square the values of the new list of key-value pairs with a simple map:
53 |
54 | array = array.map(([key, value]) => [key, Math.pow(value, 2)]); // [["prop1", 4], ["prop2", 100], ["prop3", 225]]
55 | We’ve transformed the object values but we are left with an array and that is where Object.fromEntries comes in, transforming the array back to an object:
56 |
57 | const newObj = Object.fromEntries(array); // {prop1: 4, prop2: 100, prop3: 225}
58 |
59 | # Optional Catch Binding
60 |
61 | The new proposal allows you to completely omit the catch() parameter as there are a lot of cases where you don’t want to use it:
62 |
63 | try {
64 | //...
65 | } catch (er) {
66 | //handle error with parameter er
67 | }
68 |
69 | try {
70 | //...
71 | } catch {
72 | //handle error without parameter
73 | }
74 |
75 | # Symbol.description
76 |
77 | You can now access the description property of a Symbol instead of using the toString() method:
78 |
79 | const testSymbol = Symbol("Desc");
80 |
81 | testSymbol.description; // "Desc"
82 |
83 | # Function.toString()
84 |
85 | Calling toString() on a function now returns the function exactly as it was defined including whitespaces and comments. Before we had:
86 |
87 | function /_ foo comment _/ foo() {}
88 |
89 | foo.toString(); // "function foo() {}"
90 | And now it’s:
91 |
92 | foo.toString(); // "function /_ foo comment /_ foo() {}"
93 |
--------------------------------------------------------------------------------
/01~语法基础/ECMAScript/ES6 特性.md:
--------------------------------------------------------------------------------
1 | # ES6 特性
2 |
3 | ECMAScript 6 (以下简称 ES6)是 JavaScript 语言的下一代标准,已经在 2015 年 6 月正式发布了。Mozilla 公司将在这个标准的基础上,推出 JavaScript 2.0。ES6 的目标,是使得 JavaScript 语言可以用来编写大型的复杂的应用程序,成为企业级开发语言。标准的制定者有计划,以后每年发布一次标准,使用年份作为标准的版本。因为当前版本的 ES6 是在 2015 年发布的,所以又称 ECMAScript 2015。
4 |
5 | # **Module & Module Loader**
6 |
7 | ES2015 中加入的原生模块机制支持可谓是意义最重大的 feature 了,且不说目前市面上五花八门的 module/loader 库,各种不同实现机制
8 |
9 | 互不兼容也就罢了 ( 其实这也是非常大的问题 ),关键是那些模块定义 / 装载语法都丑到爆炸,但是这也是无奈之举,在没有语言级别的支持下,js 只能做到这一
10 |
11 | 步,正所谓巧妇难为无米之炊。ES2016 中的 Module 机制借鉴自
12 |
13 | CommonJS,同时又提供了更优雅的关键字及语法 ( 虽然也存在一些问题 )。遗憾的是同样有重大价值的 Module
14 |
15 | Loader 在 2014 年底从 ES2015 草案中移除了,我猜测可能是对于浏览器而言 Module
16 |
17 | Loader 的支持遭遇了一些技术上的难点,从而暂时性的舍弃了这一 feature。但是一个原生支持的模块加载器是非常有意义的,相信它不久后还是会回
18 |
19 | 归到 ES 规范中 ( 目前由 WHATWG 组织在单独维护 )。
20 |
21 | 2. **Class**
22 |
23 | 准确来说 class 关键字只是一个 js 里构造函数的语法糖而已,跟直接 function 写法无本质区别。只不过有了 Class 的原生支持后,js 的面向对象机制有了更多的可能性,比如衍生的 extends 关键字 ( 虽然也只是语法糖 )。
24 |
25 | 3. **Promise & Reflect API**
26 |
27 | Promise 的诞生其实已经有几十年了,它被纳入 ES 规范最大意义在于,它将市面上各种异步实现库的最佳实践都标准化了。至于 Reflect API,它让 js 历史上第一次具备了元编程能力,这一特性足以让开发者们脑洞大开。
28 |
29 | 除此之外,ES2016 的相关草案也已经确定了一大部分其他 new features。这里提两个我比较感兴趣的 new feature:
30 |
31 | 1. async/await:协程。ES2016 中 async/await 实际是对 Generator&Promise 的上层封装,几乎同步的写法写异步比 Promise 更优雅更简单,非常值得期待。
32 | 2. decorator:装饰器,其实等同于 Java 里面的注解。注解机制对于大型应用的开发的作用想必不用我过多赘述了。用过的同学都说好。
33 |
34 | 而关于纯 ES6 语法在各大浏览器上的支持情况,可以查看[这里](http://kangax.github.io/compat-table/es6/)。另外推荐一个可以将 ES5 代码转化为可读的 ES6 代码的转化器:[lebab](https://github.com/mohebifar/lebab)
35 |
--------------------------------------------------------------------------------
/01~语法基础/ECMAScript/ES8 特性.md:
--------------------------------------------------------------------------------
1 | # ECMAScript 2017(ES8) Features
2 |
3 | ECMAScript 2017 或 ES8 与 2017 年六月底由 TC39 正式发布,可以在[这里](https://www.ecma-international.org/ecma-262/8.0/index.html)浏览完整的版本;而 ES8 中代表性的特征包括了字符串填充、对象值遍历、对象的属性描述符获取、函数参数列表与调用中的尾部逗号、异步函数、共享内存与原子操作等。
4 |
5 | ### 字符串填充
6 |
7 | ES8 中添加了内置的字符串填充函数,分别为 padStart 与 padEnd,该函数能够通过填充字符串的首部或者尾部来保证字符串达到固定的长度;开发者可以指定填充的字符串或者使用默认的空格,函数的声明如下:
8 |
9 | ```js
10 | str.padStart(targetLength [, padString])
11 | str.padEnd(targetLength [, padString])
12 | ```
13 |
14 | 如上所示,函数的首个参数为目标长度,即最终生成的字符串长度;第二个参数即是指定的填充字符串:
15 |
16 | ```js
17 | "es8".padStart(2); // 'es8'
18 | "es8".padStart(5); // ' es8'
19 | "es8".padStart(6, "woof"); // 'wooes8'
20 | "es8".padStart(14, "wow"); // 'wowwowwowwoes8'
21 | "es8".padStart(7, "0"); // '0000es8'
22 | "es8".padEnd(2); // 'es8'
23 | "es8".padEnd(5); // 'es8 '
24 | "es8".padEnd(6, "woof"); // 'es8woo'
25 | "es8".padEnd(14, "wow"); // 'es8wowwowwowwo'
26 | "es8".padEnd(7, "6"); // 'es86666'
27 | ```
28 |
29 | ### 对象值遍历
30 |
31 | `Object.values` 函数会返回指定对象的可枚举的属性值数组,数组中值顺序与 `for-in` 循环保持一致,函数的声明为:
32 |
33 | ```js
34 | Object.values(obj);
35 | ```
36 |
37 | 首个参数 `obj` 即为需要遍历的目标对象,它可以为某个对象或者数组(数组可以看做键为下标的对象):
38 |
39 | ```js
40 | const obj = { x: "xxx", y: 1 };
41 | Object.values(obj); // ['xxx', 1]
42 |
43 | const obj = ["e", "s", "8"]; // same as { 0: 'e', 1: 's', 2: '8' };
44 | Object.values(obj); // ['e', 's', '8']
45 |
46 | // when we use numeric keys, the values returned in a numerical
47 | // order according to the keys
48 | const obj = { 10: "xxx", 1: "yyy", 3: "zzz" };
49 | Object.values(obj); // ['yyy', 'zzz', 'xxx']
50 | Object.values("es8"); // ['e', 's', '8']
51 | ```
52 |
53 | 而 `Object.entries` 方法则会将某个对象的可枚举属性与值按照二维数组的方式返回,数组中顺序与 `Object.values` 保持一致,该函数的声明与使用为:
54 |
55 | ```js
56 | const obj = { x: "xxx", y: 1 };
57 | Object.entries(obj); // [['x', 'xxx'], ['y', 1]]
58 |
59 | const obj = ["e", "s", "8"];
60 | Object.entries(obj); // [['0', 'e'], ['1', 's'], ['2', '8']]
61 |
62 | const obj = { 10: "xxx", 1: "yyy", 3: "zzz" };
63 | Object.entries(obj); // [['1', 'yyy'], ['3', 'zzz'], ['10': 'xxx']]
64 | Object.entries("es8"); // [['0', 'e'], ['1', 's'], ['2', '8']]
65 | ```
66 |
67 | ### 对象的属性描述符获取
68 |
69 | `getOwnPropertyDescriptors` 函数会返回指定对象的某个指定属性的描述符;该属性必须是对象自己定义而不是继承自原型链,函数的声明为:
70 |
71 | ```js
72 | Object.getOwnPropertyDescriptor(obj, prop);
73 | ```
74 |
75 | `obj` 即为源对象,而 `prop` 即为需要查看的属性名;结果中包含的键可能有 configurable、enumerable、writable、get、set 以及 value。
76 |
77 | ```
78 | const obj = { get es8() { return 888; } };
79 | Object.getOwnPropertyDescriptor(obj, 'es8');
80 | // {
81 | // configurable: true,
82 | // enumerable: true,
83 | // get: function es8(){}, //the getter function
84 | // set: undefined
85 | // }
86 | ```
87 |
88 | ### 函数参数列表与调用中的尾部逗号
89 |
90 | 该特性允许我们在定义或者调用函数时添加尾部逗号而不报错:
91 |
92 | ```js
93 | function es8(var1, var2, var3) {
94 | // ...
95 | }
96 | es8(10, 20, 30);
97 | ```
98 |
99 | ### 异步函数
100 |
101 | ES8 中允许使用 async/await 语法来定义与执行异步函数,async 关键字会返回某个 AsyncFunction 对象;在内部实现中虽然异步函数与迭代器的实现原理类似,但是其并不会被转化为迭代器函数:
102 |
103 | ```js
104 | function fetchTextByPromise() {
105 | return new Promise((resolve) => {
106 | setTimeout(() => {
107 | resolve("es8");
108 | }, 2000);
109 | });
110 | }
111 | async function sayHello() {
112 | const externalFetchedText = await fetchTextByPromise();
113 | console.log(`Hello, ${externalFetchedText}`); // Hello, es8
114 | }
115 | sayHello();
116 |
117 | console.log(1);
118 | sayHello();
119 | console.log(2);
120 |
121 | // 调用结果
122 | 1; // immediately
123 | 2; // immediately
124 | Hello, es8; // after 2 seconds
125 | ```
126 |
127 | ### 共享内存与原子操作
128 |
129 | 共享内存允许多个线程并发读写数据,而原子操作则能够进行并发控制,确保多个存在竞争关系的线程顺序执行。本部分则介绍了新的构造器 `SharedArrayBuffer` 与包含静态方法的命名空间对象 `Atomics`。`Atomic` 对象类似于 `Math`,我们无法直接创建其实例,而只能使用其提供的静态方法:
130 |
131 | - add /sub - 增加或者减去某个位置的某个值
132 | - and / or /xor - 进行位操作
133 | - load - 获取值
134 |
--------------------------------------------------------------------------------
/01~语法基础/ECMAScript/ES9 特性.md:
--------------------------------------------------------------------------------
1 | # ECMAScript 2018(ES9) Features
2 |
3 | Major new features:
4 |
5 | - [Asynchronous Iteration](http://2ality.com/2016/10/asynchronous-iteration.html) (Domenic Denicola, Kevin Smith)
6 | - [Rest/Spread Properties](http://2ality.com/2016/10/rest-spread-properties.html) (Sebastian Markbåge)
7 |
8 | New regular expression features:
9 |
10 | - [RegExp named capture groups](http://2ality.com/2017/05/regexp-named-capture-groups.html) (Gorkem Yakin, Daniel Ehrenberg)
11 | - [RegExp Unicode Property Escapes](http://2ality.com/2017/07/regexp-unicode-property-escapes.html) (Mathias Bynens)
12 | - [RegExp Lookbehind Assertions](http://2ality.com/2017/05/regexp-lookbehind-assertions.html) (Gorkem Yakin, Nozomu Katō, Daniel Ehrenberg)
13 | - [`s` (`dotAll`) flag for regular expressions](http://2ality.com/2017/07/regexp-dotall-flag.html) (Mathias Bynens)
14 |
15 | Other new features:
16 |
17 | - [`Promise.prototype.finally()`](http://2ality.com/2017/07/promise-prototype-finally.html) (Jordan Harband)
18 | - [Template Literal Revision](http://2ality.com/2016/09/template-literal-revision.html) (Tim Disney)
19 |
--------------------------------------------------------------------------------
/01~语法基础/ECMAScript/README.md:
--------------------------------------------------------------------------------
1 | # ECMAScript
2 |
3 | ECMAScript 是 JavaScript 语言的国际标准,JavaScript 是 ECMAScript 的实现。要讲清楚这个问题,需要回顾历史。1996 年 11 月,JavaScript 的创造者 Netscape 公司,决定将 JavaScript 提交给国际标准化组织 ECMA,希望这种语言能够成为国际标准。次年,ECMA 发布 262 号标准文件(ECMA-262 )的第一版,规定了浏览器脚本语言的标准,并将这种语言称为 ECMAScript。这个版本就是 ECMAScript 1.0 版。
4 |
5 | 之所以不叫 JavaScript,有两个原因。一是商标,Java 是 Sun 公司的商标,根据授权协议,只有 Netscape 公司可以合法地使用 JavaScript 这个名字,且 JavaScript 本身也已经被 Netscape 公司注册为商标。二是想体现这门语言的制定者是 ECMA,不是 Netscape,这样有利于保证这门语言的开放性和中立性。因此,ECMAScript 和 JavaScript 的关系是,前者是后者的规格,后者是前者的一种实现。在日常场合,这两个词是可以互换的。
6 |
7 | ECMAScript 定义了:
8 |
9 | - [语言语法](https://developer.mozilla.org/en-US/docs/Web/JavaScript/Reference/Lexical_grammar) – 语法解析规则、关键字、语句、声明、运算符等。
10 | - [类型](https://developer.mozilla.org/en-US/docs/Web/JavaScript/Data_structures) – 布尔型、数字、字符串、对象等。
11 | - [原型和继承](https://developer.mozilla.org/en-US/docs/Web/JavaScript/Inheritance_and_the_prototype_chain)
12 | - 内建对象和函数的[标准库](https://developer.mozilla.org/en-US/docs/Web/JavaScript/Reference/Global_Objects) – [JSON](https://developer.mozilla.org/en-US/docs/Web/JavaScript/Reference/Global_Objects/JSON)、[Math](https://developer.mozilla.org/en-US/docs/Web/JavaScript/Reference/Global_Objects/Math)、[数组方法](https://developer.mozilla.org/en-US/docs/Web/JavaScript/Reference/Global_Objects/Array)、[对象自省方法](https://developer.mozilla.org/en-US/docs/Web/JavaScript/Reference/Global_Objects/Object)等。
13 |
14 | ECMAScript 标准不定义 HTML 或 CSS 的相关功能,也不定义类似 DOM(文档对象模型)的[Web API](https://developer.mozilla.org/en-US/docs/Web/API),这些都在独立的标准中进行定义。ECMAScript 涵盖了各种环境中 JS 的使用场景,无论是浏览器环境还是类似[node.js](http://nodejs.org/)的非浏览器环境。
15 |
16 | ## 特性阶段
17 |
18 | 
19 |
20 | - Stage 0 “strawman” — The starting point for all proposals. These can change significantly before advancing to the next stage. There is no acceptance criteria and anyone can make a new proposal for this stage. There doesn’t need to be any implementation and the spec isn’t held to any standard. This stage is intended to start a discussion about the feature. There are currently over twenty stage 0 proposals.
21 |
22 | - Stage 1 “proposal” — An actual formal proposal. These require a “champion”(i.e. a member of TC39 committee). At this stage the API should be well thought out and any potential implementation challenges should be outlined. At this stage, a polyfill is developed and demos produced. Major changes might happen after this stage, so use with caution. Proposals at this stage include the long-awaited Observables type and the Promise.try function.
23 |
24 | - Stage 2 “draft” — At this stage the syntax is precisely described using the formal TC39 spec language. Minor editorial changes might still happen after this stage, but the specification should be complete enough not to need major revisions. If a proposal makes it this far, it’s a good bet that the committee expects the feature to be included eventually.
25 |
26 | - Stage 3 “candidate” — The proposal has approved and further changes will only occur at the request of implementation authors. Here is where you can expect implementation to begin in JavaScript engines. Polyfills for proposals at this stage are safe to use without worry.
27 |
28 | - Stage 4 “finished” — Indicates that the proposal has been accepted and the specification has been merged with the main JavaScript spec. No further changes are expected. JavaScript engines are expected to ship their implementations. As of October 2017 there are nine finished proposals, most notably async functions.
29 |
30 | # Links
31 |
32 | - https://github.com/daumann/ECMAScript-new-features-list
33 | - https://mp.weixin.qq.com/s/8bov6788ivV0sHzmwrn5lw
34 | - https://mp.weixin.qq.com/s/3Ku8w-LLgM0cor2c8ipY9A
35 |
--------------------------------------------------------------------------------
/01~语法基础/元编程/Proxy/README.md:
--------------------------------------------------------------------------------
1 | # Proxy
2 |
3 | ```js
4 | /*
5 | const proxy = new Proxy({}, {
6 | get: (obj, prop) => { ... },
7 | set: (obj, prop, value) => { ... },
8 | // more props here
9 | });
10 | */
11 |
12 | // This basic proxy returns null instead of undefined if the
13 | // property doesn't exist
14 | // 如果属性不存在那么返回的是 null 而不是 undefined
15 | const proxy = new Proxy(
16 | {},
17 | {
18 | get: (obj, prop) => {
19 | return prop in obj ? obj[prop] : null;
20 | },
21 | }
22 | );
23 |
24 | // proxy.whatever => null
25 | ```
26 |
27 | # Proxy 案例
28 |
29 | ## 数据存储
30 |
31 | ```js
32 | // storage 是 Storage API 的类型,可以是 localStorage 或是 sessionStorage
33 | // prefix 则属于 namespace
34 | function getStorage(storage, prefix) {
35 | // 这里返回一个 Proxy 实例,调用这个实例的 set或get 方法来存取数据
36 | return new Proxy(
37 | {},
38 | {
39 | set: (obj, prop, value) => {
40 | obj[prop] = value;
41 | storage.setItem(`${prefix}.${prop}`, value);
42 | },
43 | get: (obj, prop) => {
44 | // return obj[prop];
45 | return storage.getItem(`${prefix}.${prop}`);
46 | },
47 | }
48 | );
49 | }
50 |
51 | // Create an instance of the storage proxy
52 | // 使用的时候首先通过 namespace 创建 Storage Proxy 实例
53 | const userObject = getStorage(localStorage, "user");
54 |
55 | // Set a value in localStorage
56 | // 然后通过直接访问属性的方法来操作数据
57 | userObject.name = "David";
58 |
59 | // Get the value from localStorage
60 | // 可以方便的使用解构获取数据
61 | const { name } = userObject;
62 | ```
63 |
64 | ## 网络请求
65 |
66 | ```js
67 | const www = new Proxy(new URL("https://www"), {
68 | get: function get(target, prop) {
69 | let o = Reflect.get(target, prop);
70 | if (typeof o === "function") {
71 | return o.bind(target);
72 | }
73 | if (typeof prop !== "string") {
74 | return o;
75 | }
76 | if (prop === "then") {
77 | return Promise.prototype.then.bind(fetch(target));
78 | }
79 | target = new URL(target);
80 | target.hostname += `.${prop}`;
81 | return new Proxy(target, { get });
82 | },
83 | });
84 | ```
85 |
86 | 访问百度:
87 |
88 | ```js
89 | www.baidu.com.then((response) => {
90 | console.log(response.status);
91 | // ==> 200
92 | });
93 |
94 | const response = await www.baidu.com;
95 |
96 | console.log(response.ok);
97 | // ==> true
98 |
99 | console.log(response.status);
100 | // ==> 200
101 | ```
102 |
--------------------------------------------------------------------------------
/01~语法基础/元编程/Proxy/案例-状态管理工具.md:
--------------------------------------------------------------------------------
1 | # 案例:状态管理工具
2 |
3 | # Links
4 |
5 | - Dob is a tool for monitoring object changes. Using Proxy. https://cubox.pro/c/qb2MvM
6 |
--------------------------------------------------------------------------------
/01~语法基础/元编程/README.md:
--------------------------------------------------------------------------------
1 | # JavaScript 中的元编程
2 |
--------------------------------------------------------------------------------
/01~语法基础/元编程/数据绑定.md:
--------------------------------------------------------------------------------
1 | # JavaScript 中的属性监听与数据绑定
2 |
3 | 数据绑定即将某个数据源与消费者绑定,譬如将某个响应函数绑定到某个对象的属性,在该属性发生变化时触发。
4 |
5 | > In computer programming, data binding is a general technique that binds data sources from the provider and consumer together and synchronizes them. - Wiki
6 |
--------------------------------------------------------------------------------
/01~语法基础/函数/README.md:
--------------------------------------------------------------------------------
https://raw.githubusercontent.com/wx-chevalier/JavaScript-Notes/2c3c57c322e60a50a553e47b69f03839d95df99f/01~语法基础/函数/README.md
--------------------------------------------------------------------------------
/01~语法基础/函数/装饰器.md:
--------------------------------------------------------------------------------
1 | # 函数装饰器
2 |
3 | # Links
4 |
5 | - https://techsparx.com/nodejs/typescript/decorators/classes.html
6 |
--------------------------------------------------------------------------------
/01~语法基础/函数/闭包.md:
--------------------------------------------------------------------------------
1 | # 闭包
2 |
3 | 
4 |
5 | 在 JavaScript 中,闭包是由词法作用域和函数作为值传递的特性产生的。闭包允许函数记住并访问它们的词法作用域,即使这些函数在其词法作用域之外执行。词法作用域是由函数声明的位置决定的,而闭包是这种作用域规则的自然结果。当一个函数内部声明了另一个函数,并将这个内部函数作为值返回时,就会形成闭包。
6 |
7 | - 词法作用域:按照代码书写时的样子,内部函数可以访问外部函数的变量。JavaScript 引擎通过数据结构和算法来表示一个函数,使得在代码执行时,能够按照词法作用域的规则访问外部的变量。这些变量会被记录在相应的数据结构中。
8 |
9 | - 函数作为值传递:即所谓的 first class 对象。函数可以像值一样被赋值、作为参数传递给其他函数,或者作为返回值返回。当一个函数作为值返回时,相当于返回了一个通道,这个通道可以访问该函数的词法作用域中的变量。虽然外层函数执行完毕后,这些变量理应被销毁,但由于内部函数作为值返回,这些变量得以保存下来,并且只能通过返回的函数访问。这也就是所谓的私有性。
10 |
11 | # Lexical Scope(词法作用域)
12 |
13 | # 异步代码中的闭包避免
14 |
15 | ```js
16 | for (const i = 0; i < 5; i++) {
17 | setTimeout(function () {
18 | console.log(new Date(), i);
19 | }, 1000);
20 | }
21 |
22 | console.log(new Date(), i);
23 | ```
24 |
25 | ## IIFE
26 |
27 | ```js
28 | for (const i = 0; i < 5; i++) {
29 | (function (j) {
30 | // j = i
31 | setTimeout(function () {
32 | console.log(new Date(), j);
33 | }, 1000);
34 | })(i);
35 | }
36 |
37 | console.log(new Date(), i);
38 | ```
39 |
40 | ```js
41 | const output = function (i) {
42 | setTimeout(function () {
43 | console.log(new Date(), i);
44 | }, 1000);
45 | };
46 |
47 | for (const i = 0; i < 5; i++) {
48 | output(i); // 这里传过去的 i 值被复制了
49 | }
50 |
51 | console.log(new Date(), i);
52 | ```
53 |
54 | ## Promise
55 |
56 | ```js
57 | const tasks = []; // 这里存放异步操作的 Promise
58 | const output = (i) =>
59 | new Promise((resolve) => {
60 | setTimeout(() => {
61 | console.log(new Date(), i);
62 | resolve();
63 | }, 1000 * i);
64 | });
65 |
66 | // 生成全部的异步操作
67 | for (const i = 0; i < 5; i++) {
68 | tasks.push(output(i));
69 | }
70 |
71 | // 异步操作完成之后,输出最后的 i
72 | Promise.all(tasks).then(() => {
73 | setTimeout(() => {
74 | console.log(new Date(), i);
75 | }, 1000);
76 | });
77 | ```
78 |
79 | ## Async
80 |
81 | ```js
82 | // 模拟其他语言中的 sleep,实际上可以是任何异步操作
83 | const sleep = (timeountMS) =>
84 | new Promise((resolve) => {
85 | setTimeout(resolve, timeountMS);
86 | });
87 |
88 | (async () => {
89 | // 声明即执行的 async 函数表达式
90 | for (const i = 0; i < 5; i++) {
91 | await sleep(1000);
92 | console.log(new Date(), i);
93 | }
94 |
95 | await sleep(1000);
96 | console.log(new Date(), i);
97 | })();
98 | ```
99 |
--------------------------------------------------------------------------------
/01~语法基础/函数/限流.md:
--------------------------------------------------------------------------------
1 | # 限流
2 |
3 | 在处理诸如 resize、scroll、mousemove 和 keydown/keyup/keypress 等事件的时候,通常我们不希望这些事件太过频繁地触发,尤其是监听程序中涉及到大量的计算或者有非常耗费资源的操作。以 mousemove 为例,根据 DOM Level 3 的规定,如果鼠标连续移动,那么浏览器就应该触发多个连续的 mousemove 事件,这意味着浏览器会在其内部计时器允许的情况下,根据用户移动鼠标的速度来触发 mousemove 事件;resize、scroll 和 `key*` 等事件与此类似。
4 |
5 | debounce 会合并一组函数调用,并等待一段时间未有新的触发后执行该函数,其强制函数在某段时间内只执行一次;throttle 强制函数以固定的速率执行,并且 throttle 会保证函数的返回结果。在处理一些高频率触发的 DOM 事件的时候,它们都能极大提高用户体验。
6 |
7 | 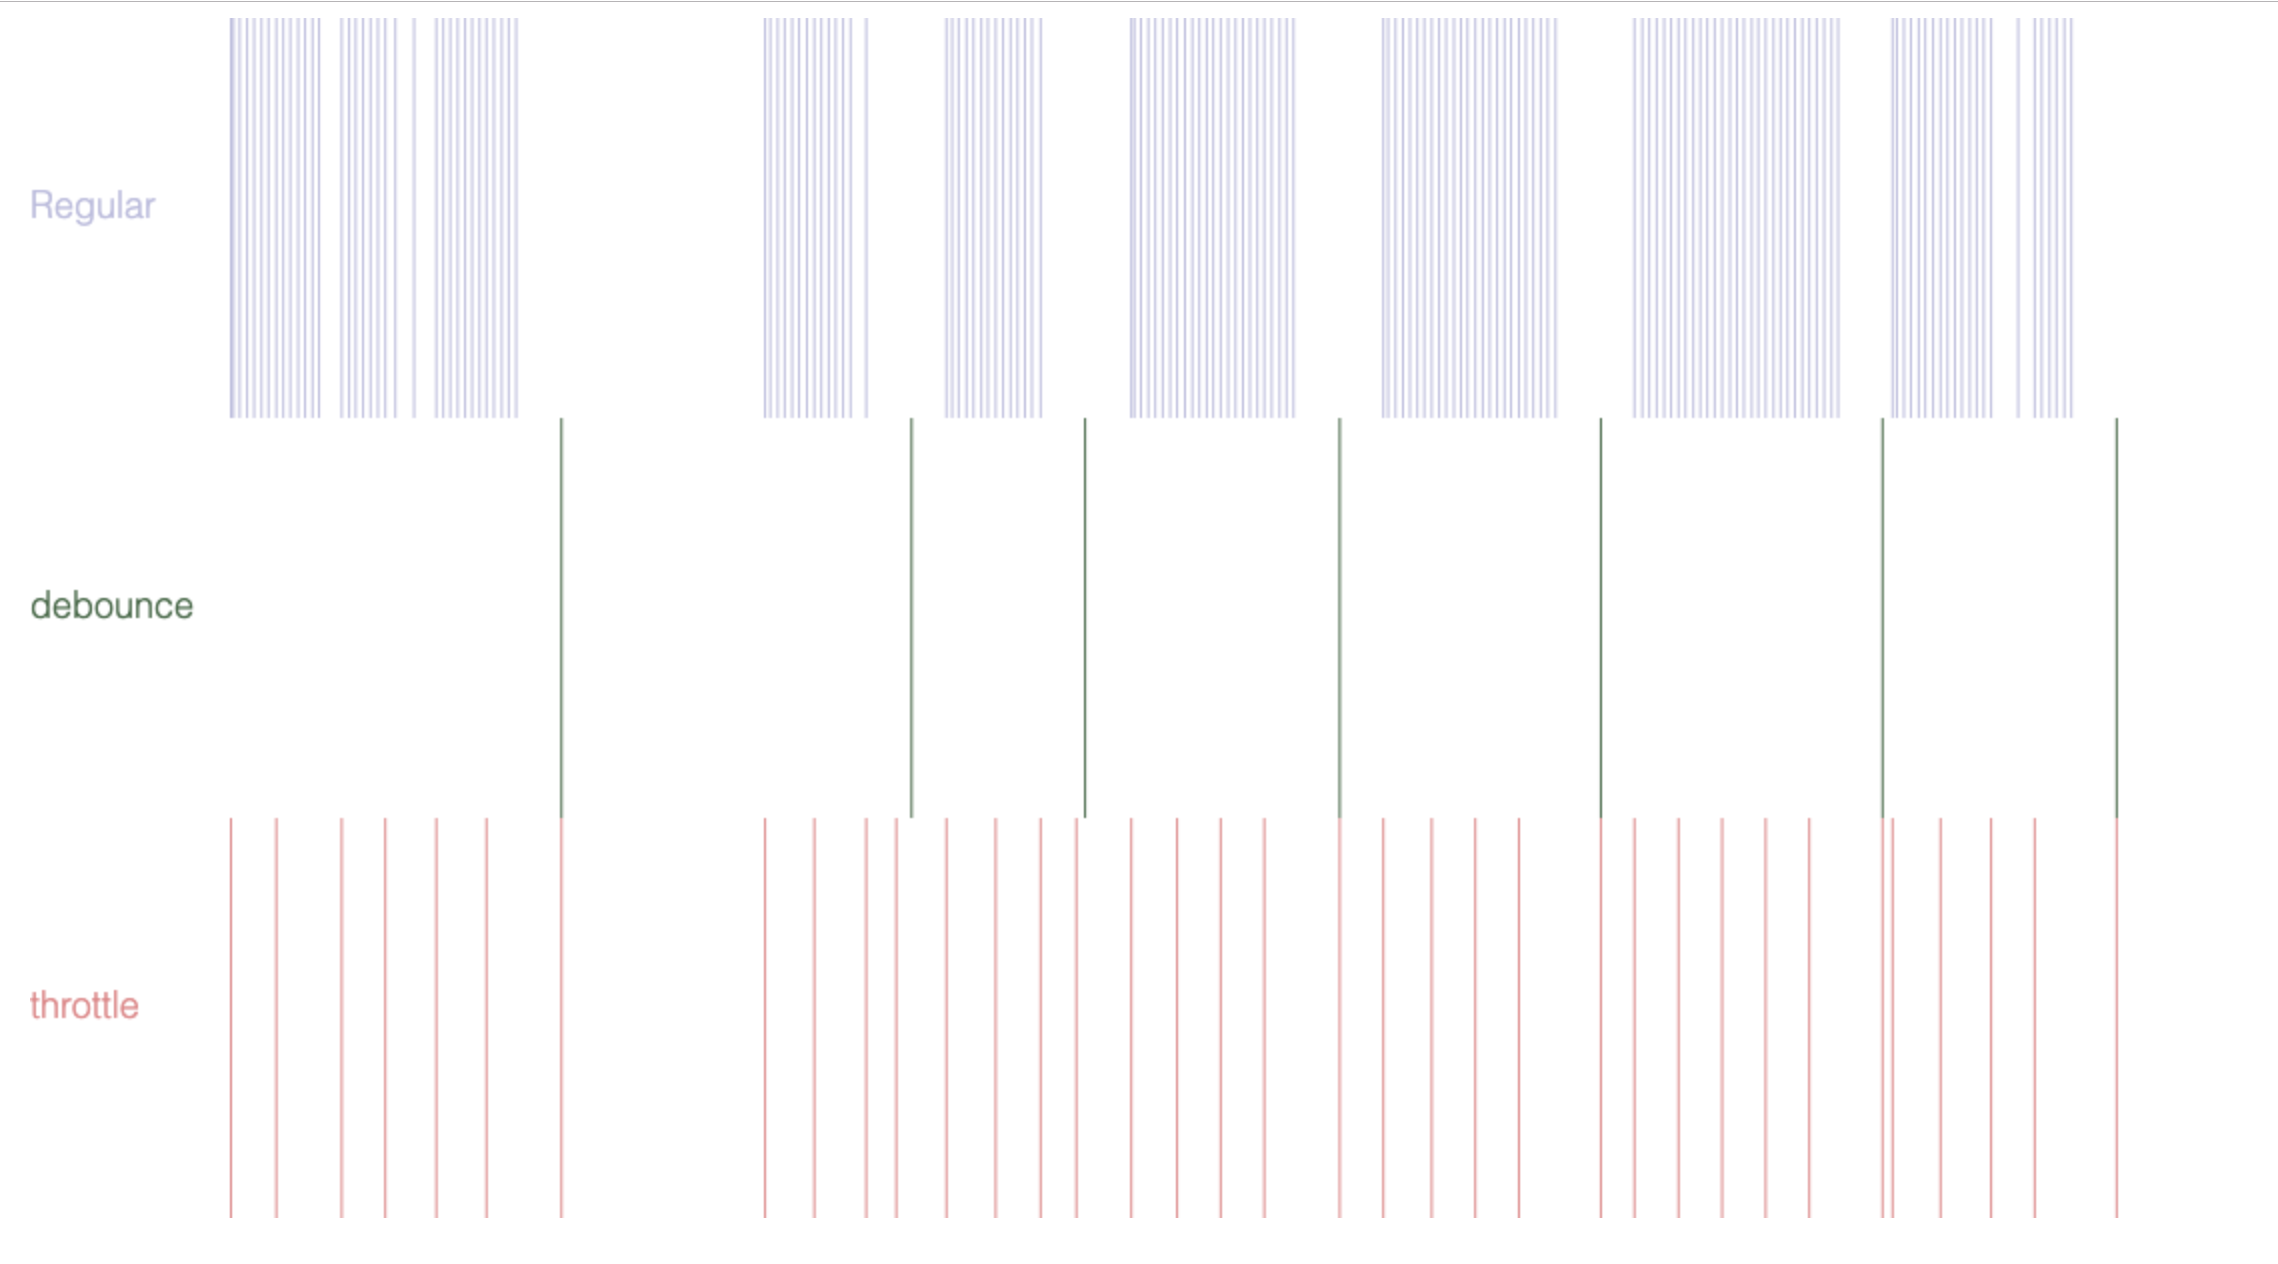
8 |
9 | 
10 |
11 | # Debounce
12 |
13 | DOM 事件里的 debounce 概念其实是从机械开关和继电器的“去弹跳”(debounce)衍生 出来的,基本思路就是把多个信号合并为一个信号。在 JavaScript 中,debounce 函数所做的事情就是,强制一个函数在某个连续时间段内只执行一次,哪怕它本来会被调用多次。我们希望在用户停止某个操作一段时间之后才执行相应的监听函数,而不是在用户操作的过程当中,浏览器触发多少次事件,就执行多少次监听函数。比如,在某个 3s 的时间段内连续地移动了鼠标,浏览器可能会触发几十(甚至几百)个 mousemove 事件,不使用 debounce 的话,监听函数就要执行这么多次;如果对监听函数使用 100ms 的“去弹跳”,那么浏览器只会执行一次这个监听函数,而且是在第 3.1s 的时候执行的。
14 |
15 | 我们这个 debounce 函数接收两个参数,第一个是要“去弹跳”的回调函数 fn,第二个是延迟的时间 delay。实际上,大部分的完整 debounce 实现还有第三个参数 immediate,表明回调函数是在一个时间区间的最开始执行(immediate 为 true)还是最后执行(immediate 为 false),比如 underscore 的 `_.debounce`。本文不考虑这个参数,只考虑最后执行的情况,感兴趣的可以自行研究。
16 |
17 | ```js
18 | /**
19 | *
20 | * @param fn {Function} 实际要执行的函数
21 | * @param delay {Number} 延迟时间,也就是阈值,单位是毫秒(ms)
22 | *
23 | * @return {Function} 返回一个“去弹跳”了的函数
24 | */
25 | function debounce(fn, delay) {
26 | // 定时器,用来 setTimeout
27 | let timer;
28 |
29 | // 返回一个函数,这个函数会在一个时间区间结束后的 delay 毫秒时执行 fn 函数
30 | return function () {
31 | // 保存函数调用时的上下文和参数,传递给 fn
32 | let context = this;
33 | let args = arguments;
34 |
35 | // 每次这个返回的函数被调用,就清除定时器,以保证不执行 fn
36 | clearTimeout(timer);
37 |
38 | // 当返回的函数被最后一次调用后(也就是用户停止了某个连续的操作),
39 | // 再过 delay 毫秒就执行 fn
40 | timer = setTimeout(function () {
41 | fn.apply(context, args);
42 | }, delay);
43 | };
44 | }
45 | ```
46 |
47 | 其实思路很简单,debounce 返回了一个闭包,这个闭包依然会被连续频繁地调用,但是在闭包内部,却限制了原始函数 fn 的执行,强制 fn 只在连续操作停止后只执行一次。debounce 的使用方式如下:
48 |
49 | ```js
50 | $(document).on(
51 | "mouvemove",
52 | debounce(function (e) {
53 | // 代码
54 | }, 250)
55 | );
56 | ```
57 |
58 | # Throttle
59 |
60 | throttle 的概念理解起来更容易,就是固定函数执行的速率,即所谓的“节流”。正常情况下,mousemove 的监听函数可能会每 20ms(假设)执行一次,如果设置 200ms 的“节流”,那么它就会每 200ms 执行一次。比如在 1s 的时间段内,正常的监听函数可能会执行 50(1000/20)次,“节流” 200ms 后则会执行 5(1000/200)次。
61 |
62 | 与 debounce 类似,我们这个 throttle 也接收两个参数,一个实际要执行的函数 fn,一个执行间隔阈值 threshhold。同样的,throttle 的更完整实现可以参看 underscore 的 `_.throttle`。
63 |
64 | ```js
65 | /**
66 | *
67 | * @param fn {Function} 实际要执行的函数
68 | * @param delay {Number} 执行间隔,单位是毫秒(ms)
69 | *
70 | * @return {Function} 返回一个“节流”函数
71 | */
72 |
73 | function throttle(fn, threshhold) {
74 | // 记录上次执行的时间
75 | let last;
76 |
77 | // 定时器
78 | let timer;
79 |
80 | // 默认间隔为 250ms
81 | threshhold || (threshhold = 250);
82 |
83 | // 返回的函数,每过 threshhold 毫秒就执行一次 fn 函数
84 | return function () {
85 | // 保存函数调用时的上下文和参数,传递给 fn
86 | let context = this;
87 | let args = arguments;
88 |
89 | let now = +new Date();
90 |
91 | // 如果距离上次执行 fn 函数的时间小于 threshhold,那么就放弃
92 | // 执行 fn,并重新计时
93 | if (last && now < last + threshhold) {
94 | clearTimeout(timer);
95 |
96 | // 保证在当前时间区间结束后,再执行一次 fn
97 | timer = setTimeout(function () {
98 | last = now;
99 | fn.apply(context, args);
100 | }, threshhold);
101 |
102 | // 在时间区间的最开始和到达指定间隔的时候执行一次 fn
103 | } else {
104 | last = now;
105 | fn.apply(context, args);
106 | }
107 | };
108 | }
109 | ```
110 |
111 | 原理也不复杂,相比 debounce,无非是多了一个时间间隔的判断,其他的逻辑基本一致。throttle 的使用方式如下:
112 |
113 | ```js
114 | $(document).on(
115 | "mouvemove",
116 | throttle(function (e) {
117 | // 代码
118 | }, 250)
119 | );
120 | ```
121 |
--------------------------------------------------------------------------------
/01~语法基础/变量操作/README.md:
--------------------------------------------------------------------------------
1 | # JavaScript 中的变量操作
2 |
3 | ES6 为我们引入了 let 与 const 两种新的变量声明关键字,同时也引入了块作用域;本篇首先介绍 ES6 中常用的三种变量声明方式,然后讨论了 JavaScript 按值传递的特性以及多种的赋值方式,最后介绍了复合类型拷贝的技巧。
4 |
5 | 如果 x,y 皆为 Object,则进行引用比较;譬如 `[] == [](false)` 等。
6 |
--------------------------------------------------------------------------------
/01~语法基础/变量操作/变量作用域.md:
--------------------------------------------------------------------------------
1 | # 变量作用域与提升
2 |
3 | JavaScript 中的作用域主要分为全局作用域(Global Scope)与局部作用域(Local Scope)两大类。在 ES6 之前,JavaScript 中只存在着函数作用域;而在 ES6 中,JavaScript 引入了 let、const 等变量声明关键字与块级作用域,在不同作用域下变量与函数的提升表现也是不一致的。在 JavaScript 中,所有绑定的声明会在控制流到达它们出现的作用域时被初始化;这里的作用域其实就是所谓的执行上下文(Execution Context),每个执行上下文分为内存分配(Memory Creation Phase)与执行(Execution)这两个阶段。在执行上下文的内存分配阶段会进行变量创建,即开始进入了变量的生命周期;变量的生命周期包含了声明(Declaration phase)、初始化(Initialization phase)与赋值(Assignment phase)过程这三个过程。
4 |
5 | 传统的 const 关键字声明的变量允许在声明之前使用,此时该变量被赋值为 undefined;而函数作用域中声明的函数同样可以在声明前使用,其函数体也被提升到了头部。这种特性表现也就是所谓的提升(Hoisting);虽然在 ES6 中以 let 与 const 关键字声明的变量同样会在作用域头部被初始化,不过这些变量仅允许在实际声明之后使用。在作用域头部与变量实际声明处之间的区域就称为所谓的暂时死域(Temporal Dead Zone),TDZ 能够避免传统的提升引发的潜在问题。另一方面,由于 ES6 引入了块级作用域,在块级作用域中声明的函数会被提升到该作用域头部,即允许在实际声明前使用;而在部分实现中该函数同时被提升到了所处函数作用域的头部,不过此时被赋值为 undefined。
6 |
7 | # 作用域
8 |
9 | 作用域(Scope)即代码执行过程中的变量、函数或者对象的可访问区域,作用域决定了变量或者其他资源的可见性;计算机安全中一条基本原则即是用户只应该访问他们需要的资源,而作用域就是在编程中遵循该原则来保证代码的安全性。除此之外,作用域还能够帮助我们提升代码性能、追踪错误并且修复它们。JavaScript 中的作用域主要分为全局作用域(Global Scope )与局部作用域(Local Scope )两大类,在 ES5 中定义在函数内的变量即是属于某个局部作用域,而定义在函数外的变量即是属于全局作用域。
10 |
11 | ## 全局作用域
12 |
13 | 当我们在浏览器控制台或者 Node.js 交互终端中开始编写 JavaScript 时,即进入了所谓的全局作用域:
14 |
15 | ```js
16 | // the scope is by default global
17 | const name = "Hammad";
18 | ```
19 |
20 | 定义在全局作用域中的变量能够被任意的其他作用域中访问:
21 |
22 | ```js
23 | const name = "Hammad";
24 |
25 | console.log(name); // logs 'Hammad'
26 |
27 | function logName() {
28 | console.log(name); // 'name' is accessible here and everywhere else
29 | }
30 |
31 | logName(); // logs 'Hammad'
32 | ```
33 |
34 | ## 函数作用域
35 |
36 | 定义在某个函数内的变量即从属于当前函数作用域,在每次函数调用中都会创建出新的上下文;换言之,我们可以在不同的函数中定义同名变量,这些变量会被绑定到各自的函数作用域中:
37 |
38 | ```js
39 | // Global Scope
40 | function someFunction() {
41 | // Local Scope #1
42 | function someOtherFunction() {
43 | // Local Scope #2
44 | }
45 | }
46 |
47 | // Global Scope
48 | function anotherFunction() {
49 | // Local Scope #3
50 | }
51 | // Global Scope
52 | ```
53 |
54 | 函数作用域的缺陷在于粒度过大,在使用闭包或者其他特性时导致异常的变量传递:
55 |
56 | ```js
57 | const callbacks = [];
58 |
59 | // 这里的 i 被提升到了当前函数作用域头部
60 | for (const i = 0; i <= 2; i++) {
61 | callbacks[i] = function () {
62 | return i * 2;
63 | };
64 | }
65 |
66 | console.log(callbacks[0]()); //6
67 | console.log(callbacks[1]()); //6
68 | console.log(callbacks[2]()); //6
69 | ```
70 |
71 | ## 块级作用域
72 |
73 | 类似于 if、switch 条件选择或者 for、while 这样的循环体即是所谓的块级作用域;在 ES5 中,要实现块级作用域,即需要在原来的函数作用域上包裹一层,即在需要限制变量提升的地方手动设置一个变量来替代原来的全局变量,譬如:
74 |
75 | ```js
76 | const callbacks = [];
77 | for (const i = 0; i <= 2; i++) {
78 | (function (i) {
79 | // 这里的 i 仅归属于该函数作用域
80 |
81 | callbacks[i] = function () {
82 | return i * 2;
83 | };
84 | })(i);
85 | }
86 | callbacks[0]() === 0;
87 | callbacks[1]() === 2;
88 | callbacks[2]() === 4;
89 | ```
90 |
91 | 而在 ES6 中,可以直接利用 `let` 关键字达成这一点:
92 |
93 | ```js
94 | let callbacks = [];
95 | for (let i = 0; i <= 2; i++) {
96 | // 这里的 i 属于当前块作用域
97 |
98 | callbacks[i] = function () {
99 | return i * 2;
100 | };
101 | }
102 | callbacks[0]() === 0;
103 | callbacks[1]() === 2;
104 | callbacks[2]() === 4;
105 | ```
106 |
107 | ## 词法作用域
108 |
109 | 词法作用域是 JavaScript 闭包特性的重要保证,笔者在[基于 JSX 的动态数据绑定](https://parg.co/bF0)一文中也介绍了如何利用词法作用域的特性来实现动态数据绑定。一般来说,在编程语言里我们常见的变量作用域就是词法作用域与动态作用域(Dynamic Scope ),绝大部分的编程语言都是使用的词法作用域。词法作用域注重的是所谓的 Write-Time,即编程时的上下文,而动态作用域以及常见的 this 的用法,都是 Run-Time,即运行时上下文。词法作用域关注的是函数在何处被定义,而动态作用域关注的是函数在何处被调用。JavaScript 是典型的词法作用域的语言,即一个符号参照到语境中符号名字出现的地方,局部变量缺省有着词法作用域。此二者的对比可以参考如下这个例子:
110 |
111 | ```js
112 | function foo() {
113 | console.log(a); // 2 in Lexical Scope,But 3 in Dynamic Scope
114 | }
115 |
116 | function bar() {
117 | const a = 3;
118 | foo();
119 | }
120 |
121 | const a = 2;
122 |
123 | bar();
124 | ```
125 |
--------------------------------------------------------------------------------
/01~语法基础/变量操作/变量声明.md:
--------------------------------------------------------------------------------
1 | # 变量声明
2 |
3 | 在 JavaScript 中,基本的变量声明可以用 const 方式;JavaScript 允许省略 var,直接对未声明的变量赋值。也就是说,`const a = 1` 与 `a = 1`,这两条语句的效果相同。但是由于这样的做法很容易不知不觉地创建全局变量(尤其是在函数内部),所以建议总是使用 const 命令声明变量。在 ES6 中,对于变量声明的方式进行了扩展,引入了 let 与 const。var 与 let 两个关键字创建变量的区别在于,const 声明的变量作用域是最近的函数块;而 let 声明的变量作用域是最近的闭合块,往往会小于函数块。另一方面,以 let 关键字创建的变量虽然同样被提升到作用域头部,但是并不能在实际声明前使用;如果强行使用则会抛出 ReferenceError 异常。
4 |
5 | ## const
6 |
7 | const 是 JavaScript 中基础的变量声明方式之一,其基本语法为
8 |
9 | ```js
10 | const x; // Declaration and initialization
11 | x = 'Hello World'; // Assignment
12 |
13 | // Or all in one
14 | const y = 'Hello World';
15 | ```
16 |
17 | ECMAScript 6 以前我们在 JavaScript 中并没有其他的变量声明方式,以 `const` 声明的变量作用于函数作用域中,如果没有相应的闭合函数作用域,那么该变量会被当做默认的全局变量进行处理。
18 |
19 | ```js
20 | function sayHello() {
21 | const hello = "Hello World";
22 | return hello;
23 | }
24 | console.log(hello);
25 | ```
26 |
27 | 像如上这种调用方式会抛出异常 : `ReferenceError: hello is not defined`,因为 `hello` 变量只能作用于 `sayHello` 函数中,不过如果按照如下先声明全局变量方式再使用时,其就能够正常调用
28 |
29 | ```js
30 | const hello = "Hello World";
31 | function sayHello() {
32 | return hello;
33 | }
34 | console.log(hello);
35 | ```
36 |
37 | ## let
38 |
39 | 在 ECMAScript 6 中我们可以使用 `let` 关键字进行变量声明
40 |
41 | ```js
42 | let x; // Declaration and initialization
43 | x = "Hello World"; // Assignment
44 |
45 | // Or all in one
46 | let y = "Hello World";
47 | ```
48 |
49 | `let` 关键字声明的变量是属于块作用域,也就是包含在 `{}` 之内的作用于。使用 `let` 关键字的优势在于能够降低偶然的错误的概率,因为其保证了每个变量只能在最小的作用域内进行访问。
50 |
51 | ```js
52 | const name = "Peter";
53 | if (name === "Peter") {
54 | let hello = "Hello Peter";
55 | } else {
56 | let hello = "Hi";
57 | }
58 | console.log(hello);
59 | ```
60 |
61 | 上述代码同样会抛出 `ReferenceError: hello is not defined` 异常,因为 `hello` 只能够在闭合的块作用域中进行访问,我们可以进行如下修改
62 |
63 | ```js
64 | const name = "Peter";
65 | if (name === "Peter") {
66 | let hello = "Hello Peter";
67 | console.log(hello);
68 | } else {
69 | let hello = "Hi";
70 | console.log(hello);
71 | }
72 | ```
73 |
74 | 我们可以利用这种块级作用域的特性来避免闭包中因为变量保留而导致的问题,譬如如下两种异步代码,使用 const 时每次循环中使用的都是相同变量;而使用 let 声明的 i 则会在每次循环时进行不同的绑定,即每次循环中闭包捕获的都是不同的 i 实例:
75 |
76 | ```
77 | for(let i = 0;i < 2; i++){
78 | setTimeout(()=>{console.log(`i:${i}`)},0);
79 | }
80 |
81 |
82 | for(const j = 0;j < 2; j++){
83 |
84 | setTimeout(()=>{console.log(`j:${j}`)},0);
85 | }
86 |
87 |
88 | let k = 0;
89 | for(k = 0;k < 2; k++){
90 |
91 | setTimeout(()=>{console.log(`k:${k}`)},0);
92 | }
93 |
94 |
95 | // output
96 | i:0
97 | i:1
98 | j:2
99 | j:2
100 | k:2
101 | k:2
102 | ```
103 |
104 | ## const
105 |
106 | `const` 关键字一般用于常量声明,用 `const` 关键字声明的常量需要在声明时进行初始化并且不可以再进行修改,并且 `const` 关键字声明的常量被限制于块级作用域中进行访问。
107 |
108 | ```js
109 | function f() {
110 | {
111 | let x;
112 | {
113 | // okay, block scoped name
114 | const x = "sneaky"; // error, const
115 | x = "foo";
116 | } // error, already declared in block
117 | let x = "inner";
118 | }
119 | }
120 | ```
121 |
122 | JavaScript 中 const 关键字的表现于 C 中存在着一定差异,譬如下述使用方式在 JavaScript 中就是正确的,而在 C 中则抛出异常:
123 |
124 | ```js
125 | # JavaScript
126 | const numbers = [1, 2, 3, 4, 6]
127 | numbers[4] = 5
128 | console.log(numbers[4]) // print 5
129 |
130 |
131 | # C
132 | const int numbers[] = {1, 2, 3, 4, 6};
133 | numbers[4] = 5; // error: read-only variable is not assignable
134 | printf("%d\n", numbers[4]);
135 | ```
136 |
137 | 从上述对比我们也可以看出,JavaScript 中 const 限制的并非值不可变性;而是创建了不可变的绑定,即对于某个值的只读引用,并且禁止了对于该引用的重赋值,即如下的代码会触发错误:
138 |
139 | ```js
140 | const numbers = [1, 2, 3, 4, 6];
141 | numbers = [7, 8, 9, 10, 11]; // error: assignment to constant variable
142 | console.log(numbers[4]);
143 | ```
144 |
145 | 我们可以参考如下图片理解这种机制,每个变量标识符都会关联某个存放变量实际值的物理地址;所谓只读的变量即是该变量标识符不可以被重新赋值,而该变量指向的值还是可变的。
146 |
147 | JavaScript 中存在着所谓的原始类型与复合类型,使用 const 声明的原始类型是值不可变的:
148 |
149 | ```js
150 | # Example 1
151 | const a = 10
152 | a = a + 1 // error: assignment to constant variable
153 | # Example 2
154 | const isTrue = true
155 | isTrue = false // error: assignment to constant variable
156 | # Example 3
157 | const sLower = 'hello world'
158 | const sUpper = sLower.toUpperCase() // create a new string
159 | console.log(sLower) // print hello world
160 | console.log(sUpper) // print HELLO WORLD
161 | ```
162 |
163 | 而如果我们希望将某个对象同样变成不可变类型,则需要使用 `Object.freeze()`;不过该方法仅对于键值对的 Object 起作用,而无法作用于 Date、Map 与 Set 等类型:
164 |
165 | ```js
166 | # Example 4
167 | const me = Object.freeze({name: “Jacopo”})
168 | me.age = 28
169 | console.log(me.age) // print undefined
170 | # Example 5
171 | const arr = Object.freeze([-1, 1, 2, 3])
172 | arr[0] = 0
173 | console.log(arr[0]) // print -1
174 | # Example 6
175 | const me = Object.freeze({
176 | name: 'Jacopo',
177 | pet: {
178 | type: 'dog',
179 | name: 'Spock'
180 | }
181 | })
182 | me.pet.name = 'Rocky'
183 | me.pet.breed = 'German Shepherd'
184 | console.log(me.pet.name) // print Rocky
185 | console.log(me.pet.breed) // print German Shepherd
186 | ```
187 |
188 | 即使是 `Object.freeze()` 也只能防止顶层属性被修改,而无法限制对于嵌套属性的修改,这一点我们会在下文的浅拷贝与深拷贝部分继续讨论。
189 |
--------------------------------------------------------------------------------
/01~语法基础/数据结构/.DS_Store:
--------------------------------------------------------------------------------
https://raw.githubusercontent.com/wx-chevalier/JavaScript-Notes/2c3c57c322e60a50a553e47b69f03839d95df99f/01~语法基础/数据结构/.DS_Store
--------------------------------------------------------------------------------
/01~语法基础/数据结构/README.md:
--------------------------------------------------------------------------------
https://raw.githubusercontent.com/wx-chevalier/JavaScript-Notes/2c3c57c322e60a50a553e47b69f03839d95df99f/01~语法基础/数据结构/README.md
--------------------------------------------------------------------------------
/01~语法基础/数据结构/字符串与编码/README.md:
--------------------------------------------------------------------------------
1 | # JavaScript 字符串
2 |
3 | # Manipulation: 操作
4 |
5 | ## 创建添加
6 |
7 | ## Format/Template: 格式化与模板字符串生成
8 |
9 | ## 替换删除
10 |
11 | ## 创建增删
12 |
13 | ### 插值 ES6 中开始支持较为复杂的模板字符串方式:
14 |
15 | ```javascript
16 | // Basic literal string creation `In JavaScript '\n' is a line-feed.`
17 |
18 | // Multiline strings `In JavaScript this is not legal.`
19 |
20 | // String interpolation const name = "Bob", time = "today"; `Hello ${name}, how are you ${time}?`
21 |
22 | // Construct an HTTP request prefix is used to interpret the replacements and construction GET`http://foo.org/bar?a=${a}&b=${b} Content-Type: application/json X-Credentials: ${credentials} { "foo": ${foo}, "bar": ${bar}}`(myOnReadyStateChangeHandler);
23 | ```
24 |
25 | ### 替换删除如果是仅替换一次,可以直接使用 String.prototype.replace,如果需要全部替换:
26 |
27 | ```js
28 | str = str.replace(/abc/g, "");
29 | function replaceAll(str, find, replace) {
30 | return str.replace(new RegExp(find, "g"), replace);
31 | }
32 | ```
33 |
--------------------------------------------------------------------------------
/01~语法基础/数据结构/字符串与编码/编解码.md:
--------------------------------------------------------------------------------
1 | # JavaScript 内置编码函数
2 |
3 | ## escape
4 |
5 | Javascript 语言用于编码的函数,一共有三个,最古老的一个就是 escape()。该方法不会对 ASCII 字母和数字进行编码,也不会对下面这些 ASCII 标点符号进行编码: - \_ . ! ~ _ ' ( )。其他所有的字符都会被转义序列替换。所有的空格符、标点符号、特殊字符以及其他非 ASCII 字符都将被转化成 %xx 格式的字符编码(xx 等于该字符在字 符集表里面的编码的 16 进制数字)。比如,空格符对应的编码是 %20。不会被此方法编码的字符: @ _ / +。实际上,escape() 不能直接用于 URL 编码,它的真正作用是返回一个字符的 Unicode 编码值。比如 " 王下邀月熊 " 的返回结果 是 %u738B%u4E0B%u9080%u6708%u718A,也就是说在 Unicode 字符集中," 王 " 是第 738B 个(十六进制)字符,后面的以此类推。
6 |
7 | ```
8 | > escape("王下邀月熊")
9 | '%u738B%u4E0B%u9080%u6708%u718A'
10 | ```
11 |
12 | 其对应的解码函数为 unescape:
13 |
14 | ```
15 | > unescape('%u738B%u4E0B%u9080%u6708%u718A')
16 | '王下邀月熊'
17 | ```
18 |
19 | ## encodeURI
20 |
21 | encodeURI() 是 Javascript 中真正用来对 URL 编码的函数。它着眼于对整个 URL 进行编码,因此除了常见的符号以外,对其他一些在网址中有特殊含义的符号 "; / ? : @ & = + \$, #",也不进行编码。编码后,它输出符号的 utf-8 形式,并且在每个字节前加上 %。
22 |
23 | ```
24 | > encodeURI("http://王下邀月熊.com")
25 | 'http://%E7%8E%8B%E4%B8%8B%E9%82%80%E6%9C%88%E7%86%8A.com'
26 | ```
27 |
28 | 它对应的解码函数是 decodeURI()。
29 |
30 | ```
31 | > decodeURI('http://%E7%8E%8B%E4%B8%8B%E9%82%80%E6%9C%88%E7%86%8A.com')
32 | 'http://王下邀月熊.com'
33 | ```
34 |
35 | # DOM 下 GBK 编码
36 |
37 | 在 node 环境下我们可以使用[node-urlencode](https://www.npmjs.com/package/urlencode)方便地进行各种格式的编解码,但是在 DOM 下 GBK 的编码却是个小麻烦。另一方面,如果看过笔者之前的[浏览器跨域方法与基于 Fetch 的 Web 请求最佳实践](https://segmentfault.com/a/1190000006095018)这篇文章会发现,因为希望能在 Node 环境下测试,而后在 Browser 环境中无缝运行,所以笔者封装了[isomorphic-urlencode](https://github.com/wx-chevalier/Web-Frontend-Introduction-And-Best-Practices/tree/master/dom/network/HTTPClient/isomorphic-urlencode),其保证了接口风格是与[node-urlencode](https://www.npmjs.com/package/urlencode)保持一致,但是因为基于 DOM 的解码是异步进行的,因此最后是设置了 Promise 作为异步的返回对象。在 Browser 中其核心的对于 GBK 的编码方式分为两步,首先是在当前的页面中创建隐藏的 form 表单与隐藏的 iframe:
38 |
39 | ```js
40 | //创建form通过accept-charset做encode
41 | const form = document.createElement("form");
42 | form.method = "get";
43 | form.style.display = "none";
44 | form.acceptCharset = "gbk";
45 |
46 | //创建伪造的输入
47 | const input = document.createElement("input");
48 | input.type = "hidden";
49 | input.name = "str";
50 | input.value = url;
51 |
52 | //将输入框添加到表单中
53 | form.appendChild(input);
54 | form.target = "_urlEncode_iframe_";
55 |
56 | document.body.appendChild(form);
57 |
58 | //隐藏iframe截获提交的字符串
59 | if (!window["_urlEncode_iframe_"]) {
60 | const iframe = document.createElement("iframe");
61 | //iframe.name = '_urlEncode_iframe_';
62 | iframe.setAttribute("name", "_urlEncode_iframe_");
63 | iframe.style.display = "none";
64 | iframe.width = "0";
65 | iframe.height = "0";
66 | iframe.scrolling = "no";
67 | iframe.allowtransparency = "true";
68 | iframe.frameborder = "0";
69 | iframe.src = "about:blank";
70 | document.body.appendChild(iframe);
71 | }
72 |
73 | //
74 | window._urlEncode_iframe_callback = callback;
75 |
76 | //设置回调编码页面的地址,这里需要用户修改
77 | form.action = window.location.href;
78 |
79 | //提交表单
80 | form.submit();
81 |
82 | //定时删除两个子Element
83 | setTimeout(function () {
84 | form.parentNode.removeChild(form);
85 | iframe.parentNode.removeChild(iframe);
86 | }, 100);
87 | ```
88 |
89 | 即将 form 表单的提交结果异步显示在 iframe 中,因为笔者是基于 React 进行的开发,因此只有一个 HTML 文件作为入口,因此笔者是提交到了自身,并且需要在 HTML 文件首部添加如下回调控制代码
90 |
91 | ```js
92 | if (parent._urlEncode_iframe_callback) {
93 | parent._urlEncode_iframe_callback(location.search.split("=")[1]);
94 |
95 | //直接关闭当前子窗口
96 | window.close();
97 | }
98 | ```
99 |
100 | 在原文中还有关于 IE 的 Bug 的讨论,这里暂时不做详细介绍。总结而言,isomorphic-urlencode 简单的用法为
101 |
102 | ```js
103 | const urlencode = require("isomorphic-urlencode");
104 |
105 | urlencode("王下邀月熊").then(function (data) {
106 | console.log(data);
107 | });
108 |
109 | urlencode("王下邀月熊", "gbk").then(function (data) {
110 | console.log(data);
111 | });
112 | ```
113 |
114 | 在笔者自己以流式风格基于 fetch 封装的[fluent-fetch](https://www.npmjs.com/package/fluent-fetcher)中,建议是将所有的非 UTF-8 编码的操作提取到网络请求之外,即可以如下使用:
115 |
116 | ```js
117 | //测试需要以GBK编码方式发起的请求
118 | const urlencode = require("isomorphic-urlencode");
119 |
120 | urlencode("左盼", "gbk").then((data) => {
121 | fluentFetcher = new FluentFetcher({
122 | host: "ggzy.njzwfw.gov.cn",
123 | responseContentType: "text",
124 | });
125 |
126 | //http://ggzy.njzwfw.gov.cn/njggzy/consultant/showresault.aspx?ShowLsh=0&Mlsh=123456&Name=%D7%F3%C5%CE
127 | //测试以代理模式发起请求
128 | fluentFetcher
129 | .parameter({ ShowLsh: "0", Mlsh: "123456", Name: data })
130 | .get({ path: "/njggzy/consultant/showresault.aspx" })
131 | .proxy({ proxyUrl: "http://app.truelore.cn:11499/proxy" })
132 | .build()
133 | .then((data) => {
134 | console.log(data);
135 | })
136 | .catch((error) => {
137 | console.log(error);
138 | });
139 | });
140 | ```
141 |
--------------------------------------------------------------------------------
/01~语法基础/数据结构/时间与日期/Dayjs.md:
--------------------------------------------------------------------------------
1 | # Dayjs
2 |
--------------------------------------------------------------------------------
/01~语法基础/数据结构/时间与日期/Moment.js.md:
--------------------------------------------------------------------------------
1 | # [Moment.js](http://momentjs.com/guides/)
2 |
3 | Moment.js 为 JavaScript Date 对象提供了封装与统一好的 API 接口,并且提供了更多的功能。首先需要了解的是,Moment 提供的 moment 对象是可变的,即当我们对该对象执行类似于增减或者设置的时候,其对象本身的值会发生变化,譬如下面这段代码
4 |
5 | ```js
6 | const a = moment("2016-01-01");
7 | const b = a.add(1, "week");
8 | a.format();
9 | ("2016-01-08T00:00:00-06:00");
10 | ```
11 |
12 | 而如果我们不希望改变原有的值,特别是在需要创建多个时间日期对象的时候,我们可以利用 clone 方法
13 |
14 | ```js
15 | const a = moment("2016-01-01");
16 | const b = a.clone().add(1, "week");
17 | a.format();
18 | ("2016-01-01T00:00:00-06:00");
19 | ```
20 |
21 | 笔者是习惯在 Webpack 中进行打包,类似于 Node 下的安装方式
22 |
23 | ```js
24 | // 安装
25 | npm install moment
26 |
27 | // 使用
28 | const moment = require('moment');
29 | moment().format();
30 | ```
31 |
32 | 如果你需要引入某个语言包,那么可以用如下方式
33 |
34 | ```
35 | const moment = require('moment');
36 | require('moment/locale/cs');
37 | console.log(moment.locale()); // cs
38 | ```
39 |
40 | ## Parse
41 |
42 | ### TimeStamp
43 |
44 | ```
45 | //毫秒
46 | const day = moment(1318781876406);
47 | //秒
48 | const day = moment.unix(1318781876);
49 | ```
50 |
51 | ### DateTimeString
52 |
53 | ```
54 | moment("2010-10-20 4:30", "YYYY-MM-DD HH:mm"); // parsed as 4:30 local time
55 | moment("2010-10-20 4:30 +0000", "YYYY-MM-DD HH:mm Z"); // parsed as 4:30 UTC
56 |
57 | moment("2010 13", "YYYY MM").isValid(); // false (not a real month)
58 | moment("2010 11 31", "YYYY MM DD").isValid(); // false (not a real day)
59 | moment("2010 2 29", "YYYY MM DD").isValid(); // false (not a leap year)
60 | moment("2010 notamonth 29", "YYYY MMM DD").isValid(); // false (not a real month name)
61 | ```
62 |
63 | ## Manipulate
64 |
65 | ### Get/Set
66 |
67 | ```
68 | moment().seconds(30) === new Date().setSeconds(30);
69 | moment().seconds() === new Date().getSeconds();
70 |
71 | moment().get('year');
72 | moment().get('month'); // 0 to 11
73 | moment().get('date');
74 | moment().get('hour');
75 | moment().get('minute');
76 | moment().get('second');
77 | moment().get('millisecond');
78 | ```
79 |
80 | ```
81 | moment().set('year', 2013);
82 | moment().set('month', 3); // April
83 | moment().set('date', 1);
84 | moment().set('hour', 13);
85 | moment().set('minute', 20);
86 | moment().set('second', 30);
87 | moment().set('millisecond', 123);
88 |
89 | moment().set({'year': 2013, 'month': 3});
90 | ```
91 |
92 | ### Add&Subtract
93 |
94 | ```
95 | moment().add(Number, String);
96 | moment().add(Duration);
97 | moment().add(Object);
98 |
99 | moment().add(7, 'days');
100 |
101 | moment().subtract(Number, String);
102 | moment().subtract(Duration);
103 | moment().subtract(Object);
104 |
105 | moment().subtract(7, 'days');
106 | ```
107 |
108 | ### Comparison
109 |
110 | ```
111 | moment().isBefore(Moment|String|Number|Date|Array);
112 | moment().isBefore(Moment|String|Number|Date|Array, String);
113 |
114 | moment('2010-10-20').isBefore('2010-12-31', 'year'); // false
115 | moment('2010-10-20').isBefore('2011-01-01', 'year'); // true
116 | ```
117 |
118 | ### Diff
119 |
120 | ```
121 | moment().diff(Moment|String|Number|Date|Array);
122 | moment().diff(Moment|String|Number|Date|Array, String);
123 | moment().diff(Moment|String|Number|Date|Array, String, Boolean);
124 |
125 | const a = moment([2007, 0, 29]);
126 | const b = moment([2007, 0, 28]);
127 | a.diff(b, 'days') // 1
128 | ```
129 |
130 | ## Display
131 |
132 | ### Format
133 |
134 | ```js
135 | moment().format(); // "2014-09-08T08:02:17-05:00" (ISO 8601)
136 | moment().format("dddd, MMMM Do YYYY, h:mm:ss a"); // "Sunday, February 14th 2010, 3:25:50 pm"
137 | moment().format("ddd, hA"); // "Sun, 3PM"
138 | moment("gibberish").format("YYYY MM DD"); // "Invalid date"
139 | ```
140 |
141 | ### Relative Format
142 |
143 | ```
144 | moment([2007, 0, 29]).fromNow(); // 4 years ago
145 | moment([2007, 0, 29]).fromNow(true); // 4 years
146 | ```
147 |
148 | ### Duration
149 |
150 | ```
151 | moment.duration(1, "minutes").humanize(); // a minute
152 | moment.duration(2, "minutes").humanize(); // 2 minutes
153 | moment.duration(24, "hours").humanize(); // a day
154 | ```
155 |
156 | ## i18n
157 |
--------------------------------------------------------------------------------
/01~语法基础/数据结构/时间与日期/README.md:
--------------------------------------------------------------------------------
1 | # JavaScript 时间与日期类型
2 |
3 | ## 标准时间
4 |
5 | GMT 即格林威治标准时间( Greenwich Mean Time,简称 G.M.T. ),指位于英国伦敦郊区的皇家格林威治天文台的标准时间,因为本初子午线被定义为通过那里的经线。然而由于地球的不规则自转,导致 GMT 时间有误差,因此目前已不被当作标准时间使用。UTC 是最主要的世界时间标准,是经过平均太阳时 ( 以格林威治时间 GMT 为准 )、地轴运动修正后的新时标以及以秒为单位的国际原子时所综合精算而成的时间。UTC 比 GMT 来得更加精准。其误差值必须保持在 0.9 秒以内,若大于 0.9 秒则由位于巴黎的国际地球自转事务中央局发布闰秒,使 UTC 与地球自转周期一致。不过日常使用中,GMT 与 UTC 的功能与精确度是没有差别的。协调世界时区会使用 “Z” 来表示。而在航空上,所有使用的时间划一规定是协调世界时。而且 Z 在无线电中应读作 “Zulu”(可参见北约音标字母),协调世界时也会被称为 “Zulu time”。
6 |
7 | ### TimeZone&UTC Offsets | 时区与偏移
8 |
9 | 人们经常会把时区与 UTC 偏移量搞混,UTC 偏移量代表了某个具体的时间值与 UTC 时间之间的差异,通常用 HH:mm 形式表述。而 TimeZone 则表示某个地理区域,某个 TimeZone 中往往会包含多个偏移量,而多个时区可能在一年的某些时间有相同的偏移量。譬如 America/Chicago, America/Denver, 以及 America/Belize 在一年中不同的时间都会包含 -06:00 这个偏移。
10 |
11 | ### 时间戳
12 |
13 | Unix 时间戳表示当前时间到 1970 年 1 月 1 日 00:00:00 UTC 对应的秒数。注意,JavaScript 内的时间戳指的是当前时间到 1970 年 1 月 1 日 00:00:00 UTC 对应的毫秒数,和 Unix 时间戳不是一个概念,后者表示秒数,差了 1000 倍。
14 |
15 | ## 时间数字字符串格式
16 |
17 | ### RFC2822
18 |
19 | ```
20 | YYYY/MM/DD HH:MM:SS ± timezone(时区用4位数字表示)
21 | // eg 1992/02/12 12:23:22+0800
22 | ```
23 |
24 | ### ISO 8601
25 |
26 | 国际标准化组织的国际标准 ISO 8601 是日期和时间的表示方法,全称为《数据存储和交换形式 · 信息交换 · 日期和时间的表示方法》。目前最新为第三版 ISO8601:2004,第一版为 ISO8601:1988,第二版为 ISO8601:2000。年由 4 位数组成,以公历公元 1 年为 0001 年,以公元前 1 年为 0000 年,公元前 2 年为 -0001 年,其他以此类推。应用其他纪年法要换算成公历,但如果发送和接受信息的双方有共同一致同意的其他纪年法,可以自行应用。
27 |
28 | ```
29 | YYYY-MM-DDThh:mm:ss ± timezone(时区用HH:MM表示)
30 | 1997-07-16T08:20:30Z
31 | // “Z”表示UTC标准时区,即"00:00",所以这里表示零时区的`1997年7月16日08时20分30秒`
32 | //转换成位于东八区的北京时间则为`1997年7月17日16时20分30秒`
33 | 1997-07-16T19:20:30+01:00
34 | // 表示东一区的1997年7月16日19时20秒30分,转换成UTC标准时间的话是1997-07-16T18:20:30Z
35 | ```
36 |
--------------------------------------------------------------------------------
/01~语法基础/数据结构/正则表达式.md:
--------------------------------------------------------------------------------
1 | # JavaScript 正则表达式详解与实战
2 |
3 | - Symbols
4 |
5 | | 符号 | 描述 |
6 | | ---- | -------------------------------------------------------------- |
7 | | . | (period) Matches any single character, except for line breaks. |
8 | | `*` | Matches the preceding expression 0 or more times. |
9 | | + | Matches the preceding expression 1 or more times. |
10 | | ? | Preceding expression is optional (Matches 0 or 1 times). |
11 | | ^ | Matches the beginning of the string. |
12 | | `$` | Matches the end of the string. |
13 |
14 | - Character groups
15 |
16 | | 符号 | 描述 |
17 | | ------ | ------------------------------------------------------------------------------------------------------------------------- |
18 | | \d | Matches any single digit character. |
19 | | \w | Matches any word character (alphanumeric & underscore). |
20 | | [XYZ] | Character Set: Matches any single character from the character within the brackets. You can also do a range such as [A-Z] |
21 | | [XYZ]+ | Matches one or more of any of the characters in the set. |
22 | | [^a-z] | Inside a character set, the ^ is used for negation. In this example, match anything that is NOT an uppercase letter. |
23 |
24 | - Flags: There are five optional flags. They can be used separately or together and are placed after the closing slash. Example: /[A-Z]/g I’ll only be introducing 2 here.
25 |
26 | | 符号 | 描述 |
27 | | ---- | ----------------------- |
28 | | g | Global search |
29 | | i | case insensitive search |
30 |
31 | - Advanced
32 |
33 | | 符号 | 描述 |
34 | | ------ | ------------------------------------------------------------------------- |
35 | | (x) | Capturing Parenthesis: Matches x and remembers it so we can use it later. |
36 | | (?:x) | Non-capturing Parenthesis: Matches x and does not remembers it. |
37 | | x(?=y) | Lookahead: Matches x only if it is followed by y. |
38 |
39 | # 匹配模式
40 |
41 | ## 全局模式
42 |
43 | ## 严格模式
44 |
45 | Sticky 模式常用于语句令牌化这种需要严格指定匹配位置的地方:
46 |
47 | ```js
48 | function tokenize(TOKEN_REGEX, str) {
49 | let result = [];
50 | let match;
51 | while ((match = TOKEN_REGEX.exec(str))) {
52 | result.push(match[1]);
53 | }
54 | return result;
55 | }
56 |
57 | const TOKEN_GY = /\s*(\+|[0-9]+)\s*/gy;
58 | const TOKEN_G = /\s*(\+|[0-9]+)\s*/g;
59 | ```
60 |
61 | ```sh
62 | > tokenize(TOKEN_GY, '3 + 4')
63 | [ '3', '+', '4' ]
64 | > tokenize(TOKEN_G, '3 + 4')
65 | [ '3', '+', '4' ]
66 |
67 | > tokenize(TOKEN_GY, '3x + 4')
68 | [ '3' ]
69 | > tokenize(TOKEN_G, '3x + 4')
70 | [ '3', '+', '4' ]
71 | ```
72 |
--------------------------------------------------------------------------------
/01~语法基础/数据结构/视图类型.md:
--------------------------------------------------------------------------------
1 | # ArrayBuffer, TypedArray, DataView
2 |
3 | 在[剖析 V8 引擎](https://github.com/wx-chevalier/JavaScript-Notes)一节中我们讨论过,目前 JavaScript 使用的数组实际上是伪数组。这种伪数组给我们的操作带来了极大的方便性,但这种实现方式也带来了另一个问题,及无法达到数组快速索引的极致。上百万的数据量的情况下,每次新添加一条数据都需要动态分配内存空间,数据索引时都要遍历链表索引造成的性能浪费会变得异常的明显。
4 |
5 | 在 ES6 中,JS 新提供了一种获得真正数组的方式:ArrayBuffer,TypedArray 和 DataView。ArrayBuffer 代表分配的一段定长的连续内存块。但是我们无法直接对该内存块进行操作,只能通过 TypedArray 和 DataView 来对其操作。
6 |
7 | ```ts
8 | const ab = new ArrayBuffer(32);
9 | const iA = new Int8Array(ab);
10 | iA[0] = 97; //把二进制的数据的首位改为97,97为小写字母a的 ascii 码;
11 | const blob = new Blob([iA], { type: "application/octet-binary" }); //把二进制的码转化为blob类型
12 | const url = URL.createObjectURL(blob);
13 | window.open(url);
14 | ```
15 |
16 | 如果希望将 Blob 转化为 ArrayBuffer,则需要使用到 FileReader:
17 |
18 | ```js
19 | // ArrayBuffer -> Blob
20 | const uint8Array = new Uint8Array([1, 2, 3]);
21 | const arrayBuffer = uint8Array.buffer;
22 | const blob = new Blob([arrayBuffer]);
23 |
24 | // Blob -> ArrayBuffer
25 | const uint8ArrayNew = null;
26 | const arrayBufferNew = null;
27 | const fileReader = new FileReader();
28 | fileReader.onload = function (event) {
29 | arrayBufferNew = event.target.result;
30 | uint8ArrayNew = new Uint8Array(arrayBufferNew);
31 |
32 | // warn if read values are not the same as the original values
33 | // arrayEqual from: http://stackoverflow.com/questions/3115982/how-to-check-javascript-array-equals
34 | function arrayEqual(a, b) {
35 | return !(a < b || b < a);
36 | }
37 | if (arrayBufferNew.byteLength !== arrayBuffer.byteLength)
38 | // should be 3
39 | console.warn("ArrayBuffer byteLength does not match");
40 | if (arrayEqual(uint8ArrayNew, uint8Array) !== true)
41 | // should be [1,2,3]
42 | console.warn("Uint8Array does not match");
43 | };
44 | fileReader.readAsArrayBuffer(blob);
45 | fileReader.result; // also accessible this way once the blob has been read
46 | ```
47 |
48 | # TypedArray
49 |
50 | TypeArray 是一个统称,包含 Int8Array, Int16Array, Int32Array, Float32Array 等等。以 Int8Array 为例,这个对象可拆分为三个部分:Int、8、Array:首先这是一个数组,这个数据里存储的是有符号的整形数据,每条数据占 8 个比特位,及该数据里的每个元素可表示的最大数值是 2^7 = 128, 最高位为符号位。
51 |
52 | ```js
53 | // TypedArray
54 | const typedArray = new Int8Array(10);
55 |
56 | typedArray[0] = 8;
57 | typedArray[1] = 127;
58 | typedArray[2] = 128;
59 | typedArray[3] = 256;
60 |
61 | console.log("typedArray", " -- ", typedArray);
62 | //Int8Array(10) [8, 127, -128, 0, 0, 0, 0, 0, 0, 0]
63 | ```
64 |
65 | 其他类型也都以此类推,可以存储的数据越长,所占的内存空间也就越大。这也要求在使用 TypedArray 时,对你的数据非常了解,在满足条件的情况下尽量使用占较少内存的类型。
66 |
67 | # DataView
68 |
69 | DataView 相对 TypedArray 来说更加的灵活。每一个 TypedArray 数组的元素都是定长的数据类型,如 Int8Array 只能存储 Int8 类型;但是 DataView 却可以在传递一个 ArrayBuffer 后,动态分配每一个元素的长度,即存不同长度及类型的数据。
70 |
71 | ```js
72 | // DataView
73 | const arrayBuffer = new ArrayBuffer(8 * 10);
74 |
75 | const dataView = new DataView(arrayBuffer);
76 |
77 | dataView.setInt8(0, 2);
78 | dataView.setFloat32(8, 65535);
79 |
80 | // 从偏移位置开始获取不同数据
81 | dataView.getInt8(0);
82 | // 2
83 | dataView.getFloat32(8);
84 | // 65535
85 | ```
86 |
87 | DataView 最大的性能问题在于将 JS 转成 C++ 过程的性能浪费。而谷歌将该部分使用 CSA(CodeStubAssembler)语言重写后,可以直接操作 TurboFan(V8 引擎)来避免转换时带来的性能损耗。
88 |
89 | ## 性能对比
90 |
91 | ```js
92 | // 普通数组
93 | function arrayFunc() {
94 | const length = 2e6;
95 | const array = [];
96 | const index = 0;
97 |
98 | while (length--) {
99 | array[index] = 10;
100 | index++;
101 | }
102 | }
103 |
104 | // dataView
105 | function dataViewFunc() {
106 | const length = 2e6;
107 | const arrayBuffer = new ArrayBuffer(length);
108 | const dataView = new DataView(arrayBuffer);
109 | const index = 0;
110 |
111 | while (length--) {
112 | dataView.setInt8(index, 10);
113 | index++;
114 | }
115 | }
116 |
117 | // typedArray
118 | function typedArrayFunc() {
119 | const length = 2e6;
120 | const typedArray = new Int8Array(length);
121 | const index = 0;
122 |
123 | while (length--) {
124 | typedArray[index++] = 10;
125 | }
126 | }
127 | ```
128 |
--------------------------------------------------------------------------------
/01~语法基础/模块化/ES Modules.md:
--------------------------------------------------------------------------------
1 | # ES Modules
2 |
3 | # 浏览器
4 |
5 | 目前主流浏览器中默认支持 ES2015 Modules 只有 Safari,而 Firefox 在 54 版本之后允许用户手动启用该特性。以 Firefox 为例,如果我们在浏览器中使用 ES2015 Modules,我们需要声明入口模块:
6 |
7 | ```js
8 |
9 | ```
10 |
11 | 这里的 `module` 关键字就告诉浏览器该脚本中包含了对于其他脚本的导入语句,需要进行预先处理;不过问题来了,那么 JavaScript 解释器又该如何判断某个文件是否为模块。社区也经过很多轮的讨论,我们可以来看下简单的例子:
12 |
13 | ```html
14 |
15 |
16 |
17 |
18 |
19 |
20 |
21 |
22 |
23 | ```
24 |
25 | main.js 的代码实现如下:
26 |
27 | ```
28 | // main.js
29 | import utils from "./utils.js";
30 |
31 |
32 | utils.alert(`
33 | JavaScript modules work in this browser:
34 | https://blog.whatwg.org/js-modules
35 | `);
36 | ```
37 |
38 | 待导入的模块如下:
39 |
40 | ```
41 | // utils.js
42 | export default {
43 | alert: (msg)=>{
44 | alert(msg);
45 | }
46 | };
47 | ```
48 |
49 | 我们可以发现,在 `import` 语句中我们提供了 `.js` 扩展名,这也是区别于打包工具的重要特性之一,往往打包工具中并不需要我们提供扩展名。此外,在浏览器中进行模块的动态加载,也要求待加载文件具有正确的 MIME 类型。我们常用的正确的模块地址譬如:
50 |
51 | ```
52 | https://example.com/apples.js
53 | http:example.com\pears.mjs (becomes http://example.com/pears.mjs as step 1 parses with no base URL)
54 | //example.com/bananas
55 | ./strawberries.js.cgi
56 | ../lychees
57 | /limes.jsx
58 | data:text/javascript,export default ‘grapes’;
59 | blob:https://whatwg.org/d0360e2f-caee-469f-9a2f-87d5b0456f6f
60 | ```
61 |
62 | 不过笔者觉得有个不错的特性在于浏览器中支持 CORS 协议,跨域加载其他域中的脚本。在浏览器中加载进来的模块与直接加载的脚本的作用域也是不一致的,并且不需要 `use strict` 声明其也默认处于严格模式下:
63 |
64 | ```
65 | const x = 1;
66 |
67 |
68 | alert(x === window.x);//false
69 | alert(this === undefined);// true
70 | ```
71 |
72 | 浏览器对于模块的加载默认是异步延迟进行的,即模块脚本的加载并不会阻塞浏览器的解析行为,而是并发加载并在页面加载完毕后进行解析,也就是所有的模块脚本具有 `defer` 属性。我们也可以为脚本添加 `async` 属性,即指明该脚本会在加载完毕后立刻执行。这一点与传统的非模块脚本相比很大不同,传统的脚本会阻塞浏览器解析直到抓取完毕,在抓取之后也会立刻进行执行操作。整个加载流程如下所示:
73 | 
74 |
75 | # Node.js
76 |
77 | - [利用 std/esm 在 Node.js 开发中使用 ES Modules](https://zhuanlan.zhihu.com/p/28478464) 整理自[ES Modules in Node Today!](https://parg.co/bjg),从属于笔者的[现代 JavaScript 开发:语法基础与实践技巧](https://parg.co/bWW)系列中的模块化与构建章节。本文主要介绍了如何利用 std/esm 第三方库在 Node.js 应用中顺滑地使用 ES Modules 语法。
78 |
79 | # 利用 std/esm 在 Node.js 开发中使用 ES Modules
80 |
81 | 随着主流浏览器逐步开始支持 ES Modules 标准,越来越多的目光投注于 Node.js 对于 ESM 的支持实现上;目前 Node.js 使用 CommonJS 作为官方的模块解决方案,虽然内置的模块方案促进了 Node.js 的流行,但是也为引入新的 ES Modules 造成了一定的阻碍。CommonJS 与 ES Modules 模块标准的对比如下:
82 |
83 | ```
84 | // CJS
85 | const a = require("./a")
86 | module.exports = { a, b: 2 }
87 |
88 |
89 | // ESM
90 | import a from "./a"
91 | export default { a, b: 2 }
92 | ```
93 |
94 | 鉴于 CommonJS 并不兼容于 ES Modules,Node.js 打算引入 `.mjs`(Modular JavaScript)文件扩展来指明模块解析规则;这个有点类似于目前对于 JSON 文件的解析,如果我们指明了载入 `.json` 格式文件,Node.js 会自动调用 `JSON.parse` 方法。Node.js 拟计划在 2020 年发布的 9.x 版本中引入内置的 ESM 支持,详细的 Node.js 中 ESM 实现规范查看 Node.js 官方文档 [ES Module Interoperability](https://parg.co/bjW);而目前主流的办法即是采用 Rollup、Webpack 这样的构建工具或者 Babel 这样的转化工具来进行代码转化。
95 |
96 | 而近日正式发布的 [@std/esm](https://www.npmjs.com/package/@std/esm) 为我们提供了高性能的 Node.js 中 CommonJS 与 ES Modules 模块间调用,其能够作用于 Node.js 4.x 以上版本;它能够顺滑地集成到现有的 Webpack、Babel 环境中,并且支持不同模块使用不同的依赖版本。不同于目前的解决方案需要是发布编译之后的 CommonJS 格式的文件,[@std/esm] 能够以最小的代价的、按需转化的、动态缓存的方式来进行源代码转化,其基本命令行中的使用方式如下所示:
97 |
98 | ```
99 | > require('@std/esm')
100 | @std/esm enabled
101 | > import path from 'path';
102 | undefined
103 | > path.join("Hello","World");
104 | 'Hello/World'
105 | ```
106 |
107 | [@std/esm] 除了会自动识别 `.mjs` 扩展的文件之外,它还支持任何包含 `import/export`、Dynamic import、file URI scheme 等语句的文件,典型的用例如下:
108 |
109 | ```js
110 | // 首先安装依赖
111 | // npm i --save @std/esm
112 |
113 |
114 |
115 |
116 | // index.js
117 |
118 | import hello from "./main.js";
119 |
120 | hello();
121 |
122 |
123 |
124 | // main.js
125 |
126 |
127 | import thing from "./constants.js";
128 |
129 | export default function hello() {
130 | console.log(thing);
131 | }
132 |
133 |
134 |
135 | // constants.js
136 |
137 | export default "Hello World!";
138 |
139 |
140 | // 运行文件
141 | // node -r @std/esm index.js
142 | // Hello World!
143 | ```
144 |
145 | 笔者在自己尝试的时候发现 @std/esm 还存在些 Bug,对于缓存代码的处理也并不完善,目前并不建议直接用于生产环境,但是有所了解还是不错的。@std/esm 官方给出的与 [Node.js 9](https://github.com/nodejs/node/pull/14369) 以及 CommonJS 模块的加载时间对比如下,可以发现还是很接近于内建的解决方案性能的:
146 |
147 | - Loading CJS equivs was ~0.28 milliseconds per module
148 | - Loading built-in ESM was ~0.51 milliseconds per module
149 | - First `@std/esm` no cache run\* \*was ~1.56 milliseconds per module
150 | - Secondary `@std/esm` cached runs were ~0.54 milliseconds per module
151 |
--------------------------------------------------------------------------------
/01~语法基础/模块化/README.md:
--------------------------------------------------------------------------------
1 | - [JavaScript 模块衍化史与构建工具对比]()归纳于笔者的[现代 JavaScript 开发:语法基础与实践技巧](https://parg.co/b1c)系列文章中;也欢迎关注[前端每周清单系列](https://parg.co/bh1)获得一手资讯。
2 |
3 | # 模块化与构建工具
4 |
5 | 近年来随着前端技术栈的蓬勃发展,现代化与工程化的概念被反复地提及;这些概念主要是区别于传统的所谓刀耕火种时代的前端开发。所谓的刀耕火种往往是用来描述那些没有规范、没有模块化、工程化落后、框架初级的开发状态;而以 Webpack 为代表的构建工具正是帮助我们从刀耕火种过渡到现代化开发的重要工具。
6 |
7 | 从下图可以看出,构建工具是所谓现代化工程化的前端开发流中重要的基石。
8 |
--------------------------------------------------------------------------------
/01~语法基础/流程控制/异常处理.md:
--------------------------------------------------------------------------------
1 | # JavaScript 中的异常处理
2 |
3 | # 异常类型
4 |
5 | - **Syntax Error**: Your code won’t parse. Translation: You have a typo.
6 | Solutions:
7 | i) go check that line number. (see also: your linter)
8 | ii) know that a syntax error will be generated by the line where the code itself breaks — often the actual typo might be in the lines above (or below, if you have a brackets problem)
9 |
10 | - **TypeError**: your code expects a variable to be one _kind_ of thing, but it is in fact another. This is one that you’ll see a lot, because it can be caused by lots of different kinds of screw ups. error messages like “cannot read {property} of undefined” or “{such and such} is not a function” are generally type errors. This is a very non-exhuastive list of solutions, to give you an idea of where to start looking.
11 | i ) console.log(typeof offendingVariable) to see if it’s what you expect/need.
12 | ii) check the formatting of your function — is it being called _on_ what it should be called on, is it structured correctly?
13 | iii) is your data moving where it should? (console.log your function arguments and maybe their types?)
14 | iv) if this error is being thrown by your use of a library, check the docs to see if you’re using it right.
15 | ivA) try to find examples of other people using that tool!
16 |
17 | - **ReferenceError**: You’re referencing a variable that does not exist. Solution: look for where you think you’ve defined it, or where you should have defined it. you will likely find that you have either a) made a typo, b) imported/exported incorrectly c) not actually declared it at all or d) made a scoping error (eg, using “let” inside an “if” block, and then referencing that variable outside the code block). Solution: look for where you think you’ve defined it, or where you should have defined it. you will likely find that you have either a) made a typo, b) imported/exported incorrectly c) not actually declared it at all or d) made a scoping error (eg, using “let” inside an “if” block, and then referencing that variable outside the code block).
18 |
19 | - **RangeError**: Raised when a numeric variable exceeds its allowed range (solution: don’t do complicated math in javascript. or at least, use a special math-y library for it. alternately: fix your callstack.)
20 |
21 | - **EvalError**: you’re using eval() wrong. but if you get this error, you *know *you’re using eval() wrong, because you’ve decided to use eval(). Don’t do that.
22 |
23 | - **URIError**: Raised when the encodeURI() or decodeURI() functions are used in an incorrect manner. Lots of cool libraries exist just so that you never have to make this error. Like Express. Or Koa. Or Hapi. Consider using one.
24 |
25 | # Promise 与事件中的异常
26 |
27 | ```sh
28 | (node:48446) UnhandledPromiseRejectionWarning: This is fine
29 | (node:48446) UnhandledPromiseRejectionWarning: Unhandled promise rejection. This error originated either by throwing inside of an async function without a catch block, or by rejecting a promise which was not handled with .catch(). (rejection id: 1)
30 | (node:48446) [DEP0018] DeprecationWarning: Unhandled promise rejections are deprecated. In the future, promise rejections that are not handled will terminate the Node.js process with a non-zero exit code.
31 | ```
32 |
33 | The process doesn’t crash. The process continues to work. But you get noticed. However, this behavior will change in the future! In future versions of Node.js the process will crash.
34 |
35 | ```js
36 | process.on("unhandledRejection", (reason, promise) => {
37 | console.log("Unhandled Rejection at:", reason.stack || reason);
38 | // Recommended: send the information to sentry.io
39 | // or whatever crash reporting service you use
40 | });
41 | ```
42 |
43 | For promises rejected with an error (e.g. Promise.reject(new Error('This is fine'))) this will print both the message and the stack trace. In any other case this will print the object passed to reject the promise. So, it is important to always reject with an error object in order to get a stack trace!
44 |
45 | ```js
46 | const fs = require('fs');
47 | const stream = fs.createReadStream('do-not-exists.txt')
48 |
49 | // Output
50 | events.js:137
51 | throw er; // Unhandled 'error' event
52 | ^
53 | Error: ENOENT: no such file or directory, open 'do-not-exists.txt'
54 | ```
55 |
56 | Always handle promise rejections. Listen to unhandled rejection events for crash reporting. And always use errors to reject promises in order to get stack traces!
57 |
58 | Always handle the error event for streams!
59 | Wrap JSON.parse() and any\*Sync() function in a
60 |
61 | try-catch block or inside a Promise. Well, in general any function that can throw errors.
62 |
--------------------------------------------------------------------------------
/01~语法基础/流程控制/条件判断.md:
--------------------------------------------------------------------------------
1 | # JavaScript 中的条件判断
2 |
3 | ```js
4 | const weekendOrWeekday = inputDate => {
5 | const day = inputDate.getDay();
6 |
7 | if (day === 0 || day === 6) {
8 | return "weekend";
9 | }
10 | return "weekday"; // Or, for ternary fans: // return (day === 0 || day === 6) ? 'weekend' : 'weekday';
11 | };
12 |
13 | console.log(weekendOrWeekday(new Date()));
14 | ```
15 |
16 | ```js
17 | const weekendOrWeekday = inputDate => {
18 | const day = inputDate.getDay();
19 |
20 | return weekendOrWeekday.labels[day] || weekendOrWeekday.labels["default"];
21 | };
22 |
23 | weekendOrWeekday.labels = {
24 | 0: "weekend",
25 | 6: "weekend",
26 | default: "weekday"
27 | };
28 |
29 | console.log(weekendOrWeekday(new Date()));
30 | ```
31 |
32 | ```js
33 | const doubler = input => {
34 | switch (typeof input) {
35 | case "number":
36 | return input + input;
37 |
38 | case "string":
39 | return input
40 |
41 | .split("")
42 |
43 | .map(letter => letter + letter)
44 |
45 | .join("");
46 |
47 | case "object":
48 | Object.keys(input).map(key => (input[key] = doubler(input[key])));
49 |
50 | return input;
51 |
52 | case "function":
53 | input();
54 |
55 | input();
56 | }
57 | };
58 |
59 | console.log(doubler(-10));
60 |
61 | console.log(doubler("hey"));
62 |
63 | console.log(doubler([5, "hello"]));
64 |
65 | console.log(doubler({ a: 5, b: "hello" }));
66 |
67 | console.log(
68 | doubler(function() {
69 | console.log("call-me");
70 | })
71 | );
72 | ```
73 |
74 | ```js
75 | const doubler = input => {
76 | return doubler.operationsByType[typeof input](input);
77 | };
78 |
79 | doubler.operationsByType = {
80 | number: input => input + input,
81 |
82 | string: input =>
83 | input
84 |
85 | .split("")
86 |
87 | .map(letter => letter + letter)
88 |
89 | .join(""),
90 |
91 | function: input => {
92 | input();
93 |
94 | input();
95 | },
96 |
97 | object: input => {
98 | Object.keys(input).map(key => (input[key] = doubler(input[key])));
99 |
100 | return input;
101 | }
102 | };
103 |
104 | console.log(doubler(-10));
105 |
106 | console.log(doubler("hey"));
107 |
108 | console.log(doubler([5, "hello"]));
109 |
110 | console.log(doubler({ a: 5, b: "hello" }));
111 |
112 | console.log(
113 | doubler(function() {
114 | console.log("call-me");
115 | })
116 | );
117 | ```
118 |
--------------------------------------------------------------------------------
/01~语法基础/类与对象/README.md:
--------------------------------------------------------------------------------
1 | # 类与对象
2 |
3 | 面向对象编程思想核心是在软件工程领域解决代码重用与组织的问题,面向对象编程包含类、对、属性与方法这些关键组成。而类具有以下特征:封装、继承与多态。
4 |
--------------------------------------------------------------------------------
/01~语法基础/类与对象/类的封装与实例化.md:
--------------------------------------------------------------------------------
1 | # JavaScript 类的封装与实例化
2 |
3 | JavaScript 是强大的面向对象的编程语言,不过不同于很多传统的编程语言,JavaScript 使用了基于原型链的 OOP 模型;同时,JavaScript 将函数也视作一等对象,也导致了很多开发者可能陷入迷惑。而在面向对象的学习中,我们会考虑命名空间、类的声明、构造函数、对象实例化、类继承等内容。
4 |
5 | # 传统的类实现
6 |
7 | ## 命名空间
8 |
9 | 面向对象编程的一大特性就是类的封装性,能够避免来自全局命名空间的冲突;在传统的类实现中,我们常用命名空间的模式来进行类封装,[Essential JavaScript Namespacing Patterns](https://addyosmani.com/blog/essential-js-namespacing/#beginners) 一文中 AddyOsmani 就为我们详细介绍了多种 JavaScript 命名空间模式。最简单的嵌套命名空间范式就是使用 Object Literal 来将函数、变量打包到某个唯一的命名下:
10 |
11 | ```js
12 | MyApp.users = {
13 | // properties
14 | existingUsers: [...],
15 | // methods
16 | renderUsersHTML: function() {
17 | ...
18 | }
19 | };
20 | ```
21 |
22 | ## 构造函数
23 |
24 | ```js
25 | function User( name, email ) {
26 | // properties
27 | this.name = name;
28 | this.email = email;
29 | // methods
30 | this.sayHey = function() {
31 | console.log( “Hey, I’m “ + this.name );
32 | };
33 | }
34 | // instantiating the object
35 | const steve = new User( “Steve”, “steve@hotmail.com” );
36 | // accessing methods and properties
37 | steve.sayHey();
38 | ```
39 |
40 | # ES6 Class
41 |
--------------------------------------------------------------------------------
/02~TypeScript/01~类型机制/01~类型系统基础/01~结构化类型系统.md:
--------------------------------------------------------------------------------
https://raw.githubusercontent.com/wx-chevalier/JavaScript-Notes/2c3c57c322e60a50a553e47b69f03839d95df99f/02~TypeScript/01~类型机制/01~类型系统基础/01~结构化类型系统.md
--------------------------------------------------------------------------------
/02~TypeScript/01~类型机制/01~类型系统基础/02~类型兼容性.md:
--------------------------------------------------------------------------------
https://raw.githubusercontent.com/wx-chevalier/JavaScript-Notes/2c3c57c322e60a50a553e47b69f03839d95df99f/02~TypeScript/01~类型机制/01~类型系统基础/02~类型兼容性.md
--------------------------------------------------------------------------------
/02~TypeScript/01~类型机制/01~类型系统基础/03~类型推导机制.md:
--------------------------------------------------------------------------------
https://raw.githubusercontent.com/wx-chevalier/JavaScript-Notes/2c3c57c322e60a50a553e47b69f03839d95df99f/02~TypeScript/01~类型机制/01~类型系统基础/03~类型推导机制.md
--------------------------------------------------------------------------------
/02~TypeScript/01~类型机制/01~类型系统基础/04~类型擦除.md:
--------------------------------------------------------------------------------
https://raw.githubusercontent.com/wx-chevalier/JavaScript-Notes/2c3c57c322e60a50a553e47b69f03839d95df99f/02~TypeScript/01~类型机制/01~类型系统基础/04~类型擦除.md
--------------------------------------------------------------------------------
/02~TypeScript/01~类型机制/01~类型系统基础/类型推断.md:
--------------------------------------------------------------------------------
1 | # 类型推断
2 |
3 | # 通过定义推断
4 |
5 | ```ts
6 | let foo = 123; // foo 是 'number'
7 | let bar = "hello"; // bar 是 'string'
8 |
9 | foo = bar; // Error: 不能将 'string' 赋值给 `number`
10 |
11 | // 返回类型能被 return 语句推断,如下所示,推断函数返回为一个数字:
12 | function add(a: number, b: number) {
13 | return a + b;
14 | }
15 | ```
16 |
17 | 函数参数类型/返回值也能通过赋值来推断。如下所示,foo 的类型是 Adder,他能让 foo 的参数 a、b 是 number 类型。
18 |
19 | ```ts
20 | type Adder = (a: number, b: number) => number;
21 | let foo: Adder = (a, b) => a + b;
22 | 这个事实可以用下面的代码来证明,TypeScript 会发出正如你期望发出的错误警告:
23 |
24 | type Adder = (a: number, b: number) => number;
25 | let foo: Adder = (a, b) => {
26 | a = 'hello'; // Error:不能把 'string' 类型赋值给 'number' 类型
27 | return a + b;
28 | };
29 | ```
30 |
31 | 这是一个从左向右流动类型的示例。如果你创建一个函数,并且函数参数为一个回调函数,相同的赋值规则也适用于它。从 argument 至 parameter 只是变量赋值的另一种形式。
32 |
33 | ```ts
34 | type Adder = (a: number, b: number) => number;
35 | function iTakeAnAdder(adder: Adder) {
36 | return adder(1, 2);
37 | }
38 |
39 | iTakeAnAdder((a, b) => {
40 | a = "hello"; // Error: 不能把 'string' 类型赋值给 'number' 类型
41 | return a + b;
42 | });
43 | ```
44 |
45 | # 结构化与解构推断
46 |
47 | 这些简单的规则也适用于结构化的存在(对象字面量),例如在下面这种情况下 `foo` 的类型被推断为 `{ a: number, b: number }`:
48 |
49 | ```ts
50 | const foo = {
51 | a: 123,
52 | b: 456
53 | };
54 |
55 | foo.a = "hello"; // Error:不能把 'string' 类型赋值给 'number' 类型
56 | ```
57 |
58 | 数组也一样:
59 |
60 | ```ts
61 | const bar = [1, 2, 3];
62 | bar[0] = "hello"; // Error:不能把 'string' 类型赋值给 'number' 类型
63 | ```
64 |
65 | 这些也适用于解构中:
66 |
67 | ```ts
68 | const foo = {
69 | a: 123,
70 | b: 456
71 | };
72 | let { a } = foo;
73 |
74 | a = "hello"; // Error:不能把 'string' 类型赋值给 'number' 类型
75 | ```
76 |
77 | 数组中:
78 |
79 | ```ts
80 | const bar = [1, 2];
81 | let [a, b] = bar;
82 |
83 | a = "hello"; // Error:不能把 'string' 类型赋值给 'number' 类型
84 | ```
85 |
86 | 如果函数参数能够被推断出来,那么解构亦是如此。在如下例子中,函数参数能够被解构为 `a/b` 成员:
87 |
88 | ```ts
89 | type Adder = (number: { a: number; b: number }) => number;
90 | function iTakeAnAdder(adder: Adder) {
91 | return adder({ a: 1, b: 2 });
92 | }
93 |
94 | iTakeAnAdder(({ a, b }) => {
95 | // a, b 的类型能被推断出来
96 | a = "hello"; // Error:不能把 'string' 类型赋值给 'number' 类型
97 | return a + b;
98 | });
99 | ```
100 |
101 | # 类型保护
102 |
103 | 我们可以使用 `typeof`, `instanceof`, `in` 来实现手动类型推导,`typeof` 可以获取变量的数据类型:
104 |
105 | ```ts
106 | function foo(x: string | number) {
107 | if (typeof x === "string") {
108 | return x; // string
109 | }
110 | return x; // number
111 | }
112 | ```
113 |
114 | `instanceof` 可以用于判断某个对象是否是某个类的实例:
115 |
116 | ```ts
117 | function f1(x: B | C | D) {
118 | if (x instanceof B) {
119 | x; // B
120 | } else if (x instanceof C) {
121 | x; // C
122 | } else {
123 | x; // D
124 | }
125 | }
126 | ```
127 |
128 | `in` 用于更方便地进行 `object` 类型的推导:
129 |
130 | ```ts
131 | interface A {
132 | a: number;
133 | }
134 | interface B {
135 | b: string;
136 | }
137 |
138 | function foo(x: A | B) {
139 | if ("a" in x) {
140 | return x.a;
141 | }
142 | return x.b;
143 | }
144 | ```
145 |
--------------------------------------------------------------------------------
/02~TypeScript/01~类型机制/02~类型检查机制/01~类型检查器工作原理.md:
--------------------------------------------------------------------------------
https://raw.githubusercontent.com/wx-chevalier/JavaScript-Notes/2c3c57c322e60a50a553e47b69f03839d95df99f/02~TypeScript/01~类型机制/02~类型检查机制/01~类型检查器工作原理.md
--------------------------------------------------------------------------------
/02~TypeScript/01~类型机制/02~类型检查机制/02~类型收窄.md:
--------------------------------------------------------------------------------
https://raw.githubusercontent.com/wx-chevalier/JavaScript-Notes/2c3c57c322e60a50a553e47b69f03839d95df99f/02~TypeScript/01~类型机制/02~类型检查机制/02~类型收窄.md
--------------------------------------------------------------------------------
/02~TypeScript/01~类型机制/02~类型检查机制/03~类型扩宽与收缩.md:
--------------------------------------------------------------------------------
https://raw.githubusercontent.com/wx-chevalier/JavaScript-Notes/2c3c57c322e60a50a553e47b69f03839d95df99f/02~TypeScript/01~类型机制/02~类型检查机制/03~类型扩宽与收缩.md
--------------------------------------------------------------------------------
/02~TypeScript/01~类型机制/02~类型检查机制/04~控制流分析.md:
--------------------------------------------------------------------------------
https://raw.githubusercontent.com/wx-chevalier/JavaScript-Notes/2c3c57c322e60a50a553e47b69f03839d95df99f/02~TypeScript/01~类型机制/02~类型检查机制/04~控制流分析.md
--------------------------------------------------------------------------------
/02~TypeScript/01~类型机制/类型计算/01~条件类型.md:
--------------------------------------------------------------------------------
https://raw.githubusercontent.com/wx-chevalier/JavaScript-Notes/2c3c57c322e60a50a553e47b69f03839d95df99f/02~TypeScript/01~类型机制/类型计算/01~条件类型.md
--------------------------------------------------------------------------------
/02~TypeScript/01~类型机制/类型计算/02~映射类型.md:
--------------------------------------------------------------------------------
https://raw.githubusercontent.com/wx-chevalier/JavaScript-Notes/2c3c57c322e60a50a553e47b69f03839d95df99f/02~TypeScript/01~类型机制/类型计算/02~映射类型.md
--------------------------------------------------------------------------------
/02~TypeScript/01~类型机制/类型计算/03~模板字面量类型.md:
--------------------------------------------------------------------------------
https://raw.githubusercontent.com/wx-chevalier/JavaScript-Notes/2c3c57c322e60a50a553e47b69f03839d95df99f/02~TypeScript/01~类型机制/类型计算/03~模板字面量类型.md
--------------------------------------------------------------------------------
/02~TypeScript/01~类型机制/类型计算/04~递归类型.md:
--------------------------------------------------------------------------------
https://raw.githubusercontent.com/wx-chevalier/JavaScript-Notes/2c3c57c322e60a50a553e47b69f03839d95df99f/02~TypeScript/01~类型机制/类型计算/04~递归类型.md
--------------------------------------------------------------------------------
/02~TypeScript/02~类型使用/01~基础类型/函数与类/Mixins.md:
--------------------------------------------------------------------------------
1 | # TypeScript Mixins
2 |
3 | Mixin 是一些特殊的类,它们包含了一些可以被其他类使用的方法组合。Mixins 促进了代码的可重用性,并帮助你避免与多继承相关的限制。尽管属性和实例化参数是在编译时定义的,但 Mixins 可以将方法的定义和绑定推迟到运行时。
4 |
5 | # 创建 Mixins
6 |
7 | 为了创建一个 Mixins,我们将利用 TypeScript 的两个方面:接口类扩展和声明合并。不出所料,接口类扩展被用来扩展 TypeScript 中的多个类。声明合并是指 TypeScript 将两个或多个同名的声明合并在一起的过程。接口也可以合并到类和其他结构体中,如果它们有相同的名字。
8 |
9 | 下面是一个声明合并的例子:
10 |
11 | ```js
12 | interface Car {
13 | steering: number;
14 | tyre: number;
15 | }
16 | interface Car {
17 | exhaustOutlet: number;
18 | }
19 | // contains properties from both Car interfaces
20 | const BMW: Car = {
21 | steering: 1,
22 | tyre: 4,
23 | exhaustOutlet: 2,
24 | };
25 | ```
26 |
27 | 现在我们了解了这两个 TypeScript 特性,我们就可以开始了。首先,我们需要创建一个基类,然后将 Mixins 应用到基类中。
28 |
29 | ```js
30 | class Block {
31 | name = "";
32 | length = 0;
33 | breadth = 0;
34 | height = 0;
35 | constructor(name: string, length: number, breadth: number, height: number) {
36 | this.name = name;
37 | this.length = length;
38 | this.breadth = breadth;
39 | this.height = height;
40 | }
41 | }
42 | ```
43 |
44 | 接下来,创建基类所要扩展的类。
45 |
46 | ```js
47 | class Moulder {
48 | moulding = true;
49 | done = false;
50 | mould() {
51 | this.moulding = false;
52 | this.done = true;
53 | }
54 | }
55 |
56 | class Stacker {
57 | stacking = true;
58 | done = false;
59 | stack() {
60 | this.stacking = false;
61 | this.done = true;
62 | }
63 | }
64 | ```
65 |
66 | 创建一个接口,合并与你的基类(Block)同名的预期类。
67 |
68 | ```js
69 | interface Block extends Moulder, Stacker {}
70 | ```
71 |
72 | 这个新接口的定义与我们之前创建的 Block 类的名称完全相同。这一点至关重要,因为这个接口同时扩展了 Moulder 和 Stacker 类。这意味着接口将把它们的方法定义合并到一个结构中(接口),同时合并到同名的类定义中。由于声明的合并,Block 类将与 Block 接口合并。
73 |
74 | # 创建函数
75 |
76 | 要创建一个函数来连接两个或多个类声明,我们将使用 TypeScript 官方手册中提供的函数。
77 |
78 | ```js
79 | function applyMixins(derivedCtor: any, constructors: any[]) {
80 | constructors.forEach((baseCtor) => {
81 | Object.getOwnPropertyNames(baseCtor.prototype).forEach((name) => {
82 | Object.defineProperty(
83 | derivedCtor.prototype,
84 | name,
85 | Object.getOwnPropertyDescriptor(baseCtor.prototype, name) ||
86 | Object.create(null)
87 | );
88 | });
89 | });
90 | }
91 | ```
92 |
93 | 前面的函数迭代了 Moulder 和 Stacker 类,然后迭代了它的属性列表,并将这些属性定义到 Block 类中。从本质上讲,我们是在手动地将 Moulder 和 Stacker 类的所有方法和属性链接到 Block 类中。要继续,请按以下方式执行前面的函数,然后查看下面的例子。
94 |
95 | ```js
96 | applyMixins(Block, [Moulder, Stacker]);
97 | ```
98 |
99 | # TypeScript Mixin example
100 |
101 | ```js
102 | let cube = new Block("cube", 4, 4, 4);
103 | cube.mould();
104 | cube.stack();
105 | console.log(
106 | cube.length,
107 | cube.breadth,
108 | cube.height,
109 | cube.name,
110 | cube.moulding,
111 | cube.stacking
112 | );
113 | ```
114 |
115 | 在这里,我们将 cube 分配给基类 Block 的实例。现在,Block 实例可以直接访问分别来自 Moulder 和 Stacker 类的 mould() 和 stack() 方法。
116 |
117 | 虽然有其他方法来创建 TypeScript 混合器,但这是最优化的模式,因为它更少地依赖编译器,而更多地依赖你的代码库来确保运行时和类型系统保持同步。
118 |
119 | # 常用案例
120 |
121 | 让我们来看看你可能会遇到的或想要考虑的 TypeScript 混杂元素的一些使用情况。
122 |
123 | ## Handling multiple class extension
124 |
125 | TypeScript 的类不能同时扩展几个类,除非在接口中引入一个 mixin。
126 |
127 | ```js
128 | class Moulder {
129 | moulding = true;
130 | done = false
131 | mould() {
132 | this.moulding = false;
133 | this.done = true;
134 | }
135 | }
136 |
137 | class Stacker {
138 | stacking = true;
139 | done = false
140 | stack() {
141 | this.stacking = false;
142 | this.done = true;
143 | }
144 | }
145 |
146 | class Block extends Moulder, Stacker{
147 | constructor() {
148 | super()
149 | }
150 | }
151 | ```
152 |
153 | 在这个例子中,Block 类试图同时扩展两个类而没有引入 mixins 的概念。如果你把这个片段添加到在线编辑器(playcode.io)中,你会得到以下错误。
154 |
--------------------------------------------------------------------------------
/02~TypeScript/02~类型使用/01~基础类型/函数与类/useDefineForClassFields 与 class-fields 提案.md:
--------------------------------------------------------------------------------
1 | # 从 TS 的 useDefineForClassFields 选项到 class-fields 提案
2 |
3 | useDefineForClassFields 是 TypeScript 3.7.0 中新增的一个编译选项(详见 PR),启用后的作用是将 class 声明中的字段语义从 [[Set]] 变更到 [[Define]]。我们考虑如下代码:
4 |
5 | ```ts
6 | class C {
7 | foo = 100;
8 | bar: string;
9 | }
10 | ```
11 |
12 | 这是长期以来很常见的一种 TS 字段声明方式,默认情况下它的[编译结果](https://link.zhihu.com/?target=https%3A//www.typescriptlang.org/play%3F%23code/MYGwhgzhAEDC0G8CwAoa0BmB7L0C80AjAAzEDcq6ARmAE4Bc0EALrQJYB2A5hSgL5A)如下:
13 |
14 | ```ts
15 | class C {
16 | constructor() {
17 | this.foo = 100;
18 | }
19 | }
20 | ```
21 |
22 | 当启用了 `useDefineForClassFields` 编译选项后它的[编译结果](https://link.zhihu.com/?target=https%3A//www.typescriptlang.org/play%3FuseDefineForClassFields%3Dtrue%23code/MYGwhgzhAEDC0G8CwAoa0BmB7L0C80AjAAzEDcq6ARmAE4Bc0EALrQJYB2A5hSgL5A)如下:
23 |
24 | ```ts
25 | class C {
26 | constructor() {
27 | Object.defineProperty(this, "foo", {
28 | enumerable: true,
29 | configurable: true,
30 | writable: true,
31 | value: 100,
32 | });
33 | Object.defineProperty(this, "bar", {
34 | enumerable: true,
35 | configurable: true,
36 | writable: true,
37 | value: void 0,
38 | });
39 | }
40 | }
41 | ```
42 |
43 | 可以看到变化主要由如下两点:
44 |
45 | 1. 字段声明的方式从 `=` 赋值的方式变更成了 `Object.defineProperty`
46 | 2. 所有的字段声明都会生效,即使它没有指定默认值
47 |
48 | 默认 `=` 赋值的方式就是所谓的 `[[Set]]` 语义,因为 `this.foo = 100` 这个操作会隐式地调用上下文中 `foo` 的 `setter`。相应地 `Object.defineProperty` 的方式即所谓的 `[[Define]]` 语义。
49 |
50 | 在没有 `setter` 相关的 `class` 中两种语义使用上基本没有区别,但一旦和 `setter` 或继承混合使用时不同的语义就会产生截然不同的效果。
51 |
52 | 考虑如下代码:
53 |
54 | ```ts
55 | class Base {
56 | value: number | string;
57 |
58 | set data(value: string) {
59 | console.log("data changed to " + value);
60 | }
61 |
62 | constructor(value: number | string) {
63 | this.value = value;
64 | }
65 | }
66 |
67 | class Derived extends Base {
68 | // 当使用 `useDefineForClassFields` 时 `value` 将在调用 `super()` 后
69 | // 被初始化为 `undefined`,即使你传入了正确的 `value` 值
70 | value: number;
71 |
72 | // 当使用 `useDefineForClassFields` 时
73 | // `console.log` 将不再被触发
74 | data = 10;
75 |
76 | constructor(value: number) {
77 | super(value);
78 | }
79 | }
80 |
81 | const derived = new Derived(5);
82 | ```
83 |
84 | # class-fields 提案的选择
85 |
86 | 对于字段声明默认赋值为 `undefined` 相对能获得认可,毕竟是显式地声明了一个字段并且未赋值,类似于不同层级的代码块中声明 `let value: number`,内层的 `value` 会默认重新创建一个值为 `undefined` 的标识符,因此 TS 中也提供了 `declare field` 的新语法来支持声明字段但不产生实际代码的用法。
87 |
88 | ```text
89 | class Derived extends Base {
90 | // 即使启用了 `useDefineForClassFields` 也不会覆盖初始化为 `undefined`
91 | declare value: number;
92 | }
93 | ```
94 |
95 | 但初次接触到新的 `[[Define]]` 语义可能会觉得不可理喻,社区内也有[很大的分歧](https://link.zhihu.com/?target=https%3A//github.com/tc39/proposal-class-fields/issues/151%23issuecomment-431597270),但实际上 TC39 最终选择了 `[[Define]]` 语义自然有他们的考虑。
96 |
97 | 在上面的例子中,如果是 `[[Set]]` 语义,`data` 的 `setter` 被正确触发,但 `Derived` 的实例上并不会拥有一个值为 `10` 的 `data` 属性,即 `derived.hasOwnProperty('data') === false` 且 `derived.data === undefined`,这『可能』也是不符合预期的。
98 |
99 | 正如 TC39 总结道:
100 |
101 | > 在 `[[Set]]` 和 `[[Define]]` 之间的选择是在比较了不同的行为预期后的设计决策:第一种预期是不管父类包含的内容,字段总是应该被创建成类的属性,而第二种预期是父类的 `setter` 应该被调用。经过长时间的讨论,TC39 发现保留第一种预期更重要因此决定使用 `[[Define]]` 语义。
102 |
103 | 作为替代,TC39 决定在仍处于 stage 2 阶段且『命途多舛』的 [decorators 提案](https://link.zhihu.com/?target=https%3A//github.com/tc39/proposal-decorators/)中提供一个显式使用 `[[Set]]` 语义的装饰器。
104 |
105 | 这在我个人看来无疑是可笑的:
106 |
107 | 1. 首先装饰器提案已经改了又改,不知何时才能定稿,一个 stage 3 的提案依赖另一个 stage 2 的提案不合常规
108 | 2. 长期以来 Babel/TS 的实现都是 `[[Set]]` 语义,虽然 `[[Define]]` 语义有它实际的价值,但显然从当前的迁移成本来看保留 `[[Set]]` 作为默认语义更合理
109 | 3. `[[Define]]` 语义的实际作用是总是创建类的属性,如果依赖装饰器提案,默认 `[[Set]]` 显式添加类似 `@define` 装饰器来使用 `[[Define]]` 语义影响面更小
110 |
111 | TC39 的结论可能见仁见智,无法让所有人满意,但 Chrome 已经在版本 72 中发布了基于 `[[Define]]` 语义的实现,而这个决定几乎不可能被重新考虑了。
112 |
--------------------------------------------------------------------------------
/02~TypeScript/02~类型使用/01~基础类型/函数与类/函数.md:
--------------------------------------------------------------------------------
1 | # TypeScript 函数
2 |
3 | 函数类型在 TypeScript 类型系统中扮演着非常重要的角色,它们是可组合系统的核心构建块。
4 |
5 | # 参数注解
6 |
7 | TypeScript 中函数的声明与 JavaScript 中保持一致,不过其允许指定额外的类型信息:
8 |
9 | ```ts
10 | let stories: [string, string[]][] = [];
11 |
12 | function addStory(title: string, tags: string[]): void {
13 | stories.push([title, tags]);
14 | }
15 | ```
16 |
17 | 同样可以在 Lambda 表达式中指定类型:
18 |
19 | ```ts
20 | let sortByLength: (x: string, y: string) => number = (x, y) =>
21 | x.length - y.length;
22 | tags.sort(sortByLength);
23 | ```
24 |
25 | 也可以在函数参数中指定可选参数:
26 |
27 | ```ts
28 | function storySummary(title: string, description?: string) {
29 | if (description) {
30 | return title + description;
31 | } else {
32 | return title;
33 | }
34 | }
35 | ```
36 |
37 | 或者使用默认值:
38 |
39 | ```ts
40 | function storySummary(title: string, description: string = "") {
41 | return title + description;
42 | }
43 | ```
44 |
45 | 值得一提的是,当我们确定某个函数并不返回值时,需要注意不能使用 any 来替代 void,以避免误用返回值的情形:
46 |
47 | ```ts
48 | function fn(x: () => void) {
49 | const k = x(); // oops! meant to do something else
50 | k.doSomething(); // error, but would be OK if the return type had been 'any'
51 | }
52 | ```
53 |
54 | # 函数重载
55 |
56 | JavaScript 中并不支持函数重载,但是在 TypeScript 中我们可以通过参数的不同实现重载:
57 |
58 | ```ts
59 | declare function createStore(
60 | reducer: Reducer,
61 | preloadedState: PreloadedState,
62 | enhancer: Enhancer
63 | );
64 | declare function createStore(reducer: Reducer, enhancer: Enhancer);
65 | ```
66 |
67 | 该特性可以帮我们优化代码,譬如:
68 |
69 | ```js
70 | function padding(a: number, b?: number, c?: number, d?: any) {
71 | if (b === undefined && c === undefined && d === undefined) {
72 | b = c = d = a;
73 | } else if (c === undefined && d === undefined) {
74 | c = a;
75 | d = b;
76 | }
77 | return {
78 | top: a,
79 | right: b,
80 | bottom: c,
81 | left: d
82 | };
83 | }
84 | ```
85 |
86 | 如果仔细查看代码,就会发现 a,b,c,d 的值会根据传入的参数数量而变化。此函数也只需要 1 个,2 个或 4 个参数。可以使用函数重载来强制和记录这些约束。你只需多次声明函数头。最后一个函数头是在函数体内实际处于活动状态但不可用于外部。
87 |
88 | ```ts
89 | // 重载
90 | function padding(all: number);
91 | function padding(topAndBottom: number, leftAndRight: number);
92 | function padding(top: number, right: number, bottom: number, left: number);
93 | // Actual implementation that is a true representation of all the cases the function body needs to handle
94 | function padding(a: number, b?: number, c?: number, d?: number) {
95 | if (b === undefined && c === undefined && d === undefined) {
96 | b = c = d = a;
97 | } else if (c === undefined && d === undefined) {
98 | c = a;
99 | d = b;
100 | }
101 | return {
102 | top: a,
103 | right: b,
104 | bottom: c,
105 | left: d
106 | };
107 | }
108 |
109 | padding(1); // Okay: all
110 | padding(1, 1); // Okay: topAndBottom, leftAndRight
111 | padding(1, 1, 1, 1); // Okay: top, right, bottom, left
112 |
113 | padding(1, 1, 1); // Error: Not a part of the available overloads
114 | ```
115 |
116 | TypeScript 中的函数重载没有任何运行时开销。它只允许你记录希望调用函数的方式,并且编译器会检查其余代码。
117 |
118 | # 函数类型注解
119 |
120 | 我们可以使用类型别名或者接口来表示一个可被调用的类型注解:
121 |
122 | ```ts
123 | interface ReturnString {
124 | (): string;
125 | }
126 | ```
127 |
128 | 它可以表示一个返回值为 string 的函数:
129 |
130 | ```ts
131 | declare const foo: ReturnString;
132 |
133 | const bar = foo(); // bar 被推断为一个字符串。
134 | ```
135 |
136 | 一个接口可提供多种调用签名,用以特殊的函数重载:
137 |
138 | ```ts
139 | interface Overloaded {
140 | (foo: string): string;
141 | (foo: number): number;
142 | }
143 |
144 | // 实现接口的一个例子:
145 | function stringOrNumber(foo: number): number;
146 | function stringOrNumber(foo: string): string;
147 | function stringOrNumber(foo: any): any {
148 | if (typeof foo === 'number') {
149 | return foo * foo;
150 | } else if (typeof foo === 'string') {
151 | return `hello ${foo}`;
152 | }
153 | }
154 |
155 | const overloaded: Overloaded = stringOrNumber;
156 |
157 | // 使用
158 | const str = overloaded(''); // str 被推断为 'string'
159 | const num = overloaded(123); // num 被推断为 'number'
160 | 这也可以用于内联注解中:
161 |
162 | let overloaded: {
163 | (foo: string): string;
164 | (foo: number): number;
165 | };
166 | ```
167 |
168 | # Generator | 生成器
169 |
170 | ```ts
171 | function* numbers(): IterableIterator {
172 | console.log("Inside numbers; start");
173 | yield 1;
174 | console.log("Inside numbers; after the first yield");
175 | yield 2;
176 | console.log("Inside numbers; end");
177 | }
178 | ```
179 |
180 | ```ts
181 | // 迭代器结果的类型声明
182 | interface IteratorResult {
183 | value: CompletedType | SuspendedType;
184 | done: this is { value: CompletedType };
185 | }
186 | ```
187 |
--------------------------------------------------------------------------------
/02~TypeScript/02~类型使用/02~高级类型/类型守卫(Type Guards).md:
--------------------------------------------------------------------------------
1 | ## 类型守卫(Type Guards)
2 |
3 | 类型守卫是一些表达式,它们会在运行时检查以确保在某个作用域里的类型。
4 |
5 | ```typescript
6 | function isString(test: any): test is string {
7 | return typeof test === "string";
8 | }
9 |
10 | function example(x: number | string) {
11 | if (isString(x)) {
12 | console.log(x.toUpperCase()); // x is treated as string here
13 | } else {
14 | console.log(x.toFixed(2)); // x is treated as number here
15 | }
16 | }
17 | ```
18 |
--------------------------------------------------------------------------------
/02~TypeScript/02~类型使用/02~高级类型/联合类型(Union Types).md:
--------------------------------------------------------------------------------
1 | ## 联合类型(Union Types)
2 |
3 | 联合类型表示一个值可以是几种类型之一。
4 |
5 | ```typescript
6 | type Combinable = string | number;
7 |
8 | function add(a: Combinable, b: Combinable) {
9 | if (typeof a === "string" || typeof b === "string") {
10 | return a.toString() + b.toString();
11 | }
12 | return a + b;
13 | }
14 | ```
15 |
--------------------------------------------------------------------------------
/02~TypeScript/02~类型使用/03~类型操作符/01~typeof/01~typeof.md:
--------------------------------------------------------------------------------
https://raw.githubusercontent.com/wx-chevalier/JavaScript-Notes/2c3c57c322e60a50a553e47b69f03839d95df99f/02~TypeScript/02~类型使用/03~类型操作符/01~typeof/01~typeof.md
--------------------------------------------------------------------------------
/02~TypeScript/02~类型使用/03~类型操作符/02~keyof.md:
--------------------------------------------------------------------------------
https://raw.githubusercontent.com/wx-chevalier/JavaScript-Notes/2c3c57c322e60a50a553e47b69f03839d95df99f/02~TypeScript/02~类型使用/03~类型操作符/02~keyof.md
--------------------------------------------------------------------------------
/02~TypeScript/02~类型使用/03~类型操作符/03~instanceof.md:
--------------------------------------------------------------------------------
https://raw.githubusercontent.com/wx-chevalier/JavaScript-Notes/2c3c57c322e60a50a553e47b69f03839d95df99f/02~TypeScript/02~类型使用/03~类型操作符/03~instanceof.md
--------------------------------------------------------------------------------
/02~TypeScript/02~类型使用/03~类型操作符/04~is.md:
--------------------------------------------------------------------------------
https://raw.githubusercontent.com/wx-chevalier/JavaScript-Notes/2c3c57c322e60a50a553e47b69f03839d95df99f/02~TypeScript/02~类型使用/03~类型操作符/04~is.md
--------------------------------------------------------------------------------
/02~TypeScript/02~类型使用/03~类型操作符/类型修饰/Decorator.md:
--------------------------------------------------------------------------------
1 | # Decorator | 装饰器
2 |
3 | Typescript 中的装饰器与类相关,分别可以修饰类的实例函数和静态函数、类本身、类的属性、类中函数的参数以及类的 set/get 存取器。TypeScript 内建支持装饰器语法,需要我们在编译配置中开启装饰器参数:
4 |
5 | ```json
6 | {
7 | "compilerOptions": {
8 | // ...
9 | "experimentalDecorators": true
10 | }
11 | // ...
12 | }
13 | ```
14 |
15 | # 类方法的装饰器
16 |
17 | 装饰器提供了声明式的语法来修改类的结构或者属性声明,以简单的日志装饰器为例:
18 |
19 | ```ts
20 | export function Log() {
21 | return function (
22 | target: Object,
23 | propertyKey: string,
24 | descriptor: TypedPropertyDescriptor
25 | ) {
26 | // 保留原函数引用
27 | let originalFunction = descriptor.value || descriptor.get;
28 |
29 | // 定义包裹函数
30 | function wrapper() {
31 | let startedAt = +new Date();
32 | let returnValue = originalFunction.apply(this);
33 | let endedAt = +new Date();
34 | console.log(
35 | `${propertyKey} executed in ${endedAt - startedAt} milliseconds`
36 | );
37 | return returnValue;
38 | }
39 |
40 | // 将描述对象中的函数引用指向包裹函数
41 | if (descriptor.value) descriptor.value = wrapper;
42 | else if (descriptor.get) descriptor.get = wrapper;
43 | };
44 | }
45 | ```
46 |
47 | 对于类的函数的装饰器函数,依次接受的参数为:
48 |
49 | - target:如果修饰的是类的实例函数,那么 target 就是类的原型。如果修饰的是类的静态函数,那么 target 就是类本身。
50 | - key:该函数的函数名。
51 | - descriptor:该函数的描述属性,比如 configurable、value、enumerable 等。
52 |
53 | 其使用方式如下:
54 |
55 | ```js
56 | import { Log } from './log';
57 |
58 | export class Entity {
59 | // ...
60 |
61 | @Log()
62 | get title(): string {
63 | Entity.wait(1572);
64 | return this._title;
65 | }
66 |
67 | // ...
68 |
69 | private static wait(ms) {
70 | let start = Date.now();
71 | let now = start;
72 | while (now - start < ms) {
73 | now = Date.now();
74 | }
75 | }
76 | }
77 | ```
78 |
79 | # 类的装饰器
80 |
81 | 当装饰函数直接修饰类的时候,装饰函数接受唯一的参数,这个参数就是该被修饰类本身。
82 |
83 | ```ts
84 | let temple;
85 | function foo(target) {
86 | console.log(target);
87 | temple = target;
88 | }
89 | @foo
90 | class P {
91 | constructor() {}
92 | }
93 |
94 | const p = new P();
95 | temple === P; //true
96 | ```
97 |
98 | 此外,在修饰类的时候,如果装饰函数有返回值,该返回值会重新定义这个类,也就是说当装饰函数有返回值时,其实是生成了一个新类,该新类通过返回值来定义。
99 |
100 | ```ts
101 | function foo(target) {
102 | return class extends target {
103 | name = "Jony";
104 | sayHello() {
105 | console.log("Hello " + this.name);
106 | }
107 | };
108 | }
109 |
110 | @foo
111 | class P {
112 | constructor() {}
113 | }
114 |
115 | const p = new P();
116 | p.sayHello(); // 会输出Hello Jony
117 | ```
118 |
119 | 上面的例子可以看到,当装饰函数 foo 有返回值时,实际上 P 类已经被返回值所代表的新类所代替,因此 P 的实例 p 拥有 sayHello 方法。
120 |
121 | # 属性与参数装饰器
122 |
123 | 装饰函数修饰类的属性时,在类实例化的时候调用属性的装饰函数,举例来说:
124 |
125 | ```ts
126 | function foo(target, name) {
127 | console.log("target is", target);
128 | console.log("name is", name);
129 | }
130 | class P {
131 | @foo
132 | name = "Jony";
133 | }
134 | const p = new P();
135 | //会依次输出 target is f P() name is Jony
136 | ```
137 |
138 | 这里对于类的属性的装饰器函数接受两个参数,对于静态属性而言,第一个参数是类本身,对于实例属性而言,第一个参数是类的原型,第二个参数是指属性的名字。类函数的参数装饰器可以修饰类的构建函数中的参数,以及类中其他普通函数中的参数。该装饰器在类的方法被调用的时候执行,下面来看实例:
139 |
140 | ```ts
141 | function foo(target, key, index) {
142 | console.log("target is", target);
143 | console.log("key is", key);
144 | console.log("index is", index);
145 | }
146 | class P {
147 | test(@foo a) {}
148 | }
149 | const p = new P();
150 | p.test("Hello Jony");
151 | // 依次输出 f P(), test, 0
152 | ```
153 |
154 | 类函数参数的装饰器函数接受三个参数,依次为类本身,类中该被修饰的函数本身,以及被修饰的参数在参数列表中的索引值。上述的例子中,会依次输出 f P()、test 和 0。再次明确一下修饰函数参数的装饰器函数中的参数含义:
155 |
156 | - target:类本身
157 | - key:该参数所在的函数的函数名
158 | - index:该参数在函数参数列表中的索引值
159 |
--------------------------------------------------------------------------------
/02~TypeScript/02~类型使用/03~类型操作符/类型修饰/类型修饰.md:
--------------------------------------------------------------------------------
1 | # readonly
2 |
3 | ```js
4 | type Writeable = { -readonly [P in keyof T]-?: T[P] };
5 |
6 | interface Foo {
7 | readonly bar: boolean;
8 | }
9 |
10 | let baz: Writeable;
11 |
12 | baz.bar = true;
13 | ```
14 |
--------------------------------------------------------------------------------
/02~TypeScript/02~类型使用/04~类型断言/类型断言.md:
--------------------------------------------------------------------------------
1 | # 类型断言
2 |
3 | TypeScript 允许你覆盖它的推断,并且能以你任何你想要的方式分析它,这种机制被称为类型断言。TypeScript 类型断言用来告诉编译器你比它更了解这个类型,并且它不应该再发出错误。类型断言的一个常见用例是当你从 JavaScript 迁移到 TypeScript 时:
4 |
5 | ```ts
6 | const foo = {};
7 | foo.bar = 123; // Error: 'bar' 属性不存在于 ‘{}’
8 | foo.bas = "hello"; // Error: 'bas' 属性不存在于 '{}'
9 | ```
10 |
11 | 这里的代码发出了错误警告,因为 foo 的类型推断为 {},即是具有零属性的对象。因此,你不能在它的属性上添加 bar 或 bas,你可以通过类型断言来避免此问题:
12 |
13 | ```ts
14 | interface Foo {
15 | bar: number;
16 | bas: string;
17 | }
18 |
19 | const foo = {} as Foo;
20 | foo.bar = 123;
21 | foo.bas = "hello";
22 | ```
23 |
24 | TypeScript 会在变量属性访问时进行强制空检测,这就促成了大量的前置检测代码,其在提高整体代码安全性的同时,对配置文件这样的静态数据就会造成冗余:
25 |
26 | ```ts
27 | const config = {
28 | port: 8000,
29 | };
30 |
31 | if (config) {
32 | console.log(config.port);
33 | }
34 | ```
35 |
36 | TypeScript 2.0 中提供了非空断言标志符:
37 |
38 | ```ts
39 | console.log(config!.port);
40 | ```
41 |
42 | 类型断言,尽管我们已经证明了它并不是那么安全,但它也还是有用武之地。如下一个非常实用的例子所示,当使用者了解传入参数更具体的类型时,类型断言能按预期工作:
43 |
44 | ```ts
45 | function handler(event: Event) {
46 | const mouseEvent = event as MouseEvent;
47 | }
48 | ```
49 |
50 | 然而,如下例子中的代码将会报错,尽管使用者已经使用了类型断言:
51 |
52 | ```ts
53 | function handler(event: Event) {
54 | const element = event as HTMLElement; // Error: 'Event' 和 'HTMLElement' 中的任何一个都不能赋值给另外一个
55 | }
56 | ```
57 |
58 | 如果你仍然想使用那个类型,你可以使用双重断言。首先断言成兼容所有类型的 any,编译器将不会报错:
59 |
60 | ```ts
61 | function handler(event: Event) {
62 | const element = event as any as HTMLElement; // ok
63 | }
64 | ```
65 |
66 | # 类型捕获
67 |
68 | TypeScript 类型系统非常强大,它支持其他任何单一语言无法实现的类型流动和类型片段。
69 |
70 | ## 复制类型和值
71 |
72 | 如果你想移动一个类,你可能会想要做以下事情:
73 |
74 | ```ts
75 | class Foo {}
76 |
77 | const Bar = Foo;
78 |
79 | let bar: Bar; // Error: 不能找到名称 'Bar'
80 | ```
81 |
82 | 这会得到一个错误,因为 `const` 仅仅是复制了 `Foo` 到一个变量声明空间,因此你无法把 `Bar` 当作一个类型声明使用。正确的方式是使用 `import` 关键字,请注意,如果你在使用 `namespace` 或者 `modules`,使用 `import` 是你唯一能用的方式:
83 |
84 | ```ts
85 | namespace importing {
86 | export class Foo {}
87 | }
88 |
89 | import Bar = importing.Foo;
90 | let bar: Bar; // ok
91 | ```
92 |
93 | 这个 `import` 技巧,仅适合于类型和变量。
94 |
95 | ## 捕获变量的类型
96 |
97 | 你可以通过 `typeof` 操作符在类型注解中使用变量。这允许你告诉编译器,一个变量的类型与其他类型相同,如下所示:
98 |
99 | ```ts
100 | let foo = 123;
101 | let bar: typeof foo; // 'bar' 类型与 'foo' 类型相同(在这里是:'number')
102 |
103 | bar = 456; // ok
104 | bar = "789"; // Error: 'string' 不能分配给 'number' 类型
105 | ```
106 |
107 | ## 捕获类成员的类型
108 |
109 | 与捕获变量的类型相似,你仅仅是需要声明一个变量用来捕获到的类型:
110 |
111 | ```ts
112 | class Foo {
113 | foo: number; // 我们想要捕获的类型
114 | }
115 |
116 | declare let _foo: Foo;
117 |
118 | // 与之前做法相同
119 | let bar: typeof _foo.foo;
120 | ```
121 |
122 | ## 捕获字符串类型
123 |
124 | 许多 JavaScript 库和框架都使用原始的 JavaScript 字符串,你可以使用 `const` 定义一个变量捕获它的类型:
125 |
126 | ```ts
127 | // 捕获字符串的类型与值
128 | const foo = "Hello World";
129 |
130 | // 使用一个捕获的类型
131 | let bar: typeof foo;
132 |
133 | // bar 仅能被赋值 'Hello World'
134 | bar = "Hello World"; // ok
135 | bar = "anything else"; // Error
136 | ```
137 |
138 | 在这个例子里,`bar` 有字面量类型 `Hello World`,我们在[字面量类型](https://jkchao.github.io/typescript-book-chinese/typings/literals.html)章节已经深入讨论。
139 |
140 | ## 捕获键的名称
141 |
142 | `keyof` 操作符能让你捕获一个类型的键。例如,你可以使用它来捕获变量的键名称,在通过使用 `typeof` 来获取类型之后:
143 |
144 | ```ts
145 | const colors = {
146 | red: "red",
147 | blue: "blue",
148 | };
149 |
150 | type Colors = keyof typeof colors;
151 |
152 | let color: Colors; // color 的类型是 'red' | 'blue'
153 | color = "red"; // ok
154 | color = "blue"; // ok
155 | color = "anythingElse"; // Error
156 | ```
157 |
158 | 这允许你很容易地拥有像字符串枚举+常量这样的类型,如上例所示。
159 |
--------------------------------------------------------------------------------
/02~TypeScript/02~类型使用/05~泛型编程/01~泛型基础.md:
--------------------------------------------------------------------------------
https://raw.githubusercontent.com/wx-chevalier/JavaScript-Notes/2c3c57c322e60a50a553e47b69f03839d95df99f/02~TypeScript/02~类型使用/05~泛型编程/01~泛型基础.md
--------------------------------------------------------------------------------
/02~TypeScript/02~类型使用/05~泛型编程/02~泛型约束.md:
--------------------------------------------------------------------------------
https://raw.githubusercontent.com/wx-chevalier/JavaScript-Notes/2c3c57c322e60a50a553e47b69f03839d95df99f/02~TypeScript/02~类型使用/05~泛型编程/02~泛型约束.md
--------------------------------------------------------------------------------
/02~TypeScript/02~类型使用/05~泛型编程/03~泛型工具类型.md:
--------------------------------------------------------------------------------
https://raw.githubusercontent.com/wx-chevalier/JavaScript-Notes/2c3c57c322e60a50a553e47b69f03839d95df99f/02~TypeScript/02~类型使用/05~泛型编程/03~泛型工具类型.md
--------------------------------------------------------------------------------
/02~TypeScript/02~类型使用/05~泛型编程/04~泛型最佳实践.md:
--------------------------------------------------------------------------------
https://raw.githubusercontent.com/wx-chevalier/JavaScript-Notes/2c3c57c322e60a50a553e47b69f03839d95df99f/02~TypeScript/02~类型使用/05~泛型编程/04~泛型最佳实践.md
--------------------------------------------------------------------------------
/02~TypeScript/03~工程实践/ID 类型.md:
--------------------------------------------------------------------------------
1 | # ID 类型
2 |
3 | ```ts
4 | type UserId = `user_${string}`;
5 | type GroupId = `group_${string}`;
6 |
7 | function updateUser(id: UserId): void {
8 | //
9 | }
10 |
11 | // Imagine somewhere in the code you have an id variable that is a GroupId
12 | declare const id: GroupId;
13 |
14 | updateUser(id); // Error: Argument of type '`group_${string}`' is not assignable to parameter of type '`user_${string}`'
15 | ```
16 |
--------------------------------------------------------------------------------
/02~TypeScript/03~工程实践/类型使用注意.md:
--------------------------------------------------------------------------------
1 | # 类型使用注意
2 |
3 | # Links
4 |
5 | - https://startup-cto.net/10-bad-typescript-habits-to-break-this-year/
6 |
--------------------------------------------------------------------------------
/02~TypeScript/04~编译原理/README.md:
--------------------------------------------------------------------------------
1 | # TypeScript 编译原理
2 |
3 | TypeScript 编译器源文件位于 src/compiler 目录下,它分为以下几个关键部分:
4 |
5 | - Scanner 扫描器(scanner.ts)
6 | - Parser 解析器(parser.ts)
7 | - Binder 绑定器(binder.ts)
8 | - Checker 检查器(checker.ts)
9 | - Emitter 发射器(emitter.ts)
10 |
11 | # Links
12 |
13 | - https://jkchao.github.io/typescript-book-chinese/compiler/overview.html#%E6%96%87%E4%BB%B6%EF%BC%9Autilities
14 |
--------------------------------------------------------------------------------
/02~TypeScript/04~编译原理/程序与抽象语法树.md:
--------------------------------------------------------------------------------
https://raw.githubusercontent.com/wx-chevalier/JavaScript-Notes/2c3c57c322e60a50a553e47b69f03839d95df99f/02~TypeScript/04~编译原理/程序与抽象语法树.md
--------------------------------------------------------------------------------
/02~TypeScript/04~编译原理/编译流程.md:
--------------------------------------------------------------------------------
https://raw.githubusercontent.com/wx-chevalier/JavaScript-Notes/2c3c57c322e60a50a553e47b69f03839d95df99f/02~TypeScript/04~编译原理/编译流程.md
--------------------------------------------------------------------------------
/02~TypeScript/05~类型库/type-challenge/README.md:
--------------------------------------------------------------------------------
1 | # Type Challenge
2 |
3 | # Links
4 |
5 | > https://github.com/type-challenges/type-challenges
6 |
--------------------------------------------------------------------------------
/02~TypeScript/05~类型库/type-fest/README.md:
--------------------------------------------------------------------------------
1 | # type-fest
2 |
--------------------------------------------------------------------------------
/02~TypeScript/05~类型库/内置类型/Capitalize.md:
--------------------------------------------------------------------------------
1 | # Capitalize
2 |
3 | ```ts
4 | type T = Capitalize<"hello">; // 'Hello'
5 |
6 | type T2 = Capitalize<"foo" | "bar">; // 'Foo' | 'Bar'
7 |
8 | type T3 = Capitalize<`aB${S}`>;
9 | type T4 = T3<"xYz">; // 'ABxYz'
10 |
11 | type T5 = Capitalize; // string
12 | type T6 = Capitalize; // any
13 | type T7 = Capitalize; // never
14 | type T8 = Capitalize<42>; // Error, type 'number' does not satisfy the constraint 'string'
15 | ```
16 |
--------------------------------------------------------------------------------
/02~TypeScript/05~类型库/内置类型/Exclude.md:
--------------------------------------------------------------------------------
1 | # Exclude
2 |
3 | ```ts
4 | interface ServerConfig {
5 | port: null | string | number;
6 | }
7 |
8 | type RequestHandler = (request: Request, response: Response) => void;
9 |
10 | // Exclude `null` type from `null | string | number`.
11 | // In case the port is equal to `null`, we will use default value.
12 | function getPortValue(port: Exclude): number {
13 | if (typeof port === "string") {
14 | return parseInt(port, 10);
15 | }
16 |
17 | return port;
18 | }
19 |
20 | function startServer(handler: RequestHandler, config: ServerConfig): void {
21 | const server = require("http").createServer(handler);
22 |
23 | const port = config.port === null ? 3000 : getPortValue(config.port);
24 | server.listen(port);
25 | }
26 | ```
27 |
--------------------------------------------------------------------------------
/02~TypeScript/05~类型库/内置类型/Extract.md:
--------------------------------------------------------------------------------
1 | # Extract
2 |
3 | ```ts
4 | declare function uniqueId(): number;
5 |
6 | const ID = Symbol("ID");
7 |
8 | interface Person {
9 | [ID]: number;
10 | name: string;
11 | age: number;
12 | }
13 |
14 | // Allows changing the person data as long as the property key is of string type.
15 | function changePersonData<
16 | Obj extends Person,
17 | Key extends Extract,
18 | Value extends Obj[Key]
19 | >(obj: Obj, key: Key, value: Value): void {
20 | obj[key] = value;
21 | }
22 |
23 | // Tiny Andrew was born.
24 | const andrew = {
25 | [ID]: uniqueId(),
26 | name: "Andrew",
27 | age: 0,
28 | };
29 |
30 | // Cool, we're fine with that.
31 | changePersonData(andrew, "name", "Pony");
32 |
33 | // Goverment didn't like the fact that you wanted to change your identity.
34 | changePersonData(andrew, ID, uniqueId());
35 | ```
36 |
--------------------------------------------------------------------------------
/02~TypeScript/05~类型库/内置类型/InstanceType.md:
--------------------------------------------------------------------------------
1 | # InstanceType
2 |
3 | ```ts
4 | class IdleService {
5 | doNothing(): void {}
6 | }
7 |
8 | class News {
9 | title: string;
10 | content: string;
11 |
12 | constructor(title: string, content: string) {
13 | this.title = title;
14 | this.content = content;
15 | }
16 | }
17 |
18 | const instanceCounter: Map = new Map();
19 |
20 | interface Constructor {
21 | new (...arguments_: any[]): any;
22 | }
23 |
24 | // Keep track how many instances of `Constr` constructor have been created.
25 | function getInstance<
26 | Constr extends Constructor,
27 | Arguments extends ConstructorParameters
28 | >(constructor: Constr, ...arguments_: Arguments): InstanceType {
29 | let count = instanceCounter.get(constructor) || 0;
30 |
31 | const instance = new constructor(...arguments_);
32 |
33 | instanceCounter.set(constructor, count + 1);
34 |
35 | console.log(`Created ${count + 1} instances of ${Constr.name} class`);
36 |
37 | return instance;
38 | }
39 |
40 | const idleService = getInstance(IdleService);
41 | // Will log: `Created 1 instances of IdleService class`
42 | const newsEntry = getInstance(
43 | News,
44 | "New ECMAScript proposals!",
45 | "Last month..."
46 | );
47 | // Will log: `Created 1 instances of News class`
48 | ```
49 |
--------------------------------------------------------------------------------
/02~TypeScript/05~类型库/内置类型/Lowercase.md:
--------------------------------------------------------------------------------
1 | # Lowercase
2 |
3 | ```ts
4 | type T = Lowercase<"HELLO">; // 'hello'
5 |
6 | type T2 = Lowercase<"FOO" | "BAR">; // 'foo' | 'bar'
7 |
8 | type T3 = Lowercase<`aB${S}`>;
9 | type T4 = T3<"xYz">; // 'abxyz'
10 |
11 | type T5 = Lowercase; // string
12 | type T6 = Lowercase; // any
13 | type T7 = Lowercase; // never
14 | type T8 = Lowercase<42>; // Error, type 'number' does not satisfy the constraint 'string'
15 | ```
16 |
--------------------------------------------------------------------------------
/02~TypeScript/05~类型库/内置类型/NonNullable.md:
--------------------------------------------------------------------------------
1 | # NonNullable
2 |
3 | 条件类型根据一个条件表达式来选择两种可能类型之一。
4 |
5 | ```typescript
6 | type NonNullable = T extends null | undefined ? never : T;
7 |
8 | type Result = NonNullable; // Result is string
9 | ```
10 |
11 | ```ts
12 | type PortNumber = string | number | null;
13 |
14 | /** Part of a class definition that is used to build a server */
15 | class ServerBuilder {
16 | portNumber!: NonNullable;
17 |
18 | port(this: ServerBuilder, port: PortNumber): ServerBuilder {
19 | if (port == null) {
20 | this.portNumber = 8000;
21 | } else {
22 | this.portNumber = port;
23 | }
24 |
25 | return this;
26 | }
27 | }
28 |
29 | const serverBuilder = new ServerBuilder();
30 |
31 | serverBuilder
32 | .port("8000") // portNumber = '8000'
33 | .port(null) // portNumber = 8000
34 | .port(3000); // portNumber = 3000
35 |
36 | // TypeScript error
37 | serverBuilder.portNumber = null;
38 | ```
39 |
--------------------------------------------------------------------------------
/02~TypeScript/05~类型库/内置类型/Nullable.md:
--------------------------------------------------------------------------------
1 | ## 可空类型(Nullable Types)
2 |
3 | 可空类型允许我们明确地处理 `null` 或 `undefined` 值。
4 |
5 | ```typescript
6 | type Nullable = T | null | undefined;
7 |
8 | function process(value: Nullable) {
9 | if (value != null) {
10 | console.log(value.toUpperCase());
11 | }
12 | }
13 | ```
14 |
--------------------------------------------------------------------------------
/02~TypeScript/05~类型库/内置类型/Omit.md:
--------------------------------------------------------------------------------
1 | # Omit
2 |
3 | ```ts
4 | interface Animal {
5 | imageUrl: string;
6 | species: string;
7 | images: string[];
8 | paragraphs: string[];
9 | }
10 |
11 | // Creates new type with all properties of the `Animal` interface
12 | // except 'images' and 'paragraphs' properties. We can use this
13 | // type to render small hover tooltip for a wiki entry list.
14 | type AnimalShortInfo = Omit;
15 |
16 | function renderAnimalHoverInfo(animals: AnimalShortInfo[]): HTMLElement {
17 | const container = document.createElement("div");
18 | // Internal implementation.
19 | return container;
20 | }
21 | ```
22 |
--------------------------------------------------------------------------------
/02~TypeScript/05~类型库/内置类型/Parameters.md:
--------------------------------------------------------------------------------
1 | # Parameters
2 |
3 | ```ts
4 | function shuffle(input: any[]): void {
5 | // Mutate array randomly changing its' elements indexes.
6 | }
7 |
8 | function callNTimes any>(
9 | func: Fn,
10 | callCount: number
11 | ) {
12 | // Type that represents the type of the received function parameters.
13 | type FunctionParameters = Parameters;
14 |
15 | return function (...arguments_: FunctionParameters) {
16 | for (let i = 0; i < callCount; i++) {
17 | func(...arguments_);
18 | }
19 | };
20 | }
21 |
22 | const shuffleTwice = callNTimes(shuffle, 2);
23 | ```
24 |
25 | # ConstructorParameters
26 |
27 | ```ts
28 | class ArticleModel {
29 | title: string;
30 | content?: string;
31 |
32 | constructor(title: string) {
33 | this.title = title;
34 | }
35 | }
36 |
37 | class InstanceCache any> {
38 | private ClassConstructor: T;
39 | private cache: Map> = new Map();
40 |
41 | constructor(ctr: T) {
42 | this.ClassConstructor = ctr;
43 | }
44 |
45 | getInstance(...arguments_: ConstructorParameters): InstanceType {
46 | const hash = this.calculateArgumentsHash(...arguments_);
47 |
48 | const existingInstance = this.cache.get(hash);
49 | if (existingInstance !== undefined) {
50 | return existingInstance;
51 | }
52 |
53 | return new this.ClassConstructor(...arguments_);
54 | }
55 |
56 | private calculateArgumentsHash(...arguments_: any[]): string {
57 | // Calculate hash.
58 | return "hash";
59 | }
60 | }
61 |
62 | const articleCache = new InstanceCache(ArticleModel);
63 | const amazonArticle = articleCache.getInstance("Amazon forests burining!");
64 | ```
65 |
--------------------------------------------------------------------------------
/02~TypeScript/05~类型库/内置类型/Partial.md:
--------------------------------------------------------------------------------
1 | # Partial
2 |
3 | ```ts
4 | interface NodeConfig {
5 | appName: string;
6 | port: number;
7 | }
8 |
9 | class NodeAppBuilder {
10 | private configuration: NodeConfig = {
11 | appName: "NodeApp",
12 | port: 3000,
13 | };
14 |
15 | private updateConfig(
16 | key: Key,
17 | value: NodeConfig[Key]
18 | ) {
19 | this.configuration[key] = value;
20 | }
21 |
22 | config(config: Partial) {
23 | type NodeConfigKey = keyof NodeConfig;
24 |
25 | for (const key of Object.keys(config) as NodeConfigKey[]) {
26 | const updateValue = config[key];
27 |
28 | if (updateValue === undefined) {
29 | continue;
30 | }
31 |
32 | this.updateConfig(key, updateValue);
33 | }
34 |
35 | return this;
36 | }
37 | }
38 |
39 | // `Partial`` allows us to provide only a part of the
40 | // NodeConfig interface.
41 | new NodeAppBuilder().config({ appName: "ToDoApp" });
42 | ```
43 |
--------------------------------------------------------------------------------
/02~TypeScript/05~类型库/内置类型/Pick.md:
--------------------------------------------------------------------------------
1 | # Pick
2 |
3 | `Pick` 是 TypeScript 中一个非常有用的工具类型(Utility Type)。它允许你从一个已有的类型中选择一部分属性来创建一个新的类型。让我们来看看 `Pick` 的定义和使用方法:
4 |
5 | 1. `Pick` 的定义
6 |
7 | `Pick` 的类型定义如下:
8 |
9 | ```typescript
10 | type Pick = {
11 | [P in K]: T[P];
12 | };
13 | ```
14 |
15 | 这个定义看起来可能有点复杂,让我们来逐步解析:
16 |
17 | - `T` 是源类型,即我们要从中选择属性的类型。
18 | - `K extends keyof T` 表示 `K` 必须是 `T` 的键的子集。
19 | - `[P in K]: T[P]` 是一个映射类型,它遍历 `K` 中的所有属性,并为每个属性创建一个新的属性,其类型与 `T` 中对应属性的类型相同。
20 |
21 | 2. `Pick` 的使用示例
22 |
23 | 让我们通过一个例子来看看如何使用 `Pick`:
24 |
25 | ```typescript
26 | interface Person {
27 | name: string;
28 | age: number;
29 | address: string;
30 | email: string;
31 | }
32 |
33 | type PersonNameAndAge = Pick;
34 |
35 | // 等同于:
36 | // type PersonNameAndAge = {
37 | // name: string;
38 | // age: number;
39 | // }
40 |
41 | const john: PersonNameAndAge = {
42 | name: "John",
43 | age: 30,
44 | // address 和 email 不再是必需的
45 | };
46 | ```
47 |
48 | 在这个例子中,我们从 `Person` 接口中选择了 `name` 和 `age` 属性来创建一个新的类型 `PersonNameAndAge`。
49 |
50 | 3. 更复杂的 `Pick` 用法
51 |
52 | `Pick` 可以与其他类型操作符结合使用,创建更复杂的类型:
53 |
54 | ```typescript
55 | interface Todo {
56 | title: string;
57 | description: string;
58 | completed: boolean;
59 | createdAt: number;
60 | }
61 |
62 | // 创建一个类型,只包含 Todo 中的字符串类型属性
63 | type StringPropertyNames = {
64 | [K in keyof T]: T[K] extends string ? K : never;
65 | }[keyof T];
66 |
67 | type TodoStringProps = Pick>;
68 |
69 | // 等同于:
70 | // type TodoStringProps = {
71 | // title: string;
72 | // description: string;
73 | // }
74 | ```
75 |
76 | 在这个例子中,我们首先创建了一个 `StringPropertyNames` 类型,它会从一个类型中提取所有字符串类型的属性名。然后我们使用 `Pick` 和这个 `StringPropertyNames` 来创建一个新的类型,这个新类型只包含原始类型中的字符串属性。
77 |
78 | 理解和熟练使用 `Pick` 类型可以帮助你更灵活地操作和转换类型,从而编写出更精确、更易维护的 TypeScript 代码。
79 |
80 | # 案例
81 |
82 | ```ts
83 | interface Article {
84 | title: string;
85 | thumbnail: string;
86 | content: string;
87 | }
88 |
89 | // Creates new type out of the `Article` interface composed
90 | // from the Articles' two properties: `title` and `thumbnail`.
91 | // `ArticlePreview = {title: string; thumbnail: string}`
92 | type ArticlePreview = Pick;
93 |
94 | // Render a list of articles using only title and description.
95 | function renderArticlePreviews(previews: ArticlePreview[]): HTMLElement {
96 | const articles = document.createElement("div");
97 |
98 | for (const preview of previews) {
99 | // Append preview to the articles.
100 | }
101 |
102 | return articles;
103 | }
104 |
105 | const articles = renderArticlePreviews([
106 | {
107 | title: "TypeScript tutorial!",
108 | thumbnail: "/assets/ts.jpg",
109 | },
110 | ]);
111 | ```
112 |
--------------------------------------------------------------------------------
/02~TypeScript/05~类型库/内置类型/Readonly.md:
--------------------------------------------------------------------------------
1 | # Readonly
2 |
3 | ```ts
4 | enum LogLevel {
5 | Off,
6 | Debug,
7 | Error,
8 | Fatal,
9 | }
10 |
11 | interface LoggerConfig {
12 | name: string;
13 | level: LogLevel;
14 | }
15 |
16 | class Logger {
17 | config: Readonly;
18 |
19 | constructor({ name, level }: LoggerConfig) {
20 | this.config = { name, level };
21 | Object.freeze(this.config);
22 | }
23 | }
24 |
25 | const config: LoggerConfig = {
26 | name: "MyApp",
27 | level: LogLevel.Debug,
28 | };
29 |
30 | const logger = new Logger(config);
31 |
32 | // TypeScript Error: cannot assign to read-only property.
33 | logger.config.level = LogLevel.Error;
34 |
35 | // We are able to edit config variable as we please.
36 | config.level = LogLevel.Error;
37 | ```
38 |
--------------------------------------------------------------------------------
/02~TypeScript/05~类型库/内置类型/Record.md:
--------------------------------------------------------------------------------
1 | # Record
2 |
3 | ```ts
4 | // Positions of employees in our company.
5 | type MemberPosition = "intern" | "developer" | "tech-lead";
6 |
7 | // Interface describing properties of a single employee.
8 | interface Employee {
9 | firstName: string;
10 | lastName: string;
11 | yearsOfExperience: number;
12 | }
13 |
14 | // Create an object that has all possible `MemberPosition` values set as keys.
15 | // Those keys will store a collection of Employees of the same position.
16 | const team: Record = {
17 | intern: [],
18 | developer: [],
19 | "tech-lead": [],
20 | };
21 |
22 | // Our team has decided to help John with his dream of becoming Software Developer.
23 | team.intern.push({
24 | firstName: "John",
25 | lastName: "Doe",
26 | yearsOfExperience: 0,
27 | });
28 |
29 | // `Record` forces you to initialize all of the property keys.
30 | // TypeScript Error: "tech-lead" property is missing
31 | const teamEmpty: Record = {
32 | intern: null,
33 | developer: null,
34 | };
35 | ```
36 |
--------------------------------------------------------------------------------
/02~TypeScript/05~类型库/内置类型/Required.md:
--------------------------------------------------------------------------------
1 | # Required
2 |
3 | ```ts
4 | interface ContactForm {
5 | email?: string;
6 | message?: string;
7 | }
8 |
9 | function submitContactForm(formData: Required) {
10 | // Send the form data to the server.
11 | }
12 |
13 | submitContactForm({
14 | email: "ex@mple.com",
15 | message: "Hi! Could you tell me more about…",
16 | });
17 |
18 | // TypeScript error: missing property 'message'
19 | submitContactForm({
20 | email: "ex@mple.com",
21 | });
22 | ```
23 |
--------------------------------------------------------------------------------
/02~TypeScript/05~类型库/内置类型/ReturnType.md:
--------------------------------------------------------------------------------
1 | # ReturnType
2 |
3 | ```ts
4 | /** Provides every element of the iterable `iter` into the `callback` function and stores the results in an array. */
5 | function mapIter<
6 | Elem,
7 | Func extends (elem: Elem) => any,
8 | Ret extends ReturnType
9 | >(iter: Iterable, callback: Func): Ret[] {
10 | const mapped: Ret[] = [];
11 |
12 | for (const elem of iter) {
13 | mapped.push(callback(elem));
14 | }
15 |
16 | return mapped;
17 | }
18 |
19 | const setObject: Set = new Set();
20 | const mapObject: Map = new Map();
21 |
22 | mapIter(setObject, (value: string) => value.indexOf("Foo")); // number[]
23 |
24 | mapIter(mapObject, ([key, value]: [number, string]) => {
25 | return key % 2 === 0 ? value : "Odd";
26 | }); // string[]
27 | ```
28 |
--------------------------------------------------------------------------------
/02~TypeScript/05~类型库/内置类型/Uncapitalize.md:
--------------------------------------------------------------------------------
1 | # Uncapitalize
2 |
3 | ```ts
4 | type T = Uncapitalize<"Hello">; // 'hello'
5 |
6 | type T2 = Uncapitalize<"Foo" | "Bar">; // 'foo' | 'bar'
7 |
8 | type T3 = Uncapitalize<`AB${S}`>;
9 | type T4 = T3<"xYz">; // 'aBxYz'
10 |
11 | type T5 = Uncapitalize; // string
12 | type T6 = Uncapitalize; // any
13 | type T7 = Uncapitalize; // never
14 | type T8 = Uncapitalize<42>; // Error, type 'number' does not satisfy the constraint 'string'
15 | ```
16 |
--------------------------------------------------------------------------------
/02~TypeScript/05~类型库/内置类型/Uppercase.md:
--------------------------------------------------------------------------------
1 | # Uppercase
2 |
3 | ```ts
4 | type T = Uppercase<"hello">; // 'HELLO'
5 |
6 | type T2 = Uppercase<"foo" | "bar">; // 'FOO' | 'BAR'
7 |
8 | type T3 = Uppercase<`aB${S}`>;
9 | type T4 = T3<"xYz">; // 'ABXYZ'
10 |
11 | type T5 = Uppercase; // string
12 | type T6 = Uppercase; // any
13 | type T7 = Uppercase; // never
14 | type T8 = Uppercase<42>; // Error, type 'number' does not satisfy the constraint 'string'
15 | ```
16 |
--------------------------------------------------------------------------------
/02~TypeScript/05~类型库/自定义类型/Branded Types/README.md:
--------------------------------------------------------------------------------
1 | # Introduction
2 |
3 | Branded types in TypeScript enable the creation of new types by affixing a type tag to an existing underlying type. This tag, commonly referred to as the "brand", distinguishes values of the branded type from others sharing the same underlying type. Acting as a compile-time validator, the brand ensures that values are utilized correctly within their intended contexts.
4 |
5 | # Issue
6 |
7 | Imagine a scenario where a function generates a hash from a string input. Without the use of branded types, the function signature lacks specificity regarding the nature of the returned string, potentially leading to confusion or misuse in the codebase.
8 |
9 | ```
10 | const generateHash = (input: string): string => {
11 | return "hashed_" + input; // For demonstration, appending "hashed_" to input
12 | };
13 |
14 | // Ideally, we only want to pass hashes to this function
15 | const compareHash = (hash: string, input: string): boolean => {
16 | return true;
17 | };
18 |
19 | // Example usage
20 | const userInput = "secretData";
21 | const hash = generateHash(userInput);
22 |
23 | // Without branded types, there's no indication that the returned string is a hash.
24 | // Developers may erroneously treat it as a regular string because there's no immediate context attached to it, leading to misuse, e.g.
25 | console.log(hash.toUpperCase());
26 |
27 | // Notice the parameters are in incorrect order
28 | const matches = compareHash(userInput, hash);
29 | ```
30 |
31 | # Solution
32 |
33 | It's fairly easy to enhance the clarity and safety of the code above by introducing a Branded type. This Branded type ensures that the returned string from the `generateHash` function is explicitly marked as a hash, preventing potential misuse or confusion in the codebase.
34 |
35 | ```
36 | // By declaring a unique symbol, we create a distinct marker in TypeScript.
37 | declare const __brand: unique symbol;
38 |
39 | // Define a Branded type that combines a base type with a brand
40 | type Branded = Type & {
41 | readonly [__brand]: Brand;
42 | };
43 | ```
44 |
45 | The `__brand` is enclosed in square brackets to denote that it is a computed property with a key that is dynamically determined at compile time. This property is defined using a unique symbol, `__brand`, ensuring that it is unique across the codebase. Unique symbols are opaque and don't have a runtime value; they're simply used as identifiers to prevent accidental collisions.With the `Branded` type defined, the `generateHash` function can be modified to return a value of type `Branded`. In practice, the returned string will be both a string and carry the specific brand `'Hash'`, making its intended purpose clear.
46 |
47 | ```
48 | type Hash = Branded;
49 |
50 | const generateHash = (input: string): Hash => {
51 | return ("hashed_" + input) as Hash;
52 | };
53 |
54 | const compareHash = (hash: Hash, input: string): boolean => {
55 | return true;
56 | };
57 |
58 | const userInput = "secretData";
59 | const hash = generateHash(userInput); // hash is of type Hash
60 |
61 | // This won't compile!
62 | // Argument of type 'string' is not assignable to parameter of type 'Hash'.
63 | //Type 'string' is not assignable to type '{ readonly [__brand]: "Hash"; }'.(2345)
64 | const _matches = compareHash(userInput, hash);
65 |
66 | // This, however, compiles!
67 | const matches = compareHash(hash, userInput);
68 | ```
69 |
70 | By changing the type of the `hash` parameter in `compareHash`, it's possible to eliminate cases where the order of arguments is incorrect. **A runtime bug is now a compile time bug.**
71 |
--------------------------------------------------------------------------------
/02~TypeScript/99~参考资料/2023~Ruanyf~《TypeScript 新手教程》/array.md:
--------------------------------------------------------------------------------
1 | # TypeScript 的数组类型
2 |
3 | JavaScript 数组在 TypeScript 里面分成两种类型,分别是数组(array)和元组(tuple)。
4 |
5 | 本章介绍数组,下一章介绍元组。
6 |
7 | ## 简介
8 |
9 | TypeScript 数组有一个根本特征:所有成员的类型必须相同,但是成员数量是不确定的,可以是无限数量的成员,也可以是零成员。
10 |
11 | 数组的类型有两种写法。第一种写法是在数组成员的类型后面,加上一对方括号。
12 |
13 | ```typescript
14 | let arr:number[] = [1, 2, 3];
15 | ```
16 |
17 | 上面示例中,数组`arr`的类型是`number[]`,其中`number`表示数组成员类型是`number`。
18 |
19 | 如果数组成员的类型比较复杂,可以写在圆括号里面。
20 |
21 | ```typescript
22 | let arr:(number|string)[];
23 | ```
24 |
25 | 上面示例中,数组`arr`的成员类型是`number|string`。
26 |
27 | 这个例子里面的圆括号是必须的,否则因为竖杠(`|`)的优先级低于`[]`,TypeScript 会把`number|string[]`理解成`number`和`string[]`的联合类型。
28 |
29 | 如果数组成员可以是任意类型,写成`any[]`。当然,这种写法是应该避免的。
30 |
31 | ```typescript
32 | let arr:any[];
33 | ```
34 |
35 | 数组类型的第二种写法是使用 TypeScript 内置的 Array 接口。
36 |
37 | ```typescript
38 | let arr:Array = [1, 2, 3];
39 | ```
40 |
41 | 上面示例中,数组`arr`的类型是`Array`,其中`number`表示成员类型是`number`。
42 |
43 | 这种写法对于成员类型比较复杂的数组,代码可读性会稍微好一些。
44 |
45 | ```typescript
46 | let arr:Array;
47 | ```
48 |
49 | 这种写法本质上属于泛型,这里只要知道怎么写就可以了,详细解释参见《泛型》一章。另外,数组类型还有第三种写法,因为很少用到,本章就省略了,详见《interface 接口》一章。
50 |
51 | 数组类型声明了以后,成员数量是不限制的,任意数量的成员都可以,也可以是空数组。
52 |
53 | ```typescript
54 | let arr:number[];
55 | arr = [];
56 | arr = [1];
57 | arr = [1, 2];
58 | arr = [1, 2, 3];
59 | ```
60 |
61 | 上面示例中,数组`arr`无论有多少个成员,都是正确的。
62 |
63 | 这种规定的隐藏含义就是,数组的成员是可以动态变化的。
64 |
65 | ```typescript
66 | let arr:number[] = [1, 2, 3];
67 |
68 | arr[3] = 4;
69 | arr.length = 2;
70 |
71 | arr // [1, 2]
72 | ```
73 |
74 | 上面示例中,数组增加成员或减少成员,都是可以的。
75 |
76 | 正是由于成员数量可以动态变化,所以 TypeScript 不会对数组边界进行检查,越界访问数组并不会报错。
77 |
78 | ```typescript
79 | let arr:number[] = [1, 2, 3];
80 | let foo = arr[3]; // 正确
81 | ```
82 |
83 | 上面示例中,变量`foo`的值是一个不存在的数组成员,TypeScript 并不会报错。
84 |
85 | TypeScript 允许使用方括号读取数组成员的类型。
86 |
87 | ```typescript
88 | type Names = string[];
89 | type Name = Names[0]; // string
90 | ```
91 |
92 | 上面示例中,类型`Names`是字符串数组,那么`Names[0]`返回的类型就是`string`。
93 |
94 | 由于数组成员的索引类型都是`number`,所以读取成员类型也可以写成下面这样。
95 |
96 | ```typescript
97 | type Names = string[];
98 | type Name = Names[number]; // string
99 | ```
100 |
101 | 上面示例中,`Names[number]`表示数组`Names`所有数值索引的成员类型,所以返回`string`。
102 |
103 | ## 数组的类型推断
104 |
105 | 如果数组变量没有声明类型,TypeScript 就会推断数组成员的类型。这时,推断行为会因为值的不同,而有所不同。
106 |
107 | 如果变量的初始值是空数组,那么 TypeScript 会推断数组类型是`any[]`。
108 |
109 | ```typescript
110 | // 推断为 any[]
111 | const arr = [];
112 | ```
113 |
114 | 后面,为这个数组赋值时,TypeScript 会自动更新类型推断。
115 |
116 | ```typescript
117 | // 推断为 any[]
118 | const arr = [];
119 |
120 | // 推断类型为 number[]
121 | arr.push(123);
122 |
123 | // 推断类型为 (string | number)[]
124 | arr.push('abc');
125 | ```
126 |
127 | 上面示例中,数组变量`arr`的初始值是空数组,然后随着新成员的加入,TypeScript 会自动修改推断的数组类型。
128 |
129 | 但是,类型推断的自动更新只发生初始值为空数组的情况。如果初始值不是空数组,类型推断就不会更新。
130 |
131 | ```typescript
132 | // 推断类型为 number[]
133 | const arr = [123];
134 |
135 | arr.push('abc'); // 报错
136 | ```
137 |
138 | 上面示例中,数组变量`arr`的初始值是`[123]`,TypeScript 就推断成员类型为`number`。新成员如果不是这个类型,TypeScript 就会报错,而不会更新类型推断。
139 |
140 | ## 只读数组,const 断言
141 |
142 | JavaScript 规定,`const`命令声明的数组变量是可以改变成员的。
143 |
144 | ```typescript
145 | const arr = [0, 1];
146 | arr[0] = 2;
147 | ```
148 |
149 | 上面示例中,修改`const`命令声明的数组的成员是允许的。
150 |
151 | 但是,很多时候确实有声明为只读数组的需求,即不允许变动数组成员。
152 |
153 | TypeScript 允许声明只读数组,方法是在数组类型前面加上`readonly`关键字。
154 |
155 | ```typescript
156 | const arr:readonly number[] = [0, 1];
157 |
158 | arr[1] = 2; // 报错
159 | arr.push(3); // 报错
160 | delete arr[0]; // 报错
161 | ```
162 |
163 | 上面示例中,`arr`是一个只读数组,删除、修改、新增数组成员都会报错。
164 |
165 | TypeScript 将`readonly number[]`与`number[]`视为两种不一样的类型,后者是前者的子类型。
166 |
167 | 这是因为只读数组没有`pop()`、`push()`之类会改变原数组的方法,所以`number[]`的方法数量要多于`readonly number[]`,这意味着`number[]`其实是`readonly number[]`的子类型。
168 |
169 | 我们知道,子类型继承了父类型的所有特征,并加上了自己的特征,所以子类型`number[]`可以用于所有使用父类型的场合,反过来就不行。
170 |
171 | ```typescript
172 | let a1:number[] = [0, 1];
173 | let a2:readonly number[] = a1; // 正确
174 |
175 | a1 = a2; // 报错
176 | ```
177 |
178 | 上面示例中,子类型`number[]`可以赋值给父类型`readonly number[]`,但是反过来就会报错。
179 |
180 | 由于只读数组是数组的父类型,所以它不能代替数组。这一点很容易产生令人困惑的报错。
181 |
182 | ```typescript
183 | function getSum(s:number[]) {
184 | // ...
185 | }
186 |
187 | const arr:readonly number[] = [1, 2, 3];
188 |
189 | getSum(arr) // 报错
190 | ```
191 |
192 | 上面示例中,函数`getSum()`的参数`s`是一个数组,传入只读数组就会报错。原因就是只读数组是数组的父类型,父类型不能替代子类型。这个问题的解决方法是使用类型断言`getSum(arr as number[])`,详见《类型断言》一章。
193 |
194 | 注意,`readonly`关键字不能与数组的泛型写法一起使用。
195 |
196 | ```typescript
197 | // 报错
198 | const arr:readonly Array = [0, 1];
199 | ```
200 |
201 | 上面示例中,`readonly`与数组的泛型写法一起使用,就会报错。
202 |
203 | 实际上,TypeScript 提供了两个专门的泛型,用来生成只读数组的类型。
204 |
205 | ```typescript
206 | const a1:ReadonlyArray = [0, 1];
207 |
208 | const a2:Readonly = [0, 1];
209 | ```
210 |
211 | 上面示例中,泛型`ReadonlyArray`和`Readonly`都可以用来生成只读数组类型。两者尖括号里面的写法不一样,`Readonly`的尖括号里面是整个数组(`number[]`),而`ReadonlyArray`的尖括号里面是数组成员(`number`)。
212 |
213 | 只读数组还有一种声明方法,就是使用“const 断言”。
214 |
215 | ```typescript
216 | const arr = [0, 1] as const;
217 |
218 | arr[0] = [2]; // 报错
219 | ```
220 |
221 | 上面示例中,`as const`告诉 TypeScript,推断类型时要把变量`arr`推断为只读数组,从而使得数组成员无法改变。
222 |
223 | ## 多维数组
224 |
225 | TypeScript 使用`T[][]`的形式,表示二维数组,`T`是最底层数组成员的类型。
226 |
227 | ```typescript
228 | var multi:number[][] =
229 | [[1,2,3], [23,24,25]];
230 | ```
231 |
232 | 上面示例中,变量`multi`的类型是`number[][]`,表示它是一个二维数组,最底层的数组成员类型是`number`。
233 |
234 |
--------------------------------------------------------------------------------
/02~TypeScript/99~参考资料/2023~Ruanyf~《TypeScript 新手教程》/chapters.yml:
--------------------------------------------------------------------------------
1 | - intro.md: 简介
2 | - basic.md: 基本用法
3 | - any.md: any 类型
4 | - types.md: 类型系统
5 | - array.md: 数组
6 | - tuple.md: 元组
7 | - symbol.md: symbol 类型
8 | - function.md: 函数
9 | - object.md: 对象
10 | - interface.md: interface
11 | - class.md: 类
12 | - generics.md: 泛型
13 | - enum.md: Enum 类型
14 | - assert.md: 类型断言
15 | - module.md: 模块
16 | - namespace.md: namespace
17 | - decorator.md: 装饰器
18 | - decorator-legacy.md: 装饰器(旧语法)
19 | - declare.md: declare 关键字
20 | - d.ts.md: d.ts 类型声明文件
21 | - operator.md: 运算符
22 | - mapping.md: 类型映射
23 | - utility.md: 类型工具
24 | - comment.md: 注释指令
25 | - tsconfig.json.md: tsconfig.json 文件
26 | - tsc.md: tsc 命令
27 |
28 |
--------------------------------------------------------------------------------
/02~TypeScript/99~参考资料/2023~Ruanyf~《TypeScript 新手教程》/comment.md:
--------------------------------------------------------------------------------
1 | # TypeScript 的注释指令
2 |
3 | TypeScript 接受一些注释指令。
4 |
5 | 所谓“注释指令”,指的是采用 JS 双斜杠注释的形式,向编译器发出的命令。
6 |
7 | ## `// @ts-nocheck`
8 |
9 | `// @ts-nocheck`告诉编译器不对当前脚本进行类型检查,可以用于 TypeScript 脚本,也可以用于 JavaScript 脚本。
10 |
11 | ```javascript
12 | // @ts-nocheck
13 |
14 | const element = document.getElementById(123);
15 | ```
16 |
17 | 上面示例中,`document.getElementById(123)`存在类型错误,但是编译器不对该脚本进行类型检查,所以不会报错。
18 |
19 | ## `// @ts-check`
20 |
21 | 如果一个 JavaScript 脚本顶部添加了`// @ts-check`,那么编译器将对该脚本进行类型检查,不论是否启用了`checkJs`编译选项。
22 |
23 | ```javascript
24 | // @ts-check
25 | let isChecked = true;
26 |
27 | console.log(isChceked); // 报错
28 | ```
29 |
30 | 上面示例是一个 JavaScript 脚本,`// @ts-check`告诉 TypeScript 编译器对其进行类型检查,所以最后一行会报错,提示拼写错误。
31 |
32 | ## `// @ts-ignore`
33 |
34 | `// @ts-ignore`或`// @ts-expect-error`,告诉编译器不对下一行代码进行类型检查,可以用于 TypeScript 脚本,也可以用于 JavaScript 脚本。
35 |
36 | ```typescript
37 | let x:number;
38 |
39 | x = 0;
40 |
41 | // @ts-expect-error
42 | x = false; // 不报错
43 | ```
44 |
45 | 上面示例中,最后一行是类型错误,变量`x`的类型是`number`,不能等于布尔值。但是因为前面加上了`// @ts-expect-error`,编译器会跳过这一行的类型检查,所以不会报错。
46 |
47 | ## JSDoc
48 |
49 | TypeScript 直接处理 JS 文件时,如果无法推断出类型,会使用 JS 脚本里面的 JSDoc 注释。
50 |
51 | 使用 JSDoc 时,有两个基本要求。
52 |
53 | (1)JSDoc 注释必须以`/**`开始,其中星号(`*`)的数量必须为两个。若使用其他形式的多行注释,则 JSDoc 会忽略该条注释。
54 |
55 | (2)JSDoc 注释必须与它描述的代码处于相邻的位置,并且注释在上,代码在下。
56 |
57 | 下面是 JSDoc 的一个简单例子。
58 |
59 | ```javascript
60 | /**
61 | * @param {string} somebody
62 | */
63 | function sayHello(somebody) {
64 | console.log('Hello ' + somebody);
65 | }
66 | ```
67 |
68 | 上面示例中,注释里面的`@param`是一个 JSDoc 声明,表示下面的函数`sayHello()`的参数`somebody`类型为`string`。
69 |
70 | TypeScript 编译器支持大部分的 JSDoc 声明,下面介绍其中的一些。
71 |
72 | ### @typedef
73 |
74 | `@typedef`命令创建自定义类型,等同于 TypeScript 里面的类型别名。
75 |
76 | ```javascript
77 | /**
78 | * @typedef {(number | string)} NumberLike
79 | */
80 | ```
81 |
82 | 上面示例中,定义了一个名为`NumberLike`的新类型,它是由`number`和`string`构成的联合类型,等同于 TypeScript 的如下语句。
83 |
84 | ```typescript
85 | type NumberLike = string | number;
86 | ```
87 |
88 | ### @type
89 |
90 | `@type`命令定义变量的类型。
91 |
92 | ```javascript
93 | /**
94 | * @type {string}
95 | */
96 | let a;
97 | ```
98 |
99 | 上面示例中,`@type`定义了变量`a`的类型为`string`。
100 |
101 | 在`@type`命令中可以使用由`@typedef`命令创建的类型。
102 |
103 | ```javascript
104 | /**
105 | * @typedef {(number | string)} NumberLike
106 | */
107 |
108 | /**
109 | * @type {NumberLike}
110 | */
111 | let a = 0;
112 | ```
113 |
114 | 在`@type`命令中允许使用 TypeScript 类型及其语法。
115 |
116 | ```javascript
117 | /**@type {true | false} */
118 | let a;
119 |
120 | /** @type {number[]} */
121 | let b;
122 |
123 | /** @type {Array} */
124 | let c;
125 |
126 | /** @type {{ readonly x: number, y?: string }} */
127 | let d;
128 |
129 | /** @type {(s: string, b: boolean) => number} */
130 | let e;
131 | ```
132 |
133 | ### @param
134 |
135 | `@param`命令用于定义函数参数的类型。
136 |
137 | ```javascript
138 | /**
139 | * @param {string} x
140 | */
141 | function foo(x) {}
142 | ```
143 |
144 | 如果是可选参数,需要将参数名放在方括号`[]`里面。
145 |
146 | ```javascript
147 | /**
148 | * @param {string} [x]
149 | */
150 | function foo(x) {}
151 | ```
152 |
153 | 方括号里面,还可以指定参数默认值。
154 |
155 | ```javascript
156 | /**
157 | * @param {string} [x="bar"]
158 | */
159 | function foo(x) {}
160 | ```
161 |
162 | 上面示例中,参数`x`的默认值是字符串`bar`。
163 |
164 | ### @return,@returns
165 |
166 | `@return`和`@returns`命令的作用相同,指定函数返回值的类型。
167 |
168 | ```javascript
169 | /**
170 | * @return {boolean}
171 | */
172 | function foo() {
173 | return true;
174 | }
175 |
176 | /**
177 | * @returns {number}
178 | */
179 | function bar() {
180 | return 0;
181 | }
182 | ```
183 |
184 | ### @extends 和类型修饰符
185 |
186 | `@extends`命令用于定义继承的基类。
187 |
188 | ```javascript
189 | /**
190 | * @extends {Base}
191 | */
192 | class Derived extends Base {
193 | }
194 | ```
195 |
196 | `@public`、`@protected`、`@private`分别指定类的公开成员、保护成员和私有成员。
197 |
198 | `@readonly`指定只读成员。
199 |
200 | ```javascript
201 | class Base {
202 | /**
203 | * @public
204 | * @readonly
205 | */
206 | x = 0;
207 |
208 | /**
209 | * @protected
210 | */
211 | y = 0;
212 | }
213 | ```
214 |
215 |
--------------------------------------------------------------------------------
/02~TypeScript/99~参考资料/2023~Ruanyf~《TypeScript 新手教程》/es6.md:
--------------------------------------------------------------------------------
1 | # TypeScript 的 ES6 类型
2 |
3 | ## `Map`
4 |
5 | ```typescript
6 | let map2 = new Map(); // Key any, value any
7 | let map3 = new Map(); // Key string, value number
8 | ```
9 |
10 | TypeScript 使用 Map 类型,描述 Map 结构。
11 |
12 | ```typescript
13 | const myMap: Map = new Map([
14 | [false, 'no'],
15 | [true, 'yes'],
16 | ]);
17 | ```
18 |
19 | Map 是一个泛型,使用时,比如给出类型变量。
20 |
21 | 由于存在类型推断,也可以省略类型参数。
22 |
23 | ```typescript
24 | const myMap = new Map([
25 | [false, 'no'],
26 | [true, 'yes'],
27 | ]);
28 | ```
29 |
30 | ## `Set`
31 |
32 | ## `Promise`
33 |
34 | ## async 函数
35 |
36 | async 函数的的返回值是一个 Promise 对象。
37 |
38 | ```typescript
39 | const p:Promise = /* ... */;
40 |
41 | async function fn(): Promise {
42 | var i = await p;
43 | return i + 1;
44 | }
45 | ```
46 |
47 | ## `Iterable<>`
48 |
49 | 对象只要部署了 Iterator 接口,就可以用`for...of`循环遍历。Generator 函数(生成器)返回的就是一个具有 Iterator 接口的对象。
50 |
51 | TypeScript 使用泛型`Iterable`表示具有 Iterator 接口的对象,其中`T`表示 Iterator 接口包含的值类型(每一轮遍历获得的值)。
52 |
53 | ```typescript
54 | interface Iterable {
55 | [Symbol.iterator](): Iterator;
56 | }
57 | ```
58 |
59 | 上面是`Iterable`接口的定义,表示一个具有`Symbol.iterator`属性的对象,该属性是一个函数,调用后返回的是一个 Iterator 对象。
60 |
61 | Iterator 对象必须具有`next()`方法,另外还具有两个可选方法`return()`和`throw()`,类型表述如下。
62 |
63 | ```typescript
64 | interface Iterator {
65 | next(value?: any): IteratorResult;
66 | return?(value?: any): IteratorResult;
67 | throw?(e?: any): IteratorResult;
68 | }
69 | ```
70 |
71 | 上面的类型定义中,可以看到`next()`、`return()`、`throw()`这三个方法的返回值是一个部署了`IteratorResult`接口的对象。
72 |
73 | `IteratorResult`接口的定义如下。
74 |
75 | ```typescript
76 | interface IteratorResult {
77 | done: boolean; //表示遍历是否结束
78 | value: T; // 当前遍历得到的值
79 | }
80 | ```
81 |
82 | 上面的类型定义表示,Iterator 对象的`next()`等方法的返回值,具有`done`和`value`两个属性。
83 |
84 | 下面的例子是 Generator 函数返回一个具有 Iterator 接口的对象。
85 |
86 | ```typescript
87 | function* g():Iterable {
88 | for (var i = 0; i < 100; i++) {
89 | yield '';
90 | }
91 | yield* otherStringGenerator();
92 | }
93 | ```
94 |
95 | 上面示例中,生成器`g()`返回的类型是`Iterable`,其中`string`表示 Iterator 接口包含的是字符串。
96 |
97 | 这个例子的类型声明可以省略,因为 TypeScript 可以自己推断出来 Iterator 接口的类型。
98 |
99 | ```typescript
100 | function* g() {
101 | for (var i = 0; i < 100; i++) {
102 | yield ""; // infer string
103 | }
104 | yield* otherStringGenerator();
105 | }
106 | ```
107 |
108 | 另外,扩展运算符(`...`)后面的值必须具有 Iterator 接口,下面是一个例子。
109 |
110 | ```typescript
111 | function toArray(xs: Iterable):X[] {
112 | return [...xs]
113 | }
114 | ```
115 |
116 | ## Generator 函数
117 |
118 | Generator 函数返回一个同时具有 Iterable 接口(具有`[Symbol.iterator]`属性)和 Iterator 接口(具有`next()`方法)的对象,因此 TypeScript 提供了一个泛型`IterableIterator`,表示同时满足`Iterable`和`Iterator`两个接口。
119 |
120 | ```typescript
121 | interface IterableIterator extends Iterator {
122 | [Symbol.iterator](): IterableIterator;
123 | }
124 | ```
125 |
126 | 上面类型定义中,`IterableIterator`接口就是在`Iterator`接口的基础上,加上`[Symbol.iterator]`属性。
127 |
128 | 下面是一个例子。
129 |
130 | ```typescript
131 | function* createNumbers(): IterableIterator {
132 | let n = 0;
133 | while (1) {
134 | yield n++;
135 | }
136 | }
137 |
138 | let numbers = createNumbers()
139 |
140 | // {value: 0, done: false}
141 | numbers.next()
142 |
143 | // {value: 1, done: false}
144 | numbers.next()
145 |
146 | // {value: 2, done: false}
147 | numbers.next()
148 | ```
149 |
150 | 上面示例中,`createNumbers()`返回的对象`numbers`即具有`next()`方法,也具有`[Symbol.iterator]`属性,所以满足`IterableIterator`接口。
151 |
152 | ## 参考链接
153 |
154 | - [Typing Iterables and Iterators with TypeScript](https://www.geekabyte.io/2019/06/typing-iterables-and-iterators-with.html)
--------------------------------------------------------------------------------
/02~TypeScript/99~参考资料/2023~Ruanyf~《TypeScript 新手教程》/npm.md:
--------------------------------------------------------------------------------
1 | # TypeScript 项目使用 npm 模块
2 |
3 | ## 简介
4 |
5 | npm 模块都是 JavaScript 代码。即使模块是用 TypeScript 写的,还是必须编译成 JavaScript 再发布,保证模块可以在没有 TypeScript 的环境运行。
6 |
7 | 问题就来了,TypeScript 项目开发时,加载外部 npm 模块,如果拿不到该模块的类型信息,就会导致无法开发。所以,必须有一个方法,可以拿到模块的类型信息。
8 |
9 | 有些 npm 模块本身可能包含`.d.ts`文件甚至完整的 TypeScript 代码。它的`package.json`文件里面有一个`types`字段,指向一个`.d.ts`文件,这就是它的类型声明文件。
10 |
11 | ```javascript
12 | {
13 | "name": "left-pad",
14 | "version": "1.3.0",
15 | "description": "String left pad",
16 | "main": "index.js",
17 | "types": "index.d.ts",
18 | // ...
19 | }
20 | ```
21 |
22 | 如果某个模块没有`.d.ts`文件,TypeScript 官方和社区就自发为常用模块添加类型描述,可以去[官方网站](https://www.typescriptlang.org/dt/search)搜索,然后安装网站给出的 npm 类型模块,通常是`@types/[模块名]`。
23 |
24 | ```bash
25 | $ npm install --save lodash
26 | $ npm install --save @types/lodash
27 | ```
28 |
29 | lodash 的类型描述就是`@types/lodash`的文件`index.d.ts`。
30 |
31 | ## TS 模块转 npm 模块
32 |
33 | TS 代码放在`ts`子目录,编译出来的 CommonJS 代码放在`dist`子目录。
34 |
35 | ## 如何写 TypeScript 模块
36 |
37 | 首先,创建模块目录,然后在该目录里面新建一个`tsconfig.json`。
38 |
39 | ```json
40 | {
41 | "compilerOptions": {
42 | "module": "commonjs",
43 | "target": "es2015",
44 | "declaration": true,
45 | "outDir": "./dist"
46 | },
47 | "include": [
48 | "src/**/*"
49 | ]
50 | }
51 | ```
52 |
53 | - `"declaration": true`:生成 .d.ts 文件,方便其他使用 TypeScript 的开发者加载你的库。
54 | - `"module": "commonjs"`:编译后的模块格式为`commonjs`,表示该模块供 Node.js 使用。如果供浏览器使用,则要写成`"module": "esnext"`。
55 | - `"target": "es2015"`:生成的 JavaScript 代码版本为 ES2015,需要 Node.js 8 以上版本。
56 | - `"outDir": "./dist"`:编译后的文件放在`./dist`目录。
57 | - `include`:指定需要编译的文件。
58 |
59 | 然后,使用 TypeScript 编写仓库代码。可以在`src`子目录里面,编写一个入口文件`index.ts`。
60 |
61 | 最后,编写`package.json`。
62 |
63 | ```typescript
64 | {
65 | "name": "hwrld",
66 | "version": "1.0.0",
67 | "description": "Can log \"hello world\" and \"goodbye world\" to the console!",
68 | "main": "dist/index.js",
69 | "types": "dist/index.d.ts",
70 | "files": [
71 | "/dist"
72 | ]
73 | }
74 | ```
75 |
76 | 里面的`"types": "dist/index.d.ts"`字段指定类型声明文件,否则使用这个库的 TypeScript 开发者找不到类型声明文件。`files`属性指定打包进入 npm 模块的文件。
77 |
78 | 然后,就是编译和发布。
79 |
80 | ```bash
81 | $ tsc
82 | $ npm publish
83 | ```
84 |
85 | ## 参考链接
86 |
87 | - [How to Write a TypeScript Library](https://www.tsmean.com/articles/how-to-write-a-typescript-library/), by tsmean
88 |
89 |
--------------------------------------------------------------------------------
/02~TypeScript/99~参考资料/2023~Ruanyf~《TypeScript 新手教程》/react.md:
--------------------------------------------------------------------------------
1 | # TypeScript 的 React 支持
2 |
3 | ## JSX 语法
4 |
5 | JSX 是 React 库引入的一种语法,可以在 JavaScript 脚本中直接书写 HTML 风格的标签。
6 |
7 | TypeScript 支持 JSX 语法,但是必须将脚本后缀名改成`.tsx`。
8 |
9 | `.tsx`文件中,类型断言一律使用`as`形式,因为尖括号的写法会与 JSX 冲突。
10 |
11 | ```typescript
12 | // 使用
13 | var x = foo as any;
14 |
15 | // 不使用
16 | var x = foo;
17 | ```
18 |
19 | 上面示例中,变量`foo`被断言为类型`any`,在`.tsx`文件中只能使用第一种写法,不使用第二种写法。
20 |
21 | ## React 库
22 |
23 | TypeScript 使用 React 库必须引入 React 的类型定义。
24 |
25 | ```typescript
26 | ///
27 | interface Props {
28 | name: string;
29 | }
30 | class MyComponent extends React.Component {
31 | render() {
32 | return {this.props.name};
33 | }
34 | }
35 | ; // OK
36 | ; // error, `name` is not a number
37 | ```
38 |
39 | ## 内置元素
40 |
41 | 内置元素使用`JSX.IntrinsicElements`接口。默认情况下,内置元素不进行类型检查。但是,如果给出了接口定义,就会进行类型检查。
42 |
43 | ```typescript
44 | declare namespace JSX {
45 | interface IntrinsicElements {
46 | foo: any;
47 | }
48 | }
49 | ; // ok
50 | ; // error
51 | ```
52 |
53 | 上面示例中,``不符合接口定义,所以报错。
54 |
55 | 一种解决办法就是,在接口中定义一个通用元素。
56 |
57 | ```typescript
58 | declare namespace JSX {
59 | interface IntrinsicElements {
60 | [elemName: string]: any;
61 | }
62 | }
63 | ```
64 |
65 | 上面示例中,元素名可以是任意字符串。
66 |
67 | ## 组件的写法
68 |
69 | ```typescript
70 | interface FooProp {
71 | name: string;
72 | X: number;
73 | Y: number;
74 | }
75 | declare function AnotherComponent(prop: { name: string });
76 | function ComponentFoo(prop: FooProp) {
77 | return ;
78 | }
79 | const Button = (prop: { value: string }, context: { color: string }) => (
80 |
81 | );
82 | ```
83 |
--------------------------------------------------------------------------------
/02~TypeScript/99~参考资料/2023~Ruanyf~《TypeScript 新手教程》/symbol.md:
--------------------------------------------------------------------------------
1 | # TypeScript 的 symbol 类型
2 |
3 | ## 简介
4 |
5 | Symbol 是 ES2015 新引入的一种原始类型的值。它类似于字符串,但是每一个 Symbol 值都是独一无二的,与其他任何值都不相等。
6 |
7 | Symbol 值通过`Symbol()`函数生成。在 TypeScript 里面,Symbol 的类型使用`symbol`表示。
8 |
9 | ```typescript
10 | let x:symbol = Symbol();
11 | let y:symbol = Symbol();
12 |
13 | x === y // false
14 | ```
15 |
16 | 上面示例中,变量`x`和`y`的类型都是`symbol`,且都用`Symbol()`生成,但是它们是不相等的。
17 |
18 | ## unique symbol
19 |
20 | `symbol`类型包含所有的 Symbol 值,但是无法表示某一个具体的 Symbol 值。
21 |
22 | 比如,`5`是一个具体的数值,就用`5`这个字面量来表示,这也是它的值类型。但是,Symbol 值不存在字面量,必须通过变量来引用,所以写不出只包含单个 Symbol 值的那种值类型。
23 |
24 | 为了解决这个问题,TypeScript 设计了`symbol`的一个子类型`unique symbol`,它表示单个的、某个具体的 Symbol 值。
25 |
26 | 因为`unique symbol`表示单个值,所以这个类型的变量是不能修改值的,只能用`const`命令声明,不能用`let`声明。
27 |
28 | ```typescript
29 | // 正确
30 | const x:unique symbol = Symbol();
31 |
32 | // 报错
33 | let y:unique symbol = Symbol();
34 | ```
35 |
36 | 上面示例中,`let`命令声明的变量,不能是`unique symbol`类型,会报错。
37 |
38 | `const`命令为变量赋值 Symbol 值时,变量类型默认就是`unique symbol`,所以类型可以省略不写。
39 |
40 | ```typescript
41 | const x:unique symbol = Symbol();
42 | // 等同于
43 | const x = Symbol();
44 | ```
45 |
46 | 每个声明为`unique symbol`类型的变量,它们的值都是不一样的,其实属于两个值类型。
47 |
48 | ```typescript
49 | const a:unique symbol = Symbol();
50 | const b:unique symbol = Symbol();
51 |
52 | a === b // 报错
53 | ```
54 |
55 | 上面示例中,变量`a`和变量`b`的类型虽然都是`unique symbol`,但其实是两个值类型。不同类型的值肯定是不相等的,所以最后一行就报错了。
56 |
57 | 由于 Symbol 类似于字符串,可以参考下面的例子来理解。
58 |
59 | ```typescript
60 | const a:'hello' = 'hello';
61 | const b:'world' = 'world';
62 |
63 | a === b // 报错
64 | ```
65 |
66 | 上面示例中,变量`a`和`b`都是字符串,但是属于不同的值类型,不能使用严格相等运算符进行比较。
67 |
68 | 而且,由于变量`a`和`b`是两个类型,就不能把一个赋值给另一个。
69 |
70 | ```typescript
71 | const a:unique symbol = Symbol();
72 | const b:unique symbol = a; // 报错
73 | ```
74 |
75 | 上面示例中,变量`a`和变量`b`的类型都是`unique symbol`,但是其实类型不同,所以把`a`赋值给`b`会报错。
76 |
77 | 上例变量`b`的类型,如果要写成与变量`a`同一个`unique symbol`值类型,只能写成类型为`typeof a`。
78 |
79 | ```typescript
80 | const a:unique symbol = Symbol();
81 | const b:typeof a = a; // 正确
82 | ```
83 |
84 | 不过我们知道,相同参数的`Symbol.for()`方法会返回相同的 Symbol 值。TypeScript 目前无法识别这种情况,所以可能出现多个 unique symbol 类型的变量,等于同一个 Symbol 值的情况。
85 |
86 | ```typescript
87 | const a:unique symbol = Symbol.for('foo');
88 | const b:unique symbol = Symbol.for('foo');
89 | ```
90 |
91 | 上面示例中,变量`a`和`b`是两个不同的值类型,但是它们的值其实是相等的。
92 |
93 | unique symbol 类型是 symbol 类型的子类型,所以可以将前者赋值给后者,但是反过来就不行。
94 |
95 | ```typescript
96 | const a:unique symbol = Symbol();
97 |
98 | const b:symbol = a; // 正确
99 |
100 | const c:unique symbol = b; // 报错
101 | ```
102 |
103 | 上面示例中,unique symbol 类型(变量`a`)赋值给 symbol 类型(变量`b`)是可以的,但是 symbol 类型(变量`b`)赋值给 unique symbol 类型(变量`c`)会报错。
104 |
105 | unique symbol 类型的一个作用,就是用作属性名,这可以保证不会跟其他属性名冲突。如果要把某一个特定的 Symbol 值当作属性名,那么它的类型只能是 unique symbol,不能是 symbol。
106 |
107 | ```typescript
108 | const x:unique symbol = Symbol();
109 | const y:symbol = Symbol();
110 |
111 | interface Foo {
112 | [x]: string; // 正确
113 | [y]: string; // 报错
114 | }
115 | ```
116 |
117 | 上面示例中,变量`y`当作属性名,但是`y`的类型是 symbol,不是固定不变的值,导致报错。
118 |
119 | `unique symbol`类型也可以用作类(class)的属性值,但只能赋值给类的`readonly static`属性。
120 |
121 | ```typescript
122 | class C {
123 | static readonly foo:unique symbol = Symbol();
124 | }
125 | ```
126 |
127 | 上面示例中,静态只读属性`foo`的类型就是`unique symbol`。注意,这时`static`和`readonly`两个限定符缺一不可,这是为了保证这个属性是固定不变的。
128 |
129 | ## 类型推断
130 |
131 | 如果变量声明时没有给出类型,TypeScript 会推断某个 Symbol 值变量的类型。
132 |
133 | `let`命令声明的变量,推断类型为 symbol。
134 |
135 | ```typescript
136 | // 类型为 symbol
137 | let x = Symbol();
138 | ```
139 |
140 | `const`命令声明的变量,推断类型为 unique symbol。
141 |
142 | ```typescript
143 | // 类型为 unique symbol
144 | const x = Symbol();
145 | ```
146 |
147 | 但是,`const`命令声明的变量,如果赋值为另一个 symbol 类型的变量,则推断类型为 symbol。
148 |
149 | ```typescript
150 | let x = Symbol();
151 |
152 | // 类型为 symbol
153 | const y = x;
154 | ```
155 |
156 | `let`命令声明的变量,如果赋值为另一个 unique symbol 类型的变量,则推断类型还是 symbol。
157 |
158 | ```typescript
159 | const x = Symbol();
160 |
161 | // 类型为 symbol
162 | let y = x;
163 | ```
164 |
165 |
--------------------------------------------------------------------------------
/02~TypeScript/99~参考资料/2023~Ruanyf~《TypeScript 新手教程》/tsc.md:
--------------------------------------------------------------------------------
1 | # tsc 命令行编译器
2 |
3 | ## 简介
4 |
5 | tsc 是 TypeScript 官方的命令行编译器,用来检查代码,并将其编译成 JavaScript 代码。
6 |
7 | tsc 默认使用当前目录下的配置文件`tsconfig.json`,但也可以接受独立的命令行参数。命令行参数会覆盖`tsconfig.json`,比如命令行指定了所要编译的文件,那么 tsc 就会忽略`tsconfig.json`的`files`属性。
8 |
9 | tsc 的基本用法如下。
10 |
11 | ```bash
12 | # 使用 tsconfig.json 的配置
13 | $ tsc
14 |
15 | # 只编译 index.ts
16 | $ tsc index.ts
17 |
18 | # 编译 src 目录的所有 .ts 文件
19 | $ tsc src/*.ts
20 |
21 | # 指定编译配置文件
22 | $ tsc --project tsconfig.production.json
23 |
24 | # 只生成类型声明文件,不编译出 JS 文件
25 | $ tsc index.js --declaration --emitDeclarationOnly
26 |
27 | # 多个 TS 文件编译成单个 JS 文件
28 | $ tsc app.ts util.ts --target esnext --outfile index.js
29 | ```
30 |
31 | ## 命令行参数
32 |
33 | tsc 的命令行参数,大部分与 tsconfig.json 的属性一一对应。
34 |
35 | 下面只是按照首字母排序,简单罗列出主要的一些参数,详细解释可以参考《tsconfig.json 配置文件》一章。
36 |
37 | `--all`:输出所有可用的参数。
38 |
39 | `--allowJs`:允许 TS 脚本加载 JS 模块,编译时将 JS 一起拷贝到输出目录。
40 |
41 | `--allowUnreachableCode`:如果 TS 脚本有不可能运行到的代码,不报错。
42 |
43 | `--allowUnusedLabels`:如果 TS 脚本有没有用到的标签,不报错。
44 |
45 | `--alwaysStrict`:总是在编译产物的头部添加`use strict`。
46 |
47 | `--baseUrl`:指定非相对位置的模块定位的基准 URL。
48 |
49 | `--build`:启用增量编译。
50 |
51 | `--checkJs`:对 JS 脚本进行类型检查。
52 |
53 | `--declaration`:为 TS 脚本生成一个类型生成文件。
54 |
55 | `--declarationDir`:指定生成的类型声明文件的所在目录。
56 |
57 | `--declarationMap`:为`.d.ts`文件生成 SourceMap 文件。
58 |
59 | `--diagnostics`:构建后输出编译性能信息。
60 |
61 | `--emitBOM`:在编译输出的 UTF-8 文件头部加上 BOM 标志。
62 |
63 | `--emitDeclarationOnly`:只编译输出类型声明文件,不输出 JS 文件。
64 |
65 | `--esModuleInterop`:更容易使用 import 命令加载 CommonJS 模块。
66 |
67 | `--exactOptionalPropertyTypes`:不允许将可选属性设置为`undefined`。
68 |
69 | `--experimentalDecorators`:支持早期的装饰器语法。
70 |
71 | `--explainFiles`:输出进行编译的文件信息。
72 |
73 | `--forceConsistentCasingInFileNames`:文件名大小写敏感,默认打开。
74 |
75 | `--help`:输出帮助信息。
76 |
77 | `--importHelpers`:从外部库(比如 tslib)输入辅助函数。
78 |
79 | `--incremental`:启用增量构建。
80 |
81 | `--init`:在当前目录创建一个全新的`tsconfig.json`文件,里面是预设的设置。
82 |
83 | `--inlineSourceMap`:SourceMap 信息嵌入 JS 文件,而不是生成独立的`.js.map`文件。
84 |
85 | `--inlineSources`:将 TypeScript 源码作为 SourceMap 嵌入编译出来的 JS 文件。
86 |
87 | `--isolatedModules`:确保每个模块能够独立编译,不依赖其他输入的模块。
88 |
89 | `--jsx`:设置如何处理 JSX 文件。
90 |
91 | `--lib`:设置目标环境需要哪些内置库的类型描述。
92 |
93 | `--listEmittedFiles`:编译后输出编译产物的文件名。
94 |
95 | `--listFiles`:编译过程中,列出读取的文件名。
96 |
97 | `--listFilesOnly`:列出编译所要处理的文件,然后停止编译。
98 |
99 | `--locale`:指定编译时输出的语言,不影响编译结果。
100 |
101 | `--mapRoot`:指定 SourceMap 文件的位置。
102 |
103 | `--module`:指定编译生成的模块格式。
104 |
105 | `--moduleResolution`:指定如何根据模块名找到模块的位置。
106 |
107 | `--moduleSuffixes`:指定模块文件的后缀名。
108 |
109 | `--newLine`:指定编译产物的换行符,可以设为`crlf`或者`lf`。
110 |
111 | `--noEmit`:不生成编译产物,只进行类型检查。
112 |
113 | `--noEmitHelpers`:不在编译产物中加入辅助函数。
114 |
115 | `--noEmitOnError`:一旦报错,就停止编译,没有编译产物。
116 |
117 | `--noFallthroughCasesInSwitch`:Switch 结构的`case`分支必须有终止语句(比如`break`)。
118 |
119 | `--noImplicitAny`:类型推断只要为`any`类型就报错。
120 |
121 | `--noImplicitReturns`:函数内部没有显式返回语句(比如`return`)就报错。
122 |
123 | `--noImplicitThis`:如果`this`关键字是`any`类型,就报错。
124 |
125 | `--noImplicitUseStrict`:编译产生的 JS 文件头部不添加`use strict`语句。
126 |
127 | `--noResolve`:不进行模块定位,除非该模块是由命令行传入。
128 |
129 | `--noUnusedLocals`:如果有未使用的局部变量就报错。
130 |
131 | `--noUnusedParameters`:如果有未使用的函数参数就报错。
132 |
133 | `--outDir`:指定编译产物的存放目录。
134 |
135 | `--outFile`:所有编译产物打包成一个指定文件。
136 |
137 | `--preserveConstEnums`:不将`const enum`结构在生成的代码中,替换成常量。
138 |
139 | `--preserveWatchOutput`: watch 模式下不清屏。
140 |
141 | `--pretty`:美化显示编译时的终端输出。这是默认值,但是可以关闭`--pretty false`。
142 |
143 | `--project`(或者`-p`):指定编译配置文件,或者该文件所在的目录。
144 |
145 | `--removeComments`:编译结果中移除代码注释。
146 |
147 | `--resolveJsonModule`:允许加载 JSON 文件。
148 |
149 | `--rootDir`:指定加载文件所在的根目录,该目录里面的目录结构会被复制到输出目录。
150 |
151 | `--rootDirs`:允许模块定位时,多个目录被当成一个虚拟目录。
152 |
153 | `--skipDefaultLibCheck`:跳过 TypeScript 内置类型声明文件的类型检查。
154 |
155 | `--skipLibCheck`:跳过`.d.ts`类型声明文件的类型检查。这样可以加快编译速度。
156 |
157 | `--showConfig`:终端输出编译配置信息,而不进行配置。
158 |
159 | `--sourcemap`:为编译产生的 JS 文件生成 SourceMap 文件(.map 文件)。
160 |
161 | `--sourceRoot`:指定 SourceMap 文件里面的 TypeScript 源码根目录位置。
162 |
163 | `--strict`:打开 TypeScript 严格检查模式。
164 |
165 | `--strictBindCallApply`:bind, call、apply 这三个函数的类型,匹配原始函数。
166 |
167 | `--strictFunctionTypes`:如果函数 B 的参数是函数 A 参数的子类型,那么函数 B 不能替代函数 A。
168 |
169 | `--strictNullChecks`:对`null`和`undefined`进行严格类型检查。
170 |
171 | `--strictPropertyInitialization`:类的属性必须进行初始值,但是允许在构造函数里面赋值。
172 |
173 | `--suppressExcessPropertyErrors`:关闭对象字面量的多余参数的报错。
174 |
175 | `--target`:指定编译出来的 JS 代码的版本,TypeScirpt 还会在编译时自动加入对应的库类型声明文件。
176 |
177 | `--traceResolution`:编译时在终端输出模块解析(moduleResolution)的具体步骤。
178 |
179 | `--typeRoots`:设置类型模块所在的目录,替代默认的`node_modules/@types`。
180 |
181 | `--types`:设置`typeRoots`目录下需要包括在编译之中的类型模块。
182 |
183 | `--version`:终端输出 tsc 的版本号。
184 |
185 | `--watch`(或者`-w`):进入观察模式,只要文件有修改,就会自动重新编译。
186 |
187 |
--------------------------------------------------------------------------------
/03~异步并发/.DS_Store:
--------------------------------------------------------------------------------
https://raw.githubusercontent.com/wx-chevalier/JavaScript-Notes/2c3c57c322e60a50a553e47b69f03839d95df99f/03~异步并发/.DS_Store
--------------------------------------------------------------------------------
/03~异步并发/Event Loop/Node 事件循环.md:
--------------------------------------------------------------------------------
1 | # Node.js 中的事件循环
2 |
3 | 浏览器和 Node 环境下,microtask 任务队列的执行时机不同
4 |
5 | - Node 端,microtask 在事件循环的各个阶段之间执行
6 | - 浏览器端,microtask 在事件循环的 macrotask 执行完之后执行
7 |
8 | # Node.js 事件循环机制
9 |
10 | ## setImmediate 与 setTimeout 对比
11 |
12 | 上文中我们介绍过 setImmediate 与 setTimeout 都属于 MacroTask,每轮事件循环中都会执行 MacroTask 中的队列首部回调;不过我们也经常可以看到描述说 setImmediate 会优于 setTimeout 执行,
13 |
14 | ```js
15 | //index.js
16 | setTimeout(function(){
17 | console.log("SETTIMEOUT");
18 | });
19 | setImmediate(function(){
20 | console.log("SETIMMEDIATE");
21 | });
22 |
23 | //run it
24 | node index.js
25 | ```
26 |
27 | 上述代码的执行结果并不固定,在介绍 setImmediate 与 setTimeout 的区别之前,我们先来讨论下 Node.js 中的事件循环机制;其基本流程如下图所示:
28 |
29 | ```js
30 | ┌───────────────────────┐
31 | ┌─>│timers │
32 | │└──────────┬────────────┘
33 | │┌──────────┴────────────┐
34 | ││ IO callbacks │
35 | │└──────────┬────────────┘
36 | │┌──────────┴────────────┐
37 | ││ idle, prepare │
38 | │└──────────┬────────────┘┌───────────────┐
39 | │┌──────────┴────────────┐│ incoming: │
40 | ││ poll│<─────┤connections, │
41 | │└──────────┬────────────┘│ data, etc.│
42 | │┌──────────┴────────────┐└───────────────┘
43 | ││check│
44 | │└──────────┬────────────┘
45 | │┌──────────┴────────────┐
46 | └──┤close callbacks│
47 | └───────────────────────┘
48 | ```
49 |
50 | ```js
51 | //index.js
52 | var fs = require('fs');
53 | fs.readFile("my-file-path.txt", function() {
54 | setTimeout(function(){
55 | console.log("SETTIMEOUT");
56 | });
57 | setImmediate(function(){
58 | console.log("SETIMMEDIATE");
59 | });
60 | });
61 |
62 | //run it
63 | node index.js
64 |
65 | //output (always)
66 | SETIMMEDIATE
67 | SETTIMEOUT
68 | ```
69 |
70 | ```js
71 | var Suite = require('benchmark').Suite
72 | var fs = require('fs')
73 |
74 |
75 | var suite = new Suite
76 |
77 |
78 | suite.add('deffered.resolve()', function(deferred) {
79 | deferred.resolve()
80 | }, {defer: true})
81 |
82 |
83 | suite.add('setImmediate()', function(deferred) {
84 | setImmediate(function() {
85 | deferred.resolve()
86 | })
87 | }, {defer: true})
88 |
89 |
90 | suite.add('setTimeout(,0)', function(deferred) {
91 | setTimeout(function() {
92 | deferred.resolve()
93 | },0)
94 | }, {defer: true})
95 |
96 |
97 | suite
98 | .on('cycle', function(event) {
99 | console.log(String(event.target));
100 | })
101 | .on('complete', function() {
102 | console.log('Fastest is ' + this.filter('fastest').pluck('name'));
103 | })
104 | .run({async: true})
105 |
106 |
107 | // 输出
108 | deffered.resolve() x 993 ops/sec ±0.67% (22 runs sampled)
109 | setImmediate() x 914 ops/sec ±2.48% (57 runs sampled)
110 | setTimeout(,0) x 445 ops/sec ±2.79% (82 runs sampled)
111 | ```
112 |
113 | ## 浏览器中实现 setImmediate
114 |
115 | 当我们使用 Webpack 打包应用时,其默认会添加 setImmediate 的垫片
116 |
117 | # Node.js Event Loop
118 |
119 | 
120 |
121 | ```
122 | ┌───────────────────────┐
123 | ┌─>│timers │
124 | │└──────────┬────────────┘
125 | │┌──────────┴────────────┐
126 | ││ IO callbacks │
127 | │└──────────┬────────────┘
128 | │┌──────────┴────────────┐
129 | ││ idle, prepare │
130 | │└──────────┬────────────┘┌───────────────┐
131 | │┌──────────┴────────────┐│ incoming: │
132 | ││ poll│<─────┤connections, │
133 | │└──────────┬────────────┘│ data, etc.│
134 | │┌──────────┴────────────┐└───────────────┘
135 | ││check│
136 | │└──────────┬────────────┘
137 | │┌──────────┴────────────┐
138 | └──┤close callbacks│
139 | └───────────────────────┘
140 | ```
141 |
142 | ## nextTick 与 setImmediate
143 |
144 | 我们通过比较以下两个用例来了解 setImmediate 与 nextTick 的区别:
145 |
146 | - setImmediate
147 |
148 | ```
149 | setImmediate(function A() {
150 | setImmediate(function B() {
151 | log(1);
152 | setImmediate(function D() { log(2); });
153 | setImmediate(function E() { log(3); });
154 | });
155 | setImmediate(function C() {
156 | log(4);
157 | setImmediate(function F() { log(5); });
158 | setImmediate(function G() { log(6); });
159 | });
160 | });
161 |
162 |
163 | setTimeout(function timeout() {
164 | console.log('TIMEOUT FIRED');
165 | }, 0)
166 |
167 |
168 | // 'TIMEOUT FIRED' 1 4 2 3 5 6
169 | // OR
170 | // 1 'TIMEOUT FIRED' 4 2 3 5 6
171 | ```
172 |
173 | - nextTick
174 |
175 | ```js
176 | process.nextTick(function A() {
177 | process.nextTick(function B() {
178 | log(1);
179 | process.nextTick(function D() {
180 | log(2);
181 | });
182 | process.nextTick(function E() {
183 | log(3);
184 | });
185 | });
186 | process.nextTick(function C() {
187 | log(4);
188 | process.nextTick(function F() {
189 | log(5);
190 | });
191 | process.nextTick(function G() {
192 | log(6);
193 | });
194 | });
195 | });
196 |
197 | setTimeout(function timeout() {
198 | console.log("TIMEOUT FIRED");
199 | }, 0);
200 |
201 | // 1 4 2 3 5 6 'TIMEOUT FIRED'
202 | ```
203 |
204 | 如上文所述,通过 setImmediate 设置的回调会以 MacroTask 加入到 Event Loop 中,每个循环中会提取出某个回调执行;setImmediate 能够避免 Event Loop 被阻塞,从而允许其他完成的 IO 操作或者定时器回调顺利执行。而通过 nextTick 加入的回调会在当前代码执行完毕(即函数调用栈执行完毕)后立刻执行,即会在返回 Event Loop 之前立刻执行。譬如上面的例子中,setTimeout 的回调会在 Event Loop 中调用,因此 TIMEOUT FIRED 的输出会在所有的 nextTick 回调执行完毕后打印出来。
205 |
--------------------------------------------------------------------------------
/03~异步并发/README.md:
--------------------------------------------------------------------------------
1 | # JavaScript 异步与并发编程
2 |
--------------------------------------------------------------------------------
/03~异步并发/RxJS/Observer.md:
--------------------------------------------------------------------------------
1 | # Observer
2 |
3 | 观察者是由 Observable 发送的值的消费者。观察者只是一组回调函数的集合,每个回调函数对应一种 Observable 发送的通知类型:next、error 和 complete 。下面的示例是一个典型的观察者对象:
4 |
5 | ```js
6 | const observer = {
7 | next: x => console.log("Observer got a next value: " + x),
8 | error: err => console.error("Observer got an error: " + err),
9 | complete: () => console.log("Observer got a complete notification")
10 | };
11 | ```
12 |
13 | 要使用观察者,需要把它提供给 Observable 的 subscribe 方法:
14 |
15 | ```js
16 | observable.subscribe(observer);
17 | ```
18 |
19 | RxJS 中的观察者也可能是*部分的*。如果你没有提供某个回调函数,Observable 的执行也会正常运行,只是某些通知类型会被忽略,因为观察者中没有相对应的回调函数。
20 |
21 | 下面的示例是没有 `complete` 回调函数的观察者:
22 |
23 | ```js
24 | const observer = {
25 | next: x => console.log("Observer got a next value: " + x),
26 | error: err => console.error("Observer got an error: " + err)
27 | };
28 | ```
29 |
30 | 当订阅 Observable 时,你可能只提供了一个回调函数作为参数,而并没有将其附加到观察者对象上,例如这样:
31 |
32 | ```js
33 | observable.subscribe(x => console.log("Observer got a next value: " + x));
34 | ```
35 |
36 | 在 `observable.subscribe` 内部,它会创建一个观察者对象并使用第一个回调函数参数作为 `next` 的处理方法。三种类型的回调函数都可以直接作为参数来提供:
37 |
38 | ```js
39 | observable.subscribe(
40 | x => console.log("Observer got a next value: " + x),
41 | err => console.error("Observer got an error: " + err),
42 | () => console.log("Observer got a complete notification")
43 | );
44 | ```
45 |
46 | # Subscription
47 |
48 | Subscription 是表示可清理资源的对象,通常是 Observable 的执行。Subscription 有一个重要的方法,即 unsubscribe,它不需要任何参数,只是用来清理由 Subscription 占用的资源。在上一个版本的 RxJS 中,Subscription 叫做 "Disposable" (可清理对象)。
49 |
50 | ```js
51 | const observable = Rx.Observable.interval(1000);
52 | const subscription = observable.subscribe(x => console.log(x));
53 | // 稍后:
54 | // 这会取消正在进行中的 Observable 执行
55 | // Observable 执行是通过使用观察者调用 subscribe 方法启动的
56 | subscription.unsubscribe();
57 | ```
58 |
59 | Subscription 基本上只有一个 unsubscribe() 函数,这个函数用来释放资源或去取消 Observable 执行。Subscription 还可以合在一起,这样一个 Subscription 调用 unsubscribe() 方法,可能会有多个 Subscription 取消订阅 。你可以通过把一个 Subscription 添加到另一个上面来做这件事:
60 |
61 | ```js
62 | const observable1 = Rx.Observable.interval(400);
63 | const observable2 = Rx.Observable.interval(300);
64 |
65 | const subscription = observable1.subscribe(x => console.log("first: " + x));
66 | const childSubscription = observable2.subscribe(x =>
67 | console.log("second: " + x)
68 | );
69 |
70 | subscription.add(childSubscription);
71 |
72 | setTimeout(() => {
73 | // subscription 和 childSubscription 都会取消订阅
74 | subscription.unsubscribe();
75 | }, 1000);
76 | ```
77 |
--------------------------------------------------------------------------------
/03~异步并发/RxJS/README.md:
--------------------------------------------------------------------------------
1 | # RxJS
2 |
3 | RxJS 是一个库,它通过使用 observable 序列来编写异步和基于事件的程序。它提供了一个核心类型 Observable,附属类型 (Observer、Schedulers、Subjects) 和受 [Array#extras] 启发的操作符 (map、filter、reduce、every, 等等),这些数组操作符可以把异步事件作为集合来处理。
4 |
5 | ReactiveX 结合了 [观察者模式、[迭代器模式 和 [使用集合的函数式编程](http://martinfowler.com/articles/collection-pipeline/#NestedOperatorExpressions),以满足以一种理想方式来管理事件序列所需要的一切。
6 |
7 | 在 RxJS 中用来解决异步事件管理的的基本概念是:
8 |
9 | - Observable (可观察对象): 表示一个概念,这个概念是一个可调用的未来值或事件的集合。
10 | - Observer (观察者): 一个回调函数的集合,它知道如何去监听由 Observable 提供的值。
11 | - Subscription (订阅): 表示 Observable 的执行,主要用于取消 Observable 的执行。
12 | - Operators (操作符): 采用函数式编程风格的纯函数 (pure function),使用像 `map`、`filter`、`concat`、`flatMap` 等这样的操作符来处理集合。
13 | - Subject (主体): 相当于 EventEmitter,并且是将值或事件多路推送给多个 Observer 的唯一方式。
14 | - Schedulers (调度器): 用来控制并发并且是中央集权的调度员,允许我们在发生计算时进行协调,例如 `setTimeout` 或 `requestAnimationFrame` 或其他。
15 |
16 | 利用这些对象,RxJS 为我们解决了如下的核心问题:
17 |
18 | - 同步和异步的统一写法
19 | - 数据变更过程的组合拆分
20 | - 数据和视图的精确绑定
21 | - 条件变更后,对应数据自动重新计算
22 |
23 | # Hello World
24 |
25 | 注册事件监听器的常规写法。
26 |
27 | ```js
28 | const button = document.querySelector("button");
29 | button.addEventListener("click", () => console.log("Clicked!"));
30 | ```
31 |
32 | 使用 RxJS 的话,创建一个 observable 来代替。
33 |
34 | ```js
35 | const button = document.querySelector("button");
36 | Rx.Observable.fromEvent(button, "click").subscribe(() =>
37 | console.log("Clicked!")
38 | );
39 | ```
40 |
41 | ## 纯净性(Purity)
42 |
43 | 使得 RxJS 强大的正是它使用纯函数来产生值的能力。这意味着你的代码更不容易出错。通常你会创建一个非纯函数,在这个函数之外也使用了共享变量的代码,这将使得你的应用状态一团糟。
44 |
45 | ```js
46 | const count = 0;
47 | const button = document.querySelector("button");
48 | button.addEventListener("click", () => console.log(`Clicked ${++count} times`));
49 | ```
50 |
51 | 使用 RxJS 的话,你会将应用状态隔离出来。
52 |
53 | ```Js
54 | const button = document.querySelector('button');
55 | Rx.Observable.fromEvent(button, 'click')
56 | .scan(count => count + 1, 0)
57 | .subscribe(count => console.log(`Clicked ${count} times`));
58 | ```
59 |
60 | scan 操作符的工作原理与数组的 reduce 类似。它需要一个暴露给回调函数当参数的初始值。每次回调函数运行后的返回值会作为下次回调函数运行时的参数。
61 |
62 | ## 流动性 (Flow)
63 |
64 | 提供了一整套操作符来帮助你控制事件如何流经 observables 。
65 |
66 | 下面的代码展示的是如何控制一秒钟内最多点击一次,先来看使用普通的 JavaScript:
67 |
68 | ```js
69 | const count = 0;
70 | const rate = 1000;
71 | const lastClick = Date.now() - rate;
72 | const button = document.querySelector("button");
73 | button.addEventListener("click", () => {
74 | if (Date.now() - lastClick >= rate) {
75 | console.log(`Clicked ${++count} times`);
76 | lastClick = Date.now();
77 | }
78 | });
79 | ```
80 |
81 | 使用 RxJS:
82 |
83 | ```js
84 | const button = document.querySelector("button");
85 | Rx.Observable.fromEvent(button, "click")
86 | .throttleTime(1000)
87 | .scan((count) => count + 1, 0)
88 | .subscribe((count) => console.log(`Clicked ${count} times`));
89 | ```
90 |
91 | 其他流程控制操作符有 filter、delay、debounceTime、take、takeUntil、distinct、distinctUntilChanged 等等。
92 |
93 | ## 值 (Values)
94 |
95 | 对于流经 observables 的值,你可以对其进行转换。
96 |
97 | 下面的代码展示的是如何累加每次点击的鼠标 x 坐标,先来看使用普通的 JavaScript:
98 |
99 | ```js
100 | const count = 0;
101 | const rate = 1000;
102 | const lastClick = Date.now() - rate;
103 | const button = document.querySelector("button");
104 | button.addEventListener("click", (event) => {
105 | if (Date.now() - lastClick >= rate) {
106 | count += event.clientX;
107 | console.log(count);
108 | lastClick = Date.now();
109 | }
110 | });
111 | ```
112 |
113 | 使用 RxJS:
114 |
115 | ```js
116 | const button = document.querySelector("button");
117 | Rx.Observable.fromEvent(button, "click")
118 | .throttleTime(1000)
119 | .map((event) => event.clientX)
120 | .scan((count, clientX) => count + clientX, 0)
121 | .subscribe((count) => console.log(count));
122 | ```
123 |
124 | 其他产生值的操作符有 pluck、pairwise、sample 等等。
125 |
--------------------------------------------------------------------------------
/03~异步并发/RxJS/Scheduler.md:
--------------------------------------------------------------------------------
https://raw.githubusercontent.com/wx-chevalier/JavaScript-Notes/2c3c57c322e60a50a553e47b69f03839d95df99f/03~异步并发/RxJS/Scheduler.md
--------------------------------------------------------------------------------
/03~异步并发/RxJS/操作符/README.md:
--------------------------------------------------------------------------------
1 | # Operator(操作符)
2 |
3 | 尽管 RxJS 的根基是 Observable,但最有用的还是它的操作符。操作符是允许复杂的异步代码以声明式的方式进行轻松组合的基础代码单元。操作符是 Observable 类型上的方法,比如 .map(...)、.filter(...)、.merge(...),等等。当操作符被调用时,它们不会改变已经存在的 Observable 实例。相反,它们返回一个新的 Observable,它的 subscription 逻辑基于第一个 Observable 。
4 |
5 | 操作符是函数,它基于当前的 Observable 创建一个新的 Observable。这是一个无副作用的操作:前面的 Observable 保持不变。操作符本质上是一个纯函数 (pure function),它接收一个 Observable 作为输入,并生成一个新的 Observable 作为输出。订阅输出 Observable 同样会订阅输入 Observable 。在下面的示例中,我们创建一个自定义操作符函数,它将从输入 Observable 接收的每个值都乘以 10:
6 |
7 | ```js
8 | function multiplyByTen(input) {
9 | const output = Rx.Observable.create(function subscribe(observer) {
10 | input.subscribe({
11 | next: (v) => observer.next(10 * v),
12 | error: (err) => observer.error(err),
13 | complete: () => observer.complete(),
14 | });
15 | });
16 | return output;
17 | }
18 |
19 | const input = Rx.Observable.from([1, 2, 3, 4]);
20 | const output = multiplyByTen(input);
21 | output.subscribe((x) => console.log(x));
22 | ```
23 |
24 | # 实例操作符 vs. 静态操作符
25 |
26 | 通常提到操作符时,我们指的是实例操作符,它是 Observable 实例上的方法。举例来说,如果上面的 multiplyByTen 是官方提供的实例操作符,它看起来大致是这个样子的:
27 |
28 | ```js
29 | Rx.Observable.prototype.multiplyByTen = function multiplyByTen() {
30 | const input = this;
31 | return Rx.Observable.create(function subscribe(observer) {
32 | input.subscribe({
33 | next: (v) => observer.next(10 * v),
34 | error: (err) => observer.error(err),
35 | complete: () => observer.complete(),
36 | });
37 | });
38 | };
39 | ```
40 |
41 | 注意,这里的 input Observable 不再是一个函数参数,它现在是 this 对象。下面是我们如何使用这样的实例运算符:
42 |
43 | ```js
44 | const observable = Rx.Observable.from([1, 2, 3, 4]).multiplyByTen();
45 |
46 | observable.subscribe((x) => console.log(x));
47 | ```
48 |
49 | 除了实例操作符,还有静态操作符,它们是直接附加到 Observable 类上的。静态操作符在内部不使用 this 关键字,而是完全依赖于它的参数。最常用的静态操作符类型是所谓的创建操作符。它们只接收非 Observable 参数,比如数字,然后创建一个新的 Observable,而不是将一个输入 Observable 转换为输出 Observable 。一个典型的静态操作符例子就是 interval 函数。它接收一个数字(非 Observable)作为参数,并生产一个 Observable 作为输出:
50 |
51 | ```js
52 | const observable = Rx.Observable.interval(1000 /* 毫秒数 */);
53 | ```
54 |
55 | ## Marble diagrams (弹珠图)
56 |
57 | 要解释操作符是如何工作的,文字描述通常是不足以描述清楚的。许多操作符都是跟时间相关的,它们可能会以不同的方式延迟(delay)、取样(sample)、节流(throttle)或去抖动值(debonce)。图表通常是更适合的工具。弹珠图是操作符运行方式的视觉表示,其中包含输入 Obserable(s) (输入可能是多个 Observable )、操作符及其参数和输出 Observable 。
58 |
59 | 
60 |
61 | 在弹珠图中,时间流向右边,图描述了在 Observable 执行中值(“弹珠”)是如何发出的。
62 |
63 | # 操作符案例
64 |
65 | ## 控制流动
66 |
67 | ```js
68 | // 输入 "hello world"
69 | const input = Rx.Observable.fromEvent(document.querySelector("input"), "input");
70 |
71 | // 过滤掉小于3个字符长度的目标值
72 | input
73 | .filter((event) => event.target.value.length > 2)
74 | .map((event) => event.target.value)
75 | .subscribe((value) => console.log(value)); // "hel"
76 |
77 | // 延迟事件
78 | input
79 | .delay(200)
80 | .map((event) => event.target.value)
81 | .subscribe((value) => console.log(value)); // "h" -200ms-> "e" -200ms-> "l" ...
82 |
83 | // 每200ms只能通过一个事件
84 | input
85 | .throttleTime(200)
86 | .map((event) => event.target.value)
87 | .subscribe((value) => console.log(value)); // "h" -200ms-> "w"
88 |
89 | // 停止输入后200ms方能通过最新的那个事件
90 | input
91 | .debounceTime(200)
92 | .map((event) => event.target.value)
93 | .subscribe((value) => console.log(value)); // "o" -200ms-> "d"
94 |
95 | // 在3次事件后停止事件流
96 | input
97 | .take(3)
98 | .map((event) => event.target.value)
99 | .subscribe((value) => console.log(value)); // "hel"
100 |
101 | // 直到其他 observable 触发事件才停止事件流
102 | const stopStream = Rx.Observable.fromEvent(
103 | document.querySelector("button"),
104 | "click"
105 | );
106 | input
107 | .takeUntil(stopStream)
108 | .map((event) => event.target.value)
109 | .subscribe((value) => console.log(value)); // "hello" (点击才能看到)
110 | ```
111 |
112 | ## 产生值
113 |
114 | ```js
115 | // 输入 "hello world"
116 | const input = Rx.Observable.fromEvent(document.querySelector("input"), "input");
117 |
118 | // 传递一个新的值
119 | input
120 | .map((event) => event.target.value)
121 | .subscribe((value) => console.log(value)); // "h"
122 |
123 | // 通过提取属性传递一个新的值
124 | input.pluck("target", "value").subscribe((value) => console.log(value)); // "h"
125 |
126 | // 传递之前的两个值
127 | input
128 | .pluck("target", "value")
129 | .pairwise()
130 | .subscribe((value) => console.log(value)); // ["h", "he"]
131 |
132 | // 只会通过唯一的值
133 | input
134 | .pluck("data")
135 | .distinct()
136 | .subscribe((value) => console.log(value)); // "helo wrd"
137 |
138 | // 不会传递重复的值
139 | input
140 | .pluck("data")
141 | .distinctUntilChanged()
142 | .subscribe((value) => console.log(value)); // "helo world"
143 | ```
144 |
--------------------------------------------------------------------------------
/03~异步并发/RxJS/操作符/创建操作符.md:
--------------------------------------------------------------------------------
https://raw.githubusercontent.com/wx-chevalier/JavaScript-Notes/2c3c57c322e60a50a553e47b69f03839d95df99f/03~异步并发/RxJS/操作符/创建操作符.md
--------------------------------------------------------------------------------
/03~异步并发/RxJS/操作符/多播操作符.md:
--------------------------------------------------------------------------------
https://raw.githubusercontent.com/wx-chevalier/JavaScript-Notes/2c3c57c322e60a50a553e47b69f03839d95df99f/03~异步并发/RxJS/操作符/多播操作符.md
--------------------------------------------------------------------------------
/03~异步并发/RxJS/操作符/工具操作符.md:
--------------------------------------------------------------------------------
https://raw.githubusercontent.com/wx-chevalier/JavaScript-Notes/2c3c57c322e60a50a553e47b69f03839d95df99f/03~异步并发/RxJS/操作符/工具操作符.md
--------------------------------------------------------------------------------
/03~异步并发/RxJS/操作符/数学和聚合操作符.md:
--------------------------------------------------------------------------------
https://raw.githubusercontent.com/wx-chevalier/JavaScript-Notes/2c3c57c322e60a50a553e47b69f03839d95df99f/03~异步并发/RxJS/操作符/数学和聚合操作符.md
--------------------------------------------------------------------------------
/03~异步并发/RxJS/操作符/条件和布尔操作符.md:
--------------------------------------------------------------------------------
https://raw.githubusercontent.com/wx-chevalier/JavaScript-Notes/2c3c57c322e60a50a553e47b69f03839d95df99f/03~异步并发/RxJS/操作符/条件和布尔操作符.md
--------------------------------------------------------------------------------
/03~异步并发/RxJS/操作符/组合操作符.md:
--------------------------------------------------------------------------------
https://raw.githubusercontent.com/wx-chevalier/JavaScript-Notes/2c3c57c322e60a50a553e47b69f03839d95df99f/03~异步并发/RxJS/操作符/组合操作符.md
--------------------------------------------------------------------------------
/03~异步并发/RxJS/操作符/转换操作符.md:
--------------------------------------------------------------------------------
https://raw.githubusercontent.com/wx-chevalier/JavaScript-Notes/2c3c57c322e60a50a553e47b69f03839d95df99f/03~异步并发/RxJS/操作符/转换操作符.md
--------------------------------------------------------------------------------
/03~异步并发/RxJS/操作符/过滤操作符.md:
--------------------------------------------------------------------------------
https://raw.githubusercontent.com/wx-chevalier/JavaScript-Notes/2c3c57c322e60a50a553e47b69f03839d95df99f/03~异步并发/RxJS/操作符/过滤操作符.md
--------------------------------------------------------------------------------
/03~异步并发/RxJS/操作符/错误处理操作符.md:
--------------------------------------------------------------------------------
https://raw.githubusercontent.com/wx-chevalier/JavaScript-Notes/2c3c57c322e60a50a553e47b69f03839d95df99f/03~异步并发/RxJS/操作符/错误处理操作符.md
--------------------------------------------------------------------------------
/03~异步并发/异步模式/async-await.md:
--------------------------------------------------------------------------------
https://raw.githubusercontent.com/wx-chevalier/JavaScript-Notes/2c3c57c322e60a50a553e47b69f03839d95df99f/03~异步并发/异步模式/async-await.md
--------------------------------------------------------------------------------
/03~异步并发/异步模式/异步编程模式.md:
--------------------------------------------------------------------------------
1 | # JavaScript 异步编程模式
2 |
3 | # Promise 编排
4 |
5 | # 异常处理
6 |
7 | 最容易犯的错误,没有使用 `catch` 去捕获 `then` 里抛出的报错:
8 |
9 | ```js
10 | // snippet1
11 | somePromise()
12 | .then(function() {
13 | throw new Error("oh noes");
14 | })
15 | .catch(function(err) {
16 | // I caught your error! :)
17 | });
18 |
19 | // snippet2
20 | somePromise().then(
21 | function resolve() {
22 | throw new Error("oh noes");
23 | },
24 | function reject(err) {
25 | // I didn't catch your error! :(
26 | }
27 | );
28 | ```
29 |
30 | 这里的问题在于 snippet2 在 function resolve 中出错时无法捕获。而 catch 则可以。
31 |
32 | 下面的两个示例返回结果是不一样的:
33 |
34 | ```js
35 | // example1
36 | Promise.resolve("foo")
37 | .then(Promise.resolve("bar"))
38 | .then(function(result) {
39 | console.log(result); // foo
40 | });
41 | // example2
42 | Promise.resolve("foo")
43 | .then(function() {
44 | return Promise.resolve("bar");
45 | })
46 | .then(function(result) {
47 | console.log(result); // bar
48 | });
49 | ```
50 |
51 | example2 改变了返回值,因而 result 发生了变化。
52 |
53 | 引入[此文](https://blog.lavrton.com/javascript-loops-how-to-handle-async-await-6252dd3c795)中对于 async/await 的循环的写法
54 |
55 | ```js
56 | async function waitAndMaybeReject() {
57 | // Wait one second
58 | await new Promise(r => setTimeout(r, 1000));
59 | // Toss a coin
60 | const isHeads = Boolean(Math.round(Math.random()));
61 |
62 | if (isHeads) return "yay";
63 | throw Error("Boo!");
64 | }
65 |
66 | async function foo() {
67 | try {
68 | // Wait for the result of waitAndMaybeReject() to settle,
69 | // and assign the fulfilled value to fulfilledValue:
70 | const fulfilledValue = await waitAndMaybeReject();
71 | // If the result of waitAndMaybeReject() rejects, our code
72 | // throws, and we jump to the catch block.
73 | // Otherwise, this block continues to run:
74 | return fulfilledValue;
75 | } catch (e) {
76 | return "caught";
77 | }
78 | }
79 | ```
80 |
81 | Promises 是为了让异步代码也能保持这些同步代码的属性:扁平缩进和单异常管道。在 ES6 之前,存在着很多的 Promise 的支持库,譬如著名的 q 以及 jQuery 中都有着对于 Promise 模式的内在的实现。在 ES6 之后,笔者是推荐仅使用 ES6 提供的 Promise 对象。
82 |
83 | # 避免异步混淆与性能损耗
84 |
85 | async/await 允许我们以同步的方式编写异步代码,不过这种方式也可能带来额外的性能损耗,或者混淆现有的代码逻辑。
86 |
87 | ```js
88 | (async () => {
89 | const pizzaData = await getPizzaData(); // async call
90 | const drinkData = await getDrinkData(); // async call
91 | const chosenPizza = choosePizza(); // sync call
92 | const chosenDrink = chooseDrink(); // sync call
93 | await addPizzaToCart(chosenPizza); // async call
94 | await addDrinkToCart(chosenDrink); // async call
95 | orderItems(); // async call
96 | })();
97 | ```
98 |
99 | 所有这些语句一个接一个地执行。这里没有并行逻辑。细想一下:为什么我们要在获取饮料列表之前等待获取披萨列表?我们应该尝试一起获取这两个列表。然而,当我们需要选择一个披萨的时候,我们确实需要在这之前获取披萨列表。对于饮料来说,道理类似。因此,我们可以总结如下:披萨相关的任务和饮料相关的任务可以并行发生,但是披萨(或饮料)各自的相关步骤需要按顺序(一个接一个地)发生。
100 |
101 | ```js
102 | async function orderItems() {
103 | const items = await getCartItems(); // async call
104 | const noOfItems = items.length;
105 | for (const i = 0; i < noOfItems; i++) {
106 | await sendRequest(items[i]); // async call
107 | }
108 | }
109 | ```
110 |
111 | 找出那些依赖其它语句执行的语句,将相互依赖的语句包在一个 async 函数中,然后并行执行这些 async 函数。可以利用事件循环来并行运行这些异步非阻塞函数。这样做的两种常见模式是 先返回 promise 和 Promise.all 方法。
112 |
113 | ```js
114 | async function selectPizza() {
115 | const pizzaData = await getPizzaData(); // async call
116 | const chosenPizza = choosePizza(); // sync call
117 | await addPizzaToCart(chosenPizza); // async call
118 | }
119 |
120 | async function selectDrink() {
121 | const drinkData = await getDrinkData(); // async call
122 | const chosenDrink = chooseDrink(); // sync call
123 | await addDrinkToCart(chosenDrink); // async call
124 | }
125 |
126 | (async () => {
127 | const pizzaPromise = selectPizza();
128 | const drinkPromise = selectDrink();
129 | await pizzaPromise;
130 | await drinkPromise;
131 | orderItems(); // async call
132 | })()(
133 | // Although I prefer it this way
134 |
135 | async () => {
136 | Promise.all([selectPizza(), selectDrink()]).then(orderItems); // async call
137 | }
138 | )();
139 | ```
140 |
141 | 在第二个例子中,我们需要处理不确定数量的 promise。处理这种情况超级简单:我们只用创建一个数组,然后将所有的 promise 放进数组中。然后使用 Promise.all(),我们就可以并行等待所有的 promise 处理。
142 |
143 | ```js
144 | async function orderItems() {
145 | const items = await getCartItems(); // async call
146 | const noOfItems = items.length;
147 | const promises = [];
148 | for (const i = 0; i < noOfItems; i++) {
149 | const orderPromise = sendRequest(items[i]); // async call
150 | promises.push(orderPromise); // sync call
151 | }
152 | await Promise.all(promises); // async call
153 | }
154 | ```
155 |
--------------------------------------------------------------------------------
/04~设计模式/Clean Code/README.md:
--------------------------------------------------------------------------------
1 | # JavaScript Clean Code 实践
2 |
3 | 在《[DesignPattern-Notes](https://github.com/wx-chevalier/DesignPattern-Notes?q=)》系列中我们详细讨论了整洁与重构的相关内容。
4 |
--------------------------------------------------------------------------------
/04~设计模式/README.md:
--------------------------------------------------------------------------------
1 | # TypeScript
2 |
3 | 本篇是面向对象的设计模式的 TypeScript 版本代码实现的配套介绍文档,其相关代码请参考 [design-pattern-snippets/ts](https://github.com/wx-chevalier/design-pattern-snippets)。
4 |
5 | # Links
6 |
7 | - https://github.com/torokmark/design_patterns_in_typescript
8 |
--------------------------------------------------------------------------------
/04~设计模式/SOLID.md:
--------------------------------------------------------------------------------
1 | # SOLID TS
2 |
--------------------------------------------------------------------------------
/10~工程实践/依赖注入/InversifyJS/README.md:
--------------------------------------------------------------------------------
1 | # [InversifyJS](https://github.com/inversify/InversifyJS)
2 |
3 | InversifyJS 是一个强大且轻量级的控制反转(IoC)容器,专为 JavaScript 和 Node.js 应用程序设计,并由 TypeScript 提供支持。以下是 InversifyJS 的主要特点:
4 |
5 | - **支持类**:InversifyJS 支持使用类来定义和管理依赖关系。
6 | - **支持符号**:使用符号作为依赖关系的标识符,确保唯一性和安全性。
7 | - **容器 API**:提供强大的容器 API,用于绑定和解析依赖关系。
8 | - **声明容器模块**:可以将依赖关系声明在模块中,便于管理和维护。
9 | - **容器快照**:支持容器快照功能,允许在不同状态之间切换。
10 | - **控制依赖关系的作用域**:可以控制依赖关系的作用域,如单例、瞬态等。
11 | - **声明可选依赖**:支持声明可选依赖关系,增强灵活性。
12 | - **注入常量或动态值**:可以注入常量值或动态计算的值。
13 | - **注入类构造函数**:支持注入类的构造函数,简化依赖关系的管理。
14 | - **注入工厂**:支持注入工厂方法,动态创建依赖对象。
15 | - **自动工厂**:提供自动工厂功能,简化工厂方法的使用。
16 | - **自动命名工厂**:支持自动命名工厂,便于区分不同的工厂实例。
17 | - **注入提供者(异步工厂)**:支持注入异步工厂方法,处理异步依赖关系。
18 | - **激活处理器**:支持激活处理器,在对象创建时执行自定义逻辑。
19 | - **停用处理器**:支持停用处理器,在对象销毁时执行自定义逻辑。
20 | - **后构造装饰器**:提供后构造装饰器,在对象构造完成后执行自定义逻辑。
21 | - **中间件**:支持中间件功能,增强容器的灵活性和可扩展性。
22 | - **多重注入**:支持多重注入,允许注入多个依赖实例。
23 | - **标签绑定**:支持标签绑定,通过标签区分不同的依赖实例。
24 | - **创建自定义标签装饰器**:可以创建自定义标签装饰器,简化标签的使用。
25 | - **命名绑定**:支持命名绑定,通过名称区分不同的依赖实例。
26 | - **默认目标**:支持默认目标,简化依赖关系的声明。
27 | - **支持分层 DI 系统**:支持分层依赖注入系统,增强模块化和可维护性。
28 | - **上下文绑定和 @targetName**:支持上下文绑定和 @targetName 装饰器,增强依赖关系的灵活性。
29 | - **属性注入**:支持属性注入,简化依赖关系的声明和使用。
30 | - **循环依赖**:支持处理循环依赖关系,确保依赖关系的正确解析。
31 | - **继承**:支持继承,增强代码的可复用性和可扩展性。
32 |
33 | 更多详细信息可以参考 [InversifyJS 的 GitHub 仓库](https://github.com/inversify/InversifyJS) 和 [官方文档](https://inversify.io/)。
34 |
--------------------------------------------------------------------------------
/10~工程实践/函数式编程/README.md:
--------------------------------------------------------------------------------
1 | # JavaScript 函数式编程导论
2 |
3 | 近年来,函数式编程(Functional Programming )已经成为了 JavaScript 社区中炙手可热的主题之一,无论你是否欣赏这种编程理念,相信你都已经对它有所了解。即使是前几年函数式编程尚未流行的时候,我已经在很多的大型应用代码库中发现了不少对于函数式编程理念的深度实践。
4 |
5 | 函数式编程即是在软件开发的工程中避免使用共享状态(Shared State )、可变状态(Mutable Data)以及副作用(Side Effects )。函数式编程中整个应用由数据驱动,应用的状态在不同纯函数之间流动。与偏向命令式编程的面向对象编程而言,函数式编程其更偏向于声明式编程,代码更加简洁明了、更可预测,并且可测试性也更好。函数式编程本质上也是一种编程范式(Programming Paradigm ),其代表了一系列用于构建软件系统的基本定义准则。其他编程范式还包括面向对象编程(Object Oriented Programming )与过程程序设计(Procedural Programming )。
6 |
--------------------------------------------------------------------------------
/10~工程实践/函数式编程/不可变对象/Immer/README.md:
--------------------------------------------------------------------------------
https://raw.githubusercontent.com/wx-chevalier/JavaScript-Notes/2c3c57c322e60a50a553e47b69f03839d95df99f/10~工程实践/函数式编程/不可变对象/Immer/README.md
--------------------------------------------------------------------------------
/10~工程实践/函数式编程/不可变对象/Immer/在类中使用.md:
--------------------------------------------------------------------------------
1 | # 在类中使用 Immer
2 |
3 | 默认情况下,Immer 并不严格处理 Plain 对象的 non-eumerable 属性,如 getters/setters,这是出于性能的考虑。如果你希望这种行为是严格的,你可以用 useStrictShallowCopy(true)来选择。
4 |
5 | 普通对象(没有原型的对象)、数组、Map 和 Set 总是由 Immer 起草的。其他所有的对象都必须使用 immerable 符号来标记自己与 Immer 兼容。当这些对象中的一个在生产者中被突变时,它的原型在两次拷贝之间被保留下来。
6 |
7 | ```ts
8 | import { immerable } from "immer";
9 |
10 | class Foo {
11 | [immerable] = true; // Option 1
12 |
13 | constructor() {
14 | this[immerable] = true; // Option 2
15 | }
16 | }
17 |
18 | Foo[immerable] = true; // Option 3
19 | ```
20 |
21 | 关于如何起草类的语义如下:
22 |
23 | - 一个类的草稿是一个新的对象,但它的原型与原始对象相同。
24 | - 当创建一个草稿时,Immer 将把所有自己的属性从基体复制到草稿中。这包括非可数和符号属性。
25 | - 自己的 getters 将在复制过程中被调用,就像 Object.assign 那样。
26 | - 继承的 getters 和方法将保持原样并被草案继承。
27 | - Immer 不会调用构造函数。
28 | - 最终的实例将以与草稿创建时相同的机制来构造。
29 | - 只有那些同时具有 setter 的 getters 在草案中才是可写的,否则值就不能被复制回来了。
30 |
31 | 因为 Immer 会将对象自己的 getter 解构为正常的属性,所以可以使用在其字段上使用 getter/setter 陷阱的对象,像 MobX 和 Vue 那样。Immer 不支持外来的/引擎原生的对象,如 DOM 节点或缓冲器,也不支持 Map、Set 或数组的子类化,immerable 符号不能用于它们。
32 |
33 | 因此,当使用日期对象时,你应该总是创建一个新的日期实例,而不是突变一个现有的日期对象。
34 |
35 | ```ts
36 | import { produce, immerable } from "immer";
37 |
38 | class ChildClock {
39 | [immerable] = true;
40 |
41 | constructor(hour, minute) {
42 | this.hour = hour;
43 | this.minute = minute;
44 | }
45 |
46 | get time() {
47 | return `${this.hour}:${this.minute}`;
48 | }
49 |
50 | tick() {
51 | return produce(this, (draft) => {
52 | draft.minute++;
53 | });
54 | }
55 | }
56 |
57 | class Clock {
58 | [immerable] = true;
59 |
60 | childClock1;
61 | childClock2;
62 |
63 | constructor(hour, minute) {
64 | this.hour = hour;
65 | this.minute = minute;
66 |
67 | this.childClock1 = new ChildClock(hour, minute);
68 | this.childClock2 = new ChildClock(hour, minute);
69 | }
70 |
71 | get time() {
72 | return `${this.hour}:${this.minute}`;
73 | }
74 |
75 | tick() {
76 | return produce(this, (draft) => {
77 | draft.minute++;
78 | draft.childClock1.minute++;
79 | });
80 | }
81 | }
82 |
83 | const clock1 = new Clock(12, 10);
84 | const clock2 = clock1.tick();
85 | console.log("clock2 === clock1", clock2 === clock1); // false
86 | console.log(
87 | "clock2.childClock1 === clock1.childClock1",
88 | clock2.childClock1 === clock1.childClock1
89 | ); // false
90 | console.log(
91 | "clock2.childClock1 instanceof ChildClock",
92 | clock2.childClock1 instanceof ChildClock
93 | ); // true
94 | console.log(
95 | "clock2.childClock2 === clock1.childClock2",
96 | clock2.childClock2 === clock1.childClock2
97 | ); // true
98 | ```
99 |
--------------------------------------------------------------------------------
/10~工程实践/函数式编程/函数组合.md:
--------------------------------------------------------------------------------
1 | # 函数组合
2 |
3 | # 高阶函数
4 |
5 | 函数式编程倾向于重用一系列公共的纯函数来处理数据,而面向对象编程则是将方法与数据封装到对象内。这些被封装起来的方法复用性不强,只能作用于某些类型的数据,往往只能处理所属对象的实例这种数据类型。而函数式编程中,任何类型的数据则是被一视同仁,譬如`map()`函数允许开发者传入函数参数,保证其能够作用于对象、字符串、数字,以及任何其他类型。JavaScript 中函数同样是一等公民,即我们可以像其他类型一样处理函数,将其赋予变量、传递给其他函数或者作为函数返回值。而高阶函数(Higher Order Function )则是能够接受函数作为参数,能够返回某个函数作为返回值的函数。高阶函数经常用在如下场景:
6 |
7 | - 利用回调函数、Promise 或者 Monad 来抽象或者隔离动作、作用以及任何的异步控制流
8 | - 构建能够作用于泛数据类型的工具函数
9 | - 函数重用或者创建柯里函数
10 | - 将输入的多个函数并且返回这些函数复合而来的复合函数
11 |
12 | 典型的高阶函数的应用就是复合函数,作为开发者,我们天性不希望一遍一遍地重复构建、测试与部分相同的代码,我们一直在寻找合适的只需要写一遍代码的方法以及如何将其重用于其他模块。代码重用听上去非常诱人,不过其在很多情况下是难以实现的。如果你编写过于偏向具体业务的代码,那么就会难以重用。而如果你把每一段代码都编写的过于泛化,那么你就很难将这些代码应用于具体的有业务场景,而需要编写额外的连接代码。而我们真正追寻的就是在具体与泛化之间寻求一个平衡点,能够方便地编写短小精悍而可复用的代码片,并且能够将这些小的代码片快速组合而解决复杂的功能需求。在函数式编程中,函数就是我们能够面向的最基础代码块,而在函数式编程中,对于基础块的组合就是所谓的函数复合(Function Composition )。我们以如下两个简单的 JavaScript 函数为例
13 |
14 | ```js
15 | const add10 = function (value) {
16 | return value + 10;
17 | };
18 | const mult5 = function (value) {
19 | return value * 5;
20 | };
21 | ```
22 |
23 | 如果你习惯了使用 ES6,那么可以用 Arrow Function 重构上述代码
24 |
25 | ```js
26 | const add10 = (value) => value + 10;
27 | const mult5 = (value) => value * 5;
28 | ```
29 |
30 | 现在看上去清爽多了吧,下面我们考虑面对一个新的函数需求,我们需要构建一个函数,首先将输入参数加 10 然后乘以 5,我们可以创建一个新函数如下
31 |
32 | ```js
33 | const mult5AfterAdd10 = (value) => 5 * (value + 10);
34 | ```
35 |
36 | 尽管上面这个函数也很简单,我们还是要避免任何函数都从零开始写,这样也会让我们做很多重复性的工作。我们可以基于上文的 add10 与 mult5 这两个函数来构建新的函数
37 |
38 | ```js
39 | const mult5AfterAdd10 = (value) => mult5(add10(value));
40 | ```
41 |
42 | 在 mult5AfterAdd10 函数中,我们已经站在了 add10 与 mult5 这两个函数的基础上,不过我们可以用更优雅的方式来实现这个需求。在数学中,我们认为`f ∘ g`是所谓的 Function Composition,因此``f ∘ g`可以认为等价于`f(g(x))`,我们同样可以基于这种思想重构上面的 mult5AfterAdd10。不过 JavaScript 中并没有原生的 Function Composition 支持,在 Elm 中我们可以用如下写法
43 |
44 | ```js
45 | add10 value =
46 | value + 10
47 | mult5 value =
48 | value * 5
49 | mult5AfterAdd10 value =
50 | (mult5 << add10) value
51 | ```
52 |
53 | 这里的`<<`操作符也就指明了在 Elm 中是如何组合函数的,同时也较为直观的展示出了数据的流向。首先 value 会被赋予给 add10,然后 add10 的结果会流向 mult5。另一个需要注意的是,`(mult5 << add10)`中的中括号是为了保证函数组合会在函数调用之前。你也可以组合更多的函数
54 |
55 | ```js
56 | f x =
57 | (g << h << s << r << t) x
58 | ```
59 |
60 | 如果在 JavaScript 中,你可能需要以如下的递归调用来实现该功能
61 |
62 | ```
63 | g(h(s(r(t(x)))))
64 | ```
65 |
--------------------------------------------------------------------------------
/10~工程实践/函数式编程/循环改造.md:
--------------------------------------------------------------------------------
1 | # 使用函数式编程改造循环
2 |
3 | For 循环的设计思想深受可变状态与副作用的影响,不过函数式编程中认为可变状态与副作用是导致潜在错误与不可预测性的罪魁祸首,是应该尽力避免的模式。众所周知,使用全局状态会污染局部代码,而同样的局部状态同样会导致与全局状态一样的问题,只不过因为局部状态的影响被限制在较小的影响范围内,因此不像全局状态那样的突兀。允许可变的状态也就意味着变量可能因为未知的原因被改变,开发者可能要花费数小时的时间去定位到底是哪一段代码修改了这个变量值。在过去的开发岁月里,我就是因为这样变秃了,却似乎没有变强。另一方面,任何修改除了作用域内变量值的函数都被称为有副作用的函数。典型的譬如修改全局变量、读入键盘输入、调用远程 API、写入磁盘等等。副作用的功效强大,我们应该尽可能地将其封装与控制在一定范围内。大道理就回顾到这里,下面我们直接看下代码:
4 |
5 | ```js
6 | const cats = [
7 | { name: "Mojo", months: 84 },
8 | { name: "Mao-Mao", months: 34 },
9 | { name: "Waffles", months: 4 },
10 | { name: "Pickles", months: 6 },
11 | ];
12 | const kittens = [];
13 | //典型的 for 循环用法
14 | for (const i = 0; i < cats.length; i++) {
15 | if (cats[i].months < 7) {
16 | kittens.push(cats[i].name);
17 | }
18 | }
19 | console.log(kittens);
20 | ```
21 |
22 | 我们改造的第一步是将 `if` 语句中的逻辑判断提取出来,老实说提取之后笔者觉得正好符合[Clean JavaScript:写出整洁的 JavaScript 代码](https://zhuanlan.zhihu.com/p/24761475)里面提及的让变量名而不是注释表述其含义的效果:
23 |
24 | ```js
25 | const isKitten = (cat) => cat.months < 7;
26 | const kittens = [];
27 | for (const i = 0; i < cats.length; i++) {
28 | if (isKitten(cats[i])) {
29 | kittens.push(cats[i].name);
30 | }
31 | }
32 | ```
33 |
34 | 这种方式一方面增加了代码的可用性,另一方面也保证了我们测试条件的可测试性,特别是当我们的逻辑判断很复杂的时候。下面我们是将属性提取也抽象出来:
35 |
36 | ```js
37 | const isKitten = (cat) => cat.months < 7;
38 | const getName = (cat) => cat.name;
39 | const kittens = [];
40 | for (const i = 0; i < cats.length; i++) {
41 | if (isKitten(cats[i])) {
42 | kittens.push(getName(cats[i]));
43 | }
44 | }
45 | ```
46 |
47 | 下面我们可以用函数式中的过滤与转换函数来描述这个过程:
48 |
49 | ```js
50 | const isKitten = (cat) => cat.months < 7;
51 | const getName = (cat) => cat.name;
52 | const kittens = cats.filter(isKitten).map(getName);
53 | ```
54 |
55 | 到这里我们摒弃了`push`函数,即移除了可变状态的介入。最后的重构即是将我们的过滤与转换过程再进行一层封装,使其成为可复用的过程:
56 |
57 | ```js
58 | const isKitten = (cat) => cat.months < 7;
59 | const getName = (cat) => cat.name;
60 | const getKittenNames = (cats) => cats.filter(isKitten).map(getName);
61 | const cats = [
62 | { name: "Mojo", months: 84 },
63 | { name: "Mao-Mao", months: 34 },
64 | { name: "Waffles", months: 4 },
65 | { name: "Pickles", months: 6 },
66 | ];
67 | const kittens = getKittenNames(cats);
68 | console.log(kittens);
69 | ```
70 |
--------------------------------------------------------------------------------
/10~工程实践/函数式编程/纯函数与副作用.md:
--------------------------------------------------------------------------------
1 | # 纯函数
2 |
3 | 顾名思义,纯函数往往指那些仅根据输入参数决定输出并且不会产生任何副作用的函数。纯函数最优秀的特性之一在于其结果的可预测性:
4 |
5 | ```js
6 | const z = 10;
7 | function add(x, y) {
8 | return x + y;
9 | }
10 | console.log(add(1, 2)); // prints 3
11 | console.log(add(1, 2)); // still prints 3
12 | console.log(add(1, 2)); // WILL ALWAYS print 3
13 | ```
14 |
15 | 在`add`函数中并没有操作`z`变量,即没有读取`z`的数值也没有修改`z`的值。它仅仅根据参数输入的`x`与`y`变量然后返回二者相加的和。这个`add`函数就是典型的纯函数,而如果在`add`函数中涉及到了读取或者修改`z`变量,那么它就失去了纯洁性。我们再来看另一个函数
16 |
17 | ```js
18 | function justTen() {
19 | return 10;
20 | }
21 | ```
22 |
23 | 对于这样并没有任何输入参数的函数,如果它要保持为纯函数,那么该函数的返回值就必须为常量。不过像这种固定返回为常量的函数还不如定义为某个常量呢,就没必要大材小用用函数了,因此我们可以认为绝大部分的有用的纯函数至少允许一个输入参数。再看看下面这个函数
24 |
25 | ```
26 | function addNoReturn(x, y) {
27 | constst z = x + y
28 | }
29 | ```
30 |
31 | 注意这个函数并没有返回任何值,它确实拥有两个输入参数`x`与`y`,然后将这两个变量相加赋值给`z`,因此这样的函数也可以认为是无意义的。这里我们可以说,绝大部分有用的纯函数必须要有返回值。总结而言,纯函数应该具有以下几个特效
32 |
33 | - 绝大部分纯函数应该拥有一或多个参数值。
34 | - 纯函数必须要有返回值。
35 | - 相同输入的纯函数的返回值必须一致。
36 | - 纯函数不能够产生任何的副作用。
37 |
38 | # 共享状态与副作用
39 |
40 | 在软件开发中有个很有趣的观点:共享的状态时万恶之源。共享状态(Shared State )可以是存在于共享作用域(全局作用域与闭包作用域)或者作为传递到不同作用域的对象属性的任何变量、对象或者内存空间。在面向对象编程中,我们常常是通过添加属性到其他对象的方式共享某个对象。共享状态问题在于,如果开发者想要理解某个函数的作用,必须去详细了解该函数可能对于每个共享变量造成的影响。譬如我们现在需要将客户端生成的用户对象保存到服务端,可以利用`saveUser()`函数向服务端发起请求,将用户信息编码传递过去并且等待服务端响应。而就在你发起请求的同时,用户修改了个人头像,触发了另一个函数`updateAvatar()`以及另一次`saveUser()`请求。正常来说,服务端会先响应第一个请求,并且根据第二个请求中用户参数的变更对于存储在内存或者数据库中的用户信息作相应的修改。不过某些意外情况下,可能第二个请求会比第一个请求先到达服务端,这样用户选定的新的头像反而会被第一个请求中的旧头像覆写。这里存放在服务端的用户信息就是所谓的共享状态,而因为多个并发请求导致的数据一致性错乱也就是所谓的竞态条件(Race Condition ),也是共享状态导致的典型问题之一。另一个共享状态的常见问题在于不同的调用顺序可能会触发未知的错误,这是因为对于共享状态的操作往往是时序依赖的。
41 |
42 | ```js
43 | const x = {
44 | val: 2,
45 | };
46 |
47 | const x1 = () => (x.val += 1);
48 |
49 | const x2 = () => (x.val *= 2);
50 |
51 | x1();
52 | x2();
53 |
54 | console.log(x.val); // 6
55 |
56 | const y = {
57 | val: 2,
58 | };
59 |
60 | const y1 = () => (y.val += 1);
61 |
62 | const y2 = () => (y.val *= 2);
63 |
64 | // 交换了函数调用顺序
65 | y2();
66 | y1();
67 |
68 | // 最后的结果也受到了影响
69 | console.log(y.val); // 5
70 | ```
71 |
72 | 副作用指那些在函数调用过程中没有通过返回值表现的任何可观测的应用状态变化,常见的副作用包括但不限于:
73 |
74 | - 修改任何外部变量或者外部对象属性
75 | - 在控制台中输出日志
76 | - 写入文件
77 | - 发起网络通信
78 | - 触发任何外部进程事件
79 | - 调用任何其他具有副作用的函数
80 |
81 | 在函数式编程中我们会尽可能地规避副作用,保证程序更易于理解与测试。Haskell 或者其他函数式编程语言通常会使用[Monads](https://en.wikipedia.org/wiki/Monad_%28functional_programming%29)来隔离与封装副作用。在绝大部分真实的应用场景进行编程开始时,我们不可能保证系统中的全部函数都是纯函数,但是我们应该尽可能地增加纯函数的数目并且将有副作用的部分与纯函数剥离开来,特别是将业务逻辑抽象为纯函数,来保证软件更易于扩展、重构、调试、测试与维护。这也是很多前端框架鼓励开发者将用户的状态管理与组件渲染相隔离,构建松耦合模块的原因。
82 |
--------------------------------------------------------------------------------
/10~工程实践/工具库/Lodash/README.md:
--------------------------------------------------------------------------------
https://raw.githubusercontent.com/wx-chevalier/JavaScript-Notes/2c3c57c322e60a50a553e47b69f03839d95df99f/10~工程实践/工具库/Lodash/README.md
--------------------------------------------------------------------------------
/10~工程实践/工具库/Radash/README.md:
--------------------------------------------------------------------------------
https://raw.githubusercontent.com/wx-chevalier/JavaScript-Notes/2c3c57c322e60a50a553e47b69f03839d95df99f/10~工程实践/工具库/Radash/README.md
--------------------------------------------------------------------------------
/10~工程实践/工具库/Remeda/README.md:
--------------------------------------------------------------------------------
https://raw.githubusercontent.com/wx-chevalier/JavaScript-Notes/2c3c57c322e60a50a553e47b69f03839d95df99f/10~工程实践/工具库/Remeda/README.md
--------------------------------------------------------------------------------
/10~工程实践/工具库/es-toolkit/README.md:
--------------------------------------------------------------------------------
https://raw.githubusercontent.com/wx-chevalier/JavaScript-Notes/2c3c57c322e60a50a553e47b69f03839d95df99f/10~工程实践/工具库/es-toolkit/README.md
--------------------------------------------------------------------------------
/10~工程实践/插件系统/README.md:
--------------------------------------------------------------------------------
1 | # Web 开发中的插件系统
2 |
3 | # 链接
4 |
5 | - https://mp.weixin.qq.com/s/GKHhVvNXELjnFz0cl6KWEw 设计一个JavaScript插件系统,编程思维比死磕API更重要
6 |
7 | - https://cubox.pro/c/dzGdOr https://cubox.pro/c/dzGdOr 前端插件式可扩展架构设计心得
--------------------------------------------------------------------------------
/10~工程实践/插件系统/动态代码执行/README.md:
--------------------------------------------------------------------------------
1 | # JavaScript 动态代码执行
2 |
3 | 我们写的 JS 代码,主要执行在浏览器环境和 node 环境,也叫宿主环境。宿主环境通过加载机制获取到我们的代码,然后使用 JS 引擎解释执行。这是正常的 JS 代码执行流程。有些场景下,js 代码是通过程序动态生成的,此时我们已经运行在 JS 引擎内部,没有宿主环境帮我们执行代码,就需要 JS 引擎提供的动态执行代码的能力。
4 |
5 | 动态执行代码普遍存在两个缺点,一是安全性问题,传递的函数体字符串如果包含非法代码也会被执行。二是执行性能,动态执行时会解析代码,存在一定的时间消耗。eval 还会影响到 js 引擎的优化过程,导致效率降低非常多。eval is evil 说的就是使用 eval 可能导致很严重的问题。从上面几种方法可以看到,理解 js 动态执行代码时的作用域是关键。一是是否存在自己的作用域,二是其父作用域是当前作用域还是全局作用域。只要记住这两个问题的答案,在使用时就不会出现大问题。
6 |
7 | # new Function
8 |
9 | Function 构造函数创建一个函数对象,这个函数对象和使用函数声明和函数表达式创建的一样,区别是函数的解析时机不同。Function 构造函数是在执行时解析,后者是在脚本加载时解析。Function 创建的函数有自己的作用域,其父作用域是全局作用域,只能访问全局变量和自己的局部变量,不能访问函数被创建时所在的作用域。需要注意在 node 环境和 esm 环境存在模块作用域,模块作用域不是全局作用域。Function 创建的函数也不能访问模块作用域。
10 |
11 | ```js
12 | var a = -100;
13 |
14 | (function () {
15 | var a = 1;
16 |
17 | // 函数执行时的父作用域时全局作用域
18 | new Function("console.log(a)")(); // -100
19 |
20 | // 内部的 this 是 window
21 | var nfunc = new Function("return this");
22 | console.log(nfunc()); // Window
23 |
24 | // 作为对象的方法时,this 是当前对象
25 | var obj = { nfunc: nfunc };
26 | console.log(obj.nfunc()); // {nfunc: ƒ}
27 | })();
28 | ```
29 |
30 | # eval
31 |
32 | eval 没有自己的作用域,而是使用执行时所在的作用域,在 eval 中初始化语会将变量加入到当前作用域。由于变量是在运行时动态添加的,导致 v8 引擎不能做出正确的判断,只能放弃优化策略。在严格模式下,eval 有自己的作用域,这样就不会污染当前作用域。
33 |
34 | ```js
35 | (function () {
36 | // eval 没有自己的作用域,使用当前作用域。
37 | var a = 100;
38 | eval("console.log(a)"); // 100
39 |
40 | // 初始化语句会添加变量到当前作用域上,也就是会污染当前作用域。这是 v8 引擎没法优化这段代码的原因,也是性能差的原因。
41 | eval("var b = 20");
42 | console.log(b); // 20
43 | })();
44 |
45 | (function () {
46 | "use strict";
47 |
48 | // 严格模式下,eval 有自己的作用域,父作用域是当前作用域。
49 | var a = 100;
50 | eval("console.log(a)"); // 100 当前作用域上的 a
51 |
52 | // 严格模式下,eval 有自己的作用域,初始化语句将变量添加到自己的作用域内。执行完后当前作用域被销毁
53 | eval("var b = 20");
54 | console.log(b); // 1 全局作用域上的 b
55 |
56 | // 返回 eval 代码段产生的闭包
57 | var innerb = eval("var b = 20; (function () { return b })")();
58 | console.log("innerb", innerb); // innerb 20
59 | })();
60 | ```
61 |
62 | 值得注意的是,eval 如果不使用 direct call 的方式调用,其使用的作用域将会变为全局作用域。
63 |
64 | ```js
65 | var a = 0;
66 |
67 | (function () {
68 | var a = 100;
69 | var fn = eval;
70 |
71 | // 非 direct call 的调用方式
72 | fn("console.log(a)"); // 0
73 | })();
74 | ```
75 |
76 | # setTimeout
77 |
78 | setTimeout 用来设置定时器,其第一个参数可以传入函数,也可以传入代码片段。传入函数时,函数的作用域是正常的函数作用域。传入代码片段时,没有自己的作用域,其执行时作用域是全局作用域。
79 |
80 | ```js
81 | var a = -100;
82 |
83 | (function () {
84 | var a = 0;
85 |
86 | // setTimeout 执行的代码段,没有自己的作用域,运行在全局作用域中
87 | var dynameicCode = "console.log(a)";
88 | setTimeout(dynameicCode, 10); // -100
89 |
90 | // setTimeout 执行的代码段,初始化语句会添加变量到 window 上
91 | var dynameicCode = "var b = 200;";
92 | setTimeout(dynameicCode, 10);
93 | setTimeout(function () {
94 | console.log("window.b", window.b); // window.b 200
95 | }, 20);
96 | })();
97 | ```
98 |
99 | # script.textContent
100 |
101 | 动态创建 script 节点,也是一种动态执行语句的方式。其创建的 script 和普通 script 没有区别,代码的作用域是全局作用域。需要注意 script 应该使用 document.createElement('script') 创建并插入到文档中。使用 innerHTML 插入 script 的方式,脚本不会执行。
102 |
103 | ```js
104 | (function () {
105 | var a = 1;
106 | var s = document.createElement("script");
107 |
108 | s.textContent = "console.log(a)";
109 | document.documentElement.append(s);
110 | })();
111 | ```
112 |
113 | # onclick="xxx"
114 |
115 | html 元素的 onclick 属性也支持设置 js 代码,这种特性被称为 Inline event handlers。这种方式执行的代码存在自己的作用域,父作用域是全局作用域。也就是说初始化语句不会污染全局作用域。
116 |
117 | ```html
118 |
122 |
123 |
124 |
125 |
126 | ```
127 |
--------------------------------------------------------------------------------
/10~工程实践/插件系统/多个插件协作.md:
--------------------------------------------------------------------------------
https://raw.githubusercontent.com/wx-chevalier/JavaScript-Notes/2c3c57c322e60a50a553e47b69f03839d95df99f/10~工程实践/插件系统/多个插件协作.md
--------------------------------------------------------------------------------
/10~工程实践/插件系统/插件调用.md:
--------------------------------------------------------------------------------
https://raw.githubusercontent.com/wx-chevalier/JavaScript-Notes/2c3c57c322e60a50a553e47b69f03839d95df99f/10~工程实践/插件系统/插件调用.md
--------------------------------------------------------------------------------
/10~工程实践/插件系统/插件配置与初始化.md:
--------------------------------------------------------------------------------
https://raw.githubusercontent.com/wx-chevalier/JavaScript-Notes/2c3c57c322e60a50a553e47b69f03839d95df99f/10~工程实践/插件系统/插件配置与初始化.md
--------------------------------------------------------------------------------
/10~工程实践/编码规约/README.md:
--------------------------------------------------------------------------------
1 | # JavaScript 编码规约
2 |
--------------------------------------------------------------------------------
/10~工程实践/编码规约/性能规约.md:
--------------------------------------------------------------------------------
1 | 本文的初衷是想介绍如何利用些简单的代码小技巧就能促进 JavaScript 编译器的优化进程从而提升代码运行效率。特别是在游戏这种对于垃圾回收速度要求较高,你性能稍微差点用户就能见到白屏的地方。
2 |
3 | # Monomorphism: 单态性
4 |
5 | JavaScript 中允许函数调用时候传入动态参数,不过就以简单的 2 参数函数为例,当你的参数类型、参数数目与返回类型动态调用时才能决定,编译器需要更多的时间来解析。编译器自然地希望能够处理那些单态可预测的数据结构、参数统计等。
6 |
7 | ```
8 | function example(a, b) {
9 | // we expect a, b to be numeric
10 | console.log(++a * ++b);
11 | };
12 |
13 | example(); // bad
14 | example(1); // still bad
15 | example("1", 2); // dammit meg
16 |
17 | example(1, 2); // good
18 | ```
19 |
20 | # Constants: 常量
21 |
22 | 使用常量能够让编译器在编译时即完成变量的值替换
23 |
24 | ```
25 | const a = 42; // we can easily unfold this
26 | const b = 1337 * 2; // we can resolve this expression
27 | const c = a + b; // still can be resolved
28 | const d = Math.random() * c; // we can only unfold 'c'
29 |
30 | // before unfolding
31 | a;
32 | b;
33 | c;
34 | d;
35 |
36 | // after unfolding
37 | // we can do this at compile time!
38 | 42;
39 | 2674;
40 | 2716;
41 | Math.random() * 2716;
42 | ```
43 |
44 | # Inlining: 内联
45 |
46 | JIT 编译器能够找出你的代码中被执行次数最多的部分,将你的代码分割成多个小的代码块能够有助于编译器在编译时将这些代码块转化为内联格式然后增加执行速度。
47 |
48 | # Data Types: 数据类型
49 |
50 | 尽可能地多用 Numbers 与 Booleans 类型,因为他们与其他类似于字符串等原始类型相比性能表现更好。使用字符串类型可能会带来额外的垃圾回收消耗。
51 |
52 | ```
53 | const ROBOT = 0;
54 | const HUMAN = 1;
55 | const SPIDER = 2;
56 |
57 | let E_TYPE = {
58 | Robot: ROBOT,
59 | Human: HUMAN,
60 | Spider: SPIDER
61 | };
62 |
63 | // bad
64 | // avoid uncached strings in heavy tasks (or better in general)
65 | if (entity.type === "Robot") {
66 |
67 | }
68 |
69 | // good
70 | // the compiler can resolve member expressions
71 | // without much deepness pretty fast
72 | if (entity.type === E_TYPE.Robot) {
73 |
74 | }
75 |
76 | // perfect
77 | // right side of binary expression can even get unfold
78 | if (entity.type === ROBOT) {
79 |
80 | }
81 | ```
82 |
83 | # Strict & Abstract Operators
84 |
85 | 尽可能使用`===`这个严格比较操作符而不是`==`操作符。使用严格比较操作符能够避免编译器进行类型推导与转换,从而提高一定的性能。
86 |
87 | # Strict Conditions
88 |
89 | JavaScript 中的 if 语句也非常灵活,你可以直接在`if(a) then bla`这个类型的条件选择语句中传入随意类似的 a 值。不过这种情况下,就像上文提及的严格比较操作符与宽松比较操作符一样,编译器需要将其转化为多个数据类型进行比较,而不能立刻得出结果。当然,这并不是一味的反对使用简写方式,而是在非常强调性能的场景,还是建议做好每一个细节的优化
90 |
91 | ```
92 | let a = 2;
93 |
94 | // bad
95 | // abstracts to check in the worst case:
96 | // - is value equal to true
97 | // - is value greater than zero
98 | // - is value not null
99 | // - is value not NaN
100 | // ..
101 | if (a) {
102 | // if a is true, do something
103 | }
104 |
105 | // good
106 | if (a === 2) {
107 | // do sth
108 | }
109 |
110 | // same goes for functions
111 | function b() {
112 | return (!false);
113 | };
114 |
115 | if (b()) {
116 | // get in here slow
117 | }
118 |
119 | if (b() === true) {
120 | // get in here fast
121 | // the compiler knows a specific value to compare with
122 | }
123 | ```
124 |
125 | # Arguments
126 |
127 | 尽可能避免使用 arguments[index]方式进行参数获取,并且尽量避免修改传入的参数变量
128 |
129 | ```
130 | function mul(a, b) {
131 | return (arguments[0]*arguments[1]); // bad, very slow
132 | return (a*b); // good
133 | };
134 |
135 | function test(a, b) {
136 | a = 5; // bad, dont modify argument identifiers
137 | let tmp = a; // good
138 | tmp *= 2; // we can now modify our fake 'a'
139 | };
140 | ```
141 |
142 | # Toxicity: 这些关键字有毒
143 |
144 | # Toxicity
145 |
146 | 如下列举的几个语法特性会影响优化进程
147 |
148 | - eval
149 | - with
150 | - try/catch
151 |
152 | 同时尽量避免在函数内声明函数或者闭包,可能在大量的运算中导致过多的垃圾回收操作。
153 |
154 | # Objecs
155 |
156 | Object 实例通常会共享隐类,因此当我们访问或者设置某个实例的未预定义变量值的时候会创建一个隐类。
157 |
158 | ```
159 | // our hidden class 'hc_0'
160 | class Vector {
161 | constructor(x, y) {
162 | // compiler finds and expects member declarations here
163 | this.x = x;
164 | this.y = y;
165 | }
166 | };
167 |
168 | // both vector objects share hidden class 'hc_0'
169 | let vec1 = new Vector(0, 0);
170 | let vec2 = new Vector(2, 2);
171 |
172 | // bad, vec2 got hidden class 'hc_1' now
173 | vec2.z = 0;
174 |
175 | // good, compiler knows this member
176 | vec2.x = 1;
177 | ```
178 |
179 | # Loops
180 |
181 | 尽可能的缓存数组长度的计算值,并且尽可能在同一个数组中存放单个类型。避免使用`for-in`语法来遍历某个数组,因为它真的很慢。另外,continue 与 break 语句在循环中的性能也是不错的,这一点使用的时候不用担心。另外,尽可能将短小的逻辑部分拆分到独立的函数中,这样更有利于编译器进行优化。另外,使用前缀自增表达式,也能带来小小的性能提升。( ++i 代替 i++)
182 |
183 | ```js
184 | let badarray = [1, true, 0]; // bad, dont mix types
185 | let array = [1, 0, 1]; // happy compiler
186 |
187 | // bad choice
188 | for (let key in array) {
189 | }
190 |
191 | // better
192 | // but always try to cache the array size
193 | let i = 0;
194 | for (; i < array.length; ++i) {
195 | key = array[i];
196 | }
197 |
198 | // good
199 | let i = 0;
200 | let key = null;
201 | let length = array.length;
202 | for (; i < length; ++i) {
203 | key = array[i];
204 | }
205 | ```
206 |
207 | # drawImage
208 |
209 | draeImage 函数算是最快的 2D Canvas API 之一了,不过我们需要注意的是如果为了图方便省略了全参数传入,也会增加性能损耗:
210 |
211 | ```js
212 | // bad
213 | ctx.drawImage(img, x, y);
214 |
215 | // good
216 | ctx.drawImage(
217 | img,
218 | // clipping
219 | sx,
220 | sy,
221 | sw,
222 | sh,
223 | // actual stuff
224 | x,
225 | y,
226 | w,
227 | h
228 | );
229 |
230 | // much hax
231 | // no subpixel rendering by passing integers
232 | ctx.drawImage(img, sx | 0, sy | 0, sw | 0, sh | 0, x | 0, y | 0, w | 0, h | 0);
233 | ```
234 |
--------------------------------------------------------------------------------
/10~工程实践/编码规约/样式指南.md:
--------------------------------------------------------------------------------
1 | # 某熊的 Opinionated JavaScript 编程样式指南
2 |
3 | - 默认使用 Prettier 进行代码格式化,因此能够由 Prettier 自动处理的格式问题本文不会提及;
4 | - 默认使用 ES 6/7 的语法,优先使用 OOP 的原则,优先使用类而不是 Object 来定义实体;我们认为组件类默认遵循统一的类编码原则。
5 | - 默认使用 Flow 进行静态类型检测;
6 | - 默认使用 Jest 进行单元测试,对于任何稳定的类或函数必须添加单元测试,任何提交前必须保证通过单元测试;
7 | - Clean Code 而不是 Hacky Code
8 |
9 | ## Principle: 基本原则
10 |
11 | ### 移除无用代码
12 |
13 | - 移除无用代码
14 |
15 | - 使用 Git 保存记录或者废弃代码,而不是建立 deprecated 文件夹。
16 |
17 | ### SRP: 遵循单一职责原则
18 |
19 | 除以之外,我们建议编码时可以多多参考 SOLID 原则;不过不建议滥用设计模式。
20 |
21 | ### DRY: 提取公共代码与避免过度抽象
22 |
23 | ```
24 | // bad
25 | if (...) {
26 | document.getElementById("second").className = "show";
27 | } else {
28 | document.getElementById("second").className = "";
29 | }
30 |
31 | // good
32 | const target = document.getElementById("second");
33 | if (...) {
34 | target.className = "show";
35 | } else {
36 | target.className = "";
37 | }
38 | ```
39 |
40 | ### 数据独立于逻辑
41 |
42 | # Code Style: 代码风格
43 |
44 | ## Name Conventions: 命名约定
45 |
46 | ### 目录与文件
47 |
48 | - 目录统一以 camel_case 方式命名,子目录不应该包含父目录信息。譬如我们需要定义领域相关目录,应该使用 `user/auth` 而不是 `user/user_auth`;
49 | - 包含类(组件类)的文件以 CamelCase 方式命名,并且遵循 Single Public Class in Single File 的原则;即每个类文件中只允许导出单个类,允许定义其他私有内部类;一旦某个内部类被其他文件引用(非 PublicClass.PrivateClass 引用),即需要将该内部类提出为公共外部类;
50 | - 仅包含函数或者配置性质的文件以 camel_case 方式命名,使用 .js 后缀;
51 | - JavaScript 类文件使用 .js 后缀,React 组件类使用 .jsx 后缀,Vue 组件使用 .vue 后缀;
52 |
53 | ### 变量、函数与类
54 |
55 | - 变量或者函数或者类等的命名必须具有自解释性,不要使用 `aa`、`bb` 等无意义命名。
56 | - 不允许英文拼音混写,不建议强制使用英文命名
57 |
58 | ## Collection: 集合类型
59 |
60 | - 优先使用 Set 存放有唯一性要求的集合;
61 |
62 | ```
63 | // bad
64 | const allChords = [];
65 |
66 | chords.forEach(chord => {
67 | if(!allChords.includes(chord)){
68 | allChords.push(chord);
69 | }
70 | });
71 |
72 | // good
73 | const allChords = new Set();
74 |
75 | chords.forEach(chord => allChords.add(chord));
76 | ```
77 |
78 | ## Function: 函数
79 |
80 | ### Param & Invoke: 参数与调用
81 |
82 | - 对于参数较少或者必须参数较多的情况下优先使用扁平化参数,使用 optional parameter 递默认值;
83 |
84 | - 对于参数较多或者可选参数较多的情况下,或者需要避免传入空值的情况下优先使用 Named Options Objects;
85 |
86 | ```
87 | // bad
88 | const createEvent = (
89 | title = 'Untitled',
90 | timeStamp = Date.now(),
91 | description = ''
92 | ) => ({ title, description, timeStamp });
93 |
94 | const birthdayParty = createEvent(
95 | 'Birthday Party',
96 | undefined, // This was avoidable
97 | 'Best party ever!'
98 | );
99 |
100 | // good
101 | const createEvent = ({
102 | title = 'Untitled',
103 | timeStamp = Date.now(),
104 | description = ''
105 | }) => ({ title, description, timeStamp });
106 |
107 | const birthdayParty = createEvent({
108 | title: 'Birthday Party',
109 | description: 'Best party ever!'
110 | });
111 | ```
112 |
113 | ### Async: 异步操作
114 |
115 | - 优先使用 async / await 进行异步操作;
116 |
117 | ```
118 | // bad
119 | levelOne(function(){
120 | levelTwo(function(){
121 | levelThree(function(){
122 | levelFour(function(){
123 | // some code here
124 | });
125 | });
126 | });
127 | });
128 |
129 | // good
130 | await levelOne();
131 | await levelTwo();
132 | await levelThree();
133 | await levelFour();
134 | ```
135 |
136 | - 合理排布多异步操作;
137 |
138 | ## Class: 类与对象
139 |
140 | - 类私有属性或方法建议使用下划线前缀;
141 |
142 | ### Method:成员方法
143 |
144 | - 构造函数参数应优先指定自有属性;避免添加无意义构造器,谨慎传递全部构造函数参数给父类;
145 |
146 | ```
147 | // bad
148 | class Jedi {
149 | constructor() {}
150 |
151 | getName() {
152 | return this.name;
153 | }
154 | }
155 |
156 | // bad
157 | class Rey extends Jedi {
158 | constructor(...args) {
159 | super(...args);
160 | }
161 | }
162 |
163 | // maybe bad 可能会传递无意义的参数给父类
164 | class Rey extends Jedi {
165 | constructor(...args) {
166 | super(...args);
167 | this.name = 'Rey';
168 | }
169 | }
170 |
171 | // good
172 | class Rey extends Jedi {
173 | constructor(ownProperty, ...args) {
174 | super(...args);
175 | this. ownProperty = ownProperty;
176 | }
177 | }
178 | ```
179 |
180 | - 优先使用纯函数,优先将纯函数定义为静态方法;
181 |
182 | - 使用箭头函数或者 `bind` 绑定方法上下文;
183 |
184 | ```
185 |
186 | ```
187 |
188 | ### Order: 定义顺序
189 |
190 | - 首先声明 flow、eslint 等配置信息;
191 |
192 | ```
193 | // @flow
194 | ```
195 |
196 | - 优先使用 `import`,或者使用 `require` 引入外部依赖;注意,对于未实际使用的外部依赖请及时清除,或者使用编辑器自带的插件进行自动清除;
197 |
198 | ```
199 |
200 | ```
201 |
202 | - 声明并导出公开外部类;
203 |
204 | - 声明静态属性(可选);
205 |
206 | - 声明类属性;
207 |
208 | - 声明复写的父类方法;
209 |
210 | - 声明自定义类方法;
211 |
212 | - 声明静态属性;
213 |
214 | - 声明静态方法;
215 |
216 | - 声明内部工具函数或者对象;
217 |
218 | - 导出高阶函数封装类,优先使用装饰器声明;
219 |
220 | # Code Format & Lint: 代码格式化与语法检测
221 |
222 | ## 使用 Prettier 格式化 JavaScript 代码
223 |
224 | Prettier 是非常优秀的、具有一定特色的支持 ES2017、JSX、Flow 的 JavaScript 格式化工具。我们可以使用 yarn 安装 Prettier:
225 |
226 | ```
227 | yarn global add prettier
228 | ```
229 |
230 | 然后直接在命令行中运行:
231 |
232 | ```
233 | prettier --single-quote --trailing-comma es5 --write "{app,__{tests,mocks}__}/**/*.js"
234 | ```
235 |
236 | ### VSCode
237 |
238 | ### JetBrains
239 |
240 | 在 JetBrains 中我们可以使用 External Tools 来添加 Prettier 的界面插件。在 macOS 中,如果已经全局安装了 Prettier,那么直接使用全局的 prettier 命令行;否则使用本地安装的 ./node_modules/.bin/prettier。然后在 External Tools 进行如下配置:
241 |
242 | 
243 |
244 | 我们也可以为 Prettier 添加快捷键,譬如将 JetBrains 默认的代码格式化工具 “ALT + COMMAND + L” 替换为 Prettier:
245 |
246 | 然后将原本的代码格式化快捷键替换为:“ALT + COMMAND + K”,这样有助于我们对除了 JavaScript 之外的其他格式的文件进行处理:
247 |
248 | JetBrains 中还能够帮我们自动进行 Imports 优化,我们可以将其快捷键设置为 “ALT + COMMAND + I”:
249 |
--------------------------------------------------------------------------------
/10~工程实践/语法编译/AST/README.md:
--------------------------------------------------------------------------------
1 | # AST
2 |
--------------------------------------------------------------------------------
/10~工程实践/语法编译/Babel/插件开发.md:
--------------------------------------------------------------------------------
1 | # Babel 编译配置
2 |
--------------------------------------------------------------------------------
/10~工程实践/语法编译/Babel/编译配置.md:
--------------------------------------------------------------------------------
1 | # Babel 编译配置
2 |
--------------------------------------------------------------------------------
/10~工程实践/语法编译/README.md:
--------------------------------------------------------------------------------
1 | # JavaScript 语法编译
2 |
3 | # Links
4 |
5 | - https://lihautan.com/json-parser-with-javascript/
6 | - https://lihautan.com/creating-custom-javascript-syntax-with-babel/
7 | - https://lihautan.com/step-by-step-guide-for-writing-a-babel-transformation/
8 | - https://lihautan.com/manipulating-ast-with-javascript/
9 |
--------------------------------------------------------------------------------
/10~工程实践/语法编译/集合类型/Map.md:
--------------------------------------------------------------------------------
1 | # Map
2 |
3 | # 创建增删
4 |
5 | ```js
6 | const map = new Map();
7 | map.set("foo", "bar");
8 | console.log(map.get("foo")); //logs "bar"
9 | const animalSounds = new Map();
10 |
11 | animalSounds.set("dog", "woof");
12 | animalSounds.set("cat", "meow");
13 | animalSounds.set("frog", "ribbit");
14 |
15 | console.log(animalSounds.size); //logs 3
16 | console.log(animalSounds.has("dog")); //logs true
17 |
18 | animalSounds.delete("dog");
19 |
20 | console.log(animalSounds.size); //logs 2
21 | console.log(animalSounds.has("dog")); //logs false
22 |
23 | animalSounds.clear();
24 | console.log(animalSounds.size); //logs 0
25 | ```
26 |
27 | # 索引遍历
28 |
29 | ```js
30 | usersMap = new Map();
31 | usersMap.set(1, "sally");
32 | usersMap.set(2, "bob");
33 | usersMap.set(3, "jane");
34 |
35 | console.log(usersMap.get(1)); //logs "sally"
36 | usersMap.forEach(function(username, userId) {
37 | console.log(userId, typeof userId); //logs 1..3, "number"
38 | if (userId === 1) {
39 | console.log("We found sally.");
40 | }
41 | });
42 |
43 | //如果用for...of方式遍历,每次返回的是一个Array
44 | for (data of usersMap) {
45 | console.log(data); //Array [1,"sally"]
46 | }
47 | ```
48 |
49 | Map 的键的类型可以是 object、NaN 等等。
50 |
51 | ```js
52 | const obj, map;
53 | map = new Map();
54 | obj = { foo: 'bar' };
55 | map.set(obj, 'foobar');
56 | obj.newProp = 'stuff';
57 | console.log(map.has(obj)); //logs true
58 | console.log(map.get(obj)); //logs "foobar"
59 | ```
60 |
--------------------------------------------------------------------------------
/10~工程实践/语法编译/集合类型/Object.md:
--------------------------------------------------------------------------------
1 | # Object
2 |
3 | Object 在 JavaScript 中可谓一个神奇的东西,除了 Function,其他的元素在 typeof 关键字之后都会被解释成 object。在 JavaScript 中,Object 是面向对象概念中的对象与字典类型中的混合。
4 |
5 | `typeof Object === "function"typeof {} === "object"`
6 |
7 | ```js
8 | const obj = Object.create(null);
9 |
10 | console.log(obj + "");
11 | console.log(String(obj));
12 | console.log(Number(obj));
13 | console.log(obj.__proto__ === Object.prototype);
14 |
15 | const obj = {
16 | a: 1,
17 | b: 2,
18 | };
19 | Object.setPrototypeOf(obj, {
20 | c: 3,
21 | });
22 |
23 | console.log(Object.keys(obj));
24 | console.log(JSON.stringify(obj));
25 |
26 | const keys1 = [];
27 | for (let key in obj) keys1.push(key);
28 | console.log(keys1);
29 |
30 | const keys2 = [];
31 | for (let key in Object.assign({}, obj)) keys2.push(key);
32 | console.log(keys2);
33 | ```
34 |
35 | # Object 键
36 |
37 | Object 中的 Key 类别 JavaScript 中 Object 是一个混合了类似于 Dictionary 与 Class 的用法,基本上来说也是一种键值类型。其中键的类型主要包含四种:
38 |
39 | ```js
40 | const a = "a";
41 | const object = {
42 | a, // a:"a" // `abc` is a valid identifier; no quotes are needed
43 | abc: 1, // `123` is a numeric literal; no quotes are needed
44 | 123: 2, // `012` is an octal literal with value `10` and thus isn’t allowed in strict mode; but if you insist on using it, quotes aren’t needed
45 | 012: 3, // `π` is a valid identifier; no quotes are needed
46 | π: Math.PI, // `const` is a valid identifier name (although it’s a reserved word); no quotes are needed
47 | const: 4, // `foo bar` is not a valid identifier name; quotes are required
48 | "foo bar": 5, // `foo-bar` is not a valid identifier name; quotes are required
49 | "foo-bar": 6, // the empty string is not a valid identifier name; quotes are required
50 | "": 7,
51 | };
52 | ```
53 |
54 | - Identifier: 包含任何[有效地](https://mathiasbynens.be/notes/javascript-identifiers-es6)标识符,包括了 ES 的保留关键字。
55 |
56 | - 字符串 :single (`'`) or double (`"`) quotes. `'foo'`, `"bar"`,`'qu\'ux'`, `""` (the empty string), and `'Ich \u2665 B\xFCcher'` are all valid string literals.
57 |
58 | - 数字 :decimal literal (e.g. `0`, `123`, `123.`, `.123`, `1.23`, `1e23`, `1E-23`, `1e+23`, `12`, but not `01`, `+123` or `-123`) or a hex integer literal (`0[xX][0-9a-fA-F]+` in regex, e.g. `0xFFFF`, `0X123`,`0xaBcD`).
59 |
60 | - Object Literals: 在 ES6 中,Object 的字面值调用也得到了增强,譬如用于构建时候的原型设置、`foo:foo`形式的简写、方法定义、父类调用以及计算属性值等等。
61 |
62 | 注意,与 object 不同的是,[JSON](http://json.org/) 只允许用双引号 (`"`) 包裹的字符串作为键名。而如果要根据键名进行索引的话,可以使用方括号,这种方式对于三种键值皆有效:
63 |
64 | ```js
65 | object["abc"]; // 1
66 | ```
67 |
68 | 有时候也可以使用点操作符,不过这种方式只可以被用于键为有效地 Identifier 情况:
69 |
70 | ```js
71 | object.abc; // 1
72 | ```
73 |
74 | 如果需要获取所有的键名的话,可以使用 Object.keys 方法:> 注意,所有的 Object 的方法只能用 Object.methodName 方式调用。
75 |
76 | ## Object.create | 指定原型创建
77 |
78 | ECMAScript 5 中引入了一个新方法:[Object.create](https://developer.mozilla.org/zh-cn/JavaScript/Reference/Global_Objects/Object/create)。可以调用这个方法来创建一个新对象。新对象的原型就是调用 `create` 方法时传入的第一个参数:
79 |
80 | ````js
81 | const a = {a: 1};
82 | // a ---> Object.prototype ---> null
83 |
84 | const b = Object.create(a);
85 | // b ---> a ---> Object.prototype ---> null
86 | console.log(b.a); // 1 (继承而来)
87 |
88 | const c = Object.create(b);
89 | // c ---> b ---> a ---> Object.prototype ---> null
90 |
91 | const d = Object.create(null);
92 | // d ---> null
93 | console.log(d.hasOwnProperty); // undefined, 因为d没有继承Object.prototype
94 |
95 | //如下是实现了简单的基于函数的原型链的继承
96 | const Scope = function(){};
97 | Scope.prototype.$clone = function(){
98 | return Object.create(this);
99 | }
100 | ```
101 |
102 | 其基本语法为:
103 |
104 | ```
105 | Object.create(proto, { propertiesObject })
106 | ```
107 |
108 | 这里需要注意的是,propertiesObject 不是一个简单的键值类型,而是有固定格式的 object。
109 | ````
110 |
--------------------------------------------------------------------------------
/10~工程实践/语法编译/集合类型/README.md:
--------------------------------------------------------------------------------
https://raw.githubusercontent.com/wx-chevalier/JavaScript-Notes/2c3c57c322e60a50a553e47b69f03839d95df99f/10~工程实践/语法编译/集合类型/README.md
--------------------------------------------------------------------------------
/10~工程实践/语法编译/集合类型/对象比较.md:
--------------------------------------------------------------------------------
1 | # 对象比较
2 |
3 | # shallowEqual | 浅层比较
4 |
5 | ```js
6 | /**
7 | * 功能:浅层比较两个对象
8 | * @param {*} objA
9 | * @param {*} objB
10 | * @link https://github.com/dashed/shallowequal/blob/master/index.js
11 | */
12 | function shallowEqual(objA, objB) {
13 | if (objA === objB) {
14 | return true;
15 | }
16 |
17 | // 判断是否为有效类型
18 | if (typeof objA !== "object" || !objA || typeof objB !== "object" || !objB) {
19 | return false;
20 | }
21 |
22 | // 判断键是否相等
23 | const keysA = Object.keys(objA);
24 | const keysB = Object.keys(objB);
25 |
26 | if (keysA.length !== keysB.length) {
27 | return false;
28 | }
29 |
30 | // 提取出 objB 的属性判断函数
31 | const bHasOwnProperty = Object.prototype.hasOwnProperty.bind(objB);
32 |
33 | // 依次比较 A 中的每个属性值是否与 B 中对应一致
34 | for (const idx = 0; idx < keysA.length; idx++) {
35 | const key = keysA[idx];
36 |
37 | if (!bHasOwnProperty(key)) {
38 | return false;
39 | }
40 |
41 | const valueA = objA[key];
42 | const valueB = objB[key];
43 |
44 | if (valueA !== valueB) {
45 | return false;
46 | }
47 | }
48 |
49 | return true;
50 | }
51 | ```
52 |
--------------------------------------------------------------------------------
/10~工程实践/语法编译/集合类型/序列化.md:
--------------------------------------------------------------------------------
1 | # 序列化
2 |
3 | # JSON
4 |
5 | ## JSON.stringify(value[, replacer [, space]])
6 |
7 | 关于序列化,有下面五点注意事项:
8 |
9 | - 非数组对象的属性不能保证以特定的顺序出现在序列化后的字符串中。
10 | - 布尔值、数字、字符串的包装对象在序列化过程中会自动转换成对应的原始值。
11 | - `undefined、`任意的函数以及 symbol 值,在序列化过程中会被忽略(出现在非数组对象的属性值中时)或者被转换成 `null`(出现在数组中时)。
12 | - 所有以 symbol 为属性键的属性都会被完全忽略掉,即便 `replacer` 参数中强制指定包含了它们。
13 | - 不可枚举的属性会被忽略
14 |
15 | ```js
16 | JSON.stringify({}); // '{}'
17 | JSON.stringify(true); // 'true'
18 | JSON.stringify("foo"); // '"foo"'
19 | JSON.stringify([1, "false", false]); // '[1,"false",false]'
20 | JSON.stringify({ x: 5 }); // '{"x":5}'
21 |
22 | JSON.stringify({ x: 5, y: 6 });
23 | // '{"x":5,"y":6}' 或者 '{"y":6,"x":5}' 都可能
24 | JSON.stringify([new Number(1), new String("false"), new Boolean(false)]);
25 | // '[1,"false",false]'
26 | JSON.stringify({ x: undefined, y: Object, z: Symbol("") });
27 | // '{}'
28 | JSON.stringify([undefined, Object, Symbol("")]);
29 | // '[null,null,null]'
30 | JSON.stringify({ [Symbol("foo")]: "foo" });
31 | // '{}'
32 | JSON.stringify({ [Symbol.for("foo")]: "foo" }, [Symbol.for("foo")]);
33 | // '{}'
34 | JSON.stringify({ [Symbol.for("foo")]: "foo" }, function (k, v) {
35 | if (typeof k === "symbol") {
36 | return "a symbol";
37 | }
38 | });
39 |
40 | // '{}'
41 |
42 | // 不可枚举的属性默认会被忽略:
43 | JSON.stringify(
44 | Object.create(null, {
45 | x: { value: "x", enumerable: false },
46 | y: { value: "y", enumerable: true },
47 | })
48 | );
49 | // '{"y":"y"}'
50 | ```
51 |
52 | - Space 参数
53 |
54 | space 参数用来控制结果字符串里面的间距。如果是一个数字, 则在字符串化时每一级别会比上一级别缩进多这个数字值的空格(最多 10 个空格);如果是一个字符串,则每一级别会比上一级别多缩进用该字符串(或该字符串的前十个字符)。
55 |
56 | ```js
57 | JSON.stringify({ a: 2 }, null, " "); // '{\n "a": 2\n}'
58 | ```
59 |
60 | 使用制表符(\t )来缩进:
61 |
62 | ```js
63 | JSON.stringify({ uno: 1, dos: 2 }, null, "\t");
64 | // '{ \
65 | // "uno": 1, \
66 | // "dos": 2 \
67 | // }'
68 | ```
69 |
70 | ### toJSON 方法
71 |
72 | 如果一个被序列化的对象拥有 `toJSON` 方法,那么该 `toJSON` 方法就会覆盖该对象默认的序列化行为:不是那个对象被序列化,而是调用 `toJSON` 方法后的返回值会被序列化,例如:
73 |
74 | ```js
75 | const obj = {
76 | foo: "foo",
77 | toJSON: function () {
78 | return "bar";
79 | },
80 | };
81 | JSON.stringify(obj); // '"bar"'
82 | JSON.stringify({ x: obj }); // '{"x":"bar"}'
83 | ```
84 |
85 | ## JSON.parse(text[, reviver])
86 |
87 | ```js
88 | JSON.parse("{}"); // {}
89 | JSON.parse("true"); // true
90 | JSON.parse('"foo"'); // "foo"
91 | JSON.parse('[1, 5, "false"]'); // [1, 5, "false"]
92 | JSON.parse("null"); // null
93 | ```
94 |
95 | 如果指定了 `reviver` 函数,则解析出的 JavaScript 值(解析值)会经过一次转换后才将被最终返回(返回值)。更具体点讲就是:解析值本身以及它所包含的所有属性,会按照一定的顺序(从最最里层的属性开始,一级级往外,最终到达顶层,也就是解析值本身)分别的去调用 `reviver` 函数,在调用过程中,当前属性所属的对象会作为 `this` 值,当前属性名和属性值会分别作为第一个和第二个参数传入 `reviver` 中。如果 `reviver` 返回 `undefined`,则当前属性会从所属对象中删除,如果返回了其他值,则返回的值会成为当前属性新的属性值。
96 |
97 | 当遍历到最顶层的值(解析值)时,传入 `reviver` 函数的参数会是空字符串 `""`(因为此时已经没有真正的属性)和当前的解析值(有可能已经被修改过了),当前的 `this` 值会是 `{"": 修改过的解析值 }`,在编写 `reviver` 函数时,要注意到这个特例。
98 |
99 | ```js
100 | JSON.parse('{"p": 5}', function (k, v) {
101 | if (k === "") return v; // 如果到了最顶层,则直接返回属性值,
102 | return v * 2; // 否则将属性值变为原来的 2 倍。
103 | }); // { p: 10 }
104 |
105 | JSON.parse('{"1": 1, "2": 2,"3": {"4": 4, "5": {"6": 6}}}', function (k, v) {
106 | console.log(k); // 输出当前的属性名,从而得知遍历顺序是从内向外的,
107 | // 最后一个属性名会是个空字符串。
108 | return v; // 返回原始属性值,相当于没有传递 reviver 参数。
109 | });
110 |
111 | // 1
112 | // 2
113 | // 4
114 | // 6
115 | // 5
116 | // 3
117 | // ""
118 | ```
119 |
--------------------------------------------------------------------------------
/10~工程实践/面向对象编程/README.md:
--------------------------------------------------------------------------------
1 | # JavaScript 面向对象编程
2 |
--------------------------------------------------------------------------------
/10~工程实践/面向对象编程/对象校验.md:
--------------------------------------------------------------------------------
1 | # JavaScript 对象校验
2 |
3 | # class-validator
4 |
5 | ```js
6 | import {
7 | validate,
8 | validateOrReject,
9 | Contains,
10 | IsInt,
11 | Length,
12 | IsEmail,
13 | IsFQDN,
14 | IsDate,
15 | Min,
16 | Max,
17 | } from "class-validator";
18 |
19 | export class Post {
20 | @Length(10, 20)
21 | title: string;
22 |
23 | @Contains("hello")
24 | text: string;
25 |
26 | @IsInt()
27 | @Min(0)
28 | @Max(10)
29 | rating: number;
30 |
31 | @IsEmail()
32 | email: string;
33 |
34 | @IsFQDN()
35 | site: string;
36 |
37 | @IsDate()
38 | createDate: Date;
39 | }
40 |
41 | let post = new Post();
42 | post.title = "Hello"; // should not pass
43 | post.text = "this is a great post about hell world"; // should not pass
44 | post.rating = 11; // should not pass
45 | post.email = "google.com"; // should not pass
46 | post.site = "googlecom"; // should not pass
47 |
48 | validate(post).then((errors) => {
49 | // errors is an array of validation errors
50 | if (errors.length > 0) {
51 | console.log("validation failed. errors: ", errors);
52 | } else {
53 | console.log("validation succeed");
54 | }
55 | });
56 |
57 | validateOrReject(post).catch((errors) => {
58 | console.log("Promise rejected (validation failed). Errors: ", errors);
59 | });
60 | // or
61 | async function validateOrRejectExample(input) {
62 | try {
63 | await validateOrReject(input);
64 | } catch (errors) {
65 | console.log(
66 | "Caught promise rejection (validation failed). Errors: ",
67 | errors
68 | );
69 | }
70 | }
71 | ```
72 |
--------------------------------------------------------------------------------
/20~V8 引擎/.DS_Store:
--------------------------------------------------------------------------------
https://raw.githubusercontent.com/wx-chevalier/JavaScript-Notes/2c3c57c322e60a50a553e47b69f03839d95df99f/20~V8 引擎/.DS_Store
--------------------------------------------------------------------------------
/20~V8 引擎/99~参考资料/2021-Google V8 引擎浅析.md:
--------------------------------------------------------------------------------
1 | # Google V8 引擎浅析
2 |
3 | # Links
4 |
5 | - https://mp.weixin.qq.com/s?__biz=MzkxNTIwMzU5OQ==&mid=2247488828&idx=1&sn=eb6998cd39ac1dcdadf3c9dfb294639e&utm_source=tuicool&utm_medium=referral
--------------------------------------------------------------------------------
/20~V8 引擎/JIT/README.md:
--------------------------------------------------------------------------------
1 | # JIT
2 |
3 | 
4 |
5 | 
6 |
--------------------------------------------------------------------------------
/20~V8 引擎/QuickJS/README.md:
--------------------------------------------------------------------------------
1 | # QuickJS
2 |
3 | QuickJS 支持 ES2019 规范,包括模块,异步生成器和代理。同时可选地支持数学扩展,例如 BigInt、BigFloat 和运算符重载。
4 |
5 | 主要特点:
6 |
7 | - 小巧且易于嵌入:只需几个 C 文件,无外部依赖,x86 下一个简单的 hello world 示例程序仅 190 KB 的大小。
8 | - 具有极低启动时间的快速解释器:在台式 PC 的单核上,在大约 100 秒内运行 ECMAScript 测试套件 56000 次测试。运行时实例的完整生命周期在不到 300 微秒的时间内完成。
9 | - 支持 ES2019,包括模块、异步生成器和完整的 Annex B 支持(传统的 Web 兼容性)。
10 | - 100%的通过了 ECMAScript 测试用例。
11 | - 可以将 Javascript 源编译为没有外部依赖的可执行文件。
12 | - 使用引用计数(以减少内存使用并具有确定性行为)的垃圾收集与循环删除。
13 | - 数学扩展:BigInt,BigFloat,运算符重载,bigint 模式,数学模式。
14 | - 在 Javascript 中实现的具有上下文着色的命令行解释器。
15 | - 带有 C 库包装库构建的内置标准库。
16 |
--------------------------------------------------------------------------------
/20~V8 引擎/V8 纵览.md:
--------------------------------------------------------------------------------
1 | # V8 纵览
2 |
3 | V8 是用 C++ 编写的 Google 开源高性能 JavaScript 和 WebAssembly 引擎,用于 Chrome 和 Node.js 等运行环境。换句话说,V8 是用 C++ 开发的软件,可将 JavaScript 转换为可执行代码,即机器代码。
4 |
5 | 在这个顿悟时刻,我们开始更清楚地看到事物。Google Chrome 和 Node.js 都只是将 JavaScript 代码传输到其最终目的地的桥梁:在该特定机器上运行的机器代码。V8 性能表现中的另一个重要角色是其世代和超精确的垃圾收集器。它经过优化,可以使用低内存来收集 JavaScript 不再需要的对象。除此之外,V8 还依靠其他工具和功能来改善某些固有的 JavaScript 功能,这些功能在历史上使该语言变慢(例如,其动态特性)。
6 |
7 | # 基础
8 |
9 | 机器代码如何工作?简而言之,机器代码是一堆非常低级的指令,它们在机器内存的特定部分中执行。使用 C++ 语言作为参考的生成过程与此类似:
10 |
11 | 
12 |
13 | 在继续进行之前,必须指出这是一个编译过程,与 JavaScript 解释过程不同。实际上,尽管编译器会在过程结束时生成整个程序,但解释器将作为程序本身工作,通过读取指令(通常是脚本,如 JavaScript 脚本)并将其转换为可执行命令来完成任务。解释过程既可以是即时的(解释器仅在其中解析并运行当前命令),也可以是完全解析的(即解释器在继续处理相应的机器指令之前首先完全翻译脚本)。
14 |
15 | 回到图中,众所周知,编译过程通常从源代码开始。您实现代码,保存并运行。反过来,正在运行的过程从编译器开始。像其他程序一样,编译器是在您的计算机上运行的程序。然后,它将遍历所有代码并生成目标文件。这些文件是机器代码。它们是在特定计算机上运行的经过优化的代码,这就是为什么从一个操作系统迁移到另一个操作系统时必须使用特定的编译器的原因。但是您无法执行单独的目标文件,需要将它们合并为一个文件,即众所周知的 .exe 文件(可执行文件)。那是链接器的工作。
16 |
17 | 最后,加载程序是负责将该 exe 文件中的代码传输到操作系统的虚拟内存的代理。它基本上是一个运输者。在这里,您的程序终于启动并运行。听起来像一个漫长的过程,不是吗?在大多数情况下(除非您是在银行大型机中使用 Assembly 的开发人员),您都将花费时间用高级语言进行编程:Java,C#,Ruby,JavaScript 等。
18 |
19 | 语言越高,速度越慢。这就是为什么 C 和 C++ 如此之快的原因,它们非常接近于机器代码语言:汇编语言。除了性能之外,V8 的主要优点之一就是可以超越 ECMAScript 标准并了解例如 C++:
20 |
21 | 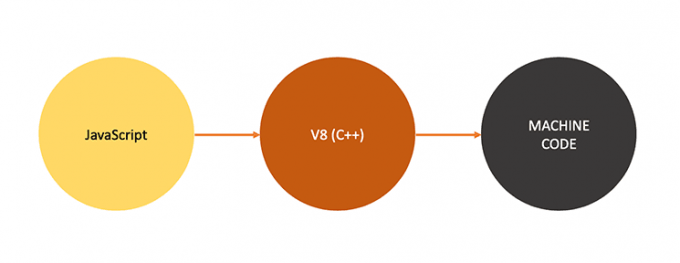
22 |
23 | JavaScript 仅限于 ECMAScript。V8 为了存在,必须符合但不限于此。能够将 C++ 功能集成到 V8 中的能力很棒。由于 C++ 已发展成为非常擅长于操作系统的特殊性(例如文件操作和内存/线程处理),因此掌握所有这些功能非常有用。如果您考虑一下,Node.js 本身就是以类似的方式诞生的。它采用了类似的方式来升级到 V8,再加上服务器和网络功能。
24 |
25 | # Single-Threaded
26 |
27 | 如果您是 Node 开发人员,那么您将熟悉 V8 的单线程性质。每个 JavaScript 执行上下文都与一个线程成正比。当然,V8 在后台管理 OS 线程机制;它是一个复杂的软件,并且可以同时执行许多工作,因此可以使用多个线程。
28 |
29 | 我们有一个执行代码的主线程,另一个用于编译代码的线程(是的,每次编译新代码时我们都无法停止执行),还有一些用于处理垃圾回收,等等。但是,V8 为每个 JavaScript 的执行上下文创建了一个线程的环境,其余的保持在其控制之下。
30 |
31 | 想象一下您应该执行 JavaScript 代码的函数调用栈。JavaScript 通过按照插入/调用每个函数的顺序将一个函数堆叠在另一个函数之上来工作。在介绍每个功能的内容之前,我们无法知道它是否调用了其他功能。如果发生这种情况,那么被调用的函数将被放置在堆栈中调用者之后。例如,当涉及到回调时,它们被放置在堆栈的末尾。V8 的主要任务之一是管理该堆栈组织和该过程所需的内存。
32 |
33 | # Ignition & TurboFan
34 |
35 | 自 2017 年 5 月发布 5.9 版以来,V8 附带了一个新的 JavaScript 执行管道,该管道基于 V8 的解释器 Ignition 构建。它还包括更新更好的优化编译器 - TurboFan。这些更改完全集中在整体性能以及 Google 开发人员在使引擎适应 JavaScript 世界提出的所有快速而重大的更改时面临的困难。
36 |
37 | 从项目一开始,V8 的维护者就一直担心要找到一种以 JavaScript 不断发展的步伐来提高 V8 性能的好方法。现在,我们可以在以最高基准运行新引擎时看到巨大的改进:
38 |
--------------------------------------------------------------------------------
/20~V8 引擎/内存管理/README.md:
--------------------------------------------------------------------------------
1 | # V8 中的内存管理
2 |
3 | 内存分为堆(heap)和栈(stack)。栈内存储简单数据类型,方便快速写入和读取数据。堆内存则可以存储复杂的数据类型。在访问数据时,先从栈内寻找相应数据的存储地址,再根据获得的地址,找到堆内该变量真正存储的内容读取出来。
4 |
5 | 在前端中,被存储在栈内的数据包括小数值型,string,boolean 和复杂类型的地址索引。所谓小数值数据(small number), 即长度短于 32 位存储空间的 number 型数据。一些复杂的数据类型,诸如 Array,Object 等,是被存在堆中的。如果我们要获取一个已存储的对象 A,会先从栈中找到这个变量存储的地址,再根据该地址找到堆中相应的数据。
6 |
7 | 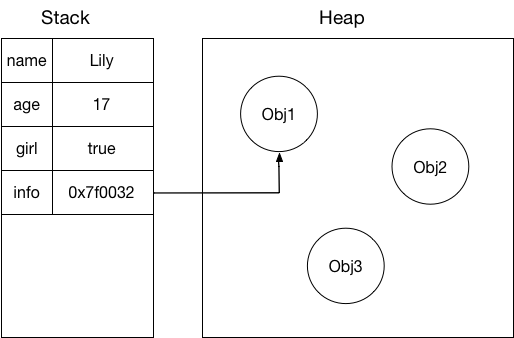
8 |
9 | 简单的数据类型由于存储在栈中,读取写入速度相对复杂类型(存在堆中)会更快些。下面的 Demo 对比了存在堆中和栈中的写入性能:
10 |
11 | ```js
12 | function inStack() {
13 | let number = 1e5;
14 | const a;
15 |
16 | while (number--) {
17 | a = 1;
18 | }
19 | }
20 |
21 | const obj = {};
22 | function inHeap() {
23 | let number = 1e5;
24 |
25 | while (number--) {
26 | obj.key = 1;
27 | }
28 | }
29 | ```
30 |
--------------------------------------------------------------------------------
/20~V8 引擎/内存管理/内存泄露.md:
--------------------------------------------------------------------------------
1 | # 内存泄露
2 |
3 | # 数组
4 |
5 | ## 内存攻击
6 |
7 | 哈希的拉链算法在极端情况下也会造成严重的内存消耗。
8 | 我们知道,良好的哈希映射算法,可以讲数据均匀的映射到不同的地址。但如果我们掌握了这种映射规律而将不同的数据都映射到相同的地址所对应的链表中去,并且数据量足够大,将造成内存的严重损耗,读取和插入一条数据会中了链表的天生的缺陷而变的异常的慢最终拖垮内存。这就是我们所说的内存攻击。构造一个 JSON 对象,使该对象的 key 大量命中同一个地址指向的列表,附件为 JS 代码,只包含了一个特意构造的对象。
9 |
--------------------------------------------------------------------------------
/20~V8 引擎/内存管理/垃圾回收.md:
--------------------------------------------------------------------------------
1 | # V8 垃圾回收
2 |
3 | Todos
4 |
5 | - https://mp.weixin.qq.com/s/YAvBfY7cF8WUm5XuJDoYTg
--------------------------------------------------------------------------------
/20~V8 引擎/运行时/README.md:
--------------------------------------------------------------------------------
https://raw.githubusercontent.com/wx-chevalier/JavaScript-Notes/2c3c57c322e60a50a553e47b69f03839d95df99f/20~V8 引擎/运行时/README.md
--------------------------------------------------------------------------------
/20~V8 引擎/运行时/调用与堆栈.md:
--------------------------------------------------------------------------------
1 | # JavaScript 调用与堆栈
2 |
3 | - https://mp.weixin.qq.com/s/GfGzYlMhI3D7zBNlwskuRg
4 |
--------------------------------------------------------------------------------
/INTRODUCTION.md:
--------------------------------------------------------------------------------
1 | # 本篇导读
2 |
--------------------------------------------------------------------------------
/README.md:
--------------------------------------------------------------------------------
1 | 
2 |
3 | # 现代 JavaScript 开发:语法基础与工程实践
4 |
5 | 历经二十载风云变幻,JavaScript 也终于成为了一流的语言,在前端开发、服务端开发、嵌入式开发乃至于机器学习与数据挖掘、操作系统开发等各个领域都有不俗的表现。而在这不断的变化之后,也有很多语法或者模式成了明日黄花;本系列文章即是希望为读者总结与呈现出最新的应该掌握的 JavaScript 语法基础与实践基础。
6 |
7 | JavaScript 的设计与语法一直为人所诟病,不过正如 Zeit 的 CEO Guillermo Rauch 所言:JavaScript 虽然生于泥沼,但是在这么多年不断地迭代中,它也慢慢被开发者与市场所认可,最终化茧成蝶,被广泛地应用在从客户端到服务端,从应用开发、系统构建到数据分析的各个领域。JavaScript 最薄弱的一点在于其是解释性的无类型的语言,这一点让其在大型项目或者系统开发中充满了很多的性能瓶颈或者不稳定性;譬如在 JavaScript 中某个函数可以接受任意数目、任意类型的参数,而 Java 则会在编译时即检测参数类型是否符合预期。早期的 JavaScript 仅被用于为网页添加简单的用户交互,譬如按钮响应事件或者发送 Ajax 请求;不过随着 Webpack 等现代构建工具的发展,开发者可以更加工程化地进行高效的前端项目开发,并且整个网页的加载性能也大大提高,譬如 PWA 等现代 Web 技术能够使 Web 应用拥有与原生应用相近的用户体验。
8 |
9 | 我喜爱这门语言,所以我希望能够以绵薄之力让更多的人无痛地使用它,在返回主页后您可以看到更多有关 JavaScript 的代码实践。本篇的所有参考资料声明在 [Awesome JavaScript Lists](https://ngte-al.gitbook.io/i/?q=JavaScript)。
10 |
11 | 
12 |
13 | # About
14 |
15 | ## Copyright & More | 延伸阅读
16 |
17 | [](https://github.com/wx-chevalier/Awesome-MindMaps)
18 |
19 | 您还可以前往 [NGTE Books](https://ng-tech.icu/books-gallery/) 主页浏览包含知识体系、编程语言、软件工程、模式与架构、Web 与大前端、服务端开发实践与工程架构、分布式基础架构、人工智能与深度学习、产品运营与创业等多类目的书籍列表:
20 |
21 | [](https://ng-tech.icu/books-gallery/)
22 |
--------------------------------------------------------------------------------