14 | {post.data.title} 15 |
16 |
17 | {t('posted_at')}
18 |
19 | {
20 | post.data.categories &&
21 | post.data.categories.map((category) => (
22 |
23 | # {category}
24 |
25 | ))
26 | }
27 |
28 |  19 |
20 | ## 获取外接显示器 DisplayVendorID 和 DisplayProductID
21 |
22 | 在终端输入以下命令:
23 |
24 | ```
25 | $ ioreg -l | grep "DisplayVendorID"
26 |
27 | $ ioreg -l | grep "DisplayProductID"
28 | ```
29 |
30 | 如果获得两个,那说明的你的 Macbook 还在亮着,可以合盖来排除掉
31 |
32 | ## 制作外接显示屏系统配置文件
33 |
34 | ### 转换 16 进制
35 |
36 | 将 DisplayVendorID 和 DisplayProductID 的数值,转换为 16 进制,[在线转换工具](https://tool.lu/hexconvert/)
37 |
38 | ### 创建显示器配置文件夹
39 |
40 | 新建文件夹,命名为:DisplayVendorID-XXXX,其中 XXXX 是刚才转换的 DisplayVendorID 的 16 进制值小写
41 |
42 | ### 创建显示器配置内容
43 |
44 | 这里需要借助工具来生成,[在线生成工具](https://codeclou.github.io/Display-Override-PropertyList-File-Parser-and-Generator-with-HiDPI-Support-For-Scaled-Resolutions/),将显示器的名称、DisplayVendorID(16 进制) 和 DisplayProductID(16 进制) 对应填写进去,即可获得配置文件,下载文件到刚创建的 DisplayVendorID-XXXX 文件夹内,将 plist 的后缀去掉
45 |
46 | 
47 |
48 | 然后需要将文件放到系统的 `/System/Library/Displays/Contents/Resources/Overrides/` 文件夹中
49 |
50 | 如果 `Overrides` 没有权限操作,在终端中输入
51 |
52 | ```
53 | $ csrutil status
54 | ```
55 |
56 | 
57 |
58 | 如果是关闭状态,则需要开启
59 |
60 | ### 开启 rootless
61 |
62 | 1. 重启 MacBook,按住 command + R 直到屏幕上出现苹果的标志和进度条,进入 Recovery 模式
63 | 2. 在屏幕左上方的工具栏找到实用工具(左数第 3 个),打开终端
64 | ```
65 | $ csrutil disable
66 | ```
67 | 3. 重启 MacBook
68 |
69 | ### 关闭 rootless
70 |
71 | 1. 重启 MacBook,按住 command + R 直到屏幕上出现苹果的标志和进度条,进入 Recovery 模式
72 | 2. 在屏幕左上方的工具栏找到实用工具(左数第 3 个),打开终端
73 | ```
74 | $ csrutil disable
75 | ```
76 | 3. 重启 MacBook
77 |
78 | 如果已关闭 rootless,还是不行,那么需要在终端输入以下命令:
79 |
80 | ```
81 | $ sudo mount -rw /
82 | ```
83 |
84 | Tips:
85 |
86 | 1. 10.15 之后,系统的目录除了几个 rootless 可以修改的,都是只读的,所有对系统的修改都不支持,你的那个目录是在只读分区内的。要是写机器域的文件,在/Library 目录中操作。
87 |
88 | 2. macOS 有个内核保护机制 rootless,有时候你需要装什么软件时,需要一些 root 权限,但是在 macOS 上 root 虽然权力是最大的,但是苹果还是限制了它一下。
89 |
90 | ## 开启 HiDPI
91 |
92 | [one-key-hidpi](https://github.com/xzhih/one-key-hidpi/blob/master/README-zh.md)
93 |
94 | 此脚本的目的是为中低分辨率的屏幕开启 HiDPI 选项,并且具有原生的 HiDPI 设置,不需要 RDM 软件即可在系统显示器设置中设置
95 |
96 | macOS 的 DPI 机制和 Windows 下不一样,比如 1080p 的屏幕在 Windows 下有 125%、150% 这样的缩放选项,而同样的屏幕在 macOS 下,缩放选项里只是单纯的调节分辨率,这就使得在默认分辨率下字体和 UI 看起来很小,降低分辨率又显得模糊
97 |
98 | 同时,此脚本也可以通过注入修补后的 EDID 修复闪屏,或者睡眠唤醒后的闪屏问题,当然这个修复因人而异
99 |
100 | 开机的第二阶段 logo 总是会稍微放大,因为分辨率是仿冒的
101 |
102 | ### 使用方法
103 |
104 | 1. 远程模式: 在终端输入以下命令回车即可
105 |
106 | ```
107 | $ bash -c "$(curl -fsSL https://raw.githubusercontent.com/xzhih/one-key-hidpi/master/hidpi.sh)"
108 | ```
109 |
110 | 2. 本地模式: 下载项目解压,双击 `hidpi.command` 运行
111 |
112 | 
113 |
114 | 
115 |
116 | ## RDM
117 |
118 | RDM 全称为 Retina Display Manage,[安装地址](http://avi.alkalay.net/software/RDM)
119 |
120 | 重启后打开 RDM,选取带雷电符号的 1920x1080,即可开启 HiDPI。
121 |
122 | 
123 |
124 | ## 总结
125 |
126 | 
127 |
--------------------------------------------------------------------------------
/src/content/posts/Node.js 爬虫获取网页内容乱码.md:
--------------------------------------------------------------------------------
1 | ---
2 | title: Node.js 爬虫获取网页内容乱码
3 | pubDate: 2019-08-08 09:47:41
4 | categories: ["Node.js"]
5 | description: ""
6 | ---
7 |
8 | ## 返回的 html 乱码
9 |
10 | 网页内容格式是 GBK 和头部用 gzip 压缩,设置属性`gzip: true`和`encoding:null`,再通过 iconv 转成 utf8
11 |
12 | ```
13 | npm install request
14 | npm install iconv-lite
15 | ```
16 |
17 | ```
18 | const request = require('request');
19 | const iconv = require('iconv-lite');
20 | const options = {
21 | url: `http://xxxx`,
22 | proxy: 'http://127.0.0.1:8888',
23 | secureProtocol: 'TLSv1_method',
24 | gzip: true,
25 | encoding: null
26 | };
27 | request.get(options, function (err, response, data) {
28 | const result = iconv.decode(data, 'utf-8').toString();
29 | console.log(result);
30 | });
31 | ```
32 |
33 | ## 返回参数乱码
34 |
35 | 去掉 encoding 参数即可
36 |
37 | ```
38 | const request = require('request');
39 | const iconv = require('iconv-lite');
40 | const options = {
41 | url: `http://xxxx`,
42 | proxy: 'http://127.0.0.1:8888',
43 | secureProtocol: 'TLSv1_method',
44 | gzip: true
45 | };
46 | request.get(options, function (err, response, data) {
47 | console.log(data.toString());
48 | });
49 | ```
50 |
51 | 如果头部没有压缩过的,去掉 gzip 参数,然后再把返回的参数`data.toString()`一下
52 |
--------------------------------------------------------------------------------
/src/content/posts/PhantomJS not found on PATH.md:
--------------------------------------------------------------------------------
1 | ---
2 | title: PhantomJS not found on PATH
3 | pubDate: 2019-05-06 16:02:32
4 | categories: ["PhantomJS"]
5 | description: ""
6 | ---
7 |
8 | 今天 Win 上进行`npm install`的时候遇到一个问题
9 |
10 | ```
11 | PhantomJS not found on PATH
12 | Downloading https://github.com/Medium/phantomjs/releases/download/v2.1.1/phantomjs-2.1.1-windows.zip
13 | Saving to C:\Users\hezhi\AppData\Local\Temp\phantomjs\phantomjs-2.1.1-windows.zip
14 | Receiving...
15 | [=---------------------------------------] 2%
16 | ```
17 |
18 | 这个 phantomjs-2.1.1-windows.zip 包一直下载不了,原来是天朝的网给墙了。
19 |
20 | [http://phantomjs.org/download.html](http://phantomjs.org/download.html) 通过这个网址进行下载对应的包
21 |
22 | 把包放进此路径下`C:\Users\hezhi\AppData\Local\Temp\phantomjs\`(Win)
23 |
24 | 解压,然后复制 phantomjs 所在的路径`C:\Users\hezhi\AppData\Local\Temp\phantomjs\phantomjs-2.1.1-windows\phantomjs-2.1.1-windows\bin`
25 |
26 | 再设置环境变量,添加刚才复制的路径。
27 | 
28 |
--------------------------------------------------------------------------------
/src/content/posts/React 如何进行上传图片.md:
--------------------------------------------------------------------------------
1 | ---
2 | title: React 如何进行上传图片
3 | pubDate: 2018-06-15 16:16:03
4 | categories: ["React"]
5 | description: ""
6 | ---
7 |
8 | ## 标签
9 |
10 | ```
11 |
19 | ```
20 |
21 | `input` //标签的 type 设置为 file 属性
22 | `accept` //属性,支持很多类型,这里设置为只上传图片
23 | `hidden` //隐藏文字,做下面这种效果的时候,就需要隐藏文字。
24 | 
25 | onChange //上传完成后的回调
26 |
27 | ## JS 代码
28 |
29 | ```
30 | upload() {
31 | let files;
32 | files = this.refs.upload.files
33 | let count = files.length;
34 | let formData = new FormData();
35 | for (let i = 0; i < count; i++) {
36 | files[i].thumb = URL.createObjectURL(files[i]);
37 | formData.append('filedata', files[i]);
38 | }
39 | }
40 | ```
41 |
42 | 这里主要是通过 `this.refs.upload`来获取上传之后的文件,然后通过`createObjectURL` 静态方法创建一个 `DOMString`(mac 测试通过 input 上传过来`webkitRelativePath` 是空的),然后追加进 formData。再通过`send(body: formData)`方法传进后端
43 |
44 | ## 后端
45 |
46 | ```
47 | const express = require('express');
48 | const multiparty = require('multiparty');
49 | const gm = require('gm').subClass({
50 | imageMagick: true
51 | });
52 | const fs = require('fs');
53 | router.put(`uploadImages`, function (req, res) {
54 | let datas = {};
55 | if (!(fs.existsSync('./images/'))) {
56 | fs.mkdir('./images/', function (err, status) {
57 |
58 | });
59 | }
60 | const form = new multiparty.Form({
61 | uploadDir: './images/'
62 | });
63 | form.parse(req, function (err, fields, files) {
64 | const filesTmp = files.filedata;
65 | if (err) {
66 | throw err;
67 | } else {
68 | const relPath = filesTmp;
69 | for (let i in relPath) {
70 | gm(relPath[i].path)
71 | .resize(240, 240)
72 | .noProfile()
73 | .write(relPath[i].path, function (err, data) {
74 | if (err) {
75 | throw err;
76 | }
77 | console.log(data);
78 | });
79 | }
80 | }
81 | });
82 | });
83 | ```
84 |
85 | 后端用的是 node.js,express 框架。fs 模块,来进行判断是否存在该文件夹,如果不存在,则创建。
86 | `fs.existsSync()` 返回值为 true or false `fs.mkdir()` 创建文件夹 multiparty 模块来解析 form 表单
87 | gm 进行裁剪图片。
88 |
89 | ## 错误处理
90 |
91 | 1、`Error: unsupported content-type`
92 |
93 | 这个错误是因为你的 content-type 设置错了,设置成`multipart/form-data`即可。
94 |
95 | 2、设置完成之后,还是不行。
96 | 去掉`headers`的设置
97 | `body: formData` //body 的内容为表单内容
98 |
99 | 3、上传一次图片之后,无法上传第二次,是因为 value 此时有值,没有进行清空处理,在上传成功回调里,进行`e.target.value = '';`
100 |
--------------------------------------------------------------------------------
/src/content/posts/React全家桶建站教程-Express.md:
--------------------------------------------------------------------------------
1 | ---
2 | title: React全家桶建站教程-Express
3 | pubDate: 2018-06-07 11:37:22
4 | categories: ["React"]
5 | description: ""
6 | ---
7 |
8 | ## 介绍
9 |
10 | - 丰富的 HTTP 快捷方法和任意排列组合的 Connect 中间件,让你创建健壮、友好的 API 变得既快速又简单。
11 | - Express 是一个基于 Node.js 平台的极简、灵活的 web 应用开发框架,它提供一系列强大的特性,帮助你创建各种 Web 和移动设备应用。
12 |
13 | ## 例子
14 |
15 | https://github.com/xuya227939/blog/tree/master/examples/express/myapp
16 |
17 | ## 安装
18 |
19 | ```
20 | $ sudo npm install express-generator -g //因为是在mac下安装的,所以要注意权限问题,使用sudo
21 | $ express myapp //通过express生成器,生成项目
22 | $ cd myapp
23 | $ npm i //安装相关依赖
24 | $ npm install compression //安装compression 压缩请求
25 | $ npm start //开启
26 | ```
27 |
28 | 访问 [http://localhost:3000](http://localhost:3000)
29 |
30 | ## 使用
31 |
32 | 在 app.js 中使用如下代码
33 |
34 | ```
35 | const compression = require('compression');
36 | app.use(compression());
37 | ```
38 |
39 | ```
40 | app.use('/', function(req, res) {
41 | const count = 24;
42 | // const count = req.body.count;
43 | let listData = [];
44 | for (let i = 0; i < count; i++) {
45 | listData.push({
46 | src: '',
47 | avatar: 'https://zos.alipayobjects.com/rmsportal/ODTLcjxAfvqbxHnVXCYX.png',
48 | title: `Title Jiang ${i}`,
49 | description:'Rise n’ shine and don’t forget to smile',
50 | star: i * 2,
51 | like: i * 3
52 | });
53 | }
54 | let data = {};
55 | data.listData = listData;
56 | data.count = count;
57 | res.send(JSON.stringify(data));
58 | });
59 | ```
60 |
61 | 在 app.js 中替换 app.use('/users', indexRouter); 即可,然后 npm start 访问下[http://localhost:3000](http://localhost:3000) 就会看到输出了。
62 |
63 | ## 更新代码
64 |
65 | 通过 npm start 开启之后,你会发现你修改代码之后,刷新没有效果?这是因为 npm start 不支持动态更改代码,这时候就需要 supervisor 来管理 node 进程
66 |
67 | ```
68 | $ npm install supervisor
69 | $ supervisor bin/www
70 | ```
71 |
72 | 然后试试?
73 | 线上的话,通过 pm2 管理。
74 | `$yum install pm2 `
75 | 在根目录下新建 start.json `$ vim start.json`
76 | 输入以下代码
77 |
78 | ```
79 | {
80 | "apps" : [{
81 | "name" : "app",
82 | "script" : "bin/www",
83 | "log_date_format" : "YYYY-MM-DD HH:mm:SS",
84 | "log_file" : "logs/success.log",
85 | "error_file" : "logs/error.log",
86 | "out_file" : "logs/out.log",
87 | "pid_file" : "logs/app.pid",
88 | "watch" : true
89 | }]
90 | }
91 | ```
92 |
93 | `$ :wq` //保存并退出
94 |
95 | ## pm2 常用命令
96 |
97 | - `$ pm2 start start.json` //进行启动,帮你管理 node 进程。
98 | - `$ pm2 stop all` //停止所有应用。
99 | - `$ pm2 restart all` //重启所有应用。
100 | - `$ pm2 log` //查看应用日志。
101 |
102 | ## 欢迎在此 issue 下进行交流、学习
103 |
104 | ## 结语
105 |
106 | ~~https://github.com/xuya227939/m4a1~~ 可以参考这个项目。
107 | 通过 express 框架,建立后端服务速度还是蛮快的。简单方便,适合初学者入门。
108 |
--------------------------------------------------------------------------------
/src/content/posts/React全家桶建站教程-React&Ant.md:
--------------------------------------------------------------------------------
1 | ---
2 | title: React全家桶建站教程-React&Ant
3 | pubDate: 2018.06.08
4 | categories: ["React"]
5 | description: ""
6 | ---
7 |
8 | ## 介绍
9 |
10 | 这里使用到的 UI 库是蚂蚁金服开源的 ant-design,为啥使用?我觉得是使用人数比较多,坑比较少吧。
11 |
12 | ## 例子
13 |
14 | https://github.com/xuya227939/blog/tree/master/examples/react/my-app
15 |
16 | ## 安装
17 |
18 | ```
19 | $ sudo npm install -g create-react-app //全局安装的话,需要权限,所以使用sudo
20 | $ create-react-app my-app
21 | $ cd my-app
22 | $ npm install antd
23 | $ npm start
24 | ```
25 |
26 | ## 使用
27 |
28 | 1.引用官方代码,修改 App.js 文件,引入 ant 组件
29 |
30 | ```
31 | import React, { Component } from 'react';
32 | import Button from 'antd/lib/button';
33 | import './App.css';
34 |
35 | class App extends Component {
36 | render() {
37 | return (
38 |
19 |
20 | ## 获取外接显示器 DisplayVendorID 和 DisplayProductID
21 |
22 | 在终端输入以下命令:
23 |
24 | ```
25 | $ ioreg -l | grep "DisplayVendorID"
26 |
27 | $ ioreg -l | grep "DisplayProductID"
28 | ```
29 |
30 | 如果获得两个,那说明的你的 Macbook 还在亮着,可以合盖来排除掉
31 |
32 | ## 制作外接显示屏系统配置文件
33 |
34 | ### 转换 16 进制
35 |
36 | 将 DisplayVendorID 和 DisplayProductID 的数值,转换为 16 进制,[在线转换工具](https://tool.lu/hexconvert/)
37 |
38 | ### 创建显示器配置文件夹
39 |
40 | 新建文件夹,命名为:DisplayVendorID-XXXX,其中 XXXX 是刚才转换的 DisplayVendorID 的 16 进制值小写
41 |
42 | ### 创建显示器配置内容
43 |
44 | 这里需要借助工具来生成,[在线生成工具](https://codeclou.github.io/Display-Override-PropertyList-File-Parser-and-Generator-with-HiDPI-Support-For-Scaled-Resolutions/),将显示器的名称、DisplayVendorID(16 进制) 和 DisplayProductID(16 进制) 对应填写进去,即可获得配置文件,下载文件到刚创建的 DisplayVendorID-XXXX 文件夹内,将 plist 的后缀去掉
45 |
46 | 
47 |
48 | 然后需要将文件放到系统的 `/System/Library/Displays/Contents/Resources/Overrides/` 文件夹中
49 |
50 | 如果 `Overrides` 没有权限操作,在终端中输入
51 |
52 | ```
53 | $ csrutil status
54 | ```
55 |
56 | 
57 |
58 | 如果是关闭状态,则需要开启
59 |
60 | ### 开启 rootless
61 |
62 | 1. 重启 MacBook,按住 command + R 直到屏幕上出现苹果的标志和进度条,进入 Recovery 模式
63 | 2. 在屏幕左上方的工具栏找到实用工具(左数第 3 个),打开终端
64 | ```
65 | $ csrutil disable
66 | ```
67 | 3. 重启 MacBook
68 |
69 | ### 关闭 rootless
70 |
71 | 1. 重启 MacBook,按住 command + R 直到屏幕上出现苹果的标志和进度条,进入 Recovery 模式
72 | 2. 在屏幕左上方的工具栏找到实用工具(左数第 3 个),打开终端
73 | ```
74 | $ csrutil disable
75 | ```
76 | 3. 重启 MacBook
77 |
78 | 如果已关闭 rootless,还是不行,那么需要在终端输入以下命令:
79 |
80 | ```
81 | $ sudo mount -rw /
82 | ```
83 |
84 | Tips:
85 |
86 | 1. 10.15 之后,系统的目录除了几个 rootless 可以修改的,都是只读的,所有对系统的修改都不支持,你的那个目录是在只读分区内的。要是写机器域的文件,在/Library 目录中操作。
87 |
88 | 2. macOS 有个内核保护机制 rootless,有时候你需要装什么软件时,需要一些 root 权限,但是在 macOS 上 root 虽然权力是最大的,但是苹果还是限制了它一下。
89 |
90 | ## 开启 HiDPI
91 |
92 | [one-key-hidpi](https://github.com/xzhih/one-key-hidpi/blob/master/README-zh.md)
93 |
94 | 此脚本的目的是为中低分辨率的屏幕开启 HiDPI 选项,并且具有原生的 HiDPI 设置,不需要 RDM 软件即可在系统显示器设置中设置
95 |
96 | macOS 的 DPI 机制和 Windows 下不一样,比如 1080p 的屏幕在 Windows 下有 125%、150% 这样的缩放选项,而同样的屏幕在 macOS 下,缩放选项里只是单纯的调节分辨率,这就使得在默认分辨率下字体和 UI 看起来很小,降低分辨率又显得模糊
97 |
98 | 同时,此脚本也可以通过注入修补后的 EDID 修复闪屏,或者睡眠唤醒后的闪屏问题,当然这个修复因人而异
99 |
100 | 开机的第二阶段 logo 总是会稍微放大,因为分辨率是仿冒的
101 |
102 | ### 使用方法
103 |
104 | 1. 远程模式: 在终端输入以下命令回车即可
105 |
106 | ```
107 | $ bash -c "$(curl -fsSL https://raw.githubusercontent.com/xzhih/one-key-hidpi/master/hidpi.sh)"
108 | ```
109 |
110 | 2. 本地模式: 下载项目解压,双击 `hidpi.command` 运行
111 |
112 | 
113 |
114 | 
115 |
116 | ## RDM
117 |
118 | RDM 全称为 Retina Display Manage,[安装地址](http://avi.alkalay.net/software/RDM)
119 |
120 | 重启后打开 RDM,选取带雷电符号的 1920x1080,即可开启 HiDPI。
121 |
122 | 
123 |
124 | ## 总结
125 |
126 | 
127 |
--------------------------------------------------------------------------------
/src/content/posts/Node.js 爬虫获取网页内容乱码.md:
--------------------------------------------------------------------------------
1 | ---
2 | title: Node.js 爬虫获取网页内容乱码
3 | pubDate: 2019-08-08 09:47:41
4 | categories: ["Node.js"]
5 | description: ""
6 | ---
7 |
8 | ## 返回的 html 乱码
9 |
10 | 网页内容格式是 GBK 和头部用 gzip 压缩,设置属性`gzip: true`和`encoding:null`,再通过 iconv 转成 utf8
11 |
12 | ```
13 | npm install request
14 | npm install iconv-lite
15 | ```
16 |
17 | ```
18 | const request = require('request');
19 | const iconv = require('iconv-lite');
20 | const options = {
21 | url: `http://xxxx`,
22 | proxy: 'http://127.0.0.1:8888',
23 | secureProtocol: 'TLSv1_method',
24 | gzip: true,
25 | encoding: null
26 | };
27 | request.get(options, function (err, response, data) {
28 | const result = iconv.decode(data, 'utf-8').toString();
29 | console.log(result);
30 | });
31 | ```
32 |
33 | ## 返回参数乱码
34 |
35 | 去掉 encoding 参数即可
36 |
37 | ```
38 | const request = require('request');
39 | const iconv = require('iconv-lite');
40 | const options = {
41 | url: `http://xxxx`,
42 | proxy: 'http://127.0.0.1:8888',
43 | secureProtocol: 'TLSv1_method',
44 | gzip: true
45 | };
46 | request.get(options, function (err, response, data) {
47 | console.log(data.toString());
48 | });
49 | ```
50 |
51 | 如果头部没有压缩过的,去掉 gzip 参数,然后再把返回的参数`data.toString()`一下
52 |
--------------------------------------------------------------------------------
/src/content/posts/PhantomJS not found on PATH.md:
--------------------------------------------------------------------------------
1 | ---
2 | title: PhantomJS not found on PATH
3 | pubDate: 2019-05-06 16:02:32
4 | categories: ["PhantomJS"]
5 | description: ""
6 | ---
7 |
8 | 今天 Win 上进行`npm install`的时候遇到一个问题
9 |
10 | ```
11 | PhantomJS not found on PATH
12 | Downloading https://github.com/Medium/phantomjs/releases/download/v2.1.1/phantomjs-2.1.1-windows.zip
13 | Saving to C:\Users\hezhi\AppData\Local\Temp\phantomjs\phantomjs-2.1.1-windows.zip
14 | Receiving...
15 | [=---------------------------------------] 2%
16 | ```
17 |
18 | 这个 phantomjs-2.1.1-windows.zip 包一直下载不了,原来是天朝的网给墙了。
19 |
20 | [http://phantomjs.org/download.html](http://phantomjs.org/download.html) 通过这个网址进行下载对应的包
21 |
22 | 把包放进此路径下`C:\Users\hezhi\AppData\Local\Temp\phantomjs\`(Win)
23 |
24 | 解压,然后复制 phantomjs 所在的路径`C:\Users\hezhi\AppData\Local\Temp\phantomjs\phantomjs-2.1.1-windows\phantomjs-2.1.1-windows\bin`
25 |
26 | 再设置环境变量,添加刚才复制的路径。
27 | 
28 |
--------------------------------------------------------------------------------
/src/content/posts/React 如何进行上传图片.md:
--------------------------------------------------------------------------------
1 | ---
2 | title: React 如何进行上传图片
3 | pubDate: 2018-06-15 16:16:03
4 | categories: ["React"]
5 | description: ""
6 | ---
7 |
8 | ## 标签
9 |
10 | ```
11 |
19 | ```
20 |
21 | `input` //标签的 type 设置为 file 属性
22 | `accept` //属性,支持很多类型,这里设置为只上传图片
23 | `hidden` //隐藏文字,做下面这种效果的时候,就需要隐藏文字。
24 | 
25 | onChange //上传完成后的回调
26 |
27 | ## JS 代码
28 |
29 | ```
30 | upload() {
31 | let files;
32 | files = this.refs.upload.files
33 | let count = files.length;
34 | let formData = new FormData();
35 | for (let i = 0; i < count; i++) {
36 | files[i].thumb = URL.createObjectURL(files[i]);
37 | formData.append('filedata', files[i]);
38 | }
39 | }
40 | ```
41 |
42 | 这里主要是通过 `this.refs.upload`来获取上传之后的文件,然后通过`createObjectURL` 静态方法创建一个 `DOMString`(mac 测试通过 input 上传过来`webkitRelativePath` 是空的),然后追加进 formData。再通过`send(body: formData)`方法传进后端
43 |
44 | ## 后端
45 |
46 | ```
47 | const express = require('express');
48 | const multiparty = require('multiparty');
49 | const gm = require('gm').subClass({
50 | imageMagick: true
51 | });
52 | const fs = require('fs');
53 | router.put(`uploadImages`, function (req, res) {
54 | let datas = {};
55 | if (!(fs.existsSync('./images/'))) {
56 | fs.mkdir('./images/', function (err, status) {
57 |
58 | });
59 | }
60 | const form = new multiparty.Form({
61 | uploadDir: './images/'
62 | });
63 | form.parse(req, function (err, fields, files) {
64 | const filesTmp = files.filedata;
65 | if (err) {
66 | throw err;
67 | } else {
68 | const relPath = filesTmp;
69 | for (let i in relPath) {
70 | gm(relPath[i].path)
71 | .resize(240, 240)
72 | .noProfile()
73 | .write(relPath[i].path, function (err, data) {
74 | if (err) {
75 | throw err;
76 | }
77 | console.log(data);
78 | });
79 | }
80 | }
81 | });
82 | });
83 | ```
84 |
85 | 后端用的是 node.js,express 框架。fs 模块,来进行判断是否存在该文件夹,如果不存在,则创建。
86 | `fs.existsSync()` 返回值为 true or false `fs.mkdir()` 创建文件夹 multiparty 模块来解析 form 表单
87 | gm 进行裁剪图片。
88 |
89 | ## 错误处理
90 |
91 | 1、`Error: unsupported content-type`
92 |
93 | 这个错误是因为你的 content-type 设置错了,设置成`multipart/form-data`即可。
94 |
95 | 2、设置完成之后,还是不行。
96 | 去掉`headers`的设置
97 | `body: formData` //body 的内容为表单内容
98 |
99 | 3、上传一次图片之后,无法上传第二次,是因为 value 此时有值,没有进行清空处理,在上传成功回调里,进行`e.target.value = '';`
100 |
--------------------------------------------------------------------------------
/src/content/posts/React全家桶建站教程-Express.md:
--------------------------------------------------------------------------------
1 | ---
2 | title: React全家桶建站教程-Express
3 | pubDate: 2018-06-07 11:37:22
4 | categories: ["React"]
5 | description: ""
6 | ---
7 |
8 | ## 介绍
9 |
10 | - 丰富的 HTTP 快捷方法和任意排列组合的 Connect 中间件,让你创建健壮、友好的 API 变得既快速又简单。
11 | - Express 是一个基于 Node.js 平台的极简、灵活的 web 应用开发框架,它提供一系列强大的特性,帮助你创建各种 Web 和移动设备应用。
12 |
13 | ## 例子
14 |
15 | https://github.com/xuya227939/blog/tree/master/examples/express/myapp
16 |
17 | ## 安装
18 |
19 | ```
20 | $ sudo npm install express-generator -g //因为是在mac下安装的,所以要注意权限问题,使用sudo
21 | $ express myapp //通过express生成器,生成项目
22 | $ cd myapp
23 | $ npm i //安装相关依赖
24 | $ npm install compression //安装compression 压缩请求
25 | $ npm start //开启
26 | ```
27 |
28 | 访问 [http://localhost:3000](http://localhost:3000)
29 |
30 | ## 使用
31 |
32 | 在 app.js 中使用如下代码
33 |
34 | ```
35 | const compression = require('compression');
36 | app.use(compression());
37 | ```
38 |
39 | ```
40 | app.use('/', function(req, res) {
41 | const count = 24;
42 | // const count = req.body.count;
43 | let listData = [];
44 | for (let i = 0; i < count; i++) {
45 | listData.push({
46 | src: '',
47 | avatar: 'https://zos.alipayobjects.com/rmsportal/ODTLcjxAfvqbxHnVXCYX.png',
48 | title: `Title Jiang ${i}`,
49 | description:'Rise n’ shine and don’t forget to smile',
50 | star: i * 2,
51 | like: i * 3
52 | });
53 | }
54 | let data = {};
55 | data.listData = listData;
56 | data.count = count;
57 | res.send(JSON.stringify(data));
58 | });
59 | ```
60 |
61 | 在 app.js 中替换 app.use('/users', indexRouter); 即可,然后 npm start 访问下[http://localhost:3000](http://localhost:3000) 就会看到输出了。
62 |
63 | ## 更新代码
64 |
65 | 通过 npm start 开启之后,你会发现你修改代码之后,刷新没有效果?这是因为 npm start 不支持动态更改代码,这时候就需要 supervisor 来管理 node 进程
66 |
67 | ```
68 | $ npm install supervisor
69 | $ supervisor bin/www
70 | ```
71 |
72 | 然后试试?
73 | 线上的话,通过 pm2 管理。
74 | `$yum install pm2 `
75 | 在根目录下新建 start.json `$ vim start.json`
76 | 输入以下代码
77 |
78 | ```
79 | {
80 | "apps" : [{
81 | "name" : "app",
82 | "script" : "bin/www",
83 | "log_date_format" : "YYYY-MM-DD HH:mm:SS",
84 | "log_file" : "logs/success.log",
85 | "error_file" : "logs/error.log",
86 | "out_file" : "logs/out.log",
87 | "pid_file" : "logs/app.pid",
88 | "watch" : true
89 | }]
90 | }
91 | ```
92 |
93 | `$ :wq` //保存并退出
94 |
95 | ## pm2 常用命令
96 |
97 | - `$ pm2 start start.json` //进行启动,帮你管理 node 进程。
98 | - `$ pm2 stop all` //停止所有应用。
99 | - `$ pm2 restart all` //重启所有应用。
100 | - `$ pm2 log` //查看应用日志。
101 |
102 | ## 欢迎在此 issue 下进行交流、学习
103 |
104 | ## 结语
105 |
106 | ~~https://github.com/xuya227939/m4a1~~ 可以参考这个项目。
107 | 通过 express 框架,建立后端服务速度还是蛮快的。简单方便,适合初学者入门。
108 |
--------------------------------------------------------------------------------
/src/content/posts/React全家桶建站教程-React&Ant.md:
--------------------------------------------------------------------------------
1 | ---
2 | title: React全家桶建站教程-React&Ant
3 | pubDate: 2018.06.08
4 | categories: ["React"]
5 | description: ""
6 | ---
7 |
8 | ## 介绍
9 |
10 | 这里使用到的 UI 库是蚂蚁金服开源的 ant-design,为啥使用?我觉得是使用人数比较多,坑比较少吧。
11 |
12 | ## 例子
13 |
14 | https://github.com/xuya227939/blog/tree/master/examples/react/my-app
15 |
16 | ## 安装
17 |
18 | ```
19 | $ sudo npm install -g create-react-app //全局安装的话,需要权限,所以使用sudo
20 | $ create-react-app my-app
21 | $ cd my-app
22 | $ npm install antd
23 | $ npm start
24 | ```
25 |
26 | ## 使用
27 |
28 | 1.引用官方代码,修改 App.js 文件,引入 ant 组件
29 |
30 | ```
31 | import React, { Component } from 'react';
32 | import Button from 'antd/lib/button';
33 | import './App.css';
34 |
35 | class App extends Component {
36 | render() {
37 | return (
38 |  65 |
66 | 如果访问报这个错误,需要在
67 |
68 | ```
69 | devServer: {
70 | // ...
71 | disableHostCheck: true
72 | }
73 | ```
74 |
75 | 配置完之后,本地启动开发服务,输入域名和端口号跳转页面,则可以看到修改了,受缓存影响,最好用无痕浏览器噢。
76 |
77 | 2. Windows 企业微信浏览器内核版本过低,如何解决?
78 |
79 | 由于 Windows 企业微信浏览器内核版本在 53,导致 `async` 使用不了,配置 `Babel`,支持到 53 即可。
80 |
81 | ```
82 | {
83 | "presets": [
84 | [
85 | "@babel/preset-env",
86 | {
87 | "targets": {
88 | "edge": "17",
89 | "firefox": "60",
90 | "chrome": "53",
91 | "safari": "11.1"
92 | },
93 | "useBuiltIns": "usage",
94 | "corejs": 3
95 | }
96 | ],
97 | ["@babel/preset-react"]
98 | ]
99 | }
100 |
101 | ```
102 |
--------------------------------------------------------------------------------
/src/content/posts/使用 Sourcetree 提示需要输入密码.md:
--------------------------------------------------------------------------------
1 | ---
2 | title: 使用 Sourcetree 提示需要输入密码
3 | pubDate: 2019-06-10 11:30:47
4 | categories: ["React"]
5 | description: ""
6 | ---
7 |
8 | 
9 | 使用公司`GitLab`提交的时候,每次都需要输入密码
10 |
11 | ## 解决方案(mac)
12 |
13 | ### 命令行解决
14 |
15 | 输入以下命令
16 | `git config --global credential.helper osxkeychain`
17 | 执行完成后,再次在 SourceTree 里面输入一下 GitLab 里面的密码。注意勾选选项“store password in keychain”。
18 | 这个时候,会跳出钥匙串的对话框,这个时候要输入的密码,是 mac 的开机密码。并且一定要勾选始终允许。否则,还是要一直跳出现在的这个登陆窗口了
19 |
20 | 
21 |
22 | ### 还有一种就是 Keychain 中产生了冲突,使勾选失效
23 |
24 | 将已失效的 git.a. Access Key for git 删除,再次操作输入密码后新的密码就会存储在 Keychain,以后就不用每次远程操作都手动输入密码了
25 |
26 | 
27 |
--------------------------------------------------------------------------------
/src/content/posts/使用 react.lazy 打包之后得文件如何不显示数字.md:
--------------------------------------------------------------------------------
1 | ---
2 | title: 使用 react.lazy 打包之后得文件如何不显示数字
3 | pubDate: 2019-06-28 13:17:10
4 | categories: ["React"]
5 | description: ""
6 | ---
7 |
8 | ## 解决方法
9 |
10 | ```
11 | /* webpackChunkName: "name"*/' '文件路径'
12 | const Chart = lazy(() => import(/* webpackChunkName: "chart"*/'./pages/Chart/index'));
13 | ```
14 |
--------------------------------------------------------------------------------
/src/content/posts/修改滚动条样式.md:
--------------------------------------------------------------------------------
1 | ---
2 | title: 修改滚动条样式
3 | pubDate: 2018-09-20 20:02:42
4 | categories: ["修改滚动条样式"]
5 | description: ""
6 | ---
7 |
8 | ## 滚动条组成
9 |
10 | ::-webkit-scrollbar 滚动条整体部分
11 | ::-webkit-scrollbar-thumb 滚动条里面的小方块,能向上向下移动(或往左往右移动,取决于是垂直滚动条还是水平滚动条)
12 | ::-webkit-scrollbar-track 滚动条的轨道(里面装有 Thumb)
13 | ::-webkit-scrollbar-button 滚动条的轨道的两端按钮,允许通过点击微调小方块的位置。
14 | ::-webkit-scrollbar-track-piece 内层轨道,滚动条中间部分(除去)
15 | ::-webkit-scrollbar-corner 边角,即两个滚动条的交汇处
16 | ::-webkit-resizer 两个滚动条的交汇处上用于通过拖动调整元素大小的小控件
17 |
18 | ```
19 | /*定义滚动条高宽及背景 高宽分别对应横竖滚动条的尺寸*/
20 | ::-webkit-scrollbar
21 | {
22 | width: 16px;
23 | height: 16px;
24 | background-color: #F5F5F5;
25 | }
26 |
27 | /*定义滚动条轨道 内阴影+圆角*/
28 | ::-webkit-scrollbar-track
29 | {
30 | -webkit-box-shadow: inset 0 0 6px rgba(0,0,0,0.3);
31 | border-radius: 10px;
32 | background-color: #F5F5F5;
33 | }
34 |
35 | /*定义滑块 内阴影+圆角*/
36 | ::-webkit-scrollbar-thumb
37 | {
38 | border-radius: 10px;
39 | -webkit-box-shadow: inset 0 0 6px rgba(0,0,0,.3);
40 | background-color: #555;
41 | }
42 | ```
43 |
44 | ## 详细设置
45 |
46 | 定义滚动条就是利用伪元素与伪类,那什么是伪元素和伪类呢?
47 |
48 | 伪类大家应该很熟悉:link,:focus,:hover,此外 CSS3 中又增加了许多伪类选择器,如:nth-child,:last-child,:nth-last-of-type()等。
49 |
50 | CSS 中的伪元素大家以前看过::first-line,:first-letter,:before,:after。那么在 CSS3 中,伪元素进行了调整,在以前的基础上增加了一个“:”也就是现在变成了“::first-letter,::first-line,::before,::after”,另外 CSS3 还增加了一个“::selection”。两个“::”和一个“:”在 css3 中主要用来区分伪类和伪元素。
51 |
52 | webkit 的伪类和伪元素的实现很强,可以把滚动条当成一个页面元素来定义,再结合一些高级的 CSS3 属性,比如渐变、圆角、RGBa 等等。然后如果有些地方要用图片,可以把图片也可以转换成 Base64,不然每次都得加载那个多个图片,增加请求数。
53 |
54 | 任何对象都可以设置:边框、阴影、背景图片等等,创建的滚动条任然会按照操作系统本身的设置来完成其交互的行为。下面的伪类可以应用到上面的伪元素中。有点小复杂,具体怎么写可以看第一个 demo,那里也有注释。
55 |
56 | ```
57 | :horizontal
58 | //horizontal伪类适用于任何水平方向上的滚动条
59 |
60 | :vertical
61 | //vertical伪类适用于任何垂直方向的滚动条
62 |
63 | :decrement
64 | //decrement伪类适用于按钮和轨道碎片。表示递减的按钮或轨道碎片,例如可以使区域向上或者向右移动的区域和按钮
65 |
66 | :increment
67 | //increment伪类适用于按钮和轨道碎片。表示递增的按钮或轨道碎片,例如可以使区域向下或者向左移动的区域和按钮
68 |
69 | :start
70 | //start伪类适用于按钮和轨道碎片。表示对象(按钮 轨道碎片)是否放在滑块的前面
71 |
72 | :end
73 | //end伪类适用于按钮和轨道碎片。表示对象(按钮 轨道碎片)是否放在滑块的后面
74 |
75 | :double-button
76 | //double-button伪类适用于按钮和轨道碎片。判断轨道结束的位置是否是一对按钮。也就是轨道碎片紧挨着一对在一起的按钮。
77 |
78 | :single-button
79 | //single-button伪类适用于按钮和轨道碎片。判断轨道结束的位置是否是一个按钮。也就是轨道碎片紧挨着一个单独的按钮。
80 |
81 | :no-button
82 | no-button伪类表示轨道结束的位置没有按钮。
83 |
84 | :corner-present
85 | //corner-present伪类表示滚动条的角落是否存在。
86 |
87 | :window-inactive
88 | //适用于所有滚动条,表示包含滚动条的区域,焦点不在该窗口的时候。
89 |
90 | ::-webkit-scrollbar-track-piece:start {
91 | /*滚动条上半边或左半边*/
92 | }
93 |
94 | ::-webkit-scrollbar-thumb:window-inactive {
95 | /*当焦点不在当前区域滑块的状态*/
96 | }
97 |
98 | ::-webkit-scrollbar-button:horizontal:decrement:hover {
99 | /*当鼠标在水平滚动条下面的按钮上的状态*/
100 | }
101 | ```
102 |
103 | ## 参考来源
104 |
105 | https://www.cnblogs.com/kugeliu/p/7196656.html
106 |
--------------------------------------------------------------------------------
/src/content/posts/关于 tristana.md:
--------------------------------------------------------------------------------
1 | ---
2 | title: 关于 tristana
3 | pubDate: 2021-04-19 10:20:19
4 | categories: ["Tristana"]
5 | description: ""
6 | ---
7 |
8 | ## 前言
9 |
10 | 大概在 2019 年的时候,为公司搭建了一套项目框架,截止到今天,用起来很不错,最近 `Vite` 太火,折腾了下,花了两天的时间,用 `Vite` 替换了 `Webpack`(`Webpack5`、`Webpack4` 都有,切换分支即可),体验直接起飞,基于 `Vite` + `React` + `Ant Design` + `Mobx` + `ESLint` + `TypeScript` 的项目框架。
11 |
12 | ## 特点
13 |
14 | - **快速开始**,只要您了解 `react`、`mobx`、`webpack` 和 `react router`,就可以快速搭建中后台管理平台。
15 |
16 | - **路由匹配**,包括 `url` 输入,`js` 跳转,菜单切换。
17 |
18 | - **Loading**,不需要重复写组件 `loading` 判断。
19 |
20 | ## Demo
21 |
22 | [tristana](https://order.downfuture.com/)
23 |
24 | ## 项目地址
25 |
26 | [tristana](https://github.com/xuya227939/tristana.git)
27 |
28 | ## 关于命名
29 |
30 | 由于本人非常喜欢玩 LOL 射手小炮,所以叫 tristana
31 |
32 | ## 能否使用在生产环境?
33 |
34 | 当然,目前我司多个产品线在使用中。
35 |
36 | ## 启动
37 |
38 | ```
39 | $ git clone https://github.com/xuya227939/tristana.git
40 |
41 | $ cd tristana
42 |
43 | $ git checkout vite
44 |
45 | $ npm install
46 |
47 | $ npm run dev
48 | ```
49 |
50 | ## 打包
51 |
52 | ```
53 | $ npm run build
54 | ```
55 |
56 | ## 是否支持 IE8?
57 |
58 | 不支持
59 |
60 | ## 结语
61 |
62 | 大佬们觉得不错的话,可以给个 Star 🌟,也欢迎给项目提 issues ~
63 |
--------------------------------------------------------------------------------
/src/content/posts/创业艰难,道阻且长.md:
--------------------------------------------------------------------------------
1 | ---
2 | title: 创业艰难,道阻且长
3 | pubDate: 2025-07-13 15:39:34
4 | categories: ["创业"]
5 | description: "创业真的好难!时间过得飞快,转眼半年多了。"
6 | ---
7 |
8 | 创业真的好难!时间过得飞快,转眼半年多了。
9 |
10 | 去年 9 月离职后,先放松了几个月,11 月开始动手做第一款产品 —— SnapVee 社媒提取器。
11 | 初衷是帮助内容创作者更高效地获取社交媒体上的视频、字幕、封面图等信息。
12 |
13 | 到了 3 月,决定继续深入做下去,陆续加入了音频提取、字幕翻译、视频总结等功能。但实际效果并不理想,用户只把它当作一个「社媒下载工具」,难以支撑持续增长与付费——而这类工具,竞品多、免费多、头部强(比如 BD 下载器)。
14 |
15 | 我尝试做差异化,但没有找到突破口。
16 | 最后决定砍掉所有扩展功能,只保留最基础的提取功能,免费开放。
17 |
18 | 4 月解散团队。
19 | 5 月开始构思新的方向——一个端到端的社媒创作链路,覆盖:脚本生成、图文创作、视频生成、数据分析,全链路闭环。
20 |
21 | 刚开始从「AI Agent 自动生成文案」切入,思路类似天工智能体 —— 用户提问 + 辅助信息输入,自动生成社媒文案。但很快发现一个关键问题:「去 AI 味很难」
22 |
23 | 6 月开始做深入竞品调研,发现:你想做的事,已经有人在做,而且不止一家,有的体验比你好、功能比你全、团队还比你大。
24 |
25 | 这时候,我有点道心破碎了。
26 |
27 | 在做产品这条路上,有很长一段时间,你是一个人在黑暗中走,没有用户反馈、没有数据指引,也不知道自己是不是在往对的方向走。
28 |
29 | 我自认为,我在心性,心态,坚韧,思维上还算不错了,但在创业面前,不值一提,于是,摆烂了一段时间。
30 |
31 | 完
32 |
--------------------------------------------------------------------------------
/src/content/posts/前端如何支持PDF、Excel、Word在线预览.md:
--------------------------------------------------------------------------------
1 | ---
2 | title: 前端如何支持PDF、Excel、Word在线预览
3 | pubDate: 2018-12-27 15:54:14
4 | categories: ["前端", "Excel", "Word"]
5 | description: ""
6 | ---
7 |
8 | ## 注意一下几点:
9 |
10 | - url 必须经过 encodeURIComponent 转移,且是能够打开的文件域名。
11 | - 谷歌文件在线预览,必须使用代理,各种文件都支持。
12 | - 不想用代理,可以用微软这个,但是微软这个,不支持最新的 xlsx 格式,xls 格式可以。
13 | - 谷歌格式:https://docs.google.com/viewer?url=[url]
14 | - 微软格式:https://view.officeapps.live.com/op/view.aspx?src=[url]
15 |
16 | ## 例子(Word)
17 |
18 | ```
19 | 谷歌:
20 | https://docs.google.com/viewer?url=http%3A%2F%2Fsruserfiletest.oss-cn-hangzhou.aliyuncs.com%2Fcrm%2Fcc604886ae8d4be9afffab02313d646d.docx%3FExpires%3D1545898717%26OSSAccessKeyId%3DLTAIm573A7RmsqeQ%26Signature%3DVOaSsvyYy9f%252BF6R1GcSnCG%252BaVI4%253D
21 |
22 | 微软:
23 | https://view.officeapps.live.com/op/view.aspx?src=http%3A%2F%2Fsruserfiletest.oss-cn-hangzhou.aliyuncs.com%2Fcrm%2Fcc604886ae8d4be9afffab02313d646d.docx%3FExpires%3D1545898717%26OSSAccessKeyId%3DLTAIm573A7RmsqeQ%26Signature%3DVOaSsvyYy9f%252BF6R1GcSnCG%252BaVI4%253D
24 | ```
25 |
26 | ## 例子(Excel)
27 |
28 | ```
29 | 谷歌:
30 | https://docs.google.com/viewer?url=http%3A%2F%2Fsruserfiletest.oss-cn-hangzhou.aliyuncs.com%2Fcrm%2F981f08e66ffa4f64934b37e543f5700b.xlsx%3FExpires%3D1545898717%26OSSAccessKeyId%3DLTAIm573A7RmsqeQ%26Signature%3DFgItdsB%252BPrm2%252BOQShja1HkfqKyY%253D
31 |
32 | 微软:
33 | https://view.officeapps.live.com/op/view.aspx?src=http%3A%2F%2Fsruserfiletest.oss-cn-hangzhou.aliyuncs.com%2Fcrm%2F981f08e66ffa4f64934b37e543f5700b.xlsx%3FExpires%3D1545898717%26OSSAccessKeyId%3DLTAIm573A7RmsqeQ%26Signature%3DFgItdsB%252BPrm2%252BOQShja1HkfqKyY%253D
34 | ```
35 |
36 | ## PDF
37 |
38 | window.open([url])
39 |
--------------------------------------------------------------------------------
/src/content/posts/前端技术架构选型.md:
--------------------------------------------------------------------------------
1 | ---
2 | title: 前端技术架构选型
3 | pubDate: 2018-11-20 17:46:12
4 | categories: ["前端技术架构"]
5 | description: ""
6 | ---
7 |
8 | 
9 |
10 | ## 结语
11 |
12 | 可以从以下几个指标,来选择一套适合自己团队的项目。
13 |
14 | - 是否符合团队的技术栈
15 | - 是否符合项目需求
16 | - 生态圈是否完善、社区是否活跃
17 | - 开发效率是否会降低
18 | - 团队的学习能力如何
19 |
--------------------------------------------------------------------------------
/src/content/posts/告前端同学的小记.md:
--------------------------------------------------------------------------------
1 | ---
2 | title: 告前端同学的小记
3 | pubDate: 2023-10-15 17:44:07
4 | categories: ["前端"]
5 | description: ""
6 | ---
7 |
8 | 
9 |
10 | 转载周爱民老师《告前端同学书》,有些思绪需要发散,随联想到自己的过往。
11 |
12 | 文中提到'领域'一词,用在前端,个人认为非常合适。领域一词在我印象中,还需追溯到初中时期,我读的一本叫《吞噬星空》的小说,书籍大概 400 多万字,读起来却是昼夜不分(这也是我唯一看完的一本小说),此书也提到了领域,行星级武者可以展开自己的领域。我个人所理解的领域,用大白话通俗解释,就是当你的本领到达一定阶段时,你会在这个范围拥有一定的话语权。类似的阿里技术等级序列也是,通常来说,P7 一般拥有自己的领域。
13 |
14 | 从疫情后开始,互联网的就业环境非常糟糕。前端就业,每况愈下,不断传出前端已死。之前,我也有发文,并不认同前端已死,如今还是持有该观点。周爱民老师的观点也与我一致。
15 |
16 | 我从 16 年入行至今,快 7 年的时光,经历了从 jQuery 时代到前端三大框架,如今相持不下的,只剩 React 和 Vue 。Angular 基本被社区抛弃,算是赶上了前端黄金时期的末尾阶段,前五年我是在做一个大前端方向,微信小程序、H5、Web、APP 开发都有涉及,前端工程化链路搭建也小有涉及。所谓的技术广泛度。也向往大厂。想见识见识大厂的工作氛围,大厂的技术链路到底是怎样的。后面,我进去了,但也经历了裁员,之前的想法是想靠大厂背书 + 前端工具链路这个方向,做可持续性的发展。随后,我搞了微前端,想在这个领域深入下去,但这条路走失败了,让我不得不重新思考,未来的出路在那?35 岁以后呢?我可不想去送外卖,开滴滴。
17 |
18 | 后面,我接触到了 WebGL,前端 3D 图形化的概念和场景非常吸引我,我也慢慢开始在往这个方向去做探索 + 转型,转型是一件非常痛苦的事,因为你要从自己的舒适区进入到坑洼区,你不得不去做很多东西,从 0 - 1 。辛运的是,我还年轻(但也不年轻了)。我个人坚信选择大于努力,时代会不断的造就一批人,之前的土木,现今的互联网,自媒体,直播带货等。
19 |
20 | 
21 |
22 | 很多人问我搞矩阵有什么用,你的目的是什么?
23 |
24 | 其实很简单,学习。我本人的学习模式是,需要通过大量的实战摸索 + 理论知识,梳理成一套成熟的方法论,单纯的去学理论知识,对于我本人而言,非常枯燥,况且 3D 图形化知识体系,非常困难。
25 |
26 | > 这是在一个新阶段的前夜。故此,有很多信息并不那么明朗,比如说像前后端分离这样的标志性事件并没有出现,亦或者出现了也还没有形成典型影响。我倾向于认为引领新时代的,或者说开启下一个阶段的运动将会发生在交互领域,也就是说新的交互方式决定了前端的未来。之前行业里在讲的 VR 和 AR(虚拟现实和增强实景)是在这个方向上的典型技术,但不唯于此。几乎所有在交互方式上的变革,都会成为人们认识与改变这个世界的全新动力,像语音识别、视觉捕捉、脑机接口等等,这些半成熟的或者实验性的技术都在影响着我们对'交互'的理解,从而重新定义了前端
27 |
28 | 周爱民老师这段文字,讲得非常透彻。AI、VR、AR 的不断发展,对前端的要求越来越高,如果还是停留在写业务页面的思想层面上,估计很快会被替代,大量的培训班造就一批人,已经告诉了我们。培训几个月,稍微伪造下履历,就可以快速上手业务开发,那么对比一个五年的,你有什么优势?,何况随着低代码不断的演进,让本不会写代码的一批人,也可以通过低代码引擎平台,快速生成页面,如果 AI 再持续迭代呢?这是一件很可怕的事
29 |
30 | 前端的很多理念来自于后端,并没有造就出真正属于自己的革命。底子很薄,真正要下功夫的其实是系统、网络、编译、机器学习、图形化等层面,或许 WASM + RUST 又会产生一点不一样的东西
31 |
32 | 在这个行业待了很久,见识了很多人转到其他行业。互联网的发展非常迅速,如果做不到持之以恒的学习,那将会被慢慢淘汰。以汽车为例,燃油车"固若金汤",谁会想到互联网 + 纯电,基本上算是革了燃油车的命,这些传统燃油车商,也要做出相应的改变,以应对时代的变化。
33 |
34 | 眼光高远而脚踏实地
35 |
--------------------------------------------------------------------------------
/src/content/posts/命令行 MySQL 基本操作(CentOS).md:
--------------------------------------------------------------------------------
1 | ---
2 | title: 命令行 MySQL 基本操作(CentOS)
3 | pubDate: 2020-07-24 10:54:53
4 | categories: ["MySQL", "CentOS"]
5 | description: ""
6 | ---
7 |
8 | ## 安装
9 |
10 | ```
11 | $ brew install mysql
12 | ```
13 |
14 | ## 登录
15 |
16 | ```
17 | $ mysql -uroot -p
18 | ```
19 |
20 | 连接到 mysql 数据库,默认没有密码的,直接按回车进入。
21 |
22 | ## 启动数据库
23 |
24 | ```
25 | $ service mysqld start
26 | ```
27 |
28 | ## 停止数据库
29 |
30 | ```
31 | $ service mysqld stop
32 | ```
33 |
34 | ## 重启数据库
35 |
36 | ```
37 | $ service mysqld restart
38 | ```
39 |
40 | ## 显示所有数据库
41 |
42 | ```
43 | $ show databases;
44 | ```
45 |
46 | 
47 |
48 | ## 进入数据库
49 |
50 | ```
51 | $ use mysql;
52 | ```
53 |
54 | ## 显示所有表
55 |
56 | ```
57 | $ show tables;
58 | ```
59 |
60 | 
61 |
62 | ## 创建表名和字段
63 |
64 | ```
65 | $ CREATE TABLE data (images VARCHAR(20));
66 | ```
67 |
68 | ## 修改字段大小
69 |
70 | ```
71 | $ ALTER TABLE data images MODIFY VARCHAR(100);
72 | ```
73 |
74 | ## 查询表
75 |
76 | ```
77 | $ select * from card;
78 | ```
79 |
80 | ## 修改用户密码
81 |
82 | ```
83 | $ mysql -u root -p
84 |
85 | $ show databases;
86 |
87 | $ use mysql;
88 |
89 | $ desc user; # 用户表存放用户和面膜
90 |
91 | $ update user set authentication_string=PASSWORD('123') where user = 'root';
92 | ```
93 |
--------------------------------------------------------------------------------
/src/content/posts/垂直居中.md:
--------------------------------------------------------------------------------
1 | ---
2 | title: CSS-垂直居中
3 | pubDate: 2018-09-27 19:14:57
4 | categories: ["CSS"]
5 | description: ""
6 | ---
7 |
8 | ## line-height
9 |
10 | ```
11 |
65 |
66 | 如果访问报这个错误,需要在
67 |
68 | ```
69 | devServer: {
70 | // ...
71 | disableHostCheck: true
72 | }
73 | ```
74 |
75 | 配置完之后,本地启动开发服务,输入域名和端口号跳转页面,则可以看到修改了,受缓存影响,最好用无痕浏览器噢。
76 |
77 | 2. Windows 企业微信浏览器内核版本过低,如何解决?
78 |
79 | 由于 Windows 企业微信浏览器内核版本在 53,导致 `async` 使用不了,配置 `Babel`,支持到 53 即可。
80 |
81 | ```
82 | {
83 | "presets": [
84 | [
85 | "@babel/preset-env",
86 | {
87 | "targets": {
88 | "edge": "17",
89 | "firefox": "60",
90 | "chrome": "53",
91 | "safari": "11.1"
92 | },
93 | "useBuiltIns": "usage",
94 | "corejs": 3
95 | }
96 | ],
97 | ["@babel/preset-react"]
98 | ]
99 | }
100 |
101 | ```
102 |
--------------------------------------------------------------------------------
/src/content/posts/使用 Sourcetree 提示需要输入密码.md:
--------------------------------------------------------------------------------
1 | ---
2 | title: 使用 Sourcetree 提示需要输入密码
3 | pubDate: 2019-06-10 11:30:47
4 | categories: ["React"]
5 | description: ""
6 | ---
7 |
8 | 
9 | 使用公司`GitLab`提交的时候,每次都需要输入密码
10 |
11 | ## 解决方案(mac)
12 |
13 | ### 命令行解决
14 |
15 | 输入以下命令
16 | `git config --global credential.helper osxkeychain`
17 | 执行完成后,再次在 SourceTree 里面输入一下 GitLab 里面的密码。注意勾选选项“store password in keychain”。
18 | 这个时候,会跳出钥匙串的对话框,这个时候要输入的密码,是 mac 的开机密码。并且一定要勾选始终允许。否则,还是要一直跳出现在的这个登陆窗口了
19 |
20 | 
21 |
22 | ### 还有一种就是 Keychain 中产生了冲突,使勾选失效
23 |
24 | 将已失效的 git.a. Access Key for git 删除,再次操作输入密码后新的密码就会存储在 Keychain,以后就不用每次远程操作都手动输入密码了
25 |
26 | 
27 |
--------------------------------------------------------------------------------
/src/content/posts/使用 react.lazy 打包之后得文件如何不显示数字.md:
--------------------------------------------------------------------------------
1 | ---
2 | title: 使用 react.lazy 打包之后得文件如何不显示数字
3 | pubDate: 2019-06-28 13:17:10
4 | categories: ["React"]
5 | description: ""
6 | ---
7 |
8 | ## 解决方法
9 |
10 | ```
11 | /* webpackChunkName: "name"*/' '文件路径'
12 | const Chart = lazy(() => import(/* webpackChunkName: "chart"*/'./pages/Chart/index'));
13 | ```
14 |
--------------------------------------------------------------------------------
/src/content/posts/修改滚动条样式.md:
--------------------------------------------------------------------------------
1 | ---
2 | title: 修改滚动条样式
3 | pubDate: 2018-09-20 20:02:42
4 | categories: ["修改滚动条样式"]
5 | description: ""
6 | ---
7 |
8 | ## 滚动条组成
9 |
10 | ::-webkit-scrollbar 滚动条整体部分
11 | ::-webkit-scrollbar-thumb 滚动条里面的小方块,能向上向下移动(或往左往右移动,取决于是垂直滚动条还是水平滚动条)
12 | ::-webkit-scrollbar-track 滚动条的轨道(里面装有 Thumb)
13 | ::-webkit-scrollbar-button 滚动条的轨道的两端按钮,允许通过点击微调小方块的位置。
14 | ::-webkit-scrollbar-track-piece 内层轨道,滚动条中间部分(除去)
15 | ::-webkit-scrollbar-corner 边角,即两个滚动条的交汇处
16 | ::-webkit-resizer 两个滚动条的交汇处上用于通过拖动调整元素大小的小控件
17 |
18 | ```
19 | /*定义滚动条高宽及背景 高宽分别对应横竖滚动条的尺寸*/
20 | ::-webkit-scrollbar
21 | {
22 | width: 16px;
23 | height: 16px;
24 | background-color: #F5F5F5;
25 | }
26 |
27 | /*定义滚动条轨道 内阴影+圆角*/
28 | ::-webkit-scrollbar-track
29 | {
30 | -webkit-box-shadow: inset 0 0 6px rgba(0,0,0,0.3);
31 | border-radius: 10px;
32 | background-color: #F5F5F5;
33 | }
34 |
35 | /*定义滑块 内阴影+圆角*/
36 | ::-webkit-scrollbar-thumb
37 | {
38 | border-radius: 10px;
39 | -webkit-box-shadow: inset 0 0 6px rgba(0,0,0,.3);
40 | background-color: #555;
41 | }
42 | ```
43 |
44 | ## 详细设置
45 |
46 | 定义滚动条就是利用伪元素与伪类,那什么是伪元素和伪类呢?
47 |
48 | 伪类大家应该很熟悉:link,:focus,:hover,此外 CSS3 中又增加了许多伪类选择器,如:nth-child,:last-child,:nth-last-of-type()等。
49 |
50 | CSS 中的伪元素大家以前看过::first-line,:first-letter,:before,:after。那么在 CSS3 中,伪元素进行了调整,在以前的基础上增加了一个“:”也就是现在变成了“::first-letter,::first-line,::before,::after”,另外 CSS3 还增加了一个“::selection”。两个“::”和一个“:”在 css3 中主要用来区分伪类和伪元素。
51 |
52 | webkit 的伪类和伪元素的实现很强,可以把滚动条当成一个页面元素来定义,再结合一些高级的 CSS3 属性,比如渐变、圆角、RGBa 等等。然后如果有些地方要用图片,可以把图片也可以转换成 Base64,不然每次都得加载那个多个图片,增加请求数。
53 |
54 | 任何对象都可以设置:边框、阴影、背景图片等等,创建的滚动条任然会按照操作系统本身的设置来完成其交互的行为。下面的伪类可以应用到上面的伪元素中。有点小复杂,具体怎么写可以看第一个 demo,那里也有注释。
55 |
56 | ```
57 | :horizontal
58 | //horizontal伪类适用于任何水平方向上的滚动条
59 |
60 | :vertical
61 | //vertical伪类适用于任何垂直方向的滚动条
62 |
63 | :decrement
64 | //decrement伪类适用于按钮和轨道碎片。表示递减的按钮或轨道碎片,例如可以使区域向上或者向右移动的区域和按钮
65 |
66 | :increment
67 | //increment伪类适用于按钮和轨道碎片。表示递增的按钮或轨道碎片,例如可以使区域向下或者向左移动的区域和按钮
68 |
69 | :start
70 | //start伪类适用于按钮和轨道碎片。表示对象(按钮 轨道碎片)是否放在滑块的前面
71 |
72 | :end
73 | //end伪类适用于按钮和轨道碎片。表示对象(按钮 轨道碎片)是否放在滑块的后面
74 |
75 | :double-button
76 | //double-button伪类适用于按钮和轨道碎片。判断轨道结束的位置是否是一对按钮。也就是轨道碎片紧挨着一对在一起的按钮。
77 |
78 | :single-button
79 | //single-button伪类适用于按钮和轨道碎片。判断轨道结束的位置是否是一个按钮。也就是轨道碎片紧挨着一个单独的按钮。
80 |
81 | :no-button
82 | no-button伪类表示轨道结束的位置没有按钮。
83 |
84 | :corner-present
85 | //corner-present伪类表示滚动条的角落是否存在。
86 |
87 | :window-inactive
88 | //适用于所有滚动条,表示包含滚动条的区域,焦点不在该窗口的时候。
89 |
90 | ::-webkit-scrollbar-track-piece:start {
91 | /*滚动条上半边或左半边*/
92 | }
93 |
94 | ::-webkit-scrollbar-thumb:window-inactive {
95 | /*当焦点不在当前区域滑块的状态*/
96 | }
97 |
98 | ::-webkit-scrollbar-button:horizontal:decrement:hover {
99 | /*当鼠标在水平滚动条下面的按钮上的状态*/
100 | }
101 | ```
102 |
103 | ## 参考来源
104 |
105 | https://www.cnblogs.com/kugeliu/p/7196656.html
106 |
--------------------------------------------------------------------------------
/src/content/posts/关于 tristana.md:
--------------------------------------------------------------------------------
1 | ---
2 | title: 关于 tristana
3 | pubDate: 2021-04-19 10:20:19
4 | categories: ["Tristana"]
5 | description: ""
6 | ---
7 |
8 | ## 前言
9 |
10 | 大概在 2019 年的时候,为公司搭建了一套项目框架,截止到今天,用起来很不错,最近 `Vite` 太火,折腾了下,花了两天的时间,用 `Vite` 替换了 `Webpack`(`Webpack5`、`Webpack4` 都有,切换分支即可),体验直接起飞,基于 `Vite` + `React` + `Ant Design` + `Mobx` + `ESLint` + `TypeScript` 的项目框架。
11 |
12 | ## 特点
13 |
14 | - **快速开始**,只要您了解 `react`、`mobx`、`webpack` 和 `react router`,就可以快速搭建中后台管理平台。
15 |
16 | - **路由匹配**,包括 `url` 输入,`js` 跳转,菜单切换。
17 |
18 | - **Loading**,不需要重复写组件 `loading` 判断。
19 |
20 | ## Demo
21 |
22 | [tristana](https://order.downfuture.com/)
23 |
24 | ## 项目地址
25 |
26 | [tristana](https://github.com/xuya227939/tristana.git)
27 |
28 | ## 关于命名
29 |
30 | 由于本人非常喜欢玩 LOL 射手小炮,所以叫 tristana
31 |
32 | ## 能否使用在生产环境?
33 |
34 | 当然,目前我司多个产品线在使用中。
35 |
36 | ## 启动
37 |
38 | ```
39 | $ git clone https://github.com/xuya227939/tristana.git
40 |
41 | $ cd tristana
42 |
43 | $ git checkout vite
44 |
45 | $ npm install
46 |
47 | $ npm run dev
48 | ```
49 |
50 | ## 打包
51 |
52 | ```
53 | $ npm run build
54 | ```
55 |
56 | ## 是否支持 IE8?
57 |
58 | 不支持
59 |
60 | ## 结语
61 |
62 | 大佬们觉得不错的话,可以给个 Star 🌟,也欢迎给项目提 issues ~
63 |
--------------------------------------------------------------------------------
/src/content/posts/创业艰难,道阻且长.md:
--------------------------------------------------------------------------------
1 | ---
2 | title: 创业艰难,道阻且长
3 | pubDate: 2025-07-13 15:39:34
4 | categories: ["创业"]
5 | description: "创业真的好难!时间过得飞快,转眼半年多了。"
6 | ---
7 |
8 | 创业真的好难!时间过得飞快,转眼半年多了。
9 |
10 | 去年 9 月离职后,先放松了几个月,11 月开始动手做第一款产品 —— SnapVee 社媒提取器。
11 | 初衷是帮助内容创作者更高效地获取社交媒体上的视频、字幕、封面图等信息。
12 |
13 | 到了 3 月,决定继续深入做下去,陆续加入了音频提取、字幕翻译、视频总结等功能。但实际效果并不理想,用户只把它当作一个「社媒下载工具」,难以支撑持续增长与付费——而这类工具,竞品多、免费多、头部强(比如 BD 下载器)。
14 |
15 | 我尝试做差异化,但没有找到突破口。
16 | 最后决定砍掉所有扩展功能,只保留最基础的提取功能,免费开放。
17 |
18 | 4 月解散团队。
19 | 5 月开始构思新的方向——一个端到端的社媒创作链路,覆盖:脚本生成、图文创作、视频生成、数据分析,全链路闭环。
20 |
21 | 刚开始从「AI Agent 自动生成文案」切入,思路类似天工智能体 —— 用户提问 + 辅助信息输入,自动生成社媒文案。但很快发现一个关键问题:「去 AI 味很难」
22 |
23 | 6 月开始做深入竞品调研,发现:你想做的事,已经有人在做,而且不止一家,有的体验比你好、功能比你全、团队还比你大。
24 |
25 | 这时候,我有点道心破碎了。
26 |
27 | 在做产品这条路上,有很长一段时间,你是一个人在黑暗中走,没有用户反馈、没有数据指引,也不知道自己是不是在往对的方向走。
28 |
29 | 我自认为,我在心性,心态,坚韧,思维上还算不错了,但在创业面前,不值一提,于是,摆烂了一段时间。
30 |
31 | 完
32 |
--------------------------------------------------------------------------------
/src/content/posts/前端如何支持PDF、Excel、Word在线预览.md:
--------------------------------------------------------------------------------
1 | ---
2 | title: 前端如何支持PDF、Excel、Word在线预览
3 | pubDate: 2018-12-27 15:54:14
4 | categories: ["前端", "Excel", "Word"]
5 | description: ""
6 | ---
7 |
8 | ## 注意一下几点:
9 |
10 | - url 必须经过 encodeURIComponent 转移,且是能够打开的文件域名。
11 | - 谷歌文件在线预览,必须使用代理,各种文件都支持。
12 | - 不想用代理,可以用微软这个,但是微软这个,不支持最新的 xlsx 格式,xls 格式可以。
13 | - 谷歌格式:https://docs.google.com/viewer?url=[url]
14 | - 微软格式:https://view.officeapps.live.com/op/view.aspx?src=[url]
15 |
16 | ## 例子(Word)
17 |
18 | ```
19 | 谷歌:
20 | https://docs.google.com/viewer?url=http%3A%2F%2Fsruserfiletest.oss-cn-hangzhou.aliyuncs.com%2Fcrm%2Fcc604886ae8d4be9afffab02313d646d.docx%3FExpires%3D1545898717%26OSSAccessKeyId%3DLTAIm573A7RmsqeQ%26Signature%3DVOaSsvyYy9f%252BF6R1GcSnCG%252BaVI4%253D
21 |
22 | 微软:
23 | https://view.officeapps.live.com/op/view.aspx?src=http%3A%2F%2Fsruserfiletest.oss-cn-hangzhou.aliyuncs.com%2Fcrm%2Fcc604886ae8d4be9afffab02313d646d.docx%3FExpires%3D1545898717%26OSSAccessKeyId%3DLTAIm573A7RmsqeQ%26Signature%3DVOaSsvyYy9f%252BF6R1GcSnCG%252BaVI4%253D
24 | ```
25 |
26 | ## 例子(Excel)
27 |
28 | ```
29 | 谷歌:
30 | https://docs.google.com/viewer?url=http%3A%2F%2Fsruserfiletest.oss-cn-hangzhou.aliyuncs.com%2Fcrm%2F981f08e66ffa4f64934b37e543f5700b.xlsx%3FExpires%3D1545898717%26OSSAccessKeyId%3DLTAIm573A7RmsqeQ%26Signature%3DFgItdsB%252BPrm2%252BOQShja1HkfqKyY%253D
31 |
32 | 微软:
33 | https://view.officeapps.live.com/op/view.aspx?src=http%3A%2F%2Fsruserfiletest.oss-cn-hangzhou.aliyuncs.com%2Fcrm%2F981f08e66ffa4f64934b37e543f5700b.xlsx%3FExpires%3D1545898717%26OSSAccessKeyId%3DLTAIm573A7RmsqeQ%26Signature%3DFgItdsB%252BPrm2%252BOQShja1HkfqKyY%253D
34 | ```
35 |
36 | ## PDF
37 |
38 | window.open([url])
39 |
--------------------------------------------------------------------------------
/src/content/posts/前端技术架构选型.md:
--------------------------------------------------------------------------------
1 | ---
2 | title: 前端技术架构选型
3 | pubDate: 2018-11-20 17:46:12
4 | categories: ["前端技术架构"]
5 | description: ""
6 | ---
7 |
8 | 
9 |
10 | ## 结语
11 |
12 | 可以从以下几个指标,来选择一套适合自己团队的项目。
13 |
14 | - 是否符合团队的技术栈
15 | - 是否符合项目需求
16 | - 生态圈是否完善、社区是否活跃
17 | - 开发效率是否会降低
18 | - 团队的学习能力如何
19 |
--------------------------------------------------------------------------------
/src/content/posts/告前端同学的小记.md:
--------------------------------------------------------------------------------
1 | ---
2 | title: 告前端同学的小记
3 | pubDate: 2023-10-15 17:44:07
4 | categories: ["前端"]
5 | description: ""
6 | ---
7 |
8 | 
9 |
10 | 转载周爱民老师《告前端同学书》,有些思绪需要发散,随联想到自己的过往。
11 |
12 | 文中提到'领域'一词,用在前端,个人认为非常合适。领域一词在我印象中,还需追溯到初中时期,我读的一本叫《吞噬星空》的小说,书籍大概 400 多万字,读起来却是昼夜不分(这也是我唯一看完的一本小说),此书也提到了领域,行星级武者可以展开自己的领域。我个人所理解的领域,用大白话通俗解释,就是当你的本领到达一定阶段时,你会在这个范围拥有一定的话语权。类似的阿里技术等级序列也是,通常来说,P7 一般拥有自己的领域。
13 |
14 | 从疫情后开始,互联网的就业环境非常糟糕。前端就业,每况愈下,不断传出前端已死。之前,我也有发文,并不认同前端已死,如今还是持有该观点。周爱民老师的观点也与我一致。
15 |
16 | 我从 16 年入行至今,快 7 年的时光,经历了从 jQuery 时代到前端三大框架,如今相持不下的,只剩 React 和 Vue 。Angular 基本被社区抛弃,算是赶上了前端黄金时期的末尾阶段,前五年我是在做一个大前端方向,微信小程序、H5、Web、APP 开发都有涉及,前端工程化链路搭建也小有涉及。所谓的技术广泛度。也向往大厂。想见识见识大厂的工作氛围,大厂的技术链路到底是怎样的。后面,我进去了,但也经历了裁员,之前的想法是想靠大厂背书 + 前端工具链路这个方向,做可持续性的发展。随后,我搞了微前端,想在这个领域深入下去,但这条路走失败了,让我不得不重新思考,未来的出路在那?35 岁以后呢?我可不想去送外卖,开滴滴。
17 |
18 | 后面,我接触到了 WebGL,前端 3D 图形化的概念和场景非常吸引我,我也慢慢开始在往这个方向去做探索 + 转型,转型是一件非常痛苦的事,因为你要从自己的舒适区进入到坑洼区,你不得不去做很多东西,从 0 - 1 。辛运的是,我还年轻(但也不年轻了)。我个人坚信选择大于努力,时代会不断的造就一批人,之前的土木,现今的互联网,自媒体,直播带货等。
19 |
20 | 
21 |
22 | 很多人问我搞矩阵有什么用,你的目的是什么?
23 |
24 | 其实很简单,学习。我本人的学习模式是,需要通过大量的实战摸索 + 理论知识,梳理成一套成熟的方法论,单纯的去学理论知识,对于我本人而言,非常枯燥,况且 3D 图形化知识体系,非常困难。
25 |
26 | > 这是在一个新阶段的前夜。故此,有很多信息并不那么明朗,比如说像前后端分离这样的标志性事件并没有出现,亦或者出现了也还没有形成典型影响。我倾向于认为引领新时代的,或者说开启下一个阶段的运动将会发生在交互领域,也就是说新的交互方式决定了前端的未来。之前行业里在讲的 VR 和 AR(虚拟现实和增强实景)是在这个方向上的典型技术,但不唯于此。几乎所有在交互方式上的变革,都会成为人们认识与改变这个世界的全新动力,像语音识别、视觉捕捉、脑机接口等等,这些半成熟的或者实验性的技术都在影响着我们对'交互'的理解,从而重新定义了前端
27 |
28 | 周爱民老师这段文字,讲得非常透彻。AI、VR、AR 的不断发展,对前端的要求越来越高,如果还是停留在写业务页面的思想层面上,估计很快会被替代,大量的培训班造就一批人,已经告诉了我们。培训几个月,稍微伪造下履历,就可以快速上手业务开发,那么对比一个五年的,你有什么优势?,何况随着低代码不断的演进,让本不会写代码的一批人,也可以通过低代码引擎平台,快速生成页面,如果 AI 再持续迭代呢?这是一件很可怕的事
29 |
30 | 前端的很多理念来自于后端,并没有造就出真正属于自己的革命。底子很薄,真正要下功夫的其实是系统、网络、编译、机器学习、图形化等层面,或许 WASM + RUST 又会产生一点不一样的东西
31 |
32 | 在这个行业待了很久,见识了很多人转到其他行业。互联网的发展非常迅速,如果做不到持之以恒的学习,那将会被慢慢淘汰。以汽车为例,燃油车"固若金汤",谁会想到互联网 + 纯电,基本上算是革了燃油车的命,这些传统燃油车商,也要做出相应的改变,以应对时代的变化。
33 |
34 | 眼光高远而脚踏实地
35 |
--------------------------------------------------------------------------------
/src/content/posts/命令行 MySQL 基本操作(CentOS).md:
--------------------------------------------------------------------------------
1 | ---
2 | title: 命令行 MySQL 基本操作(CentOS)
3 | pubDate: 2020-07-24 10:54:53
4 | categories: ["MySQL", "CentOS"]
5 | description: ""
6 | ---
7 |
8 | ## 安装
9 |
10 | ```
11 | $ brew install mysql
12 | ```
13 |
14 | ## 登录
15 |
16 | ```
17 | $ mysql -uroot -p
18 | ```
19 |
20 | 连接到 mysql 数据库,默认没有密码的,直接按回车进入。
21 |
22 | ## 启动数据库
23 |
24 | ```
25 | $ service mysqld start
26 | ```
27 |
28 | ## 停止数据库
29 |
30 | ```
31 | $ service mysqld stop
32 | ```
33 |
34 | ## 重启数据库
35 |
36 | ```
37 | $ service mysqld restart
38 | ```
39 |
40 | ## 显示所有数据库
41 |
42 | ```
43 | $ show databases;
44 | ```
45 |
46 | 
47 |
48 | ## 进入数据库
49 |
50 | ```
51 | $ use mysql;
52 | ```
53 |
54 | ## 显示所有表
55 |
56 | ```
57 | $ show tables;
58 | ```
59 |
60 | 
61 |
62 | ## 创建表名和字段
63 |
64 | ```
65 | $ CREATE TABLE data (images VARCHAR(20));
66 | ```
67 |
68 | ## 修改字段大小
69 |
70 | ```
71 | $ ALTER TABLE data images MODIFY VARCHAR(100);
72 | ```
73 |
74 | ## 查询表
75 |
76 | ```
77 | $ select * from card;
78 | ```
79 |
80 | ## 修改用户密码
81 |
82 | ```
83 | $ mysql -u root -p
84 |
85 | $ show databases;
86 |
87 | $ use mysql;
88 |
89 | $ desc user; # 用户表存放用户和面膜
90 |
91 | $ update user set authentication_string=PASSWORD('123') where user = 'root';
92 | ```
93 |
--------------------------------------------------------------------------------
/src/content/posts/垂直居中.md:
--------------------------------------------------------------------------------
1 | ---
2 | title: CSS-垂直居中
3 | pubDate: 2018-09-27 19:14:57
4 | categories: ["CSS"]
5 | description: ""
6 | ---
7 |
8 | ## line-height
9 |
10 | ```
11 |  57 |
58 | 无法在开发者工具上查看 DOM 视图
59 |
60 | ## 现象
61 |
62 | ### 正常
63 |
64 | 
65 |
66 | ### 文字消失
67 |
68 | 
69 |
70 | 这个元素的宽高都在,就是文字消失
71 |
72 | ## 微信小程序架构图
73 |
74 | 
75 |
76 | ## 展业小程序架构图
77 |
78 | 
79 |
--------------------------------------------------------------------------------
/src/content/posts/微信小程序 web-view 问题讨论.md:
--------------------------------------------------------------------------------
1 | ---
2 | title: 微信小程序 web-view 问题讨论
3 | pubDate: 2021-10-14 12:51:25
4 | categories: ["微信小程序"]
5 | description: ""
6 | ---
7 |
8 | 大家好,我是江辰,这篇文章记录一次在真实的线上环境中,关于 web-view 的问题,大家可以跟随作者一起看看心路历程。
9 |
10 | 本文首发于微信公众号:野生程序猿江辰
11 |
12 | 欢迎大家点赞,收藏,关注
13 |
14 | ## 问题背景
15 |
16 | 上半年最开始做的一版是展业大厅页面和互动白板页面(以下统称 `web-view`)分离,后面由于腾讯那边对交互方式不满意,强调一定要展业大厅页面和白板页面在同一个页面进行交互,最开始我们没有思路,因为在小程序官方中的描述,`web-view` 页面不允许叠加任何组件,后面是产品找到一个 demo,发现可以叠加,我这边去翻了下他们的源码(`renderingMode: 'seperated'`),最终解决了该问题,也就导致后面很多问题的产生。
17 |
18 | ## 现存问题
19 |
20 | ### web-view 存在的情况
21 |
22 | 1. 安卓更新组件不生效,比如 tab 切换,tab1 切换到 tab2 ,不生效,内容不会更新
23 |
24 | 2. 安卓更新图片不生效
25 |
26 | 3. 安卓更新样式不生效
27 |
28 | 4. cover-view 文字消失
29 |
30 | 5. 按钮响应慢,机型性能低的手机比较明显
31 |
32 | 针对问题 2,目前的 `hack` 方案,先渲染一张透明的图片,然后再渲染其他图片,可以生效
33 |
34 | 针对问题 1、2、3,仅在安卓端出现,苹果手机上没有发现,目前有一个比较 `hack` 的方案,通过卸载组件,重新渲染,可以达到目的,但是产生的性能损耗比较大,对交互体验不友好,而且也导致了第四点问题的产生
35 |
36 | 针对问题 4 安卓复现频率比较高,苹果出现过一次
37 |
38 | 针对问题 5 安卓跟苹果都存在
39 |
40 | ### web-view 不存在的情况
41 |
42 | 都正常
43 |
44 | ## 尝试过的方案
45 |
46 | 针对 `cover-view` 文字消失
47 |
48 | - 设置组件宽高
49 | - 设置字体颜色和背景颜色
50 | - 刷新
51 |
52 | 以上方案,都不行,也没法在开发者工具上查看 `DOM` 视图
53 |
54 | ### Console
55 |
56 | 
57 |
58 | 元素的宽高都在,偏移位置也正常,就是文字消失
59 |
60 | ### DOM
61 |
62 | 
63 |
64 | 无法在开发者工具上查看 DOM 视图
65 |
66 | ## 现象
67 |
68 | ### 正常
69 |
70 | 
71 |
72 | ### 文字消失
73 |
74 | 
75 |
76 | 这个元素的宽高都在,就是文字消失
77 |
78 | ## 微信小程序架构图
79 |
80 | 
81 |
82 | ## 展业小程序架构图
83 |
84 | 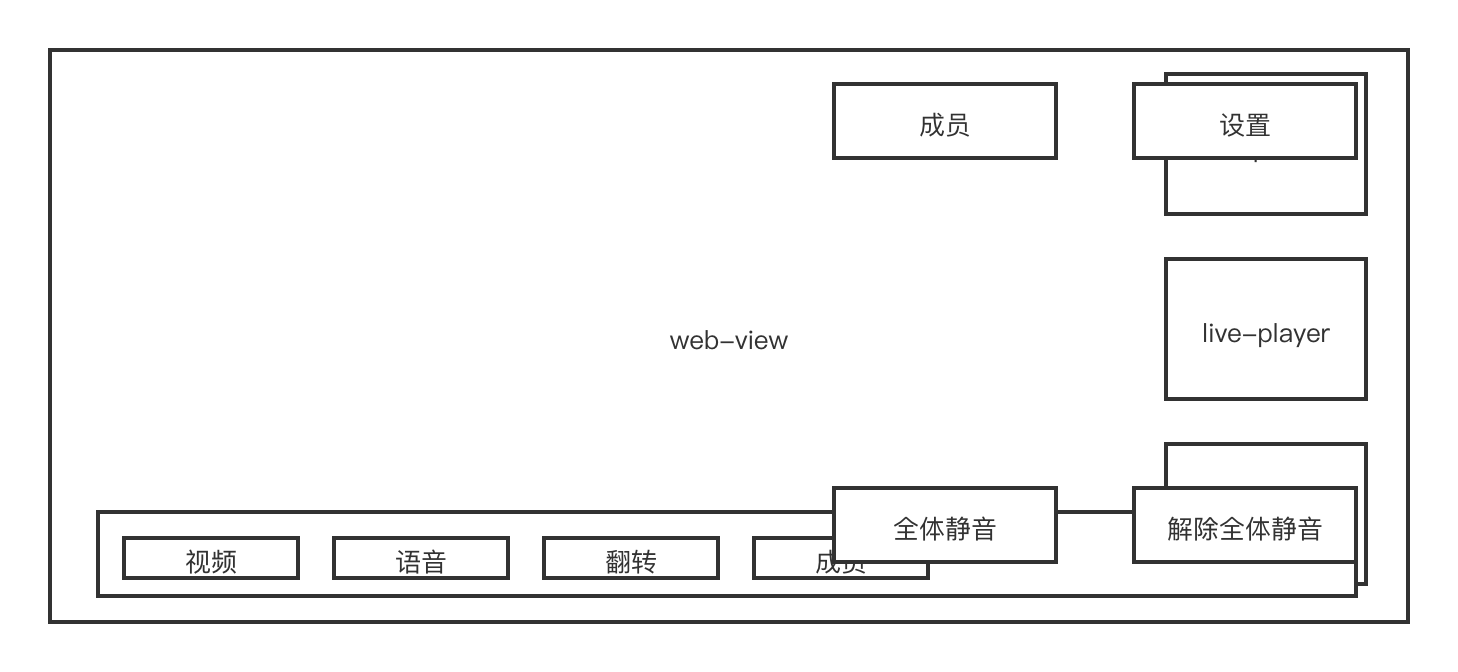
85 |
86 | ## 解决方案
87 |
88 | - 所有人的视频流不再全部获取,而是只显示四路视频流,其他人员要显示,在成员列表进行切换显示
89 |
90 | - 重点⼯作中花费精⼒最多的是模块化解耦的重构、我简单说下背景。因为之前我们代码共建的、 但是因为客户这边定制化的需求有很多,并且不是那么简单的能⽤抽象的⽅式把这些⾮通⽤功能的功能实现的、所以我们想出来的⽅案是:把⼩程序代码⾥划分重点模块,把每个模块都做成可插拔的,这样我们只需要把差异化很多的部分抽出来完全独⽴交给⾃⼰开发即可。同时这个⽅案实现好后,如果后续我们要开发新形态的应⽤,可以通过实现模块的⽅式实现⼀套新的应⽤形态
91 |
92 | 这些优化工作总共时间大概花了一个月左右,完成之后,目前我们的产品能够支持到 **20+** 人同时进行音视频,这块实际测试过。对我们的产品稳定性越来越好!
93 |
--------------------------------------------------------------------------------
/src/content/posts/桌面、生产力和泛娱乐 .md:
--------------------------------------------------------------------------------
1 | ---
2 | title: 桌面、生产力和泛娱乐
3 | pubDate: 2023-06-07 12:52:41
4 | categories: ["办公桌面"]
5 | description: ""
6 | ---
7 |
8 | 
9 |
10 | 感谢室友送的显示器支架和宜家办公桌!周末的时候,总算把家庭生产工具组装起来了,之前用的 MBP2017 款,实在太老了。性能渐渐缺失,最近 618 大促,更换了一套生产力 + 娱乐设备,致力提升在家办公体验,桌面有点乱,总算能兼顾生产和娱乐
11 |
12 | ### 显示器
13 |
14 | 我用过 4k 显示器之后,发现再也回不去了。1080,2k 都是些什么东西?(手动狗头)趁着 618 大促期间,购入了红米 4k 显示器,最开始买的是 WESCOM 27 英寸 4K(感觉性价比很高阿,800 多大洋就能有 27 寸 4k),显示器到手之后,测试发现,整体画面偏白,举个简单的例子,微信的消息框,你看不到它的背景色,我调教了很久,发现都不行,也就是色域太低。还在七天无理由内,赶紧退货。然后又考虑买那台呢?戴尔,lG?细细思考之后,我不是专业的设计人士,没有必要去追求极致的参数,最终选定了红米 4k,价格也很合适,性价比拉满,到手测试之后,很满意,比 WESCOM 好太多,毕竟一分价钱一分货
15 |
16 | ### 显示器支架手臂
17 |
18 | 看过很多手臂来支撑显示器,觉得很酷,有没有!而且还能把桌面上的空间给空出来,最终选定了北弧的显示器支架
19 |
20 | 
21 |
22 | 如图所示,很有科幻感。装上之后,脖子舒服不少,还能各个方向调动,如果后面再把手臂提升下,接入 chatGPT + 语音会咋样?或许正如钢铁侠中吧?空间层次感上升+1
23 |
24 | ### 桌面主机
25 |
26 | 用过两台 macbook pro ,一直想换 mac mini,M 系列的 mac mini ,主打就是一个性价比,而且不占空间。这次终于尝试了,确实很舒服,mac mini + 双显示器,体验拉满,性能又够,平时剪剪视频,写写代码,很优雅
27 |
28 | ### 三合一无线充
29 |
30 | 网上看过很多款无线充。看了评论,基本比较差劲,比如功率不够,充电发热等等。最终目光锁定在了贝尔金的三合一无线充,跟苹果官方合作的厂商,京东自营有卖,价格偏贵,我买的二手,解放了很多线
31 |
32 | 清单:
33 |
34 | - Mac Mini M2 25G + 512G
35 | - 红米 4K 显示器
36 | - 红米 1080 显示器
37 | - 阿米诺迷你洛键盘 68 键
38 | - 阿米洛手托
39 | - 罗技 Master 3s
40 | - Switch Oled 喷喷限定
41 | - Xbox Series X
42 | - 飞利浦桌面音箱
43 | - 绿联扩展坞
44 | - 希捷 2TB 移动硬盘
45 | - iPad mini6
46 | - 贝尔金三合一无线充
47 | - Apple Watch S7
48 | - iPhone 12 mini
49 | - AirPods 2
50 | - 宜家办公桌:140x65
51 |
52 | 完
53 |
--------------------------------------------------------------------------------
/src/content/posts/检测浏览器刷新还是退出代码.md:
--------------------------------------------------------------------------------
1 | ---
2 | title: 检测浏览器刷新还是退出代码
3 | pubDate: 2021-09-27 15:17:23
4 | categories: ["React"]
5 | description: ""
6 | ---
7 |
8 | ```
9 | let beginTime = 0;
10 | let differTime = 0;
11 | window.onunload = function () {
12 | differTime = new Date().getTime() - beginTime;
13 | if (differTime <= 5) {
14 | console.log('浏览器关闭');
15 | } else {
16 | console.log('浏览器刷新');
17 | }
18 | };
19 | window.onbeforeunload = function () {
20 | beginTime = new Date().getTime();
21 | };
22 | ```
23 |
--------------------------------------------------------------------------------
/src/content/posts/水平居中.md:
--------------------------------------------------------------------------------
1 | ---
2 | title: 水平居中
3 | pubDate: 2018-09-27 19:14:10
4 | categories: ["CSS"]
5 | description: ""
6 | ---
7 |
8 | ## text-align
9 |
10 | ```
11 |
57 |
58 | 无法在开发者工具上查看 DOM 视图
59 |
60 | ## 现象
61 |
62 | ### 正常
63 |
64 | 
65 |
66 | ### 文字消失
67 |
68 | 
69 |
70 | 这个元素的宽高都在,就是文字消失
71 |
72 | ## 微信小程序架构图
73 |
74 | 
75 |
76 | ## 展业小程序架构图
77 |
78 | 
79 |
--------------------------------------------------------------------------------
/src/content/posts/微信小程序 web-view 问题讨论.md:
--------------------------------------------------------------------------------
1 | ---
2 | title: 微信小程序 web-view 问题讨论
3 | pubDate: 2021-10-14 12:51:25
4 | categories: ["微信小程序"]
5 | description: ""
6 | ---
7 |
8 | 大家好,我是江辰,这篇文章记录一次在真实的线上环境中,关于 web-view 的问题,大家可以跟随作者一起看看心路历程。
9 |
10 | 本文首发于微信公众号:野生程序猿江辰
11 |
12 | 欢迎大家点赞,收藏,关注
13 |
14 | ## 问题背景
15 |
16 | 上半年最开始做的一版是展业大厅页面和互动白板页面(以下统称 `web-view`)分离,后面由于腾讯那边对交互方式不满意,强调一定要展业大厅页面和白板页面在同一个页面进行交互,最开始我们没有思路,因为在小程序官方中的描述,`web-view` 页面不允许叠加任何组件,后面是产品找到一个 demo,发现可以叠加,我这边去翻了下他们的源码(`renderingMode: 'seperated'`),最终解决了该问题,也就导致后面很多问题的产生。
17 |
18 | ## 现存问题
19 |
20 | ### web-view 存在的情况
21 |
22 | 1. 安卓更新组件不生效,比如 tab 切换,tab1 切换到 tab2 ,不生效,内容不会更新
23 |
24 | 2. 安卓更新图片不生效
25 |
26 | 3. 安卓更新样式不生效
27 |
28 | 4. cover-view 文字消失
29 |
30 | 5. 按钮响应慢,机型性能低的手机比较明显
31 |
32 | 针对问题 2,目前的 `hack` 方案,先渲染一张透明的图片,然后再渲染其他图片,可以生效
33 |
34 | 针对问题 1、2、3,仅在安卓端出现,苹果手机上没有发现,目前有一个比较 `hack` 的方案,通过卸载组件,重新渲染,可以达到目的,但是产生的性能损耗比较大,对交互体验不友好,而且也导致了第四点问题的产生
35 |
36 | 针对问题 4 安卓复现频率比较高,苹果出现过一次
37 |
38 | 针对问题 5 安卓跟苹果都存在
39 |
40 | ### web-view 不存在的情况
41 |
42 | 都正常
43 |
44 | ## 尝试过的方案
45 |
46 | 针对 `cover-view` 文字消失
47 |
48 | - 设置组件宽高
49 | - 设置字体颜色和背景颜色
50 | - 刷新
51 |
52 | 以上方案,都不行,也没法在开发者工具上查看 `DOM` 视图
53 |
54 | ### Console
55 |
56 | 
57 |
58 | 元素的宽高都在,偏移位置也正常,就是文字消失
59 |
60 | ### DOM
61 |
62 | 
63 |
64 | 无法在开发者工具上查看 DOM 视图
65 |
66 | ## 现象
67 |
68 | ### 正常
69 |
70 | 
71 |
72 | ### 文字消失
73 |
74 | 
75 |
76 | 这个元素的宽高都在,就是文字消失
77 |
78 | ## 微信小程序架构图
79 |
80 | 
81 |
82 | ## 展业小程序架构图
83 |
84 | 
85 |
86 | ## 解决方案
87 |
88 | - 所有人的视频流不再全部获取,而是只显示四路视频流,其他人员要显示,在成员列表进行切换显示
89 |
90 | - 重点⼯作中花费精⼒最多的是模块化解耦的重构、我简单说下背景。因为之前我们代码共建的、 但是因为客户这边定制化的需求有很多,并且不是那么简单的能⽤抽象的⽅式把这些⾮通⽤功能的功能实现的、所以我们想出来的⽅案是:把⼩程序代码⾥划分重点模块,把每个模块都做成可插拔的,这样我们只需要把差异化很多的部分抽出来完全独⽴交给⾃⼰开发即可。同时这个⽅案实现好后,如果后续我们要开发新形态的应⽤,可以通过实现模块的⽅式实现⼀套新的应⽤形态
91 |
92 | 这些优化工作总共时间大概花了一个月左右,完成之后,目前我们的产品能够支持到 **20+** 人同时进行音视频,这块实际测试过。对我们的产品稳定性越来越好!
93 |
--------------------------------------------------------------------------------
/src/content/posts/桌面、生产力和泛娱乐 .md:
--------------------------------------------------------------------------------
1 | ---
2 | title: 桌面、生产力和泛娱乐
3 | pubDate: 2023-06-07 12:52:41
4 | categories: ["办公桌面"]
5 | description: ""
6 | ---
7 |
8 | 
9 |
10 | 感谢室友送的显示器支架和宜家办公桌!周末的时候,总算把家庭生产工具组装起来了,之前用的 MBP2017 款,实在太老了。性能渐渐缺失,最近 618 大促,更换了一套生产力 + 娱乐设备,致力提升在家办公体验,桌面有点乱,总算能兼顾生产和娱乐
11 |
12 | ### 显示器
13 |
14 | 我用过 4k 显示器之后,发现再也回不去了。1080,2k 都是些什么东西?(手动狗头)趁着 618 大促期间,购入了红米 4k 显示器,最开始买的是 WESCOM 27 英寸 4K(感觉性价比很高阿,800 多大洋就能有 27 寸 4k),显示器到手之后,测试发现,整体画面偏白,举个简单的例子,微信的消息框,你看不到它的背景色,我调教了很久,发现都不行,也就是色域太低。还在七天无理由内,赶紧退货。然后又考虑买那台呢?戴尔,lG?细细思考之后,我不是专业的设计人士,没有必要去追求极致的参数,最终选定了红米 4k,价格也很合适,性价比拉满,到手测试之后,很满意,比 WESCOM 好太多,毕竟一分价钱一分货
15 |
16 | ### 显示器支架手臂
17 |
18 | 看过很多手臂来支撑显示器,觉得很酷,有没有!而且还能把桌面上的空间给空出来,最终选定了北弧的显示器支架
19 |
20 | 
21 |
22 | 如图所示,很有科幻感。装上之后,脖子舒服不少,还能各个方向调动,如果后面再把手臂提升下,接入 chatGPT + 语音会咋样?或许正如钢铁侠中吧?空间层次感上升+1
23 |
24 | ### 桌面主机
25 |
26 | 用过两台 macbook pro ,一直想换 mac mini,M 系列的 mac mini ,主打就是一个性价比,而且不占空间。这次终于尝试了,确实很舒服,mac mini + 双显示器,体验拉满,性能又够,平时剪剪视频,写写代码,很优雅
27 |
28 | ### 三合一无线充
29 |
30 | 网上看过很多款无线充。看了评论,基本比较差劲,比如功率不够,充电发热等等。最终目光锁定在了贝尔金的三合一无线充,跟苹果官方合作的厂商,京东自营有卖,价格偏贵,我买的二手,解放了很多线
31 |
32 | 清单:
33 |
34 | - Mac Mini M2 25G + 512G
35 | - 红米 4K 显示器
36 | - 红米 1080 显示器
37 | - 阿米诺迷你洛键盘 68 键
38 | - 阿米洛手托
39 | - 罗技 Master 3s
40 | - Switch Oled 喷喷限定
41 | - Xbox Series X
42 | - 飞利浦桌面音箱
43 | - 绿联扩展坞
44 | - 希捷 2TB 移动硬盘
45 | - iPad mini6
46 | - 贝尔金三合一无线充
47 | - Apple Watch S7
48 | - iPhone 12 mini
49 | - AirPods 2
50 | - 宜家办公桌:140x65
51 |
52 | 完
53 |
--------------------------------------------------------------------------------
/src/content/posts/检测浏览器刷新还是退出代码.md:
--------------------------------------------------------------------------------
1 | ---
2 | title: 检测浏览器刷新还是退出代码
3 | pubDate: 2021-09-27 15:17:23
4 | categories: ["React"]
5 | description: ""
6 | ---
7 |
8 | ```
9 | let beginTime = 0;
10 | let differTime = 0;
11 | window.onunload = function () {
12 | differTime = new Date().getTime() - beginTime;
13 | if (differTime <= 5) {
14 | console.log('浏览器关闭');
15 | } else {
16 | console.log('浏览器刷新');
17 | }
18 | };
19 | window.onbeforeunload = function () {
20 | beginTime = new Date().getTime();
21 | };
22 | ```
23 |
--------------------------------------------------------------------------------
/src/content/posts/水平居中.md:
--------------------------------------------------------------------------------
1 | ---
2 | title: 水平居中
3 | pubDate: 2018-09-27 19:14:10
4 | categories: ["CSS"]
5 | description: ""
6 | ---
7 |
8 | ## text-align
9 |
10 | ```
11 |