├── README.md
├── car_noncar.jpg
├── demo.ipynb
├── example_images
├── car_noncar.jpg
├── classifier.jpg
├── detection945.jpg
├── features.jpg
├── heatmap.jpg
└── labels.png
├── project_video.mp4
├── scaler.npz
├── svm.pkl
├── test.py
├── test_images
├── test1.jpg
├── test2.jpg
├── test3.jpg
├── test4.jpg
├── test5.jpg
└── test6.jpg
├── train.py
└── util.py
/README.md:
--------------------------------------------------------------------------------
1 | ## Vehicle Detection
2 | The goals / steps of this project are the following:
3 | - Extract features using a labeled training set of RGB Images
4 | - Histograms of Oriented Gradients of each YCrCb color spaces
5 | - Histograms of value of each YCrCb color spaces
6 | - Binned raw images of each YCrCb color spaces
7 | * Training a Linear SVM classifier using a extracted features
8 | * Using a sliding-window technique for searching and classifying vehicles.
9 | * Estimate a bounding box for vehicles detected.
10 |
11 | [//]: # (Image References)
12 | [image1]: ./example_images/car_noncar.jpg
13 | [image2]: ./example_images/features.jpg
14 | [image3]: ./examples/sliding_windows.jpg
15 | [image4]: ./examples/sliding_window.jpg
16 | [image5]: ./examples/bboxes_and_heat.png
17 | [image6]: ./examples/labels_map.png
18 | [image7]: ./examples/output_bboxes.png
19 | [video1]: ./project_video.mp4
20 |
21 | ---
22 | ### Histogram of Oriented Gradients (HOG)
23 |
24 | #### 1. How to extract HOG features from the training images.
25 | The code for this step is contained in lines 17 through 42 of the file called `util.py`.
26 |
27 | I started by reading in all the `vehicle` and `non-vehicle` images. When I see all image directories, there are few images from `left` and `right` view. So I augmented left and right images by using techniques such as flip and brightness conversion. The code for using datasets is contained in lines 65 through 96 of the file called `train.py`.
28 | Here is an example of one of each of the `vehicle` and `non-vehicle` classes:
29 |
30 |
31 |
32 |
33 | I then explored different color spaces and different `skimage.hog()` parameters (`orientations`, `pixels_per_cell`, and `cells_per_block`). I grabbed random images from each of the two classes and displayed them to get a feel for what the `skimage.hog()` output looks like.
34 |
35 | Here is an example using the `YCrCb` color space and HOG parameters of `orientations=18`, `pixels_per_cell=(8, 8)` and `cells_per_block=(3, 3)`:
36 |
37 |
38 |
39 |
40 |
41 | #### 2. How to settled on final choice of HOG parameters.
42 |
43 | First I imitate the parameter of HOG thesis, but the test accuracy is not good. So I increase orientation parameter for extracting more detailed direction of each block gradient, and get more about 2% accuracy.
44 | And increasing cells_per_block parameter for extracting more robust features to noise.
45 |
46 | #### 3. How to trained a classifier using extracted features
47 |
48 | I extracted three features `HOG feature`, `binned image` and `histogram of each channel` of YCrCb color image, and standardize extracted features.
49 | And then, I trained a linear SVM by using standardized extracted features.
50 |
51 | ### Sliding Window Search
52 |
53 | #### 1. How to implement a sliding window search.
54 |
55 | I implement a sliding window search by using multiple windows according to the height position of image. As the height is increasing, the size of window is increasing.
56 | And in the image, about the half of it is sky or forests and the lowest part of it is including the own car. So I remove these area for sliding window search. This is the last parameter.
57 |
58 | | y place | Width, Height | overlap |
59 | |:----:|:----:|:----:|
60 | | lower | 200, 170 | 0.9 |
61 | | lower-middle | 150, 120 | 0.9 |
62 | | middle | 120, 110 | 0.9 |
63 | | middle | 120, 96 | 0.9 |
64 | | upper | 84, 64 | 0.9 |
65 |
66 | #### 2. How to decide parameter of window size and overlap
67 |
68 | As the height is increasing, the size of car is bigger. So The window size is decided based on the height of image.
69 | I examined various window sizes, regions and overlap.
70 | In the middle area, The size of car is depending on the place. Car in the center looks smaller than the side because we can see not only the back, but also the side of the car. So in the middle range, I prepared two windows. About the rate of overlap, first I use the smaller parameter when the window size is smaller. But, as the car is smaller, the accuracy of classifier is lower. So I decided all window's overlap is same.
71 |
72 | #### 3. Show examples of classifier
73 |
74 | I searched on two scales using YCrCb 3-channel HOG features plus spatially binned color(16×16) and histograms of YCrCb color space, which provided a nice result. Here are some example images:
75 |
76 |
77 |
78 | ---
79 |
80 | ### Video Implementation
81 |
82 | #### 1. Video
83 | [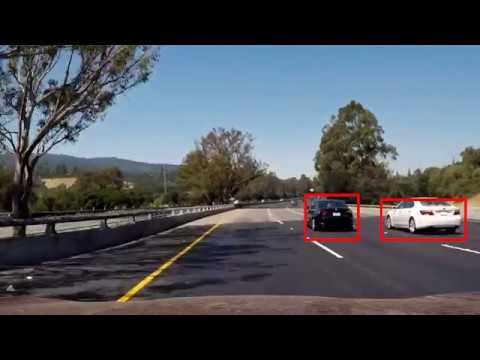](https://youtu.be/K-QHdTBfSbI)
84 |
85 |
86 |
87 | #### 2. How to implement some kind of filter for false positives and some method for combining overlapping bounding boxes.
88 |
89 | The code for this step is contained in lines 125 through 135 of the file called `test.py`.
90 | From the detected area from previous 4 frames and the result of sliding window search in a target frame, I created a heatmap and then thresholded that map to identify vehicle positions. I then used `scipy.ndimage.measurements.label()` to identify individual blobs in the heatmap. I then assumed each blob corresponded to a vehicle. I constructed bounding boxes to cover the area of each blob detected.
91 |
92 | Here's an example result showing the heatmap from a series of frames of video, the result of `scipy.ndimage.measurements.label()` and the bounding boxes then overlaid on the last frame of video:
93 |
94 | ##### Heatmaps of six frame
95 |
96 |
97 | ##### Output of `scipy.ndimage.measurements.label()` on the integrated heatmap(945 frame in the movie):
98 |
99 |
100 | ##### Resulting bounding boxes are drawn onto the 945 frame in the movie:
101 |
102 |
103 | ---
104 |
105 | ### Discussion
106 |
107 | #### 1. Briefly discuss any problems / issues you faced in your implementation of this project. Where will your pipeline likely fail? What could you do to make it more robust?
108 |
109 | My pipeline is so slow because of using sliding-window technique. These days, by using convolutional neural network like SSD or YOLO, we can execute both of region proposal and feature sampling simultaneously for object detection.
110 | If there are steep slopes, my pipeline couldn't recognize cars because I utilize lower part of image(about half).
111 | And If it's rainy, probably my pipeline couldn't classify cars or not correctly because rain makes the features unclearly.
112 |
--------------------------------------------------------------------------------
/car_noncar.jpg:
--------------------------------------------------------------------------------
https://raw.githubusercontent.com/yukitsuji/Vehicle_Detection_hog/193813f594c2d9a67f92f518200931d865fe2515/car_noncar.jpg
--------------------------------------------------------------------------------
/example_images/car_noncar.jpg:
--------------------------------------------------------------------------------
https://raw.githubusercontent.com/yukitsuji/Vehicle_Detection_hog/193813f594c2d9a67f92f518200931d865fe2515/example_images/car_noncar.jpg
--------------------------------------------------------------------------------
/example_images/classifier.jpg:
--------------------------------------------------------------------------------
https://raw.githubusercontent.com/yukitsuji/Vehicle_Detection_hog/193813f594c2d9a67f92f518200931d865fe2515/example_images/classifier.jpg
--------------------------------------------------------------------------------
/example_images/detection945.jpg:
--------------------------------------------------------------------------------
https://raw.githubusercontent.com/yukitsuji/Vehicle_Detection_hog/193813f594c2d9a67f92f518200931d865fe2515/example_images/detection945.jpg
--------------------------------------------------------------------------------
/example_images/features.jpg:
--------------------------------------------------------------------------------
https://raw.githubusercontent.com/yukitsuji/Vehicle_Detection_hog/193813f594c2d9a67f92f518200931d865fe2515/example_images/features.jpg
--------------------------------------------------------------------------------
/example_images/heatmap.jpg:
--------------------------------------------------------------------------------
https://raw.githubusercontent.com/yukitsuji/Vehicle_Detection_hog/193813f594c2d9a67f92f518200931d865fe2515/example_images/heatmap.jpg
--------------------------------------------------------------------------------
/example_images/labels.png:
--------------------------------------------------------------------------------
https://raw.githubusercontent.com/yukitsuji/Vehicle_Detection_hog/193813f594c2d9a67f92f518200931d865fe2515/example_images/labels.png
--------------------------------------------------------------------------------
/project_video.mp4:
--------------------------------------------------------------------------------
https://raw.githubusercontent.com/yukitsuji/Vehicle_Detection_hog/193813f594c2d9a67f92f518200931d865fe2515/project_video.mp4
--------------------------------------------------------------------------------
/scaler.npz:
--------------------------------------------------------------------------------
https://raw.githubusercontent.com/yukitsuji/Vehicle_Detection_hog/193813f594c2d9a67f92f518200931d865fe2515/scaler.npz
--------------------------------------------------------------------------------
/svm.pkl:
--------------------------------------------------------------------------------
https://raw.githubusercontent.com/yukitsuji/Vehicle_Detection_hog/193813f594c2d9a67f92f518200931d865fe2515/svm.pkl
--------------------------------------------------------------------------------
/test.py:
--------------------------------------------------------------------------------
1 | #!/user/bin/env python3
2 | import time
3 | import pickle
4 | import numpy as np
5 | import cv2
6 | import matplotlib.pyplot as plt
7 | import matplotlib.image as mpimg
8 | from skimage import io
9 | import glob
10 | from skimage.feature import hog
11 | from sklearn.preprocessing import StandardScaler
12 | from sklearn.model_selection import train_test_split
13 | from sklearn.svm import LinearSVC
14 | from sklearn.svm import SVC # for rbf
15 | from sklearn.metrics import accuracy_score
16 | from scipy.ndimage.measurements import label
17 | from util import *
18 |
19 | def slide_window(image, x_start_stop=[None, None], y_start_stop=[None, None],
20 | xy_window=(64, 64), xy_overlap=(0.5, 0.5)):
21 | if x_start_stop[0] == None:
22 | x_start_stop[0] = 0
23 | if x_start_stop[1] == None:
24 | x_start_stop[1] = image.shape[1]
25 | if y_start_stop[0] == None:
26 | y_start_stop[0] = 0
27 | if y_start_stop[1] == None:
28 | y_start_stop[1] = image.shape[0]
29 |
30 | window_list = []
31 | xspan = x_start_stop[1] - x_start_stop[0]
32 | yspan = y_start_stop[1] - y_start_stop[0]
33 | rate = 1/2
34 | xy_window_list = [[200, 170, int(yspan*rate), yspan, 0, xspan],
35 | [150, 120, int(yspan*rate*6 / 4), yspan-int(yspan*rate*rate*rate), 0, xspan],
36 | [120, 110, int(yspan*rate*6 / 4), yspan-int(yspan*rate*rate), 0, xspan],
37 | [120, 96, int(yspan*rate*rate*rate), yspan-int(yspan*rate), 0, xspan],
38 | [84, 64, 0, int(yspan*rate*rate), 0, xspan]]
39 |
40 | for xy_window in xy_window_list:
41 | nx_pix_per_step = np.int(xy_window[0]*(1 - xy_overlap[0]))
42 | ny_pix_per_step = np.int(xy_window[1]*(1 - xy_overlap[1]))
43 |
44 | nx_windows = np.int((xy_window[5] - xy_window[4]) / nx_pix_per_step) - 1
45 | ny_windows = np.int((xy_window[3] - xy_window[2]) / ny_pix_per_step) - 1
46 |
47 | for ys in range(ny_windows):
48 | for xs in range(nx_windows):
49 | startx = xs * nx_pix_per_step + x_start_stop[0] + xy_window[4]
50 | endx = startx + xy_window[0]
51 | starty = ys * ny_pix_per_step + y_start_stop[0] + xy_window[2]
52 | endy = starty + xy_window[1]
53 | window_list.append(((startx, starty), (endx, endy)))
54 | return window_list
55 |
56 | def draw_boxes(image, bboxes, color=(0, 0, 255), thick=6):
57 | new_image = image.copy()
58 | for bbox in bboxes:
59 | cv2.rectangle(new_image, bbox[0], bbox[1], color, thick)
60 | return new_image
61 |
62 | def add_heat(heatmap, bbox_list, value=1):
63 | for box in bbox_list:
64 | heatmap[box[0][1]:box[1][1], box[0][0]:box[1][0]] += value
65 | return heatmap
66 |
67 | def apply_threshold(heatmap, threshold):
68 | heatmap[heatmap <= threshold] = 0
69 | return heatmap
70 |
71 | def search_windows(image, windows, svc, scaler, hog_color="RGB", hog_channel="ALL",
72 | spatial_size=(32, 32), spatial_color="RGB", hist_color="HLS", hist_feat=True,
73 | spatial_feat=True, orient=9, cell_per_block=3):
74 | on_windows = []
75 | for window in windows:
76 | test_img = cv2.resize(image[window[0][1]:window[1][1], window[0][0]:window[1][0]], (64, 64))
77 | features = extract_feature(test_img, hog_color=hog_color, hog_channel=hog_channel, spatial_feat=spatial_feat,
78 | spatial_size=spatial_size, spatial_color=spatial_color, hist_color=hist_color,
79 | hist_feat=hist_feat, orient=orient, cell_per_block=cell_per_block)
80 | test_features = scaler.transform(np.array(features).reshape(1, -1))
81 | prediction = svc.predict(test_features)
82 | if prediction == 1:
83 | if svc.decision_function(test_features)[0] > 0.3:
84 | on_windows.append([window, svc.decision_function(test_features)[0]])
85 | return on_windows
86 |
87 | def draw_labeled_bboxes(img, labels):
88 | bbox_list = []
89 | for car_number in range(1, labels[1]+1):
90 | nonzero = (labels[0] == car_number).nonzero()
91 | nonzeroy = np.array(nonzero[0])
92 | nonzerox = np.array(nonzero[1])
93 | bbox = ((np.min(nonzerox), np.min(nonzeroy)), (np.max(nonzerox), np.max(nonzeroy)))
94 | bbox_list.append(bbox)
95 | cv2.rectangle(img, bbox[0], bbox[1], (0,0,255), 6)
96 | return img, bbox_list
97 |
98 | def main():
99 | scaler = np.load("scaler.npz")
100 | X_scaler = StandardScaler()
101 | X_scaler.mean_, X_scaler.scale_ = scaler["mean"], scaler["scale"]
102 | with open("svm.pkl", mode="rb") as f:
103 | svc = pickle.load(f)
104 |
105 | cap = cv2.VideoCapture("project_video.mp4")
106 | fourcc = cv2.VideoWriter_fourcc(*'MJPG')
107 | out = cv2.VideoWriter('output.avi', fourcc, 20.0, (1280,720))
108 | heatmap = None
109 | ex_bbox_list = []
110 | exex_bbox_list = []
111 | exexex_bbox_list = []
112 | exexexex_bbox_list = []
113 | index=0
114 | while(1):
115 | ret, image = cap.read()
116 | index+=1
117 | heatmap = np.zeros_like(image)
118 | print("index", index)
119 | converted_image = cv2.cvtColor(image, cv2.COLOR_BGR2RGB)
120 | windows = slide_window(converted_image, x_start_stop=[None, None], y_start_stop=[400, image.shape[0]-200],
121 | xy_window=(240, 160), xy_overlap=(0.9, 0.9))
122 | bboxes = search_windows(converted_image, windows, svc, X_scaler, hog_color="YCrCb", hog_channel="ALL",
123 | spatial_size=(16, 16), spatial_color="YCrCb", hist_color="YCrCb",
124 | spatial_feat=True, orient=18, cell_per_block=2)
125 | if bboxes:
126 | heatmap = add_heat(heatmap, np.array(bboxes)[:, 0], value=2)
127 | if ex_bbox_list:
128 | heatmap = add_heat(heatmap, ex_bbox_list, value=2)
129 | if exex_bbox_list:
130 | heatmap = add_heat(heatmap, exex_bbox_list, value=2)
131 | if exexex_bbox_list:
132 | heatmap = add_heat(heatmap, exexex_bbox_list, value=1)
133 | if exexexex_bbox_list:
134 | heatmap = add_heat(heatmap, exexexex_bbox_list, value=1)
135 | heatmap = apply_threshold(heatmap, threshold=6)
136 | labels = label(heatmap)
137 | exexexex_bbox_list = exexex_bbox_list
138 | exexex_bbox_list = exex_bbox_list
139 | exex_bbox_list = ex_bbox_list
140 | window_img, ex_bbox_list = draw_labeled_bboxes(image, labels)
141 | out.write(window_img)
142 | # window_img = draw_boxes(image, bboxes, color=(0, 0, 255), thick=6)
143 | # cv2.imwrite("./images13/detected" + str(index) + ".jpg", window_img)
144 | out.release()
145 | cap.release()
146 |
147 | if __name__ == "__main__":
148 | main()
149 |
--------------------------------------------------------------------------------
/test_images/test1.jpg:
--------------------------------------------------------------------------------
https://raw.githubusercontent.com/yukitsuji/Vehicle_Detection_hog/193813f594c2d9a67f92f518200931d865fe2515/test_images/test1.jpg
--------------------------------------------------------------------------------
/test_images/test2.jpg:
--------------------------------------------------------------------------------
https://raw.githubusercontent.com/yukitsuji/Vehicle_Detection_hog/193813f594c2d9a67f92f518200931d865fe2515/test_images/test2.jpg
--------------------------------------------------------------------------------
/test_images/test3.jpg:
--------------------------------------------------------------------------------
https://raw.githubusercontent.com/yukitsuji/Vehicle_Detection_hog/193813f594c2d9a67f92f518200931d865fe2515/test_images/test3.jpg
--------------------------------------------------------------------------------
/test_images/test4.jpg:
--------------------------------------------------------------------------------
https://raw.githubusercontent.com/yukitsuji/Vehicle_Detection_hog/193813f594c2d9a67f92f518200931d865fe2515/test_images/test4.jpg
--------------------------------------------------------------------------------
/test_images/test5.jpg:
--------------------------------------------------------------------------------
https://raw.githubusercontent.com/yukitsuji/Vehicle_Detection_hog/193813f594c2d9a67f92f518200931d865fe2515/test_images/test5.jpg
--------------------------------------------------------------------------------
/test_images/test6.jpg:
--------------------------------------------------------------------------------
https://raw.githubusercontent.com/yukitsuji/Vehicle_Detection_hog/193813f594c2d9a67f92f518200931d865fe2515/test_images/test6.jpg
--------------------------------------------------------------------------------
/train.py:
--------------------------------------------------------------------------------
1 | #!/user/bin/env python3
2 | import time
3 | import pickle
4 | import numpy as np
5 | import cv2
6 | import matplotlib.pyplot as plt
7 | import matplotlib.image as mpimg
8 | from skimage import io
9 | import glob
10 | from skimage.feature import hog
11 | from sklearn.preprocessing import StandardScaler
12 | from sklearn.model_selection import train_test_split
13 | from sklearn.svm import LinearSVC
14 | from sklearn.svm import SVC # for rbf
15 | from sklearn.metrics import accuracy_score
16 | from util import *
17 |
18 | def augment_brightness_image(image, bright=1.25):
19 | """Apply brightness conversion to RGB image
20 |
21 | # Args
22 | image(ndarray): RGB image (3-dimension)
23 | bright(float) : bright value for multiple
24 | # Returns
25 | image(ndarray): RGB image (3-dimension)
26 | """
27 | image1 = cv2.cvtColor(image,cv2.COLOR_RGB2HSV)
28 | image1[:,:,2] = image1[:,:,2]*bright
29 | image1 = cv2.cvtColor(image1,cv2.COLOR_HSV2RGB)
30 | return image1
31 |
32 | def make_datasets(car_parent_dir, noncar_parent_dir):
33 | """get pathes of car and non-car images from directories.
34 | # Args:
35 | car_parent_dir(str) : car's parent directory
36 | noncar_parent_dir(str): non-car's parent directory
37 |
38 | # Returns:
39 | dataset_pathes(dic): dictionary of car and non-car path
40 | key: ["car", "noncar"]
41 | """
42 | datasets_dir = {}
43 | car_list = np.array([])
44 | noncar_list = np.array([])
45 | car_directories = glob.glob(car_parent_dir)
46 | for car_dir in car_directories:
47 | car_list = np.hstack((car_list, np.array(glob.glob(car_dir + "/*.png"))))
48 | if car_dir == "./vehicles/KITTI_extracted":
49 | car_list = np.hstack((car_list, np.array(glob.glob(car_dir + "/*.png"))))
50 | if car_dir == "./vehicles/GTI_Right":
51 | car_list = np.hstack((car_list, np.array(glob.glob(car_dir + "/*.png"))))
52 | if car_dir == "./vehicles/GTI_Left":
53 | car_list = np.hstack((car_list, np.array(glob.glob(car_dir + "/*.png"))))
54 |
55 | noncar_directories = glob.glob(noncar_parent_dir)
56 | for noncar_dir in noncar_directories:
57 | noncar_list = np.hstack((noncar_list, np.array(glob.glob(noncar_dir + "/*.png"))))
58 | if noncar_dir == "./non-vehicles/Extras":
59 | noncar_list = np.hstack((noncar_list, np.array(glob.glob(noncar_dir + "/*.png"))))
60 | noncar_list = np.hstack((noncar_list, np.array(glob.glob(noncar_dir + "/*.png"))))
61 |
62 | datasets_dir = {"car" : car_list, "noncar" : noncar_list}
63 | return datasets_dir
64 |
65 | def input_datasets(datasets, shape=(64, 64, 3)):
66 | """Input images from pathes of car and non-car.
67 | For adjust brightness, left-right balance, I apply data augmentation
68 | Apply Flip and Brightness conversion to GTI_Left and GTI_Right
69 |
70 | # Args:
71 | datasets(dic): pathes of datasets "car" and "non-car"
72 | shape(tuple) : shape of input images
73 |
74 | # Returns:
75 | input_images(ndarray): all images of datasets(4 dimension)
76 | Y (ndarray) : all labels of datasets(1 (car) or 0 (non-car))
77 | """
78 | left_true = glob.glob("./vehicles/GTI_Left/*.png")
79 | len_left_true = len(left_true)
80 | right_true = glob.glob("./vehicles/GTI_Right/*.png")
81 | len_right_true = len(right_true)
82 | input_images = np.zeros((datasets["car"].shape[0] + datasets["noncar"].shape[0],
83 | shape[0], shape[1], shape[2]), dtype=np.uint8)
84 | input_images[:datasets["car"].shape[0]] = [io.imread(path) for path in datasets["car"]]
85 | input_images[datasets["car"].shape[0]:] = [io.imread(path) for path in datasets["noncar"]]
86 |
87 | augmented_images = np.zeros((len_left_true*2 + len_right_true*2,
88 | shape[0], shape[1], shape[2]), dtype=np.uint8)
89 | augmented_images[:len_left_true] = [augment_brightness_image(io.imread(path)) for path in left_true]
90 | augmented_images[len_left_true:len_left_true*2] = [cv2.flip(augment_brightness_image(io.imread(path), bright=1.1), 1) for path in left_true]
91 | augmented_images[2*len_left_true:2*len_left_true+len_right_true] = [augment_brightness_image(io.imread(path)) for path in right_true]
92 | augmented_images[2*len_left_true+len_right_true:] = [cv2.flip(augment_brightness_image(io.imread(path), bright=1.1), 1) for path in right_true]
93 | input_images = np.vstack((input_images, augmented_images))
94 | Y = np.hstack((np.ones((datasets["car"].shape[0])), np.zeros(datasets["noncar"].shape[0])))
95 | Y = np.hstack((Y, np.ones((len_left_true*2 + len_right_true*2))))
96 | return input_images, Y
97 |
98 | def main():
99 | datasets = make_datasets("./vehicles/*", "./non-vehicles/*")
100 | X, Y = input_datasets(datasets)
101 | X = extract_features(X, hog_color="YCrCb", hog_channel="ALL", hist_color="YCrCb", spatial_size=(16, 16),
102 | spatial_color="YCrCb", orient=18, cell_per_block=3, spatial_feat=True)
103 | X_scaler = StandardScaler().fit(X)
104 | scaled_X = X_scaler.transform(X)
105 | X_train, X_test, Y_train, Y_test = train_test_split(
106 | scaled_X,
107 | Y,
108 | test_size=0.1,
109 | random_state=0,
110 | )
111 | svc = LinearSVC()
112 | # svc = SVC(kernel='rbf')
113 | t=time.time()
114 | svc.fit(X_train, Y_train)
115 | t2 = time.time()
116 | print(round(t2-t, 2), 'Seconds to train SVC...')
117 | print('Test Accuracy of SVC = ', round(svc.score(X_test, Y_test), 4))
118 | t=time.time()
119 | n_predict = 1000
120 | print('My SVC predicts: ', svc.predict(X_test[0:n_predict]))
121 | print('For these',n_predict, 'labels: ', Y_test[0:n_predict])
122 | t2 = time.time()
123 | print(round(t2-t, 5), 'Seconds to predict', n_predict,'labels with SVC')
124 | print(accuracy_score(Y_test, svc.predict(X_test)))
125 |
126 | print("saving svm parameter and scaler")
127 | np.savez("scaler.npz", mean=X_scaler.mean_, scale=X_scaler.scale_)
128 | with open("svm.pkl", mode="wb") as f:
129 | pickle.dump(svc, f)
130 |
131 | if __name__ == "__main__":
132 | main()
133 |
--------------------------------------------------------------------------------
/util.py:
--------------------------------------------------------------------------------
1 | #!/user/bin/env python3
2 | import time
3 | import pickle
4 | import numpy as np
5 | import cv2
6 | import matplotlib.pyplot as plt
7 | import matplotlib.image as mpimg
8 | from skimage import io
9 | import glob
10 | from skimage.feature import hog
11 | from sklearn.preprocessing import StandardScaler
12 | from sklearn.model_selection import train_test_split
13 | from sklearn.svm import LinearSVC
14 | from sklearn.svm import SVC # for rbf
15 | from sklearn.metrics import accuracy_score
16 |
17 | def cal_hog_feature(img, orient, pix_per_cell, cell_per_block, vis=False, feature_vec=True):
18 | """Extract HOG feature from one color channel"""
19 | features = hog(img, orientations=orient, pixels_per_cell=(pix_per_cell, pix_per_cell),
20 | cells_per_block=(cell_per_block, cell_per_block), transform_sqrt=True, feature_vector=feature_vec)
21 | return features
22 |
23 | def extract_hog_features(image, orient, pix_per_cell, cell_per_block, vis=False, feature_vec=True, hog_color="RGB"):
24 | """Extract HOG features from colorspace you specify"""
25 | if hog_color != 'RGB':
26 | if hog_color == 'HSV':
27 | feature_image = cv2.cvtColor(image, cv2.COLOR_RGB2HSV)
28 | elif hog_color == 'LUV':
29 | feature_image = cv2.cvtColor(image, cv2.COLOR_RGB2LUV)
30 | elif hog_color == 'HLS':
31 | feature_image = cv2.cvtColor(image, cv2.COLOR_RGB2HLS)
32 | elif hog_color == 'YUV':
33 | feature_image = cv2.cvtColor(image, cv2.COLOR_RGB2YUV)
34 | elif hog_color == 'YCrCb':
35 | feature_image = cv2.cvtColor(image, cv2.COLOR_RGB2YCrCb)
36 | else: feature_image = np.copy(image)
37 |
38 | hog_features = []
39 | for channel in range(feature_image.shape[2]):
40 | hog_features.extend(cal_hog_feature(feature_image[:,:,channel],
41 | orient, pix_per_cell, cell_per_block,
42 | vis=vis, feature_vec=feature_vec))
43 | return hog_features
44 |
45 | def extract_features(images, hog_color='RGB', spatial_color="LUV", hist_color="HLS", spatial_size=(32, 32),
46 | hist_bins=32, orient=9,
47 | pix_per_cell=8, cell_per_block=2, hog_channel=0,
48 | spatial_feat=True, hist_feat=True, hog_feat=True):
49 | """Extract features from HOG, color binning, and histogram of color space.
50 | You could choose features you wanna use.
51 |
52 | # Returns:
53 | features(ndarray): extracted features (1-dimensional array)
54 | """
55 | features = []
56 | for image in images:
57 | file_features = []
58 | if spatial_feat == True:
59 | spatial_features = bin_spatial(image, size=spatial_size, color=spatial_color)
60 | file_features.append(spatial_features)
61 | if hist_feat == True:
62 | hist_features = color_hist(image, nbins=hist_bins, color=hist_color)
63 | file_features.append(hist_features)
64 | if hog_feat == True:
65 | hog_features = extract_hog_features(image, orient, pix_per_cell, cell_per_block, hog_color=hog_color)
66 | file_features.append(hog_features)
67 | features.append(np.concatenate(file_features))
68 | return np.array(features)
69 |
70 | def extract_feature(image, hog_color='RGB', spatial_color="LUV", hist_color="HLS", spatial_size=(32, 32),
71 | hist_bins=32, orient=9,
72 | pix_per_cell=8, cell_per_block=2, hog_channel=0,
73 | spatial_feat=True, hist_feat=True, hog_feat=True):
74 | file_features = []
75 | if hog_color != 'RGB':
76 | if hog_color == 'HSV':
77 | feature_image = cv2.cvtColor(image, cv2.COLOR_RGB2HSV)
78 | elif hog_color == 'LUV':
79 | feature_image = cv2.cvtColor(image, cv2.COLOR_RGB2LUV)
80 | elif hog_color == 'HLS':
81 | feature_image = cv2.cvtColor(image, cv2.COLOR_RGB2HLS)
82 | elif hog_color == 'YUV':
83 | feature_image = cv2.cvtColor(image, cv2.COLOR_RGB2YUV)
84 | elif hog_color == 'YCrCb':
85 | feature_image = cv2.cvtColor(image, cv2.COLOR_RGB2YCrCb)
86 | else: feature_image = np.copy(image)
87 |
88 | if spatial_feat == True:
89 | spatial_features = bin_spatial(image, size=spatial_size, color=spatial_color)
90 | file_features.append(spatial_features)
91 | if hist_feat == True:
92 | hist_features = color_hist(image, nbins=hist_bins, color=hist_color)
93 | file_features.append(hist_features)
94 | if hog_feat == True:
95 | hog_features = extract_hog_features(image, orient, pix_per_cell, cell_per_block, hog_color=hog_color)
96 | file_features.append(hog_features)
97 | return np.concatenate(file_features)
98 |
99 | def bin_spatial(image, size=(32, 32), color="RGB"):
100 | """binning image of specified color space"""
101 | if color != 'RGB':
102 | if color == 'HSV':
103 | feature_image = cv2.cvtColor(image, cv2.COLOR_RGB2HSV)
104 | elif color == 'LUV':
105 | feature_image = cv2.cvtColor(image, cv2.COLOR_RGB2LUV)
106 | elif color == 'HLS':
107 | feature_image = cv2.cvtColor(image, cv2.COLOR_RGB2HLS)
108 | elif color == 'YUV':
109 | feature_image = cv2.cvtColor(image, cv2.COLOR_RGB2YUV)
110 | elif color == 'YCrCb':
111 | feature_image = cv2.cvtColor(image, cv2.COLOR_RGB2YCrCb)
112 | else: feature_image = np.copy(image)
113 | return cv2.resize(feature_image, size).ravel()
114 |
115 | def color_hist(image, nbins=32, bins_range=(0, 256), color="RGB"):
116 | """convert RGB Image to specified color space histogram"""
117 | if color != 'RGB':
118 | if color == 'HSV':
119 | feature_image = cv2.cvtColor(image, cv2.COLOR_RGB2HSV)
120 | elif color == 'LUV':
121 | feature_image = cv2.cvtColor(image, cv2.COLOR_RGB2LUV)
122 | elif color == 'HLS':
123 | feature_image = cv2.cvtColor(image, cv2.COLOR_RGB2HLS)
124 | elif color == 'YUV':
125 | feature_image = cv2.cvtColor(image, cv2.COLOR_RGB2YUV)
126 | elif color == 'YCrCb':
127 | feature_image = cv2.cvtColor(image, cv2.COLOR_RGB2YCrCb)
128 | else: feature_image = np.copy(image)
129 | channel1_hist = np.histogram(feature_image[:,:,0], bins=nbins, range=bins_range)
130 | channel2_hist = np.histogram(feature_image[:,:,1], bins=nbins, range=bins_range)
131 | channel3_hist = np.histogram(feature_image[:,:,2], bins=nbins, range=bins_range)
132 | hist_features = np.concatenate((channel1_hist[0], channel2_hist[0], channel3_hist[0]))
133 | return hist_features
134 |
--------------------------------------------------------------------------------


